orativo Lanix de C V LX12 GSM Dual Band GPRS Digital Mobile Phone User Manual
Corporativo Lanix S.A. de C.V. GSM Dual Band GPRS Digital Mobile Phone
UserManual.wiki
>
orativo Lanix de C V
>
LX12 User Manual
Users manual
Navigation menu
Upload a User Manual
Namespaces
Wiki Guide
HTML
PDF
Info
Views
User Manual
Discussion / Help
Navigation


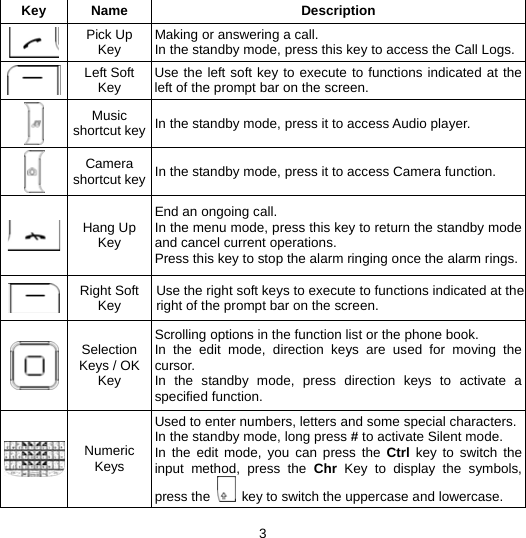

![13 GUIDE TO MENU OPERATIONS Menu guides you to the various features, applications and services available in your phone. Press the Menu [LEFT SOFT Key] in the idle mode to access the main menu. Press the Navigation Keys Up/Down/Left/Right to choose the desired operation and press Ok to enter the selected operation. File Manager You can use the function to manage all types of files saved in the Memory card or Phone. Phonebook You can fast locate the number of the person you want to contact. Please enter the initial letter of the person’s name, and related records about it will display in the middle of the screen. You can locate your records by up or down key and press OK key. Fun & Games Java You may download the latest Java games and applications from the Internet. If you know where you can download the application software (the web address), please follow the steps described as below: 1> In the standby mode, select Menu > Services > Opera. You should input the web address and name it. 2> To connect to the internet, select Option > Go to. 3> Please choose your favorite application software, and then select Option > Go to. 4> Your phone will ask you download it or not, with their name, version number, type, and size. 5> Select “Yes”, and then you should select where to save that application file. Phone is recommended. 6> These downloaded games and applications are automatically saved to the Java. Select a Java game or an application and then press the OK key to run it. You can view the details of installed games or applications, remove them form your device, and specify installation settings. Warning: Only install and use applications and other software from trusted sources.](https://usermanual.wiki/orativo-Lanix-de-C-V/LX12/User-Guide-1618518-Page-18.png)