Zebra Technologies RFID-R4LANG-01 Zebra Printer with Embedded b/G radio and RFID radio User Manual UMAN P4TB3
Zebra Technologies Corporation Zebra Printer with Embedded b/G radio and RFID radio UMAN P4TB3
Contents
- 1. Users Manual Part 1 of 2
- 2. Users Manual Part 2 of 2
- 3. User Manual Part 1 of 2
- 4. User Manual Part 2 of 2
Users Manual Part 1 of 2


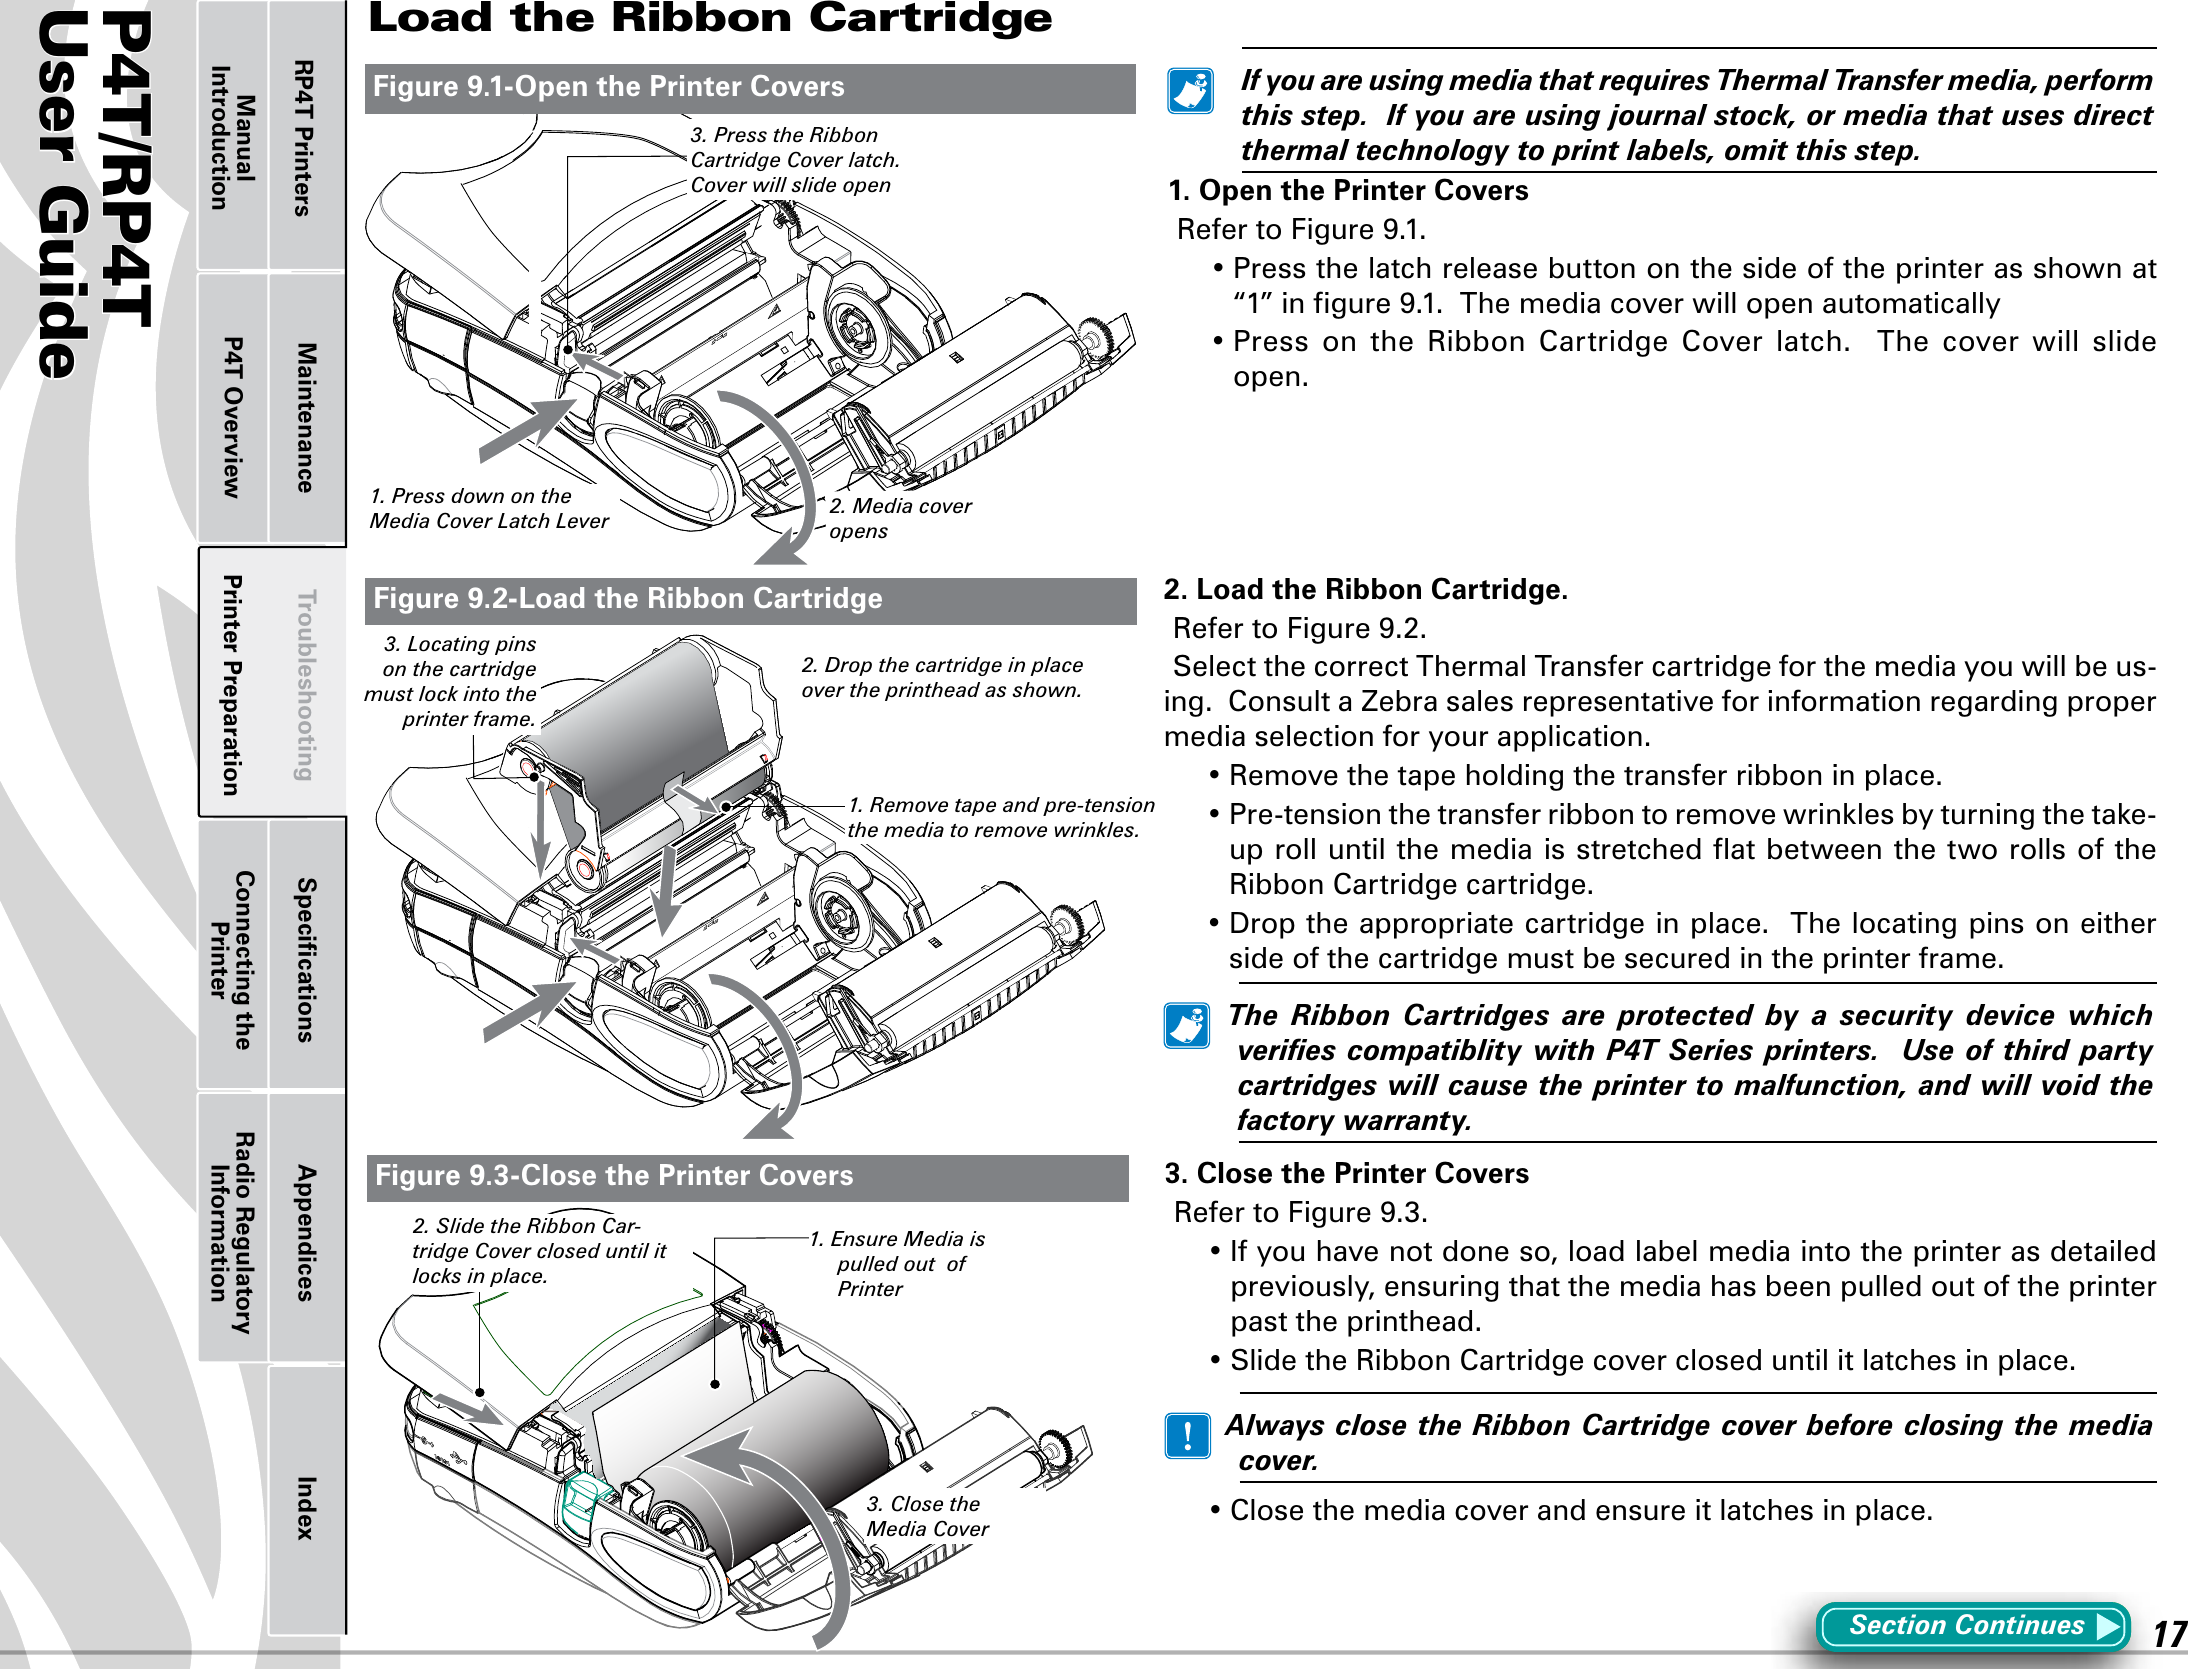
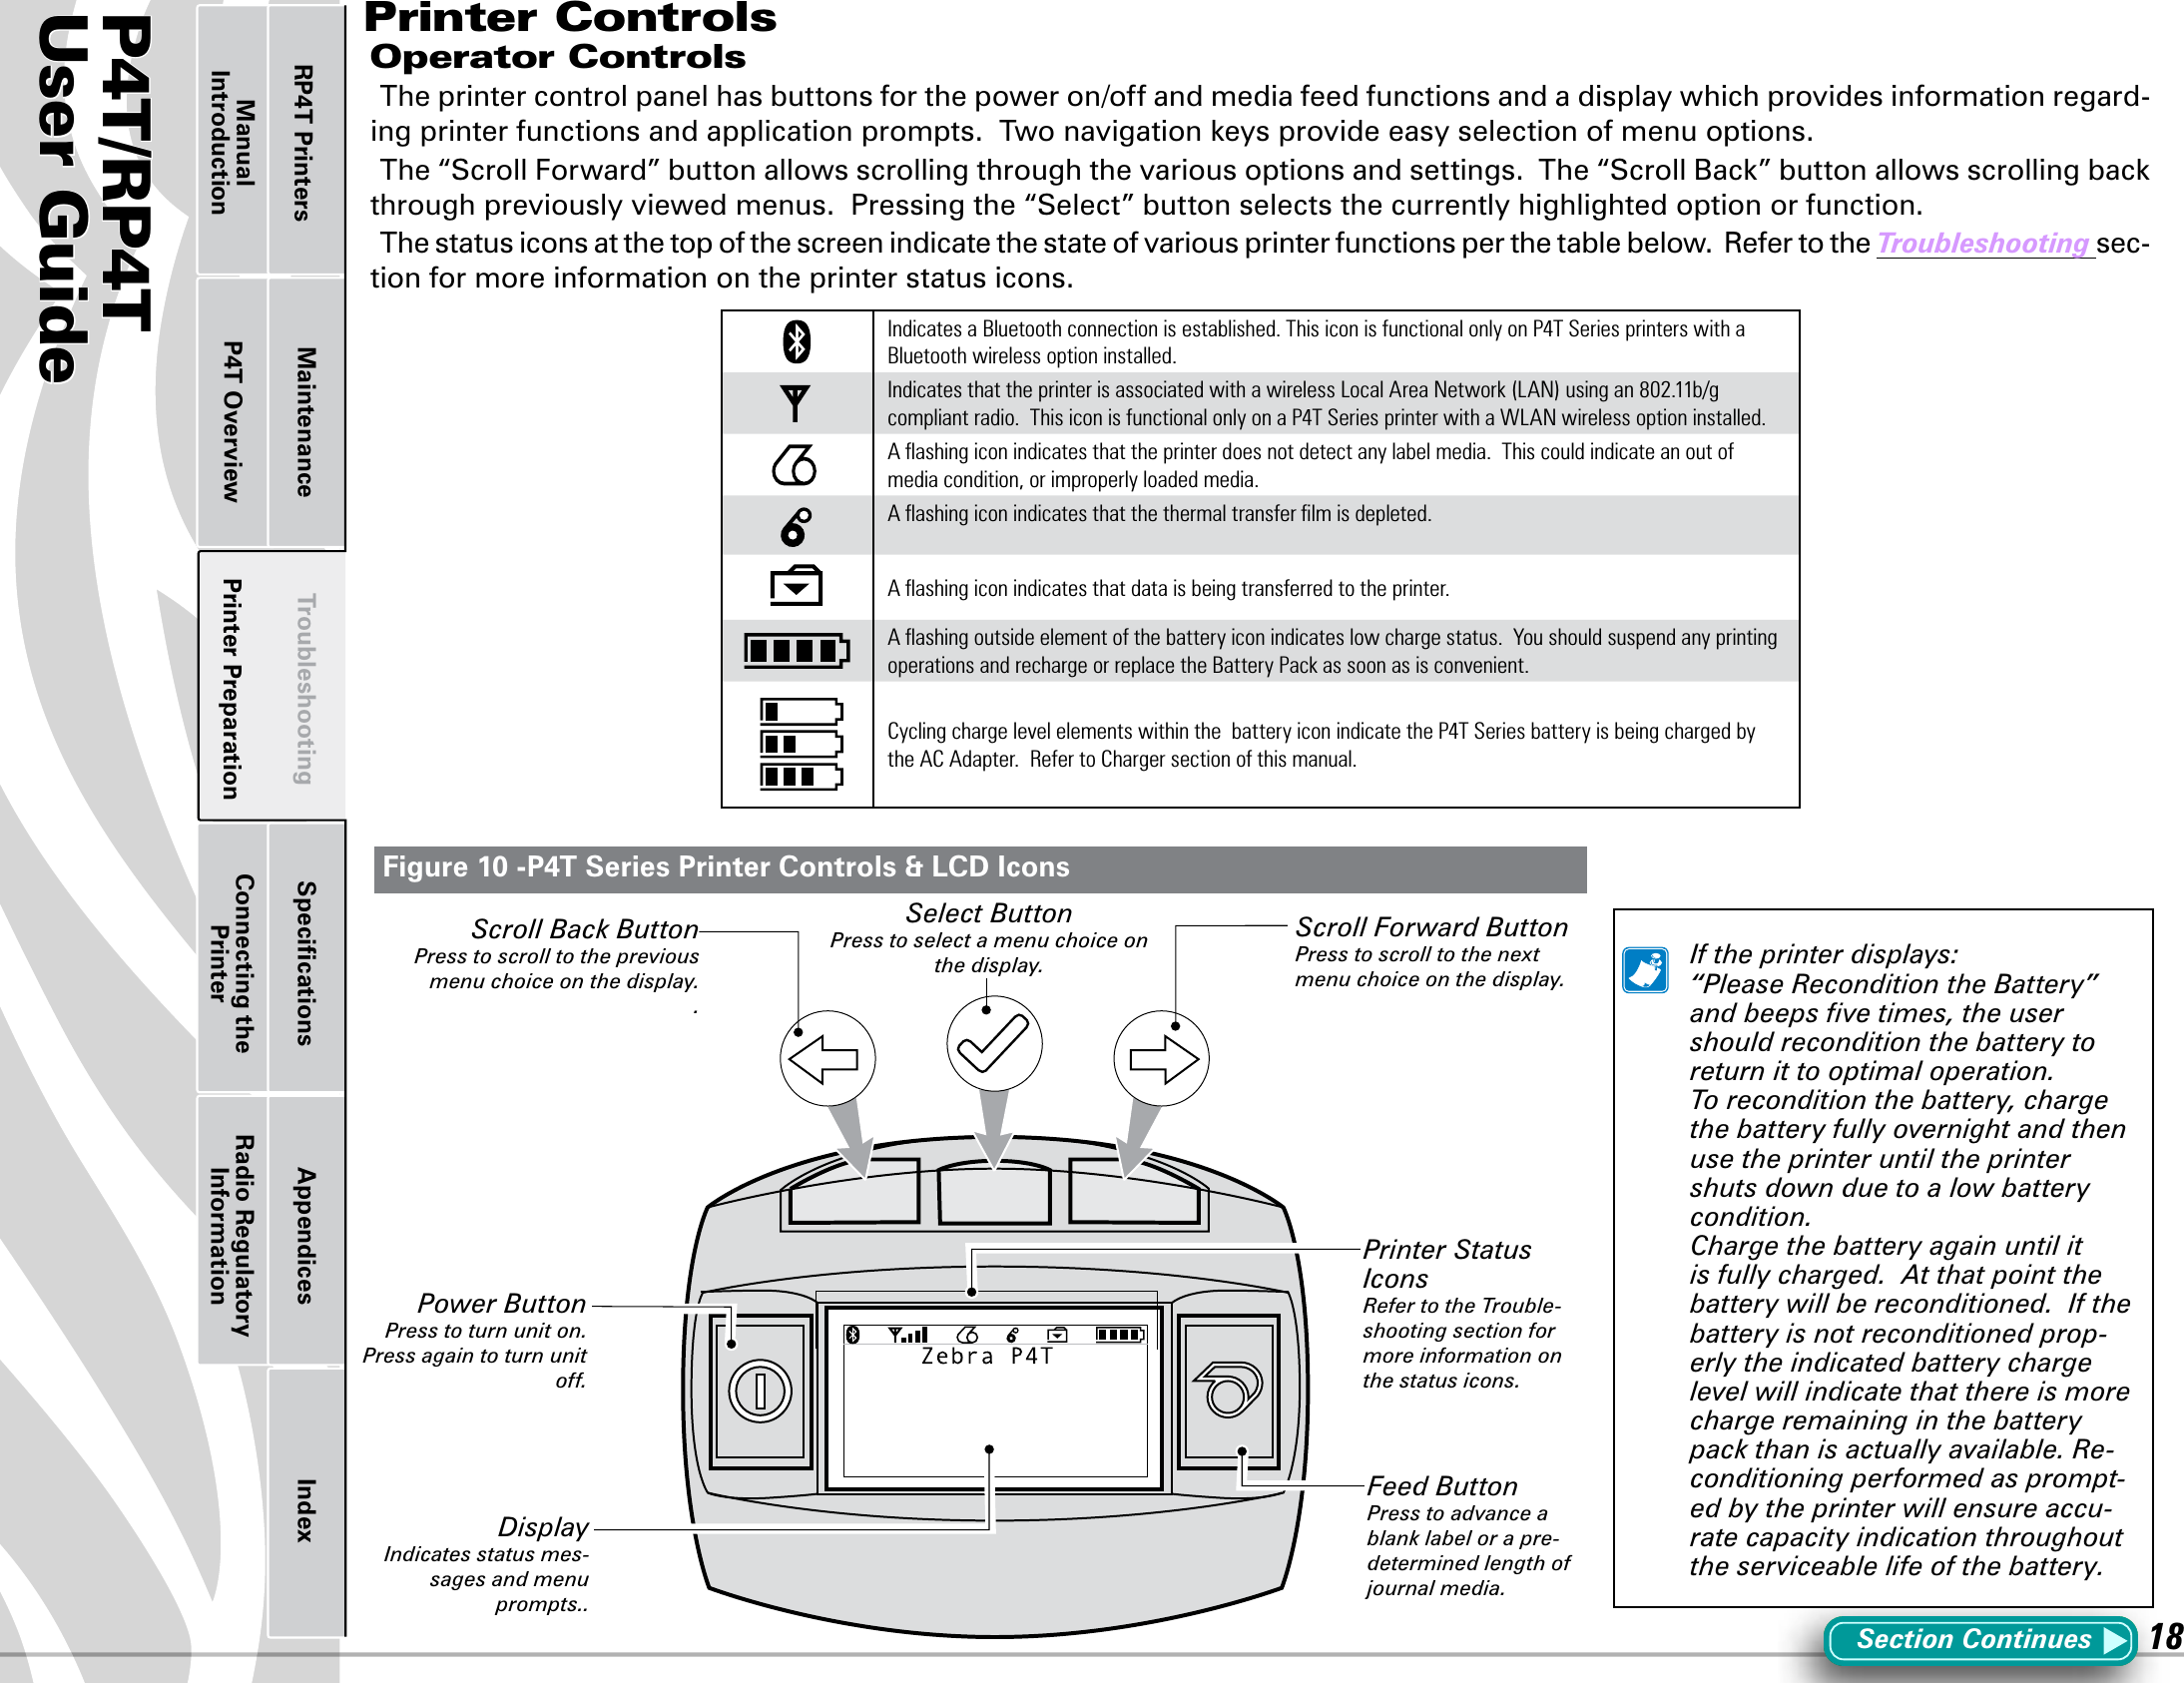
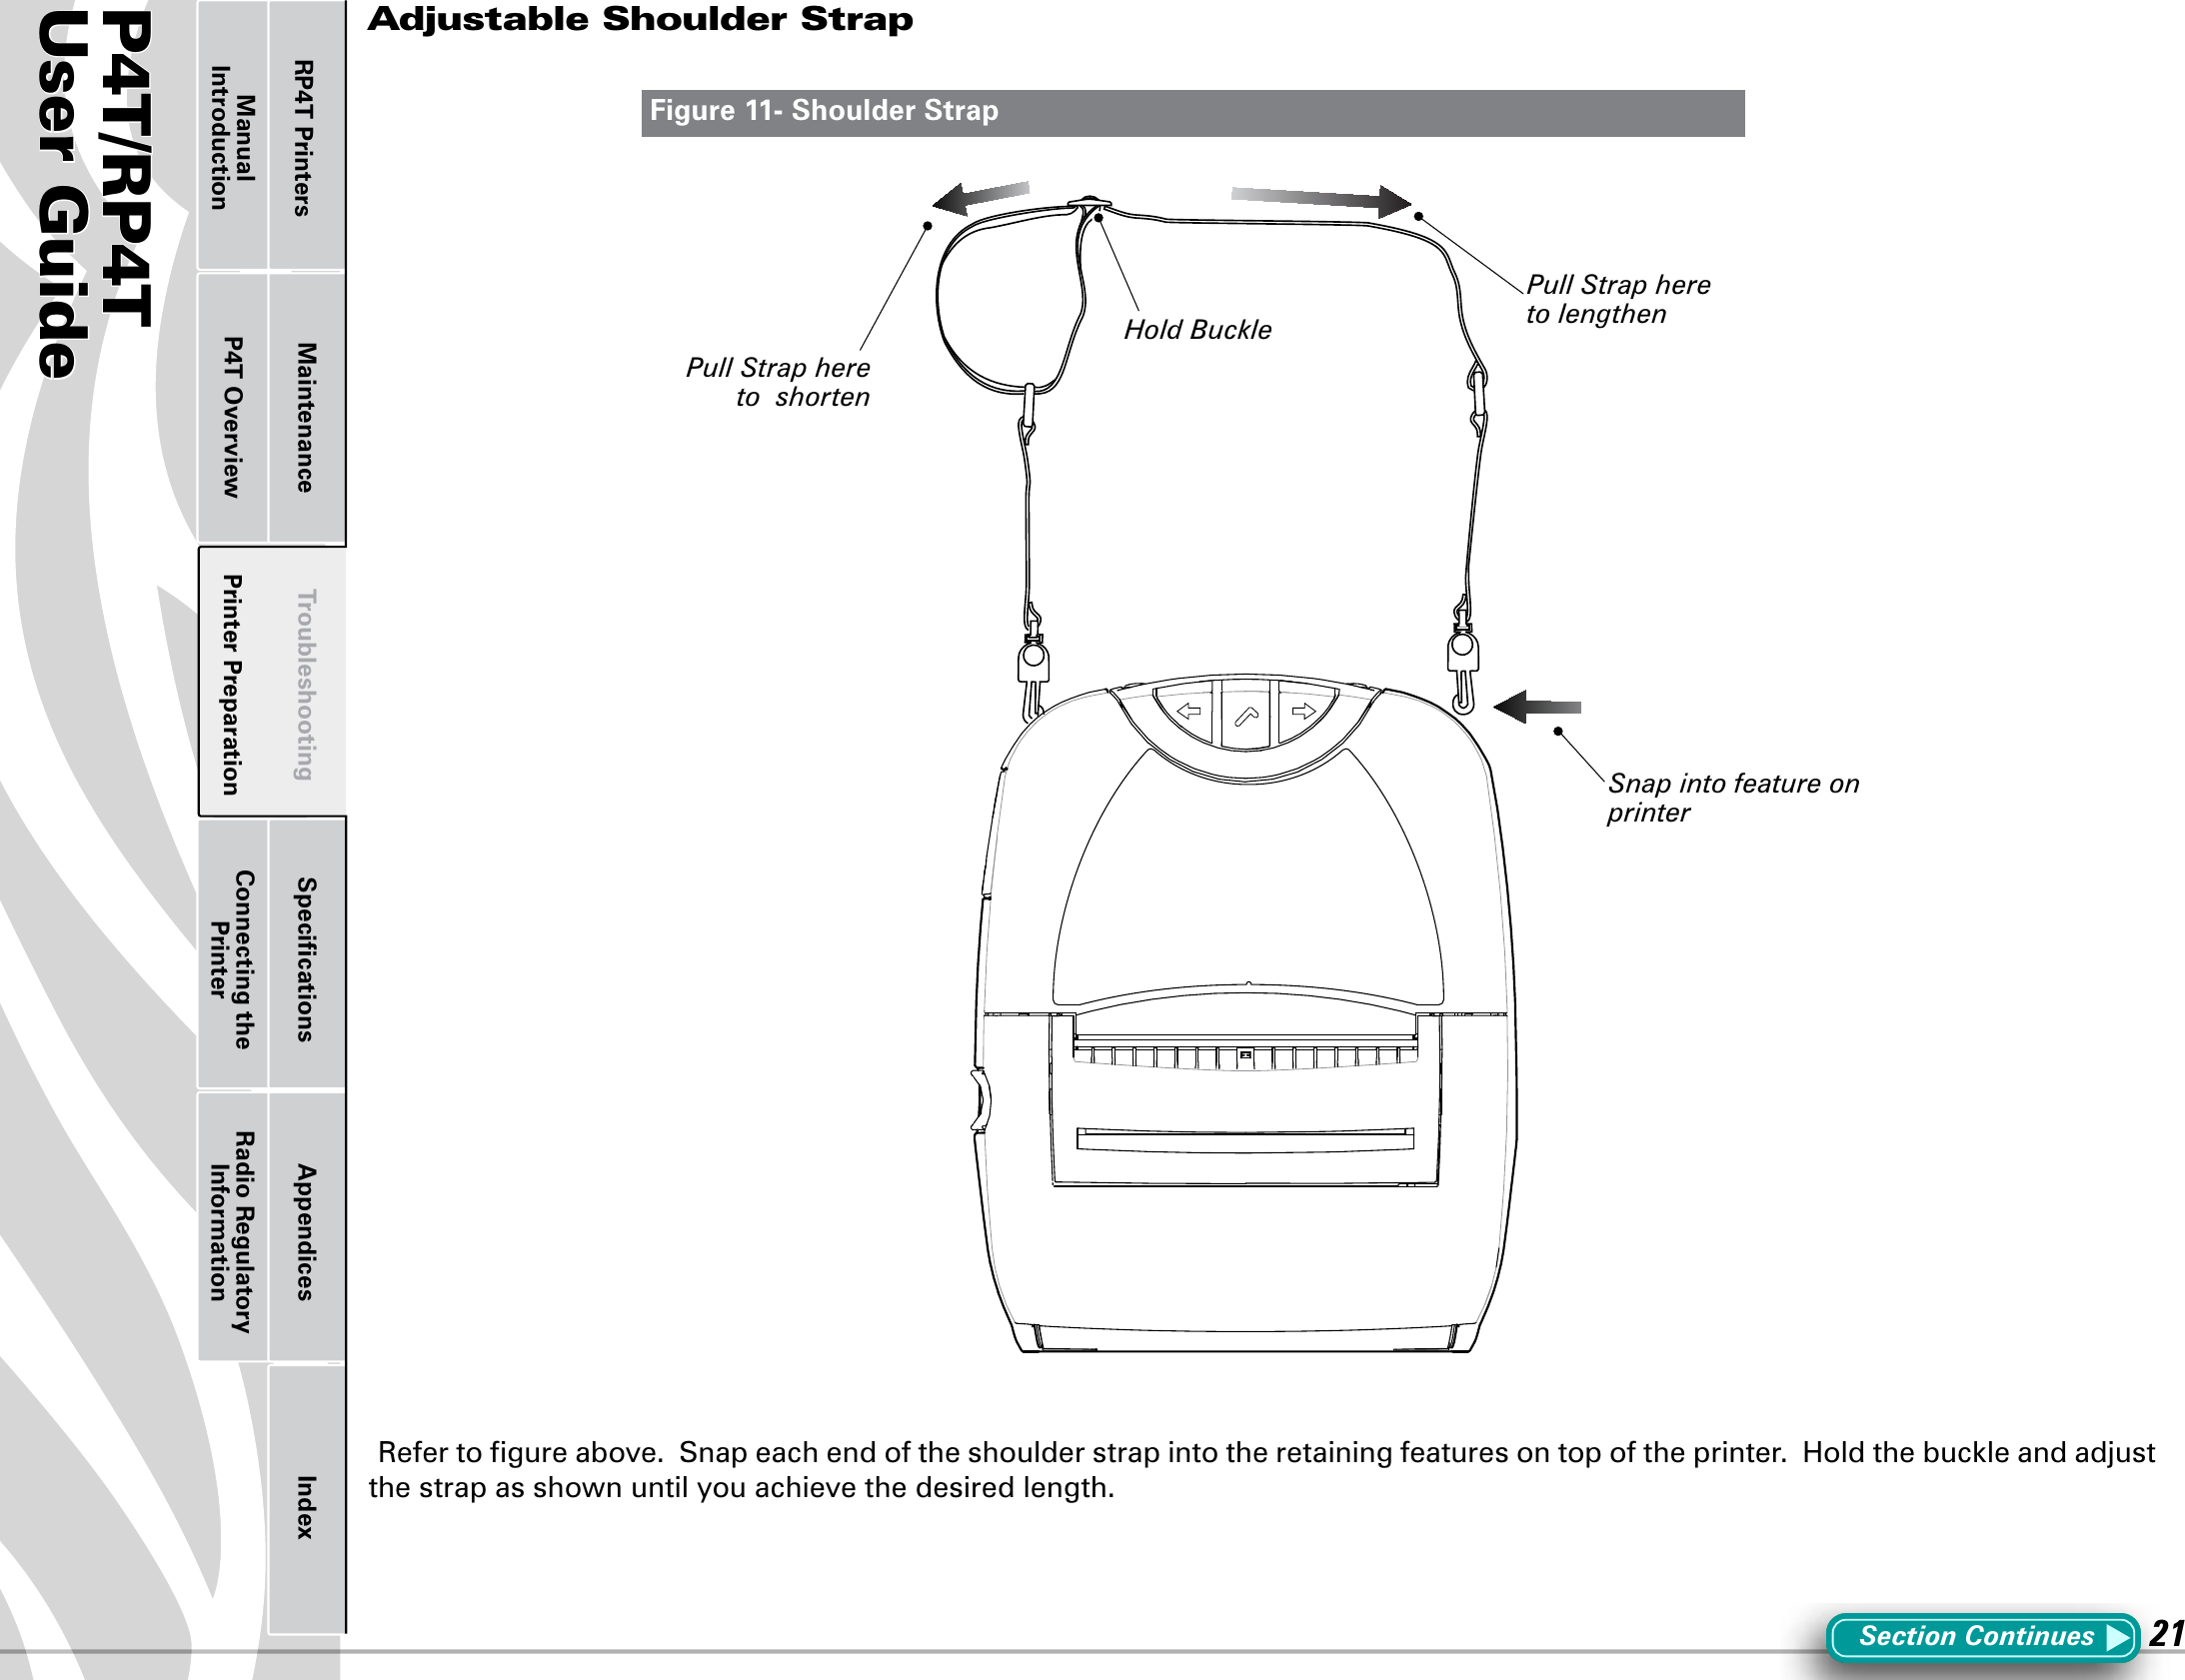
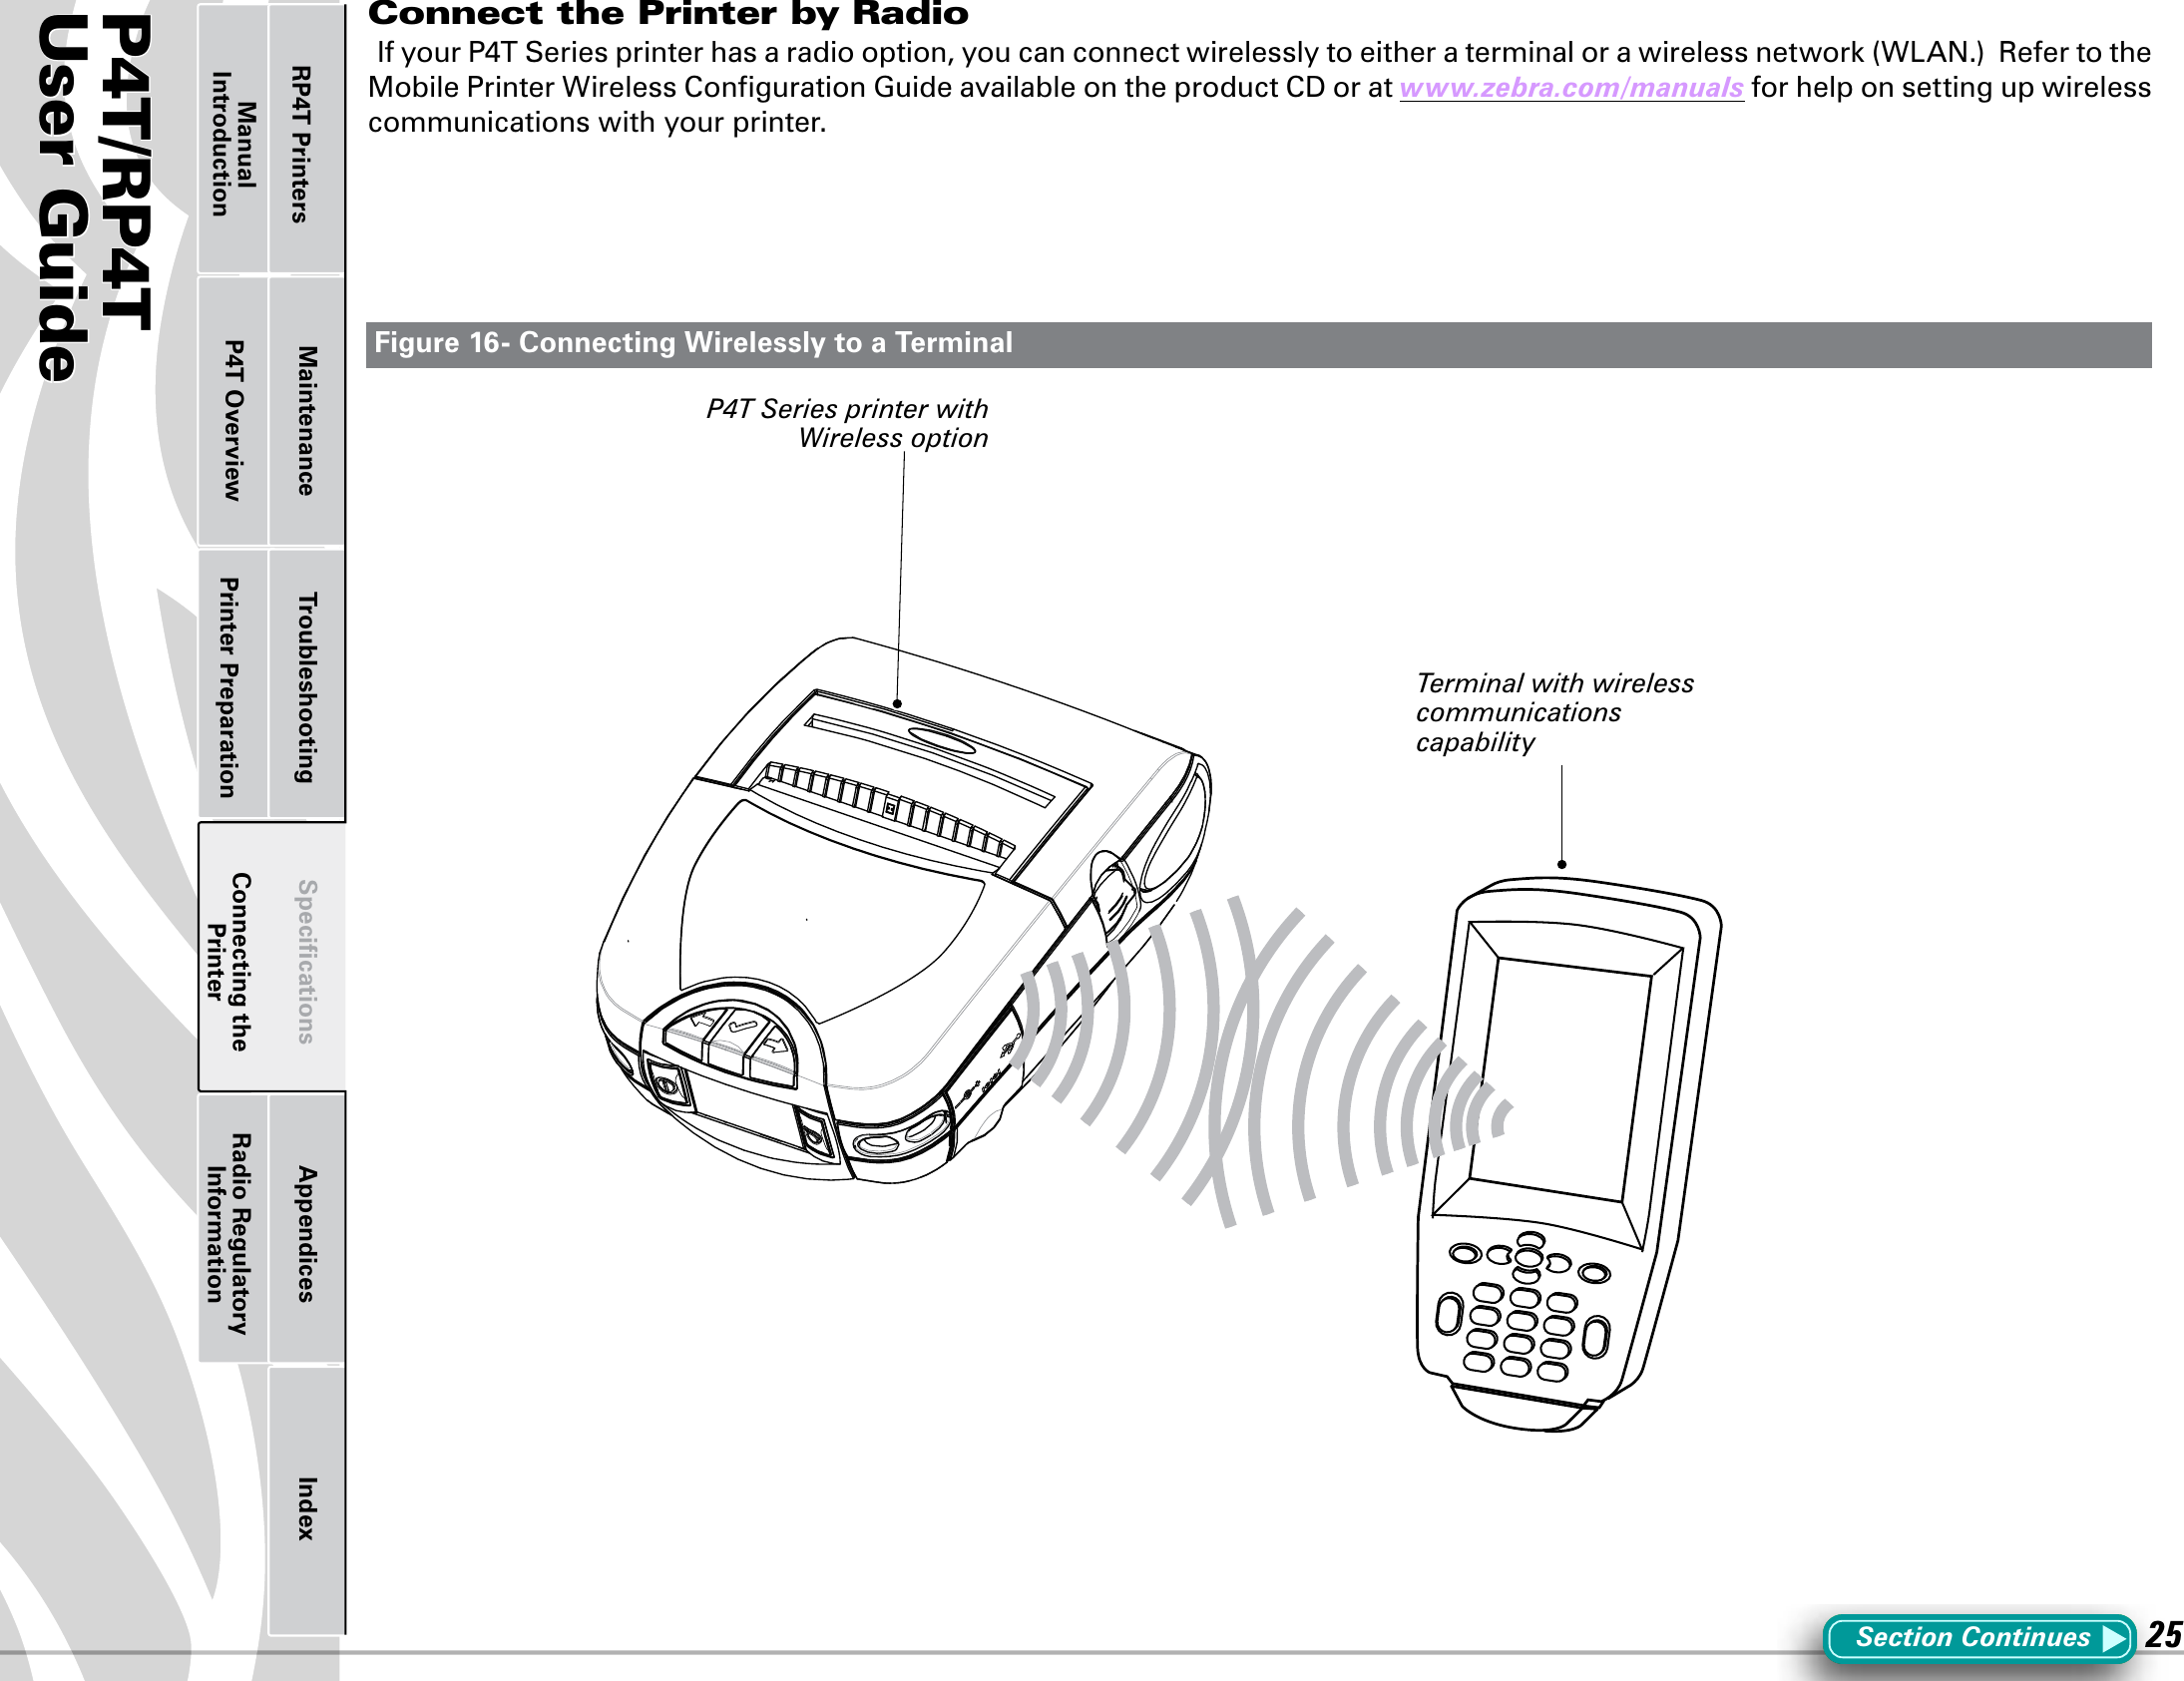
![P4T/RP4TUser Guide 15Printer Preparation Connecting the PrinterRadio Regulatory InformationRP4T Printers Maintenance Troubleshooting Specifications Appendices IndexP4T OverviewManual IntroductionFigure 7.4-Close the Media Cover Figure 7.5- Insert Media into PeelerSection Continues4. Close the Media Cover:RefertoFigure7.4.•Pullthemediaoutoftheprinterasshownat“1.”•Closethemediacoverasshownat“2”,ensuringthatitlatchessecurely into place.•TurntheprinteronorpresstheFeedbuttoniftheprinterisalready on.•Theprinterwilladvanceashortstripofmediaandwillthenbe ready for printing.5. Using the Label PeelerOptional Step for label stock onlyRefertoFigure7.5.The label peeler feature allows automatic separation of the printed labelfromitsbacking.1.Ifyouwishtousethelabelpeelingfeature,removeenoughlabelsfromthemediarolltocreatealeaderapproximately4”[100mm.]long.2.Alignthemediaasitemergesfromtheprintheadwiththeindexmarksonthetopcovertoensureitwillpassthroughthepeelerassemblywithoutwrinkling.2.Feedtheleaderyoucreatedinstep1overthepeelerbarandinto the peeler assembly.3Push on the peeler assembly where shown in Figure 6.5.Insert the leader into the label peeler as shown and push on the media roll until it emerges from the slot at the rear of the peeler assembly. •TurntheprinteronorpresstheFeedbuttoniftheprinterisalready on.•Theprinterwilladvanceashortstripofmediaandwillthenbe ready for printing.Close Media Cover3. Feed the leader over the peeler bar and into the printer if you will be peeling labels as you print.4. Press down on Peeler Assembly where shown and slide the media until it emerges . Peeler Bar.2. Align the edge of the leader with the index marks on the top cover to ensure it will pass through the peeler without wrinkling.Peeler Assembly.Pull Media out of the Printer. Use alignment marks on the cover to ensure alignment.1. Remove enough labels from the media roll to create a 4” [100 mm] leader.](https://usermanual.wiki/Zebra-Technologies/RFID-R4LANG-01.Users-Manual-Part-1-of-2/User-Guide-1000694-Page-15.png)
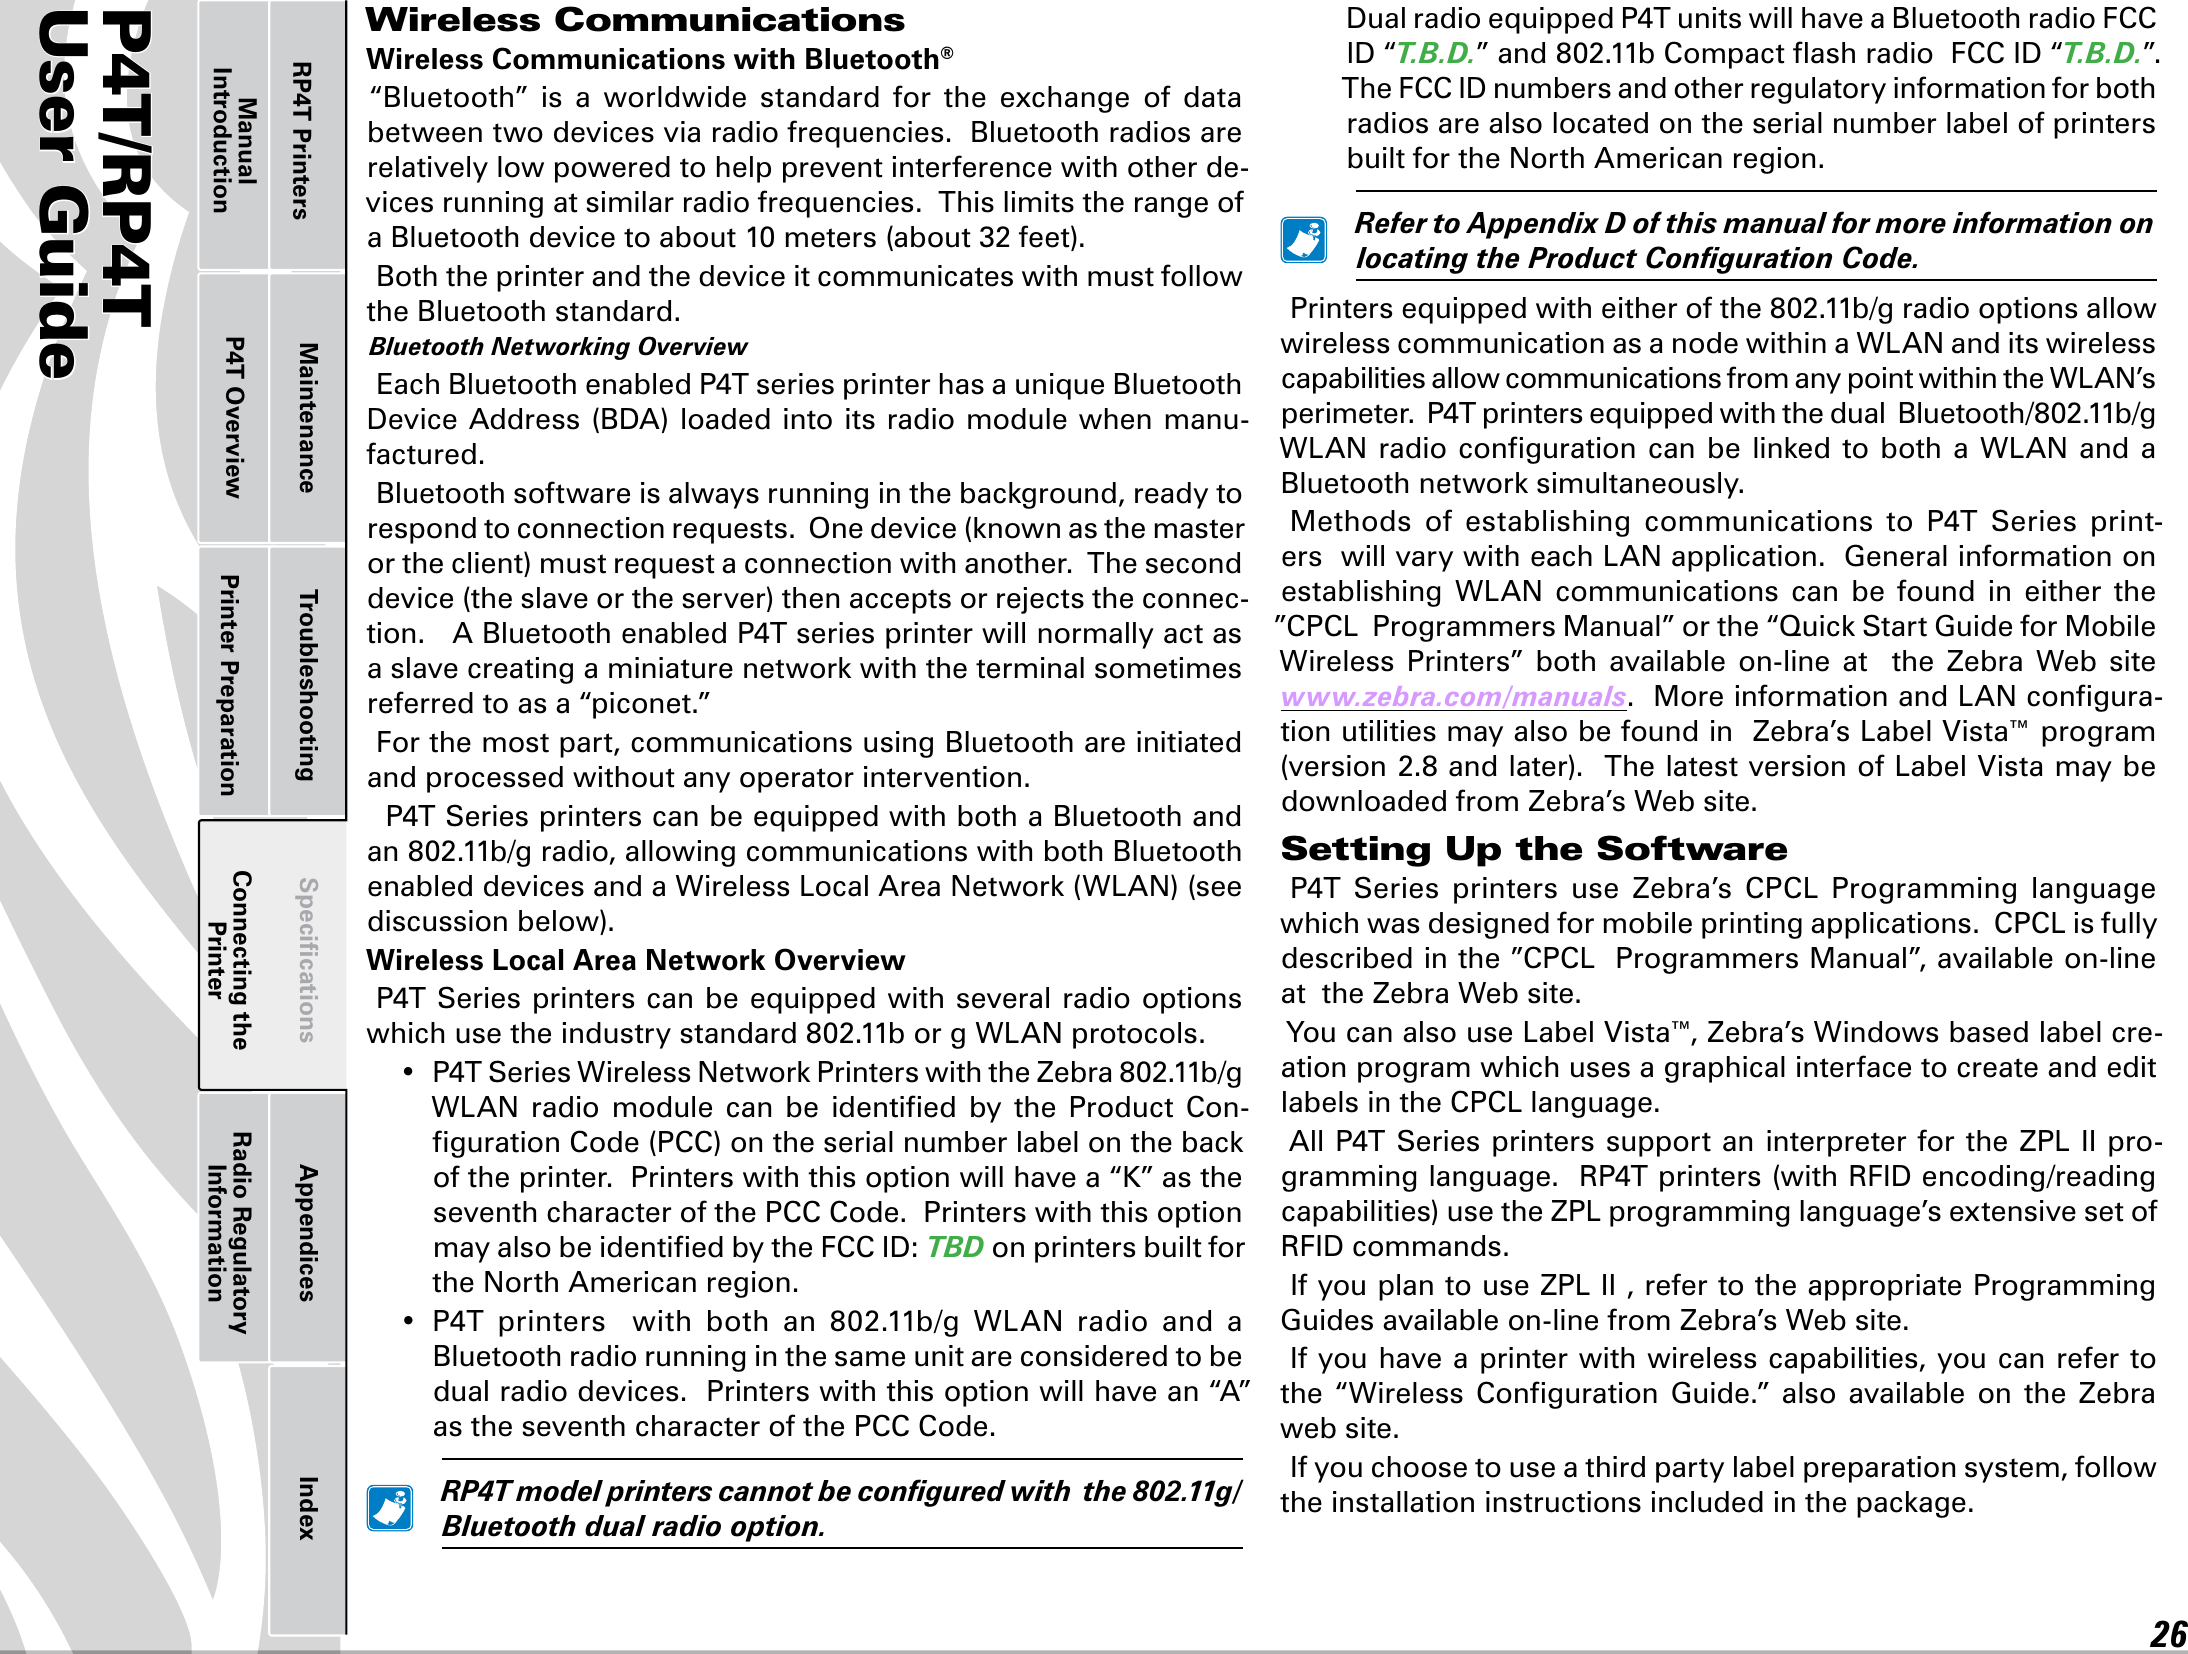
![P4T/RP4TUser Guide 16Printer Preparation Connecting the PrinterRadio Regulatory InformationRP4T Printers Maintenance Troubleshooting Specifications Appendices IndexP4T OverviewManual IntroductionAdjusting The Media Support DisksMedia Core SizeMediasuppliedfortheP4TSe-ries printers will have two pos-sible core sizes, depending on the media type. Journal media and most label media is supplied witha0.75”[19.1mm]diametercore to maximize the amount of media contained on a roll.P4Tprintermediasupportsaresetatthefactoryfor0.75”diam-eter media cores.RP4T printers (equipped withtheRFIDencoder)areconguredformediawith1.38”[35.05mm]diametercoressinceRFIDme-dia cannot be wound around a small diameter core without both degrading its ability to feed properly past the printhead and causing possible damage to the embeddedRFIDcircuitry.Changing The Media Support Core Diameter SizeIt may become necessary to change the media core size in the field to allow use of different media. The media support disks aredesigned for both sizes of media cores, and they can be adjusted by removing them, flipping their position and re-securing them to the printer. 1. Open the Media Cover andremove any label media.2.UsePhillipsheadscrewdriverwith a long blade to keep thescrewattachingtheSupportDiskto the printer from turning.3.RotatetheSupportDiskwhilekeeping the attachment screwfrom turning, and remove it.4. Flip the Media Support Diskso that the desired core diameter ridge faces towards the inside of theprinter.PleaserefertoFigure8.5.Re-securetheSupportDiskbytighten-ingitontotheattachingscrew.DonotovertightentheSupportDisk.Itmustbeabletospinfreely.RepeatthisprocedureontheotherSupportDisk. AlwaysensurethatbothSupportDisksareadjustedforthesamesizemediacore. ReplacetheMediaSupportDisksiftheyhavebeenadjustedfordifferentcoresizesmorethan5(ve)times.Figure 8- Adjusting the Media Core DiameterSection ContinuesMedia Support Disk (shown adjusted for 1 3/8” label media core)Media Support Disk (shown re-adjusted for 3/4” label media core)Remove Support Disk, and flip it 180° to change core size.](https://usermanual.wiki/Zebra-Technologies/RFID-R4LANG-01.Users-Manual-Part-1-of-2/User-Guide-1000694-Page-16.png)