Yaesu Musen 20605X20 Analog Scanning Receiver User Manual part 4
Yaesu Musen Co., Ltd. Analog Scanning Receiver part 4
UserManual.wiki
>
Yaesu Musen
>
20605X20 User Manual
>
User Manual - part 4
Contents
1.
User Manual - part 1
2.
User Manual - part 2
3.
User Manual - part 3
4.
User Manual - part 4
User Manual - part 4
Navigation menu
Upload a User Manual
Namespaces
Wiki Guide
HTML
PDF
Info
Views
User Manual
Discussion / Help
Navigation
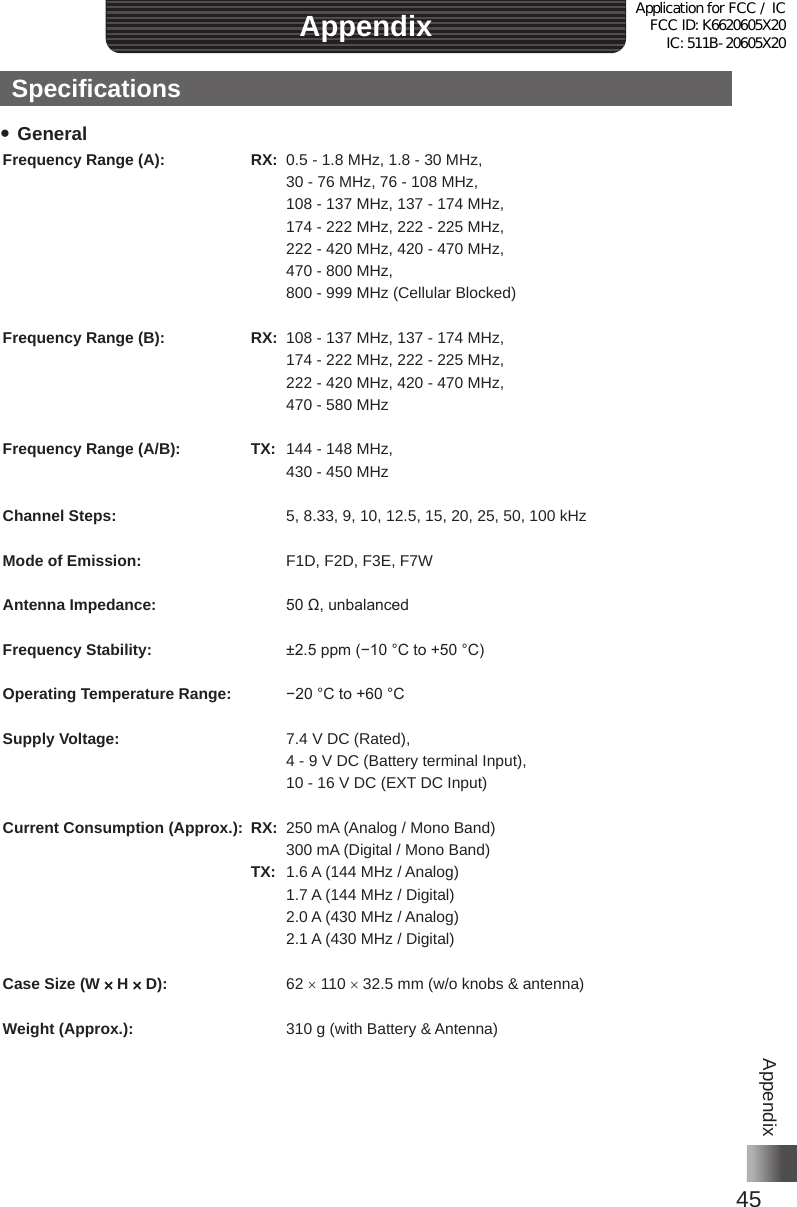
![33Basic OperationPerforming CommunicationTips• The frequency settings from the factory are: A-band: 145�000 MHz B-band: 433�000 MHz• In the default, Auto mode is set so that the transceiver can be automatically switched to the optimal reception mode for the frequency bands�Press and hold for over 1 second to switch the transceiver to Set mode, then touch, [TX/RX] → [1 MODE] → [3 RX MODE] to change mode ( see page xx)�• For the relations between frequency bands and reception frequencies, see the table on page xx�• You can also recall the home channel of each frequency band by touching [F MW] followed by [HOME] ( see page xx)�Tuning in to a FrequencyTune in to your desired frequency using either of the following methods: yRotating the DIAL to tune in to your desired frequency1 Press the key to switch the transceiver to VFO mode�2 Rotate the DIAL to tune in to your desired frequency� Rotate clockwise: The frequency increases� Rotate counterclockwise: The frequency decreases� Tip By touching [F MW] and rotating the DIAL, you can tune in to the desired frequency in steps of 1 MHz� yEntering your desired frequency directly using the numeric keys1 Press the key to switch the transceiver to VFO mode�2 Touch the frequency displayed on the LCD� The numeric keypad appears�メモリー書き込み中!A1Application for FCC / IC FCC ID: K6620605X20 IC: 511B-20605X20](https://usermanual.wiki/Yaesu-Musen/20605X20.User-Manual-part-4/User-Guide-2549782-Page-3.png)
![34Basic OperationPerforming Communication3 Enter the frequency using the numeric keys� Example: To input 145�520 MHz [1] → [4] → [5] → [5] → [2] → [ENT] Example: To input 430�000 MHz [4] → [3] → [ENT]Tips• In factory settings, Auto Step mode is set such that the transceiver is automatically switched to the optimal frequency steps for the reception frequency�You can also change frequency steps manually rotating the DIAL ( see page xx)�• If you enter a wrong digit when entering a frequency using numeric keys, you can cancel it by pressing �• In factory settings, turning the DIAL further beyond the selected frequency band causes the transceiver to switch to another frequency band�To prevent this from happening, press and hold for over 1 second to switch to Set mode, then touch [CONFIG] → [21 VFO MODE], and select “BAND” for repeatedly showing frequencies on the same frequency band�Selecting Communication Mode yUsing AMSThis transceiver is equipped with AMS (Automatic Mode Select) which automatically selects between 4 modes of transmission to fit the signal being received� Because the transmission is automatically adjusted to that of the other station, not only C4FM digital signals, but analog signals are also recognized automatically�To utilize the AMS function, repeatedly touch [MODE] on the LCD until “ ” appears� After receiving the signal, “DN” of “ ” will be changed according to the received signal�メモリー書き込み中!A1Example of whenAMS is displayed yFixing the Communication ModeTo fix the communication mode for operation, touch [MODE] on the LCD to switch the communication mode�Touching [MODE] on the LCD each time toggles the communication mode as follows�Application for FCC / IC FCC ID: K6620605X20 IC: 511B-20605X20](https://usermanual.wiki/Yaesu-Musen/20605X20.User-Manual-part-4/User-Guide-2549782-Page-4.png)
![35Basic OperationPerforming Communication[ (AMS)] → [DN (V/D mode)] → [VW (FR mode)] → [FM (analog)]Operation mode Icon Description of ModesAMS(Automatic Mode Select)Transmission mode is automatically selected from 4 types according to the signal received�(“DN” part differs depending on the received signal�)The AMS function operation can be changed with the Set mode setting ( see page xx)�V/D Mode(Voice/Data simultaneoustransmission mode)DN Calls are less prone to interruptions due to detection and correction of voice signals during digital voice signal transmission� This is the standard mode for C4FM FDMA Digital�Voice FR Mode(Voice Full Rate Mode)VW High speed data communication using entire 12�5 kHz band�Enables high-quality voice communication�Data FR Mode (High SpeedData Communication Mode)DW Digital voice data transmission using the entire 12�5 kHz band�The transceiver automatically switches to this mode during image transmission�Analog FM Mode FM Analog communication using FM mode�Effective when the signal is weak and audio is susceptible to interruption in digital mode�Cautions yDigital communication can be performed only on the A-band� yDigital communication cannot be performed on the B-band� yIn V/D mode (“DN” on the LCD), position information is included in the radio wave during voice communication, however, it is not include in the Voice FR mode (“VW” on the LCD)�Transmitting/Receiving Signals1 While pressing and holding , speak into the microphone� Keep your mouth about 5 cm away from the microphone when you speak�2 Release � The transceiver returns to Reception mode�Cautions yUse the transceiver at the minimum required transmission power level� Doing so prevents the transceiver from overheating and saves battery power, increasing the operating time� yDo not continue transmitting for a prolonged period� The transceiver can overheat, resulting in malfunction or burn� yIf transmission is continued for a long period, the transceiver overheats and the overheat protection function is activated� As a result, the transmitting power level is automatically set to Low Power� If you continue transmitting while the overheat protection function is active, the transceiver will be forcibly returned to the Reception mode� yIf you touch the transceiver immediately after the overheat protection function has become active, you can get burned� Wait for the temperature inside the transceiver to drop sufficiently before resuming transmission� yDo not perform transmission without attaching the antenna� The transmitter circuit can be damaged�Application for FCC / IC FCC ID: K6620605X20 IC: 511B-20605X20](https://usermanual.wiki/Yaesu-Musen/20605X20.User-Manual-part-4/User-Guide-2549782-Page-5.png)
![36Basic OperationPerforming CommunicationTips• In FM mode, you can transmit on the 144 MHz and 430 MHz ham radio bands�• Even while you are receiving in AM mode, you can transmit in NFM mode by pressing �• You can change the transmit power level by touching [F MW] followed by [TXPWR] ( see page xx)�Transmit power level is different when using the battery pack or the alkaline battery case�For more details, see “Changing the Transmission Power Level” on page xx�• If is pressed when a frequency other than the amateur ham radio band is selected, an alarm tone (beep) will be emitted and “ERROR” appears on the LCD, disabling transmission�• You can select whether or not to prohibit transmission while receiving a signal� Press and hold for over 1 second to switch the transceiver to Set mode, then with the setting from [CONFIG] → [2 BCLO], select [ON]�Application for FCC / IC FCC ID: K6620605X20 IC: 511B-20605X20](https://usermanual.wiki/Yaesu-Musen/20605X20.User-Manual-part-4/User-Guide-2549782-Page-6.png)
![37Basic OperationMiscellaneous SettingsChanging the Transmission Power LevelThe maximum transmission power level of this transceiver is 5 W� When communicating with a friend in the immediate area or when you want to reduce the battery power consumption, you can lower the transmit power level� For power supply types and transmit power levels, see the table shown below�Battery typeHI (High Power)L3 L2 L1Battery pack 5W 2�5W 1W 0�1WExternal power supply (DC13�8V)Battery Case (alkaline battery) Approx� 0�8W 0�1W1 Touch [F MW]�2 Touch [TXPWR]�MENU DISPLAY 2'!A7723 TOP画面プリセットレシーバー!A1TOP画面AF-DUAL表示'!A1 Band Scope'!A1FUNCTION!A389 APRS Message list1'!A1APRS Station list1'!A13 Rotate the DIAL to select one of the following transmission power levels� “Hi”, “L1”, “L2”, “L3”4 Press � The transmission power level will be set�Tips• You can set the transmitter power level separately for the A-band and B-band�• Use the transceiver at the minimum required transmit power level to reduce battery power consumption�• By default, “HI (High power)” is selected�T�B�D�Application for FCC / IC FCC ID: K6620605X20 IC: 511B-20605X20](https://usermanual.wiki/Yaesu-Musen/20605X20.User-Manual-part-4/User-Guide-2549782-Page-7.png)
![38Basic OperationMiscellaneous SettingsAdjusting the Squelch LevelYou can mute the raspy noise heard when no signal is being received� The squelch level can be adjusted separately for two broadcasts (FM and AM) received on the A-band and B-band�When the squelch level is increased, the noise is more liable to disappear, but it becomes difficult to receive weak signals� Adjust the squelch level as required�1 Press to set the band for which you want to adjust the squelch, to the operating band�2 While pressing , rotate the DIAL to adjust the squelch level� Remarks • The squelch level can be adjusted within the range from 0 to 15� • Default: LEVEL 13 Release � The squelch level adjustment mode will be canceled�TipWhile is held pressed, the squelch function will be deactivated for both the A-band and B-band�Setting the Frequency StepBy default, “AUTO (Step)” is selected so that the optimum frequency step is automatically selected according to the received frequency� You can set the frequency step to a fixed value�1 Press and hold for over 1 second� The transceiver enters Set mode�2 Touch [CONFIG]�3 Touch [18 STEP]�T�B�D�T�B�D�Application for FCC / IC FCC ID: K6620605X20 IC: 511B-20605X20](https://usermanual.wiki/Yaesu-Musen/20605X20.User-Manual-part-4/User-Guide-2549782-Page-8.png)
![39Basic OperationMiscellaneous Settings4 Rotate the DIAL to select your desired frequency step� Remark Selectable frequency steps are as follows:• AUTO • 5�0KHz • 6�25KHz• (8�33KHz) • (9�0KHz) • 10KHz• 12�5KHz • 15KHz • 20�0KHz• 25�0KHz • 50�0KHz • 100�0KHz It is recommended that AUTO be selected normally� Default: AUTO5 Press � The frequency step setting mode will be canceled�Tips• For the AIR band (108 MHz to 136�991 MHz), the frequency step “8�33 kHz” can also be selected�• For bands covering 250 MHz to 300 MHz, and bands covering 580 MHz or higher, the frequency steps “5 kHz”, “6�25 kHz”, and “15 kHz” cannot be selected�Changing the ModeYou can change the selected band mode�By default, “AUTO (Auto Mode)” is set so that the optimal mode (radio wave type) is automatically selected according to the band (frequency band)�1 Press and hold for over 1 second� The transceiver enters Set mode�2 Touch [TX/RX]�3 Touch [1 MODE]�4 Touch [3 RX MODE]� The current setting will be displayed�T�B�D�T�B�D�Application for FCC / IC FCC ID: K6620605X20 IC: 511B-20605X20](https://usermanual.wiki/Yaesu-Musen/20605X20.User-Manual-part-4/User-Guide-2549782-Page-9.png)
![40Basic OperationMiscellaneous Settings5 Rotate the DIAL to select your desired mode� It is recommended that AUTO be selected normally�Display OperationAUTO The optimal mode is automatically selected according to the frequency band�NFM Only the selected band is switched to the NFM (FM mode)�AM Only the selected band is switched to the AM mode�6 Press � Set mode will be canceled�TipEven if AM mode is selected on a ham radio band, 144 MHz band or 430 MHz band, transmission takes place in the FM mode�Caution You cannot change the mode of A-band AM/FM broadcast radio bands�Locking Keys and SwitchesTo prevent accidental frequency change during operation, keys, switches and the DIAL except , , and can be locked�1 Press � [LOCK] appears on the LCD� Remark To unlock a key or switch, press again� [UNLOCK] is displayed on the LCD for few seconds�TipYou can also lock the DIAL and by selecting the Set mode option [CONFIG] → [9 LOCK]�T�B�D�Application for FCC / IC FCC ID: K6620605X20 IC: 511B-20605X20](https://usermanual.wiki/Yaesu-Musen/20605X20.User-Manual-part-4/User-Guide-2549782-Page-10.png)
![41Basic OperationMiscellaneous SettingsRestoring to Defaults (All Reset)You can restore all transceiver settings and memory content to the defaults�1 Press and hold for over 1 second, then turn off the transceiver�2 While pressing press � The transceiver turns on and you hear the beep�3 When you hear the beep, release the key� “ALL RESET?” appears on the LCD�4 Touch [OK]� A beep sounds and the call sign input screen appears on the LCD�5 Input the call sign� Input the call sign using the numeric key pad�6 Press � The call sign is set and the frequency screen appears� Remark To cancel resetting, touch [CANCEL]�CautionWhen the All Reset function is performed, all data registered in the memory will be deleted� Be sure to write it down on paper or back up the data on a microSD memory card ( pages xx to xx)�TipTo restore only the Set Mode settings to default, while pressing , press to turn on the transceiver�Application for FCC / IC FCC ID: K6620605X20 IC: 511B-20605X20](https://usermanual.wiki/Yaesu-Musen/20605X20.User-Manual-part-4/User-Guide-2549782-Page-11.png)
![42Using the MemoryUsing the MemoryRegistering to Memory ChannelCautionThe information registered to memory channels can be corrupted due to wrong operation, static electricity, or electrical noise� Also, it can be erased in the case of a failure or repair� Be sure to write it down on paper or back up the data on a microSD memory car ( see pages xx to xx)�The transceiver allows you to use 900 memory channels (memory channel numbers 1 to 900)�1 Press the key to enter VFO mode�2 Rotate the DIAL to select the frequency you want to register to a memory channel�3 Touch [F MW] for over 1 second� The transceiver enters Memory Channel Registration mode, and the number of the memory channel next to the most recently registered memory will flash� Remarks • To cancel the memory channel registration, press � • To specify a memory channel to which you want to register the frequency, select the memory channel by rotating the DIAL� The ( icon indicating [The specified memory channel is unregistered] lights up, and the memory channel flashes� The ) icon indicating [The specified memory channel is registered] lights up� • Pressing each time skips memory channels quickly in steps of 100 memory channels�メモリー書き込み中!A1Application for FCC / IC FCC ID: K6620605X20 IC: 511B-20605X20](https://usermanual.wiki/Yaesu-Musen/20605X20.User-Manual-part-4/User-Guide-2549782-Page-12.png)
![43Using the MemoryA Wide Variety of Memory Functions4 Touch [M.WRITE]� The frequency registration will initiate� If you attempt to register a frequency to a memory channel on which another frequency has already been registered, “Overwrite OK?” will appear on the LCD� Once the registration is completed, the frequency will be displayed on the LCD�TOP画面!A1Tips• By default, 145�000 MHz is registered to the memory channel 1� It can be changed to another frequency, but not be deleted�The frequency which has been registered to a memory channel can be overwritten with a new frequency�When you attempt to register a new frequency to a memory channel, an unregistered memory channel appears�• To display the lowest unregistered memory number when you register a frequency to a memory channel, press and hold for over 1 second to enter Set mode, and then select [MEMORY] → [6 MEMORY WRITE]�• To inhibit registration to all memory channels, press and hold for over 1 second to enter Set mode, and then select [MEMORY] → [4 MEMORY PROTECT]�Split MemoryTwo different frequencies, one for reception and other for transmission, can be registered to a memory channel�1 Register a reception frequency to a memory channel� Remark See “Registering to Memory Channel” above�2 Select a transmission frequency in VFO mode�3 Touch [F MW] for over 1 second�4 Rotate the DIAL to select the channel number to which you have registered the reception frequency�5 While pressing , touch [M.WRITE]� When you recall the memory channel to which you registered two different frequencies (one for receive and the other for transmit), @ appears on the LCD� T�B�D�Application for FCC / IC FCC ID: K6620605X20 IC: 511B-20605X20](https://usermanual.wiki/Yaesu-Musen/20605X20.User-Manual-part-4/User-Guide-2549782-Page-13.png)
![44Using the MemoryA Wide Variety of Memory FunctionsRecalling a Memory ChannelRecall a registered memory channel following the steps below�1 Press the key to enter Memory mode� The memory channel most recently used appears on the LCD�2 Rotate the DIAL to select the desired memory channel� Remark Touching [F MW] and rotating the DIAL allows you to skip memory channels quickly in steps of 10 memory channels�3 Press � Memory mode will be canceled and the frequency selected in VFO mode will be displayed�Tips• Unregistered memory channels are skipped�• By default, a priority memory channel, which is used as dual receive priority memory channel, is set to the memory channel number 1� “P” appears on the upper right corner of the priority memory channel number ( see page xx)�• The information registered to a memory channel can be transferred to the VFO operating band by following procedure below�Touch [F MW] for over 1 second. → Press the key. → “OVERWRITE OK?” appears. → Press the key�• Placing the transceiver in the Memory Channel Only mode by following the procedure below restricts use to memory channels�while pressing , press to turn on the transceiver�To cancel the Memory Channel Only mode, while pressing , press again�Application for FCC / IC FCC ID: K6620605X20 IC: 511B-20605X20](https://usermanual.wiki/Yaesu-Musen/20605X20.User-Manual-part-4/User-Guide-2549782-Page-14.png)