Yaesu Musen 20515X20 HH AMATEUR SCANNING RECEIVER User Manual OM
Yaesu Musen Co., Ltd. HH AMATEUR SCANNING RECEIVER OM
UserManual.wiki
>
Yaesu Musen
>
20515X20 User Manual
>
Operating Manual 3
Contents
1.
Operating Manual 1
2.
Operating Manual 2
3.
Operating Manual 3
4.
Operating Manual 4
Operating Manual 3
Navigation menu
Upload a User Manual
Namespaces
Wiki Guide
HTML
PDF
Info
Views
User Manual
Discussion / Help
Navigation
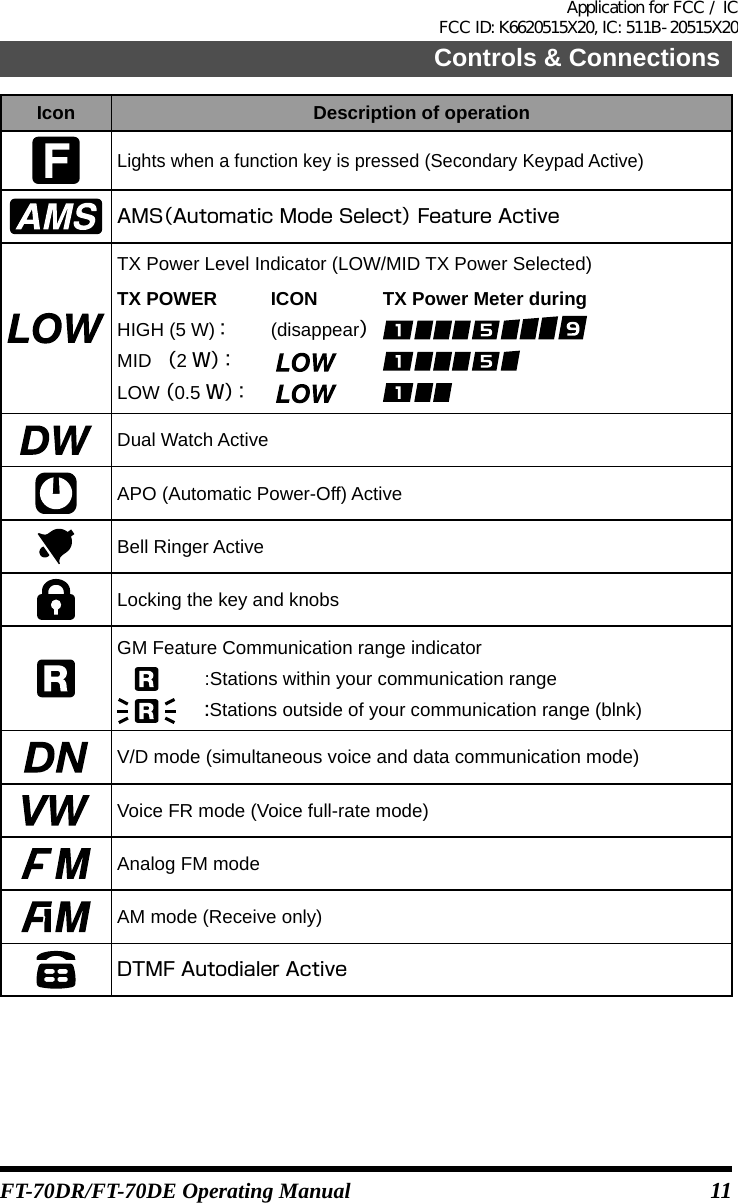
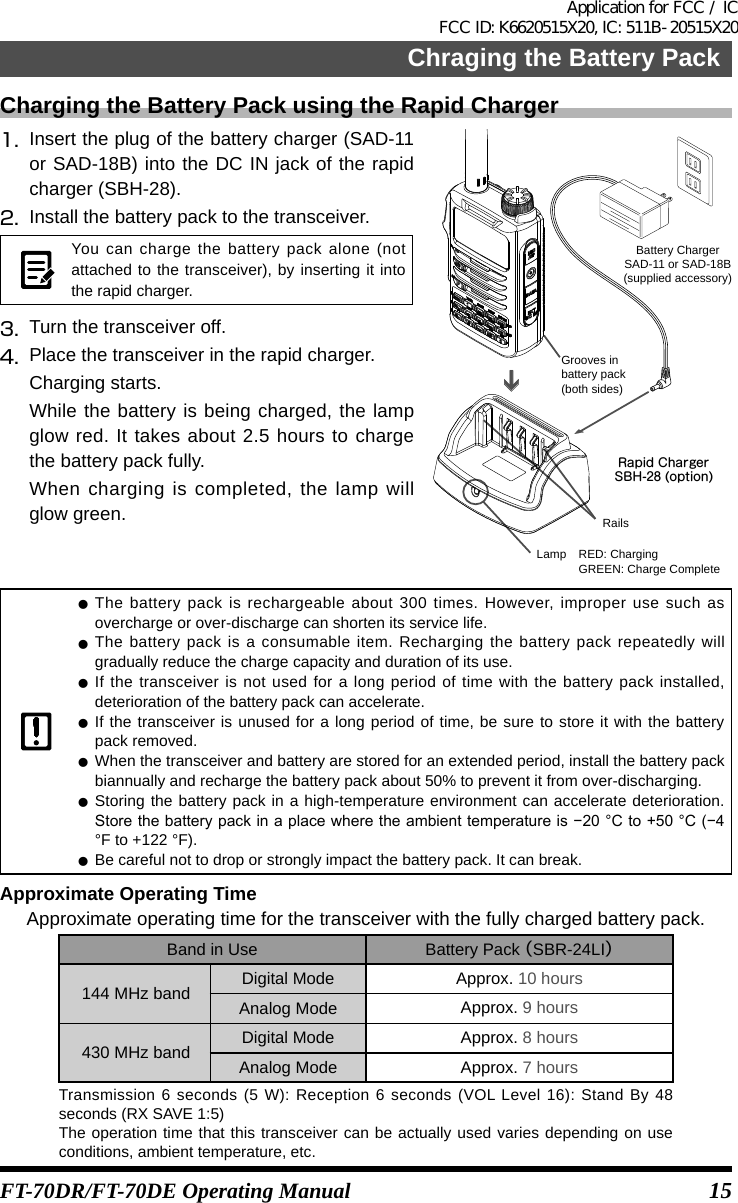
![18 FT-70DR/FT-70DE Operating ManualTurning on the Transceiver1. Press and hold [POWER] switch.When the transceiver is turned on for the first time after purchase, the call sign input message appears on the LCD.The next time, the frequency screen will appear after the opening screen.When the transceiver is turned on the second time, and subsequently, the frequency screen appears. zBe sure to set the call sign ID using the FT-70DR/DE. zThe Call Sign ID can be changed using the set mode [76 MYCALL]. ●Turning off the TransceiverTo turn the transceiver OFF, press and hold [POWER] switch.Inputing the call sign1. Input a callsign for your transceiver.Input the callsign with the ten key or DIAL knob.Example 1:Press the [2] key repeatedly to toggle amongthe four available characters associated with that key:A→B→C→2→A→···Example 2:Rotate the DIAL knob to select any of the 38available characters.0~9↔A~Z↔(space)↔‒↔⁄↔···2. Press [F] key or [PTT] switch to save the inputted call sign. zUp to 10 characters (letters, numbers, a hyphen and a slash) can be entered. zPress [MODE] key / [BAND] key to move the cursor to left / right in the text input area. zPress and hold [GM] key to delete all characters after the cursor.Basic OperationApplication for FCC / IC FCC ID: K6620515X20, IC: 511B-20515X20](https://usermanual.wiki/Yaesu-Musen/20515X20.Operating-Manual-3/User-Guide-3232555-Page-8.png)
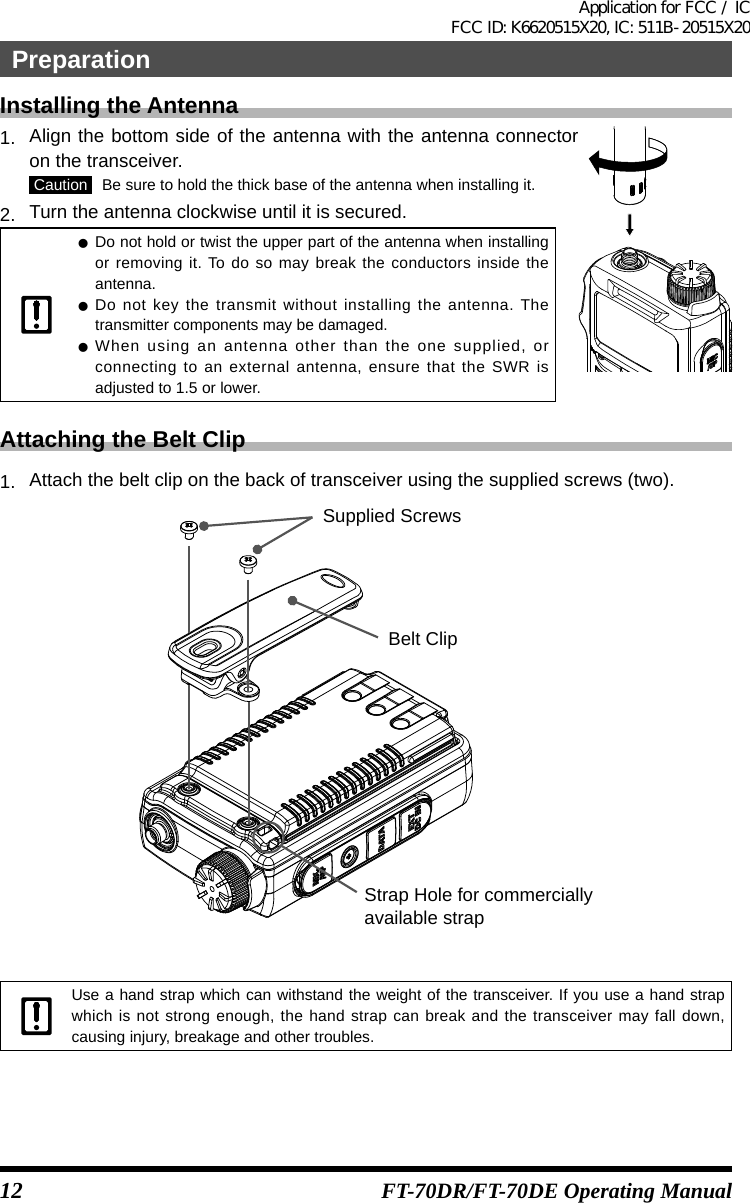
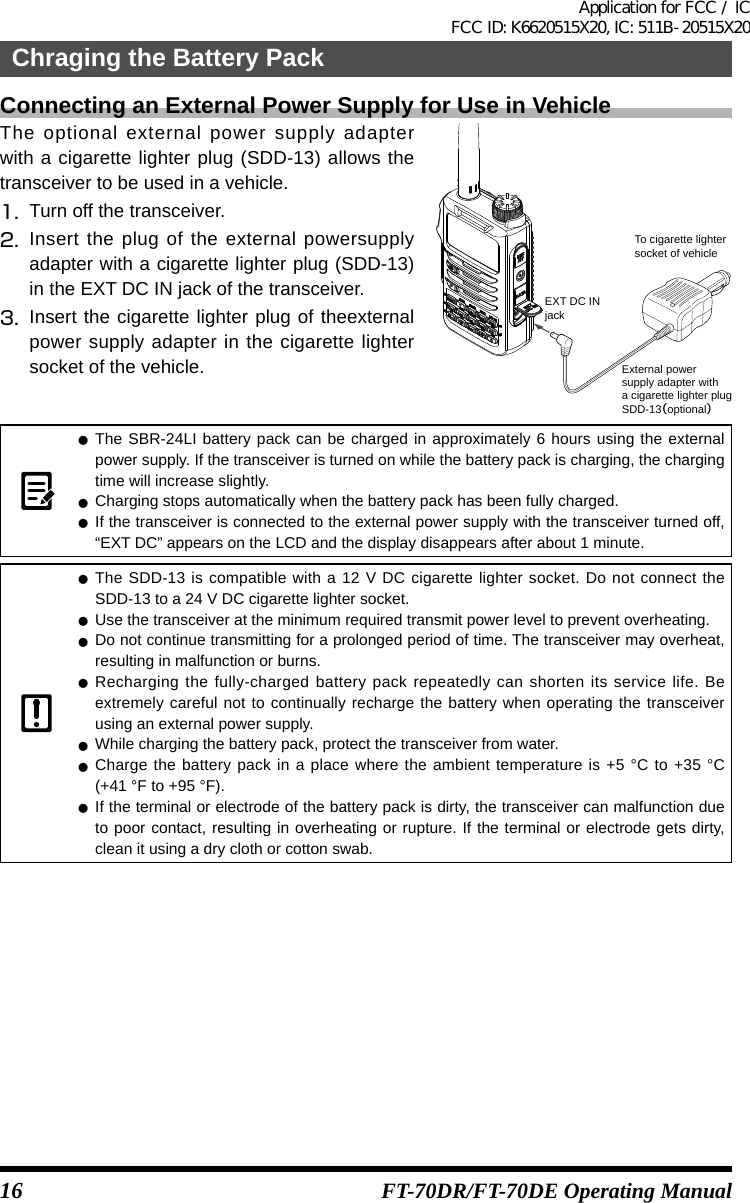
![19Basic OperationFT-70DR/FT-70DE Operating ManualAdjusting the Volume Level1. Rotate the DIAL knob while pressing and holding the key to set the desired audio level.Clockwise rotation increases the volume level. z If no sound is heard from the speaker, press and then adjust the volume level while listening to white noise. zPress [F] key, then press the [MONI](T-CALL) Key to adjust the squelch level.Selecting a Frequency Band1. Press the [BAND] key to select the desired frquency band.Frequency bandsInformationradio band (1)144 MHz band 430 MHz bandInformationradio band (3)AIR bandInformationradio band (2)108 - 137 MHz 137 - 174 MHz 174 - 222 MHz 222 - 420 MHz 420 - 470 MHz 470 - 580MHz z Press [F] key, then press the [BAND] key to switch the frequency bands in reverse order. zTo recall the HOME channel of each frequency band touch [HM/RV] key.Tuning to a FrequencyTune in to your desired frequency using either of the following methods: ●Rotate the DIAL to tune to the desired frequency1. Press the [V/M] key to switch the transceiver to VFO mode.2. Rotate the [DIAL] knob to tune to the desired frequency.Rotate clockwise: The frequency increases.Rotate counterclockwise: The frequency decreases.By pressing [F] key and rotating the [DIAL] knob, the frequency will change in 1 MHz steps Entering.Application for FCC / IC FCC ID: K6620515X20, IC: 511B-20515X20](https://usermanual.wiki/Yaesu-Musen/20515X20.Operating-Manual-3/User-Guide-3232555-Page-9.png)
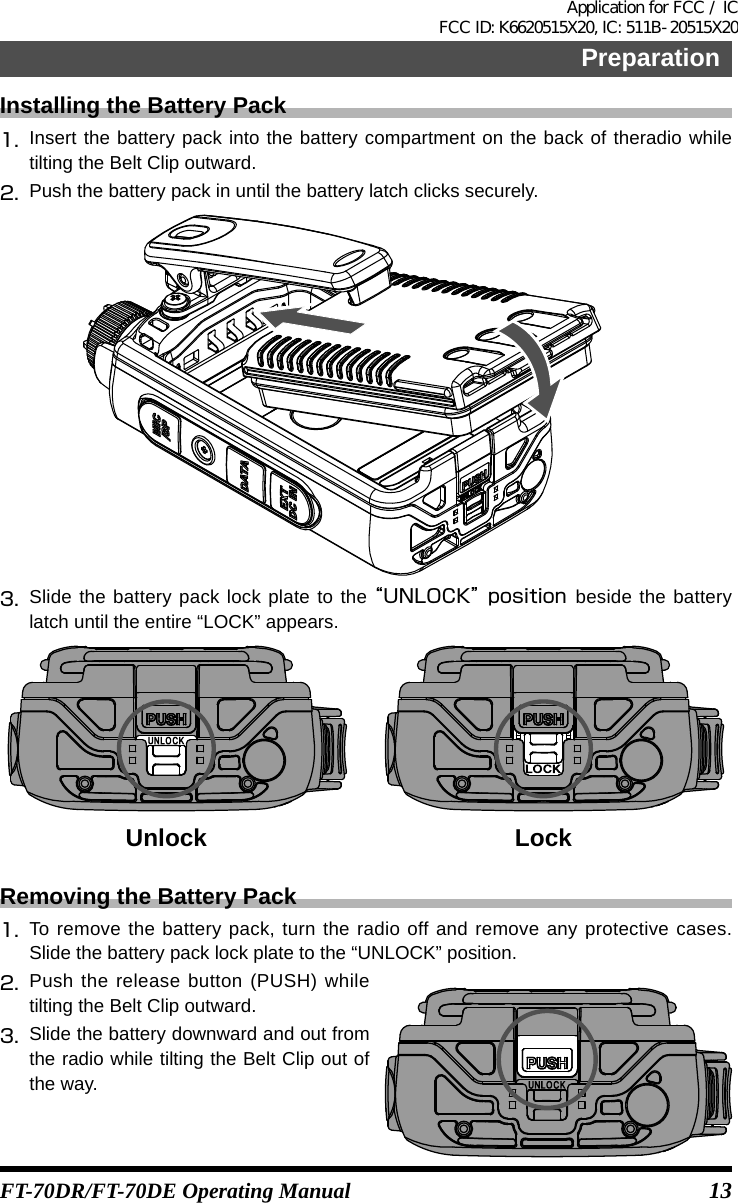
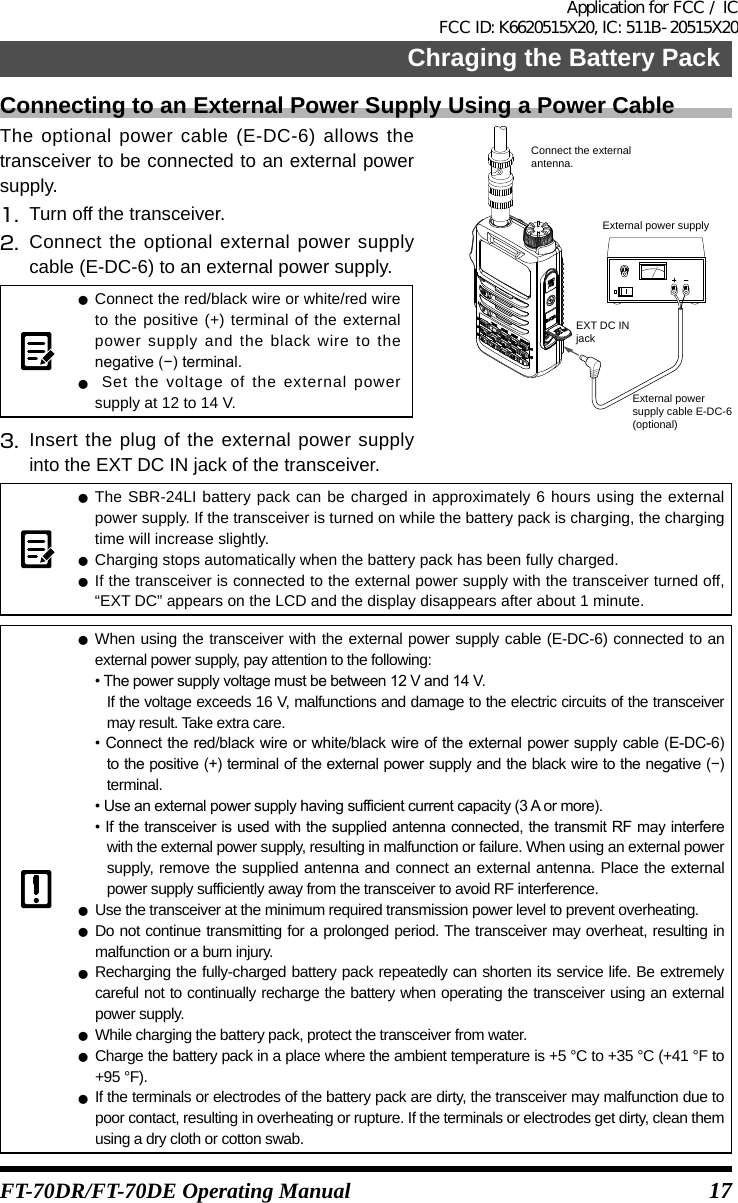
![20Basic OperationFT-70DR/FT-70DE Operating Manual zIn factory settings, Auto Step mode is set so that the transceiver is automatically switched to the optimal frequency steps for the receiver frequency. zIn factory settings, turning the [DIAL] knob beyond the selected frequency band causes the transceiver to switch to the next frequency band.To change the tuning so the frequency will move repeatedly through the selected band, enter the Set mode, then select [74 VFO.MOD] and select “BAND”. ●Entering the frequency directly using the numeric keys1. Press the [V/M] key to switch the transceiver to VFO mode.2. Enter the desired frequency using numeric keys.Examples:To enter 145.520 MHz, press [1]→[4]→[5]→[5]→[2]To enter 430.000 MHz, press [4]→[3]→[V/M] (or press and hold [0]) zIf a wrong digit is entered when entering a frequency using the numeric keys, it may be canceled by pressing [PTT] switch.Selecting the Communication ModeUsing AMS(Automatic Mode Select)The FT-70DR/DE transceiver is equipped with the AMS (Automatic Mode Select) function which automatically selects from two modes of transmission corresponding to the signal being received.The transmit mode is selected according to the received signal so that C4FM digital signals, and analog signals are received and transmitted automatically.1. Press [AMS] key to display “ ” icon on the LCD.Displays the communication mode (radio wave type).DN : V/D Mode (Voice/Data simultaneous transmission mode)VW : Voice FR Mode (Voice Full Rate Mode)FM : Analog FM ModeCurrent Communication ModeAMS icon ●Setting the transmission mode when using the AMS function1. Press the [AMS] key to active the AMS function.2. Press and hold [AMS] key.3. Rotate the [DIAL] knob to tune to the desired communication mode as follows.Application for FCC / IC FCC ID: K6620515X20, IC: 511B-20515X20](https://usermanual.wiki/Yaesu-Musen/20515X20.Operating-Manual-3/User-Guide-3232555-Page-10.png)