Yaesu Musen 20345X40 AMATEUR RADIO WITH SCANNING RECEIVER User Manual OM
Yaesu Musen Co., Ltd. AMATEUR RADIO WITH SCANNING RECEIVER OM
Contents
- 1. User Manual
- 2. User Manual 1
- 3. User Manual 2
- 4. User Manual 3
- 5. User Manual 4
- 6. User Manual 5
- 7. User Manual 6
- 8. User Manual 7
- 9. User Manual 8
- 10. User Manual 9
- 11. User Manual 10
- 12. User Manual 11
- 13. User Manual 12
- 14. User Manual 13
- 15. User Manual 14
- 16. User Manual 15
- 17. User Manual 16
- 18. User Manual 17
- 19. User Manual 18
- 20. User Manual 19
- 21. User Manual 20
- 22. User Manual 21
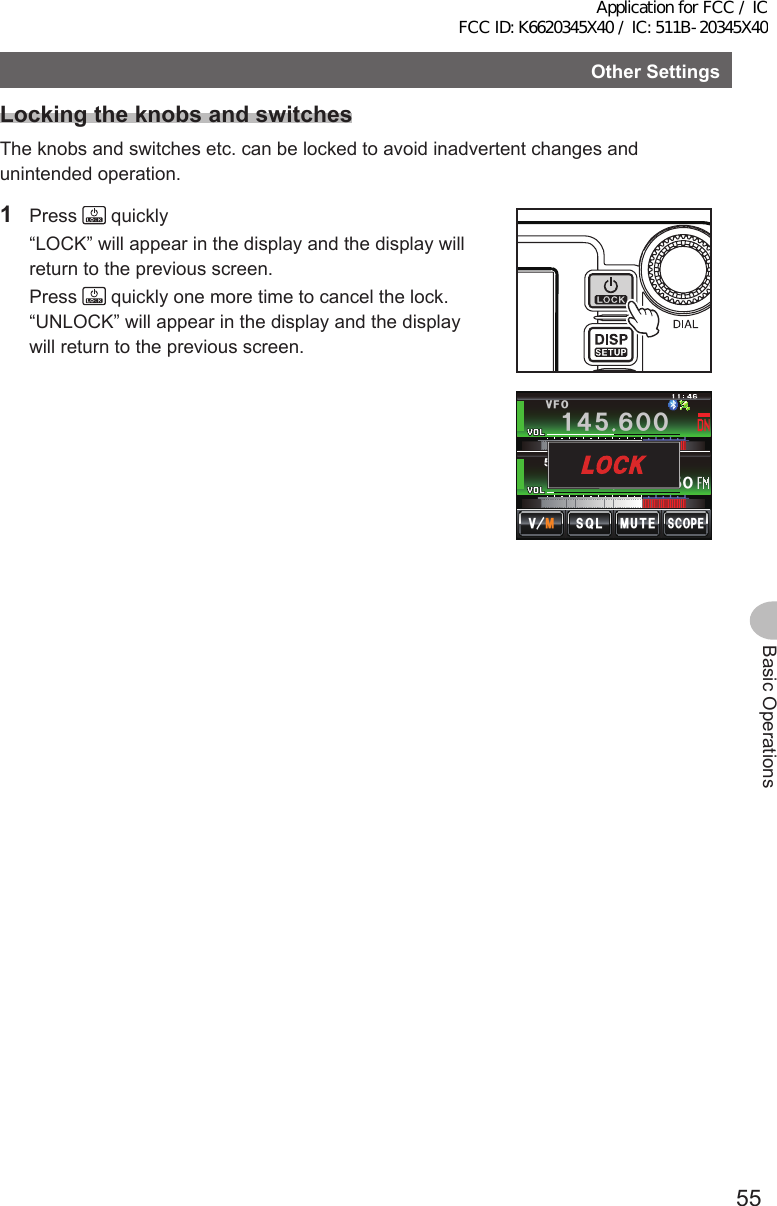
User Manual 5
![53Basic OperationsCommunicating2 Touch [CONFIG] The menu list will be displayed.$#%-$#%-6:4:5'672/'074'5'6%.10'%10(+)9Ჰ4'55%#0&+52.#;5+) 0#.+0)#245 126+105&%#4&/'/14;&#6#%#..5+) 03 Turn , or touch the screen to select [4AUTORPTSHIFT]4 Touch [4AUTORPTSHIFT] to select “ON” The setting will switch between “ON” and “OFF” each time it is touched.$#%-$#%-6+/'<10'#7614265*+(676% ᲸᲸ105 Press for one second or longer The automatic repeater shift will be set and the display will return to the previous screen.Tip The display can also be returned to the previous screen by touching [BACK] twice. ●ToneCalling(1750Hz)Press and hold in the program key [P1] of the microphone (MH-48) to generates a 1750 Hz burst tone to access the repeater. The transmitter will automatically be activated, and a 1750 Hz audio tone will be superimposed on the carrier. Once access to the repeater has been gained, you may release the [P1] key, and use the [PTT] for activating the transmitter thereafter.Application for FCC / IC FCC ID: K6620345X40 / IC: 511B-20345X40](https://usermanual.wiki/Yaesu-Musen/20345X40.User-Manual-5/User-Guide-2766132-Page-1.png)
![54Basic OperationsOtherSettingsChangingthebeepvolumeThe volume of the confirmation beep that goes off when a key is pressed can be adjusted.1 Press for one second or longer The set-up menu will be displayed.2 Touch [CONFIG] The menu list will be displayed.$#%-$#%-6:4:5'672/'074'5'6%.10'%10(+)9Ჰ4'55%#0&+52.#;5+) 0#.+0)#245 126+105&%#4&/'/14;&#6#%#..5+) 03 Touch [8BEEP] to select the volume The volume changes in the following sequence each time the screen is touched. “OFF” → “LOW” → “HIGH”Tip Factory default value: LOW$#%-$#%-%10(+)4265*+(6(4'3(/#/56'2$''2 /*\.19#7611((4265*+(64 Press for one second or longer The beep volume will be set and the display will return to the previous screen.Tip The display can also be returned to the previous screen by touching [BACK] twice.Application for FCC / IC FCC ID: K6620345X40 / IC: 511B-20345X40](https://usermanual.wiki/Yaesu-Musen/20345X40.User-Manual-5/User-Guide-2766132-Page-2.png)
![56Basic OperationsOtherSettingsAdjustingthedateandtimeThis radio has a built-in clock. Adjust the time before using.1 Press for one second or longer The mode will change to the set-up mode. 2 Touch [CONFIG] The menu list will be displayed.$#%-$#%-6:4:5'672/'074'5'6%.10'%10(+)9Ჰ4'55%#0&+52.#;5+) 0#.+0)#245 126+105&%#4&/'/14;&#6#%#..5+) 03 Touch [1DATA&TIMEADJUST] The screen for setting the date and time will be displayed.$#%-$#%-%10(+)&#6'6+/'(14/#66+/'<10'#7614265*+(676% ᲸᲸᲹᲺ10ŻŻ&#6'6+/'#&,7564 Touch [SET] “Month” will blink.$#%-$#%-5'6%10(+)ᲸᲸᲹᲹᲺ,7.Ჹ ᲺᲺᲹ&#6'6+/'#&,7565 Touch [+] and [-] to set the month$#%-$#%-5'6ᲸᲹ Ჹ&#6'6+/'#&,756ᲸᲹᲺ,7.Ჹ ᲺᲺ6 Touch [SET] “Day” will blink.$#%-$#%-5'6ᲸᲹ Ჹ&#6'6+/'#&,756ᲸᲹᲺ#7)Ჹ ᲺᲺApplication for FCC / IC FCC ID: K6620345X40 / IC: 511B-20345X40](https://usermanual.wiki/Yaesu-Musen/20345X40.User-Manual-5/User-Guide-2766132-Page-4.png)
![57Basic OperationsOtherSettings7 Touch [+] and [-] to set the day$#%-$#%-5'6ᲸᲹ Ჹ&#6'6+/'#&,756ᲸᲹᲺ#7)Ჹ ᲺᲺ8 Touch [SET] “Year” will blink.$#%-$#%-5'6ᲸᲹ Ჹ&#6'6+/'#&,756ᲸᲹᲺ#7)Ჺ ᲺᲸ9 Touch [+] and [-] to set the year$#%-$#%-5'6ᲸᲹ Ჹ&#6'6+/'#&,756ᲸᲹᲺ#7)Ჺ ᲺᲸ10 Touch [SET] “Hour” will blink.$#%-$#%-5'6ᲸᲹ Ჹ&#6'6+/'#&,756ᲸᲹ#7)Ჺ ᲺᲸ11 Touch [+] and [-] to set the hour$#%-$#%-5'6ᲸᲹ Ჹ&#6'6+/'#&,756ᲸᲹ#7)Ჺ ᲺᲸ12 Touch [SET] “Minute” will blink.$#%-$#%-5'6ᲸᲹ ᲽᲹ&#6'6+/'#&,756ᲸᲹ#7)Ჺ ᲺᲸ13 Touch [+] and [-] to set the minute$#%-$#%-5'6ᲸᲹ ᲽᲹ&#6'6+/'#&,756ᲸᲹ#7)Ჺ ᲺᲸApplication for FCC / IC FCC ID: K6620345X40 / IC: 511B-20345X40](https://usermanual.wiki/Yaesu-Musen/20345X40.User-Manual-5/User-Guide-2766132-Page-5.png)
![58Basic OperationsOtherSettings14 Touch [SET]$#%-$#%-5'6ᲸᲹ ᲽᲸᲹ&#6'6+/'#&,756ᲸᲹ#7)Ჺ ᲺᲸ15 Press for one second or longer The date and time will be set and the display will return to the previous screen.Tips • The time will be displayed at the top right of the display. • You can also return to the previous screen by touching [BACK] three times.Tips• The accuracy of the clock is ±30 seconds per month at normal temperature. The accuracy may differ depending on the operating conditions such as temperature.• The time is automatically set when signals are received from the GPS.• When using this radio for the first time, the accuracy of the clock may occasionally be lower. In this case, adjust the time again.• The calendar can display dates between Jan 1, 2000 and Dec 31, 2099. AdjustingthedisplaybrightnessThe brightness and contrast of the touch panel can be adjusted.1 Press for one second or longer The set-up menu will be displayed.2 Touch [DISPLAY] The menu list will be displayed.$#%-$#%-6:4:5'672/'074'5'6%.10'%10(+)9Ჰ4'55%#0&+52.#;5+) 0#.+0)#245 126+105&%#4&/'/14;&#6#%#..5+) 0Application for FCC / IC FCC ID: K6620345X40 / IC: 511B-20345X40](https://usermanual.wiki/Yaesu-Musen/20345X40.User-Manual-5/User-Guide-2766132-Page-6.png)
![59Basic OperationsOtherSettings3 Select [5LCDBRIGHTNESS] and touch the screen The screen for selecting the level will be displayed.9+&'6+/'.%&$4+)*60'55&+52.#;$#0&5%12'.%&%1064#56 ⌽#:/6+/'8&&ᲽᲾᲿ$#%-$#%-4 Touch [+] and [-] to select the brightness level The setting changes by one level each time the screen is touched. The brightness level can be selected from one of the following seven levels. “MIN”, “2”, “3”, “4”, “5”, “6” and “MAX”Tip Factory default value: MAX/#:/+0.%&$4+)*60'55Ჽ&+52.#;$#%-$#%-5 Touch [BACK] The brightness is set and the display returns to the previous screen./#:/+0.%&$4+)*60'55Ჽ&+52.#;$#%-$#%-6 Select [6LCDCONTRAST] and touch the screen The screen for selecting the level will be displayed.6+/'.%&$4+)*60'55.%&%1064#56 ⌽⍁6+/'8&&ᲽᲾᲿ$#%-$#%-7 Touch [+] and [-] to select the contrast level The setting changes by one level each time the screen is touched. The contrast level can be selected from one of the following seven levels. “-3”, “-2”, “-1”, “0”, “+1”, “+2”, “+3”Tip Factory default value: +3.%&%1064#56Ჾ&+52.#;$#%-$#%- 8 Press for one second or longer The contrast is set and the display returns to the previous screen.Tip The display can also be returned to the previous screen by touching [BACK] twice.Application for FCC / IC FCC ID: K6620345X40 / IC: 511B-20345X40](https://usermanual.wiki/Yaesu-Musen/20345X40.User-Manual-5/User-Guide-2766132-Page-7.png)
![60Basic OperationsOtherSettingsChangingthebackgroundcolorofthefrequencydisplayareaThe background (shade) of the frequency display can be selected from five colors.1 Press for one second or longer The set-up menu will be displayed.2 Touch [DISPLAY] The menu list will be displayed.$#%-$#%-6:4:5'672/'074'5'6%.10'%10(+)9Ჰ4'55%#0&+52.#;5+) 0#.+0)#245 126+105&%#4&/'/14;&#6#%#..5+) 03 Touch [3BACKGROUNDCOLOR] to select the color The setting changes in the following sequence each time the screen is touched. “ORANGE” → “GREEN” → “BLUE” → “PURPLE” → “GRAY”Tip Factory default value: ORANGEŻ6#4)'6.1%#6+10&+52.#;&+52.#;5'.'%6#0)'41$#%-)4170&%1.14%1/2#559+&'$#0&5%12'ᲹᲺ$#%-$#%-4 Press for one second or longer The background color is set and the display returns to the previous screen.Tip The display can also be returned to the previous screen by touching [BACK] twice.Application for FCC / IC FCC ID: K6620345X40 / IC: 511B-20345X40](https://usermanual.wiki/Yaesu-Musen/20345X40.User-Manual-5/User-Guide-2766132-Page-8.png)