Yaesu Musen 20345X40 AMATEUR RADIO WITH SCANNING RECEIVER User Manual OM
Yaesu Musen Co., Ltd. AMATEUR RADIO WITH SCANNING RECEIVER OM
Contents
- 1. User Manual
- 2. User Manual 1
- 3. User Manual 2
- 4. User Manual 3
- 5. User Manual 4
- 6. User Manual 5
- 7. User Manual 6
- 8. User Manual 7
- 9. User Manual 8
- 10. User Manual 9
- 11. User Manual 10
- 12. User Manual 11
- 13. User Manual 12
- 14. User Manual 13
- 15. User Manual 14
- 16. User Manual 15
- 17. User Manual 16
- 18. User Manual 17
- 19. User Manual 18
- 20. User Manual 19
- 21. User Manual 20
- 22. User Manual 21
User Manual 14
![140Functions to be Used when NecessaryTakingPictureswiththeoptionalCamera(SnapshotFunction)Snapshots can be easily taken with the camera that is built into the optional speaker microphone “MH-85A11U”.The picture taken will appear on the display for several seconds and can also be transmitted to other transceivers simply by pressing the transmit picture button on the microphone.Tips• Refer to our YAESU website and catalog for the transceiver models that can transmit pictures.• The picture transmit button on the microphone can only transmit picture data after the image has been taken.• The snapshot function will not operate unless the micro-SD card is inserted into the card slot on the main body.The picture taken will be saved in the micro-SD card inserted into the main body card slot.The saved picture data can be transmitted to transceivers operating in the digital mode.Connectingthespeakermicrophonewithcamera1 Switch the power supply to the radio OFF2 Connect the MH-85A11U to the main body Refer to the figure on the right to plug the connector of the microphone into the [DATA] jack at the front of the main body. Caution Check the direction of the connector and plug it in all the way.3 Referring to the figure, mount the provided microphone cord holder to secure the MH-85A11U cord to the main body. Caution Remove the screws at the side of the radio and use the provided screw and washer to mount the microphone cord holder. Tip As the microphone connector can be passed through the microphone cord holder attached to the radio, there is no need to remove it once it is mounted. Provided screwProvided washer Cord holder Removethe screw of the main body4 Switch on the power supply to the main device5 Press for one second or longer The set-up menu will be displayed.6 Touch [DATA]$#%-$#%-6:4:5'672/'074'5'6%.10'%10(+)9Ჰ4'55%#0&+52.#;5+) 0#.+0)#245 126+105&%#4&/'/14;&#6#%#..5+) 0Application for FCC / IC FCC ID: K6620345X40 / IC: 511B-20345X40](https://usermanual.wiki/Yaesu-Musen/20345X40.User-Manual-14/User-Guide-2766349-Page-1.png)
![141Functions to be Used when NecessaryTakingPictureswiththeoptionalCamera(SnapshotFunction)7 Touch [1COMPORTSETTING] The screen for the detailed settings will be displayed.ŻŻŻ&#6#$#0&5'.'%6%1/21465'66+0)&#6#52''&ᲹᲺŻ&#6#537'.%*&#6#$#%-$#%-8 Touch [OUTPUT] to select “OFF(camera)” The setting changes as follows each time it is touched. “OFF(camera)” → “GPS OUT” → “PACKET” → “WAYPOINT” Tip Factory default value: OFF (camera)$#%-$#%-%1/21465'66+0)1((ECOGTC52''&92(+.6'4176276᳁ᲾᲸᲸDRU#..92(14/#6 0/'#Ჹ&#6#9 Press for one second or longer The display will return to the previous screen. Tip The display can also be returned to the previous screen by touching [BACK] twice.Takingpictures1 Insert the micro-SD card and turn the radio ON2 Point the camera lens at the object to be photographed and press the shutter button on the microphone Caution Keep a focal distance of at least 50 cm between the object and the camera. The picture will be out of focus when the object is too near and the image will not be clear. Tip In factory default, pictures will be taken with a size of 320 ✽ 240 in the NORMAL picture quality. The size (resolution) and quality (compression ratio) of the picture can be set using “OPTION” → “1USBCAMERA” in the set-up menu ( P.200). The picture taken will appear in the display for 10 seconds. Subsequently, the picture will be stored in JPEG format, on the microSD card that has been inserted into the main body card slot. While the picture appears in the display, touch [BACK], [DEL] or [FORWARD], you can save the data, delete or transfer it to other stations. [BACK]: Save the picture to the microSD card, then return to the original screen.Shutter buttonTransmitpicture buttonLensApplication for FCC / IC FCC ID: K6620345X40 / IC: 511B-20345X40](https://usermanual.wiki/Yaesu-Musen/20345X40.User-Manual-14/User-Guide-2766349-Page-2.png)
![142Functions to be Used when NecessaryTakingPictureswiththeoptionalCamera(SnapshotFunction) [DEL]: Delete the picture*, then return to the original screen.*:Deleted images, can be seen on the PC. [FORWARD]: Send the picture to other transceivers.Press the microphone [PTT] button to cancel the picture transmission (the picture will be stored in the microSD card). While the picture appears in the display, press the shutter button again, the picture will be saved to the microSD card, then the pic-ture taken will appear in the display. Tips • It takes about 30 seconds to transmit a picture taken with a resolution of 320 ✽ 240 to another transceiver. • Press the microphone [PTT] button to cancel the picture transmission (it may take a while for the transmission to be canceled). • After the picture is transmitted, the mode will automatically switch to DN of the AMS mode.TipThe first picture taken will be saved under the filename “M✽✽✽✽✽000001.jpg” while the pictures taken subsequently will be saved under the filenames “M✽✽✽✽✽000002.jpg”, “M✽✽✽✽✽000003.jpg” and so on in increasing order.The folder configuration in the micro-SD card is as follows and the data of the pictures taken is saved in the folder named “PHOTO” under the root directory.RootFTM400DBACKUPGPSLOGPHOTOGMPHOTOQSOLOGApplication for FCC / IC FCC ID: K6620345X40 / IC: 511B-20345X40](https://usermanual.wiki/Yaesu-Musen/20345X40.User-Manual-14/User-Guide-2766349-Page-3.png)
![143Functions to be Used when NecessaryTakingPictureswiththeoptionalCamera(SnapshotFunction)TakingPictureswiththeoptionalCamera(SnapshotFunction)Viewingasavedpicture1 Press The function menu will be displayed.2 Touch [LOG] A list of the text messages or the pictures saved in the micro-SD card will be displayed. Tips • A list of the text messages will be displayed when the touch key is [ ]. This will change to a list of pictures when [ ] is touched. • The date and time the picture was taken will be used as the tag of the picture. • Newly taken pictures will be displayed at the top of the list.ᲹᲽᲾᲸᲸ8(1 ᳀ᲾᲸᲽᲸᲽᲸᲸ61-;1Ჺ/76'5%12'/8 53.(9&$#%-$'#%106:5.+56.1)/5)$'#%10*1/'3 Select and touch the picture that you want to see The picture will appear after the message “Waiting...” is shown. Tips • Pictures taken with the resolution set to “320 ✽ 240” (unit: pixel) in the set-up menu under “OPTION” → “1USBCAMERA” → “PICTURESIZE” will be displayed in full screen when touched. After 10 seconds or when the picture is touched again, it will return to the original screen. • Touch [EDIT] at the top right of the screen to edit the tag. • Touch [DEL] to erase the picture from the micro-SD card. • Touch [FORWARD] or [REPLY] to send the picture to other transceivers ( P.129).᳂᳂Ჹ612&'.$#%-$#%-Ჹ᳂ᲺᲹᲽᲾᲹ Ჺ#,# ;1'6 41Ჹ61ᲾᲿᲹᲺ᳂Ჾ᳂ ᲺᲹᲾᲹᲹᲹ᳂ᲹᲹᲽᲺᲺ᳂᳂ ᲺᲹᲺ᳂Ჺ᳂ Ჹ4 Touch [BACK] The display will return to the screen showing the list of pictures.TipThe pictures can be viewed on a personal computer by reading the contents of the micro-SD card into the personal computer.CautionWhen the filename of the picture is changed on the personal computer, the picture can not longer be shown in the display of the FTM-400XDR/DE.Application for FCC / IC FCC ID: K6620345X40 / IC: 511B-20345X40](https://usermanual.wiki/Yaesu-Musen/20345X40.User-Manual-14/User-Guide-2766349-Page-4.png)
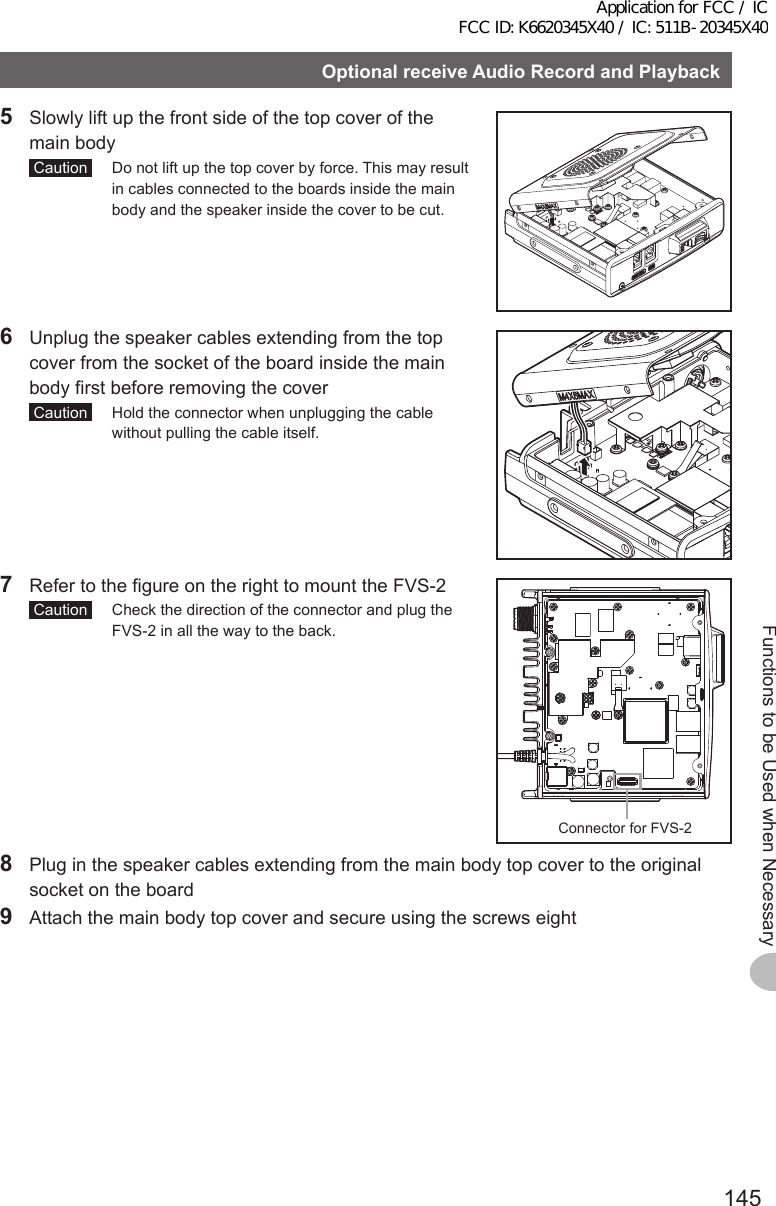
![146Functions to be Used when NecessaryOptionalreceiveAudioRecordandPlaybackUsingthevoicememoryThe voice memory is a function for recording the audio received. The audio is saved in FVS-2 that is mounted to the radio. The saved audio can be replayed on the radio and erased later.Settingthevoicememoryoperation1 Switch on the power supply to the radio2 Press for one second or longer The set-up menu will be displayed.3 Touch [OPTION]$#%-$#%-6:4:5'672/'074'5'6%.10'%10(+)9Ჰ4'55%#0&+52.#;5+) 0#.+0)#245 126+105&%#4&/'/14;&#6#%#..5+) 04 Select and touch [3VOICEMEMORY] The screen for the detailed settings will be displayed.ŻŻŻ$ᲴWGVQQVJ75$%#/'4#81+%'/'/14;ᲹᲺ126+10$#%-$#%-5 Touch [PLAY/REC] to set the recording time The setting will switch between “FREE 5min” and “LAST 30sec” each time it is touched. “FREE 5min”: A total of 5 minutes of audio in 8 recording areas can be recorded. “LAST 30sec”: The last 30 seconds will be recorded. Tip Factory default value: FREE 5 min$#%-$#%-81+%'/'/14;126+10(4''OKP*+)*/#07#.10,#2#0'5'2.#;4'% #00170%'81.7/'4:/76'.#0)7#)'6 Press for one second or longer The display will return to the previous screen.Application for FCC / IC FCC ID: K6620345X40 / IC: 511B-20345X40](https://usermanual.wiki/Yaesu-Musen/20345X40.User-Manual-14/User-Guide-2766349-Page-7.png)
![147Functions to be Used when NecessaryOptionalreceiveAudioRecordandPlaybackRecordingthereceiveaudio1 Press The function menu will be displayed.2 Touch [REC] The recording will be started. Tips • When [REC] is not displayed in the menu, use [BACK] or [FWD] to switch the menu. • Set the recording time set using “OPTION” → “3VOICEMEMORY” in the set-up menu will be displayed under [REC].4'%2.#; 64#%-#..2.#;5612%.4 81+%'(9&$#%-3 Touch [STOP] The recording will stop. The track number of the audio recorded will be displayed under [PLAYTRACK] .4'%2.#; 64#%-#..2.#;5612%.4 81+%'(9&$#%-4'%2.#; 64#%-2.#;5612%.4 81+%'(9&$#%-4 Press The display will return to the previous screen.Replayingtherecordedaudio1 Press The function menu will be displayed.2 Touch [PLAY/REC] to select the track number to be replayed Tips • This is not available if there is only one recording. • When there are two or more recordings, the track number will change in the order “ALL”, “1”, “2”… each time it is touched. • All recorded tracks will be replayed in sequence when “ALL” is selected.4'%2.#; 64#%-2.#;5612%.4 81+%'(9&$#%-Application for FCC / IC FCC ID: K6620345X40 / IC: 511B-20345X40](https://usermanual.wiki/Yaesu-Musen/20345X40.User-Manual-14/User-Guide-2766349-Page-8.png)
![148Functions to be Used when NecessaryOptionalreceiveAudioRecordandPlayback3 Touch [PLAY] Replay will be started. The replay will stop automatically at the end of the selected track.4'%2.#; 64#%-2.#;5612%.4 81+%'(9&$#%- Touch [STOP] to stop the replay.4'%2.#; 64#%-2.#;5612%.4 81+%'(9&$#%-4 Press The display will return to the previous screen.Erasingtherecordedaudio1 Press The function menu will be displayed.2 Touch [CLR] The confirmation screen will be displayed.4'%2.#; 64#%-2.#;5612%.4 81+%'(9&$#%-3 Touch [OK?] Erasure will be started. Caution All recorded audio will be erased. When there are two or more recordings, the track number to be erased cannot be chosen. When the recordings are erased, [ALL] will be displayed under [PLAYTRACK].4'%2.#; 64#%-#..2.#;5612%.4 81+%'(9&$#%-4'%2.#; 64#%-2.#;5612%.4 81+%'(9&$#%-%CPEGᲴ1-!%.'#4 #..4'%&#6#4 Press The display will return to the previous screen.Application for FCC / IC FCC ID: K6620345X40 / IC: 511B-20345X40](https://usermanual.wiki/Yaesu-Musen/20345X40.User-Manual-14/User-Guide-2766349-Page-9.png)
![149Functions to be Used when NecessaryOptionalreceiveAudioRecordandPlaybackListeningtothefrequencyvoiceannouncementSettingtheannouncefunctionoperationSet the following voice announcement parameters.• Automatically reading out the frequency or not• Reading out the frequency in English or Japanese• Reading out aloud• Mute the receive audio during a voice announcement or replaying recorded audio.1 Press for one second or longer The set-up menu will be displayed.2 Touch [OPTION]$#%-$#%-6:4:5'672/'074'5'6%.10'%10(+)9Ჰ4'55%#0&+52.#;5+) 0#.+0)#245 126+105&%#4&/'/14;&#6#%#..5+) 03 Select and touch [3VOICEMEMORY] The screen for the detailed settings will be displayed.ŻŻŻ$ᲴWGVQQVJ75$%#/'4#81+%'/'/14;ᲹᲺ126+10$#%-$#%-4 Touch [ANNOUNCE] to select the condition for reading out of the frequency The setting will switch between “AUTO”, “OFF” and “MANUAL” each time it is touched. “AUTO”: The frequency is read out when the band is changed after touching [VOICE]. “OFF”: The frequency is not read out. “MANUAL”: The frequency is read out when [VOICE] is touched. Tip Factory default value: AUTO104:/76'$#%-$#%-81+%'/'/14;126+10(4''OKP*+)*#761,#2#0'5'2.#;4'% #00170%'81.7/'.#0)7#)'5 Touch [LANGUAGE] to select the language in which to read out the frequency The setting will switch between “ENGLISH” and “JAPANESE” each time it is touched. Tip Factory default value: ENGLISH$#%-$#%-81+%'/'/14;126+10(4''OKP*+)*#761,#2#0'5'2.#;4'% #00170%'81.7/'.#0)7#)'104:/76'Application for FCC / IC FCC ID: K6620345X40 / IC: 511B-20345X40](https://usermanual.wiki/Yaesu-Musen/20345X40.User-Manual-14/User-Guide-2766349-Page-10.png)
![150Functions to be Used when NecessaryOptionalreceiveAudioRecordandPlayback6 Touch [VOLUME] to select the announcement volume The setting will switch between “HIGH”, “MID” and “LOW” each time it is touched. Tip Factory default value: HIGH$#%-$#%-81+%'/'/14;126+10(4''OKP*+)*#761,#2#0'5'2.#;4'% #00170%'81.7/'.#0)7#)'104:/76'7 Touch [RXMUTE] to select ON/OFF The setting will switch between “ON” and “OFF” each time the symbol is touched. ON: The receive audio will be muted during a voice announcement or replaying recorded audio. OFF: The receive audio will not be muted during a voice announcement or replaying recorded audio. Tip Factory default value: ON$#%-$#%-81+%'/'/14;126+10(4''OKP*+)*#761,#2#0'5'2.#;4'% #00170%'81.7/'.#0)7#)'104:/76'8 Press for one second or longer The announce function operation will be set and the display will return to the previous screen.Listeningtothefrequencyvoiceannouncement(1)Whentheoperationissetto“AUTO”The frequency of the operating band will be automatically announced in the following cases.• When the VFO mode and memory mode are switched• When the operating band is changedTips• The frequency will also be announced when [VOICE] is touched.• The volume may be adjusted by turning of the operating band.(2)Whentheoperationissetto“MANUAL”1 Press The function menu will be displayed.2 Touch [VOICE] The frequency of the operating band will be announced.4'%2.#; 64#%-#..2.#;5612%.4 81+%'(9&$#%-TipThe volume can also be adjusted by turning of the operating band.Application for FCC / IC FCC ID: K6620345X40 / IC: 511B-20345X40](https://usermanual.wiki/Yaesu-Musen/20345X40.User-Manual-14/User-Guide-2766349-Page-11.png)