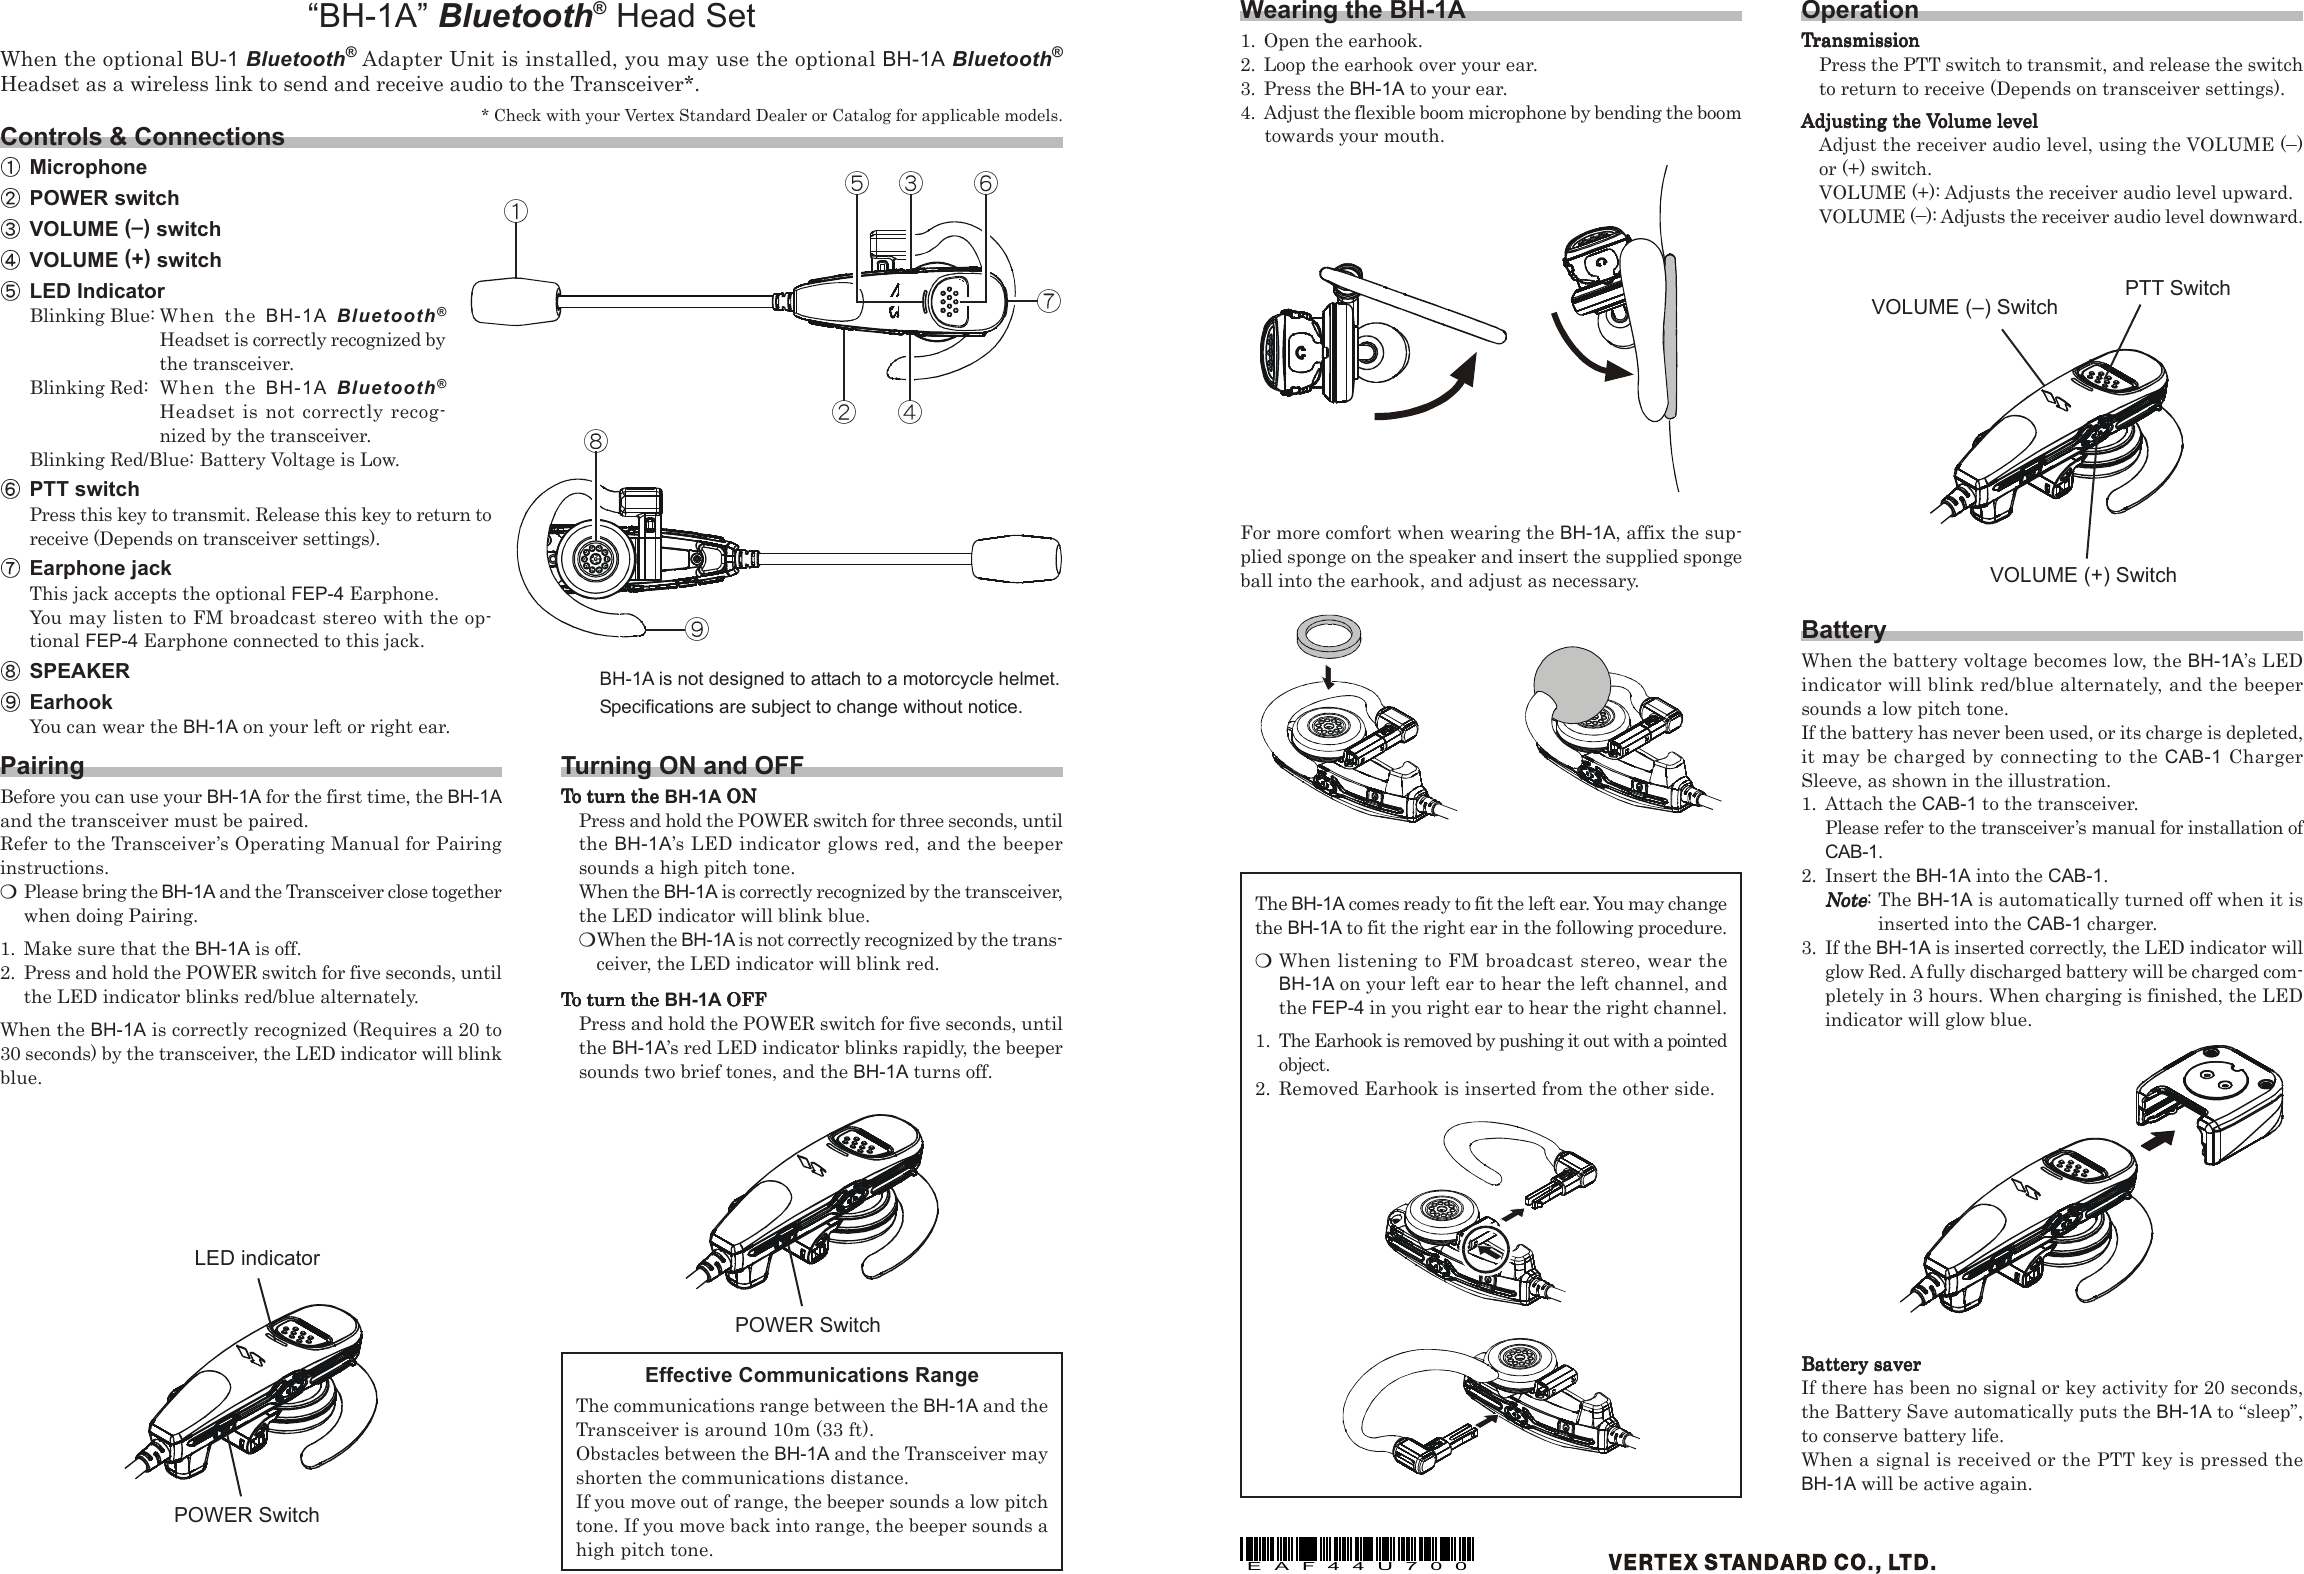
Yaesu Musen 0F444X10 Bluetooth Head Set User Manual BH 1A pmd

Yaesu Musen Co., Ltd. Bluetooth Head Set BH 1A pmd

Contents

User manual

EAF44U700Controls & ConnectionsMicrophonePOWER switchVOLUME (–) switchVOLUME (+) switchLED IndicatorBlinking Blue: When the BH-1A Bluetooth®Headset is correctly recognized bythe transceiver.Blinking Red: When the BH-1A Bluetooth®Headset is not correctly recog-nized by the transceiver.Blinking Red/Blue: Battery Voltage is Low.PTT switchPress this key to transmit. Release this key to return toreceive (Depends on transceiver settings).Earphone jackThis jack accepts the optional FEP-4 Earphone.You may listen to FM broadcast stereo with the op-tional FEP-4 Earphone connected to this jack.SPEAKEREarhookYou can wear the BH-1A on your left or right ear.“BH-1A” Bluetooth® Head SetWhen the optional BU-1 Bluetooth® Adapter Unit is installed, you may use the optional BH-1A Bluetooth®Headset as a wireless link to send and receive audio to the Transceiver*.* Check with your Vertex Standard Dealer or Catalog for applicable models.Wearing the BH-1A1. Open the earhook.2. Loop the earhook over your ear.3. Press the BH-1A to your ear.4. Adjust the flexible boom microphone by bending the boomtowards your mouth.The BH-1A comes ready to fit the left ear. You may changethe BH-1A to fit the right ear in the following procedure.PWhen listening to FM broadcast stereo, wear theBH-1A on your left ear to hear the left channel, andthe FEP-4 in you right ear to hear the right channel.1. The Earhook is removed by pushing it out with a pointedobject.2. Removed Earhook is inserted from the other side.PairingBefore you can use your BH-1A for the first time, the BH-1Aand the transceiver must be paired.Refer to the Transceiver’s Operating Manual for Pairinginstructions.PPlease bring the BH-1A and the Transceiver close togetherwhen doing Pairing.1. Make sure that the BH-1A is off.2. Press and hold the POWER switch for five seconds, untilthe LED indicator blinks red/blue alternately.When the BH-1A is correctly recognized (Requires a 20 to30 seconds) by the transceiver, the LED indicator will blinkblue.Effective Communications RangeThe communications range between the BH-1A and theTransceiver is around 10m (33 ft).Obstacles between the BH-1A and the Transceiver mayshorten the communications distance.If you move out of range, the beeper sounds a low pitchtone. If you move back into range, the beeper sounds ahigh pitch tone.Turning ON and OFFTTTTTo turn the o turn the o turn the o turn the o turn the BH-1A ON ON ON ON ONPress and hold the POWER switch for three seconds, untilthe BH-1A’s LED indicator glows red, and the beepersounds a high pitch tone.When the BH-1A is correctly recognized by the transceiver,the LED indicator will blink blue.PWhen the BH-1A is not correctly recognized by the trans-ceiver, the LED indicator will blink red.TTTTTo turn the o turn the o turn the o turn the o turn the BH-1A OFF OFF OFF OFF OFFPress and hold the POWER switch for five seconds, untilthe BH-1A’s red LED indicator blinks rapidly, the beepersounds two brief tones, and the BH-1A turns off.LED indicatorPOWER SwitchPOWER SwitchFor more comfort when wearing the BH-1A, affix the sup-plied sponge on the speaker and insert the supplied spongeball into the earhook, and adjust as necessary.OperationTTTTTransmissionransmissionransmissionransmissionransmissionPress the PTT switch to transmit, and release the switchto return to receive (Depends on transceiver settings).Adjusting the VAdjusting the VAdjusting the VAdjusting the VAdjusting the Volume levelolume levelolume levelolume levelolume levelAdjust the receiver audio level, using the VOLUME (–)or (+) switch.VOLUME (+): Adjusts the receiver audio level upward.VOLUME (–): Adjusts the receiver audio level downward.BatteryWhen the battery voltage becomes low, the BH-1A’s LEDindicator will blink red/blue alternately, and the beepersounds a low pitch tone.If the battery has never been used, or its charge is depleted,it may be charged by connecting to the CAB-1 ChargerSleeve, as shown in the illustration.1. Attach the CAB-1 to the transceiver.Please refer to the transceiver’s manual for installation ofCAB-1.2. Insert the BH-1A into the CAB-1.NoteNoteNoteNoteNote: The BH-1A is automatically turned off when it isinserted into the CAB-1 charger.3. If the BH-1A is inserted correctly, the LED indicator willglow Red. A fully discharged battery will be charged com-pletely in 3 hours. When charging is finished, the LEDindicator will glow blue.BH-1A is not designed to attach to a motorcycle helmet.Specifications are subject to change without notice.VOLUME (+) SwitchVOLUME (–) Switch PTT SwitchBattery saverBattery saverBattery saverBattery saverBattery saverIf there has been no signal or key activity for 20 seconds,the Battery Save automatically puts the BH-1A to “sleep”,to conserve battery life.When a signal is received or the PTT key is pressed theBH-1A will be active again.
This device complies with Part 15 of the FCC Rules. Operation is subject to the following twoconditions: (1) this device may not cause harmful interference, and (2) this device must accept anyinterference received, including interference that may cause undesired operation.Part 15.21: Changes or modifications to this device not expressly approved by Vertex Standardcould void the user’s authorization to operate this device.CAUTION: This device and its antenna(s) must not be co-located or operated in conjunction withany other antenna or transmitter. End users cannot modify this transmitter device. Any unautho-rized modification could void the user’s authority to operate this device.To comply with FCC RF exposure compliance requirements, This equipment complies with FCCradiation exposure limits set forth for an uncontrolled environment. End users must follow thespecific operating instructions for satisfying RF exposure compliance. This transmitter must notbe co-located or operating in conjunction with any other antenna or transmitter.The term “IC” before the radio certification number only signifies that Industry Canada technicalspecifications were met.This device complies with RSS 210 of industry Canada “IC”.“Operation is subject to the following two conditions:(1) this device may not cause interference, and(2) this device must accept any interference, including interference that may cause undesiredoperation of the device.”L’ utilisation de ce dispositif est autorisée seulement aux conditions suivantes : (1) il ne doit pasproduire de brouillage et (2) l’ utilisateur du dispositif doit étre prêt à accepter tout brouillageradioélectrique reçu, même si ce brouillage est susceptible de compromettre le fonctionnementdu dispositif.“The installer of this radio equipment must ensure that the antenna is located or pointed suchthat it does not emit RF field in excess of Health Canada limits for the general population; consultSafety Code 6, obtainable from Health Canada’s website www.hc-sc.ca/rpb”“BH-1A” Bluetooth® Head SetThe “BH-1A” is a Bluetooth® Head Set for Vertex Standard Transceivers*. When the Bluetooth®Head Set “BH-1A” is used with the “BU-1” Adapter, you can enjoy comfortable hands freeoperation.*: Please refer to the Vertex Standard catalog for the correct “BH-1A” Head Set for the radio you are using.EAF44U561Declaration of ConformityWe, Yaesu UK Ltd. declare under our sole responsibility that the following equipment com-plies with the essential requirements of the Directive 1999/5/EC.Type of Equipment: Bluetooth HeadsetBrand Name: VERTEX STANDARDModel Number: BH-1AManufacturer: Vertex Standard Co., Ltd.Address of Manufacturer: 4-8-8 Nakameguro Meguro-Ku, Tokyo 153-8644, JapanApplicable Standards:This equipment is tested and conforms to the essential requirements of directive, asincluded in following standards.EN 300 328 V1,7,1Radio Standard:EN 301 489-17 V1.2.1EMC Standard:EN 60950-1: 2006Safety Standard:The technical documentation as required by the Conformity Assessment procedures iskept at the following address:Company: Yaesu UK Ltd.Address: Unit 12, Sun Valley Business Park, Winnall Close,Winchester, Hampshire, SO23 0LB, U.K.

Navigation menu