Worldline n v VAL512 NFC Payment terminal User Manual VALINA IntegrationManual

Worldline s.a./n.v. NFC Payment terminal VALINA IntegrationManual

user manual part1

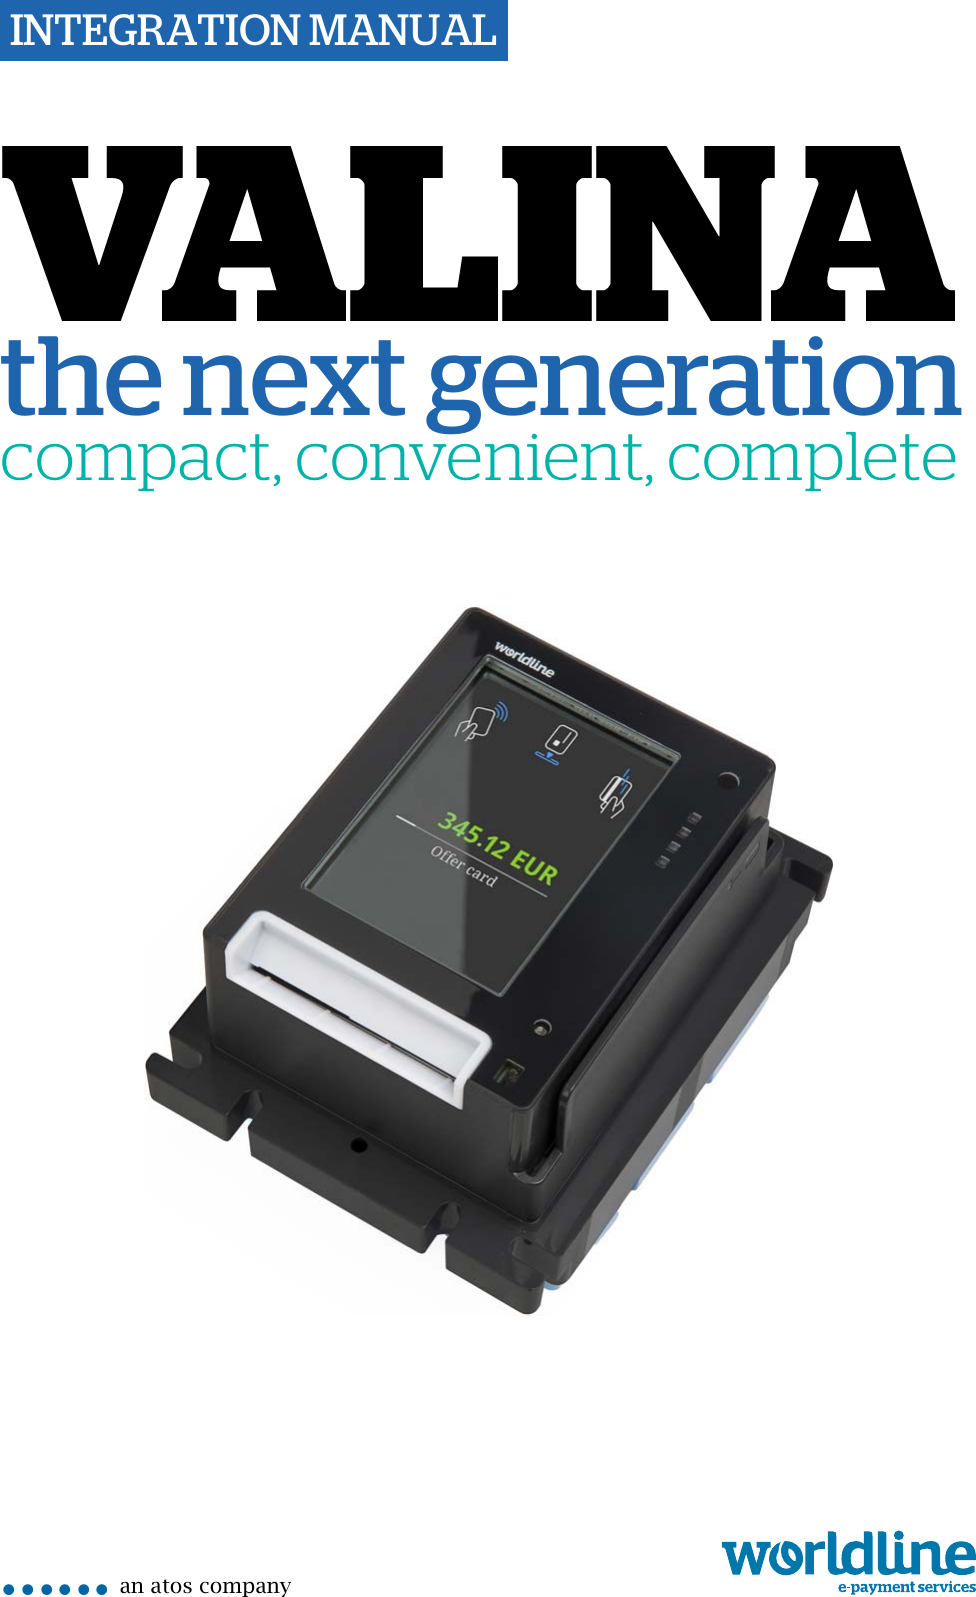
INTEGRATION MANUALan atos company••••••VALINAthe next generationcompact, convenient, completeproduct picture – 4.014 x 3.596
VALINA integration manualLegal disclaimer and copyrightsThe information in this document is subject to change without notice and shall not be construed as a commitment by Worldline S.A./N.V. (“Worldline”)The content of this document, including but not limited to trademarks, designs, logos, text, images, is the property of Worldline and is protected by the Belgian Act of 30.06.1994 related to authors’ rights and by the other applicable Acts.The word VALINA and other trademarks used in this document are the property of Worldline. Worldline trademarks used in this document are indicated. Linux is a registered trademark of Linus Torvalds, Java is a registered trademark of Oracle and/or its affiliates and Android is a trademark of Google Inc.The contents of this document can be reproduced by or on behalf of third parties with the prior written consent of Worldline and following its instructions. Worldline accepts no responsibility for errors and omissions introduced when translating or reworking this document.Except with respect to the limited licence to download and print certain material from this document for non-commercial and personal use only, nothing contained in this document shall grant any licence or right to use any of Worldline's proprietary material.While Worldline has made every attempt to ensure that the information contained in this document is correct, Worldline does not provide any legal or commercial warranty on the document that is described in this specification. The technology is thus provided “as is” without warranties of any kind, expressed or implied, included those of merchantability and fitness for a particular purpose. Worldline does not warrant or assume any legal liability or responsibility for the accuracy, completeness, or usefulness of any information, product or processes disclosed.To the fullest extent permitted under applicable law, neither Worldline nor its affiliates, directors, employees and agents shall be liable to any party for any damages that might result from the use of the technology as described in this document (including without limitation direct, indirect, incidental, special, consequential and punitive damages, lost profits).These terms shall be governed by and construed in accordance with the laws of Belgium. You irrevocably consent to the jurisdiction of the courts located in Brussels for any action arising from or related to the use of this document.Document informationdocument title VALINA integration manualsecurity unrestrictedlast modified 6 June 2016owner Luc Luyckxauthor Niels Grundtvig Nielsendocument release 0.1© Worldline 2016
unrestricted iim_valinaTOC.fm document release 0.1 last updated 6/6/16INTEGRATION MANUALVALINAContents1. About this book.................................................................................................. 1What is in this book ............................................................................................ 1Who should use this book .................................................................................. 12. VALINA key features.......................................................................................... 33. Safety................................................................................................................... 5Operating safety ................................................................................................. 5Repairs and end-of-life ....................................................................................... 64. Installing VALINA............................................................................................... 7Selecting a location ............................................................................................ 8Installation step by step...................................................................................... 9Step 1.Check the gasket positioning ......................................................................9Step 2.Mount the VALINA in the vending machine ................................................9Step 3.Connect power and communication cables at the back of the VALINA ......9Step 4.Power up VALINA and fasten cables ........................................................10Step 5.Install SAM card – optional................................................................. 12Step 6.Install micro SD card – optional ................................................................13Step 7.Install communications board – optional ...................................................145. Power supply, ports and pin-outs .................................................................. 17Power supply.................................................................................................... 17USB-B (device) interface.................................................................................. 18Ethernet 10/100 Mbit ........................................................................................ 18RS-232 interface .............................................................................................. 19USB-A (host) interface ..................................................................................... 19Vending machine controller.............................................................................. 19Power consumption.......................................................................................... 206. JTAG/DEBUG port............................................................................................ 217. Cleaning............................................................................................................ 23Cleaning cards ................................................................................................. 238. Repairs and end-of-life .................................................................................... 25Step by step ..................................................................................................... 25Appendix A. Technical specifications...............................................................  27Software ........................................................................................................... 30Appendix B. Approvals.......................................................................................  31Approvals/certification ...................................................................................... 31EMC emissions and immunity .................................................................... 31
VALINAINTEGRATION MANUALii – empty for double-sided printing –  im_valinaTOC.fmESD immunity............................................................................................. 32Safety ......................................................................................................... 32VALINA with GSM ...................................................................................... 32VALINA with WLAN.................................................................................... 32
unrestricted iiiim_valinaLOF.fm document release 0.1 last updated 6/6/16INTEGRATION MANUALVALINAFiguresFigure 1. VALINA – front view................................................................................................4Figure 2. VALINA – back view ............................................................................................... 4Figure 3. Aligning VALINA terminal and mounting plate........................................................9Figure 4. Power connections – Microfit (left), MDB (right) ................................................... 10Figure 5. Cable ties for VALINA...........................................................................................11Figure 6. VALINA with TELECOM cover [1] in place ...........................................................12Figure 7. Fitting SAM cards ................................................................................................. 13Figure 8. Inserting the micro SD card ..................................................................................14Figure 9. Inserting optional communications board in VALINA............................................15Figure 10. Fitting the SIM card.............................................................................................15Figure 11. Power supply / data connectors on the VALINA.................................................17Figure 12. JTAG/DEBUG port..............................................................................................21Figure 13. Cleaning card for chip-card reader (sliding brush)..............................................23Figure 14. Cleaning card for magstripe-card reader............................................................ 23Figure 15. Internal mounting details for VALINA..................................................................28Figure 16. Minimum required space (from EVA Specs)....................................................... 28
VALINAINTEGRATION MANUALiv – empty for double-sided printing –  im_valinaLOF.fm
unrestricted 1im_vln_about.fm document release 0.1 last updated 6/6/16INTEGRATION MANUALVALINA1. About this bookThe VALINA is the newest unattended payment terminal from Worldline.What is in this book•VALINA and its accessories•technical specifications•integrating the VALINA in other equipment such as a vending machine, including safety considerations•powering and maintaining VALINA•troubleshooting•approvals and certifications, including applicable environmental regulationsWho should use this book•anyone who will be installing a VALINA in a vending machine or other equipment•field and service technicians using the service unitInformation from this book may be reused in other documentation such as a user guide.
INTEGRATION MANUALVALINA2 – empty for double-sided printing –  im_vln_about.fm
unrestricted 3im_vln_keyFeatures.fm document release 0.1 last updated 6/6/16INTEGRATION MANUALVALINA2. VALINA key featuresThe VALINA is an intelligent all-in-one terminal for unattended payments with and without PIN, supporting a range of standards including EMV and Mifare. It handles payments by chip card, NFC cards and devices, and magstripe card.The VALINA is PCI 4.x certified, SRED included. It has been designed to provide a complete solution for EMV payments, and can run either newly-developed Android apps or legacy apps (written for the MAPS platform) from Worldline.Key hardware features include:•3.5” touch TFT colour display for an enjoyable payment experience•small footprint matches EVA/CVS 1.3 standards for Standard Door Module (SDM) dimensions, making integration in vending machines easyThe VALINA takes up limited space inside the machine: compare this with the footprint of a bank note acceptor (BNA) or coin detector.•onboard Ethernet, serial interface, MDB, USB host and USB device meet most communications requirements out-of-the-box•proximity detector (patented) for improved power managementTypical integration scenarios for the VALINA include:•vending machines, ticket machines and kiosks•petrol forecourts and car-washes•on-street and off-street parking•dispensers and pre-payment meters•self-service checkouts
INTEGRATION MANUALVALINA4 – empty for double-sided printing –  im_vln_keyFeatures.fmFigure 1. VALINA – front viewFigure 2. VALINA – back viewFor more information on connectors, see Power supply, ports and pin-outs, on page 17.
unrestricted 5im_vln_safety.fm document release 0.1 last updated 6/6/16INTEGRATION MANUALVALINA3. SafetyFollow the guidelines in this manual when integrating the VALINA. Neither Worldline nor its vendor will bear any responsibility or cost for malfunctioning, breakdowns or any anomaly that may result from incorrect handling of the VALINA. Worldline declines any liability if the instructions and precautions contained in this manual are not observed.If you notice that any VALINA component blocks, does not fit, or shows any other malfunction, contact your vendor. Do not try to repair or alter it in any way.Use only accessories (power adaptor, cables and so on) provided by your vendor or by an approved source.Check that the VALINA has completed the required application-loading and key-loading stages.Operating safetyKeep the VALINA away from excessive heat, fire, high voltage, radiation, shocks and abrasive chemicals.To guarantee safe operation of the VALINA, make sure:•the VALINA is firmly fixed in the kiosk/vending machine and correctly powered•the kiosk/vending machine where the VALINA is mounted is protected from dust, strong sunlight, rain, wind and flying debris (for example, stones thrown up by passing traffic)•the operating temperature of the VALINA remains between -20°C and 70°CThis corresponds to an environmental temperature of -20°C to +50°C, depending on the position of the terminal (in direct sunlight, sheltered …)•the VMC is installed, positioned in line with manufacturer recommendationsAlways:•use only the power adaptor supplied, or a power adaptor compliant with the appropriate specifications•disconnect the power adaptor before cleaning the housing and for servicing or repairNever:•drop, throw, slam or vibrate the VALINA•let oil, water or other liquids enter the VALINA!
INTEGRATION MANUALVALINA6 unrestrictedlast updated 6/6/16 document release 0.1 im_vln_safety.fm•use extension cables to extend the power cable between the power adaptor and the VALINA•connect any unused cables to the VALINA•store, install or use the VALINA–near any source of excessive voltage fluctuations, electromagnetic fields or microwave radiation (for example, electric motors or high-frequency devices)–in a deep-freeze or a defrosting system•store the VALINA near food, or with explosive substances such as lighter fuel or petrol•open the VALINARepairs and end-of-lifeAll servicing other than the actions described in this manual must be performed by Worldline or an approved service centre.Contact your vendor for information on how to dispose of your VALINA at the end of its life. Do not discard, give away or sell your VALINA as it contains materials that can be recycled and must be treated by a professional party.
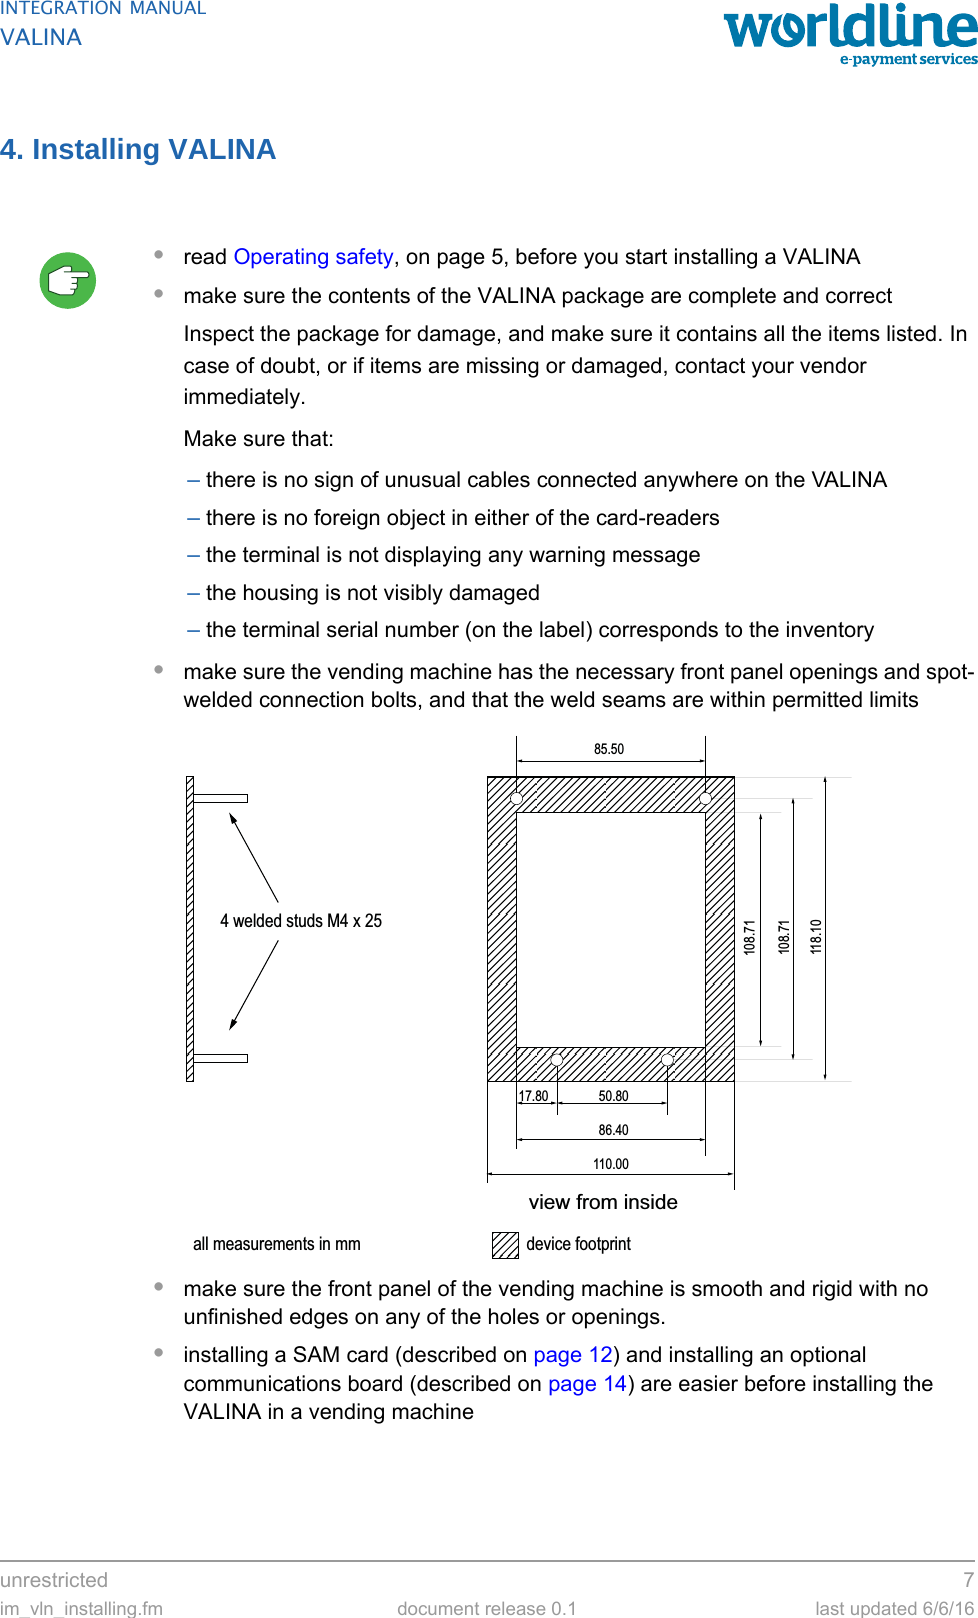
unrestricted 7im_vln_installing.fm document release 0.1 last updated 6/6/16INTEGRATION MANUALVALINA4. Installing VALINA•read Operating safety, on page 5, before you start installing a VALINA•make sure the contents of the VALINA package are complete and correctInspect the package for damage, and make sure it contains all the items listed. In case of doubt, or if items are missing or damaged, contact your vendor immediately.Make sure that:–there is no sign of unusual cables connected anywhere on the VALINA–there is no foreign object in either of the card-readers–the terminal is not displaying any warning message–the housing is not visibly damaged–the terminal serial number (on the label) corresponds to the inventory•make sure the vending machine has the necessary front panel openings and spot-welded connection bolts, and that the weld seams are within permitted limits•make sure the front panel of the vending machine is smooth and rigid with no unfinished edges on any of the holes or openings.•installing a SAM card (described on page 12) and installing an optional communications board (described on page 14) are easier before installing the VALINA in a vending machine85.5017.80 50.80110.00108.7186.40108.71118.10view from insidedevice footprintall measurements in mm4 welded studs M4 x 25
INTEGRATION MANUALVALINA8 unrestrictedlast updated 6/6/16 document release 0.1 im_vln_installing.fm•make sure the VALINA cannot be removed from the vending machine after integrationSelecting a locationThe terminal is designed for unattended use both indoors and outdoors. Electrical installations where the VALINA is installed must comply with local and regional codes for office and residential electrical wiring, such as International Electrotechnical Commission (IEC).Finding a proper location is an important aspect of installing VALINA components.Follow the guidelines given here, and also check local requirements:•select a location on the machine that is conveniently accessible•on the front side of the vending machine, make sure that:–the VALINA fits in the mounting position–the VALINA faces the cardholder and will be clearly visible–the display is readable–the card slot is accessible•avoid a position that exposes the VALINA to rain or hostile weather•make sure air can circulate freely around the components•to avoid reflections and guarantee readability, do not expose the display to direct sunlight•for the security of the card-holder, make sure that PIN privacy is guaranteed:–locating the display outside the field of vision of cameras, mirrors and so on, and away from stairs–check all local regulations and requirements for PIN privacy•for the convenience of the technician, make sure there is sufficient space on the vending machine to:–access the ground connection–guide the cables without folding them, and use cable ties–fit the mounting brace that fastens the terminal tightly into the machine–access the rear side of the VALINA•the maximum permitted length of the cable between the VALINA and the vending machine controller (VMC) is 3m
unrestricted 9im_vln_installing.fm document release 0.1 last updated 6/6/16INTEGRATION MANUALVALINAPackagingpackagingInspect the package for damage, and make sure it contains all the items listed. In case of doubt, or if items are missing or damaged, contact your shipping company and/or vendor.If you are going to attach the mounting plate direct to the vending machine, you will also need four M4 locknuts. These are not included in the package.Installation step by stepStep 1. Check the gasket positioningLugs (pins) in the rubber should fit into the terminal openings above and below.Step 2. Mount the VALINA in the vending machine1. Line up the VALINA with the front panel opening on the vending machine.valinaAlignFigure 3. Aligning VALINA terminal and mounting plate2. Clamp the EVA frame to the rigid front plate of the machine using four locknuts.note: these locknuts are not included in the terminal package3. Tighten the locknuts in a Z-pattern.To avoid damaging the VALINA, do not over-tighten the nuts. 0.7Nm is recommended, depending on the material the front plate is made from.After mounting the VALINA on the vending machine, continue by connecting the power and communications cables as described under Power up VALINA and fasten cables, on page 10Step 3. Connect power and communication cables at the back of the VALINAThere are six numbered interfaces on the back of the VALINA, for connections to external peripherals.quantity item1 VALINA terminal2 fixing plates1 gasketoptional items1 power adaptorcable(s) RS232 VALINA serial cable 2m (ePOS/ECR to VALINA), Ethernet, RS232, USB, power (TTL)
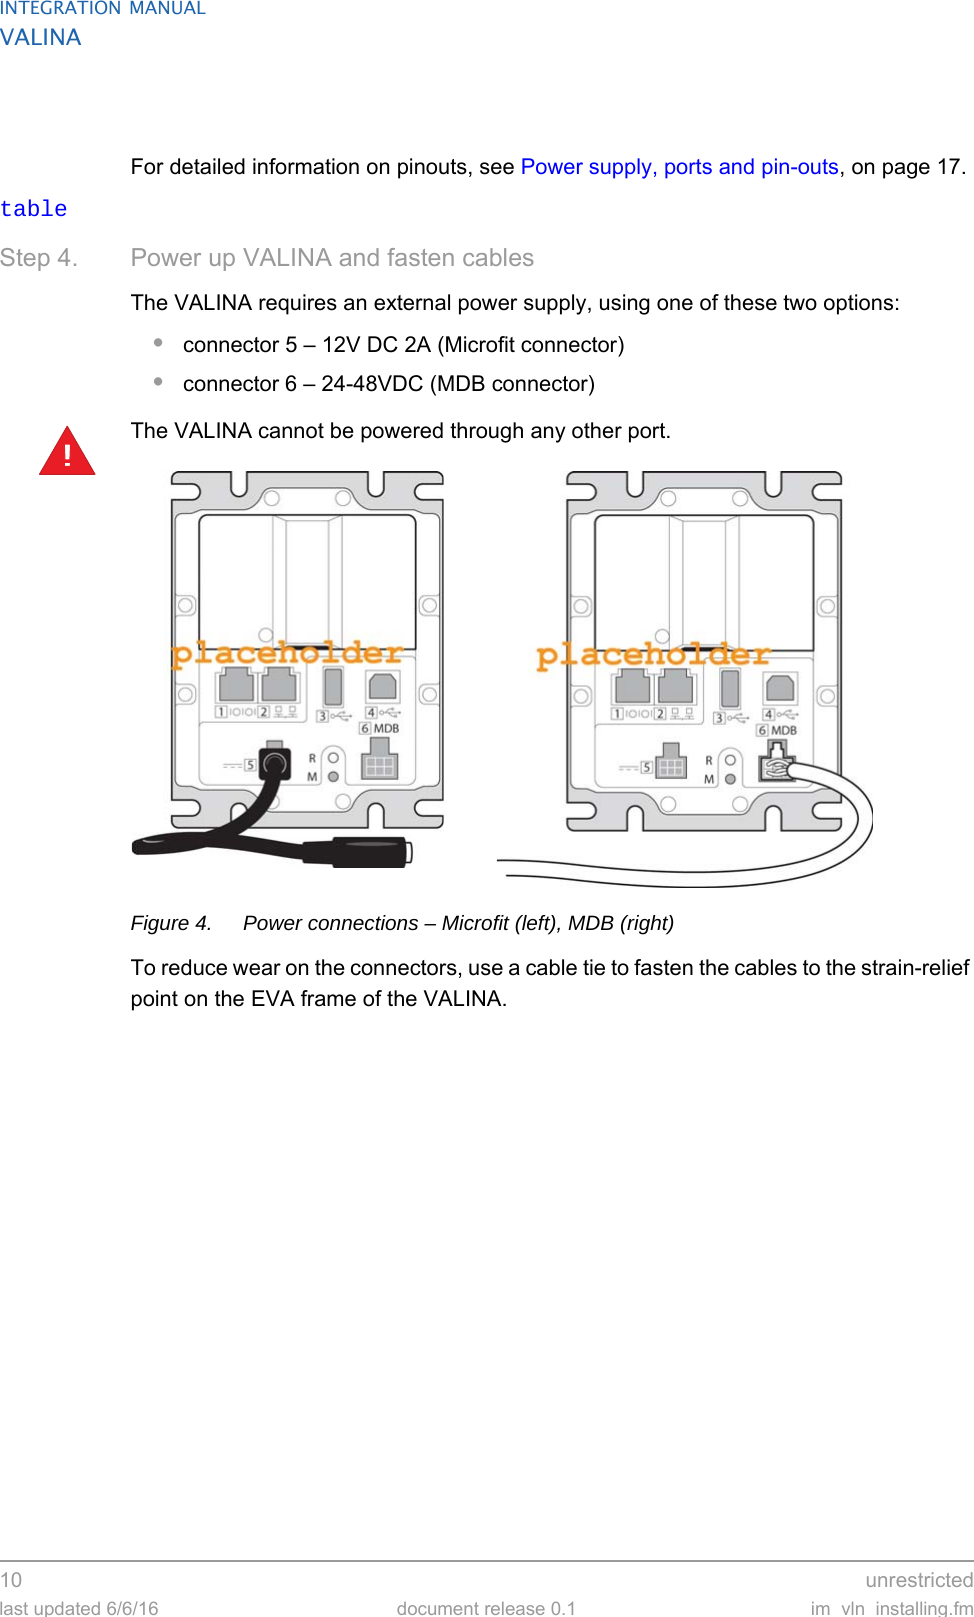
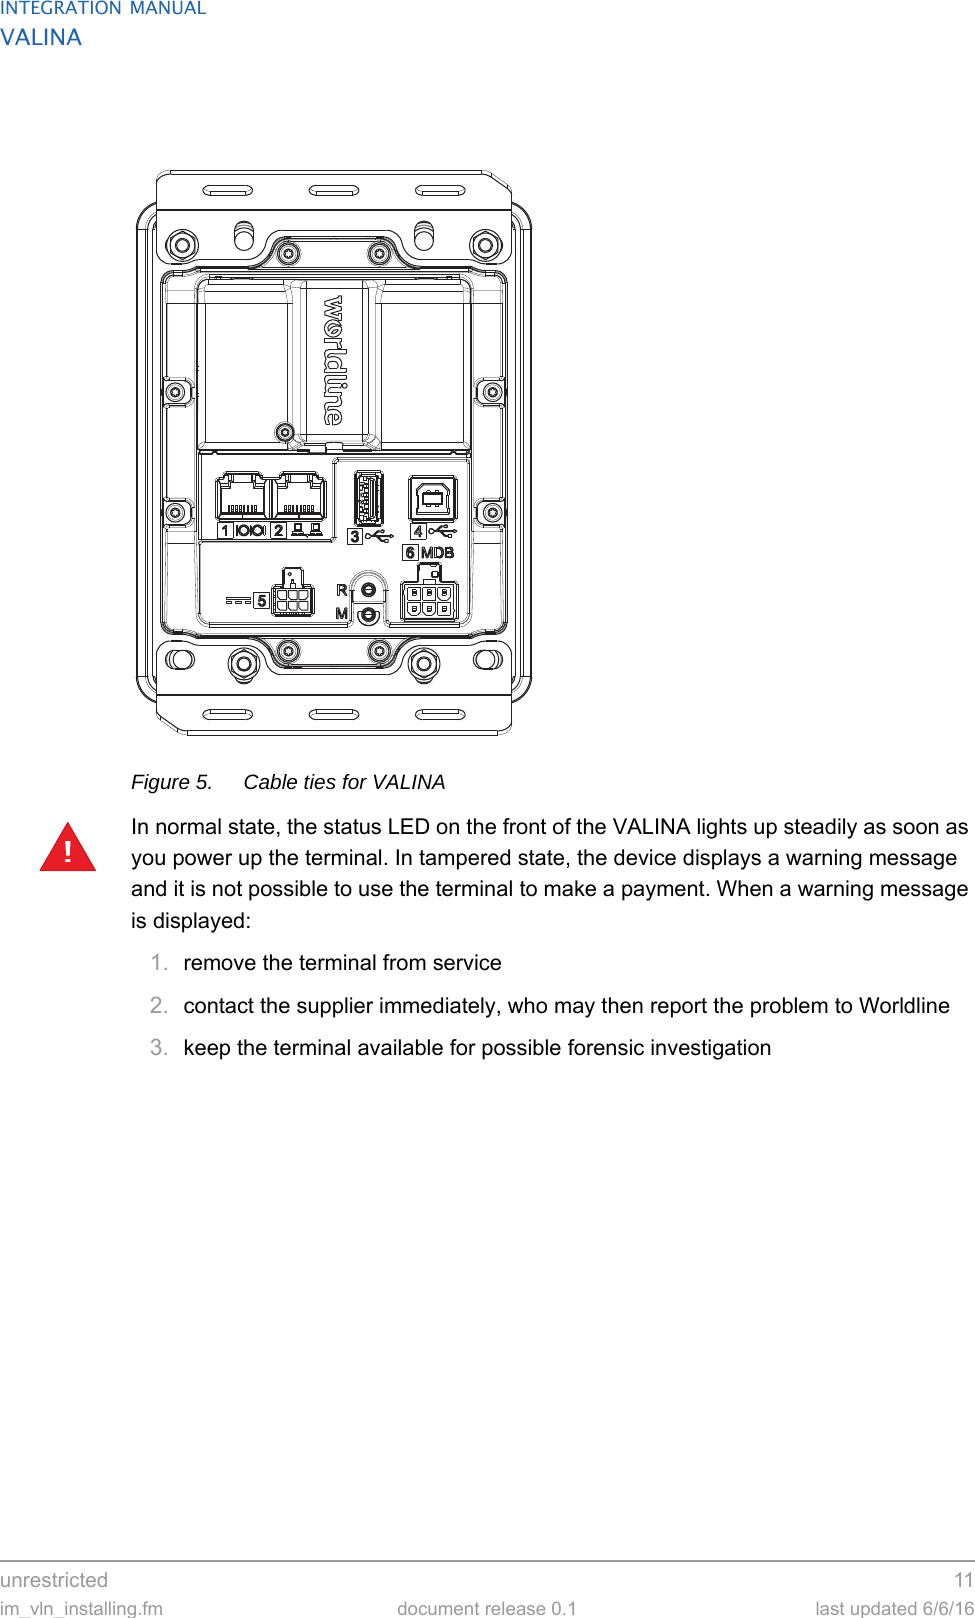
INTEGRATION MANUALVALINA10  unrestrictedlast updated 6/6/16 document release 0.1 im_vln_installing.fmFor detailed information on pinouts, see Power supply, ports and pin-outs, on page 17.tableStep 4. Power up VALINA and fasten cablesThe VALINA requires an external power supply, using one of these two options:•connector 5 – 12V DC 2A (Microfit connector)•connector 6 – 24-48VDC (MDB connector)The VALINA cannot be powered through any other port.Figure 4. Power connections – Microfit (left), MDB (right)To reduce wear on the connectors, use a cable tie to fasten the cables to the strain-relief point on the EVA frame of the VALINA.!
unrestricted 11im_vln_installing.fm document release 0.1 last updated 6/6/16INTEGRATION MANUALVALINAFigure 5. Cable ties for VALINAIn normal state, the status LED on the front of the VALINA lights up steadily as soon as you power up the terminal. In tampered state, the device displays a warning message and it is not possible to use the terminal to make a payment. When a warning message is displayed:1. remove the terminal from service2. contact the supplier immediately, who may then report the problem to Worldline3. keep the terminal available for possible forensic investigation!
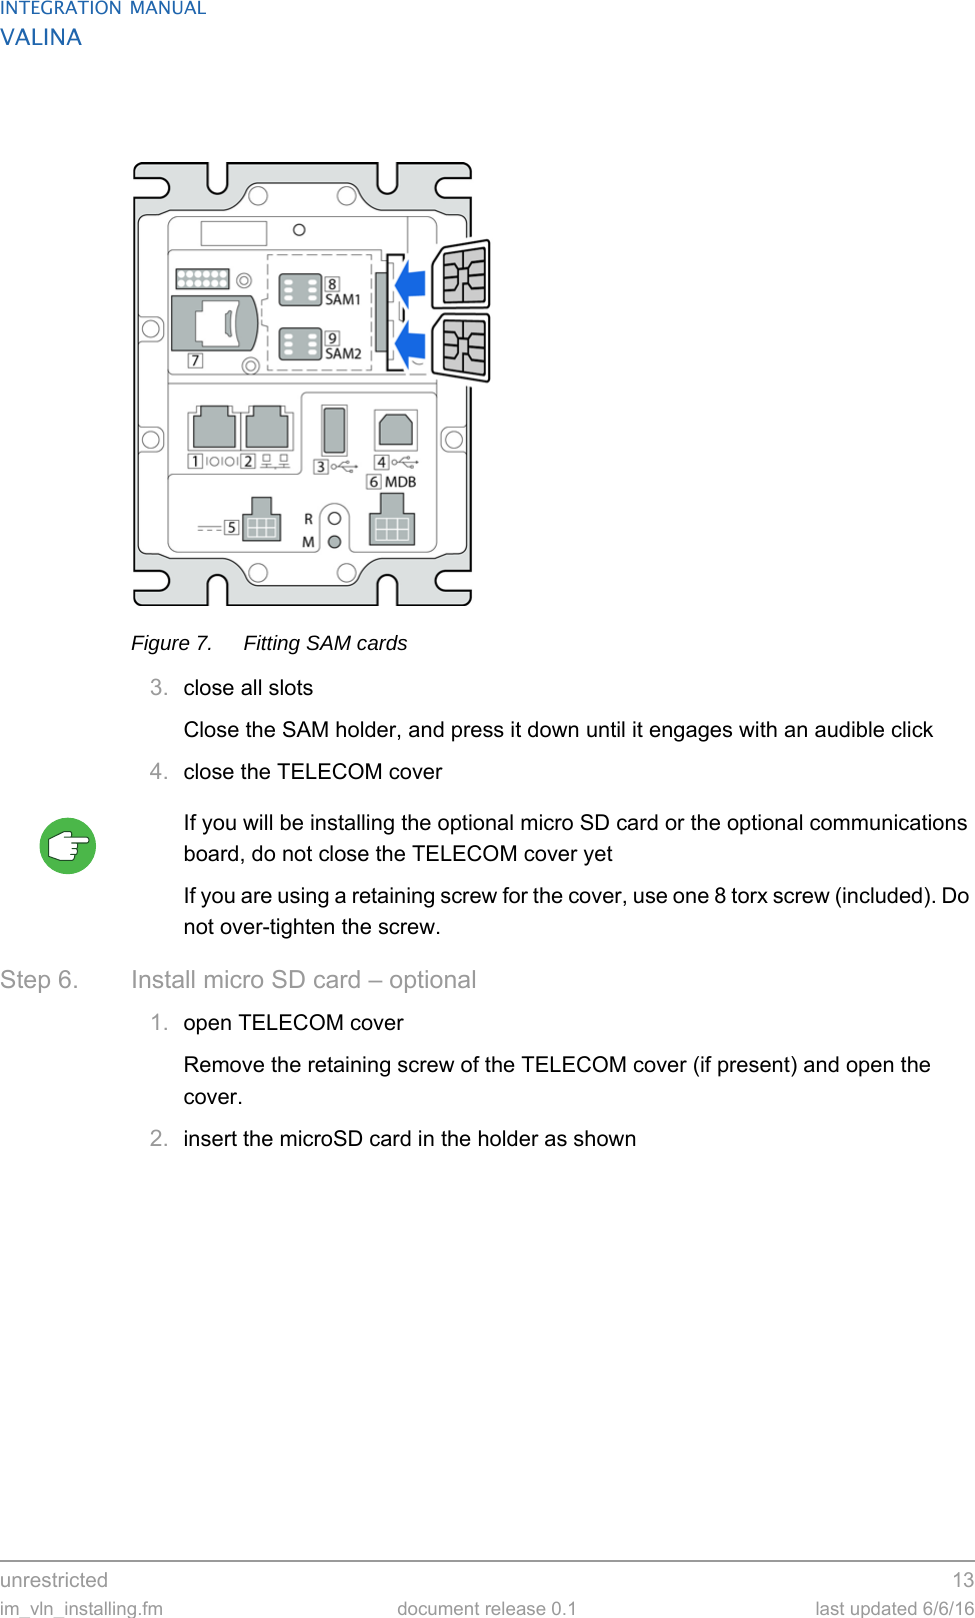
INTEGRATION MANUALVALINA12  unrestrictedlast updated 6/6/16 document release 0.1 im_vln_installing.fmStep 5. Install SAM card – optionalThe VALINA has two type ID 0 SAM slots.•install any SAM card before installing the optional communications board•install both SAM card and communications board before installing the VALINA in the vending machine.1. open TELECOM coverRemove the retaining screw of the TELECOM cover (if present) and open the cover.Figure 6. VALINA with TELECOM cover [1] in place2. open SAM holder and insert SAM cardOpen the SAM holder (with the two bar-code labels on) and insert one or two SAM cards as shown. Make sure the card is completely inserted.
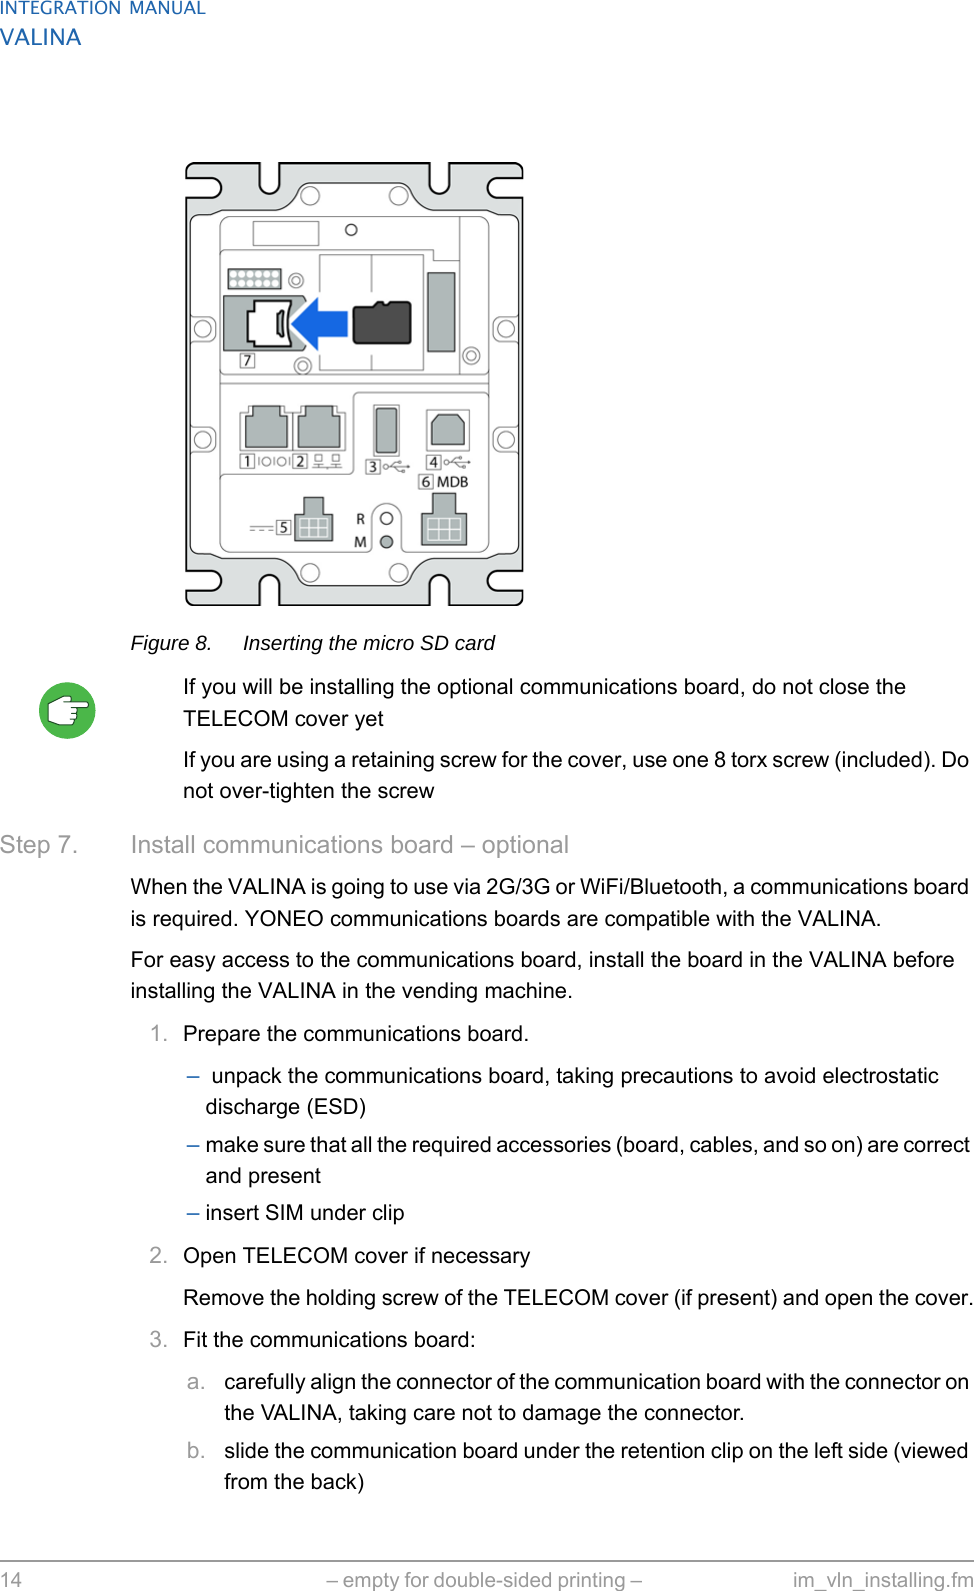
unrestricted 13im_vln_installing.fm document release 0.1 last updated 6/6/16INTEGRATION MANUALVALINAFigure 7. Fitting SAM cards3. close all slotsClose the SAM holder, and press it down until it engages with an audible click4. close the TELECOM coverIf you will be installing the optional micro SD card or the optional communications board, do not close the TELECOM cover yetIf you are using a retaining screw for the cover, use one 8 torx screw (included). Do not over-tighten the screw.Step 6. Install micro SD card – optional1. open TELECOM coverRemove the retaining screw of the TELECOM cover (if present) and open the cover.2. insert the microSD card in the holder as shown
INTEGRATION MANUALVALINA14 – empty for double-sided printing –  im_vln_installing.fmFigure 8. Inserting the micro SD cardIf you will be installing the optional communications board, do not close the TELECOM cover yetIf you are using a retaining screw for the cover, use one 8 torx screw (included). Do not over-tighten the screwStep 7. Install communications board – optionalWhen the VALINA is going to use via 2G/3G or WiFi/Bluetooth, a communications board is required. YONEO communications boards are compatible with the VALINA.For easy access to the communications board, install the board in the VALINA before installing the VALINA in the vending machine.1. Prepare the communications board.– unpack the communications board, taking precautions to avoid electrostatic discharge (ESD)–make sure that all the required accessories (board, cables, and so on) are correct and present–insert SIM under clip2. Open TELECOM cover if necessaryRemove the holding screw of the TELECOM cover (if present) and open the cover.3. Fit the communications board:a. carefully align the connector of the communication board with the connector on the VALINA, taking care not to damage the connector.b. slide the communication board under the retention clip on the left side (viewed from the back)
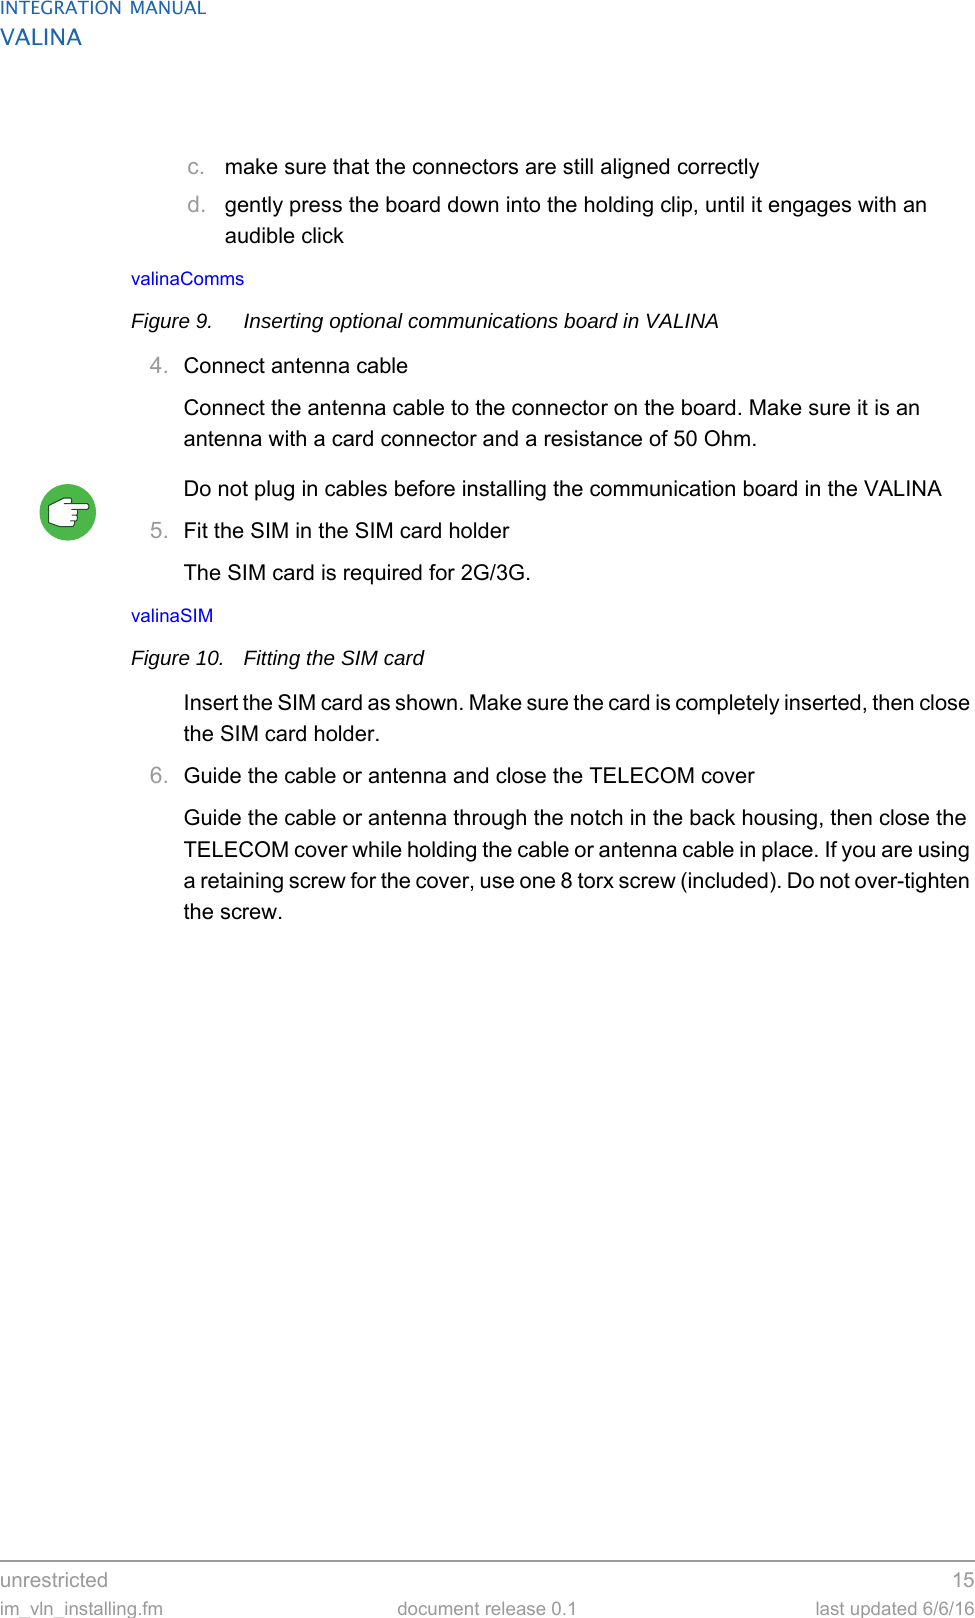
unrestricted 15im_vln_installing.fm document release 0.1 last updated 6/6/16INTEGRATION MANUALVALINAc. make sure that the connectors are still aligned correctlyd. gently press the board down into the holding clip, until it engages with an audible clickvalinaCommsFigure 9. Inserting optional communications board in VALINA4. Connect antenna cableConnect the antenna cable to the connector on the board. Make sure it is an antenna with a card connector and a resistance of 50 Ohm.Do not plug in cables before installing the communication board in the VALINA5. Fit the SIM in the SIM card holderThe SIM card is required for 2G/3G.valinaSIMFigure 10. Fitting the SIM cardInsert the SIM card as shown. Make sure the card is completely inserted, then close the SIM card holder.6. Guide the cable or antenna and close the TELECOM coverGuide the cable or antenna through the notch in the back housing, then close the TELECOM cover while holding the cable or antenna cable in place. If you are using a retaining screw for the cover, use one 8 torx screw (included). Do not over-tighten the screw.
INTEGRATION MANUALVALINA16 – empty for double-sided printing –  im_vln_installing.fm
unrestricted 17im_vln_connections.fm document release 0.1 last updated 6/6/16INTEGRATION MANUALVALINA5. Power supply, ports and pin-outsThis chapter describes the power supply / data connectors on the VALINA.Figure 11. Power supply / data connectors on the VALINAPower supplyThe VALINA is powered from an external power adaptor through port 5 (TTL) or port 6 (MDB).•the TTL interface is a surface-mounted, dual-row, 6 circuit connector (Molex Microfit connector) with a press-fit metal retention clip•the MDB interface is …Table 1 Pinout for Microfit 43045-0616 interfacepin description pin description1 Vcc in 4 IN [1]2 GND 5 IN [2]3 IN [0] 6 OUT [0]Table 2 Pinout for MDB interfacepin description pin description1425
INTEGRATION MANUALVALINA18  unrestrictedlast updated 6/6/16 document release 0.1 im_vln_connections.fmThe VALINA is CE certified in combination with the Powertech ADS 0271-B adaptor. If any other power supply is used, the distributor is responsible for compliance with local safety requirements and regulations.USB-B (device) interfaceThe VALINA is fitted with a USB 2.0 Full Speed (up to 480 MBit/sec) device interface, which can be used to connect to ePOS equipment or a PC and to perform keyloading.The necessary USB-driver is included in recent installation packages of most operating systems (Windows, MacOS and Linux). If the driver is not available, contact your vendor.VALINA cannot be powered through the USB device interface: it always needs an external power supply.Ethernet 10/100 MbitThe VALINA has a standard 10/100 megabit Ethernet interface, using an RJ45 (8p/8c) connector.VALINA cannot be powered through the Ethernet interface.36Table 2 Pinout for MDB interface!Table 3 Pinout for USB-B interface   pin description direction1 VCC (5V) VALINA IN2 D- VALINA IN/OUT3 D+ VALINA IN/OUT4GND!Table 4 Pinout for Ethernet 10 Mbit connectorpin description direction8HF GND7HF GND6 RX B VALINA [IN] from network5HF GND4HF GND3 RX A VALINA [IN] network2 TX B VALINA [OUT] network1 TX A VALINA [OUT] network
unrestricted 19im_vln_connections.fm document release 0.1 last updated 6/6/16INTEGRATION MANUALVALINARS-232 interfaceThe VALINA has one RS-232 interface with RTS/CTS flow-control, for connecting to peripherals such as a vending-machine controller, ePOS equipment or a printer.VALINA cannot be powered through the RS-232 interface.The interface allows connections up to 230,400bps and is fitted with an 8p RJ45 connector with the following pinout.USB-A (host) interfaceThe VALINA is fitted with a USB 2.0 full speed (up to 480 MBit/sec) host interface, which can be used to connect to a USB stick or other storage device.VALINA cannot be powered through the USB host interface: it always needs an external power supply.The pin-out of the USB host interface is as follows:Vending machine controllerThe VALINA communicates with the Vending Machine Controller (VMC) through RJ45 connector 3 (RS-232) or through TTL connector 6.!Table 5 Pinout for RS-232 interfacepin description direction8VCC VALINA [IN]7VCC VALINA [IN]6TX VALINA [OUT]5RX VALINA [IN]4CTS VALINA [IN]3RTS VALINA [OUT]2GND1GND!Table 6 Pinout for USB host interfacepin description direction1 VCC (5V) VALINA OUT2 D- VALINA IN/OUT3 D+ VALINA IN/OUT4GND
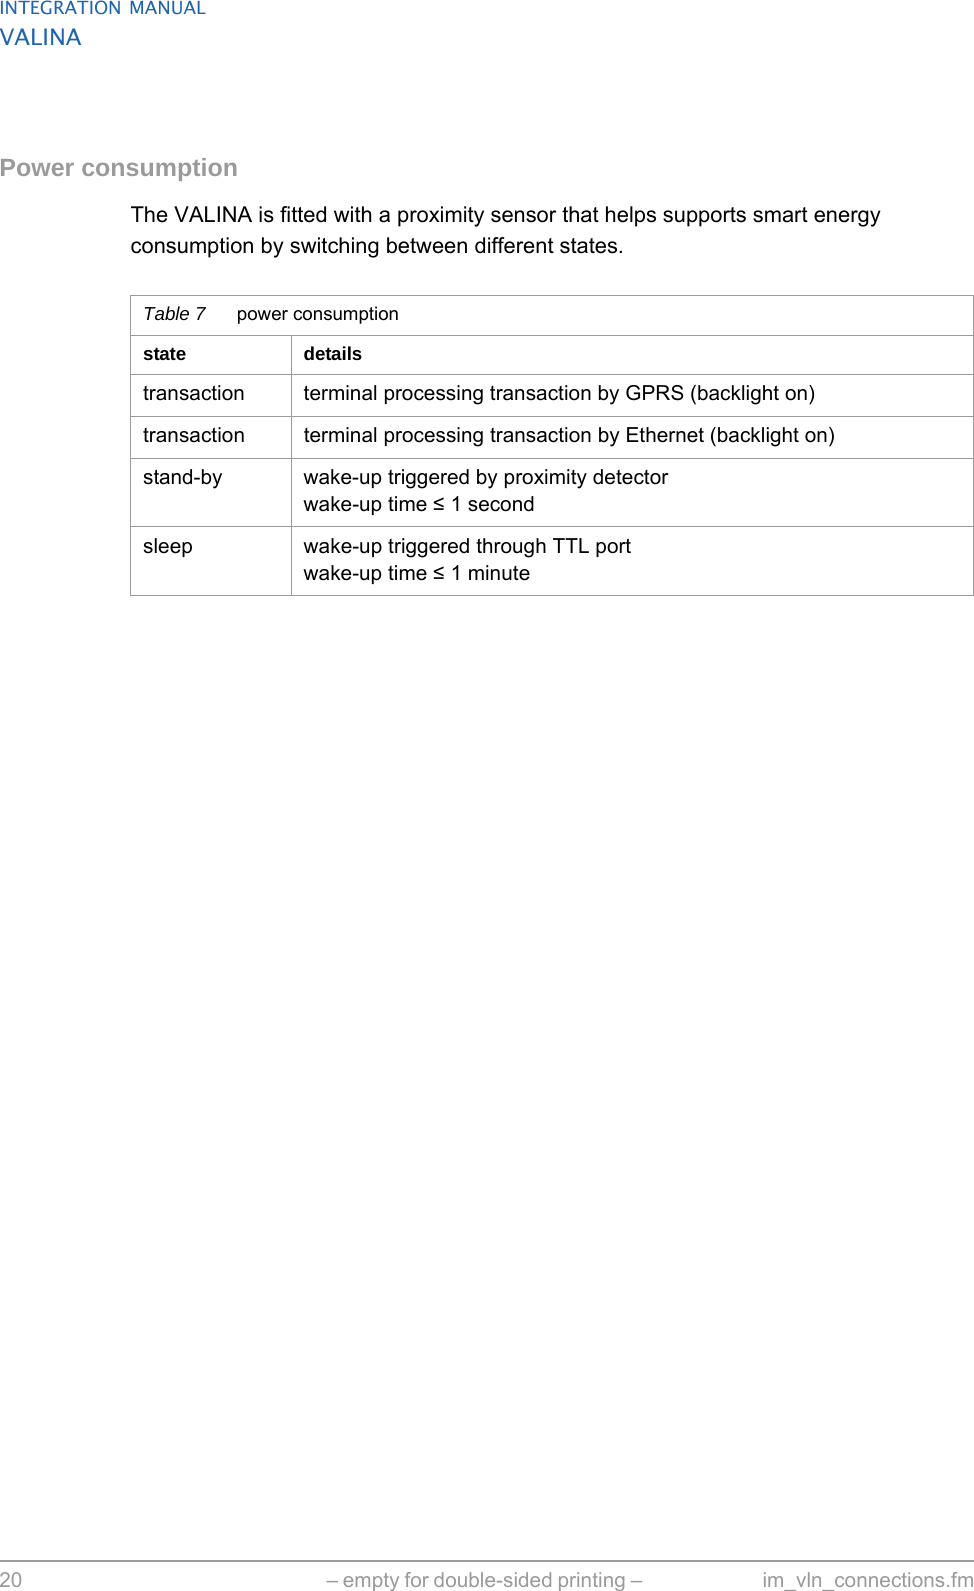
INTEGRATION MANUALVALINA20 – empty for double-sided printing –  im_vln_connections.fmPower consumptionThe VALINA is fitted with a proximity sensor that helps supports smart energy consumption by switching between different states.Table 7 power consumptionstate detailstransaction terminal processing transaction by GPRS (backlight on)transaction terminal processing transaction by Ethernet (backlight on)stand-by wake-up triggered by proximity detectorwake-up time ≤ 1 secondsleep wake-up triggered through TTL portwake-up time ≤ 1 minute
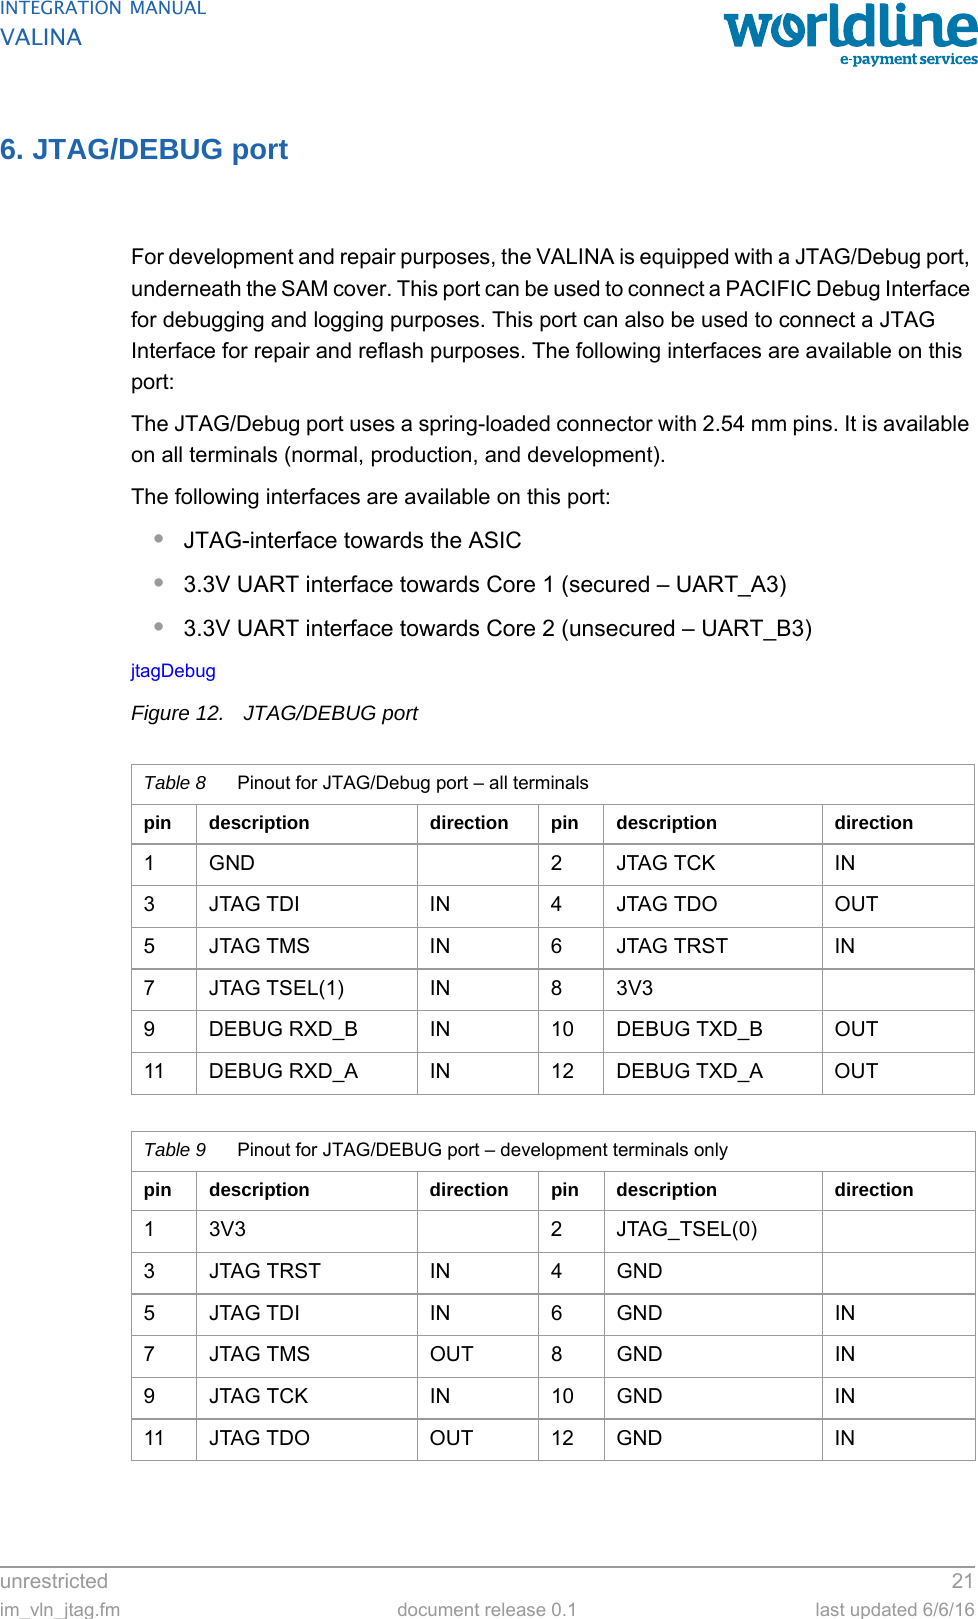
unrestricted 21im_vln_jtag.fm document release 0.1 last updated 6/6/16INTEGRATION MANUALVALINA6. JTAG/DEBUG portFor development and repair purposes, the VALINA is equipped with a JTAG/Debug port, underneath the SAM cover. This port can be used to connect a PACIFIC Debug Interface for debugging and logging purposes. This port can also be used to connect a JTAG Interface for repair and reflash purposes. The following interfaces are available on this port:The JTAG/Debug port uses a spring-loaded connector with 2.54 mm pins. It is available on all terminals (normal, production, and development).The following interfaces are available on this port:•JTAG-interface towards the ASIC•3.3V UART interface towards Core 1 (secured – UART_A3)•3.3V UART interface towards Core 2 (unsecured – UART_B3)jtagDebugFigure 12. JTAG/DEBUG portTable 8 Pinout for JTAG/Debug port – all terminalspin description direction pin description direction1GND 2JTAG TCK IN3 JTAG TDI IN 4 JTAG TDO OUT5 JTAG TMS IN 6 JTAG TRST IN7 JTAG TSEL(1) IN 8 3V39 DEBUG RXD_B IN 10 DEBUG TXD_B OUT11 DEBUG RXD_A IN 12 DEBUG TXD_A OUTTable 9 Pinout for JTAG/DEBUG port – development terminals onlypin description direction pin description direction1 3V3 2 JTAG_TSEL(0)3JTAG TRST IN 4GND5 JTAG TDI IN 6 GND IN7JTAG TMS OUT 8GND IN9JTAG TCK IN 10GND IN11 JTAG TDO OUT 12 GND IN
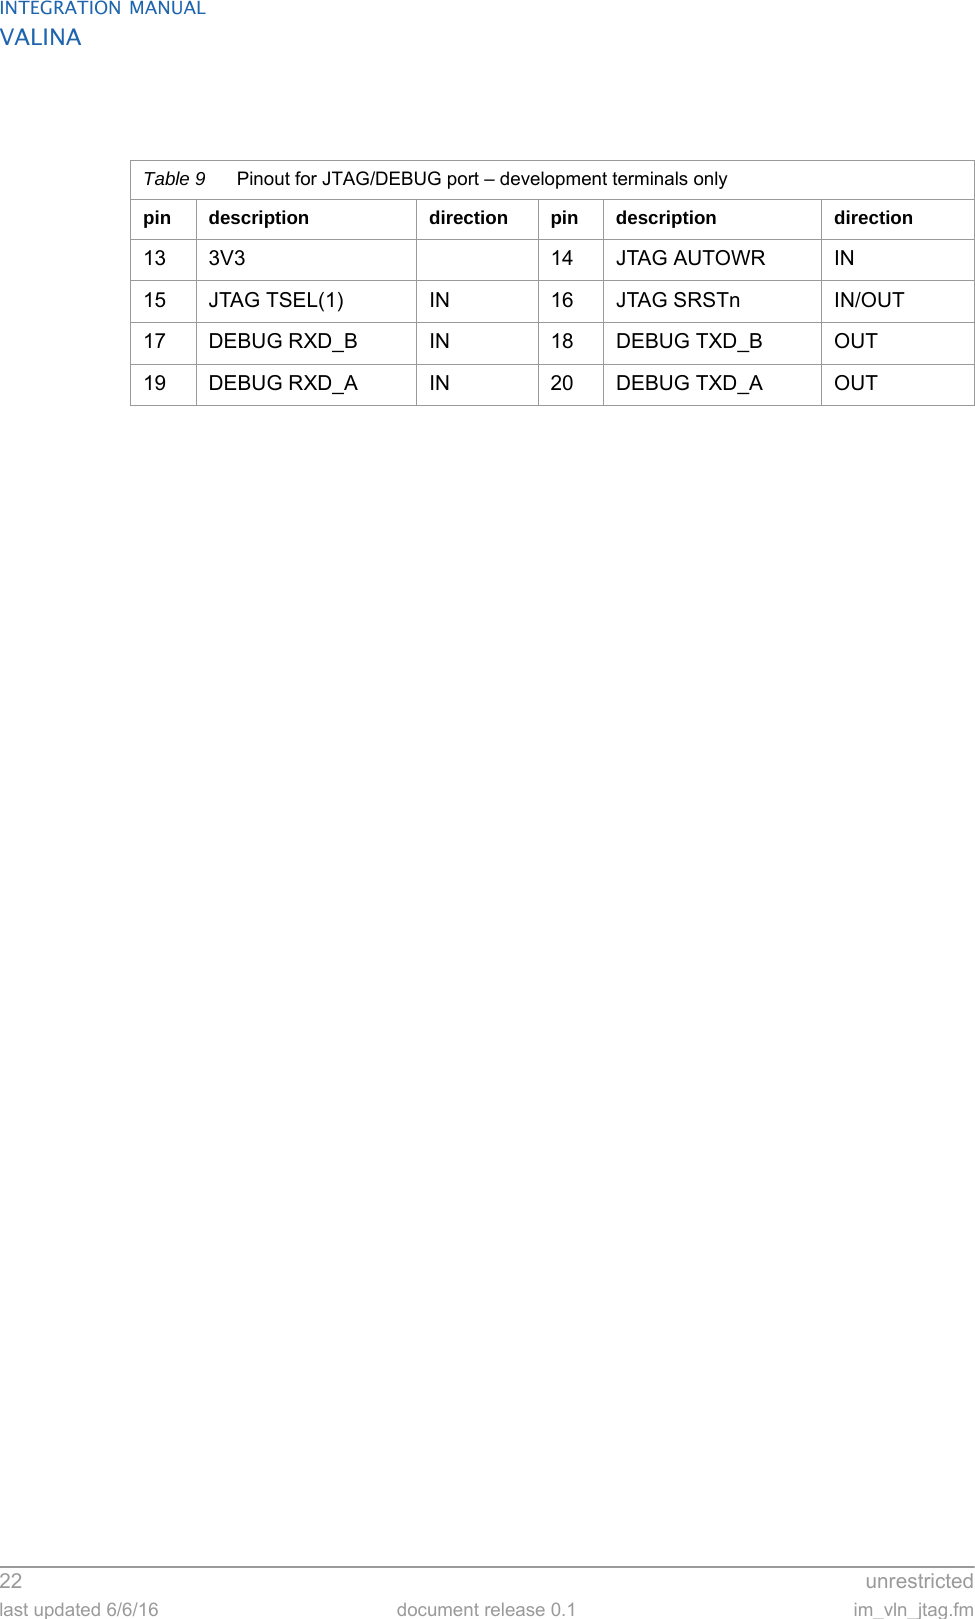
INTEGRATION MANUALVALINA22  unrestrictedlast updated 6/6/16 document release 0.1 im_vln_jtag.fm13 3V3 14 JTAG AUTOWR IN15 JTAG TSEL(1) IN 16 JTAG SRSTn IN/OUT17 DEBUG RXD_B IN 18 DEBUG TXD_B OUT19 DEBUG RXD_A IN 20 DEBUG TXD_A OUTTable 9 Pinout for JTAG/DEBUG port – development terminals onlypin description direction pin description direction
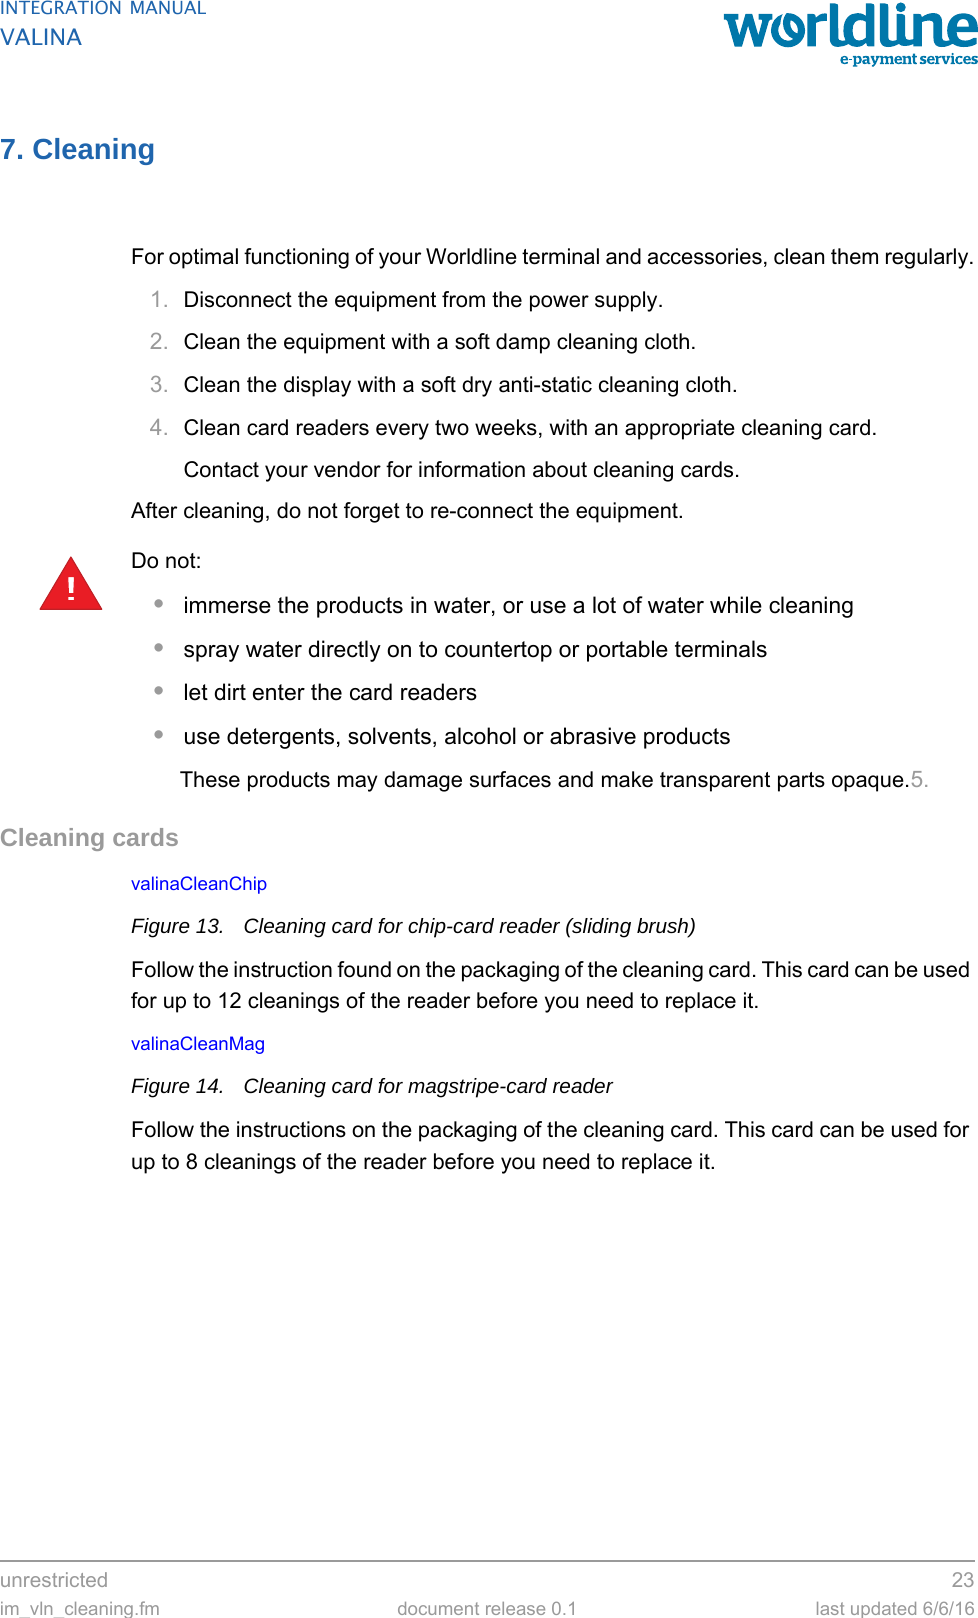
unrestricted 23im_vln_cleaning.fm document release 0.1 last updated 6/6/16INTEGRATION MANUALVALINA7. CleaningFor optimal functioning of your Worldline terminal and accessories, clean them regularly.1. Disconnect the equipment from the power supply.2. Clean the equipment with a soft damp cleaning cloth.3. Clean the display with a soft dry anti-static cleaning cloth.4. Clean card readers every two weeks, with an appropriate cleaning card.Contact your vendor for information about cleaning cards.After cleaning, do not forget to re-connect the equipment.Do not:•immerse the products in water, or use a lot of water while cleaning•spray water directly on to countertop or portable terminals•let dirt enter the card readers•use detergents, solvents, alcohol or abrasive productsThese products may damage surfaces and make transparent parts opaque.5.Cleaning cardsvalinaCleanChip Figure 13. Cleaning card for chip-card reader (sliding brush)Follow the instruction found on the packaging of the cleaning card. This card can be used for up to 12 cleanings of the reader before you need to replace it.valinaCleanMag Figure 14. Cleaning card for magstripe-card readerFollow the instructions on the packaging of the cleaning card. This card can be used for up to 8 cleanings of the reader before you need to replace it.!
INTEGRATION MANUALVALINA24 – empty for double-sided printing –  im_vln_cleaning.fm
unrestricted 25im_vln_decommission.fm document release 0.1 last updated 6/6/16INTEGRATION MANUALVALINA8. Repairs and end-of-lifeAll servicing other than the actions described in this manual must be performed by Worldline or an approved service centre.When a VALINA or any of its accessories is at the end of its life, it must not be simply thrown away, given away or sold on. As terminal vendor, you are responsible for the correct decommissioning of terminals and their components or accessories at their end of life. Remember that:•security awareness requires erasing cryptographic components securely and completely•sustainability requires recycling as many components as possible•environmental awareness requires disposing of hazardous materials professionallyStep by stepInspect the terminal for completeness, signs of intrusion and tampering, as explained under Security recommendations, on page 17.If you find any evidence of tampering, report the problem to Worldline and keep the terminal available for possible forensic investigation1. If you do not find any evidence of tampering, dispose of the terminal following local rules and regulations for disposal of electronic equipment, such as WEEE. Make sure that the person or organisation responsible effectively destroys the terminal and its components.2. Log the physical disposal of the terminal in the assets register.
INTEGRATION MANUALVALINA26 – empty for double-sided printing –  im_vln_decommission.fm
unrestricted 27im_vln_techSpecs.fm document release 0.1 last updated 6/6/16INTEGRATION MANUALVALINAAppendix A. Technical specificationsdisplay3.5”, 320 x 480 pixels, 64K colour, capacitative touchscreen (backlit)communications – on-boardEthernet 10/100RS-232communications – optional extensions2G/3G – GSM, GPRS, EDGE / UMTS, HSDPABluetooth/WiFiinterfacesEthernetRS232, to serial peripherals (for example, vending machine controller or printer)Microfit 43045, power input/output socket (12V DC, 2A)MDBUSB host and USB devicechip security modules2 SAM slots type ID 02G/3G interface board contains 1 SIM slot processing capabilitieshardware cryptographic acceleratorsmemory512 Mbytes RAM4 Gbytes Flash memorymicro USDpower supply12V DC, 2A (when using Microfit)24 – 45 VDC (when using MDB)proximity detectorweight573 g
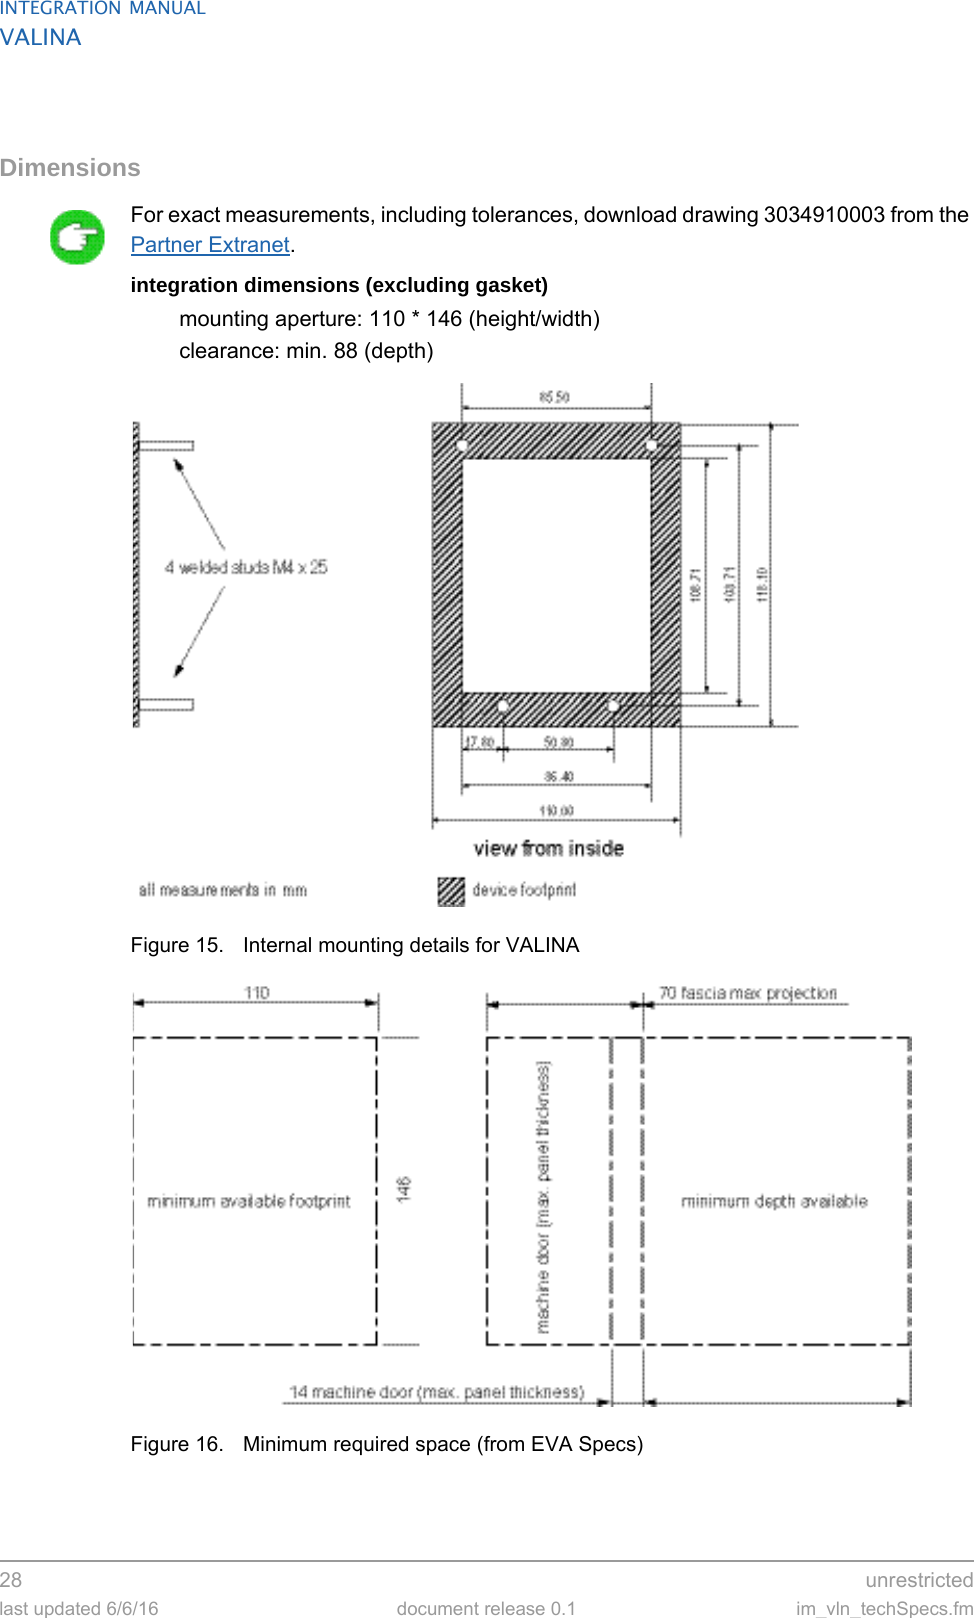
INTEGRATION MANUALVALINA28  unrestrictedlast updated 6/6/16 document release 0.1 im_vln_techSpecs.fmDimensionsFor exact measurements, including tolerances, download drawing 3034910003 from the Partner Extranet.integration dimensions (excluding gasket)mounting aperture: 110 * 146 (height/width)clearance: min. 88 (depth)Figure 15. Internal mounting details for VALINAFigure 16. Minimum required space (from EVA Specs)
unrestricted 29im_vln_techSpecs.fm document release 0.1 last updated 6/6/16INTEGRATION MANUALVALINAOptional accessories•communications boards•debug interface•power adaptorinput100-240 VAC, 50 – 60 Hz; output 12 VDC 2A
INTEGRATION MANUALVALINA30 – empty for double-sided printing –  im_vln_techSpecs.fmEnvironmental conditionsoperating temperature/humidity-20°C to +70°C (for VALINA without display); 0% to 90% RH non-condensingstorage temperature/humidity-25°C to +70°C; storage humidity: 0% to 95% RHflammability ratingANSI/UL 94 V-0dust-/waterproof rating IP65protection classificationvandal-proof class IK08Software•Android and Linux® OS•Linux-based development kit (C and Java™)•secured remote download of software (RTL server)
unrestricted 31im_vln_approvals.fm document release 0.1 last updated 6/6/16INTEGRATION MANUALVALINAAppendix B. ApprovalsWorldline declares that the VALINA complies with Radio and Telecommunications Terminal Equipment directive 1999/5/EC, based on test results referencing harmonised standards. The declaration of conformity (DoC) can be consulted on the partner extranet or on the terminal website:•terminals.worldline.com, under Technology and Innovation•internationalpartners.extranet.worldline.com The product is designed for operation in commercial or residential structures that have electrical installations in compliance with local and regional codes for office and residential electrical wiring, such as International Electrotechnical Commission (IEC) 364 parts 1 through 7.The VALINA has been approved/certified in line with international standards including:Approvals/certification•PCI PTS 4.x (SRED and Open Protocols)•MasterCard TQM•EMVCo Level 1 contact V4.3•EMVCo Contactless V2.5•CE directives 1995/5/CE, 2004/108/CE, 2006/95/CE•Environmental directives Reach, RoHS 2, WEEE•FCCEMC emissions and immunity•EN61000-3 Electromagnetic compatibility (EMC) – Part 3, Testing and measurement techniques, Section 2, Limits for harmonic current emissions (equipment input current 16A per phase)•EN61000-4 Electromagnetic compatibility – Part 4: Testing and measurement techniques:– Section 3, Electromagnetic compatibility – conducted disturbances induced by radio-frequency field: Immunity test– Section 5, Surge immunity– Section 6, Immunity to conducted disturbances induced by radio-frequency fields– Section 8, Power frequency magnetic field: Immunity test•EN55022 Limits and methods of measurement of radio disturbance characteristics of IT Equipment
INTEGRATION MANUALVALINA32  unrestrictedlast updated 6/6/16 document release 0.1 im_vln_approvals.fmESD immunity•EN61000-3 Electromagnetic compatibility – Part 3: Testing and measurement techniques, Section 3: Limitation of voltage fluctuations and flicker in low voltage supply systems for equipment with rate current 16A per phase•EN61000-4 Electromagnetic compatibility – Part 4: Testing and measurement techniques:– Section 2: Electrostatic discharge immunity test Voltage fluctuations and transient– Section 4: Electrical fast transient / burst immunity test– Section 11: Voltage dips, short interruptions and voltage variations immunity testSafetyEN60950-1 Information technology equipmentVALINA with GSM•EN301 489 Electromagnetic compatibility and radio spectrum matters (ERM); Electromagnetic compatibility (EMC) standard for radio equipment and services– Part 1: Common technical requirements– Part 7: Specific conditions for mobile and portable radio and ancillary equipment of digital cellular radio telecommunications systems (GSM and DCS)•EN301 511 Global system for mobile communications (GSM); Harmonised EN for mobile stations in the GSM 900 and GSM 1800 bands covering essential requirements of article 3.2 of the R&TTE directive (1999/5/EC)VALINA with WLAN•EN301 489– Part 1: Common technical requirements– Part 17: Specific conditions for 2.4 GHz wideband transmission systems and 5 GHz high performance WLAN equipment•EN300 328 Electromagnetic compatibility and radio spectrum matters (ERM) Wideband transmission systems

Navigation menu