Westell A90VZ10XX06 Spread Spectrum Transmitter User Manual PRODUCT DESCRIPTION
Westell Inc Spread Spectrum Transmitter PRODUCT DESCRIPTION
UserManual.wiki
>
Westell
>
A90VZ10XX06 User Manual
>
Users Manual Part2
Contents
1.
Users Manual Part1
2.
Users Manual Part2
Users Manual Part2
Navigation menu
Upload a User Manual
Namespaces
Wiki Guide
HTML
PDF
Info
Views
User Manual
Discussion / Help
Navigation
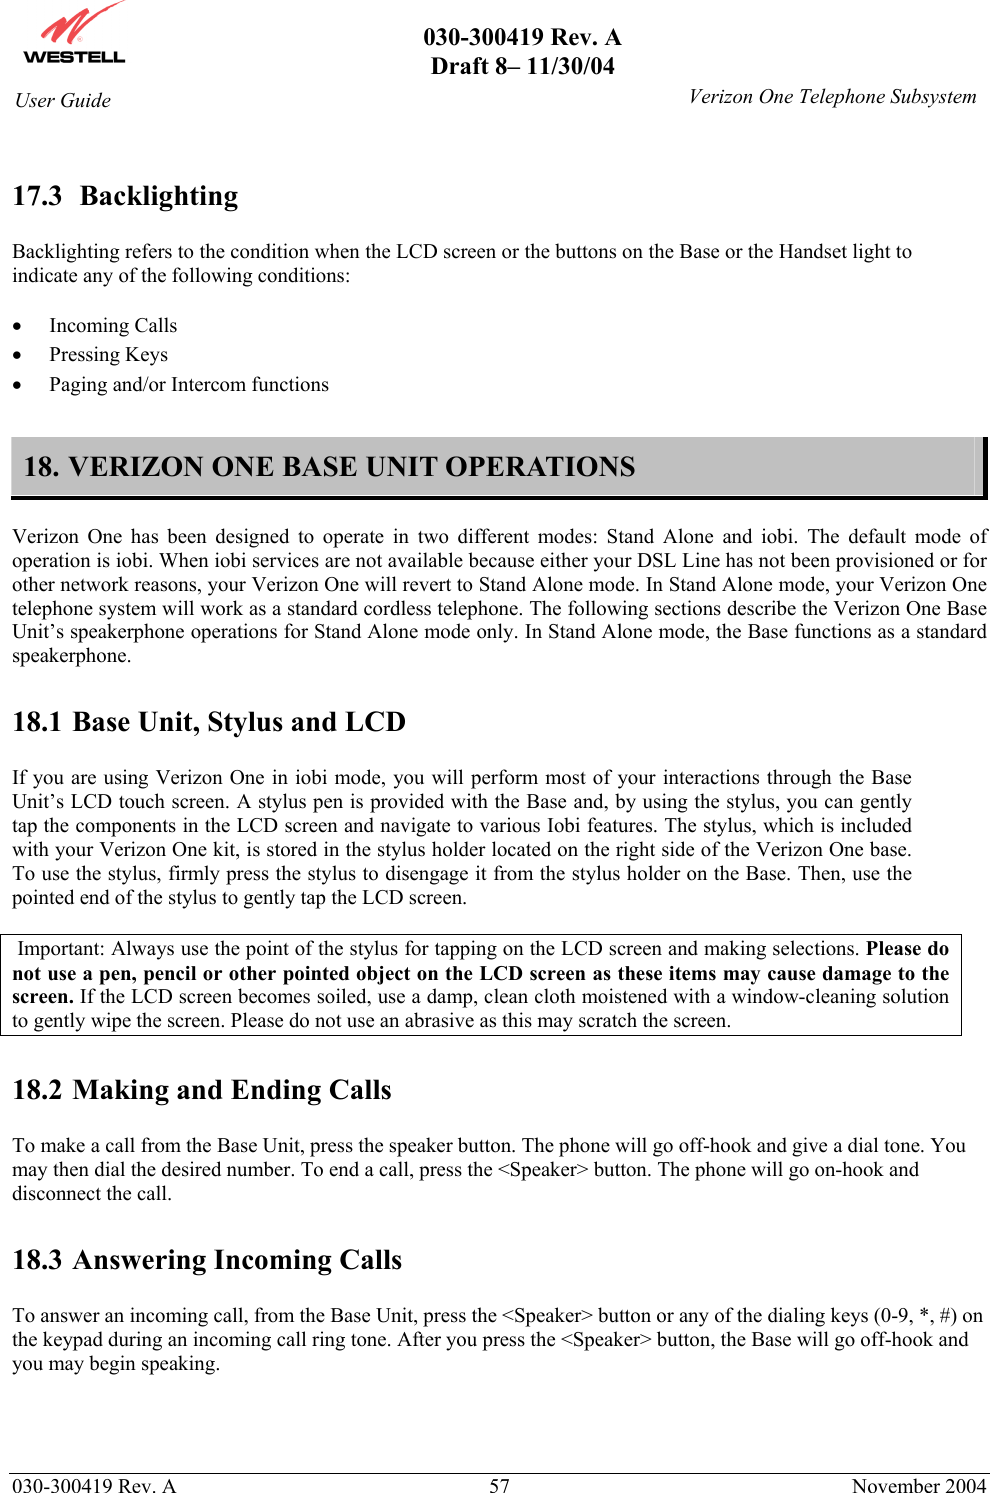
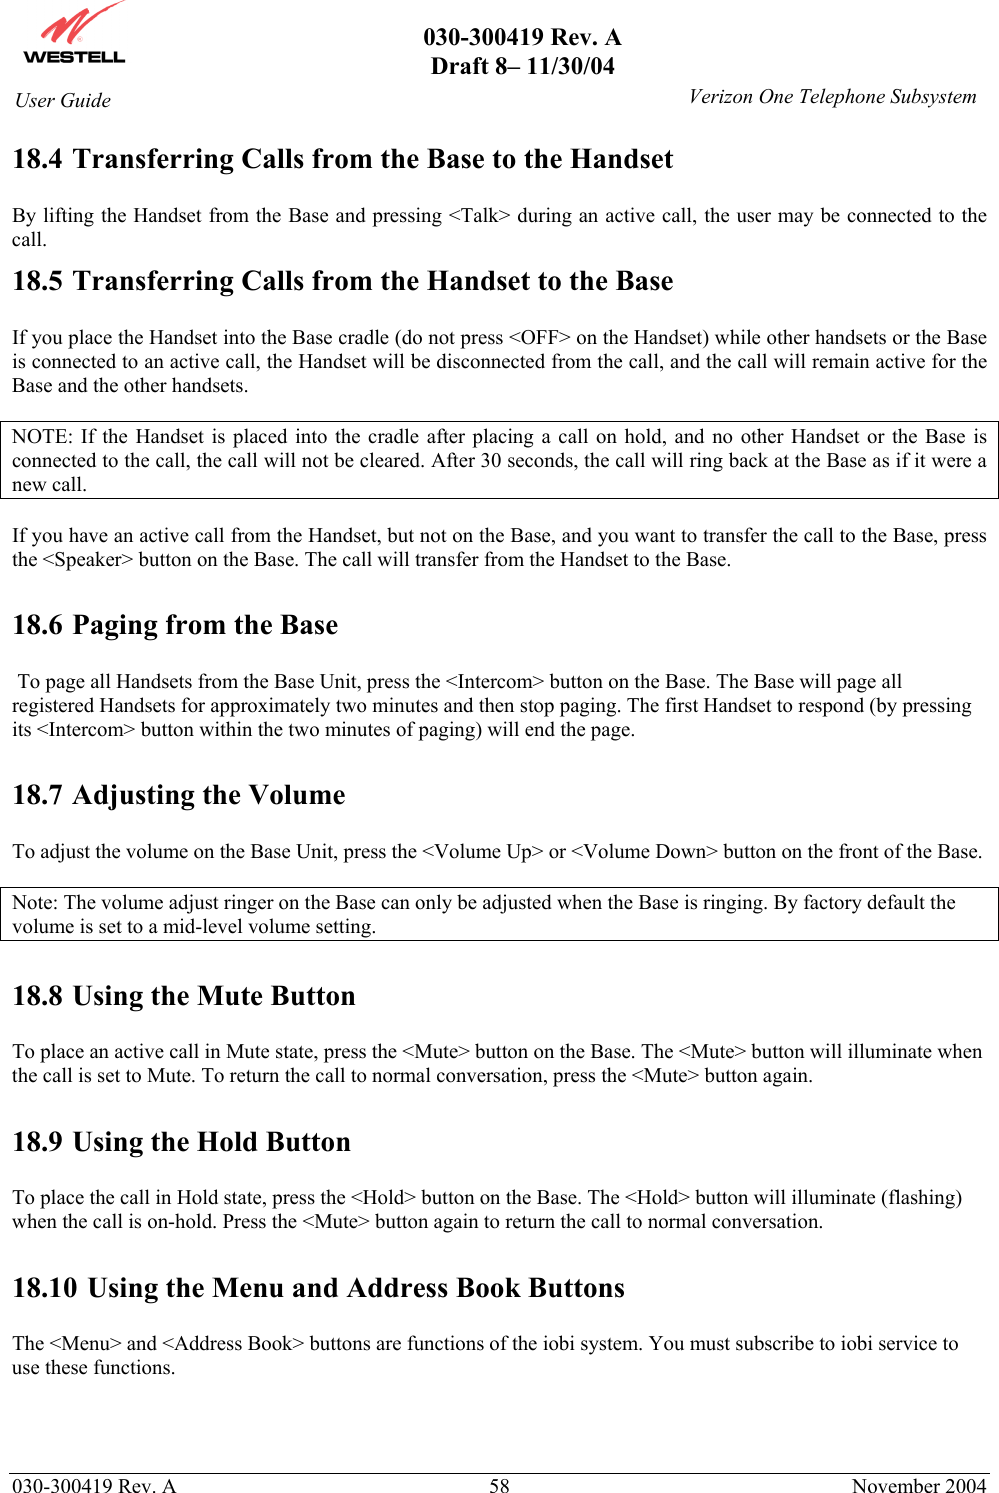
![030-300419 Rev. A Draft 8– 11/30/04 030-300419 Rev. A 31 November 2004 User Guide Verizon One Telephone Subsystem 12.6.1.2 Phonebook is Full - No Entries Accepted from the Incoming Calls Log If you select [Save] in the “Save/Erase/Erase All” screen and phonebook detects that it is full, the following “Phonebook Full” screen will be displayed for 2 seconds. When the Phonebook is full, you must delete existing entries from the phonebook prior to saving new entries to the phonebook. 12.6.2 Erasing Calls from the Incoming Calls log To erase calls from the Incoming Calls log, first select [Incoming Calls] at the main menu screen. View the list of incoming calls and select the entry that you want to erase (delete). Next, select [Options] to display the following “Save/Erase/Erase All” screen.](https://usermanual.wiki/Westell/A90VZ10XX06.Users-Manual-Part2/User-Guide-530872-Page-1.png)
![030-300419 Rev. A Draft 8– 11/30/04 030-300419 Rev. A 32 November 2004 User Guide Verizon One Telephone Subsystem12.6.2.1 Erasing Selected Entries Selecting [Erase] at the “Save/Erase/Erase All” screen enables you to delete specific Caller ID records from the Incoming Calls logs. To erase a selected entry, move the pointer to [Erase] and then select [Select]. The Handset LCD will display the following “Entry erased” screen, and after 2 seconds, the LCD will return to the next Caller ID record. Note: If there is only one record, and you choose to erase this record, the LCD will return to the Standby screen. 12.6.2.2 Erasing All Entries Selecting [Erase All] at the “Save/Erase/Erase All” screen enables you to delete all Caller ID records from the Incoming Calls logs. To erase all entries from the Incoming Calls log, move the pointer to [Erase All] and then select [Select]. The LCD will display the following [Erase all?] screen. Select [OK] to erase all entries in the Caller ID log. NOTE: If you do not want to erase all entries in the log, select [Exit] to return to the last Caller ID message in the log. If you select [OK] in the “Erase all?” screen, the following “List erased” screen will be displayed. After 2 seconds, the LCD will return to the Standby screen.](https://usermanual.wiki/Westell/A90VZ10XX06.Users-Manual-Part2/User-Guide-530872-Page-2.png)
![030-300419 Rev. A Draft 8– 11/30/04 030-300419 Rev. A 33 November 2004 User Guide Verizon One Telephone Subsystem13. USING THE PHONEBOOK MENU 13.1 Accessing the Phonebook To access the Handset’s phonebook, select [Phonebook] in from Standby menu, the following screen will be displayed, and the pointer will be positioned at “(Add New Name).” Please choose one of the following options and then select [Select]: • Select [Select] while the pointer is positioned at (Add New Name) and perform the steps explained in section 13.2). • Press the <Up/Down> button to scroll through the list of Phonebook entries, and then select [Select] to select an entry. • Press a number (1 – 50) to go to an entry number in the phonebook. Note: The second digit is ignored if the number entered is greater than the number of entries in the Phonebook. • After selecting a phone entry, press the <TALK> button to go off-hook and dial the selected phone number. If there is no entry in the Phonebook, the “Empty List” message will be displayed in the screen.](https://usermanual.wiki/Westell/A90VZ10XX06.Users-Manual-Part2/User-Guide-530872-Page-3.png)
![030-300419 Rev. A Draft 8– 11/30/04 030-300419 Rev. A 34 November 2004 User Guide Verizon One Telephone Subsystem13.2 Adding a New Name To add a new name, select [Select] when pointer is at (Add New Name). The following Name screen will be displayed. This screen will prompt you for Name information. Select one of the following options: NOTE: If the phonebook is full, you will not be able to enter a new name until entries are deleted from the phonebook. • Enter a name at the blinking underscore using the keypad characters (0-9, *, #). Note: If user tries to input more than 11 characters, an error tone will be emitted and additional input will not be accepted. While in the Name screen, you can select the [Clear] key to delete (backspace) characters. • Press the <OFF> button to return to the Standby screen. If the <Up/Down> button is pressed while you are at the Name screen, the Number screen will be displayed. Select one of the following options: • Enter a number at the blinking underscore using the keypad characters (0-9, *, #). Note: While in the “Number” screen, you can select the [Clear] key to delete (backspace) numbers. NOTE: Press the # symbol once to enter #. Press the # symbol twice to insert “P,” which is a 3-second pause during dialing. If you try to input more than 24 digits, an error tone will emit and digit input is not accepted.) The phone number will be formatted according to the following rules: String of digits Screen Format 1 7 digit number ###-#### 2 8 digits, leading digit 1 1 ###-#### 3 10 digits (###)###-#### 4 11 digits, leading digit 1 1(###)###-#### 5 Other cases No formatting](https://usermanual.wiki/Westell/A90VZ10XX06.Users-Manual-Part2/User-Guide-530872-Page-4.png)
![030-300419 Rev. A Draft 8– 11/30/04 030-300419 Rev. A 35 November 2004 User Guide Verizon One Telephone Subsystem• Press the <OFF> button to return to the Standby screen. • Press the <Up/Down> button to go back to the “Name” input screen. After you have entered the name and number into the screens, select [Save] to store the entry to the Phonebook. The entry will be listed in alphabetical order, and the list will be renumbered. After you select [Save], the following “Name Saved” screen will be displayed for 2 seconds. If you selected [Save] but did not enter a name into the name field, the empty name record is treated as "space" and is sorted to the beginning of the list regardless the number field, using first found/first display. The screen then returns to the Phonebook List at the “Add New Name” item. If you selected [Save] but did not enter a phone number entered has been entered, a “No Number Entered” message will be displayed on the screen for 2 seconds, an error tone will be emitted, and then the screen will return to the “number edit” screen. If the Phonebook is full when you select (Add New Name), a “Phonebook Full” message will be displayed for 2 seconds. When the Phonebook is full, you can store new a Name entry only after existing entries have been deleted.](https://usermanual.wiki/Westell/A90VZ10XX06.Users-Manual-Part2/User-Guide-530872-Page-5.png)
![030-300419 Rev. A Draft 8– 11/30/04 030-300419 Rev. A 36 November 2004 User Guide Verizon One Telephone Subsystem13.3 Phonebook Listing If no name has been input to the Phonebook entry, the entry will still be stored instead of the name but number is displayed. If the number has more than 11 digits and less than 23, the display is swapped with two pages, each page interval of 3 seconds. If the number has more than 22 digits, the display is swapped with three pages, each page with interval of 3 seconds. Phonebook and Phone number Features Quantity The maximum number of entries that the Phonebook can contain 50 The maximum number of characters for name entry 11 The Maximum number of digits for phone number entry 24 13.4 Phonebook View Entry When the pointer is at an entry in the list, the following screen will be displayed. If you select [View] when the pointer is at one of the entries, for example “1 John Smith,” the telephone number of that entry will be displayed. Press the <TALK> button to go off hook and dial the number.](https://usermanual.wiki/Westell/A90VZ10XX06.Users-Manual-Part2/User-Guide-530872-Page-6.png)
![030-300419 Rev. A Draft 8– 11/30/04 030-300419 Rev. A 37 November 2004 User Guide Verizon One Telephone Subsystem13.5 Phonebook Options If you select [Options] when the pointer is at an existing entry, the following screen will be displayed; the pointer will be position at [Edit]. Select one of the following options: Press the <Up/Down> button to move the pointer to the desired option. • Select [Edit] to edit a phonebook entry. • Select [Erase] to erase a phonebook entry. • Select [Exit] to return to Phonebook Menu screen. • Press the <OFF> button to return to the Standby screen. 13.6 Edit a Phone Entry If [Edit] is selected, the following “Name” screen will be display. Select one of the following options • Enter a name at the blinking underscore using the keypad characters (0-9, *, #). (Note: If you input more than 11 characters, an error tone will be emitted and additional characters will not be accepted.) • Select [Clear] to delete (backspace) characters. • Select [Save] to save you settings and to return to the Standby screen. • Press the <OFF> button to return to the Standby screen.](https://usermanual.wiki/Westell/A90VZ10XX06.Users-Manual-Part2/User-Guide-530872-Page-7.png)
![030-300419 Rev. A Draft 8– 11/30/04 030-300419 Rev. A 38 November 2004 User Guide Verizon One Telephone Subsystem If the <Up/Down> button is pressed at this time, the display will show the corresponding telephone number of the Name you have selected. Select one of the following options: • Enter a number at the blinking underscore using the keypad characters (0-9, *, #). • Press the # key once to insert a #. Press the # key twice to insert “P,” which is a 3 second pause during dialing. (Note: If user tries to input more than 24 digits, an error tone will be emitted, and the digit input is not accepted.) • Select the [Clear] soft key to delete (backspace) numbers. • Select [Save] to store the entry to the Phonebook, listing it in alphabetical order and renumbering the list. • Press the <OFF> button to return to the Standby screen. • Press the <Up/Down> button to go back to the “Name” input screen. If you select [Save], the “Name Saved” screen will be displayed for 2 seconds. If there is no name entered, the empty name record is treated as "space" and is sorted to the beginning of the list regardless the number field using first found/first display. The display then returns to the [Edit] option in the Phonebook list. If you select [Save] and no phone number has been entered, the following “No Number Entered” screen will be displayed for 2 seconds. It will also play an error tone, and the return to the “number edit” screen.](https://usermanual.wiki/Westell/A90VZ10XX06.Users-Manual-Part2/User-Guide-530872-Page-8.png)
![030-300419 Rev. A Draft 8– 11/30/04 030-300419 Rev. A 39 November 2004 User Guide Verizon One Telephone Subsystem13.7 Deleting Existing Phone Numbers If you select [Erase], the name and phone number will be erased, and the Phonebook will be re-sorted/re-numbered. The Handset will display the “Entry Erase” message for 2 seconds, and then the screen will return to the Phonebook menu.](https://usermanual.wiki/Westell/A90VZ10XX06.Users-Manual-Part2/User-Guide-530872-Page-9.png)
![030-300419 Rev. A Draft 8– 11/30/04 030-300419 Rev. A 40 November 2004 User Guide Verizon One Telephone Subsystem14. USING INTERCOM AND CALL TRANSFER FUNCTIONS 14.1 Intercom Functions In this section, the names “Lucy” and “Verizon-One” were assigned to two handsets. The Handset for the Verizon One Base Unit was assigned the name “Verizon-On.” A second Handset was assigned the named “Lucy.” The names were used to explain the Intercom and Call Transfer Functions discussed in this section. 14.1.1 Paging the Base To page the Base Unit, press the <Intercom> button on the Handset. If there is only one Handset registered to the Base Unit when the <Intercom> button is pressed, the Base is paged. The Handset will display the following screen. Select [Exit] on the screen, or press the <OFF> or <Intercom> button to stop paging and to return to Standby mode. If there is more than one Handset registered to the Base Unit when the <Intercom> button is pressed, all the registered Handsets (except the user’s Handset) will be listed on the Handset’s screen as well as on the Base Unit’s screen. The following screen displays an example of this function. (Note: “Verizon-One” is the user’s Handset, which, as mentioned earlier, is not shown in the following screen.)](https://usermanual.wiki/Westell/A90VZ10XX06.Users-Manual-Part2/User-Guide-530872-Page-10.png)
![030-300419 Rev. A Draft 8– 11/30/04 030-300419 Rev. A 41 November 2004 User Guide Verizon One Telephone SubsystemPress the <Up/Down> button to position the pointer at the desired option. If [Page] is selected while the pointer is at “ALL,” all registered Handsets will be paged at the same time. The first Handset that replies can intercom to the page originator. NOTE: You must scroll down further using the <UP/Down> button to select the “ALL” option. If [Page] is selected while the pointer is at a name, for example, “Lucy,” the “VerizonOne” Handset will page Handset “Lucy,” and the following screen will be displayed on the “VerizonOne” Handset. Alternatively, you can press the number on the keypad that corresponds to the Handset to be paged (for example, press the <Intercom> button, and then press the number “2” to page “Lucy”). Select [Exit] on the screen, or press the <OFF> or <Intercom> button if you want to stop paging and to return to Standby mode. If you page Handset “Lucy,” the “Verizon-One” Handset will display the following screen. If [Answer] is selected in the screen, or if the <Talk> or <Intercom> button is pressed on Handset “Lucy,” an Intercom connection is established, and the “Verizon-One” Handset will display the following screen. In this screen, the earpiece speaker volume level is set at Vol-2. Select [Exit], or press the <Off> or <Intercom> button on either Handset to terminate the Intercom page.](https://usermanual.wiki/Westell/A90VZ10XX06.Users-Manual-Part2/User-Guide-530872-Page-11.png)
![030-300419 Rev. A Draft 8– 11/30/04 030-300419 Rev. A 42 November 2004 User Guide Verizon One Telephone Subsystem14.1.2 No Reply From the Handset Being Paged For example, If “Verizon One” pages “Lucy” and after two minutes there is no reply from “Lucy,” “Verizon One” will display a “No answer” message. If [Exit] is selected or the <OFF> button is pressed on Handset “Lucy,” “Lucy” will return to Standby screen, and “Verizon-One” will display the “No answer” message. You can select one of the following options: • Select [Exit] in “Verizon One” screen, or • Press the <OFF> button on the Handset, or • Wait for the page to timeout and return to the Standby screen. 14.1.3 Using Intercom and Call Transfer During an Active Call When you are on an active call, press the <Intercom> button on Handset. The Handset will hold the call and start paging. When there is more than one Handset registered to the Base, pressing the <Intercom> button during off hook will show “Call on hold” BLINKING on the 2nd row of the LCD, followed by a list of the other intercom devices. The following screen will be displayed. Select one of the following options: • Use the <Up/Down> button to scroll line by line through the list of available intercom devices (0 is the Base, 1 is the Base’s Handset (“Verizon One”) and is not shown, 2 is a Handset named “Lucy,” 3 is a Handset named “John, ” etc…). • Select [Exit] or <Intercom> on the “Verizon One” Handset to return to TALK mode. • Select the [Page] key to page the Handset adjacent to the pointer [►]. Select [Exit] or press <Intercom> if you want to stop paging, unhold a call, or return to TALK mode.](https://usermanual.wiki/Westell/A90VZ10XX06.Users-Manual-Part2/User-Guide-530872-Page-12.png)
![030-300419 Rev. A Draft 8– 11/30/04 030-300419 Rev. A 43 November 2004 User Guide Verizon One Telephone SubsystemIf you select [Page] on the “Verizon-One” Handset, the following screen will be displayed. Then, Handset “Lucy,” will display the following screen. If you select [Answer] on the screen or press the <Intercom> button on Handset “Lucy,” an intercom connection is established, and the following screen will be displayed: Select [Exit] on the Handset or press the <Intercom> button on “Lucy” to disconnect the Intercom page and return Handset “Lucy” to Standby mode. The “Verizon One” Handset will return to TALK mode and display a “Call on Hold “ message.](https://usermanual.wiki/Westell/A90VZ10XX06.Users-Manual-Part2/User-Guide-530872-Page-13.png)
![030-300419 Rev. A Draft 8– 11/30/04 030-300419 Rev. A 44 November 2004 User Guide Verizon One Telephone SubsystemThe Talk screen will alternate with the “Intercom Lucy Vol-2” screen in 1-second intervals. Select one of the following options: • Press the <Hold> button or select [Unhold] on the “Verizon-One” screen to have conference between external lines and the “Verizon-One” and “Lucy” Handsets. • Press the <OFF> button on the “Verizon-One” Handset to disconnect the Intercom page. This will transfer the external call to Handset “Lucy,” and return “Verizon-One” to Standby mode. • Press the <Intercom> button on the “Verizon One” Handset to disconnect the Intercom page and return to TALK mode. If there is no answer from “Lucy” after two minutes or if [Exit] on Handset “Lucy” is pressed, “Lucy” will return to the Standby screen and ”Verizon-One” will display “No Answer” for 2 seconds and then return to TALK mode. 14.2 Call Transfer Functions 14.2.1 Setting Up a Call Transfer A call transfer may be set up by pressing <Hold> on the “Verizon-One” Handset, and then pressing <Intercom> to page Handset “Lucy.” The “Verizon-One” Handset will display “Call on Hold” and “Paging Lucy,” switching messages alternatively. If you press the <OFF> button at this moment, the “Verizon-One” Handset will display a “Line In-Use” message, and Handset “Lucy” will ring and display a “Transfer from Verizon-One” message, as shown in the following screen. Press the <TALK> button on Handset “Lucy,” or select [OK] on the screen to accept the call transfer.](https://usermanual.wiki/Westell/A90VZ10XX06.Users-Manual-Part2/User-Guide-530872-Page-14.png)
![030-300419 Rev. A Draft 8– 11/30/04 030-300419 Rev. A 45 November 2004 User Guide Verizon One Telephone Subsystem 14.2.2 Call Back If you select the [Exit] key or press the <OFF> button on the “Lucy” screen, or if you press “Lucy’s” <OFF> button within the 30 seconds of ringing but no reply, “Lucy” will stop ringing and return to the “Line in use” screen. The call will be “called back” to the “Verizon-One” Handset, and “Verizon-One” will ring and display a “Call back” message. If you select [Exit] or press the <OFF> button on the “Verizon-One” Handset, or if you press “Verizon One’s” <OFF> button within the 30 seconds of ringing but no reply, “VerizonOne” will stop ringing, drop the call, and return to the Standby screen. Press the <TALK> button if you want to accept the call back. 14.2.3 3-Way Conferencing Use 3-way conferencing during an Intercom call “while the user’s Handset is talking to the line.” To set up 3-way conferencing, first press the <Hold> button or the [Unhold] key on ”VerizonOne” while on Intercom with Handset “Lucy.” After either of these keys is pressed, both “VerizonOne” and “Lucy” will display the following screen. Select one of the following options: • Press the <OFF> button on ”VerizonOne” to quit the conference. Handset “Lucy” can continue the external call, Or, similarly, press the <OFF> button on Handset “Lucy” to quit the conference, ”VerizonOne” can continue the external call. • Press <OFF> button on both “VerizonOne” and “Lucy” to disconnect the call and the intercom. • Press the <Hold> button on either Handset “VerizonOne” or “Lucy” to hold the external line and Handset “Lucy” and “VerizonOne” can continue intercom. 14.2.4 One Touch Conferencing If one Handset is talking to the line and the 2nd Handset would like to join into the “3-way conference,” the 2nd Handset’s user has to press the <TALK> button once to enter into the conference directly. Then, a New Party Joined tone is emitted to alert you that another Handset has joined in the conference call successfully. A “Conference” screen will also be displayed. A “Line In-Use” prompt will be displayed on the other Handsets.](https://usermanual.wiki/Westell/A90VZ10XX06.Users-Manual-Part2/User-Guide-530872-Page-15.png)
![030-300419 Rev. A Draft 8– 11/30/04 030-300419 Rev. A 46 November 2004 User Guide Verizon One Telephone Subsystem14.3 Handset Locator The Handset’s locating process is initiated from the Base unit. The “Handsets locating” means that all registered Handsets are paged at the same time so that you are able to locate the Handsets by tracking the page tone. In addition to a paging tone being generated at the paged Handsets (even if ringer is OFF), a “Base Paging” message will also be displayed on the LCD screen of each Handset paged. The registered Handset will emit a Paging tone for 2 minutes and then return to the Standby screen. To stop the paging tone for all Handsets, select the [Exit] key or the <OFF> button on one of the registered Handsets. Or press the <Intercom> button on the Verizon One Base Unit. NOTE: To stop the paging on specific Handsets select [OK], or press any key except the [Exit] key or the <OFF> button.](https://usermanual.wiki/Westell/A90VZ10XX06.Users-Manual-Part2/User-Guide-530872-Page-16.png)
![030-300419 Rev. A Draft 8– 11/30/04 030-300419 Rev. A 47 November 2004 User Guide Verizon One Telephone Subsystem15. USING DIALING FUNCTIONS 15.1 Dialing Screen If you press the <TALK> button on the Handset’s LCD screen, the Handset will switch to Talk mode, and the following “Talk” screen will be displayed for 5 seconds. After 5 seconds, the following screen will be displayed. Where “000:06” is the talk time in minutes and seconds. The timer should start counting from “000:06” onwards. After counting to “999:59” the timer change back to “000:00” and continue counting. “VOL-2” indicates the “level 2” talk volume level. Select [Mute] to mute the microphone of the Handset. This will alternate the Talk screen with the Call muted screen at 1-second intervals. During the interval when the Handset is muted, press the <TALK> button to flash the line and unmute the Handset. Then, select one of the following options: • Select [Unmute] key to return the Handset to an “unmute” state. • Press the <Hold> button to hold the line.](https://usermanual.wiki/Westell/A90VZ10XX06.Users-Manual-Part2/User-Guide-530872-Page-17.png)
![030-300419 Rev. A Draft 8– 11/30/04 030-300419 Rev. A 48 November 2004 User Guide Verizon One Telephone Subsystem15.1.1 Pre-Dialing Press number keys (0-9) during Standby screen to go to the Pre-Dialing screen, shown below. The number input will first appear on the right side of the 2nd row. The last number input will move to the right as a new number is entered. The number is always aligned to the right. The maximum number of digits accepted for Pre-view dialing is 32. The quotation marks “█” represent the blinking cursor ready for input. Select one of the following options: • Select [Clear] to delete the last input number. • Select [Save] to initiate a phonebook entry. The number input will be in place on the number row. Unit prompts for name input. If the number of digits exceeds 24, the [Save] prompt will not be displayed. Press the <TALK> button after you have entered the number. The following Talk screen will be displayed, and the number will be dialed out.](https://usermanual.wiki/Westell/A90VZ10XX06.Users-Manual-Part2/User-Guide-530872-Page-18.png)
![030-300419 Rev. A Draft 8– 11/30/04 030-300419 Rev. A 49 November 2004 User Guide Verizon One Telephone Subsystem15.1.2 Off-hook Dialing Press the <TALK> button during the Standby screen to go to off-hook state. Pressed numbers will be dialed out immediately. Select the [Mute] key in the screen to mute the microphone of the Handset. This will alternate the Talk screen with the Call muted screen in 1-second intervals. Select [Unmute] if you want to cancel the Mute function and to return to the previous screen. 15.1.3 Call on Hold During Talk mode, press the <Hold> button to place the call in “On-hold” state, as displayed in the following screen.](https://usermanual.wiki/Westell/A90VZ10XX06.Users-Manual-Part2/User-Guide-530872-Page-19.png)
![030-300419 Rev. A Draft 8– 11/30/04 030-300419 Rev. A 50 November 2004 User Guide Verizon One Telephone SubsystemDuring line hold state, if one of the following event occurs the Handset will automatically switch to Standby mode and displays “Line In Use”: • If another extension/parallel phone goes off-hook. • If one of other [Standby] Handsets or base switches to Talk mode. 15.1.4 Off-hook Dialing from Phonebook List During Talk mode, press the <Up/Down> button enables you to select an entry from the Phonebook and dial. The Handset will display the following screen. Select one of the following options: • Press the <Up/Down> button to scroll the Phonebook list up or down. • Select [Dial] to dial the number in the pointed entry. • Select [Exit] to return to the Talk screen.](https://usermanual.wiki/Westell/A90VZ10XX06.Users-Manual-Part2/User-Guide-530872-Page-20.png)
![030-300419 Rev. A Draft 8– 11/30/04 030-300419 Rev. A 51 November 2004 User Guide Verizon One Telephone Subsystem15.2 Redial Screen Press the <Redial> button while at the Standby screen to go to the redial list. The screen will display the 5 last numbers that were dialed. Press the <Up/Down> button to review the list. Initially, pointer will be positioned at the most recent number. Each redial number shall consist of maximum of 32 digits. If the last outgoing number matches the number of an entry in the Phonebook, this name will be displayed instead of the number. Select one of the following options: • Press <Redial> again or [Dial] or <TALK> will go off hook and dial the pointed number. • Select [Save] to initiate a Name entry. If the number of digits inside the off-hook redial buffer is less than or equal to 24 digits count, then this redial buffer can be totally stored into memory. The number input will be in place on the number row. The phone will prompt you enter a name. If the number of digits is more than 24 digits, “Unable to Save” will be displayed. After the number is successfully stored, the display will return to redial screen. • Press <OFF> to put the phone in the on-hook state and to go to the Standby screen. 15.3 Incoming Call Screen During the first ring of an incoming call, the LCD will display the “Incoming Call,” as shown in the following screen. If there is an incoming call while the Handset is in a menu, the menu will quit and show the incoming call screen. If a name is present in the Caller ID log, then the Handset will display that name and number as delivered. If no name is present in the Caller ID log, the Handset will then match the number with the Phonebook. If there is matching record found, the name field of the LCD will display the name field of the Name entry. If there is an incoming call and before user picks up the call the caller hangs up, the Caller ID display will remain on the LCD until 60 sec time out. Before time out, user may cancel the CID display by pressing <OFF/clear>, <TALK/flash> and Up/Down arrow. These keys function immediately after pressed. For example, pressing <TALK/flash> once will clear Caller ID display, and then the phone will enter an off-hook state.](https://usermanual.wiki/Westell/A90VZ10XX06.Users-Manual-Part2/User-Guide-530872-Page-21.png)
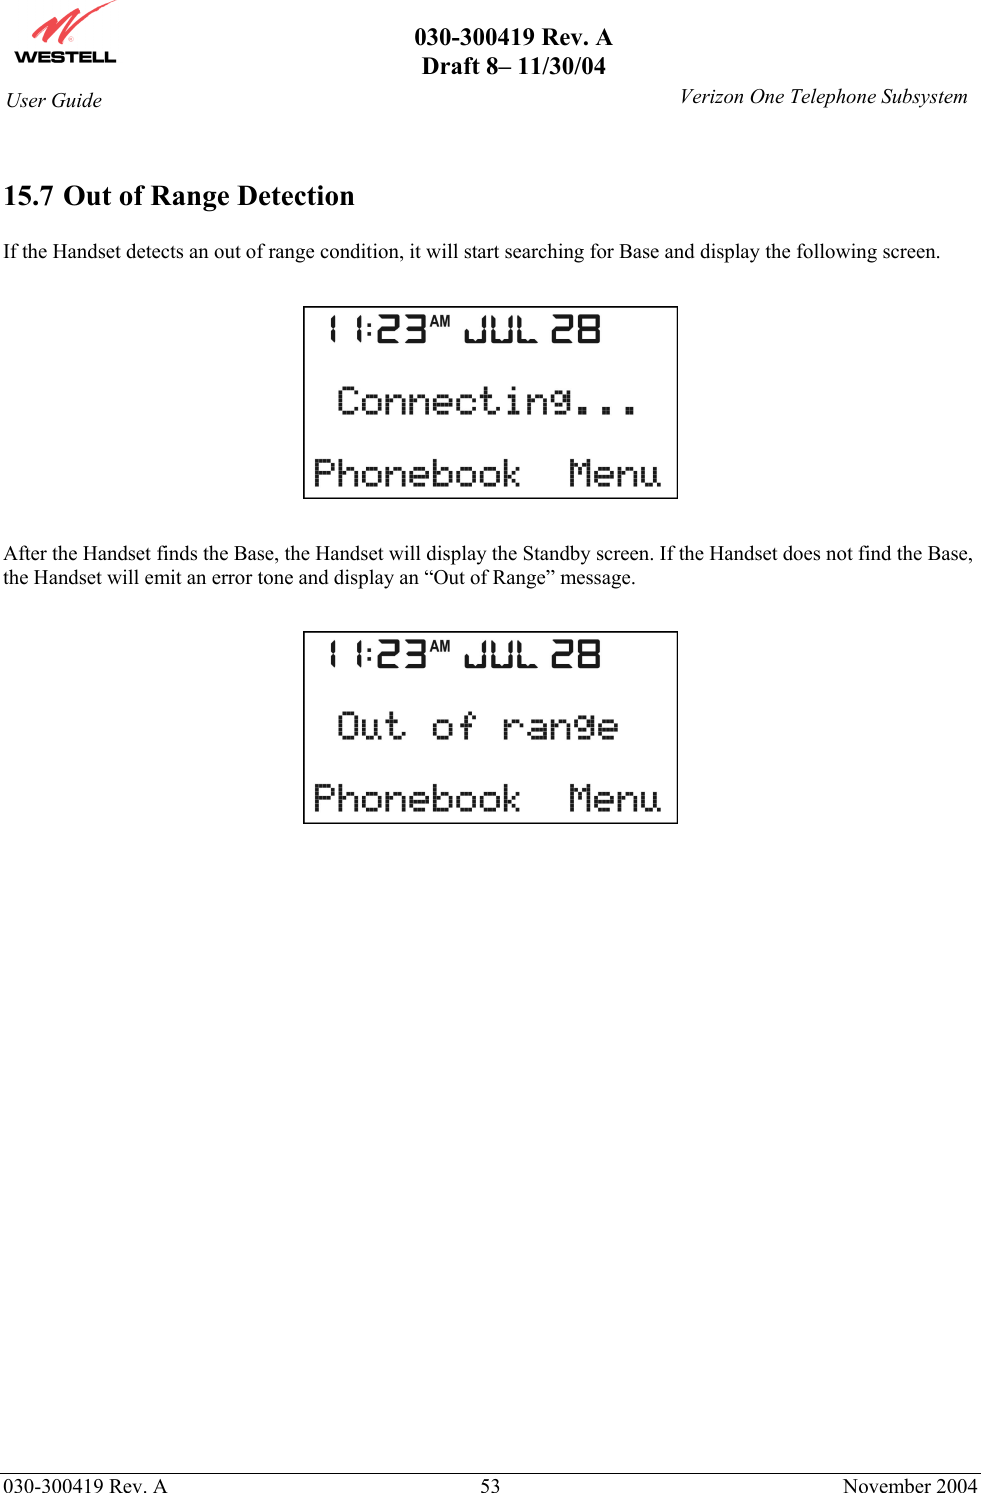
![030-300419 Rev. A Draft 8– 11/30/04 030-300419 Rev. A 52 November 2004 User Guide Verizon One Telephone Subsystem15.4 Talk Screen When in Talk mode the screen will display the caller’s name, the phone number, and the volume level. 15.5 Call Waiting Screen If you have Call Waiting service, a call waiting tone will be generated every 6 seconds. The Talk screen will alternate in 1-second intervals with the Call Waiting screen. You can press the <Talk> button to flash the line and toggle between callers. 15.6 Unregistered Handset Screen For any unregistered Handset, the first LCD screen shall automatically come into the Unregistered Handset Screen. Select one of the following options: • Select [OK] to go to Registration menu. • Select [Exit] to go to the Standby screen. • Pressing the <TALK> button will emit an error tone return the unregistered Handsets to the Unregistered Handset screen. Call waiting Caller ID Name and Number](https://usermanual.wiki/Westell/A90VZ10XX06.Users-Manual-Part2/User-Guide-530872-Page-22.png)