Welch Allyn FN802FH Propaq 802 LTRN User Manual part 9 of 10
Welch Allyn, Inc. Propaq 802 LTRN Users Manual part 9 of 10
UserManual.wiki
>
Welch Allyn
>
FN802FH User Manual
>
Users Manual part 9 of 10
Contents
1.
Users Manual part 1 of 10
2.
Users Manual part 2 of 10
3.
Users Manual part 3 of 10
4.
Users Manual part 4 of 10
5.
Users Manal part 5 of 10
6.
Users Manual part 6 of 10
7.
Users Manual part 7 of 10
8.
Users Manual part 8 of 10
9.
Users Manual part 9 of 10
10.
Users Manual part 10 of 10
Users Manual part 9 of 10
Navigation menu
Upload a User Manual
Namespaces
Wiki Guide
HTML
PDF
Info
Views
User Manual
Discussion / Help
Navigation
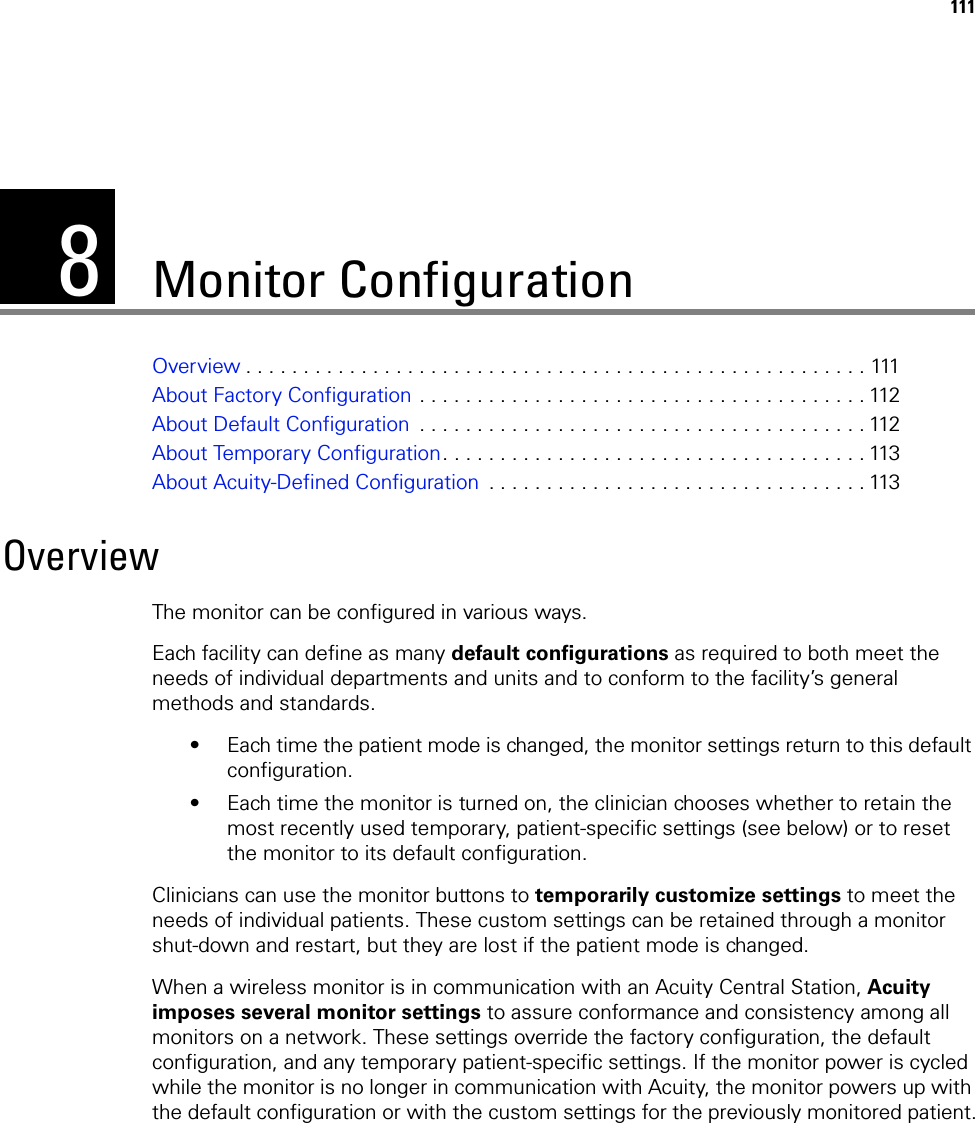
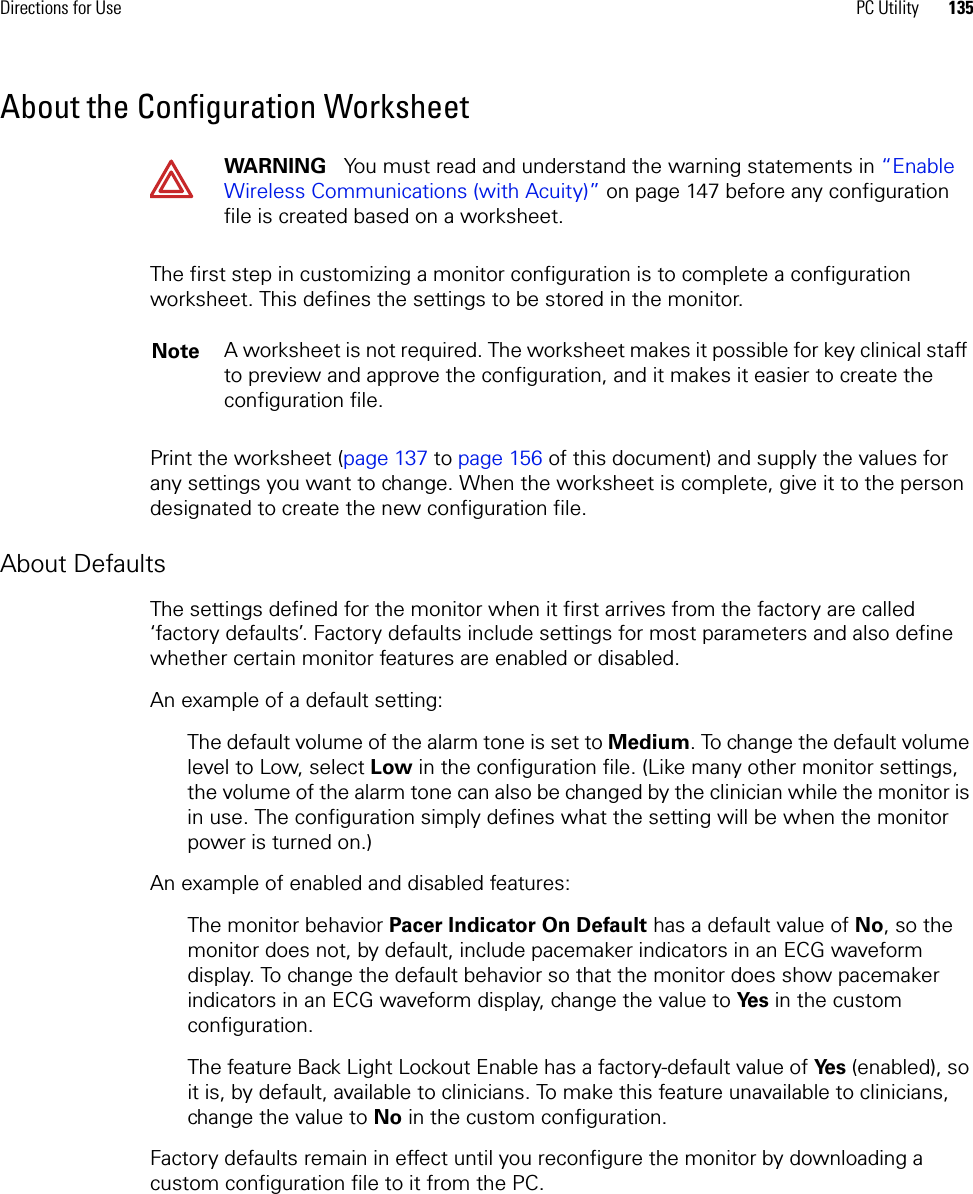
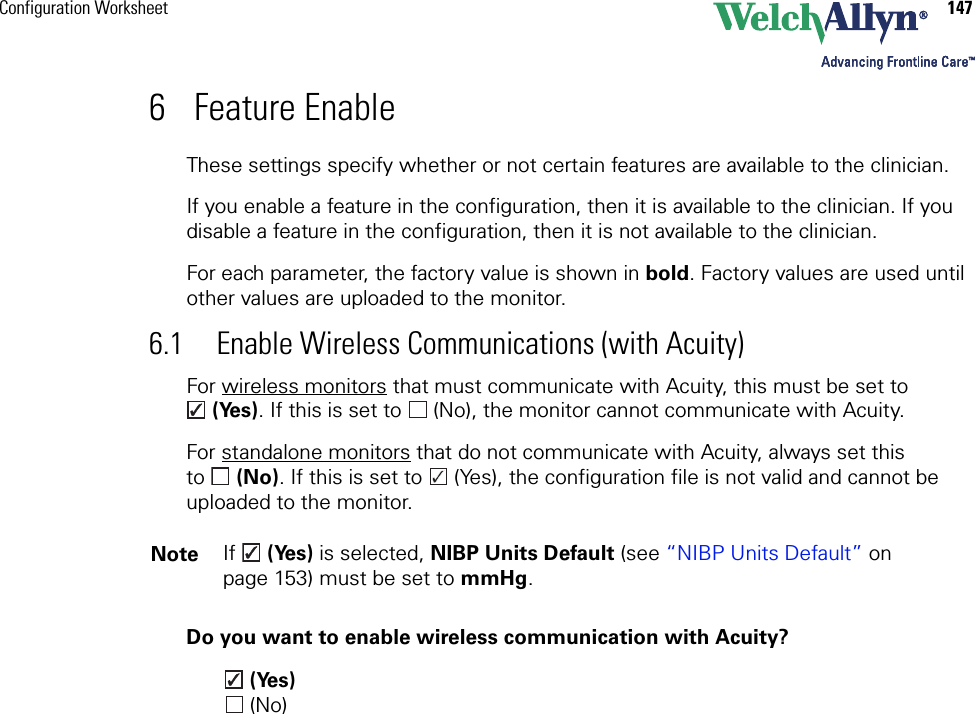
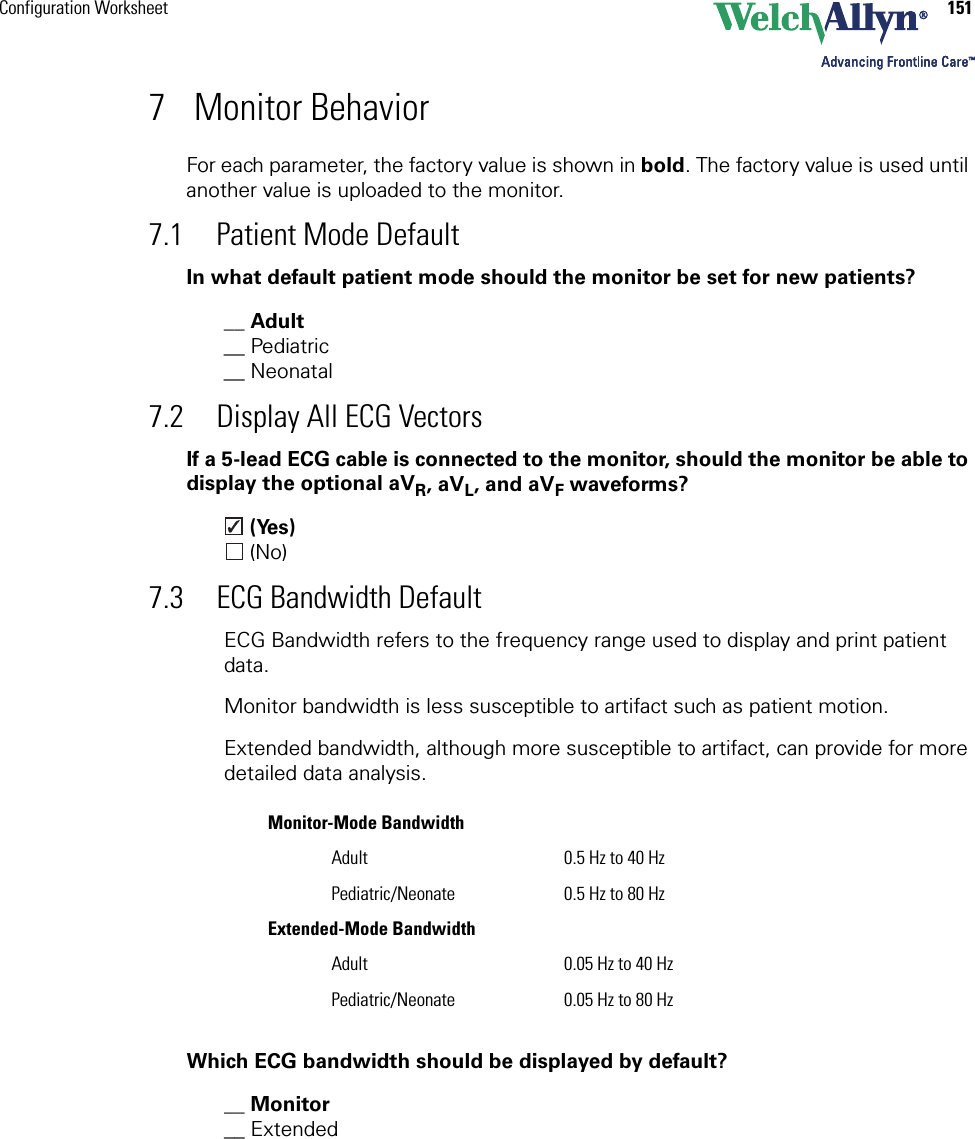
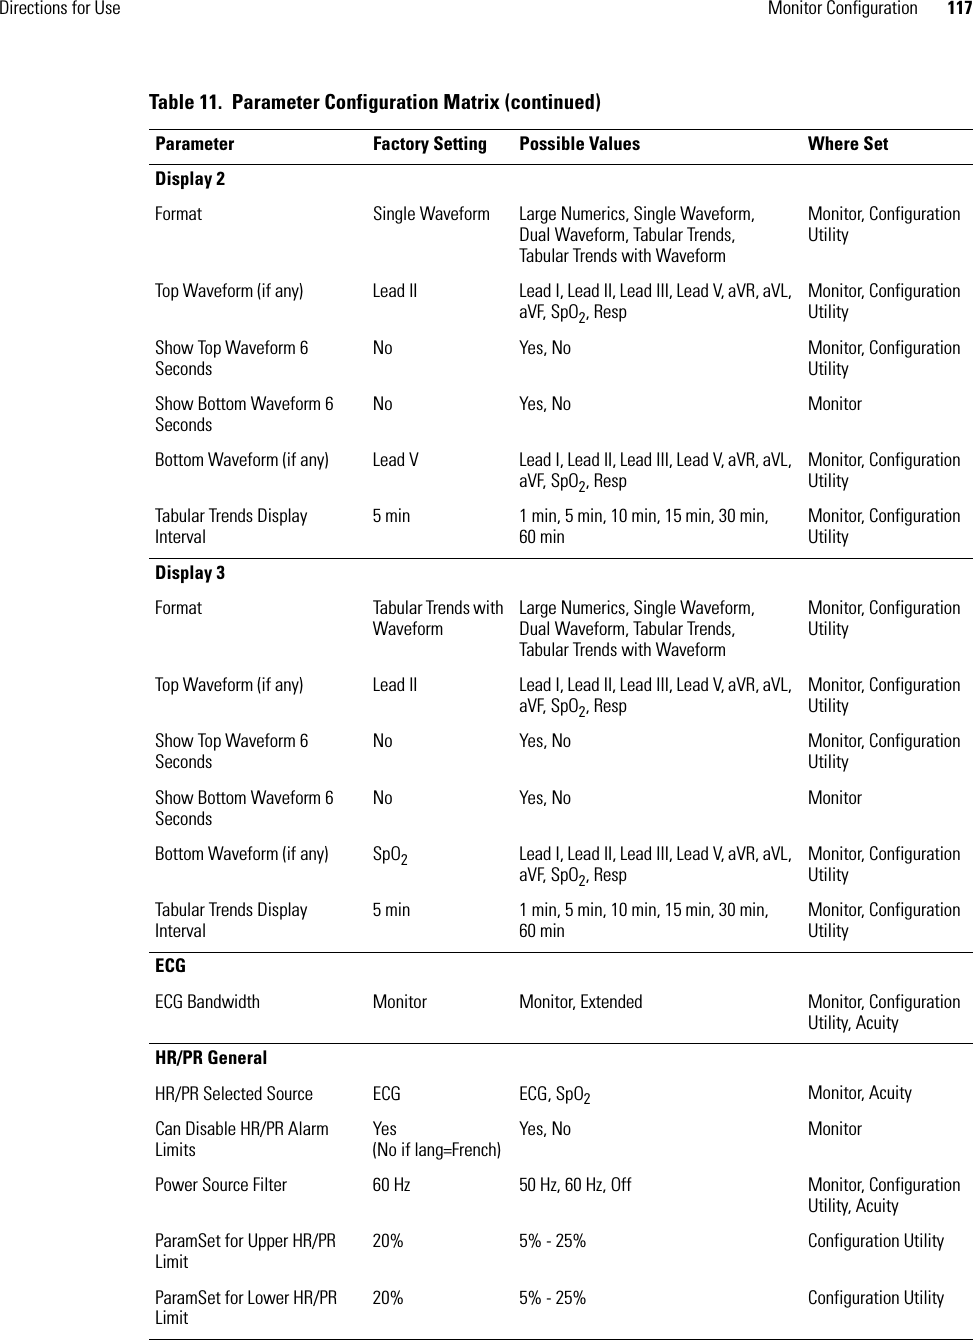
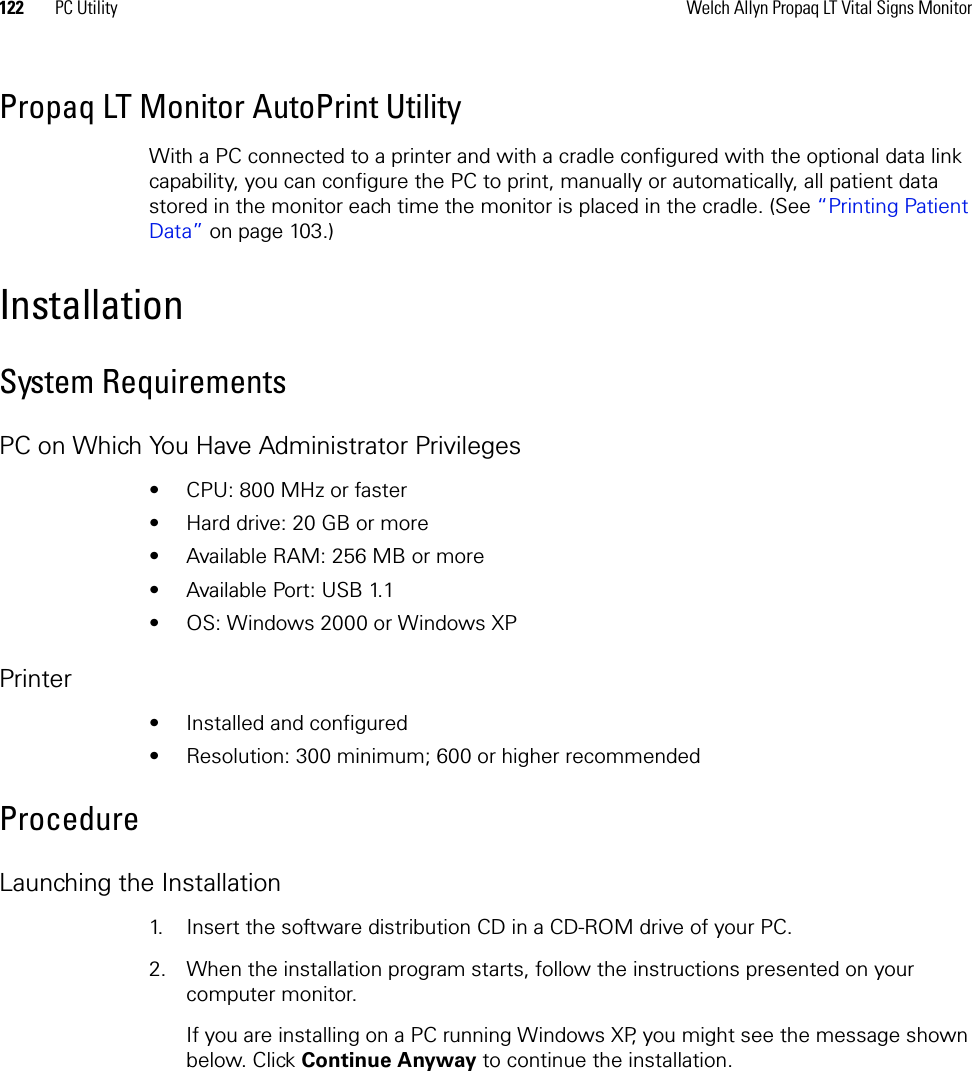
![114 Monitor Configuration Welch Allyn Propaq LT Vital Signs MonitorTable 11. Parameter Configuration MatrixParameter Factory Setting Possible Values Where SetGeneralPatient Name(Last, First, MI)[blank] (≤16 characters displayed; actual number of characters depends on character width)Monitor, AcuityPatient ID [blank] (12 characters) Monitor, AcuityRoom [blank] (5 characters) Monitor, AcuityRegulatory Setting US US, European EC, Japan Metrology Configuration Utility, AcuityPatient Mode Adult Adult, Pediatric, Neonate Monitor, Configuration Utility, AcuityLCD Bias 32 1 - 64 MonitorNetworkRadio Card ON and Acuity EnabledYES if the radio card is installed.NO if the radio card is not installed.Yes, No Configuration UtilityRadio ESSID (NetName) com.protocol com.protocol(1), demo.protocol(2)com1.protocol(3), com2.protocol(4)com1.protocol(5), com2.protocol(6)com1.protocol(7), com2.protocol(8)com1.protocol(9), com2.protocol(10)com1.protocol(11), com2.protocol(12)com1.protocol(13), com2.protocol(14)com1.protocol(15), com2.protocol(16)com1.protocol(17), com2.protocol(18)com1.protocol(19), com2.protocol(20)MonitorCAUTION Do not attempt to change the network name unless you are a qualified biomedical service engineer or technician. Changing the network name causes the monitor to disconnect from the current FlexNet network, restart (deleting all stored patient data), and attempt to connect to the FlexNet network corresponding to the new network name.To change the network name:1. Enter the Service menu.2. Highlight Radio.3. Highlight NetName and press .4. Select another network name and press .5. Press to return to the monitoring display.Radio Disconnect Not Disconnected Disconnected, Not Disconnected Monitor](https://usermanual.wiki/Welch-Allyn/FN802FH.Users-Manual-part-9-of-10/User-Guide-611436-Page-4.png)
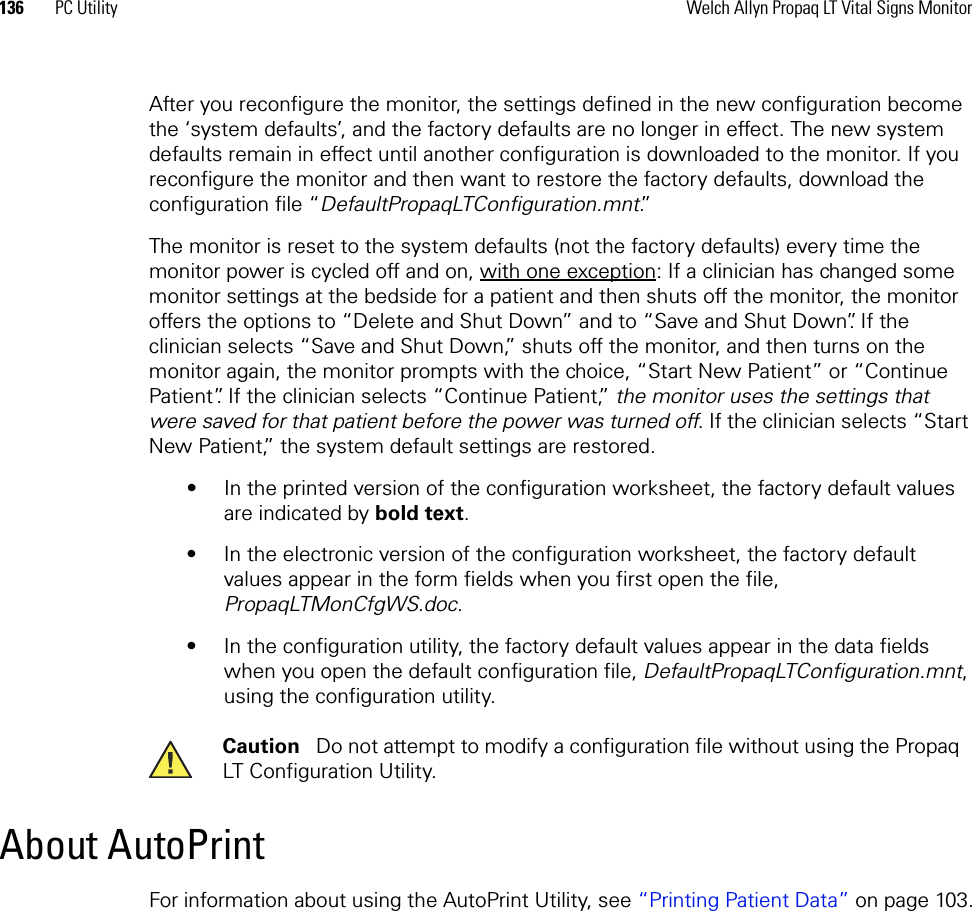
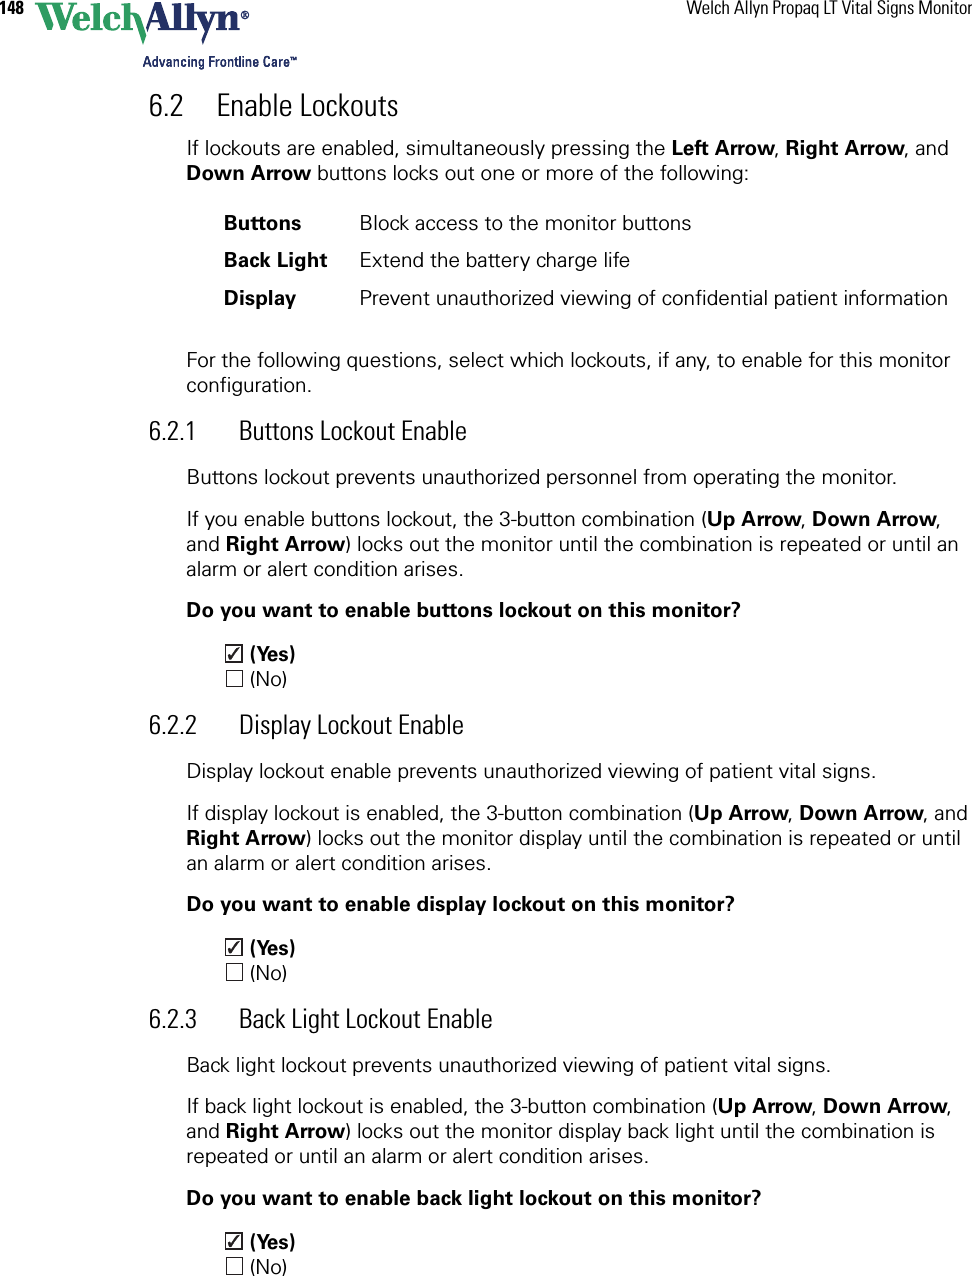
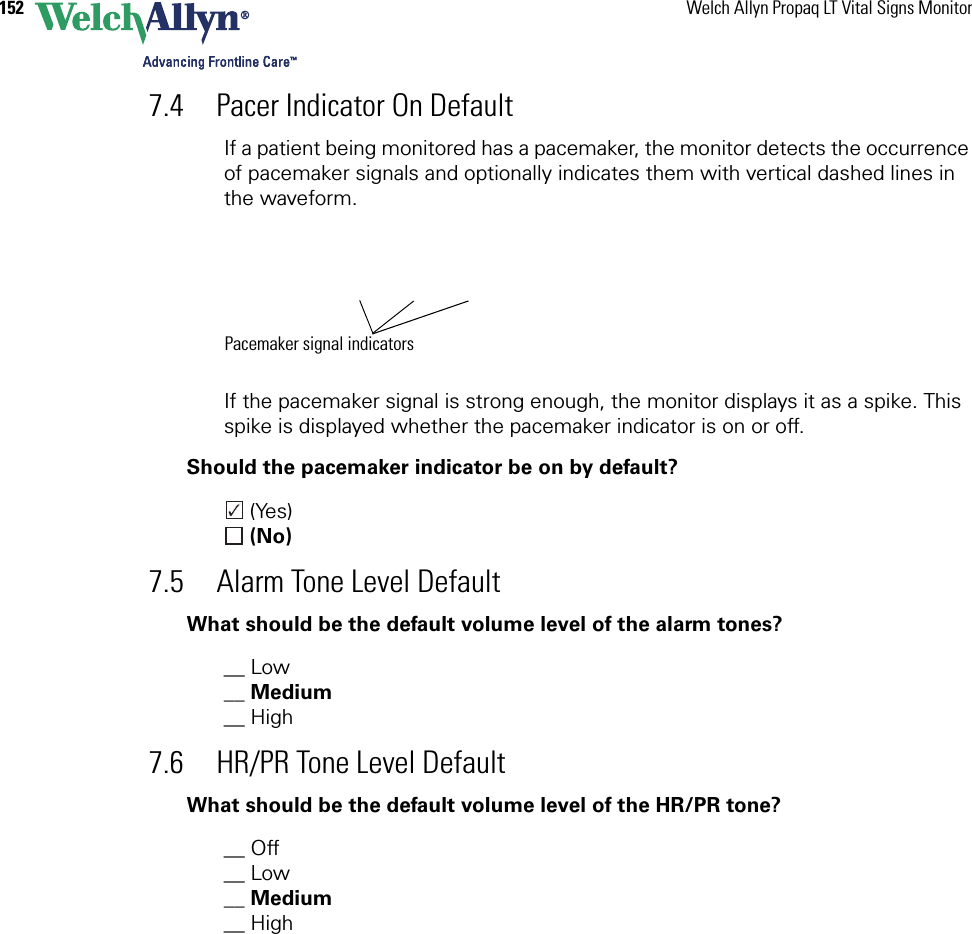
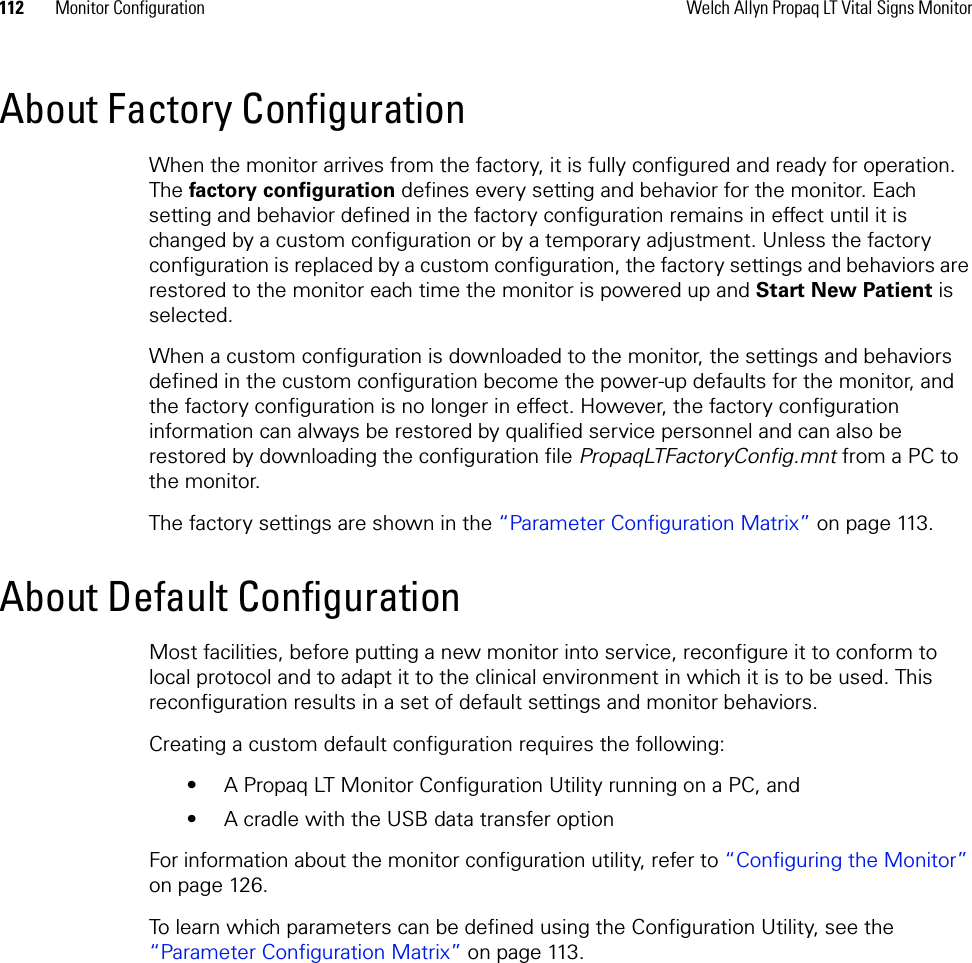
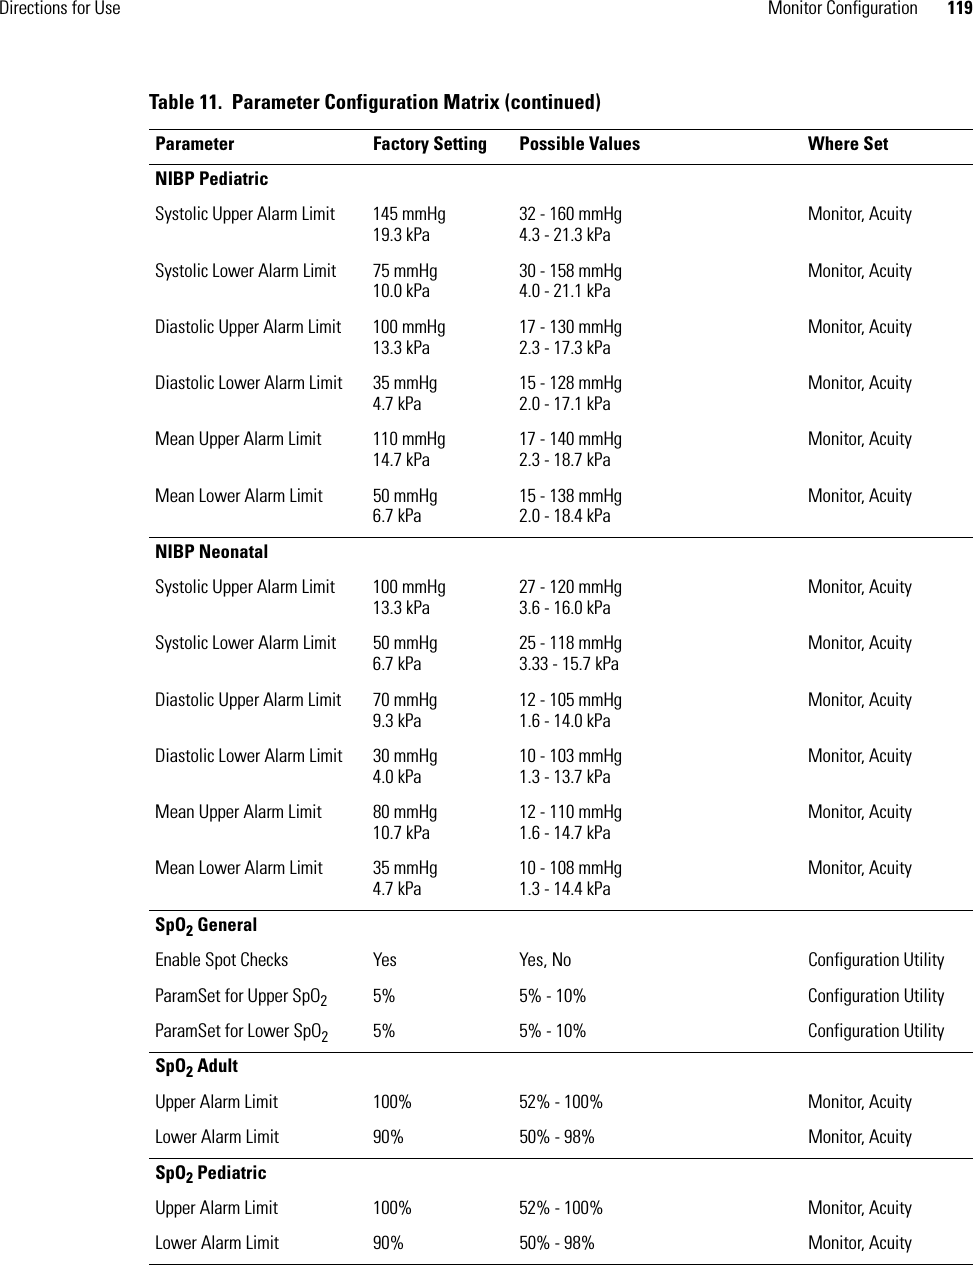
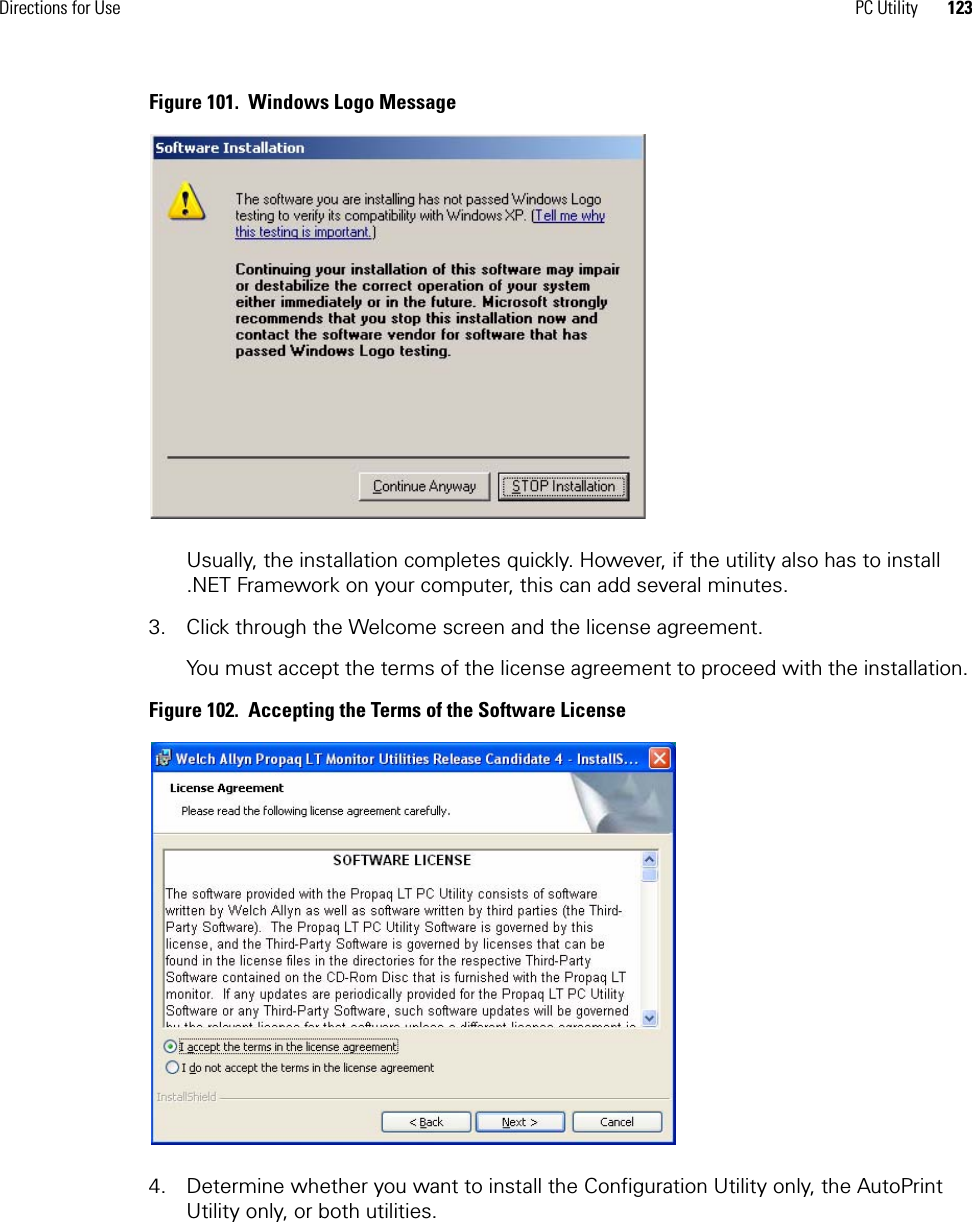
![Directions for Use Monitor Configuration 115User InterfaceConfiguration Name Factory 1.00 0 - 40 characters Configuration UtilityFacility Name [blank] 0 - 40 characters Configuration UtilityContact Name [blank] 0 - 40 characters Configuration UtilityUnit/Department ID [blank] 0 - 40 characters Configuration UtilityContact Telephone [blank] 0 - 40 characters Configuration UtilityTime Format 24-Hr 12-Hr, 24-Hr Monitor, Configuration UtilityConfigured Language English Dutch, English, French, German, Italian, Polish, Portuguese, Spanish, SwedishMonitor, Acuity, Configuration UtilityDecimal Format Dot Comma, Dot Configuration UtilityDate Format MM/DD/YY MM/DD/YY, DD.MM.YY, YY/MM/DD Monitor, Configuration UtilityAlarm/Alert Tone Level Medium Low, Medium, High Monitor, Configuration Utility, AcuityHR/Pulse Tone Level Medium Off, Low, Medium, High Monitor, Configuration UtilityNIBP Units mmHg mmHg, kPa Monitor, Configuration UtilityAudible Alarm Suspension Time4 min Disable, 90 sec, 2 min, 3 min, 4 min, 5 min, 10 min, 15 min, 30 min, 60 min, Always OnMonitor, Configuration UtilityPacer Indicator On No Yes, No Monitor, Configuration UtilityButtons Lock-Out Enabled Yes Yes, No Configuration Utility, AcuityDisplay Lock-Out Enabled Yes Yes, No Configuration UtilityBack Light Lock-Out Enabled Yes Yes, No Configuration UtilityBack Light Time-Out 2 min Always Off, 2 min, 5 min, 10 min, 15 min, 30 min, Always OnMonitor, Configuration UtilityDisplay Time-Out Always On 2 min, 5 min, 10 min, 15 min, 30 min, Always OnMonitor, Configuration UtilityAdult NIBP Mean Numerics Small Small, Large, Off Monitor, Configuration UtilityPediatric NIBP Mean NumericsSmall Small, Large, Off Monitor, Configuration UtilityNeonatal NIBP Mean NumericsLarge Small, Large, Off Monitor, Configuration UtilityTable 11. Parameter Configuration Matrix (continued)Parameter Factory Setting Possible Values Where Set](https://usermanual.wiki/Welch-Allyn/FN802FH.Users-Manual-part-9-of-10/User-Guide-611436-Page-5.png)

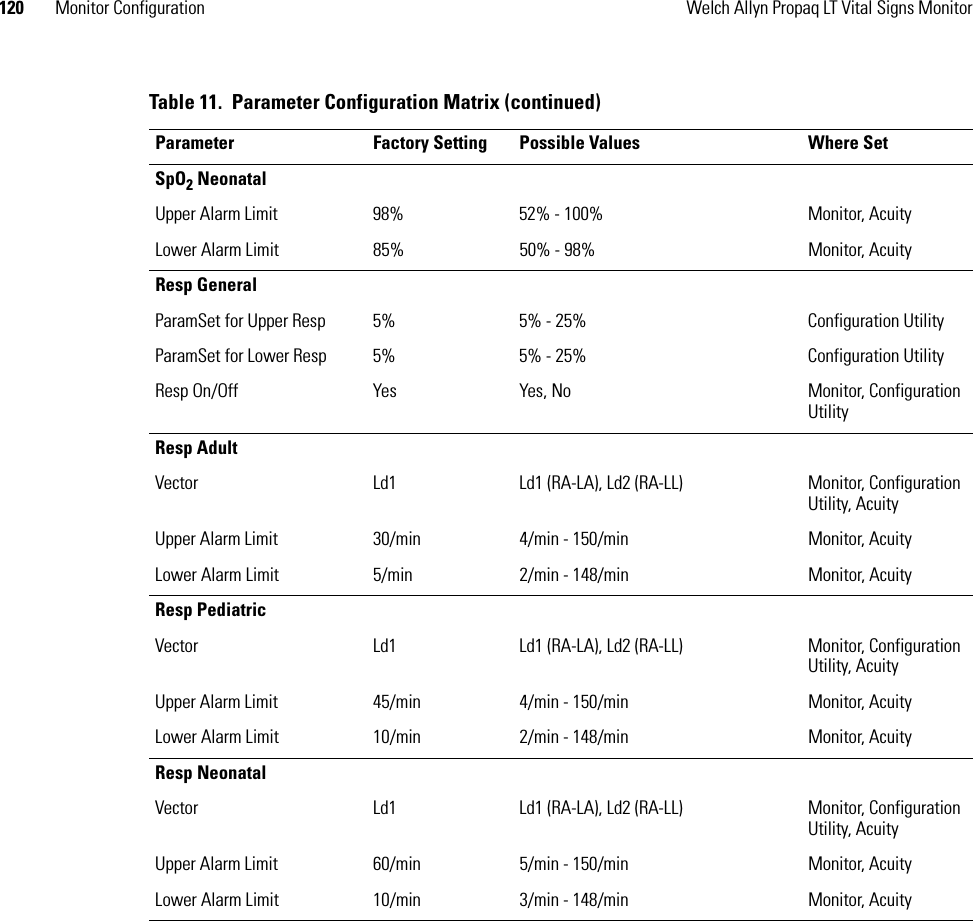


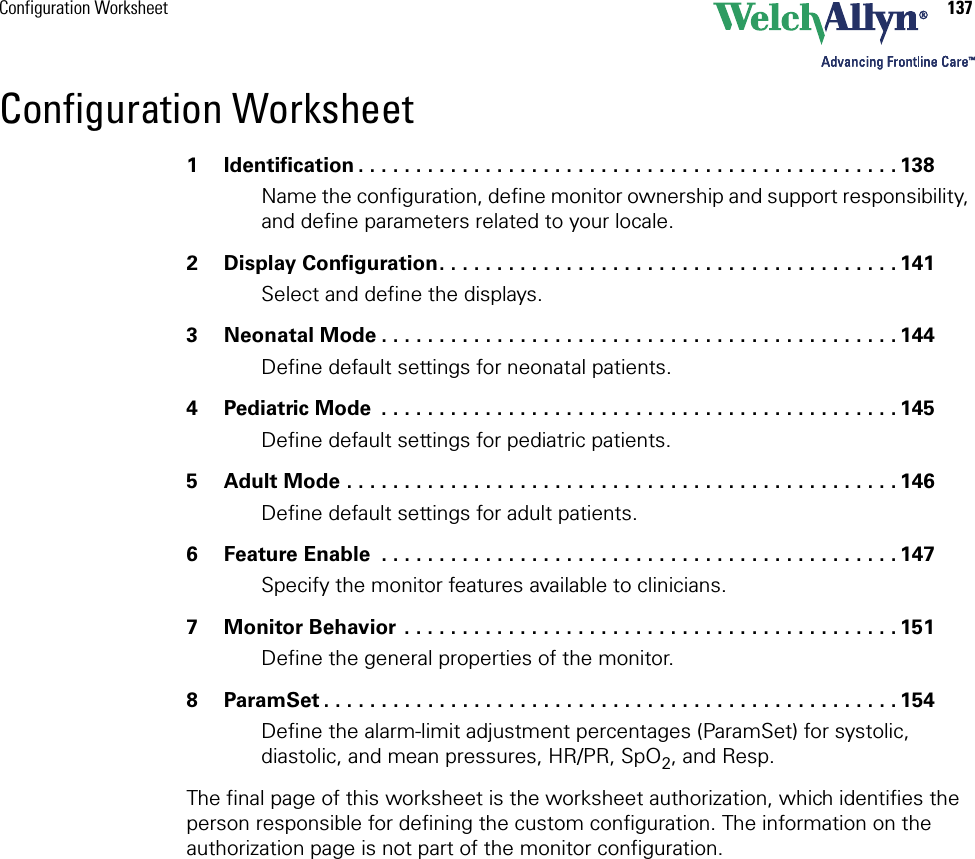
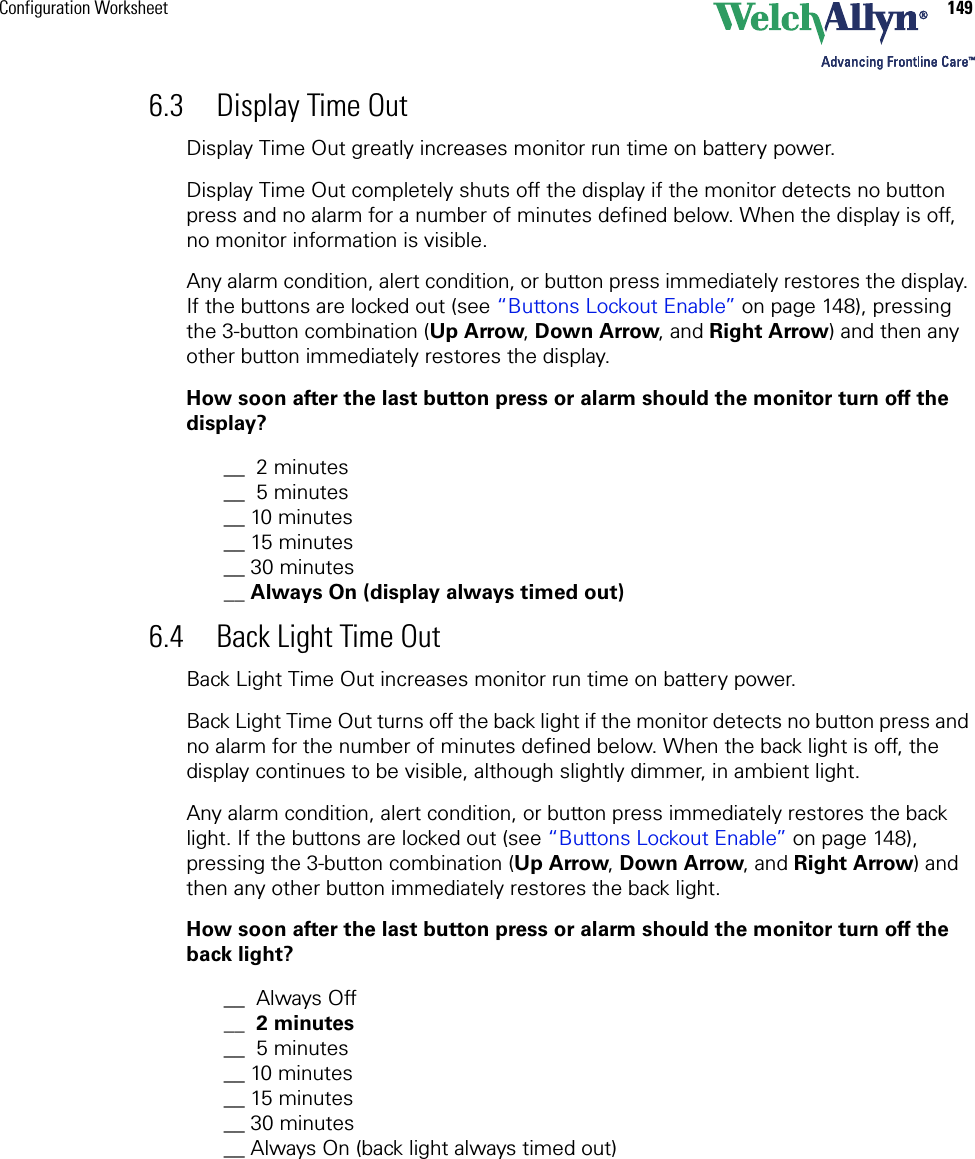
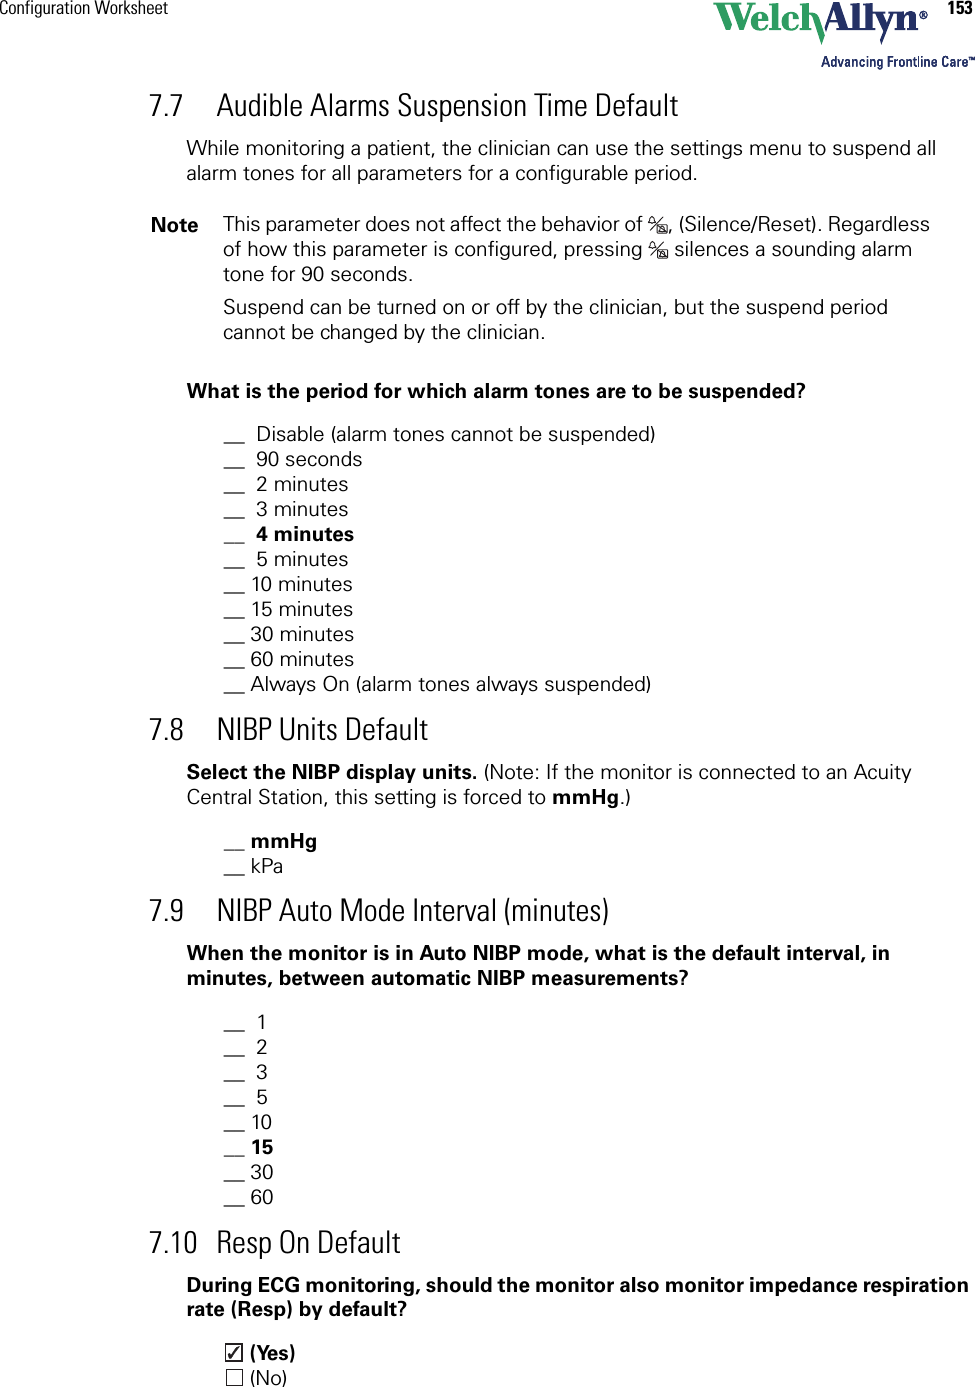
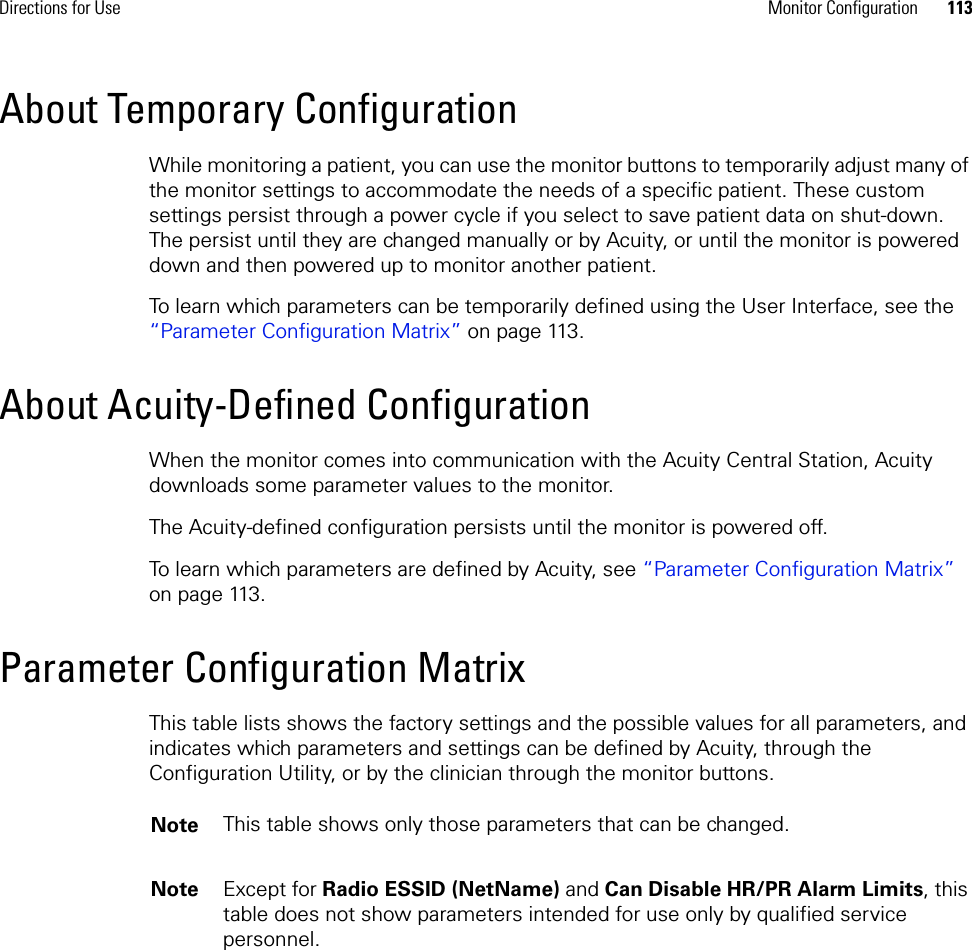
![134 PC Utility Welch Allyn Propaq LT Vital Signs MonitorFigure 119. Selecting No (No Check Mark)To view the settings for a topic, click the tab for that topic. For example, to see the Default Resp Lead setting for adults, click Adult Mode (Figure 120).Figure 120. Settings Under Adult ModeError Messages• Communication with the monitor failed. Verify that the monitor is powered on and properly seated in the cradle. Verify that the cable is connected.• Could not read patient data from the monitor. Please contact Welch Allyn customer service.• The configuration file did not install on the monitor. Verify all connections between monitor, cradle, and PC and try again. If problems continue, contact Welch Allyn customer service.• Configuration file format is invalid. Try editing the configuration and saving it again.• The selected file is read-only and cannot be edited. Please select another file or Save the File with another name.• The Configuration File: [file name] that you are attempting to read is in the wrong format. Please select another file.](https://usermanual.wiki/Welch-Allyn/FN802FH.Users-Manual-part-9-of-10/User-Guide-611436-Page-24.png)