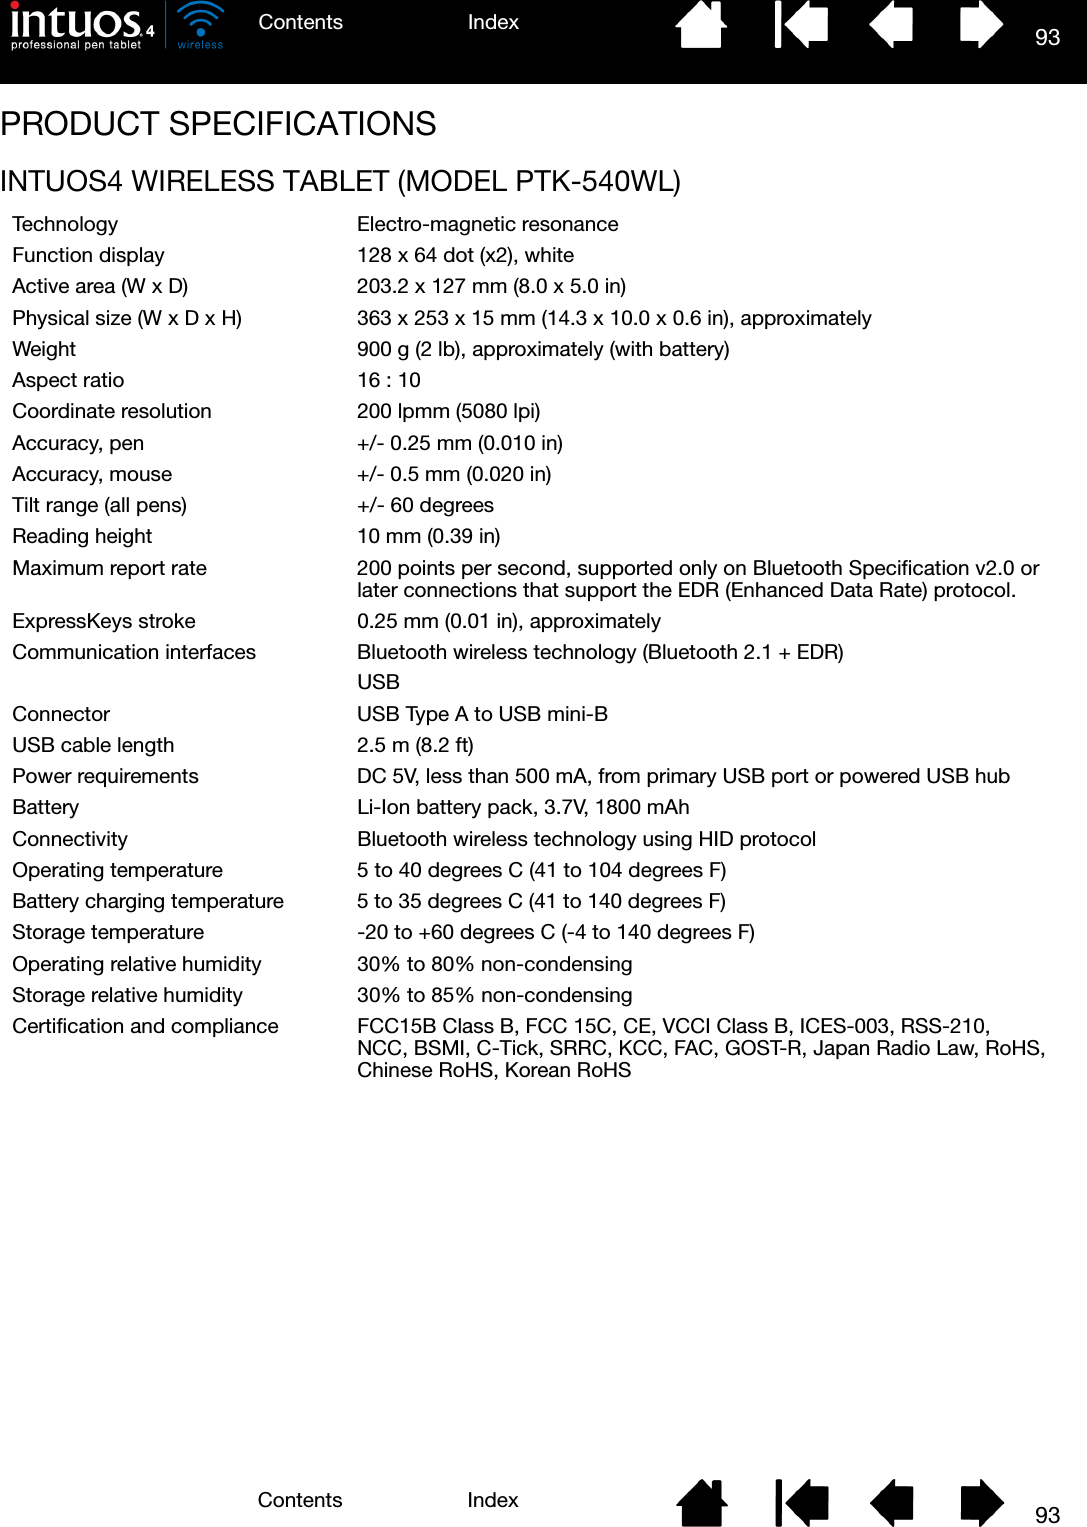
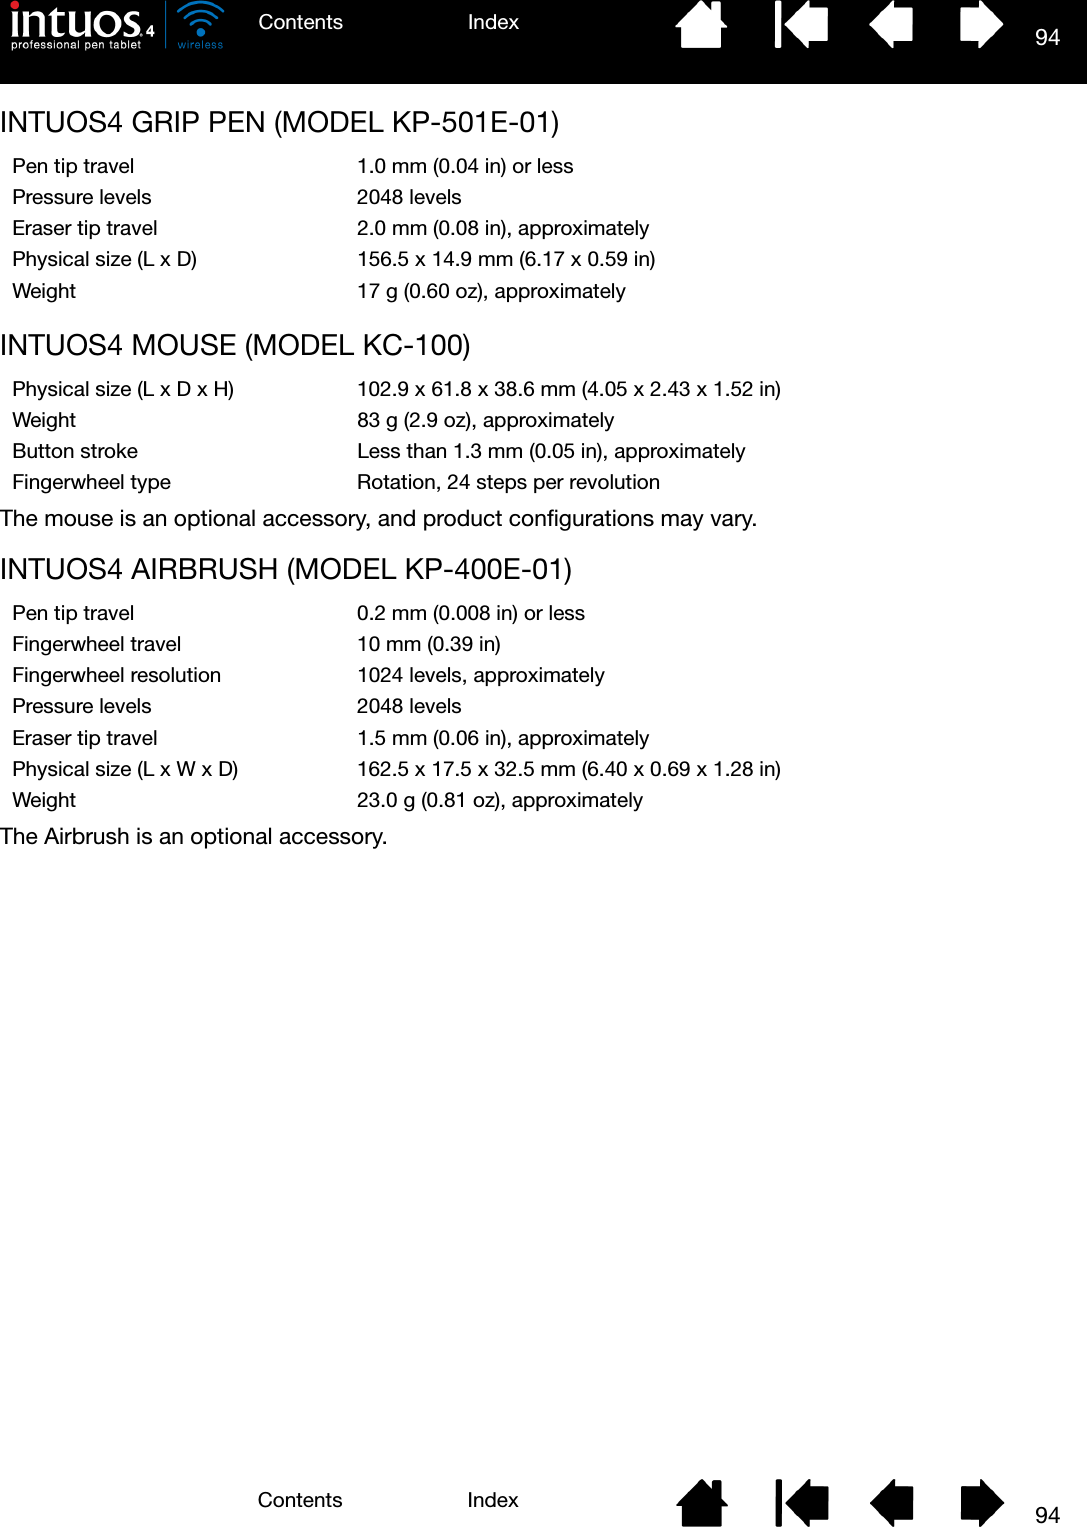
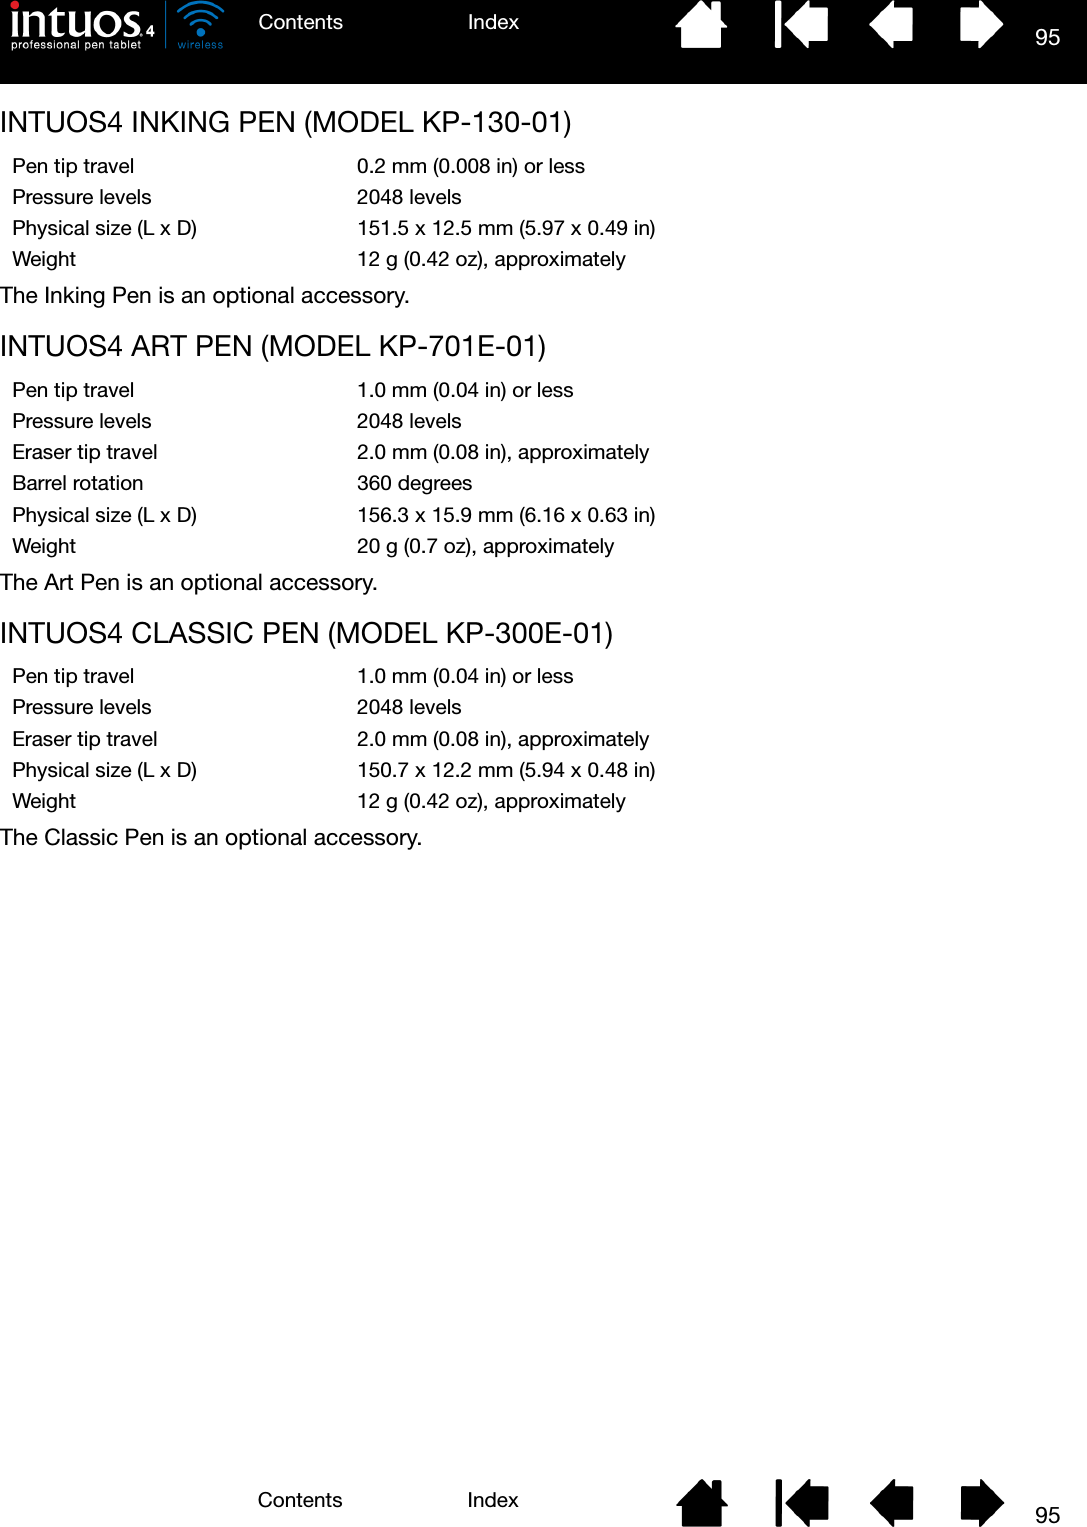
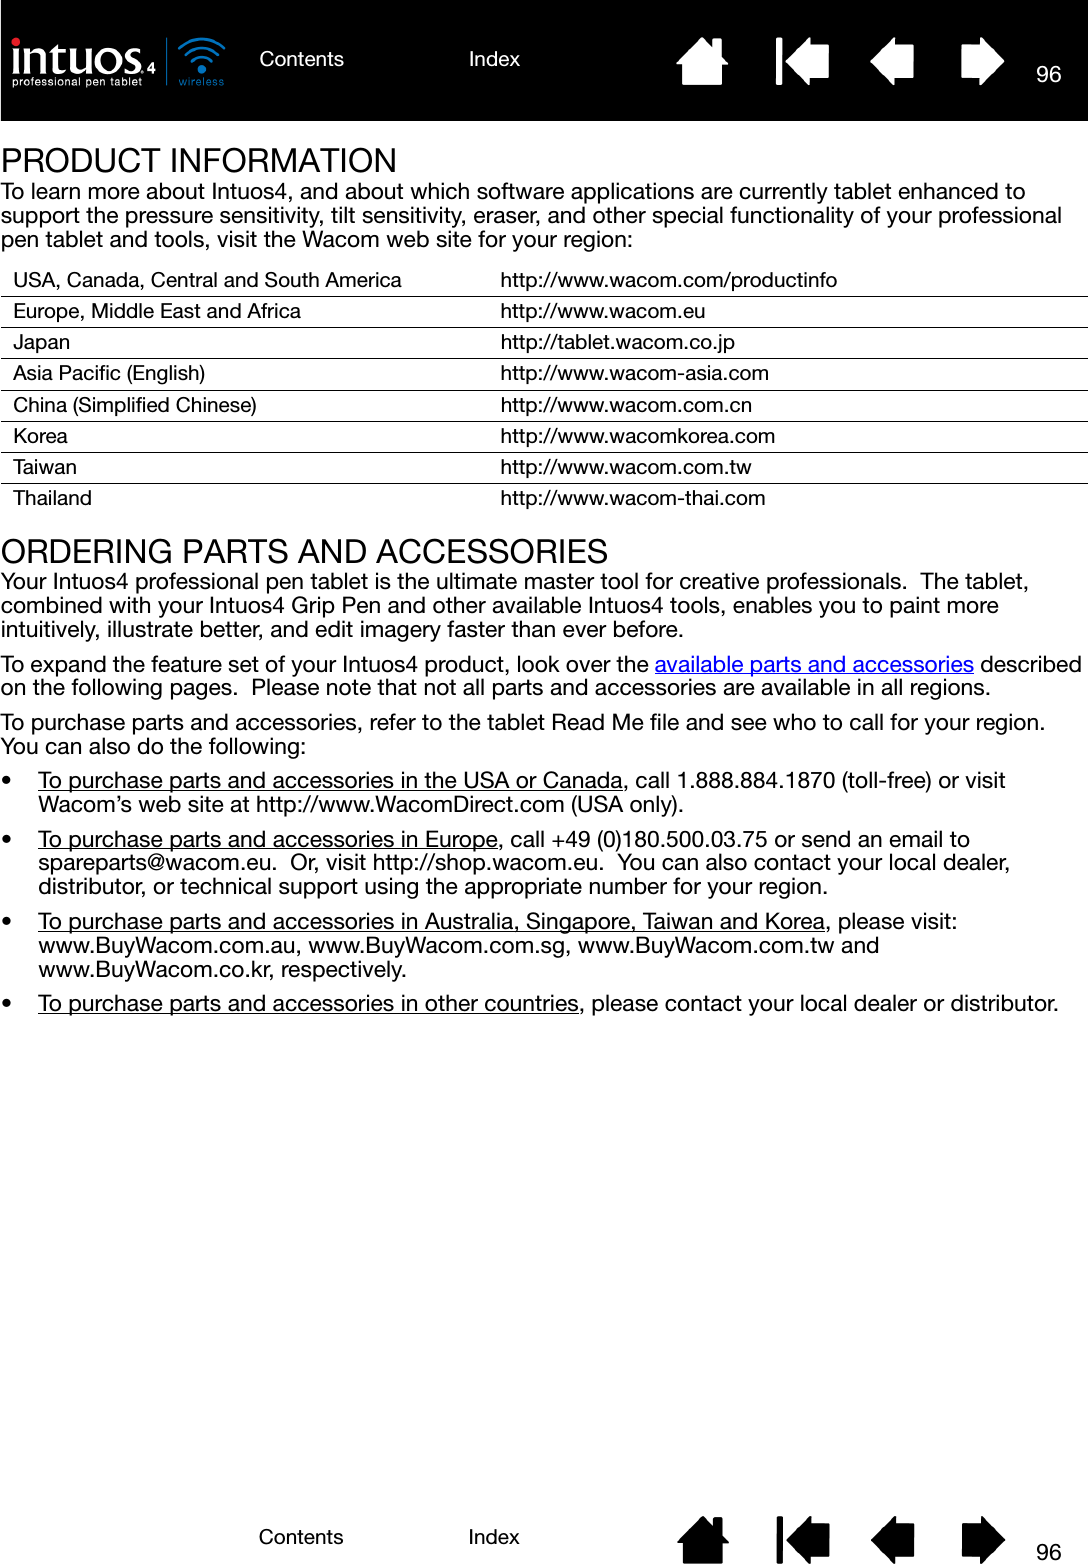
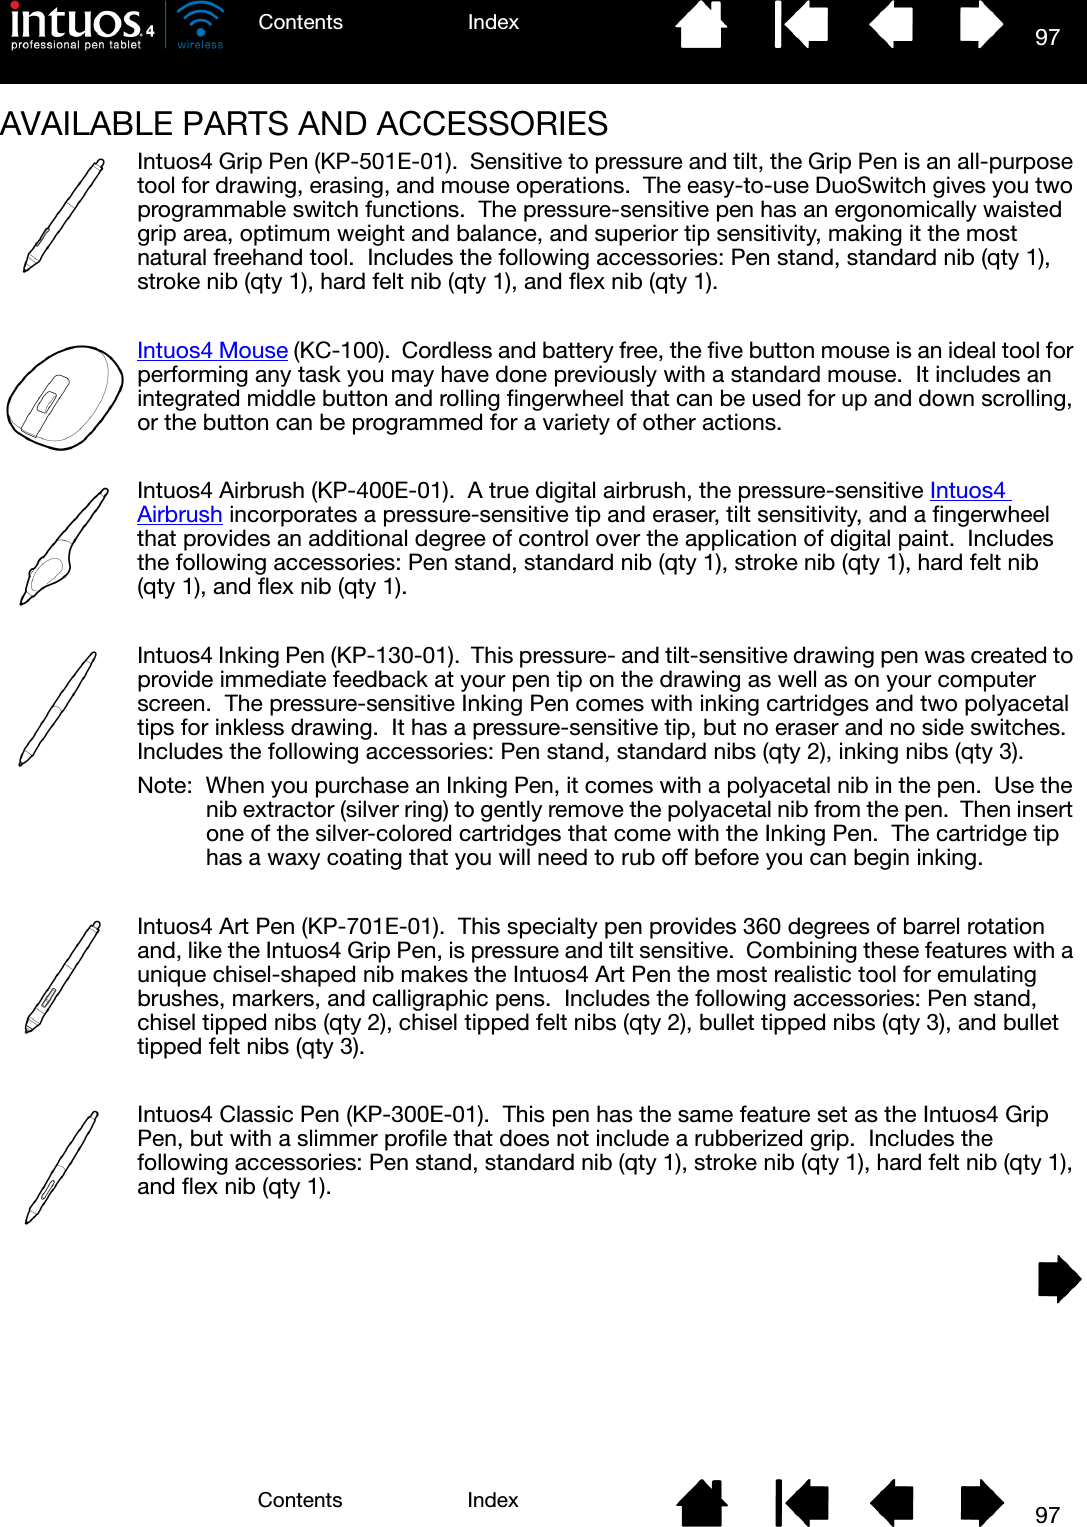
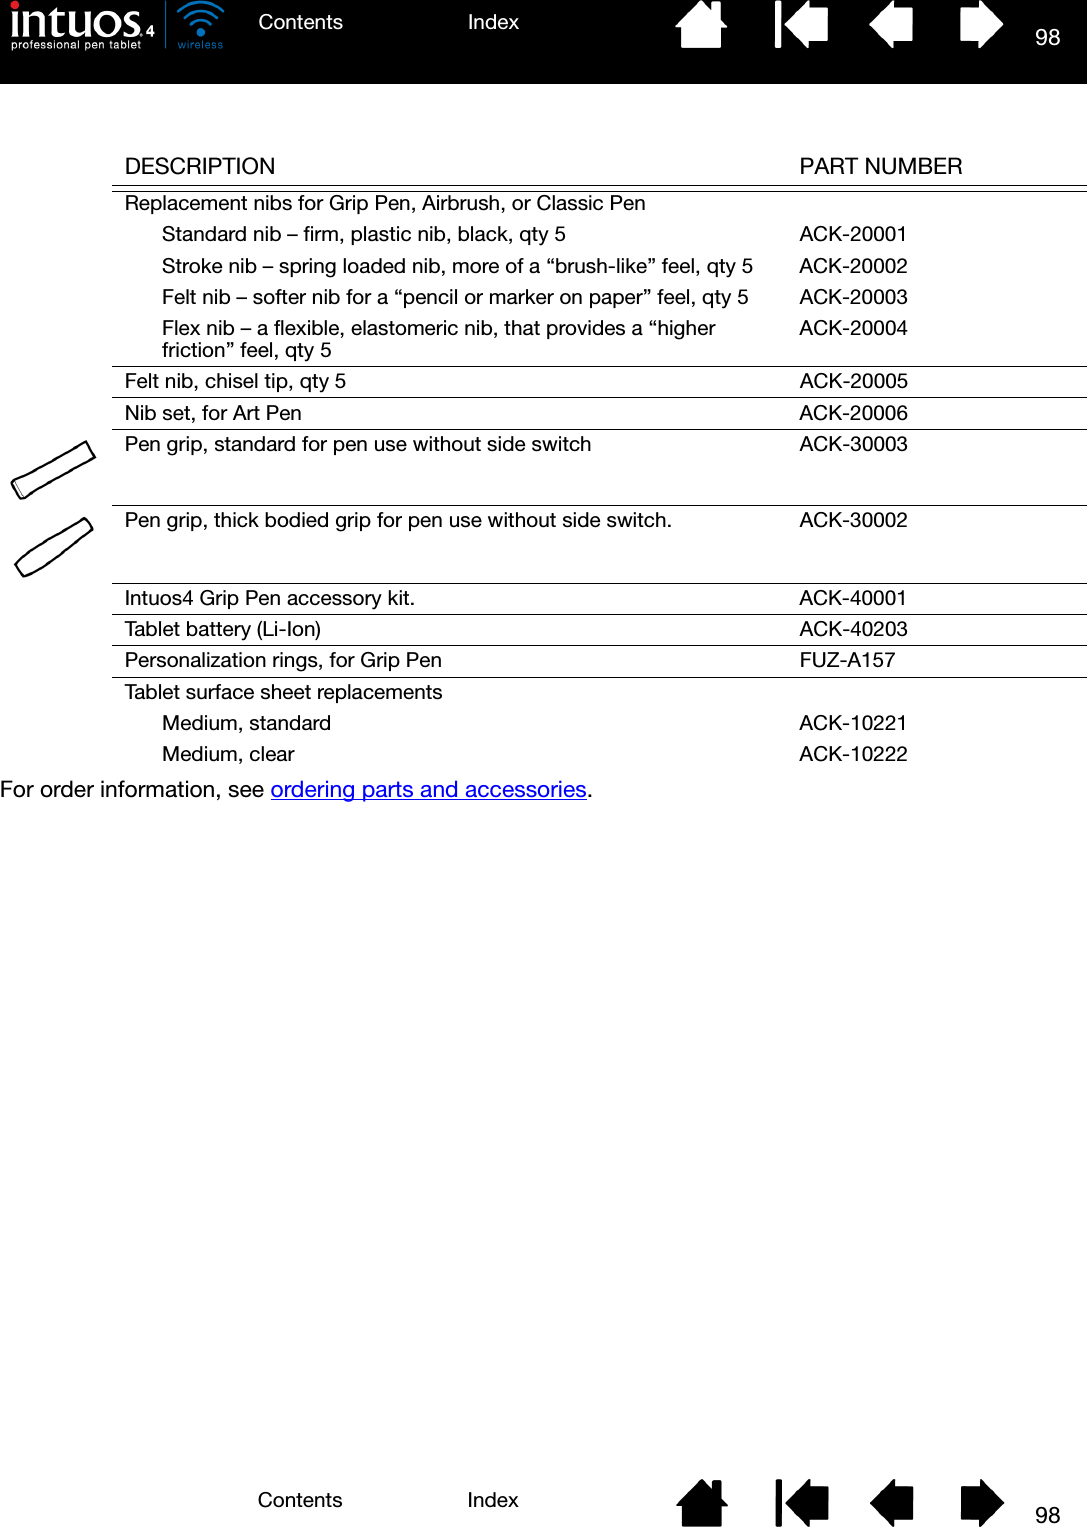
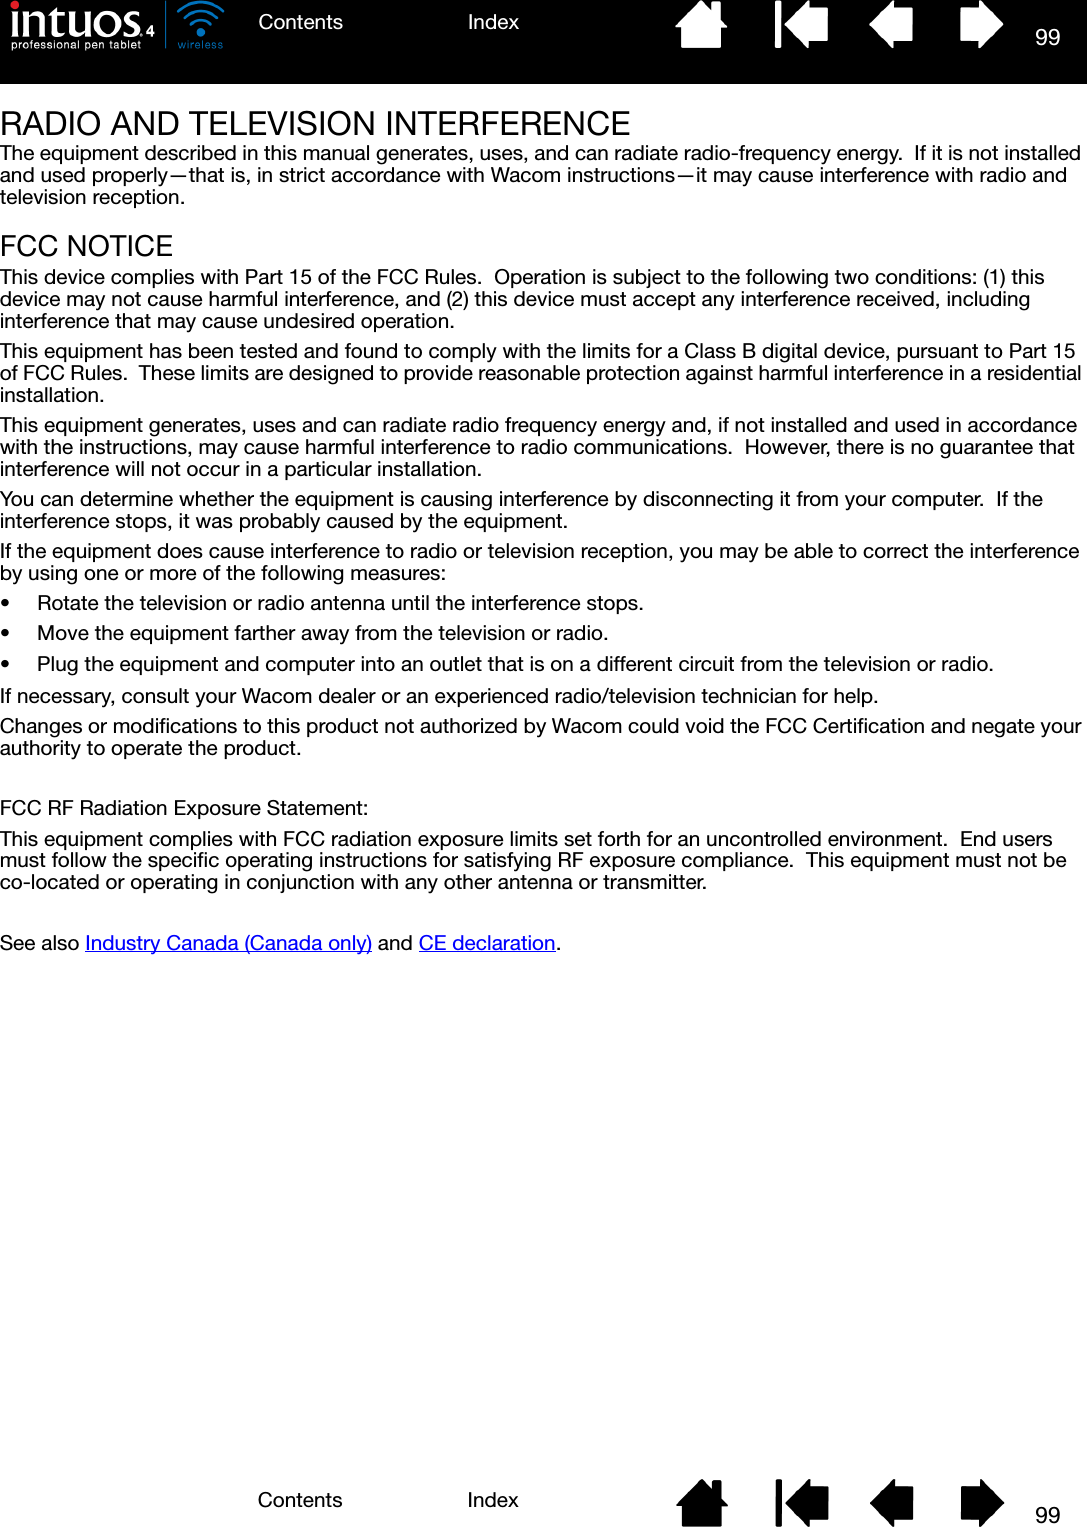
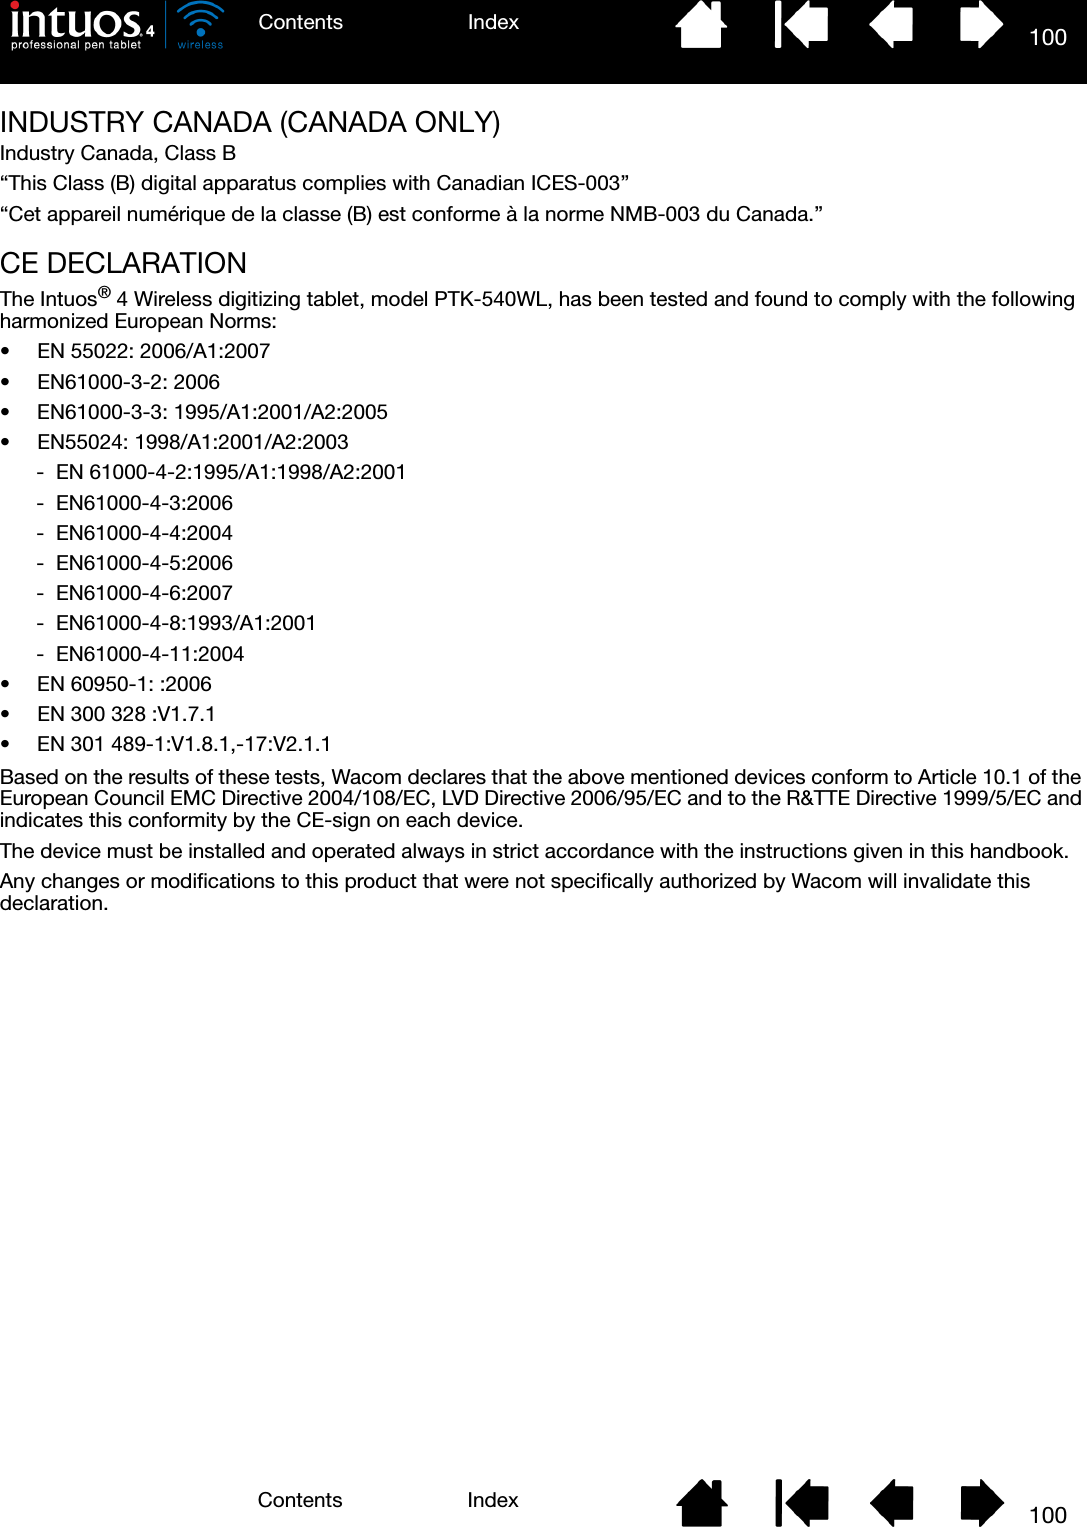
Wacom Co PTKW Digitizer User Manual Intuos4 User s Manual for Windows Macintosh

Wacom Co Ltd Digitizer Intuos4 User s Manual for Windows Macintosh

Contents

Users manual-2

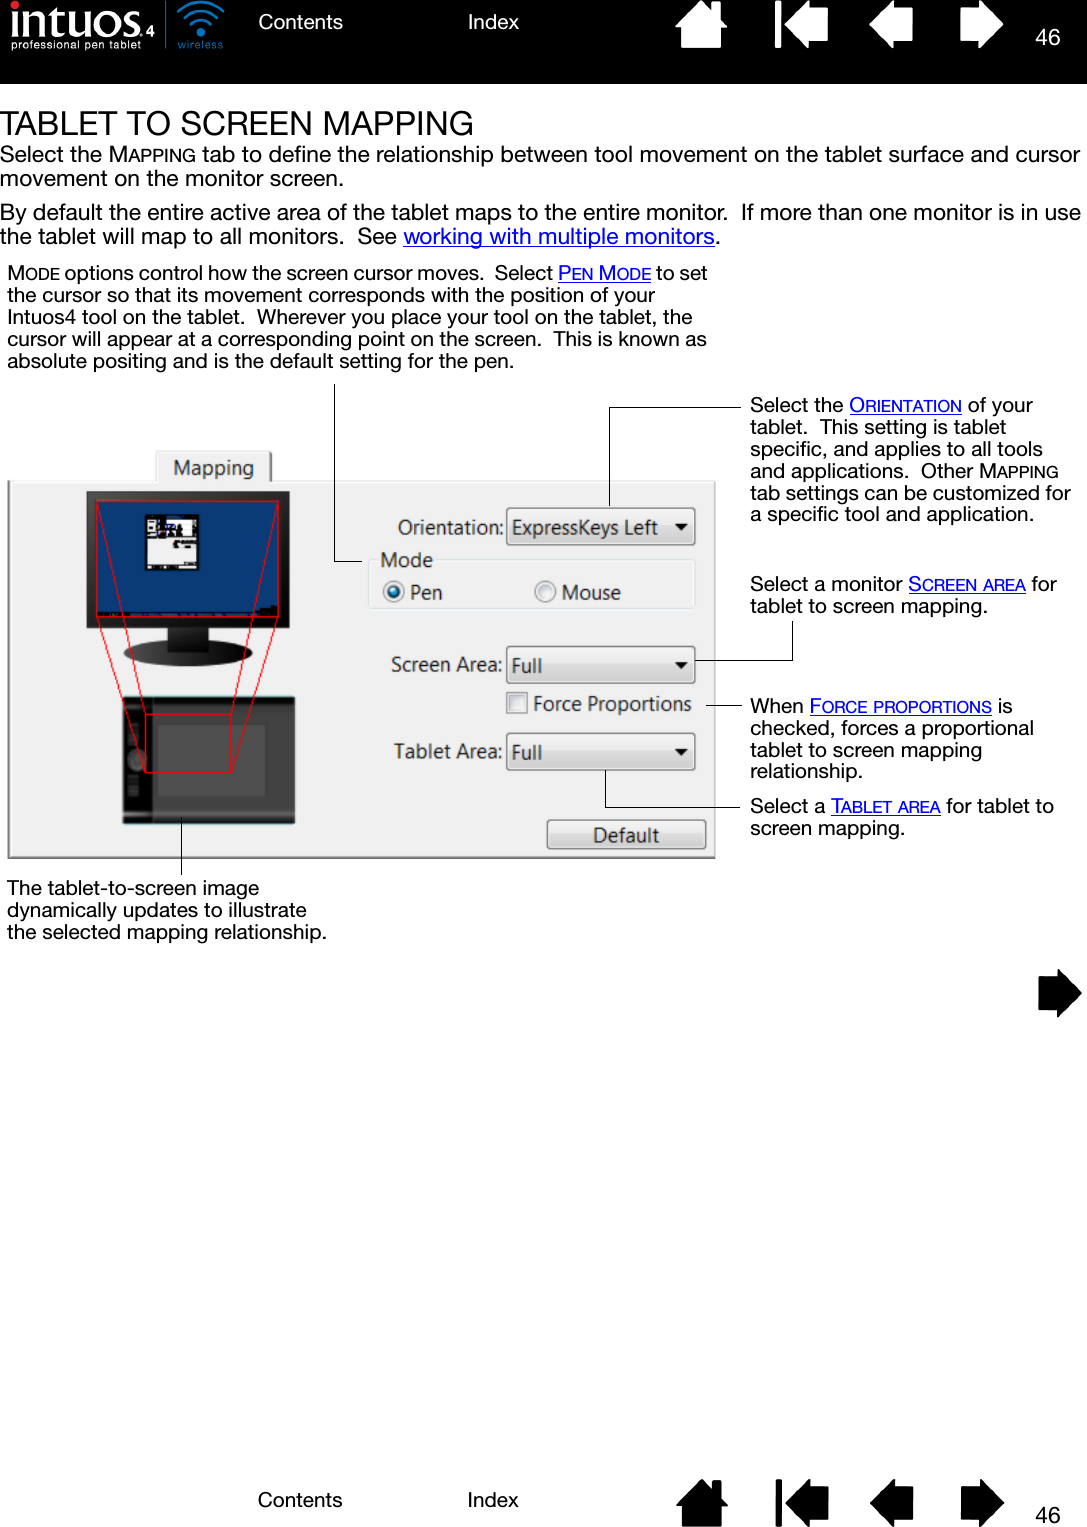
46IndexContents46IndexContentsTABLET TO SCREEN MAPPINGSelect the MAPPING tab to define the relationship between tool movement on the tablet surface and cursor movement on the monitor screen.By default the entire active area of the tablet maps to the entire monitor.  If more than one monitor is in use the tablet will map to all monitors.  See working with multiple monitors. MODE options control how the screen cursor moves.  Select PEN MODE to set the cursor so that its movement corresponds with the position of your Intuos4 tool on the tablet.  Wherever you place your tool on the tablet, the cursor will appear at a corresponding point on the screen.  This is known as absolute positing and is the default setting for the pen.Select the ORIENTATION of your tablet.  This setting is tablet specific, and applies to all tools and applications.  Other MAPPING tab settings can be customized for a specific tool and application.Select a monitor SCREEN AREA for tablet to screen mapping.When FORCE PROPORTIONS is checked, forces a proportional tablet to screen mapping relationship.Select a TABLET AREA for tablet to screen mapping.The tablet-to-screen image dynamically updates to illustrate the selected mapping relationship.
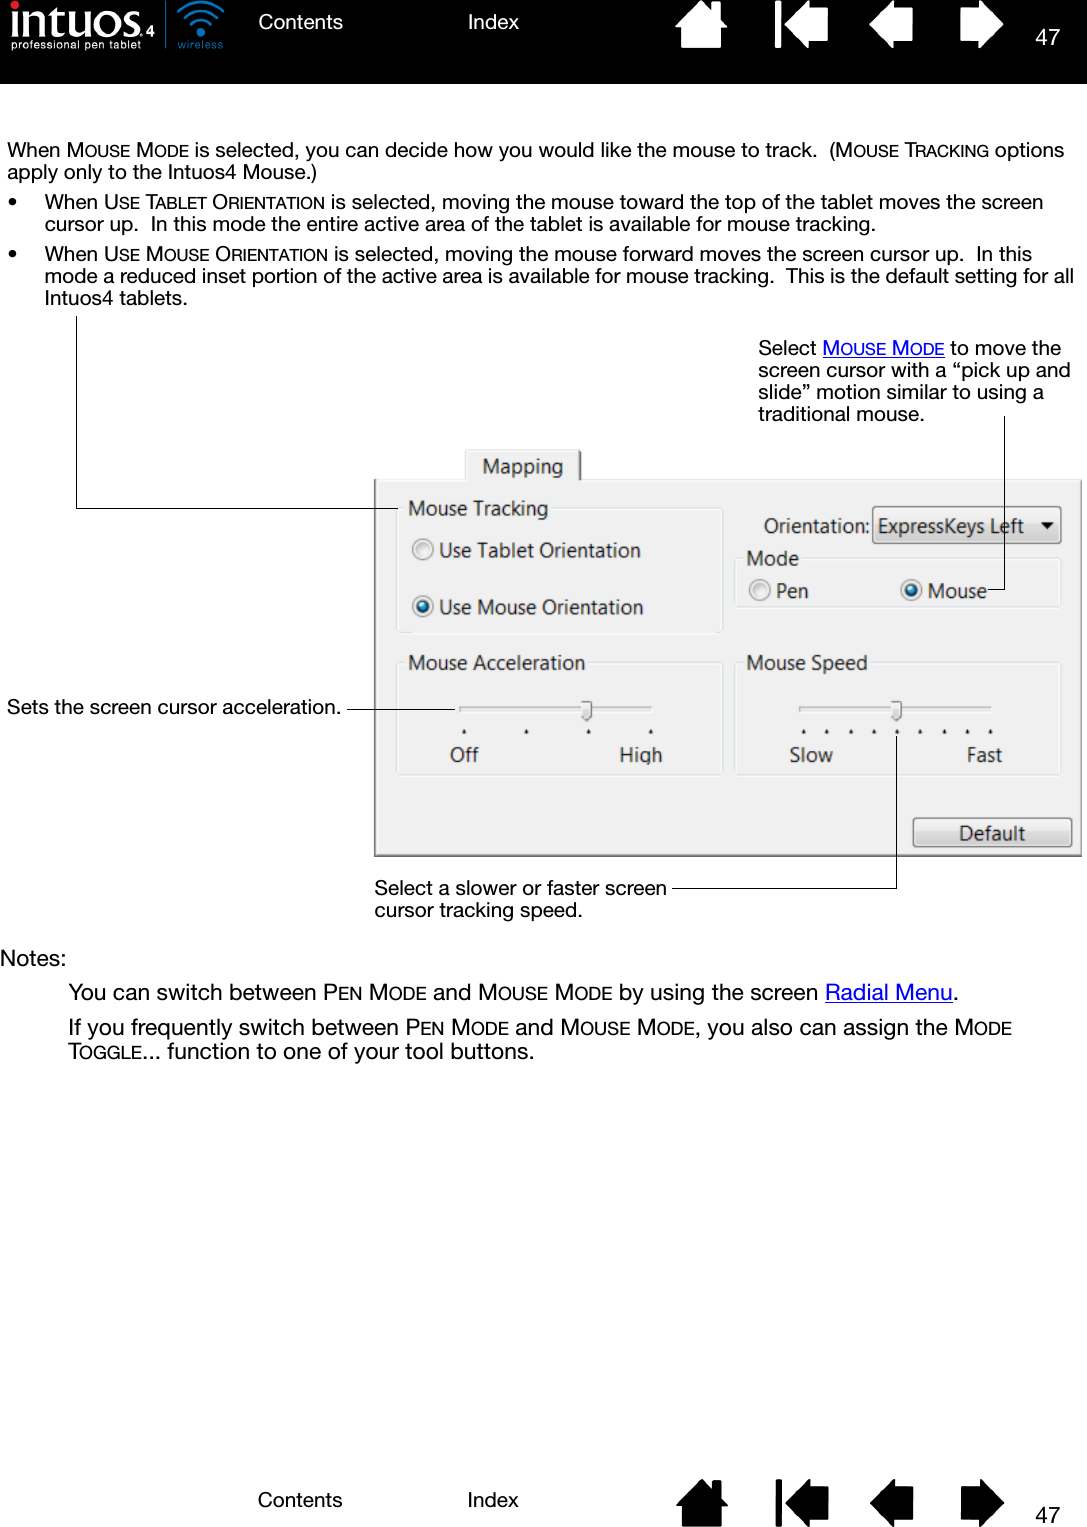
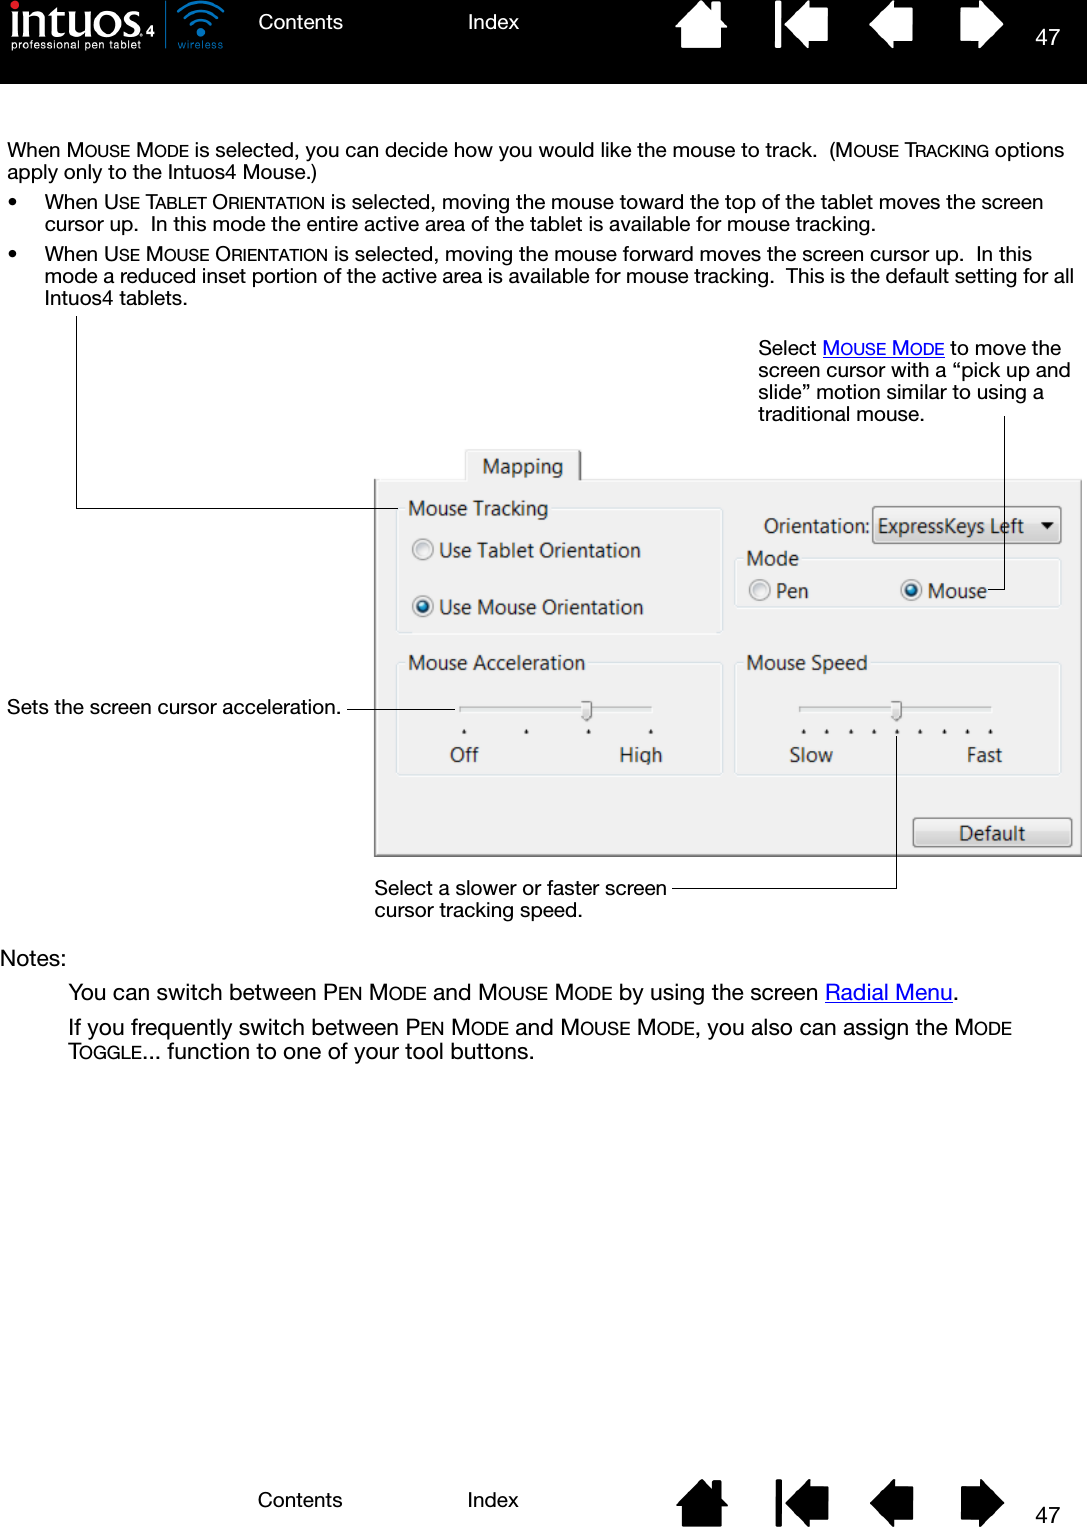
47IndexContents47IndexContentsNotes: You can switch between PEN MODE and MOUSE MODE by using the screen Radial Menu.If you frequently switch between PEN MODE and MOUSE MODE, you also can assign the MODE TOGGLE... function to one of your tool buttons.When MOUSE MODE is selected, you can decide how you would like the mouse to track.  (MOUSE TRACKING options apply only to the Intuos4 Mouse.)• When USE TABLET ORIENTATION is selected, moving the mouse toward the top of the tablet moves the screen cursor up.  In this mode the entire active area of the tablet is available for mouse tracking.• When USE MOUSE ORIENTATION is selected, moving the mouse forward moves the screen cursor up.  In this mode a reduced inset portion of the active area is available for mouse tracking.  This is the default setting for all Intuos4 tablets.Select MOUSE MODE to move the screen cursor with a “pick up and slide” motion similar to using a traditional mouse.Sets the screen cursor acceleration.Select a slower or faster screen cursor tracking speed.
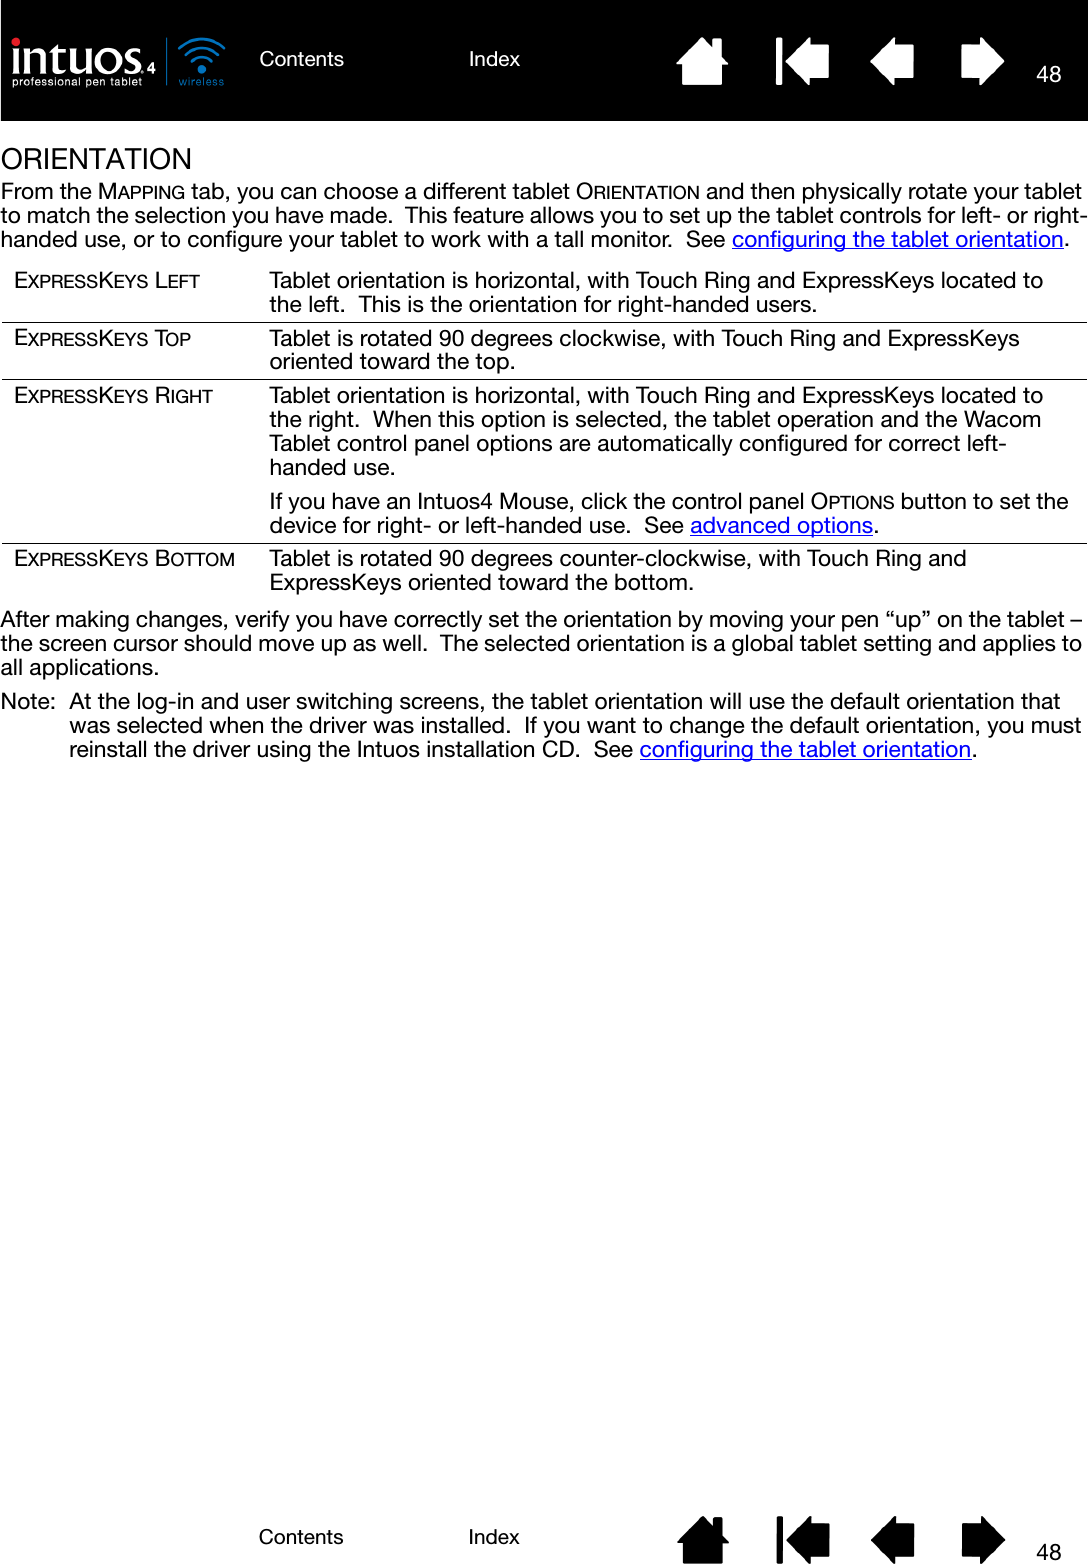
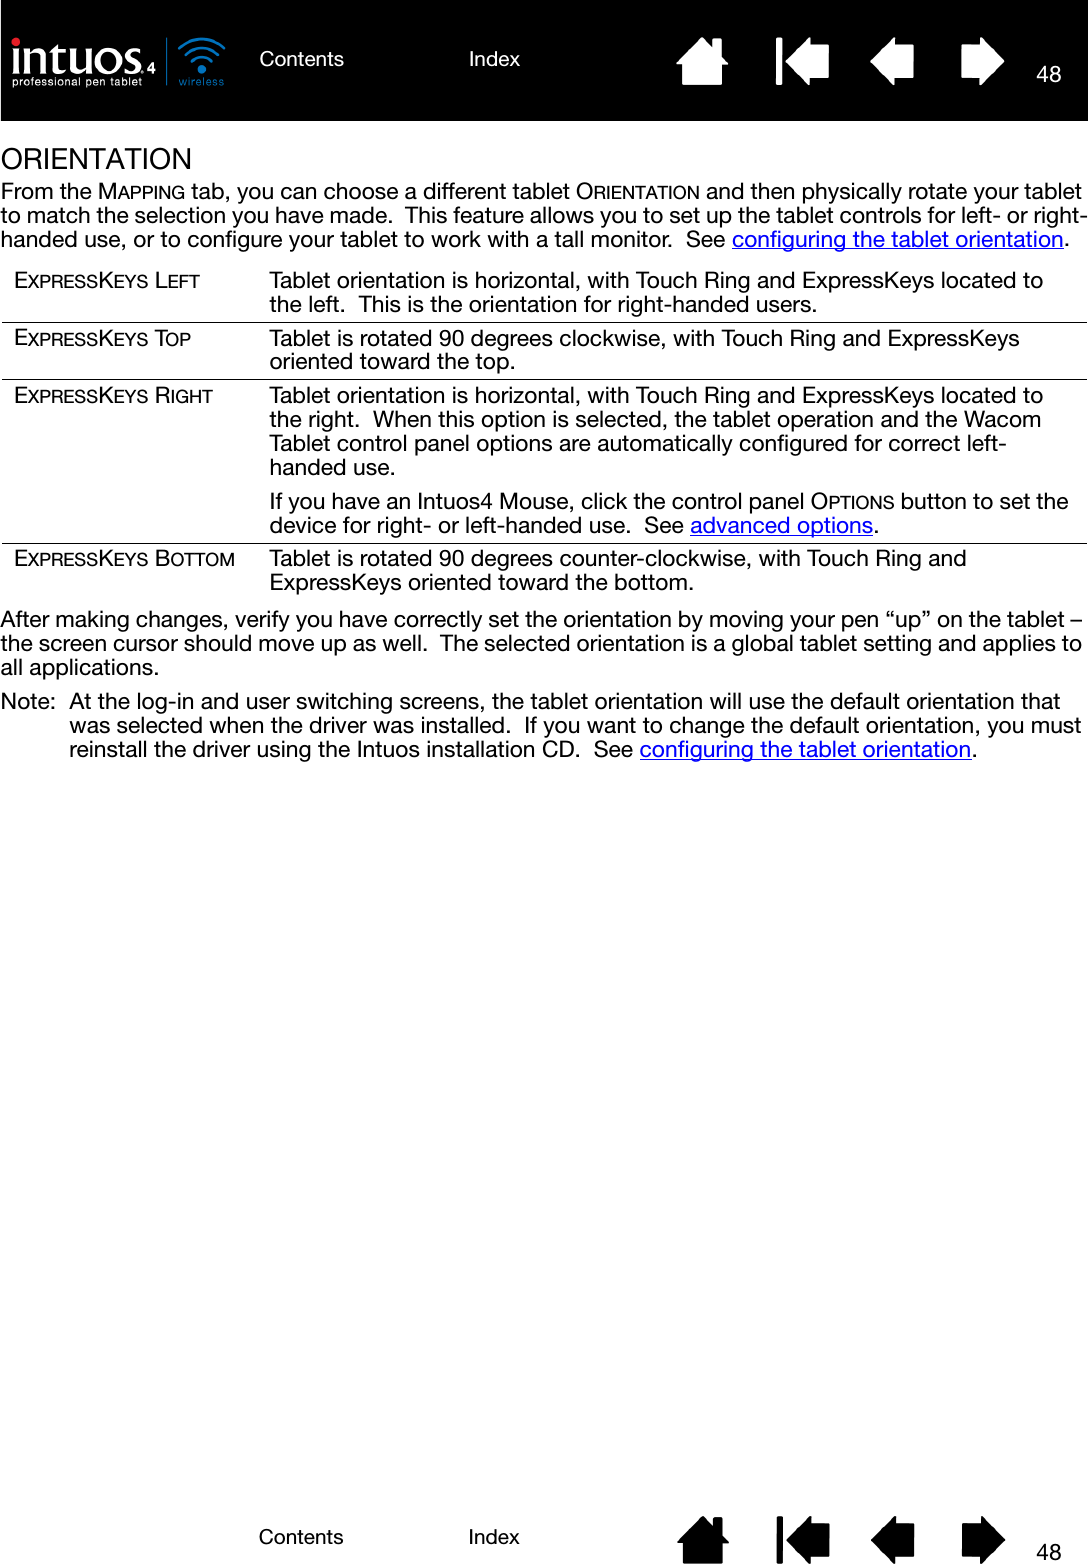
48IndexContents48IndexContentsORIENTATIONFrom the MAPPING tab, you can choose a different tablet ORIENTATION and then physically rotate your tablet to match the selection you have made.  This feature allows you to set up the tablet controls for left- or right-handed use, or to configure your tablet to work with a tall monitor.  See configuring the tablet orientation.After making changes, verify you have correctly set the orientation by moving your pen “up” on the tablet – the screen cursor should move up as well.  The selected orientation is a global tablet setting and applies to all applications.Note: At the log-in and user switching screens, the tablet orientation will use the default orientation that was selected when the driver was installed.  If you want to change the default orientation, you must reinstall the driver using the Intuos installation CD.  See configuring the tablet orientation.EXPRESSKEYS LEFT Tablet orientation is horizontal, with Touch Ring and ExpressKeys located to the left.  This is the orientation for right-handed users.EXPRESSKEYS TOP Tablet is rotated 90 degrees clockwise, with Touch Ring and ExpressKeys oriented toward the top.EXPRESSKEYS RIGHT Tablet orientation is horizontal, with Touch Ring and ExpressKeys located to the right.  When this option is selected, the tablet operation and the Wacom Tablet control panel options are automatically configured for correct left-handed use.If you have an Intuos4 Mouse, click the control panel OPTIONS button to set the device for right- or left-handed use.  See advanced options.EXPRESSKEYS BOTTOM Tablet is rotated 90 degrees counter-clockwise, with Touch Ring and ExpressKeys oriented toward the bottom.
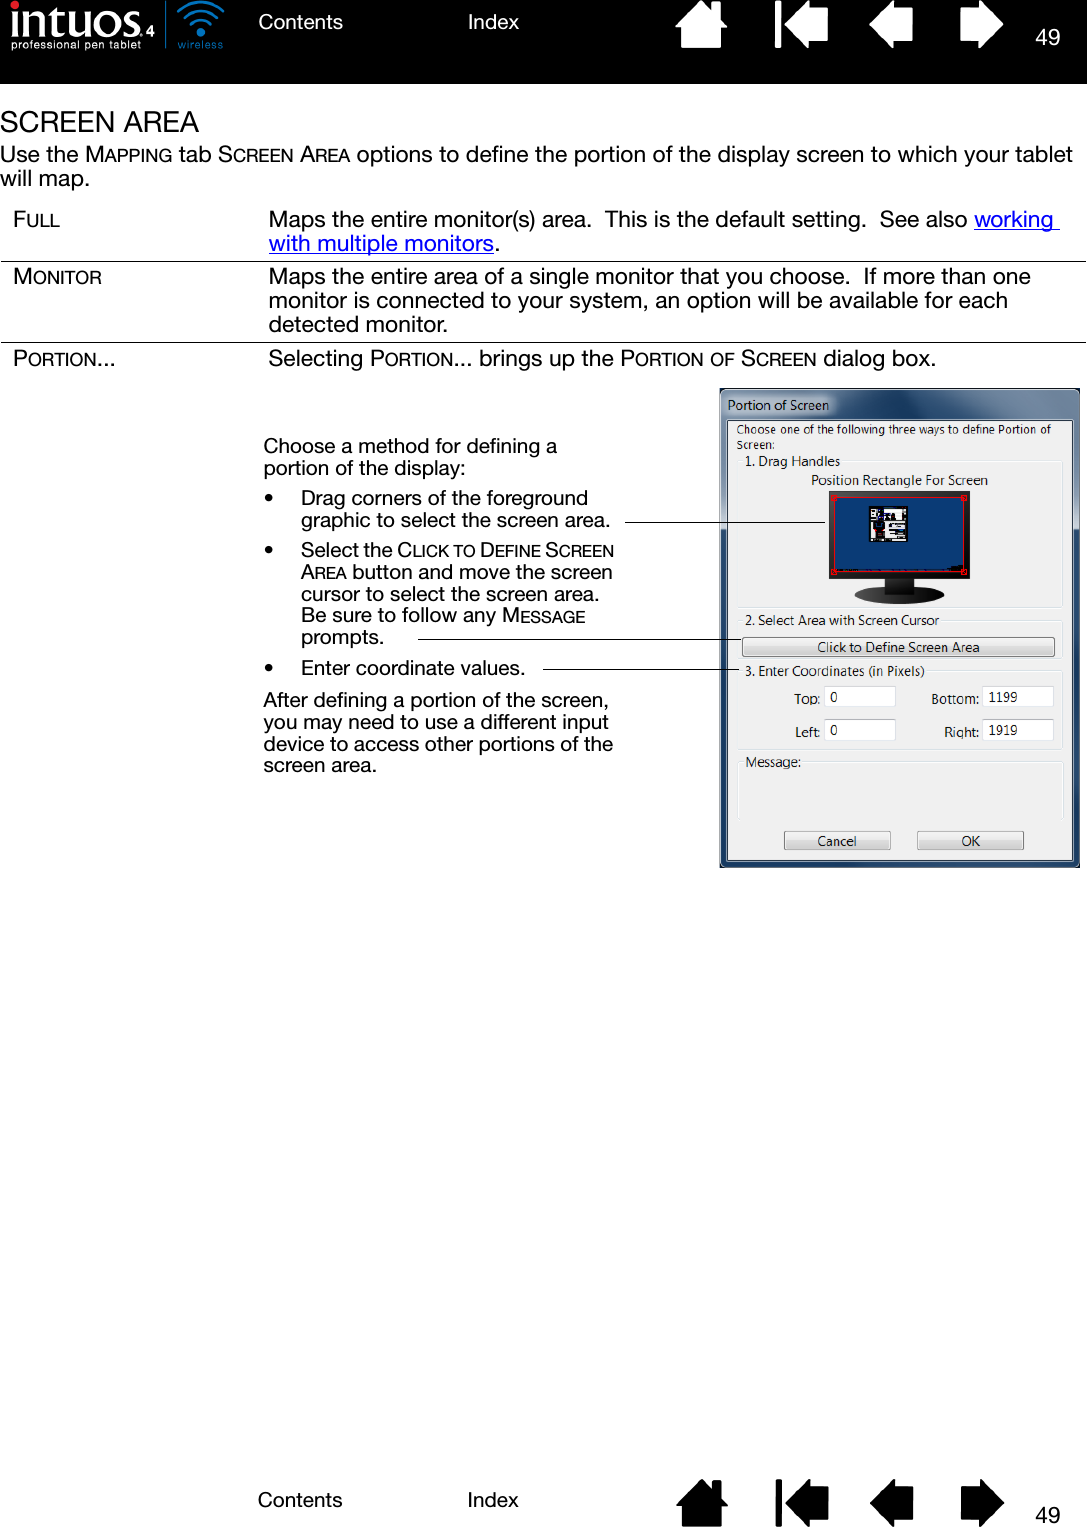
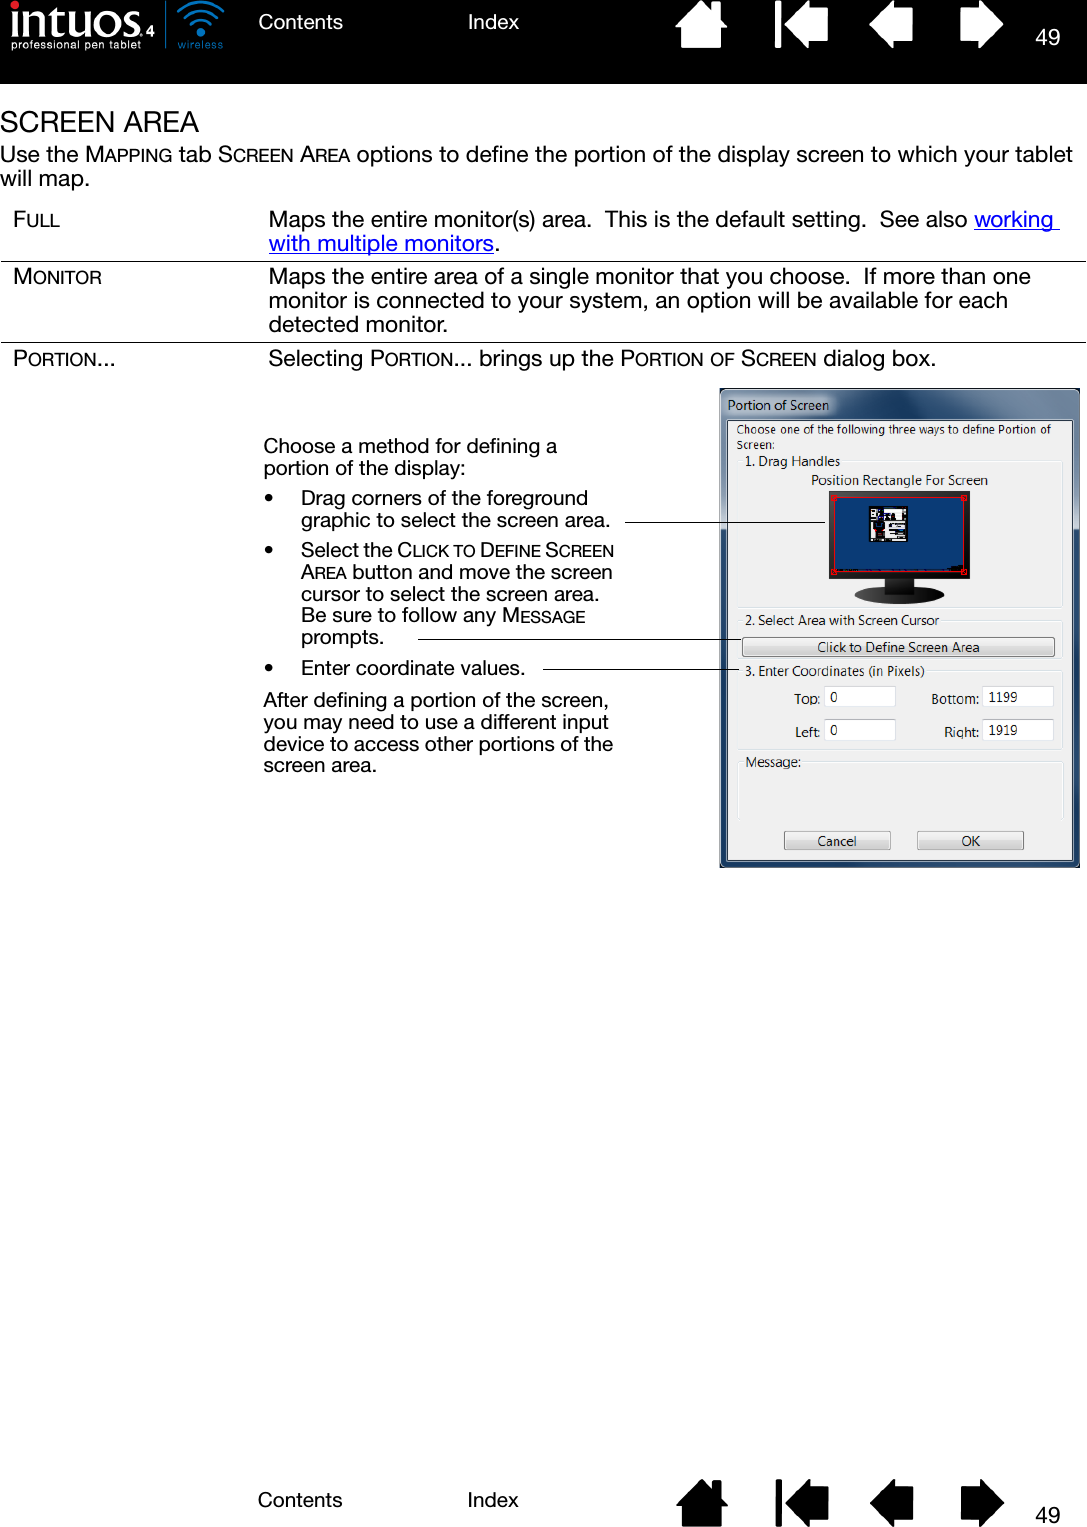
49IndexContents49IndexContentsSCREEN AREAUse the MAPPING tab SCREEN AREA options to define the portion of the display screen to which your tablet will map.FULL Maps the entire monitor(s) area.  This is the default setting.  See also working with multiple monitors.MONITOR Maps the entire area of a single monitor that you choose.  If more than one monitor is connected to your system, an option will be available for each detected monitor.PORTION... Selecting PORTION... brings up the PORTION OF SCREEN dialog box.Choose a method for defining a portion of the display:• Drag corners of the foreground graphic to select the screen area.• Select the CLICK TO DEFINE SCREEN AREA button and move the screen cursor to select the screen area.  Be sure to follow any MESSAGE prompts.• Enter coordinate values.After defining a portion of the screen, you may need to use a different input device to access other portions of the screen area.
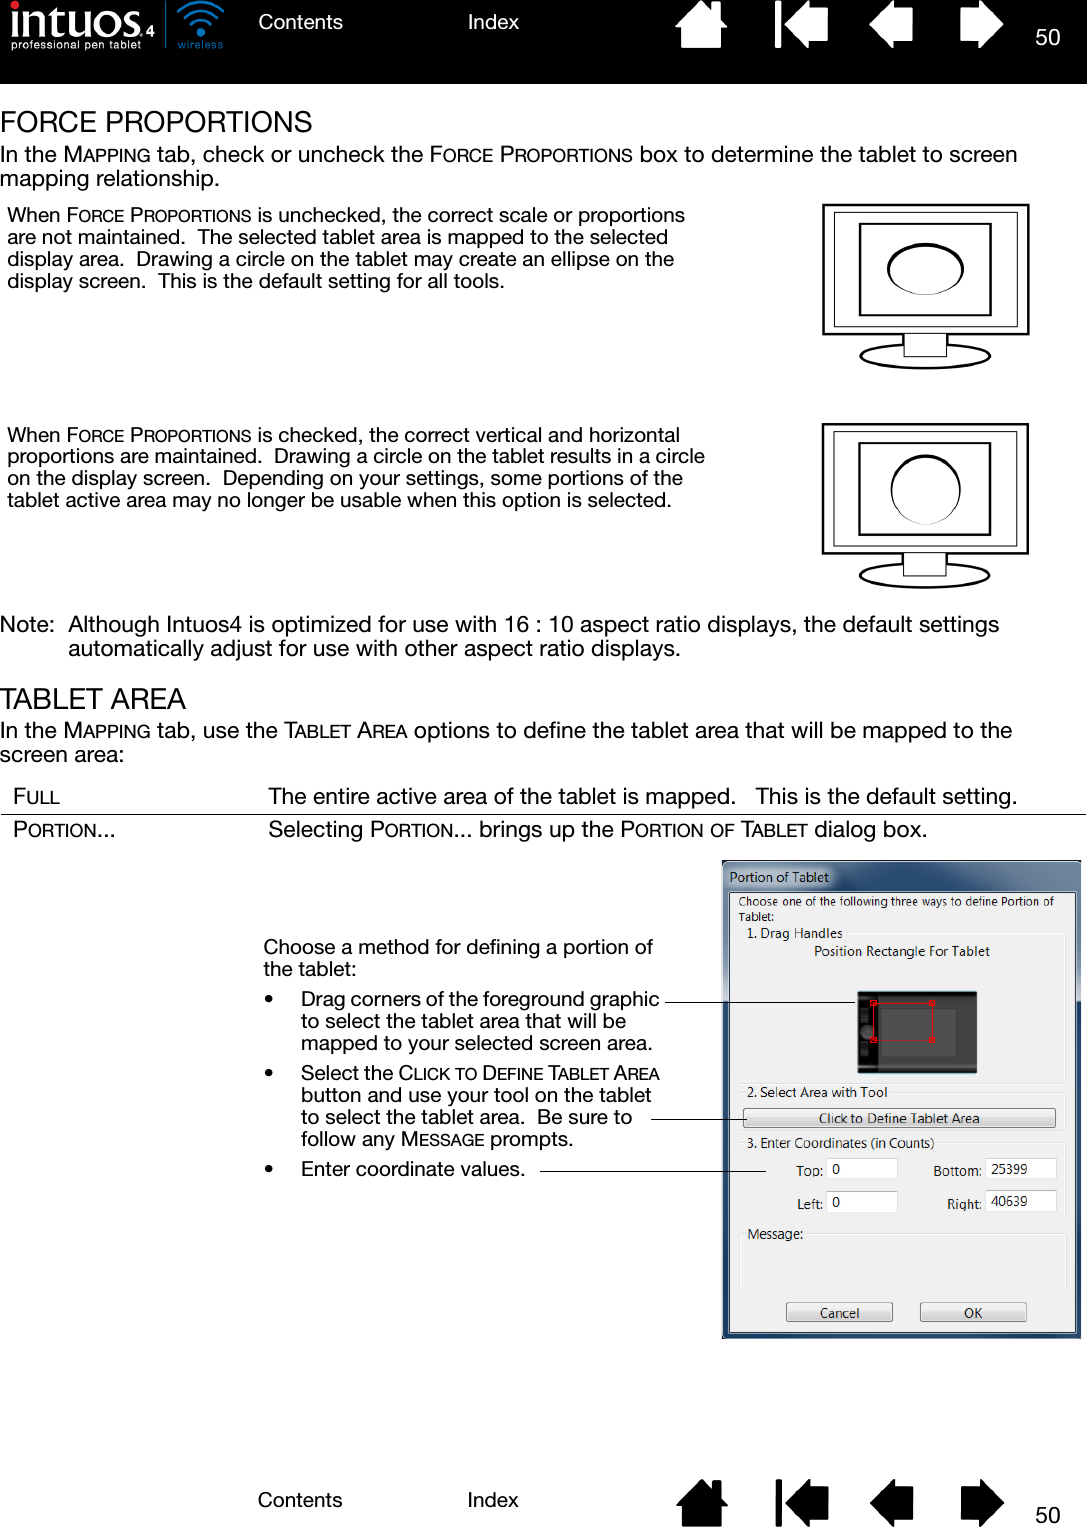
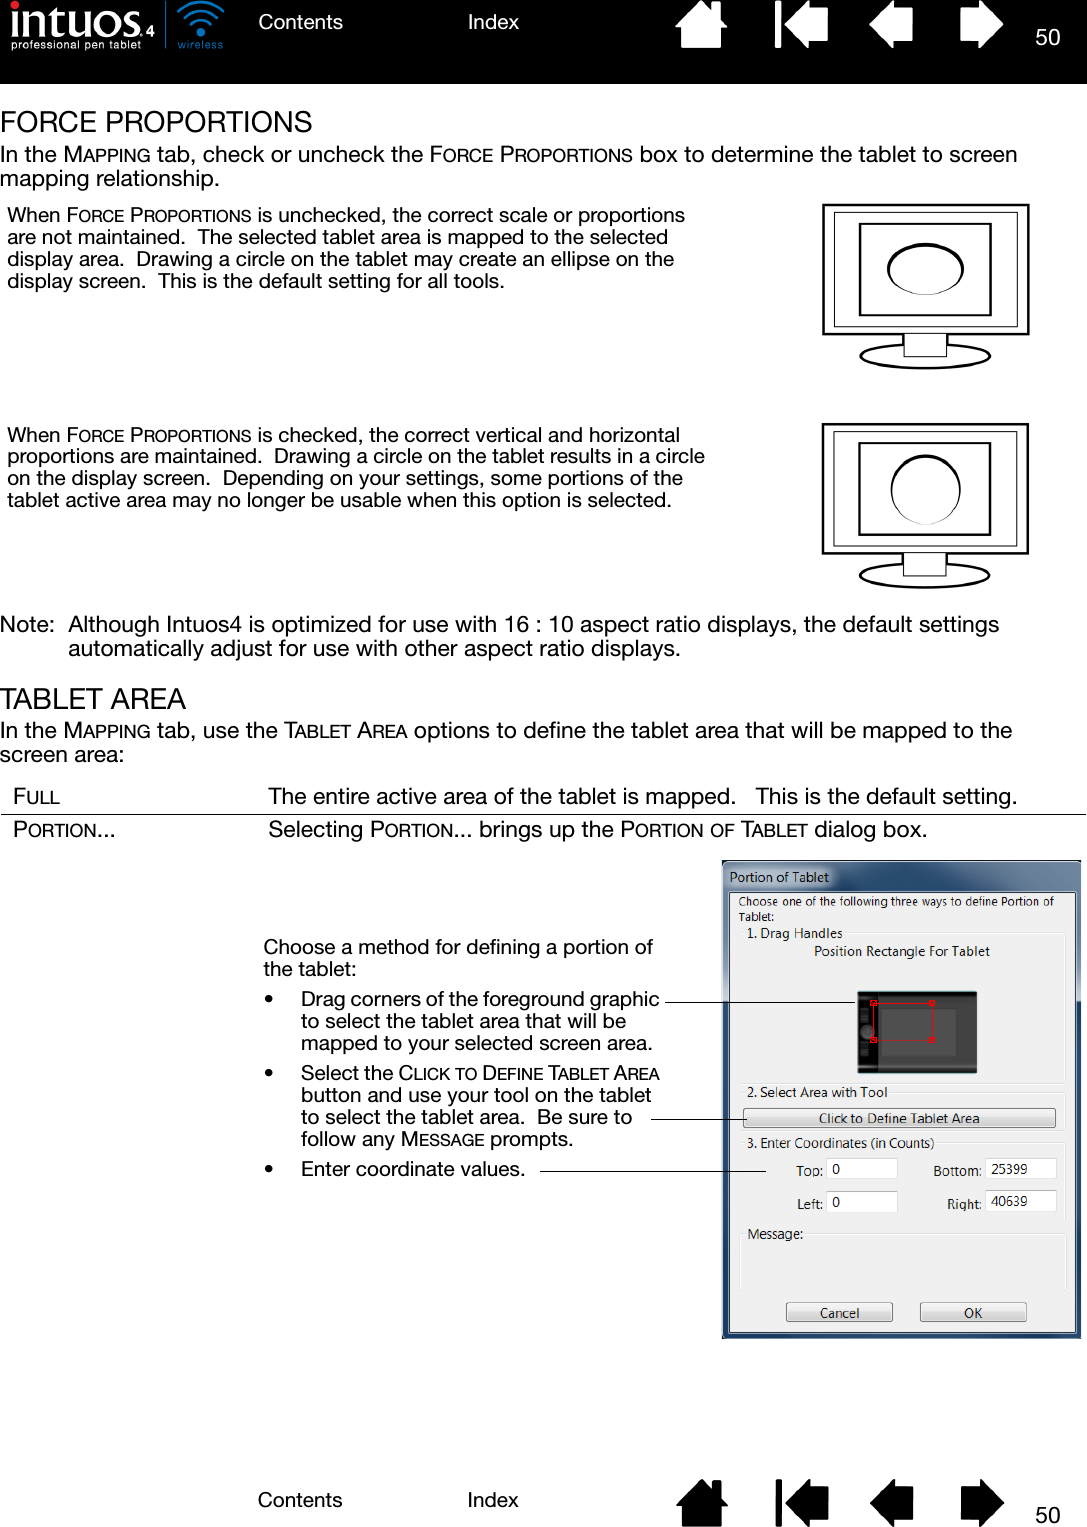
50IndexContents50IndexContentsFORCE PROPORTIONSIn the MAPPING tab, check or uncheck the FORCE PROPORTIONS box to determine the tablet to screen mapping relationship.Note:  Although Intuos4 is optimized for use with 16 : 10 aspect ratio displays, the default settings automatically adjust for use with other aspect ratio displays.TABLET AREAIn the MAPPING tab, use the TABLET AREA options to define the tablet area that will be mapped to the screen area:FULL The entire active area of the tablet is mapped.   This is the default setting.PORTION... Selecting PORTION... brings up the PORTION OF TABLET dialog box.When FORCE PROPORTIONS is unchecked, the correct scale or proportions are not maintained.  The selected tablet area is mapped to the selected display area.  Drawing a circle on the tablet may create an ellipse on the display screen.  This is the default setting for all tools.When FORCE PROPORTIONS is checked, the correct vertical and horizontal proportions are maintained.  Drawing a circle on the tablet results in a circle on the display screen.  Depending on your settings, some portions of the tablet active area may no longer be usable when this option is selected.Choose a method for defining a portion of the tablet:• Drag corners of the foreground graphic to select the tablet area that will be mapped to your selected screen area.• Select the CLICK TO DEFINE TABLET AREA button and use your tool on the tablet to select the tablet area.  Be sure to follow any MESSAGE prompts.• Enter coordinate values.
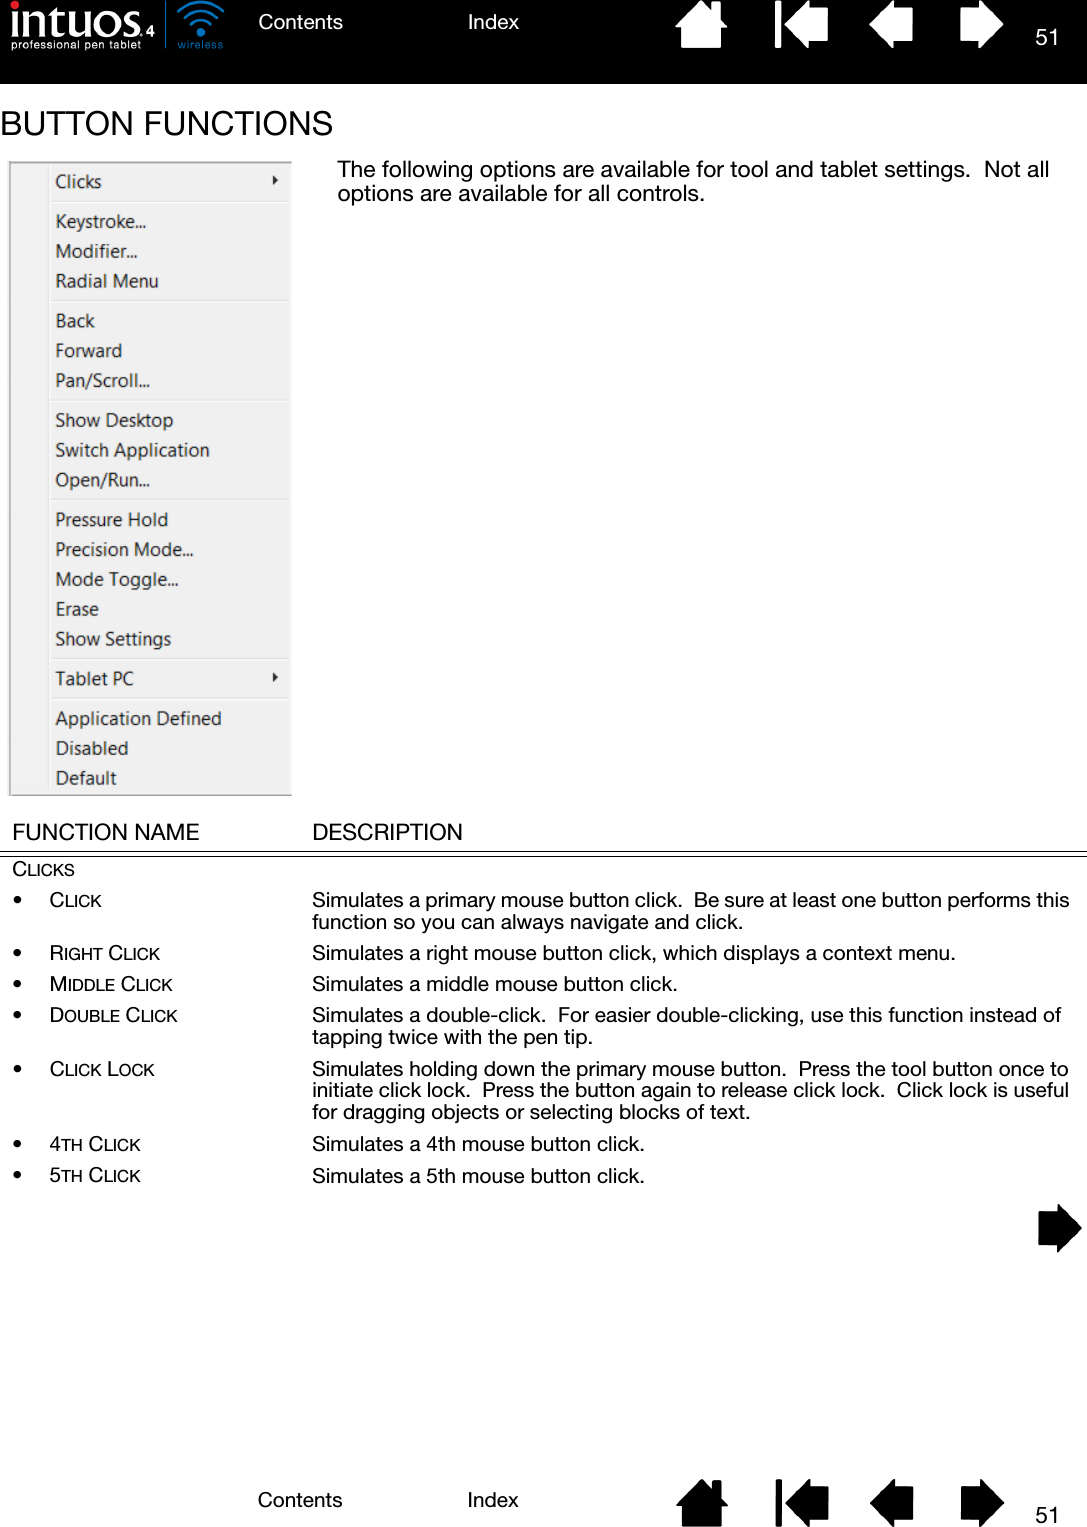
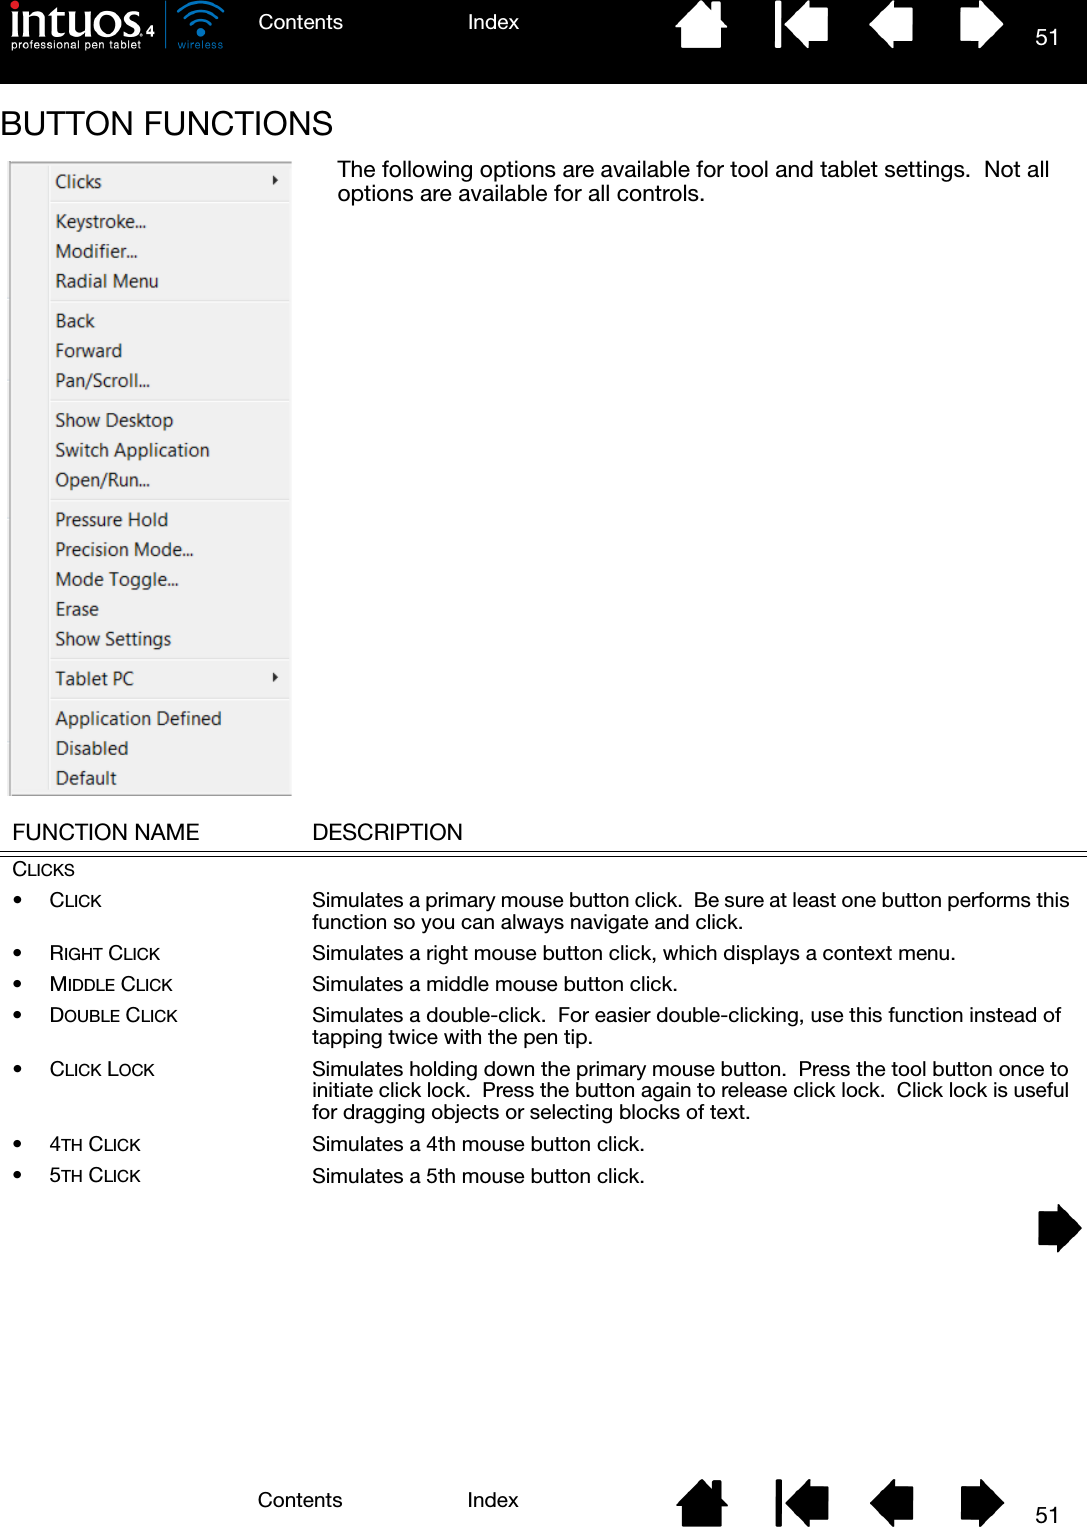
51IndexContents51IndexContentsBUTTON FUNCTIONS    FUNCTION NAME DESCRIPTIONCLICKS•CLICK Simulates a primary mouse button click.  Be sure at least one button performs this function so you can always navigate and click.•RIGHT CLICK Simulates a right mouse button click, which displays a context menu.•MIDDLE CLICK Simulates a middle mouse button click.•DOUBLE CLICK Simulates a double-click.  For easier double-clicking, use this function instead of tapping twice with the pen tip.•CLICK LOCK Simulates holding down the primary mouse button.  Press the tool button once to initiate click lock.  Press the button again to release click lock.  Click lock is useful for dragging objects or selecting blocks of text.•4TH CLICK Simulates a 4th mouse button click.•5TH CLICK Simulates a 5th mouse button click.The following options are available for tool and tablet settings.  Not all options are available for all controls.
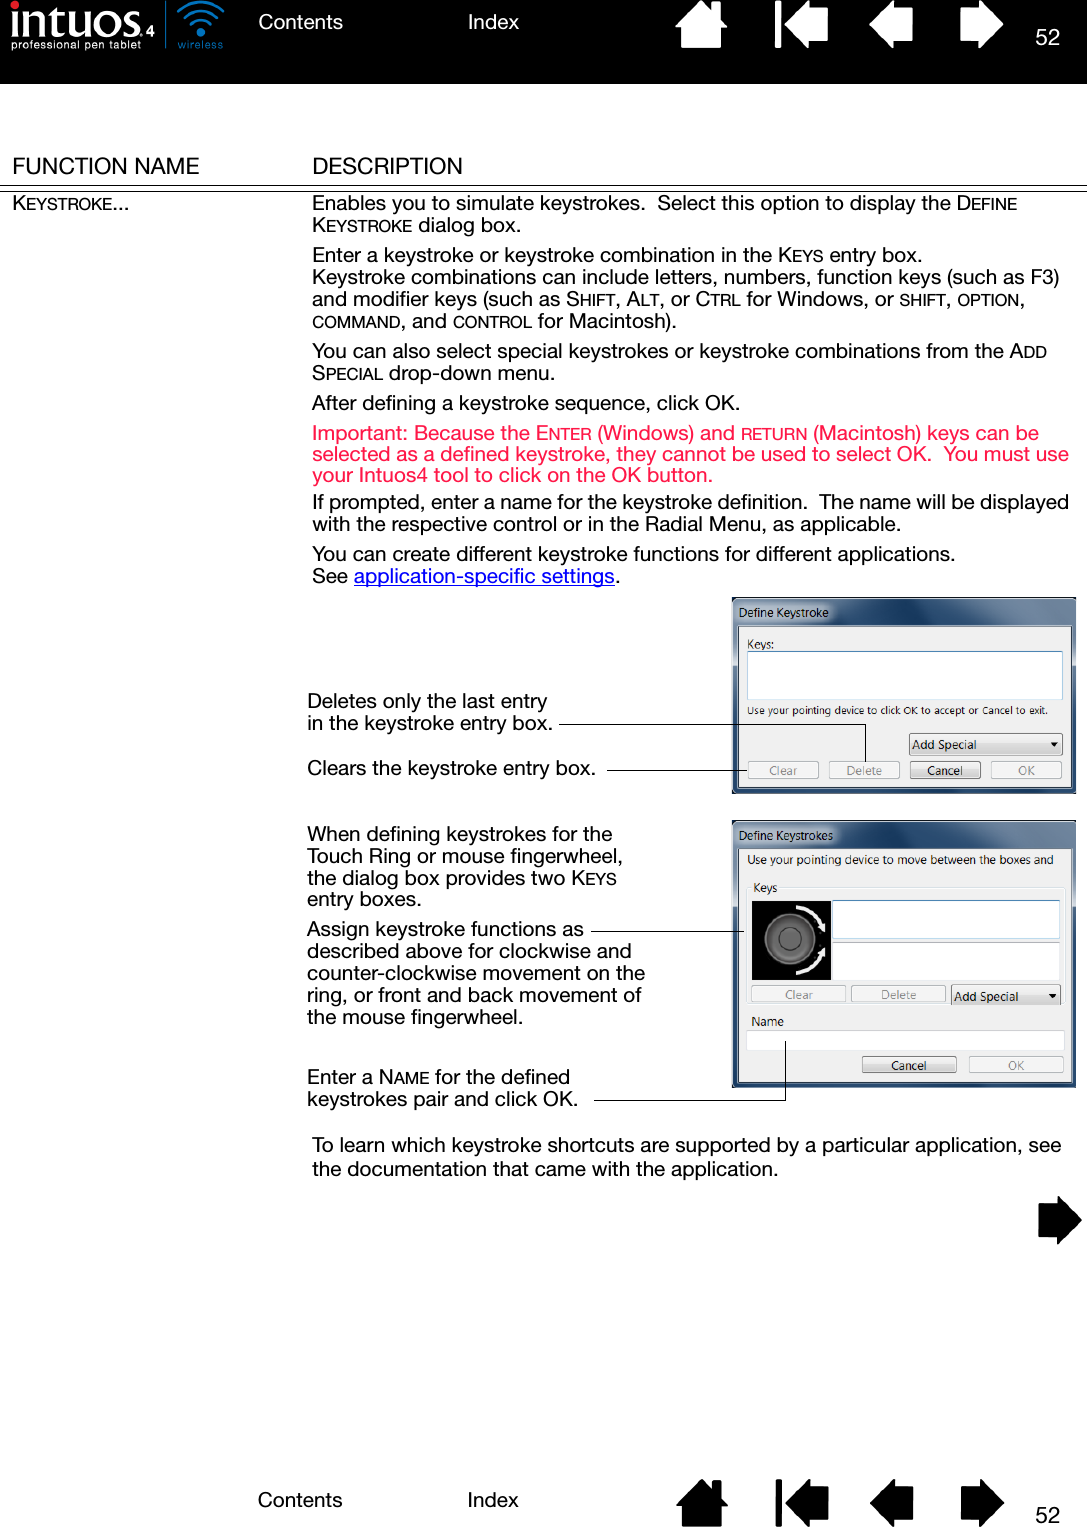
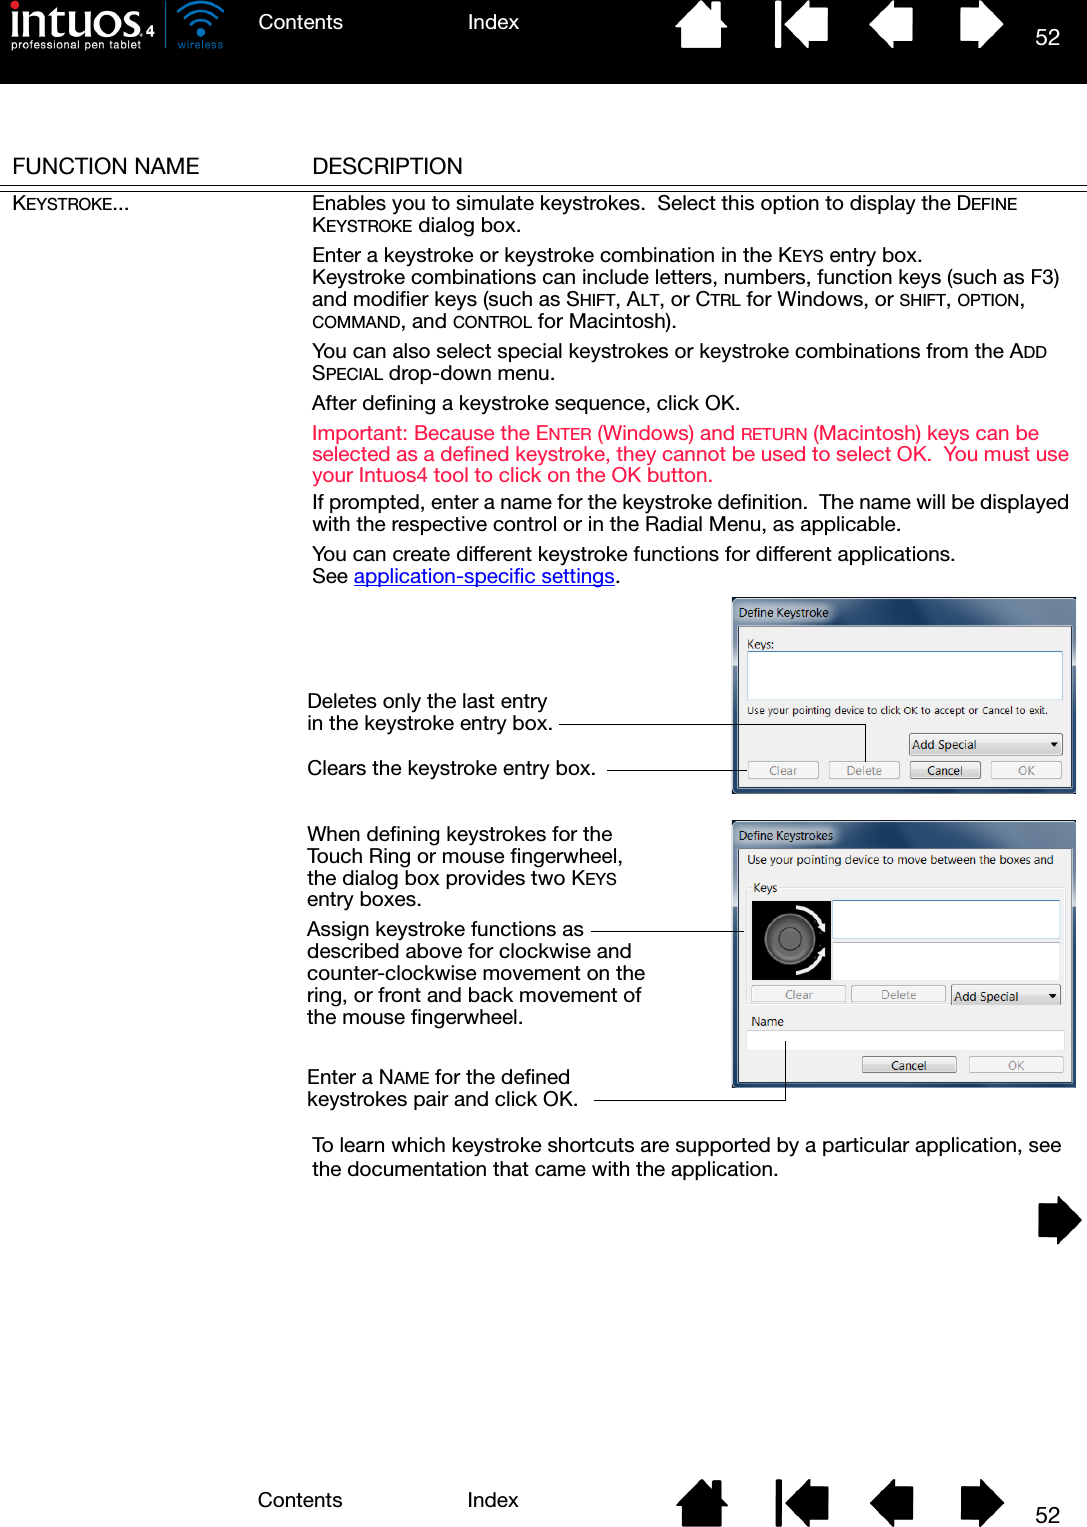
52IndexContents52IndexContentsFUNCTION NAME DESCRIPTIONKEYSTROKE... Enables you to simulate keystrokes.  Select this option to display the DEFINE KEYSTROKE dialog box.Enter a keystroke or keystroke combination in the KEYS entry box.  Keystroke combinations can include letters, numbers, function keys (such as F3) and modifier keys (such as SHIFT, ALT, or CTRL for Windows, or SHIFT, OPTION, COMMAND, and CONTROL for Macintosh).You can also select special keystrokes or keystroke combinations from the ADD SPECIAL drop-down menu.After defining a keystroke sequence, click OK.Important: Because the ENTER (Windows) and RETURN (Macintosh) keys can be selected as a defined keystroke, they cannot be used to select OK.  You must use your Intuos4 tool to click on the OK button.If prompted, enter a name for the keystroke definition.  The name will be displayed with the respective control or in the Radial Menu, as applicable.You can create different keystroke functions for different applications.  See application-specific settings.To learn which keystroke shortcuts are supported by a particular application, see the documentation that came with the application.Deletes only the last entry in the keystroke entry box.Clears the keystroke entry box.When defining keystrokes for the Touch Ring or mouse fingerwheel, the dialog box provides two KEYS entry boxes.Assign keystroke functions as described above for clockwise and counter-clockwise movement on the ring, or front and back movement of the mouse fingerwheel.Enter a NAME for the defined keystrokes pair and click OK.
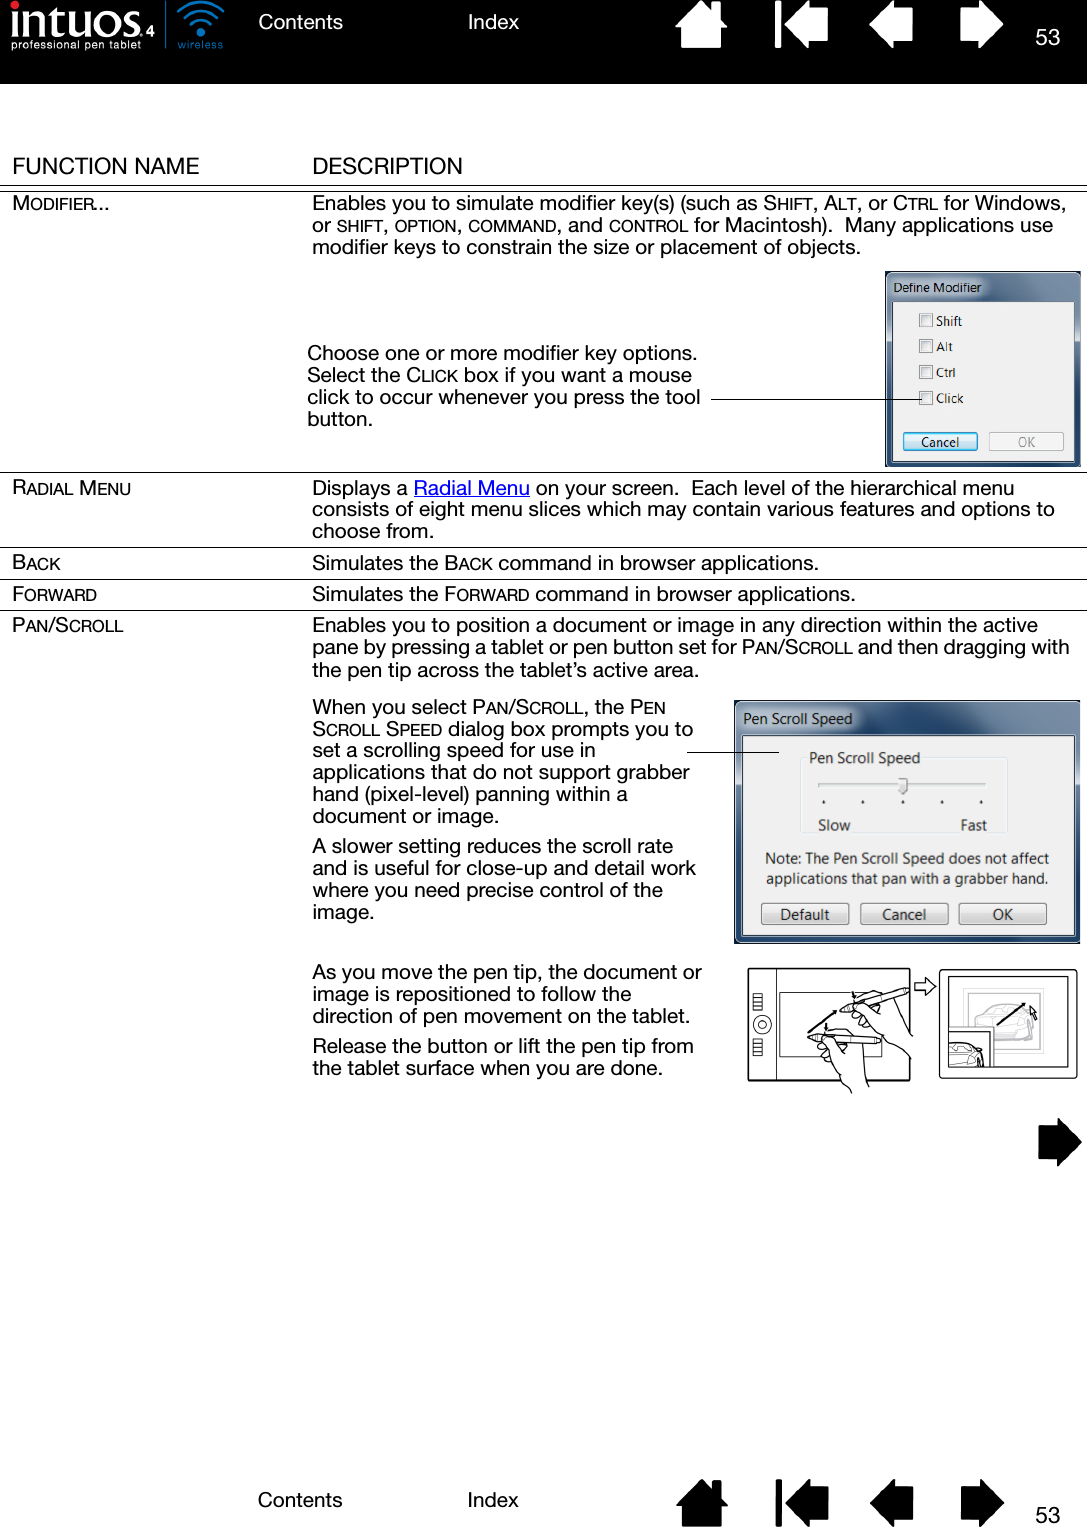
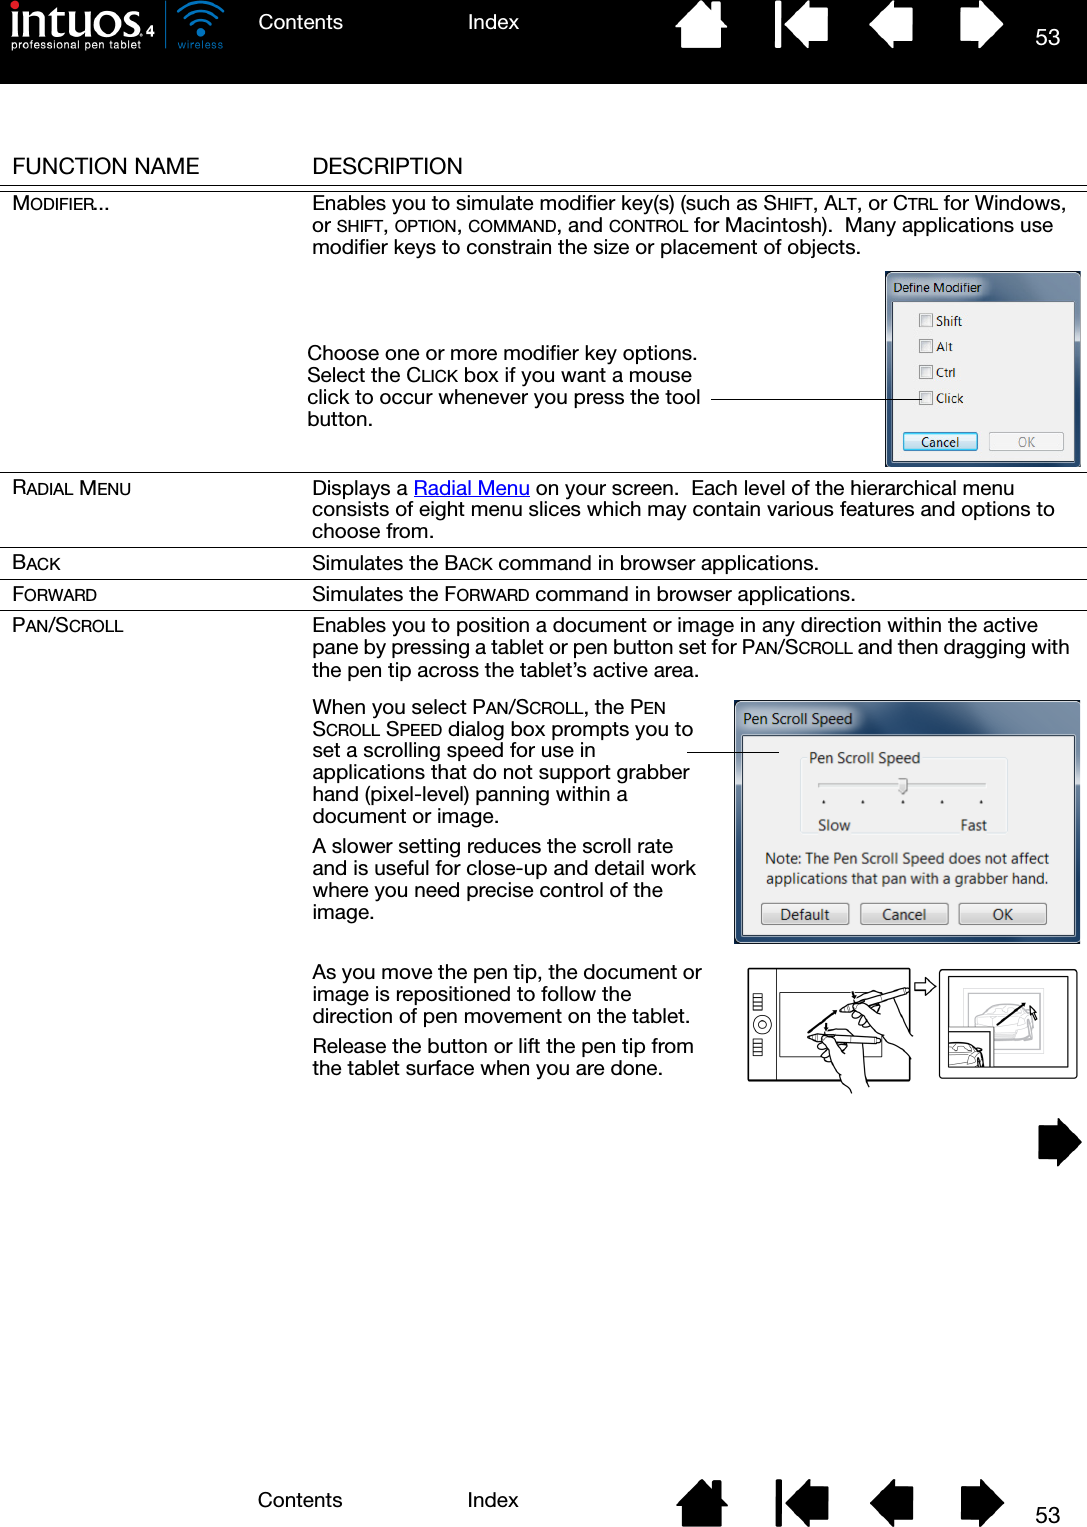
53IndexContents53IndexContentsFUNCTION NAME DESCRIPTIONMODIFIER... Enables you to simulate modifier key(s) (such as SHIFT, ALT, or CTRL for Windows, or SHIFT, OPTION, COMMAND, and CONTROL for Macintosh).  Many applications use modifier keys to constrain the size or placement of objects.RADIAL MENU Displays a Radial Menu on your screen.  Each level of the hierarchical menu consists of eight menu slices which may contain various features and options to choose from.BACK Simulates the BACK command in browser applications.FORWARD Simulates the FORWARD command in browser applications.PAN/SCROLL Enables you to position a document or image in any direction within the active pane by pressing a tablet or pen button set for PAN/SCROLL and then dragging with the pen tip across the tablet’s active area.Choose one or more modifier key options.  Select the CLICK box if you want a mouse click to occur whenever you press the tool button.As you move the pen tip, the document or image is repositioned to follow the direction of pen movement on the tablet.  Release the button or lift the pen tip from the tablet surface when you are done.When you select PAN/SCROLL, the PEN SCROLL SPEED dialog box prompts you to set a scrolling speed for use in applications that do not support grabber hand (pixel-level) panning within a document or image.A slower setting reduces the scroll rate and is useful for close-up and detail work where you need precise control of the image.
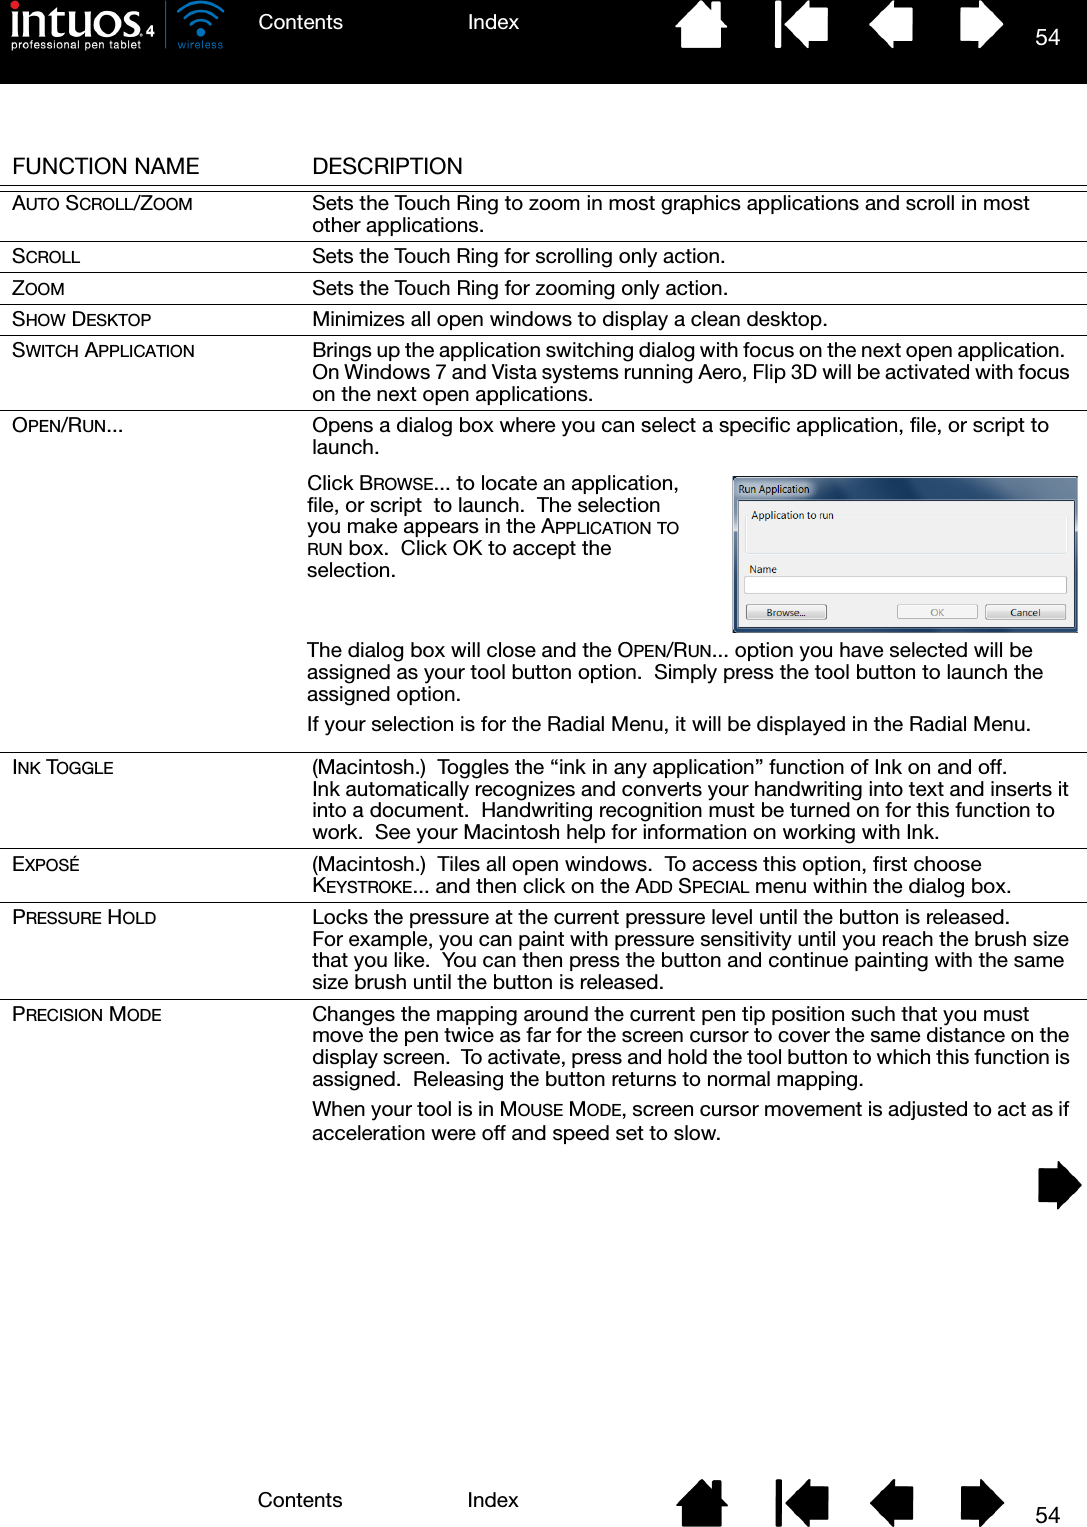
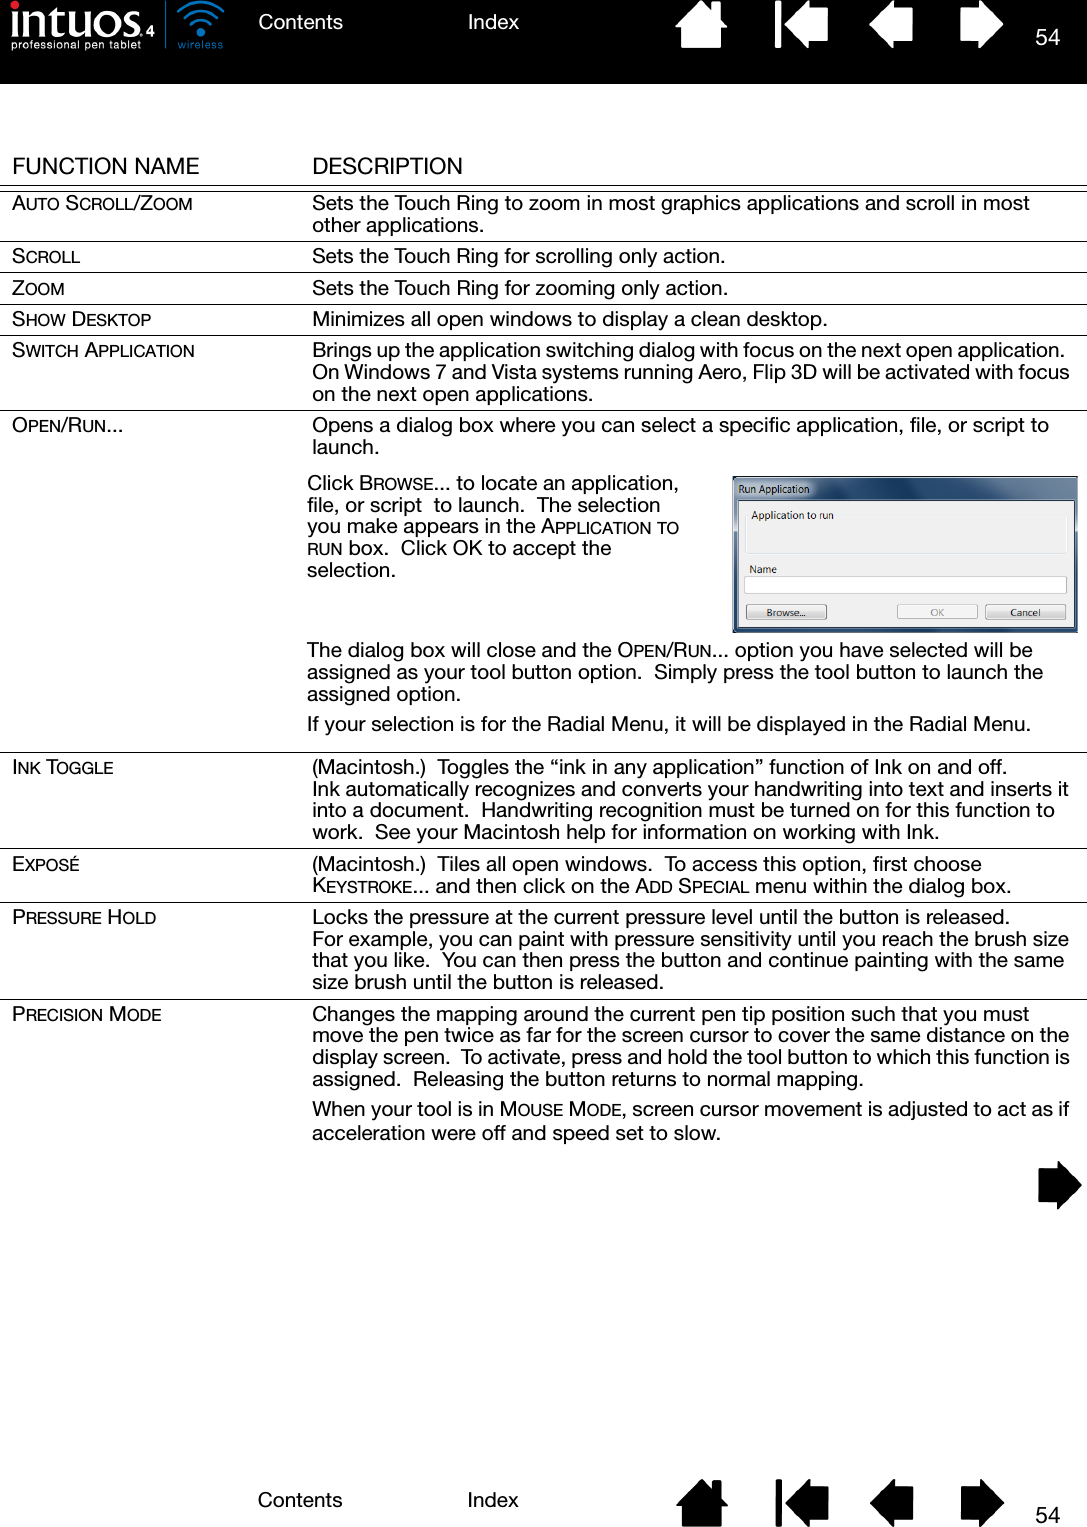
54IndexContents54IndexContentsFUNCTION NAME DESCRIPTIONAUTO SCROLL/ZOOM Sets the Touch Ring to zoom in most graphics applications and scroll in most other applications.SCROLL Sets the Touch Ring for scrolling only action.ZOOM Sets the Touch Ring for zooming only action.SHOW DESKTOP Minimizes all open windows to display a clean desktop.SWITCH APPLICATION Brings up the application switching dialog with focus on the next open application.  On Windows 7 and Vista systems running Aero, Flip 3D will be activated with focus on the next open applications.OPEN/RUN... Opens a dialog box where you can select a specific application, file, or script to launch.INK TOGGLE (Macintosh.)  Toggles the “ink in any application” function of Ink on and off.  Ink automatically recognizes and converts your handwriting into text and inserts it into a document.  Handwriting recognition must be turned on for this function to work.  See your Macintosh help for information on working with Ink.EXPOSÉ (Macintosh.)  Tiles all open windows.  To access this option, first choose KEYSTROKE... and then click on the ADD SPECIAL menu within the dialog box.PRESSURE HOLD Locks the pressure at the current pressure level until the button is released.  For example, you can paint with pressure sensitivity until you reach the brush size that you like.  You can then press the button and continue painting with the same size brush until the button is released.PRECISION MODE Changes the mapping around the current pen tip position such that you must move the pen twice as far for the screen cursor to cover the same distance on the display screen.  To activate, press and hold the tool button to which this function is assigned.  Releasing the button returns to normal mapping.When your tool is in MOUSE MODE, screen cursor movement is adjusted to act as if acceleration were off and speed set to slow.Click BROWSE... to locate an application, file, or script  to launch.  The selection you make appears in the APPLICATION TO RUN box.  Click OK to accept the selection.  The dialog box will close and the OPEN/RUN... option you have selected will be assigned as your tool button option.  Simply press the tool button to launch the assigned option.If your selection is for the Radial Menu, it will be displayed in the Radial Menu.
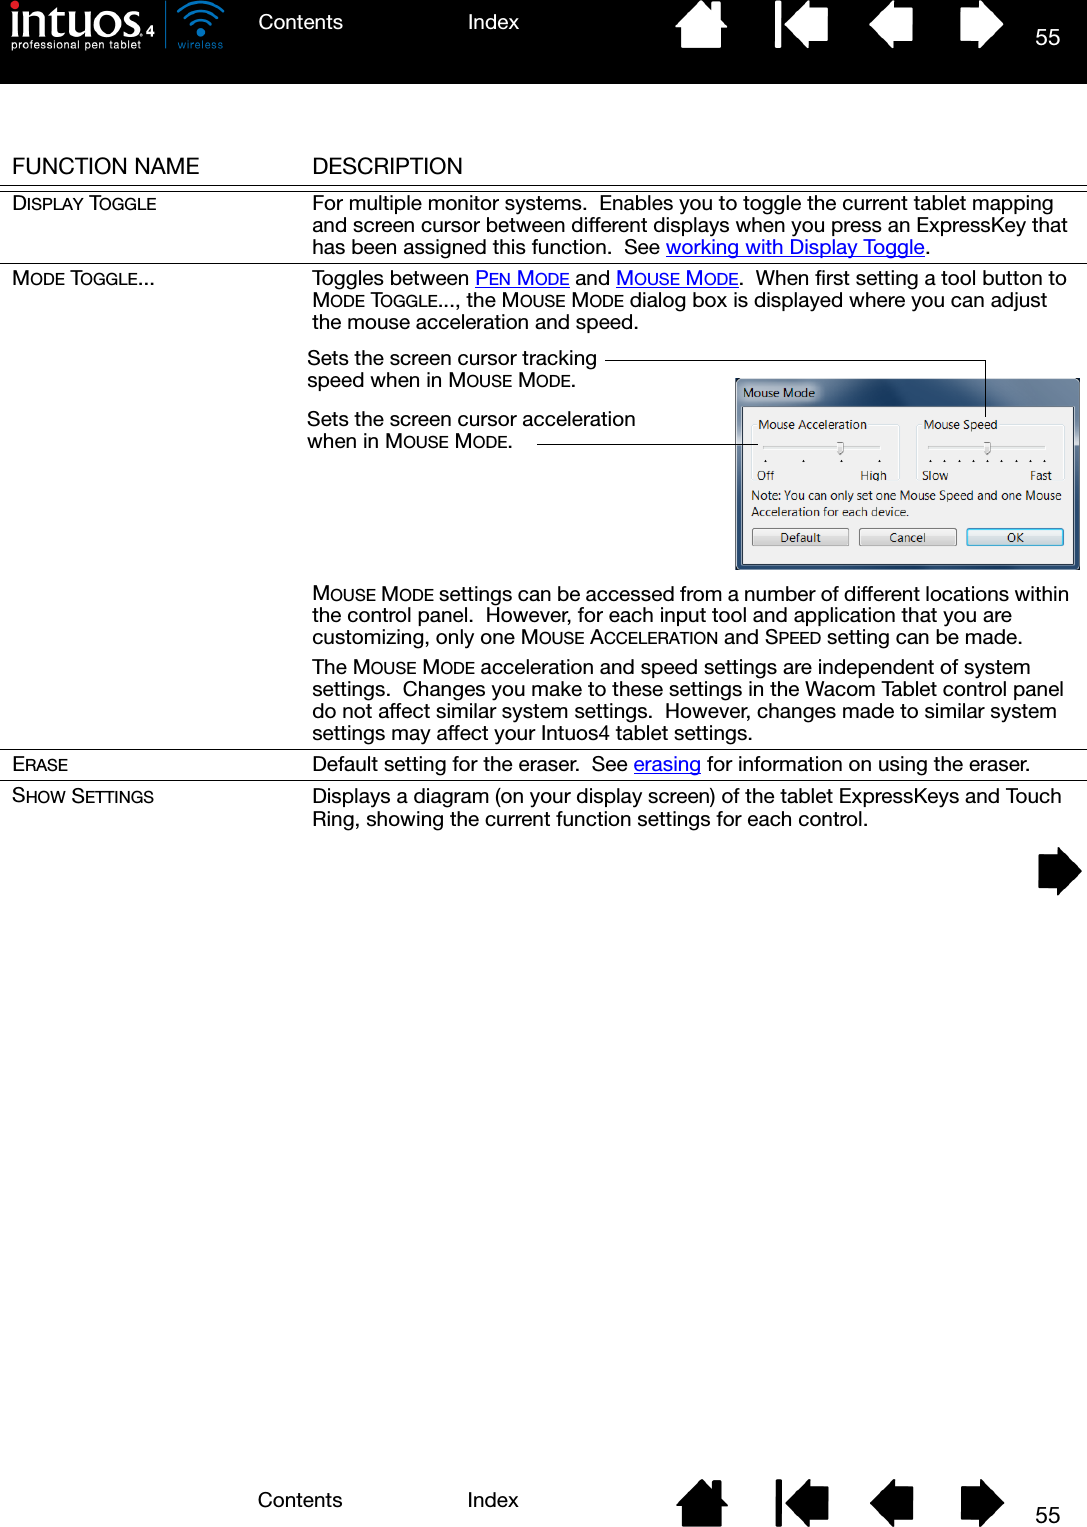
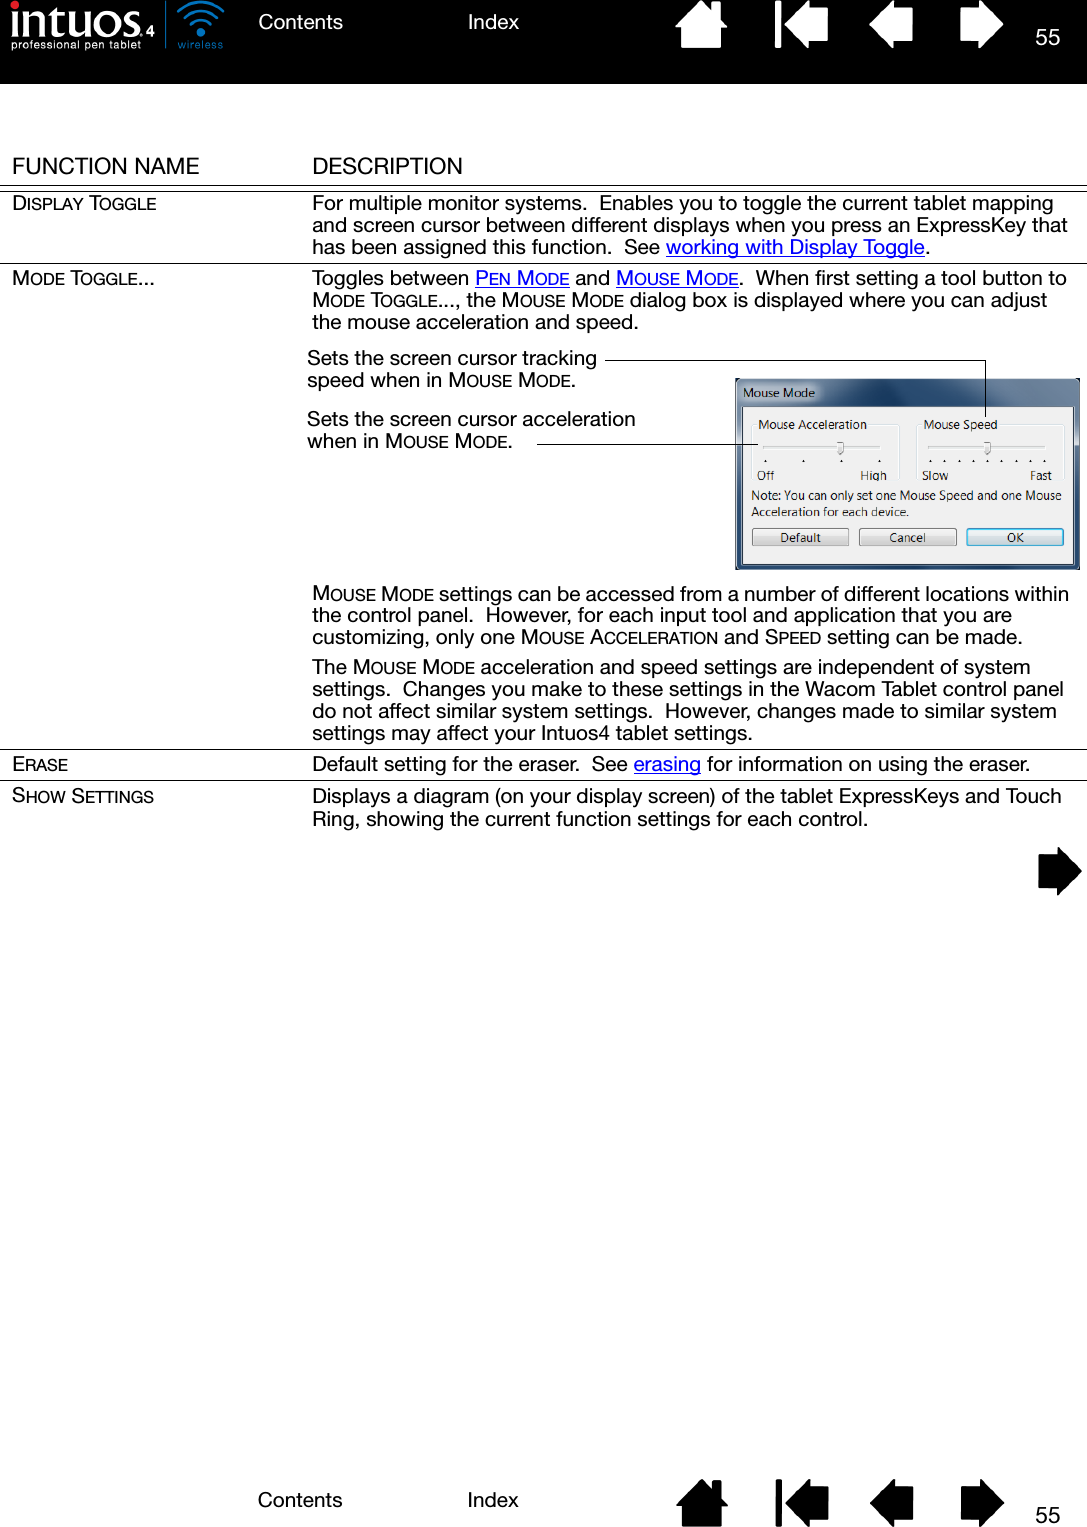
55IndexContents55IndexContents FUNCTION NAME DESCRIPTIONDISPLAY TOGGLE For multiple monitor systems.  Enables you to toggle the current tablet mapping and screen cursor between different displays when you press an ExpressKey that has been assigned this function.  See working with Display Toggle.MODE TOGGLE... Toggles between PEN MODE and MOUSE MODE.  When first setting a tool button to MODE TOGGLE..., the MOUSE MODE dialog box is displayed where you can adjust the mouse acceleration and speed.MOUSE MODE settings can be accessed from a number of different locations within the control panel.  However, for each input tool and application that you are customizing, only one MOUSE ACCELERATION and SPEED setting can be made.The MOUSE MODE acceleration and speed settings are independent of system settings.  Changes you make to these settings in the Wacom Tablet control panel do not affect similar system settings.  However, changes made to similar system settings may affect your Intuos4 tablet settings.ERASE Default setting for the eraser.  See erasing for information on using the eraser.SHOW SETTINGS Displays a diagram (on your display screen) of the tablet ExpressKeys and Touch Ring, showing the current function settings for each control.Sets the screen cursor tracking speed when in MOUSE MODE.Sets the screen cursor acceleration when in MOUSE MODE.
56IndexContents56IndexContentsFUNCTION NAME DESCRIPTIONTABLET PC•TABLET PC INPUT PANEL (Tablet PCs, and Windows 7 and Vista systems that support the Tablet PC Input Panel.)  Opens the Tablet PC Input Panel when you press a tool button set to this function.•JOURNAL (Windows 7, Vista, and Tablet PC systems that include Microsoft Journal.)  Opens Microsoft Journal.•TABLET PC DEFINED (Tablet PCs, and Windows 7 and Vista systems that support the Tablet PC Input Panel.)  Sets the button function according to settings found in the:• Windows 7 and Vista TABLET PC SETTINGS and PEN AND INPUT DEVICES control panels.• Windows XP Tablet Edition TABLET AND PEN SETTINGS control panel.DISABLED Disables the control function.APPLICATION DEFINED Reports only the button number to the application.  This is for applications, such as CAD programs, that have built-in support for the Intuos4 Mouse.This function may also be used by some highly integrated applications for direct control of the pen tablet ExpressKeys and Touch Ring.SKIP Sets the Touch Ring toggle button to skip a function state that has been assigned this option in the toggle sequence.DEFAULT Returns a control to its default setting.
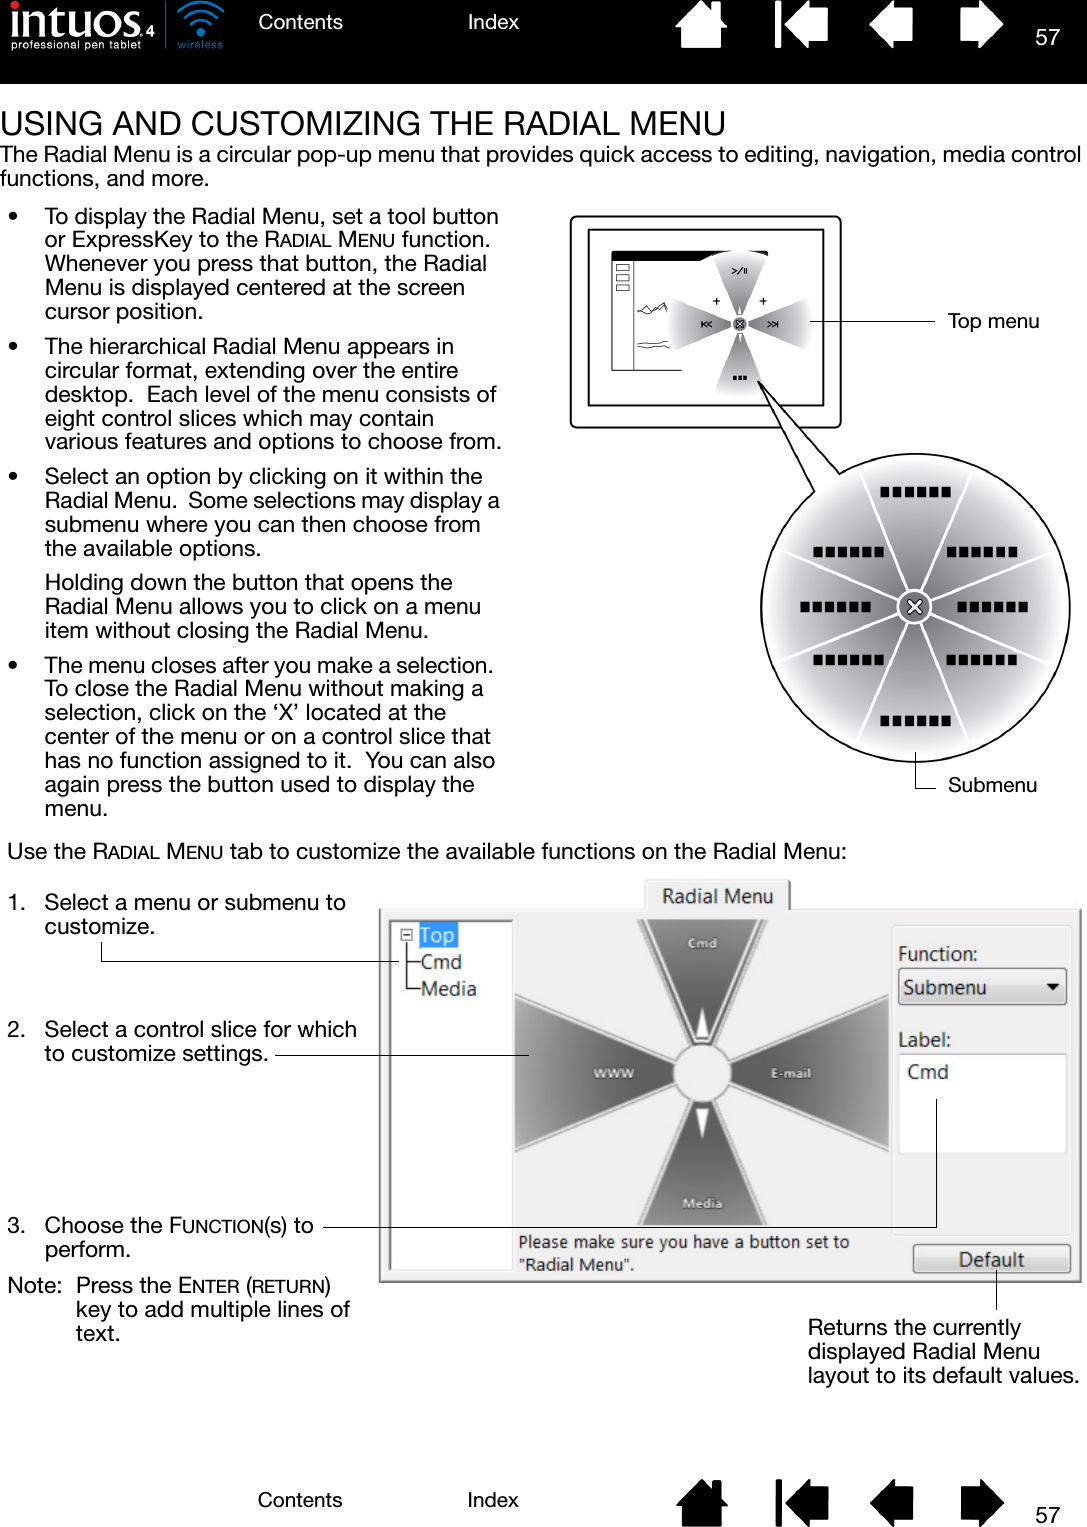
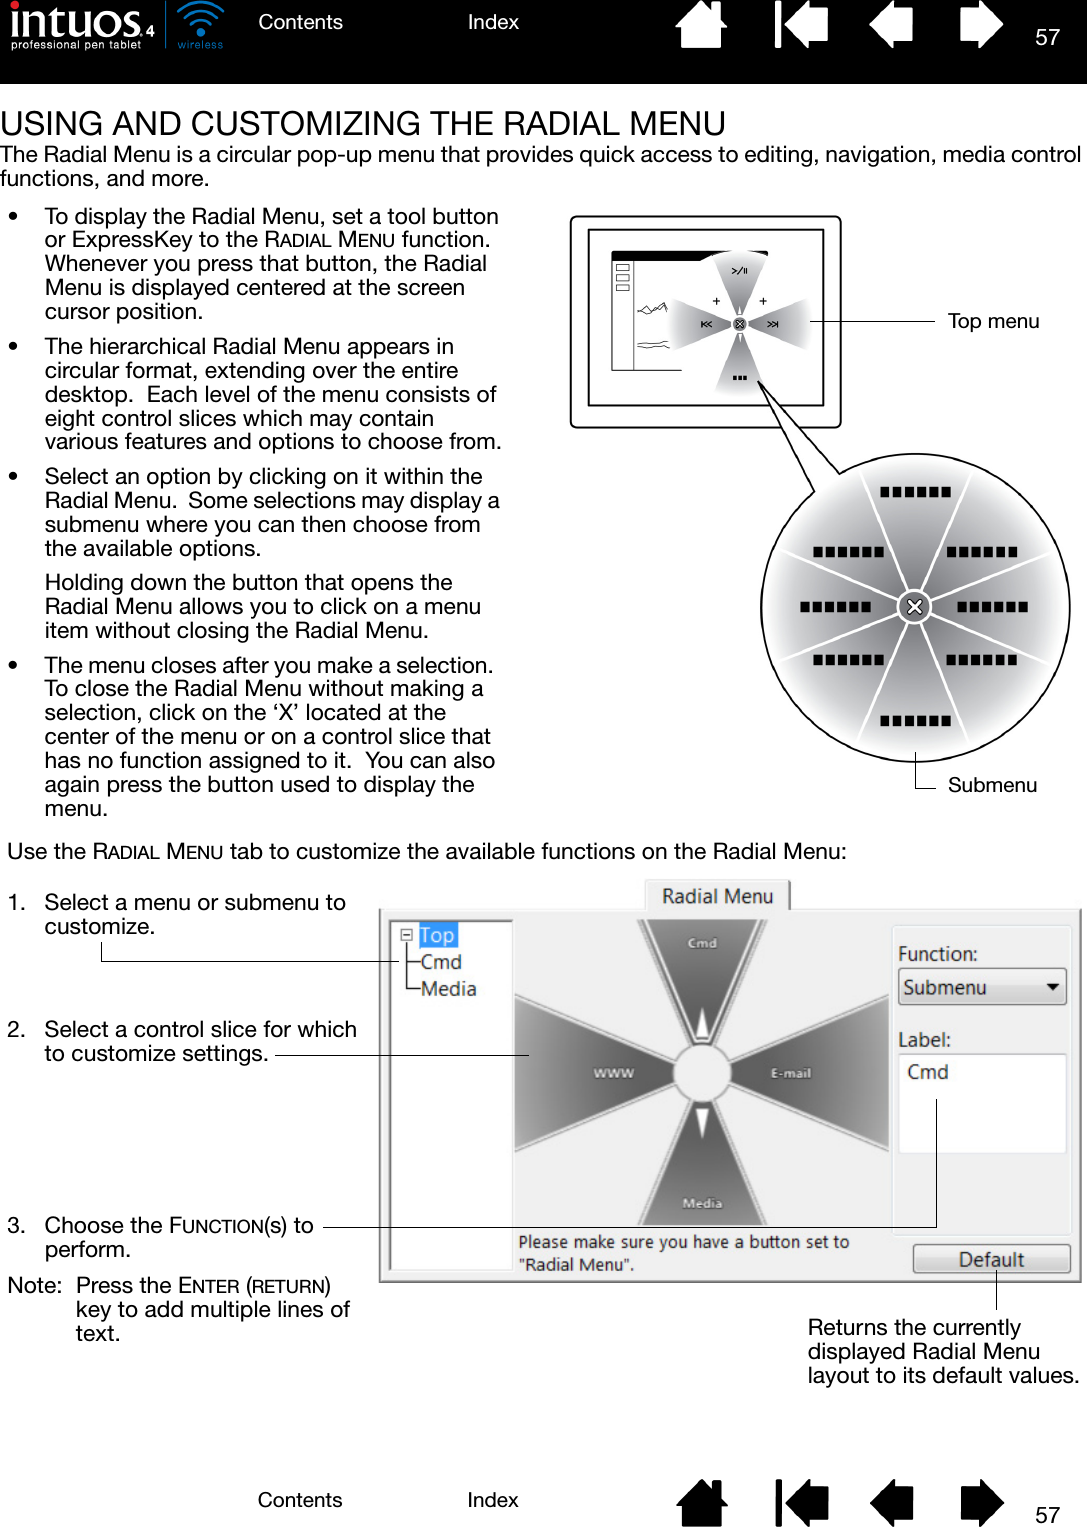
57IndexContents57IndexContentsUSING AND CUSTOMIZING THE RADIAL MENUThe Radial Menu is a circular pop-up menu that provides quick access to editing, navigation, media control functions, and more.• To display the Radial Menu, set a tool button or ExpressKey to the RADIAL MENU function.  Whenever you press that button, the Radial Menu is displayed centered at the screen cursor position.• The hierarchical Radial Menu appears in circular format, extending over the entire desktop.  Each level of the menu consists of eight control slices which may contain various features and options to choose from.• Select an option by clicking on it within the Radial Menu.  Some selections may display a submenu where you can then choose from the available options.Holding down the button that opens the Radial Menu allows you to click on a menu item without closing the Radial Menu.• The menu closes after you make a selection.  To close the Radial Menu without making a selection, click on the ‘X’ located at the center of the menu or on a control slice that has no function assigned to it.  You can also again press the button used to display the menu.Use the RADIAL MENU tab to customize the available functions on the Radial Menu:Returns the currently displayed Radial Menu layout to its default values.1. Select a menu or submenu to customize.2. Select a control slice for which to customize settings.3. Choose the FUNCTION(s) to perform.Note: Press the ENTER (RETURN) key to add multiple lines of text.Top menuSubmenu
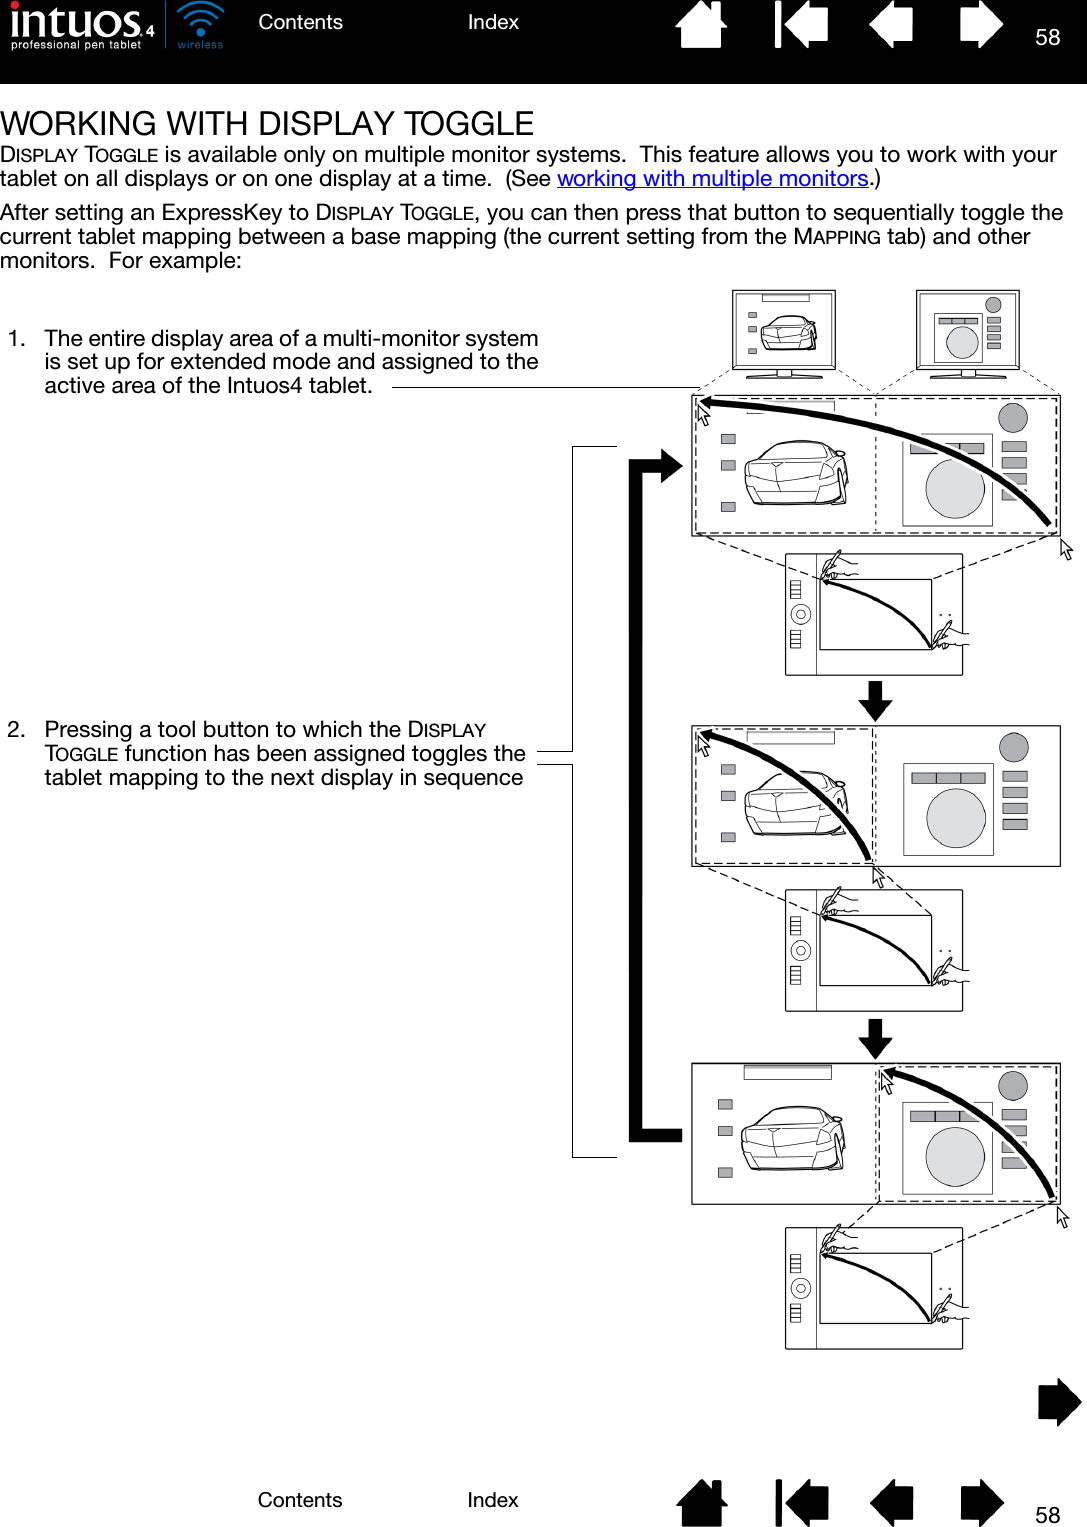
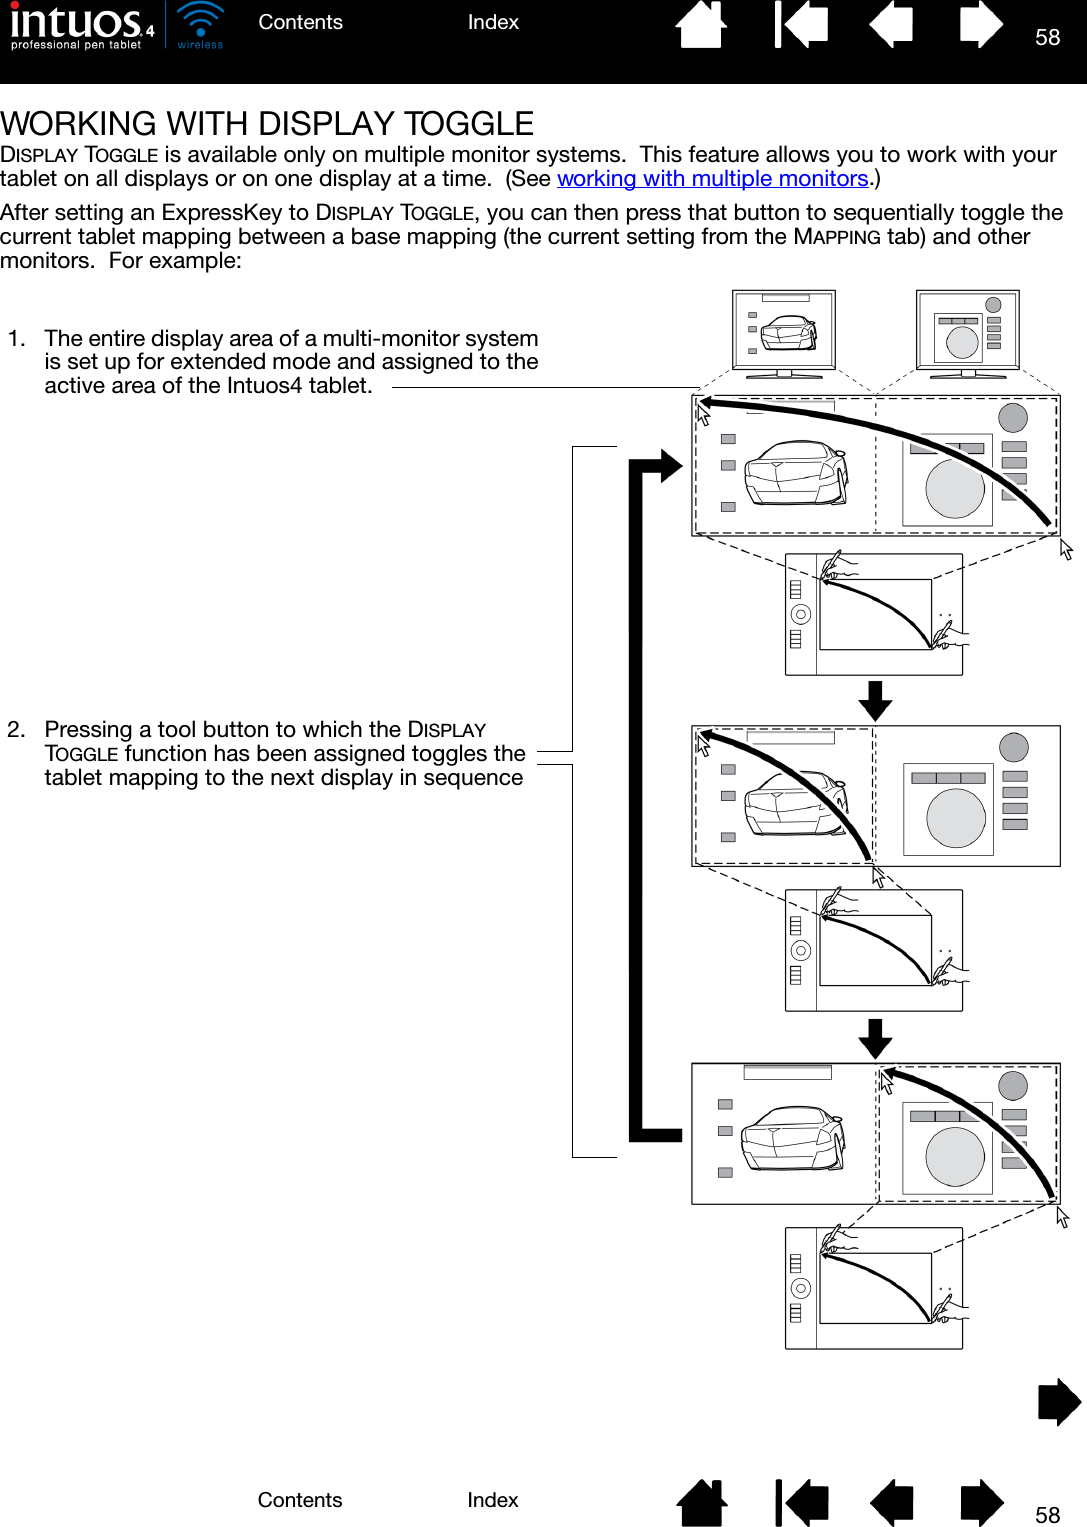
58IndexContents58IndexContentsWORKING WITH DISPLAY TOGGLEDISPLAY TOGGLE is available only on multiple monitor systems.  This feature allows you to work with your tablet on all displays or on one display at a time.  (See working with multiple monitors.)After setting an ExpressKey to DISPLAY TOGGLE, you can then press that button to sequentially toggle the current tablet mapping between a base mapping (the current setting from the MAPPING tab) and other monitors.  For example: 1. The entire display area of a multi-monitor system is set up for extended mode and assigned to the active area of the Intuos4 tablet.2. Pressing a tool button to which the DISPLAY TOGGLE function has been assigned toggles the tablet mapping to the next display in sequence
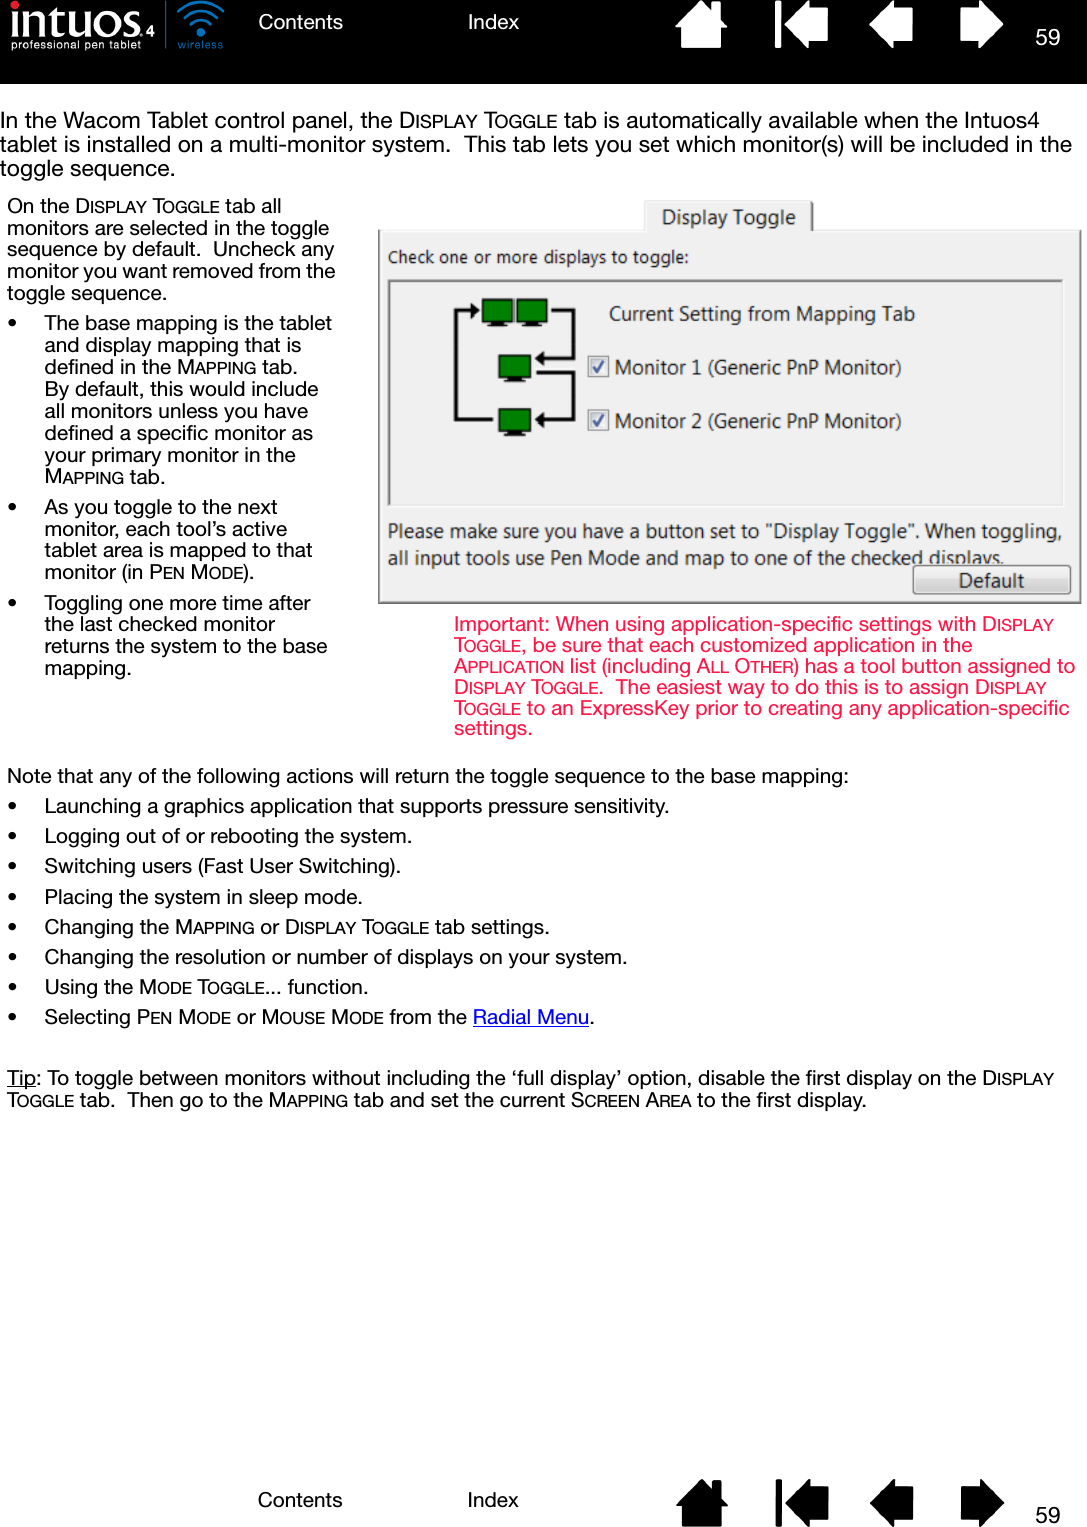
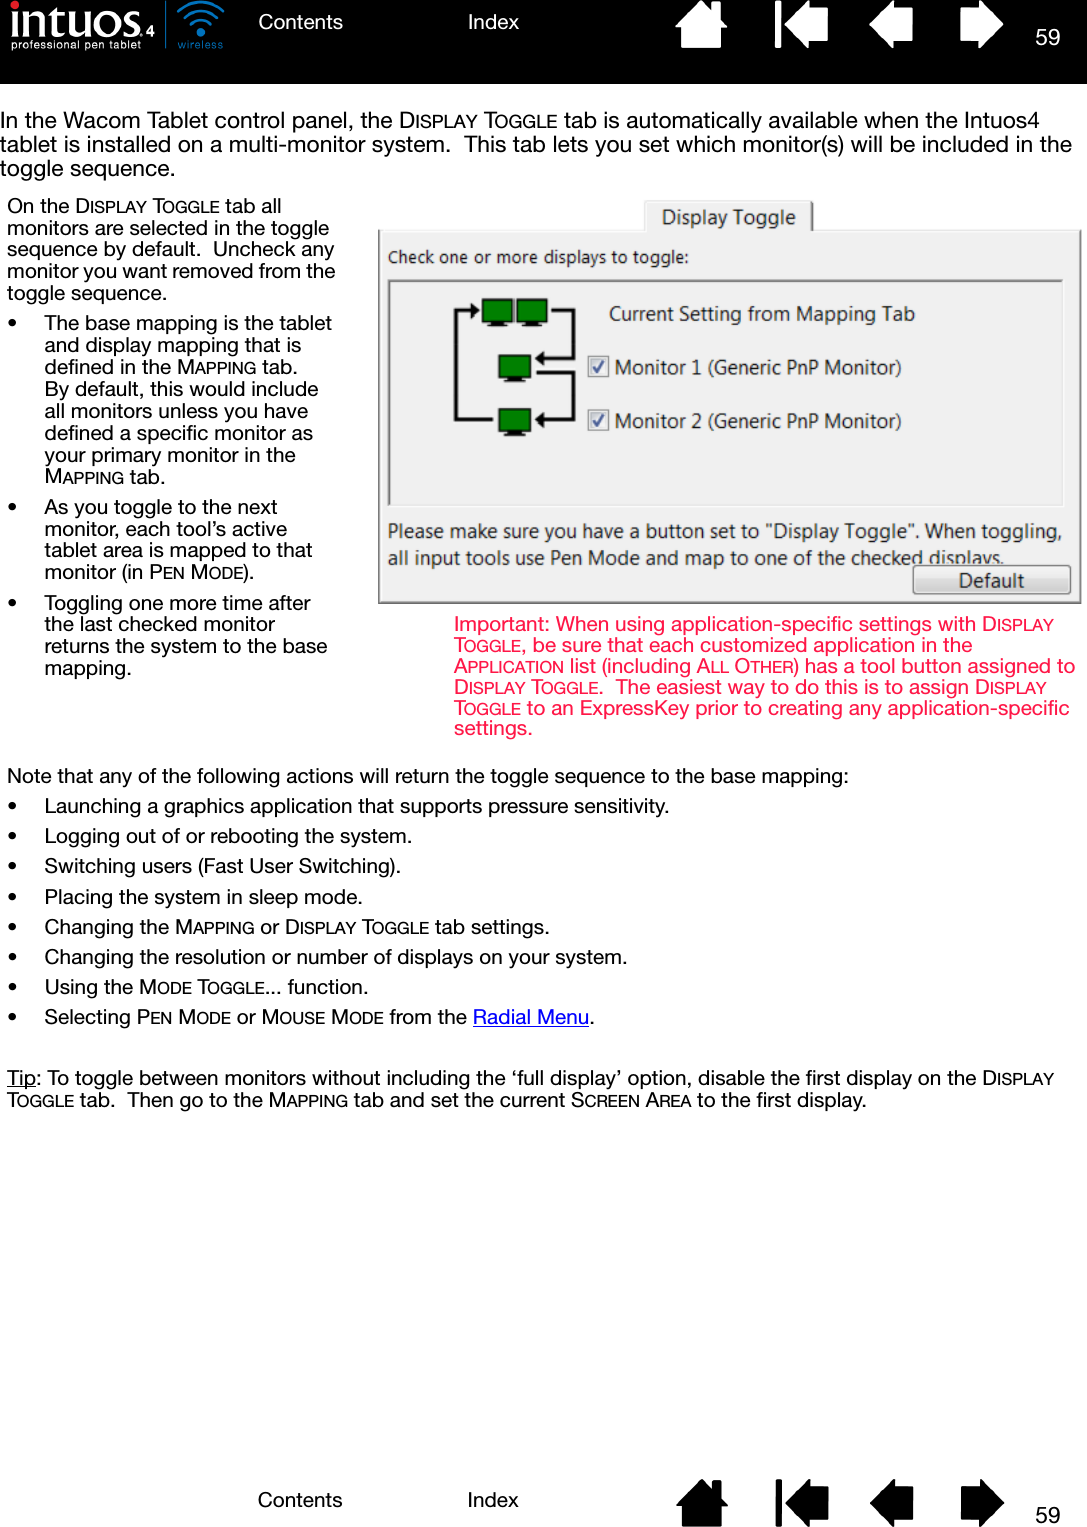
59IndexContents59IndexContentsIn the Wacom Tablet control panel, the DISPLAY TOGGLE tab is automatically available when the Intuos4 tablet is installed on a multi-monitor system.  This tab lets you set which monitor(s) will be included in the toggle sequence.On the DISPLAY TOGGLE tab all monitors are selected in the toggle sequence by default.  Uncheck any monitor you want removed from the toggle sequence.• The base mapping is the tablet and display mapping that is defined in the MAPPING tab.  By default, this would include all monitors unless you have defined a specific monitor as your primary monitor in the MAPPING tab.• As you toggle to the next monitor, each tool’s active tablet area is mapped to that monitor (in PEN MODE).• Toggling one more time after the last checked monitor returns the system to the base mapping.Note that any of the following actions will return the toggle sequence to the base mapping:• Launching a graphics application that supports pressure sensitivity.• Logging out of or rebooting the system.• Switching users (Fast User Switching).• Placing the system in sleep mode.• Changing the MAPPING or DISPLAY TOGGLE tab settings.• Changing the resolution or number of displays on your system.• Using the MODE TOGGLE... function.• Selecting PEN MODE or MOUSE MODE from the Radial Menu.Tip: To toggle between monitors without including the ‘full display’ option, disable the first display on the DISPLAY TOGGLE tab.  Then go to the MAPPING tab and set the current SCREEN AREA to the first display.Important: When using application-specific settings with DISPLAY TOGGLE, be sure that each customized application in the APPLICATION list (including ALL OTHER) has a tool button assigned to DISPLAY TOGGLE.  The easiest way to do this is to assign DISPLAY TOGGLE to an ExpressKey prior to creating any application-specific settings.
60IndexContents60IndexContentsWORKING WITH MULTIPLE TOOLSThe Wacom Tablet control panel is designed to help you customize and keep track of the settings for your Intuos4 tools.  The tool you use to open the control panel is automatically selected, and the appropriate tabs for that tool are displayed.To add a different tool to the control panel’s TOOL list, simply use the tool on your Intuos4 tablet.• When you select a tool that has been added to the TOOL list, the appropriate tab settings for that tool are displayed.  Any changes you make to the tab settings will then apply to that tool.  Your changes take effect immediately.• Identical tools will use the same settings.To remove a selected tool from the TOOL list, click on the TOOL list’s [ – ] button.  In the dialog box that appears, click DELETE to confirm your selection.  The selected tool is removed from the list, along with any custom settings you may have created for it.  (A removed tool can be added back to the TOOL list by placing it back onto the tablet.)All Intuos4 pens have a unique Tool ID.  In supporting applications, such as Corel Painter, you can assign different tools to different pens and then change between them by switching the pen in your hand.Select a tool to change its settings.Removes the selected tool.  The button is inactive when there is only one item in the list.The FUNCTIONS icon cannot be deleted.The TOOL list displays an icon for the tablet FUNCTIONS and the different tools that have been used on the tablet.If application-specific settings have not been added, the ALL icon is displayed and the tool settings apply to all applications.  Tab settings apply only to the selected tool and application.
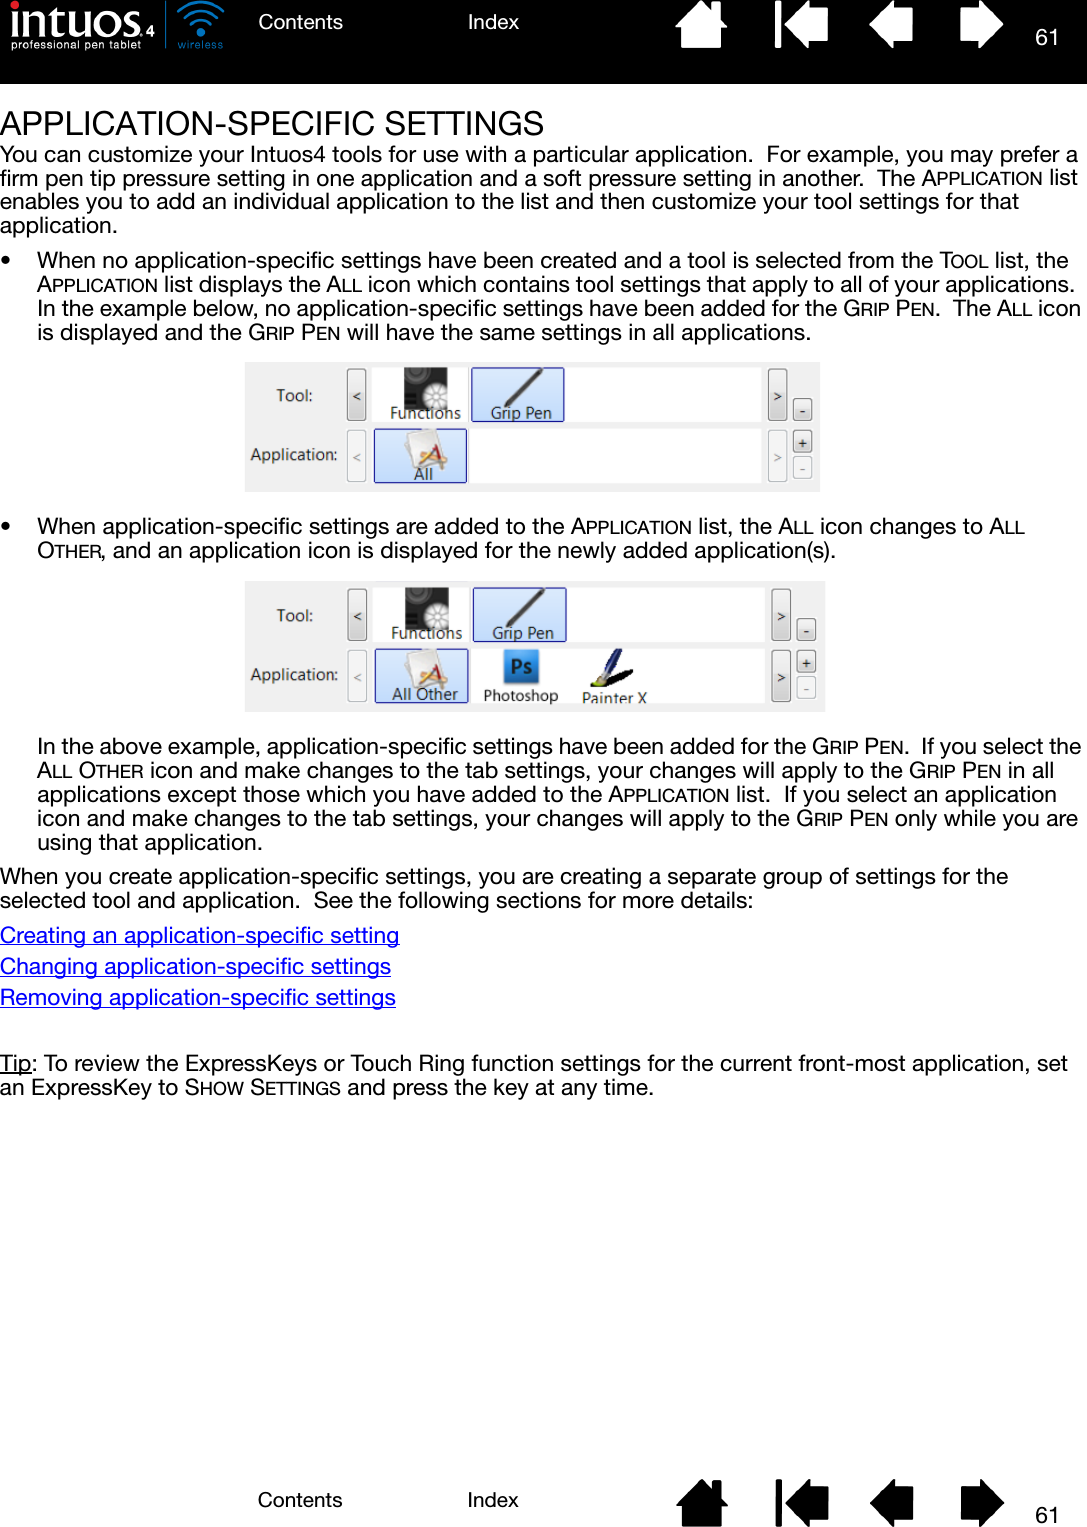
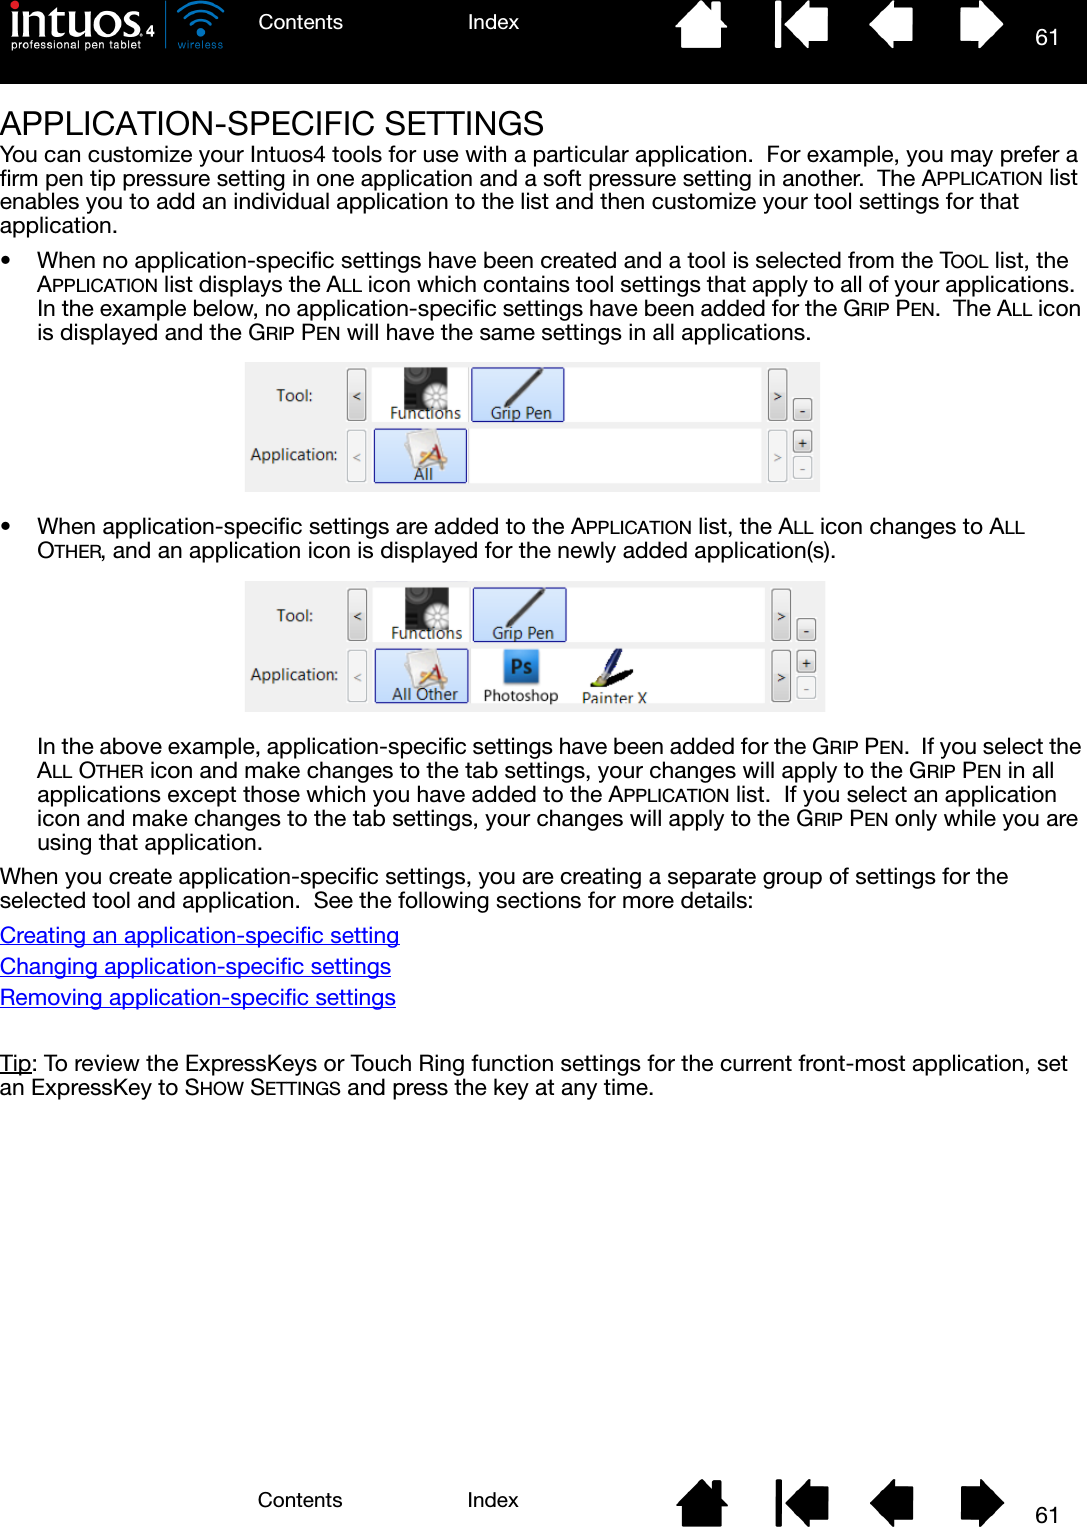
61IndexContents61IndexContentsAPPLICATION-SPECIFIC SETTINGSYou can customize your Intuos4 tools for use with a particular application.  For example, you may prefer a firm pen tip pressure setting in one application and a soft pressure setting in another.  The APPLICATION list enables you to add an individual application to the list and then customize your tool settings for that application.• When no application-specific settings have been created and a tool is selected from the TOOL list, the APPLICATION list displays the ALL icon which contains tool settings that apply to all of your applications.  In the example below, no application-specific settings have been added for the GRIP PEN.  The ALL icon is displayed and the GRIP PEN will have the same settings in all applications.• When application-specific settings are added to the APPLICATION list, the ALL icon changes to ALL OTHER, and an application icon is displayed for the newly added application(s).In the above example, application-specific settings have been added for the GRIP PEN.  If you select the ALL OTHER icon and make changes to the tab settings, your changes will apply to the GRIP PEN in all applications except those which you have added to the APPLICATION list.  If you select an application icon and make changes to the tab settings, your changes will apply to the GRIP PEN only while you are using that application.When you create application-specific settings, you are creating a separate group of settings for the selected tool and application.  See the following sections for more details:Creating an application-specific settingChanging application-specific settingsRemoving application-specific settingsTip: To review the ExpressKeys or Touch Ring function settings for the current front-most application, set an ExpressKey to SHOW SETTINGS and press the key at any time.
62IndexContents62IndexContentsCREATING AN APPLICATION-SPECIFIC SETTINGFirst choose the tablet and tool for which you want to create an application-specific setting.  Then click on the APPLICATION list’s [ + ] button to display the ADD APPLICATION FOR CUSTOM SETTINGS dialog box.After adding an application, its icon appears in the APPLICATION list whenever the respective tool is selected in the TOOL list.  Select the application and then customize the control panel tab settings for your tool and the selected application.Once you have created application-specific settings, applications that have not been customized in this manner will use the tool settings for ALL OTHER.Tip: First customize settings for one application.  When you feel comfortable with the process, you can create more application-specific settings.CHANGING APPLICATION-SPECIFIC SETTINGSTo change tool settings for a specific application, select the tool and the application and then customize the control panel tab settings.REMOVING APPLICATION-SPECIFIC SETTINGSTo remove an application-specific setting:1. In the TOOL list, select the tool from which you want to remove the application-specific setting.  Then, in the APPLICATION list select the application you want to remove.2. Click on the APPLICATION list’s [ – ] button.  In the dialog box that appears, click DELETE to confirm your selection.  The selected application is removed from the list, along with any custom tool settings that you may have created for it.Tip: To quickly remove all application-specific settings from a tool, remove the tool from the TOOL list.  Then place the tool back on the tablet.  The tool will be added back to the TOOL list using the default settings.Choose from one of two methods to select an application:• Open the application for which you want to create custom settings, and then select that application from the CURRENTLY OPEN APPLICATIONS box.•BROWSE to select the executable file of any application installed on your computer.Your selection is added to the SELECTED APPLICATION box where the name of the selected application is displayed.Click OK to complete the process.Note:  If two programs have the same executable file name, they will share the same customized settings.
6363IndexContentsIndexContentsTROUBLESHOOTINGMost of the time your tablet will work flawlessly.  But if you are having trouble, Wacom recommends you do the following:1. If the Wacom tablet driver failed to load properly, first perform the recommended action in any error message that may appear on your screen.  If that does not solve the problem, review the troubleshooting procedures in this chapter.2. Look in the troubleshooting tables.  Your problem may be described there and you can try the solution offered.3. Open the Wacom tablet Read Me file for any information updates.4. Test your tablet and input tools.  See testing your tablet and testing your tools.5. If you are having a compatibility conflict between Intuos4 and a new hardware or software product, see obtaining driver downloads for information on downloading an updated software driver.  Wacom periodically updates the software driver to maintain compatibility with new products.6. Check the FAQs (Frequently Asked Questions) on the Wacom web site for your region.7. If you have tried the suggestions in this manual and still cannot resolve the problem, then contact Wacom for Technical Support.  See technical support options and the Read Me file for information on where to obtain support for your region.Testing your tabletTesting your toolsTroubleshooting tablesTechnical support optionsObtaining driver downloads
64IndexContents64IndexContentsTESTING YOUR TABLETTurn on your computer and wait until the system has fully loaded.  Ensure that your computer has a working Bluetooth connection, either through built-in Bluetooth support or a USB-to-Bluetooth adapter (dongle).1. Check the tablet connection in USB mode.  A tablet status LED will light whenever the tablet is properly connected via the USB cable and your computer has registered it as a USB device.  If an LED does not glow, then:• Verify that the tablet power switch is in the on position.• Make sure the USB cable is securely connected to the tablet and to an active USB port on your computer.  Intuos4 requires that you connect to a primary USB port (located directly on your computer) or to a powered USB hub.• If you are connecting the tablet to a powered USB hub, be sure the USB hub is properly connected to your computer and is active.• Connect the tablet to a different powered USB port or try connecting to the powered USB port on another computer.• If a status LED does not illuminate after your computer is on and has finished booting up, your USB port may be disabled.  Verify that you have connected the tablet to an active USB port.• For best results when troubleshooting no power to the tablet (a status LED does not light), plug the tablet directly into the system USB port located on your computer.  Temporarily eliminate any external hubs in use until you determine that the system recognizes the tablet and that it is functional.  When the tablet is working properly, it is usually okay to then move the tablet to a powered USB hub.2. Check the tablet connection in wireless mode.  A tablet status LED will light whenever the tablet is properly connected and your computer has registered it as a Bluetooth enabled device.  If an LED does not glow, then:• Verify that the tablet power switch is in the on position.• Check the battery power.  If the battery status light glows green the battery is charged, if it glows red the battery charge is low.  If your battery charge is low, plug in the USB cable.  With the USB cable properly connected, the battery status light will glow yellow when charging, and a steady green when fully charged.• If the tablet wireless connection light glows a steady blue, your Bluetooth connection is working.  Otherwise, it is not.  Open the Bluetooth control panel and make sure the tablet was not disconnected.  If not disconnected, see step 3, following.• Switch the tablet power off, then back on.• Reset the tablet by disconnecting both the battery and the USB cable (if in use) for at least 10 seconds.  Then reconnect the tablet battery and try again.
65IndexContents65IndexContents3. If necessary, troubleshoot the Bluetooth connection as follows:• Move the tablet closer to the antenna.  Make sure there are no metal or other high density obstructions in the line of sight between the tablet and Bluetooth antenna.• If you are using a computer with a built-in Bluetooth module, ensure it is enabled and working.  If using a USB-to-Bluetooth adapter (dongle), be sure it is plugged into an active USB port on your computer and working.• Verify your Bluetooth support is working properly.  Test the functionality with a different Bluetooth enabled device or check the documentation that came with your Bluetooth support to be sure it is working correctly.• Be sure that your Bluetooth configuration supports Bluetooth and the HID profile.• Make another attempt to pair the tablet to your system.  See establishing a Bluetooth connection.4. Check the Grip Pen. • Move your pen across the tablet active area; the screen cursor should move in the corresponding direction on your monitor or display screen.• Press the pen tip against the surface of the tablet.  A status LED should brighten.• Next, without applying pressure to the pen tip, hold the pen tip within approximately 10 mm (0.39 inch) of the tablet surface and press the side switch.  The LED should again brighten.• Turn the pen over and press the eraser against the surface of the tablet; the LED should brighten.•See testing your to ols for detailed information.5. Check the Touch Ring.  See testing your tools.6. Check the ExpressKeys.  See testing your tools.7. Check any other tool(s), such as the optional Intuos4 Mouse.  See testing your tools.8. If these tests fail, you may have a defective input tool or tablet.  See technical support options.9. After testing, use the Wacom Tablet control panel to reconfigure your tablet and tools for any custom settings you may originally have been using.
66IndexContents66IndexContentsTESTING YOUR TOOLSIf an input tool does not work as you expect, first open the Wacom Tablet control panel and check the assigned functions or reset the tool to its default condition.To quickly return a tool to the default settings, remove it from the TOOL list by clicking on the control panel list’s [ – ] button.  After the tool has been removed, place it back onto the tablet.  The tool will be added back to the TOOL list with its default settings.To test your input tools:• In the Wacom Tablet control panel, click on the ABOUT button.  In the dialog box that appears, click on the DIAGNOSE... button.  The DIAGNOSTICS dialog box displays to show dynamic information about the tablet hardware and pointing devices, including the battery status of the currently selected tablet.• If you have more than one tablet connected to your system, in the TABLET INFO column select the tablet for which you are testing your tool.• Use the information presented in the DIAGNOSTICS dialog box when testing your tablet and tools.Note:  When testing your tool buttons, if a button is set to RADIAL MENU or OPEN/RUN..., that function will occur when the button is pressed.  In this case you may want to change that button function before testing.Testing a penTesting the Touch RingTesting the ExpressKeysTesting the optional mouse
67IndexContents67IndexContentsTESTING A PEN1. While observing the POINTING DEVICE INFO column, bring your Intuos4 tool within 10 mm (0.39 inch) of the tablet active area.  A value for PROXIMITY, the DEVICE NAME, DEVICE TYPE, and a DEVICE S/N (serial number) should be displayed.  If you have more than one tablet connected to your system, be sure you have selected the TABLET for which you are testing your tools from the TABLET INFO column.2. Move your tool along the tablet surface. The X and Y DATA values should change to reflect the tool position.3. Test your Intuos4 pen switches.  A tablet status LED should brighten each time you click with the tool tip, press the side switch, or press the tool’s eraser to the tablet.• Click on the tablet surface with the tool tip – the SWITCHES state and PRESSURE value should change.  (PRESSURE should change from approximately 0% with no pressure applied to approximately 100% when full pressure is applied.)• Press the side switch without pressing the tip to the tablet – the SWITCHES state should change.  (For the Intuos4 pen, do this for both positions of the side switch.)• Press the tool’s eraser to the tablet – the SWITCHES state and PRESSURE value should change.    (Pressure should change from approximately 0% with no pressure applied to approximately 100% when full pressure is applied.)• For the Airbrush, move the fingerwheel forward – the WHEEL value should decrease to a value of approximately 0 when the fingerwheel is all the way forward.  Move the fingerwheel backward – the WHEEL value should increase to approximately 1000 when the fingerwheel is all the way back.4. Test tilt for the x-axis by moving the pen from a vertical position toward the right; the X TILT value should change from approximately 0 to +60.  Now move the tool to the left of vertical; the X TILT value should change from approximately 0 to -60.5. Test tilt for the y-axis by moving the pen from a vertical position toward the bottom of the tablet; the Y TILT value should change from approximately 0 to +60.  Now move the tool toward the top of the tablet; the Y TILT value should change from approximately 0 to -60.6. If you are testing an Art Pen, test pen rotation by holding the pen vertically and twisting it around its axis.  The displayed ROTATION value should change.7. When you are done, click on the CLOSE button to exit the dialog box.Pen Tip = 1Side switch (lower position) = 2Side switch (upper position) = 3Eraser = 1Airbrush Tip = 1Side Switch = 2Eraser = 1
68IndexContents68IndexContentsTESTING THE TOUCH RING1. With the DIAGNOSTICS dialog box open, observe the TABLET INFO column as you test the tablet Touch Ring.  If you have more than one tablet connected to your system, be sure you have selected the tablet you are testing from the TABLET INFO column.2. Slide your finger around the entire circumference of the Touch Ring.  As you touch and move your finger along the Touch Ring, a LEFT TOUCH number will indicate your current finger position on the Touch Ring.3. Press the Touch Ring toggle button to toggle between the four customizable states.  As you cycle between settings, a corresponding LED should illuminate.  Within the DIAGNOSTICS dialog box, the button state is also shown as LEFT BUTTONS.If any of the functions are set to SKIP, the corresponding LED will be skipped in the toggle sequence.4. When you are done, click on the CLOSE button to exit the dialog box.Important: Remember that some applications can override and control the Touch Ring functions.  Consider closing any open applications except the Wacom Tablet control panel when testing the Touch Ring.  For details, see using applications integrated for tablet control.TESTING THE EXPRESSKEYS1. With the DIAGNOSTICS dialog box open, observe the TABLET INFO column as you test each ExpressKey.  If more than one tablet is connected to your system, be sure you have selected the tablet you are testing from the TABLET INFO column.2. Test the keys on your tablet by clicking them one at a time.  Each time you press a key, its number will be displayed next to the LEFT KEYS category.3. On the tablet itself, verify also that a tablet ExpressKeys icon is visible for each corresponding ExpressKey.4. When you are done, click on the CLOSE button to exit the dialog box.Important: Remember that some applications can override and control the ExpressKey functions.  Consider closing any open applications except the Wacom Tablet control panel when testing the ExpressKeys.  For details, see using applications integrated for tablet control.
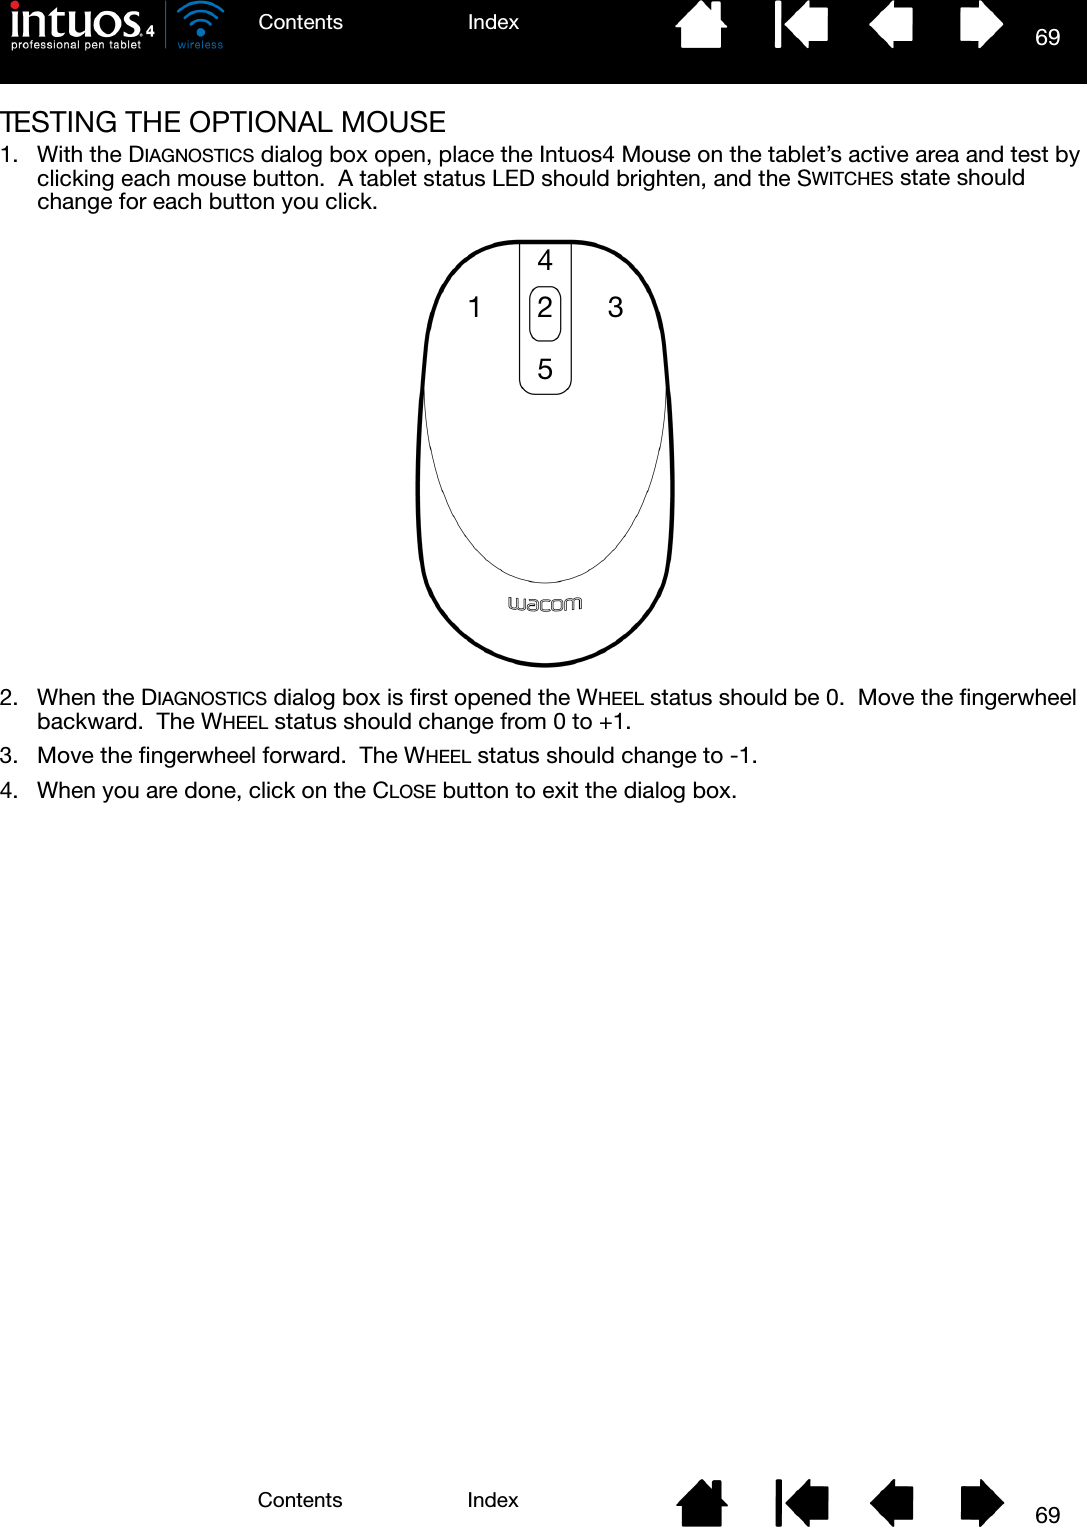
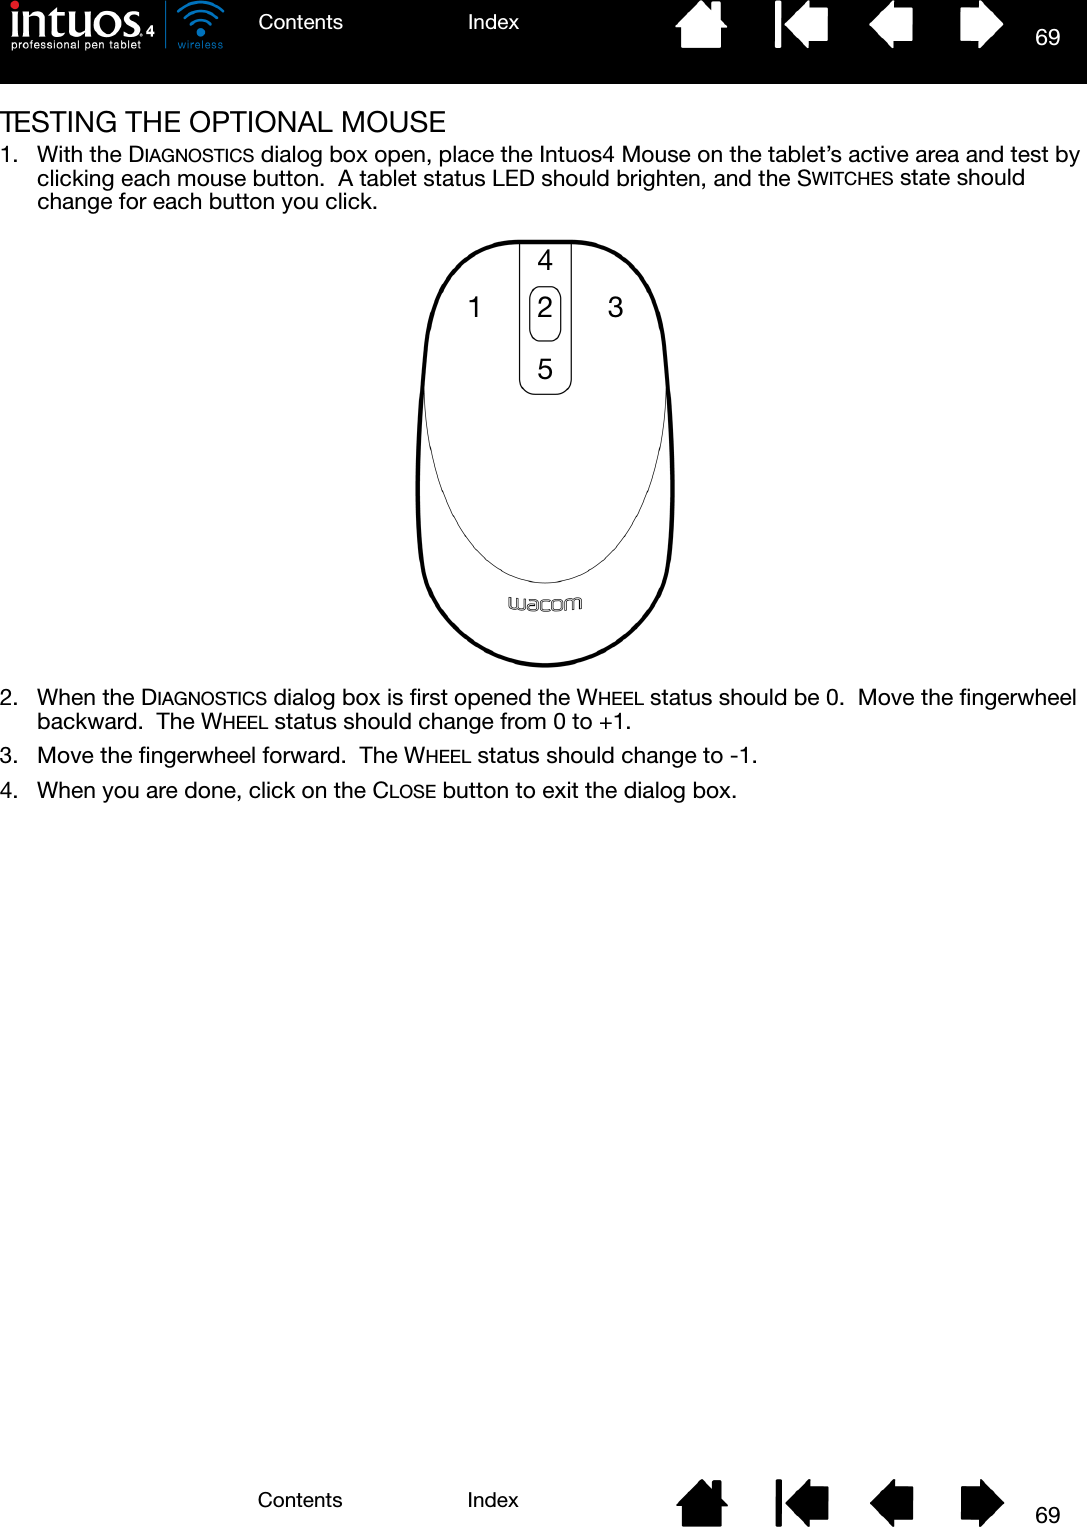
69IndexContents69IndexContentsTESTING THE OPTIONAL MOUSE1. With the DIAGNOSTICS dialog box open, place the Intuos4 Mouse on the tablet’s active area and test by clicking each mouse button.  A tablet status LED should brighten, and the SWITCHES state should change for each button you click.2. When the DIAGNOSTICS dialog box is first opened the WHEEL status should be 0.  Move the fingerwheel backward.  The WHEEL status should change from 0 to +1.3. Move the fingerwheel forward.  The WHEEL status should change to -1.4. When you are done, click on the CLOSE button to exit the dialog box.42531
70IndexContents70IndexContentsTROUBLESHOOTING TABLESIf you encounter problems with your Intuos4 tools or tablet, refer to the following tables.  Your problem may be described here, and you can try the solution offered.  Be sure to check the Read Me file for the latest information updates.For additional information, visit Wacom’s web site at http://www.wacom.com/productsupport.Connection problemsGeneral problemsWindows-specific problemsMac-specific problemsCONNECTION PROBLEMSThe computer does not have built-in Bluetooth support. You will need to install a USB-to-Bluetooth adapter (dongle) in order to add wireless connectivity to your computer.  The adapter should support Bluetooth with Human Interface Device (HID) profile.After moving the power switch to the on position, the wireless connection light glows steadily for 2 to 5 seconds and then turns off.If the tablet was previously working on your computer but works no longer, check the configuration of your Bluetooth connection:• If you are using a computer with a built-in Bluetooth module, ensure that it is enabled and working.  If you are using a USB-to-Bluetooth adapter (dongle), make sure it is plugged in and working.• Test your computer’s Bluetooth support with another Bluetooth enabled device, such as a mouse or keyboard.• Open the Bluetooth control panel and make sure the tablet was not disconnected.• Move the tablet closer to the antenna and make sure there are no metal or other high density obstructions in the line of sight between the tablet and Bluetooth antenna.Repeat the process of establishing a Bluetooth connection with your computer.After moving the power switch to the on position, the wireless connection light flashes blue.The tablet has not been paired to a computer, or the connection has been broken either by pressing the tablet’s pairing button or by deleting the pairing from the Bluetooth control panel.  Pair the tablet to your computer as described in establishing a Bluetooth connection.
71IndexContents71IndexContentsThe battery status light does not come on after moving the power switch to the on position.Try again.  If the light does not come on after repeated attempts, your battery charge may be too low.Connect the USB cable directly to a powered USB port on your computer or powered USB hub.  If the battery status light does not glow when the power switch is in the on position the battery may be defective.When pairing the tablet, the tablet does not appear in the list of available devices to pair.• The tablet should appear in the pairing list with a mouse icon named WACOM TABLET.• If the wireless connection light is not flashing, press the pairing button on the side of the tablet to make the tablet discoverable.  The tablet will be in discoverable mode for 3 minutes and the wireless connection light will flash blue.• Verify that your Bluetooth configuration supports Bluetooth with Human Interface Device (HID) profile.• Make sure the tablet is not too far away from the antenna, and that there are no metal obstructions between the Bluetooth antenna and the tablet.A pairing unsuccessful message is displayed when attempting to link the tablet to the computer.Check for possible interference from other wireless devices, such as from a cordless telephone or microwave oven.  If you suspect interference, turn off the interfering device or move it farther away from your computer.Try again linking the wireless tablet to the computer.Pairing was successful, but the wireless tablet does not seem to work correctly.Be sure that you have correctly installed the Wacom tablet driver software.See also optimizing the Bluetooth connection.The tablet works fine when the USB cable is connected to a primary USB port (located directly on your computer) or to a powered USB hub, but switches off as soon as the cable is disconnected.• Open the battery compartment and verify that the battery is properly installed.• Check the battery appearance to ensure there is no leakage or other indication of damage.• Charge the battery overnight and try again.  If the problem persists, the battery may be completely discharged or damaged and can no longer hold a charge.  You will have to purchase a replacement battery from Wacom.  See ordering parts and accessories.• Confirm the tablet is paired to your system.
72IndexContents72IndexContentsGENERAL PROBLEMSAfter switching on the tablet, the battery status light remains on but the screen cursor cannot be moved with the pen.•Review Using the Grip Pen to be sure you are using the tool correctly.• Switch the tablet power off, then back on.• If your battery charge is low, plug in the USB cable to a primary USB port (located directly on your computer) or to a powered USB hub.• Reset the tablet by disconnecting both the battery and the USB cable for at least 10 seconds.  Then reconnect the tablet battery and try again.The battery status light does not illuminate when the USB cable is plugged in.Check that the cable is properly plugged into the tablet, and that it is plugged directly into a powered USB port on your computer or a powered USB hub.Try connecting the tablet to a different powered USB port.The battery may need replacement.While using the tablet, the tablet battery status light flashes red.The battery is nearly empty.  Plug in the USB cable to continue working, or power down the tablet.You want to connect the tablet using the provided USB data cable but the computer does not have an available USB port.Check if there is an available USB port on a powered USB hub.  If not available you will need to add a powered USB hub or USB card.The tablet status LEDs are off.  An LED does not illuminate when using the pen, mouse, or Touch Ring toggle button.Be sure the tablet is turned on.If your connection is wireless, verify that the battery status light is on and that the Bluetooth wireless connection is active.If your tablet is connected using the provided USB data cable, verify that the USB cable is properly connected to the tablet and to an active USB port.  Be sure the tablet USB cable is plugged into a primary USB port (directly into your computer) or into a powered USB hub.  If connecting to a powered USB hub device, make sure the hub is connected to an active USB port and that the hub is active.  Try also connecting to another USB port or using another USB cable.After plugging in the tablet with a USB connection, a message appears indicating that the USB device needs more power than is available.Make sure the tablet is plugged into a primary USB port on your computer or into a powered USB hub attached to your computer.
73IndexContents73IndexContentsThe tablet charging process seems to stop whenever the computer enters sleep mode.As required, adjust your system power or energy saver settings so that the computer does not enter sleep mode while the tablet is charging.When using the pen to operate the Touch Ring, the Touch Ring does not work well.The Touch Ring is designed to be used with your finger, and does not work with the pen tip.The pen works only in MOUSE MODE, and does not draw or ink with pressure sensitivity.The tablet driver software was not installed or did not load properly.• Make sure the tablet driver software is installed and functioning.• Insert the Intuos installation CD into your computer and install the driver software for the tablet.The pen does not draw or ink with pressure sensitivity. Some applications require that you turn on the pressure capabilities within the application or the selected tool before the pen will respond as a pressure-sensitive tool.Some applications do not support pressure.  If you are unsure whether pressure is supported, see the documentation that came with your application(s).Clicking is difficult. Try using a lighter TIP FEEL.  See adjusting tip feel and double-click.Double-clicking is difficult. • Use the side switch to double-click.  Review the technique in clicking.• Be sure you are quickly tapping the tablet twice in the same place on the tablet’s active area.• Try increasing the TIP DOUBLE CLICK DISTANCE.  See adjusting tip feel and double-click. • Try using a lighter TIP FEEL.  See adjusting tip feel and double-click.• Set an ExpressKey to DOUBLE CLICK and use it to issue double-clicks.•Windows: Try setting your system to launch programs with a single click.  See clicking.The pen selects everything, will not stop selecting. Open the Wacom Tablet control panel and go to the PEN tab.  Move the TIP FEEL slider toward FIRM, or select DETAILS... and increase the CLICK THRESHOLD setting.  If this does not help, see testing your tools.The pen nib may be worn.  See replacing the pen tip.The eraser selects everything or will not stop erasing. Open the Wacom Tablet control panel and go to the ERASER tab.  Move the ERASER FEEL slider toward FIRM, or select DETAILS... and increase the CLICK THRESHOLD setting.  If this does not help, see testing your tools.
74IndexContents74IndexContentsYou notice a screen delay at the beginning of pen or inking strokes.Open the Wacom Tablet control panel and go to the PEN tab.  Try decreasing the TIP DOUBLE CLICK DISTANCE (see adjusting tip feel and double-click).  If that does not work, try dragging the TIP DOUBLE CLICK DISTANCE slider to the OFF position in order to turn off double-click assist.Try turning off the operating system inking features.You have to press hard with the pen when clicking, drawing, or writing.Open the Wacom Tablet control panel and go to the PEN tab.  Move the TIP FEEL slider toward SOFT, or select DETAILS... and decrease the SENSITIVITY and CLICK THRESHOLD settings.The pen tip does not function. Be sure you are using the pen that originally came with Intuos4.  Other pens may not function properly on the tablet.Check the control panel’s PEN tab and verify that a CLICK function is assigned to the tip.Try the pen eraser to see if that portion of the pen is functional.A tablet status LED should brighten when the tip or eraser is pressed.  If not, you may have defective hardware.  See testing your tools.Changing the function settings of an input tool has no effect. Make sure you are changing the settings for the tool and application that you are using.  See working with multiple tools and application-specific settings.The pen side switch does not work. Be sure you are using the pen that originally came with Intuos4 or an Intuos4 accessory pen.  Other pens may not function properly on the tablet.Be sure to press the side switch when the pen tip is within 10 mm (0.39 inch) of the tablet’s active area.  Do this without pressing down on the pen tip.In the Wacom Tablet control panel, verify that the side switch is set to the function you are expecting to occur for the application and tool you are using.  Check also the SIDE SWITCH MODE.  If CLICK & TAP is selected, you will need to first press the side switch while touching the pen tip to the tablet surface in order to perform a click function.  See customizing tool buttons.A tablet status LED should brighten when you press the side switch.  If not, you may have defective hardware.  See testing your tools.
75IndexContents75IndexContentsThe screen cursor “jumps” back. Do not place an Intuos4 tool on the tablet when it is not in use, or when you are using another pointing device.  Leaving your tool on the tablet may interfere with screen cursor positioning when using other input devices.Cannot move the cursor (pointer) where you want to on the screen, or the line you are drawing does not line up with the location of the cursor in paint applications.Open the Wacom Tablet control panel and go to the MAPPING tab.  Verify that PEN MODE is selected and that the SCREEN AREA is set to FULL for the selected tool and application.  If this does not help, click on the DEFAULT button to reestablish tablet to screen mapping.  If you are still having difficulty, remove the tablet preferences.Confirm whether the pen does (or does not) function.  See testing your tools.The computer does not go to sleep. When you are not using your Intuos4 input tool(s), remove them from the tablet surface or the tablet will continue to send data, keeping the computer awake.When using the tablet the screen cursor is very erratic or “jumps” around.On rare occasions the tablet may receive interfering radio frequencies from a computer monitor or nearby AM radio station.  If you notice interference from a monitor, try moving the tablet at least 6 inches away from the monitor, or change the monitor refresh rate or monitor resolution.If the screen cursor lags or “jumps”, try optimizing the Bluetooth connection.When using the tablet, the screen cursor or pen strokes seem to lag or skip in some applications.See optimizing the Bluetooth connection for tips on improving the Bluetooth connection.When using Intuos4 on a multiple monitor system, you cannot use the pen tip to control the other monitor(s).Determine if an ExpressKey has been set to DISPLAY TOGGLE and if it may have been activated accidentally.  See working with Display Toggle.Verify that the SCREEN AREA in the MAPPING tab is set to FULL.You can also use your pen to control the other monitors in MOUSE MODE.  To use MOUSE MODE, first set a pen button to MODE TOGGLE....  Then use the button to toggle between PEN MODE and MOUSE MODE.
76IndexContents76IndexContentsWINDOWS-SPECIFIC PROBLEMSWhen working in some applications, the ExpressKeys or Touch Ring perform a different function than what is set in the Wacom Tablet control panel.Some applications can override and control the ExpressKey and Touch Ring functions.• When an ExpressKey is overridden by an application, the ExpressKeys display will automatically update to show either the new function name or “Application Defined”.• See using applications integrated for tablet control.If you use application-specific settings, be sure you have updated the settings for the correct application.The tablet is set to EXPRESSKEYS RIGHT (or EXPRESSKEYS LEFT), but at the log-in screen the tablet seems to work upside down.Begin by uninstalling the software for the existing tablet driver.  Restart your computer. Then reinstall the tablet driver from the Intuos installation CD and change the default orientation of the tablet.  See configuring the tablet orientation for details.You suspect the tablet preferences may be corrupted, or want to make certain that all settings are at their factory defaults.Use the Wacom Tablet Preference File Utility to work with your preferences.  Close any open applications.  Click the START icon and select ALL PROGRAMS.  Then select WACOM TABLET and WACOM TABLET PREFERENCE FILE UTILITY. • It is a good idea to first back up your tablet preferences.  In the TABLET PREFERENCE FILE UTILITY dialog box, click BACKUP... and follow the prompts.• Then, delete the tablet preferences as follows:Single user.  In the TABLET PREFERENCE FILE UTILITY dialog box, click the REMOVE button under MY PREFERENCES to delete the preferences for the current user.Multiple users.  Click the REMOVE button under ALL USER PREFERENCES to delete preferences for multiple users.  Note that administrator rights are required to delete preferences for all users.  Relaunch any currently open tablet-aware applications that you may be running.You can quickly restore tablet preferences that have been backed up by clicking RESTORE... under MY PREFERENCES.After changing right- and left- handed settings in the computer’s mouse control panel, the pen tip no longer functions properly and the Intuos4 Mouse tool button functions are reversed.Restart Windows for your Wacom tool settings to be correctly recognized.
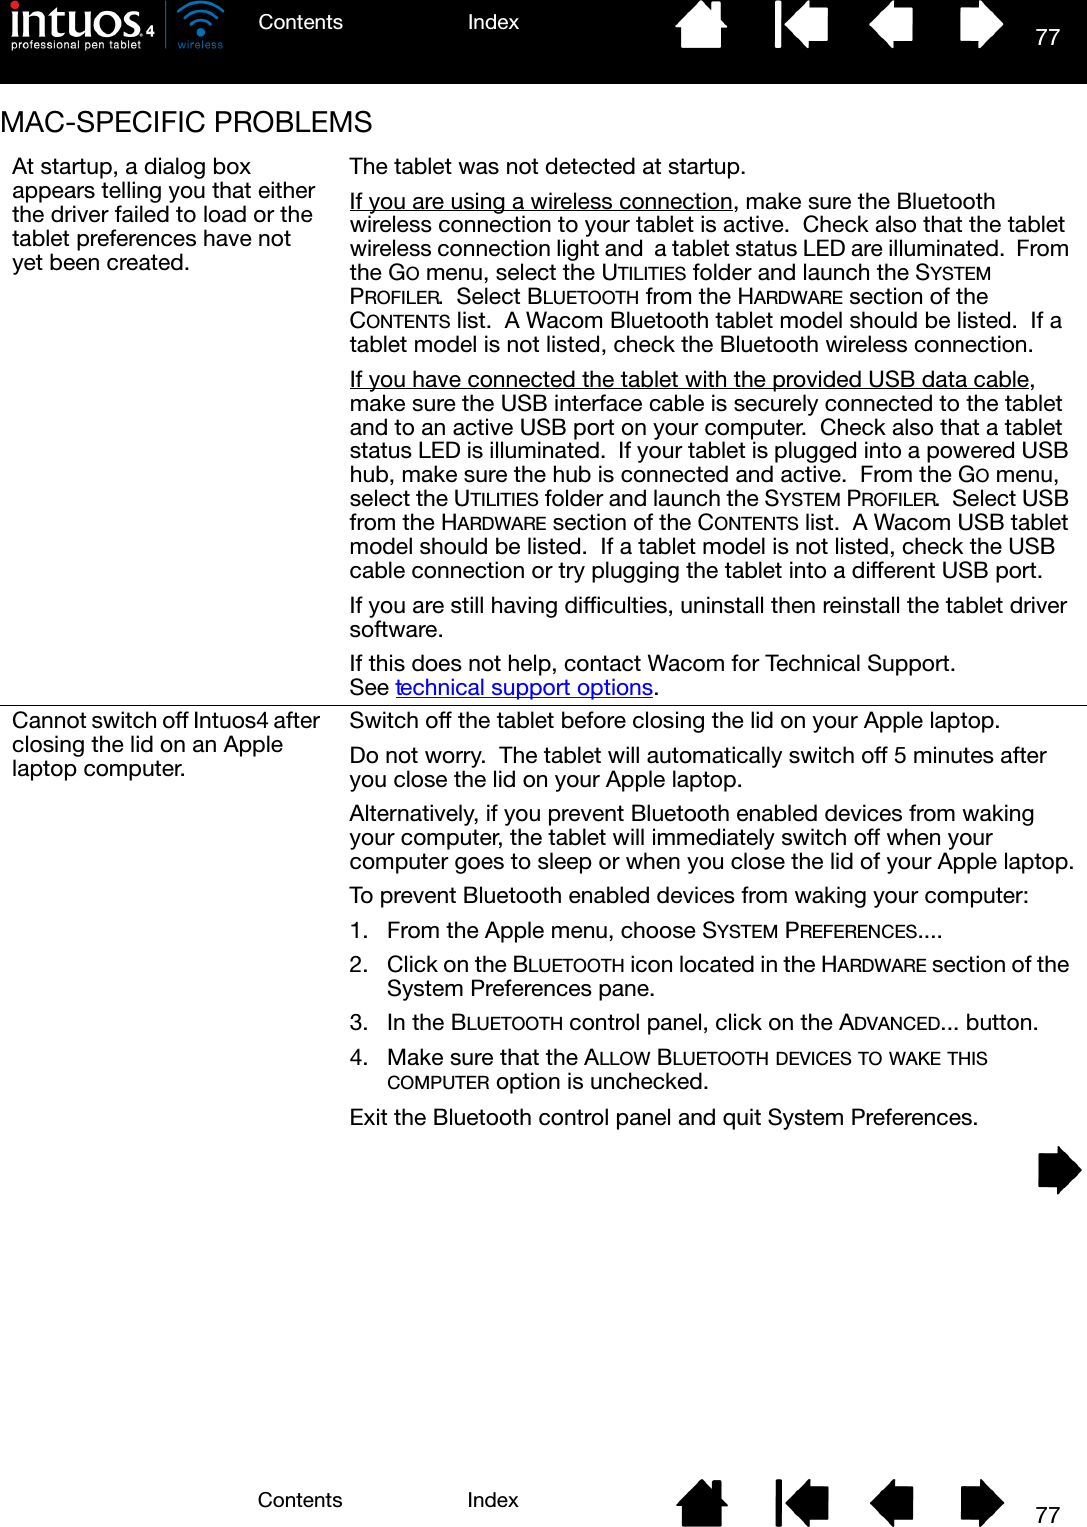
77IndexContents77IndexContentsMAC-SPECIFIC PROBLEMSAt startup, a dialog box appears telling you that either the driver failed to load or the tablet preferences have not yet been created.The tablet was not detected at startup.If you are using a wireless connection, make sure the Bluetooth wireless connection to your tablet is active.  Check also that the tablet wireless connection light and  a tablet status LED are illuminated.  From the GO menu, select the UTILITIES folder and launch the SYSTEM PROFILER.  Select BLUETOOTH from the HARDWARE section of the CONTENTS list.  A Wacom Bluetooth tablet model should be listed.  If a tablet model is not listed, check the Bluetooth wireless connection.If you have connected the tablet with the provided USB data cable, make sure the USB interface cable is securely connected to the tablet and to an active USB port on your computer.  Check also that a tablet status LED is illuminated.  If your tablet is plugged into a powered USB hub, make sure the hub is connected and active.  From the GO menu, select the UTILITIES folder and launch the SYSTEM PROFILER.  Select USB from the HARDWARE section of the CONTENTS list.  A Wacom USB tablet model should be listed.  If a tablet model is not listed, check the USB cable connection or try plugging the tablet into a different USB port.If you are still having difficulties, uninstall then reinstall the tablet driver software.If this does not help, contact Wacom for Technical Support.  See technical support options.Cannot switch off Intuos4 after closing the lid on an Apple laptop computer.Switch off the tablet before closing the lid on your Apple laptop.Do not worry.  The tablet will automatically switch off 5 minutes after you close the lid on your Apple laptop.Alternatively, if you prevent Bluetooth enabled devices from waking your computer, the tablet will immediately switch off when your computer goes to sleep or when you close the lid of your Apple laptop.To prevent Bluetooth enabled devices from waking your computer:1. From the Apple menu, choose SYSTEM PREFERENCES....2. Click on the BLUETOOTH icon located in the HARDWARE section of the System Preferences pane.3. In the BLUETOOTH control panel, click on the ADVANCED... button.4. Make sure that the ALLOW BLUETOOTH DEVICES TO WAKE THIS COMPUTER option is unchecked.Exit the Bluetooth control panel and quit System Preferences.
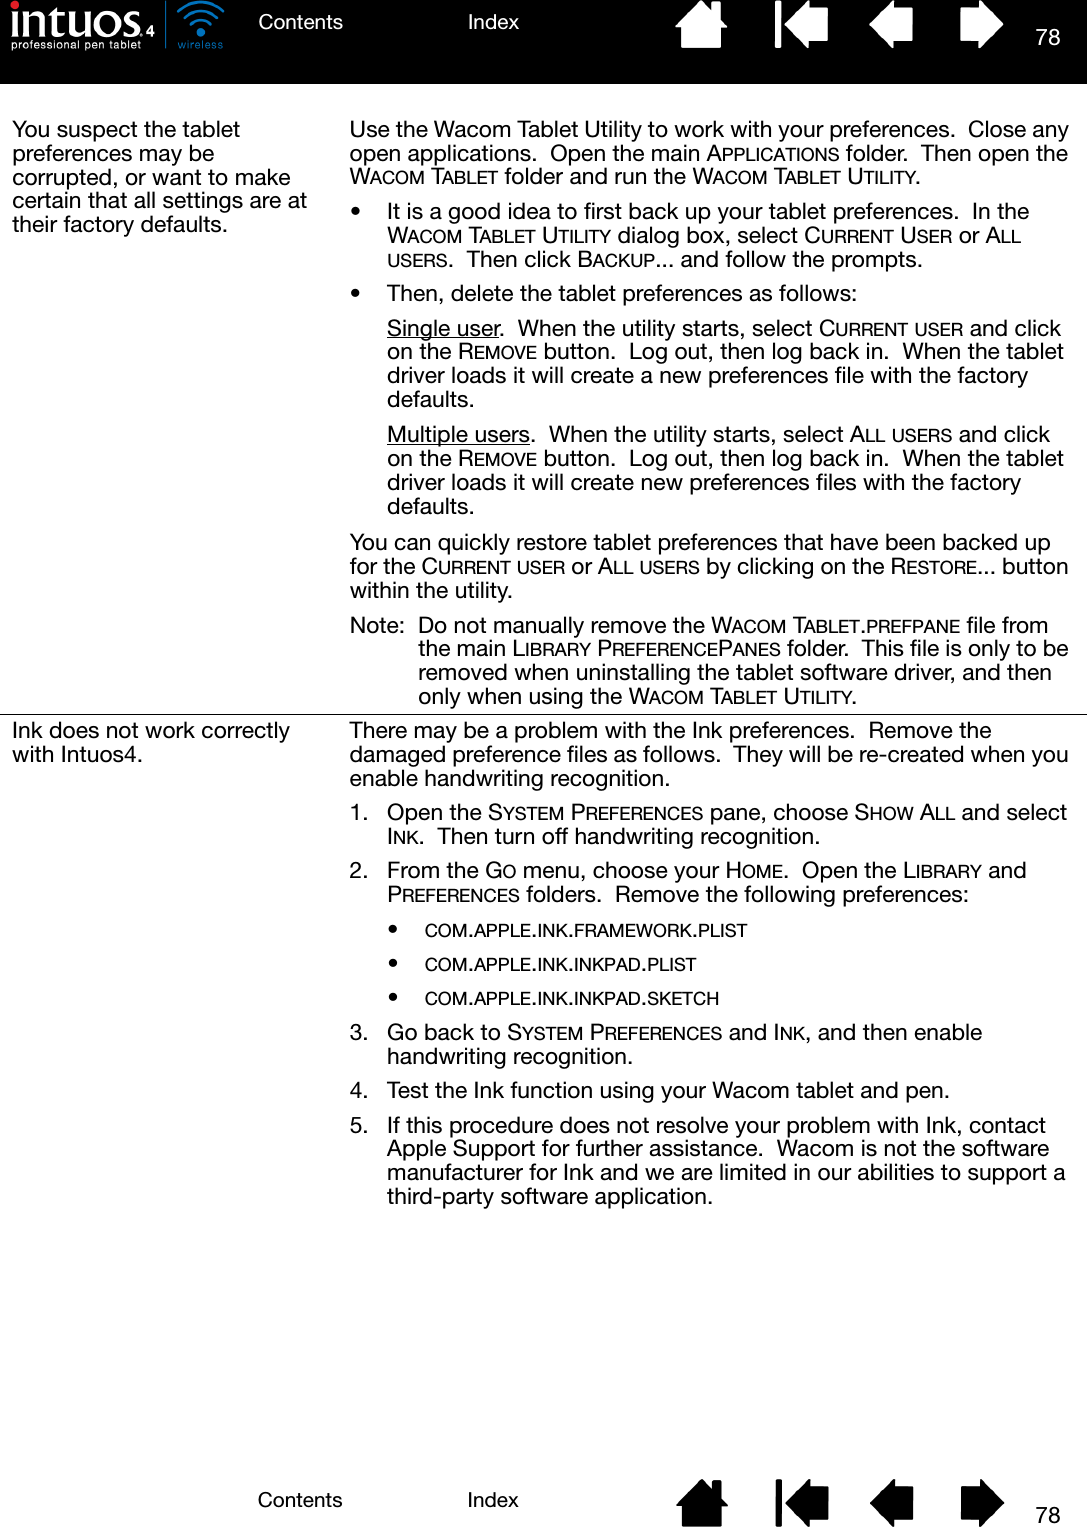
78IndexContents78IndexContentsYou suspect the tablet preferences may be corrupted, or want to make certain that all settings are at their factory defaults.Use the Wacom Tablet Utility to work with your preferences.  Close any open applications.  Open the main APPLICATIONS folder.  Then open the WACOM TABLET folder and run the WACOM TABLET UTILITY.• It is a good idea to first back up your tablet preferences.  In the WACOM TABLET UTILITY dialog box, select CURRENT USER or ALL USERS.  Then click BACKUP... and follow the prompts.• Then, delete the tablet preferences as follows:Single user.  When the utility starts, select CURRENT USER and click on the REMOVE button.  Log out, then log back in.  When the tablet driver loads it will create a new preferences file with the factory defaults.Multiple users.  When the utility starts, select ALL USERS and click on the REMOVE button.  Log out, then log back in.  When the tablet driver loads it will create new preferences files with the factory defaults.You can quickly restore tablet preferences that have been backed up for the CURRENT USER or ALL USERS by clicking on the RESTORE... button within the utility.Note:  Do not manually remove the WACOM TABLET.PREFPANE file from the main LIBRARY PREFERENCEPANES folder.  This file is only to be removed when uninstalling the tablet software driver, and then only when using the WACOM TABLET UTILITY.Ink does not work correctly with Intuos4. There may be a problem with the Ink preferences.  Remove the damaged preference files as follows.  They will be re-created when you enable handwriting recognition.1. Open the SYSTEM PREFERENCES pane, choose SHOW ALL and select INK.  Then turn off handwriting recognition.2. From the GO menu, choose your HOME.  Open the LIBRARY and PREFERENCES folders.  Remove the following preferences:•COM.APPLE.INK.FRAMEWORK.PLIST•COM.APPLE.INK.INKPAD.PLIST•COM.APPLE.INK.INKPAD.SKETCH3. Go back to SYSTEM PREFERENCES and INK, and then enable handwriting recognition.4. Test the Ink function using your Wacom tablet and pen.5. If this procedure does not resolve your problem with Ink, contact Apple Support for further assistance.  Wacom is not the software manufacturer for Ink and we are limited in our abilities to support a third-party software application.
79IndexContents79IndexContentsTECHNICAL SUPPORT OPTIONSIf you have a problem with your Wacom tablet, first check the tablet installation guide to be sure the unit is installed correctly.  Then review the troubleshooting procedures.If you cannot find the answer in this manual, you may find updated information about your problem in the appropriate Read Me file for your platform (located on the Intuos installation CD).  You can also check the product FAQs (Frequently Asked Questions) on the Wacom web site for your region.If you have an Internet connection you can download the latest software drivers from the Wacom web site for your region.  See obtaining driver downloads.If you cannot solve the problem and you think your Wacom tablet is not working properly, contact the Wacom support staff for the area where your product was purchased.  See the Wacom tablet Read Me file, located on the Intuos installation CD, for contact information.When you call, you should be at your computer with the following information available:• This manual.• Tablet serial and model number.  (Look on the bottom of the tablet.)• Driver version number.  (See the Intuos installation CD or click on the Wacom Tablet control panel ABOUT button.)• The make and model of your computer, and operating system version number.• A list of peripheral devices attached to your computer.• The software application and version you were using when the problem occurred.• The exact wording of any error message that appeared on your screen.• What happened and what you were doing when the problem occurred.• How you tried to solve the problem.You can also contact the Wacom Customer Care Center using our Email Inquiry form at:http://www.wacom.com/productsupport/email.cfm
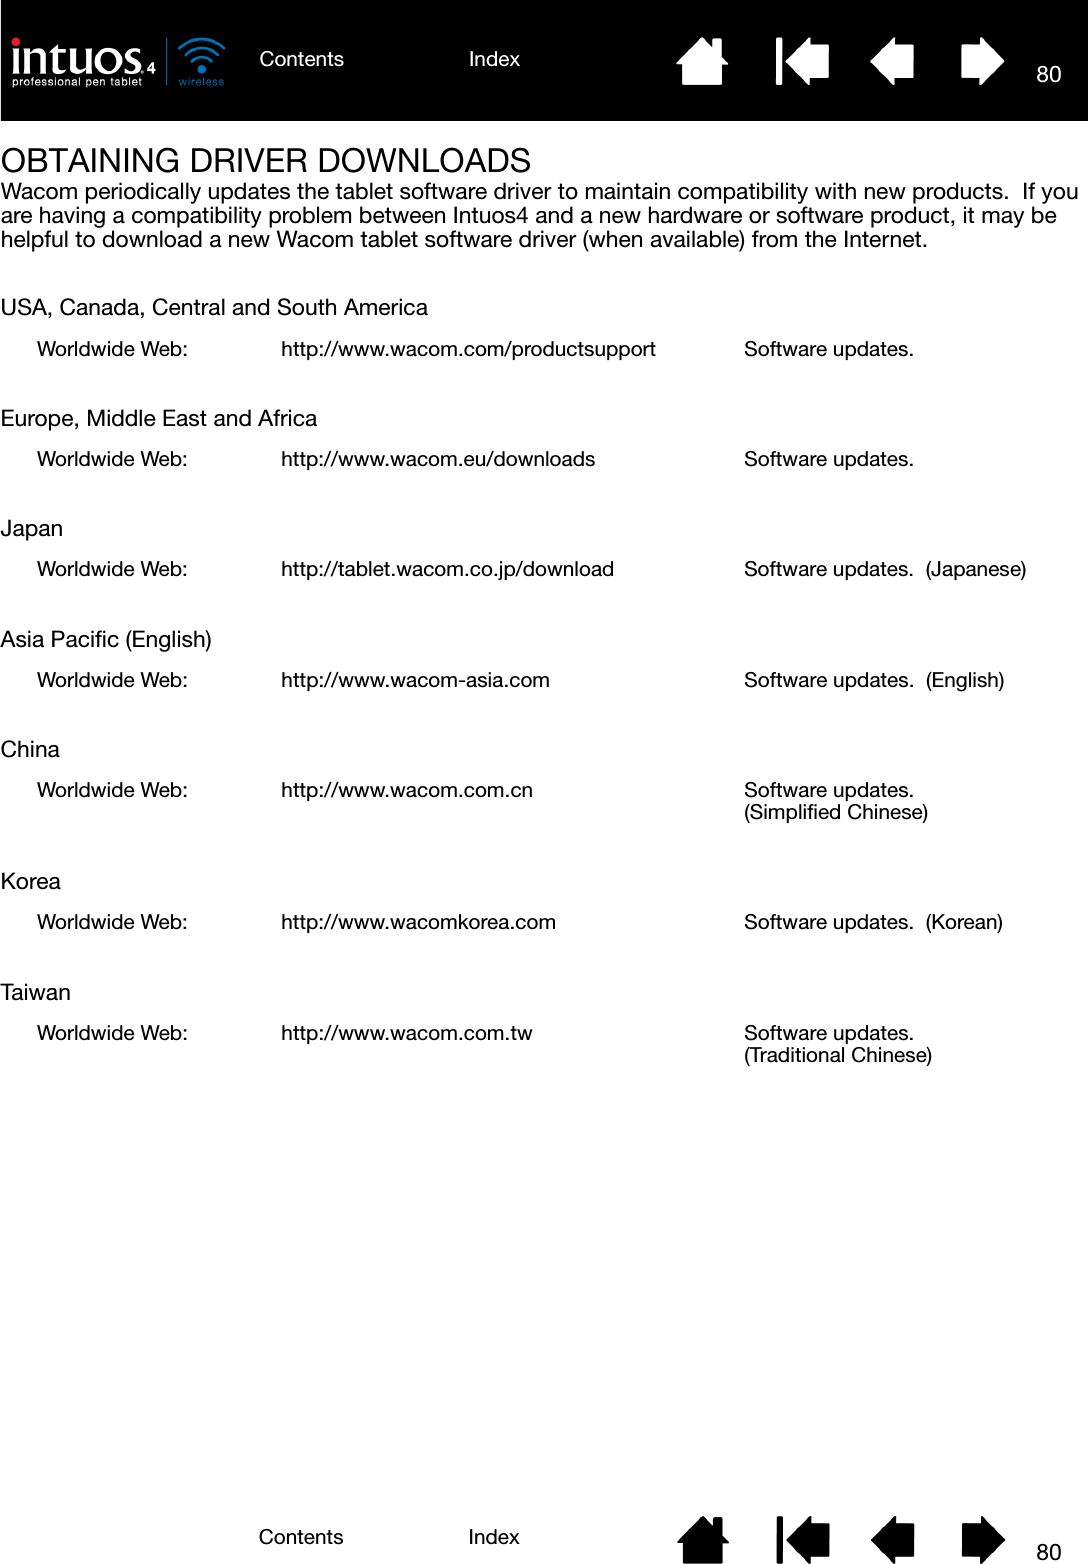
80IndexContents80IndexContentsOBTAINING DRIVER DOWNLOADSWacom periodically updates the tablet software driver to maintain compatibility with new products.  If you are having a compatibility problem between Intuos4 and a new hardware or software product, it may be helpful to download a new Wacom tablet software driver (when available) from the Internet.USA, Canada, Central and South AmericaEurope, Middle East and AfricaJapanAsia Pacific (English)ChinaKoreaTaiwanWorldwide Web: http://www.wacom.com/productsupport Software updates.Worldwide Web: http://www.wacom.eu/downloads Software updates.Worldwide Web: http://tablet.wacom.co.jp/download Software updates.  (Japanese)Worldwide Web: http://www.wacom-asia.com Software updates.  (English)Worldwide Web: http://www.wacom.com.cn Software updates.  (Simplified Chinese)Worldwide Web: http://www.wacomkorea.com Software updates.  (Korean)Worldwide Web: http://www.wacom.com.tw Software updates.  (Traditional Chinese)
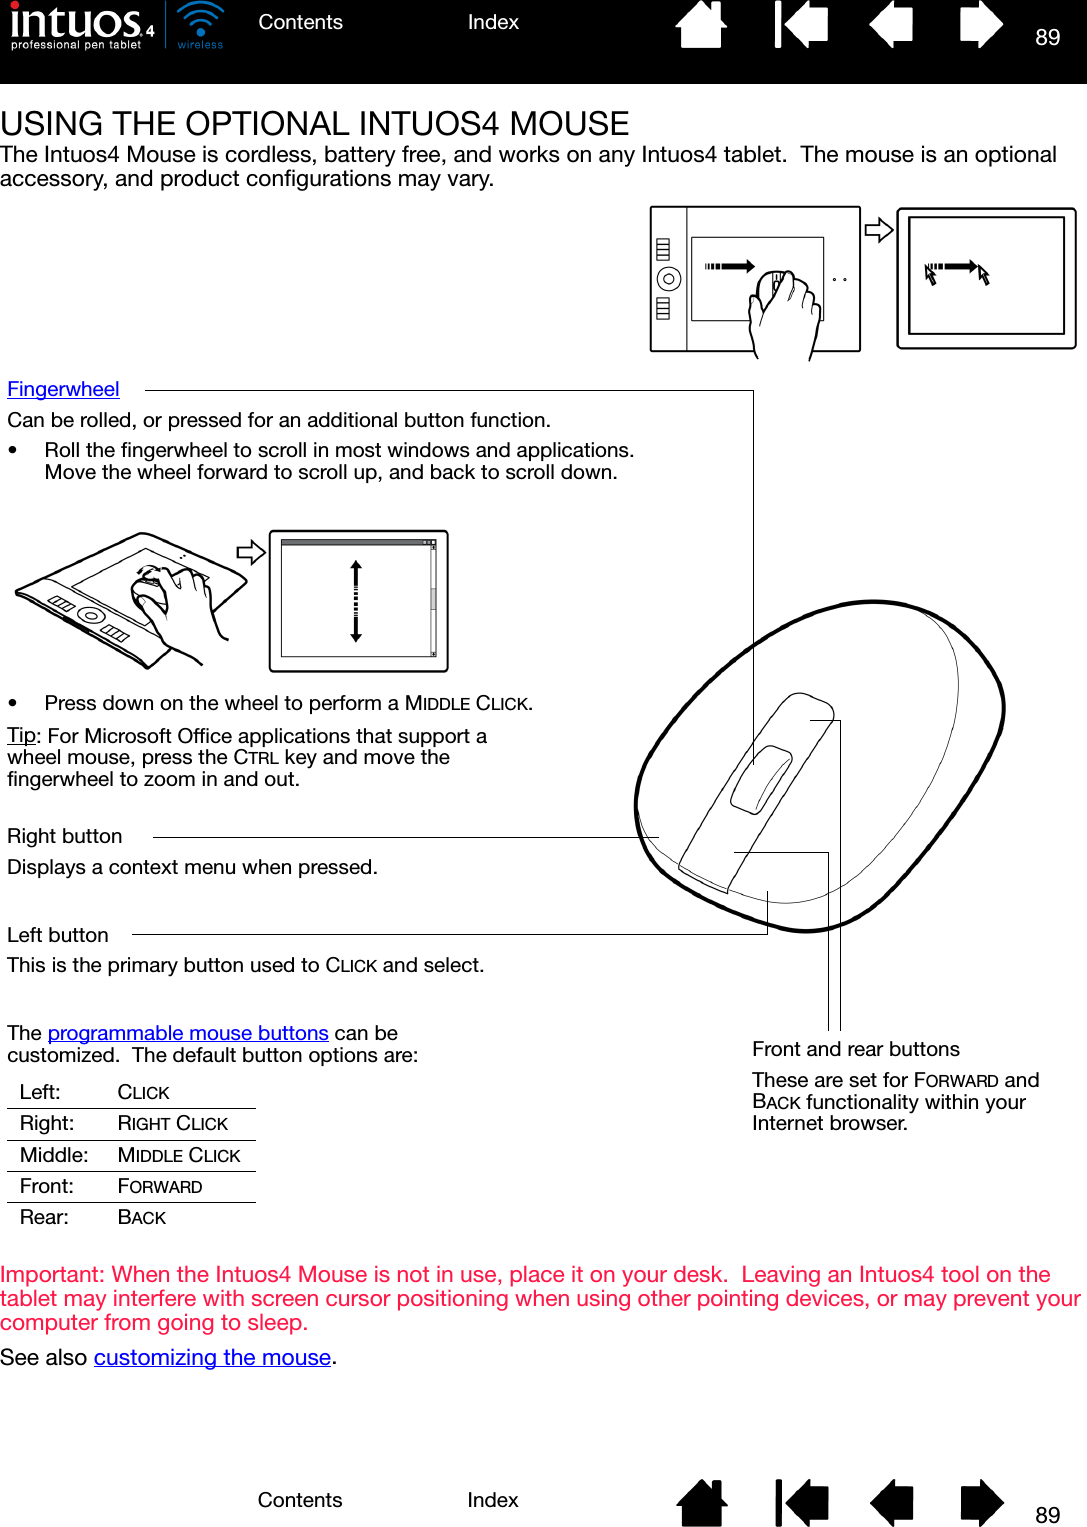
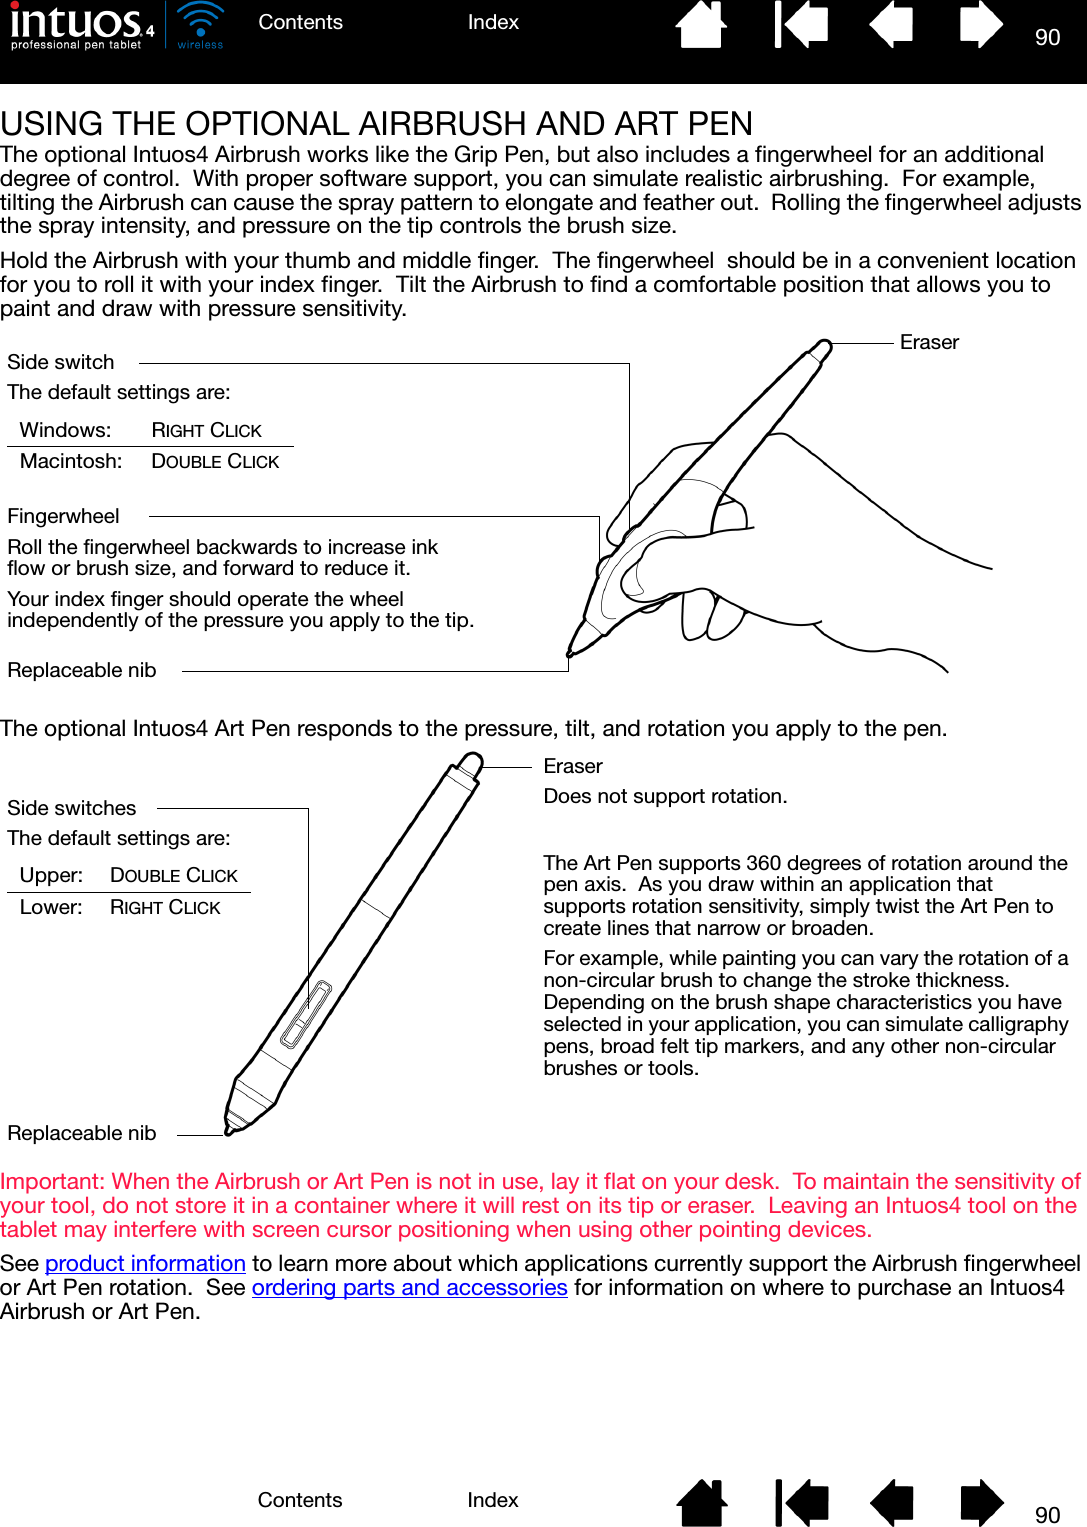
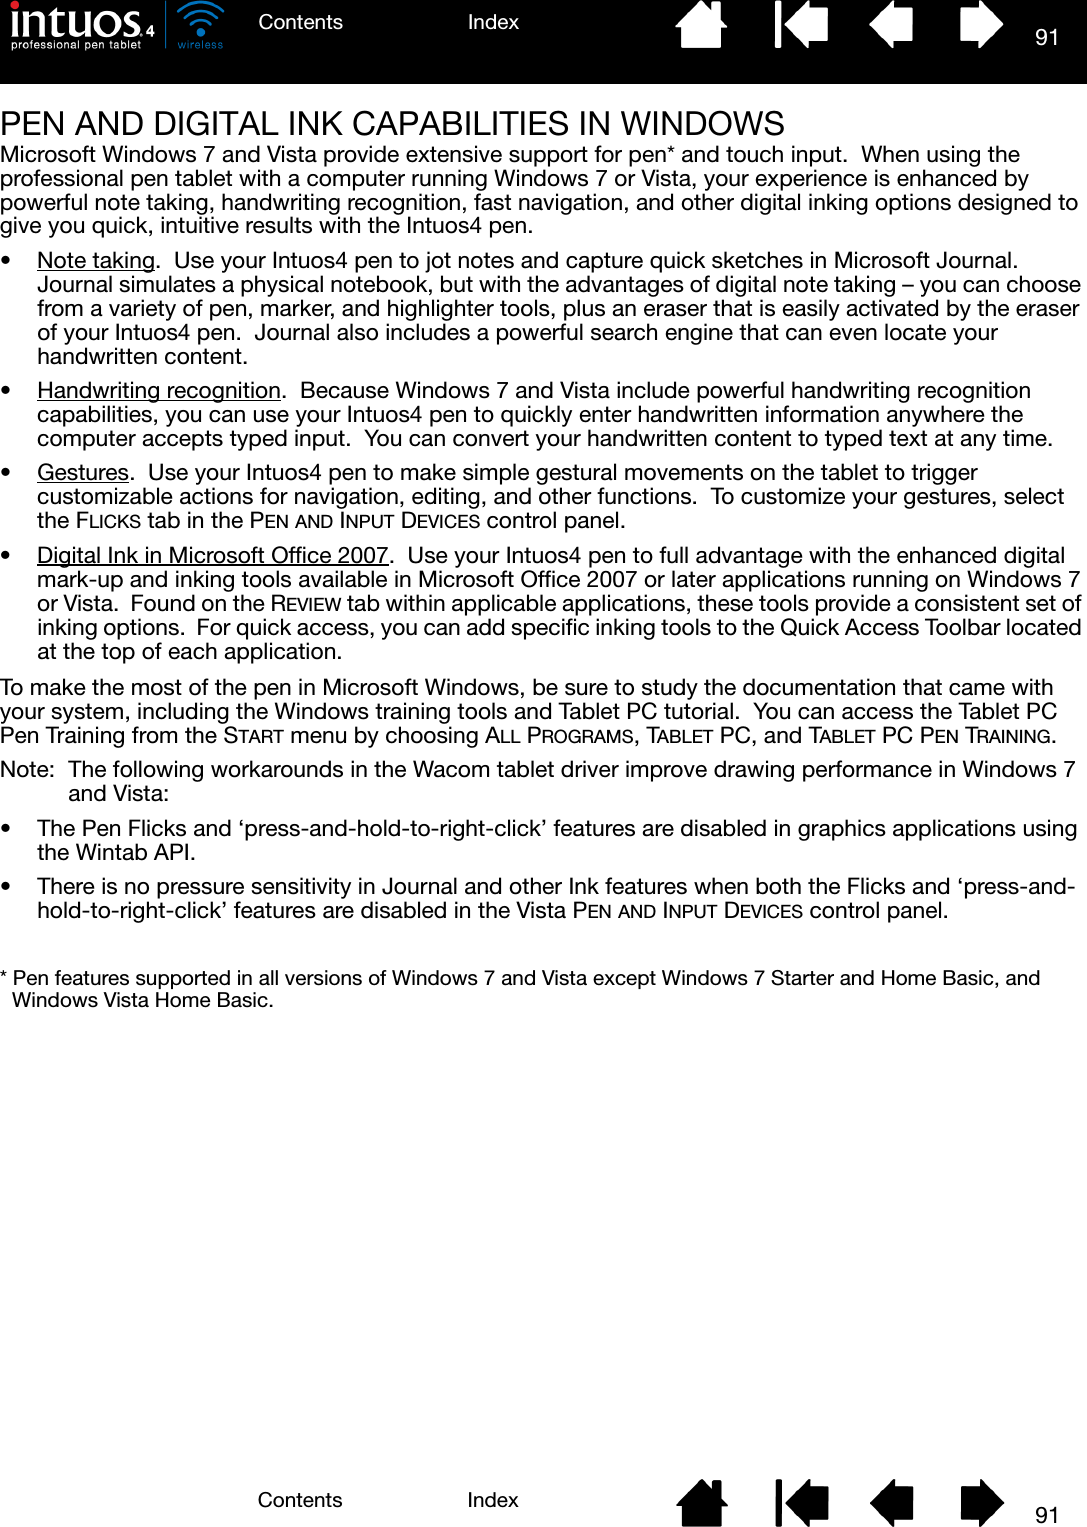
8181IndexContentsIndexContentsAPPENDIXThis section contains a variety of information: tips on caring for your tablet and tools, instructions on how to uninstall the tablet software, your license and warranty, and more.Tablet installationBattery life informationReplacing the tablet batteryCaring for your tablet and toolsReplacing the pen tipUninstalling the softwareManaging your tablet preferencesChanging the tablet mode optionsInstalling multiple tabletsAdvanced optionsOptimizing the ExpressKeys displayUsing applications integrated for tablet controlUsing the optional Intuos4 MouseUsing the optional Airbrush and Art PenPen and digital ink capabilities in WindowsAbout the Windows Tablet PC Input PanelProduct specificationsProduct informationOrdering parts and accessoriesAvailable parts and accessoriesRadio and television interferencePrecautionsLicense and Warranties (Worldwide, Except for Europe, Africa and Middle East)Licence warranty conditions (Europe, Africa and Middle East)TABLET INSTALLATIONFor detailed instructions, please review the Quick Start Guide that came with your tablet.  See also establishing a Bluetooth connection.
82IndexContents82IndexContentsBATTERY LIFE INFORMATIONAll batteries age over time and gradually lose their ability to hold a charge.  The typical life span of a Li-Ion battery is two to three years, whether it is used or not.You will need to purchase a new tablet battery when it is no longer capable of holding an adequate charge.  For information on ordering a replacement battery, see ordering parts and accessories.  Batteries can also be purchased at various retail outlets.• The life and performance of Li-Ion batteries is not improved by cycling (discharging and recharging) the batteries.• Cool storage and keeping the battery in a partially (not fully) charged state when not in use can slow the aging process.• Always charge your tablet battery whenever the low battery warning appears on your display screen, or at the latest when the tablet battery status light begins to flash red.  To reduce the power consumption of an empty battery, the tablet will enter an auto shut-down state whenever the battery level is very low.  In this state the tablet will continue to draw a small amount of power.  The power switch must be turned off and the battery must be recharged.• The tablet will draw current from the battery whenever the power switch is in the on position.  A small current is drawn even in auto sleep and tablet auto shut-down modes, and will slowly discharge the battery.  It is a good idea to charge the battery and move the tablet power switch to the off position before leaving the tablet unused for a number of days.• If the battery charge is low and the battery remains in the tablet for a long period of time (a week or longer) with the power switch in the on position, the small trickle of current used by the tablet is likely to discharge the battery so far that an internal protection circuit within the battery is activated.  If this occurs you will no longer be able to charge the battery.  To preserve your battery, be sure to move the tablet power switch to the off position before leaving the tablet unused for a week or longer.• For extended storage (a month or longer), Wacom recommends that the battery be at least half full before you move the power switch to the off position.  You do not need to remove the battery because the power switch disconnects the battery from the tablet circuit when in the off position.• An internal protection circuit within the battery prevents any charging once the voltage has fallen below a minimum safety level.  Once a Li-Ion battery has been over-discharged it cannot be recharged.Warning: See the safety precautions for Lithium-Ion batteries.
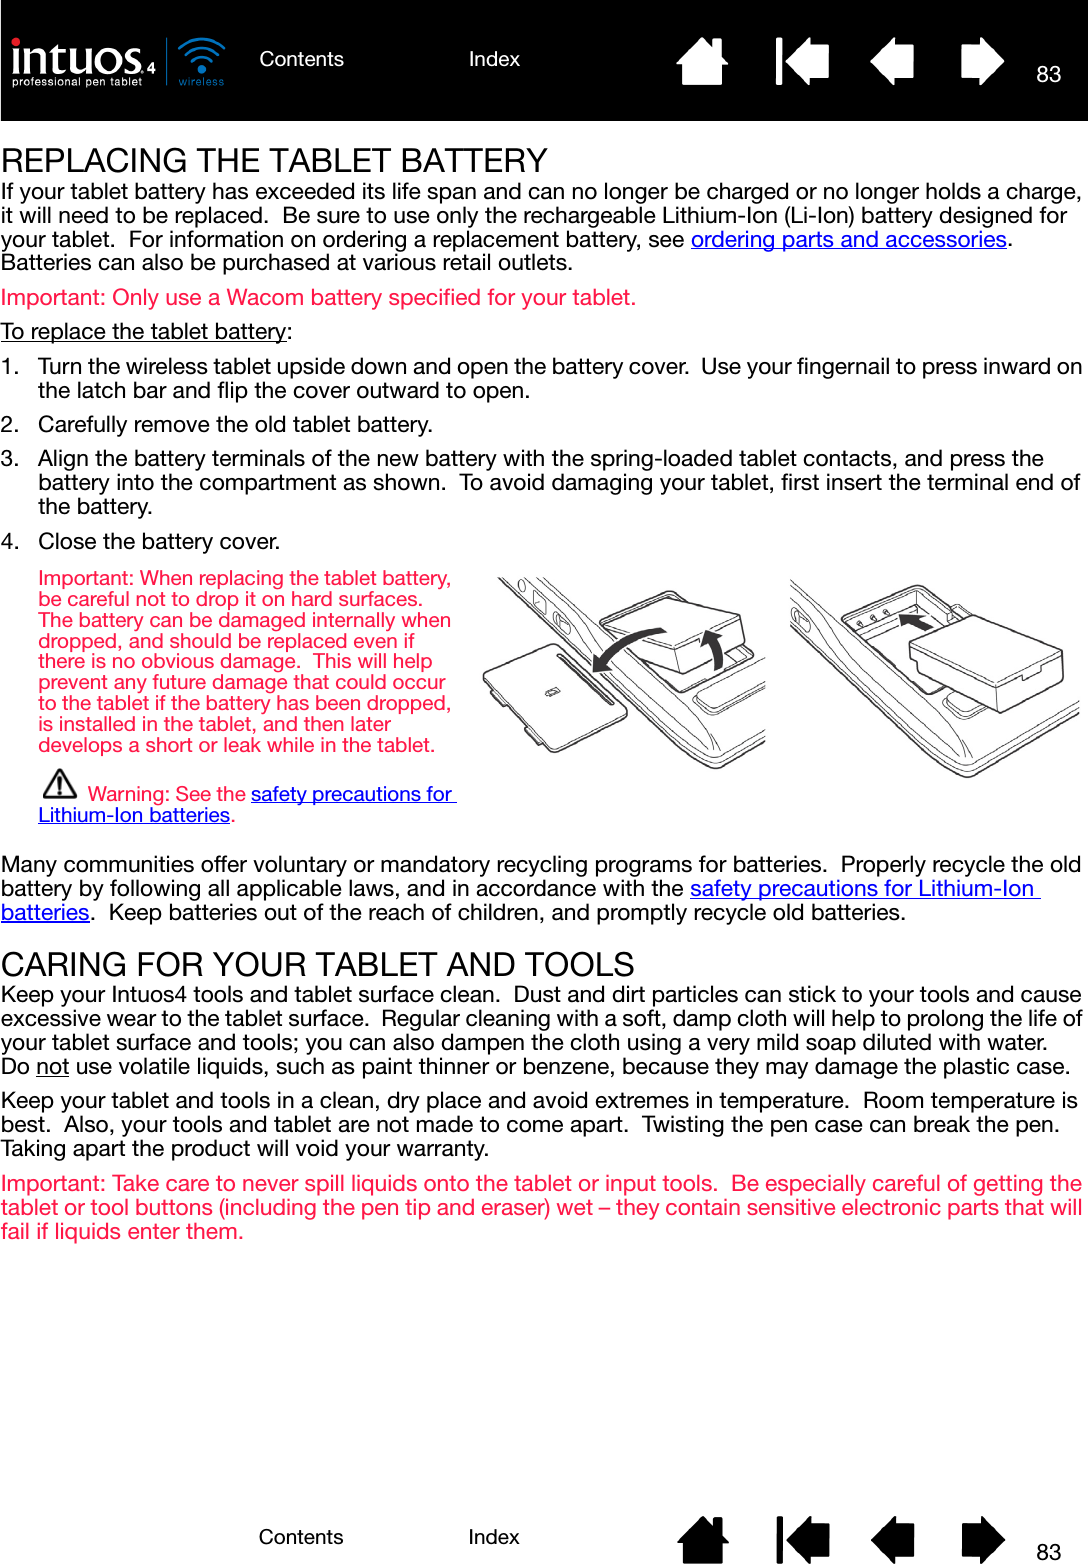
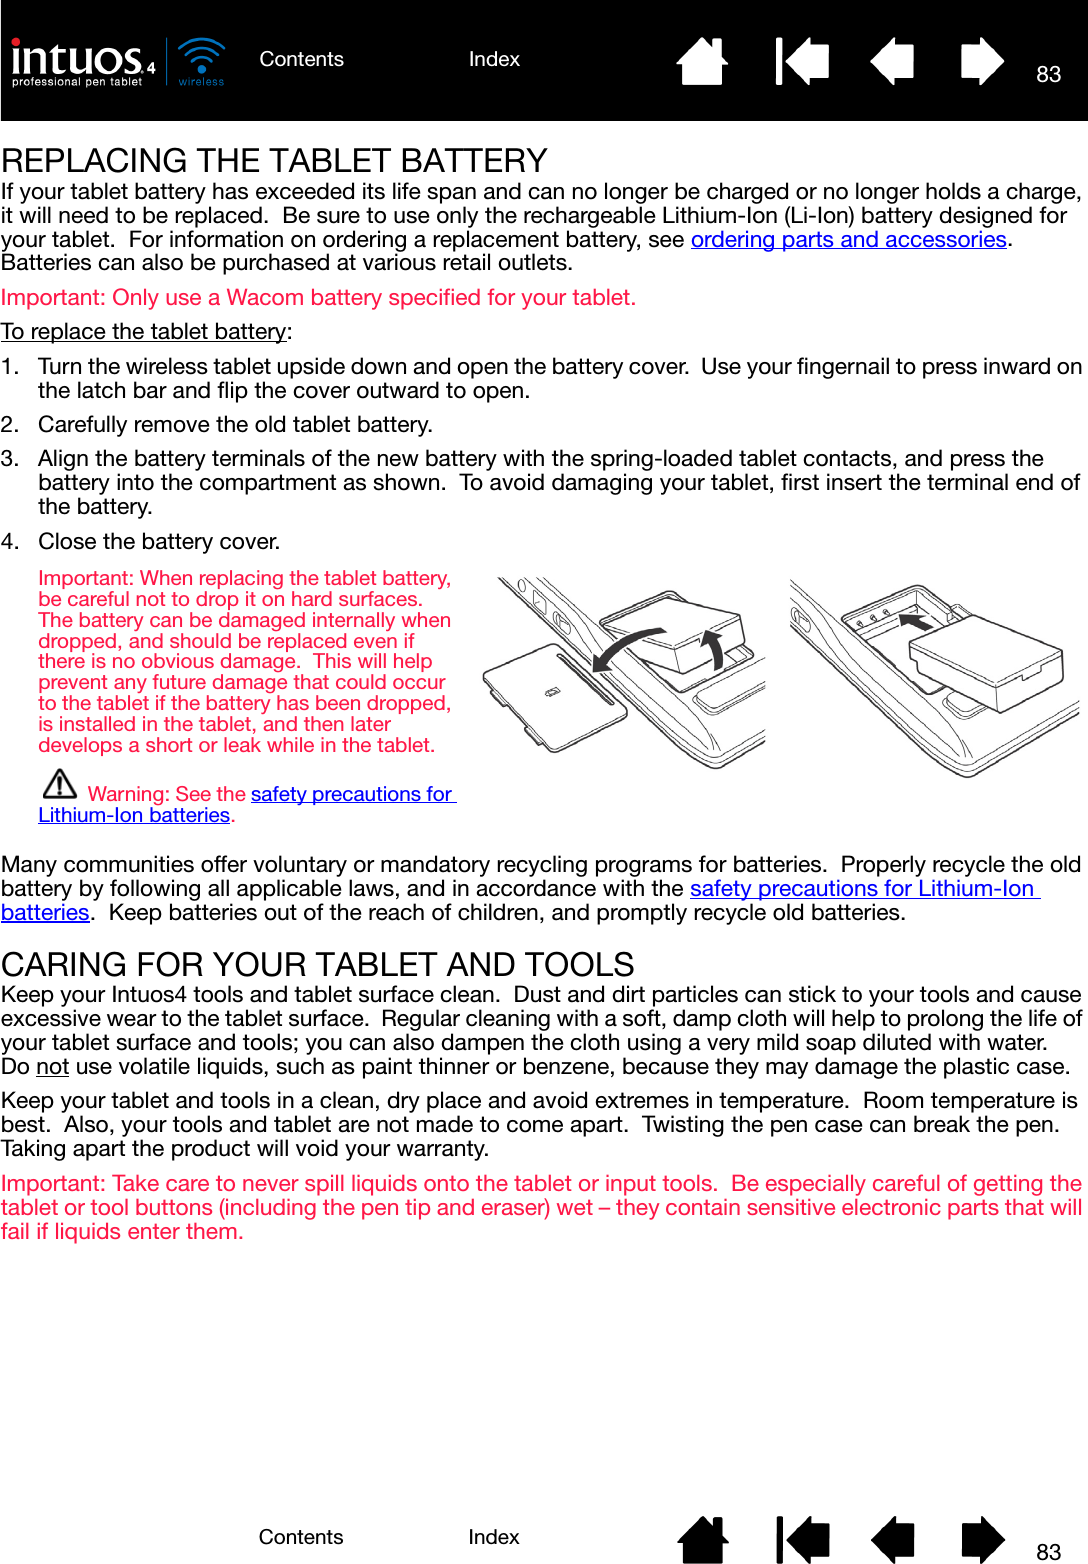
83IndexContents83IndexContentsREPLACING THE TABLET BATTERYIf your tablet battery has exceeded its life span and can no longer be charged or no longer holds a charge, it will need to be replaced.  Be sure to use only the rechargeable Lithium-Ion (Li-Ion) battery designed for your tablet.  For information on ordering a replacement battery, see ordering parts and accessories.  Batteries can also be purchased at various retail outlets.Important: Only use a Wacom battery specified for your tablet.To replace the tablet battery:1. Turn the wireless tablet upside down and open the battery cover.  Use your fingernail to press inward on the latch bar and flip the cover outward to open.2. Carefully remove the old tablet battery.3. Align the battery terminals of the new battery with the spring-loaded tablet contacts, and press the battery into the compartment as shown.  To avoid damaging your tablet, first insert the terminal end of the battery.4. Close the battery cover.Many communities offer voluntary or mandatory recycling programs for batteries.  Properly recycle the old battery by following all applicable laws, and in accordance with the safety precautions for Lithium-Ion batteries.  Keep batteries out of the reach of children, and promptly recycle old batteries.CARING FOR YOUR TABLET AND TOOLSKeep your Intuos4 tools and tablet surface clean.  Dust and dirt particles can stick to your tools and cause excessive wear to the tablet surface.  Regular cleaning with a soft, damp cloth will help to prolong the life of your tablet surface and tools; you can also dampen the cloth using a very mild soap diluted with water.  Do not use volatile liquids, such as paint thinner or benzene, because they may damage the plastic case.Keep your tablet and tools in a clean, dry place and avoid extremes in temperature.  Room temperature is best.  Also, your tools and tablet are not made to come apart.  Twisting the pen case can break the pen.  Taking apart the product will void your warranty.Important: Take care to never spill liquids onto the tablet or input tools.  Be especially careful of getting the tablet or tool buttons (including the pen tip and eraser) wet – they contain sensitive electronic parts that will fail if liquids enter them.Important: When replacing the tablet battery, be careful not to drop it on hard surfaces.  The battery can be damaged internally when dropped, and should be replaced even if there is no obvious damage.  This will help prevent any future damage that could occur to the tablet if the battery has been dropped, is installed in the tablet, and then later develops a short or leak while in the tablet.Warning: See the safety precautions for Lithium-Ion batteries.
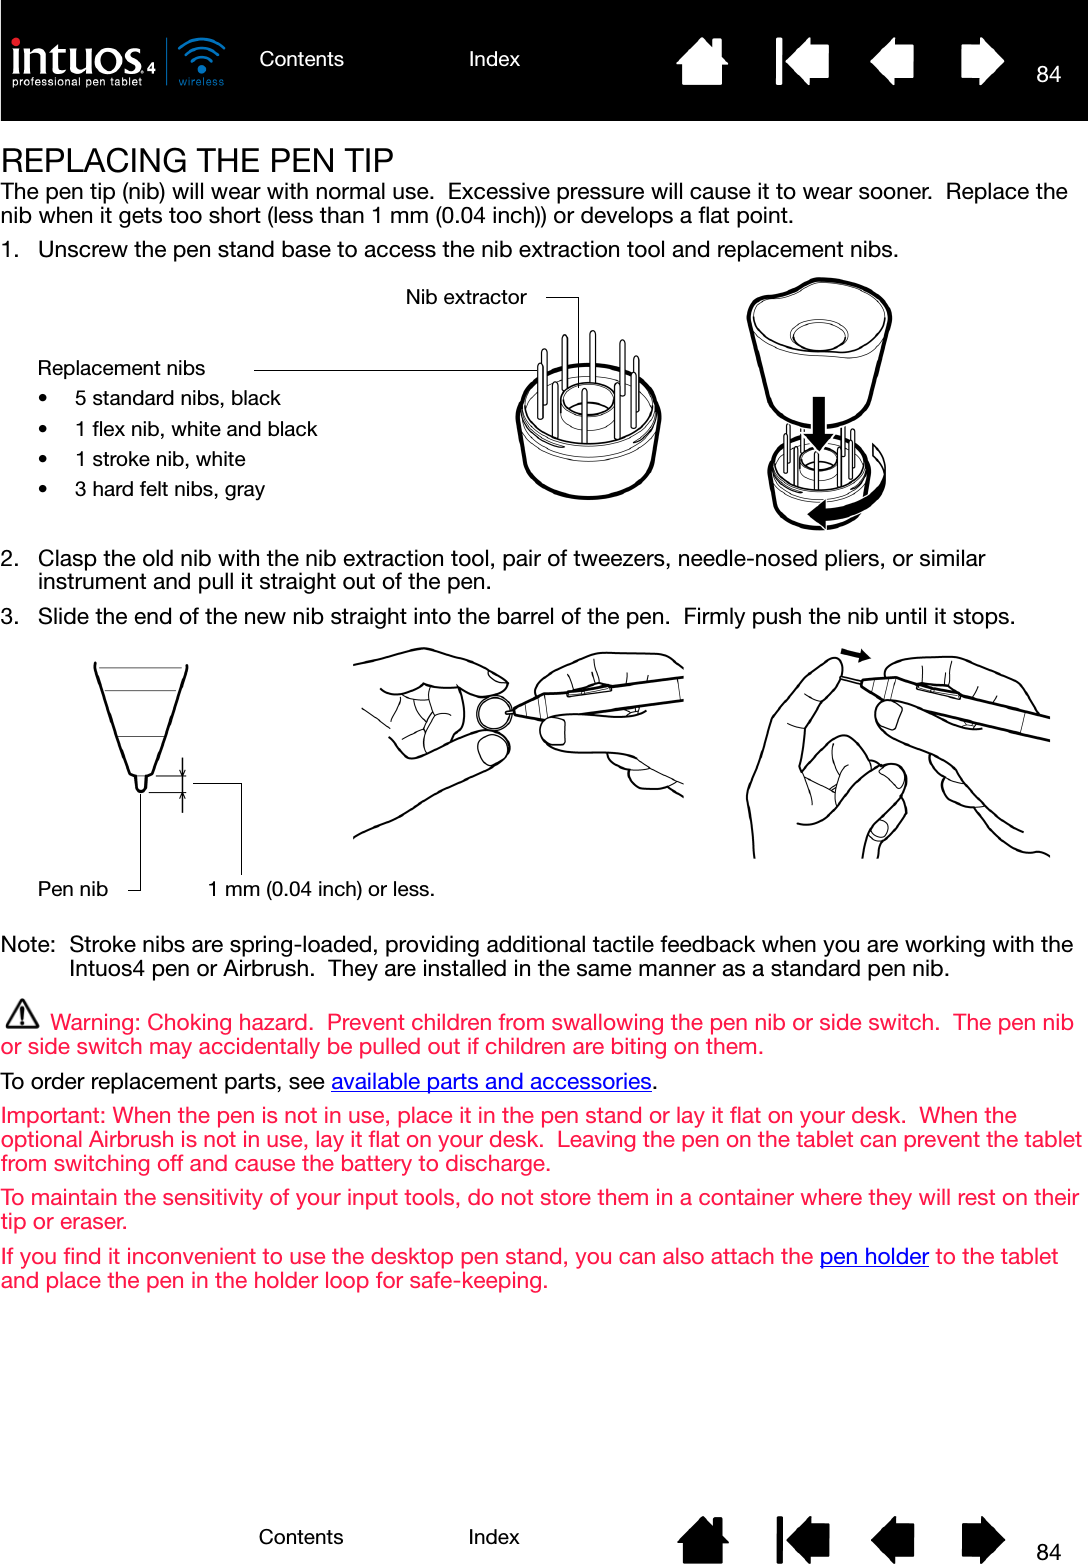
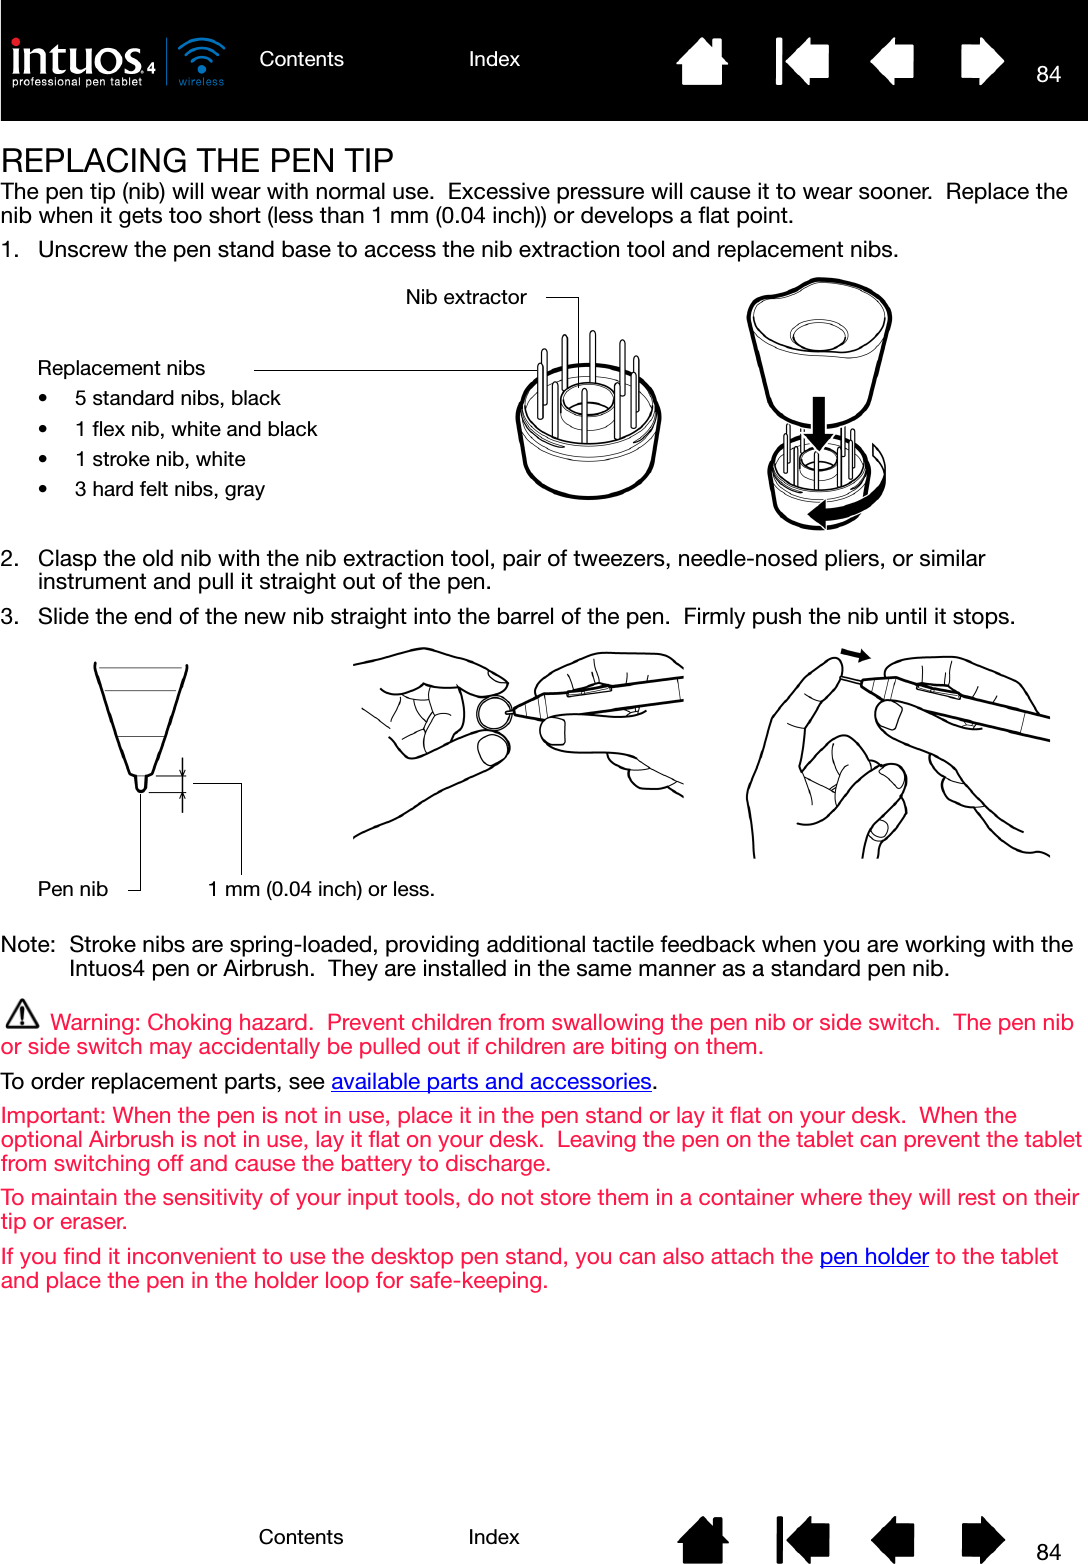
84IndexContents84IndexContentsREPLACING THE PEN TIPThe pen tip (nib) will wear with normal use.  Excessive pressure will cause it to wear sooner.  Replace the nib when it gets too short (less than 1 mm (0.04 inch)) or develops a flat point.1. Unscrew the pen stand base to access the nib extraction tool and replacement nibs.2. Clasp the old nib with the nib extraction tool, pair of tweezers, needle-nosed pliers, or similar instrument and pull it straight out of the pen.3. Slide the end of the new nib straight into the barrel of the pen.  Firmly push the nib until it stops.Note:  Stroke nibs are spring-loaded, providing additional tactile feedback when you are working with the Intuos4 pen or Airbrush.  They are installed in the same manner as a standard pen nib.Warning: Choking hazard.  Prevent children from swallowing the pen nib or side switch.  The pen nib or side switch may accidentally be pulled out if children are biting on them.To order replacement parts, see available parts and accessories.Important: When the pen is not in use, place it in the pen stand or lay it flat on your desk.  When the optional Airbrush is not in use, lay it flat on your desk.  Leaving the pen on the tablet can prevent the tablet from switching off and cause the battery to discharge.  To maintain the sensitivity of your input tools, do not store them in a container where they will rest on their tip or eraser.If you find it inconvenient to use the desktop pen stand, you can also attach the pen holder to the tablet and place the pen in the holder loop for safe-keeping.Nib extractorReplacement nibs• 5 standard nibs, black• 1 flex nib, white and black• 1 stroke nib, white• 3 hard felt nibs, grayPen nib 1 mm (0.04 inch) or less.
85IndexContents85IndexContentsUNINSTALLING THE SOFTWAREFollow the appropriate procedure below to remove the Wacom tablet driver software from your system.Important: When you remove the Wacom tablet software from your system, your Wacom tablet will no longer operate with full tablet functionality but will continue to function as a mouse device.Windows 7 and Vista: Click on the Windows START button and choose CONTROL PANEL.  In the CONTROL PANEL window, click on UNINSTALL A PROGRAM.  In the dialog box that appears, choose WACOM TABLET.  Click UNINSTALL and follow the prompts to remove the tablet driver.  (If prompted, enter your administrator login name and password.)  Be sure to restart your computer after uninstalling the software.Windows XP or XP x64: Click START.  In the start menu, select CONTROL PANEL.  Then select ADD OR REMOVE PROGRAMS.  In the ADD OR REMOVE PROGRAMS window, choose WACOM TABLET and click on the REMOVE button.  Follow the prompts to remove the tablet driver.  Be sure to restart your computer after uninstalling the software.Macintosh: From the GO menu, choose APPLICATIONS and open the WACOM TABLET folder.  Double-click on the WACOM TABLET UTILITY icon and select the TABLET SOFTWARE: REMOVE button.  Enter your administrator login name and password.  After the removal is completed, click OK.  Be sure to restart your computer after uninstalling the software.Note: To fully remove the Intuos4 Wireless tablet from your computer, you will need to delete the paired connection from the Bluetooth devices control panel for your operating system.MANAGING YOUR TABLET PREFERENCESUse the Wacom tablet preferences utility to manage your tablet preferences for a single or multiple users.For Windows, first close any open applications.  Then open the utility by clicking the START icon and selecting ALL PROGRAMS.  Select WACOM TABLET and WACOM TABLET PREFERENCE FILE UTILITY.• To remove preferences for the current user, click on the REMOVE button under MY PREFERENCES.• To delete preferences for multiple users, click on the REMOVE button under ALL USER PREFERENCES.  Administrator rights are required to delete preferences for all users.  Relaunch any currently open tablet-aware applications that you may be running.• To back up your preferences, click on the BACKUP... button under MY PREFERENCES.• To restore preferences that you had previously backed up, click on the RESTORE... button under MY PREFERENCES.Be sure to carefully follow any prompts that may appear.For Macintosh, open the main APPLICATIONS folder.  Then open the WACOM TABLET folder and run the WACOM TABLET UTILITY.• To remove preferences, select CURRENT USER or ALL USERS.   Then click on the REMOVE button.  Log out, then log back in.  When the tablet driver loads it will create a new preferences file with the factory defaults.• To back up your preferences, select CURRENT USER or ALL USERS.  Then click on the BACKUP... button.• To restore preferences that you had previously backed up, select CURRENT USER or ALL USERS.  Then click on the RESTORE... button.Be sure to carefully follow any prompts that may appear.
86IndexContents86IndexContentsCHANGING THE TABLET MODE OPTIONSWithin the control panel’s TABLET list, double-click on the tablet icon to display the TABLET dialog box.  The TABLET mode settings apply to all tools and applications.INSTALLING MULTIPLE TABLETSThe TABLET list displays an icon for any supported tablet that has been detected on your system, and allows you to select the tablet for which your changes will apply.To add a new tablet, connect it to your computer.  The system will automatically find the tablet and initialize it.  An icon for the tablet will then appear in the control panel.Important: When installing additional tablets on Windows systems, please note that the eraser function may not work in some applications when using the additional tablet(s).  The eraser function will continue to work correctly using the first tablet that was added to the control panel.To remove one of multiple tablets from the driver, in the Wacom Tablet control panel select the tablet to be removed and click on the [ – ] button next to the TABLET list.  • A tablet cannot be deleted from the control panel list unless it is attached to the computer.• Note that you will need to restart your computer before you can again add the tablet to the driver.STANDARD MODE is recommended for graphics applications, and is the default condition.Choose RECOGNITION MODE for the maximum data rate.  Required by some handwriting recognition software.  Supported only on Bluetooth Specification v2.0 or later connections that support the EDR (Enhanced Data Rate) protocol.If desired, enter a new name to be used for the tablet icon.Select a tablet icon for which to customize tool and application settings.• The control panel will not launch unless a supported tablet is connected to the computer.• Settings can only be viewed or changed for an attached tablet.
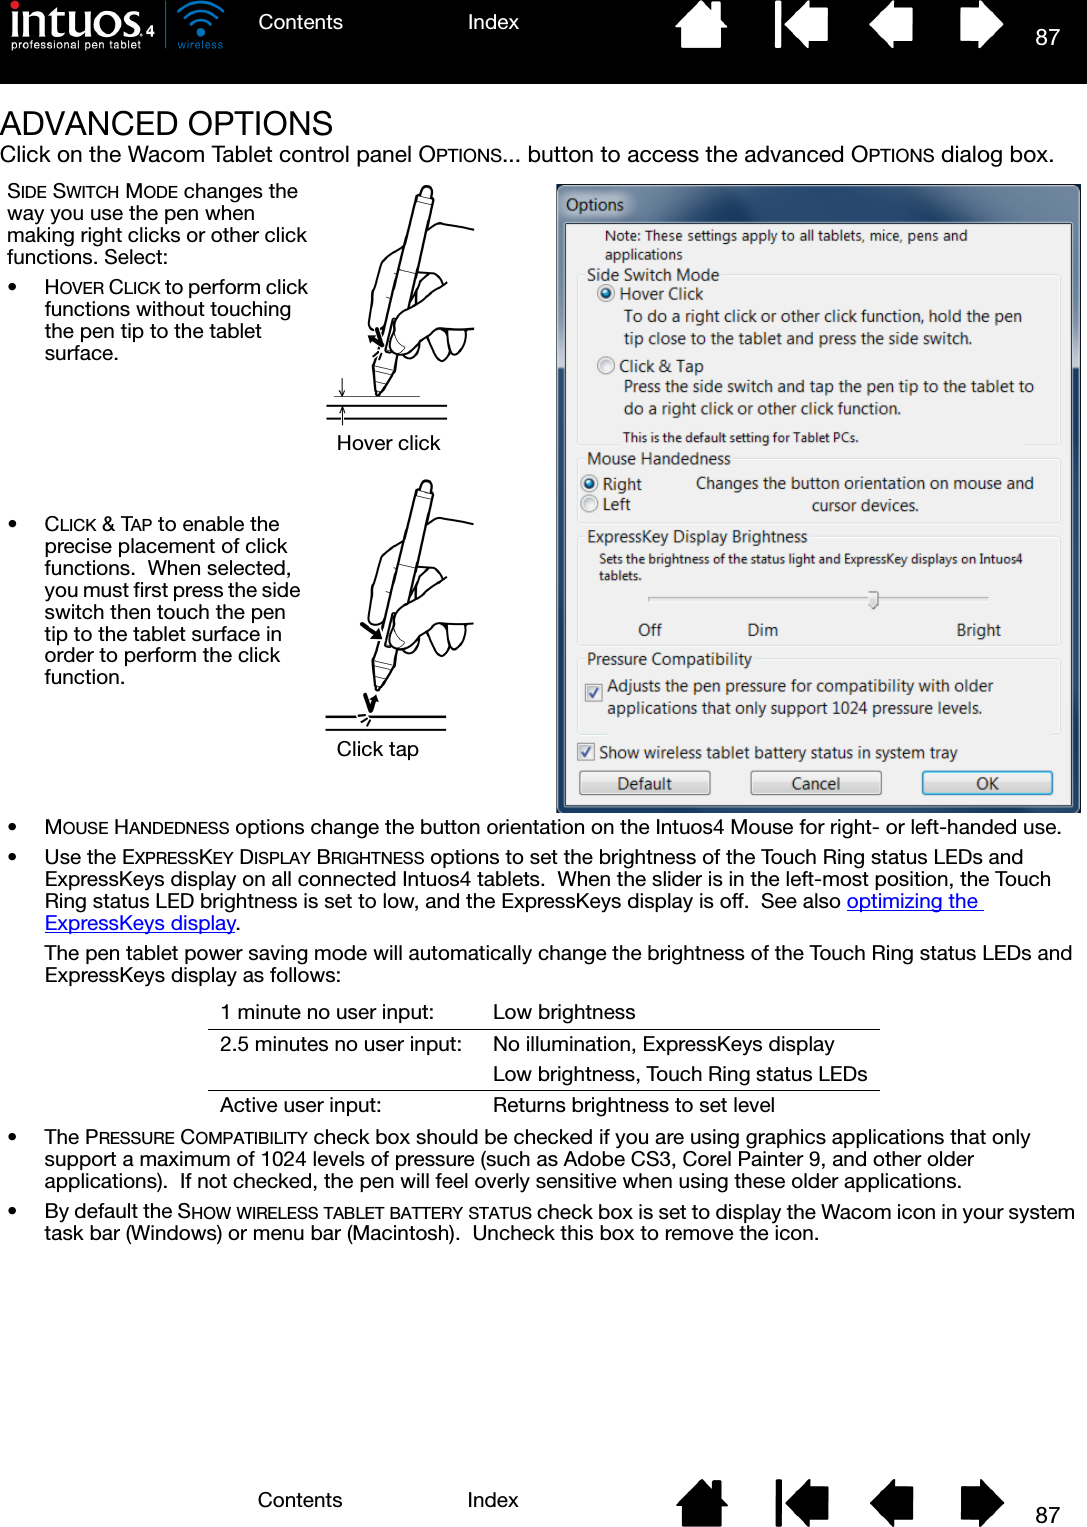
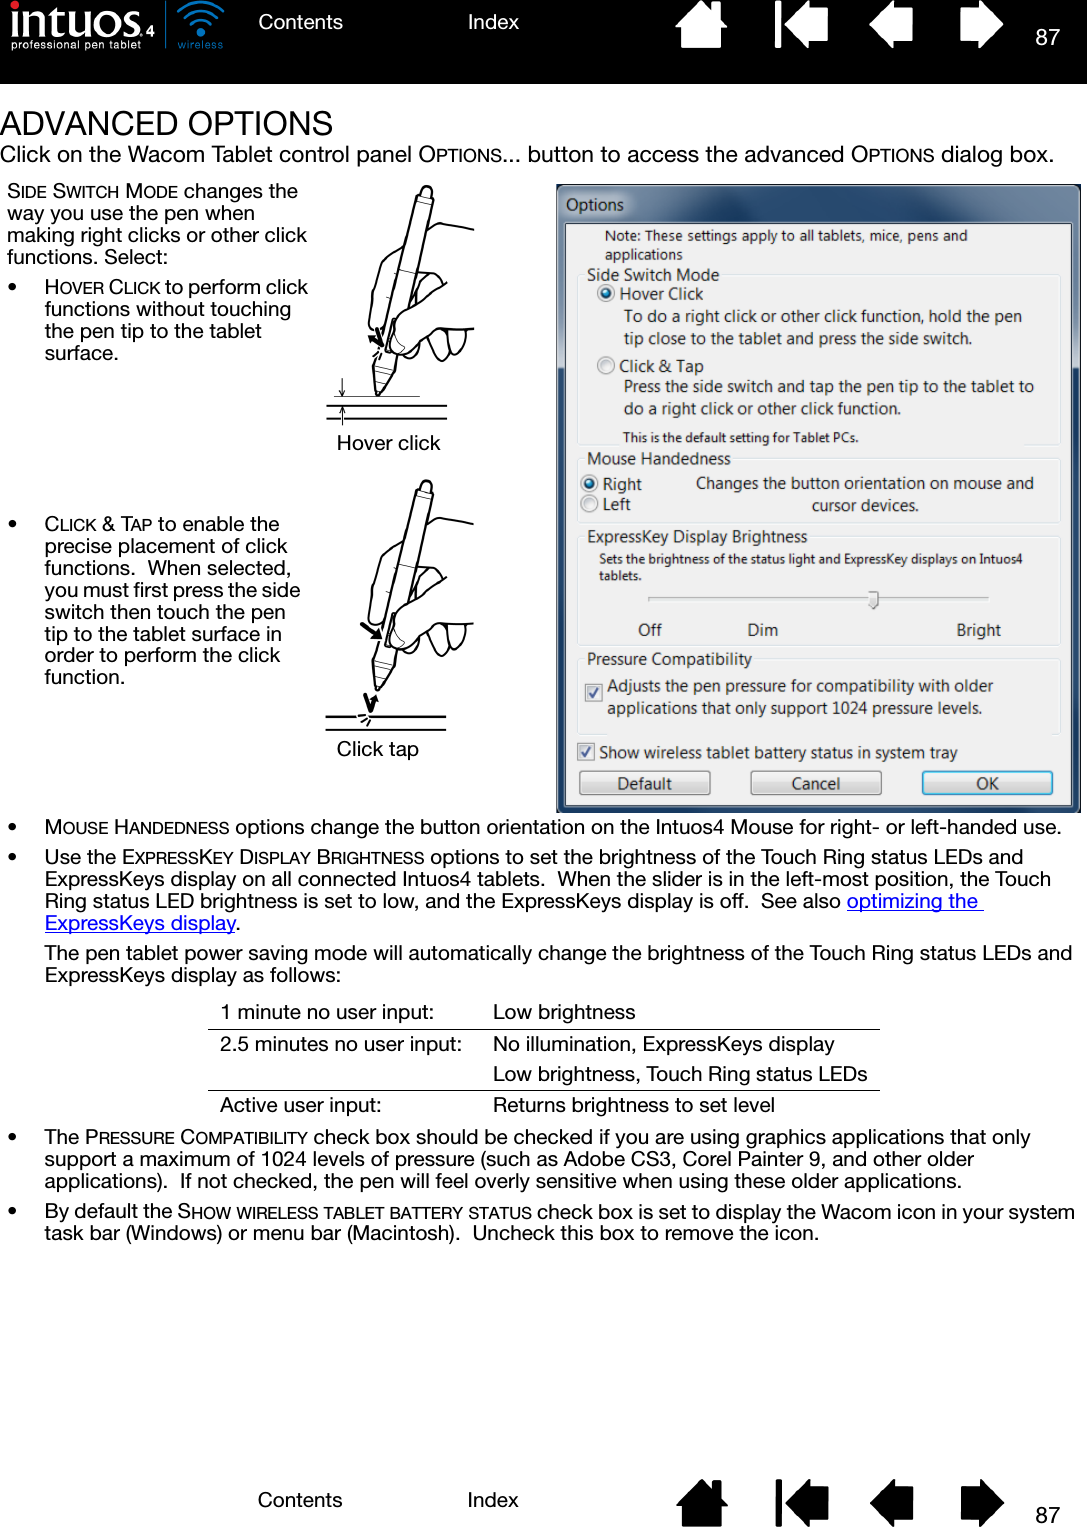
87IndexContents87IndexContentsADVANCED OPTIONSClick on the Wacom Tablet control panel OPTIONS... button to access the advanced OPTIONS dialog box.SIDE SWITCH MODE changes the way you use the pen when making right clicks or other click functions. Select:•HOVER CLICK to perform click functions without touching the pen tip to the tablet surface.Hover clickClick tap•MOUSE HANDEDNESS options change the button orientation on the Intuos4 Mouse for right- or left-handed use.• Use the EXPRESSKEY DISPLAY BRIGHTNESS options to set the brightness of the Touch Ring status LEDs and ExpressKeys display on all connected Intuos4 tablets.  When the slider is in the left-most position, the Touch Ring status LED brightness is set to low, and the ExpressKeys display is off.  See also optimizing the ExpressKeys display.The pen tablet power saving mode will automatically change the brightness of the Touch Ring status LEDs and ExpressKeys display as follows:•The PRESSURE COMPATIBILITY check box should be checked if you are using graphics applications that only support a maximum of 1024 levels of pressure (such as Adobe CS3, Corel Painter 9, and other older applications).  If not checked, the pen will feel overly sensitive when using these older applications.• By default the SHOW WIRELESS TABLET BATTERY STATUS check box is set to display the Wacom icon in your system task bar (Windows) or menu bar (Macintosh).  Uncheck this box to remove the icon.1 minute no user input: Low brightness2.5 minutes no user input: No illumination, ExpressKeys displayLow brightness, Touch Ring status LEDsActive user input: Returns brightness to set level•CLICK & TAP to enable the precise placement of click functions.  When selected, you must first press the side switch then touch the pen tip to the tablet surface in order to perform the click function.
88IndexContents88IndexContentsOPTIMIZING THE EXPRESSKEYS DISPLAYThe pen tablet ExpressKeys display uses Organic Light-Emitting Diodes (OLEDs).  Although the display has been designed to provide reliable performance for many years, you may eventually notice a decrease in luminosity for pixels that are lit over extended periods of time.  To minimize the appearance of different pixel brightnesses due to this effect, adjust the EXPRESSKEY DISPLAY BRIGHTNESS option to the lowest comfortable light level.  See advanced options for details.Note:  The power saving feature of the pen tablet will automatically dim the ExpressKeys display if there has been no user input for 1 minute, and it will turn off the ExpressKeys display if the pen tablet has been idle for 2.5 minutes.USING APPLICATIONS INTEGRATED FOR TABLET CONTROLSome software applications may be designed to directly control the pen tablet ExpressKeys or Touch Ring function(s).  When working in an application that has been integrated in this manner, the ExpressKeys or Touch Ring may perform a different function than what is currently set in the Wacom Tablet control panel.• When an ExpressKey is overridden by an application, the ExpressKeys display will automatically update to show either the new function name or “Application Defined”.  Some or all of the ExpressKeys may be overridden, depending on the application.• When an application overrides the Touch Ring, all Touch Ring functions are affected.  If an application overrides only one, two, or three of the available Touch Ring functions, the remaining function(s) are set to SKIP.• An integrated application will control the ExpressKeys or Touch Ring only when that application is active and in the foreground.  When you close that application (or select a new application pane to work in), your Wacom Tablet control panel settings are returned to their previous state.• To review the ExpressKeys or Touch Ring function settings for the current front-most application, set an ExpressKey to SHOW SETTINGS and press the key at any time.Applications that have been integrated in this manner will typically provide you with the opportunity to opt-out or disable this functionality when first using your Wacom tablet with the application.  See the documentation provided with your application for any specific details on functionality and how to customize or disable this feature.If an automatic prompt or the application’s documentation does not describe how to disable this behavior, you can use the Wacom Tablet control panel to create application-specific settings which will override the behavior of the integrated application.Important: If an application-specific setting has been created for an integrated application, setting an ExpressKey or Touch Ring function to APPLICATION DEFINED will allow the integrated application to control the function.
89IndexContents89IndexContentsUSING THE OPTIONAL INTUOS4 MOUSEThe Intuos4 Mouse is cordless, battery free, and works on any Intuos4 tablet.  The mouse is an optional accessory, and product configurations may vary.Important: When the Intuos4 Mouse is not in use, place it on your desk.  Leaving an Intuos4 tool on the tablet may interfere with screen cursor positioning when using other pointing devices, or may prevent your computer from going to sleep.See also customizing the mouse.FingerwheelCan be rolled, or pressed for an additional button function.• Roll the fingerwheel to scroll in most windows and applications.  Move the wheel forward to scroll up, and back to scroll down.Front and rear buttonsThese are set for FORWARD and BACK functionality within your Internet browser.Right buttonDisplays a context menu when pressed.Left buttonThis is the primary button used to CLICK and select.The programmable mouse buttons can be customized.  The default button options are:Left: CLICKRight: RIGHT CLICKMiddle: MIDDLE CLICKFront: FORWARDRear: BACK• Press down on the wheel to perform a MIDDLE CLICK.Tip: For Microsoft Office applications that support a wheel mouse, press the CTRL key and move the fingerwheel to zoom in and out.
90IndexContents90IndexContentsUSING THE OPTIONAL AIRBRUSH AND ART PENThe optional Intuos4 Airbrush works like the Grip Pen, but also includes a fingerwheel for an additional degree of control.  With proper software support, you can simulate realistic airbrushing.  For example, tilting the Airbrush can cause the spray pattern to elongate and feather out.  Rolling the fingerwheel adjusts the spray intensity, and pressure on the tip controls the brush size.Hold the Airbrush with your thumb and middle finger.  The fingerwheel  should be in a convenient location for you to roll it with your index finger.  Tilt the Airbrush to find a comfortable position that allows you to paint and draw with pressure sensitivity.The optional Intuos4 Art Pen responds to the pressure, tilt, and rotation you apply to the pen.Important: When the Airbrush or Art Pen is not in use, lay it flat on your desk.  To maintain the sensitivity of your tool, do not store it in a container where it will rest on its tip or eraser.  Leaving an Intuos4 tool on the tablet may interfere with screen cursor positioning when using other pointing devices.See product information to learn more about which applications currently support the Airbrush fingerwheel or Art Pen rotation.  See ordering parts and accessories for information on where to purchase an Intuos4 Airbrush or Art Pen.Side switchThe default settings are:Windows: RIGHT CLICKMacintosh: DOUBLE CLICKFingerwheelRoll the fingerwheel backwards to increase ink flow or brush size, and forward to reduce it.Your index finger should operate the wheel independently of the pressure you apply to the tip.EraserReplaceable nibThe Art Pen supports 360 degrees of rotation around the pen axis.  As you draw within an application that supports rotation sensitivity, simply twist the Art Pen to create lines that narrow or broaden.For example, while painting you can vary the rotation of a non-circular brush to change the stroke thickness.  Depending on the brush shape characteristics you have selected in your application, you can simulate calligraphy pens, broad felt tip markers, and any other non-circular brushes or tools.Side switchesThe default settings are:Upper: DOUBLE CLICKLower: RIGHT CLICKEraserDoes not support rotation.Replaceable nib
91IndexContents91IndexContentsPEN AND DIGITAL INK CAPABILITIES IN WINDOWSMicrosoft Windows 7 and Vista provide extensive support for pen* and touch input.  When using the professional pen tablet with a computer running Windows 7 or Vista, your experience is enhanced by powerful note taking, handwriting recognition, fast navigation, and other digital inking options designed to give you quick, intuitive results with the Intuos4 pen.•Note taking.  Use your Intuos4 pen to jot notes and capture quick sketches in Microsoft Journal.  Journal simulates a physical notebook, but with the advantages of digital note taking – you can choose from a variety of pen, marker, and highlighter tools, plus an eraser that is easily activated by the eraser of your Intuos4 pen.  Journal also includes a powerful search engine that can even locate your handwritten content.• Handwriting recognition.  Because Windows 7 and Vista include powerful handwriting recognition capabilities, you can use your Intuos4 pen to quickly enter handwritten information anywhere the computer accepts typed input.  You can convert your handwritten content to typed text at any time.•Gestures.  Use your Intuos4 pen to make simple gestural movements on the tablet to trigger customizable actions for navigation, editing, and other functions.  To customize your gestures, select the FLICKS tab in the PEN AND INPUT DEVICES control panel.• Digital Ink in Microsoft Office 2007.  Use your Intuos4 pen to full advantage with the enhanced digital mark-up and inking tools available in Microsoft Office 2007 or later applications running on Windows 7 or Vista.  Found on the REVIEW tab within applicable applications, these tools provide a consistent set of inking options.  For quick access, you can add specific inking tools to the Quick Access Toolbar located at the top of each application.To make the most of the pen in Microsoft Windows, be sure to study the documentation that came with your system, including the Windows training tools and Tablet PC tutorial.  You can access the Tablet PC Pen Training from the START menu by choosing ALL PROGRAMS, TABLET PC, and TABLET PC PEN TRAINING.Note:  The following workarounds in the Wacom tablet driver improve drawing performance in Windows 7 and Vista:• The Pen Flicks and ‘press-and-hold-to-right-click’ features are disabled in graphics applications using the Wintab API.• There is no pressure sensitivity in Journal and other Ink features when both the Flicks and ‘press-and-hold-to-right-click’ features are disabled in the Vista PEN AND INPUT DEVICES control panel.* Pen features supported in all versions of Windows 7 and Vista except Windows 7 Starter and Home Basic, and Windows Vista Home Basic.
92IndexContents92IndexContentsABOUT THE WINDOWS TABLET PC INPUT PANELThe Windows 7 or Vista Input Panel enables you to use handwriting or an on-screen keyboard to directly enter text with your Intuos4 pen.  There are different ways to launch the Input Panel:• Click on the Input Panel icon which appears when you move the screen cursor into a text entry area.• Click on the Input Panel tab, located by default on the left edge of the display screen.• Click on the Tablet PC Input Panel icon located on the Windows task bar.  If the icon is not visible, right-click on the task bar, select TOOLBARS, and TABLET PC INPUT PANEL.To customize the Input Panel:1. First open the Input Panel and then click on TOOLS in the menu bar.2. Select OPTIONS to open the Input Panel Options dialog box.3. Customize the Input Panel settings for the way you like to work.To learn more about using your Intuos4 pen in Microsoft Windows and Office 2007 or later, study the documentation that came with your system and Microsoft Office applications.  Be sure to take advantage of the Windows training tools, including the Tablet PC tutorial, available from Microsoft.You can also visit our web site at www.wacom.com/vista for more information on working with your Intuos4 pen in Windows.
93IndexContents93IndexContentsPRODUCT SPECIFICATIONSINTUOS4 WIRELESS TABLET (MODEL PTK-540WL)Technology Electro-magnetic resonanceFunction display 128 x 64 dot (x2), whiteActive area (W x D) 203.2 x 127 mm (8.0 x 5.0 in)Physical size (W x D x H) 363 x 253 x 15 mm (14.3 x 10.0 x 0.6 in), approximatelyWeight 900 g (2 lb), approximately (with battery)Aspect ratio 16 : 10Coordinate resolution 200 lpmm (5080 lpi)Accuracy, pen +/- 0.25 mm (0.010 in)Accuracy, mouse +/- 0.5 mm (0.020 in)Tilt range (all pens) +/- 60 degreesReading height 10 mm (0.39 in)Maximum report rate 200 points per second, supported only on Bluetooth Specification v2.0 or later connections that support the EDR (Enhanced Data Rate) protocol.ExpressKeys stroke 0.25 mm (0.01 in), approximatelyCommunication interfaces Bluetooth wireless technology (Bluetooth 2.1 + EDR)USBConnector USB Type A to USB mini-BUSB cable length 2.5 m (8.2 ft)Power requirements DC 5V, less than 500 mA, from primary USB port or powered USB hubBattery Li-Ion battery pack, 3.7V, 1800 mAhConnectivity Bluetooth wireless technology using HID protocolOperating temperature 5 to 40 degrees C (41 to 104 degrees F)Battery charging temperature 5 to 35 degrees C (41 to 140 degrees F)Storage temperature -20 to +60 degrees C (-4 to 140 degrees F)Operating relative humidity 30% to 80% non-condensingStorage relative humidity 30% to 85% non-condensingCertification and compliance FCC15B Class B, FCC 15C, CE, VCCI Class B, ICES-003, RSS-210, NCC, BSMI, C-Tick, SRRC, KCC, FAC, GOST-R, Japan Radio Law, RoHS, Chinese RoHS, Korean RoHS
94IndexContents94IndexContentsINTUOS4 GRIP PEN (MODEL KP-501E-01)INTUOS4 MOUSE (MODEL KC-100)The mouse is an optional accessory, and product configurations may vary.INTUOS4 AIRBRUSH (MODEL KP-400E-01)The Airbrush is an optional accessory.Pen tip travel 1.0 mm (0.04 in) or lessPressure levels 2048 levelsEraser tip travel 2.0 mm (0.08 in), approximatelyPhysical size (L x D) 156.5 x 14.9 mm (6.17 x 0.59 in)Weight 17 g (0.60 oz), approximatelyPhysical size (L x D x H) 102.9 x 61.8 x 38.6 mm (4.05 x 2.43 x 1.52 in)Weight 83 g (2.9 oz), approximatelyButton stroke Less than 1.3 mm (0.05 in), approximatelyFingerwheel type Rotation, 24 steps per revolutionPen tip travel 0.2 mm (0.008 in) or lessFingerwheel travel 10 mm (0.39 in)Fingerwheel resolution 1024 levels, approximatelyPressure levels 2048 levelsEraser tip travel 1.5 mm (0.06 in), approximatelyPhysical size (L x W x D) 162.5 x 17.5 x 32.5 mm (6.40 x 0.69 x 1.28 in)Weight 23.0 g (0.81 oz), approximately
95IndexContents95IndexContentsINTUOS4 INKING PEN (MODEL KP-130-01)The Inking Pen is an optional accessory.INTUOS4 ART PEN (MODEL KP-701E-01)The Art Pen is an optional accessory.INTUOS4 CLASSIC PEN (MODEL KP-300E-01)The Classic Pen is an optional accessory.Pen tip travel 0.2 mm (0.008 in) or lessPressure levels 2048 levelsPhysical size (L x D) 151.5 x 12.5 mm (5.97 x 0.49 in)Weight 12 g (0.42 oz), approximatelyPen tip travel 1.0 mm (0.04 in) or lessPressure levels 2048 levelsEraser tip travel 2.0 mm (0.08 in), approximatelyBarrel rotation 360 degreesPhysical size (L x D) 156.3 x 15.9 mm (6.16 x 0.63 in)Weight 20 g (0.7 oz), approximatelyPen tip travel 1.0 mm (0.04 in) or lessPressure levels 2048 levelsEraser tip travel 2.0 mm (0.08 in), approximatelyPhysical size (L x D) 150.7 x 12.2 mm (5.94 x 0.48 in)Weight 12 g (0.42 oz), approximately
96IndexContents96IndexContentsPRODUCT INFORMATIONTo learn more about Intuos4, and about which software applications are currently tablet enhanced to support the pressure sensitivity, tilt sensitivity, eraser, and other special functionality of your professional pen tablet and tools, visit the Wacom web site for your region:ORDERING PARTS AND ACCESSORIESYour Intuos4 professional pen tablet is the ultimate master tool for creative professionals.  The tablet, combined with your Intuos4 Grip Pen and other available Intuos4 tools, enables you to paint more intuitively, illustrate better, and edit imagery faster than ever before.  To expand the feature set of your Intuos4 product, look over the available parts and accessories described on the following pages.  Please note that not all parts and accessories are available in all regions.To purchase parts and accessories, refer to the tablet Read Me file and see who to call for your region.  You can also do the following:• To purchase parts and accessories in the USA or Canada, call 1.888.884.1870 (toll-free) or visit Wacom’s web site at http://www.WacomDirect.com (USA only).• To purchase parts and accessories in Europe, call +49 (0)180.500.03.75 or send an email to spareparts@wacom.eu.  Or, visit http://shop.wacom.eu.  You can also contact your local dealer, distributor, or technical support using the appropriate number for your region.• To purchase parts and accessories in Australia, Singapore, Taiwan and Korea, please visit: www.BuyWacom.com.au, www.BuyWacom.com.sg, www.BuyWacom.com.tw and www.BuyWacom.co.kr, respectively.• To purchase parts and accessories in other countries, please contact your local dealer or distributor.USA, Canada, Central and South America http://www.wacom.com/productinfoEurope, Middle East and Africa http://www.wacom.euJapan http://tablet.wacom.co.jpAsia Pacific (English) http://www.wacom-asia.comChina (Simplified Chinese) http://www.wacom.com.cnKorea http://www.wacomkorea.comTaiwan http://www.wacom.com.twThailand http://www.wacom-thai.com
97IndexContents97IndexContentsAVAILABLE PARTS AND ACCESSORIES Intuos4 Grip Pen (KP-501E-01).  Sensitive to pressure and tilt, the Grip Pen is an all-purpose tool for drawing, erasing, and mouse operations.  The easy-to-use DuoSwitch gives you two programmable switch functions.  The pressure-sensitive pen has an ergonomically waisted grip area, optimum weight and balance, and superior tip sensitivity, making it the most natural freehand tool.  Includes the following accessories: Pen stand, standard nib (qty 1), stroke nib (qty 1), hard felt nib (qty 1), and flex nib (qty 1).Intuos4 Mouse (KC-100).  Cordless and battery free, the five button mouse is an ideal tool for performing any task you may have done previously with a standard mouse.  It includes an integrated middle button and rolling fingerwheel that can be used for up and down scrolling, or the button can be programmed for a variety of other actions.Intuos4 Airbrush (KP-400E-01).  A true digital airbrush, the pressure-sensitive Intuos4 Airbrush incorporates a pressure-sensitive tip and eraser, tilt sensitivity, and a fingerwheel that provides an additional degree of control over the application of digital paint.  Includes the following accessories: Pen stand, standard nib (qty 1), stroke nib (qty 1), hard felt nib (qty 1), and flex nib (qty 1).Intuos4 Inking Pen (KP-130-01).  This pressure- and tilt-sensitive drawing pen was created to provide immediate feedback at your pen tip on the drawing as well as on your computer screen.  The pressure-sensitive Inking Pen comes with inking cartridges and two polyacetal tips for inkless drawing.  It has a pressure-sensitive tip, but no eraser and no side switches.  Includes the following accessories: Pen stand, standard nibs (qty 2), inking nibs (qty 3).Note:  When you purchase an Inking Pen, it comes with a polyacetal nib in the pen.  Use the nib extractor (silver ring) to gently remove the polyacetal nib from the pen.  Then insert one of the silver-colored cartridges that come with the Inking Pen.  The cartridge tip has a waxy coating that you will need to rub off before you can begin inking.Intuos4 Art Pen (KP-701E-01).  This specialty pen provides 360 degrees of barrel rotation and, like the Intuos4 Grip Pen, is pressure and tilt sensitive.  Combining these features with a unique chisel-shaped nib makes the Intuos4 Art Pen the most realistic tool for emulating brushes, markers, and calligraphic pens.  Includes the following accessories: Pen stand, chisel tipped nibs (qty 2), chisel tipped felt nibs (qty 2), bullet tipped nibs (qty 3), and bullet tipped felt nibs (qty 3).Intuos4 Classic Pen (KP-300E-01).  This pen has the same feature set as the Intuos4 Grip Pen, but with a slimmer profile that does not include a rubberized grip.  Includes the following accessories: Pen stand, standard nib (qty 1), stroke nib (qty 1), hard felt nib (qty 1), and flex nib (qty 1).
98IndexContents98IndexContentsFor order information, see ordering parts and accessories.DESCRIPTION PART NUMBERReplacement nibs for Grip Pen, Airbrush, or Classic Pen Standard nib – firm, plastic nib, black, qty 5 ACK-20001Stroke nib – spring loaded nib, more of a “brush-like” feel, qty 5 ACK-20002Felt nib – softer nib for a “pencil or marker on paper” feel, qty 5 ACK-20003Flex nib – a flexible, elastomeric nib, that provides a “higher friction” feel, qty 5 ACK-20004Felt nib, chisel tip, qty 5 ACK-20005Nib set, for Art Pen ACK-20006Pen grip, standard for pen use without side switch ACK-30003Pen grip, thick bodied grip for pen use without side switch. ACK-30002Intuos4 Grip Pen accessory kit. ACK-40001Tablet battery (Li-Ion) ACK-40203Personalization rings, for Grip Pen FUZ-A157Tablet surface sheet replacementsMedium, standard ACK-10221Medium, clear ACK-10222
99IndexContents99IndexContentsRADIO AND TELEVISION INTERFERENCEThe equipment described in this manual generates, uses, and can radiate radio-frequency energy.  If it is not installed and used properly—that is, in strict accordance with Wacom instructions—it may cause interference with radio and television reception.FCC NOTICEThis device complies with Part 15 of the FCC Rules.  Operation is subject to the following two conditions: (1) this device may not cause harmful interference, and (2) this device must accept any interference received, including interference that may cause undesired operation.This equipment has been tested and found to comply with the limits for a Class B digital device, pursuant to Part 15 of FCC Rules.  These limits are designed to provide reasonable protection against harmful interference in a residential installation. This equipment generates, uses and can radiate radio frequency energy and, if not installed and used in accordance with the instructions, may cause harmful interference to radio communications.  However, there is no guarantee that interference will not occur in a particular installation.You can determine whether the equipment is causing interference by disconnecting it from your computer.  If the interference stops, it was probably caused by the equipment.If the equipment does cause interference to radio or television reception, you may be able to correct the interference by using one or more of the following measures:• Rotate the television or radio antenna until the interference stops.• Move the equipment farther away from the television or radio.• Plug the equipment and computer into an outlet that is on a different circuit from the television or radio.If necessary, consult your Wacom dealer or an experienced radio/television technician for help.Changes or modifications to this product not authorized by Wacom could void the FCC Certification and negate your authority to operate the product.FCC RF Radiation Exposure Statement:This equipment complies with FCC radiation exposure limits set forth for an uncontrolled environment.  End users must follow the specific operating instructions for satisfying RF exposure compliance.  This equipment must not be co-located or operating in conjunction with any other antenna or transmitter.See also Industry Canada (Canada only) and CE declaration.
100IndexContents100IndexContentsINDUSTRY CANADA (CANADA ONLY)Industry Canada, Class B“This Class (B) digital apparatus complies with Canadian ICES-003”“Cet appareil numérique de la classe (B) est conforme à la norme NMB-003 du Canada.”CE DECLARATIONThe Intuos® 4 Wireless digitizing tablet, model PTK-540WL, has been tested and found to comply with the following harmonized European Norms:• EN 55022: 2006/A1:2007• EN61000-3-2: 2006• EN61000-3-3: 1995/A1:2001/A2:2005• EN55024: 1998/A1:2001/A2:2003-  EN 61000-4-2:1995/A1:1998/A2:2001-  EN61000-4-3:2006-  EN61000-4-4:2004-  EN61000-4-5:2006-  EN61000-4-6:2007-  EN61000-4-8:1993/A1:2001-  EN61000-4-11:2004• EN 60950-1: :2006• EN 300 328 :V1.7.1• EN 301 489-1:V1.8.1,-17:V2.1.1Based on the results of these tests, Wacom declares that the above mentioned devices conform to Article 10.1 of the European Council EMC Directive 2004/108/EC, LVD Directive 2006/95/EC and to the R&TTE Directive 1999/5/EC and indicates this conformity by the CE-sign on each device.The device must be installed and operated always in strict accordance with the instructions given in this handbook.Any changes or modifications to this product that were not specifically authorized by Wacom will invalidate this declaration.
101IndexContents101IndexContentsPRECAUTIONSWarningsSafety precautions for Lithium-Ion batteriesCautionsWARNINGS• Do not place or leave the pen tablet or input tool(s) within reach of children.  If your product is used improperly there is a potential for accident or human injury.  Prevent children from swallowing the pen nib or side switch.  The pen nib, side switch, or other movable parts may accidentally be pulled out if children are biting on them.  Small parts, such as the pen nib or nib refills, pen side switch, or tablet pen stand, can be removed and accidentally swallowed by children.• Do not use the pen tablet in a facility control system that requires extremely high reliability.  It may cause other electronic devices to malfunction, or other devices may cause the pen tablet to malfunction.• Power off your pen tablet in locations where/when electronic devices are not allowed.  Because the pen tablet may cause other electronic devices to malfunction in some locations where/when the use of electronic devices is not allowed, such as within an airplane, be sure to turn off the pen tablet by moving the power switch to the off position.  For added security, turn off Bluetooth.• Do not disassemble the pen tablet or input tool(s).  Do not disassemble or otherwise modify the pen tablet or input tool(s).  Such action may cause heat generation, ignition, electrical shock, or other damage, including human injury.  Disassembly of the product will void your warranty.• Take note of damaged cabling.  If you notice that your pen tablet cabling is torn or otherwise damaged, there is a potential for product malfunction, electrical shock, or fire.  Stop using the product and contact your local distributor or the Wacom customer support center for your region.• Do not expose this product to water or other liquids.  Take care to never spill liquids onto the pen tablet or input tool(s).  Exposing this product to water or other liquids may cause product malfunction or electrical shock.  If the product is exposed to water or other liquids, turn tablet off by moving the power switch to the off position.  If your product is equipped with a power cord, unplug the cord from the wall outlet.  When the tablet is connected using the supplied USB data cable, unplug the USB connector.  Power down your computer.  Then disconnect any other cables that may remain between the pen tablet and your computer.  Remove the tablet battery.  Stop using the product and contact your local distributor or the Wacom customer support center for your region.• Do not insert foreign material into the USB port or any other opening of this product.  If a metal object or foreign material is inserted into a port or other opening of this product, it may cause the product to malfunction or burn out, or cause electrical shock. See also safety precautions for Lithium-Ion batteries and cautions.
102IndexContents102IndexContentsSAFETY PRECAUTIONS FOR LITHIUM-ION BATTERIESAlways follow proper use and handling of the tablet battery:• Do not abuse the battery in any manner.  Puncturing, crushing, heating, exposure to water or fire, disassembly, shorting the terminals, or other types of abuse may cause the battery to explode or ignite, and potentially cause a fire or personal injury.• Use only the correct battery provided by Wacom and be careful not to drop it on hard surfaces.  The battery can be damaged internally when dropped, and should be replaced even if there is no obvious damage.  This will help prevent any future damage that could occur to the tablet if the battery has been dropped, is installed in the tablet, and then later develops a short or leak while in the tablet.• Do not use a battery that is visibly deformed in any manner.  A deformed battery has the potential to rupture, or generate heat, smoke, or fire.• Do not attempt to install the battery backwards or reverse the polarity.  If you do so, you may damage the tablet, cause a fire, or personal injury may result.• Only use a Wacom battery specified for your tablet.  NEVER attempt to use or charge other battery types in your tablet.  Doing so may damage the tablet, cause a fire, or personal injury may result.  Doing so will also void your warranty.• Do NOT attempt to charge the tablet battery with any power adapter that does not meet the specifications required for your Intuos4 tablet.  Doing so may damage the tablet, cause a fire, or personal injury may result.  Doing so will also void your warranty.  You can charge the tablet by connecting it (using the provided USB cable) to any powered USB port.• Do not overcharge the tablet battery.  Doing so may damage the tablet, cause a fire, or personal injury may result.• If you will be traveling with your wireless tablet, be sure to check with the appropriate regulatory authority for any air or travel restrictions that may apply to Lithium-Ion batteries.• If the tablet becomes excessively warm or emits an unusual smell while the battery is charging, immediately disconnect the USB cable (if in use) and shut down the tablet.  The same applies if the tablet is connected to an after-market power adapter.  Contact Wacom Technical Support for assistance (see technical support options).• If a Li-Ion battery is discharged below a certain minimum charge, it cannot be recharged.  An internal protection circuit within the battery prevents any charging once the voltage has fallen below a minimum safety level.• Properly recycle the old battery in accordance with the battery manufacturer recommendations, and follow any applicable warnings.  • Keep batteries out of the reach of children, and promptly recycle old batteries.• When recycling the Li-Ion battery, do not carry it loosely in your pocket or in any container that may contain metal objects.  If transported improperly and metal objects come in contact with the battery terminals, the battery could short, causing personal injury or fire.  It is recommended that you cover the terminals with adhesive tape to insulate them from possible contact with metal objects.• If the battery should leak, do not get the fluid in your eye.  If battery fluid does enter the eye, do not rub the eye.  Immediately rinse the affected eye with water and seek medical attention.See also warnings and cautions.
103IndexContents103IndexContentsCAUTIONS• Do not place or use this product on an unstable surface or workspace.  Do not place this product on a shaky, inclined, or vibrating surface.  It may drop or fall off, causing damage to the product or human injury.• When cleaning your pen tablet, power off the unit by moving the power switch to the off position and unplugging the USB connector from between the pen tablet and your computer.  Electrical shock may occur if you attempt to clean this product when it is connected to your computer or to an after-market power adapter.• Do not apply heavy stress to the pen tip, eraser, or side switch.  It may shorten pen tip life or may cause the pen to malfunction.• If a distorted or bent pen nib is used, the pen tool may operate improperly.  Therefore, do not apply excessive force when using the pen.• Using a pen nib other than one specifically designed by Wacom for your pen input tool may cause product malfunction.• Do not place metal objects on this product when it is in use.  Metal objects placed on the pen tablet during use may cause interference, improper operation, or product malfunction.See also warnings and safety precautions for Lithium-Ion batteries.
104IndexContents104IndexContentsLICENSE AND WARRANTIES(WORLDWIDE, EXCEPT FOR EUROPE, AFRICA AND MIDDLE EAST)SOFTWARE LICENSEThis legal document is an agreement between you, the end-user, and Wacom Technology Corporation (Wacom).1. Grant of License.  The enclosed product includes computer programs embedded in firmware and accompanying diskette or CD-ROM (the “Software”).  The Software is licensed, not sold, to you for use only with Wacom products upon the terms of this license, and Wacom reserves any rights not expressly granted to you.  Wacom grants to you a non-exclusive right to use this copy of the Software in conjunction with a Wacom product at a single location.2. Ownership of Software.  Although you may own the product in which the Software is originally recorded, Wacom retains ownership of the Software itself.  You acknowledge that the Software is Wacom’s property, and contains valuable confidential, unpublished information developed or acquired by Wacom at great expense, including data processing algorithms, innovations and concepts.  The Software is protected by copyright and other federal and state laws.  You agree to use your reasonable best efforts to protect the Software from unauthorized reproduction, distribution, disclosure, use, or publication.3. Copy Restrictions.  Unauthorized copying of the Software is expressly forbidden.4. Use Restrictions.  You may not decompile, reverse assemble, disassemble or reverse engineer the Software.5. Termination.  This License is effective until terminated.  This License will terminate automatically without notice from Wacom if you fail to comply with any provisions of the License.6. Miscellaneous.  This License is governed by the laws of the United States of America and the state of Washington except in Asia Pacific and by the laws of Japan for Asia Pacific.LIMITED WARRANTYWacom warrants the product, to the original consumer purchaser, except for the Software and consumable items such as the battery and pen nibs, to be free from defects in materials and workmanship under normal use and service for a period of two (2) years, from the date of original retail purchase, as evidenced by a copy of the receipt and registration with Wacom within 30 days of purchase.The Software is licensed “as is.”  Wacom makes no warranty with respect to its quality or performance.  Wacom cannot guarantee you uninterrupted service or the correction of any errors.Upon discovery of a defect in the product, except in the Software, within the Warranty Period, you should contact Wacom Technical Support via telephone, email, or fax to obtain an RMA (Return Merchandise Authorization) number and instructions for shipping the product to a service location designated by Wacom.  You should send the product, shipping charges prepaid, to the designated service location, accompanied by the return authorization number, your name, address and telephone number, proof of purchase date, and a description of the defect.  Wacom will pay for return shipping by United Parcel Service or by an equivalent service as chosen by Wacom.Wacom’s sole obligation and entire liability under this warranty shall be, at Wacom’s option, either the repair or replacement of the defective product or parts thereof of which Wacom is notified during the Warranty Period; provided, however, that you are responsible for (i) the cost of transportation of the product to the designated service location and (ii) any loss or damage to the product resulting from such transportation.
105IndexContents105IndexContentsWacom shall have no responsibility to repair or replace the product if the failure of the product has resulted from accident, abuse, misuse, negligence, or unauthorized modification or repair, or if it has been handled or stored other than in accordance with Wacom’s storage instructions.Any descriptions, drawings, specifications, samples, models, bulletins, or similar material, used in connection with the sale of the product, shall not be construed as an express warranty that the product will conform or comply with your requirements.EXCEPT FOR THE LIMITED WARRANTY DESCRIBED ABOVE, THERE ARE NO OTHER WARRANTIES MADE BY WACOM ON THIS PRODUCT.  NO ORAL OR WRITTEN INFORMATION OR ADVICE GIVEN BY WACOM, ITS DEALERS, DISTRIBUTORS, AGENTS, OR EMPLOYEES SHALL CREATE A WARRANTY OR IN ANY WAY INCREASE THE SCOPE OF THIS WARRANTY, AND YOU MAY NOT RELY ON ANY SUCH INFORMATION OR ADVICE.  THIS WARRANTY GIVES YOU SPECIFIC LEGAL RIGHTS, AND YOU MAY ALSO HAVE OTHER RIGHTS WHICH VARY FROM STATE TO STATE.WACOM LIMITS THE DURATION OF ANY LEGALLY IMPLIED WARRANTIES INCLUDING IMPLIED WARRANTIES OF MERCHANTABILITY OR FITNESS FOR A PARTICULAR PURPOSE, TO THE DURATION OF WACOM’S EXPRESS WARRANTY.  SOME STATES DO NOT ALLOW LIMITATIONS ON HOW LONG AN IMPLIED WARRANTY LASTS, SO THE ABOVE LIMITATION MAY NOT APPLY TO YOU.NEITHER WACOM NOR ANYONE ELSE WHO HAS BEEN INVOLVED IN THE CREATION, PRODUCTION, OR DELIVERY OF THIS PRODUCT SHALL BE LIABLE FOR ANY DIRECT, CONSEQUENTIAL, OR INCIDENTAL DAMAGES (INCLUDING DAMAGES FOR LOSS OF BUSINESS PROFITS, BUSINESS INTERRUPTION, LOSS OF BUSINESS INFORMATION AND THE LIKE) ARISING OUT OF THE USE OF OR INABILITY TO USE SUCH PRODUCT, EVEN IF WACOM HAS BEEN ADVISED OF THE POSSIBILITY OF SUCH DAMAGES.  SOME STATES DO NOT ALLOW THE EXCLUSION OR LIMITATION OF INCIDENTAL OR CONSEQUENTIAL DAMAGES, SO THE ABOVE LIMITATION OR EXCLUSION MAY NOT APPLY TO YOU.In the event that any of the above limitations are held unenforceable, Wacom’s liability for any damages to you or any party shall not exceed the purchase price you paid, regardless of the form of any claim.This Limited Warranty is governed by the laws of the United States of America and the state of Washington.This Limited Warranty is valid for and only applies to products purchased and used inside the United States (and its territories or possessions) and Canada.WARRANTY SERVICE IN THE U.S.A. AND CANADATo obtain Warranty service within the U.S. or Canada contact:Wacom Customer Care CenterPhone: 1.360.896.9833Email Inquiry form: http://www.wacom.com/productsupport/email.cfm
106IndexContents106IndexContentsWARRANTY ON SALES OUTSIDE OF THE U.S.A. AND CANADAFor products purchased or used outside of the United States and Canada, the warranty period is one (1) year from the date of original retail purchase.  Upon discovery of a defect in the product, except in the Software, within the Warranty Period you should contact your local dealer or distributor.  In all other respects the terms of the warranty as set forth above apply to such sales.Wacom Technical Support in Asia Pacific (except Japan and China)Detailed Asia Pacific Limited Warranty policy and product registration may be found online at http://www.wacom-asia.comTo obtain technical support or Warranty service within Southeast Asia, Oceania and Taiwan, please contact the Wacom Customer Support Service.Phone numbers can be found here: http://www.wacom-asia.com/support/contactShould you have any questions about this Agreement, or if you desire to contact Wacom for any reason, please contact in writing:IN NORTH AND SOUTH AMERICA CONTACT: IN JAPAN CONTACT:Wacom Technology Corporation Wacom Co., Ltd.1311 SE Cardinal Court 2-510-1 ToyonodaiVancouver, Washington 98683 Otone-Machi, Kitasaitama-GunU.S.A. Saitama, 349-1148JapanIN ASIA PACIFIC CONTACT: IN MAINLAND CHINA (EXCEPT HONG KONG) CONTACT:Wacom Co., Ltd. Wacom China CorporationHarmony Tower 18F, 1-32-2 Hon-Cho, Unit 2807, 28th Floor, SK Tower,Nakano-Ku, Tokyo 164-0012 No 6 Jia, Jianguomenwai Avenue,Japan Beijing, 100022, ChinaE-mail: support@wacom.com.cn
107IndexContents107IndexContentsLICENCE WARRANTY CONDITIONS(EUROPE, AFRICA AND MIDDLE EAST)SOFTWARE LICENCE AGREEMENTImportant customer informationThe scope of delivery of this product covers copyright-protected computer programs ("software"), which are the inalienable intellectual property of WACOM Europe GmbH ("WACOM").  This software is an integral component of the product and is also held on the associated data carrier.  The software of WACOM and the associated rights of use are not included with the purchase of this product from your retailer.  WACOM grants you-the user-the right to use the software exclusively in accordance with the conditions stipulated in this licence agreement.  By purchasing this product, you agree to the following licence conditions.Conditions for using the softwareWACOM issues the user with a personal, non-exclusive licence to use the software solely in connection with this product and for the correct operation of the product.  This licence may only be assigned to a third party in connection with this product.Use of this software includes the creation of permanent or temporary copies of the software by means of loading, displaying, exporting, transferring or saving, for the purposes of exporting the commands and the data they contain or for observing, researching or testing the software functions.The customer may not license the software to a third party, lease, lend or in any other way provide access to the software. The customer may not copy, change, transfer or edit the software without prior written agreement from WACOM. The only exceptions to this are necessary procedures for creating a back-up copy and the scenarios outlined in section 2. The customer may not carry out any "reverse engineering", decompile or depacketise the software, or try by any other means to discover the source code of the software. This restriction shall continue to apply after the termination of this agreement. If the software contains interfaces to other programs that are not supported by WACOM, WACOM shall provide the customer with the necessary information on request, as long as the customer can prove his right to use the software and agrees to bear the copying and postage costs.WACOM AND ITS SUPPLIERS CANNOT OFFER ANY GUARANTEE FOR THE PERFORMANCE OF THE SOFTWARE OR FOR THE RESULTS PRODUCED THERE FROM. WACOM AND ITS SUPPLIERS OFFER NO GUARANTEES OR ASSURANCES (EITHER EXPRESSLY OR IMPLICITLY, INCLUDING THOSE THAT MAY BE DERIVED FROM A BUSINESS RELATIONSHIP OR FROM TRADE PRACTICE, OR FROM LEGAL PROVISIONS OR CUSTOMARY LAW) WITH REGARD TO THE MARKETABILITY, FREEDOM FROM DEFECTS OF TITLE OR USEFULNESS OF THE SOFTWARE.WACOM AND ITS SUPPLIERS ACCEPT NO LIABILITY FOR DAMAGES, CLAIMS OR COSTS OF ANY KIND, NOR FOR CONSEQUENTIAL DAMAGES, SECONDARY, ACCIDENTAL, INDIRECT OR PENAL DAMAGES, PARTICULAR OR MISCELLANEOUS DAMAGES OR FOR DEMANDS OR INDEMNITY CLAIMS FOR REDUCED PROFITS OR LOSSES. THIS SHALL ALSO APPLY IN THE CASE OF A REPRESENTATIVE OF WACOM BEING PREVIOUSLY AWARE OF THE POSSIBILITY OF SUCH LOSSES, DAMAGES, CLAIMS OR COSTS, OR DEMANDS FROM THIRD PARTIES.
108IndexContents108IndexContentsThe existing limitations on liability shall not apply in the case of the assumption of explicit guarantees, or in case of fraudulent behaviour on the part of WACOM, nor for damages arising from wilful or grossly negligent behaviour on the part of WACOM, from damages leading to loss of life, personal injury or sickness or in the case of binding legal provisions. For slight negligence, WACOM and its suppliers shall only be liable in the event of a breach of essential contractual obligations. Liability when such an essential contractual obligation is breached is, however, limited to damages typical to this type of contract, which WACOM must have determined at the conclusion of the contract based on the known risks and circumstances at that time. Claims for reduced profits or expenses saved, indemnity claims from third parties or claims for any other direct or consequential damages still cannot be asserted in this case.The laws of the Federal Republic of Germany shall apply to this agreement. However, the applicability of the United Nations Convention on Contracts for the International Sale of Goods is explicitly excluded. Krefeld is the sole place of jurisdiction for all claims arising from this contractual relationship and all disputes between the parties resulting from the formation, handling or termination of the contractual relationship, provided that the customer is a trader, a legal entity under public law or a special fund under public law. The jurisdiction agreement shall also apply for customers who do not have a general place of jurisdiction in Germany. The jurisdiction agreement shall not apply if, due to legal provisions, a different sole place of jurisdiction must be established for the case. Furthermore, WACOM is authorised to file a lawsuit against the headquarters of the customer.This licence constitutes the entire contractual agreement between the parties. It overrides all other verbal and written contracts and agreements and may only be altered by means of a written and signed contract. Should one of the provisions of these licence conditions be or become void, the validity of the other provisions shall not be affected, in full or in part. Should a provision be invalid, the legally permissible regulation most closely resembling the invalid regulation shall apply in its place.LIMITED WARRANTYWACOM guarantees to you, as the initial purchaser, that the product hardware, when used as intended, will remain free from material defects and processing errors for a warranty period of TWO (2) YEARS and Cintiq products shall be guaranteed for a warranty period of THREE (3) YEARS, commencing from the purchase date and provided that the product was unused at the time of purchase. Defects in wear parts (e.g. pen tips) resulting from normal wear and tear are exempt from the warranty. Furthermore, WACOM guarantees that the data carriers delivered with the product are free from material defects and processing errors for a period of SIX (6) MONTHS from the date of purchase. If the product-excluding any software-is discovered to be faulty it must be returned immediately to the place of purchase in its original packaging within the warranty period together with your name, address and telephone number, a description of the problem and a copy of the original receipt. The customer shall be liable for any possible damage or loss of the product during transit for this purpose. Under the provisions of this warranty, WACOM only undertakes to repair or replace the faulty product or parts at its own discretion, in cases where defects are proven and the product is sent within the warranty period.WACOM is not obligated to repair or replace the product if: (a) the damage to the product results from any accident, misuse, improper use, negligence or unauthorised alteration or repair; (b) the product was not handled or stored according to the instructions provided by WACOM; (c) the damage resulted from normal wear and tear; or d) the serial number affixed by WACOM has been removed or rendered unintelligible.If, when a claim made under this warranty is checked, it emerges that it is outside the permitted time period or is not covered by the warranty or that the product is not faulty, the costs of any checks or repairs must be borne by the customer.
109IndexContents109IndexContentsAny descriptions, drawings, specifications, samples, models, notifications or similar material provided in connection with the purchase of the product cannot be taken as an explicit guarantee that the product corresponds to or fulfils the customer's requirements.If this product is faulty, the purchaser shall be entitled to assert legal claims against the vendor for liability due to defects. These legal rights against the vendor are not limited by the existing warranty. The warranty grants the customer many additional rights under the conditions stipulated in this text.This limited warranty shall apply if the registered office of the vendor is in the EU or in Iceland, Norway, Jersey, Switzerland, Russia, Ukraine, Croatia, Serbia, Tunisia, Turkey, Syria, Lebanon, Jordan, Israel, Egypt, United Arab Emirates, Iran or South Africa.The granting of this limited warranty is subject to the laws of the Federal Republic of Germany. However, the applicability of the United Nations Convention on Contracts for the International Sale of Goods is explicitly excluded. Krefeld is the sole place of jurisdiction for all claims arising from this contractual relationship and all disputes between the parties resulting from the formation, handling or termination of the contractual relationship, provided that the customer is a trader, a legal entity under public law or a special fund under public law. The jurisdiction agreement shall also apply for customers who do not have a general place of jurisdiction in Germany. The jurisdiction agreement shall not apply if, due to legal provisions, a different sole place of jurisdiction must be established for the case. Furthermore, WACOM is authorised to file a lawsuit against the headquarters of the customer.Should one of the provisions of these limited warranty conditions be or become void, the validity of the other provisions shall not be affected, in full or in part. Should a provision be invalid, the legally permissible regulation most closely resembling the invalid regulation shall apply in its place.If you have any questions about this agreement, or would like to contact WACOM for another reason, please contact us by post at this address:WACOM Europe GmbHEuropark Fichtenhain A947807 KrefeldGERMANY
110110IndexContentsIndexContentsGLOSSARYActive area.  The drawing area of the tablet where your Intuos4 tools are detected.Application-specific settings.  Intuos4 tool and tablet settings that have been customized for individual applications.  The Wacom Tablet control panel enables you to customize a tool to behave uniquely in different applications.  Application-specific settings are in effect whenever you use the application.Aspect.  The ratio between the vertical and horizontal dimension of the tablet or display.Bluetooth.  A standardized wireless technology and Specification.  Manufacturers build Bluetooth wireless technology into their products in order to create Bluetooth enabled devices, providing seamless voice and data connections between a variety of wireless devices operating at short range to one another.Click force.  The amount of force you must apply to the pen tip for a click to occur.Digital Ink.  A broad category that typically describes handwritten content which as been created using pen-based input on a computer.  This handwritten content takes the form of sketches, ink mark-up, or handwriting.  The handwriting can optionally be converted to typewritten text or simply left alone for use in its original format.  Depending on your system and applications settings, the handwritten text you make with digital ink can be converted on-the-fly or at another time.Discoverable mode.  An operational state in which a Bluetooth enabled device is available for discovery by another Bluetooth enabled device.Display Toggle.  An Intuos4 feature that allows you to work with your tablet on all displays or on one display at a time.  Available only on multiple monitor systems.  See working with Display Toggle for more information.Double-click assist.  A function of the Wacom Tablet control panel that makes it easier to double-click by setting the size of the double-click distance.Double-click distance.  The maximum distance (in screen pixels) that the cursor can move between clicks and still be accepted as a double-click.  Increasing the double-click distance makes double-clicking easier, but may cause a delay in brush strokes in some graphics applications.Double-click speed.  The maximum time that can pass between clicks and still be accepted as a double-click.Eraser-aware application.  A software application that has built-in support for the Intuos4 eraser.  These applications take advantage of the eraser in different ways, depending on what makes sense for the application.ExpressKeys.  The customizable control keys located on your professional pen tablet.ExpressKeys Left.  A tablet ORIENTATION setting where the Touch Ring and ExpressKeys are oriented to the left of the tablet.ExpressKeys Right.  A tablet ORIENTATION setting where the Touch Ring and ExpressKeys are oriented to the right of the tablet.
111IndexContents111IndexContentsFingerwheel.  The control wheel on the Intuos4 Mouse and optional Airbrush.Journal.  A Microsoft Windows application that electronically simulates a physical journal pad, but with the advantages of digital note taking.  For example, you can create quick sketches and jot handwritten notes that can be converted to text and sent on to colleagues for digital mark-up.  Journal includes a variety of pen, marker, and highlighter tools, plus an eraser that is easily activated by the eraser of your Intuos4 pen.  Additionally, your handwritten content is searchable within Journal.Mapping.  The relationship between your Intuos4 tool position on the tablet and the cursor position on the monitor screen.Modifier.  Modifier keys include SHIFT, ALT, and CTRL for Windows, or SHIFT, CONTROL, COMMAND, and OPTION for Macintosh.  You can customize your Intuos4 tool to simulate a modifier key.Mouse acceleration.  A setting that allows you to adjust the screen cursor acceleration when your Intuos4 tool is in MOUSE MODE.Mouse mode.  A method for positioning the screen cursor.  When you place an Intuos4 tool on the tablet, you can move the screen cursor with a “pick up and slide” motion similar to using a traditional mouse.  This is known as relative positioning, and is the default setting for the Intuos4 Mouse.  See also pen mode.Mouse speed.  A setting that allows you to adjust the speed at which your screen cursor moves when your Intuos4 tool is in MOUSE MODE.Nib.  The replaceable pen tip.OLED.  Organic Light Emitting Diodes (OLEDs) are made up of semi-conductor polymers.  OLEDs do not need a background lighting to function, and thus have a lower power consumption and can be much thinner than LCD panels.Pairing.  A method of creating a virtual cable link between two Bluetooth enabled devices.  Pairing is the process whereby Intuos4 and the computer discover one another for the “first” time.Pen mode.  A method of positioning the screen cursor.  Wherever you place your Intuos4 tool on the tablet, the screen cursor will appear at the corresponding point on the screen.  This is known as absolute positioning, and is the default setting for all Intuos4 pen tools.  Also, PEN MODE allows you to quickly position the screen cursor without having to first find it and then move it across the desktop.  See also mouse mode.Pixel.  The smallest unit of measure on your monitor screen.Pressure sensitive.  A quality of the Intuos4 pen tip and eraser that senses the amount of pressure being applied.  This is used to create natural-looking pen, brush, and eraser strokes in applications that are pressure sensitive.Pressure-sensitive application.  Any application that supports pressure-sensitive input.Proximity.  The height above the tablet’s active area where the Intuos4 tools are detected.  See also positioning.
112IndexContents112IndexContentsRadial Menu.  A hierarchical menu (in radial format).  Each level of the menu consists of eight menu slices which may contain various features and options to choose from.  You can customize the buttons of your Intuos4 tools or tablet to display this menu.Screen cursor.  The pointer on the display screen.  Screen cursors come in different shapes (such as an I-beam, arrow, or box), depending on which application you are running.Tablet PC Input Panel (TIP).  The Microsoft Windows Tablet PC Input Panel enables you to use your Intuos4 pen to create handwritten notes or work with an on-screen keyboard.  The Input Panel dynamically converts your handwriting to text.  Information you create can then be inserted into other documents, spreadsheets, or illustrations.  See pen and digital ink capabilities in Windows.Tilt sensitive.  A quality of the Intuos4 pen tip and eraser that senses the amount of tilt between the tool and tablet.  This is used to create natural-looking pen, brush, and eraser strokes in applications that are tilt sensitive.Tool ID.  A unique serial number in each Intuos4 tool.  Some graphics applications, such as Corel Painter, recognize Tool IDs and allow you to assign different settings and brushes to every Intuos4 tool (e.g., two Grip Pens).  Switching between the settings and brushes then becomes as easy as switching between the two pens.Touch Ring.  The customizable control ring located on your professional pen tablet.Transceiver.  A radio device capable of both transmitting and receiving information.USB.  Universal Serial Bus.  A hardware interface standard for connecting computer peripheral devices.  USB ports support hot-plugging, which allows you to disconnect a USB device without turning off your computer.Wintab.  An interface standard used by Windows applications for receiving tablet information.  Intuos4 supports all Wintab-compatible applications under Windows.
113IndexContents113IndexContentsINDEXAbout the manual  6Accessories and partsavailable 97ordering 96Active area, understanding  21Adding a new tool  60Airbrushholding 90replacing the tip  84using 90applications, using integrated  88Application-specific settings  61changing 62creating 62removing 62Art Pen, using  90Batteryactivation 11charging 11life, information  82management 10replacing 83status light  14warnings 102Bluetooth connection, optimizing  18Button functions  51Care, for tools and tablet  83Cautions 103CE declaration  100Clicking, how to  26Connecting wirelessly  15Connectionoptimizing 18problems, troubleshooting  70USB 18Connection light  14Control panelfeatures 34lists 35opening 33tabs 35Customizingdouble-click 38eraser feel  39advanced 39ExpressKeys 44mouse 41buttons 42fingerwheel 42pen 37Radial Menu  57tablet 43ExpressKeys 44Touch Ring  45tablet to screen mapping  46tilt sensitivity  41tip feel  38advanced 39tool buttons  40Touch Ring  45Diagnostics 66Display Toggle, working with  58Double-click, customizing  38Double-clicking, how to  26Dragging, with pen  26Drawingwith pressure sensitivity  28with tilt  28Driver downloads, obtaining  80Environmental conditions  83Eraser feeladvanced 39customizing 39
114IndexContents114IndexContentsErasing 29Ergonomics 19ExpressKeyscustomizing 44display optimization  88testing 68using 31Eye-hand coordination exercise  29FCC notice  99Featurescontrol panel  34pen 10power saving  13tablet 8Fingerwheel, mouse, using  89Force proportions  50Functions, button  51General problems, troubleshooting  72HoldingAirbrush 90pen 24Industry Canada notice  100Information, product  96Installingmultiple tablets  86tablet 81Linking, to computer  16Macintosh-specific problems, troubleshooting  77Mapping to multiple monitors  22Mousebuttons, customizing  42customizing 41fingerwheelcustomizing 42using 89testing 69using 89Mouse Mode  47Multiplemonitors, working with  22tablets, installing  86New tool, adding  60Nib, replacing  84Options, advanced  87Ordering parts and accessories  96Orientation, tablet  48physical configuration  20Parts and accessoriesavailable 97ordering 96Penclicking with  26customizing 37double-clicking with  26dragging with  26drawingwith pressure sensitivity  28with tilt  28erasing with  29features 10holding 24pointing with  25positioning with  25replacing the tip  84side switch  27testing 67tip, replacing  84using 23Pen Mode  46Pointing, with pen  25Positioning, with pen  25power management  10Precautions 101battery warnings  102Cautions 103Warnings 101Preferences, managing tablet  85Pressure sensitivity, drawing with  28Product information  96Proximity 25Radial Menucustomizing 57using 57Removing application-specific settings  62Screen area  49Settingschanging application specific  62creating application specific  62removing application specific  62
115IndexContents115IndexContentsSide switch, using  27Softwaredriver downloads  80uninstalling 85Specifications, product  93Airbrush 94Art Pen  95Classic Pen  95Grip Pen  94Inking Pen  95Intuos4 Wireless tablet  93mouse 94Tabletarea 50battery activation  11battery and power management  10battery status light  14charging the battery  11connecting to your computer  16customizing 43ExpressKeyscustomizing 44testing 68using 31features 8installation 81mode options, changing  86orientation 48physical configuration  20power saving features  13preferences, managing  85properties, working with  36replacing battery  83storing 83testing 64Touch Ringcustomizing 45testing 68using 32wireless connection light  14working with  30Tablet to screen mapping, customizing  46Technical Support, contacting  79TestingExpressKeys 68mouse 69pen 67tablets 64tools 66Touch Ring  68Tiltdrawing with  28sensitivity, customizing  41Tip feeladvanced 39customizing 38Tool buttons, customizing  40Toolstesting 66working with multiple  60Touch Ringcustomizing 45testing 68using 32Troubleshootingconnection problems  70general problems  72Macintosh-specific problems  77tables 70Windows-specific problems  76Uninstalling software  85USB connection  18UsingAirbrush 90applications integrated for tablet control  88Art Pen  90ExpressKeys 31mouse 89pen 23Radial Menu  57Touch Ring  32Wacom international offices  116Warnings 101Warnings, battery  102Windows-specific problems, troubleshooting  76Wireless connection  15establishing 16Wireless connection light  14Work area, setting up  19Working with Intuos4  23
116IndexContents116IndexContentsWACOM INTERNATIONAL OFFICESWACOM TECHNOLOGY CORPORATION WACOM EUROPE GMBH1311 SE Cardinal Court Europark Fichtenhain A9Vancouver, WA 98683 47807 KrefeldU.S.A. GermanyTelephone: +1.360.896.9833 Telephone: +49.(0)2151.3614.0Fax: +1.360.896.9724 Fax: +49.(0)2151.3614.111WACOM CO., LTD.JAPAN MARKETING AND SALES DIVISIONWACOM CO., LTD.ASIA PACIFIC MARKETING AND SALES DIVISIONHarmony Tower 21F, 1-32-2 Hon-Cho, Harmony Tower 18F, 1-32-2 Hon Cho,Nakano-Ku, Tokyo 164-0012 Nakano-Ku, Tokyo 164-0012Japan JapanInternet: http://tablet.wacom.co.jp Telephone: +81.3.5309.1513Fax: +81.3.5309.1514WACOM CHINA CORPORATION WACOM KOREA CO., LTD.Unit 2807, 28th Floor, SK Tower 25th Floor DMC iaan Sangam 2nd Complex, 1653No 6 Jia, Jianguomenwai Avenue, Sangam-dong, Mapo-gu, Seoul, Korea, 121-270Beijing, 100022, China KoreaInternet: http://www.wacom.com.cn Telephone: +82.2.557.3894Fax: +82.2.557.3895WACOM AUSTRALIA PTY. LTD. WACOM SINGAPORE PTE. LTD.Unit 8, Stage 1 Cumberland Green 3 Bishan Place2-8 South Street Rydalmere CPF Bishan Building #06-08NSW 2116 Australia Singapore 579838Telephone: +61.2.9422.6700 Telephone: +65.6258.8640Fax: +61.2.9420.2272 Fax: +65.6258.8697WACOM TAIWAN INFORMATION CO., LTD.Suite 605, 6th floor, No. 205 Tun-Hwa North RoadTaipei, 105 TaiwanTelephone: +886.2.2712.2675Fax: +886.2.2712.9789

Users manual -2
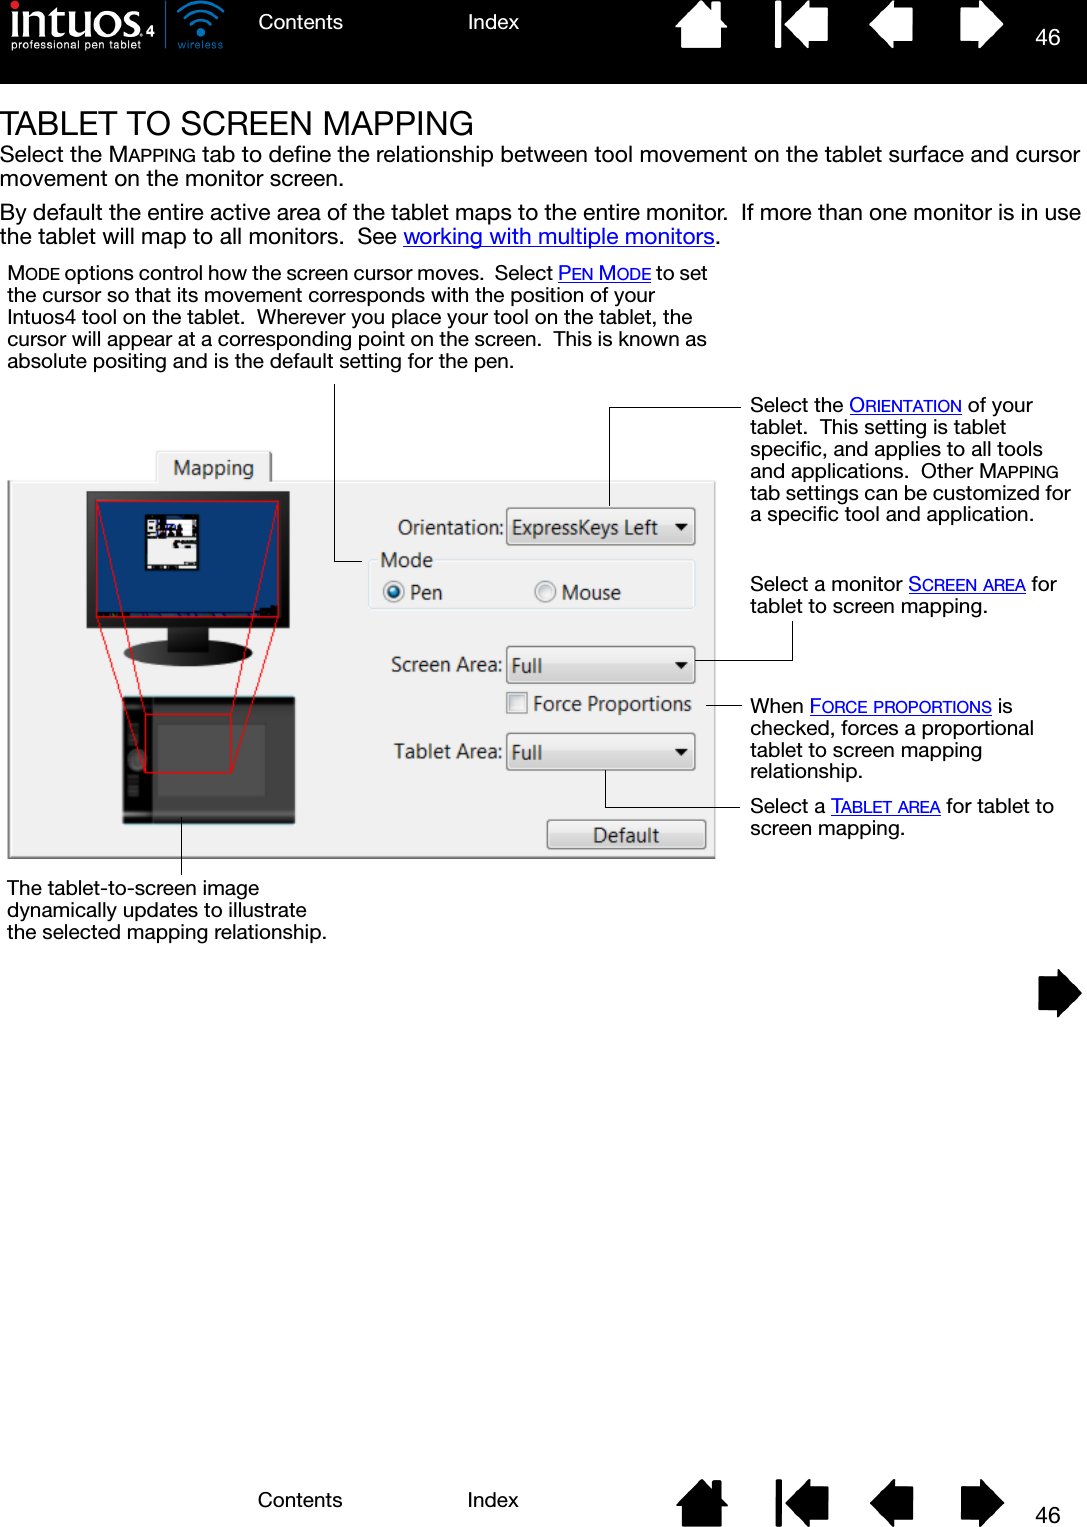
46IndexContents46IndexContentsTABLET TO SCREEN MAPPINGSelect the MAPPING tab to define the relationship between tool movement on the tablet surface and cursor movement on the monitor screen.By default the entire active area of the tablet maps to the entire monitor.  If more than one monitor is in use the tablet will map to all monitors.  See working with multiple monitors. MODE options control how the screen cursor moves.  Select PEN MODE to set the cursor so that its movement corresponds with the position of your Intuos4 tool on the tablet.  Wherever you place your tool on the tablet, the cursor will appear at a corresponding point on the screen.  This is known as absolute positing and is the default setting for the pen.Select the ORIENTATION of your tablet.  This setting is tablet specific, and applies to all tools and applications.  Other MAPPING tab settings can be customized for a specific tool and application.Select a monitor SCREEN AREA for tablet to screen mapping.When FORCE PROPORTIONS is checked, forces a proportional tablet to screen mapping relationship.Select a TABLET AREA for tablet to screen mapping.The tablet-to-screen image dynamically updates to illustrate the selected mapping relationship.
47IndexContents47IndexContentsNotes: You can switch between PEN MODE and MOUSE MODE by using the screen Radial Menu.If you frequently switch between PEN MODE and MOUSE MODE, you also can assign the MODE TOGGLE... function to one of your tool buttons.When MOUSE MODE is selected, you can decide how you would like the mouse to track.  (MOUSE TRACKING options apply only to the Intuos4 Mouse.)• When USE TABLET ORIENTATION is selected, moving the mouse toward the top of the tablet moves the screen cursor up.  In this mode the entire active area of the tablet is available for mouse tracking.• When USE MOUSE ORIENTATION is selected, moving the mouse forward moves the screen cursor up.  In this mode a reduced inset portion of the active area is available for mouse tracking.  This is the default setting for all Intuos4 tablets.Select MOUSE MODE to move the screen cursor with a “pick up and slide” motion similar to using a traditional mouse.Sets the screen cursor acceleration.Select a slower or faster screen cursor tracking speed.
48IndexContents48IndexContentsORIENTATIONFrom the MAPPING tab, you can choose a different tablet ORIENTATION and then physically rotate your tablet to match the selection you have made.  This feature allows you to set up the tablet controls for left- or right-handed use, or to configure your tablet to work with a tall monitor.  See configuring the tablet orientation.After making changes, verify you have correctly set the orientation by moving your pen “up” on the tablet – the screen cursor should move up as well.  The selected orientation is a global tablet setting and applies to all applications.Note: At the log-in and user switching screens, the tablet orientation will use the default orientation that was selected when the driver was installed.  If you want to change the default orientation, you must reinstall the driver using the Intuos installation CD.  See configuring the tablet orientation.EXPRESSKEYS LEFT Tablet orientation is horizontal, with Touch Ring and ExpressKeys located to the left.  This is the orientation for right-handed users.EXPRESSKEYS TOP Tablet is rotated 90 degrees clockwise, with Touch Ring and ExpressKeys oriented toward the top.EXPRESSKEYS RIGHT Tablet orientation is horizontal, with Touch Ring and ExpressKeys located to the right.  When this option is selected, the tablet operation and the Wacom Tablet control panel options are automatically configured for correct left-handed use.If you have an Intuos4 Mouse, click the control panel OPTIONS button to set the device for right- or left-handed use.  See advanced options.EXPRESSKEYS BOTTOM Tablet is rotated 90 degrees counter-clockwise, with Touch Ring and ExpressKeys oriented toward the bottom.
49IndexContents49IndexContentsSCREEN AREAUse the MAPPING tab SCREEN AREA options to define the portion of the display screen to which your tablet will map.FULL Maps the entire monitor(s) area.  This is the default setting.  See also working with multiple monitors.MONITOR Maps the entire area of a single monitor that you choose.  If more than one monitor is connected to your system, an option will be available for each detected monitor.PORTION... Selecting PORTION... brings up the PORTION OF SCREEN dialog box.Choose a method for defining a portion of the display:• Drag corners of the foreground graphic to select the screen area.• Select the CLICK TO DEFINE SCREEN AREA button and move the screen cursor to select the screen area.  Be sure to follow any MESSAGE prompts.• Enter coordinate values.After defining a portion of the screen, you may need to use a different input device to access other portions of the screen area.
50IndexContents50IndexContentsFORCE PROPORTIONSIn the MAPPING tab, check or uncheck the FORCE PROPORTIONS box to determine the tablet to screen mapping relationship.Note:  Although Intuos4 is optimized for use with 16 : 10 aspect ratio displays, the default settings automatically adjust for use with other aspect ratio displays.TABLET AREAIn the MAPPING tab, use the TABLET AREA options to define the tablet area that will be mapped to the screen area:FULL The entire active area of the tablet is mapped.   This is the default setting.PORTION... Selecting PORTION... brings up the PORTION OF TABLET dialog box.When FORCE PROPORTIONS is unchecked, the correct scale or proportions are not maintained.  The selected tablet area is mapped to the selected display area.  Drawing a circle on the tablet may create an ellipse on the display screen.  This is the default setting for all tools.When FORCE PROPORTIONS is checked, the correct vertical and horizontal proportions are maintained.  Drawing a circle on the tablet results in a circle on the display screen.  Depending on your settings, some portions of the tablet active area may no longer be usable when this option is selected.Choose a method for defining a portion of the tablet:• Drag corners of the foreground graphic to select the tablet area that will be mapped to your selected screen area.• Select the CLICK TO DEFINE TABLET AREA button and use your tool on the tablet to select the tablet area.  Be sure to follow any MESSAGE prompts.• Enter coordinate values.
51IndexContents51IndexContentsBUTTON FUNCTIONS    FUNCTION NAME DESCRIPTIONCLICKS•CLICK Simulates a primary mouse button click.  Be sure at least one button performs this function so you can always navigate and click.•RIGHT CLICK Simulates a right mouse button click, which displays a context menu.•MIDDLE CLICK Simulates a middle mouse button click.•DOUBLE CLICK Simulates a double-click.  For easier double-clicking, use this function instead of tapping twice with the pen tip.•CLICK LOCK Simulates holding down the primary mouse button.  Press the tool button once to initiate click lock.  Press the button again to release click lock.  Click lock is useful for dragging objects or selecting blocks of text.•4TH CLICK Simulates a 4th mouse button click.•5TH CLICK Simulates a 5th mouse button click.The following options are available for tool and tablet settings.  Not all options are available for all controls.
52IndexContents52IndexContentsFUNCTION NAME DESCRIPTIONKEYSTROKE... Enables you to simulate keystrokes.  Select this option to display the DEFINE KEYSTROKE dialog box.Enter a keystroke or keystroke combination in the KEYS entry box.  Keystroke combinations can include letters, numbers, function keys (such as F3) and modifier keys (such as SHIFT, ALT, or CTRL for Windows, or SHIFT, OPTION, COMMAND, and CONTROL for Macintosh).You can also select special keystrokes or keystroke combinations from the ADD SPECIAL drop-down menu.After defining a keystroke sequence, click OK.Important: Because the ENTER (Windows) and RETURN (Macintosh) keys can be selected as a defined keystroke, they cannot be used to select OK.  You must use your Intuos4 tool to click on the OK button.If prompted, enter a name for the keystroke definition.  The name will be displayed with the respective control or in the Radial Menu, as applicable.You can create different keystroke functions for different applications.  See application-specific settings.To learn which keystroke shortcuts are supported by a particular application, see the documentation that came with the application.Deletes only the last entry in the keystroke entry box.Clears the keystroke entry box.When defining keystrokes for the Touch Ring or mouse fingerwheel, the dialog box provides two KEYS entry boxes.Assign keystroke functions as described above for clockwise and counter-clockwise movement on the ring, or front and back movement of the mouse fingerwheel.Enter a NAME for the defined keystrokes pair and click OK.
53IndexContents53IndexContentsFUNCTION NAME DESCRIPTIONMODIFIER... Enables you to simulate modifier key(s) (such as SHIFT, ALT, or CTRL for Windows, or SHIFT, OPTION, COMMAND, and CONTROL for Macintosh).  Many applications use modifier keys to constrain the size or placement of objects.RADIAL MENU Displays a Radial Menu on your screen.  Each level of the hierarchical menu consists of eight menu slices which may contain various features and options to choose from.BACK Simulates the BACK command in browser applications.FORWARD Simulates the FORWARD command in browser applications.PAN/SCROLL Enables you to position a document or image in any direction within the active pane by pressing a tablet or pen button set for PAN/SCROLL and then dragging with the pen tip across the tablet’s active area.Choose one or more modifier key options.  Select the CLICK box if you want a mouse click to occur whenever you press the tool button.As you move the pen tip, the document or image is repositioned to follow the direction of pen movement on the tablet.  Release the button or lift the pen tip from the tablet surface when you are done.When you select PAN/SCROLL, the PEN SCROLL SPEED dialog box prompts you to set a scrolling speed for use in applications that do not support grabber hand (pixel-level) panning within a document or image.A slower setting reduces the scroll rate and is useful for close-up and detail work where you need precise control of the image.
54IndexContents54IndexContentsFUNCTION NAME DESCRIPTIONAUTO SCROLL/ZOOM Sets the Touch Ring to zoom in most graphics applications and scroll in most other applications.SCROLL Sets the Touch Ring for scrolling only action.ZOOM Sets the Touch Ring for zooming only action.SHOW DESKTOP Minimizes all open windows to display a clean desktop.SWITCH APPLICATION Brings up the application switching dialog with focus on the next open application.  On Windows 7 and Vista systems running Aero, Flip 3D will be activated with focus on the next open applications.OPEN/RUN... Opens a dialog box where you can select a specific application, file, or script to launch.INK TOGGLE (Macintosh.)  Toggles the “ink in any application” function of Ink on and off.  Ink automatically recognizes and converts your handwriting into text and inserts it into a document.  Handwriting recognition must be turned on for this function to work.  See your Macintosh help for information on working with Ink.EXPOSÉ (Macintosh.)  Tiles all open windows.  To access this option, first choose KEYSTROKE... and then click on the ADD SPECIAL menu within the dialog box.PRESSURE HOLD Locks the pressure at the current pressure level until the button is released.  For example, you can paint with pressure sensitivity until you reach the brush size that you like.  You can then press the button and continue painting with the same size brush until the button is released.PRECISION MODE Changes the mapping around the current pen tip position such that you must move the pen twice as far for the screen cursor to cover the same distance on the display screen.  To activate, press and hold the tool button to which this function is assigned.  Releasing the button returns to normal mapping.When your tool is in MOUSE MODE, screen cursor movement is adjusted to act as if acceleration were off and speed set to slow.Click BROWSE... to locate an application, file, or script  to launch.  The selection you make appears in the APPLICATION TO RUN box.  Click OK to accept the selection.  The dialog box will close and the OPEN/RUN... option you have selected will be assigned as your tool button option.  Simply press the tool button to launch the assigned option.If your selection is for the Radial Menu, it will be displayed in the Radial Menu.
55IndexContents55IndexContents FUNCTION NAME DESCRIPTIONDISPLAY TOGGLE For multiple monitor systems.  Enables you to toggle the current tablet mapping and screen cursor between different displays when you press an ExpressKey that has been assigned this function.  See working with Display Toggle.MODE TOGGLE... Toggles between PEN MODE and MOUSE MODE.  When first setting a tool button to MODE TOGGLE..., the MOUSE MODE dialog box is displayed where you can adjust the mouse acceleration and speed.MOUSE MODE settings can be accessed from a number of different locations within the control panel.  However, for each input tool and application that you are customizing, only one MOUSE ACCELERATION and SPEED setting can be made.The MOUSE MODE acceleration and speed settings are independent of system settings.  Changes you make to these settings in the Wacom Tablet control panel do not affect similar system settings.  However, changes made to similar system settings may affect your Intuos4 tablet settings.ERASE Default setting for the eraser.  See erasing for information on using the eraser.SHOW SETTINGS Displays a diagram (on your display screen) of the tablet ExpressKeys and Touch Ring, showing the current function settings for each control.Sets the screen cursor tracking speed when in MOUSE MODE.Sets the screen cursor acceleration when in MOUSE MODE.
56IndexContents56IndexContentsFUNCTION NAME DESCRIPTIONTABLET PC•TABLET PC INPUT PANEL (Tablet PCs, and Windows 7 and Vista systems that support the Tablet PC Input Panel.)  Opens the Tablet PC Input Panel when you press a tool button set to this function.•JOURNAL (Windows 7, Vista, and Tablet PC systems that include Microsoft Journal.)  Opens Microsoft Journal.•TABLET PC DEFINED (Tablet PCs, and Windows 7 and Vista systems that support the Tablet PC Input Panel.)  Sets the button function according to settings found in the:• Windows 7 and Vista TABLET PC SETTINGS and PEN AND INPUT DEVICES control panels.• Windows XP Tablet Edition TABLET AND PEN SETTINGS control panel.DISABLED Disables the control function.APPLICATION DEFINED Reports only the button number to the application.  This is for applications, such as CAD programs, that have built-in support for the Intuos4 Mouse.This function may also be used by some highly integrated applications for direct control of the pen tablet ExpressKeys and Touch Ring.SKIP Sets the Touch Ring toggle button to skip a function state that has been assigned this option in the toggle sequence.DEFAULT Returns a control to its default setting.
57IndexContents57IndexContentsUSING AND CUSTOMIZING THE RADIAL MENUThe Radial Menu is a circular pop-up menu that provides quick access to editing, navigation, media control functions, and more.• To display the Radial Menu, set a tool button or ExpressKey to the RADIAL MENU function.  Whenever you press that button, the Radial Menu is displayed centered at the screen cursor position.• The hierarchical Radial Menu appears in circular format, extending over the entire desktop.  Each level of the menu consists of eight control slices which may contain various features and options to choose from.• Select an option by clicking on it within the Radial Menu.  Some selections may display a submenu where you can then choose from the available options.Holding down the button that opens the Radial Menu allows you to click on a menu item without closing the Radial Menu.• The menu closes after you make a selection.  To close the Radial Menu without making a selection, click on the ‘X’ located at the center of the menu or on a control slice that has no function assigned to it.  You can also again press the button used to display the menu.Use the RADIAL MENU tab to customize the available functions on the Radial Menu:Returns the currently displayed Radial Menu layout to its default values.1. Select a menu or submenu to customize.2. Select a control slice for which to customize settings.3. Choose the FUNCTION(s) to perform.Note: Press the ENTER (RETURN) key to add multiple lines of text.Top menuSubmenu
58IndexContents58IndexContentsWORKING WITH DISPLAY TOGGLEDISPLAY TOGGLE is available only on multiple monitor systems.  This feature allows you to work with your tablet on all displays or on one display at a time.  (See working with multiple monitors.)After setting an ExpressKey to DISPLAY TOGGLE, you can then press that button to sequentially toggle the current tablet mapping between a base mapping (the current setting from the MAPPING tab) and other monitors.  For example: 1. The entire display area of a multi-monitor system is set up for extended mode and assigned to the active area of the Intuos4 tablet.2. Pressing a tool button to which the DISPLAY TOGGLE function has been assigned toggles the tablet mapping to the next display in sequence
59IndexContents59IndexContentsIn the Wacom Tablet control panel, the DISPLAY TOGGLE tab is automatically available when the Intuos4 tablet is installed on a multi-monitor system.  This tab lets you set which monitor(s) will be included in the toggle sequence.On the DISPLAY TOGGLE tab all monitors are selected in the toggle sequence by default.  Uncheck any monitor you want removed from the toggle sequence.• The base mapping is the tablet and display mapping that is defined in the MAPPING tab.  By default, this would include all monitors unless you have defined a specific monitor as your primary monitor in the MAPPING tab.• As you toggle to the next monitor, each tool’s active tablet area is mapped to that monitor (in PEN MODE).• Toggling one more time after the last checked monitor returns the system to the base mapping.Note that any of the following actions will return the toggle sequence to the base mapping:• Launching a graphics application that supports pressure sensitivity.• Logging out of or rebooting the system.• Switching users (Fast User Switching).• Placing the system in sleep mode.• Changing the MAPPING or DISPLAY TOGGLE tab settings.• Changing the resolution or number of displays on your system.• Using the MODE TOGGLE... function.• Selecting PEN MODE or MOUSE MODE from the Radial Menu.Tip: To toggle between monitors without including the ‘full display’ option, disable the first display on the DISPLAY TOGGLE tab.  Then go to the MAPPING tab and set the current SCREEN AREA to the first display.Important: When using application-specific settings with DISPLAY TOGGLE, be sure that each customized application in the APPLICATION list (including ALL OTHER) has a tool button assigned to DISPLAY TOGGLE.  The easiest way to do this is to assign DISPLAY TOGGLE to an ExpressKey prior to creating any application-specific settings.
60IndexContents60IndexContentsWORKING WITH MULTIPLE TOOLSThe Wacom Tablet control panel is designed to help you customize and keep track of the settings for your Intuos4 tools.  The tool you use to open the control panel is automatically selected, and the appropriate tabs for that tool are displayed.To add a different tool to the control panel’s TOOL list, simply use the tool on your Intuos4 tablet.• When you select a tool that has been added to the TOOL list, the appropriate tab settings for that tool are displayed.  Any changes you make to the tab settings will then apply to that tool.  Your changes take effect immediately.• Identical tools will use the same settings.To remove a selected tool from the TOOL list, click on the TOOL list’s [ – ] button.  In the dialog box that appears, click DELETE to confirm your selection.  The selected tool is removed from the list, along with any custom settings you may have created for it.  (A removed tool can be added back to the TOOL list by placing it back onto the tablet.)All Intuos4 pens have a unique Tool ID.  In supporting applications, such as Corel Painter, you can assign different tools to different pens and then change between them by switching the pen in your hand.Select a tool to change its settings.Removes the selected tool.  The button is inactive when there is only one item in the list.The FUNCTIONS icon cannot be deleted.The TOOL list displays an icon for the tablet FUNCTIONS and the different tools that have been used on the tablet.If application-specific settings have not been added, the ALL icon is displayed and the tool settings apply to all applications.  Tab settings apply only to the selected tool and application.
61IndexContents61IndexContentsAPPLICATION-SPECIFIC SETTINGSYou can customize your Intuos4 tools for use with a particular application.  For example, you may prefer a firm pen tip pressure setting in one application and a soft pressure setting in another.  The APPLICATION list enables you to add an individual application to the list and then customize your tool settings for that application.• When no application-specific settings have been created and a tool is selected from the TOOL list, the APPLICATION list displays the ALL icon which contains tool settings that apply to all of your applications.  In the example below, no application-specific settings have been added for the GRIP PEN.  The ALL icon is displayed and the GRIP PEN will have the same settings in all applications.• When application-specific settings are added to the APPLICATION list, the ALL icon changes to ALL OTHER, and an application icon is displayed for the newly added application(s).In the above example, application-specific settings have been added for the GRIP PEN.  If you select the ALL OTHER icon and make changes to the tab settings, your changes will apply to the GRIP PEN in all applications except those which you have added to the APPLICATION list.  If you select an application icon and make changes to the tab settings, your changes will apply to the GRIP PEN only while you are using that application.When you create application-specific settings, you are creating a separate group of settings for the selected tool and application.  See the following sections for more details:Creating an application-specific settingChanging application-specific settingsRemoving application-specific settingsTip: To review the ExpressKeys or Touch Ring function settings for the current front-most application, set an ExpressKey to SHOW SETTINGS and press the key at any time.
62IndexContents62IndexContentsCREATING AN APPLICATION-SPECIFIC SETTINGFirst choose the tablet and tool for which you want to create an application-specific setting.  Then click on the APPLICATION list’s [ + ] button to display the ADD APPLICATION FOR CUSTOM SETTINGS dialog box.After adding an application, its icon appears in the APPLICATION list whenever the respective tool is selected in the TOOL list.  Select the application and then customize the control panel tab settings for your tool and the selected application.Once you have created application-specific settings, applications that have not been customized in this manner will use the tool settings for ALL OTHER.Tip: First customize settings for one application.  When you feel comfortable with the process, you can create more application-specific settings.CHANGING APPLICATION-SPECIFIC SETTINGSTo change tool settings for a specific application, select the tool and the application and then customize the control panel tab settings.REMOVING APPLICATION-SPECIFIC SETTINGSTo remove an application-specific setting:1. In the TOOL list, select the tool from which you want to remove the application-specific setting.  Then, in the APPLICATION list select the application you want to remove.2. Click on the APPLICATION list’s [ – ] button.  In the dialog box that appears, click DELETE to confirm your selection.  The selected application is removed from the list, along with any custom tool settings that you may have created for it.Tip: To quickly remove all application-specific settings from a tool, remove the tool from the TOOL list.  Then place the tool back on the tablet.  The tool will be added back to the TOOL list using the default settings.Choose from one of two methods to select an application:• Open the application for which you want to create custom settings, and then select that application from the CURRENTLY OPEN APPLICATIONS box.•BROWSE to select the executable file of any application installed on your computer.Your selection is added to the SELECTED APPLICATION box where the name of the selected application is displayed.Click OK to complete the process.Note:  If two programs have the same executable file name, they will share the same customized settings.
6363IndexContentsIndexContentsTROUBLESHOOTINGMost of the time your tablet will work flawlessly.  But if you are having trouble, Wacom recommends you do the following:1. If the Wacom tablet driver failed to load properly, first perform the recommended action in any error message that may appear on your screen.  If that does not solve the problem, review the troubleshooting procedures in this chapter.2. Look in the troubleshooting tables.  Your problem may be described there and you can try the solution offered.3. Open the Wacom tablet Read Me file for any information updates.4. Test your tablet and input tools.  See testing your tablet and testing your tools.5. If you are having a compatibility conflict between Intuos4 and a new hardware or software product, see obtaining driver downloads for information on downloading an updated software driver.  Wacom periodically updates the software driver to maintain compatibility with new products.6. Check the FAQs (Frequently Asked Questions) on the Wacom web site for your region.7. If you have tried the suggestions in this manual and still cannot resolve the problem, then contact Wacom for Technical Support.  See technical support options and the Read Me file for information on where to obtain support for your region.Testing your tabletTesting your toolsTroubleshooting tablesTechnical support optionsObtaining driver downloads
64IndexContents64IndexContentsTESTING YOUR TABLETTurn on your computer and wait until the system has fully loaded.  Ensure that your computer has a working Bluetooth connection, either through built-in Bluetooth support or a USB-to-Bluetooth adapter (dongle).1. Check the tablet connection in USB mode.  A tablet status LED will light whenever the tablet is properly connected via the USB cable and your computer has registered it as a USB device.  If an LED does not glow, then:• Verify that the tablet power switch is in the on position.• Make sure the USB cable is securely connected to the tablet and to an active USB port on your computer.  Intuos4 requires that you connect to a primary USB port (located directly on your computer) or to a powered USB hub.• If you are connecting the tablet to a powered USB hub, be sure the USB hub is properly connected to your computer and is active.• Connect the tablet to a different powered USB port or try connecting to the powered USB port on another computer.• If a status LED does not illuminate after your computer is on and has finished booting up, your USB port may be disabled.  Verify that you have connected the tablet to an active USB port.• For best results when troubleshooting no power to the tablet (a status LED does not light), plug the tablet directly into the system USB port located on your computer.  Temporarily eliminate any external hubs in use until you determine that the system recognizes the tablet and that it is functional.  When the tablet is working properly, it is usually okay to then move the tablet to a powered USB hub.2. Check the tablet connection in wireless mode.  A tablet status LED will light whenever the tablet is properly connected and your computer has registered it as a Bluetooth enabled device.  If an LED does not glow, then:• Verify that the tablet power switch is in the on position.• Check the battery power.  If the battery status light glows green the battery is charged, if it glows red the battery charge is low.  If your battery charge is low, plug in the USB cable.  With the USB cable properly connected, the battery status light will glow yellow when charging, and a steady green when fully charged.• If the tablet wireless connection light glows a steady blue, your Bluetooth connection is working.  Otherwise, it is not.  Open the Bluetooth control panel and make sure the tablet was not disconnected.  If not disconnected, see step 3, following.• Switch the tablet power off, then back on.• Reset the tablet by disconnecting both the battery and the USB cable (if in use) for at least 10 seconds.  Then reconnect the tablet battery and try again.
65IndexContents65IndexContents3. If necessary, troubleshoot the Bluetooth connection as follows:• Move the tablet closer to the antenna.  Make sure there are no metal or other high density obstructions in the line of sight between the tablet and Bluetooth antenna.• If you are using a computer with a built-in Bluetooth module, ensure it is enabled and working.  If using a USB-to-Bluetooth adapter (dongle), be sure it is plugged into an active USB port on your computer and working.• Verify your Bluetooth support is working properly.  Test the functionality with a different Bluetooth enabled device or check the documentation that came with your Bluetooth support to be sure it is working correctly.• Be sure that your Bluetooth configuration supports Bluetooth and the HID profile.• Make another attempt to pair the tablet to your system.  See establishing a Bluetooth connection.4. Check the Grip Pen. • Move your pen across the tablet active area; the screen cursor should move in the corresponding direction on your monitor or display screen.• Press the pen tip against the surface of the tablet.  A status LED should brighten.• Next, without applying pressure to the pen tip, hold the pen tip within approximately 10 mm (0.39 inch) of the tablet surface and press the side switch.  The LED should again brighten.• Turn the pen over and press the eraser against the surface of the tablet; the LED should brighten.•See testing your to ols for detailed information.5. Check the Touch Ring.  See testing your tools.6. Check the ExpressKeys.  See testing your tools.7. Check any other tool(s), such as the optional Intuos4 Mouse.  See testing your tools.8. If these tests fail, you may have a defective input tool or tablet.  See technical support options.9. After testing, use the Wacom Tablet control panel to reconfigure your tablet and tools for any custom settings you may originally have been using.
66IndexContents66IndexContentsTESTING YOUR TOOLSIf an input tool does not work as you expect, first open the Wacom Tablet control panel and check the assigned functions or reset the tool to its default condition.To quickly return a tool to the default settings, remove it from the TOOL list by clicking on the control panel list’s [ – ] button.  After the tool has been removed, place it back onto the tablet.  The tool will be added back to the TOOL list with its default settings.To test your input tools:• In the Wacom Tablet control panel, click on the ABOUT button.  In the dialog box that appears, click on the DIAGNOSE... button.  The DIAGNOSTICS dialog box displays to show dynamic information about the tablet hardware and pointing devices, including the battery status of the currently selected tablet.• If you have more than one tablet connected to your system, in the TABLET INFO column select the tablet for which you are testing your tool.• Use the information presented in the DIAGNOSTICS dialog box when testing your tablet and tools.Note:  When testing your tool buttons, if a button is set to RADIAL MENU or OPEN/RUN..., that function will occur when the button is pressed.  In this case you may want to change that button function before testing.Testing a penTesting the Touch RingTesting the ExpressKeysTesting the optional mouse
67IndexContents67IndexContentsTESTING A PEN1. While observing the POINTING DEVICE INFO column, bring your Intuos4 tool within 10 mm (0.39 inch) of the tablet active area.  A value for PROXIMITY, the DEVICE NAME, DEVICE TYPE, and a DEVICE S/N (serial number) should be displayed.  If you have more than one tablet connected to your system, be sure you have selected the TABLET for which you are testing your tools from the TABLET INFO column.2. Move your tool along the tablet surface. The X and Y DATA values should change to reflect the tool position.3. Test your Intuos4 pen switches.  A tablet status LED should brighten each time you click with the tool tip, press the side switch, or press the tool’s eraser to the tablet.• Click on the tablet surface with the tool tip – the SWITCHES state and PRESSURE value should change.  (PRESSURE should change from approximately 0% with no pressure applied to approximately 100% when full pressure is applied.)• Press the side switch without pressing the tip to the tablet – the SWITCHES state should change.  (For the Intuos4 pen, do this for both positions of the side switch.)• Press the tool’s eraser to the tablet – the SWITCHES state and PRESSURE value should change.    (Pressure should change from approximately 0% with no pressure applied to approximately 100% when full pressure is applied.)• For the Airbrush, move the fingerwheel forward – the WHEEL value should decrease to a value of approximately 0 when the fingerwheel is all the way forward.  Move the fingerwheel backward – the WHEEL value should increase to approximately 1000 when the fingerwheel is all the way back.4. Test tilt for the x-axis by moving the pen from a vertical position toward the right; the X TILT value should change from approximately 0 to +60.  Now move the tool to the left of vertical; the X TILT value should change from approximately 0 to -60.5. Test tilt for the y-axis by moving the pen from a vertical position toward the bottom of the tablet; the Y TILT value should change from approximately 0 to +60.  Now move the tool toward the top of the tablet; the Y TILT value should change from approximately 0 to -60.6. If you are testing an Art Pen, test pen rotation by holding the pen vertically and twisting it around its axis.  The displayed ROTATION value should change.7. When you are done, click on the CLOSE button to exit the dialog box.Pen Tip = 1Side switch (lower position) = 2Side switch (upper position) = 3Eraser = 1Airbrush Tip = 1Side Switch = 2Eraser = 1
68IndexContents68IndexContentsTESTING THE TOUCH RING1. With the DIAGNOSTICS dialog box open, observe the TABLET INFO column as you test the tablet Touch Ring.  If you have more than one tablet connected to your system, be sure you have selected the tablet you are testing from the TABLET INFO column.2. Slide your finger around the entire circumference of the Touch Ring.  As you touch and move your finger along the Touch Ring, a LEFT TOUCH number will indicate your current finger position on the Touch Ring.3. Press the Touch Ring toggle button to toggle between the four customizable states.  As you cycle between settings, a corresponding LED should illuminate.  Within the DIAGNOSTICS dialog box, the button state is also shown as LEFT BUTTONS.If any of the functions are set to SKIP, the corresponding LED will be skipped in the toggle sequence.4. When you are done, click on the CLOSE button to exit the dialog box.Important: Remember that some applications can override and control the Touch Ring functions.  Consider closing any open applications except the Wacom Tablet control panel when testing the Touch Ring.  For details, see using applications integrated for tablet control.TESTING THE EXPRESSKEYS1. With the DIAGNOSTICS dialog box open, observe the TABLET INFO column as you test each ExpressKey.  If more than one tablet is connected to your system, be sure you have selected the tablet you are testing from the TABLET INFO column.2. Test the keys on your tablet by clicking them one at a time.  Each time you press a key, its number will be displayed next to the LEFT KEYS category.3. On the tablet itself, verify also that a tablet ExpressKeys icon is visible for each corresponding ExpressKey.4. When you are done, click on the CLOSE button to exit the dialog box.Important: Remember that some applications can override and control the ExpressKey functions.  Consider closing any open applications except the Wacom Tablet control panel when testing the ExpressKeys.  For details, see using applications integrated for tablet control.
69IndexContents69IndexContentsTESTING THE OPTIONAL MOUSE1. With the DIAGNOSTICS dialog box open, place the Intuos4 Mouse on the tablet’s active area and test by clicking each mouse button.  A tablet status LED should brighten, and the SWITCHES state should change for each button you click.2. When the DIAGNOSTICS dialog box is first opened the WHEEL status should be 0.  Move the fingerwheel backward.  The WHEEL status should change from 0 to +1.3. Move the fingerwheel forward.  The WHEEL status should change to -1.4. When you are done, click on the CLOSE button to exit the dialog box.42531
70IndexContents70IndexContentsTROUBLESHOOTING TABLESIf you encounter problems with your Intuos4 tools or tablet, refer to the following tables.  Your problem may be described here, and you can try the solution offered.  Be sure to check the Read Me file for the latest information updates.For additional information, visit Wacom’s web site at http://www.wacom.com/productsupport.Connection problemsGeneral problemsWindows-specific problemsMac-specific problemsCONNECTION PROBLEMSThe computer does not have built-in Bluetooth support. You will need to install a USB-to-Bluetooth adapter (dongle) in order to add wireless connectivity to your computer.  The adapter should support Bluetooth with Human Interface Device (HID) profile.After moving the power switch to the on position, the wireless connection light glows steadily for 2 to 5 seconds and then turns off.If the tablet was previously working on your computer but works no longer, check the configuration of your Bluetooth connection:• If you are using a computer with a built-in Bluetooth module, ensure that it is enabled and working.  If you are using a USB-to-Bluetooth adapter (dongle), make sure it is plugged in and working.• Test your computer’s Bluetooth support with another Bluetooth enabled device, such as a mouse or keyboard.• Open the Bluetooth control panel and make sure the tablet was not disconnected.• Move the tablet closer to the antenna and make sure there are no metal or other high density obstructions in the line of sight between the tablet and Bluetooth antenna.Repeat the process of establishing a Bluetooth connection with your computer.After moving the power switch to the on position, the wireless connection light flashes blue.The tablet has not been paired to a computer, or the connection has been broken either by pressing the tablet’s pairing button or by deleting the pairing from the Bluetooth control panel.  Pair the tablet to your computer as described in establishing a Bluetooth connection.
71IndexContents71IndexContentsThe battery status light does not come on after moving the power switch to the on position.Try again.  If the light does not come on after repeated attempts, your battery charge may be too low.Connect the USB cable directly to a powered USB port on your computer or powered USB hub.  If the battery status light does not glow when the power switch is in the on position the battery may be defective.When pairing the tablet, the tablet does not appear in the list of available devices to pair.• The tablet should appear in the pairing list with a mouse icon named WACOM TABLET.• If the wireless connection light is not flashing, press the pairing button on the side of the tablet to make the tablet discoverable.  The tablet will be in discoverable mode for 3 minutes and the wireless connection light will flash blue.• Verify that your Bluetooth configuration supports Bluetooth with Human Interface Device (HID) profile.• Make sure the tablet is not too far away from the antenna, and that there are no metal obstructions between the Bluetooth antenna and the tablet.A pairing unsuccessful message is displayed when attempting to link the tablet to the computer.Check for possible interference from other wireless devices, such as from a cordless telephone or microwave oven.  If you suspect interference, turn off the interfering device or move it farther away from your computer.Try again linking the wireless tablet to the computer.Pairing was successful, but the wireless tablet does not seem to work correctly.Be sure that you have correctly installed the Wacom tablet driver software.See also optimizing the Bluetooth connection.The tablet works fine when the USB cable is connected to a primary USB port (located directly on your computer) or to a powered USB hub, but switches off as soon as the cable is disconnected.• Open the battery compartment and verify that the battery is properly installed.• Check the battery appearance to ensure there is no leakage or other indication of damage.• Charge the battery overnight and try again.  If the problem persists, the battery may be completely discharged or damaged and can no longer hold a charge.  You will have to purchase a replacement battery from Wacom.  See ordering parts and accessories.• Confirm the tablet is paired to your system.
72IndexContents72IndexContentsGENERAL PROBLEMSAfter switching on the tablet, the battery status light remains on but the screen cursor cannot be moved with the pen.•Review Using the Grip Pen to be sure you are using the tool correctly.• Switch the tablet power off, then back on.• If your battery charge is low, plug in the USB cable to a primary USB port (located directly on your computer) or to a powered USB hub.• Reset the tablet by disconnecting both the battery and the USB cable for at least 10 seconds.  Then reconnect the tablet battery and try again.The battery status light does not illuminate when the USB cable is plugged in.Check that the cable is properly plugged into the tablet, and that it is plugged directly into a powered USB port on your computer or a powered USB hub.Try connecting the tablet to a different powered USB port.The battery may need replacement.While using the tablet, the tablet battery status light flashes red.The battery is nearly empty.  Plug in the USB cable to continue working, or power down the tablet.You want to connect the tablet using the provided USB data cable but the computer does not have an available USB port.Check if there is an available USB port on a powered USB hub.  If not available you will need to add a powered USB hub or USB card.The tablet status LEDs are off.  An LED does not illuminate when using the pen, mouse, or Touch Ring toggle button.Be sure the tablet is turned on.If your connection is wireless, verify that the battery status light is on and that the Bluetooth wireless connection is active.If your tablet is connected using the provided USB data cable, verify that the USB cable is properly connected to the tablet and to an active USB port.  Be sure the tablet USB cable is plugged into a primary USB port (directly into your computer) or into a powered USB hub.  If connecting to a powered USB hub device, make sure the hub is connected to an active USB port and that the hub is active.  Try also connecting to another USB port or using another USB cable.After plugging in the tablet with a USB connection, a message appears indicating that the USB device needs more power than is available.Make sure the tablet is plugged into a primary USB port on your computer or into a powered USB hub attached to your computer.
73IndexContents73IndexContentsThe tablet charging process seems to stop whenever the computer enters sleep mode.As required, adjust your system power or energy saver settings so that the computer does not enter sleep mode while the tablet is charging.When using the pen to operate the Touch Ring, the Touch Ring does not work well.The Touch Ring is designed to be used with your finger, and does not work with the pen tip.The pen works only in MOUSE MODE, and does not draw or ink with pressure sensitivity.The tablet driver software was not installed or did not load properly.• Make sure the tablet driver software is installed and functioning.• Insert the Intuos installation CD into your computer and install the driver software for the tablet.The pen does not draw or ink with pressure sensitivity. Some applications require that you turn on the pressure capabilities within the application or the selected tool before the pen will respond as a pressure-sensitive tool.Some applications do not support pressure.  If you are unsure whether pressure is supported, see the documentation that came with your application(s).Clicking is difficult. Try using a lighter TIP FEEL.  See adjusting tip feel and double-click.Double-clicking is difficult. • Use the side switch to double-click.  Review the technique in clicking.• Be sure you are quickly tapping the tablet twice in the same place on the tablet’s active area.• Try increasing the TIP DOUBLE CLICK DISTANCE.  See adjusting tip feel and double-click. • Try using a lighter TIP FEEL.  See adjusting tip feel and double-click.• Set an ExpressKey to DOUBLE CLICK and use it to issue double-clicks.•Windows: Try setting your system to launch programs with a single click.  See clicking.The pen selects everything, will not stop selecting. Open the Wacom Tablet control panel and go to the PEN tab.  Move the TIP FEEL slider toward FIRM, or select DETAILS... and increase the CLICK THRESHOLD setting.  If this does not help, see testing your tools.The pen nib may be worn.  See replacing the pen tip.The eraser selects everything or will not stop erasing. Open the Wacom Tablet control panel and go to the ERASER tab.  Move the ERASER FEEL slider toward FIRM, or select DETAILS... and increase the CLICK THRESHOLD setting.  If this does not help, see testing your tools.
74IndexContents74IndexContentsYou notice a screen delay at the beginning of pen or inking strokes.Open the Wacom Tablet control panel and go to the PEN tab.  Try decreasing the TIP DOUBLE CLICK DISTANCE (see adjusting tip feel and double-click).  If that does not work, try dragging the TIP DOUBLE CLICK DISTANCE slider to the OFF position in order to turn off double-click assist.Try turning off the operating system inking features.You have to press hard with the pen when clicking, drawing, or writing.Open the Wacom Tablet control panel and go to the PEN tab.  Move the TIP FEEL slider toward SOFT, or select DETAILS... and decrease the SENSITIVITY and CLICK THRESHOLD settings.The pen tip does not function. Be sure you are using the pen that originally came with Intuos4.  Other pens may not function properly on the tablet.Check the control panel’s PEN tab and verify that a CLICK function is assigned to the tip.Try the pen eraser to see if that portion of the pen is functional.A tablet status LED should brighten when the tip or eraser is pressed.  If not, you may have defective hardware.  See testing your tools.Changing the function settings of an input tool has no effect. Make sure you are changing the settings for the tool and application that you are using.  See working with multiple tools and application-specific settings.The pen side switch does not work. Be sure you are using the pen that originally came with Intuos4 or an Intuos4 accessory pen.  Other pens may not function properly on the tablet.Be sure to press the side switch when the pen tip is within 10 mm (0.39 inch) of the tablet’s active area.  Do this without pressing down on the pen tip.In the Wacom Tablet control panel, verify that the side switch is set to the function you are expecting to occur for the application and tool you are using.  Check also the SIDE SWITCH MODE.  If CLICK & TAP is selected, you will need to first press the side switch while touching the pen tip to the tablet surface in order to perform a click function.  See customizing tool buttons.A tablet status LED should brighten when you press the side switch.  If not, you may have defective hardware.  See testing your tools.
75IndexContents75IndexContentsThe screen cursor “jumps” back. Do not place an Intuos4 tool on the tablet when it is not in use, or when you are using another pointing device.  Leaving your tool on the tablet may interfere with screen cursor positioning when using other input devices.Cannot move the cursor (pointer) where you want to on the screen, or the line you are drawing does not line up with the location of the cursor in paint applications.Open the Wacom Tablet control panel and go to the MAPPING tab.  Verify that PEN MODE is selected and that the SCREEN AREA is set to FULL for the selected tool and application.  If this does not help, click on the DEFAULT button to reestablish tablet to screen mapping.  If you are still having difficulty, remove the tablet preferences.Confirm whether the pen does (or does not) function.  See testing your tools.The computer does not go to sleep. When you are not using your Intuos4 input tool(s), remove them from the tablet surface or the tablet will continue to send data, keeping the computer awake.When using the tablet the screen cursor is very erratic or “jumps” around.On rare occasions the tablet may receive interfering radio frequencies from a computer monitor or nearby AM radio station.  If you notice interference from a monitor, try moving the tablet at least 6 inches away from the monitor, or change the monitor refresh rate or monitor resolution.If the screen cursor lags or “jumps”, try optimizing the Bluetooth connection.When using the tablet, the screen cursor or pen strokes seem to lag or skip in some applications.See optimizing the Bluetooth connection for tips on improving the Bluetooth connection.When using Intuos4 on a multiple monitor system, you cannot use the pen tip to control the other monitor(s).Determine if an ExpressKey has been set to DISPLAY TOGGLE and if it may have been activated accidentally.  See working with Display Toggle.Verify that the SCREEN AREA in the MAPPING tab is set to FULL.You can also use your pen to control the other monitors in MOUSE MODE.  To use MOUSE MODE, first set a pen button to MODE TOGGLE....  Then use the button to toggle between PEN MODE and MOUSE MODE.
76IndexContents76IndexContentsWINDOWS-SPECIFIC PROBLEMSWhen working in some applications, the ExpressKeys or Touch Ring perform a different function than what is set in the Wacom Tablet control panel.Some applications can override and control the ExpressKey and Touch Ring functions.• When an ExpressKey is overridden by an application, the ExpressKeys display will automatically update to show either the new function name or “Application Defined”.• See using applications integrated for tablet control.If you use application-specific settings, be sure you have updated the settings for the correct application.The tablet is set to EXPRESSKEYS RIGHT (or EXPRESSKEYS LEFT), but at the log-in screen the tablet seems to work upside down.Begin by uninstalling the software for the existing tablet driver.  Restart your computer. Then reinstall the tablet driver from the Intuos installation CD and change the default orientation of the tablet.  See configuring the tablet orientation for details.You suspect the tablet preferences may be corrupted, or want to make certain that all settings are at their factory defaults.Use the Wacom Tablet Preference File Utility to work with your preferences.  Close any open applications.  Click the START icon and select ALL PROGRAMS.  Then select WACOM TABLET and WACOM TABLET PREFERENCE FILE UTILITY. • It is a good idea to first back up your tablet preferences.  In the TABLET PREFERENCE FILE UTILITY dialog box, click BACKUP... and follow the prompts.• Then, delete the tablet preferences as follows:Single user.  In the TABLET PREFERENCE FILE UTILITY dialog box, click the REMOVE button under MY PREFERENCES to delete the preferences for the current user.Multiple users.  Click the REMOVE button under ALL USER PREFERENCES to delete preferences for multiple users.  Note that administrator rights are required to delete preferences for all users.  Relaunch any currently open tablet-aware applications that you may be running.You can quickly restore tablet preferences that have been backed up by clicking RESTORE... under MY PREFERENCES.After changing right- and left- handed settings in the computer’s mouse control panel, the pen tip no longer functions properly and the Intuos4 Mouse tool button functions are reversed.Restart Windows for your Wacom tool settings to be correctly recognized.
77IndexContents77IndexContentsMAC-SPECIFIC PROBLEMSAt startup, a dialog box appears telling you that either the driver failed to load or the tablet preferences have not yet been created.The tablet was not detected at startup.If you are using a wireless connection, make sure the Bluetooth wireless connection to your tablet is active.  Check also that the tablet wireless connection light and  a tablet status LED are illuminated.  From the GO menu, select the UTILITIES folder and launch the SYSTEM PROFILER.  Select BLUETOOTH from the HARDWARE section of the CONTENTS list.  A Wacom Bluetooth tablet model should be listed.  If a tablet model is not listed, check the Bluetooth wireless connection.If you have connected the tablet with the provided USB data cable, make sure the USB interface cable is securely connected to the tablet and to an active USB port on your computer.  Check also that a tablet status LED is illuminated.  If your tablet is plugged into a powered USB hub, make sure the hub is connected and active.  From the GO menu, select the UTILITIES folder and launch the SYSTEM PROFILER.  Select USB from the HARDWARE section of the CONTENTS list.  A Wacom USB tablet model should be listed.  If a tablet model is not listed, check the USB cable connection or try plugging the tablet into a different USB port.If you are still having difficulties, uninstall then reinstall the tablet driver software.If this does not help, contact Wacom for Technical Support.  See technical support options.Cannot switch off Intuos4 after closing the lid on an Apple laptop computer.Switch off the tablet before closing the lid on your Apple laptop.Do not worry.  The tablet will automatically switch off 5 minutes after you close the lid on your Apple laptop.Alternatively, if you prevent Bluetooth enabled devices from waking your computer, the tablet will immediately switch off when your computer goes to sleep or when you close the lid of your Apple laptop.To prevent Bluetooth enabled devices from waking your computer:1. From the Apple menu, choose SYSTEM PREFERENCES....2. Click on the BLUETOOTH icon located in the HARDWARE section of the System Preferences pane.3. In the BLUETOOTH control panel, click on the ADVANCED... button.4. Make sure that the ALLOW BLUETOOTH DEVICES TO WAKE THIS COMPUTER option is unchecked.Exit the Bluetooth control panel and quit System Preferences.
78IndexContents78IndexContentsYou suspect the tablet preferences may be corrupted, or want to make certain that all settings are at their factory defaults.Use the Wacom Tablet Utility to work with your preferences.  Close any open applications.  Open the main APPLICATIONS folder.  Then open the WACOM TABLET folder and run the WACOM TABLET UTILITY.• It is a good idea to first back up your tablet preferences.  In the WACOM TABLET UTILITY dialog box, select CURRENT USER or ALL USERS.  Then click BACKUP... and follow the prompts.• Then, delete the tablet preferences as follows:Single user.  When the utility starts, select CURRENT USER and click on the REMOVE button.  Log out, then log back in.  When the tablet driver loads it will create a new preferences file with the factory defaults.Multiple users.  When the utility starts, select ALL USERS and click on the REMOVE button.  Log out, then log back in.  When the tablet driver loads it will create new preferences files with the factory defaults.You can quickly restore tablet preferences that have been backed up for the CURRENT USER or ALL USERS by clicking on the RESTORE... button within the utility.Note:  Do not manually remove the WACOM TABLET.PREFPANE file from the main LIBRARY PREFERENCEPANES folder.  This file is only to be removed when uninstalling the tablet software driver, and then only when using the WACOM TABLET UTILITY.Ink does not work correctly with Intuos4. There may be a problem with the Ink preferences.  Remove the damaged preference files as follows.  They will be re-created when you enable handwriting recognition.1. Open the SYSTEM PREFERENCES pane, choose SHOW ALL and select INK.  Then turn off handwriting recognition.2. From the GO menu, choose your HOME.  Open the LIBRARY and PREFERENCES folders.  Remove the following preferences:•COM.APPLE.INK.FRAMEWORK.PLIST•COM.APPLE.INK.INKPAD.PLIST•COM.APPLE.INK.INKPAD.SKETCH3. Go back to SYSTEM PREFERENCES and INK, and then enable handwriting recognition.4. Test the Ink function using your Wacom tablet and pen.5. If this procedure does not resolve your problem with Ink, contact Apple Support for further assistance.  Wacom is not the software manufacturer for Ink and we are limited in our abilities to support a third-party software application.
79IndexContents79IndexContentsTECHNICAL SUPPORT OPTIONSIf you have a problem with your Wacom tablet, first check the tablet installation guide to be sure the unit is installed correctly.  Then review the troubleshooting procedures.If you cannot find the answer in this manual, you may find updated information about your problem in the appropriate Read Me file for your platform (located on the Intuos installation CD).  You can also check the product FAQs (Frequently Asked Questions) on the Wacom web site for your region.If you have an Internet connection you can download the latest software drivers from the Wacom web site for your region.  See obtaining driver downloads.If you cannot solve the problem and you think your Wacom tablet is not working properly, contact the Wacom support staff for the area where your product was purchased.  See the Wacom tablet Read Me file, located on the Intuos installation CD, for contact information.When you call, you should be at your computer with the following information available:• This manual.• Tablet serial and model number.  (Look on the bottom of the tablet.)• Driver version number.  (See the Intuos installation CD or click on the Wacom Tablet control panel ABOUT button.)• The make and model of your computer, and operating system version number.• A list of peripheral devices attached to your computer.• The software application and version you were using when the problem occurred.• The exact wording of any error message that appeared on your screen.• What happened and what you were doing when the problem occurred.• How you tried to solve the problem.You can also contact the Wacom Customer Care Center using our Email Inquiry form at:http://www.wacom.com/productsupport/email.cfm
80IndexContents80IndexContentsOBTAINING DRIVER DOWNLOADSWacom periodically updates the tablet software driver to maintain compatibility with new products.  If you are having a compatibility problem between Intuos4 and a new hardware or software product, it may be helpful to download a new Wacom tablet software driver (when available) from the Internet.USA, Canada, Central and South AmericaEurope, Middle East and AfricaJapanAsia Pacific (English)ChinaKoreaTaiwanWorldwide Web: http://www.wacom.com/productsupport Software updates.Worldwide Web: http://www.wacom.eu/downloads Software updates.Worldwide Web: http://tablet.wacom.co.jp/download Software updates.  (Japanese)Worldwide Web: http://www.wacom-asia.com Software updates.  (English)Worldwide Web: http://www.wacom.com.cn Software updates.  (Simplified Chinese)Worldwide Web: http://www.wacomkorea.com Software updates.  (Korean)Worldwide Web: http://www.wacom.com.tw Software updates.  (Traditional Chinese)
8181IndexContentsIndexContentsAPPENDIXThis section contains a variety of information: tips on caring for your tablet and tools, instructions on how to uninstall the tablet software, your license and warranty, and more.Tablet installationBattery life informationReplacing the tablet batteryCaring for your tablet and toolsReplacing the pen tipUninstalling the softwareManaging your tablet preferencesChanging the tablet mode optionsInstalling multiple tabletsAdvanced optionsOptimizing the ExpressKeys displayUsing applications integrated for tablet controlUsing the optional Intuos4 MouseUsing the optional Airbrush and Art PenPen and digital ink capabilities in WindowsAbout the Windows Tablet PC Input PanelProduct specificationsProduct informationOrdering parts and accessoriesAvailable parts and accessoriesRadio and television interferencePrecautionsLicense and Warranties (Worldwide, Except for Europe, Africa and Middle East)Licence warranty conditions (Europe, Africa and Middle East)TABLET INSTALLATIONFor detailed instructions, please review the Quick Start Guide that came with your tablet.  See also establishing a Bluetooth connection.
82IndexContents82IndexContentsBATTERY LIFE INFORMATIONAll batteries age over time and gradually lose their ability to hold a charge.  The typical life span of a Li-Ion battery is two to three years, whether it is used or not.You will need to purchase a new tablet battery when it is no longer capable of holding an adequate charge.  For information on ordering a replacement battery, see ordering parts and accessories.  Batteries can also be purchased at various retail outlets.• The life and performance of Li-Ion batteries is not improved by cycling (discharging and recharging) the batteries.• Cool storage and keeping the battery in a partially (not fully) charged state when not in use can slow the aging process.• Always charge your tablet battery whenever the low battery warning appears on your display screen, or at the latest when the tablet battery status light begins to flash red.  To reduce the power consumption of an empty battery, the tablet will enter an auto shut-down state whenever the battery level is very low.  In this state the tablet will continue to draw a small amount of power.  The power switch must be turned off and the battery must be recharged.• The tablet will draw current from the battery whenever the power switch is in the on position.  A small current is drawn even in auto sleep and tablet auto shut-down modes, and will slowly discharge the battery.  It is a good idea to charge the battery and move the tablet power switch to the off position before leaving the tablet unused for a number of days.• If the battery charge is low and the battery remains in the tablet for a long period of time (a week or longer) with the power switch in the on position, the small trickle of current used by the tablet is likely to discharge the battery so far that an internal protection circuit within the battery is activated.  If this occurs you will no longer be able to charge the battery.  To preserve your battery, be sure to move the tablet power switch to the off position before leaving the tablet unused for a week or longer.• For extended storage (a month or longer), Wacom recommends that the battery be at least half full before you move the power switch to the off position.  You do not need to remove the battery because the power switch disconnects the battery from the tablet circuit when in the off position.• An internal protection circuit within the battery prevents any charging once the voltage has fallen below a minimum safety level.  Once a Li-Ion battery has been over-discharged it cannot be recharged.Warning: See the safety precautions for Lithium-Ion batteries.
83IndexContents83IndexContentsREPLACING THE TABLET BATTERYIf your tablet battery has exceeded its life span and can no longer be charged or no longer holds a charge, it will need to be replaced.  Be sure to use only the rechargeable Lithium-Ion (Li-Ion) battery designed for your tablet.  For information on ordering a replacement battery, see ordering parts and accessories.  Batteries can also be purchased at various retail outlets.Important: Only use a Wacom battery specified for your tablet.To replace the tablet battery:1. Turn the wireless tablet upside down and open the battery cover.  Use your fingernail to press inward on the latch bar and flip the cover outward to open.2. Carefully remove the old tablet battery.3. Align the battery terminals of the new battery with the spring-loaded tablet contacts, and press the battery into the compartment as shown.  To avoid damaging your tablet, first insert the terminal end of the battery.4. Close the battery cover.Many communities offer voluntary or mandatory recycling programs for batteries.  Properly recycle the old battery by following all applicable laws, and in accordance with the safety precautions for Lithium-Ion batteries.  Keep batteries out of the reach of children, and promptly recycle old batteries.CARING FOR YOUR TABLET AND TOOLSKeep your Intuos4 tools and tablet surface clean.  Dust and dirt particles can stick to your tools and cause excessive wear to the tablet surface.  Regular cleaning with a soft, damp cloth will help to prolong the life of your tablet surface and tools; you can also dampen the cloth using a very mild soap diluted with water.  Do not use volatile liquids, such as paint thinner or benzene, because they may damage the plastic case.Keep your tablet and tools in a clean, dry place and avoid extremes in temperature.  Room temperature is best.  Also, your tools and tablet are not made to come apart.  Twisting the pen case can break the pen.  Taking apart the product will void your warranty.Important: Take care to never spill liquids onto the tablet or input tools.  Be especially careful of getting the tablet or tool buttons (including the pen tip and eraser) wet – they contain sensitive electronic parts that will fail if liquids enter them.Important: When replacing the tablet battery, be careful not to drop it on hard surfaces.  The battery can be damaged internally when dropped, and should be replaced even if there is no obvious damage.  This will help prevent any future damage that could occur to the tablet if the battery has been dropped, is installed in the tablet, and then later develops a short or leak while in the tablet.Warning: See the safety precautions for Lithium-Ion batteries.
84IndexContents84IndexContentsREPLACING THE PEN TIPThe pen tip (nib) will wear with normal use.  Excessive pressure will cause it to wear sooner.  Replace the nib when it gets too short (less than 1 mm (0.04 inch)) or develops a flat point.1. Unscrew the pen stand base to access the nib extraction tool and replacement nibs.2. Clasp the old nib with the nib extraction tool, pair of tweezers, needle-nosed pliers, or similar instrument and pull it straight out of the pen.3. Slide the end of the new nib straight into the barrel of the pen.  Firmly push the nib until it stops.Note:  Stroke nibs are spring-loaded, providing additional tactile feedback when you are working with the Intuos4 pen or Airbrush.  They are installed in the same manner as a standard pen nib.Warning: Choking hazard.  Prevent children from swallowing the pen nib or side switch.  The pen nib or side switch may accidentally be pulled out if children are biting on them.To order replacement parts, see available parts and accessories.Important: When the pen is not in use, place it in the pen stand or lay it flat on your desk.  When the optional Airbrush is not in use, lay it flat on your desk.  Leaving the pen on the tablet can prevent the tablet from switching off and cause the battery to discharge.  To maintain the sensitivity of your input tools, do not store them in a container where they will rest on their tip or eraser.If you find it inconvenient to use the desktop pen stand, you can also attach the pen holder to the tablet and place the pen in the holder loop for safe-keeping.Nib extractorReplacement nibs• 5 standard nibs, black• 1 flex nib, white and black• 1 stroke nib, white• 3 hard felt nibs, grayPen nib 1 mm (0.04 inch) or less.
85IndexContents85IndexContentsUNINSTALLING THE SOFTWAREFollow the appropriate procedure below to remove the Wacom tablet driver software from your system.Important: When you remove the Wacom tablet software from your system, your Wacom tablet will no longer operate with full tablet functionality but will continue to function as a mouse device.Windows 7 and Vista: Click on the Windows START button and choose CONTROL PANEL.  In the CONTROL PANEL window, click on UNINSTALL A PROGRAM.  In the dialog box that appears, choose WACOM TABLET.  Click UNINSTALL and follow the prompts to remove the tablet driver.  (If prompted, enter your administrator login name and password.)  Be sure to restart your computer after uninstalling the software.Windows XP or XP x64: Click START.  In the start menu, select CONTROL PANEL.  Then select ADD OR REMOVE PROGRAMS.  In the ADD OR REMOVE PROGRAMS window, choose WACOM TABLET and click on the REMOVE button.  Follow the prompts to remove the tablet driver.  Be sure to restart your computer after uninstalling the software.Macintosh: From the GO menu, choose APPLICATIONS and open the WACOM TABLET folder.  Double-click on the WACOM TABLET UTILITY icon and select the TABLET SOFTWARE: REMOVE button.  Enter your administrator login name and password.  After the removal is completed, click OK.  Be sure to restart your computer after uninstalling the software.Note: To fully remove the Intuos4 Wireless tablet from your computer, you will need to delete the paired connection from the Bluetooth devices control panel for your operating system.MANAGING YOUR TABLET PREFERENCESUse the Wacom tablet preferences utility to manage your tablet preferences for a single or multiple users.For Windows, first close any open applications.  Then open the utility by clicking the START icon and selecting ALL PROGRAMS.  Select WACOM TABLET and WACOM TABLET PREFERENCE FILE UTILITY.• To remove preferences for the current user, click on the REMOVE button under MY PREFERENCES.• To delete preferences for multiple users, click on the REMOVE button under ALL USER PREFERENCES.  Administrator rights are required to delete preferences for all users.  Relaunch any currently open tablet-aware applications that you may be running.• To back up your preferences, click on the BACKUP... button under MY PREFERENCES.• To restore preferences that you had previously backed up, click on the RESTORE... button under MY PREFERENCES.Be sure to carefully follow any prompts that may appear.For Macintosh, open the main APPLICATIONS folder.  Then open the WACOM TABLET folder and run the WACOM TABLET UTILITY.• To remove preferences, select CURRENT USER or ALL USERS.   Then click on the REMOVE button.  Log out, then log back in.  When the tablet driver loads it will create a new preferences file with the factory defaults.• To back up your preferences, select CURRENT USER or ALL USERS.  Then click on the BACKUP... button.• To restore preferences that you had previously backed up, select CURRENT USER or ALL USERS.  Then click on the RESTORE... button.Be sure to carefully follow any prompts that may appear.
86IndexContents86IndexContentsCHANGING THE TABLET MODE OPTIONSWithin the control panel’s TABLET list, double-click on the tablet icon to display the TABLET dialog box.  The TABLET mode settings apply to all tools and applications.INSTALLING MULTIPLE TABLETSThe TABLET list displays an icon for any supported tablet that has been detected on your system, and allows you to select the tablet for which your changes will apply.To add a new tablet, connect it to your computer.  The system will automatically find the tablet and initialize it.  An icon for the tablet will then appear in the control panel.Important: When installing additional tablets on Windows systems, please note that the eraser function may not work in some applications when using the additional tablet(s).  The eraser function will continue to work correctly using the first tablet that was added to the control panel.To remove one of multiple tablets from the driver, in the Wacom Tablet control panel select the tablet to be removed and click on the [ – ] button next to the TABLET list.  • A tablet cannot be deleted from the control panel list unless it is attached to the computer.• Note that you will need to restart your computer before you can again add the tablet to the driver.STANDARD MODE is recommended for graphics applications, and is the default condition.Choose RECOGNITION MODE for the maximum data rate.  Required by some handwriting recognition software.  Supported only on Bluetooth Specification v2.0 or later connections that support the EDR (Enhanced Data Rate) protocol.If desired, enter a new name to be used for the tablet icon.Select a tablet icon for which to customize tool and application settings.• The control panel will not launch unless a supported tablet is connected to the computer.• Settings can only be viewed or changed for an attached tablet.
87IndexContents87IndexContentsADVANCED OPTIONSClick on the Wacom Tablet control panel OPTIONS... button to access the advanced OPTIONS dialog box.SIDE SWITCH MODE changes the way you use the pen when making right clicks or other click functions. Select:•HOVER CLICK to perform click functions without touching the pen tip to the tablet surface.Hover clickClick tap•MOUSE HANDEDNESS options change the button orientation on the Intuos4 Mouse for right- or left-handed use.• Use the EXPRESSKEY DISPLAY BRIGHTNESS options to set the brightness of the Touch Ring status LEDs and ExpressKeys display on all connected Intuos4 tablets.  When the slider is in the left-most position, the Touch Ring status LED brightness is set to low, and the ExpressKeys display is off.  See also optimizing the ExpressKeys display.The pen tablet power saving mode will automatically change the brightness of the Touch Ring status LEDs and ExpressKeys display as follows:•The PRESSURE COMPATIBILITY check box should be checked if you are using graphics applications that only support a maximum of 1024 levels of pressure (such as Adobe CS3, Corel Painter 9, and other older applications).  If not checked, the pen will feel overly sensitive when using these older applications.• By default the SHOW WIRELESS TABLET BATTERY STATUS check box is set to display the Wacom icon in your system task bar (Windows) or menu bar (Macintosh).  Uncheck this box to remove the icon.1 minute no user input: Low brightness2.5 minutes no user input: No illumination, ExpressKeys displayLow brightness, Touch Ring status LEDsActive user input: Returns brightness to set level•CLICK & TAP to enable the precise placement of click functions.  When selected, you must first press the side switch then touch the pen tip to the tablet surface in order to perform the click function.
88IndexContents88IndexContentsOPTIMIZING THE EXPRESSKEYS DISPLAYThe pen tablet ExpressKeys display uses Organic Light-Emitting Diodes (OLEDs).  Although the display has been designed to provide reliable performance for many years, you may eventually notice a decrease in luminosity for pixels that are lit over extended periods of time.  To minimize the appearance of different pixel brightnesses due to this effect, adjust the EXPRESSKEY DISPLAY BRIGHTNESS option to the lowest comfortable light level.  See advanced options for details.Note:  The power saving feature of the pen tablet will automatically dim the ExpressKeys display if there has been no user input for 1 minute, and it will turn off the ExpressKeys display if the pen tablet has been idle for 2.5 minutes.USING APPLICATIONS INTEGRATED FOR TABLET CONTROLSome software applications may be designed to directly control the pen tablet ExpressKeys or Touch Ring function(s).  When working in an application that has been integrated in this manner, the ExpressKeys or Touch Ring may perform a different function than what is currently set in the Wacom Tablet control panel.• When an ExpressKey is overridden by an application, the ExpressKeys display will automatically update to show either the new function name or “Application Defined”.  Some or all of the ExpressKeys may be overridden, depending on the application.• When an application overrides the Touch Ring, all Touch Ring functions are affected.  If an application overrides only one, two, or three of the available Touch Ring functions, the remaining function(s) are set to SKIP.• An integrated application will control the ExpressKeys or Touch Ring only when that application is active and in the foreground.  When you close that application (or select a new application pane to work in), your Wacom Tablet control panel settings are returned to their previous state.• To review the ExpressKeys or Touch Ring function settings for the current front-most application, set an ExpressKey to SHOW SETTINGS and press the key at any time.Applications that have been integrated in this manner will typically provide you with the opportunity to opt-out or disable this functionality when first using your Wacom tablet with the application.  See the documentation provided with your application for any specific details on functionality and how to customize or disable this feature.If an automatic prompt or the application’s documentation does not describe how to disable this behavior, you can use the Wacom Tablet control panel to create application-specific settings which will override the behavior of the integrated application.Important: If an application-specific setting has been created for an integrated application, setting an ExpressKey or Touch Ring function to APPLICATION DEFINED will allow the integrated application to control the function.
89IndexContents89IndexContentsUSING THE OPTIONAL INTUOS4 MOUSEThe Intuos4 Mouse is cordless, battery free, and works on any Intuos4 tablet.  The mouse is an optional accessory, and product configurations may vary.Important: When the Intuos4 Mouse is not in use, place it on your desk.  Leaving an Intuos4 tool on the tablet may interfere with screen cursor positioning when using other pointing devices, or may prevent your computer from going to sleep.See also customizing the mouse.FingerwheelCan be rolled, or pressed for an additional button function.• Roll the fingerwheel to scroll in most windows and applications.  Move the wheel forward to scroll up, and back to scroll down.Front and rear buttonsThese are set for FORWARD and BACK functionality within your Internet browser.Right buttonDisplays a context menu when pressed.Left buttonThis is the primary button used to CLICK and select.The programmable mouse buttons can be customized.  The default button options are:Left: CLICKRight: RIGHT CLICKMiddle: MIDDLE CLICKFront: FORWARDRear: BACK• Press down on the wheel to perform a MIDDLE CLICK.Tip: For Microsoft Office applications that support a wheel mouse, press the CTRL key and move the fingerwheel to zoom in and out.
90IndexContents90IndexContentsUSING THE OPTIONAL AIRBRUSH AND ART PENThe optional Intuos4 Airbrush works like the Grip Pen, but also includes a fingerwheel for an additional degree of control.  With proper software support, you can simulate realistic airbrushing.  For example, tilting the Airbrush can cause the spray pattern to elongate and feather out.  Rolling the fingerwheel adjusts the spray intensity, and pressure on the tip controls the brush size.Hold the Airbrush with your thumb and middle finger.  The fingerwheel  should be in a convenient location for you to roll it with your index finger.  Tilt the Airbrush to find a comfortable position that allows you to paint and draw with pressure sensitivity.The optional Intuos4 Art Pen responds to the pressure, tilt, and rotation you apply to the pen.Important: When the Airbrush or Art Pen is not in use, lay it flat on your desk.  To maintain the sensitivity of your tool, do not store it in a container where it will rest on its tip or eraser.  Leaving an Intuos4 tool on the tablet may interfere with screen cursor positioning when using other pointing devices.See product information to learn more about which applications currently support the Airbrush fingerwheel or Art Pen rotation.  See ordering parts and accessories for information on where to purchase an Intuos4 Airbrush or Art Pen.Side switchThe default settings are:Windows: RIGHT CLICKMacintosh: DOUBLE CLICKFingerwheelRoll the fingerwheel backwards to increase ink flow or brush size, and forward to reduce it.Your index finger should operate the wheel independently of the pressure you apply to the tip.EraserReplaceable nibThe Art Pen supports 360 degrees of rotation around the pen axis.  As you draw within an application that supports rotation sensitivity, simply twist the Art Pen to create lines that narrow or broaden.For example, while painting you can vary the rotation of a non-circular brush to change the stroke thickness.  Depending on the brush shape characteristics you have selected in your application, you can simulate calligraphy pens, broad felt tip markers, and any other non-circular brushes or tools.Side switchesThe default settings are:Upper: DOUBLE CLICKLower: RIGHT CLICKEraserDoes not support rotation.Replaceable nib
91IndexContents91IndexContentsPEN AND DIGITAL INK CAPABILITIES IN WINDOWSMicrosoft Windows 7 and Vista provide extensive support for pen* and touch input.  When using the professional pen tablet with a computer running Windows 7 or Vista, your experience is enhanced by powerful note taking, handwriting recognition, fast navigation, and other digital inking options designed to give you quick, intuitive results with the Intuos4 pen.•Note taking.  Use your Intuos4 pen to jot notes and capture quick sketches in Microsoft Journal.  Journal simulates a physical notebook, but with the advantages of digital note taking – you can choose from a variety of pen, marker, and highlighter tools, plus an eraser that is easily activated by the eraser of your Intuos4 pen.  Journal also includes a powerful search engine that can even locate your handwritten content.• Handwriting recognition.  Because Windows 7 and Vista include powerful handwriting recognition capabilities, you can use your Intuos4 pen to quickly enter handwritten information anywhere the computer accepts typed input.  You can convert your handwritten content to typed text at any time.•Gestures.  Use your Intuos4 pen to make simple gestural movements on the tablet to trigger customizable actions for navigation, editing, and other functions.  To customize your gestures, select the FLICKS tab in the PEN AND INPUT DEVICES control panel.• Digital Ink in Microsoft Office 2007.  Use your Intuos4 pen to full advantage with the enhanced digital mark-up and inking tools available in Microsoft Office 2007 or later applications running on Windows 7 or Vista.  Found on the REVIEW tab within applicable applications, these tools provide a consistent set of inking options.  For quick access, you can add specific inking tools to the Quick Access Toolbar located at the top of each application.To make the most of the pen in Microsoft Windows, be sure to study the documentation that came with your system, including the Windows training tools and Tablet PC tutorial.  You can access the Tablet PC Pen Training from the START menu by choosing ALL PROGRAMS, TABLET PC, and TABLET PC PEN TRAINING.Note:  The following workarounds in the Wacom tablet driver improve drawing performance in Windows 7 and Vista:• The Pen Flicks and ‘press-and-hold-to-right-click’ features are disabled in graphics applications using the Wintab API.• There is no pressure sensitivity in Journal and other Ink features when both the Flicks and ‘press-and-hold-to-right-click’ features are disabled in the Vista PEN AND INPUT DEVICES control panel.* Pen features supported in all versions of Windows 7 and Vista except Windows 7 Starter and Home Basic, and Windows Vista Home Basic.
92IndexContents92IndexContentsABOUT THE WINDOWS TABLET PC INPUT PANELThe Windows 7 or Vista Input Panel enables you to use handwriting or an on-screen keyboard to directly enter text with your Intuos4 pen.  There are different ways to launch the Input Panel:• Click on the Input Panel icon which appears when you move the screen cursor into a text entry area.• Click on the Input Panel tab, located by default on the left edge of the display screen.• Click on the Tablet PC Input Panel icon located on the Windows task bar.  If the icon is not visible, right-click on the task bar, select TOOLBARS, and TABLET PC INPUT PANEL.To customize the Input Panel:1. First open the Input Panel and then click on TOOLS in the menu bar.2. Select OPTIONS to open the Input Panel Options dialog box.3. Customize the Input Panel settings for the way you like to work.To learn more about using your Intuos4 pen in Microsoft Windows and Office 2007 or later, study the documentation that came with your system and Microsoft Office applications.  Be sure to take advantage of the Windows training tools, including the Tablet PC tutorial, available from Microsoft.You can also visit our web site at www.wacom.com/vista for more information on working with your Intuos4 pen in Windows.
93IndexContents93IndexContentsPRODUCT SPECIFICATIONSINTUOS4 WIRELESS TABLET (MODEL PTK-540WL)Technology Electro-magnetic resonanceFunction display 128 x 64 dot (x2), whiteActive area (W x D) 203.2 x 127 mm (8.0 x 5.0 in)Physical size (W x D x H) 363 x 253 x 15 mm (14.3 x 10.0 x 0.6 in), approximatelyWeight 900 g (2 lb), approximately (with battery)Aspect ratio 16 : 10Coordinate resolution 200 lpmm (5080 lpi)Accuracy, pen +/- 0.25 mm (0.010 in)Accuracy, mouse +/- 0.5 mm (0.020 in)Tilt range (all pens) +/- 60 degreesReading height 10 mm (0.39 in)Maximum report rate 200 points per second, supported only on Bluetooth Specification v2.0 or later connections that support the EDR (Enhanced Data Rate) protocol.ExpressKeys stroke 0.25 mm (0.01 in), approximatelyCommunication interfaces Bluetooth wireless technology (Bluetooth 2.1 + EDR)USBConnector USB Type A to USB mini-BUSB cable length 2.5 m (8.2 ft)Power requirements DC 5V, less than 500 mA, from primary USB port or powered USB hubBattery Li-Ion battery pack, 3.7V, 1800 mAhConnectivity Bluetooth wireless technology using HID protocolOperating temperature 5 to 40 degrees C (41 to 104 degrees F)Battery charging temperature 5 to 35 degrees C (41 to 140 degrees F)Storage temperature -20 to +60 degrees C (-4 to 140 degrees F)Operating relative humidity 30% to 80% non-condensingStorage relative humidity 30% to 85% non-condensingCertification and compliance FCC15B Class B, FCC 15C, CE, VCCI Class B, ICES-003, RSS-210, NCC, BSMI, C-Tick, SRRC, KCC, FAC, GOST-R, Japan Radio Law, RoHS, Chinese RoHS, Korean RoHS
94IndexContents94IndexContentsINTUOS4 GRIP PEN (MODEL KP-501E-01)INTUOS4 MOUSE (MODEL KC-100)The mouse is an optional accessory, and product configurations may vary.INTUOS4 AIRBRUSH (MODEL KP-400E-01)The Airbrush is an optional accessory.Pen tip travel 1.0 mm (0.04 in) or lessPressure levels 2048 levelsEraser tip travel 2.0 mm (0.08 in), approximatelyPhysical size (L x D) 156.5 x 14.9 mm (6.17 x 0.59 in)Weight 17 g (0.60 oz), approximatelyPhysical size (L x D x H) 102.9 x 61.8 x 38.6 mm (4.05 x 2.43 x 1.52 in)Weight 83 g (2.9 oz), approximatelyButton stroke Less than 1.3 mm (0.05 in), approximatelyFingerwheel type Rotation, 24 steps per revolutionPen tip travel 0.2 mm (0.008 in) or lessFingerwheel travel 10 mm (0.39 in)Fingerwheel resolution 1024 levels, approximatelyPressure levels 2048 levelsEraser tip travel 1.5 mm (0.06 in), approximatelyPhysical size (L x W x D) 162.5 x 17.5 x 32.5 mm (6.40 x 0.69 x 1.28 in)Weight 23.0 g (0.81 oz), approximately
95IndexContents95IndexContentsINTUOS4 INKING PEN (MODEL KP-130-01)The Inking Pen is an optional accessory.INTUOS4 ART PEN (MODEL KP-701E-01)The Art Pen is an optional accessory.INTUOS4 CLASSIC PEN (MODEL KP-300E-01)The Classic Pen is an optional accessory.Pen tip travel 0.2 mm (0.008 in) or lessPressure levels 2048 levelsPhysical size (L x D) 151.5 x 12.5 mm (5.97 x 0.49 in)Weight 12 g (0.42 oz), approximatelyPen tip travel 1.0 mm (0.04 in) or lessPressure levels 2048 levelsEraser tip travel 2.0 mm (0.08 in), approximatelyBarrel rotation 360 degreesPhysical size (L x D) 156.3 x 15.9 mm (6.16 x 0.63 in)Weight 20 g (0.7 oz), approximatelyPen tip travel 1.0 mm (0.04 in) or lessPressure levels 2048 levelsEraser tip travel 2.0 mm (0.08 in), approximatelyPhysical size (L x D) 150.7 x 12.2 mm (5.94 x 0.48 in)Weight 12 g (0.42 oz), approximately
96IndexContents96IndexContentsPRODUCT INFORMATIONTo learn more about Intuos4, and about which software applications are currently tablet enhanced to support the pressure sensitivity, tilt sensitivity, eraser, and other special functionality of your professional pen tablet and tools, visit the Wacom web site for your region:ORDERING PARTS AND ACCESSORIESYour Intuos4 professional pen tablet is the ultimate master tool for creative professionals.  The tablet, combined with your Intuos4 Grip Pen and other available Intuos4 tools, enables you to paint more intuitively, illustrate better, and edit imagery faster than ever before.  To expand the feature set of your Intuos4 product, look over the available parts and accessories described on the following pages.  Please note that not all parts and accessories are available in all regions.To purchase parts and accessories, refer to the tablet Read Me file and see who to call for your region.  You can also do the following:• To purchase parts and accessories in the USA or Canada, call 1.888.884.1870 (toll-free) or visit Wacom’s web site at http://www.WacomDirect.com (USA only).• To purchase parts and accessories in Europe, call +49 (0)180.500.03.75 or send an email to spareparts@wacom.eu.  Or, visit http://shop.wacom.eu.  You can also contact your local dealer, distributor, or technical support using the appropriate number for your region.• To purchase parts and accessories in Australia, Singapore, Taiwan and Korea, please visit: www.BuyWacom.com.au, www.BuyWacom.com.sg, www.BuyWacom.com.tw and www.BuyWacom.co.kr, respectively.• To purchase parts and accessories in other countries, please contact your local dealer or distributor.USA, Canada, Central and South America http://www.wacom.com/productinfoEurope, Middle East and Africa http://www.wacom.euJapan http://tablet.wacom.co.jpAsia Pacific (English) http://www.wacom-asia.comChina (Simplified Chinese) http://www.wacom.com.cnKorea http://www.wacomkorea.comTaiwan http://www.wacom.com.twThailand http://www.wacom-thai.com
97IndexContents97IndexContentsAVAILABLE PARTS AND ACCESSORIES Intuos4 Grip Pen (KP-501E-01).  Sensitive to pressure and tilt, the Grip Pen is an all-purpose tool for drawing, erasing, and mouse operations.  The easy-to-use DuoSwitch gives you two programmable switch functions.  The pressure-sensitive pen has an ergonomically waisted grip area, optimum weight and balance, and superior tip sensitivity, making it the most natural freehand tool.  Includes the following accessories: Pen stand, standard nib (qty 1), stroke nib (qty 1), hard felt nib (qty 1), and flex nib (qty 1).Intuos4 Mouse (KC-100).  Cordless and battery free, the five button mouse is an ideal tool for performing any task you may have done previously with a standard mouse.  It includes an integrated middle button and rolling fingerwheel that can be used for up and down scrolling, or the button can be programmed for a variety of other actions.Intuos4 Airbrush (KP-400E-01).  A true digital airbrush, the pressure-sensitive Intuos4 Airbrush incorporates a pressure-sensitive tip and eraser, tilt sensitivity, and a fingerwheel that provides an additional degree of control over the application of digital paint.  Includes the following accessories: Pen stand, standard nib (qty 1), stroke nib (qty 1), hard felt nib (qty 1), and flex nib (qty 1).Intuos4 Inking Pen (KP-130-01).  This pressure- and tilt-sensitive drawing pen was created to provide immediate feedback at your pen tip on the drawing as well as on your computer screen.  The pressure-sensitive Inking Pen comes with inking cartridges and two polyacetal tips for inkless drawing.  It has a pressure-sensitive tip, but no eraser and no side switches.  Includes the following accessories: Pen stand, standard nibs (qty 2), inking nibs (qty 3).Note:  When you purchase an Inking Pen, it comes with a polyacetal nib in the pen.  Use the nib extractor (silver ring) to gently remove the polyacetal nib from the pen.  Then insert one of the silver-colored cartridges that come with the Inking Pen.  The cartridge tip has a waxy coating that you will need to rub off before you can begin inking.Intuos4 Art Pen (KP-701E-01).  This specialty pen provides 360 degrees of barrel rotation and, like the Intuos4 Grip Pen, is pressure and tilt sensitive.  Combining these features with a unique chisel-shaped nib makes the Intuos4 Art Pen the most realistic tool for emulating brushes, markers, and calligraphic pens.  Includes the following accessories: Pen stand, chisel tipped nibs (qty 2), chisel tipped felt nibs (qty 2), bullet tipped nibs (qty 3), and bullet tipped felt nibs (qty 3).Intuos4 Classic Pen (KP-300E-01).  This pen has the same feature set as the Intuos4 Grip Pen, but with a slimmer profile that does not include a rubberized grip.  Includes the following accessories: Pen stand, standard nib (qty 1), stroke nib (qty 1), hard felt nib (qty 1), and flex nib (qty 1).
98IndexContents98IndexContentsFor order information, see ordering parts and accessories.DESCRIPTION PART NUMBERReplacement nibs for Grip Pen, Airbrush, or Classic Pen Standard nib – firm, plastic nib, black, qty 5 ACK-20001Stroke nib – spring loaded nib, more of a “brush-like” feel, qty 5 ACK-20002Felt nib – softer nib for a “pencil or marker on paper” feel, qty 5 ACK-20003Flex nib – a flexible, elastomeric nib, that provides a “higher friction” feel, qty 5 ACK-20004Felt nib, chisel tip, qty 5 ACK-20005Nib set, for Art Pen ACK-20006Pen grip, standard for pen use without side switch ACK-30003Pen grip, thick bodied grip for pen use without side switch. ACK-30002Intuos4 Grip Pen accessory kit. ACK-40001Tablet battery (Li-Ion) ACK-40203Personalization rings, for Grip Pen FUZ-A157Tablet surface sheet replacementsMedium, standard ACK-10221Medium, clear ACK-10222
99IndexContents99IndexContentsRADIO AND TELEVISION INTERFERENCEThe equipment described in this manual generates, uses, and can radiate radio-frequency energy.  If it is not installed and used properly—that is, in strict accordance with Wacom instructions—it may cause interference with radio and television reception.FCC NOTICEThis device complies with Part 15 of the FCC Rules.  Operation is subject to the following two conditions: (1) this device may not cause harmful interference, and (2) this device must accept any interference received, including interference that may cause undesired operation.This equipment has been tested and found to comply with the limits for a Class B digital device, pursuant to Part 15 of FCC Rules.  These limits are designed to provide reasonable protection against harmful interference in a residential installation. This equipment generates, uses and can radiate radio frequency energy and, if not installed and used in accordance with the instructions, may cause harmful interference to radio communications.  However, there is no guarantee that interference will not occur in a particular installation.You can determine whether the equipment is causing interference by disconnecting it from your computer.  If the interference stops, it was probably caused by the equipment.If the equipment does cause interference to radio or television reception, you may be able to correct the interference by using one or more of the following measures:• Rotate the television or radio antenna until the interference stops.• Move the equipment farther away from the television or radio.• Plug the equipment and computer into an outlet that is on a different circuit from the television or radio.If necessary, consult your Wacom dealer or an experienced radio/television technician for help.Changes or modifications to this product not authorized by Wacom could void the FCC Certification and negate your authority to operate the product.FCC RF Radiation Exposure Statement:This equipment complies with FCC radiation exposure limits set forth for an uncontrolled environment.  End users must follow the specific operating instructions for satisfying RF exposure compliance.  This equipment must not be co-located or operating in conjunction with any other antenna or transmitter.See also Industry Canada (Canada only) and CE declaration.
100IndexContents100IndexContentsINDUSTRY CANADA (CANADA ONLY)Industry Canada, Class B“This Class (B) digital apparatus complies with Canadian ICES-003”“Cet appareil numérique de la classe (B) est conforme à la norme NMB-003 du Canada.”CE DECLARATIONThe Intuos® 4 Wireless digitizing tablet, model PTK-540WL, has been tested and found to comply with the following harmonized European Norms:• EN 55022: 2006/A1:2007• EN61000-3-2: 2006• EN61000-3-3: 1995/A1:2001/A2:2005• EN55024: 1998/A1:2001/A2:2003-  EN 61000-4-2:1995/A1:1998/A2:2001-  EN61000-4-3:2006-  EN61000-4-4:2004-  EN61000-4-5:2006-  EN61000-4-6:2007-  EN61000-4-8:1993/A1:2001-  EN61000-4-11:2004• EN 60950-1: :2006• EN 300 328 :V1.7.1• EN 301 489-1:V1.8.1,-17:V2.1.1Based on the results of these tests, Wacom declares that the above mentioned devices conform to Article 10.1 of the European Council EMC Directive 2004/108/EC, LVD Directive 2006/95/EC and to the R&TTE Directive 1999/5/EC and indicates this conformity by the CE-sign on each device.The device must be installed and operated always in strict accordance with the instructions given in this handbook.Any changes or modifications to this product that were not specifically authorized by Wacom will invalidate this declaration.
101IndexContents101IndexContentsPRECAUTIONSWarningsSafety precautions for Lithium-Ion batteriesCautionsWARNINGS• Do not place or leave the pen tablet or input tool(s) within reach of children.  If your product is used improperly there is a potential for accident or human injury.  Prevent children from swallowing the pen nib or side switch.  The pen nib, side switch, or other movable parts may accidentally be pulled out if children are biting on them.  Small parts, such as the pen nib or nib refills, pen side switch, or tablet pen stand, can be removed and accidentally swallowed by children.• Do not use the pen tablet in a facility control system that requires extremely high reliability.  It may cause other electronic devices to malfunction, or other devices may cause the pen tablet to malfunction.• Power off your pen tablet in locations where/when electronic devices are not allowed.  Because the pen tablet may cause other electronic devices to malfunction in some locations where/when the use of electronic devices is not allowed, such as within an airplane, be sure to turn off the pen tablet by moving the power switch to the off position.  For added security, turn off Bluetooth.• Do not disassemble the pen tablet or input tool(s).  Do not disassemble or otherwise modify the pen tablet or input tool(s).  Such action may cause heat generation, ignition, electrical shock, or other damage, including human injury.  Disassembly of the product will void your warranty.• Take note of damaged cabling.  If you notice that your pen tablet cabling is torn or otherwise damaged, there is a potential for product malfunction, electrical shock, or fire.  Stop using the product and contact your local distributor or the Wacom customer support center for your region.• Do not expose this product to water or other liquids.  Take care to never spill liquids onto the pen tablet or input tool(s).  Exposing this product to water or other liquids may cause product malfunction or electrical shock.  If the product is exposed to water or other liquids, turn tablet off by moving the power switch to the off position.  If your product is equipped with a power cord, unplug the cord from the wall outlet.  When the tablet is connected using the supplied USB data cable, unplug the USB connector.  Power down your computer.  Then disconnect any other cables that may remain between the pen tablet and your computer.  Remove the tablet battery.  Stop using the product and contact your local distributor or the Wacom customer support center for your region.• Do not insert foreign material into the USB port or any other opening of this product.  If a metal object or foreign material is inserted into a port or other opening of this product, it may cause the product to malfunction or burn out, or cause electrical shock. See also safety precautions for Lithium-Ion batteries and cautions.
102IndexContents102IndexContentsSAFETY PRECAUTIONS FOR LITHIUM-ION BATTERIESAlways follow proper use and handling of the tablet battery:• Do not abuse the battery in any manner.  Puncturing, crushing, heating, exposure to water or fire, disassembly, shorting the terminals, or other types of abuse may cause the battery to explode or ignite, and potentially cause a fire or personal injury.• Use only the correct battery provided by Wacom and be careful not to drop it on hard surfaces.  The battery can be damaged internally when dropped, and should be replaced even if there is no obvious damage.  This will help prevent any future damage that could occur to the tablet if the battery has been dropped, is installed in the tablet, and then later develops a short or leak while in the tablet.• Do not use a battery that is visibly deformed in any manner.  A deformed battery has the potential to rupture, or generate heat, smoke, or fire.• Do not attempt to install the battery backwards or reverse the polarity.  If you do so, you may damage the tablet, cause a fire, or personal injury may result.• Only use a Wacom battery specified for your tablet.  NEVER attempt to use or charge other battery types in your tablet.  Doing so may damage the tablet, cause a fire, or personal injury may result.  Doing so will also void your warranty.• Do NOT attempt to charge the tablet battery with any power adapter that does not meet the specifications required for your Intuos4 tablet.  Doing so may damage the tablet, cause a fire, or personal injury may result.  Doing so will also void your warranty.  You can charge the tablet by connecting it (using the provided USB cable) to any powered USB port.• Do not overcharge the tablet battery.  Doing so may damage the tablet, cause a fire, or personal injury may result.• If you will be traveling with your wireless tablet, be sure to check with the appropriate regulatory authority for any air or travel restrictions that may apply to Lithium-Ion batteries.• If the tablet becomes excessively warm or emits an unusual smell while the battery is charging, immediately disconnect the USB cable (if in use) and shut down the tablet.  The same applies if the tablet is connected to an after-market power adapter.  Contact Wacom Technical Support for assistance (see technical support options).• If a Li-Ion battery is discharged below a certain minimum charge, it cannot be recharged.  An internal protection circuit within the battery prevents any charging once the voltage has fallen below a minimum safety level.• Properly recycle the old battery in accordance with the battery manufacturer recommendations, and follow any applicable warnings.  • Keep batteries out of the reach of children, and promptly recycle old batteries.• When recycling the Li-Ion battery, do not carry it loosely in your pocket or in any container that may contain metal objects.  If transported improperly and metal objects come in contact with the battery terminals, the battery could short, causing personal injury or fire.  It is recommended that you cover the terminals with adhesive tape to insulate them from possible contact with metal objects.• If the battery should leak, do not get the fluid in your eye.  If battery fluid does enter the eye, do not rub the eye.  Immediately rinse the affected eye with water and seek medical attention.See also warnings and cautions.
103IndexContents103IndexContentsCAUTIONS• Do not place or use this product on an unstable surface or workspace.  Do not place this product on a shaky, inclined, or vibrating surface.  It may drop or fall off, causing damage to the product or human injury.• When cleaning your pen tablet, power off the unit by moving the power switch to the off position and unplugging the USB connector from between the pen tablet and your computer.  Electrical shock may occur if you attempt to clean this product when it is connected to your computer or to an after-market power adapter.• Do not apply heavy stress to the pen tip, eraser, or side switch.  It may shorten pen tip life or may cause the pen to malfunction.• If a distorted or bent pen nib is used, the pen tool may operate improperly.  Therefore, do not apply excessive force when using the pen.• Using a pen nib other than one specifically designed by Wacom for your pen input tool may cause product malfunction.• Do not place metal objects on this product when it is in use.  Metal objects placed on the pen tablet during use may cause interference, improper operation, or product malfunction.See also warnings and safety precautions for Lithium-Ion batteries.
104IndexContents104IndexContentsLICENSE AND WARRANTIES(WORLDWIDE, EXCEPT FOR EUROPE, AFRICA AND MIDDLE EAST)SOFTWARE LICENSEThis legal document is an agreement between you, the end-user, and Wacom Technology Corporation (Wacom).1. Grant of License.  The enclosed product includes computer programs embedded in firmware and accompanying diskette or CD-ROM (the “Software”).  The Software is licensed, not sold, to you for use only with Wacom products upon the terms of this license, and Wacom reserves any rights not expressly granted to you.  Wacom grants to you a non-exclusive right to use this copy of the Software in conjunction with a Wacom product at a single location.2. Ownership of Software.  Although you may own the product in which the Software is originally recorded, Wacom retains ownership of the Software itself.  You acknowledge that the Software is Wacom’s property, and contains valuable confidential, unpublished information developed or acquired by Wacom at great expense, including data processing algorithms, innovations and concepts.  The Software is protected by copyright and other federal and state laws.  You agree to use your reasonable best efforts to protect the Software from unauthorized reproduction, distribution, disclosure, use, or publication.3. Copy Restrictions.  Unauthorized copying of the Software is expressly forbidden.4. Use Restrictions.  You may not decompile, reverse assemble, disassemble or reverse engineer the Software.5. Termination.  This License is effective until terminated.  This License will terminate automatically without notice from Wacom if you fail to comply with any provisions of the License.6. Miscellaneous.  This License is governed by the laws of the United States of America and the state of Washington except in Asia Pacific and by the laws of Japan for Asia Pacific.LIMITED WARRANTYWacom warrants the product, to the original consumer purchaser, except for the Software and consumable items such as the battery and pen nibs, to be free from defects in materials and workmanship under normal use and service for a period of two (2) years, from the date of original retail purchase, as evidenced by a copy of the receipt and registration with Wacom within 30 days of purchase.The Software is licensed “as is.”  Wacom makes no warranty with respect to its quality or performance.  Wacom cannot guarantee you uninterrupted service or the correction of any errors.Upon discovery of a defect in the product, except in the Software, within the Warranty Period, you should contact Wacom Technical Support via telephone, email, or fax to obtain an RMA (Return Merchandise Authorization) number and instructions for shipping the product to a service location designated by Wacom.  You should send the product, shipping charges prepaid, to the designated service location, accompanied by the return authorization number, your name, address and telephone number, proof of purchase date, and a description of the defect.  Wacom will pay for return shipping by United Parcel Service or by an equivalent service as chosen by Wacom.Wacom’s sole obligation and entire liability under this warranty shall be, at Wacom’s option, either the repair or replacement of the defective product or parts thereof of which Wacom is notified during the Warranty Period; provided, however, that you are responsible for (i) the cost of transportation of the product to the designated service location and (ii) any loss or damage to the product resulting from such transportation.
105IndexContents105IndexContentsWacom shall have no responsibility to repair or replace the product if the failure of the product has resulted from accident, abuse, misuse, negligence, or unauthorized modification or repair, or if it has been handled or stored other than in accordance with Wacom’s storage instructions.Any descriptions, drawings, specifications, samples, models, bulletins, or similar material, used in connection with the sale of the product, shall not be construed as an express warranty that the product will conform or comply with your requirements.EXCEPT FOR THE LIMITED WARRANTY DESCRIBED ABOVE, THERE ARE NO OTHER WARRANTIES MADE BY WACOM ON THIS PRODUCT.  NO ORAL OR WRITTEN INFORMATION OR ADVICE GIVEN BY WACOM, ITS DEALERS, DISTRIBUTORS, AGENTS, OR EMPLOYEES SHALL CREATE A WARRANTY OR IN ANY WAY INCREASE THE SCOPE OF THIS WARRANTY, AND YOU MAY NOT RELY ON ANY SUCH INFORMATION OR ADVICE.  THIS WARRANTY GIVES YOU SPECIFIC LEGAL RIGHTS, AND YOU MAY ALSO HAVE OTHER RIGHTS WHICH VARY FROM STATE TO STATE.WACOM LIMITS THE DURATION OF ANY LEGALLY IMPLIED WARRANTIES INCLUDING IMPLIED WARRANTIES OF MERCHANTABILITY OR FITNESS FOR A PARTICULAR PURPOSE, TO THE DURATION OF WACOM’S EXPRESS WARRANTY.  SOME STATES DO NOT ALLOW LIMITATIONS ON HOW LONG AN IMPLIED WARRANTY LASTS, SO THE ABOVE LIMITATION MAY NOT APPLY TO YOU.NEITHER WACOM NOR ANYONE ELSE WHO HAS BEEN INVOLVED IN THE CREATION, PRODUCTION, OR DELIVERY OF THIS PRODUCT SHALL BE LIABLE FOR ANY DIRECT, CONSEQUENTIAL, OR INCIDENTAL DAMAGES (INCLUDING DAMAGES FOR LOSS OF BUSINESS PROFITS, BUSINESS INTERRUPTION, LOSS OF BUSINESS INFORMATION AND THE LIKE) ARISING OUT OF THE USE OF OR INABILITY TO USE SUCH PRODUCT, EVEN IF WACOM HAS BEEN ADVISED OF THE POSSIBILITY OF SUCH DAMAGES.  SOME STATES DO NOT ALLOW THE EXCLUSION OR LIMITATION OF INCIDENTAL OR CONSEQUENTIAL DAMAGES, SO THE ABOVE LIMITATION OR EXCLUSION MAY NOT APPLY TO YOU.In the event that any of the above limitations are held unenforceable, Wacom’s liability for any damages to you or any party shall not exceed the purchase price you paid, regardless of the form of any claim.This Limited Warranty is governed by the laws of the United States of America and the state of Washington.This Limited Warranty is valid for and only applies to products purchased and used inside the United States (and its territories or possessions) and Canada.WARRANTY SERVICE IN THE U.S.A. AND CANADATo obtain Warranty service within the U.S. or Canada contact:Wacom Customer Care CenterPhone: 1.360.896.9833Email Inquiry form: http://www.wacom.com/productsupport/email.cfm
106IndexContents106IndexContentsWARRANTY ON SALES OUTSIDE OF THE U.S.A. AND CANADAFor products purchased or used outside of the United States and Canada, the warranty period is one (1) year from the date of original retail purchase.  Upon discovery of a defect in the product, except in the Software, within the Warranty Period you should contact your local dealer or distributor.  In all other respects the terms of the warranty as set forth above apply to such sales.Wacom Technical Support in Asia Pacific (except Japan and China)Detailed Asia Pacific Limited Warranty policy and product registration may be found online at http://www.wacom-asia.comTo obtain technical support or Warranty service within Southeast Asia, Oceania and Taiwan, please contact the Wacom Customer Support Service.Phone numbers can be found here: http://www.wacom-asia.com/support/contactShould you have any questions about this Agreement, or if you desire to contact Wacom for any reason, please contact in writing:IN NORTH AND SOUTH AMERICA CONTACT: IN JAPAN CONTACT:Wacom Technology Corporation Wacom Co., Ltd.1311 SE Cardinal Court 2-510-1 ToyonodaiVancouver, Washington 98683 Otone-Machi, Kitasaitama-GunU.S.A. Saitama, 349-1148JapanIN ASIA PACIFIC CONTACT: IN MAINLAND CHINA (EXCEPT HONG KONG) CONTACT:Wacom Co., Ltd. Wacom China CorporationHarmony Tower 18F, 1-32-2 Hon-Cho, Unit 2807, 28th Floor, SK Tower,Nakano-Ku, Tokyo 164-0012 No 6 Jia, Jianguomenwai Avenue,Japan Beijing, 100022, ChinaE-mail: support@wacom.com.cn
107IndexContents107IndexContentsLICENCE WARRANTY CONDITIONS(EUROPE, AFRICA AND MIDDLE EAST)SOFTWARE LICENCE AGREEMENTImportant customer informationThe scope of delivery of this product covers copyright-protected computer programs ("software"), which are the inalienable intellectual property of WACOM Europe GmbH ("WACOM").  This software is an integral component of the product and is also held on the associated data carrier.  The software of WACOM and the associated rights of use are not included with the purchase of this product from your retailer.  WACOM grants you-the user-the right to use the software exclusively in accordance with the conditions stipulated in this licence agreement.  By purchasing this product, you agree to the following licence conditions.Conditions for using the softwareWACOM issues the user with a personal, non-exclusive licence to use the software solely in connection with this product and for the correct operation of the product.  This licence may only be assigned to a third party in connection with this product.Use of this software includes the creation of permanent or temporary copies of the software by means of loading, displaying, exporting, transferring or saving, for the purposes of exporting the commands and the data they contain or for observing, researching or testing the software functions.The customer may not license the software to a third party, lease, lend or in any other way provide access to the software. The customer may not copy, change, transfer or edit the software without prior written agreement from WACOM. The only exceptions to this are necessary procedures for creating a back-up copy and the scenarios outlined in section 2. The customer may not carry out any "reverse engineering", decompile or depacketise the software, or try by any other means to discover the source code of the software. This restriction shall continue to apply after the termination of this agreement. If the software contains interfaces to other programs that are not supported by WACOM, WACOM shall provide the customer with the necessary information on request, as long as the customer can prove his right to use the software and agrees to bear the copying and postage costs.WACOM AND ITS SUPPLIERS CANNOT OFFER ANY GUARANTEE FOR THE PERFORMANCE OF THE SOFTWARE OR FOR THE RESULTS PRODUCED THERE FROM. WACOM AND ITS SUPPLIERS OFFER NO GUARANTEES OR ASSURANCES (EITHER EXPRESSLY OR IMPLICITLY, INCLUDING THOSE THAT MAY BE DERIVED FROM A BUSINESS RELATIONSHIP OR FROM TRADE PRACTICE, OR FROM LEGAL PROVISIONS OR CUSTOMARY LAW) WITH REGARD TO THE MARKETABILITY, FREEDOM FROM DEFECTS OF TITLE OR USEFULNESS OF THE SOFTWARE.WACOM AND ITS SUPPLIERS ACCEPT NO LIABILITY FOR DAMAGES, CLAIMS OR COSTS OF ANY KIND, NOR FOR CONSEQUENTIAL DAMAGES, SECONDARY, ACCIDENTAL, INDIRECT OR PENAL DAMAGES, PARTICULAR OR MISCELLANEOUS DAMAGES OR FOR DEMANDS OR INDEMNITY CLAIMS FOR REDUCED PROFITS OR LOSSES. THIS SHALL ALSO APPLY IN THE CASE OF A REPRESENTATIVE OF WACOM BEING PREVIOUSLY AWARE OF THE POSSIBILITY OF SUCH LOSSES, DAMAGES, CLAIMS OR COSTS, OR DEMANDS FROM THIRD PARTIES.
108IndexContents108IndexContentsThe existing limitations on liability shall not apply in the case of the assumption of explicit guarantees, or in case of fraudulent behaviour on the part of WACOM, nor for damages arising from wilful or grossly negligent behaviour on the part of WACOM, from damages leading to loss of life, personal injury or sickness or in the case of binding legal provisions. For slight negligence, WACOM and its suppliers shall only be liable in the event of a breach of essential contractual obligations. Liability when such an essential contractual obligation is breached is, however, limited to damages typical to this type of contract, which WACOM must have determined at the conclusion of the contract based on the known risks and circumstances at that time. Claims for reduced profits or expenses saved, indemnity claims from third parties or claims for any other direct or consequential damages still cannot be asserted in this case.The laws of the Federal Republic of Germany shall apply to this agreement. However, the applicability of the United Nations Convention on Contracts for the International Sale of Goods is explicitly excluded. Krefeld is the sole place of jurisdiction for all claims arising from this contractual relationship and all disputes between the parties resulting from the formation, handling or termination of the contractual relationship, provided that the customer is a trader, a legal entity under public law or a special fund under public law. The jurisdiction agreement shall also apply for customers who do not have a general place of jurisdiction in Germany. The jurisdiction agreement shall not apply if, due to legal provisions, a different sole place of jurisdiction must be established for the case. Furthermore, WACOM is authorised to file a lawsuit against the headquarters of the customer.This licence constitutes the entire contractual agreement between the parties. It overrides all other verbal and written contracts and agreements and may only be altered by means of a written and signed contract. Should one of the provisions of these licence conditions be or become void, the validity of the other provisions shall not be affected, in full or in part. Should a provision be invalid, the legally permissible regulation most closely resembling the invalid regulation shall apply in its place.LIMITED WARRANTYWACOM guarantees to you, as the initial purchaser, that the product hardware, when used as intended, will remain free from material defects and processing errors for a warranty period of TWO (2) YEARS and Cintiq products shall be guaranteed for a warranty period of THREE (3) YEARS, commencing from the purchase date and provided that the product was unused at the time of purchase. Defects in wear parts (e.g. pen tips) resulting from normal wear and tear are exempt from the warranty. Furthermore, WACOM guarantees that the data carriers delivered with the product are free from material defects and processing errors for a period of SIX (6) MONTHS from the date of purchase. If the product-excluding any software-is discovered to be faulty it must be returned immediately to the place of purchase in its original packaging within the warranty period together with your name, address and telephone number, a description of the problem and a copy of the original receipt. The customer shall be liable for any possible damage or loss of the product during transit for this purpose. Under the provisions of this warranty, WACOM only undertakes to repair or replace the faulty product or parts at its own discretion, in cases where defects are proven and the product is sent within the warranty period.WACOM is not obligated to repair or replace the product if: (a) the damage to the product results from any accident, misuse, improper use, negligence or unauthorised alteration or repair; (b) the product was not handled or stored according to the instructions provided by WACOM; (c) the damage resulted from normal wear and tear; or d) the serial number affixed by WACOM has been removed or rendered unintelligible.If, when a claim made under this warranty is checked, it emerges that it is outside the permitted time period or is not covered by the warranty or that the product is not faulty, the costs of any checks or repairs must be borne by the customer.
109IndexContents109IndexContentsAny descriptions, drawings, specifications, samples, models, notifications or similar material provided in connection with the purchase of the product cannot be taken as an explicit guarantee that the product corresponds to or fulfils the customer's requirements.If this product is faulty, the purchaser shall be entitled to assert legal claims against the vendor for liability due to defects. These legal rights against the vendor are not limited by the existing warranty. The warranty grants the customer many additional rights under the conditions stipulated in this text.This limited warranty shall apply if the registered office of the vendor is in the EU or in Iceland, Norway, Jersey, Switzerland, Russia, Ukraine, Croatia, Serbia, Tunisia, Turkey, Syria, Lebanon, Jordan, Israel, Egypt, United Arab Emirates, Iran or South Africa.The granting of this limited warranty is subject to the laws of the Federal Republic of Germany. However, the applicability of the United Nations Convention on Contracts for the International Sale of Goods is explicitly excluded. Krefeld is the sole place of jurisdiction for all claims arising from this contractual relationship and all disputes between the parties resulting from the formation, handling or termination of the contractual relationship, provided that the customer is a trader, a legal entity under public law or a special fund under public law. The jurisdiction agreement shall also apply for customers who do not have a general place of jurisdiction in Germany. The jurisdiction agreement shall not apply if, due to legal provisions, a different sole place of jurisdiction must be established for the case. Furthermore, WACOM is authorised to file a lawsuit against the headquarters of the customer.Should one of the provisions of these limited warranty conditions be or become void, the validity of the other provisions shall not be affected, in full or in part. Should a provision be invalid, the legally permissible regulation most closely resembling the invalid regulation shall apply in its place.If you have any questions about this agreement, or would like to contact WACOM for another reason, please contact us by post at this address:WACOM Europe GmbHEuropark Fichtenhain A947807 KrefeldGERMANY
110110IndexContentsIndexContentsGLOSSARYActive area.  The drawing area of the tablet where your Intuos4 tools are detected.Application-specific settings.  Intuos4 tool and tablet settings that have been customized for individual applications.  The Wacom Tablet control panel enables you to customize a tool to behave uniquely in different applications.  Application-specific settings are in effect whenever you use the application.Aspect.  The ratio between the vertical and horizontal dimension of the tablet or display.Bluetooth.  A standardized wireless technology and Specification.  Manufacturers build Bluetooth wireless technology into their products in order to create Bluetooth enabled devices, providing seamless voice and data connections between a variety of wireless devices operating at short range to one another.Click force.  The amount of force you must apply to the pen tip for a click to occur.Digital Ink.  A broad category that typically describes handwritten content which as been created using pen-based input on a computer.  This handwritten content takes the form of sketches, ink mark-up, or handwriting.  The handwriting can optionally be converted to typewritten text or simply left alone for use in its original format.  Depending on your system and applications settings, the handwritten text you make with digital ink can be converted on-the-fly or at another time.Discoverable mode.  An operational state in which a Bluetooth enabled device is available for discovery by another Bluetooth enabled device.Display Toggle.  An Intuos4 feature that allows you to work with your tablet on all displays or on one display at a time.  Available only on multiple monitor systems.  See working with Display Toggle for more information.Double-click assist.  A function of the Wacom Tablet control panel that makes it easier to double-click by setting the size of the double-click distance.Double-click distance.  The maximum distance (in screen pixels) that the cursor can move between clicks and still be accepted as a double-click.  Increasing the double-click distance makes double-clicking easier, but may cause a delay in brush strokes in some graphics applications.Double-click speed.  The maximum time that can pass between clicks and still be accepted as a double-click.Eraser-aware application.  A software application that has built-in support for the Intuos4 eraser.  These applications take advantage of the eraser in different ways, depending on what makes sense for the application.ExpressKeys.  The customizable control keys located on your professional pen tablet.ExpressKeys Left.  A tablet ORIENTATION setting where the Touch Ring and ExpressKeys are oriented to the left of the tablet.ExpressKeys Right.  A tablet ORIENTATION setting where the Touch Ring and ExpressKeys are oriented to the right of the tablet.
111IndexContents111IndexContentsFingerwheel.  The control wheel on the Intuos4 Mouse and optional Airbrush.Journal.  A Microsoft Windows application that electronically simulates a physical journal pad, but with the advantages of digital note taking.  For example, you can create quick sketches and jot handwritten notes that can be converted to text and sent on to colleagues for digital mark-up.  Journal includes a variety of pen, marker, and highlighter tools, plus an eraser that is easily activated by the eraser of your Intuos4 pen.  Additionally, your handwritten content is searchable within Journal.Mapping.  The relationship between your Intuos4 tool position on the tablet and the cursor position on the monitor screen.Modifier.  Modifier keys include SHIFT, ALT, and CTRL for Windows, or SHIFT, CONTROL, COMMAND, and OPTION for Macintosh.  You can customize your Intuos4 tool to simulate a modifier key.Mouse acceleration.  A setting that allows you to adjust the screen cursor acceleration when your Intuos4 tool is in MOUSE MODE.Mouse mode.  A method for positioning the screen cursor.  When you place an Intuos4 tool on the tablet, you can move the screen cursor with a “pick up and slide” motion similar to using a traditional mouse.  This is known as relative positioning, and is the default setting for the Intuos4 Mouse.  See also pen mode.Mouse speed.  A setting that allows you to adjust the speed at which your screen cursor moves when your Intuos4 tool is in MOUSE MODE.Nib.  The replaceable pen tip.OLED.  Organic Light Emitting Diodes (OLEDs) are made up of semi-conductor polymers.  OLEDs do not need a background lighting to function, and thus have a lower power consumption and can be much thinner than LCD panels.Pairing.  A method of creating a virtual cable link between two Bluetooth enabled devices.  Pairing is the process whereby Intuos4 and the computer discover one another for the “first” time.Pen mode.  A method of positioning the screen cursor.  Wherever you place your Intuos4 tool on the tablet, the screen cursor will appear at the corresponding point on the screen.  This is known as absolute positioning, and is the default setting for all Intuos4 pen tools.  Also, PEN MODE allows you to quickly position the screen cursor without having to first find it and then move it across the desktop.  See also mouse mode.Pixel.  The smallest unit of measure on your monitor screen.Pressure sensitive.  A quality of the Intuos4 pen tip and eraser that senses the amount of pressure being applied.  This is used to create natural-looking pen, brush, and eraser strokes in applications that are pressure sensitive.Pressure-sensitive application.  Any application that supports pressure-sensitive input.Proximity.  The height above the tablet’s active area where the Intuos4 tools are detected.  See also positioning.
112IndexContents112IndexContentsRadial Menu.  A hierarchical menu (in radial format).  Each level of the menu consists of eight menu slices which may contain various features and options to choose from.  You can customize the buttons of your Intuos4 tools or tablet to display this menu.Screen cursor.  The pointer on the display screen.  Screen cursors come in different shapes (such as an I-beam, arrow, or box), depending on which application you are running.Tablet PC Input Panel (TIP).  The Microsoft Windows Tablet PC Input Panel enables you to use your Intuos4 pen to create handwritten notes or work with an on-screen keyboard.  The Input Panel dynamically converts your handwriting to text.  Information you create can then be inserted into other documents, spreadsheets, or illustrations.  See pen and digital ink capabilities in Windows.Tilt sensitive.  A quality of the Intuos4 pen tip and eraser that senses the amount of tilt between the tool and tablet.  This is used to create natural-looking pen, brush, and eraser strokes in applications that are tilt sensitive.Tool ID.  A unique serial number in each Intuos4 tool.  Some graphics applications, such as Corel Painter, recognize Tool IDs and allow you to assign different settings and brushes to every Intuos4 tool (e.g., two Grip Pens).  Switching between the settings and brushes then becomes as easy as switching between the two pens.Touch Ring.  The customizable control ring located on your professional pen tablet.Transceiver.  A radio device capable of both transmitting and receiving information.USB.  Universal Serial Bus.  A hardware interface standard for connecting computer peripheral devices.  USB ports support hot-plugging, which allows you to disconnect a USB device without turning off your computer.Wintab.  An interface standard used by Windows applications for receiving tablet information.  Intuos4 supports all Wintab-compatible applications under Windows.
113IndexContents113IndexContentsINDEXAbout the manual  6Accessories and partsavailable 97ordering 96Active area, understanding  21Adding a new tool  60Airbrushholding 90replacing the tip  84using 90applications, using integrated  88Application-specific settings  61changing 62creating 62removing 62Art Pen, using  90Batteryactivation 11charging 11life, information  82management 10replacing 83status light  14warnings 102Bluetooth connection, optimizing  18Button functions  51Care, for tools and tablet  83Cautions 103CE declaration  100Clicking, how to  26Connecting wirelessly  15Connectionoptimizing 18problems, troubleshooting  70USB 18Connection light  14Control panelfeatures 34lists 35opening 33tabs 35Customizingdouble-click 38eraser feel  39advanced 39ExpressKeys 44mouse 41buttons 42fingerwheel 42pen 37Radial Menu  57tablet 43ExpressKeys 44Touch Ring  45tablet to screen mapping  46tilt sensitivity  41tip feel  38advanced 39tool buttons  40Touch Ring  45Diagnostics 66Display Toggle, working with  58Double-click, customizing  38Double-clicking, how to  26Dragging, with pen  26Drawingwith pressure sensitivity  28with tilt  28Driver downloads, obtaining  80Environmental conditions  83Eraser feeladvanced 39customizing 39
114IndexContents114IndexContentsErasing 29Ergonomics 19ExpressKeyscustomizing 44display optimization  88testing 68using 31Eye-hand coordination exercise  29FCC notice  99Featurescontrol panel  34pen 10power saving  13tablet 8Fingerwheel, mouse, using  89Force proportions  50Functions, button  51General problems, troubleshooting  72HoldingAirbrush 90pen 24Industry Canada notice  100Information, product  96Installingmultiple tablets  86tablet 81Linking, to computer  16Macintosh-specific problems, troubleshooting  77Mapping to multiple monitors  22Mousebuttons, customizing  42customizing 41fingerwheelcustomizing 42using 89testing 69using 89Mouse Mode  47Multiplemonitors, working with  22tablets, installing  86New tool, adding  60Nib, replacing  84Options, advanced  87Ordering parts and accessories  96Orientation, tablet  48physical configuration  20Parts and accessoriesavailable 97ordering 96Penclicking with  26customizing 37double-clicking with  26dragging with  26drawingwith pressure sensitivity  28with tilt  28erasing with  29features 10holding 24pointing with  25positioning with  25replacing the tip  84side switch  27testing 67tip, replacing  84using 23Pen Mode  46Pointing, with pen  25Positioning, with pen  25power management  10Precautions 101battery warnings  102Cautions 103Warnings 101Preferences, managing tablet  85Pressure sensitivity, drawing with  28Product information  96Proximity 25Radial Menucustomizing 57using 57Removing application-specific settings  62Screen area  49Settingschanging application specific  62creating application specific  62removing application specific  62
115IndexContents115IndexContentsSide switch, using  27Softwaredriver downloads  80uninstalling 85Specifications, product  93Airbrush 94Art Pen  95Classic Pen  95Grip Pen  94Inking Pen  95Intuos4 Wireless tablet  93mouse 94Tabletarea 50battery activation  11battery and power management  10battery status light  14charging the battery  11connecting to your computer  16customizing 43ExpressKeyscustomizing 44testing 68using 31features 8installation 81mode options, changing  86orientation 48physical configuration  20power saving features  13preferences, managing  85properties, working with  36replacing battery  83storing 83testing 64Touch Ringcustomizing 45testing 68using 32wireless connection light  14working with  30Tablet to screen mapping, customizing  46Technical Support, contacting  79TestingExpressKeys 68mouse 69pen 67tablets 64tools 66Touch Ring  68Tiltdrawing with  28sensitivity, customizing  41Tip feeladvanced 39customizing 38Tool buttons, customizing  40Toolstesting 66working with multiple  60Touch Ringcustomizing 45testing 68using 32Troubleshootingconnection problems  70general problems  72Macintosh-specific problems  77tables 70Windows-specific problems  76Uninstalling software  85USB connection  18UsingAirbrush 90applications integrated for tablet control  88Art Pen  90ExpressKeys 31mouse 89pen 23Radial Menu  57Touch Ring  32Wacom international offices  116Warnings 101Warnings, battery  102Windows-specific problems, troubleshooting  76Wireless connection  15establishing 16Wireless connection light  14Work area, setting up  19Working with Intuos4  23
116IndexContents116IndexContentsWACOM INTERNATIONAL OFFICESWACOM TECHNOLOGY CORPORATION WACOM EUROPE GMBH1311 SE Cardinal Court Europark Fichtenhain A9Vancouver, WA 98683 47807 KrefeldU.S.A. GermanyTelephone: +1.360.896.9833 Telephone: +49.(0)2151.3614.0Fax: +1.360.896.9724 Fax: +49.(0)2151.3614.111WACOM CO., LTD.JAPAN MARKETING AND SALES DIVISIONWACOM CO., LTD.ASIA PACIFIC MARKETING AND SALES DIVISIONHarmony Tower 21F, 1-32-2 Hon-Cho, Harmony Tower 18F, 1-32-2 Hon Cho,Nakano-Ku, Tokyo 164-0012 Nakano-Ku, Tokyo 164-0012Japan JapanInternet: http://tablet.wacom.co.jp Telephone: +81.3.5309.1513Fax: +81.3.5309.1514WACOM CHINA CORPORATION WACOM KOREA CO., LTD.Unit 2807, 28th Floor, SK Tower 25th Floor DMC iaan Sangam 2nd Complex, 1653No 6 Jia, Jianguomenwai Avenue, Sangam-dong, Mapo-gu, Seoul, Korea, 121-270Beijing, 100022, China KoreaInternet: http://www.wacom.com.cn Telephone: +82.2.557.3894Fax: +82.2.557.3895WACOM AUSTRALIA PTY. LTD. WACOM SINGAPORE PTE. LTD.Unit 8, Stage 1 Cumberland Green 3 Bishan Place2-8 South Street Rydalmere CPF Bishan Building #06-08NSW 2116 Australia Singapore 579838Telephone: +61.2.9422.6700 Telephone: +65.6258.8640Fax: +61.2.9420.2272 Fax: +65.6258.8697WACOM TAIWAN INFORMATION CO., LTD.Suite 605, 6th floor, No. 205 Tun-Hwa North RoadTaipei, 105 TaiwanTelephone: +886.2.2712.2675Fax: +886.2.2712.9789

Navigation menu