WINIA Electronics DPA5034LDS 50" Plasma Display Panel User Manual 2
Dongbu Daewoo Electronics Corporation 50" Plasma Display Panel Users Manual 2
UserManual.wiki
>
WINIA Electronics
>
DPA5034LDS User Manual
>
Users Manual 2
Contents
1.
Users Manual 1
2.
Users Manual 2
Users Manual 2
Navigation menu
Upload a User Manual
Namespaces
Wiki Guide
HTML
PDF
Info
Views
User Manual
Discussion / Help
Navigation
![55Selecting PictureMode• Select the Picture modethat is appropriately setdepending on the kindsof pictures, and enjoythem.Selecting Picture ModePICTUREMODE• Press the [PICTURE MODE] on theRemote Control.• While pressing the [PICTURE MODE] forthe first time, the current PICTURE MODEwill be displayed.Each Press of the Button Will SelectOne of Four Picture Modes.• Each time you press the button, adifferent Picture mode appears. Thesequence used is as follows:* Normal : For a highly defined image in a normally brightroom* Dynamic: For a clear-cut image emphasizing high contrastfor sports viewing* Cinema: For a movie* User: Allows the user to customise settings as desired. Menu on the Screen will disappear.• After selecting a desired Picture mode, themenu on the screen will disappear. • Normal, Dynamic, and Cinema Modes arefactory preset values.If you want to customise the Picture modes,refer to the following page.3 12Selecting Picture ModeNOTES:1) Normal, Dynamic, and Cinema Modes are factory preset values.2) When adjusting sub-menus while you are in Normal, Dynamic,and Cinema Modes, the Picture Mode will be automaticallyconverted to User Mode, and the adjustments will be made.3) Selecting [Initialise] in the [Features], Menu will allow theBrightness, Contrast, etc. to return to the factory preset values.PICTUREMODEVIDEO/DVD SATTV CATVDISPLAYTV/VIDEOSTILLCHCHVOLVOLMULTIMEDIAS.EFFECTMENUPREVCHSCREENSIZEMUTE PROG.GUIDEF.F/SLOWPLAYF.R/SLOWREC STOP PAUSEPREVOPEN/CLOSENEXTPICTUREMODE SOUNDMODE SLEEPPOWERMTS CAPTIONPIP POSITION SWAPTV/VIDEOADD/ERASECHCHNormal DynamicCinema User](https://usermanual.wiki/WINIA-Electronics/DPA5034LDS.Users-Manual-2/User-Guide-515232-Page-12.png)
![56CustomizingPicture• You can adjust thecolor tone andbrightness to yourpreference.Customizing PictureVIDEO/DVD SATTV CATVDISPLAYTV/VIDEOSTILLCHCHVOLVOLMULTIMEDIAS.EFFECTMENUPREVCHSCREENSIZEMUTE PROG.GUIDEF.F/SLOWPLAYF.R/SLOWREC STOP PAUSEPREVOPEN/CLOSENEXTPICTUREMODE SOUNDMODE SLEEPPOWERMTS CAPTIONPIP POSITION SWAPTV/VIDEOADD/ERASECHCHPress the “ CH ” Button.• After selecting [Picture] by by pressing “ CH ” button,press the “ VOL ”button. Then the sub menu of[Picture] will be displayed.Select the User Mode.• Select [User] by pressing the “ VOL ”button.3 Press the MENU Button.• The MENU shown below will display on the screen. 12VideoChannelMENUAudioFeatureTimePrev. Move SelectNormalNormalModeBrightnessContrastColorTintSharpnessColor temp.VideoChannelMENUAudioFeatureTimePrev. Move SelectNormalUserModeBrightnessContrastColorTintSharpnessColor temp.CHCHVOLVOLMULTIMEDIAS.EFFECTMENUPREVCHSCREENSIZECHCHVOLVOLMULTIMEDIAS.EFFECTMENUPREVCHSCREENSIZECHCHVOLVOLMULTIMEDIAS.EFFECTMENUPREVCHSCREENSIZEVideoChannelMENUAudioFeatureTimeExit Move SelectNormalNormalModeBrightnessContrastColorTintSharpnessColor temp.](https://usermanual.wiki/WINIA-Electronics/DPA5034LDS.Users-Manual-2/User-Guide-515232-Page-13.png)
![57Select User Mode AdjustmentsPicture Condition Adjustments• Press the “ VOL ”buttons to adjust the picture at yourpreference.45VideoChannelMENUAudioFeatureTimePrev. Move SelectNormalUserModeBrightnessContrastColorTintSharpnessColor temp.VideoChannelMENUAudioFeatureTimeExit Move SelectNormalNormalModeBrightnessContrastColorTintSharpnessColor temp.• While you are in [Picture Mode – User], press the “ CH ”buttons to select a specific adjustment item.NOTES:1) While you are in the PC or DVI INPUT mode, you can onlyadjust brightness, contrast, sharpness and color temperature.2) When you adjust Brightness, Contrast, Color and Tint in DTVmode or adjust Brightness and Contrast in PC or DVI mode,the picture is adjusted finely.3) The Tint control is used when the input signal is NTSC If inputsignal is NTSC, Tint control is displayed in picture menu. 4) Selecting the Color Temperature makes the mood normal,warm or cold.CHCHVOLVOLMULTIMEDIAS.EFFECTMENUPREVCHSCREENSIZECHCHVOLVOLMULTIMEDIAS.EFFECTMENUPREVCHSCREENSIZE](https://usermanual.wiki/WINIA-Electronics/DPA5034LDS.Users-Manual-2/User-Guide-515232-Page-14.png)
![58Adjusting Screen Size• You can adjustscreen size oraspect ratio asdesired.Adjusting Screen SizeVIDEO/DVD SATTV CATVDISPLAYTV/VIDEOSTILLCHCHVOLVOLMULTIMEDIAS.EFFECTMENUPREVCHSCREENSIZEMUTE PROG.GUIDEF.F/SLOWPLAYF.R/SLOWREC STOP PAUSEPREVOPEN/CLOSENEXTPICTUREMODE SOUNDMODE SLEEPPOWERMTS CAPTIONPIP POSITION SWAPTV/VIDEOADD/ERASECHCHPress the “SCREEN SIZE” Button.• Each time you press the “SCREEN SIZE” button on the RemoteControl, a different “SCREEN SIZE” appears. The sequenceused is as follows:• The current screen size will be displayed on the screen.1SCREENSIZENormal (4:3)Wide (16:9) Zoom 1Zoom 2NOTES:1) When the INPUT SIGNAL is DTV [in Component 1 orComponent 2], only the aspect ratios of 16:9 and 4:3 areavailable.2) Displaying a picture in a 4:3 mode for a long time may causephosphor of the PDP to be burned. So avoid displaying apicture in 4:3 screen size for a long time.3) 16:9 : Theater-like 16:9 picture formats4:3 : 4:3 picture formats like an Analog TV.Enlarge LB : Enlarges the screen as to fill the black part ofup and down.Enlarge LBS : Enlarges the screen, and shifts up as to seethe subtitles in case you are watching videowith subtitles.Panorama : 16:9 picture formats with panorama effect.4) If the picture shows unclear image in the 480p componentinput source, try to toggle the resolution from the [MENU]-[Screen]-[DTV/DVD]. This menu appears only when the inputsignal is component 480p.](https://usermanual.wiki/WINIA-Electronics/DPA5034LDS.Users-Manual-2/User-Guide-515232-Page-15.png)
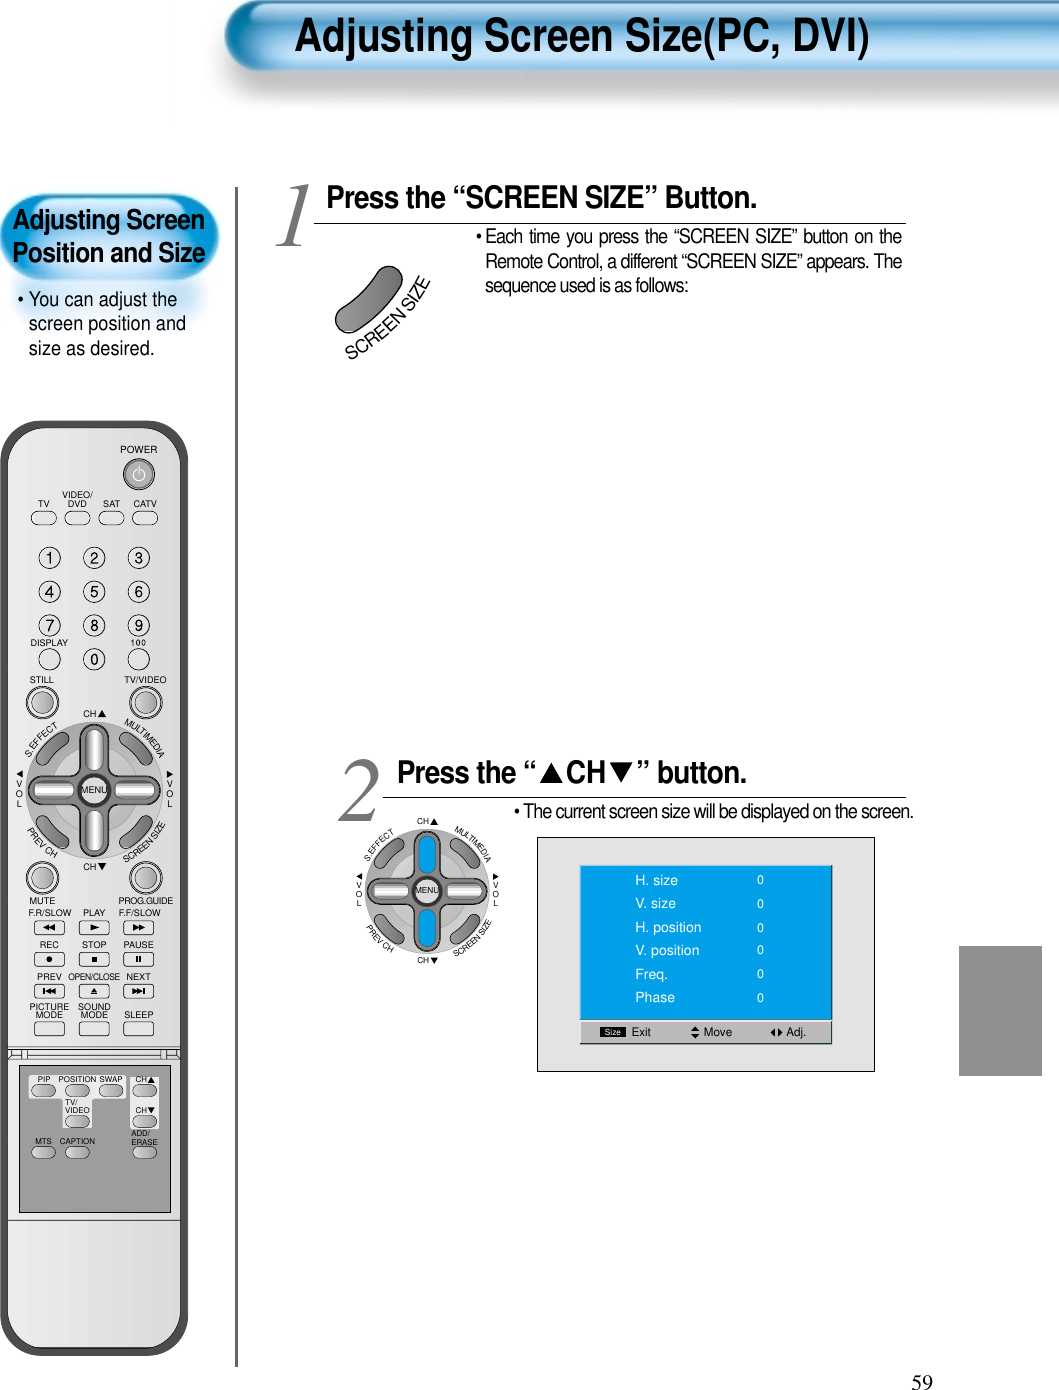
![60Press the Volume “ VOL ”button.• Press the Volume “ VOL ”button to enter the sub menuof [Screen].• While you are in [Screen] mode, press the “ CH ”button to select a desired item, and then, adjust thevalue by pressing the “ VOL ”.3 Move Adj.SizeExit00000H. sizeV. sizeH. positionV. positionFreq.Phase0NOTES:1) Horizontal/Vertical size and position values can be adjusted only in the[PC] input mode and in the [DVI] input mode, only Horizontal/Vertical sizeare available.2) H. Size: As the value increases, the screen width increases3) V. Size: As the value increases, the screen height increases.4) H. Position: As the value increases, the screen moves to the right.5) V. Position: As the value increases, the screen mores up.6) Phase: When there is jitter or blurring of the image, adjust this value.7) Frequency: When there is jitter or blurring of the image, adjust this value.8) In case of DVI, only H and V size can be adjusted.9) Using Screen Size button on the remote control, you can control the Hand V size directly in PC or DVI mode.CHCHVOLVOLMULTIMEDIAS.EFFECTMENUPREVCHSCREENSIZE](https://usermanual.wiki/WINIA-Electronics/DPA5034LDS.Users-Manual-2/User-Guide-515232-Page-17.png)
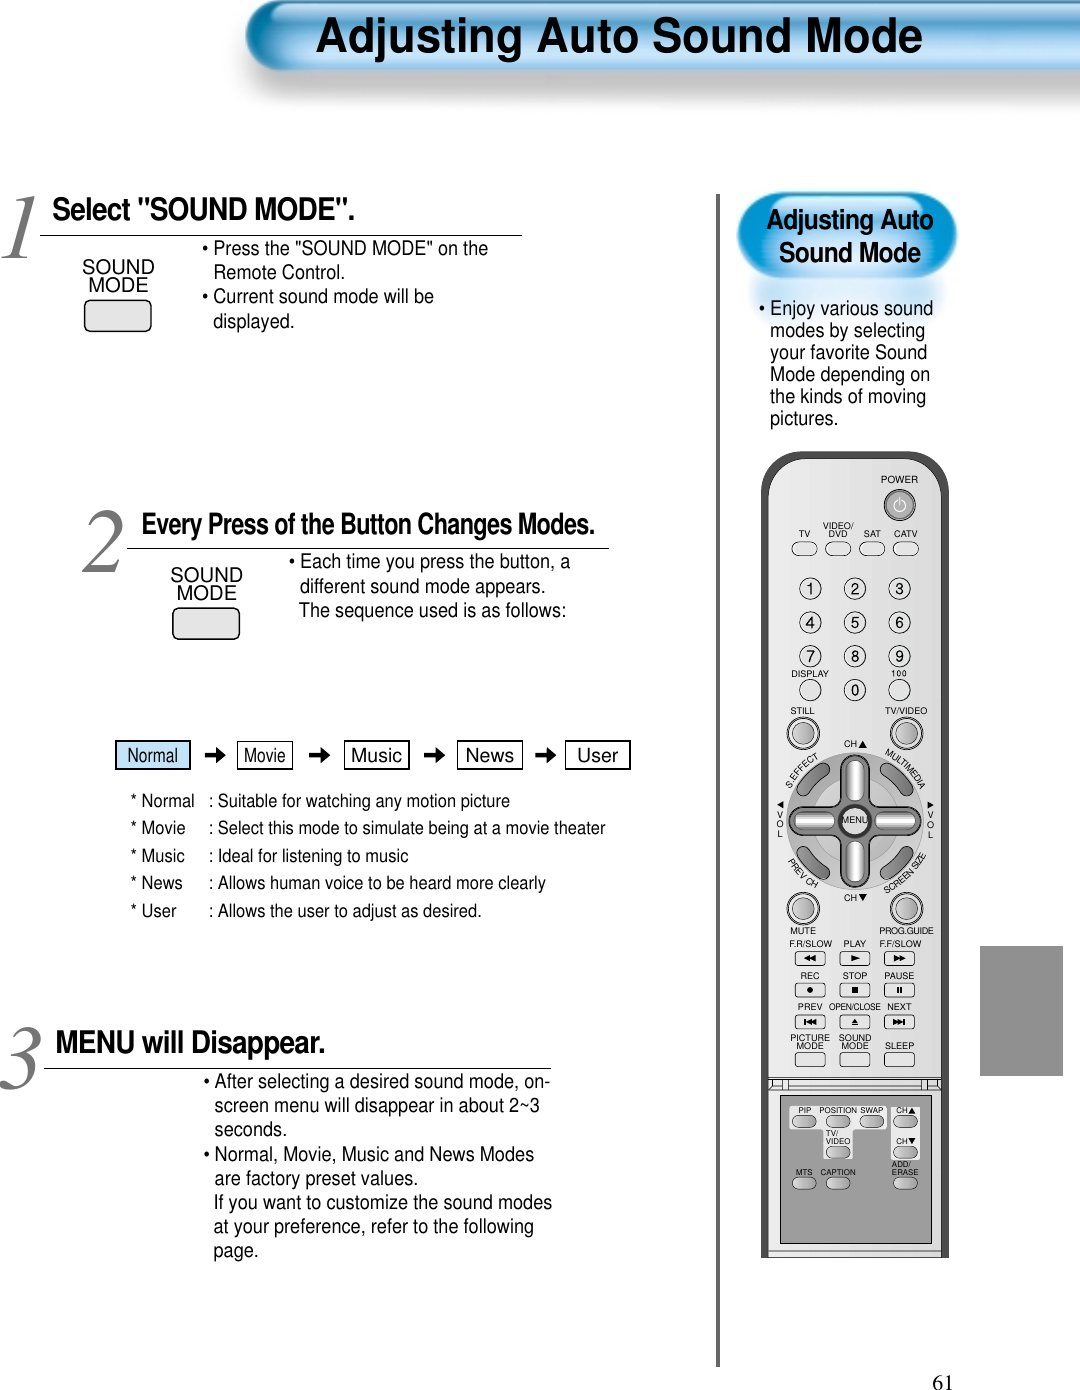
![62CustomizingSound Mode• This feature allowsthe user to adjust athis preference. Customizing Sound ModePress the “ CH ” button. • Select [Sound] by pressing the “ CH ” button, thenpress the “ VOL ”button to display the following.Select SOUND BALANCE. • Select Sound [Balance] by the “ VOL ” button,then adjust it.• Sound Balance Function adjusts sound balance of left andright speaker. 3 Press the MENU Button.• The MENU Screen as below will be displayed. 12VideoChannelMENUFeatureTimeExit Move SelectOffOffNormalStereoAudioBalanceAVCEffectMode120Hz500Hz1.2kHz7.5kHz12kHzMTS000000VideoChannelMENUFeatureTimePrev. Move AdjustNormalStereoAudioBalanceAVCEffectMode120Hz500Hz1.2kHz7.5kHz12kHzMTS000000OffOffCHCHVOLVOLMULTIMEDIAS.EFFECTMENUPREVCHSCREENSIZEVideoChannelMENUAudioFeatureTimeExit Move SelectNormalNormalModeBrightnessContrastColorTintSharpnessColor temp.VIDEO/DVD SATTV CATVDISPLAYTV/VIDEOSTILLCHCHVOLVOLMULTIMEDIAS.EFFECTMENUPREVCHSCREENSIZEMUTE PROG.GUIDEF.F/SLOWPLAYF.R/SLOWREC STOP PAUSEPREVOPEN/CLOSENEXTPICTUREMODE SOUNDMODE SLEEPPOWERMTS CAPTIONPIP POSITION SWAPTV/VIDEOADD/ERASECHCHCHCHVOLVOLMULTIMEDIAS.EFFECTMENUPREVCHSCREENSIZECHCHVOLVOLMULTIMEDIAS.EFFECTMENUPREVCHSCREENSIZE](https://usermanual.wiki/WINIA-Electronics/DPA5034LDS.Users-Manual-2/User-Guide-515232-Page-19.png)
![63Select the Effect Mode.• Select [Effect] by pressing the “ CH ” buttons, thenselect ON/OFF by pressing the “ VOL ”button.• [Effect]: Used to emphasize stereo effect.45VideoChannelMENUFeatureTimePrev. Move SelectNormalStereoAudioBalanceAVCEffectMode120Hz500Hz1.2kHz7.5kHz12kHzMTS000000OffOffVideoChannelMENUFeatureTimePrev. Move SelectStereoAudioBalanceAVCEffectMode120 Hz500 Hz1.2 kHz7.5 kHz12 kHzMTS000000OffOffNormalSelect the Sound Mode. • Select the Sound Mode by pressing the “ CH ” button,then adjust it by pressing the “ VOL ”button. * Normal : Suitable for watching any motion picture * Movie : Select this mode to simulate being at a movietheater* Music : Suitable for listening to music * News : Allows human voice to be heard more clearly* User : Allows the user to adjust as desired. NOTES:1) User Mode : Used as an Equalizer with which the user can adjust the sound frequency as desired.2) If you modify the sound frequency in auto Sound Mode (News, Movie, Music, etc.), it is automatically switched to the User Mode.3) For the realistic sound effect, lower than 120Hz frequency sound and greater than 10kHz frequency sound are emphasized. 4) If you make connection to the Left Audio Input as input is MONO you can hear from both speakers. 5) AVC function : This function adjusts volume to the set level automatically. However, depend on the sources, it may have differentvolume level because the sound sources have their own initially set up levels.6) MTS function can control the sound output according to the current state of sound.Pressing “DISPLAY” button displays current state of sound in the OSD located upper right comer of the screen.CHCHVOLVOLMULTIMEDIAS.EFFECTMENUPREVCHSCREENSIZECHCHVOLVOLMULTIMEDIAS.EFFECTMENUPREVCHSCREENSIZENormal MovieMusic UserNewsMTS FunctionIf a channel isreceived in twolanguages(duallanguage) and stereo,you can switch toMONO, STEREO orSAP by the MTSmenu or pressing theMTS button of theremote controlrepeatedly.MONOMONO sends themono sound to theloudspeakers.STEREOSTEREO sends thestereo sound to theloudspeakers.SAPSAP sends thesecondary broadcastelanguage to theloudspeakers.](https://usermanual.wiki/WINIA-Electronics/DPA5034LDS.Users-Manual-2/User-Guide-515232-Page-20.png)
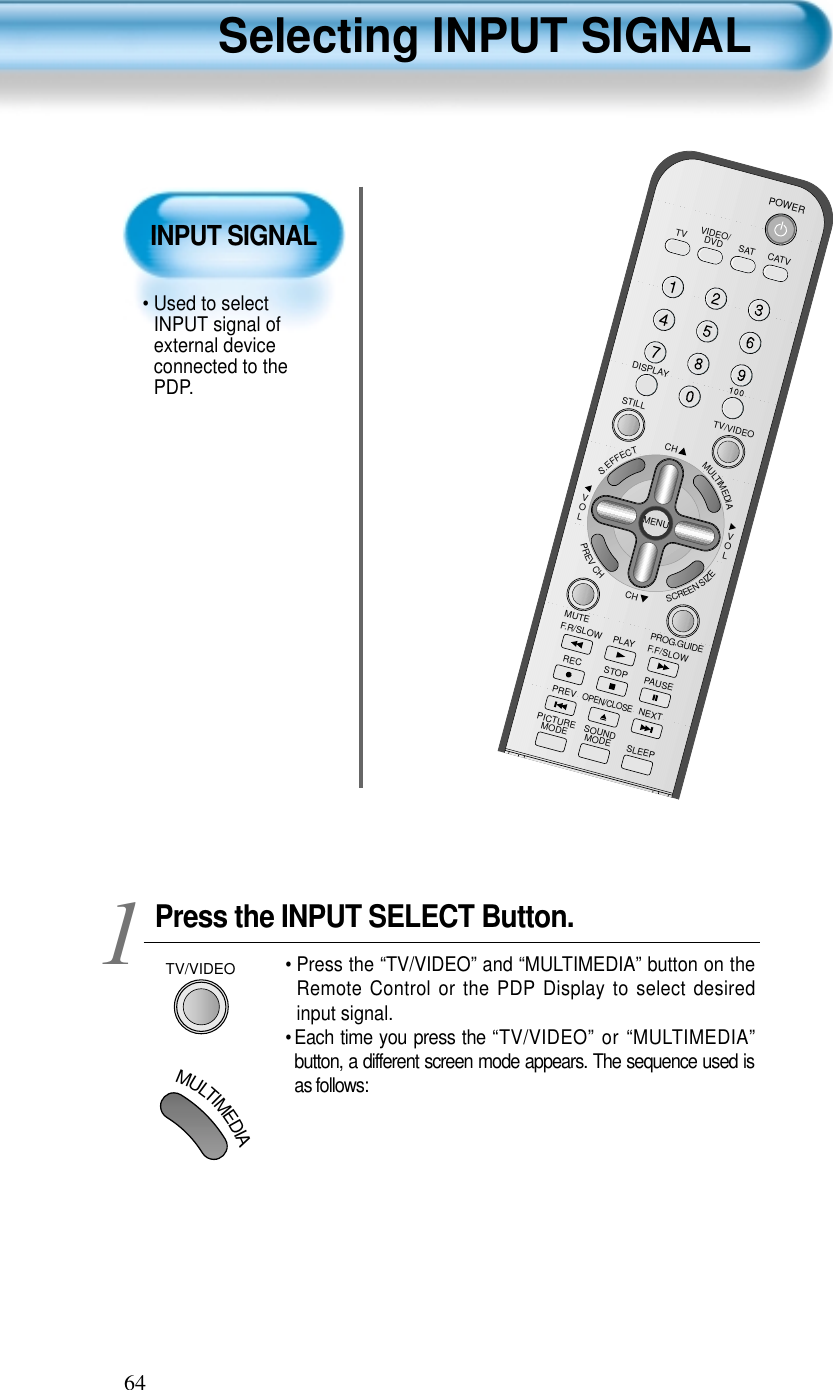
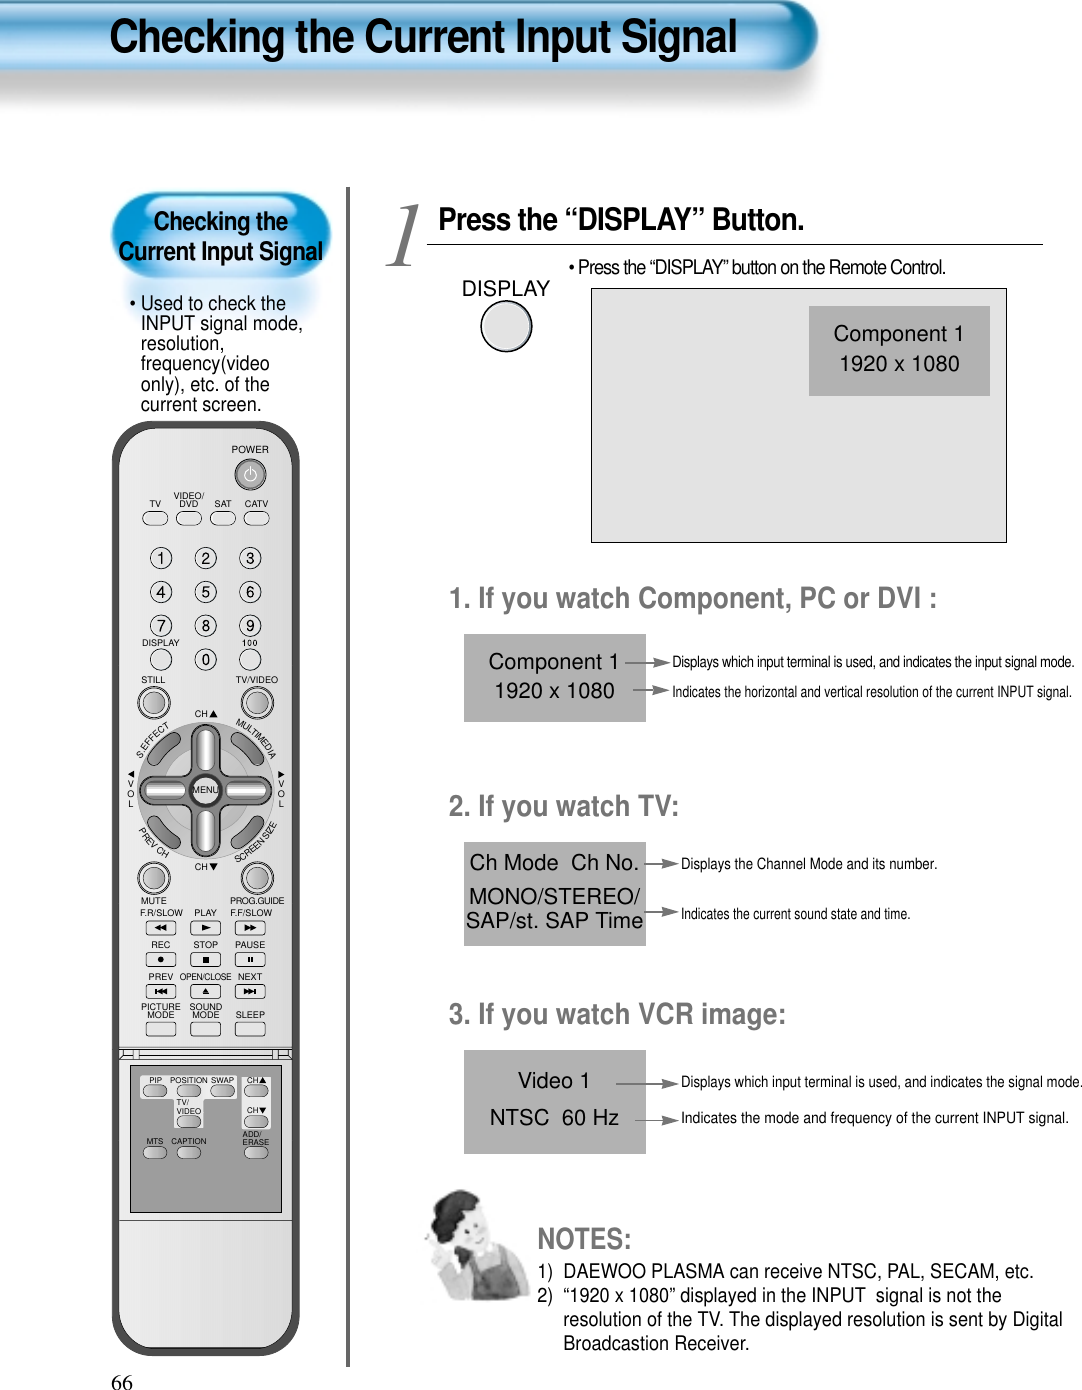
![65NOTES:1) If an external device is not connected or INPUT signal is notapplied, Warning Message (“No Signal”) would be displayed.2) In this case, check if external device is connected and/orterminal connection is properly done.3) Also, you can select input using [INPUT SELECT] button inthe keypad of the pdp set. The used sequence is as follows:TV -> PC -> DVI -> Component1 -> Component2 -> Video1-> Video2Component 11920 x 1080Component1PCDVITVComponent2Video1 Video2TV•“MULTIMEDIA”button•“TV/VIDEO”button](https://usermanual.wiki/WINIA-Electronics/DPA5034LDS.Users-Manual-2/User-Guide-515232-Page-22.png)
![67Menu Backgroundand LanguageSettings• Used to selecttransparent ofMENU backgroundand language usedin MENU. Press the MENU Button.CHCHVOLVOLMULTIMEDIAS.EFFECTMENUPREVCHSCREENSIZE• The MENU screen will be displayed as below.Press the “ CH ” Button. • Select [Features] by Pressing the“ CH ” button. Select the menu Background.• Select the MENU [Background] by pressing the “ VOL ”button.• Every press of the “ VOL ” button while you are inthe[Background] would switch between Transparent andOpaque.3 12MENU Background, Language and Key pad Lock SettingsVideoChannelMENUAudioFeatureTimeExit Move SelectNormalNormalModeBrightnessContrastColorTintSharpnessColor temp.Move Adjust MENU ExitEnglishOffOnOffPictureScreenSoundFeaturesChannelBackgroundLanguageKeypad LockMGDIAuto PowerClosed CaptionTime SettingISMParental LockInitializeOpaqueVideoChannelMENUAudioFeatureTimeExit Move SelectCaptionCaption stylePIP / POPISMMGDIMenu opacityRatingLanguageSetSetOffOffRichOnSetEnglishCHCHVOLVOLMULTIMEDIAS.EFFECTMENUPREVCHSCREENSIZECHCHVOLVOLMULTIMEDIAS.EFFECTMENUPREVCHSCREENSIZE](https://usermanual.wiki/WINIA-Electronics/DPA5034LDS.Users-Manual-2/User-Guide-515232-Page-24.png)
![68VIDEO/DVD SATTV CATVDISPLAYTV/VIDEOSTILLCHCHVOLVOLMULTIMEDIAS.EFFECTMENUPREVCHSCREENSIZEMUTE PROG.GUIDEF.F/SLOWPLAYF.R/SLOWREC STOP PAUSEPREVOPEN/CLOSENEXTPICTUREMODE SOUNDMODE SLEEPPOWERMTS CAPTIONPIP POSITION SWAPTV/VIDEOADD/ERASECHCHMENU Background, Language and Key pad Lock SettingsSelect LANGUAGE by using the “ CH ” Button.• Select LANGUAGE by using the “ CH ” button.• Every press of the “ VOL ” button while you are in the[LANGUAGE] mode would cycle through the differentlanguages.Keypad Lock Setting• Select [Keypad Lock] by the “ CH ” buttons, thenpress the “ VOL ” button to set Keypad Lock ON.45Move Adjust MENU ExitOnOffPictureScreenSoundFeaturesChannelBackgroundLanguageKeypad LockMGDIAuto PowerClosed CaptionTime SettingISMParental LockInitializeOpaqueEnglishOffVideoChannelMENUAudioFeatureTimePrev. Move SelectSetSetOffOffRichOnSetCaptionCaption stylePIP / POPISMMGDIMenu opacityRatingLanguage EnglishKeypad Lock1) If Keypad Lock is set to On, pdp can be turned on only using theremote controller.CHCHVOLVOLMULTIMEDIAS.EFFECTMENUPREVCHSCREENSIZECHCHVOLVOLMULTIMEDIAS.EFFECTMENUPREVCHSCREENSIZENOTES:*When Power is turned ON first time, ‘SELECTLANGUAGE’ Mode will be displayed, then, select adesired language by using “ VOL ” button. (Displayedonly once)](https://usermanual.wiki/WINIA-Electronics/DPA5034LDS.Users-Manual-2/User-Guide-515232-Page-25.png)
![69MGDIDemo• When [MGDI] is set toDemo mode, Half ofscreen is [MGDI] ONand the other half is[MGDI] OFF.• As [MGDI] is off, thesharpness of thePicture mode cannotbe controlled.Press the MENU Button.CHCHVOLVOLMULTIMEDIAS.EFFECTMENUPREVCHSCREENSIZE• The MENU screen will be displayed as below.Select Features• Select [Features] by the “ CH ” button. MGDI Setting• Enter the sub Menu by using the “VOL ”button.• Select the [MGDI] by pressing the “CH”button.• You can select [MGDI] On, Off, and Demo mode by usingthe “ VOL ”button.3 12MGDI (Meta Genuine Digital Image)VideoChannelMENUAudioFeatureTimeExit Move SelectNormalNormalModeBrightnessContrastColorTintSharpnessColor temp.VideoChannelMENUAudioFeatureTimePrev. Move SelectSetSetOffOffRichSetCaptionCaption stylePIP / POPISMMGDIMenu opacityRatingLanguage EnglishOnVideoChannelMENUAudioFeatureTimeExit Move SelectCaptionCaption stylePIP / POPISMMGDIMenu opacityRatingLanguageSetSetOffOffRichOnSetEnglishCHCHVOLVOLMULTIMEDIAS.EFFECTMENUPREVCHSCREENSIZECHCHVOLVOLMULTIMEDIAS.EFFECTMENUPREVCHSCREENSIZE*MGDI Demo ModeMGDI MGDION OFFMGDI is the image enhancement technology of Daewoo Electronics, which provides more clear,splendid, and delicated images.](https://usermanual.wiki/WINIA-Electronics/DPA5034LDS.Users-Manual-2/User-Guide-515232-Page-26.png)
![70POWER/STANDBYIndicatorFront panel LED lights• When the AC poweris on : Green.• When the AC poweris in the standbymode : Red.Auto Power SettingAuto Power Setting• Select the [Auto Power] by pressing the “ CH ” buttonfrom [Features].• You can select [Auto Power] ON and OFF mode by usingthe “ VOL ”button.4 Move Adjust MENU ExitPictureScreenSoundFeaturesChannelBackgroundLanguageKeypad LockMGDIAuto PowerClosed CaptionTime SettingISMParental LockInitializeOpaqueEnglishOffOnOffCHCHVOLVOLMULTIMEDIAS.EFFECTMENUPREVCHSCREENSIZEAuto Power1) ON : When the AC power is ON, the TV will by turned onautomatically without pressing the power button on the remotecontrol.2) OFF : When the AC power is ON, the TV will by turned on bypressing the power button on the remote control or the keypadof front panel.AC POWER ON PDP SET ONAutomaticallyAC POWER ON PDP SET ONWith the remote control orthe keypad of front panel.STANDBY MODEVIDEO/DVD SATTV CATVDISPLAYTV/VIDEOSTILLCHCHVOLVOLMULTIMEDIAS.EFFECTMENUPREVCHSCREENSIZEMUTE PROG.GUIDEF.F/SLOWPLAYF.R/SLOWREC STOP PAUSEPREVOPEN/CLOSENEXTPICTUREMODE SOUNDMODE SLEEPPOWERMTS CAPTIONPIP POSITION SWAPTV/VIDEOADD/ERASECHCH](https://usermanual.wiki/WINIA-Electronics/DPA5034LDS.Users-Manual-2/User-Guide-515232-Page-27.png)
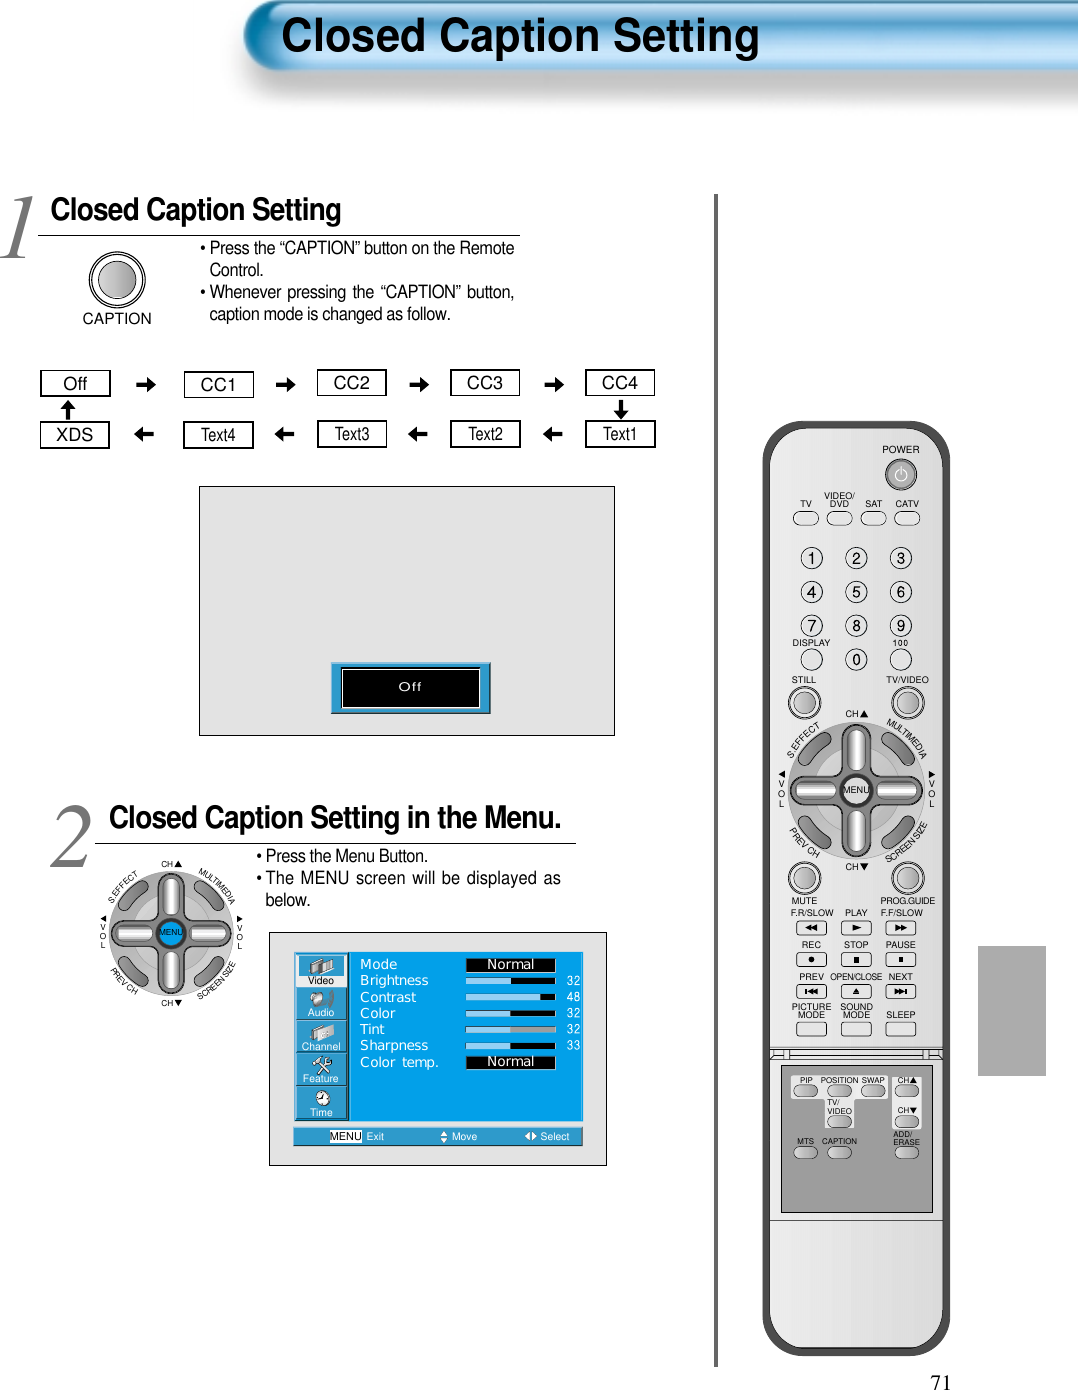
![72Caption BoxSetting• Black : Background ofthe caption box isblack.• Transparent :Background of thecaption box isTransparent.Closed Caption SettingSelect FeaturesCHCHVOLVOLMULTIMEDIAS.EFFECTMENUPREVCHSCREENSIZE• Select [Features] by pressing the “ CH ” button. Select Closed Caption• Enter the sub menu by using the “ VOL ” button.• Select the [Closed Caption] by pressing the “ CH ”button. •You can select [Closed Caption] by using the “ VOL ”button. 34VideoChannelMENUAudioFeatureTimeExit Move SelectCaptionCaption stylePIP / POPISMMGDIMenu opacityRatingLanguageSetSetOffOffRichOnSetEnglishMove Select MENU ExitPictureScreenSoundFeaturesChannelBackgroundLanguageKeypad LockMGDIAuto PowerClosed CaptionTime SettingISMParental LockInitializeOpaqueEnglishOffOnOffCHCHVOLVOLMULTIMEDIAS.EFFECTMENUPREVCHSCREENSIZE• Caption Mode (Off -> CC1 -> CC2 -> CC3 -> CC4 ->Text1 -> Text2 -> Text3 -> Text4 -> XDS -> Off), captionbox(black and trasparent) and CC on Mute can be set.CC on Mute function : Display “CC1” automaticallywhen sound is “MUTE”.Move Adjust MENU ExitPictureScreenSoundFeaturesChannel Closed CaptionCaption ModeCaption BoxCC on MuteOffBlackOffVIDEO/DVD SATTV CATVDISPLAYTV/VIDEOSTILLCHCHVOLVOLMULTIMEDIAS.EFFECTMENUPREVCHSCREENSIZEMUTE PROG.GUIDEF.F/SLOWPLAYF.R/SLOWREC STOP PAUSEPREVOPEN/CLOSENEXTPICTUREMODE SOUNDMODE SLEEPPOWERMTS CAPTIONPIP POSITION SWAPTV/VIDEOADD/ERASECHCH](https://usermanual.wiki/WINIA-Electronics/DPA5034LDS.Users-Manual-2/User-Guide-515232-Page-29.png)
![73Press the MENU Button.CHCHVOLVOLMULTIMEDIAS.EFFECTMENUPREVCHSCREENSIZE• The MENU screen will be displayed as below.Select FeaturesCHCHVOLVOLMULTIMEDIAS.EFFECTMENUPREVCHSCREENSIZE• Select [Features] by the “ CH ”button. Select Time SettingCHCHVOLVOLMULTIMEDIAS.EFFECTMENUPREVCHSCREENSIZE• Enter the sub menu by using the “ VOL ”button.• Select the [Time setting] by pressing the “ CH ” button. • You can select [Time setting] by using the “ VOL ”button. 3 12Time SettingVideoChannelMENUAudioFeatureTimeExit Move SelectNormalNormalModeBrightnessContrastColorTintSharpnessColor temp.VideoChannelMENUAudioFeatureTimeExit Move SelectCaptionCaption stylePIP / POPISMMGDIMenu opacityRatingLanguageSetSetOffOffRichOnSetEnglishMove Select MENU ExitPictureScreenSoundFeaturesChannelBackgroundLanguageKeypad LockMGDIAuto PowerClosed CaptionTime SettingISMParental LockInitializeOpaqueEnglishOffNormalOffVIDEO/DVD SATTV CATVDISPLAYTV/VIDEOSTILLCHCHVOLVOLMULTIMEDIAS.EFFECTMENUPREVCHSCREENSIZEMUTE PROG.GUIDEF.F/SLOWPLAYF.R/SLOWREC STOP PAUSEPREVOPEN/CLOSENEXTPICTUREMODE SOUNDMODE SLEEPPOWERMTS CAPTIONPIP POSITION SWAPTV/VIDEOADD/ERASECHCH](https://usermanual.wiki/WINIA-Electronics/DPA5034LDS.Users-Manual-2/User-Guide-515232-Page-30.png)
![74Clock(currenttime) Setting• The “Current time”must be set up aheadof setting up other timememories.Time SettingOff Time and Wake Time settings.• Select Functions by pressing the “CH” button.First, set [Clock]- current time, and then You cansetup off-time and wake time.• [Clock] : Enter clock setting menu by pressing the“VOL ” button. then adjust the desired hour andminute with “ CH ” button.• [Off Time] and [Wake Time] Setting methods aresame as [Clock] setting method.• [Off Timer] and [Wake Timer] : Setting [On] and[Off] of each Timer.• [Wake Ch. ] and [Wake Vol. ] : Setting channel andvolume when TV is turned on by [Wake Timer].4Move Select MENU ExitPictureScreenSoundFeaturesChannel Time SettingClockOff TimerOff TimeWake TimerWake TimeWake Ch.Wake Vol.AM 11 : 50OffOff192AM 12 : 00AM 12 : 00CHCHVOLVOLMULTIMEDIAS.EFFECTMENUPREVCHSCREENSIZETime Setting Functions1) This time memory function automatically turns theTV set “On” of “Off”at a desired time. Once set up,this function works every day unless the set time iscanceled or the TV set is unplugged. Therefore, thisfunction could be used for a “Get up” alarm (MorningCall) by setting up the time for “On” in the morning.2) However, if you once power off with ON/OFF in thePDP unit, the Time Setting will be reset.VIDEO/DVD SATTV CATVDISPLAYTV/VIDEOSTILLCHCHVOLVOLMULTIMEDIAS.EFFECTMENUPREVCHSCREENSIZEMUTE PROG.GUIDEF.F/SLOWPLAYF.R/SLOWREC STOP PAUSEPREVOPEN/CLOSENEXTPICTUREMODE SOUNDMODE SLEEPPOWERMTS CAPTIONPIP POSITION SWAPTV/VIDEOADD/ERASECHCH](https://usermanual.wiki/WINIA-Electronics/DPA5034LDS.Users-Manual-2/User-Guide-515232-Page-31.png)
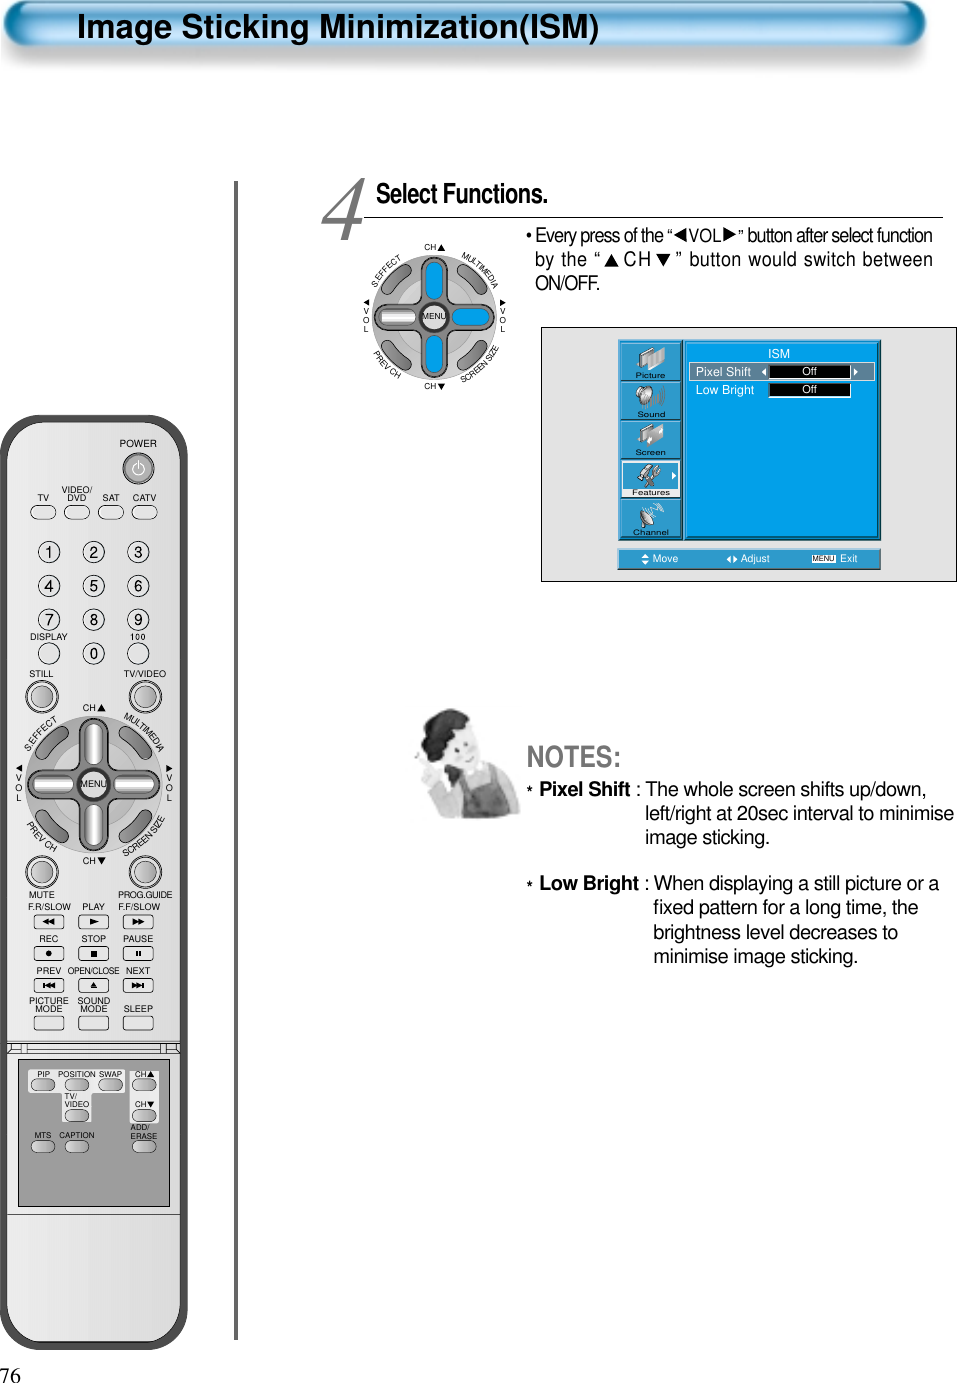
![75ISM• Image stickingminimization.• Displaying a stillimage like PC inputfor a long timecauses part imagesticking in the panel • The ISM functionminimize this effect.Image Sticking Minimization(ISM)Press the MENU Button.CHCHVOLVOLMULTIMEDIAS.EFFECTMENUPREVCHSCREENSIZE• The MENU screen will be displayed as below.Press the “ CH ” Button. • Select [Features] by pressing the “ CH ”button. Select ISM.• Enter the sub menu by using the “ VOL ” button.• Select the [ISM] by pressing the “ CH ” button.• Press of the “ VOL ” button while you are in theISM.3 12VideoChannelMENUAudioFeatureTimeExit Move SelectNormalNormalModeBrightnessContrastColorTintSharpnessColor temp.Move Select MENU ExitPictureScreenSoundFeaturesChannelBackgroundLanguageKeypad LockMGDIAuto PowerClosed CaptionTime SettingISMParental LockInitializeOpaqueEnglishOffOnOffVideoChannelMENUAudioFeatureTimeExit Move SelectCaptionCaption stylePIP / POPISMMGDIMenu opacityRatingLanguageSetSetOffOffRichOnSetEnglishCHCHVOLVOLMULTIMEDIAS.EFFECTMENUPREVCHSCREENSIZECHCHVOLVOLMULTIMEDIAS.EFFECTMENUPREVCHSCREENSIZEVIDEO/DVD SATTV CATVDISPLAYTV/VIDEOSTILLCHCHVOLVOLMULTIMEDIAS.EFFECTMENUPREVCHSCREENSIZEMUTE PROG.GUIDEF.F/SLOWPLAYF.R/SLOWREC STOP PAUSEPREVOPEN/CLOSENEXTPICTUREMODE SOUNDMODE SLEEPPOWERMTS CAPTIONPIP POSITION SWAPTV/VIDEOADD/ERASECHCH](https://usermanual.wiki/WINIA-Electronics/DPA5034LDS.Users-Manual-2/User-Guide-515232-Page-32.png)
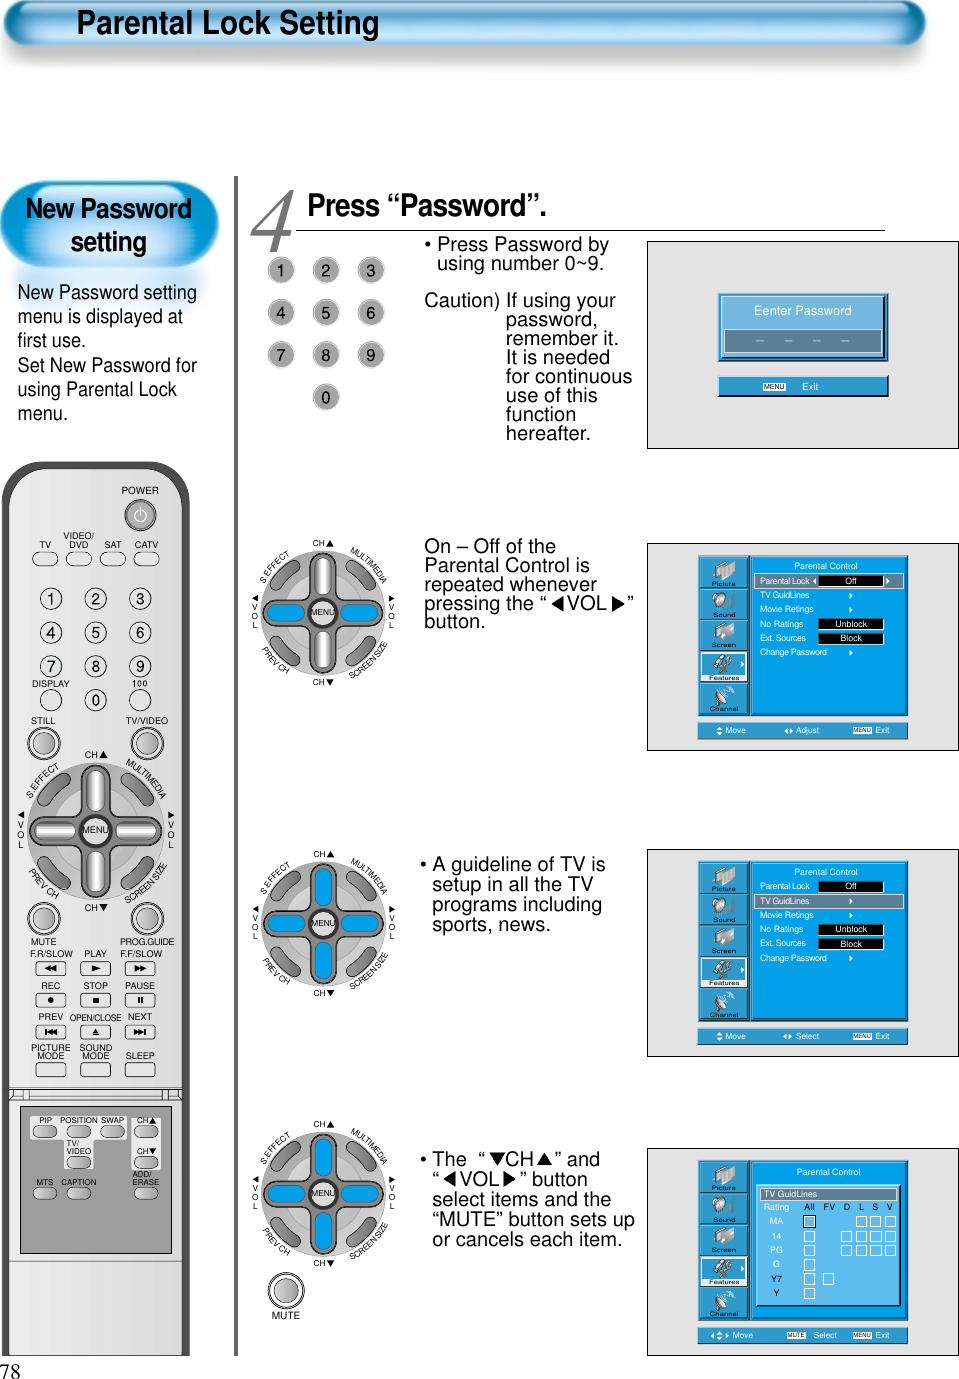
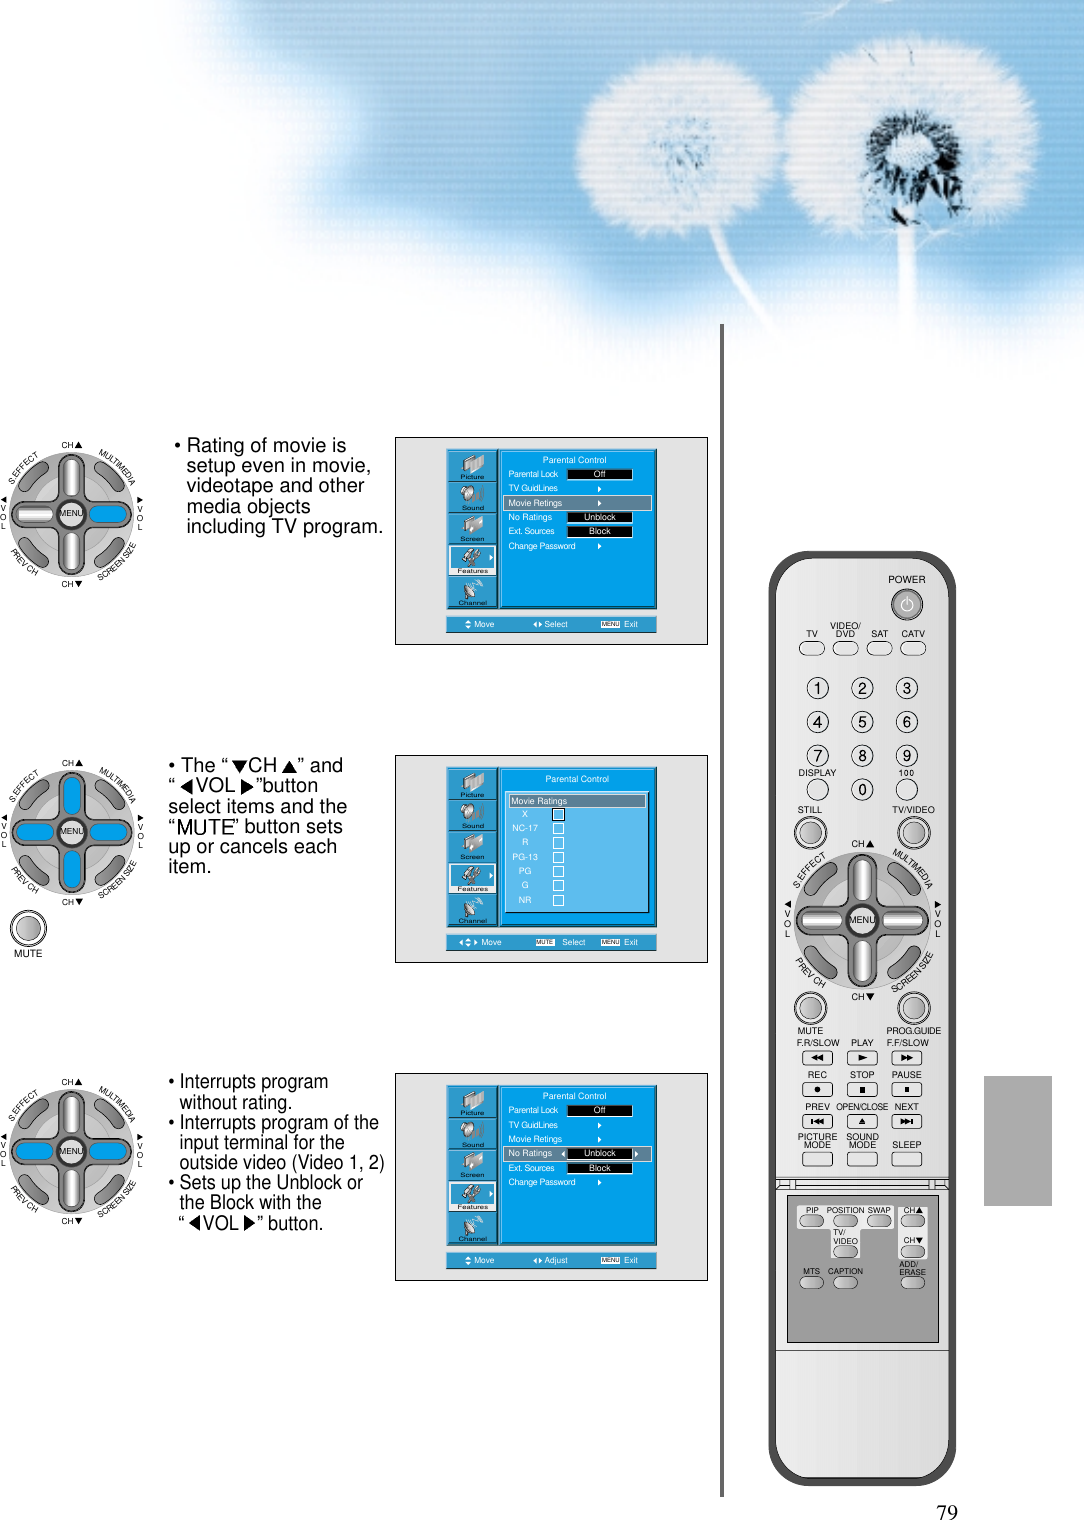
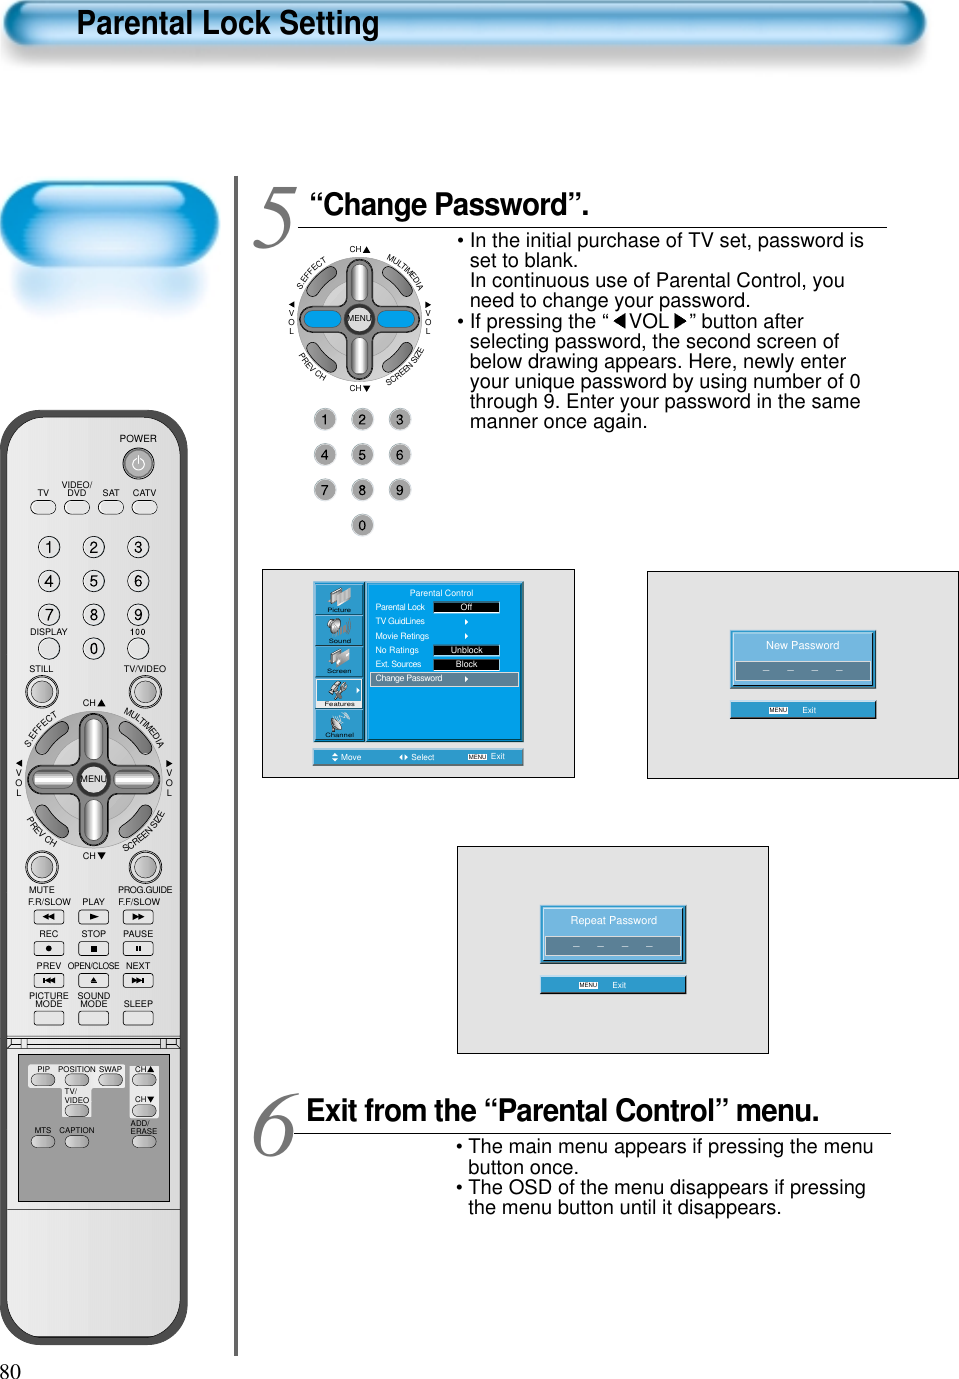
![77Parental Lock• When “ParentalLock” is on, thelocked channels arenot available on thescreen.Parental Lock SettingPress the MENU Button.CHCHVOLVOLMULTIMEDIAS.EFFECTMENUPREVCHSCREENSIZE• The MENU screen will be displayed as below.Select Features• Select [Features] by pressing the “ CH ” button. Select the Parental Lock• Enter the sub menu by using the“ VOL ”button.• Select the [Parental Lock] by pressing the “ CH ”button. •You can select [Parental Lock] by using the “ VOL ”button. 3 12VideoChannelMENUAudioFeatureTimeExit Move SelectNormalNormalModeBrightnessContrastColorTintSharpnessColor temp.Move Select MENU ExitPictureScreenSoundFeaturesChannelBackgroundLanguageKeypad LockMGDIAuto PowerClosed CaptionTime SettingISMParental LockInitializeOpaqueEnglishOffNormalOffVideoChannelMENUAudioFeatureTimeExit Move SelectCaptionCaption stylePIP / POPISMMGDIMenu opacityRatingLanguageSetSetOffOffRichOnSetEnglishCHCHVOLVOLMULTIMEDIAS.EFFECTMENUPREVCHSCREENSIZECHCHVOLVOLMULTIMEDIAS.EFFECTMENUPREVCHSCREENSIZEVIDEO/DVD SATTV CATVDISPLAYTV/VIDEOSTILLCHCHVOLVOLMULTIMEDIAS.EFFECTMENUPREVCHSCREENSIZEMUTE PROG.GUIDEF.F/SLOWPLAYF.R/SLOWREC STOP PAUSEPREVOPEN/CLOSENEXTPICTUREMODE SOUNDMODE SLEEPPOWERMTS CAPTIONPIP POSITION SWAPTV/VIDEOADD/ERASECHCH](https://usermanual.wiki/WINIA-Electronics/DPA5034LDS.Users-Manual-2/User-Guide-515232-Page-34.png)
![81Back toInitialization• You can restore thevalues of theadjustment settingmade in the MENUto factory settings.Initialize SettingPress the MENU Button.CHCHVOLVOLMULTIMEDIAS.EFFECTMENUPREVCHSCREENSIZE• The MENU screen will be displayed as below.Select Features• Select [Features] by the “ CH ” button. 12VideoChannelMENUAudioFeatureTimeExit Move SelectNormalNormalModeBrightnessContrastColorTintSharpnessColor temp.VideoChannelMENUAudioFeatureTimeExit Move SelectCaptionCaption stylePIP / POPISMMGDIMenu opacityRatingLanguageSetSetOffOffRichOnSetEnglishCHCHVOLVOLMULTIMEDIAS.EFFECTMENUPREVCHSCREENSIZEVIDEO/DVD SATTV CATVDISPLAYTV/VIDEOSTILLCHCHVOLVOLMULTIMEDIAS.EFFECTMENUPREVCHSCREENSIZEMUTE PROG.GUIDEF.F/SLOWPLAYF.R/SLOWREC STOP PAUSEPREVOPEN/CLOSENEXTPICTUREMODE SOUNDMODE SLEEPPOWERMTS CAPTIONPIP POSITION SWAPTV/VIDEOADD/ERASECHCH](https://usermanual.wiki/WINIA-Electronics/DPA5034LDS.Users-Manual-2/User-Guide-515232-Page-38.png)
![82When [INITIALIZATION] is completed: 1) When [INITIALIZATION] is completed, those values that have beenset in the User Mode of [SCREEN MODE] and [SOUND MODE] willbe returned to the factory preset values.2) Once initialized, you can not undo.3) The items in the [SCREEN] Menu in PC or DVI INPUT are alsoinitialized (i.e., H. Size, V. Size, H. Position, V. Position, Phase,Frequency, etc.)4) Language, channel, time, volume, input mode are not initialized.INITIALIZATION• Enter the sub menu by using the “ VOL ”button.• Select the [Initialize] by pressing the “ CH ”button, then press the “VOL ”button. • A confirmation message will be displayed.• To perform initialization, press the “VOL ”buttonafter selecting [YES] by pressing the “ CH ”button.• To return to MENU, press "MENU" button.3 Are you Sure?NoYesMove Select MENU ExitCHCHVOLVOLMULTIMEDIAS.EFFECTMENUPREVCHSCREENSIZEInitialize SettingMove Select MENU ExitPictureScreenSoundFeaturesChannelBackgroundLanguageKeypad LockMGDIAuto PowerClosed CaptionTime SettingISMParental LockInitializeOpaqueEnglishOffOnOff](https://usermanual.wiki/WINIA-Electronics/DPA5034LDS.Users-Manual-2/User-Guide-515232-Page-39.png)