VeryKool USA S351 Mobile Phone User Manual
VeryKool USA Inc Mobile Phone
User Manual

User’s Manual of Mobile Phone
Contents
1 Preface...................................................................................... 4
1.1 Insert SIM card and battery..................................................................4
1.2 Insert memory card................................................................................ 4
1.3 Battery charging......................................................................................4
1.4 Power on and off..................................................................................... 5
1.5 Phone display & key basics.................................................................... 5
2 Interface................................................................................... 6
2.1 Home screen.............................................................................................6
2.2 Onscreen Keyboard................................................................................ 7
2.3 Applications.............................................................................................8
3 Phone Call..............................................................................10
3.1 Making a call.........................................................................................10
3.2 Answering and Ending a call...............................................................10
3.3 Using call history...................................................................................10
4 Contacts..................................................................................11
4.1 Add a contact.........................................................................................11
4.2 Edit contact details................................................................................11
4.3 Communicate with a contact................................................................11
4.4 SIM contacts import and export......................................................... 12
5 Messaging...............................................................................13
6 Camera & Gallery.................................................................15
7Music
...................................................................................... 17
8Browser
.................................................................................. 18
9Clock
.......................................................................................19
10 Calendar.................................................................................20
11 Calculator.............................................................................. 21
12 Search.....................................................................................22
13 Other applications.................................................................23
14 Settings................................................................................... 24
14.1 Dual Sim Settings..................................................................................24
14.2 Wireless & networks.............................................................................24
14.3 Language and keyboard.......................................................................24
14.4 Date & time........................................................................................... 24
14.5 Audio profiles........................................................................................24
14.6 Display Settings.....................................................................................25
15 Additional Function..............................................................26
15.1 U Disk Function.................................................................................... 26
16 Maintenance of Mobile Phone.............................................26
17 Safety Message and notices..................................................28
Safe power on....................................................................................... 28
Safe transportation first..................................................................... 28
Disturbance............................................................................................28
All mobile phone performances might be disturbed.................28
Turn off when in hospital................................................................... 28
Turn off on an airplane........................................................................28
Turn off when at a gasoline station.................................................28
Turn off around exposure Area........................................................ 28
Proper use..............................................................................................28
Use qualified after sale service........................................................28
Accessories and batteries.................................................................28
Waterproof..............................................................................................28
Backup.....................................................................................................28
Connect to other devices...................................................................28
SOS emergency calls..........................................................................28

1Preface
Thank you for choosing this smart phone.
1.1 Insert SIM card and battery
¾Long press Power key for 3s to turn it off;
¾Remove the back cover from the gap at the end side of the phone;
¾Remove the battery. Insert SIM1 (per the mark “SIM1”onthecardslot.The
contactor shall face down (note the notch on the SIM card is in line with the slot).
Push the SIM card inwards from the card slot until it absolutely fits the slot.
¾Insert SIM2 in the same manner.
Insert the battery with metallic contact aligned to the phone battery contact and
replace the back cover.
1.2 Insert memory card
This phone supports the T-Flash memory card. After it is inserted, you can browse or
copy, etc. the files stored in the memory card. Also, the disk space of this phone can
be expanded.
¾Remove the back cover and battery;
¾Insert the memory card as the prompt on the card slot shows.
Warning:
Please don’t insert or remove the memory card quickly or frequently to avoid
damage.
1.3 Battery charging
The phone battery may be charged with travel charger.
¾Insert the battery in the phone correctly;

¾Charging port is at the right side of this device below the screen, let the charger
arrow towards the screen, insert the charger plug into the screen, and connect the
charger to the standard power supply socket.
¾After the charger is inserted, the battery intensity icon on the upper right of the
screen starts running, which means the battery begins charging. When it is
charged full, the icon stops running and the battery icon on the screen comes full
.
¾After charging is over, cut off the connection between the charger and the
standard power supply socket and then that between this device and the charger
by pressing the buttons on both sides of the charger.
1.4 Power on and off
Power off
¾Long press Power key for 3s to turn on this phone.
Power off
¾Long press Power key for 3s to turn off this device.
1.5 Phone display & key basics
When this device is standby, you may activate some functions quickly if pressing
some key.
Key Operation Function
Power key
Long
press
To turn on your phone and or To turn off your
phone, press and hold Power Key till Phone
options menu appears.
Volume
Keys
press Press to adjust the volume.
2Interface
2.1Home screen
Wherever you are, whatever you’re doing on your phone, simply touch HOME to return to Home
screen.
The home screen is your starting point for using applications on your phone. You can customize your
Home screen as you like.
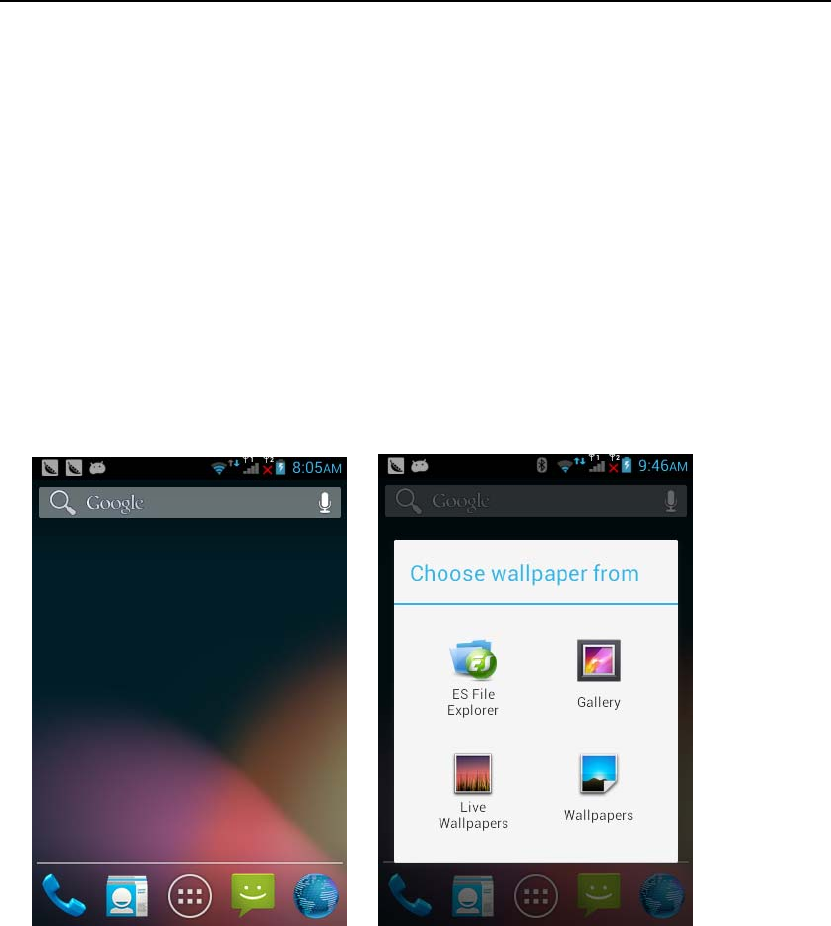
To add a Home screen item, touch and hold an empty area to access the context menus, choose
wallpaper from items.
To remove items from the Home screen, touch and hold an item and when it vibrates, drag it to the
Trash icon
Quick Start: Home Screen & Apps
Start from the home screen to explore apps and more.
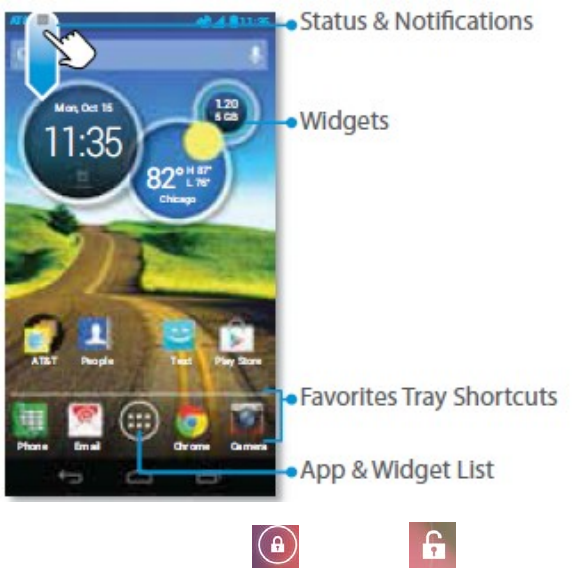
¾Screen lock :To unlock the screen, touch and flick to .
¾Status & Notifications: Icons at the top of your screen show notifications . (like a new email or
message ) on the left, and phone status on the right. Flick the bar down and touch a notification to
the right to remove it.
¾Widgets: Show current times.
¾Favorites Tray Shortcuts: To touch the shortcuts
¾App & Widget List: To show all of the apps and widgets, touch Apps.
2.2 Onscreen Keyboard
When you start a program or select a field that requires text or numbers, the onscreen keyboard
becomes available.
When you do not need the keyboard, you can close it by pressing Back Key.
To adjust onscreen keyboard settings, you can go to Settings > Language & keyboard > Android
keyboard. If you select the Quick fixes, Show suggestions and Auto-complete options, the phone
offers you smart word suggestions as you type, so you can enter text more quickly and accurately on
the onscreen keyboard.
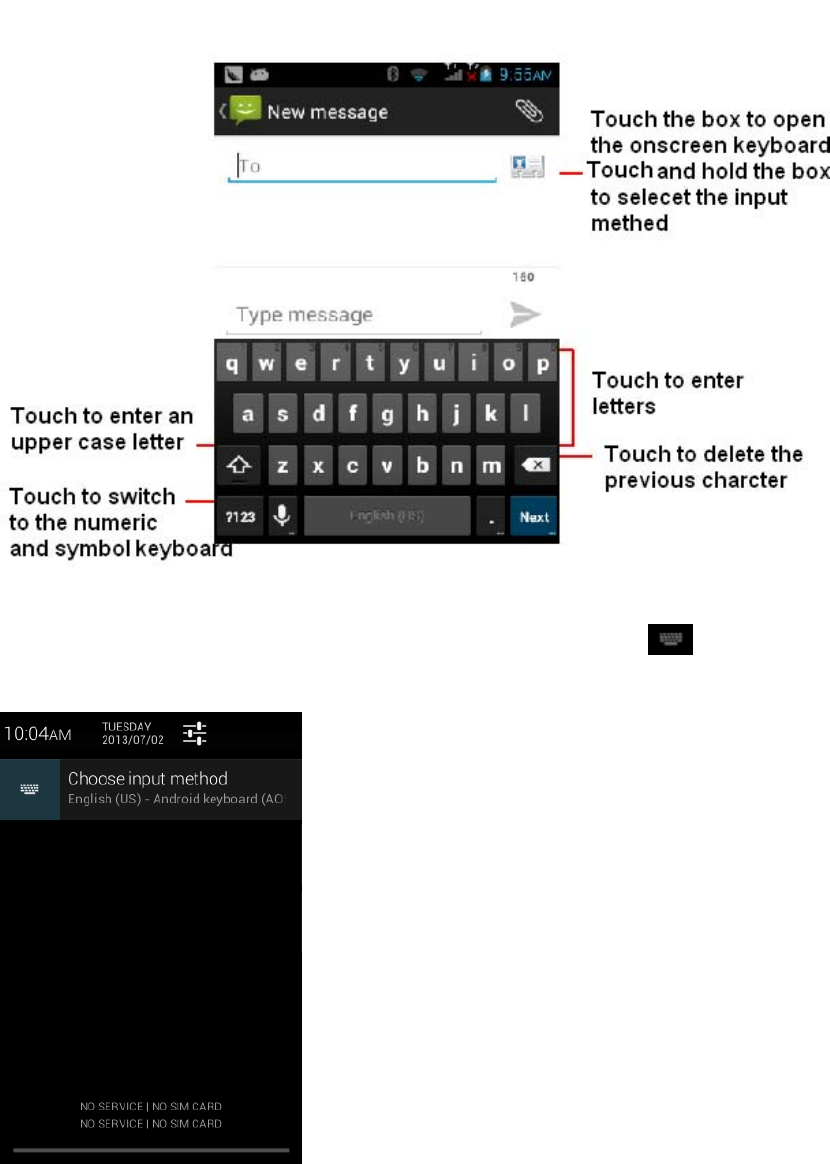
If you want to select input methods, you can flick the status bar down. Touch ,you can switch
input methods .
2.3Applications
The applications tab holds all applications on your phone. All applications that you downloaded and
installed from Android Market or from the web are also added to the Application tab.
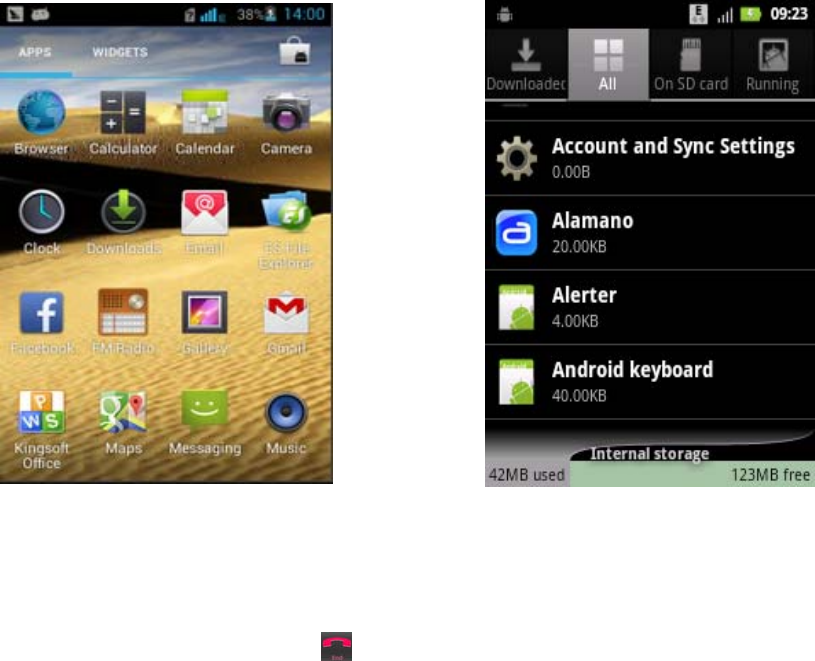
To open an application, press Home Key, touch application tab, and slide your finger up/down to
choose an application.
To manage and remove installed applications, you can go to Settings > Applications > Manage
applications.
o make a call, touch a phone number in Contacts, an Email, a text message or anywhere on your phone.
You can also enter the phone number manually by virtual keypad and dial directly.
To answer a call, drag the green phone icon to the right.
To reject a call, drag the red phone icon to the left.
To end a call, touch the End Call icon .
3 Phone Call
3.1 Making a call
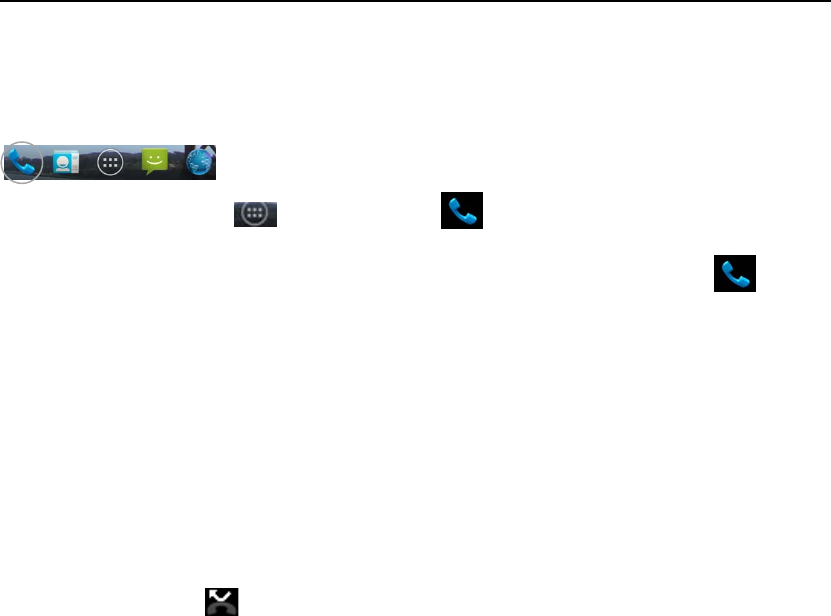
1. Click "Phone" icon on Quick Tool bar on main screen to enter the dial screen.
2.On Home screen, touch -> Click "Phone" to enter the dial screen.
Touch the on-screen dial pad to enter a number, touch ‘Delete’ button to delete numbers you’ve
entered. Touch & hold to delete all the numbers in the field. To dial a number press
3.2 Answering and Ending a call
When you receive a phone call, the incoming voice call screen will appear, allowing you to either
answer or ignore the call.
1. To answer an incoming call, slide ‘ANSWER’(Green icon) button rightward.
2. To reject a call, slide ‘REJECT’ button (Red icon) button leftward.
3.3 Using call history
1. The missed call icon appears in the title bar when you missed a call.
2. Use ‘Call log’ tab to check who the caller was, or view all your dialed numbers, and received
calls. To open ‘Call log’ tab, touch ‘Call log’ button in the phone screen to enter the call history
list.
3. Scroll to select the contact or number you want to dial, touch ‘Call’ button.
4. Tap and hold the selected contact you want to call, and then you can make to do the following
options of call, edit number before call, send message, add to contacts or remove from call log
phone on the shortcut menu.

4Contacts
The contacts on your phone are synced with your account contacts stored on the Web.
To view the contacts on your phone, touch and select Contacts
4.1 Add a contact
1. On the Home screen, then touch and select Contacts. Your contact list appears.
2. Touch the icon on the right bottom of the screen to add new contact.
3. Add all the information you want to store for this contact in the appropriate fields. You must add
some information to save a contact. To change a default label, select the label name to open the
label menu. Select a different label or create a custom label. To add more fields, select ‘Add
another field’.
4. You can assign a Caller ID icon to your contact by touching Caller ID icon. The Pictures
application opens. Navigate to a picture and select it, size the cropper with your fingertips. When
finished, select "Crop". The picture is associated with your contact. If you do not assign an icon, a
default android icon will be assigned.
5. To save your contact, touch "Ok".
4.2 Edit contact details
You can always make changes to the information you’ve stored for a contact:
1 From Contacts, touch the contact to open the Contact details screen.
2. Press ‘Menu Key and select ‘Edit’. The Edit contact screen appears.
3. Make your edits, then press "Done".
4.3 Communicate with a contact
From Contacts you can quickly call or text a contact’s default number, as displayed below their
name on the screen. However, to view all the information you’ve stored for a contact, and to
initiate other types of communication with that contact, open the Contact details screen. To open a
contact’s details screen, simply touch and hold their name from Contacts.
1. Call a contact: From the contact list, touch the contact you want to open the Contact details
screen. Touch the call number directly to dial that contact’s primary number (first in the list on
their details screen).
2. To dial a different number for the contact, select the contact’s name, and then select the number
on their details screen and then touch the call number that you want.
3. Send a text or multimedia: To send a text or multimedia message to a contact, you must have a
message to a contact mobile number stored for them in contact details. From the Contact details
screen, select a phone number and click "Message" icon, A Compose screen opens for your new
message. Complete your message and select ‘Send’ icon.
4. Send email to a contact: To send an email message to a contact, you must have an email address
stored for them in their contact details.
• Select the contact you want to email. Their Contact details screen opens.
• In the Send email section, select the email address. If you are fetching POP3 or IMAP email
accounts to your phone, then select the account you wish to use to send. A Compose screen opens
for your new message.
• Complete your message, select ‘Send’ icon.
4.4 SIM contacts import and export
If you have stored names and phone numbers on your SIM card, you can add these to the Contacts
stored on your phone by selecting this settings option.
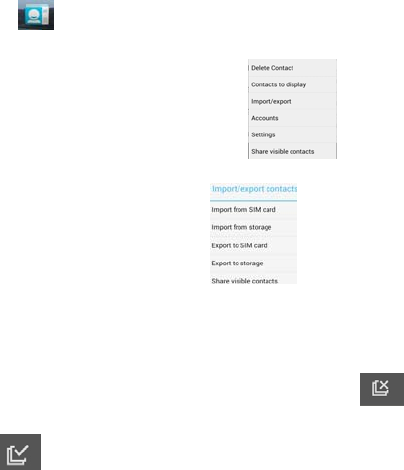
1. click the icon on the main menu
2. click left side “Menu Key” , you will see
3. click Import/export and you will see choose the type you want to copy from
4. choose the type you want to copy to
5. select the contact check box , or remove the contact no.
6. Finally click , then all the contact no. will copy as your request successfully

5Messaging
To open the SMS & MMS Messaging application, on the Home screen, then touch and
select the Messaging icon.
About text and multimedia messages
SMS messages are also known as “text” messages and can each be around 160 characters. If you
continue to type after the limit is reached, your message will be delivered as one, but count as
more than one message. These are called “concatenated” messages.
MMS messages are also known as “multimedia” or “picture” messages and can contain text,
picture, audio, and video files.
When you compose a message, the phone will automatically convert a text message into a
multimedia message as soon as you add a subject or an attachment, or if you address the message
using an email address rather than a phone number.
View the message from the message list
Select a message thread in the list to open it for reading. When open, the individual messages
appear stacked on the screen, much like with instant messaging conversations (or chats).
Note that messages you send are also listed in the Read view.
1. Reading multimedia messages
If you have selected to auto-retrieve your multimedia messages, then both the message header and
body will download.
If you are downloading only the headers, then you must first select the Download button to
retrieve the message body. If you are concerned about the size of your data downloads, you can
check the message size before you download.
Once the message has downloaded, select “Play” button to view the message.
From a message read view, you can do the following:
1. To view details about a particular message, in the Read view, touch & hold the message to open
the context menu. Select View details.
2. Reply to a message: Simply start typing your message to reply to a message. You can always
press MENU and select to add a subject or an attachment to convert it to a multimedia message.
Select ‘Send’ icon when ready.
3. Links in messages: If a message contains a link to a Web page, it will be selectable. To view the
Web page in the Browser, simply select it.
4. Delete messages: Your messages will be saved until you explicitly delete them.
Delete one message in a thread - With the message thread open in Read view, touch & hold the
individual message you want to delete to open the context menu. Delete all messages in a thread -
With the message thread open in Read view, press MENU > Delete. You can also delete an entire
thread from the message list by pressing & holding the thread to open the context menu, then
select ‘Delete’.
Delete all message threads - From the message list, press MENU and select Delete all threads.
Compose text and multimedia messages
1. Touch ‘Compose’ icon. The Compose screen opens.
2. Add recipients by typing a name, phone number, or email address in the ‘To’ field. Matching
contacts will appear. Select the recipient or continue typing. Add as many recipients as you wish.
If you send the message to an email address, the message will automatically convert from a text to
a multimedia message.
3. To add a subject, press MENU and select ‘Add subject’. If you add a subject, the message will
convert to a multimedia message.
4. To add an attachment, touch ‘Attach’ icon on the right-top of the screen. Adding an attachment
will always convert the message to a multimedia message. Select from audio or picture files. You
can select to take a new picture if you want, or record an audio file. Any recordings you make will
be stored automatically in the Music application in a play list named “My recordings”. To remove
an attachment, select the attachment’s ‘Remove’ button.
5. Type your message. As you type, you’ll be able to track how many characters/messages you’re
creating. Remember that text messages have a limit around 160 characters. Once you go over that
limit, a new message is actually created but automatically joined into one when received.
6. Select ‘Send’ icon when ready. You can also simply press Back Key to save a draft.
7. As your message sends, progress displays in the title bar. If you see this icon to the right of the
message, it means your message is still being delivered.
6Camera&Gallery
All the pictures you can capture or view on your phone are stored on Phone storage or SD card
(Micro SD card), and the Storage location depends on the settings, which you can change it via
Settings> Storage> Preferred install location. If you do not insert a Micro SD card, the pictures
will store in Phone storage by default.
Load pictures onto your memory card
Read the instructions below to add pictures to your Micro card or the phone storage.
1. Insert your Micro SD card which inserted into an adopter or a card reader (can be read) to your
computer.
2. On your computer, find the Turn on USB storage and open it.
3. Create a folder at the (Root Directory) called “Pictures” or some other descriptive name and
open it.
4. Copy .jpg or other image files into this folder. To organize pictures into albums that will display
in the Pictures application, create a folder and copy pictures there for each album you want to
display.
5. When finished, close the USB drive window and eject the drive as required by your computer's
operating system.
Camera & Camcorder
Captured pictures are saved to the “DCIM” folder on your Micro SD card or the phone.
Tip: Before you take a picture, wipe the sensor window (on the back cover) to remove any small
amounts of oil.
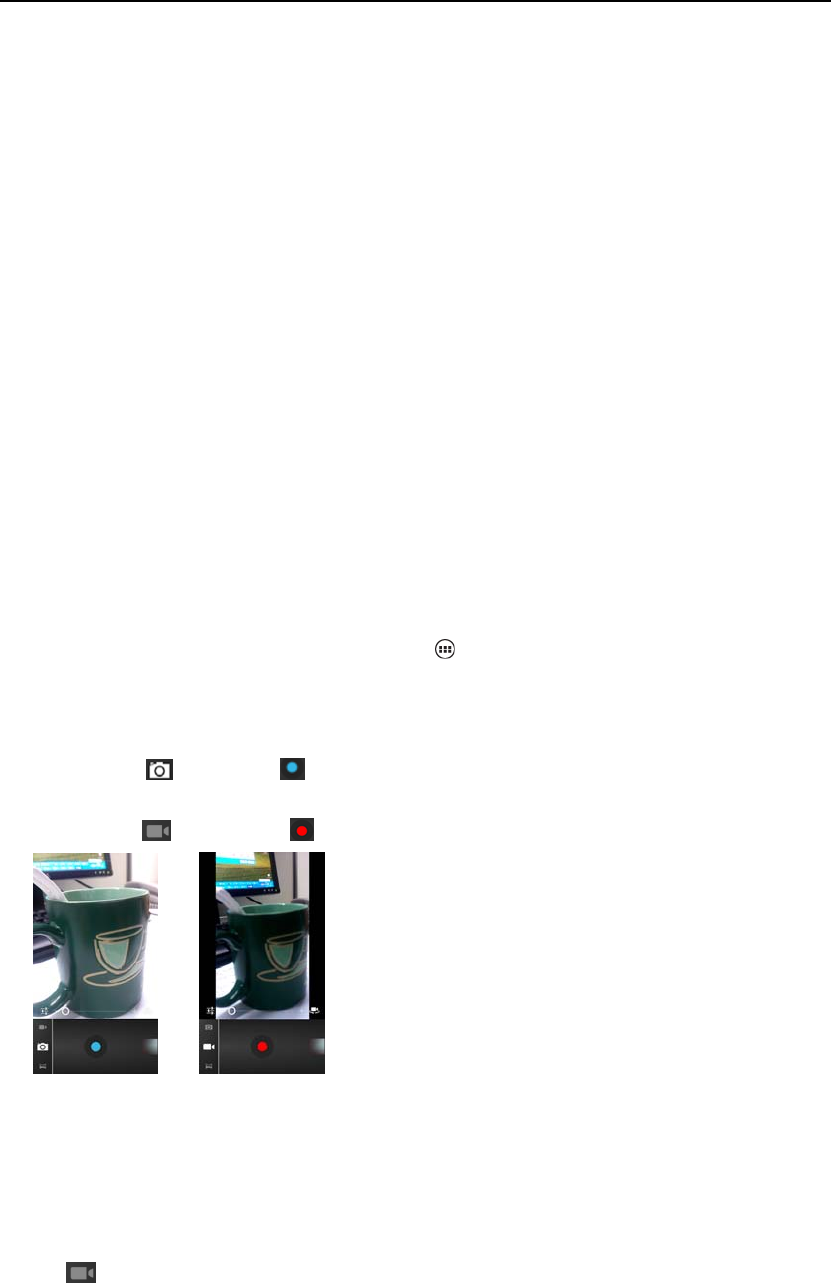
1. To open the Camera, on the Home screen, touch and select Camera icon.
2. The Camera opens in capture mode. Frame your picture within the screen and hold the phone
steady. Touch Camera button to capture. Continue to hold the camera steady for a second after you
hear the shutter sound.
In capture mode ,touchicon to take a picture.
In video mode , touch icon to record a video.
3. Immediately after capture, you can select to Save, Set as (contact icon or wallpaper), Share (via
a compatible application), or Delete your picture.
4. If you select to save, set as, or share, your picture is saved to Gallery application.
Video
To record a video, press Home key, touch application tab and then touch Camcorder. You can also
touch icon and switch to video mode in Camera menu.

To play video files, press Home key, touch application tab and touch Videos icon. Touch a video
you want to watch in the video list to play.
View your pictures
To view the pictures you’ve captured, as well as any you’ve stored on your memory card or the
phone storage, go to Gallery application:
1. To open Pictures, on the Home screen, touch and select Gallery icon.
2. Depending on how many pictures you’ve stored, they may take a few minutes to load.
3. If you’ve stored your pictures in folders on your Memory card, then the folders will display as
separate “albums”. The top left album always contains all the pictures in all the albums.
4. The individual pictures display in a grid in thumbnail format. You can select to display smaller
or large thumbnails in Settings.
5. To open a picture in full-screen view, touch the picture. Once in full-screen, scroll through the
pictures for zoom controls.
7Music
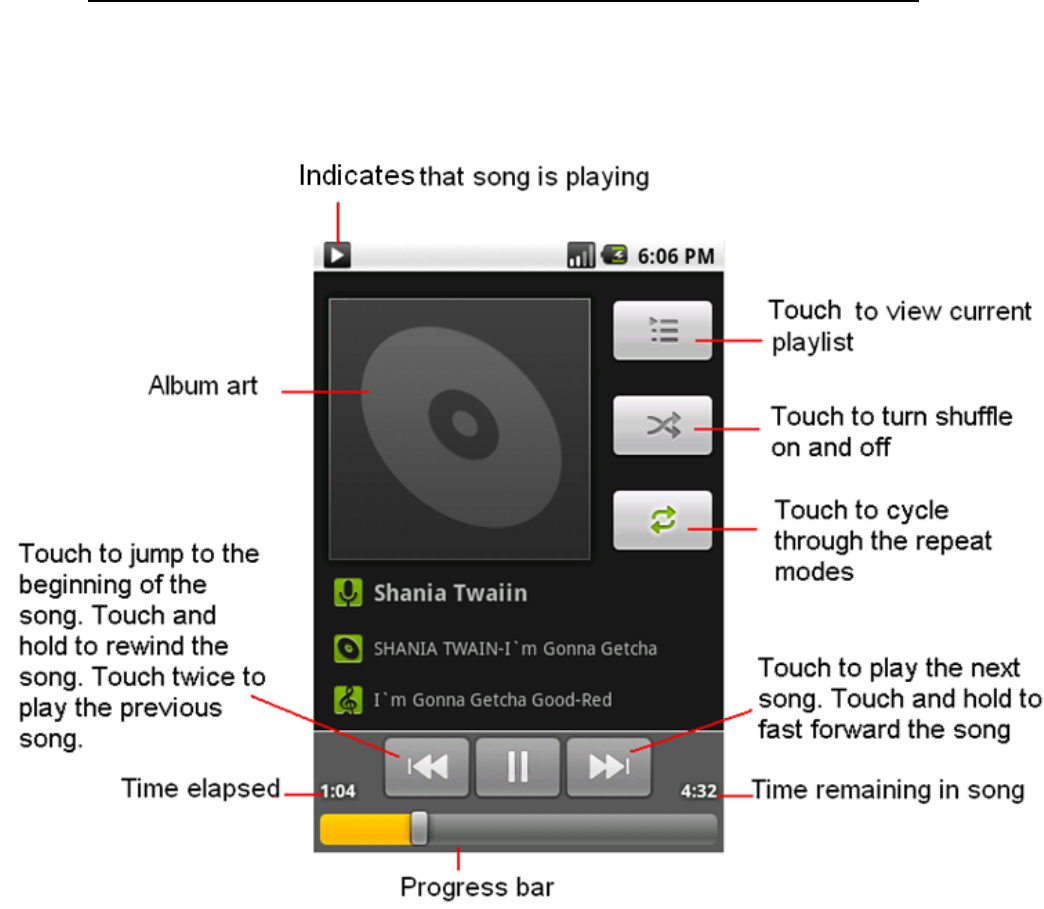
Music only plays audio files saved on SD card. Please insert SD card correctly before playing music.
At any level in your music library, touch and hold a list (a song, artist, album or playlist) to open the
context menu. Select a song to play and go to the playback screen.
8Browser
To open the Browser, touch and select Browser icon.
The Browser always opens to the last Web page you were viewing. The first time you enter the
Browser after powering on, your home page will display.
You can change your home page by pressing MENU > Settings >General > Set homepage.
Zoom and navigation in Web pages
While viewing a Web page, you can press MENU and select Settings > >Advanced >Default
zoom to set the zoom controls.
Slide your fingertip in any direction to shift your page view.
The Browse screen
From the Browse screen you can do the following:
1. Go to a Web page: Make sure the focus is not on a text box and then start typing the URL.
2. Add a bookmark: Bookmark the Web page you are currently viewing:
• Press MENU and select ‘Save to bookmarks’.
• Confirm the URL and name, and then select ‘OK’.
To view all your bookmarks, press MENU and select Bookmarks.
3. Refresh a Web page: To refresh the contents of the current page, press MENU and select
‘Refresh’.
Open pages in separate windows
You can keep more than one Web page open by using multiple windows to display the pages. You
canopenuptoeightwindows.
Open a new window: From a Web page, press . The Current windows screen opens,
showing the Web page you started from, plus a “new window”. Select ‘New window’icon "+".
Your home page opens in a new window. To return to one of the other windows, press
and select the page you want to view.
Manage bookmarks
You can store as many bookmarks as you want on your phone

9Clock
The clock have four functions, such as Alarm, World Time, Stopwatch, Timer.
Alarm
To open Alarm Clock, on the Home screen, then touch and select Clock icon. The Alarm
clock offers as many alarms as you want.
Set an alarm
Two alarms are set up for you, ready to customize. Both two alarms are turned off by default.
Select the check box to turn on the alarm. If no day shows under the set time, the alarm will go off
once when the set time is reached.
This alarm will go off at 9:00 am every Tuesday and Friday.
To begin, select one of the default alarms to open Alarm settings.
Set the following options:
Alarm: Select the check box to turn alarm on (checked) or off (cleared). This is the same check
box that appears on the main Alarm Clock screen.
Time: The time the alarm will go off is shown. To change this time, select Time to open the time
selector. Slide the finger up or down to set the time you want, and then select Done.
Repeat: The current repeat selection is shown. To change the setting, select Repeat and make a
selection from the menu. To have your alarm will only go off once at the set time, don’t select any
of the options. A one-time alarm is shown on the Alarm Clock screen without any days under the
set time.
Ring tone: The current ring tone selection is shown. Select Ring tone to pick another ring tone that
will play when the alarm rings.
Vibrate: Select this check box to have your phone vibrate when it goes off.
Once your alarm goes off, you will receive an alert with the options to Snooze (for 10 minutes) or
Dismiss.
Add more alarms
To add more than three alarms, from the main Alarm Clock screen, touch ‘Add alarm’.
World Time
Tap add city at the top of the screen to add a city to your world clock.
Stopwatch
You can touch the to start running the clock.
You can touch the to stop the running clock..
Timer
You can touch the to start run the timer after set time.

10 Calendar
Calendar views
You can view your calendar in a variety of ways. Touch the date on the left-top of the screen to
select from Day, Week, Month or Agenda.
1. Day view
Days are divided into hour time slots. Events are shown tiled and span the time they last. All-day
events are displayed at the top of the day list.
View event details - Highlight an event to open a small pop up window that provides more event
information.
Create an event
From any of the views, press Menu Key and select ‘New event’ to open the new Event details
screen.
• Type the information in the fields.
• Select date & time.
• Name that appears in Day view.
• Description can be as long as you like.
• Select a Repetition if you display more than one.
• Set a default reminder time.
• Set online presence: available or busy.
• Select calendar privacy from Default (as defined when calendar was created), Private, or Public.
When finished, select ‘Done’. Pressing Back Key also saves the event.
Tip: Create an event quickly in the Day or Week view by selecting an empty time slot. A new
Event details screen appears.
Calendar settings
From any of the calendar views, press Menu Key and select Settings.
Calendar view setting
Hide declined events: Select this check box if you want all the events you decline to be hidden
from all calendar views.

11 Calculator
To open Calculator, on the Home screen, then touch and select the Calculator icon.
The Calculator offers two panels: basic and advanced. Switch back and forth between panels by
pressing Menu key and selecting ‘Advanced panel’ or ‘Basic panel’, as you wish.
Calculator panels
Two calculator’s panels are available: basic and advanced. Use the Basic panel to enter numbers
and perform basic addition, subtraction, multiplication, and division. Use the Advanced panel to
insert advanced operators or delimiters, such as sine, cosine, tangent, square root, parentheses, etc.
Switch back and forth between calculator panels by pressing Menu key and selecting ‘Advanced
panel’ or ‘Basic panel’, as you wish. As soon as you select an advanced operator, the panel
switches back to Basic, where your operator appears. When you touch a key on the screen, the key
flashes blue to let you know the selection was made. Make sure you see the blue flash before
entering your next number or completing the operation.
To delete numbers, one at a time, touch DELETE on the screen.
To clear your operation history, press Menu Key and select ‘Clear history’.

12 Search
To search your phone, press Search Key to open the search bar.
Type in what you’d like to search, the search results will be listed under the search bar.
To make search faster, you can select the search type like All, Web, Apps, Contacts or others.

13 Other applications
You can find several games and practical application in your phone, Such as Gmail,
Facebook, Gtalk, Maps, Play Store, You can enjoy your entertainment life easily.

14 Settings
14.1 Dual Sim Settings
You can personalize the name of Card slot one and Card slot two. You can set
Reply by original SIM in functions like Making a call, SMS, MMS and Internet. After
the setting, you can use the current card to reply calls, SMS, MMS and Internet.
14.2 Wireless & networks
You can set the airplane mode .if you open the airplane mode.disable all wireless
connections. You can set WLAN .APN and Bluetooth.
14.3 Language and keyboard
You can customize the display language and selecting keyboard
14.4 Date & time
You can customize time and date as well as their formats.
¾Set time: Click on the blank space of the input box, enter the edit box to set the
current time. You can also press SL Key, enter [Time] and then set time.
¾Set date: Click on the blank space of the input box, enter the edit box to set the
current date. You can also press SL Key, enter [Date] and then set date.
¾Time format: You can choose either 12-hour time system or 24-hour time system.
¾Date display type: You can choose either “year-month-day”,“month-day-year”or
“day-month-year”.
¾Update time settings: Time settings can be refreshed automatically or manually.
Please refer to the Instruction.
14.5 Audio profiles
The have four predefined audio profiles. Such as :General profiles ,Silent profiles ,Vibration or
Outdoor profiles. When you select Add, you can make your own personalized settings.
¾Ringtone settings: You can use this menu to set the ring tone and message tone
respectively for SIM1 and SIM2.
¾Volume adjust : You can use this menu to set the volume of incoming calls,
incoming messages, alarm and media, callings, and Power ringtone. You can set
all kinds of volumes by pressing <Left> and <Right> keys, or <Up> and <Down>
keys.
¾Ring type: You can use this menu to set the warning tone for incoming calls,
incoming messages, alarm and calendar for SIM1 and SIM2.
¾Other alert rings: Use this menu to customize various warning tones for the
phone according to your needs.
Touch tone: It can be set as on or off.
Vibrate on touch: it can be set as on or off.
Screen lock sound: it can be set as on or off.
Dial pad touch tones: it can be set as on or off.
14.6 Display Settings
You can adjust the screen backlight .animation and Screen timeout.

15 Additional Function
15.1U Disk Function
U disk is used as follows:
¾Before using U disk, please confirm your computer is Windows 2000 or
Windows XP system.
¾Link mobile phone to computer with the USB data line provided to the mobile
phone.
¾The mobile phone is linked to computer, select[USB Storage]at the end of
mobile phone. After the computer successfully identify U disk, a green USB
equipment small sign will appear on the status bar at the right corner below.
¾Open “My computer”, now see “Removable disc”, operate U disk.
¾The multi-media files browsed by mobile phone must be saved under designated
content before it can be identified, or it can be read or broadcast through mobile
phone under other contents. For example, photo file is readable only under the
content of “Photos”.
16 Maintenance of Mobile Phone
Mobile phone is a high-precision electronic product, so please take good care of it.
The following suggestions can help you preserve it and lengthen its useful life:
¾Put mobile phone and its accessories to the place where children are out of reach.
¾Keep mobile phone dry. Rain, moisture or water may erode circuit board. If
mobile phone falls into water carelessly, take battery out in time and send it to
local authorized service center immediately.
¾Please do not put mobile phone at dust-covered place or its normal usage will be
affected.
¾Liquid crystal display is an easily vulnerable part of mobile phone, try to prevent
it from falling down or violently shaken; it is forbidden to use sharp item to touch
the screen.
¾Please do not put mobile phone on the place where temperature is too high. High
temperature will shorten the life of electric equipment, damage the battery,
deform or melt its plastic cover.

¾Please do not put mobile phone on the place where temperature is too low, or
moisture will come out when its temperature increases to normal temperature, it
will damage the circuit board of mobile phone.
¾Please do not throw, knock or forcefully shake mobile phone to avoid its inner
circuit board and precise structure are damaged. Please do not clean mobile or
with chemical agent, cleaning solvent or powerful detergent, instead, clean it
lightly with soft cloth with soap water.
¾Please do not draw mobile phone with painting material to prevent its removable
parts from being stuck, which will affect its normal operation. Please use cleaning
soft cloth to clean lens, such as camera’s lens.
¾When antenna is replaced, use only supporting or designated antenna. Using
unauthorized antenna, accessories or reshaping mobile phone may damage it or
violated relevant wireless electric equipments.
17 Safety Message and notices
Failure to comply with the following precautions may be dangerous or illegal.
Please carefully read and observe the terms below:
Safe power on
Do not use your mobile phone where it is forbidden to use or you might cause a
disturbance or danger.
Safe transportation first
Please observe all related local laws and regulations.
Please drive with both hands.
Transportation security should be considered when driving.
Disturbance
All mobile phone performances might be disturbed
Turn off when in hospital
Please follow related limitations.
Please turn off your mobile phone when near a medical instrument.
Turn off on an airplane
Please follow related limitations.
Do not use your phone on an airplane.
Turn off when at a gasoline station
Do not use your mobile phone at a filling station or around fuels or chemicals.
Turn off around exposure Area
Please observe related limitations and do not use your mobile phone around an area
where explosions can occur.

Proper use
As described in this manual, your mobile phone can be used only in right location.
If possible, please do not touch the antenna area on your phone.
Use qualified after sale service
Only a qualified maintainer can install or repair your mobile phone.
Accessories and batteries
Only use the authorized accessories and batteries and do not connect to unmatched
manufacturers or products.
Waterproof
Your mobile phone is not waterproof. Please keep it away from water.
Backup
Do remember to make a backup or keep a written record of all important information
saved in your mobile phone.
Connect to other devices
Please read the user manual of the device to get more detailed security instructions
before connecting to other devices and do not connect to unmatched product.
SOS emergency calls
Make sure your mobile phone is switched on and in a service area. In home screen,
tap the dial key, input the SOS number, then press the Dial Key. Tell where you are
and do not hang up without permission.
FCC Caution.
§ 15.19 Labelling requirements.
This device complies with part 15 of the FCC Rules. Operation is subject to the
following two conditions: (1) This device may not cause harmful interference, and (2)
this device must accept any interference received, including interference that may
cause undesired operation.
§ 15.21 Information to user.
Any Changes or modifications not expressly approved by the party responsible for
compliance could void the user's authority to operate the equipment.
§ 15.105 Information to the user.
Note: This equipment has been tested and found to comply with the limits for a Class
B digital device, pursuant to part 15 of the FCC Rules. These limits are designed to
provide reasonable protection against harmful interference in a residential installation.
This equipment generates uses and can radiate radio frequency energy and, if not
installed and used in accordance with the instructions, may cause harmful interference
to radio communications. However, there is no guarantee that interference will not
occur in a particular installation. If this equipment does cause harmful interference to
radio or television reception, which can be determined by turning the equipment off
and on, the user is encouraged to try to correct the interference by one or more of the
following measures:
-Reorient or relocate the receiving antenna.
-Increase the separation between the equipment and receiver.
-Connect the equipment into an outlet on a circuit different from that to which the
receiver is connected.
-Consult the dealer or an experienced radio/TV technician for help.
Specific Absorption Rate (SAR) information:
This Mobile Phone meets the government's requirements for exposure to radio waves.
The guidelines are based on standards that were developed by independent scientific
organizations through periodic and thorough evaluation of scientific studies. The
standards include a substantial safety margin designed to assure the safety of all
persons regardless of age or health.
FCC RF Exposure Information and Statement The SAR limit of USA (FCC) is 1.6
W/kg averaged over one gram of tissue. Device types: S351 (FCC ID: WA6S351)has
also been tested against this SAR limit. The highest SAR value reported under this
standard during product certification for use at the ear is 1.05W/kg and when properly
worn on the body is1.07W/kg. This device was tested for typical body-worn
operations with the back of the handset kept 1.5cm from the body. To maintain
compliance with FCC RF exposure requirements, use accessories that maintain a
1.5cm separation distance between the user's body and the back of the handset. The
use of belt clips, holsters and similar accessories should not contain metallic
components in its assembly. The use of accessories that do not satisfy these
requirements may not comply with FCC RF exposure requirements, and should be
avoided.
Body-worn Operation
This device was tested for typical body-worn operations. To comply with RF
exposure requirements, a minimum separation distance of 1.5 cm must be maintained
between the user’s body and the handset, including the antenna. Third-party belt-clips,
holsters, and similar accessories used by this device should not contain any metallic
components. Body-worn accessories that do not meet these requirements may not
comply with RF exposure requirements and should be avoided. Use only the supplied
or an approved antenna.