VeryKool USA I600 GSM Dual Band GPRS Digital Mobile Phone User Manual i600
VeryKool USA Inc GSM Dual Band GPRS Digital Mobile Phone i600
Contents
- 1. User Manual
- 2. User manual
User manual


Mobiles Ltd. ©2010. All rights are reserved. No part of this document
may be reproduced without permission. All trademarks and brand
names mentioned in this publication are property of their respective
owners.
While all efforts have been made to ensure the accuracy of all contents
in this manual, we assume no liability for errors or omissions or by
statements of any kind in this manual, whether such errors are
omissions or statements resulting from negligence, accidents, or any
other cause. The contents of this manual are subject to change without
any prior notice.
Protect your environment! We strive to produce products in compliance
with global environmental standards. Please consult your local
authorities for proper disposal.
Note: User’s Manual is just to guide the user about the functionality of
the phone. This does not seem any certificate of technology. Some
functions may vary due to modifications and up gradations of software
or due to print mistake.
SAFETY PRECAUTIONS
Before using your phone, please read the following important
information to eliminate or reduce any possibility of causing damage
and personal injury.
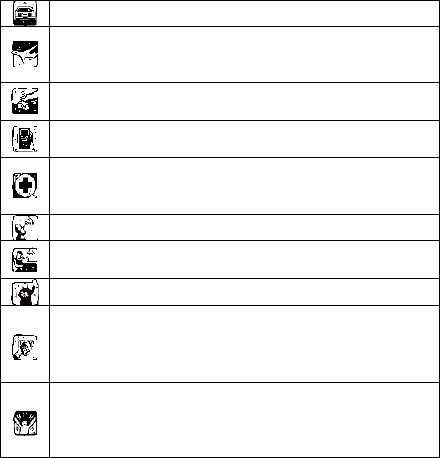
Do not use wireless phones while driving.
Switch off wireless devices in aircraft. The signal
may cause interference. Using them on aircraft is
illegal.
Do not use mobile phones near fire. Follow every
rules and regulations. .
Do not use mobile phones at refueling point. Don’t
use near fuel or chemicals.
Follow every rules and regulations in hospital and
health care facilities. Switch off your phone near
medical equipments.
All wireless devices may cause interference.
Only qualified service personnel can install or repair
this device.
Use only approved accessories and batteries.
Use the device only in normal position. Do not
expose your phone to extreme high temperatures
above +60℃(+140°F). Do not use anything static to
clean your phone.
Ensure the phone is turned on and in service. Enter
the emergency number, then press Pick Up key.
Give your location. Do not end the call until told to
do so.
Table of Content
GENERAL INFORMATION ..................................................... 1
Antenna............................................................................................ 1
Network Service............................................................................... 1
Accessories...................................................................................... 1
KNOW YOUR MOBILE PHONE ............................................. 2
Positions of Phone Keys .................................................................. 2
Functions of Keys............................................................................. 3
Display Screen................................................................................. 4
Status Icons...................................................................................... 5
Back Light ........................................................................................ 5
GETTING STARTED............................................................... 6
First Call........................................................................................... 6
Inserting the SIM Card ..................................................................... 6
Inserting the T-Flash Memory Card.................................................. 7
Charging the Battery ........................................................................ 7
Switching Your Phone On/Off........................................................... 8
Using the Personal Handsfree Handset........................................... 8
CALLING................................................................................. 9
Making Calls..................................................................................... 9
Answering Calls ............................................................................. 10
Options in Call................................................................................ 10
GUIDE TO MENU OPERATIONS ..........................................11
Phone Book.................................................................................... 11
Messaging...................................................................................... 11
Call History..................................................................................... 14
User profiles................................................................................... 15
Multimedia...................................................................................... 17
Fun & Games................................................................................. 21
Settings .......................................................................................... 22
File Manager .................................................................................. 30
Organizer ....................................................................................... 30
Shortcuts........................................................................................ 31
Extra............................................................................................... 31
Services ......................................................................................... 32
IMPORTANT INFORMATION................................................ 34
Use of Passwords .......................................................................... 34
Battery Information......................................................................... 35
Usage & Maintenance.................................................................... 37
Emergency Calls............................................................................ 38
APPENDIX ............................................................................ 39
Appendix A: Guidance On Entry Methods...................................... 39
Appendix B: Troubleshooting ......................................................... 40
Appendix C: Available Accessories................................................ 41
Appendix D: FCC Statement.......................................................... 41

1
GENERAL INFORMATION
Antenna
Use of other antenna devices could damage your mobile phone and reduce
performance. Your phone has a built-in antenna. Don’t touch the antenna
area unnecessarily when the phone is switched on. Contact with the
antenna affects call quality and may cause the phone to operate at a higher
power level than otherwise needed.
Network Service
To use the phone you must have service from a wireless service provider.
Many of the features in this device depend on features in the wireless
network to function. These network services may not be available on all
networks or you may have to make specific arrangements with your service
provider before you can utilize network services. Your service provider may
need to give you additional instructions for their use and explain what
changes will apply. Some network may have limitations that affect how you
can use network services.
Your service provider may have requested that certain features may be
disabled or not activated in your device. If so, they will not appear in the
device menu. Your device may also has been specially configured, this
configuration may include changes. Contact your service provider for more
information. For availability and information using SIM card services, contact
your service provider.
Accessories
Li-Ion battery is the manufacturer-approved rechargeable battery available
for your phone. May be some batteries perform best after several full
charge/discharge cycles.
Use batteries, chargers and accessories approved by the phone
manufacturer with this particular model. The use of any other type will
invalidate any approval or warranty applying to the phone, and may be
dangerous.
Please consult with your dealer for availability of approved accessories.
2
KNOW YOUR MOBILE PHONE
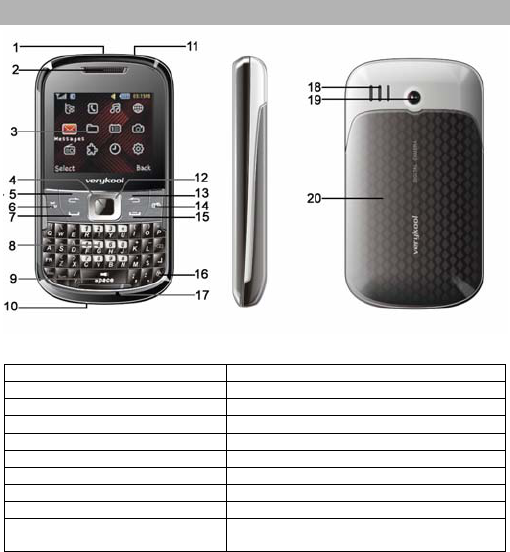
Positions of Phone Keys
1. Cord hole 11. Torch
2. Receiver 12. Direction key
3. Screen 13. Right Soft Key
4. OK key 14. Camera shortcuts key
5. Left Soft key 15. Hang up and Power key
6. Music key 16. Lock key
7. Pick up key 17. Microphone
8. Keypad 18. Speaker
9. Space key 19. Camera
10. Charger and
accessories connector 20. Battery Cover
3
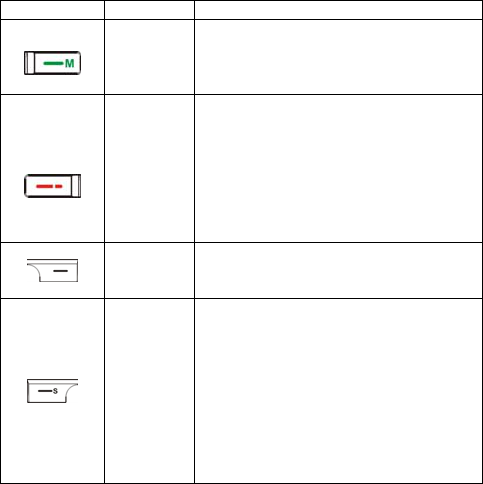
Functions of Keys
Key Name Description
Master
SIM Call
Key
Making or answering a call from
Master SIM.
In the standby mode, press this key to
access the Call Logs.
Call End
Key
End an ongoing call.
Press and hold this key to turn on or
off the mobile phone.
In the menu mode, press this key to
return the standby mode and cancel
current operations.
Press this key to stop the alarm
ringing once the alarm rings.
Right Soft
Key
Use the right soft keys to execute to
functions indicated at the right of the
prompt bar on the screen.
Slave SIM
Call Key /
Left Soft
Key
Use the left soft key to execute to
functions indicated at the left of the
prompt bar on the screen.
In the standby mode, press it to access
main menu.
When the “Master SIM & Slave SIM
open” has been selected, press the left
soft key to making a call with Slave
SIM card after press the number key or
get into the function of phonebook.

4
Selection
Key
Scrolling options in the function list or
the phone book.
In the edit mode, it is used for moving
the cursor.
In the standby mode, press it to
activate a specified function.
Numeric
Keys
Used to enter numbers, letters and
some special characters.
In the standby mode, press and hold
the # key to activate Silent mode,
In the edit mode, you can press the #
key to switch the input method, press
the * key to display the symbols.
Long Press of “*” Key to activate/
deactivate “Torch Light”, Long Press
of “5” Key to activate/deactivate “UV
Currency Checker Light”, Long
Press of “0” Key to activate “FM
Radio”.
Display Screen
Your mobile phone has a single LCD display, which consists of three
main areas:
The First line displays status icons, which indicate the signal strength,
the remaining power of the battery, etc.
The Middle lines display text and graphics, including numbers, text,
animated icons and the information you enter.
The Last line displays the currently available operations assigned to the
left or right soft key.

5
Status Icons
Master SIM Network Signal
Connecting GPRS and using GPRS
Connecting GPRS but no data alternating
Divert all Voice Calls
Auto Keypad Lock
Alarm Clock is activated
Battery Status
Missed Calls
New SMS/MMS or Message Memory Full
MMS is busy
WAP Message
Sound Status
Ring only
Vib. Only
Vib. then Ring
Silent
Note: The picture is for reference only; the product is subject to the real
one.
Back Light
You can set the Back Light for the display and keypad through options
in the menu. The backlight will be off automatically without any key
operation.

6
GETTING STARTED
First Call
Switch off your phone, remove the battery, insert SIM card. Enter
the area code and phone number and press Call Key.
Tip: Before you start insert a valid SIM card in your phone and
charge the battery.
SIM Card: Please refer to “Mounting the SIM Card” for more
reference on installation.
Charging the battery: Please refer to “Charging the Battery” for
more details.
Inserting the SIM Card
Your mobile phone number, PIN (Personal Identification Number), PIN2,
PUK (Personal Unlock Key), PUK2 (Personal Unlock Key2), IMSI
(International Mobile Subscriber Identity), the network information, the
phonebook data, SMS (short messages) and other data are stored in
your SIM card.
Note: This particular phone model only supports the SIM cards of 1.8V
and 3V.
Some network operators don’t offer PIN2 and PUK2, so functions
using those passwords will be unavailable.
The SIM card and its contacts can be easily damaged by
scratches or bending, so be careful while handling, inserting or
removing the card.
Keep all miniature SIM cards out of children’s reach.
Note: Always make sure that the phone is switched off before you insert
or remove the SIM card, otherwise it may damage the SIM card.

7
Procedure
1. Remove the battery cover by sliding it.
2. Insert the SIM card, with the notch at the bottom right and the gold
contacts face down, into the card slot.
3. Replace the battery and close the cover tightly.
Note:
If the SIM Card is not installed properly or gets damaged, “Insert
Master/ Insert Slave” will display on the screen after you switch on
your phone. Remove the SIM Card and mount it again as shown in
the picture
If you have inserted the SIM correctly but still “Insert Master/ Insert
Slave” appears on the screen, please ensure there is no stain on the
surface of the SIM card. If there are some stains on it, please clean
them with rubber carefully and then try again.
If the screen displays that the SIM card is locked permanently,
please consult with your network operator.
Inserting the T-Flash Memory Card
Please follow the steps as described below:
Open the gold cap from the Hinge Type Connector. Lay the T-Flash
card with gold contacts facing down on the Connector, and then close it.
Align the card to the arrow sign as showing the picture:
Charging the Battery
Note: Always keep your phone connector and charger dry.
1. Connect the connector of the travel adapter to the phone.
2. Plug the travel adapter into a proper AC wall outlet.

8
3. When your phone indicates that the battery is fully charged,
please pull the travel adapter out from the I/O socket of the
phone.
Tip: 1. If the battery is totally empty or not enough, it may take a few
minutes before the charging indicator appears on the screen.
2. You can turn on/off, and use the phone while charging.
Warning: Make sure that the standard voltage/power of the place
where you charge the battery matches with the rated voltage/power of
our travel adapter.
Switching Your Phone On/Off
Press and hold Power Key for few seconds to switch on your phone.
If the phone ask for a phone lock code:
Enter the phone lock code, and press OK.
If the phone ask for a PIN code:
Enter the PIN code, and press OK. The PIN code is usually supplied
with the SIM card. Please consult your network operator for more
information.
Access the standby mode.
Press and hold Power Key for a few seconds to switch your phone
off.
Using the Personal Handsfree Handset
Connect the handsfree handset to your mobile phone, you can still
answer calls and use the microphone without holding the phone.

9
CALLING
Making Calls
1. Enter the phone number (with the area code)
2. Press Master SIM Call Key/Slave SIM Call Key to make a call
through the respective SIM.
3. Press End Key to end a call.
Making International Calls
1. Press the * key twice for the international prefix symbol +.
2. Enter the country code, area code and phone number.
3. Press Pick up Key to make a call.
Making Extension Calls
1. Enter the host number, and press the * key three or four times for the
extension prefix symbol P or W.
2. Enter the extension number, and press Master SIM Call Key/Slave
SIM Call Key to make a call.
Clear Wrong Enters
Press right soft key to delete the last character on the screen. Hold right
soft key will clear all you entered.
Making a call from the Phone Book
1. Press right soft key to access the Phone Book List. Scroll to search
the desired number. (Enter the first letter or more of the name and
press the selection key Up/Down to reach the desired name.)
2. Press Master SIM Call Key/Slave SIM Call Key to call the number.
Last Number Redial
1. In the standby mode, press Call Key to access the Call Logs.
2. Press the Up/Down key to reach the desired number or name and
press Master SIM Call Key/Slave SIM Call Key.
10
Speed Dialing
You can save 7 Speed Dial Numbers you often dial to positions titled
with number keys from “2, 3, 4, 6, 7, 8, 9” respectively. Select
“Phonebook > Options > Phonebook settings > Speed Dial > Set
Number”, and then set “Enable speed dial” on. In the standby mode,
press and hold the number key to dial the corresponding number.
Adjusting the Sound Volume
During a call, you can press the Up/Down Key to adjust the earpiece
volume.
Answering Calls
1. To answer an incoming call, press Call Key or left soft key.
2. To end or reject an incoming/ongoing call, press End Key.
Options in Call
Your phone provides a number of functions that you can use during a
call.
During a call, you can access Hold/End single call, New Call, Phone
Book, Message center, Sound Recorder and other functions.

11
GUIDE TO MENU OPERATIONS
All functions about the mobile phone is listed as below with brief
descriptions.
Phone Book
You can fast locate the number of the person you want to contact.
Please enter the initial letter of the person’s name, and related records
about it will display in the middle of the screen. You can locate your
records by up/ down Selection key and pressing OK key, and then you
can view, send Text Message, Send Multimedia, call and so on.
Messaging
Write Message
1. You can enter letters and numbers, and insert pictures and rings.
(Support EMS service).
2. Please press the left soft key to access Options, and then you can
do: Send to, Input methods, Insert Templates, Save to Drafts and so
on.
3. Edit your message, and press the “Sym” key to insert special
symbols.
Inbox
The icon means an unread message or the message box is full.
You would not receive new messages once the message box is full.
Please delete unnecessary messages.
1. Select the unread message, and press the left soft key to read.
2. Select Options, and then you can reply, delete, forward and so on.
Drafts
In the Drafts, please select Options, and then you can send, edit or
select other operations.

12
Outbox
The screen will display the message list once you select the Outbox.
1. Select “OK” to read the current messages.
2. Select Options, and then you can send, edit or select other
operations.
MMS
Please consult your network operator to obtain the MMS services.
Write Message
While writing messages, you can select To, Cc, Bcc, Subject or Edit
content.
To: You can enter the phone number or E-mail address..
Cc: send the MMS to others at the same time. You can enter phone
numbers or E-mail addresses.
Bcc: send the MMS to others secretly at the same time. You can
enter phone numbers or E-mail addresses.
Subject: edit the Subject of the MMS.
Edit content: enter the text or add picture, audio and so on.
Inbox
The phone saves the received MMS into the inbox.
All received Messages display in the inbox, and the icon means the
MMS is unread. Use the Down/Up key to scroll the cursor to check the
list, and the sender's name and number will display. If the MMS has
been read, the icon will change to the read icon. Please press the left
soft key to access Options, and then you can view, reply, delete and so
on.
Outbox
In the Outbox, please select Options, and then you can send, or select
other operations.
Drafts
In the Drafts, please select Options, and then you can send, edit or
select other operations.
13
Templates
User defined: you can save many MMS in it.
Default: Your mobile phone saves many MMS in it.
And you can View MMS, Write Message and Set the Properties for
MMS.
MMS Settings
Please follow steps described as below:
Profiles: You can Add New or select one profile to activate, or edit.
Common Settings:
1. Compose: You can configure Creation Mode, best page time, auto
signature, signature, Picture Resizing.
2. Send: You can configure Validity period, Delivery Report, Read
Report, Priority, Slide Timing, and Delivery Time.
3. Retrieve: You can configure Home Network, Roaming, Read Report,
and Delivery Report.
4. Filter: You can configure Anonymous and Advertisement.
5. Memory Status: You can check the Usage, Used space and Free
space.
Broadcast Message
This network service enables you to receive all kind of text messages,
such as weather reports or transportation information. There are
several networks who afford this service in this world. Please consult
your network operator for more reference.
Receive Mode: Turn on or off the Cell Broadcast.
Read Message: Scroll the Up/Down Key to select the message.
Languages: Select the desired language to display the broadcast
message.
Note: Your network operator decides whether the language is
supported or not.
Channel Settings: You can choose Select, Add, Edit or Delete to
receive the Broadcast information.

14
Templates
You mobile phone saves many messages in common use. You can edit,
remove or write message.
SMS Settings
You can set the default information about SMS properties.
Schedule SMS
Press the left soft key to access the Add or Options > Add, and then you
can set the date, time, message, enter number, and select SIM card.
Press Done and Save the message will sent out the message to the
number as your desire.
Note: The time format of this function is 24 hours.
Call History
In the standby mode, press left soft key to access Menu > Call History.
Missed Calls
With this function, you can check recent missed calls.
Scroll the Up/Down key to select a missed call.
Press OK key to access Missed Call Information, and you can Delete,
Save to Phone book, call, Edit and so on.
Dialled Calls
With this function, you can check recent dialed calls. In this function,
you can Delete, Save to Phone Book, Call, Edit and so on.
Received Calls
With this function, you can check recent received calls. In this function,
you can Delete, Save to Phone Book, Call, Edit and so on.
Delete Call Logs
You can delete all records of missed calls, dialed calls or received calls
with this function or Delete all folders drastically.

15
Call Timers
Last Call: The last call time can be checked.
Dialled Calls: The total time for all dialed calls can be checked.
Received Calls: The total time for all received calls can be checked.
Reset All: Reset the counters.
Call Cost
Last Call Cost: You can check the cost of last call.
Total Cost: You can check the total cost of all calls.
Reset Cost: You can modify the cost of call, and reset the cost to 0.
PIN2 code is required while modifying.
Max Cost: You can check and modify the upper limit. PIN2 code is
required while modifying.
Price per Unit: You can check and modify the call rate. PIN2 code is
required while modifying.
Note: This function is related with the SIM card. Some SIM cards don't
support the function. PIN2 is provided from the network operator.
Please consult your network operator to obtain the number.
Text msg. Counter
Sent: You can check and clear the number of sent messages.
Received: You can check and clear the number of received
messages.
Note: This function has nothing to do with the SIM card. The amount of
sent or received messages will not change even if you change the SIM
card.
GPRS Counter
You can check or reset the Last Sent, Last Received, All Sent, All
Received and Reset Counter.
User profiles
16
General
1. Activate
2. Customize
Tone Settings: Includes Incoming Call, Power on, Power off,
Message, Keypad. You can select built-in ring tunes, or the tunes
composed by yourself.
Volume: Includes the volume setting of Ring Tone and Key Tone.
The volume degree is from 1 to 7.
Alert Type:
− Ring Only: Just ringing, no vibration.
− Vib. Only: Just Vibrating, no ringing.
− Vib. and Ring: Ringing and vibration.
− Vib. then Ring: Ringing after vibration.
− Silent: No ring or vibration.
Ring Type:
− Single: Rings once when a call is coming.
− Repeat: Rings continuously when a call is coming.
− Ascending: Rings continuously and the volume increases
gradually.
Extra Tone:
− Warning: If necessary, you will be warned by the prompt tone.
− Error: You will be warned by a tone if you make a mistake.
− Camp On: A prompt tone will be heard after searching the
network successfully.
− Connect: A prompt tone will be heard after the call gets
connected.
Answer Mode:
− Any Key: Press any key to answer a call (Except of Hang Up
Key and Right Soft Key).
Meeting
Please refer to “General” for more details.

17
Note: Press and hold the # key to enable or cancel the silent mode.
Outdoor
Please refer to “General” for more details.
Indoor
Please refer to “General” for more details.
Headset
Insert the earphone and access the Headset mode automatically. This
mode has no Activate option. Please refer to “General” for more details.
Bluetooth
You will enter into Bluetooth mode after you activate the Bluetooth
function. This mode has no Activate option; the detailed operation has
been shown in the “General”.
Power Saving
This is a special profile which increases the usage time of the phone. In
this profile only important functions of the phone will work so the power
consumption of the phone will be minimizes.
Multimedia
Camera
CMOS camera is built in to your mobile phone. .
Select Camera in Multimedia menu to activate the camera, press the
OK key/the number key 0 to take a photo. Press the left soft key to
access the following options:
Photos: With this function, you can view, browse style, forward,
rename, delete and do some other operations with these pictures.
Camera Settings: You can configure the basic settings of camera.
− Shutter Sound: Off, Sound1, Sound2, Sound3.
− EV: You can adjust exposure value to improve the image quality
according to the actual conditions.
− Anti-Flicker: 50Hz, 60Hz.
18
− Delay Timer: Off, 5 seconds, 10 seconds, and 15 seconds.
Tip: You can use the selection key repeatedly to select the desired
option.
Image Settings: You can set the size and quality of these images.
Tip: You can use the Left/Right selection key repeatedly to select the
desired option.
− Image Size: You can take and store pictures in various sizes. The
larger the image size is the more memory space will occupy on your
phone’s memory.
− Image Quality: Normal, Good, and Low. Good quality images will
take up more space.
White Balance: Adjust the color balance of the image. You can make
your photo appear warmer or cooler.
Scene Mode: You can set Auto or Night.
Storage: To set the default storage path.
Restore Default: Camera Parameters will be restored to factory
parameters with this function.
Image Viewer
The Image Viewer provides you with a quick view of the picture
functions. Please refer to the Photos operations of the Camera for
more details.
Video Recorder
You can record videos of special moments with this function. Press OK
key to start/pause record.
Press the left soft key to access Options:
CamCorder Settings:
− EV: You can adjust exposure value to improve the image quality
according to the actual conditions.
− Anti-flicker: 50Hz, 60Hz.
Video Settings: You can set the quality of these images.
19
White Balance: Adjust the color balance of the video. You can make
your video appear warmer or cooler.
Storage: You can store the Video in phone or T-Flash card.
Restore Default: Video Recorder Parameters will be restored to factory
parameters with this function.
Tip: You can use the Left/Right or Up/Down selection key to select the
desired setting option accordingly. Please refer the section “Camera” for
more details.
Video Player
You can perform the following operations:
− Play: You can play the specified video.
− Send: You can forward the video via Bluetooth.
− Rename: You can rename the specified video.
− Delete: You can delete the specified video.
− Delete All Files: You can delete all videos.
− Sort by: You can sort all video files and display them in a new order;
you can choose to Sort By Name, By Type, By Time, By Size and
None.
− Storage: To set the default storage path.
Audio Player
The Play/pause, Stop/Back, Backward, Forward functions correspond
to the OK key, right soft key, Left and Right Key respectively. Press the
Up/Down key to adjust audio volume. Select List to access the Play
List, and then select Options to perform the following functions: play,
details, add to ringtones, refresh list, settings.
Note: The Audio Player of the phone will automatically play music files
from the My Music folder. You may need to refresh it manually from the
settings in case you have earlier opted for manual refresh settings.
Warning: Make sure that the volume is appropriate for your hearing
while using the audio player.
20
Sound Recorder
The mobile phone supports WAV, AMR recording formats. You can
record conversations, which may be saved to the Audio folder under
File Manager. If there is a record, press left soft key you can do: Play,
Append (only for AMR), Rename, Delete, Delete All files, Use As and so
on.
Note: If a call is coming while recording, the record will abort and the
data will be paused. AMR adopts dynamic compression and provides a
longer recording time than WAV‘s while utilizing the same storage
space.
FM Radio
You can use your phone to listen to FM radio stations once the original
Handset is plugged into the connector. Select FM Radio in the Menu to
access the radio controls.
z Press the down key to Power on/ off the FM radio.
z Press the OK key to record the FM radio.
z Press the Left/Right key to step down/up to the next frequency.
z Press the “*”/”#” key to adjust radio volume.
z Press Options to access the following options: channel list, manual
input and so on.
Tip: Long press of the Numeric key 0 in idle screen activates the FM
function.
Schedule FM Record
With this function, your phone can record the FM program as the
schedules once the original Handset is plugged into the connector. You
can set On/Off, the date and time, repeat style, channel settings and
record settings.
Melody Composer
The mobile phone enables you to compose your favorite music as the
tune of the incoming call, alarm.
21
Note: The phone can save multiple tones edited by you according to
the volume of tones.
When the Tune Editing List is blank, you can edit your favorite tunes by
pressing “Add”. After you have finished editing, press Options to select
a music instrument or playing speed to play the editing tunes. You can
also save the editing tunes.
Select the edited music, and press Options to perform the following
operations:
− Play: You can play the specified self-edit tunes.
− Edit: You can edit the specified self-edit tunes.
− Add: You can add new self-edit tunes.
Note: A maximum of 150 notes can be edited with a piece of
self-edit tune.
− Rename: You can modify the name of the selected self-edit tune.
− Delete: You can delete the selected self-edit tune.
− Delete All Files: You can delete all self-edit tunes.
− Use As: You can send the self-edit tones to User Profile.
− Send: You can send the self-edit tones to Text Message,
Multimedia Message, and Bluetooth.
In the window of Tone Editing, press Options to perform the following
operations:
− Play: You can preview the edited tone.
− Play Speed: You can set the playing speed of the current editing
tone.
− Select Instrument: You can select the music instrument playing
the tone.
− Save: You can save the tone.
Fun & Games
There are several interesting games in the phone. Please refer to
instructions from the game menu for more details.

22
Tip: The game menu includes Start Game, Game Level, Best Grades
and Game Help.
Settings
In the standby mode, press left soft key to access Menu > Settings.
Phone Settings
Time and Date
Set Home City: Select the desired home city.
Set Time / Date: Enter the current time and date.
Set Format: Select a time and a date format.
Schedule Power On / Off
You can set the time for auto power on /off. Do turn the status on before
using that function, and then the time.
Note: Please disable the Schedule Power On function before you board
an airplane.
Language
Select the desired language for the display text. In i600 you can select 3
language options English, French, Spanish.
Pref. Input Methods
Select the desired input method for the default input method.
Display
With this function you can configure the basic status of display
characteristics including Wallpaper, Screen saver, Power On Display,
Power Off Display, Main menu style, Show date and time, Show owner
number, Can auto open Keypad light.
Greeting Text
Set On, input words as your greeting text once you switch on the
phone.
23
Dedicated key
You can configure short cut functions for the Up, Down, Left and Right
key respectively. In the standby mode, press any one of them to access
the appointed function.
Auto update of date and time
It can be set to On or Off.
Flight Mode
You can set the normal mode, flight mode and Query When Power On.
Dazzle Ringtone
Abb Har Bar Naya Gana Bajega! You like lot of songs and also like to
set those all songs to be a ring tone of your mobile phone?? For this
you have to change ring tone every time with new song.
Not anymore. i600 gives you the facility of Dazzle/Shuffle Ringtones.
Where you can set up to 10 songs in one time as your ring tone.
Now whenever a new call will come every time a new song will play as
your ring tone.
Misc. Settings
LCD backlight: You can set the LCD backlight.
Call settings
Caller ID: You can select Set By Network, Hide ID or Send ID. The
default status is Set by Network.
Note: This function is related with your network. Selecting Hide ID
setting may cause failure to dial. Please test the calling function
before you enable Hide ID.
Call Waiting:
1> Activate: The mobile phone will connect to the network when
Call Wait is enabled. After a while, the network will take a
response by sending messages to ensure your operation. If Call
Wait is enabled, the network will warn you. At the same time,
another incoming call will display on the screen while the first
call is in process.
24
2> Deactivate: If you cancel Call Waiting, the network will not warn
you when you are on a call and a new call is coming.
3> Query Status: With this function, you can inquire about the
current status from the network.
Call Divert: This function allows your phone to divert coming calls to
another phone.
1> Divert All Voice Calls: When this function is enabled, all coming
calls will be diverted to another phone. Set it On or Off, the
phone will connect to the network. After a while, the network will
take a response and tell you the result on operation.
2> Divert If Unreachable: When this function is enabled, the
coming call will be diverted to another phone number if the
phone is unreachable.
3> Divert If No Answer: When this function is enabled, the coming
call will be diverted to another phone number if there is no
answer in some time.
4> Divert If Busy: When this function is enabled, the coming call
will be diverted to another phone number if the phone number
you dialed is busy.
5> Divert All Data Calls: You can divert all data calls with the need
of your network operator's support.
6> Cancel All Divert: Use to cancel all diverting functions.
Call Barring:
This function limits some selected calls. When you configure this
function, you should consult your network operator for the password. If
the password is wrong, the phone will prompt the fault message. After
the desired number is selected, please continue to select On or Off.
After a while, the network will take a response and tell you the result.
1> Outgoing Calls:
− All Calls: When this option is enabled, you cannot make any
calls.
25
− International Calls: When this option is enabled, you cannot
make any international calls.
− International Calls Except to Home PLMN: When this option
is enabled, you can make only local calls when you are abroad
or dial to the country in which the network provider is.
2> Incoming Calls:
− All Calls: When this option is enabled, you cannot make any
calls.
− When Roaming: When this option is enabled, you cannot
receive any incoming calls if you are out of reach of the network
service.
3> Activate All: When this option is enabled, you cannot receive any
incoming calls.
4> Cancel All: Cancel the call barring. It also needs the Call baring
password provided by the network operator.
5> Change Barring Password: Use to modify the Call baring
password. It needs to input the original password before you
modify.
Line Switching: Switch to Line 1 or Line 2, the default is Line 1.
Note: If Line 2 is selected, making calls from Line 2 depends on the
network operator.
Closed user group: Press the left soft key to access Group List, and
then select Add to input the group's name. Press the left soft key to
select Done, and then add the number. Press the left key to finish.
Select Option to Edit, Add, Activate, and Deactivate or Delete the
existent group.
Advance settings
1) Auto Redial
You can set the Auto Redial function On or Off. When you activate auto
redial, the phone will automatically redial the last called number after a
while if you fail to connect to the number. The time for auto redial is up
26
to 10 times. You cannot make any other calls when the Auto Redial is in
process. Press Cancel to end Auto Redial.
2) Call Time Display
You can set Call Time Display On or Off. The call time will display when
it is activated, .The call time would not display when it is deactivated.
3) Call Time Reminder
In order to save the call cost, this function prompts you to end the call in
time. You can select Off, Single, or Periodic. There is no prompt when
Off is selected. You should enter a specific time between 1 and 3000
seconds when Single is selected. The phone will ring once when the
time is up. You should enter a specific time between 30 and 60 seconds
when Periodic is selected. The phone will ring once automatically at the
specific time before the integral minute is up.
4) Auto Quick End
You can set ON/ OFF, and set a time (1~9999s) as your desire.
Network Settings
Please contact the network operator for the following network service.
1. Network Selection
You can choose Automatic or Manual to select the network (Auto is
recommended). When you select Automatic, the phone will make the
preferential selection according to the network where the SIM card
belongs. When you select Manual, you are required to select the same
network as the registered network with the network operator by SIM
card for your use.
2. Preferences
Select the Preferred Networks. The default network is the network
where the SIM card belongs. Select Options to perform the following
operations:
Add From List: Display all PLMN list.
New: Create a new network and set the network priority.
Change Priority: Reset the selected Network Priority.
Delete: Delete the current preferred network.
27
3. GPRS Connection
You can set always or when needed.
Security Settings
SIM Lock:
You will be asked to input the PIN. It can be configured if the PIN is
correct. If SIM card is set on, you will need to input the PIN every time
you switch on the power. If you enter incorrect PIN three times, you will
be asked to enter PUK. PUK is used to release and modify the locked
PIN. If PUK is not provided or missed, please consult your network
operator.
Phone Lock
You can lock or unlock the phone. Enter the password to activate or
deactivate the phone lock. When the phone is locked, you will be
required to enter the phone password. 4-8 numbers can be used for the
phone password. The default phone password is 1122.
Auto Keypad Lock
You can lock/unlock the phone keyboard and set the Key Lock Time
to None, 5 sec, 30 sec, 1 min, and 5 min.
Fixed Dial
If this function is enabled, only phone numbers in the Fixed Dial List can
be dialed. PIN2 is required for this function. Network support is also
required.
Note: If you enter PIN2 after the phone is switched on, PIN2 is not
required before the phone is switched off. Therefore, please switch the
phone off and switch it on again after configuration, if you do not want
others to change the status of the Fixed Dial.
Barred Dial
If this function is activated, the phone numbers in the barred dial list
cannot be dialed. PIN2 is required for the function. Network support is
also required.
28
Change Password
You can change PIN, PIN2, Phone password and Tracker Password.
1> PIN
− The original PIN is required before change the PIN.
− Enter the new PIN. 4-8 numbers can be used for PIN.
− Enter New PIN to ensure the New PIN.
2> PIN2
− The original PIN2 is required before change PIN2.
− Enter the new PIN2. 8 figures can be used for PIN2.
− Enter the New PIN2 again to ensure the new PIN2.
3> Phone Password
− The current phone password is required before change the
phone password.
− Enter the new phone password.
− Enter the new phone password again to ensure the new
phone password.
4> Tracker Password: please refer to Phone Lock Password for more
details.
Connectivity
Bluetooth
You can establish a wireless connection with other compatible devices
using Bluetooth technology. Such compatible devices include cell
phone, computer, earphone and vehicle parts. For the compatibility of
other devices please consult the manufacturer. You can use Bluetooth
to send pictures, videos, music, notes and voice segments; or establish
a wireless connection with compatible PC (to send files for example).
As the communication between two Bluetooth devices is just wireless,
so it’s not necessary to keep the mobile phone dead against the other
device. You shall ensure that the distance between two Bluetooth
devices is not more than 10 meters (about 32 feet). However, the
Bluetooth connection may be interfered by obstacles like wall or other
29
electronic devices.
In some circumstances, the application of Bluetooth may be restricted.
Please consult your local authorities or service providers.
Application of Bluetooth technology in your cell phone will accelerate
the consumption of electricity power and thus shorten the service life of
your battery.
Power: select to switch ‘on’ or ‘off’ Bluetooth.
Inquiry Audio Device: Searching for hand-free devices: After
confirmation, your phone will search for Bluetooth devices and a list of
available devices will be displayed in the screen. Select a Bluetooth
device and input a correct password to establish a security connection.
Note: The initial password of Bluetooth earphone is 0000 or 1122. For
details please contact your device provider.
My Device: Search for new devices and show the list of all Bluetooth
devices within the scope of your phone. Select the available device,
press OK and then you have the following options:
− Connect: Enter into service record option after confirmation.
− Rename: Rename a device.
− Delete: Delete a device.
− Delete All: Delete all the devices.
− Service list: Press left soft key to Refresh OPP profile, SPP
profile, handsfree profile and headset profile function.
Active Device: Show all devices already connected.
Setting: After selecting, you have the following options: Visibility,
Change Device name, Audio path, Storage.
About: Show detail the Bluetooth serviced provided by this phone.
Restore Factory Settings
Access Settings to select Restore Factory Settings, and press OK.
All settings can be restored to factory settings with this function. The
default password is 1122.
30
File Manager
You can use the function to manage all types of files saved in the phone
or the Memory card.
Organizer
Calendar
You can view and edit the memo of a specified date with this function.
1. View: You can view or edit the daily arrangement of the day.
2. View All: You can view or edit all the daily arrangement of the
day.
3. Add Event: You can select task types: Reminder, Meeting, and
Course.
4. Delete Event: You can select delete entries form All, Overdue,
Spec Period.
5. Jump to Date: Skip to the specified date to view or edit the daily
arrangements of the day.
6. Go To Weekly/Monthly View: Go to the specified date to check
which week/Month it is.
Tasks
You can View, Add, Edit, Delete, Delete Overdue, Delete All, Send
Vcalendar and Save As File as desired. Start up the Tasks and press
OK. Press Add to access to add a new memo.
Alarm
The mobile phone provides 5 alarms and you can set them as your
need. If you have configured an alarm, an icon indicated that you have
configured the alarm will appear. No icon will show if you don’t set an
alarm. Select “Edit” to set the current alarm.
World Clock
Scroll to browse every city’s time zone in the world map. The related
date and time will display at the bottom of the screen.
31
Flash Light
You can turn On/ Off the Torch light function by long press of “Space”
Key on ideal screen mode.
Shortcuts
You can set shortcuts for those functions you often use.
Extra
MSN
MSN allows you to access MSN messenger.
Yahoo
Yahoo zone allows you to access yahoo mail, yahoo messenger, cricket,
movies, finance, news updates and astrology.
Facebook
Facebook is a very popular social networking site around the world
giving people the power to share and make the world more open and
connected. Millions of people use Facebook everyday to keep up with
friends, upload an unlimited number of photos, share links and videos,
and learn more about the people they meet.
Please ensure that you have GPRS settings in your phone to open
Facebook. Contact your operator for GPRS settings.
Calculator
The calculator can add, subtract, multiply and divide. To use the
calculator:
1. Press the # key to enter the decimal point
2. Press the up, down, left and right key and OK key to select +, -, ×,
÷, = respectively.
3. Press Clear to delete the figure.
32
Unit Converter
You can make the units conversion for weight and length. Enter the
number into the column, and then press “OK” to get the result.
Currency Converter
You can make currency conversions. Press OK after entering the
exchange rate, and then enter the number of the currency, and press
OK to get the result.
Health
Provides the reference of body mass index (height, weight and sex).
Stopwatch
The stopwatch has two modes - Split Timing and Lap Timing, and you
can view the records of both the modes.
Services
STK Service
This service is offered as the SIM card service provided by the network
operator.
Internet service
WAP enable you tour around the Internet world easily and pleasantly.
Please follow the steps described as below:
1. Homepage: The default Internet Web Address.
2. Bookmarks: Save the Web address you often use.
3. Recent Pages: Records after you browse the Website.
4. Offline Pages: You can view offline pages which you saved.
5. Input Address: Press the left soft key to access Enter Address, and
then input the web address to go to the Internet.
6. Service Inbox: Messages sent to users from the Web site.
7. Settings: You can configure Profiles, Browser Options, Service
Message Settings, Clear Cache, Clear Cookies and Trusted
Certificates.
33
Data Account
Press the left soft key to perform the following steps:
1. GSM Data: Edit the GSM account.
2. GPRS: Edit the GPRS account.

34
IMPORTANT INFORMATION
Use of Passwords
Your mobile phone and SIM card have various passwords. Those
passwords avoid unauthorized use of your phone and SIM card. You
can change PIN, PIN2 and phone password in the “Settings > Security
Settings”.
Phone Code
The Phone code can be used to avoid unauthorized use of your phone.
The factory setting for the phone code is 1122. If phone lock is enabled,
you will be asked to input the phone password when you switch on your
phone.
PIN (4 to 8 digits)
The PIN (Personal Identification Number) code protects your SIM card
from unauthorized use. The PIN code is usually supplied with the SIM
card. When the PIN code request is enabled, you will be asked for the
password every time the phone gets turned on.
If you enter incorrect PIN three times, the SIM card will be locked and
you will need to use the PUK to unlock it. PUK is usually set by the
network operator.
1. Enter the correct PUK to unlock the SIM card, and then enter the
new PIN and press OK.
2. If you are prompted to enter the new PIN again, enter it and press
OK.
3. If the PUK is correct, the SIM card will be unlocked and the PIN will
be reset.
PUK (8 digits)
The PUK (Personal Unblocking Key) code is required to change a
blocked PIN code. Please contact your network operator for the code.

35
Note: If you enter wrong PUK ten times, the SIM card gets invalid. In
that case, you have to consult with your network operator for a new SIM
card.
PIN2 (4 to 8 digits)
The PIN2 code, supplied with some SIM card, is used for some
functions, such as Call Cost, Fixed Dial and so on. Please consult your
network operator to confirm whether your SIM card supports those
services or not.
If you enter wrong PIN2 code for three times, the SIM card gets locked
and you will need PUK2 to unlock it.
1. Enter the correct PUK2 to unlock PIN2, and then enter the new PIN2
and press OK.
2. If you are prompted to enter the new PIN2 again, enter it and press
OK.
PUK2 (8 digits)
The PUK2 code, supplied with some SIM card, is required to change a
blocked PIN2 code. It may be supplied with the SIM card. If not, contact
your network operator.
Note: If you enter wrong PUK2 ten times, the SIM card will get invalid.
In that case, you have to consult your network operator for a new SIM
card.
Barring Code
To activate call barring, you need a Barring Code. You can obtain the
password from your service provider.
Battery Information
Charing and Discharging
The charger is designed to be used in temperatures between 0°C to
40°C.
Do not charge the phone in wet and damp conditions.
Use batteries and chargers approved by the Spice.
36
We strive to produce products in compliance with global
environmental standards
The charger meets the standard for safety of information technology
equipment and office equipment use. It must be used for this
purpose only.
Your phone is powered by a rechargeable battery. Full performance
of the battery is achieved only after two or three complete charge
and discharge cycles.
When the battery level is low, “Low Battery” will be displayed on the
LCD screen. If you have selected Alert Tone (Warning Tone of any
profile in Profiles), the phone will sound the alert tone.
When a charger is not in use, disconnect it from the power source.
Do not leave the battery connected to a charger for longer than 12
hours, since overcharging may shorten its life.
Temperature extremes will affect the ability of your battery to charge.
Tips for Battery
Placing the battery in hot or cold places, such as in a closed car in
summer or winter, will reduce the capacity and lifetime of the battery.
Do not let the metal contacts on the battery touch another metal
contact. It could short-circuit and damage the battery. Use the
battery only for its intended purpose.
Do not disassemble or modify the battery by yourself.
Do not clean the battery with water or any other organic solvent.
Always keep the battery dry.
The battery can be charged and discharged many times but it will
wear out as last. When the talk and standby time is obviously shorter
than normal, please change the original battery approved by
manufacturer.
Do not short-circuit the battery.
Turn off mobile phone before removing the battery.
Do not dispose of batteries in fire.

37
If you smell anything strange from the battery or find that the battery
is overheated, stop using it immediately and contact the authorized
Service Center in your region.
If you don’t use the battery for a long time, please fully charge the
battery before you store it.
Batteries should never be placed in municipal waste. Batteries
must be recycled or disposed off properly. Please follow the
regulations for disposal of batteries.
Usage & Maintenance
To keep your product working well, take a moment to review the
following usage & maintenance tips, which will help you to fulfill any
warranty obligations and to enjoy this product for many years.
Keep your phone and all its parts and accessories out of children’s
reach.
Your products are not water-resistant. Keep it dry. Precipitation,
humidity and liquids contain minerals that will corrode the
connectors.
Always treat your products with care and keep it in a clean and
dust-free place.
Do not expose your product to extreme high or low temperatures.
Your phone operates best in temperature between 15 °C and 25°C.
Minimum and maximum temperatures recommended by the
manufacturer are -10°C and 55°C.
Do not expose your product to open flames or lit tobacco products.
Do not attempt to disassemble or modify your product.
Do not drop, throw or try to bend your product.
Do not paint your product.
Do not use harsh chemicals, cleaning solvents, or strong detergents
to clean it.
Do not keep any magnetic thing, like credit cards, near your product.
If you find any crack on the battery, deformation or anything else,
stop using the battery immediately.
38
If the electrolyte leaks out and contact your skin or clothes, you
should immediately use soap and clean water to clean it. In case the
electrolyte spatters into your eyes, use clean water to wash your
eyes thoroughly and go to the hospital immediately.
If your phone or any accessory doesn’t function normally, please
send them to the nearest authorized service facility. The qualified
personnel will assist you, and if necessary, arrange for service.
Emergency Calls
This phone, like any wireless phone, operates using radio signals,
wireless and landline networks which cannot guarantee connection in
all conditions. Therefore, you should never rely solely upon any
wireless phone for essential communications (e.g. medical
emergencies)
To make an emergency call:
1> Switch on your phone.
Some networks may require that a valid SIM card is properly
inserted in the phone
2> Dial the official emergency number. Emergency numbers vary by
location.
While making an emergency call, please remember to give all
information as particularly as possible. Never disconnect the call until
you are given permission to do so.

39
APPENDIX
Appendix A: Guidance On Entry Methods
This phone provides several input methods which can be used in
editing the Phone Book, Short Messages, Memos, Greetings, Alarms
and other text applications.
The Icons of Input Methods
After entering different kinds of edit windows (including edit phonebook,
short messages. etc.), the icons of input are as follows:
“123”: The Entry method of Numeric appears as: “123”
“ABC”: The entry method of Multitap ABC appears as: “ABC”
“abc”: The entry method of Multiitap abc appears as: “abc”
“Abc”: The entry method of Multiitap Abc appears as: “Abc”
“ES”: The entry method of Multitap ES appears as: “ES”
“Es”: The entry method of Multitap ES appears as: “Es”
“es”: The entry method of Mulitap es appears as: “es”
“FR”: The entry method of Multitap FR appears as: “FR”
“Fr”: The entry method of Multitap FR appears as: “Fr”
“fr”: The entry method of Mulitap fr appears as: “fr”
How to Switch Between the Input Methods
Please press the left soft key to access Options > Input methods, to
switch the input methods.
E.g.: If the current input is abc the screen will show “abc”. Press the left
soft key to access Options > Input methods > 123, and the screen will
show “123”.
Press the “Abc” key to switch the uppercase and lowercase.
How to Input Special Symbols
If you want to input special symbols, such as " @ = < >”, Etc., please
press the “Sym” key at the left bottom of your keypad.

40
Appendix B: Troubleshooting
This section lists some problems that you might meet while using your
phone. If you feel that your phone do not operate normally, please reset
settings first, and then follow Troubleshooting Guide. If you are still
unable to solve problems, please contact the authorized service center
or the store from where you purchased the phone.
Problems Solutions
Can not
answer or
make a call
Make sure that the phone has been switched on.
Make sure that the battery is charged.
Make sure that the signal intensity is high enough.
Make sure the own number function in the call
setting is system preset or number sending.
Make sure the line switch in call setting is the
system preset line. Check whether you have set up
call barring or fixed dialing or any other safety
function.
Check whether you have set up call diverts. Check
whether you have inserted the proper SIM card
correctly.
Low voice Check if the volume has been set too low.
No ring
Check whether you have set up the” Silent” option.
Check whether the ring volume is not too low.
Move away from a noisy place to check if you can
hear the phone ringing.
Check whether you have set up call diverts.
T-Flash
card detect
slowly
Format your T-Flash card with your phone.
Note: To protect your files from getting lost, please
take the backup of important information before
formatting your card.
41
Appendix C: Available Accessories
Dual Stereo Personal Hands Free Handset
The Dual Stereo Personal Hands Free Handset allows you listen to
music or to make conversations with hands free comfort.
Travel Charger
You can charge the phone with the Travel Charger when you are on the
move.
Note: Please use approved accessories to get the most out of your
phone.
Appendix D: FCC Statement
This device has been tested and found to comply with Part 15 of the
FCC rules. Performance is subject to the following conditions:
1. This device may not cause harmful interference.
2. This device must accept any interference received, including
interference that may cause undesired operation.
3. Changes or modifications not expressly approved by the
manufacturer or authorized service center could void the user’s
authority to operate this equipment.
Certification information (SAR)
Your model wireless phone meets the governmental requirements for exposure to radio
waves.
Your mobile device is a radio transmitter and receiver. It is designed and manufactured to
not exceed limits for exposure to radio frequency (RF) energy set by the Federal
Communications Commission (FCC) of the U.S. overnment and by the Canadian
regulatory authorities. These limits are part of comprehensive guidelines and establish
permitted levels of RF energy for the general population. The guidelines are based on
standards that were developed by independent scientific organizations through periodic
and thorough evaluation of scientific studies. The standards include a substantial safety
margin designed for the safety of all persons, regardless of age or health, and to account
for any variations in measurements. The exposure standard for mobile devices employs a
unit of measurement known as the Specific Absorption Rate (SAR). The IEEE SAR limit
set by the FCC and by the Canadian regulatory authorities is 1.6 watts per kilogram
(W/kg), averaged over one gram of tissue. Tests for SAR are conducted using procedures
accepted by the FCC and by Industry Canada with the mobile device transmitting at its
highest certified power level in all tested frequencies. Although the SAR is determined at
the highest certified power level, the actual SAR level of the mobile device while operating
can be below the maximum value. This is because the mobile device is designed to
operate at multiple power levels so as to use only the power required to reach the network.
In general, the closer you are to a wireless base station, the lower the power output.
Before a mobile device is available for sale to the public in the U.S. and Canada, it must
be tested and certified to the FCC and Industry Canada that it does not exceed the limit
established by each government for safe exposure. The tests are performed in positions
and locations (e.g., at the ear and worn on the body) submitted to the FCC and available
for review by Industry Canada. The highest SAR value for this mobile device when tested
for use at the ear is 850/1900: 0.479 W/kg, and when worn on the body, as described in
this guide, is 850/1900: 0.249 W/kg. Body-worn measurements can differ, depending
upon available accessories and regulatory requirements. The SAR information includes
the Motorola testing protocol, assessment procedure, and measurement uncertainty
range for this product. While there may be differences between the SAR levels of various
mobile devices and at various positions, they meet the governmental requirements for
safe exposure. Please note that improvements to this product model could cause
differences in the SAR value for later products; in all cases, products are designed to be
within the guidelines.
NOTE: This equipment has been tested and found to comply with the limits for a Class B
digital device, pursuant to Part 15 of the FCC Rules. These limits are designed to provide
reasonable protection against harmful interference in a residential installation.
This equipment generates uses and can radiate radio frequency energy and, if not
installed and used in accordance with the instructions, may cause harmful interference to
radio communications. However, there is no guarantee that interference will not occur in a
particular installation. If this equipment does cause harmful interference to radio or
television reception, which can be determined by turning the equipment off and on, the
user is encouraged to try to correct the interference by one or more of the following
measures:
Reorient or relocate the receiving antenna.
Increase the separation between the equipment and receiver.
Connect the equipment into an outlet on a circuit different from that to which the
receiver is connected.
Consult the dealer or an experienced radio/TV technician for help.