Ubiquiti PBE5AC Access Point User Manual PowerBeam PBE 5AC 620 Quick Start Guide
Ubiquiti Networks, Inc. Access Point PowerBeam PBE 5AC 620 Quick Start Guide
Ubiquiti >
Contents
- 1. Manual 300
- 2. Manual 400
- 3. Manual 500
- 4. Manual 620 pt1
- 5. Manual Omni
- 6. Manual 620 pt2
- 7. Manual 620 pt3
- 8. Manual 620 pt4
- 9. UNII-2 300
- 10. UNII-2 400
- 11. UNII-2 500
- 12. UNII-2 620 part 1 of 4
- 13. UNII-2 620 part 2 of 4
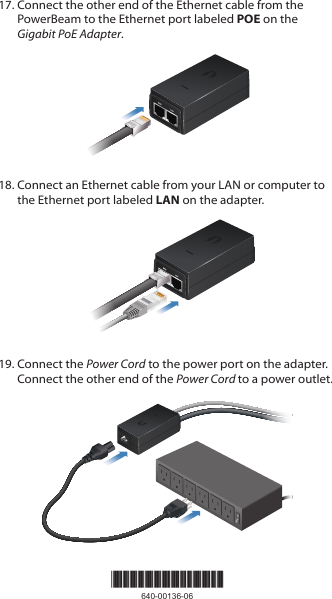
- 14. UNII-2 620 part 3 of 4
- 15. UNII-2 620 part 4 of 4
- 16. UNII-2 Omni
- 17. PBE-5AC300 User Manual
- 18. PBE-5AC400 User Manual
- 19. PBE-5AC500 User Manual
- 20. PBE-5AC-Omni
- 21. PBE-5AC620 User Manual Part 1 of 2
- 22. PBE-5AC620 User Manual Part 2 of 2
Manual 620 pt2