Trimble 614 Geo Explorer 2008 : XM/XT/XH User Manual GeoExpl2008 UserGde ENG

Trimble Navigation Ltd Geo Explorer 2008 : XM/XT/XH GeoExpl2008 UserGde ENG

Contents

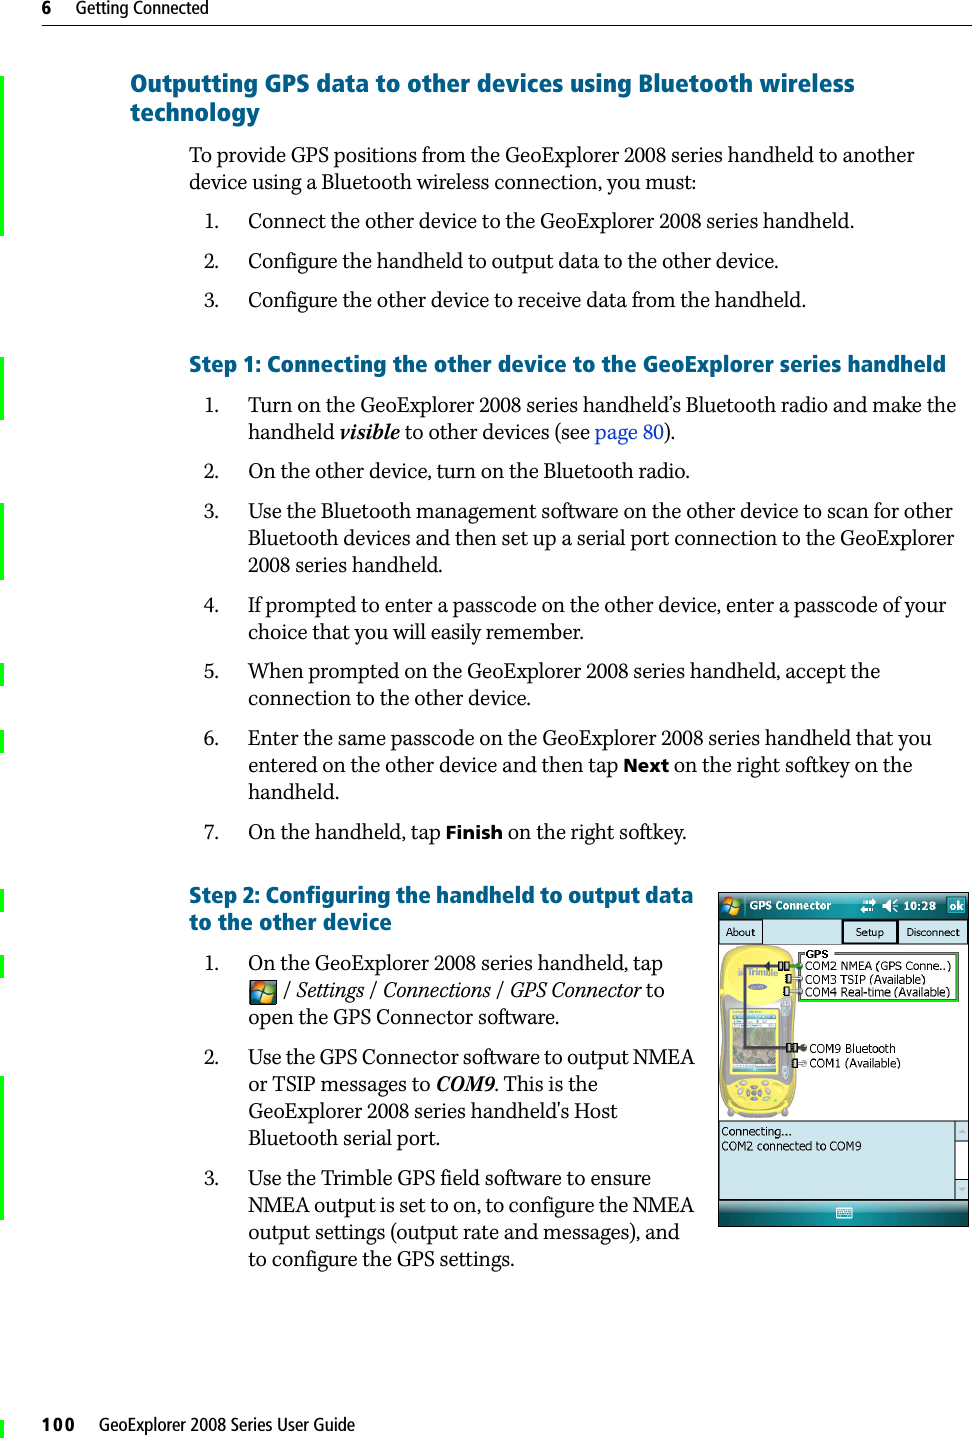
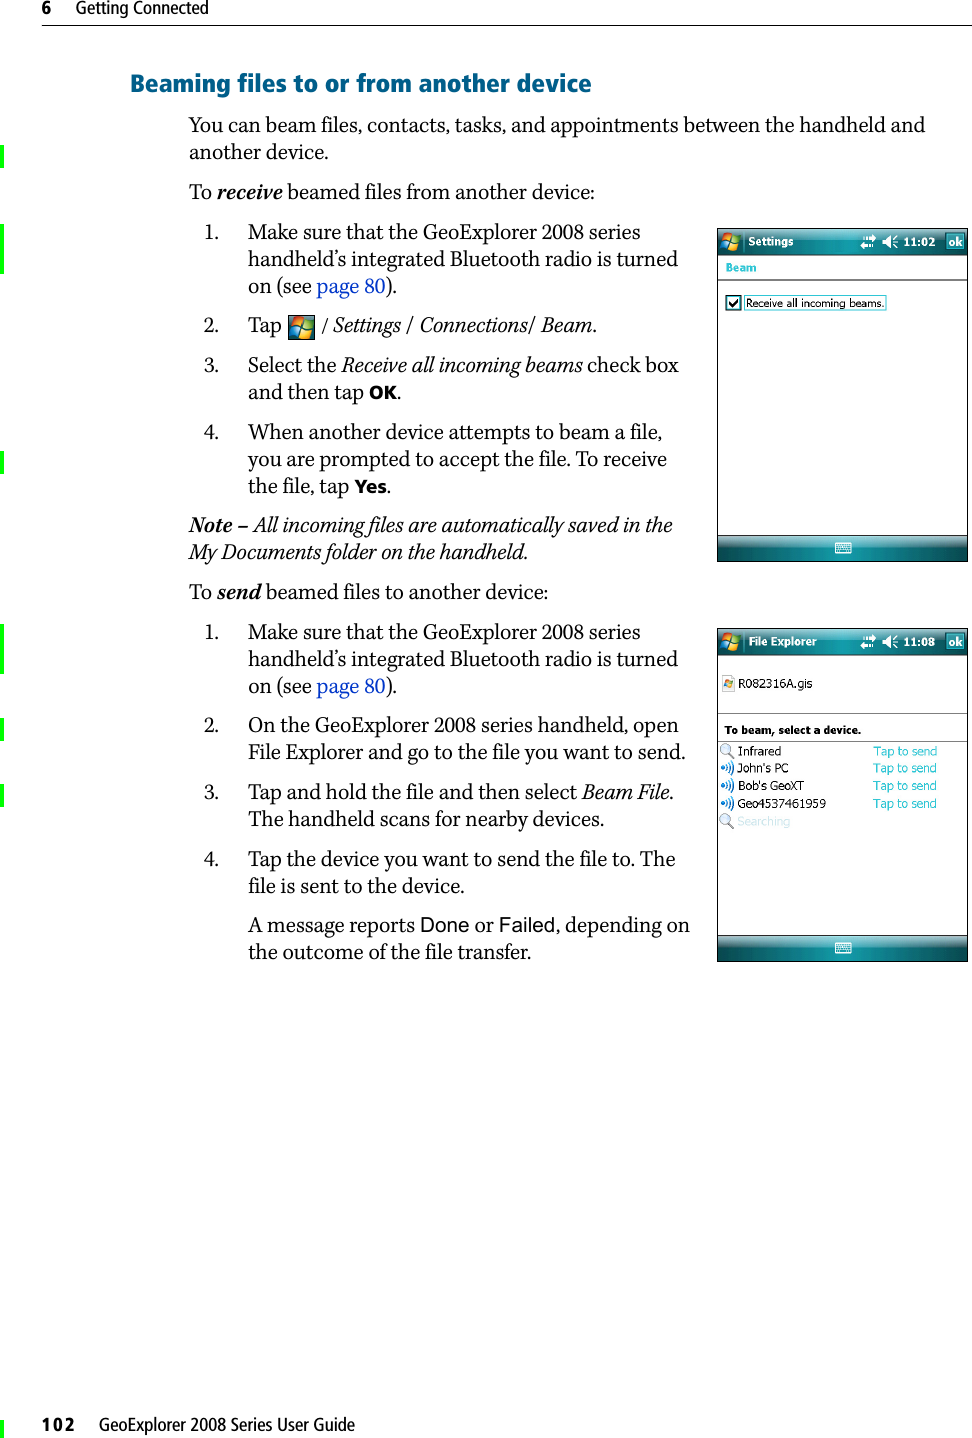
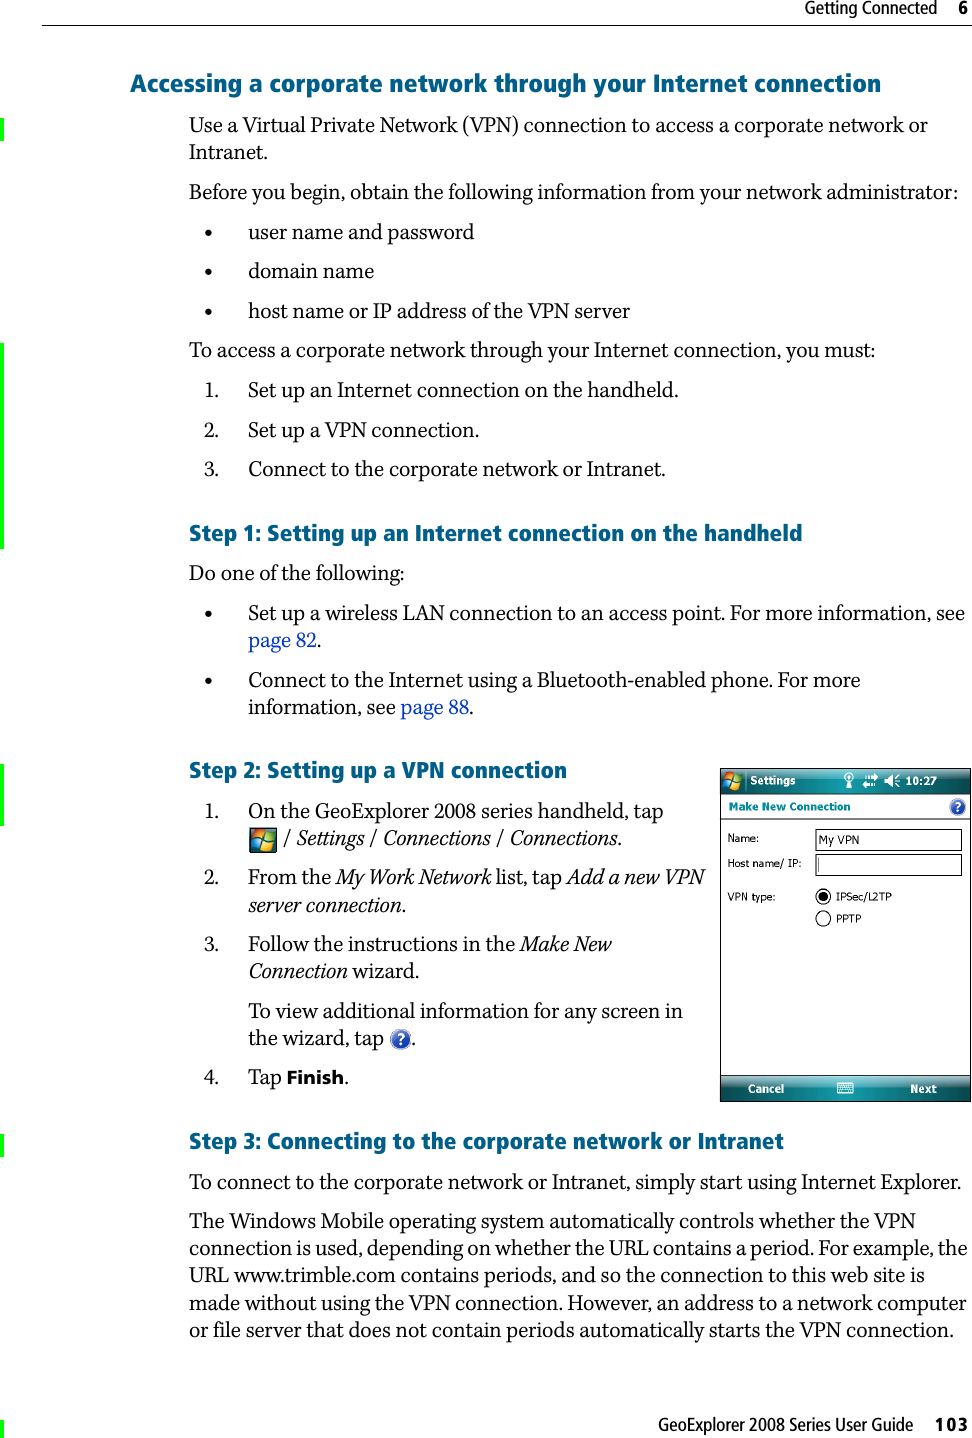
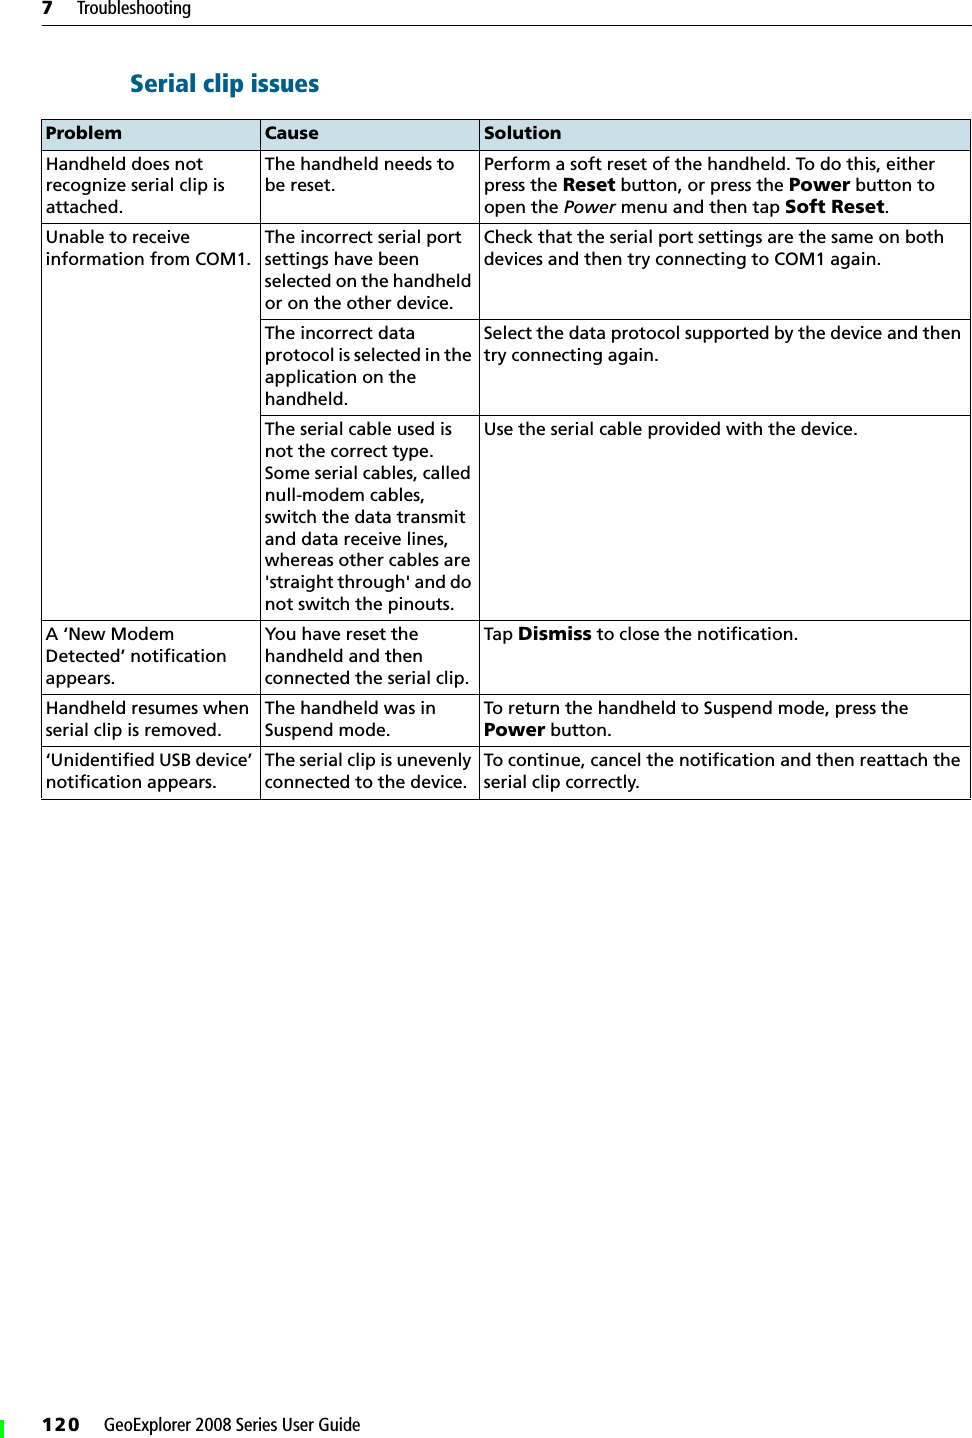
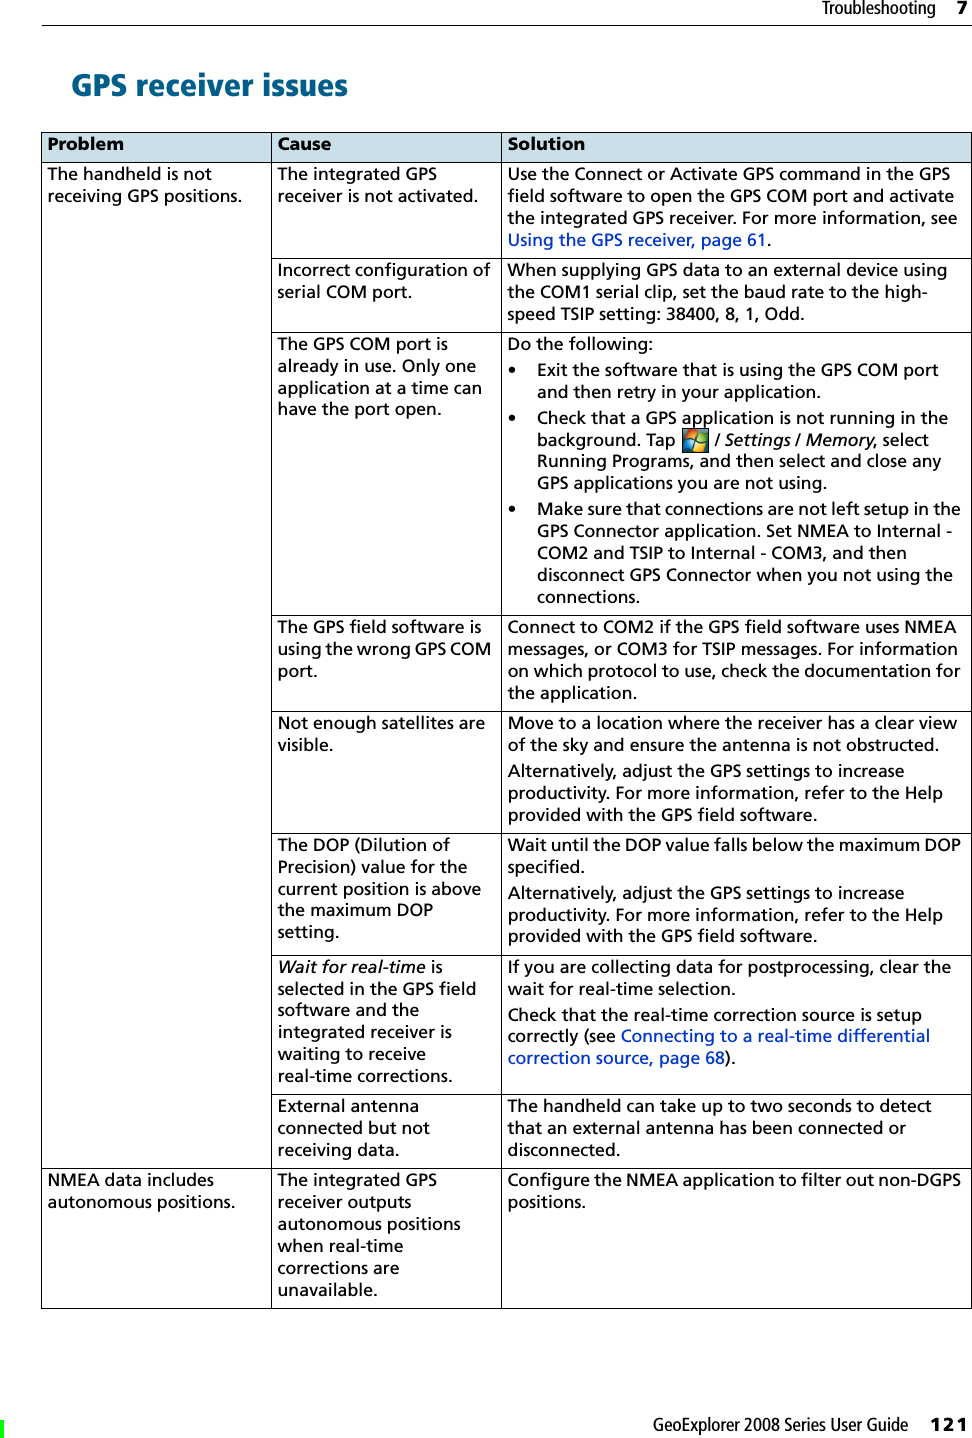
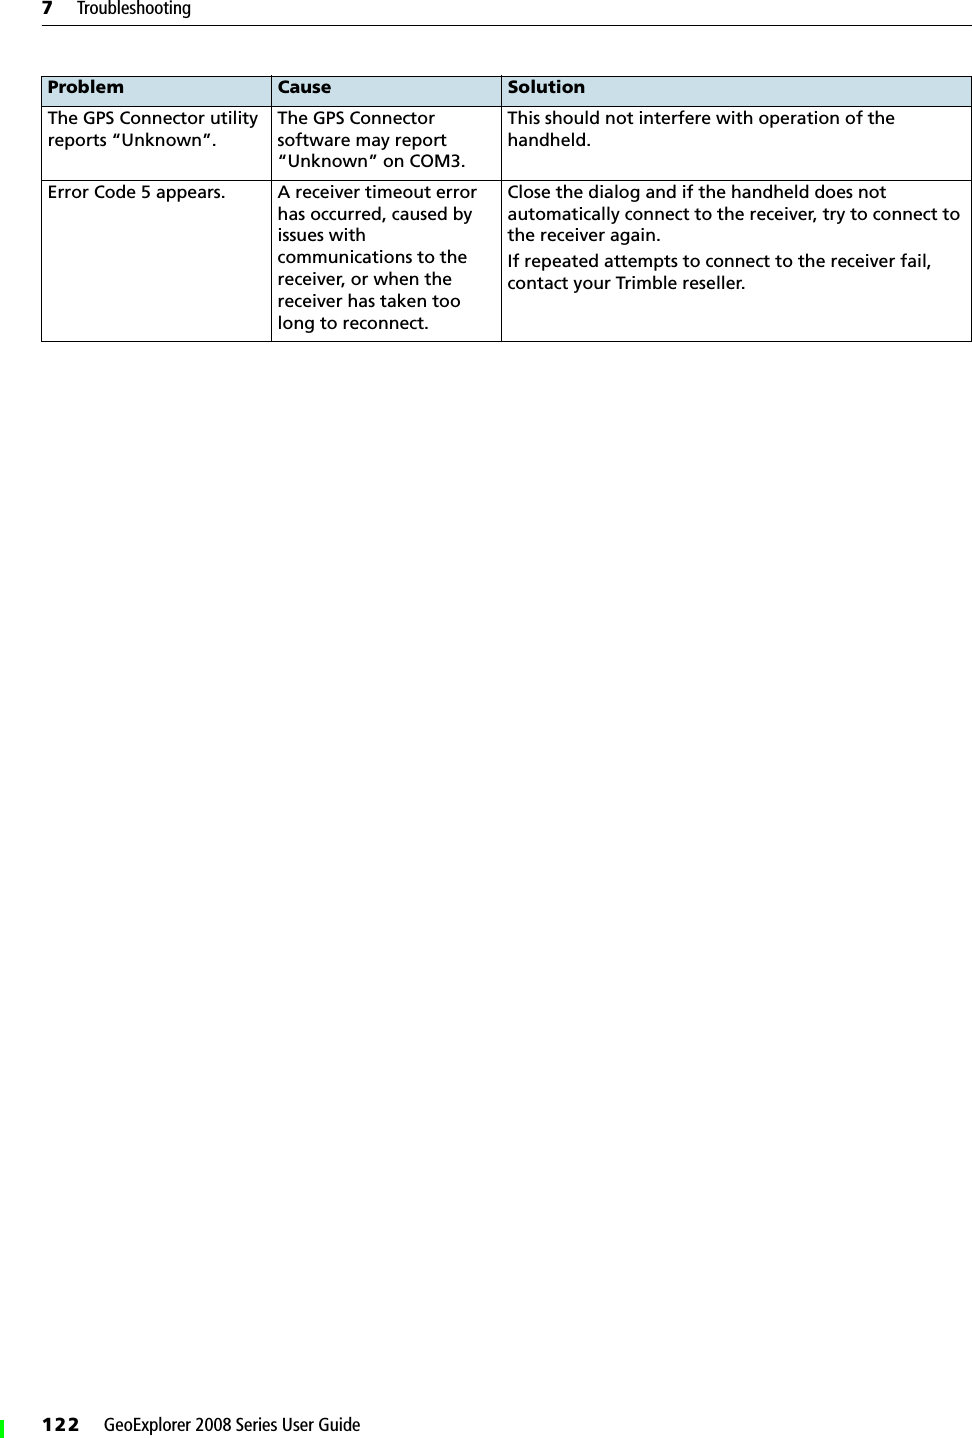
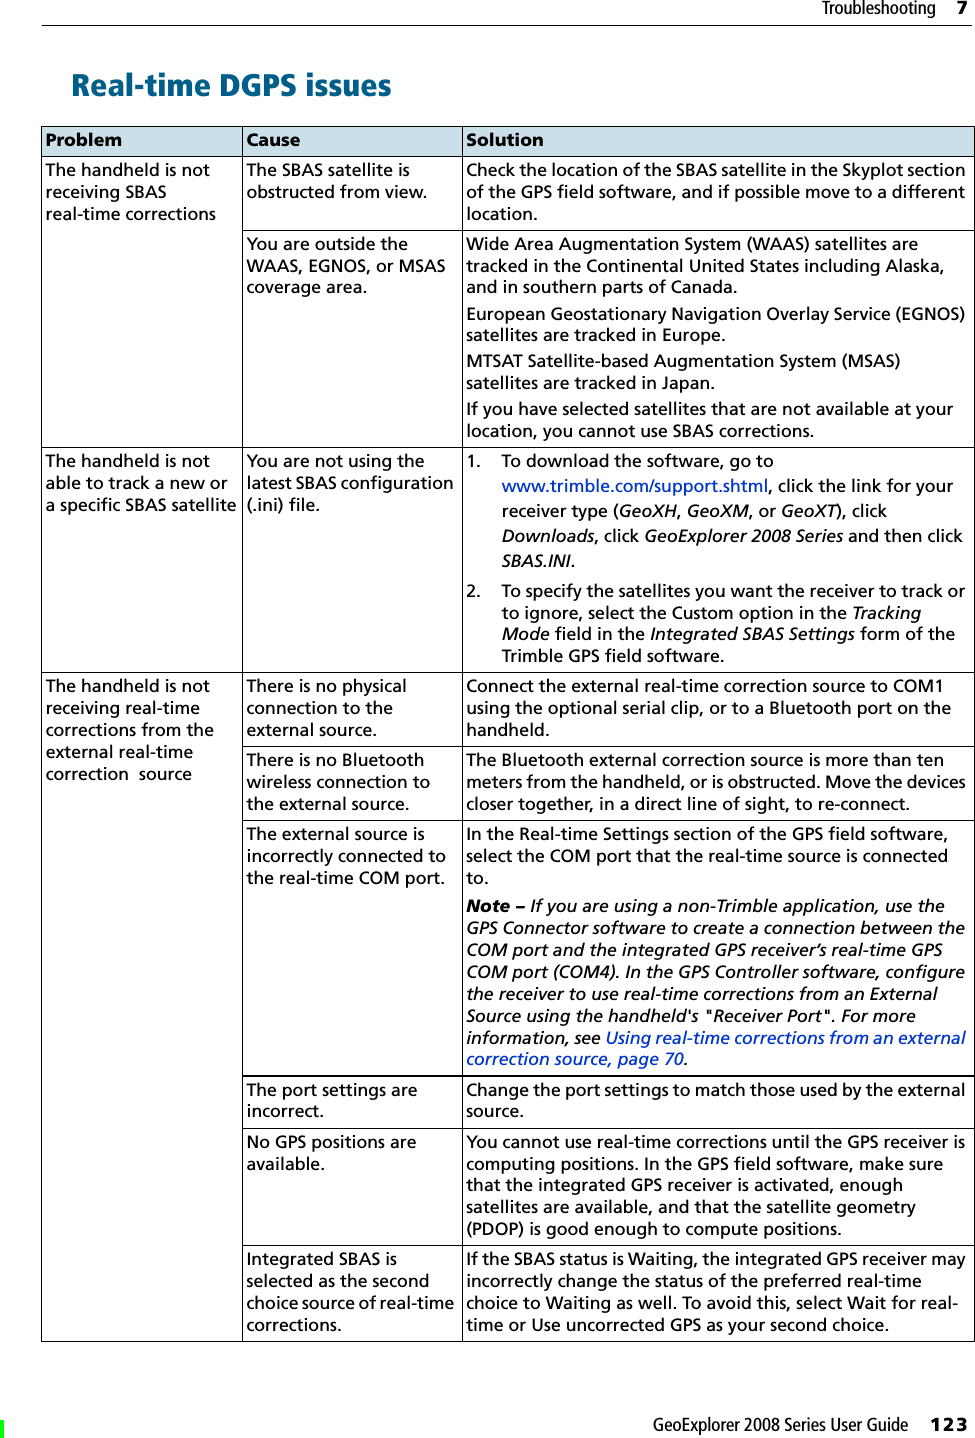
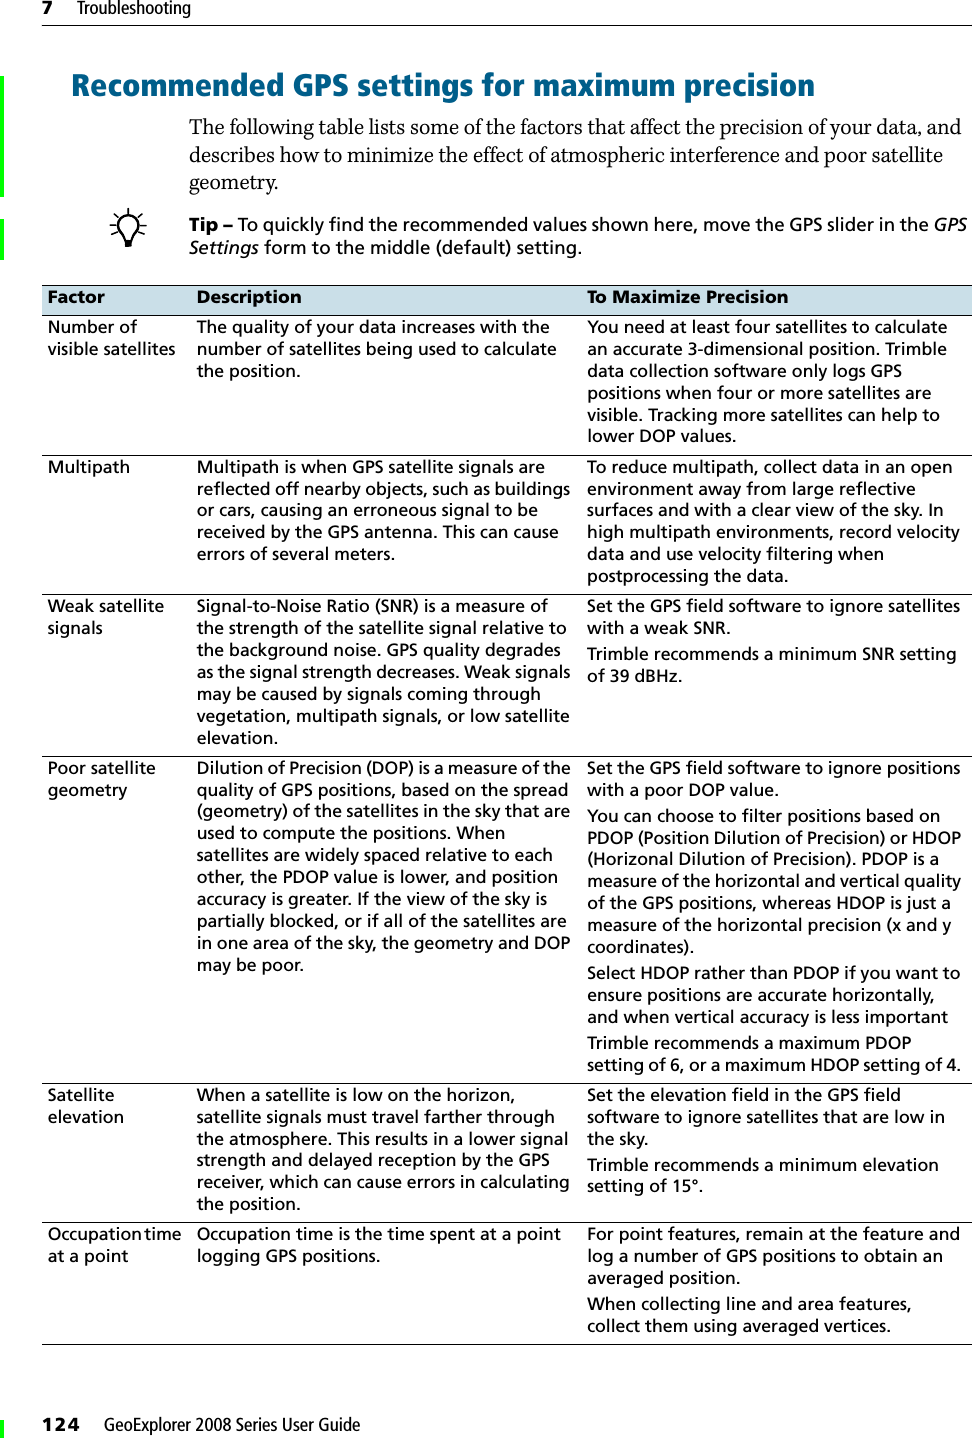
User Manual Part Three

GeoExplorer 2008 Series User Guide     75Using the GPS receiver     5For more information, refer to the documentation provided with the postprocessing software.Postprocessed real-time DGPSIf you collected data with decimeter or subfoot accuracy in real time, you do not need to postprocess the data.However, if your data files contain autonomous (uncorrected) positions as well as real-time corrected positions, Trimble recommends that you postprocess the data. During postprocessing, you can choose whether to correct only autonomous positions, or all positions. If you collected data with submeter accuracy in real time, Trimble recommends that you postprocess the data, as postprocessed data is often more accurate than data corrected in real time.For more information about GPS and DGPS, go to www.trimble.com/gps and review the All About GPS tutorial.
5     Using the GPS receiver76     GeoExplorer 2008 Series User GuideOutputting GPS data to external equipmentThe GPS Connector software is pre-installed on the GeoExplorer 2008 series handheld. Use the software to specify how the integrated GPS receiver communicates with equipment that is connected to one of the handheld’s external communications ports.To open GPS Connector, tap /Settings /Connections /GPS Connector. The GPS Connector software lets you connect the GPS COM ports to COM1 or Bluetooth ports and configure port settings such as the baud rate. GPS Connector software has a graphical display that shows all active connections, and a text display that shows connection messages.Use the GPS Connector software to output NMEA or TSIP messages from the integrated GPS receiver to another device, such as an external data collector. Note – If you are using a Bluetooth port, ensure that the Bluetooth radio is on and the handheld is visible to other devices.  Use the GPS Connector software to configure NMEA or TSIP output to Bluetooth - COM9, which is the pre-defined Bluetooth Host Serial Port. For more information, see Providing Bluetooth services as a host, page 107.  The connections that you create in the GPS Connector software are active only while the software is running. Connections created by the GPS Connector software are labeled GPS Connector in the status screen and end when you exit the software.For more information, refer to the GPS Connector Help.
CHAPTER6GeoExplorer 2008 Series User Guide     77Getting Connected 6In this chapter:QGeneral wireless connection informationQOptions for connecting wirelessly to other devices and networksQBluetooth wireless connections explainedQConnecting to other devices using the serial clipThe GeoExplorer 2008 series handheld includes an integrated wireless LAN radio and an integrated Bluetooth radio, and provides a number of options for connecting to networks and other devices.This chapter describes how to enable the radios, and the main connectivity options available.Use the table on page 81 to identify the wireless connection type you want to make and then follow the steps provided to connect to that device.You can use the handheld’s integrated wireless LAN radio to connect to the Internet or a corporate network using a wireless LAN (Local Area Network) connection.Alternatively, you can use Bluetooth wireless technology to connect to the Internet using a cellular phone and then receive real-time corrections from a VRS network or download background map data. You can also connect directly to other Bluetooth-enabled devices such as a GeoBeacon receiver, a laser rangefinder, or a barcode scanner.You can also use the optional serial clip to connect to external devices using a cabled serial connection.
6     Getting Connected78     GeoExplorer 2008 Series User GuideGeneral wireless connection informationThe GeoExplorer 2008 series handheld has an integrated wireless LAN radio compliant with IEEE 802.11 b/g  and  an integrated Bluetooth radio. The handheld is shipped with  the wireless LAN and Bluetooth wireless technology activated. To use the wireless LAN or Bluetooth radio,you need to turn it on (see Turning on and turning off the integrated radios below). Note – You may need to deactivate the wireless LAN and/or Bluetooth radio in the handheld (see below) if the country in which you are working does not approve the use of wireless LAN and/or Bluetooth wireless technology.Deactivating the integrated radiosNote – If you are unsure about whether the GeoExplorer 2008 series handheld’s radios are approved for use in your country, check with your Trimble reseller.Use the Radio Activation Manager software to deactivate the integrated wireless LAN and/or Bluetooth radio, or to reactivate the radios if they have been deactivated. The Radio Activation Manager software runs on an office computer. The latest copy of the software is available for download from the Trimble website. Go to www.trimble.com/support.shtml, click the link for your receiver type (GeoXH, GeoXM, or GeoXT), click Downloads, click GeoExplorer 2008 Series and then click Radio Activation Manager.Turning on and turning off the integrated radiosYou can use the Wireless Manager application to turn on and turn off the GeoExplorer 2008 series handheld's wireless LAN radio and/or Bluetooth radio (see Using the Wireless Manager, page 79).You can also turn on or turn off the Bluetooth radio from within the Bluetooth application (see Turning on and turning off the Bluetooth radio from within the Bluetooth application, page 80).To make the GeoExplorer 2008 series handheld visible to other Bluetooth-enabled devices and enable them to connect, see Making the handheld visible (discoverable) to other Bluetooth devices, page 80.
GeoExplorer 2008 Series User Guide     79Getting Connected     6Using the Wireless ManagerYou can use the Wireless Manager application to turn on and turn off the GeoExplorer 2008 series handheld's wireless LAN radio and/or Bluetooth radio.  You can turn on and turn off both radios at the same time, or control each radio individually.To open the Wireless Manager, do one of the following:  •Tap the Wi-Fi   icon or the Bluetooth icon    in the Today screen.•Tap  ,  , or   in the title bar and then tap Wireless Manager.•Tap / Settings /Connections /Wireless Manager.Turn on the wireless LAN radio and/or Bluetooth radio to be able to connect to other devices or networks.Turn off the wireless LAN radio and/or Bluetooth radio to prevent the handheld from sending or receiving wireless signals. BTip – To conserve power, turn off the wireless LAN radio and/or the Bluetooth radio when not in use.To turn on or turn off the radios using the Wireless Manager1. Open the Wireless Manager (see above).  2. Do one of the following:–Tap  All at the top of the screen to turn on both radios, or to turn off both radios if they are already on.–Tap Wi-Fi or Bluetooth to turn on the radio that you want to use, or to turn off the radio if it is already on.The status fields below the Wi-Fi button and the Bluetooth button change from Off when the radios are turned on and show the current state of the radio. The Wi-Fi status field shows Connecting or Available, and the Bluetooth status field shows On or Visible.3. Tap Done to exit the Wireless Manager.After you turn on the wireless LAN radio, the wireless LAN icon   appears in the title bar to indicate that the wireless LAN radio is enabled. A second icon   appears if a wireless LAN network is detected, and a Notification for the detected network may appear in the left softkey.
6     Getting Connected80     GeoExplorer 2008 Series User GuideTurning on and turning off the Bluetooth radio from within the Bluetooth application1. Tap / Settings / Connections /Bluetooth.  2. Tap the Mode tab.3. Select the Turn on Bluetooth check box to turn on the radio, or clear this check box to turn off the radio.4. Tap OK.Note – If the integrated Bluetooth radio is deactivated, the message Problem with Bluetooth hardware may appear when you try to turn on the Bluetooth radio or discover devices. Making the handheld visible (discoverable) to other Bluetooth devicesTo allow other Bluetooth-enabled devices to connect to the GeoExplorer 2008 series handheld, or if the handheld will not connect to or pair with another device you are attempting to connect to, you must make the handheld visible (this is sometimes referred to as “discoverable”).To make the handheld visible to other devices:1. Tap / Settings / Connections /Bluetooth.2. Tap the Mode tab.3. Select the Turn on Bluetooth check box, if it is not already selected. This enables the integrated Bluetooth radio.4. Select the Make this device visible to other devices check box. 5. Tap OK.
GeoExplorer 2008 Series User Guide     81Getting Connected     6Options for connecting wirelessly to other devices and networksThe GeoExplorer 2008 series handheld has an integrated wireless LAN radio and an integrated Bluetooth radio that you can use to connect to other devices and networks.When you are within range of an available wireless LAN access point, you can use a wireless LAN connection to connect to the Internet (at broadband speeds) or a corporate network to:•browse the Internet or an Intranet•send and receive e-mail and instant messages•access files on the network Access points are also known as “hotspots”. Wireless LAN is often referred to as Wi-Fi.You can use Bluetooth wireless technology to connect to other Bluetooth-enabled devices that are within range (typically within 5 m to 10 m of the handheld). You can connect to:•Bluetooth-enabled devices such as cellular phones to access the Internet and receive data ( for example, to obtain real-time corrections from a VRS network)•computers and other handheld devices to exchange files•other devices such as a GeoBeacon receiver, laser rangefinder or barcode scannerThe following table lists devices you can connect to using the handheld, and where to find detailed information on how to achieve these connections.Note – For information on connecting to external devices using the optional serial clip, see Connecting to other devices using the serial clip, page 109.Connection method To.. . See...Wireless LAN Connect to a wireless LAN access point page 82Bluetooth wireless technologyConnect to another Bluetooth-enabled device (paired and non-paired connections)page 84Connect to a Bluetooth-enabled phone for Internet access or real-time corrections (including VRS networks)page 88Connect to a Bluetooth-enabled serial device page 94Connect to an office computer to use ActiveSync technology page 97Output GPS data to other devices using Bluetooth wireless technology page 100Enable other devices to transfer files using Bluetooth wireless technologypage 101Beam files to or from another device page 102Wireless LAN or Bluetooth wireless technologyAccess a corporate network through your Internet connection page 103
6     Getting Connected82     GeoExplorer 2008 Series User GuideConnecting to a wireless LAN access pointTo connect to a wireless LAN access point, you must:1. Set up the wireless LAN connection2. Connect to the wireless LAN network or access point.Note – If you have installed a personal certificate on the handheld, you do not need to set up the wireless connection manually as described in Step 1. To connect to the network or access point go to Step 2: Connecting to the network or access point.Step 1: Setting up the wireless LAN connection1. Make sure that the GeoExplorer 2008 series handheld’s wireless LAN radio is enabled (see page 78). 2. Tap / Settings /Connections /Network Cards.3. Select the Wireless tab.   Any networks that you have already configured are displayed in the list of preferred networks. 4. To add a new network, tap Add New. To change the settings for an existing network, tap the network.5. Enter the name of the network and other connection details and then tap Next.6. To use authentication, select the authentication method from the Authentication list.7. To use data encryption, select an encryption method from the Data encryption list.8. To automatically use a network key, select the check box for The key is automatically provided. Otherwise, enter the network key.9. Tap Next.10. For increased security, select the Use IEEE 802.1x network access control check box and then configure additional authentication information. 11. Tap Finish. Step 2: Connecting to the network or access point1. Remove the handheld from the support module, as the handheld prioritizes a USB connection over a wireless LAN connection.2. Bring the handheld within range of the network or access point.When a wireless LAN is detected, the access point icon   on the title bar is animated, and a notification message appears on the left softkey.
GeoExplorer 2008 Series User Guide     83Getting Connected     6If the access point icon or the notification does not appear, use the Wireless Manager to turn off and then turn back on the wireless LAN radio. When the wireless LAN radio is turned on, any networks or access points within range are detected and the icon and notification appear.3. Tap the access point icon on the title bar or tap Notification on the left softkey. A popup message shows the available networks.4. Select the network you want to connect to and then tap OK on the left softkey.5. Select The Internet (or work via a VPN) or Work and then tap Connect on the left softkey.6. If a Network Log On screen appears, enter your user name, password, and domain information and then tap OK on the left softkey.When the handheld is connected to the network or access point, the wireless LAN connected icon   appears in the title bar.7. Start using the program you want to use, for example Windows Explorer Mobile or Internet Explorer. Note – To disconnect from the network or an access point at any time, turn off the handheld’s wireless radio. To do this, tap the wireless LAN connected icon   in the title bar, select Wireless Manager and then tap the Wi-Fi button.BTip – To delete a wireless LAN connection, tap and hold the connection in  the Wireless tab of the Network Cards screen and then select Delete.
6     Getting Connected84     GeoExplorer 2008 Series User GuideConnecting to a Bluetooth-enabled device  To use another Bluetooth-enabled device with the GeoExplorer 2008 series handheld, you must form a Bluetooth connection between the two devices, during which you  select the type of service to use for the connection.  This defines how the devices will communicate with each other.After forming the Bluetooth connection between the devices you may need to configure settings for the connection such as the COM port for the field software to use, or the number for the phone to dial. You must then connect to the other device using the appropriate software application.To connect the GeoExplorer 2008 series handheld to another Bluetooth-enabled device, you can use either a paired connection or a non-paired connection.Note – If you are connecting to a phone, skip this section and go to Connecting to a Bluetooth-enabled phone for Internet access or real-time corrections (including VRS networks) on page 88, where the pairing step is described as part of the procedure for connecting to a phone.Trimble recommends using a paired connection, if pairing is supported by the other device, as a paired connection creates a more secure connection and makes reconnecting to the device easier. For more information, see Pairing with a Bluetooth-enabled device below.Some devices, such as a Trimble GeoBeacon receiver, do not support paired connections. Use a non-paired connection if the device does not have a keyboard, and if you know that the device does not automatically exchange a pre-programmed passkey during pairing. For more information, see Setting up a connection to a non-paired device, page 86.To connect the GeoExplorer 2008 handheld to the other device, do one of the following:•Pair with a Bluetooth-enabled device (see below)•Set up a connection to a non-paired device (see page 86)Pairing with a Bluetooth-enabled devicePairing the handheld with another Bluetooth-enabled device creates a permanent security bond between the devices, which helps to exchange information securely between the devices. The paired relationship is established when two devices create and exchange a link key. Once the relationship is established, the handheld and the other Bluetooth device only need to have their Bluetooth radios turned on to exchange information; they do not need to be visible to other devices.To pair with a Bluetooth device:1. Make sure that the handheld and the Bluetooth device you want to pair with are within five meters of each other, and that the Bluetooth radio in each device is turned on.2. On the GeoExplorer 2008 series handheld, tap  / Settings / Connections / Bluetooth.
GeoExplorer 2008 Series User Guide     85Getting Connected     63. In the Devices tab, tap Add new device. The handheld searches for other Bluetooth devices and displays them in the list.If the device you are trying to connect is not displayed in the list, ensure that the device is on and within range and then tap Refresh to search for devices again. 4. Tap the name of the device you want to pair with and then tap Next on the right softkey.5. In the Passcode field, enter a passcode of between 1 and 16 characters. If you are connecting to:–a device with a keypad, enter a passcode of your choice.–a device without a keypad, but you know that the device has a pre-programmed passcode that will be exchanged, enter that passcode on the GeoExplorer handheld.Note – Trimble recommends that you enter only numbers, as some devices do not support passcodes that include letters.6. Tap Next on the right softkey.7. When prompted, enter the same passcode on the other device.On the handheld, the Partnership Settings screen appears.8. If required, change the name of the device in the Display Name field.9. Select the service(s) you want to use with this device. For example, if you are connecting to:–a Bluetooth-enabled phone to connect to the Internet and receive real-time corrections or download background maps, select Dialup Networking (DUN).–a serial device, such as a GeoBeacon receiver or a laser rangefinder, select Serial Port.–a computer to access ActiveSync technology, select ActiveSync.Note – For more information on the types of devices that the GeoExplorer 2008 series handheld can connect to, and the supported Bluetooth services, see Connecting to a Bluetooth device as a client, page 105.10. Tap Finish on the right softkey.11. Tap OK in the top right corner of the screen to close the Bluetooth application.12. Tap   in the top right corner to close the Settings screen.
6     Getting Connected86     GeoExplorer 2008 Series User GuideYou have now created a partnership between the GeoExplorer 2008 handheld and the other Bluetooth-enabled device so that they can communicate. To start using the connection, you must complete the configuration steps for that type of connection and then connect to the device. For more information, see: •Connecting to a Bluetooth-enabled phone for Internet access or real-time corrections (including VRS networks), page 88•Connecting to a Bluetooth-enabled serial device, page 94•Connecting to an office computer to use ActiveSync technology, page 97BTip – You only need to pair the handheld with a device before you connect to the device for the first time. Setting up a connection to a non-paired deviceSetting up a connection to a non-paired device enables you to connect to a device that does not allow you to enter a passcode on the device, or that does not automatically exchange a pre-programmed passkey during pairing.To set up a non-paired connection to a Bluetooth-enabled device:1. Make sure that the handheld and the Bluetooth device you want to connect to are within five meters of each other, and that the Bluetooth radio in each device is turned on.2. Tap  / Settings / Connections /Bluetooth.3. In the Devices tab, tap Add new device. The handheld searches for other Bluetooth devices and displays them in the list.4. Tap the name of the device you want to connect to and then tap Next on the right softkey. The Enter Passcode screen appears.5. Tap Next without entering a passcode. 6. If prompted to add the device to your device list, tap No. The Partnership Settings screen appears.7. If required, change the name of the device in the Display Name field.8. Select the service(s) you want to use with this device. For example, if you are connecting to:–a Bluetooth-enabled phone to connect to the Internet and receive real-time corrections or download background maps, select Dialup Networking (DUN).–a serial device, such as a GeoBeacon receiver or a laser rangefinder, select Serial Port.
GeoExplorer 2008 Series User Guide     87Getting Connected     6–a computer to access ActiveSync, select ActiveSync.Note – For more information on the types of devices that the GeoExplorer 2008 series handheld can connect to, and the supported Bluetooth services, see Connecting to a Bluetooth device as a client, page 105.9. Tap Finish on the right softkey.10. Tap OK in the top right corner of the screen to close the Bluetooth application.11. Tap   in the top right corner to close the Settings screen.You have now created a partnership between the GeoExplorer 2008 handheld and the other Bluetooth-enabled device so that they can communicate. To start using the connection, you must complete the configuration steps for that type of connection and then connect to the device. For more information, see: •Connecting to a Bluetooth-enabled phone for Internet access or real-time corrections (including VRS networks), page 88•Connecting to a Bluetooth-enabled serial device, page 94•Connecting to an office computer to use ActiveSync technology, page 97
6     Getting Connected88     GeoExplorer 2008 Series User GuideConnecting to a Bluetooth-enabled phone for Internet access or real-time corrections (including VRS networks)       Use the GeoExplorer series handheld’s Bluetooth radio to connect to a Bluetooth-enabled cellular phone and then connect to the Internet. Use this type of connection to access a VRS network or other correction source from the Internet, a background map server, or for Internet and email access.Note – Some cellular phones support the Bluetooth PAN (Personal Area Networking) service as well as the Bluetooth DUN (Dialup Networking) service. Because DUN connections are more common, this section assumes you are making a dialup network connection with the Bluetooth-enabled phone.To connect to a Bluetooth-enabled phone using a Bluetooth DUN (Dialup Networking) connection, you must:1. Connect the GeoExplorer 2008 series handheld to a Bluetooth-enabled phone and then configure the connection to the dialup network.2. Connect to the Internet using the dialup network.3. Configure the software to use the connection. For example, you must configure the GPS field software to use real-time corrections or map data received from the Internet source, or you must set up the Messaging application to send and receive email using the connection.Note – Before you begin the steps below, Trimble recommends that you confirm that the phone can access the Internet directly. If necessary, contact the cellular phone provider and confirm whether you must enter a user name, password, and domain details when connecting an external device to the phone using Bluetooth dialup networking.Step 1: Connecting the handheld to the phone and configuring the connection to the dialup network1. Make sure that the handheld and the Bluetooth device you want to connect to are within five meters of each other, and that the Bluetooth radio in each device is turned on. For more information, see Turning on and turning off the integrated radios, page 78.2. On the handheld, tap  / Settings / Connections /Connections.3. Below My ISP, tap Add a new modem connection.
GeoExplorer 2008 Series User Guide     89Getting Connected     64. Enter the name for the connection. For example, enter the name of the phone or the VRS network that you will connect to. 5. From the Select a Modem dropdown list, select Bluetooth and then tap Next on the right softkey.6. If the phone you want to connect to is:–listed, go to Step 7 below. –not listed:a. Tap Add new device. The handheld searches for other Bluetooth devices and displays them in the list.If the handheld’s integrated Bluetooth radio is turned off, it is now automatically turned on.b. From the list of available devices, select the device you want to connect to and then tap Next on the right softkey.c. To pair with the phone, enter a passcode of your choice that you will easily remember onto the handheld and then tap Next on the right softkey.d. When prompted by the phone, enter the same password and then accept the connection.e. On the GeoExplorer 2008 series handheld, in the Partnership Settings screen, make sure that Dialup Networking (DUN) is selected and then tap Finish on the right softkey.You have now created a partnership between the GeoExplorer 2008 series handheld and the phone so that they can communicate.7. From the My Connections list, select the phone that you want to configure the connection to.8. Enter the GPRS access number for the Internet. Two of the common GPRS access numbers for cellular phones on GSM networks are *99***1# and *99#. If these access numbers do not work, contact the cellular phone provider to obtain the appropriate number to use.Note – You do not need to set up dialling rules or change the Internet connection settings on the phone. The connection settings you enter on the handheld are passed to the phone to use for this connection.9. Tap Next on the right softkey.
6     Getting Connected90     GeoExplorer 2008 Series User Guide10. Unless the phone provider confirmed that you must enter user name, password, and domain settings to access the Internet, tap Finish on the right softkey without entering any information in this screen. Otherwise:a. Enter the required information. b. If the phone provider has told you that you need to change the baud rate or other settings for the connection, tap Advanced, configure these settings and then tap OK in the top right corner of the screen.c. Tap Finish on the right softkey.You are returned to the Connections screen.You have now configured the dialup networking connection.Step 2: Connecting to the Internet using the dialup network1. On the handheld, go to the Connections screen, if it is not already open (tap  / Settings / Connections /Connections).2. Below My ISP, tap Manage existing connections. 3. Tap and hold the connection you want to use and then select Connect. 4. Unless the phone provider confirmed that you must enter user name, password, and domain settings to access the Internet, tap OK on the left softkey without entering any information in this screen. Otherwise, enter the required information and then tap OK on the left softkey.5. If the phone prompts for confirmation to connect to the Internet, accept the connection.The phone dials the configured GPRS access number and then connects to the Internet. A Connectivity notification appears on the handheld as the connection is being made.After the connection is made you are returned to the My ISP screen.To confirm that the GeoExplorer series handheld is connected to the phone, or to check the status of the connection at any time, tap the Connectivity icon   in the title bar. The notification shows the name of the current connection, and the time elapsed since the connection was made. To hide the notification, tap Hide.Note – If you have an active wireless LAN connection, the connectivity icon appears as  instead. 6. Tap OK in the top right corner of the screen to close the My ISP screen.7. Tap OK in the top right corner to close the Connections screen.8. Tap   in the top right corner to close the Settings screen.
GeoExplorer 2008 Series User Guide     91Getting Connected     6To check the connection status at any time, tap the   or   icon in the title bar.To end the connection at any time, tap the   or   icon in the title bar and then tap Disconnect.To connect to a corporate network or Intranet, see page 103.To send and receive email messages, see Messaging, page 49.Step 3: Configuring the GPS field software to use data received from the Internet sourceNow that you have connected the GeoExplorer 2008 series handheld to the Internet using a Bluetooth-enabled cellular phone, you must configure the software to use the connection to receive data.To use real-time corrections in Trimble field software, see Using real-time corrections from the Internet below.To use background map data in the TerraSync software, see Downloading background map files from an Internet map server, page 93.Using real-time corrections from the Internet1. Start the Trimble GPS field software and then open the Setup section.2. Tap Real-time Settings. The Real-time Settings form appears.3. From the Choice 1 field, select External Source.4. Configure the external source:a. Tap the Setup button   beside the Choice 1 field. The External Source Settings form appears. b. From the Correction Datum field, select the same datum as the VRS network coordinate system.c. From the Type field, select:–VRS if the real-time correction source is a VRS network. –Single Base if the real-time correction source is a single base station that broadcasts its corrections over the Internet.d. From the Connection Method field, select Internet.
6     Getting Connected92     GeoExplorer 2008 Series User Guidee. In the Address field, enter the IP address or URL of the VRS network or the server that is supplying the corrections from the VRS network.Typically, the IP address or URL of a VRS network has the format 10.3.123.456:1234, where the digits before the colon (:) are the address, and the digits after the colon (:) are the port number.f. In the Port field, enter the port number that you will use to connect to the server.g. If you are connecting to a VRS network through a broadcast server, tap the Setup button   beside the Source field. The GPS field software attempts to establish a connection to the broadcast server. If the connection is successful, the Select Server form appears. Select the server that you want to use and then tap OK to return to the External Source Settings form. h. If you selected a VRS network that requires authentication, the Name and Password fields appear. Enter the user name and password that you obtained from the service provider.i. From the Connection Control field, select: –Auto if you want the GPS field software to automatically establish and end connections to the VRS network as necessary. –Manual if you want to connect or disconnect only when you tap Ext Source in the Setup screen.j. Tap OK to confirm the settings and return to the Real-time Settings form.5. Tap OK to confirm the real-time settings and return to the main screen of the Setup section.If you selected Auto in the Connection Control field, the Ext Source button is depressed and the software attempts to connect to the server.6. If you selected Manual in the Connection Control field, tap the Ext Source button that appears below the Status bar in the Setup section to connect the Trimble GPS field software to the Internet correction source.BTip – To disconnect or reconnect to the server at any time, tap Ext Source.  To view the status of the real-time correction source, open the Status section, select the Real-time subsection and then select External from the Summary list button.
GeoExplorer 2008 Series User Guide     93Getting Connected     6Downloading background map files from an Internet map server1. Make sure that the coordinate system selected in the TerraSync software matches the coordinate system of the map server.2. In the Map section of the TerraSync software, pan or zoom to make sure that the area for which you want a background image is displayed on the map. If the map server covers the area you are in, it will provide a background image that matches the current map extents.3. Tap Layers and then select Background files. The Background Files form appears. 4. In the Location field select Internet and then use the fields that appear to specify the Map Server type, the URL of the server, the service, and the layers from that service that you want to download. 5. Tap OK to close the Background File form and download the selected background map. This may take some time. When a download is in progress, an icon   appears in the top left corner of the map. Once the background file is downloaded, the hourglass icon appears until the downloaded image is rendered and becomes visible.If you pan or zoom beyond the extents of the downloaded image, new images are downloaded automatically and displayed in the background of the map. To stop automatic downloading of background files, either clear the address of the map server from the URL field, or set the Location field to Default and then clear the check box next to any files.Reconnecting to the InternetTo reconnect to the Internet at any time after setting up the connection, repeat the steps listed under Step 2: Connecting to the Internet using the dialup network on page 90.If you selected Auto in the Connection Control field of the Trimble GPS field software, the software automatically connects to the Internet source that is providing real-time differential corrections.To  manually reconnect the Trimble GPS field software to the Internet source that is providing real-time differential corrections, open the software and then tap the Ext Source button that appears below the status bar in the Setup section.
6     Getting Connected94     GeoExplorer 2008 Series User GuideConnecting to a Bluetooth-enabled serial deviceUse Bluetooth wireless technology to receive data from a Bluetooth-enabled serial device, such as a GeoBeacon receiver or a laser rangefinder.To connect to a Bluetooth-enabled serial device, you must:1. Connect to the Bluetooth-enabled serial device.2. Configure the COM port on the handheld to use for the connection.3. If necessary, configure the GPS field software to use data received from the serial device.Step 1: Connecting to the Bluetooth-enabled serial deviceConnect the handheld to the Bluetooth-enabled device, selecting the Serial Port service if it is not already selected (see Connecting to a Bluetooth-enabled device, page 84).Step 2: Configuring the COM port to use on the handheld1. On the GeoExplorer 2008 series handheld, tap  / Settings / Connections /Bluetooth.2. Tap the COM Ports tab. 3. Tap New Outgoing Port. 4. Select the device you want to set up the connection to and then tap Next on the right softkey.5. Select the COM port on the GeoExplorer handheld to use for the connection.The GeoExplorer 2008 series handheld has three COM ports (COM5, COM6, and COM7) available for connections out to Bluetooth-enabled serial devices.6. Do one of the following:–To communicate with any device, for example if you have formed this connection without pairing to a device, clear the Secure Connection check box.–To communicate only with devices with which the handheld has a Bluetooth partnership, select the Secure Connection check box.7. Tap Finish on the right softkey.8. Tap OK in the top right corner to close the Bluetooth application.9. Tap   in the top right corner to close the Settings screen.
GeoExplorer 2008 Series User Guide     95Getting Connected     6Step 3: Configuring the GPS field software to use data from the serial deviceOnce you configure the connection between the GeoExplorer 2008 series handheld and the Bluetooth-enabled serial device, you must configure the software to use the connection to receive data.To use real-time corrections in Trimble field software, see Using real-time corrections from an external serial device below.To use an Bluetooth-enabled external sensor such as a laser rangefinder or a barcode scanner in TerraSync software, see Using data from an external source in the TerraSync software, page 96.Using real-time corrections from an external serial device1. Start the Trimble GPS field software and then open the Setup section.2. Tap Real-time Settings. The Real-time Settings form appears.3. From the Choice 1 field, select External Source.4. Tap the Setup button   beside the Choice 1 field. The External Source Settings form appears. 5. From the Correction Datum field, select the datum used by the correction source to calculate corrections. Trimble recommends that you select NAD 1983 (Conus) CORS96 if you are using a US Coast Guard beacon service, or WGS84 for any other beacon service.6. From the Type field, select Single Base.7. From the Connection Method field, select Serial Port.8. From the Port field, select the name of the COM port that you selected in the Bluetooth application when you set up the connection to the serial device.9. Tap OK to confirm the external source settings and return to the Real-time Settings form.10. Tap OK to confirm the real-time settings and return to the main screen of the Setup section.The real-time correction source is now set up for use. The TerraSync software automatically connects to the correction source when you run the software, and automatically disconnects from the  source when you close the software. To manually disconnect from the correction source at any time, go to the Real-time Settings form and from the Choice 2 field select Use Uncorrected GPS.To view the status of the real-time correction source, open the Status section, select the Real-time subsection and then select External from the Summary list button.
6     Getting Connected96     GeoExplorer 2008 Series User GuideUsing data from an external source in the TerraSync software To configure the TerraSync software to use data from an external source, for example, a laser rangefinder or barcode scanner:1. Start the TerraSync software and then open a data file.2. In the Setup section, tap External Sensors. The External Sensors form appears. 3. If you are connecting to:–a laser rangefinder, select the Laser check box and then tap the Properties button beside the Laser check box. The Laser Properties form appears.–a barcode scanner or other external sensor, select the Sensor 1 or Sensor 2 check box and then tap the Properties button beside the appropriate check box. The Sensor Properties form appears.4. If you are connecting to a barcode scanner or other external sensor, enter a name for the connection in the Name field.5. From the Port drop-down list, select the name of the COM port that you selected in the Bluetooth application when you set up the connection to the  device.6. Tap OK to confirm the sensor settings and return to the External Sensors form.7. Tap OK to confirm the settings and return to the main screen of the Setup section.8. The external sensor is now setup for use and can be used to add data as attributes into an open file in TerraSync. The device is automatically connected and disconnected when data files in TerraSync are opened and closed.To check the status of the connection, select the Comms subsection in the Status section of the GPS field software .
GeoExplorer 2008 Series User Guide     97Getting Connected     6Connecting to an office computer to use ActiveSync technology    Instead of using a USB or serial cable to physically connect to an office computer, you can use Bluetooth wireless technology to connect to ActiveSync technology or the Windows Mobile Device Center on a Bluetooth-enabled office computer.Note – Not all Bluetooth devices and Bluetooth management software support ActiveSync connections. Check with the manufacturer of the office computer for compatibility. Note – The exact steps required may vary depending on the office computer.To connect to a office computer to use ActiveSync with a Bluetooth connection, you must:1. Set up the connection to the computer.2. Connect to ActiveSync using Bluetooth wireless technology.Step 1: Setting up the connection to the computer1. From the Bluetooth user interface on the office computer, make sure that the computer allows itself to be discovered by other Bluetooth devices.2. Configure the ActiveSync software on the office computer to connect to the correct Bluetooth port. The steps required depend on the operating system installed on the office computer. If the office computer is using:•the Windows Vista operating system:a. From the Start menu on the office computer, select Control Panel / Hardware and Sound / Windows Mobile Device Center.The Connection Settings dialog appears: b. Select the Allow connections to one of the following check box.c. From the list, select Bluetooth and then click OK.•the Windows XP or 2000 operating system:a. From the Bluetooth user interface on the office computer, identify the virtual COM port of the of the host Bluetooth Serial Port or Local Service and ensure that this is enabled. In this example, the virtual COM port is COM5.b. Start the ActiveSync software on the office computer.
6     Getting Connected98     GeoExplorer 2008 Series User Guidec. Select File / Connection Settings. The Connection Settings dialog appears: d. Select the Allow connections to one of the following check box.e. From the list, select the COM port that you selected in Step a and then click OK.Note – Before you try to form a Bluetooth connection from the GeoExplorer 2008 series handheld to the office computer, you must correctly configure the Bluetooth host serial port and ActiveSync technology on the office computer.3. On the handheld, tap  / Settings / Connections /Bluetooth.4. In the Devices tab, tap Add new device. The handheld searches for other Bluetooth devices and displays them in the list.5. Tap the name of the computer you want to connect to and then tap Next on the right softkey.6. When prompted, enter a passcode of your choice that you will easily remember on the handheld.7. Enter the same passcode on the office computer.8. On the handheld, select the ActiveSync check box in the list of services provided by the computer and then tap Finish on the right softkey.You have now created a partnership between the GeoExplorer 2008 series handheld and the office computer so that they can communicate.9. Tap OK in the top right corner to close the Bluetooth application.10. Tap   in the top right corner to close the Settings screen.To connect to ActiveSync, see Step 2 on the following page.
GeoExplorer 2008 Series User Guide     99Getting Connected     6Step 2: Connecting to ActiveSync using Bluetooth wireless technology1. On the GeoExplorer 2008 series handheld, tap  / Programs / ActiveSync.2. Tap Menu and then select Connect via Bluetooth.On the GeoExplorer handheld, a message box shows the status of the connection as it is made.3. When the connection to the office computer is successful, you are returned to the ActiveSync application on the handheld.4. Tap   to close.The connectivity icon in the status bar shows  , or   if WLAN is connected.To check the status of the ActiveSync connection, tap the connectivity icon in the title bar.To disconnect, tap   / Programs / ActiveSync on the handheld and then select Menu / Disconnect.
6     Getting Connected100     GeoExplorer 2008 Series User GuideOutputting GPS data to other devices using Bluetooth wireless technology To provide GPS positions from the GeoExplorer 2008 series handheld to another device using a Bluetooth wireless connection, you must:1. Connect the other device to the GeoExplorer 2008 series handheld.2. Configure the handheld to output data to the other device.3. Configure the other device to receive data from the handheld.Step 1: Connecting the other device to the GeoExplorer series handheld1. Turn on the GeoExplorer 2008 series handheld’s Bluetooth radio and make the handheld visible to other devices (see page 80).2. On the other device, turn on the Bluetooth radio.3. Use the Bluetooth management software on the other device to scan for other Bluetooth devices and then set up a serial port connection to the GeoExplorer 2008 series handheld.4. If prompted to enter a passcode on the other device, enter a passcode of your choice that you will easily remember.5. When prompted on the GeoExplorer 2008 series handheld, accept the connection to the other device.6. Enter the same passcode on the GeoExplorer 2008 series handheld that you entered on the other device and then tap Next on the right softkey on the handheld.7. On the handheld, tap Finish on the right softkey.Step 2: Configuring the handheld to output data to the other device  1. On the GeoExplorer 2008 series handheld, tap /Settings /Connections /GPS Connector to open the GPS Connector software.2. Use the GPS Connector software to output NMEA or TSIP messages to COM9. This is the GeoExplorer 2008 series handheld's Host Bluetooth serial port.3. Use the Trimble GPS field software to ensure NMEA output is set to on, to configure the NMEA output settings (output rate and messages), and to configure the GPS settings.
GeoExplorer 2008 Series User Guide     101Getting Connected     6Step 3: Configuring the other device to receive data from the handheld1. On the other device, run the application that will use the data from the handheld.2. Configure the application to connect to the COM port on the other device that you selected (or was assigned) when you created the serial port connection to the handheld.Enabling other devices to transfer files using Bluetooth wireless technology  To transfer files to and from another device without connecting using ActiveSync technology, follow the general steps below:Note – The exact steps for transferring files will depend on the Bluetooth file management software that is installed on the other device.1. Turn on the GeoExplorer 2008 series handheld’s Bluetooth radio and make the handheld visible to other devices (see page 80).2. On the other device, turn on the Bluetooth radio.3. On the other device, make sure that Bluetooth file transfer is enabled. 4. Use the Bluetooth management software on the other device to scan for devices and then set up a connection to the GeoExplorer 2008 series handheld. 5. Use the Bluetooth management software on the other device to locate the file and transfer it to the \My Documents folder on the handheld.
6     Getting Connected102     GeoExplorer 2008 Series User GuideBeaming files to or from another deviceYou can beam files, contacts, tasks, and appointments between the handheld and another device.To  receive beamed files from another device:1. Make sure that the GeoExplorer 2008 series handheld’s integrated Bluetooth radio is turned on (see page 80).2. Tap  / Settings / Connections/ Beam.3. Select the Receive all incoming beams check box and then tap OK.4. When another device attempts to beam a file, you are prompted to accept the file. To receive the file, tap Yes.Note – All incoming files are automatically saved in the My Documents folder on the handheld.To  send beamed files to another device:1. Make sure that the GeoExplorer 2008 series handheld’s integrated Bluetooth radio is turned on (see page 80).2. On the GeoExplorer 2008 series handheld, open File Explorer and go to the file you want to send.3. Tap and hold the file and then select Beam File. The handheld scans for nearby devices.4. Tap the device you want to send the file to. The file is sent to the device.A message reports Done or Failed, depending on the outcome of the file transfer.
GeoExplorer 2008 Series User Guide     103Getting Connected     6Accessing a corporate network through your Internet connectionUse a Virtual Private Network (VPN) connection to access a corporate network or Intranet. Before you begin, obtain the following information from your network administrator:•user name and password•domain name•host name or IP address of the VPN serverTo access a corporate network through your Internet connection, you must:1. Set up an Internet connection on the handheld.2. Set up a VPN connection.3. Connect to the corporate network or Intranet.Step 1: Setting up an Internet connection on the handheldDo one of the following:•Set up a wireless LAN connection to an access point. For more information, see page 82.•Connect to the Internet using a Bluetooth-enabled phone. For more information, see page 88.Step 2: Setting up a VPN connection1. On the GeoExplorer 2008 series handheld, tap /Settings / Connections / Connections. 2. From the My Work Network list, tap Add a new VPN server connection.3. Follow the instructions in the Make New Connection wizard.To view additional information for any screen in the wizard, tap  .4. Tap Finish.Step 3: Connecting to the corporate network or IntranetTo connect to the corporate network or Intranet, simply start using Internet Explorer.The Windows Mobile operating system automatically controls whether the VPN connection is used, depending on whether the URL contains a period. For example, the URL www.trimble.com contains periods, and so the connection to this web site is made without using the VPN connection. However, an address to a network computer or file server that does not contain periods automatically starts the VPN connection.
6     Getting Connected104     GeoExplorer 2008 Series User GuideIf you need to use the VPN connection to access URL addresses that contain periods, specify exceptions for the addresses that are within the corporate network. To do this:1. Tap / Settings / Connections / Connections. 2. Tap the Advanced tab.3. Tap Exceptions. The Work URL Exceptions screen appears. 4. Tap Add new URL.5. Enter the URL and then tap OK in the top right corner of the screen.6. Repeat steps 4 and 5 as required.7. Tap OK in the top right corner of the screen to return to the Advanced tab of the Connections screen.8. Tap OK in the top right corner of the screen to close the Connections screen.9. Tap   to close the Settings screen.
GeoExplorer 2008 Series User Guide     105Getting Connected     6Bluetooth wireless connections explainedThe GeoExplorer 2008 series handheld has an integrated Bluetooth radio that you can use to establish a wireless connection to other Bluetooth devices that are within range. Using a Bluetooth connection, you can communicate with devices such as cellular phones, office computers, other handhelds, and Bluetooth-enabled laser rangefinders and barcode scanners. You can also communicate with peripheral devices that use Bluetooth adaptors instead of serial or USB connections.The GeoExplorer 2008 series handheld can act as a Bluetooth client device or a Bluetooth host device, and can act as both at the same time. The concepts of client and host devices are explained in detail below.Connecting to a Bluetooth device as a clientYou can use the GeoExplorer 2008 series handheld as  client device, which uses services offered by Bluetooth host devices that are within range. In general the host device provides information to the client device, but in some cases the client initiates the connection and also provides information to the host device.The services used by a GeoExplorer 2008 series handheld when connecting as a Bluetooth client are:A client can connect to a number of different services provided by different hosts. The number of active connections at any one time affects the speed of the connections. Figure 6.1 shows the handheld connected to different types of host devices using Bluetooth wireless technology. Service DescriptionDialup Networking (DUN)Connects the handheld to a cellular phone or modem for dial-up network or Internet access.Personal Area Networking (PAN) Connects to Bluetooth network access points or phones that support the Personal Area Network/Network Access (PAN) profile.Serial Port   Emulates an RS-232 serial (COM) port on the handheld.ActiveSync Enables an ActiveSync connection to a computer. Input Device (HID) Connects the handheld to a physical input device, such as a keyboard.Wireless Stereo Connects to Bluetooth A2DP (Advanced Audio Distribution Profile) headphones.
6     Getting Connected106     GeoExplorer 2008 Series User Guide Figure 6.1 GeoExplorer 2008 series handheld Bluetooth client connectionsIn Figure 6.1, the dashed arrows indicate the client device—that is, the GeoExplorer 2008 series handheld—connecting to host devices. The Bluetooth profile (or service) used for the connection is shown between the arrows, for example, the DUN service is used for a connection to a cell phone, and the Serial Port service is used for a serial connection to a GeoBeacon receiver or laser rangefinder. The solid arrows indicate the flow of information between devices. For example, when the GeoExplorer 2008 series handheld connects as a client to:•a cellphone, the handheld uses the DUN or PAN host service provided by the phone to access the Internet and receive real-time differential corrections or background map data.•a laptop computer or office computer, the devices use the ActiveSync service to exchange information to and from either device.  •Bluetooth headphones, the handheld uses the Wireless Stereo host service provided by the headphones to play audio files and system sounds.
GeoExplorer 2008 Series User Guide     107Getting Connected     6Providing Bluetooth services as a hostYou can use the GeoExplorer 2008 series handheld as a Bluetooth host device, which provides services to Bluetooth client devices that are within range.Host services provided by the GeoExplorer 2008 series handheld are:To provide a host service, you must turn on the Bluetooth radio and make both devices visible to other devices (see page 78 and page 80).Figure 6.2 shows different client devices connecting to the handheld using Bluetooth wireless technology. Figure 6.2 GeoExplorer 2008 series handheld Bluetooth host connectionsIn Figure 6.2 the dashed arrows indicate the client devices—for example, the laptop or PDA—connecting to the GeoExplorer 2008 series handheld, which is the host device.  The Bluetooth profile (or service) used for the connection is shown between the arrows, for example the Serial Port service is used when outputting GPS data from the handheld to another device.Service DescriptionSerial Port  Emulates an RS-232 serial (COM) port on the handheld. For more information, see Outputting GPS data to other devices using Bluetooth wireless technology below.File Transfer Allows a client to browse, copy, paste, and delete files and folders on the handheld.Note – You cannot transfer files between two GeoExplorer 2008 series handhelds, as the client file transfer profile is not supported. The handheld supports file transfers as a host device only. To transfer files between handhelds, you can beam them (see page 102).
6     Getting Connected108     GeoExplorer 2008 Series User GuideThe solid arrows indicate the flow of information between devices. The GeoExplorer 2008 series handheld can output GPS data to client devices that connect to the handheld using a Bluetooth serial port. When a laptop computer or office computer connects to the GeoExplorer 2008 series handheld and selects the File Transfer service, files and information can be exchanged to and from either device.When a client device connects to the Serial Port service provided by the GeoExplorer 2008 series handheld, applications on the handheld can use the pre-defined host serial port on COM9 to provide host services to the client device. For example, to provide GPS positions from the integrated GPS receiver to another device, use the GPS Connector software to redirect the NMEA or TSIP output to COM9.
GeoExplorer 2008 Series User Guide     109Getting Connected     6Connecting to other devices using the serial clipThe optional serial clip attaches to the communication swipes on the back of the handheld. When the serial clip is attached, it adds a serial port (COM1) to the GeoExplorer 2008 series handheld.You can use the serial clip to:•receive differential corrections from an external real-time correction source, such as a Trimble GeoBeacon receiver, or a DGPS radio (see Using real-time corrections from an external correction source, page 70)•receive GPS data from a Trimble GPS Pathfinder series or GPS Pathfinder Pro series receiver•connect to other external devices, such as a laser rangefinder (see Using data from an external source in the TerraSync software, page 96, and select COM1 instead of a Bluetooth COM port)•connect to a computer to supply GPS data (for example, when running the Trimble GPS Analyst extension for ESRI ArcGIS software on a laptop) (see Outputting GPS data to external equipment, page 76)•supply external power from the external power kit or a vehicle’s battery (see Connecting to an external power source with the serial clip, page 111)•recharge the internal battery from an external power source (see Connecting to an external power source with the serial clip, page 111)Attaching the serial clipTo attach the serial clip to the handheld:1. Line up the communication swipes on the handheld with the pins on the serial clip.2. Lower the handheld onto the serial clip.3. Use the screws supplied with the serial clip to secure it to the handheld. Note – When the serial clip is attached, you cannot place the handheld in the support module.screw
6     Getting Connected110     GeoExplorer 2008 Series User GuideConnecting to external devicesYou can use the serial clip instead of the support module to connect to an external device that has a serial port, such as a computer. The serial clip also provides a serial port to connect to other devices.Note – When connecting to an office computer using the serial clip, you cannot use ActiveSync technology to establish the connection or synchronize data. To use ActiveSync, you must use a support module USB or a Bluetooth connection (see Connecting the handheld to a computer, page 55) . To connect to an external device that has a serial port:1. Attach the serial clip to the handheld. 2. Plug the null modem cable into the serial (COM) port on the serial clip.3. Connect the other end of the cable to the serial port on the external device.To connect to a serial device that does not have a standard 9-pin serial port, use a cable that has a DE9 connector on one end, and the appropriate connector for the other device on the other end. A suitable cable may be supplied with the external device.
GeoExplorer 2008 Series User Guide     111Getting Connected     6Connecting to an external power source with the serial clipUse the optional serial clip to connect the GeoExplorer 2008 series handheld to an external power source. Depending on the optional accessories that you have purchased, you can use mains power, the external power kit, or a vehicle battery to supply power to the handheld.To connect to an external power source:1. Attach the serial clip to the handheld.2. Plug the appropriate cable into the power port on the serial clip.3. Connect the other end of the cable to the external power source. Details about each type of external power source are as follows: Recharging from an external power sourceBy default, the GeoExplorer 2008 series handheld recharges its internal battery from any external power source that is connected. Recharging the battery draws more power from the external source than is used to power the handheld.Note – The life of the battery can be significantly shortened if power is constantly supplied to the handheld. To avoid this issue, connect the handheld to an external power source only when the battery requries charging. Once fully charged, disconnect the external power source and allow the battery to discharge through normal use.To use power from… connect the… to the…AC power source (mains power)AC power adaptor supplied with the handheldAC power outletexternal Lithium-ion power kit batteryadaptor cable from the optional external Lithium-ion power kit for GeoExplorer 2008 series handheldsLithium-ion battery provided as part of external power kitvehicle battery optional vehicle power adaptor for GeoExplorer 2008 series handhelds that supports 12–24 V inputscigarette lighter socket of the vehicle
6     Getting Connected112     GeoExplorer 2008 Series User Guide
CHAPTER7GeoExplorer 2008 Series User Guide     113Troubleshooting 7In this chapter:QPower issuesQBacklight issuesQTouch screen issuesQKeypad issuesQMemory card issuesQConnection issuesQGPS receiver issuesQReal-time DGPS issuesQRecommended GPS settings for maximum precisionUse this section to identify and solve common problems that may occur when using the GeoExplorer 2008 series handheld. Please read this section before you contact technical support.
7     Troubleshooting114     GeoExplorer 2008 Series User GuidePower issues Backlight issues Problem Cause SolutionThe handheld does not turn on.The battery is flat. Recharge the battery (see page 24).The screen is blank. The handheld is turned off.Press the Power button to turn on the handheld.The handheld has locked up.Reset the handheld (see Resetting the handheld, page 29).The handheld is not charging.The internal temperature has risen above the allowed maximum (40 °C or 104 °F) for charging the battery.Do one or all of the following:• Turn off the integrated radios before charging the handheld.• Suspend the handheld before charging.• Remove the handheld from any external heat sources (for example, sunlight). The handheld will automatically start charging again when the internal temperature has dropped below the range for charging the battery.The battery power percentage bar does not appear in the Power control.The battery has 0% power.Recharge the battery (see page 24). Once the battery level is above 0%, the battery power percentage bar reappears. Tap  / Settings / System / Power  / Battery to view the level of power remaining in the battery.The charge level of the battery drops when the handheld is turned off.The handheld was left in Suspend mode or was left fully charged for a long duration.Before storing the handheld, completely shut down the handheld (see Turning on and turning off the handheld, page 27). Then store the handheld as recommended (see Storage, page 19).Problem Cause SolutionThe backlight does not come on when you tap the screen or press a button.The backlight is not set to turn on in the Backlight control.Tap / Settings / System / Backlight to view the Backlight control, and make sure that:•the Turn on backlight when a button is pressed or the screen is tapped check box is selected.• the brightness is not set to Dark in the Brightness tab.The screen is blank or hard to see.The backlight is off. Tap the screen or press a button.The backlight level needs to be adjusted.Tap / Settings / System / Backlight to view the Backlight control and then adjust the slider in the Brightness tab.
GeoExplorer 2008 Series User Guide     115Troubleshooting     7Touch screen issues   Keypad issues  Problem Cause SolutionThe touch screen does not respond to stylus taps.The touch screen is incorrectly aligned.Realign the screen (see page 47).The touch screen is locked. To unlock the touch screen, tap Unlock in the menu bar of the Today screen.The handheld has locked up.Reset the handheld (see Resetting the handheld, page 29).The screen is blank. The handheld is turned off.Press the Power button to turn on the handheld.The battery is flat. Recharge the battery (see page 25).The handheld has locked up.Reset the handheld (see Resetting the handheld, page 29).The screen is hard to see.The backlight level needs to be adjusted.Open the Backlight control and then adjust the backlight level (see Backlight, page 48).The backlight is off. Tap the screen to turn on the backlight.You are unable to see parts of an application windows when the screen is in landscape orientation.Some applications are designed for portrait orientation only. To view the entire application window, change the screen display to portrait.The selected display theme does not have enough contrast.Select the High-Contrast display theme. Tap  / Settings / Personal / Today, select the High-Contrast theme and then tap OK.Images on the screen do not display correctly.An electrostatic discharge has occurred to one of the recessed connector terminals at the rear of the handheld.Press the Power button to turn off the handheld and then press the Power button again to turn on the handheld.This corrects the screen display without losing any data.Problem Cause SolutionPressing the application key does not activate the function shown on the softkey above it.The hardware application key has been programmed to run another program or to perform another action.Do one of the following:• Tap the touchscreen softkey to activate the function shown on the softkey.• Re-program the application key to perform the same action as the touchscreen softkey.  To do this, tap  / Settings / Personal / Buttons, select the button to reprogram and then select <Left Softkey> or <Right Softkey>.
7     Troubleshooting116     GeoExplorer 2008 Series User GuideMemory card issues  Connection issuesActiveSync technology   Problem Cause SolutionThe handheld does not recognize a memory card.The handheld does not support SDIO (SD input/output) cards.Use an SD or SDHC memory card.Files on the memory card are not visible or are not able to be opened.Files have been encrypted on another device and have a .menc file extension.Remove encryption from the files (see Encrypting files on memory cards, page 32).Problem Cause SolutionActiveSync technology will not connect to the handheld.The connection is not initiated automatically.Remove the handheld from the support module and then place it in the support module again. Alternatively, in the ActiveSync software on the office computer, select File /Connection Settings and then tap Connect.ActiveSync does not recognize the GeoExplorer 2008 series handheld.Restart the office computer. Remove the handheld from the support module, reset it (see Resetting the handheld, page 29) and then replace it in the support module.An incompatible version of ActiveSync software is installed.ActiveSync version 4.5 and later is compatible with the GeoExplorer 2008 series handheld. If version 4.5 or later of the ActiveSync software is not installed on the office computer, you can install it from the GeoExplorer 2008 Series Getting Started Disc.You can also download the latest version from the Microsoft website at www.microsoft.com/windowsmobile/activesync/default.mspx.The connection is not enabled in ActiveSync on the computer.In the ActiveSync software on the office computer, click File /Connection Settings. If you are using:• the support module, make sure that the Allow USB connections check box is selected from the drop-down list.• a Bluetooth connection, make sure that the correct port for Bluetooth is selected. Then open the Bluetooth control on the handheld. In the Devices tab, tap the partnership and in the services list make sure that the ActiveSync check box is selected.The connection is not enabled in ActiveSync on the handheld.On the handheld, tap  / Programs / ActiveSync / Menu / Connections. Make sure that the Synchronize all PCs using this connection check box is selected, and that the correct option is selected.The handheld connection settings conflict with network settings or VPN client software.If you are using the support module, use the USB to PC utility to change the connection method the handheld uses to connect to ActiveSync on the computer. Tap  / Settings / Connections / USB to PC Utility. Clear the Enable advanced network functionality check box.The handheld stops using the default RNDIS method to connect to the ActiveSync software.
GeoExplorer 2008 Series User Guide     117Troubleshooting     7Windows Mobile Device Center   Network connections   Problem Cause SolutionWindows Mobile Device Center will not connect to the handheld.The connection is not initiated automatically.Remove the handheld from the support module and then place it in the support module again. Alternatively, in the Windows Mobile Device Center software on the office computer, select Mobile Device Settings /Connection Settings.The Windows Mobile Device Center software does not recognize the GeoExplorer 2008 series handheld.Restart the office computer. Remove the handheld from the support module, reset it (see Resetting the handheld, page 29) and then replace it in the support module.The connection is not enabled in Windows Mobile Device Center on the computer.In the Windows Mobile Device Center software on the office computer, click Mobile Device Settings / Connection Settings. If you are using:• the support module, make sure that the Allow USB connection check box is selected from the drop-down list.• a Bluetooth connection, make sure that the correct port for Bluetooth is selected. Then open the Bluetooth control on the handheld. In the Devices tab, tap the partnership and in the services list make sure that the ActiveSync check box is selected.The connection is not enabled on the handheld.On the handheld, tap  / Programs / ActiveSync / Menu / Connections. Make sure that the Synchronize all PCs using this connection check box is selected, and that the correct option is selected.The handheld connection settings conflict with network settings or VPN client software.If you are using the support module, use the USB to PC utility to change the connection method the handheld uses to connect to the Windows Mobile Device Center on the computer. Tap  / Settings / Connections / USB to PC Utility. Clear the Enable advanced network functionality check box.The handheld stops using the default RNDIS method to connect to the Windows Mobile Device Center.Problem Cause SolutionThe connection with the cellular phone suddenly ends.If you change the proxy settings of the handheld while connected to a cellular phone, the cellular phone ends the connection.Make any changes to proxy settings before connecting to a mobile device.Unable to connect to another GeoExplorer 2008 series handheld.Data encryption settings are set incorrectly.When setting up a peer-to-peer ad-hoc network with a WEP encryption, set a Network Key, rather than leaving the key blank to be provided automatically.
7     Troubleshooting118     GeoExplorer 2008 Series User GuideBluetooth wireless technology  Problem Cause SolutionThe handheld cannot discover a nearby Bluetooth device.The integrated Bluetooth radio is not activated.The handheld’s Bluetooth radio has been deactivated. If Bluetooth wireless technology is allowed where you are working, use the Radio Activation Manager software to re-activate the radio (see Deactivating the integrated radios, page 7). The device is out of range.Move the devices closer to each other and then scan again.Bluetooth wireless technology is not enabled on one or both devices.Make sure that the Bluetooth radio is turned on, on both the handheld (see page 80) and the other Bluetooth device.The device has not been made Discoverable.Make sure that the Bluetooth device has been made Discoverable. The COM port that you assigned to a serial port service is not available in your application.The application cannot recognize ports if they are added after the application opens.Exit from the application, add the port and then run the application again.The Bluetooth connection fails while in use.The Bluetooth device has moved out of range.Move the devices closer to each other. The devices should reconnect automatically. If they do not, select the Bluetooth device in the Devices tab. Tap and hold the device name and then select Delete. Tap New to discover the device again.The Bluetooth radio has lost the connection.Turn off the Bluetooth radio on the handheld and then turn on the Bluetooth radio (see page 80).Bluetooth file transfer interrupts the connection.When you transfer large image or data files, other Bluetooth connections may stop responding. To avoid problems, close other Bluetooth connections before transferring large files.An error message reports “Problem with Bluetooth Hardware”.The integrated Bluetooth radio may have been deactivated.Use the Radio Activation Manager to reactivate the Bluetooth radio (see Deactivating the integrated radios, page 7).
GeoExplorer 2008 Series User Guide     119Troubleshooting     7Wireless LAN connections    Problem Cause SolutionThe “New Network Detected” notification does not appear automatically.The wireless LAN radio is off.Tap the wireless icon in the Today screen or go to the Wireless Manager and make sure wireless LAN is on.The handheld is out of range of the network.Move to within range of the network, then tap  / Settings /Connections /Network Cards  and then setup the connection.The handheld cannot connect to a secure site.The date on the handheld is incorrect.Check that the handheld has the date set correctly on the Today screen. If the date is incorrect, tap the clock icon on the Today screen and then adjust the date and time.You cannot configure an Internet connection.Within range of more than one network, you are not connecting to the network you would prefer to use.The radio is connecting to the first network signal it has received.Tap / Settings /Connections /Network Cards. Tap and hold the network you would prefer to use and then select Connect. The “New Network Detected” notification appears but the menu bar and soft key options are not displayed.Some applications are not fully compatible with all features of the Windows Mobile 6 operating system.Use the application buttons on the keypad, as they map to the soft keys in the menu bar:• To dismiss the notification, press the right application button on the keypad. • To connect to the network, press the left application button. Alternatively, select a Windows Mobile application from the Start menu, such as the Today screen or File Explorer, and the menu bar and soft keys will be displayed correctly.Wireless LAN is unavailable in the Wireless Manager.The integrated wireless LAN radio has been deactivated.Use the Radio Activation Manager to reactivate the wireless LAN radio (see Deactivating the integrated radios, page 7).
7     Troubleshooting120     GeoExplorer 2008 Series User GuideSerial clip issues  Problem Cause SolutionHandheld does not recognize serial clip is attached.The handheld needs to be reset.Perform a soft reset of the handheld. To do this, either press the Reset button, or press the Power button to open the Power menu and then tap Soft Reset.Unable to receive information from COM1.The incorrect serial port settings have been selected on the handheld or on the other device.Check that the serial port settings are the same on both devices and then try connecting to COM1 again.The incorrect data protocol is selected in the application on the handheld.Select the data protocol supported by the device and then try connecting again.The serial cable used is not the correct type.  Some serial cables, called null-modem cables, switch the data transmit and data receive lines, whereas other cables are 'straight through' and do not switch the pinouts.Use the serial cable provided with the device.A ‘New Modem Detected’ notification appears.You have reset the handheld and then connected the serial clip.Tap Dismiss to close the notification. Handheld resumes when serial clip is removed.The handheld was in Suspend mode.To return the handheld to Suspend mode, press the Power button.‘Unidentified USB device’ notification appears.The serial clip is unevenly connected to the device.To continue, cancel the notification and then reattach the serial clip correctly.
GeoExplorer 2008 Series User Guide     121Troubleshooting     7GPS receiver issues   Problem Cause SolutionThe handheld is not receiving GPS positions.The integrated GPS receiver is not activated.Use the Connect or Activate GPS command in the GPS field software to open the GPS COM port and activate the integrated GPS receiver. For more information, see Using the GPS receiver, page 61.Incorrect configuration of serial COM port.When supplying GPS data to an external device using the COM1 serial clip, set the baud rate to the high-speed TSIP setting: 38400, 8, 1, Odd.The GPS COM port is already in use. Only one application at a time can have the port open. Do the following:• Exit the software that is using the GPS COM port and then retry in your application.• Check that a GPS application is not running in the background. Tap  / Settings / Memory, select Running Programs, and then select and close any GPS applications you are not using.• Make sure that connections are not left setup in the GPS Connector application. Set NMEA to Internal - COM2 and TSIP to Internal - COM3, and then disconnect GPS Connector when you not using the connections.The GPS field software is using the wrong GPS COM port.Connect to COM2 if the GPS field software uses NMEA messages, or COM3 for TSIP messages. For information on which protocol to use, check the documentation for the application.Not enough satellites are visible.Move to a location where the receiver has a clear view of the sky and ensure the antenna is not obstructed.Alternatively, adjust the GPS settings to increase productivity. For more information, refer to the Help provided with the GPS field software.The DOP (Dilution of Precision) value for the current position is above the maximum DOP setting.Wait until the DOP value falls below the maximum DOP specified.Alternatively, adjust the GPS settings to increase productivity. For more information, refer to the Help provided with the GPS field software.Wait for real-time is selected in the GPS field software and the integrated receiver is waiting to receive real-time corrections.If you are collecting data for postprocessing, clear the wait for real-time selection.Check that the real-time correction source is setup correctly (see Connecting to a real-time differential correction source, page 68).External antenna connected but not receiving data.The handheld can take up to two seconds to detect that an external antenna has been connected or disconnected.NMEA data includes autonomous positions.The integrated GPS receiver outputs autonomous positions when real-time corrections are unavailable.Configure the NMEA application to filter out non-DGPS positions.
7     Troubleshooting122     GeoExplorer 2008 Series User GuideThe GPS Connector utility reports “Unknown”.The GPS Connector software may report “Unknown” on COM3.This should not interfere with operation of the handheld.Error Code 5 appears. A receiver timeout error has occurred, caused by issues with communications to the receiver, or when the receiver has taken too long to reconnect.Close the dialog and if the handheld does not automatically connect to the receiver, try to connect to the receiver again.If repeated attempts to connect to the receiver fail, contact your Trimble reseller.Problem Cause Solution
GeoExplorer 2008 Series User Guide     123Troubleshooting     7Real-time DGPS issues       Problem Cause SolutionThe handheld is not receiving SBAS real-time correctionsThe SBAS satellite is obstructed from view.Check the location of the SBAS satellite in the Skyplot section of the GPS field software, and if possible move to a different location.You are outside the WAAS, EGNOS, or MSAS coverage area.Wide Area Augmentation System (WAAS) satellites are tracked in the Continental United States including Alaska, and in southern parts of Canada.European Geostationary Navigation Overlay Service (EGNOS) satellites are tracked in Europe. MTSAT Satellite-based Augmentation System (MSAS) satellites are tracked in Japan.If you have selected satellites that are not available at your location, you cannot use SBAS corrections.The handheld is not able to track a new or a specific SBAS satelliteYou are not using the latest SBAS configuration (.ini) file.1. To download the software, go to www.trimble.com/support.shtml, click the link for your receiver type (GeoXH, GeoXM, or GeoXT), click Downloads, click GeoExplorer 2008 Series and then click SBAS.INI.2. To specify the satellites you want the receiver to track or to ignore, select the Custom option in the Tracking Mode field in the Integrated SBAS Settings form of the Trimble GPS field software.The handheld is not receiving real-time corrections from the external real-time correction  sourceThere is no physical connection to the external source.Connect the external real-time correction source to COM1 using the optional serial clip, or to a Bluetooth port on the handheld.There is no Bluetooth wireless connection to the external source.The Bluetooth external correction source is more than ten meters from the handheld, or is obstructed. Move the devices closer together, in a direct line of sight, to re-connect.The external source is incorrectly connected to the real-time COM port.In the Real-time Settings section of the GPS field software, select the COM port that the real-time source is connected to.Note – If you are using a non-Trimble application, use the GPS Connector software to create a connection between the COM port and the integrated GPS receiver’s real-time GPS COM port (COM4). In the GPS Controller software, configure the receiver to use real-time corrections from an External Source using the handheld's "Receiver Port". For more information, see Using real-time corrections from an external correction source, page 70.The port settings are incorrect.Change the port settings to match those used by the external source.No GPS positions are available.You cannot use real-time corrections until the GPS receiver is computing positions. In the GPS field software, make sure that the integrated GPS receiver is activated, enough satellites are available, and that the satellite geometry (PDOP) is good enough to compute positions.Integrated SBAS is selected as the second choice source of real-time corrections.If the SBAS status is Waiting, the integrated GPS receiver may incorrectly change the status of the preferred real-time choice to Waiting as well. To avoid this, select Wait for real-time or Use uncorrected GPS as your second choice.
7     Troubleshooting124     GeoExplorer 2008 Series User GuideRecommended GPS settings for maximum precisionThe following table lists some of the factors that affect the precision of your data, and describes how to minimize the effect of atmospheric interference and poor satellite geometry.BTip – To quickly find the recommended values shown here, move the GPS slider in the GPS Settings form to the middle (default) setting.  Factor Description To Maximize PrecisionNumber of visible satellitesThe quality of your data increases with the number of satellites being used to calculate the position.You need at least four satellites to calculate an accurate 3-dimensional position. Trimble data collection software only logs GPS positions when four or more satellites are visible. Tracking more satellites can help to lower DOP values.Multipath Multipath is when GPS satellite signals are reflected off nearby objects, such as buildings or cars, causing an erroneous signal to be received by the GPS antenna. This can cause errors of several meters. To reduce multipath, collect data in an open environment away from large reflective surfaces and with a clear view of the sky. In high multipath environments, record velocity data and use velocity filtering when postprocessing the data.Weak satellite signalsSignal-to-Noise Ratio (SNR) is a measure of the strength of the satellite signal relative to the background noise. GPS quality degrades as the signal strength decreases. Weak signals may be caused by signals coming through vegetation, multipath signals, or low satellite elevation.Set the GPS field software to ignore satellites with a weak SNR. Trimble recommends a minimum SNR setting of 39 dBHz.Poor satellite geometryDilution of Precision (DOP) is a measure of the quality of GPS positions, based on the spread (geometry) of the satellites in the sky that are used to compute the positions. When satellites are widely spaced relative to each other, the PDOP value is lower, and position accuracy is greater. If the view of the sky is partially blocked, or if all of the satellites are in one area of the sky, the geometry and DOP may be poor.Set the GPS field software to ignore positions with a poor DOP value. You can choose to filter positions based on PDOP (Position Dilution of Precision) or HDOP (Horizonal Dilution of Precision). PDOP is a measure of the horizontal and vertical quality of the GPS positions, whereas HDOP is just a measure of the horizontal precision (x and y coordinates).Select HDOP rather than PDOP if you want to ensure positions are accurate horizontally, and when vertical accuracy is less importantTrimble recommends a maximum PDOP setting of 6, or a maximum HDOP setting of 4. Satellite elevationWhen a satellite is low on the horizon, satellite signals must travel farther through the atmosphere. This results in a lower signal strength and delayed reception by the GPS receiver, which can cause errors in calculating the position.Set the elevation field in the GPS field software to ignore satellites that are low in the sky.Trimble recommends a minimum elevation setting of 15°.Occupation time at a pointOccupation time is the time spent at a point logging GPS positions.For point features, remain at the feature and log a number of GPS positions to obtain an averaged position.When collecting line and area features, collect them using averaged vertices.
GeoExplorer 2008 Series User Guide     125Symbols.ini file 123.menc files 32AAC power adaptorconnecting 25included component 17safety 8access point 81accessing DGPS corrections from the Internet 88accessing online help 36accessories 18accuracyimproving 66–73, 74–75of GeoExplorer 2008 series handhelds 16, 66Accuracy Settings form 67accuracy-based logging 67ActiveSyncconnecting to the handheld 57installing onto a computer 55pre-installed software 37synchronizing 57troubleshooting 116, 117USB support module connection 55ActiveSync service 97–99, 105adjusting screen display 39alarms 45aligning the screen 28animated skyplot 73antennaexternal 18, 72Hurricane 18, 72internal 72Zephyr 18, 72Application keys 22, 23appointments 37ArcPad softwareconnecting to GPS 64installing 62supported versions 62Australia, notices to users 5Bbacking up data 53backlightreducing brightness to save power 27settings 48troubleshooting 114turning off to save power 48backpack kit 18barcode scanner 96, 106base stations 66, 68, 74baseball cap with antenna sleeve 18batterycamcorder 111charging 24, 25, 111charging fault 25, 26conserving 27included component 17low battery indicators 26power level 26recharging from external power 111recycling 6safety 9, 24troubleshooting 121, 123vehicle 111beaming files 102Bluetooth client services 105Bluetooth radioconserving power 27deactivating 7, 78reactivating 7, 78safety 7Bluetooth wireless technologyActiveSync service 97–99, 105cellular phone connection 88–92client device 105client services 105computer connection 97–99connecting without pairing 86–87Dialup Networking (DUN) service 88, 105, 106File Transfer service 107host device 105, 107host services on the handheld 107Input Device (HID) service 105Internet connection 88–92pairing with a device 84–86Index
Index126     GeoExplorer 2008 Series User GuidePersonal Area Networking (PAN) service 88, 105, 106Serial Port service 94, 105, 106, 107troubleshooting 118VRS network connection 88–92Wireless Stereo service 105, 106bonding with a device See pairing with a devicebracket, range pole 18browsing the Internet 37buttons, customizing 43CCalculator software 37Calendar software 37camcorder battery, using power from 111canopy, working under 72carrier data logging 67, 73carry case 18cautionsaccidentally synchronizing data 54deleting files from the flash disk 31resetting to factory default settings 30characters, entering special 41charging the batteryusing the serial clip 111using the support module 25checking battery power level 26cleaning the handheld 18ClearType font smoothing 47client device 105client services 105clock icon 45comments 20communicating with a desktop computer 53communication swipes 109computer, connecting toBluetooth wireless connection 55, 97using USB support module connection 55configuringGPS field software 63mail service 50connecting toa barcode scanner 96a Bluetooth-enabled cellular phone 88–92a Bluetooth-enabled device 84–87a computer 55–58, 97–99a laser rangefinder 96a VRS network 88–92an Internet server 88–92Bluetooth network access points 105Bluetooth-enabled headphones 105corporate network 103e-mail server 50external device 110GPS receiver 64Intranet 103laser rangefinder 106Connection Manager Utility 57, 58connectorsexternal GPS antenna 18, 22conserving power 27Contacts software 37context-sensitive help 36corporate network, connecting to 103customizingapplication keys 43notifications 46softkeys 43sounds 46Tod ay screen 44Ddata collection, planning 67, 73data loggingaccuracy-based 67carrier 67, 73H-Star 67, 73deactivating the Bluetooth radio 7, 78decrypting files 32deletingalmanac 65e-mail messages 49, 50files 31wireless LAN connection 83desktop computer, connecting to 56, 57device lock 23DGPS correctionsaccessing from the Internet 88receiving from a VRS network 68receiving from an external correction source 70receiving from an SBAS 69Dialup Networking service 105disabling encryption 32display See touch screendisplaying the input panel 40documentation feedback 20DOP graph 73dual-frequency GPS corrections 66DUN service 105, 106
GeoExplorer 2008 Series User Guide     127IndexEEGNOS satellites 69, 123electrostatic discharge 9, 10, 18, 115elevation, satellite 124e-mail See Messagingenabling encryption 32encrypted files 32Enter key 22, 23enteringinformation onto the handheld 40special characters 41text 40Europe, notices to users 5EVEREST multipath rejection technology 66Excel Mobile software 37external antenna 18external antenna port 18external device, connecting to 110external patch antenna 72external power 111external power kit 18Ffactory default settings, resetting to 30feedback 20File Explorer software 37File Transfer service 107file viewers 37fitting the handstrap 33flashing LEDorange 25, 26red 26GGeoBeacon receiver 18, 106, 109GeoExplorer 2008 seriesmicrophone 42GeoExplorer 2008 series handheldaccuracy 16, 66attaching serial clip 109automatic power off 28caring for 18companion CD 17copying files to 54GeoXH 16GeoXM 16GeoXT 16H-Star technology 16included components 17integrated SBAS receiver 69locking and unlocking 45parts 22resetting 29storing 19stylus 39turning on and turning off 27using support module 25GeoXH See GeoExplorer 2008 series handheldGeoXM See GeoExplorer 2008 series handheldGeoXT See GeoExplorer 2008 series handheldgetting help 36GPSabout 61field software 62, 64satellite signals 61, 65troubleshooting 121viewing status 64GPS COM ports 70GPS Connector software 37, 76using 108GPS Controller software 37connecting to GPS 64features 64mission planning 73GPS dataoutputting 76GPS field softwareconfiguring 63supported 16, 62GPS Pathfinder Office software 57, 58GPS Pathfinder Pro series receiver 109GPS Pathfinder series receiver 109GPS Pathfinder Tools SDK 16, 63GPS quality settings 71, 124GPS receiverchanging settings 64resetting 65green LED 25, 26ground plane 18, 72Hhandstrap 33handwriting recognition 40hard reset 29HDOP 124Help 36, 37HID service 105hiding the keyboard 41
Index128     GeoExplorer 2008 Series User Guidehost device 107host services 107hotspot See access pointH-Star data logging 67, 73H-Star technology 16, 66, 74Hurricane antenna 18, 72Iidle time 28IMAP4 mail service 50Inbox See Messaging 49Input Device service 105input panels 40installingActiveSync 55GPS field software 62software 57, 58, 59Windows Mobile Device Center 54integrated GPS receiver 61international adaptor kit 17Internet Explorer software 37Intranet, connecting to 103Kkeyboard (on-screen) 40keypad 22, 23keys, larger on the screen 41Llaser rangefinder 96, 106LED indicator 26Letter Recognizer 40, 41lock the screen 23locking the handheld 45loggingcarrier data 67H-Star data 67low battery indicators 26low-power mode See Suspend mode 28Mmail service, setting up 50Main battery low messages 26mains power, using 111maintenance 18Make New Connection wizard 103managing files 37meetings, arranging 37memorybacking up data 31, 53program memory 30storage memory 30memory cardelectrostatic discharge 10encrypted files 32inserting 31installing software to 59removing 31slot door 22thumbscrews 22troubleshooting 115, 116warnings 10, 31menu bar 36messagesMain battery low 26Main battery very low 26Problem with Bluetooth hardware 80Messaging software 37, 50Messenger software 37microphone 22, 42Microsoft Exchange software 49Microsoft Outlook software 49Microsoft Transcriber software 41mission planning 73modesFlight 7Shutdown 28Suspend 28MP3 files 38MSAS satellites 69, 123multipath 124NNavigation keys 22, 23navigation using GPS data 68network, connecting to a 103New Zealand, notices to users 5NMEAcompatible GPS field software 63connecting applications to GPS 64GPS COM port for 63output to external device 76supported messages 63Notes software 38notices to users
GeoExplorer 2008 Series User Guide     129IndexAustralia and New Zealand 5Europe 5notifications, customizing 46null modem cable 18Ooccupation time 124Office Mobile software 38OK key 22, 23online help, accessing 36optional accessories 18orange LED 25, 26orientation of screen 47Ppairing with a device 84–86PAN service 105, 106password settings 45PC, connecting to 53PDOP 124Personal Area Networking service 105Pictures and Videos software 38planning GPS data collection 67, 73playing a recording 42POP3 mail service 50postprocessing 66, 68, 73, 74pouch 17powerautomatic power off 28charging battery 24, 25, 111conserving 48external 111low-power mode See Suspend mode 28status LED 22troubleshooting 121, 123Power key 22, 23Power status LED 22PowerPoint Mobile software 38precision 67, 71, 124preferences 35pre-installed software 37Problem with Bluetooth hardware message 80Program 30programs, pre-installed 37QQuick Start Guide 17RRadio Activation Manager software 7, 78radio use, safety 7range pole 18range pole bracket 18reactivating the Bluetooth radio 7, 78real-timedifferential correction 66, 68–70, 74external correction source 70, 94GPS COM port (COM4) 70SBAS corrections 68, 69troubleshooting 121VRS corrections 66, 68, 91receivingbeamed files 102e-mail messages 37, 49recharging battery from external power source 111recording notes 42recycle bin 31red LED 26reference stations 66release button on support module 25removing encryption from files 32required accuracy 67Reset button 22, 23resettingGPS receiver 65the handheld 29restoring lost data 30SsafetyAC power adaptor 8battery 9, 24memory card use 10radio use 7satellite geometry 73SBAS satellitestracking mode 69troubleshooting 123using 68, 69screen protectors 18screen See touch screenSD memory cards 31SDHC memory cards 31SDIO memory cards 31Search software 38searchingfor files on the handheld 38
Index130     GeoExplorer 2008 Series User Guidethe Internet 38sendingbeamed files 102e-mail messages 37, 49error report 20instant messages 37serial clip 18attaching to handheld 109connecting to external device 110connecting to external power 111recharging battery with 111Serial Portservice 100, 101, 105Serial Port service 94, 106, 107setting a password 45setting the time 45setting upVPN connection 103Shutdown mode 28single-frequency GPS corrections 66Skyplot 65skyplot 73SMTP mail service 50soft reset 29softwareActiveSync 37Calculator 37Calendar 37Contacts 37Excel Mobile 37File Explorer 37GPS Connector 37, 76, 108GPS Controller 37, 64Help 37installing 59Internet Explorer 37Messaging 37Messenger 37Notes 38Office Mobile 38Pictures and Videos 38PowerPoint Mobile 38pre-installed 37Radio Activation Manager 7, 78Search 38Tasks 38uninstalling 57, 58Windows Live 38Windows Media 38Word Mobile 38sounds, customizing 46speaker 22special characters, entering 41spreadsheets, working with 37Start button 36Start key 23Start menu 36Start menu key 22static GPS positions 66status indicators 37Storage 30storage space 30storing the handheld 19streaming GPS positions 67stylus 22, 39stylus kit 18subfoot accuracy 66support 19support moduleconnecting to desktop computer 55included component 17placing handheld in 25removing handheld from 25supported GPS field software 62Suspend mode 19, 28switching keyboards 41synchronizinge-mail messages 49information 56, 57TTasks s oftware 38technical support 19TerraSync data files, receiving by e-mail 50TerraSync softwareautomatically transferring data 57, 58connecting to GPS 64installing 62supported versions 62tethering the stylus 39text editor 38text entry 40text size on screen 47thumb screws 22time zone, setting 45title bar 36Today screen 36touch screenaligning 28, 47care of 18display issues 9, 115electrostatic discharge 9, 115
GeoExplorer 2008 Series User Guide     131Indexorientation 47text size 47troubleshooting 115trackingappointments 37contacts 37tasks 38Transcriber software 41transferring files to a computer 56, 58Trimble GPScorrect extensionconnecting to GPS receiver 64installing 62supported versions 62TrimPix technology 63troubleshootingActiveSync 116, 117backlight 114battery 121, 123Bluetooth wireless technology 118GPS 121memory card 115, 116power 121, 123real-time 121touch screen 115wireless LAN 117, 119TSIPGPS COM port for 63output to external device 76Turn off device if not used for checkbox 28turning on and offhandheld 19, 27Uunlocking the handheld 45USB connection to a computer 55, 116, 117Vvehicleantenna 72power adaptor 18using power from 111velocity filtering 124viewing files 37Virtual Private Network (VPN) 103VRS networkaccuracy 66address format 92connecting to 88–92real-time correction source 68WWAAS satellites 69, 123warningsAC adaptor 8, 24battery 9, 24memory card slot 10, 31static electricity 10, 31wi-fi See wireless LANWindows Error Reporting 20Windows Live Messenger 37Windows Live software 38Windows Media software 38Windows Mobilehelp 36parts of the screen 36themes 44Windows Mobile Device Centerconnecting to the handheld 56installing 54synchronizing 56wireless 27wireless LANtroubleshooting 117, 119wireless LAN radioconserving power 27safety 7Wireless Manager 79Wireless Stereo service 105, 106Word Mobile software 38World Wide Web 37write messages 37writing on the screen 40Yyield, improved 72ZZephyr antenna 18, 72
Index132     GeoExplorer 2008 Series User Guide

Navigation menu