Toshiba TEC GN4020 Wireless LAN with Bluetooth USB Adapter User Manual 08 user s manual
Toshiba TEC Corporation Wireless LAN with Bluetooth USB Adapter 08 user s manual
UserManual.wiki
>
Toshiba TEC
>
GN4020 User Manual
>
Users Manual
Contents
1.
Users Manual
2.
User manual
Users Manual
Navigation menu
Upload a User Manual
Namespaces
Wiki Guide
HTML
PDF
Info
Views
User Manual
Discussion / Help
Navigation

![1.PREPARATIONPreparation 1 - Turning Power ON 191 PREPARATIONSaving energy when not in use - Energy saving mode -To reduce power consumption, the equipment automatically enters into the energy saving mode when a specified periodof time has passed since its last use.Types of energy saving modeLow power mode: “SAVING ENERGY” appears on the LCD screen.The equipment automatically enters into low power mode when a specified period of time elapses.Sleep mode: The LCD screen is turned off and only [ENERGY SAVER] is lit.The equipment enters into sleep mode when a specified period of time elapses or the [ENERGYSAVER] button is pressed.When “Status Monitor” is running, the equipment does not enter into the sleep mode. If you want to enable thesleep mode, exit it out.P.74 “Status Monitor”This equipment does not enter sleep mode when the Wireless LAN Module is installed.The timers for “AUTO POWER SAVE” and “SLEEP MODE” have been set respectively as the factory default settings.You can change them in the “USER FUNCTIONS” menu.P.135 “User Functions Menu List”To turn the equipment into the energy saving mode (Sleep mode) manuallyPress [ENERGY SAVER].Canceling conditions for energy saving modeThe energy saving mode is canceled under the following conditions.When [ENERGY SAVER], [START], [COPY], [SCAN], or [FAX] on the control panel is pressed.- For the low power mode: Press [ENERGY SAVER], [START], [COPY], [SCAN], or [FAX]- For the sleep mode: Press [ENERGY SAVER]When printing or scanning is performed from a PC connected with this equipment.When fax data is received.is installed.](https://usermanual.wiki/Toshiba-TEC/GN4020.Users-Manual/User-Guide-2732348-Page-3.png)
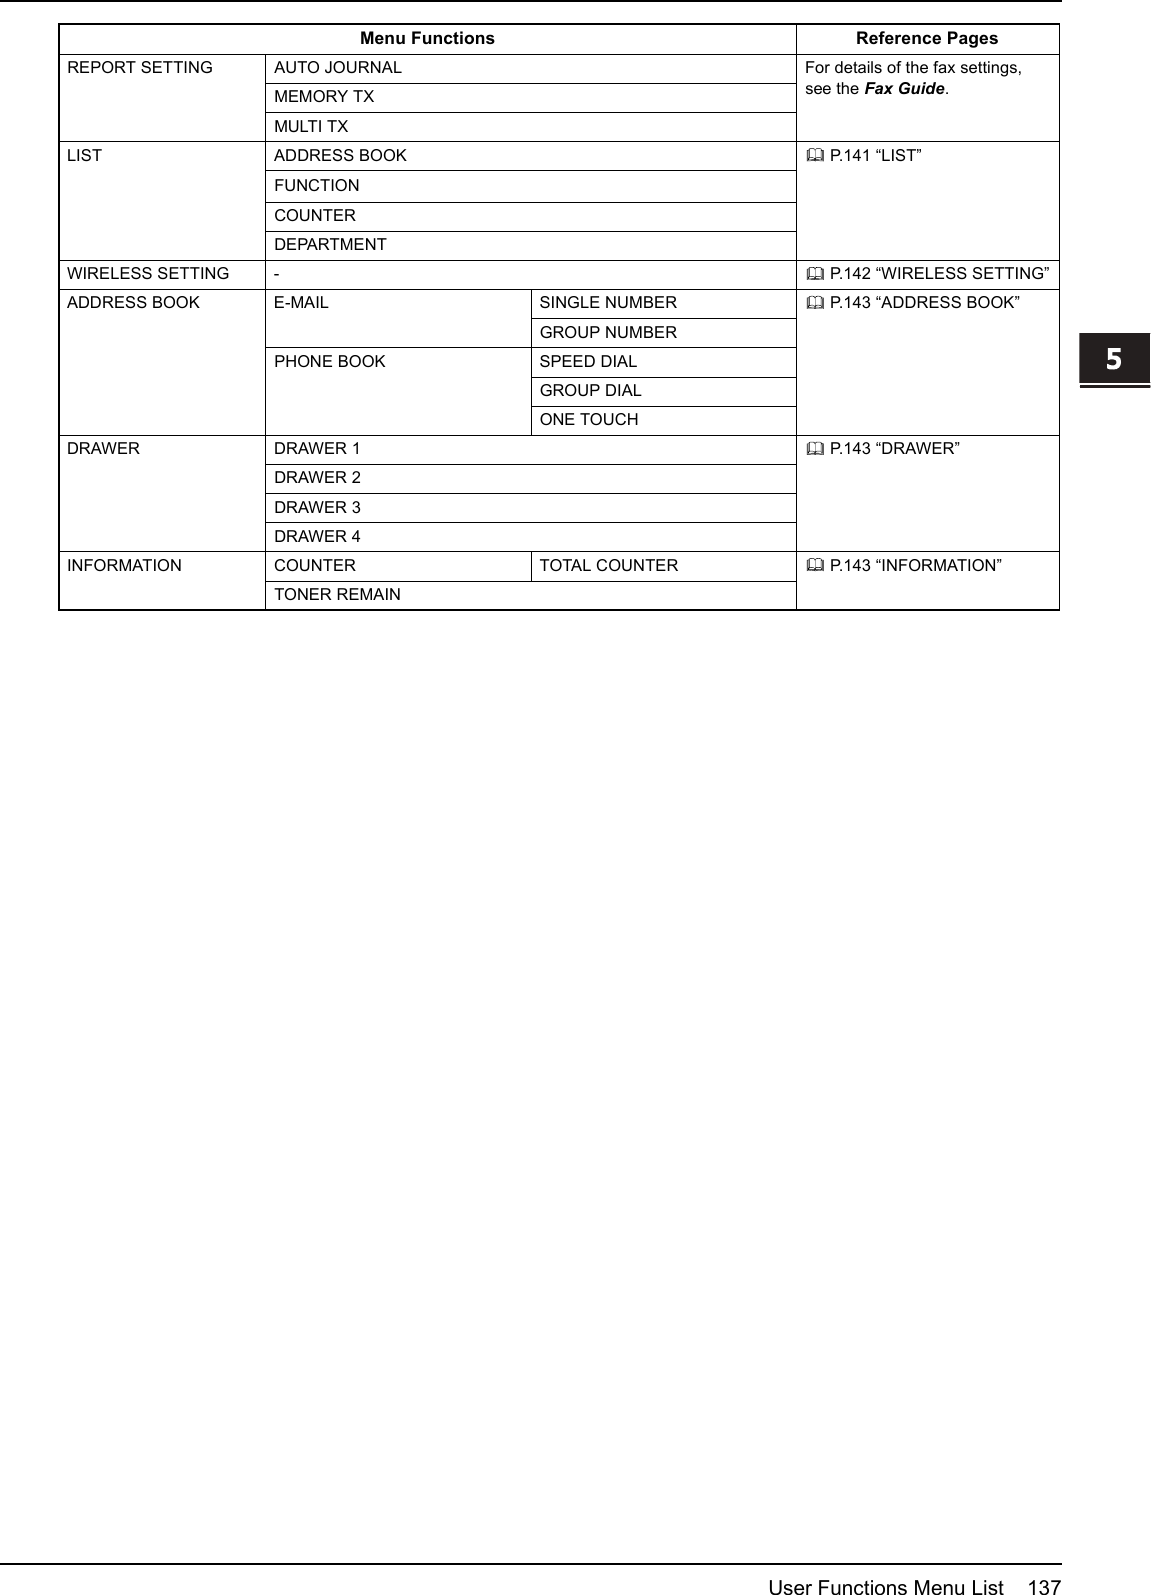
![5 VARIOUS FUNCTIONSUser Functions Menu List 135User Functions Menu ListBefore you start operating the “USER FUNCTIONS” menu, learn the general procedure below.Press [CANCEL] to exit from the setting without making any changes. You can also exit with the button if it isactive.Press [CLEAR/STOP] to delete a character. Keep pressing [CLEAR/STOP] for a second to clear all characters.1Press [USER FUNCTIONS].2Press or to scroll the menu, and then press to enter the function menu.P.136 “User functions menu items”3Press or to scroll the menu, and then press to select the function.4Press or to scroll the menu, and then press to select the settings for eachfunction.5Press , , , or to select a setting, and then press [OK].Continues to the next step if the selected setting has more options or values.Exits from the menu if the selected setting has no more options or values. At this point, the operation iscomplete.6Make option settings with , , , or , or enter characters using the digital keys, andthen press [OK].Repeat this step if the selected setting has more options or values.Exits from the menu if the selected setting has no more options or values. At this point, the operation iscomplete.The options or values vary depending on the function.P.138 “GENERAL”P.140 “COPY”P.141 “SCAN”P.141 “LIST”P.142 “WIRELESS SETTING”P.143 “ADDRESS BOOK”P.143 “DRAWER”P.143 “INFORMATION”](https://usermanual.wiki/Toshiba-TEC/GN4020.Users-Manual/User-Guide-2732348-Page-4.png)
![5 VARIOUS FUNCTIONS142 User Functions Menu ListWIRELESS SETTINGYou can configure the Wireless LAN Module if it is installed.Select Infrastructure Mode or Ad Hoc Mode to specify the security mode.If you do not set no security, anyone knows how the SSID can connect to the wireless network. Therefore, it isrecommended to set the security if it is possible.Once the WIRELESS SETTING (except WPS) has been set up, exit from USER FUNCTIONS menu by pressing[CANCEL] or [USER FUNCTIONS] button. When “APPLY AND REBOOT?” message appears, select “YES”, andthen press [OK]. The equipment is automatically rebooted and the WIRELESS SETTING is applied.WPSWPS is a standard to allow easy wireless LAN configurations. This equipment supports Push Button Configuration andPIN methods.The Push Button Configuration method completes the configuration by transmitting the ESSID and encryption key tothe wireless LAN device as you press the button on the Access Point.Whereas the PIN method completes the configuration by transmitting the ESSID and encryption key to the wirelessLAN device as you register the PIN generated by the wireless LAN device to the Access Point.WPA2-PSK, WPA2/WPA-PSKWPA2 and WPA2/WPA-PSK are authentication methods using the PSK (Pre-Shared Key) between the Access Pointand other wireless devices.To access the wireless network using the WPA2-PSK or WPA2/WPA-PSK authentication, the same PSK passphrasemust be assigned in both the Access Point and other wireless devices. If the PSKs are same between the AccessPoint and other wireless devices, the Access Point allows them to access the wireless network through the AccessPoint.WEPWEP is a data encryption method using the WEP key between the Access Point and other wireless devices.WEP is less secure compared with WPA2 and WPA2/WPA-PSK. If the wireless network is configured in theInfrastructure Mode and the Access Point supports WPA2-PSK or WPA2/WPA-PSK, it is recommended to useWPA2-PSK or WPA2/WPA-PSK rather than WEP.The following functions are available on the “WIRELESS SETTING” menu.Menu Functions Settings DescriptionON INFRASTRUCTUREWPS - Selects the connection method from[PBC] or [PIN]. Press the WPS button onthe Access Point within 2 minutes ofselecting the PBC method. Register thePIN generated by this equipment to theAccess Point within 2 minutes of selectingthe PIN method.SSID/SECURITY - WPA2-PSK, WPA2/WPA-PSK:Specify the passphrase after selectingAES if you are using WPA2-PSK, or afterselecting TKIP+AES if you are usingWPA2/WPA-PSK.WEP:Selects the WEP encryption and keyentry method, and then enter the WEPkey.NONE:Sets no security for wireless access.AD HOC AUTO - At first, select the channel setting method.Next, selects the WEP encryption andkey entry method, and then enter theWEP key.MANUAL -OFF - Disables the wireless network.](https://usermanual.wiki/Toshiba-TEC/GN4020.Users-Manual/User-Guide-2732348-Page-6.png)


