Toshiba Client Solutions PL5080WL Libretto User Manual Manual 3of7
Toshiba Corporation Libretto Manual 3of7
UserManual.wiki
>
Toshiba Client Solutions
>
PL5080WL User Manual
>
Manual 3of7
Contents
1.
Manual 1of7
2.
Manual 2of7
3.
Manual 3of7
4.
Manual 4of7
5.
Manual 5of7
6.
Manual 6of7
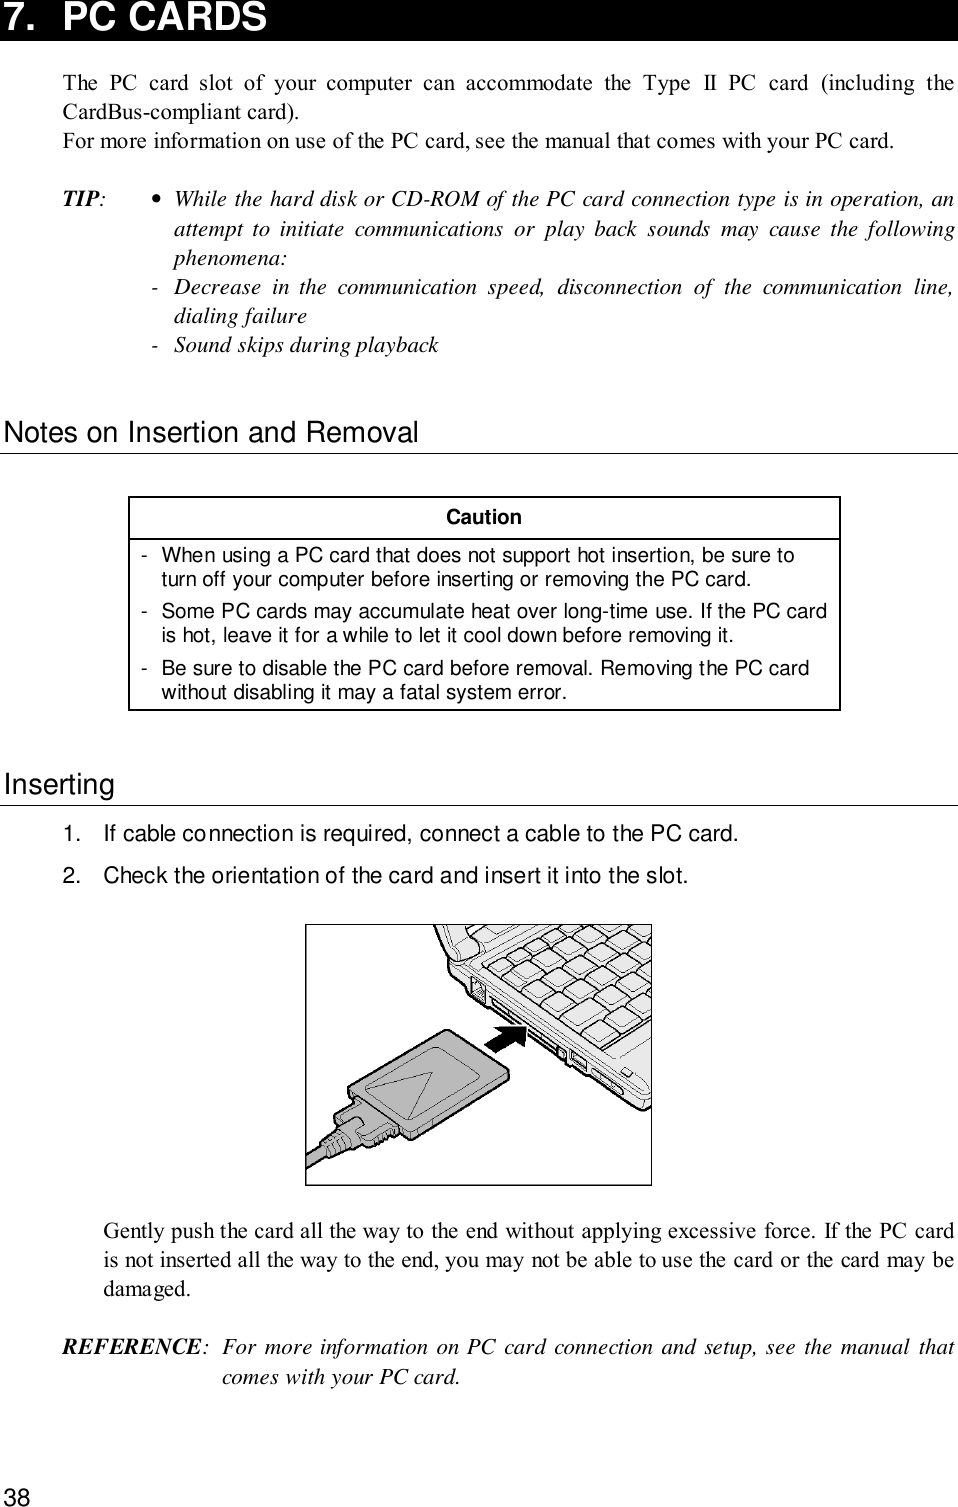
7.
Manual 7of7
Manual 3of7
Navigation menu
Upload a User Manual
Namespaces
Wiki Guide
HTML
PDF
Info
Views
User Manual
Discussion / Help
Navigation

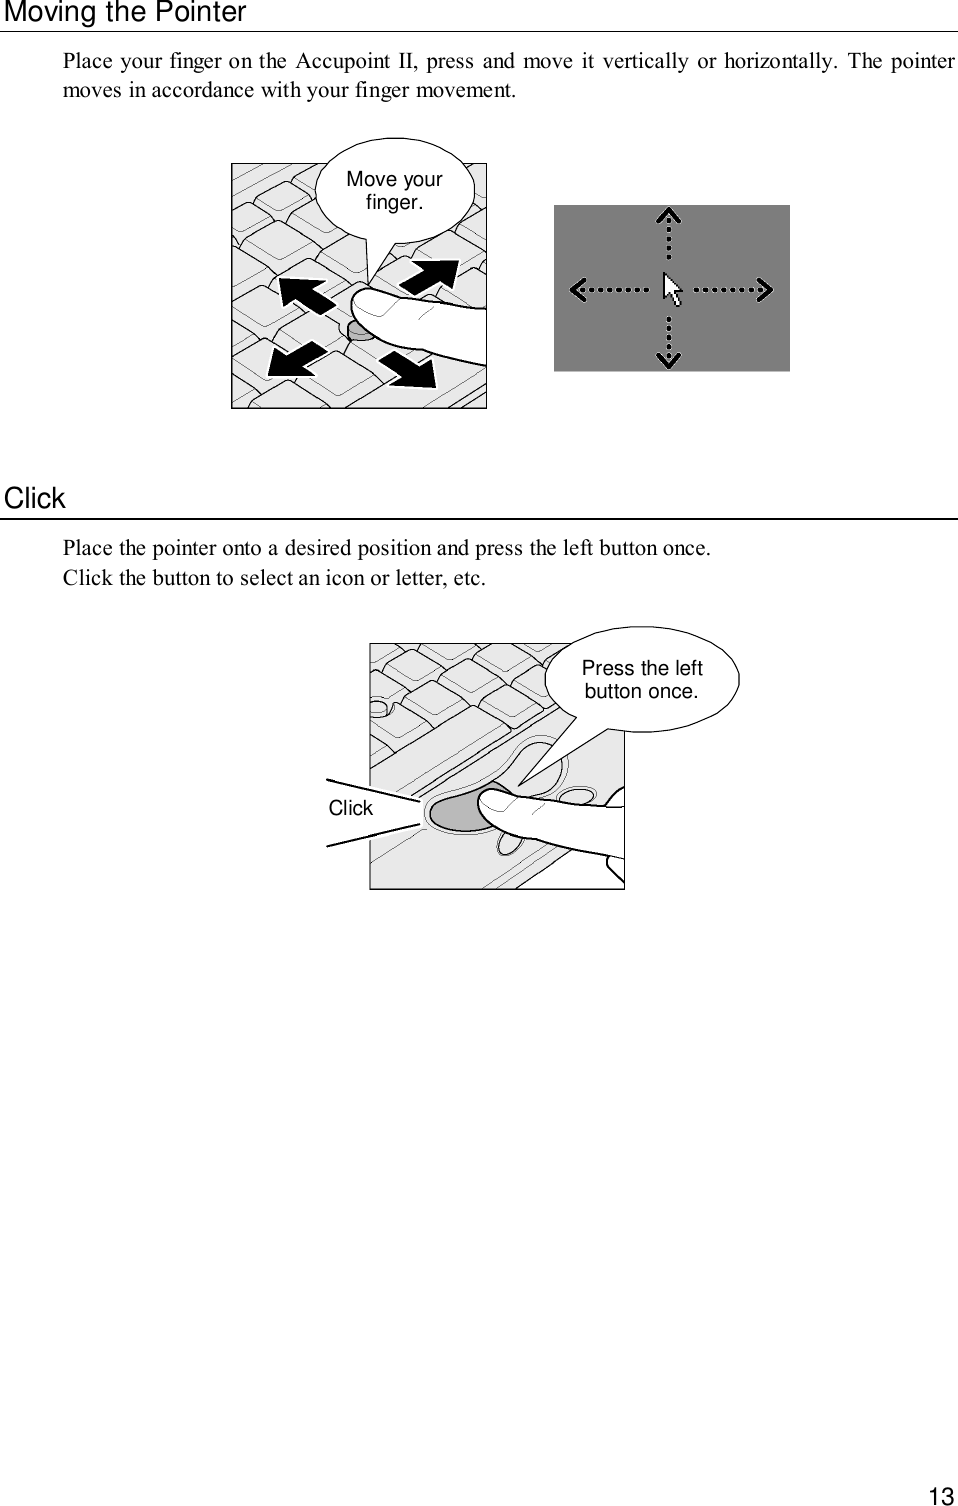
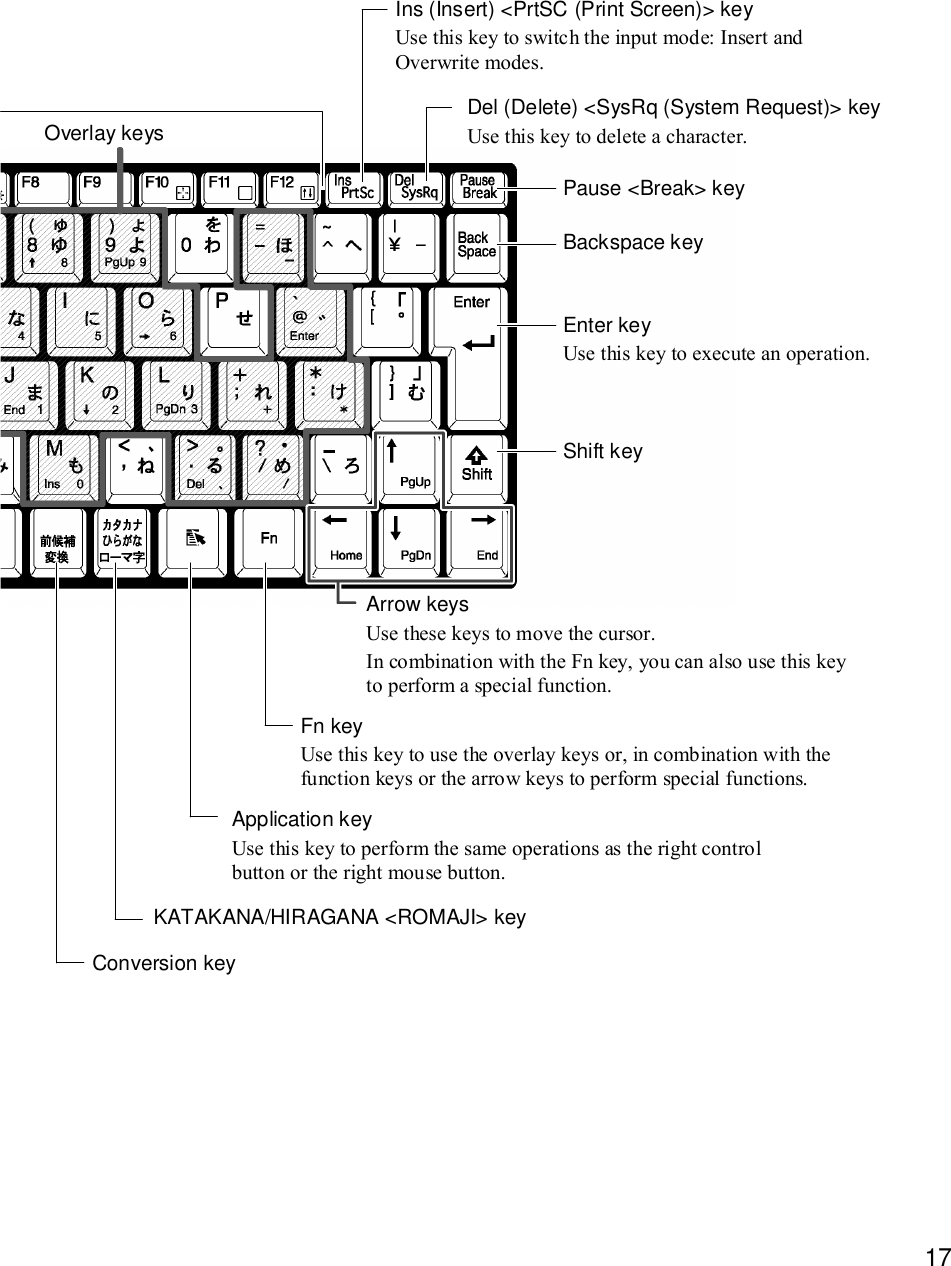
![19Input Control KeysThe control keys for character input are listed below:Key Description Ctrl + Caps Lock Alphanumeric 1Activates the one-byte KATAKANA input mode.In this mode, you can input the HIRAGANAcharacter printed at the bottom right on the keytop in the one-byte KATAKANA character.When the IME toolbar is on the desktop, [KANA]changes in color.Alternatively, you can click on [KANA] to activatethe one-byte KATAKANA input mode. Shift + Caps Lock Alphanumeric 1Activates the upper-case lock mode. In thismode, you can input the alphanumeric characterprinted at the top left on the key top in the uppercase.When the IME toolbar is on the desktop, [CAPS]changes in color.Alternatively, you can also click on [CAPS] toactivate the upper-case lock mode.To deactivate the one-byte KATAKANA input mode or the upper-case lock mode, repeat thekey operation.The priority in the locked state goes to the one-byte KATAKANA input mode, then to the upper-case lock mode.](https://usermanual.wiki/Toshiba-Client-Solutions/PL5080WL.Manual-3of7/User-Guide-232988-Page-12.png)
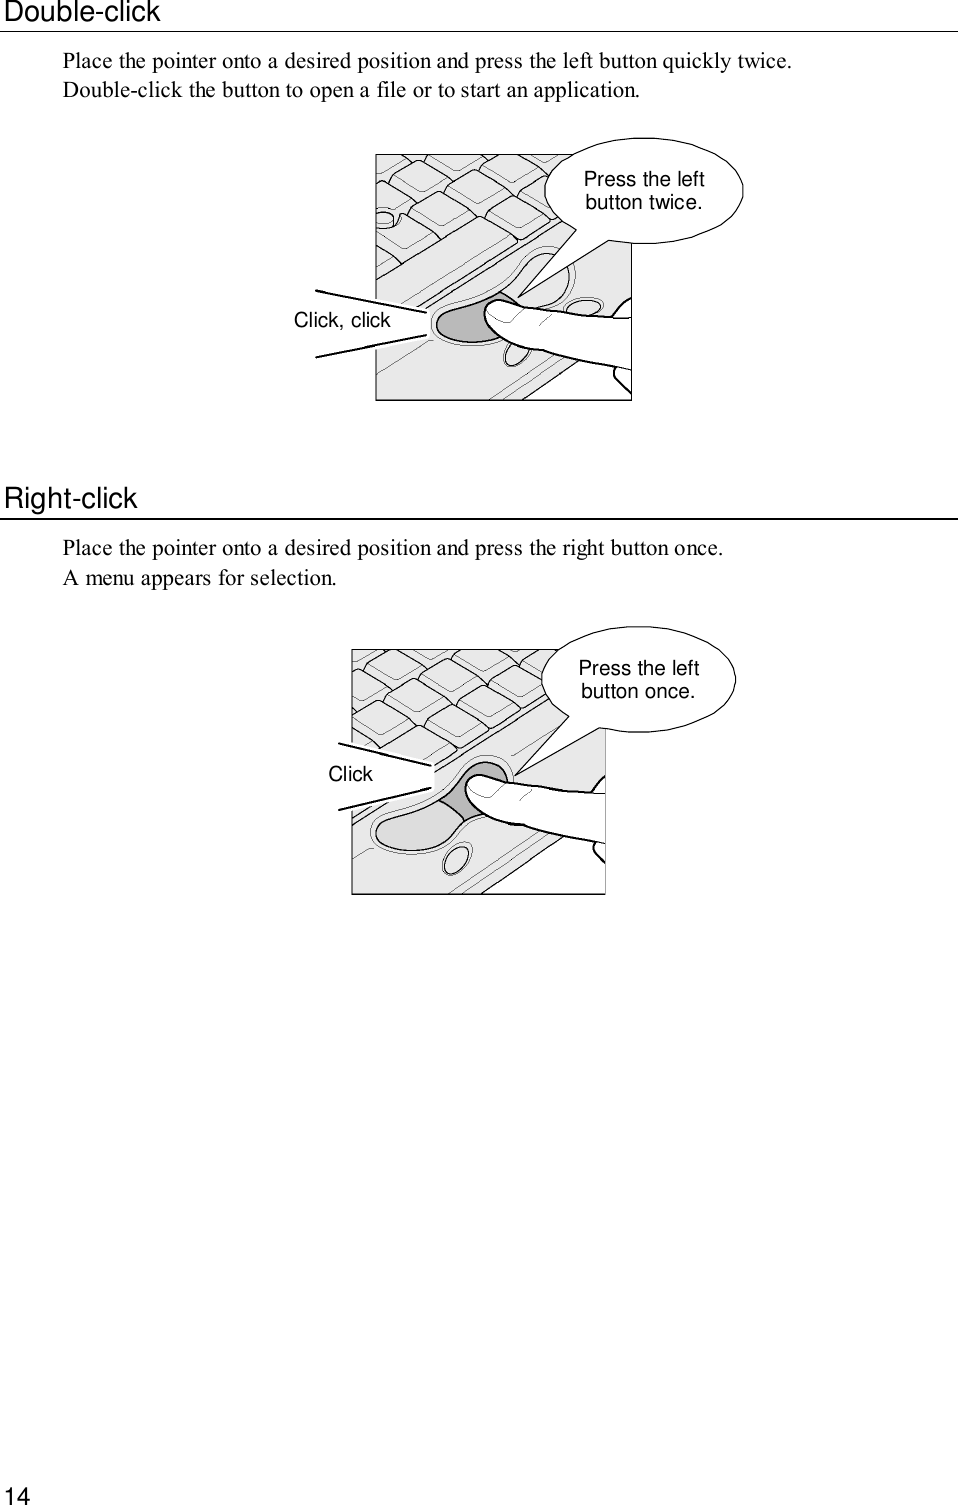
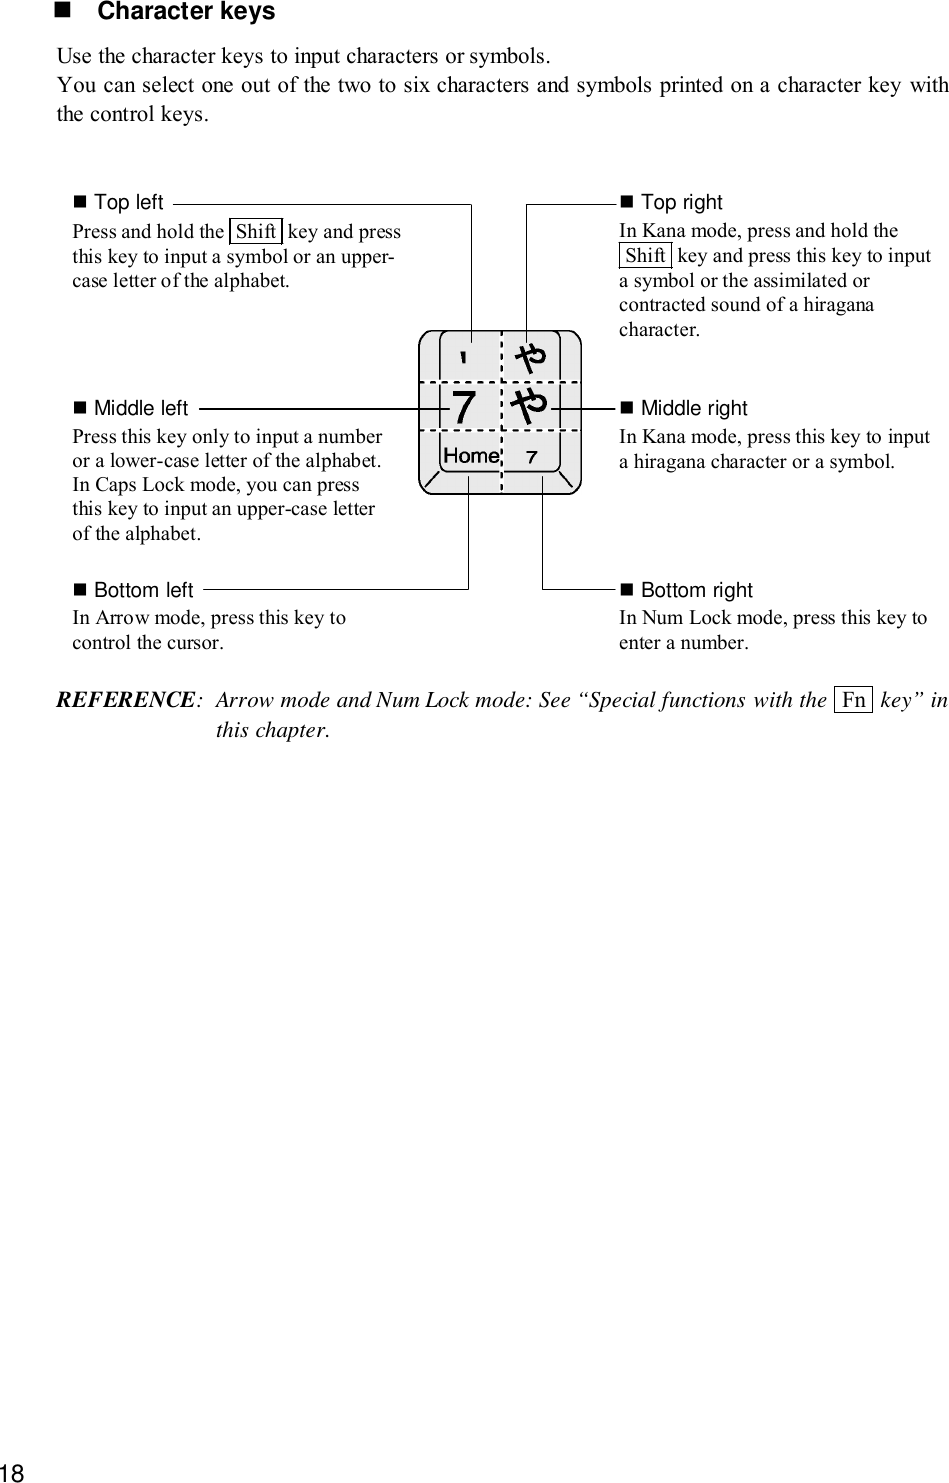
![20Special Function Keys with the Fn KeyKey Description Fn + Esc 1<<speaker mute>Mutes the volume of the internal speaker or theheadphones. To resume the sound, press the Fn + Esc keys again. Fn + F1 1<Instant security function>Displays the lock icon at the top right of thescreen and turns off the screen display.Protection with the password (by checking[Protect with the password] or [Return to theWelcome to Windows window at restart] on the[Screen Saver] tab of the [Display Properties]window) will enhance the security. To deactivatethe instant security function, do one of thefollowing:(1) Press the Shift or Ctrl key or move theAccupoint II.(2) If multiple users are registered, click a username.(3) Enter the Windows log-on password on thepassword input window and press the Enter key.If protection with the password is not activated,you can press the Shift or Ctrl key or movethe Accupoint II to deactivate the instant securityfunction. Fn + F2 1<Power saving mode setup>Press the Fn + F2 keys to display the powersaving mode set with the Toshiba Power SavingUtility.To switch through the power saving modes,press and hold the Fn key and press the F2 1key. Fn + F3 1<Standby>Press the Fn + F3 keys to display a dialogwindow and click the [Yes] button to place yourcomputer on Standby. (*1) Fn + F4 1<Hibernate>Press the Fn + F4 keys to display a dialogwindow and click the [Yes] button to place yourcomputer in Hibernate. (*1) Fn + F5 1<Display device selection>You can select a display device.REFERENCE: For more information,see “9 External display” in thisChapter.](https://usermanual.wiki/Toshiba-Client-Solutions/PL5080WL.Manual-3of7/User-Guide-232988-Page-13.png)
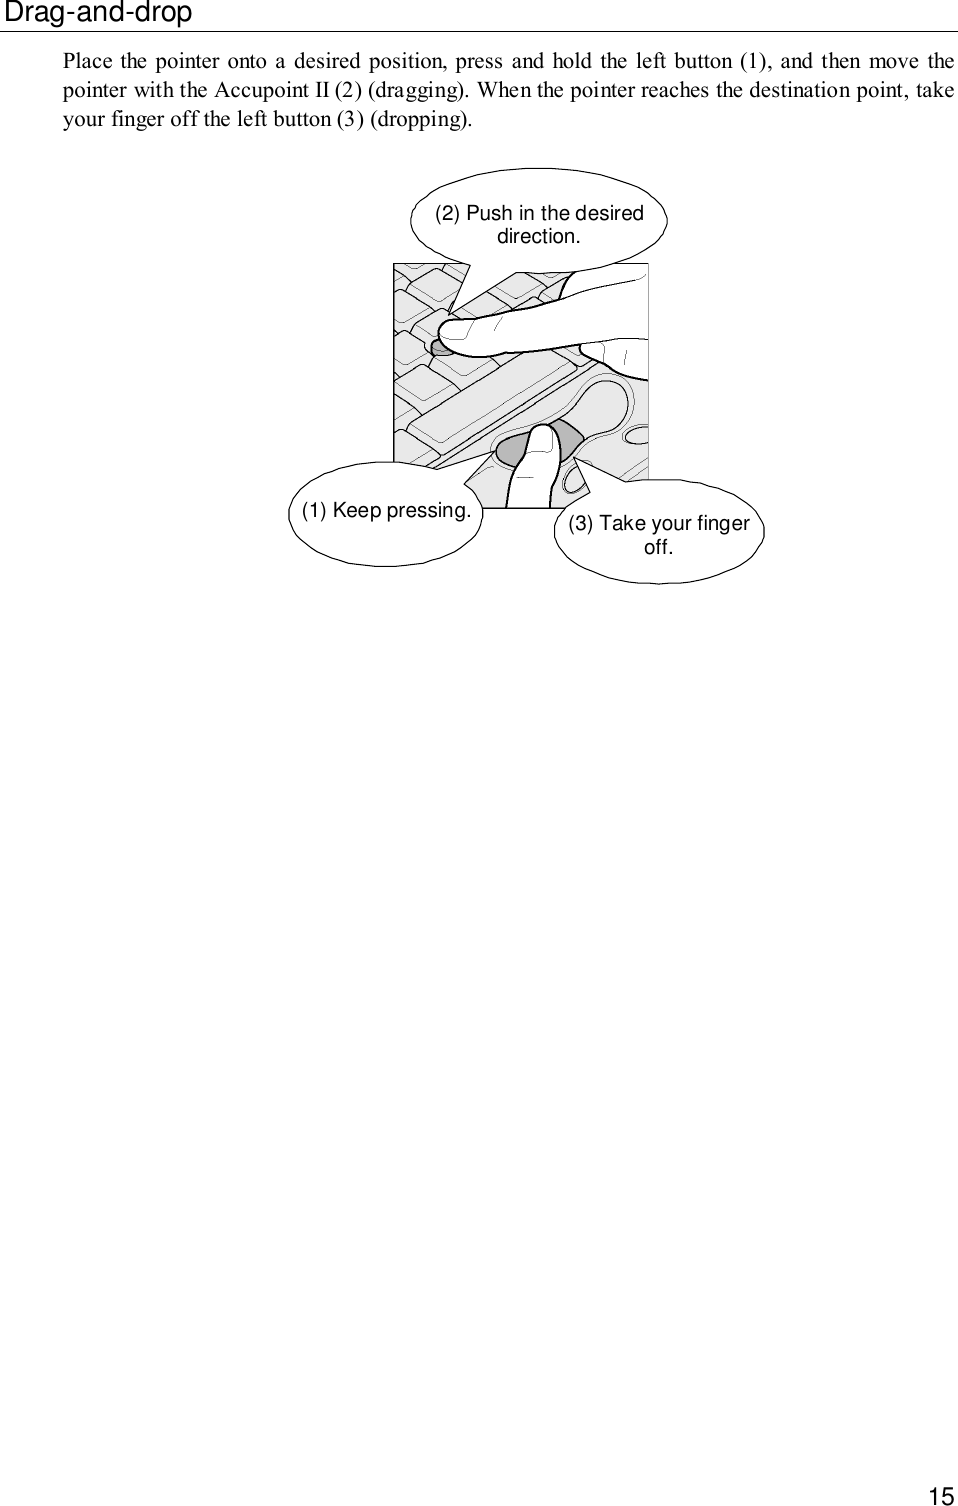
![21Key Description Fn + F6 1<Decrease screen brightness>Press and hold the Fn key and press the F6 keyto decrease screen brightness by one level.The screen icon shows the state of brightness. (*2) Fn + F7 1<Increase screen brightness>Press and hold the Fn key and press the F7 keyto increase screen brightness by one level.The screen icon shows the state of brightness. (*2) Fn + F10 1<Overlay function: arrow mode>You can use the overlay keys as the cursor controlkeys of which functions are printed at the bottomleft on the key top.To deactivate the arrow mode, press the Fn + F10 keys again. Fn + F11 1<Overlay function: number lock mode>You can enter numbers that are printed at thebottom right on the key top.To deactivate the number lock mode, press the Fn + F11 keys again.Some applications, including Microsoft Excel, mayperform different functions. Fn + F12 1<Scroll lock mode>In some applications, you can use the up, down,left, and right arrow keys ↑ ↓ ← → forscrolling the screen.To deactivate the scroll lock mode, press the Fn 1+ F12 keys again. Fn + ↑ 1<PgUp (Page Up)>Press and hold the Fn key and press the uparrow key ↑ to move to the previous page. Fn + ↓ 1<PgDn (Page Down)>Press and hold the Fn key and press the downarrow key ↓ to move to the next page. Fn + ← 1<Home>Press and hold the Fn key and press the leftarrow key ← to move the cursor to the beginningof the line or document. Fn + → 1<End>Press and hold the Fn key and press the rightarrow key → to move the cursor to the end of theline or document.*1: If you check [Do not display this message again.] on the message window, the windowwill not appear from then on.*2: No change in brightness is allowed for 18 seconds immediately after the LCD is turnedon. The maximum brightness is applied in that period for stabilizing the LCD.](https://usermanual.wiki/Toshiba-Client-Solutions/PL5080WL.Manual-3of7/User-Guide-232988-Page-14.png)
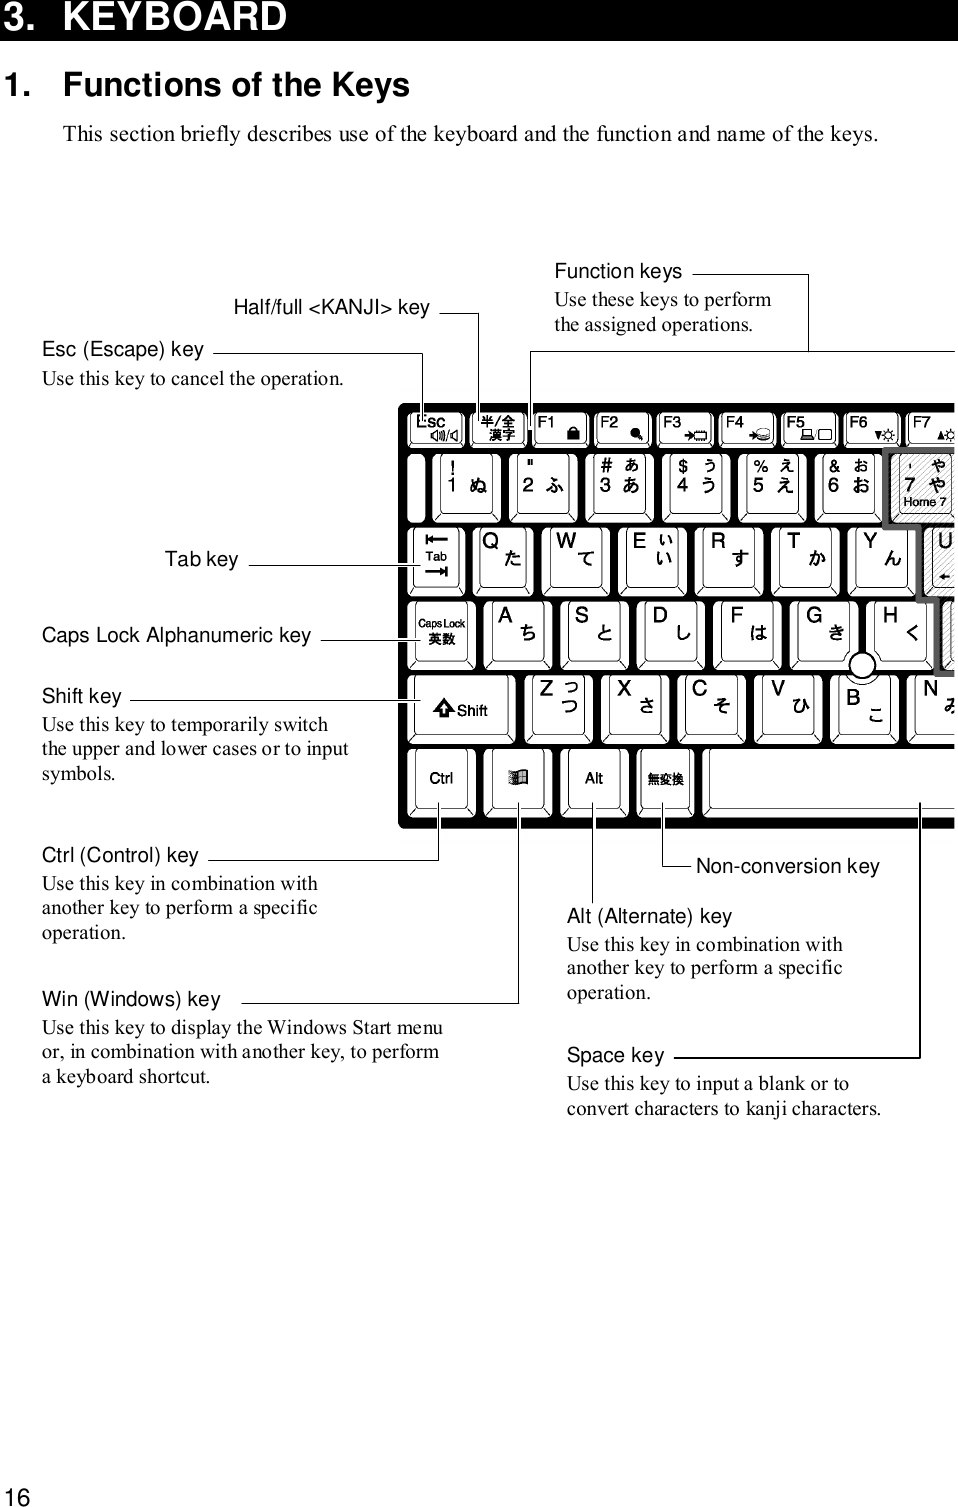
![22Shortcut keys with the Windows keyCombinations of the Windows key and another key for shortcuts are listed below:Key Operation + R 1Displays the [Run] window. + M 1Minimizes all the windows to icons. Shift + + M 1Maximizes all the window icons. + F1 1Starts “Help and Support Center”. + E 1Displays the [My Computer] window. + F 1Initiates the search for a file or folder. Ctrl + + F 1Initiates the search for other computers. + Tab 1Moves the focus on the taskbar buttons. + Break 1Displays the [System Properties] window.Special Function KeysSpecial Function Key OperationStart of the TaskManager Ctrl + Alt + Del 1Displays the [Task Manager] window.You can abort applications and the system. Fn + PrtSc 1Copies the current desktop into the clipboard.Screen copy Alt + Fn + PrtSc 1Copies the active window into the clipboard.](https://usermanual.wiki/Toshiba-Client-Solutions/PL5080WL.Manual-3of7/User-Guide-232988-Page-15.png)
![232. To Input JapaneseYour computer is provided with the Japanese input system MS-IME.The Japanese input system is the software to input Japanese characters.When you turn on your computer, you can input alphanumeric characters. To input Japanesecharacters, press the Half/Full key.When you activate the Japanese input mode, the IME toolbar appears as shown below:Input Mode SelectionThe default mode is the ROMAJI input mode.To switch between the ROMAJI input mode and the KANA input mode, press the Alt + KATAKANA/HIRAGANA keys.When you restart your computer, the ROMAJI input mode is resumed.To always use the same input mode, follow the steps below:(1) Click the [Tool] icon ( ) on the toolbar.(2) Click [Properties] on the menu that appears.(3) On the [General] tab, select the input mode.KANJI Character ConversionTo convert characters that you entered into KANJI characters, press the Space key.If converted KANJI characters are not desired ones, press the Space key again to displayothers.If you press the Space key one more again, a list of KANJI characters appears.Use the up ( ↑ ) or down ( ↓ ) arrow key to select desired ones and press the Enter key.REFERENCE: For use of MS-IME, see “MS-IME Online Help”.TIP:•To see the MS-IME online help, click the [Help] icon ( ) on the toolbar and click[Microsoft(R) IME Standard 2002] → [Contents and Keyword].](https://usermanual.wiki/Toshiba-Client-Solutions/PL5080WL.Manual-3of7/User-Guide-232988-Page-16.png)
![244. VOLUME CONTROL1. Controlling Speaker VolumeTo adjust the speaker volume, use the volume dial or control it on Windows.TIP:•Some applications may cause feedback between the external microphone and thespeaker. In such a case, do the following:- Adjust the volume with the volume dial.- Change the settings of the application in use.- Move the external microphone away from the speaker.Control with the Volume DialTurn the dial to the right to increase the volume or to the left to decrease the volume.Muting1. Press and hold the Fn key and press the Esc key.Muting of the speaker is activated or deactivated.Control on Windows! Sound and Audio Device Properties(1) Click [Start] → [Control Panel].(2) Click [Sounds, Speech, and Audio Devices].(3) Click [Change the speaker settings].The [Sound and Audio Device Properties] window appears.(4) Drag the slider for [Device volume] on the [Volume] tab.](https://usermanual.wiki/Toshiba-Client-Solutions/PL5080WL.Manual-3of7/User-Guide-232988-Page-17.png)
![25! Master VolumeTo adjust the volume of individual files that you play back, follow the steps below:(1) Click [Start] → [All Programs] → [Accessories] → [Entertainment] → [Volume Control].(2) Drag the slider for each option vertically to adjust the volume.Move the slider upward to increase the speaker volume. To mute the sound, click [Mute].On the [Master Volume] window, you can adjust the following volume options.Master Volume The overall volumeWAVE MP3 files, Wave files, music CD, DVD-VideoMIDI MIDI filesCD AUDIO Music CD (not for playback with Windows Media Player)These options may vary depending on the application. For more information, see the manual thatcomes with the application or “Master Volume Help”.2. Controlling Audio and Voice Recording VolumeTo adjust the recording level on your computer, follow the steps below:1. Click [Start] → [All Programs] → [Accessories] → [Entertainment] → [VolumeControl].2. Click [Options] → [Properties] on the menu bar.3. Check [Recording] under [Volume control].4. Confirm [Control to display].Confirm that [Microphone] is checked.5. Click the [OK] button.](https://usermanual.wiki/Toshiba-Client-Solutions/PL5080WL.Manual-3of7/User-Guide-232988-Page-18.png)
![266. On the [Recording Control] window, click [Select] for the device to use.[Microphone]: when recording with the external microphone.7. Move the slider for the selected device to adjust the volume.TIPS:•You cannot select more than one device at the same time.•If the music or speech that you want to record is applicable to [WAVE] on the[Master Volume] window, the volume setting for [WAVE] also controls therecording volume.](https://usermanual.wiki/Toshiba-Client-Solutions/PL5080WL.Manual-3of7/User-Guide-232988-Page-19.png)

![28To Disconnect the Modular CableTo disconnect the modular cable, press and hold the lock on the modular plug and pull it outfrom the modular jack.LockModular plug! Changing the region settingThe internal modem in your computer can be used in the following countries and regions:Iceland, Ireland, U.S.A, U.A.E, U.K., Israel, Italia, India, Indonesia, Egypt, Estonia, Australia,Austria, Oman, Netherlands, Canada, Korea, Greece, Kuwait, Saudi Arabia, Singapore,Switzerland, Sweden, Spain, Sri Lanka, Slovakia, Slovenia, Thailand, Taiwan, Czech, China,Denmark, Germany, Turkey, Japan, New Zealand, Norway, Pakistan, Hungary, Bangladesh,Philippines, Finland, France, Bulgaria, Belgium, Poland, Portugal, Hong Kong, Malta,Malaysia, South Africa, Morocco, Latvia, Lithuania, Luxemburg, Lebanon, RussiaAs of April 2002When using the modem overseas, use “Internal Modem Region Select Utility” for regionalsettings.When using your computer in Japan, be sure to use it in Japan mode. Use of the product in anyother mode is a violation of Telecommunications Business Law (Technical Standards).NOTE:•Before starting “Internal Modem Region Select Utility”, be sure to log onto yourcomputer using the Administrator user account. An attempt to start the utility usingany user account other than the Administrator may cause an error message toappear.1. Click [Start] → [All Programs] → [TOSHIBA Internal Modem] → [Region SelectUtility].The [Internal Modem Region Select Utility] icon ( ) appears on the Notification area.2. Click the [Internal Modem Region Select Utility] icon ( ) on the Notification area.The list of regions that the internal modem supports appears.The currently selected region and the location name on the sub-menu are marked with thecheck mark.](https://usermanual.wiki/Toshiba-Client-Solutions/PL5080WL.Manual-3of7/User-Guide-232988-Page-21.png)
![293. Click to select a region name or a location name.If a region name is selected, new region information will be created after the region setupfor the modem and new location information will be used as the current locationinformation.If a location name is selected, the region specified in its location information will be usedfor the region setup for the modem and the selected location information will be used as thecurrent location information.Other Settings1. Right-click the [Internal Modem Region Select Utility] icon ( ) on the Notificationarea and select an option from the menu.• SettingsClick the check box to change the following settings:Automatic start mode “Internal Modem Region Select Utility”automatically starts at the system start-up andthe region setting is made for the modem.Automatically display dial properties afterregion selection. The [Phone and Modem Options] windowappears after region selection.Select a region from the location setting The location name specified in the [Phone andModem Options] window appears in the sub-menu of the region name. You can now select aregion using its location name.Display a dialog if the region code of thecurrent location setting is inconsistentbetween the modem and the telephony.If the region setting of the modem is differentfrom the region code of the current locationsetting specified on the [Phone and ModemOptions] window, a message dialog appears.• Modem selectionThe window for selecting the COM port number appears. When using the internal modem, nochange is required as the COM port number is automatically set.• Dial propertiesThe [Phone and Modem Options] window appears.](https://usermanual.wiki/Toshiba-Client-Solutions/PL5080WL.Manual-3of7/User-Guide-232988-Page-22.png)
![32! Notes on use of the wireless LAN•Place a wireless antenna for a wireless LAN in an obstacle-free location. To maximize thewireless communication range, open the LCD and keep obstacles, including books and sheavesof thick paper, away from your computer.•The wireless LAN is a wireless product. For local wireless regulations, check with “UserInformation”.Types of the Wireless LAN Network! Peer-to-peer workgroupA method to build a temporary network in an environment without a wireless LAN access point,such as Small Office/Home Office (SOHO). Setting a peer-to-peer workgroup allows you tobuild a small wireless network. When devices, including computers, are located within thecommunication range of one another, setting a peer-to-peer workgroup is the easiest and mosteconomical method to build a wireless network.In this workgroup, you can exchange files using the function such as [File and Printer Sharing]supported by the Microsoft network. It is convenient for sharing data or exchange files in afamily or among friends.! Infrastructure networkA method to connect to a network and access all network facilities from wireless LAN devicesusing the wireless access point. You can access both of the following networks:[Standalone network]A network that is built with the wireless access point only[Infrastructure network]A network topology where the wireless access point is included in the existing wired networkBasic SetupTo connect to a wireless LAN network, a setup appropriate to your network is required.Windows XP is compatible with wireless LAN networks.1. Click [Start] → [Control Panel].2. Click [Network and Internet Connections].3. Click [Set up or change your home or small office network].The [Start Network Setup Wizard] window appears. Follow the on-screen instructions toproceed.](https://usermanual.wiki/Toshiba-Client-Solutions/PL5080WL.Manual-3of7/User-Guide-232988-Page-25.png)
![33Advanced SetupThe wireless LAN can be built in almost all network environments with the basic setup only.When it is connected to the infrastructure network, you can also add advanced settings on the[Change Settings] window.1. Click [Start] → [My Computer].2. Click [My Network] under [Others].3. Click [Display network connections] under [Network tasks].The [Network Connections] window appears.4. Select [Wireless network connections] (1) and click [Change this connectionsettings] (2) under [Network tasks].(1)(2)The [Wireless Network Connection Properties] window appears.5. Change the settings and click the [OK] button.](https://usermanual.wiki/Toshiba-Client-Solutions/PL5080WL.Manual-3of7/User-Guide-232988-Page-26.png)
![34Using the Wireless LANThis section describes how to view other computers on the network and the radio state of thewireless LAN, and how to change the wireless LAN settings.1. Slide the wireless communication switch on your computer to the right (On).Wireless communication switchUse this switch to enable/disable the wireless LAN function.Slide the switch to the right (ON) to enable; to the left (Off) todisable.Wireless communication LEDThe wireless communication LED lights and the wireless LAN becomes available.When the wireless LAN is activated, your computer automatically looks for availablenetworks.When an available network is found, a message appears on the bottom of the desktop.2. Click [Click here to display a list of available networks].The [Connect to Wireless Network] window appears.](https://usermanual.wiki/Toshiba-Client-Solutions/PL5080WL.Manual-3of7/User-Guide-232988-Page-27.png)
![353. Select a desired network under [Available networks] (1) and click the [Connect]button.(1)(2)When a connection is established, the message “Wireless network connection isestablished.” appears at the bottom of the desktop.4. Click [Start] → [My Computer].5. Click [My Network] under [Others].6. Click [Display computers in the workgroup] under [Network tasks].Devices available for connection through the wireless LAN, including computers, appear.! To start helpFor more information on the wireless LAN, see “Windows Help”.](https://usermanual.wiki/Toshiba-Client-Solutions/PL5080WL.Manual-3of7/User-Guide-232988-Page-28.png)
![36Selecting a Network DeviceWith the “Network Device Switch”, you can select a desired device from among multipledevices with the network feature.You can also switch between the wired LAN and the wireless LAN using this switch. Forexample, you can connect to the wired LAN in the living room and to the network through thewireless LAN when you move to the study.In addition, you can use this switch as the utility to enable/disable network devices.For more information, see the help files for the “Network Device Switch”.TIP:•Log onto your computer using the Administrator user account in order to activatethe network device switch.1. Click [Start] → [All Programs] → [Network Device Switch] → [Network DeviceSwitch].The [Network Device Switch] icon ( ) appears on the Notification area.! To select a deviceBefore using the wireless LAN, turn on the wireless communication switch.1. Click the [Network Device Switch] icon ( ) on the Notification area.Available devices for your computer are listed.2. Click the name of a device you want to use.The device is selected and the enabled device is marked with the check mark. Other devicesare disabled.TIP:•When you have changed the device, you may have to log onto the network again.](https://usermanual.wiki/Toshiba-Client-Solutions/PL5080WL.Manual-3of7/User-Guide-232988-Page-29.png)
![37! Other settings1. Right-click the [Network Device Switch] icon ( ) on the Notification area andselect an option from the menu.•Automatic selectionWhen the cable is disconnected from the wired LAN, the wireless LAN is automaticallyput in operation.You can use this option when the wired LAN is in operation and the TCP/IP protocol isin use.•Disable (Enable)Disables or enables the “Network Device Switch” function.•HelpDisplays the readme file for the “Network Device Switch”.•ExitDeactivates the “Network Device Switch”.](https://usermanual.wiki/Toshiba-Client-Solutions/PL5080WL.Manual-3of7/User-Guide-232988-Page-30.png)
![39Removing1. Disable the PC card.(1) Click the [Safe Hardware Removal] icon ( ) on the Notification area.(2) Click [Remove XXXX (the PC card to remove) safely] in the menu.(3) When the message “The ‘XXXX’ device can now be safely removed from the system.”appears, click the [Close] button ( ).2. Press the PC card eject button.The eject button comes out.Eject button3. Press the PC card eject button again.Press the button until it clicks.The card comes out.4. Grab the card end and pull out the card.NOTE:•Do not pull the cable to pull out the card, as it may cause a malfunction.](https://usermanual.wiki/Toshiba-Client-Solutions/PL5080WL.Manual-3of7/User-Guide-232988-Page-32.png)

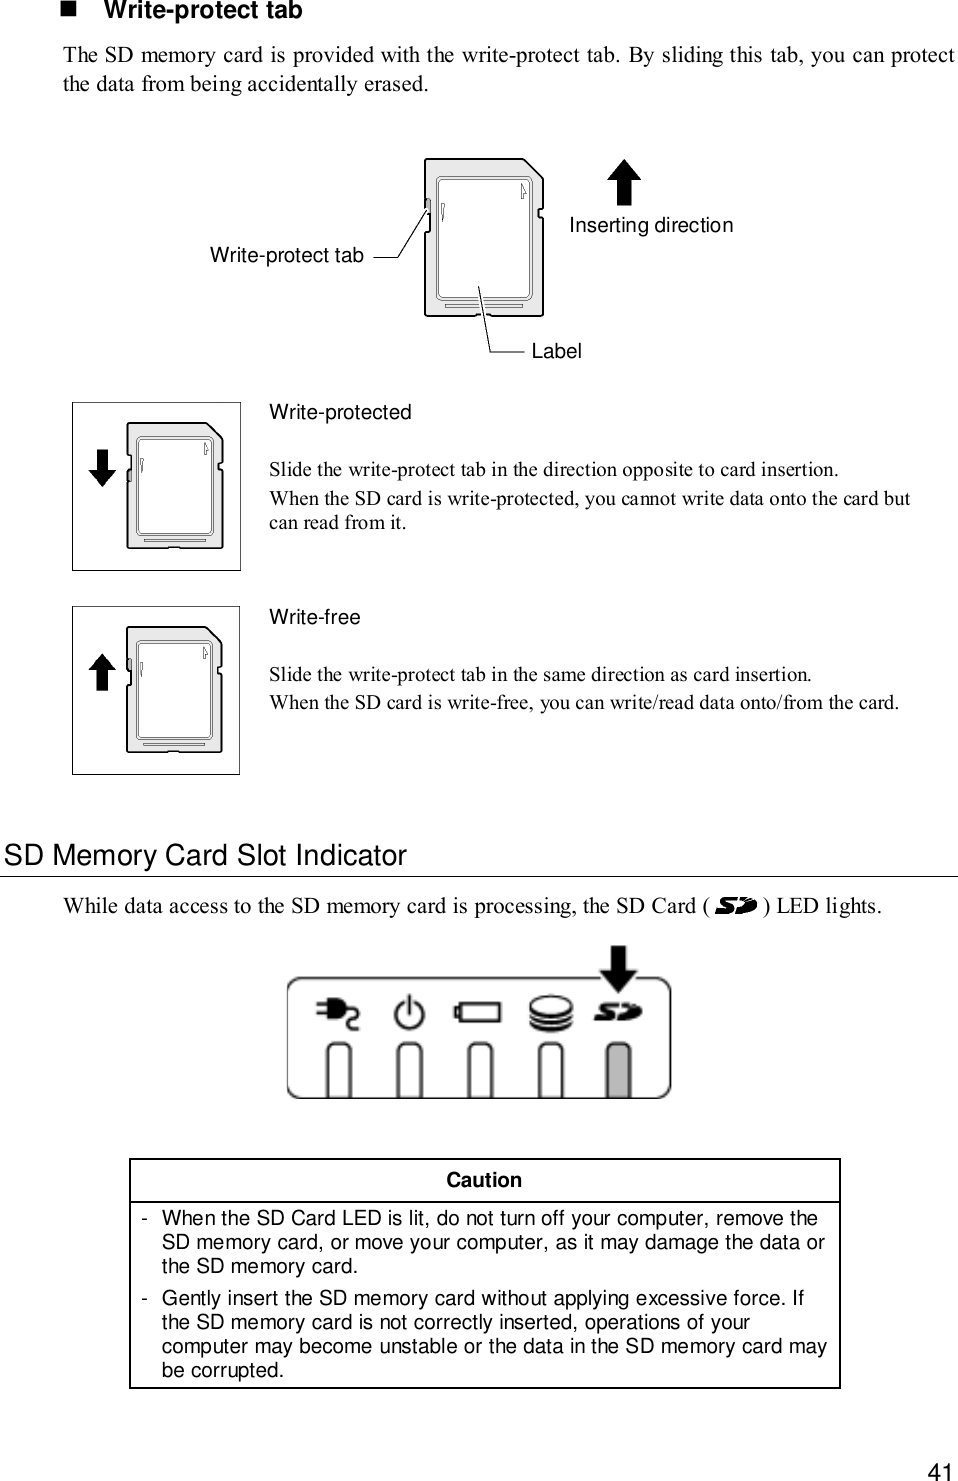
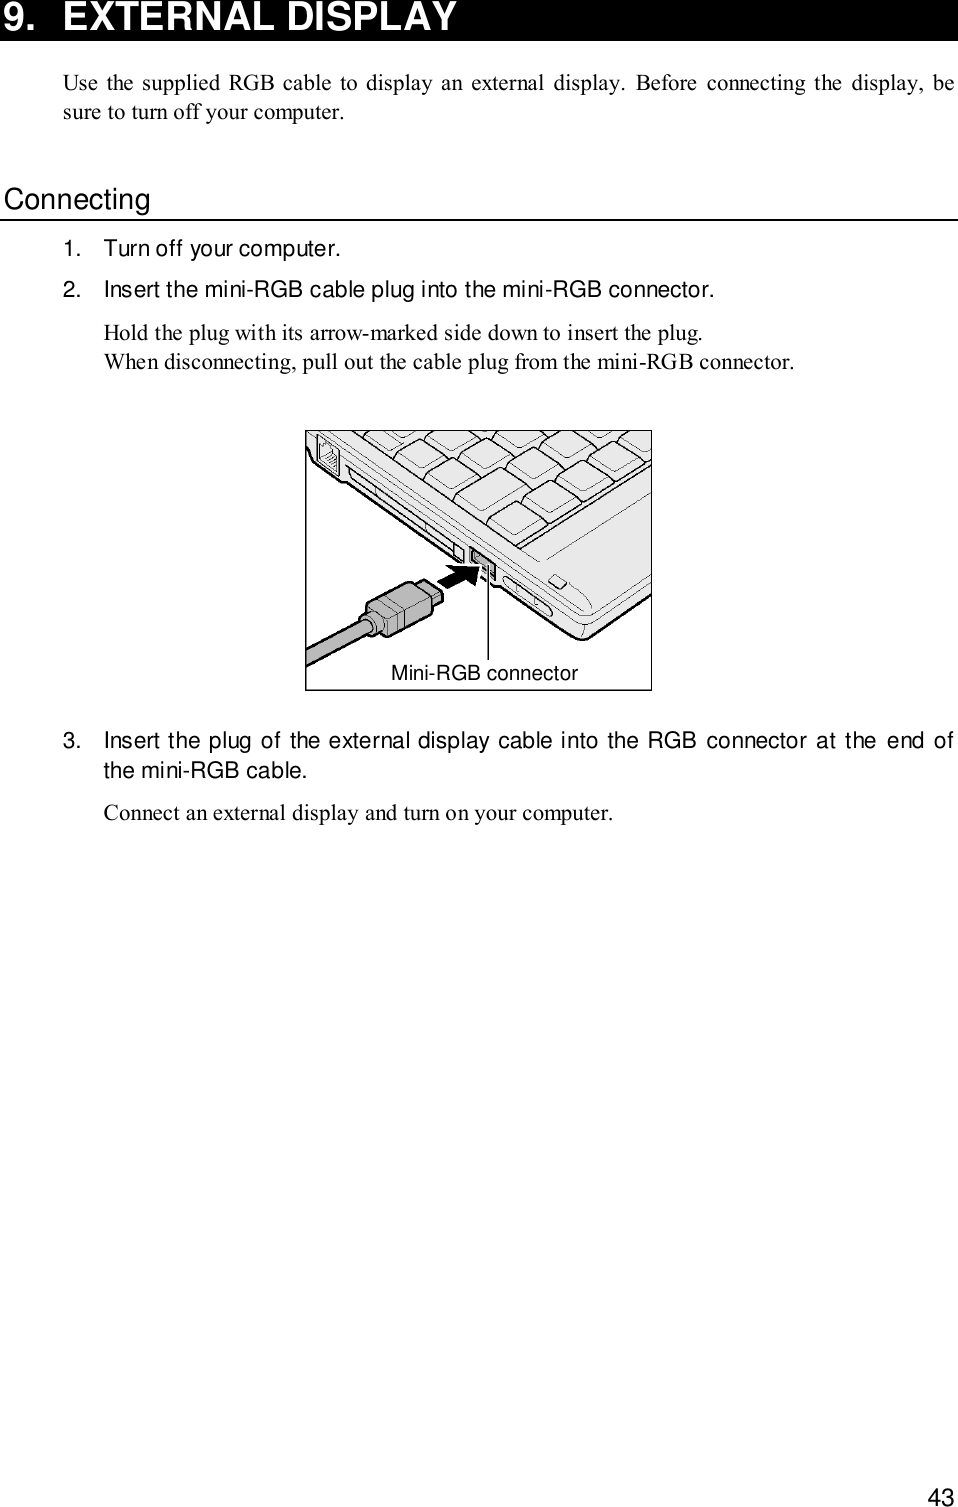
![42Inserting1. Hold the SD memory card with its labeled side up and insert it into the card slot.Insert the card all the way to the end.Removing1. Disable the SD memory card.(1) Click the [Safe Hardware Removal] icon ( )on the Notification area.(2) Click [Remove TOSHIBA SD Memory Card Drive safely] in the menu.(3) When the message “The ‘XXXX’ device can now be safely removed from the system.”appears, click the [Close] button ( ).2. Push the SD memory card.The card slightly comes out. Grab the card and pull it out.NOTE:•Do not remove the SD memory card when the SD Card ( ) LED is lit, as itcorrupts the data contained in the card.FormattingFormatting is to write the basic information, including the track number and the head number,onto the SD memory card and make the card available for use.New SD memory cards are formatted in accordance with the SD memory card standard beforesale. If you want to reformat the SC memory card, use the device (digital camera, audio player,etc.) with which you want the SD memory card. For information on formatting, see the manualthat comes with your device.Caution- Do not format the SD memory card on Windows (the [My Computer]window), as it may make the card unavailable for use with otherdevices, including a digital camera and an audio player.NOTE:•Reformatting the SD memory card erases all the information stored in the card. Becareful when reformatting SD cards that have been used.](https://usermanual.wiki/Toshiba-Client-Solutions/PL5080WL.Manual-3of7/User-Guide-232988-Page-35.png)

![45! Using the Fn + F5 keysPress and hold the Fn key and press the F5 key to select a display.LCD (LCD only)LCD/CRT (LCD and external display)CRT (External display only)This option is selected regardless of the stateof the external display connection. Note thatnothing appears on your computer's LCDwhen no external display is connected.TIP:•If you cycle the power to your computer when an external display is connected andselected for display, the image appears on your computer’s LCD.Use the Fn + F5 keys to select the external display.! Using the [Display Properties] window1. Click [Start] → [Control Panel].2. Click [Appearance and Themes].3. Click [Display].The [Display Properties] window appears.4. Click [Advanced] on the [Settings] tab.The [Plug-and-play Monitor and Rage Mobility Properties] window appears.](https://usermanual.wiki/Toshiba-Client-Solutions/PL5080WL.Manual-3of7/User-Guide-232988-Page-38.png)
![465. Enable the device on the [Displays] tab.Click the [Enable/Disable] button ( ) at the top left corner of the display device name toselect the device.By default, your computer’s LCD (Panel) only is selected.Follow the instructions below to select a display.Your computer’s LCD (Panel) only↓↑ Click the [Enable/Disable] button for [Monitor].Both your computer’s LCD (Panel) and the external display (Monitor)↓↑ Click the [Enable/Disable] button for [Panel].External display (Monitor) onlyThe [Enable/Disable] button changes in color as listed below.Monitor PanelYour computer’s LCD (Panel) only Red GrayBoth your computer’s LCD (Panel) and theexternal display (Monitor)* Green GreenExternal display (Monitor) only Gray Red* When both your computer’s LCD and the external display are selected, you can use thePrimary ( ) and Secondary ( ) buttons to select a device for video display.](https://usermanual.wiki/Toshiba-Client-Solutions/PL5080WL.Manual-3of7/User-Guide-232988-Page-39.png)
![476. Click the [OK] buttonThe following window appears.TIP:•If nothing appears on the external display within 15 seconds, the display selection isdiscarded.7. Click the [Yes] button.](https://usermanual.wiki/Toshiba-Client-Solutions/PL5080WL.Manual-3of7/User-Guide-232988-Page-40.png)
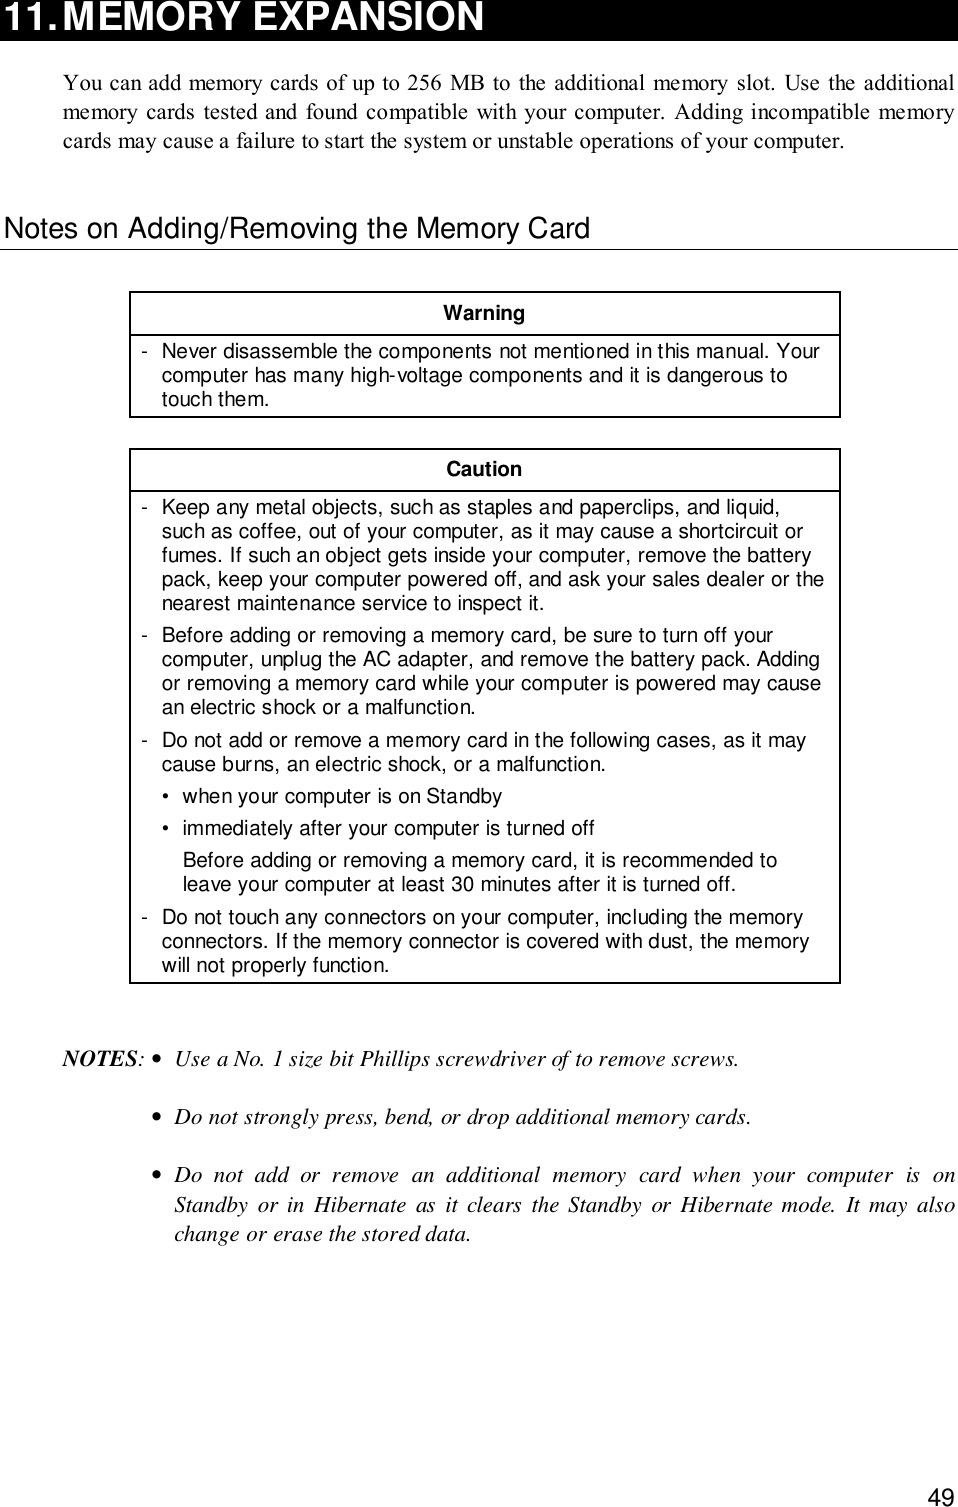
![526. Replace the additional memory cover and fasten the screws that you removed instep 4.Make sure that the additional memory cover is firmly closed.7. Replace the battery pack.When you turn on your computer, the total memory capacity is automatically recognized. Checkif the total memory capacity is correct.REFERENCE: For checking the memory capacity, see “Checking the memory capacity” inthis section.Checking the Memory CapacityTIP:•As the system uses approximately 16 MB of the main memory, the memory capacitydisplayed on the [PC Diagnostic Tool] or [System Properties] window is less thanthe actual capacity.! Checking with [PC Diagnostic Tool](1) Click [Start] → [All Programs] → [Toshiba Utilities] → [PC Diagnostic Tool].(2) Click the [View the basic information] button.(3) Check the value for [Memory].](https://usermanual.wiki/Toshiba-Client-Solutions/PL5080WL.Manual-3of7/User-Guide-232988-Page-45.png)