Technicolor Delivery Technologies Belgium TG587N Wireless Residential ADSL Gateway User Manual TG587n SetupUserGuide en

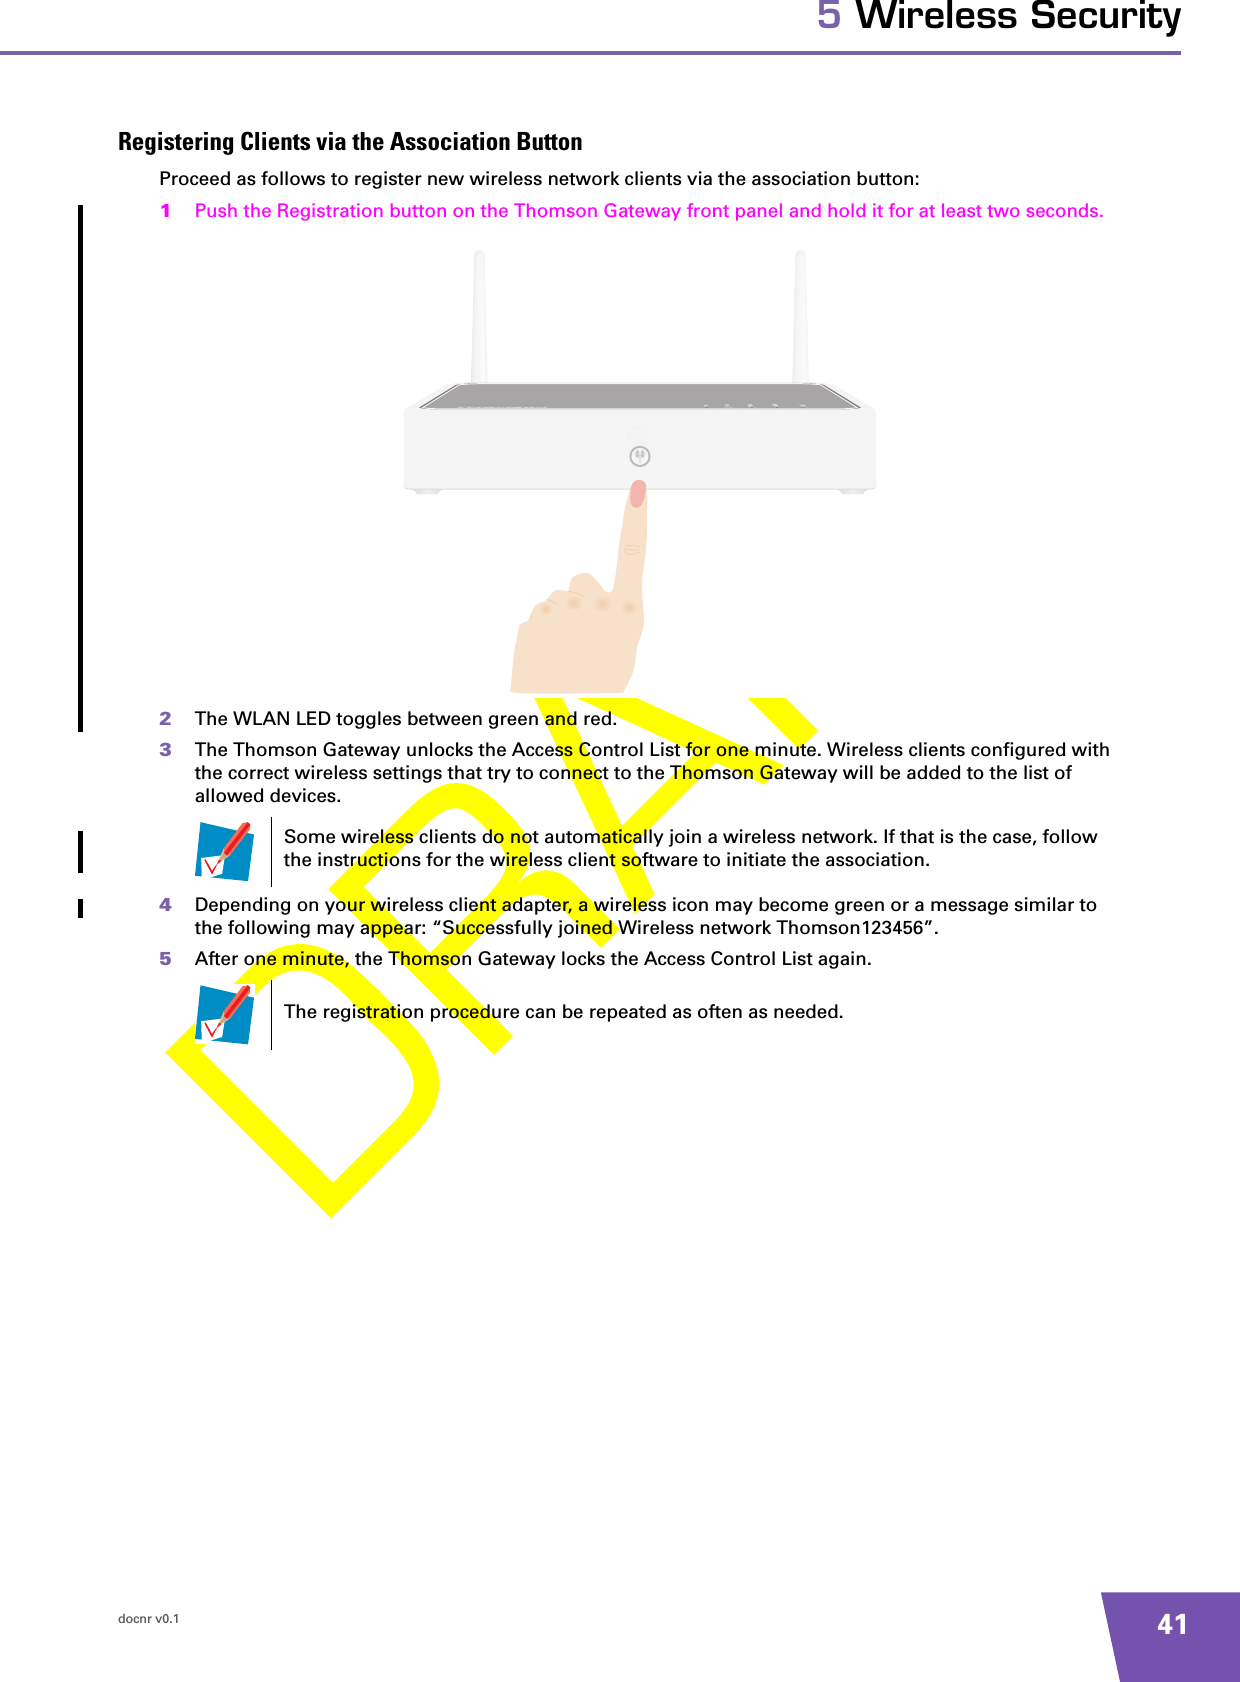
Technicolor Delivery Technologies Belgium Wireless Residential ADSL Gateway TG587n SetupUserGuide en

Contents

Users manaul 2

Setup and User’s GuideThomson TG587nWireless Multi-User ADSL2+ Gateway
Thomson TG587nSetup and User’s Guide
CopyrightCopyright ©1999-2007 Thomson. All rights reserved. Distribution and copying of this document, use and communication of its contents is not permitted without written authorization from Thomson. The content of this document is furnished for informational use only, may be subject to change without notice, and should not be construed as a commitment by Thomson. Thomson assumes no responsibility or liability for any errors or inaccuracies that may appear in this document.Thomson Telecom BelgiumPrins Boudewijnlaan, 47 B-2650 Edegem Belgium http://www.thomson-broadband.comTrademarksThe following trademarks may be used in this document:>DECT is a trademark of ETSI.>Bluetooth® word mark and logos are owned by the Bluetooth SIG, Inc.>Ethernet™ is a trademark of Xerox Corporation.>Wi-Fi® and the Wi-Fi logo are registered trademarks of the Wi-Fi Alliance. "Wi-Fi CERTIFIED", "Wi-Fi ZONE", "Wi-Fi Alli-ance", their respective logos and "Wi-Fi Protected Access" are trademarks of the Wi-Fi Alliance.>UPnP™ is a certification mark of the UPnP™ Implementers Corporation.>Microsoft®, MS-DOS®, Windows® and Windows NT® are either registered trademarks or trademarks of Microsoft Corpo-ration in the United States and/or other countries.>Apple® and Mac OS® are registered trademarks of Apple Computer, Incorporated, registered in the United States and other countries.>UNIX® is a registered trademark of UNIX System Laboratories, Incorporated.>Adobe®, the Adobe logo, Acrobat and Acrobat Reader are trademarks or registered trademarks of Adobe Systems, Incor-porated, registered in the United States and/or other countries.Other brands and product names may be trademarks or registered trademarks of their respective holders.Document InformationStatus: v0.1 (December 2007)Reference: docnrShort Title: Setup and User’s Guide TG587n R8.1
docnr v0.1 iContentsAbout this Setup and User’s Guide ..........................................  11 Installation.................................................................................... 31.1 Preliminary Steps............................................................................................ 41.2 Placing your Thomson Gateway ..................................................................... 51.3 Installing your Thomson Gateway .................................................................. 61.3.1 Guided Installation ................................................................................................................................. 71.3.2 Manual Installation................................................................................................................................. 92 Thomson Gateway Basics ........................................................ 112.1 Thomson Gateway LED Behaviour ................................................................ 122.2 Thomson Gateway Web Interface ................................................................. 142.3 Backing Up/Restoring your Configuration .................................................... 173 Adding New Devices to your Network....................................193.1 Adding a Computer to your Network............................................................ 203.1.1 Connecting a computer using Wireless.............................................................................................. 213.1.2 Connecting a computer using Ethernet.............................................................................................. 224 Getting the Most Out of Your Thomson Gateway................. 234.1 Universal Plug and Play ................................................................................ 244.1.1 Accessing Your Thomson Gateway with UPnP .................................................................................254.1.2 Managing your Internet connection with UPnP................................................................................. 264.1.3 Configuring UPnP on the Thomson Gateway ....................................................................................284.1.4 Installing UPnP on Windows XP ......................................................................................................... 294.2 Assigning a service (HTTP, FTP,...) to a computer ........................................ 314.3 Dynamic DNS ................................................................................................ 335 Wireless Security ....................................................................... 355.1 Encryption ..................................................................................................... 365.1.1 Configuring WEP Encryption............................................................................................................... 375.1.2 Configuring WPA-PSK Encryption ...................................................................................................... 385.2 Access Control .............................................................................................. 395.3 Disabling SSID Broadcast ............................................................................. 42
docnr v0.1iiContents6 Internet Security ........................................................................ 436.1 Firewall.......................................................................................................... 446.2 Web site Filtering .......................................................................................... 456.2.1 Denying access to a specific Web site ................................................................................................ 466.2.2 Allowing access to a specific Web site ............................................................................................... 476.2.3 Redirecting a Web site ......................................................................................................................... 486.2.4 Redirecting all Web sites ..................................................................................................................... 497 Troubleshooting ........................................................................ 517.1 Setup wizard Troubleshooting ...................................................................... 527.2 General Thomson Gateway Troubleshooting ................................................ 537.2.1 Wired Connection Troubleshooting.................................................................................................... 547.2.2 Wireless Connection Troubleshooting ............................................................................................... 557.3 Reset to Factory Defaults ............................................................................. 56
docnr v0.1 1About this Setup and User’s GuideAbout this Setup and User’s GuideUsed SymbolsTerminologyGenerally, the Thomson TG587n will be referred to as Thomson Gateway in this Setup and User’s Guide.Typographical ConventionsFollowing typographical convention is used throughout this manual:Sample text indicates a hyperlink to a Web site.Example: For more information, visit us at www.thomson-broadband.com.Sample text indicates an internal cross-reference.Example: If you want to know more about guide, see “1 Introduction” on page 7”.Sample text indicates an important content-related word.Example: To enter the network, you must authenticate yourself.Sample text indicates a GUI element (commands on menus and buttons, dialog box elements, file names, paths and folders).Example: On the File menu, click Open to open a file.Documentation and software updatesThomson continuously develops new solutions, but is also committed to improving its existing products.For more information on Thomson's latest technological innovations, documents and software releases, visit us at http://www.thomson-broadband.com.A note provides additional information about a topic.A caution warns you about potential problems or specific precautions that need to be taken.
docnr v0.12About this Setup and User’s Guide
docnr v0.1 31 Installation1 InstallationIntroductionIn a few minutes you will be able to access the Internet using your Thomson Gateway.This Setup and User’s Guide will show you how to set up your Thomson Gateway and how to connect your computer(s) to the Internet.
docnr v0.141 Installation1.1 Preliminary StepsDSL serviceThe DSL service must be up and running on your telephone line.If both conventional telephone and DSL service are simultaneously available from the same copper pair, you will need a central splitter or distributed filters for decoupling DSL and telephone signals.Computer requirementsTo connect a computer via Ethernet, make sure the computer is equipped with an Ethernet Network Interface Card (NIC).For wireless networking, you will need a WiFi-certified wireless client adapter for each computer you want to connect wirelessly.Internet connection detailsYou may need the following connection details from your Internet Service Provider (ISP): Your ISP’s method for connecting to the Internet (for example PPPoE)The VPI/VCI (for example 8/35)Your user name and password to connect to the Internet for PPP connectionsYour IP settings in case of static configurationsYou may have received this information when you subscribed to DSL at your Internet Service Provider (ISP). You will be prompted for this information at a given step in the installation procedure.Voice over IP (VoIP) connection detailsIf you want to be able to make phone calls over the Internet, you will need following details for your VoIP connection:A user account at your VoIP Service ProviderThe server settings of your VoIP ServicePublic telephone lines carry voltages that can cause electric shock. Only try to set up splitter/filters that have been designed to be installed by unqualified personnel. For further assistance, contact your Internet Service Provider.Optionally your ISP may indicate the Service Profile to use during Setup.These settings may be provided by your Internet Service Provider.
docnr v0.1 51 Installation1.2 Placing your Thomson GatewayPossibilitiesYou can mount the Thomson Gateway on a wall or simply place it on a desk.Wall mountProceed as follows to mount the Thomson Gateway on a wall or other vertical surface:1Take the wall mount leaflet out of the box.2Stick the wall mount leaflet on the place where your want to mount your Thomson Gateway.3Drill two holes through the marked positions. 4Fasten two screws in the wall holes. The screws should protrude five millimetres from the surface of the wall.5Attach your Thomson Gateway on the wall using the two mounting slots on the bottom.If you install the Thomson Gateway onto plasterboard, use dowels to secure the screws. Otherwise the strain of the cables connected to the Thomson Gateway rear panel connectors could pull the Thomson Gateway from the wall.
docnr v0.161 Installation1.3 Installing your Thomson GatewayInstallation methodsThere two ways to set up your Thomson Gateway:Guided InstallationManual InstallationGuided InstallationHow it worksThe Setup wizard included on the CD will guide you through all configuration aspects of your Thomson Gateway. This is the recommended way to install your Thomson Gateway.RequirementsYour computer must run one of the following operating systems:Microsoft Windows Vista (x64)Microsoft Windows XP Service Pack (SP) 2 or higherMicrosoft Windows XP x64 SP 1 or higherMicrosoft Windows 2000 SP4Mac OS X 10.3 (Panther)Mac OS X 10.4 (Tiger)You must have administrative rights on your computerGetting startedProceed with“1.3.1 Guided Installation” on page 7.Manual InstallationHow it worksThe Setup and User’s Guide will first help you to connect your computer to the Thomson Gateway. After this is done, you can configure your Thomson Gateway using your web browser.RequirementsJavascript must be enabled on your web browser.Getting startedProceed with“1.3.2 Manual Installation” on page 9.
docnr v0.1 71 Installation1.3.1 Guided InstallationConnecting devices: wait!Do not plug in any cables or connect any devices until you are prompted to do so by the wizard.In case of problemsIf you encounter problems during this installation please refer to “7.1 Setup wizard Troubleshooting” on page 52.Starting the wizardTo start the wizard:1Insert the Setup CD into your computer's CD- or DVD-ROM drive. 2If your computer runs:Microsoft Windows: The CD should autostart.Mac OS X: Double-click Menu in the window with the content of the CD.3Select the language of your choice and click OK.4The Setup wizard will now guide you through the installation.5At the end of the installation, following screen appears:6Select the Go to the Thomson Gateway Web Interface if you want to go to the Thomson Gateway Web Interface after closing the wizard. On the Thomson Gateway Web Interface, you can further configure your Thomson Gateway.7Click Finish.8The CD menu appears.
docnr v0.181 InstallationCD menuOn the CD Menu, click:(Re)configure my Thomson Gateway to reconfigure your Thomson Gateway or add a new computer to your network.View Documentation to view the documentation that is available for your Thomson Gateway. This list will be automatically updated if you are connected to the Internet.Visit Thomson Broadband to visit the online support sections on www.thomson-broadband.com.Actual available items may depend on the Setup CD delivered with your Thomson Gateway.
docnr v0.1 91 Installation1.3.2 Manual InstallationProcedureProceed as follows:1Connect the cables2Configure the Thomson GatewayConnect the cablesProceed as follows:1Connect your computer to the Thomson Gateway as described in “3.1 Adding a Computer to your Network” on page 20.2Connect the Thomson Gateway to the DSL line.3Connect the power supply.4Turn on the Thomson Gateway.Configure the Thomson Gateway1Open your web browser.2The Thomson Gateway informs you that you have not yet configured your Thomson Gateway.If this window does not appear browse to http://dsldevice.lan or to the IP address of your Thomson Gateway (by default: 192.168.1.254) and click Thomson Gateway on the menu on the left-hand side.3Click Setup my Thomson Gateway.4The Easy Setup wizard appears. This wizard will guide you through the configuration of your Thomson Gateway. Click Next and follow the instructions.
docnr v0.1101 Installation
docnr v0.1 112 Thomson Gateway Basics2 Thomson Gateway BasicsIn this chapterTopic PageThomson Gateway LED Behaviour 12Thomson Gateway Web Interface 14Backing Up/Restoring your Configuration 17
docnr v0.1122 Thomson Gateway Basics2.1 Thomson Gateway LED BehaviourStatus LEDsOn the top panel of your Thomson Gateway, you can find a number of status LEDs, indicating the state of the device during normal operation.The following table shows the meaning of the different LEDs.   Indicator DescriptionName Colour StatePower Green Solid on Power on, normal operationRed Solid on Power on, self-test failed, indicating device malfunctionOrange Solid on Bootloader active (during upgrade)Off Power offEthernet Green Blinking Ethernet activitySolid on Ethernet connection, no activityOff No Ethernet connection Wireless Green Blinking Wireless activity, WPA(2) encryptionSolid on No wireless activity, WPA(2) encryptionAmber Blinking Wireless activity, WEP encryptionSolid on No wireless activity, WEP encryptionRed Blinking Wireless activity, no securitySolid on No wireless activity, no securityRed/green Toggling Wireless client registration phaseOff WLAN disabledBroadband Green Blinking Pending DSL line synchronisationSolid on DSL line synchronisedOff No DSL lineInternet Green Blinking Internet activitySolid on Internet connectivity, no activityRed Solid on Internet connection setup failedOff No Internet connection
docnr v0.1 132 Thomson Gateway BasicsEthernet LEDA LED may be provided per Ethernet port to indicate link integrity (or activity).LED Status DescriptionOff No connection on this portSolid on Ethernet link upBlinking Data is flowing from/to this port
docnr v0.1142 Thomson Gateway Basics2.2 Thomson Gateway Web InterfaceIntroductionThe Thomson Gateway Web Interface allows you to configure your Thomson Gateway using your web browser.RequirementsJavascript must be enabled on your browser.Accessing the Thomson Gateway Web InterfaceProceed as follows:1Open your web browser.2Browse to http://dsldevice.lan or to the IP address of your Thomson Gateway (by default: 192.168.1.254).3If you have protected your Thomson Gateway with a user name and password, the Thomson Gateway will prompt you to enter these. Enter your user name and password and click OK.4The Thomson Gateway Web Interface appears.If your computer runs Windows Vista or Windows XP, you can also access the Thomson Gateway Web Interface using the Internet Gateway Device icon. For more information, see “4.1 Universal Plug and Play” on page 24.
docnr v0.1 152 Thomson Gateway BasicsComponentsMenuThe menu is located on the left side of the page and consists of the following menu items:Thomson Gateway:Provides basic information on the Thomson Gateway.Broadband Connection:Allows you to view/configure your broadband connections.Toolbox:Allows you to assign games or applications to a device and secure your Internet connection.Home Network:Allows you to manage your local network.Language BarThe language bar is located in the top banner and allows you to change the language of the Thomson Gateway Web interface.Label Description1Menu2Language Bar3Navigation Bar4Notification Area5Content pane6Tasks213456The language bar will only be shown if more than one language is available.
docnr v0.1162 Thomson Gateway BasicsNavigation BarThe navigation bar is located at the top of the page and allows you to:View the current user name.Click this name to change your password or switch to another user.View the current position on the Thomson Gateway Web interface.Select change the display level of the page (for example: Overview, Details or Configure)Get context-related Help information.Notification AreaThe notification area is located under the Navigation Bar and is used to display:Error messages, indicated by a red traffic light.Warnings, indicated by an orange traffic light.Information, indicated by a green traffic light.Content paneThe content pane is located at the centre of the page and displays the information and configurable items of the selected topic.TasksTo allow a quick configuration of your Thomson Gateway, some pages may offer you a number of related tasks in the Pick a task list. These tasks will guide you to the page where you can perform the selected task.If none of these events occur, the notification area will not be shown.
docnr v0.1 172 Thomson Gateway Basics2.3 Backing Up/Restoring your ConfigurationIntroductionOnce you have configured your Thomson Gateway to your needs, it may be a good idea to save your configuration for later use. This way you can always return to your working configuration in case of problems.Backing up your configurationProceed as follows:1Browse to the Thomson Gateway Web Interface.2On the Thomson Gateway menu, click Configuration.3In the Pick a task list, click Save or Restore Configuration.4Under Backup current configuration, click Backup Configuration Now.5The Thomson Gateway prompts you to save your file.6Save your file to a location of your choice.Restoring your configurationProceed as follows:1Browse to the Thomson Gateway Web Interface.2On the Thomson Gateway menu, click Configuration.3In the Pick a task list, click Save or Restore Configuration.4Under Restore saved configuration, click Browse.5Open your backup file.6The Thomson Gateway restores your configuration.
docnr v0.1182 Thomson Gateway Basics
docnr v0.1 193 Adding New Devices to your Network3 Adding New Devices to your NetworkIn this chapterTopic PageAdding a Computer to your Network 20
docnr v0.1203 Adding New Devices to your Network3.1 Adding a Computer to your NetworkGuided InstallationIf you configured your Thomson Gateway using the Guided Installation, use the same procedure on the computer that you want to add.At a specific point in the installation, the Setup wizard will inform you that the Thomson Gateway has already been configured:Select No and click Next to continue.Manual InstallationYou can also manually add a new computer to your local network:Connecting a computer using WirelessConnecting a computer using Ethernet
docnr v0.1 213 Adding New Devices to your Network3.1.1 Connecting a computer using WirelessBefore you startBefore you can connect a computer to your wireless network you need to know which Network Name (SSID) and encryption your Thomson Gateway is using.Where can I find the SSID?If you did not change the SSID manually, your Thomson Gateway uses the SSID that is printed on the bottom panel label of your Thomson Gateway.Where can I find the encryption?You have not yet configured your Thomson GatewayIn this case, no encryption is used.You have already configured your Thomson Gateway using the Guided InstallationIf you choose to use the wireless settings proposed by the Setup wizard, you can find the encryption keys on the label on the bottom of your Thomson Gateway:Forgot your wireless settings?If you have changed the wireless settings manually and you can’t remember your settings, try one of the following:If one of your computers is already connected to your network:1Browse to the Thomson Gateway Web Interface on a computer that is already connected to your network.2On the Home Network menu, click Wireless.3In the upper-right corner, click Details.4The wireless Access Point page appears. Under:Configuration, you can find the network name (SSID).Security, you can find the encryption.If none of your computers is connected to your network, connect a computer using a wired connection and follow the procedure above to find out what your wireless settings are.Another option is to reset your Thomson Gateway and reconfigure it all over again. For more information, see “7.3 Reset to Factory Defaults” on page 56.ProcedureProceed as follows:1Configure your computer with the same wireless settings as your Thomson Gateway. For more information, consult the help of your wireless client.2If you enabled the access control list on the Thomson Gateway, you have to register your computer before you can connect to the network. Access control is disabled by default.For more information, see “5.2 Access Control” on page 39.
docnr v0.1223 Adding New Devices to your Network3.1.2 Connecting a computer using EthernetRequirementsYour computer must have a free Ethernet port.Your computer must be configured to obtain an IP address automatically. This is the default setting.ProcedureProceed as follows:1Connect one end of the (yellow) Ethernet cable to (one of the) yellow Ethernet port(s) of your Thomson Gateway:2Connect the other end of the (yellow) Ethernet cable to your computer.3Your computer is now connected to your network. No additional configuration is needed.
docnr v0.1 234 Getting the Most Out of Your Thomson Gateway4 Getting the Most Out of Your Thomson GatewayIn this chapterIn this chapter we will take a closer look at following features:Feature availabilityDepending on the configuration offered by your Internet Service Provider (ISP), some features may not be available on your Thomson Gateway. For more information, contact your ISP.Topic PageUniversal Plug and Play 24Assigning a service (HTTP, FTP,...) to a computer 31Dynamic DNS 33
docnr v0.1244 Getting the Most Out of Your Thomson Gateway4.1 Universal Plug and PlayIntroductionUPnP is designed to automate the installation and configuration of a (small) network as much as possible. This means that UPnP-capable devices can join and leave a network without any effort of a network administrator.Supported Operating SystemsFollowing operating systems support UPnP:Windows VistaWindows XPUPnP and the Thomson GatewayWith UPnP you can:Access the Thomson Gateway Web Interface without having to open the Thomson Gateway Web Interface. For more information, see Accessing Your Thomson Gateway with UPnP.Connect/disconnect without having to open the Thomson Gateway Web Interface.For more information, see Managing your Internet connection with UPnP.Automatic port configuration for UPnP-enabled games and applications. You do not have to create port to run services on a computer. If the application is UPnP-enabled, UPnP will create these entries automatically. For more information, see Assigning a service (HTTP, FTP,...) to a computer.If your computer is running Windows XP, you first have to install the UPnP component. For more information, see “4.1.4 Installing UPnP on Windows XP” on page 29.
docnr v0.1 254 Getting the Most Out of Your Thomson Gateway4.1.1 Accessing Your Thomson Gateway with UPnPWindows VistaIf you computer runs Windows Vista:1On the Windows Start menu, click Network.2The Network window appears:3Right-click your Thomson Gateway (displayed as Thomson TGXXX) and click View device web page.4The Thomson Gateway Web Interface appears.Windows XPIf you computer runs Windows XP:1Go to My Network Places.2The My Network Places window appears:3Double-click your Thomson Gateway (displayed as Thomson TGXXX).4The Thomson Gateway Web Interface appears.
docnr v0.1264 Getting the Most Out of Your Thomson Gateway4.1.2 Managing your Internet connection with UPnPWindows VistaIf you computer runs Windows Vista:1On the Windows Start menu, click Network.2The Network window appears:3Right-click your Thomson Gateway (displayed as Thomson TGXXX).4If you are currently:Connected to the Internet, click Disable to disconnect from the Internet.Not connected to the Internet, click Enable to connect to the Internet.Windows XPProceed as follows:1On the Windows Start menu, click (Settings >) Control Panel.2The Control Panel window appears.Click (Network and Internet Connections) > Internet Connections.3The Network Connections window appears;4If you right-click the Internet Connection icon, you can connect/disconnect your connection to the Internet.
docnr v0.1 274 Getting the Most Out of Your Thomson GatewayDisabling this featureTo prevent that users can connect/disconnect you can enable Extended Security. For more information, see “4.1.3 Configuring UPnP on the Thomson Gateway” on page 28.
docnr v0.1284 Getting the Most Out of Your Thomson Gateway4.1.3 Configuring UPnP on the Thomson GatewayIntroductionOn the Thomson Gateway Web Interface you can:Enable/Disable UPnPExtended SecurityEnable/Disable UPnPProceed as follows:1Browse to the Thomson Gateway Web Interface.2On the Toolbox menu, click Game & Application Sharing.3Under Universal Plug and Play:Select the Use UPnP check box, to enable UPnP.Clear the Use UPnP check box, to disable UPnP.4Click Apply.Extended SecurityIf Extended Security is enable only limited UPnP operation between the host and the Thomson Gateway is allowed. A local host is not allowed to connect/disconnect the Thomson Gateway Internet connection. You can then only connect/disconnect the Internet connection on the Thomson Gateway Web Interface.Enabling Extended SecurityProceed as follows:1Browse to the Thomson Gateway Web Interface.2On the Toolbox menu, click Game & Application Sharing.3Under Universal Plug and Play, select Use Extended Security.4Click Apply.
docnr v0.1 294 Getting the Most Out of Your Thomson Gateway4.1.4 Installing UPnP on Windows XPAdding UPnPIf you are running Microsoft Windows XP, it is recommended to add the UPnP component to your system.Proceed as follows:1In the Start menu, click (Settings >) Control Panel.2The Control Panel window appears.Click Add or Remove Programs.3The Add or Remove Programs window appears.Click Add/Remove Windows Components.4The Windows Components Wizard appears:In the Components list, select Networking Services and click Details5The Networking Services window appears: Select Universal Plug and Play or UPnP User Interface and click OK.6Click Next to start the installation and follow the instructions in the Windows Components Wizard.7At the end of the procedure the Wizard informs you that the installation was successful. Click Finish to quit.
docnr v0.1304 Getting the Most Out of Your Thomson GatewayAdding IGD Discovery and ControlYour Windows XP system is able to discover and control Internet Gateway Devices (IGD), like the Thomson Gateway on your local network. Therefore, it is recommended to add the IGD Discovery and Control client to your system.Proceed as follows:1On the Windows taskbar, click Start.2Select (Settings >) Control Panel > Add or Remove Programs.3In the Add or Remove Programs window, click Add/Remove Windows Components.4The Windows Components Wizard appears:Select Networking Services in the Components list and click Details.5The Networking Services window appears:Select Internet Gateway Device Discovery and Control Client and click OK.6Click Next to start the installation and follow the instructions in the Windows Components Wizard.7At the end of the procedure, the Wizard informs you that the installation was successful. Click Finish to quit.
docnr v0.1 314 Getting the Most Out of Your Thomson Gateway4.2 Assigning a service (HTTP, FTP,...) to a computerIntroductionThe Thomson Gateway allows you to use one internet connection for multiple computers. This means that all your computers share one public IP address, as if only one computer is connected to the outside world.ProblemWhen the Thomson Gateway receives an incoming message, the Thomson Gateway has to decide to which computer he will have to send this message.If the incoming message is a response to an outgoing message originating from one of your computers, the Thomson Gateway sends the incoming message to this computer.If your are running a server or an application that acts as a server (for example a HTTP server, internet game), the initial message will come from the internet and the Thomson Gateway has to decide to which computer he should forward the incoming message.SolutionTo avoid this problem you can:Enable UPnP.Assign a game or application to a local networking device.InternetInternet?
docnr v0.1324 Getting the Most Out of Your Thomson GatewayUPnPUPnP is a technology that enables seamless operation of a wide range of games and messaging applications. Your computer will use UPnP to communicate to the Thomson Gateway which services are running on the computer.For more information on UPnP, see “4.1 Universal Plug and Play” on page 24.Assign a game or application to a local networking deviceIf you assign a game or application to a local networking device, you will basically tell the Thomson Gateway that if it receives requests for a specific game or application, it has to forward these messages to a specific computer.Proceed as follows to do so:1Browse to the Thomson Gateway Web Interface.2On the Toolbox menu, click Game & Application Sharing.3In the Pick a task list, click Assign a game or application to a local network device.4In the Game or application list, click the service you want to run on the computer. For example, HTTP Server (World Wide Web).5In the Device, list select the computer to which you want to assign the service. Your computer will be listed with it’s computer name.6All incoming request for the selected service will now be directed to the selected device. The Thomson Gateway will also configure the Thomson Gateway firewall to allow this service.If the service is not available in the list, click Create a new game or application in the Pick a task list. For more information, click Help on the Thomson Gateway Web Interface.
docnr v0.1 334 Getting the Most Out of Your Thomson Gateway4.3 Dynamic DNSIntroductionThe Dynamic DNS service allows you to assign a dynamic DNS host name (for example john.dyndns.org) to a broadband connection even if it is using a dynamic IP address. As soon as the device gets a new IP address, the dynamic DNS server updates its entry to the new IP address.What you needBefore we can configure Dynamic DNS, you first have to create an account at one of the following Dynamic DNS service providers:www.dyndns.orgwww.no-ip.comwww.dtdns.comProcedureProceed as follows: 1Browse to the Thomson Gateway Web Interface.2On the Toolbox menu, click Dynamic DNS.3On the Navigation Bar, click Configure.4Select the Enabled check box.5If necessary, select the broadband connection to which you want to assign the Dynamic DNS host name in the Interface list.6Type the user name and password of your Dynamic DNS service account in the corresponding fields.7In the Service list, click the name of your Dynamic DNS service provider.8In the Host box, type the host name that you got from the Dynamic DNS service provider (for example mywebpage.dyndns.org).9Click Apply.
docnr v0.1344 Getting the Most Out of Your Thomson Gateway
docnr v0.1 355 Wireless Security5 Wireless SecurityMethodsThe Thomson Gateway offers you following tools to protect your wireless network from intruders:EncryptionAccess ControlDisabling SSID BroadcastAs you will find out in the following sections, not all of these security measures are hard to crack. But all together it may discourage some hackers to break into you network.
docnr v0.1365 Wireless Security5.1 EncryptionIntroductionBy using encryption, communication between the wireless clients and your Thomson Gateway is protected by a passphrase. Only clients which use the correct network name (SSID) and passphrase can connect to your network.Encryption methodsDuring the years a number of encryption types have been developed. The list below gives you an overview of the supported encryption types ordered by security level, you will find the highest level of security at the top of the list:WPA-PSK Encryption:The wireless data is being encrypted with a user-defined key. Wireless clients must be configured with this key before they can connect to the Thomson Gateway.WEP Encryption:The first encryption type used for wireless connections. Like WPA-PSK it uses a user-defined key, but WEP has been proven to have some security issues. We strongly recommend you to use WPA-PSK instead.Configuring the wireless encryptionProceed as follows:1Open the Thomson Gateway Web Interface.2On the left menu, click Home Network.3Under Wireless, click your access point.4The Wireless Access Point page appears.5In the Navigation Bar, click Configure.6Under Security, you can change the Encryption. If you want to use:WEP Encryption, continue with “5.1.1 Configuring WEP Encryption” on page 37.WPA-PSK Encryption, continue with “5.1.2 Configuring WPA-PSK Encryption” on page 38.Your access point will be listed in the following format: “WLAN:<Network Name> (<Actual Speed>)”. For example, WLAN: Thomson83C7C7 (54Mbps).
docnr v0.1 375 Wireless Security5.1.1 Configuring WEP EncryptionProcedureContinuing from “ Configuring the wireless encryption”:1Select Use WEP Encryption 2In the WEP Key Length list, click the desired key length (a higher key length offers higher security). 3In the Encryption key box, type a Network key of your choice. If you are using:A 64-bit key:Type 10 hexadecimal characters (characters from 0 to 9 and from A to F) or 5 alphanumeric characters.A 128-bit key:Type 26 hexadecimal characters (characters from 0 to 9 and from A to F) or 13 alphanumeric characters.4Click Apply. 5Configure your wireless client(s) with the same settings.
docnr v0.1385 Wireless Security5.1.2 Configuring WPA-PSK EncryptionProcedureContinuing from “ Configuring the wireless encryption”:1Select Use WPA-PSK Encryption.2In the WPA-PSK Encryption Key box, type a pass phrase (also known as Pre-shared key) of your choice. The pass phrase must consist of 8 to 63 alphanumeric characters or 64 hexadecimal characters (characters from 0 to 9 and from A to F). 3In the WPA-PSK Version list, click the WPA-version of your choice. Following options are available:WPA2:WPA2 is the most secure version, but not all wireless clients already support it. Before you select this version, make sure all of your wireless clients support it.WPA+WPA2:If not all of your wireless clients support WPA2 or you are not sure if they support WPA2, we recommend you to choose WPA+WPA2. Wireless clients that support WPA2 will use WPA2, the others will use WPA.WPA:If none of your wireless clients support WPA2 choose this option.4Click Apply.5Configure your wireless client(s) with the same settings.To use WPA2 on Windows XP SP2 you first have to install Wi-Fi Protected Access 2 (WPA2)/Wireless Provisioning Services Information Element (WPS IE) update. You can find this update on http://support.microsoft.com/kb/917021.
docnr v0.1 395 Wireless Security5.2 Access ControlWhat is access control?Every network device carries a unique hexadecimal code (MAC address). Access control enables you to allow/deny access to wireless clients based on their MAC address.DrawbacksMAC authentication is linked to the user’s hardware and not to his identity.You can easily change the MAC address of your wireless clients.How can I configure this on the Thomson Gateway?Proceed as follows:1Browse to the Thomson Gateway Web Interface.2On the left menu, click Home Network.3Under Wireless, click your access point.4The Wireless Access Point page appears.5In the Navigation Bar, click Configure.6Under Security, you can set the Allow New Devices property to:New stations are allowed (automatically).New stations are allowed (via registration)New stations are not allowed.7Select the option of your choice and click Apply.New stations are allowed (automatically)Access control is disabled. All wireless client can connect if they use the correct SSID and encryption.New stations are allowed (via registration)Access Control is enabled. To add new wireless clients to the access control list, you have to search for new wireless devices using the:Registration button on the front panel of your Thomson Gateway.Search for wireless devices task on the Thomson Gateway Web Interface.Your access point will be listed in the following format: “WLAN:<Network Name> (<Actual Speed>)”. For example, WLAN: Thomson83C7C7 (54Mbps).
docnr v0.1405 Wireless SecurityNew stations are not allowedAccess Control is enabled. You can only add your wireless devices to the access control list using the Search for wireless devices task on the Thomson Gateway Web Interface.Search for wireless devices taskTo add new wireless devices to the access control list:1Browse to the Thomson Gateway Web Interface.2On the Home Network menu, click Devices.3In the Pick a task list, click Search for wireless devices.4The Thomson Gateway is now in registering mode and will add all devices that use the correct SSID and encryption to the access control list. During this phase the WLAN LED colour will switch between red and green.5Your new wireless clients should now be connected to the Thomson Gateway.
docnr v0.1 415 Wireless SecurityRegistering Clients via the Association ButtonProceed as follows to register new wireless network clients via the association button:1Push the Registration button on the Thomson Gateway front panel and hold it for at least two seconds.2The WLAN LED toggles between green and red.3The Thomson Gateway unlocks the Access Control List for one minute. Wireless clients configured with the correct wireless settings that try to connect to the Thomson Gateway will be added to the list of allowed devices.4Depending on your wireless client adapter, a wireless icon may become green or a message similar to the following may appear: “Successfully joined Wireless network Thomson123456”.5After one minute, the Thomson Gateway locks the Access Control List again.Some wireless clients do not automatically join a wireless network. If that is the case, follow the instructions for the wireless client software to initiate the association.The registration procedure can be repeated as often as needed.
docnr v0.1425 Wireless Security5.3 Disabling SSID BroadcastWhat does this mean?Access points broadcast their Network Name (SSID) to announce themselves to the wireless stations and other access points. Wireless clients will make a list of these access points and show them to the user. The user can then select his wireless client and try to connect to this access point.By disabling the SSID broadcasting, your access point will no longer be available in those lists. Users will have to enter the Network Name manually if they want to connect to your wireless network.SecurityThis was the first method to secure a WLAN, because you have to know the Network Name in order to access the wireless network. With the correct tools, hackers can still find out which SSID you are using. But you can see it as a first step in discouraging them to try and break in to your wireless network.ProcedureTo disable SSID broadcast, proceed as follows:1Open the Thomson Gateway Web Interface.2Under Home Network, click Wireless.3The Wireless Access Point page appears.4In the Navigation Bar, click Configure.5Under Security, clear the Broadcast Network Name check box.
docnr v0.1 436 Internet Security6 Internet SecurityOverviewThe Thomson Gateway offers you various options to secure your network:Topic PageFirewall 44Web site Filtering 45
docnr v0.1446 Internet Security6.1 FirewallChanging the security levelProceed as follows:1Browse to the Thomson Gateway Web Interface.2On the Toolbox menu, click Firewall.3The Firewall page appears. In the upper-right corner, click Configure.4A list with security settings with a brief description is displayed.5Select the security level of your choice and click Apply.Creating a new security levelIf you do not find a security level up to your need, you are able to create a new security level.Proceed as follows:1In the Toolbox menu, click Firewall.2In the upper right corner, click Configure.3In the Pick a task list, click Create a new Security Level.4In the Name box, type a name for the new security level.5In the Clone from existing Security Levels list, click the security level you want to start from.6Click Apply.7You can now make the necessary changes to the security level.This feature is intended for advanced users only.
docnr v0.1 456 Internet Security6.2 Web site FilteringIntroductionWeb site filtering allows you to restrict access to specific web sites.StrategiesThere are two strategies you can follow:Allow access to all web sites and manually specify a number of web sites that may be accessed.- or -Deny access to all web site and manually specify which web sites may not be accessed.ProcedureProceed as follows:1Enable Web site filtering and specify a default action.2Configure the exceptions.Enable Web site filtering and specify a default actionProceed as follows:1Browse to the Thomson Gateway Web Interface.2On the Toolbox menu, click Web Site Filtering.3On the Navigation Bar, click Configure.4Select the Use Address Based Filter check box.5In the Action for Unknown Sites, select the action you want to use by default.6Click Apply.Configure the exceptionsYou can now:Denying access to a specific Web siteAllowing access to a specific Web siteRedirecting a Web siteRedirecting all Web sites
docnr v0.1466 Internet Security6.2.1 Denying access to a specific Web siteUse casesUse this feature if:Allow is selected under Action for Unknown Sites and you want to make an exception for a specific site.Block is selected under Action for Unknown Sites and you want to make an exception on an allow rule. For example: you are allowing “provider.com” but you want to block access to “mail.provider.com”.ProcedureProceed as follows:1Browse to the Thomson Gateway Web Interface.2On the Toolbox menu, click Web Site Filtering.3Select the Use Address Based Filter check box.4Type the URL of the Web site you want to block (for example “mail.provider.com”) in the Web Site box.5In the Action list, click:Block if you want to block this Web site.Redirect if you want to redirect to another page. Type the address of the redirect page in the Redirect box.6Click Add.
docnr v0.1 476 Internet Security6.2.2 Allowing access to a specific Web siteUse casesUse this feature if:Block is selected under Action for Unknown Sites and you want to make an exception for a specific site.Allow is selected under Action for Unknown Sites and you want to make an exception on a block/redirect rule. For example: you are blocking “bank.com” but you want to allow access to “netbanking.bank.com”.ProcedureProceed as follows:1Type the URL of the Web site you want to allow (for example “netbanking.bank.com”) in the Web Site box.2Click Allow in the Action list.3Click Add.
docnr v0.1486 Internet Security6.2.3 Redirecting a Web siteProcedureProceed as follows:1Type the URL of the Web site you want to redirect (for example “cracks.am”) in the Web Site box.2Click Redirect in the Action list.3Type the URL of the Web site you want to redirect to (for example “mycompany.com/internetpolicy.htm”) in the Redirect box.4Click Add.
docnr v0.1 496 Internet Security6.2.4 Redirecting all Web sitesProcedureProceed as follows:1Type “*” in the Web Site box.2Click Redirect in the Action list.3Type the URL of the Web site you want to redirect to (for example “mycompany.com/internetpolicy.htm”) in the Redirect box.4Click Add.5Type the URL of the Web site you want to redirect to (for example “mycompany.com/internetpolicy.htm”) in the Web Site box.6Click Allow in the Action list.7Click Add.
docnr v0.1506 Internet Security
docnr v0.1 517 Troubleshooting7 TroubleshootingIntroductionThis chapter suggest solutions for problems you may encounter while installing or configuring your Thomson Gateway.If the suggestions do not resolve the problem, look at the support pages on http://www.thomson-broadband.com or contact your service provider.For Internet connection troubleshooting, refer to the provided Installation and Setup Guide.TopicsIn this chapter:General Thomson Gateway TroubleshootingReset to Factory Defaults
docnr v0.1527 Troubleshooting7.1 Setup wizard TroubleshootingThe Setup CD does not start automaticallyIf your computer runs:Microsoft Windows:1Click the Windows Start button.2Click Run.3In the Open field, type the following path: D:\Setup.exe, where D stands for the drive letter of your CD- or DVD-ROM drive.Mac OS X:1On your desktop, double-click the CD icon.2Double-click Menu.Your Thomson Gateway has not been foundIf you see this error during setup, check whether:The Thomson Gateway is turned on and fully initialized.Your computer has a valid IP address, that is any address but 0.0.0.0.No dedicated firewall device or router is placed between your computer and the Thomson Gateway.No personal network security software (for example firewall software) is running on your computer.Your computer is correctly connected to the Thomson Gateway
docnr v0.1 537 Troubleshooting7.2 General Thomson Gateway TroubleshootingThomson Gateway does not workIf none of the LEDs light up, make sure that:The Thomson Gateway is plugged into a power socket outlet.You are using the correct power supply for your Thomson Gateway device.The Thomson Gateway is turned on via the push button or rocker switch on the back panel.Thomson Gateway unreachableIf your Thomson Gateway cannot be reached due to misconfiguration, you might consider a hardware reset to factory defaults as described in “7.3 Reset to Factory Defaults” on page 56.Poor Thomson Gateway performanceMake sure that the Thomson Gateway is installed and configured as instructed in “1 Installation” on page 3 or as instructed by the Service Provider.The power requirements for your Thomson Gateway are clearly indicated on the identification label on the bottom of the Thomson Gateway. Only use the power adaptor supplied with your Thomson Gateway.
docnr v0.1547 Troubleshooting7.2.1 Wired Connection TroubleshootingLAN LED does not light upMake sure that:The LAN cable is securely connected to the 10/100Base-T port.You are using the correct cable type for your Ethernet equipment, that is UTP CAT5 with RJ-45 connectors.
docnr v0.1 557 Troubleshooting7.2.2 Wireless Connection TroubleshootingNot Able to Connect Wireless ClientsCheck the following:If registration is enabled, you must press the 'Association' button to register the wireless client or search for wireless devices via the embedded web pages.Make sure the Thomson Gateway Association Control List is not locked. You can check this on the web pages. On the Wireless Access Point settings, make sure New stations are not allowed is NOT selected. No Wireless ConnectivityMake sure that:Both the wireless client adapter and the Thomson Gateway are allowed to connect through wireless channels as defined for local regulatory domain.The wireless client is configured for the correct wireless settings (SSID, security settings).Check the signal strength, indicated by the wireless client manager. If the signal is low, try repositioning the Thomson Gateway or directing the Thomson Gateway’s antenna(s) for optimal performance.Make sure that the wireless client adapter is enabled (message like “radio on”).Poor Wireless Connectivity or RangeTry the following:Change the wireless channel.Make sure both the wireless client adapter and the Thomson Gateway are allowed to connect through wireless channels as defined for local regulatory domain.Check the location of the Thomson Gateway in the building. Check the signal strength, indicated by the wireless client manager. If the signal is low, try to place the Thomson Gateway or to direct the Thomson Gateway’s antenna(s) for optimal performance.Change the wireless channelProceed as follows:1Browse to the Thomson Gateway Web Interface.2On the left menu, click Home Network.3Under Wireless, click your access point.4The Wireless Access Point page appears.5In the Navigation Bar, click Configure.6Under Configuration, select the channel of your choice in the Channel Selection list.7Click Apply.Your access point will be listed in the following format: “WLAN:<Network Name> (<Actual Speed>)”. For example, WLAN: Thomson83C7C7 (54Mbps).
docnr v0.1567 Troubleshooting7.3 Reset to Factory DefaultsResetting your Thomson GatewayIf at some point you can no longer connect to the Thomson Gateway or you want to make a fresh install, it may be useful to perform a reset to factory defaults.WarningA reset to factory default settings deletes all configuration changes you made. Therefore, after the reset, a reconfiguration of your Thomson Gateway will be needed.Also your WLAN clients will have to be re-associated, as described in “3.1.1 Connecting a computer using Wireless” on page 21.MethodsYou can choose between:Software ResetHardware ResetSoftware ResetProceed as follows:1Browse to the Thomson Gateway Web Interface.2On the Thomson Gateway menu, click Configuration.3In the Pick a task list, click Reset my Thomson Gateway to default settings.4The Thomson Gateway restores the initial configuration and restarts.5The Thomson Gateway returns to the Thomson Gateway home page (unless the IP address of your computer is not in the same subnet as the default IP address of the Thomson Gateway, being 192.168.1.254).
docnr v0.1 577 TroubleshootingHardware ResetProceed as follows:1Make sure the Thomson Gateway is turned on.2Use a pen or an unfolded paperclip to push the recessed Reset button on the back panel. Push it until the Power LED lights red - this will take about 7 seconds.3Release the Reset button.4The Thomson Gateway restarts.Your system administrator may have disabled the physical reset button of the Thomson Gateway. In this case, a hardware reset to defaults is not possible.
docnr v0.1587 Troubleshooting
THOMSON Telecom BelgiumPrins Boudewijnlaan 472650 Edegemwww.thomson-broadband.com© Thomson 2007. All rights reserved.docnr v0.1.

Navigation menu