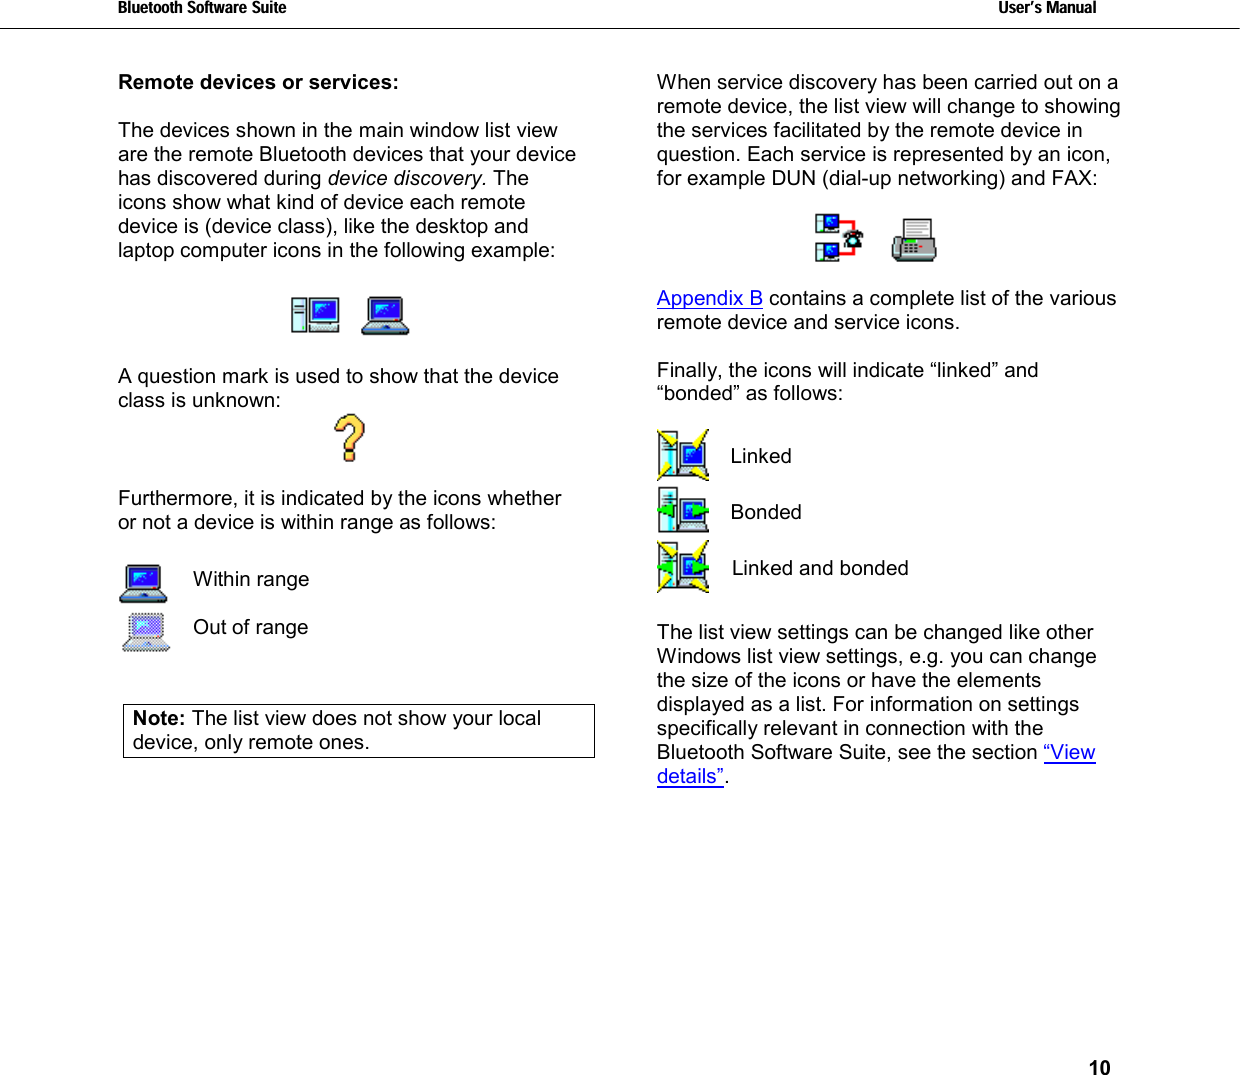
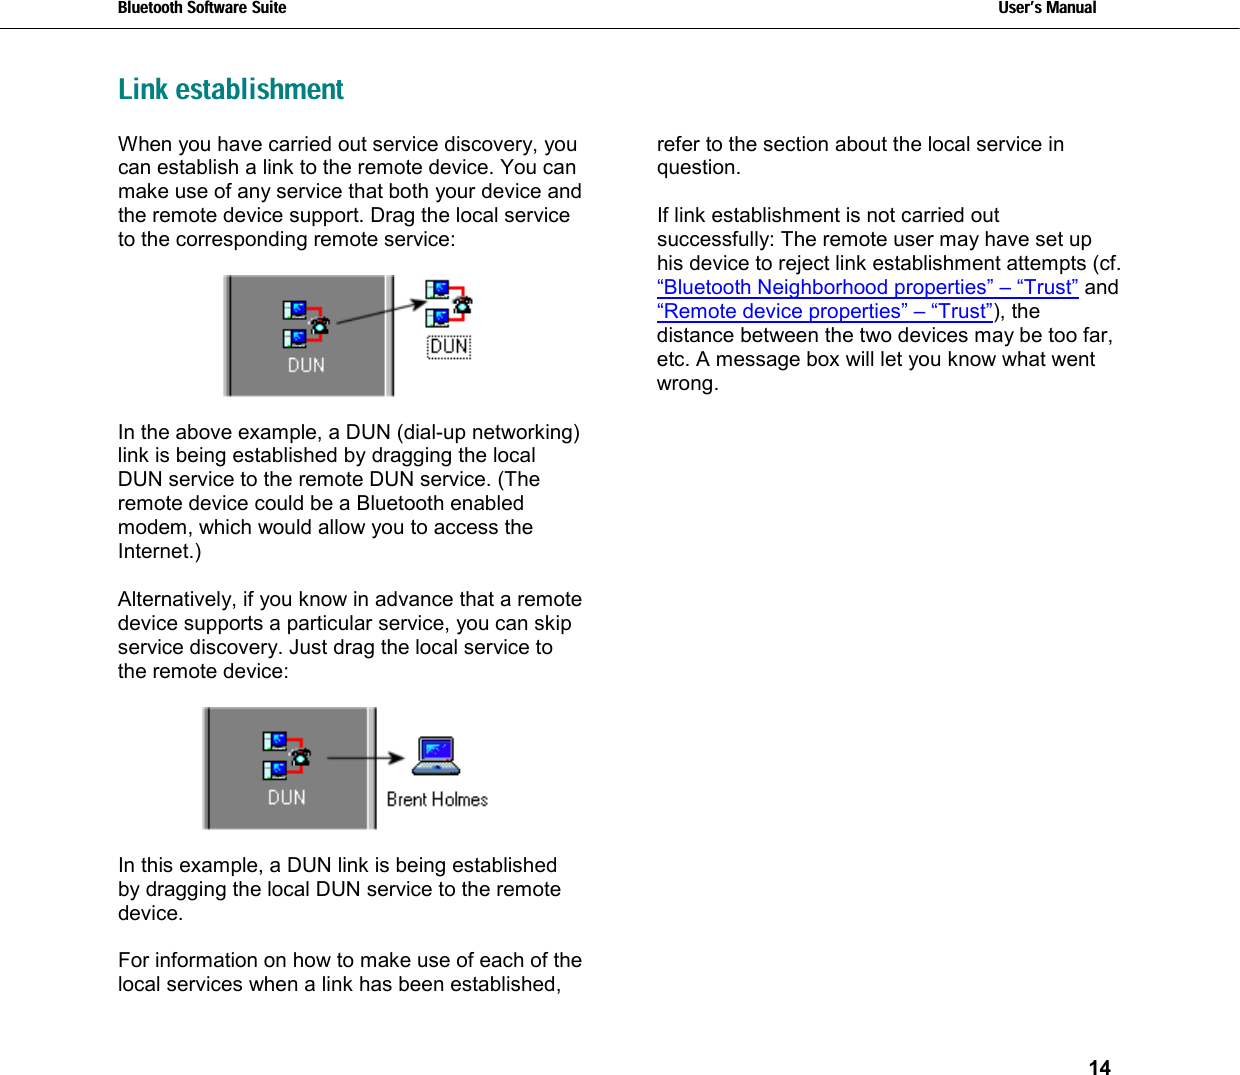
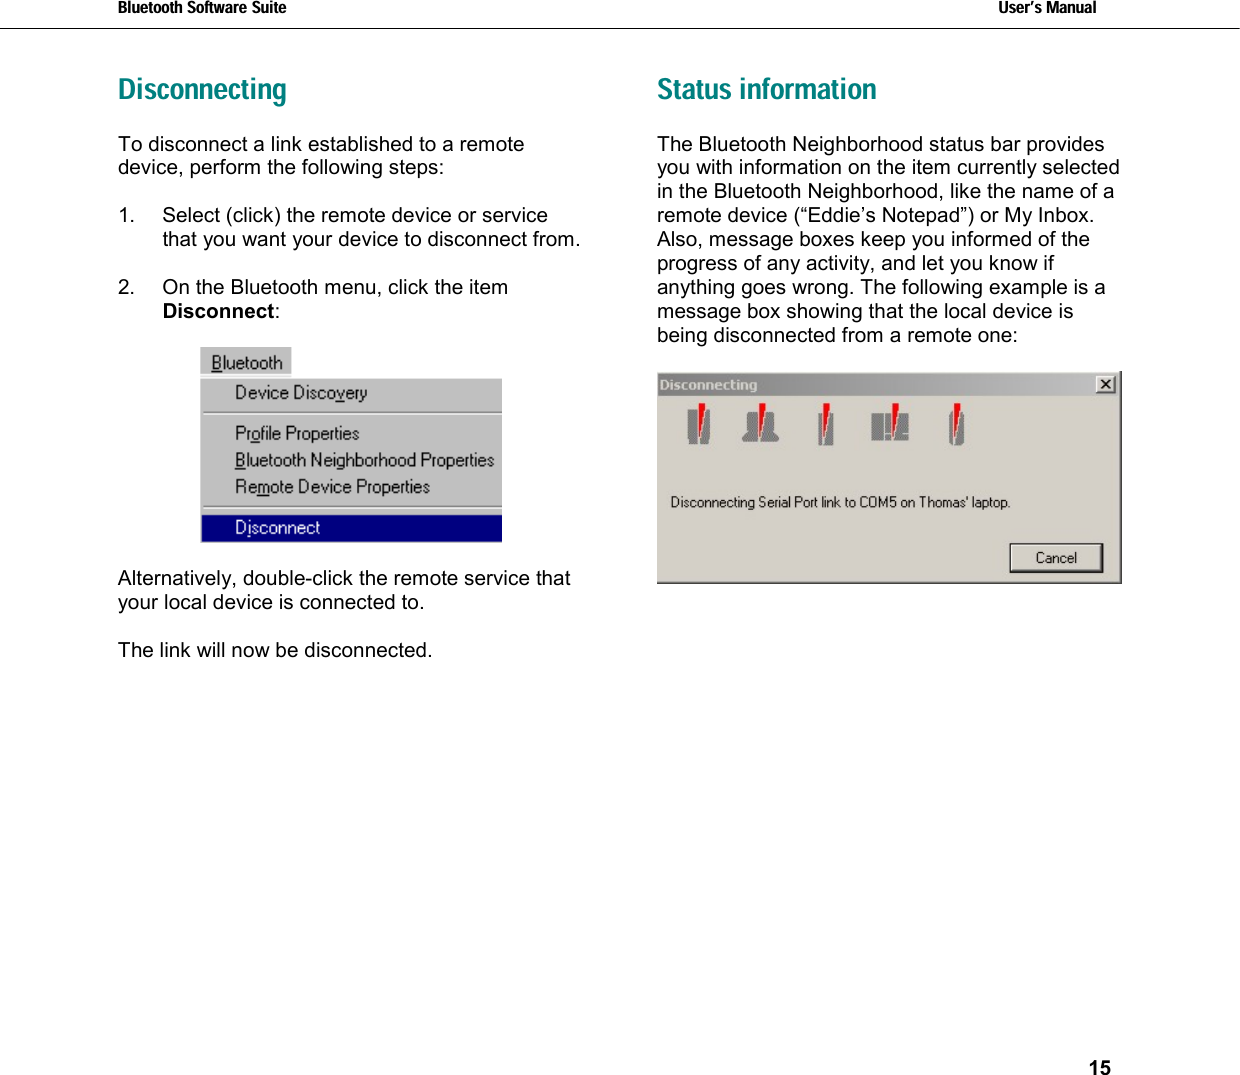
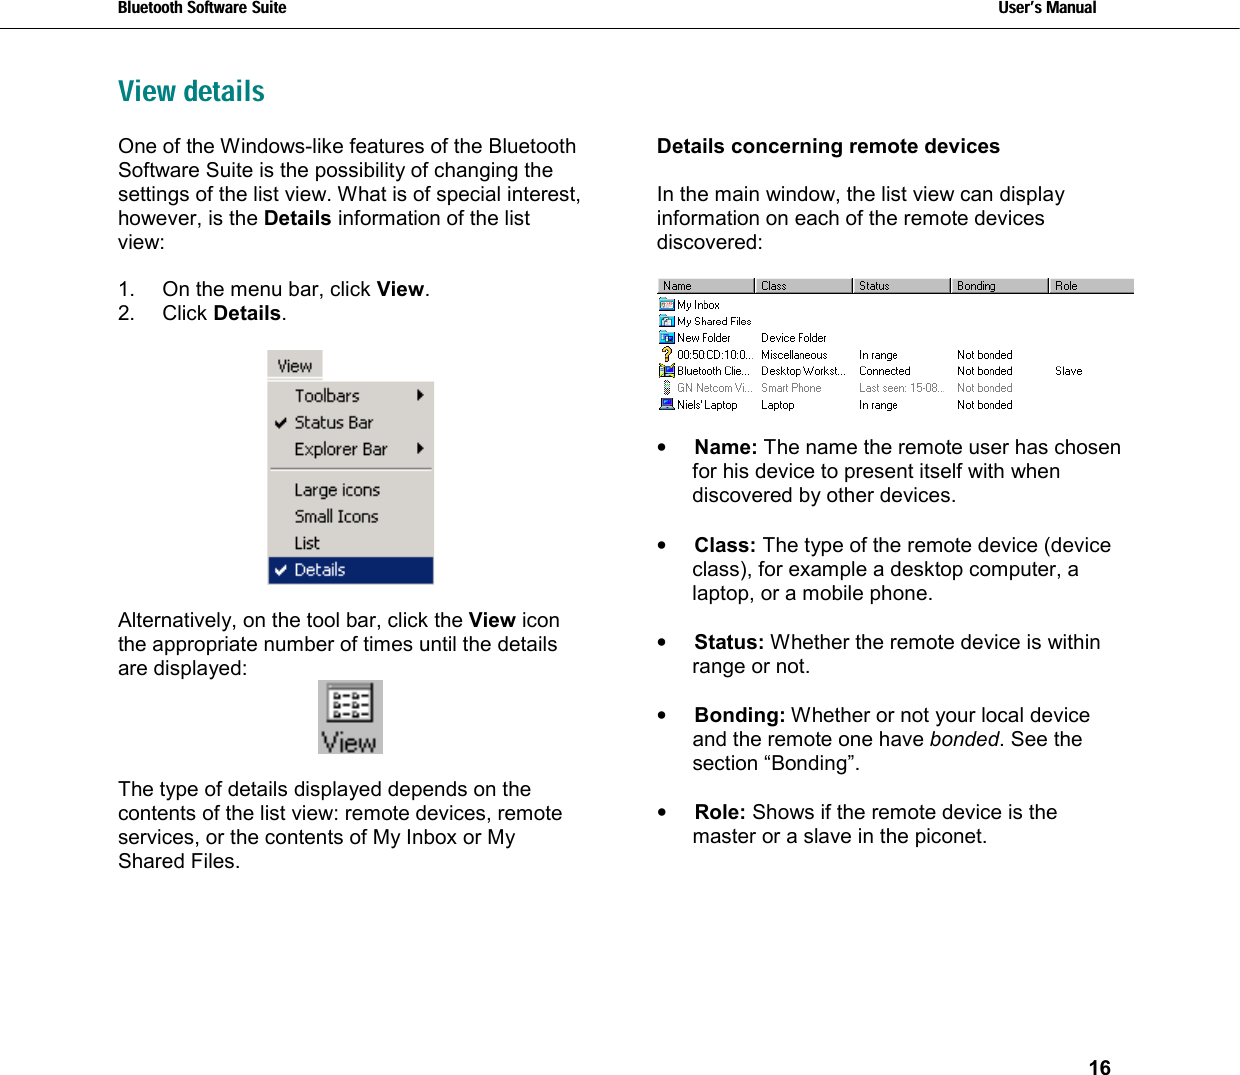
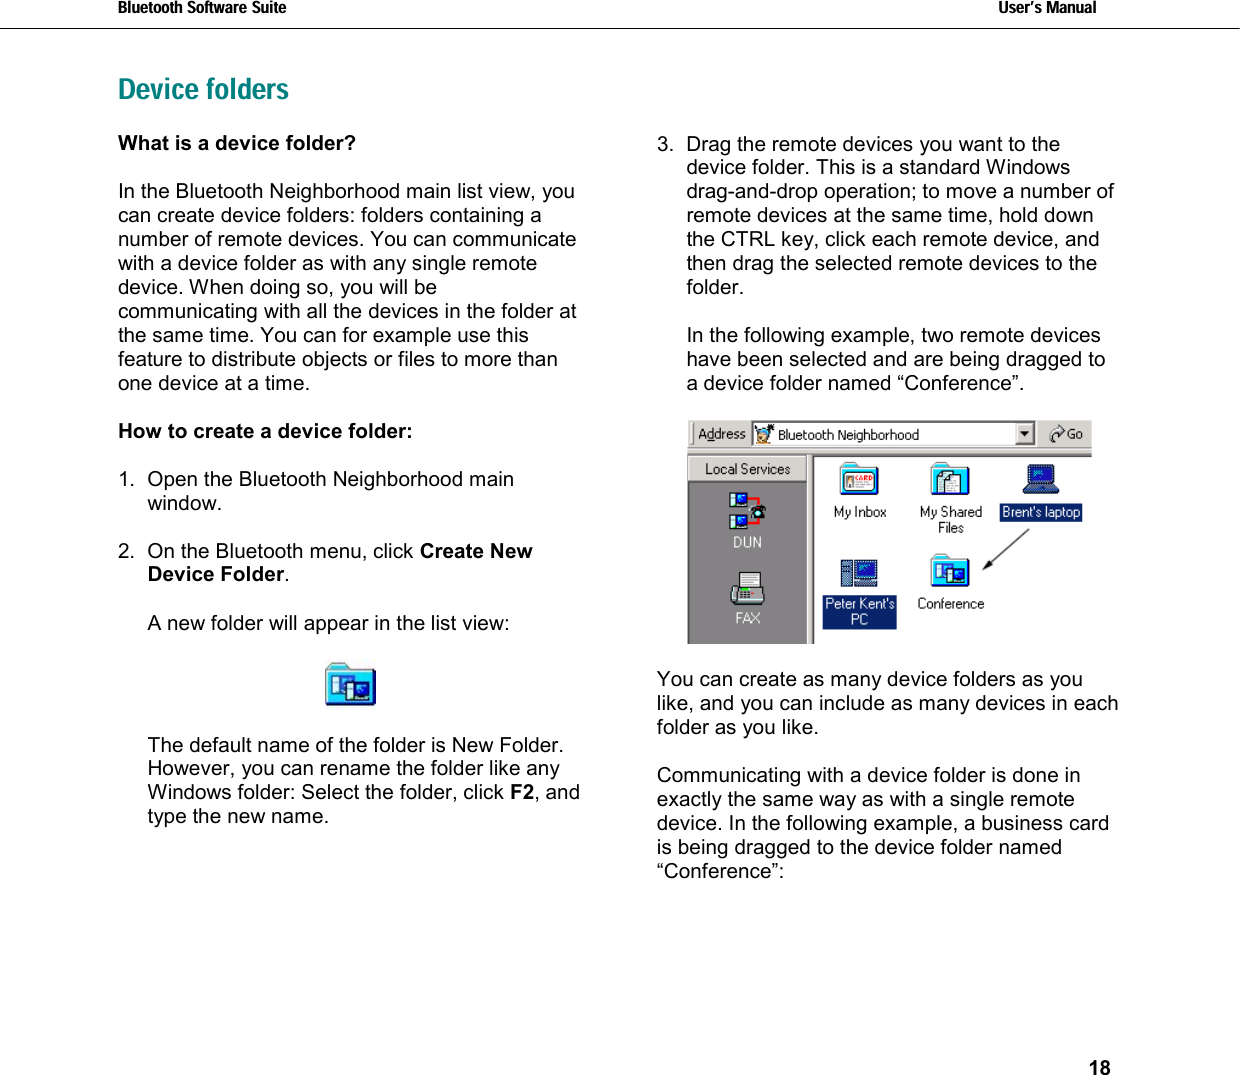
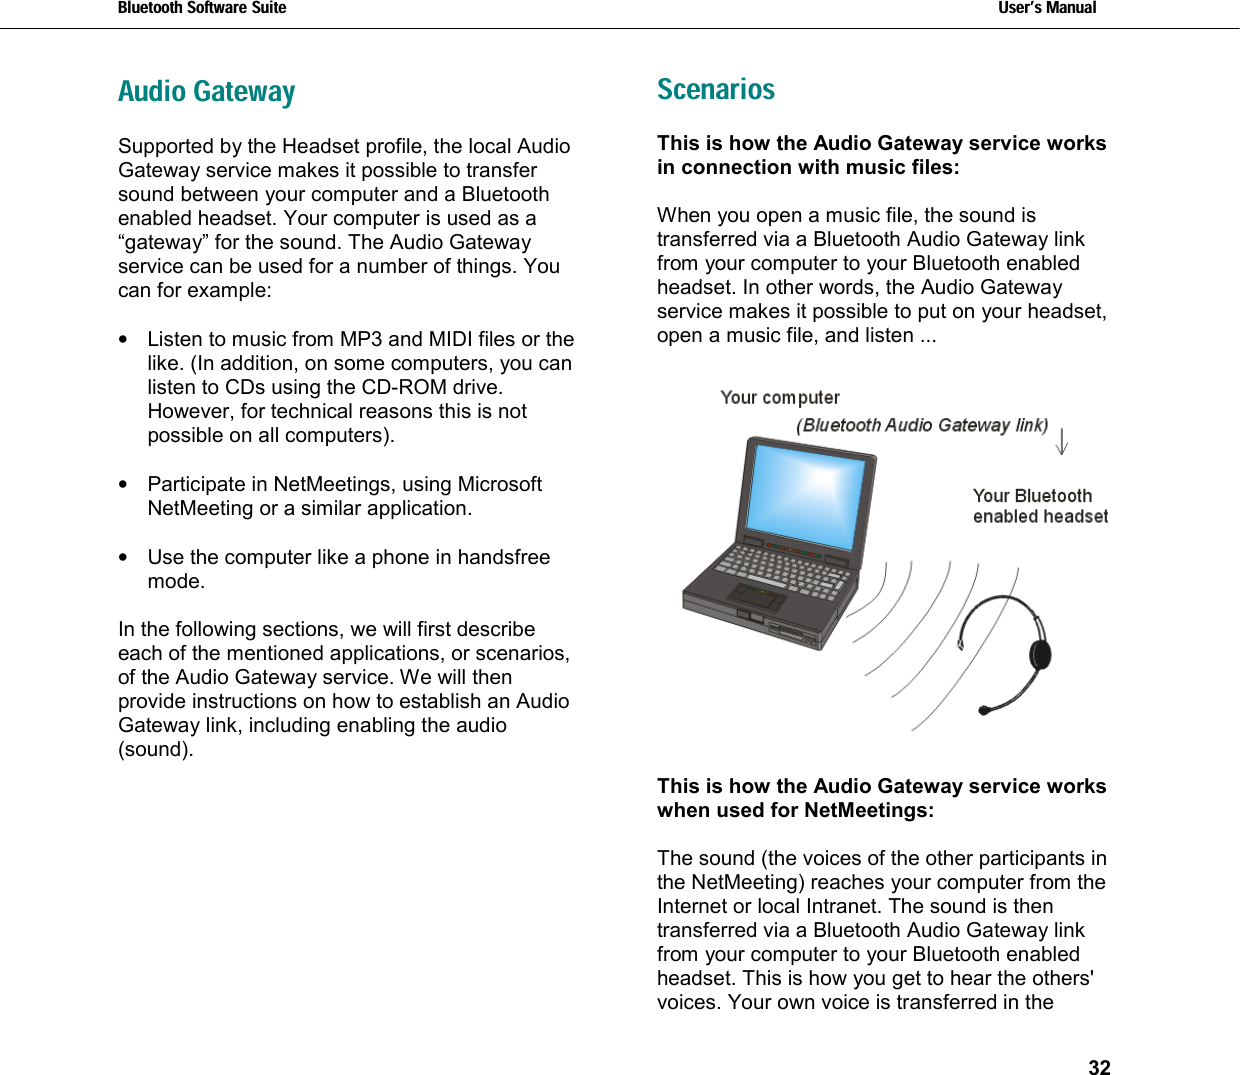
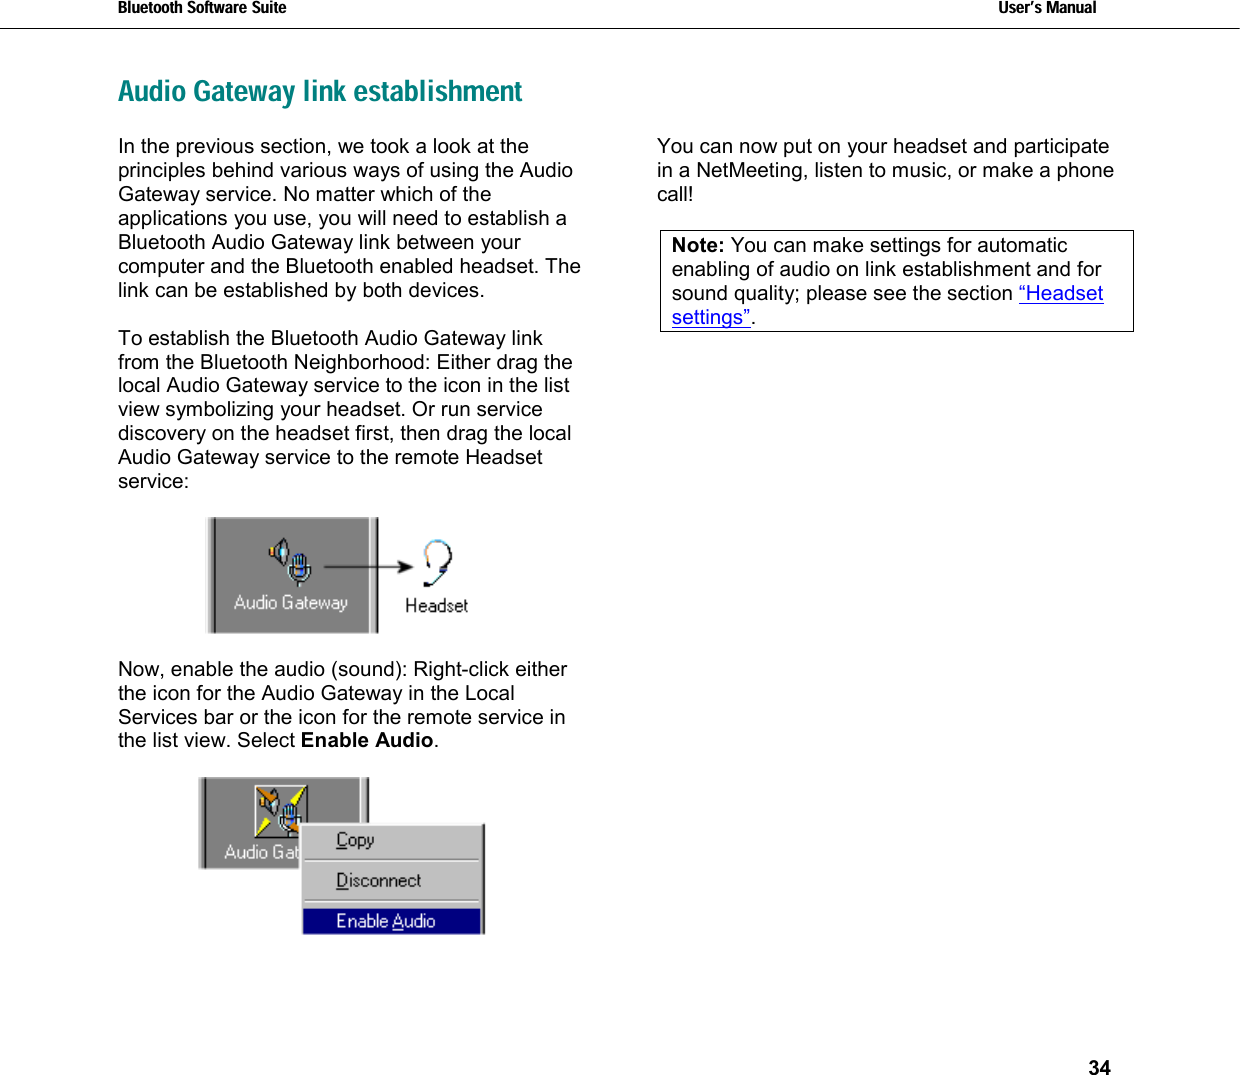
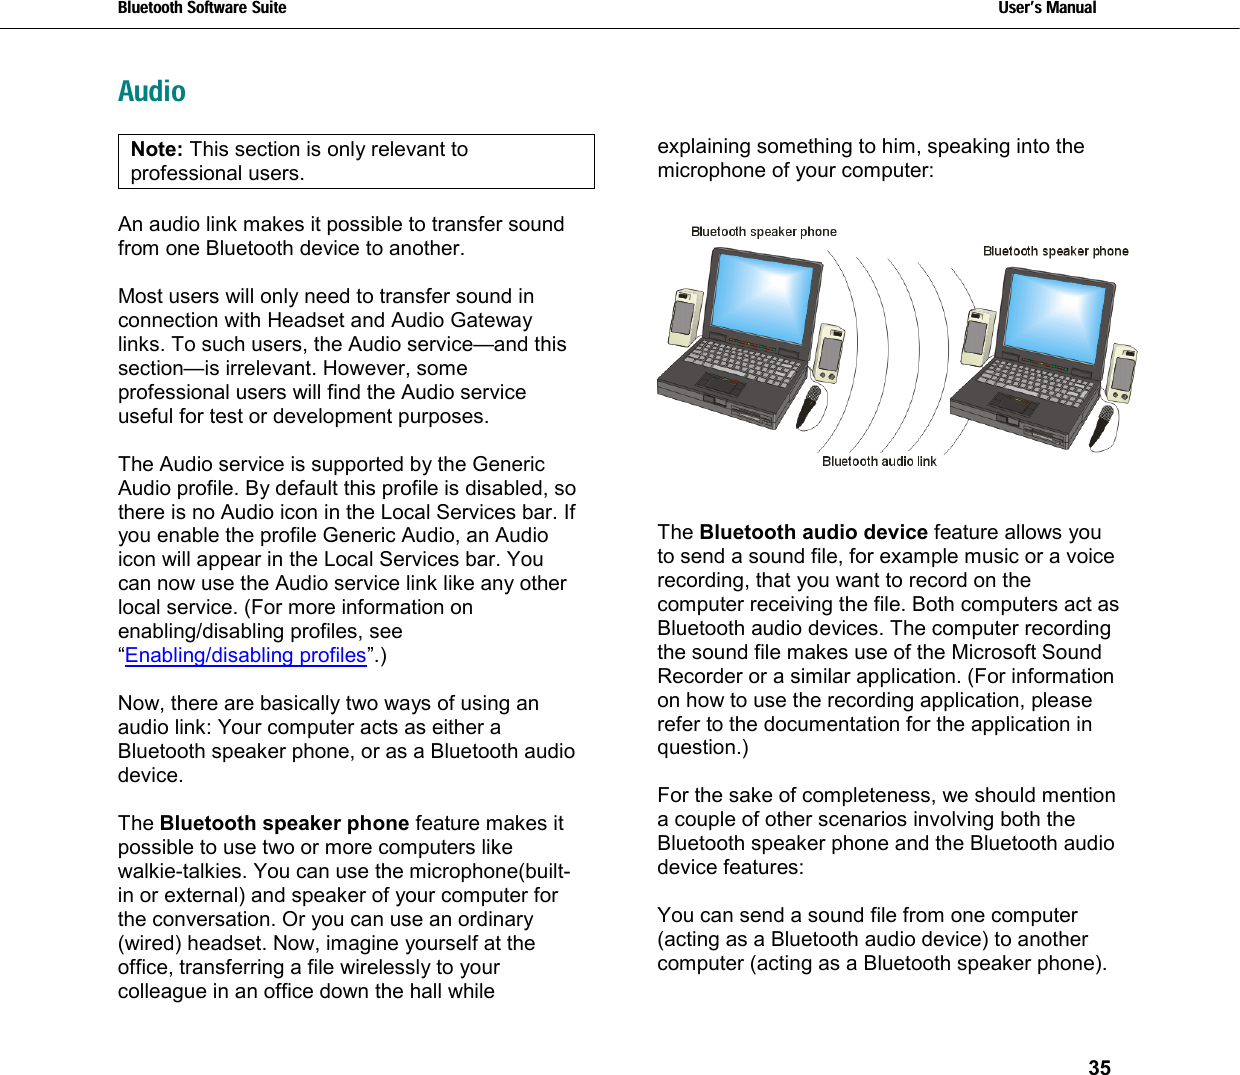
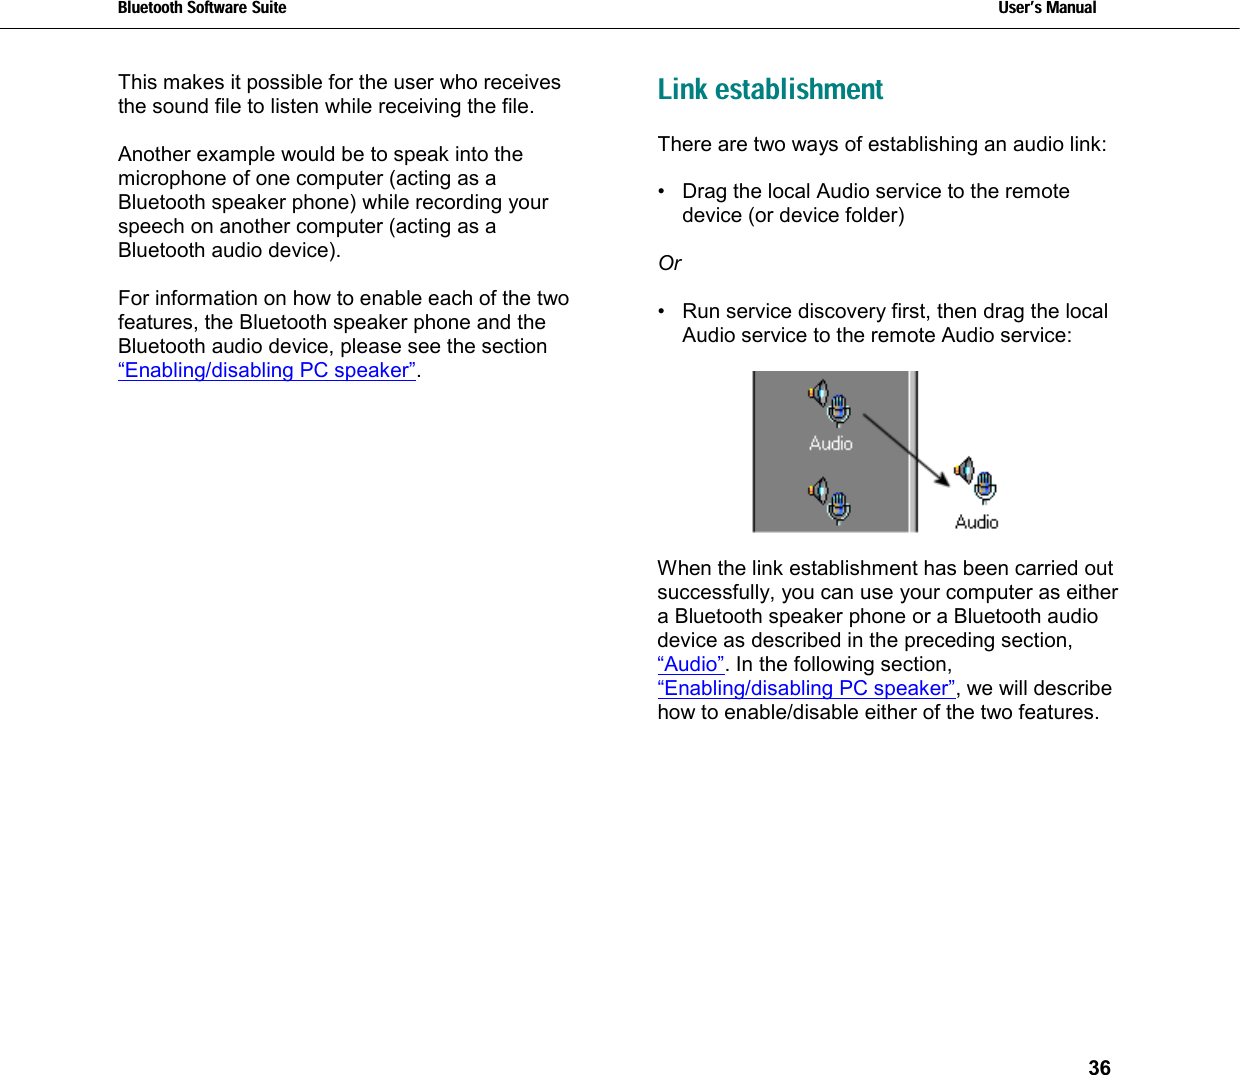
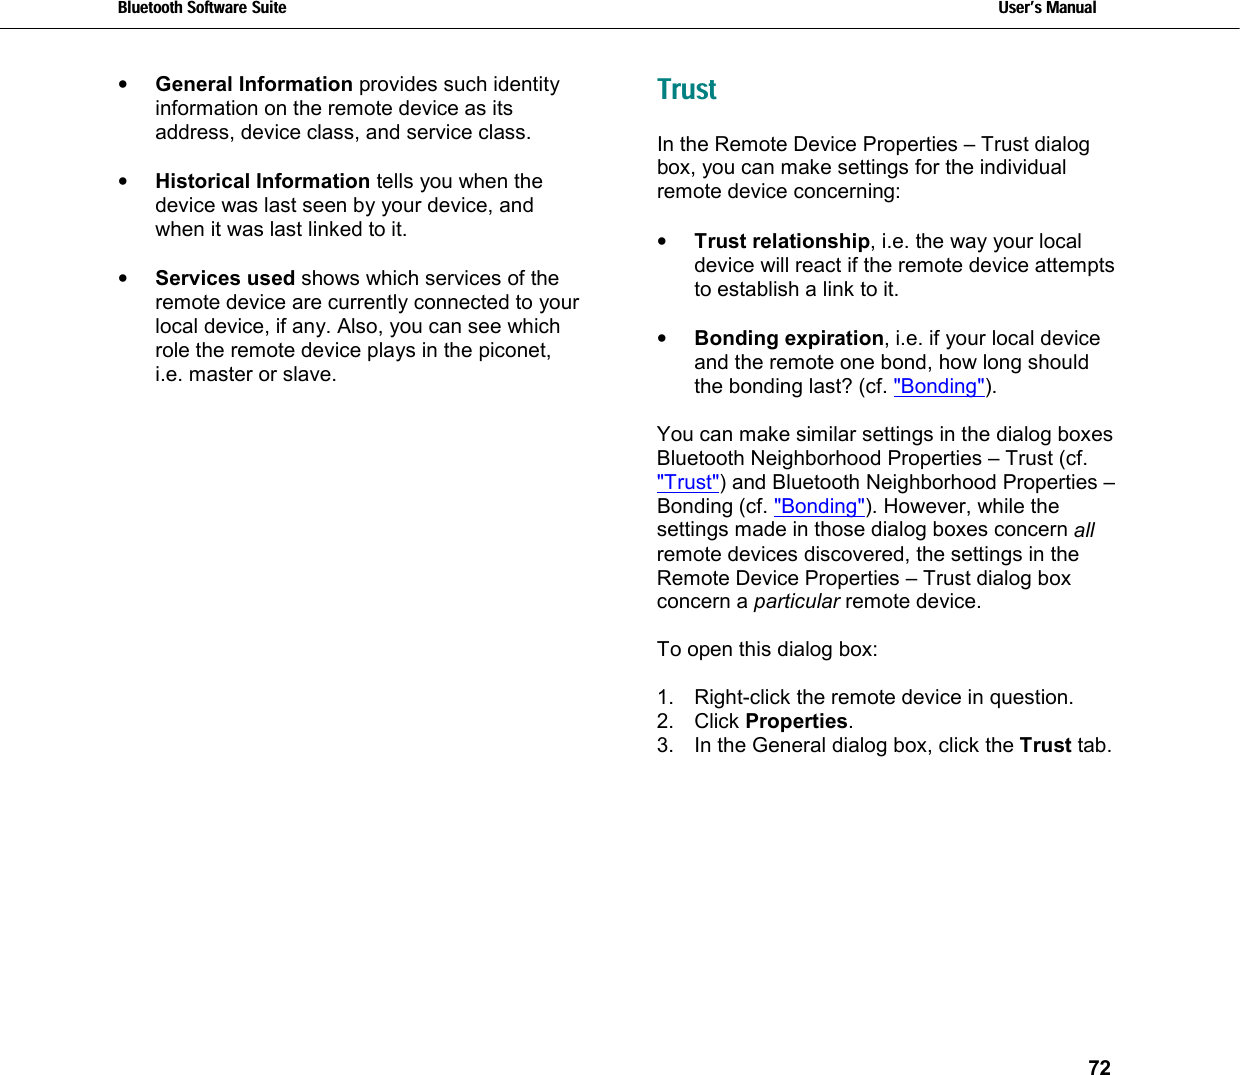
TOSHIBA Digital Media Network OME Operations PA3122U-1MPC Bluetooth Mini PCI Card in Toshiba Computer User Manual BTSWS User s Manual 1 0 00 06 19

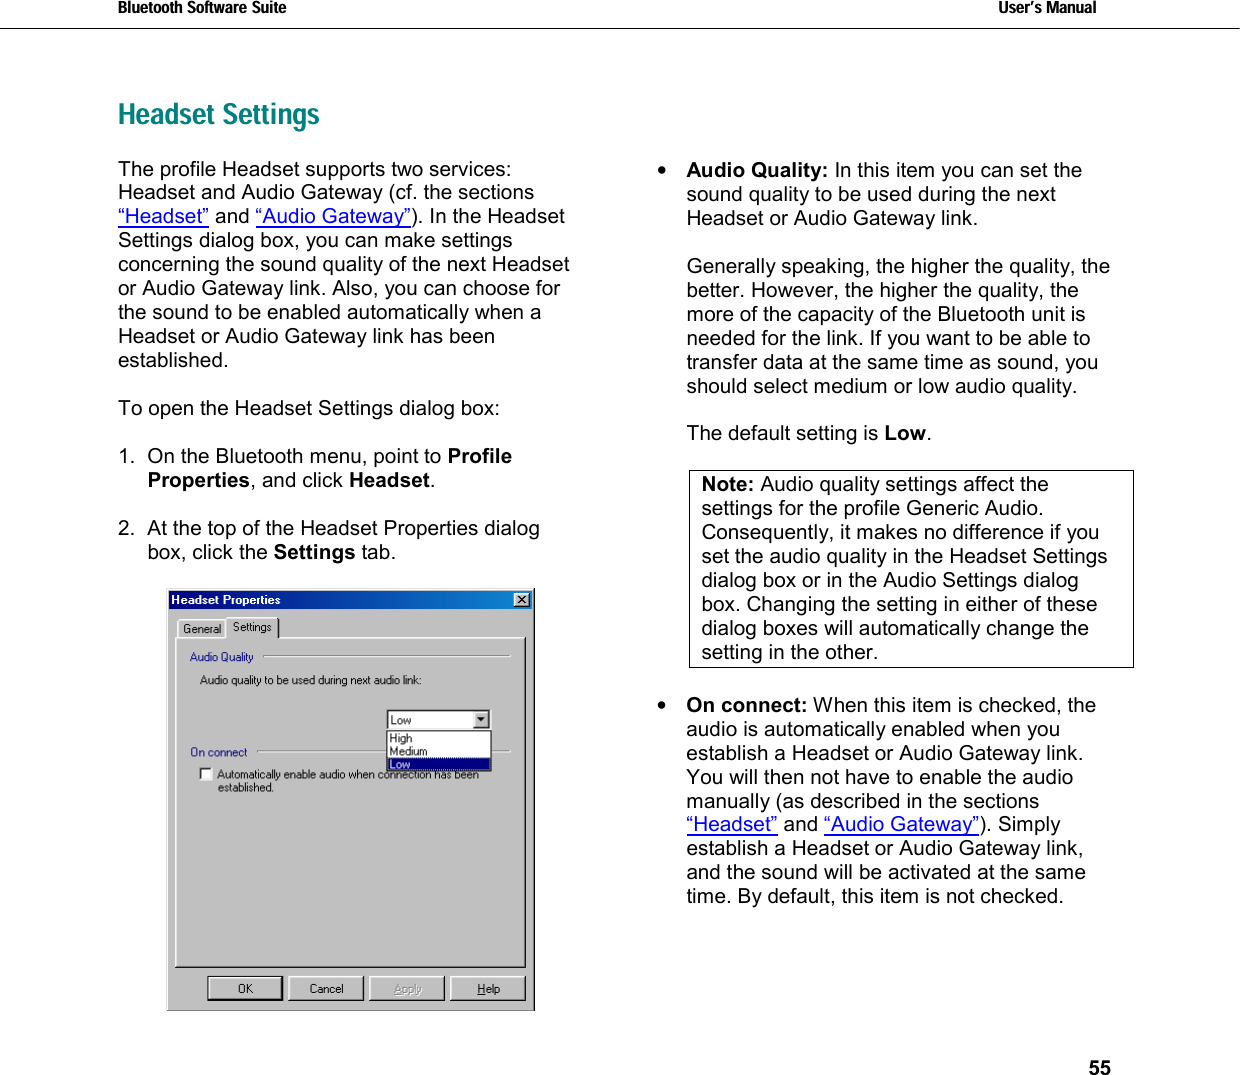
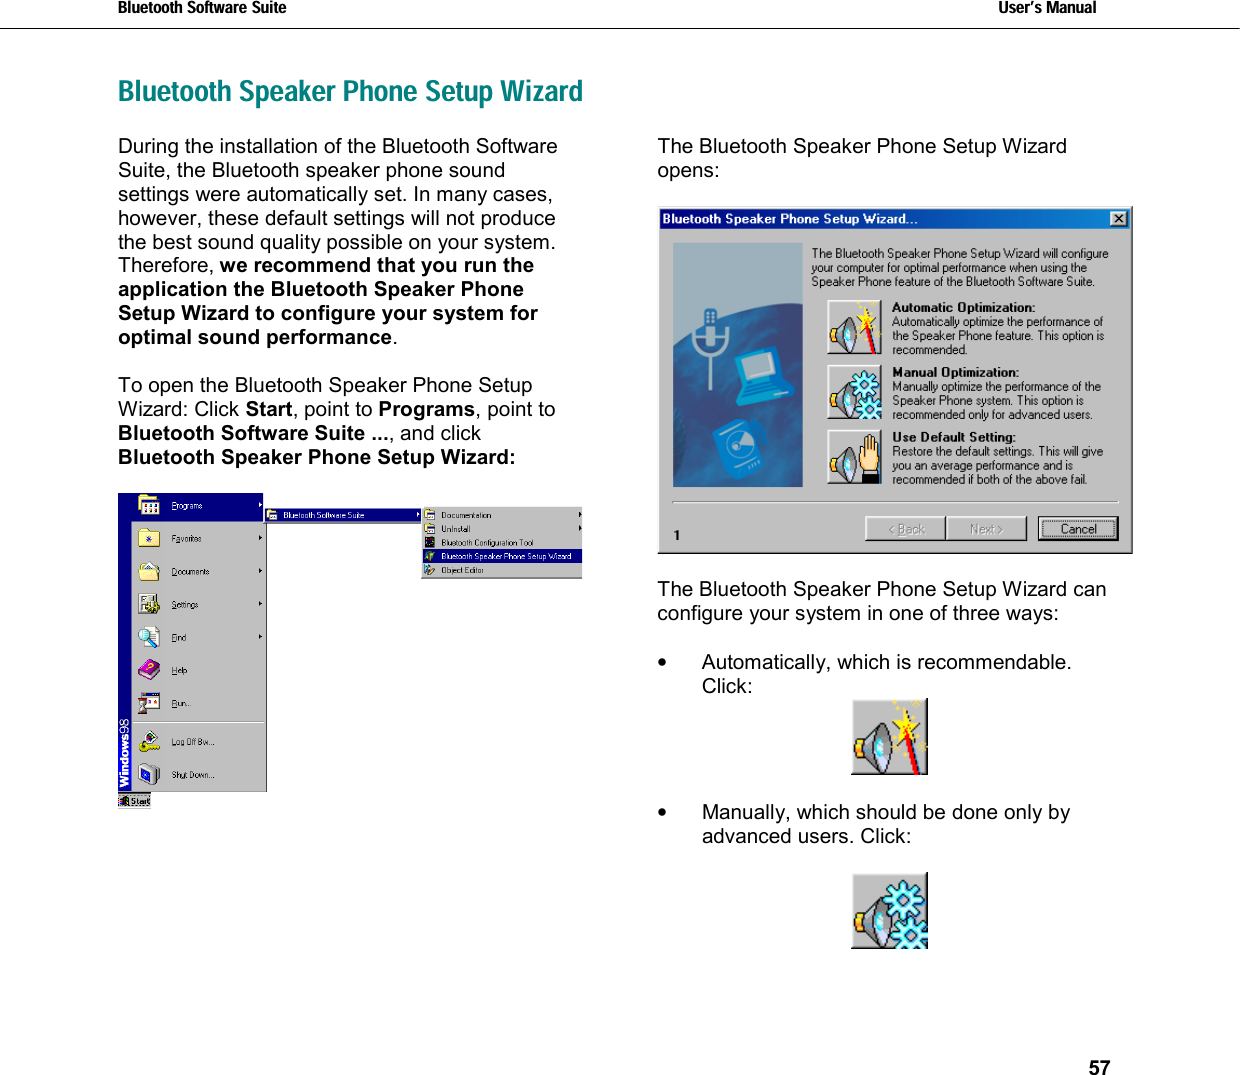
TOSHIBA Corporation Digital Media Network Company OME Operations Bluetooth Mini PCI Card in Toshiba Computer BTSWS User s Manual 1 0 00 06 19

US Users manual Eng

          Bluetooth       SOFTWARE SUITE        Users Manual
Bluetooth Software Suite   Users Manual   2  About this manual This User’s Manual will provide you with the information needed to make the most of the Bluetooth™1 Software Suite.   If you need basic information on the Bluetooth technology, please refer to the Bluetooth Introduction accompanying the Bluetooth Software Suite. Both the Bluetooth Introduction and this User's Manual are included on the Bluetooth Software Suite CD-ROM. Also, when you have installed the Bluetooth Software Suite, the two documents are available from the Windows Start menu. In addition, this User’s Manual is available as online help.  The Bluetooth Software Suite and Microsoft2 Windows are highly integrated. However, it is beyond the scope of this manual to explain the basics of using Windows. Therefore, if you need information on that topic, please refer to the Windows online help.  The information in this document is furnished for informational use only, is subject to change without notice, may contain errors or inaccuracies, and represents no commitment whatsoever.   Rev. 1.089 01-05-01                                                            1 The Bluetooth trademarks are owned by their proprietor and used under license.  2 Microsoft® is a registered trademark of Microsoft corp.
Bluetooth Software Suite   Users Manual       3   ContentsAbout this manual 2 Getting started 5 Bluetooth Neighborhood 5 Introduction 5 Opening Bluetooth Neighborhood 6 Bluetooth Neighborhood window 7 Profiles and services 8 List view 9 Basic functions 11 Naming your local device 11 Device discovery 12 Service discovery 13 Link establishment 14 Disconnecting 15 Status information 15 View details 16 Device folders 18 Online help 19 Local services 20 Object transfer 20 Making default business card available 20 Business card transfer 24 Sending objects directly from MS Outlook 25 Receiving objects 25 Creating objects in the Object Editor 26 File transfer 28 Headset 30 Audio Gateway 32 Scenarios 32 Audio Gateway link establishment 34 Audio 35 Link establishment 36 Enabling/disabling PC speaker 37 Bluetooth COM port 38 General information 38 Bluetooth COM port settings 39 Bluetooth COM port link establishment 42 LAN 43 DUN 45 FAX 47 Network 49 Setting up networks 49 Network link establishment 49 Local device settings 50 Local profile properties 50 General information 50 Enabling/disabling profile 51 Object Push Settings 52 Object Push - Security 53 File Transfer Settings 54
Bluetooth Software Suite   Users Manual       4  Headset Settings 55 Audio Settings 56 Bluetooth Speaker Phone Setup Wizard 57 LAN Access Settings 58 Dial-up Networking Settings 60 Bluetooth Neighborhood properties 61 General 61 Settings 62 Device discovery 63 Trust 64 Security 66 Bonding 68 Bluetooth unit settings 70 Enabling/disabling Bluetooth unit 70 Indication of Bluetooth unit state 70 Remote device settings 71 Remote device properties 71 General 71 Trust 72 Diagnostics 74 Appendices 75 Appendix A: Profiles 75 Appendix B: List view icons 76 Index 78
Bluetooth Software Suite   Users Manual       5  Getting startedBluetooth Neighborhood Introduction With the Bluetooth Software Suite, you can establish wireless links between your computer and other Bluetooth enabled devices. For example, without using an inch of cable, you can:   •  Transfer computer files  •  Transfer objects, for example electronic business cards (vCards)  •  Transfer sound  •  Access the Internet by means of dial-up networking   •  Connect to local area networks   •  Send fax messages  •  Establish Bluetooth ad hoc networks consisting of two or more Bluetooth devices  •  Connect to serial devices (legacy applications) Most operations are carried out from the application called the Bluetooth Neigborhood. This is an equivalent to the Microsoft Network Neighborhood/My Network Places. The latter is an ordinary network, the Bluetooth Neighborhood is a wireless network of the Bluetooth devices within range.  The basic functions of the Bluetooth Neighborhood include:  1.  Carrying out device discovery—finding out which remote Bluetooth devices are available within your range;   2.  Carrying out service discovery—finding out which services (applications) a remote device facilitates;  3.  Establishing links to remote devices.  When a Bluetooth link has been established between two or more devices, they can communicate, making use of a great number of possible applications.
Bluetooth Software Suite   Users Manual       6  Opening Bluetooth NeighborhoodTo open the Bluetooth Neighborhood, perform the following steps:  1. Open Windows Explorer.  2.  Select the Bluetooth Neighborhood among the folders in Windows.   Alternatively, open the Bluetooth Neighborhood from the shortcut placed on your desktop during the installation:
Bluetooth Software Suite   Users Manual       7  Bluetooth Neighborhood window When you open the Bluetooth Neighborhood, the following window appears*:      The figures 1-7 refer to the following explanations:                                                            * The first time you open the Bluetooth Neighborhood, you will not see any remote Bluetooth devices. To discover the remote devices within range, press F5.   Note also that as the setup of the window depends on your Windows Explorer setup, the components in the above example may not be exactly the ones shown on your screen.  1:  Menu bar: Contains standard Windows pull-down menus and a Bluetooth menu. We will deal with the Bluetooth menu in later sections. Furthermore, from the menu bar, you can access the Bluetooth Software Suite online help.  2:  Tool bar: Contains standard Windows tools like Back, Forward, View, etc. In addition, the bar contains such Bluetooth tools as Device Discovery and Disconnect.  3:  Address bar: Shows which item is currently selected. Also, from this bar you can browse in Windows Explorer.  4:  View details: Appears when on the View menu you have selected the item View Details. You will see various information on the items in the list view. For more information, see the section “View details”.  5:  Local Profiles/Local Services bar: Shows the local profiles or the local services that your Bluetooth device supports. For more information, see the section "Profiles and services".  6: Status bar: Provides information on the item currently selected in the Bluetooth Neighborhood.   7:  List view: Shows you the contents of the folder, remote device, etc. currently selected. See the section “List view”.
Bluetooth Software Suite   Users Manual       8  The setup of the Bluetooth Neighborhood window depends on your Windows Explorer setup. Thus, the above example does not show all the standard Windows components that may be added to the window.  Profiles and services  Interoperability depends on profiles Any Bluetooth device has at least one profile, i.e. an application that you can use the device for.  When two devices are to interoperate, i.e. communicate with each other, they must have a shared profile. If, for example, you want to transfer a file from one Bluetooth enabled computer to another, both computers must support the profile OBEX File Transfer.   The Bluetooth Software Suite supports a number of profiles, called your Local Profiles. You will find these on the Local Profiles bar.  Services are used for link establishment  While the function of the Local Profiles bar is to display the profiles your device supports, the Local Services bar is what you will actually be using when operating the Bluetooth Neighborhood. Facilitated by a profile, each of the services represents a specific operation that your device can carry out. An example of a service is business card transfer, which is facilitated by the profile OBEX Object Push. Business card transfer can take place between your computer and other Bluetooth devices supporting the OBEX Object Push profile.   In later sections, we will show you how to make use of each of the services that your device features.  For the Local Profiles bar, click Local Profiles.  For the Local Services bar, click Local Services.
Bluetooth Software Suite   Users Manual       9     For a complete list of the profiles that your Bluetooth device supports, including which services each profile facilitates, see “Appendix A: Profiles”. List view The list view in the main window contains three elements: My Inbox, My Shared Files, and a list of discovered remote devices. When an item is selected in the Bluetooth Neighborhood, for example My Inbox or a remote device, the list view will display the contents of that item. (In this connection, the contents of a remote device are the services it supports).  My Inbox: This is where your device receives objects like electronic business cards, messages, notes, and calendar objects. My Inbox is a folder of files like any other Windows folder, and its contents can be copied, renamed, dragged and dropped etc. (For more information, see the section “Receiving objects”.)   My Shared Files: In this folder, you can make files available to remote users. When a remote user has carried out service discovery on your device, he will be able to open your folder My Shared Files and the files you have placed in it. Also, remote users can place files in your folder My Shared Files and – if allowed – delete files (see “File Transfer Settings” for information on the security aspects of receiving files). Finally, if a remote device sends a file to your device, it is received in My Shared Files. Like My Inbox, you can manipulate My Shared Files like any Windows folder. For more information, see the section “File transfer”.
Bluetooth Software Suite   Users Manual       10  Remote devices or services:  The devices shown in the main window list view are the remote Bluetooth devices that your device has discovered during device discovery. The icons show what kind of device each remote device is (device class), like the desktop and laptop computer icons in the following example:         A question mark is used to show that the device class is unknown:   Furthermore, it is indicated by the icons whether or not a device is within range as follows:    Within range   Out of range   Note: The list view does not show your local device, only remote ones.  When service discovery has been carried out on a remote device, the list view will change to showing the services facilitated by the remote device in question. Each service is represented by an icon, for example DUN (dial-up networking) and FAX:        Appendix B contains a complete list of the various remote device and service icons.   Finally, the icons will indicate “linked” and “bonded” as follows:   Linked  Bonded  Linked and bonded  The list view settings can be changed like other Windows list view settings, e.g. you can change the size of the icons or have the elements displayed as a list. For information on settings specifically relevant in connection with the Bluetooth Software Suite, see the section “View details”.
Bluetooth Software Suite   Users Manual       11  Basic functions Naming your local device Before you start communicating with remote users, you should select a device name you want remote users to see. To name your device, perform the following steps:  1.  On the Bluetooth menu, click Bluetooth Neighborhood Properties:    The following dialog box opens:   2.  At the top of the dialog box, click the Settings tab.     3. In the Bluetooth Device Name text box, type the device name you wish remote users to see. For example, “Adam”:    4. Click OK.  Other Bluetooth devices will now see your device as "Adam".
Bluetooth Software Suite   Users Manual       12  For information on the item Bluetooth Device Class in the dialog box shown above, see the section “Bluetooth Neighborhood properties” – “Settings”. Device discovery Before your local device can communicate with a remote Bluetooth device, it will need to discover the remote devices available within range. This process is called device discovery.  To run device discovery, click on Device Discovery on the Bluetooth drop-down menu.    While your device is looking for remote devices, the following dialog box will show the progress of the device discovery:    When device discovery has finished running, the list view will show which remote devices within range are currently available. Also, you can see the previously discovered devices that are no longer available (cf. the section “List view”):
Bluetooth Software Suite   Users Manual       13    Note: The main window list view does not show your local device, only the discovered remote ones.  Alternative ways of carrying out device discovery:  •  When the main window list view is displayed, press F5. This will update the list view.  •  On the tool bar, click the tool button Device Discovery.   Service discovery Before trying to establish a link to a remote device, it may be useful to know which services the device supports. To find out, run service discovery by double-clicking on the remote device in the main window list view:    When the service discovery has been carried out, the list view will show the services that the remote device supports:    In some cases, it may not be possible to run service discovery. There could be a number of reasons for this: The remote user may have set up his device to reject link establishment attempts (cf. “Bluetooth Neighborhood properties” – “Trust” and “Remote device properties” – “Trust”), the distance between the two devices may be too far, etc.  If service discovery (or any other activity) is not carried out successfully, a message box will let you know what went wrong.
Bluetooth Software Suite   Users Manual       14  Link establishmentWhen you have carried out service discovery, you can establish a link to the remote device. You can make use of any service that both your device and the remote device support. Drag the local service to the corresponding remote service:     In the above example, a DUN (dial-up networking) link is being established by dragging the local DUN service to the remote DUN service. (The remote device could be a Bluetooth enabled modem, which would allow you to access the Internet.)  Alternatively, if you know in advance that a remote device supports a particular service, you can skip service discovery. Just drag the local service to the remote device:    In this example, a DUN link is being established by dragging the local DUN service to the remote device.  For information on how to make use of each of the local services when a link has been established, refer to the section about the local service in question.  If link establishment is not carried out successfully: The remote user may have set up his device to reject link establishment attempts (cf. “Bluetooth Neighborhood properties” – “Trust” and “Remote device properties” – “Trust”), the distance between the two devices may be too far, etc. A message box will let you know what went wrong.
Bluetooth Software Suite   Users Manual       15  Disconnecting To disconnect a link established to a remote device, perform the following steps:   1.  Select (click) the remote device or service that you want your device to disconnect from.  2.  On the Bluetooth menu, click the item Disconnect:    Alternatively, double-click the remote service that your local device is connected to.  The link will now be disconnected.     Status information The Bluetooth Neighborhood status bar provides you with information on the item currently selected in the Bluetooth Neighborhood, like the name of a remote device (“Eddie’s Notepad”) or My Inbox. Also, message boxes keep you informed of the progress of any activity, and let you know if anything goes wrong. The following example is a message box showing that the local device is being disconnected from a remote one:
Bluetooth Software Suite   Users Manual       16  View detailsOne of the Windows-like features of the Bluetooth Software Suite is the possibility of changing the settings of the list view. What is of special interest, however, is the Details information of the list view:  1.  On the menu bar, click View. 2. Click Details.    Alternatively, on the tool bar, click the View icon the appropriate number of times until the details are displayed:     The type of details displayed depends on the contents of the list view: remote devices, remote services, or the contents of My Inbox or My Shared Files.  Details concerning remote devices   In the main window, the list view can display information on each of the remote devices discovered:     •  Name: The name the remote user has chosen for his device to present itself with when discovered by other devices.  •  Class: The type of the remote device (device class), for example a desktop computer, a laptop, or a mobile phone.  •  Status: Whether the remote device is within range or not.  •  Bonding: Whether or not your local device and the remote one have bonded. See the section “Bonding”.   •  Role: Shows if the remote device is the master or a slave in the piconet.
Bluetooth Software Suite   Users Manual       17  Details concerning remote services  When you run service discovery on a remote device, the list view will display the following information on the services supported by the remote device:     •  Name: The name of the remote service.  •  Description: The name of the profile that supports the remote service. If your device features the same profile, interoperability between the two devices is possible.  •  Status: The connection status of the remote service. Details concerning My Inbox and My Shared Files  If you have opened My Inbox or My Shared Files, you can get the same information on each of the received objects or files that you can get in standard Windows folders:     •  Name: The name given to the object or file when it was saved.  •  Size: The size of the object or folder.  •  Type: The type of the object or folder.  •  Modified: The date when the object or file was last saved.
Bluetooth Software Suite   Users Manual       18  Device foldersWhat is a device folder?  In the Bluetooth Neighborhood main list view, you can create device folders: folders containing a number of remote devices. You can communicate with a device folder as with any single remote device. When doing so, you will be communicating with all the devices in the folder at the same time. You can for example use this feature to distribute objects or files to more than one device at a time.   How to create a device folder:  1.  Open the Bluetooth Neighborhood main window.  2.  On the Bluetooth menu, click Create New Device Folder.  A new folder will appear in the list view:    The default name of the folder is New Folder. However, you can rename the folder like any Windows folder: Select the folder, click F2, and type the new name. 3.  Drag the remote devices you want to the device folder. This is a standard Windows drag-and-drop operation; to move a number of  remote devices at the same time, hold down the CTRL key, click each remote device, and then drag the selected remote devices to the folder.  In the following example, two remote devices have been selected and are being dragged to a device folder named “Conference”.    You can create as many device folders as you like, and you can include as many devices in each folder as you like.  Communicating with a device folder is done in exactly the same way as with a single remote device. In the following example, a business card is being dragged to the device folder named “Conference”:
Bluetooth Software Suite   Users Manual       19    Each of the remote devices included in the device folder “Conference” will now receive the business card. Online help The Bluetooth Software Suite features online help similar to that of Microsoft Windows. To open the Bluetooth Software Suite online help, click the menu bar item Help or press F1 on your keyboard.  Help provides you with links to the online version of this User’s Manual. The design of the Help function is similar to the Windows Help:    Each tab helps you locate information in a different way. To locate topics, use the Contents tab. To look up keywords, use the Index tab. To search for text, use the Search tab.
Bluetooth Software Suite   Users Manual       20  Local servicesObject transfer With the Bluetooth Neighborhood, you can transfer such objects as business cards, e-mail messages, calendar objects, and notes. If Microsoft Outlook is installed on your computer, that is where you create and send objects. If Microsoft Outlook is not installed on your computer, you can use the Object Editor included in the Bluetooth Software Suite. Making default business card available Before your business card can be transferred to a remote device, it needs to be included as a service on your Local Services bar. This will allow remote users to pull your business card, i.e. transfer it to their devices. Also, you can push the business card yourself, i.e. transfer it to remote devices. Finally, pulling and pushing can take place in one and the same operation: exchanging business cards. This can be done by both you and a remote user.  If Microsoft Outlook is installed on your computer, you can create a business card in Contacts, and then drag it into the Bluetooth Neighborhood. If Microsoft Outlook is not installed, you can use the Object Editor. Both ways of making your default business card available on the Local Services bar are explained in the following.  From Microsoft Outlook  1.  Open both the Bluetooth Neighborhood and Microsoft Outlook.  2.  Arrange the Bluetooth Neighborhood and Microsoft Outlook Contacts windows so they are both visible on your screen:
Bluetooth Software Suite   Users Manual       21    3.  Drag the item containing your own contact information into the Local Services bar:   A new icon on the Local Services bar shows that your default business card is now available for transfer to remote devices:    From the Object Editor  An alternative way of registering your default business card is by means of the Object Editor.  To open the Object Editor:  1.  On the Bluetooth menu, point to Profile Properties, and click OBEX Object Push.    The OBEX Object Push Properties dialog box opens:
Bluetooth Software Suite   Users Manual       22    2.  At the top of the dialog box, click the Object Push Settings tab.   3.  In the item Default Business Card, click the button Create New. The Object Editor opens:    4.  In the Object Editor, type the information you want to include in your default business card. You can include information about your name and one or more e-mail addresses, telephone numbers, and addresses.  5.  To save the business card, select the Object Editor File drop-down menu, and click Save.
Bluetooth Software Suite   Users Manual       23  6.  To quit the Object Editor: Click the OK button. You will now return to the dialog box OBEX Object Push Properties – Object Push Settings. Here you will see the name of your default business card, which is the same as the name typed in the Object Editor.    If you want to view or edit the default location of the business card, click the “ ... “ button.  7.  To complete the creation of the new default business card: Click the OK button.  A new icon on the Local Services bar shows that your default business card is now available for transfer to remote devices:   Editing an existing business card in the Object  Editor:  As appears from the information above, the Object Editor can be used to create a new default business card. Furthermore, you can use the Object Editor to edit an existing business card. The procedure is almost the same as that described above; however, in step 3, click Edit (instead of Create New).
Bluetooth Software Suite   Users Manual       24  Business card transfer Before your default business card can be transferred to remote devices, you must make it available among your local services as described in the section "Making default business card available".   To send your business card to a remote device, drag the card icon to the remote Inbox folder or remote device (or device folder). In the following example, the business card is being dragged to a remote device:    If the link is established successfully, the remote device will now receive your business card in its Bluetooth Neighborhood Inbox.  For the choice of sending, receiving, or exchanging business cards with another user, right-click the remote device, and point to Business Card:    You can now choose one of the following options:  •  To transfer your business card (included on the Local Services bar) to the remote device: Click Push business card.  •  To transfer the remote user’s business card to your device: Click Pull business card.  •  To exchange business cards with the remote user: click Exchange business cards.
Bluetooth Software Suite   Users Manual       25  Sending objects directly from MS Outlook Microsoft Outlook users can send objects (like messages or notes) directly from Microsoft Outlook: Drag the object either to the remote Inbox folder or to the remote device (or device folder):    In the above example, an e-mail message is being dragged from the local Microsoft Outlook inbox to the remote Bluetooth device. Receiving objects When your local Bluetooth device receives an object (a default business card, message, note, or calendar object) from a remote device, the object is placed in My Inbox:    If Microsoft Outlook is installed on your computer: When you double-click a received object, it will open in Microsoft Outlook.  If Microsoft Outlook is not installed on your computer: When you double-click a received object, it will open in the Object Editor.  You can open a received object directly from My Inbox, or you can drag the object to wherever you want to store it. In the following example, an object is being dragged from My Inbox to the Desktop:
Bluetooth Software Suite   Users Manual       26  Creating objects in the Object Editor If Microsoft Outlook is not installed on your computer, you can use the Object Editor to create objects – messages, notes, and cards. Note that objects created in the Object Editor are not saved as objects but as files. You can then transfer these files as you would any file in the Bluetooth Neighborhood (cf. “File transfer”).  1.  To open the Object Editor: Click Start, point to Programs, point to Bluetooth Software Suite ..., and click Object Editor:      The Object Editor opens:    2.  To create an object in the Object Editor:  Click File, point to New, and click the kind of object you want to create, for example a VMessage:
Bluetooth Software Suite   Users Manual       27  Cards are created in the Object Editor itself (by typing the information you want to include); messages and notes are created in a new window. The following example shows the window that pops up on clicking VMessage as shown above:     3.  Type the information you want to be included in the object.  4.  To save the object: In the window where you typed the contents, click File and Save As.  A new dialog box pops up. In the following example, a message is about to be saved:    5.  Select the location and name of the new file.   6. Click Save.  When you have saved the file, you can transfer it like any file using the Bluetooth Neighborhood. For more information, see “File transfer”.
Bluetooth Software Suite   Users Manual       28  File transfer  File transfer is a way of sharing files with others. In the Bluetooth Neighborhood, you can make a file available to a remote user by placing it in the folder My Shared Files:     When a remote user has carried out service discovery on your device, he can open your folder My Shared Files and the files in it. Furthermore, he can add and delete files if he is allowed to do so (for information on the security aspects of My Shared Files, see the section “File Transfer Settings”).  Finally, if a remote device sends a file to your local device, it is received in My Shared Files.  Making a file available in My Shared Files  Placing a file in My Shared Files is easily done by dragging the file from where it is stored to the folder My Shared Files. Or you can open My Shared Files first, and then drag the file to the list view displaying the contents of My Shared Files.     In the above example, a file is being dragged from the desktop to the list view displaying the contents of My Shared Files. When a remote user opens your folder My Shared Files, he will have access to the file you placed in it.   Sending a file to a remote device  If you want to transfer a file to the Shared Files folder of a remote device, you can do so in a number of ways:  •  Drag the file from where it is stored to the remote device (or device folder):    In the above example, a file is being dragged from My Documents to the remote device.  •  First run service discovery on the remote device. Then drag the file from where it is stored into the remote Shared Files folder:
Bluetooth Software Suite   Users Manual       29    In the above example, a file is being dragged from My Documents to the Shared Files folder of the remote device.  •  First run service discovery on the remote device; then open the remote Shared Files folder; finally drag the file from where it is stored to the list view displaying the contents of the remote Shared Files folder.    In the above example, a file is being dragged from the Desktop into the contents of the remote Shared Files folder.  No matter which way you choose to transfer a file to a remote device, the user of that device will receive the file in his Shared Files folder.  Receiving files   When your local Bluetooth device receives a file sent from a remote device, the file is placed in My Shared Files.   You can then open the received file directly from My Shared Files, or you can drag the file to wherever you want to store it. In the following example, a file is being dragged from My Shared Files to My Documents:
Bluetooth Software Suite   Users Manual       30  HeadsetThe Headset service makes it possible to have phone conversations using your computer as a speaker phone.   This is how the Headset service works:  Sound can be transferred via a Bluetooth link between your Bluetooth enabled phone and computer. The phone works as a “gateway” for the sound to and from the computer. This makes it possible to carry out a phone conversation using the (built-in or external) speaker and microphone of your computer. Alternatively, instead of using the speaker and microphone of your computer, you can connect an ordinary (wired) headset to the computer and use that for the conversation.   How to use the Headset service:  First, establish a link between your computer and Bluetooth enabled phone. The link can be established by both devices. To establish the link from the Bluetooth Neighborhood: Either drag the local Headset service to the icon in the list view symbolizing your phone. Or run service discovery on the phone first, then drag the local Headset service to the remote Audio Gateway service:    Now, enable the audio (sound): Right-click either the Headset icon in the Local Services bar or the icon for the remote service in the list view. Select Enable Audio:   The sound reaching your phone from the public telephone network will now be transferred wirelessly to your computer (and the other way around: from your computer to your phone ...). Make a phone call or answer the phone, and carry out the conversation by your computer.
Bluetooth Software Suite   Users Manual       31  Note that when Audio is enabled, disconnecting must be done from the Audio Gateway, i.e. the phone.   However, on the menu opened by right-clicking the local or remote Headset icon, you can select Send Command. This is a “virtual pushbutton” which will allow you to control most phones from your computer. Selecting Send Command may cause the phone to dial up or, when you are already connected, hang up and disconnect the link.  Note: You can make settings for automatic enabling of audio on link establishment and for sound quality; please see the section “Headset settings”.
Bluetooth Software Suite   Users Manual       32   Audio Gateway Supported by the Headset profile, the local Audio Gateway service makes it possible to transfer sound between your computer and a Bluetooth enabled headset. Your computer is used as a “gateway” for the sound. The Audio Gateway service can be used for a number of things. You can for example:  •  Listen to music from MP3 and MIDI files or the like. (In addition, on some computers, you can listen to CDs using the CD-ROM drive. However, for technical reasons this is not possible on all computers).  •  Participate in NetMeetings, using Microsoft NetMeeting or a similar application.   •  Use the computer like a phone in handsfree mode.   In the following sections, we will first describe each of the mentioned applications, or scenarios, of the Audio Gateway service. We will then provide instructions on how to establish an Audio Gateway link, including enabling the audio (sound).  Scenarios This is how the Audio Gateway service works in connection with music files:   When you open a music file, the sound is transferred via a Bluetooth Audio Gateway link from your computer to your Bluetooth enabled headset. In other words, the Audio Gateway service makes it possible to put on your headset, open a music file, and listen ...   This is how the Audio Gateway service works when used for NetMeetings:   The sound (the voices of the other participants in the NetMeeting) reaches your computer from the Internet or local Intranet. The sound is then transferred via a Bluetooth Audio Gateway link from your computer to your Bluetooth enabled headset. This is how you get to hear the others' voices. Your own voice is transferred in the
Bluetooth Software Suite   Users Manual       33  opposite direction: When you speak into the microphone of the headset, the sound is transferred via the Bluetooth Audio Gateway link to your computer. The sound is then sent via the Internet/Intranet to the other NetMeeting participants. The meeting can proceed ...  Note: To participate in a NetMeeting, you need Microsoft NetMeeting (or a similar application). Before the meeting, each participant has to set up his NetMeeting application for it. For details on Microsoft NetMeeting, please refer to the Windows online help.  This is how the Audio Gateway service works when your computer is used like a phone in handsfree mode:   The sound (the voice of the person you are talking to) reaches your voice modem via the public telephone network. The voice modem is connected to your computer (with a wire) or perhaps built into your computer. From the modem, the sound reaches your computer. It is then transferred via a Bluetooth Audio Gateway link to your Bluetooth enabled headset. This is how you get to hear the voice of the person at the other end of the line. The sound of your own voice is routed back the same way: From the microphone of your Bluetooth enabled headset to your computer; from your computer to your voice modem; and via the public telephone network to the other person's phone (or computer?). Your computer has been turned into a handsfree phone!  Note: To use your computer like a handsfree phone, you need a software application supporting voice. Such an application is typically included with a voice modem. For information on how to use the application, please refer to the documentation accompanying it.
Bluetooth Software Suite   Users Manual       34  Audio Gateway link establishmentIn the previous section, we took a look at the principles behind various ways of using the Audio Gateway service. No matter which of the applications you use, you will need to establish a Bluetooth Audio Gateway link between your computer and the Bluetooth enabled headset. The link can be established by both devices.   To establish the Bluetooth Audio Gateway link from the Bluetooth Neighborhood: Either drag the local Audio Gateway service to the icon in the list view symbolizing your headset. Or run service discovery on the headset first, then drag the local Audio Gateway service to the remote Headset service:    Now, enable the audio (sound): Right-click either the icon for the Audio Gateway in the Local Services bar or the icon for the remote service in the list view. Select Enable Audio.   You can now put on your headset and participate in a NetMeeting, listen to music, or make a phone call!  Note: You can make settings for automatic enabling of audio on link establishment and for sound quality; please see the section “Headset settings”.
Bluetooth Software Suite   Users Manual       35   AudioNote: This section is only relevant to professional users.  An audio link makes it possible to transfer sound from one Bluetooth device to another.   Most users will only need to transfer sound in connection with Headset and Audio Gateway links. To such users, the Audio service—and this section—is irrelevant. However, some professional users will find the Audio service useful for test or development purposes.  The Audio service is supported by the Generic Audio profile. By default this profile is disabled, so there is no Audio icon in the Local Services bar. If you enable the profile Generic Audio, an Audio icon will appear in the Local Services bar. You can now use the Audio service link like any other local service. (For more information on enabling/disabling profiles, see “Enabling/disabling profiles”.)  Now, there are basically two ways of using an audio link: Your computer acts as either a Bluetooth speaker phone, or as a Bluetooth audio device.    The Bluetooth speaker phone feature makes it possible to use two or more computers like walkie-talkies. You can use the microphone(built-in or external) and speaker of your computer for the conversation. Or you can use an ordinary (wired) headset. Now, imagine yourself at the office, transferring a file wirelessly to your colleague in an office down the hall while explaining something to him, speaking into the microphone of your computer:   The Bluetooth audio device feature allows you to send a sound file, for example music or a voice recording, that you want to record on the computer receiving the file. Both computers act as Bluetooth audio devices. The computer recording the sound file makes use of the Microsoft Sound Recorder or a similar application. (For information on how to use the recording application, please refer to the documentation for the application in question.)  For the sake of completeness, we should mention a couple of other scenarios involving both the Bluetooth speaker phone and the Bluetooth audio device features:  You can send a sound file from one computer (acting as a Bluetooth audio device) to another computer (acting as a Bluetooth speaker phone).
Bluetooth Software Suite   Users Manual       36  This makes it possible for the user who receives the sound file to listen while receiving the file.  Another example would be to speak into the microphone of one computer (acting as a Bluetooth speaker phone) while recording your speech on another computer (acting as a Bluetooth audio device).  For information on how to enable each of the two features, the Bluetooth speaker phone and the Bluetooth audio device, please see the section “Enabling/disabling PC speaker”.  Link establishment There are two ways of establishing an audio link:   •  Drag the local Audio service to the remote device (or device folder)   Or   •  Run service discovery first, then drag the local Audio service to the remote Audio service:    When the link establishment has been carried out successfully, you can use your computer as either a Bluetooth speaker phone or a Bluetooth audio device as described in the preceding section, “Audio”. In the following section, “Enabling/disabling PC speaker”, we will describe how to enable/disable either of the two features.
Bluetooth Software Suite   Users Manual       37  Enabling/disabling PC speakerUsing your computer as a Bluetooth speaker phone (the Audio Service “walkie-talkie feature”) involves using the PC speaker. This may be a built-in or external speaker, or it may be the speaker of a wired headset connected to your computer. The PC speaker can be enabled/disabled from the Local Services bar or the list view by performing the following steps:  1.  Right-click the local/remote Audio service. 2. Click Enable/Disable PC speaker.    To enable the Bluetooth speaker phone feature, enable the PC speaker.  To enable the Bluetooth audio device feature, disable the PC speaker.   Note: You can only disable the PC speaker when your device is not sending or receiving sound. Do not attempt to use the disabling function when an audio link has been established. Should this happen anyway, the disabling function will not work until you have restarted your computer.   For more information on audio settings, see the section “Audio Settings”.  For information on how to optimize the sound performance of the Bluetooth speaker phone feature, see the section “Bluetooth Speaker Phone Setup Wizard”.
Bluetooth Software Suite   Users Manual       38  Bluetooth COM port General information What is a Bluetooth COM port?   Physical communications (COM) ports are used when two serial devices are connected by means of a cable. A Bluetooth COM port, however, is a virtual COM port providing a wireless alternative to a physical one. Bluetooth COM ports make it possible to connect to almost any Bluetooth enabled serial application (legacy application) that would otherwise have been connected using a cable and a physical COM port.  Some profiles require a Bluetooth COM port  As Bluetooth links are wireless, you need no physical COM port to connect to a remote device. However, in connection with some of your local profiles, you need a Bluetooth COM port. This provides an address, so to speak, needed by your legacy application to establish a link to a remote device.  Note: Most users need not worry about Bluetooth COM ports at all; the default settings ensure that you can use all your Local Services without having to make any Bluetooth COM port settings.  The following table shows which services are supported by profiles associated with a Bluetooth COM port. Also, the table shows which Bluetooth COM port each profile is associated with by default:   Service:  Profile: Default Bluetooth COM port: Default business card OBEX Object Push 8 File transfer  OBEX File Transfer 9 Headset Headset 10 Audio Gateway Headset 11 DUN Dial-Up Networking 7 FAX Fax  7 LAN Lan Access 7  You can change the default COM port settings, if you like. For more information, see the section “Bluetooth COM port settings”.  Note: The profile Serial Port requires a Bluetooth COM port. However, there is no default Bluetooth COM port associated with that profile. Please see the following sections for more information.   Note: Some profiles cannot share a Bluetooth COM port with any other profiles. Each of the following profiles must be associated with a Bluetooth COM port that no other profile is associated with: OBEX Object Push, OBEX File Transfer, Headset, and Audio Gateway. You need not worry about this if you do not change the default settings.
Bluetooth Software Suite   Users Manual       39  New Bluetooth COM ports and interoperability  Some users may want to add one or more additional Bluetooth COM ports to the computer. This is necessary if you want to make use of the Serial Port Profile, for example to use a serial application like HyperTerminal to transfer data between two Bluetooth enabled computers.  The same profile must be associated with the local Bluetooth COM port and the remote one you want to connect to. Therefore, before you can establish a serial Bluetooth COM port link to a remote device, you must associate the Serial Port Profile with a Bluetooth COM port, and then add the Bluetooth COM port to your computer. For link establishment to be possible, the remote device must have a Bluetooth COM port with the Serial Port associated with it, too.  In "Bluetooth COM port settings" we will look into how you can add and remove Bluetooth COM ports, and change the settings concerning which profiles are associated with which Bluetooth COM ports.   Bluetooth COM port settings Before you can make use of a Bluetooth COM port link, you must associate one or more appropriate profiles with a Bluetooth COM port and then add the COM port to your Local Services bar (cf. “Bluetooth COM ports” – “General information”). These settings are made by means of the Bluetooth Configuration Tool.   Opening the Bluetooth Configuration Tool:  1.  Open the Microsoft Control Panel. 2. Double-click Bluetooth Configuration Tool.  The Bluetooth Configuration Tool dialog box opens:
Bluetooth Software Suite   Users Manual       40  Adding Bluetooth COM ports  Add a Bluetooth COM port by performing the following steps:  1.  In the Bluetooth Configuration Tool window, click Add. The following dialog box opens:     2.  Use the arrows to go to the Bluetooth COM port you want to add and the profile you want to associate with it. In the above example, the Serial Port Profile is being associated with Bluetooth COM port 3.  Note: Some programs (like HyperTerminal) cannot detect COM ports higher than 4.   You will only be allowed to add Bluetooth COM ports that are not already in use. Only available Bluetooth COM ports will appear on the list in the above dialog box.  3.  To confirm the settings, click Add.  The new Bluetooth COM port will now be included on the Bluetooth Neighborhood Local Services bar:    Note: Before you can use the new Bluetooth COM port, you have to restart your computer.  Note: Windows NT users will not see the new Bluetooth COM port icon on the local services bar until the computer has been restarted.   Deleting Bluetooth COM ports  If you want to delete a Bluetooth COM that you no longer need:   1.  In the Bluetooth Configuration Tool window, highlight the Bluetooth COM port you want to delete, for example COM2:
Bluetooth Software Suite   Users Manual       41  2. Click Remove. The following dialog box opens:    3.  To confirm that you want to delete the Bluetooth COM port, click Yes.  The Bluetooth COM port will now be removed from the Local Services bar.   Note: Windows NT users have to restart the computer for the changes to take effect.  Associating and removing profiles from existing Bluetooth COM ports  In the Bluetooth Configuration Tool, you can see which profiles are associated with which Bluetooth COM ports. You can change these settings in order to associate the profiles you need with an existing Bluetooth COM port. Also, you can remove a profile from a Bluetooth COM port.  In the following example, it appears that the Serial Port Profile is associated with Bluetooth COM port 2:    To change the settings:  1. In Existing COM ports, click the Bluetooth COM port in question.  2. In Associated Profiles, check the profiles you want to associate with the Bluetooth COM port, or remove the ones you no longer want to be associated with it.  3. Click OK.  Note: Windows NT users have to restart the computer for the changes to take effect.   Note: Some profiles cannot share a Bluetooth COM port with any other profiles. Each of the following profiles must be associated with a Bluetooth COM port that no other profile is associated with: OBEX Object Push, OBEX File Transfer, Headset, and Audio Gateway.
Bluetooth Software Suite   Users Manual       42   Bluetooth COM port link establishment When you have added a Bluetooth COM port to the Local Services bar (as described in the section “Bluetooth COM port settings”), you can establish a link to a remote device.   Drag the Bluetooth COM port icon to the remote device (or device folder). Or run service discovery, then drag the local Bluetooth COM port icon to a remote Bluetooth COM port icon:    The link established between your local device and the remote one can now be used exactly as if it were a wired link.
Bluetooth Software Suite   Users Manual       43  LANTo be able to make the most of the LAN service, some previous knowledge of Microsoft networking is required. If necessary, please refer to the Microsoft Windows online help for information on Microsoft networking.  What is Bluetooth LAN?  The LAN service is used for accessing a Local Area Network. This is done by establishing a link between your computer and a Bluetooth enabled LAN access point device connected to a LAN server.     What the Bluetooth link does is supply an alternative to establishing a network link by means of a NULL modem cable. This way you establish a wireless Bluetooth link to the LAN access point, instead of connecting your computer to the LAN server using a NULL modem cable.  Configuring Direct Cable Connection  Both your computer and the LAN access point have to support the Microsoft Windows component Direct Cable Connection*. For information on how to install and open the Direct Cable Connection, please refer to the Microsoft Windows online help.   Note: To be able to use the Direct Cable Connection, all operating systems except Windows NT and 2000 require that the Dial-up adapter is installed (in Control Panel / Network). For instructions, see the Windows online help.   First, open the Direct Cable Connection and follow the onscreen instructions to configure your connection to the LAN access point.   Note that during the configuration of the Direct Cable Connection, you will be prompted to specify whether your computer is to be a guest or the host. Select guest as you are the one to access resources on the LAN access point (the host). Furthermore, when prompted, select Bluetooth COM port 7 for your LAN link. That is the default COM port for Bluetooth LAN. (It is possible to change this default setting. For more information, see “Bluetooth COM ports” – “General information” and “Bluetooth COM port settings”.)                                                            * The name of this Windows component varies from one operating system to another. However, whether called “Direct Cable Connection”, “Network and Dial-up Connections”, or something else, the function is basically the same.
Bluetooth Software Suite   Users Manual       44  Connecting to LAN   Once you have configured the Direct Cable Connection, every time you want to get on the LAN, go through the following procedure:  1.  Establish a Bluetooth LAN link between your computer and LAN access point. This can be done from either device. To establish the link from the Bluetooth Neighborhood on your computer:   •  Drag the LAN icon from the Local Services bar to the icon representing the LAN access point in the list view.  Or:  •  First run service discovery on the LAN access point. Then drag the LAN icon from the Local Services bar to the remote Bluetooth LAN service.  2.  Open the Direct Cable Connection, check your settings, and click connect.   You are on the LAN!   On Windows 2000, you do not have to go through step 2 of the procedure described above. You can set up the Bluetooth Software Suite to do it automatically. For information on how to set up your program for this, please see the section “LAN Access Settings”.
Bluetooth Software Suite   Users Manual       45    DUNWhat is Bluetooth DUN?  Dial-up Networking (DUN) is used for accessing the Internet.   Whether you use Bluetooth or not, the procedure is as follows: First, connect a modem to your computer. Then, to be able to use the modem, configure your Dial-up Networking application (more information below). Using the modem, you can now establish a connection between your computer and your Internet Service Provider via the public telephone network. You are on the Internet!   Bluetooth DUN eliminates the need for a cable for the connection between your computer and the modem. In other words, the Bluetooth DUN service allows you to connect wirelessly to a Bluetooth enabled modem – by means of which you can access the Internet.   Configuring Dial-up Networking application  To use DUN, first you have to configure your Dial-up Networking application. This is a standard Windows component. Please refer to the Windows on-line help for information on how to open the Dial-up Networking application. Follow the on-screen instructions.   During the configuration of the Dial-up Networking application, you will be asked to select which port to use with the Bluetooth enabled modem. We recommend that you choose Bluetooth COM port 7, which is the default COM port providing Bluetooth DUN, LAN, and FAX. (You can choose an alternative Bluetooth COM port if you like. For more information on Bluetooth COM ports, see “Bluetooth COM ports” – “General information” and “Bluetooth COM port settings”.)    You will also be asked to type a name for the computer you want to dial (i.e. the server of the Internet Service Provider). You can type any name you want, for example “My Internet link”.  Connecting computer to Bluetooth enabled modem  When the Dial-up Networking application has been configured, you are ready to establish a link between your computer and the Bluetooth enabled modem. To do so, first run device discovery to have the Bluetooth Neighborhood list view display an icon representing the Bluetooth enabled modem. Then:
Bluetooth Software Suite   Users Manual       46  •  Drag the DUN icon from the Local Services bar to the icon representing the Bluetooth enabled modem in the list view.  Or:   •  First run service discovery on the Bluetooth enabled modem. Then drag the DUN icon from the Local Services bar to the remote Bluetooth DUN service.  Dialing  When you have established a link between your computer and the Bluetooth enabled modem, the dialing up to the Internet Service Provider can be done in two ways:  •  Manually: Open the Dial-up Networking application and double-click the connection you created when configuring the Dial-up Networking application (for example “My Internet link”). A dialog box appears. Follow the onscreen instructions to connect to your Internet Service Provider.   Or:  •  Automatically: The DUN profile can be set up to dial automatically. This means that when you have established a link between your computer and the Bluetooth enabled modem, you do not have to open the Dial-up Networking application. A dialog box appears. Follow the onscreen instructions to connect to your Internet Service Provider.   Setting up the DUN profile to dial up automatically is done in the Dial-up Networking Settings dialog box:  1.  On the Bluetooth menu, point to Profile Properties, and click Dial-up Networking.   2.  At the top of the Dial-up Networking Properties dialog box, click the Dial-up Networking Settings tab. The following dialog box appears:    3.  Select the option Automatically establish Dial-up connection when Bluetooth link has been established. (This is not selected by default.)  4.  Follow the on-screen instructions to select which recipient should be dialed. You can add new recipients to the list by clicking
Bluetooth Software Suite   Users Manual       47  Create New or edit the selected recipient by clicking Edit Selected.  Now, when you have established a link between your computer and a Bluetooth enabled modem, a dialog box will appear. Follow the onscreen instructions to connect to your Internet Service Provider. FAX What is Bluetooth FAX?  The procedure for sending and receiving fax messages by means of a computer is basically the same, whether you use Bluetooth or not: First connect a modem to your computer. Then configure your fax application to use the modem as a fax machine (more information below).    The Bluetooth FAX service eliminates the need for a cable for the connection between your computer and the modem. In other words, the Bluetooth FAX service allows you to connect wirelessly to a Bluetooth enabled modem – which can be used as a fax machine:  Your computerBluetooth enabled modem(Public telephone network)(Wireless Bluetooth link)Remote fax / computer withaccess to fax machine
Bluetooth Software Suite   Users Manual       48  Connecting computer to Bluetooth enabled modem  The first step is to establish a link between your computer and a Bluetooth enabled modem: Run device discovery to have the Bluetooth Neighborhood list view display an icon representing the Bluetooth enabled modem. Then:  •  Drag the FAX icon from the Local Services bar to the icon representing the Bluetooth enabled modem in the list view.  Or:   •  First run service discovery on the Bluetooth enabled modem. Then drag the FAX icon from the Local Services bar to the remote Bluetooth FAX service.  Configuring fax application  Now configure your fax application for the modem to be able to work as a fax machine. You can use the Microsoft fax software or a third party application like Symantex WinFax Pro. Follow the onscreen instructions to configure the fax application. For more information, please refer to the online help or other documentation accompanying your fax application.  During the configuration of the fax application, you will be asked to select which port to use with the Bluetooth enabled modem. We recommend that you choose Bluetooth COM port 7, which is the default COM port providing Bluetooth DUN, LAN, and FAX. (You can choose an alternative Bluetooth COM port if you like. In some cases, this is necessary as some programs cannot detect COM ports higher than 4. For more information on Bluetooth COM ports, see “Bluetooth COM ports” – “General information” and “Bluetooth COM port settings”.)
Bluetooth Software Suite   Users Manual       49  Network In this section, we will focus on setting up and establishing Bluetooth networks. We will assume that you have some previous experience in ordinary, i.e. wired networks using Microsoft networking. If that is not the case, please refer to the Microsoft Windows online help for information on Microsoft networking.  Setting up networks During the installation of the Bluetooth Software Suite, the installation program assigned a static IP address to the TCP/IP protocol bound to the Bluetooth Ethernet adapter.  The settings made during the installation will be used when you establish a network link as described in the section "Network link establishment". You can, of course, change these settings as you like.   The Bluetooth network works in the same way as if the computers were connected through a hub using a wired Ethernet. The settings made in Windows are used, exactly as if using Microsoft networking.  Network link establishment Establishing a Bluetooth ad hoc network link is done in the same way as you establish other Bluetooth links: In the Bluetooth Neighborhood main window, drag the local service Network to the remote device, device folder, or service:    When a network link has been established between a master and its slaves, this network is similar to connecting the same computers through a hub using a wired Ethernet. The settings made in Windows are used, exactly as if using Microsoft networking.
Bluetooth Software Suite   Users Manual       50  Local device settingsLocal profile properties General informationThe Bluetooth Software Suite provides you with general information on the profiles that your device supports. For each profile, you can see:   •  Which version of the profile your device features;  •  A description, i.e. the name of the profile;  •  The company name;   •  The copyright holder.  This information is included in the Profile Properties dialog box. To open this: On the Bluetooth menu, point to Profile Properties, and click the profile in question, for example Serial Port:   The mentioned information appears from the item General Information:
Bluetooth Software Suite   Users Manual       51  Enabling/disabling profileYou can enable or disable each of the profiles that your device supports. If you enable a profile, remote users will be allowed to access the services associated with the profile. If you disable a profile, remote users will not be allowed to access the services associated with the profile.  Enabling/disabling a profile is done from the Profile Properties dialog box. To open this: On the Bluetooth menu, point to Profile Properties, and click the profile in question, for example OBEX File Transfer:   In the item Activate Profile, you can now enable or disable the profile.  When a profile is disabled, the icon for the profile on the Local Profiles bar will change:   Enabled:    Disabled:    The Local Services bar, too, will be affected when a profile is disabled: The icon(s) for the service(s) supported by the profile will disappear from the Local Services bar.   Note: When your computer is connected to a remote device, no profile can be disabled.
Bluetooth Software Suite   Users Manual       52  Object Push Settings The profile OBEX Object Push is used for transferring objects: messages, notes, cards (including the default business card), and calendar objects. In the Object Push Settings dialog box, you can view or edit the location of the physical Inbox folder and the default business card.   To open the Object Push Settings dialog box:   1.  On the Bluetooth menu, point to Profile Properties, and click OBEX Object Push.   2.  At the top of the OBEX Object Push Properties dialog box, click the Object Push Settings tab.   •  Object Inbox: By default, the “physical” Inbox folder is placed in My Documents in a folder named Bluetooth. This is where the received objects are actually placed on your system. However, you can move the Inbox to any location you want. To browse for a different location, click the “...“ button.  •  Default Business Card: The “physical” default business card is placed in My Documents in a folder named Bluetooth. However, like the Inbox, you can browse using the “...” button, and place the business card where you want.  If you have not already created a business card, clicking Create New will open the Object Editor, where you can register your default business card. Click Edit if you want to edit an existing business card. For more information, see “Making default business card available”.
Bluetooth Software Suite   Users Manual       53  Object Push - Security The profile OBEX Object Push is used for transferring objects: messages, notes, cards, and calendar objects. In the Security dialog box, you can make decisions concerning the security aspects of receiving and sending objects.  To open the Security dialog box:  1.  On the Bluetooth menu, point to Profile Properties, and click OBEX Object Push.  2.  At the top of the OBEX Object Push  Properties dialog box, click the Security tab.   • Incoming Objects: Here you can decide if your device should:  –  Accept incoming objects of any type; or   –  Reject all incoming objects; or  –  Only accept incoming objects of certain  types: Business cards, calendar objects, messages, and/or notes.  •  Outgoing Objects: Here you can select for remote devices to be allowed/not allowed to pull your default business card.  By default, your device will automatically  accept incoming objects, and it will allow  remote users to pull your default business  card.
Bluetooth Software Suite   Users Manual       54  File Transfer Settings   The profile OBEX File Transfer is used for transferring files. In the File Transfer Settings dialog box, you can view or edit the location of the physical My Shared Files folder. Furthermore, you can make decisions concerning the security aspects of remote users’ access to the files in “My Shared Files”.  To open the File Transfer Settings dialog box:   1.  On the Bluetooth menu, point to Profile Properties, and click OBEX File Transfer.   2.  At the top of the OBEX File Transfer Properties dialog box, click the File Transfer Settings tab.   •  Shared Files folder: By default, the “physical” shared files folder is placed in My Documents in a folder named Bluetooth. This is where the shared files are actually placed on your system. However, you can move the Shared Files folder to any location you want. To browse for a different location, click the "..." button.  •  Security: From this item you can make settings regarding which kind of access remote users will have to your local My Shared Files folder, i.e. whether they will be allowed to read, edit, and delete the contents of the folder. You can choose among:  –  Read only access; or –  Read and write access; or –  Read, write, and delete access.  Furthermore, if you select Remote users are required to be authenticated ..., remote users will have to enter a password before they can access your shared files. In the field at the bottom of the dialog box, you can type the password you require remote users to enter.  The default settings are as shown in the above illustration.
Bluetooth Software Suite   Users Manual       55  Headset Settings The profile Headset supports two services: Headset and Audio Gateway (cf. the sections “Headset” and “Audio Gateway”). In the Headset Settings dialog box, you can make settings concerning the sound quality of the next Headset or Audio Gateway link. Also, you can choose for the sound to be enabled automatically when a Headset or Audio Gateway link has been established.  To open the Headset Settings dialog box:  1.  On the Bluetooth menu, point to Profile Properties, and click Headset.  2.  At the top of the Headset Properties dialog box, click the Settings tab.   •  Audio Quality: In this item you can set the  sound quality to be used during the next Headset or Audio Gateway link.    Generally speaking, the higher the quality, the better. However, the higher the quality, the more of the capacity of the Bluetooth unit is needed for the link. If you want to be able to transfer data at the same time as sound, you should select medium or low audio quality.   The default setting is Low.  Note: Audio quality settings affect the settings for the profile Generic Audio. Consequently, it makes no difference if you set the audio quality in the Headset Settings dialog box or in the Audio Settings dialog box. Changing the setting in either of these dialog boxes will automatically change the setting in the other.  •  On connect: When this item is checked, the audio is automatically enabled when you establish a Headset or Audio Gateway link. You will then not have to enable the audio manually (as described in the sections “Headset” and “Audio Gateway”). Simply establish a Headset or Audio Gateway link, and the sound will be activated at the same time. By default, this item is not checked.
Bluetooth Software Suite   Users Manual       56  Audio SettingsIn the Audio Settings dialog box, you can set the sound quality to be used during the next audio link. Also, you can select if your computer should act by default as a Bluetooth speaker phone or as a Bluetooth audio device. (For a detailed explanation of either of those features, please see the section “Audio”).  To open the Audio Settings dialog box:  1.  On the Bluetooth menu, point to Profile Properties, and click Generic Audio.  2.  At the top of the Audio Properties dialog box, click the Audio Settings tab.   •  Audio quality: Here you can set the sound quality to be used during the next audio link.   Generally speaking, the higher the sound quality the better. However, the higher the quality, the more of the capacity of the Bluetooth unit is needed for the link. If you want to be able to transfer data at the same time as sound, you should select medium or low audio quality.   The default setting is Low.  Note: The audio quality can be set in both the Audio Settings dialog box and the Headset Settings dialog box. Changing the setting in either of these dialog boxes will automatically change the setting in the other.  •  Audio path: Here you can select either  Bluetooth Audio Device or Bluetooth Speaker Phone as the default setting.  By default, your computer is set up as a Bluetooth speaker phone.   Note: For optimal sound performance when using your computer as a Bluetooth speaker phone, you should run the Bluetooth Speaker Phone Setup Wizard. See the following section, “Bluetooth Speaker Phone Setup Wizard”.
Bluetooth Software Suite   Users Manual       57  Bluetooth Speaker Phone Setup WizardDuring the installation of the Bluetooth Software Suite, the Bluetooth speaker phone sound settings were automatically set. In many cases, however, these default settings will not produce the best sound quality possible on your system. Therefore, we recommend that you run the application the Bluetooth Speaker Phone Setup Wizard to configure your system for optimal sound performance.  To open the Bluetooth Speaker Phone Setup Wizard: Click Start, point to Programs, point to Bluetooth Software Suite ..., and click Bluetooth Speaker Phone Setup Wizard:     The Bluetooth Speaker Phone Setup Wizard opens:     The Bluetooth Speaker Phone Setup Wizard can configure your system in one of three ways:  •  Automatically, which is recommendable. Click:   •  Manually, which should be done only by advanced users. Click:
Bluetooth Software Suite   Users Manual       58  •  Using the default settings (the same as those made during the installation of the Bluetooth Software Suite). This way is recommended if both of the above fail. Click:    Follow the onscreen instructions to complete the configuration of your system for optimal sound performance of the Bluetooth speaker phone feature.  LAN Access Settings Note: This section is only relevant to Windows 2000 users.   As described in the section “LAN”, every time you want to access the Local Area Network, you have to go through the following procedure: First establish a Bluetooth LAN link between your computer and LAN access point. Then open the Direct Cable Connection application and connect to your LAN access point.  On Windows 2000, however, the Bluetooth Software Suite can make it a little easier for you to connect to the LAN: You do not have to open the Network and Dial-up Connections application (which is the Windows 2000 version of the Direct Cable Connection) every time you want to access the LAN. You can set up the Bluetooth Software Suite to do it automatically.  Configuration  The settings are done from the LAN Access Settings dialog box:   1.  On the Bluetooth menu, point to Profile Properties and click LAN Access.  2.  At the top of the LAN Access Properties dialog box, click the LAN Access Settings tab.
Bluetooth Software Suite   Users Manual       59    3. Select Automatically establish… and click Create new. The Network Connection Wizard opens:      4. Select Connect directly to another computer and follow the onscreen instructions to configure the connection to your LAN access point.  Note: When prompted to “Select a Device”, select COM7 (default for Bluetooth LAN).   The configuration in the Network Connection Wizard is completed when you have specified a name for the new connection, for example “My LAN Access Point”. You will then return to the LAN Access Settings dialog box.  5. In Recipient…, select the name you specified for the direct connection during the configuration, for example “My LAN Access Point”:
Bluetooth Software Suite   Users Manual       60  6. Click OK.  Link establishment  Now, every time you want to connect to the LAN, simply establish a Bluetooth LAN link between your computer and LAN access point, for example by dragging and dropping in the Bluetooth Neighborhood. The program will then automatically connect to the LAN access point –and you will be on the LAN.     Dial-up Networking Settings For information on Bluetooth Dial-up Networking, please refer to the section “DUN”.
Bluetooth Software Suite   Users Manual       61  Bluetooth Neighborhood properties General The Bluetooth Software Suite provides information on the properties of the Bluetooth Neighborhood. This information is accessible from the Bluetooth Neighborhood Properties dialog box. To open this: On the Bluetooth menu, click Bluetooth Neighborhood Properties.     The Bluetooth Neighborhood Properties – General dialog box opens:   At the top of the dialox box you can see the name of your local device, in this case “John’s desktop”. (For information on how to name your local device, see “Naming your local device”.)  Furthermore, the dialog box contains the items General Information and Connections:  •  General Information shows the identity information that, in addition to the name of your device, will be sent to remote devices carrying out device or service discovery on your device. The device address and service type are determined by the Bluetooth hardware, the device class you can set yourself (see “Settings” ).   •  Connections shows which remote devices your device is currently connected to, if any. Also, you can see which role your local device plays in the piconet: master or slave.  As appears, from this dialog box you can access a number of other dialog boxes: Settings, Device Discovery, Trust, Security, and Bonding. We will deal with each of these in the following sections.
Bluetooth Software Suite   Users Manual       62  Settings In the Bluetooth Neighborhood Properties – Settings dialog box, you can set such identity information as the name and class of your local device. To open the dialog box:  1.  On the Bluetooth menu, click Bluetooth Neighborhood Properties.  2. Click the Settings tab.    •  Bluetooth Device Name: Here you can select a name for your device (cf. “Naming your local device”).   •  Bluetooth Device Class: Here you can provide the Bluetooth Software Suite with information on which class of device your computer belongs to: is it a desktop, laptop or server-class computer?      This information will be given to remote devices having carried out device discovery on your local device.
Bluetooth Software Suite   Users Manual       63  Device discovery  In connection with device discovery, you can make a number of settings in the Bluetooth Neighborhood Properties – Device Discovery dialog box. To open this dialog box:  1.  On the Bluetooth menu, click Bluetooth Neighborhood Properties.  2. Click the Device Discovery tab.  The Bluetooth Neighborhood Properties – Device Discovery dialog box opens:   •  In Device Discovery you can choose for device discovery to take place only when you activate the function manually (which is the default setting), or for device discovery to be initiated automatically at certain intervals. If you select the latter option so that device discovery will take place automatically, you can set the duration of the interval between device discovery sessions in the item Device Discovery Period.  •  In Device Discovery Length you can set the number of seconds that you want device discovery to last. The default setting is 10 seconds, which should be enough in most cases. However, if for some reason it is difficult for two devices to discover each other, you can increase the duration.  •  In Device Discovery Period you can set the number of minutes that you want the intervals between automatic device discovery sessions to last. This function is active when in the item Device Discovery you have set automatic device discovery to take place periodically.   •  In Previously Discovered Devices you can have the Bluetooth Neighborhood list view display remote devices discovered during previous device discovery sessions. (This item is selected by default). If this item is not selected, the list view will only display the remote devices discovered during the latest session.
Bluetooth Software Suite   Users Manual       64  •  In Expire Discovered Devices you can decide to have discovered remote devices removed automatically from the Bluetooth Neighborhood list view when they have not been seen for a specified period of time. Note that if the dialog box item Previously Discovered Devices is not selected, the list view will only display the remote devices discovered during the latest device discovery.  Trust The Bluetooth Neighborhood Properties – Trust dialog box concerns the trust relationship you want your local device to apply to newly discovered remote devices: How do you want your local device to react if a newly discovered remote device tries to establish a link to it? To open this dialog box:  1.  On the Bluetooth menu, click Bluetooth Neighborhood Properties.  2. Click the Trust tab.
Bluetooth Software Suite   Users Manual       65  You can decide whether your device should:  –   Reject a link establishment attempt; or  –  Prompt you before accepting link establishment; or   –  Accept link establishment automatically. (This is the default setting).  To have the default trust relationship settings applied to all existing discovered devices as well as the newly discovered ones, click Apply to all devices.   Note: If you want to make trust relationship settings for a particular remote device – rather than for all remote devices – you can do so from the Remote Device Properties – Trust dialog box. For information on how to open this, see "Remote device properties” – “Trust".  Advanced link policy  To view or change the trust relationship settings for one or more discovered remote devices: In the Bluetooth Neighborhood Properties – Trust dialog box (shown above), click Advanced Settings … The dialog box for Advanced Link Policy Settings opens:    In this dialog box, each discovered remote device is located in one of three boxes: Reject link establishment attempt, Prompt before accepting link establishment, or Automatically
Bluetooth Software Suite   Users Manual       66  accept link establishment. The location of each remote device (i.e. the box it is placed in) indicates which default trust relationship settings have been selected for it.  To change the trust relationship setting for a device in the Advanced Link Policy dialog box:    Drag the device from its present position into the  box representing the trust relationship you want for the device. The new settings will now be applied to the remote device next time it attempts to connect to your local device. Security In the Bluetooth Neighborhood Properties – Security dialog box, you can make a number of decisions concerning the security of your local device. To open this dialog box:  1.  On the Bluetooth menu, click Bluetooth Neighborhood Properties.  2. Click the Security tab.
Bluetooth Software Suite   Users Manual       67  •  Security Mode can be set to either No Security or Link level security.      If a device has selected link level security, no remote device can connect to it without bonding (see “Bonding”). Furthermore, only when you have selected link level security can you use encryption (see below).  •  Encryption Mode can be enabled or disabled. Based on the use of a link key, this feature can only be enabled when link level security has been selected (see above).    If encryption is enabled: When your device is communicating, only the linked devices will be able to understand the data sent between them.   •  Connectability Mode refers to whether or not remote devices having discovered your device will be allowed to establish a link to it. In other words, selecting non-connectable mode is a way of ensuring that no remote device can connect to your device.   •  Discoverability Mode refers to whether or not other devices will be allowed to discover your device.  In other words, selecting non-discoverable mode is a way of preventing remote devices from discovering your device.    The default settings are as shown in the examples (the illustrations) above.   Note: If devices wanting to communicate have different security settings, the highest level of security required will be used. Imagine, for example, that a device requiring no security tries to establish a link to a device requiring link level security. Link establishment between the two devices will then require link level security (i.e. the devices will have to bond, both entering a pass key).
Bluetooth Software Suite   Users Manual       68  BondingBonding refers to the creation of a link key –  a bond – between two devices. Bonding is used when a device requires link level security (see “Security” for information on how to do so). When a remote device attempts to connect to the device requiring link level security, the users of both devices will be prompted for a password. They must then enter the same password.   The purpose of bonding is for two devices to be able to identify each other so that no remote device can connect without knowing the right password. This may be convenient if for example you do not want any other device than your own Bluetooth enabled phone to be able to connect to your computer. Other devices trying to connect will be prompted for the password, which prevents them from interfering in the connection.  The duration of the bonding can be set to last beyond the current link; if so, the two devices will only be prompted for the password the first time they connect, i.e. when creating the bond.  Both when creating the bond and when making use of an existing one, both devices must be in bondable mode. Below you will find information on how to set both bonding mode and duration.  Settings concerning bonding are done in the Bluetooth Neighborhood Properties – Bonding dialog box. To open this:  1.  On the Bluetooth menu, click Bluetooth Neighborhood Properties.  2. Click the Bonding tab.   •  In Bluetooth Bonding, you can decide whether or not your device should be able to bond to other devices.     The default setting is bondable mode. To be able to establish both a new bond, and to make use of an existing one, your device must be in bondable mode.
Bluetooth Software Suite   Users Manual       69  •  In Default Bluetooth Bonding Expiration, you can set bonding to expire when the link is disconnected, after a specified period of time, or never. (The default setting is: Never).  Note: The settings you make in the Bluetooth Neighborhood Properties – Bonding dialog box are default settings that will be applied to all remote devices. For information on how to make settings for the duration of a bond between your device and a particular remote device, see the section "Remote Device Properties” – “Trust".
Bluetooth Software Suite   Users Manual       70  Bluetooth unit settings The settings of the Bluetooth unit are controlled from the Bluetooth Control Center. From this application, which is located in the lower right corner of the screen, you can enable/disable the Bluetooth unit. Also, the Bluetooth Control Center icon indicates the state of the Bluetooth unit.  Enabling/disabling Bluetooth unit From the Bluetooth Control Center, you can enable or disable the Bluetooth unit.   1.  Right-click the Bluetooth Control Center icon in the lower right corner of the screen.  2. Click Enable ... or Disable ...:       Indication of Bluetooth unit state Located in the lower right corner of the screen, the Bluetooth Control Center displays one of three icons to show the state of the Bluetooth unit:   •  Disabled:    In this state, your Bluetooth device cannot communicate with other devices.   •  Enabled but not transmitting:    Your device is ready to communicate with other devices.  •  Enabled and transmitting:    Your device is communicating with one or more remote devices, or an attempt is being made to establish a link.
Bluetooth Software Suite   Users Manual       71  Remote device settings Remote device properties General For information on the properties of a remote device:  1.  Right-click the remote device. 2. Click Properties.    The Remote Device Properties – General dialog  box opens.    At the top of this dialog box, you will see the name of the remote device.  In addition, the box contains the items General Information, Historical Information, and Services used.
Bluetooth Software Suite   Users Manual       72  •  General Information provides such identity information on the remote device as its address, device class, and service class.  •  Historical Information tells you when the device was last seen by your device, and when it was last linked to it.  •  Services used shows which services of the remote device are currently connected to your local device, if any. Also, you can see which role the remote device plays in the piconet, i.e. master or slave. Trust In the Remote Device Properties – Trust dialog box, you can make settings for the individual remote device concerning:  •  Trust relationship, i.e. the way your local device will react if the remote device attempts to establish a link to it.  •  Bonding expiration, i.e. if your local device and the remote one bond, how long should the bonding last? (cf. "Bonding").  You can make similar settings in the dialog boxes Bluetooth Neighborhood Properties – Trust (cf. "Trust") and Bluetooth Neighborhood Properties – Bonding (cf. "Bonding"). However, while the settings made in those dialog boxes concern all remote devices discovered, the settings in the Remote Device Properties – Trust dialog box concern a particular remote device.   To open this dialog box:  1.  Right-click the remote device in question. 2. Click Properties. 3.  In the General dialog box, click the Trust tab.
Bluetooth Software Suite   Users Manual       73    •  Trust Relationship allows you to define the trust relationship to be applied when the remote device wants to establish a link to your device:  – Reject link establishment, or  – Prompt before accepting link establishment, or  – Automatically accept link establishment. (This is the default setting).  If you like, you can apply the selected trust relationship to all remote devices (as in the Bluetooth Neighborhood Properties – Trust and Bonding dialog boxes). To do so, click Apply to all devices. •  Device Bonding Expiration allows you to make settings concerning the duration of bonding between your device and the remote one. You can set the bonding to expire when the link is disconnected, after a specified period of time, or never. (The default settings is: Never)  For more information on bonding, see "Bonding".
Bluetooth Software Suite   Users Manual       74  Diagnostics We recommend you verify the Bluetooth Software Suite hardware has been properly installed by performing the loopback test. This test is carried out from the Bluetooth Configuration Tool:   1.  Open the Microsoft Control panel.  2. Double-click Bluetooth Configuration Tool. The Bluetooth Configuration Tool dialog box opens:    3. Click the Diagnostics tab. This will open the window where you can perform a loopback test to check if your hardware is working properly:    4. In Loop Mode, select either Single Loop (to test a single loop) or Infinite Loops (to test a number of loops). We recommend that you choose the latter (which is also the default setting).  5.  To start the test, click Run. When in the Infinite Loops mode, the test will run until you click Stop.   6. In Loop Count you can see the number of loops tested. The number of Errors should always be: 0. If the test shows one or more errors, your hardware has probably not been installed correctly. We recommend that you perform the following steps:  1.  Make sure that the hardware is installed correctly (cf. the Installation Manual).  2. Restart your computer.
Bluetooth Software Suite   Users Manual       75  Appendices  Appendix A: Profiles The following table shows which profiles the Bluetooth Software Suite currently supports and which role each profile plays:    The profile:  Supports the following: Ethernet Network  Network service  OBEX File Transfer  File transfer  OBEX Object Push  Object transfer Serial Port  Bluetooth COM port service Generic Access  All other profiles Service Discovery Application  Service discovery Dial-up Networking   DUN service (as data terminal) Fax  FAX service (as data terminal) LAN Access   LAN service (as data terminal) Generic Object Exchange  OBEX File Transfer and OBEX Object Push profiles  Headset  Headset service and Audio Gateway service Generic Audio  Audio service
Bluetooth Software Suite   Users Manual       76   Appendix B: List view icons In the Bluetooth Neighborhood list view, the following icons are used to represent remote devices and remote services respectively:  Remote devices:   Desktop computer   Laptop computer    Server-class computer    Handheld PC/PDA    Palm sized PC/PDA    Cellular phone    Cordless phone   Smart phone      Unclassified phone    LAN access point    LAN access point, 33-50% utilized   Audio – headset   Unclassified audio    Modem   Peripheral   Unclassified
Bluetooth Software Suite   Users Manual       77  Remote services:    Audio    Bluetooth COM port   LAN     DUN    FAX    Business card   Network   Inbox    Shared Files   Device folder
Bluetooth Software Suite   Users Manual       78  Index About this manual, 2 Advanced link policy, 65, 66 Audio, 35 Audio device, 35 Audio Gateway, 32 Audio Gateway link establishment, 34 Audio link establishment, 36 Audio path, 56 Audio quality, 55, 56 Audio settings, 56 Audio, enable/disable, Audio Gateway, 34 Audio, enable/disable, Headset, 30 Basic functions, Bluetooth Neighborhood, 11 Bluetooth audio device, 35 Bluetooth bonding, 68 Bluetooth COM port link establishment, 42 Bluetooth COM port settings, 39 Bluetooth COM port, what is, 38 Bluetooth COM ports, general information, 38 Bluetooth COM ports, how to add, 40 Bluetooth COM ports, how to associate and remove profiles, 41 Bluetooth COM ports, how to delete, 40 Bluetooth COM ports, interoperability, 39 Bluetooth COM ports, profiles, 38 Bluetooth Configuration Tool, 74 Bluetooth Configuration Tool – Bluetooth COM Ports dialog box, 39 Bluetooth Configuration Tool, how to open, 39 Bluetooth device class, 62 Bluetooth Neighborhood, 5 Bluetooth Neighborhood properties, 61 Bluetooth Neighborhood properties – General dialog box, 61 Bluetooth Neighborhood properties – Settings dialog box, 62 Bluetooth Neighborhood window, 7 Bluetooth Neighborhood, how to open, 6 Bluetooth speaker phone, 35 Bluetooth speaker phone settings, 57 Bluetooth Speaker Phone Setup Wizard, 57 Bluetooth unit settings, 70 Bluetooth unit state indication, 70 Bluetooth unit, how to enable/disable, 70 Bonding expiration, 69, 72 Bonding expiration, remote device settings, 73 Business card transfer, 24 Business card, location, 52 Business card, making default available, 20 Class of local device, 62 COM port link establishment, 42 COM port settings, 39 COM port, what is, 38 COM ports, general information, 38 COM ports, how to add, 40 COM ports, how to associate and remove profiles, 41 COM ports, how to delete, 40 COM ports, interoperability, 39 COM ports, profiles, 38 Connectability mode, 67 Default Bluetooth bonding expiration, 69 Default business card, location, 52 Default business card, making available, 20 Device class, 62 Device discovery, 12 Device discovery length, 63 Device discovery period, 63 Device discovery, manually or automatically, 63
Bluetooth Software Suite   Users Manual       79  Device discovery, settings, 63 Device name, 11 Devices, icons, 76 Devices, remote, in list view, 10 Diagnostics, 74 Diagnostics dialog box, 74 Dial-up networking settings, 60 Disabling Bluetooth unit, 70 Disconnecting, 15 Discoverability mode, 67 DUN, 45 Enabling Bluetooth unit, 70 Encryption mode, 67 Expire discovered devices, 64 FAX, 47 File transfer, 28 File transfer settings, 54 Files, receiving, 29 Files, receiving, security, 54 Getting started, 5 Handsfree phone, Audio Gateway, 33 Headset service, 30 Headset settings, 55 Help, 19 Historical information, remote device, 72 Icons, list, 76 Inbox, 9 Interoperability, Bluetooth COM ports, 39 Interoperability, profiles, 8 Introduction, 5 LAN, 43 LAN Access Settings, 58 Link establishment, 14 Link level security, 67 Link policy settings, advanced, 65 List view, 9 List view icons, 76 Local device name, 11 Local device settings, 50 Local loopback test, 74 Local profile properties, 50 Local profiles and services, 8 Local profiles, interoperability, 8 Local profiles, list, 75 Microsoft Outlook, making default business card available, 20 Microsoft Outlook, sending objects directly from, 25 Music files, Audio Gateway, 32 My Inbox, 9 My Inbox, location, 52 My Shared Files, 9, 28 My Shared Files, location, 54 Name of local device, 11 NetMeeting, Audio Gateway, 32 Network, 49 Network link establishment, 49 Networks, setting up, 49 OBEX file transfer settings, 54 OBEX Object Push - Security, 53 OBEX Object Push settings, 52 Object Editor, creating objects, 26 Object Editor, editing business card, 23 Object Editor, making default business card available, 21 Object Inbox, location, 52 Object Push - Security, 53 Object Push settings, 52 Object transfer, 20 Objects, creating in the Object Editor, 26 Objects, receiving, 25 Objects, sending directly from Microsoft Outlook, 25 Online help, 19 Previously discovered devices, 63 Profile properties, 50
Bluetooth Software Suite   Users Manual       80  Profiles and services, 8 Profiles, interoperability, 8 Profiles, list, 75 Receiving files, 29 Receiving objects, 25 Remote device properties, 71 Remote device properties – General dialog box, 71 Remote device properties, general information, 72 Remote device settings, 71 Remote device settings, bonding expiration, 73 Remote device settings, trust, 72 Remote device settings, trust relationship, 73 Remote device, historical information, 72 Remote device, services used, 72 Remote devices, icons, 76 Remote devices, in list view, 10 Remote devices, view details, 16 Remote services, icons, 77 Remote services, in list view, 10 Security mode, 67 Security, link level, 67 Security, OBEX Object Push, 53 Security, receiving files, 54 Security, settings, 66 Serial devices, 38 Serial Port Profile, 39 Service discovery, 13 Services and profiles, 8 Services, icons, 77 Services, remote, in list view, 10 Settings, Bluetooth Neighborhood properties, 62 Shared Files, 9 Shared Files folder, location, 54 Speaker phone, 30, 35 Speaker phone settings, 57 Status information, 15 Trust relationship, 72 Trust relationship, remote device settings, 73 Trust, remote device settings, 72 Trust, settings, 64

Navigation menu