TOA WM-D5200 Digital Wireless Microphone User Manual
TOA Corporation Digital Wireless Microphone
UserManual.wiki
>
TOA
>
WM D5200 User Manual
User Manual
Navigation menu
Upload a User Manual
Namespaces
Wiki Guide
HTML
PDF
Info
Views
User Manual
Discussion / Help
Navigation
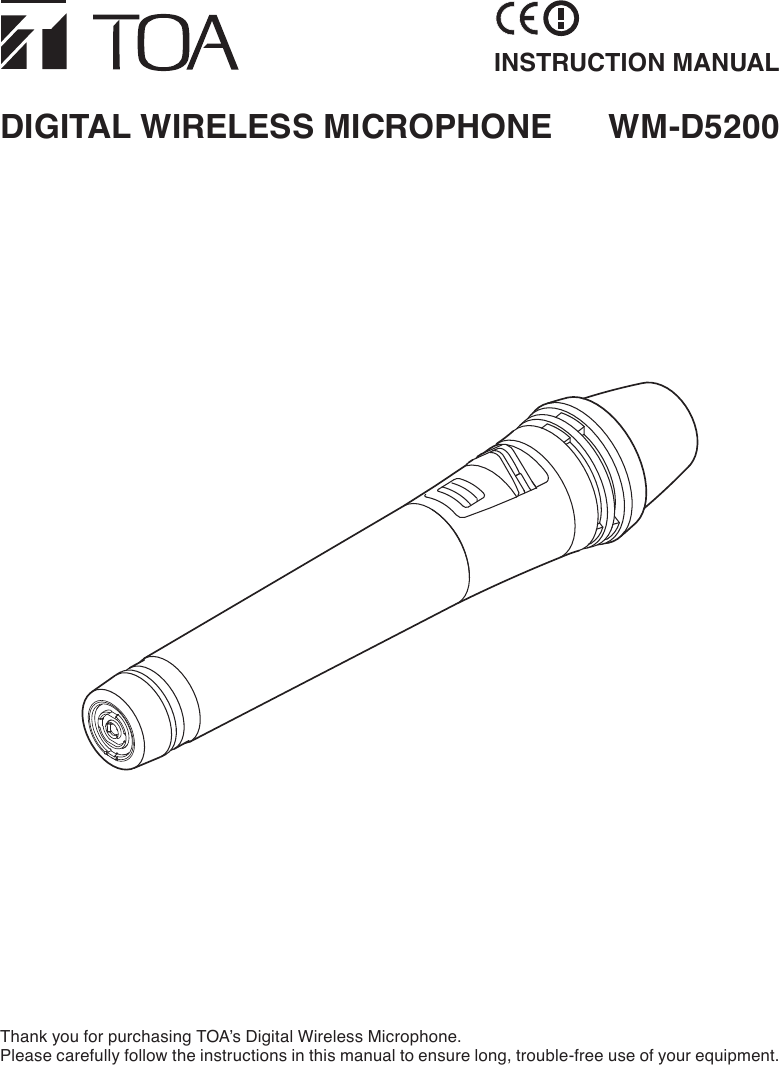
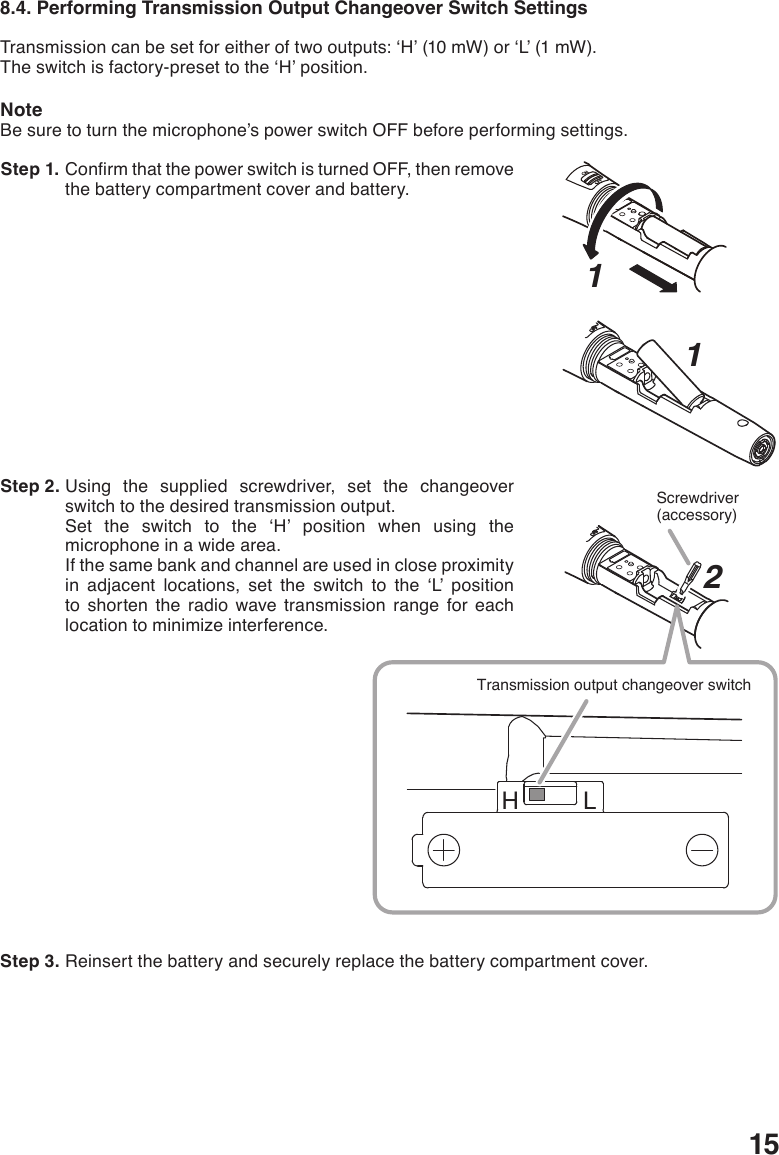
![65. NOMENCLATURE AND FUNCTIONS1. Power switch [ON/OFF]Power can be turned on by sliding the power switch to the ON position, while it can be turned off by sliding it back to the OFF position.2. Battery checker (green/orange/red)Lit: Power ONUnlit: Power OFF*The remaining battery power is represented by the color of the indicator.Green: Battery power is at full charge.Orange: Battery power depletion has started.Red: Battery power is almost depleted, and battery replacement is required.* When the battery power is depleted, the indicator will not light up.NoteThe microphone does not transmit the signal if the bank and channel selector switches are set to the empty channel.Inthiscase,theindicatorashesredandgreenalternately.3. Microphone grip (Battery compartment cover)The internal parts consist of the battery compartment and switches for various settings. ONOFF123[Front]](https://usermanual.wiki/TOA/WM-D5200/User-Guide-3293887-Page-6.png)
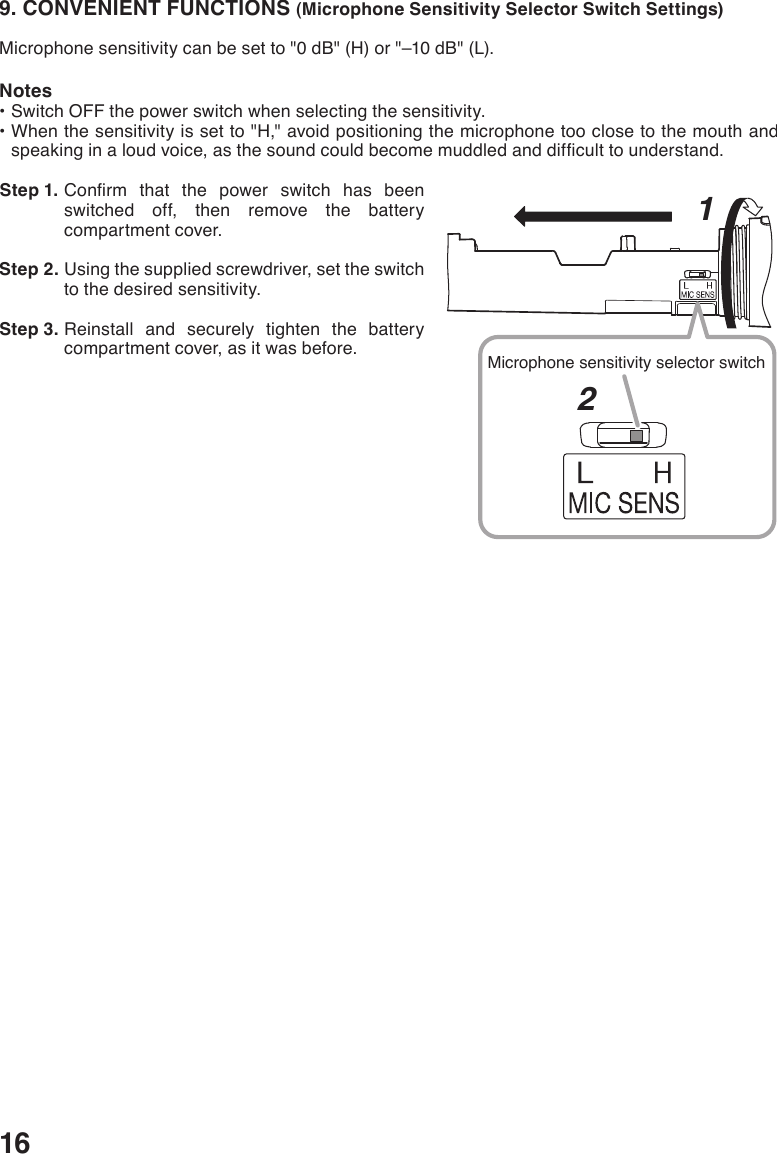
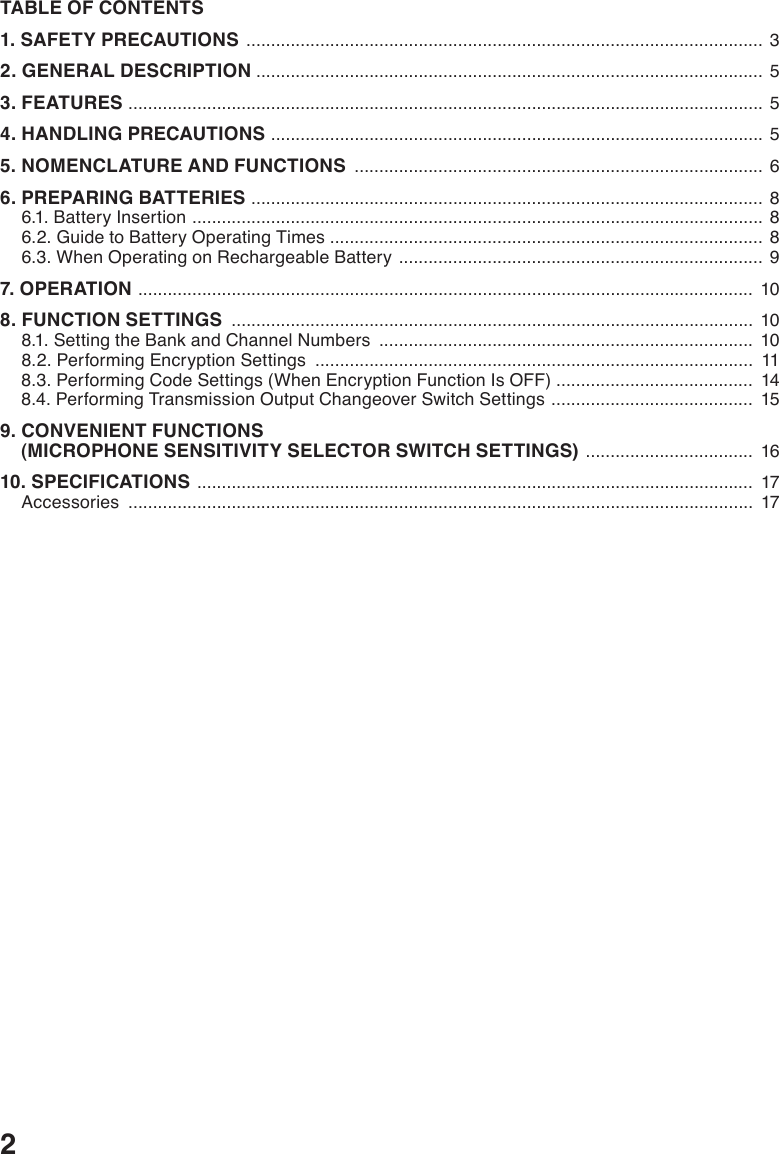
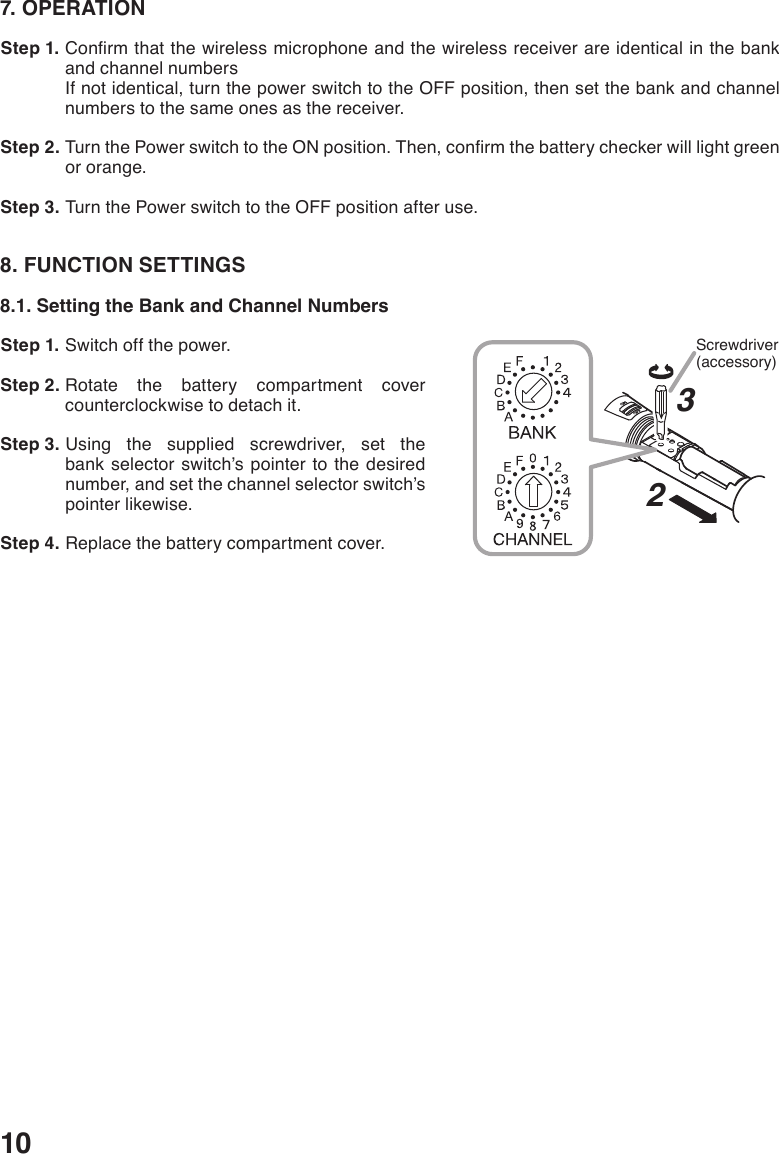
![7 4. Bank selector switchMake sure that the microphone is identical to the wireless receiver in the bank number. 5. Channel selector switchMake sure that the microphone is identical to the wireless receiver in the channel number. 6. Maintenance portNot used.NoteNever open the rubber cover. 7. Encryption indicatorLit: Encryption ONUnlit: Encryption OFF 8. Encryption setting switch 9. Code setting switch [0 – 9] 10. Transmission output changeover switch [H/L]H:10mWL: 1 mW 11. Battery compartmentInsert and use a dedicated rechargeable battery or AA alkaline batteries. 12. Microphone sensitivity selector switch [H/L]H:0dBL: –10 dBONOFFH L6789101145[Battery case internals – front] [Battery case internals – side]12](https://usermanual.wiki/TOA/WM-D5200/User-Guide-3293887-Page-7.png)
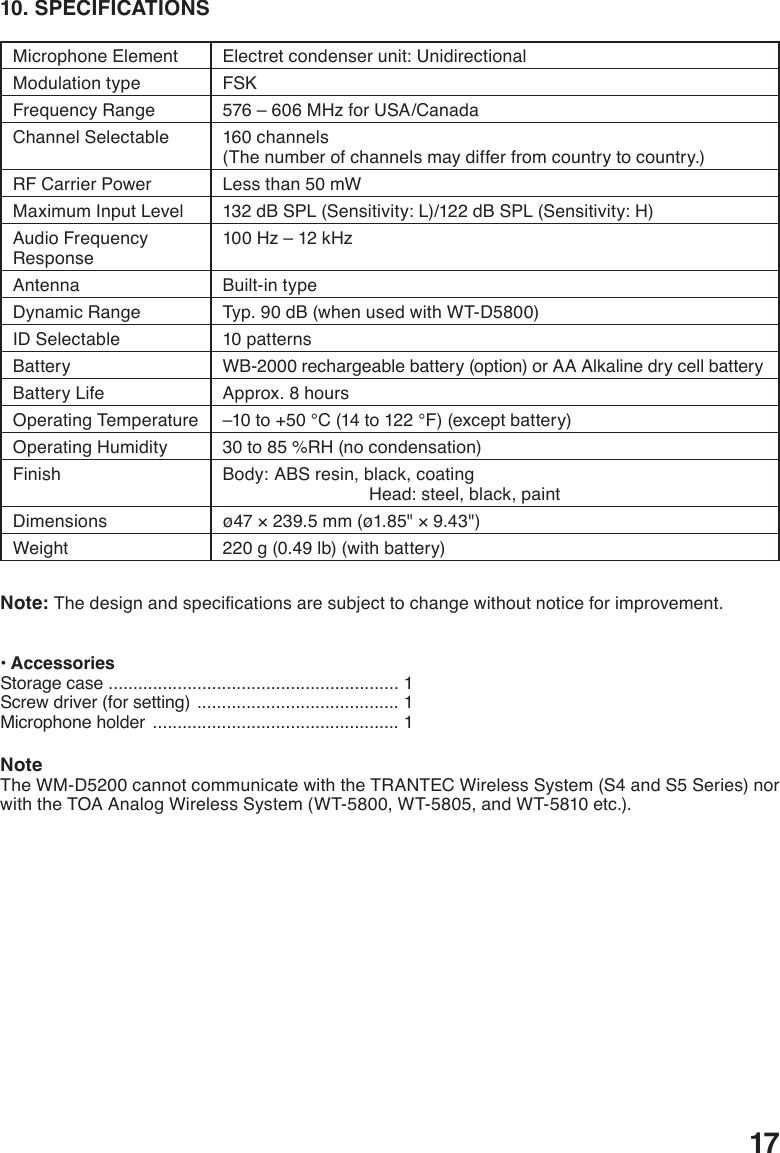
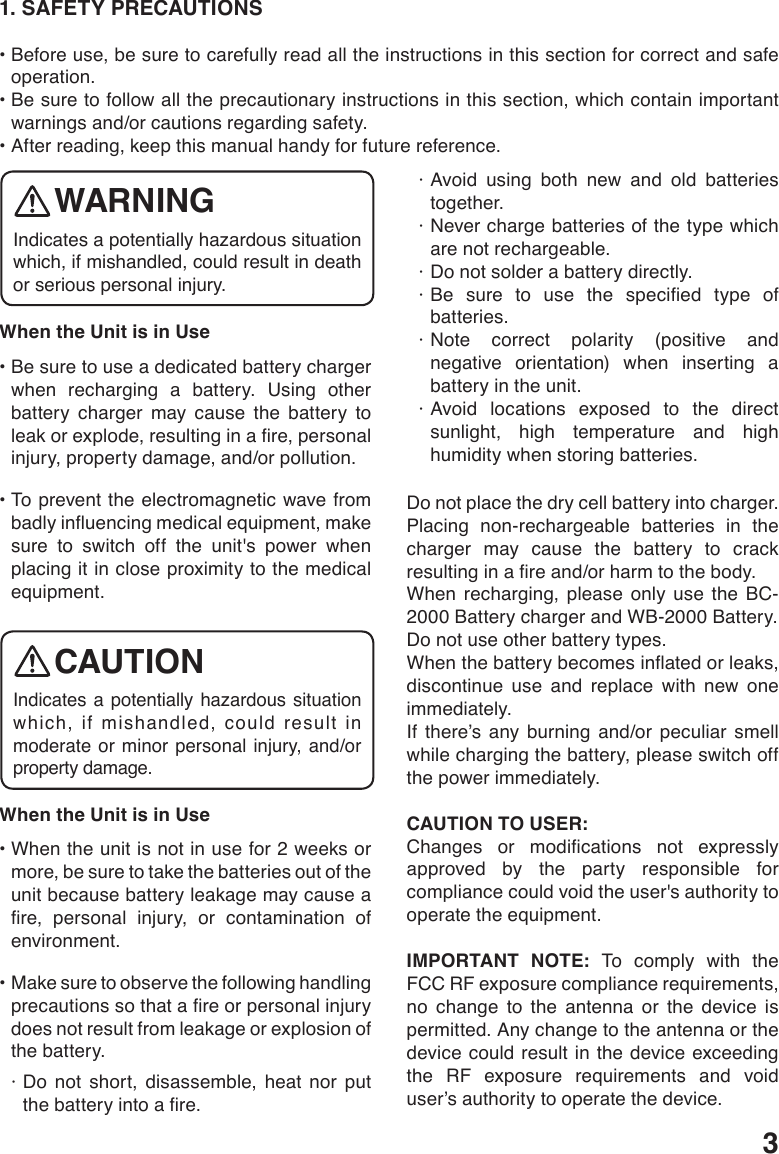
![86. PREPARING BATTERIESThe WM-D5200 can operate on both the optional rechargeable battery or replaceable dry batteries. Please carefully read the corresponding sections for correct use. 6.1. Battery Insertion Step 1. Turn off the power switch. Step 2. Holdthemicrophonebodyandrotatethebatterycompartment cover counterclockwise to remove it. Step 3. Insert an AA battery according to (+) and (–) indications on the battery compartment.For the rechargeable battery, use the optional TOA WB-2000-2 (package of 2).For dry batteries, use either the supplied battery or commercial AA alkaline batteries (LR6). Step 4. Replace the battery compartment cover by sliding and rotating it clockwise.6.2. Guide to Battery Operating Times6.2.1. Remaining operating timeThe color of the battery checker changes from green to orange as battery consumption progresses, and to red if the battery is further continuously used. When the battery checker turns red, charge the battery if the dedicated rechargeable battery is used. In the case of dry batteries, replace it with a new one. [Guide to the remaining operating time based on the battery charge indicator status]Battery checker status Remaining operating timeLights green 2 – 8 hoursLights orange Less than 2 hoursLights red Battery requires charge or replacement.6.2.2. Continuous operating timeGuide to continuous operating times: Approx. 8 hours (for fully-charged dedicated rechargeable battery or alkaline battery)NoteOperating times may vary depending on usage conditions, such as ambient temperature. 23ONOFFGreen Orange Red](https://usermanual.wiki/TOA/WM-D5200/User-Guide-3293887-Page-8.png)
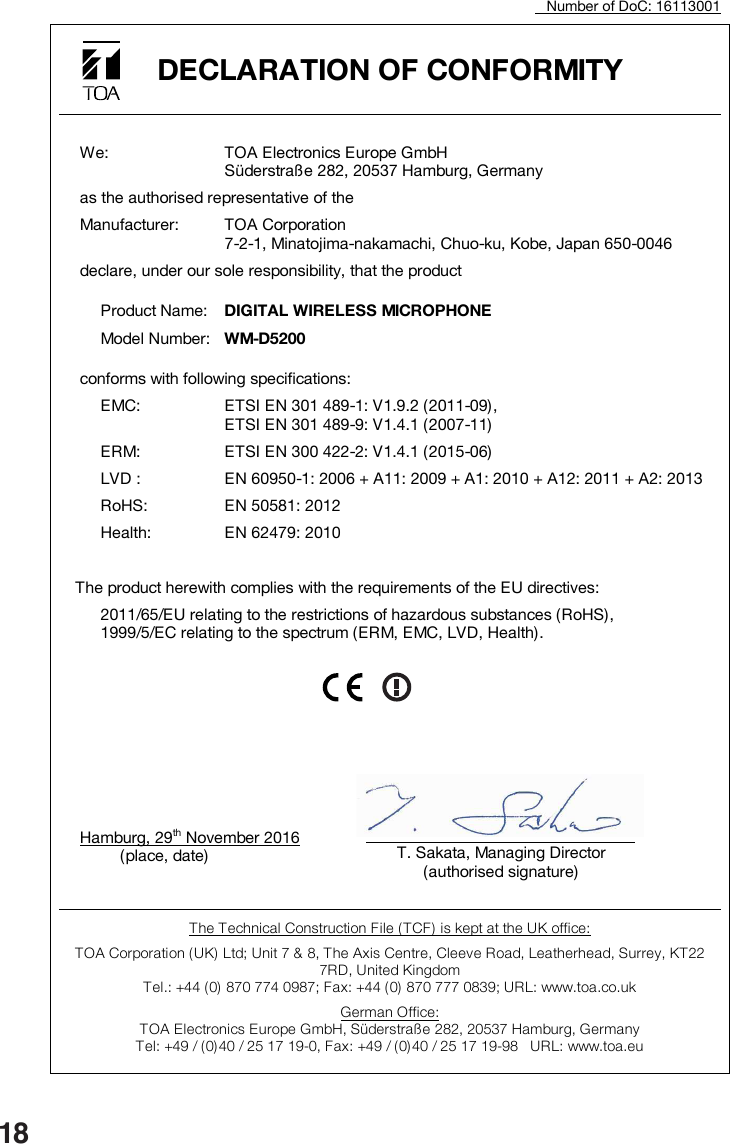
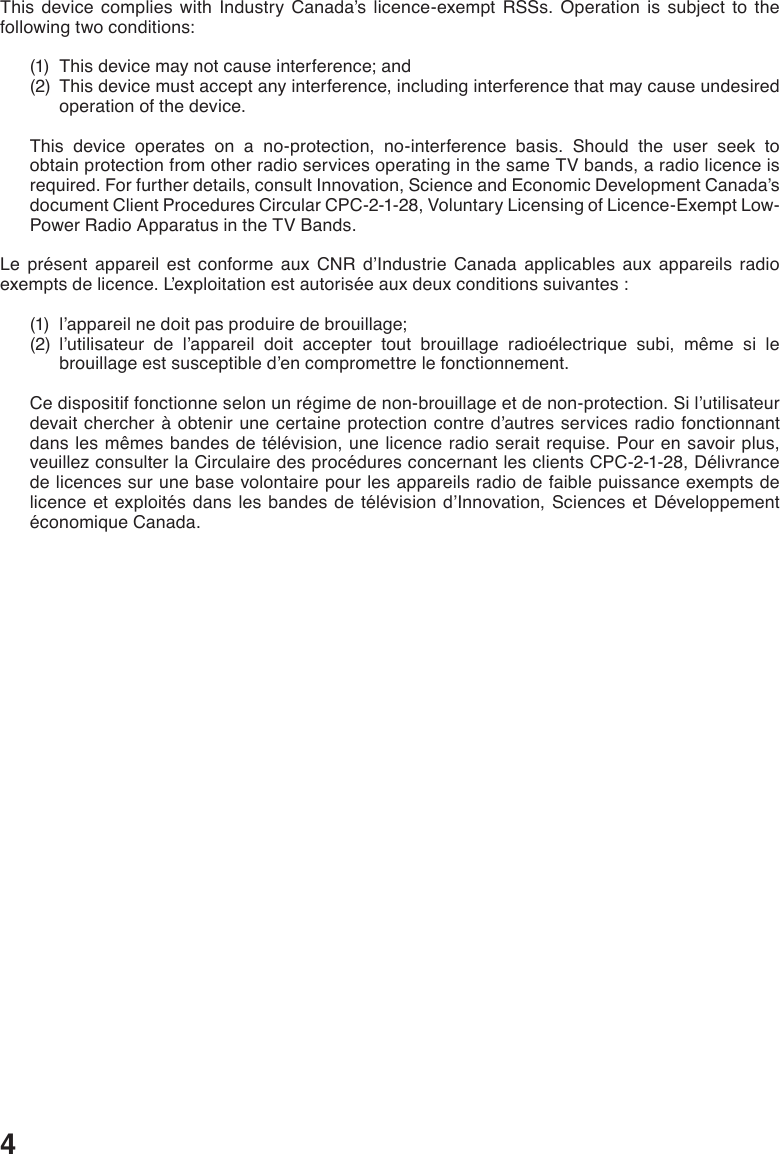
![96.3. When Operating on Rechargeable BatteryNotes•Whenoperatingonrechargeablebatteries,theoptionalBC-2000Batterychargerisrequired.•For rechargeable batteries, be sure to use the optional BC-2000 or the optional WB-2000-2(package of 2).•Avoidusingothermakesofrechargeablebatteries.•WhenusingtheWB-2000rechargeablebatteryforthersttimeorwhenusingitafterithasbeenstored for a long period of time, be sure to charge it before use.•TheWB-2000batteryisdesignedtocyclethroughabout500chargesanddischarges.Whenthemicrophone operation interval becomes extremely short after prolonged repeated use, change the battery with a new one.•Charge the rechargeable battery after it has been fully used. (The wireless microphone willcontinue to operate for approx. 8 hours per charge.) Frequent charging at short intervals may shorten the operating life of the rechargeable battery. [How to charge] Step 1. Place the WB-2000 rechargeable battery in the wireless microphone.(See p. 8, "Battery Insertion.") Step 2. Set the wireless microphone's power switch to the OFF position. Step 3. Fully insert the wireless microphone into the microphone receptacle of the BC-2000 Battery charger.The BC-2000's charging indicator lights red and charging begins.Charging is completed in approximately 3 hours and the BC-2000's full-charge indicator lights green.•If the red charging indicator does not light even ifthe wireless microphone has been inserted into the charger, check to see if the microphone has been correctly inserted.•Thewirelessmicrophonebecomeswarmafterchargingcompletion, however this is not a failure.•When disconnecting the wireless microphone fromthecharger,rmlyholdthechargersothatitdoesnotmove. For more information, see the instruction manual enclosed with the BC-2000 Battery charger.WM-D5200Digital wireless microphone BC-2000Battery chargerDo not charge the unit with an alkaline dry battery installed. Charge the dedicated rechargeable battery*.Failure toobservetheseinstructionscouldcausereorpersonalinjury due to a bursting battery. * The optional TOA WB-2000-2 (package of 2).CAUTION](https://usermanual.wiki/TOA/WM-D5200/User-Guide-3293887-Page-9.png)
![118.2. Performing Encryption SettingsTo enhance security, the WM-D5200 is provided with an encryption setting function that prevents leakage of transmitted information.This function also has the advantage of eliminating radio interference if enabled. Before enabling theencryptionsetting,besurethatbankandchannelsettingsarecompletedrst.TipIn addition to the WM-D5200, the WT-D5800 Digital Wireless Receiver also requires setup. Therefore, be sure to see the receiver's instruction manual as well. 8.2.1. Encryption settings summary[Before use (preparatory operation for setting)]Transmit an ID number from the wireless microphone to the receiver. The ID number is randomly selected on the wireless microphone side. The ID number to be used is selected from an extensive numberofcombinationsandcannotbedesignatedbytheoperator,norcanitbeidentiedfromoutside. [In use] (No operations required.)When the receiver detects a signal from the wireless microphone, it simultaneously reads the microphone's ID information, ensuring that only the audio of the wireless microphone assigned with the same ID number as the receiver can be output. Even if the bank/channel numbers are identically set in an attempt to enable reception of a radio signal from outside, since no audio is output if the ID number does not match, the possibility of leakage of transmitted information to the outside is quite low. [Encryption setting ON/OFF confirmation] Step 1. After removing the battery compartment cover, switch ON the microphone power switch. Step 2. ConrmthestatusoftheEncryptionindicator.The setting is ON when the indicator is lit, and OFF when the indicator is unlit. Note: The encryption setting is factory-preset to OFF12Encryption setting switchEncryption indicator](https://usermanual.wiki/TOA/WM-D5200/User-Guide-3293887-Page-11.png)
![128.2.2. Performing encryption settings[Switching the Encryption function from OFF to ON]See also the instruction manual enclosed with the WT-D5800 receiver. Step 1. Enable the receiver's encryption function. Step 2. With the battery compartment cover removed, switch ON the microphonepowerswitchandconrmthattheEncryptionindicatoris unlit. If the indicator is lit, switch encryption from ON to OFF (see p. 13). Step 3. Switch OFF the microphone power switch. Step 4. Switch ON the microphone power switch while holding down the microphone's Encryption setting switch (continue holding until Step 6).Conrmthatthemicrophone'sEncryptionindicatorisashing.An ID number is transmitted while the microphone's Encryption setting switch is held down. Step 5. Perform pairing setting at the receiver. The receiver waits for the microphone’s transmitted ID number for as long as the Set key is held down. The "RECEIVING" indication is displayed on the receiver's LCD screen until the ID number is correctly received. Step 6. AfterconrmingthattheLCDdisplayhasswitchedtothe"SUCCESS"indication, release both the microphone's Encryption setting switch and the receiver's Set key. Step 7. Conrmthatthemicrophone'sEncryptionindicatorislit.The encryption setting is now ON. Notes•DonotswitchOFFthepowertothemicrophoneorreceiverduringsetting.•Hold down the microphone's Encryption setting switch and the receiver's Set key until the"SUCCESS" indication appears on the receiver's LCD screen. If the microphone's Encryption setting switch or the receiver's Set key is released while the "RECEIVING" indication is displayed on the receiver's screen, the receiver will not have correctly received the new ID number, leaving the ID number unchanged from the previous value. To match the receiver ID number with the microphone ID number, switch OFF the microphone's encryption setting, then repeat Steps 1 – 7 above. Tips•TheIDnumberisupdatedwhentheencryptionisswitchedfromOFFtoONagain.(TheencryptionON/OFF status and ID number are retained even if the power switch is switched OFF.)•SettingscanbeperformedregardlessofwhetherthemicrophoneorreceiverEncryptionsettingswitchwasdepressedrst.•ThereceiverdoesnotoutputaudioduringIDnumbersetting,evenifitreceivesaradiosignalfromthe microphone.UnlitFlashingLit](https://usermanual.wiki/TOA/WM-D5200/User-Guide-3293887-Page-12.png)
![13Unlit[Switching the Encryption function from ON to OFF] Step 1. With the battery compartment cover removed, switch ON the microphonepowerswitchandconrmthattheEncryptionindicatoris lit. Step 2. Switch OFF the power switch. Step 3. Switch ON the microphone power switch while holding down the Encryption setting switch.NoteDo not switch OFF the microphone power switch during setting. Step 4. ConrmthattheEncryptionindicatorhasextinguished,thenreleasethe Encryption setting switch. The encryption setting switches to OFF.Lit](https://usermanual.wiki/TOA/WM-D5200/User-Guide-3293887-Page-13.png)
![148.3. Performing Code Settings (When Encryption Function Is OFF)8.3.1. Code Setting SummaryBy presetting the specied code between the wireless microphone and receiver, audio is onlyoutput when a digital signal received from the wireless microphone has the same ID code as the receiver. Even if another signal is received from an adjacent area, if the code does not match, audio is not output. Ten varieties of code can be selected ([0] – [9]) for appropriate use, depending on circumstances. 8.3.2. Code settingsCode is factory-preset to "0."NoteSwitch OFF the microphone power switch when performing settings. If the power switch is left ON, the codes will remain unaffected even if the settings are manually changed. Step 1. After removing the battery compartment cover, switch ON the microphone power switch. Step 2. ConrmthattheEncryptionindicatorisunlit.If it is lit, switch encryption from ON to OFF, referring to p. 12, "Switching the Encryption function from OFF to ON." Step 3. Switch OFF the power. Step 4. Using the supplied screwdriver, set the code setting switch to the desired code number. Step 5. Reinstall and securely tighten the battery compartment cover, as it was before.This puts the code into the set state. Step 6. Set the same code number for the receiver, as well. For the setting method, see the instruction manual enclosed with the receiver. 124Encryption indicatorUnlitCode setting switch](https://usermanual.wiki/TOA/WM-D5200/User-Guide-3293887-Page-14.png)