user manual

3D0813250A
ENGLISH FRANÇAIS ESPAÑOL ITALIANO POLSKA DEUTSCH PORTUGUÊS
Model MJBTS-1
USER MANUAL
oThank you for purchasing this product.
oBe sure to read this user manual before operating
the product and use it correctly.
oStore this manual in a safe place for future reference.
2
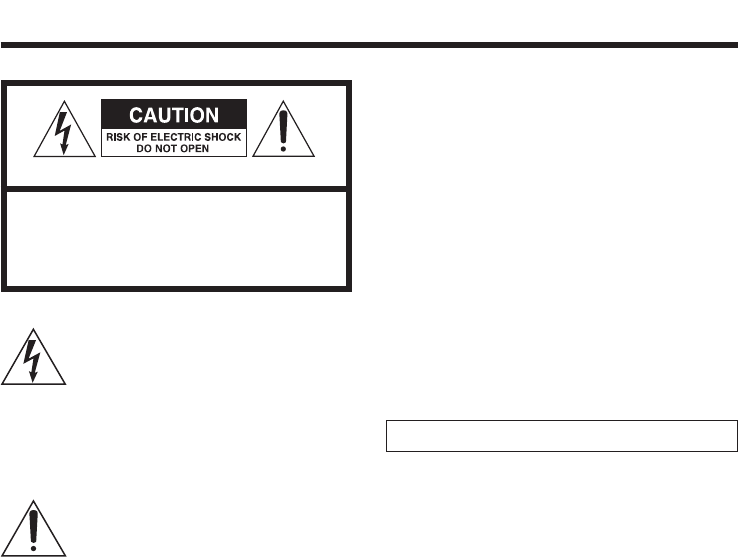
CAUTION: TO REDUCE THE RISK OF ELECTRIC
SHOCK, DO NOT REMOVE COVER (OR BACK). NO
USER-SERVICEABLE PARTS INSIDE.
The lightning flash with arrowhead
symbol, within an equilateral triangle, is
intended to alert the user to the pres-
ence of uninsulated “dangerous voltage” within
the product’s enclosure that may be of sufficient
magnitude to constitute a risk of electric shock to
persons.
The exclamation point within an equi-
lateral triangle is intended to alert the
user to the presence of important oper-
ating and maintenance (servicing) instructions in
the literature accompanying the appliance.
CAUTION
oDO NOT REMOVE THE EXTERNAL CASES OR
CABINETS TO EXPOSE THE ELECTRONICS. NO USER
SERVICEABLE PARTS ARE WITHIN.
oIF YOU ARE EXPERIENCING PROBLEMS WITH THIS
PRODUCT, CONTACT THE RETAILER WHERE YOU
PURCHASED THE PRODUCT.
oTEAC FOR A SERVICE REFERRAL. DO NOT USE THE
PRODUCT UNTIL IT HAS BEEN REPAIRED.
oUSE OF CONTROLS OR ADJUSTMENTS OR PERFORMANCE
OF PROCEDURES OTHER THAN THOSE SPECIFIED HEREIN
MAY RESULT IN HAZARDOUS RADIATION EXPOSURE.
IN USA, USE ONLY ON 120 V SUPPLY.
IMPORTANT SAFETY PRECAUTIONS
3
1) Read these instructions.
2) Keep these instructions.
3) Heed all warnings.
4) Follow all instructions.
5) Do not use this apparatus near water.
6) Clean only with dry cloth.
7) Do not block any ventilation openings. Install in
accordance with this manual.
8) Do not install near any heat sources such as radi-
ators, heat registers, stoves, or other apparatus
(including amplifiers) that produce heat.
9)
Do not defeat the safety purpose of the polarized
or grounding-type plug. A polarized plug has two
blades with one wider than the other. A grounding
type plug has two blades and a third grounding
prong. The wide blade or the third prong are pro-
vided for your safety. If the provided plug does not
fit into your outlet, consult an electrician for replace-
ment of the obsolete outlet.
10) Protect the power cord from being walked on or
pinched particularly at plugs, convenience recep-
tacles, and the point where they exit from the
apparatus.
11) Only use attachments/accessories specified by the
manufacturer.
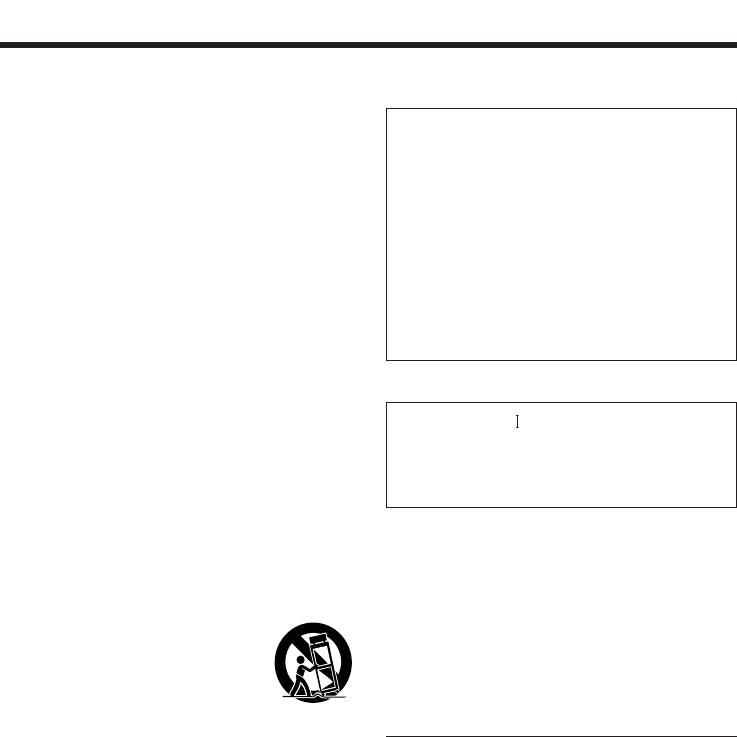
12) Use only with the cart, stand, tripod,
bracket, or table specified by the man-
ufacturer, or sold with the apparatus.
When a cart is used, use caution when
moving the cart/apparatus combination to avoid
injury from tip-over.
13) Unplug this apparatus during lightning storms or
when unused for long periods of time.
14) Stop use immediately when the apparatus has
been damaged in any way, such as power-supply
cord or plug is damaged, liquid has been spilled or
objects have fallen into the apparatus, the appara-
tus has been exposed to rain or moisture, does not
operate normally, or has been dropped.
<
The apparatus draws nominal non-operating power
from the AC outlet with its POWER or STANDBY/ON
switch not in the ON position.
<
The mains plug is used as the disconnect device,
the disconnect device shall remain readily operable.
< Do not expose this apparatus to drips or splashes.
< Do not place any objects lled with liquids, such as
vases, on the apparatus.
< Do not install this apparatus in a conned space
such as a book case or similar unit.
< The apparatus should be located close enough
to the AC outlet so that you can easily reach the
power cord plug at any time.
< If the product uses batteries (including a battery
pack or installed batteries), they should not be
exposed to sunshine, re or excessive heat.
CAUTION
Products with Class construction are equipped with a
power supply cord that has a grounding plug. The
cord of such a product must be plugged into an AC
outlet that has a protective grounding connection.
WARNING
The Bluetooth® word mark and logos are registered
trademarks owned by Bluetooth SIG, Inc. and any use of
such marks by Ryohin Keikaku Co. Ltd. is under license.
Android is a trademark of Google Inc.
iPhone is a trademark of Apple Inc., registered in the
U.S. and other countries.
IOS is a trademark or registered trademark of Cisco in
the U.S. and other countries and is used under license.
Other company names and product names in this
document are the trademarks or registered trademarks
of their respective owners.
IMPORTANT SAFETY INSTRUCTIONS
4
BPrecautions concerning batteries
Misuse of batteries could cause them to rupture
or leak leading to fire, injury or the staining of
nearby things. Please read and observe the fol-
lowing precautions carefully.
oBe sure to insert the batteries with correct
positive (+) and negative (_) orientations.
oIf the remote control is not used for a long time
(more than a month), remove the batteries to
prevent them from leaking.
oIf the batteries leak, wipe away the leakage
inside the battery compartment and replace
the batteries with new ones.
oDo not use batteries of types other than those
specified.
oDo not heat or disassemble batteries. Never
throw batteries into fire or water.
oDo not carry or store batteries with other
metallic objects. The batteries could short
circuit, leak or explode.
oNever recharge a battery unless it is confirmed
to be a rechargeable type.
5
ENGLISH
For European Customers
Disposal of electrical and electronic equipment
(a) All electrical and electronic equipment should be disposed of separately from the municipal waste
stream via collection facilities designated by the government or local authorities.
(b) By disposing of electrical and electronic equipment correctly, you will help save valuable resources and
prevent any potential negative effects on human health and the environment.
(c) Improper disposal of waste electrical and electronic equipment can have serious effects on the environ-
ment and human health because of the presence of hazardous substances in the equipment.
(d) The Waste Electrical and Electronic Equipment (WEEE) symbol, which shows a wheeled bin that
has been crossed out, indicates that electrical and electronic equipment must be collected and
disposed of separately from household waste.
(e) Return and collection systems are available to end users. For more detailed information about
the disposal of old electrical and electronic equipment, please contact your city office, waste
disposal service or the shop where you purchased the equipment.
Disposal of batteries and/or accumulators
(a) Waste batteries and/or accumulators should be disposed of separately from the municipal waste stream
via collection facilities designated by the government or local authorities.
(b) By disposing of waste batteries and/or accumulators correctly, you will help save valuable resources and
prevent any potential negative effects on human health and the environment.
(c) Improper disposal of waste batteries and/or accumulators can have serious effects on the environment
and human health because of the presence of hazardous substances in them.
(d) The WEEE symbol, which shows a wheeled bin that has been crossed out, indicates that batter-
ies and/or accumulators must be collected and disposed of separately from household waste.
If a battery or accumulator contains more than the specified values of lead (Pb), mercury (Hg),
and/or cadmium (Cd) as defined in the Battery Directive (2006/66/EC), then the chemical sym-
bols for those elements will be indicated beneath the WEEE symbol.
(e) Return and collection systems are available to end users. For more detailed information about the dis-
posal of waste batteries and/or accumulators, please contact your city office, waste disposal service or
the shop where you purchased them.
Pb, Hg,
Cd
6
Wireless equipment precautions
Compliance of radio transmitter
and interference
USA model
This device complies with Part.15 of FCC Rules.
Operation is subject to the following two conditions:
1) This device may not cause interference
2) This device must accept any interference, including
interference that may cause undesired operation of
the device.
Labeling of authorization
FCC ID: XEG-MJBTS1
EEA (European Economic Area) model
This equipment complies with the harmonised stan-
dards of DIRECTIVE 1999/5/EC ( R&TTE )
Labeling of conformity
CE marking:
CAUTION
Changes or modifications not expressly approved by
the party responsible for compliance could void the
user’s authority to operate the equipment.
CAUTION
Authorization of wireless devices are different in
countries or regions. Please use only in the country
where you purchased the product.
oDepending on the country, restrictions on the
use of Bluetooth might exist.
Confirm the laws and regulations of the country or
region where you want to use the unit before use.
Radiation Exposure requirements
This equipment meets the regulation, which is recog-
nized internationally, for the case of human exposure
to radio waves generated by the transmitter.
Based on the following two conditions:
oEnd-users and installers must be provided with
antenna installation instructions and transmitter
operating conditions for satisfying RF exposure
compliance.
oThis equipment should be installed and operated
with minimum distance 20 cm between the radiator
and your body.
Statement of compliance
USA model
This equipment complies with FCC radiation expo-
sure limits set forth for an uncontrolled environment
and meets the FCC radio frequency Exposure
Guidelines.
EEA (European Economic Area) model
This equipment complies with EN.62311; Assessment
of electronic and electrical equipment related to
human exposure restrictions for electromagnetic fields;
the harmonised standard of DIRECTIVE 1999/5/EC.

7
ENGLISH
Bluetooth® notes
When using this unit with a mobile phone or other
Bluetooth devices, they should be no more than about
10 m apart. Depending on the circumstances of use,
however, the effective transmission distance might be
shorter.
Wireless communication with every device that sup-
ports Bluetooth wireless technology is not guaranteed.
To determine the compatibility between this unit
and another device that supports Bluetooth wireless
technology, refer to that device's operation manual or
contact the shop where you purchased it.
Information for interference
(FCC requirements)
This equipment has been tested and found to comply
with the limits for a Class B digital device, pursuant to
Part 15 of the FCC Rules. These limits are designed to
provide reasonable protection against harmful interfer-
ence in a residential installation.
This equipment generates, uses, and can radiate radio
frequency energy and, if not installed and used in
accordance with the instructions, may cause harmful
interference to radio communications.
However, there is no guarantee that interference will
not occur in a particular installation.
If this equipment does cause harmful interference
to radio or television reception, which can be deter-
mined by turning the equipment off and on, the user is
encouraged to try to correct the interference by one or
more of the following measures.
oReorient or relocate the equipment and/or the
receiving antenna.
oIncrease the separation between the equipment
and receiver.
oConnect the equipment into an outlet on a circuit
different from that to which the receiver is connected.
oConsult the dealer or an experienced radio/TV
technician for help.
8
Table of contents
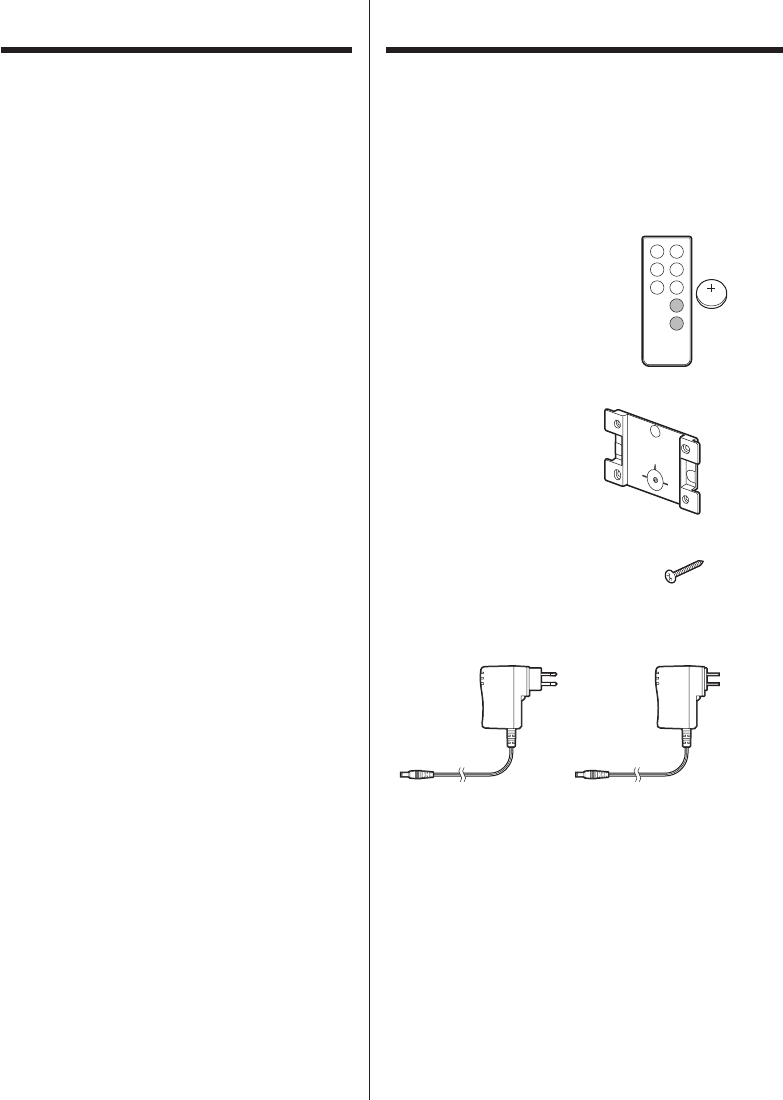
Included parts
If any of the included parts should be missing or dam-
aged, please contact the retailer where you purchased
the product.
Remote control × 1
CR2025 button cell lithium bat-
tery for remote control × 1
(installed in remote control when
shipped new)
Wall-mounting plate × 1
Wood screws × 4
Dedicated AC adaptor × 1
For Europe For USA
User manual (this document) × 1
Wireless equipment precautions .....................6
Bluetooth® notes ....................................7
Before use ...........................................8
Names of parts .....................................10
Using the remote control ...........................11
Installing the wall-mounting plate ..................12
Attaching the unit ..................................13
Connecting the adaptor ............................13
Listening to audio from a Bluetooth device .........14
Listening to the radio ...............................18
Troubleshooting ....................................19
Specifications .......................................21
or
Before use
9
ENGLISH
Precautions for use
oAvoid placing the unit in direct sunlight, close to a
heater or any other place that might become hot.
Furthermore, do not place it on top of an amplifier
or other equipment that generates heat. Doing
so might result in discoloration or deformation, or
cause a malfunction.
oIf a nearby TV is turned on when the unit is being
used, lines might appear on the screen depending
on the broadcast frequency. This is not a malfunc-
tion of the unit or the TV. If you see such lines, turn
the unit off or unplug the dedicated AC adaptor
from the socket.
oWhen the dedicated AC adaptor is plugged into an
outlet, standby power is consumed.
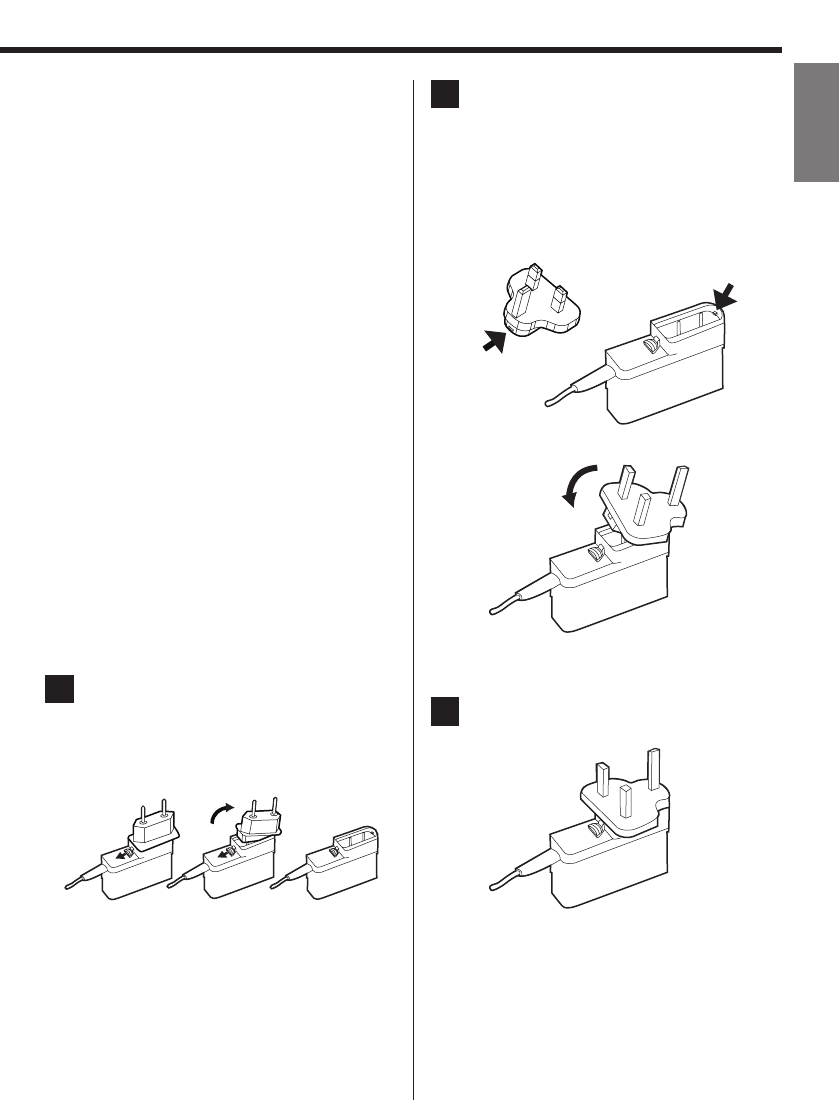
For customers in the UK
Change the AC adaptor plug so that it suits the outlets
where you are using the unit.
1 While pulling the tab toward the
AC adaptor plug, pull the plug in
the direction shown by the arrow
below to remove it.
2 While continuing to pull the tab
toward the AC adaptor plug, insert
the concave part (A) of the plug
into the convex part (B) on the
inside opposite the tab. Then, push
it into the other side in the direc-
tion of the arrow.
(A)
(B)
3 Insert the plug until you hear a click.
10
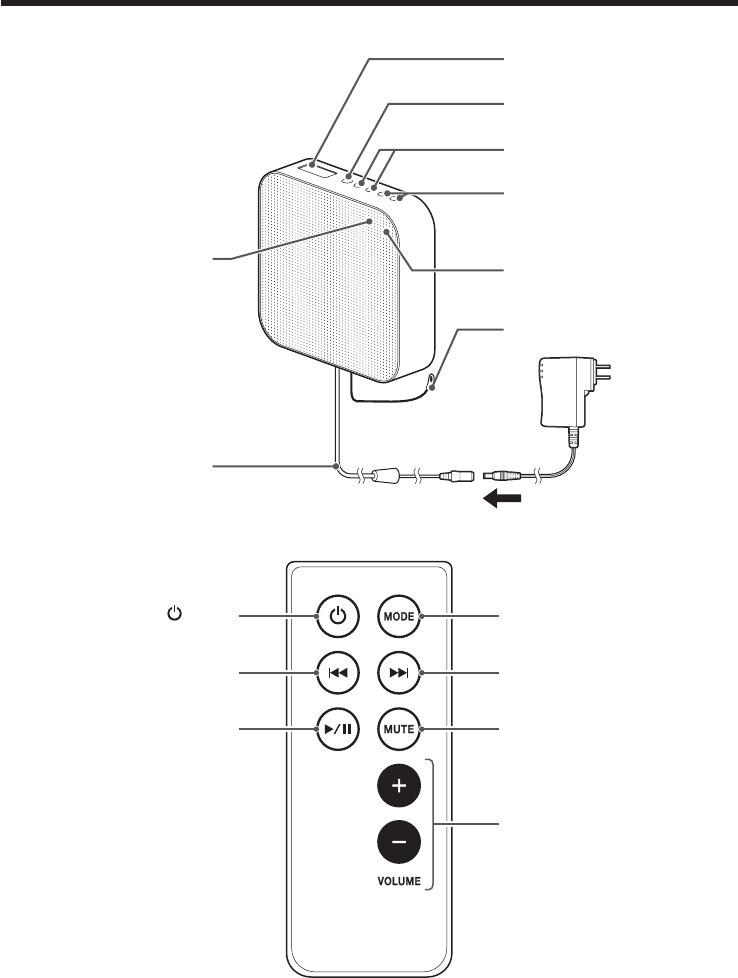
Names of parts
Main unit
Remote control
Skip (raise frequency)
(/) button
Skip (lower frequency)
(.) button
Play/Stop (y/J) button MUTE button
VOLUME (+/–) buttons
Power cord
(ON/OFF switch)
Power ( ) button MODE button
Remote control receiver
Dedicated
AC adaptor
Display
MODE button
Volume (–/+) buttons
Skip (.//) buttons
LED
Bluetooth indicator
FM antenna
11
ENGLISH
Using the remote control
Precautions during use
oPoint the remote control toward the remote control
receiver on the main unit and use it from a dis-
tance of 5 m or less. Do not place any obstructions
between the main unit and the remote control.
oIf the remote control receiver is exposed to direct
sunlight or strong lighting, the remote control
might not work properly.
oBe aware that use of this remote control could
cause the accidental operation of other devices
that can be controlled by infrared rays.
Before use
Remove the isolation sheet from the back of the
remote control before use.
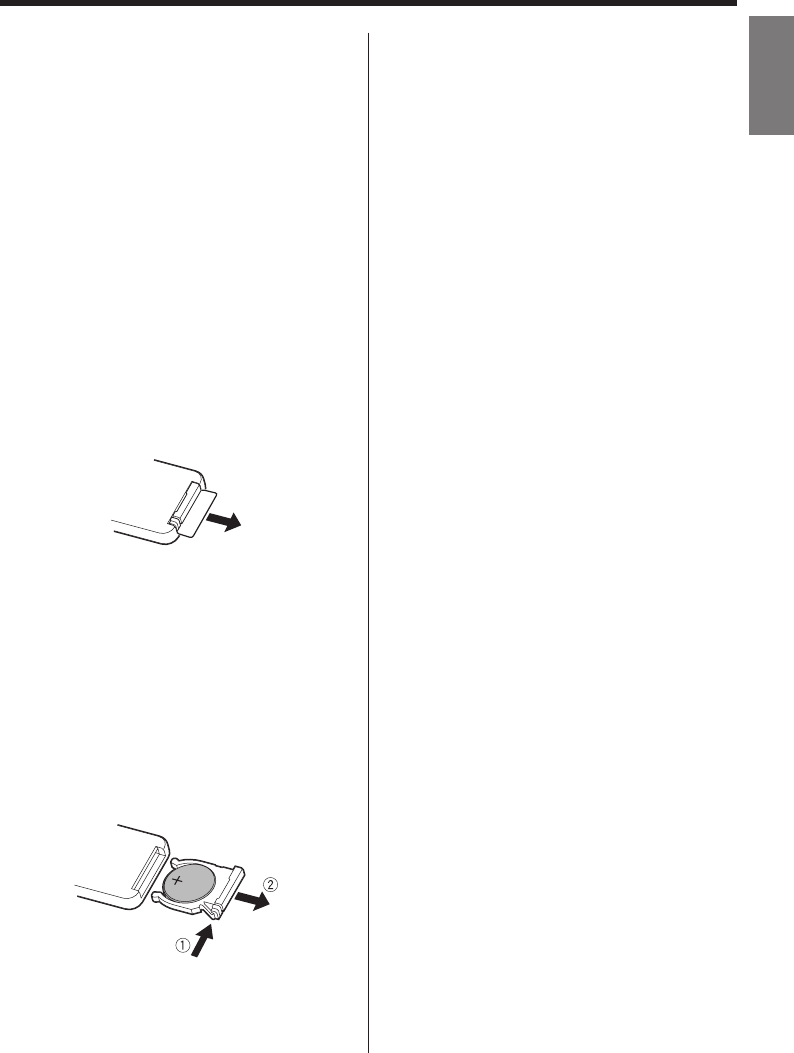
Replacing the battery
The battery has already been installed in the remote
control when shipped from the factory. To replace the
battery, while pushing on , pull in the direction of .
Pull the battery tray out from the end and put one
button cell lithium battery (CR2025) in with the “+” side
facing up, as shown in the illustration. Then, insert the
tray again.
When to replace the battery
If the maximum operating distance between the
remote control and the main unit decreases, or the
remote control's buttons stop working, replace the
battery with a new one.
For information about the disposal of a used battery,
refer to its label or follow the disposal method pre-
scribed by your local government.
Q WARNING
Misuse of batteries could cause them to rupture
or leak, which might result in fire, injury or stain-
ing of the surroundings. Review the warnings on
page 4 carefully.
12
Installing the wall-mounting plate
Q CAUTION
oBefore installation of the wall-mounting plate,
determine the location while confirming that
no radio wave interference occurs with other
electronic devices. (See “Radiation Exposure
requirements” on page 6.)
oBefore installing the wall-mounting plate on
a wall, confirm that the wall is strong enough
for it.
oInstall the plate on a smooth vertical wall.
oDo not install the plate in a location that small chil-
dren or pets could reach.
oAfter installation, confirm that nothing is loose and
there are no gaps before use.
oThe wall-mounting plate is for use on walls. Do not
use it on a ceiling.
oTake care to avoid installing the wall-mounting
plate at an angle.
oWhen handling parts that the tips of screws are
sticking out of, take care not to allow them to hurt
anyone.
oInspect the mounting plate regularly, and reinstall
it in a new position if it is loose.
Always check it after an earthquake or other vibra-
tion or force has been applied to it.
oThe parts provided are designed specifically for this
unit. Do not use them for any other purpose.
oWhen storing parts, store them in a location that
cannot be reached by small children or pets.
oBe aware that we will take absolutely no respon-
sibility if an accident occurs because of improper
installation.
oAfter installation, do not rest hands or place objects
on the unit or pull on it forcefully. Doing so could
cause the unit to fall off the wall.
oThis mount cannot be attached to sound absorp-
tion panels.
Installation on other surfaces
(wood walls, pillars, etc.)
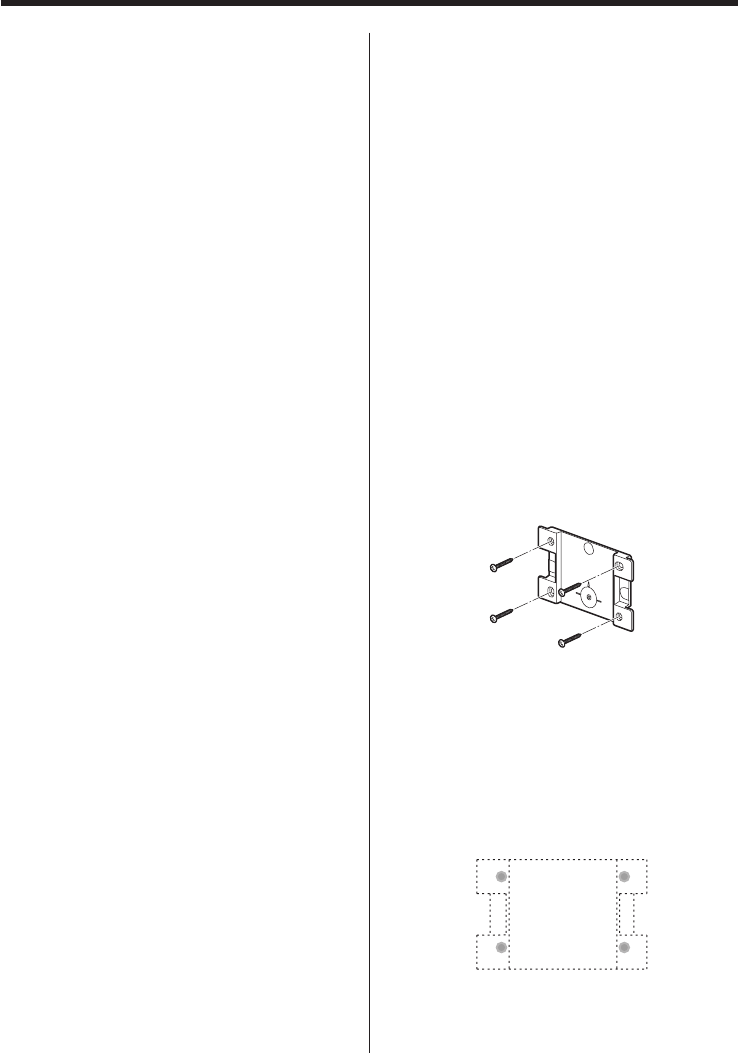
Choose a solid surface and use the included wood
screws or other suitable fasteners to install the wall-
mounting plate by the holes in its four corners.
oThe included wood screws cannot be used in walls
made of concrete or earth, for example.
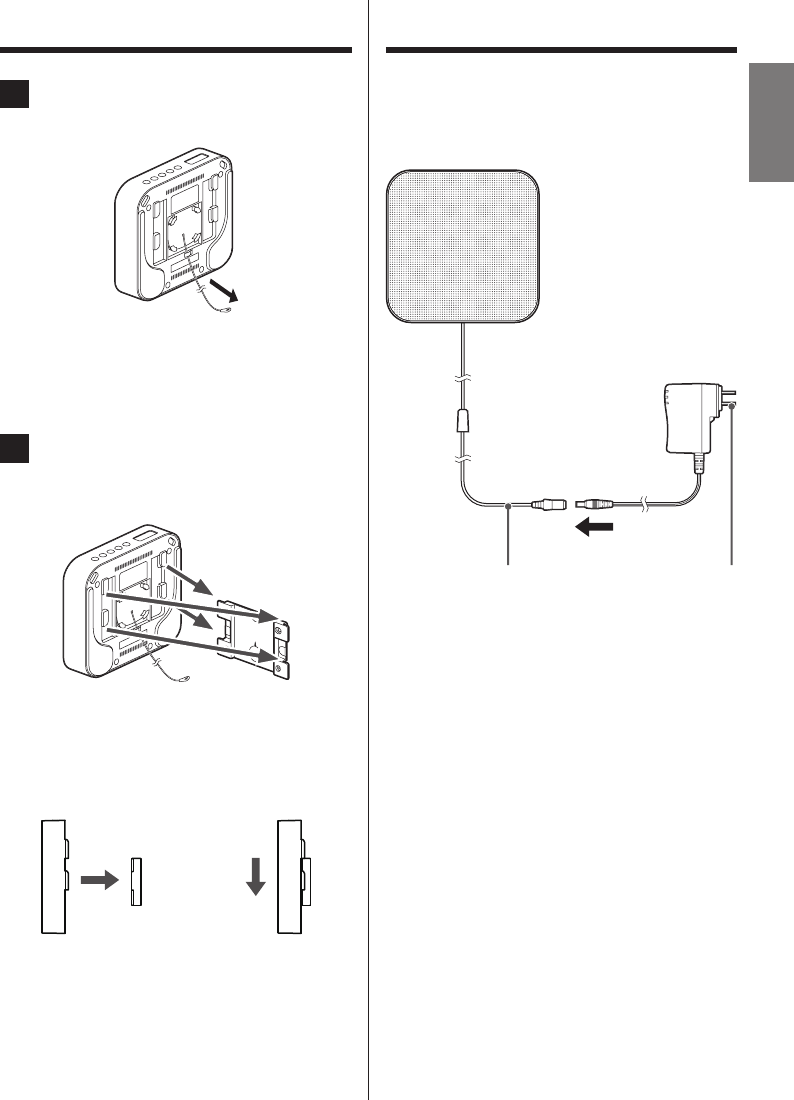
If you use the included wood screws for installation,
holes will be left in the wall as shown in the illustration
below.
We will take no responsibility for holes like these that
occur.
13
ENGLISH
Attaching the unit
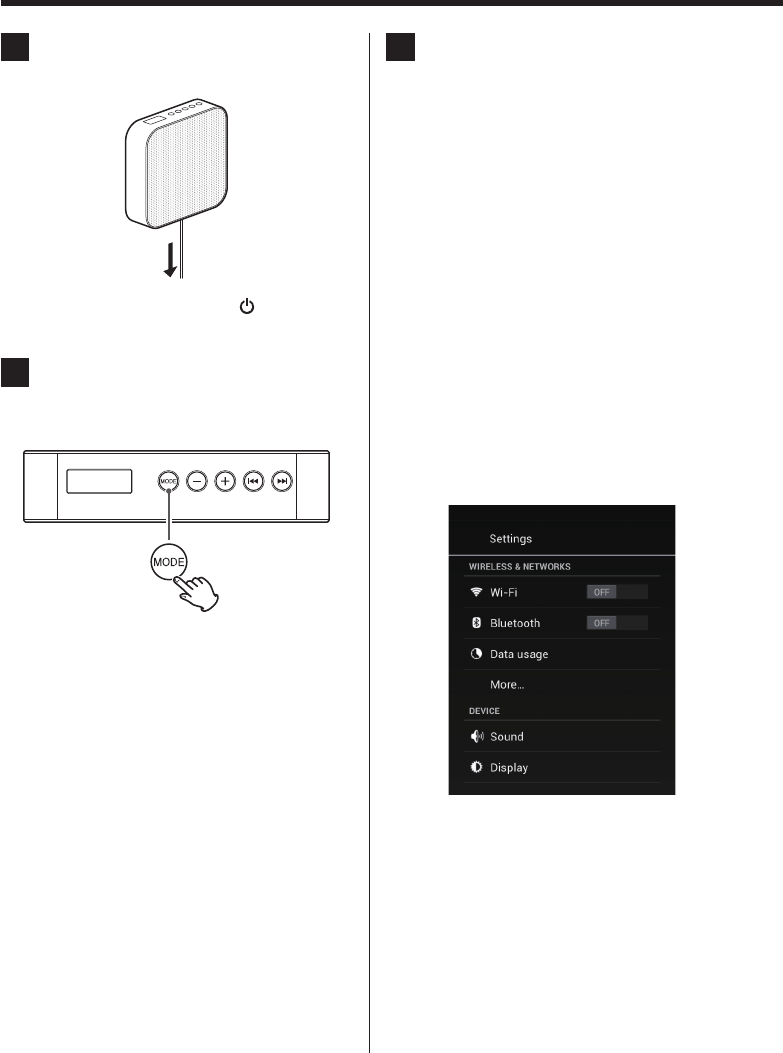
1 Extend the FM antenna.
Unwind and extend the FM antenna attached to the
back of the unit.
2 Install the unit on the wall-mount-
ing plate.
Align the unit with the
wall-mounting plate
brackets.
Slide the unit down
into place.
Align the brackets on the unit with the brackets on the
wall-mounting plate and slide it into place.
oMake sure the unit is attached securely.
oExtend the FM antenna to the position that pro-
vides the best reception.
Connecting the adaptor
After connecting the power cord to the dedicated
AC adaptor cord, plug the adaptor into an outlet.
Plug into
outlet
Dedicated AC
adaptor
Power cord Power plug
14
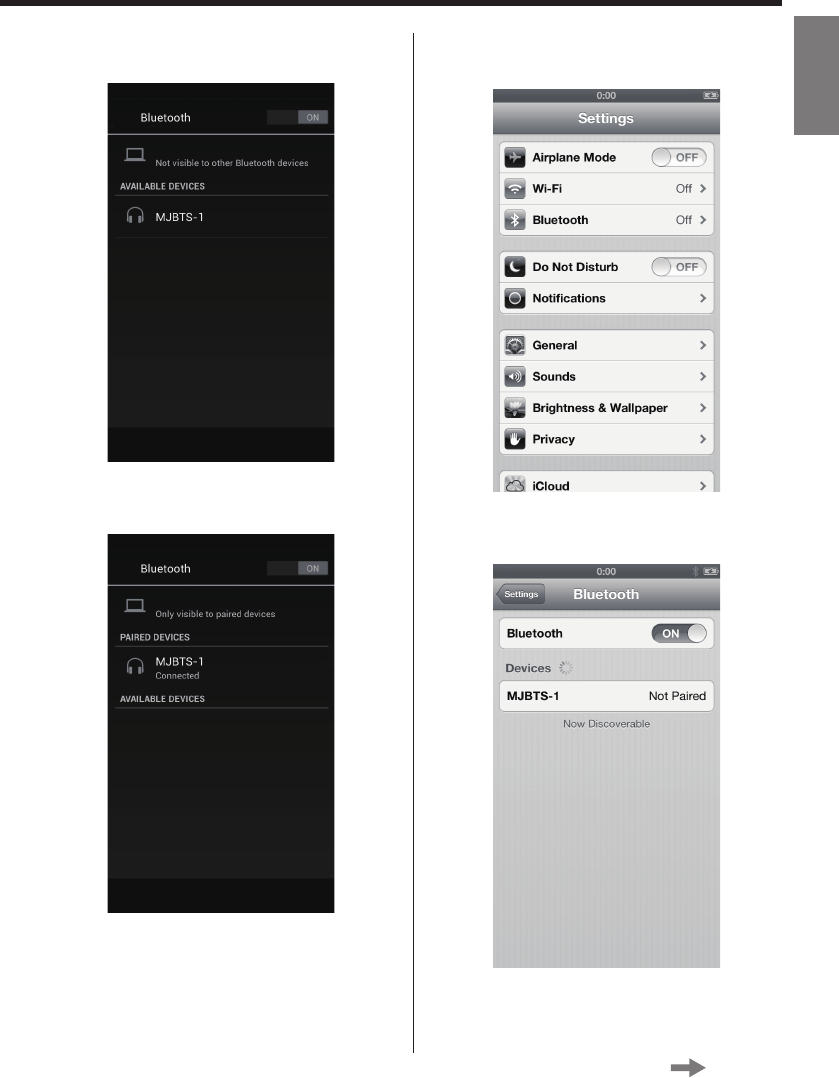
1 Pull the power cord down gently to
turn the unit on.
oYou can also use the Power ( ) button on the
remote control.
2 Press the MODE button.
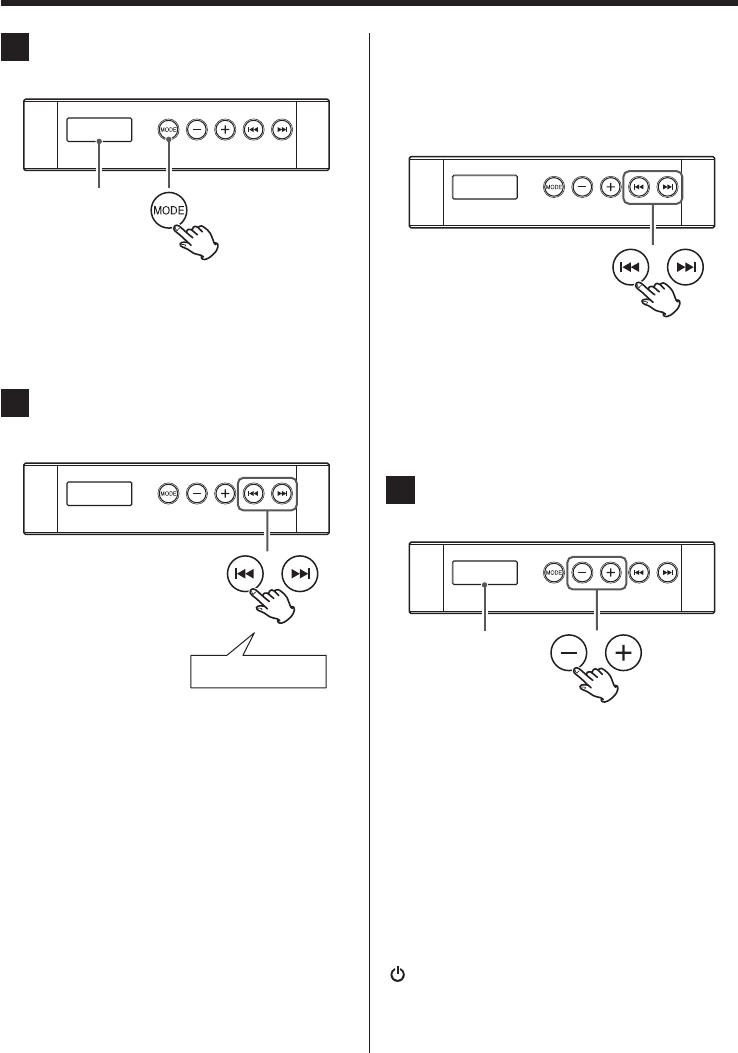
When Bluetooth mode is activated as the source,
“BT” appears on the display.
BT
oWhen you put this unit into Bluetooth mode,
the Bluetooth indicator blinks, indicating that
it can be paired with or connected to another
Bluetooth device.
oYou can also use the MODE button on the
remote control.
oThe unit retains its mode setting when the
unit is off.
If the unit was in Bluetooth mode the last time
you turned the unit off, you can skip this step.
If you unplug the dedicated AC adaptor from
the outlet or disconnect the power cord from
the dedicated AC adaptor, however, the unit
will be reset to its default settings (TUNER
mode, volume 10).
3 Pair the unit with or connect it to
the other Bluetooth device
Pairing with a Bluetooth device
The first time you use this unit with a new
Bluetooth device, you must pair them.
After activating this unit's Bluetooth mode, use
the other Bluetooth device to pair them.
If you have already paired the other device, follow
the instructions in “Connecting with an already
paired Bluetooth device” on page 16.
The following explanation provides examples of
setting up smart phones to use them as paired
Bluetooth devices. For details, refer to the operation
manual of the Bluetooth device that you are using.
Examples of pairing with smart phones
Set up using Android 4.0
1. Find the Bluetooth item under WIRELESS &
NETWORKS in the Settings menu.
2. Set Bluetooth to ON, and then select “Scan for
devices”.
Listening to audio from a Bluetooth device (1)
15
ENGLISH
3. When “MJBTS-1” appears in the list of
AVAILABLE DEVICES, select it.
4. When pairing with the MJBTS-1 completes,
the devices are connected.
oAfter pairing completes, “MJBTS-1” becomes
a “PAIRED DEVICES” instead of an “AVAILABLE
DEVICES”.
Continued on the next page
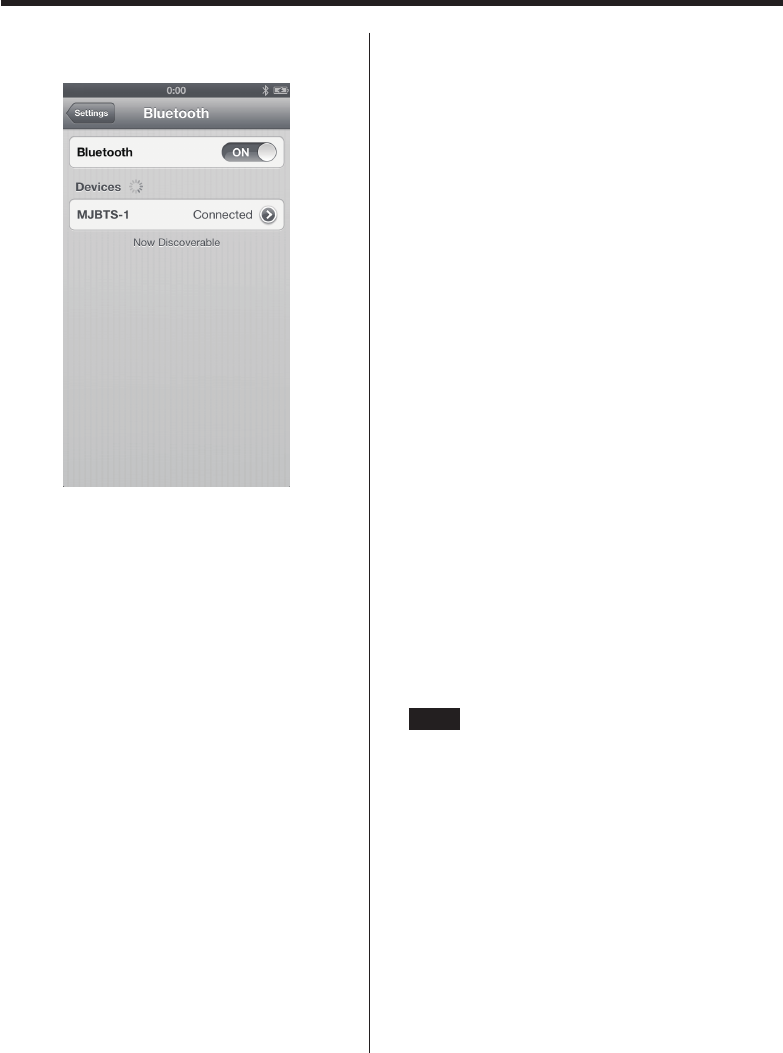
Set up on an iPhone with iOS 6
1. Open the Settings app and select “Bluetooth”.
2. Set Bluetooth to ON. “MJBTS-1 Not Paired”
appears.
16
Listening to audio from a Bluetooth device (2)
3. Select “MJBTS-1 Not Paired”. When pairing
completes, “MJBTS-1 connected” appears.
Connecting with an already paired
Bluetooth device
When this unit is on and the Bluetooth device
is also on and its Bluetooth function is on, they
should usually connect automatically.
If they do not connect automatically, however,
you can connect them manually as shown in the
following examples with smart phones.
Examples of connecting manually with
smart phones
Connecting with Android 4.0
1. Find the Bluetooth item under WIRELESS &
NETWORKS in the Settings menu.
2. Set Bluetooth to ON to connect with the
MJBTS-1.
Connecting with an iPhone running iOS 6
1. Open the Settings app and select “Bluetooth”.
2. Set Bluetooth to ON. “MJBTS-1 Not
Connected” appears.
3. Select “MJBTS-1 Not Connected” to connect
with the MJBTS-1.
oIf a request for a passcode appears on the
screen of the Bluetooth device, enter “0000”
(four zeros).
oWhen this unit connects with another
Bluetooth device, its Bluetooth indicator lights
and it will make a short beeping sound twice.
oThe other Bluetooth device and this unit
should be no more than a few meters away
from each other when paired and connected.
If the distance is too great, pairing might not
be possible and the connection could be lost.
oIf the Bluetooth indicator on the front of this
unit blinks continuously for 10 minutes, it
will automatically enter standby mode. If this
occurs, turn the unit on again.
oThis unit can remember up to 8 paired devices.
If a 9th device is paired, the oldest pairing will
be discarded so that there are never more than
8 pairings. (If the same device is paired more
than once, however, it only counts as 1 pairing.)
NOTE
Regardless of the connection status of this unit and
another Bluetooth device, if the Bluetooth indicator
continues blinking for a long time, restart both this
unit and the other device and then reconnect them.
17
ENGLISH
4 Select and play an audio le on the
Bluetooth device.
oYou can also use the remote control Play/Stop
(y/9) button.
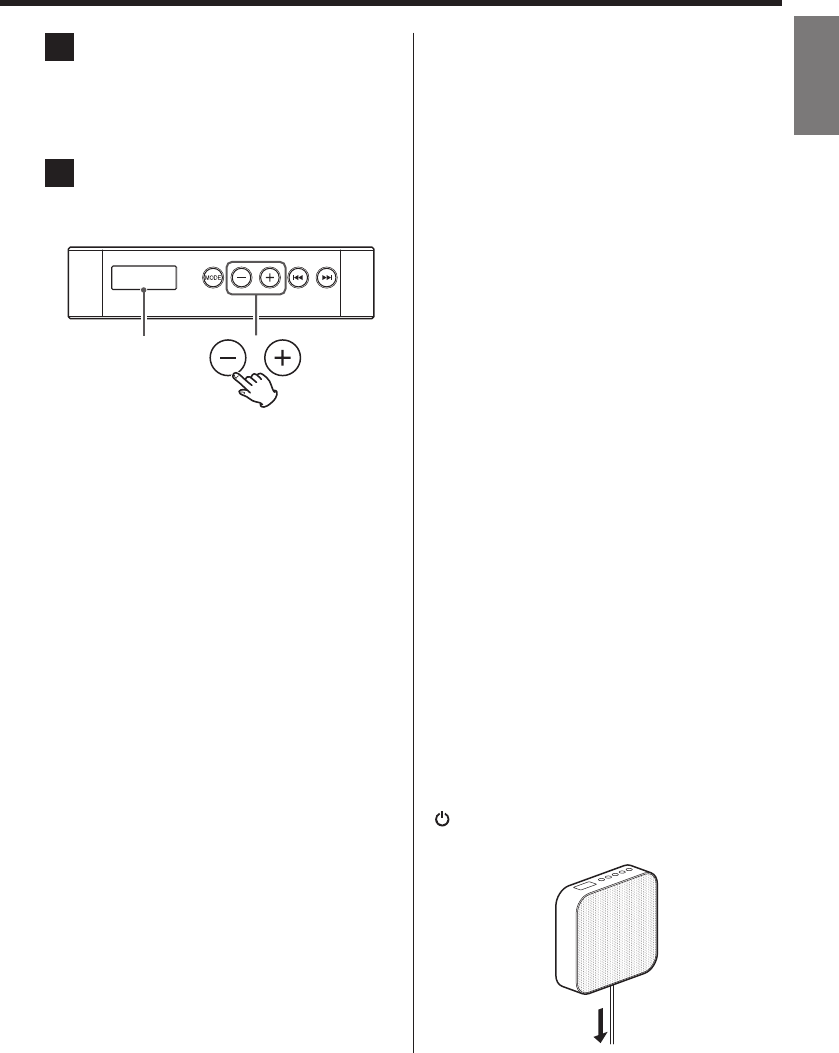
5 Use the Volume (–/+) buttons or the
remote control VOLUME +/– buttons
to adjust the volume.
VOL 05
oThe volume can be adjusted in a range
between 00 and 32. (“MAX” is shown on the
display at 32.) (The default volume level is 10.)
oDepending on the connected Bluetooth
device, its volume buttons might be disabled.
For details, see the operation manual of the
device you are using.
Volume level
shown
Selecting songs
Selecting the previous song
Press the . button on the main unit or a similar
control on the Bluetooth device.
oYou can also use the . button on the remote
control.
Selecting the next song
Press the / button on the main unit or a similar
control on the Bluetooth device.
oYou can also use the / button on the remote
control.
Pausing playback
Press pause or a similar control on the Bluetooth
device or press the Play/Stop (y/9) button on the
remote control.
Muting playback
If you want to temporarily mute the volume of this
unit, press the MUTE button on the remote control.
Press the MUTE button on the remote control again to
return to the previous volume level.
Turning the unit off
Gently pull the power cord down or press the Power
() button on the remote control to turn this unit off.
After doing this, turn the Bluetooth device off.
18
Listening to the radio
1 Press the MODE button to set the
source to FM.
)0
oYou can also use the MODE button on the
remote control.
2 Choose a station.
Automatic tuning
)0
Press and hold a skip (.//) button for 2 or
more seconds until the frequency shown on the
display begins to change.
When a station has been automatically tuned
in, the display will stop changing and show the
frequency.
oTo stop automatic tuning at any time, briefly
press a Skip (.//) button.
Press and hold
When “FM” appears,
the frequency is
shown.
Manual tuning
If you want to tune in a station that cannot be
tuned in automatically, press the Skip (.//)
buttons repeatedly to set the frequency of the
station.
)0
oEach time you press a Skip (.//) button,
the frequency will change by 0.1 MHz.
oYou can also use the Skip (.//) buttons
on the remote control.
3 Press the volume (–/+) buttons to
adjust the volume.
VOL 05
Volume level
shown
oThe volume can be adjusted in a range between
00 and 32. (“MAX” is shown on the display at 32.)
If reception is poor
If reception is poor, change the direction and placement
of the FM antenna and find a position that provides the
best reception.
Turning the unit off
Gently pull the power cord down or press the Power
( ) button on the remote control.

19
ENGLISH
If you should have any trouble with this unit please
review the following information.
If it still does not function properly, please contact the
retailer where you purchased the unit.
General
The unit does not work.
ePlug the dedicated AC adaptor into an outlet that
is supplying power.
eCheck the connection between the power cord
and dedicated AC adaptor cord.
eChange the battery in the remote control.
There is no sound.
eAdjust the volume.
The remote control does not work.
eAn isolation sheet is inserted in the battery com-
partment when shipped from the factory. Pull it out
before use. For details, see page 11.
eIf the battery is dead, replace it with a new one.
eUse the remote control from a distance of 5 m or
less, and point it at the main unit.
eIf any obstruction is between this unit and the
remote control, operation might not be possible,
so change positions as necessary.
eIf a bright light is near the unit, turn it off.
The sound is noisy.
eLocate the unit as far as possible from televisions,
microwaves and other devices that produce elec-
tromagnetic waves.
Radio
Station cannot be tuned or its reception is poor.
eChange the position of the FM antenna.
Bluetooth wireless technology
Unable to pair with a Bluetooth device.
eRefer to the operation manual of that Bluetooth
device.
eTurn both this unit and the other Bluetooth device
off once and then turn them on and try pairing
again.
eTurn off the Bluetooth devices other than the one
that you are trying to pair with the unit.
eMake the Bluetooth device delete (forget) the
“MJBTS-1” pairing and then try pairing again. (See
“Pairing with a Bluetooth device” on page 14.)
Unable to connect.
eConfirm that the Bluetooth device is on and that
it's Bluetooth function is on.
eIs the Bluetooth device too far away? Is there a
wall or other obstruction between the unit and
that device?
eTurn this unit off and then on again.
eMake the Bluetooth device delete (forget) the
“MJBTS-1” pairing and then try pairing again. (See
“Pairing with a Bluetooth device” on page 14.)
Troubleshooting (1)
Continued on the next page

20
The sound breaks up.
eIs there a wireless LAN, another Bluetooth device,
a microwave oven or anything similar nearby?
Use this unit as far as possible from such things.
eKeep this unit and the Bluetooth device as close
as possible when using them. Try changing their
locations.
eWhen using a smart phone application for some-
thing other than music playback, the sound
might break up. If this occurs, do not use applica-
tions other than the music playback application.
This unit uses a microcomputer, and sometimes
it might not operate correctly due to noise and
other interference from around the unit. In this
case, unplug its AC adaptor from the power outlet
once and wait for a while before plugging it into
the outlet again. Then, try using the unit again.
Cleaning
If the main unit or remote control becomes dirty, wipe
with a soft cloth using a diluted pH-neutral cleaner.
Do not use chemically treated wiping cloths, thinner or
similar substances as they could damage the surface
of the unit.
Q WARNING!
Unplug the AC adaptor from the power outlet
before cleaning.
Troubleshooting (2)

21
ENGLISH
Specifications
Bluetooth wireless technology
Version .............................................3.0
Profiles ...................................A2DP, AVRCP
Codec .............................................SBC
Copy protection ...................SCMS-T supported*
Class .................................................2
(about 10m maximum reception distance)
* SCMS-T support enables the playback of copyright-
protected music and 1seg audio.
Tuner
Frequency range ................87.5 MHz – 108.0 MHz
Speakers
Units ..............................3.5cm full range × 2
Rated impedance ................................. 4 Ω
Amplifier
Rated output (JEITA)** .........................2 W × 2
Frequency response . . . . . . . . . . . . . . . . . . . 50 Hz – 20 kHz
** Value measured using the JEITA (Japan Electronics
and Information Technology Industries Association)
standard
General
Power supply
GOLDEN PROFIT ELECTRONICS LTD.
GPE248-120200-Z(included)
AC input ....................100-240V , 50/60Hz , 0.75A
DC output ...................................+12V,2.0A
Rated power consumption ........................5 W
Maximum outer dimensions (main unit)
172 mm (W) × 172 mm (H) × 41 mm (D)
Weight .......................................... 485 g
(not including dedicated AC adaptor )
Items included
Remote control × 1
Button cell lithium battery for remote control (CR2025) × 1
(installed in remote when shipped new)
Wall-mounting plate × 1
Wood screws × 4
Dedicated AC adaptor × 1
User manual (this document) × 1
For the purpose of improvement, specifications and
appearances are subject to change without notice.
Illustrations in this manual might differ in part from pro-
duction models.
130
131

RYOHIN KEIKAKU EUROPE LTD.
8-12 LEEKE STREET, LONDON WC1X 9HT
www.muji.eu
MUJI U.S.A. LIMITED
250 West 39th Street, Suite 605
New York, NY 10018
www.muji.us