TCL Technoly Electronics BDHTS001 BLU-RAY DISC RECEIVER User Manual
TCL Technoly Electronics (Huizhou) Co., Ltd. BLU-RAY DISC RECEIVER
UserManual.wiki
>
TCL Technoly Electronics
>
BDHTS001 User Manual
XV-BD122W_User manual
Navigation menu
Upload a User Manual
Namespaces
Wiki Guide
HTML
PDF
Info
Views
User Manual
Discussion / Help
Navigation

![Notes on Copyrights %HFDXVH$$&6$GYDQFHG$FFHVV&RQWHQW6\VWHPLVDSSURYHGDVFRQWHQWSURWHFWLRQV\VWHPIRU%OXUD\'LVFIRUPDWVLPLODUWRXVHRI&66&RQWHQW6FUDPEOH6\VWHPIRU'9'IRUPDWFHUWDLQUHVWULFWLRQVDUHLPSRVHGRQSOD\EDFNDQDORJVLJQDORXWSXWHWFRI$$&6SURWHFWHGFRQWHQWV7KHRSHUDWLRQRIWKLVSURGXFWDQGUHVWULFWLRQVRQWKLVSURGXFWPD\YDU\GHSHQGLQJRQ\RXUWLPHRISXUFKDVHDVWKRVHUHVWULFWLRQVPD\EHDGRSWHGDQGRUFKDQJHGE\$$&6DIWHUWKHSURGXFWLRQRIWKLVSURGXFW )XUWKHUPRUH%'5200DUNDQG%'DUHDGGLWLRQDOO\XVHGDVFRQWHQWSURWHFWLRQV\VWHPVIRU%OXUD\'LVFIRUPDWZKLFKLPSRVHVFHUWDLQUHVWULFWLRQVLQFOXGLQJSOD\EDFNUHVWULFWLRQVIRU%'5200DUNDQGRU%'SURWHFWHGFRQWHQWV7RREWDLQDGGLWLRQDOLQIRUPDWLRQRQ$$&6%'5200DUN%'RUWKLVSURGXFWSOHDVHFRQWDFWDQDXWKRUL]HG&XVWRPHU6HUYLFH&HQWHU 0DQ\%'520'9'GLVFVDUHHQFRGHGZLWKFRS\SURWHFWLRQ%HFDXVHRIWKLV\RXVKRXOGRQO\FRQQHFW\RXUSOD\HUGLUHFWO\WR\RXU79QRWWRD9&5&RQQHFWLQJWRD9&5UHVXOWVLQDGLVWRUWHGSLFWXUHIURPFRS\SURWHFWHGGLVFV 7KLVLWHPLQFRUSRUDWHVFRS\SURWHFWLRQWHFKQRORJ\WKDWLVSURWHFWHGE\86SDWHQWVDQGRWKHULQWHOOHFWXDOSURSHUW\ULJKWVRI5RYL&RUSRUDWLRQ5HYHUVHHQJLQHHULQJDQGGLVDVVHPEO\DUHSURKLELWHG 8QGHUWKH86&RS\ULJKWODZVDQG&RS\ULJKWODZVRIRWKHUFRXQWULHVXQDXWKRUL]HGUHFRUGLQJXVHGLVSOD\GLVWULEXWLRQRUUHYLVLRQRIWHOHYLVLRQSURJUDPVYLGHRWDSHV%'520GLVFV'9'V&'VDQGRWKHUPDWHULDOVPD\VXEMHFW\RXWRFLYLODQGRUFULPLQDOOLDELOLW\](https://usermanual.wiki/TCL-Technoly-Electronics/BDHTS001/User-Guide-1696335-Page-6.png)
![Before you start8EnBefore you start1Chapter 1Before you startIntroductionSupplied accessoriesVideo cable (1) Remote control (1)Battery (2) FM antenna (1)iPod cradle (1) Power cord:DUUDQW\FDUG2SHUDWLQJLQVWUXFWLRQV7KLVGRFXPHQWAccessories of speaker box (BCS-727)Speaker cables (4) Non-skid pads (1)Screws M4 x 16 (16)(They are used to fix to the base and lower cabinet.)Screws M4 x 12 (8) (They are used to fix the upper and lower cabinet.)Accessories of speaker (BCS-323)Non-skid pads (5) Screws M4x12 [Taping type] (5)(These screws are used to fix the speakers to the stands.)Accessories of speaker (BCS-HW929)Bracket (2)Large non-skid pads (1)Non-skid pads (1) :LUHVWD\V](https://usermanual.wiki/TCL-Technoly-Electronics/BDHTS001/User-Guide-1696335-Page-10.png)

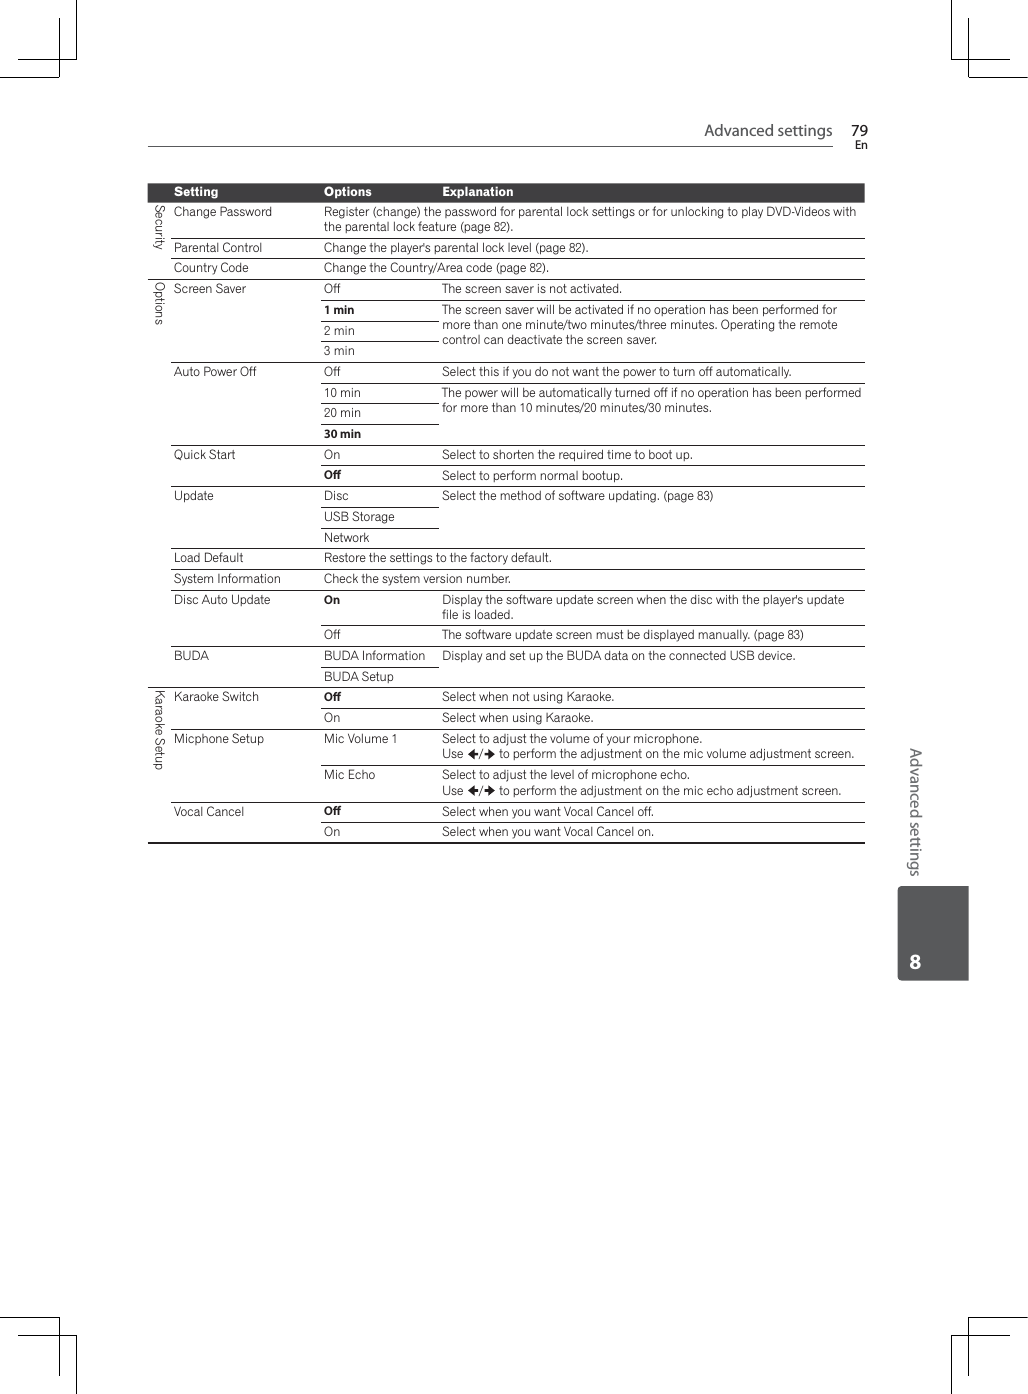
![Before you start18EnBefore you start1Remote control1234567 1 1 (STANDBY/ON): Press to turn the power on and off.FUNCTION: Changes the input source or function.When switching while viewing the display window on the player1. The input source switches every time the FUNCTION is pressed.2. Select the desired input source and press ENTER.When switching while viewing the TV or monitor1. Press FUNCTION to display the [Source Menu].2. The input source switches every time the FUNCTION is pressed. You can also use the cursor /to switch the input source. 3. Select the desired input source and press ENTER.* The Source Menu screen can also be displayed by [HOME MENU] A[Source Menu] and pressing ENTER.$ OPEN/CLOSE: Opens and closes the disc tray. 2 TV Control Buttons: See page 53.HOME MEDIA GALLERY: See page 64.KARAOKE: Press to display the Karaoke Settings screen.RESOLUTION: Sets the output resolution for HDMI (See page 77).NET CONTENTS: Enhances the picture quality of network video contents.KEY LOCK: See page 19.MIC VOLUME: Adjust mic volume.DIMMER: Dims the light on the unit.SLEEP: Sets a certain period of time after which the unit will switch to off.EXIT: See page 68. 3 VIRTUAL 3D SOUND: Switch VIRTUAL 3D SOUND effects. (See page 75)SOUND: Switches to Sound settings. (See page 75).](https://usermanual.wiki/TCL-Technoly-Electronics/BDHTS001/User-Guide-1696335-Page-20.png)
![Before you start 19EnBefore you start1VOL +/- : Adjusts speaker volume.SOUND RETRIEVER: Switches Sound Retriever setting.CD/SACD: See page 59.'USB REC: Records an audio.DISPLAY: Displays or exits On- Screen Display.MUTE: Mute the unit. 4 TOP MENU: Press to display the top menu of the BD-ROM or DVD-Video.POPUP MENU/MENU: Press to display the BD-ROM or DVD-Video menus./ / / (up/ down/ left/ right): Used to navigate on-screen displays.ENTER: Acknowledges menu selection. HOME MENU: Displays or exits the [HomeMenu]. RETURN: Press to return to the previous screen. 5 REPLAY: Press to jump back 10 seconds when REPLAY is pressed during playback.TOOLS: See page 62.CONTINUED: Use to continue playback from a specified position.SKIP SEARCH: Press to skip 30 seconds ahead when SKIP SEARCH is pressed during playback.+/-//,0/./,: See page 56.PLAY ( ): Starts playback.REV/FWD ()*): See page 56.PAUSE (!): Pauses playback.STOP (#): Stops playback or recording. 6 0-9 numerical buttons: Selects numbered options in a menu or inputs letters in the keypad menu.AUDIO: See page 59.SUBTITLE: See page 58.ANGLE: See page 58. 7 CLEAR: Press to clear the numeric number, etc.REPEAT: See page 56.A-B: See page 56.Color buttons: Use these to navigate BD-ROM menus.PROGRAM: Registers FM radio stations.BOOKMARK (RDS): Create a BOOKMARK (page :KHQ)0781(5LVVHOHFWHGVZLWFKHVRDS information (page 72).ZOOM (PTY)::LOO]RRPLQRU]RRPRXW:KHQthis button is pressed while the FM tuner is selected, the PTY value will switch.INDEX: Slideshow playback (page 58).Keylock functionYou can set the keylock to prevent accidental operations.This function allows TVs compatible with control function with HDMI to also perform a Key Lock on the player.Press and hold KEYLOCK for more than 2 seconds. Each time you perform this operation, the function is activated or deactivated. If you try to operate the player while the keylock function is set, LOCK lights on the front panel display.](https://usermanual.wiki/TCL-Technoly-Electronics/BDHTS001/User-Guide-1696335-Page-21.png)

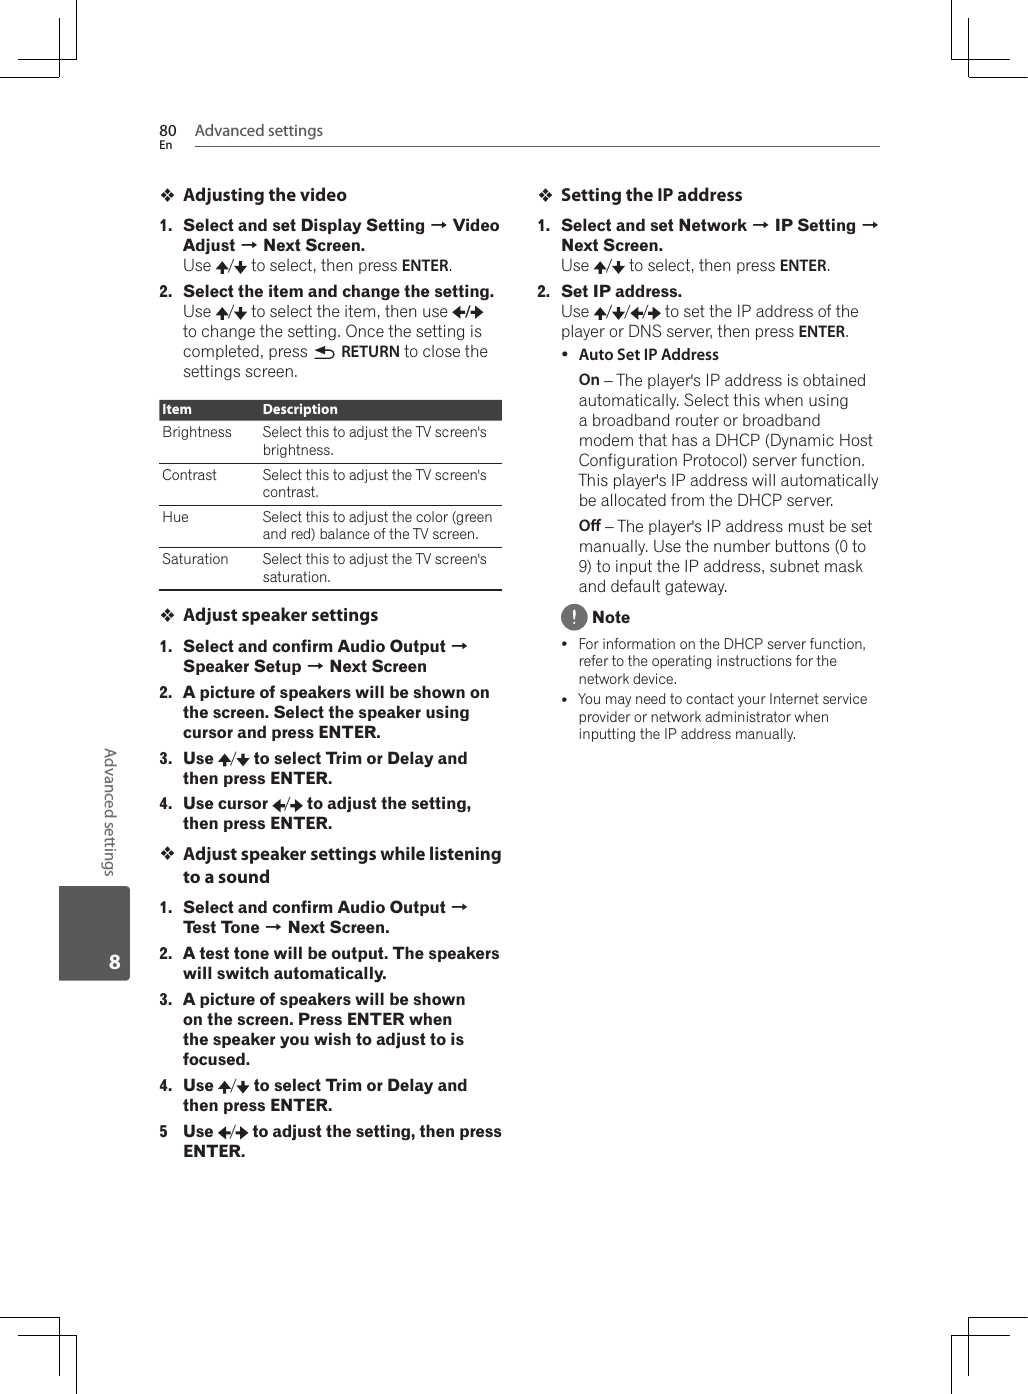
![Connecting 43EnConnecting2ARC (Audio Return Channel) functionThe ARC function enables an HDMI capable TV to send the audio stream to HDMI OUT of this player.To use this function:- Your TV must support the ARC function.- The setting method of ARC may differ depending on the TV. For details about ARC function, refer to your TV manual.- You must use the HDMI cable (High Speed HDMI™ Cable).- You must connect with the HDMI IN of TV that supports the ARC function using the HDMI OUT on this player.- You can connect only one Home Theater to TV compatible with ARC.- The ARC function does not warrant that the function works in all cases even if the above conditions are satisfied.-:KHQ\RXXVHWKH$5&IXQFWLRQ&(&(Consumer Electronics Control) may work. If you do not want to use CEC, you can stop it work by setting [HDMI Control O] on Home Menu. In this case, it is needed to connect TV and this player by an optical cable to send the audio stream to this player. Power on the unit when using CEC function. CEC does not operate during Standby mode.Video connectionConnect the VIDEO OUT terminal on the player to the video in terminal on the TV using a video cable. You can hear the sound through the system’s speakers.Rear of the unitTVVideo cable](https://usermanual.wiki/TCL-Technoly-Electronics/BDHTS001/User-Guide-1696335-Page-37.png)
![Connecting44EnConnecting2Antenna connectionConnect the supplied antenna for listening to the radio.Rear of the unit Note After connecting the FM wire antenna, keep it as horizontal as possible. Be sure to fully extend the FM wire antenna.Connections with external deviceAUX connectionYou can enjoy the sound from an external component through the speakers of this system.Connect the analog audio output terminals of your component into the AUX L/R (INPUT) on this unit. And then select the [AUX] option by pressing FUNCTION and ENTER.To the audio output terminals of your component(TV, VCR, etc.)Rear of the unit:KLWHRed](https://usermanual.wiki/TCL-Technoly-Electronics/BDHTS001/User-Guide-1696335-Page-38.png)
![Connecting 45EnConnecting2PORTABLE IN connectionYou can enjoy the sound from your portable audio player through the speakers of this system.Connect the headphones (or line out ) terminal of the portable audio player into the PORTABLE socket of this unit. And then select the [Portable In] option by pressing FUNCTION and ENTER.MP3 Player, etc...OPTICAL IN 1/2 connectionYou can enjoy the sound from your component with a digital optical connection through the speakers of this system.Connect the optical output terminal of your component into the OPTICAL IN 1 or 2 terminal on the unit. And then select the [Optical IN 1/2] option by pressing FUNCTION and ENTER.To the digital optical output terminal of your componentRear of the unit](https://usermanual.wiki/TCL-Technoly-Electronics/BDHTS001/User-Guide-1696335-Page-39.png)
![Connecting46EnConnecting2HDMI IN 1/2 connectionYou can enjoy the pictures and sound from your component through this connection.Connect the HDMI OUT terminal of your component into the HDMI IN 1 or 2 terminal on this unit. And then select the [HDMI IN 1/2]option by pressing FUNCTION and ENTER.To the HDMI OUT terminal of your component(set-top box, digitalsatellite receiver,video game machine, etc.)Rear of the unit Note You cannot change the video resolution in the HDMI IN 1/2 mode. Change the video resolution of the connected component. If the video output signal is abnormal when your personal computer is connected to HDMI IN 1/2 terminal, change the resolution of your personal computer to 576p, 720p, 1080i or 1080p. The video signal from the HDMI input cannot be output from the component or composite video outputs.Connecting optional Bluetooth® ADAPTER:KHQWKHBluetooth ADAPTER (Pioneer Model No. AS-BT100 or AS-BT200) is connected to this unit, a product equipped with Bluetoothwireless technology (portable cell phone, digital music player, etc.) can be used to listen to music wirelessly.Connect a Bluetooth ADAPTER to the ADAPTER PORT terminal on the rear panel.*For instructions on playing the Bluetoothwireless technology device, see Pairing the Bluetooth ADAPTER and Bluetooth wireless technology device on page 73.Bluetooth® ADAPTERRear of the unit Note Do not move the unit while the Bluetooth ADAPTER is connected. Doing so could cause damage or faulty contact.](https://usermanual.wiki/TCL-Technoly-Electronics/BDHTS001/User-Guide-1696335-Page-40.png)
![Connecting48EnConnecting2Wireless network connectionAnother connection option is to use an Access Point or a wireless router. The network configuration and connection method may vary depending on the equipment in use and the network environment.This player is equipped with an IEEE 802.11n (Single band, 2.4 GHz band) wireless module, which also supports the 802.11b/g standards. For the best wireless performance, we UHFRPPHQGXVLQJD,(((QFHUWLILHG:LFi network (access point or wireless router). WirelessCommunicationPC and/orDLNA certified serverAccess Point or :LUHOHVV5RXWHUBroadbandserviceRefer to the setup instructions supplied with your access point or wireless router for detailed connection steps and network settings.For best performance, a direct wired connection from this player to your home network’s router or cable/DSL modem is always the best option. If you do chose to use the wireless option, note that performance can sometimes be affected by other electronic devices in the home.Wireless network setupFor the wireless network connection, the player needs to be set up for network communication. This adjustment can be done from the [Setup]menu. Adjust the [NETWORK] setting as follow. Setting up the access point or the wireless router is required before connecting the player to the network.PreparationBefore setting the wireless network, you need to:- connect the broadband internet to the wireless home network.- set the access point or wireless router.- note the SSID and security code of the network.1. Select [Initial Setup] A[Network] A[Interface] A[Wireless] and press ENTER.2. Select [Initial Setup] A[Network] A[Wireless Setting] A[Next Screen] and press ENTER.3. Select [Yes] and press ENTER to continue. The new connection settings reset the current network settings.4. [Wireless Setting] menu is displayed. Use / to select [Scan]. Then select [Next] using the / and press ENTER.5. The player scans the all available access points or wireless routers within range and display them as a list. Use / to select an access point or wireless router on the list, and then press ENTER.If you have security on your access point RUZLUHOHVVURXWHUYHULI\WKDWWKH:(3RU:3$NH\WKDWZDVHQWHUHGLQWRWKHSOD\HUmatches the router’s information exactly. You need to input the security code as necessary.6. Use the direction button, select the password, the button upon the Clear can change it to capital letter, lower case or symbol. Press the Enter end it. Select the Next button.7. If it connects success, it will display connection success and IP is obtained.](https://usermanual.wiki/TCL-Technoly-Electronics/BDHTS001/User-Guide-1696335-Page-42.png)
![Connecting 49EnConnecting2 Notey:(3VHFXULW\PRGHJHQHUDOO\KDYHNH\Vavailable on an access point or wireless router’s setting. If your access point or wireless URXWHUXVH:(3VHFXULW\HQWHUWKHVHFXULW\code of the key “No.1” to connect on your home network.yAn Access Point is a device that allows you to connect to your home network wirelessly.[Scan] – The player scans the all available access points or wireless routers within range and display them as a list.[Manual] – Your access point may not be broadcasting its access point name (SSID). Check your router settings through your computer and either set your router to broadcast SSID, or manually enter the access point name (SSID) in [Manual].[Auto] – If your access point or wireless router that supports the Push Button Configuration method, select this option and press the Push Button on your access point or wireless router within 120 counts. You do not need to know the access point name (SSID) and security code of your access point or wireless router. NoteyIf there is no DHCP server on the network and you want to set the IP address manually, Please refer to “Setting the IP address”. (Page 80)WPS setup (Wi-Fi Protected Setup)WPS connection setting:36LVDEEUHYLDWLRQRI:L)L3URWHFWHG6HWXS$VWDQGDUGHVWDEOLVKHGE\WKH:L)L$OOLDQFHindustry group for a function allowing settings UHODWHGWRLQWHUFRQQHFWLRQRI:36FRPSDWLEOHwireless LAN devices and encryption to be made with simple operations.This unit supports push-button configuration and PIN code configuration.PBC (Push Button Conguration)Connection settings are made automatically VLPSO\E\SUHVVLQJWKH:36EXWWRQVRQWKH:36FRPSDWLEOHZLUHOHVV/$1GHYLFH7KLVLVthe simplest way of making the settings, and LVSRVVLEOHZKHQWKH:36FRPSDWLEOHZLUHOHVV/$1GHYLFHLVHTXLSSHGZLWK:36EXWWRQPIN InputConnection settings are made by inputting the 8-digit PIN code shown on the main display to the access point to which you selected. Follow the instructions shown in Connecting using PIN code configuration on the right.:KHQSHUIRUPLQJZLUHOHVVVHWWLQJVVHW[Initial Setup] A[Network] A[Interface] to [Wireless].1. Press HOME MENU.The HOME MENU screen is displayed.2. Use cursor buttons to select [Initial Setup] and press ENTER.The Initial Setup screen is displayed.3. Select [Initial Setup] A [Network] A[Wireless Setting] A [Next Screen] and press ENTER.A confirmation screen is displayed. 4. Use / to select Yes, then press ENTER.The Wireless Setting screen is displayed.5. Use / to select Auto, then press ENTER.The WPS Setting screen is displayed.6. Use / to switch between [PBC] or [PIN] screens.:KHQFRQQHFWLQJXVLQJ3%&JRWRVWHS:KHQFRQQHFWLQJXVLQJ3,1JRWRVWHS](https://usermanual.wiki/TCL-Technoly-Electronics/BDHTS001/User-Guide-1696335-Page-43.png)
![Connecting50EnConnecting27. When connecting using PBC (Push Button), on the [PBC] screen use /to select NEXT, then press ENTER.7KHQSUHVVWKH:36EXWWRQRQWKHDFFHVVpoint within 120 seconds.8. When connecting using PIN confirm the PIN Code on the [PIN] screen. Use cursor / to select NEXT, then press ENTER.9. Enter into the access point the PIN Code that you confirmed in step 8 above.The PIN Code input method differs depending on the LAN device used. For details, consult the operating instructions accompanying your LAN device.Notes on Network Connection: Many network connection problems during set up can often be fixed by re-setting the router or modem. After connecting the player to the home network, quickly power off and/or disconnect the power cord of the home network router or cable modem. Then power on and/or connect the power cord again. Depending on the internet service provider (ISP), the number of devices that can receive internet service may be limited by the applicable terms of service. For details, contact your ISP. Our company is not responsible for any malfunction of the player and/or the internet connection feature due to communication errors/malfunctions associated with your broadband internet connection, or other connected equipment. The features of BD-ROM discs made available through the Internet Connection feature are not created or provided by our company, and our company is not responsible for their functionality or continued availability. Some disc related material available by the Internet Connection may not be compatible with this player. If you have questions about such content, please contact the producer of the disc. Some internet contents may require a higher bandwidth connection. Even if the player is properly connected and configured, some internet contents may not operate properly because of internet congestion, the quality or bandwidth of your internet service, or problems at the provider of the content. Some internet connection operations may not be possible due to certain restrictions set by the Internet service provider (ISP) supplying your broadband Internet connection. Any fees charged by an ISP including, without limitation, connection charges are your responsibility. A 10 Base-T or 100 Base-TX LAN port is required for wired connection to this player. If your internet service does not allow for such a connection, you will not be able to connect the player. You must use a Router to use xDSL service.](https://usermanual.wiki/TCL-Technoly-Electronics/BDHTS001/User-Guide-1696335-Page-44.png)
![Connecting 51EnConnecting2 ADSL modem is required to use DSL service and a cable modem is required to use cable modem service. Depending on the access method of and subscriber agreement with your ISP, you may not be able to use the internet connection feature contained in this player or you may be limited to the number of devices you can connect at the same time. (If your ISP limits subscription to one device, this player may not be allowed to connect when a PC is already connected.) The use of a “Router” may not be allowed or its usage may be limited depending on the policies and restrictions of your ISP. For details, contact your ISP directly. The wireless network operate at 2.4 GHz radio frequencies that are also used by other household devices such as cordless telephone, Bluetooth®devices, microwave oven, and can be affected by interference from them. Turn off all unused network equipment in your local home network. Some devices may generate network traffic. For the purpose of the better transmission, placing the player from the access point as close as possible. In some instances, placing the access point or wireless router at least 0.45 m above the floor may improve the reception. Move closer to the access point if possible or re-orient the player so there is nothing between it and the access point. The reception quality over wireless depends on many factors such as type of the access point, distance between the player and access point, and the location of the player. Set your access point or wireless router to Infrastructure mode. Ad-hoc mode is not supported.USB device connectionThis player can play movie, music and photo files contained in the USB device.1. Insert a USB device to the USB port until it fits into place. Note This player supports USB device/external HDD formatted in FAT16, FAT32 and NTFS when accessing files (music, photo, movie). However, for BD-LIVE and Audio CD recording, only FAT16 and FAT32 formats are supported. Use the USB device/external HDD formatted in either FAT16 or FAT32 when using BD-LIVE and Audio CD recording. The USB device can be used for the local storage for enjoying BD-LIVE discs with Internet. This unit can support up to 8 partitions of the USB device. Do not extract the USB device during operation (play, etc.). A USB device which requires additional program installation when you have connected it to a computer, is not supported. USB device: USB device that supports USB1.1 and USB2.0. Movie, music and photo files can be played. For details of operations on each file, refer to relevant pages. Regular back up is recommended to prevent data loss. If you use a USB extension cable, USB HUB or USB Multi-reader, the USB device may not be recognized. Some USB device may not work with this unit. Digital camera and mobile phone are not supported. USB Port of the unit cannot be connected to PC. The unit cannot be used as a storage device. If more than one USB device is connected, the number displayed for the USB device may change depending on the type of device connected or circumstance. To confirm USB device number, go to [HOME MENU] A[Home Media Gallery].](https://usermanual.wiki/TCL-Technoly-Electronics/BDHTS001/User-Guide-1696335-Page-45.png)
![Playback 59EnPlayback4Switching the audioFor discs or files on which multiple audio streams/channels are recorded, audio streams/channels can be switched during playback.During playback, press AUDIO.yThe current audio and total number of recorded audio streams are displayed on the TV screen. To switch the audio, press AUDIO again.yThe audio can also be switched by selecting Audio from the TOOLS menu.yIf the audio is not switched when AUDIOis pressed, switch it from the disc menu screen.Switching the CD/SACD playback area1. Select the area you want to play.In the stop mode, press CD/SACD. The playback area switches on the front panel display window each time the button is pressed.[CD AREA] A[SACD 2CH] A[SACD MCH]A (back to beginning)yDuring playback, press # twice to cancel continuous play before selecting the playback area.2. Open the disc tray.Press the $OPEN/CLOSE button.3 Close the disc tray.Press the $OPEN/CLOSE button. Once the disc is loaded, the playback area switches.Displaying the disc informationPress DISPLAY.The disc information appears on the TV screen. To switch off the information display, press DISPLAY again. The information display differs between during playback and when playback is stopped.](https://usermanual.wiki/TCL-Technoly-Electronics/BDHTS001/User-Guide-1696335-Page-53.png)
![Playback 61EnPlayback4Playback functionsThe functions that can be used differ according to the type of disc and file. In some cases, some of the functions cannot be used. Check the usable functions on the table below.Function1Disc/file typeBD-ROMBD-R/-REDVD-VideoDVD-R/-RW(VRformat)AVCRECAVCHDVideo fileImagefileAudiofileAudioCDForward and reverse scanning2333333344Playing specific titles, chapters or tracks Skipping content 6Slow motion play2,5 7Step forward and step reverse2 A-B Repeat play2Repeat Play Zoom Angle8Subtitle9 Audio10 Disc information 1. Some functions may not work for some discs or files, even if indicated [] on the table.2. For some discs, normal playback resumes automatically when the chapter switches.3. No sound is produced during forward and reverse scanning.4. Sound is produced during forward and reverse scanning. 1RVRXQGLVRXWSXWGXULQJVORZPRWLRQSOD\EDFN ,WLVQRWSRVVLEOHWRVZLWFKWKHVSHHGGXULQJUHYHUVHVORZPRWLRQSOD\EDFN6. Reverse slow motion playback is not possible.7. Reverse step playback is not possible.8. Angle mark is displayed for scenes at which multiple angles are recorded if Angle Mark is set to On (page 78). 7KHW\SHVRIUHFRUGHGVXEWLWOHVGHSHQGRQWKHGLVFDQGILOH ,QVRPHFDVHVWKHVXEWLWOHPD\VZLWFKRUWKHVZLWFKLQJVFUHHQSURYLGHGRQWKHGLVFPD\EHGLVSOD\HGimmediately, without the current subtitle or the total number of subtitles recorded on the disc being displayed.10. The types of recorded audio streams depend on the disc and file.](https://usermanual.wiki/TCL-Technoly-Electronics/BDHTS001/User-Guide-1696335-Page-55.png)
![Other Operating 69EnOther Operating7Chapter 7Other OperatingRecording Audio CD to a USB deviceYou can record audio CD to a USB device using this player.1. Insert an USB device into the USB port on the front panel. NoteyPlease connect only one USB device.2. Open the disc tray and place an Audio CD on the tray.Press $OPEN/CLOSE.3. Close disc tray.:KHQ$OPEN/CLOSE is pressed, playback will start automatically.yIf playback does not start automatically, press the PLAY on the remote or /!(PLAY/PAUSE) on the device to start playback.4. Press USB REC during CD playback.[CD RIP] will be displayed.5. Select the song or the Track No. you want to record.If you are recording all the songs on the CD use / / / to select [Select all] and press ENTER.If you are selecting a Track to record use / / / to select the Track No. and press ENTER.yIf there are more than one Track you want to record, repeat the step for 5.yIf you want to delete a selected Track use / / / to select [Select None] and press ENTER.6. Set the recording speedUse / / / to select [Speed] and press ENTER.yThe recording speed will change each time ENTER is pressed. The recording speed will change as shown below.Normal: when recording while listening to the music.Fast: will record at approx 4x speed. You cannot listen to the music.7. Start recording.Use / / / to select [Start] and press ENTER to start recording.8. Exit CD recording display.Use / / / to select [Cancel] then press ENTER after recording has finished. Note Use cursor / / / to select [Bitrate] then press ENTER to change the Bitrate setting.The set speed will change each time [Bitrate] is pressed. The set value can be selected from those shown below.[64kps] A[96kbps] A [128kps] A[192kps] A[256kps] A[320kps]](https://usermanual.wiki/TCL-Technoly-Electronics/BDHTS001/User-Guide-1696335-Page-63.png)
![Other Operating72EnOther Operating7Radio OperationsBe sure that FM aerial is connected. (Refer to the page 44)Listening to the radio1. Press FUNCTION until FM appears in the display window and press ENTER.The last received station is tuned in.2. Scanning will start when either the * or the ) button is pressed.orPress / repeatedly.orPress +,, on the front panel of the player repeatedly.3. Adjust the volume by rotating VOLUME on the front panel or by pressing VOL + or VOL – on the remote control repeatedly. Presetting the radio stationsYou can preset 50 stations for FM.Before tuning, make sure that you have turned down the volume.1. Press FUNCTION until FM appears in the display window and press ENTER.The last received station is tuned in.2. Select the desired frequency by using / .3. Press PROGRAM a preset number will flash in the display window.4. Press / to select the preset number you want.5. Press PROGRAM.The station is stored.6. Repeat the steps 2 to 5 to store other stations.7. You can select the stored station by pressing / .Deleting all the saved stations1. Press and hold STOP for two seconds. [ERASE ALL] will flash up on the display window.2. Press STOP to erase all of the saved radio stations.Improving poor FM receptionPress AUDIO on the remote control. This will change the tuner from stereo to mono and usually improve the reception.Seeing information about a radio stationThe FM tuner is supplied with the RDS (Radio Data System) facility. This shows information about the radio station being listened to. Press BOOKMARK (RDS) repeatedly to cycle through the various data types:PS (Programme Service Name)The name of the channel will appear in the display.PTY (Programme Type Recognition)The programme type (e.g. Jazz or News) will appear in the display.RT (Radio Text) A text message contains special information from the broadcast station. This text may scroll across the display.You can search the radio stations by programme type by pressing BOOKMARK (RDS). The display will show the last PTY in use. Press ZOOM (PTY) one or more times to select your preferred programme type. Press and hold /7KHWXQHUZLOOVHDUFKDXWRPDWLFDOO\:KHQa station is found the search will stop.](https://usermanual.wiki/TCL-Technoly-Electronics/BDHTS001/User-Guide-1696335-Page-66.png)
![Other Operating 73EnOther Operating7Bluetooth® ADAPTER for Wireless Enjoyment of Music Bluetooth wireless technology enabled device: cell phone Bluetooth wireless technology enabled device: Digital music player Device not equipped with Bluetooth wireless technology: Digital music player + Bluetoothaudio transmitter (sold commercially)Wireless music play:KHQWKHBluetooth ADAPTER (Pioneer Model No. AS-BT100 or AS-BT200) is connected to this unit, a product equipped with Bluetoothwireless technology (portable cell phone, digital music player, etc.) can be used to listen to music wirelessly. Also, by using a commercially available transmitter supporting Bluetoothwireless technology, you can listen to music on a device not equipped with Bluetooth wireless technology. The AS-BT100 and AS-BT200 model supports SCMS-T contents protection, so music can also be enjoyed on devices equipped with SCMS-T type Bluetooth wireless technology. :LWKWKH$6%7VRPHIXQFWLRQVPD\QRWbe available on this unit. It must be necessary that the Bluetoothwireless technology enabled device supports A2DP profiles. Note Pioneer does not guarantee proper connection and operation of this unit with all Bluetooth wireless technology enabled devices. About one minute is required between turning the power on and completion of startup.Listen to music on a Bluetoothwireless technology enabled devicePairing of the unit and a Bluetoothwireless technology enabled device. (Initial registration)Prior to starting pairing, make sure that the Bluetooth function on your Bluetooth wireless technology enabled device is turned on. Please see the user manual of your Bluetooth wireless technology enabled device for more details. The pairing operation only needs to be performed once, and then is not required again.1. Press FUNCTION and change input to BLUETOOTH and press ENTER.After [BLUETOOTH] is displayed in the unit's display window, [READY] will then be displayed.2. Operate the Bluetooth wireless technology enabled device and perform pairing.:KHQDBluetooth wireless technology enabled device searches for this unit, some Bluetooth wireless technology enabled devices will display a list of supported devices on their display section. This unit will be displayed as Bluetooth ADAPTER [AS-BT100] or [AS-BT200].3. Enter the PIN code.Pin code: 0000This unit cannot be set with any PIN code other than 0000.4. When the unit and a Bluetoothwireless technology enabled device are successfully paired, [SINK] will be displayed in the unit's display window. NoteyThe pairing method may differ depending on the type of Bluetooth wireless technology enabled device.5. Playback music using the Bluetoothwireless technology enabled device. Please see the user manual of your Bluetooth wireless technology enabled device for details on how to playback music.](https://usermanual.wiki/TCL-Technoly-Electronics/BDHTS001/User-Guide-1696335-Page-67.png)
![Other Operating74EnOther Operating7 Note This unit does not support AVRCP. This unit does not support Mono Headset Profile (Hands Free Profile). ABluetooth wireless technology enabled device cannot be operated by this unit. This unit cannot be used to listen to one seg sounds on a Bluetooth wireless technology enabled device. Music contents protected by SCMS-T cannot be listened to. Only one Bluetooth wireless technology enabled device may be paired with this unit; multiple pairing is not possible. You may be unable to use the Bluetooth function, depending on the type of Bluetooth wireless technology enabled device. :KHQQRWFRQQHFWHGE\Bluetooth,[READY] will be displayed in the unit's display window. Other electro-magnetic waves may cause interference with the connection, causing the sound to cut out. If medical equipment, microwaves, wireless LAN routers etc. on the same frequency cause malfunction to occur, the Bluetooth connection will be lost. Even if the distance between the Bluetooth wireless technology enabled device and the unit is less than 10 meters, if there are other obstacles in between the two of them then you will be unable to connect the Bluetooth wireless technology enabled device. If an obstacle comes between the Bluetoothwireless technology enabled device and the unit to interrupt communication, the Bluetooth connection will be lost. If the Bluetooth wireless technology enabled device and the unit move apart then sound quality will fall, and if they move beyond the operating range the Bluetooth connection will be lost. If the power to the unit is cut or the Bluetoothwireless technology enabled device is moved more than 10 meters from the unit, the Bluetoothconnection will be lost.Karaoke1. Press KARAOKE on the remote control.Karaoke Setup under Initial Setup will be displayed on the TV screen.2. Turn the Karaoke Switch on.Select [Karaoke Setup] A[Karaoke Switch]A[On] using cursor and press ENTER.3. Adjust microphone volume.Select [Karaoke Setup] A[Microphone] A[Mic Volume] using cursor and press ENTER.Use / to adjust the microphone volume.Press RETURN to finish.4. Adjust microphone echo.Select [Karaoke Setup] A[Microphone] A[Mic Echo] using cursor and press ENTER.Use cursor / to adjust the microphone echo. Press RETURN to finish.5. Switch Vocal Cancel on or off.Use cursor to select [Karaoke Setup] A[Vocal Cancel] A[On] or [O] and press ENTER. Note Karaoke can only be used with disc playback or USB playback. Depending on the song, Voice Cancel may not be effective. :KHQLQVHUWLQJWKH0,&WHUPLQDOVXSSRUWWKHtop of the unit with your hand to prevent it from moving.](https://usermanual.wiki/TCL-Technoly-Electronics/BDHTS001/User-Guide-1696335-Page-68.png)
![Advanced settings 81EnAdvanced settings8Setting the proxy serverOnly set the proxy server if so instructed by your Internet service provider. 1. Select and set Network A Proxy Server A Next Screen.Use / to select, then press ENTER.2. Select and set Use or Not use at Proxy Server.Use / to change, then press .yUse – Select this when using a proxy server.yNot use – Select this when not using a proxy server.If you have selected Use, proceed to step 3.3. Select and set Server Select Method.Use / to change, then press .yIP Address – Input the IP address.yServer Name – Input the server name.4. Input IP Address or Server Name.Use the number buttons (0 to 9) to input the number if you select IP address in step 3. Use / to move the cursor.:KHQ6HUYHU1DPHLVVHOHFWHGLQVWHSuse the number buttons (0 to 9) to launch the software keyboard. Now use / / /to select characters and items, then press ENTER to input.5. Input Port Number.Press , then use the number buttons (0 to 9) to input the number.6. Press ENTER to set.Displaying the network settingsSelect and set Network A Information A Next Screen.Use / to select, then press ENTER.The MAC address, IP address, subnet mask, default gateway and DNS server (primary and secondary) settings are displayed.:KHQAuto Set IP Address is set to On, the values obtained automatically are displayed. Notey[0.0.0.0] is displayed when each IP address has not been set.Testing the network connectionSelect and set Network A Connection Test A Start.Use / to select, then press ENTER.[Network is OK.] is displayed once the test is completed. If any other message is displayed, check the connections and/or settings (pages 47 and 80).Changing to other language at language setting1. Select and set Language.Use / to select, then press ENTER.2. Select and set OSD, Audio, Subtitle or MenuUse / to select, then press ENTER.3. Select and set the desired language.Use / to select, then press ENTER. NoteyIf a language not recorded on the BD/DVD is set, one of the recorded languages is automatically selected and played.Erasing data that has been added to BDs and application dataUse this procedure to erase data that has been added to BDs (data downloaded with the BD-LIVE function and data used with WKH%21869,(:IXQFWLRQDQGDSSOLFDWLRQdata. CautionySome time is required to erase the data.yDo not unplug the power cord while data is being erased.1. Select and set BUDA A BUDA Setup.Use / to select, then press ENTER.2. Select and set Fmt buda.Press ENTER.](https://usermanual.wiki/TCL-Technoly-Electronics/BDHTS001/User-Guide-1696335-Page-75.png)
![Advanced settings82EnAdvanced settings8Registering or Changing the passwordUse this procedure to register or change the code number required for the Parental Lock settings.About default password of this unitThe default password is [0000].yThis unit might ask you to enter a password when you change the password.yIf you reset this unit, your password is simultaneously changed to the default setting.1. Select and set Security A Change Password A Next Screen.Use / to select, then press ENTER.2. Input the password.Use the number buttons (0 to 9) to input the number, then press ENTER to set. Use / to move the cursor.3. Re-input the password.Use the number buttons (0 to 9) to input the number, then press ENTER to set. Use / to move the cursor.yTo change the password, input the previously registered password, then input the new password. Notey:HUHFRPPHQGPDNLQJDQRWHRIWKHSDVVZRUGyIf you have forgotten the password, reset the player to the factory default setting, then register the password again (page 84).Changing the Parental Lock level for viewing DVDs/BD-ROMsSome DVD-Video discs containing scenes of violence, for example, have Parental Lock levels (check the indications on the disc's jacket or elsewhere). To restrict viewing these discs, set the player's level to the level lower than the discs.1. Select and set Security A Parental Control A Next Screen.Use / to select, then press ENTER.2. Input the password.Use the number buttons (0 to 9) to input the number, then press ENTER to set. Use / to move the cursor.3. Change the level.Use / to change, then press ENTER to set. NoteyThe level can be set to Off or between Level1 DQG/HYHO:KHQVHWWR2IIYLHZLQJLVQRWrestricted.Changing the Country/Area code1. Select and set Security A Country Code A Next Screen.Use / tto select, then press ENTER.2. Input the password.Use the number buttons (0 to 9) to input the number, then press ENTER to set. Use / to move the cursor.3. Change the country/area code.Use / to change, then press ENTER to set. Refer to page 85.](https://usermanual.wiki/TCL-Technoly-Electronics/BDHTS001/User-Guide-1696335-Page-76.png)

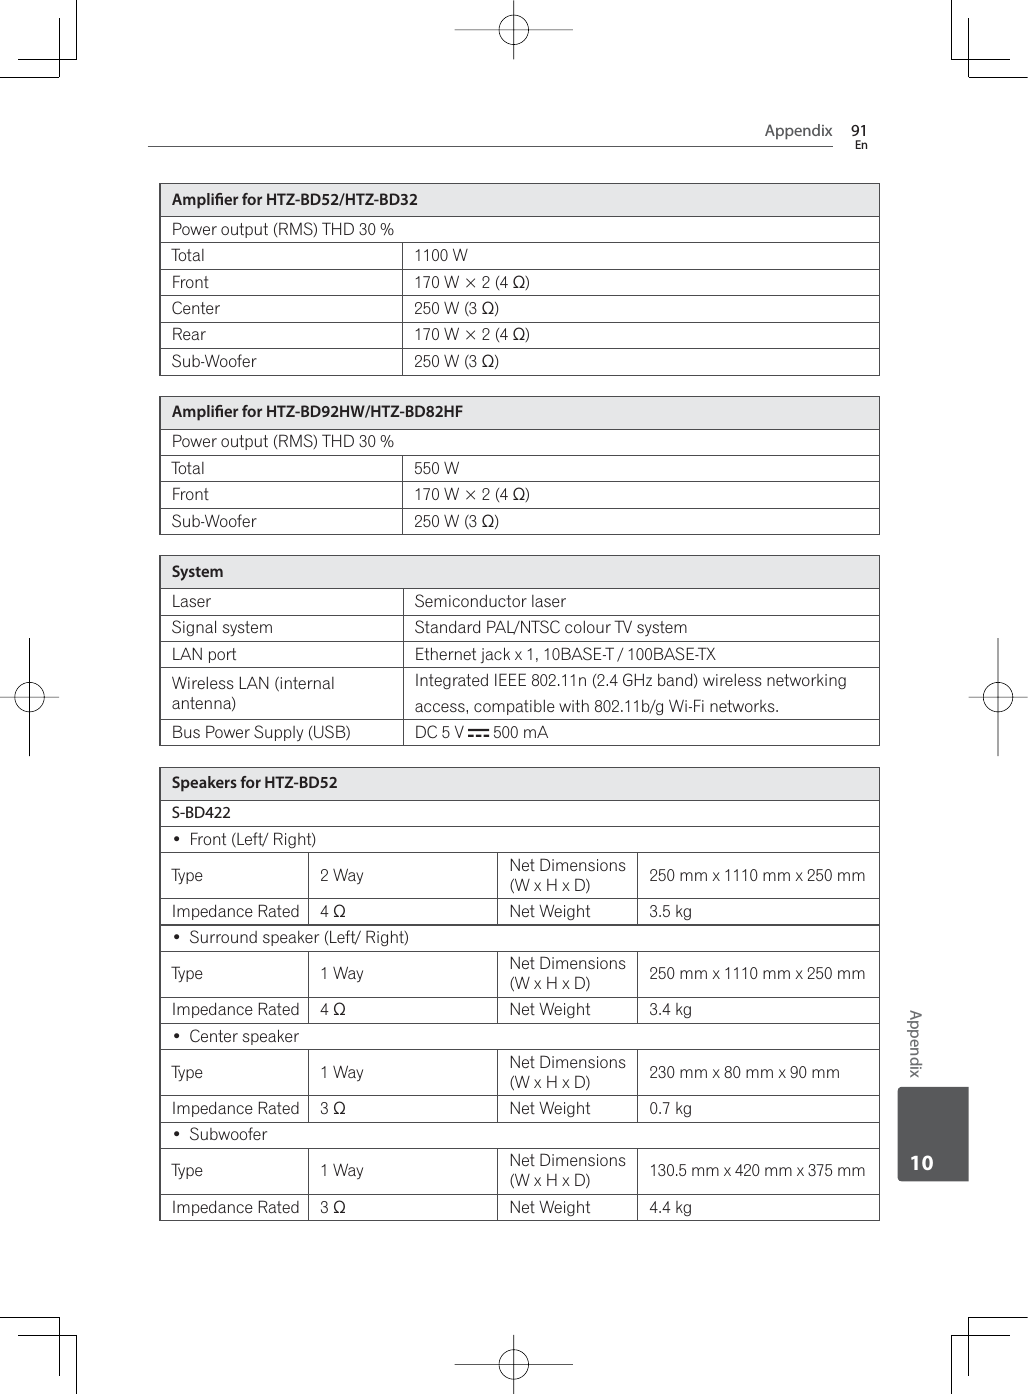
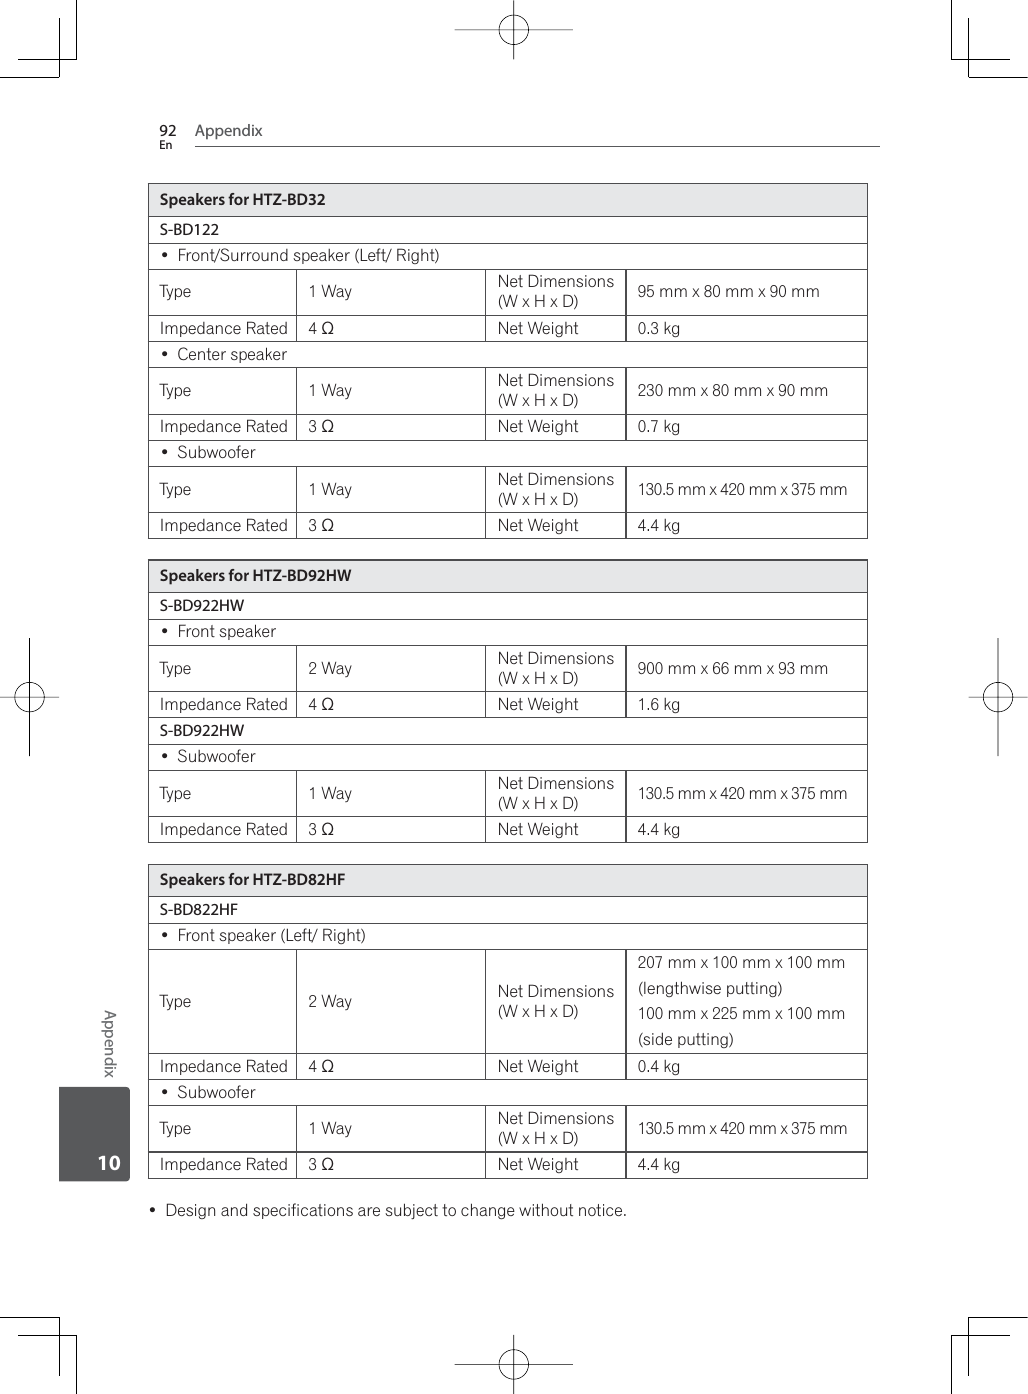
![Appendix90EnAppendix10Chapter 10AppendixSpecicationsGeneral for HTZ-BD52/HTZ-BD32Power requirements AC 120 V, 50 Hz/60 HzPower consumption 190 W (In Standby mode: Less than 0.5 W)Dimensions (W x H x D) Approx. 430 mm x 345 mm x 63 mm Net Weight (Approx.) 3.4 kgOperating temperature 5 °C to 35 °COperating humidity 5 % to 85 %General for HTZ-BD92HW/HTZ-BD82HFPower requirements AC 120 V, 50 Hz/60 HzPower consumption 105 W (In Standby mode: Less than 0.5 W)Dimensions (W x H x D) Approx. 430 mm x 345 mm x 63 mm Net Weight (Approx.) 3.3 kgOperating temperature 5 °C to 35 °COperating humidity 5 % to 85 %Inputs/OutputsVIDEO OUT 9SSV\QFQHJDWLYH5&$MDFN[+'0,,1287YLGHRDXGLR 19 pin (HDMI®/™ Connector)ANALOG AUDIO IN 9UPVN+]G%5&$MDFN/5[DIGITAL IN (OPTICAL) 9SS2SWLFDOMDFN[N+]N+]VDPSOLQJ3257$%/(,1 9UPVPPVWHUHRMDFN$'$37(53257 5 V, 100 mAMIC 0LFMDFN[USB 4 pin A Type x 2Tuner)07XQLQJ5DQJH 87.5 MHz to 108.0 MHzAntenna input XQEDODQFHG](https://usermanual.wiki/TCL-Technoly-Electronics/BDHTS001/User-Guide-1696335-Page-84.png)