Symbol Technologies MC5574 EDA (Enterprise Digital Assistant) User Manual MC55 User Guide draft

Symbol Technologies Inc EDA (Enterprise Digital Assistant) MC55 User Guide draft

UserMan3 update
Chapter 3 Using GPS NavigationIntroductionThe MC55 includes Global Positioning System (GPS) technology using the SiRF III chipset. GPS technology is based on a worldwide system of GPS satellites orbiting the earth that continuously transmit digital radio signals. These radio signals contain data on the satellites’ locations and their exact clock time and are used to determine your location on the earth.Software InstallationThird-party GPS navigation software is required. Evaluation software is available from various suppliers. For example; VisualGPS, visit: http://www.visualgps.net/VisualGPSce/If interested in purchasing GPS navigation software check with the GPS software vendor (before purchasing, downloading, or installing any software) to determine that the application is compatible with the MC55. Refer to the application’s user guide for application installation and setup information.MC55 GPS SetupThe GPS-enabled MC55 uses Microsoft Windows Mobile 6, so the operating system automatically manages access to the GPS receiver to allow multiple programs to simultaneously access GPS data.Ensure that the following settings are set on the MC55:1. Tap Start > Settings > System > External GPS icon.2. In the Programs tab, select None from the GPS program port drop-down list.3. In the Hardware tab, select COM8 in the GPS hardware port drop-down list.WARNING!When using the MC55 in a vehicle, it is the user’s responsibility to place, secure and use in a manner that will not cause accidents, personal injury or property damage or obstruct their view. It is the responsibility of the driver to operate the vehicle in a safe manner, maintain observation of all driving conditions at all times, and not become distracted by the device to the exclusion of safe driving practices. It is unsafe to operate the controls of the device while driving.DRAFT
3 - 2 MC55 User Guide4. Select 57600 from the Baud rate drop-down list.5. Tap ok to close the Setting window.OperationAcquiring satellite signals may take a few minutes. It is best to be outside and have a clear, unobstructed view of the sky. Without a clear view, acquisition takes much longer and could result in the MC55 being unable to compute the initial position quickly. When operating the device indoors access to the GPS signals may be limited or unavailable. GPS Maps on microSD CardsGPS navigation software vendors may sell maps on microSD cards. If using a microSD card with the GPS navigation software:1. Remove the Memory Card Cover on the side of the MC55.2. Insert the microSD card into the slot.3. Replace the Memory Card Cover.Answering a Phone Call While Using GPSIf you receive a phone call while using your GPS navigation software:1. Answer the phone call by pressing the Answer button.2. Once you end the phone call, press the End Call button to resume the audio on the GPS software.Losing the GPS Signal While in a VehicleGPS performance on the MC55 may be affected if the vehicle has thermal glass windows and windshields, which can block the MC55 from receiving a GPS signal from satellites. To improve GPS signal strength, place the MC55 where there is a clear view of the sky. A direct line of sight is required between the MC55 and the GPS satellites to access information from the satellites.The Global Positioning System (GPS) is a system that allows the user to track their position anywhere on the earth.Assisted GPSGPS can be used in stand-alone or Assisted GPS (A-GPS) modes. A Stand-alone GPS receiver downloads data from GPS satellites. It can take several minutes to get a fix. By using GPS Location servers, A-GPS dramatically NOTE If an application error message appears indicating that the COM port cannot be opened, ensure that a free COM port is selected in the GPS hardware port drop-down list.NOTE When using a GPS navigation application, ensure that the MC55 does not go into suspend mode. If the MC55 suspends then the power to the GPS radio is removed. Upon resume the GPS receiver must reacquire a valid GPS signal, resulting in a a delay of positional information.NOTE Anytime you are using GPS on the MC55 and you receive a phone call, the audio on the GPS navigation software is muted until you finish the call.DRAFT
Using GPS Navigation 3 - 3improves the performance of the Time To First Fix (TTFF) of GPS receivers by providing them with data that they would ordinarily have to download from the GPS satellites. With the A-GPS data, GPS receivers can operate faster and more reliably.A-GPS follows the Secure User Plane Location (SUPL) protocol which allows a mobile device to communicate with a location server. Refer to the EMDK Help file for information on setting up SUPL on the MC55.DRAFT
3 - 4 MC55 User GuideDRAFT
Chapter 4 Using BluetoothIntroductionBluetooth-equipped devices can communicate without wires, using frequency-hopping spread spectrum (FHSS) radio frequency (RF) to transmit and receive data in the 2.4 GHz Industry Scientific and Medical (ISM) band (802.15.1). Bluetooth wireless technology is specifically designed for short-range (30 feet/10 meters) communication and low power consumption. MC55s with Bluetooth capabilities can exchange information (e.g., files, appointments, and tasks) with other Bluetooth enabled devices such as phones, printers, access points, and other mobile computers. To use the MC55 as a modem, create a dial-up modem connection between a computer and MC55.Motorola mobile computers with Bluetooth technology use the StoneStreet Bluetooth stack. To program Bluetooth within the MC55 refer to the Enterprise Mobility Developer Kit (EMDK) Help.Adaptive Frequency HoppingAdaptive Frequency Hopping (AFH) is a method of avoiding fixed frequency interferers, and can be used with Bluetooth voice. All devices in the piconet (Bluetooth network) must be AFH-capable in order for AFH to work. There is no AFH when connecting and discovering devices. Avoid making Bluetooth connections and discoveries during critical 802.11b communications. AFH for Bluetooth consists of four main sections:•Channel Classification - A method of detecting an interference on a channel-by-channel basis, or pre-defined channel mask.•Link Management - Coordinates and distributes the AFH information to the rest of the Bluetooth network.•Hop Sequence Modification - Avoids interference by selectively reducing the number of hopping channels.•Channel Maintenance - A method for periodically re-evaluating the channels.When AFH is enabled, the Bluetooth radio “hops around” (instead of through) the 802.11b high-rate channels. AFH coexistence allows Motorola mobile computers to operate in any infrastructure. DRAFT
4 - 2 MC75 User GuideThe Bluetooth radio in this MC55 operates as a Class 2 device power class. The maximum output power is 2.5mW and the expected range is 32.8 feet (10 meters). A definition of ranges based on power class is difficult to obtain due to power and device differences, and whether one measures open space or closed office space. SecurityThe current Bluetooth specification defines security at the link level. Application-level security is not specified. This allows application developers to define security mechanisms tailored to their specific need. Link-level security occurs between devices, not users, while application-level security can be implemented on a per-user basis. The Bluetooth specification defines security algorithms and procedures needed to authenticate devices, and if needed, encrypt the data flowing on the link between the devices. Device authentication is a mandatory feature of Bluetooth while link encryption is optional.Pairing of Bluetooth devices is accomplished by creating an initialization key that is used to authenticate the devices and create a link key for them. Entering a common PIN number in the devices being paired generates the initialization key. The PIN number is never sent over the air. By default, the Bluetooth stack responds with no key when a key is requested (it is up to user to respond to the key request event). Authentication of Bluetooth devices is based-upon a challenge-response transaction. Bluetooth allows for a PIN number or passkey that is used to create other 128-bit keys used for security and encryption. The encryption key is derived from the link key used to authenticate the pairing devices. Also worthy of note is the limited range and fast frequency hopping of the Bluetooth radios that makes long-distance eavesdropping difficult.Recommendations are:•Perform pairing in a secure environment•Keep PIN codes private and don't store the PIN codes in the mobile computer•Implement application-level security.NOTE It is not recommended to perform Bluetooth wireless technology inquiry when high rate 802.11b operation is required.DRAFT
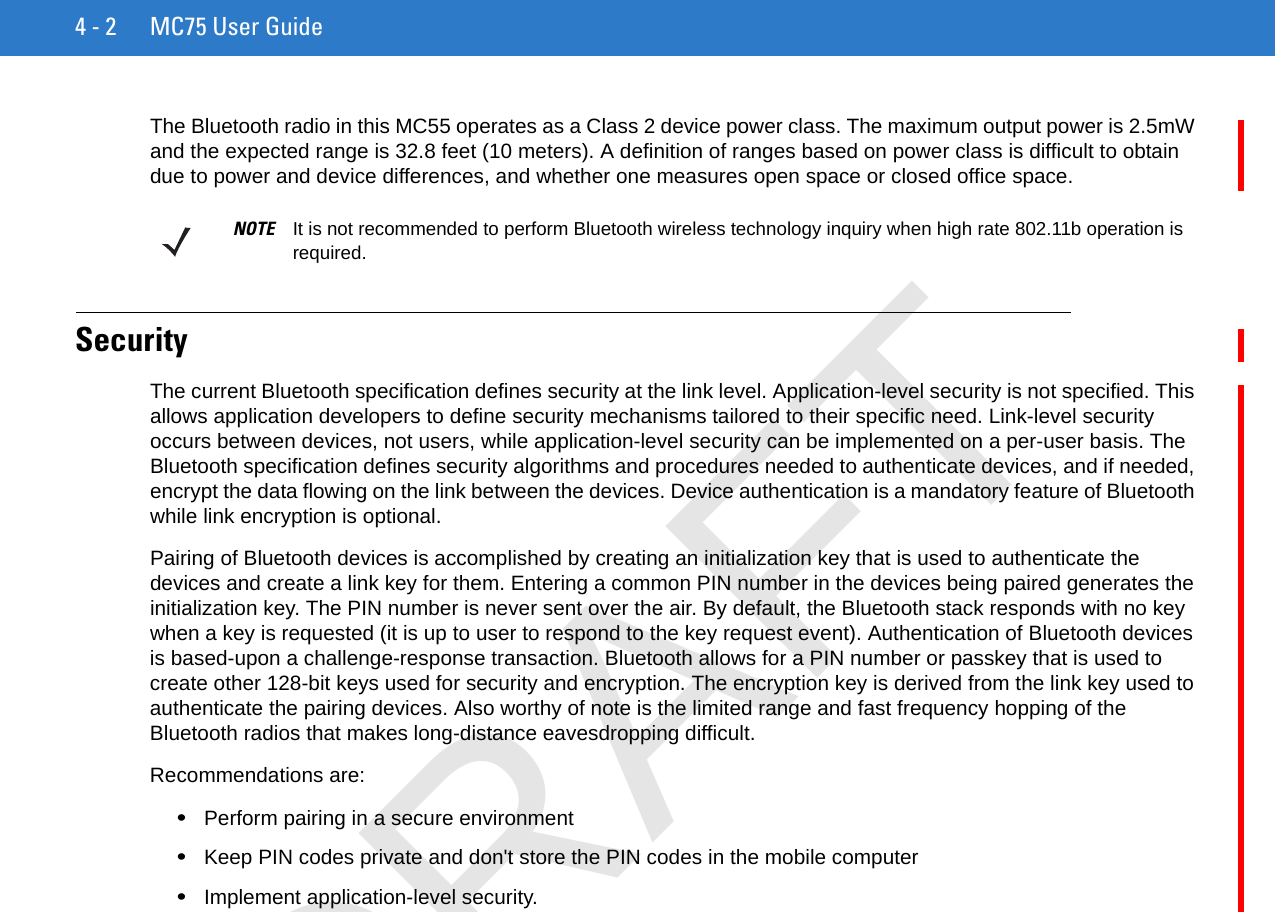
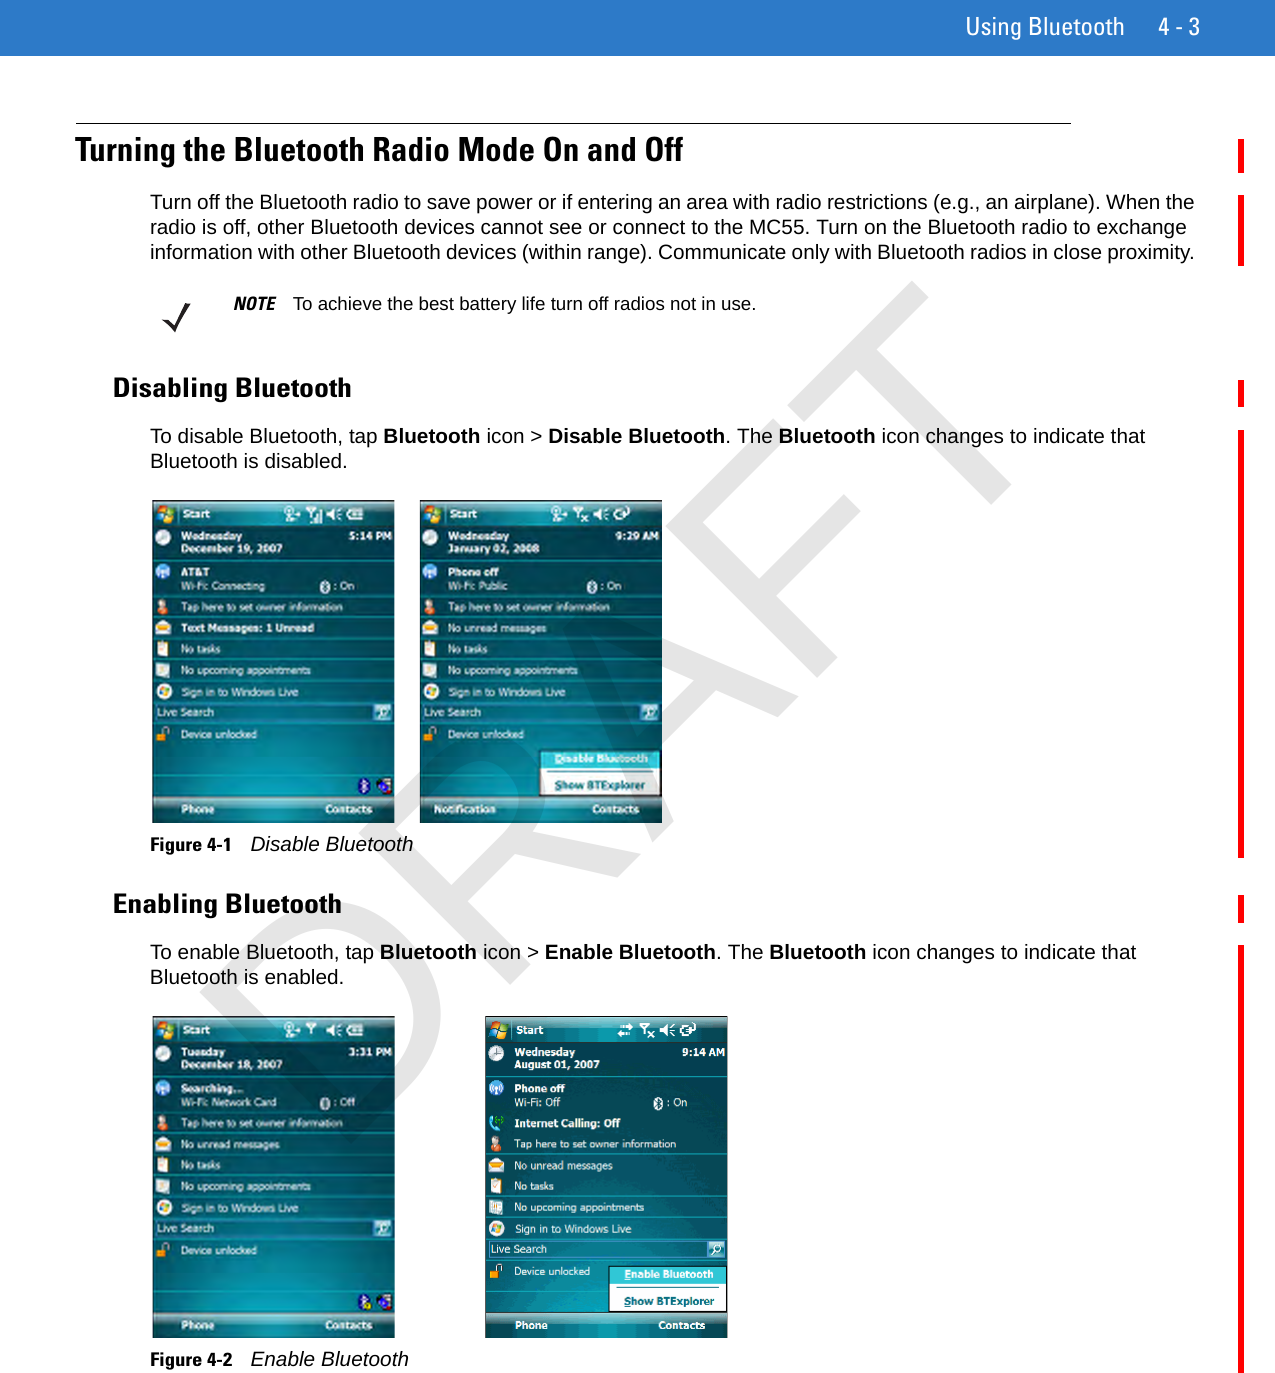
Using Bluetooth 4 - 3Turning the Bluetooth Radio Mode On and OffTurn off the Bluetooth radio to save power or if entering an area with radio restrictions (e.g., an airplane). When the radio is off, other Bluetooth devices cannot see or connect to the MC55. Turn on the Bluetooth radio to exchange information with other Bluetooth devices (within range). Communicate only with Bluetooth radios in close proximity. Disabling BluetoothTo disable Bluetooth, tap Bluetooth icon > Disable Bluetooth. The Bluetooth icon changes to indicate that Bluetooth is disabled. Figure 4-1    Disable BluetoothEnabling BluetoothTo enable Bluetooth, tap Bluetooth icon > Enable Bluetooth. The Bluetooth icon changes to indicate that Bluetooth is enabled.Figure 4-2    Enable BluetoothNOTE To achieve the best battery life turn off radios not in use.DRAFT
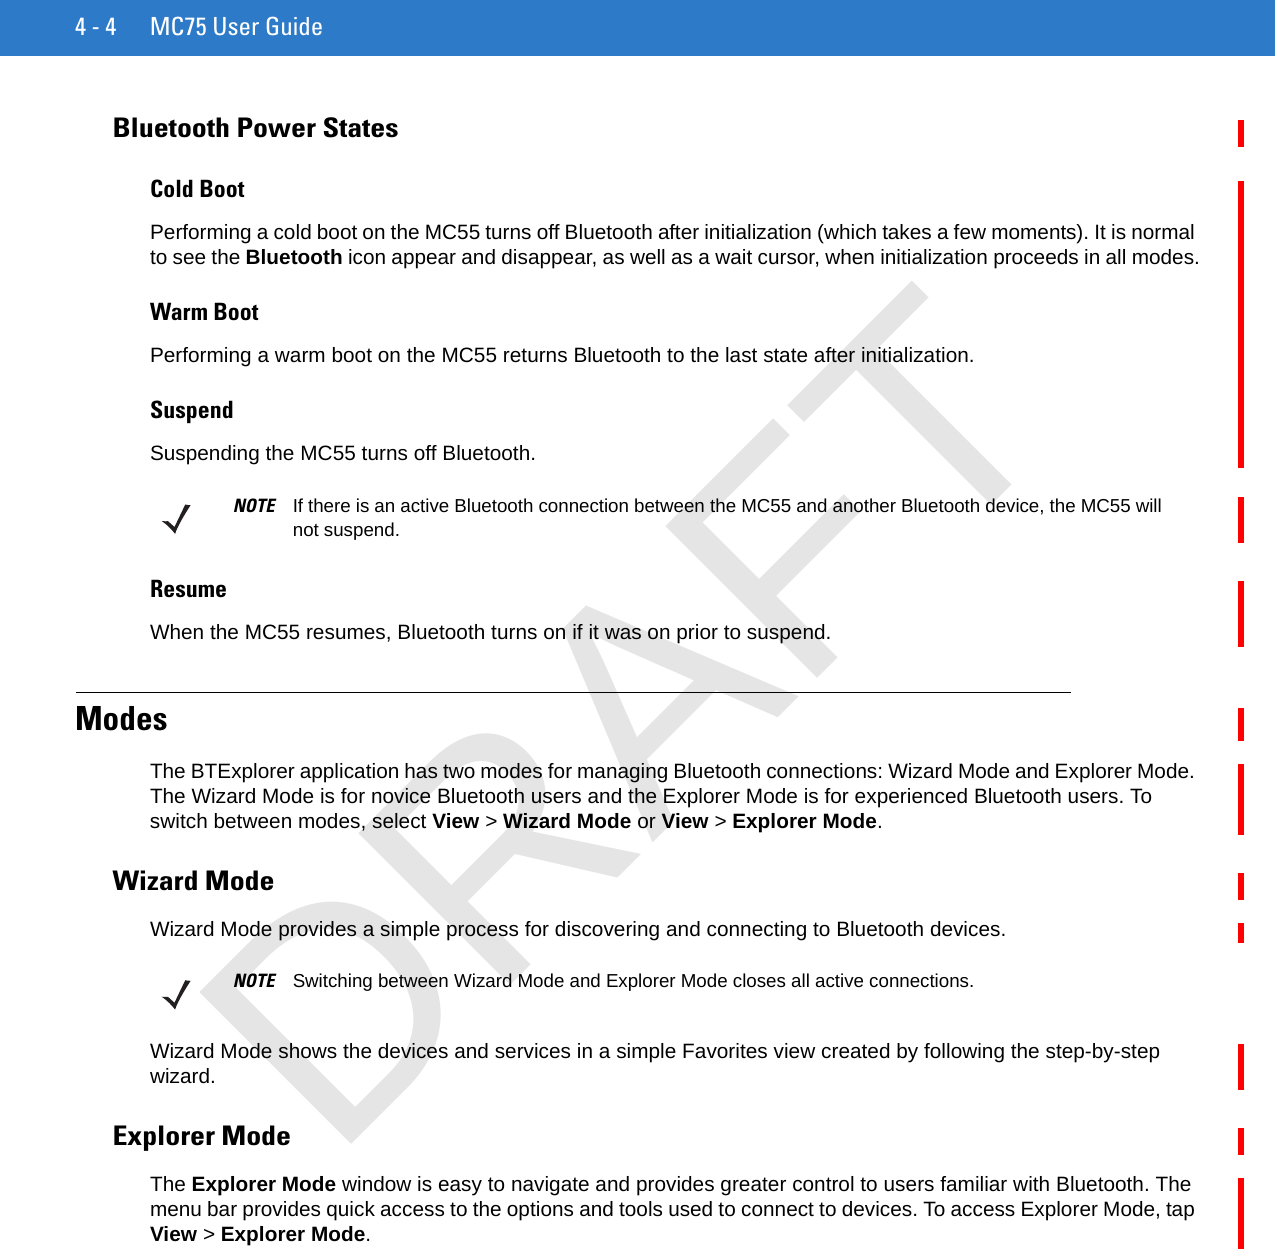
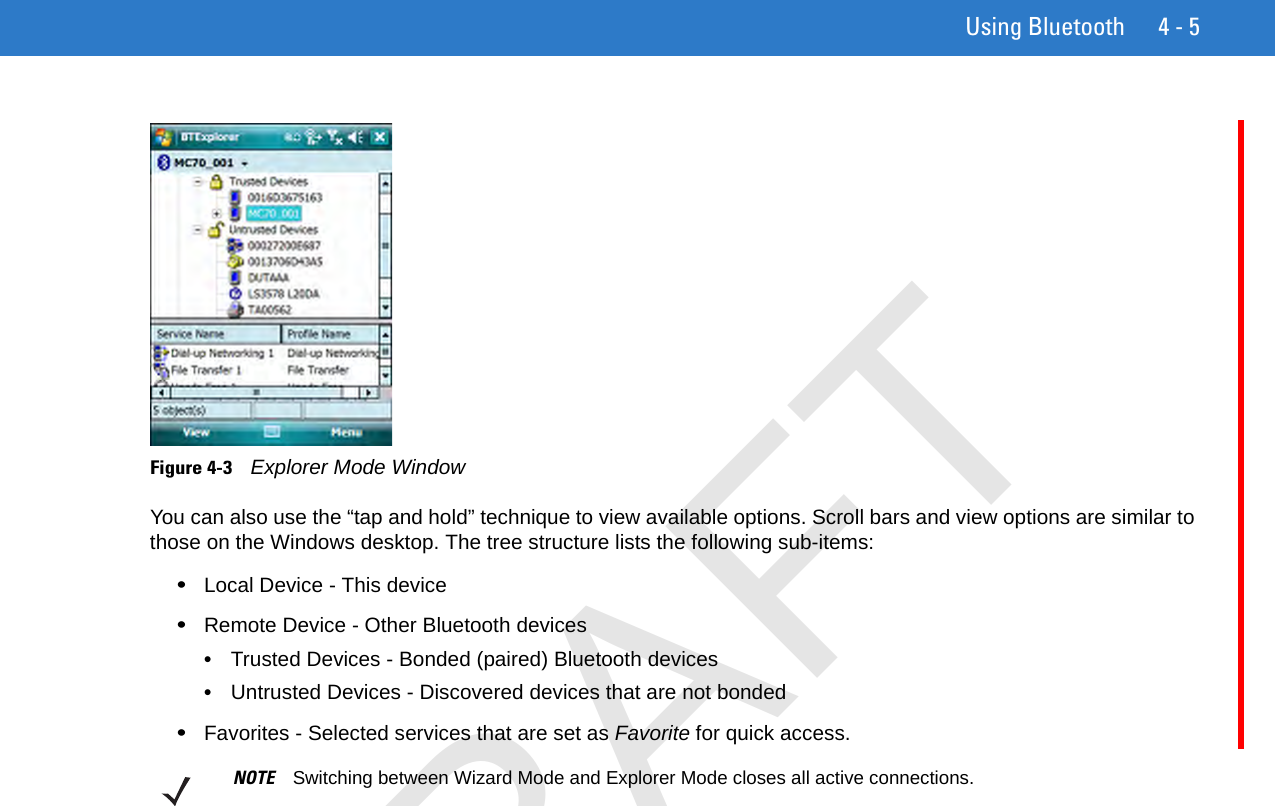
4 - 4 MC75 User GuideBluetooth Power StatesCold BootPerforming a cold boot on the MC55 turns off Bluetooth after initialization (which takes a few moments). It is normal to see the Bluetooth icon appear and disappear, as well as a wait cursor, when initialization proceeds in all modes.Warm BootPerforming a warm boot on the MC55 returns Bluetooth to the last state after initialization.SuspendSuspending the MC55 turns off Bluetooth.ResumeWhen the MC55 resumes, Bluetooth turns on if it was on prior to suspend.ModesThe BTExplorer application has two modes for managing Bluetooth connections: Wizard Mode and Explorer Mode. The Wizard Mode is for novice Bluetooth users and the Explorer Mode is for experienced Bluetooth users. To switch between modes, select View > Wizard Mode or View > Explorer Mode.Wizard ModeWizard Mode provides a simple process for discovering and connecting to Bluetooth devices.Wizard Mode shows the devices and services in a simple Favorites view created by following the step-by-step wizard.Explorer ModeThe Explorer Mode window is easy to navigate and provides greater control to users familiar with Bluetooth. The menu bar provides quick access to the options and tools used to connect to devices. To access Explorer Mode, tap View > Explorer Mode.NOTE If there is an active Bluetooth connection between the MC55 and another Bluetooth device, the MC55 will not suspend.NOTE Switching between Wizard Mode and Explorer Mode closes all active connections.DRAFT
Using Bluetooth 4 - 5Figure 4-3    Explorer Mode WindowYou can also use the “tap and hold” technique to view available options. Scroll bars and view options are similar to those on the Windows desktop. The tree structure lists the following sub-items:•Local Device - This device•Remote Device - Other Bluetooth devices•Trusted Devices - Bonded (paired) Bluetooth devices•Untrusted Devices - Discovered devices that are not bonded•Favorites - Selected services that are set as Favorite for quick access. NOTE Switching between Wizard Mode and Explorer Mode closes all active connections.DRAFT
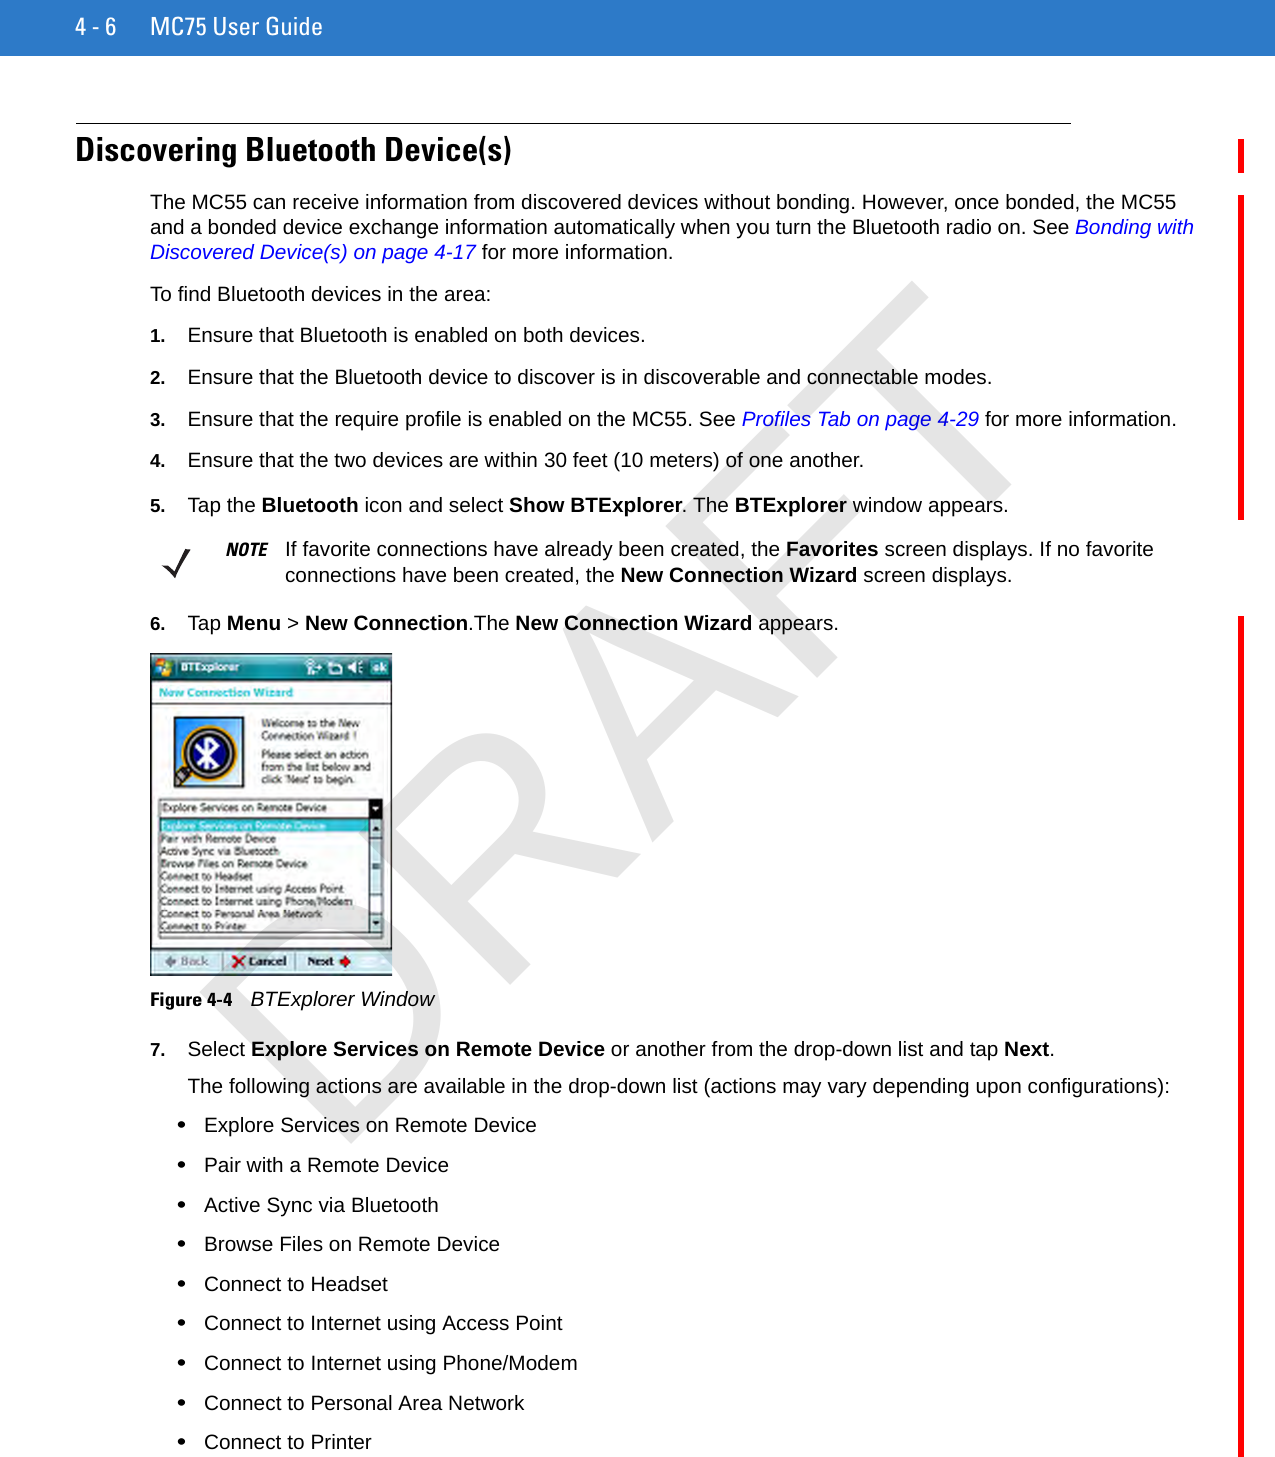
4 - 6 MC75 User GuideDiscovering Bluetooth Device(s)The MC55 can receive information from discovered devices without bonding. However, once bonded, the MC55 and a bonded device exchange information automatically when you turn the Bluetooth radio on. See Bonding with Discovered Device(s) on page 4-17 for more information.To find Bluetooth devices in the area:1. Ensure that Bluetooth is enabled on both devices.2. Ensure that the Bluetooth device to discover is in discoverable and connectable modes.3. Ensure that the require profile is enabled on the MC55. See Profiles Tab on page 4-29 for more information.4. Ensure that the two devices are within 30 feet (10 meters) of one another.5. Tap the Bluetooth icon and select Show BTExplorer. The BTExplorer window appears.6. Tap Menu > New Connection.The New Connection Wizard appears.Figure 4-4    BTExplorer Window7. Select Explore Services on Remote Device or another from the drop-down list and tap Next.The following actions are available in the drop-down list (actions may vary depending upon configurations):•Explore Services on Remote Device•Pair with a Remote Device•Active Sync via Bluetooth•Browse Files on Remote Device•Connect to Headset•Connect to Internet using Access Point•Connect to Internet using Phone/Modem•Connect to Personal Area Network•Connect to PrinterNOTE If favorite connections have already been created, the Favorites screen displays. If no favorite connections have been created, the New Connection Wizard screen displays.DRAFT
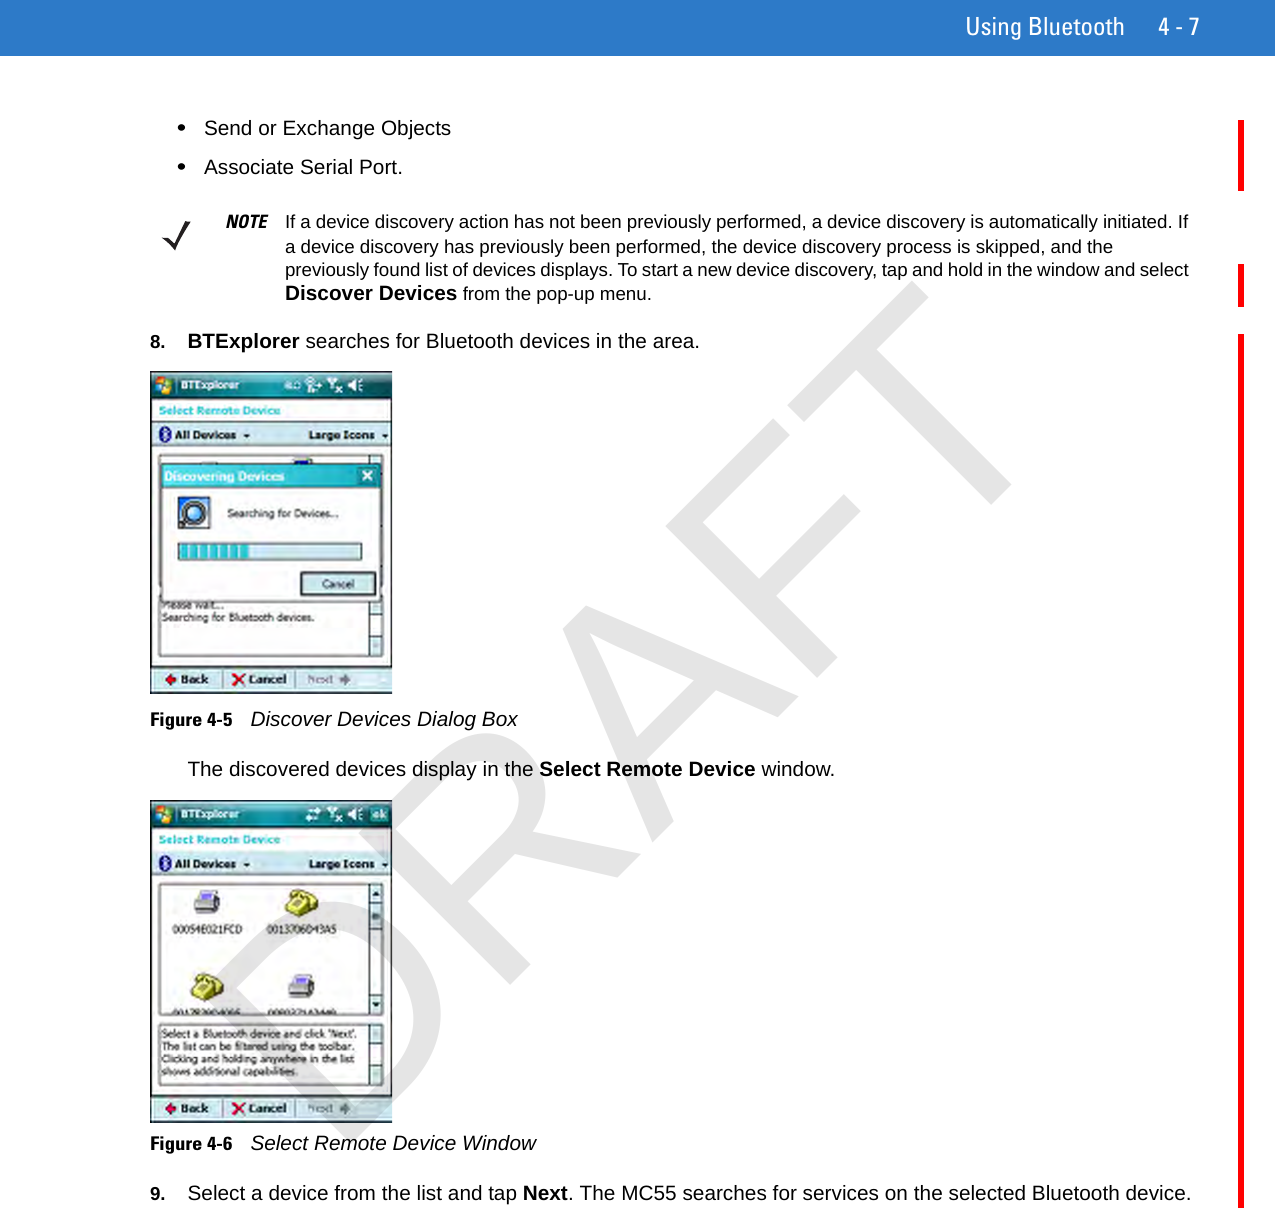
Using Bluetooth 4 - 7•Send or Exchange Objects•Associate Serial Port.8. BTExplorer searches for Bluetooth devices in the area.Figure 4-5    Discover Devices Dialog BoxThe discovered devices display in the Select Remote Device window.Figure 4-6    Select Remote Device Window9. Select a device from the list and tap Next. The MC55 searches for services on the selected Bluetooth device.NOTE If a device discovery action has not been previously performed, a device discovery is automatically initiated. If a device discovery has previously been performed, the device discovery process is skipped, and the previously found list of devices displays. To start a new device discovery, tap and hold in the window and select Discover Devices from the pop-up menu.DRAFT
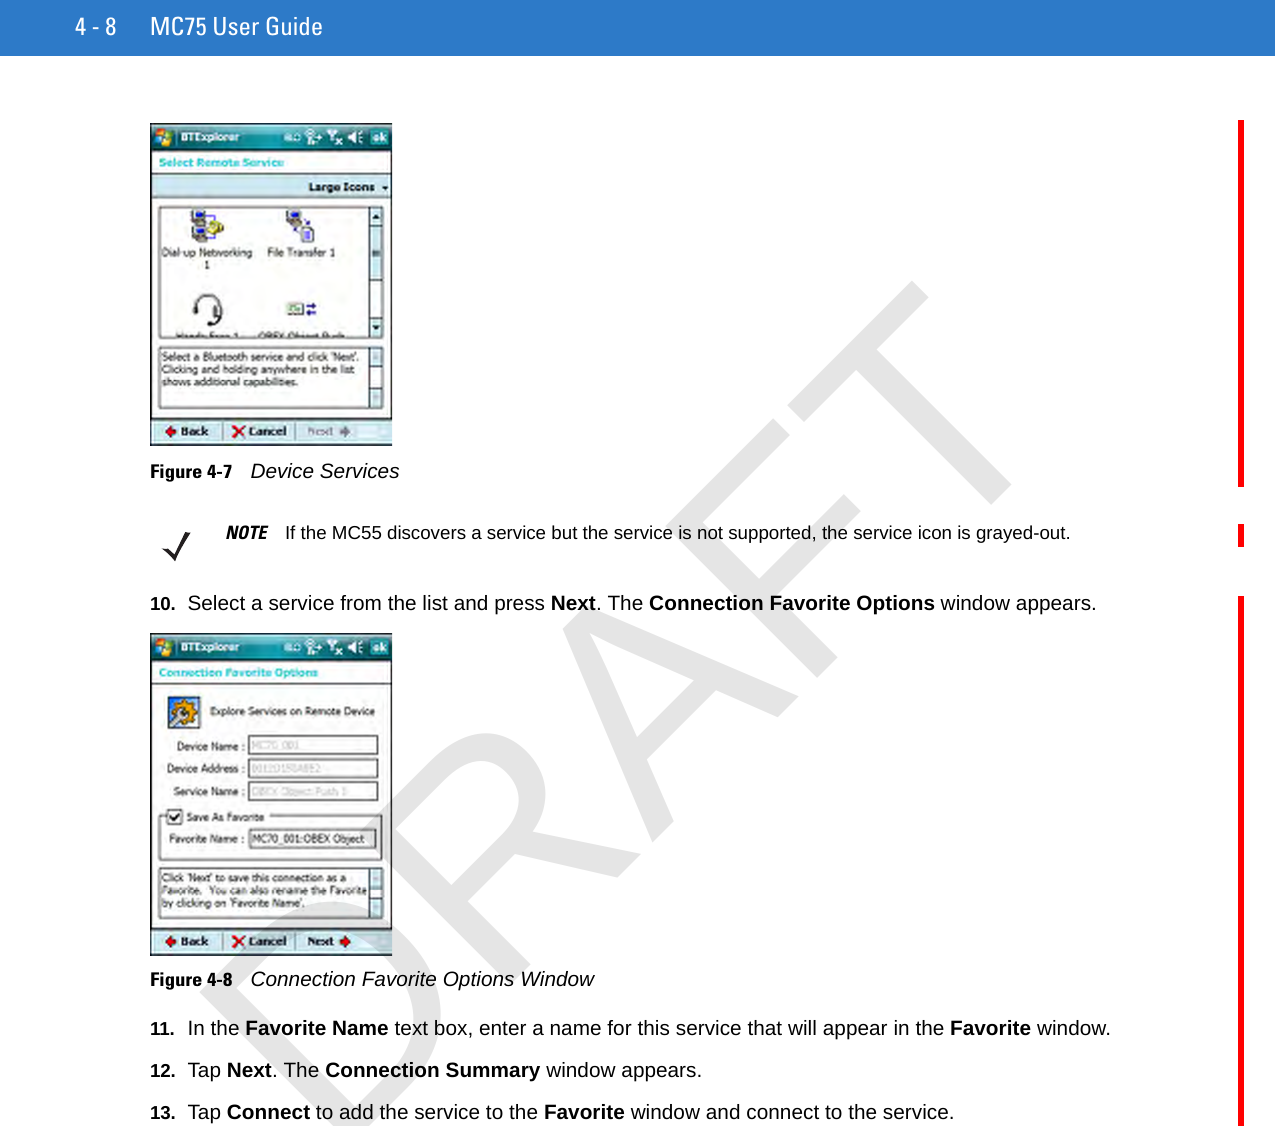
4 - 8 MC75 User GuideFigure 4-7    Device Services10. Select a service from the list and press Next. The Connection Favorite Options window appears.Figure 4-8    Connection Favorite Options Window11. In the Favorite Name text box, enter a name for this service that will appear in the Favorite window.12. Tap Next. The Connection Summary window appears.13. Tap Connect to add the service to the Favorite window and connect to the service.NOTE If the MC55 discovers a service but the service is not supported, the service icon is grayed-out.DRAFT
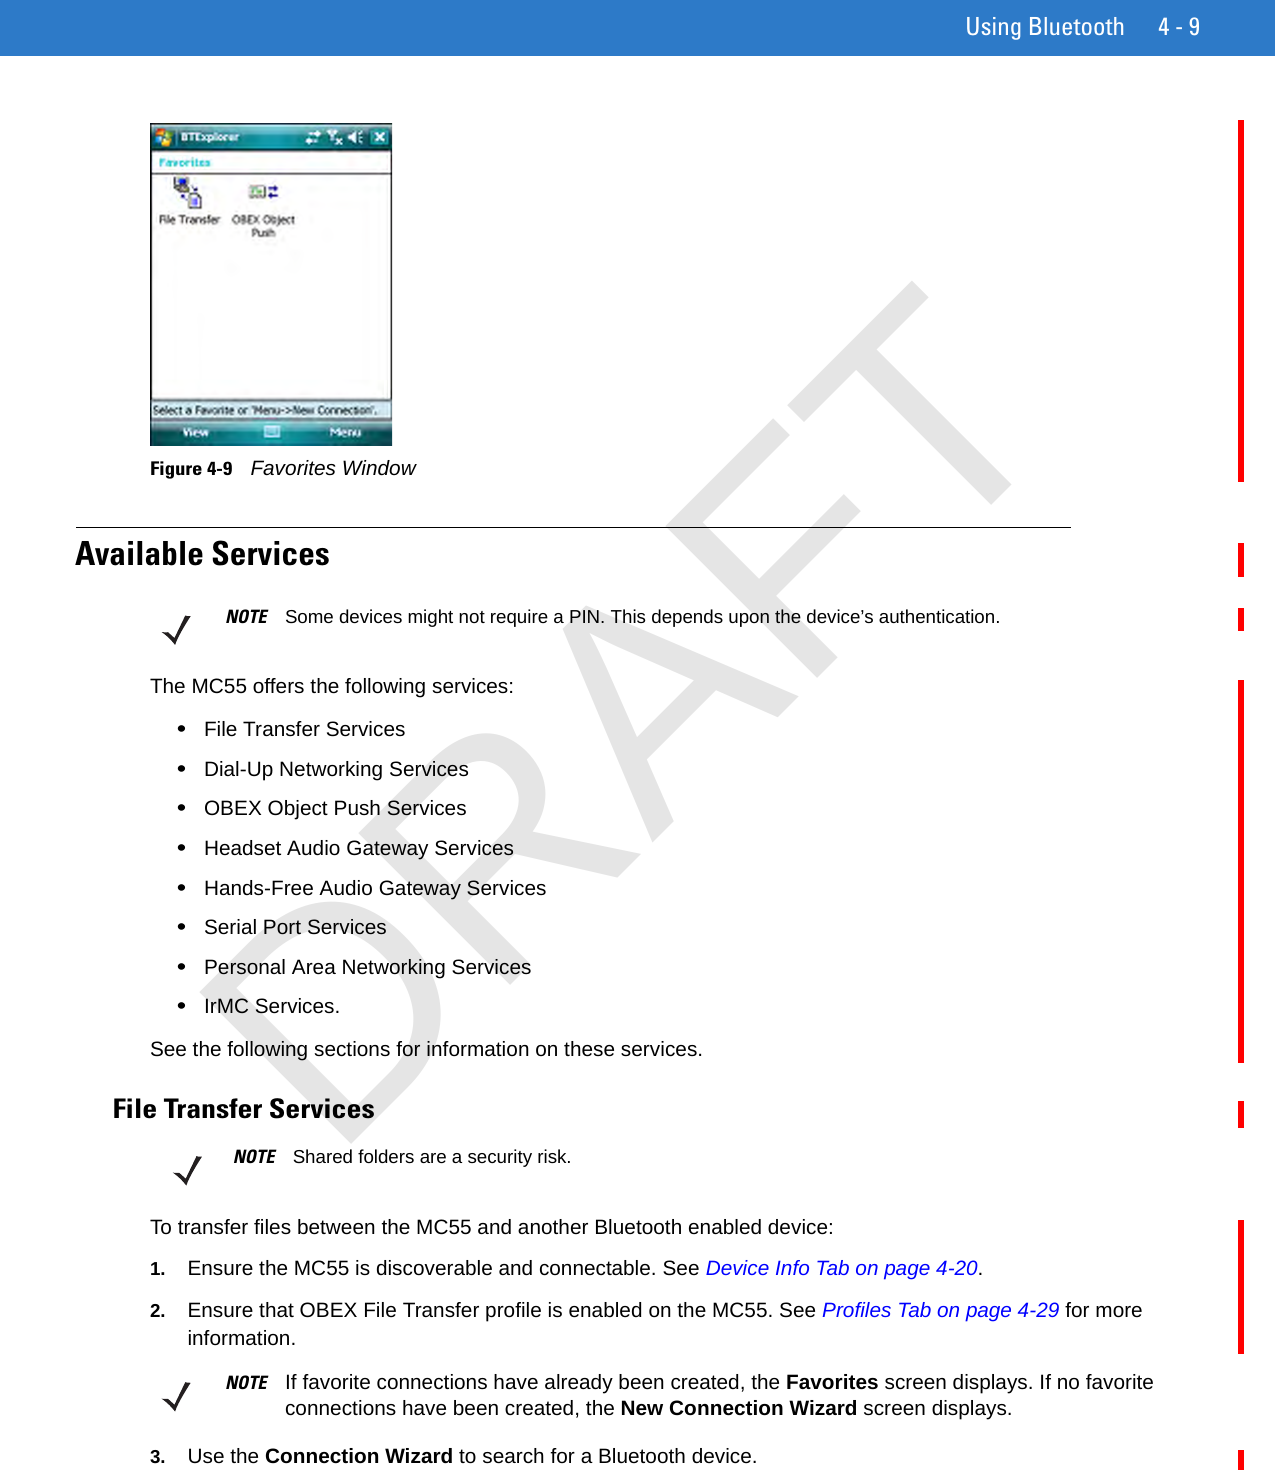
Using Bluetooth 4 - 9Figure 4-9    Favorites WindowAvailable ServicesThe MC55 offers the following services:•File Transfer Services•Dial-Up Networking Services•OBEX Object Push Services•Headset Audio Gateway Services•Hands-Free Audio Gateway Services•Serial Port Services•Personal Area Networking Services•IrMC Services.See the following sections for information on these services.File Transfer ServicesTo transfer files between the MC55 and another Bluetooth enabled device:1. Ensure the MC55 is discoverable and connectable. See Device Info Tab on page 4-20.2. Ensure that OBEX File Transfer profile is enabled on the MC55. See Profiles Tab on page 4-29 for more information.3. Use the Connection Wizard to search for a Bluetooth device. NOTE Some devices might not require a PIN. This depends upon the device’s authentication.NOTE Shared folders are a security risk.NOTE If favorite connections have already been created, the Favorites screen displays. If no favorite connections have been created, the New Connection Wizard screen displays.DRAFT
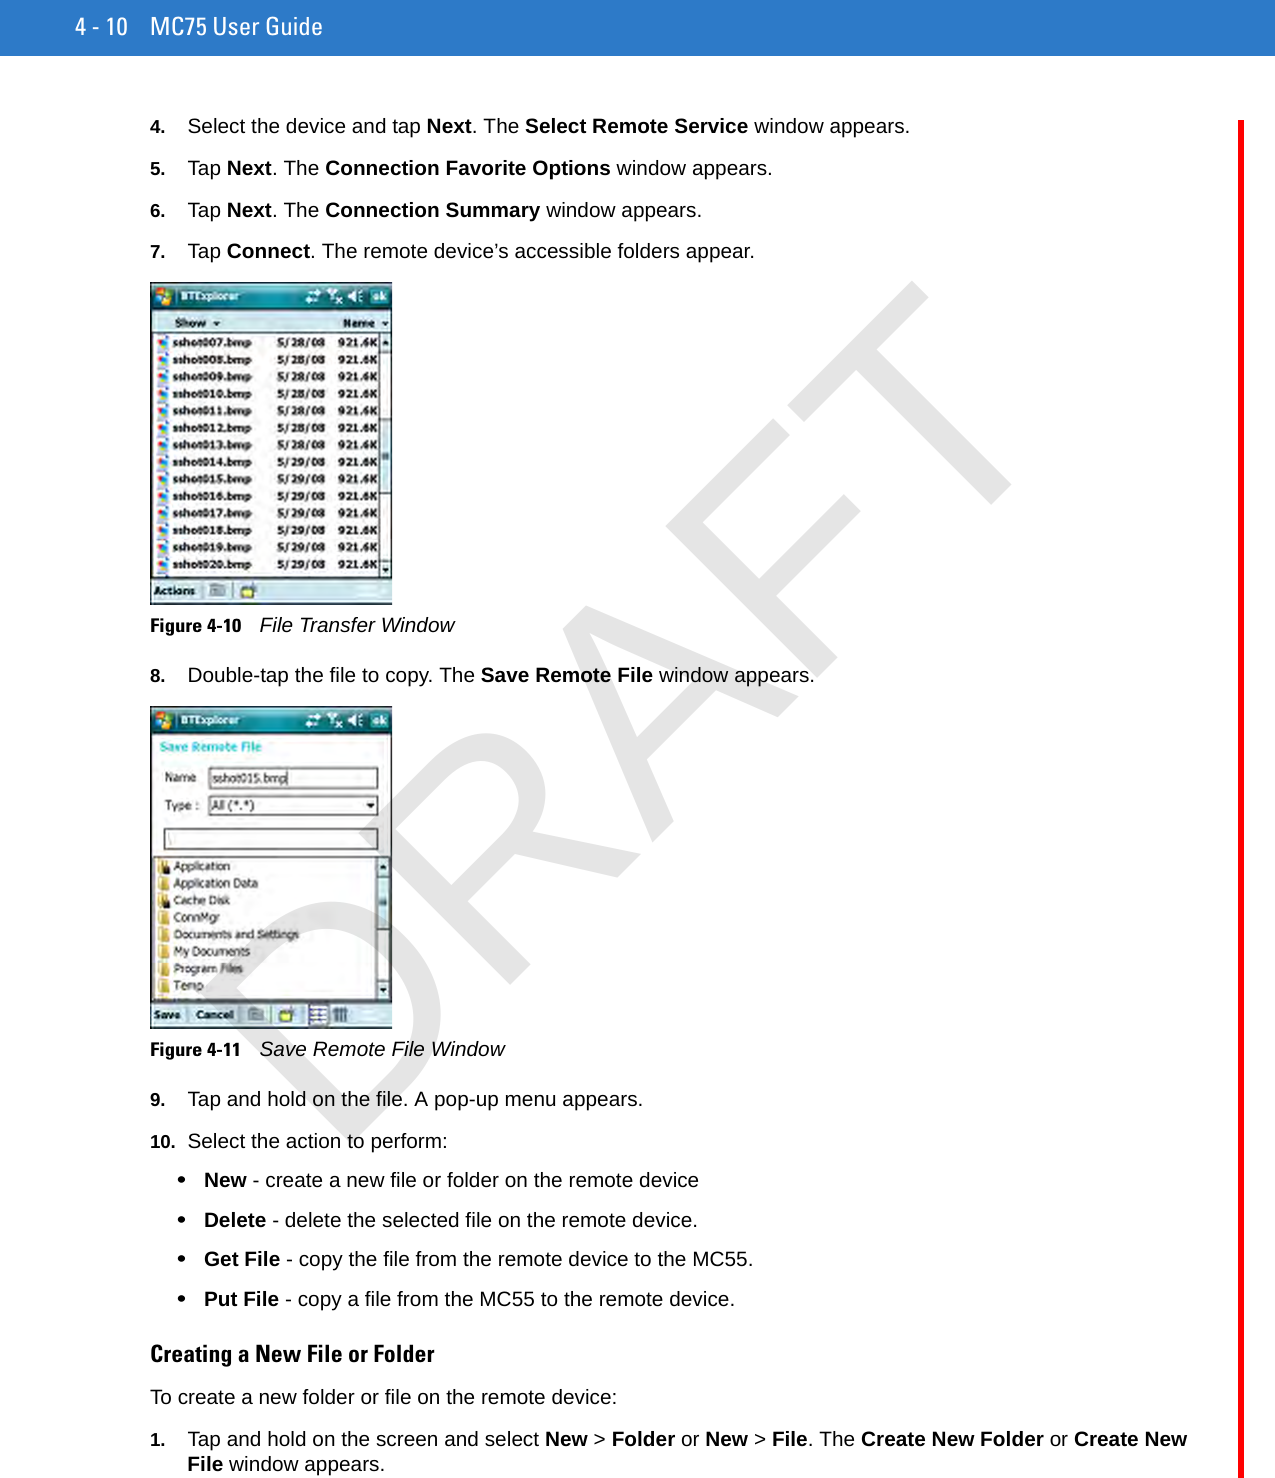
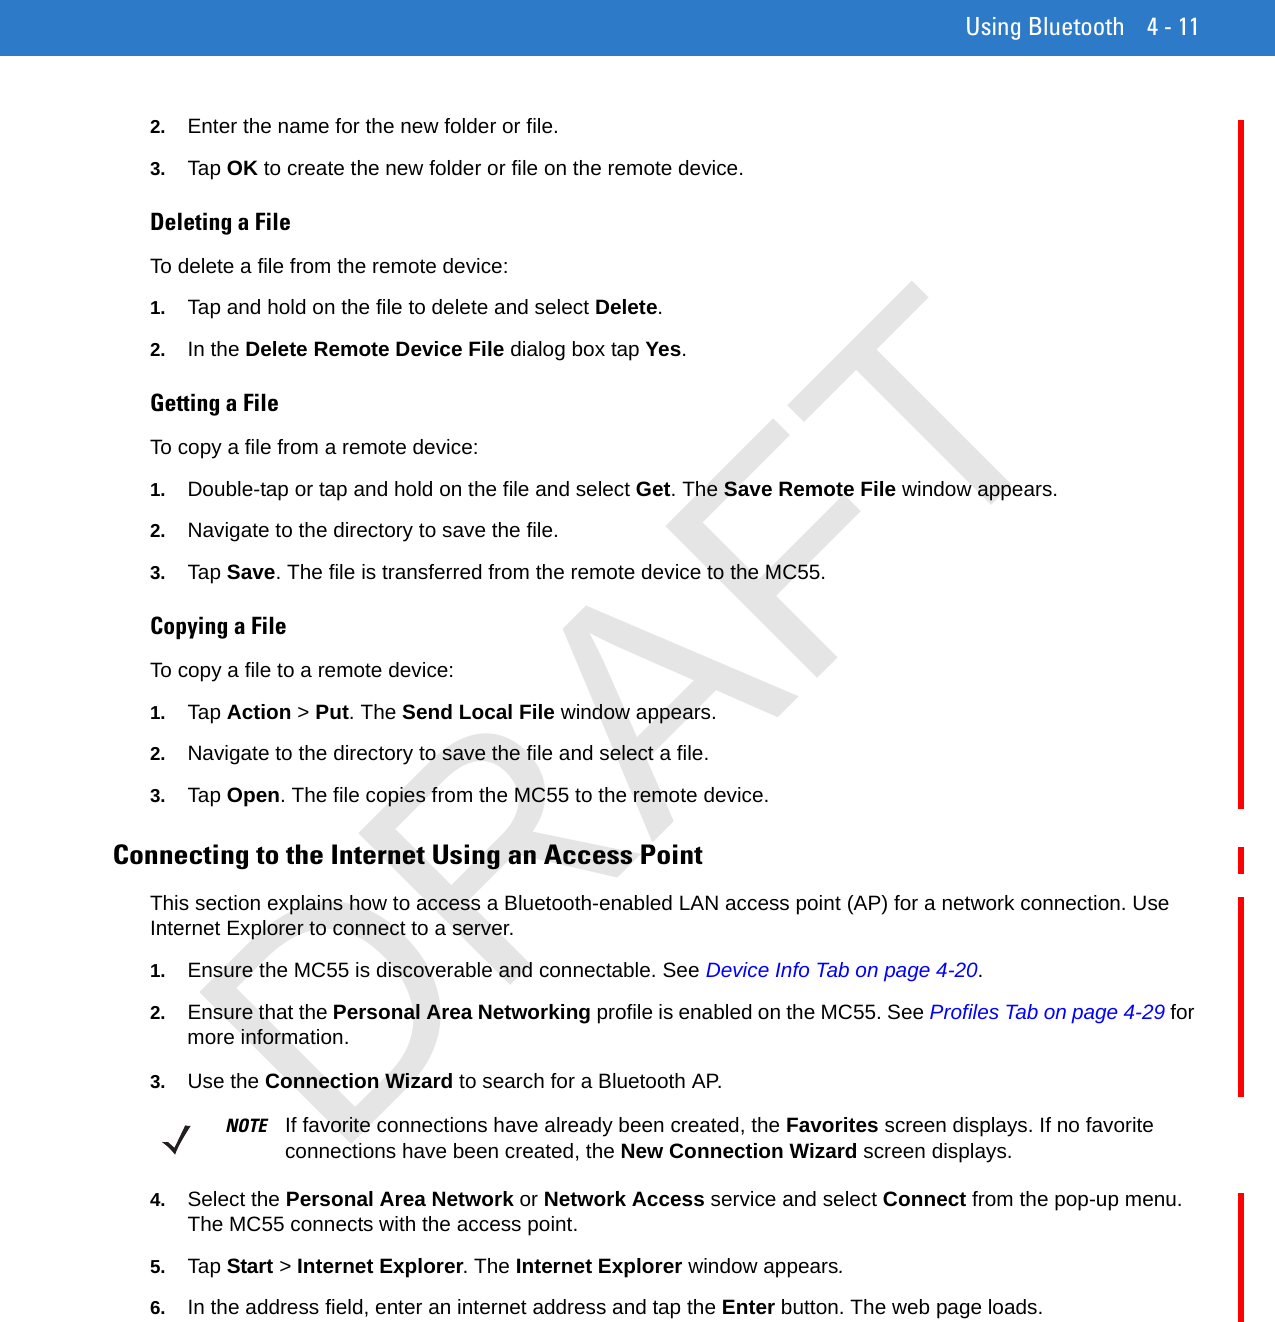
4 - 10 MC75 User Guide4. Select the device and tap Next. The Select Remote Service window appears.5. Tap Next. The Connection Favorite Options window appears.6. Tap Next. The Connection Summary window appears.7. Tap Connect. The remote device’s accessible folders appear.Figure 4-10    File Transfer Window8. Double-tap the file to copy. The Save Remote File window appears.Figure 4-11    Save Remote File Window9. Tap and hold on the file. A pop-up menu appears.10. Select the action to perform:•New - create a new file or folder on the remote device•Delete - delete the selected file on the remote device.•Get File - copy the file from the remote device to the MC55.•Put File - copy a file from the MC55 to the remote device.Creating a New File or FolderTo create a new folder or file on the remote device:1. Tap and hold on the screen and select New > Folder or New > File. The Create New Folder or Create New File window appears.DRAFT
Using Bluetooth 4 - 112. Enter the name for the new folder or file.3. Tap OK to create the new folder or file on the remote device.Deleting a FileTo delete a file from the remote device:1. Tap and hold on the file to delete and select Delete.2. In the Delete Remote Device File dialog box tap Yes.Getting a FileTo copy a file from a remote device:1. Double-tap or tap and hold on the file and select Get. The Save Remote File window appears.2. Navigate to the directory to save the file.3. Tap Save. The file is transferred from the remote device to the MC55.Copying a FileTo copy a file to a remote device:1. Tap Action > Put. The Send Local File window appears.2. Navigate to the directory to save the file and select a file.3. Tap Open. The file copies from the MC55 to the remote device.Connecting to the Internet Using an Access PointThis section explains how to access a Bluetooth-enabled LAN access point (AP) for a network connection. Use Internet Explorer to connect to a server.1. Ensure the MC55 is discoverable and connectable. See Device Info Tab on page 4-20.2. Ensure that the Personal Area Networking profile is enabled on the MC55. See Profiles Tab on page 4-29 for more information.3. Use the Connection Wizard to search for a Bluetooth AP.4. Select the Personal Area Network or Network Access service and select Connect from the pop-up menu. The MC55 connects with the access point.5. Tap Start > Internet Explorer. The Internet Explorer window appears.6. In the address field, enter an internet address and tap the Enter button. The web page loads.NOTE If favorite connections have already been created, the Favorites screen displays. If no favorite connections have been created, the New Connection Wizard screen displays.DRAFT
4 - 12 MC75 User GuideDial-Up Networking ServicesDial-up networking allows the user to connect a PC or laptop to the MC55 and use the MC55 as a modem to connect to an office network or ISP.Before setting up dial-up networking, obtain dial-up information and other necessary settings (username, password and domain name, if required) for the office network or ISP. To create a new Bluetooth connection:1. Ensure the MC55 is discoverable and connectable. See Device Info Tab on page 4-20.2. Ensure that the Dial-Up Networking profile is enabled on the MC55. See Profiles Tab on page 4-29 for more information.3. On the PC or laptop, set up Bluetooth according to the manufacturer’s instructions.4. On the PC or laptop Bluetooth software, search for the MC55 and select the Dial-up Networking service.5. Using dial-up software on the PC or laptop, connect to the MC55.6. The MC55 phone function dials the ISP number and connects to the ISP.7. To verify, on the PC or laptop, launch Internet Explorer and open a web site.Object Exchange Push ServicesObject Exchange (OBEX) is a set of protocols that allows sharing objects such as Contacts or pictures using Bluetooth.To exchange contact information with another Bluetooth enabled device:1. Ensure the MC55 is discoverable and connectable. See Device Info Tab on page 4-20.2. Ensure that the OBEX Object Push profile is enabled on the MC55. See Profiles Tab on page 4-29 for more information.3. Use the Connection Wizard to search for a Bluetooth device.4. Select the device and tap Next.5. Select the OBEX Object Push service and select Connect. The OBEX Object Push window appears.6. In the Action drop-down list, select one of the following options: Send Contact Information, Swap Contact Information, Fetch Contact Information, or Send a Picture.Sending a ContactTo send a contact to another device:1. Tap and hold on OBEX Object Push and select Connect. The OBEX Object Push window appears.NOTE If favorite connections have already been created, the Favorites screen displays. If no favorite connections have been created, the New Connection Wizard screen displays.NOTE Prior to sending a contact, a default contact must be set up before attempting to send a contact.DRAFT
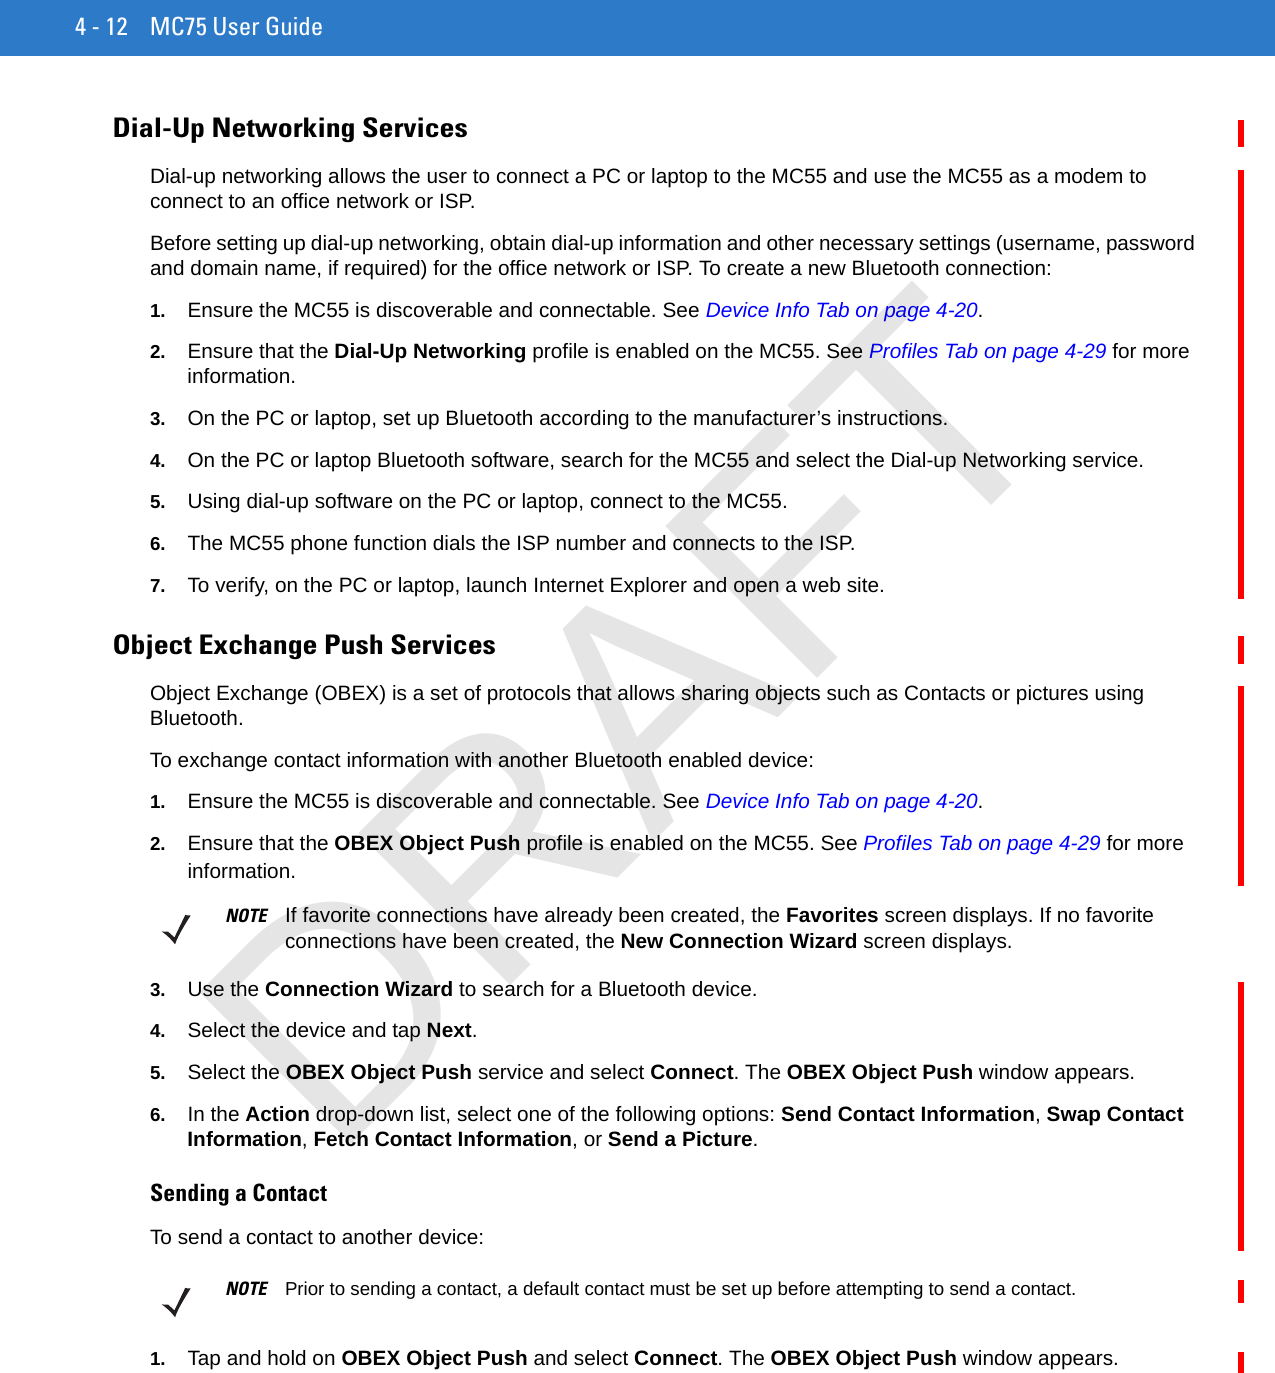
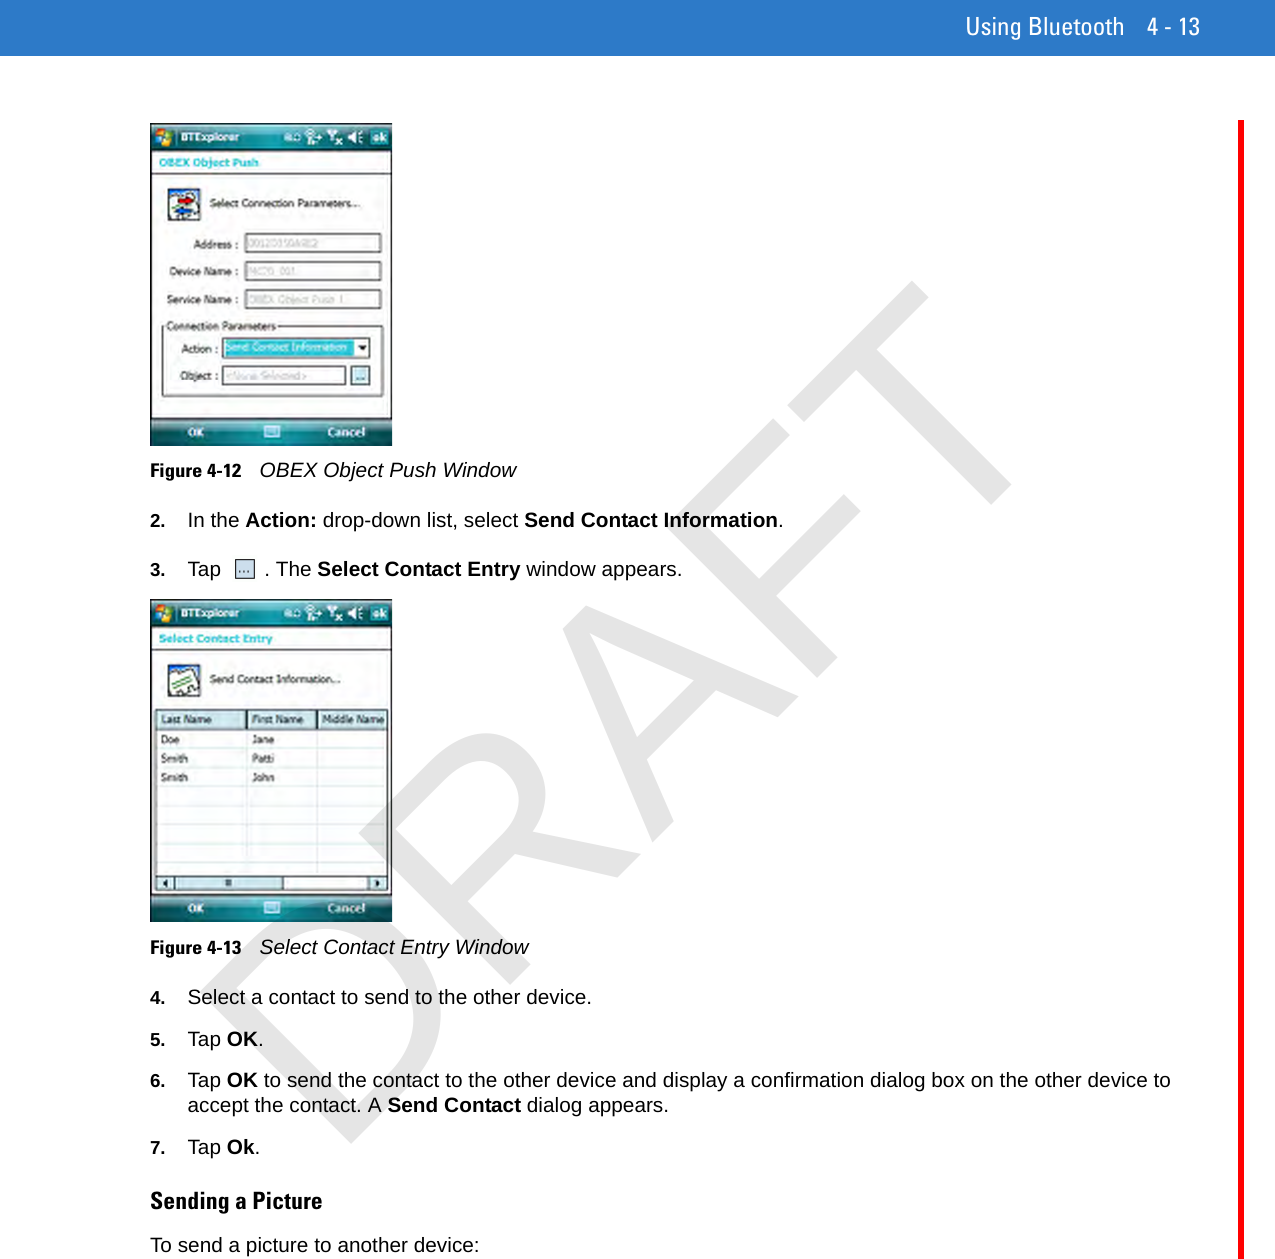
Using Bluetooth 4 - 13Figure 4-12    OBEX Object Push Window2. In the Action: drop-down list, select Send Contact Information.3. Tap . The Select Contact Entry window appears.Figure 4-13    Select Contact Entry Window4. Select a contact to send to the other device.5. Tap OK.6. Tap OK to send the contact to the other device and display a confirmation dialog box on the other device to accept the contact. A Send Contact dialog appears.7. Tap Ok.Sending a PictureTo send a picture to another device:DRAFT
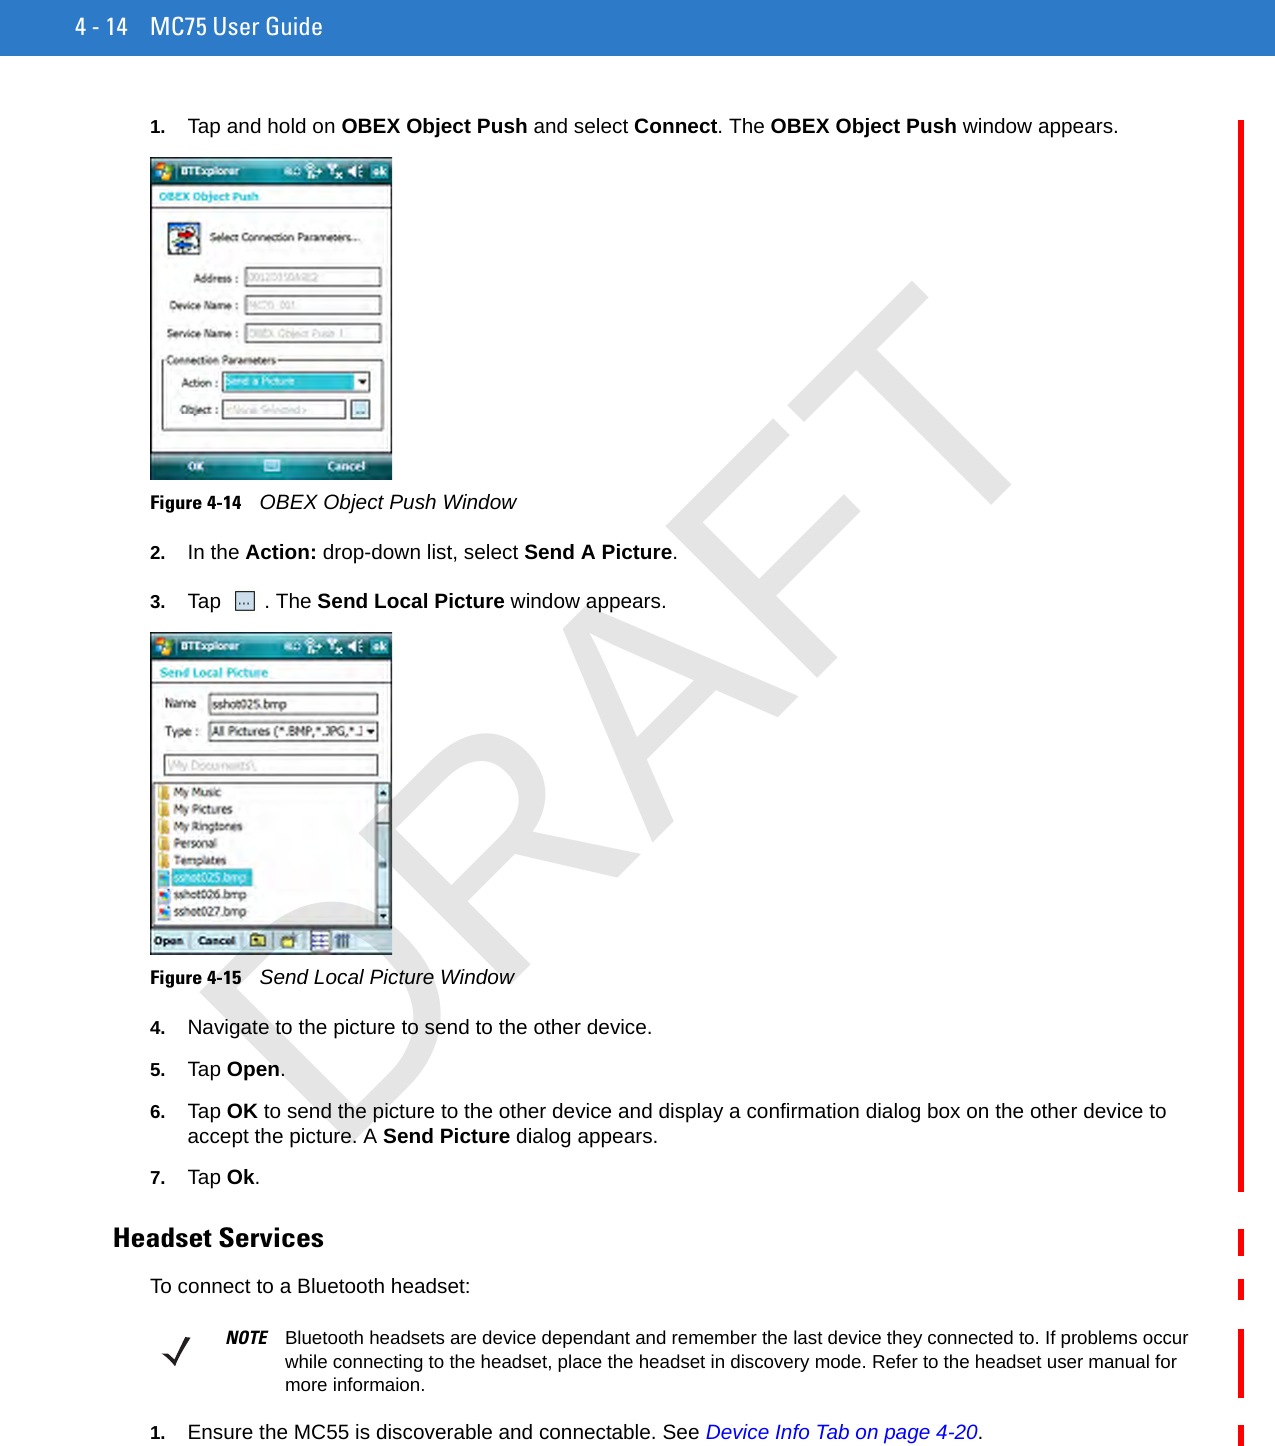
4 - 14 MC75 User Guide1. Tap and hold on OBEX Object Push and select Connect. The OBEX Object Push window appears.Figure 4-14    OBEX Object Push Window2. In the Action: drop-down list, select Send A Picture.3. Tap . The Send Local Picture window appears.Figure 4-15    Send Local Picture Window4. Navigate to the picture to send to the other device.5. Tap Open.6. Tap OK to send the picture to the other device and display a confirmation dialog box on the other device to accept the picture. A Send Picture dialog appears.7. Tap Ok.Headset ServicesTo connect to a Bluetooth headset:1. Ensure the MC55 is discoverable and connectable. See Device Info Tab on page 4-20.NOTE Bluetooth headsets are device dependant and remember the last device they connected to. If problems occur while connecting to the headset, place the headset in discovery mode. Refer to the headset user manual for more informaion.DRAFT
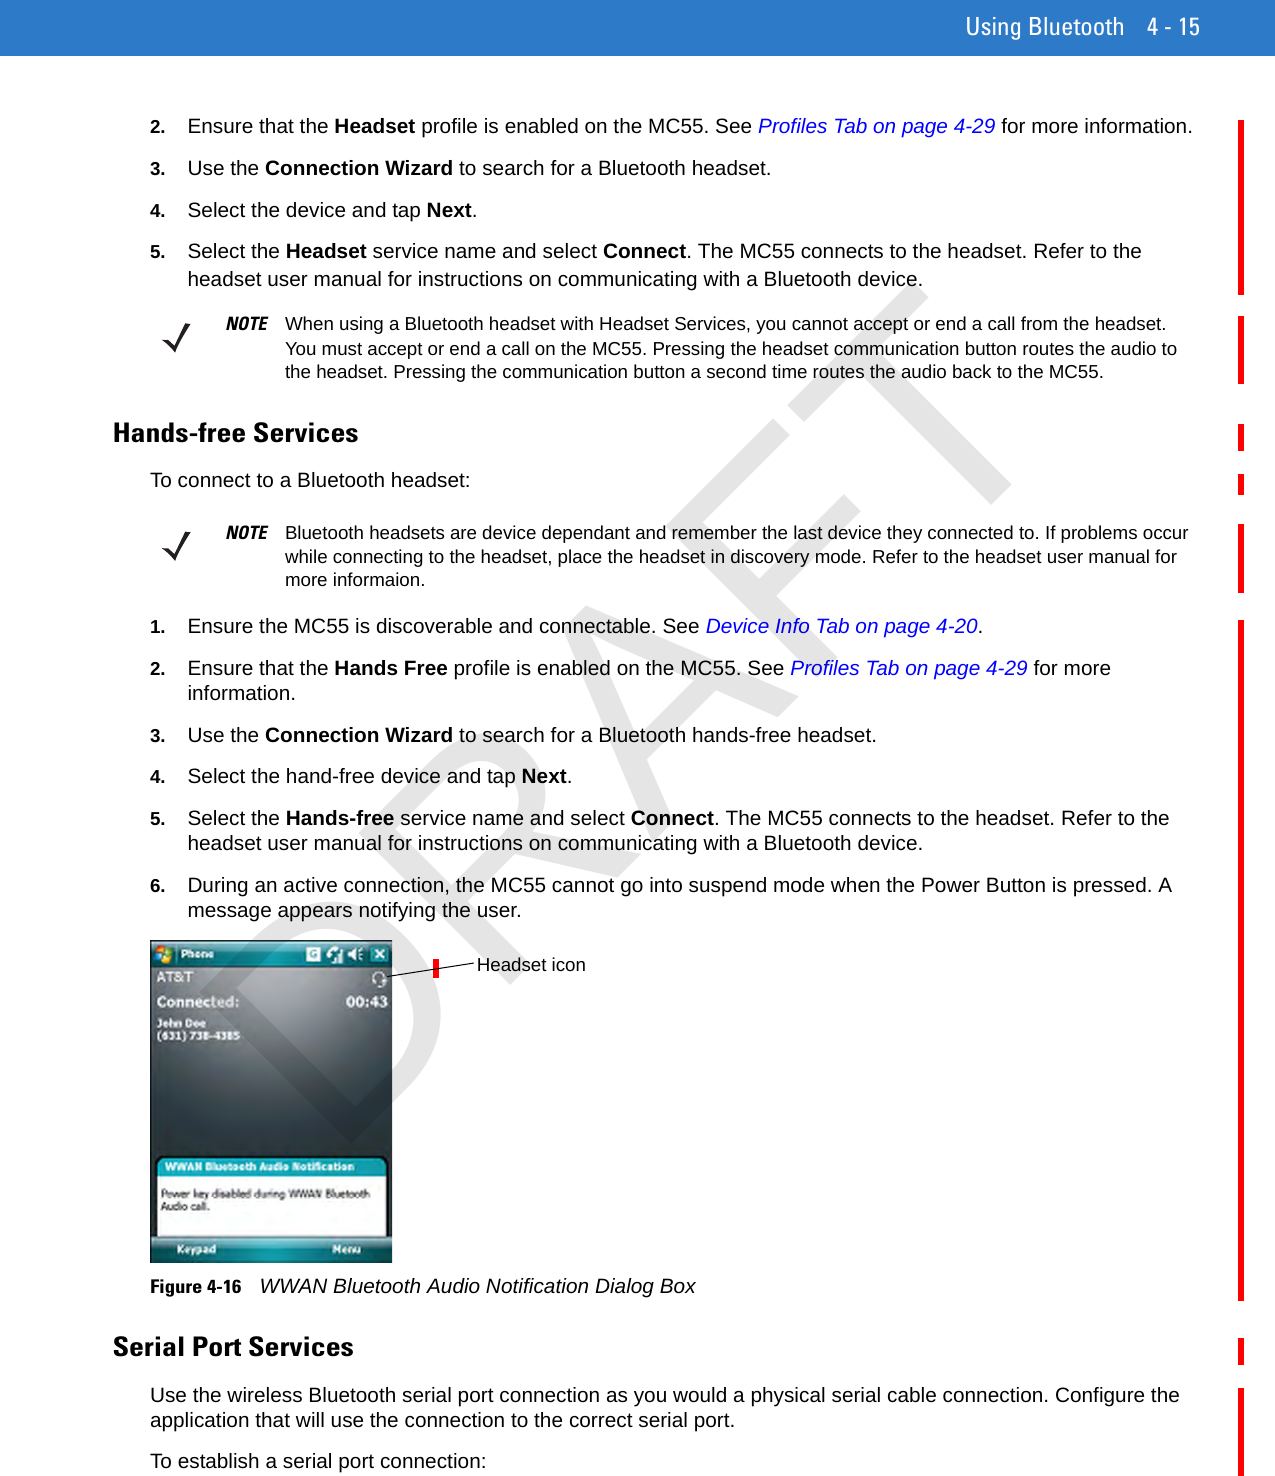
Using Bluetooth 4 - 152. Ensure that the Headset profile is enabled on the MC55. See Profiles Tab on page 4-29 for more information.3. Use the Connection Wizard to search for a Bluetooth headset.4. Select the device and tap Next.5. Select the Headset service name and select Connect. The MC55 connects to the headset. Refer to the headset user manual for instructions on communicating with a Bluetooth device.Hands-free ServicesTo connect to a Bluetooth headset:1. Ensure the MC55 is discoverable and connectable. See Device Info Tab on page 4-20.2. Ensure that the Hands Free profile is enabled on the MC55. See Profiles Tab on page 4-29 for more information.3. Use the Connection Wizard to search for a Bluetooth hands-free headset.4. Select the hand-free device and tap Next.5. Select the Hands-free service name and select Connect. The MC55 connects to the headset. Refer to the headset user manual for instructions on communicating with a Bluetooth device.6. During an active connection, the MC55 cannot go into suspend mode when the Power Button is pressed. A message appears notifying the user.Figure 4-16    WWAN Bluetooth Audio Notification Dialog BoxSerial Port ServicesUse the wireless Bluetooth serial port connection as you would a physical serial cable connection. Configure the application that will use the connection to the correct serial port.To establish a serial port connection:NOTE When using a Bluetooth headset with Headset Services, you cannot accept or end a call from the headset. You must accept or end a call on the MC55. Pressing the headset communication button routes the audio to the headset. Pressing the communication button a second time routes the audio back to the MC55.NOTE Bluetooth headsets are device dependant and remember the last device they connected to. If problems occur while connecting to the headset, place the headset in discovery mode. Refer to the headset user manual for more informaion.Headset iconDRAFT
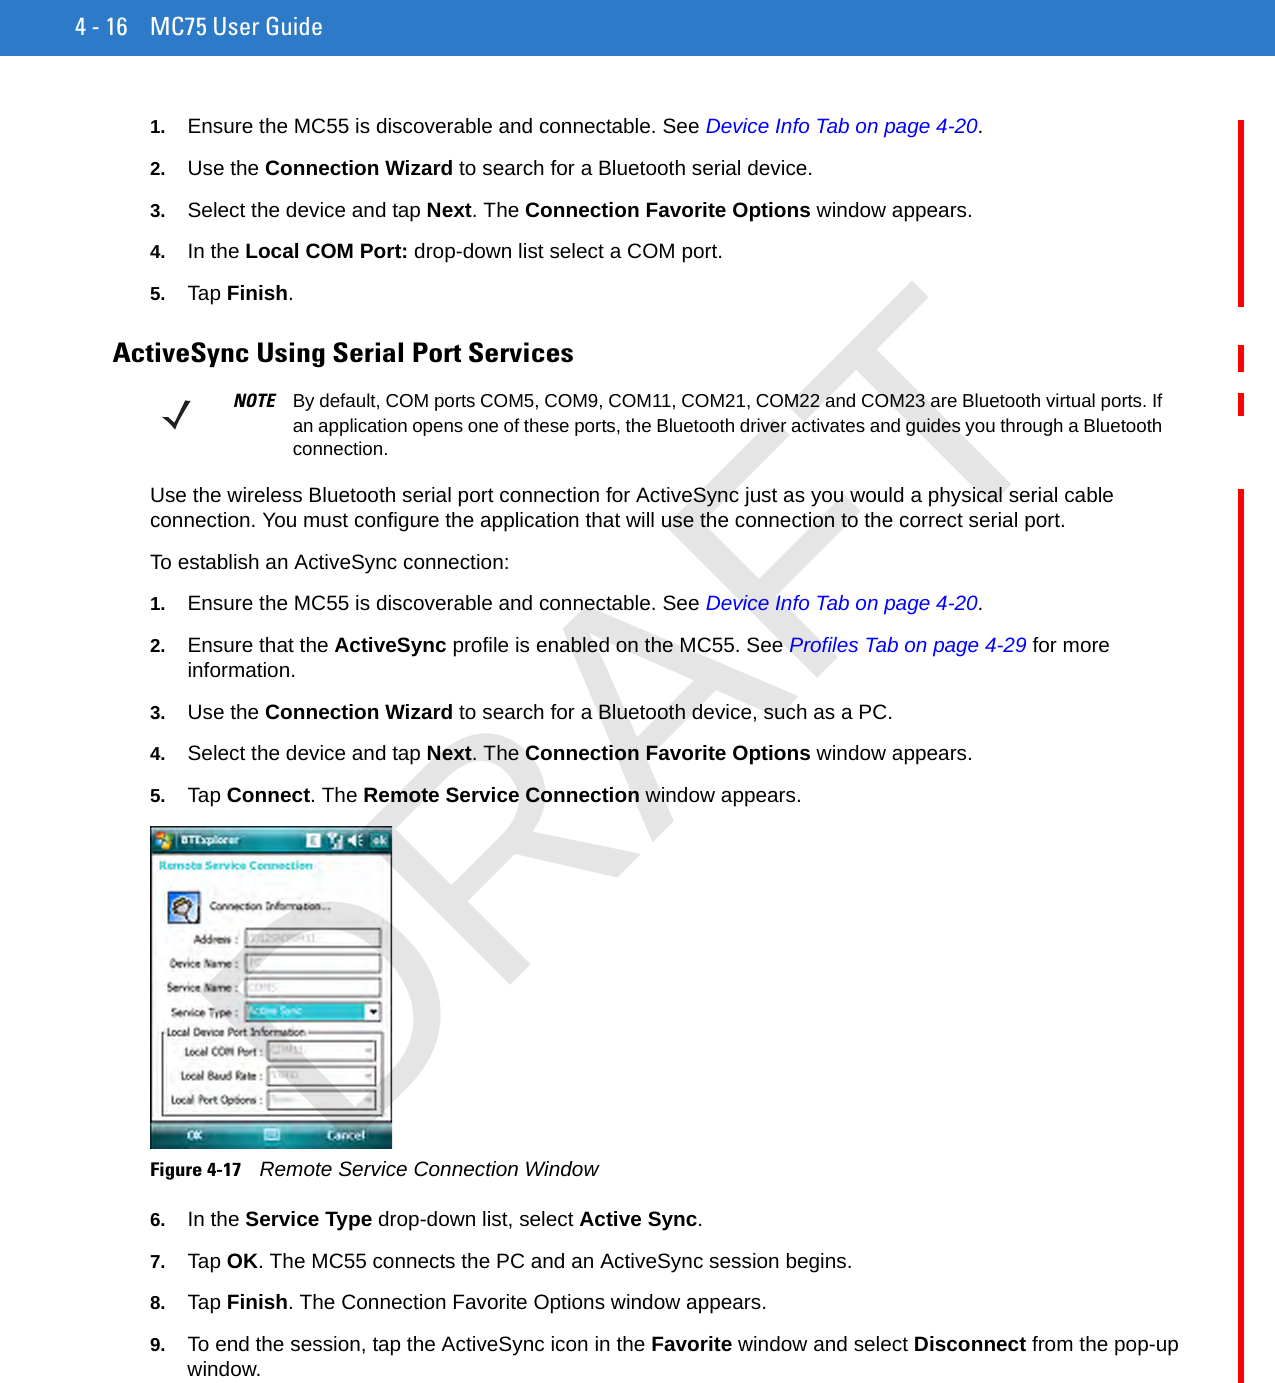
4 - 16 MC75 User Guide1. Ensure the MC55 is discoverable and connectable. See Device Info Tab on page 4-20.2. Use the Connection Wizard to search for a Bluetooth serial device.3. Select the device and tap Next. The Connection Favorite Options window appears.4. In the Local COM Port: drop-down list select a COM port.5. Tap Finish.ActiveSync Using Serial Port ServicesUse the wireless Bluetooth serial port connection for ActiveSync just as you would a physical serial cable connection. You must configure the application that will use the connection to the correct serial port.To establish an ActiveSync connection:1. Ensure the MC55 is discoverable and connectable. See Device Info Tab on page 4-20.2. Ensure that the ActiveSync profile is enabled on the MC55. See Profiles Tab on page 4-29 for more information.3. Use the Connection Wizard to search for a Bluetooth device, such as a PC.4. Select the device and tap Next. The Connection Favorite Options window appears.5. Tap Connect. The Remote Service Connection window appears.Figure 4-17    Remote Service Connection Window6. In the Service Type drop-down list, select Active Sync.7. Tap OK. The MC55 connects the PC and an ActiveSync session begins.8. Tap Finish. The Connection Favorite Options window appears.9. To end the session, tap the ActiveSync icon in the Favorite window and select Disconnect from the pop-up window.NOTE By default, COM ports COM5, COM9, COM11, COM21, COM22 and COM23 are Bluetooth virtual ports. If an application opens one of these ports, the Bluetooth driver activates and guides you through a Bluetooth connection.DRAFT
Using Bluetooth 4 - 17Personal Area Network ServicesConnect two or more Bluetooth devices to share files, collaborate, or play multi-player games. To establish a Personal Area Network connection:1. Ensure the MC55 is discoverable and connectable. See Device Info Tab on page 4-20.2. Ensure that the Personal Area Networking profile is enabled on the MC55. See Profiles Tab on page 4-29 for more information.3. Use the Connection Wizard to search for a Bluetooth device.4. Select the device and tap Next. The Connection Favorite Options window appears.5. Tap Next. The Connection Summary window appears.6. Tap Connect. The MC55 connects to the Bluetooth device.IrMC Synchronization ServicesIrMC Synchronization is used to synchronize PIM contacts between a remote device and the MC55. To establish an IrMC synchronization:1. Ensure the MC55 is discoverable and connectable. See Device Info Tab on page 4-20.2. Ensure that the Personal Area Networking profile is enabled on the MC55. See Profiles Tab on page 4-29 for more information.3. Use the Connection Wizard to search for a Bluetooth device.4. Select the device and tap Next. The Connection Favorite Options window appears.5. Tap and hold IrMA Synchronization and select Connect in the pop-up menu.Bonding with Discovered Device(s)A bond is a relationship created between the MC55 and another Bluetooth device in order to exchange information in a secure manner. Creating a bond involves entering the same PIN on the two devices. After creating a bond and turning on the Bluetooth radios, the devices recognize the bond and can exchange information without re-entering a PIN.To bond with a discovered Bluetooth device:1. Tap the Bluetooth icon and select Show BTExplorer. The BTExplorer window appears.2. Tap Menu > New Connection. The New Connection Wizard window appears.3. In the drop-down list, select Pair with Remote Device.4. Tap Next. The Select Remote Device window appears.NOTE If favorite connections have already been created, the Favorites screen displays. If no favorite connections have been created, the New Connection Wizard screen displays.NOTE Devices discovered previously are listed to save time. To start a new device discovery, tap and hold on the list area and select Discover Devices from the pop-up menu.DRAFT
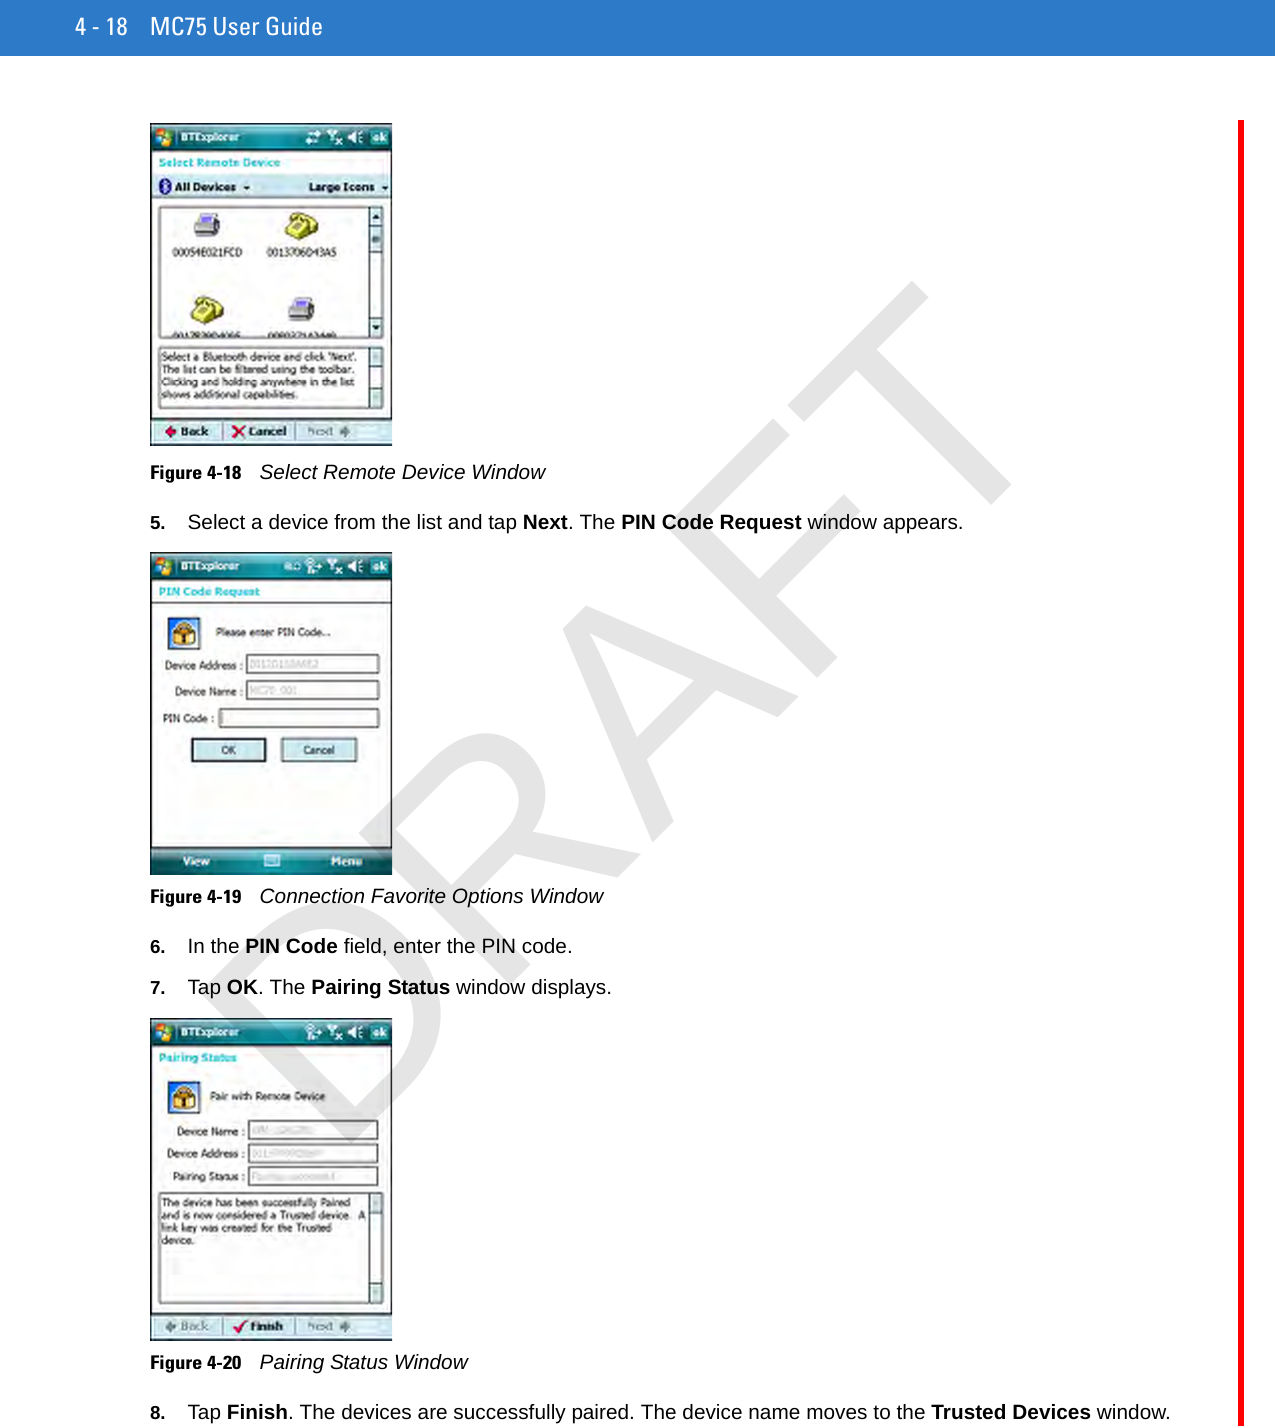
4 - 18 MC75 User GuideFigure 4-18    Select Remote Device Window5. Select a device from the list and tap Next. The PIN Code Request window appears.Figure 4-19    Connection Favorite Options Window6. In the PIN Code field, enter the PIN code.7. Tap OK. The Pairing Status window displays.Figure 4-20    Pairing Status Window8. Tap Finish. The devices are successfully paired. The device name moves to the Trusted Devices window.DRAFT
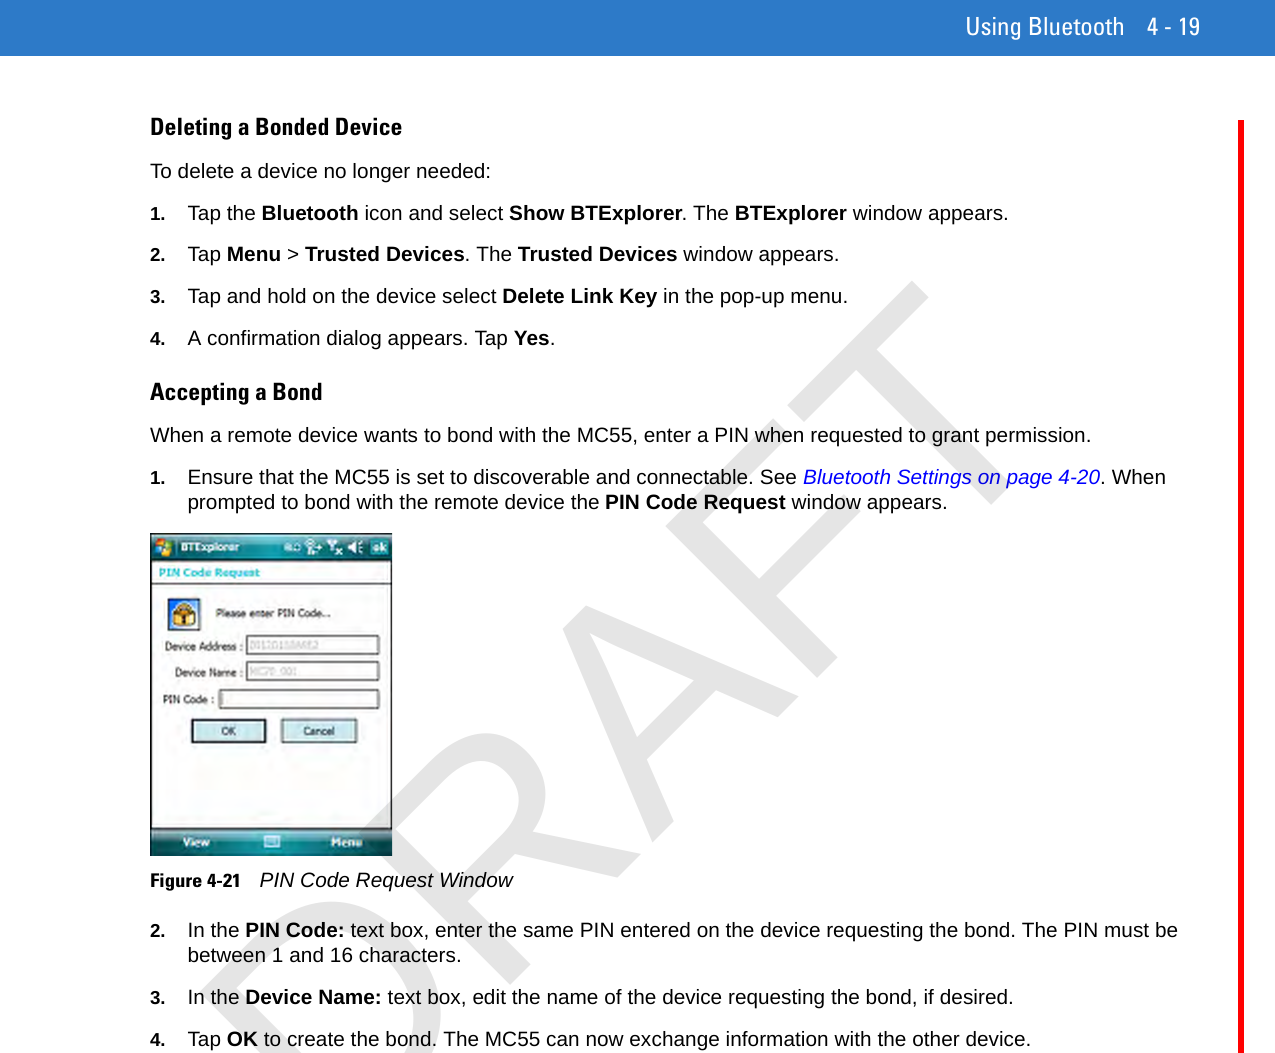
Using Bluetooth 4 - 19Deleting a Bonded DeviceTo delete a device no longer needed:1. Tap the Bluetooth icon and select Show BTExplorer. The BTExplorer window appears.2. Tap Menu > Trusted Devices. The Trusted Devices window appears.3. Tap and hold on the device select Delete Link Key in the pop-up menu.4. A confirmation dialog appears. Tap Yes.Accepting a BondWhen a remote device wants to bond with the MC55, enter a PIN when requested to grant permission.1. Ensure that the MC55 is set to discoverable and connectable. See Bluetooth Settings on page 4-20. When prompted to bond with the remote device the PIN Code Request window appears.Figure 4-21    PIN Code Request Window2. In the PIN Code: text box, enter the same PIN entered on the device requesting the bond. The PIN must be between 1 and 16 characters.3. In the Device Name: text box, edit the name of the device requesting the bond, if desired.4. Tap OK to create the bond. The MC55 can now exchange information with the other device.DRAFT
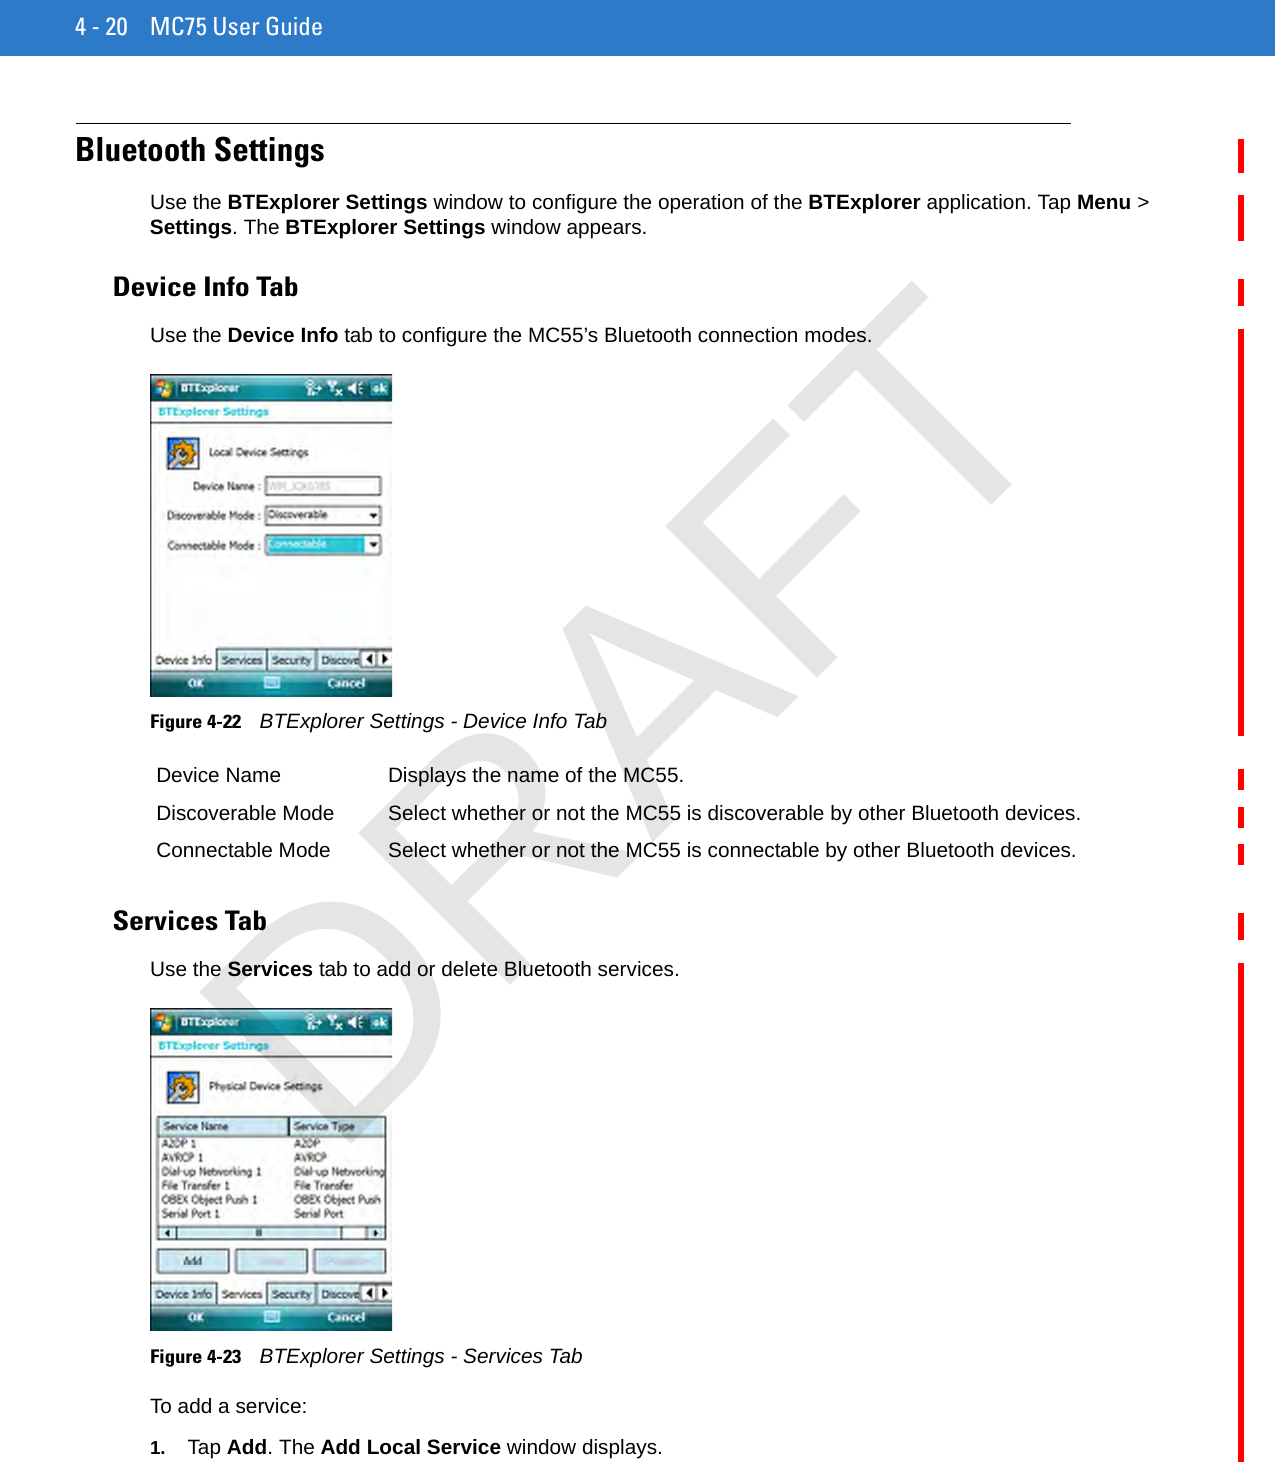
4 - 20 MC75 User GuideBluetooth SettingsUse the BTExplorer Settings window to configure the operation of the BTExplorer application. Tap Menu > Settings. The BTExplorer Settings window appears.Device Info TabUse the Device Info tab to configure the MC55’s Bluetooth connection modes.Figure 4-22    BTExplorer Settings - Device Info TabServices TabUse the Services tab to add or delete Bluetooth services.Figure 4-23    BTExplorer Settings - Services TabTo add a service:1. Tap Add. The Add Local Service window displays.Device Name Displays the name of the MC55.Discoverable Mode Select whether or not the MC55 is discoverable by other Bluetooth devices.Connectable Mode Select whether or not the MC55 is connectable by other Bluetooth devices.DRAFT
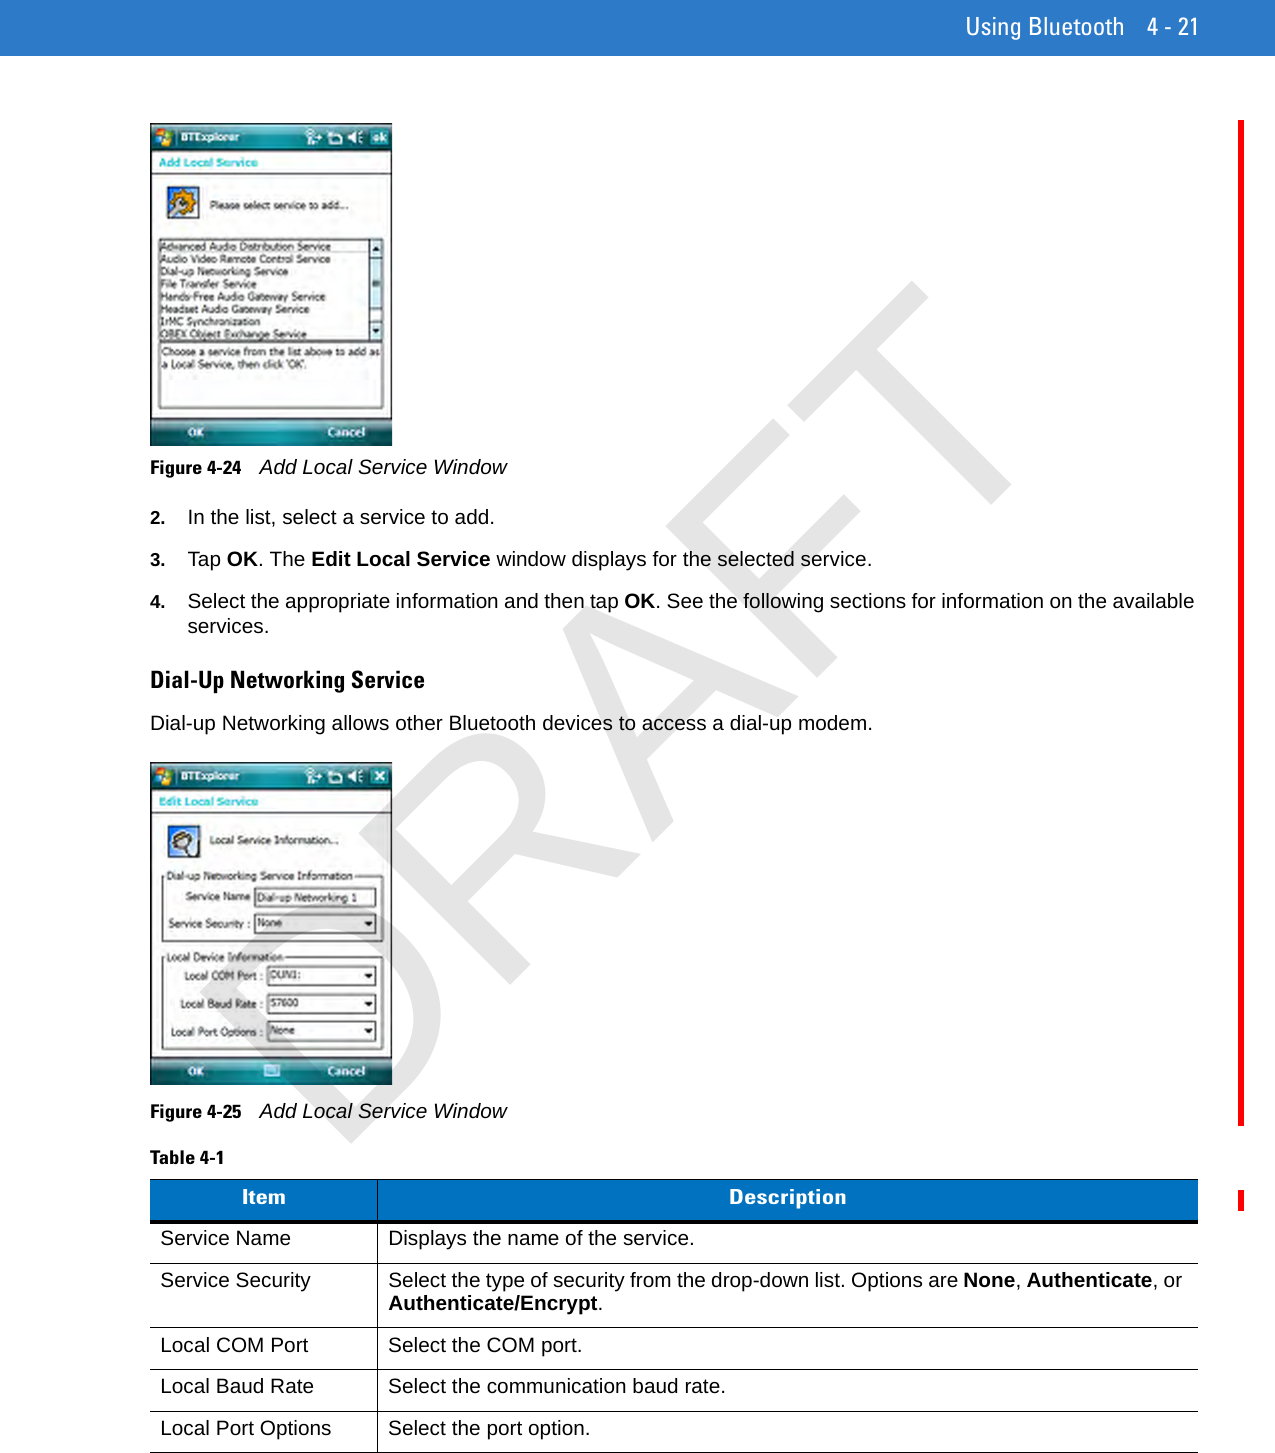
Using Bluetooth 4 - 21Figure 4-24    Add Local Service Window2. In the list, select a service to add.3. Tap OK. The Edit Local Service window displays for the selected service.4. Select the appropriate information and then tap OK. See the following sections for information on the available services.Dial-Up Networking ServiceDial-up Networking allows other Bluetooth devices to access a dial-up modem.Figure 4-25    Add Local Service WindowTable 4-1    Item DescriptionService Name Displays the name of the service.Service Security Select the type of security from the drop-down list. Options are None, Authenticate, or Authenticate/Encrypt.Local COM Port Select the COM port.Local Baud Rate Select the communication baud rate.Local Port Options Select the port option.DRAFT
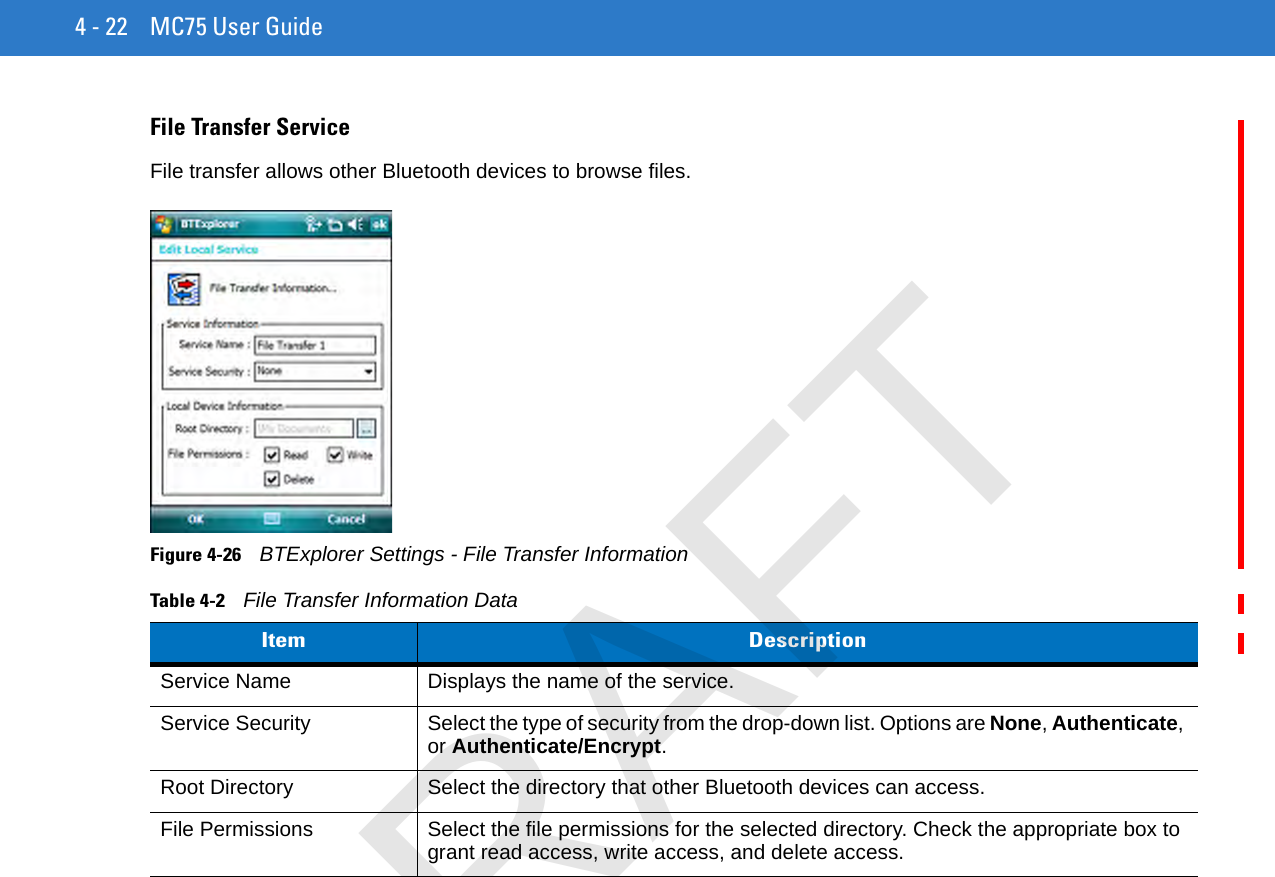
4 - 22 MC75 User GuideFile Transfer ServiceFile transfer allows other Bluetooth devices to browse files.Figure 4-26    BTExplorer Settings - File Transfer InformationTable 4-2    File Transfer Information DataItem DescriptionService Name Displays the name of the service.Service Security Select the type of security from the drop-down list. Options are None, Authenticate, or Authenticate/Encrypt.Root Directory Select the directory that other Bluetooth devices can access.File Permissions Select the file permissions for the selected directory. Check the appropriate box to grant read access, write access, and delete access.DRAFT
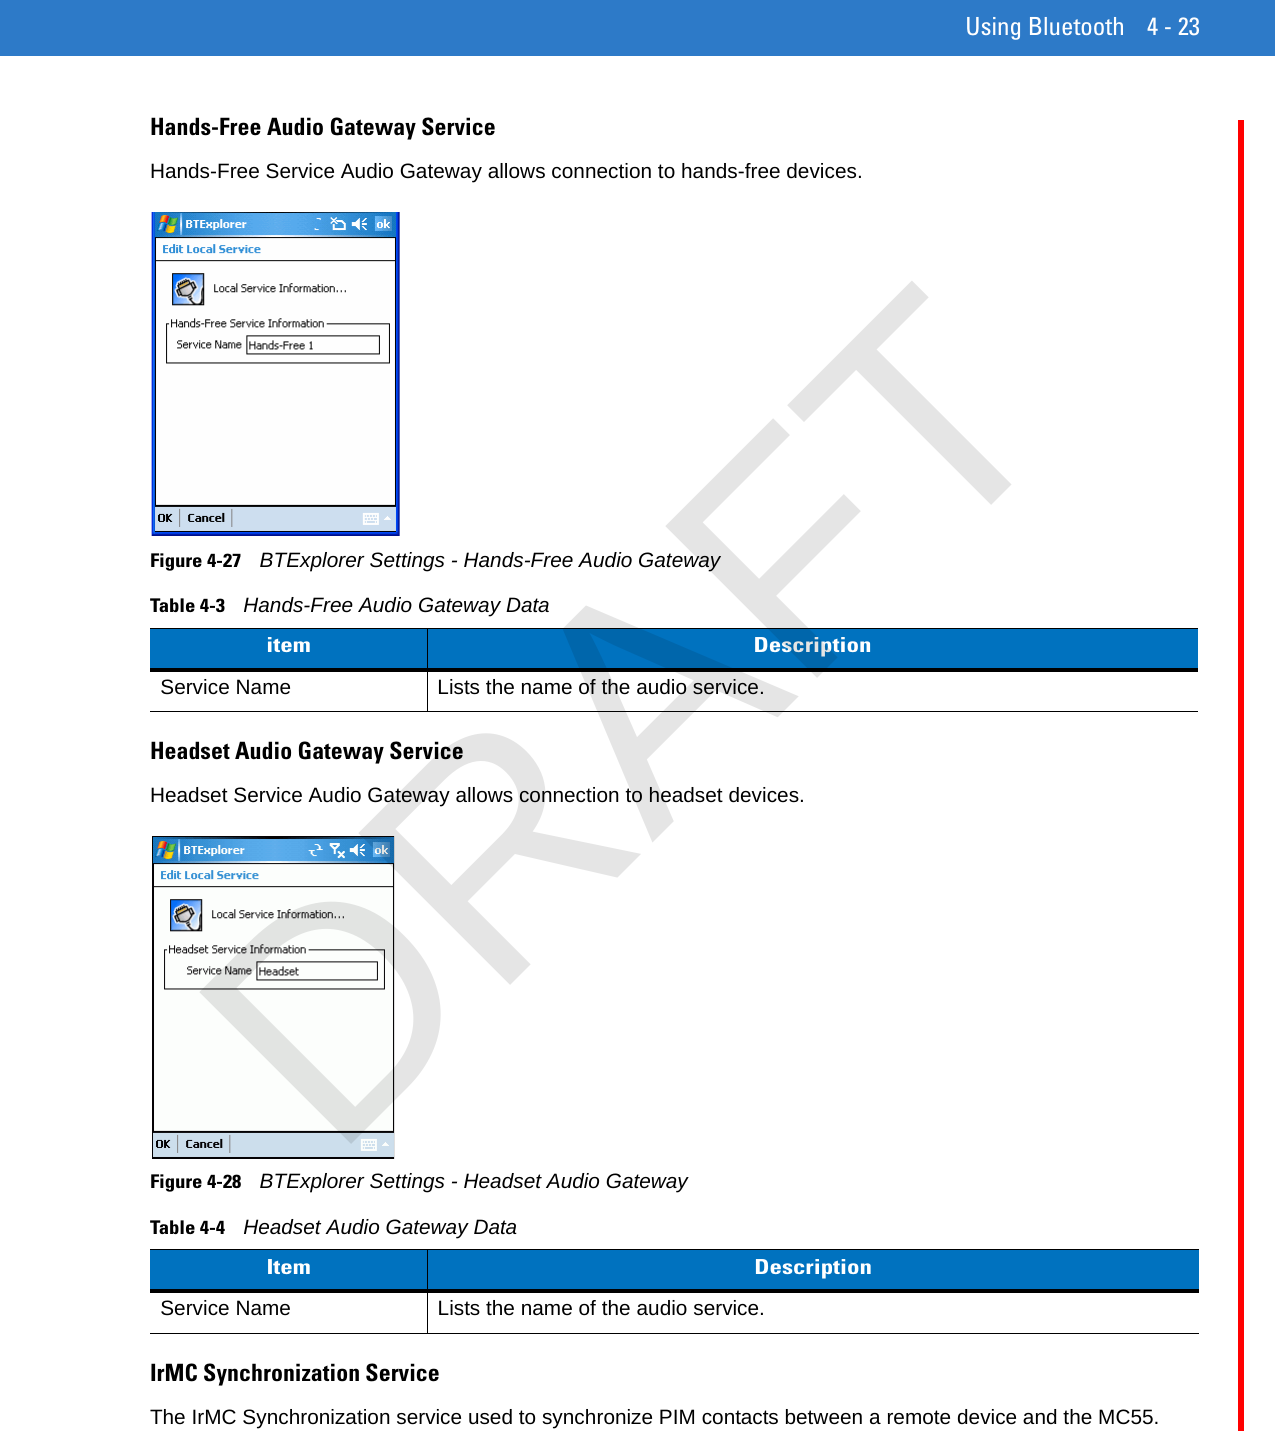
Using Bluetooth 4 - 23Hands-Free Audio Gateway ServiceHands-Free Service Audio Gateway allows connection to hands-free devices.Figure 4-27    BTExplorer Settings - Hands-Free Audio GatewayHeadset Audio Gateway ServiceHeadset Service Audio Gateway allows connection to headset devices.Figure 4-28    BTExplorer Settings - Headset Audio GatewayIrMC Synchronization ServiceThe IrMC Synchronization service used to synchronize PIM contacts between a remote device and the MC55.Table 4-3    Hands-Free Audio Gateway Dataitem DescriptionService Name Lists the name of the audio service.Table 4-4    Headset Audio Gateway DataItem DescriptionService Name Lists the name of the audio service.DRAFT
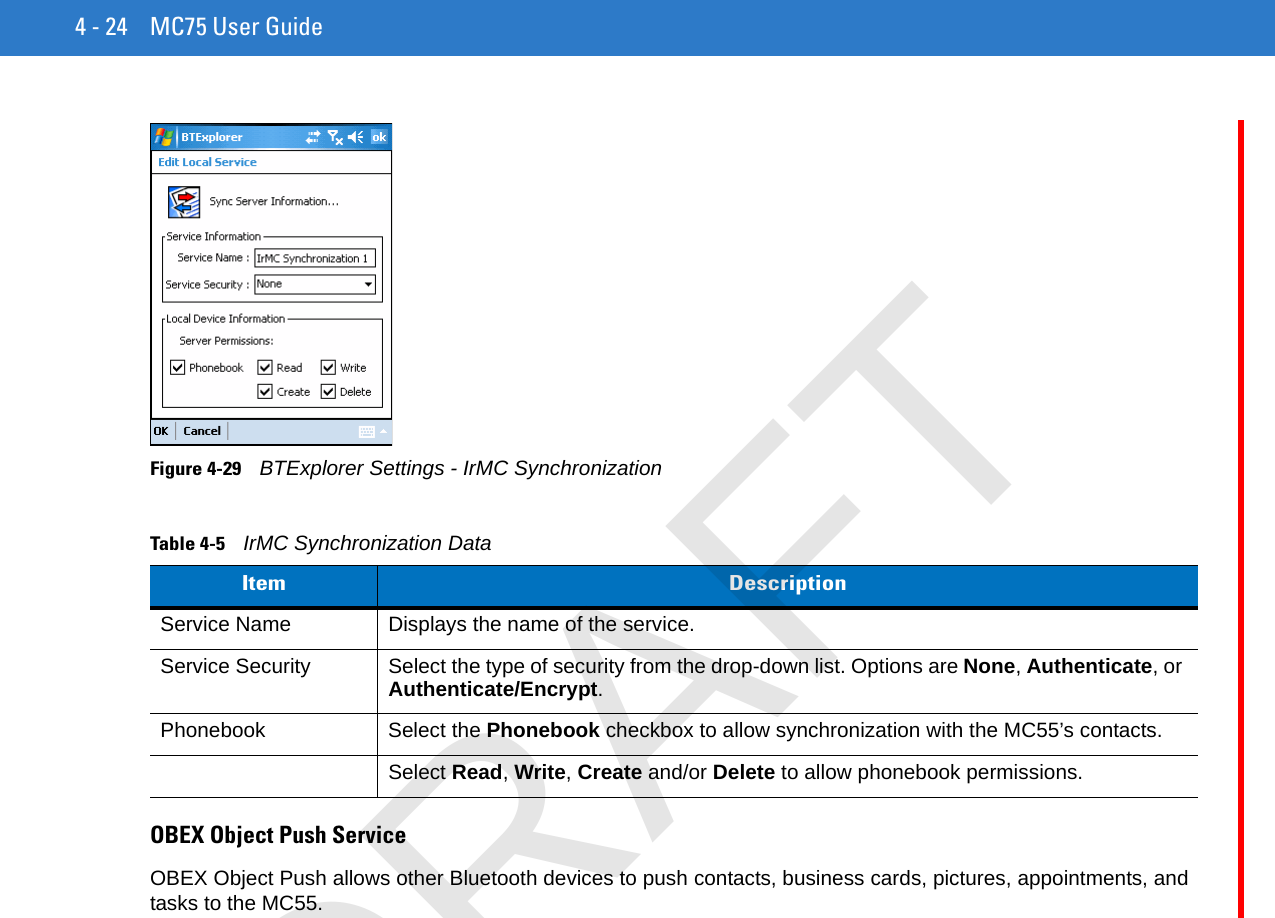
4 - 24 MC75 User GuideFigure 4-29    BTExplorer Settings - IrMC SynchronizationOBEX Object Push ServiceOBEX Object Push allows other Bluetooth devices to push contacts, business cards, pictures, appointments, and tasks to the MC55.Table 4-5    IrMC Synchronization DataItem DescriptionService Name Displays the name of the service.Service Security Select the type of security from the drop-down list. Options are None, Authenticate, or Authenticate/Encrypt.Phonebook Select the Phonebook checkbox to allow synchronization with the MC55’s contacts.Select Read, Write, Create and/or Delete to allow phonebook permissions.DRAFT
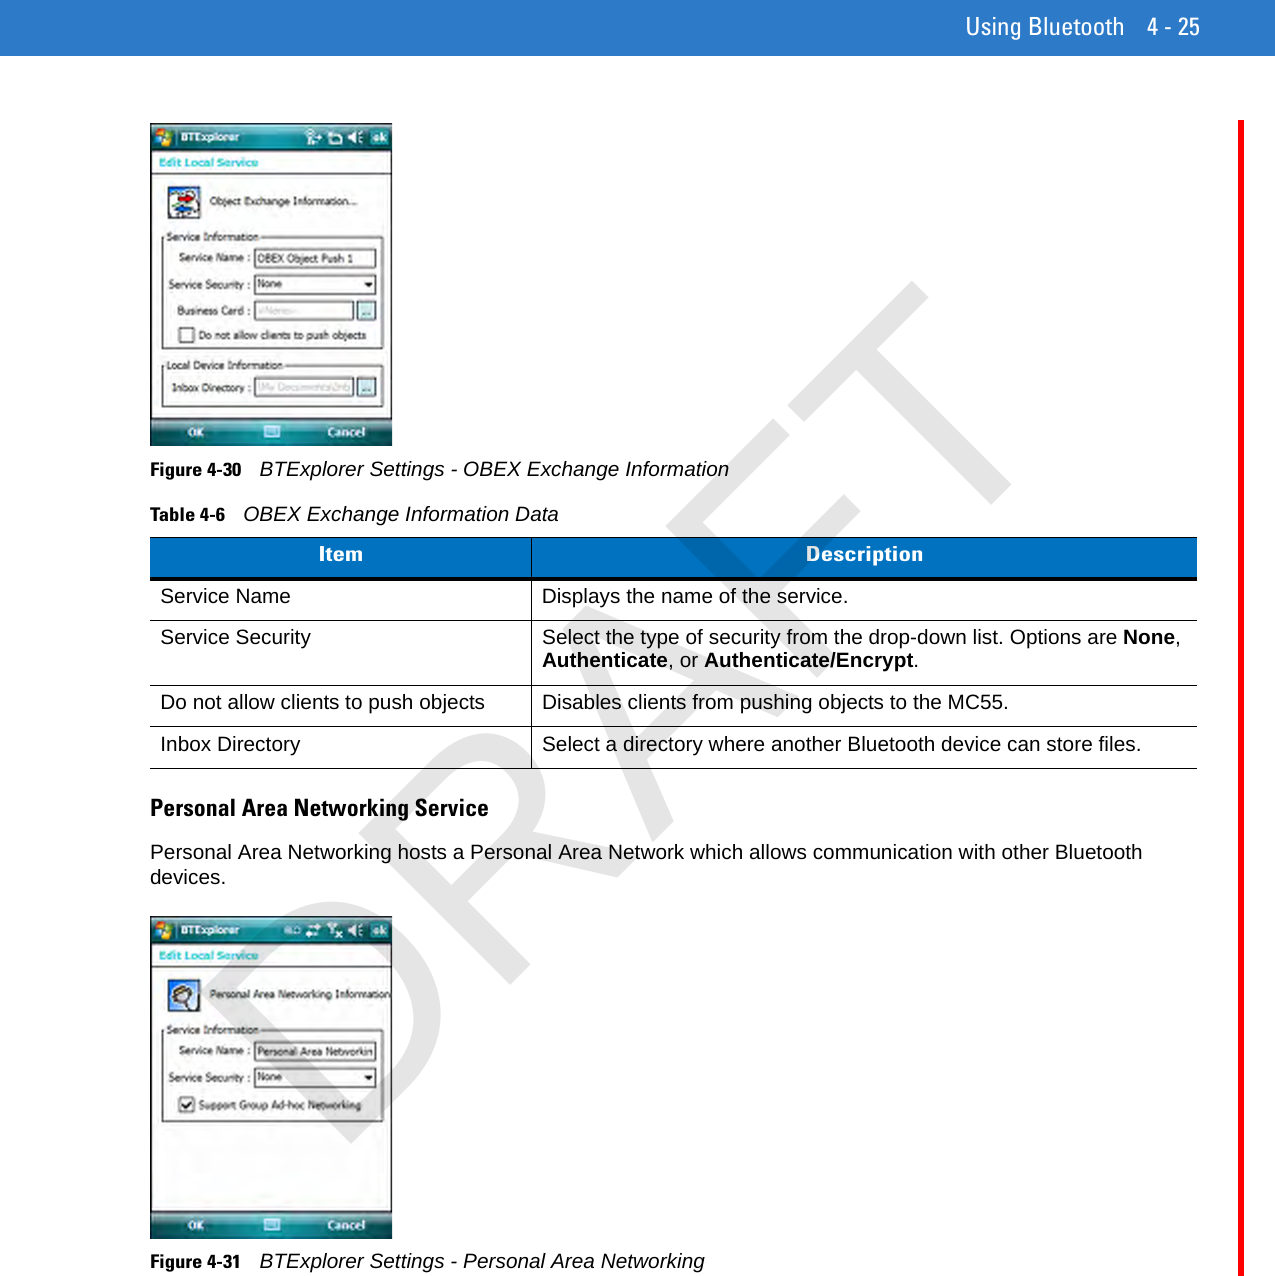
Using Bluetooth 4 - 25Figure 4-30    BTExplorer Settings - OBEX Exchange InformationPersonal Area Networking ServicePersonal Area Networking hosts a Personal Area Network which allows communication with other Bluetooth devices.Figure 4-31    BTExplorer Settings - Personal Area NetworkingTable 4-6    OBEX Exchange Information DataItem DescriptionService Name Displays the name of the service.Service Security Select the type of security from the drop-down list. Options are None, Authenticate, or Authenticate/Encrypt.Do not allow clients to push objects Disables clients from pushing objects to the MC55.Inbox Directory Select a directory where another Bluetooth device can store files.DRAFT
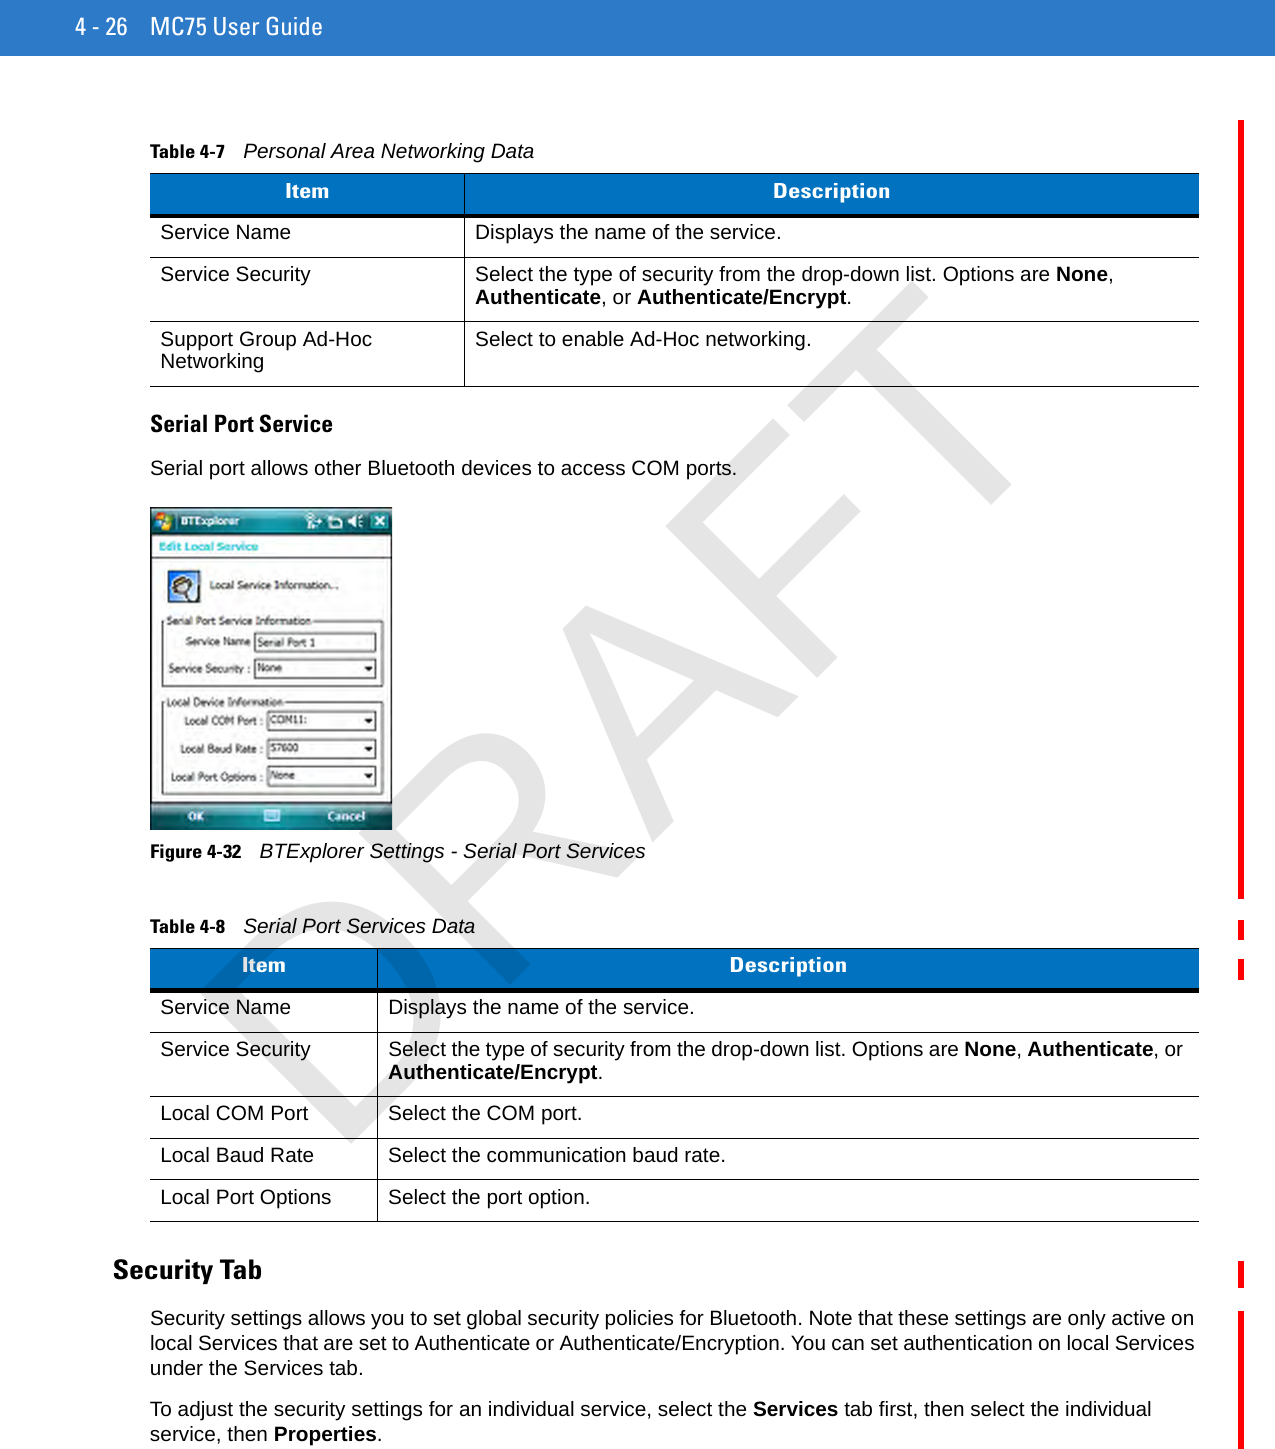
4 - 26 MC75 User GuideSerial Port ServiceSerial port allows other Bluetooth devices to access COM ports.Figure 4-32    BTExplorer Settings - Serial Port ServicesSecurity TabSecurity settings allows you to set global security policies for Bluetooth. Note that these settings are only active on local Services that are set to Authenticate or Authenticate/Encryption. You can set authentication on local Services under the Services tab.To adjust the security settings for an individual service, select the Services tab first, then select the individual service, then Properties.Table 4-7    Personal Area Networking DataItem DescriptionService Name Displays the name of the service.Service Security Select the type of security from the drop-down list. Options are None, Authenticate, or Authenticate/Encrypt.Support Group Ad-Hoc Networking Select to enable Ad-Hoc networking.Table 4-8    Serial Port Services DataItem DescriptionService Name Displays the name of the service.Service Security Select the type of security from the drop-down list. Options are None, Authenticate, or Authenticate/Encrypt.Local COM Port Select the COM port.Local Baud Rate Select the communication baud rate.Local Port Options Select the port option.DRAFT
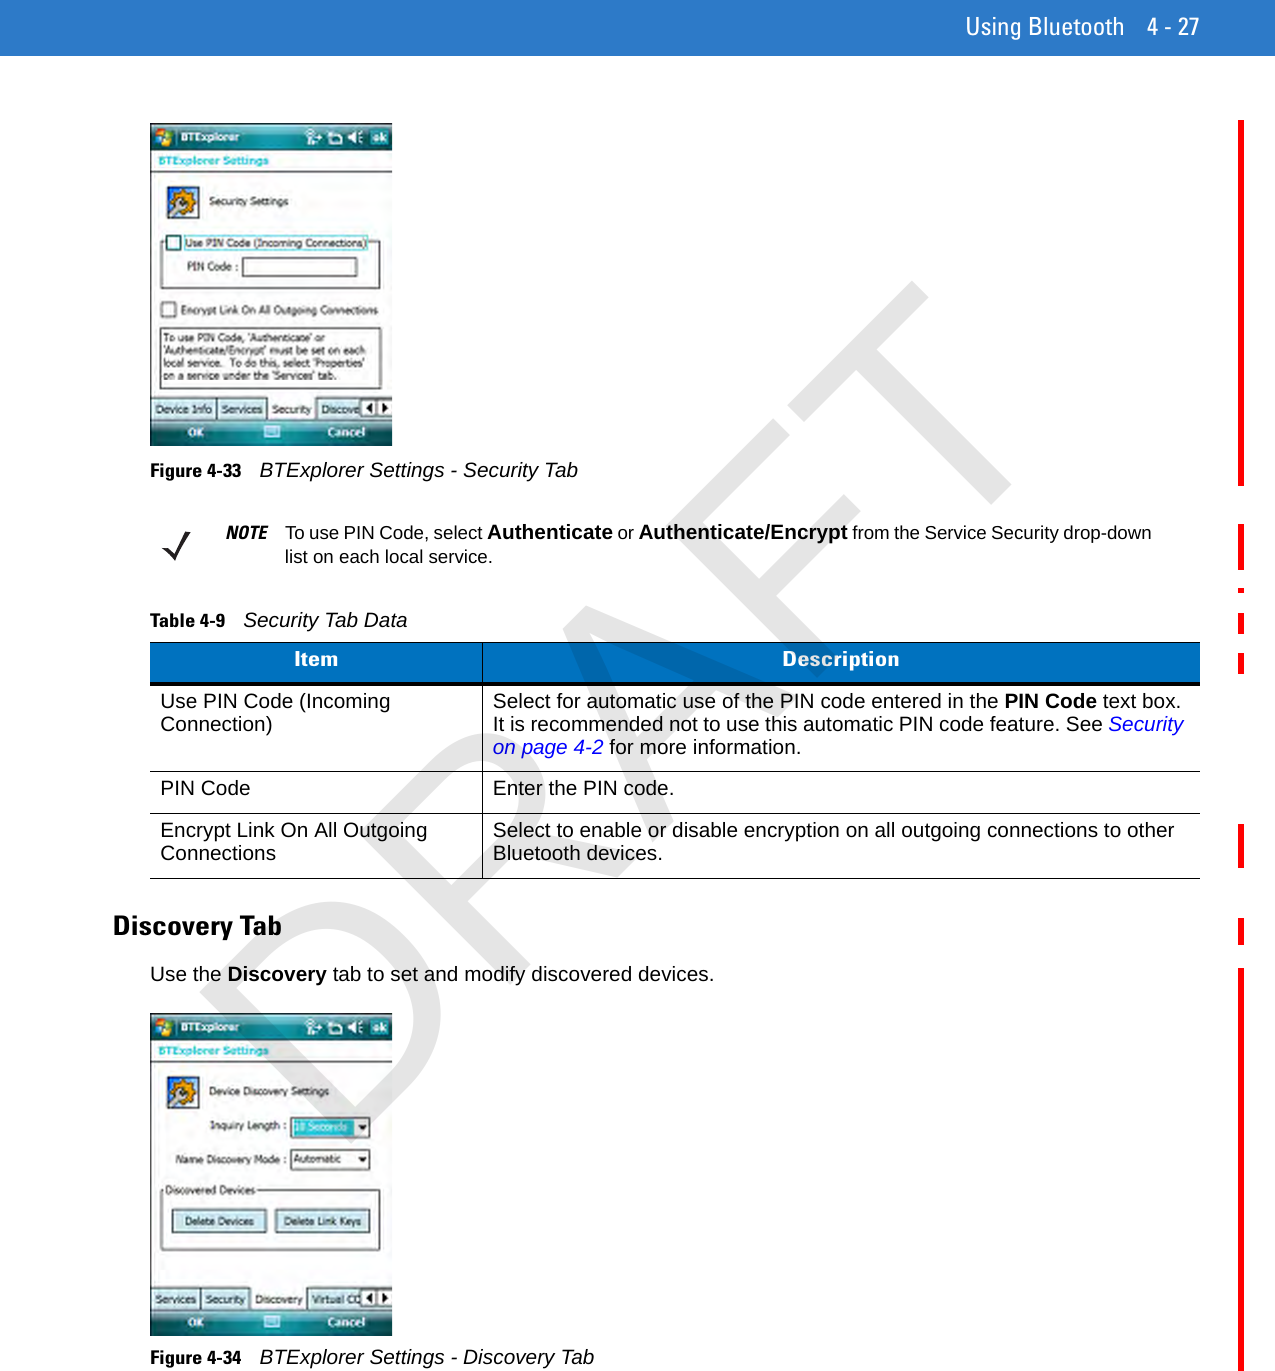
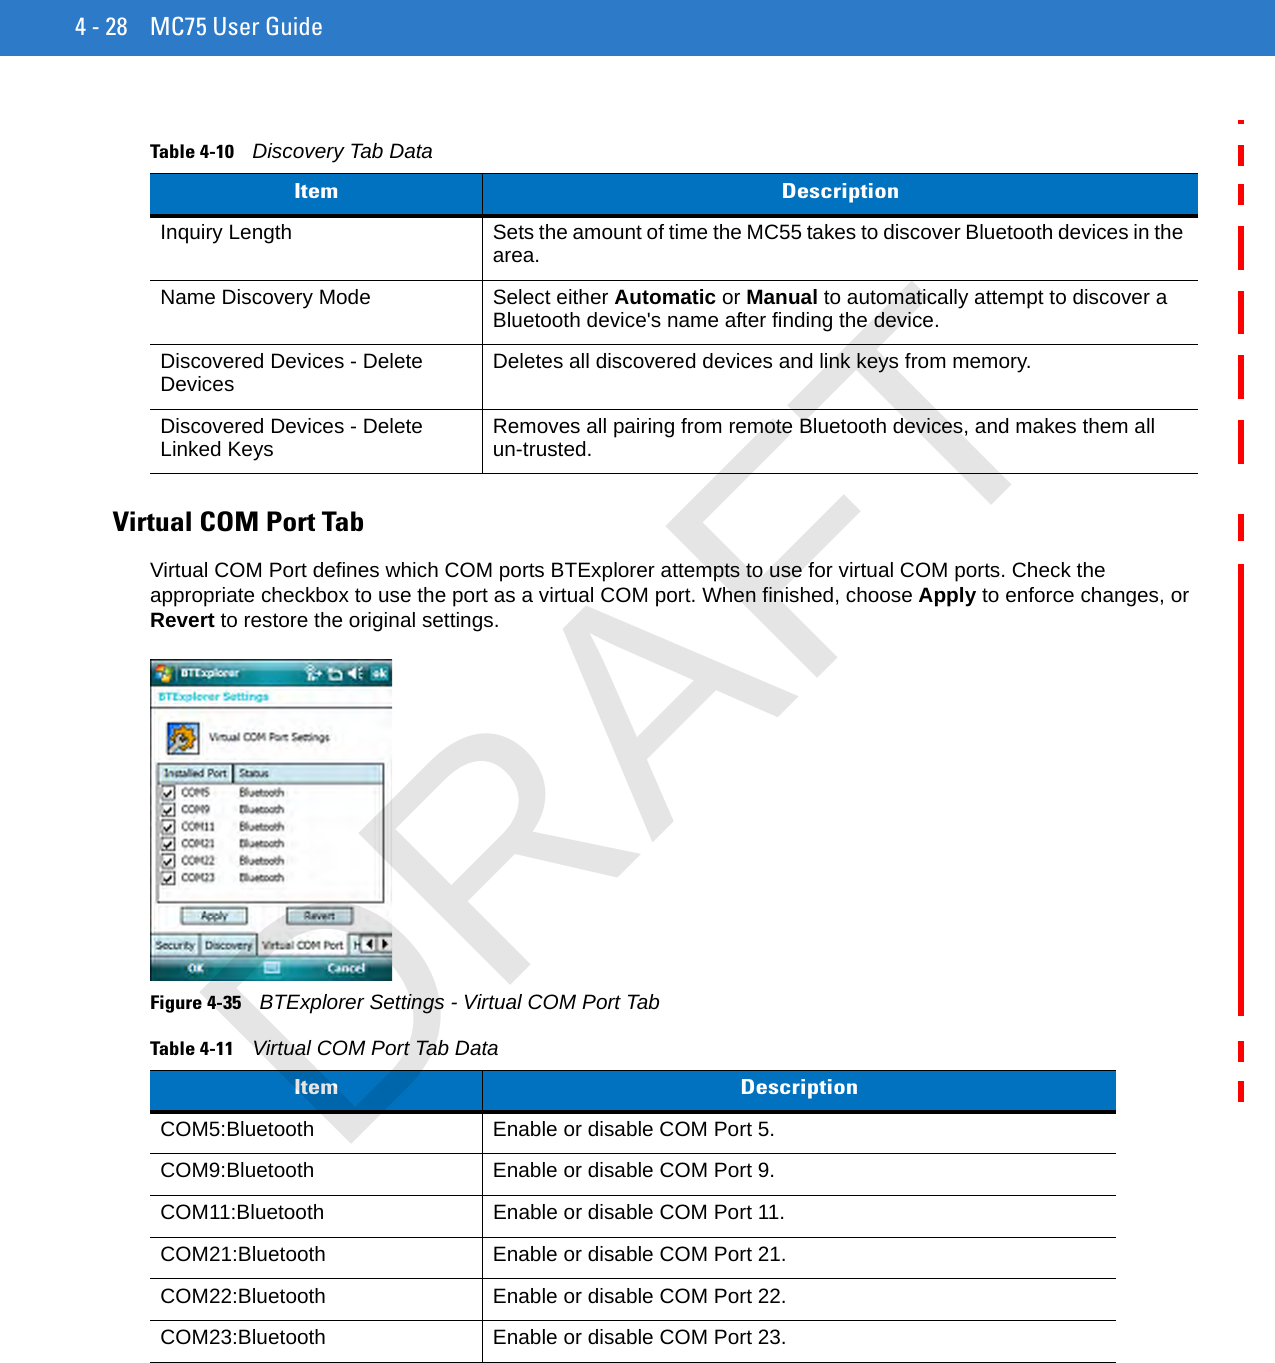
Using Bluetooth 4 - 27Figure 4-33    BTExplorer Settings - Security TabDiscovery TabUse the Discovery tab to set and modify discovered devices.Figure 4-34    BTExplorer Settings - Discovery TabNOTE To use PIN Code, select Authenticate or Authenticate/Encrypt from the Service Security drop-down list on each local service.Table 4-9    Security Tab DataItem DescriptionUse PIN Code (Incoming Connection) Select for automatic use of the PIN code entered in the PIN Code text box. It is recommended not to use this automatic PIN code feature. See Security on page 4-2 for more information.PIN Code Enter the PIN code.Encrypt Link On All Outgoing Connections Select to enable or disable encryption on all outgoing connections to other Bluetooth devices.DRAFT
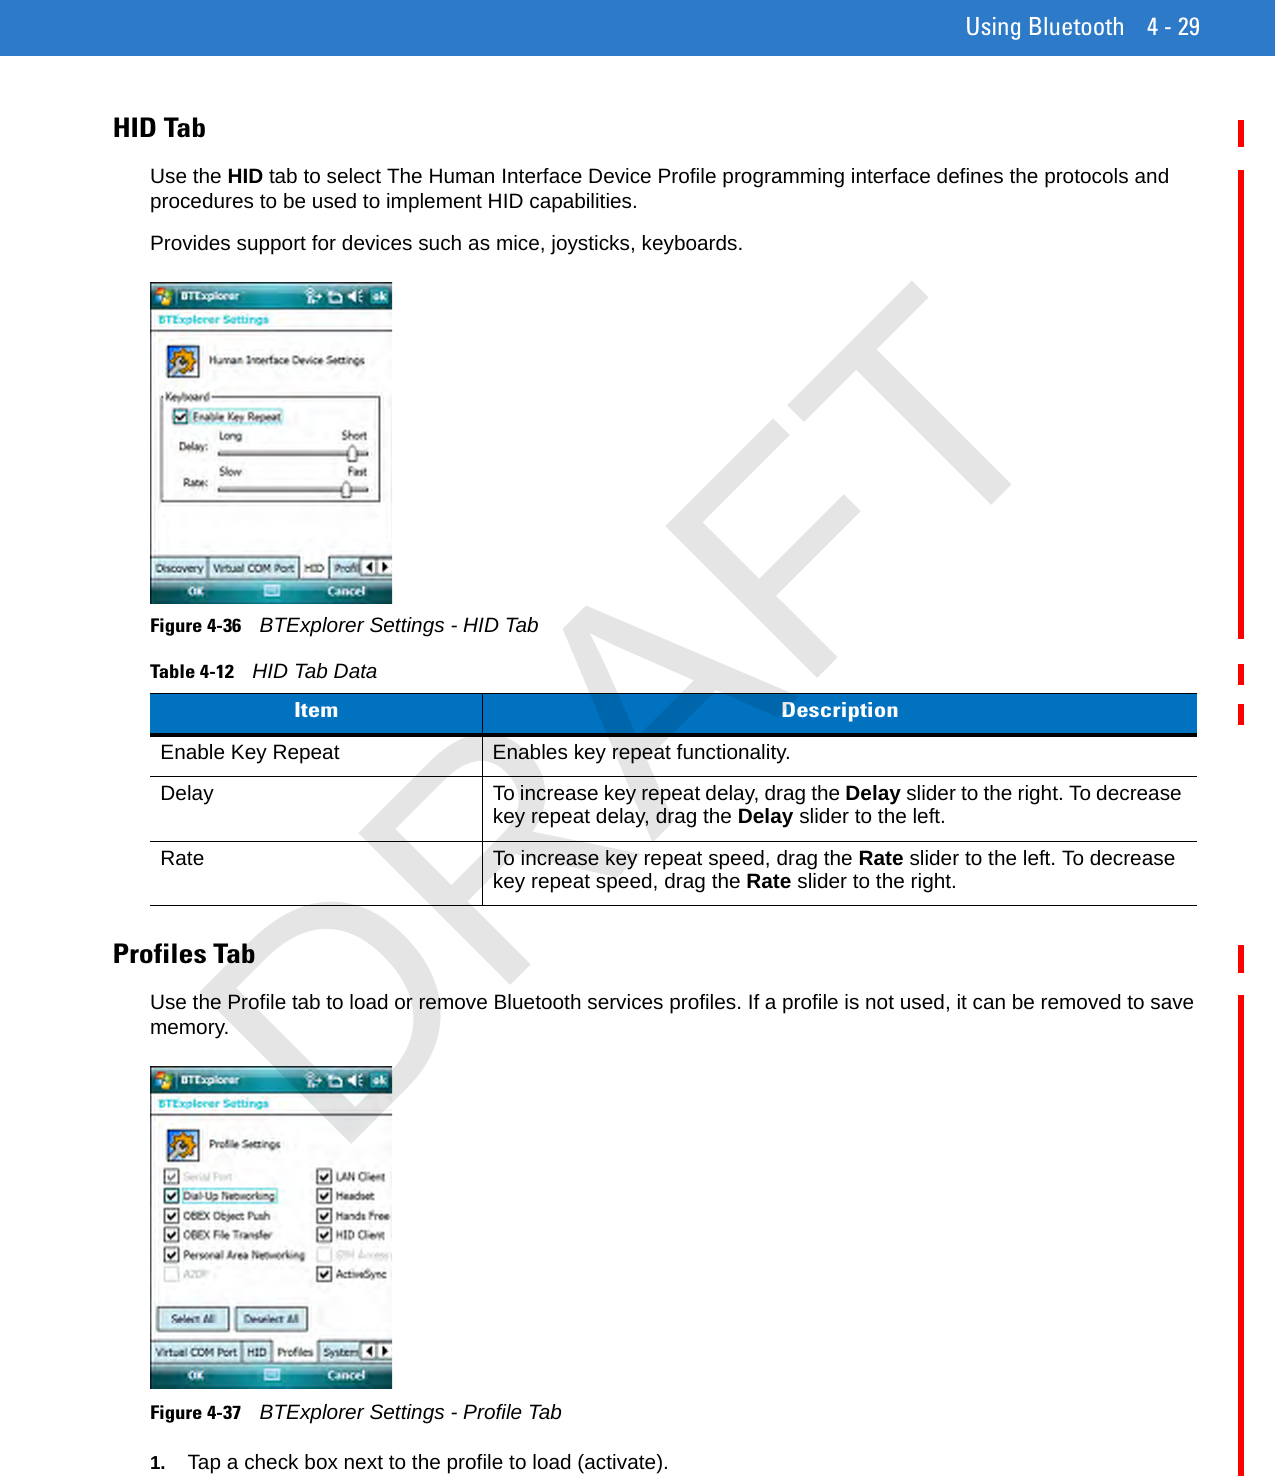
4 - 28 MC75 User GuideVirtual COM Port TabVirtual COM Port defines which COM ports BTExplorer attempts to use for virtual COM ports. Check the appropriate checkbox to use the port as a virtual COM port. When finished, choose Apply to enforce changes, or Revert to restore the original settings.Figure 4-35    BTExplorer Settings - Virtual COM Port TabTable 4-10    Discovery Tab DataItem DescriptionInquiry Length Sets the amount of time the MC55 takes to discover Bluetooth devices in the area.Name Discovery Mode Select either Automatic or Manual to automatically attempt to discover a Bluetooth device's name after finding the device.Discovered Devices - Delete Devices Deletes all discovered devices and link keys from memory.Discovered Devices - Delete Linked Keys Removes all pairing from remote Bluetooth devices, and makes them all un-trusted.Table 4-11    Virtual COM Port Tab DataItem DescriptionCOM5:Bluetooth Enable or disable COM Port 5.COM9:Bluetooth Enable or disable COM Port 9.COM11:Bluetooth Enable or disable COM Port 11.COM21:Bluetooth Enable or disable COM Port 21.COM22:Bluetooth Enable or disable COM Port 22.COM23:Bluetooth Enable or disable COM Port 23.DRAFT
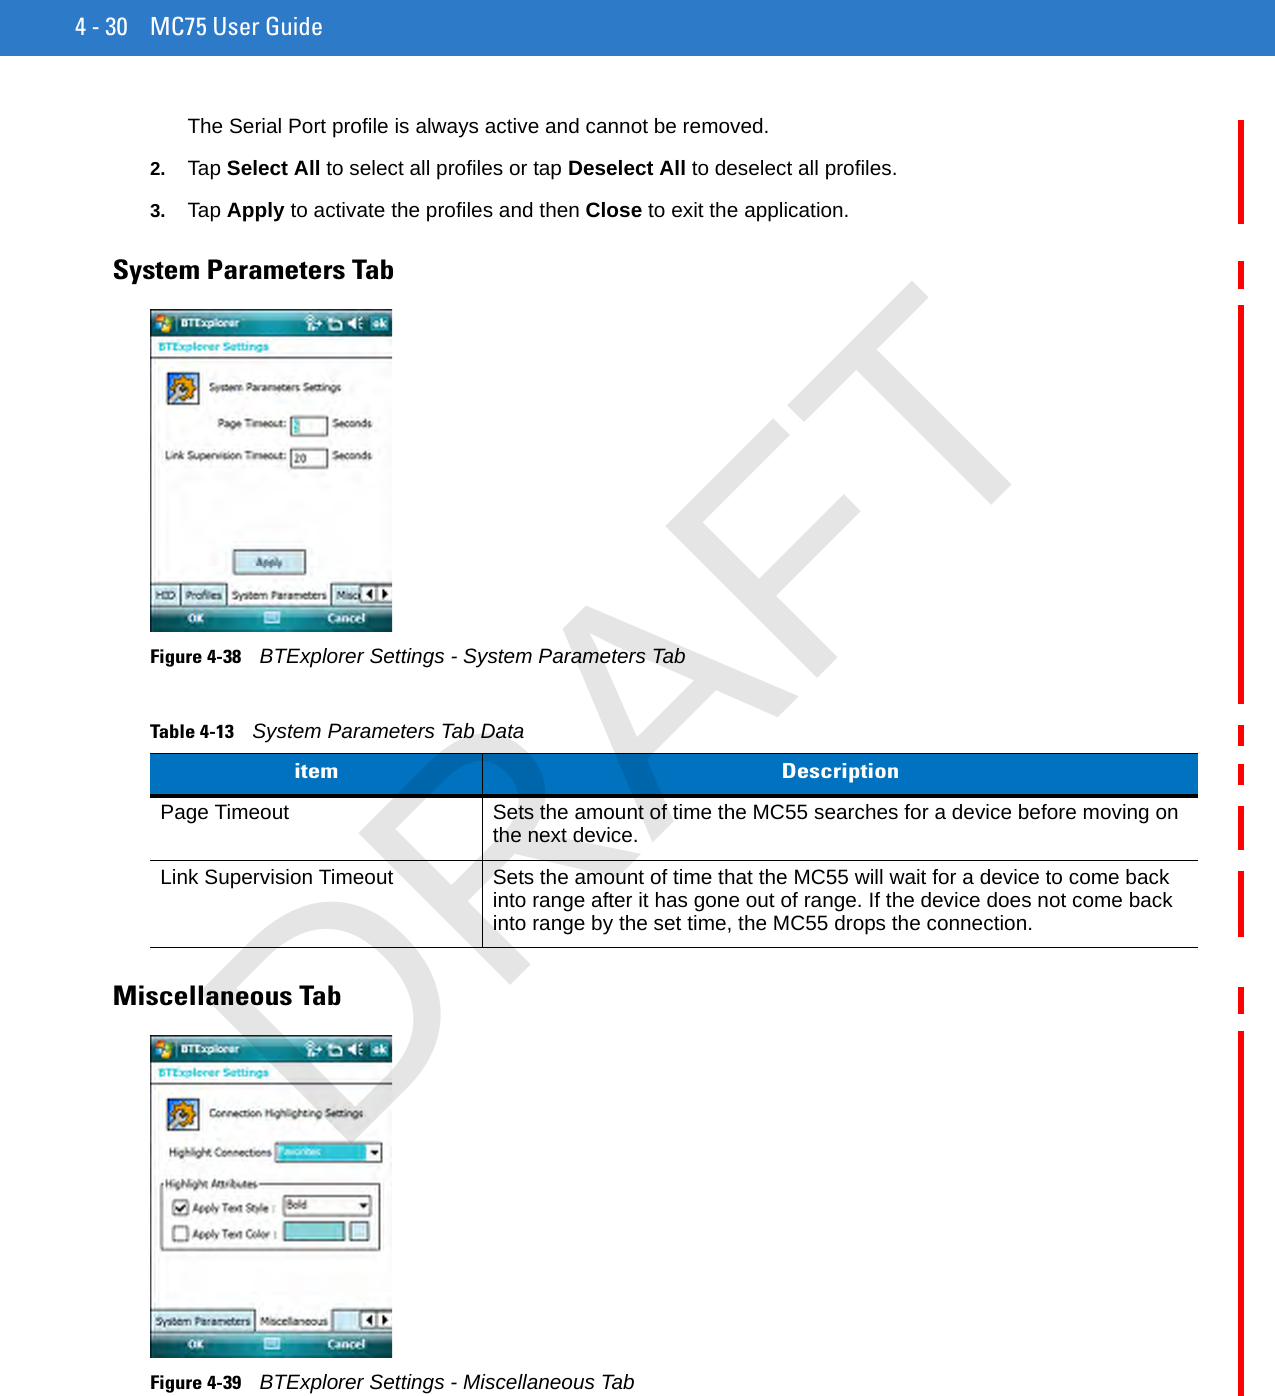
Using Bluetooth 4 - 29HID TabUse the HID tab to select The Human Interface Device Profile programming interface defines the protocols and procedures to be used to implement HID capabilities.Provides support for devices such as mice, joysticks, keyboards.Figure 4-36    BTExplorer Settings - HID TabProfiles TabUse the Profile tab to load or remove Bluetooth services profiles. If a profile is not used, it can be removed to save memory.Figure 4-37    BTExplorer Settings - Profile Tab1. Tap a check box next to the profile to load (activate).Table 4-12    HID Tab DataItem DescriptionEnable Key Repeat Enables key repeat functionality.Delay To increase key repeat delay, drag the Delay slider to the right. To decrease key repeat delay, drag the Delay slider to the left.Rate To increase key repeat speed, drag the Rate slider to the left. To decrease key repeat speed, drag the Rate slider to the right.DRAFT
4 - 30 MC75 User GuideThe Serial Port profile is always active and cannot be removed.2. Tap Select All to select all profiles or tap Deselect All to deselect all profiles.3. Tap Apply to activate the profiles and then Close to exit the application.System Parameters TabFigure 4-38    BTExplorer Settings - System Parameters TabMiscellaneous TabFigure 4-39    BTExplorer Settings - Miscellaneous TabTable 4-13    System Parameters Tab Dataitem DescriptionPage Timeout Sets the amount of time the MC55 searches for a device before moving on the next device.Link Supervision Timeout Sets the amount of time that the MC55 will wait for a device to come back into range after it has gone out of range. If the device does not come back into range by the set time, the MC55 drops the connection.DRAFT
Using Bluetooth 4 - 31Table 4-14    Miscellaneous tab DataItem DescriptionHighlight Connections Select the connection type to highlight when connected. In the Wizard Mode, the only options are Favorites or None. In the Explorer Mode the options are None, Tree View Only, List View Only, or Tree and List View.Apply Text Style Select the text style to apply to the connection text.Apply Text Color Select the text color to apply to the connection text.DRAFT
4 - 32 MC75 User GuideDRAFT
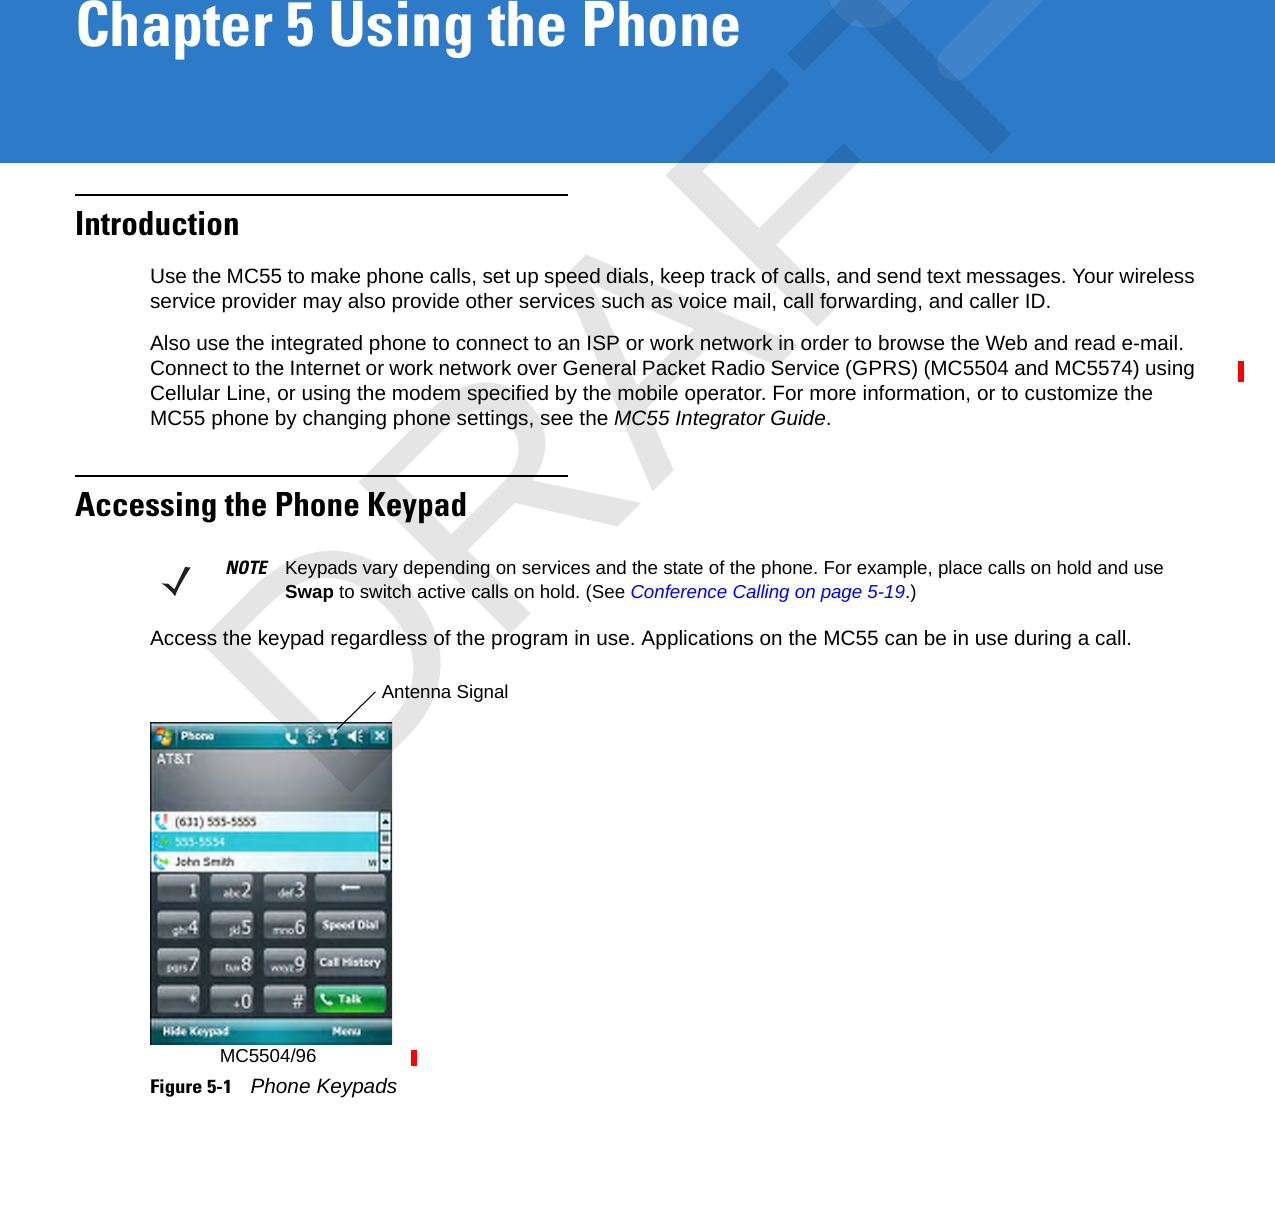
Chapter 5 Using the PhoneIntroductionUse the MC55 to make phone calls, set up speed dials, keep track of calls, and send text messages. Your wireless service provider may also provide other services such as voice mail, call forwarding, and caller ID.Also use the integrated phone to connect to an ISP or work network in order to browse the Web and read e-mail. Connect to the Internet or work network over General Packet Radio Service (GPRS) (MC5504 and MC5574) using Cellular Line, or using the modem specified by the mobile operator. For more information, or to customize the MC55 phone by changing phone settings, see the MC55 Integrator Guide.Accessing the Phone KeypadAccess the keypad regardless of the program in use. Applications on the MC55 can be in use during a call.Figure 5-1    Phone KeypadsNOTE Keypads vary depending on services and the state of the phone. For example, place calls on hold and use Swap to switch active calls on hold. (See Conference Calling on page 5-19.)Antenna SignalMC5504/96DRAFT
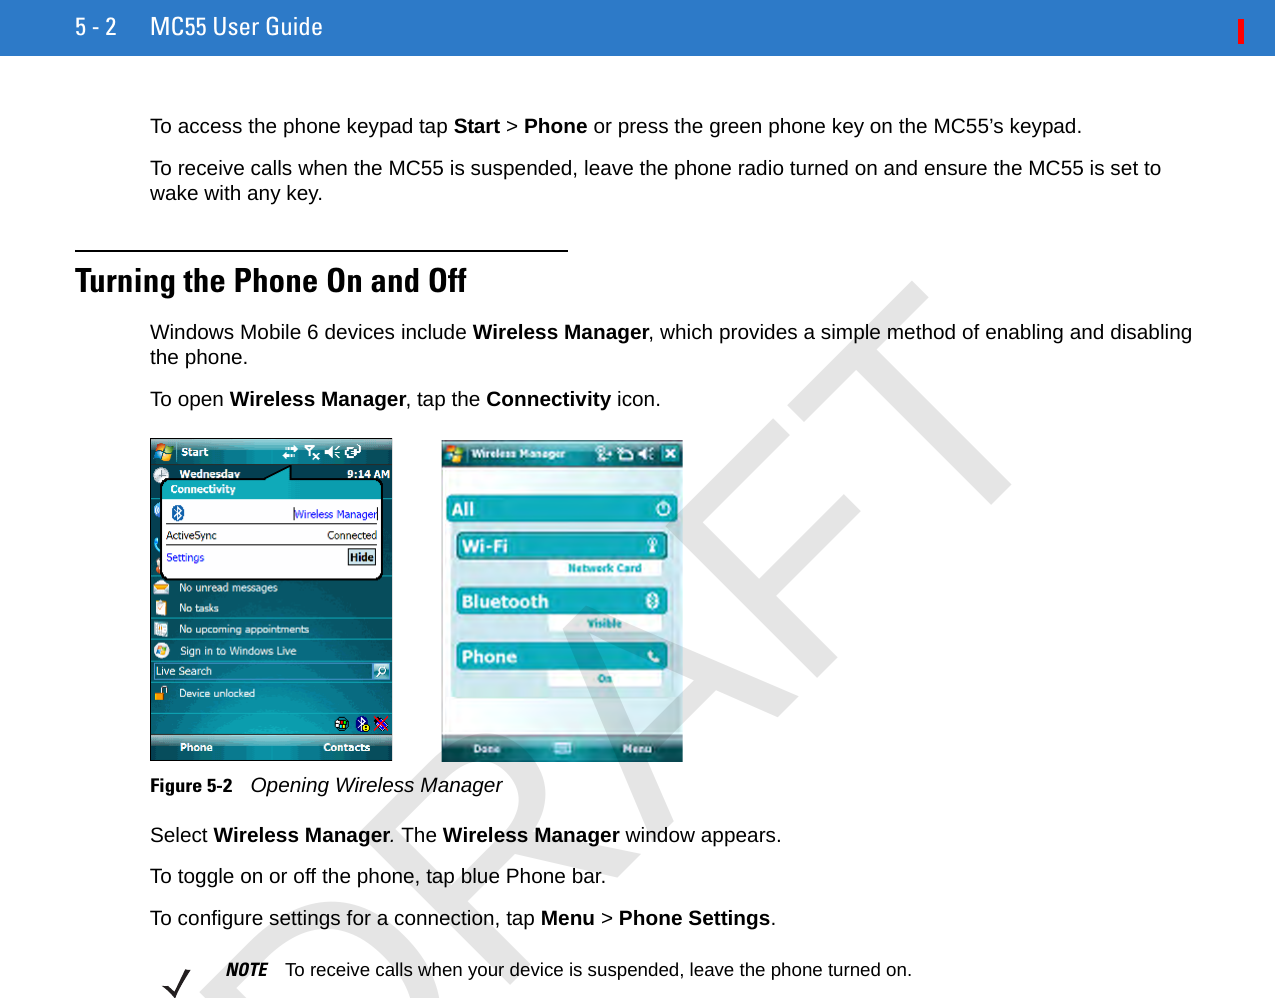
5 - 2 MC55 User GuideTo access the phone keypad tap Start > Phone or press the green phone key on the MC55’s keypad.To receive calls when the MC55 is suspended, leave the phone radio turned on and ensure the MC55 is set to wake with any key.Turning the Phone On and OffWindows Mobile 6 devices include Wireless Manager, which provides a simple method of enabling and disabling the phone.To open Wireless Manager, tap the Connectivity icon.Figure 5-2    Opening Wireless ManagerSelect Wireless Manager. The Wireless Manager window appears.To toggle on or off the phone, tap blue Phone bar.To configure settings for a connection, tap Menu > Phone Settings.NOTE To receive calls when your device is suspended, leave the phone turned on.DRAFT
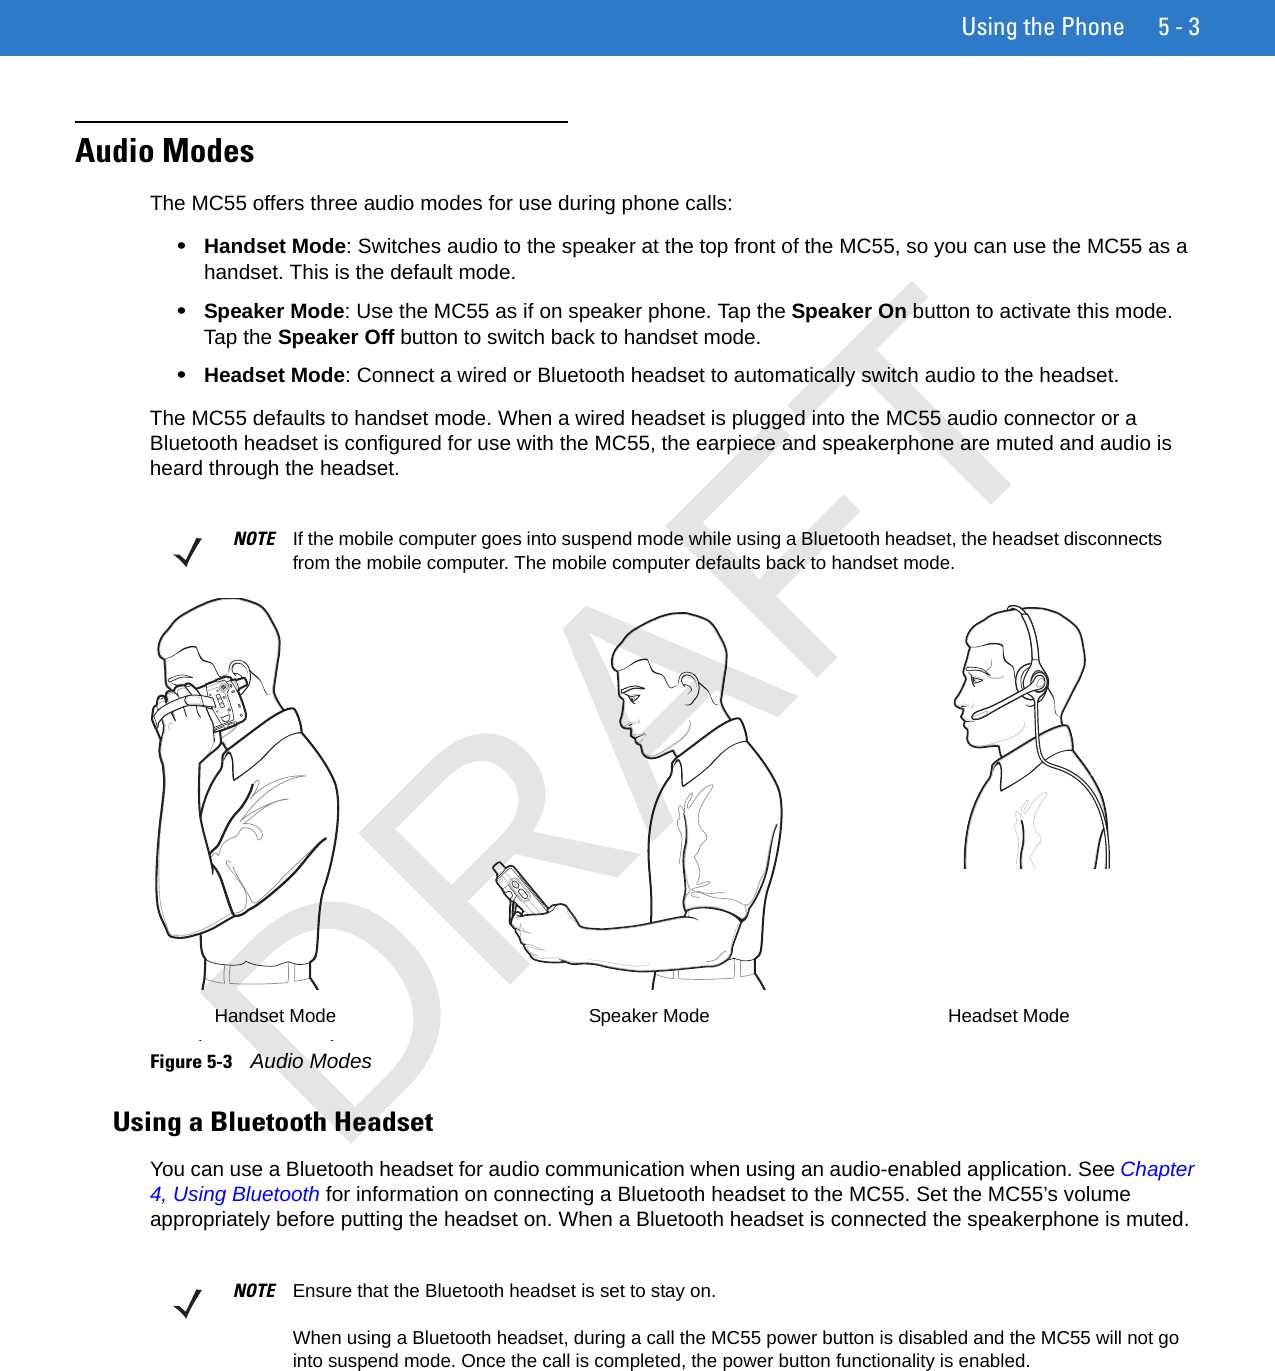
Using the Phone 5 - 3Audio ModesThe MC55 offers three audio modes for use during phone calls:•Handset Mode: Switches audio to the speaker at the top front of the MC55, so you can use the MC55 as a handset. This is the default mode.•Speaker Mode: Use the MC55 as if on speaker phone. Tap the Speaker On button to activate this mode. Tap the Speaker Off button to switch back to handset mode.•Headset Mode: Connect a wired or Bluetooth headset to automatically switch audio to the headset.The MC55 defaults to handset mode. When a wired headset is plugged into the MC55 audio connector or a Bluetooth headset is configured for use with the MC55, the earpiece and speakerphone are muted and audio is heard through the headset.Figure 5-3    Audio ModesUsing a Bluetooth HeadsetYou can use a Bluetooth headset for audio communication when using an audio-enabled application. See Chapter 4, Using Bluetooth for information on connecting a Bluetooth headset to the MC55. Set the MC55’s volume appropriately before putting the headset on. When a Bluetooth headset is connected the speakerphone is muted.NOTE If the mobile computer goes into suspend mode while using a Bluetooth headset, the headset disconnects from the mobile computer. The mobile computer defaults back to handset mode.Headset ModeHandset Mode Speaker ModeNOTE Ensure that the Bluetooth headset is set to stay on.When using a Bluetooth headset, during a call the MC55 power button is disabled and the MC55 will not go into suspend mode. Once the call is completed, the power button functionality is enabled.DRAFT
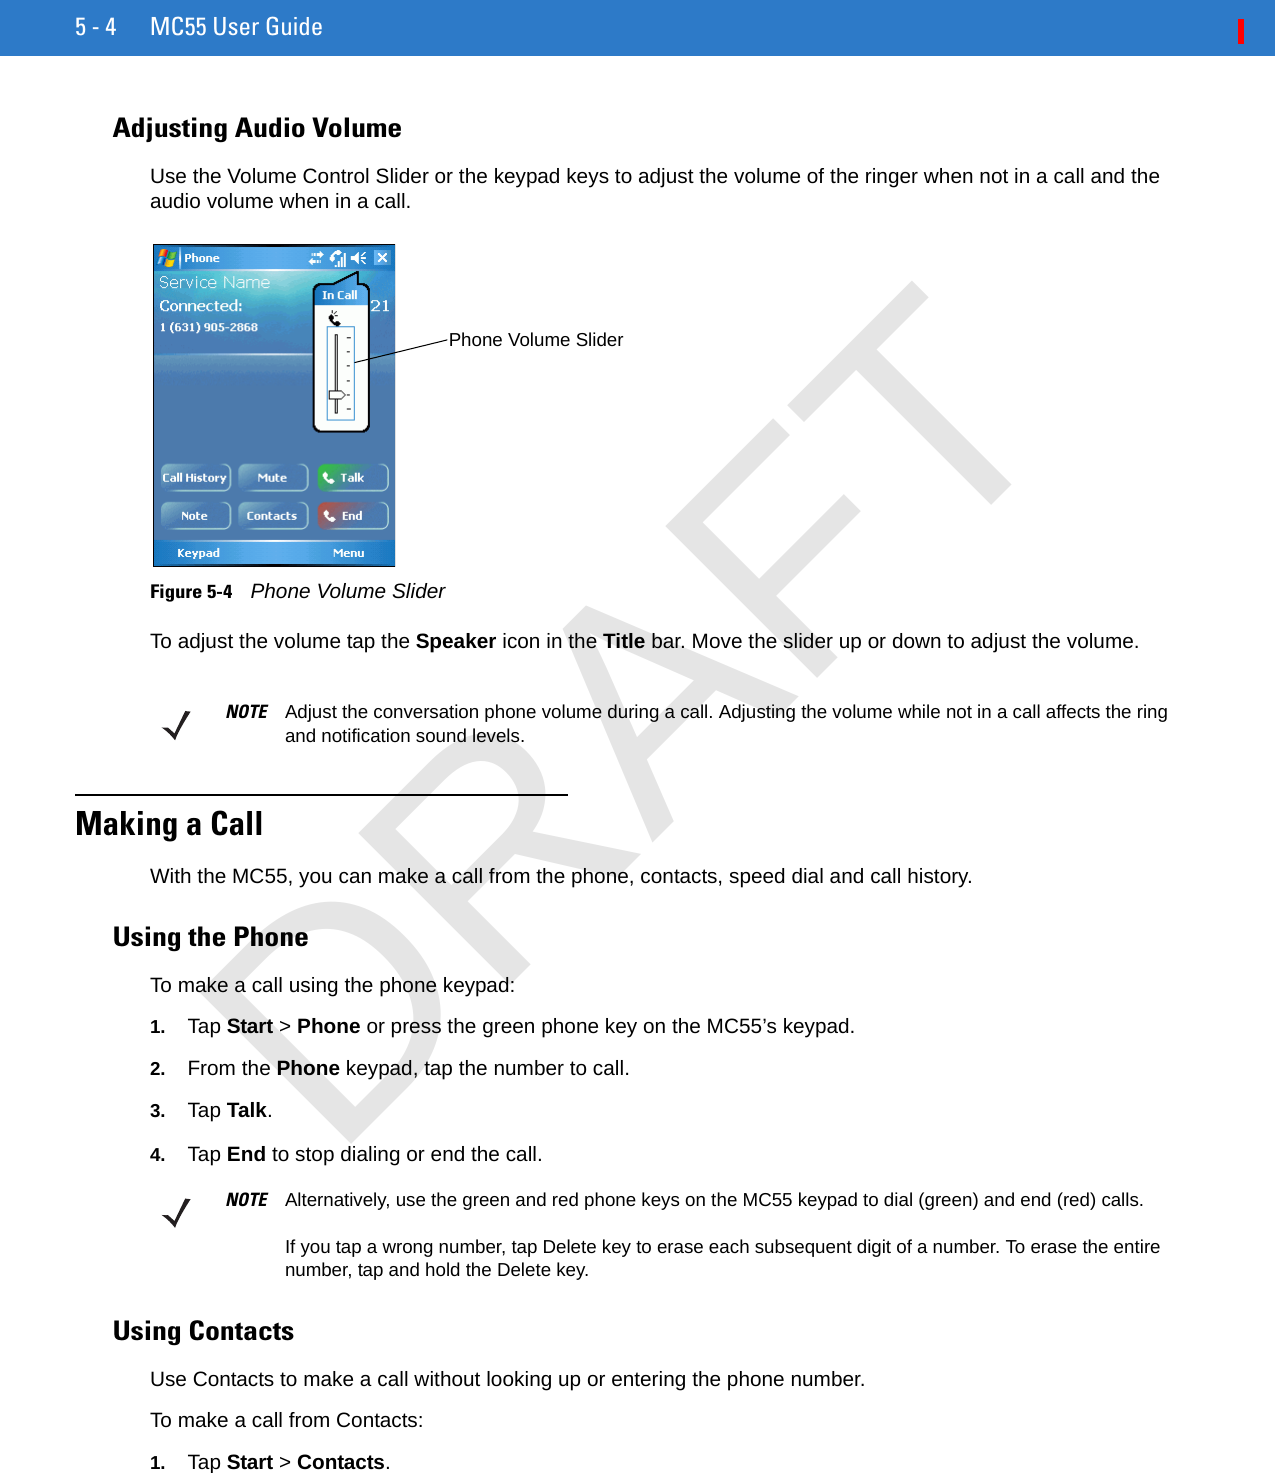
5 - 4 MC55 User GuideAdjusting Audio VolumeUse the Volume Control Slider or the keypad keys to adjust the volume of the ringer when not in a call and the audio volume when in a call.Figure 5-4    Phone Volume SliderTo adjust the volume tap the Speaker icon in the Title bar. Move the slider up or down to adjust the volume.Making a CallWith the MC55, you can make a call from the phone, contacts, speed dial and call history.Using the PhoneTo make a call using the phone keypad:1. Tap Start > Phone or press the green phone key on the MC55’s keypad.2. From the Phone keypad, tap the number to call.3. Tap Talk.4. Tap End to stop dialing or end the call.Using ContactsUse Contacts to make a call without looking up or entering the phone number.To make a call from Contacts:1. Tap Start > Contacts.Phone Volume SliderNOTE Adjust the conversation phone volume during a call. Adjusting the volume while not in a call affects the ring and notification sound levels.NOTE Alternatively, use the green and red phone keys on the MC55 keypad to dial (green) and end (red) calls.If you tap a wrong number, tap Delete key to erase each subsequent digit of a number. To erase the entire number, tap and hold the Delete key.DRAFT
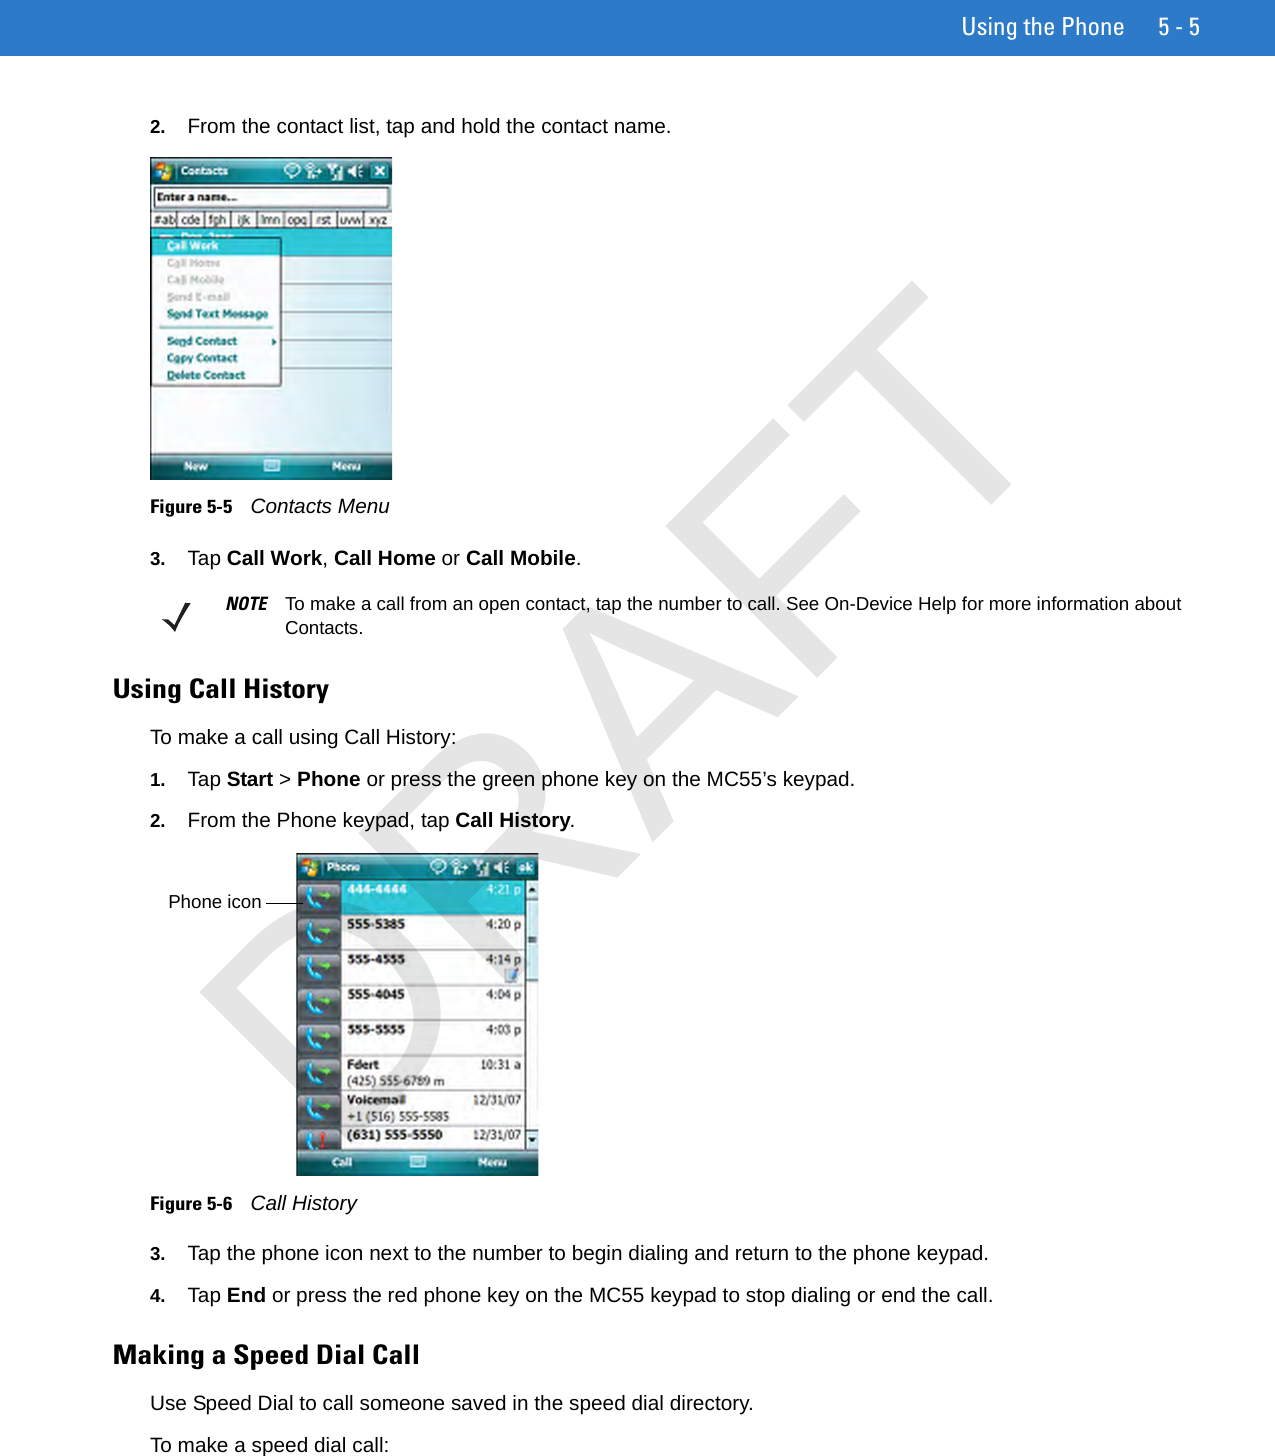
Using the Phone 5 - 52. From the contact list, tap and hold the contact name.Figure 5-5    Contacts Menu3. Tap Call Work, Call Home or Call Mobile.Using Call HistoryTo make a call using Call History:1. Tap Start > Phone or press the green phone key on the MC55’s keypad.2. From the Phone keypad, tap Call History.Figure 5-6    Call History3. Tap the phone icon next to the number to begin dialing and return to the phone keypad.4. Tap End or press the red phone key on the MC55 keypad to stop dialing or end the call.Making a Speed Dial CallUse Speed Dial to call someone saved in the speed dial directory. To make a speed dial call:NOTE To make a call from an open contact, tap the number to call. See On-Device Help for more information about Contacts.Phone iconDRAFT
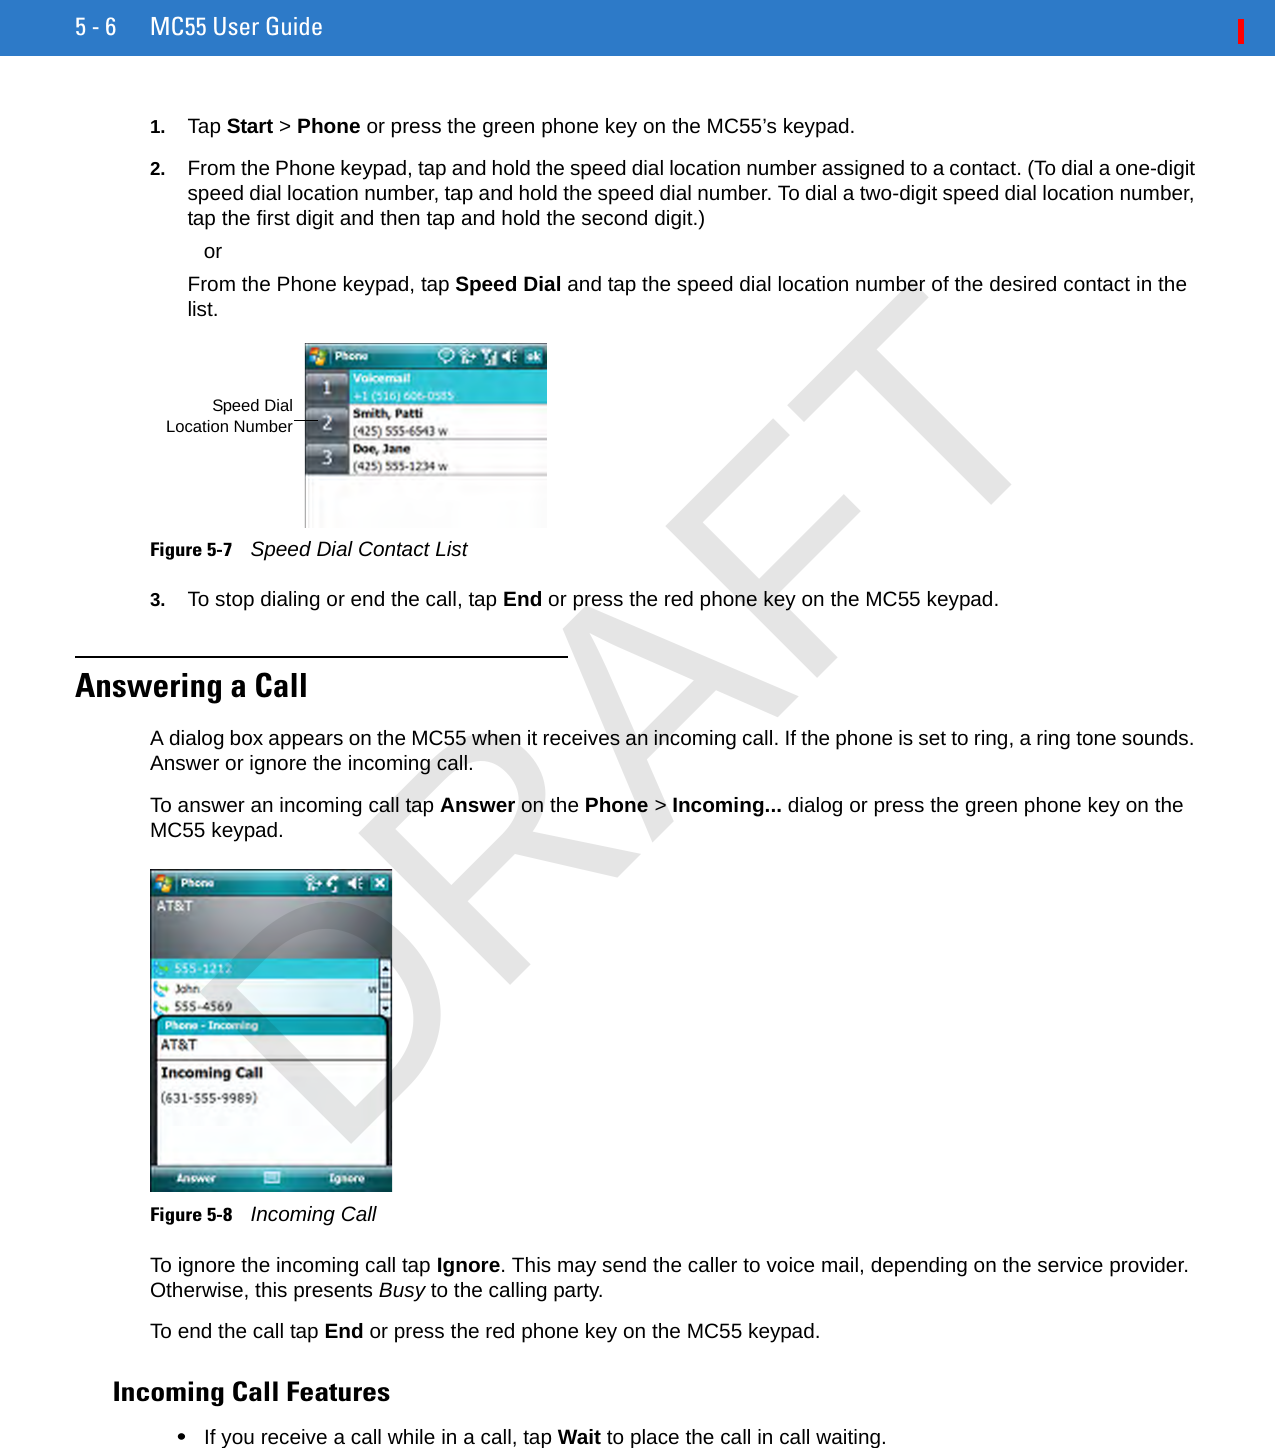
5 - 6 MC55 User Guide1. Tap Start > Phone or press the green phone key on the MC55’s keypad.2. From the Phone keypad, tap and hold the speed dial location number assigned to a contact. (To dial a one-digit speed dial location number, tap and hold the speed dial number. To dial a two-digit speed dial location number, tap the first digit and then tap and hold the second digit.) orFrom the Phone keypad, tap Speed Dial and tap the speed dial location number of the desired contact in the list.Figure 5-7    Speed Dial Contact List3. To stop dialing or end the call, tap End or press the red phone key on the MC55 keypad.Answering a CallA dialog box appears on the MC55 when it receives an incoming call. If the phone is set to ring, a ring tone sounds. Answer or ignore the incoming call.To answer an incoming call tap Answer on the Phone > Incoming... dialog or press the green phone key on the MC55 keypad.Figure 5-8    Incoming CallTo ignore the incoming call tap Ignore. This may send the caller to voice mail, depending on the service provider. Otherwise, this presents Busy to the calling party.To end the call tap End or press the red phone key on the MC55 keypad.Incoming Call Features•If you receive a call while in a call, tap Wait to place the call in call waiting.Speed DialLocation NumberDRAFT
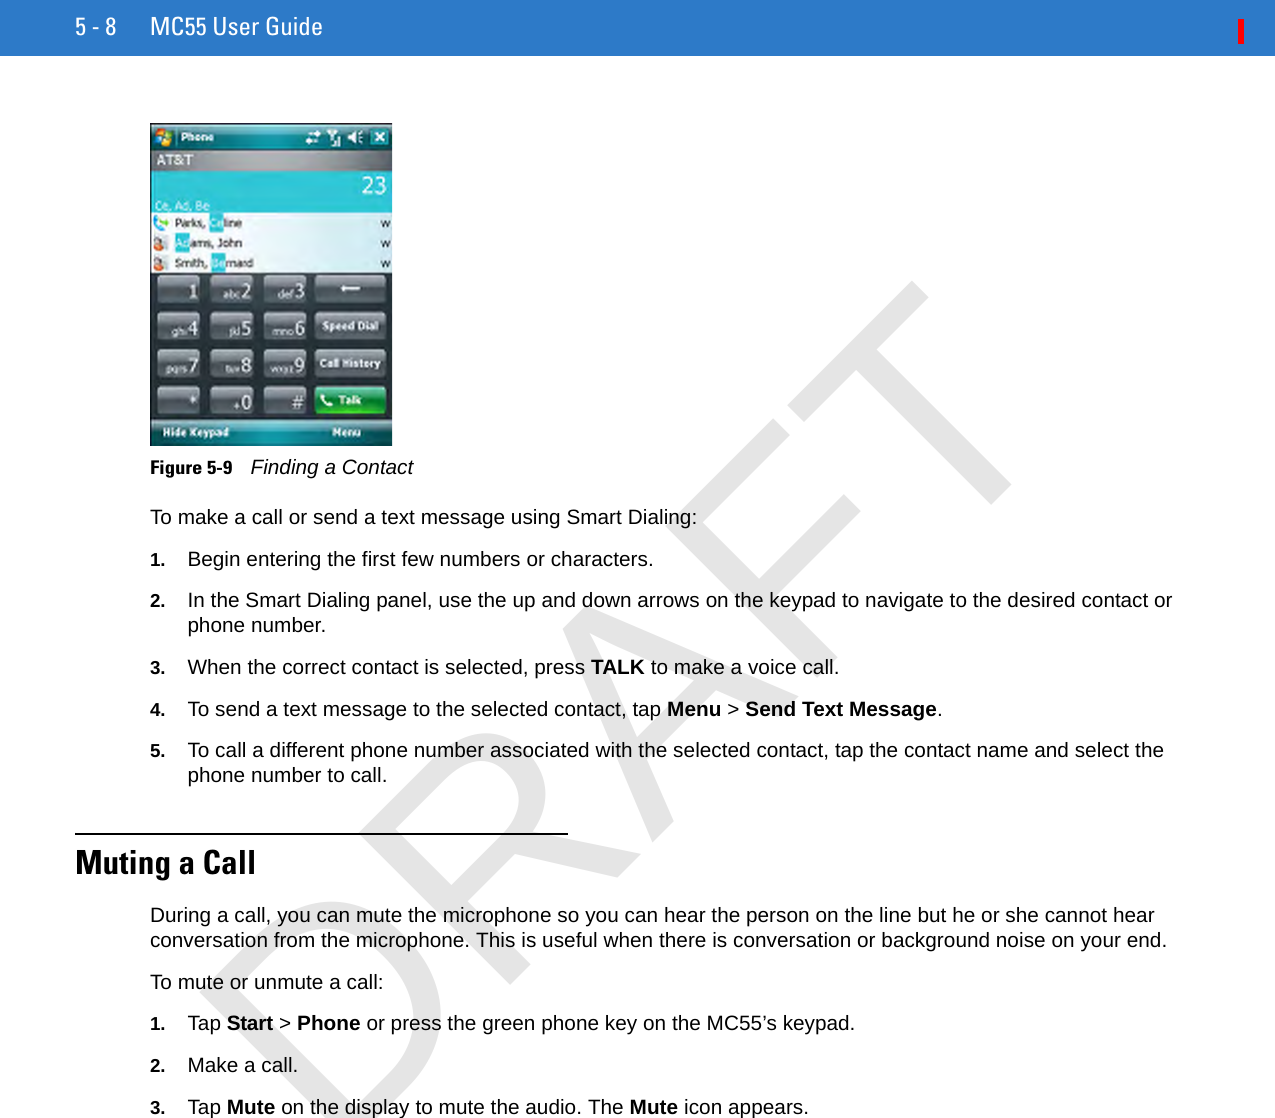
Using the Phone 5 - 7•You can use other programs on the MC55 during a call. To switch back to Phone, tap Talk or tap Start > Phone. Tap End to end the call.•If a caller isn't in your contact list, create a contact during the call or from Call History by tapping Menu > Save to Contacts.•To terminate a call when a second call comes in and answer the waiting call, tap End on the Phone keypad to disconnect the active call, then tap Answer or press the Send key to answer the waiting call. •To hold the current call and answer a waiting call, tap Answer or press the Send key to place the current call on hold and answer the incoming call.•To put a call on hold to call another number or answer an incoming call, tap Hold. To move from one call to another, tap Swap .Smart DialingSmart Dialing makes it easy to dial a phone number. When you start entering numbers or characters, Smart Dialing automatically searches and sorts the contact entries on the SIM card, in Contacts, and the phone numbers in Call History (including incoming, outgoing, and missed calls). You can then select the desired number or contact from the filtered list to dial.Open the Phone screen, then tap the keys on the Phone keypad that correspond to the phone number or contact to call. The contact panel lists contacts that match the sequence that you entered.Smart Dialing starts looking for numbers or contacts that match the sequence entered.To find a phone number:•Enter the first one or two digits to find a phone number in Call History.•Enter the first three digits or more to find a phone number from the saved Contacts and SIM card.To find a contact name:•Enter the first letter of a contact’s first name or last name. Smart Dialing searches for the letter starting from the first character of a contact name as well as from the character that appears after a space, dash, or underscore in a contact name. For example, if you tap number “2” which is associated with [a, b, c] on the Phone keypad, contact names such as the following will be considered matches: “Smith, Bernard”, “Adams, John”, “Carlson, Eileen”, “Dillon, Albert”, “Childs, Larry”, “Cooper, Robert” and “Parks, Celine”.•If the matching list is long narrow down the search further by entering another letter. Using the same example above, tap “3” which is associated with (d, e, f), the matching list is narrowed down to the following names: “Smith, Bernard”, “Adams, John”, and “Parks, Celine”.DRAFT
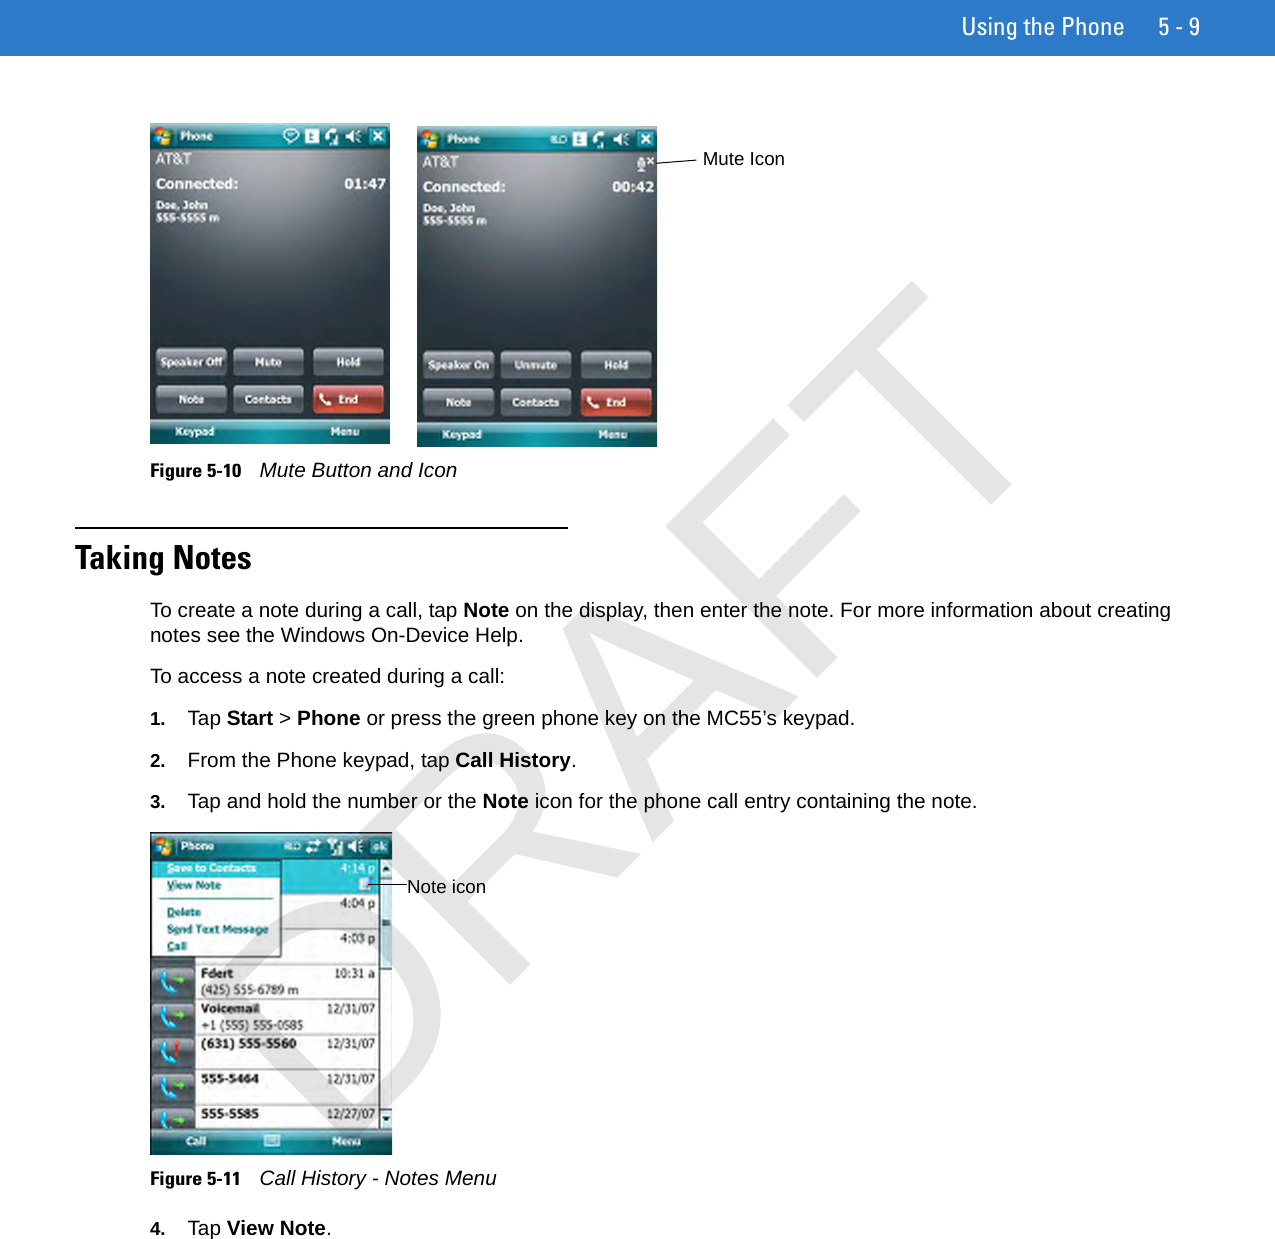
5 - 8 MC55 User GuideFigure 5-9    Finding a ContactTo make a call or send a text message using Smart Dialing:1. Begin entering the first few numbers or characters.2. In the Smart Dialing panel, use the up and down arrows on the keypad to navigate to the desired contact or phone number.3. When the correct contact is selected, press TALK to make a voice call.4. To send a text message to the selected contact, tap Menu > Send Text Message.5. To call a different phone number associated with the selected contact, tap the contact name and select the phone number to call.Muting a CallDuring a call, you can mute the microphone so you can hear the person on the line but he or she cannot hear conversation from the microphone. This is useful when there is conversation or background noise on your end.To mute or unmute a call:1. Tap Start > Phone or press the green phone key on the MC55’s keypad.2. Make a call.3. Tap Mute on the display to mute the audio. The Mute icon appears.DRAFT
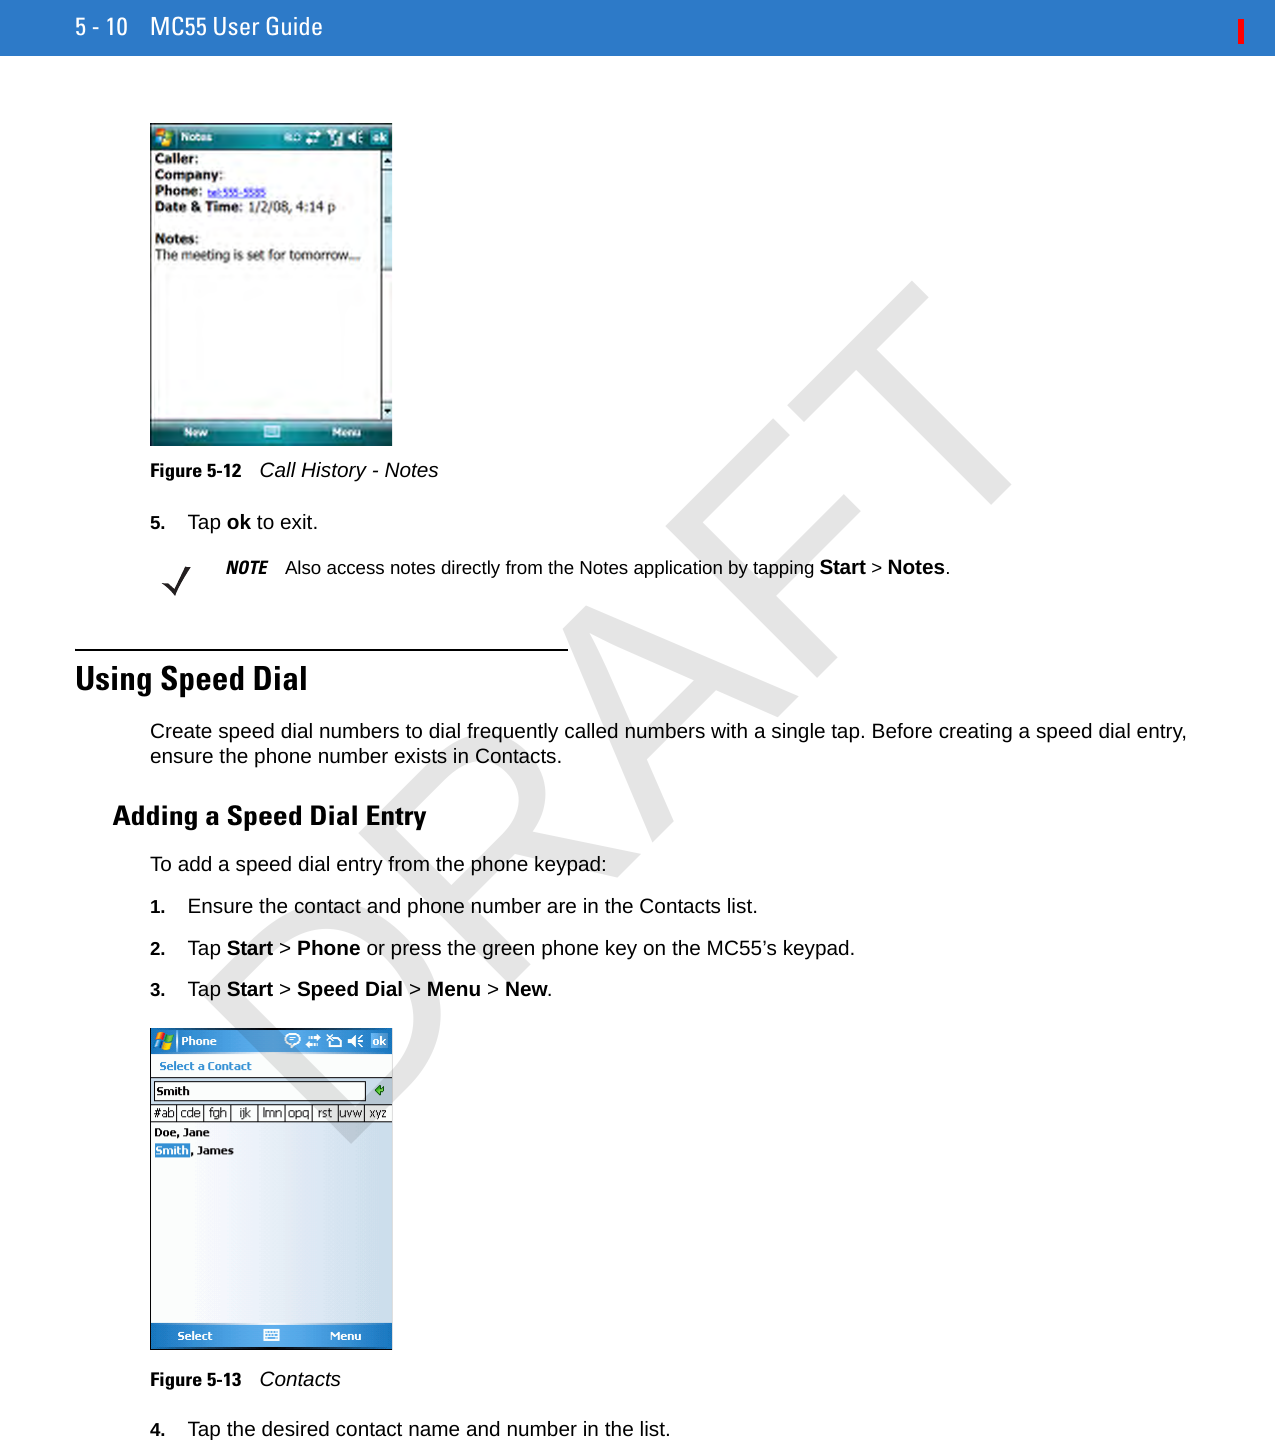
Using the Phone 5 - 9Figure 5-10    Mute Button and IconTaking NotesTo create a note during a call, tap Note on the display, then enter the note. For more information about creating notes see the Windows On-Device Help.To access a note created during a call:1. Tap Start > Phone or press the green phone key on the MC55’s keypad.2. From the Phone keypad, tap Call History.3. Tap and hold the number or the Note icon for the phone call entry containing the note.Figure 5-11    Call History - Notes Menu4. Tap View Note.Mute IconNote iconDRAFT
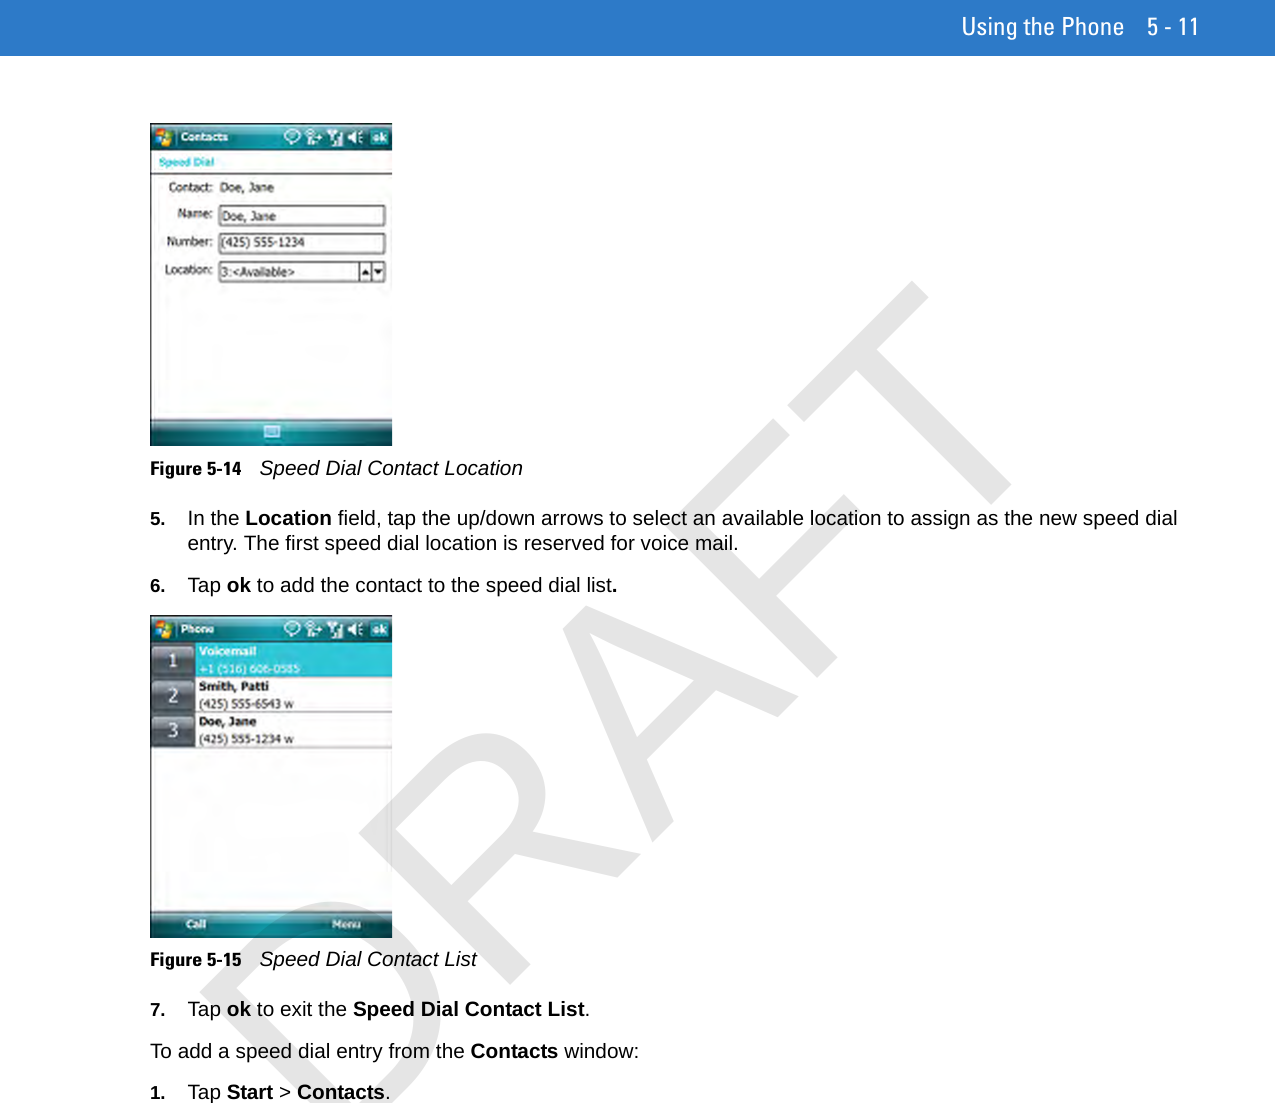
5 - 10 MC55 User GuideFigure 5-12    Call History - Notes5. Tap ok to exit.Using Speed DialCreate speed dial numbers to dial frequently called numbers with a single tap. Before creating a speed dial entry, ensure the phone number exists in Contacts.Adding a Speed Dial EntryTo add a speed dial entry from the phone keypad:1. Ensure the contact and phone number are in the Contacts list.2. Tap Start > Phone or press the green phone key on the MC55’s keypad.3. Tap Start > Speed Dial > Menu > New.Figure 5-13    Contacts4. Tap the desired contact name and number in the list.NOTE Also access notes directly from the Notes application by tapping Start > Notes.DRAFT
Using the Phone 5 - 11Figure 5-14    Speed Dial Contact Location5. In the Location field, tap the up/down arrows to select an available location to assign as the new speed dial entry. The first speed dial location is reserved for voice mail.6. Tap ok to add the contact to the speed dial list.Figure 5-15    Speed Dial Contact List7. Tap ok to exit the Speed Dial Contact List.To add a speed dial entry from the Contacts window:1. Tap Start > Contacts.DRAFT
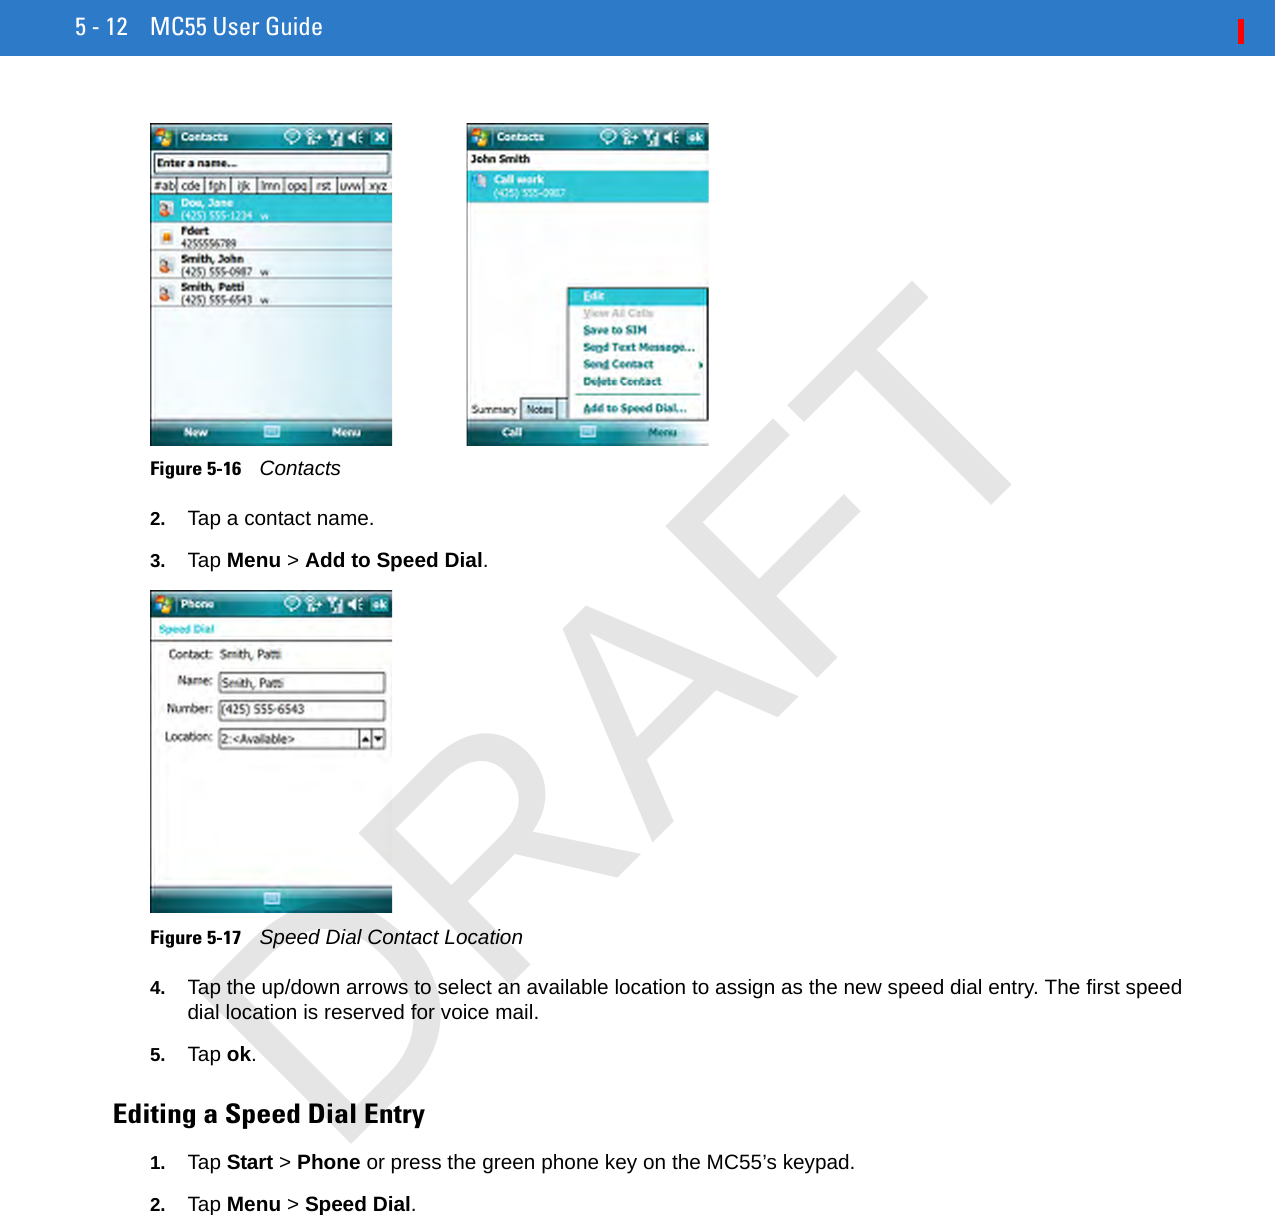
5 - 12 MC55 User GuideFigure 5-16    Contacts2. Tap a contact name.3. Tap Menu > Add to Speed Dial.Figure 5-17    Speed Dial Contact Location4. Tap the up/down arrows to select an available location to assign as the new speed dial entry. The first speed dial location is reserved for voice mail.5. Tap ok.Editing a Speed Dial Entry1. Tap Start > Phone or press the green phone key on the MC55’s keypad.2. Tap Menu > Speed Dial.DRAFT
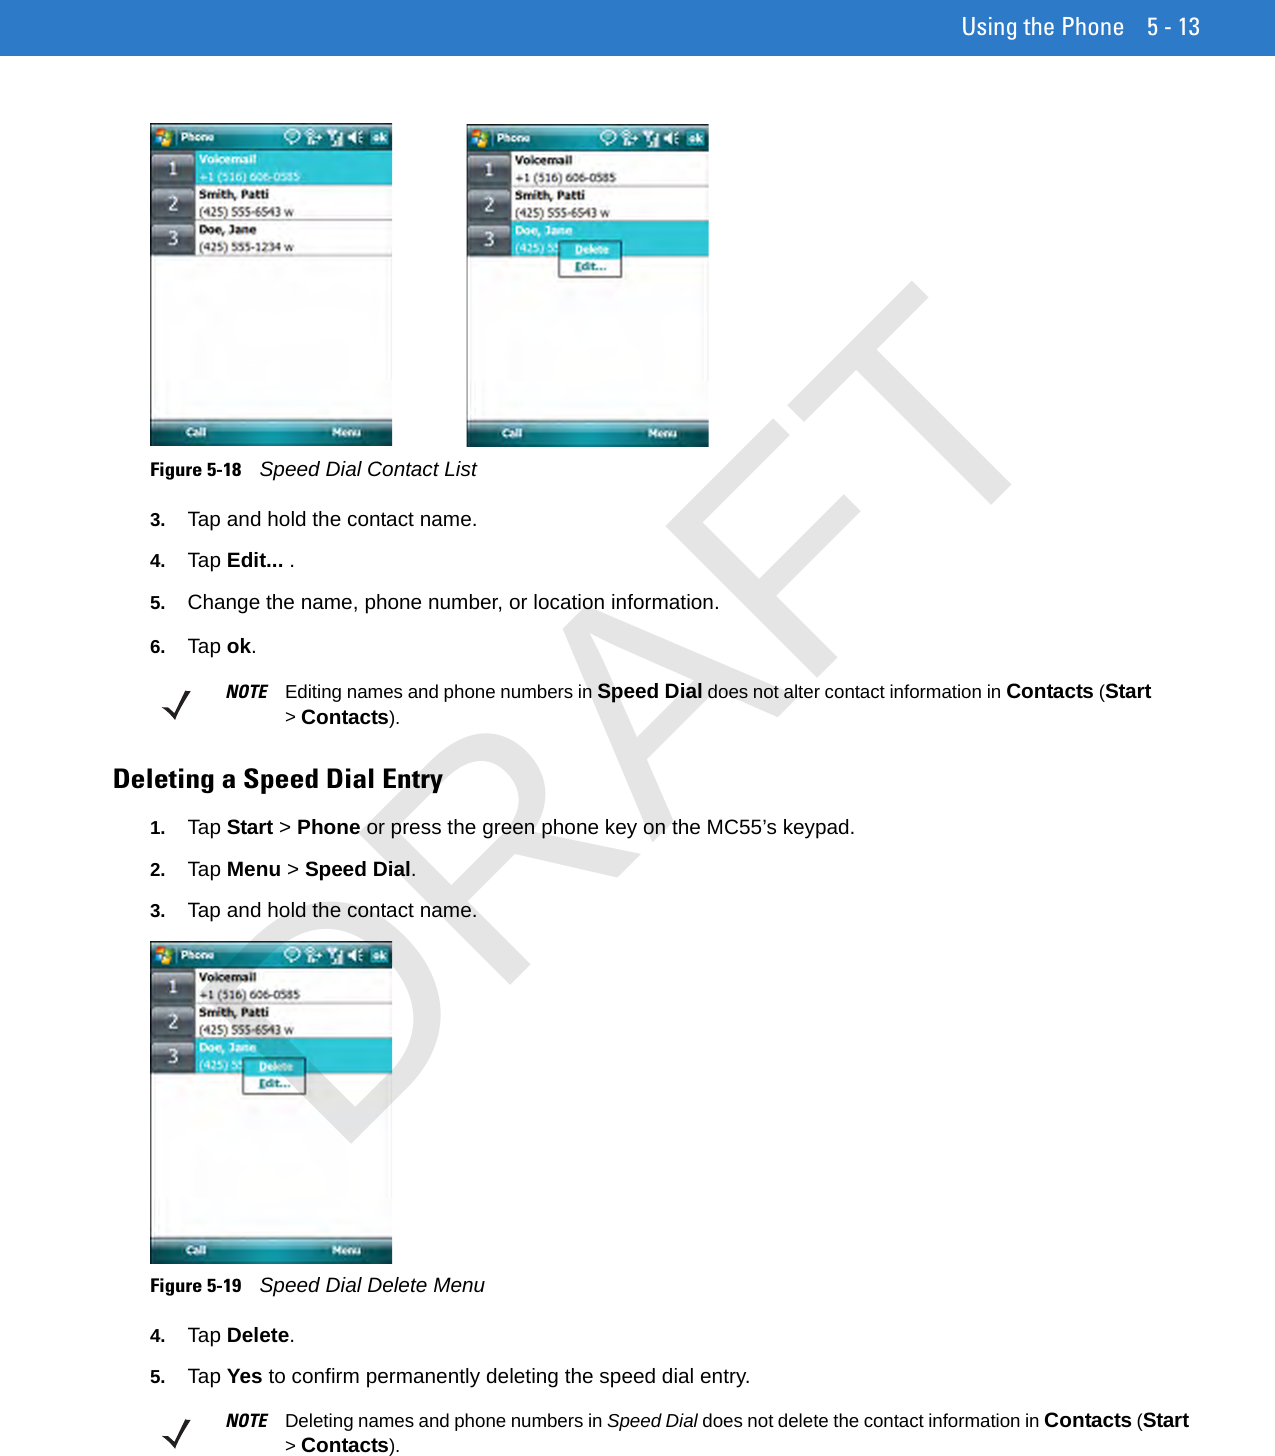
Using the Phone 5 - 13Figure 5-18    Speed Dial Contact List3. Tap and hold the contact name.4. Tap Edit... .5. Change the name, phone number, or location information.6. Tap ok.Deleting a Speed Dial Entry1. Tap Start > Phone or press the green phone key on the MC55’s keypad.2. Tap Menu > Speed Dial.3. Tap and hold the contact name.Figure 5-19    Speed Dial Delete Menu4. Tap Delete.5. Tap Yes to confirm permanently deleting the speed dial entry.NOTE Editing names and phone numbers in Speed Dial does not alter contact information in Contacts (Start > Contacts).NOTE Deleting names and phone numbers in Speed Dial does not delete the contact information in Contacts (Start > Contacts).DRAFT
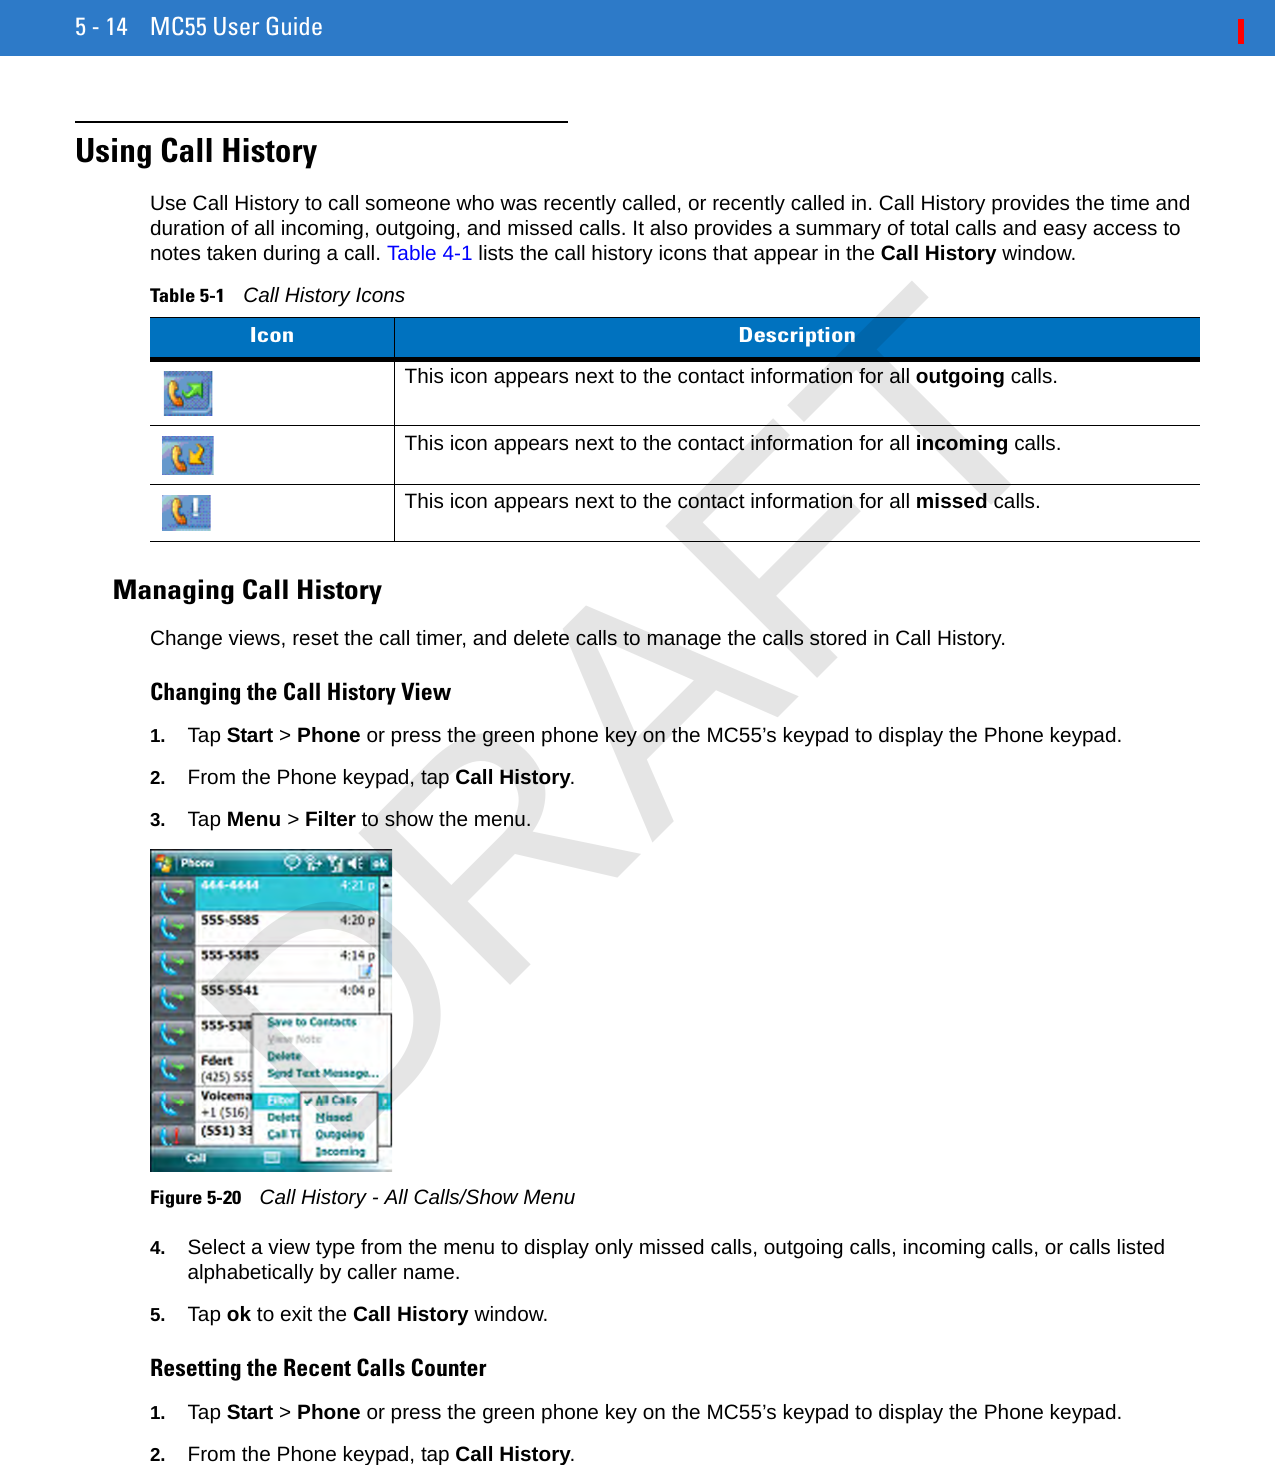
5 - 14 MC55 User GuideUsing Call HistoryUse Call History to call someone who was recently called, or recently called in. Call History provides the time and duration of all incoming, outgoing, and missed calls. It also provides a summary of total calls and easy access to notes taken during a call. Table 4-1 lists the call history icons that appear in the Call History window.Managing Call HistoryChange views, reset the call timer, and delete calls to manage the calls stored in Call History.Changing the Call History View1. Tap Start > Phone or press the green phone key on the MC55’s keypad to display the Phone keypad.2. From the Phone keypad, tap Call History.3. Tap Menu > Filter to show the menu.Figure 5-20    Call History - All Calls/Show Menu4. Select a view type from the menu to display only missed calls, outgoing calls, incoming calls, or calls listed alphabetically by caller name.5. Tap ok to exit the Call History window.Resetting the Recent Calls Counter1. Tap Start > Phone or press the green phone key on the MC55’s keypad to display the Phone keypad.2. From the Phone keypad, tap Call History.Table 5-1    Call History IconsIcon DescriptionThis icon appears next to the contact information for all outgoing calls. This icon appears next to the contact information for all incoming calls.This icon appears next to the contact information for all missed calls.DRAFT
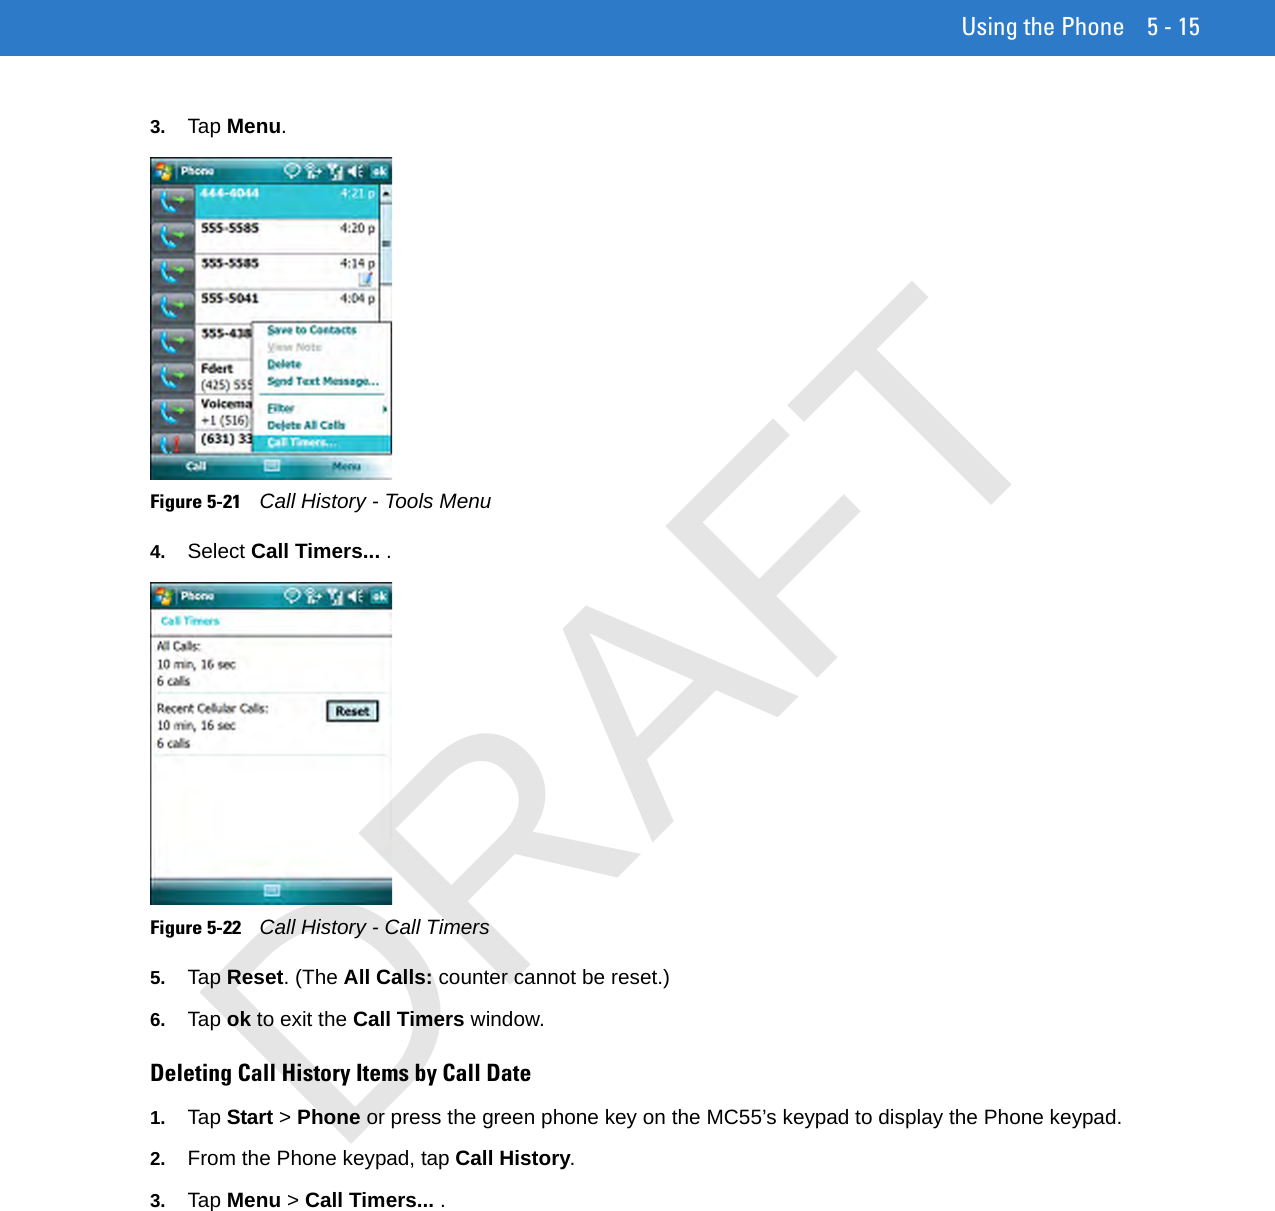
Using the Phone 5 - 153. Tap Menu.Figure 5-21    Call History - Tools Menu4. Select Call Timers... .Figure 5-22    Call History - Call Timers5. Tap Reset. (The All Calls: counter cannot be reset.) 6. Tap ok to exit the Call Timers window.Deleting Call History Items by Call Date1. Tap Start > Phone or press the green phone key on the MC55’s keypad to display the Phone keypad.2. From the Phone keypad, tap Call History.3. Tap Menu > Call Timers... .DRAFT
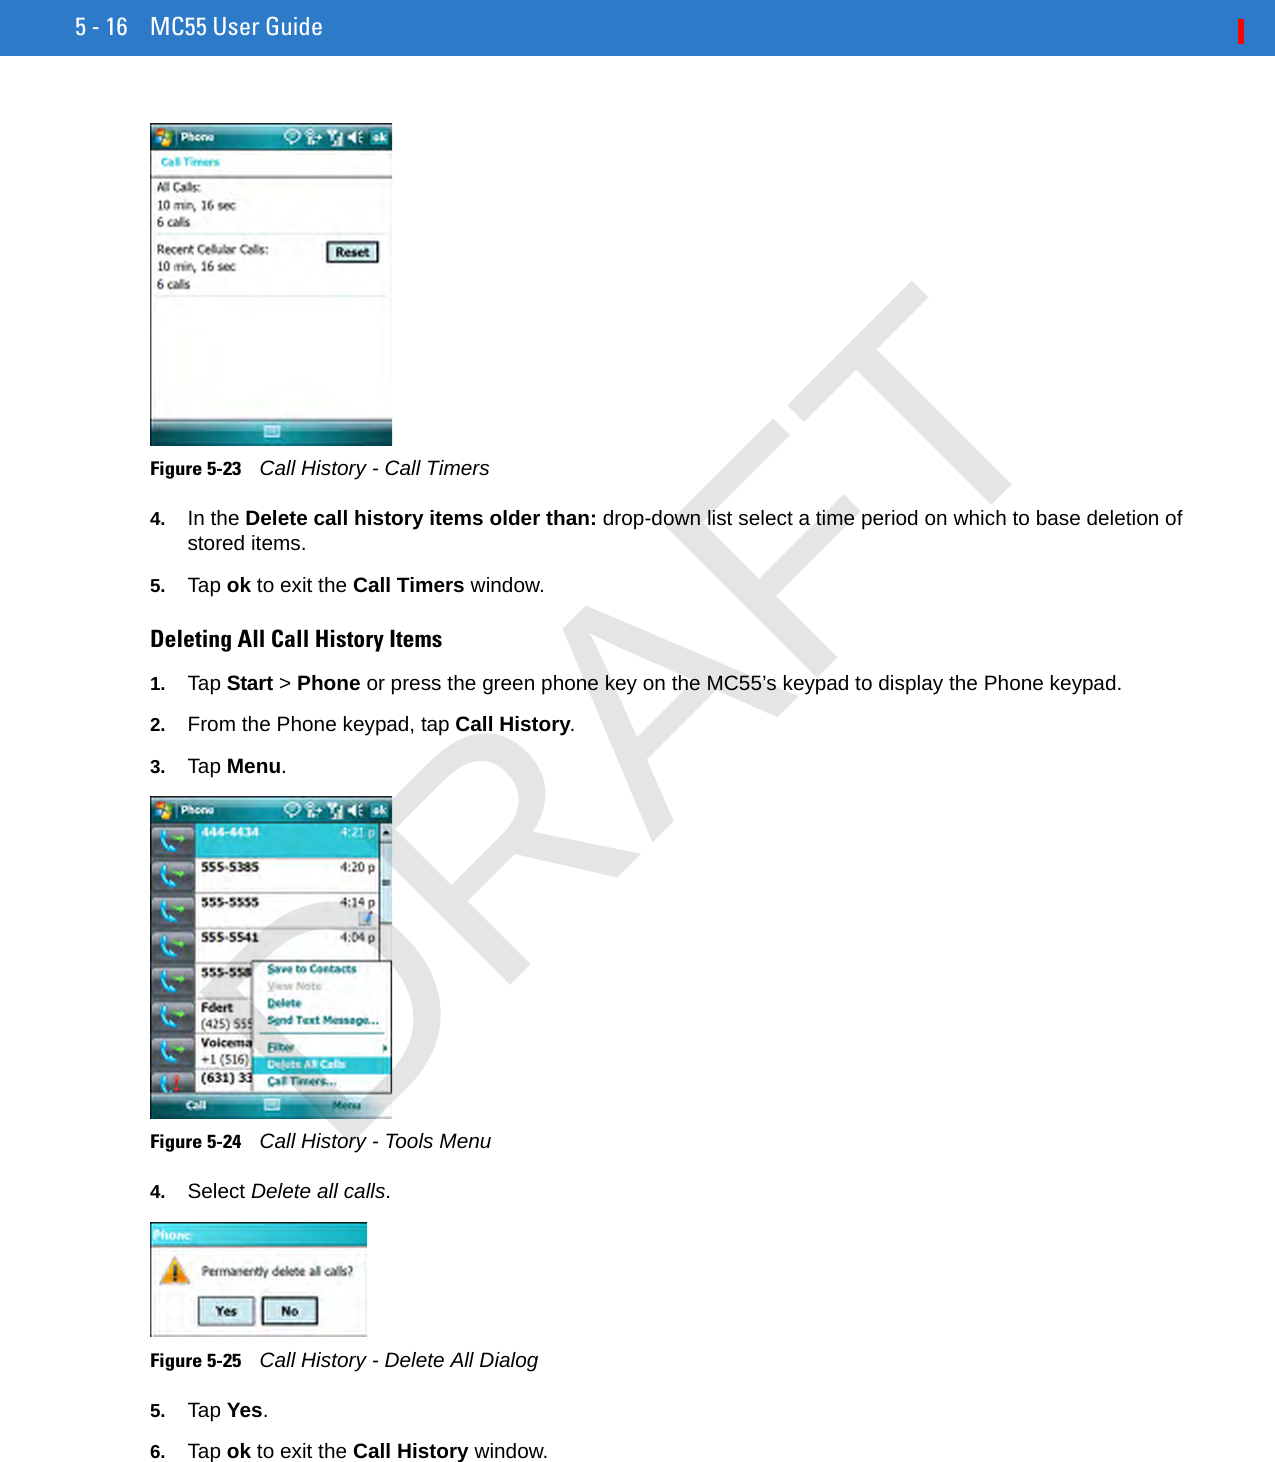
5 - 16 MC55 User GuideFigure 5-23    Call History - Call Timers4. In the Delete call history items older than: drop-down list select a time period on which to base deletion of stored items.5. Tap ok to exit the Call Timers window.Deleting All Call History Items1. Tap Start > Phone or press the green phone key on the MC55’s keypad to display the Phone keypad.2. From the Phone keypad, tap Call History.3. Tap Menu.Figure 5-24    Call History - Tools Menu4. Select Delete all calls.Figure 5-25    Call History - Delete All Dialog5. Tap Yes.6. Tap ok to exit the Call History window.DRAFT
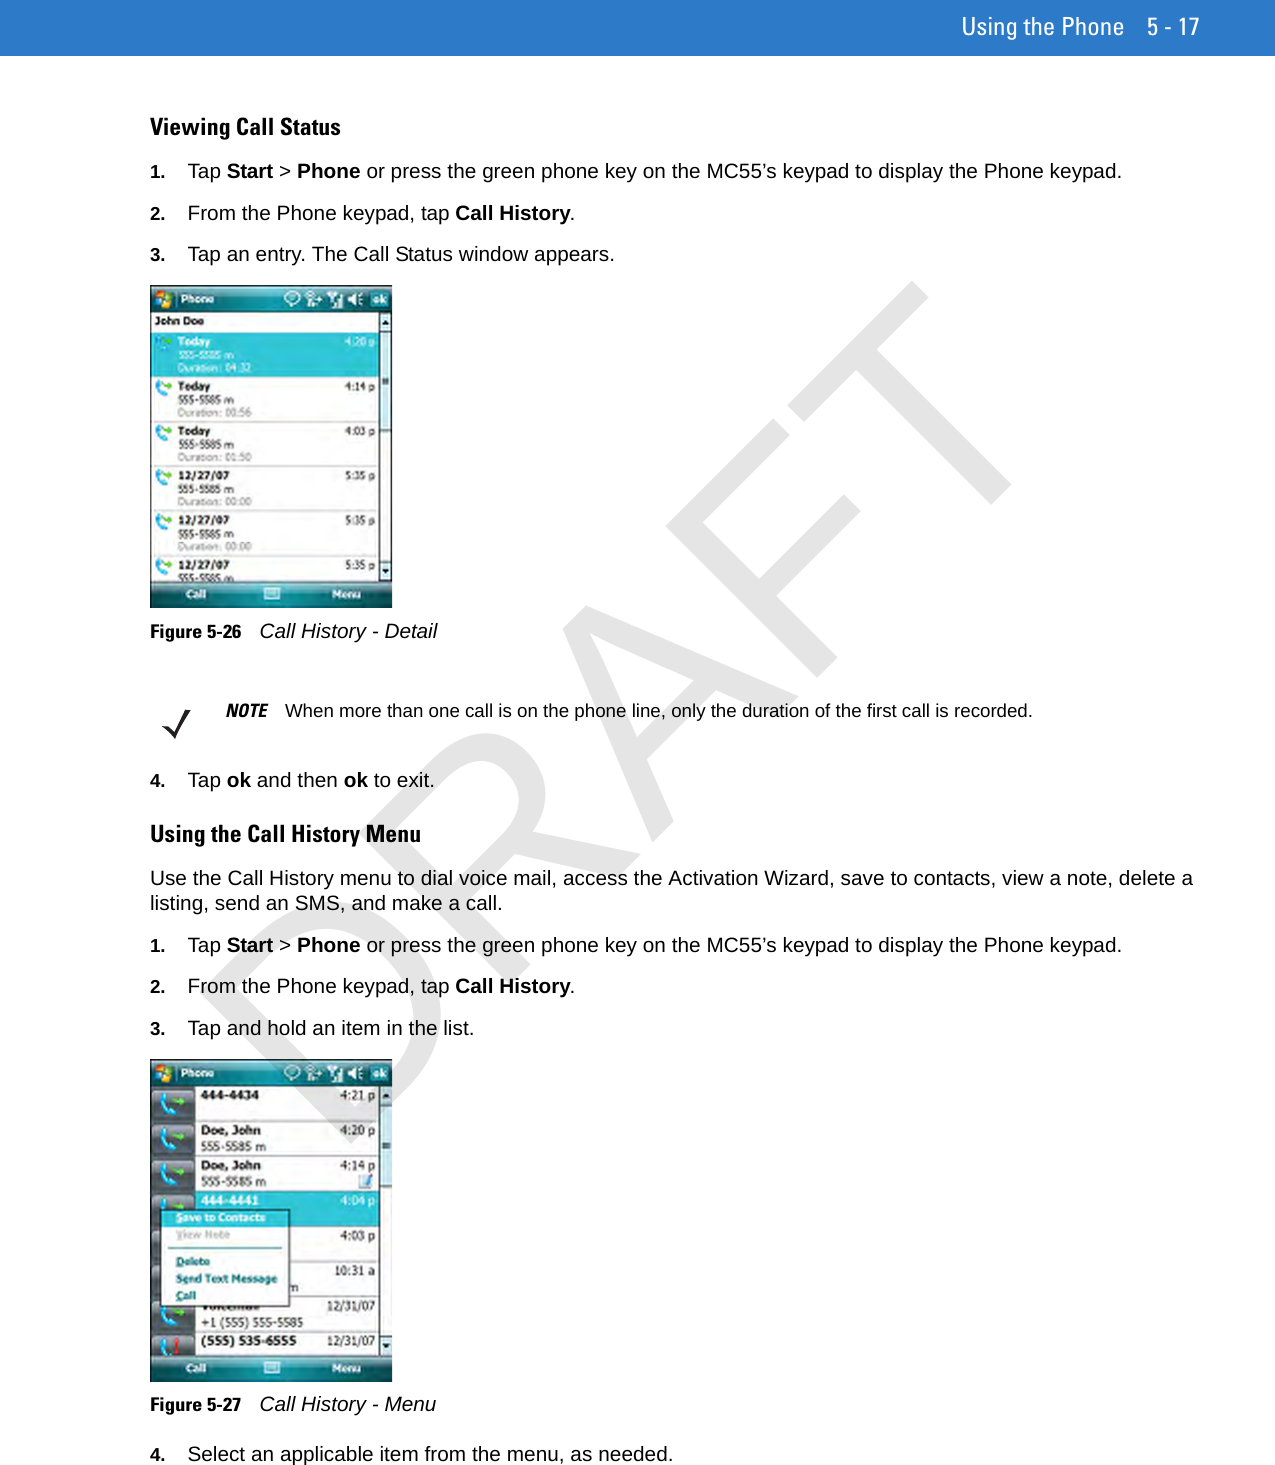
Using the Phone 5 - 17Viewing Call Status1. Tap Start > Phone or press the green phone key on the MC55’s keypad to display the Phone keypad.2. From the Phone keypad, tap Call History.3. Tap an entry. The Call Status window appears.Figure 5-26    Call History - Detail4. Tap ok and then ok to exit.Using the Call History MenuUse the Call History menu to dial voice mail, access the Activation Wizard, save to contacts, view a note, delete a listing, send an SMS, and make a call.1. Tap Start > Phone or press the green phone key on the MC55’s keypad to display the Phone keypad.2. From the Phone keypad, tap Call History.3. Tap and hold an item in the list.Figure 5-27    Call History - Menu4. Select an applicable item from the menu, as needed.NOTE When more than one call is on the phone line, only the duration of the first call is recorded.DRAFT
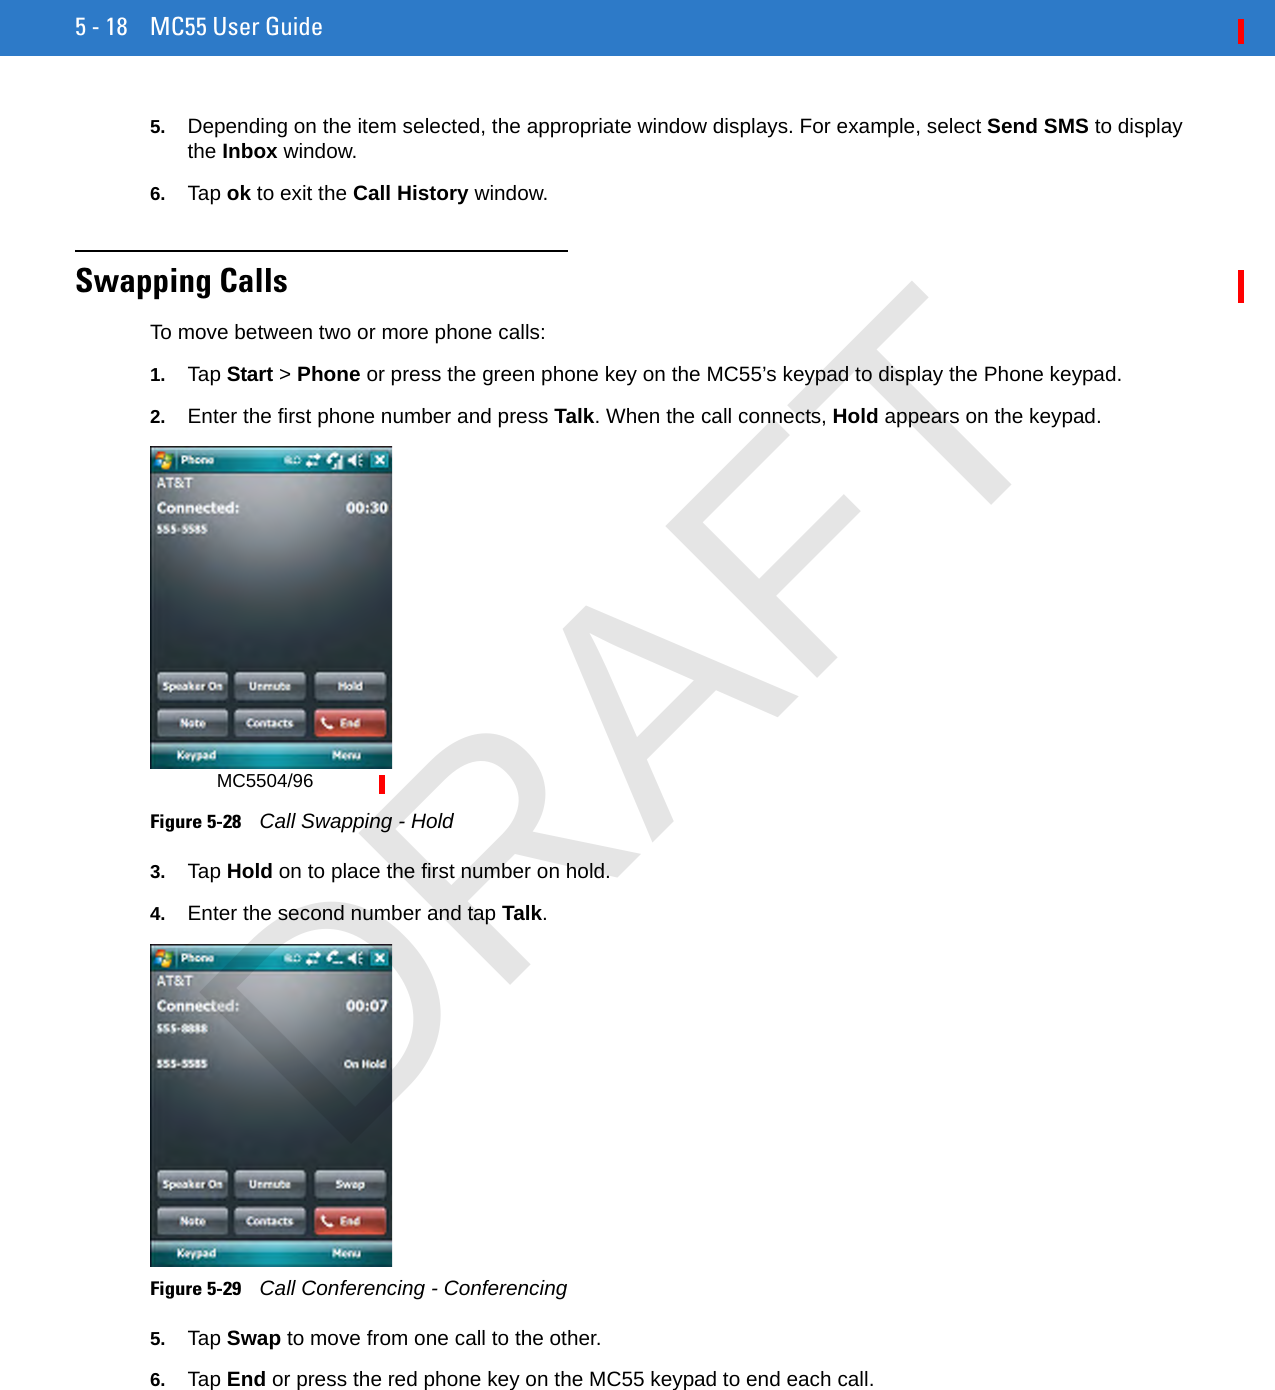
5 - 18 MC55 User Guide5. Depending on the item selected, the appropriate window displays. For example, select Send SMS to display the Inbox window.6. Tap ok to exit the Call History window.Swapping CallsTo move between two or more phone calls:1. Tap Start > Phone or press the green phone key on the MC55’s keypad to display the Phone keypad.2. Enter the first phone number and press Talk. When the call connects, Hold appears on the keypad.Figure 5-28    Call Swapping - Hold3. Tap Hold on to place the first number on hold.4. Enter the second number and tap Talk.Figure 5-29    Call Conferencing - Conferencing5. Tap Swap to move from one call to the other.6. Tap End or press the red phone key on the MC55 keypad to end each call.MC5504/96DRAFT
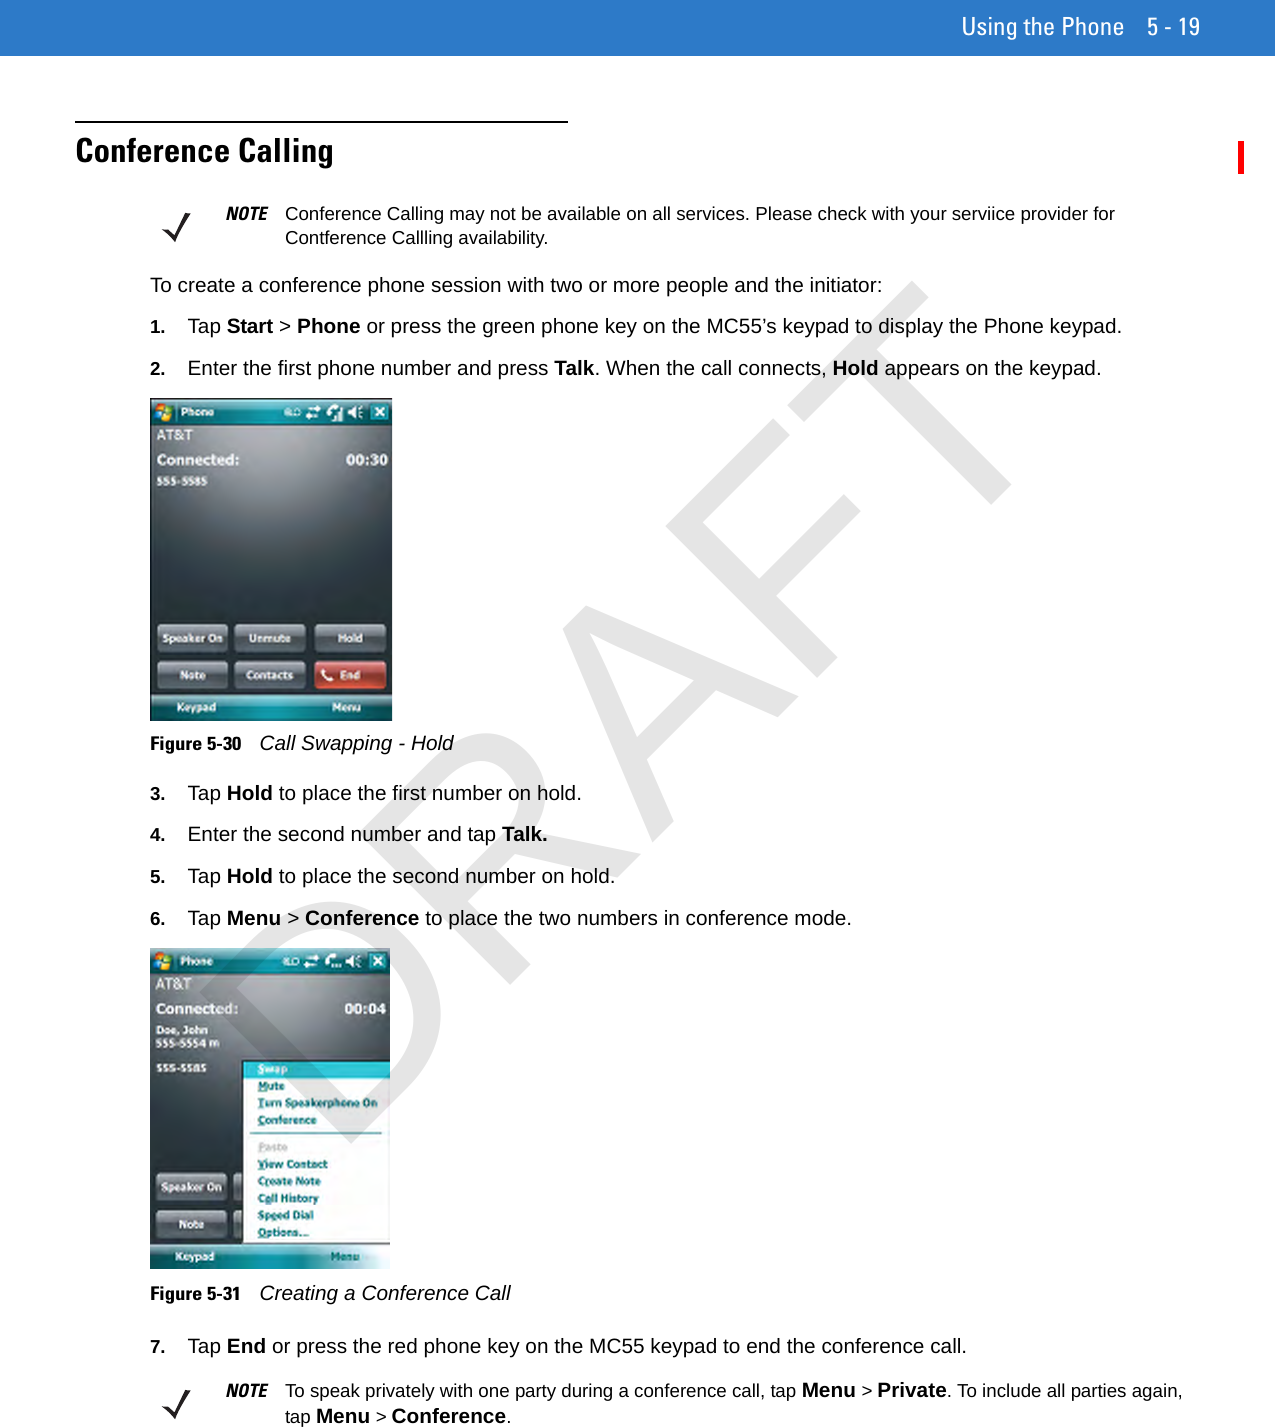
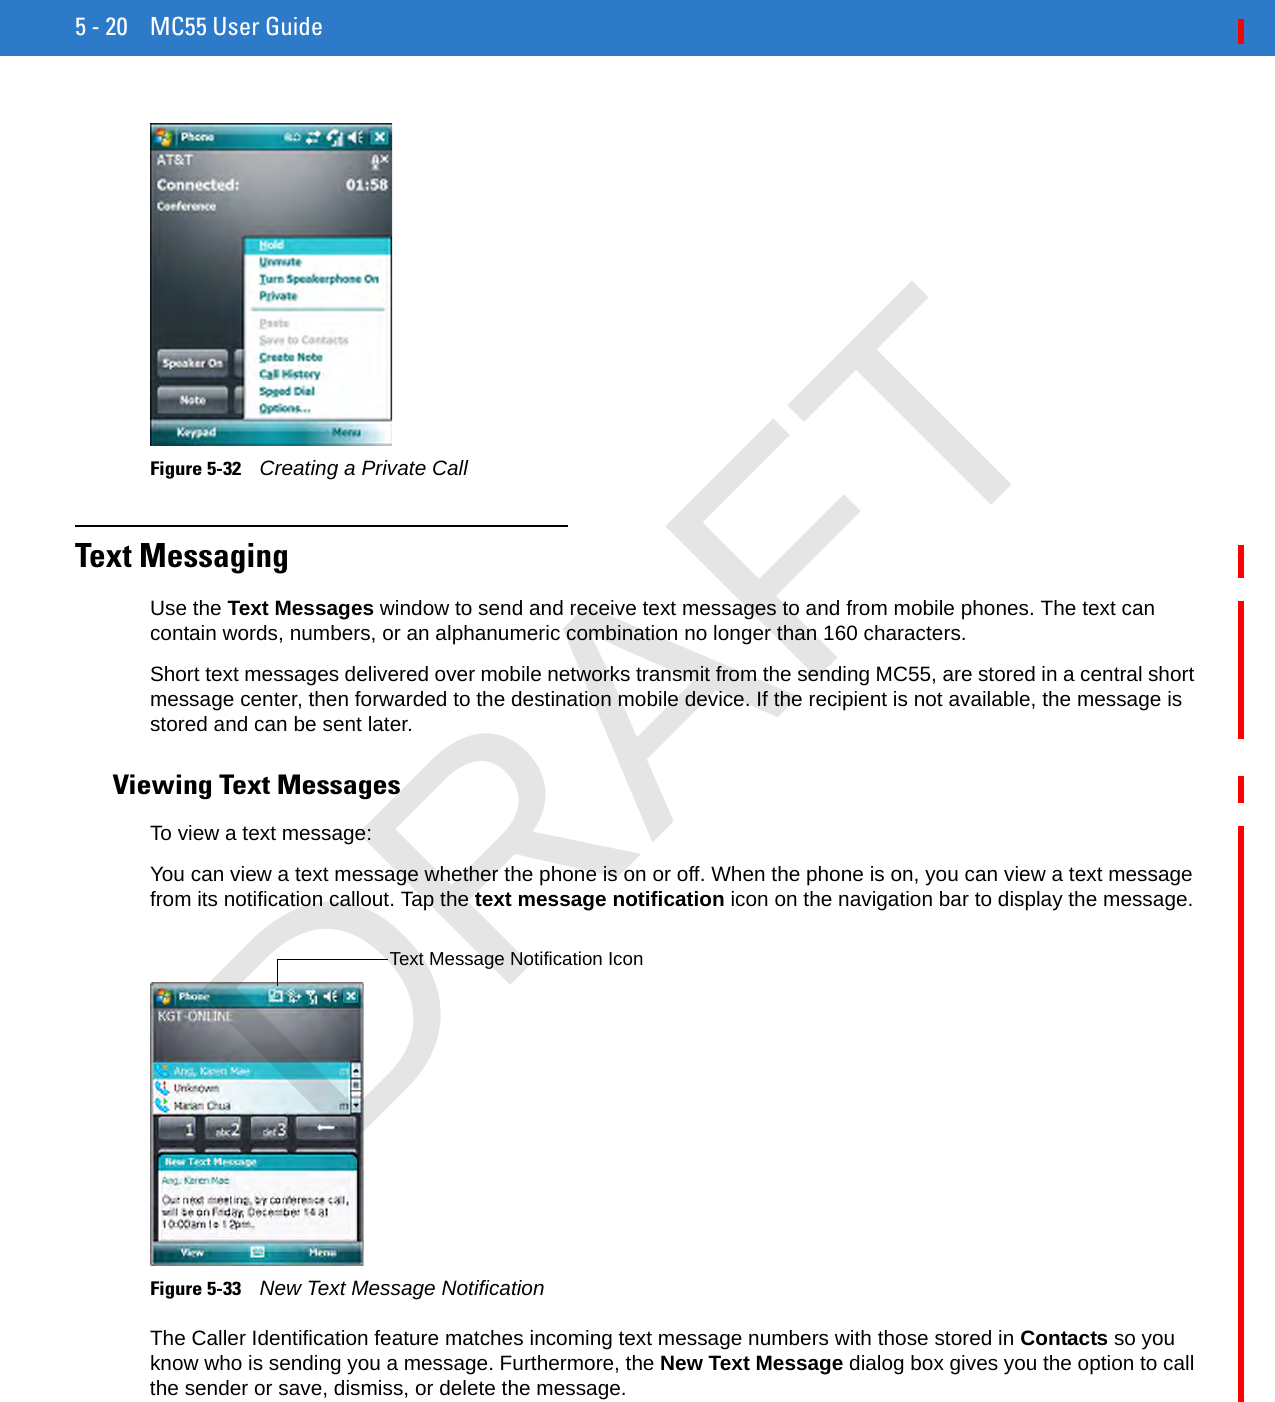
Using the Phone 5 - 19Conference CallingTo create a conference phone session with two or more people and the initiator:1. Tap Start > Phone or press the green phone key on the MC55’s keypad to display the Phone keypad.2. Enter the first phone number and press Talk. When the call connects, Hold appears on the keypad.Figure 5-30    Call Swapping - Hold3. Tap Hold to place the first number on hold.4. Enter the second number and tap Talk.5. Tap Hold to place the second number on hold.6. Tap Menu > Conference to place the two numbers in conference mode.Figure 5-31    Creating a Conference Call7. Tap End or press the red phone key on the MC55 keypad to end the conference call.NOTE Conference Calling may not be available on all services. Please check with your serviice provider for Contference Callling availability.NOTE To speak privately with one party during a conference call, tap Menu > Private. To include all parties again, tap Menu > Conference.DRAFT
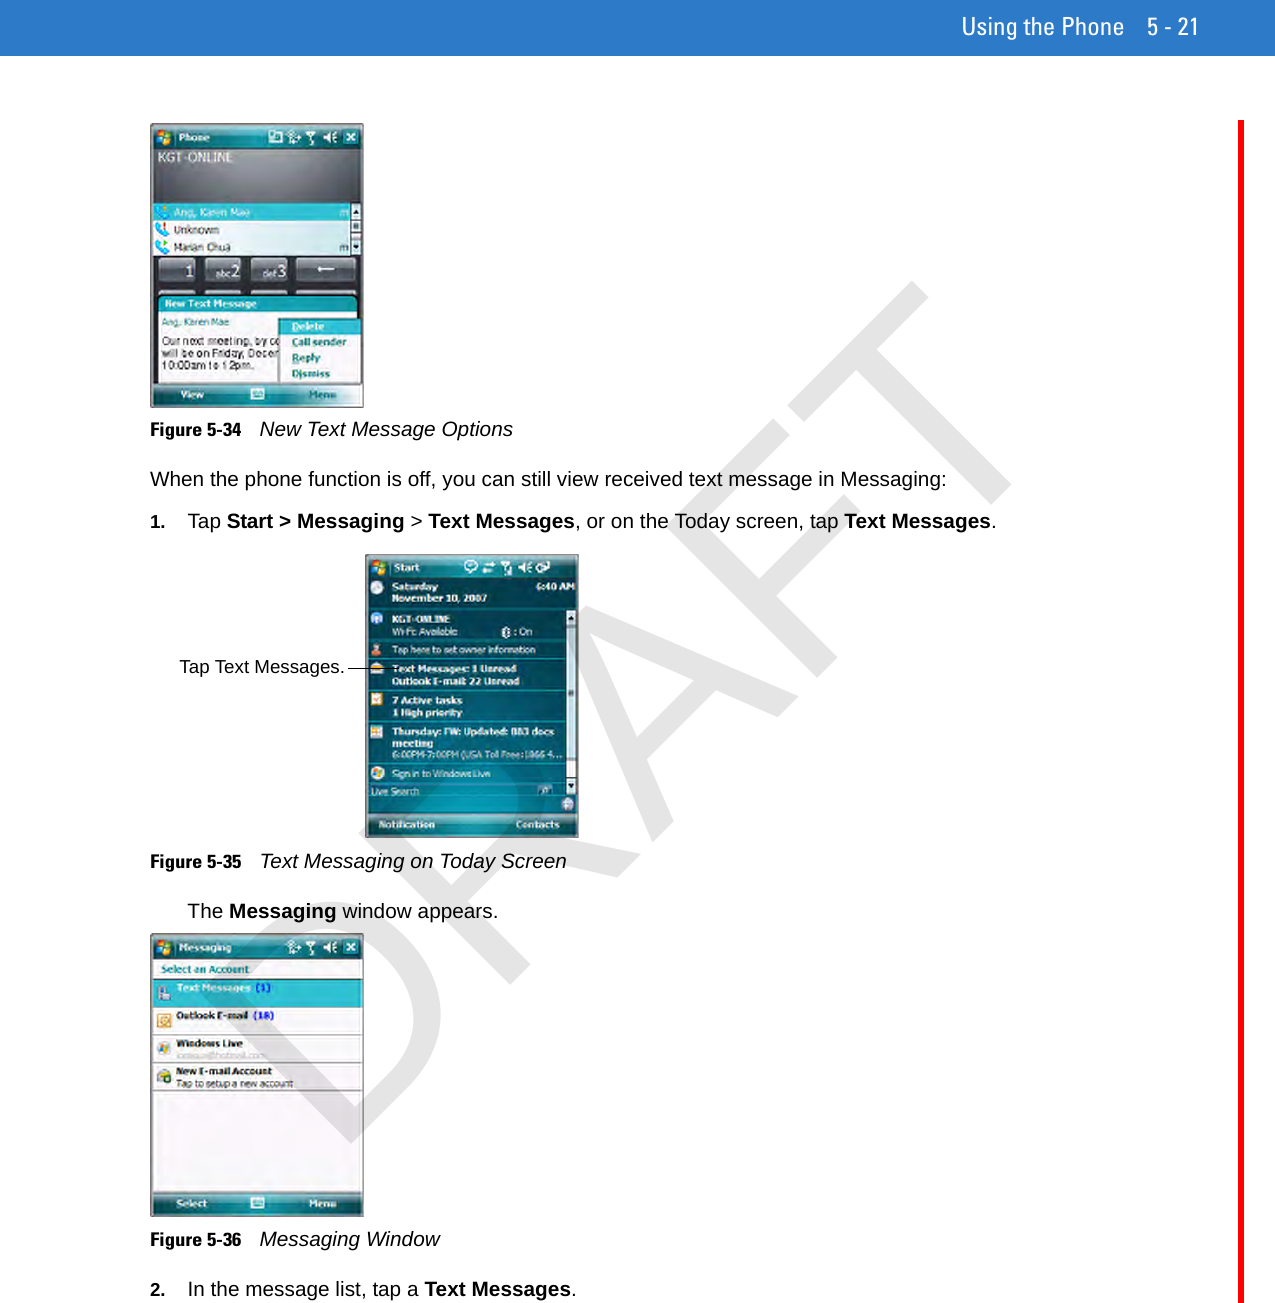
5 - 20 MC55 User GuideFigure 5-32    Creating a Private CallText MessagingUse the Text Messages window to send and receive text messages to and from mobile phones. The text can contain words, numbers, or an alphanumeric combination no longer than 160 characters.Short text messages delivered over mobile networks transmit from the sending MC55, are stored in a central short message center, then forwarded to the destination mobile device. If the recipient is not available, the message is stored and can be sent later.Viewing Text MessagesTo view a text message:You can view a text message whether the phone is on or off. When the phone is on, you can view a text message from its notification callout. Tap the text message notification icon on the navigation bar to display the message.Figure 5-33    New Text Message NotificationThe Caller Identification feature matches incoming text message numbers with those stored in Contacts so you know who is sending you a message. Furthermore, the New Text Message dialog box gives you the option to call the sender or save, dismiss, or delete the message.Text Message Notification IconDRAFT
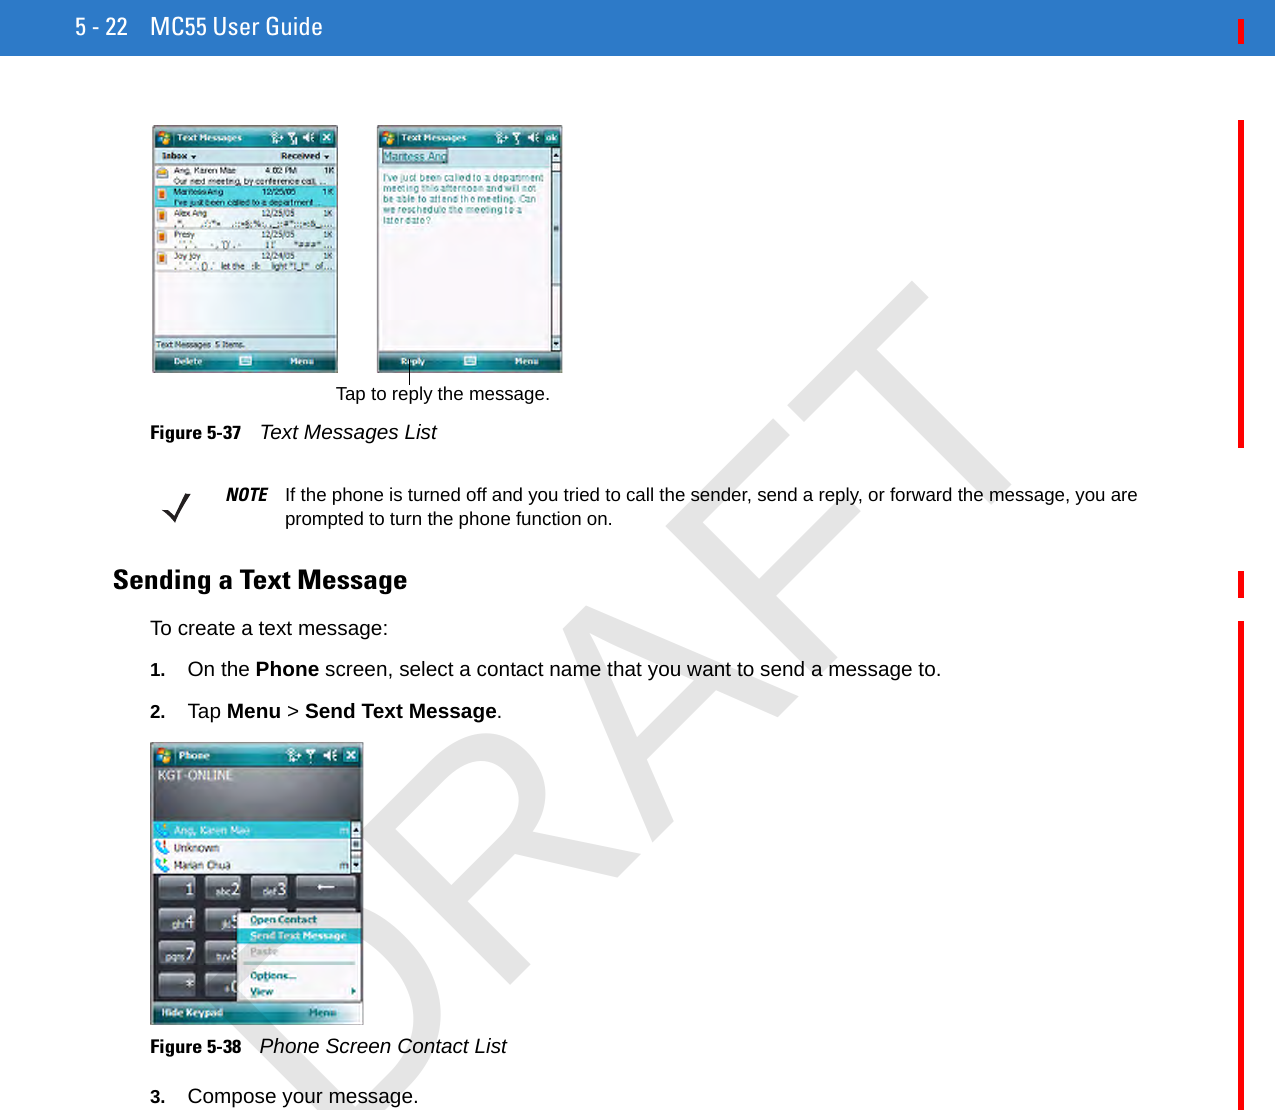
Using the Phone 5 - 21Figure 5-34    New Text Message OptionsWhen the phone function is off, you can still view received text message in Messaging:1. Tap Start > Messaging > Text Messages, or on the Today screen, tap Text Messages.Figure 5-35    Text Messaging on Today ScreenThe Messaging window appears.Figure 5-36    Messaging Window2. In the message list, tap a Text Messages.Tap Text Messages.DRAFT
5 - 22 MC55 User Guide Figure 5-37    Text Messages ListSending a Text MessageTo create a text message:1. On the Phone screen, select a contact name that you want to send a message to.2. Tap Menu > Send Text Message.Figure 5-38    Phone Screen Contact List3. Compose your message.Tap to reply the message.NOTE If the phone is turned off and you tried to call the sender, send a reply, or forward the message, you are prompted to turn the phone function on.DRAFT
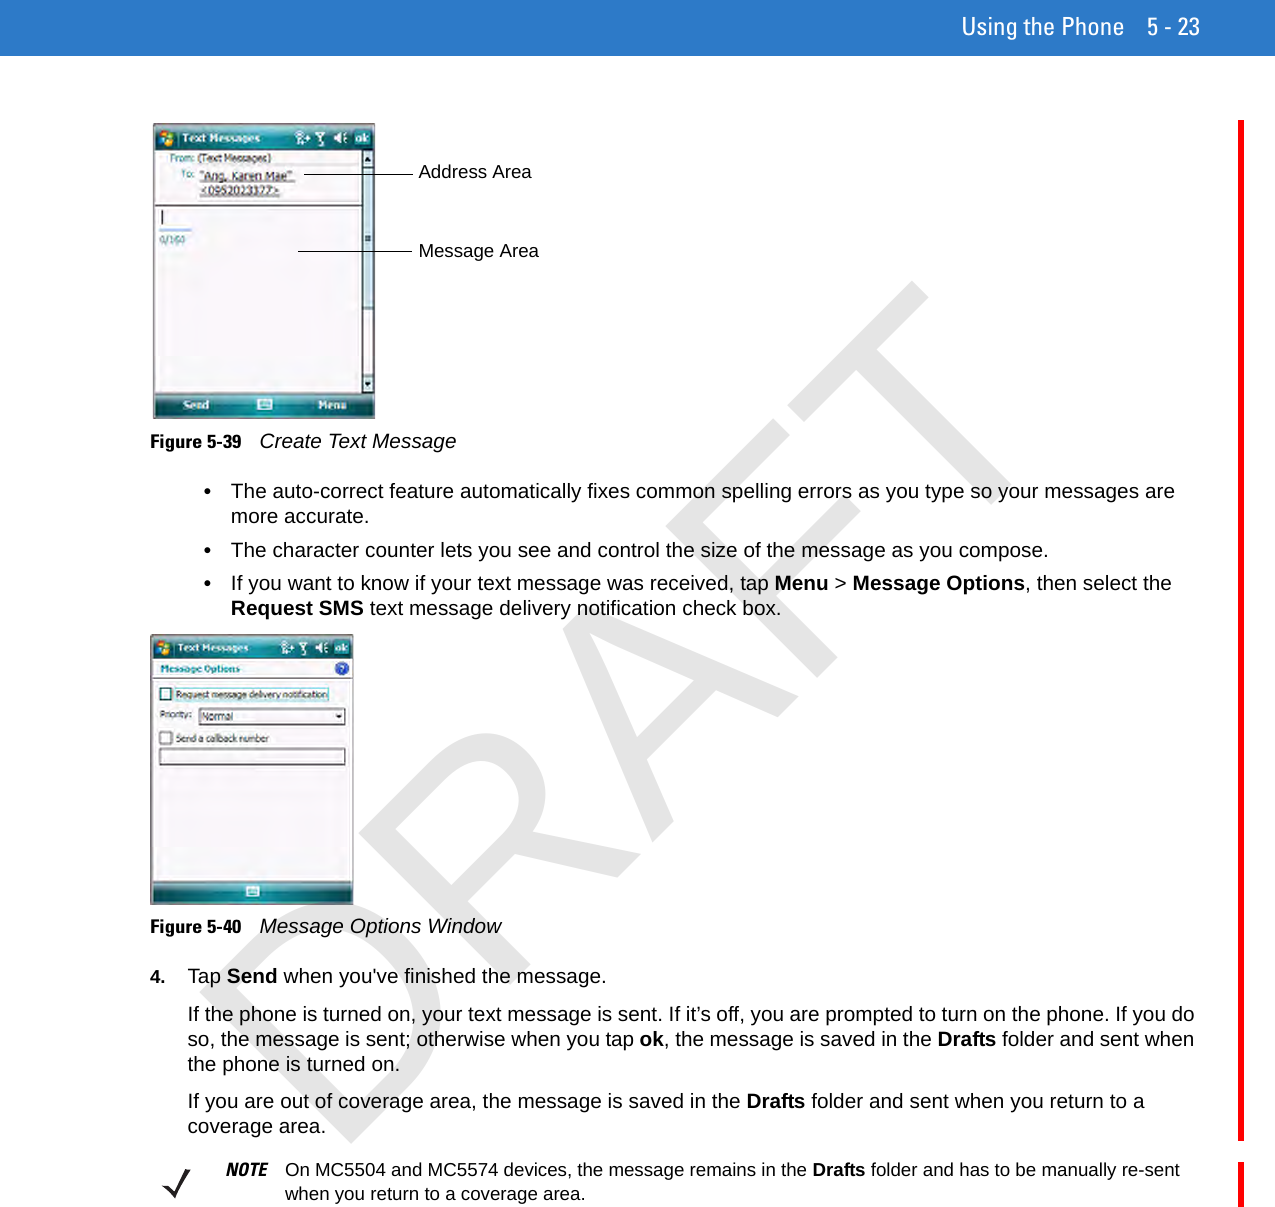
Using the Phone 5 - 23Figure 5-39    Create Text Message•The auto-correct feature automatically fixes common spelling errors as you type so your messages are more accurate.•The character counter lets you see and control the size of the message as you compose.•If you want to know if your text message was received, tap Menu > Message Options, then select the Request SMS text message delivery notification check box.Figure 5-40    Message Options Window4. Tap Send when you've finished the message.If the phone is turned on, your text message is sent. If it’s off, you are prompted to turn on the phone. If you do so, the message is sent; otherwise when you tap ok, the message is saved in the Drafts folder and sent when the phone is turned on.If you are out of coverage area, the message is saved in the Drafts folder and sent when you return to a coverage area.Address AreaMessage AreaNOTE On MC5504 and MC5574 devices, the message remains in the Drafts folder and has to be manually re-sent when you return to a coverage area.DRAFT
5 - 24 MC55 User GuideDRAFT

Navigation menu