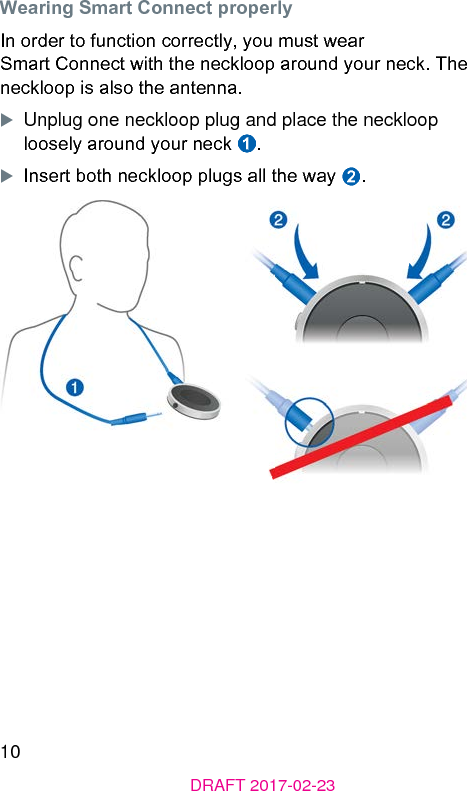
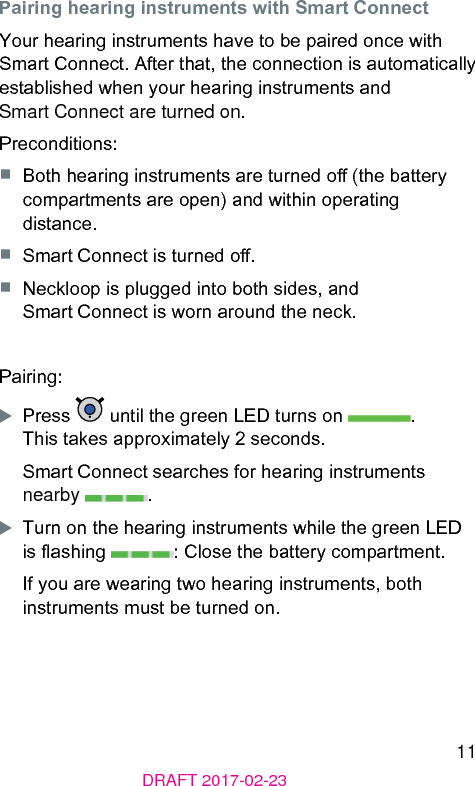
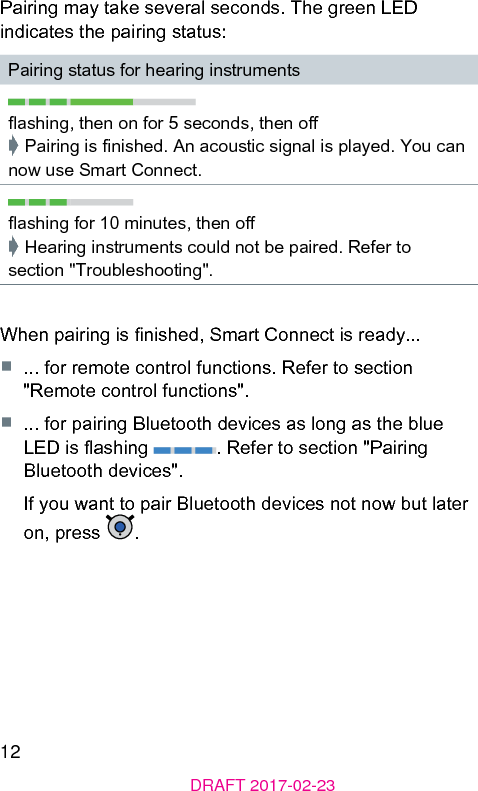
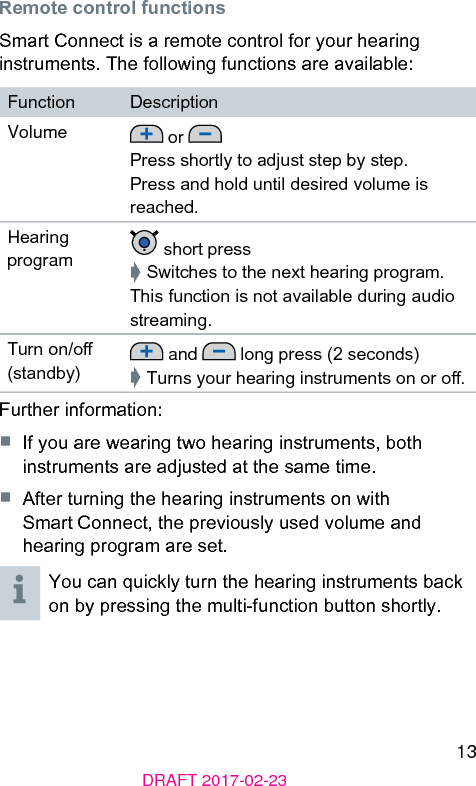
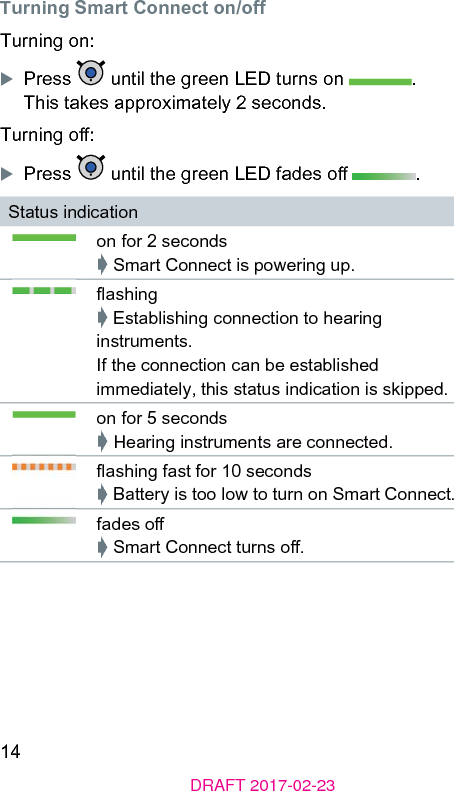
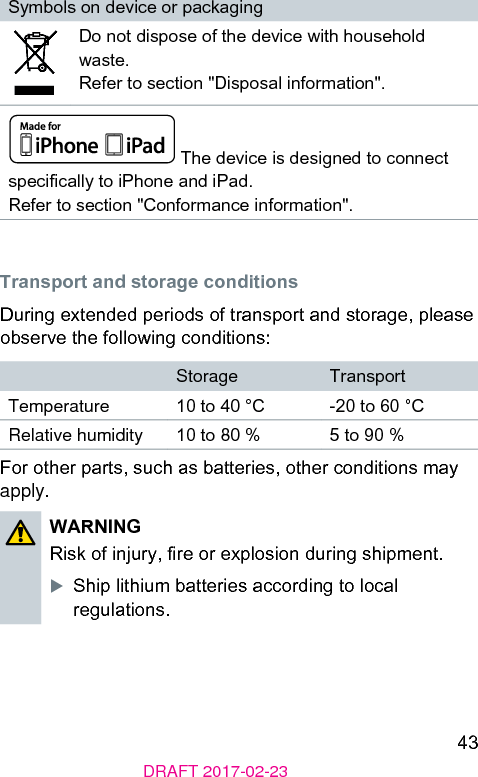
Sivantos WL402 Remote Control User Manual UserManual smart connect EN

Sivantos GmbH Remote Control UserManual smart connect EN

UserManual_smart connect_EN

Click DomeDRAFT 2017-02-23 Smart Connect™User Guide
2DRAFT 2017-02-23ContentBefore you art    4Included in delivery    4Compatible hearing inruments    5Components    6Getting arted    8Charging    8Wearing Smart Connect properly    10Pairing hearing inruments with Smart Connect   11Remote control functions    13Turning Smart Connect on/o    14Audio reaming    16Supported devices    17Pairing Bluetooth devices    19Pairing our transmitters    21Audio reaming functions    23Several devices connected    24Making phone calls    25Phone call functions    26Maintenance and service    29Cleaning    29Unpairing    29Resetting    30
3DRAFT 2017-02-23Further information    31Operating diance    31Conguration of hearing inruments    31Accessories    32Smart Connect App    33Troubleshooting    35Important safety information    37Personal safety    37Product safety    40Important information    42Intended use    42Symbols    42Transport and orage conditions    43Technical data of the power supply    44Disposal information    44Conformance information    45Country-specic information    47Quick reference    48Button overview    48LED atus indication    50
4DRAFT 2017-02-23Before you artSmart Connect is a remote control and audio reaming device in one device. It connects many Bluetooth®* wireless technology enabled devices, andard audio devices and FM receivers with your hearing inruments. CAUTIONRead this user guide thoroughly and completely and follow the safety information in this document to avoid damage or injury. Included in deliveryCheck the package contents.■  Smart Connect with neckloop:■  USB cable for charging:■  Power supply with dierent adapters  (depending on your country)*  The Bluetooth word mark and logos are owned by the Bluetooth SIG, Inc., and any use of such marks by Sivantos GmbH is under licenses. Other trademarks and trade names are those of their respective owners.
5DRAFT 2017-02-23Compatible hearing inrumentsSmart Connect works with our specic wireless hearing inruments. Your Hearing Care Professional will advise you on the compatible models.
6DRAFT 2017-02-23Components➑➑➑➑➑
7DRAFT 2017-02-23➊ Multi-function button ➋ LED atus indicator (orange, green, blue)➌ Neckloop (is also the antenna)➍ Microphone openings➎ USB port for charging➏ Reset button➐ Port for FM receiver➑ Port for audio devices (andard 3.5 mm audio jack)➒ Volume buttons
8DRAFT 2017-02-23 Getting artedFollow the inructions in this chapter to make Smart Connect ready for operation. ChargingNOTICEPlease make sure that the power plug is easily accessible to remove it from power supply if necessary.Battery atus while chargingeady orange light➧ Charging.eady green light➧ Charging is completed.
9DRAFT 2017-02-23The orange LED indicates the battery atus:Battery atusorange LED o➧ Battery is sufficiently charged.ashing fa for 5 seconds when a button is pressed➧ Battery is low.Further information:■  Only use the USB cable and power adapter that came with the device.Select the adapter that is used in your country.■  When charging via computer:□  Smart Connect switches o automatically.□  Your computer mu be turned on and not in sleep or andby mode. Otherwise, the battery may drain inead of charge.■  Typically, fully charging takes 2 hours.■  A special tool is needed to replace the rechargeable battery. Contact your Hearing Care Professional if the battery has to be replaced.NOTICEDo not open the housing. This might damage the device.
10DRAFT 2017-02-23Wearing Smart Connect properlyIn order to function correctly, you mu wear Smart Connect with the neckloop around your neck. The neckloop is also the antenna. XUnplug one neckloop plug and place the neckloop loosely around your neck ➊.XInsert both neckloop plugs all the way ➋.૝૝
11DRAFT 2017-02-23Pairing hearing inruments with Smart ConnectYour hearing inruments have to be paired once with Smart Connect. After that, the connection is automatically eablished when your hearing inruments and Smart Connect are turned on.Preconditions:■  Both hearing inruments are turned o (the battery compartments are open) and within operating diance.■  Smart Connect is turned o.■  Neckloop is plugged into both sides, and Smart Connect is worn around the neck.Pairing:XPress   until the green LED turns on  . This takes approximately 2 seconds.Smart Connect searches for hearing inruments nearby  .XTurn on the hearing inruments while the green LED is ashing  : Close the battery compartment.If you are wearing two hearing inruments, both inruments mu be turned on.
12DRAFT 2017-02-23Pairing may take several seconds. The green LED indicates the pairing atus:Pairing atus for hearing inrumentsashing, then on for 5 seconds, then o➧ Pairing is nished. An acouic signal is played. You can now use Smart Connect.ashing for 10 minutes, then o➧ Hearing inruments could not be paired. Refer to section "Troubleshooting".When pairing is nished, Smart Connect is ready...■  ... for remote control functions. Refer to section "Remote control functions".■  ... for pairing Bluetooth devices as long as the blue LED is ashing  . Refer to section "Pairing Bluetooth devices".If you want to pair Bluetooth devices not now but later on, press  .
13DRAFT 2017-02-23Remote control functionsSmart Connect is a remote control for your hearing inruments. The following functions are available:Function DescriptionVolume  or Press shortly to adju ep by ep.Press and hold until desired volume is reached.Hearing program  short press➧ Switches to the next hearing program.This function is not available during audio reaming.Turn on/o (andby)  and   long press (2 seconds)➧ Turns your hearing inruments on or o. Further information:■  If you are wearing two hearing inruments, both inruments are adjued at the same time.■  After turning the hearing inruments on with Smart Connect, the previously used volume and hearing program are set.You can quickly turn the hearing inruments back on by pressing the multi-function button shortly.
14DRAFT 2017-02-23Turning Smart Connect on/off Turning on:XPress   until the green LED turns on  . This takes approximately 2 seconds.Turning o:XPress   until the green LED fades o  .Status indicationon for 2 seconds➧ Smart Connect is powering up.ashing➧ Eablishing connection to hearing inruments.If the connection can be eablished immediately, this atus indication is skipped.on for 5 seconds➧ Hearing inruments are connected.ashing fa for 10 seconds➧ Battery is too low to turn on Smart Connect.fades o➧ Smart Connect turns o.
15DRAFT 2017-02-23Further information:■  The hearing inruments are not automatically turned on or o when Smart Connect is turned on or o.■  After turning on, Smart Connect searches for 10 minutes for hearing inruments. If no hearing inruments can be detected during that time, Smart Connect switches o automatically.In this case: Ensure that the hearing inruments are turned on and try again.■  To check if Smart Connect is turned on, press   or  . If the green LED lights up, Smart Connect is turned on.
16DRAFT 2017-02-23 Audio reamingConnect the audio device with Smart Connect - with wire or wirelessly. Smart Connect wirelessly transmits (reams) the audio signal to your hearing inruments.The audio signal is played through your hearing inruments. You do not need loudspeakers or headphones.
17DRAFT 2017-02-23 Supported devicesYou can connect the following devices:Bluetooth phones (up to two)Bluetooth audio devices, such as tablet PC, ereo, ...Standard line-in devices (audio devices with 3.5 mm audio jack)Our transmitters (up to two)Enable wireless audio reaming for devices that do not support Bluetooth.FM receiver Enables you to use FM syems even if your hearing inruments do not have an audio input.Whenever audio reaming is active - independent of the connected audio source - the blue LED lights up  .
18DRAFT 2017-02-23The setup depends on the device type:■  Standard line-in devices and FM receivers mu only be plugged in.■  Bluetooth phones and Bluetooth audio devices mu be paired once before audio reaming is possible. Refer to section "Pairing Bluetooth devices".■  Our transmitters mu also be paired once, but the procedure is slightly dierent. Refer to section "Pairing our transmitters".Further information:■  FM receivers: The same signal is transmitted to both hearing inruments (mono sound).■  Transmitters: You can also use third-party transmitters. Smart Connect treats them like other Bluetooth devices. We recommend to use our transmitters.
19DRAFT 2017-02-23Pairing Bluetooth devicesEvery Bluetooth device has to be paired once with Smart Connect. After that, the connection is automatically eablished when Smart Connect is turned on and the Bluetooth device is within operating diance.Bluetooth devices are, for example, Bluetooth phones, TV, tablets or third-party transmitters.The procedure for pairing and using our transmitters is slightly dierent. Refer to section "Pairing our transmitters".Preconditions:■  Bluetooth device is turned on.■  Smart Connect is turned on.■  Neckloop is plugged into both sides, and Smart Connect is worn around the neck.
20DRAFT 2017-02-23Pairing andard Bluetooth devices:XPress   and   simultaneously until the blue LED ashes  . This takes approximately 5 seconds.Smart Connect searches for devices nearby.XSet up your Bluetooth device to search for other Bluetooth devices. Refer to the device's manual.XOn the Bluetooth device, select "Smart Connect" from the li of detected devices.XIf requeed, enter the PIN "0000".Pairing may take several seconds. The blue LED indicates the pairing atus:Pairing atus for andard Bluetooth devicesashing, then on for 5 seconds, then o➧ Pairing has been completed successfully.  You can now use the Bluetooth device.ashing, then o➧ Pairing was not successful. In this case, ensure that the Bluetooth device is within operating diance and try again.Tips:■  You can also use the Smart Connect App for pairing.■  To cancel pairing, press   shortly. The blue LED goes o.
21DRAFT 2017-02-23Pairing our transmittersEach transmitter has to be paired once with Smart Connect. You can use up to two of our transmitters.Preconditions:■  Smart Connect is turned on.■  Neckloop is plugged into both sides, and Smart Connect is worn around the neck.■  Transmitter is within operating diance.Pairing our transmitters:XTurn on the transmitter.XPress  ,   and   simultaneously until the blue and green LEDs ash  . This takes approximately 5 seconds.Smart Connect searches for transmitters nearby.
22DRAFT 2017-02-23Pairing may take several seconds. The blue LED indicates the pairing atus:Pairing atus for our transmittersashing, then on➧ Pairing has been completed successfully. Streaming arts automatically. You can now use the transmitter.ashing, then o➧ Pairing was not successful. In this case, ensure that the transmitter is within operating diance and try again.You can also use the Smart Connect App for pairing.Further information:■  If the transmitter is only temporarily (< 5 min) out of operating diance, the transmission of the audio signal is interrupted but automatically picked up again when the transmitter is back within operating diance.■  If a transmitter is already paired, you cannot pair it again.■  If you pair a third transmitter, the r paired transmitter is automatically unpaired.
23DRAFT 2017-02-23Audio reaming functionsFor making phone calls, refer to chapter "Making phone calls".Function ExplanationStart reaming ■  For Bluetooth audio devices: Start audio playback on the audio device.■  For andard line-in devices and FM receivers: Plug the device.■  For our transmitters:  Double-press  .Volume  or Press shortly to adju ep by ep.Press and hold until desired volume is reached.Sound mixer  and   short pressPress both buttons simultaneously to switch between the following input signals:■  Audio input and ambient sound■  Audio input onlyStop reaming  short pressThe blue LED goes o.Toggle between transmitters  double-pressOnly for our transmitters.
24DRAFT 2017-02-23For andard line-in devices and FM receivers you can pause / play the audio ream by pressing   shortly.When the audio ream is paused, the blue LED goes o.Several devices connectedIf you connect more than one device to Smart Connect, the la device connected is played. If you turn on Smart Connect while more than one device is connected, Smart Connect selects one of the signals, according to the following priorities:➊Phone calls➋Bluetooth audio devices, for example the music player of a smartphone or a tablet PC(all but our transmitters)➌FM receiver➍Audio device (with andard 3.5 mm jack)➎Our transmitters
25DRAFT 2017-02-23 Making phone callsYou can use your hearing inruments’ loudspeakers and the microphone of Smart Connect for phone calls when you are making a call.Preconditions:■  The phone mu support Bluetooth.■  The phone mu be paired with Smart Connect (refer to section "Pairing Bluetooth devices").
26DRAFT 2017-02-23Phone call functionsFunction DescriptionAccept / end a call  short pressAlternative:Use your phone's accept/end function.Reject a call  long press (more than 2 seconds)Alternative:Use your phone's reject function.Volume  or Press shortly to adju ep by ep. Press and hold until desired volume is reached.Sound mixer  and Press both buttons simultaneously to switch between the following input signals:■  caller’s voice and ambient sound■  only caller's voiceHand call over  double-pressHands the phone call from Smart Connect to the phone or from the phone to the Smart Connect.
27DRAFT 2017-02-23Further information:■  Outgoing calls:When you call someone, your hearing inruments automatically connect with the phone.Some phones do not support this function. In this case: □  Stop or disconnect all other audio devices.□  Press   and   shortly to eablish the connection manually. ■  Incoming calls:□  When someone calls you, your hearing inruments play a ring tone and the blue LED is ashing fa .□  When someone calls you, Smart Connect cannot be turned o.■  Rejecting calls:This function is not supported by all phones.■  Using two phones:□  If both phones ring simultaneously, Smart Connect signals only the r call.□  While you are on the phone using the Smart Connect, incoming calls of the second phone cannot be signaled. You have to end the call on the r phone in order to answer the call on the second phone.□  Both phones have to be paired with the Smart Connect.
28DRAFT 2017-02-23■  Hand call over:This function is helpful if you want to hand the phone to another person.■  It is not possible to put a call on hold via Smart Connect. Use your phone’s functions to put a call on hold.■  During a phone call, the hearing inruments cannot be turned o (andby) and the hearing program cannot be changed.■  After pairing is completed, we recommend to turn o the phone’s keypad tones.
29DRAFT 2017-02-23 Maintenance and service Cleaning NOTICEXDo not put your remote control in water! XDo not clean your remote control with alcohol or benzine.XClean the remote control and the neckloop as necessary with a dry or slightly damp soft cloth.Use only diilled water to dampen the cloth.XAvoid any cleaning agents. UnpairingYou can unpair all devices except our transmitters.XPress   and   simultaneously until the blue and orange LED art ashing  . This takes approximately 10 seconds.Smart Connect unpairs the hearing inruments and all Bluetooth devices except our transmitters.Smart Connect searches for hearing inruments and Bluetooth devices nearby  . Turn your hearing inruments o and on again to pair them with Smart Connect. In order to pair other devices, refer to "Pairing Bluetooth devices". To unpair our transmitters, you have to use the Smart Connect App.
30DRAFT 2017-02-23 ResettingIn case of a syem crash or if Smart Connect does not respond when you press a button, you can reset the Smart Connect. The reset does not aect the pairing atus. All paired devices remain paired.XUse a long thin tool, for example, a wooden or plaic toothpick, and press the reset button.
31DRAFT 2017-02-23Further informationOperating dianceXSmart Connect and hearing inruments: You mu wear Smart Connect around the neck and you mu wear your hearing inruments as usual. XSmart Connect and wireless audio devices: The maximum diance is approximately 10 m or 32 ft.Conguration of hearing inrumentsYou can use Smart Connect right out of the box. You only have to pair your hearing inruments and the desired Bluetooth devices.However, if you prefer a dedicated hearing program for liening to music (via your Bluetooth HiFi) or when using the FM receiver:XAsk your Hearing Care Professional to congure a hearing program with the desired properties.With dedicated hearing programs, you can enjoy the sound quality even more.
32DRAFT 2017-02-23If your Hearing Care Professional sets up a new hearing program for your hearing inruments or changes the conguration of the hearing inruments, you have to do the following:XTurn Smart Connect o and then on again.Read more in section "Turning Smart Connect on/o".XPair your hearing inruments once again.Read more in section "Pairing hearing inruments with Smart Connect".The updated conguration of the hearing inruments is now known by Smart Connect.Accessories■  Transmitter set:Bluetooth transmitter for devices that do not support Bluetooth.■  Speech Connect set:Bluetooth transmitter plus lapel microphone that can be given to speakers/teachers for eective speech transmission to the user.More accessories might be available in your country. Ask your Hearing Care Professional.
33DRAFT 2017-02-23Smart Connect AppWith the Smart Connect App™ you conveniently operate your hearing inruments right from your Android* smartphone, from your iPhone**, or from your tablet.You can control your hearing inruments and how they interact with all of your favorite electronic devices. Whether it is watching TV, liening to your favorite song, or talking to a friend on your mobile phone - control is right at your ngertips.Prerequisites for using the app:■  You mu have a Smart Connect. Wear it as usual and turn it on.■  Your smartphone or tablet mu be within Bluetooth operating diance (about 10 m or 32 ft).Prerequisites for download and inallation:■  Your smartphone or tablet mu have access to the Internet.■  You mu have or create an account for the Google Play* Store (Android smartphone or tablet) or for the App Store** (iPhone or iPad).*  Android and Google Play are trademarks of Google Inc.** iPhone and iPad are trademarks of Apple Inc., regiered in the U.S. and other countries. App Store is a service mark of Apple Inc.
34DRAFT 2017-02-23Download and inallation:XSearch for "Smart Connect" in the Google Play Store or in the App Store and inall the app on your smartphone or tablet.XTo art the app, it is lied under the name "Smart Connect" on your smartphone or tablet.
35DRAFT 2017-02-23TroubleshootingIf an error occurs, make sure that Smart Connect is worn correctly and that all devices are within operating diance. Refer to sections "Wearing Smart Connect properly" and "Operating diance".Problem and possible solutionsThe device does not work.■  Ensure that the device is charged and turned on. Refer to sections "Charging" and "Turning Smart Connect on/o".■  Pair the hearing inruments again. Refer to section "Pairing your hearing inruments".■  Reset the device. Refer to section "Resetting".Hearing inruments cannot be paired.■  Unpair all devices and pair them again.  Refer to section "Unpairing devices".Audio reaming is interrupted.■  Ensure that the neckloop is not twied.■  Ensure that the Bluetooth device is within operating diance.■  In rare cases, metal-based necklaces can interrupt audio reaming. Remove the necklace.
36DRAFT 2017-02-23Problem and possible solutionsAn external audio source is connected, but not played.■  For plugged connections: Ensure that the device is fully connected.■  For wireless connections: The device has not been paired. Refer to section "Pairing Bluetooth devices".■  More than one audio device is connected and another connected audio device has a higher priority. Unplug unused audio device or press   to op wireless audio reaming from unused audio devices.Cannot toggle between transmitters.■  Only one transmitter has been paired. Pair both transmitters.■  Ensure that both transmitters are within operating diance.■  At lea one transmitter is a third-party transmitter. Toggling between transmitters works only for our transmitters.Consult your Hearing Care Professional if you encounter further problems.
37DRAFT 2017-02-23Important safety informationPersonal safetyWARNINGRisk of rangulation!XEnsure that the neckloop does not get entangled, e. g. in moving mechanical parts of machines.XUse only the delivered neckloop. It will automatically detach when entangled.XDo not use the device for children under the age of twelve.WARNINGChoking hazard!Your device contains small parts which can be swallowed.XKeep hearing inruments, batteries and accessories out of reach of children and mentally disabled persons.XIf parts have been swallowed consult a physician or hospital immediately.WARNINGRisk of electrical shock!XDo not use obviously damaged devices and return them to point of sale.
38DRAFT 2017-02-23WARNINGNote that any unauthorized changes to the product may cause damage to the product or cause injury.XUse only approved parts and accessories.  Ask your Hearing Care Professional for support.WARNINGRisk of electric shock!XConnect audio input only to a device conforming to IEC 60065, the IEC-Norm for audio, video and other electronic devices.WARNINGInterference with implantable devicesXThe device can be used with all electronic implants that comply with the ANSI/AAMI/ISO 14117:2012 Electromagnetic compatibility andard for human implants.XIn case your implant does not comply with the ANSI/AAMI/ISO 14117:2012 andard, consult the manufacturer of your implantable device for information about the risk of diurbance.WARNINGThis device may interfere with measuring and electronic equipment.XDo not use your device on airplanes or areas where sensitive or life-supporting electronic equipment is used.
39DRAFT 2017-02-23WARNINGRisk of explosion!XDo not use your remote control in explosive atmospheres (e. g. in mining areas).WARNINGRisk of explosion when the rechargeable battery is handled wrong.XDo not short circuit, pierce, crush or disassemble the rechargeable battery.XPrior to return the battery for recycling, tape the electrodes to prevent short circuit, which may cause the battery to explode.XDo not place it in oven or re.XDo not immerse it in water.XCharge the rechargeable battery between 0ºC and 45ºC.Radiofrequency radiation exposure InformationThe radiated output power of the device is far below the FCC radio frequency exposure limits. Nevertheless, the device shall be used in such a manner that the potential for human contact during normal operation is minimized.
40DRAFT 2017-02-23Product safetyNOTICEXProtect your devices from extreme heat. Do not expose them to direct sunlight.NOTICEXProtect your devices from high humidity.NOTICEXDo not dry your devices in the microwave oven.NOTICEDierent types of rong radiation, e. g. during X-ray or MRI head examinations, may damage devices.XDo not use the devices during these or similar procedures.Weaker radiation, e. g. from radio equipment or airport security, does not damage the devices.In some countries rerictions for the usage of wireless equipment exi.XRefer to local authorities for further information.
41DRAFT 2017-02-23NOTICEYour hearing inruments are designed to comply with international andards on electromagnetic compatibility but interference with nearby electronic devices could occur. In this case, move away from the source of interference.NOTICEFor inruments with wireless connectivity:When the telecoil program is active, the remote control may cause a pulsing noise.XUse the remote control with a diance greater than 10 cm (4 inches).NOTICEXYour remote control is programmed to exclusively communicate with your hearing inruments. If you experience problems with another person's remote control, consult your Hearing Care Professional.
42DRAFT 2017-02-23 Important information Intended useThe remote control is intended to operate hearing inruments.Use the remote control only as described in this user guide. SymbolsSymbols used in this documentPoints out a situation that could lead to serious, moderate, or minor injuries.Indicates possible property damage.Advice and tips on how to handle your device better.Symbols on device or packagingRead and follow the inructions in the user guide.CE compliance label, conrms compliance with certain European Directives. Refer to section "Conformance information".EMC and radio communications compliance label Auralia.Refer to section "Conformance information".
43DRAFT 2017-02-23Symbols on device or packagingDo not dispose of the device with household wae. Refer to section "Disposal information". The device is designed to connect specically to iPhone and iPad.Refer to section "Conformance information". Transport and orage conditionsDuring extended periods of transport and orage, please observe the following conditions:Storage TransportTemperature 10 to 40 °C -20 to 60 °CRelative humidity 10 to 80 % 5 to 90 %For other parts, such as batteries, other conditions may apply.WARNING Risk of injury, re or explosion during shipment.XShip lithium batteries according to local regulations.
44DRAFT 2017-02-23Technical data of the power supplyGolden Prot GPE006H-050100-Z Input voltage: 100-240 V ACInput current: 0.5 AInput frequency: 50-60 HzOutput voltage: 5 V DCOutput current: 1 ADisposal informationWithin the European Union, the marked equipment is covered by "Directive 2002/96/EC of the European Parliament and of the Council of 27 January 2003 on wae electrical and electronic equipment."Amended by "Directive 2003/108/EC" (WEEE).NOTICEXRecycle hearing inruments, accessories and packaging according to national regulations.NOTICEXTo avoid environmental pollution, do not throw batteries into household trash.XRecycle or dispose of batteries according to national regulations or return them to your Hearing Care Professional.
45DRAFT 2017-02-23Conformance informationThe CE mark indicates conformity with the following European directives: 93/42/EEC concerning medical devices, 99/5/EC (R&TTE) concerning radio and telecommunications terminal equipment, and 2011/65/EU RoHS concerning the reriction of hazardous subances.Wireless functionalityOperating frequency: fc= 3.28 MHzFCC and ISED compliance information can be found on the back of the device.The ACMA compliance mark   indicates conformity with the electromagnetic interference andards set by the Auralian Communications and Media Authority (ACMA).Devices with the FCC marking comply with the andards of the FCC regarding electromagnetic interference.This Class B digital apparatus complies with Canadian ICES-003.This device complies with Part 15 of the FCC Rules and with ISED's licence-exempt RSSs.Operation is subject to the following two conditions:■  This device may not cause harmful interference, and■  this device mu accept any interference received, including interference that may cause undesired operation.
46DRAFT 2017-02-23This equipment has been teed and found to comply with the limits for a Class B digital device, pursuant to Part 15 of the FCC Rules. These limits are designed to provide reasonable protection again harmful interference in a residential inallation. This equipment generates, uses and can radiate radio frequency energy and, if not inalled and used in accordance with the inructions, may cause harmful interference to radio communications. However, there is no guarantee that interference will not occur in a particular inallation. If this equipment does cause harmful interference to radio or television reception, which can be determined by turning the equipment o and on, the user is encouraged to try to correct the interference by one or more of the following measures:■  Reorient or relocate the receiving antenna.■  Increase the separation between the equipment and receiver.■  Connect the equipment to an outlet on a circuit dierent from that to which the receiver is connected.■  Consult the dealer or an experienced radio/TV technician for help.FCC caution: Any changes or modications not expressly approved by the party responsible for compliance could void the user's authority to operate this equipment.
47DRAFT 2017-02-23Made for iPhone, iPad"Made for iPhone" and "Made for iPad" mean that the device has been designed to connect specically to iPhone or iPad, respectively, and has been certied by the developer to meet Apple performance andards. Apple is not responsible for the operation of this device or its compliance with safety and regulatory andards. Please note that the use of this accessory with iPhone or iPad may aect wireless performance.Country-specic information
48DRAFT 2017-02-23Quick referenceButton overviewButton Description or  Adju volumePress shortly to adju ep by ep.Press and hold until desired volume is reached. and   short pressOnly during audio reaming or phone callsSwitch between the following input signals:■  Audio input/caller's voice and ambient sound■  Audio input/caller's voice only and   long press (2 seconds)Turn your hearing inruments on/o (andby).  short press ■  During audio reaming:  Stop reaming■  No audio reaming:  Switch to next hearing program■  When hearing inruments are turned o:  Turn hearing inruments on■  Incoming call: Accept call■  During phone call: End call■  During Bluetooth pairing:  Cancel pairing
49DRAFT 2017-02-23Button Description long press ■  No active phone call: Turn Smart Connect on/o■  During phone call: Reject call double-press ■  During phone call: Hand call over■  Only for our transmitters: Switch to the transmitter or toggle between transmitters and  Pair andard Bluetooth device,   and  Pair one of our transmitters and  Unpair all devices except our transmitters
50DRAFT 2017-02-23LED atus indicationOrange LEDOrange LED o ➧ Battery is sufficiently charged.Flashing fa for 5 seconds......when a button is pressed: ➧ Battery is low. ... after turning on: ➧ Battery is too low to turn on Smart Connect.Flashing fa for 1 second➧ An error has occurred.Examples: Hearing inruments are not in operating diance or the neckloop is open.Steady orange light➧ Charging.Blue LEDBlue LED o➧ No audio reaming and no phone call is active.Steady blue light➧ Audio reaming is active.➧ Phone call is active.Flashing fa➧ Incoming phone call
51DRAFT 2017-02-23Blue LEDFlashing➧ Pairing with andard Bluetooth devices➧ Eablishing connection to our transmittersOn for 5 seconds after ashing➧ Bluetooth device is connected.Green LEDGreen LED o➧ No button is currently pressed, no charging in progress or Smart Connect is turned o.Steady green light (when charging)➧ Charging is completed.On for 1 second after pressing buttons➧ Switch hearing program or adju volume.On for 2 seconds after pressing buttons➧ Turn hearing inruments on/o (andby).On for 2 seconds after turning on➧ Smart Connect is turned on.On as long as   or   is pressed➧ Adju volume.Flashing➧ Eablishing connection to hearing inruments.
52DRAFT 2017-02-23Green LEDFades o➧ Smart Connect turns o.On for 5 seconds, then o➧ Pairing with hearing inruments is nished.Several LEDsFlashing orange and blue➧ All Bluetooth phones are unpaired.Flashing green and blue➧ Searching for our transmitters nearby.➧ Searching for nearby hearing inruments and Bluetooth devices simultaneously.
53
54
DRAFT 2017-02-23www.sivantos.com/brandsDocument No. 02412-99T02-#### ##Order/Item No. 109 310 79Master Rev##, ##.2017© Sivantos GmbH, 02.2017 0123 Legal ManufacturerSivantos GmbHHenri-Dunant-Strasse 10091058 ErlangenGermanyPhone +49 9131 308 0

Navigation menu