Silex Technology SX10WAG SX-10WAG User Manual
Silex Technology, Inc. SX-10WAG
UserManual.wiki
>
Silex Technology
>
SX10WAG User Manual
>
Manual 6
Contents
1.
Manual
2.
Manual 1
3.
Manual 2
4.
Manual 3
5.
Manual 4
6.
Manual 5
7.
Manual 6
8.
Manual 7
9.
Manual 8
10.
Manual 9
11.
Manual 10
Manual 6
Navigation menu
Upload a User Manual
Namespaces
Wiki Guide
HTML
PDF
Info
Views
User Manual
Discussion / Help
Navigation
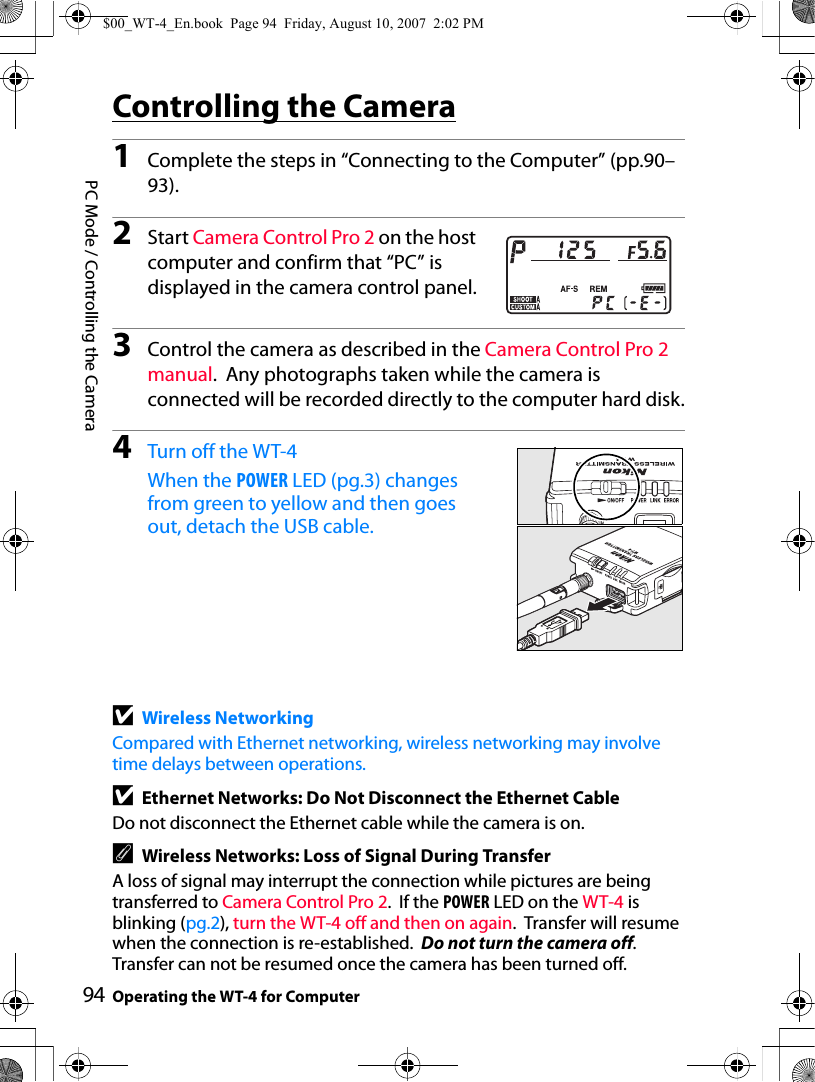
![90PC Mode / Connecting to the ComputerOperating the WT-4 for ComputerPC ModeIn PC mode, a camera equipped with a WT-4 can be controlled over a wireless or Ethernet network from a computer running Camera Control Pro 2 (available separately) and photographs saved directly to the computer hard disk instead of the camera memory card.Connecting to the ComputerBefore connecting the WT-4, select [MTP/PTP] for the [USB] option in the camera setup menu (pg.7) and confirm that the host computer is running.1Turn the camera off.To access the network via Ethernet, connect the Ethernet cable (pg.2). Note that wireless transfer is disabled while an Ethernet cable is connected. Disconnect the Ethernet cable before accessing a wireless network. Turn the WT-4 off before connecting or disconnecting the Ethernet cable.2Open the WT-4 USB connector cover and connect the USB cable from the WT-4 to the camera USB connector.3Turn the camera on.UMMY$00_WT-4_En.book Page 90 Friday, August 10, 2007 2:02 PM](https://usermanual.wiki/Silex-Technology/SX10WAG.Manual-6/User-Guide-853226-Page-1.png)
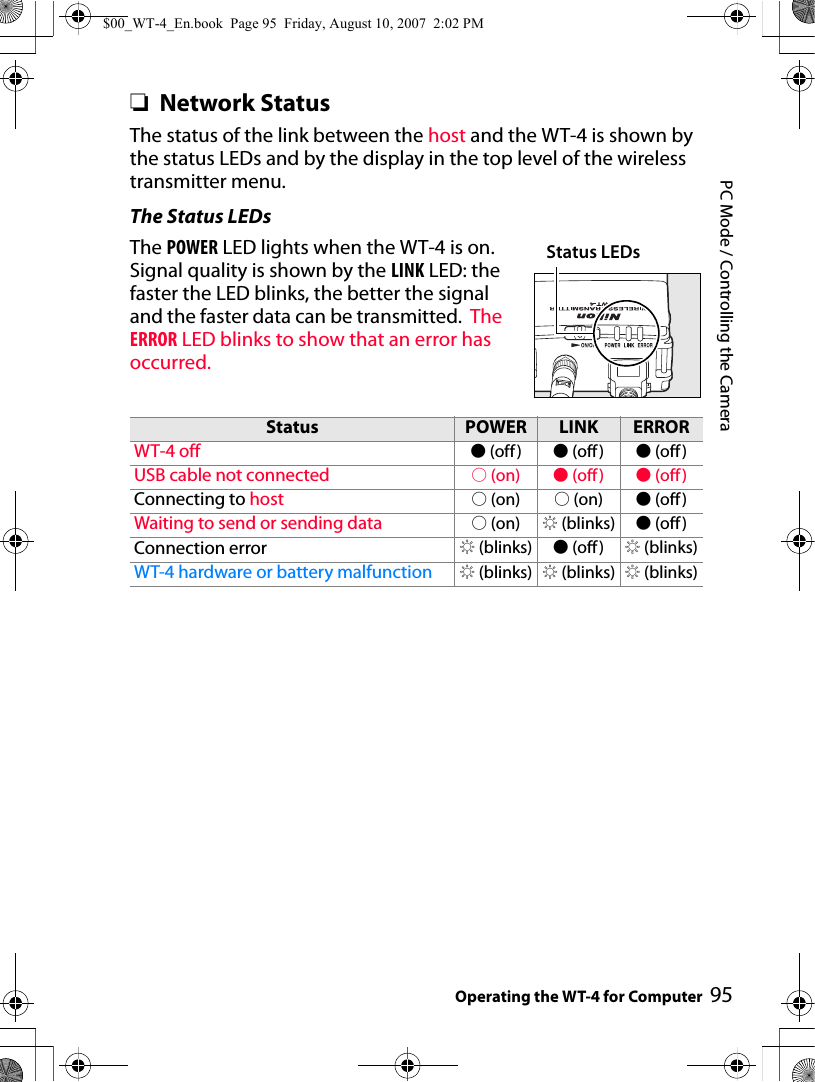
![91PC Mode / Connecting to the ComputerOperating the WT-4 for Computer4Select [PC mode] for the [Wireless transmitter] > [Mode] option in the camera setup menu (pg.152).5A list of available connection profiles will be displayed. Highlight the desired profile and press J.CViewing Profile InformationPress the camera L (?) button to view information on the selected profile.6Turn on the WT-4.7The message “Now in PC mode” will be displayed in the top level of the wireless transmitter menu when a connection is established. For information on what to do if an error is displayed, see “Troubleshooting” (pp.178).Power switch$00_WT-4_En.book Page 91 Friday, August 10, 2007 2:02 PM](https://usermanual.wiki/Silex-Technology/SX10WAG.Manual-6/User-Guide-853226-Page-2.png)
![92PC Mode / Connecting to the ComputerOperating the WT-4 for ComputerAUsing the Windows Vista Ad-hoc ConnectionTo use the Windows Vista ad-hoc connection, turn on the WT-4 and conduct the following steps on your computer.1Click the [Start] and select [Connect To].2Select a preset network name and click [Connet].$00_WT-4_En.book Page 92 Friday, August 10, 2007 2:02 PM](https://usermanual.wiki/Silex-Technology/SX10WAG.Manual-6/User-Guide-853226-Page-3.png)
![93PC Mode / Connecting to the ComputerOperating the WT-4 for Computer3Enter the network security key and click [Connect].4Click [Close].$00_WT-4_En.book Page 93 Friday, August 10, 2007 2:02 PM](https://usermanual.wiki/Silex-Technology/SX10WAG.Manual-6/User-Guide-853226-Page-4.png)

![97Print Mode / Copying Network Profiles to the CameraOperating the WT-4 for ComputerPrint ModePrint mode allows you to print JPEG pictures taken with your camera from a printer connected to a network computer via the WT-4. The printer normally used with your computer is set as the printer which will be operated via the WT-4. To configure a different printer, conduct the following steps (to change the settings to a different printer, it is not necessary to use a USB cable to connect the camera to your computer).The computer’s OS settings will be applied for print quality and paper type at the time wireless transmission is configured. To change these settings, conduct step 4 for Macintosh; for Windows, change the OS printer settings before printing.Copying Network Profiles to the Camera1Turn the computer on and start the WT-4 Setup Utility.•Windows: Double-click the [WT-4 Setup Utility] icon on the desktop•Macintosh: Click the [WT-4WirelessSetup] icon in the Dock.$00_WT-4_En.book Page 97 Friday, August 10, 2007 2:02 PM](https://usermanual.wiki/Silex-Technology/SX10WAG.Manual-6/User-Guide-853226-Page-8.png)
![98Print Mode / Copying Network Profiles to the CameraOperating the WT-4 for Computer2The dialog shown below will be displayed; click [Next].3Select [Setup wireless printer] and click [Next].$00_WT-4_En.book Page 98 Friday, August 10, 2007 2:02 PM](https://usermanual.wiki/Silex-Technology/SX10WAG.Manual-6/User-Guide-853226-Page-9.png)
![99Print Mode / Copying Network Profiles to the CameraOperating the WT-4 for Computer4Choose a printer and click [Next].•Windows: Select a printer from the pull-down menu.$00_WT-4_En.book Page 99 Friday, August 10, 2007 2:02 PM](https://usermanual.wiki/Silex-Technology/SX10WAG.Manual-6/User-Guide-853226-Page-10.png)
![100Print Mode / Copying Network Profiles to the CameraOperating the WT-4 for Computer•Macintosh: Click [Select Printer…].The following dialog will be displayed; choose a printer and adjust printer settings. Click [Print] to return to the WT-4 setup utility.$00_WT-4_En.book Page 100 Friday, August 10, 2007 2:02 PM](https://usermanual.wiki/Silex-Technology/SX10WAG.Manual-6/User-Guide-853226-Page-11.png)
![101Print Mode / Copying Network Profiles to the CameraOperating the WT-4 for Computer5Select [Finish wizard] and click [Next].The network profile has now been copied to the camera. $00_WT-4_En.book Page 101 Friday, August 10, 2007 2:02 PM](https://usermanual.wiki/Silex-Technology/SX10WAG.Manual-6/User-Guide-853226-Page-12.png)
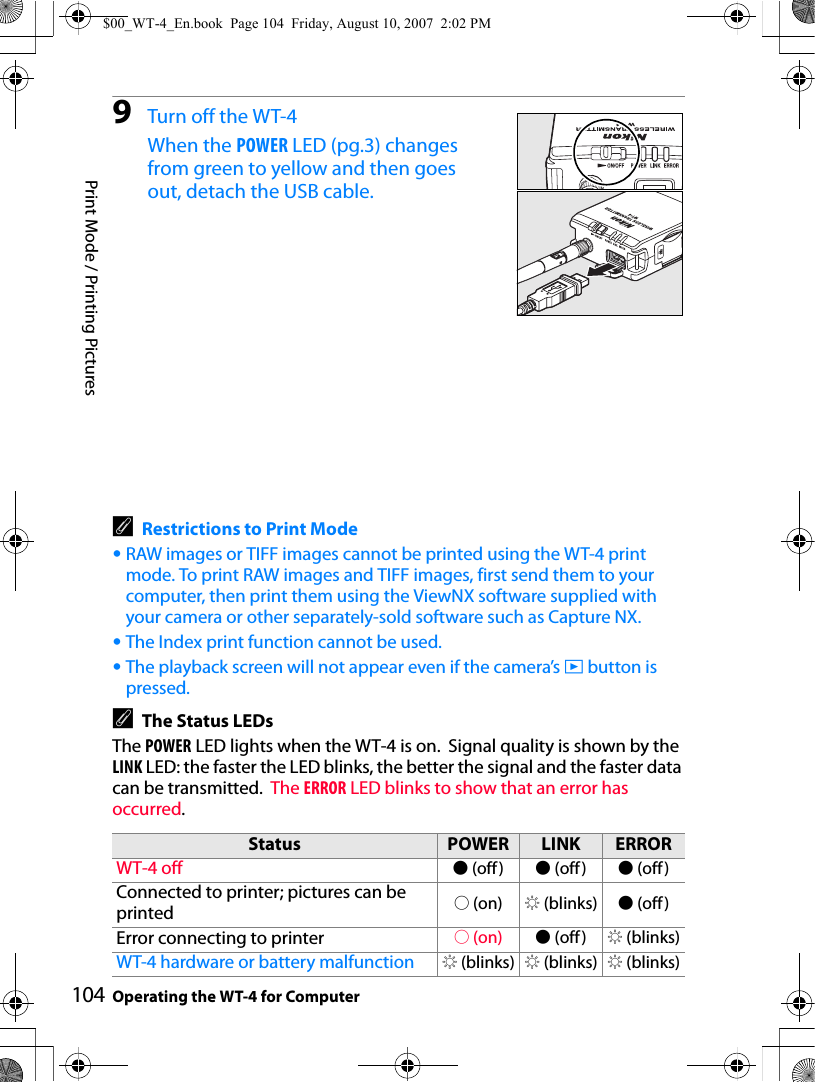
![102Print Mode / Printing PicturesOperating the WT-4 for ComputerPrinting PicturesBefore connecting the WT-4, select [MTP/PTP] for the [USB] option in the camera setup menu (pg.7) and confirm that the host computer is running and that the printer is on.1Turn the camera off and insert the memory card containing the pictures to be sent.•If there are multiple card slots, insert the card into any slot.To access the network via Ethernet, connect the Ethernet cable (pg.2). Note that wireless transfer is disabled while an Ethernet cable is connected. Disconnect the Ethernet cable before accessing a wireless network. Turn the WT-4 off before connecting or disconnecting the Ethernet cable.2Open the WT-4 USB connector cover and connect the USB cable from the WT-4 to the camera USB connector.3Turn the camera on.4Select [Print mode] for the [Wireless transmitter] > [Mode] option in the camera setup menu (pg.152).DUMMYFrontUMMY$00_WT-4_En.book Page 102 Friday, August 10, 2007 2:02 PM](https://usermanual.wiki/Silex-Technology/SX10WAG.Manual-6/User-Guide-853226-Page-13.png)
![103Print Mode / Printing PicturesOperating the WT-4 for Computer5A list of available printer profiles will be displayed. Highlight the desired profile, then press J to select and return to the top level of the wireless transmitter menu.AViewing Profile InformationPress the camera L (?) button to view information on the selected profile.6Turn on the WT-4.7Select [Print] in the top level of the [Wireless Transmitter] menu to connect to the printer. The status LEDs will light as a connection is negotiated with the printer.8Print photographs from the [Print] menu as described in the camera manual.Power switch$00_WT-4_En.book Page 103 Friday, August 10, 2007 2:02 PM](https://usermanual.wiki/Silex-Technology/SX10WAG.Manual-6/User-Guide-853226-Page-14.png)
![105Print Mode / Printing PicturesOperating the WT-4 for ComputerAUsing the Windows Vista Ad-hoc ConnectionTo use the Windows Vista ad-hoc connection, turn on the WT-4 and conduct the following steps on your computer.1Click the [Start] and select [Connect To].2Select a preset network name and click [Connet].$00_WT-4_En.book Page 105 Friday, August 10, 2007 2:02 PM](https://usermanual.wiki/Silex-Technology/SX10WAG.Manual-6/User-Guide-853226-Page-16.png)
![106Print Mode / Printing PicturesOperating the WT-4 for Computer3Enter the network security key and click [Connect].4Click [Close].$00_WT-4_En.book Page 106 Friday, August 10, 2007 2:02 PM](https://usermanual.wiki/Silex-Technology/SX10WAG.Manual-6/User-Guide-853226-Page-17.png)
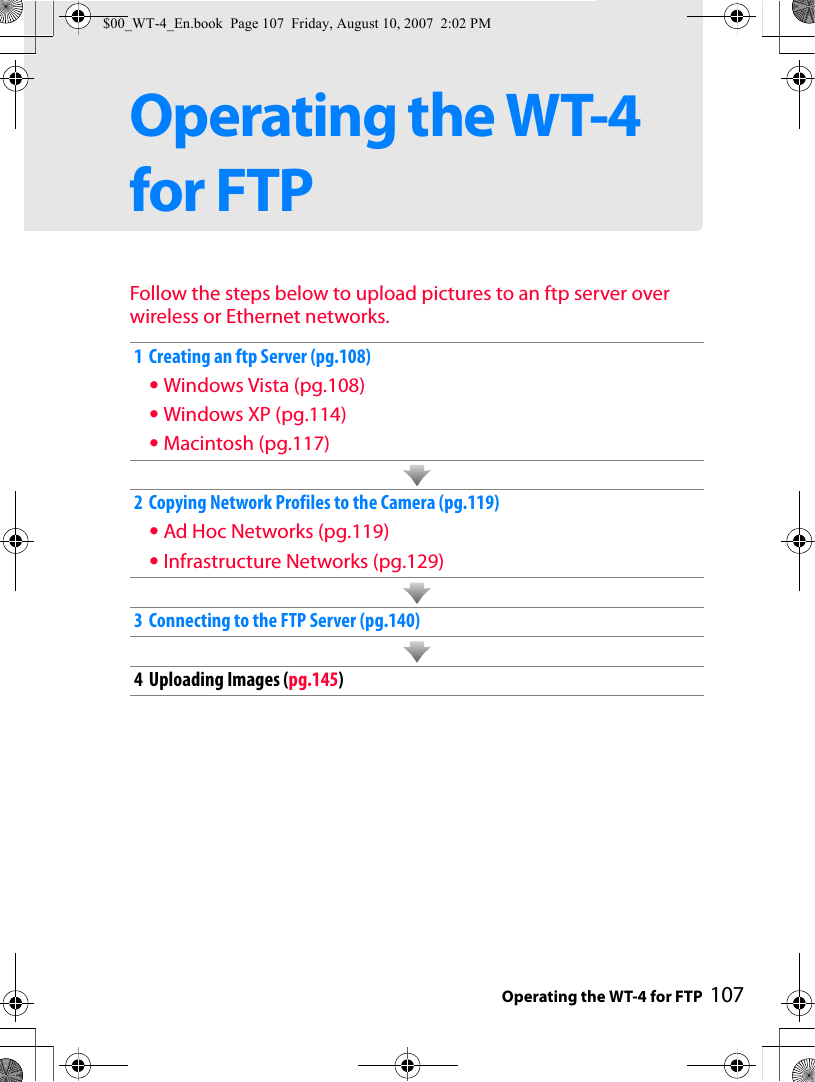
![108Creating an ftp Server / Windows VistaOperating the WT-4 for FTPCreating an ftp ServerThe WT-4 can be used to upload pictures to ftp servers created using standard ftp services included with Windows Vista (32-bit Ultimate/Business/Enterprise editions), Windows XP Professional (Service Pack 1 or later), and Mac OS X (version 10.3.9 or version 10.4.10). Under Windows, Internet Information Services (IIS) are required to configure ftp servers (IIS is included in the standard install of Windows Vista Ultimate, Windows Vista Business, Windows Vista Enterprise, and Windows XP Professional; for information, contact Microsoft). Mac OS X versions 10.3.9 and 10.4.10 also support ftp services. Be sure to use characters supported by the WT-4 (pg.153) when specifying such settings as user ID, password, and folder names.Windows Vista1Open the > [Network and Internet] > [Network and Sharing Center] control panel.2Select [Manage network connetctions].$00_WT-4_En.book Page 108 Friday, August 10, 2007 2:02 PM](https://usermanual.wiki/Silex-Technology/SX10WAG.Manual-6/User-Guide-853226-Page-19.png)
![109Creating an ftp Server / Windows VistaOperating the WT-4 for FTP3Right-click the [Wireless Network Connection] icon and select [Properties] from the menu that appears.4A “User Account Control” dialog will be displayed; click [Allow].5Select [Internet Protocol Version 4 (TCP/IPv4)] and click [Properties].$00_WT-4_En.book Page 109 Friday, August 10, 2007 2:02 PM](https://usermanual.wiki/Silex-Technology/SX10WAG.Manual-6/User-Guide-853226-Page-20.png)
![110Creating an ftp Server / Windows VistaOperating the WT-4 for FTP6Enter an IP address and sub-net mask for the ftp server and click [OK].7Go to the [System and Maintenance] > [Administrative Tools] control panel.8Double-click [IIS6 Manager].9A “User Account Control” dialog will be displayed; click [Allow].$00_WT-4_En.book Page 110 Friday, August 10, 2007 2:02 PM](https://usermanual.wiki/Silex-Technology/SX10WAG.Manual-6/User-Guide-853226-Page-21.png)
![111Creating an ftp Server / Windows VistaOperating the WT-4 for FTP10Right-click [Default FTP Site] and select [Properties] from the menu that appears.$00_WT-4_En.book Page 111 Friday, August 10, 2007 2:02 PM](https://usermanual.wiki/Silex-Technology/SX10WAG.Manual-6/User-Guide-853226-Page-22.png)
![112Creating an ftp Server / Windows VistaOperating the WT-4 for FTP11Select the IP address entered in Step 6 and enter a [TCP port] number. The port number is normally 21.$00_WT-4_En.book Page 112 Friday, August 10, 2007 2:02 PM](https://usermanual.wiki/Silex-Technology/SX10WAG.Manual-6/User-Guide-853226-Page-23.png)
![113Creating an ftp Server / Windows VistaOperating the WT-4 for FTP12Open the [Home Directory] tab and select [A directory located on this computer]. The root directory for images uploaded to the ftp server is listed in the [Local path] text box; choose a folder and select [Read], [Write], and [Log visits]. Click [OK] to close the properties dialog.This completes ftp server setup. Proceed to “Copying Network Profiles to the Camera” (pg.119).$00_WT-4_En.book Page 113 Friday, August 10, 2007 2:02 PM](https://usermanual.wiki/Silex-Technology/SX10WAG.Manual-6/User-Guide-853226-Page-24.png)
![114Creating an ftp Server / Windows XPOperating the WT-4 for FTPWindows XP1Open the [Control Panel] > [Network and Internet Settings] > [Network Connections] control panel.2Right-click the [Wireless Network Connection] icon and select [Properties] from the menu that appears.3Select [Internet Protocol (TCP/IP)] and click [Properties].$00_WT-4_En.book Page 114 Friday, August 10, 2007 2:02 PM](https://usermanual.wiki/Silex-Technology/SX10WAG.Manual-6/User-Guide-853226-Page-25.png)