Silex Technology SX10WAG SX-10WAG User Manual
Silex Technology, Inc. SX-10WAG
UserManual.wiki
>
Silex Technology
>
SX10WAG User Manual
>
Manual 4
Contents
1.
Manual
2.
Manual 1
3.
Manual 2
4.
Manual 3
5.
Manual 4
6.
Manual 5
7.
Manual 6
8.
Manual 7
9.
Manual 8
10.
Manual 9
11.
Manual 10
Manual 4
Navigation menu
Upload a User Manual
Namespaces
Wiki Guide
HTML
PDF
Info
Views
User Manual
Discussion / Help
Navigation
![Configuring the Network / Macintosh / Creating an Ad Hoc NetworkIntroduction406After choosing a network name and channel and adjusting encryption and password options as described below, click [OK].•Name: Enter a name of up to 32 characters.•Channel: Choose a channel.•Enable encryption (using WEP): Select this option to enable WEP encryption.•Password: If WEP encryption is enabled, enter a security key. The length of the key depends on the option selected for [WEP key]:❏[40-bit (more compatible)]: Enter a five-character ASCII or ten-digit hexadecimal key.❏[128-bit]: Enter a 13-character ASCII or 26-digit hexadecimal key.ASCII keys may contain letters, punctuation, and the numbers 0–9, hexadecimal keys the numbers 0–9 and the letters a, b, c, d, e, and f.•WEP key: Choose the length of the WEP key.Network setup is now complete. Proceed to “Operating the WT-4 for Computer” (pg.47), “Operating the WT-4 for FTP” (pg.107).$00_WT-4_En.book Page 40 Friday, August 10, 2007 2:02 PM](https://usermanual.wiki/Silex-Technology/SX10WAG.Manual-4/User-Guide-853224-Page-1.png)
![Configuring the Network / Macintosh / Connecting to an Infrastructure Introduction 41❏Connecting to an Infrastructure NetworkProcedures for connecting your computer to a wireless LAN access point are described here.Configuring the Wireless LAN Access PointFollowing the instructions in the manual for the wireless LAN access point, choose a network name (SS-ID), authentication, encryption, security key, and key index.Configuring the Host1Open [System Preferences] and click [Network].$00_WT-4_En.book Page 41 Friday, August 10, 2007 2:02 PM](https://usermanual.wiki/Silex-Technology/SX10WAG.Manual-4/User-Guide-853224-Page-2.png)
![Configuring the Network / Macintosh / Connecting to an Infrastructure Introduction422Choose [Network Port Configurations] from the [Show] menu.3Enable [AirPort], drag it to the top of the list, and click [Apply Now].$00_WT-4_En.book Page 42 Friday, August 10, 2007 2:02 PM](https://usermanual.wiki/Silex-Technology/SX10WAG.Manual-4/User-Guide-853224-Page-3.png)
![Configuring the Network / Macintosh / Connecting to an Infrastructure Introduction 434Choose [AirPort] from the [Show] menu.5Choose [Preferred networks] from the [By default, join] menu and click [+].$00_WT-4_En.book Page 43 Friday, August 10, 2007 2:02 PM](https://usermanual.wiki/Silex-Technology/SX10WAG.Manual-4/User-Guide-853224-Page-4.png)
![Configuring the Network / Macintosh / Connecting to an Infrastructure Introduction446Enter the network name and other settings for the wireless access point and click [OK].•Network Name: Enter a name of up to 32 characters.•Wireless Security: Choose from [None], [WEP Password], [WEP 40/128-bit hex], [WEP 40/128-bit ASCII], [WPA Personal], and [WPA2 Personal]. [LEAP], [WPA Enterprise], [WPA2 Enterprise], and [802.1X WEP] can not be used with the WT-4.•Password: If WEP or WPA encryption is enabled, enter a security key. The length of the key depends on the option selected for [Wireless security]:❏[WEP password]: Enter a five- or ten-character key.❏[WEP 40/128 bit (hex)]: Enter a 10- or 26-digit hexadecimal key. Hexadecimal keys may contain only the numbers 0–9 and the letters a, b, c, d, e, and f.❏[WEP 40/128 bit (ASCII)]: Enter a five- or ten-character key.❏[WPA-Personal], [WPA2-Personal]: Enter a key of 8 to 63 characters.$00_WT-4_En.book Page 44 Friday, August 10, 2007 2:02 PM](https://usermanual.wiki/Silex-Technology/SX10WAG.Manual-4/User-Guide-853224-Page-5.png)
![Configuring the Network / Macintosh / Connecting to an Infrastructure Introduction 457Click [Apply Now].Network setup is now complete. Proceed to “Operating the WT-4 for Computer” (pg.47), “Operating the WT-4 for FTP” (pg.107).$00_WT-4_En.book Page 45 Friday, August 10, 2007 2:02 PM](https://usermanual.wiki/Silex-Technology/SX10WAG.Manual-4/User-Guide-853224-Page-6.png)
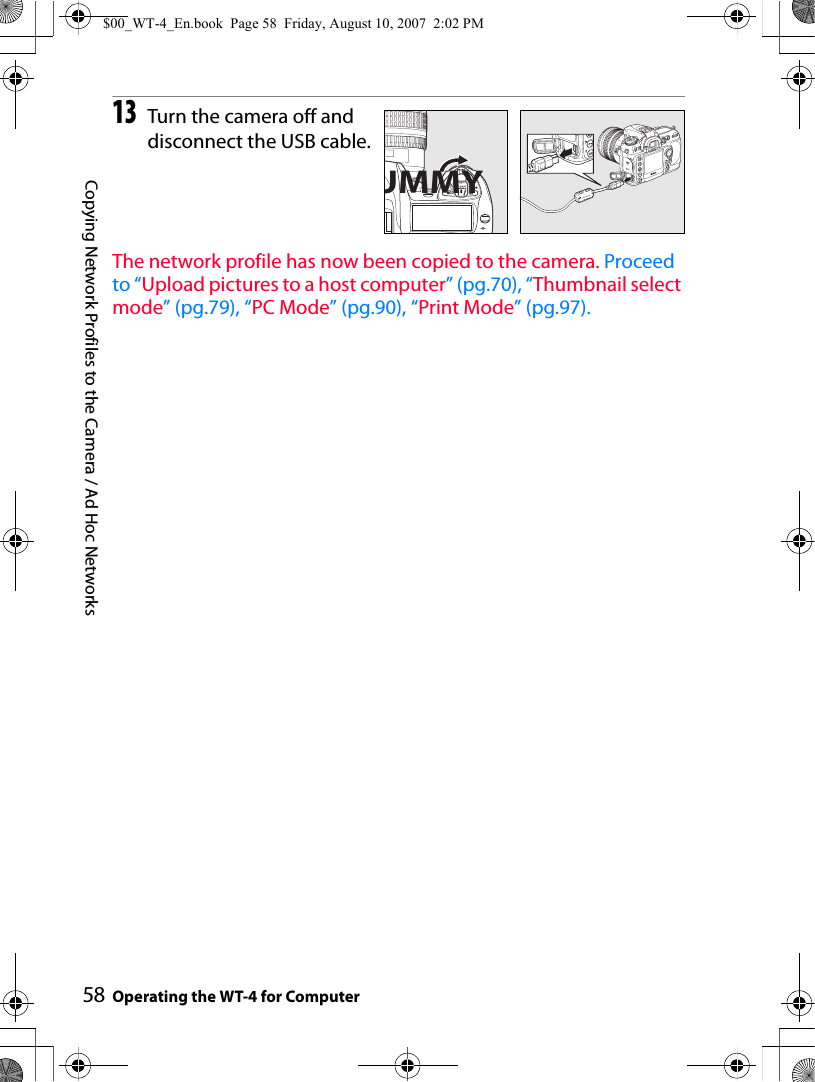
![48Copying Network Profiles to the Camera / Ad Hoc NetworksOperating the WT-4 for ComputerCopying Network Profiles to the CameraAd Hoc Networks1Connect the UC-E4 as shown below.2Turn the camera on.3Turn the computer on and start the WT-4 Setup Utility.•Windows: Double-click the [WT-4 Setup Utility] icon on the desktop•Macintosh: Click the [WT-4WirelessSetup] icon in the Dock.MMYPower switch$00_WT-4_En.book Page 48 Friday, August 10, 2007 2:02 PM](https://usermanual.wiki/Silex-Technology/SX10WAG.Manual-4/User-Guide-853224-Page-9.png)
![49Copying Network Profiles to the Camera / Ad Hoc NetworksOperating the WT-4 for Computer4The dialog shown below will be displayed; click [Next].5Select [Add/Edit profiles] and click [Next].$00_WT-4_En.book Page 49 Friday, August 10, 2007 2:02 PM](https://usermanual.wiki/Silex-Technology/SX10WAG.Manual-4/User-Guide-853224-Page-10.png)
![50Copying Network Profiles to the Camera / Ad Hoc NetworksOperating the WT-4 for ComputerAThe “Select Action” DialogThe other options in the “Select Action” dialog are described below. Note that the camera need not be connected to a computer to choose a printer or change the upload folder.•Change password: The dialog shown at right will be displayed. By default, no password is required to change device profiles using the WT-4 Setup Utility. A password can be added by selecting Change password. If the camera is later connected to a different computer, a password prompt will be displayed. Once the correct password has been entered, the prompt will not be displayed again. To change an existing password, enter the old password before typing the new password. To remove the password, select Reset password (profiles will be lost) and click Next. Please note that resetting the password deletes all existing device profiles from the camera. Click [Back] to exit without changing password settings.•Setup wireless printer: By default, the system default printer for the host computer will be used when printing pictures. To choose a different printer, select Setup wireless printer (pg.97).•Setup picture folder: The dialog shown at right will be displayed. This screen allows you to select the destination folder when downloading images to your computer in transfer mode. Click the […] button to display a folder list from your computer, then select a destination folder. Changing the destination folder does not require you to connect the camera to your computer. The default destination is the [WT-4] folder in [Pictures] (Windows Vista/Mac OS X) or [My Pictures] (Windows XP).•Show it with ViewNX: When the [Show it with ViewNX] option is toggled on, after connection with WT-4 is terminated, ViewNX will launch and downloaded images are displayed. If ViewNX has not been installed, [Display in ViewNX] cannot be selected.$00_WT-4_En.book Page 50 Friday, August 10, 2007 2:02 PM](https://usermanual.wiki/Silex-Technology/SX10WAG.Manual-4/User-Guide-853224-Page-11.png)
![51Copying Network Profiles to the Camera / Ad Hoc NetworksOperating the WT-4 for Computer6Select [Add new profile] and click [Next].7Enter the following information and click [Next]:•Profile name: Enter a name of up to 16 characters.•Profile type: Choose [Computer].•Interface type: Choose [Wireless & Ethernet] for networks that include wireless, or [Ethernet only] for Ethernet-only networks.$00_WT-4_En.book Page 51 Friday, August 10, 2007 2:02 PM](https://usermanual.wiki/Silex-Technology/SX10WAG.Manual-4/User-Guide-853224-Page-12.png)
![52Copying Network Profiles to the Camera / Ad Hoc NetworksOperating the WT-4 for Computer8Select [Manual setup] and click [Next].$00_WT-4_En.book Page 52 Friday, August 10, 2007 2:02 PM](https://usermanual.wiki/Silex-Technology/SX10WAG.Manual-4/User-Guide-853224-Page-13.png)
![53Copying Network Profiles to the Camera / Ad Hoc NetworksOperating the WT-4 for ComputerA“Automatic Setup”Choose [Automatic setup (recommended)] when using a new network for the first time. The following dialog will be displayed; select [Use Ad-hoc network] and click [Next] to proceed to Step 11 (pg.57).[Automatic setup] cannot be selected in the following cases:•When editing a preset network•When using a third party network adapter•When the computer network is set to a static IP address•When the OS is Windows XP SP1 or Mac OSX$00_WT-4_En.book Page 53 Friday, August 10, 2007 2:02 PM](https://usermanual.wiki/Silex-Technology/SX10WAG.Manual-4/User-Guide-853224-Page-14.png)
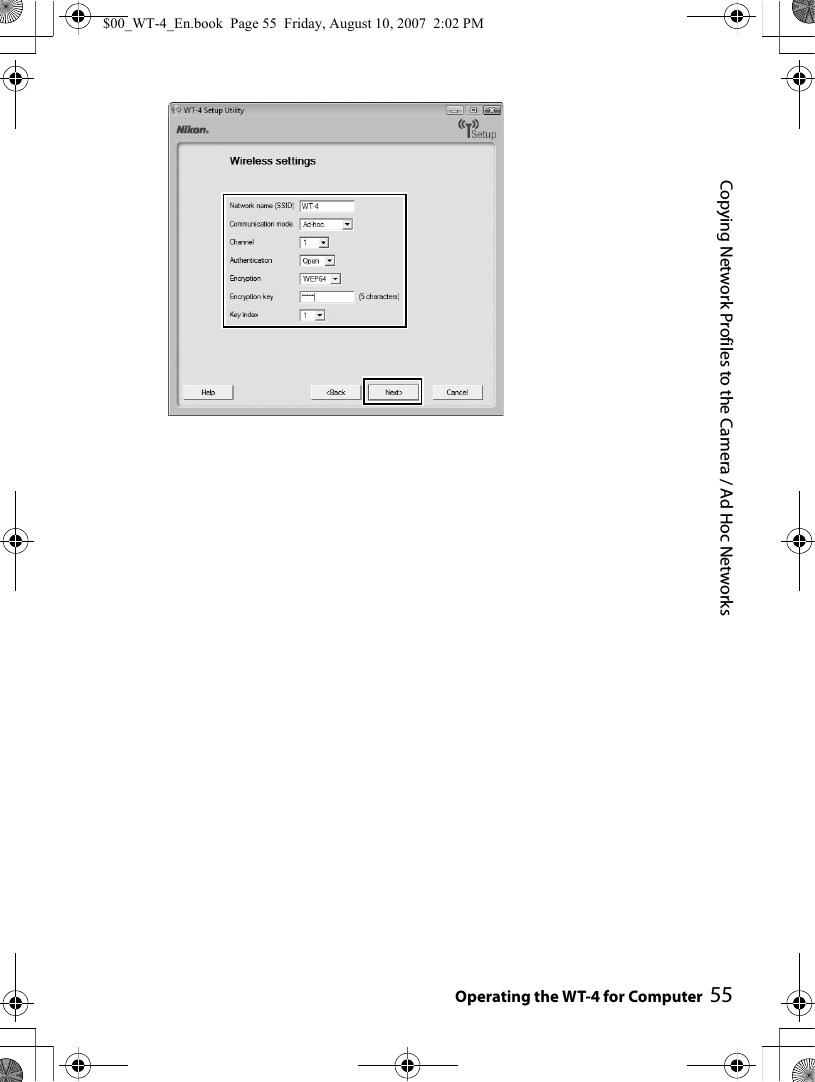
![54Copying Network Profiles to the Camera / Ad Hoc NetworksOperating the WT-4 for Computer9Enter the following information and click [Next].•Network name (SSID): Enter a network name or choose from a list of existing networks. Do not change the name if it is supplied automatically.•Network type: Select [Ad hoc].•Channel: Select a communication channel. However, if the network name (SSID) is consistent, a predetermined channel separate from the channel set here may be applied.•Authentication: Choose the type of authentication used on the network. In ad-hoc mode, the camera supports open system and shared key authentication.•Encryption: The type of encryption used on the network. Choose from [None] (open networks only), 64-bit WEP, and 128-bit WEP.•Encryption key: If the network uses encryption, enter the network key. The number of characters required depends on the type of key used:•Key Index: Set the key index when [WEP64] or [WEP128] is set for [Encryption]. The default index is [1]. Setting the key index is not necessary when [No encryption] was selected for [Encryption]. WEP (64-bit) WEP (128-bit)Number of characters (ASCII) 513Number of characters (hex) 10 26$00_WT-4_En.book Page 54 Friday, August 10, 2007 2:02 PM](https://usermanual.wiki/Silex-Technology/SX10WAG.Manual-4/User-Guide-853224-Page-15.png)
![56Copying Network Profiles to the Camera / Ad Hoc NetworksOperating the WT-4 for Computer10Select [Obtain IP address automatically] and click [Next].•Obtain IP address automatically: Select this option if the network is configured to supply IP addresses automatically. If the network does not include a DHCP server, addresses will be supplied by Auto IP (pg.180).•IP address: If the network is configured for manual IP addressing, enter an IP address for the WT-4.•Subnet mask: If the network is configured for manual IP addressing, enter a subnet mask for the WT-4.•Default gateway: If the network requires a gateway address, select this option and enter the address supplied by the network administrator. This option applies only if [FTP server] is selected for Profile type in Step 7.•DNS server: If a Domain Name Server exists on the network, select this option and enter the address supplied by the network administrator. This option applies only if [FTP server] is selected for Profile type in Step 7.$00_WT-4_En.book Page 56 Friday, August 10, 2007 2:02 PM](https://usermanual.wiki/Silex-Technology/SX10WAG.Manual-4/User-Guide-853224-Page-17.png)
![57Copying Network Profiles to the Camera / Ad Hoc NetworksOperating the WT-4 for Computer11Confirm that settings are correct and click [Next].12Select [Finish wizard] and click [Next].$00_WT-4_En.book Page 57 Friday, August 10, 2007 2:02 PM](https://usermanual.wiki/Silex-Technology/SX10WAG.Manual-4/User-Guide-853224-Page-18.png)
![59Copying Network Profiles to the Camera / Infrastructure NetworksOperating the WT-4 for ComputerInfrastructure Networks1Connect the UC-E4 as shown below.2Turn the camera on.3Turn the computer on and start the WT-4 Setup Utility.•Windows: Double-click the [WT-4 Setup Utility] icon on the desktop•Macintosh: Click the [WT-4WirelessSetup] icon in the Dock.4The dialog shown below will be displayed; click [Next].MMYPower switch$00_WT-4_En.book Page 59 Friday, August 10, 2007 2:02 PM](https://usermanual.wiki/Silex-Technology/SX10WAG.Manual-4/User-Guide-853224-Page-20.png)
![60Copying Network Profiles to the Camera / Infrastructure NetworksOperating the WT-4 for Computer5Select [Add/Edit profiles] and click [Next].$00_WT-4_En.book Page 60 Friday, August 10, 2007 2:02 PM](https://usermanual.wiki/Silex-Technology/SX10WAG.Manual-4/User-Guide-853224-Page-21.png)
![61Copying Network Profiles to the Camera / Infrastructure NetworksOperating the WT-4 for ComputerAThe “Select Action” DialogThe other options in the “Select Action” dialog are described below. Note that the camera need not be connected to a computer to choose a printer or change the upload folder.•Change password: The dialog shown at right will be displayed. By default, no password is required to change device profiles using the WT-4 Setup Utility. A password can be added by selecting Change password. If the camera is later connected to a different computer, a password prompt will be displayed. Once the correct password has been entered, the prompt will not be displayed again. To change an existing password, enter the old password before typing the new password. To remove the password, select Reset password (profiles will be lost) and click Next. Please note that resetting the password deletes all existing device profiles from the camera. Click [Back] to exit without changing password settings.•Setup wireless printer: By default, the system default printer for the host computer will be used when printing pictures. To choose a different printer, select Setup wireless printer (pg.97).•Setup picture folder: The dialog shown at right will be displayed. This screen allows you to select the destination folder when downloading images to your computer in transfer mode. Click the […] button to display a folder list from your computer, then select a destination folder. Changing the destination folder does not require you to connect the camera to your computer. The default destination is the [WT-4] folder in [Pictures] (Windows Vista/Mac OS X) or [My Pictures] (Windows XP).•Show it with ViewNX: When the [Show it with ViewNX] option is toggled on, after connection with WT-4 is terminated, ViewNX will launch and downloaded images are displayed. If ViewNX has not been installed, [Display in ViewNX] cannot be selected.$00_WT-4_En.book Page 61 Friday, August 10, 2007 2:02 PM](https://usermanual.wiki/Silex-Technology/SX10WAG.Manual-4/User-Guide-853224-Page-22.png)
![62Copying Network Profiles to the Camera / Infrastructure NetworksOperating the WT-4 for Computer6Select [Add new profile] and click [Next].7Enter the following information and click [Next]:•Profile name: Enter a name of up to 16 characters.•Profile type: Choose [Computer].•Interface type: Choose [Wireless & Ethernet] for networks that include wireless, or [Ethernet only] for Ethernet-only networks.$00_WT-4_En.book Page 62 Friday, August 10, 2007 2:02 PM](https://usermanual.wiki/Silex-Technology/SX10WAG.Manual-4/User-Guide-853224-Page-23.png)
![63Copying Network Profiles to the Camera / Infrastructure NetworksOperating the WT-4 for Computer8Select [Manual setup] and click [Next].$00_WT-4_En.book Page 63 Friday, August 10, 2007 2:02 PM](https://usermanual.wiki/Silex-Technology/SX10WAG.Manual-4/User-Guide-853224-Page-24.png)
![64Copying Network Profiles to the Camera / Infrastructure NetworksOperating the WT-4 for ComputerA“Automatic Setup”Choose [Automatic setup (recommended)] when using a new network for the first time. The following dialog will be displayed; if multiple infrastructure networks have been setup, select a setting which will be used for network connection and click [Next]. to proceed to Step 11 (pg.68).[Automatic setup] cannot be selected in the following cases:•When editing a preset network•When using a third party network adapter•When the computer network is set to a static IP address•When the OS is Windows XP SP1 or Mac OSX$00_WT-4_En.book Page 64 Friday, August 10, 2007 2:02 PM](https://usermanual.wiki/Silex-Technology/SX10WAG.Manual-4/User-Guide-853224-Page-25.png)