Sierra Wireless SB3000P PCS CDMA Voice/Data Modem for Handspring PDAs User Manual SB3000

Sierra Wireless, Inc PCS CDMA Voice/Data Modem for Handspring PDAs SB3000

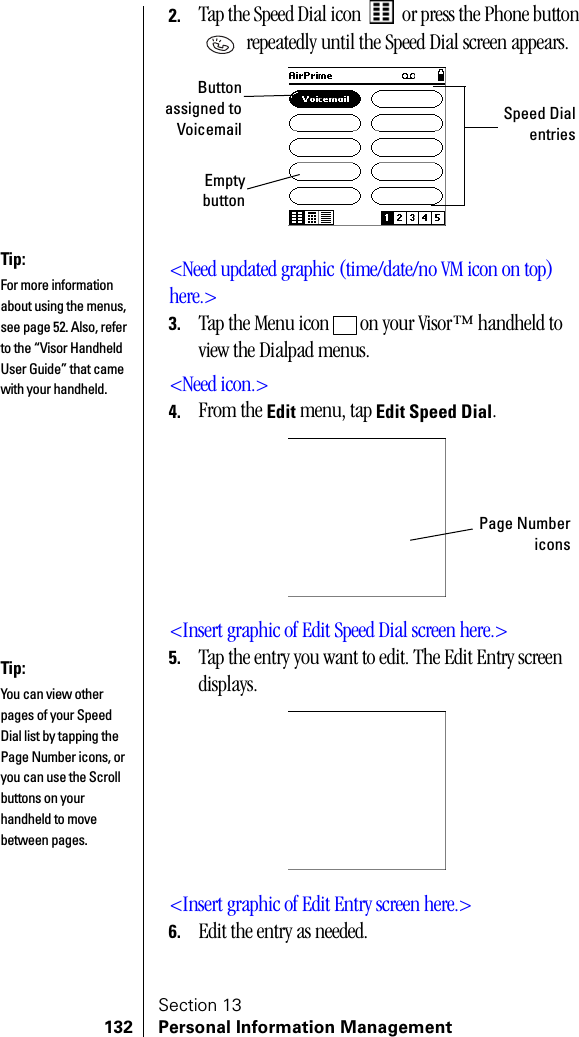
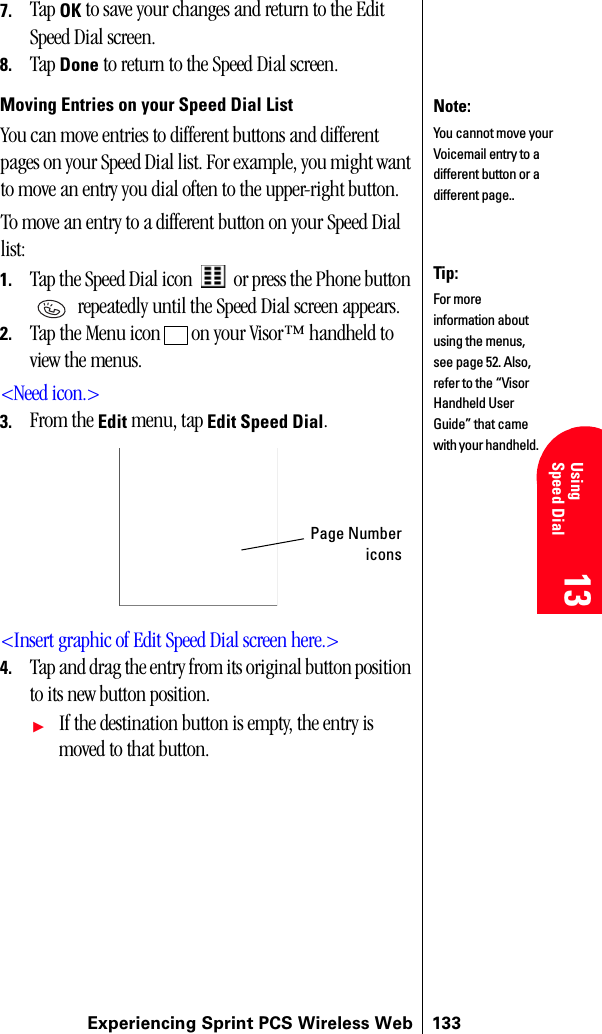
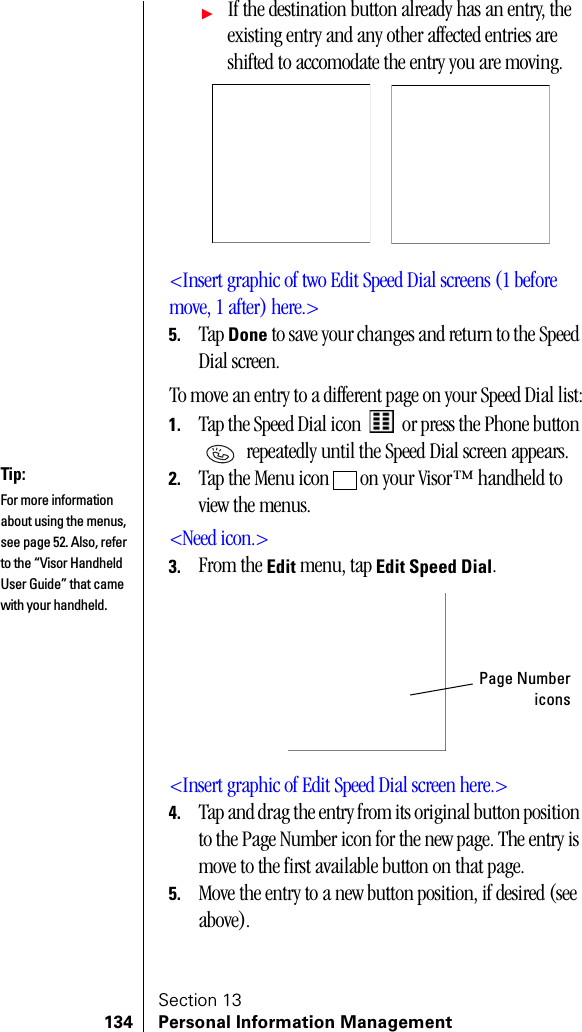
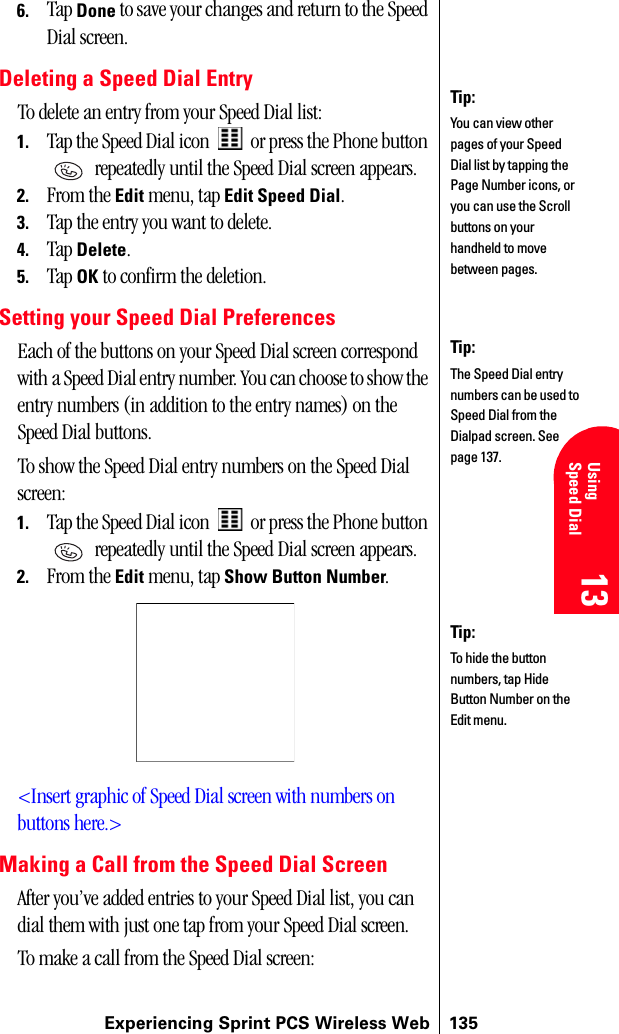
Users Manual Part 5 of 6

Using Your Address Book 9910 10 10 10 Using YourAddress Book 10ᮣBy displaying the Internal Phone Book entry name or phone number, the time and date of the alarm and the following menu options.Call Alarm Menu<This section is not applicable. Confirmed by AirPrime. OK to remove?>When your phone is turned on and you have a call alarm scheduled, your phone alerts you and displays the following options. To select an option, highlight it and press  .ᮣOK to display the Call or Roam Call option. To dial the number, press   again.ᮣᮣEditing an Internal Phone Book Entry<This section is not applicable. Confirmed by AirPrime. OK to remove?>To make changes to an entry:1. Display an Internal Phone Book entry.2. Highlight Edit Entry and press  .To select an option, highlight it and press  .ᮣName to change the entry’s name. Enter the new name and press  . (See “Entering Characters by Tapping the Keypad” on page xx.)ᮣRinger Type to assign an individual ringer type to the entry. (See “Selecting a Ringer Type for an Entry” on page xx.)ᮣSecret Mode to select the entry’s Secret mode. (See Secret Internal Phone Book Entries” on page xx.)ᮣᮣSelecting a Ringer Type for an Entry<This section is covered in Speed Dial section. OK to remove here?>
Section 10100 Using Your Address BookYou can assign a ringer type to an Internal Phone Book entry so you can identify the caller by the ringer type. (See Ringer Types” on page xx.)To select a ringer type for an entry:1. Display an Internal Phone Book entry.2. Highlight Edit Entry and press  .3. Highlight Ringer Type and press  .4. Highlight a ringer type and press  . (You will hear a preview of the ringer type when you highlight it.)Secret Internal Phone Book Entries<This section is not applicable. Confirmed by AirPrime. OK to remove?>You can hide an entry’s phone number(s) and require your lock code to change it by making the entry secret. The entry name is still displayed, but the number is replaced by “(Secret).”To make an entry secret:1. Display an Internal Phone Book entry.2. Highlight Edit Entry and press  .3. Highlight Secret Mode and press  .4. Highlight Yes and press  .To make an entry not secret:1. Display an Internal Phone Book entry.2. Highlight Edit Entry and press  .3. Enter your lock code.4. Highlight Secret Mode and press  .5. Highlight No and press  .Dialing Sprint PCS Services<This section is not applicable. There is no way to access Sprint PCS Services through the Address Book. OK to remove?>You must be in Digital mode to access Sprint PCS Services.
Using Your Address Book 10110 10 10 10 Using YourAddress Book 10To dial a service:1. From the main menu, highlight Phone Book and press .2. Highlight Services and press  .3. Highlight Account Info, Customer Care, Dir Assist, Prepaid or Road Assist and press  .4. Highlight Call and press  .My Sprint PCS Communicator Number<This section is not applicable. It’s not included in Address Book. Will cover this in settings. OK to remove?>To display your phone number:1. From the main menu, highlight Phone Book and press .2. Highlight My Phone # and press  .
102
Changing Your Module’s Settings 103Changing Your Module’s Settings11 11 11 11 1111Changing Your Module’s SettingsIn this SectionᮣSetting Your Phone Module PreferencesᮣSetting Your Ringer PreferencesᮣSetting Your Call PreferencesᮣSetting Your Data Preferences<change this to something more descriptive>ᮣChanging the ContrastᮣDisplaying your Sprint PCS Communicator NumberᮣChanging the GreetingᮣAdjusting the VolumeᮣRinger TypesᮣSelecting Ringer TypesᮣChanging the Backlight Settinghis section describes how you can change your module’s settings to best suit your requirements. Take a few moments to review these options and add or adjust the settings that are right for you.T
Changing Your Module’s Settings 105Changing Your Module’s Settings 11 11 Understanding Roaming 11 11 11Changing the Greeting<This section is not applicable. Confirmed by AirPrime. OK to discard?>The greeting can be up to xx characters and is displayed on the first line of your phone’s display screen in Standby mode.To change your greeting:1.2.3.Setting Your Phone Module PreferencesYou can customize how your module looks and behaves using the Phone Preferences menu item. This menu item lets you choose which screen you want to see when you launch the Phone application and which screens are available when you repeatedly press the Phone Application button. You can also specify the type of DTMF tones your module sends and load the current CDMA time onto your module.To set your phone preferences:1. Make sure your module is on.2. Press the Phone Application button   or tap the Phone icon in the Applications Launcher to start the Phone application.3. Tap the Menu icon   on your Visor™ handheld to view the menus.<Need icon.>Tip:For more information about using the menus, see page 52. Also, refer to the “Visor Handheld User Guide” that came with your handheld.
Section 11106 Changing Your Module’s Settings4. From the Options menu, tap Phone Preferences.<Insert graphic of Phone Prefs screen.>5. Use the following options to change how your module looks. To select or change an option, tap it.ᮣStarting View is the screen you see when you start the Phone application. Tap   to choose the Speed Dial screen, tap   to choose the Dialpad screen, or tap   to choose the Call History screen. The current starting view is highlighted.ᮣButton View controls which screens are available to cycle through when you press the Phone Application button   repeatedly. Highlighted views are available. Tap a view to select or de-select it.ᮣShort DTMF tone sets the length of DTMF tones your module sends. Short tones work well with most automated systems.ᮣLoad CDMA time to load the highly accurate CDMA time onto your module. When prompted, tap OK to confirm.6. Tap OK to save your changes, or tap Cancel to return to the Phone application without saving your changes.Setting Your Ringer PreferencesThe Ringer Preferences menu item lets you control how your module alerts you to new voice calls, messages, and service alerts. You can also use this menu item to turn off all of the sounds on your module.Tip:Tap the Information icon <> on the Phone Preferences screen to get additional info.<Need info icon.>Tip:If you set one ring profile to have a loud ring and the other profile to vibrate only, you can use the Ring Profile Selector to quickly change to a vibrating ringer. That way, you can be alerted to calls and messages without disturbing others. You can also immediately silence the ringer by briefly pressing the Power button.
Changing Your Module’s Settings 107Changing Your Module’s Settings 11 11 Understanding Roaming 11 11 11Your Sprint PCS Communicator uses ring profiles to help you organize your sounds. A ring profile is a group of settings that work together to determine what you hear when you get an incoming call, message, or alert.Your module allows you to set up two distinct ring profiles. For each ring profile, you can set the type of sound you want, the volume of the ringer, and whether you want the module to vibrate. You can also choose whether you want the module to ring when you have a new voicemail message or to there is a network change.To set your ringer preferences:1. Make sure your module is on.2. Press the Phone Application button   or tap the Phone icon in the Applications Launcher to start the Phone application.3. Tap the Menu icon   on your Visor™ handheld to view the menus.<Need icon.>4. From the Options menu, tap Ringer Preferences.<Insert graphic of Ringer Prefs screen.>5. The Ringer Preferences screen gives you the following options. To change or select an option, tap it.ᮣAll Sound Off turns off all of the sounds on your module. This setting overrides all other ringer settings.ᮣRing is the sound you hear when you receive an incoming call. You can choose between 9 different Tip:For more information about using the menus, see page 52. Also, refer to the “Visor Handheld User Guide” that came with your handheld. Tip:Tap the Information icon <> on the Phone Preferences screen to get additional info.<Need info icon.>Tip:There are certain instances where you might not hear the ring you selected. See “Using Special Ringers” on page 108 for more information.
Section 11108 Changing Your Module’s Settingsrings, including standard ringer types and familiar music. To select the ring, tap the arrow next to Ring, then tap the ring you want from the pull-down menu.ᮣVolume is the volume of the ring. You can choose from three preset volume levels: Loud, Soft, or Off.ᮣVibrate turns the vibrating mechanism on and off.ᮣMsg Alert controls whether the module rings when you have a new voicemail message.ᮣSvc Alert controls whether the module rings when there is a network change.6. Tap OK to save your changes, or tap Cancel to return to the Phone application without saving your changes.Switching Between the Ring ProfilesOnce you’ve set up your two ring profiles, you can quickly switch between them using the Ring Profile Selector  on the top of the SB3000. The Ring Profile Selector has two settings that correspond to the two ring profiles. To switch the ring profile:▲Slide the Ring Profile Selector  to the other setting.Using Special RingersSome special ringers may override the ring you selected in the Ringer Preferences menu.ᮣIf you receive a call from someone on your Speed Dial list for whom you’ve set up a special ring (see page 127), you will hear the special Speed Dial ringer instead of the ring you selected in the Ringer Preferences menu.ᮣIf Roam ringer is enabled (see page 32) and you receive a call while roaming, you will hear the special Roam ringer instead of the ring you selected in the Ringer Preferences menu.Tip:The module plays the ring as you make changes to it. To disable this feature, tap the checkbox next to Play ring when changed to deselect it.Tip:By using different combinations of settings, you can set your module to ring and vibrate, ring only, or vibrate only.
Changing Your Module’s Settings 109Changing Your Module’s Settings 11 11 Understanding Roaming 11 11 11ᮣIf you selected All Sound Off in the Ringer Preferences menu, you will not hear any ring.Setting Your Call PreferencesThe Call Preferences menu item lets you select how your calls are handled. You can use this menu item to set up Call Forwarding, disable Call Waiting, and block your outgoing Caller ID.Setting Up Call ForwardingCall Forwarding lets you forward all your incoming calls to another phone number – even when your module is turned off.To set up Call Forwarding:1. Make sure your module is on.2. Press the Phone Application button   or tap the Phone icon in the Applications Launcher to start the Phone application.3. Tap the Menu icon   on your Visor™ handheld to view the menus.<Need icon.>4. From the Options menu, tap Call Preferences.5. Tap the arrow next to forward all calls to and select a number to forward your calls to, or select one of these options from the pop-up Call Forwading list:ᮣDo not forward to disable Call Forwarding.ᮣEdit numbers to add new a new forwarding number or edit an existing number (see "Managing your Call Forwarding List" on page 68).6. Tap OK.Disabling Call Waiting Call Waiting alerts you to an incoming call while you are on the phone. If you disable Call Waiting, any calls that come in while you are on the phone go directly to voicemail.Tip:For more information about Call Forwarding, see page 67.Note:You are charged a higher rate for calls you have forwarded.Tip:For more information about using the menus, see page 52. Also, refer to the “Visor Handheld User Guide” that came with your handheld. Tip:For more information about Call Waiting, see page 64.
Section 11110 Changing Your Module’s SettingsTo disable Call Waiting:1. Make sure your module is on.2. Press the Phone Application button   or tap the Phone icon in the Applications Launcher to start the Phone application.3. Tap the Menu icon   on your Visor™ handheld to view the menus.<Need icon.>4. From the Options menu, tap Call Preferences.5. Tap the checkbox next to Disable call waiting to select it.6. Tap OK.Blocking Outgoing Caller IDWhen you make a call from your Sprint PCS Communicator, your phone number is displayed to the person you call (if that person has Caller ID). If you do not want your number to display on outgoing calls, you can block outgoing Caller ID.To block outgoing Caller ID:1. Make sure your module is on.2. Press the Phone Application button   or tap the Phone icon in the Applications Launcher to start the Phone application.3. Tap the Menu icon   on your Visor™ handheld to view the menus.<Need icon.>4. From the Options menu, tap Call Preferences.5. Tap the checkbox next to Block outgoing caller id to select it.6. Tap OK.Setting Your Security PreferencesYou can use the Security Preferences menu item to lock your phone and program special numbers that can be Note:Call Waiting is never enabled when you are on a data call.Note:You cannot disable Call Waiting and block the ougoing Caller ID at the same time.Tip:For more information about Caller ID, see page 64.Tip:For more information about using the menus, see page 52. Also, refer to the “Visor Handheld User Guide” that came with your handheld.
Changing Your Module’s Settings 111Changing Your Module’s Settings 11 11 Understanding Roaming 11 11 11dialed even when your phone is locked. You can also use this menu to change the password for your module.To set your security preferences:1. Make sure your module is on.2. Press the Phone Application button   or tap the Phone icon in the Applications Launcher to start the Phone application.3. Tap the Menu icon   on your Visor™ handheld to view the menus.<Need icon.>4. From the Options menu, tap Security Preferences.<Insert graphic of Security Prefs screen.>5. Tap the checkbox next to Lock Phone on power off to lock your module the next time you turn it off. To turn your phone back on, you will need to enter a password. For more information, see page 121.6. Enter up to three phone numbers that you want to be able to dial even if your phone is locked. For more information about using special numbers, see page 124.7. To change your password, tap Change Password. For more information, see page 123.8. Tap OK.Tip:Tap the Information icon <> on the Security Preferences screen to get additional info.<Need info icon.>
Section 11112 Changing Your Module’s SettingsSetting Your Roam PreferencesThe Roam Preferences menu item lets you choose options to help you control your roaming. For more information on roaming, see page 29.To choose your roaming preferences:1. Make sure your module is on.2. Press the Phone Application button   or tap the Phone icon in the Applications Launcher to start the Phone application.3. Tap the Menu icon   on your Visor™ handheld to view the menus.<Need icon.>4. From the Options menu, tap Roam Preferences.<Insert graphic of Roam Prefs screen.>5. The Roam Preferences screen gives you the following options. To change or select an option, tap it.ᮣAllow digital roaming: This option determines whether you can roam off the Sprint PCS Nationwide Network.ᮣCall Guard: This feature causes a warning dialog to appear when you try to place a call while you are roaming off the Sprint PCS Network. See page 32 for more information.ᮣRoam Ringer: This feature allows you to pick a special ringer to alert you to incoming calls while you are roaming. See page 32 for more information.Tip:For more information about using the menus, see page 52. Also, refer to the “Visor Handheld User Guide” that came with your handheld. Tip:Tap the Information icon <> on the Roam Preferences screen to get additional info.<Need info icon.>Note:Call Guard and Roam Ringer are only applicable if Allow digital roaming is enabled.
Changing Your Module’s Settings 113Changing Your Module’s Settings 11 11 Understanding Roaming 11 11 116. Tap OK.Setting Your Data PreferencesThe Data Preferences menu item lets you select the data applications you can launch using the Data Applications button .To set your data preferences:1. Make sure your module is on.2. Press the Phone Application button   or tap the Phone icon in the Applications Launcher to start the Phone application.3. From the Options menu, tap Data Preferences.<Insert graphic of Data Prefs screen.>4. Select the data applications you want to be able to access using the Data Applications button  . The first application you select becomes your default data application.5. Tap the arrow next to Idle timeout to select how long to maintain the network connection after a data application closes. This setting works with the network settings on your Visor handheld. For more information, refer to the “Visor Handheld User Guide” that came with your handheld.6. Tap OK.Tip:You can access the module’s menus by tapping the menu icon on your Visor handheld. For more information, see the “Visor Handheld User Guide” that came with your handheld. Tip:Tap the Information icon <> on the Roam Preferences screen to get additional info.<Need info icon.>Tip:Once you have selected your data applications, you can cycle through them by repeatedly pressing the Data Applications button.
Section 11114 Changing Your Module’s SettingsSetting Your Font PreferencesYou can use the Font Preferences menu item to change the font used to display your Call History. This menu is only available when you are viewing the Call History screen.For more information about setting your Call History preferences, see page 92.Using the About Phone Menu ItemThe About Phone menu item gives you information about your module, including your Sprint PCS phone number, the model number of your module, and the Electronic Serial Number (ESN). This menu also gives you information about the software versions you are using.To view the About Phone menu:1. Make sure your module is on.2. Press the Phone Application button   or tap the Phone icon in the Applications Launcher to start the Phone application.3. From the Options menu, tap About Phone.<Insert graphic of About Phone screen.>4. Tap OK to return to the Phone application.Using the Activation ScreenThe Activation screen is only available before your module is activated. It is used to activate your module if it cannot be activated over the air. Once your module is activated, this screen is no longer available.Tip:You can access the module’s menus by tapping the menu icon on your Visor handheld. For more information, see the “Visor Handheld User Guide” that came with your handheld.
Changing Your Module’s Settings 115Changing Your Module’s Settings 11 11 Understanding Roaming 11 11 11During the activation process, you may be instructed by Sprint PCS Customer Care to go to this screen.To go to the Activation sreen:1. Make sure your module is on.2. Press the Phone Application button   or tap the Phone icon in the Applications Launcher to start the Phone application.3. From the Options menu, tap Activation.<Insert graphic of Activation screen.>4. Enter the lock code and any other information given to you by Sprint PCS Customer Care.5. Tap OK to complete the activation process.Adjusting the Ringer Volume<Covered above. OK’d by AirPrime. OK to discard?>To adjust the ringer volume:1.2.3.4.5.Ringer Types<Not applicable. Confirmed by AirPrime. OK to discard?>Ringer types help you identify incoming calls and messages. You can assign ringer types to individual Internal Phone Book entries, types of calls and types of messages.Tip:You can access the module’s menus by tapping the menu icon on your Visor handheld. For more information, see the “Visor Handheld User Guide” that came with your handheld. Tip:You can use the volume control keys on the side of the phone to adjust the ringer volume in Standby mode or the voice or speakerphone volume during a call.
Section 11116 Changing Your Module’s SettingsᮣPreprogrammed Ringers include a variety of standard ringer types and familiar music.ᮣVibrating Ringer alerts you to calls or messages without disturbing others.ᮣDownloadable Ringers can be downloaded from Internet sites.Selecting Ringer Types for Voice Calls<Not applicable. Confirmed by AirPrime. OK to discard?>To select a ringer type for voice calls so you can tell what kind of call is coming in by the ringer:1.2.3.Selecting Ringer Types for Messages<Not applicable. Confirmed by AirPrime. OK to discard?>To select a ringer type for messages:1.2.3.Selecting Ringer Types for Alarms<Not applicable. Confirmed by AirPrime. OK to discard?>To select a ringer type for alarms:1.2.Changing the Backlight Time Length<Not applicable. Confirmed by AirPrime. OK to discard?>The backlight setting lets you select how long the display screen and keypad are backlit after any key press is made.To change the backlight setting:1.2.3.Note:Long backlight settings affect the battery’s talk and standby times.
Changing Your Module’s Settings 117Changing Your Module’s Settings 11 11 Understanding Roaming 11 11 11Changing the ContrastTo adjust the contrast on the module’s display screen:1. Tap the Contrast control on your Visor handheld.2. Use the Adjust Contrast screen to change the contrast.3. Tap Done.Data Mode<Not applicable. Confirmed by AirPrime. OK to remove?>The Sprint PCS Wireless Web™ Connection Kit (purchased separately) lets you link your laptop PC to your Sprint PCS Communicator so you can send and receive data. Receiving Data<Not applicable. Confirmed by AirPrime. OK to remove?>To receive data with your module:1.2.3.Returning to Voice Mode<Covered in Data Apps chapter OK to discard here?>To return to Standby mode at the end of a data transmission, highlight Exit Data Mode and press  .To return to Standby mode from Data mode:1.2.3.4.Tip:For more information on the Contrast control, see "Handheld Controls" on page 16, or refer to the “Visor Handheld User Guide” that came with your handheld. Note:The module must be on adigital network to send or receive data.Note: When your module is in Data mode, you cannot make or receive voice calls.Note: The module always powers up in Standby mode, even if it was powered down in Data mode. The module also returns to Standby mode if the data cable is disconnected.
118
Setting Your Module’s Security 119Understanding Roaming 12 Your Module’s Secruity 12 Understanding Roaming 12 Getting Started 12 Getting Started 1212Setting Your Module’s SecurityIn this SectionᮣAccessing the Security Preferences MenuᮣLocking Your ModuleᮣUnlocking Your ModuleᮣRestricting CallsᮣUsing Special Numbersy using the security setting on your Sprint PCS Communicator™, you receive peace of mind without sacrificing flexibility. With several options available, you can customize your module to meet your personal needs.B
Section 12120 Setting Your Module’s SecurityAccessing the Security Preferences MenuYou can use the Security Preferences menu to lock your phone and program special numbers that can be dialed even when your phone is locked. You can also use this menu to change the password for your module.To access the Security Preferences menu:1. Make sure your module is on.2. Press the Phone Application button   or tap the Phone icon in the Applications Launcher to start the Phone application.3. Tap the Menu icon   on your Visor™ handheld to view the menus.<Need icon.>4. From the Options menu, tap Security Preferences.<Insert graphic of Security Prefs screen.>5. Tap the checkbox next to Lock Phone on power off to lock your module the next time you turn it off. To turn your phone back on, you will need to enter a password. For more information, see page 121.6. Enter up to three phone numbers that you want to be able to dial even if your phone is locked. For more information about using special numbers, see page 124.7. To change your password, tap Change Password. For more information, see page 123.8. Tap OK.Tip:For more information about using the menus, see page 52. Also, refer to the “Visor Handheld User Guide” that came with your handheld. Tip:Tap the Information icon <> on the Security Preferences screen to get additional info.<Need info icon.>
Setting Your Module’s Security 121Getting Started 12 Your Module’s Secruity 12 Understanding Roaming 12 Getting Started 12 Getting Started 12Locking Your ModuleWhen your module is locked, you can receive incoming calls, missed call alerts, and SMS Text Messages. You can also make calls to 911, Sprint PCS Customer Care or special numbers. You cannot make other outgoing calls without unlocking your phone.To lock your module:1. On the Security Preferences menu, tap the checkbox next to Lock Phone on power off to select it. The Password screen appears.<Insert graphic of Password screen.>2. Enter your password and tap OK. 3. Tap OK. Your module will lock when you turn it off. The next time you turn on your module, you will need to enter your password to place a call.Placing a call while your module is lockedWhen your module is locked, you will see the Unlock Phone dialog.<Insert graphic of Unlock Phone screen.>Tip:If you can’t recall your lock password, try using the last four digits of either your Social Security number or Sprint PCS Communicator Number or try 0000. If none of these work, call Sprint PCS Customer Care at 1-888-211-4PCS (4727).
Section 12122 Setting Your Module’s SecurityᮣTo place a regular call, enter your password and tap Unlock.ᮣTo place an emergency call, tap Make Emergency Call and dial 911.ᮣTo place a call to one of your special numbers, tap Make Special Call and dial the number. For more information about special numbers, see page 124.Unlocking Your ModuleOnce you have locked your phone, it remains locked until you use the Security Preferences menu to unlock it.To unlock your module:1. On the Security Preferences menu, tap the checkbox next to Lock Phone on power off to deselect it. The Password screen appears.<Insert graphic of Password screen.>2. Enter your password and tap OK. 3. Tap OK. Your module will unlock when you turn it off. The next time you turn on your module, you will not need to enter your password to place a call.Tip:If you can’t recall your lock password, try using the last four digits of either your Social Security number or Sprint PCS Communicator Number or try 0000. If none of these work, call Sprint PCS Customer Care at 1-888-211-4PCS (4727).
Setting Your Module’s Security 123Getting Started 12 Your Module’s Secruity 12 Understanding Roaming 12 Getting Started 12 Getting Started 12Changing the Lock PasswordTo change your lock password:1. On the Security Preferences menu, tap Change Password. The Change Password screen appears.<Insert graphic of Change Password screen.>2. Enter your old password3. Enter a new password.4. Re-enter the new password.5. Tap OK. Restricting Calls<Not applicable. Confirmed by AirPrime. OK to remove?>You can restrict which phone numbers you can receive calls from or dial. (The Restrict Calls setting does not apply to 911 or Sprint PCS Customer Care.)To restrict calls:1.2.3.Unrestricting CallsTo unrestrict all calls:1.2.3.Tip:If you can’t recall your lock password, try using the last four digits of either your Social Security number or Sprint PCS Communicator Number or try 0000. If none of these work, call Sprint PCS Customer Care at 1-888-211-4PCS (4727).Note:Restricted incoming calls are forwarded to voicemail.
Section 12124 Setting Your Module’s SecurityUsing Special NumbersUse the Security Menu to save three special numbers. You can make calls to these special numbers even when your module is locked. To add or replace a special number:▲On the Security Preferences menu, enter up to three special numbers. You can enter any combination of numbers and letters.To place a call to a special number while your module is locked:▲On the Unlock Phone dialog, tap Make Special Call and dial the number.Erasing the Internal Phone Book<Not applicable. Confirmed by AirPrime. OK to discard?>To erase all the names and phone numbers in your Internal Phone Book:1.2.3.Resetting Your HandheldAlthough your module has been designed to work seamlessly with your Visor handheld, occasionally you may experience a problem that requires you to reset your handheld. For more information, see the “Visor Handheld User Guide” that came with your handheld.
Experiencing Sprint PCS Wireless Web 125Understanding Roaming 13 13 UsingSpeed Dial 13 13 1313Using Speed DialIn this SectionᮣAdding a Phone Number to your Speed Dial ListᮣEditing your Speed Dial ListᮣDeleting a Speed Dial EntryᮣSetting your Speed Dial PreferencesᮣMaking a Call From the Speed Dial ScreenᮣSpeed Dialing from the Dialpad ScreenPersonal Information Management<This entire section is not applicable. Cconfirmed with Air Prime. OK to discard all PIM info and change this section to Speed Dial info? Change side tabs as well.>In this SectionᮣAdding an Event to the SchedulerᮣEvent AlertsᮣAdding a Call Alarm to the SchedulerᮣAdding To Do Items
Experiencing Sprint PCS Wireless Web 126Understanding Roaming 13 13 UsingSpeed Dial 13 13 13ᮣViewing the Scheduler CalendarᮣUsing the CalculatorᮣPlaying Gamesour Sprint PCS Communicator™ has been equipped with several personal information management features to help you manage your busy lifestyle. These features turn your phone into a time management planner that helps you keep up with your contacts, schedules and commitments. It takes productivity to a whole new level.peed Dial lets you place a call without entering a phone number. You can store up to 50 numbers in your Speed Dial list. Once a phone number is in your Speed Dial list, you can call the number with just one tap. You can also assign special ringers to entries in your Speed Dial list, so you always know who’s calling you.YS
Experiencing Sprint PCS Wireless Web 12713 13 UsingSpeed Dial 13 13 13Adding an Entry to your Speed Dial ListBefore you can use your Speed Dial screen to call a phone number, you need to add the number to your Speed Dial list.To add an entry to your Speed Dial list:1. Press the Phone Application button   or tap the Phone icon in the Applications Launcher to start the Phone application.2. Tap the Speed Dial icon   or press the Phone button  repeatedly until the Speed Dial screen appears.<Need updated graphic (time/date/no VM icon on top) here.>3. Tap any empty button. The Edit Entry screen displays.<Insert graphic of Edit Entry screen here.>4. Enter the name you want to display in the button on your Speed Dial list. You can enter up to 16 characters, however, the name may be shortened to fit on the Speed Dial button.Speed DialentriesPage NumbericonsButtonassigned toVoicemailEmptybuttonTip:For more information on entering text and other characters, see the “Visor Handheld User Guide” that came with your handheld.Tip:Tap the Information icon <> on the Edit Entry screen to get additional info.<Need info icon.>Tip:You can also add a number to your Speed Dial list directly from your Address Book. See page 128.
Section 13128 Personal Information Management5. Enter the phone number. Make sure you enter all of the digits required to dial the number. For example, if you need to dial “1” + area code + phone number, be sure to enter all 11 digits. You can also enter letters as well as numbers.6. Enter any extra digits, such as an extension or a passcode (see "Adding Phone Numbers with Pauses and Extra Digits" on page 130).7. Select a special ring from the pop-up menu. This is the ring you will hear when you receive a call from this phone number. If you want to hear your regular ringer, tap None.8. Tap OK. The entry is assigned to the button you selected,<Need updated graphic showing 2nd button assigned to a number (also - time/date/no VM icon on top) here.>Adding Phone Numbers from your Address BookYou can use the Lookup feature to add entries from your Address Book to your Speed Dial list.To add a phone number from your Address Book:1. On the Speed Dial screen, tap any empty button. The Tip:You can also enter numbers with pauses and extra digits. This is useful for speed dialing automated systems that require passcodes, or for entering credit card information after you’ve dialed a phone number. See "Adding Phone Numbers with Pauses and Extra Digits" on page 130.Buttonassigned toVoicemailNewlyassignedbuttonTip:After you’ve added an entry, you can always move it to a different button. See"Moving Entries on your Speed Dial List" on page 133.
Experiencing Sprint PCS Wireless Web 12913 13 UsingSpeed Dial 13 13 13Edit Entry screen displays.<Insert graphic of Edit Entry screen here.>2. Tap Lookup. The Phone Number Lookup screen displays.<Insert graphic of Phone Number Lookup screen here.>3. Tap the Address Book entry you want to add to your Speed Dial list. The name and phone number are entered automatically on the Edit Entry screen.<Insert graphic of Edit Entry screen here with .>4. Edit the information (if necessary) and add any pauses or extra digits (see below).Tip:Use the Scroll buttons on your handheld to move through the Phone Number Lookup list. You can also enter the first character of the entry. For more information, see the “Visor Handheld User Guide” that came with your handheld.
Section 13130 Personal Information Management5. Select a special ring from the pop-up menu. This is the ring you will hear when you receive a call from this phone number. If you want to hear your regular ringer, tap None.6. Tap OK.Adding Phone Numbers with Pauses and Extra DigitsSome numbers you dial may require pauses or extra digits. For example, if you call an automated system that requires a passcode, you may need to dial the phone number, pause for a moment, then dial the passcode. With your new Sprint PCS Communicator, you can enter these special numbers into your Speed Dial list so that you can dial them with just one tap.There are two types of pauses:ᮣA hard pause causes dialing to stop. The module then waits for you to release the pause before it continues dialing the next digits.ᮣA timed pause causes dialing to stop for 1 second before it dials the next digits.To add a phone number with a pause and extra digits:1. On the Speed Dial screen, tap any empty button. The Edit Entry screen displays.<Insert graphic of Edit Entry screen here.>2. Enter the name.3. On the first line of the Number field, enter the phone number.4. On the second line, enter any pauses and extra digits. Tip:To Speed Dial a number with a hard pause, use the Release Pause button. See page 136 for more information.Tip:The second line of the Number field automatically begins with a hard pause. You can delete this hard pause, if desired.
Experiencing Sprint PCS Wireless Web 13113 13 UsingSpeed Dial 13 13 13ᮣTo add a hard pause, enter >.ᮣTo add a timed pause, enter ,.<Insert graphic of Edit Entry screen with pause/extra digits entered here.>5. Select a special ring from the pop-up menu. This is the ring you will hear when you receive a call from this phone number. If you want to hear your regular ringer, tap None.6. Tap OK.Editing your Speed Dial ListMaking changes to your Speed Dial list is quick and easy. You can even make changes while your module is turned off. You can edit individual entries, or you can move entries to different buttons or different pages on your Speed Dial list.Editing Individual EntriesTo edit an entry on your Speed Dial list:1. Press the Phone Application button   or tap the Phone icon in the Applications Launcher to start the Phone application.Note:You cannot change your Voicemail phone number, but you can add pauses and extra digits.
Section 13132 Personal Information Management2. Tap the Speed Dial icon   or press the Phone button  repeatedly until the Speed Dial screen appears.<Need updated graphic (time/date/no VM icon on top) here.>3. Tap the Menu icon   on your Visor™ handheld to view the Dialpad menus.<Need icon.>4. From the Edit menu, tap Edit Speed Dial.<Insert graphic of Edit Speed Dial screen here.>5. Tap the entry you want to edit. The Edit Entry screen displays.<Insert graphic of Edit Entry screen here.>6. Edit the entry as needed.Speed DialentriesButtonassigned toVoicemailEmptybuttonTip:For more information about using the menus, see page 52. Also, refer to the “Visor Handheld User Guide” that came with your handheld. Page NumbericonsTip:You can view other pages of your Speed Dial list by tapping the Page Number icons, or you can use the Scroll buttons on your handheld to move between pages.
Experiencing Sprint PCS Wireless Web 13313 13 UsingSpeed Dial 13 13 137. Tap OK to save your changes and return to the Edit Speed Dial screen.8. Tap Done to return to the Speed Dial screen.Moving Entries on your Speed Dial ListYou can move entries to different buttons and different pages on your Speed Dial list. For example, you might want to move an entry you dial often to the upper-right button.To move an entry to a different button on your Speed Dial list:1. Tap the Speed Dial icon   or press the Phone button  repeatedly until the Speed Dial screen appears.2. Tap the Menu icon   on your Visor™ handheld to view the menus.<Need icon.>3. From the Edit menu, tap Edit Speed Dial.<Insert graphic of Edit Speed Dial screen here.>4. Tap and drag the entry from its original button position to its new button position.ᮣIf the destination button is empty, the entry is moved to that button.Note:You cannot move your Voicemail entry to a different button or a different page..Tip:For more information about using the menus, see page 52. Also, refer to the “Visor Handheld User Guide” that came with your handheld. Page Numbericons
Section 13134 Personal Information ManagementᮣIf the destination button already has an entry, the existing entry and any other affected entries are shifted to accomodate the entry you are moving.<Insert graphic of two Edit Speed Dial screens (1 before move, 1 after) here.>5. Tap Done to save your changes and return to the Speed Dial screen.To move an entry to a different page on your Speed Dial list:1. Tap the Speed Dial icon   or press the Phone button  repeatedly until the Speed Dial screen appears.2. Tap the Menu icon   on your Visor™ handheld to view the menus.<Need icon.>3. From the Edit menu, tap Edit Speed Dial.<Insert graphic of Edit Speed Dial screen here.>4. Tap and drag the entry from its original button position to the Page Number icon for the new page. The entry is move to the first available button on that page.5. Move the entry to a new button position, if desired (see above).Tip:For more information about using the menus, see page 52. Also, refer to the “Visor Handheld User Guide” that came with your handheld. Page Numbericons
Experiencing Sprint PCS Wireless Web 13513 13 UsingSpeed Dial 13 13 136. Tap Done to save your changes and return to the Speed Dial screen.Deleting a Speed Dial EntryTo delete an entry from your Speed Dial list:1. Tap the Speed Dial icon   or press the Phone button  repeatedly until the Speed Dial screen appears.2. From the Edit menu, tap Edit Speed Dial.3. Tap the entry you want to delete.4. Tap Delete.5. Tap OK to confirm the deletion.Setting your Speed Dial PreferencesEach of the buttons on your Speed Dial screen correspond with a Speed Dial entry number. You can choose to show the entry numbers (in addition to the entry names) on the Speed Dial buttons.To show the Speed Dial entry numbers on the Speed Dial screen:1. Tap the Speed Dial icon   or press the Phone button  repeatedly until the Speed Dial screen appears.2. From the Edit menu, tap Show Button Number.<Insert graphic of Speed Dial screen with numbers on buttons here.>Making a Call from the Speed Dial ScreenAfter you’ve added entries to your Speed Dial list, you can dial them with just one tap from your Speed Dial screen.To make a call from the Speed Dial screen:Tip:You can view other pages of your Speed Dial list by tapping the Page Number icons, or you can use the Scroll buttons on your handheld to move between pages.Tip:The Speed Dial entry numbers can be used to Speed Dial from the Dialpad screen. See page 137.Tip:To hide the button numbers, tap Hide Button Number on the Edit menu.
Section 13136 Personal Information Management1. Press the Phone Application button   or tap the Phone icon in the Applications Launcher to start the Phone application.2. Tap the Speed Dial icon   or press the Phone button  repeatedly until the Speed Dial screen appears.<Need better graphic (one with more speed dial entries) here.>3. Tap the entry’s button to dial the number.Speed Dialing Numbers with Hard PausesIf the Speed Dial entry includes a hard pause (>), the module will stop dialing when it reaches the pause. To continue dialing, you must release the pause.To Speed Dial a number with a hard pause:1. On the Speed Dial screen, tap the entry’s button to dial the number. The Active Call screen displays.<Insert graphic of Speed Dial screen with numbers on buttons here.>2. Tap Release Pause to release the pause and send the extra digits.Tip:To view additional Speed Dial entries, tap the Page Number icon at the bottom of the screen, or use the Scroll buttons on the front of your handheld.Speed DialentriesPage NumbericonsTip:You can choose to view the button numbers on your Speed Dial list. See "Setting your Speed Dial Preferences" on page 135.Tip:To learn how to add a Speed Dial entry with a hard pause, see page 130..
Experiencing Sprint PCS Wireless Web 13713 13 UsingSpeed Dial 13 13 13Speed Dialing from the Dialpad ScreenYou can also Speed Dial a number from the Dialpad screen, using the Speed Dial entry number that corresponds to the button on your Speed Dial list.To Speed Dial from the Dialpad screen:1. Tap the digit(s) that correspond to the the button number on your Speed Dial entry. (For example, to Speed Dial your voicemail box, tap  . To Speed Dial the number that occupies the 24th button on your Speed Dial list, tap  .2. Tap .Adding an Event to the Scheduler<The sections from here until the end of the chapter are not applicable. OK to remove?>Your Scheduler helps organize your time and reminds you of important events.To add an event:1.2.3.Event AlertsThere are several ways your Sprint PCS Communicator alerts you of scheduled events:ᮣBy playing the assigned ringer type.ᮣBy illuminating the backlight.ᮣBy flashing the LED.ᮣBy displaying event’s description, time and date.Event Alert MenuWhen your phone is turned on and you have an event alarm scheduled, your phone alerts you and displays the following options. To select an option, highlight it and press .ᮣSnooze to repeat the alarm in ten minutes.Caution:If you move an entry to a different button, the corresponding digit(s) will change.Tip:Use the volume control keys to scroll by month through the Scheduler calendar or press the Mouse Key up or down to scroll by week.Note: Default alarm times are 10 minutes for Meetings, Events and Dining Appointments, 24 hours for Special Occasions and zero minutes for Call Alarms.
138ᮣErase to delete the event (even if it is a repeating event).ᮣᮣAdding a Call Alarm to the SchedulerTo add a call alarm from the Scheduler:1.2.3.For call alarm alerts, see “Call Alarm Alerts” on page xx.Viewing Events and Call AlarmsTo view your scheduled events and call alarms:1. From the main menu, highlight Scheduler and press .2. A weekly calendar is displayed. An asterisk is displayed under days with events or call alarms scheduled. 3.4.Editing EventsTo change an event:1.2.3.Editing Call AlarmsTo change a call alarm:1.2.3.Adding To Do ItemsYour phone can store and manage xx To Do items.To add an entry to your To Do List:1.2.Tip:You can also add a call alarm from the Phone Book menu. (See “Adding a Call Alarm from the Internal Phone Book” on page xx.)
Experiencing Sprint PCS Wireless Web 13913 13 UsingSpeed Dial 13 13 133.Viewing To Do ItemsTo view your To Do List:1.2.3.Editing To Do ItemsTo change a To Do item:1.2.3.Deleting To Do Items1.2.Viewing and Clearing MemoryTo view available and used memory space:1.2.3.Using the CalculatorYour phone comes with a built-in calculator function. To use this tool, follow these easy steps:1. From the main menu, highlight Calculator and press .2. Enter numbers using your keypad. Press   to insert a decimal point.3. To select an arithmetic option, press   (press   again to scroll through options) or highlight the option and press  .4. Press   again to calculate the equation.Playing GamesTo start a game:1. From the main menu, highlight Games and press
Section 13140 Personal Information Management.2. To select a game, highlight it and press  .ᮣBlackjack: Press   to begin the game. Try and beat the Dealer’s score (D:) by choosing Hit or Stay and pressing  . A running dollar total keeps track of your winnings (or losses).ᮣᮣ
Using the Data Applications 141Understanding Roaming 14 14 Understanding Roaming 14 Data Applications 14 1414Using the Data ApplicationsUsing the Voice Services of Your Sprint PCS Communicator<This whole section is not applicable. Confirmed by AirPrime. OK to use this section for Data Apps? Also changed side tab.>In this SectionᮣInstalling Data ApplicationsᮣLaunching Data ApplicationsᮣSetting Up the Data Applications ButtonᮣViewing the Status MonitorIn this SectionᮣUsing Voice DialingᮣRecording MemosᮣUsing Commandshis section explains the features associated with your phone’s Voice Services. The easy-to-follow instructions explain how to make T
Using the Voice Services of Your Sprint PCS Communicator142Understanding Roaming 14 14 Understanding Roaming 14 Data Applications 14 14calls or go to a menu by simply speaking a command. You’ll also learn how to record memos and personal ringers.his section explains how to use your module to access all kinds of data applications, such as a Web browser or an e-mail application. You can also get information about your connection while you are using your data applications.T
Using the Voice Services of Your Sprint PCS Communicator14314 14 Understanding Roaming 14 Data Applications 14 14Installing Data ApplicationsYour new Sprint PCS Communicator comes with data applications that you can use with your module. To use these data applications, install them on your PC, then sync your handheld with your PC.To install the data applications, please follow the instructions included with the CD-ROM in this box.Launching Data ApplicationsYou can use your Sprint PCS Communicator to access lots of different data applications, including SMS Text Messages (see page 75), Web browsers, and e-mail applications.To launch a data application:▲Press the Data Applications button   to launch your default data application or tap the application’s icon in the Application Launcher. Press the Data Applications button repeatedly to cycle through your three favorite data applications.Setting Up the Data Applications ButtonThe Data Applications button   can launch up to three of your favorite data applications.Use the Data Preferences menu option to select the three applications to attach to the Data Applications button.For more information, see "Setting Your Data Preferences" on page 113.Returning to the Phone ApplicationTo return to the Phone application:▲Press the Phone Application button   to return to the Phone application.Viewing the Status MonitorThe Status Monitor gives you information about your data connection, including whether the connection is active, the Tip:Press the Data Applications button repeatedly to cycle through your favorite data applications. You can choose up to three data applications to use with the Data Applications button, and you can select the default data application by using the Data Preferences menu option (see "Setting Your Data Preferences" on page 113).Note:If you press the Phone Application button while you are on a data call, you will be asked if you want to end the data call.
Section 14144 Using the Voice Services of Your Sprint PCS Com-type of call, and the connection time. You can view the Status Monitor whether your module is on or off.To view the Status Monitor:▲Press and hold the Data Applications button   for approximately 2 seconds.Using Voice Dialing<Not applicable. Confirmed by AirPrime. OK to discard?>You can use a Voice Dial tag to automatically dial a phone number in your Internal Phone Book.To use a Voice Dial tag to call a phone number:1. Press the Voice Services key on the side of the phone.2. Follow the voice prompts and recite the entry’s Voice Dial tag into your phone’s microphone.Recording Memos<Not applicable. Confirmed by AirPrime. OK to discard?>To record a memo:1.2.3.Memo Options<Not applicable. Confirmed by AirPrime. OK to discard?>To select a memo option:1.2.3.Using Commands<Not applicable. Confirmed by AirPrime. OK to discard?>Commands allow you to perform some of your phone’s features by using your voice.ᮣCall Back redials your last outgoing phone number.Note:Train Voice Dial tags in a quiet environment and without the aid of an accessory (for example, a headset or hands-free car kit).
Using the Voice Services of Your Sprint PCS Communicator14514 14 Understanding Roaming 14 Data Applications 14 14ᮣSprint PCS Wireless Web Bookmarks displays the appropriate bookmark.ᮣᮣTo use a command, you must first train the command (see “Training Commands” on page xx).To use a command:1. Press the Voice Services key on the side of the phone.2. Follow the voice prompt and recite your command.Training Commands<Not applicable. Confirmed by AirPrime. OK to discard?>To train your phone to react to your voice commands:Voice Dial Options<Not applicable. Confirmed by AirPrime. OK to discard?>To use a Voice Dial tag, see “Using Voice Dialing” on page xx. To display Voice Dial tag options:1.2.3.4.Note:Train commands in a quiet environment and without the aid of an accessory (for example, a headset or hands-free car kit).
146
Experiencing Sprint PCS Wireless Web 14715 15 15 15 Sprint PCS Wireless Web 1515Experiencing Sprint PCS Wireless WebSM<This whole section is not applicable. Cconfirmed by AirPrime. OK to discard?>In this SectionᮣLaunching and Using the Sprint PCS Wireless Web BrowserᮣCreating and Finding BookmarksᮣUsing Sprint PCS Wireless Web MailSMᮣUsing the AOL Instant MessengerSM Service with Your Sprint PCS CommunicatorᮣUsing Sprint PCS Wireless Web Short MailSMᮣSigning up for Sprint PCS Wireless Web UpdatesᮣSetting up a Sprint PCS Wireless Web Connectiony now you’ve discovered the great features that come with your Sprint PCS Phone™. Now it’s time to experience the Sprint PCS Wireless Web. Let the adventure begin.B
Section 15148 Experiencing Sprint PCS Wireless WebThe Sprint PCS Wireless WebWith the Sprint PCS Wireless Web and your wireless Internet-ready phone, you have access to many features via the wireless Internet:ᮣThe Sprint PCS Wireless Web Browser allows you to view specially-designed text versions of popular web sites.ᮣSprint PCS Wireless Web Mail lets you send and receive e-mail quickly and easily.ᮣThe AOL Instant Messenger Service lets you keep in touch with family and friends via two-way instant messaging.ᮣWith Sprint PCS Wireless Web Short Mail, you can use a person’s Sprint PCS Communicator Number to send instant text messages from your Internet-ready Sprint PCS Phone to their Internet-ready Sprint PCS Communicator – and they can send messages to you.ᮣThe Sprint PCS Wireless Web Connection lets you connect to the Internet or your company's network with a laptop PC or hand-held computing device and a Sprint PCS Wireless Web™ Connection Kit.ᮣSprint PCS Wireless Web Updates let you receive daily information updates, including weather, stock quotes and sports scores.Note:Sprint PCS Wireless Web service will not work when roaming off the Sprint PCS Nationwide Network and may not be available in select affiliate areas.
Experiencing Sprint PCS Wireless Web 14915 15 15 15 Sprint PCS Wireless Web 15The Sprint PCS Wireless Web BrowserYour phone comes equipped with a MiniBrowser, which allows you to access up-to-the minute information through the Sprint PCS Wireless Web.You can view specially-designed text versions of popular Internet sites, including Yahoo!®, Amazon.com®, The Weather Channel®, and more. Browsing the Sprint PCS Wireless Web using your phone is different than using a home computer because sites display specialized text and reduce their graphics.The MiniBrowser connects to the Internet by placing a call. Note that   appears on the display whenever a call is in progress, just as with a regular voice call. Service charges vary depending on your service option.
Section 15150 Experiencing Sprint PCS Wireless WebLaunching a Sprint PCS Wireless Web Browser SessionTo launch the Sprint PCS Wireless Web Browser:ᮣFrom the main menu, highlight Wireless Web and press  . You'll see a few introductory messages as the browser launches.The first time you use the MiniBrowser, you'll be prompted to enable the security feature. This automatic process will take 3–6 minutes to complete and it occurs just once. When the process is complete, you're ready to start using the Sprint PCS Wireless Web.Following the security setup, you'll see the Sprint PCS Wireless Web Home Page. This is the main page for the MiniBrowser and it gives you access to all the sites in the Sprint PCS Wireless Web. The next time you use the MiniBrowser, you may not see the home page at first because the MiniBrowser will display the page you were viewing when you last exited the MiniBrowser.The Sprint PCS Wireless Web Home PageNote:The Sprint PCS Wireless Web Home Page is subject to change.WIRELESS WEB1. Messaging2. My Wireless Web3. AOL4Amazon.com5Yahoo!6MSN Mobile7Fidelity8@SprintPCS9Business ToolsMore...
Experiencing Sprint PCS Wireless Web 15115 15 15 15 Sprint PCS Wireless Web 15You may notice that sometimes the MiniBrowser will launch without placing a call. This is because the phone stores recently viewed pages in its memory cache. The MiniBrowser will connect automatically when you access a page that's not stored in the cache.If the phone has been inactive for awhile and a new wireless Internet site has not been requested, the MiniBrowser will automatically disconnect. The MiniBrowser will remain active – only the connection will end. The MiniBrowser will automatically reconnect when you go to a wireless Internet site that's not stored in the phone's memory cache. For this reason, you may find that you are billed for several network connections within a single session. This is normal and is designed to minimize airtime charges.When launching the MiniBrowser, you may need to take an extra step or see a reminder that MiniBrowser calls will be charged. If you need to take an extra step, see “Web Guard” on page xx to disable the setting.

Navigation menu