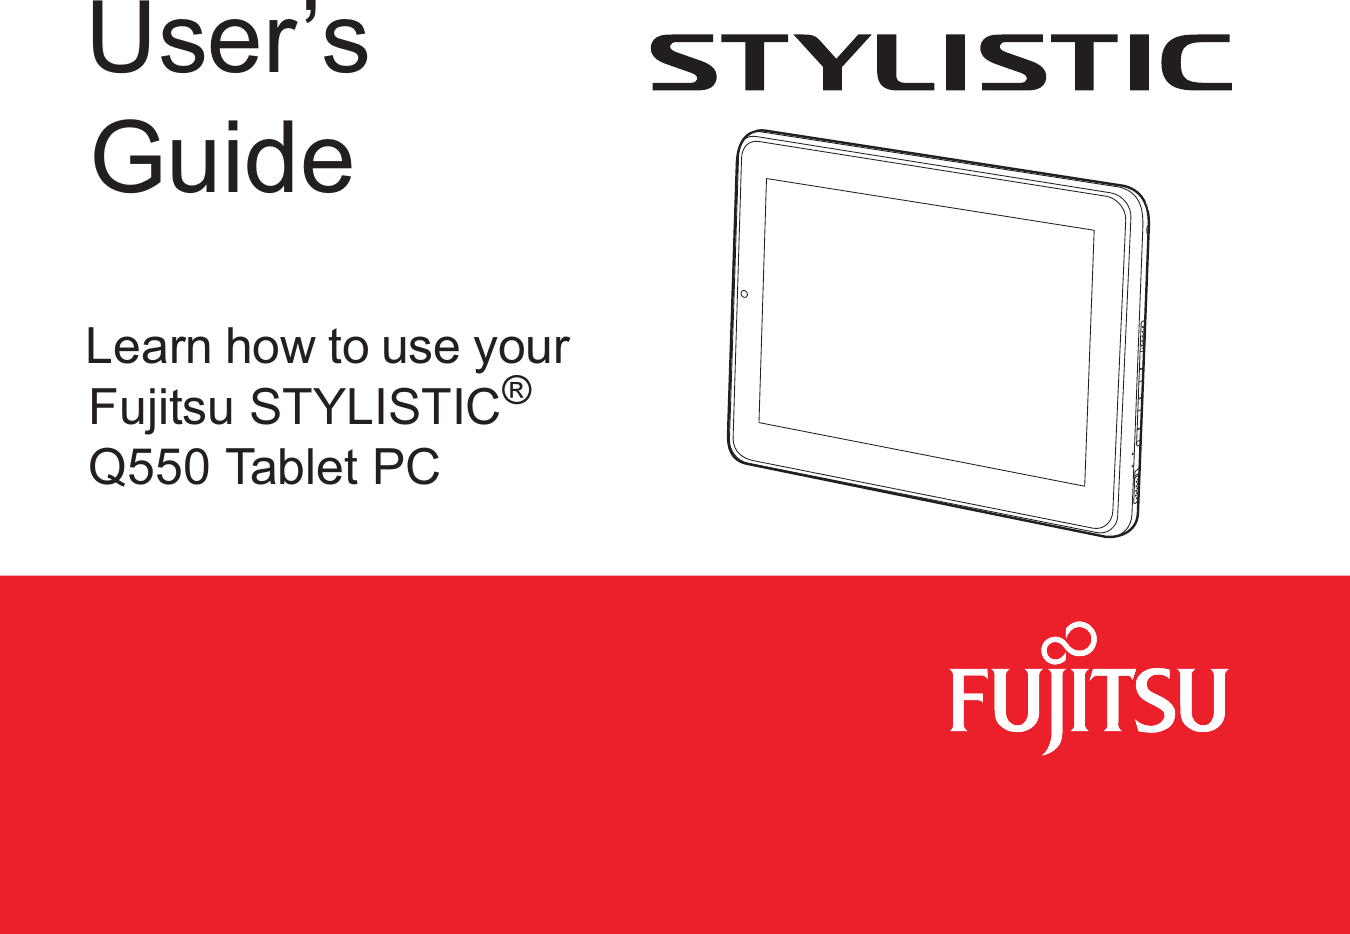
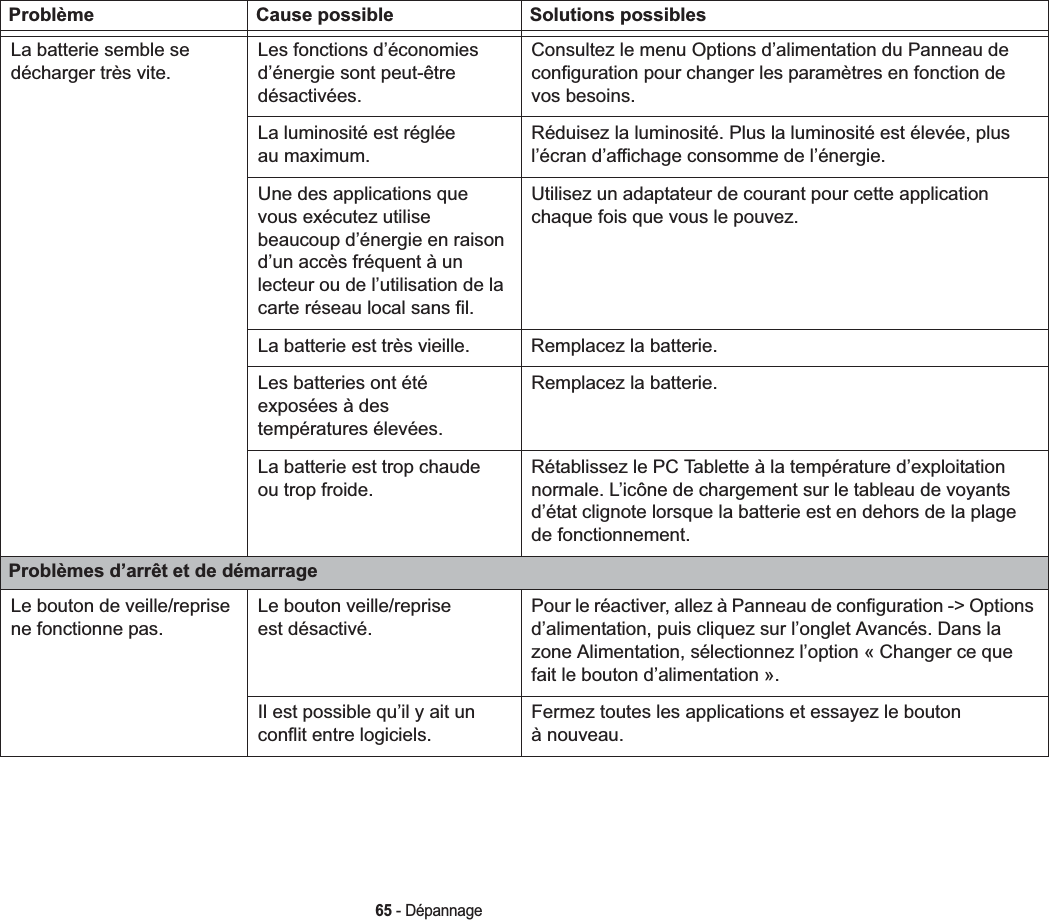
Sierra Wireless MC8355 Multi-band Radio Module User Manual Q550 2 lang cover
Sierra Wireless Inc. Multi-band Radio Module Q550 2 lang cover
UserManual.wiki
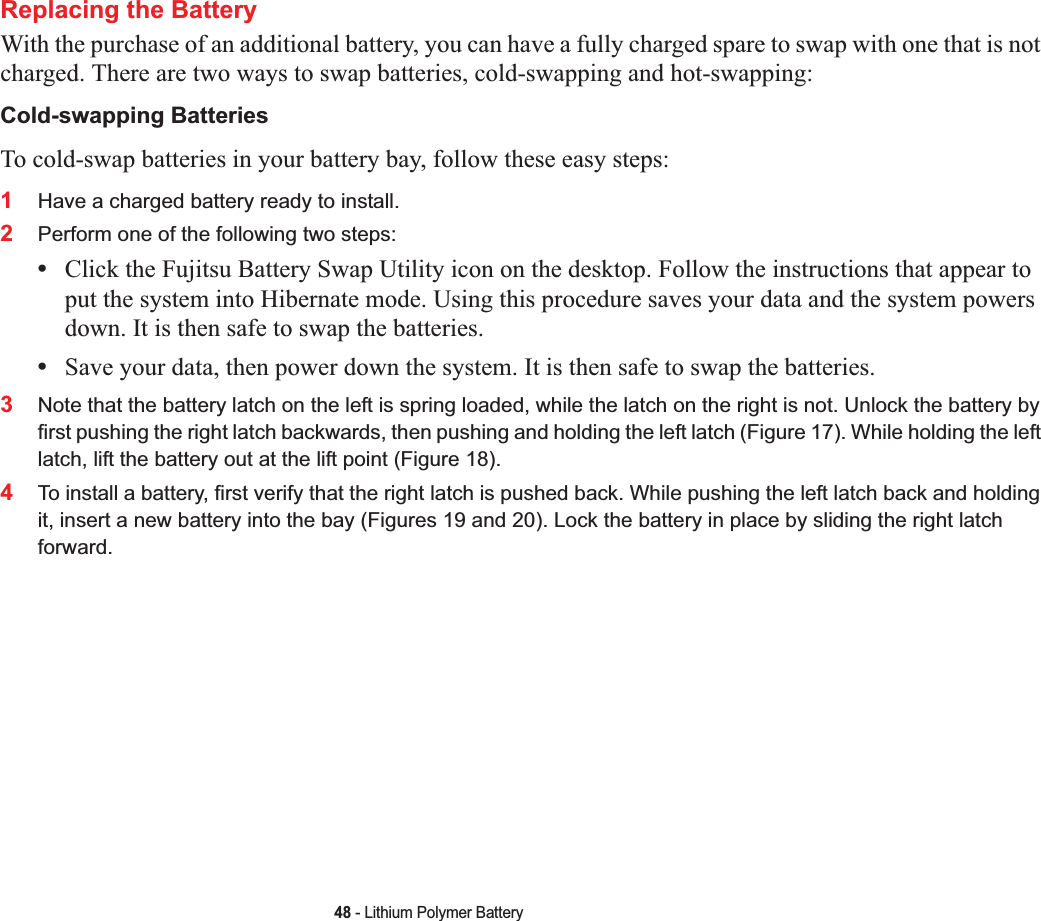
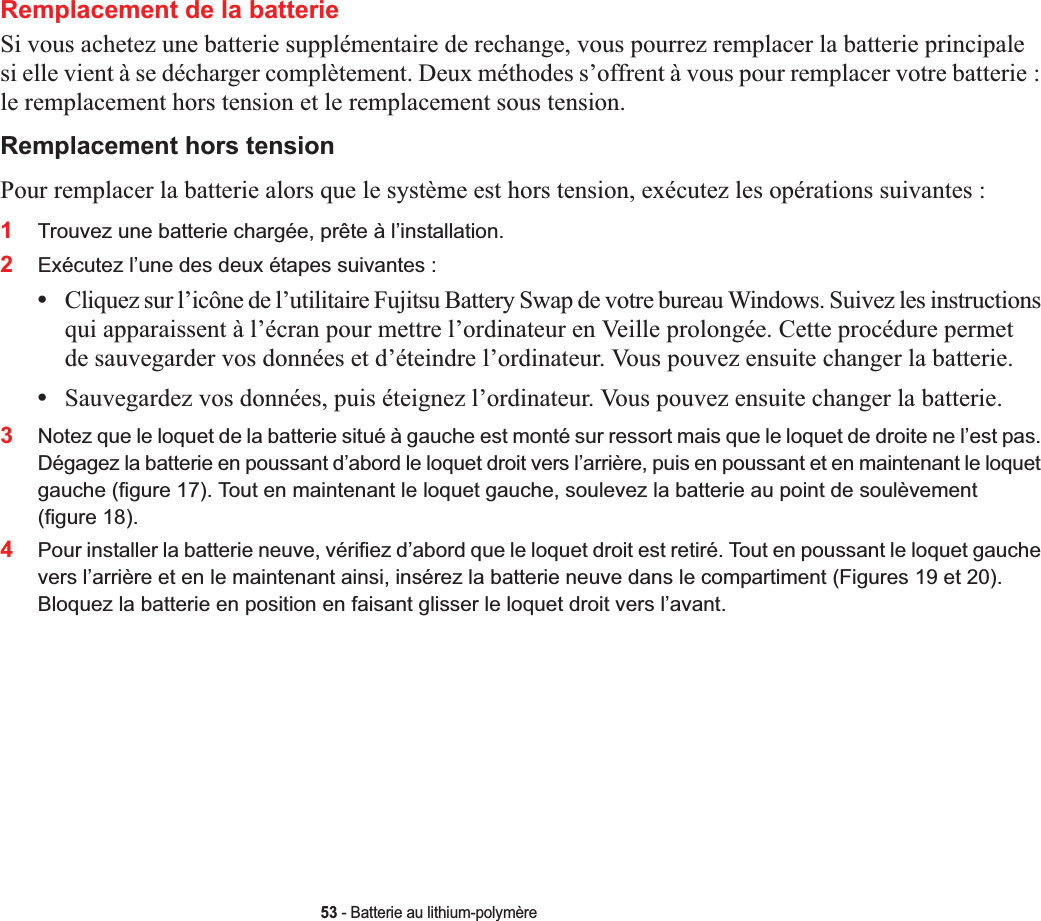
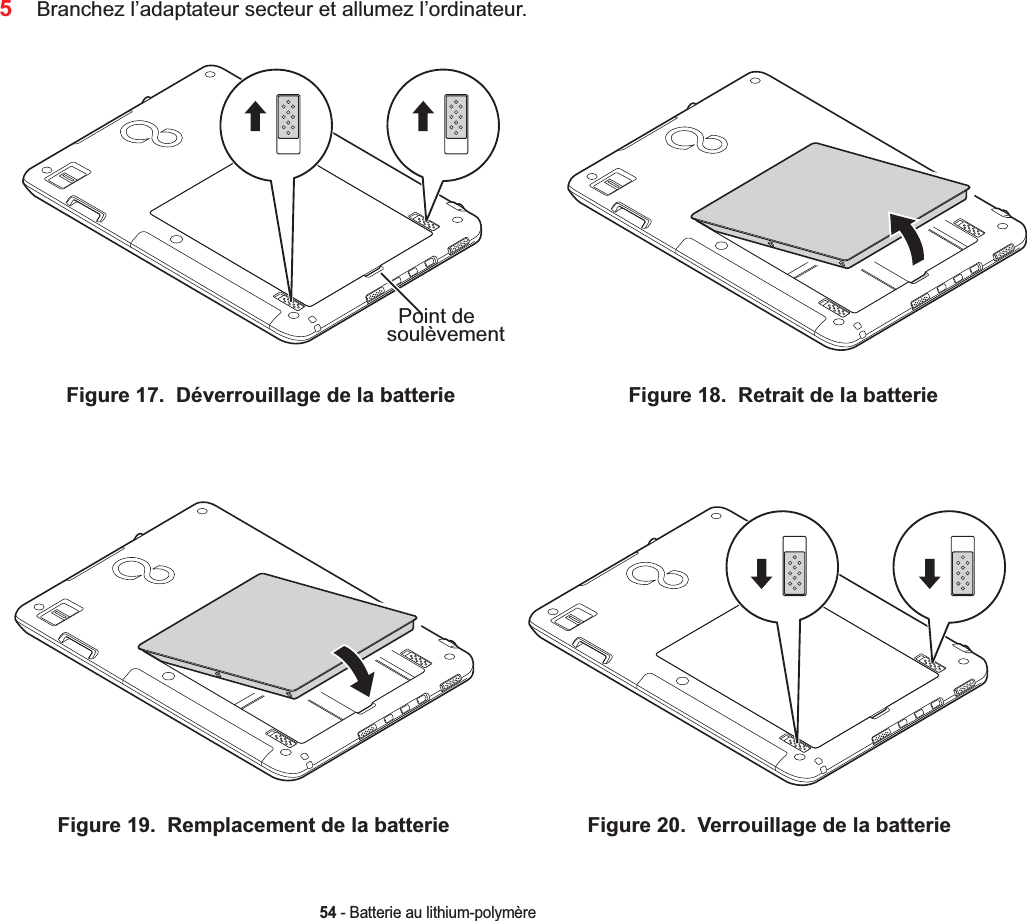
>
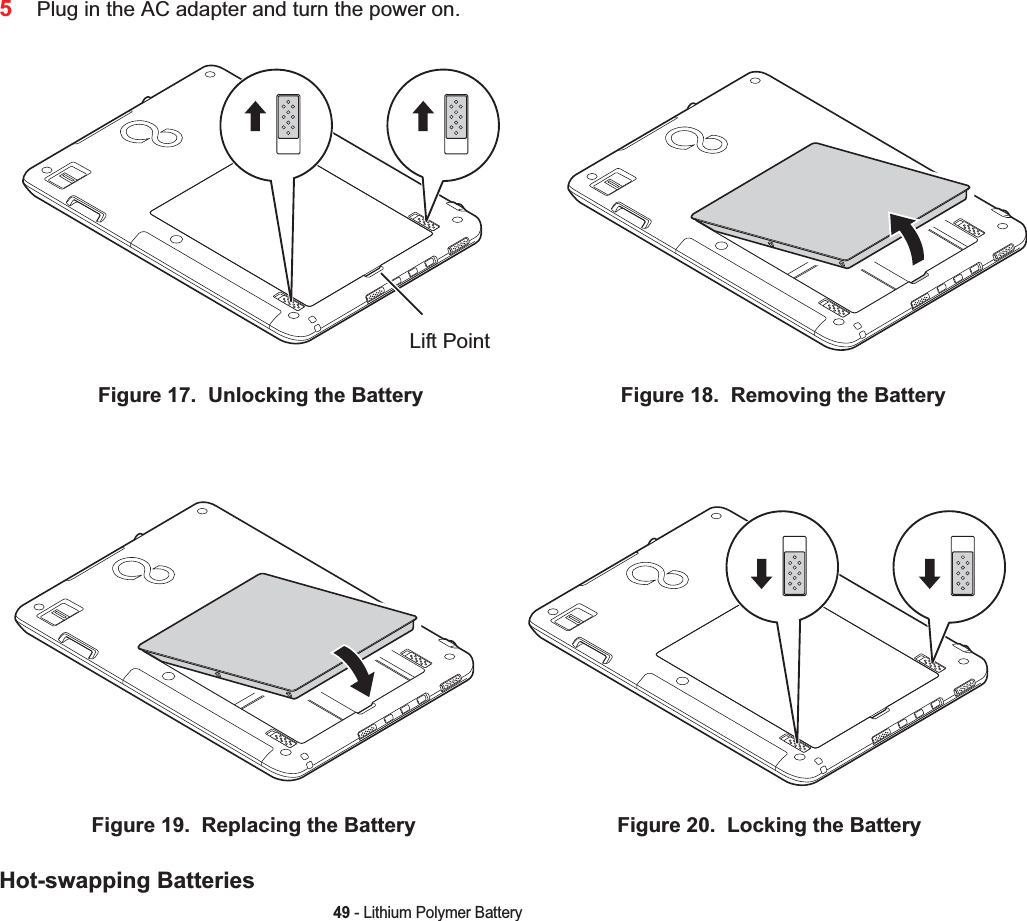
Sierra Wireless
>
MC8355 User Manual
>
Manual 2
Contents
1.
User Manual
2.
Regulatory Guide
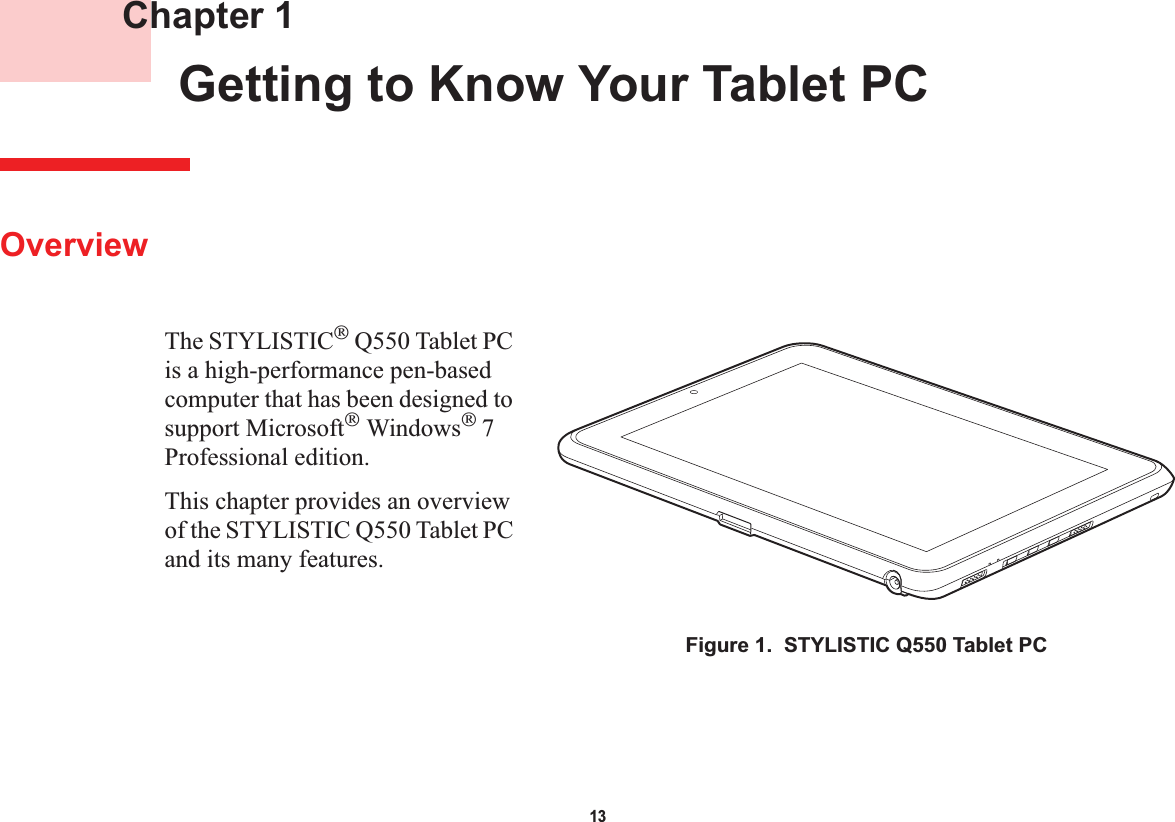
3.
User Guide
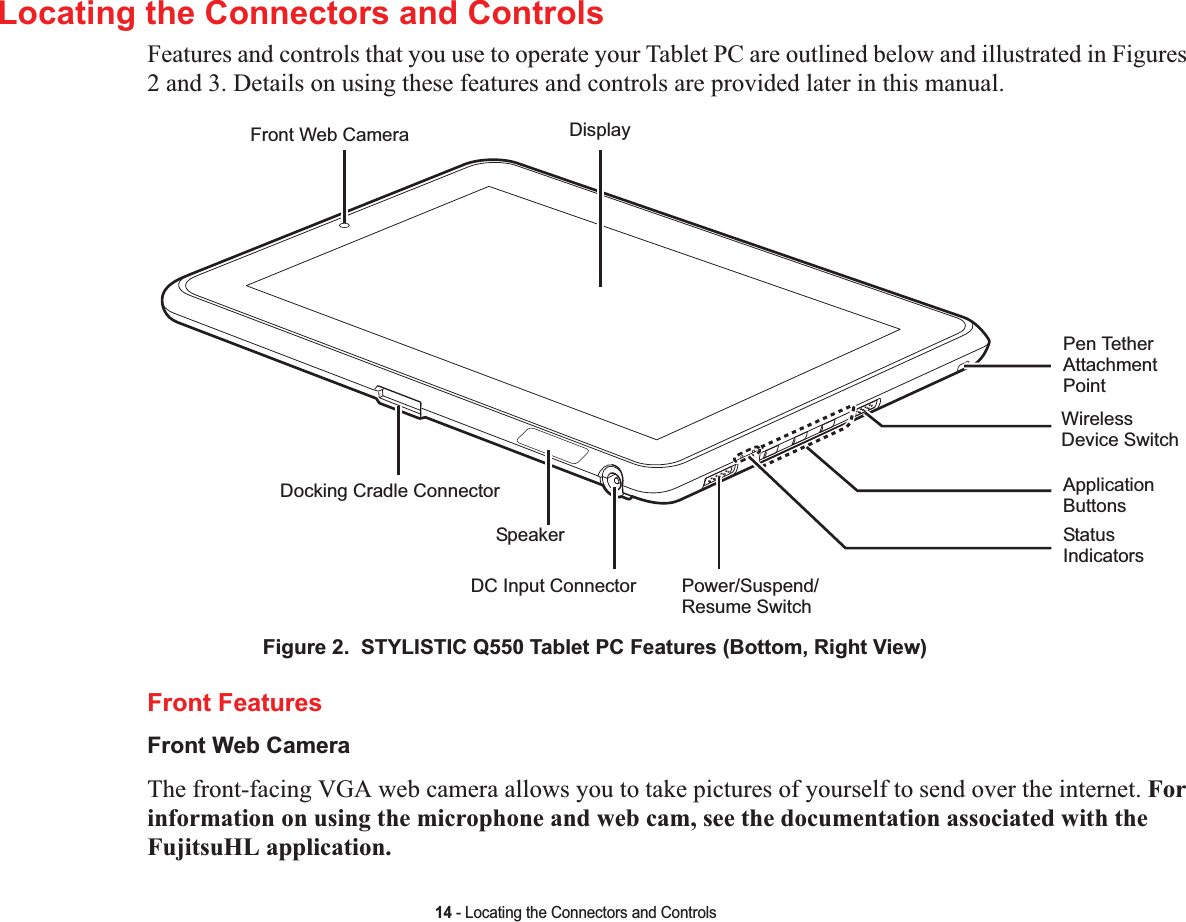
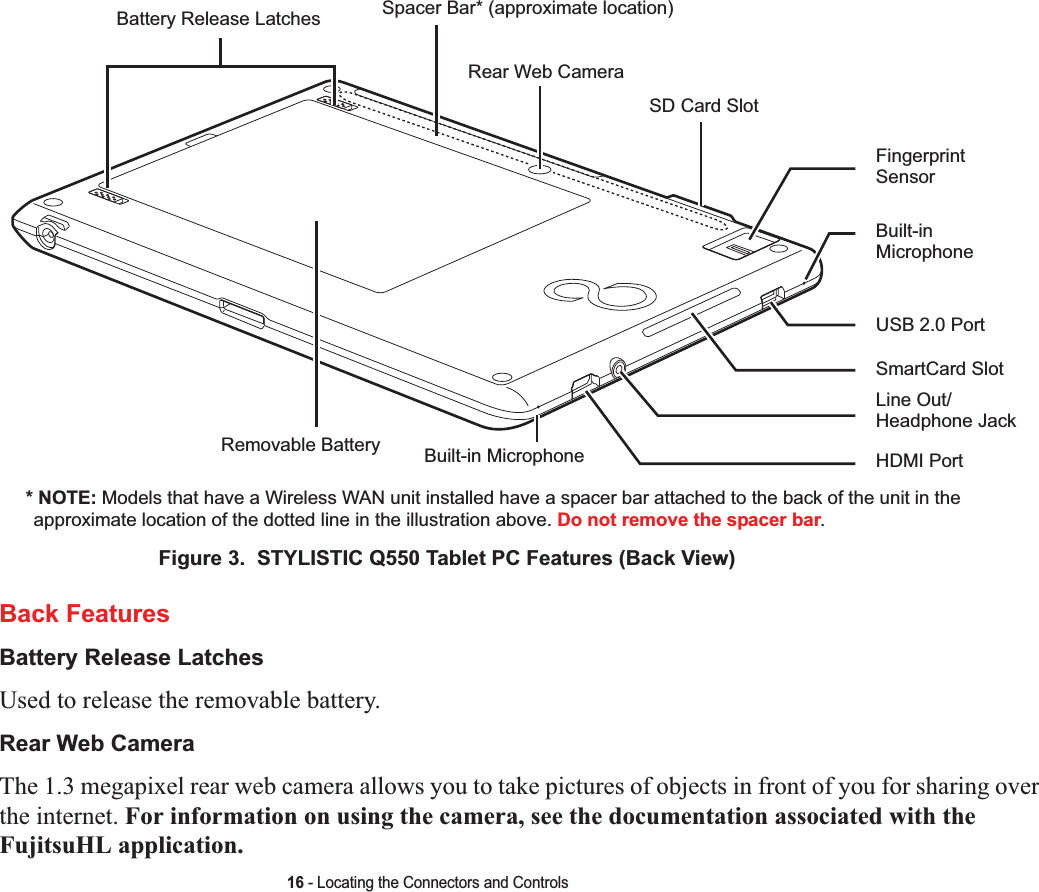
4.
Docking station user manual
5.
Host User Manual
6.
WWAN Fujitsu Manual revised
7.
User Manual 1
8.
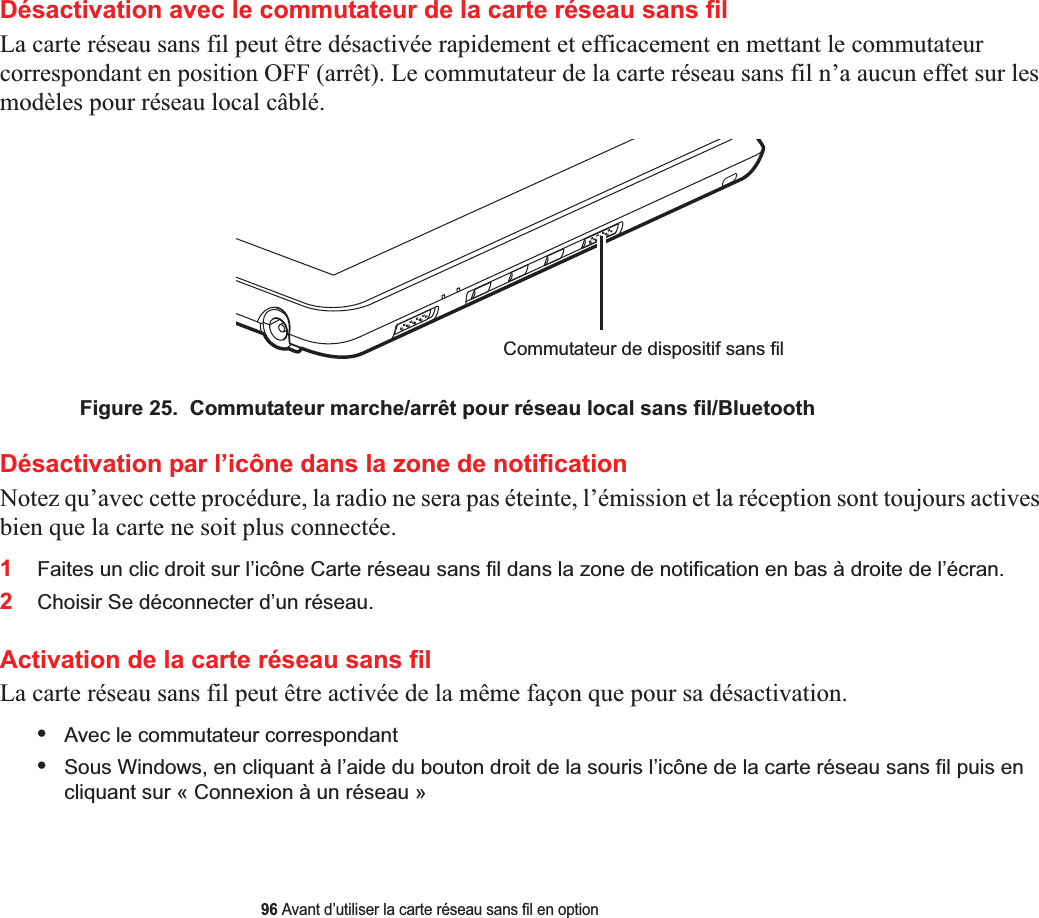
Manual 2
9.
User Manual 2
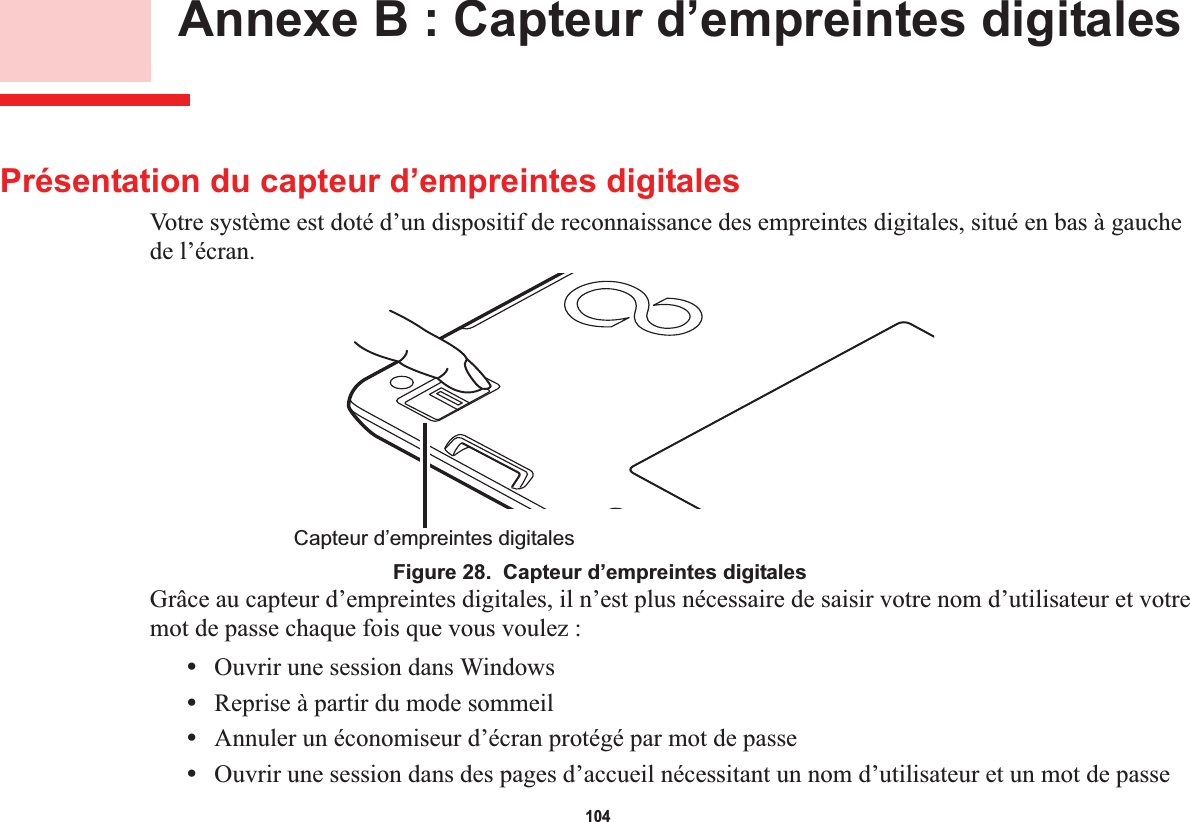
10.
User Manual 3
11.
Regulatory Safety Guide
12.
Users Guide
13.
Users Manual
Manual 2
Navigation menu
Upload a User Manual
Namespaces
Wiki Guide
HTML
PDF
Info
Views
User Manual
Discussion / Help
Navigation


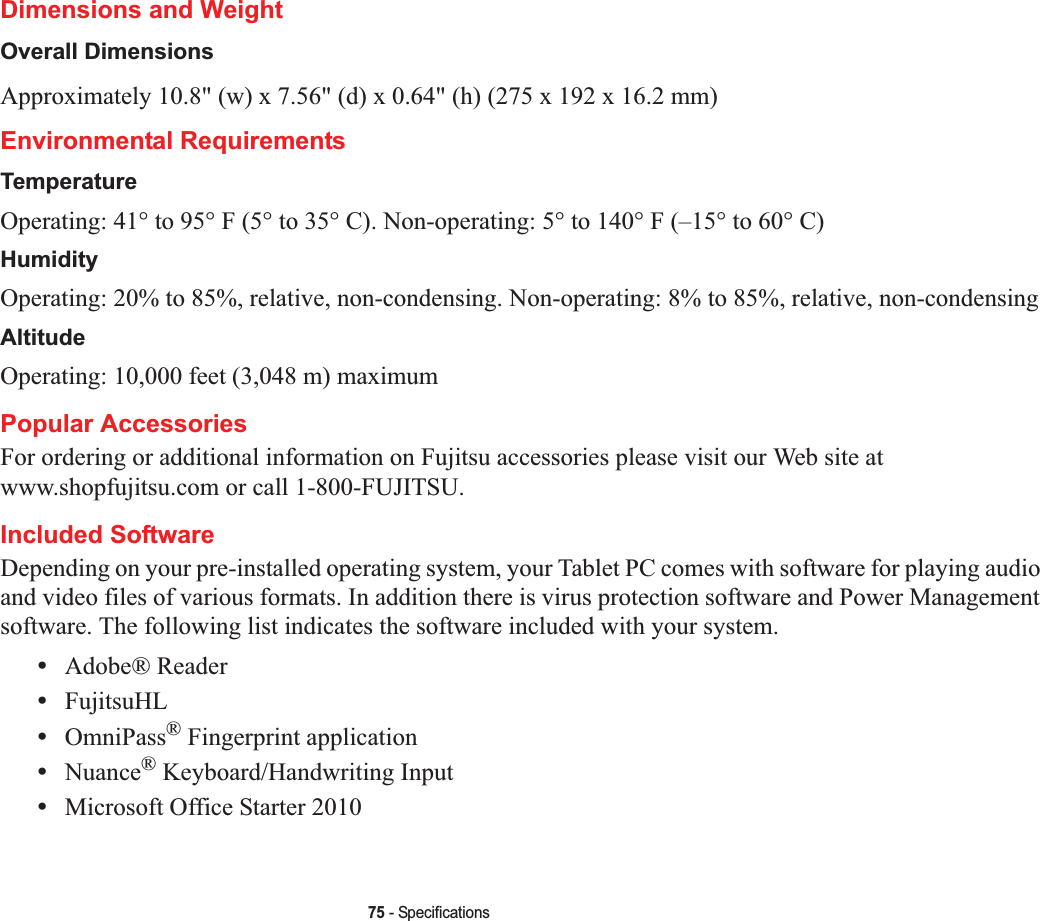
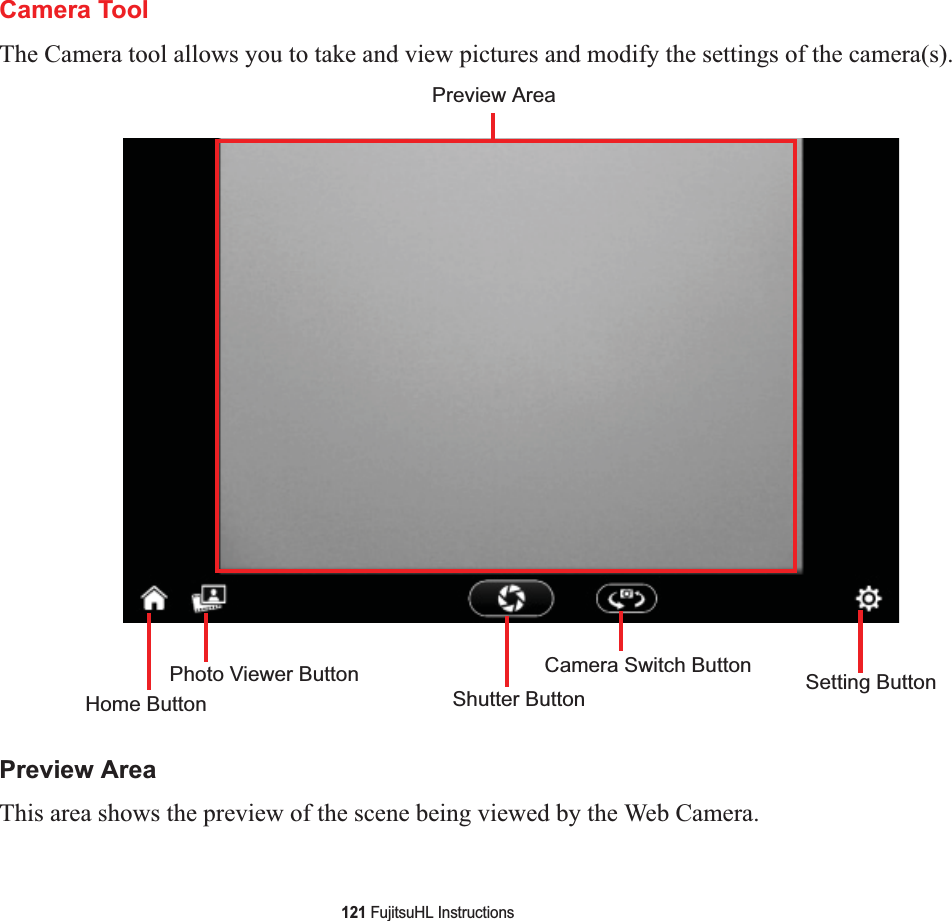
![23 - Active Digitizer/TouchscreenClicking on Active Digitizer DisplayTo left-click, touch the object you wish to select and then lift the stylus tip immediately. Figure 7. Clicking on the Active Digitizer DisplayFigure 8. Right-clicking Active DigitizerRight-Clicking on Active DigitizerRight-click can be accomplished by holding the front of the toggle button down while tapping on the screen. To change the settings for the right-click feature, go to Start -> Control Panel -> Pen and Touch. In the Pen Options tab, select “Press and Hold” then click the [Settings] button.](https://usermanual.wiki/Sierra-Wireless/MC8355.Manual-2/User-Guide-1598135-Page-24.png)
![25 - Active Digitizer/TouchscreenCalibrating the DisplayIn order to ensure accurate tracking between the stylus and cursor, you must run the Calibration Utility before you use the system for the first time, or after you change the display resolution.To run the calibration utility:1Go to Start -> Control Panel. 2Double-click the Tablet PC Settings icon and select the Display tab3Click the [Calibrate] button, then select whether you want to calibrate pen input or touch input.4Adjust the display of your Tablet PC to a comfortable angle and find the (+) symbol in the upper-left corner of the display.5Using the stylus or your finger (depending upon which type of input you are calibrating), firmly touch the screen directly on the (+) symbol. Lift the stylus from the screen and the target will move to a different location on the screen.6Repeat step 5 until you have selected all of the (+) symbols.7Once you have selected all the symbols, press the [OK] button.8Touch the stylus to various points on the screen to verify that the screen is correctly calibrated. If you are not satisfied with the screen’s calibration, press the [Calibrate]) button to begin again.DO NOT USE EXCESSIVE FORCE WHEN TAPPING ON THE SCREEN DURING CALIBRATION. USE OFEXCESSIVE FORCE COULD RESULT IN DAMAGE TO THE LED AND/OR TOUCH PANEL.](https://usermanual.wiki/Sierra-Wireless/MC8355.Manual-2/User-Guide-1598135-Page-26.png)
![27 - Active Digitizer/TouchscreenIf at least one finger has moved at least 10 mm, a zoom event is considered. If the distance between the fingers has changed by at least 10 mm, and both fingers have stayed on approximately the same line, Zoom Mode is entered. If either finger strays more than 10 mm from the "zoom line" created when the fingers first made contact, the zoom is canceled.To zoom out, place two fingers on the item you want to reduce (one finger quickly followed by the second), then move them towards each other.Rotate GestureTo change the orientation of an object on the screen, place two fingers on the image you want to rotate (one finger quickly followed by the second), then move them in opposite directions (as if you were turning a knob). The direction the item turns is dependant upon the direction you move your fingers.If at least one finger moves at least 12 mm, a rotate is considered. If one finger is stationary (moving less than 5 mm in any direction), and the other is moving, a rotate is considered. If the fingers begin moving in the same direction, the rotation is canceled. If the distance between the fingers changes by more than 10 mm, the rotation is canceled.Accessing the OnScreen TouchPadYour tablet has a handy on-screen touchpad that offers a variety of helpful functions. Features of the OnScreen TouchPad include:•Virtual Mouse Emulator: The Virtual Mouse Emulator works in much the same manner as a hardware mouse. With the virtual mouse, you can scroll, drag, and click, as well as perform [Ctl]+[Click] and [Shift]+[Click] actions.•Application Launch/Key Macro: This window provides access to five pages, each of which can contain up to twenty buttons. Each button can be programmed to open an application, a folder, document, or key (such as [Esc], [ Alt+X] and [Page Up]).•Digital Keyboard: This window provides a soft keyboard for use in mathematical procedures. It works in much the same way as the Windows standard calculator.To access the OnScreen TouchPad, go to the Start Menu > All Programs > Fujitsu OnScreen TouchPad. To learn more about the utility, click on Usage and Help.](https://usermanual.wiki/Sierra-Wireless/MC8355.Manual-2/User-Guide-1598135-Page-28.png)

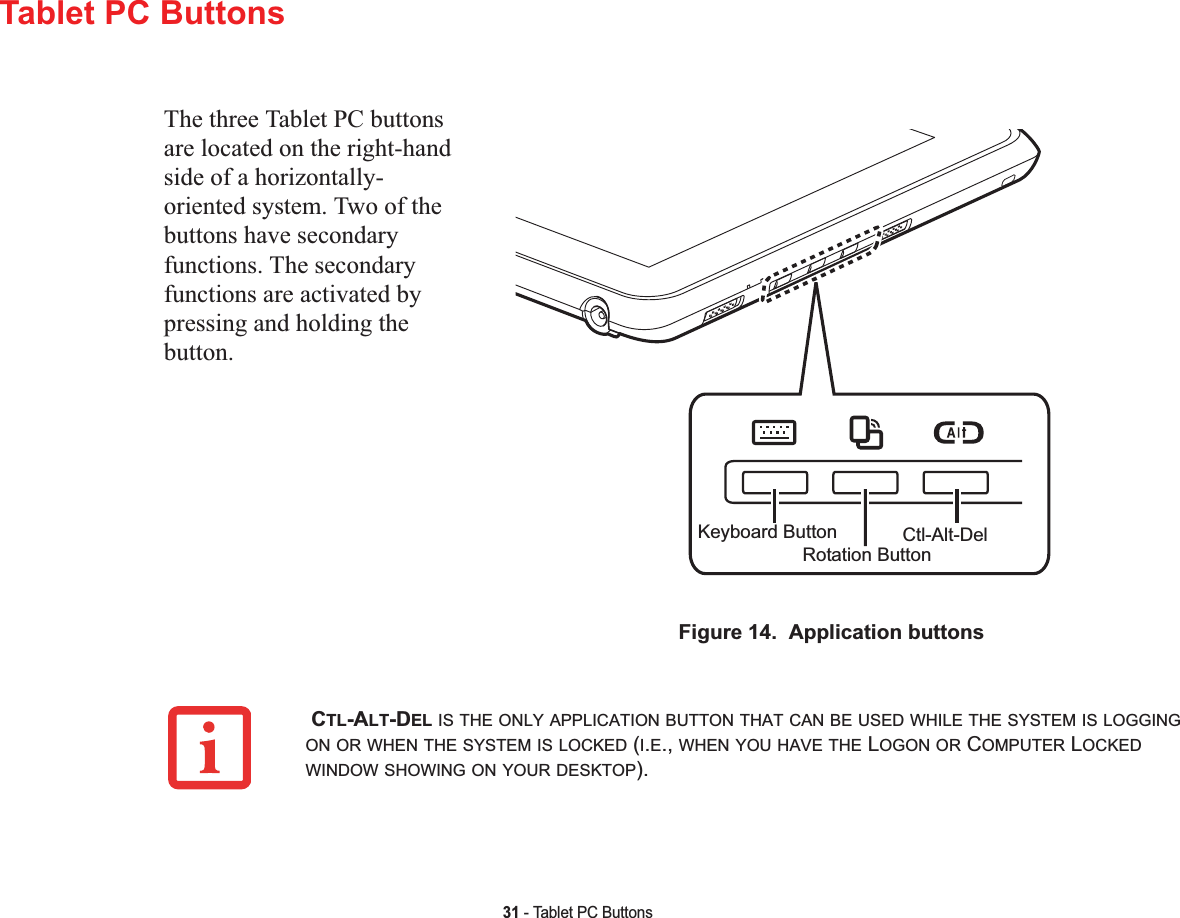
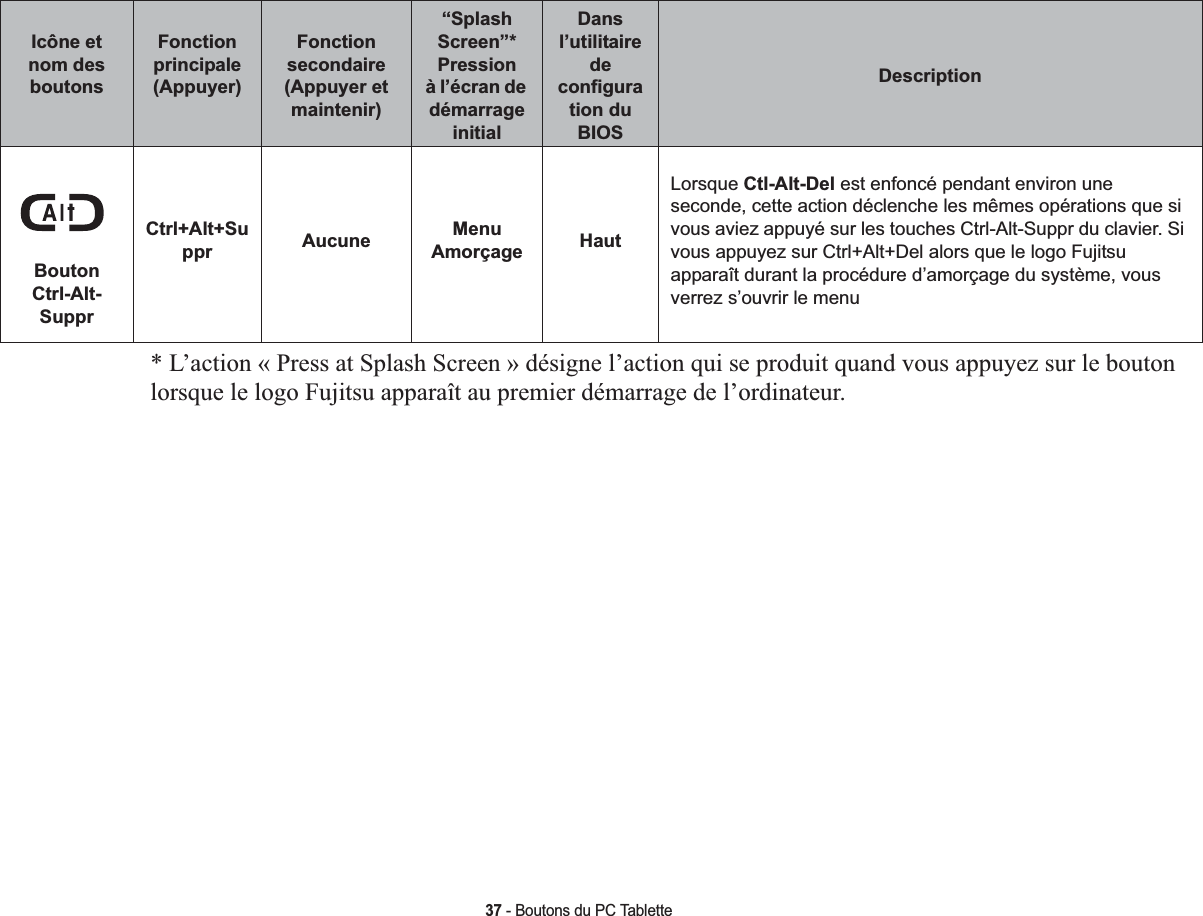
![32 - Tablet PC Buttons* “Press at Splash Screen”refers to the action that occurs when you press the button when the Fujitsu logo appears when you first start up the system.Button Icon and NamePrimary Function (Press)Secondary Function (Press and Hold)Press at Splash Screen*In BIOS Setup Utility DescriptionKeyboardButtonLaunch Tablet PC Input PanelLaunch FujitsuHL Boot Menu EnterPressing the Keyboard button launches the Tablet PC Input Panel. Pressing and holding the button launches the FujitsuHL utility that provides shortcuts to a variety of commonly accessed tools and tasks, including the web camera application. If you press the Keyboard button while the Fujitsu logo appears during system boot, the Boot Menu will open. While you are in the BIOS Setup utility, this button can be used as an [Enter] key.RotationButtonScreen RotateEnable/Disable Auto RotateBIOS Setup Utility DownWhen you press the Rotate button, the system screen orientation changes from landscape (horizontal) to portrait (vertical) or from portrait to landscape. When you would like to use the Tablet PC as an eBook, for example, you would use the portrait orientation, when accessing spreadsheets, you would more typically use a landscape orientation. Pressing and holding the button enables and disables the Auto Rotate function. If you press the Rotation button while the Fujitsu logo appears during system boot, the BIOS Setup Utility will open. While you are in the BIOS Setup utility, this button can be used as a Down keyCtl-Alt-Del ButtonCtrl + Alt + Del None ApplicationMenu UpPressing the Ctl-Alt-Del button for approximately one second causes it to act as if Ctl-Alt-Del had actually been entered from a keyboard. If you press the Ctrl+Alt+Del button while the Fujitsu logo appears during system boot, the Application Menu will appear. While you are in the BIOS Setup utility, this button can be used as an Up key.](https://usermanual.wiki/Sierra-Wireless/MC8355.Manual-2/User-Guide-1598135-Page-33.png)


![37 - Starting Your STYLISTIC Tablet PCHard Disk Drive PasswordsTo provide additional security for your data, you can assign passwords to your hard disk drive(s). This feature is managed in the system BIOS Setup Utility. See BIOS Setup Utility below for information about accessing the utility.BIOS Setup UtilityThe BIOS Setup Utility is a program that sets up the operating environment for your STYLISTIC Tablet PC. Your BIOS is set at the factory for normal operating conditions, therefore there is no need to set or change the BIOS’ environment to operate your Tablet PC.The BIOS Setup Utility configures:•Device control feature parameters, such as changing I/O addresses and boot devices.•System Data Security feature parameters, such as passwords.Entering the BIOS Setup UtilityTo enter the setup utility, do the following:1Turn on or restart your STYLISTIC Tablet PC.2To enter the BIOS Setup Utility, either press the Rotation button (or press the [F2] key if you have an external keyboard) when the Fujitsu logo appears on the screen. This will open the main menu of the BIOS Setup Utility with the current settings displayed.3Press the [RIGHT ARROW] or [LEFT ARROW] key to scroll through the other setup menus to review or alter the current settings.REMEMBER YOUR PASSWORDS. IF YOU SET AND FORGET YOUR USER AND MASTER HARD DISKPASSWORDS, FUJITSU WILL NOT BE ABLE TO RESET IT. YOU MAY LOSE DATA AND HAVE TO REPLACEYOUR SYSTEM BOARD OR HARD DISK DRIVE.](https://usermanual.wiki/Sierra-Wireless/MC8355.Manual-2/User-Guide-1598135-Page-38.png)
![38 - Starting Your STYLISTIC Tablet PCBIOS GuideA guide to your Tablet PC’s BIOS is available online. Please visit our service and support website at http://www.computers.us.fujitsu.com/support, then select User’s Guides under Online Support. Select your Product, Series, and Model, then click [Go]. Under the Manuals tab, select the BIOS Guide. Booting the SystemWe strongly recommend that you not attach any external devices until you have gone through the initial power on sequence.When you turn on your Tablet PC for the first time, it will display a Fujitsu logo on the screen. If you do nothing the system will load the operating system, and then the Windows Welcome will begin.Starting Windows the first timeIn order to ensure that you receive the most benefits from the Windows operating system, it should be registered the first time you use it.1First of all, you will need to read and accept the End User License Agreements (EULAs). IMPORTANT:DURING THE SETUP PROCEDURE,DO NOT DISCONNECT THE POWER SUPPLY,PRESS ANYBUTTONS,OR USE ANY PERIPHERAL DEVICES SUCH AS A MOUSE OR KEYBOARD.•IF YOU REJECT THE TERMS OF THE LICENSE AGREEMENTS YOU WILL BE ASKED TO REVIEW THELICENSE AGREEMENTS FOR INFORMATION ON RETURNING WINDOWS OR TO SHUT DOWN YOURSTYLISTIC TABLET PC.•YOU CANNOT USE YOUR TABLET PC UNTIL YOU HAVE ACCEPTED THE LICENSE AGREEMENTS. IF YOUSTOP THE PROCESS YOUR TABLET PC WILL RETURN TO THE BEGINNING OF THE WINDOWS WELCOMEPROCESS,EVEN IF YOU SHUT YOUR TABLET PC DOWN AND START IT UP AGAIN.](https://usermanual.wiki/Sierra-Wireless/MC8355.Manual-2/User-Guide-1598135-Page-39.png)
![40 - Starting Your STYLISTIC Tablet PCInstalling ClickMe! The first time you boot up your system, you will see a “Primary Settings for the PC” window. This window explains the installations which will be performed by the Click Me! utility. If you click [Execute], ClickMe! will begin installing. If after clicking the button you receive a “User Account Control” window, you will be asked for your permission to continue. Click [Continue] to continue. If you cancel the operation, the ClickMe! icon will appear on your desktop for later installation.BEFORE INSTALLING THE CLICKME!UTILITY,BE SURE THE WIRELESS LAN SWITCH IS TURNED ON.THERE MAY BE SOME THIRD-PARTY APPLICATIONS THAT DO NOT GET INSTALLED USING THE CLICKME!UTILITY. FOR MORE INFORMATION,REFER TO YOUR GETTING STARTED GUIDE.ClickMe!](https://usermanual.wiki/Sierra-Wireless/MC8355.Manual-2/User-Guide-1598135-Page-41.png)
![42 - Power Management•Selecting “Sleep” after clicking [Start] then clicking the small arrow at the bottom right of the window.•Timing out from lack of activity.•Allowing the battery to reach the Dead Battery Warning condition.Your Tablet PC’s system memory typically stores the file on which you are working, open application information, and any other data required to support operations in progress. When you resume operation from Sleep mode, your Tablet PC will return to the point where it left off. You must use the Power/Suspend/Resume switch to resume operation, and there must be an adequate power source available, or your Tablet PC will not resume.•IF RUNNING YOUR TABLET PC ON BATTERY POWER,BE AWARE THAT THE BATTERY CONTINUES TODISCHARGE WHILE YOUR TABLET PC IS IN SLEEP MODE,THOUGH NOT AS QUICKLY AS WHEN FULLYOPERATIONAL.•DISABLING THE POWER/SUSPEND/RESUME SWITCH PREVENTS IT FROM BEING USED TO PUT THETABLET PC INTO SLEEP OR HIBERNATION MODE. THE BUTTON RESUME FUNCTION CANNOT BEDISABLED.•IF YOUR TABLET PC IS ACTIVELY ACCESSING INFORMATION WHEN YOU ENTER THE SLEEP ORHIBERNATION MODE,CHANGES TO OPEN FILES ARE NOT LOST. THE FILES ARE LEFT OPEN ANDMEMORY IS KEPT ACTIVE DURING SLEEP MODE OR THE MEMORY IS TRANSFERRED TO THE INTERNALHARD DRIVE DURING HIBERNATION MODE.•THE MAIN ADVANTAGE OF USING HIBERNATION IS THAT POWER IS NOT REQUIRED TO MAINTAIN YOURDATA. THIS IS PARTICULARLY IMPORTANT IF YOU WILL BE LEAVING YOUR TABLET PC IN A SUSPENDEDSTATE FOR A PROLONGED PERIOD OF TIME. THE DRAWBACK OF USING HIBERNATION MODE IS THAT ITLENGTHENS THE POWER DOWN AND POWER UP SEQUENCES AND RESETS PERIPHERAL DEVICES.](https://usermanual.wiki/Sierra-Wireless/MC8355.Manual-2/User-Guide-1598135-Page-43.png)
![43 - Power ManagementHibernation FeatureThe Hibernation feature saves the contents of your Tablet PC’s system memory to the hard drive as a part of the Suspend/Resume mode. Hibernation is enabled by default. Defining Power Button ActionTo determine what occurs when the power button is pressed, follow these steps:1From the Start menu, select Control Panel, then select the Power Options icon.2Select “Choose what the power button does” or “Choose what closing the lid does”, then make your selections (Do Nothing, Sleep, Hibernate, or Shut Down).Windows Power Management The Power Options icon located in the Windows Control Panel allows you to configure some of the power management settings. For example, you can use the Power Options to set the timeout values for turning off the display and hard disks whether you are running the Tablet PC on battery power or one of the adapters. Restarting the SystemIf your system is on and you need to restart it, be sure that you use the following procedure. 1Click the [Start] button, and then move the mouse over the small arrow at the bottom right of the right-hand pane.2Select Restart from the list.TURNING OFF YOUR STYLISTIC TABLET PC WITHOUT EXITING WINDOWS OR TURNING ON YOURTABLET PC WITHIN 10 SECONDS OF THE SYSTEM BEING SHUT OFF MAY CAUSE AN ERROR WHEN YOUSTART THE NEXT TIME.](https://usermanual.wiki/Sierra-Wireless/MC8355.Manual-2/User-Guide-1598135-Page-44.png)
![44 - Power ManagementPowering OffIf you turn off the power while accessing a disk there is a risk of data loss. To ensure that your Tablet PC shuts down without error, use the Windows shut down procedure.Using the correct procedure to shut down from Windows allows your Tablet PC to complete its operations and turn off power in the proper sequence to avoid errors. The proper sequence is:1Click the [Start] button, and then move the mouse over the small arrow at the bottom right of the right-hand pane.2Select Shut Down from the list.If you are going to store your Tablet PC for a month or more, see Care and Maintenance Section. BE SURE TO CLOSE ALL FILES,EXIT ALL APPLICATIONS,AND SHUT DOWN YOUR OPERATING SYSTEMPRIOR TO TURNING OFF THE POWER. IF FILES ARE OPEN WHEN YOU TURN THE POWER OFF,YOU WILLLOSE ANY CHANGES THAT HAVE NOT BEEN SAVED,AND MAY CAUSE DISK ERRORS.](https://usermanual.wiki/Sierra-Wireless/MC8355.Manual-2/User-Guide-1598135-Page-45.png)


![52 - Secure Digital Cards1See your specific card manual for instructions on the installation of your card. Some cards may require that your Tablet PC is off while installing them.2Make sure there is no card currently in the slot. If there is, see Removing an SD Card.3With the product label facing in the same direction as the display screen, insert your card into the slot.4Push the card firmly into the slot until it is seated in the connector. Removing an SD CardTo remove an SD Card, follow these easy steps:1Select Safely Remove Hardware from the System Tray. Highlight the card in the list, then click [Stop].2Push the SD Card in until it unlatches. It will then eject from the slot for removal.INSTALLING OR REMOVING AN SD CARD DURING YOUR STYLISTIC TABLET PC’S SHUTDOWN ORBOOTUP PROCESS MAY DAMAGE THE CARD AND/OR YOUR STYLISTIC TABLET PC.DO NOT INSERT A CARD INTO A SLOT IF THERE IS WATER OR ANY OTHER SUBSTANCE ON THE CARD ASYOU MAY PERMANENTLY DAMAGE THE CARD,YOUR STYLISTIC TABLET PC, OR BOTH.SEE YOUR CARD MANUAL FOR SPECIFIC INSTRUCTIONS ON THE REMOVAL OF YOUR CARD. SOME CARDSMAY REQUIRE YOUR STYLISTIC TABLET PC TO BE IN SLEEP MODE OR OFF WHILE REMOVING THEM.](https://usermanual.wiki/Sierra-Wireless/MC8355.Manual-2/User-Guide-1598135-Page-53.png)

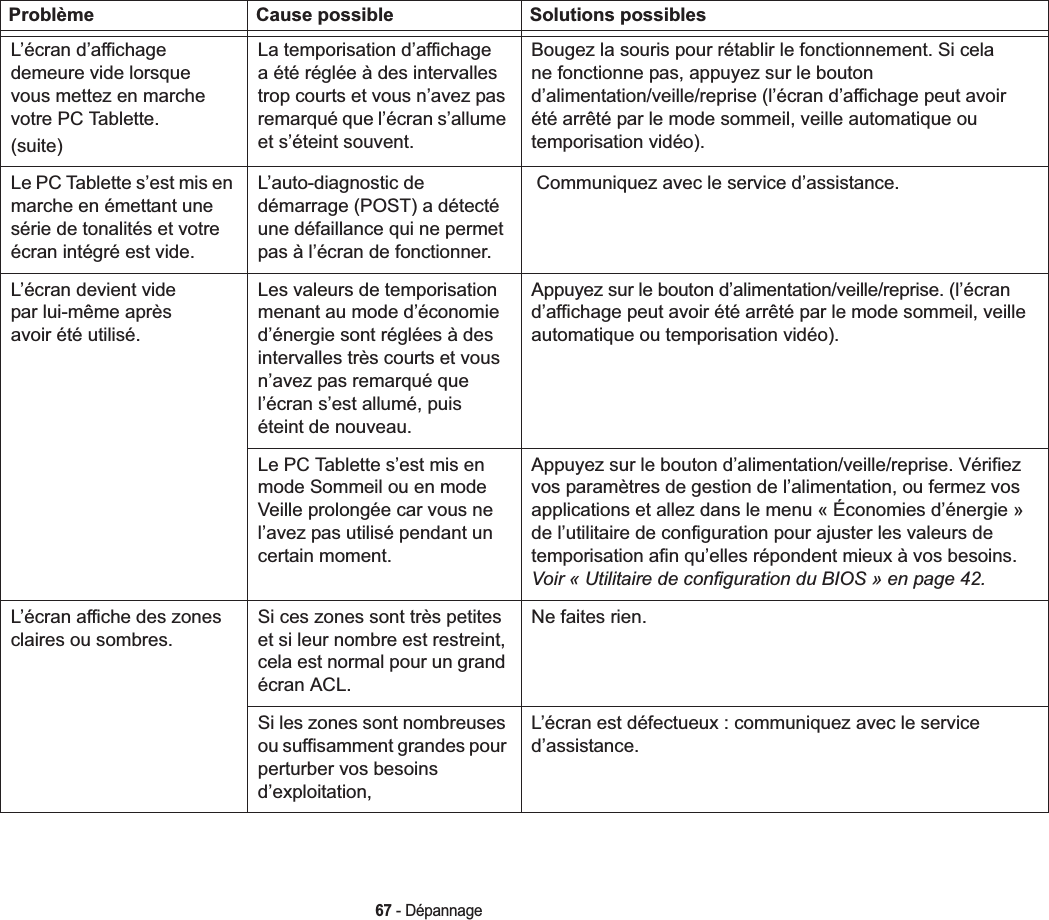
![60 - TroubleshootingShutdown and Startup ProblemsThe Suspend/Resume switch does not work.Suspend/Resume switch is disabled. To enable the button, go to Control Panel -> Power Options and click on the Advanced tab. In the Power buttons area, select the “Change what the power button does” option.There may be application software. conflictClose all applications and try the button again.The system powers up and displays power on information, but fails to load the operating system.You have a secured system requiring a password to load your operating system.Make sure you have the right password. Enter the setup util-ity and verify the Security settings and modify them as accordingly. See “BIOS Setup Utility” on page 37.The boot sequence settings of the setup utility are not compatible with your configu-ration.Set the operating source by pressing the [F12] key while the Fujitsu logo is on screen or use the [F2] key and enter the setup utility and adjust the source settings from the Boot menu. See “BIOS Setup Utility” on page 37.Hard drive was not detected. Use BIOS setup utility to auto detect the internal hard drive.An error message is dis-played on the screen dur-ing the boot sequence.Power On Self Test (POST) has detected a problem.See the Power On Self Test (POST) messages to determine the meaning and severity of the problem. Not all messages are errors; some are simply status indicators. See “Power On Self Test Messages” on page 62.Your Tablet PC appears to change setup parameters when you start it.BIOS setup changes were not saved when made and you exited the setup utility.Make sure you select Save Changes And Exit when exiting the BIOS setup utility.Video ProblemsThe display is blank when you turn on your Tablet PC.Power management timeouts are set for short intervals and you didn’t see the display go on and off again.Move the mouse to restore operation. If that fails, push the Power/Suspend/Resume switch. (The display may be shut off by Sleep mode, Auto Suspend or Video Timeout)Problem Possible Cause Possible Solutions](https://usermanual.wiki/Sierra-Wireless/MC8355.Manual-2/User-Guide-1598135-Page-61.png)
![64 - Restoring Your Pre-installed Software2After reading the License Agreement, click [I agree].3A window will appear containing a list of applications, drivers, and utilities that you can install from the DAR disc.4In the list, check off all the components you want to install. If you want to install all components, click [Select All]. Clicking [Select All] will select all of the blue-coded components; you must select grey and green components separately.5Once you have selected the components you wish to install, click [Install Selected Subsystems]; the components will be installed.6After the components are installed, click [OK], then click [Yes] when asked if you want to reboot the system. Recovery and Utility discThe Recovery and Utility disc contains six utilities:Recovery and Utility tabs•Diagnostics tab: The Diagnostics tool is designed for use by IT professionals. It is not likely you will need to use this tool. When you select devices from the Diagnosis window then click [Execute], several tests are performed on the selected components.•Recovery tab: The Recovery tab contains two tools: Restoring the Factory Image (only C: drive) and Restoring the Factory Image (full hard drive recovery). You can use these tools to perform a full hard drive recovery. •Utility tab: The Utility tab contains three tools: Hard Disk Data Delete, Restore Recovery and Utility, and Windows Complete PC Restore.•The Hard Disk Data Delete utility is used to delete all data on the hard disk and prevent the data from being reused. NOTE: Do not use the Hard Disk Data Delete utility unless you are absolutely certain that you want to erase your entire hard disk, including all partitions.•Restore Recovery and Utility allows you to restore the first hidden partition.•Windows Complete PC Restore utility allows you to restore an image created with Windows Backup and Restore Center. Windows Complete PC Restore will overwrite the data on your hard disk drive.To use the disc, follow the instructions in the “Using the Recovery and Utility Disc” booklet that is pack-aged with the disc.](https://usermanual.wiki/Sierra-Wireless/MC8355.Manual-2/User-Guide-1598135-Page-65.png)


![87 Configuring the Wireless LANConfiguring the Wireless LANThe WLAN device can be configured to establish wireless network connectivity using the software that is built into Windows. Support for most industry standard security solutions is contained in this software.Pre-defined parameters will be required for this procedure. Please consult with your network administrator for these parameters:Configuring the WLAN 1Click the Start button, then select Control Panel.2If the Control Panel is not in Classic View, select Classic View from the left panel. Double-click the Network Connections icon.3Double-click on the Wireless Network Connection icon.4Click on [View Wireless Networks]5Choose a wireless network.6Click [Connect].7Enter the Network Key, if required.8Enter any required information. It may be necessary to consult with your network administrator for some of the information.9If you require assistance, go to [Start] -> Help and Support -> Networking and the Web. Select the main topic in which you are interested, then type in relevant keywords in the Search box.Connection to the networkAfter you have configured your computer, you can connect to an active network by performing the following steps:1Click on the WLAN icon in the system tray.2Select “Connect to a network”.3Select a network from the list that appears, and click the [Connect] button.After you have configured your computer, you can connect to an active network by clicking on the Wireless Network icon in the system tray:](https://usermanual.wiki/Sierra-Wireless/MC8355.Manual-2/User-Guide-1598135-Page-88.png)
![88 Troubleshooting the WLANTroubleshooting the WLANTroubleshootingCauses and countermeasures for troubles you may encounter while using your wireless LAN are described in the following table. If you are unfamiliar with the steps required, consult your System Administrator or go to [Start] -> Help and Support -> Networking and the WebProblem Possible Cause Possible SolutionUnavailable network connectionIncorrect network name (SSID) or network keyAd hoc connection: verify that the network names (SSID’s) and network keys (WEP) of all computers to be connected have been configured correctly. SSID’s and WEP key values must be identical on each machine.Access Point (Infrastructure) connection: set network name (SSID) and network key to the same values as those of the access point. Set the Network Authentication value identically to that of the Access Point. Please consult your network administrator for this value, if necessary. Weak received signal strength and/or link qualityAd hoc connection: Retry connection after shortening the distance to the destination computer or removing any obstacles for better sight.Access Point (Infrastructure) connection: Retry connection after shortening the distance to the access point or removing any obstacles for better transmission.The WLAN device has been deactivated or disabledCheck if the wireless switch is turned On. Go to Start -> Control Panel, and double-click on Windows Mobility Center. If the wireless network is off, click the [Turn wireless on] button. The computer to be connected is turned offCheck if the computer to be connected is turned ON.](https://usermanual.wiki/Sierra-Wireless/MC8355.Manual-2/User-Guide-1598135-Page-89.png)

![92 Using the Bluetooth DeviceUsing the Bluetooth DeviceThe optional Integrated Bluetooth (V. 3.0) module is a wireless device installed in selected Fujitsu mobile computers. What is BluetoothBluetooth technology is designed as a short-range wireless link between mobile devices, such as laptop computers, phones, printers, and cameras. Bluetooth technology is used to create Personal Area Networks (PANs) between devices in short-range of each other. Where to Find Information About BluetoothFor additional information about Bluetooth Technology, visit the Bluetooth Web site at: www.bluetooth.com.THE WIRELESS LAN/BLUETOOTH ON/OFF SWITCH WILL POWER OFF BOTH THE OPTIONAL WIRELESSLAN AND BLUETOOTH DEVICES AT THE SAME TIME. TO ENABLE OR DISABLE EITHER ONE OF THEDEVICES INDIVIDUALLY,PERFORM THE FOLLOWING STEPS:1Slide the Wireless LAN/Bluetooth on/off switch to On position.2Right-click on the Bluetooth icon in the Windows notification area on the right side of the taskbar.3Select Turn Adapter On (or Off).4Click [OK].](https://usermanual.wiki/Sierra-Wireless/MC8355.Manual-2/User-Guide-1598135-Page-93.png)
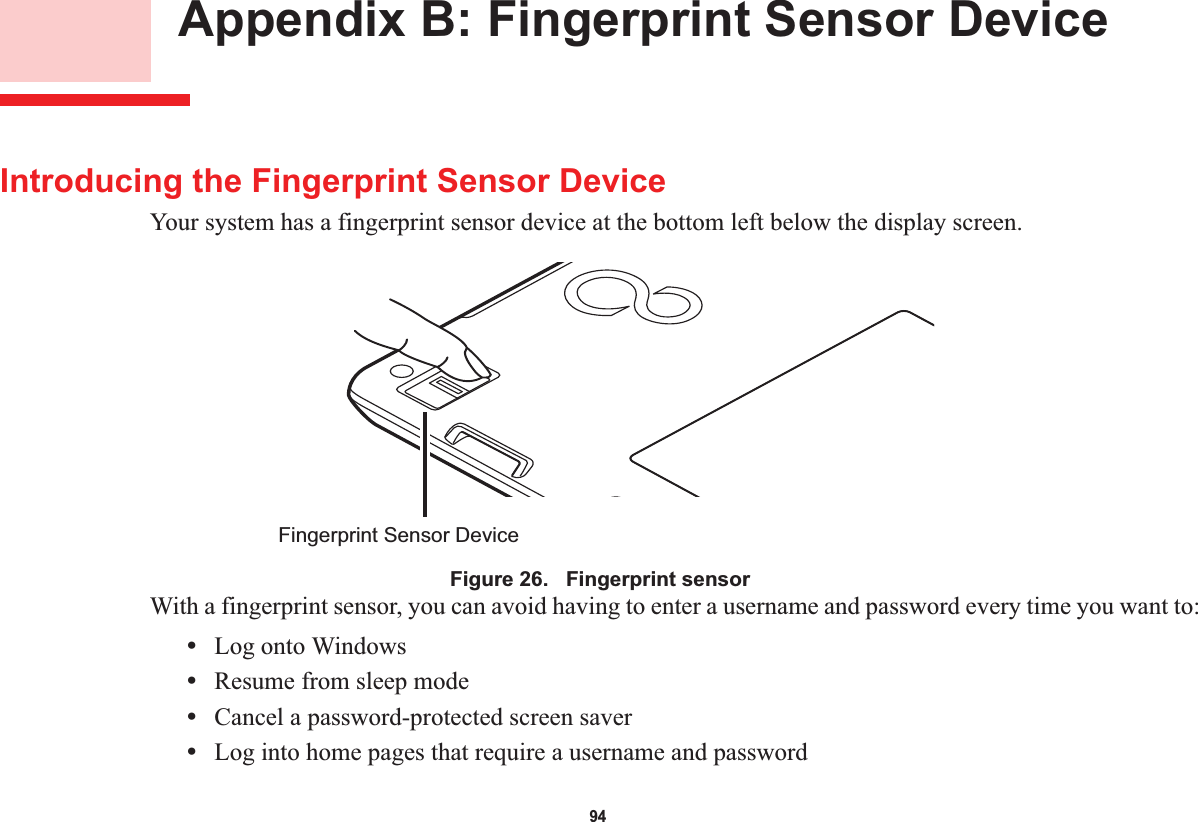
![98 - Introducing the Fingerprint Sensor DeviceComputer resources are often protected with passwords. Whether you are logging into your computer, accessing your email, e-banking, paying bills online, or accessing network resources, you often have to supply credentials to gain access. This can result in dozens of sets of credentials that you have to remember.During user enrollment a "master password” is created for the enrolled user. This master password “replaces” all other passwords for sites you register with OmniPass. Example: A user, John, installs OmniPass on his system (his home computer) and enrolls an OmniPass user with username “John_01” and password “freq14”. He then goes to his webmail site to log onto his account. He inputs his webmail credentials as usual (username “John_02” and password “STYLISTIC”), but instead of clicking [Submit], he directs OmniPass to Remember Password. Now whenever he returns to that site, OmniPass will prompt him to supply access credentials. John enters his OmniPass user credentials (“John_01” and “freq14”) in the OmniPass authentication prompt, and he is allowed into his webmail account. He can do this with as many web sites or password protected resources he likes, and he will gain access to all those sites with his OmniPass user credentials (“John_01” and “freq14”). This is assuming he is accessing those sites with the system onto which he enrolled his OmniPass user. OmniPass does not actually change the credentials of the password protected resource. If John goes to another computer without he OmniPass account to access his webmail, he would need to enter his original webmail credentials (“John_02” and “STYLISTIC”) to gain access. If he attempts his OmniPass user credentials on a system other than a system he’s enrolled on, he will not gain access.Basic EnrollmentTHE ENROLLMENT PROCEDURE ASSUMES YOU HAVE NO HARDWARE AUTHENTICATION DEVICES ORALTERNATE STORAGE LOCATIONS THAT YOU WISH TO INTEGRATE WITH OMNIPASS. IF YOU DESIRESUCH FUNCTIONALITY,CONSULT THE APPROPRIATE SECTIONS OF THIS DOCUMENT.](https://usermanual.wiki/Sierra-Wireless/MC8355.Manual-2/User-Guide-1598135-Page-99.png)
![99 - Introducing the Fingerprint Sensor DeviceThe Enrollment Wizard will guide you through the process of enrolling a user. Unless you specified otherwise, after OmniPass installation the Enrollment Wizard will launch on Windows login. If you do not see the Enrollment Wizard, you can bring it up by clicking Start on the Windows taskbar; select Programs; select Softex; click OmniPass Enrollment Wizard.1Click Enroll to proceed to username and password verification. By default, the OmniPass Enrollment Wizard enters the credentials of the currently logged in Windows user.2Enter the password you use to log in to Windows. This will become the “master password” for this OmniPass user. In most cases, the Domain: value will be your Windows computer name. In a corporate environment, or when accessing corporate resources, the Domain: may not be your Windows computer name. Click [Next] to continue.3In this step OmniPass captures your fingerprint. Refer to “Enrolling a Fingerprint” on page 99 for additional information.4Next, choose how OmniPass notifies you of various events. We recommend you keep Taskbar Tips onBeginner mode taskbar tips and Audio Tips on at least Prompt with system beeps only until you get accustomed to how OmniPass operates. Click [Next] to proceed with user enrollment. You will then see a Congratulations screen indicating your completion of user enrollment.5Click [Done] to exit the OmniPass Enrollment Wizard. You will be asked if you’d like to log in to OmniPass with your newly enrolled user; click [Yes].Enrolling a FingerprintEnrolling a fingerprint will increase the security of your system and streamline the authentication procedure.You enroll fingerprints in the OmniPass Control Center. With an OmniPass user logged in, double-click the system tray OmniPass icon. Select the User Settings tab and click Enrollment under the UserSettings area. Click Enroll Authentication Device and authenticate at the authentication prompt to start device enrollment.](https://usermanual.wiki/Sierra-Wireless/MC8355.Manual-2/User-Guide-1598135-Page-100.png)
![100 - Introducing the Fingerprint Sensor Device1During initial user enrollment, you will be prompted to select the finger you wish to enroll. Fingers that have already been enrolled will be marked by a green check. The finger you select to enroll at this time will be marked by a red arrow. OmniPass will allow you re-enroll a finger. If you choose a finger that has already been enrolled and continue enrollment, OmniPass will enroll the fingerprint, overwriting the old fingerprint. Select a finger to enroll and click [Next].2It is now time for OmniPass to capture your selected fingerprint. It may take a several capture attempts before OmniPass acquires your fingerprint. Should OmniPass fail to acquire your fingerprint, or if the capture screen times out, click [Back] to restart the fingerprint enrollment process. Your system has a “swipe” fingerprint sensor. A swipe sensor is small and resembles a skinny elongated rectangle. To capture a fingerprint, gently swipe or pull your fingertip over the sensor (starting at the second knuckle) towards yourself. Swiping too fast or too slow will result in a failed capture. The Choose Fingerscreen has a [Practice] button; click it to practice capturing your fingerprint. When you are comfortable with how your fingerprint is captured, proceed to enroll a finger.3Once OmniPass has successfully acquired the fingerprint, the Verify Fingerprint screen will automatically appear. To verify your enrolled fingerprint, place your fingertip on the sensor and hold it there as if you were having a fingerprint captured. Successful fingerprint verification will show a green fingerprint in the capture window and the text Verification Successful under the capture window.](https://usermanual.wiki/Sierra-Wireless/MC8355.Manual-2/User-Guide-1598135-Page-101.png)
![102 - Introducing the Fingerprint Sensor DeviceGo to a site that requires a login (username and password), but do not log in yet. At the site login prompt, enter your username and password in the prompted fields, but do not enter the site (do not hit [Enter], [Submit], [OK], or Login). Right-click the OmniPass system tray icon and select Remember Passwordfrom the submenu. The Windows arrow cursor will change to a golden key OmniPass cursor. Click the OmniPass cursor in the login prompt area, but don’t click [Login] or [Submit].Associating a Friendly NameAfter clicking the OmniPass key cursor near the login prompt, OmniPass will prompt you to enter a “friendly name” for this site. You should enter something that reminds you of the website, the company, or the service you are logging into. In its secure database, OmniPass associates this friendly name with this website.Additional Settings for Remembering a SiteWhen OmniPass prompts you to enter a “friendly name” you also have the opportunity to set how OmniPass authenticates you to this site. There are three effective settings for how OmniPass handles a remembered site.The default setting is Automatically click the “OK” or “Submit” button for this password protected site once the user is authenticated. With this setting, each time you navigate to this site OmniPass will prompt you for your master password or fingerprint authentication device. Once you have authenticated with OmniPass, you will automatically be logged into the site.Less secure is the option to Automatically enter this password protected site when it is activated. Do not prompt for authentication. Check the upper box to get this setting, and each time you navigate to this site OmniPass will log you into the site without prompting you to authenticate.THIS SETTING IS MORE CONVENIENT IN THAT WHENEVER YOU GO TO A SITE REMEMBERED WITH THISSETTING,YOU WILL BYPASS ANY AUTHENTICATION PROCEDURE AND GAIN INSTANT ACCESS TO THESITE. BUT SHOULD YOU LEAVE YOUR SYSTEM UNATTENDED WITH YOUR OMNIPASS USER LOGGED IN,ANYONE USING YOUR SYSTEM CAN BROWSE TO YOUR PASSWORD PROTECTED SITES AND GAINAUTOMATIC ACCESS.](https://usermanual.wiki/Sierra-Wireless/MC8355.Manual-2/User-Guide-1598135-Page-103.png)
![103 - Introducing the Fingerprint Sensor DeviceIf you uncheck both boxes in Settings for this Password Site, OmniPass will prompt you for your master password or fingerprint authentication device. Once you have authenticated with OmniPass your credentials will be filled in to the site login prompt, but you will have to click the website [OK], [Submit], or [Login] button to gain access to the site.Click Finish to complete the remember password procedure. The site location, the credentials to access the site, and the OmniPass authentication settings for the site are now stored in the OmniPass secure database. The OmniPass authentication settings (Settings for this Password Site) can always be changed in Vault Management.Logging in to a Remembered SiteWhether or not OmniPass prompts you to authenticate when you return to a remembered site is determined by Settings for this Password Site and can be changed in Vault Management.The following cases are applicable to using OmniPass to login to: Windows, remembered web sites, and all other password protected resources.With Master PasswordOnce you return to a site you have remembered with OmniPass, you may be presented with a master password prompt. Enter your master password and you will be allowed into the site.Logging into Windows with a Fingerprint DeviceWhen logging into Windows with a fingerprint device, the fingerprint capture window will now appear next to the Windows Login screen. Place your enrolled fingertip on the sensor to authenticate. You will be simultaneously logged into Windows and OmniPass. The capture window will also appear if you have used Ctrl-Alt-Del to lock a system, and the fingerprint device can be used to log back in as stated above.IF A MACHINE IS LOCKED AND OMNIPASS DETECTS A DIFFERENT USER LOGGING BACK IN WITH AFINGERPRINT,THE FIRST USER WILL BE LOGGED OUT AND THE SECOND USER LOGGED IN.](https://usermanual.wiki/Sierra-Wireless/MC8355.Manual-2/User-Guide-1598135-Page-104.png)

![105 - Introducing the Fingerprint Sensor DeviceTo add a new identity, click New Identity or double-click Click here to add a new identity. Name the new identity and click [OK], then click [Apply]. You can now switch to the new identity and start remembering passwords.To delete an identity, highlight the identity you want to delete and click [Delete Identity], then [Apply].To set the default identity, highlight the identity you want as default and click [Set as Default]; click [Apply] to ensure the settings are saved. If you log in to OmniPass with a fingerprint device, you will automatically be logged in to the default identity for that OmniPass user. You can choose the identity with which you are logging in if you login using "master password".Choosing User Identity during LoginTo choose your identity during login, type your username in the User Name: field. Press [Tab] and see that the Domain: field self-populates. Click the Password: field to bring the cursor to it, and you will see the pull-down menu in the Identity: field. Select the identity to login as, then click OK.Switch User IdentityTo switch identities at any time, right-click the OmniPass system tray icon and click Switch User Identityfrom the submenu. The Switch Identity dialog will appear. Select the desired identity and then click OK.Identities and Password ManagementOn the Manage Passwords interface of the Vault Management tab of the OmniPass Control Center, there is a pull-down selection box labeled, Identity. This field lets you choose which identity you are managing passwords for. When you select an identity here, only those password protected dialogs that are associated with that identity are shown. You can perform all the functions explained in “PasswordManagement” on page 104.WHEN YOU DELETE AN IDENTITY,ALL OF ITS ASSOCIATED REMEMBERED SITES AND PASSWORDPROTECTED DIALOGS ARE LOST.](https://usermanual.wiki/Sierra-Wireless/MC8355.Manual-2/User-Guide-1598135-Page-106.png)

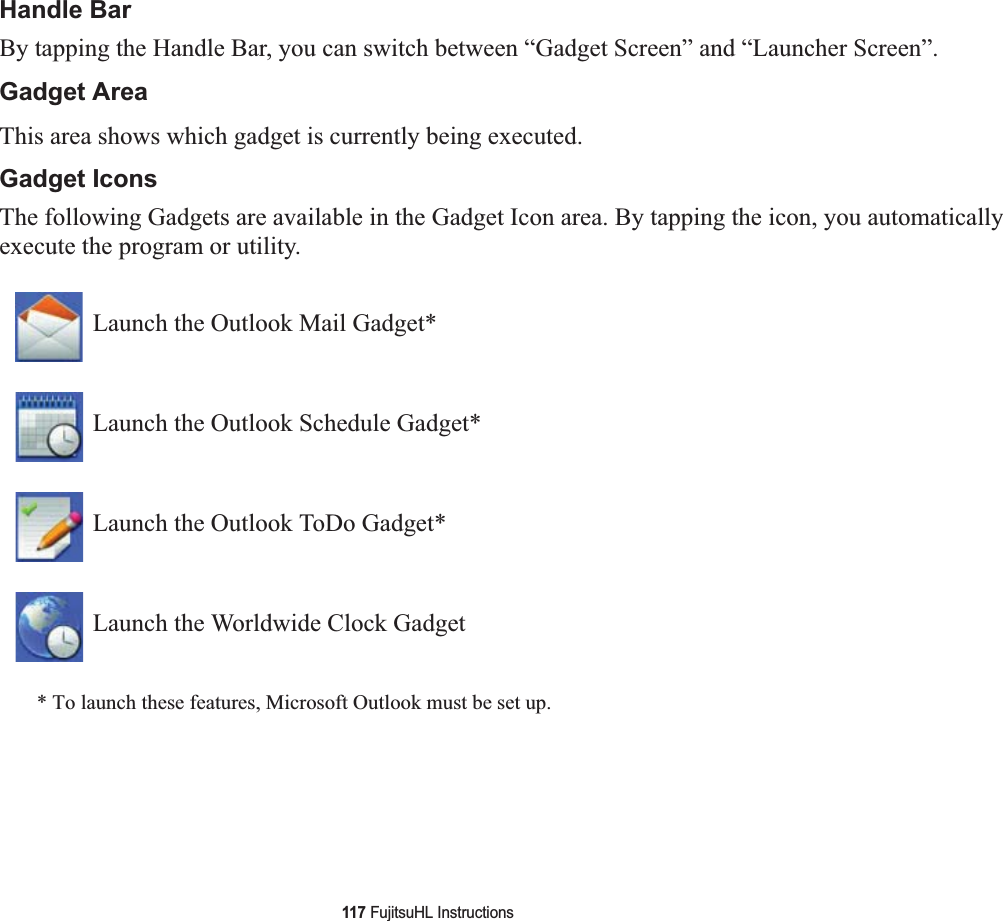
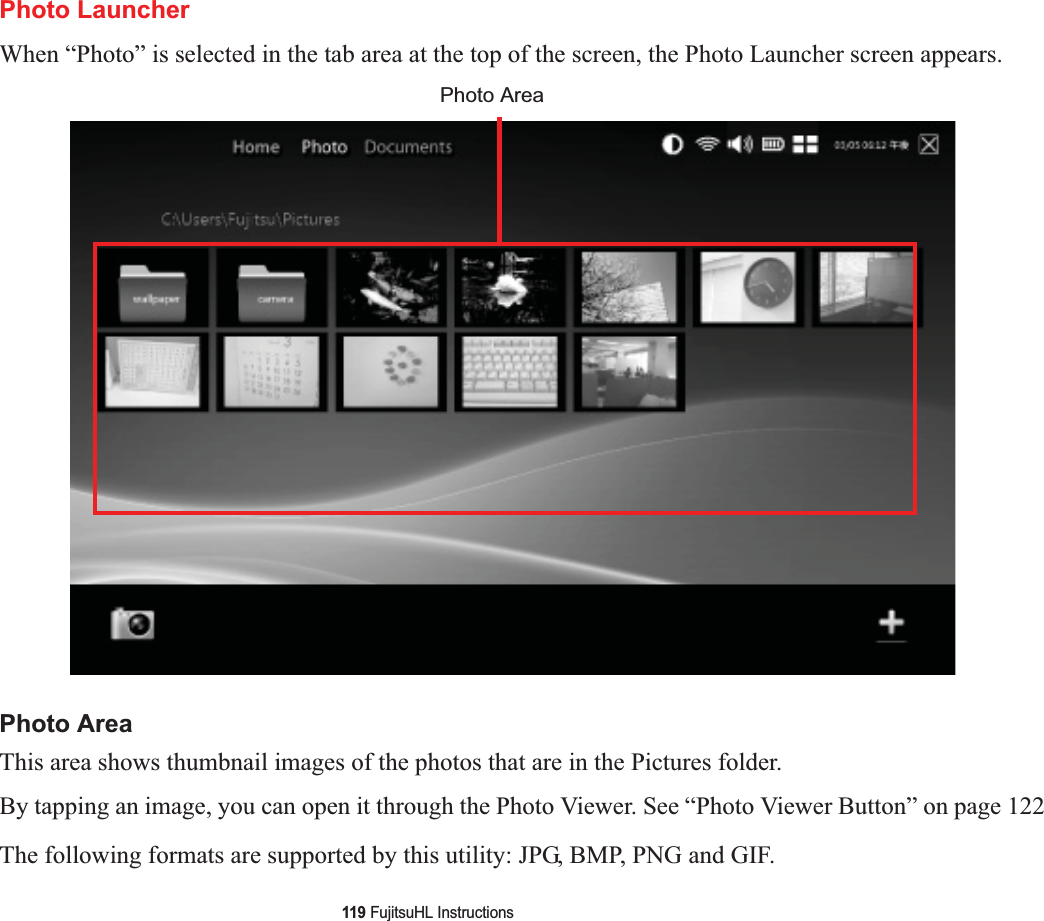
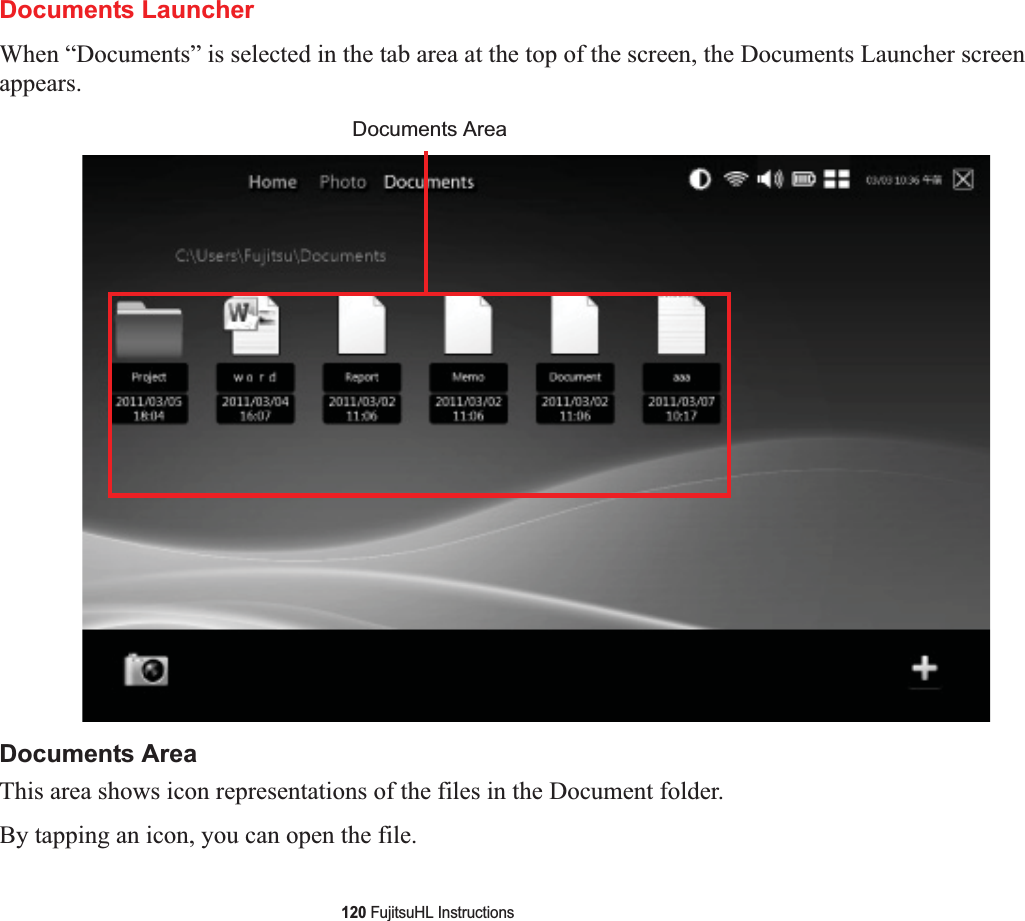
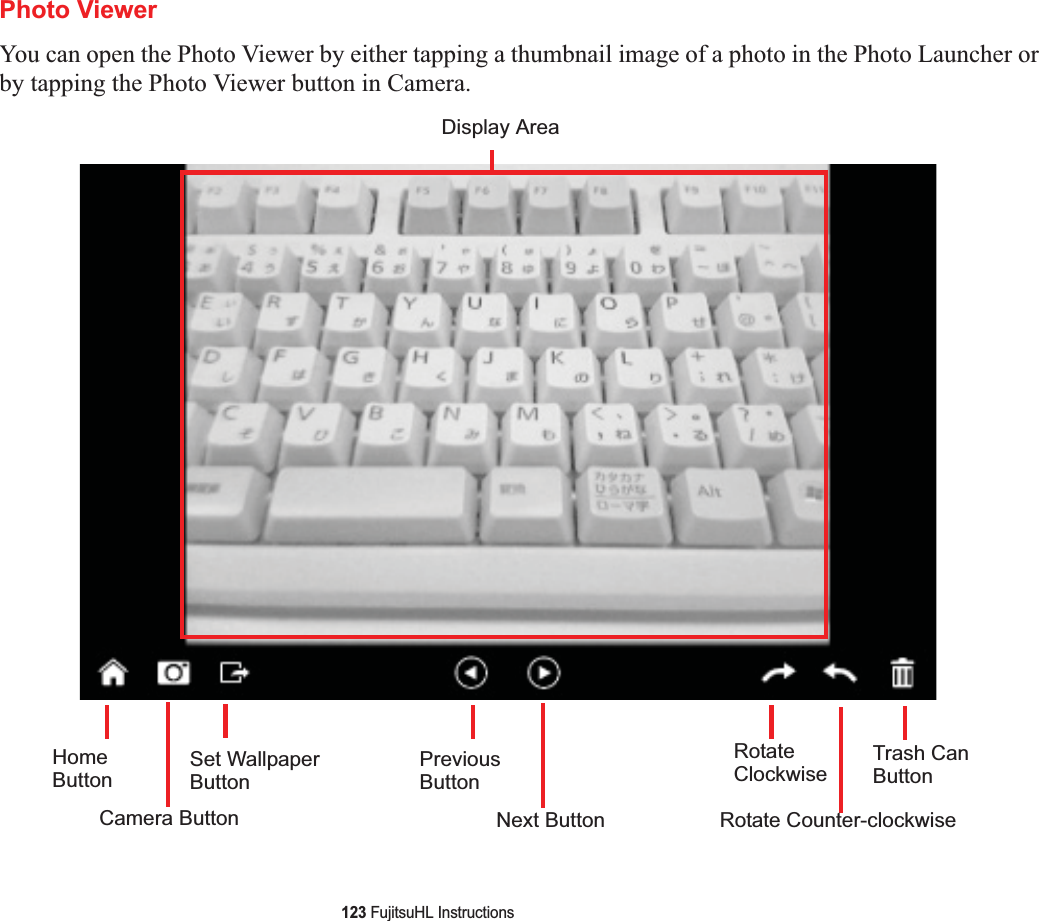
![112 Appendix C: FujitsuHL User GuideFujitsuHL InstructionsFujitsuHL provides an icon-based display of the Home, Photo, and Documents Launchers that help you easily choose them by tapping the icon on the screen.FujitsuHL assists you in performing the following functions:•Execute FujitsuHL gadgets•Link to software that you often use •Open files in the Pictures and Documents folders•Take pictures using the Web CameraStarting FujitsuHLYou can execute FujitsuHL by two methods:•Pressing the [Keyboard] button on the PC for two seconds and more, or,•Tapping Start > All Programs > FujitsuHL, then selecting FujitsuHL.TO USE FUJITSUHL, YOU SHOULD SET THE DISPLAY RESOLUTION TO 1280 X 800 DOTS.](https://usermanual.wiki/Sierra-Wireless/MC8355.Manual-2/User-Guide-1598135-Page-113.png)
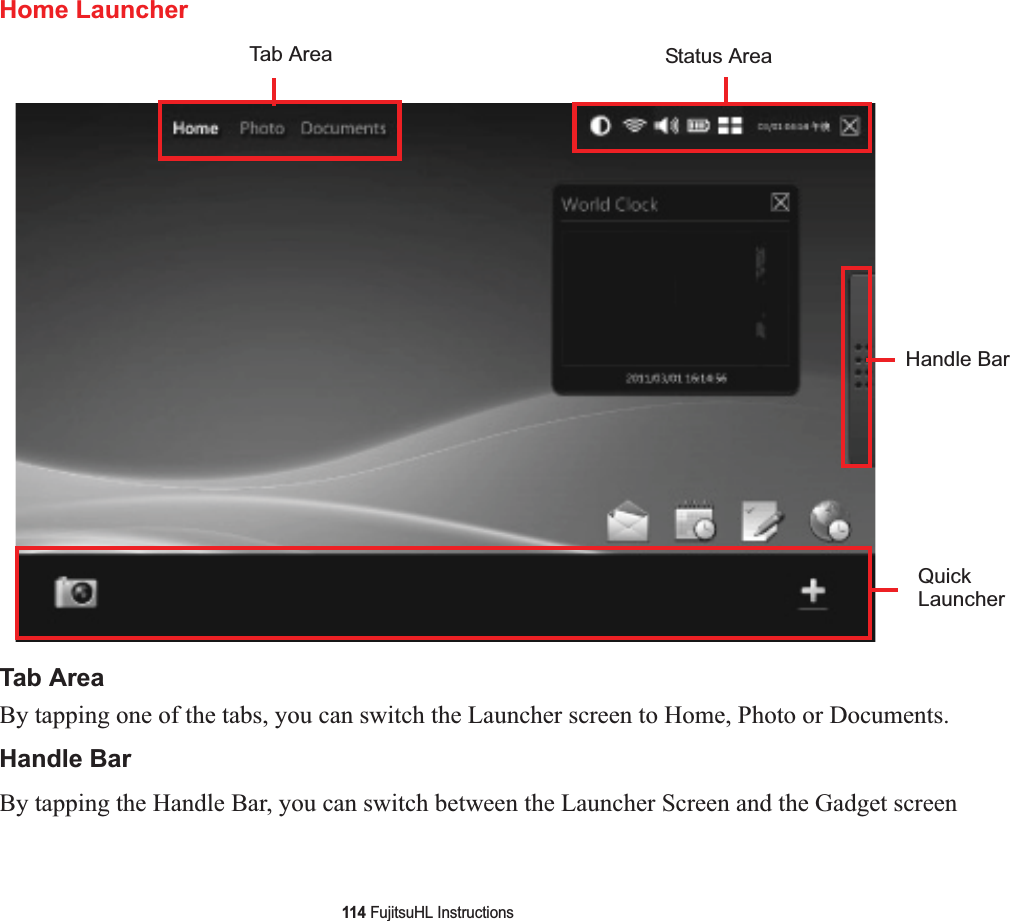
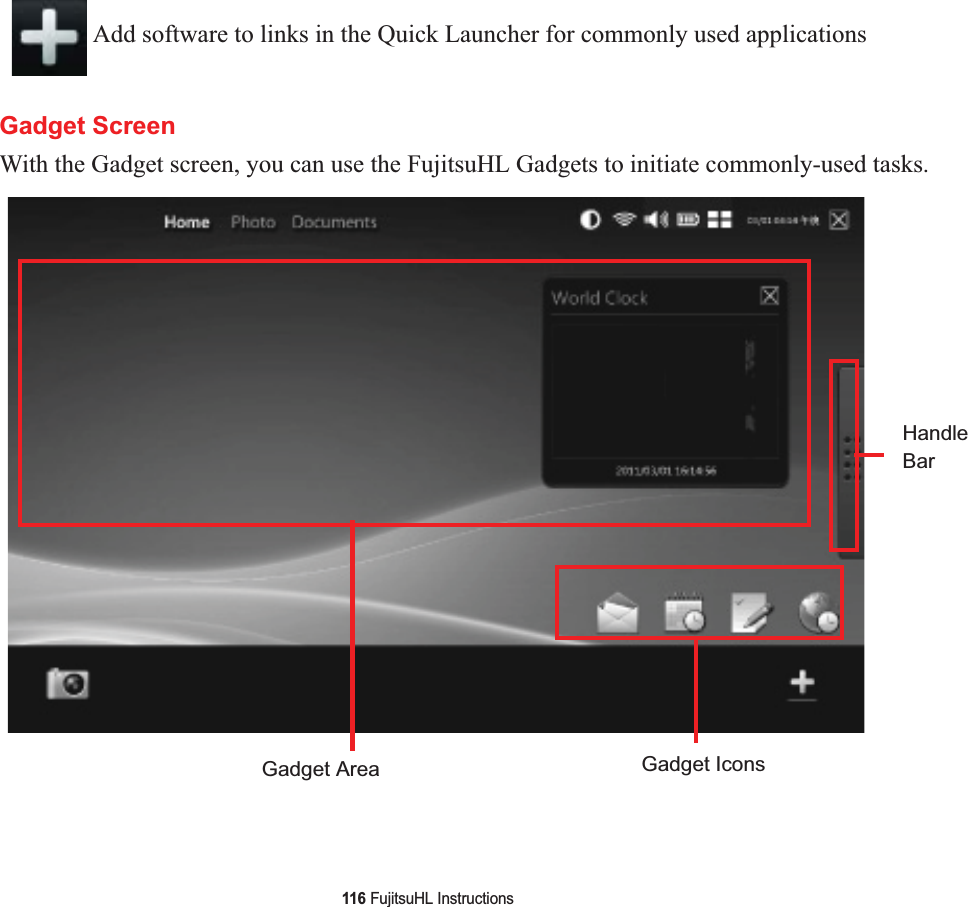
![118 FujitsuHL InstructionsLauncher ScreenWith the Launcher Screen, you can execute selected applications.Shortcut AreaThe shortcut area displays icons for each of the linked applications. To execute an application, simply tap on the icon.To add a new icon to the shortcut area, add it to the Quick Launcher (See “Quick Launcher” on page 115),then drag the icon to the shortcut area.To delete a shortcut, press it until prompted to remove, then tap [OK].Note that the Mailer and Browser icons cannot be deleted.ShortcutArea](https://usermanual.wiki/Sierra-Wireless/MC8355.Manual-2/User-Guide-1598135-Page-119.png)


![23 - ÉcranFigure 5. Écran du PC TabletteÉcranVotre PC Tablette STYLISTIC Q550 est doté d’un écran d’affichage à DEL rétroéclairé vous permettant de mieux voir son contenu lorsque la lumière environnante est intense. La ligne svelte de votre PC Tablette vous permet de le manipuler facilement et de le tourner à 90o, 180o, ou 270o dans toutes les directions. Cet écran peut être utilisé comme tablette, de la même façon qu’un bloc de papier.Réglage de la luminosité de l’écranPour régler la luminosité avec l’utilitaire de gestion de l’alimentation :Cliquez sur [Démarrer] -> Panneau de configuration. Dans Affichage par :, sélectionnez un des affichages par icônes. Sélectionnez Écran puis cliquez sur Régler la luminosité dans le panneau de gauche. Sous Sélectionner un régime d’alimentation, choisissez le régime que vous souhaitez. Faites glisser la barre Luminosité de l’écran : (au bas de la fenêtre) vers la gauche ou la droite selon votre préférence.](https://usermanual.wiki/Sierra-Wireless/MC8355.Manual-2/User-Guide-1598135-Page-151.png)
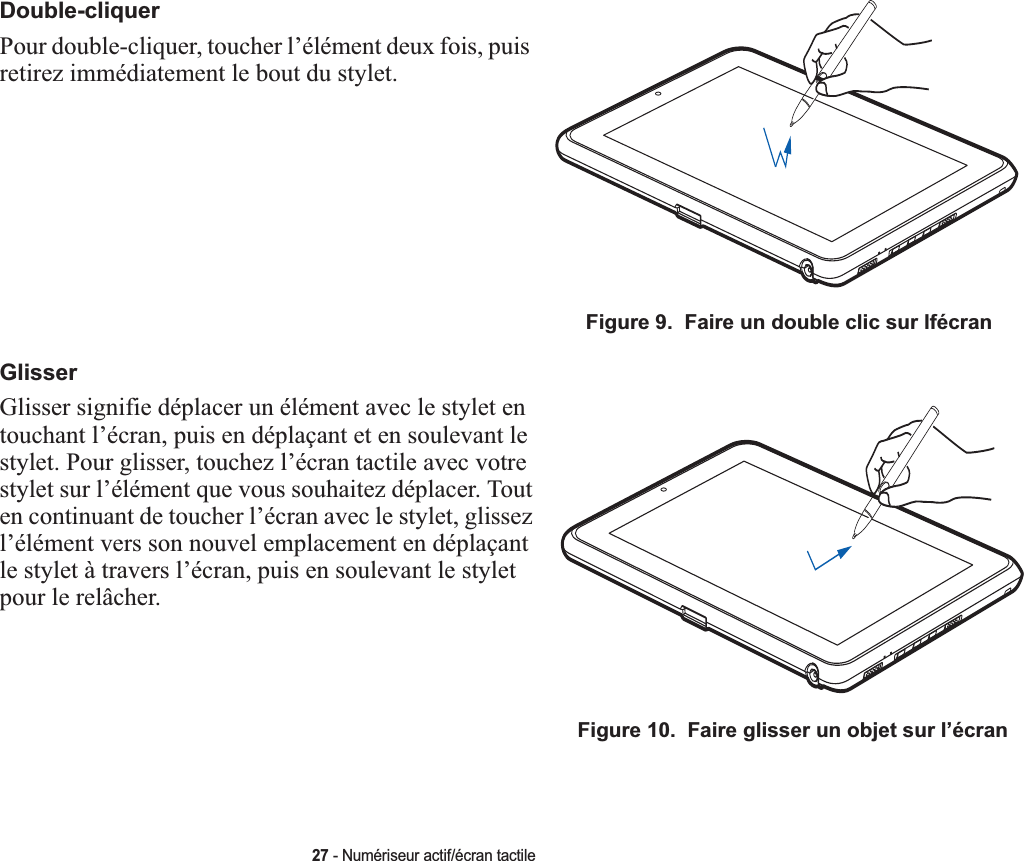
![Cliquer sur lfécran numériseur actifPour faire un clic gauche, touchez l’objet que vous voulez sélectionner, puis soulevez immédiatement le bout du stylet. Figure 7. Cliquer sur lfécran numériseur actifFigure 8. Faire un clic droit sur l’écran numériseurFaire un clic droit sur lfécran numériseurPour faire un clic droit, maintenez le bouton sur le devant du stylet enfoncé en tapotant sur lfécran. Pour changer les paramètres pour la fonction de clic à droite, allez à [Démarrer] -> Panneau de configuration -> Paramètres tactiles et du stylet. Dans l’onglet des Options de stylet, sélectionnez « Appuyer et maintenir », puis cliquez sur le bouton [Paramètres].26 - Numériseur actif/écran tactile](https://usermanual.wiki/Sierra-Wireless/MC8355.Manual-2/User-Guide-1598135-Page-154.png)
![28 - Numériseur actif/écran tactileÉtalonnage de l’écranPour assurer une correspondance précise entre le curseur et le stylet, vous devez exécuter l’Utilitaire d’étalonnage de l’écran tactile avant d’utiliser l’écran tactile pour la première fois. Faites de même si vous avez modifié la résolution de l’écran et/ou son orientation.Pour exécuter l’utilitaire d’étalonnage :1Cliquez sur [Démarrer] -> Panneau de configuration. 2Double-cliquez sur l’icône Paramètres PC Tablette, puis sélectionnez l’onglet Ecran.3Cliquez sur le bouton [Etalonner], puis sélectionnez la fonction à étalonner : stylet ou tactile.4Réglez l’écran de votre portable à un angle confortable, puis repérez le symbole (+) dans le coin supérieur gauche de l’écran.5A l’aide du stylet ou de votre doigt (selon la fonction que vous avez choisi d’étalonner), touchez fermement l’écran directement sur le symbole (+). Soulevez le stylet de l’écran et la cible se déplacera vers une position différente sur l’écran.6Répétez l’étape 5 jusqu’à ce que vous ayez sélectionné tous les symboles (+).7Une fois cette opération terminée, appuyez sur le bouton [OK].8Touchez le stylet sur plusieurs points de l’écran pour vérifier qu’il est bien étalonné. Si vous n’êtes pas satisfait de l’étalonnage de l’écran, appuyez sur le bouton [Étalonner] pour recommencer.Utilisation de l’écran tactile capacitifCe PC Tablette comporte un numériseur double permettant d’utiliser le stylet ou un doigt comme pointeur (voir « Écran numériseur actif » en page 25 pour une description). Ce type d’écran permet également d’utiliser un, deux, trois ou quatre « mouvements » de doigts pour exécuter diverses opérations, notamment pour défiler, zoomer et pivoter.LORSQUE VOUS TAPOTEZ SUR L’ÉCRAN PENDANT L’ÉTALONNAGE,N’UTILISEZ PAS DE FORCE EXCESSIVE.DANS LE CAS CONTRAIRE,VOUS RISQUEZ D’ENDOMMAGER L’ÉCRAN DEL ET/OU L’ÉCRAN TACTILE.](https://usermanual.wiki/Sierra-Wireless/MC8355.Manual-2/User-Guide-1598135-Page-156.png)
![30 - Numériseur actif/écran tactileMouvement de zoom Le mouvement de zoom est particulièrement utile pour voir des images. Pour faire un zoom avant, placez deux doigts sur l’élément que vous désirez agrandir (posez un premier doigt rapidement suivi du deuxième), puis écartez-les l’un de l’autre.Si au moins un des doigts se déplace d'au moins 10 mm, un zoom est produit. Si la distance entre les doigts change de 10 mm ou plus et que les deux doigts sont demeurés à peu près alignés, le mode zoom est activé. Si un des deux doigts s'écarte de plus de 10 mm de la « ligne de zoom » créée lors du contact initial des doigts, le mode zoom est désactivé.Pour faire un zoom arrière, placez deux doigts sur l’élément que vous désirez réduire (posez un premier doigt rapidement suivi du deuxième), puis déplacez-les l’un vers l’autre.Mouvement de rotation Si vous désirez faire pivoter un objet sur l’écran, placez deux doigts sur l’image que vous désirez faire pivoter (posez un premier doigt rapidement suivi du deuxième), puis déplacez-les en sens contraire, comme pour tourner une poignée. La direction du pivotement de l’objet dépend de la direction du mouvement des doigts.Si au moins un des doigts se déplace d'au moins 12 mm, une rotation est produite. Si un doigt demeure immobile (se déplaçant de moins de 5 mm dans n'importe quelle direction) et que l'autre est déplacé, une rotation est produite. Si les doigts commencent à se déplacer dans la même direction, la rotation est annulée. Si la distance entre les doigts change de plus de 10 mm, la rotation est annulée.Accès au pavé tactile sur écranVotre PC Tablette est doté d’un pavé tactile sur l’écran, qui offre des fonctions utiles. Les fonctions du pavé tactile sur écran comprennent :•Souris virtuelle : La souris virtuelle (Virtual Mouse Emulator) fonctionne presque de la même manière qu’une souris ordinaire. Vous pouvez ainsi faire défiler des pages, faire des glisser-déposer et des clics, ainsi que des actions avec les combinaisons [Ctrl]+[Clic] et [Maj]+[Clic].](https://usermanual.wiki/Sierra-Wireless/MC8355.Manual-2/User-Guide-1598135-Page-158.png)
![31 - Numériseur actif/écran tactile•Lancement d’applications/Touches programmées : Cette fenêtre donne accès à cinq pages dont chacune peut contenir jusqu’à vingt boutons. Chaque bouton peut être programmé pour ouvrir une application, un dossier, un document ou pour effectuer une combinaison de touches (comme [Échap], [Alt+X] et [Page haut]).•Clavier numérique : Cette fenêtre contient un clavier logiciel qui peut être utilisé dans les calculs mathématiques. Il fonctionne presque de la même manière que la calculatrice ordinaire Windows.Pour accéder au pavé tactile sur écran, allez à [Démarrer] > Tous les programmes > Pavé tactile sur écran Fujitsu (Fujitsu OnScreen TouchPad). Pour en savoir plus sur cet utilitaire, cliquez sur Utilisation et Aide (Usage and Help). Utilisation du clavier logiciel NuancePour des informations générales sur l’utilisation du clavier logiciel Nuance, veuillez consulter le Guide d’introduction fourni avec l’ordinateur. Si vous avez des questions sur le clavier logiciel Nuance ou si vous souhaitez en apprendre plus, cliquez sur l’icône Aide (semblable à un point d’interrogation) dans la barre de tâches Nuance.](https://usermanual.wiki/Sierra-Wireless/MC8355.Manual-2/User-Guide-1598135-Page-159.png)
![32 - Numériseur actif/écran tactileEntretien du styletModification des paramètres du styletVous pouvez opérer quelques changements dans les paramètres du stylet pour l’adapter à vos besoins (changement de la sensibilité à la pression, notamment) Pour ce faire, allez à [Démarrer] > Panneau de configuration, puis sélectionnez un des affichages dans la zone « Page d’accueil du Panneau de configuration :» . Cliquez sur l’icône « Stylet et périphériques d’entrée », la fenêtre des paramètres s’affichera alors.•UTILISEZ UNIQUEMENT LE STYLET FOURNI AVEC VOTRE PC TABLETTE. N’UTILISEZ PAS DE STYLETS DIFFÉRENTS : ILS N’ONT PAS ÉTÉ CONÇUS SPÉCIALEMENT POUR ÊTRE UTILISÉS AVEC VOTRE ORDINATEUR PORTABLE.REMPLACEZ L’EMBOUT DU STYLET S’IL EST USÉ. LA GARANTIE NE COUVRE PAS LES ÉGRATIGNURES SUR L’ÉCRAN.•LORSQUE VOUS ÉCRIVEZ QUELQUE CHOSE,PRENEZ GARDE À NE PAS ÉGRATIGNER LA SURFACE DE L’ÉCRAN (EX.AVEC UNE MONTRE OU UN BRACELET).LE STYLET DE L’ORDINATEUR EST UN INSTRUMENT ÉLECTRONIQUE QUI PEUT ÊTRE ENDOMMAGÉ EN CAS D’UTILISATIONNON CONFORME. IL CONVIENT DE LE MANIPULER AVEC PRÉCAUTION. LA LISTE SUIVANTE DONNE DES INDICATIONSSUR LA FAÇON DE BIEN UTILISER LE STYLET :•NE FAITES PAS DE GRANDS MOUVEMENTS AVEC LE STYLET ET NE L'UTILISEZ PAS COMME POINTEUR.•NEL'UTILISEZ JAMAIS SUR UNE SURFACE AUTRE QUE CELLE DE L'ÉCRAN DE VOTRE ORDINATEUR.•N'ESSAYEZ PAS DE FAIRE TOURNER LA ZONE DE MAINTIEN PAR LE POUCE.•NE STOCKEZ JAMAIS LE STYLET DE MANIÈRE À CE QUE L’EMBOUT SUPPORTE LE POIDS DU STYLET. SI VOUSENTREPOSEZ LE STYLET DE CETTE FAÇON,LES MÉCANISMES INTERNES RISQUENT D'ÊTRE ENDOMMAGÉS (SURTOUTSI LA TEMPÉRATURE EST ÉLEVÉE). DANS CE CAS,LE STYLET PEUT RÉAGIR COMME SI L'EMBOUT ÉTAITCONSTAMMENT ENFONCÉ.DANSCECAS,LE STYLET PEUT RÉAGIR COMME SI L’EMBOUT ÉTAIT CONSTAMMENTENFONCÉ. IL CONVIENT DONC DE TOUJOURS REMETTRE LE STYLET SUR SON SUPPORT ENTRE LES UTILISATIONS.•LE STYLET PEUT SUBIR L’INFLUENCE DES CHAMPS ÉLECTROMAGNÉTIQUES (VIBRATIONS ET TRESSAUTEMENTS DUCURSEUR). IL SE PEUT QUE LE CURSEUR VIBRE LÉGÈREMENT DANS CERTAINES ZONES DE L’ÉCRAN MÊME SI L’ONAPPUIE FERMEMENT SUR LE STYLET.](https://usermanual.wiki/Sierra-Wireless/MC8355.Manual-2/User-Guide-1598135-Page-160.png)
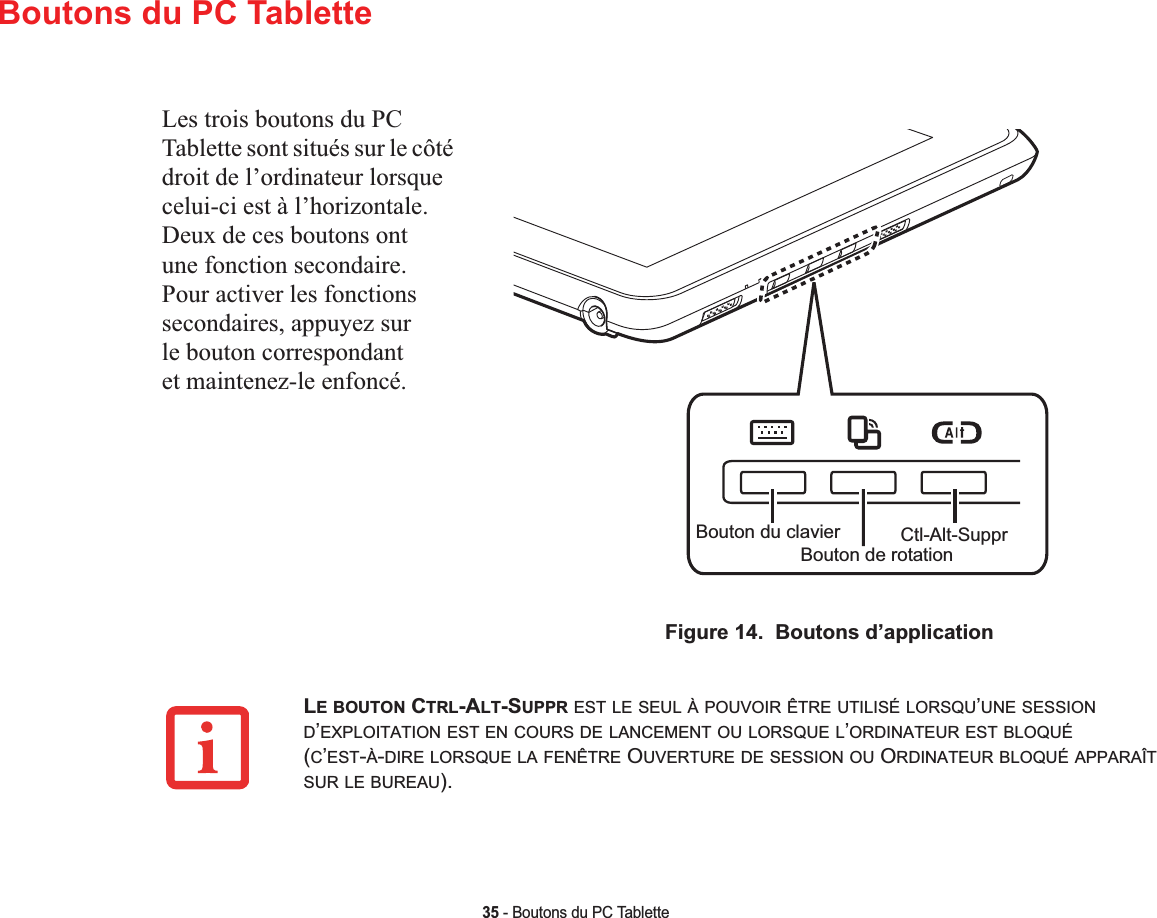
![36 - Boutons du PC TabletteIcône et nom des boutonsFonction principale (Appuyer)Fonction secondaire (Appuyer et maintenir)“Splash Screen”*Pression à l’écran de démarrage initialDansl’utilitaire deconfiguration du BIOSDescriptionBouton du clavierLancer le tableau d'entrée Tablette PC Lancer FujitsuHLMenu de la procédure d'amorçage EntréeLe bouton Clavier permet de lancer le tableau d'entrée Tablette PC. Lorsque vous appuyez sur ce bouton et le maintenez enfoncé, vous invoquez l’utilitaire FujitsuHL qui propose des raccourcis clavier pour lancer des outils et tâches fréquemment utilisés, y compris pour l’application de webcam. Si vous appuyez sur le bouton Clavier alors que le logo Fujitsu apparaît durant la procédure d’amorçage du système, vous verrez s’ouvrir le menu d’amorçage. Lorsque vous êtes dans l’utilitaire de configuration du BIOS, ce bouton peut être utilisé à titre de touche [Entrée]..Bouton de rotationRotation de l’écranActivation/désactivation de la rotation automatiqueUtilitaire de configuration du BIOSBasLorsque vous appuyez sur le bouton de rotation, l'orientation de l'écran du système change de Verticale à Horizontale ou d'Horizontale à Verticale. Lorsque vous souhaitez utiliser le PC tablette comme livre électronique, par exemple, vous pourriez utiliser l'orientation verticale, mais lorsque vous accédez aux feuilles de calculs, vous utilisez normalement l'orientation horizontale. Lorsque vous appuyez sur ce bouton et le maintenez enfoncé, vous activez ou désactivez la fonction de rotation automatique. Si vous appuyez sur le bouton de rotation alors que le logo Fujitsu apparaît durant la procédure d’amorçage du système, vous voyez s’ouvrir l’utilitaire de configuration du BIOS. Lorsque vous êtes dans l’utilitaire de configuration du BIOS, ce bouton peut être utilisé à titre de touche Bas..](https://usermanual.wiki/Sierra-Wireless/MC8355.Manual-2/User-Guide-1598135-Page-164.png)

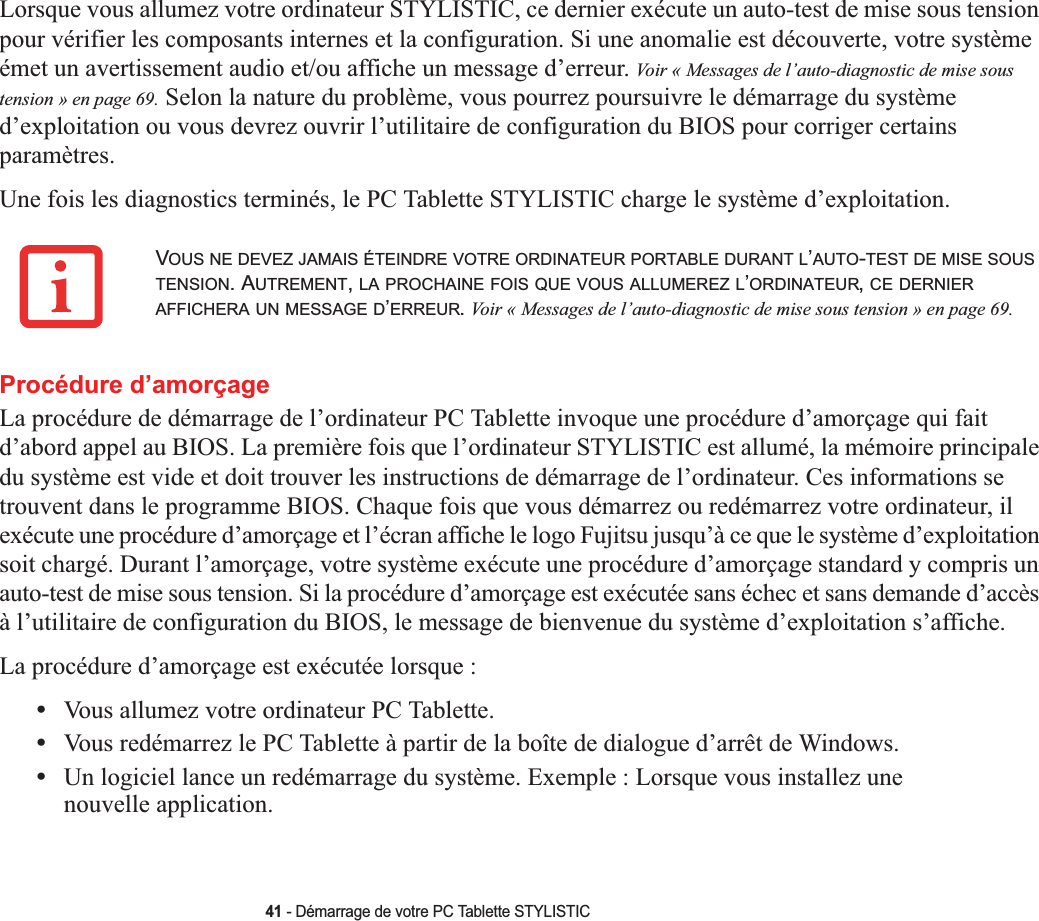
![43 - Démarrage de votre PC Tablette STYLISTIC2Pour entrer dans l’utilitaire, appuyez sur le bouton Rotation (ou sur la touche [F2] si vous avez un clavier externe) lorsque le logo Fujitsu apparaît à l’écran. Le menu principal de l’utilitaire de configuration du BIOS s’affichera avec les paramètres courants.3Avec la [TOUCHE FLÉCHÉE À DROITE] ou la [TOUCHE FLÉCHÉE À GAUCHE], parcourez les autres menus de configuration et vérifiez/modifiez les paramètres actuels.Guide d’information sur le BIOSUn guide d’information sur le BIOS de votre ordinateur portable est disponible en ligne. Pour y accéder, veuillez visiter notre site de service à la clientèle et d’assistance à http://www.computers.us.fujitsu.com/support : sous Online Support (Soutien en ligne), sélectionnez User’s Guides (Guides d’utilisation). Sélectionnez votre produit, sa série et son modèle, puis cliquez sur [Go]. Sous l’onglet Manuals (Manuels), sélectionnez BIOS Guide (Guide du BIOS). Démarrage du systèmeIl est fortement recommandé de ne pas installer de périphérique externe avant que la procédure de démarrage ne soit entièrement terminée.La première fois que vous allumez votre PC Tablette STYLISTIC, l’écran affiche le logo Fujitsu. Si vous n’intervenez pas, l’ordinateur charge le système d’exploitation et lance la procédure d’ouverture Windows.Premier démarrage de WindowsPour profiter au maximum de votre système d’exploitation Windows, il vous est suggéré de l’enregistrer lors de sa première utilisation.IMPORTANT : PENDANT LA PROCÉDURE DE CONFIGURATION,NE DÉBRANCHEZ PAS LE CORDOND’ALIMENTATION,N’APPUYEZ SUR AUCUN BOUTON ET N’UTILISEZ AUCUN PÉRIPHÉRIQUE TEL QUE LASOURIS OU LE CLAVIER.](https://usermanual.wiki/Sierra-Wireless/MC8355.Manual-2/User-Guide-1598135-Page-171.png)
![ClickMe!45 - Démarrage de votre PC Tablette STYLISTICInstallation de ClickMe!Lors du premier démarrage de votre ordinateur, vous verrez une fenêtre « Paramètres principaux de l’ordinateur ». Cette fenêtre explique les installations qui seront effectuées par l’utilitaire Click Me! Si vous cliquez sur [Exécuter], Click Me! commencera à s’installer. Après avoir cliqué sur le bouton, si une fenêtre « Contrôle de compte d’utilisateur » apparaît, il faudra donner votre permission pour continuer.Cliquez sur [Continuer] pour poursuivre. Si vous annulez cette opération, l’icône Click Me! apparaîtra sur votre bureau pour une installation future.AVANT D’INSTALLER L’UTILITAIRE CLICK ME!, VÉRIFIEZ SI LE COMMUTATEUR DE RÉSEAU SANS FIL ESTÀ LA POSITION DE MARCHE.IL EXISTE PEUT-ÊTRE DES APPLICATIONS FOURNIES PAR D’AUTRES FABRICANTS QUI NE SONT PASINSTALLÉES PAR L’UTILITAIRE CLICK ME! POUR OBTENIR DAVANTAGE DE RENSEIGNEMENTS,REPORTEZ-VOUS AU GUIDE D’INTRODUCTION.](https://usermanual.wiki/Sierra-Wireless/MC8355.Manual-2/User-Guide-1598135-Page-173.png)

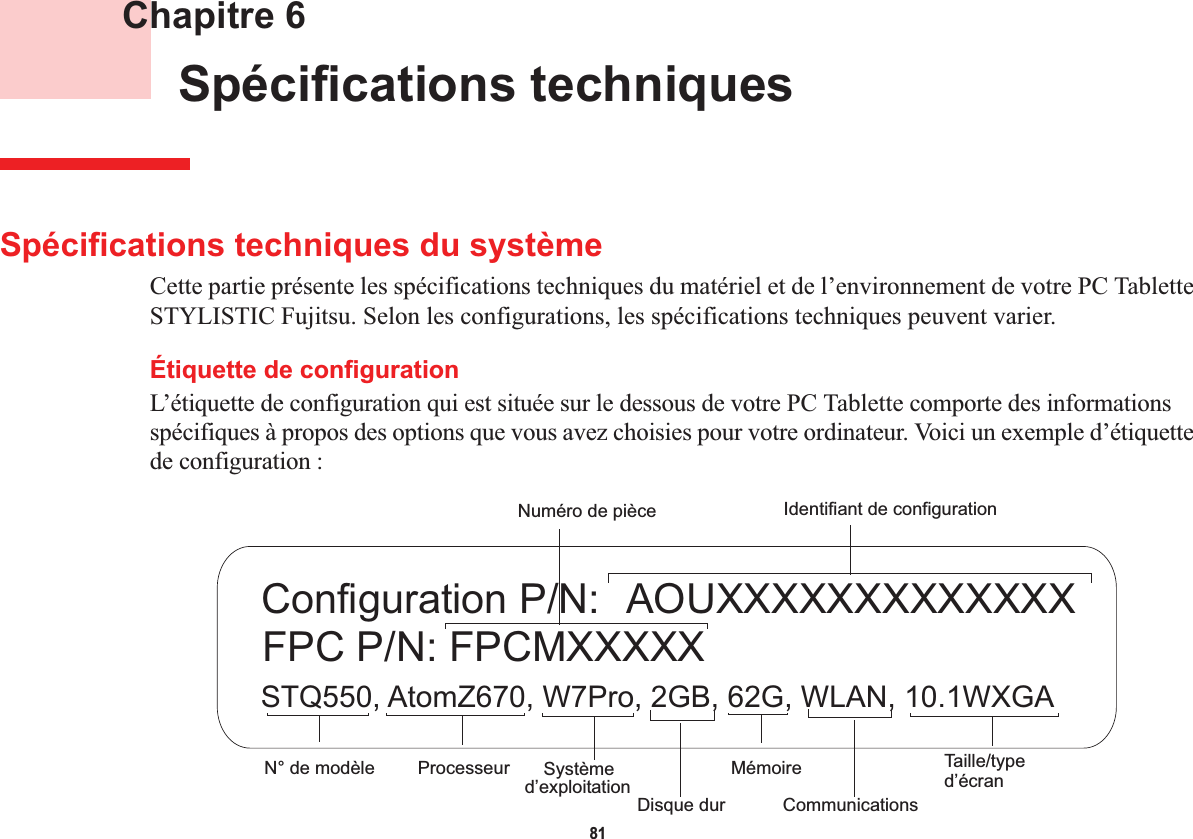
![47 - Gestion de l’alimentationVotre PC Tablette peut être mis en sommeil de plusieurs façons :•En appuyant sur le bouton d’alimentation/veille/reprise (si l’ordinateur est allumé).•En sélectionnant « Sommeil » après avoir cliqué sur le bouton [Démarrer] puis en cliquant sur la petite flèche située en bas à droite de la fenêtre.•Lorsque le délai d’inactivité est atteint.•En laissant la charge de la batterie descendre au niveau Avertissement de batterie faible.Dans ces situations, la mémoire de système de l’ordinateur enregistre généralement le fichier sur lequel vous travaillez, des informations sur les applications ouvertes et d’autres données nécessaires aux opérations en cours. Lorsque vous quittez le mode veille, l’ordinateur retournera à l’état où vous l’avez laissé. Pour reprendre l’utilisation de l’ordinateur, vous devez employer le bouton d’alimentation/veille/reprise et vous devez disposer d’une source d’alimentation valide.•SIL’ORDINATEUR UTILISE L’ALIMENTATION PAR BATTERIE,N’OUBLIEZ PAS QUE LA BATTERIE CONTINUE À SEDÉCHARGER MÊME EN MODE VEILLE,MAIS PLUS LENTEMENT QU’EN MODE DE FONCTIONNEMENT NORMAL.•SI VOUS DÉSACTIVEZ LE COMMUTATEUR D’ALIMENTATION/VEILLE/REPRISE,VOUS NE POURREZ PLUSL’UTILISER POUR METTRE L’ORDINATEUR PC TABLETTE EN MODE SOMMEIL OU EN VEILLE PROLONGÉE(ENREGISTREMENT SUR LE DISQUE). LA FONCTION DE REPRISE DU BOUTON NE PEUT PAS ÊTREDÉSACTIVÉE.•SI VOTRE ORDINATEUR ACCÈDE ACTIVEMENT À DES INFORMATIONS AU MOMENT OÙ VOUS LE METTEZEN MODE SOMMEIL OU EN MODE VEILLE PROLONGÉE,LES MODIFICATIONS AUX FICHIERS OUVERTS NESERONT PAS PERDUES. LORSQUE VOUS ACTIVEZ LE MODE SOMMEIL,LES FICHIERS SONT LAISSÉSOUVERTS ET LA MÉMOIRE DEMEURE ACTIVE. SI VOUS CHOISISSEZ LE MODE VEILLE PROLONGÉE,LA MÉMOIRE EST TRANSFÉRÉE SUR LE DISQUE DUR INTERNE.•LE PRINCIPAL AVANTAGE DU MODE VEILLE PROLONGÉE EST QU’AUCUNE ÉNERGIE N’EST NÉCESSAIREPOUR CONSERVER VOS DONNÉES. CET AVANTAGE EST PARTICULIÈREMENT IMPORTANT SI VOUSCOMPTEZ LAISSER VOTRE ORDINATEUR EN VEILLE PENDANT DE LONGUES PÉRIODES. LES PRINCIPAUXINCONVÉNIENTS DE LA VEILLE PROLONGÉE SONT UNE PLUS LONGUE DURÉE DES PROCÉDURES DEMISE EN VEILLE ET DE REPRISE,AINSI QUE LA RÉINITIALISATION DES PÉRIPHÉRIQUES.](https://usermanual.wiki/Sierra-Wireless/MC8355.Manual-2/User-Guide-1598135-Page-175.png)
![48 - Gestion de l’alimentationFonction de veille prolongéeLe mode de veille prolongée enregistre le contenu de la mémoire du système sur le disque dur du PC Tablette. Cette fonction peut être activée et désactivée. Le mode Veille prolongée est activé par défaut. Définition des actions du bouton d’alimentation Pour définir ce que le bouton d’alimentation fait lorsque vous appuyez dessus, exécutez les étapes suivantes :1Dans le menu Démarrer, ouvrez le panneau de configuration et cliquez sur l’icône Options d’alimentation.2Puis sélectionnez « Choisir ce que fait le bouton d’alimentation » ou « Choisir ce que fait la fermeture du couvercle »,puis faites votre sélection (Ne rien faire, Sommeil, Veille prolongée ou Arrêter).Gestion de l’alimentation dans Windows L’icône des options d’alimentation disponible dans le Panneau de configuration Windows vous permet de configurer certains paramètres de gestion de l’alimentation. Par exemple, vous pouvez utiliser les Options d’alimentation pour régler les valeurs de temporisation (délai d’inactivité) afin d’éteindre l’écran et les disques durs selon que l’ordinateur est alimenté par batterie ou par l’un des adaptateurs. Redémarrage du systèmeSi votre système est allumé et que vous désirez le redémarrer, vous devez exécuter les opérations suivantes :1Cliquez sur le bouton [Démarrer], puis positionnez le curseur sur la petite flèche située en bas à droite du panneau de droite.2Dans la liste, sélectionnez Redémarrer.SI VOUS ARRÊTEZ VOTRE ORDINATEUR PC TABLETTE STYLISTIC SANS FERMER WINDOWS OU SIVOUS L’ALLUMEZ MOINS DE 10 SECONDES APRÈS L’AVOIR ARRÊTÉ,VOUS RISQUEZ DE PROVOQUERUNE ERREUR LORS DU PROCHAIN DÉMARRAGE DU SYSTÈME.](https://usermanual.wiki/Sierra-Wireless/MC8355.Manual-2/User-Guide-1598135-Page-176.png)
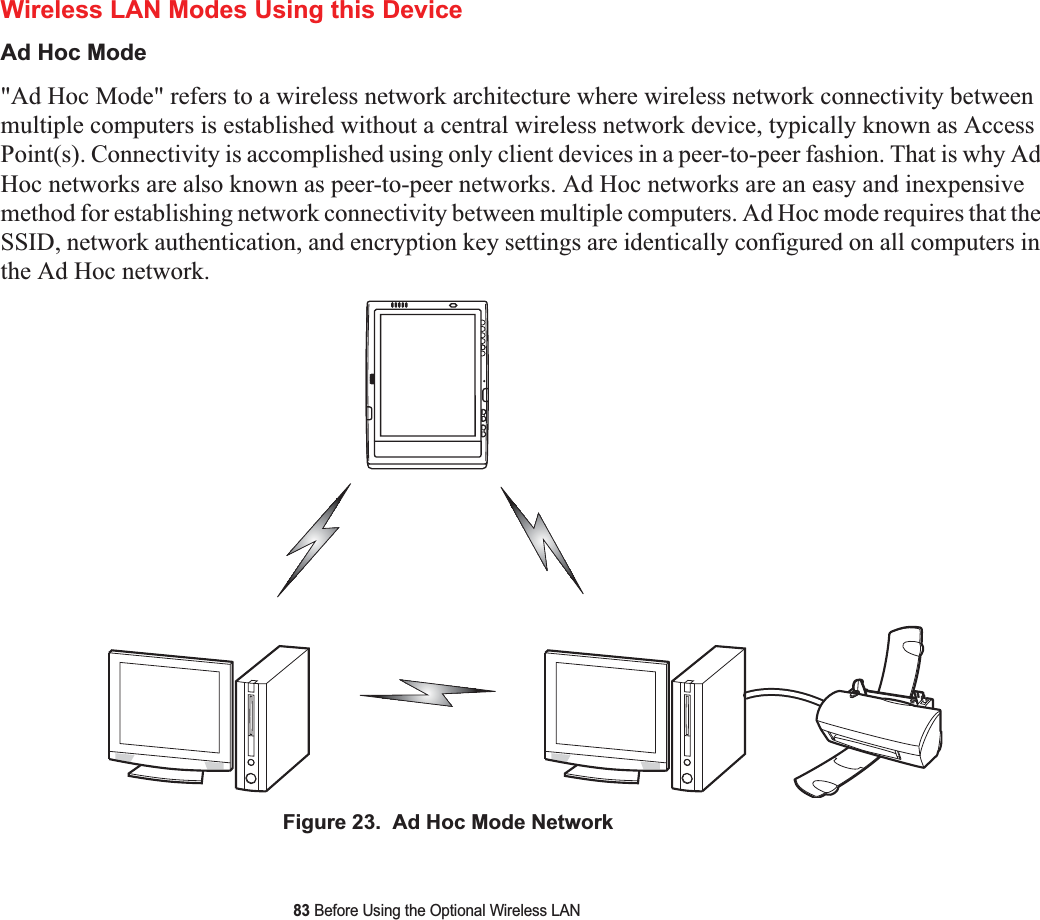
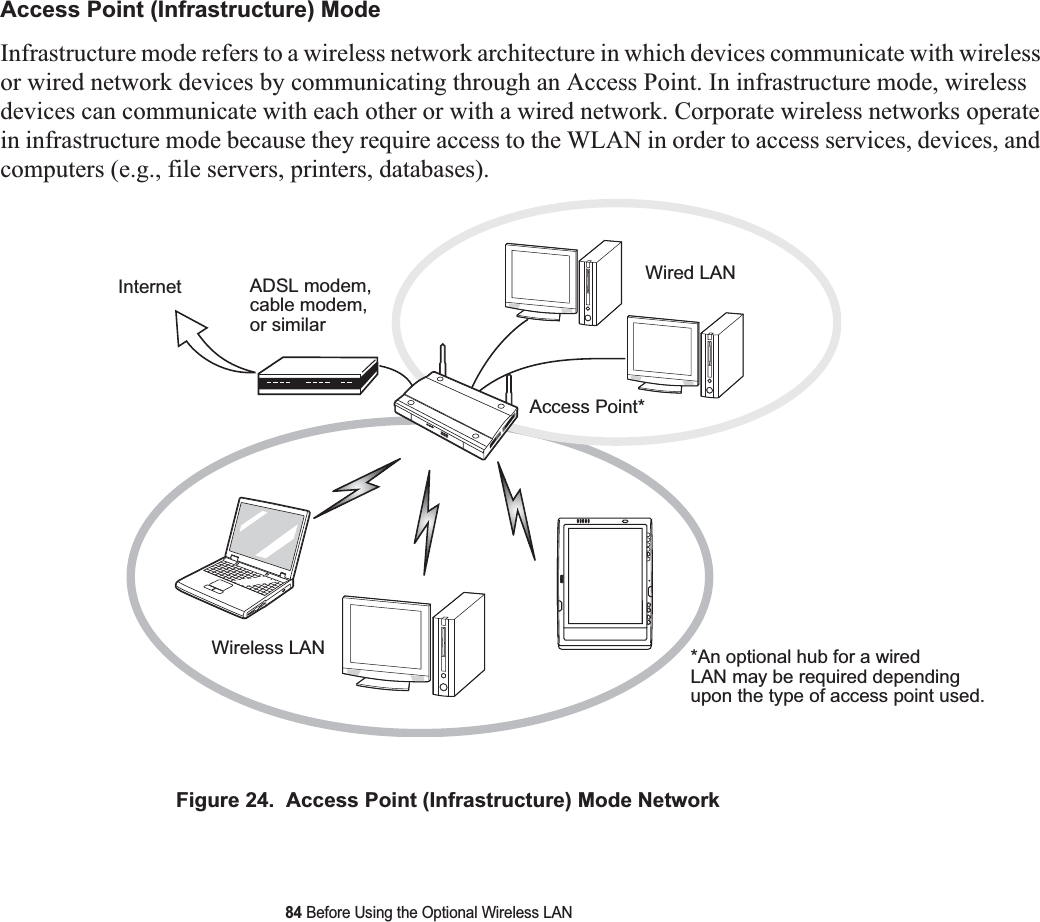
![49 - Gestion de l’alimentationMise hors tensionSi vous arrêtez l’ordinateur alors qu’un disque est en cours d’utilisation, vous risquez de perdre des données. Pour vous assurer que l’ordinateur s’arrête sans erreur, utilisez la procédure d’arrêt Windows.Si vous arrêtez votre système depuis Windows, vous permettez à l’ordinateur de terminer les opérations en cours, vous lui permettez aussi d’exécuter les opérations de mise hors tension dans le bon ordre et vous évitez les risques d’erreur. La procédure appropriée est la suivante :1Cliquez sur le bouton [Démarrer], puis positionnez le curseur sur la petite flèche située en bas à droite du panneau de droite.2Dans la liste, sélectionnez [Arrêter].Si vous comptez entreposer votre PC Tablette pendant un mois ou plus, consultez la section Entretien. AVANT DE COUPER L’ALIMENTATION ÉLECTRIQUE,N’OUBLIEZ PAS DE FERMER TOUS LES FICHIERS,DEQUITTER TOUTES LES APPLICATIONS ET D’ARRÊTER VOTRE SYSTÈME D’EXPLOITATION. SI DES FICHIERSSONT OUVERTS LORSQUE VOUS COUPEZ L’ALIMENTATION,VOUS PERDREZ TOUTES LES MODIFICATIONSN’AYANT PAS ÉTÉ ENREGISTRÉES ET VOUS RISQUEZ DE CAUSER DES ERREURS DE DISQUE.](https://usermanual.wiki/Sierra-Wireless/MC8355.Manual-2/User-Guide-1598135-Page-177.png)

![66 - DépannageLe système se met en marche et affiche les informations de mise en marche, mais n’est pas en mesure de charger le système d’exploitation.Vous avez un système protégé qui requiert un mot de passe pour charger votre système d’exploitation.Assurez-vous d’avoir le bon mot de passe. Accédez à l’utilitaire de configuration et vérifiez les paramètres de sécurité, puis modifiez-les en conséquence. Voir « Utilitaire de configuration du BIOS » en page 42.Les paramètres d’amorçage de l’utilitaire de configuration du BIOS sont incompatibles avec votre configuration.Configurez la source d’exploitation en appuyant sur la touche [Échap] pendant que le logo Fujitsu est affiché sur l’écran ou utilisez la touche [F2], accédez à l’utilitaire de configuration et ajustez les paramètres de source à partir du menu Amorçage. Voir « Utilitaire de configuration du BIOS » en page 42.Le disque dur n’a pas été détecté.Utilisez l’utilitaire de configuration du BIOS pour détecter automatiquement le disque dur interne.Un message d’erreur s’affiche sur l’écran durant la procédure d’amorçage.L’auto-diagnostic de mise sous tension (POST) a détecté un problème.Consultez les messages de l’auto-diagnostic de démarrage pour déterminer la signification et la gravité du problème. Tous les messages n’indiquent pas des erreurs ; certains sont simplement des indicateurs d’état. Voir « Messages de l’auto-diagnostic de mise sous tension » en page 69.Votre PC Tablette semble changer les paramètres de configuration lorsque vous le démarrez.Les modifications que vous avez apportées à la configuration du BIOS n’ont pas été sauvegardées et vous avez quitté l’utilitaire sans les sauvegarder.Assurez-vous de sélectionner l’option « Sauvegarder les changements et quitter » lorsque vous quittez l’utilitaire de configuration du BIOS.Problèmes vidéoL’écran d’affichage demeure vide lorsque vous mettez en marche votre PC Tablette.L’angle de l’affichage et les paramètres de luminosité ne sont pas adaptés à vos conditions d’éclairage.Il se peut que la luminosité de l’écran soit trop faible, ce qui donne l’impression qu’il est éteint. Pour modifier la luminosité, appuyez deux fois sur le bouton de fonction Fnpour ouvrir le menu Fujitsu. Vous pourrez alors régler la luminosité.Problème Cause possible Solutions possibles](https://usermanual.wiki/Sierra-Wireless/MC8355.Manual-2/User-Guide-1598135-Page-194.png)
![71 - Restaurer vos logiciels pré-installésRéinstallation des applications et pilotes individuelsLe disque de pilotes et applications peut être utilisé pour réinstaller de façon sélective les pilotes et/ou applications qui auraient pu être désinstallés ou corrompus. Pour réinstaller des pilotes et/ou applications :1Lancez le système et insérez le disque PRA après que Windows a démarré. Un écran d’installation Fujitsu s’affiche une fois que le disque est inséré.2Lorsque vous avez lu le contrat de licence, cliquez sur [J’accepte].3Une fenêtre apparaîtra contenant une liste d’applications, de pilotes et d’utilitaires que vous pouvez installer à partir du disque de pilotes et d’applications.4Dans la liste, cochez tous les composants que vous voulez installer. Si vous voulez installer tous les composants, cliquez sur [Sélectionner tout]. Si vous cliquez sur [Sélectionner tout], le système sélectionne tous les composants codés en bleu. Les composants en vert et en gris doivent être sélectionnés séparément.5Lorsque vous avez sélectionné les composants que vous désirez installer, cliquez sur [Installer les sous-systèmes sélectionnés] ; les composants seront installés.6Lorsque les composants sont installés, cliquez sur [OK], puis sur [Oui] lorsque le système vous demande si vous désirez redémarrer votre système. IL EST POSSIBLE QUE CERTAINES APPLICATIONS TIERCES GRATUITES PRÉ-INSTALLÉES SUR VOTRESYSTÈME NE SE TROUVENT PAS SUR LE DISQUE PRA. LES TOUTES DERNIÈRES VERSIONS DE CESAPPLICATIONS PEUVENT ÊTRE TÉLÉCHARGÉES À PARTIR DU SITE INTERNET DE LEUR FABRICANT.LES COMPOSANTS CITÉS SONT CHROMOCODÉS EN FONCTION DE LEUR ÉTAT D’INSTALLATION. LE BLEUINDIQUE QUE LE COMPOSANT PEUT ÊTRE INSTALLÉ. LE VERT INDIQUE QUE LE COMPOSANT DOIT ÊTREINSTALLÉ SÉPARÉMENT. LE GRIS INDIQUE QUE LE COMPOSANT EST DÉJÀ INSTALLÉ (LES ÉLÉMENTS ENGRIS PEUVENT ÊTRE RÉINSTALLÉS,MAIS AVANT L’INSTALLATION,VOUS RECEVREZ UN RAPPEL VOUSINDIQUANT QUE LE COMPOSANT EST DÉJÀ INSTALLÉ).](https://usermanual.wiki/Sierra-Wireless/MC8355.Manual-2/User-Guide-1598135-Page-199.png)
![72 - Restaurer vos logiciels pré-installésCD de restauration et d'utilitaires Le disque d'utilitaires et de restauration contient quatre utilitaires :Onglets Restauration et UtilitairesOnglet Diagnostics : L'outil de diagnostic est conçu pour être utilisé par des informaticiens professionnels. Il y a peu de chances que vous ayez besoin de l'utiliser. Lorsque vous sélectionnez des dispositifs dans la fenêtre Diagnostic et que vous cliquez ensuite sur [Exécuter], ceux-ci sont soumis à plusieurs tests.Onglet Restauration : L'onglet Restauration comprend deux outils : Restaurer l'image d'origine (seulement le disque C :) et « Restauration de l'image d'origine (restauration intégrale du disque dur) ». Vous pouvez utiliser ces outils pour exécuter une restauration complète du disque dur. Onglet Utilitaires : L'onglet Utilitaires comprend trois outils : « Supprimer les données sur le disque dur », « Restaurer la fonctionnalité Restauration et Utilitaires » et « Restauration complète d’ordinateur Windows ».•L'utilitaire Supprimer les données sur le disque dur permet de supprimer toutes les données sur votre disque dur et d'en empêcher leur réutilisation. REMARQUE : N'utilisez pas l'utilitaire « Supprimer les données sur le disque dur », à moins que vous soyez absolument certain de vouloir effacer votre disque dur en entier, y compris toutes les partitions.•Restaurer la fonctionnalité Restauration et Utilitaires permet de restaurer la première partition cachée.•L’utilitaire Restauration complète d’ordinateur Windows permet de restaurer une image créée avec le Centre de restauration et de sauvegarde Windows. L’utilitaire Restauration complète d’ordinateur Windows efface et réécrit toutes les données se trouvant sur le disque dur. Pour utiliser le disque, suivez les instructions données dans le livret « Utilisation du disque de restauration et d’utilitaires » fourni avec ce disque.](https://usermanual.wiki/Sierra-Wireless/MC8355.Manual-2/User-Guide-1598135-Page-200.png)


![97 Configuration de la carte réseau sans filConfiguration de la carte réseau sans filLa carte réseau sans fil peut être configurée pour établir la connectivité du réseau sans fil en utilisant le logiciel intégré dans Windows. Il prend également en charge la plupart des solutions de sécurité standard.Certains paramètres prédéfinis seront requis pour cette procédure. Pour les obtenir, consulter votre administrateur de réseau :Configuration de la carte réseau sans fil 1Cliquez sur le bouton [Démarrer], puis sélectionnez Panneau de configuration.2Si le Panneau de configuration n’est pas en affichage classique, sélectionnez « Basculer vers l’affichage classique » sur le panneau de gauche. Double-cliquez sur l’icône Connexions réseau.3Double-cliquez sur l’icône Connexions réseau sans fil.4Cliquez sur [Afficher les réseaux sans fil]5Choisissez un réseau sans fil.6Cliquez sur [Connexion].7Entrez la clé de réseau si nécessaire.8Entrez les informations requises. Il se peut que vous deviez consulter votre administrateur de réseau pour certaines informations.9Si vous avez besoin d’aide, allez au menu [Démarrer] -> Aide et soutien (ou support) -> Gestion du réseau et Web. Sélectionnez le sujet qui vous intéresse, puis tapez les mots-clés s’y rapportant dans la case Rechercher.Connexion au réseauAprès avoir configuré votre ordinateur, vous pouvez vous connecter à un réseau actif en réalisant les étapes suivantes :1Cliquez sur l’icône de la carte réseau sans fil de la zone de notification.2Sélectionnez « Connexion à un réseau ».3Sélectionnez un réseau dans la liste qui apparaît et cliquez sur le bouton [Connexion]Une fois la configuration effectuée, vous pouvez vous connecter à un réseau actif en cliquant sur l’icône « Connexion réseau sans fil » de la zone de notification.](https://usermanual.wiki/Sierra-Wireless/MC8355.Manual-2/User-Guide-1598135-Page-225.png)
![98 Dépannage de la carte réseau sans filDépannage de la carte réseau sans filDépannageLe tableau ci-dessous présente les causes possibles et les mesures correctives pour différents problèmes de réseau sans fil. Si les étapes à réaliser ne vous sont pas connues, consultez votre administrateur système ou allez dans [Démarrer] -> Aide et soutien (ou support) -> Gestion du réseau et Web.Problème Cause possible Solution possibleConnexion de réseau non disponibleNom de réseau (SSID) ou clé WEP non valideConnexion en mode Ad hoc : Assurez-vous que le SSID et la clé WEP de tous les ordinateurs du réseau ont été configurés correctement. Les noms de réseau et les valeurs de la clé WEP doivent être identiques sur chaque ordinateur.Connexion en mode point d’accès (Infrastructure) : Attribuez aux ordinateurs le même SSID et la même clé WEP que ceux du point d’accès. Attribuez la même valeur d’authentification réseau que celle du point d’accès. Consultez votre administrateur de réseau si cette valeur est requise. Signal faible et/ou mauvaise qualité de la liaisonConnexion en mode Ad hoc : Essayez de rétablir la connexion après avoir rapproché l’ordinateur ou retiré les éventuels obstacles.Connexion en mode point d’accès (Infrastructure) : Essayez de rétablir la connexion après avoir rapproché le point d’accès ou retiré les éventuels obstacles.La carte réseau sans fil est désactivéeAssurez-vous que l’interrupteur de la carte réseau sans fil est sur ON. Allez dans [Démarrer] -> Panneau de configuration, puis double-cliquez sur Centre de mobilité Windows. Si le réseau sans fil est éteint, cliquez sur le bouton « Allumer le réseau sans fil ». L’ordinateur à connecter est éteintVérifiez si l’ordinateur est allumé.](https://usermanual.wiki/Sierra-Wireless/MC8355.Manual-2/User-Guide-1598135-Page-226.png)


![102 Utilisation de BluetoothUtilisation de BluetoothLe module Bluetooth intégré (V 3.0) est un composant offert en option pour les ordinateurs portables Fujitsu.Présentation de BluetoothLa technologie Bluetooth est conçue pour assurer la liaison sans fil à faible portée entre divers appareils mobiles, tels que téléphones, ordinateurs portables, imprimantes et caméras. La technologie Bluetooth permet d’établir des réseaux personnels (PAN) entre des appareils situés à courte distance les uns des autres. 2Faites un clic droit sur l’icône Bluetooth située dans la zone de notification Windows en bas à droite, dans la barre de tâches. 3Sélectionnez Turn Adapter On (or Off) (Mettre l’adaptateur sous/hors tension). 4Cliquez sur [OK].Sources d’informations supplémentaires sur BluetoothPour en savoir davantage sur la technologie Bluetooth, visitez le site Web : www.bluetooth.com.LE COMMUTATEUR DE L’INTERFACE RÉSEAU SANS FIL / BLUETOOTH PERMET D’ÉTEINDRESIMULTANÉMENT LES INTERFACES RÉSEAU SANS FIL ET BLUETOOTH. POUR ACTIVER OU DÉSACTIVERSÉPARÉMENT L’UN OU L’AUTRE,PROCÉDEZ COMME SUIT :1Faites glisser le commutateur de carte réseau sans fil/Bluetooth à la position de marche (ON).](https://usermanual.wiki/Sierra-Wireless/MC8355.Manual-2/User-Guide-1598135-Page-230.png)

![107 - Présentation du capteur d’empreintes digitalesVérification des informations concernant votre version d’OmniPassAprès avoir installé OmniPass et redémarré votre système, vous pouvez décider de vérifier la version d logiciel.Pour vérifier votre version d’OmniPass :1À partir du bureau Windows, double-cliquez sur l’icône en forme de clé OmniPass dans la barre des tâches (située habituellement dans le coin inférieur droit de l’écran),oucliquez sur le bouton Démarrer , sélectionnez Paramètres, puis cliquez sur Panneau de configuration.Double-cliquez sur Softex OmniPass dans le panneau de configuration et vous verrez apparaître le Centre de contrôle OmniPass. Si ce n’est pas le cas, le programme n’est pas correctement installé, oubien cliquez sur le bouton Démarrer, sélectionnez Programmes, puis Softex dans le groupe de programmes du sous-menu et cliquez ensuite sur Centre de contrôle OmniPass.2Sélectionnez l’onglet À propos de en haut du Centre de contrôle OmniPass. Une fenêtre indiquant la version du logiciel OmniPass apparaît.Désinstallation d’OmniPassPour supprimer l’application OmniPass de votre système :1Cliquez sur [Démarrer] dans la barre des tâches. Sélectionnez Paramètres, puis Panneau de configuration.2Double-cliquez sur Ajouter ou supprimer des Programmes.3Sélectionnez OmniPass, puis cliquez sur [Modifier/Supprimer].4Suivez les instructions de désinstallation de l’application OmniPass.5Après la désinstallation d’OmniPass, redémarrez votre système lorsque vous y êtes invité.L’UTILISATEUR DÉSIRANT DÉSINSTALLER OMNIPASS DOIT DISPOSER DE DROITS D’ADMINISTRATEURDANS LE SYSTÈME. SI VOUS N’AVEZ PAS DE TELS DROITS,FERMEZ LA SESSION ET OUVREZ-EN UNEAUTRE AVEC UN NOM D’UTILISATEUR POSSÉDANT CES DROITS AVANT DE POURSUIVRE LA DÉSINSTALLATIOND’OMNIPASS.](https://usermanual.wiki/Sierra-Wireless/MC8355.Manual-2/User-Guide-1598135-Page-235.png)
![109 - Présentation du capteur d’empreintes digitalesEnregistrement de baseL’Assistant d’enregistrement vous guidera à travers les étapes d’enregistrement d’un utilisateur. Sauf indication contraire de votre part, l’Assistant d’enregistrement sera lancé après l’installation d’OmniPass au moment de l’ouverture d’une session Windows. Si l’assistant n’apparaît pas, vous pouvez le lancer en cliquant sur Démarrer dans la barre de tâches Windows. Sélectionnez ensuite Programmes, puis Softexet cliquez sur Assistant d’enregistrement OmniPass.1Cliquez sur [Enregistrement] pour procéder à la vérification de l’utilisateur et du mot de passe. Par défaut, l’Assistant d’enregistrement entre les informations d’identification de l’utilisateur Windows actuellement connecté.2Entrez le mot de passe qui vous sert à ouvrir une session dans Windows. Il deviendra le « mot de passe principal » de cet utilisateur OmniPass. Dans la plupart des cas, la valeur de Domaine : correspondra au nom de votre ordinateur Windows. Dans un environnement d’entreprise, ou lorsque vous accédez à des ressources professionnelles, il se peut que Domaine : ne corresponde pas au nom de votre ordinateur. Cliquez sur [Suivant] pour continuer.3Au cours de cette étape, OmniPass prend votre empreinte digitale. Pour de plus amples informations, reportez-vous à « Enregistrement d’une empreinte digitale » en page 110.4Ensuite, choisissez comment OmniPass doit vous avertir de différents événements. Nous vous recommandons de laisser Astuces de la barre de tâches sur Astuces de la barre des tâches en mode débutant et Invites audio sur au moins Invite avec signaux sonores uniquement, jusqu’à ce que le fonctionnement d’OmniPass vous soit familier. Cliquez sur [Suivant] pour procéder à l’enregistrement de l’utilisateur. Un écran de félicitations, indiquant que l’enregistrement de l’utilisateur est terminé, apparaîtra.5Cliquez sur [Terminé] pour quitter l’assistant d’enregistrement. Il vous sera demandé si vous voulez vous connecter à OmniPass avec les informations d’utilisateur nouvellement enregistrées. Cliquez sur [Oui].CETTE PROCÉDURE D’ENREGISTREMENT REPOSE SUR L’HYPOTHÈSE QUE VOUS NE VOULEZ INTÉGRERÀ OMNIPASS AUCUN PÉRIPHÉRIQUE D’AUTHENTIFICATION OU AUTRE EMPLACEMENT DE STOCKAGE.SI VOUS SOUHAITEZ DISPOSER DE CETTE FONCTIONNALITÉ,CONSULTEZ LES SECTIONSCORRESPONDANTES DU PRÉSENT DOCUMENT.](https://usermanual.wiki/Sierra-Wireless/MC8355.Manual-2/User-Guide-1598135-Page-237.png)
![110 - Présentation du capteur d’empreintes digitalesEnregistrement d’une empreinte digitaleL’enregistrement d’une empreinte digitale augmentera la sécurité de votre système et simplifiera la procédure d’authentification. L’enregistrement des empreintes digitales se fait à partir du Centre de contrôle OmniPass. Après vous être connecté à titre d’utilisateur OmniPass, cliquez deux fois sur l’icône OmniPass dans la zone de notification. Sélectionnez l’onglet Paramètres utilisateur, puis cliquez sur [Enregistrement] dans la zone Paramètres utilisateur. Cliquez sur [Enregistrer le périphérique d’authentification] et authentifiez-vous à l’invite d’authentification d’OmniPass. Le système ouvre la procédure d’enregistrement du périphérique.1Pendant la procédure d’enregistrement initial de l’utilisateur, vous serez invité à sélectionner le doigt qui sera enregistré. Les doigts déjà enregistrés seront marqués d’un crochet vert. Le doigt sélectionné pour l’enregistrement sera marqué d’une flèche rouge. OmniPass vous permet de réenregistrer un doigt. Si vous choisissez un doigt qui a déjà été enregistré et que vous poursuivez la procédure d’enregistrement, OmniPass enregistre l’empreinte digitale actuelle à la place de l’ancienne empreinte. Sélectionnez un doigt à enregistrer et cliquez sur [Suivant].2Il est temps pour OmniPass de prendre l’empreinte que vous avez choisie. Plusieurs tentatives peuvent être nécessaires avant qu’OmniPass prenne votre empreinte digitale. Si OmniPass n’y parvient pas ou si l’écran de capture de l’empreinte digitale expire, cliquez sur [Précédent] pour redémarrer le processus d’enregistrement d’empreinte digitale. Votre système est équipé d’un capteur d’empreintes digitales « à glissement ». Les capteurs à glissement sont de taille réduite et ressemblent à un mince rectangle allongé. Pour prendre une empreinte digitale, faites glisser ou tirez doucement vers vous le bout de votre doigt sur le capteur (à partir de la deuxième articulation). Un glissement trop rapide ou trop lent pourrait faire échouer la prise d’empreintes. L’écran Choisir un doigt dispose d’un bouton [Pratique] ; cliquez dessus pour pratiquer la prise de votre empreinte digitale. Lorsque vous maîtrisez la prise d’empreintes digitales, vous pouvez procéder à l’enregistrement d’un doigt.3Lorsque OmniPass a correctement pris l’empreinte digitale, l’écran Vérifier l’empreinte digitale s’affiche automatiquement. Pour vérifier l’enregistrement de votre empreinte, placez le bout de votre doigt sur le capteur comme lors d’une prise d’empreinte digitale. Si l’empreinte a été vérifiée avec succès, une empreinte digitale verte apparaît dans la fenêtre de prise et le texte Vérification réussie s’affiche en dessous.](https://usermanual.wiki/Sierra-Wireless/MC8355.Manual-2/User-Guide-1598135-Page-238.png)
![112 - Présentation du capteur d’empreintes digitalesMémorisation d’un mot de passeOmniPass peut mémoriser toute application, toute interface graphique ou toute autre ressource protégée par un mot de passe.À l’aide de la procédure suivante, vous pourrez sauvegarder dans OmniPass toutes les informations permettant de vous identifier. Ces informations seront ensuite associées à votre « mot de passe principal »ou à votre empreinte digitale.Allez sur un site comportant une procédure de connexion (nom d’utilisateur et mot de passe), mais ne vous connectez pas tout de suite. À l’invite de connexion au site, entrez votre nom d’utilisateur et votre mot de passe dans les champs appropriés, mais n’entrez pas sur le site (n’appuyez pas sur [Entrer], [Envoyer], [OK], ou [Connexion]). Cliquez avec le bouton droit de la souris sur l’icône OmniPass de la zone de notification et sélectionnez Mémoriser le mot de passe dans le sous-menu. Le curseur fléché Windows devient un curseur OmniPass en forme de clé dorée. Cliquez sur ce curseur dans la zone d’invite de connexion, mais ne cliquez pas sur le bouton [Connexion] ou [Envoyer].Association d’un nom convivialAprès avoir cliqué sur le curseur en forme de clé près de l’invite de connexion, OmniPass vous invitera à entrer un « nom convivial » pour ce site. Vous devez entrer un terme qui vous rappelle le site Internet, la société ou le service auquel vous vous connectez. Dans sa base de données sécurisée, OmniPass associe ce nom convivial au site Internet.Paramètres supplémentaires pour mémoriser un siteLorsque vous êtes invité à entrer un « nom convivial », vous pouvez définir la manière dont OmniPass vous authentifie sur ce site. Trois choix sont à votre disposition pour chaque site mémorisé par OmniPass.Le paramètre par défaut est Cliquer automatiquement sur le bouton « OK » ou « Soumettre » pour ce site protégé par mot de passe une fois l’utilisateur authentifié. Avec ce paramètre, chaque fois que vous accédez à ce site, OmniPass vous demandera votre mot de passe principal ou votre périphérique d’authentification d’empreintes digitales. Lorsque votre authentification est complétée par OmniPass, vous êtes automatiquement connecté au site.](https://usermanual.wiki/Sierra-Wireless/MC8355.Manual-2/User-Guide-1598135-Page-240.png)
![113 - Présentation du capteur d’empreintes digitalesLa deuxième option est moins sécuritaire : Entrer automatiquement sur ce site protégé par mot de passe lorsqu’il est activé. Ne pas demander d’authentification. Cochez la case supérieure pour sélectionner ce choix. Ensuite, chaque fois que vous vous connectez à ce site, OmniPass vous donnera accès sans vous demander de vous authentifier.Si vous désélectionnez les deux cases dans Paramètres pour ce site protégé par mot de passe,OmniPass vous demande votre mot de passe principal ou votre périphérique d’authentification. Lorsque votre authentification est complétée par OmniPass, vos informations d’identification s’affichent à l’invite de connexion du site. Toutefois, vous devez cliquer sur le bouton [OK], [Envoyer] ou [Connexion] pour accéder au site.Cliquez sur [Terminer] pour achever la procédure de mémorisation du mot de passe. L’emplacement du site, les informations d’identification pour y accéder et les paramètres d’authentification OmniPass correspondant à ce site sont désormais sauvegardés dans la base de données sécurisée d’OmniPass. Les paramètres d’authentification d’OmniPass (Paramètres pour ce site protégé par mot de passe) peuventtoujours être modifiés dans Gestion du coffre-fort.Connexion à un site mémoriséSelon les informations contenues dans Paramètres pour ce site protégé par mot de passe, OmniPass vous invitera ou non à vous authentifier lorsque vous retournerez à un site mémorisé. Ces informations peuvent être modifiées dans Gestion du coffre-fort.Les cas suivants s’appliquent à l’utilisation d’OmniPass pour se connecter à : Windows, aux sites mémorisés et à toutes les autres ressources protégées par mot de passe.CE PARAMÈTRE EST PLUS PRATIQUE CAR DÈS QUE VOUS DEMANDEZ UN SITE QUI Y EST ASSOCIÉ,VOUS SAUTEZ LA PROCÉDURE D’AUTHENTIFICATION ET VOUS ACCÉDEZ INSTANTANÉMENT AU SITE.CEPENDANT,SI VOUS LAISSEZ VOTRE ORDINATEUR SANS SURVEILLANCE AVEC VOTRE CONNEXIONOMNIPASS ACTIVÉE,TOUTE PERSONNE UTILISANT VOTRE SYSTÈME PEUT ENTRER SUR LES SITESPROTÉGÉS EN USURPANT VOTRE IDENTITÉ.](https://usermanual.wiki/Sierra-Wireless/MC8355.Manual-2/User-Guide-1598135-Page-241.png)
![115 - Présentation du capteur d’empreintes digitalesSi vous tentez d’utiliser Mémoriser le mot de passe sur un site déjà connu, OmniPass efface les anciennes informations d’identification. Le remplacement de votre mot de passe Windows constitue l’exception à la règle ci-dessus. Si votre mot de passe est réinitialisé dans Windows, le changement sera détecté par OmniPass qui vous invitera à « Mettre à jour » ou à « Reconfirmer » le mot de passe. Entrez votre nouveau mot de passe Windows dans l’invite, puis cliquez sur [OK]. Votre « mot de passe principal » Omnipass sera toujours votre mot de passe Windows.Identités d’utilisateur OmniPassLes identités permettent aux utilisateurs OmniPass de posséder plusieurs comptes sur un même site (par exemple, claude@biblomail.com et claudepicard@biblomail.com). Si OmniPass ne vous a pas fourni d’identités, vous ne pourrez mémoriser qu’un seul compte par site.Pour créer et gérer des identités, cliquez deux fois sur la clé OmniPass dans la zone de notification. Cliquez sur Gestion du coffre-fort. OmniPass vous invite à vous authentifier. Lorsque vous avez accédé àGestion du coffre-fort, cliquez sur Gérer les mots de passe sous Paramètres du coffre-fort. Vous pouvez seulement gérer les identités de l’utilisateur OmniPass actuellement connecté.Pour ajouter une nouvelle identité, cliquez sur Nouvelle identité ou double-cliquez sur Cliquer ici pour ajouter une nouvelle identité. Nommez la nouvelle identité et cliquez sur [OK], puis sur [Appliquer]. Vous pouvez désormais basculer vers la nouvelle identité et démarrer la mémorisation des mots de passe.Pour supprimer une identité, mettez en surbrillance l’identité à supprimer et cliquez sur [Supprimer l’identité], puis cliquez sur [Appliquer].LORSQUE VOUS SUPPRIMEZ UNE IDENTITÉ,TOUS LES SITES MÉMORISÉS ET LES BOÎTES DE DIALOGUE« PROTECTION PAR MOT DE PASSE » ASSOCIÉS À L’IDENTITÉ SONT PERDUS.](https://usermanual.wiki/Sierra-Wireless/MC8355.Manual-2/User-Guide-1598135-Page-243.png)
![116 - Présentation du capteur d’empreintes digitalesPour définir l’identité par défaut, mettez en surbrillance l’identité souhaitée puis cliquez sur [Définir par défaut] et cliquez sur [Appliquer] pour vérifier que les paramètres sont bien enregistrés. Si vous accédez à OmniPass à l’aide d’un capteur d’empreintes digitales, vous serez automatiquement connecté à l’identité par défaut de l’utilisateur OmniPass associé à l’empreinte. Si vous utilisez la procédure de connexion à l’aide du « mot de passe principal », vous pouvez choisir l’identité avec laquelle vous vous connectez.Choix de l’identité de l’utilisateur lors de la connexionPour choisir votre identité lors de la connexion, tapez votre nom d’utilisateur dans le champ Nomd’utilisateur :. Appuyez sur [Tab] et assurez-vous que le champ Domaine : se remplit automatiquement. Cliquez sur le champ Mot de passe : pour pointer le curseur dessus et vous verrez le menu déroulant dans le champ Identité :. Sélectionnez l’identité souhaitée puis cliquez sur [OK].Changement d’identité de l’utilisateurPour changer les identités à tout moment, cliquez avec le bouton droit de la souris sur l’icône OmniPass dans la zone de notification, puis cliquez sur Changer l’identité de l’utilisateur dans le sous-menu. La boîte de dialogue Changer d’identité apparaît. Sélectionnez l’identité souhaitée puis cliquez sur [OK].Gestion des mots de passe et des identitésSur l’interface Gérer les mots de passe de l’onglet Gestion du coffre-fort du Centre de contrôle OmniPass, il existe une liste de sélection déroulante nommée Identité. Ce champ vous permet de choisir l’identité pour laquelle vous désirez gérer les mots de passe. Lorsque vous sélectionnez une identité dans cette liste, le système affiche seulement les boîtes de dialogue « Protection par mot de passe » associées à cette identité. Vous pouvez effectuer toutes les fonctions expliquées dans « Gestion des mots de passe » en page 114.](https://usermanual.wiki/Sierra-Wireless/MC8355.Manual-2/User-Guide-1598135-Page-244.png)

![118 - Présentation du capteur d’empreintes digitalesExporter un profil d’utilisateur OmniPassPour exporter un profil utilisateur, ouvrez le Centre de contrôle OmniPass et cliquez sur Importer/exporter un utilisateur sous Gérer les utilisateurs.Cliquez sur Exporter un profil utilisateur OmniPass. OmniPass vous invitera à vous authentifier. Une fois l’authentification réussie, vous devez nommer le profil utilisateur OmniPass et décider où l’enregistrer. Un fichier .opi est généré et vous devez en sauvegarder une copie dans un endroit sûr.Ce fichier .opi contient toutes vos données d’utilisateur OmniPass. Il est crypté et protégé par mot de passe. Ce profil utilisateur ne contient AUCUN de vos fichiers de données cryptés.Importer un profil d’utilisateur OmniPassPour importer un profil utilisateur, ouvrez le Centre de contrôle OmniPass et cliquez sur [Importer/exporter un utilisateur] sous Gérer les utilisateurs. Cliquez sur [Importer un nouvel utilisateur dans OmniPass], sélectionnez « Fichier d’importation/exportation OmniPass » (*.opi) puis cliquez sur [Suivant]. OmniPass vous invite ensuite à rechercher le fichier exporté auparavant (fichier .opi). Lorsque vous sélectionnez le fichier .opi pour l’importer, OmniPass vous invite à vous authentifier. Les informations d’identification permettant d’importer un profil sont les références de connexion Windows de l’utilisateur exporté. Ces références sont celles qu’il fallait soumettre lorsque le profil d’utilisateur a été exporté. Vous aurez besoin du Nom d’utilisateur, du Mot de passe et du Domaine. Si vous avez oublié la valeur pour Domaine, celle-ci doit correspondre au nom de votre ordinateur dans un environnement PC ou SOHO.OmniPass vous informe si le profil utilisateur a été correctement importé.Informations importantes sur les opérations d’importation et d’exportation•Supposons que vous exportez un profil d’utilisateur Windows local depuis OmniPass. Vous voulez importer ce profil sur un autre ordinateur doté d’OmniPass. Avant de pouvoir importer le profil, un utilisateur Windows avec les mêmes références de connexion doit être créé sur l’ordinateur important le profil.Exemple : J’ai un utilisateur Windows avec le nom d’utilisateur « Thomas » et le mot de passe « Soleil » sur mon système. J’ai enregistré « Thomas » dans OmniPass et mémorisé des mots de passe. Je veux transférer tous mes mots de passe vers le nouveau système. J’exporte le profil](https://usermanual.wiki/Sierra-Wireless/MC8355.Manual-2/User-Guide-1598135-Page-246.png)
![119 - Présentation du capteur d’empreintes digitalesutilisateur OmniPass de Thomas. J’accède à mon nouveau système et à l’aide du panneau de configuration, je crée un utilisateur avec le nom d’utilisateur « Thomas » et le mot de passe « Soleil ». Je peux maintenant importer les données utilisateur OmniPass dans le nouveau système.•Si vous exportez un utilisateur propre à OmniPass, vous pouvez importer cet utilisateur dans tout ordinateur exécutant OmniPass, à condition qu’un utilisateur portant le même nom n’y soit pas déjà enregistré. •Si vous tentez d’importer un profil utilisateur portant le même nom qu’un utilisateur déjà enregistré dans OmniPass, le processus d’importation échoue.Centre de contrôle OmniPassCette section a pour but de présenter les fonctions du Centre de contrôle OmniPass qui n’ont pas été expliquées auparavant. Vous pouvez accéder au Centre de contrôle OmniPass de trois façons :•Double-cliquez sur l’icône OmniPass en forme de clé dorée dans la zone de notification Windows (généralement située dans le coin inférieur droit du bureau).•Cliquez sur le bouton [Démarrer], sélectionnez Tous les programmes, puis le groupe de programmes Softex et enfin cliquez sur la sélection Centre de contrôle OmniPass.•Ouvrez le Panneau de configuration Windows (accessible à partir du bouton Démarrer –> Paramètres –> Panneau de configuration) et double-cliquez sur l’icône Softex OmniPass.Gestion des utilisateursL’onglet « Gestion des utilisateurs » comporte deux interfaces principales : Ajouter/supprimer un utilisateur et Importer/exporter un utilisateur. La fonctionnalité Importer/exporter un utilisateur est expliquée dans « Exportation et importation d’utilisateurs » en page 117. La fonctionnalité Ajouter/supprimer un utilisateur est explicite. Si vous cliquez sur Ajouter un nouvel utilisateur à OmniPass, vous démarrez l’Assistant d’enregistrement OmniPass. L’Assistant d’enregistrement est expliqué dans « Enregistrement des utilisateurs » en page 108.](https://usermanual.wiki/Sierra-Wireless/MC8355.Manual-2/User-Guide-1598135-Page-247.png)
![120 - Présentation du capteur d’empreintes digitalesSi vous cliquez sur Supprimer un utilisateur OmniPass, vous êtes invité à vous authentifier. Authentifiez-vous à l’aide des informations d’identification (ou de l’empreinte digitale enregistrée) de l’utilisateur à supprimer. OmniPass vous invite à confirmer la suppression de l’utilisateur. Cliquez sur [OK] pour terminer le processus de suppression.LA SUPPRESSION D’UN UTILISATEUR DÉTRUIT AUTOMATIQUEMENT TOUTES LES DONNÉES OMNIPASSASSOCIÉES À CET UTILISATEUR. TOUTES LES IDENTITÉS ET TOUTES LES INFORMATIONS D’IDENTIFICATIONDE L’UTILISATEUR SERONT PERDUES.SI VOUS ÊTES CERTAIN DE DEVOIR SUPPRIMER L’UTILISATEUR,NOUS VOUS RECOMMANDONS D’EXPORTERLE PROFIL UTILISATEUR.](https://usermanual.wiki/Sierra-Wireless/MC8355.Manual-2/User-Guide-1598135-Page-248.png)
![121 - Présentation du capteur d’empreintes digitalesParamètres utilisateurL’onglet « Paramètres utilisateur » comporte trois interfaces : Paramètres audio,Astuces de la barre de tâches et Enregistrement. Les paramètres utilisateur vous permettent de personnaliser OmniPass pour répondre à vos préférences. Sous Paramètres utilisateur (Paramètres audio et Astuces de la barre de tâches), vous pouvez configurer la manière dont OmniPass vous informe des événements d’OmniPass (par exemple, connexion réussie, accès refusé, etc.). Les détails de chaque paramètre sous les interfaces Paramètres audio et Astuces de la barre des tâches sont explicites.L’interface Enregistrement vous permet d’enregistrer des empreintes digitales. Si vous désirez des informations sur la procédure d’enregistrement d’un périphérique d’authentification, reportez-vous au Chapitre 2.3. Pour enregistrer des empreintes digitales supplémentaires, cliquez sur Enregistrer un périphérique d’authentification et authentifiez-vous dans OmniPass. Sélectionnez le périphérique de reconnaissance d’empreintes digitales dans l’écran Sélectionner un périphérique d’authentification(il doit être déjà marqué d’une coche verte si vous avez enregistré un doigt), puis cliquez sur [Suivant].Paramètres de systèmeVous trouverez l’interface Options de démarrage dans l’onglet « Paramètres de système ». Les options de cette interface vous permettent de spécifier la manière dont votre ouverture de session OmniPass est associée à votre ouverture de session Windows.La première option, Se connecter automatiquement à OmniPass en tant qu’utilisateur actuel, est explicite. Lors de l’ouverture d’une session Windows, vous êtes connecté à OmniPass à l’aide de vos références de connexion Windows. Si l’utilisateur ouvrant une session Windows n’a jamais été enregistré dans OmniPass, personne n’est connecté à OmniPass au moment de la connexion. Ce paramètre convient à une configuration de bureau ou à toute configuration nécessitant la saisie d’un nom d’utilisateur et d’un mot de passe pour utiliser l’ordinateur. Il s’agit du paramètre par défaut.Avec la deuxième option, Se connecter manuellement à OmniPass au démarrage, OmniPass vous invite à vous connecter une fois que vous avez ouvert une session Windows.Si vous choisissez la troisième option, Ne pas se connecter à OmniPass au démarrage, OmniPass n’invite pas l’utilisateur à se connecter.](https://usermanual.wiki/Sierra-Wireless/MC8355.Manual-2/User-Guide-1598135-Page-249.png)
![122 - Présentation du capteur d’empreintes digitalesVous pouvez vous connecter manuellement à OmniPass en cliquant avec le bouton droit de la souris sur l’icône d’OmniPass dans la zone de notification et sur Connecter l’utilisateur dans le menu généré.DépannageVous ne pouvez pas utiliser OmniPass pour créer des utilisateurs Windows. Vous devez d’abord créer l’utilisateur Windows, ce qui nécessite des droits d’administrateur. Une fois l’utilisateur Windows créé, vous pouvez l’ajouter dans OmniPass avec le même nom d’utilisateur et le même mot de passe.Impossible d’ajouter des utilisateurs Windows dans OmniPassSi vous rencontrez des difficultés pour ajouter un utilisateur Windows dans OmniPass, vous devrez peut-être modifier vos paramètres de sécurité locale. Pour ce faire, allez à Démarrer, Panneau de configuration,Outils d’administration et Paramètres de sécurité locale. Ouvrez Stratégies locales et Options de sécurité, puis double-cliquez sur Accès réseau : Modèle de partage et de sécurité pour les comptes locaux. La configuration correcte doit être Classique – Les utilisateurs locaux s’authentifient eux-mêmes.Impossible d’ajouter un utilisateur avec un mot de passe vide dans OmniPassSi vous rencontrez des difficultés pour ajouter un utilisateur avec un mot de passe vide dans OmniPass, vous devrez peut-être modifier vos paramètres de sécurité locale. Essayez d’abord la procédure expliquée dans la section Impossible d’ajouter un utilisateur Windows dans OmniPass. Si le problème persiste, essayez la procédure suivante.Cliquez sur [Démarrer], Panneau de configuration, Outils d’administration et Paramètres de sécurité locale. Ouvrez Stratégies locales et Options de sécurité, puis double-cliquez sur Comptes :restreindre l’utilisation de mots de passe vierges par le compte local à l’ouverture de session console.Ce paramètre doit être configuré sur Désactivé.Durant la procédure d’ouverture d’une session Windows, une boîte de dialogue s’affiche après l’authentification OmniPass](https://usermanual.wiki/Sierra-Wireless/MC8355.Manual-2/User-Guide-1598135-Page-250.png)
![123 - Présentation du capteur d’empreintes digitalesAprès avoir installé OmniPass sur votre système, vous pouvez choisir de vous connecter à Windows à l’aide d’OmniPass. Vous vous authentifiez avec OmniPass (à l’aide du mot de passe principal ou d’un périphérique de sécurité enregistré) et OmniPass vous connecte à Windows. Au cours du processus d’authentification, il se peut que la boîte de dialogue Erreur de connexion s’affiche.Cette boîte de dialogue apparaît si OmniPass n’a pas réussi à vous connecter à Windows à l’aide des informations d’identification fournies (nom d’utilisateur et mot de passe). Ceci peut arriver dans les circonstances suivantes :•Votre mot de passe Windows a changé.•Votre compte Windows a été désactivé.Si vous rencontrez des difficultés à cause de la première raison, vous devrez mettre à jour OmniPass avec votre mot de passe de compte Windows modifié. Cliquez sur Mettre à jour le mot de passe et une boîte de dialogue vous invitera à reconfirmer votre mot de passe.Entrez le nouveau mot de passe Windows et cliquez sur [OK]. Si l’erreur persiste, il est peu probable que le problème soit dû à la modification de votre mot de passe Windows.](https://usermanual.wiki/Sierra-Wireless/MC8355.Manual-2/User-Guide-1598135-Page-251.png)
![124 Annexe C : Guide d’utilisation de FujitsuHLInstructions de FujitsuHLFujitsuHL procure un affichage avec icônes des lanceurs d’accueil, de photos et de documents, vous permettant de facilement les sélectionner directement depuis votre écran.FujitsuHL vous aide à exécuter les fonctions suivantes :•Gadgets FujitsuHL•Liens vers les logiciels que vous utilisez fréquemment •Ouverture de fichiers dans les dossiers Images et Documents•Prendre des photos avec la webcamDémarrer FujitsuHLDeux méthodes sont à votre disposition pour lancer FujitsuHL :•Appuyez sur le bouton [Clavier] de l’ordinateur pendant au moins deux secondes, ou•Sélectionnez Démarrer > Tous les programmes > FujitsuHL, puis sélectionnez FujitsuHL.POUR UTILISER FUJITSUHL, VOUS DEVEZ RÉGLER LA RÉSOLUTION D’AFFICHAGE À 1280 X 800 POINTS.](https://usermanual.wiki/Sierra-Wireless/MC8355.Manual-2/User-Guide-1598135-Page-252.png)
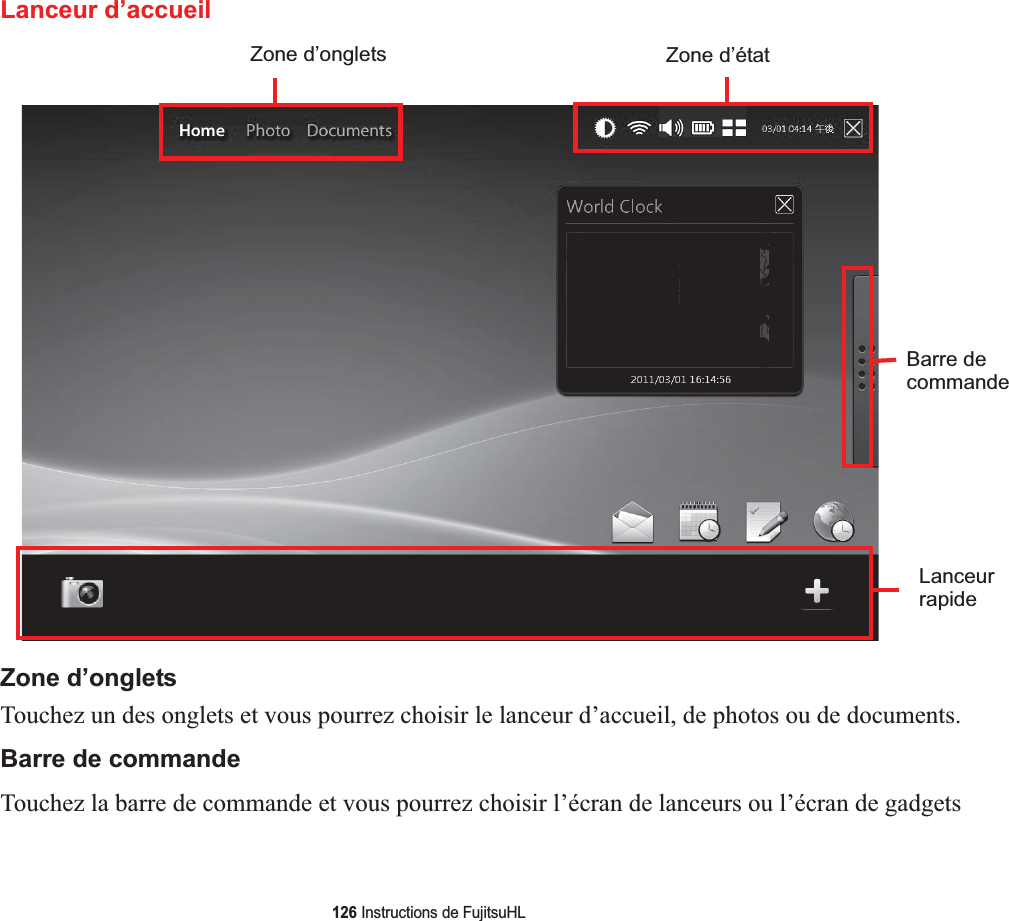
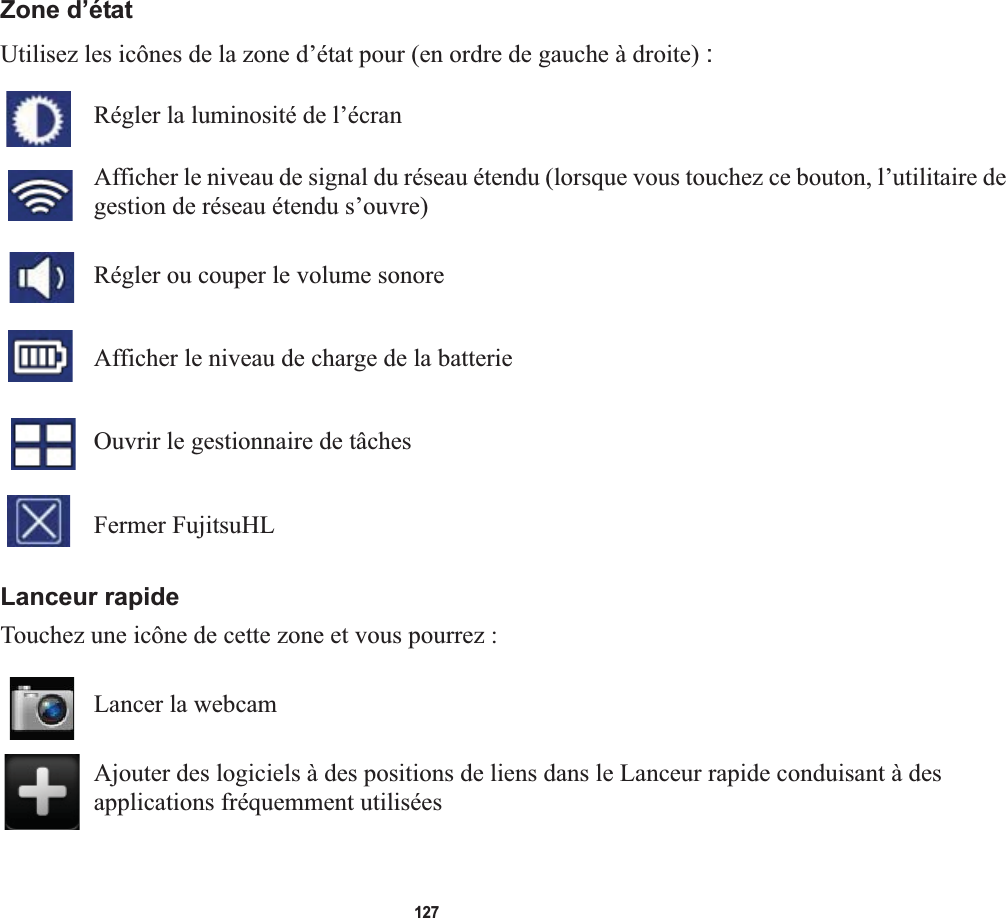
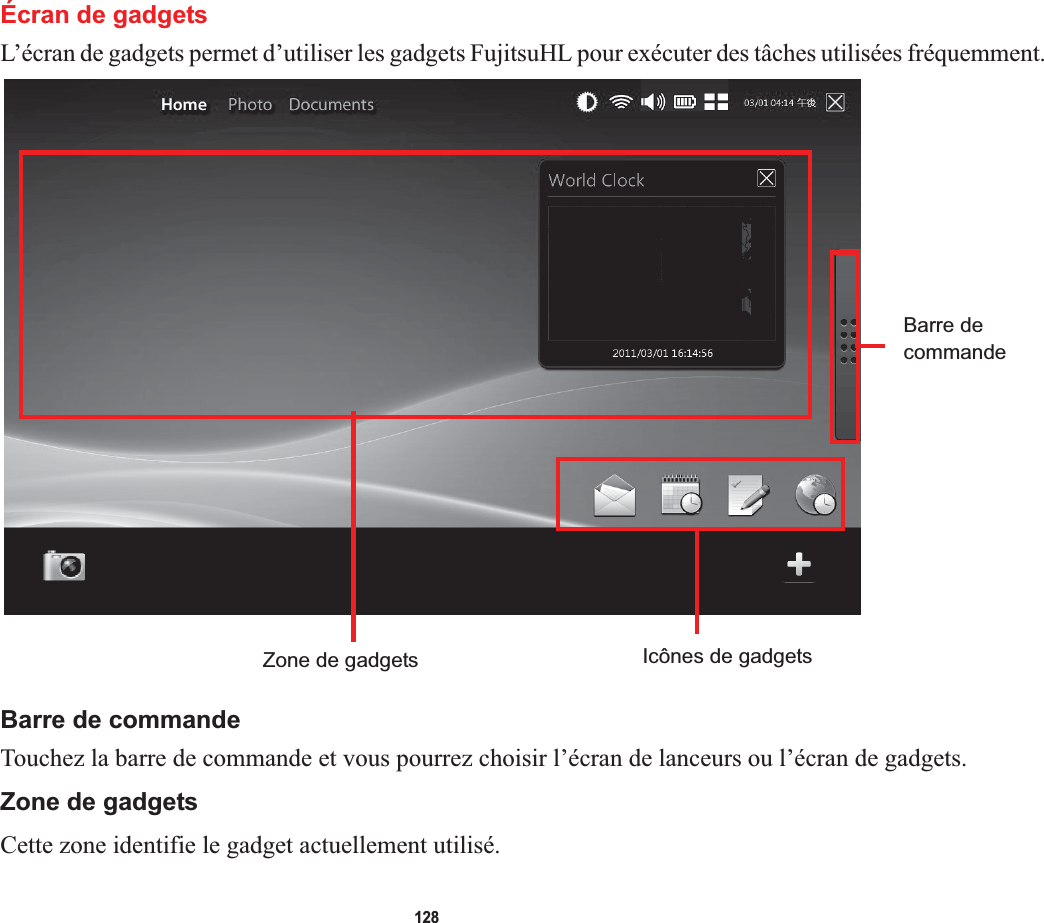
![130Écran de lanceursL'écran de lanceurs permet d'exécuter diverses applications.Zone de raccourcisLa zone de raccourcis affiche une icône pour chaque application bénéficiant d’un lien. Pour exécuter une application, il suffit de toucher l’icône correspondante.Pour ajouter une icône dans la zone de raccourcis, ajoutez-la dans le Lanceur rapide (Voir « Lanceur rapide » en page 127.), puis glissez-déposez l’icône dans la zone de raccourcis.Pour supprimer une icône, appuyez sur cette icône jusqu’à ce que le système offre de la supprimer, puis touchez [OK].Veuillez prendre note que les icônes Courrier et Navigateur ne peuvent pas être supprimées.Zone deraccourcis](https://usermanual.wiki/Sierra-Wireless/MC8355.Manual-2/User-Guide-1598135-Page-258.png)