Sharp NAR0058 GSM900/DCS1800/PCS1900 Tri band cellular phone User Manual Manual revised 2
Sharp Corporation GSM900/DCS1800/PCS1900 Tri band cellular phone Manual revised 2
Sharp >
Contents
- 1. Manual revised 1
- 2. Manual revised 2
- 3. Manual 1
- 4. Manual 2
Manual revised 2
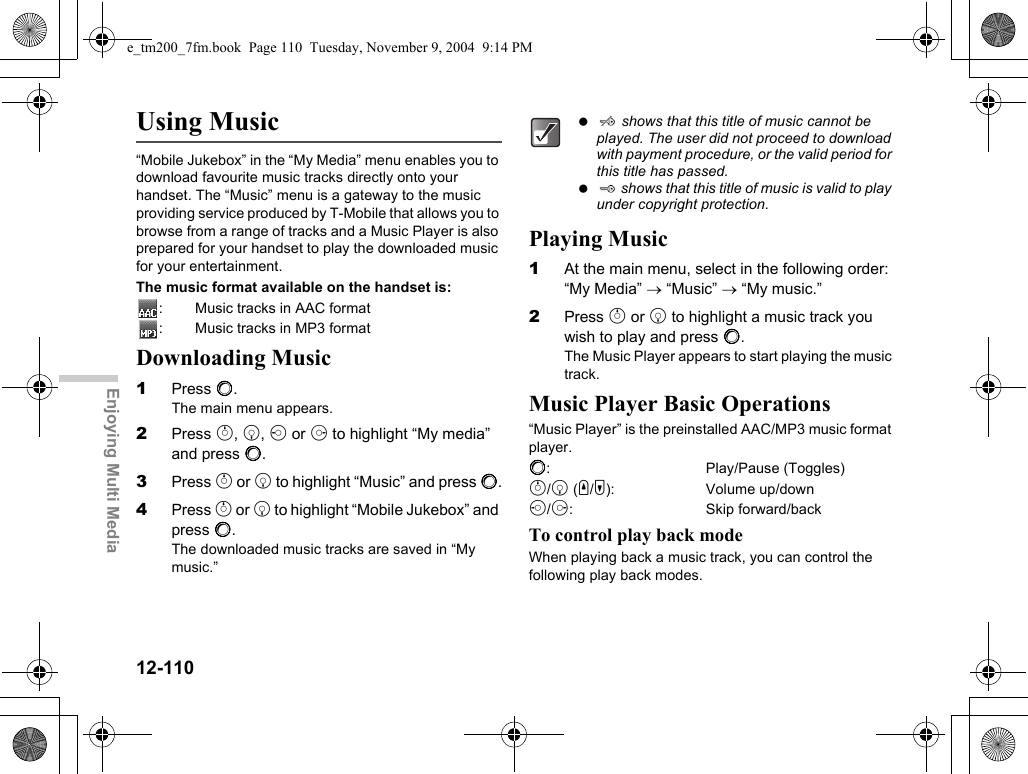
![12-111Enjoying Multi Media1When playing back a music track, press C [Options].The “Options” menu appears.2Select from the following menu items and press B. Shuffle: Sets the random shuffle play mode. Repeat1: Plays the current song repeatedly. Repeat all:Plays all songs in the list repeatedly. Normal: Plays the song in the list until the end.The mode icon you set appears on the Music Player display.Making Your Music Play ListYou can make your own play list.1At the main menu, select in the following order: “My Media” → “Music” → “My music.”The list of “My music” appears.2Press a or b to highlight a music track you wish to add to the play list and press C [Options].The “Options” menu appears.3Press a or b to highlight “Add to playlist” and press B.The music track adds to “My playlist.”Checking the Music Information1At the main menu, select in the following order: “My Media” → “Music” → “My music.”The list of “My music” appears.2Press a or b to highlight a music track whose details you wish to check and press C [Options].The “Options” menu appears.3Press a or b to highlight “Music details” and press B.The player pauses music playback if an incoming phone call is detected and the ringtone is heard through the headphones.When playing a music track, pressing C [Options] and selecting “Add to playlist” also adds the file to “My playlist.”When playing back music tracks, pressing C [Options] and selecting “Music details” also shows the detailed information.e_tm200_7fm.book Page 111 Tuesday, November 9, 2004 9:14 PM](https://usermanual.wiki/Sharp/NAR0058.Manual-revised-2/User-Guide-487918-Page-2.png)
![12-112Enjoying Multi MediaChanging the Name of Music1At the main menu, select in the following order: “My Media” → “Music” → “My music.”The list of “My music” appears.2Press a or b to highlight a music track whose name you wish to change and press C [Options].The “Options” menu appears.3Press a or b to highlight “Rename” and press B.The text entry screen appears. For information on how to enter text, refer to “Entering Text” on page 8-51.4When you finish renaming, press B to save.Moving or Copying Music to Memory Card1At the main menu, select in the following order: “My Media” → “Music” → “My music.”The list of “My music” appears.2Press a or b to highlight a music track you wish to move or copy to memory card and press C [Options].The “Options” menu appears.3Press a or b to highlight “Move to memory card” or “Copy to memory card” and press B.If you access music tracks saved in memory card, the menu item switch to “Move to handset” or “Copy to handset” and you can move or copy music tracks from memory cards to handset memory.e_tm200_7fm.book Page 112 Tuesday, November 9, 2004 9:14 PM](https://usermanual.wiki/Sharp/NAR0058.Manual-revised-2/User-Guide-487918-Page-3.png)
![12-113Enjoying Multi MediaDeleting Music1At the main menu, select in the following order:2“My Media” → “Music” → “My music.”3The list of “My music” appears.4Press a or b to highlight a music track you wish to delete and press C [Options].The “Options” menu appears.5Press a or b to highlight “One music” or “All music” and press B.6Press C [Yes].If you wish to cancel, press A [No] in this step.Memory StatusThis function helps you to check the memory status of “My Media.”1Press B.The main menu appears.2Press a, b, c or d to highlight “My Media” and press B.3Press a or b to highlight “Memory status” and press B.4Press a or b to highlight “Handset” or “Memory card” and press B.The memory status is indicated by using bar chart.Once you delete a music track, it cannot be restored.e_tm200_7fm.book Page 113 Tuesday, November 9, 2004 9:14 PM](https://usermanual.wiki/Sharp/NAR0058.Manual-revised-2/User-Guide-487918-Page-4.png)
![13-114Using the Personal OrganiserUsing the Personal OrganiserThis section provides information on the organiser features that are built into the handset. Features include a calendar, alarm clock, calculator, voice memo recorder and phone help.Using the CalendarThe Calendar helps you organise and manage your schedule on a daily basis. The calendar can display dates from January 2000 to December 2099.1Press B.The main menu appears.2Press a, b, c or d to highlight “Organiser” and press B.3Press a or b to highlight “Calendar” and press B.The current month is displayed and the current date is highlighted.Entering AppointmentsYou can navigate the calendar by using the navigation keys. You can enter up to three schedules per day.1At the main menu, select in the following order: “Organiser” → “Calendar.”2Press a, b, c or d to highlight the day you wish to create an appointment for and press B.3Press a or b to select a field and press B.4Enter the appointment title and press B.5Enter the appointment note and press B.You can enter up to 40 characters for each title and note. For information on how to enter text, refer to “Entering Text” on page 8-51.6If you have finished entering text, press A [Back].The screen returns to the calendar. Dates with appointments are underlined.You can activate the calendar by pressing a while in standby mode. (This key assignment can be changed by the user.) Appointment titles you have entered appear below the calendar when you highlight the day. If you wish to edit any of the appointments you have entered, highlight the day again in step 2 and follow the steps.e_tm200_7fm.book Page 114 Tuesday, November 9, 2004 9:14 PM](https://usermanual.wiki/Sharp/NAR0058.Manual-revised-2/User-Guide-487918-Page-5.png)
![13-115Using the Personal OrganiserFinding a Particular DateTo enter or check appointments on a particular day, jump to that day by entering the date in the calendar.1At the main menu, select in the following order: “Organiser” → “Calendar.”2Press C [Options].The “Options” menu appears.3Press a or b to highlight “Go to date” and press B.4Enter the date you wish to display and press B.The specified date is highlighted.Changing the Weekly FormatYou can change the weekly format of the Calendar.1At the main menu, select in the following order: “Organiser” → “Calendar.”2Press C [Options].The “Options” menu appears.3Press a or b to highlight “Setting” and press B.4Press a or b to highlight “Weekly format” and press B.5Press a or b to highlight “Monday-Sunday” or “Sunday-Saturday” and press B.Monday-Sunday: Weekly format from Monday.Sunday-Saturday: Weekly format from Sunday.Deleting AppointmentsYou can select three ways to make deletions in the calendar: deleting appointments one by one, deleting all appointments set for a day or deleting all appointments in the calendar.To delete appointments one by one1At the main menu, select in the following order: “Organiser” → “Calendar.”2Press a, b, c or d to highlight the day and press B.3Press a or b to highlight the field you wish to delete and press C [Options].4Press a or b to highlight “Delete” and press B.5Press a or b to highlight “1 data” and press B.6Press C [Yes].If you wish to cancel, press A [No] in this step.Once you delete appointments, they cannot be restored.e_tm200_7fm.book Page 115 Tuesday, November 9, 2004 9:14 PM](https://usermanual.wiki/Sharp/NAR0058.Manual-revised-2/User-Guide-487918-Page-6.png)
![13-116Using the Personal OrganiserTo delete all appointments on a day1At the main menu, select in the following order: “Organiser” → “Calendar.”2Press a, b, c or d to highlight the day and press C [Options].The “Options” menu appears.3Press a or b to highlight “Delete” and press B.4Press a or b to highlight “1 day” and press B.“Delete?” appears.5Press C [Yes] to delete the day’s appointments.If you wish to cancel, press A [No] in this step.To delete all appointments in the calendar1At the main menu, select in the following order: “Organiser” → “Calendar.”2Press C [Options].The “Options” menu appears.3Press a or b to highlight “Delete” and press B.4Press a or b to highlight “All data” and press B.“Delete?” appears.5Press C [Yes] to delete all appointments in the calendar.If you wish to cancel, press A [No] in this step.Using the AlarmThis function alerts you at a specified time such as for an appointment or at the time to get up.Setting the Alarm1Press B.The main menu appears.2Press a, b, c or d to highlight “Organiser” and press B.If you wish to delete all the appointments on a certain day, select “1 day” in step 5 on the previous page. The result is the same as the next option, “To delete all appointments on a day.” After changing the settings, you may have to press A [Save]. The alarm function does not work if the handset is turned off.e_tm200_7fm.book Page 116 Tuesday, November 9, 2004 9:14 PM](https://usermanual.wiki/Sharp/NAR0058.Manual-revised-2/User-Guide-487918-Page-7.png)
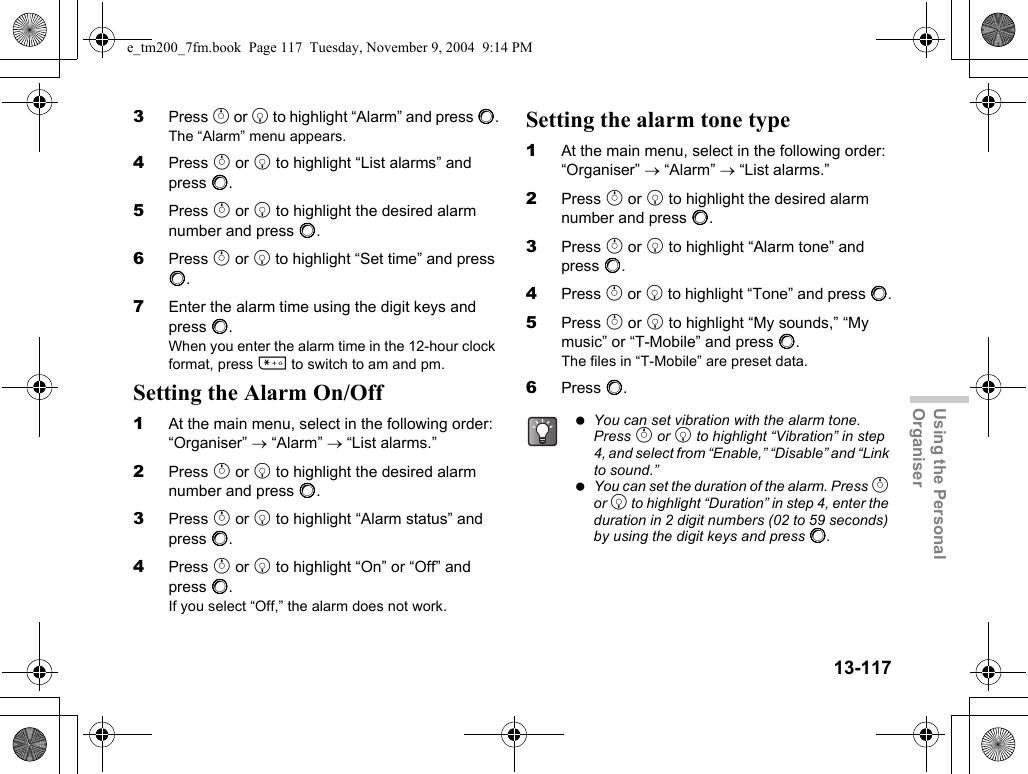
![13-118Using the Personal OrganiserSetting the Alarm to Ring at the Same Time Everyday1At the main menu, select in the following order: “Organiser” → “Alarm” → “List alarms.”2Press a or b to highlight the desired alarm number and press B.3Press a or b to highlight “Repeat daily” and press B.4Press a or b to highlight “On” or “Off” and press B.Setting the Snooze1At the main menu, select in the following order: “Organiser” → “Alarm” → “List alarms.”2Press a or b to highlight the desired alarm number and press B.3Press a or b to highlight “Snooze” and press B.4Press a or b to highlight “On” or “Off” and press B.If you select “On,” you can set the snooze interval (5, 10, 15, 20, 30 minutes) and the repeat count (1, 2, 3).Resetting an Alarm Setting1At the main menu, select in the following order: “Organiser” → “Alarm” → “List alarms.”2Press a or b to highlight the alarm you wish to reset and press B.3Press a or b to highlight “Reset alarm” and press B.4Press C [Yes].If you wish to cancel, press A [No] in this step.Resetting All Alarm Settings1At the main menu, select in the following order: “Organiser” → “Alarm” → “Clear all.”2Press C [Yes].If you wish to cancel, press A [No] in this step.When the snooze is on, the alarm will ring repeatedly as set even if the alarm is stopped.e_tm200_7fm.book Page 118 Tuesday, November 9, 2004 9:14 PM](https://usermanual.wiki/Sharp/NAR0058.Manual-revised-2/User-Guide-487918-Page-9.png)
![13-119Using the Personal OrganiserUsing the CalculatorYou can use the calculator function on the handset for basic arithmetic calculations and rate conversions using up to 12 digits.1Press B.The main menu appears.2Press a, b, c or d to highlight “Organiser” and press B.3Press a or b to highlight “Calculator” and press B.The “Calculator” appears.The table below shows you the key assignment of the handset’s keypad when using the calculator (Also refer to the display).Converting CurrencyYou can also use the calculator for currency conversion. You can convert to or from the home currency by entering the exchange rate.To set a currency conversion rate1At the main menu, select in the following order: “Organiser” → “Calculator.”2Press C [Options].The “Options” menu appears.3Press a or b to highlight “Exchange rate” and press B.4Press a or b to highlight “Foreign → Domestic” or “Domestic → Foreign” and press B.5Enter the currency conversion rate and press B.To delete all digits, press A [Clear].To convert a value1At the main menu, select in the following order: “Organiser” → “Calculator.”2Enter the value to be converted and press C [Options].The “Options” menu appears.Key FunctionB=D%a×b÷c+d–Renter a decimal pointA [Clear] ClearPswitch between negative and positivee_tm200_7fm.book Page 119 Tuesday, November 9, 2004 9:14 PM](https://usermanual.wiki/Sharp/NAR0058.Manual-revised-2/User-Guide-487918-Page-10.png)
![13-120Using the Personal Organiser3Press a or b to highlight “In domestic” or “In foreign” and press B.The result appears.Using Memo RecordingThe “Memo recording” function enables you to record a voice memo of up to 60 seconds. Also, you can send the recorded voice memo as attachments to an MMS or E-mail message.Recording a Memo1Press B.The main menu appears.2Press a, b, c or d to highlight “Organiser” and press B.3Press a or b to highlight “Memo recording” and press B.The “Memo recording” screen appears.4Press B.Recording starts.To stop while recording (the maximum recording time is 60 seconds), press B again.5Press a or b to highlight “Save” to save the voice memos and press B.To save the voice memos to the memory card1At the main menu, select in the following order:“Organiser” → “Memo recording.”2Press C [Options].The “Options” menu appears.3Press a or b to highlight “Save to…” and press B.4Press a or b to highlight “Memory card” and press B.You cannot perform step 4 if an arithmetic symbol (+, –, × or ÷ ) appears.The recorded voice memos are saved in “My sounds.” Press R while the main menu is shown instead of steps 2 to 3 to enter the “Memo recording” function. If you wish to record the voice memo again, press A [Cancel] in step 5. The screen will return to step 4.e_tm200_7fm.book Page 120 Tuesday, November 9, 2004 9:14 PM](https://usermanual.wiki/Sharp/NAR0058.Manual-revised-2/User-Guide-487918-Page-11.png)
![13-121Using the Personal OrganiserPlaying Back the Saved Voice MemoThe saved memos are in “My sounds.”1At the main menu, select in the following order: “My Media” → “Sounds” → “My sounds.”For information on how to playback a saved memo, refer to “Playing Back Sounds” on page 12-97.Using the Phone HelpYou can view the help list and use it to guide you with the phone’s functions.1Press B.The main menu appears.2Press a, b, c or d to highlight “Organiser” and press B.3Press a or b to select “Phone help” and press B.The help list appears.4Press a or b to highlight the function you wish to view.When you have finished using the help, press A [Back].e_tm200_7fm.book Page 121 Tuesday, November 9, 2004 9:14 PM](https://usermanual.wiki/Sharp/NAR0058.Manual-revised-2/User-Guide-487918-Page-12.png)
![14-122Using the Call HistoryUsing the Call HistoryIf you do not answer an incoming call, the handset records that the call was missed. “Missed calls” and the number of missed calls appears on the standby screen. The handset records the last 10 missed calls, received calls and dialled numbers. (Number of dialled numbers recorded depends on the SIM card you use.) Using the “Call Register,” you can have various useful functions such as redialling, sending messages, creating the contacts list, and you can also check the call duration.D:Dialled numbersD then d:Missed callsD then c:Received callsCalling from the Call Log1Press B.The main menu appears.2Press a, b, c or d to highlight “Call Register” and press B.The “Call Register” menu appears.3Press a or b to highlight “Missed calls,” “Received calls” or “Dialled numbers” and press B.4Press a or b to highlight the name or number you wish to call and press D.You can also access each log type in the call register using the following key operations while the handset is in standby mode.The logs in the call register are listed in chronological order. The name (if registered in the “Contacts list”) or number of the party also appears.If you press B instead of D in step 4, you can check the caller’s name and number. (To display the caller’s name, you should register the caller’s name in the “Contacts list” beforehand.) To call, press C [Options] and select “Call.”e_tm200_7fm.book Page 122 Tuesday, November 9, 2004 9:14 PM](https://usermanual.wiki/Sharp/NAR0058.Manual-revised-2/User-Guide-487918-Page-13.png)
![14-123Using the Call HistorySending Messages from the Call Log1At the main menu, select “Call Register.”2Press a or b to highlight “Missed calls,” “Received calls” or “Dialled numbers” and press B.3Press a or b to highlight the number you wish to send messages to and press C [Options].The “Options” menu appears.4Press a or b to highlight “Send message” and press B.5Press a or b to highlight “via SMS” or “via MMS” and press B.The text entry screen appears.6Enter your message.For information on how to enter text, refer to “Entering Text” on page 8-51.Saving a Call Log to the Contacts List1At the main menu, select “Call Register.”2Press a or b to highlight “Missed calls,” “Received calls” or “Dialled numbers” and press B.3Press a or b to highlight the number you wish to save and press C [Options].The “Options” menu appears.4Press a or b to highlight “Save to Contacts” and press B.The handset saves the call log in the “Contacts list.”For information on the “Contacts list,” refer to “Using the Contacts List” on page 9-54.If you press B instead of C [Options] in step 3, you can check the caller’s name and number. (To display the caller’s name, you should register the caller’s name into the “Contacts list” beforehand.) To save the call log, press C [Options] and select “Save to Contacts.” The text entry screen appears. The handset saves the call log in the “Contacts list.”e_tm200_7fm.book Page 123 Tuesday, November 9, 2004 9:14 PM](https://usermanual.wiki/Sharp/NAR0058.Manual-revised-2/User-Guide-487918-Page-14.png)
![14-124Using the Call HistoryDeleting a Call Log1At the main menu, select “Call Register.”2Press a or b to highlight “Missed calls,” “Received calls” or “Dialled numbers” and press B.3Press a or b to highlight the number you wish to delete and press C [Options].The “Options” menu appears.4Press a or b to highlight “Delete” and press B.5Press C [Yes].The call log selected in step 3 is deleted.If you wish to cancel deleting, press A [No] in this step.Clearing Call Logs1At the main menu, select “Call Register.”2Press a or b to highlight “Missed calls,” “Received calls” or “Dialled numbers” and press C [Options].The “Options” menu appears.3Press a or b to highlight “Clear missed calls” (“Clear received calls” or “Clear dialled numbers”) and press B.4Press C [Yes].The call log selected in step 3 is cleared.If you wish to cancel, press A [No] in this step.If you press B instead of C [Options] in step 3, you can check the caller’s name and number. (To display the caller’s name, you should register the caller’s name in the “Contacts list” beforehand.) To delete the call log, press C [Options] and select “Delete.” The handset deletes the call log.If you wish to delete all call logs, in each call register, select “Clear all logs” in step 3.Once you delete a call log, it cannot be restored.e_tm200_7fm.book Page 124 Tuesday, November 9, 2004 9:14 PM](https://usermanual.wiki/Sharp/NAR0058.Manual-revised-2/User-Guide-487918-Page-15.png)
![14-125Using the Call HistoryChecking the Duration of CallsYou can check the duration of your calls.Checking the Duration of the Last Call1At the main menu, select “Call Register.”2Press a or b to highlight “Call timers” and press B.3Press a or b to highlight “Last call” and press B.The duration of the last call appears.Checking the Total Call Time Log1At the main menu, select “Call Register.”2Press a or b to highlight “Call timers” and press B.3Press a or b to highlight “All calls” and press B.The total duration of all calls appears.Checking the Cost of CallsYou can check the phone charge for your calls.Checking and Setting the Charge Rate1Press B.The main menu appears.2Press a, b, c or d to highlight “Call Register” and press B.3Press a or b to highlight “Call costs” and press B.4Press a or b to highlight “Units cost” and press B.5Press a or b to highlight “Read units” and press B.The current charge rate appears. To change the current charge rate, press A [Back] and follow the next steps. To reset the call timer, select “Clear timers” in step 3. Once you reset timer, it cannot be restored. Once you delete the duration of the last call and total call time log, they cannot be restored.e_tm200_7fm.book Page 125 Tuesday, November 9, 2004 9:14 PM](https://usermanual.wiki/Sharp/NAR0058.Manual-revised-2/User-Guide-487918-Page-16.png)
![15-132Setting the HandsetAssigning PicturesA selected picture appears when turning the power on or off, receiving an incoming call or operating the alarms. Pictures taken with the built-in digital camera or images downloaded via a browser can be set.1At the main menu, select in the following order: “Settings” → “Phone settings” → “Main display.”2Press a or b to highlight “Assign pictures” and press B.3Press a or b to select when you want to display the animation or a picture from the following choices.When turning the power on or off:Highlight “Power on” or “Power off” and press B.When receiving an incoming call:Highlight “Incoming” and press B.When operating the alarm:Highlight “Alarm” and press B.To set preloaded animations4After step 3, press a or b to highlight “T-Mobile.”To set a picture from “My photos” or “My pictures”4After step 3, press a or b to highlight “My photos” or “My pictures” and press B.The thumbnail index for “My pictures,” “My photos” or the current picture appears. If you need to change the picture, press C [Change].5Press a, b, c or d to highlight the picture you wish to display and press B to set.Setting the External DisplayYou can change the settings of the external display in the same way as the main display.1Press B.The main menu appears.2Press a, b, c or d to highlight “Settings” and press B.3Press a or b to highlight “Phone settings” and press B.4Press a or b to highlight “External display” and press B.The “External display” menu appears.e_tm200_7fm.book Page 132 Tuesday, November 9, 2004 9:14 PM](https://usermanual.wiki/Sharp/NAR0058.Manual-revised-2/User-Guide-487918-Page-23.png)
![15-134Setting the HandsetTurning On/Off the BacklightYou can turn the backlight of the external display on or off when the handset is closed.1At the main menu, select in the following order: “Settings” → “Phone settings” → “External display.”2Press a or b to highlight “Backlight” and press B.3Press a or b to highlight selection and press B.When selecting “On,” enter the duration of the backlight using two-digit numbers and press B.To adjust the Contrast1At the main menu, select in the following order: “Settings” → “Phone settings” → “External display.”2Press a or b to highlight “Contrast” and press B.3Press a (higher) or b (lower) to adjust the contrast and press B.The contrast changes in 9 steps.Setting the Incoming PicturesYou can set the picture displayed when receiving an incoming call for the external display.1At the main menu, select in the following order: “Settings” → “Phone settings” → “External display.”2Press a or b to highlight “Incoming picture” and press B.3Press a or b to highlight “Picture 1,” “Picture 2” or “Picture 3” and press B.Setting the Display ClockVarious clocks can be displayed in the external display.1At the main menu, select in the following order: “Settings” → “Phone settings” → “External display.”2Press a or b to highlight “Display clock” and press B.3Press a or b to select a clock and press B.If you wish to view the clock before setting, press C [Options] to display the “Options” menu and select “View.” The selected clock is displayed.e_tm200_7fm.book Page 134 Tuesday, November 9, 2004 9:14 PM](https://usermanual.wiki/Sharp/NAR0058.Manual-revised-2/User-Guide-487918-Page-25.png)
![15-135Setting the HandsetSetting the Icon Display On/OffThe icon indications can be set on or off in the external display.1At the main menu, select in the following order: “Settings” → “Phone settings” → “External display.”2Press a or b to highlight “Icon indication” and press B.3Press a or b to highlight “On” or “Off” and press B.Turning the Display On/OffYou can turn the external display on or off when the handset is closed.1At the main menu, select in the following order: “Settings” → “Phone settings” → “External display.”2Press a or b to highlight “Display On/Off” and press B.3Press a or b to highlight “On” or “Off” and press B.Resetting the Phone SettingYou can reset all options of the “Phone setting” to the default settings.To cancel the settings, you need to set the handset code beforehand or refer to page 15-154 for details.1Press B.The main menu appears.2Press a, b, c or d to highlight “Settings” and press B.3Press a or b to highlight “Phone settings” and press B.4Press a or b to highlight “Set to default” and press B.5Enter your handset code and press B.6Press C [Yes].To cancel, press A [No] in this step.If you enter a wrong handset code in step 5, the operation is cancelled.e_tm200_7fm.book Page 135 Tuesday, November 9, 2004 9:14 PM](https://usermanual.wiki/Sharp/NAR0058.Manual-revised-2/User-Guide-487918-Page-26.png)
![15-136Setting the HandsetSetting the ProfilesThis section describes the settings for sound such as ringtone, keypad tones, etc. These are six profiles with separate settings that can be set to suit every occasion. When a profile is set, the icon corresponding to the profile name appears in the standby screen.T-Mobile : Default settings.My profile : Default settings which can be changed.Conference :Set when in a meeting or discretion is needed.Activity : Set when in a noisy situation.In car :Set when driving (connected to hands free EARphone & MIC).Silent :Set when you need to be silent. All sounds except camera shutter are muted and you are alerted to calls with the vibration.1Press B.The main menu appears.2Press a, b, c or d to highlight “Settings” and press B.3Press a or b to highlight “Profiles” and press B.The “Profiles” menu appears.4Press a or b to highlight the profile you wish to set, press C [Options].5Press a or b to highlight “Personalise” and press B.After this step, follow the appropriate instructions.Setting the Ringer VolumeYou can adjust the ringer volume to one of 5 levels or a step tone. When “Silent” is selected, the ringer volume and the application volume are also muted.1At the main menu, select in the following order: “Settings” → “Profiles” → the profile you wish to set and press C [Options] → “Personalise.”2Press a or b to highlight “Ringer volume” and press B.The current volume level appears.After changing the settings, press C [Save]. If you wish to set the “Silent” profile, press and hold R for approximately 2 seconds while in the standby mode. You can display profiles by pressing d while in the standby mode.e_tm200_7fm.book Page 136 Tuesday, November 9, 2004 9:14 PM](https://usermanual.wiki/Sharp/NAR0058.Manual-revised-2/User-Guide-487918-Page-27.png)
![15-137Setting the Handset3Press a or b to select the volume level from one of five levels, “Step tone” or “Silent” and press B.Setting a Melody as the RingtoneYou can select preset data for use as ringtones, sound effects, melodies, etc. You can also select data in “Sounds” or “Music” for the default ringtone excluding the ones in AMR/WAVE format.1At the main menu, select in the following order: “Settings” → “Profiles” → the profile you wish to set and press C [Options] → “Personalise.”2Press a or b to highlight “Assign melody” and press B.3Press a or b to highlight “My sounds,” “My Music” or “T-Mobile” and press B.The files in “T-Mobile” are preset data.4Press a or b to highlight the ringtone you wish to set.If you wish to listen to the ringtone you selected, press B.To stop, press C [Stop].5Press C [Select].Setting the VibrationYou can set the vibration for incoming calls regardless of the ringer volume and tone settings.1At the main menu, select in the following order: “Settings” → “Profiles” → the profile you wish to set and press C [Options] → “Personalise.”2Press a or b to highlight “Vibration” and press B.3Press a or b to highlight “Enable,” “Disable” or “Link to sound” and press B. You cannot set melodies for the “T-Mobile” profile. You cannot choose sound files in the memory card for ringtones. When “Link to sound” is selected in step 3, melodies are synchronised with the vibration for the ringtone. However, this function may not work depending on the melody. When you select “Enable” or “Link to sound” in step 3, “ ” is displayed on the standby screen.e_tm200_7fm.book Page 137 Tuesday, November 9, 2004 9:14 PM](https://usermanual.wiki/Sharp/NAR0058.Manual-revised-2/User-Guide-487918-Page-28.png)
![15-138Setting the HandsetSetting the Keypad TonesYou can set and change the tone of the keypad sound that you hear each time you press a key. In the following settings, you can select the volume level, the melody to be used, and the duration.1At the main menu, select in the following order: “Settings” → “Profiles” → the profile you wish to set and press C [Options] → “Personalise.”2Press a or b to highlight “Keypad tones” and press B.3Press a or b to highlight “On” or “Off” and press B.If you select “Off,” the screen returns to step 1.If you select “On,” follow the next steps.4Press a or b to highlight “Volume” and press B.5Press a or b to highlight “High,” “Middle” or “Low” to adjust the volume and press B.6Press a or b to highlight “Tone” and press B.If you select “T-Mobile” as a profile, you cannot select “Tone.”7Press a or b to highlight “My sounds,” “My music” or “Default tone” and press B.8Select the keypad tones and press C [Select].For information on how to select tones, refer to “Setting a Melody as the Ringtone” on page 15-137.9Press a or b to highlight “Duration” and press B.10 Press a or b to select the desired duration and press B.Setting the Warning ToneYou can set and change the warning tone that you hear when an error occurs. In the following settings, you can select the volume level, the melody to be used, and the duration.1At the main menu, select in the following order: “Settings” → “Profiles” → the profile you wish to set and press C [Options] → “Personalise.”2Press a or b to highlight “Warning tone” and press B.You cannot choose sound files in the memory card for the keypad tones.You cannot choose sound files in the memory card for the warning tones.e_tm200_7fm.book Page 138 Tuesday, November 9, 2004 9:14 PM](https://usermanual.wiki/Sharp/NAR0058.Manual-revised-2/User-Guide-487918-Page-29.png)
![15-139Setting the Handset3Press a or b to highlight “On” or “Off” and press B.If you select “Off,” the screen returns to step 1.If you select “On,” follow the next steps.4Press a or b to highlight “Volume” and press B.5Press a or b to highlight “High,” “Middle” or “Low” and press B.6Press a or b to highlight “Tone” and press B.If you select “T-Mobile” as a profile, you cannot select “Tone.”7Press a or b to highlight “My sounds,” “My music” or “T-Mobile” and press B.The files in “T-Mobile” are preset data.8Select the warning tone and press C [Select].For information on how to select tones, refer to “Setting a Melody as the Ringtone” on page 15-137.9Press a or b to highlight “Duration” and press B.10 Press a or b to select the desired duration and press B.Setting the Power On/Off SoundYou can set and change the power on/off sound that you hear when the handset is turned on or off. In the following settings you can select the volume level, the melody to be used, and the duration.1At the main menu, select in the following order: “Settings” → “Profiles” → the profile you wish to set and press C [Options] → “Personalise.”2Press a or b to highlight “Power on sound” or “Power off sound” and press B.3Press a or b to highlight “On” or “Off” and press B.If you select “Off,” the screen returns to step 1.If you select “On,” follow the next steps.4Press a or b to highlight “Volume” and press B.5Press a or b to select the volume level from one of 5 levels and press B.You cannot choose sound files in the memory card for the power on/off sounds.e_tm200_7fm.book Page 139 Tuesday, November 9, 2004 9:14 PM](https://usermanual.wiki/Sharp/NAR0058.Manual-revised-2/User-Guide-487918-Page-30.png)
![15-140Setting the Handset6Press a or b to highlight “Sound” and press B.If you select “T-Mobile” as a profile, you cannot select “Sound.”7Press a or b to highlight “My sounds,” “My music” or “T-Mobile” and press B.The files in “T-Mobile” are preset data.8Select the power on/off sound and press C [Select].For details on selecting a tone, refer to “Setting a Melody as the Ringtone” on page 15-137.9Press a or b to highlight “Duration” and press B.The message “How many seconds?” appears.10 Enter a two-digit number to define the duration and press B.Setting the Message AlertYou can set and change the message alert sound that you hear when receiving messages. In the following settings you can select the volume level, the melody to be used, and the duration.1At the main menu, select in the following order: “Settings” → “Profiles” → the profile you wish to set and press C [Options] → “Personalise.”2Press a or b to highlight “Message alert” and press B.3Press a or b to highlight “Messages” or “WAP” and press B.After selecting “Messages” or “WAP,” you will be led through the same settings. Just continue to the next steps.4Press a or b to highlight “Volume” and press B.5Press a or b to select the volume level from one of five levels, “Step tone” or “Silent” and press B.6Press a or b to highlight “Sound” and press B.If you select “T-Mobile” as a profile, you cannot select “Sound.”7Press a or b to highlight “My sounds,” “My music” or “T-Mobile” and press B.The files in “T-Mobile” are preset data.You cannot choose sound files in the memory card for the message alert.e_tm200_7fm.book Page 140 Tuesday, November 9, 2004 9:14 PM](https://usermanual.wiki/Sharp/NAR0058.Manual-revised-2/User-Guide-487918-Page-31.png)
![15-141Setting the Handset8Select the message alert sound and press C [Select].For information on selecting tones, refer to “Setting a Melody as the Ringtone” on page 15-137.9Press a or b to highlight “Vibration” and press B.10 Press a or b to highlight “Enable,” “Disable” or “Link to sound” and press B.11 Press a or b to highlight “Duration” and press B.The message “How many seconds?” appears.12 Enter a two-digit number to define the duration and press B.Setting the Java™ ApplicationYou can adjust the Java™ application volume. When “Silent” is selected, the application volume is muted.1At the main menu, select in the following order: “Settings” → “Profiles” → the profile you wish to set and press C [Options] → “Personalise.”2Press a or b to highlight “Java™” and press B.3Press a or b to highlight “Volume” and press B.The current volume level appears.4Press a or b to select the volume level from one of five levels or “Silent” and press B.5Press a or b to highlight “Vibration” and press B.6Press a or b to highlight “On” or “Off” and press B.Setting the Low Battery AlertYou can set and adjust the low battery alert volume you hear when the battery becomes empty.1At the main menu, select in the following order: “Settings” → “Profiles” → the profile you wish to set and press C [Options] → “Personalise.”2Press a or b to highlight “Low battery alert” and press B.Press a or b to highlight “High,” “Low” or “Silent” to adjust the volume and press B.e_tm200_7fm.book Page 141 Tuesday, November 9, 2004 9:14 PM](https://usermanual.wiki/Sharp/NAR0058.Manual-revised-2/User-Guide-487918-Page-32.png)
![15-142Setting the HandsetSetting Any Key AnswerYou can set the any key answer function so that you can answer a call by pressing any key except F or A [Busy].1At the main menu, select in the following order: “Settings” → “Profiles” → the profile you wish to set and press C [Options] → “Personalise.”2Press a or b to highlight “Any key answer” and press B.3Press a or b to highlight “On” or “Off” and press B.Setting the Automatic AnswerThe automatic answer function allows you to answer calls automatically when the handset is connected to Bluetooth headset. You can select the desired time until your handset answers.1At the main menu, select in the following order: “Settings” → “Profiles” → “In car” and press C [Options] → “Personalise.”2Press a or b to highlight “Automatic answer” and press B.3Press a or b to highlight “On” or “Off” and press B.If you select “On,” select the time span (5, 10, 15, 20 sec) before the handset automatically connects the call.Resetting the Profiles SettingYou can reset all the profiles settings that you have set to the default settings.To cancel the settings, you need to set the handset code beforehand or refer to page 15-154 for details.1At the main menu, select in the following order: “Settings” → “Profiles” → the profile you wish to reset and press C [Options] → “Set to default.”2Enter your handset code and press B.3Press C [Yes].To cancel, press A [No] in this step.For information on “Bluetooth,” refer to “Setting Bluetooth Connection” on page 15-150.If you enter a wrong handset code in step 2, the operation is cancelled.e_tm200_7fm.book Page 142 Tuesday, November 9, 2004 9:14 PM](https://usermanual.wiki/Sharp/NAR0058.Manual-revised-2/User-Guide-487918-Page-33.png)
![15-143Setting the HandsetInitialising and Checking Memory CardYou can initialise your memory card and check the status. To initialise the memory card, you need to set the handset code.To initialise the memory card1At the main menu, select in the following order: “Settings” → “Memory card.”2Press a or b to highlight “Format” and press B.3Enter your handset code and press B.4Press C [Yes].To cancel, press A [No] in this step.To check the memory card status1At the main menu, select in the following order: “Settings” → “Memory card.”2Press a or b to highlight “Memory card details” and press B.3You can now check the status of the memory card. After checking the status, press A [Back].Call SettingsThis section describes the settings for call functions such as call waiting, adjusting earpiece volume, etc. that are related directly to calling or receiving operations.Activating the Call Waiting ServiceActivating this service enables you to talk to a new caller while you are in the middle of another call. After activating this service, a beep tone notifies you of the second call. For information on how to use this function, refer to “Call Waiting” on page 6-34.1Press B.The main menu appears.2Press a, b, c or d to highlight “Settings” and press B.3Press a or b to highlight “Connectivity” and press B.4Press a or b to highlight “Call settings” and press B.The “Call settings” menu appears.5Press a or b to highlight “Call waiting” and press B.6Press a or b to highlight “On” to activate or “Off” to cancel the service and press B.e_tm200_7fm.book Page 143 Tuesday, November 9, 2004 9:14 PM](https://usermanual.wiki/Sharp/NAR0058.Manual-revised-2/User-Guide-487918-Page-34.png)
![15-144Setting the HandsetTo check the call waiting service statusIf you select “Status” in step 6 and press B, you can check the status of the call waiting service. After checking the status, press A [Back].Displaying the Call TimersActivating this function lets you check the duration of your call. For information on how to use this function, refer to “Checking the Duration of Calls” on page 14-125.1At the main menu, select in the following order: “Settings” → “Connectivity” → “Call settings.”2Press a or b to highlight “Display call timers” and press B.3Press a or b to highlight “On” to activate or “Off” to cancel the function and press B.Displaying Your Own NumberActivating this function lets you control whether or not to show your phone number to the party you are calling.1At the main menu, select in the following order: “Settings” → “Connectivity” → “Call settings.”2Press a or b to highlight “Show your number” and press B.3Press a or b to highlight “On,” “Off” or “Status” and press B.To check whether the show your number function is active or notIf you select “Status” in step 3 and press B, you can check the status. After checking the status, press B.The call waiting service may not be available on all service providers. Contact your service provider for more information.This service may not be available on all service providers. Contact your service provider for more information.e_tm200_7fm.book Page 144 Tuesday, November 9, 2004 9:14 PM](https://usermanual.wiki/Sharp/NAR0058.Manual-revised-2/User-Guide-487918-Page-35.png)
![15-145Setting the HandsetAdjusting the Earpiece VolumeYou can adjust the earpiece volume to one of five levels.1At the main menu, select in the following order: “Settings” → “Connectivity” → “Call settings.”2Press a or b to highlight “Earpiece volume” and press B.3Press a or b to select the volume level from one of five levels and press B.Activating the Picture CallThe image registered to the caller in the contacts list is displayed when receiving a call.1At the main menu, select in the following order: “Settings” → “Connectivity” → “Call settings.”2Press a or b to highlight “Picture call” and press B.3Press a or b to highlight “On” or “Off” and press B.Activating Auto RedialThis function makes the redial automatic when the first redial attempt is unsuccessful. If you wish to stop redialling, press F or A [End].1At the main menu, select in the following order: “Settings” → “Connectivity” → “Call settings.”2Press a or b to highlight “Auto redial” and press B.3Press a or b to highlight “On” or “Off” and press B.Activating the Minute MinderThis function informs you of the call duration by sounding a tone after every minute.1At the main menu, select in the following order: “Settings” → “Connectivity” → “Call settings.”2Press a or b to highlight “Minute minder” and press B.3Press a or b to highlight “On” to activate or “Off” to cancel the function and press B.You can also adjust the Hands free EARphone & MIC volume, if connected. When you receive an incoming call, the auto redial function is interrupted. Automatic redialling is not available for fax and data calls.e_tm200_7fm.book Page 145 Tuesday, November 9, 2004 9:14 PM](https://usermanual.wiki/Sharp/NAR0058.Manual-revised-2/User-Guide-487918-Page-36.png)
![15-146Setting the HandsetSettings for Flipping the Handset ClosedYou can reject an incoming call, send a busy tone or terminate a call by flipping the handset closed. For information on how to use this function, refer to “Rejecting an Incoming Call” on page 6-33.1At the main menu, select in the following order: “Settings” → “Connectivity” → “Call settings.”2Press a or b to highlight “Flip close” and press B.3Press a or b to highlight “Incoming call” or “During call” and press B.When selecting “Incoming call”:Press a or b to highlight “Reject” to reject an incoming call, “Busy” to send a busy tone or “No action” and press B.When selecting “During call”:Press a or b to highlight “Terminate” to terminate the call or “No action” and press B.Resetting the Call SettingsYou can reset all “Call settings” you have set to the default settings.To cancel the settings, you need to have set the handset code beforehand or refer to page 15-154 for details.1At the main menu, select in the following order: “Settings” → “Connectivity” → “Call settings.”2Press a or b to highlight “Set to default” and press B.3Enter your handset code and press B. “Are you sure?” appears.4Press C [Yes].To cancel, press A [No] in this step.If you enter a wrong handset code in step 3, the operation is cancelled.e_tm200_7fm.book Page 146 Tuesday, November 9, 2004 9:14 PM](https://usermanual.wiki/Sharp/NAR0058.Manual-revised-2/User-Guide-487918-Page-37.png)
![15-147Setting the HandsetCall ForwardingThis service is used to forward incoming calls to your voice mail system or to another number depending on certain conditions in which you cannot answer a call.Activating Call Forwarding1Press B.The main menu appears.2Press a, b, c or d to highlight “Settings” and press B.3Press a or b to highlight “Connectivity” and press B.4Press a or b to highlight “Call diverts” and press B.5Press a or b to highlight one of the forwarding options and press B.The forwarding options available are:“All calls”: Forwards all voice calls without ringing.“When busy”: Forwards incoming calls when you are in a call.“No answer”: Forwards incoming calls if you do not answer a call within a certain period of time.“Not reachable”: Forwards incoming calls when your handset is out of network service or is switched off.6Press a or b to highlight “On” and press B.7Enter the phone number you wish to forward to.Checking the Forward Status1At the main menu, select in following order: “Settings” → “Connectivity” → “Call diverts.”2Press a or b to highlight the forwarding option you wish to check and press B.3Press a or b to highlight “Status” and press B.You can now check the status of the selected forwarding option.When you finish, press A [Back].When “All calls” is set to “On,” “ ” is displayed on the standby screen.If you select “By service” instead of “On” in step 6, you can select further forwarding options.e_tm200_7fm.book Page 147 Tuesday, November 9, 2004 9:14 PM](https://usermanual.wiki/Sharp/NAR0058.Manual-revised-2/User-Guide-487918-Page-38.png)
![15-148Setting the HandsetCancelling Forwarding Settings Individually1At the main menu, select in the following order: “Settings” → “Connectivity” → “Call diverts.”2Press a or b to highlight the divert option you wish to cancel and press B.3Press a or b to highlight “Off” and press B.The selected divert option is cancelled.Cancelling All Forward Settings1At the main menu, select in the following order: “Settings” → “Connectivity” → “Call diverts.”2Press a or b to highlight “Cancel all” and press B.“Are you sure?” appears.3Press C [Yes].All divert option are cancelled.If you wish to cancel, press A [No] in this step.Setting NetworksThis setting enables you to connect to a preferred network each time the power is turned on.Connecting To a Network AutomaticallyIf your handset has not been connected to the network yet, you can perform the following steps to establish connection to a preferred network immediately.1Press B.The main menu appears.2Press a, b, c or d to highlight “Settings” and press B.3Press a or b to highlight “Connectivity” and press B.4Press a or b to highlight “Network settings” and press B.The “Network settings” menu appears.5Press a or b to highlight “Select network” and press B.6Press a or b to highlight “Automatic” and press B.e_tm200_7fm.book Page 148 Tuesday, November 9, 2004 9:14 PM](https://usermanual.wiki/Sharp/NAR0058.Manual-revised-2/User-Guide-487918-Page-39.png)
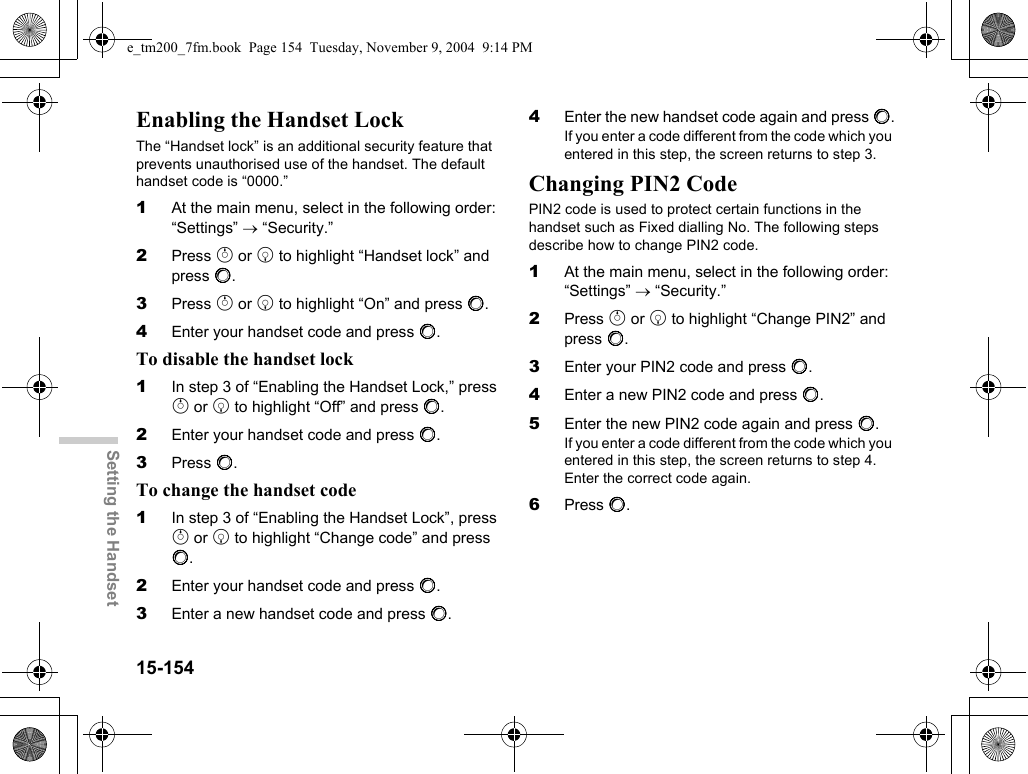
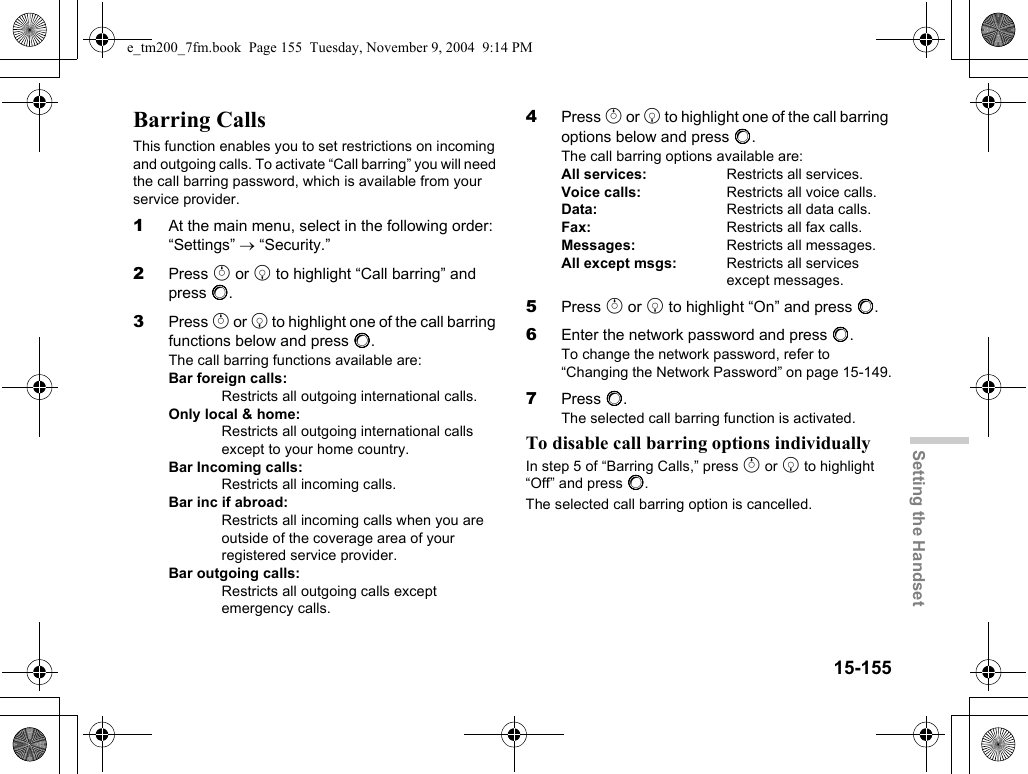
![15-156Setting the HandsetTo check call barring status5After step 4 of “Barring Calls” (page 15-155), press a or b to highlight “Status” and press B.6When you finish, press A [Back].To cancel all call barring settings3After step 2 of “Barring Calls” (page 15-155), press a or b to highlight “Cancel all” and press B.4Enter the network password and press B.All call barring settings are cancelled.Setting Fixed Dialling No.This setting enables the “Fixed dialling No.” function. If you turn the security function on, you can only call predefined numbers. In this step you are asked to enter your PIN2 code for this setting. You should check the number beforehand.1At the main menu, select in the following order: “Settings” → “Security.”2Press a or b to highlight “Fixed dialling No.” and press B.3Enter PIN2 code and press B.4Press a or b to highlight “Settings” and press B.5Press a or b to highlight “On” and press B.To disable the fixed dialling No.In step 5, press a or b to highlight “Off” and press B.The “Fixed dialling No.” function may not be available depending on the SIM card.e_tm200_7fm.book Page 156 Tuesday, November 9, 2004 9:14 PM](https://usermanual.wiki/Sharp/NAR0058.Manual-revised-2/User-Guide-487918-Page-47.png)
![15-157Setting the HandsetTo add a new phone number to the fixed dialling No. list4After step 3 of “Setting Fixed Dialling No.” (page 15-156), press a or b to highlight “Edit dial list” and press B.5Press C [Options].The “Options” menu appears.6Press a or b to highlight “Add new contact” and press B.7Add a name and phone number.For more information on how to add a name and a phone number, refer to “Saving Information to the Contacts List” on page 9-56.8Press C [Save] to save.To search a registered entry4After step 3 “Setting Fixed Dialling No.” (page 15-156), press a or b to highlight “Edit dial list” and press B.5Press C [Options].The “Options” menu appears.6Press a or b to highlight “Search” and press B to select.7Search for the desired entry.For more information on how to search for an entry, refer to “Searching a Name and Number in the Contacts List” on page 9-58.To edit a registered entry4After step 3 of “Setting Fixed Dialling No.” (page 15-156), press a or b to highlight “Edit dial list” and press B.5Press a or b to highlight the entry you wish to edit.6Press C [Options].The “Options” menu appears.7Press a or b to highlight “Edit” and press B to select.8Edit the desired entry.For more information on how to edit an entry, refer to “Editing the Contacts List” on page 9-59.e_tm200_7fm.book Page 157 Tuesday, November 9, 2004 9:14 PM](https://usermanual.wiki/Sharp/NAR0058.Manual-revised-2/User-Guide-487918-Page-48.png)
![15-158Setting the HandsetTo delete a registered entry4After step 3 of “Setting Fixed Dialling No.” (page 15-156), press a or b to highlight “Edit dial list” and press B.Press a or b to highlight the entry you wish to delete.5Press C [Options].The “Options” menu appears.6Press a or b to highlight “Delete” and press B.7Press C [Yes].The selected entry is deleted.To cancel, press A [No] in this step.Setting an AccountIn case your handset does not connect to the preset network or if you need to change the settings to establish another connection, perform the following to check or edit settings.Setting WAP/MMS/E-mail1At the main menu, select in the following order: “Settings” → “Account settings” → select “WAP settings,” “MMS settings” or “E-mail settings.”2Press a or b to highlight profile you wish to edit and press C [Options].The “Options” name appears.3Press a or b to highlight “Edit” and press B.4Press a or b to highlight the item you wish to edit and press B.5Edit each item and press C [Save].In normal operations, you do not need to change the settings.e_tm200_7fm.book Page 158 Tuesday, November 9, 2004 9:14 PM](https://usermanual.wiki/Sharp/NAR0058.Manual-revised-2/User-Guide-487918-Page-49.png)
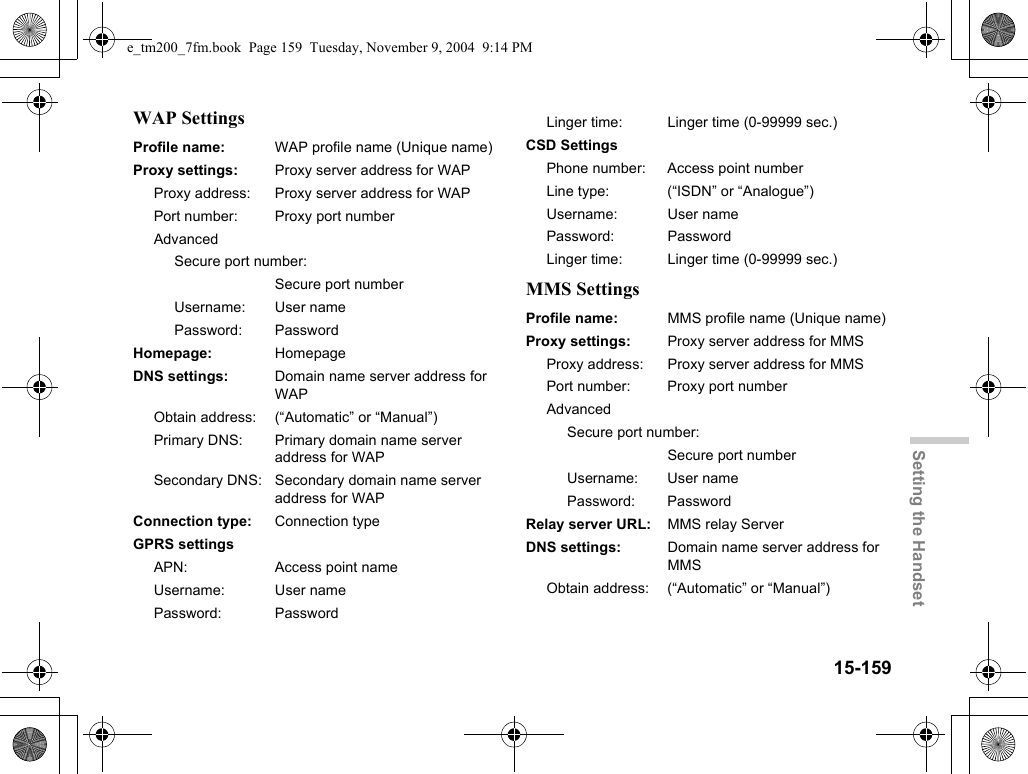
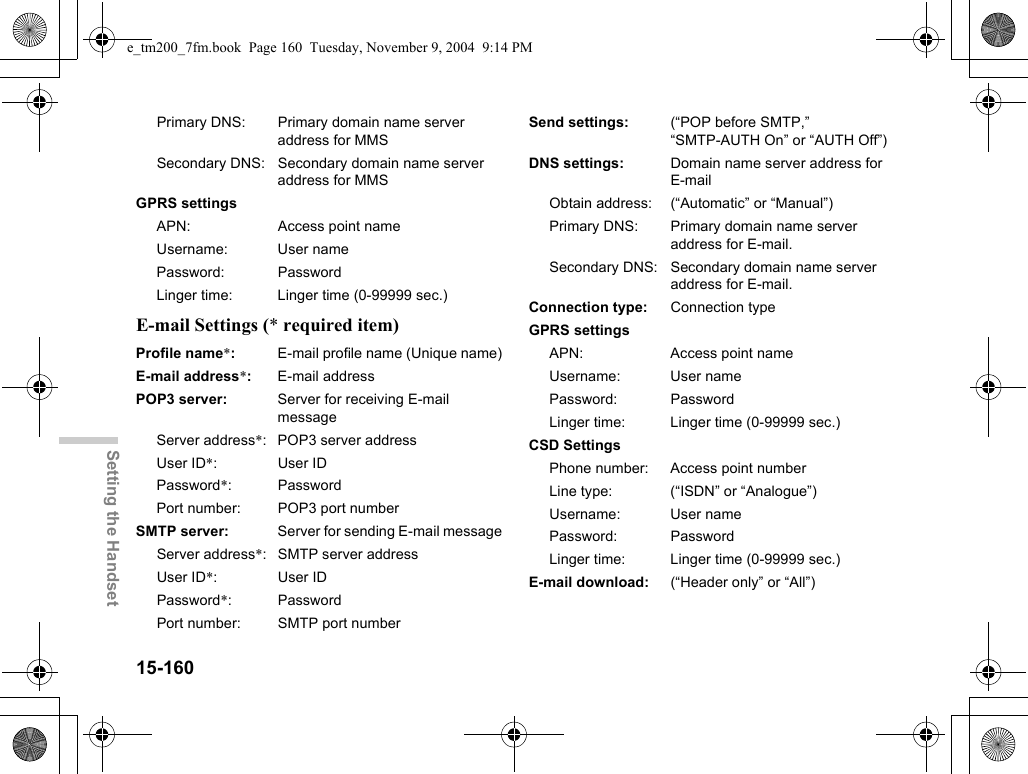
![15-161Setting the HandsetSetting Profile name1At the main menu, select in the following order: “Settings” → “Account settings” → select “WAP settings,” “MMS settings” or “E-mail settings.”2Press a or b to highlight the profile you wish to set and press B.3Press a or b to highlight “Profile name” and press B.Enter the profile name.For information on how to enter text, refer to “Entering Text” on page 8-51.Copying WAP/MMS/E-mail Profile1At the main menu, select in the following order: “Settings” → “Account settings” → select “WAP settings,” “MMS settings” or “E-mail settings.”2Press a or b to highlight the profile you wish to set and press C [Options].The “Options” menu appears.3Press a or b to highlight “Copy” and press B.The profile name is copied and “New profile name:” screen appears.4Press C [Options].The “Options” menu appears.5Press a or b to highlight “OK” and press B.The new profile is created.Deleting WAP/MMS/E-mail Profile1At the main menu, select in the following order: “Settings” → “Account settings” → select “WAP settings,” “MMS settings” or “E-mail settings.”2Press a or b to highlight the profile you wish to delete and press C [Options].The “Options” menu appears.3Press a or b to highlight “Delete” and press B.4Press C [Yes] to delete the profile.If you do not wish to delete, press A [No] in this step.Once you delete a profile, it cannot be restored.e_tm200_7fm.book Page 161 Tuesday, November 9, 2004 9:14 PM](https://usermanual.wiki/Sharp/NAR0058.Manual-revised-2/User-Guide-487918-Page-52.png)
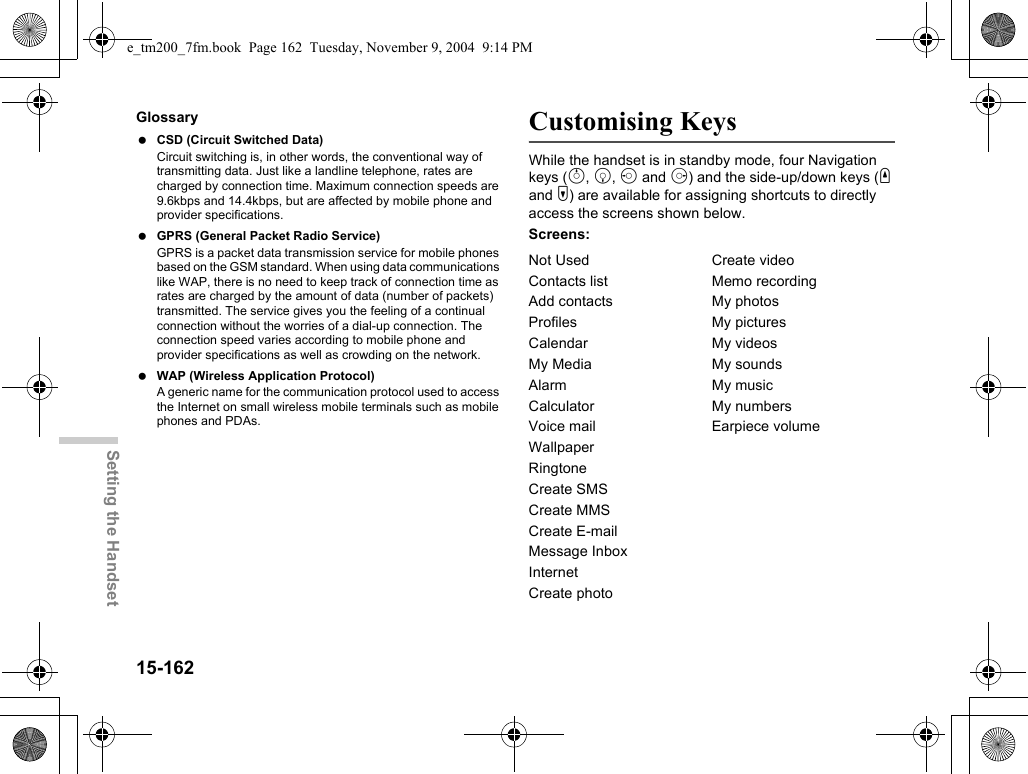
![15-163Setting the HandsetChanging the Shortcuts1Press B.The main menu appears.2Press a, b, c or d to highlight “Settings” and press B.3Press a or b to highlight “Favourites settings” and press B.The “Favourites setting” screen appears.4Press a or b to select the key whose shortcut you wish to change and press B.The list of shortcuts appear.5Press a or b to highlight the shortcut you wish to assign and press B.The selected shortcut is assigned.6Repeat steps 4 and 5 if necessary.Master ResetThese steps enable you to cancel all the settings to default. Special caution needs to be paid before you do the master reset. If you wish to retain settings for some modes or menus, write them down before performing the reset.1Press B.The main menu appears.2Press a, b, c or d to highlight “Settings” and press B.3Press a or b to highlight “Master reset” and press B.4Enter your handset code and press B.The Message “Are you sure?” appears.5Press C [Yes].To cancel, press A [No] in this step.If you select “Not used” in step 5, the key will be deactivated. If you enter a wrong handset code in step 4, the operation is cancelled.e_tm200_7fm.book Page 163 Tuesday, November 9, 2004 9:14 PM](https://usermanual.wiki/Sharp/NAR0058.Manual-revised-2/User-Guide-487918-Page-54.png)
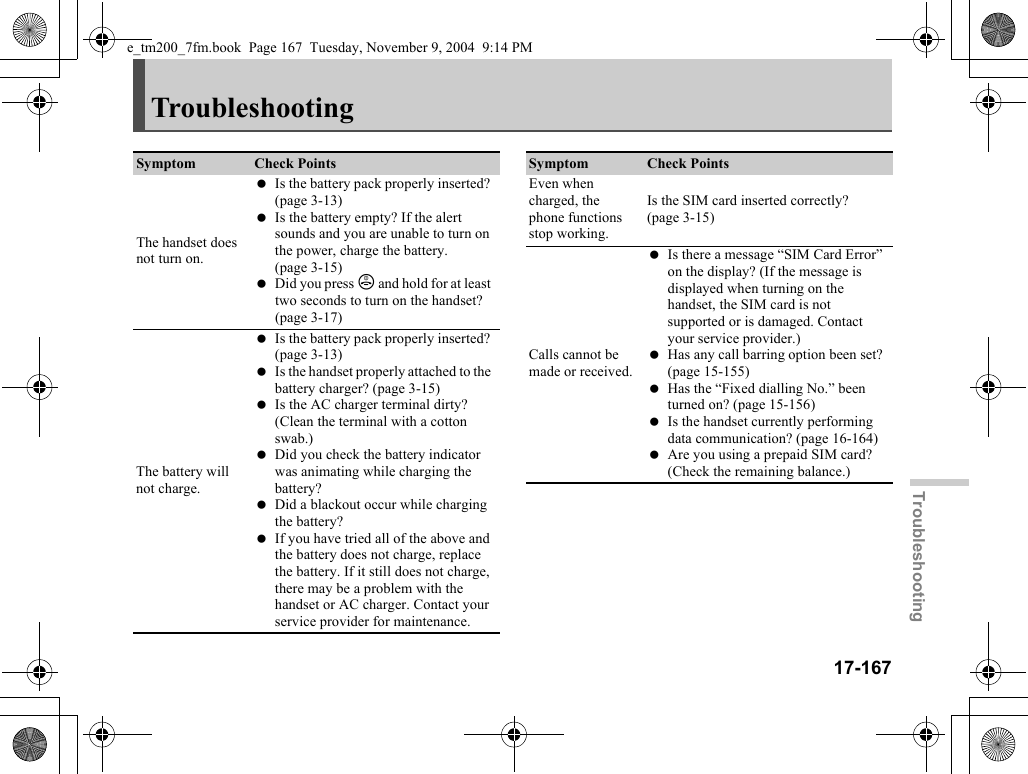
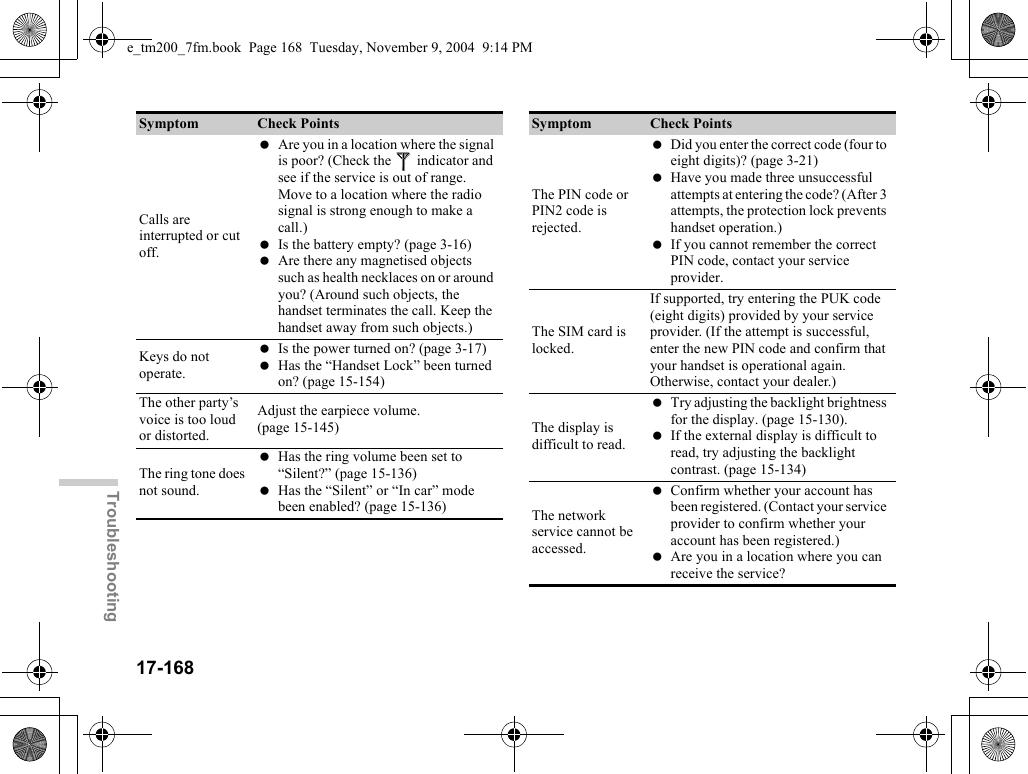
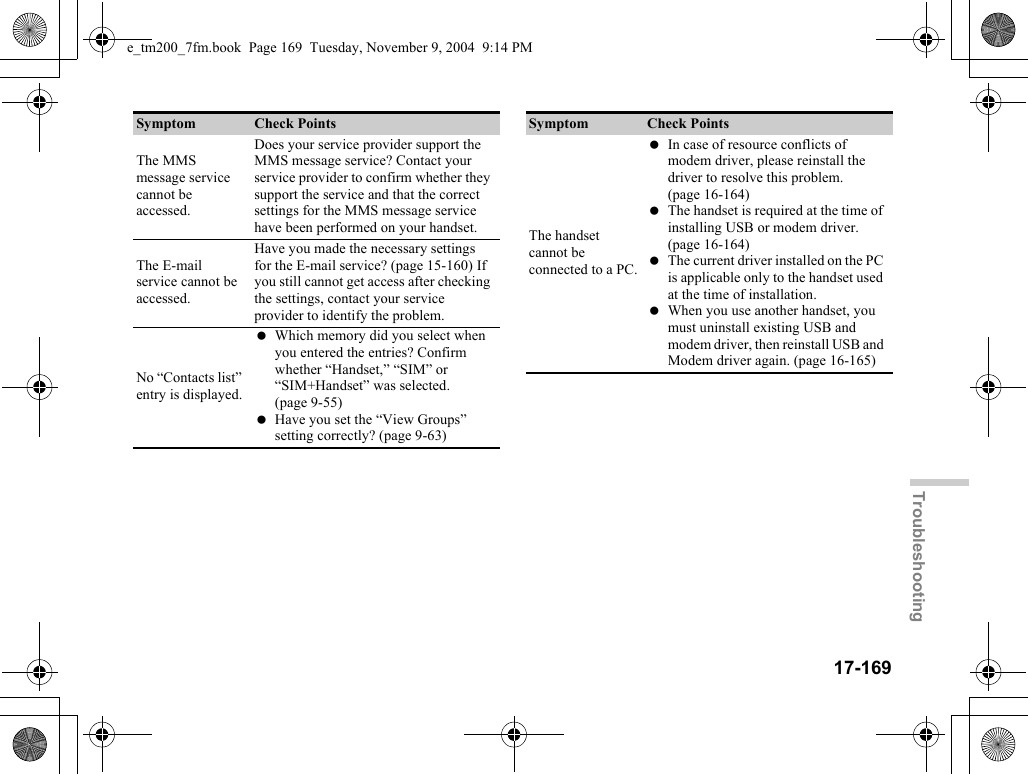
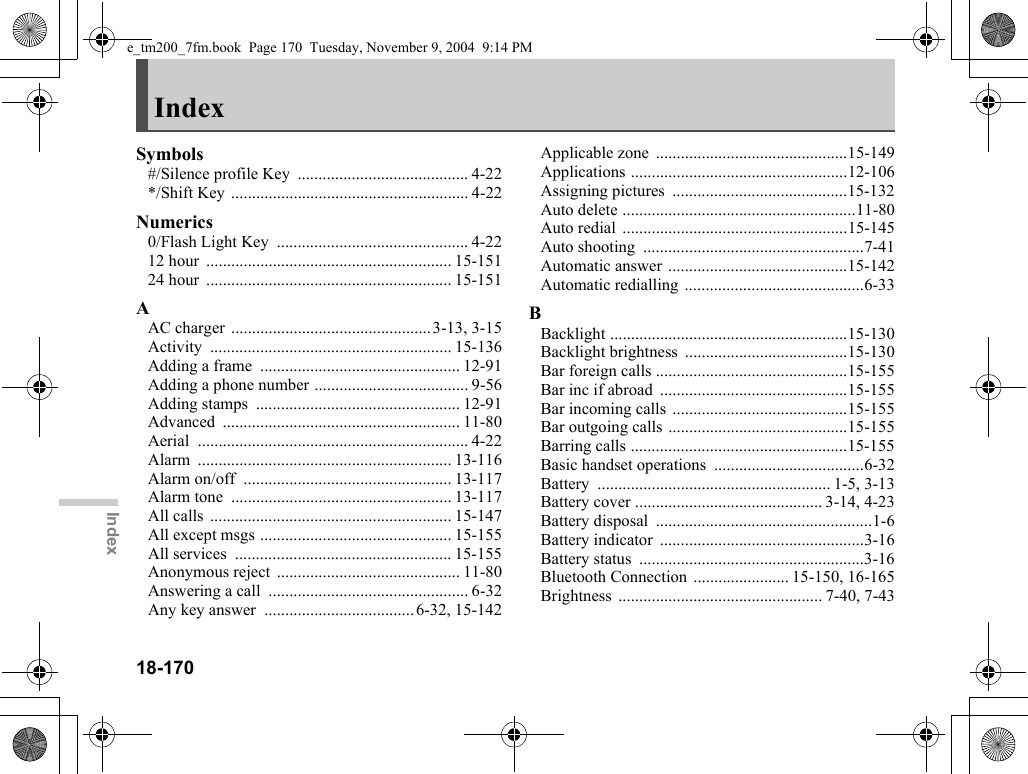
![16-164Connecting to a PCConnecting to a PCYou can use your handset with other digital equipment using USB ports or the Bluetooth wireless technology port. For a PC, an optional PC Link Kit (CE-UC32) and the following system environment is required.PC Hardware Intel®-Pentium® 266MHz or faster 64MB of available RAM or above 60MB of available hard-disk space or above CD-ROM drive USB 1.1 or Bluetooth interfaceOperating SystemMicrosoft® Windows® 98+Service Pack 1/98 Second Edition/ME/2000+Service Pack 4/XP+Service Pack 1GSM/GPRS ModemThe GSM/GPRS modem in your handset enables digital equipment to access the Internet. Connect your handset to your PC through USB or Bluetooth interface.Handset Manager“Handset Manager” is the software that enables you to manage the communication between the handset and a PC. Using this software, you can control the transmission of pictures, sounds, music, video clips and “Contacts list” entries.Installing SoftwareThe USB cable is necessary for installing the software.1Insert the CD-ROM supplied with PC Link Kit into the PC’s CD-ROM drive.The CD-ROM screen appears.If the CD-ROM screen does not appear, double-click [Launcher.exe] in your CD-ROM.2Follow the on-screen instructions to complete the installation of the three programs in order.For information on software support, refer to the following site:http://www.sharp-mobile.com/tm/Modem communication is not possible while communicating with the Handset Manager via USB or Bluetooth interface. For Windows 2000 Professional and Windows XP, install/uninstall programs after logging on as the Administrator. Connect the handset to the USB cable by following the on-screen instructions.It is not recommended that you make or answer calls when using the handset as a GSM/GPRS modem, as the operation may be interrupted.e_tm200_7fm.book Page 164 Tuesday, November 9, 2004 9:14 PM](https://usermanual.wiki/Sharp/NAR0058.Manual-revised-2/User-Guide-487918-Page-55.png)
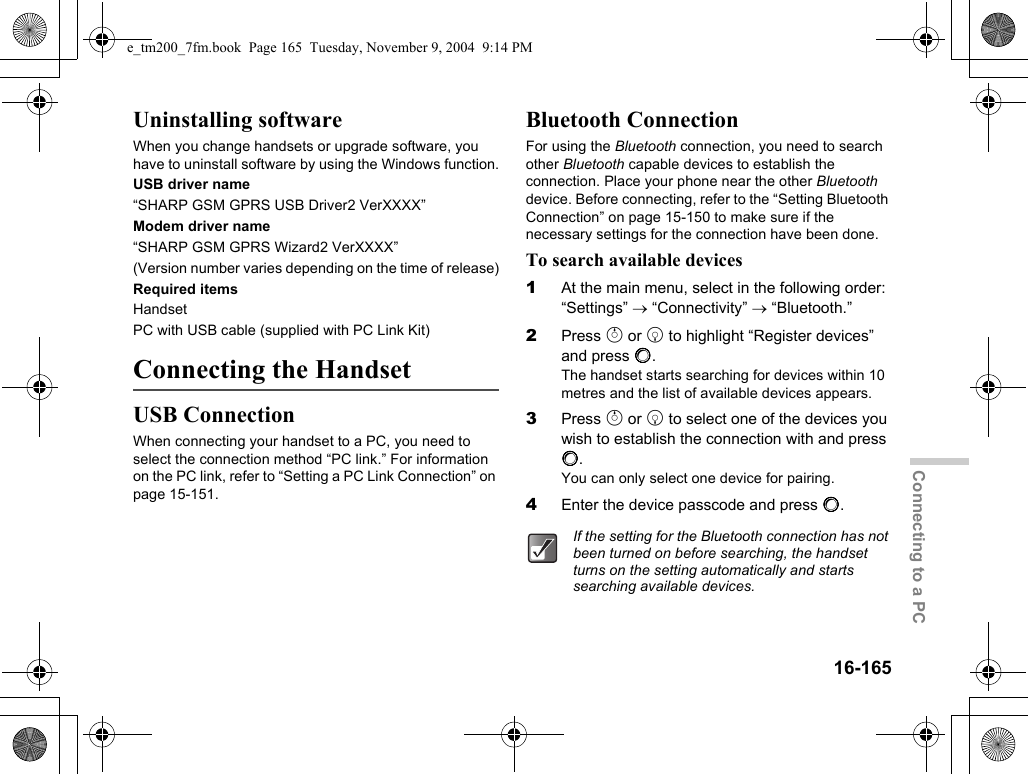
![16-166Connecting to a PCTo activate available devicesYou can activate the paired device.1At the main menu, select in the following order: “Settings” → “Connectivity” → “Bluetooth.”2Press a or b to highlight “Activate devices” and press B.3Press a or b to highlight the device you wish to activate and press B.To inactivate the device, select it again and press B.To rename a device1At the main menu, select in the following order: “Settings” → “Connectivity” → “Bluetooth” → “Activate devices.”2Press a or b to highlight the device you wish to rename.3Press C [Options].The “Options” menu appears.4Press a or b to highlight “Rename” and press B.5Rename the text and press B.For information on how to enter text, refer to “Entering Text” on page 8-51.To delete a deviceTo delete a paired device from the list, perform the following operation.1At the main menu, select in the following order: “Settings” → “Connectivity” → “Bluetooth” → “Activate devices.”2Press a or b to highlight the device you wish to delete from the list.3Press C [Options].The “Options” menu appears.4Press a or b to highlight “Delete” and press B.The device is deleted.You can save battery power by turning the Bluetooth function off when not in use. Refer to “To activate the Bluetooth” on page 15-150.e_tm200_7fm.book Page 166 Tuesday, November 9, 2004 9:14 PM](https://usermanual.wiki/Sharp/NAR0058.Manual-revised-2/User-Guide-487918-Page-57.png)
