Sharp HRO00034 Facsimile Equipment w/ Cordless Handsets User Manual

Sharp Corporation Facsimile Equipment w/ Cordless Handsets

Manual pages 1 to 50
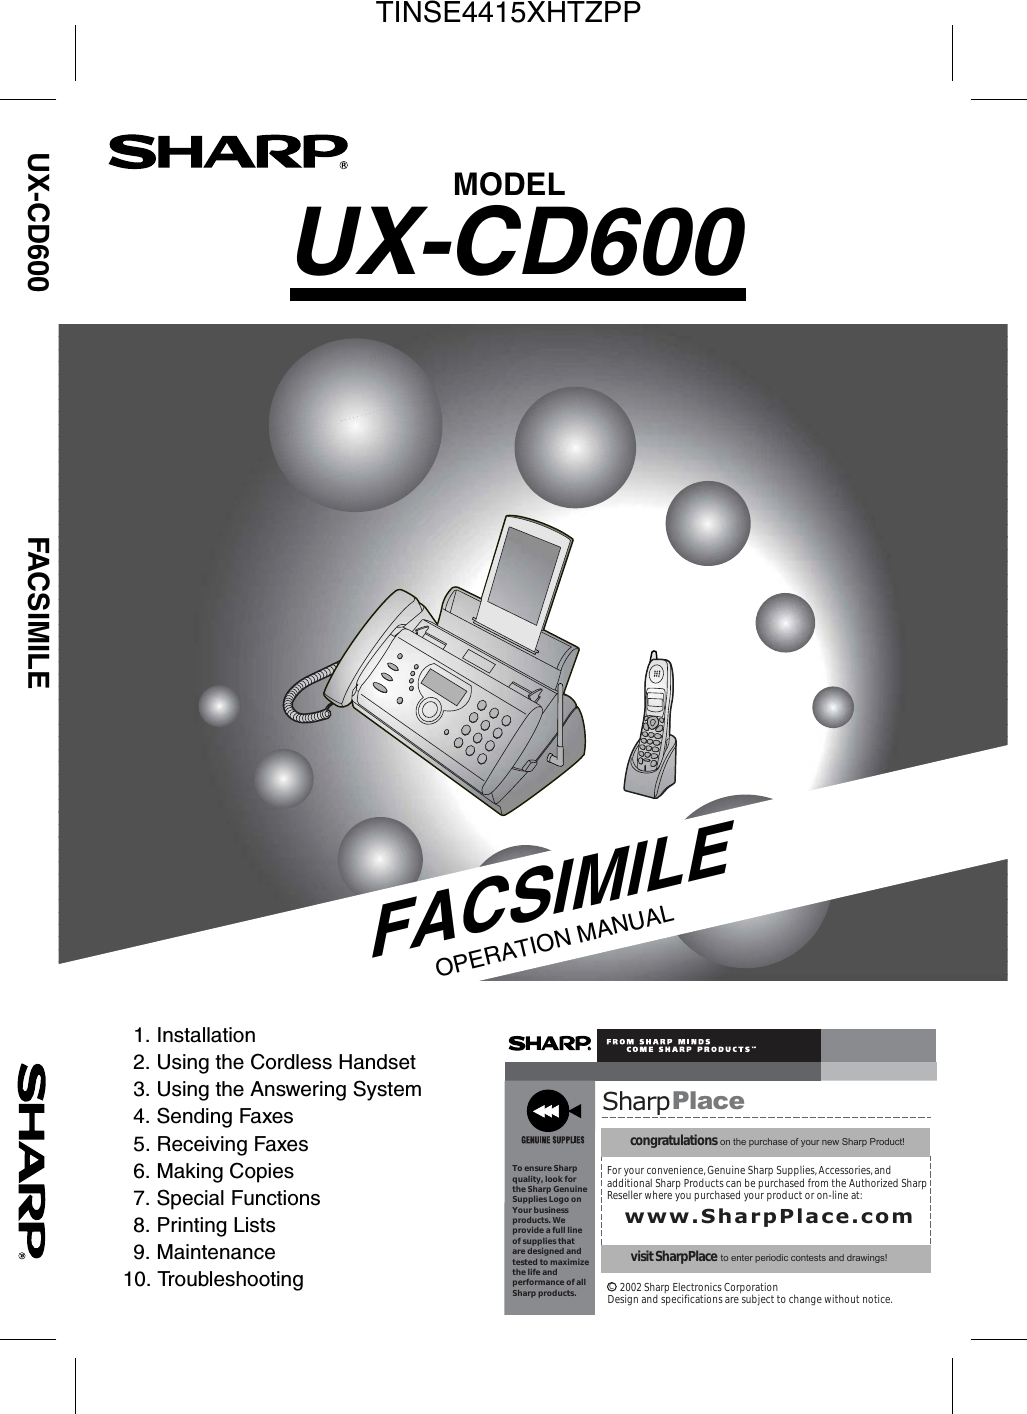
FACSIMILEOPERATION MANUALSharpPlacecongratulations on the purchase of your new Sharp Product!For your convenience, Genuine Sharp Supplies, Accessories, andadditional Sharp Products can be purchased from the Authorized SharpReseller where you purchased your product or on-line at:www.SharpPlace.comvisit SharpPlace to enter periodic contests and drawings!     2002 Sharp Electronics CorporationDesign and specifications are subject to change without notice.To ensure Sharpquality, look for  the Sharp GenuineSupplies Logo onYour businessproducts. We provide a full lineof supplies thatare designed andtested to maximizethe life andperformance of allSharp products.CMODELUX-CD600UX-CD600 FACSIMILE1. Installation2. Using the Cordless Handset3. Using the Answering System4. Sending Faxes5. Receiving Faxes6. Making Copies7. Special Functions8. Printing Lists9. Maintenance10. TroubleshootingTINSE4415XHTZPP
WARNING - FCC Regulations state that any unauthorized changes or modifications to this equipment not expressly approved by the manufacturer could void the user’s authority to operate this equipment.Note: This equipment has been tested and found to comply with the limits for a Class B digital device, pursuant to Part 15 of the FCC Rules.These limits are designed to provide reasonable protection against harmful interference in a residential installation.This equipment generates, uses and can radiate radio frequency energy and, if not installed and used in accordance with the instructions, may cause harmful interference to radio communications. However, there is no guarantee that interference will not occur in a particular installation. If this equipment does cause harmful interference to radio or television reception, which can be determined by turning the equipment off and on, the user is encouraged to try to correct the interference by one or more of the following measures:- Reorient or relocate the receiving antenna.- Increase the separation between the equipment and the receiver.- Connect the equipment into an outlet on a circuit different from that to which the receiver is connected.- Consult the dealer or an experienced radio/TV technician for help.IMPORTANT NOTICEFax machineFCC Radiation Exposure Statement:This equipment complies with FCC radiation exposure limits set forth for at uncontrolled equipment.This equipment should be installed and operated with minimum distance at least 20 cm between the radiator and persons body (excluding extremities: hands, wrists, feet and legs) and must not be co-located or operated with any other antenna or transmitter.Cordless handsetThis phone (Cordless Handset) has been tested and shown to comply with the FCC RF Exposure guidelines.For body worn operation, this phone has been tested and meets the FCC RF exposure guidelines for use with accessories that contains no metal and that positions the handset a minimum of 1.5 cm from the body. Use of other accessories may not ensure compliance with FCC RF exposure guidelines.The maximum SAR levels tested for this phone (Cordless Handset) has been shown to be 1.220 W/kg at head and 0.446 W/Kg at body.ABOUT THE TELEPHONE CONSUMER PROTECTION ACT OF 1991"The Telephone Consumer Protection Act of 1991 makes it unlawful for any person to use a computer or other electronic device to send any message via a telephone facsimile machine unless such message clearly contains in a margin at the top or bottom of each transmitted page or on the first page of the transmission the following information: (1) The date and time of transmission. (2) Identification of either the business, business entity or individual sending the message. (3) Telephone number of either the sending machine, business, business entity or individual.In order to program this information into your facsimile machine, please refer to the appropriate instructions in the operation manual." As an ENERGY STA R ® partner, SHARP has determined that this product meets the ENERGY STA R ® guidelines for energy efficiency.all.book  Page 2  Wednesday, January 21, 2004  3:38 PMTINSE4415XHTZPP
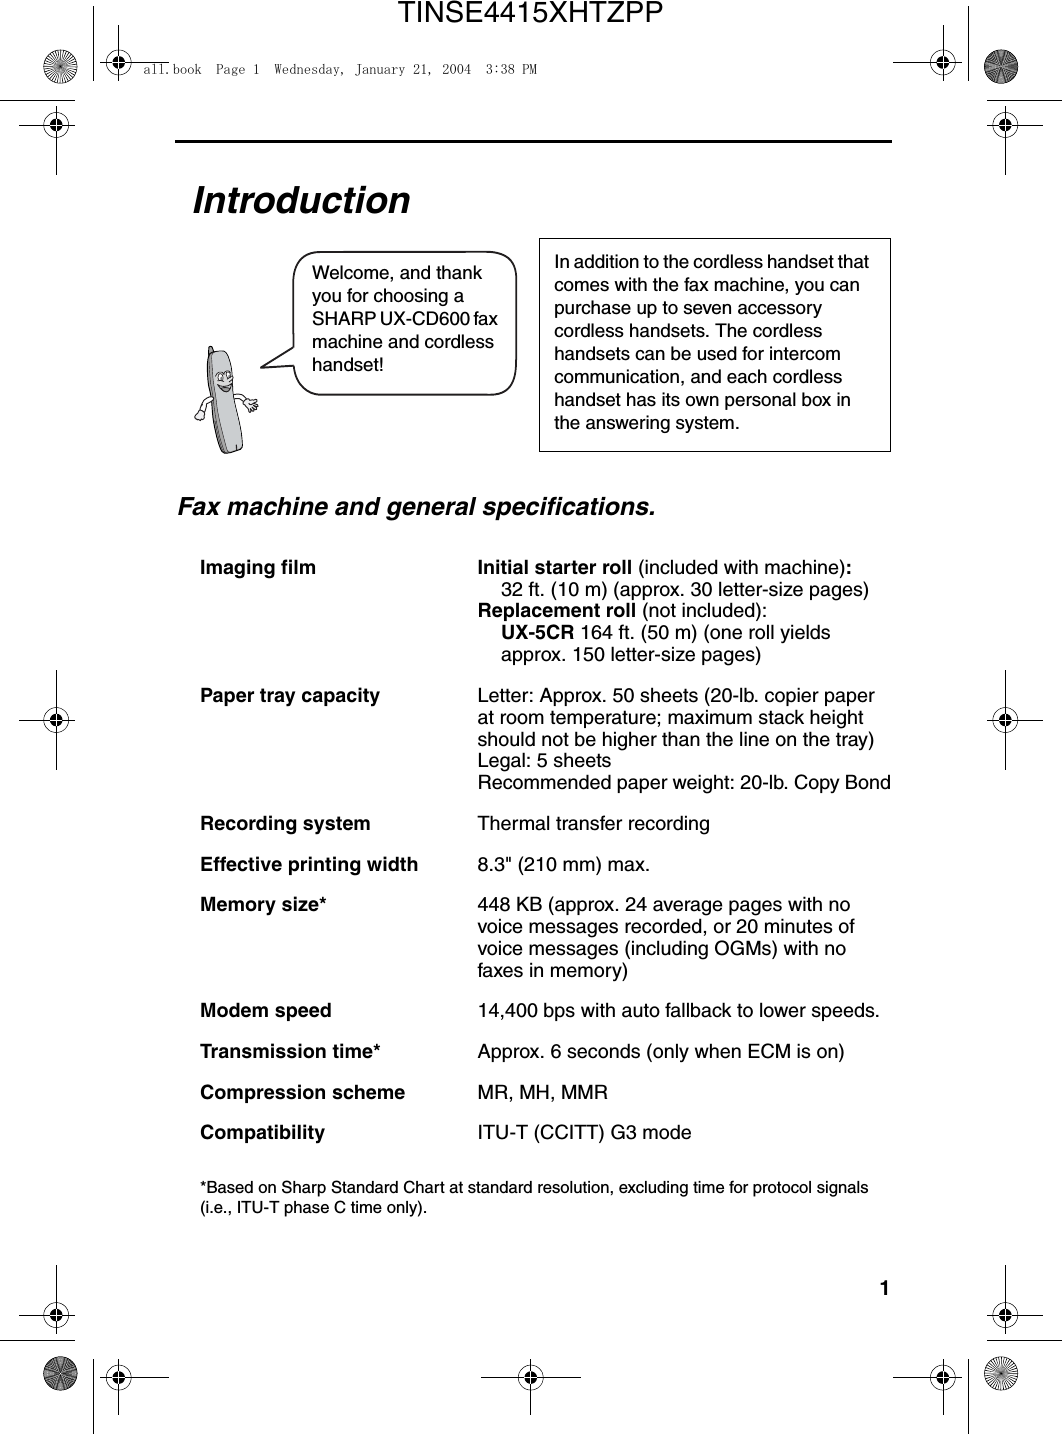
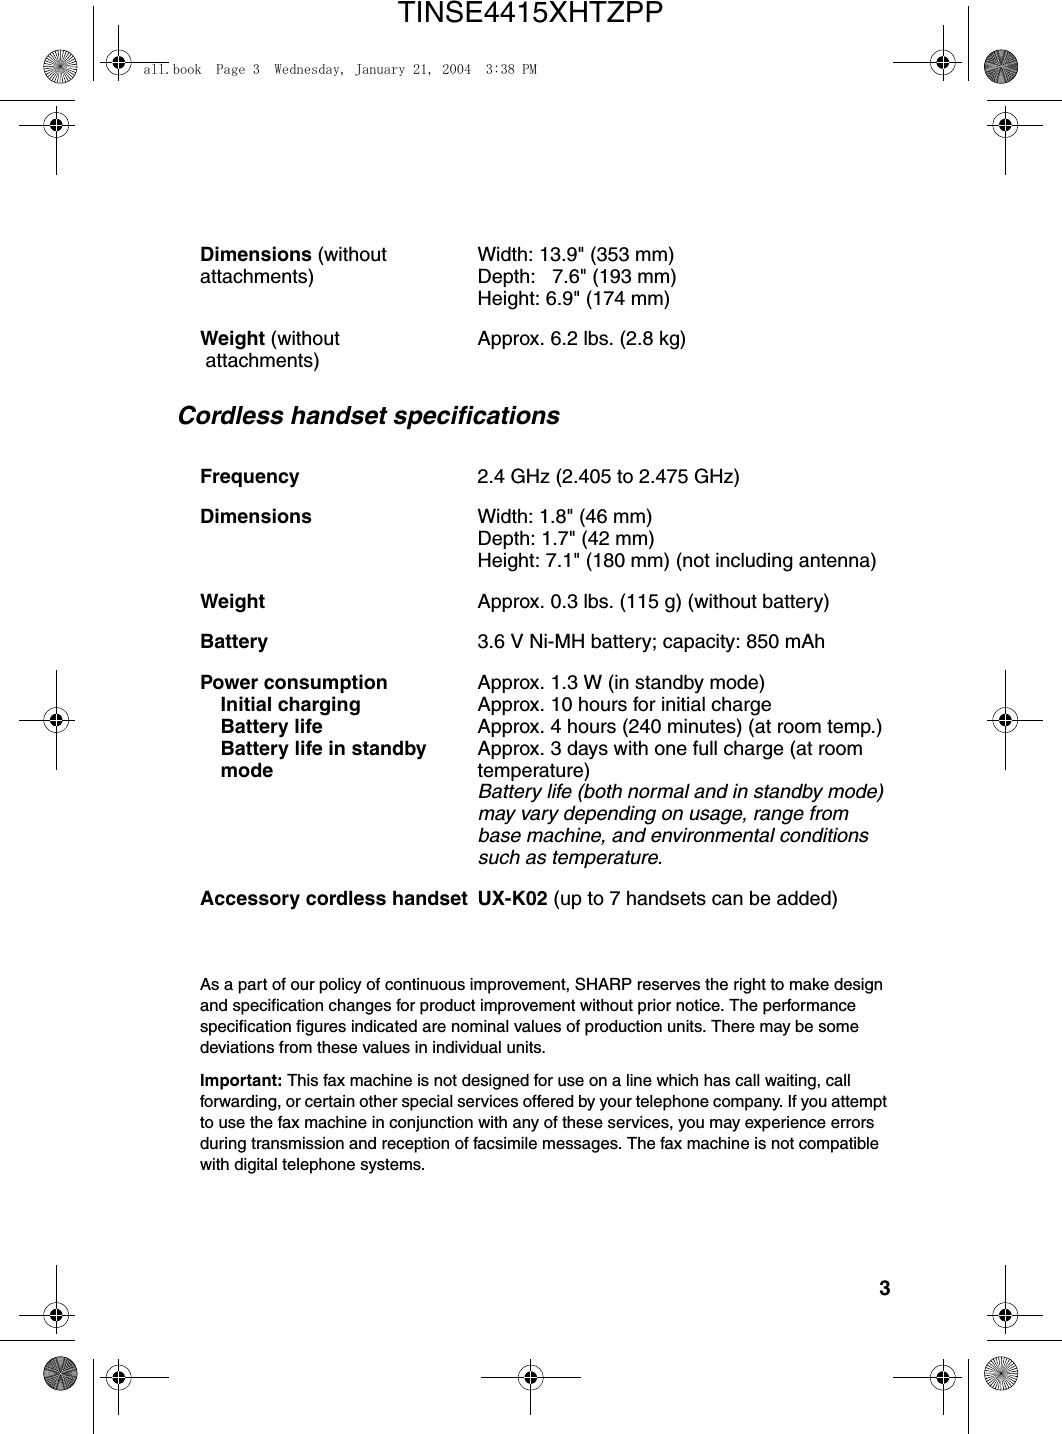
1                                                                                                                                                                                  IntroductionFax machine and general specifications.*Based on Sharp Standard Chart at standard resolution, excluding time for protocol signals (i.e., ITU-T phase C time only).Imaging film Initial starter roll (included with machine):32 ft. (10 m) (approx. 30 letter-size pages)Replacement roll (not included):UX-5CR 164 ft. (50 m) (one roll yieldsapprox. 150 letter-size pages)Paper tray capacity Letter: Approx. 50 sheets (20-lb. copier paper at room temperature; maximum stack height should not be higher than the line on the tray)Legal: 5 sheetsRecommended paper weight: 20-lb. Copy BondRecording system Thermal transfer recordingEffective printing width 8.3" (210 mm) max.Memory size* 448 KB (approx. 24 average pages with no voice messages recorded, or 20 minutes of voice messages (including OGMs) with no faxes in memory)Modem speed 14,400 bps with auto fallback to lower speeds.Transmission time* Approx. 6 seconds (only when ECM is on)Compression scheme MR, MH, MMRCompatibility ITU-T (CCITT) G3 modeIn addition to the cordless handset that comes with the fax machine, you can purchase up to seven accessory cordless handsets. The cordless handsets can be used for intercom communication, and each cordless handset has its own personal box in the answering system.Welcome, and thank you for choosing a SHARP UX-CD600 fax machine and cordless handset!all.book  Page 1  Wednesday, January 21, 2004  3:38 PMTINSE4415XHTZPP
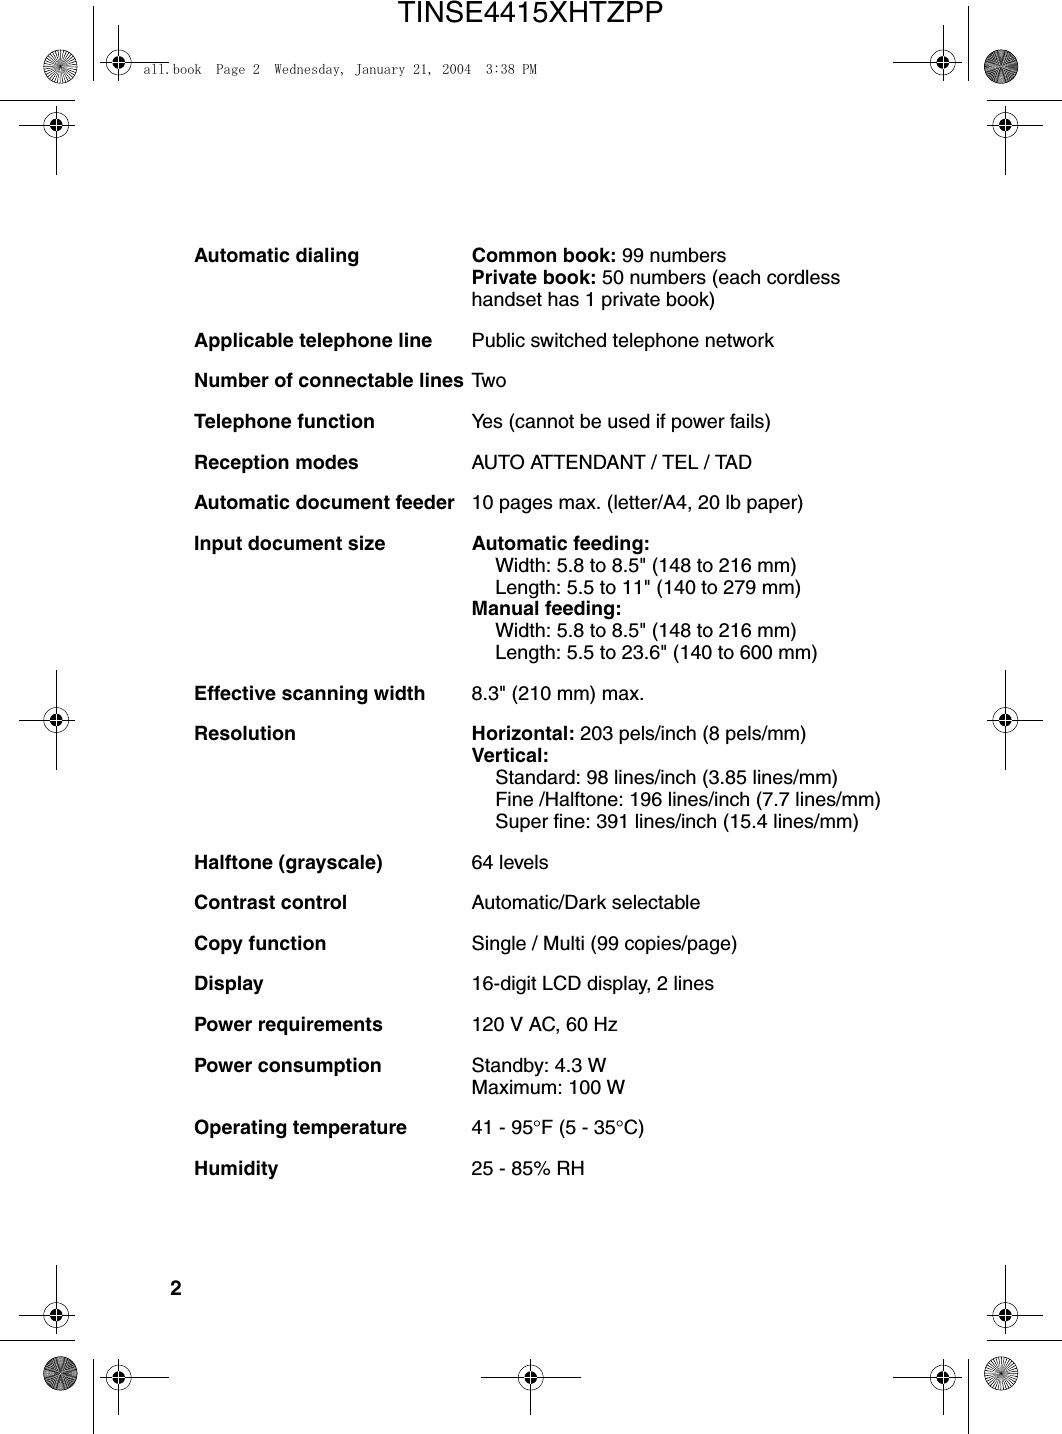
2Automatic dialing Common book: 99 numbersPrivate book: 50 numbers (each cordless handset has 1 private book)Applicable telephone line Public switched telephone networkNumber of connectable lines TwoTelephone function Yes (cannot be used if power fails)Reception modes AUTO ATTENDANT / TEL / TADAutomatic document feeder 10 pages max. (letter/A4, 20 lb paper)Input document size Automatic feeding:Width: 5.8 to 8.5" (148 to 216 mm)Length: 5.5 to 11" (140 to 279 mm)Manual feeding:Width: 5.8 to 8.5" (148 to 216 mm)Length: 5.5 to 23.6" (140 to 600 mm)Effective scanning width 8.3" (210 mm) max.Resolution Horizontal: 203 pels/inch (8 pels/mm)Vertical:Standard: 98 lines/inch (3.85 lines/mm)Fine /Halftone: 196 lines/inch (7.7 lines/mm)Super fine: 391 lines/inch (15.4 lines/mm)Halftone (grayscale) 64 levelsContrast control Automatic/Dark selectableCopy function Single / Multi (99 copies/page)Display 16-digit LCD display, 2 linesPower requirements 120 V AC, 60 HzPower consumption Standby: 4.3 WMaximum: 100 WOperating temperature 41 - 95°F (5 - 35°C)Humidity 25 - 85% RHall.book  Page 2  Wednesday, January 21, 2004  3:38 PMTINSE4415XHTZPP
3Cordless handset specificationsDimensions (without attachments)Width: 13.9" (353 mm)Depth:   7.6" (193 mm)Height: 6.9" (174 mm) Weight (without  attachments)Approx. 6.2 lbs. (2.8 kg)Frequency 2.4 GHz (2.405 to 2.475 GHz)Dimensions  Width: 1.8" (46 mm)Depth: 1.7" (42 mm)Height: 7.1" (180 mm) (not including antenna)Weight Approx. 0.3 lbs. (115 g) (without battery)Battery 3.6 V Ni-MH battery; capacity: 850 mAhPower consumption Initial chargingBattery lifeBattery life in standbymodeApprox. 1.3 W (in standby mode)Approx. 10 hours for initial chargeApprox. 4 hours (240 minutes) (at room temp.)Approx. 3 days with one full charge (at room temperature)Battery life (both normal and in standby mode) may vary depending on usage, range from base machine, and environmental conditions such as temperature.Accessory cordless handset UX-K02 (up to 7 handsets can be added)As a part of our policy of continuous improvement, SHARP reserves the right to make design and specification changes for product improvement without prior notice. The performance specification figures indicated are nominal values of production units. There may be some deviations from these values in individual units.Important: This fax machine is not designed for use on a line which has call waiting, call forwarding, or certain other special services offered by your telephone company. If you attempt to use the fax machine in conjunction with any of these services, you may experience errors during transmission and reception of facsimile messages. The fax machine is not compatible with digital telephone systems.all.book  Page 3  Wednesday, January 21, 2004  3:38 PMTINSE4415XHTZPP
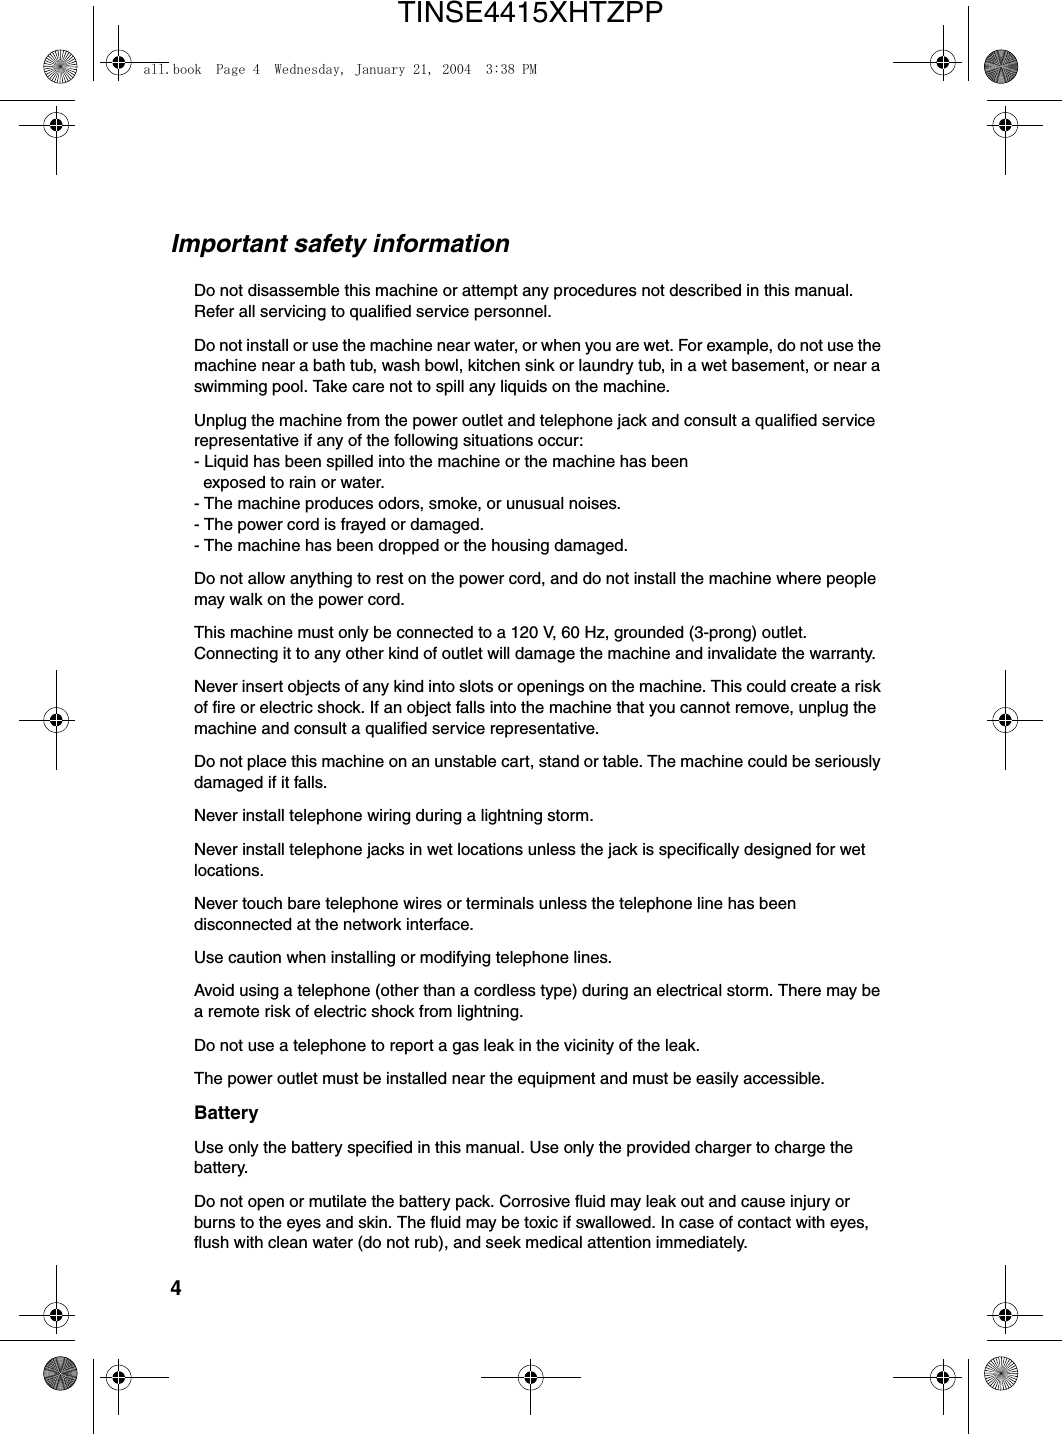
4Important safety informationDo not disassemble this machine or attempt any procedures not described in this manual. Refer all servicing to qualified service personnel.Do not install or use the machine near water, or when you are wet. For example, do not use the machine near a bath tub, wash bowl, kitchen sink or laundry tub, in a wet basement, or near a swimming pool. Take care not to spill any liquids on the machine.Unplug the machine from the power outlet and telephone jack and consult a qualified service representative if any of the following situations occur:- Liquid has been spilled into the machine or the machine has been  exposed to rain or water.- The machine produces odors, smoke, or unusual noises.- The power cord is frayed or damaged.- The machine has been dropped or the housing damaged.Do not allow anything to rest on the power cord, and do not install the machine where people may walk on the power cord.This machine must only be connected to a 120 V, 60 Hz, grounded (3-prong) outlet. Connecting it to any other kind of outlet will damage the machine and invalidate the warranty.Never insert objects of any kind into slots or openings on the machine. This could create a risk of fire or electric shock. If an object falls into the machine that you cannot remove, unplug the machine and consult a qualified service representative.Do not place this machine on an unstable cart, stand or table. The machine could be seriously damaged if it falls.Never install telephone wiring during a lightning storm.Never install telephone jacks in wet locations unless the jack is specifically designed for wet locations.Never touch bare telephone wires or terminals unless the telephone line has been disconnected at the network interface.Use caution when installing or modifying telephone lines.Avoid using a telephone (other than a cordless type) during an electrical storm. There may be a remote risk of electric shock from lightning.Do not use a telephone to report a gas leak in the vicinity of the leak.The power outlet must be installed near the equipment and must be easily accessible.BatteryUse only the battery specified in this manual. Use only the provided charger to charge the battery.Do not open or mutilate the battery pack. Corrosive fluid may leak out and cause injury or burns to the eyes and skin. The fluid may be toxic if swallowed. In case of contact with eyes, flush with clean water (do not rub), and seek medical attention immediately.all.book  Page 4  Wednesday, January 21, 2004  3:38 PMTINSE4415XHTZPP
5Do not store or carry the battery with other metal objects such as keys or pins. These may short the battery and cause it to overheat.Do not allow the battery to become wet.Do not dispose of the battery in a fire or heat the battery. The battery may explode.Health care facilities and equipmentRadio frequency energy emitted from the cordless handset equipment may cause medical equipment to malfunction. Verify that any personal medical equipment you are using is adequately shielded from external radio frequency energy before using the cordless handset equipment. Do not use the cordless handset equipment in health care facilities where such use is prohibited.all.book  Page 5  Wednesday, January 21, 2004  3:38 PMTINSE4415XHTZPP
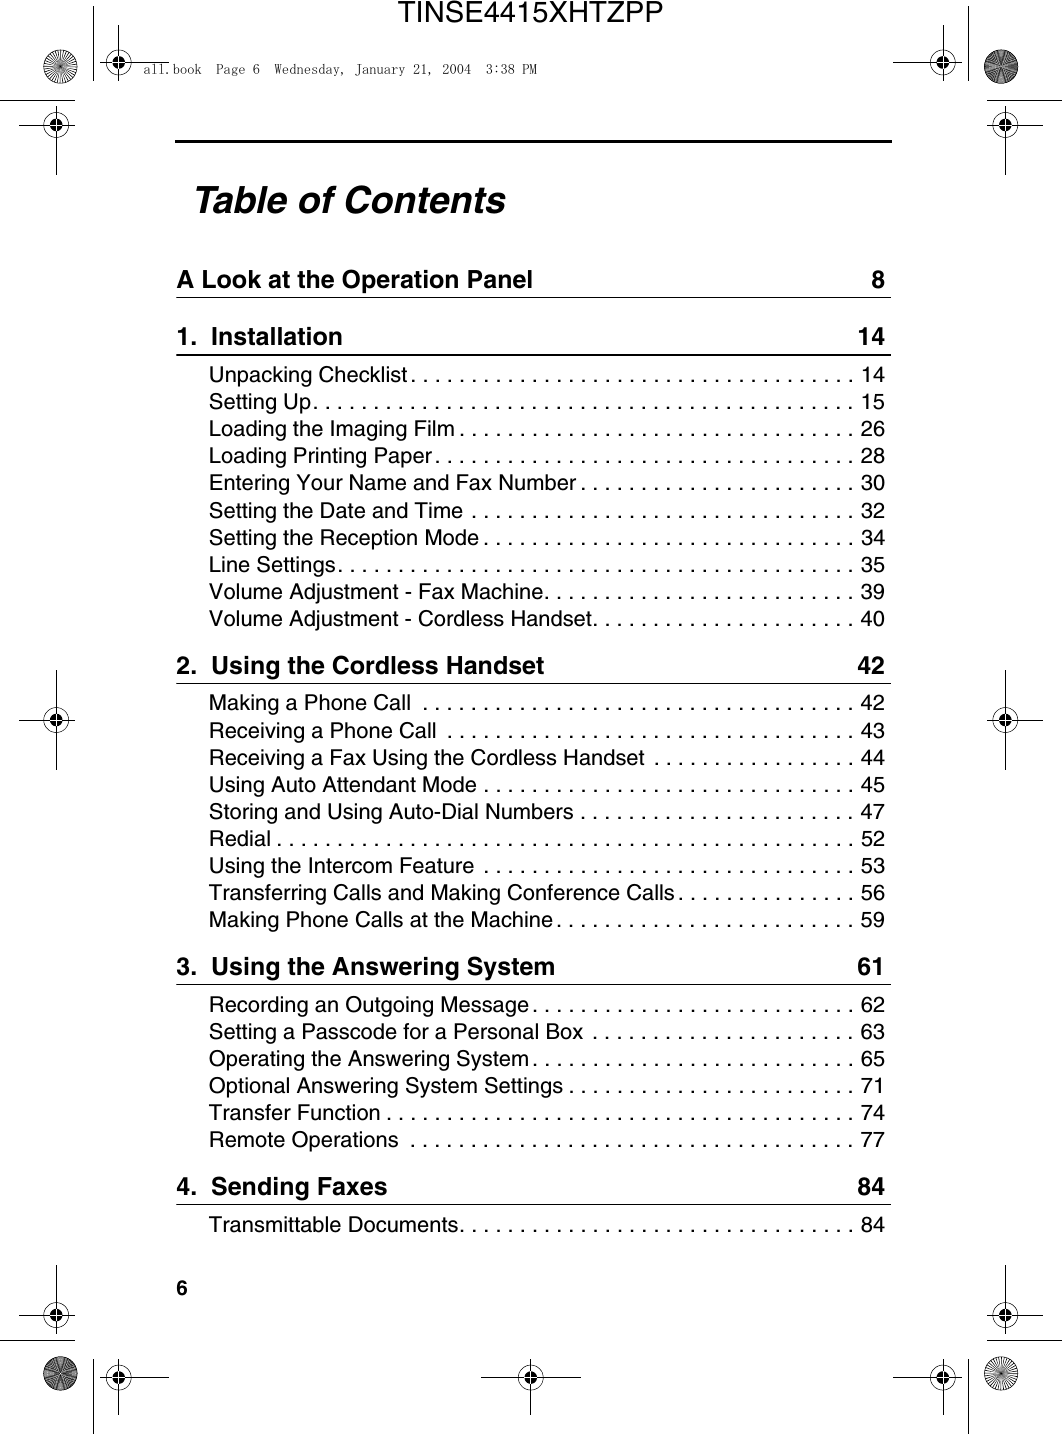
6Table of ContentsA Look at the Operation Panel 81.  Installation 14Unpacking Checklist . . . . . . . . . . . . . . . . . . . . . . . . . . . . . . . . . . . . . 14Setting Up. . . . . . . . . . . . . . . . . . . . . . . . . . . . . . . . . . . . . . . . . . . . . 15Loading the Imaging Film . . . . . . . . . . . . . . . . . . . . . . . . . . . . . . . . . 26Loading Printing Paper. . . . . . . . . . . . . . . . . . . . . . . . . . . . . . . . . . . 28Entering Your Name and Fax Number . . . . . . . . . . . . . . . . . . . . . . . 30Setting the Date and Time . . . . . . . . . . . . . . . . . . . . . . . . . . . . . . . . 32Setting the Reception Mode . . . . . . . . . . . . . . . . . . . . . . . . . . . . . . . 34Line Settings. . . . . . . . . . . . . . . . . . . . . . . . . . . . . . . . . . . . . . . . . . . 35Volume Adjustment - Fax Machine. . . . . . . . . . . . . . . . . . . . . . . . . . 39Volume Adjustment - Cordless Handset. . . . . . . . . . . . . . . . . . . . . . 402.  Using the Cordless Handset 42Making a Phone Call  . . . . . . . . . . . . . . . . . . . . . . . . . . . . . . . . . . . . 42Receiving a Phone Call  . . . . . . . . . . . . . . . . . . . . . . . . . . . . . . . . . . 43Receiving a Fax Using the Cordless Handset  . . . . . . . . . . . . . . . . . 44Using Auto Attendant Mode . . . . . . . . . . . . . . . . . . . . . . . . . . . . . . . 45Storing and Using Auto-Dial Numbers . . . . . . . . . . . . . . . . . . . . . . . 47Redial . . . . . . . . . . . . . . . . . . . . . . . . . . . . . . . . . . . . . . . . . . . . . . . . 52Using the Intercom Feature . . . . . . . . . . . . . . . . . . . . . . . . . . . . . . . 53Transferring Calls and Making Conference Calls. . . . . . . . . . . . . . . 56Making Phone Calls at the Machine . . . . . . . . . . . . . . . . . . . . . . . . . 593.  Using the Answering System 61Recording an Outgoing Message. . . . . . . . . . . . . . . . . . . . . . . . . . . 62Setting a Passcode for a Personal Box . . . . . . . . . . . . . . . . . . . . . . 63Operating the Answering System . . . . . . . . . . . . . . . . . . . . . . . . . . . 65Optional Answering System Settings . . . . . . . . . . . . . . . . . . . . . . . . 71Transfer Function . . . . . . . . . . . . . . . . . . . . . . . . . . . . . . . . . . . . . . . 74Remote Operations  . . . . . . . . . . . . . . . . . . . . . . . . . . . . . . . . . . . . . 774.  Sending Faxes 84Transmittable Documents. . . . . . . . . . . . . . . . . . . . . . . . . . . . . . . . . 84all.book  Page 6  Wednesday, January 21, 2004  3:38 PMTINSE4415XHTZPP
Table of Contents7Loading the Document . . . . . . . . . . . . . . . . . . . . . . . . . . . . . . . . . . . 85Adjusting the Resolution and Contrast . . . . . . . . . . . . . . . . . . . . . . . 86Sending a Fax by Normal Dialing . . . . . . . . . . . . . . . . . . . . . . . . . . . 88Sending a Fax by Automatic Dialing . . . . . . . . . . . . . . . . . . . . . . . . . 90Sending a Fax From Memory . . . . . . . . . . . . . . . . . . . . . . . . . . . . . . 975.  Receiving Faxes 100Receiving Faxes Automatically . . . . . . . . . . . . . . . . . . . . . . . . . . . . 100Receiving Faxes Manually  . . . . . . . . . . . . . . . . . . . . . . . . . . . . . . . 102Optional Reception Settings . . . . . . . . . . . . . . . . . . . . . . . . . . . . . . 104Substitute Reception to Memory. . . . . . . . . . . . . . . . . . . . . . . . . . . 1066.  Making Copies 1077.  Special Functions 109Caller ID and Call Waiting ID (Requires Subscription to Service). . 109Polling (Requesting a Fax Transmission) . . . . . . . . . . . . . . . . . . . . 1168.  Printing Lists 1179.  Maintenance 121Replacing the Cordless Handset Battery  . . . . . . . . . . . . . . . . . . . . 12410.  Troubleshooting 126Problems and Solutions  . . . . . . . . . . . . . . . . . . . . . . . . . . . . . . . . . 126Messages and Signals . . . . . . . . . . . . . . . . . . . . . . . . . . . . . . . . . . 132Clearing Paper Jams  . . . . . . . . . . . . . . . . . . . . . . . . . . . . . . . . . . . 138Ordering Parts. . . . . . . . . . . . . . . . . . . . . . . . . . . . . . . . . . . . . . . . . 140FCC Regulatory Information . . . . . . . . . . . . . . . . . . . . . . . . . . . . . . 141Quick Reference Guide 144Guía de referencia rápida 146Index 148all.book  Page 7  Wednesday, January 21, 2004  3:38 PMTINSE4415XHTZPP
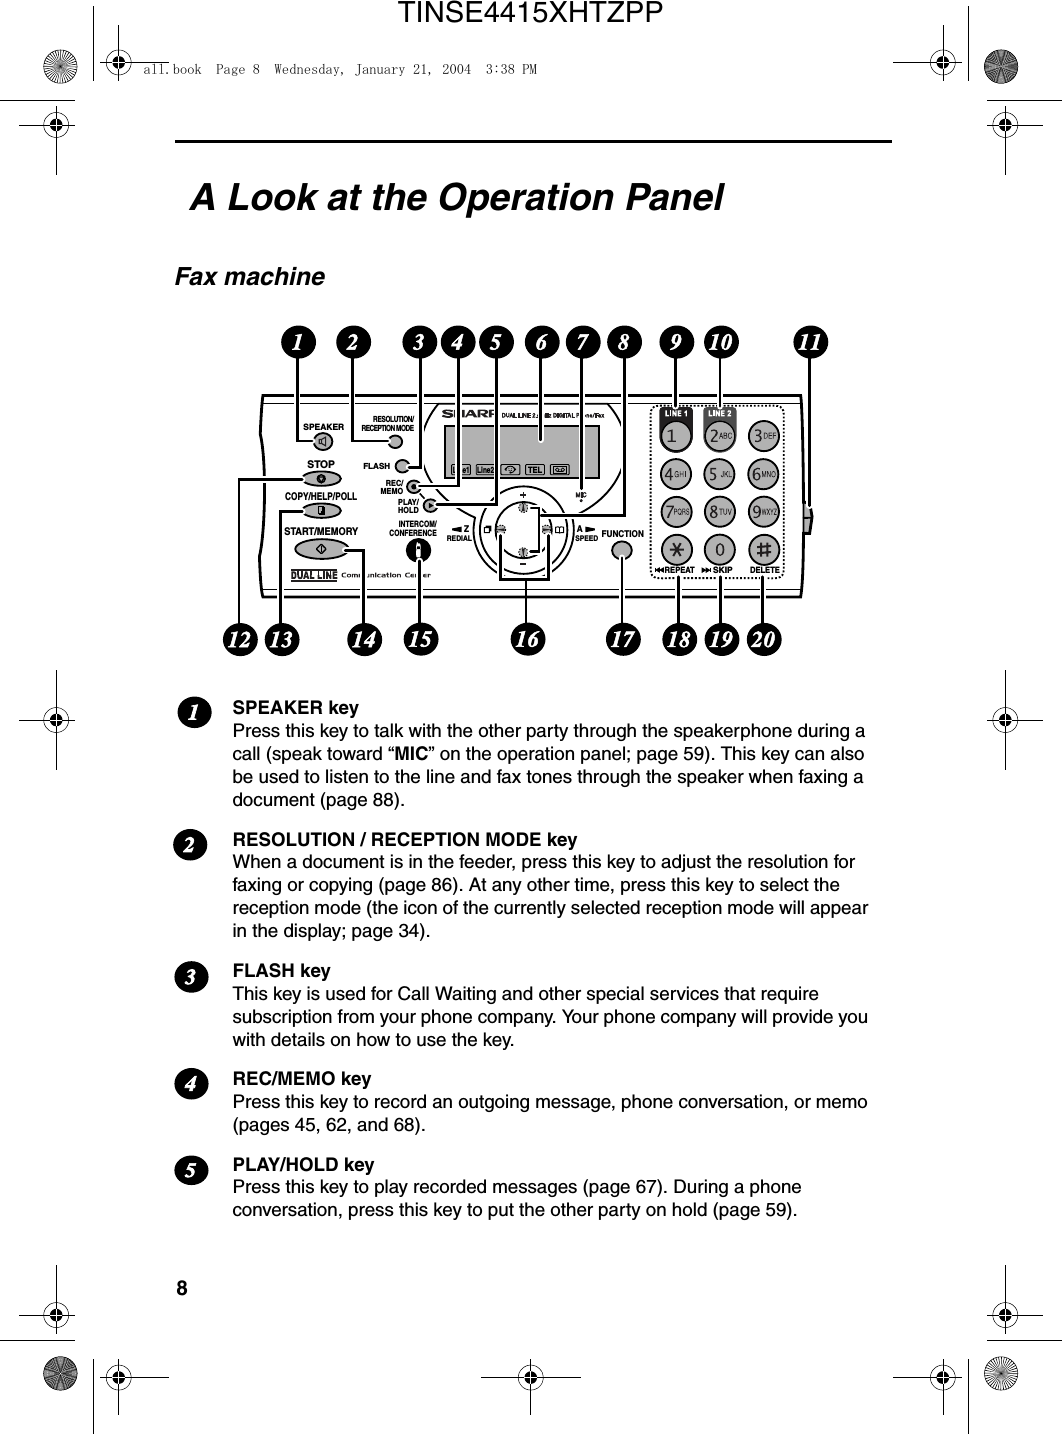
8SPEAKER keyPress this key to talk with the other party through the speakerphone during a call (speak toward “MIC” on the operation panel; page 59). This key can also be used to listen to the line and fax tones through the speaker when faxing a document (page 88). RESOLUTION / RECEPTION MODE keyWhen a document is in the feeder, press this key to adjust the resolution for faxing or copying (page 86). At any other time, press this key to select the reception mode (the icon of the currently selected reception mode will appear in the display; page 34). FLASH keyThis key is used for Call Waiting and other special services that require subscription from your phone company. Your phone company will provide you with details on how to use the key.REC/MEMO keyPress this key to record an outgoing message, phone conversation, or memo (pages 45, 62, and 68).PLAY/HOLD keyPress this key to play recorded messages (page 67). During a phone conversation, press this key to put the other party on hold (page 59).A Look at the Operation PanelFax machine12345RESOLUTION/RECEPTION MODEFUNCTIONSTOPINTERCOM/CONFERENCECOPY/HELP/POLLSTART/MEMORY ZASPEAKERFLASHREDIAL SPEEDPLAY/HOLDREC/MEMODELETEREPEATSKIPTELLine1 Line2151412 13 171 2 3 4 5 1096 7 1116818 19 20all.book  Page 8  Wednesday, January 21, 2004  3:38 PMTINSE4415XHTZPP
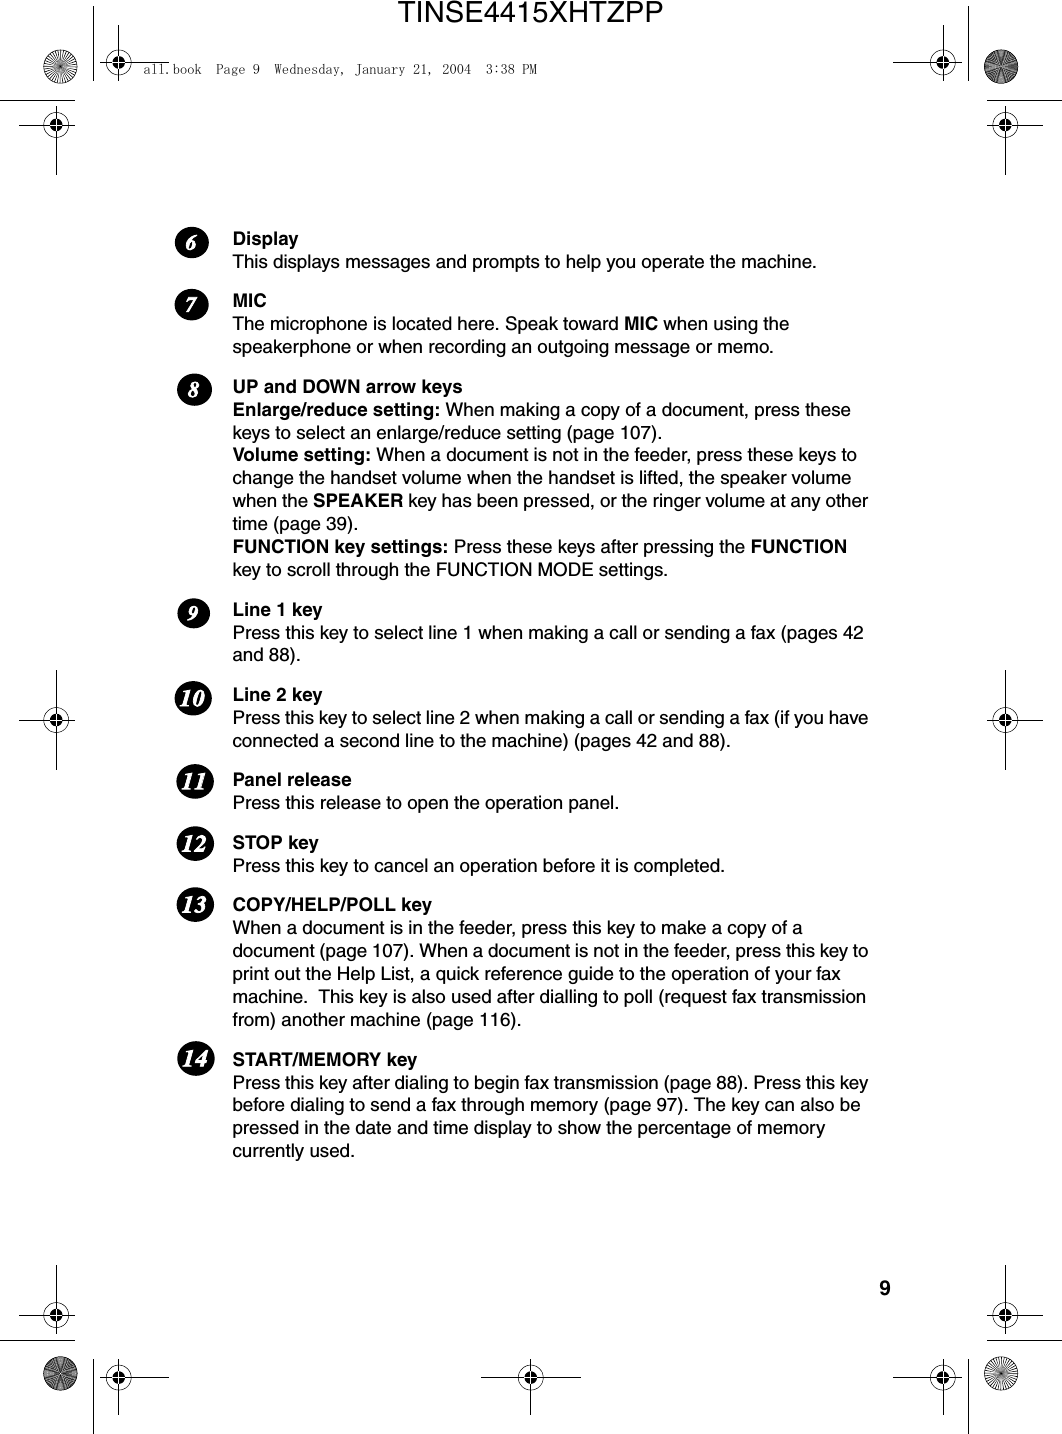
9DisplayThis displays messages and prompts to help you operate the machine.MICThe microphone is located here. Speak toward MIC when using the speakerphone or when recording an outgoing message or memo.UP and DOWN arrow keysEnlarge/reduce setting: When making a copy of a document, press these keys to select an enlarge/reduce setting (page 107). Volume setting: When a document is not in the feeder, press these keys to change the handset volume when the handset is lifted, the speaker volume when the SPEAKER key has been pressed, or the ringer volume at any other time (page 39).FUNCTION key settings: Press these keys after pressing the FUNCTION key to scroll through the FUNCTION MODE settings.Line 1 keyPress this key to select line 1 when making a call or sending a fax (pages 42 and 88).Line 2 keyPress this key to select line 2 when making a call or sending a fax (if you have connected a second line to the machine) (pages 42 and 88).Panel releasePress this release to open the operation panel.STOP keyPress this key to cancel an operation before it is completed.COPY/HELP/POLL keyWhen a document is in the feeder, press this key to make a copy of a document (page 107). When a document is not in the feeder, press this key to print out the Help List, a quick reference guide to the operation of your fax machine.  This key is also used after dialling to poll (request fax transmission from) another machine (page 116).START/MEMORY keyPress this key after dialing to begin fax transmission (page 88). Press this key before dialing to send a fax through memory (page 97). The key can also be pressed in the date and time display to show the percentage of memory currently used.1211111091314867all.book  Page 9  Wednesday, January 21, 2004  3:38 PMTINSE4415XHTZPP
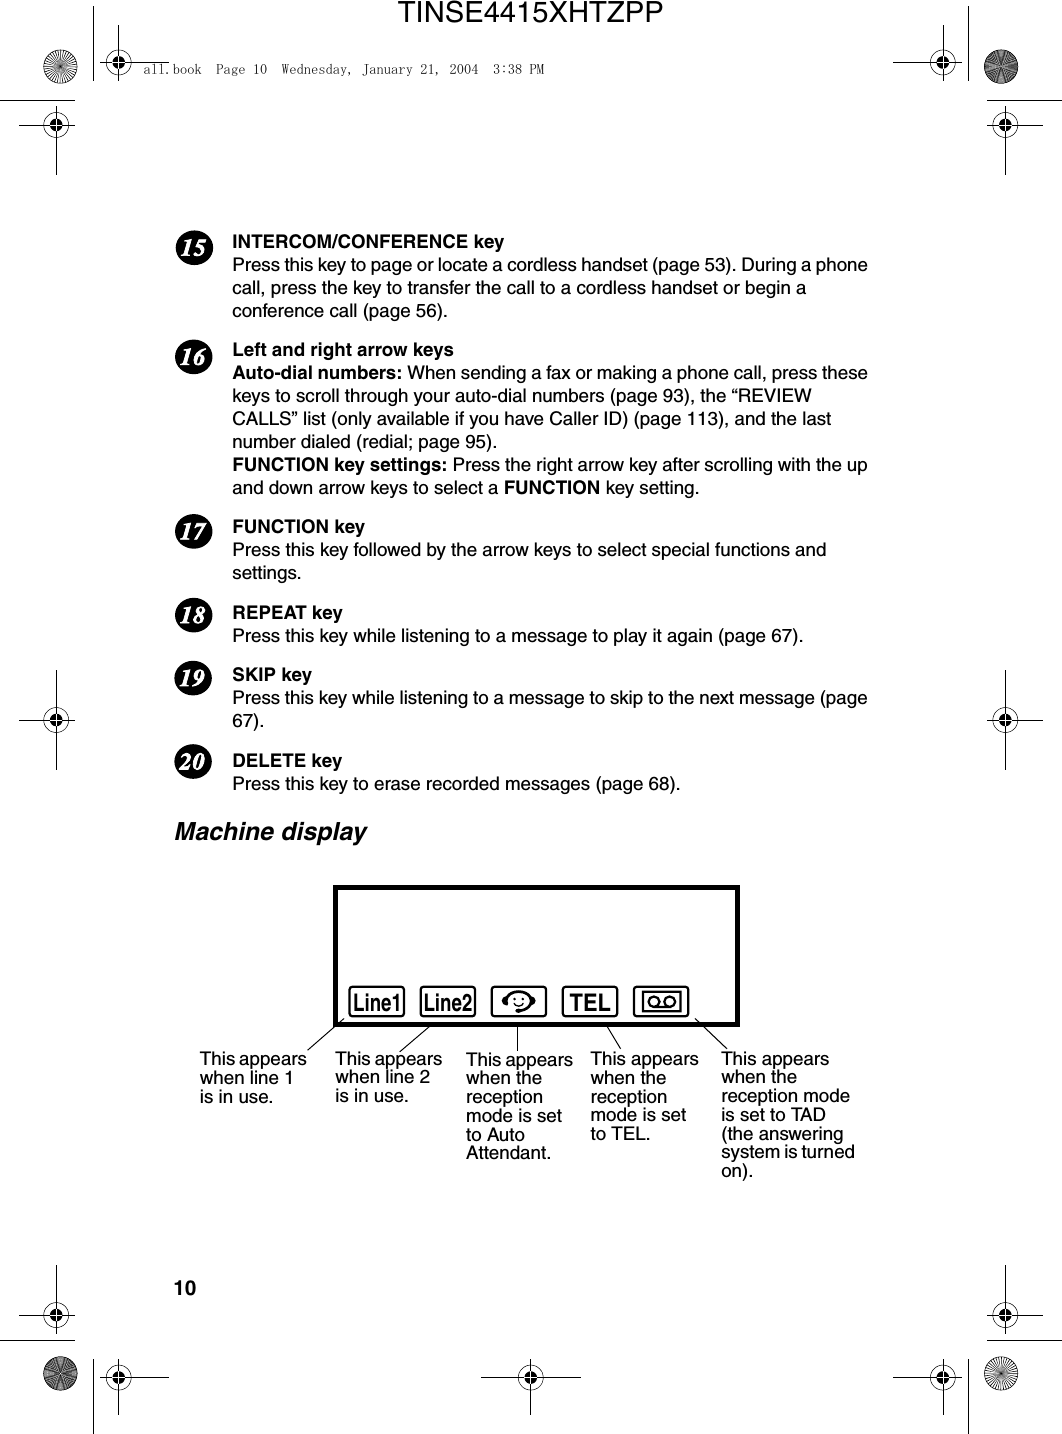
10INTERCOM/CONFERENCE keyPress this key to page or locate a cordless handset (page 53). During a phone call, press the key to transfer the call to a cordless handset or begin a conference call (page 56).Left and right arrow keysAuto-dial numbers: When sending a fax or making a phone call, press these keys to scroll through your auto-dial numbers (page 93), the “REVIEW CALLS” list (only available if you have Caller ID) (page 113), and the last number dialed (redial; page 95).FUNCTION key settings: Press the right arrow key after scrolling with the up and down arrow keys to select a FUNCTION key setting.FUNCTION keyPress this key followed by the arrow keys to select special functions and settings.REPEAT keyPress this key while listening to a message to play it again (page 67).SKIP keyPress this key while listening to a message to skip to the next message (page 67).DELETE keyPress this key to erase recorded messages (page 68).Machine display181920171615TELLine1 Line2This appears when line 1 is in use.This appears when line 2 is in use.This appears when the reception mode is set to Auto Attendant.This appears when the reception mode is set to TEL.This appears when the reception mode is set to TAD (the answering system is turned on).all.book  Page 10  Wednesday, January 21, 2004  3:38 PMTINSE4415XHTZPP
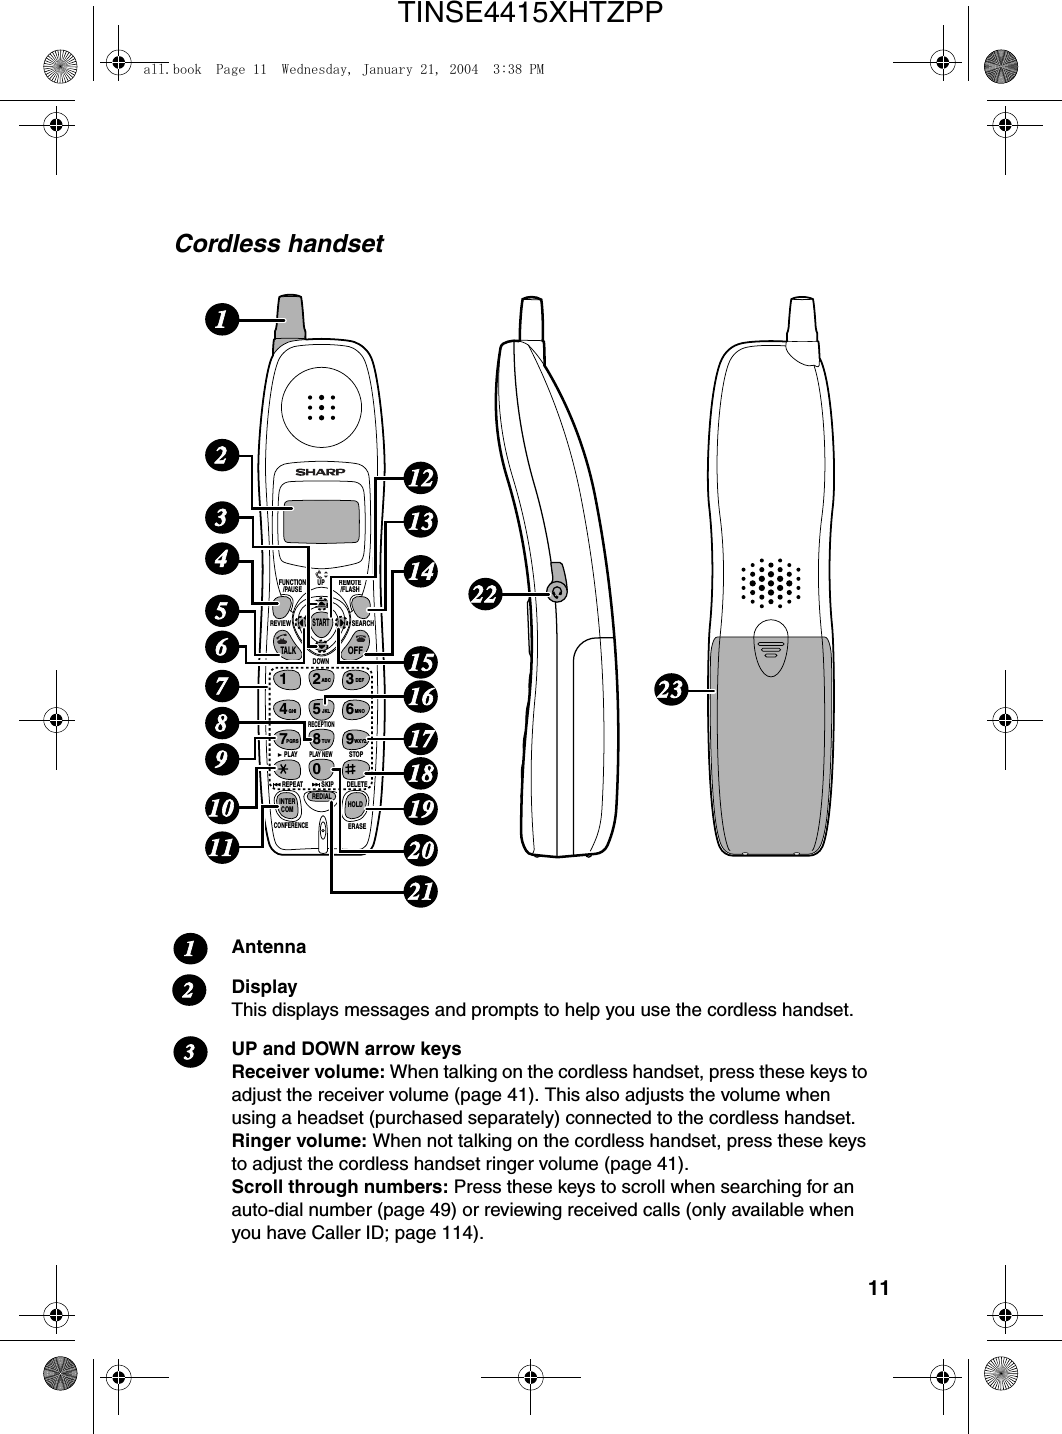
11AntennaDisplayThis displays messages and prompts to help you use the cordless handset.UP and DOWN arrow keysReceiver volume: When talking on the cordless handset, press these keys to adjust the receiver volume (page 41). This also adjusts the volume when using a headset (purchased separately) connected to the cordless handset.Ringer volume: When not talking on the cordless handset, press these keys to adjust the cordless handset ringer volume (page 41).Scroll through numbers: Press these keys to scroll when searching for an auto-dial number (page 49) or reviewing received calls (only available when you have Caller ID; page 114).123FUNCTION/PAUSETALKOFFREMOTE/FLASHSTARTDOWNPLAY NEWPLAYREPEATCONFERENCESKIP DELETEERASESTOPRECEPTIONREVIEWINTERCOM HOLDREDIALSEARCH1ABC DEFJKLGHI MNOTUVPQRS WXYZ2345678907181119171345614162021813122222315109UPCordless handsetall.book  Page 11  Wednesday, January 21, 2004  3:38 PMTINSE4415XHTZPP
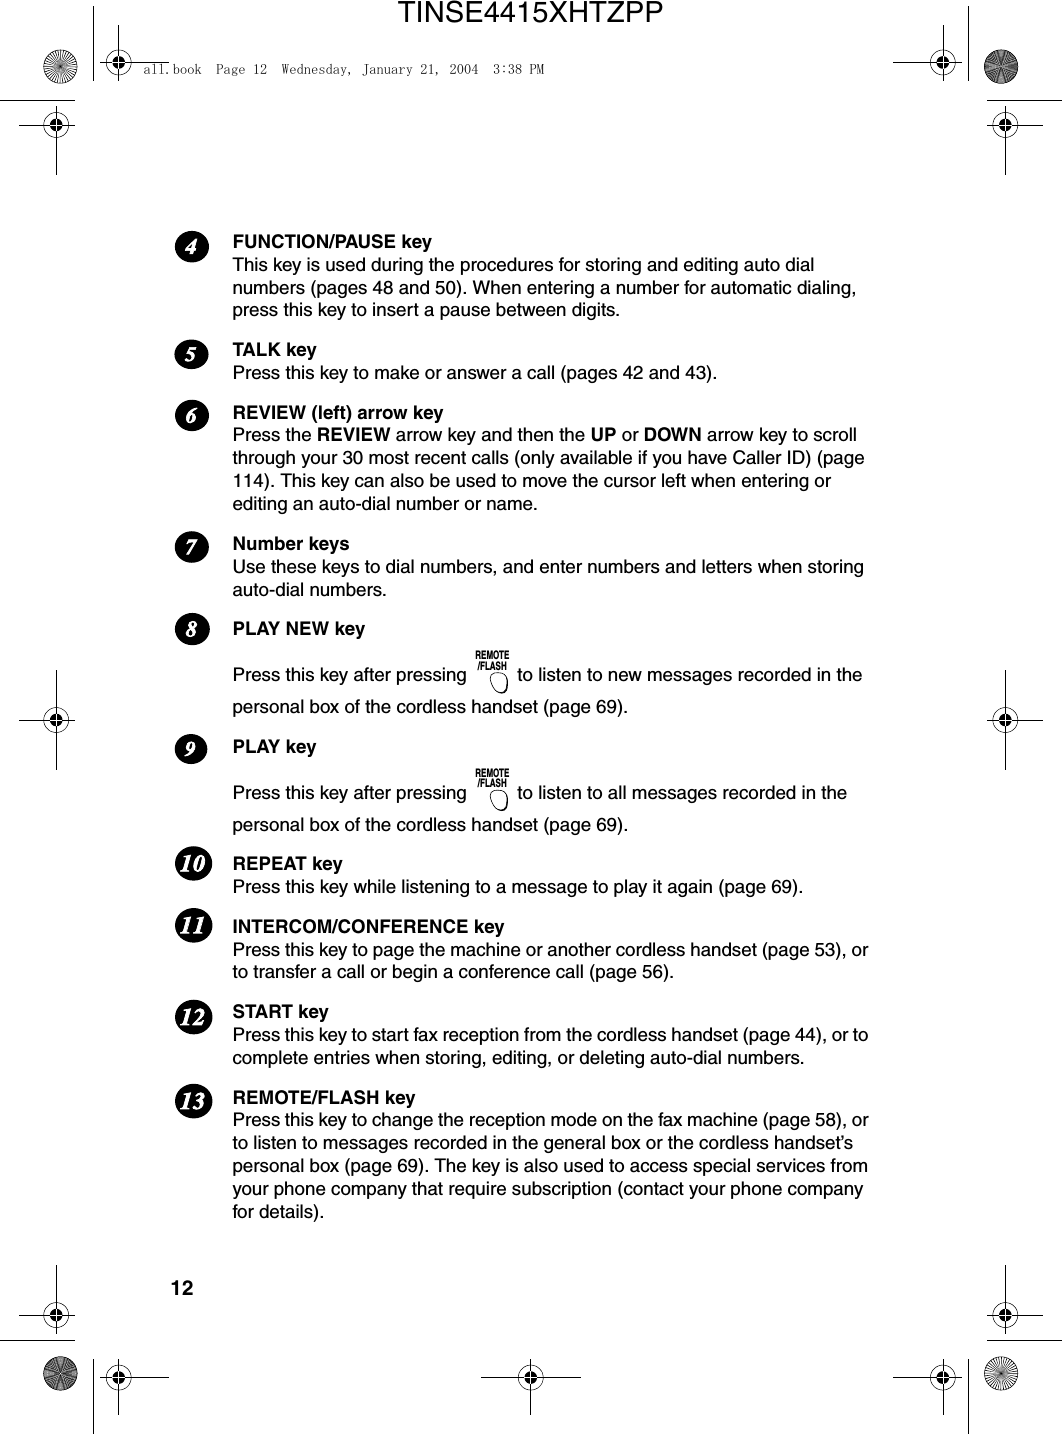
12FUNCTION/PAUSE keyThis key is used during the procedures for storing and editing auto dial numbers (pages 48 and 50). When entering a number for automatic dialing, press this key to insert a pause between digits. TALK keyPress this key to make or answer a call (pages 42 and 43). REVIEW (left) arrow keyPress the REVIEW arrow key and then the UP or DOWN arrow key to scroll through your 30 most recent calls (only available if you have Caller ID) (page 114). This key can also be used to move the cursor left when entering or editing an auto-dial number or name.Number keysUse these keys to dial numbers, and enter numbers and letters when storing auto-dial numbers. PLAY NEW keyPress this key after pressing   to listen to new messages recorded in the personal box of the cordless handset (page 69). PLAY keyPress this key after pressing   to listen to all messages recorded in the personal box of the cordless handset (page 69). REPEAT keyPress this key while listening to a message to play it again (page 69).INTERCOM/CONFERENCE keyPress this key to page the machine or another cordless handset (page 53), or to transfer a call or begin a conference call (page 56). START keyPress this key to start fax reception from the cordless handset (page 44), or to complete entries when storing, editing, or deleting auto-dial numbers.REMOTE/FLASH keyPress this key to change the reception mode on the fax machine (page 58), or to listen to messages recorded in the general box or the cordless handset’s personal box (page 69). The key is also used to access special services from your phone company that require subscription (contact your phone company for details).REMOTE/FLASHREMOTE/FLASH6781211111091354all.book  Page 12  Wednesday, January 21, 2004  3:38 PMTINSE4415XHTZPP
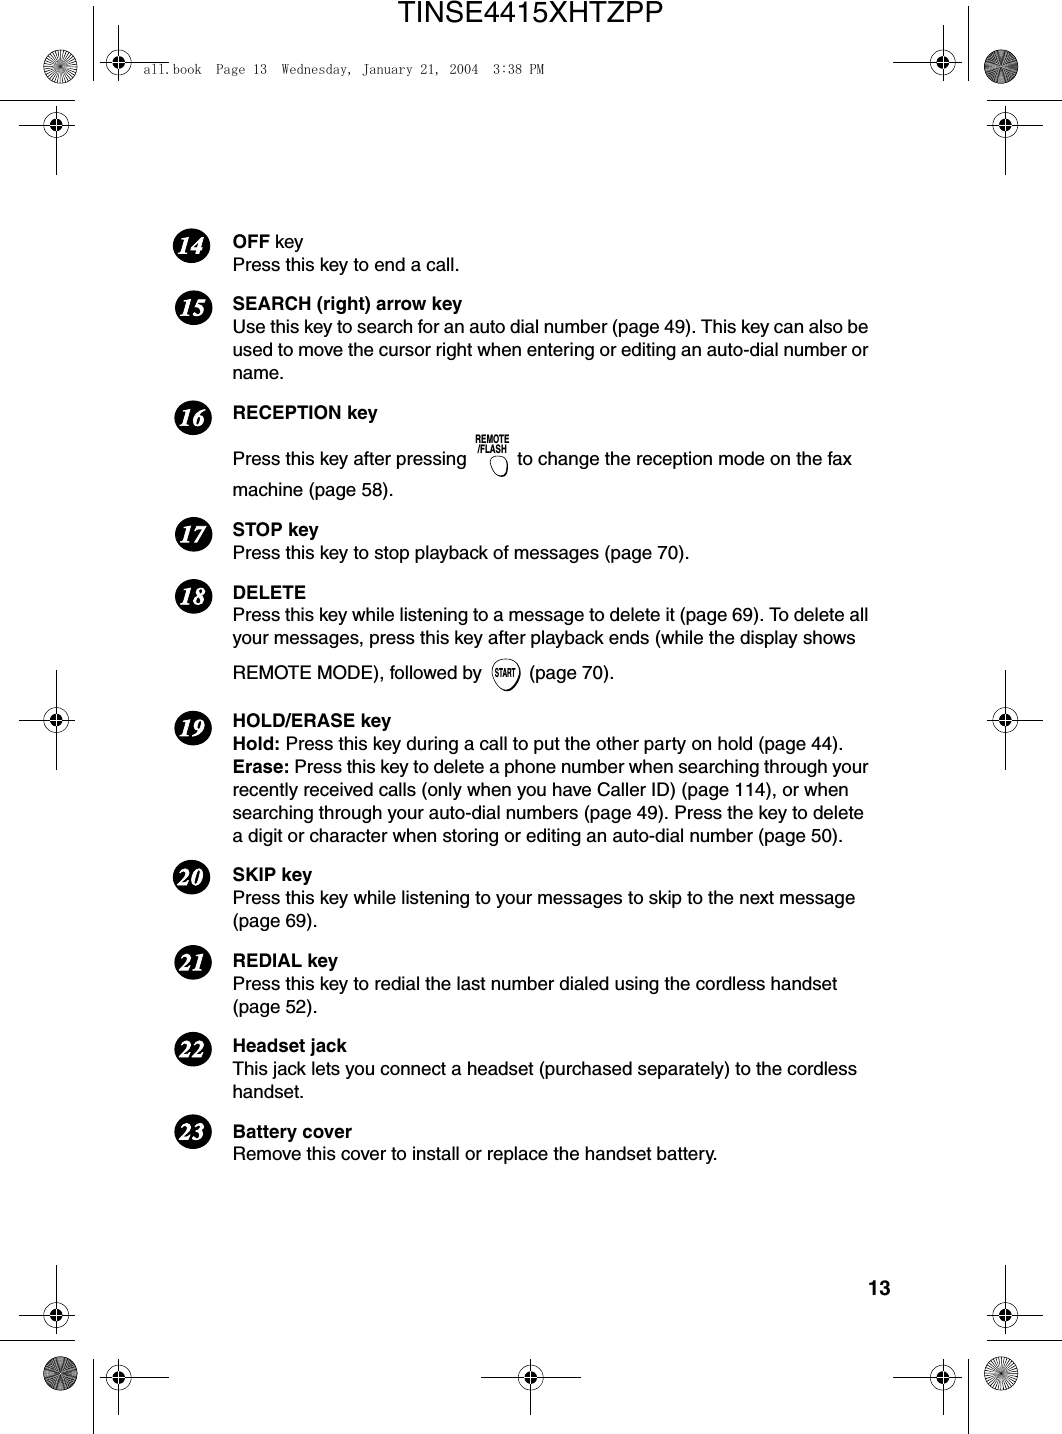
13OFF keyPress this key to end a call.SEARCH (right) arrow keyUse this key to search for an auto dial number (page 49). This key can also be used to move the cursor right when entering or editing an auto-dial number or name.RECEPTION keyPress this key after pressing   to change the reception mode on the fax machine (page 58).STOP keyPress this key to stop playback of messages (page 70).DELETEPress this key while listening to a message to delete it (page 69). To delete all your messages, press this key after playback ends (while the display shows REMOTE MODE), followed by   (page 70).HOLD/ERASE keyHold: Press this key during a call to put the other party on hold (page 44).Erase: Press this key to delete a phone number when searching through your recently received calls (only when you have Caller ID) (page 114), or when searching through your auto-dial numbers (page 49). Press the key to delete a digit or character when storing or editing an auto-dial number (page 50).SKIP keyPress this key while listening to your messages to skip to the next message (page 69).REDIAL keyPress this key to redial the last number dialed using the cordless handset (page 52).Headset jackThis jack lets you connect a headset (purchased separately) to the cordless handset.Battery coverRemove this cover to install or replace the handset battery.REMOTE/FLASHSTART17161819202122231514all.book  Page 13  Wednesday, January 21, 2004  3:38 PMTINSE4415XHTZPP
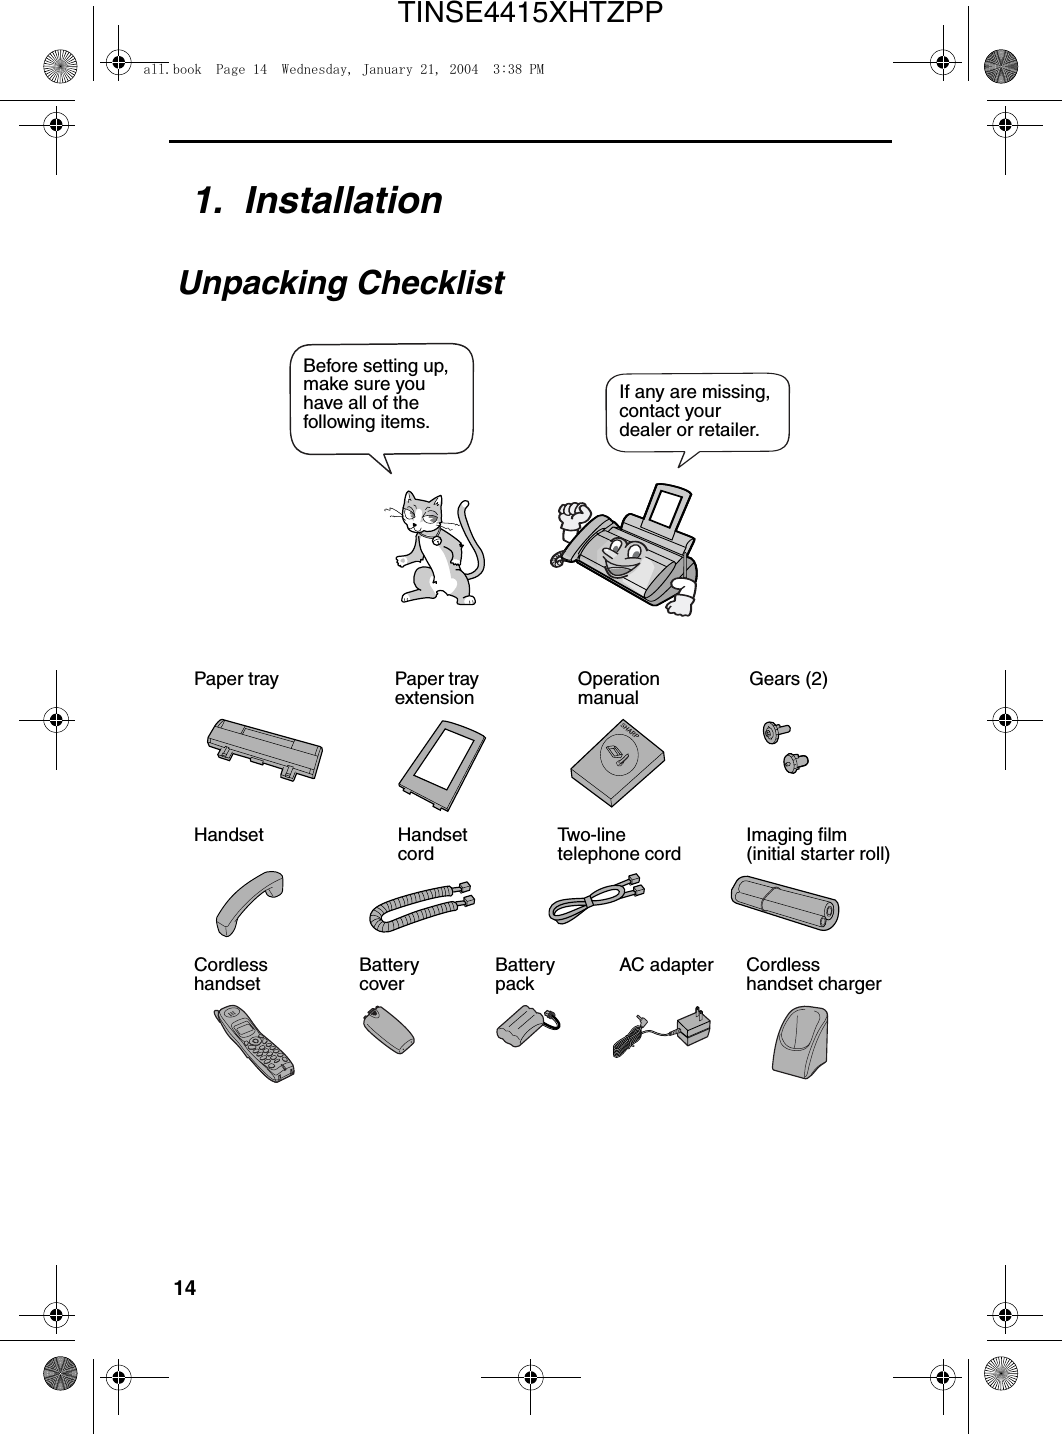
141.  InstallationUnpacking ChecklistPaper tray Paper tray extensionOperation manualGears (2)Handset Handset cordTwo-line telephone cordImaging film(initial starter roll)CordlesshandsetBattery coverBattery packCordless handset chargerAC adapterIf any are missing, contact your dealer or retailer.Before setting up, make sure you have all of the following items.all.book  Page 14  Wednesday, January 21, 2004  3:38 PMTINSE4415XHTZPP
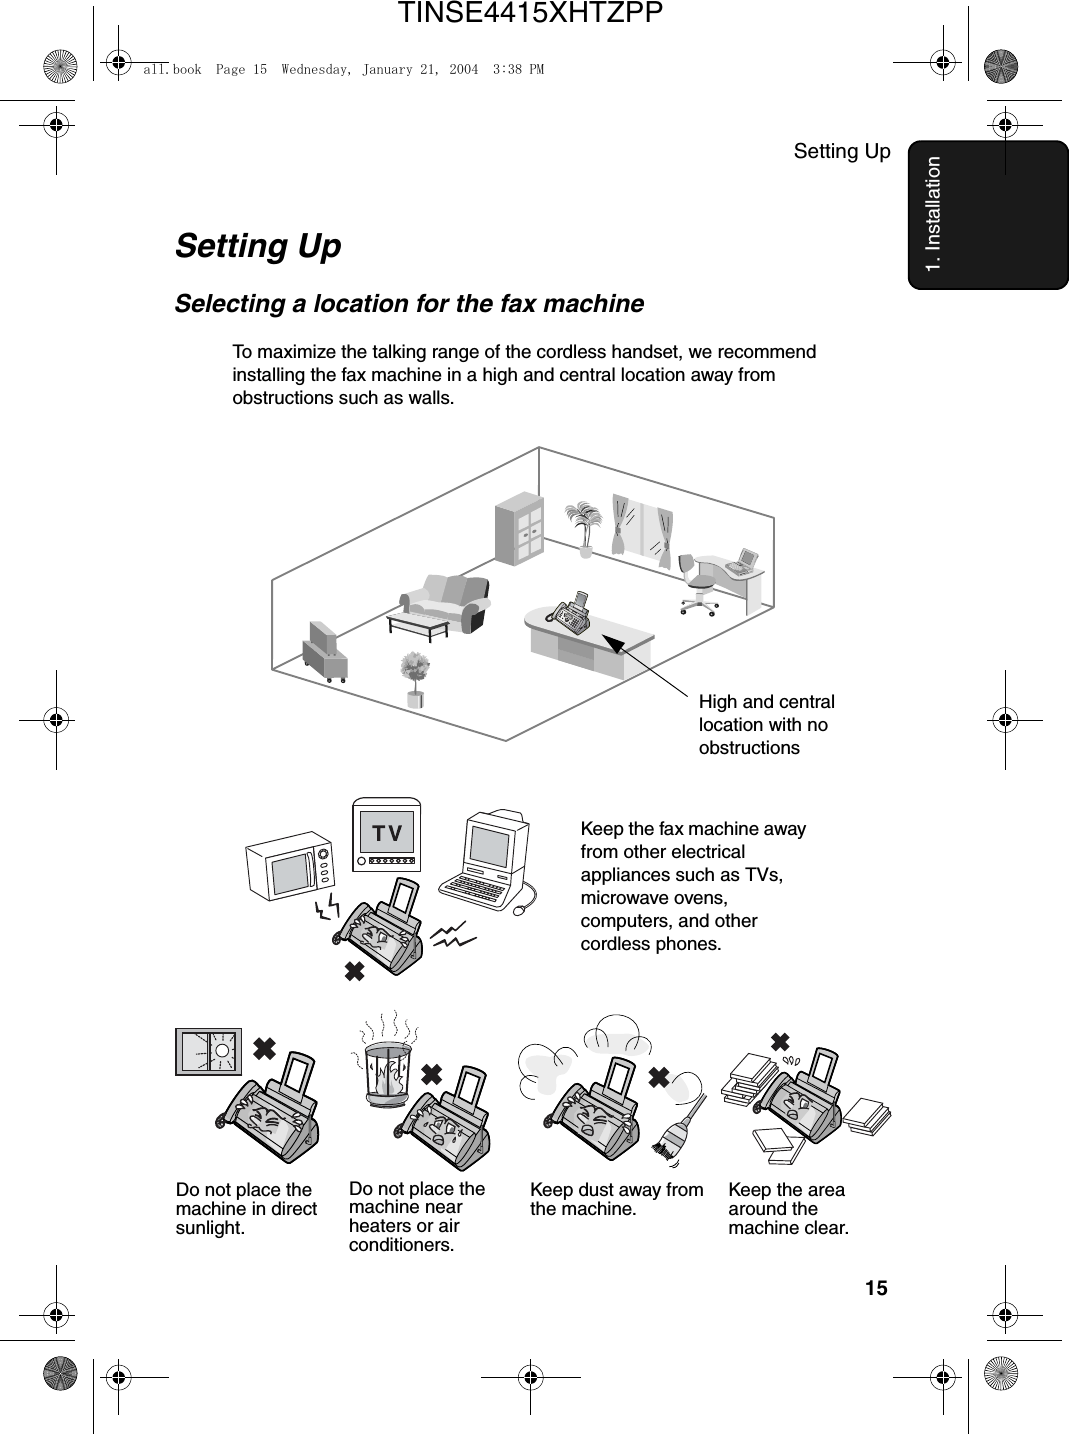
Setting Up151. InstallationSetting UpSelecting a location for the fax machineTo maximize the talking range of the cordless handset, we recommend installing the fax machine in a high and central location away from obstructions such as walls.Do not place the machine in direct sunlight.Do not place the machine near heaters or air conditioners.Keep dust away from the machine.Keep the area around the machine clear.Keep the fax machine away from other electrical appliances such as TVs, microwave ovens, computers, and other cordless phones.High and central location with no obstructionsall.book  Page 15  Wednesday, January 21, 2004  3:38 PMTINSE4415XHTZPP
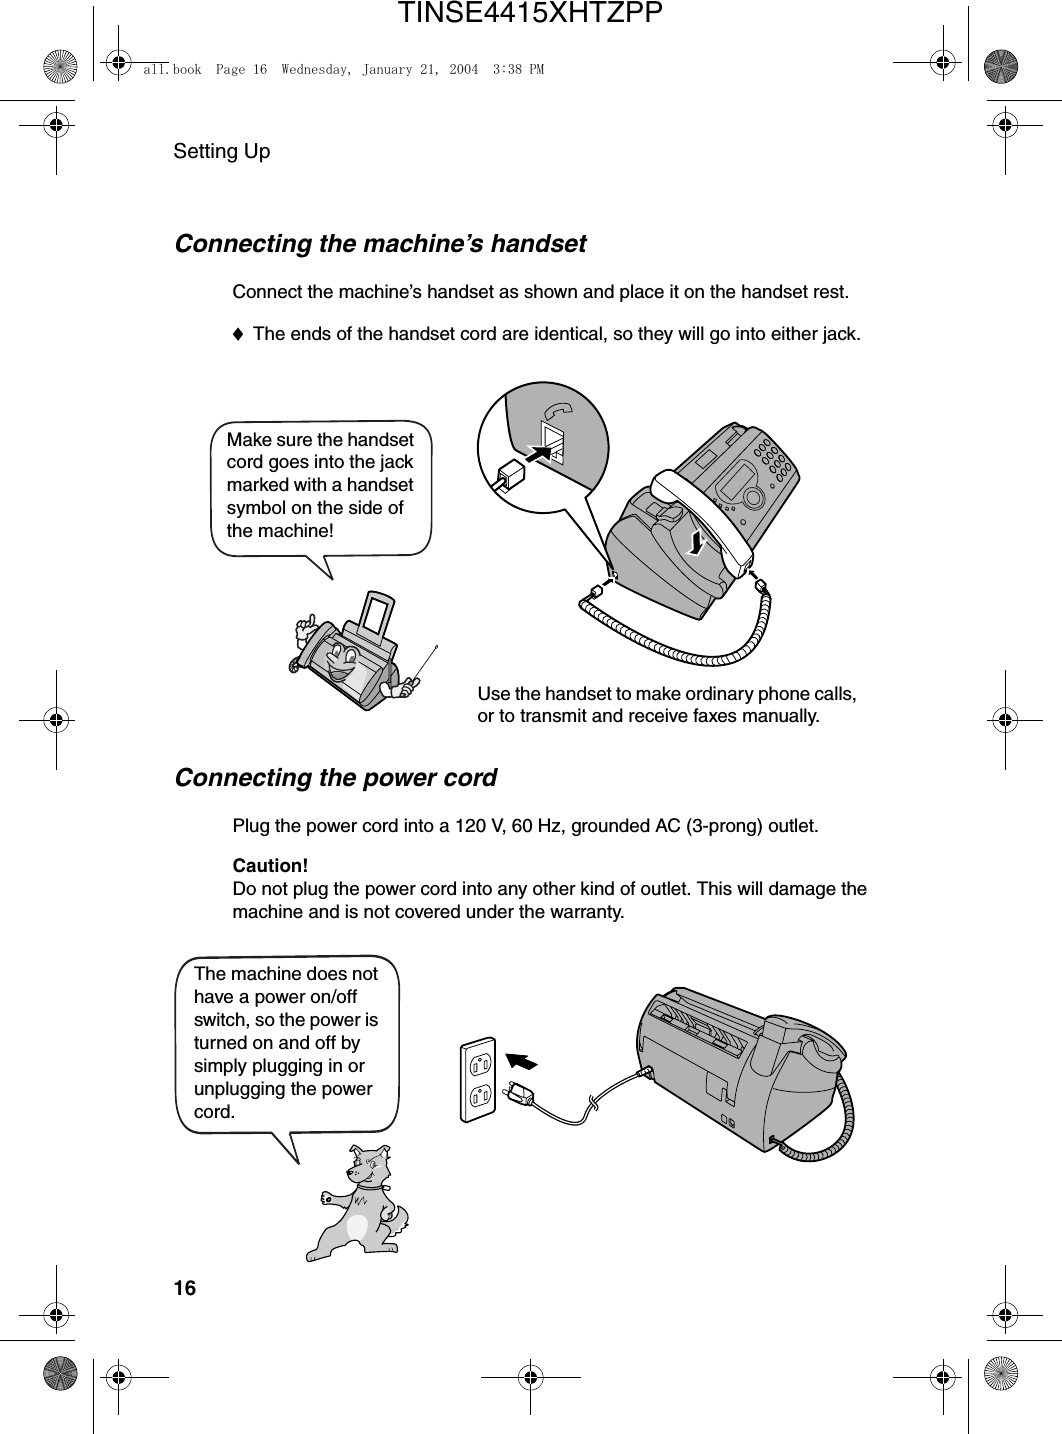
Setting Up16Connecting the power cordPlug the power cord into a 120 V, 60 Hz, grounded AC (3-prong) outlet.Caution!Do not plug the power cord into any other kind of outlet. This will damage the machine and is not covered under the warranty.The machine does not have a power on/off switch, so the power is turned on and off by simply plugging in or unplugging the power cord.Connecting the machine’s handsetConnect the machine’s handset as shown and place it on the handset rest.♦The ends of the handset cord are identical, so they will go into either jack.Make sure the handset cord goes into the jack marked with a handset symbol on the side of the machine!Use the handset to make ordinary phone calls, or to transmit and receive faxes manually.all.book  Page 16  Wednesday, January 21, 2004  3:38 PMTINSE4415XHTZPP
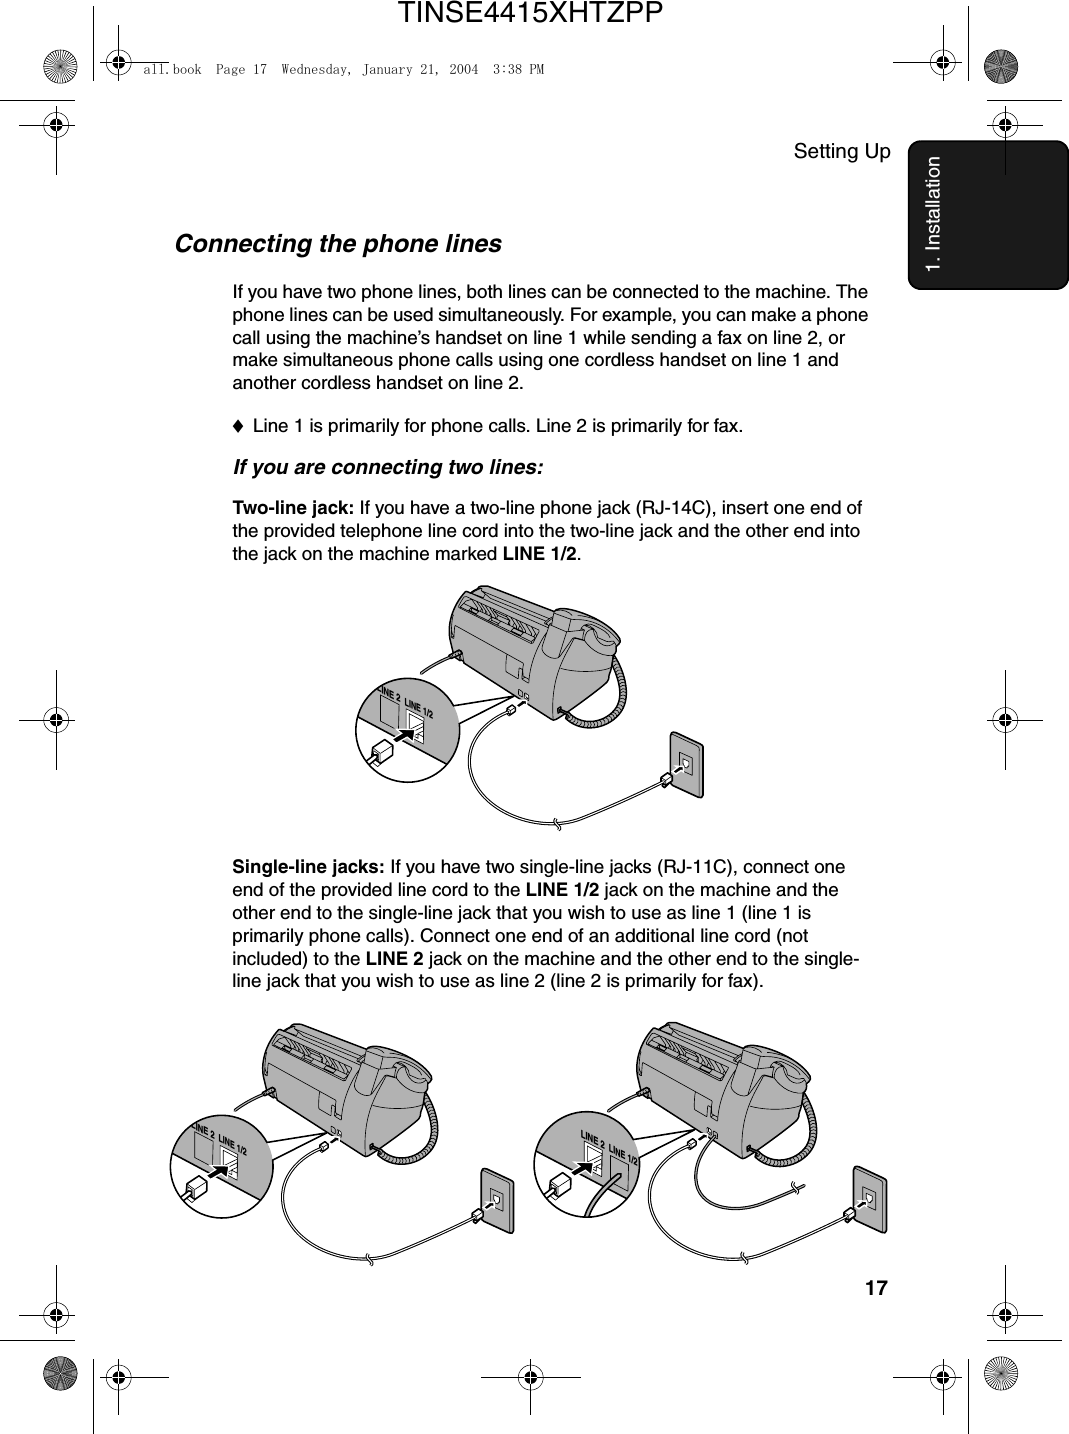
Setting Up171. InstallationConnecting the phone linesIf you have two phone lines, both lines can be connected to the machine. The phone lines can be used simultaneously. For example, you can make a phone call using the machine’s handset on line 1 while sending a fax on line 2, or make simultaneous phone calls using one cordless handset on line 1 and another cordless handset on line 2.♦Line 1 is primarily for phone calls. Line 2 is primarily for fax.If you are connecting two lines:Two-line jack: If you have a two-line phone jack (RJ-14C), insert one end of the provided telephone line cord into the two-line jack and the other end into the jack on the machine marked LINE 1/2.Single-line jacks: If you have two single-line jacks (RJ-11C), connect one end of the provided line cord to the LINE 1/2 jack on the machine and the other end to the single-line jack that you wish to use as line 1 (line 1 is primarily phone calls). Connect one end of an additional line cord (not included) to the LINE 2 jack on the machine and the other end to the single-line jack that you wish to use as line 2 (line 2 is primarily for fax). LINE 2LINE 1/2LINE 2LINE 1/2LINE 2LINE 1/2all.book  Page 17  Wednesday, January 21, 2004  3:38 PMTINSE4415XHTZPP
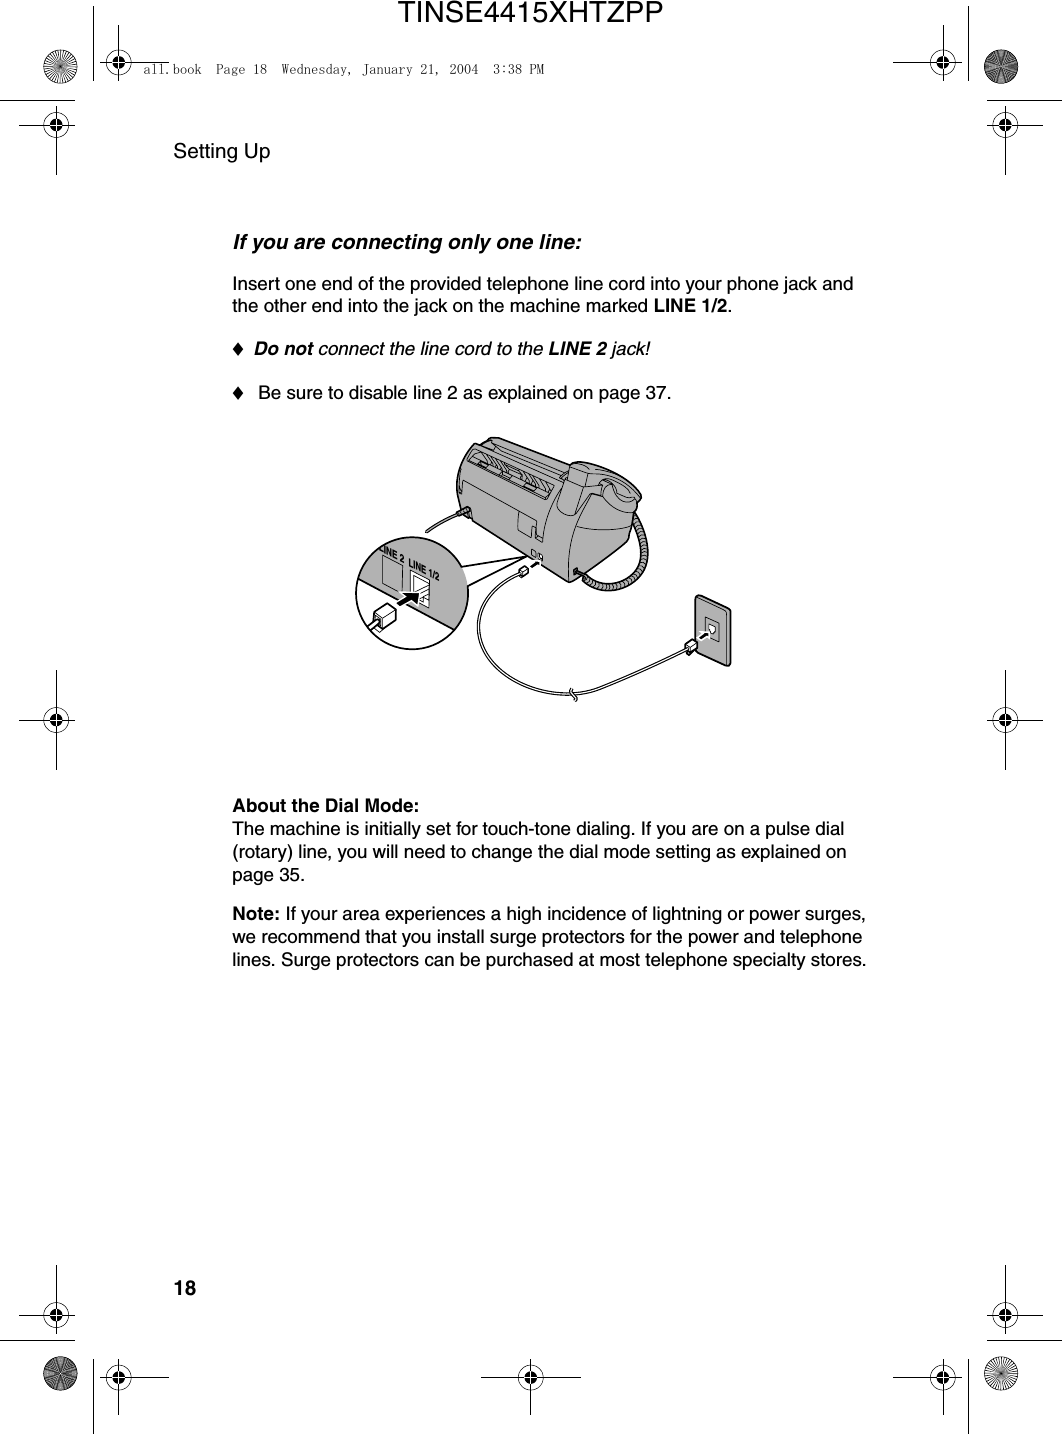
Setting Up18If you are connecting only one line:Insert one end of the provided telephone line cord into your phone jack and the other end into the jack on the machine marked LINE 1/2.♦Do not connect the line cord to the LINE 2 jack!♦ Be sure to disable line 2 as explained on page 37.LINE 2LINE 1/2About the Dial Mode: The machine is initially set for touch-tone dialing. If you are on a pulse dial (rotary) line, you will need to change the dial mode setting as explained on page 35.Note: If your area experiences a high incidence of lightning or power surges, we recommend that you install surge protectors for the power and telephone lines. Surge protectors can be purchased at most telephone specialty stores.all.book  Page 18  Wednesday, January 21, 2004  3:38 PMTINSE4415XHTZPP
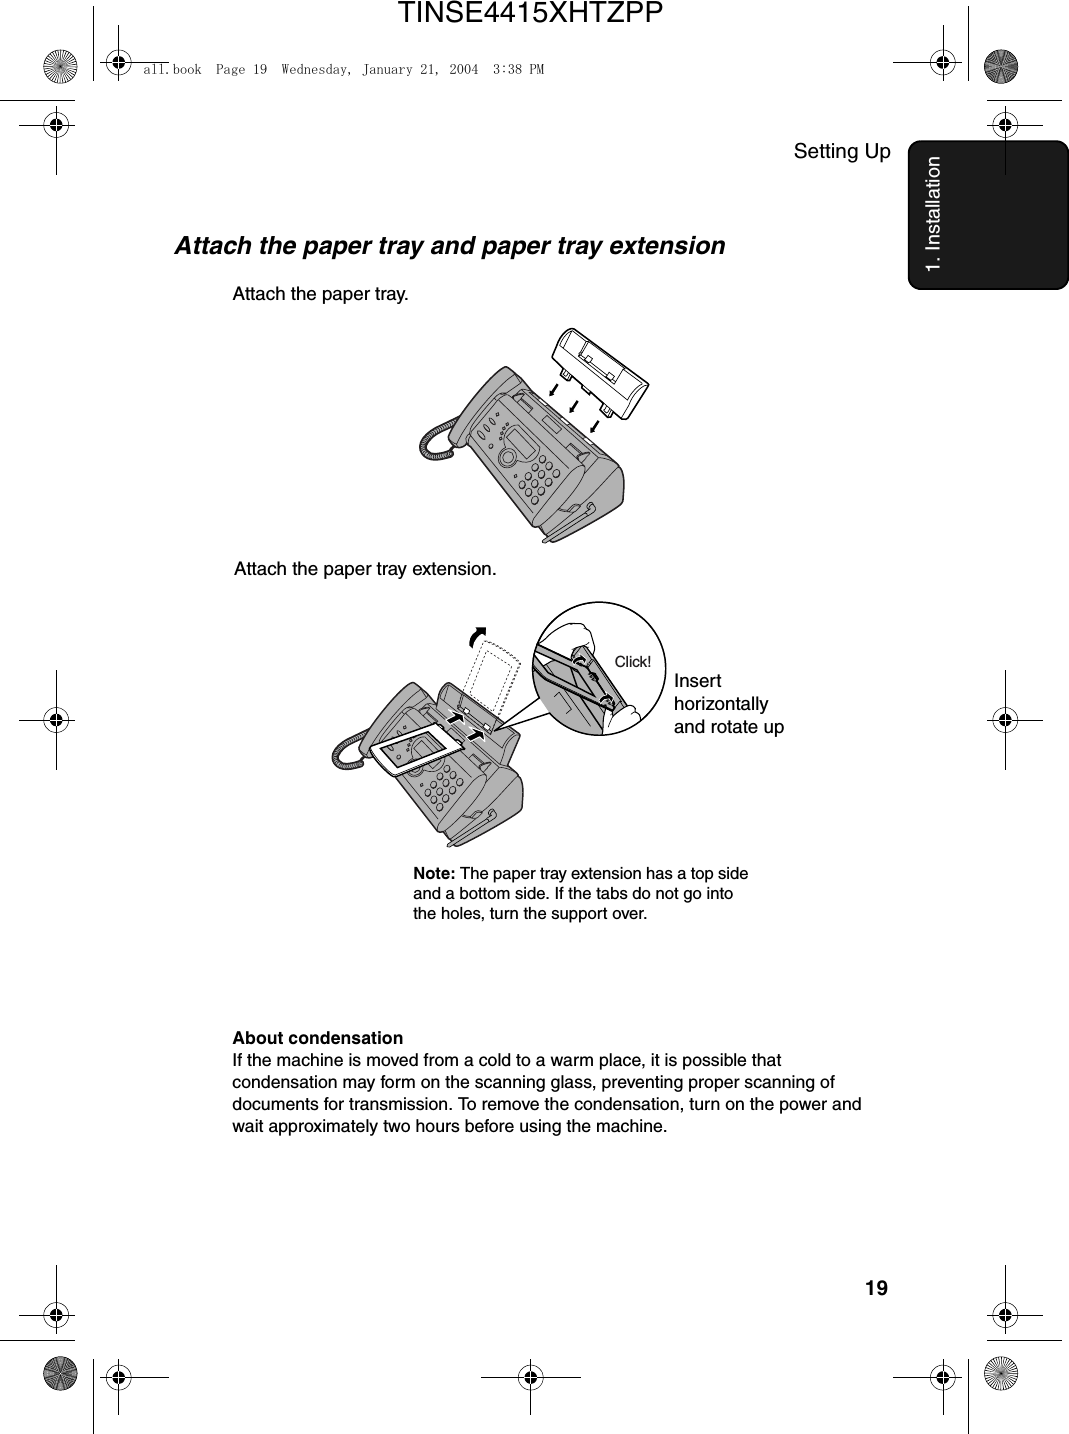
Setting Up191. InstallationAttach the paper tray and paper tray extensionAttach the paper tray.Note: The paper tray extension has a top side and a bottom side. If the tabs do not go into the holes, turn the support over.Insert horizontally and rotate upAttach the paper tray extension.Click!About condensationIf the machine is moved from a cold to a warm place, it is possible that condensation may form on the scanning glass, preventing proper scanning of documents for transmission. To remove the condensation, turn on the power and wait approximately two hours before using the machine.all.book  Page 19  Wednesday, January 21, 2004  3:38 PMTINSE4415XHTZPP
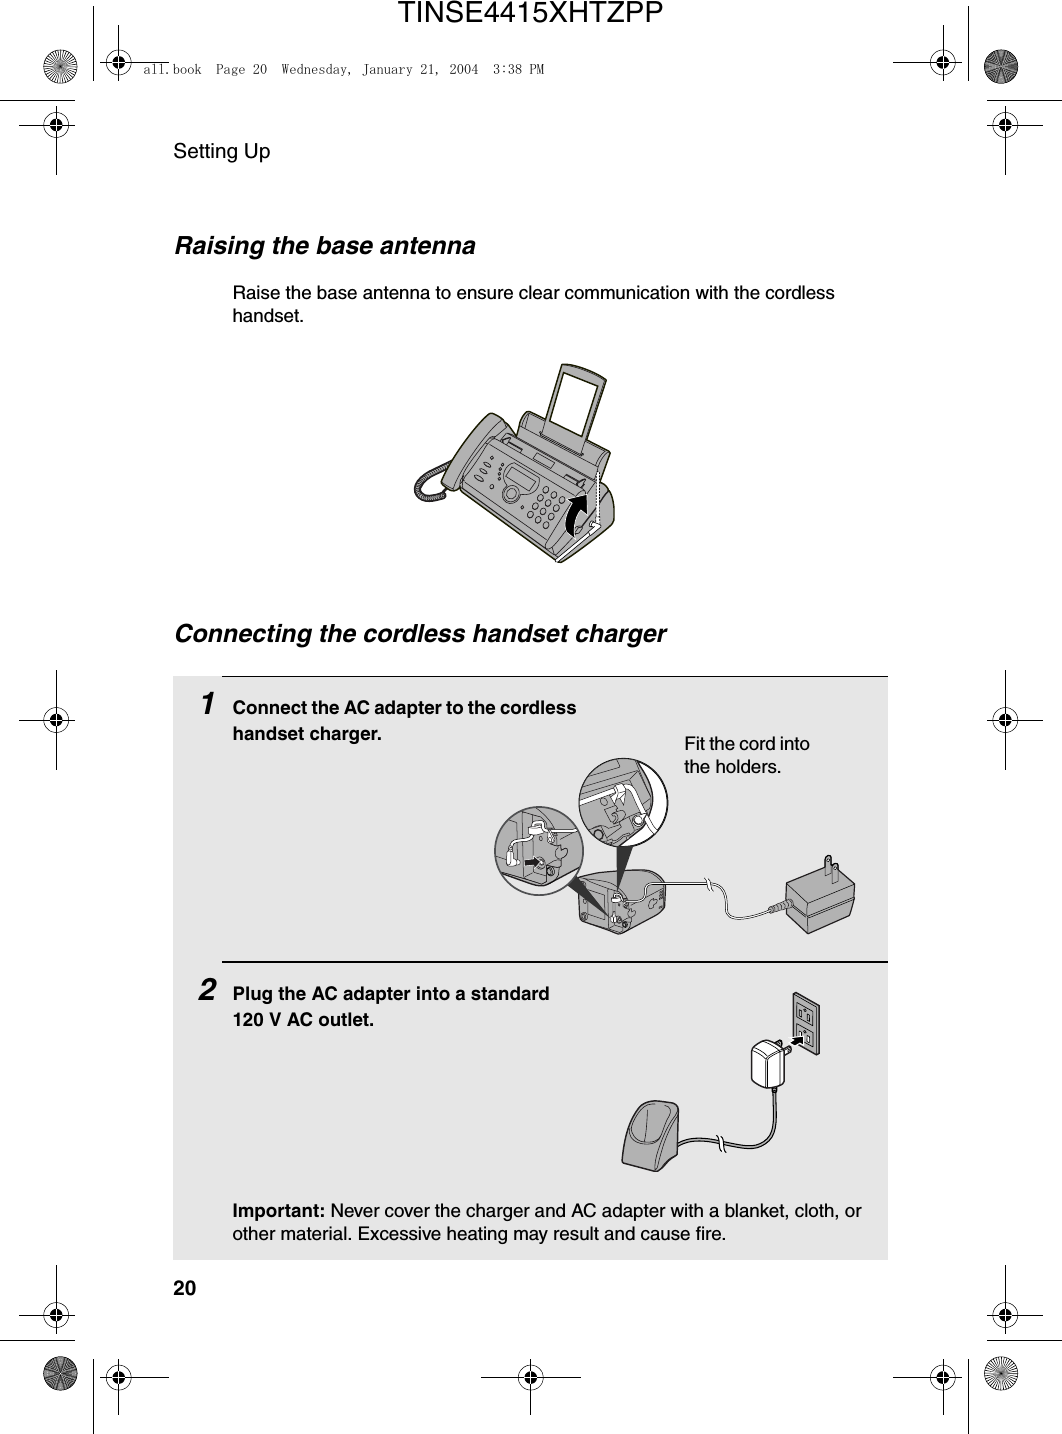
Setting Up20Connecting the cordless handset charger1Connect the AC adapter to the cordless handset charger.2Plug the AC adapter into a standard 120 V AC outlet.Important: Never cover the charger and AC adapter with a blanket, cloth, or other material. Excessive heating may result and cause fire.Raising the base antennaRaise the base antenna to ensure clear communication with the cordless handset.Fit the cord into the holders.all.book  Page 20  Wednesday, January 21, 2004  3:38 PMTINSE4415XHTZPP
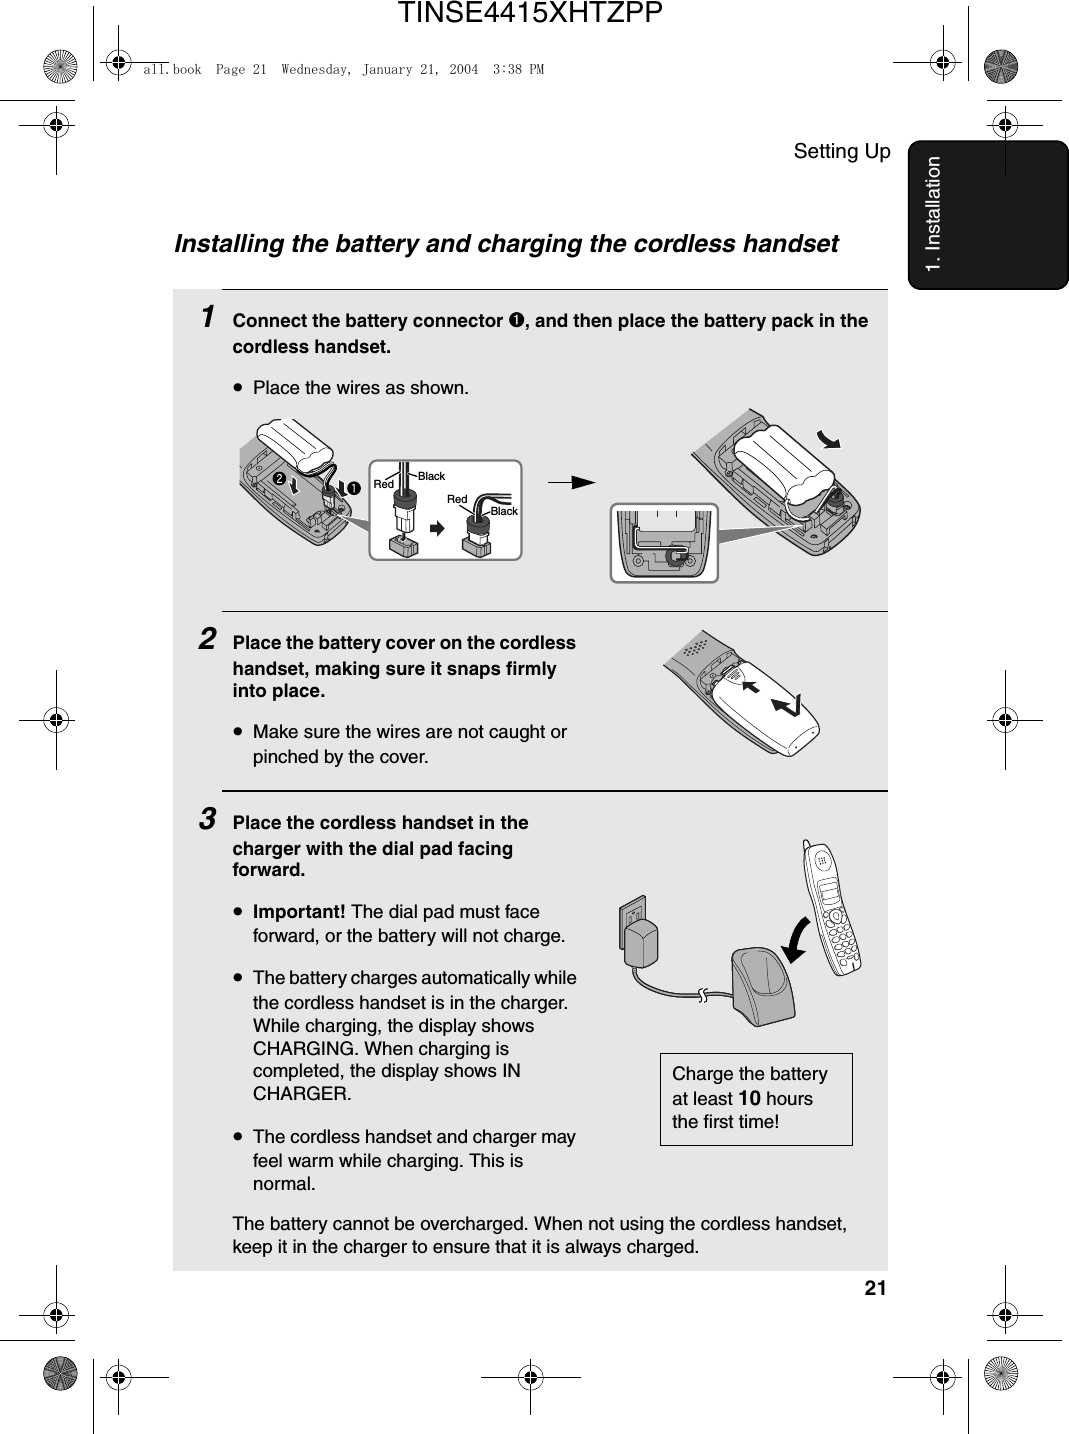
Setting Up211. InstallationInstalling the battery and charging the cordless handset1Connect the battery connector ➊1Connect the battery connector ➊, and then place the battery pack in the cordless handset.•Place the wires as shown.2Place the battery cover on the cordless handset, making sure it snaps firmly into place.•Make sure the wires are not caught or pinched by the cover.3Place the cordless handset in the charger with the dial pad facing forward.•Important! The dial pad must face forward, or the battery will not charge. •The battery charges automatically while the cordless handset is in the charger. While charging, the display shows CHARGING. When charging is completed, the display shows IN CHARGER.•The cordless handset and charger may feel warm while charging. This is normal.The battery cannot be overcharged. When not using the cordless handset, keep it in the charger to ensure that it is always charged.Charge the battery at least 10 hours the first time!BlackRedBlackRedall.book  Page 21  Wednesday, January 21, 2004  3:38 PMTINSE4415XHTZPP
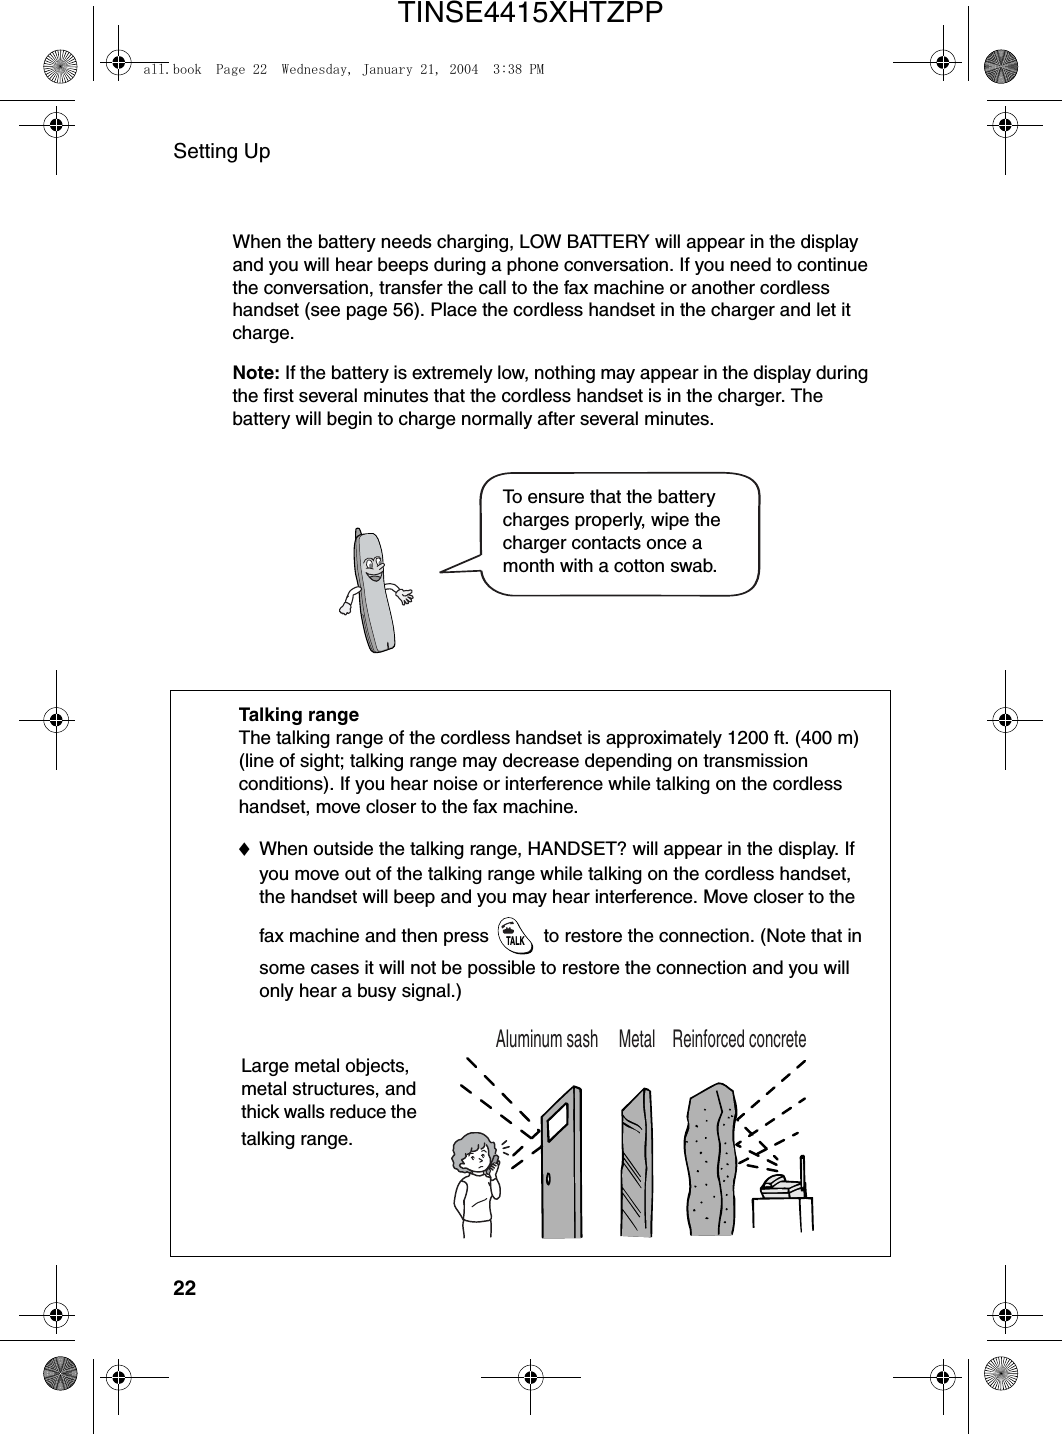
Setting Up22When the battery needs charging, LOW BATTERY will appear in the display and you will hear beeps during a phone conversation. If you need to continue the conversation, transfer the call to the fax machine or another cordless handset (see page 56). Place the cordless handset in the charger and let it charge.Note: If the battery is extremely low, nothing may appear in the display during the first several minutes that the cordless handset is in the charger. The battery will begin to charge normally after several minutes.Reinforced concreteMetalAluminum sashTalking rangeThe talking range of the cordless handset is approximately 1200 ft. (400 m) (line of sight; talking range may decrease depending on transmission conditions). If you hear noise or interference while talking on the cordless handset, move closer to the fax machine. ♦When outside the talking range, HANDSET? will appear in the display. If you move out of the talking range while talking on the cordless handset, the handset will beep and you may hear interference. Move closer to the fax machine and then press   to restore the connection. (Note that in some cases it will not be possible to restore the connection and you will only hear a busy signal.)TALKLarge metal objects, metal structures, and thick walls reduce the talking range.To ensure that the battery charges properly, wipe the charger contacts once a month with a cotton swab.all.book  Page 22  Wednesday, January 21, 2004  3:38 PMTINSE4415XHTZPP
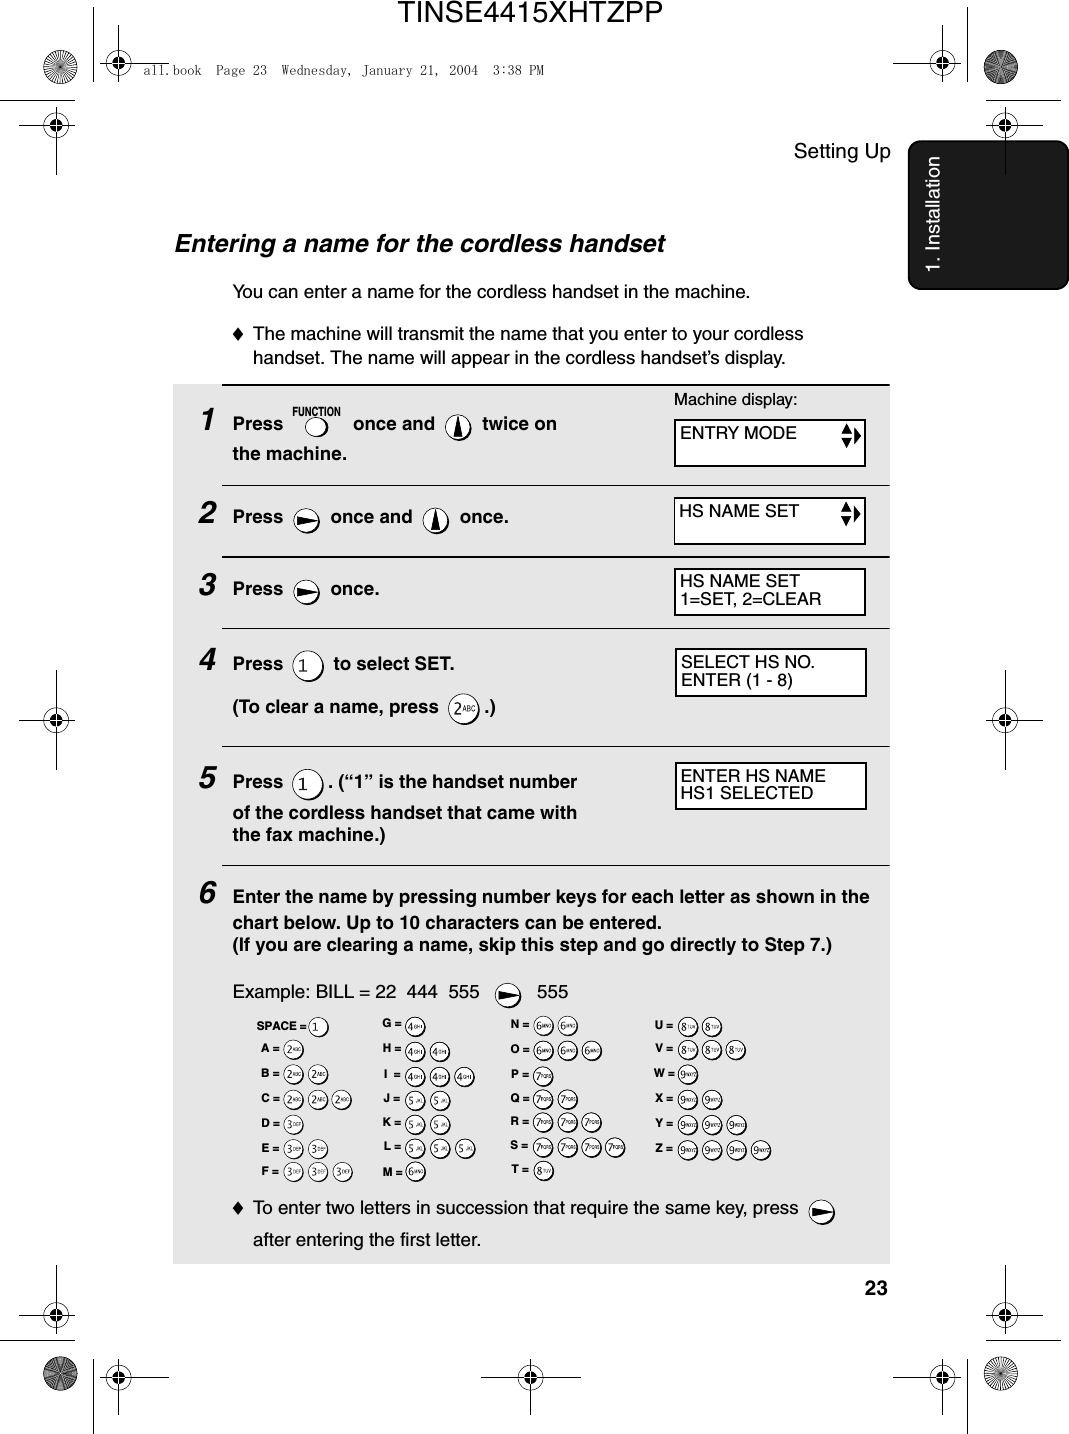
Setting Up231. InstallationEntering a name for the cordless handsetYou can enter a name for the cordless handset in the machine.♦The machine will transmit the name that you enter to your cordless handset. The name will appear in the cordless handset’s display.1Press   once and   twice on the machine.2Press   once and   once.3Press  once.4Press   to select SET. (To clear a name, press  .)5Press  . (“1” is the handset number of the cordless handset that came with the fax machine.)6Enter the name by pressing number keys for each letter as shown in the chart below. Up to 10 characters can be entered.(If you are clearing a name, skip this step and go directly to Step 7.)Example: BILL = 22  444  555    555♦To enter two letters in succession that require the same key, press   after entering the first letter. FUNCTIONMachine display:A =B =C =D =E =F =G =H =I  =J =K =L =M =N =O =P =Q =R =S =T =U =V =W =X =Y =Z =SPACE =ENTRY MODEHS NAME SETHS NAME SET1=SET, 2=CLEARSELECT HS NO.ENTER (1 - 8)ENTER HS NAMEHS1 SELECTEDall.book  Page 23  Wednesday, January 21, 2004  3:38 PMTINSE4415XHTZPP
Setting Up24♦To clear a mistake, press  .♦To enter a lower case letter, continue pressing the key for the letter until the lower case letter appears. ♦To enter one of the following symbols, press   or   repeatedly:. / ! " # $ % & ’ ( ) + + , - : ; < = > ? @ [ ¥ ] ^ _ ' { | } ) (7Press   to store the name.8Press   to exit.Note: Should you need to change the name, clear it (press “2” in Step 4 on the previous page and then follow Steps 5, 7, and 8), and then repeat the name entry procedure to enter the new name.SPEAKERSTART/MEMORYSTOPDisplay:HANDSET1BILLThe handset number and name appear in the standby display of the cordless handsetOWN NUMBER SETall.book  Page 24  Wednesday, January 21, 2004  3:38 PMTINSE4415XHTZPP
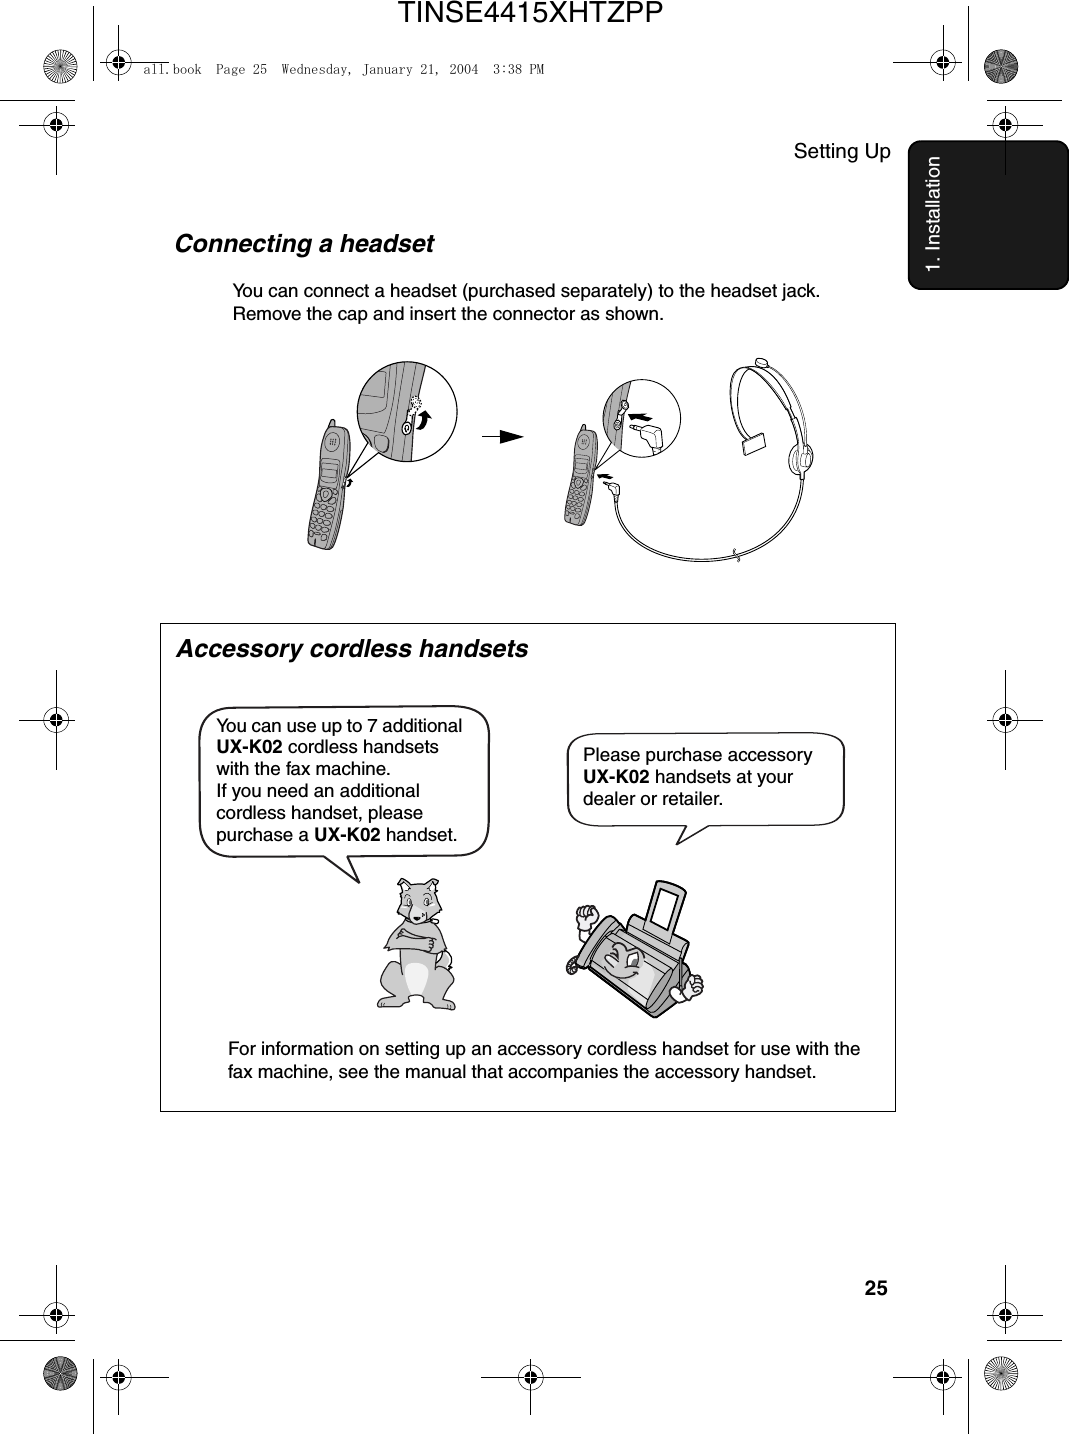
Setting Up251. InstallationConnecting a headsetYou can connect a headset (purchased separately) to the headset jack. Remove the cap and insert the connector as shown.Accessory cordless handsetsYou can use up to 7 additional UX-K02 cordless handsets with the fax machine. If you need an additional cordless handset, please purchase a UX-K02 handset.For information on setting up an accessory cordless handset for use with the fax machine, see the manual that accompanies the accessory handset.Please purchase accessory UX-K02 handsets at your dealer or retailer.all.book  Page 25  Wednesday, January 21, 2004  3:38 PMTINSE4415XHTZPP
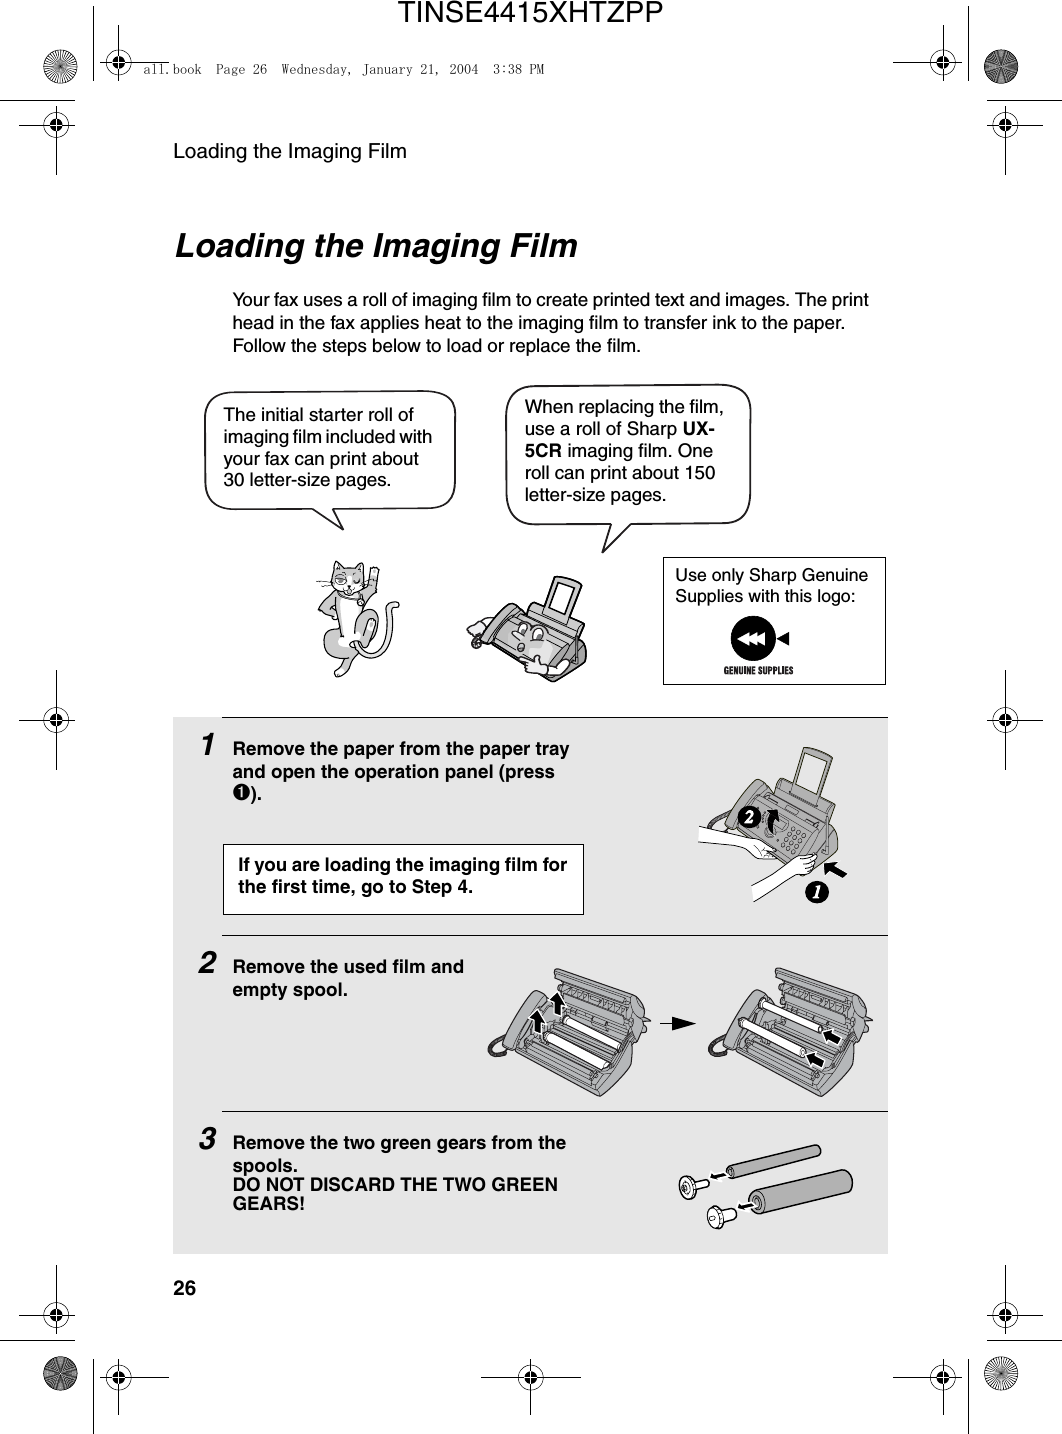
Loading the Imaging Film26Loading the Imaging FilmYour fax uses a roll of imaging film to create printed text and images. The print head in the fax applies heat to the imaging film to transfer ink to the paper. Follow the steps below to load or replace the film.1Remove the paper from the paper tray and open the operation panel (press ➊).2Remove the used film andempty spool.3Remove the two green gears from the spools. DO NOT DISCARD THE TWO GREEN GEARS!12When replacing the film, use a roll of Sharp UX-5CR imaging film. One roll can print about 150 letter-size pages.The initial starter roll of imaging film included with your fax can print about 30 letter-size pages. If you are loading the imaging film for the first time, go to Step 4.Use only Sharp Genuine Supplies with this logo:all.book  Page 26  Wednesday, January 21, 2004  3:38 PMTINSE4415XHTZPP
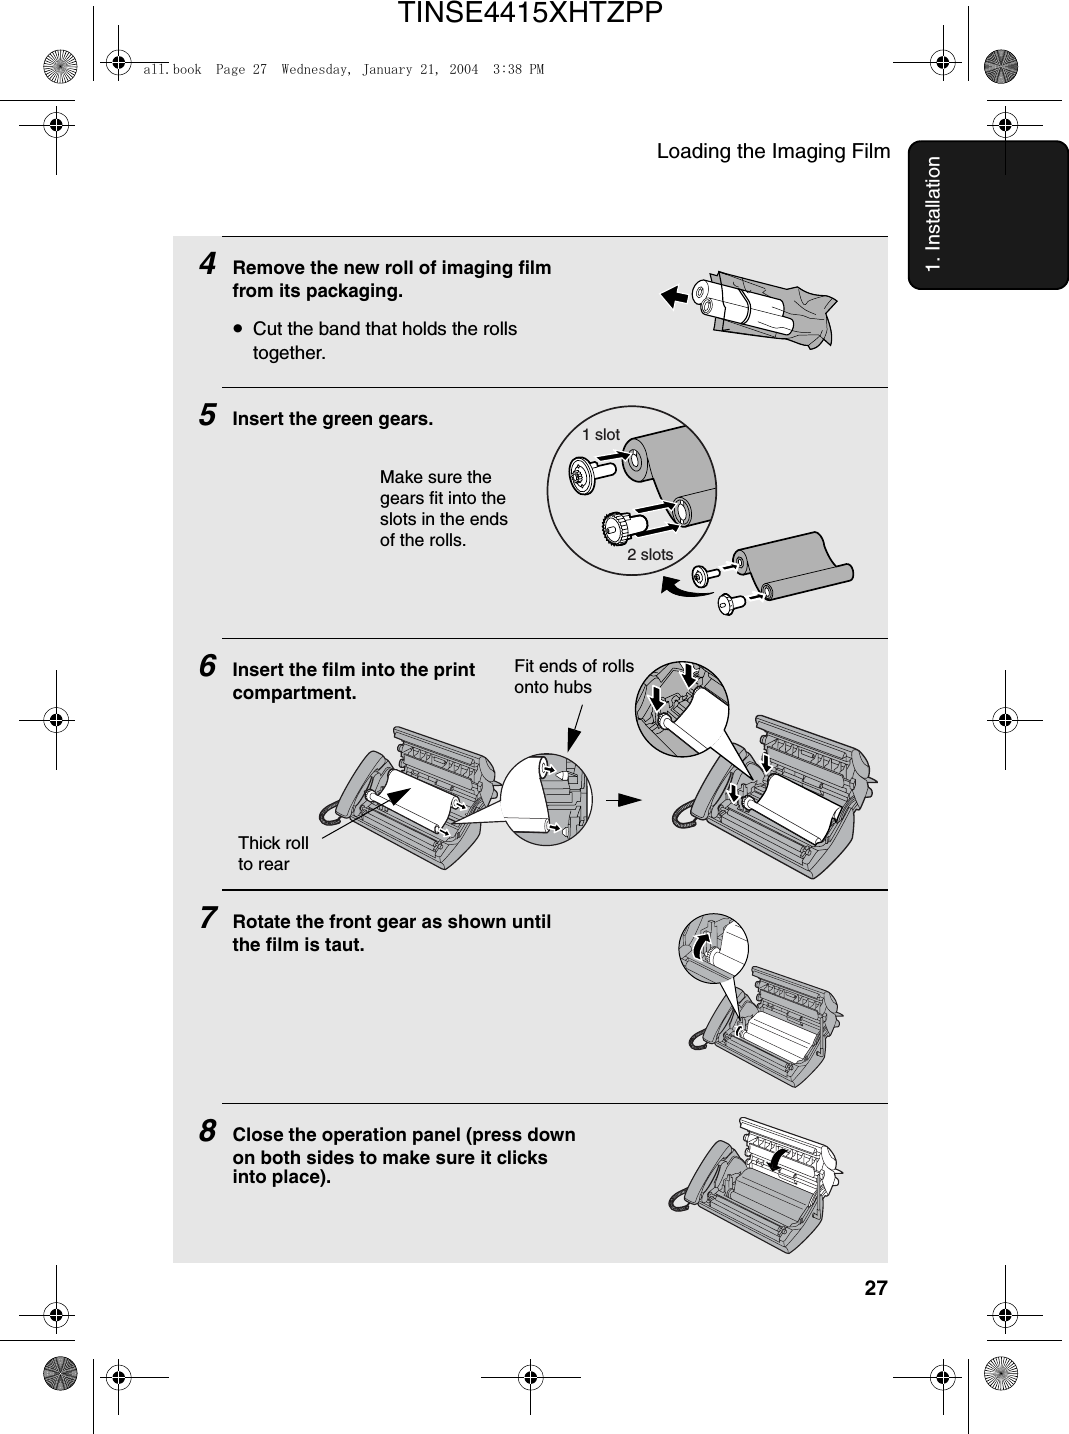
Loading the Imaging Film271. Installation4Remove the new roll of imaging film from its packaging.•Cut the band that holds the rolls together.5Insert the green gears.6Insert the film into the print compartment.7Rotate the front gear as shown until the film is taut.8Close the operation panel (press down on both sides to make sure it clicks into place).Fit ends of rolls onto hubsMake sure the gears fit into the slots in the ends of the rolls.1 slot2 slotsThick roll to rearall.book  Page 27  Wednesday, January 21, 2004  3:38 PMTINSE4415XHTZPP
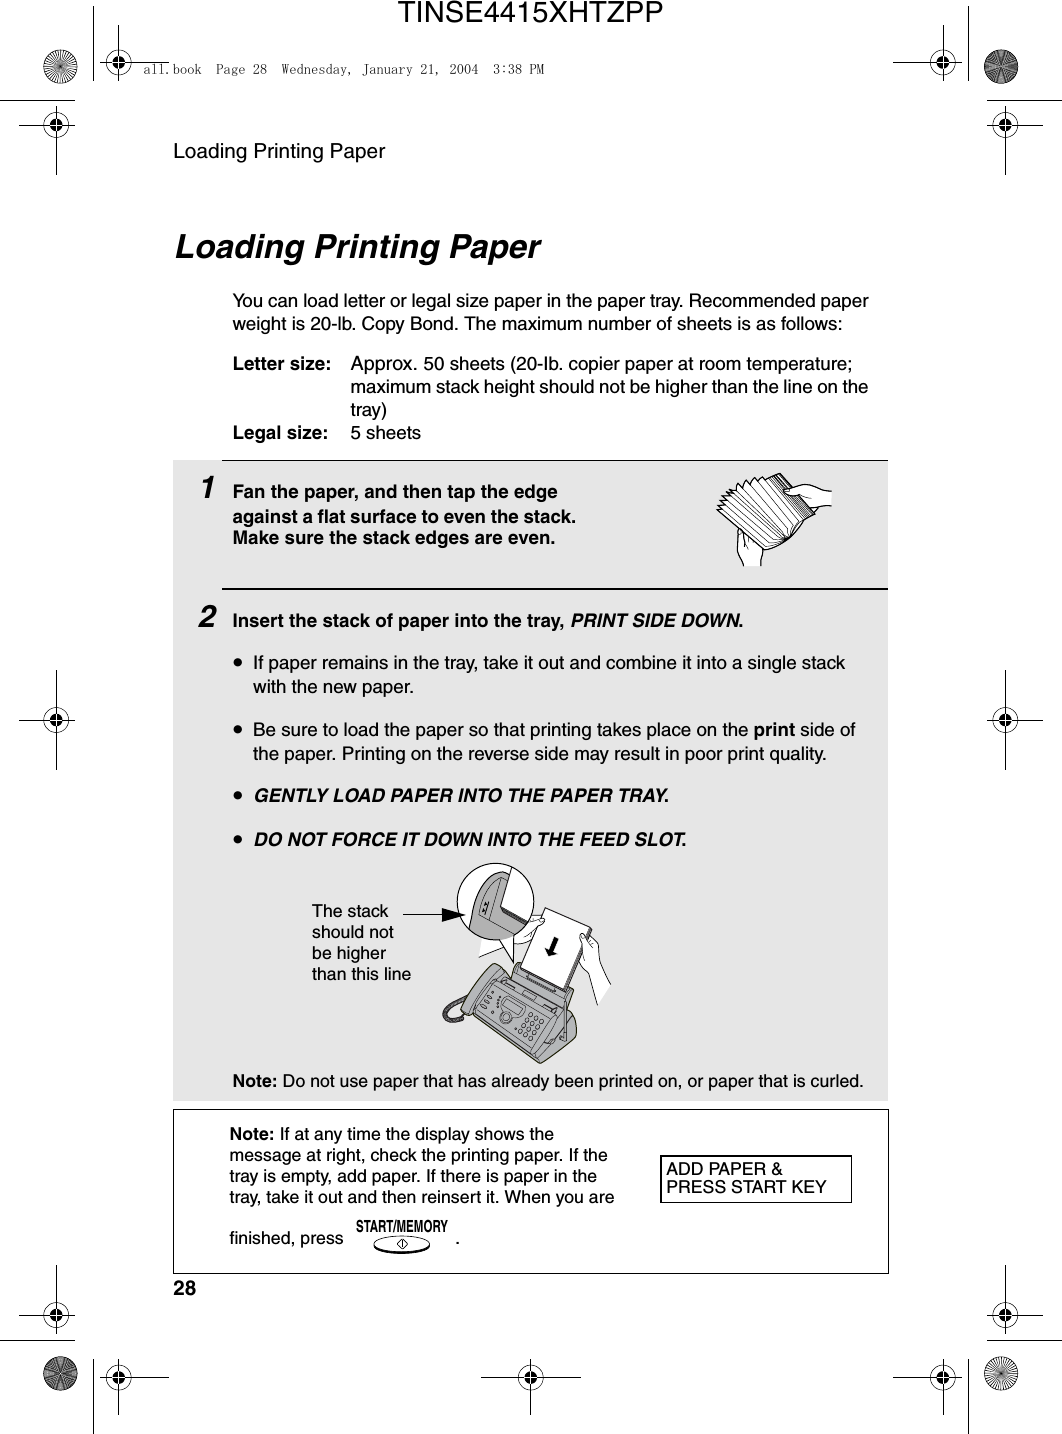
Loading Printing Paper281Fan the paper, and then tap the edge against a flat surface to even the stack. Make sure the stack edges are even.2Insert the stack of paper into the tray, PRINT SIDE DOWN.•If paper remains in the tray, take it out and combine it into a single stack with the new paper.•Be sure to load the paper so that printing takes place on the print side of the paper. Printing on the reverse side may result in poor print quality.•GENTLY LOAD PAPER INTO THE PAPER TRAY.•DO NOT FORCE IT DOWN INTO THE FEED SLOT.Note: Do not use paper that has already been printed on, or paper that is curled. Loading Printing PaperYou can load letter or legal size paper in the paper tray. Recommended paper weight is 20-lb. Copy Bond. The maximum number of sheets is as follows:Letter size: Approx. 50 sheets (20-Ib. copier paper at room temperature; maximum stack height should not be higher than the line on the tray)Legal size: 5 sheetsNote: If at any time the display shows the message at right, check the printing paper. If the tray is empty, add paper. If there is paper in the tray, take it out and then reinsert it. When you are finished, press .START/MEMORYThe stack should not be higher than this lineADD PAPER &PRESS START KEYall.book  Page 28  Wednesday, January 21, 2004  3:38 PMTINSE4415XHTZPP
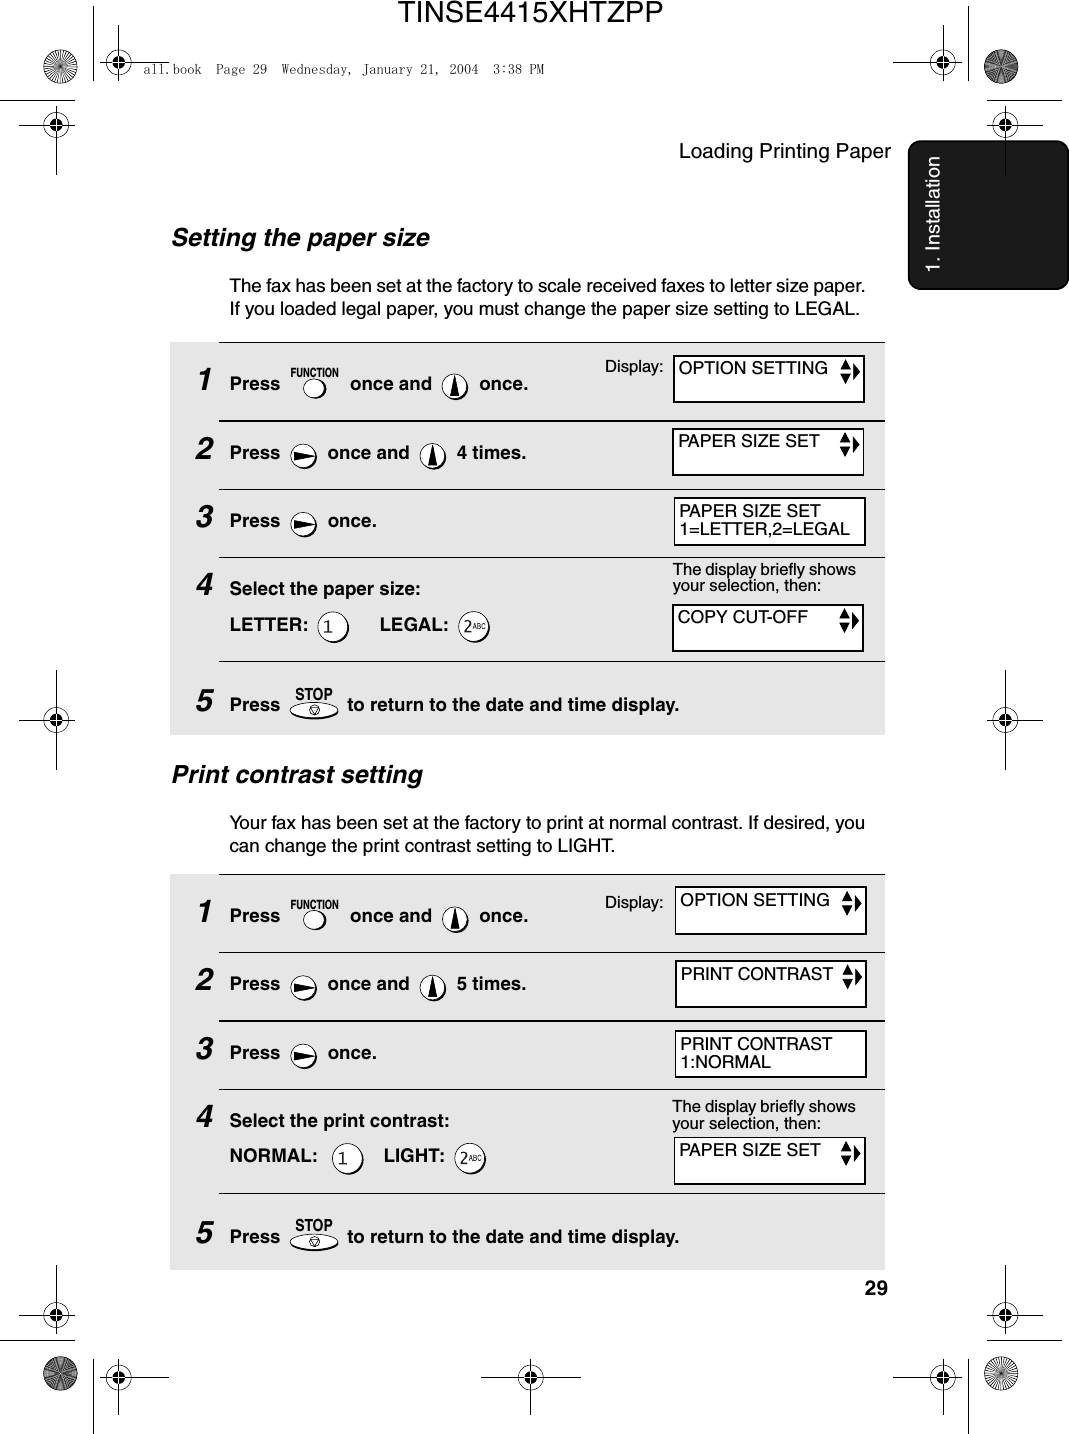
Loading Printing Paper291. Installation1Press   once and   once.2Press   once and   4 times.3Press  once.4Select the paper size:LETTER:       LEGAL: 5Press   to return to the date and time display.FUNCTIONSTOPPrint contrast settingYour fax has been set at the factory to print at normal contrast. If desired, you can change the print contrast setting to LIGHT.The display briefly shows your selection, then:1Press   once and   once.2Press   once and   5 times.3Press  once.4Select the print contrast:NORMAL:      LIGHT: 5Press   to return to the date and time display.FUNCTIONSTOPDisplay:The display briefly shows your selection, then:Display:Setting the paper sizeThe fax has been set at the factory to scale received faxes to letter size paper. If you loaded legal paper, you must change the paper size setting to LEGAL. OPTION SETTINGOPTION SETTINGPAPER SIZE SETPAPER SIZE SET1=LETTER,2=LEGALPRINT CONTRAST1:NORMALPRINT CONTRASTPAPER SIZE SETCOPY CUT-OFFall.book  Page 29  Wednesday, January 21, 2004  3:38 PMTINSE4415XHTZPP
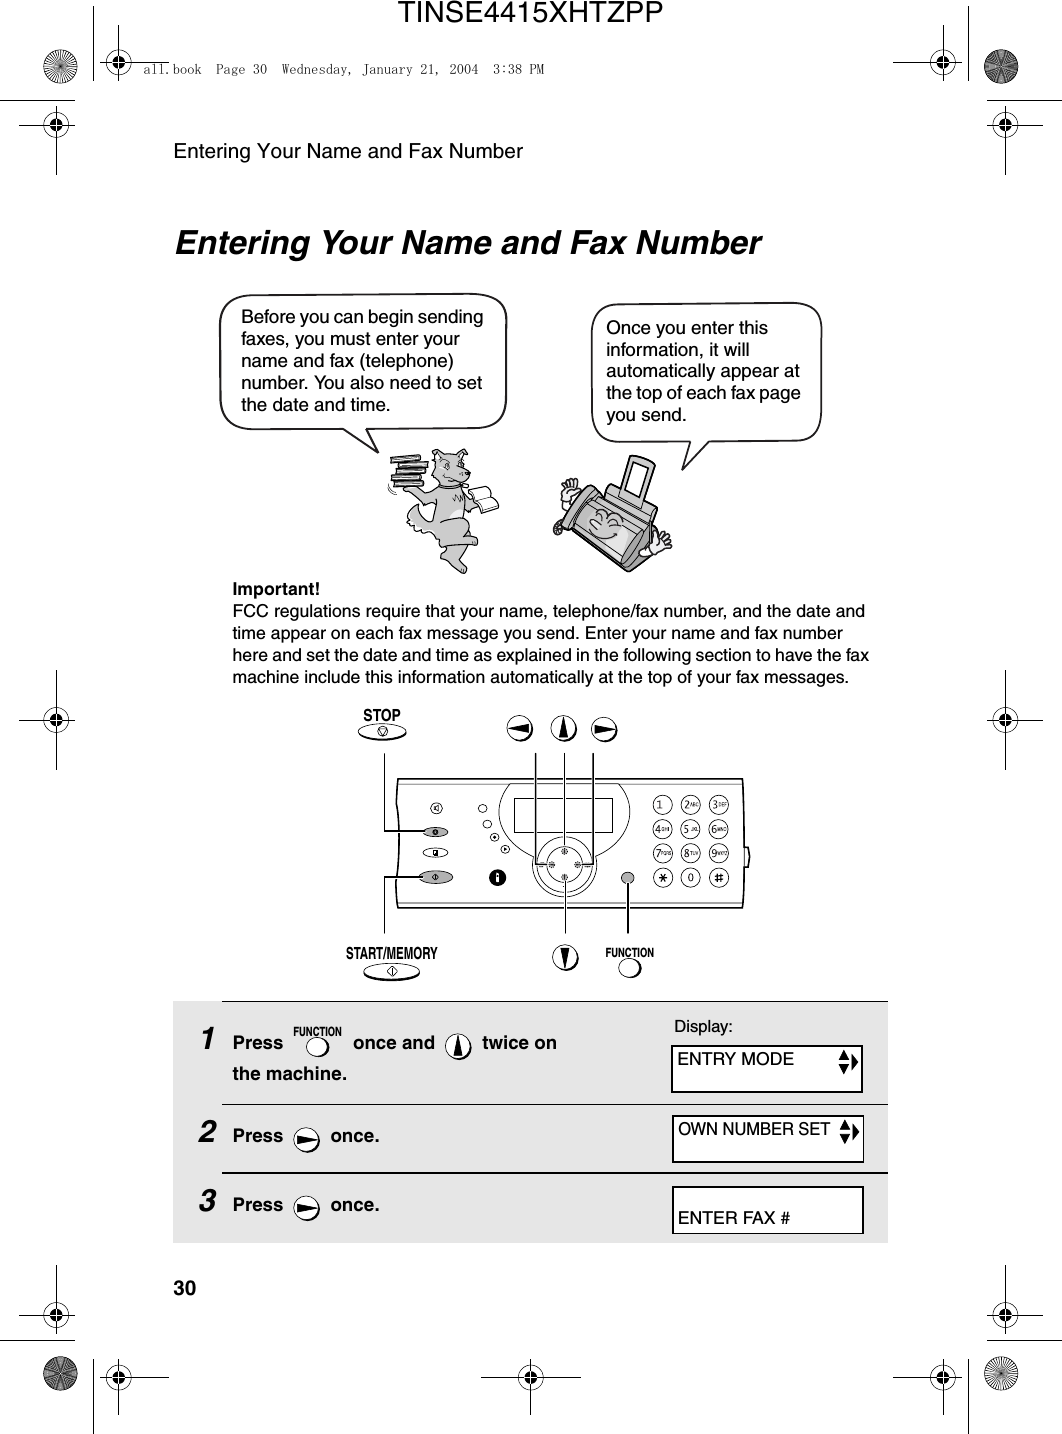
Entering Your Name and Fax Number30Entering Your Name and Fax NumberOnce you enter this information, it will automatically appear at the top of each fax page you send.Before you can begin sending faxes, you must enter your name and fax (telephone) number. You also need to set the date and time. FUNCTIONSTART/MEMORYSTOPImportant!FCC regulations require that your name, telephone/fax number, and the date and time appear on each fax message you send. Enter your name and fax number here and set the date and time as explained in the following section to have the fax machine include this information automatically at the top of your fax messages.1Press   once and   twice on the machine.2Press  once.3Press  once.FUNCTIONDisplay:ENTRY MODEOWN NUMBER SETENTER FAX #all.book  Page 30  Wednesday, January 21, 2004  3:38 PMTINSE4415XHTZPP
Entering Your Name and Fax Number311. Installation4Enter your fax number by pressing the number keys (max. 20 digits). •To insert a space between digits, press  . •To clear a mistake, press  .5Press   to enter the fax number in memory.6Enter your name by pressing number keys for each letter as shown in the chart below. Up to 24 characters can be entered.Example: SHARP = 7777  44  2  777  7♦To enter two letters in succession that require the same key, press   after entering the first letter. ♦To clear a mistake, press  .♦To enter a lower case letter, continue pressing the key for the letter until the lower case letter appears. To enter one of the following symbols, press  or   repeatedly: . / ! " # $ % & ’ ( ) + + , - : ; < = > ? @ [ ¥ ] ^ _ ' { | } ) (7Press .8Press   to return to the date and time display.SPEAKERSTART/MEMORYSPEAKERSTART/MEMORYSTOPDisplay:A =B =C =D =E =F =G =H =I  =J =K =L =M =N =O =P =Q =R =S =T =U =V =W =X =Y =Z =SPACE =DATE&TIME SETall.book  Page 31  Wednesday, January 21, 2004  3:38 PMTINSE4415XHTZPP
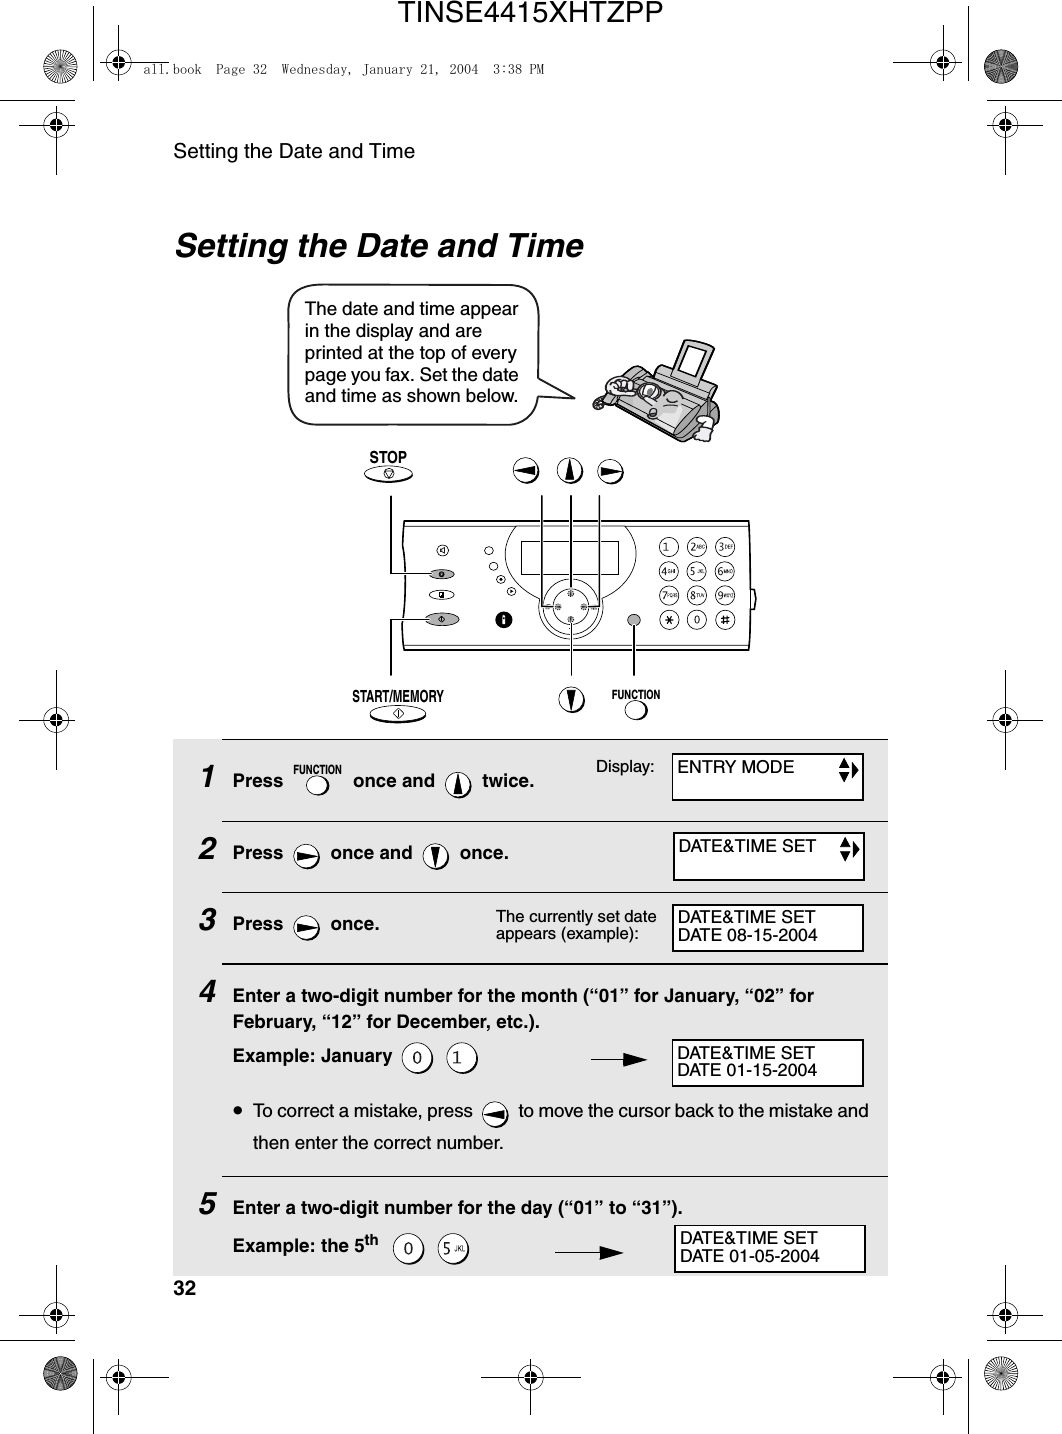
Setting the Date and Time32Setting the Date and Time1Press   once and   twice.2Press   once and   once.3Press  once. 4Enter a two-digit number for the month (“01” for January, “02” for February, “12” for December, etc.).Example: January   •To correct a mistake, press   to move the cursor back to the mistake and then enter the correct number.5Enter a two-digit number for the day (“01” to “31”).Example: the 5th    FUNCTIONThe date and time appear in the display and are printed at the top of every page you fax. Set the date and time as shown below.Display:The currently set date appears (example):ENTRY MODEDATE&TIME SETDATE&TIME SETDATE 08-15-2004DATE&TIME SETDATE 01-15-2004DATE&TIME SETDATE 01-05-2004FUNCTIONSTART/MEMORYSTOPall.book  Page 32  Wednesday, January 21, 2004  3:38 PMTINSE4415XHTZPP
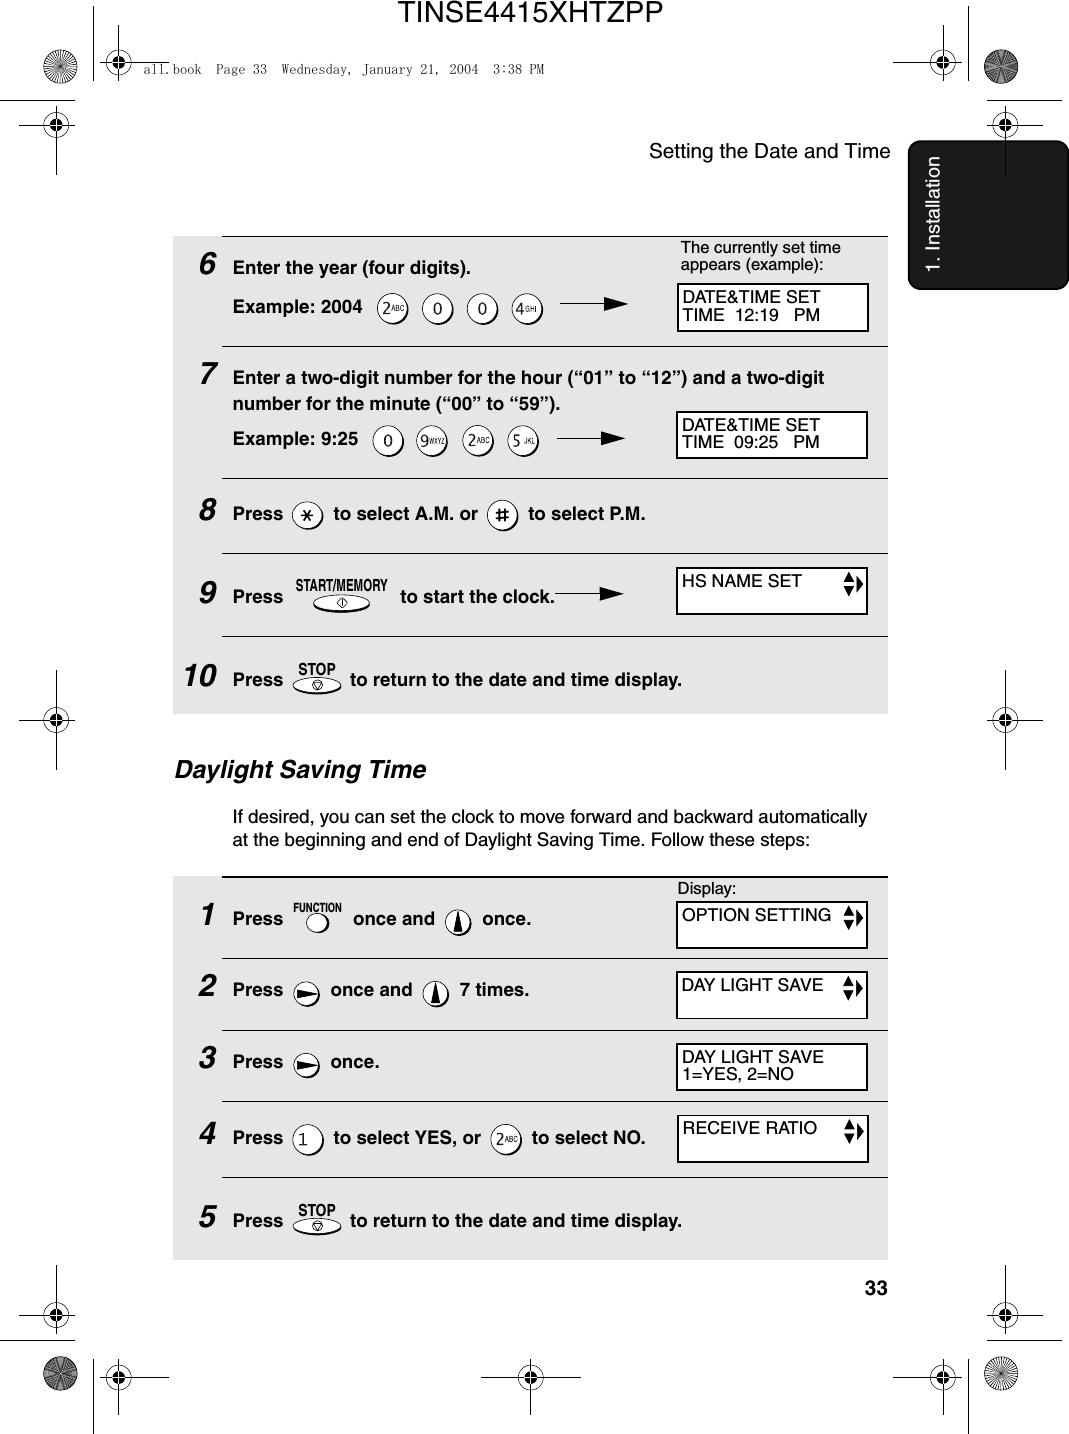
Setting the Date and Time331. Installation1Press   once and   once.2Press   once and   7 times.3Press  once.4Press   to select YES, or   to select NO.5Press   to return to the date and time display.FUNCTIONSTOPDaylight Saving TimeIf desired, you can set the clock to move forward and backward automatically at the beginning and end of Daylight Saving Time. Follow these steps:6Enter the year (four digits).Example: 2004        7Enter a two-digit number for the hour (“01” to “12”) and a two-digit number for the minute (“00” to “59”).Example: 9:25        8Press   to select A.M. or   to select P.M.9Press   to start the clock.10Press   to return to the date and time display.START/MEMORYSTOPThe currently set time appears (example):DATE&TIME SETTIME  12:19   PMDATE&TIME SETTIME  09:25   PMHS NAME SETDAY LIGHT SAVEDAY LIGHT SAVE1=YES, 2=NORECEIVE RATIODisplay:OPTION SETTINGall.book  Page 33  Wednesday, January 21, 2004  3:38 PMTINSE4415XHTZPP
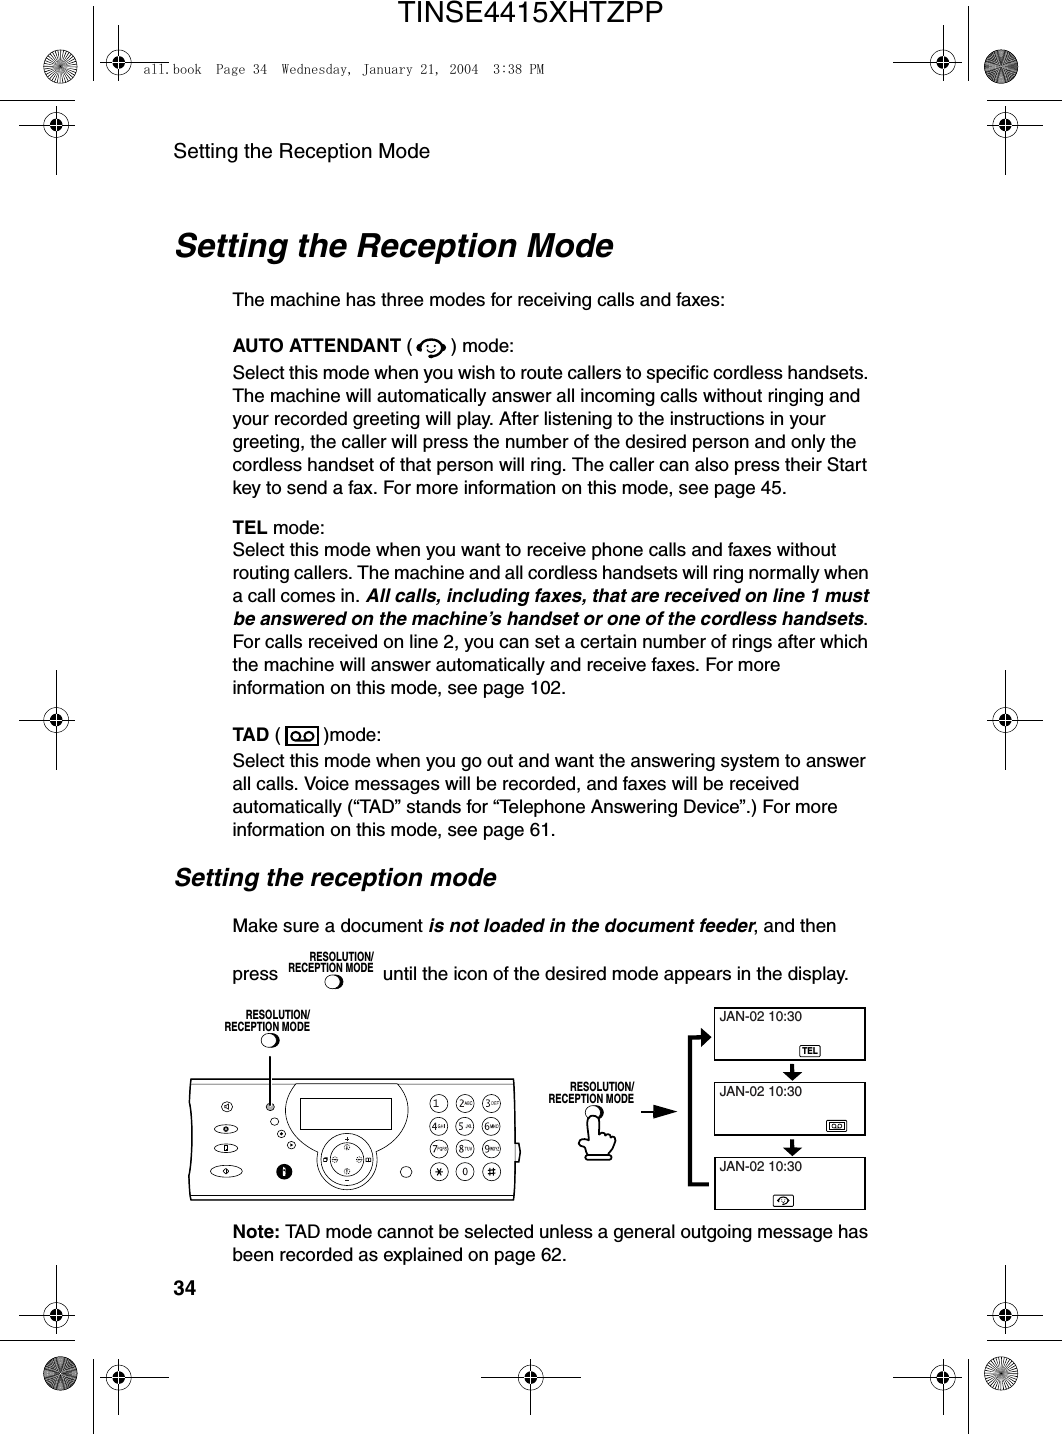
Setting the Reception Mode34Setting the Reception ModeThe machine has three modes for receiving calls and faxes:AUTO ATTENDANT ( ) mode:Select this mode when you wish to route callers to specific cordless handsets. The machine will automatically answer all incoming calls without ringing and your recorded greeting will play. After listening to the instructions in your greeting, the caller will press the number of the desired person and only the cordless handset of that person will ring. The caller can also press their Start key to send a fax. For more information on this mode, see page 45.TEL mode:Select this mode when you want to receive phone calls and faxes without routing callers. The machine and all cordless handsets will ring normally when a call comes in. All calls, including faxes, that are received on line 1 must be answered on the machine’s handset or one of the cordless handsets. For calls received on line 2, you can set a certain number of rings after which the machine will answer automatically and receive faxes. For more information on this mode, see page 102.TAD ( )mode:Select this mode when you go out and want the answering system to answer all calls. Voice messages will be recorded, and faxes will be received automatically (“TAD” stands for “Telephone Answering Device”.) For more information on this mode, see page 61.Setting the reception modeMake sure a document is not loaded in the document feeder, and then press   until the icon of the desired mode appears in the display.RESOLUTION/RECEPTION MODETELJAN-02 10:30JAN-02 10:30JAN-02 10:30RESOLUTION/RECEPTION MODERESOLUTION/RECEPTION MODENote: TAD mode cannot be selected unless a general outgoing message has been recorded as explained on page 62.all.book  Page 34  Wednesday, January 21, 2004  3:38 PMTINSE4415XHTZPP
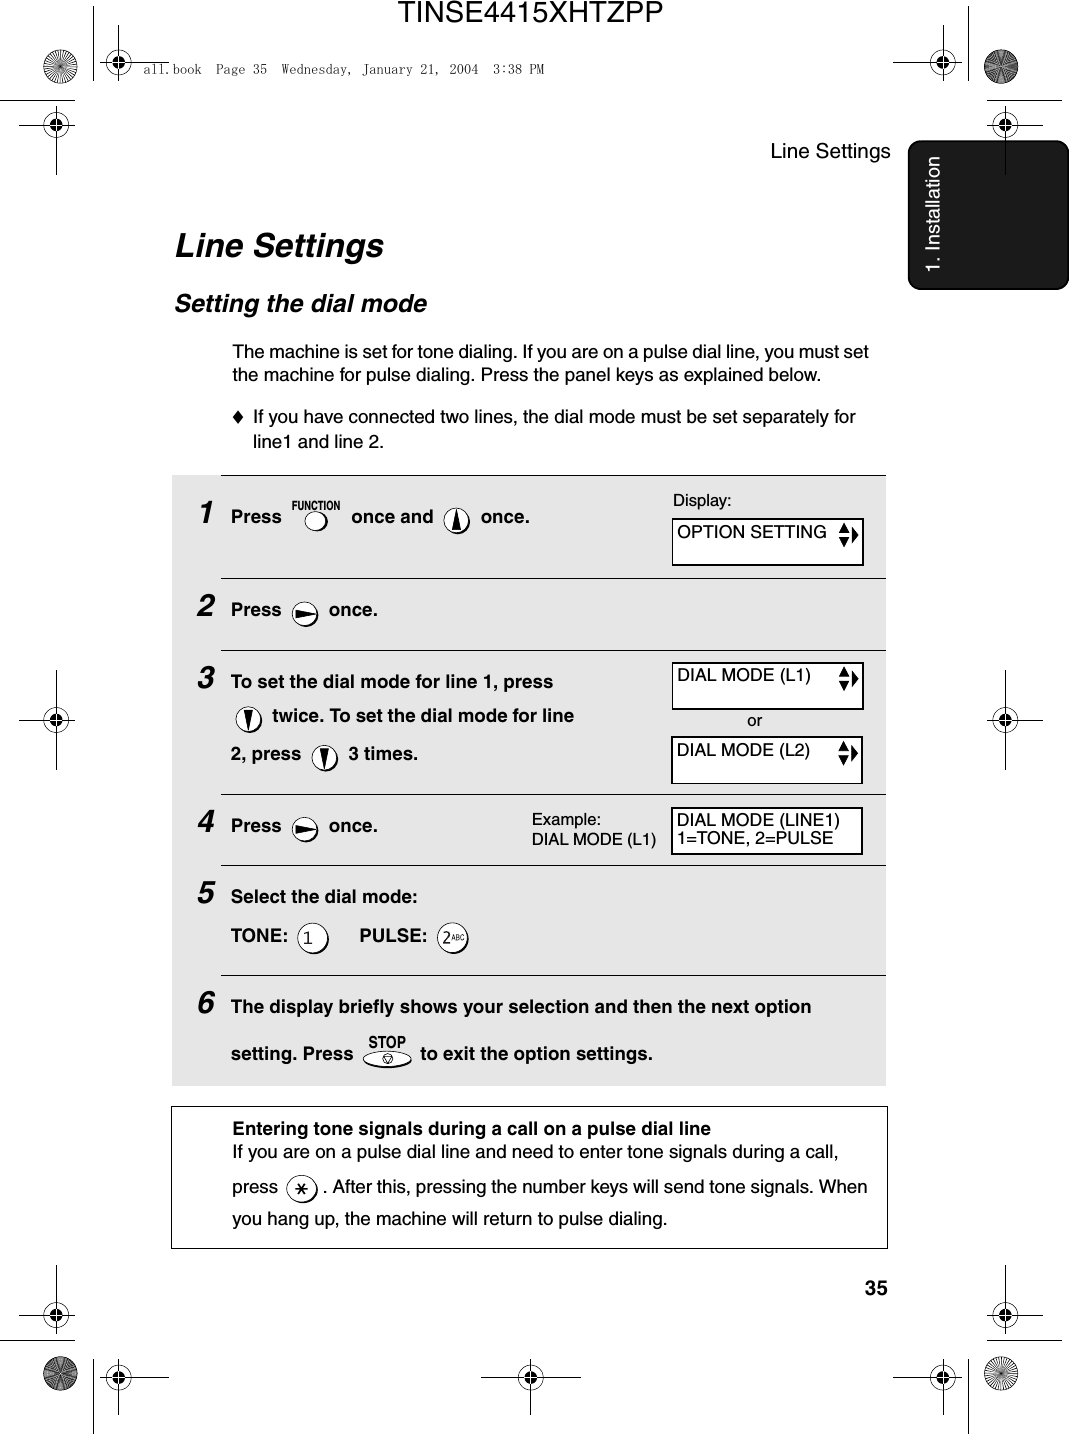
Line Settings351. InstallationLine SettingsSetting the dial mode The machine is set for tone dialing. If you are on a pulse dial line, you must set the machine for pulse dialing. Press the panel keys as explained below.♦If you have connected two lines, the dial mode must be set separately for line1 and line 2. 1Press   once and   once.2Press  once.3To set the dial mode for line 1, press  twice. To set the dial mode for line 2, press   3 times.4Press  once.5Select the dial mode:TONE:       PULSE: 6The display briefly shows your selection and then the next option setting. Press   to exit the option settings.FUNCTIONSTOPDisplay:Example: DIAL MODE (L1)DIAL MODE (L1)DIAL MODE (L2)OPTION SETTINGDIAL MODE (LINE1)1=TONE, 2=PULSEorEntering tone signals during a call on a pulse dial lineIf you are on a pulse dial line and need to enter tone signals during a call, press  . After this, pressing the number keys will send tone signals. When you hang up, the machine will return to pulse dialing.all.book  Page 35  Wednesday, January 21, 2004  3:38 PMTINSE4415XHTZPP
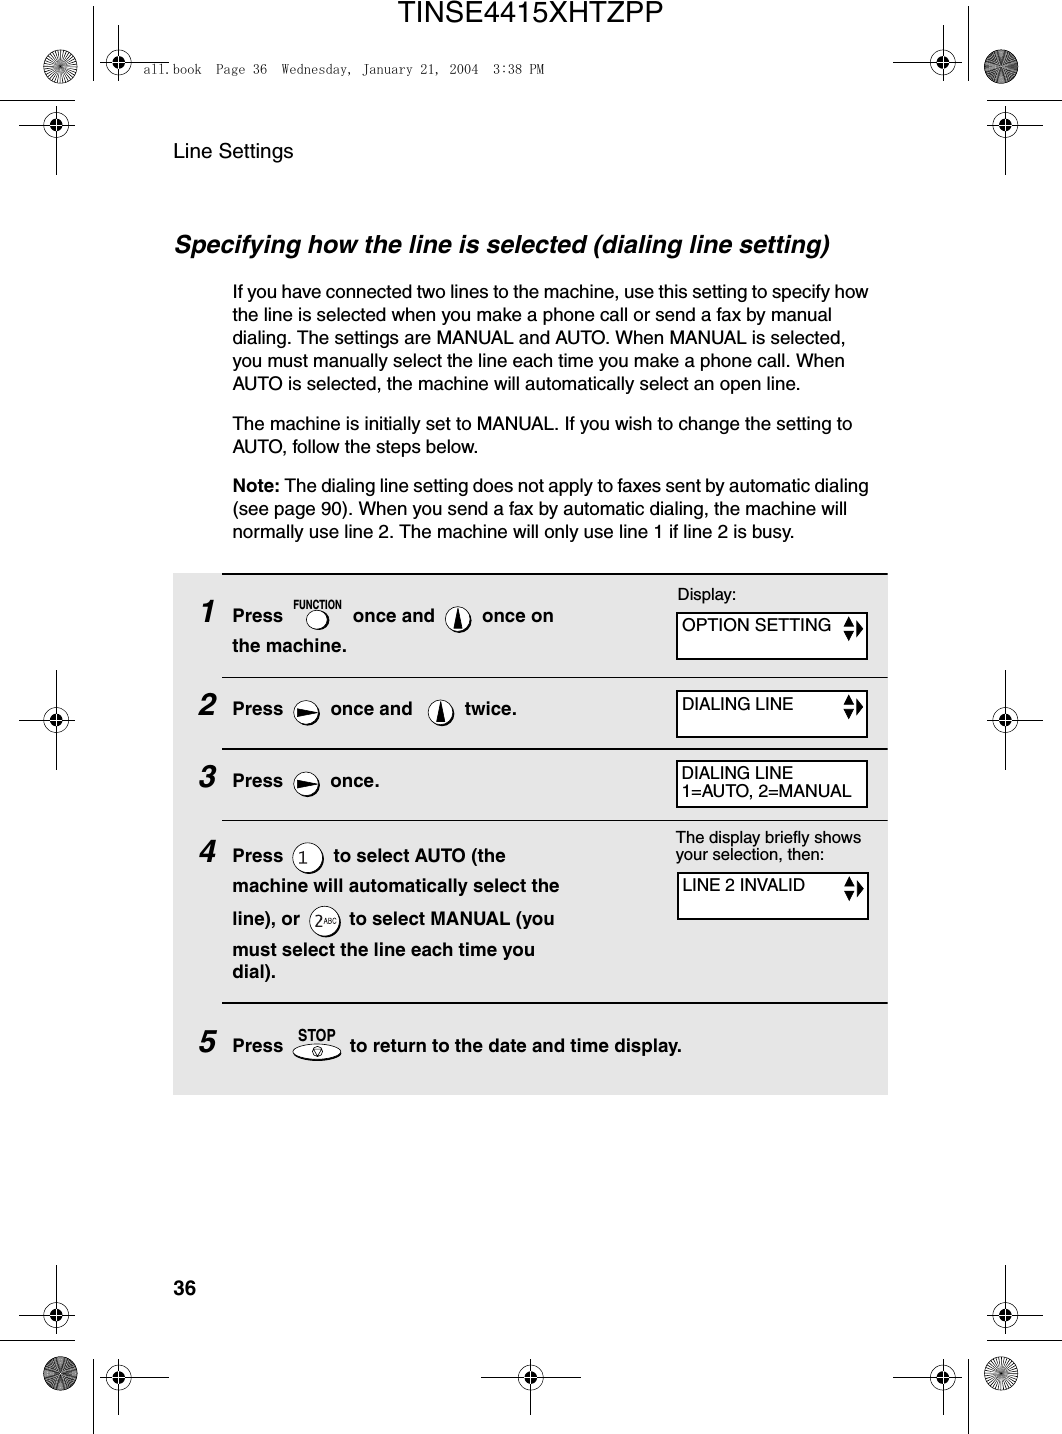
Line Settings36Specifying how the line is selected (dialing line setting)If you have connected two lines to the machine, use this setting to specify how the line is selected when you make a phone call or send a fax by manual dialing. The settings are MANUAL and AUTO. When MANUAL is selected, you must manually select the line each time you make a phone call. When AUTO is selected, the machine will automatically select an open line. The machine is initially set to MANUAL. If you wish to change the setting to AUTO, follow the steps below.Note: The dialing line setting does not apply to faxes sent by automatic dialing (see page 90). When you send a fax by automatic dialing, the machine will normally use line 2. The machine will only use line 1 if line 2 is busy.1Press   once and   once on the machine.2Press   once and    twice.3Press  once.4Press   to select AUTO (the machine will automatically select the line), or   to select MANUAL (you must select the line each time you dial).5Press   to return to the date and time display.FUNCTIONSTOPDisplay:OPTION SETTINGDIALING LINEDIALING LINE1=AUTO, 2=MANUALThe display briefly shows your selection, then:LINE 2 INVALIDall.book  Page 36  Wednesday, January 21, 2004  3:38 PMTINSE4415XHTZPP
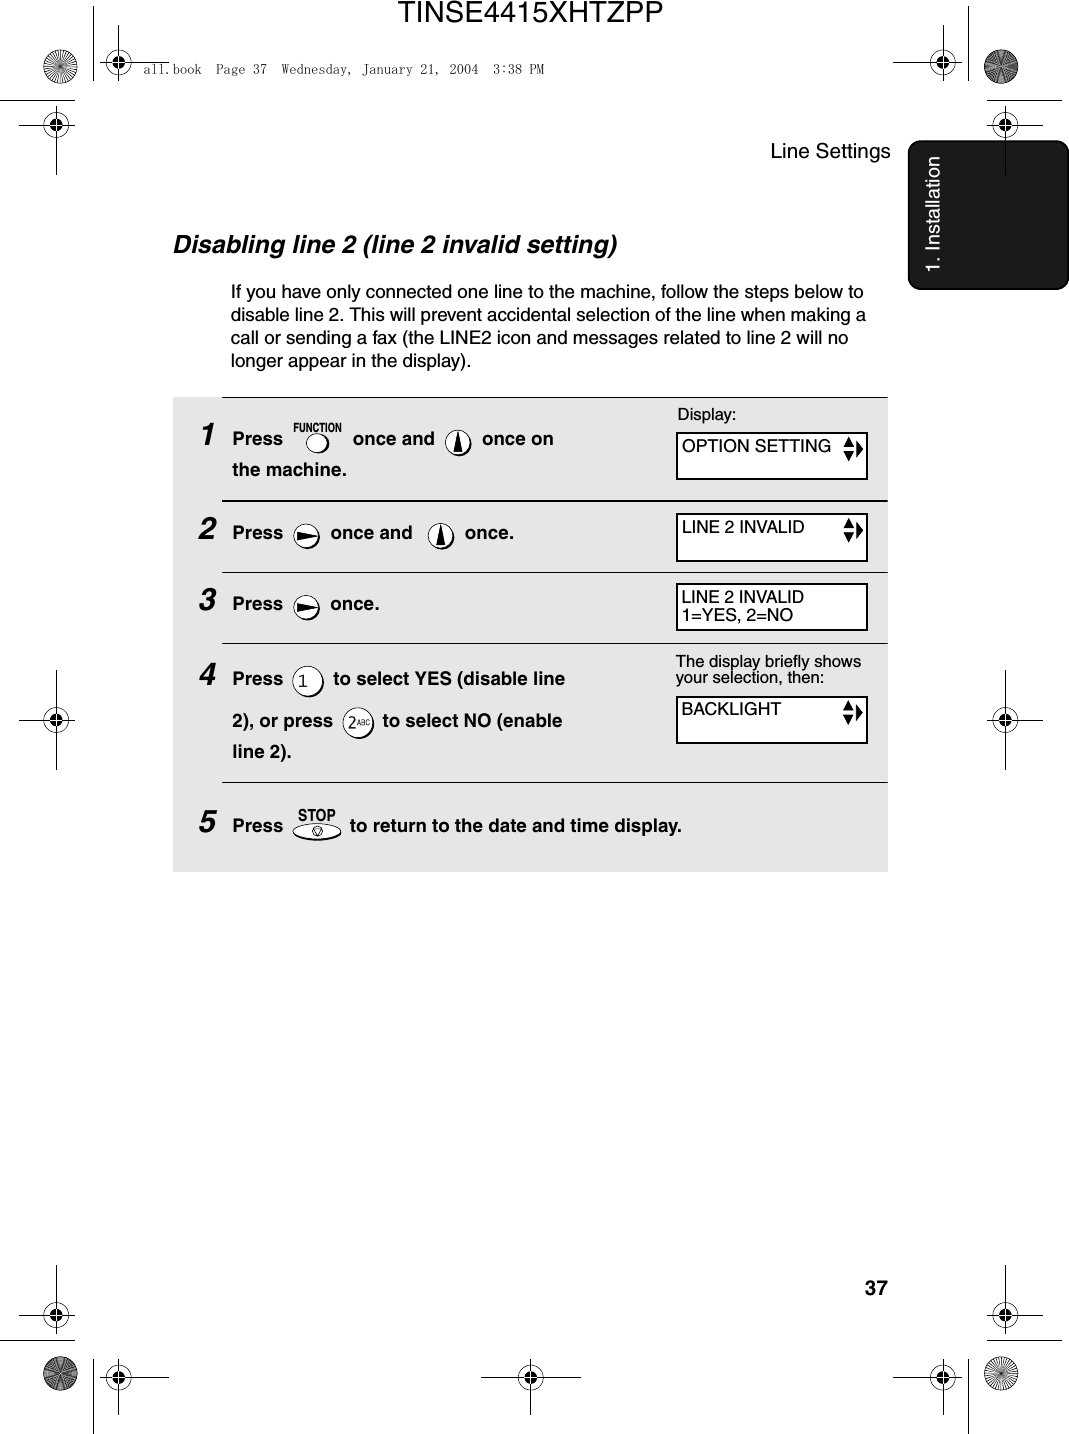
Line Settings371. InstallationDisabling line 2 (line 2 invalid setting)If you have only connected one line to the machine, follow the steps below to disable line 2. This will prevent accidental selection of the line when making a call or sending a fax (the LINE2 icon and messages related to line 2 will no longer appear in the display).1Press   once and   once on the machine.2Press   once and    once.3Press  once.4Press   to select YES (disable line 2), or press   to select NO (enable line 2).5Press   to return to the date and time display.FUNCTIONSTOPDisplay:OPTION SETTINGLINE 2 INVALIDLINE 2 INVALID1=YES, 2=NOBACKLIGHTThe display briefly shows your selection, then:all.book  Page 37  Wednesday, January 21, 2004  3:38 PMTINSE4415XHTZPP
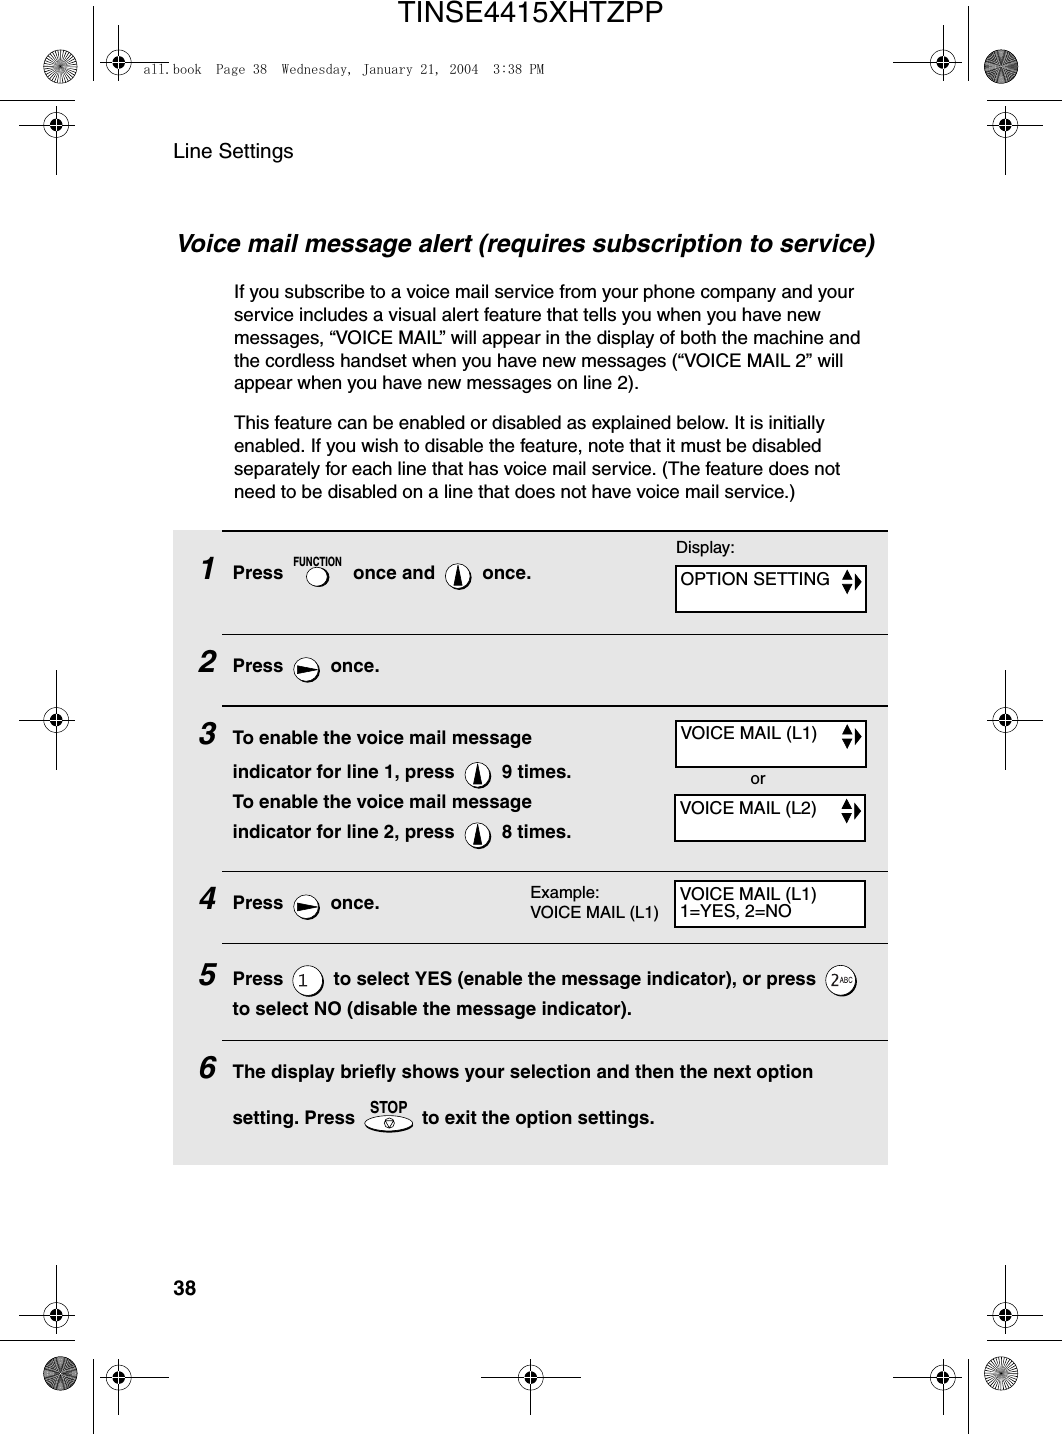
Line Settings381Press   once and   once. 2Press  once.3To enable the voice mail message indicator for line 1, press   9 times. To enable the voice mail message indicator for line 2, press   8 times.4Press  once.5Press   to select YES (enable the message indicator), or press   to select NO (disable the message indicator).6The display briefly shows your selection and then the next option setting. Press   to exit the option settings.FUNCTIONSTOPVoice mail message alert (requires subscription to service)If you subscribe to a voice mail service from your phone company and your service includes a visual alert feature that tells you when you have new messages, “VOICE MAIL” will appear in the display of both the machine and the cordless handset when you have new messages (“VOICE MAIL 2” will appear when you have new messages on line 2).This feature can be enabled or disabled as explained below. It is initially enabled. If you wish to disable the feature, note that it must be disabled separately for each line that has voice mail service. (The feature does not need to be disabled on a line that does not have voice mail service.)Display:Example: VOICE MAIL (L1)VOICE MAIL (L1)VOICE MAIL (L2)OPTION SETTINGVOICE MAIL (L1)1=YES, 2=NOorall.book  Page 38  Wednesday, January 21, 2004  3:38 PMTINSE4415XHTZPP
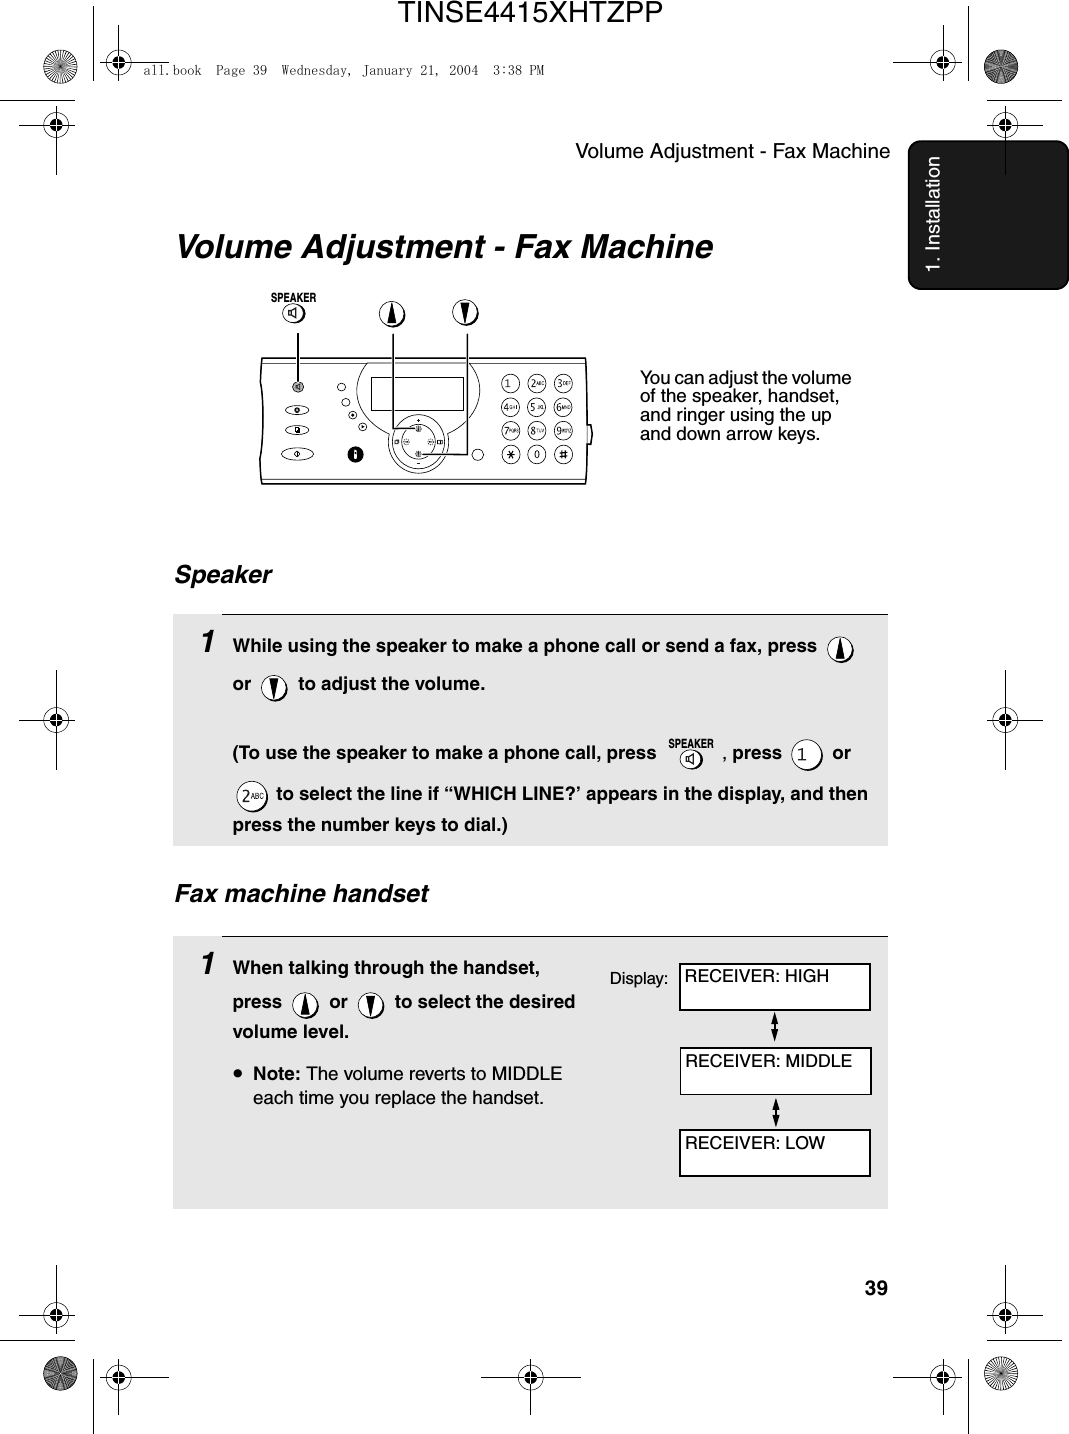
Volume Adjustment - Fax Machine391. InstallationVolume Adjustment - Fax Machine1While using the speaker to make a phone call or send a fax, press   or   to adjust the volume.(To use the speaker to make a phone call, press  , press  or  to select the line if “WHICH LINE?’ appears in the display, and then press the number keys to dial.)SPEAKERSpeakerSPEAKER1When talking through the handset, press   or   to select the desired volume level.•Note: The volume reverts to MIDDLE each time you replace the handset.Fax machine handsetYou can adjust the volume of the speaker, handset, and ringer using the up and down arrow keys.Display: RECEIVER: HIGHRECEIVER: MIDDLERECEIVER: LOWall.book  Page 39  Wednesday, January 21, 2004  3:38 PMTINSE4415XHTZPP
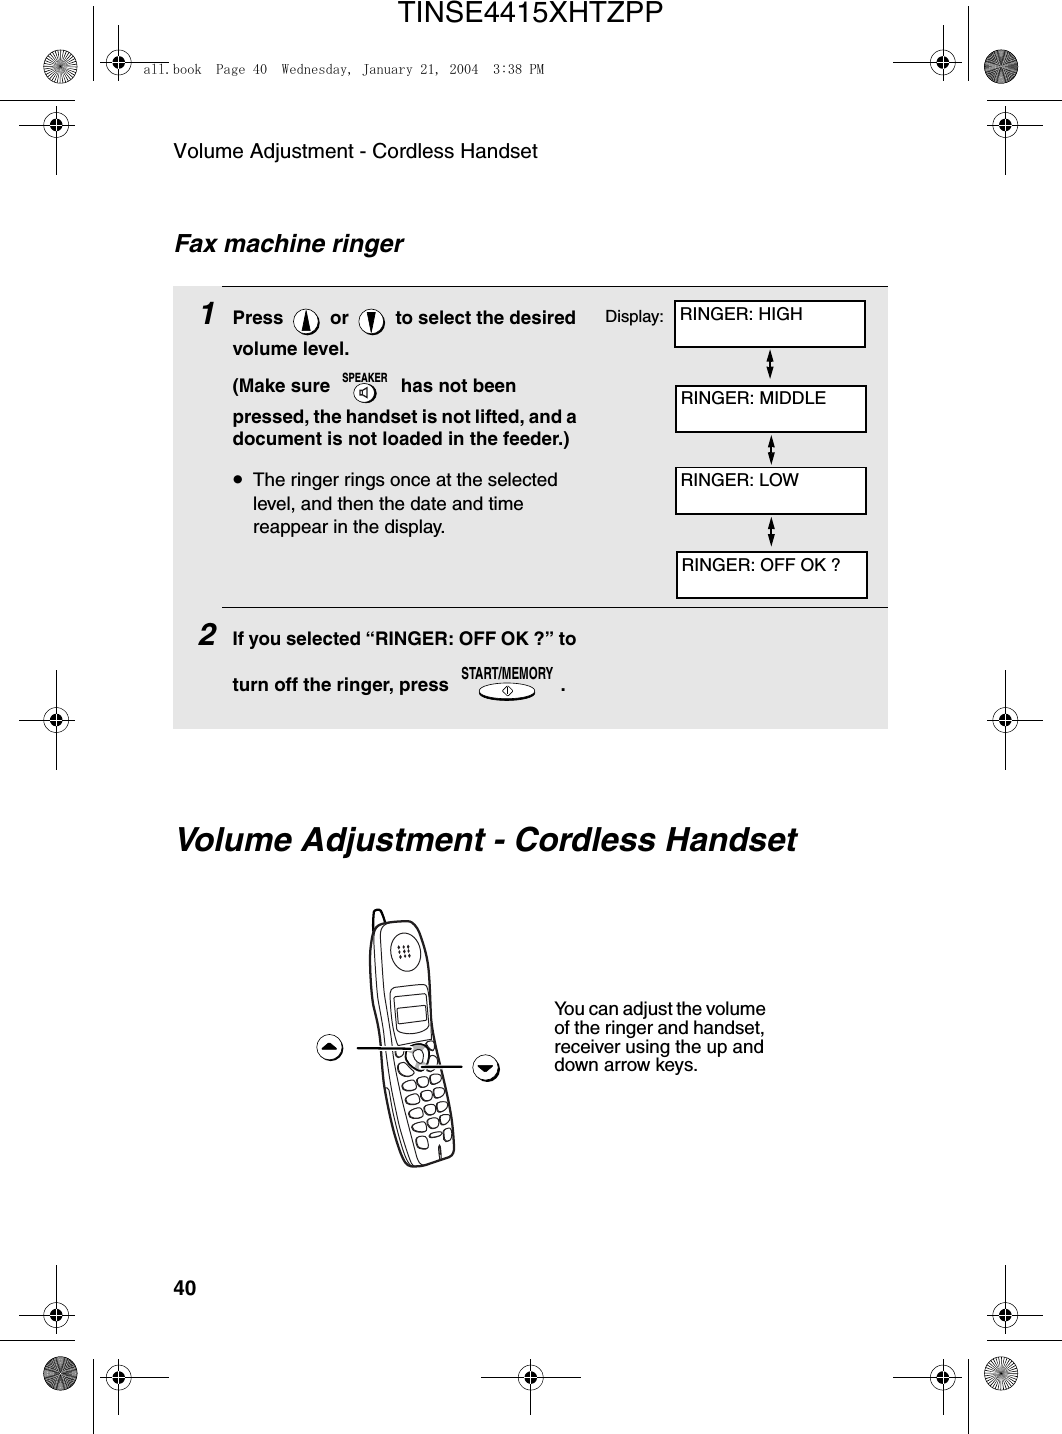
Volume Adjustment - Cordless Handset401Press   or   to select the desired volume level. (Make sure   has not been pressed, the handset is not lifted, and a document is not loaded in the feeder.)•The ringer rings once at the selected level, and then the date and time reappear in the display.2If you selected “RINGER: OFF OK ?” to turn off the ringer, press  .SPEAKERSTART/MEMORYFax machine ringerDisplay:Volume Adjustment - Cordless HandsetYou can adjust the volume of the ringer and handset, receiver using the up and down arrow keys.RINGER: HIGHRINGER: MIDDLERINGER: LOWRINGER: OFF OK ?all.book  Page 40  Wednesday, January 21, 2004  3:38 PMTINSE4415XHTZPP
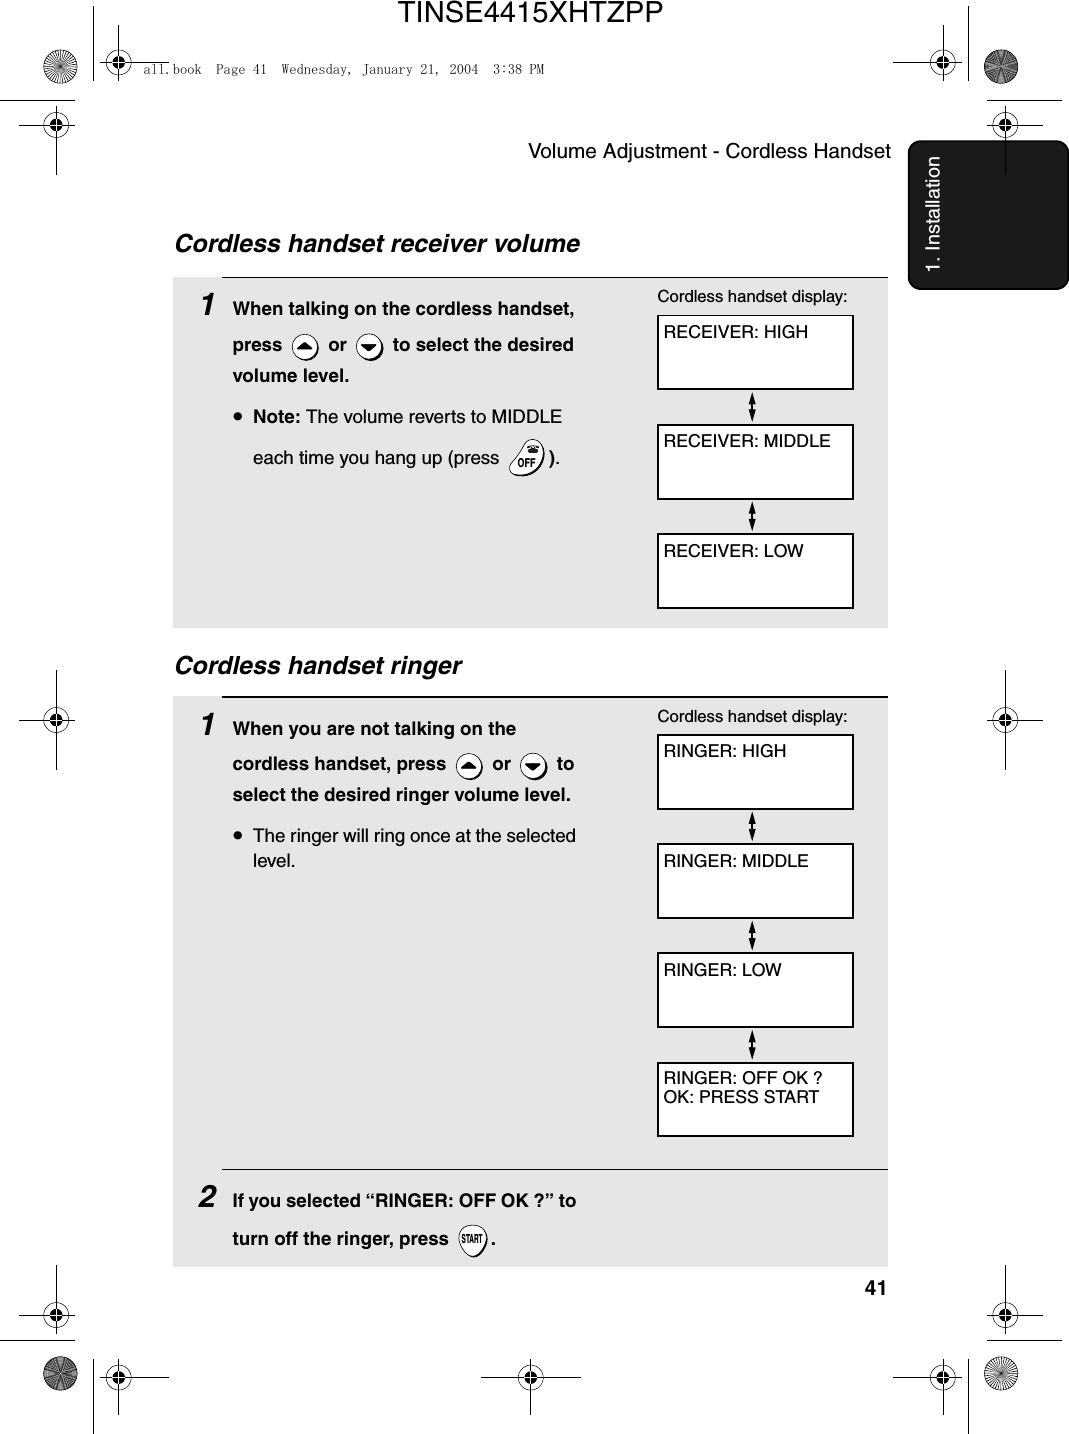
Volume Adjustment - Cordless Handset411. InstallationCordless handset ringer1When you are not talking on the cordless handset, press   or   to select the desired ringer volume level.•The ringer will ring once at the selected level.2If you selected “RINGER: OFF OK ?” to turn off the ringer, press  .STARTRINGER: HIGHCordless handset display:RINGER: MIDDLERINGER: LOWRINGER: OFF OK ?OK: PRESS START1When talking on the cordless handset, press   or   to select the desired volume level.•Note: The volume reverts to MIDDLE each time you hang up (press  ).OFFOFFRECEIVER: HIGHCordless handset display:RECEIVER: MIDDLERECEIVER: LOWCordless handset receiver volumeall.book  Page 41  Wednesday, January 21, 2004  3:38 PMTINSE4415XHTZPP
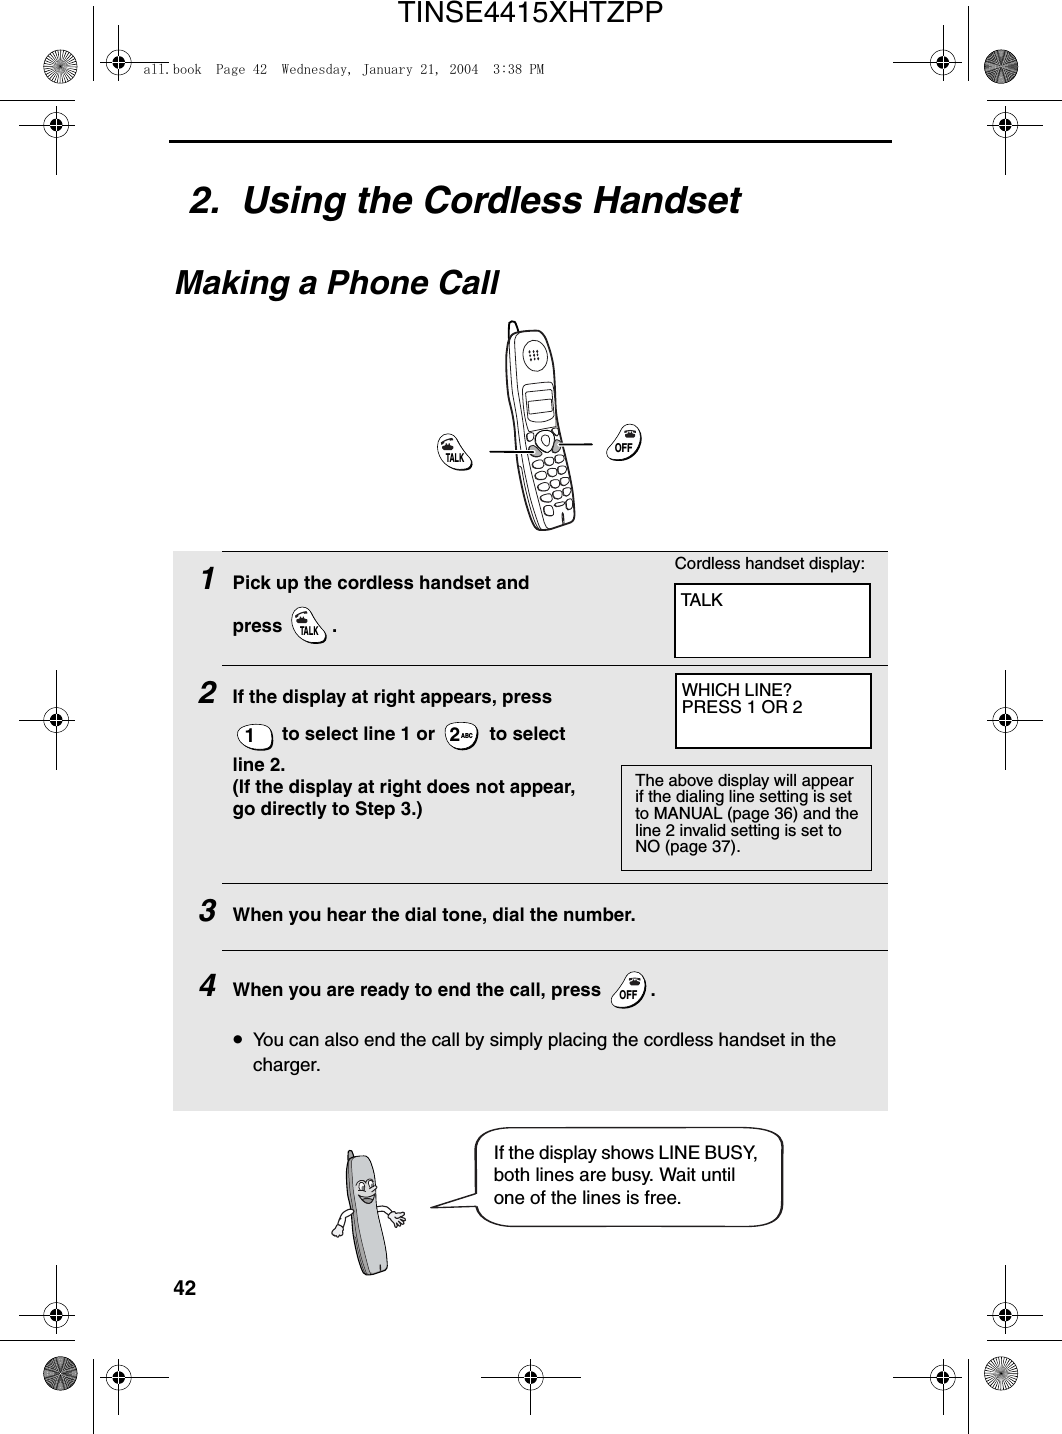
422.  Using the Cordless HandsetMaking a Phone Call1Pick up the cordless handset and press .2If the display at right appears, press  to select line 1 or   to select line 2.(If the display at right does not appear, go directly to Step 3.)3When you hear the dial tone, dial the number.4When you are ready to end the call, press  .•You can also end the call by simply placing the cordless handset in the charger.TALK1ABC2OFFOFFTALKCordless handset display:TALKOFFOFFIf the display shows LINE BUSY, both lines are busy. Wait until one of the lines is free.WHICH LINE?PRESS 1 OR 2The above display will appear if the dialing line setting is set to MANUAL (page 36) and the line 2 invalid setting is set to NO (page 37).all.book  Page 42  Wednesday, January 21, 2004  3:38 PMTINSE4415XHTZPP
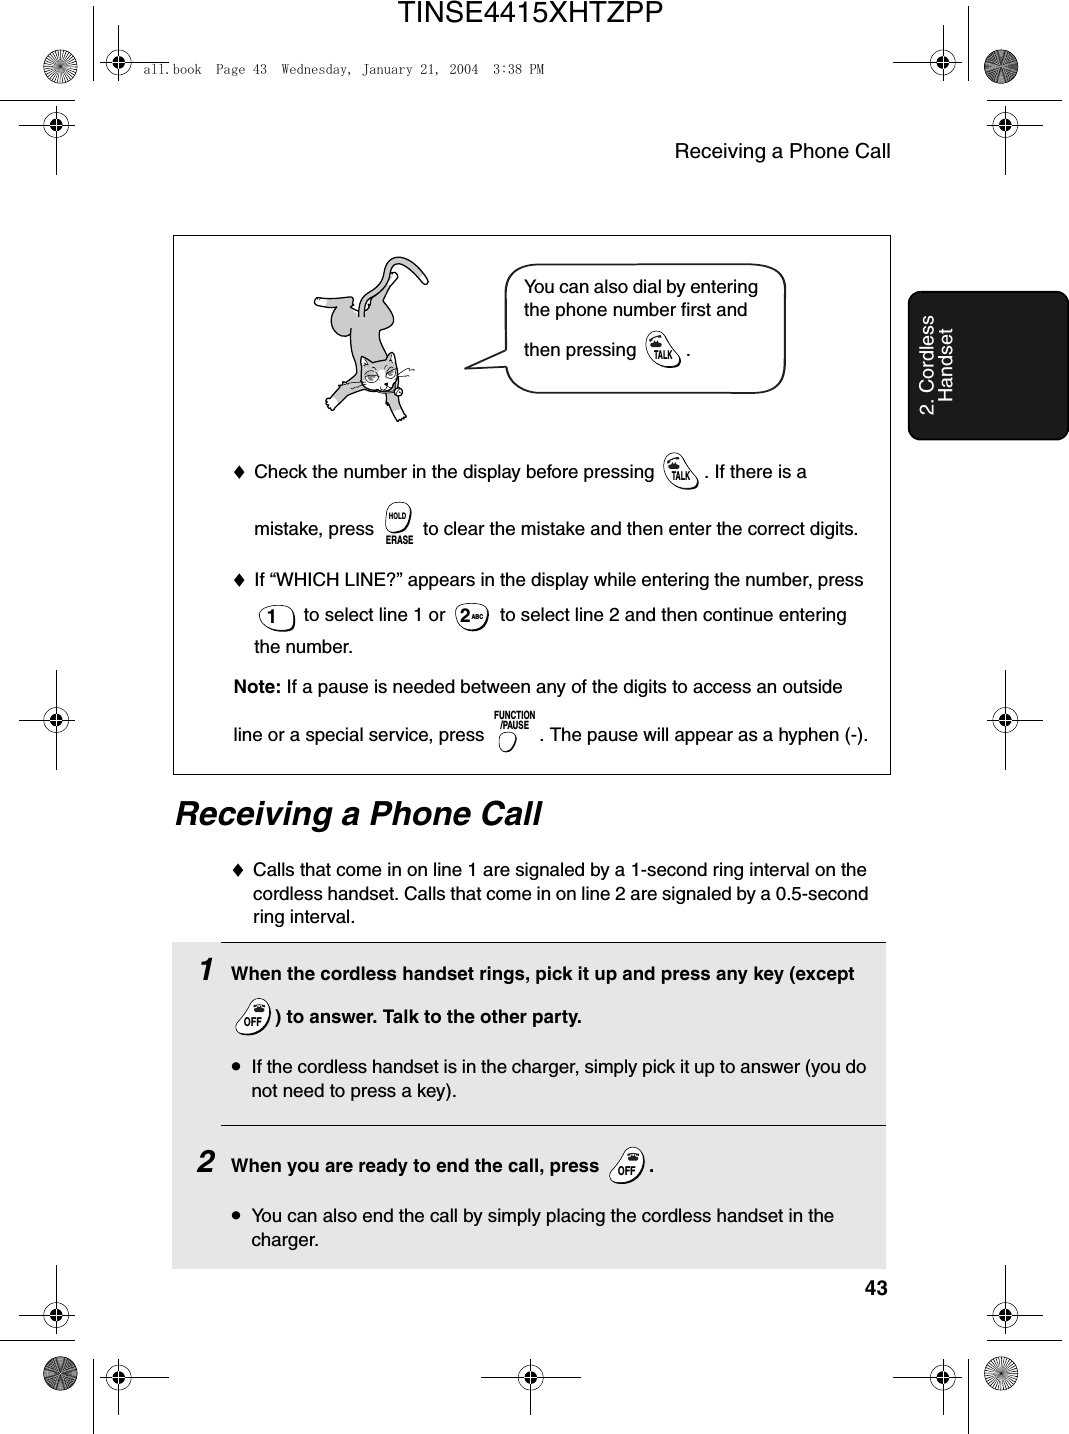
Receiving a Phone Call432. Cordless HandsetReceiving a Phone Call♦Calls that come in on line 1 are signaled by a 1-second ring interval on the cordless handset. Calls that come in on line 2 are signaled by a 0.5-second ring interval.1When the cordless handset rings, pick it up and press any key (except ) to answer. Talk to the other party.•If the cordless handset is in the charger, simply pick it up to answer (you do not need to press a key).2When you are ready to end the call, press  .•You can also end the call by simply placing the cordless handset in the charger.OFFOFFOFFOFFYou can also dial by entering the phone number first and then pressing  . TALK♦Check the number in the display before pressing  . If there is a mistake, press   to clear the mistake and then enter the correct digits.♦If “WHICH LINE?” appears in the display while entering the number, press  to select line 1 or   to select line 2 and then continue entering the number.Note: If a pause is needed between any of the digits to access an outside line or a special service, press  . The pause will appear as a hyphen (-).TALKERASEHOLD1ABC2FUNCTION/PAUSEall.book  Page 43  Wednesday, January 21, 2004  3:38 PMTINSE4415XHTZPP
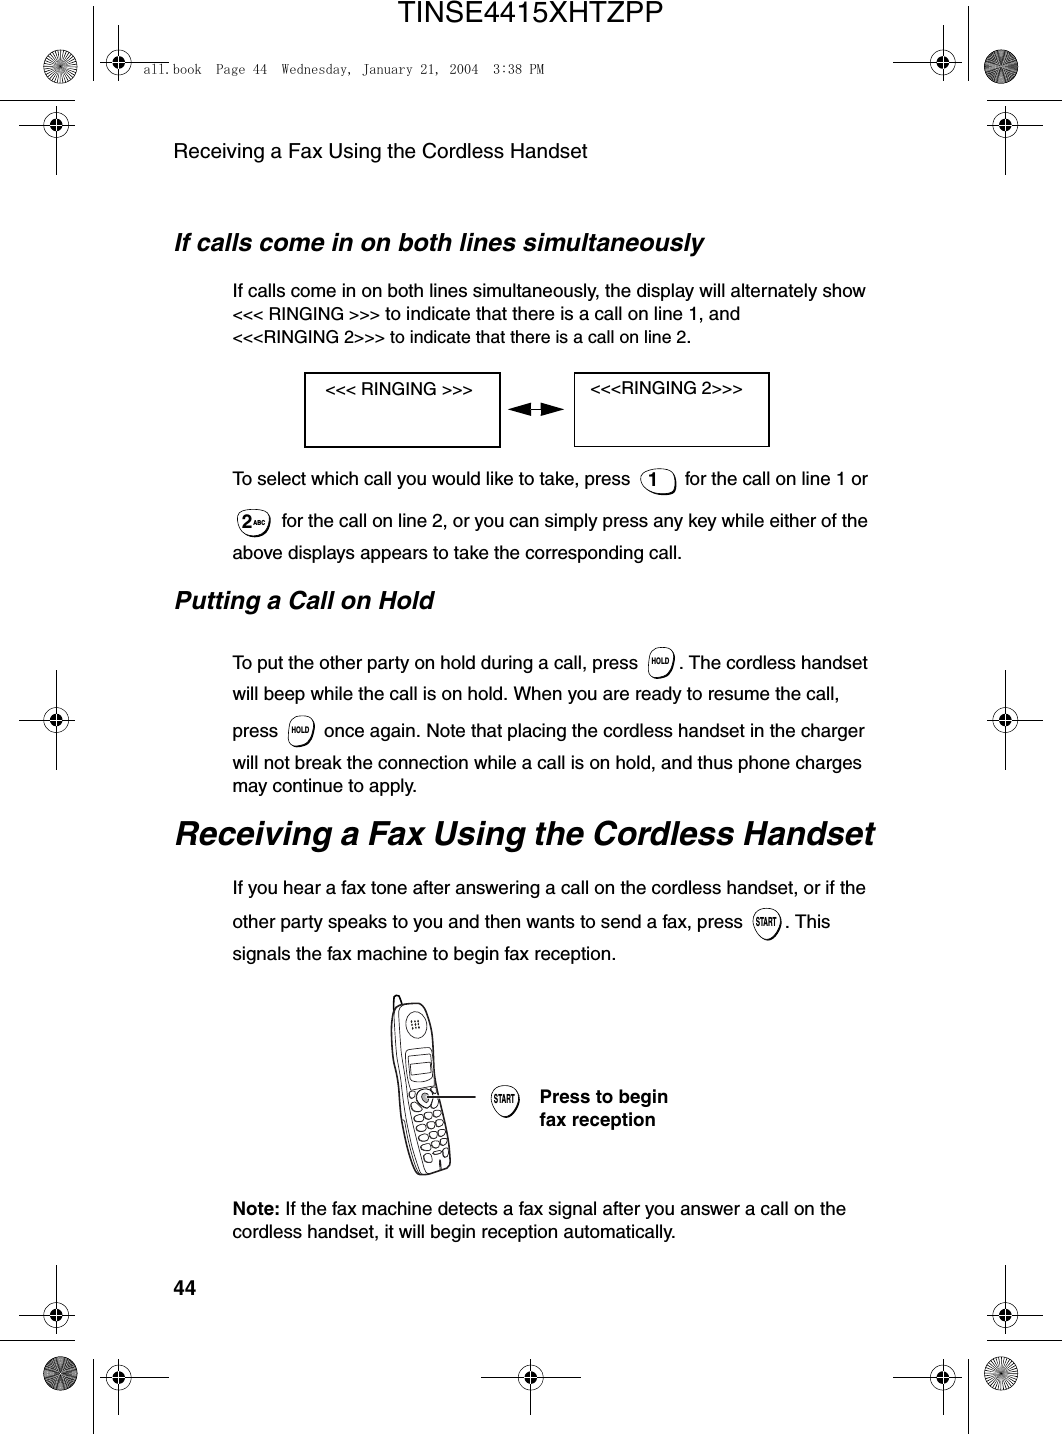
Receiving a Fax Using the Cordless Handset44STARTPress to begin fax receptionNote: If the fax machine detects a fax signal after you answer a call on the cordless handset, it will begin reception automatically.If calls come in on both lines simultaneouslyIf calls come in on both lines simultaneously, the display will alternately show <<< RINGING >>> to indicate that there is a call on line 1, and <<<RINGING 2>>> to indicate that there is a call on line 2.To select which call you would like to take, press   for the call on line 1 or  for the call on line 2, or you can simply press any key while either of the above displays appears to take the corresponding call.Putting a Call on HoldTo put the other party on hold during a call, press  . The cordless handset will beep while the call is on hold. When you are ready to resume the call, press   once again. Note that placing the cordless handset in the charger will not break the connection while a call is on hold, and thus phone charges may continue to apply.Receiving a Fax Using the Cordless HandsetIf you hear a fax tone after answering a call on the cordless handset, or if the other party speaks to you and then wants to send a fax, press  . This signals the fax machine to begin fax reception.1ABC2HOLDHOLDSTART   <<< RINGING >>>   <<<RINGING 2>>>all.book  Page 44  Wednesday, January 21, 2004  3:38 PMTINSE4415XHTZPP
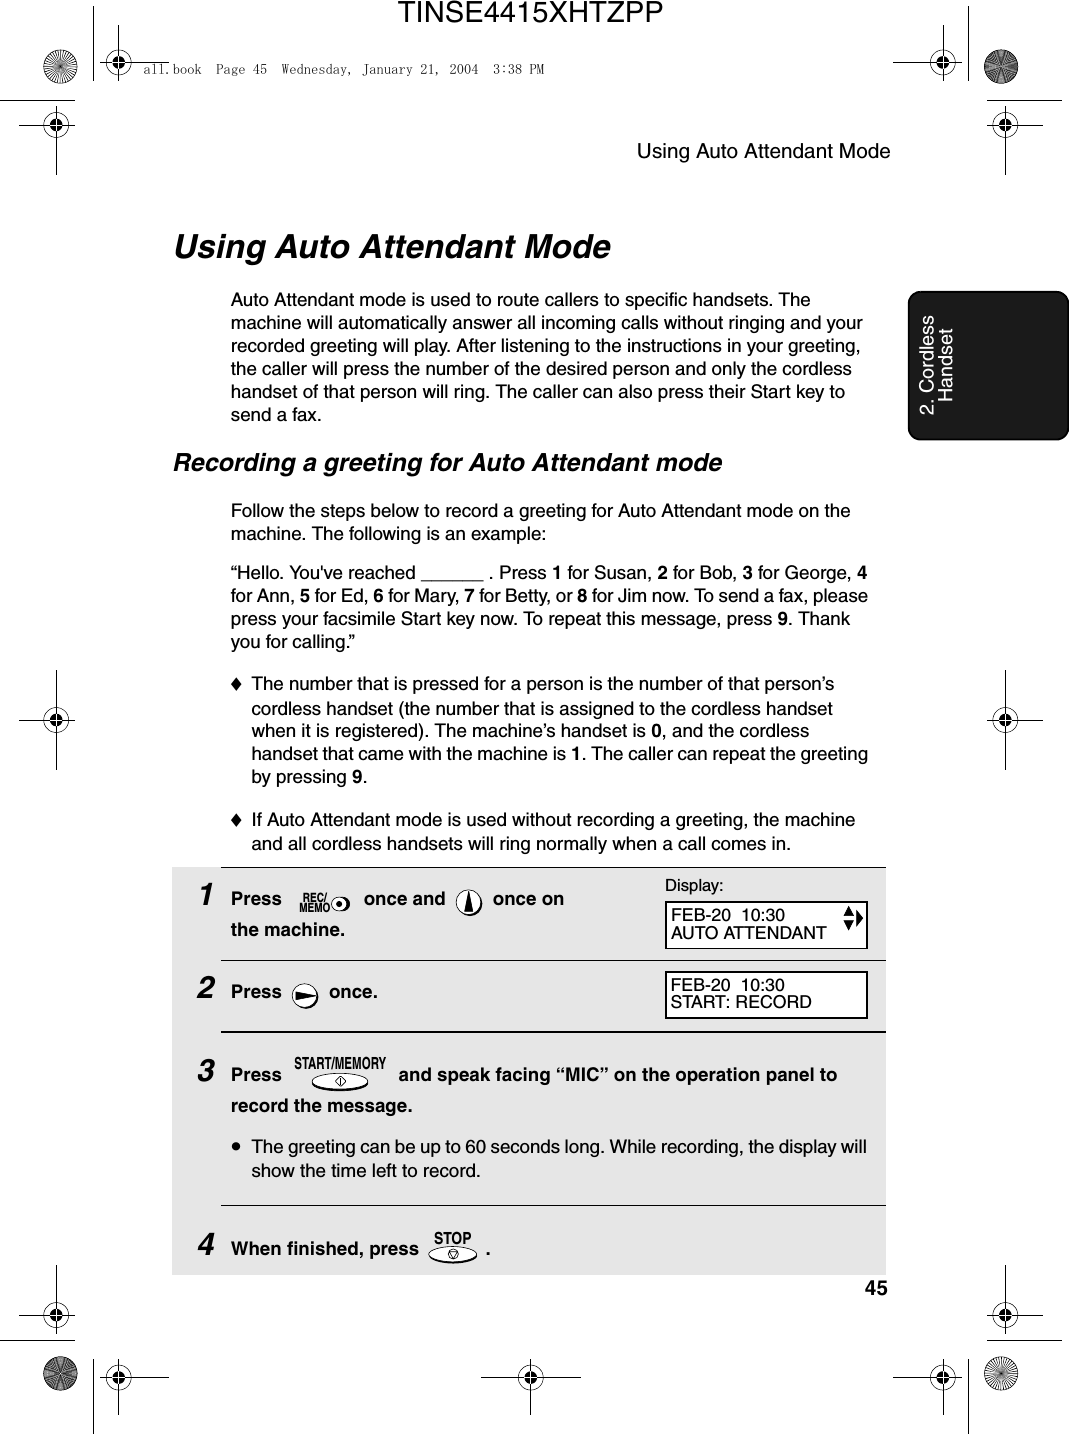
Using Auto Attendant Mode452. Cordless HandsetUsing Auto Attendant ModeAuto Attendant mode is used to route callers to specific handsets. The machine will automatically answer all incoming calls without ringing and your recorded greeting will play. After listening to the instructions in your greeting, the caller will press the number of the desired person and only the cordless handset of that person will ring. The caller can also press their Start key to send a fax.Recording a greeting for Auto Attendant modeFollow the steps below to record a greeting for Auto Attendant mode on the machine. The following is an example:“Hello. You've reached ______ . Press 1 for Susan, 2 for Bob, 3 for George, 4 for Ann, 5 for Ed, 6 for Mary, 7 for Betty, or 8 for Jim now. To send a fax, please press your facsimile Start key now. To repeat this message, press 9. Thank you for calling.”♦The number that is pressed for a person is the number of that person’s cordless handset (the number that is assigned to the cordless handset when it is registered). The machine’s handset is 0, and the cordless handset that came with the machine is 1. The caller can repeat the greeting by pressing 9.♦If Auto Attendant mode is used without recording a greeting, the machine and all cordless handsets will ring normally when a call comes in.1Press   once and   once on the machine.2Press  once.3Press   and speak facing “MIC” on the operation panel to record the message.•The greeting can be up to 60 seconds long. While recording, the display will show the time left to record.4When finished, press   .REC/MEMOSTART/MEMORYSTOPDisplay:FEB-20  10:30AUTO ATTENDANTFEB-20  10:30START: RECORDall.book  Page 45  Wednesday, January 21, 2004  3:38 PMTINSE4415XHTZPP
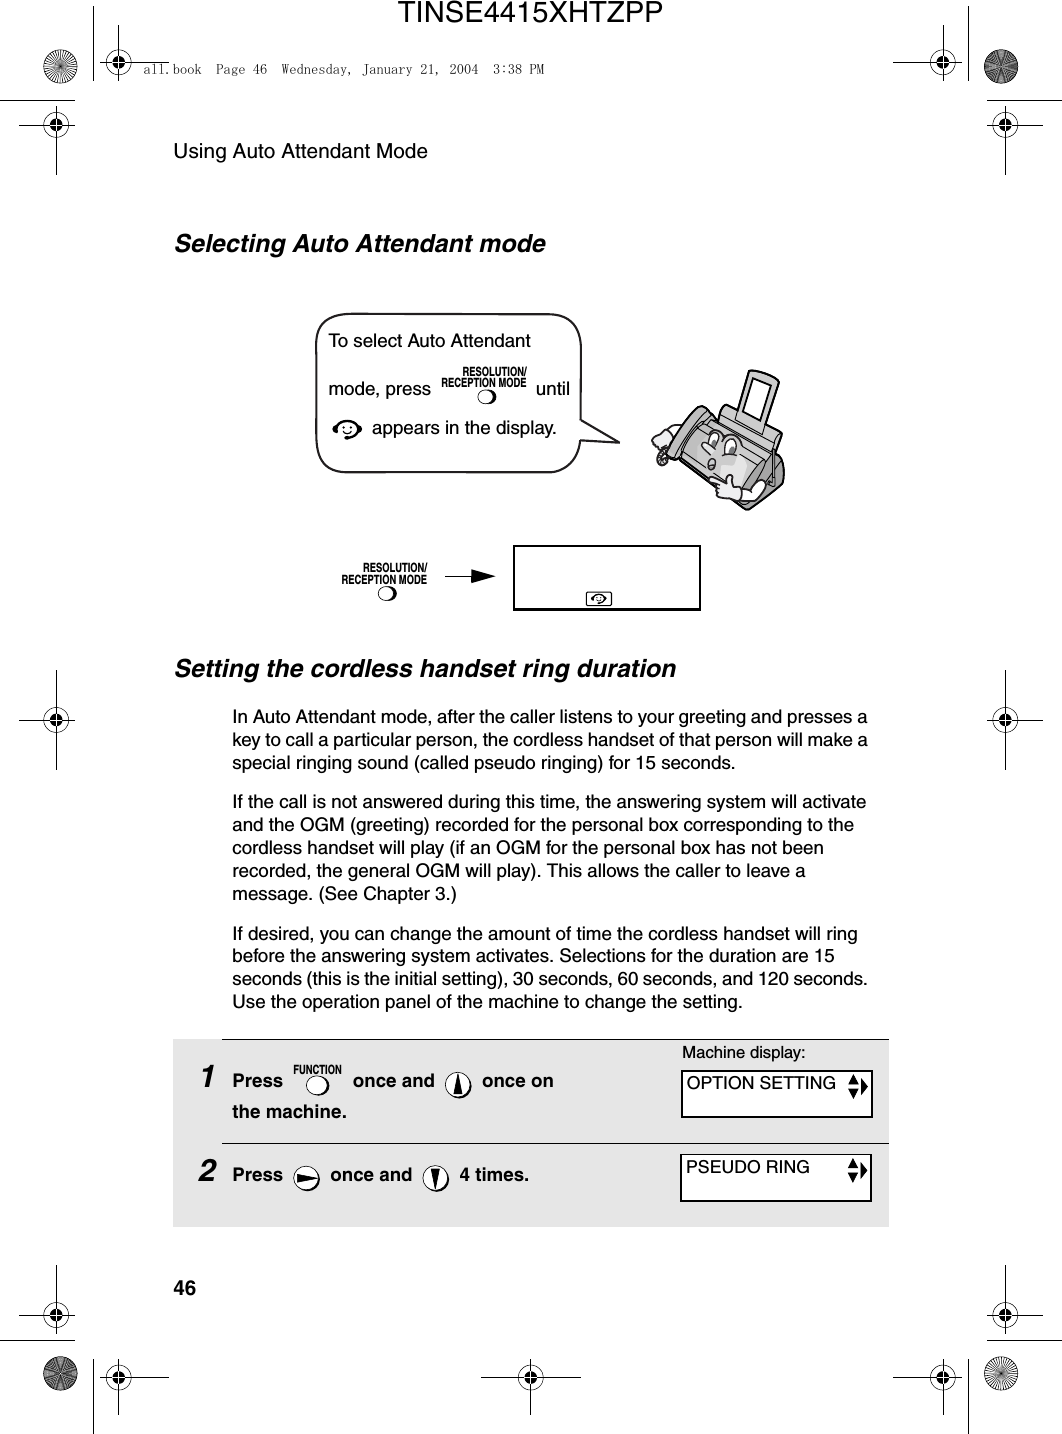
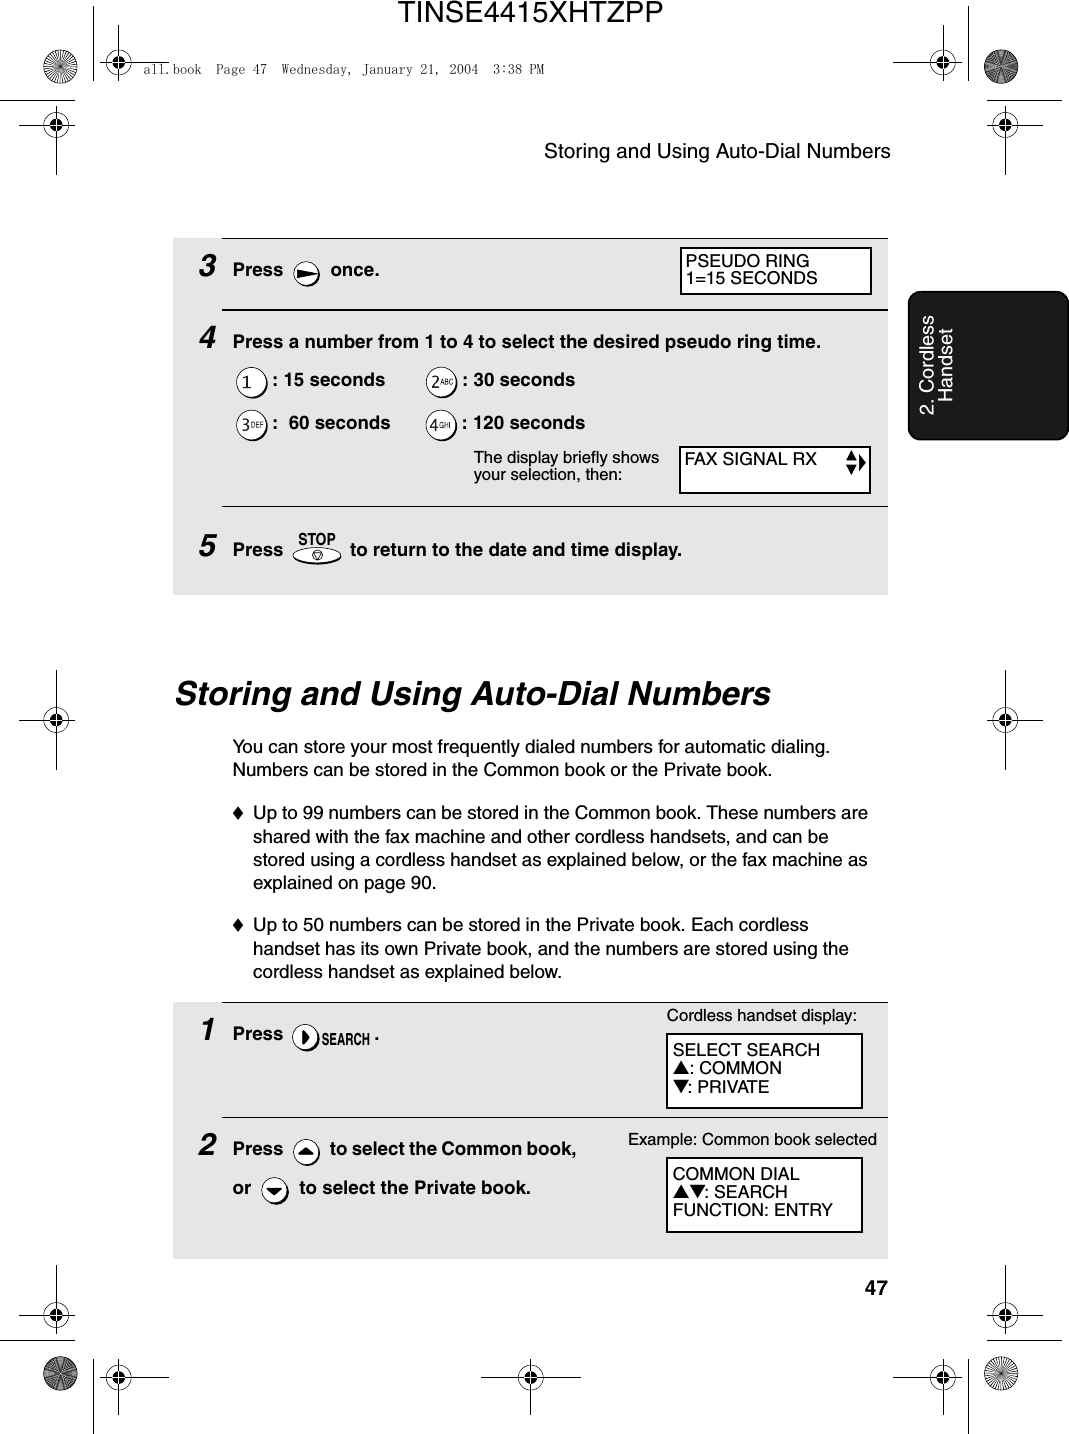
Using Auto Attendant Mode46Selecting Auto Attendant modeRESOLUTION/RECEPTION MODETo select Auto Attendant mode, press   until  appears in the display.RESOLUTION/RECEPTION MODESetting the cordless handset ring duration In Auto Attendant mode, after the caller listens to your greeting and presses a key to call a particular person, the cordless handset of that person will make a special ringing sound (called pseudo ringing) for 15 seconds. If the call is not answered during this time, the answering system will activate and the OGM (greeting) recorded for the personal box corresponding to the cordless handset will play (if an OGM for the personal box has not been recorded, the general OGM will play). This allows the caller to leave a message. (See Chapter 3.)If desired, you can change the amount of time the cordless handset will ring before the answering system activates. Selections for the duration are 15 seconds (this is the initial setting), 30 seconds, 60 seconds, and 120 seconds. Use the operation panel of the machine to change the setting.1Press   once and   once on the machine.2Press   once and   4 times.FUNCTIONMachine display:OPTION SETTINGPSEUDO RINGall.book  Page 46  Wednesday, January 21, 2004  3:38 PMTINSE4415XHTZPP
Storing and Using Auto-Dial Numbers472. Cordless HandsetStoring and Using Auto-Dial NumbersYou can store your most frequently dialed numbers for automatic dialing. Numbers can be stored in the Common book or the Private book. ♦Up to 99 numbers can be stored in the Common book. These numbers are shared with the fax machine and other cordless handsets, and can be stored using a cordless handset as explained below, or the fax machine as explained on page 90. ♦Up to 50 numbers can be stored in the Private book. Each cordless handset has its own Private book, and the numbers are stored using the cordless handset as explained below.1Press .2Press   to select the Common book, or   to select the Private book.SEARCHCordless handset display:SELECT SEARCH▲: COMMON▼: PRIVATECOMMON DIAL▲▼: SEARCHFUNCTION: ENTRYExample: Common book selected3Press  once.4Press a number from 1 to 4 to select the desired pseudo ring time.: 15 seconds        : 30 seconds:  60 seconds       : 120 seconds5Press   to return to the date and time display.STOPFAX SIGNAL RXPSEUDO RING1=15 SECONDSThe display briefly shows your selection, then:all.book  Page 47  Wednesday, January 21, 2004  3:38 PMTINSE4415XHTZPP
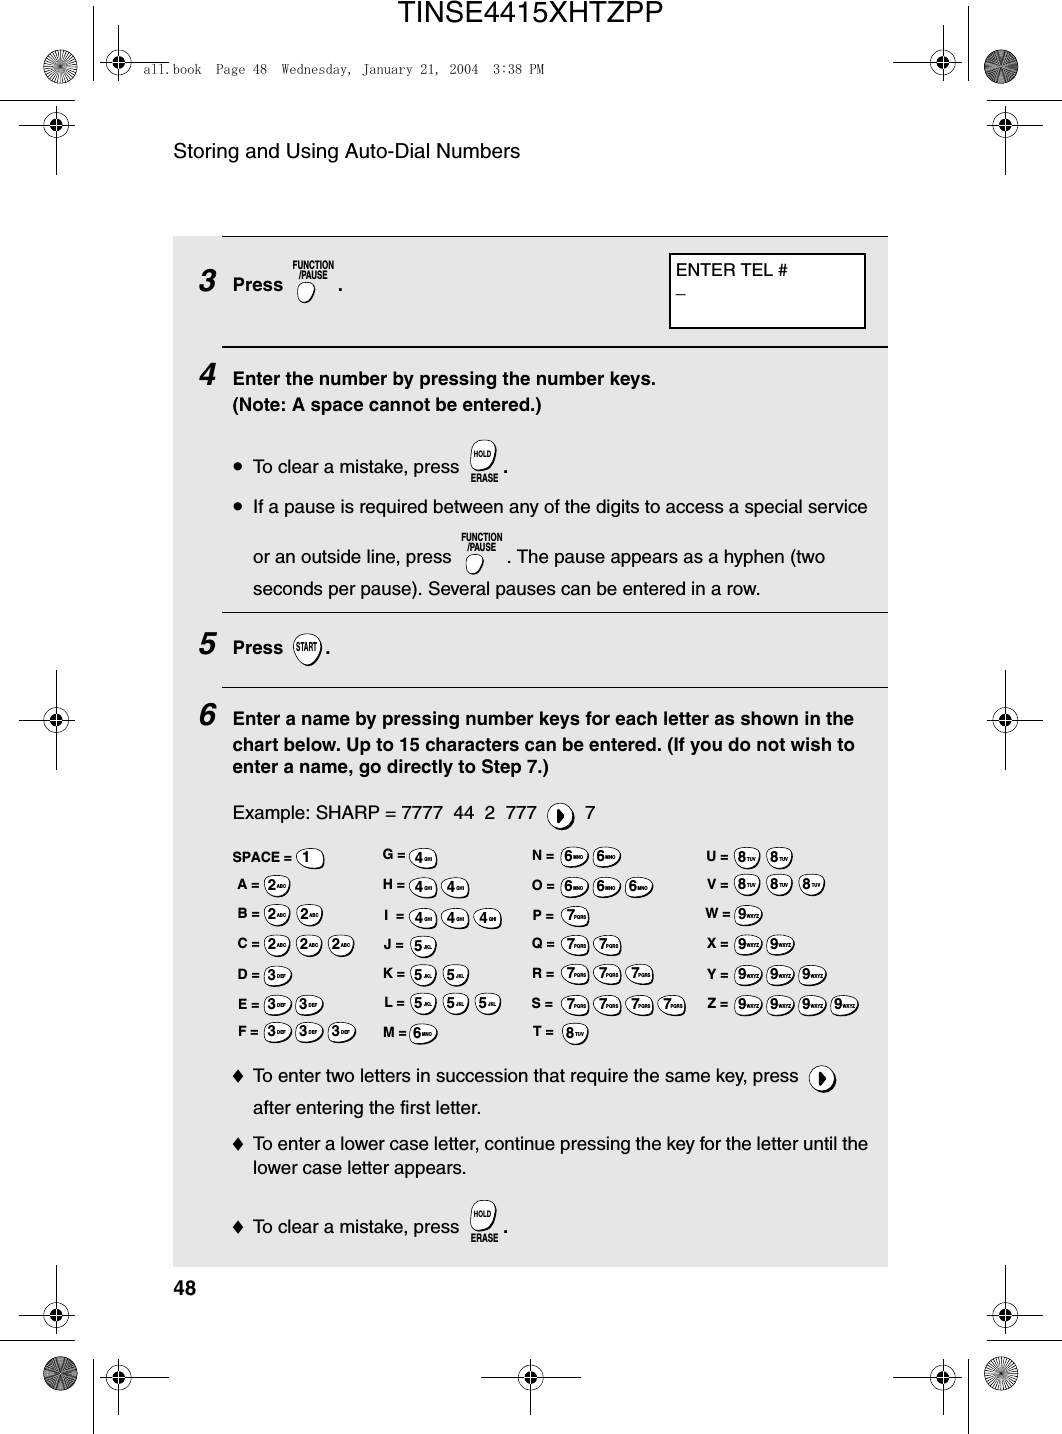
Storing and Using Auto-Dial Numbers483Press .4   Enter the number by pressing the number keys. (Note: A space cannot be entered.)•To clear a mistake, press  .•If a pause is required between any of the digits to access a special service or an outside line, press  . The pause appears as a hyphen (two seconds per pause). Several pauses can be entered in a row.5Press .6Enter a name by pressing number keys for each letter as shown in the chart below. Up to 15 characters can be entered. (If you do not wish to enter a name, go directly to Step 7.)Example: SHARP = 7777  44  2  777  7♦To enter two letters in succession that require the same key, press   after entering the first letter. ♦To enter a lower case letter, continue pressing the key for the letter until the lower case letter appears. ♦To clear a mistake, press  .FUNCTION/PAUSEERASEHOLDFUNCTION/PAUSESTARTERASEHOLDA =B =C =D =E =F =G =H =I  =J =K =L =M =N =O =P =Q =R =S =T =U =V =W =X =Y =Z =SPACE =WXYZ9WXYZ9WXYZ9WXYZ9WXYZ9WXYZ9WXYZ9WXYZ9WXYZ9WXYZ9TUV8TUV8TUV8TUV8TUV8TUV8PQRS7PQRS7PQRS7PQRS7PQRS7PQRS7PQRS7PQRS7PQRS7PQRS7MNO6MNO6MNO6MNO6MNO6JKL5JKL5JKL5MNO6JKL5JKL5JKL5GHI4GHI4GHI4GHI4GHI4GHI4DEF3DEF3DEF3DEF3DEF3DEF3ABC2ABC2ABC2ABC2ABC2ABC21ENTER TEL #_all.book  Page 48  Wednesday, January 21, 2004  3:38 PMTINSE4415XHTZPP

Navigation menu