SZ DJI TECHNOLOGY PV3311402 PHANTOM 2 VISION + User Manual PHANTOM 2 VISION
SZ DJI TECHNOLOGY CO., LTD PHANTOM 2 VISION + PHANTOM 2 VISION
UserManual.wiki
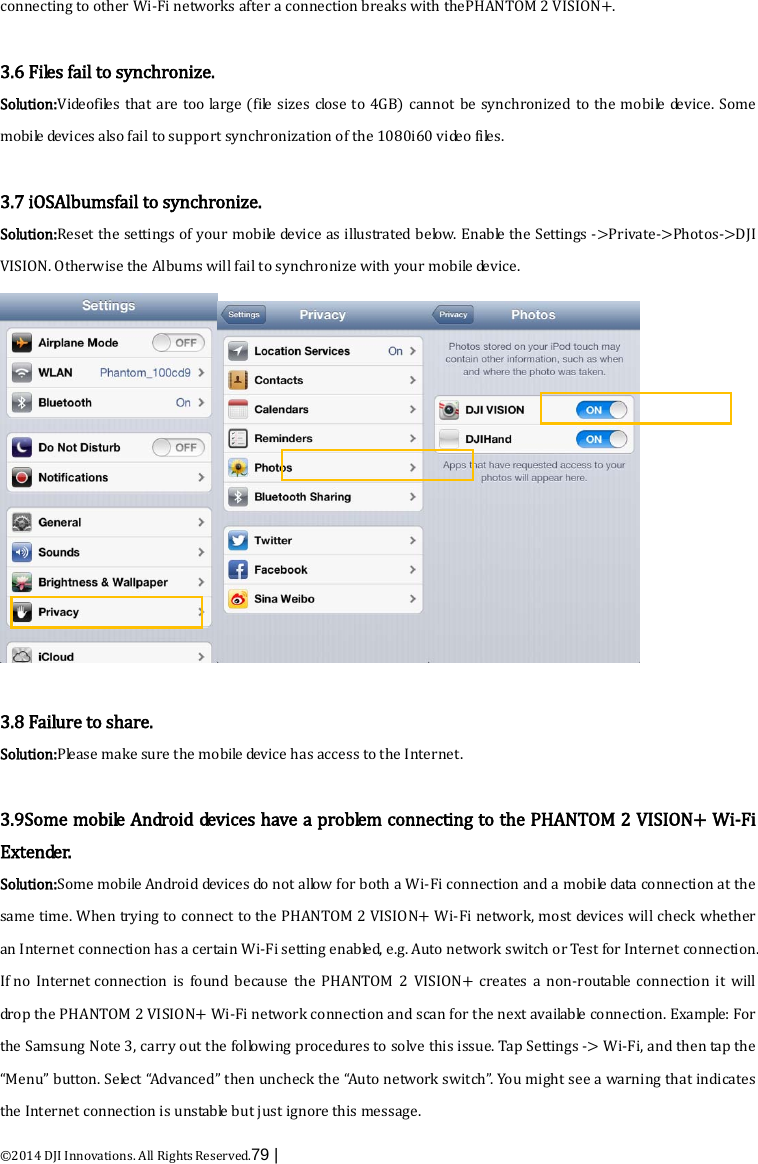
>
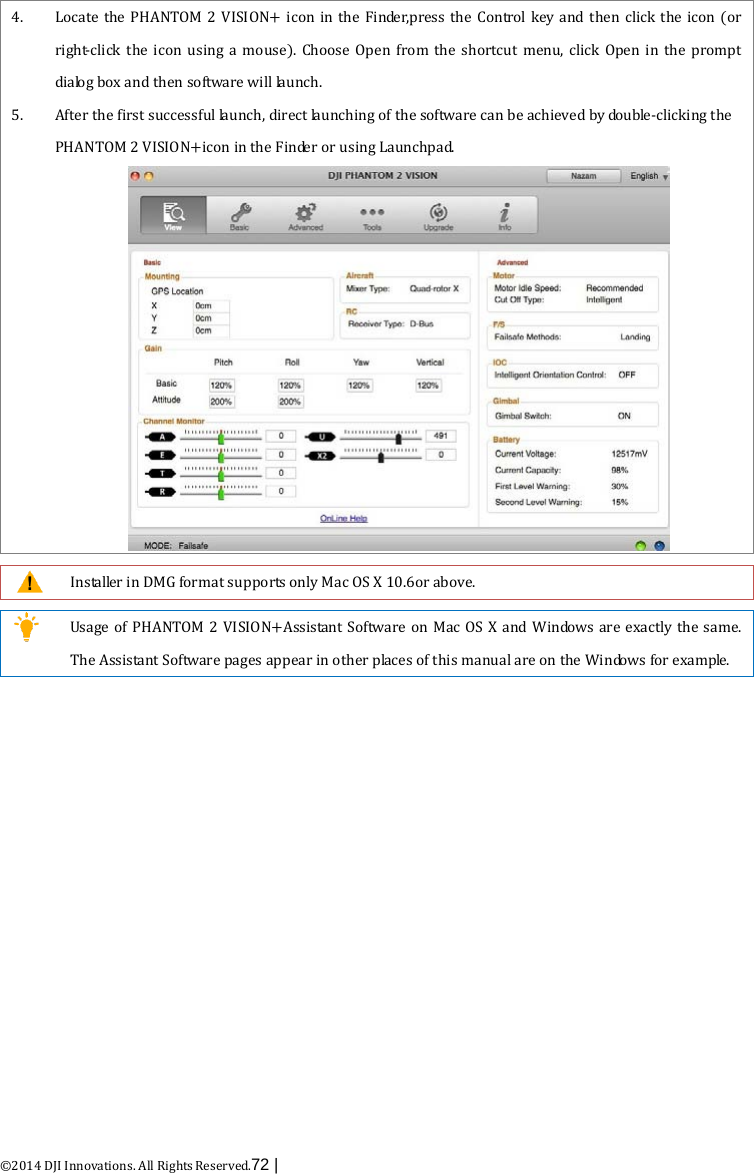
SZ DJI TECHNOLOGY
>
PV3311402 User Manual
>
User Manual Part 3
Contents
1.
User Manual Part 1
2.
User Manual Part 2
3.
User Manual Part 3
User Manual Part 3
Navigation menu
Upload a User Manual
Namespaces
Wiki Guide
HTML
PDF
Info
Views
User Manual
Discussion / Help
Navigation
![©2014 DJI Innovations. All Rights Reserved.60 | Three Field of View (FOV) options are supported when shooting in 1920x1080 60i, 1920x1080 30pand 1920x1080 25p: Wide (140°), Medium (120°) and Narrow (90°). [4]Photo Format JPEG RAW The PHANTOM 2 VISION+ camera shoots in JPEG and RAW file formats simultaneouslywhen this option is selected. See the following table for detailed specifications. JPEG photo size 4384X3288 4384X2922 4384X2466 RAW photo size 4384X3288 4384X2920 4384X2464 RAW format supports to be manipulated in Photoshop, including Photoshop CS, Photoshop Elements 3, Photoshop Elements 10 and Photoshop Lightroom. [5] Selectable ISO AUTO 100 200 400 [6] White Balance AWB (auto white balance) Sunny C lo u d y Incandescentlamp [7]Exposure Metering Center Average Spot](https://usermanual.wiki/SZ-DJI-TECHNOLOGY/PV3311402.User-Manual-Part-3/User-Guide-2214440-Page-1.png)
![©2014 DJI Innovations. All Rights Reserved.61 | [8] Exposure Compensation -2.0(EV) 2.0(EV) -1.7(EV) 1.7(EV) -1.3(EV) 1.3(EV) -1.0(EV) 1.0(EV) -0.7(EV) 0.7(EV) -0.3(EV) 0.3(EV) 0(EV) [9] Sharpness Standard Hard Soft [10]Anti-flicker Auto 50Hz 60Hz [11]Restore Default Settings Restores all cameradefault settings. Camera reboot is needed to a l lo w restoration to take effect. [12]Format Micro-SD Card FormattheMicro-SD card. All data stored in the Micro-SD cardwill be lost after formatting. Remember to backup before formatting.](https://usermanual.wiki/SZ-DJI-TECHNOLOGY/PV3311402.User-Manual-Part-3/User-Guide-2214440-Page-2.png)
![©2014 DJI Innovations. All Rights Reserved.62 | 4 Album Page DJI VISION App has SD CARD album and Mobile Device album. The captures and videos in SD CARD album store in Micro-SD card and those in Mobile Device album store in the storage devices of mobile device. The captures and videos in SD CARD album can be synchronized to Mobile Device album. In DJI VISION App, tap to enter into SD CARD album and tap to enter into Mobile Device album. SD CARD Album M obile D evice A lbum SD CARD album is accessible when the mobile device is well connected to the Wi-Fi of PHANTOM 2 VISION+. SD CARDAlbum The pictures stored in the camera is presented to you in the thumbnail fashion. Tap the corresponding thumbnail to view the picture that you wish to see. [1][4][3][2]](https://usermanual.wiki/SZ-DJI-TECHNOLOGY/PV3311402.User-Manual-Part-3/User-Guide-2214440-Page-3.png)
![©2014 DJI Innovations. All Rights Reserved.63 | [1]Photos and Videos are listed and grouped by date. [2]All photos and videos that have already been synced to your mobile device are identified with the icon. [3]Tap any thumbnail for single view mode. Tap a Photo thumbnail that hasn’t been synchronized to the mobile de v i c e to view the photo. Swipe left or right to view the previous or next photo item. Tap on a video thumbnail to play it and view the video’s length. A progress bar will also appear at the bottom of the screen.Tap to enter single synchronization m o de to synchronize a singlephoto or video, orto synchronize and play a video at the same time. [4]Tapthe button to enter multiplesynchronization m o de (as shown in the following diagram).Tap thumbnails to select photos or videos to synchronize to your mobile device (The thumbnails identified by the check markaresuccessfully selected.). Or you can select one or more groups to be synchronized by checking the box before the group, and then Tap to start synchronizing. During the synchronization process, users can tap to cancel the synchronization. Photos and videos that have been synchronized to the mobile devicewill remain. Some mobile de v i c e s does not support the synchronization of 1080i60 video files. Select a groupSelect a single photo or video[5] [5]Tap“Cancel”or “Finished” to exit themultiple synchronization m o de and return to the SD CARD page.](https://usermanual.wiki/SZ-DJI-TECHNOLOGY/PV3311402.User-Manual-Part-3/User-Guide-2214440-Page-4.png)
![©2014 DJI Innovations. All Rights Reserved.64 | Mobile Device Album [1][2][3][4] [1]You can browse all photos and videos in the album which have been synchronized to the mobile device, view a selected photo or play a selected video. [2]Photos and videos are listed in thumbnail style and sorted by capture time. [3]Pictures and videos are sorted by captured/recordedGeo-tagged locations. Internet access is required for downloading the map. [4]Tap any thumbnail for single view;you can slide left or right to view the previous or next photo.Tap a vi de o thumbnailto play a single video. [5] Geo-tagged locations](https://usermanual.wiki/SZ-DJI-TECHNOLOGY/PV3311402.User-Manual-Part-3/User-Guide-2214440-Page-5.png)
![©2014 DJI Innovations. All Rights Reserved.65 | [5]Tap to share your photos and videos to social network sites. Access to the Internet is requiredto share your photos and videos. [5]](https://usermanual.wiki/SZ-DJI-TECHNOLOGY/PV3311402.User-Manual-Part-3/User-Guide-2214440-Page-6.png)
![©2014 DJI Innovations. All Rights Reserved.67 | 6 Settings Page [1] Toolbar Auto Hide Slide the switch from left to right to enable this function. The toolbar will auto hide on the camera page. Toolbar Auto HideDisabled Toolbar Auto Hide E n a b le d [2] When Connection Lost [17]Stop Recording: Enabled:Stop recording when the Wi-Ficonnection between the mobile device and the camera breaks while the camera is recording. [8] [9] [10] [11] [12] [13] [14] [15] [16] [17] [18] [1] [2] [3] [4] [5] [6] [7]](https://usermanual.wiki/SZ-DJI-TECHNOLOGY/PV3311402.User-Manual-Part-3/User-Guide-2214440-Page-8.png)
![©2014 DJI Innovations. All Rights Reserved.68 | Disabled:Keep recording when the Wi-Ficonnection between the mobile device and the camera breaks while the camera is recording. [18] Selectthe state the camera will enter in the event of a Wi-Fi Connection break between the mobile device and the camera.Use this function to ensure you continue to capture the scenesyou don’t want to miss during a flight. [3] Camera Settings Display For iOS users, an enabled item will dis p lay in the camera settings toolbar, while a disabled item will be hidden. For Android users,there is no this item. [4]Preview Quality High: 640x480@30fps Medium: 640x480@15fps Medium: 320x240@30fps Low: 320x240@15fps (Recommended when there is a lot of interference.) [5] Parameter Unit Select imperial or metric units of measurement.](https://usermanual.wiki/SZ-DJI-TECHNOLOGY/PV3311402.User-Manual-Part-3/User-Guide-2214440-Page-9.png)
![©2014 DJI Innovations. All Rights Reserved.69 | [6]YAW Axial Control Perform the YAW axial rotate when this function is enabled. [7] Auto Flips The user interface of DJIVISION App will flip if the mobile device’s auto-flip is enabled. [8] Battery Low Warning If enabled, an alarm will sound when the battery level is too low. We recommended you to adjust the mobile devicevolume to the highestle v e l. [9] Tutorial Usage tips will be displayed. [10] Clear News Cache Tap to flush thenews cache. [11] Binding In the eventthe camera and range extender bind is lost or one of them requires repair or replacement, camera and range extender binding should be performed via the DJI VISIONApp. Refer to the<How to PerformaCamera &Range Extender Binding> for details. [12]Rename SSID of Range Extender Tap to rename the SSID of range extender.](https://usermanual.wiki/SZ-DJI-TECHNOLOGY/PV3311402.User-Manual-Part-3/User-Guide-2214440-Page-10.png)
![©2014 DJI Innovations. All Rights Reserved.70 | [13] Find My PHANTOM 2 VISION+ M y location PH A N TO M 2 V IS IO N ’S a te llit e M o d e Standard M odeM y locationS location PH A N TO M 2 V IS IO N ’S location [14] Account Tap to see user’s account information. [15] Rate Tap to rate the DJI VISION App. Internet accessis required. Android A p p do e s n’t have Rate item. [16] About Tap to see the current version of the DJI VISION App and also for contact information.](https://usermanual.wiki/SZ-DJI-TECHNOLOGY/PV3311402.User-Manual-Part-3/User-Guide-2214440-Page-11.png)
![©2014 DJI Innovations. All Rights Reserved.73 | 2Using the Assistant Software 2.1 Using the PHANTOM 2 VISION+ Assistant Software 1. 2. 3. 4. Startup the PC, power on the PHANTOM 2 VISION+, thenconnect the PHANTOM 2 VISION+ to the PC with a Micro-USB cable. DO NOT disconnect until configuration is finished. Run the PHANTOM 2 VISION+Assistant Software and wait for the PHANTOM 2 VISION+ to connect to the Assistant Software. Observe the indicators on the bottomof the screen. When connected successfully, the connection indicator is and communication indicator is blinking . Choose [Basic] or [Advanced] configuration pages. View and check the current configuration in the [View] page. Language sw apV ie w c o n fig u r a t io n sC onnection indicatorC o m m u n ic a t io n in d ic a t o rRC , G a inG im b a l, B a tte ry IM U c a lib r a t io nF irm w a re u p g ra d eA ccount, so ftw a re v e r s io n*This im age is for reference o n ly . Please refer to the actual user interface.Function sw itch betw een PH A N TO M 2 V IS IO N a n d N A Z A -M (1) Users should not enable the Naza-M function before finishing the “Advanced Flight Maneuvers” procedure, in accordance with the "Phantom Pilot Training Guide”. If the Naza-M function is enabled, users can switch the control mode to either the ATTI. Mode, GPS Mode or Manual Mode, and accessthe advanced settings (e.g. IOC). In addition, the LED located on the rear frame arms will display the flight status according to the Naza-M's indicator, instead of the PHANTOM 2 VISION+'s indicator. Do not enable the Naza-M function unless you are an experienced user or guided by a professional. (2)You can change to the PHANTOM 2 VISION+ function by tapping the same button if the Naza-M function is enabled. This operation will disable the Naza-M function and enable the PHANTOM 2 VISION+ function.All parameters will bereturned to factory settings. Firmware upgrade of the PHANTOM 2 VISION+ 1. Click the [Upgrade] icon to check the current firmware version and whether the installed firmware is](https://usermanual.wiki/SZ-DJI-TECHNOLOGY/PV3311402.User-Manual-Part-3/User-Guide-2214440-Page-14.png)
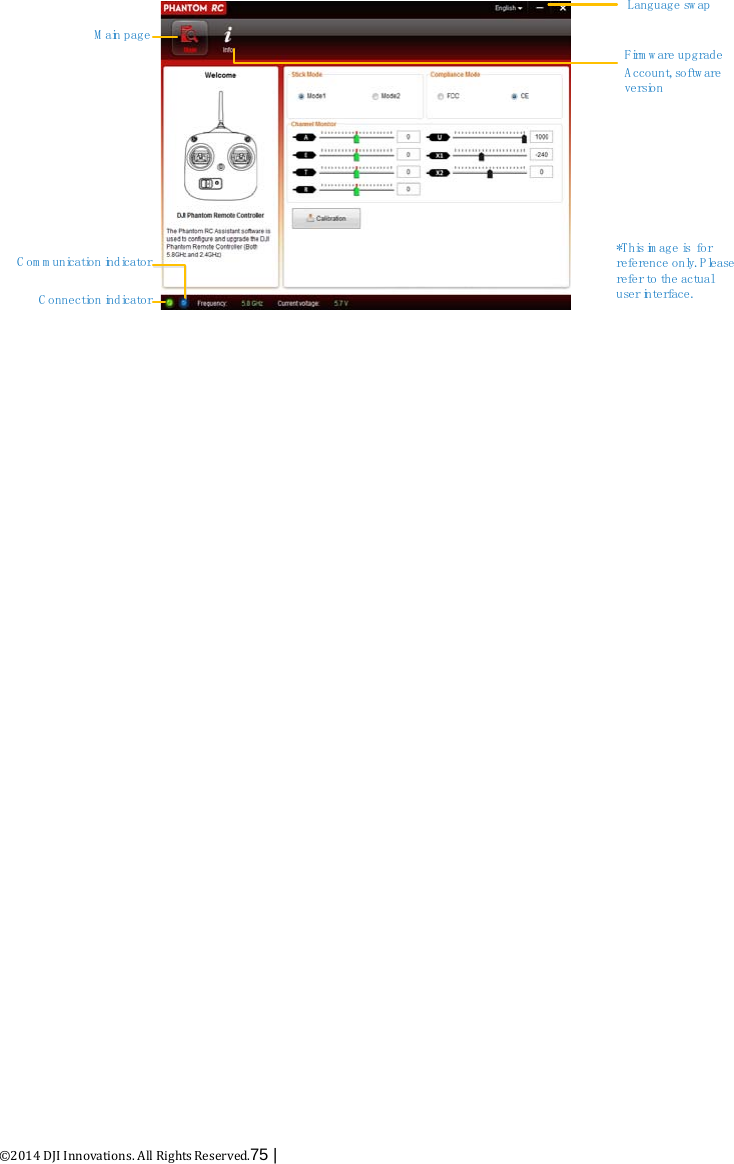
![©2014 DJI Innovations. All Rights Reserved.74 | the late s t version. If not, click the relative links to upgrade. 2. Be sure to wait until the Assistant Software shows “finished”. Click OK and power cycle the PHANTOM 2 VISION+ after 5 seconds. Once completed, the firmware is up to date. F irm w a re u p g ra d a b le ite m sC u rre n t firm w are v e rsio nU pgrade link*This im age is for reference o n ly . Please refer to the actual user interface. (1) An internet connection is required to upgrade the PHANTOM 2 VISION+’s firmware. (2) DO NOT power off until the upgrade is finished. (3) If the firmware upgrade failed, the main controller will enter a waiting for firmware upgrade status automatically. If this happens, repeat the above procedures. Firmware upgradable items: (1)Main Controller (2)GPS (3)5.8GReceiver (4)P330CB (Main Board) (5)Battery (6)Gimbal IMU 2.2PHANTOM RC Assistant SoftwareUsage Please refer to the PHANTOM 2 VISION+Assistant Software to install PHANTOM RC Assistant Software, and then follow the procedures to finish the configuration of the remote controller. 1. 2. 3. 4. 5. Turn off the remote controller and find the Micro-USB port on the back of it. (If there is no one, users should open the rear cover to find the Micro-USB port on the board inner the remote controller.) Start up the PC, power on the remote controller, and then Connect the remote controller to the PC with a Micro-USB cable. DO NOT disconnect until the configuration is finished. Run the PHANTOM RC Assistant Software and wait for the remote controller to connect to the Assistant Software. Observe the indicators on the bottom left of the screen. When connected successfully, the connection indicator is and communication indicator is blinking . Finish configuration in the [Main] page. Finish upgrade in the [Info] page if necessary.](https://usermanual.wiki/SZ-DJI-TECHNOLOGY/PV3311402.User-Manual-Part-3/User-Guide-2214440-Page-15.png)