SMART Technologies 7086 Interactive Display User Manual
SMART Technologies Inc. Interactive Display Users Manual
UserManual.wiki
>
SMART Technologies
>
7086 User Manual
Users Manual
Navigation menu
Upload a User Manual
Namespaces
Wiki Guide
HTML
PDF
Info
Views
User Manual
Discussion / Help
Navigation

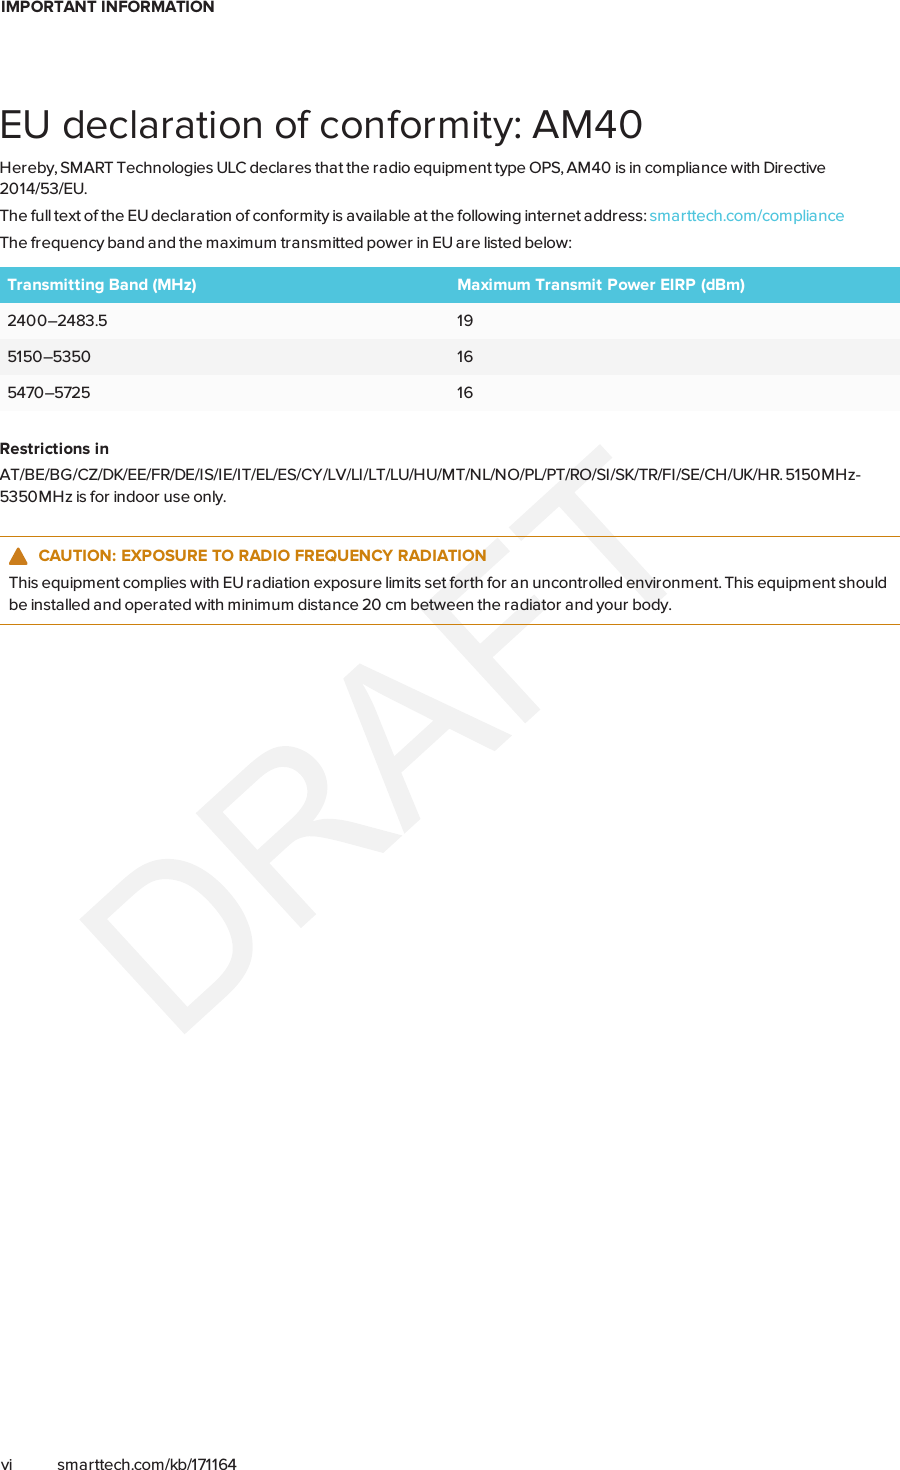

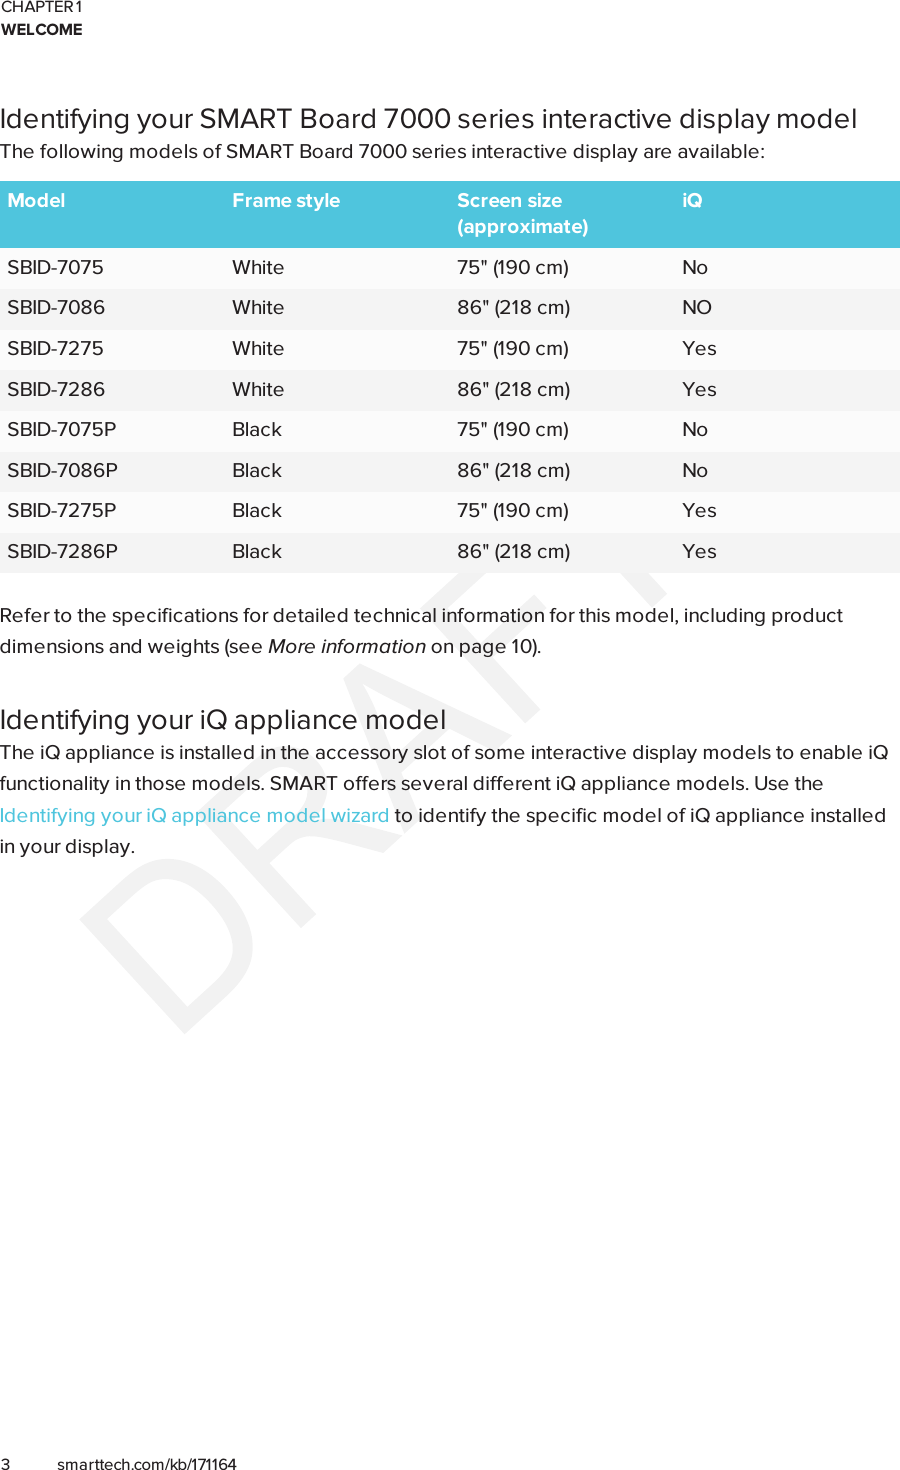

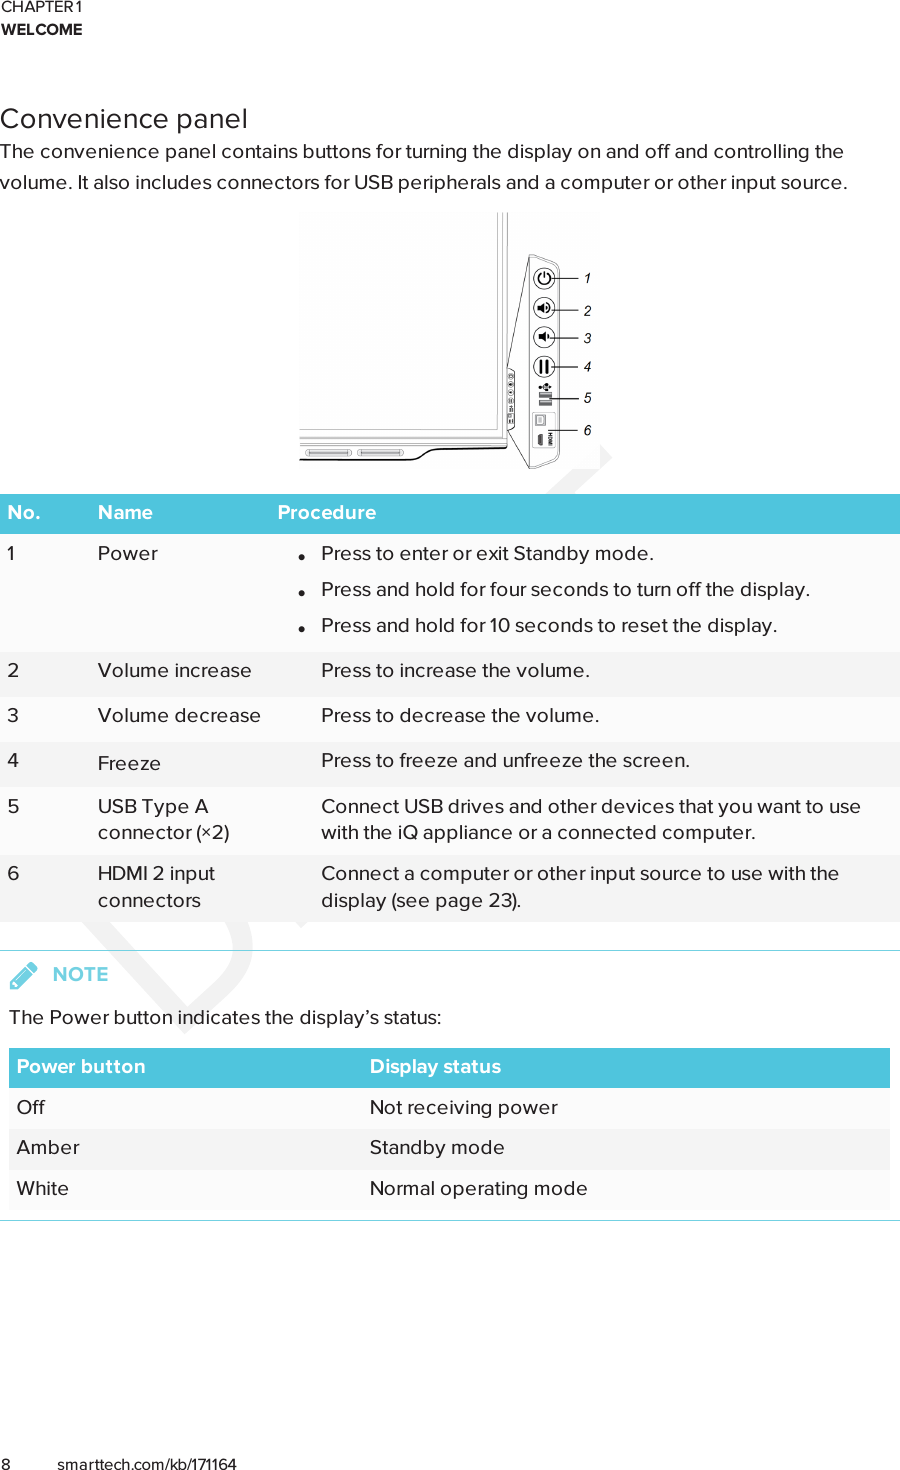


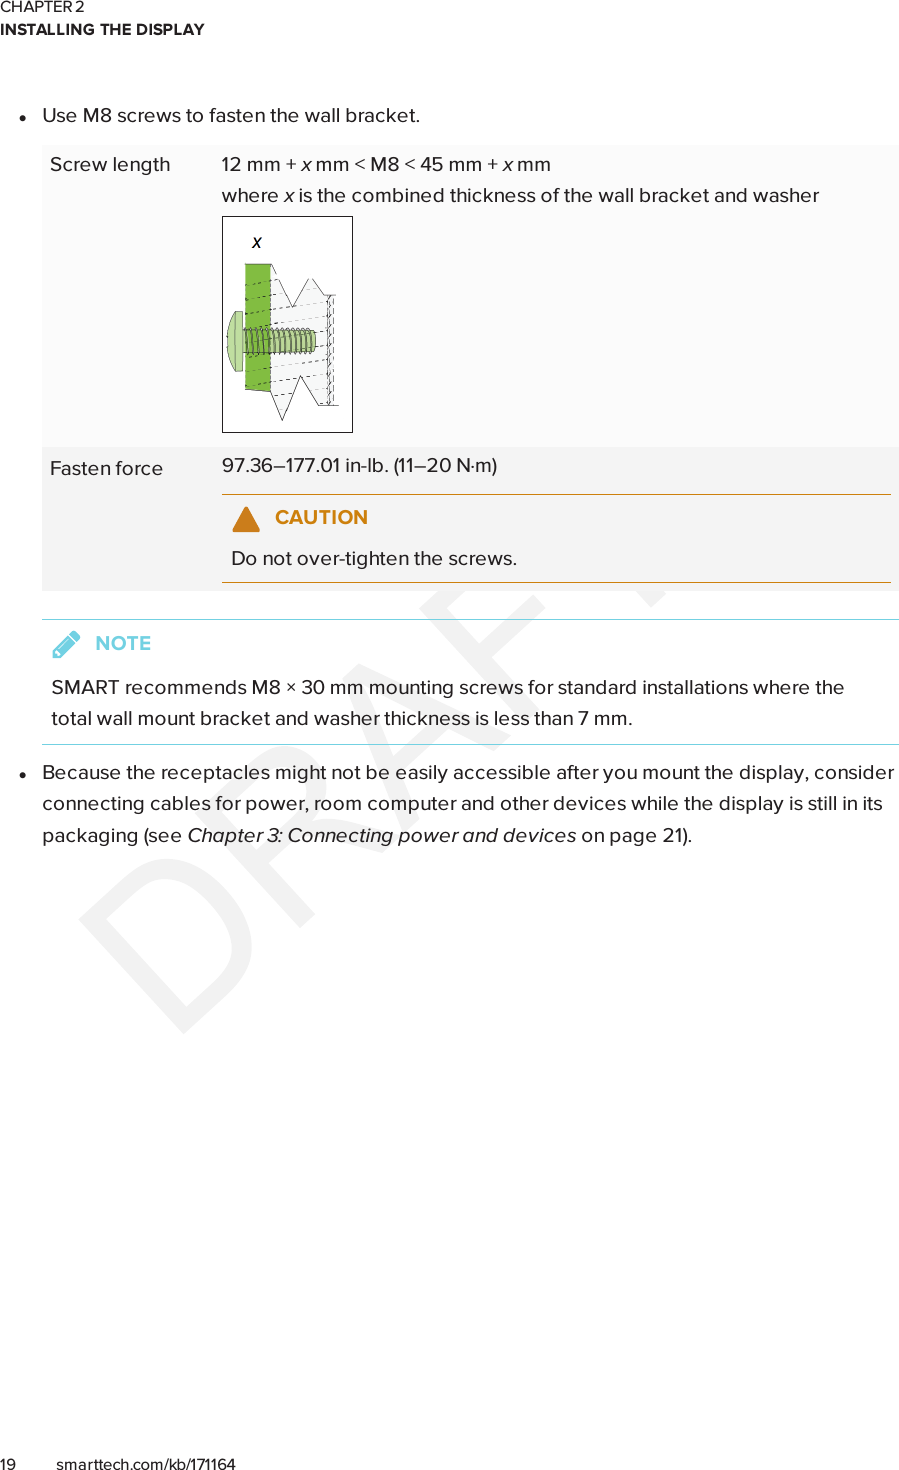
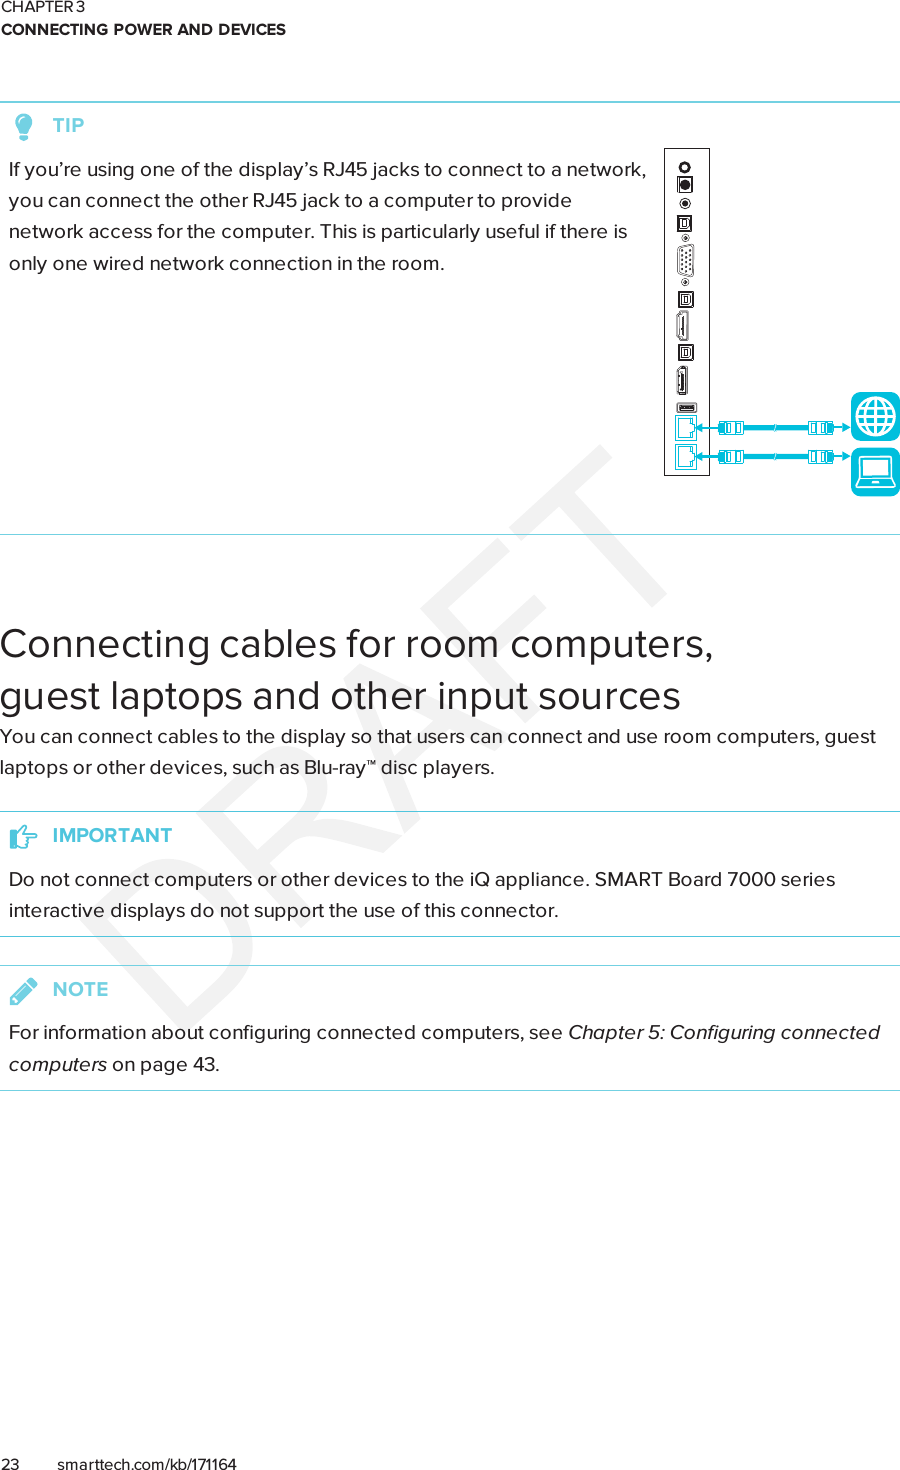
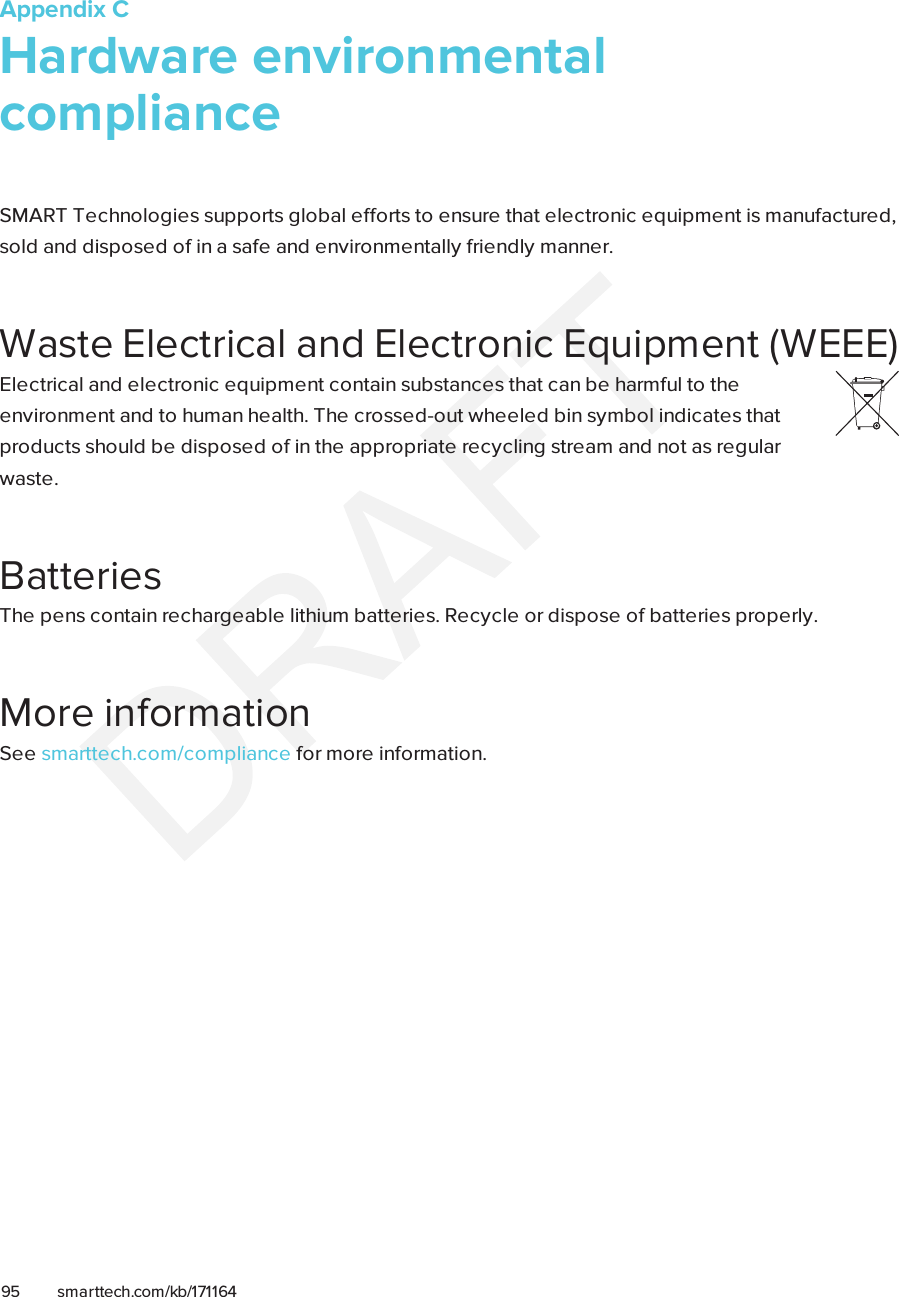
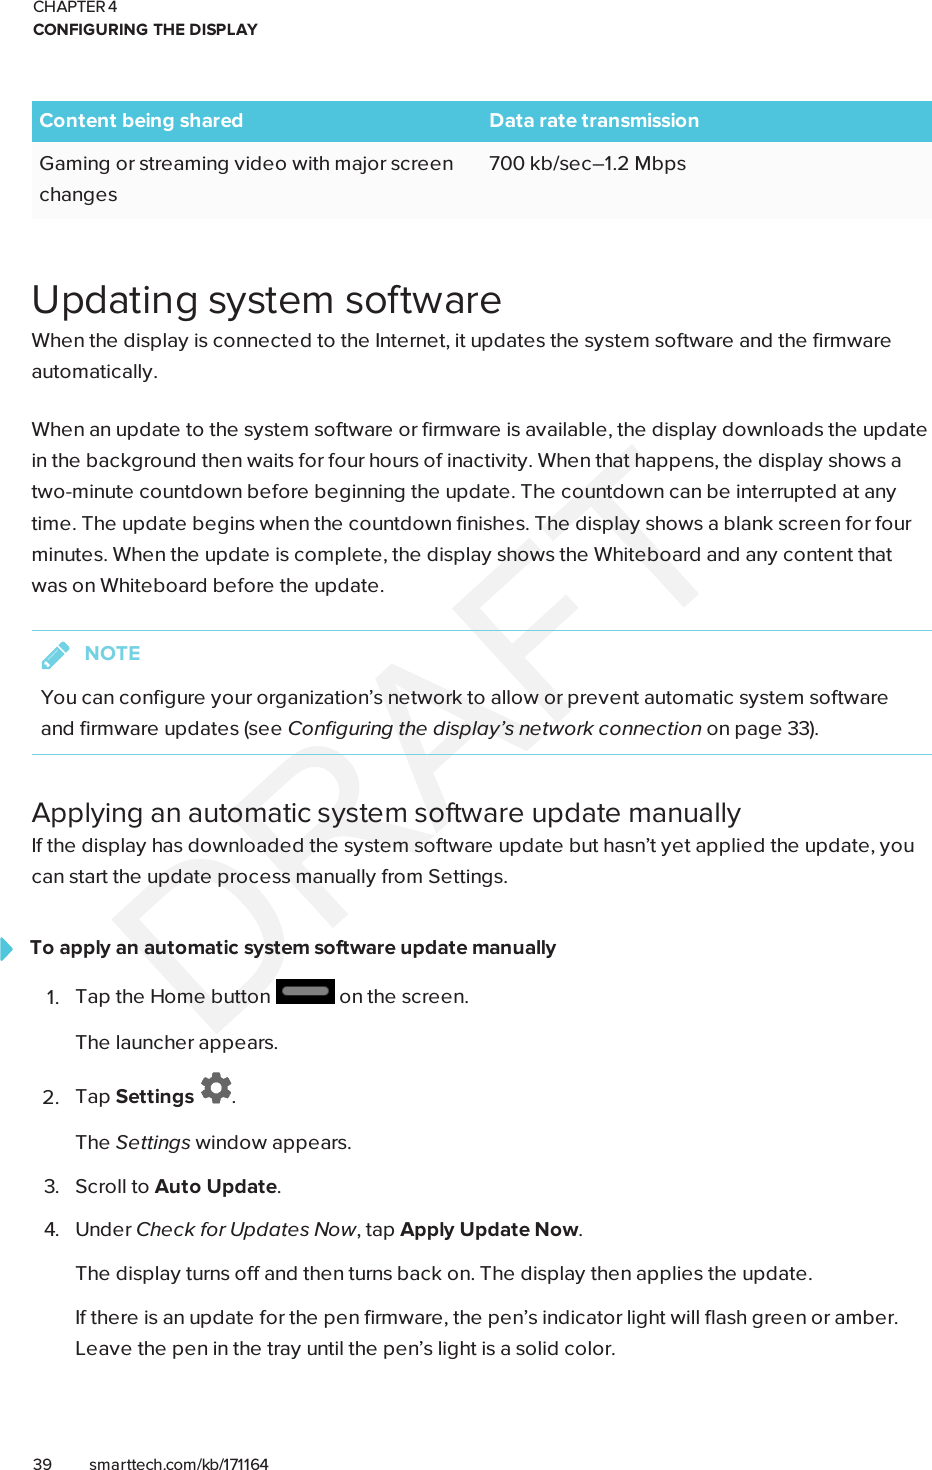
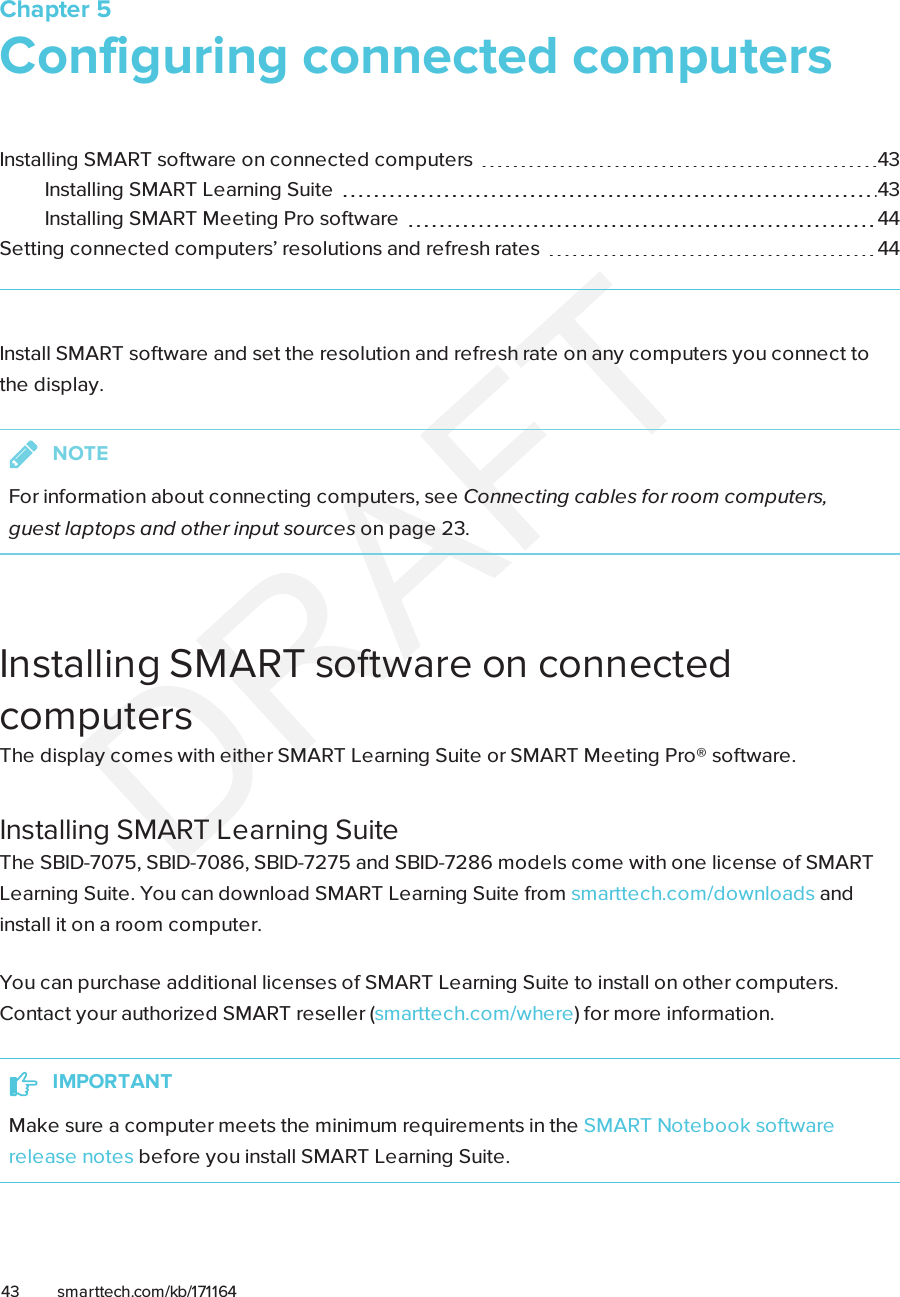
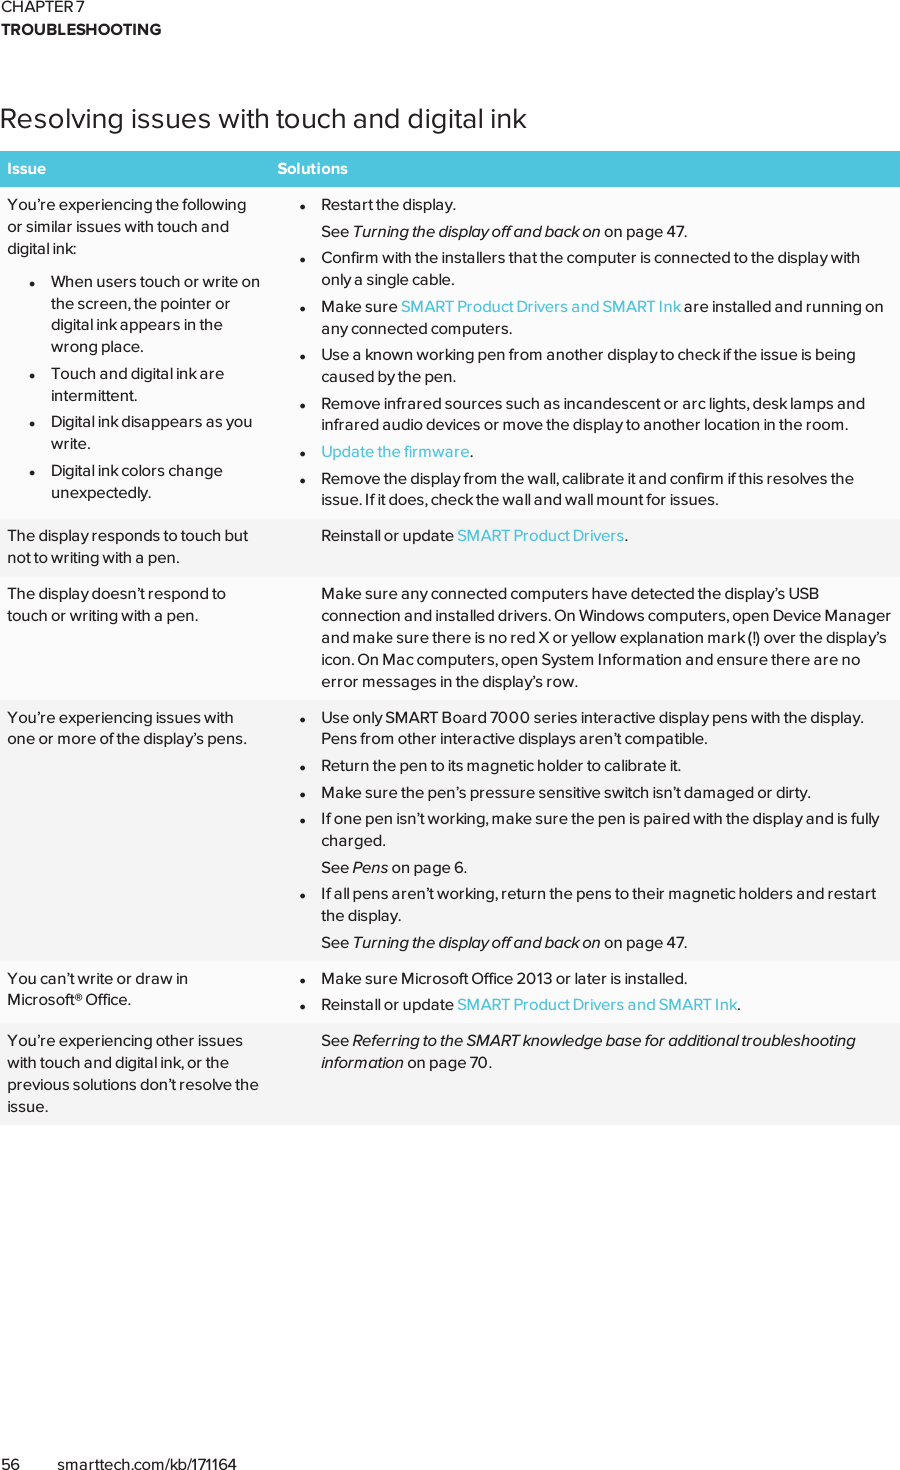
![CHAPTER 3CONNECTING POWER AND DEVICES24 smarttech.com/kb/171164Using recommend cablesSMART recommends the following varieties of cable:Cable type Maximum length RecommendationHDMI 23' (7 m)1Use only certified HDMI cables that have beentested to support the performance standard yourequire.DisplayPort 23' (7 m) Use DisplayPort 1.2 compliant or better cables.VGA [N/A] Use VGA cables with all pins in their connectors fullypopulated and wired.Stereo 3.5 mm 20' (6 m) [N/A]USB 16' (5 m) Use a USB extender if the distance between thecomputer and the display is greater than 16' (5 m).For more information, see USB extenders onpage10.Using cables that exceed these maximum lengths may produce unexpected results, degradedpicture quality or degraded USB connectivity.Connecting to the connector panelThe connector panel includes three sets of computerconnectors:lVGA: This set of connectors can accommodate aUSBcable for touch control, a VGA cable for videoand a stereo 3.5 mm cable for audio.lHDMI 1: This set of connectors can accommodatea USB cable for touch control and an HDMI cablefor video and audio. (This input supports HDMI2.0.)lDisplayPort: This set of connectors canaccommodate a USBcable for touch control and aDisplayPort cable for video and audio.1The performance of cables longer than 23' (7 m) is highly dependent on the cable’s quality.](https://usermanual.wiki/SMART-Technologies/7086/User-Guide-3626573-Page-34.png)
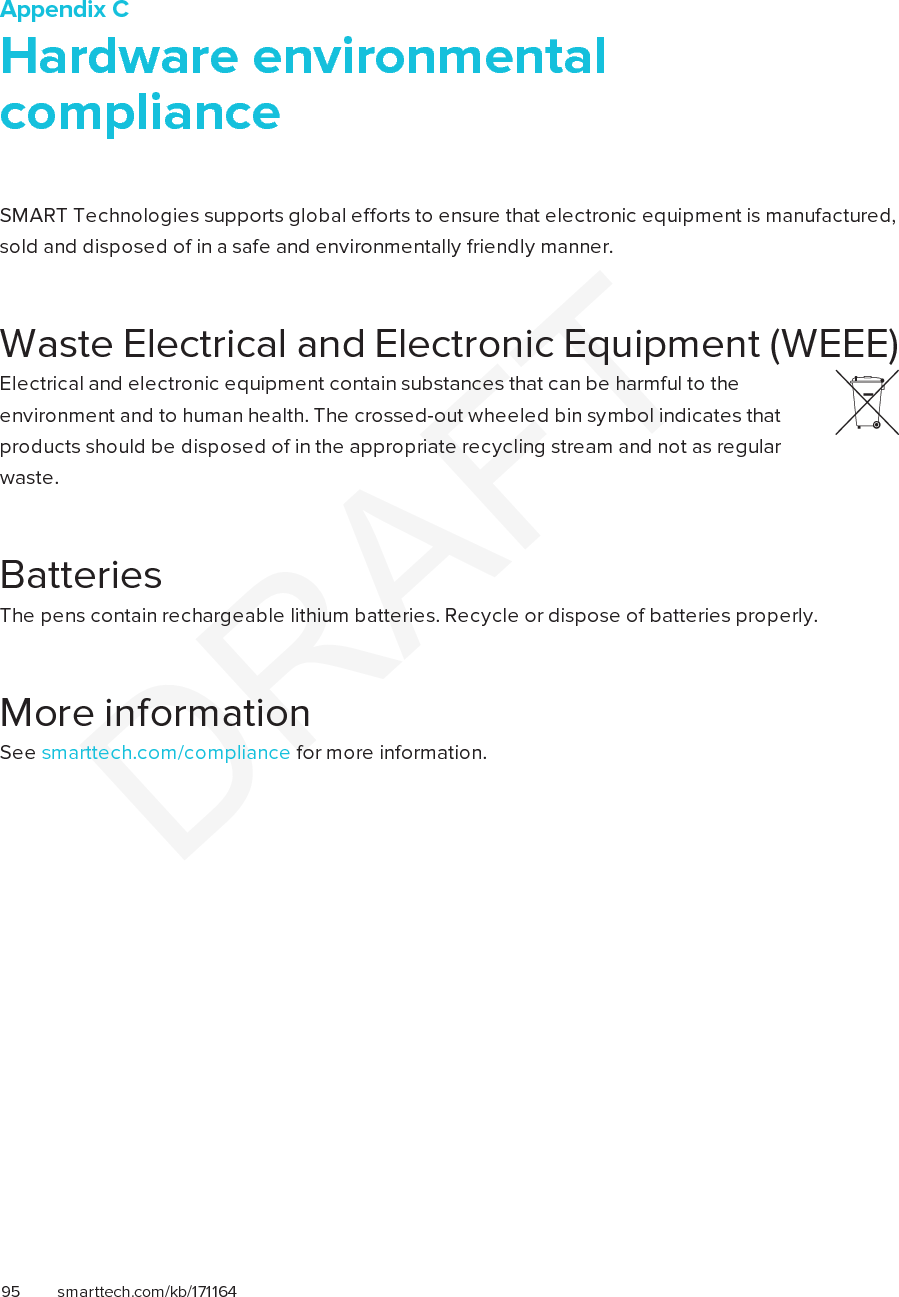
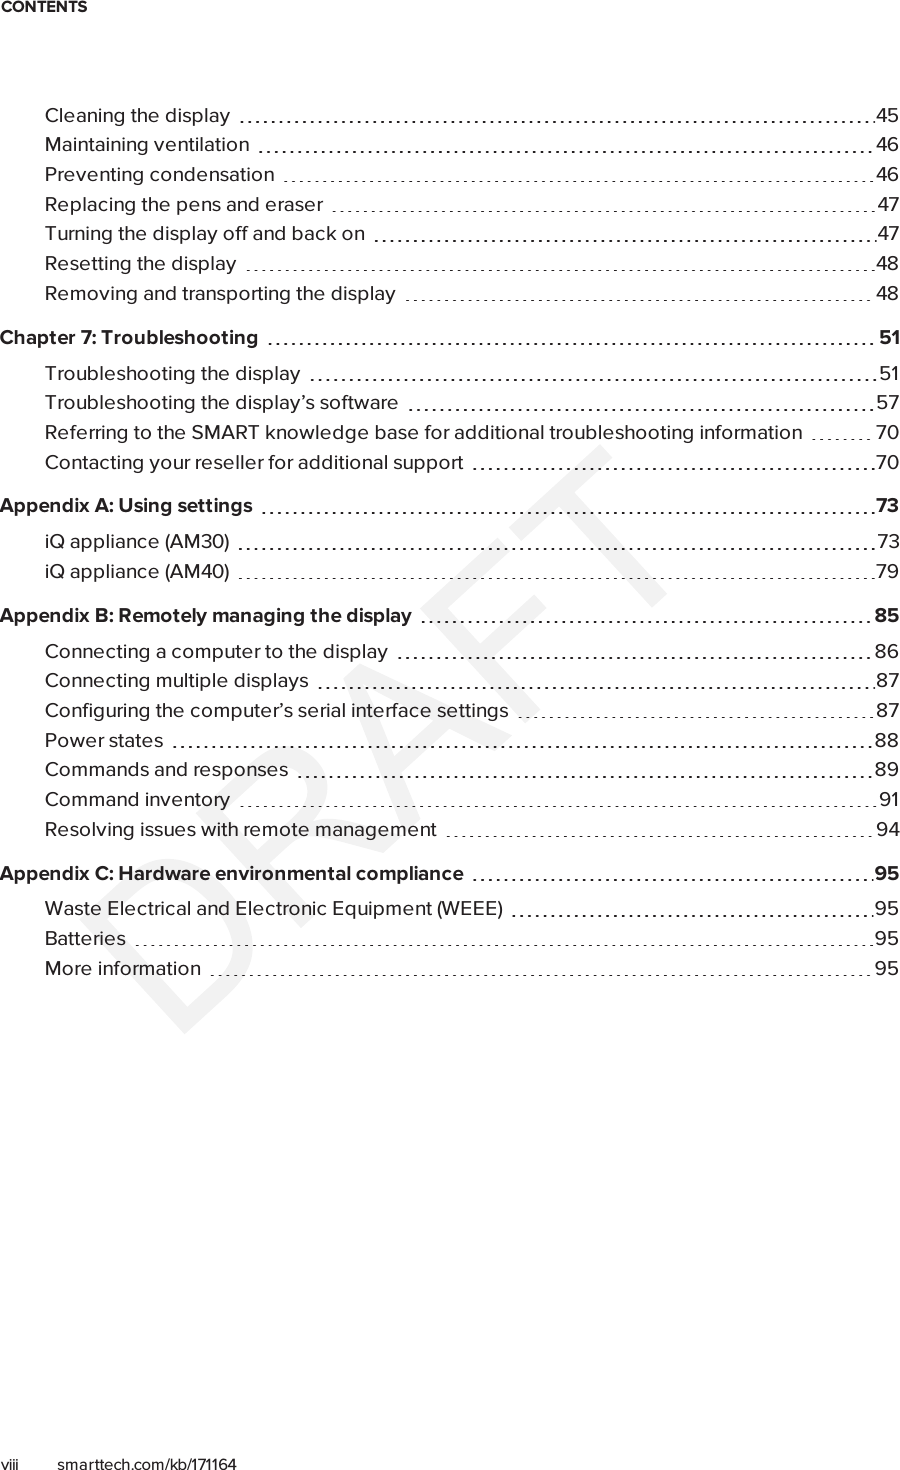
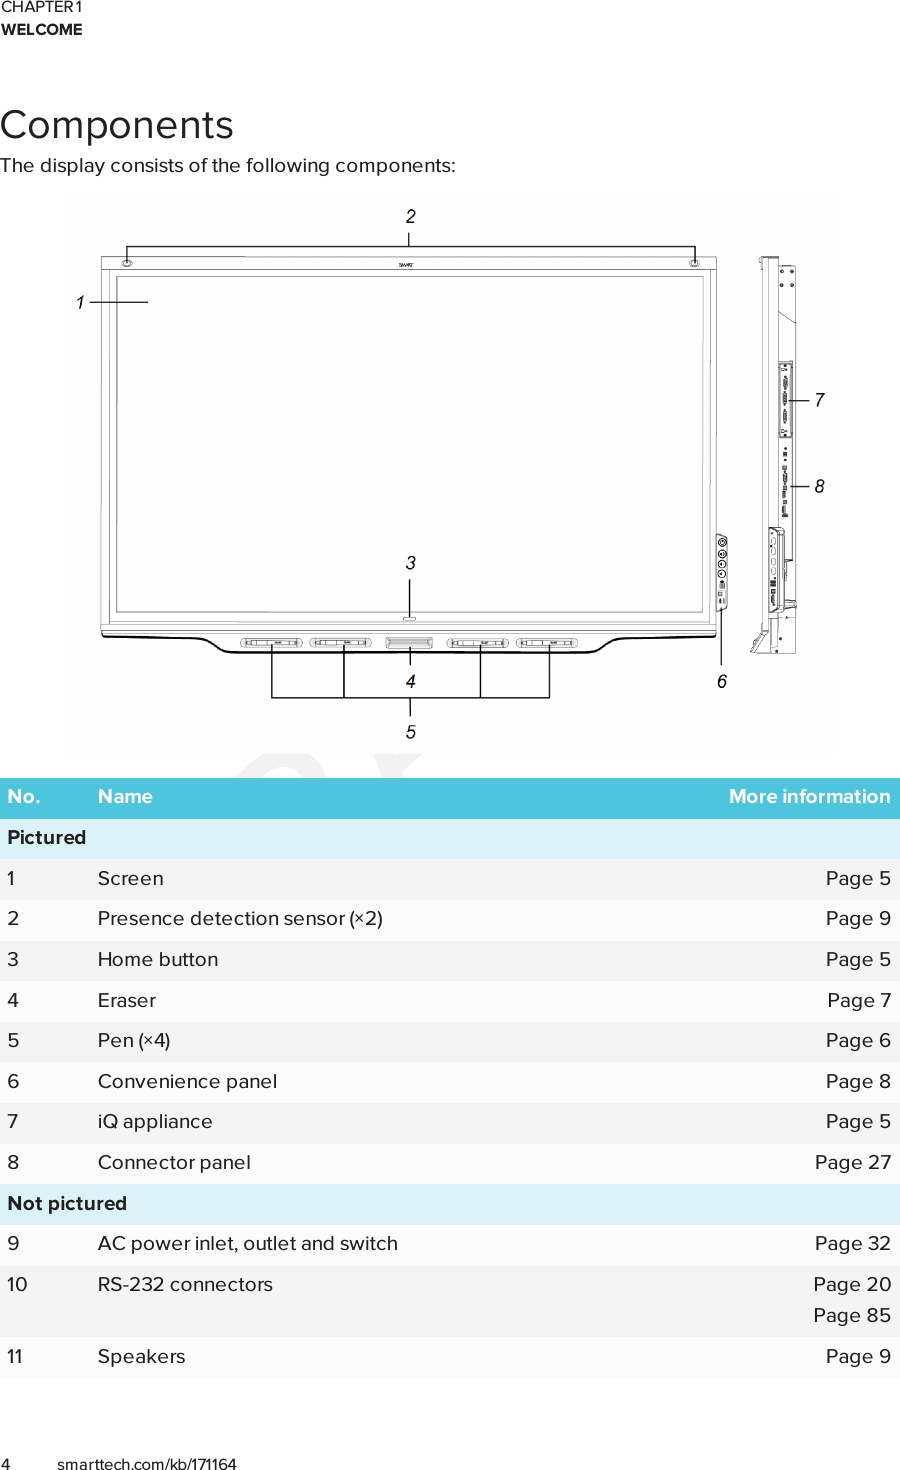
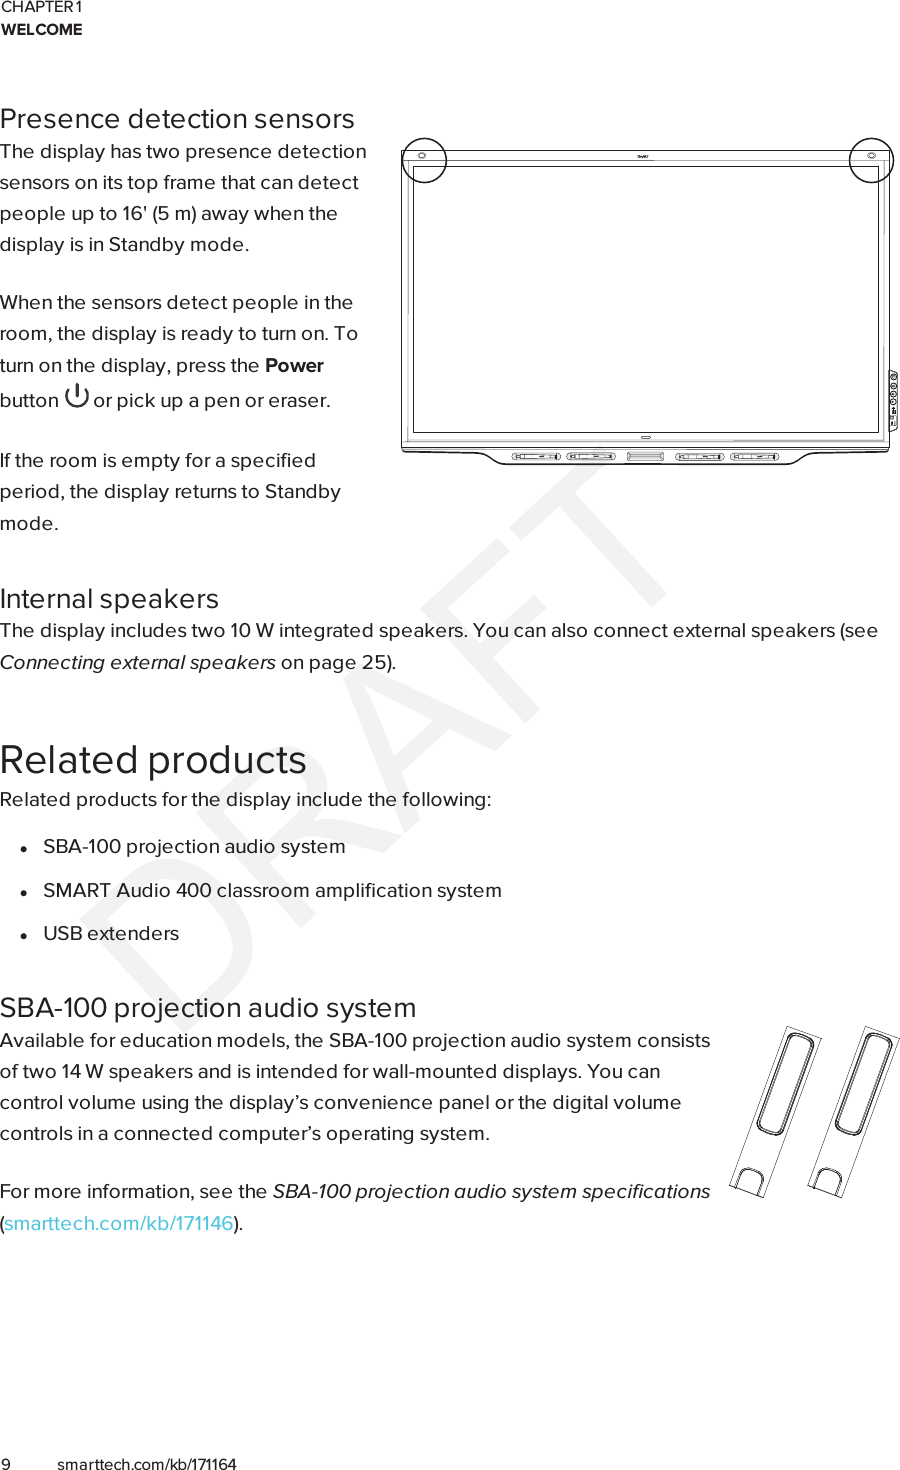
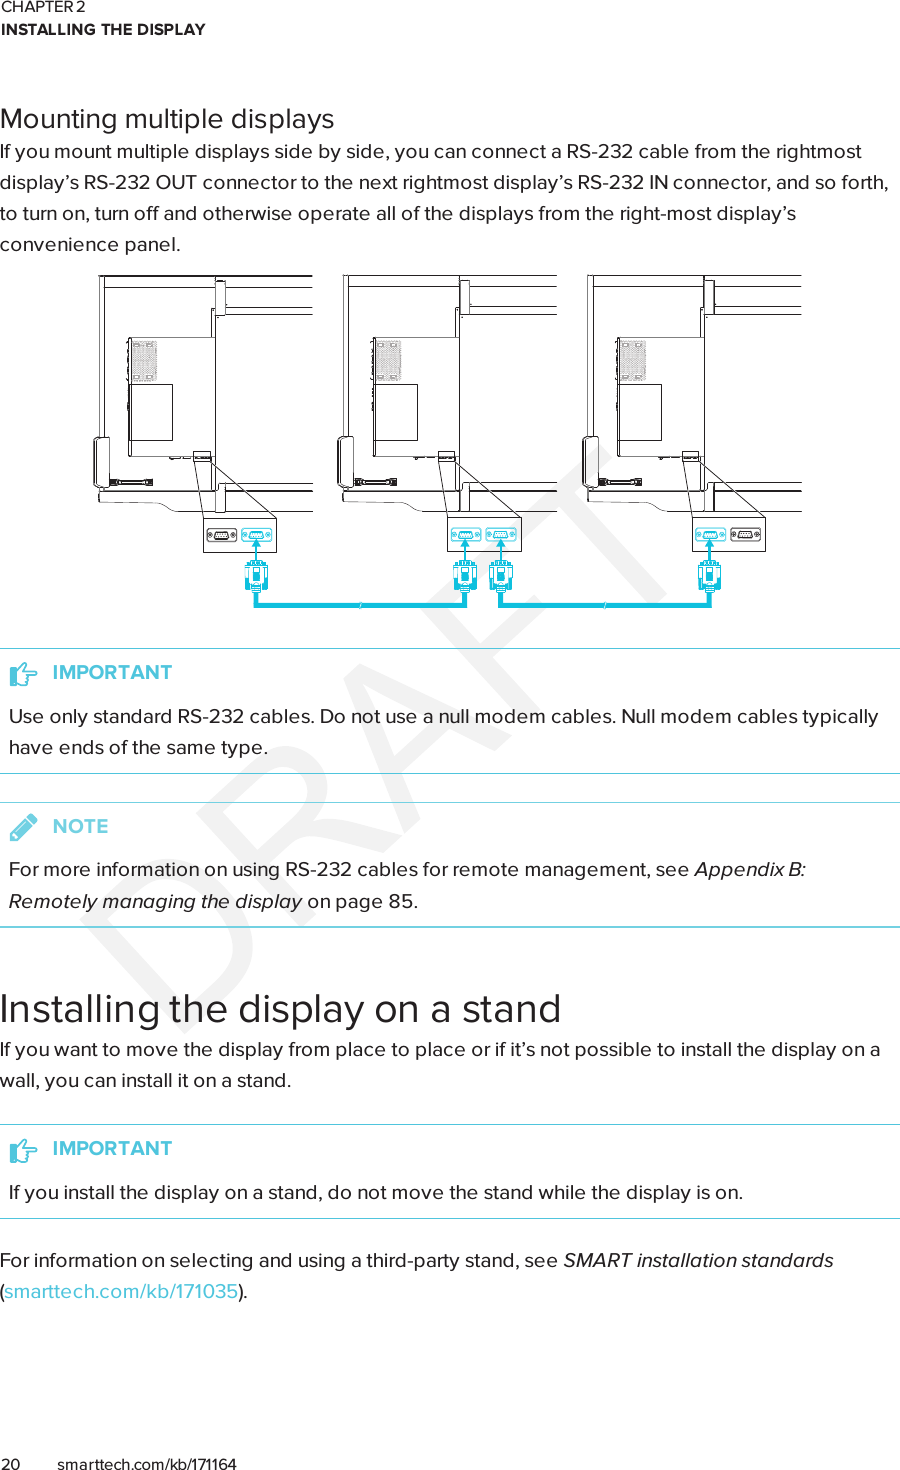
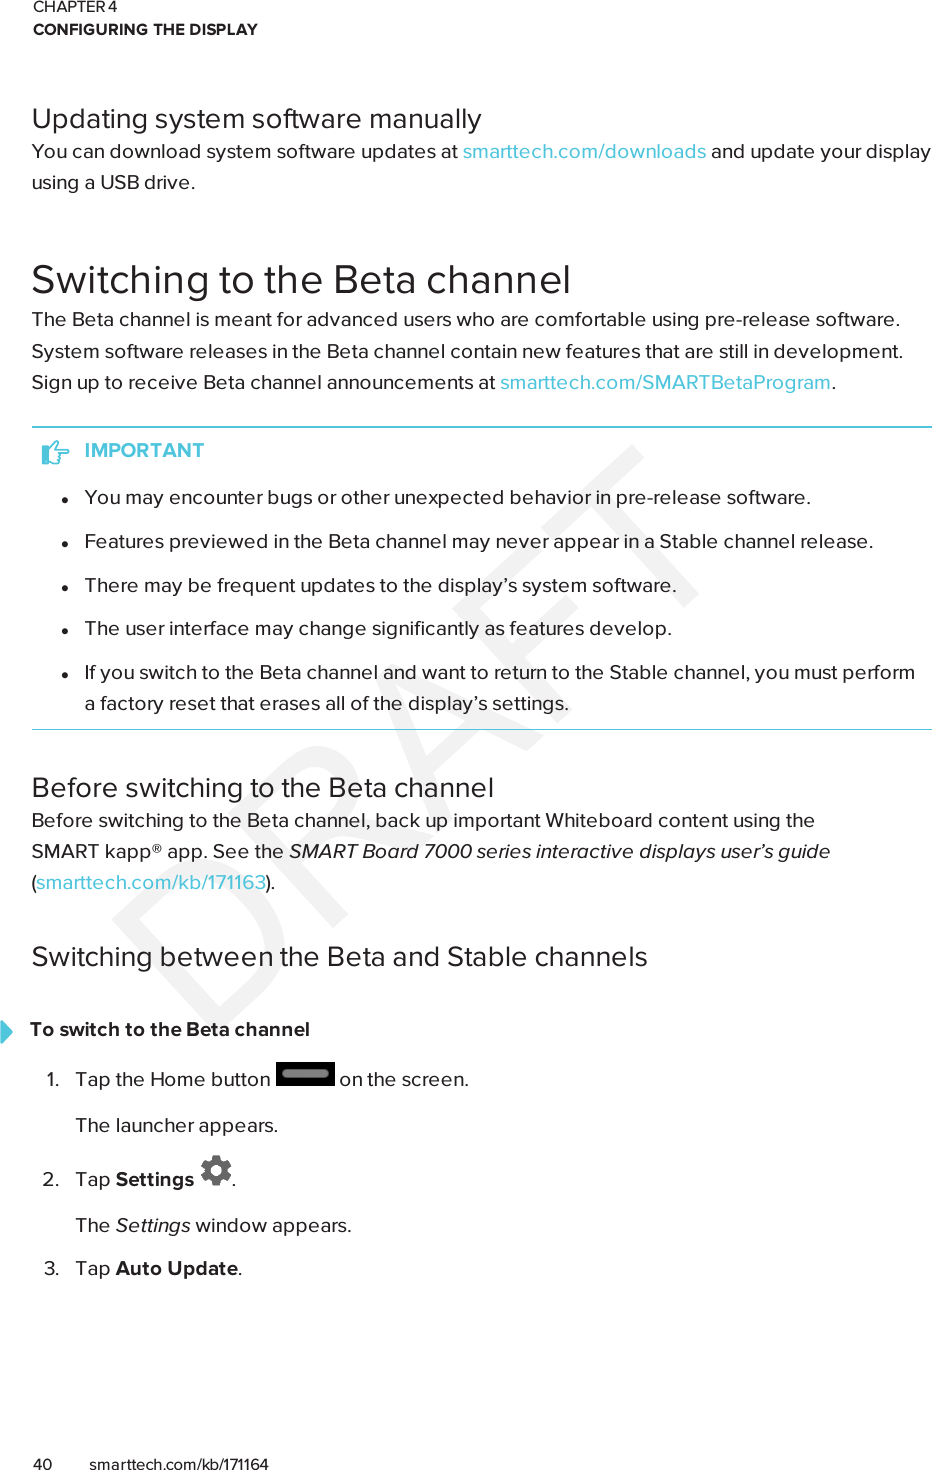
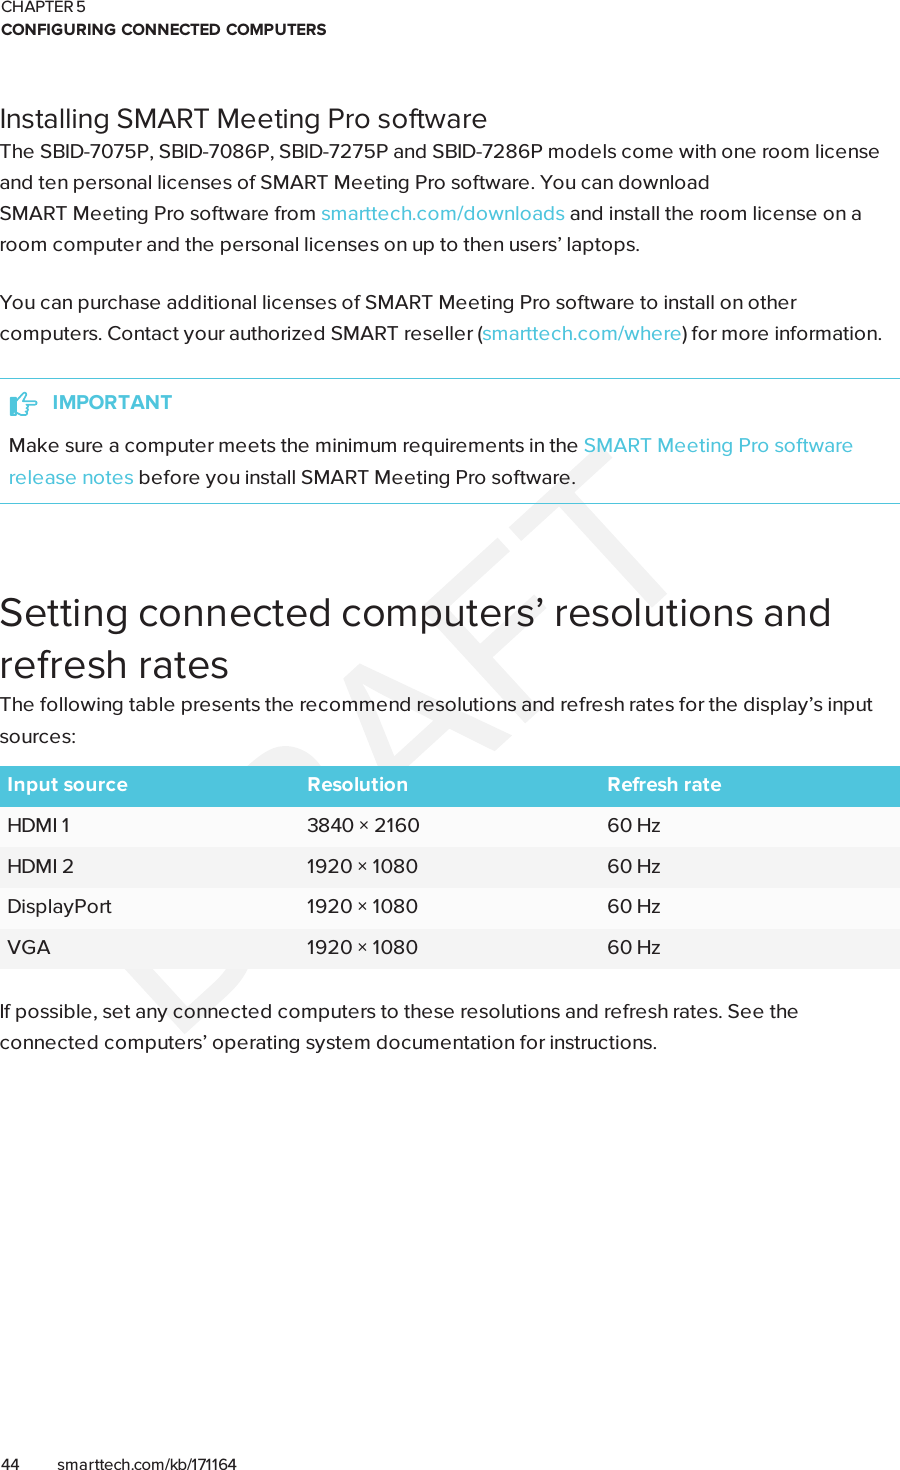
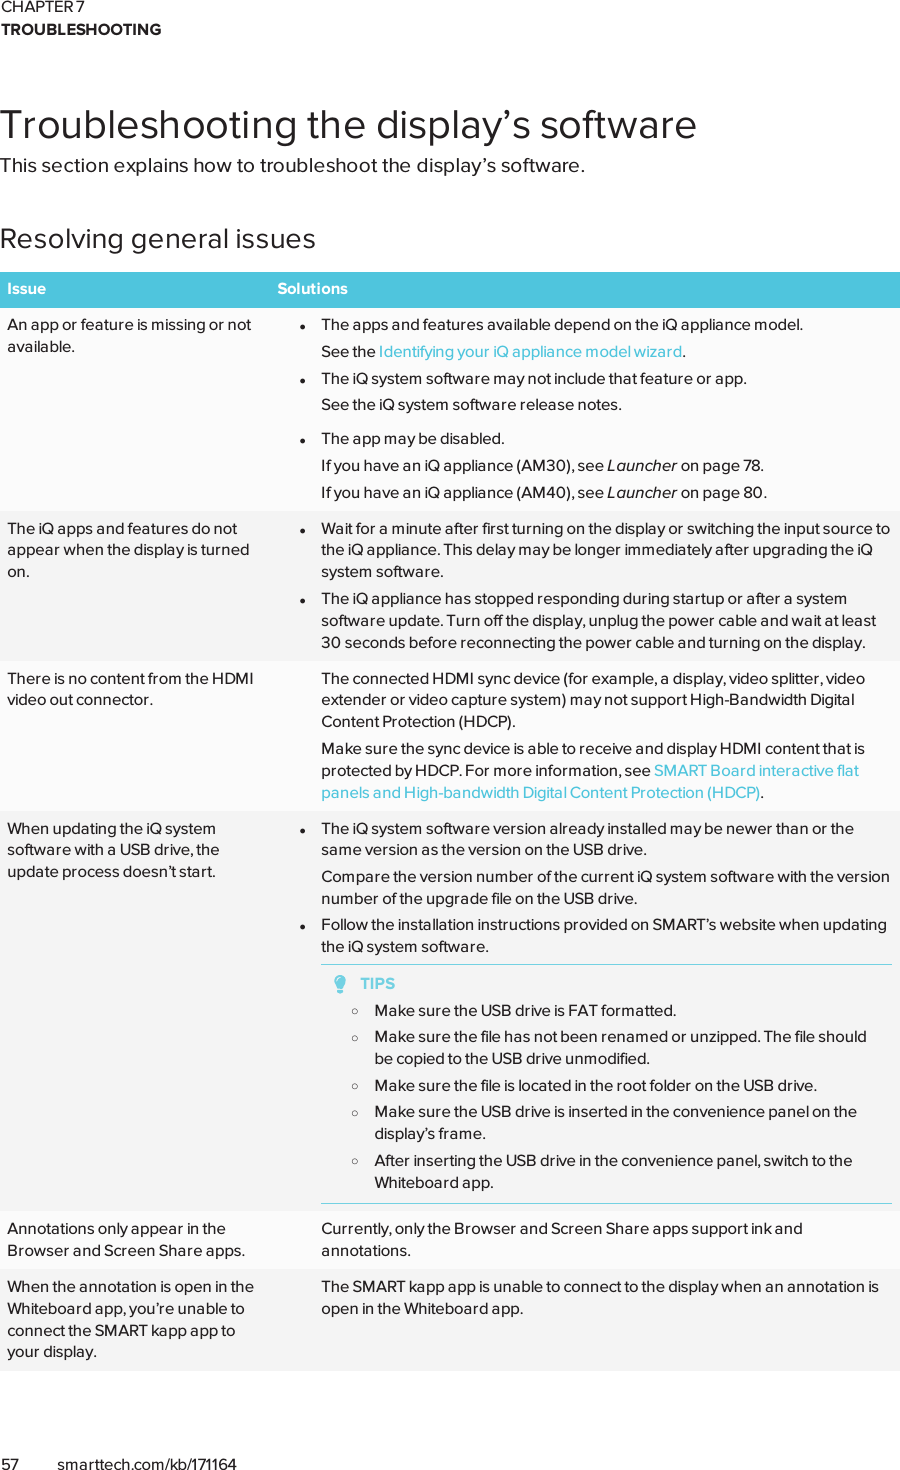
![CHAPTER 3CONNECTING POWER AND DEVICES27 smarttech.com/kb/171164Connector referenceDisplay connectorpanelThe following diagram and table present the connectors on the display’s connector panel:No. Connector Connects to Notes1 Stereo 3.5 mm out External speakers See page25.2 S/PDIF out Digital audio output See page25.3 Stereo 3.5 mm in VGA input (audio) See page23.4 USB Type-B VGA input (touch) See page23.5 VGA in VGA input (video) See page23.6 USB Type-B HDMI 1 input (touch) See page23.7 HDMI 2.0 in HDMI 1 input(videoandaudio)See page23.8 USB Type-B DisplayPort input (touch) See page23.9 DisplayPort in DisplayPort input(videoandaudio)See page23.10 USB Type-A [N/A] This connector is a service port.11 RJ45 (×2) Network See page22.](https://usermanual.wiki/SMART-Technologies/7086/User-Guide-3626573-Page-37.png)
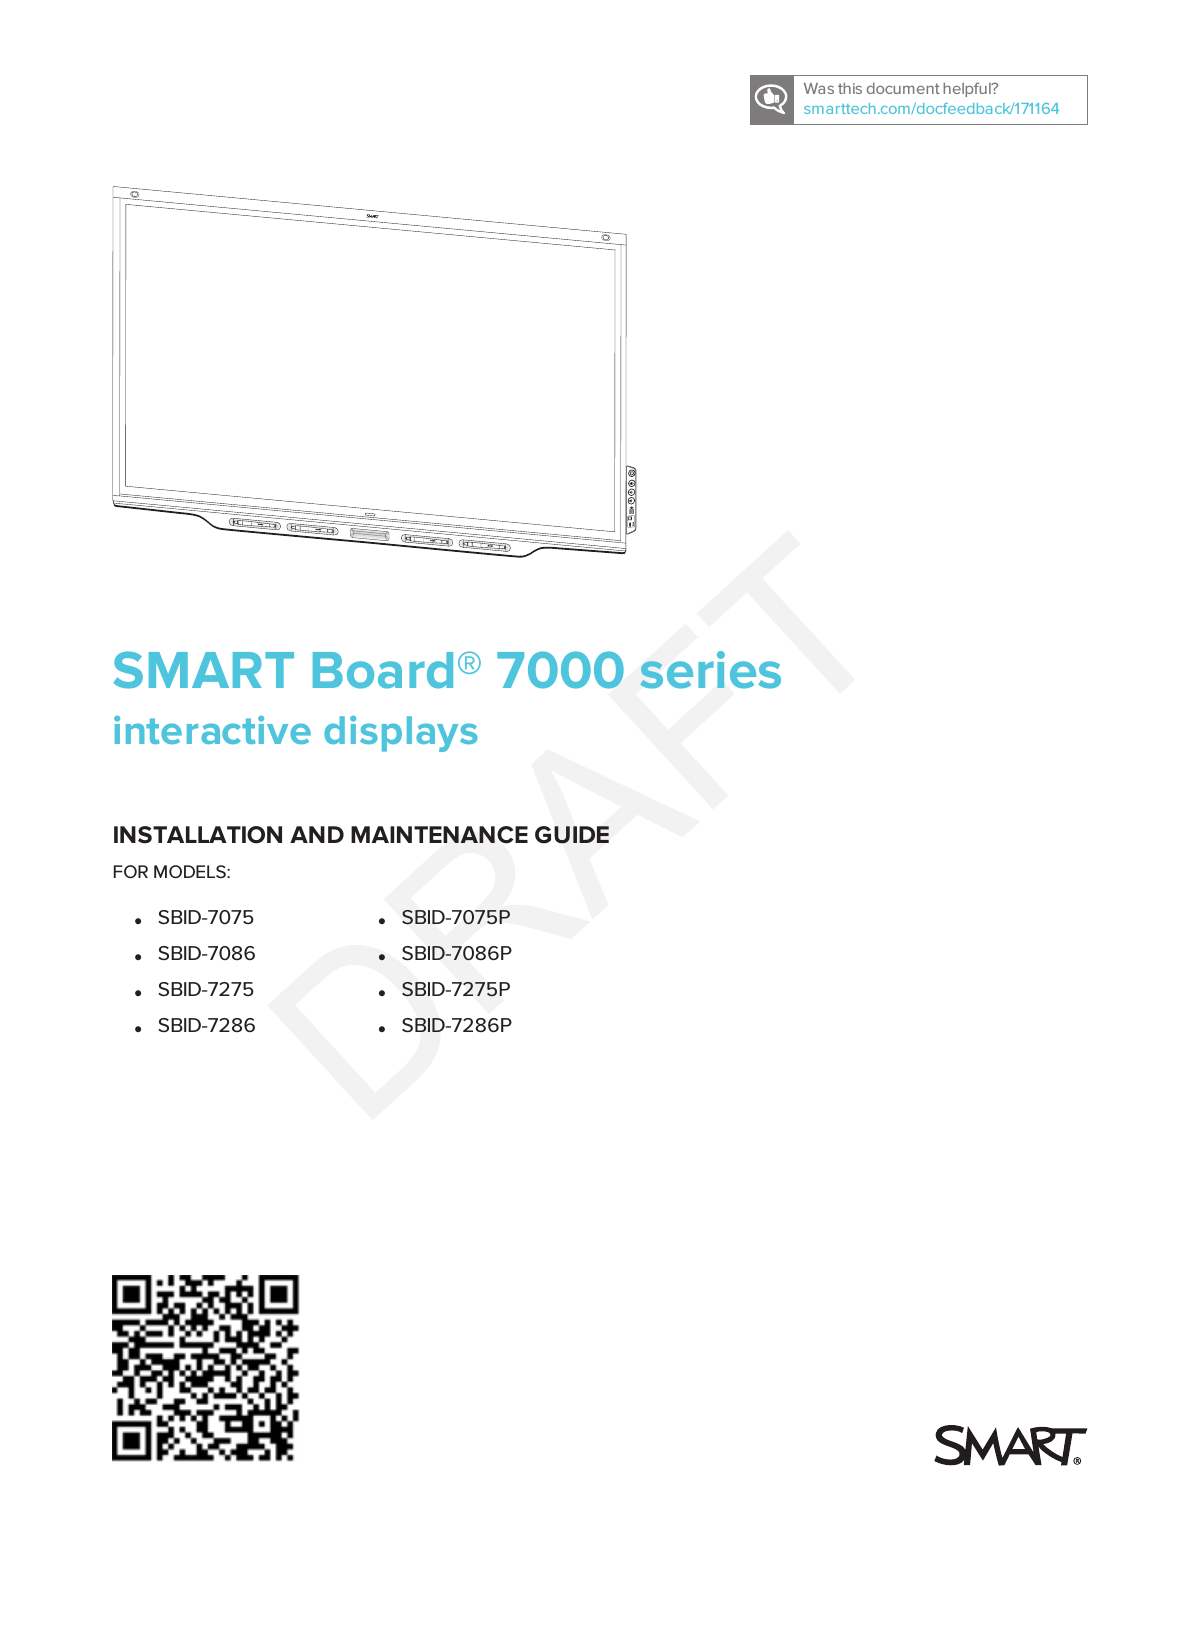
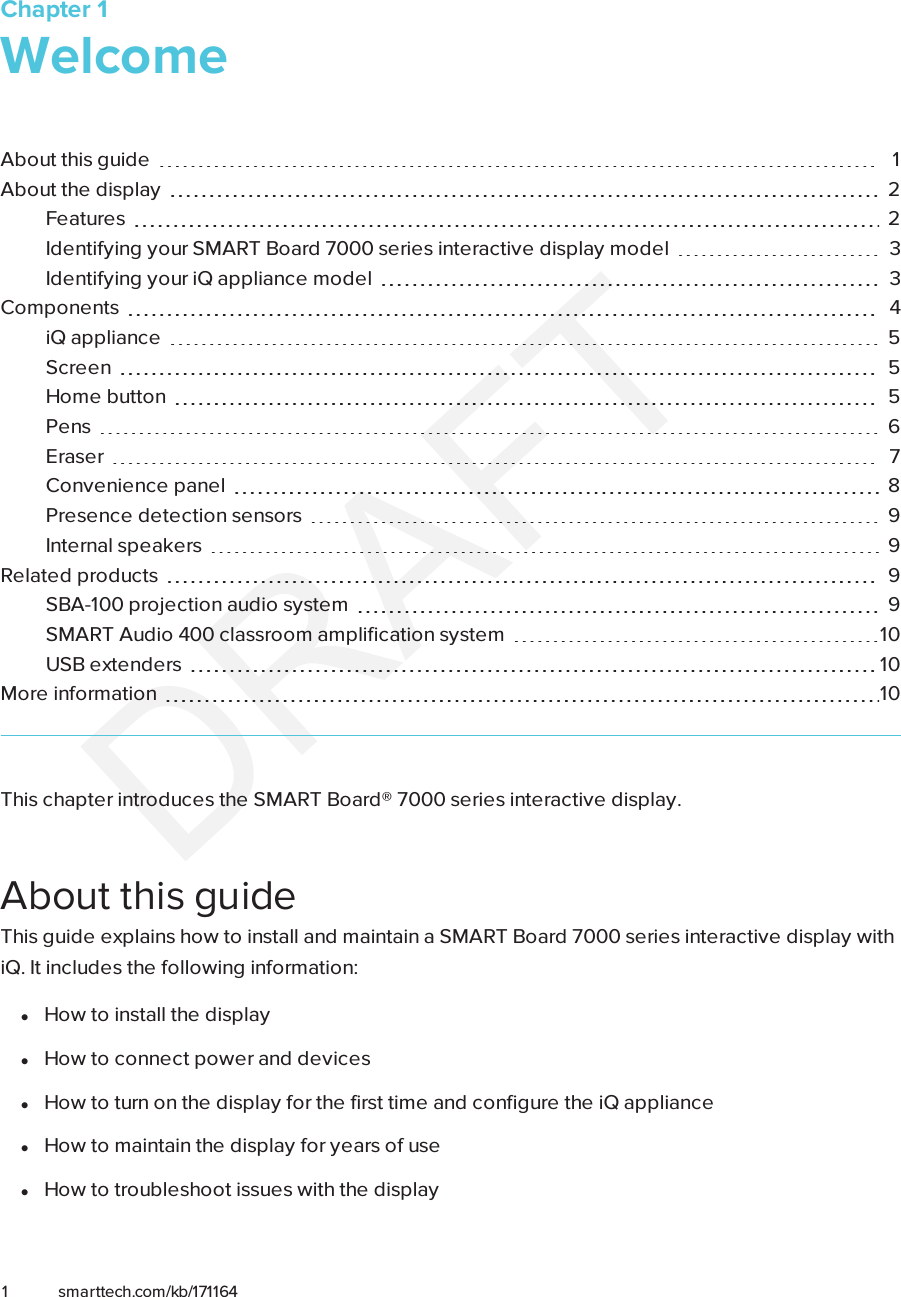
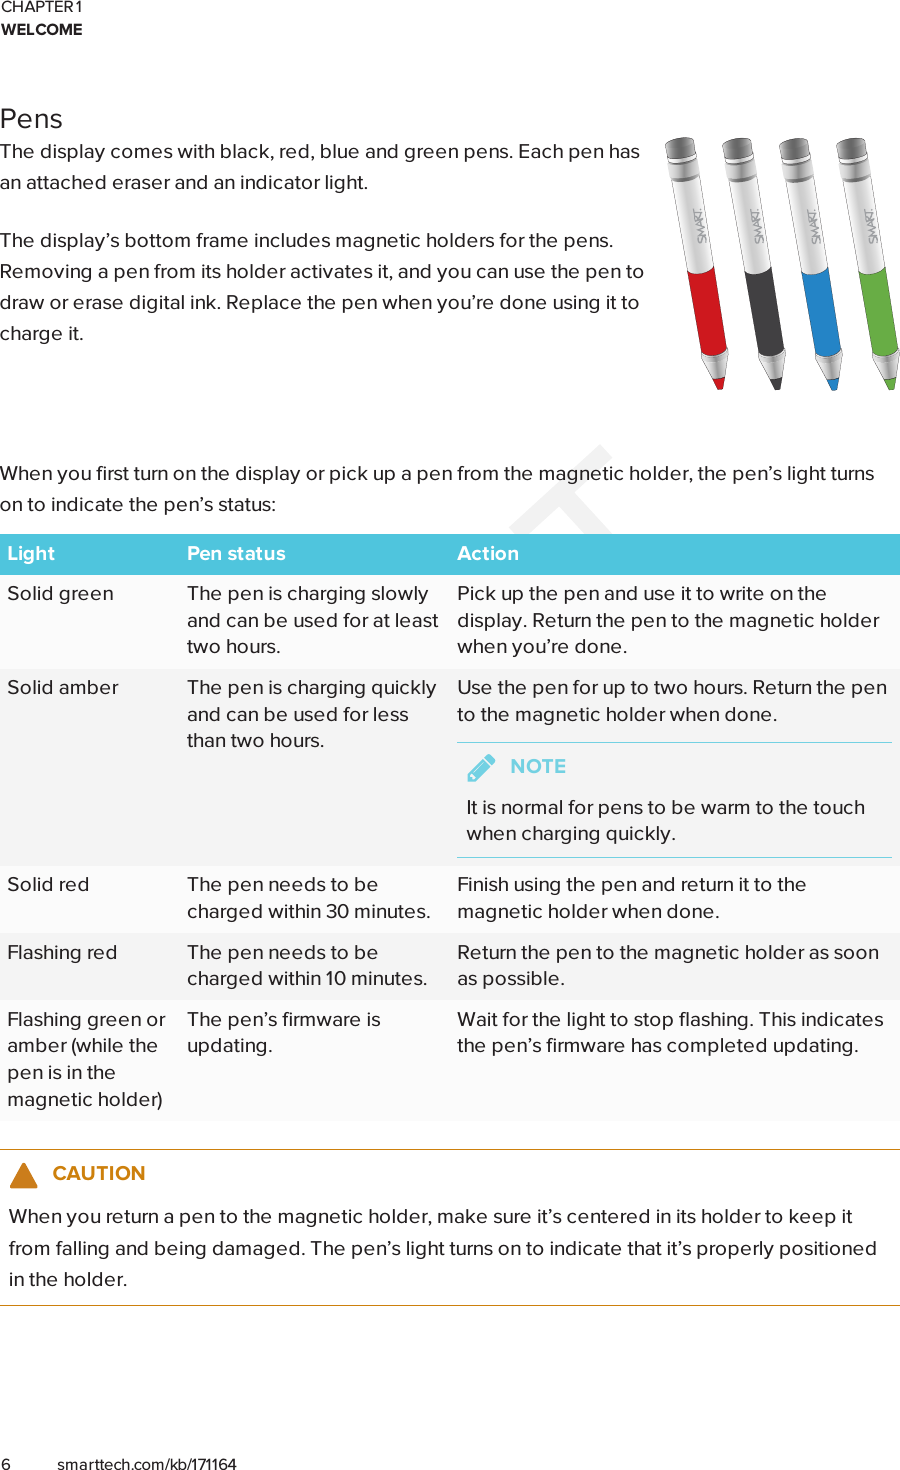
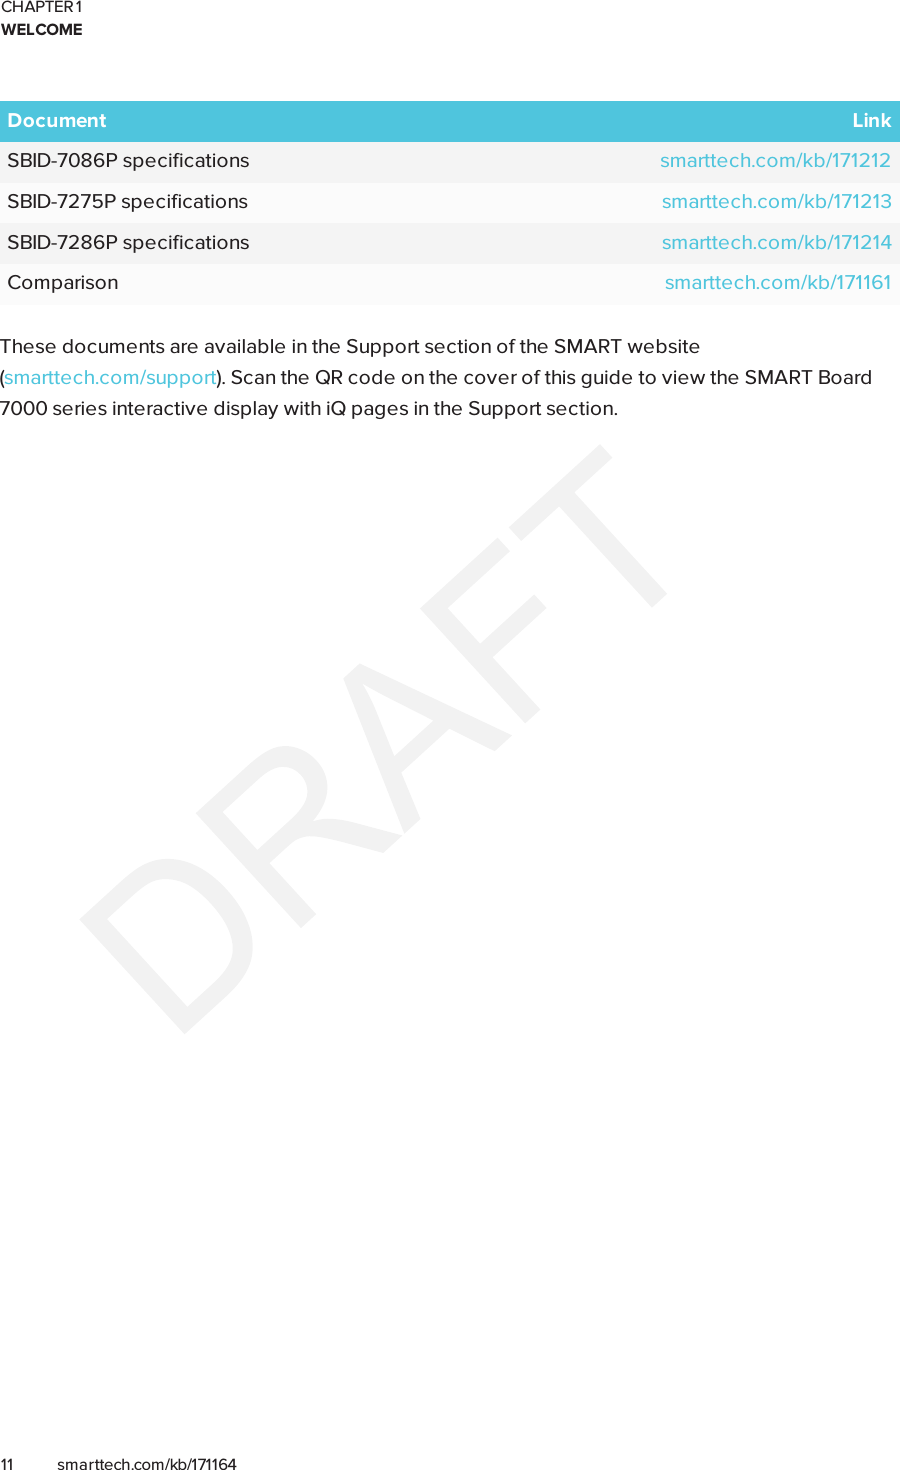
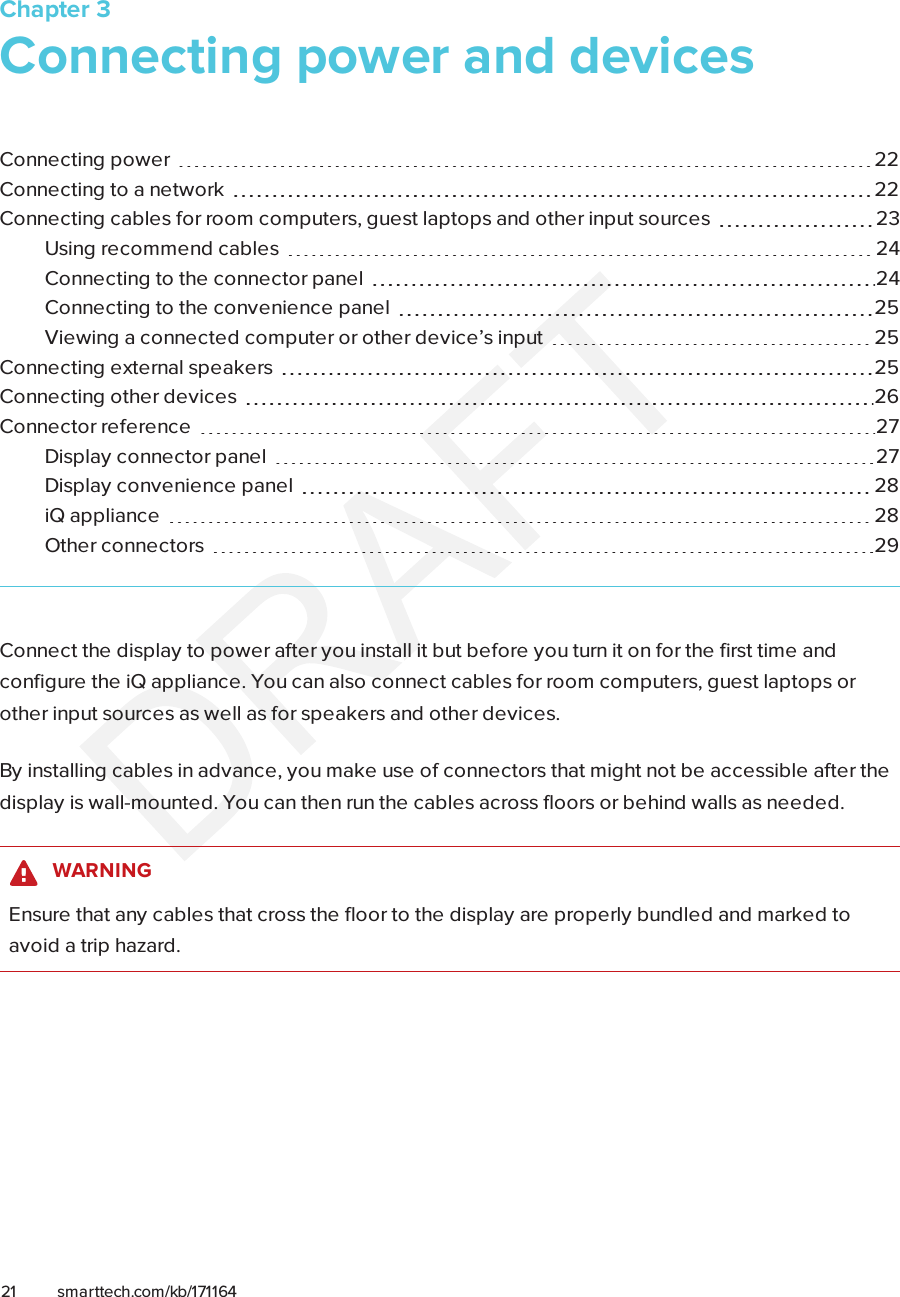
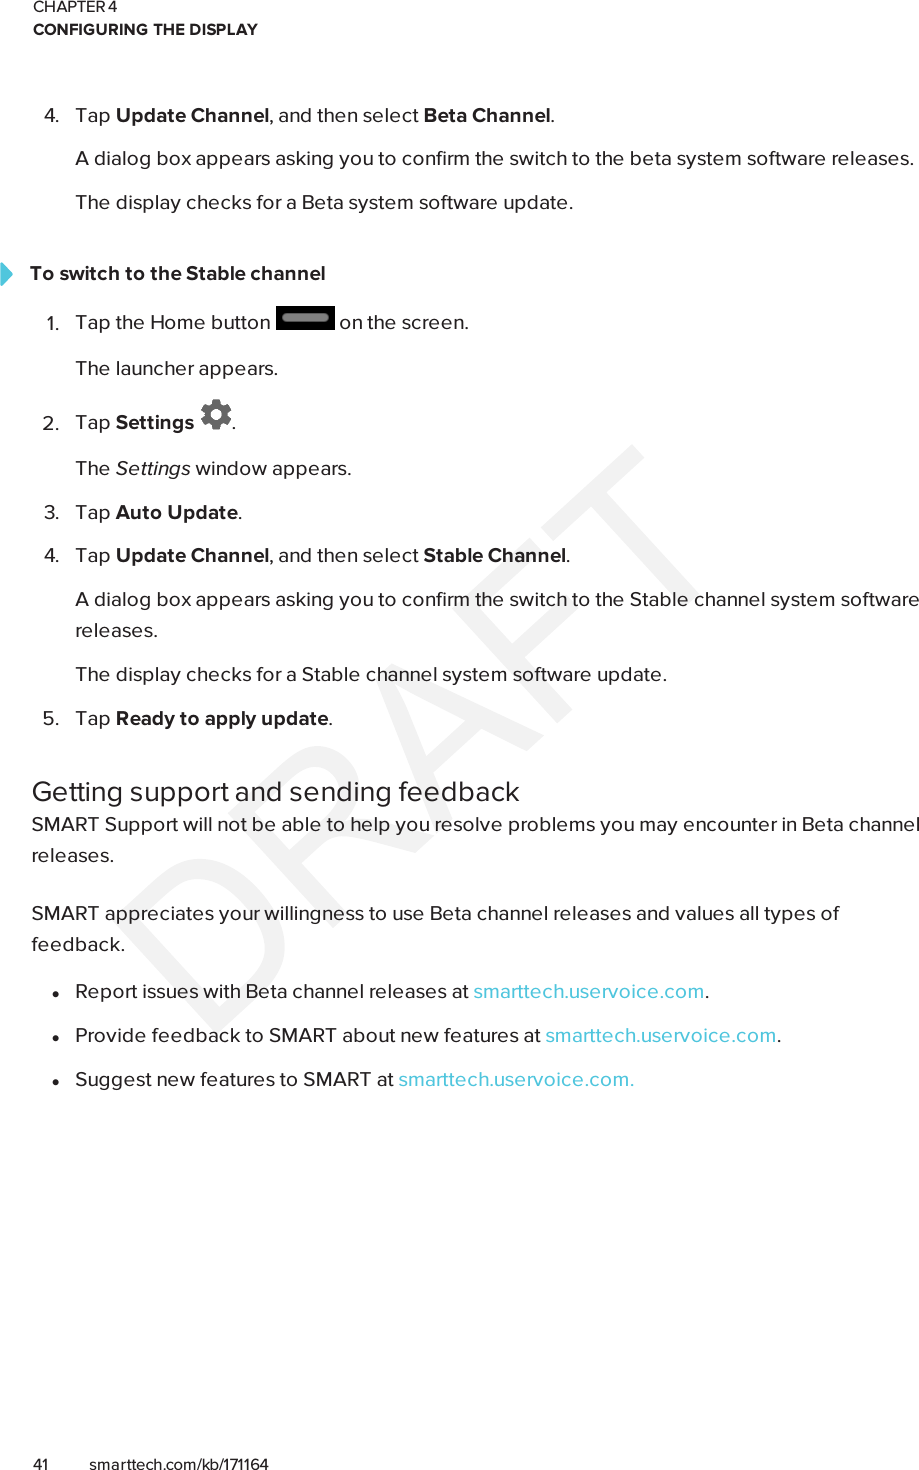
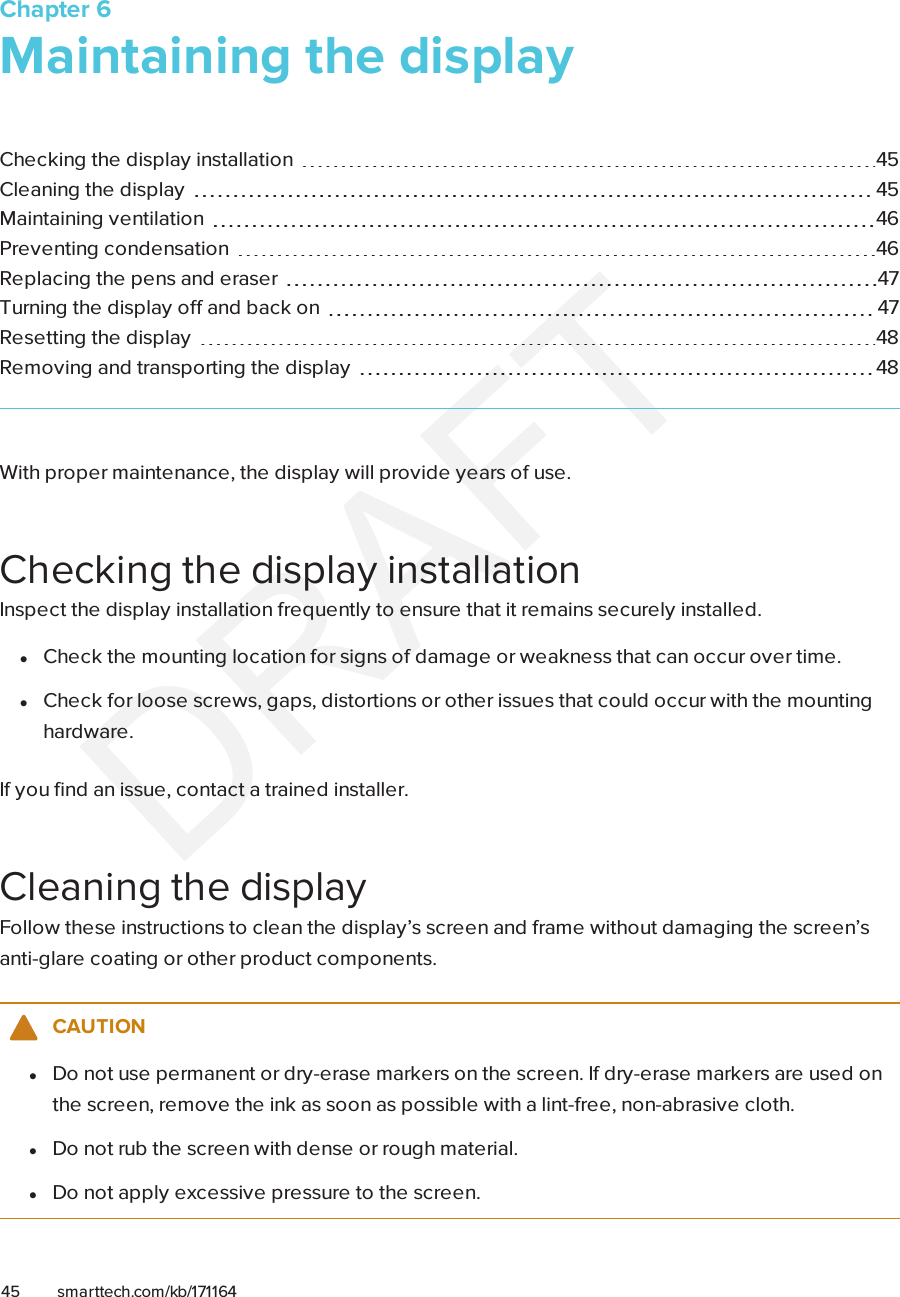
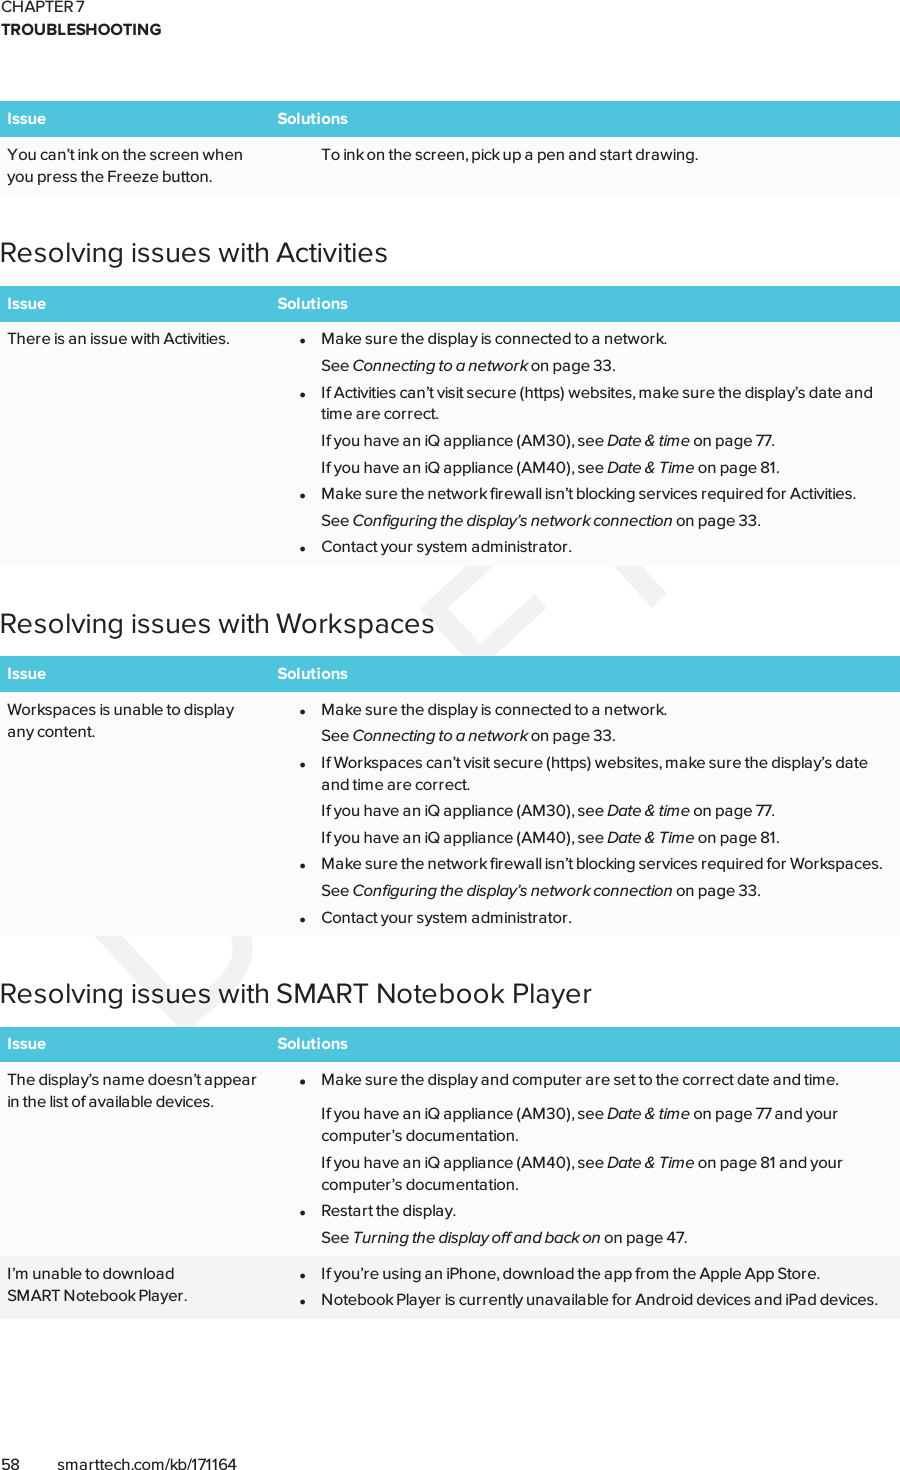
![CHAPTER 3CONNECTING POWER AND DEVICES28 smarttech.com/kb/171164Display convenience panelThe following diagram and table present the connectors on the display’s convenience panel:No. Connector Connects to Notes1 USB Type-A (×2) Supported peripherals [N/A]2 USB Type-B HDMI 2 input (touch) See page23.3 HDMI 1.4 in HDMI 2 input(videoandaudio)See page23.iQ applianceThe following diagram and table present the connectors on the iQ appliance:AM30 AM40No. Connector Connects to Notes1 RJ45 Network Do not use this connector. Usethe connectors on the displayinstead. See page22.](https://usermanual.wiki/SMART-Technologies/7086/User-Guide-3626573-Page-38.png)
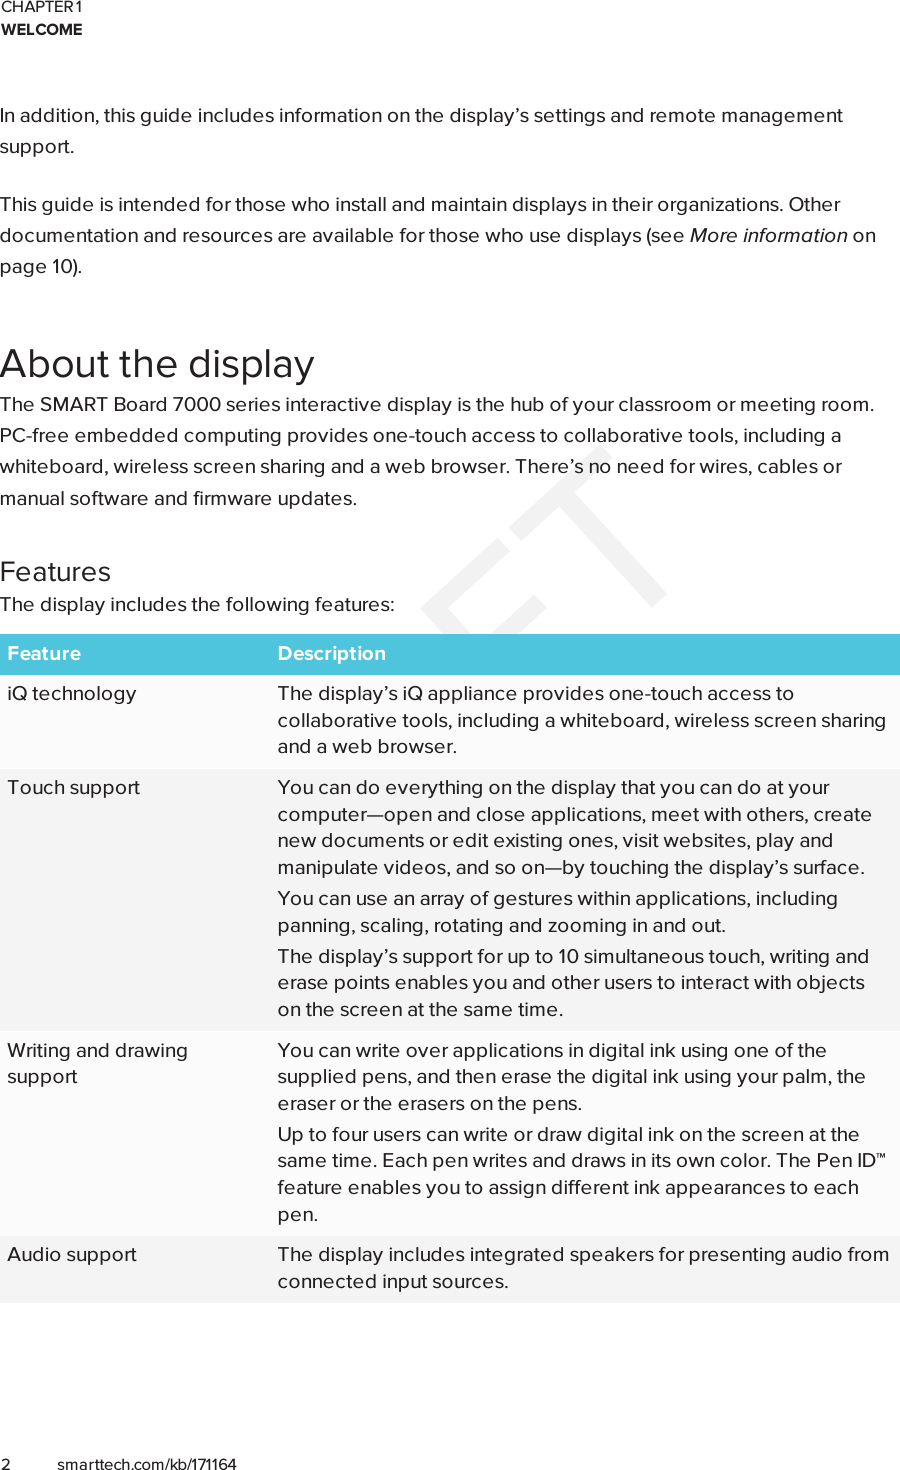
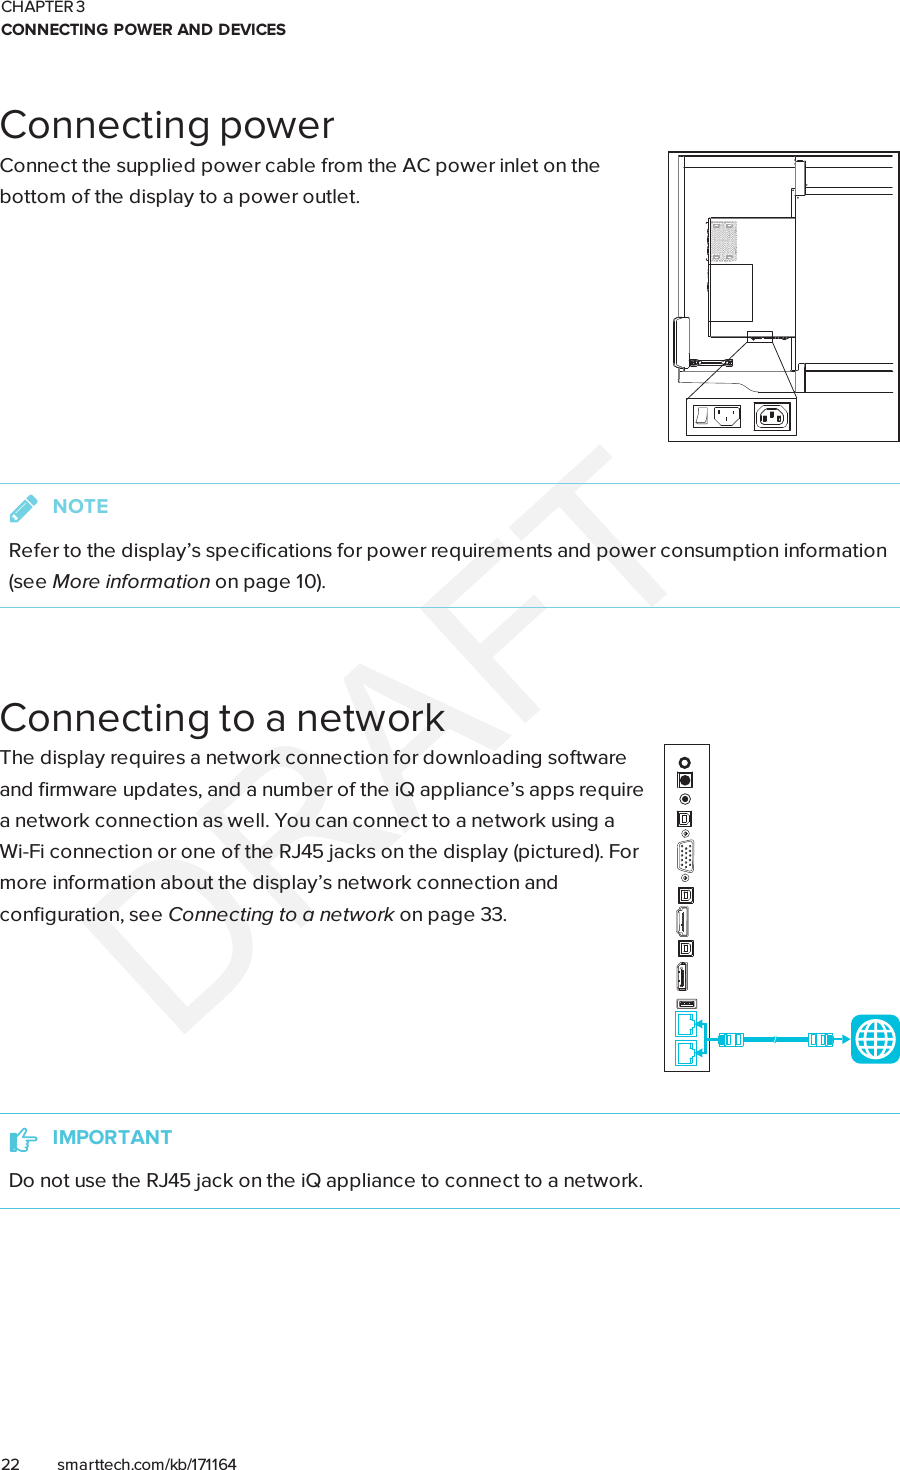
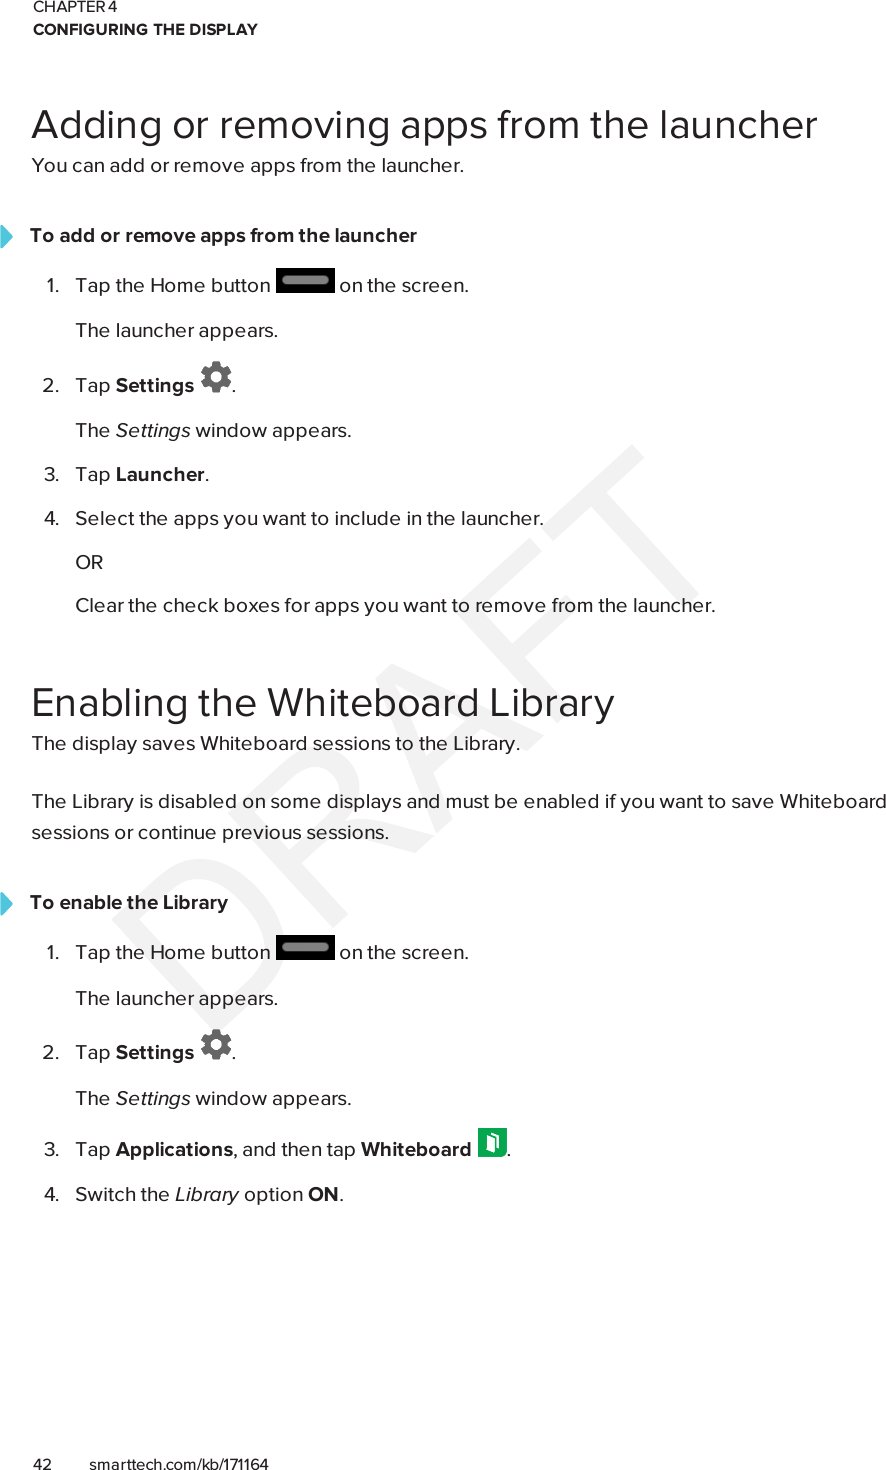
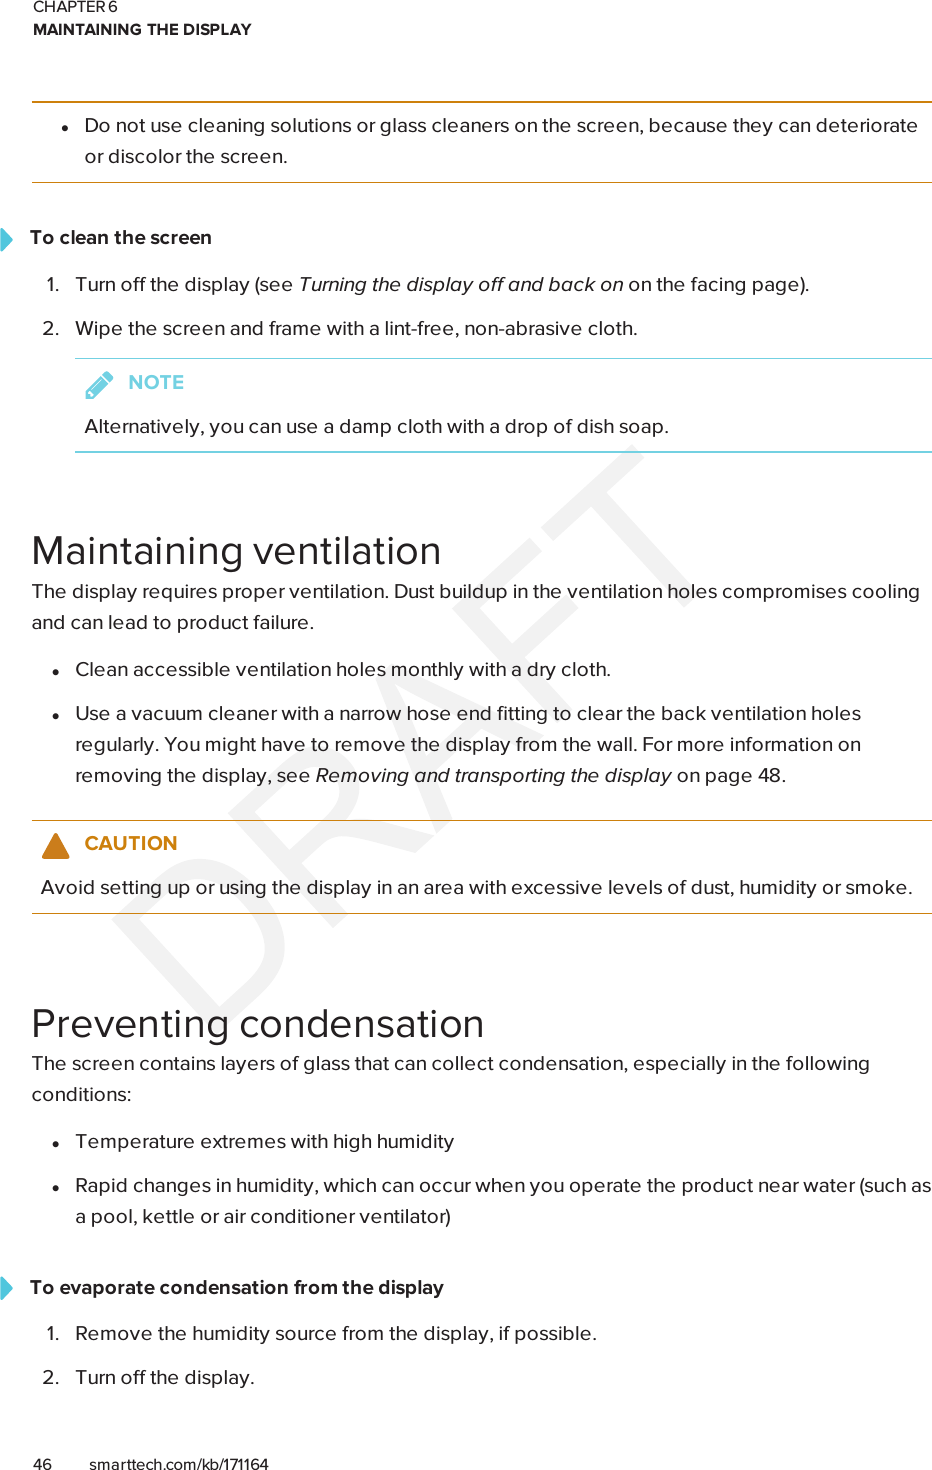
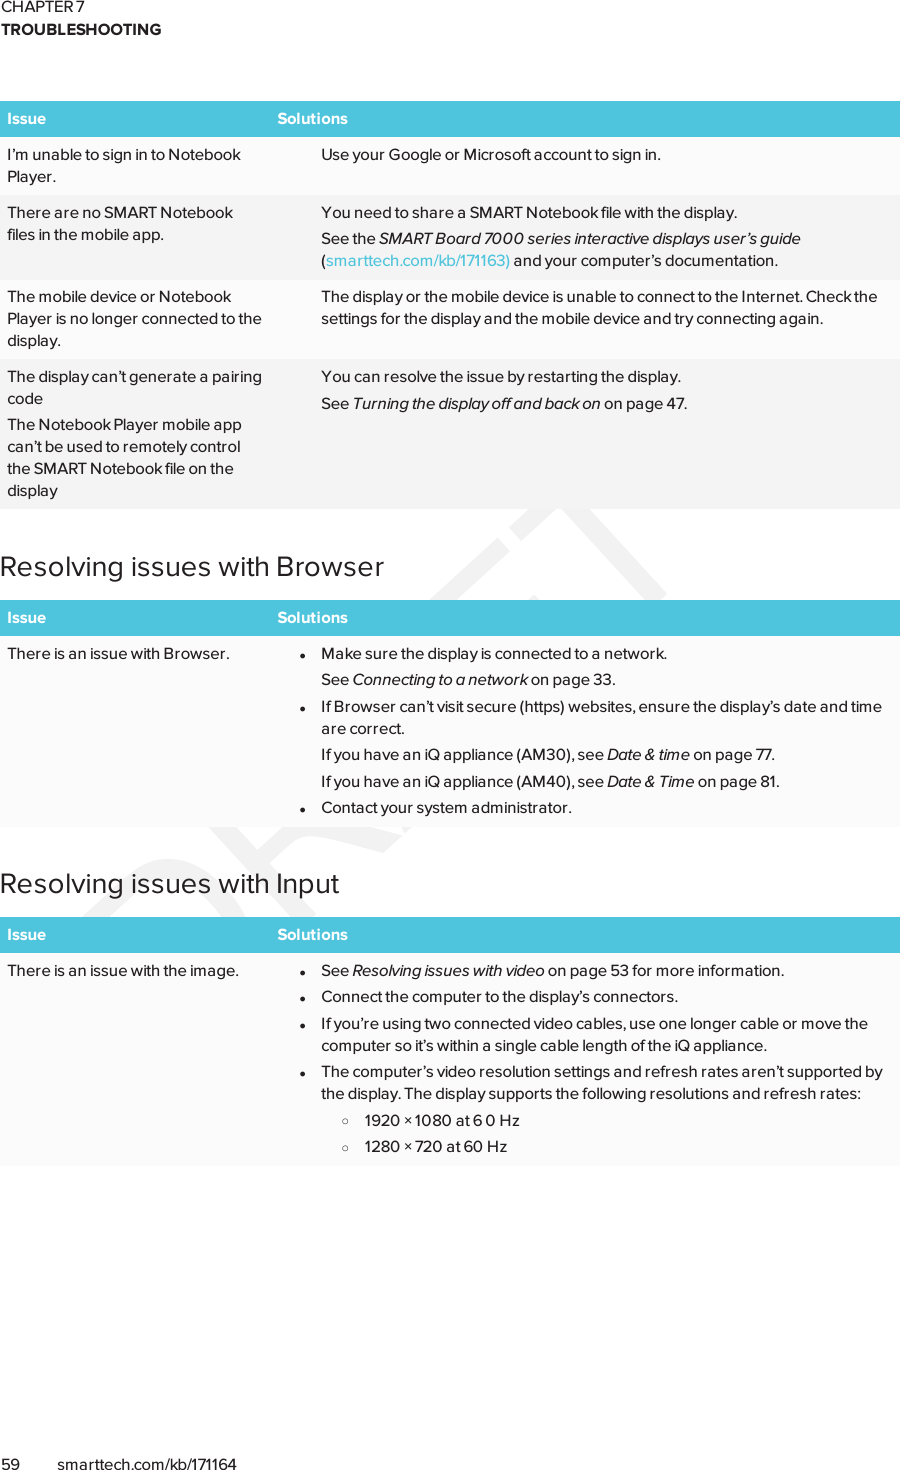
![CHAPTER 3CONNECTING POWER AND DEVICES29 smarttech.com/kb/171164No. Connector Connects to Notes2 USB Type-A (×2) Supported peripherals [N/A]3 HDMIout N/A This connector is not supported.4 USB Type-B OPS/HDMI input (touch) Do not use this connector. Usethe connectors on the displayinstead. See page23.5 HDMI in OPS/HDMI input(videoandaudio)Do not use this connector. Usethe connectors on the displayinstead. See page23.6 USBType-B [N/A] This connector is a service port.7 Micro SD [N/A] This connector is a service port.8 LED [N/A] LED lights green when the iQappliance is inserted in theaccessory slot and turned on.NOTEOlder models of the iQ appliance (AM30)don’t have all the connectors.Other connectorsThere are additional connectors on the bottom of the display (see Mounting multiple displays onpage20 and Appendix B: Remotely managing the display on page85).](https://usermanual.wiki/SMART-Technologies/7086/User-Guide-3626573-Page-39.png)


![Appendix A73 smarttech.com/kb/171164Appendix A: Using settingsiQ appliance (AM30) 73About device 73Diagnostics 74Language 74Country 75Security 75Wi-Fi 75Advanced Wi-Fi options 76Ethernet 76Date & time 77Usage Data 77Auto Update 77Display 78Audio 78Launcher 78SMARTWhiteboard 78Screen Share 79iQ appliance (AM40) 79Network settings 79Application settings 80System settings 80You can access the display’s settings using the icon in the launcher.iQ appliance (AM30)About deviceOption Values Function NotesProduct informationBoard name [N/A] Select a name for your display [N/A]](https://usermanual.wiki/SMART-Technologies/7086/User-Guide-3626573-Page-83.png)
![APPENDIX AUSING SETTINGS74 smarttech.com/kb/171164Option Values Function NotesHelp [N/A] Shows the SMART support site forthe display[N/A]Send Feedback [N/A] Send feedback to SMART about thedisplay experience[N/A]Legal Information [N/A] Shows the open source licenses,the SMART end user licenseagreement and SMART intellectualproperty information[N/A]Board informationBuild number [N/A] Shows the iQ system software’sversion number[N/A]Touch controllerversion[N/A] [N/A] [N/A]Scaler version [N/A] [N/A] [N/A]Serial number [N/A] Shows the iQ appliance’s serialnumber[N/A]Bluetooth address [N/A] Shows the display’sBluetooth®address[N/A]Up time [N/A] Shows how long the display hasbeen turned onTurning off the display resets the uptime to 0.Board configurationFactory data reset [N/A] Resets all options to their defaultvaluesOnly administrators should resetthe display.DiagnosticsOption Values Function NotesWrite logs to USB [N/A] Copy diagnostic logs to a USB drive [N/A]InputShow touches [N/A] Shows visual feedback of toucheson the screen[N/A]Pointer location [N/A] Shows touch feedback [N/A]LanguageOption Values Function NotesLanguage [Languages] Sets the language for the settingsmenu[N/A]](https://usermanual.wiki/SMART-Technologies/7086/User-Guide-3626573-Page-84.png)
![APPENDIX AUSING SETTINGS75 smarttech.com/kb/171164CountryOption Values Function NotesCountry [Countries] Sets the display’s country [N/A]SecurityOption Values Function NotesClean upClean up policy DisabledManually resetwith the CleanUp button in thelauncher1 hour2 hours3 hours1 daySets how often the display cleansup[N/A]Clean up thewhiteboard[N/A] Saves the Whiteboard session tothe Library and erases theWhiteboard[N/A]Clean up the browser [N/A] Closes the browser tabs and clearsthe history, cache and cookies[N/A]Clean up otherapplications[N/A] Closes open applications [N/A]Wi-FiNOTETo add a proxy, see Connecting the display to a network on page36.Option Values Function NotesWi-Fi [Wirelessnetworks]Select a wireless network Turn on Wi-Fi to discover networks.Scan [N/A] Scan for wireless networks Tap More to access this option.WPS Pin Entry [N/A] [N/A] Not usedWi-Fi Direct [N/A] [N/A] Not usedAdvanced [N/A] Set advanced options for Wi-Fi See Advanced Wi-Fi options on thenext page.](https://usermanual.wiki/SMART-Technologies/7086/User-Guide-3626573-Page-85.png)
![APPENDIX AUSING SETTINGS76 smarttech.com/kb/171164Option Values Function NotesWPSpush button [N/A] Connect to a wireless networkusing Wi-Fi Protected Setup[N/A]Add network [N/A] Add a wireless network [N/A]Advanced Wi-Fi optionsOption Values Function NotesAdvancedNetwork notification [N/A] Notifies you when an open wirelessnetwork is available[N/A]Keep Wi-Fi on duringsleepAlwaysOnly whenplugged inNeverDetermines if the Wi-Fi remains onwhen the display goes to sleep[N/A]Scanning alwaysavailable[N/A] Allow Google’s location service andother applications to scan fornetworks, even when Wi-Fi isturned off[N/A]Wi-Fi frequency band Auto5 Ghz2.4 GhzWi-Fi frequency band [N/A]Install certificates [N/A] Install certificates to connect to anetwork[N/A]Wi-Fi optimization [N/A] Minimize battery usage when Wi-Fiis enabled[N/A]MACaddress [N/A] Shows the display’s MACaddress [N/A]IPaddress [N/A] Shows the display’s IPaddress [N/A]EthernetNOTEManual configuration isn’t available. The IPaddress is automatically configured via DHCP. If yourequire a static IP address, use DHCP reservation on the router.Option Values Function NotesIP address [N/A] Shows the display’s IPaddress [N/A]MACaddress [N/A] Shows the display’s MACaddress [N/A]](https://usermanual.wiki/SMART-Technologies/7086/User-Guide-3626573-Page-86.png)
![APPENDIX AUSING SETTINGS77 smarttech.com/kb/171164Date & timeOption Values Function NotesAutomatic date & time [N/A] Sets the display’s date and timeautomaticallyConfigure the network to allowNetwork Time Protocol (NTP)requests to Internet time servers.See page33.Set date [N/A] Sets the display’s date Disable Automatic date & time toset the date manually.Set time [N/A] Sets the display’s time Disable Automatic date & time toset the time manually.Select time zone [N/A] Sets the display’s time zone [N/A]Use 24-hour format [N/A] Shows the display’s time using the24-hour clock[N/A]Choose date format [N/A] Sets the display’s date format [N/A]Usage DataOption Values Function NotesShare Usage Data [N/A] Sends usage statistics and errorreports to SMART[N/A]Auto UpdateNOTETo disable automatic system software updates, block access to https://ws.kappboard.com.Option Values Function NotesUpdates Channel Stable ChannelBeta ChannelSets which system softwareupdates the display receivesWhen switching from the BetaChannel to the Stable Channel, afactory reset occurs. See page74for more information about factoryreset.Check for Updates Now [N/A] Checks for updates to the systemsoftwareNOTEThe display must be connectedto the Internet to check forsystem software updates.If an update is available, the textchanges to Apply update now.](https://usermanual.wiki/SMART-Technologies/7086/User-Guide-3626573-Page-87.png)
![APPENDIX AUSING SETTINGS78 smarttech.com/kb/171164DisplayOption Values Function NotesAdjust Brightness and ContrastBrightness 0–100 Sets the display’s brightness level [N/A]Contrast 0–100 Sets the display’s contrast level [N/A]AudioOption Values Function NotesSpeakersBuilt-in Speakers OnOffEnables or disables the display’sinternal speakersWhen analog speakers areconnected to the display, itautomatically disables the display’sinternal speakers.Audio PropertiesBalance 0–100 Sets the audio output from thespeakersDrag the slider all the way to the leftto have all audio from the leftspeaker. Drag the slider all the wayto the right to have all the audiofrom the right speaker.Bass 0–100 Sets the bass level [N/A]Treble 0–100 Sets the treble level [N/A]LauncherOption Values Function NotesLauncher [N/A] Select the apps available on thelauncherSee page42 for more information.SMARTWhiteboardOption Values Function NotesWhiteboard storageLibrary OnOffEnables or disables savingwhiteboard sessions[N/A]Save whiteboards inlibraryFor 1 weekFor 1 MonthIndefinitelySets how long the whiteboardsessions are saved[N/A]](https://usermanual.wiki/SMART-Technologies/7086/User-Guide-3626573-Page-88.png)
![APPENDIX AUSING SETTINGS79 smarttech.com/kb/171164Option Values Function NotesMobile appSaving Whiteboards OnOffEnables or disables the Capturefunction in the SMARTkapp appIf this is off, the QR code is notvisible. The SMARTkapp app isunable to connect to the displayand your mobile device is unable tosave snapshots of the display in theapp.Sharing Whiteboards OnOffEnables or disables the Invitefunction on the SMARTkapp appIf this is off, you’re unable to invitepeople to your session.Screen ShareOption Values Function NotesScreen ShareReset [N/A] Closes and restarts Screen Shareapp and its discovery servicesYou can restart Screen Share as atroubleshooting step if a mobiledevice or computer can’t find orconnect to the display.iQ appliance (AM40)Network settingsOption Values Function NotesWi-Fi [N/A] Shows which wireless network thedisplay is connected to.Turn on Wi-Fi to discover networks.StatusWi-Fi [N/A] Shows information about thewireless network the display isconnected to.[N/A]Ethernet [N/A] Shows information about thenetwork the display is connected to.[N/A]Bluetooth [N/A] Shows information about thedisplay’s Bluetooth[N/A]](https://usermanual.wiki/SMART-Technologies/7086/User-Guide-3626573-Page-89.png)
![APPENDIX AUSING SETTINGS80 smarttech.com/kb/171164Application settingsOption Values Function NotesLauncher [Apps] Select which apps appear in thelauncher.See page42 for more information.SMARTWhiteboardWhiteboard Storage [N/A] [N/A] [N/A]Library OnOffEnables or disables savingwhiteboard sessions[N/A]Save Whiteboards inLibraryFor 1 weekFor 1 MonthIndefinitelySets how long the whiteboardsessions are saved[N/A]Mobile App [N/A] [N/A] [N/A]Saving Whiteboards OnOffEnables or disables the Capturefunction in the SMARTkapp appIf this is off, the QR code is notvisible. The SMARTkapp app isunable to connect to the displayand your mobile device is unable tosave snapshots of the display in theapp.Sharing Whiteboards OnOffEnables or disables the Invitefunction on the SMARTkapp appIf this is off, you’re unable to invitepeople to your session.Screen ShareReset [N/A] Closes and restarts Screen Shareapp and its discovery servicesYou can restart Screen Share as atroubleshooting step if a mobiledevice or computer can’t find orconnect to the display.System settingsOption Values Function NotesDisplayScreen Adjustment [N/A] [N/A] [N/A]Brightness 0–100 Sets the display’s brightnesslevel[N/A]Contrast 0–100 Sets the display’s contrast level [N/A]AudioSpeakers [N/A] [N/A] [N/A]Built-in Speakers OnOffEnables or disables the display’sinternal speakersWhen analog speakers areconnected to the display, itautomatically disables thedisplay’s internal speakers.](https://usermanual.wiki/SMART-Technologies/7086/User-Guide-3626573-Page-90.png)
![APPENDIX AUSING SETTINGS81 smarttech.com/kb/171164Option Values Function NotesAudio PropertiesBalance 0–100 Sets the audio output from thespeakersDrag the slider all the way tothe left to have all audio fromthe left speaker. Drag theslider all the way to the rightto have all the audio from theright speaker.Bass 0–100 Sets the bass level [N/A]Treble 0–100 Sets the treble level [N/A]Date & TimeAutomatic Date &TimeOnOffSets the display’s date and timeautomaticallyConfigure the network toallow Network Time Protocol(NTP) requests to Internettime servers. See page33.Date [N/A] Sets the display’s date Disable Automatic date &time to set the date manually.Time [N/A] Sets the display’s time Disable Automatic date &time to set the time manually.24 Hour Time OnOffShows the display’s time usingthe 24-hour clock[N/A]Time Zone [N/A] Sets the display’s time zone [N/A]Language [Languages] Sets the language for thesettings menu[N/A]Country [Countries] Sets the display’s country [N/A]DiagnosticsTouch CalibrationWizard[N/A] Calibrate the display [N/A]Factory Reset [N/A] Resets all options to their defaultvaluesOnly administrators shouldreset the display.Save Log File [N/A] Copy diagnostic logs to a USBdrive[N/A]Improve theExperienceOnOffSends usage statistics and errorreports to SMART[N/A]SecurityInstall certificates [N/A] Install certificates to connect to anetworkSeeClean up [N/A] [N/A] [N/A]](https://usermanual.wiki/SMART-Technologies/7086/User-Guide-3626573-Page-91.png)
![APPENDIX AUSING SETTINGS82 smarttech.com/kb/171164Option Values Function NotesClean Up Policy DisabledManually reset with theClean Up button in thelauncher1 hour2 hours3 hours1 daySets how often the displaycleans up[N/A]Clean Up thewhiteboard[N/A] Saves the Whiteboard sessionto the Library and erases theWhiteboard[N/A]Clean Up the browser [N/A] Closes the browser tabs andclears the history, cache andcookies[N/A]Clean Up otherapplications[N/A] Closes open applications [N/A]Auto UpdateUpdates Channel Stable ChannelBeta ChannelSets which system softwareupdates the display receivesWhen switching from theBeta Channel to the StableChannel, a factory resetoccurs. See page81 for moreinformation about factoryreset.Check for UpdatesNow[N/A] Checks for updates to thesystem softwareNOTEThe display must beconnected to the Internet tocheck for system softwareupdates.If an update is available, thetext changes to Apply updatenow.AboutBoard Name [N/A] Select a name for your display [N/A]Help [N/A] Shows the SMART support site [N/A]Send Feedback [N/A] Send feedback to SMART aboutthe display experience[N/A]Board Details [N/A] [N/A] [N/A]Build Number [N/A] Shows the iQ system software’sversion number[N/A]Serial Number [N/A] Shows the display’s serialnumber[N/A]Firmware Details [N/A] [N/A] [N/A]Touch controllerversion[N/A] [N/A] [N/A]](https://usermanual.wiki/SMART-Technologies/7086/User-Guide-3626573-Page-92.png)
![APPENDIX AUSING SETTINGS83 smarttech.com/kb/171164Option Values Function NotesScaler version [N/A] [N/A] [N/A]Legal Information [N/A] [N/A] [N/A]End User LicenseAgreement[N/A] Shows the SMART end userlicense agreement[N/A]Open Source Licenses [N/A] Shows the open source licenses [N/A]SMARTIntellectualProperty[N/A] Shows the SMART intellectualproperty information[N/A]](https://usermanual.wiki/SMART-Technologies/7086/User-Guide-3626573-Page-93.png)

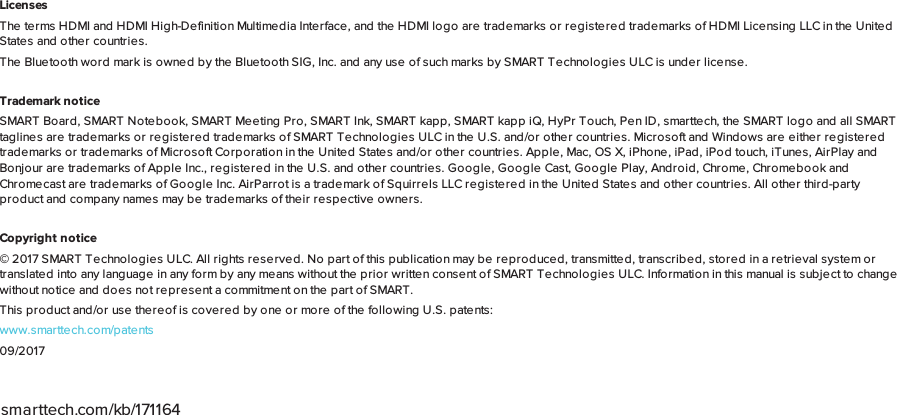
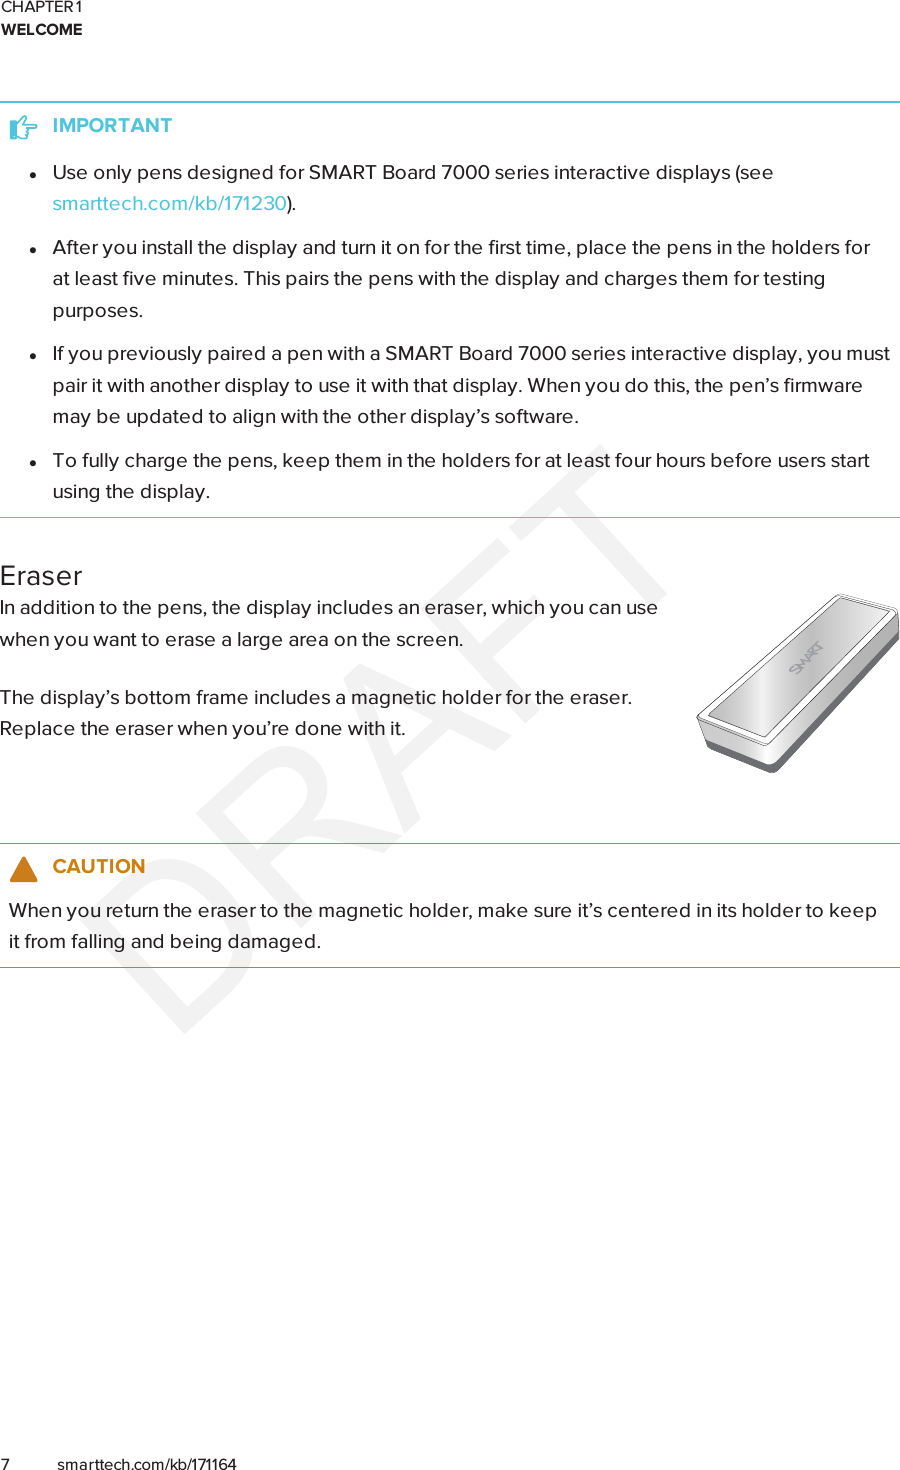
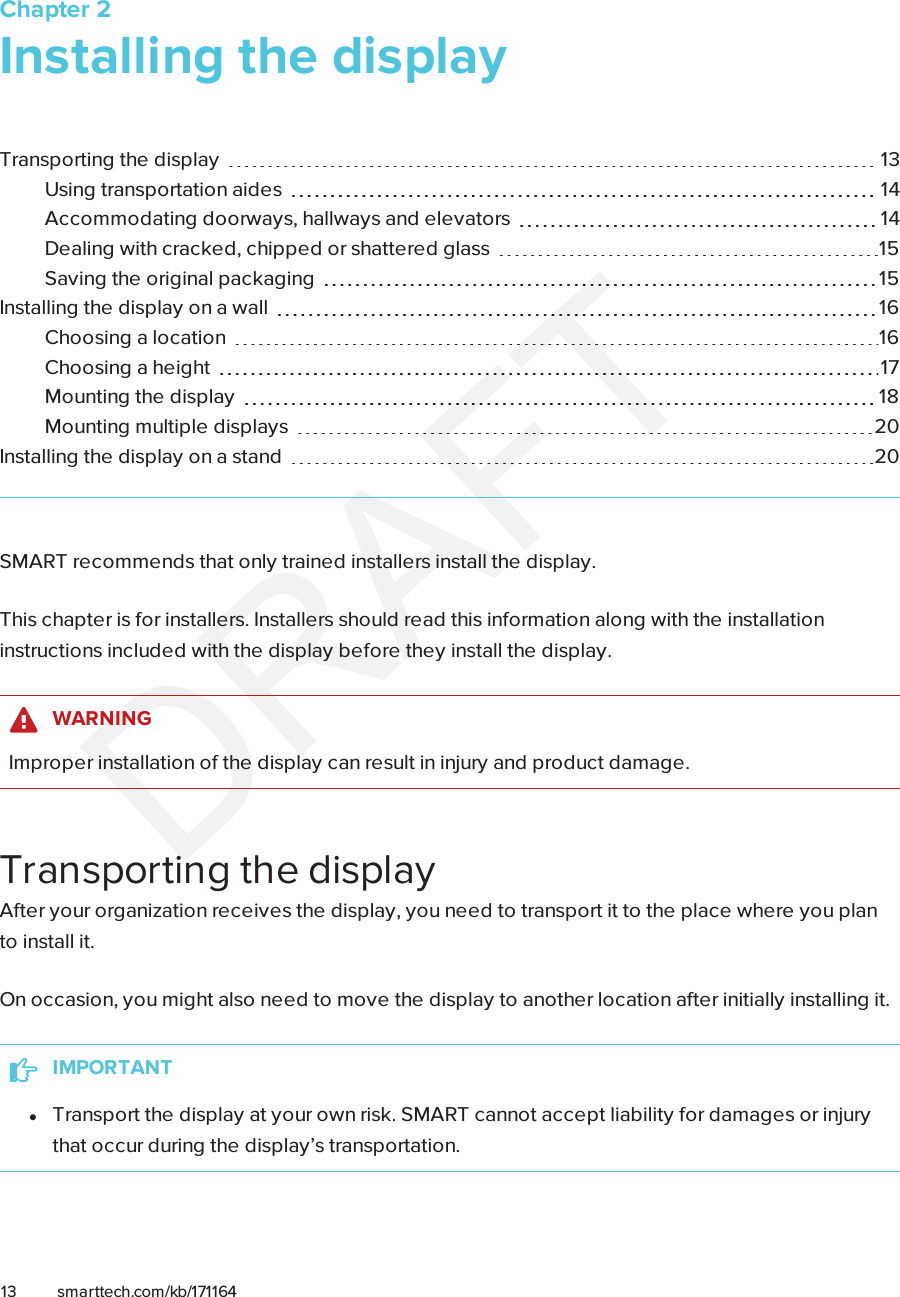
![APPENDIX BREMOTELY MANAGING THE DISPLAY90 smarttech.com/kb/171164To identify the current value of a settingUse a get command.This example shows how to get the volume:>get volumevolume=55>To assign a value to a settingUse a set command.This example sets the volume to 65:>set volume=65volume=65>To increase or decrease the value of a settingUse the set command to increase or decrease the value by a designated number.This example increases the volume by 5:>set volume+5volume=70>This example decreases the volume by 15:>set volume-15volume=55>To identify or assign a value for a specific displayStart the command with [Display],@, where [Display] is the display you want to apply thecommand to.](https://usermanual.wiki/SMART-Technologies/7086/User-Guide-3626573-Page-100.png)
![APPENDIX BREMOTELY MANAGING THE DISPLAY91 smarttech.com/kb/171164This example sets the input for the rightmost display to HDMI 2:>A,@ set input=hdmi2@,A input=hdmi2>NOTESoThe rightmost display is labeled A, the next rightmost display is labeled B, and so on.oYou can identify a specific display for only the getinput,setinput and getfwvercommands.CommandinventoryPower stateGet command Set command Responseget powerstate set powerstate[Value]Where [Value] is one of the following:l=onl=readyl=standbyl=powersaveNOTEIf the display is in UPDATEON orUPDATEREADY state, it might notchange power states after receivingthe command.powerstate=[Value]Where [Value] is one of the following:lonlreadylstandbylpowersavelupdateonlupdateready](https://usermanual.wiki/SMART-Technologies/7086/User-Guide-3626573-Page-101.png)
![APPENDIX BREMOTELY MANAGING THE DISPLAY92 smarttech.com/kb/171164InputGet command Set command ResponseIf one display is connectedget input set input[Value]Where [Value] is one of the following:l=hdmi1l=hdmi2l=dp1l=vga1l=ops1input=[Value]Where [Value] is one of the following:lhdmi1lhdmi2ldp1lvga1lops1If multiple displays are connected[Display],@ get inputWhere [Display] is the display’s label(A,B, and so on).[Display],@ set input[Value]Wherel[Display] is the display’s label(A,B, and so on).l[Value] is one of the following:o=hdmi1o=hdmi2o=dp1o=vga1o=ops1@,[Display] input=[Value]Wherel[Display] is the display’s label(A,B, and so on).l[Value] is one of the following:ohdmi1ohdmi2odp1ovga1oops1BrightnessGet command Set command Responseget brightness set brightness[Value]Where [Value] is one of the following:l+[Value]l-[Value]l=[5–100]brightness=[Value]Where [Value] is a number between 5and 100FreezeGet command Set command Responseget videofreeze set videofreeze[Value]Where [Value] is one of the following:l=onl=offvideofreeze=[Value]Where [Value] is one of the following:lonloff](https://usermanual.wiki/SMART-Technologies/7086/User-Guide-3626573-Page-102.png)
![APPENDIX BREMOTELY MANAGING THE DISPLAY93 smarttech.com/kb/171164VolumeGet command Set command Responseget volume set volume[Value]Where [Value] is one of the following:l+[Value]l-[Value]l=[0–100]volume=[Value]Where [Value] is a number between 0and 100MuteGet command Set command Responseget mute set mute[Value]Where [Value] is one of the following:l=onl=offmute=[Value]Where [Value] is one of the following:lonloffFirmware versionGet command ResponseIf one display is connectedget fwversion fwversion=[Value]Where [Value] is the firmware version.If multiple displays are connected[Display],@ get fwversionWhere [Display] is the display’s label (A,B, and so on).@,[Display] fwverversion=[Value]Wherel[Display] is the display’s label (A,B, and so on).l[Value] is the firmware version.Serial numberGet command Responseget serialnum serialnum=[Value]Where [Value] is the serial number.NOTEIf multiple display are connected, the response includesthe serial numbers for all displays separated by commas.](https://usermanual.wiki/SMART-Technologies/7086/User-Guide-3626573-Page-103.png)
![APPENDIX BREMOTELY MANAGING THE DISPLAY94 smarttech.com/kb/171164Part numberGet command Responseget partnum partnum=[Value]Where [Value] is the part number, including the revision.NOTEIf multiple display are connected, the response includesthe part numbers for all displays separated by commas.Resolving issues with remote managementThe following table presents common issues with remote management and explains how toresolve them:Issue SolutionsYou’re experiencing general issueswith remote management.lMake sure all the cable connections are secure.lRestart the display and the remote management system.See Turning the display off and back on on page47.lConfigure the serial interface settings.See Configuring the computer’s serial interface settings on page87.You’re experiencing other issueswith remote management, or theprevious solutions don’t resolve theissue.See Referring to the SMART knowledge base for additional troubleshootinginformation on page70.](https://usermanual.wiki/SMART-Technologies/7086/User-Guide-3626573-Page-104.png)