Ricoh RFAPL03 Color Copier User Manual 1 Short Confidential
Ricoh Company Ltd Color Copier 1 Short Confidential
UserManual.wiki
>
Ricoh
>
RFAPL03 User Manual
>
User Manual_1 (Short Confidential)
Contents
1.
User Manual(Connecting to the Interface) (Short Confidential)
2.
User Manual(Seting Telephone HandSet) (Short Confidential)
3.
User Manual(Setting Fax Interface) (Short Confidential)
4.
User Manual_1 (Short Confidential)
5.
User Manual_2 (Short Confidential)
User Manual_1 (Short Confidential)
Navigation menu
Upload a User Manual
Namespaces
Wiki Guide
HTML
PDF
Info
Views
User Manual
Discussion / Help
Navigation


![How to Read This ManualSymbolsThis manual uses the following symbols:Indicates points to pay attention to when using the machine, and explanations of likely causes of papermisfeeds, damage to originals, or loss of data. Be sure to read these explanations.Indicates supplementary explanations of the machine's functions, and instructions on resolving user errors.This symbol is located at the end of sections. It indicates where you can find further relevant information.[ ]Indicates the names of keys on the machine's display or control panels.Indicates instructions in book form.Indicates instructions in sheet form.Indicates instructions stored in a file on a provided CD-ROM.Machine TypesThe model names of the machines do not appear in the following pages. Check the type of your machinebefore reading this manual.• Type 1: C9130/LD630C/Aficio MP C3001/C9130G/LD630CG/Aficio MP C3001G• Type 2: C9135/LD635C/Aficio MP C3501/C9135G/LD635CG/Aficio MP C3501G• Type 3: C9145/LD645C/Aficio MP C4501/C9145G/LD645CG/Aficio MP C4501G• Type 4: C9155/LD655C/Aficio MP C5501/C9155G/LD655CG/Aficio MP C5501GCertain types might not be available in some countries. For details, please contact your local dealer.20](https://usermanual.wiki/Ricoh/RFAPL03.User-Manual-1-Short-Confidential/User-Guide-1332452-Page-21.png)


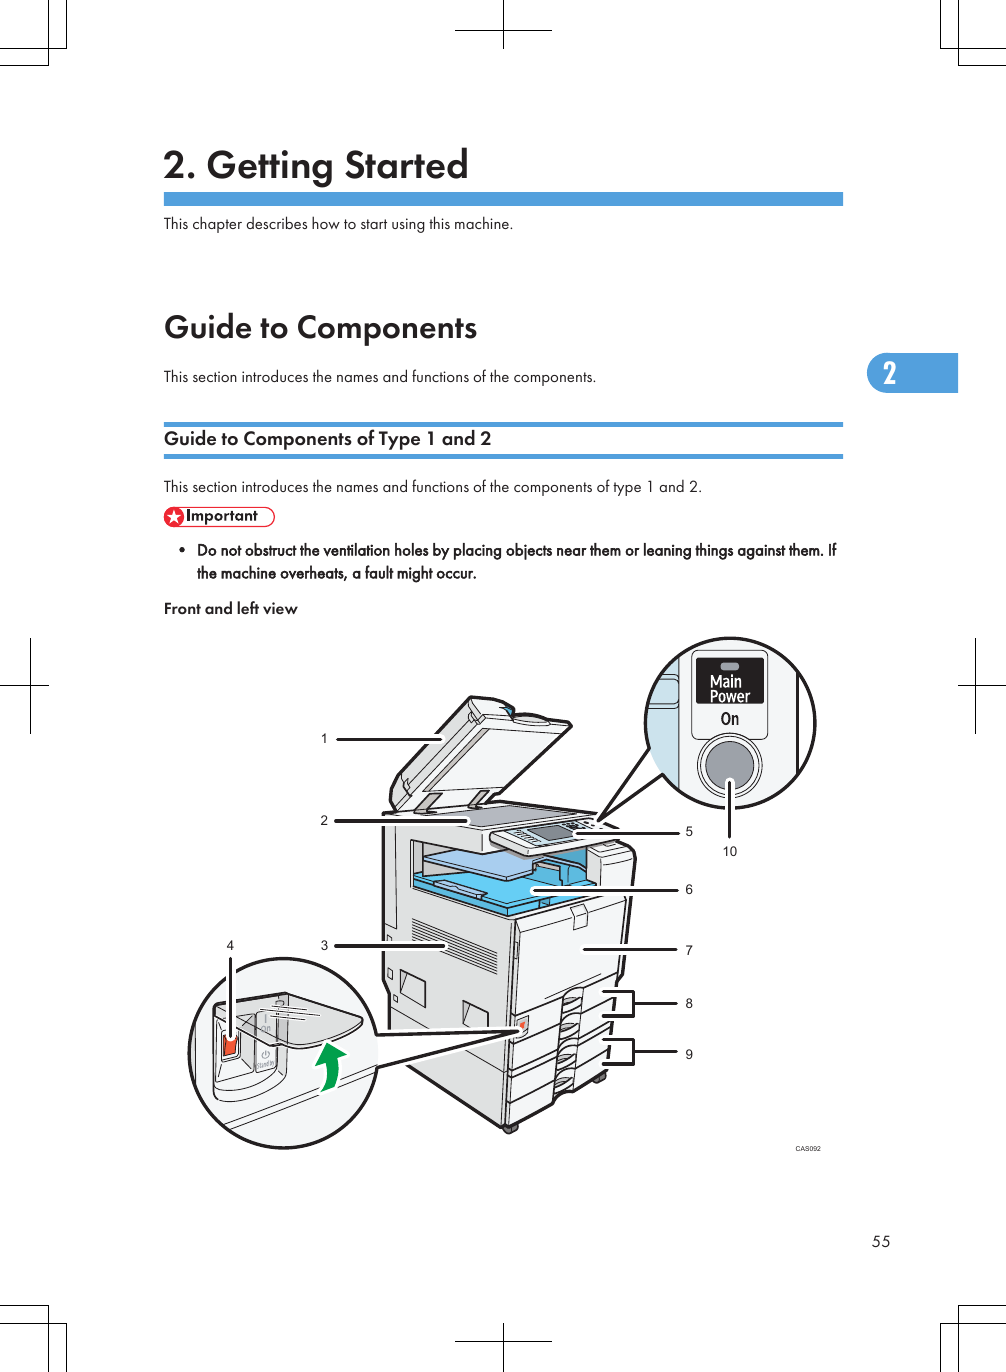
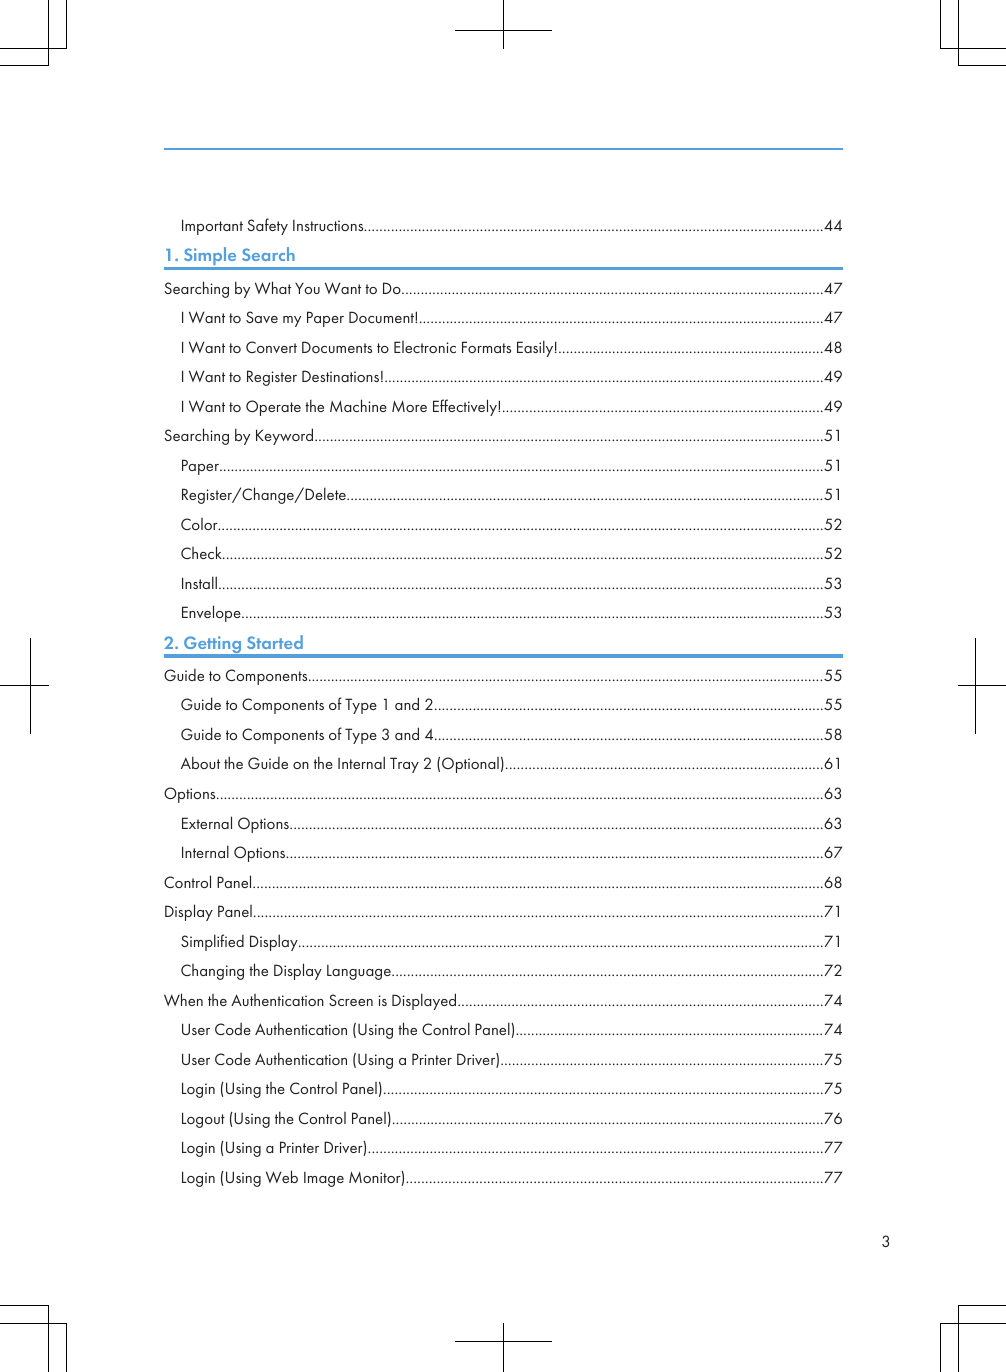
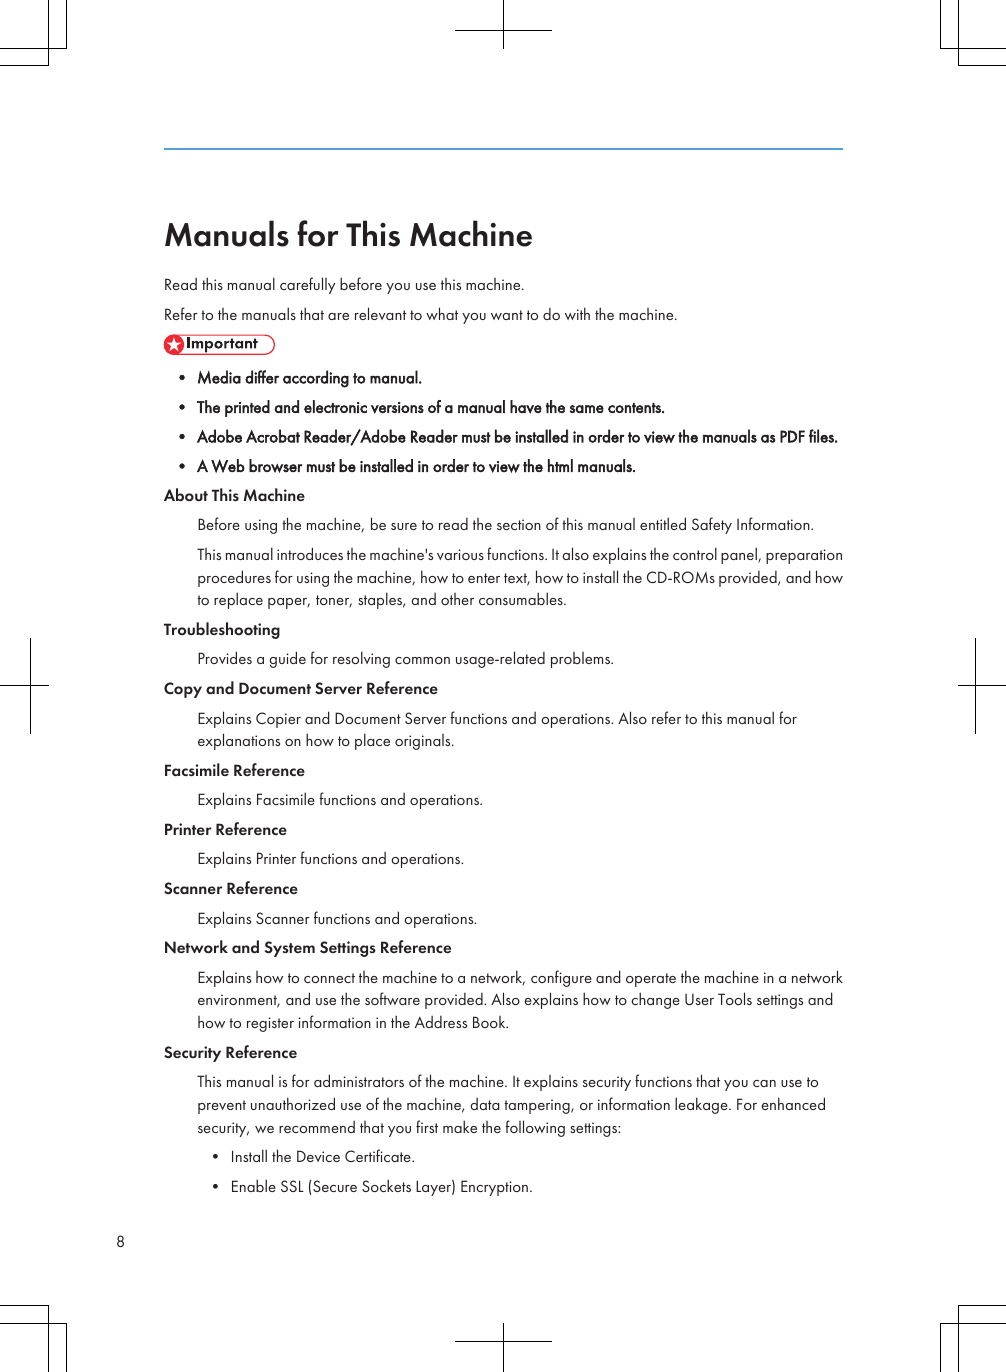
![Control PanelThis section introduces the names and functions of the components on the control panel.• Do not turn off the main power switch while the operation switch indicator is lit or blinking. Doing somay damage the hard disk.This illustration shows the control panel of the machine with options fully installed.CAS0021. [User Tools/Counter] key• User ToolsPress to change the default settings to meet your requirements. See “Accessing User Tools”, Network andSystem Settings Reference .• CounterPress to check or print the counter value. See “Counter”.• InquiryPress to find out where to order expendable supplies and where to call when a malfunction occurs. Youcan also print these details. See “Inquiry”.2. Function keysPress to display the operation screen of one of the following functions: copy, Document Server, facsimile, printer,or scanner.The indicator of the selected function goes on. See “Changing Modes”.3. Display panelDisplays keys for each function, operation status, or messages. See “Display Panel”.4. [Clear Modes] keyPress to clear the current settings.2. Getting Started682](https://usermanual.wiki/Ricoh/RFAPL03.User-Manual-1-Short-Confidential/User-Guide-1332452-Page-69.png)
![5. [Program] key (copier, Document Server, facsimile, and scanner mode)• Press to register frequently used settings, or to recall registered settings.See “Registering Frequently Used Functions” and “Registering Frequently Used Functions for Printing StoredDocuments from the Document Server”, Copy and Document Server Reference .See “Registering Frequently Used Settings”, Facsimile Reference .See “Registering Frequently Used Settings”, Scanner Reference .• Press to program defaults for the initial display when modes are cleared or reset, or immediately after theoperation switch is turned on.See “Changing the Default Functions of the Copy's Initial Display”, Copy and Document Server Reference.See “Changing the Default Functions of the Fax's Initial Display”, Facsimile Reference .See “Changing the Default Functions of the Scanner's Initial Display”, Scanner Reference .6. [Interrupt] keyPress to make interrupt copies. See “Interrupt Copy”, Copy and Document Server Reference .7. [Energy Saver] keyPress to switch to and from Energy Saver mode. See “Saving Energy”.8. Main power indicatorThe main power indicator goes on when you turn on the main power switch.9. Operation switchPress to turn the power on (the operation switch indicator goes on). To turn the power off, press again (theoperation switch indicator goes off). See “Turning On/Off the Power”.10. Communicating indicator, Receiving File indicator, Confidential File indicator• Communicating indicatorLights continuously during data transmission and reception.• Receiving File indicatorLights continuously while data other than personal box or Memory Lock file is being received and storedin the fax memory.See “Substitute Reception”, Facsimile Reference .• Confidential File indicatorLights continuously while personal box data is being received.Blinks while Memory Lock file is being received.See “Personal Boxes”, Facsimile Reference and “Printing a File Received with Memory Lock”, FacsimileReference .11. Data In indicator (facsimile and printer mode)Flashes when the machine is receiving print jobs or LAN-Fax documents from a computer. See Facsimile Reference and Printer Reference .12. Alert indicatorLights continuously if an error has occurred.Control Panel692](https://usermanual.wiki/Ricoh/RFAPL03.User-Manual-1-Short-Confidential/User-Guide-1332452-Page-70.png)
![13. Number keysUse to enter the numbers for copies, fax numbers and data for the selected function.14. [Clear/Stop] key• ClearPress to delete a number entered.• StopPress to stop a job in progress, such as copying, scanning, faxing, or printing.15. [ ] key (Enter key)Press to confirm values entered or items specified.16. [Start] keyPress to start copying, printing, scanning, or sending.17. [Sample Copy] keyPress to make a single set of copies or prints to check print quality before making multiple sets. See “SampleCopy”, Copy and Document Server Reference .18. [Simplified Display] keyPress to switch to the Simplified Display. See “Simplified Display”.19. [Login/Logout] keyPress to log in or log out.• p.71 "Display Panel"• p.71 "Simplified Display"• p.78 "Changing Modes"• p.80 "Turning On/Off the Power"• p.83 "Saving Energy"• p.160 "Counter"• p.161 "Inquiry"2. Getting Started702](https://usermanual.wiki/Ricoh/RFAPL03.User-Manual-1-Short-Confidential/User-Guide-1332452-Page-71.png)
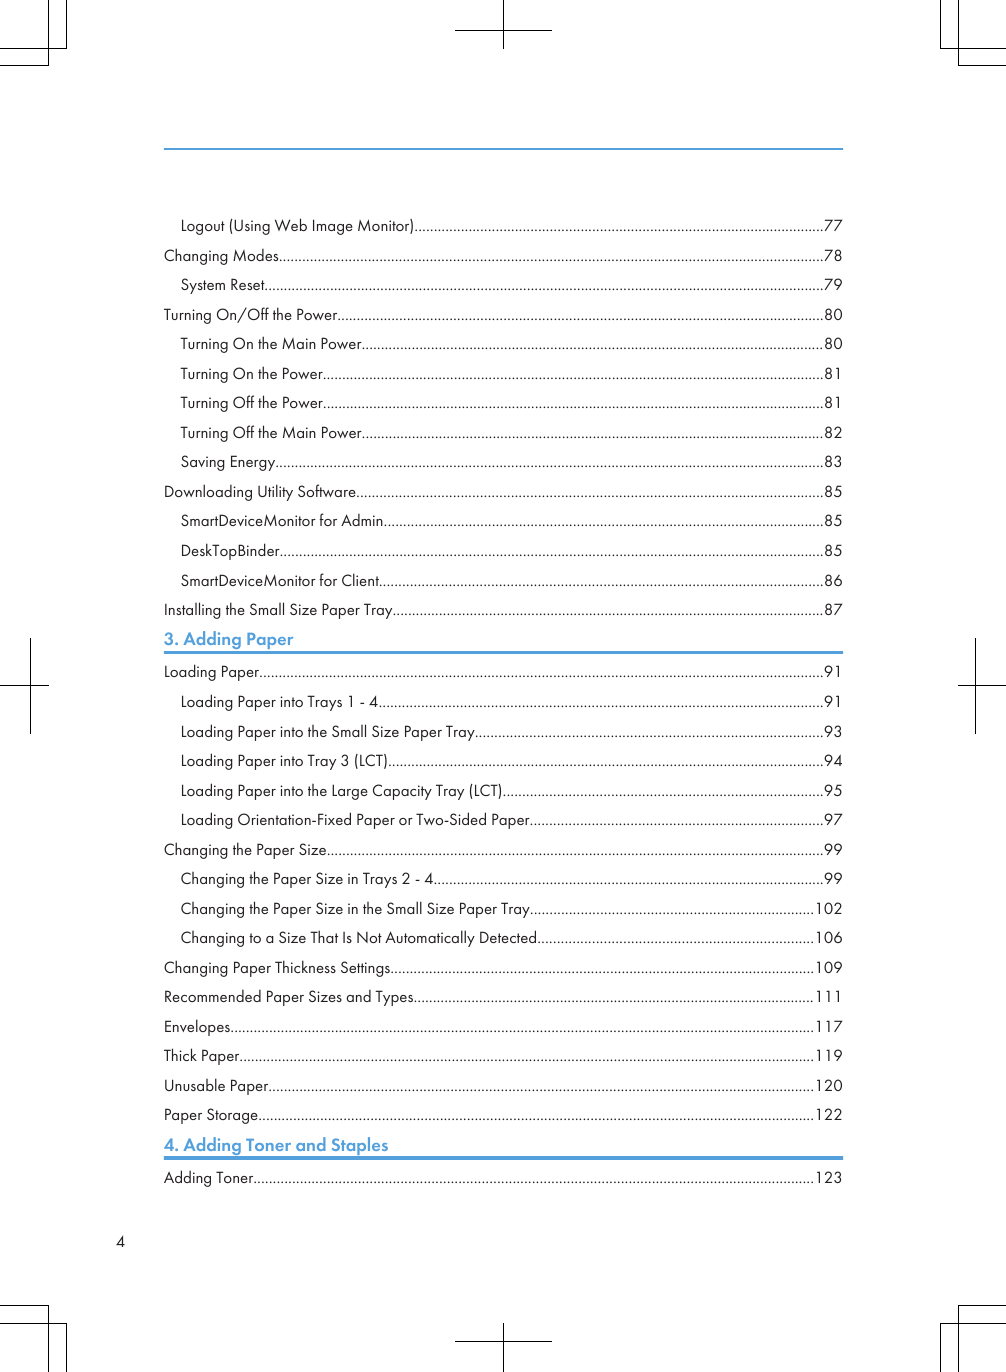
![Display PanelThe display panel shows machine status, error messages, and function menus.• Don't apply strong impact or force to the screen. Or it may be damaged. Maximum force allowableis approx. 30N (approx. 3 kgf). (N = Newton, kgf = Kilogram force. 1 kgf = 9.8N.)The function items displayed serve as selector keys. You can select or specify an item by lightly pressingthem.When you select or specify an item on the display panel, it is highlighted like . Keys appearing as cannot be used.The copy display is set as the default screen when the machine is turned on.• The display panels shown in this manual's illustrations are taken from a machine on which all optionsare installed.Simplified DisplayThis section explains how to switch to the simplified display.When you press the [Simplified Display] key, the screen changes from the initial display to the simplifieddisplay.Letters and keys are displayed at a larger size, making operations easier.Display Panel712](https://usermanual.wiki/Ricoh/RFAPL03.User-Manual-1-Short-Confidential/User-Guide-1332452-Page-72.png)
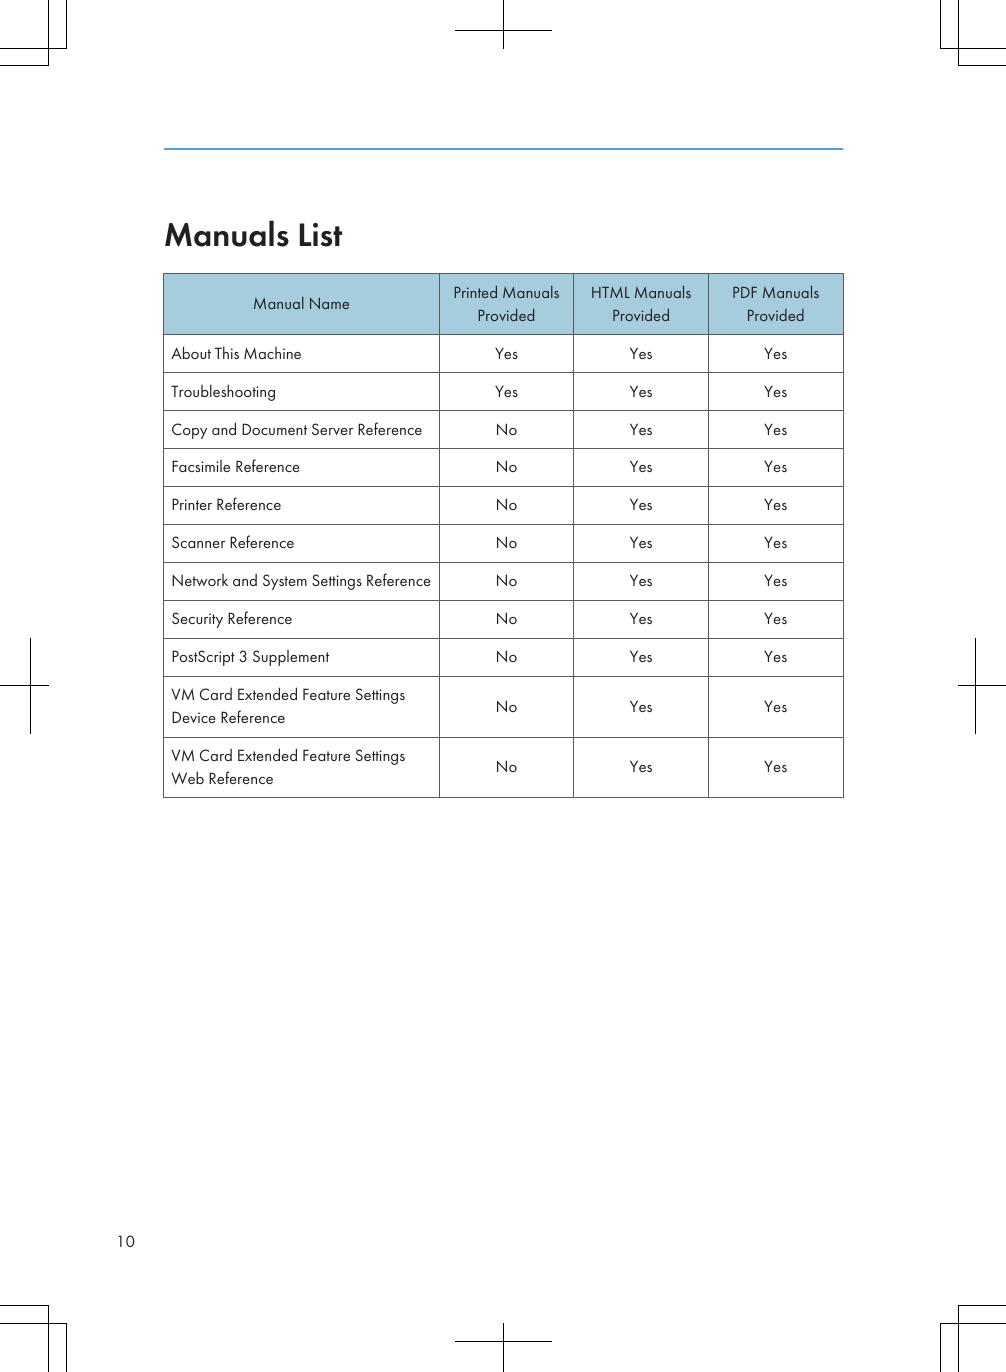
![1. Press the [Simplified Display] key.CAS097This illustration shows the copier function's simplified display.CAS10011. [Key Color]Press to increase screen contrast by changing the color of the keys.This is available only for the simplified display.• To return to the initial display, press the [Simplified Display] key again.• Certain keys do not appear on the simplified display.Changing the Display LanguageYou can change the language used on the display. English is set as default.The following procedure explains switching the language from English to Spanish.2. Getting Started722](https://usermanual.wiki/Ricoh/RFAPL03.User-Manual-1-Short-Confidential/User-Guide-1332452-Page-73.png)
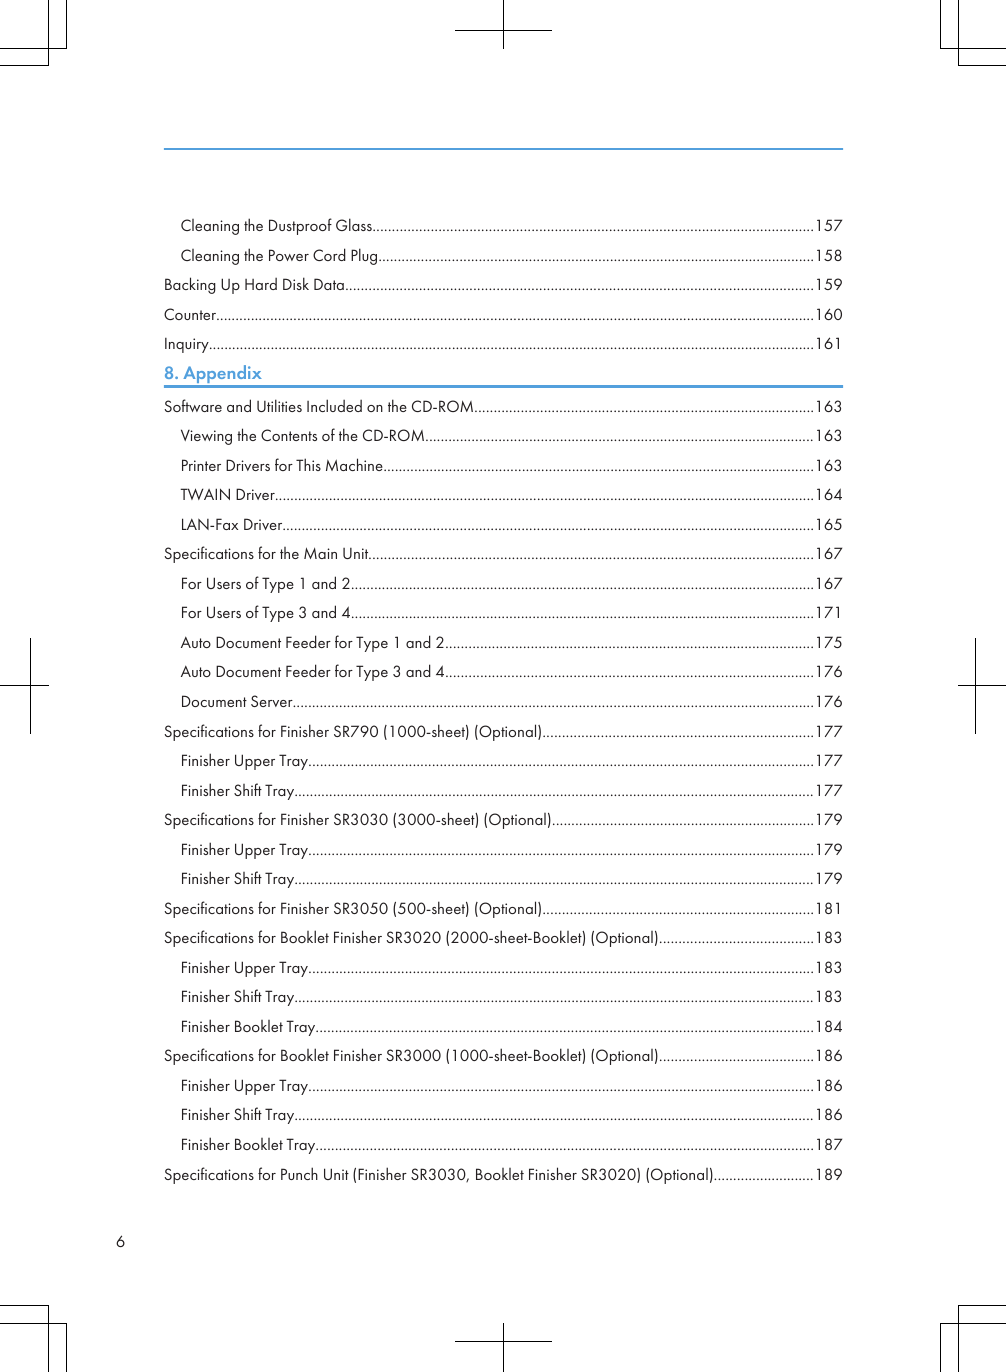
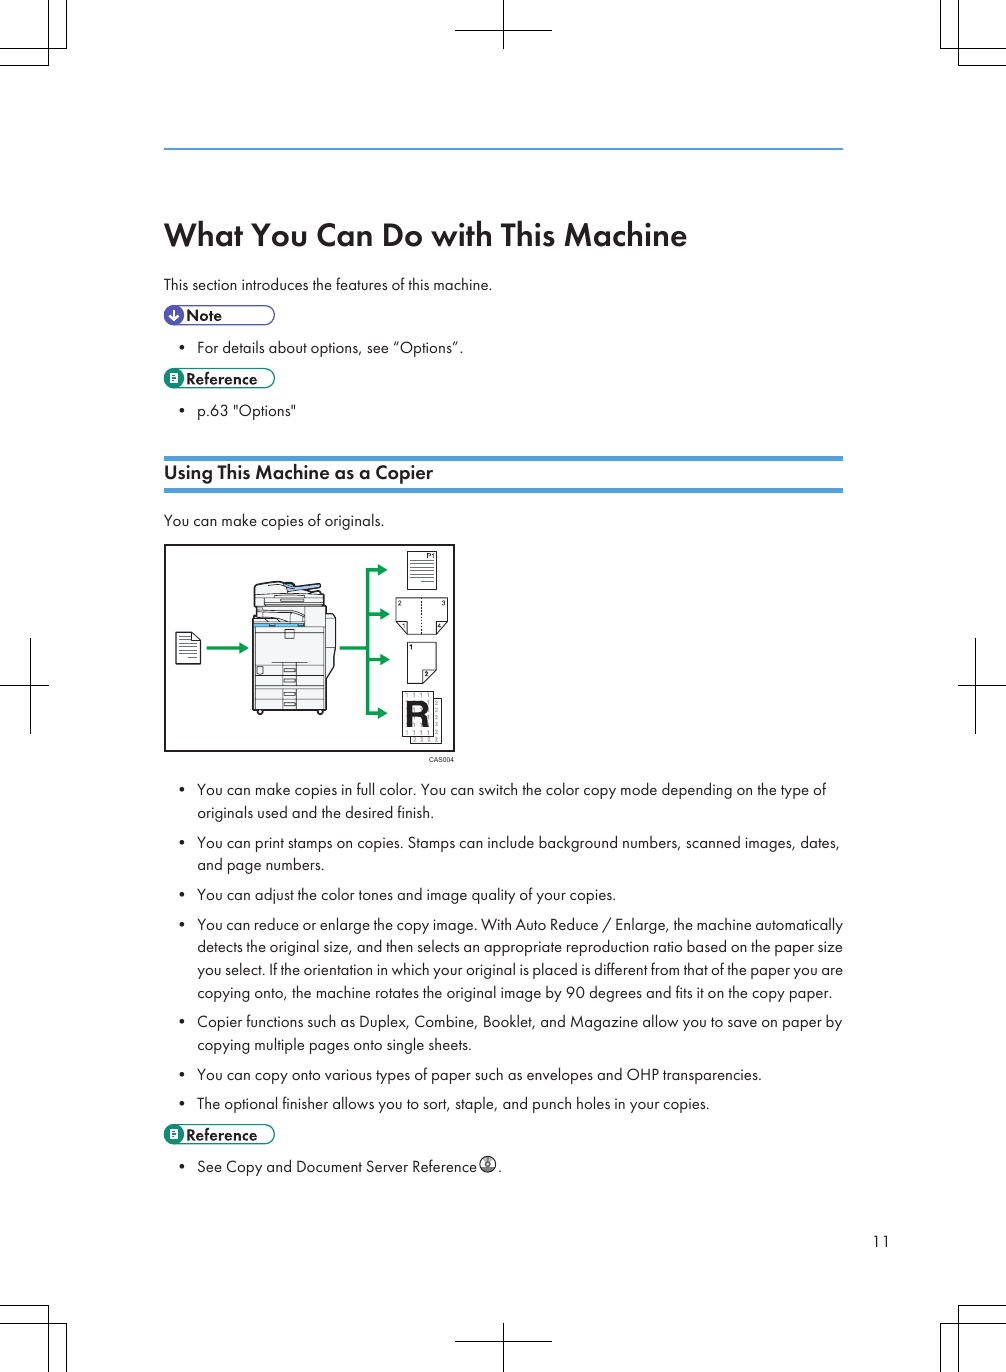
![1. Press the [User Tools/Counter] key.CAS0982. Press [Español].The language is changed to Spanish.3. Press [Salir.]The menu appears in Spanish.• If you want to return the display language to “English”, repeat the step above.Display Panel732](https://usermanual.wiki/Ricoh/RFAPL03.User-Manual-1-Short-Confidential/User-Guide-1332452-Page-74.png)
![When the Authentication Screen is DisplayedThis section explains the authentication screen.• Ask the user administrator for the Login User Name, Login Password, and User Code. For detailsabout user authentication, contact your administrator.• User Code to enter on User Code Authentication is the numerical value registered in the Address Bookas “User Code”.If Basic Authentication, Windows Authentication, LDAP Authentication, or Integration Server Authenticationis active, the authentication screen appears on the display. The machine only becomes operable afterentering your own Login User Name and Login Password. If User Code Authentication is active, you cannotuse the machine until you enter the User Code.If you can use the machine, you can say that you are logged in. When you go out of the operable state,you can say that you are logged out. After logging in the machine, be sure to log out of it to preventunauthorized usage.• If authentication fails, the "Authentication has failed." message appears. Check that the Login UserName and Login Password are correct.User Code Authentication (Using the Control Panel)This section explains the procedure for logging in to the machine using the control panel while User CodeAuthentication is active.If User Code Authentication is active, a screen prompting you to enter a User Code appears.1. Enter a User Code (up to eight digits), and then press [OK].• To log out, do one of the following:• Press the operation switch.2. Getting Started742](https://usermanual.wiki/Ricoh/RFAPL03.User-Manual-1-Short-Confidential/User-Guide-1332452-Page-75.png)
![• Press the [Energy Saver] key after jobs are completed.User Code Authentication (Using a Printer Driver)This section explains the procedure for logging in to the machine using a printer driver while User CodeAuthentication is active.If User Code Authentication is active, specify the User Code in the printer properties of the printer driver.For details, see the printer driver Help.• When logged in through User Code Authentication, you do not have to log out.Login (Using the Control Panel)This section explains the procedure for logging in to the machine when Basic Authentication, WindowsAuthentication, LDAP Authentication, or Integration Server Authentication is set.1. Press [Login].2. Enter a Login User Name, and then press [OK].When the Authentication Screen is Displayed752](https://usermanual.wiki/Ricoh/RFAPL03.User-Manual-1-Short-Confidential/User-Guide-1332452-Page-76.png)
![3. Enter a Login Password, and then press [OK].When the user is authenticated, the screen for the function you are using appears.• If authentication fails, the "Authentication has failed." message appears. Check that the Login UserName and Login Password are correct.Logout (Using the Control Panel)This section explains the procedure for logging out the machine when Basic Authentication, WindowsAuthentication, LDAP Authentication, or Integration Server Authentication is set.• To prevent use of the machine by unauthorized persons, always log out when you have finished usingthe machine.1. Press the [Login/Logout] key.CAS0992. Getting Started762](https://usermanual.wiki/Ricoh/RFAPL03.User-Manual-1-Short-Confidential/User-Guide-1332452-Page-77.png)
![2. Press [Yes].Login (Using a Printer Driver)This section explains the procedure for logging in to the machine using a printer driver.If Basic Authentication, Windows Authentication, LDAP Authentication, or Integration Server Authenticationis active, make encryption settings in the printer properties of the printer driver, and then specify a LoginUser Name and Login Password. For details, see the printer driver Help.• When logged in using a printer driver, you do not have to log out.Login (Using Web Image Monitor)This section explains the procedure for logging in to the machine via Web Image Monitor.1. Click [Login].2. Enter a Login User Name and Login Password, and then click [Login].• For User Code Authentication, enter a User Code in [Login User Name], and then click [Login].Logout (Using Web Image Monitor)This section explains the procedure for logging out the machine via Web Image Monitor.1. Click [Logout] to log out.• Delete the cache memory of a Web browser after logging out.When the Authentication Screen is Displayed772](https://usermanual.wiki/Ricoh/RFAPL03.User-Manual-1-Short-Confidential/User-Guide-1332452-Page-78.png)
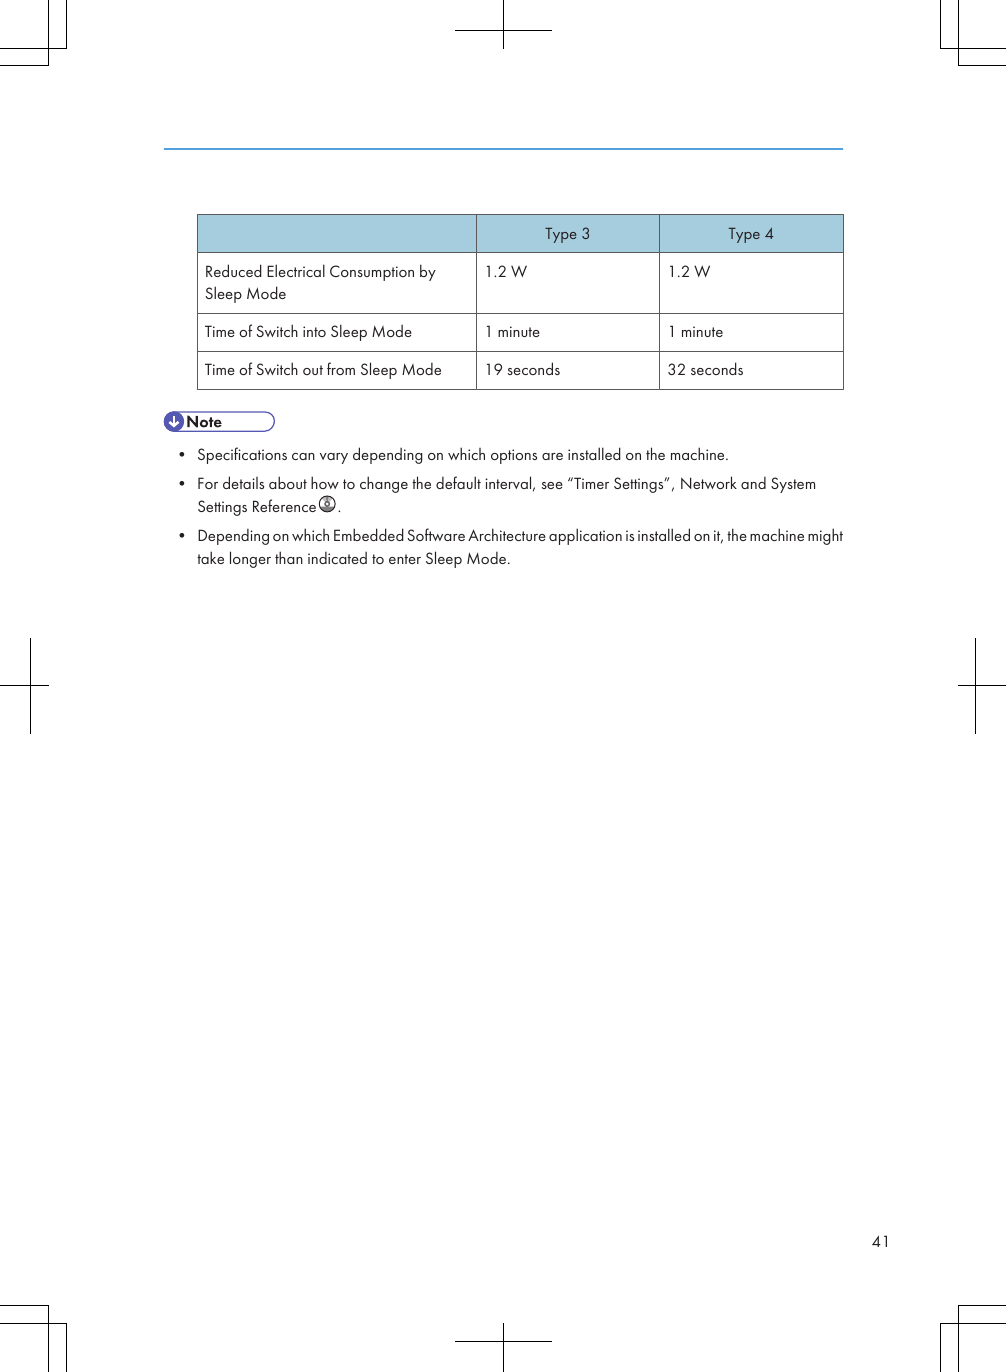
![• For details, see “Turning Off the Main Power / In the Event of Power Failure”, Troubleshooting.Saving EnergyThis section explains the machine's energy saving functions.This machine has the following energy saving functions.Energy SaverIf you do not use the machine for a certain period after an operation, or when you press the [EnergySaver] key, the display disappears and the machine goes into Energy Saver mode. When you pressthe [Energy Saver] key again, the machine returns to the ready condition. The machine uses lesselectricity in Energy Saver mode.You can change the amount of time the machine waits before switching to Energy Saver mode aftercopying has finished or the last operation is performed under Panel Off Timer.Low power modeIf you do not use the machine for a certain period, it automatically lowers its power consumption.When you press the [Energy Saver] key, the machine returns to ready condition.You can change the amount of time the machine waits before switching to the Low power mode underEnergy Saver Timer.Auto OffIf the machine remains inactive for a specified period, it automatically enters the same low powerstate that it enters when the operation switch is pressed (indicator unlit). This function is called “AutoOff”.You can change the Auto Off time under Auto Off Timer.• See “System Settings”, Network and System Settings Reference .• The Energy Saver, Low power mode, and Auto Off functions will not operate in the following cases:• When a warning message appears• When the service call message appears• When paper is jammed• When the cover is open• When the "Add Toner" message appears• When toner is being replenished• When the User Tools / Counter / Inquiry screen is displayed• When fixed warm-up is in progressTurning On/Off the Power832](https://usermanual.wiki/Ricoh/RFAPL03.User-Manual-1-Short-Confidential/User-Guide-1332452-Page-84.png)
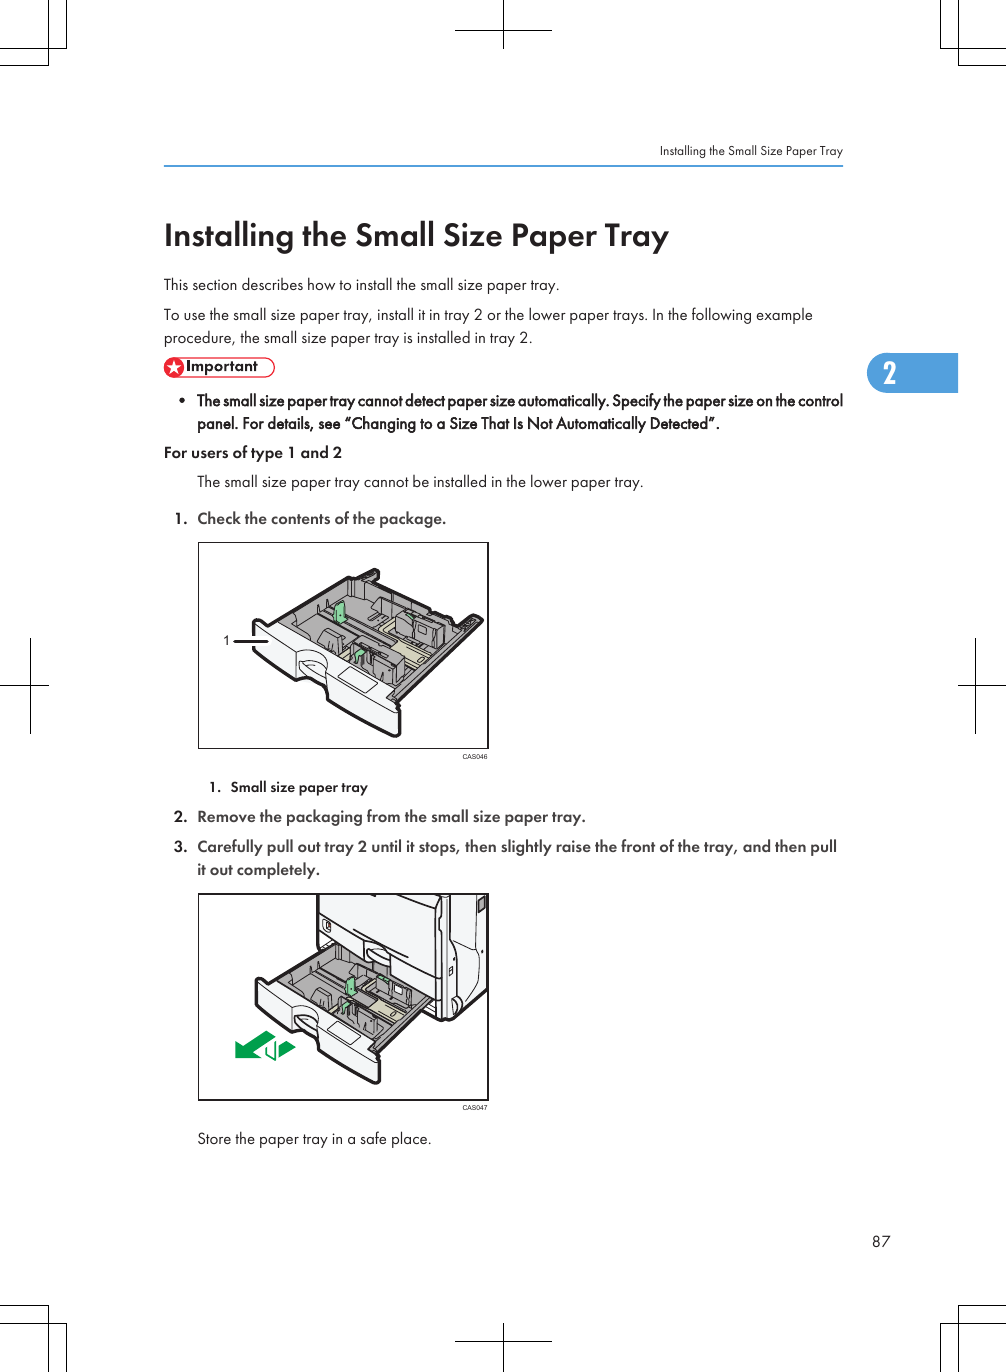
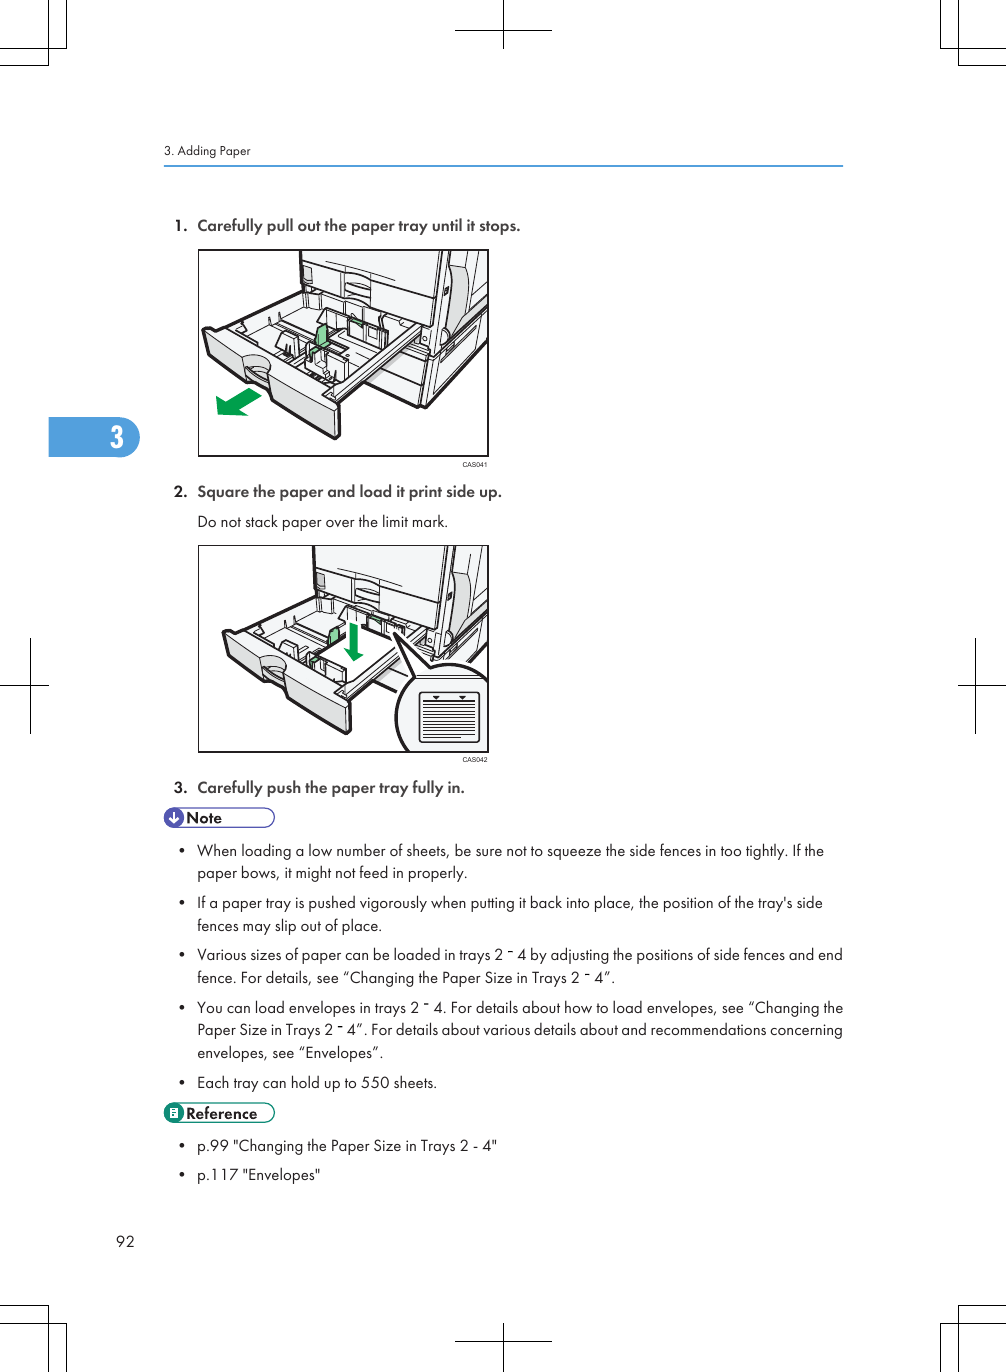
![4. Lift the front of the small size paper tray, and then carefully push it fully in.CAS0485. Press the [User Tools/Counter] key.CAS0986. Press [System Settings].7. Check that [General Features] is selected.2. Getting Started882](https://usermanual.wiki/Ricoh/RFAPL03.User-Manual-1-Short-Confidential/User-Guide-1332452-Page-89.png)
![8. Press [Small Size Paper Tray].If the setting to be specified does not appear, press [ Next] to scroll down to other settings.9. Press [On] for Tray 2.10. Press [OK].11. Turn off the machine, and then turn it back on.• If the small size paper tray is not installed correctly, repeat the installation procedure from thebeginning. If the installation is still not correct, contact your service representative.• In printer mode, configure the settings for the options that are installed on the machine. For details,see the printer driver Help.• p.106 "Changing to a Size That Is Not Automatically Detected"Installing the Small Size Paper Tray892](https://usermanual.wiki/Ricoh/RFAPL03.User-Manual-1-Short-Confidential/User-Guide-1332452-Page-90.png)