Remotesolution RH61A Touch Screen Remote Controller User Manual 2
Remote Solution Co., Ltd. Touch Screen Remote Controller 2
UserManual.wiki
>
Remotesolution
>
RH61A User Manual
>
User Manual 2
Contents
1.
User Manual 1
2.
User Manual 2
User Manual 2
Navigation menu
Upload a User Manual
Namespaces
Wiki Guide
HTML
PDF
Info
Views
User Manual
Discussion / Help
Navigation
![I 28Chapter 2 | Learning to Use the MenusWhen the TV power turns on, press the [VERIFY] icon.8If all TV functions are operating, press the [EXIT] icon.10Press the [OK] icon to save. Repeat steps 3~10 to set another device.11Use the operation buttons on the screen to conrm TV operation.9OPERATING SET-UP](https://usermanual.wiki/Remotesolution/RH61A.User-Manual-2/User-Guide-963233-Page-1.png)
![29 I Chapter 2 | Learning to Use the MenusI CODE LEARNINGOPERATING SET-UPPress the [REMOTE] icon on the screen to open the menu. The [REMOTE] screen appears.1Press the [Settings] icon on the screen. The [Settings] screen appears.2Press the [LEARN] icon on the screen. Place remote and the original remote head to head.3Press the [NEXT] icon on the screen.4](https://usermanual.wiki/Remotesolution/RH61A.User-Manual-2/User-Guide-963233-Page-2.png)
![I 30Chapter 2 | Learning to Use the MenusOPERATING SET-UPSelect a device that you want to learn.5Press the button to be learned on the remote.6Press the button on the original remote control.7Press [EXIT] button to complete the procedure. If there is a learn failure message, repeat Step 6~7 again.8](https://usermanual.wiki/Remotesolution/RH61A.User-Manual-2/User-Guide-963233-Page-3.png)
![31 I Chapter 2 | Learning to Use the MenusI SELECT SIGNAL BETWEEN IR/RF(Network Mode)RF mode needs to be used together with models which are compatible with the TSR750.(Model name : RHxx and ZRxx series) This procedure needs to be proceeded after completing PAIRING THE REMOTE CONTROL WITH THE RECEIVER Procedure. Otherwise, device can not be controlled through receiver.OPERATING SET-UPPress the [REMOTE] icon on the screen to open the menu. The [REMOTE] screen appears.1Press the [Settings] icon on the screen. The [Settings] screen appears.2Select [IR/RF] on the top menu bar. All devices are selected as IR. : IR OUTPUT : RF OUTPUT3Press a device which you like to change. Ex) TV4](https://usermanual.wiki/Remotesolution/RH61A.User-Manual-2/User-Guide-963233-Page-4.png)
![I 32Chapter 2 | Learning to Use the MenusOPERATING SET-UPThe receiver connected through previous pairing procedure is displayed. Select a device. If you do not want, press [EXIT] button.5When complete, the icon of TV is changed to RF.6Press [EXIT] button to complete the procedure.7](https://usermanual.wiki/Remotesolution/RH61A.User-Manual-2/User-Guide-963233-Page-5.png)
![33 I Chapter 2 | Learning to Use the MenusOPERATING SET-UPPress the [REMOTE] icon on the screen to open the menu. The [REMOTE] screen appears.1Press the [Setting] icon on the screen. The [Setting] screen appears.2Select [IR/RF] on the top menu bar. All devices are selected as IR. : IR OUTPUT : RF OUTPUT3I SELECT SIGNAL BETWEEN IR/RF (Stand_Alone Mode)RF mode needs to be used together with models which are compatible with the TSR750. (Model name : RHxx and ZRxx series) Press a device which you like to change. Ex) TV4](https://usermanual.wiki/Remotesolution/RH61A.User-Manual-2/User-Guide-963233-Page-6.png)
![I 34Chapter 2 | Learning to Use the MenusOPERATING SET-UPPress [+] or [- ] to change RF Channel. Press [OK] button to save RF channel.5Once it is completed, TV icon is changed to RF.6Press [EXIT] button to complete the procedure.7](https://usermanual.wiki/Remotesolution/RH61A.User-Manual-2/User-Guide-963233-Page-7.png)
![35 I Chapter 2 | Learning to Use the MenusOPERATING SET-UPPress the [REMOTE] icon on the screen to open the menu. The [REMOTE] screen appears.1Press the [Setting] icon on the screen. The [Setting] screen appears.2Select [NETWORK] on the top menu bar.It will take around 15-30 sec. to join network.3I PAIRING THE REMOTE CONTROL WITH THE RECEIVER (Network Mode)Receiver needs to be set up in advance according to the opearting(Network) section on the receiver manual.In case of success in joining, the nd devices procedure will be proceeded.4In case of success in joining... In case of failure joining...](https://usermanual.wiki/Remotesolution/RH61A.User-Manual-2/User-Guide-963233-Page-8.png)
![I 36Chapter 2 | Learning to Use the MenusOPERATING SET-UPOnce procedure is completed, a device is displayed.Compare the label on the bottom of the receiver with device name.If not the same, Press [Update] Button.If the same, Press [EXIT] button to finalize procedure.5In case that device is not found, press [Update] button.6Note■ RF Freguancy RangeCh11: 2405MHz, Ch12: 2410MHz, Ch13: 2415MHz, Ch14: 2420MHz, Ch15: 2425MHz, Ch16: 2430MHz, Ch17: 2435MHz, Ch18: 2440MHz, Ch19: 2445MHz, Ch20: 2450MHz,Ch21: 2455MHz, Ch22: 2460MHz, Ch23: 2465MHz, Ch24: 2470MHz, Ch25: 2475MHz,Ch26:2480MHz (16Channel, Fc)](https://usermanual.wiki/Remotesolution/RH61A.User-Manual-2/User-Guide-963233-Page-9.png)
![37 I Chapter 2 | Learning to Use the MenusOPERATING SET-UPI CONFIGURATION (TOUCH, EXTERNAL BUTTON SOUND Settings)Press the [REMOTE] icon on the screen to open the menu. The [REMOTE] screen appears.1Press the [Settings] icon on the screen. The [Settings] screen appears.2Press the [CONFIG] icon in the top menu bar.3Select the Touch or External Button to be modied, and select a sound. When settings are complete, press the [EXIT] icon to end.4](https://usermanual.wiki/Remotesolution/RH61A.User-Manual-2/User-Guide-963233-Page-10.png)
![I 38Chapter 2 | Learning to Use the MenusI PHOTO Function ButtonsPHOTO1 ARROW Moves [UP/DOWN/LEFT/RIGHT] in the preview screen.OK OK Opens the selected image file for viewing.2MENU MENU Opens a preview of the image in the Picture Frame folder.3EXIT EXIT Ends the still image screen and begins the slide mode.4 HOME Moves to the Home screen.5CH , CH CHANNEL Plays the [Next/Previous] MP3 file.VOL , VOL VOLUME Turns the volume of the currently playing MP3 file [Up/Down].6 MUTE Mutes the volume of the currently playing MP3 file.1452 3 6](https://usermanual.wiki/Remotesolution/RH61A.User-Manual-2/User-Guide-963233-Page-11.png)
![39 I Chapter 2 | Learning to Use the MenusI PHOTO SET-UP (SLIDE MODE)Touching the photo image on the screen moves to the PHOTO SET-UP.PHOTO1 DELAY+, - [Increases/Decreases] the delay time.10 Displays the delay time.2 SLIDEMOVE Photo images appear from left to right.IN Photo images appear from the outside edges inward to the center.OUT Photo images appear from the center outward to the outside edges.3 CONTINUE Saves the settings and continues viewing.4 EXIT Ends the photo display.31 24](https://usermanual.wiki/Remotesolution/RH61A.User-Manual-2/User-Guide-963233-Page-12.png)
![I 40Chapter 2 | Learning to Use the MenusI PHOTO DISPLAYPHOTOPress the [REMOTE] icon on the screen to open the menu. The [PHOTO] screen appears.1Photo images are automatically displayed. Any MP3 les contained in the Picture Frame folder are also played.2Press the [MENU] button during display. The image preview appears at the bottom of the LCD screen.3Move the cursor via the [UP/DOWN/LEFT/RIGHT] buttons to the image to be used in the still screen. The corresponding image can also be touched.4](https://usermanual.wiki/Remotesolution/RH61A.User-Manual-2/User-Guide-963233-Page-13.png)
![41 I Chapter 2 | Learning to Use the MenusPHOTOAfter selecting the desired image, press the [OK] button.5To end the still screen and convert to slide mode, press the [EXIT] button.6Press the product’s [ ] button to end the photo mode. The main screen appears.7](https://usermanual.wiki/Remotesolution/RH61A.User-Manual-2/User-Guide-963233-Page-14.png)
![I 42Chapter 2 | Learning to Use the MenusI Music File and Image File SavingThe following are instructions for using the PHOTO function of the remote control to save image and music les.Supported File Formats - Music Files: MP3, WAV Image Files: BMP, JPG, PNGPHOTOTurn the remote control power ON, and connect it to the PC via the USB cable.1When the connection is complete, the ActiveSync program opens. Click the [Cancel] icon in the ActiveSync screen.2Note■ Please refer to the manager help to save image or music le on remote control.](https://usermanual.wiki/Remotesolution/RH61A.User-Manual-2/User-Guide-963233-Page-15.png)
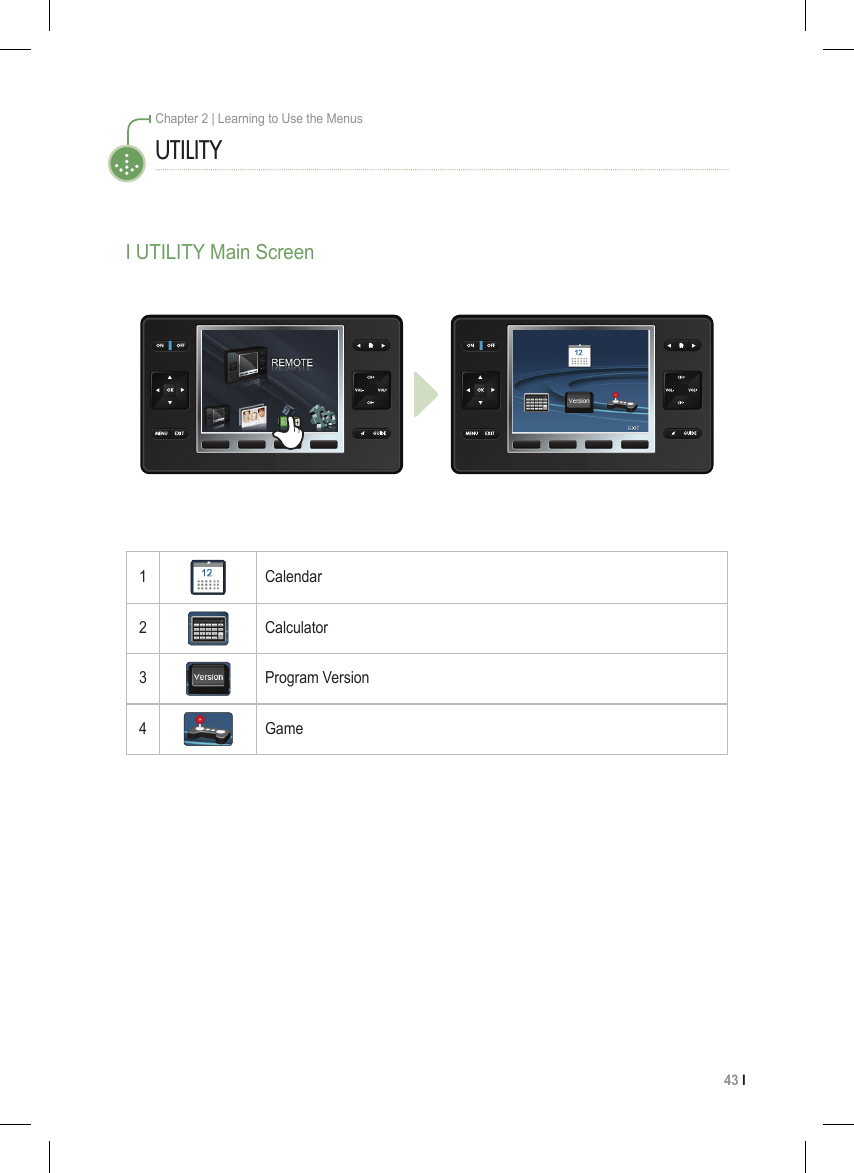
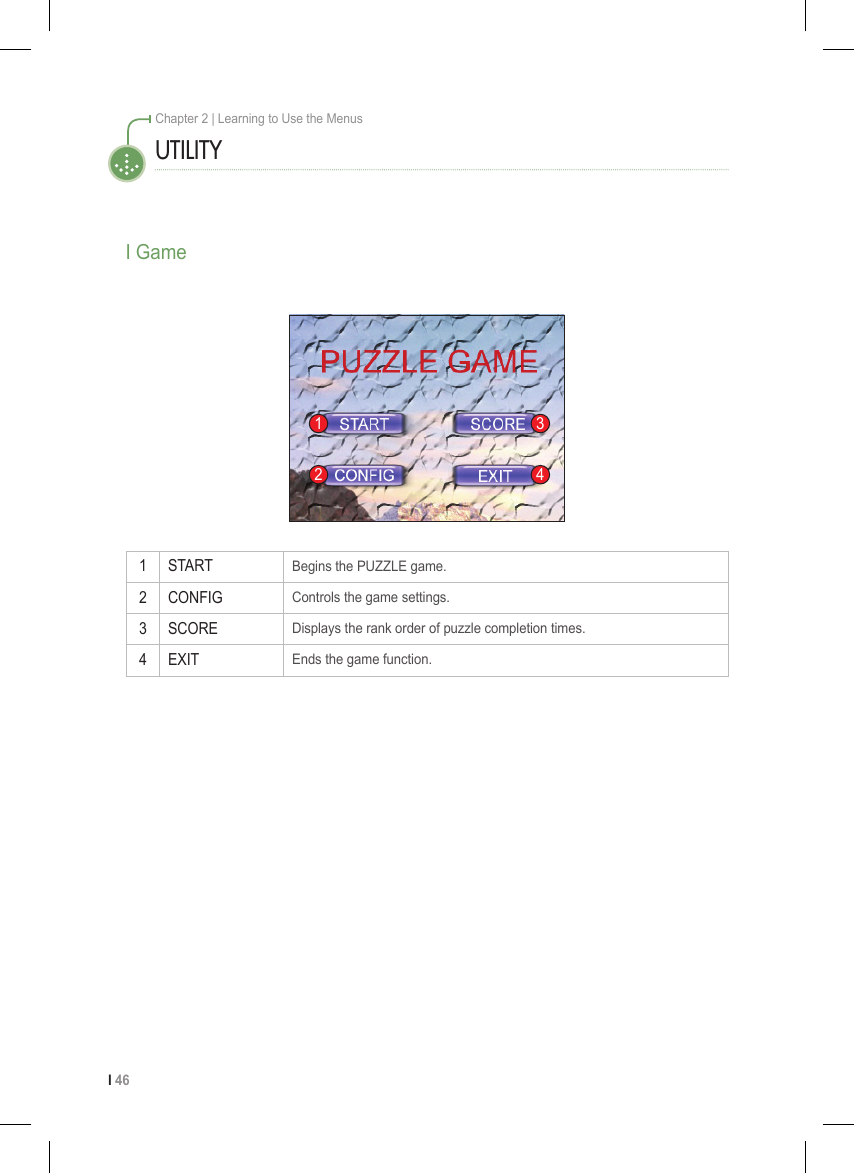
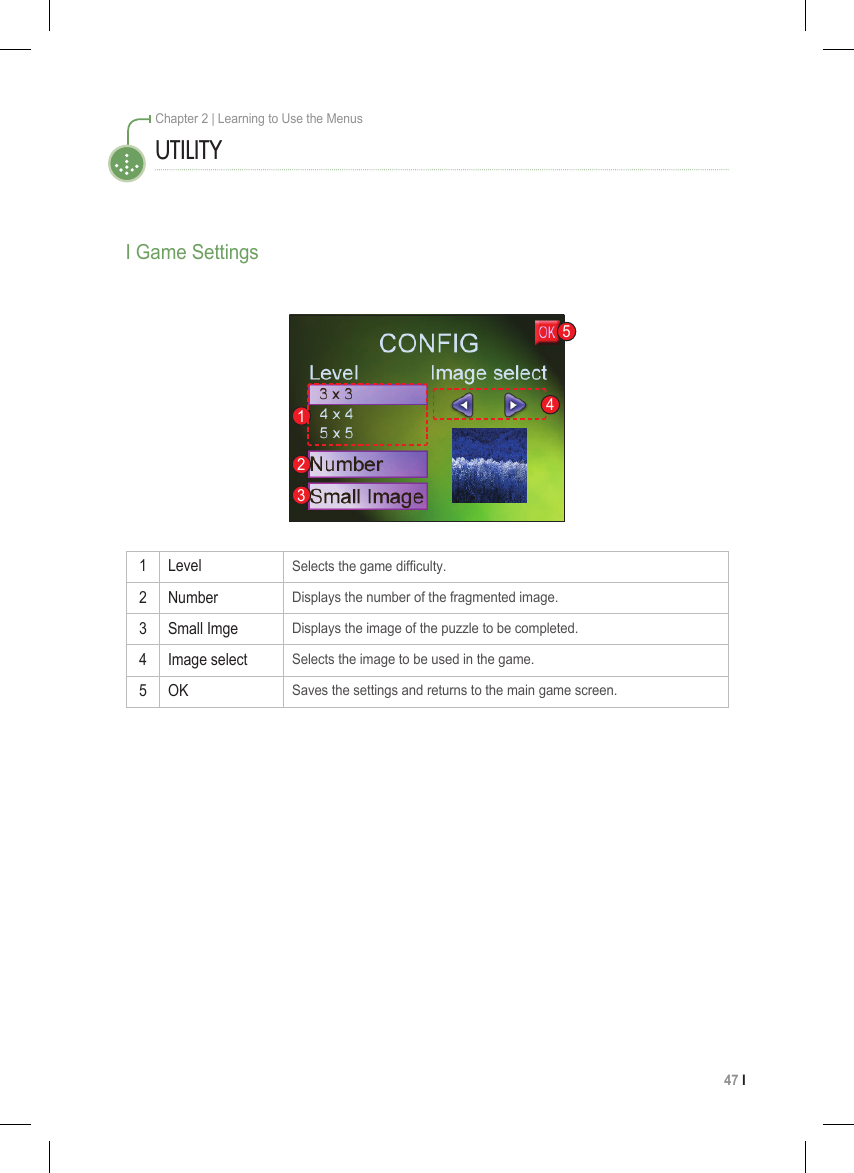
![I 48Chapter 2 | Learning to Use the MenusI Game InstructionsPress the [UTILITY] icon on the screen to open the menu. The [UTILITY] screen appears.1UTILITYPress the [START] icon on the main game screen. The game begins.3After the puzzle image to be completed is scrambled, the game begins. Drag and arrange the pieces to comprise the image shown in the upper right of the screen to nish. To end the game at any time, press the [EXIT] icon.4Press the [GAME] icon on the screen. The [GAME] screen appears.2](https://usermanual.wiki/Remotesolution/RH61A.User-Manual-2/User-Guide-963233-Page-21.png)
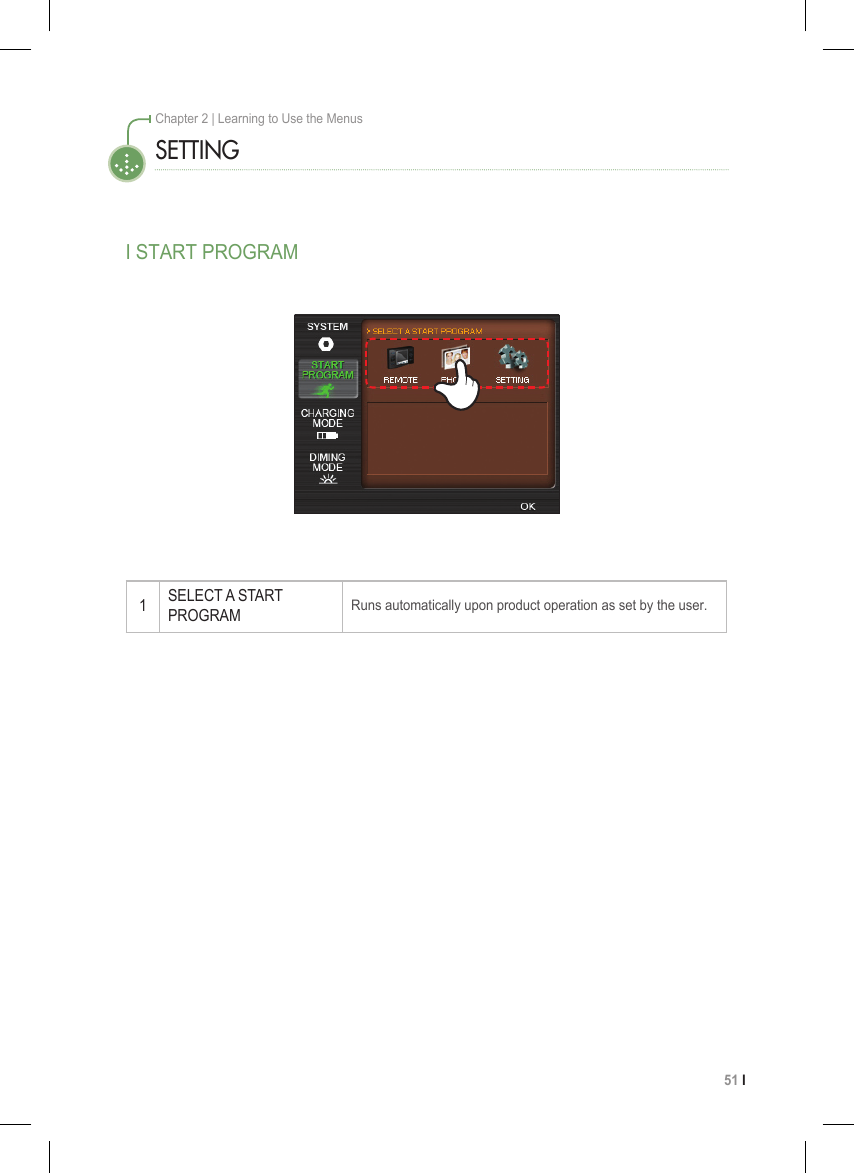
![49 I Chapter 2 | Learning to Use the MenusI SETTING Main ScreenSETTINGPress the [SETTING] icon on the screen to open the menu.1The SYSTEM SET-UP screen appears. Select the SYSTEM, START PROGRAM, CHARGING MODE, and DIMMING MODE settings.2](https://usermanual.wiki/Remotesolution/RH61A.User-Manual-2/User-Guide-963233-Page-22.png)
![I 50Chapter 2 | Learning to Use the MenusSETTINGI SYSTEM1 BRIGHTNESSAdjusts the LCD brightness.2 SOUND Adjusts the sound volume.3 DATE & TIME Adjusts the current time and day/month/year.4 LCD TIME OUT Sets the time period before the remote control is automatically turned off.5To modify settings, select the corresponding part, and use the [+, -] buttons to adjust. 12345](https://usermanual.wiki/Remotesolution/RH61A.User-Manual-2/User-Guide-963233-Page-23.png)
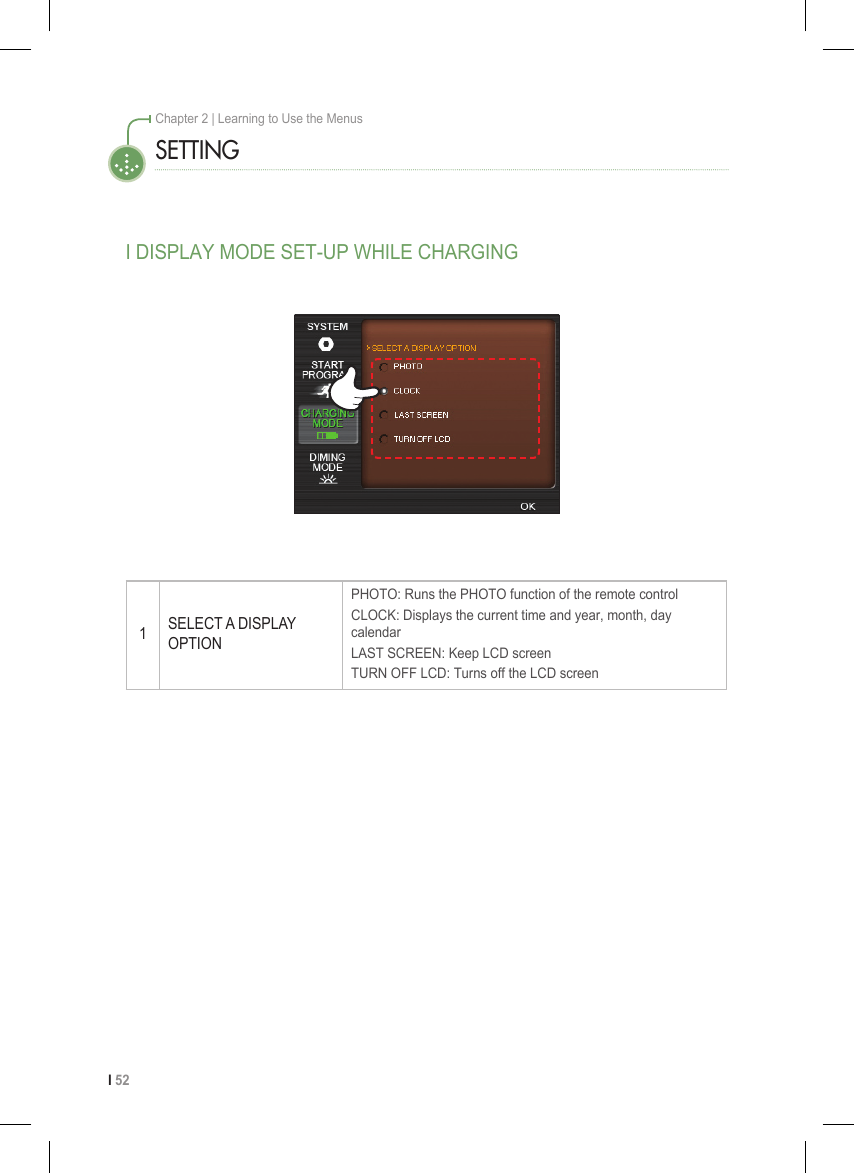
![53 I Chapter 2 | Learning to Use the MenusSETTINGI DIMING MODEThis function dims the LCD screen after a specied amount of time to reduce glare.1CONFIGURE THE DIMING MODETurns the dimming mode ON/OFF.2 DIMING ON TIMESets the time interval before automatic dimming of the remote control LCD screen.3 PERIODSets the start time and end time for the dimming mode. (24-hour based clock)4To modify settings, select the corresponding part, and use the [+, -] buttons to adjust. 4123<OFF Screen> <ON Screen>1](https://usermanual.wiki/Remotesolution/RH61A.User-Manual-2/User-Guide-963233-Page-26.png)