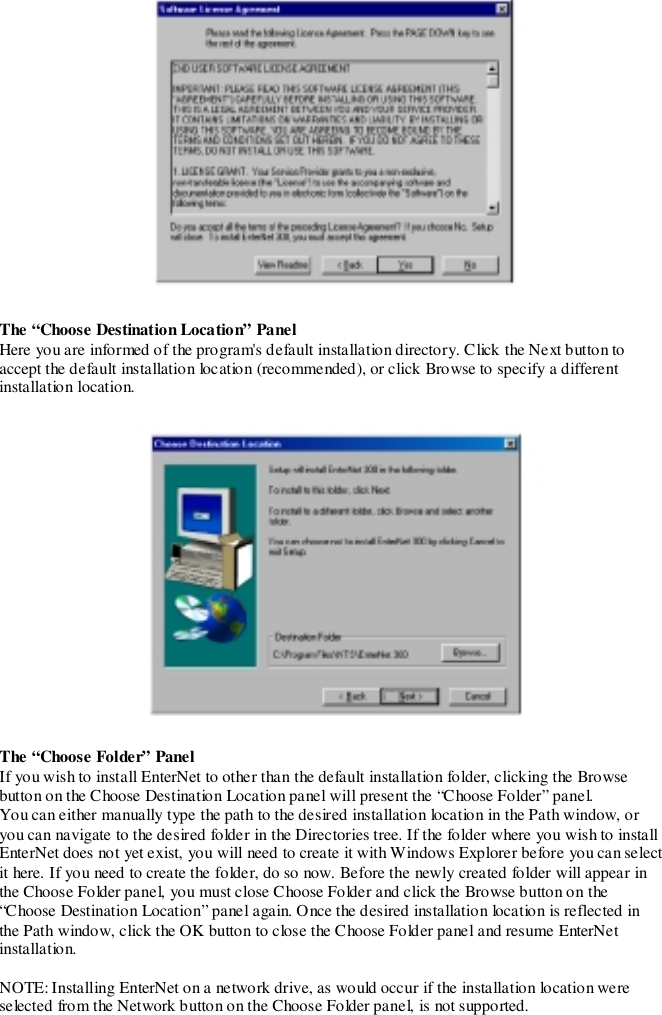
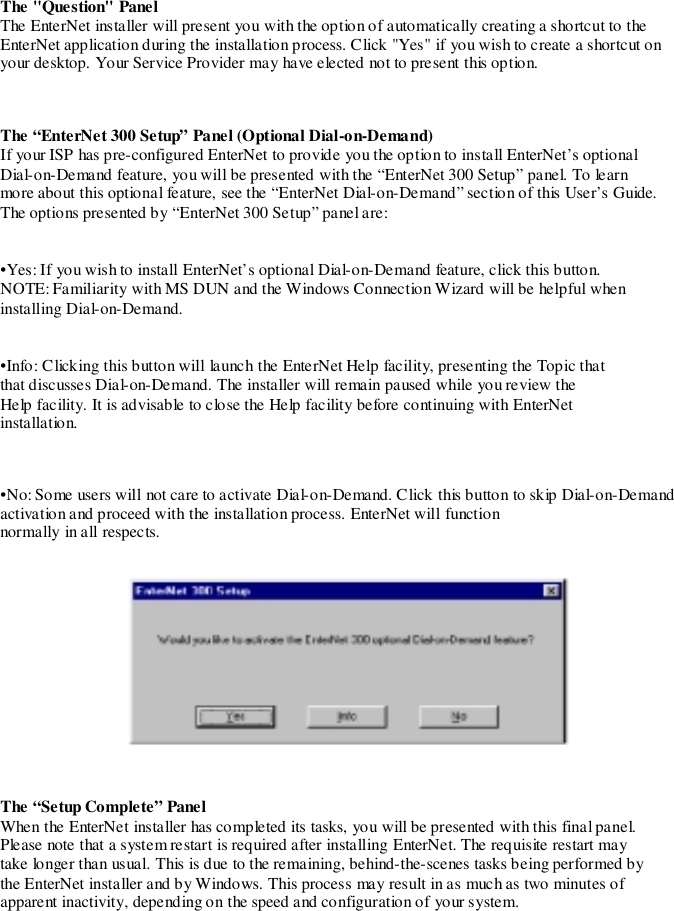
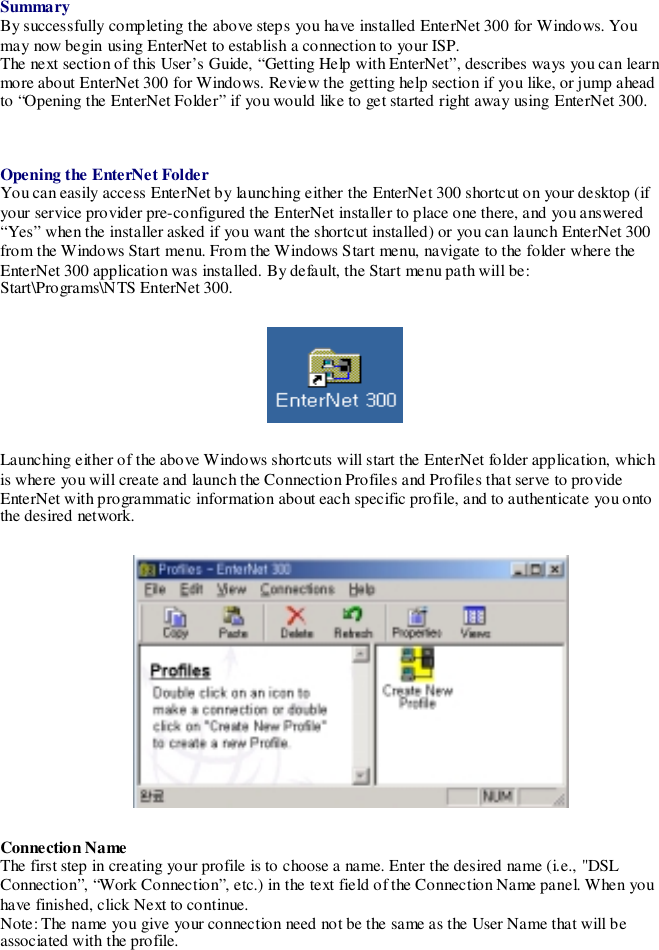
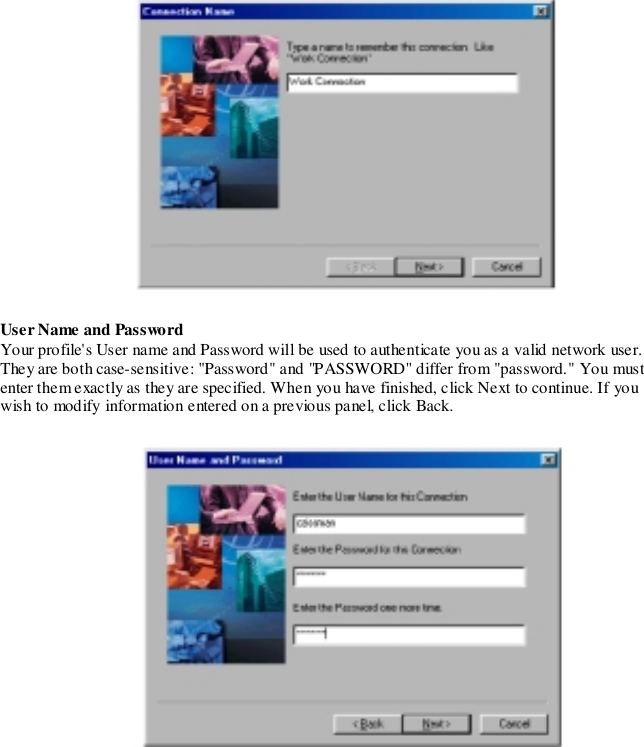
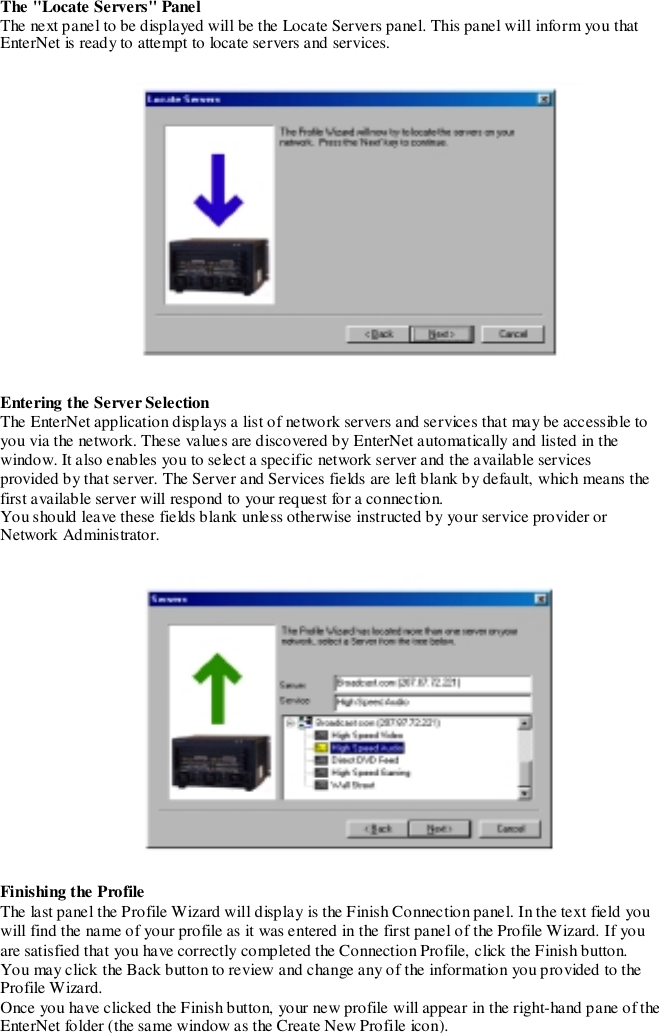
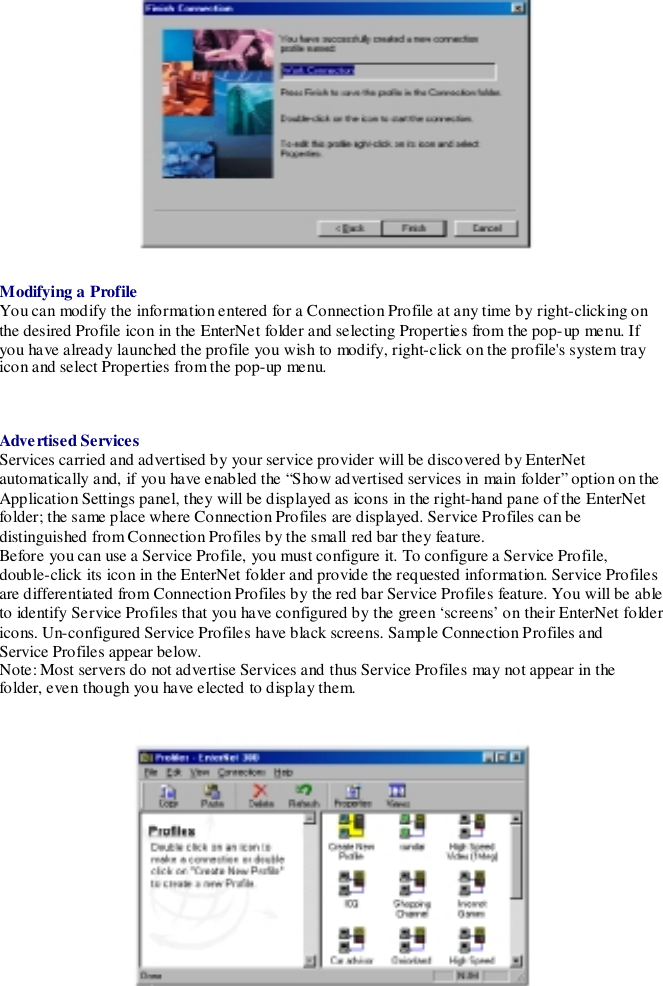
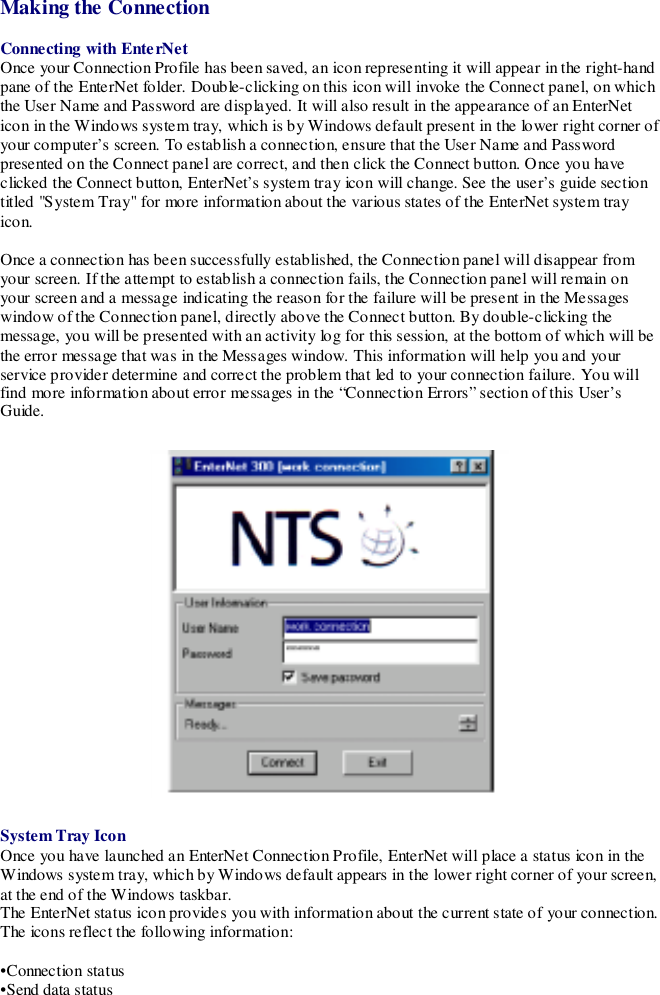
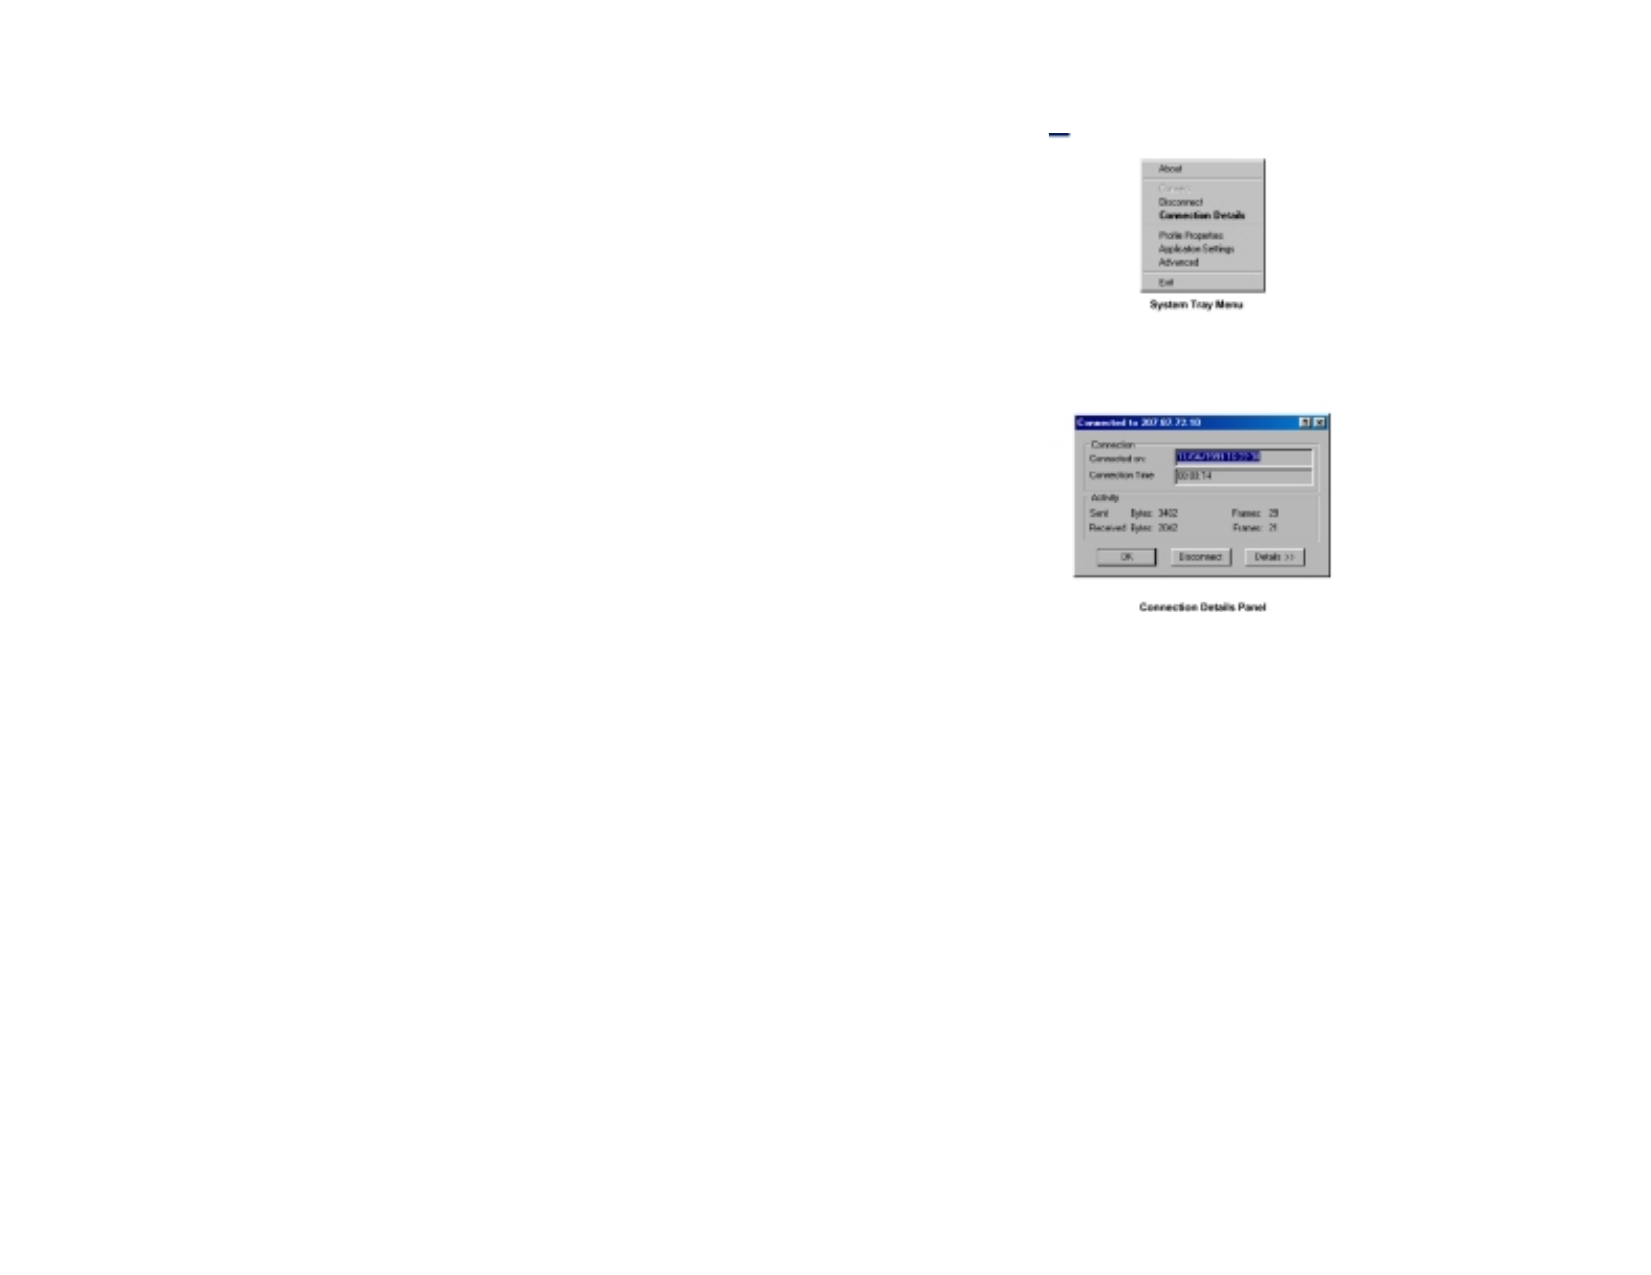
Recsol I and C RECSPEED2021P ADSL MODEM CARD User Manual

Recsol I&C; Co., Ltd. ADSL MODEM CARD

USER MANUAL

Recreative SolutionInformation & CommunicationThe Leader of the DIGITOPIAFl.6. Hanna B/D 123 kwangjang - Dong, Kwangjin-Gu,Seoul,KoreaRECSPEED-2021PADSL PCI NICInstallation Guide
Copyright  2000, RECSPEED-2021P Corporation All rights reserved.This manual and software described in it are copyrighted with all rights reserved.  This manual may notbe copied, in whole or in part, without the written consent of RECSPEED-2021P Corporation.RECSPEED-2021P is a trademark of RECSPEED-2021P Corporation. All other product names aretrademarks and or registered trademarks of their respective companies. Part Number IG02A01-xxFCC StatementThis equipment has been tested and found to comply with the limits for a Class B digital device,pursuant to Part 15 of the FCC Rules.  These limits are designed to provide reasonable protectionagainst harmful interference in a residential installation.  This equipment generates, uses and can radiateradio frequency energy and, if not installed and used in accordance with the instructions, may causeharmful interference to radio communications.  However, there is no guarantee that interference will notoccur in a particular installation.  If this equipment does cause harmful interference to radio or televisionreception, which can be determined by turning the equipment off and on, the user is encouraged to try tocorrect the interference by one or more of the following measure:! Reorient or relocated the receiving antenna.! Increase the separation between the equipment and receiver.! Connect the equipment into an outlet on a circuit different from that to which the receiver isconnected.! Consult the dealer or an experienced radio/TV technician for help.! Shielded cables must be used to comply with FCC regulations.WARNING (Part 15, Section 15.21)Changes or modifications not expressly approved by the party responsible for compliance could void theuser’s authority to operate the equipment.
                                                                     RECSPEED-2021P                                                                                                    Installation GuideiTable of ContentsBEFORE YOU START!...........................................................................................................................1STEP 1 – GATHER SYSTEM AND SERVICE CONNECTION INFORMATION .........................2SYSTEM REQUIREMENTS ........................................................................................................................2DETERMINING YOUR OPERATING SYSTEM............................................................................................. 2DETERMINING YOUR INTERNET SERVICE PROTOCOL ............................................................................3DETERMINING YOUR CONNECTION ADDRESS AND CONFIGURATION.................................................... 3STEP 2 – INSTALL THE ADSL MODEM CARD ...............................................................................4HARDWARE INSTA LLATION ....................................................................................................................4STEP3 – INSTALL THE DRIVERS AND ESTABLISH AN INTERNET SERVICECONNECTION......................................................................................................................................5DRIVER INSTALLATION AND INTERNET SERVI CE CONNECTION.............................................................5POINT TO POINT PROTOCOL OVER ATM (RFC 2364) – WINDOWS 95A................................................6POINT TO POINT PROTOCOL OVER ATM (RFC 2364) – WINDOWS 95B................................................ 8MAKING AN INTERNET CONNECTION FOR POINT TO POINT SERVICE – WIN95....................................10POINT TO POINT PROTOCOL OVER ATM (RFC 2364) – WINDOWS 98, 98A........................................10POINT TO POINT PROTOCOL OVER ATM (RFC 2364) - WINDOWS 2000 ............................................. 12POINT TO POINT PROTOCOL OVER ATM (RFC 2364) – WINDOWS NT 4.0 .........................................13CLASSICA L INTERNET PROTOCOL OVER ATM (RFC1577) - WINDOWS 95A......................................15CLASSICA L INTERNET PROTOCOL OVER ATM (RFC1577) - WINDOWS 95B......................................16MAKING AN INTERNET CONNECTION FOR IPOA - WIN 95A, 95B........................................................17CLASSICA L INTERNET PROTOCOL OVER ATM (RFC1577) - WINDOWS 98, 98A................................18CLASSICA L INTERNET PROTOCOL OVER ATM (RFC1577) - WINDOWS 2000.....................................19CLASSICA L INTERNET PROTOCOL OVER ATM (RFC1577) - WINDOWS NT 4.0..................................20BRIDGED ETHERNET OVER ATM (RFC 1483) – WINDOWS 95A.........................................................21BRIDGED ETHERNET OVER ATM (RFC 1483) – WINDOWS 95B ......................................................... 22BRIDGED ETHERNET OVER ATM (RFC 1483) – WINDOWS98, 98A.................................................... 23MAKING AN INTERNET CONNECTION FOR BRIDGED ETHERNET ON WIN 95, 98, 2000........................24Enternet 300 Installing..................................................................................................................24BRIDGED ETHERNET OVER ATM (RFC 1483) - WINDOWS 2000.........................................................35BRIDGED ETHERNET OVER ATM (RFC 1483) – WINDOWS NT 4.0.....................................................36APPENDIX A - DIAGNOSTIC TOOLS...............................................................................................37HARDWARE DIA GNOSTICS.................................................................................................................... 37CONFIGURING THE CONNECTION SERVICE............................................................................................38
                                                                     RECSPEED-2021P                                                                                                    Installation GuideiiCONNECTOR PINOUT.............................................................................................................................39APPENDIX B - TROUBLE SHOOTING.............................................................................................40APPENDIX C - REMOVING RECSPEED-2021P DRIVERS (VER 2.1.0)......................................42WINDOWS 95, 98 ..................................................................................................................................42WINDOWS 2000 ....................................................................................................................................42WINDOWS NT4.0..................................................................................................................................43REMOVIN G  RECSPEED-2021P DRIVERS (VER 2.1.2).........................................................................43APPENDIX D - SYSTEM REQUIREMENTS & COMPLIANCE INFORMATION.....................43
Before you Start!The RECSPEED-2021P Installation Guide tells you everything you need to know to install and use theRECSPEED-2021P ADSL modem card. This guide is designed to walk you through the installation oftheRECSPEED-2021P ADSL card and drivers, and then through the establishment of an Internet serviceconnection.This is a (3) step process.Step 1 – Gather system and service connection informationStep 2 – Install the ADSL modem cardStep 3 – Install the drivers and establish an Internet service connection" If you’re a beginner to the Internet – or if you’re experienced but have never installed anADSL PCI card before – Start at the beginning and work your way carefully through theinstructions. It is important to gather all the information required before you actually install thePCI card and ADSL drivers." If you’re familiar with installing PCI cards and drivers - you may be able to browse thechapters to get the basics - However, it is still important to gather all the information requiredbefore you actually install the PCI card and ADSL drivers." If you feel like enjoying Internet and Telephone simultaneously , One of the Modem ports (LINEport) can be connected to  ADSL Line , the other (PHONE port), telephone Line" When ADSL Link is connected to DSLAM equipment,  “LINK” la mp is o n" While the RECSPEED-2021P ADSL Modem  receives  the data,  “ACT” lamp blinks
Step 1 – Gather system and service connectionInformationSystem RequirementsMake sure your PC system meets ALL of the following minimum hardware and software requirements:Hardware:# IBM PC/AT or compatible# Pentium 100Mhz or faster# 30Mbytes available hard disk space or more# 2x CD-ROM drive or better# 32Mbyte available system memory or moreSoftware: Your Operating System must be one of the following:# Microsoft Windows 95.x – 95A, 95B# Microsoft Windows 98.x – 98, 98A# Microsoft Windows 2000 x – 2000 NT# Microsoft NT – NT 4.0 Service Pack 3Determining Your Operating SystemYou will need to know the exact version of Microsoft Windows installed in your computer. If youdo not know or are unsure, please proceed as follows to determine your version of the MicrosoftOperating System. On the desktop, right click My Computer. Then select Properties. Theversion number of the Microsoft Windows Operating System installed in your computer will bedisplayed on the General tab. Refer to the following table for more detailed information.Version System Description Release NameWin 95A  4.00.950A  Windows 95 OSR1Win 95B  4.00.950B  Windows 95 OSR2Win 98  4.10.1998  Window 98Win 98A  4.10.2222A  2nd Edition Windows 98 2nd EditionWin 2000      5.00 2195                        Windows 2000 NTWin NT  4.00.1381  Windows NT 4.0
Determining Your Internet Service ProtocolYour Internet service protocol will be one of the following. Contact your Internet Service Provider(ISP) if you are unsure of your service type.RFC 1483 $Bridged Ethernet over ATMRFC 2364 $Point-to-Point Protocol over ATMRFC 1577 $Classical Internet Protocol over ATMDetermining Your Connection Address and ConfigurationYou will need to know the connection address and configuration for your Internet service. Findyour Internet Service Protocol below and proceed gathering the connection address andconfiguration. If you are unsure or do not have all the information, please contact your InternetService Provider (ISP)." RFC1483 - Bridged Ethernet over ATM service requires the following information:IP Address                .              .              .              Subnet Mask                .              .              .              Gateway                .              .              .              (Domain Name Service) DNS Host                               DNS Domain                                                             DNS Server                .              .              .              VPI value VPI = ____ (Default VPI=0)VCI value VCI = ____ (Default VCI=35)ADSL Mode Type  ANSI T1.413 Issue 2 ITU G.992.1 Annex A (G.dmt) ITU G.992.2 Annex A (G.lite)" RFC2364 – Point-to-Point Protocol over ATM" RFC1577 – Classical Internet Protocol over ATMservices require the following information:User Name                                                             Password                                                             Logon Domain                                                             VPI value VPI = ____ (Default VPI=0)VCI value VCI = ____ (Default VCI=35)
ADSL Mode Type  ANSI T1.413 Issue 2 ITU G.992.1 Annex A (G.dmt) ITU G.992.2 Annex A (G.lite)Step 2 – Install the ADSL modem cardHardware InstallationWARNING! To avoid possible damage to your RECSPEED-2021P card you need to use an anti-staticgrounding device or hold onto the metal chassis of the PC to provide anti-static grounding.1. Shut down the system and switch the power off.2. Unplug the AC power cable from the PC.3. Remove the cover from the PC chassis.4. Unscrew the “slot cover bracket” from an unused PCIslot.5. Insert the card into an empty PCI slot.6. Firmly press the RECSPEED-2021P ADSL card into theslot and secure the card to the chassis with the chassisbracket screw.7. Connect one end of a phone cable to the RJ-11 port on the RECSPEED-2021P ADSL card and plugthe other end of the cable into the ADSL data service.8. Replace the cover of the PC chassisNOTE: Before you plug the power cable back into the PC system and turn the power on. Go to the nextsection (Step 3) and determine the section/page you need to be on to begin installing the drivers.
Step3 – Install the drivers and establish an Internet service connectionDriver Installation and Internet Service ConnectionRefer to the following chart and locate your connection protocol with your correspondingOperating System (OS). Then proceed to appropriate section/page.To install point to point Protocol over ATM Service (RFC 2364)Win95A Go to page 6Win95B Go to page 7Win98, 98A Go to page 10Win 2000 Go to page 11NT 4.0 Go to page 13To install Classical IP over ATM Service (RFC 1577)Win95A Go to page 15Win95B Go to page 16Win98, 98A Go to page 18Win 2000 Go to page 19NT 4.0 Go to page 20To install Bridged Ethernet protocol over ATM Service (RFC 1483)Win95A Go to page 22Win95B Go to page 22Win98, 98A Go to page 23Win 2000 Go to page 36NT 4.0 Go to page 37NOTE: You may need the Microsoft Windows Operating System installation files (CAB files) tocomplete the installation.  The CAB files are contained in the Microsoft’s system CD.  Some systemsmay have alread y installed the CAB files to the hard drive, but you should have the Microso ft C D handyjust in case.
Point to Point Protocol over ATM (RFC 2364) – Windows 95AAfter installing the RECSPEED-2021P card, plug the power cable back into the PC system and turn thepower on.1. The New Ha rdwa re  Found window will detect the card as a PCI Network Controller. Select theDriver from disk provided by hardware manufacturer option. Click OK.2. Insert the RECSPEED-2021P ADSL MODEM CD into the drive.3. The Install From Disk window appears. In the text entry bar labeled Copy manufacture’s filesfrom: type in your systems CD drive location letter ( D for example ), followed by a colon ( : ),then a back-slash ( \ ), followed by the RFC2364 driver for Windows 95 . For example, type in:D:\PPPoA\Win95 Then click OK.4. When the Service Option window appears, click Advanced5. The Service Options window shows the Connection Address.& select ADSL mode. Enter in theVPI and VCI values provided by your ISP. Make sure the Framing is set to VC MUXIn the Select ADSL Mode section , select the mode(s)  recommended by your ADSL serviceprovider. Click on the mode(s) required and then click ok    NOTE: The service mode type will be one of the followingANSI  T1.413 Issue 2ITU G. 992.2 Annex A  (G.lite)ITU G. 992.1 Annex A  (G.dmt)The previous Service Option window will appear, click Next.NOTE: During the installation process you may be asked to insert your Windows 95 CD. Insert theWindows 95 CD into the CD drive and click OK.NOTE: If during the file copying process a file is reported as “not found” enter the path <CD Driveletter> and :\Win95 (e.g. D:\Win95)IMPORTANT! You will need to upgrade your Dial-Up Networking (DUN) application to version 1.3 orabove. The Microsoft DUN is conveniently contained on you RECSPEED-2021P ADSL MODEM CD-ROM. The next section explains how to install the DUN.6. At your desktop, click Start, and select Run from the menu. The Run window appears.7. Specify the path for the MSDUN13.EXE file in the Open box i.e. <CD drive Letter> (D forexample) and then the DUN file name :\MSDUN13.EXE (e.g. D:\MSDUN13.EXE) and click OK.8. The Microsoft Dial-Up Networking 1.3 window appears with the message This will installMicrosoft Dial-Up Networking 1.3 for Windows 95. Click Yes.9. An End-User License Agreement will appear. Click Yes.10. Back in the Microsoft Dial-Up Networking 1.3 window. You will be asked Do you want torestart your computer now?, Click Ye s.
NOTE: You may be asked to restart you computer system again. Click Yes.NOTE: After you restart your system, the Microsoft Dial-Up Networking should be installed. However,It is possible to have Dial-Up Networking installed, but not have the Dial-Up Networking componentsactivated. The next procedure is for verifying that your DUN components are active.11. At the task bar click Start, Settings, Control Panel and double-click on Add/Remove Programs.12. In Add/Remove Programs Properties, choose the Windows Setup Tab and wait for Setup tocomplete the search for all installed components. Select (i.e. highlight) the Communicationscomponent and click Details.13. If Dial-Up Networking is installed, then a check mark will appear next to the entry.14. To select Dial-Up Networking, place a check mark next to the DUN component, click OK.NOTE: The Windows CD-ROM maybe required to complete the installation. Have the Windows CD-ROM ready for use.15. The Dial-up Networking windows appears, click OK.16. Yo u must now restart your PC system.17. At the conclusion of the RECSPEED-2021P driver installation, the Diagnostic Tool icon(Appendix A) is active and monitoring connectivity. You must now make a network connection.Go to page 10.
Point to Point Protocol over ATM (RFC 2364) – Windows 95BAfter installing the RECSPEED-2021P card, plug the power cable back into the PC system and turn thepower on.1. The Update Device Driver Wizard will detect the RECSPEED-2021P ADSL NIC as a PCINetwork Controller, click Next2. Insert the RECSPEED-2021P ADSL MODEM CD into you systems CD drive.3. The Update Device Driver Wizard window appears. Click Other Locations.4. The Select Other Location window appears. In the text entry bar labeled Location, type in yoursystems CD drive location letter ( D for example ), followed by a colon ( : ), then a back-slash ( \ ),followed by the RFC2364 driver for Windows 95 . For example, type in: D:\PPPoA\Win95 Thenclick OK.5. The Update Device Driver Wizard window appears. Click Finish.6. The Insert Disk window appears. Insert the RECSPEED-2021P ADSL PCI NIC CD. Click OK.7. The Copying Files window appears. Again type in your systems CD drive location letter and drivere.g. D:\Win95 Then click OK.8. When the Service Option window appears, click AdvancedThe Service Options window shows the Connection Address.& select ADSL mode Enter in theVPI and VCI values provided by your ISP. Make sure the Framing is set to VC MUXIn the Select ADSL Mode section , select the mode(s)  recommended by your ADSL serviceprovider. Click on the mode(s) required and then click ok    NOTE: The service mode type will be one of the followingANSI  T1.413 Issue 2ITU G. 992.2 Annex A  (G.lite)ITU G. 992.1 Annex A  (G.dmt)9. The previous Service Option window will appear, click Next.NOTE: During the installation process you may be asked to insert your Windows 95 CD. Insert theWindows 95 CD into the CD drive and click OK.NOTE: If during the file copying process a file is reported as “not found” enter the path <CD Driveletter> and :\Win95 (e.g. D:\Win95)IMPORTANT! You will need to upgrade your Dial-Up Networking (DUN) application to version 1.3 orabove. The Microsoft DUN is conveniently contained on you RECSPEED-2021P ADSL MODEM CD-ROM. The next section explains how to install the DUN.10. At your desktop, click Start, and select Run from the menu. The Run window appears.11. Specify the path for the MSDUN13.EXE file in the Open box i.e. <CD drive Letter> (D for
example) and then the DUN file name :\MSDUN13.EXE (e.g. D:\MSDUN13.EXE) and click OK.12. The Microsoft Dial-Up Networking 1.3 window appears with the message This will installMicrosoft Dial-Up Networking 1.3 for Windows 95. Click Yes.13. An End-User License Agreement will appear. Click Yes.14. Back in the Microsoft Dial-Up Networking 1.3 window. You will be asked Do you want torestart your computer now?, Click Ye s.NOTE: You may be asked to restart you computer system again. Click Yes.NOTE: After you restart your system, the Microsoft Dial-Up Networking should be installed. However,It is possible to have Dial-Up Networking installed, but not have the Dial-Up. Networking componentsactivated. The next procedure is for verifying that your DUN components are active.15. At the task bar click Start, Settings, Control Panel and double-click on Add/Remove Programs.16. In Add/Remove Programs Properties, choose the Windows Setup Tab and wait for Setup tocomplete the search for all installed components. Select (i.e. highlight) the Communicationscomponent and click Details.17. If Dial-Up Networking is installed, then a check mark will appear next to the entry.18. To select Dial-Up Networking, place a check mark next to the DUN component, click OK.19. NOTE: The Windows CD-ROM maybe required to complete the installation. Have the WindowsCD-ROM ready for use.20. The Dial-up Networking windows appears, click OK.21. Yo u must now restart your PC system.22. At the conclusion of the RECSPEED-2021P driver installation, the Diagnostic Tool icon(Appendix A ) is active and monitoring connectivity. You must now make a network connection.Go to page 10.
Making an Internet Connection for Point to Point Service – Win95NOTE: This section is for Win95A, 95B users only.1. Double-click the My Computer icon on the desktop. Then double-click the Dial-Up Networkingicon.2. The Dial-Up Networking window appears. Double-click on the Make New Connection icon.3. The Make New Connection window appears. The default name for the computer you are dialing isMy Connection. However, You can name the connection anything you wish. In the Select a devicebar, use the scroll down menu to locate the RECSPEED-2021P ADSL PCI NIC, then click Next.4. A new Make New Connection window appears. Enter in the Host Name or IP Address providedby your ISP, otherwise enter (0) zero, and click Next.5. Another Make New Connection window appears. It will indicate that You have successfullycreated a new Dial-Up Networking connection called “My Connection”. Click Finish.6. The new connection will appear in the Dial-Up Networking window. Double-click the newconnection e.g. “My Connection” icon to begin a Dial-Up session.7. The Connect To window appears. Enter the User Name and Password supplied by your Internetservice provider (ISP). Then click Connect.8. The Connecting to My Connection window appears. The message Logging on to networkconfirms a valid connecting process.9. The Connection Established window appears. Internet service is now established. Click Close andthe Diagnostic tool icon appears on the task bar.Congratulations, you are done. Your RECSPEED-2021P the Internet is established!Point to Point Protocol over ATM (RFC 2364) – Windows 98, 98AAfter installing the RECSPEED-2021P card, plug the power cable back into the PC system and turn thepower on.1. The Add New Hardware Wizard window will automatically appear and indicate that a new PCINetwork Controlle r has been found. Click Next.2. Then select Search for the best driver for your device. (Recommended), click Next.3. Insert the CD labeled RECSPEED-2021P ADSL MODEM into your CD drive.4. Then select Specify a location and in the text entry bar type in your systems CD drive locationletter ( D for example ), followed by a colon ( : ), then a back slash ( \ ), followed by the RFC 2364driver for Windows 98 . For example, type in: D:\PPPoA\Win98 Then click Next.5. The Add New Hardware Wizard will appear and indicate the RECSPEED-2021P ADSL PCINIC. Click Next.6. When the Service Option window appears, click Advanced.7. The Service Options window now indicates the Connection Address & select ADSL mode. Enter
in the VPI and VCI values provided by your ISP. Make sure the Framing is set to VC MUXIn the Select ADSL Mode section , select the mode(s)  recommended by your ADSL serviceprovider. Click on the mode(s) required and then click ok    NOTE: The service mode type will be one of the followingANSI  T1.413 Issue 2ITU G. 992.2 Annex A  (G.lite)ITU G. 992.1 Annex A  (G.dmt)8. The previous Service Option window will appear, click Next.9. If prompted to insert your Windows CD do so at this time then click OK. Enter the <CD driveLetter> and then :\Win98 (e.g. D:\Win98) and click OK.10. At the conclusion of the RECSPEED-2021P ADSL NIC driver installation, click Finish.11. For the PC system to set up the RECSPEED-2021P ADSL NIC, a system Restart is required.Click Yes.NOTE: After restarting the system, the Diagnostic Tool icon (See Appendix A) isactive and monitoring connectivity.12. You must now make a dial-up network connection. At the Task bar, click on Start, and then selectPrograms, Accessories, Communications, followed by Dial-Up Networking.13. The Dial-Up Networking window appears. Double-click the Make New Connection icon.14. The Make New Connection window appears. The default name for the computer you are dialing isMy Connection. However, You can name the connection anything you wish. In the Select a devicebar, use the scroll down menu to locate the RECSPEED-2021P ADSL PCI NIC, then click Next.15. A new Make New Connection window appears. Enter in the Host Name or IP Address providedby your ISP, otherwise enter (0) zero, and click Next.16. Another Make New Connection window appears. It will indicate that You have successfullycreated a new Dial-Up Networking connection called “My Connection”. Click Finish.17. The new “My Connection” will appear in the Dial-Up Networking window. Double-click the new“My Connection” icon to begin a Dial-Up session.18. The Connect To window appears indicating “My Connection”. Type in the User name andPassword supplied by your Internet Service Provider (ISP). Click Connect.19. The Connection Established window will appear indicating You are connected to “MyComputer”. Click Close and the Diagnostic tool icon appears on the task bar.
Point to Point Protocol over ATM (RFC 2364) - Windows 20001. The Add New Hardware Wizard will detect  the RECSPEED-2021P ADSL NIC as a PCI Network Controller, click Next.2.Still in the Add New Hardware Wizard window, select Search for the best driver  for your device. (Recommended), click Next3.Again in the Add Ne w Hardware Wizard window,  select Specify a location option, then click Next.4.Insert the CD labeled RECSPEED-2021P ADSL MODEM into your systems CD drive,  then type D:\PPPoA\Win2000 (D for example). And then click Next.5. The Add New Hardware Wizard will find the driver, click Next.6. When the Add New Hardware Wizard ask about additional installation, click Yes.7. When the Service Options window appears, click Advanced.   The Service Options window now indicates the Network Protocol and PVC setting section.   Type your provided values from service provider in the VPI and VCI columns. And then   make sure the Framing setting as VC MUX. In the Select ADSL Mode sectio n, selec t the   mode(s) recomanded by your ADSL service provider. Click on the mode(s) required and then   click Ok.   NOTE: The service mode type will be one of the following                    ANSI  T1.413 Issue 2                    ITU G. 992.2 Annex A  (G.lite)                    ITU G. 992.1 Annex A  (G.dmt)8. The previous Service Options window will appear, click Next.NOTE: During the installation process you may be asked to insert your Windows 2000 CD.Insert the Windows 2000 CD into your systems CD drive and click OK.9.The Add New Hardware Wizard appears, click Finish.10.When the System Settings Change window appears and asks; Do you want to restart   your co mp uter now? C lick Ye s.11.You will find new icon on your monitor.
Point to Point Protocol over ATM (RFC 2364) – Windows NT 4.0NOTE: To perform the installation, logon as Administrator. TCP/IP protocol must be installed prior tothe driver installation. At the Network window select the Protocols tab and verify that the TCP/IP ispresent.1. On the Desktop, double-click My Computer, and then double-click Control Panel.2. In the Control Panel window, double-click the Network icon then select the Adapters tab. ClickAdd.3. The Select Network Adapter window appears. Click Have Disk.4. Insert the CD labeled RECSPEED-2021P ADSL MODEM into your systems CD drive.5. The Insert Disk window appears. In the text entry bar type in your systems CD drive location letter( D for example ), followed by a colon ( : ), then a back slash ( \ ), followed by the RFC2364 driverfor Windows NT 4.0. For example, type in: D:\PPPoA\NT4.0 Then click OK.6. The Select OEM Option window will find the RECSPEED-2021P ADSL PCI NIC, Click OK.7. When the Service Option window appears, click Advanced.8. The Service Options window appears indicating the Connection Address &. select ADSL modeEnter in the VPI and VCI values provided by your ISP. Make sure the Framing is set to VC MUXIn the Select ADSL Mode section , select the mode(s)  recommended by your ADSL serviceprovider. Click on the mode(s) required and then click ok    NOTE: The service mode type will be one of the followingANSI  T1.413 Issue 2ITU G. 992.2 Annex A  (G.lite)ITU G. 992.1 Annex A  (G.dmt)9. The previous Service Option window will appear, click Next.10. The Setup message window appears. It prompts Remote Access Services (RAS) will now beinstalled. Click OK.NOTE: You may be asked to insert your Windows NT CD. Insert the Windows NT CD into the CDdrive and click OK. The Windows NT Setup window will appear. Enter the path <CD Drive letter> and:\i386 (e.g. D:\i386). Click Continue.11. The Add RAS Device window appears. Click OK12. The Remote Access Setup window appears showing  itexwana .... Click Network.13. The Network Configuration window appears showing the Dial out Protocols: Select and check() the TCP/IP protocol. Click OK.14. The Network window will appear. Click the Adapters tab to verify that the RECSPEED-2021PADSL PC NIC has been found. Click on the Protocols tab and verify that the ADSLManagement and Monitor Interface is present. Click on the Services tab to verify that theRemote Access Service is present. Then click Close.NOTE: To review the Network window properties at any time, right-click the NetworkNeighborhood icon a nd se lect Properties.
NOTE: If no previous network devices have been installed, then the Network Neighborhoodicon will not be present on the desktop. To open the Network window, double-click MyComputer then Control Panel then Network.15. The Network Settings Change window appears. It prompts Do you want to restart yourcomputer now? Click Ye s.NOTE: After the system restarts the Diagnostic Tools icon will appear on the task bar. Both panels ofthe Diagnostic Tool icon should appear black signifying a good connection.16. You must now make a dial-up network connection. To begin a dial-up connection, double-click MyComputer, then double-click Dial-Up Networking.NOTE: If this is the first dial-up connection created, the Location Information window will appear.Enter in an area code (e.g. 408) for your region, then click Close. The Dial-Up Networking windowappears, Click OK to add an entry. Enter a name for the New phonebook entry (e.g. MyDialUpServer)and click Next. When the Server window appears click Next.17. The Dial-Up Networking window prompts for the phone number of the dial-up server. Unlessinstructed to enter a phone number by the ISP, enter zero “0” Still at the Dial-Up Networkingwindow, click More.18. The Edit Phonebook Entry window appears. Select the Security tab and verify that Accept onlyMicrosoft encrypted authentication is selected. Click OK. The previous Dial-Up Networkingwindow appears, click Dial.19. The Connect to MyDialUpServer window appears. Enter the User name, Password and Domainsupplied by your Internet Service Provider (ISP). Click OK.NOTE: If this screen persists and a connection logon error is reported, confirm that thecorrect User name and Password are entered and try the connection again. Also verify thatthe connection address is correct.The Connection Complete window is displayed at the completion of a successful Dial-Up logon. Choosea display behavior and click OK to close.
Classical Internet Protocol over ATM (RFC1577) - Windows 95AAfter installing the RECSPEED-2021P card, plug the power cable back into the PC systemand turn the power on.!  CLOSE the New Hardware Found window. The next section explains how to installthe DUN.!  At your desktop, click Start, and select Run fro m the menu. The Run window appears.!  Specify the path for the MSDUN13.EXE file in the Open box and click OK.!  The Microsoft Dial-Up Networking 1.3 window appears with the message This willinstall Microsoft Dial-Up Networking 1.3 for Windows 95. Click Yes .!  An End-User License Agreement will appear. Click Yes .!  Back in the Microsoft Dial-Up Networking 1.3 window. You will be asked Do youwant to restart your computer now? Click Yes .1. The Ne w Hardware  Fo und window will detect the card as a PCI Network Controller.Select the Driver from disk provided by hardware manufacturer option. Click OK.2. Insert the RECSPEED-2021P Drivers CD into the drive.3. The Install From Disk window appears. Type in your systems CD drive location letter ( D forexample ), followed by a colon ( : ), then a back-slash ( \ ), followed by the RFC1577 driver forWindows 95. For example, type in: D:\IPoA\Win95 Then click OK.4. When the Service Option window appears, click Advanced5. The Service Options window now d isplays the Connection Address and Select ADSL Modesections.!  In the Network Protocol and PVC Setting section, select the Classical IP over ATMand then enter in the VPI and VCI values provided by your ADSL service provider.!  In the Select ADSL Mode section, select the mode(s) recommended by your ADSLservice provider. Click on the mode(s) required and then click OK.NOTE: The service mode type will be one of the following:ANSI T1.413 Issue 2----------Default mode settingITU G.992.2 Annex A (G.lite)ITU G.992.1 Annex A (G.dmt)6. The previous Service Option window will appear, click Next.NOTE: During the installation process you may be asked to insert your Windows 95 CD.Insert the Windows 95 CD into the CD drive and click OK.NOTE: If during the file copying process a file is reported as not found enter the path <CDDrive letter> and :\Win95 (e.g. D:\Win95)
7. The System Setting Change window appears. Click Ye s  to restart your computer now.8. At the conclusion of the RECSPEED-2021P driver installation, the Diagnostic Tool icon (AppendixA) is active and monitoring connectivity. You must now make a network connection.                           Go to page 17.Classical Internet Protocol over ATM (RFC1577) - Windows 95BAfter installing the RECSPEED-2021P card, plug the power cable back into the PC systemand turn the power on.1. The Update Device Driver Wizard will detect the RECSPEED-2021P as a PCI NetworkController,  click Next.2. Insert the RECSPEED-2021P Drivers CD into you systems CD drive.3. The Update Device Driver Wizard will appear and indicate that Windows was unable tolocate a driver for this device . Click Other Locations..4. The Select Other Location window appears. In the text entry bar labeled Location, type inyour systems CD drive location letter ( D for example ), followed by a colon ( : ), then aback-slash ( \ ), followed by the RFC1577 driver for Windows 95. For example, type in:D:\IPoA\Win95 Then click OK.5. The Update Device Driver Wizard will then find the RECSPEED-2021P ADSL PCI NIC. ClickFinish.6. The Insert Disk window appears. Insert the RECSPEED-2021P Drivers CD. Click OK.7. The Copying Files window appears. Again type in your systems CD drive location letter anddriver e.g. D:\IPoA\Win95 Then click OK.8. When the Service Option window appears, click Advanced9. The Service Options window now d isplays the Connection Address and Select ADSLMode sections.!  In the Network Protocol and PVC Setting section, select the Classical IP over ATMsetting and then enter in the VPI and VCI values provided by yo ur ADSL serviceprovider.!  In the Select ADSL Mode section, select the mode(s) recommended by your ADSLservice provider. Click on the mode(s) required and then click OK.NOTE: The service mode type will be one of the following:ANSI T1.413 Issue 2----------Default mode settingITU G.992.2 Annex A (G.lite)ITU G.992.1 Annex A (G.dmt)10.The previous Service Option window will appear, click Next.
NOTE: During the installation process you may be asked to insert your Windows 95 CD.Insert the Windows 95 CD into the CD drive and click OK.NOTE: If during the file copying process a file is reported as not found enter the path <CDDrive letter> and :\Win95 (e.g. D:\Win95)11. At the conclusion of the RECSPEED-2021P driver installation, the Diagnostic Tool icon (AppendixA) is active and monitoring connectivity. You must now make a network connection.Go to page 17.Making an Internet Connection for IPoA - Win 95A, 95BThis section describes how to configure the ADSL network service when your PC is runningMicrosoft Windows 95A, 95B.1. You must now make a network connection. From the Start menu on the tool bar, selectSettings, Control Panel, and then double click on the Network icon.2. The Network window appears. Select the Configuration tab, scroll the installed networkcomponent window and find RECSPEED-2021P ADSL PCI NIC.NOTE: If the RECSPEED-2021P ADSL PCI NIC is present go to step 3. If the RECSPEED-2021PADSL PCI NIC isnot present, click Add. The Select Network Component Type window appears. SelectProtocol, and click Add. The Select Network Protocol window appears. In theManufactures sectio n, se lec t Microsoft. In the Network Protocols section, select TCP/IPthen click OK.3. When the Network window appears select the Configuration tab, scroll the installed networkcomponent window and select TCP/IP %%%% RECSPEED-2021P ADSL PCI NIC.4. Still at the Network window, click the Configuration tab, select TCP/IP %%%% RECSPEED-2021PADSL PCI NIC.Then click the Properties button.5. The TCP/IP Properties window will appear. Select the IP Address tab and then select theSpecify an IP Address option. Enter the IP Address and Subnet Mask settings.6. To setup a new gateway, select the Gateway tab enter, the setting in the Ne w Gate waysection and click Add.7. Select DNS Configuration tab. Select the Enable DNS option.NOTE: You now need to have available the Host, Domain and DNS settings provided byyour ADSL service provider.8. Enter your host name into Host: box.9. Enter your domain name into Domain: box.10. Enter DNS number into DNS Server Search Order box and click Add. If you have more
than one DNS numbers, repeat this step.11. After setting all the necessary TCP/IP properties, click OK.12. The Network window appears. Click OK.13. The System Setting Change window appears. You will be asked if you want to restart yourcomputer. Click Yes.Classical Internet Protocol over ATM (RFC1577) - Windows 98, 98AAfter installing the RECSPEED-2021P card, plug the power cable back into the PC systemand turn the power on.1. The Add New Hardware Wizard window will automatically appear and indicate that a newPCI Network Controller has been found. Click Next.2. Then select Search for the best driver for your device. (Recommended), click Next.3. Insert the CD labeled RECSPEED-2021P Drivers into your CD drive.4. Then select Specify a location and in the text entry bar type in your systems CD drivelocation letter ( D for example ), followed by a colon ( : ), then a back slash ( \ ), followed bythe RFC 1577 driver for Windows 98 2nd Edition. For example, type in:D:\IPoA\Win98Then click Next.5. The Add New Hardware Wizard will appear and indicate the RECSPEED-2021P ADSL PCI NIC.Click Next.6. The Service Option window appears, click Advanced.7. The Service Options window now d isplays the Network Protocol and PVC Setting andSelect ADSL Mode sections.!  In the Network Protocol and PVC Setting section, select the Classical IP over ATMsetting and then enter in the VPI and VCI values provided by yo ur ADSL serviceprovider.!  In the Select ADSL Mode section, select the mode(s) recommended by your ADSLservice provider. Click on the mode(s) required and then click OK.NOTE: The service mode type will be one of the following:ANSI T1.413 Issue 2----------Default mode settingITU G.992.2 Annex A (G.lite)           ITU G.992.1 Annex A (G.dmt)8. The previous Service Option window will appear, click Next9. If prompted to insert the CD do so at this time then click OK. Enter the <CD drive Letter>and then :\Win98 (e.g. D:\Win98) and click OK.10. At the conclusion of the RECSPEED-2021P driver installation, click Finish.11.For the PC system to set up the RECSPEED-2021P, a system Restart is required. Click Ye s.
NOTE: After restarting the system, the Diagnostic Tool icon (See Appendix A) is active andmonitoring connectivity.12. You must now make a network connection. From the Start menu on the tool bar, selectSettings, Control Panel, and then double click on the Network icon.13. The Network window appears. Select the Configuration tab, scroll the installed networkcomponent window and find RECSPEED-2021P ADSL PCI NIC.NOTE: If the RECSPEED-2021P ADSL PCI NCI is not present, click Add. The Select NetworkComponent Type window appears. Select Protocol,and click Add. The Select Network Protocolwindow appears. In the Manufactures section, select Microsoft. In the Network Protocols section,select TCP/IP then click OK.14. When the Network window appears select the Configuration tab, scroll the installed networkcomponent window and select TCP/IP %%%%RECSPEED-2021P ADSL PCI NIC.15. Still in the Network window, with the TCP/IP %%%% RECSPEED-2021P ADSL PCI NIC selected,clickProperties. Select the Advanced tab. The Binding to ATM value should be set to YES, thenclick OK.16. Still at the Network window, click the Configuration tab, select TCP/IP %%%% RECSPEED-2021PADSL PCI NIC. Then click the Properties button.17. The TCP/IP Properties window will appear. Select the IP Address tab and then select theSpecify an IP Address option. Enter the IP Address and Subnet Mask settings.18. To setup a new gateway, select the Gateway tab enter, the setting in the Ne w Gate waysection and click Add.19. To configure the Domain Name Server, select the Enable DNS option. Enter the Host andDomain settings. Enter the DNS Server Search Order and click Add.20. Once all the TCP/IP properties have been set, click OK to return to the Network window.21. Click OK to close the Network window.22. When prompted "Do you want to restart your computer now?" Click Yes .Classical Internet Protocol over ATM (RFC1577) - Windows 20001. The Add New Hardware Wizard will detect  the RECSPEED-2021P ADSL NIC as a PCI Network Controller, click Next.2.Still in the Add New Hardware Wizard window, select Search for the best driver  for your device. (Recommended), click Next3.Again in the Add Ne w Hardware Wizard window,  select Specify a location option, then click Next.
4.Insert the CD labeled RECSPEED-2021P ADSL MODEM into your systems CD drive,  then type F:\IPoA\Win2000 (F for example). And then click Next.5. The Add New Hardware Wizard will find the driver, click Next.6. When the Add New Hardware Wizard ask about additional installation, click Yes.7. When the Service Options window appears, click Advanced.   The Service Options window now indicates the Network Protocol and PVC setting section.   Type your provided values from service provider in the VPI and VCI columns. And then   make sure the Framing setting as VC MUX. In the Select ADSL Mode sectio n, selec t the   mode(s) recomanded by your ADSL service provider. Click on the mode(s) required and thenclick Ok.   NOTE: The service mode type will be one of the following                    ANSI  T1.413 Issue 2                    ITU G. 992.2 Annex A  (G.lite)                    ITU G. 992.1 Annex A  (G.dmt)8. The previous Service Options window will appear, click Next.NOTE: During the installation process you may be asked to insert your Windows 2000 CD.Insert the Windows 2000 CD into your systems CD drive and click OK.9.The Add New Hardware Wizard appears, click Finish.10.When the System Settings Change window appears and asks; Do you want to restart   your co mp uter now? C lick Ye s.11.You will find new icon on your monitor.Classical Internet Protocol over ATM (RFC1577) - Windows NT 4.0NOTE: To perform the installation, TCP/IP protocol must be installed prior to the driverinstallation. On the control panel, double click Network. At the Network window select theProtocols tab and verify that the TCP/IP is present.After installing the RECSPEED-2021P card, plug the power cable back into the PCsystem and turn the power on.1. At the desktop, double click My Computer, double click Control Panel, double clickNetwork and then select the Adapters tab and click Add (to add new adapters).
2. In the Select Network Adapter window click Have Disk.3. Insert the RECSPEED-2021P Drivers CD into your co mputers CD drive.4. The Insert Disk window appears. In the text entry bar type in your systems CD drive locationletter ( D for example ), followed by a colon ( : ), then a back slash ( \ ), followed by theRFC1577 driver for Windows NT 4.0. For example, type in: D:\IPoA\NT4.0 Thenclick OK.5. The Select OEM Option window will find the RECSPEED-2021P ADSL PCI NIC. Click OK.6. When the Service Option window appears, click Advanced.7. The Service Options window now d isplays the Connection Address and Select ADSLMode sections.!  In the Network Protocol and PVC Setting section, select Classical IP over ATM andthen enter in the VPI and VCI values provided by your ADSL service provider.!  In the Select ADSL Mode section, select the mode(s) recommended by your ADSLservice provider. Click on the mode(s) required and then click OK.NOTE: The service mode type will be one of the following:ANSI T1.413 Issue 2----------Default mode settingITU G.992.2 Annex A (G.lite)ITU G.992.1 Annex A (G.dmt)8. The previous Service Option window will appear, click Next.9. Then the Network window will appear, click Close.10. The Microsoft TCP/IP Properties window will appear and prompt the user for information.In the Adapters selection be sure to select RECSPEED-2021P ADSL PCI NIC. When not connecting toaDHCP server.11. Enter the IP address provided by ADSL service provider.12. Enter the Subnet Mask provided by your ADSL service provider.13. Enter the Default Gateway address.14. Select the DNS Configuration tab and enter the Host Name15. Then enter the Domain Name (e.g. pacbell.net)NOTE: Use the DNS Service Search and Domain Suffix Search to locate the Host Name andDomain. Click Add to save the address. Repeat the process for additional DNS entries.16. Click OK to update the changes.17. The system must be restarted for the changes to take effect. Click Ye s  to restart.Bridged Ethernet over ATM (RFC 1483) – Windows 95A1. The New Ha rdwa re  Found wizard will detect the RECSPEED-2021P as a PCI NetworkController. Select the Driver from disk provided by hardware manufacturer option. Click OK.
2. Insert the RECSPEED-2021P ADSL MODEM CD into you computers CD drive.3. The Install From Disk window appears. In the text entry bar type in your systems CD drivelocation letter ( D for example ), followed by a colon ( : ), then a back slash ( \ ), followed by theRFC1483 driver for Windows 95  For example, type in: D:\BEoA\Win95 Then click OK.4. When the Service Option window appears, click Advanced.5. The Service Options window appears indicating the Connection Address. & select ADSL modeEnter in the VPI and VCI values provided by your ISP. Make sure the Framing is set toLLC/SNAPIn the Select ADSL Mode section , select the mode(s)  recommended by your ADSL serviceprovider. Click on the mode(s) required and then click ok    NOTE: The service mode type will be one of the followingANSI  T1.413 Issue 2ITU G. 992.2 Annex A  (G.lite)ITU G. 992.1 Annex A  (G.dmt)6. The previous Service Option window will appear, click Next.NOTE: During the installation process you may be asked to insert your Windows 95 CD. Insert theWindows 95 CD into your systems CD drive and click OK. If during the file copying process a file isreported as “not found” enter the path <CD Drive letter> and :\Win95 (e.g. D:\Win95)7. At the conclusion of the RECSPEED-2021P driver installation, the Diagnostic Tool icon (seeAppendix A) will appear disabled on the task bar. You must now Restart the PC system tocomplete the installation; the Diagnostic Tool will then become active.8. Proceed to Making an Internet connection for Bridged Ethernet. Go to page 25.Bridged Ethernet over ATM (RFC 1483) – Windows 95B1. The Add New Hardware Wizard will detect the RECSPEED-2021P ADSL NIC as a PCINetwork Controlle r, click Next.2. Insert the RECSPEED-2021P ADSL MODEM CD into the CD-ROM drive.3. The Update Device Driver Wizard will detect the RECSPEED-2021P ADSL PC NIC. ClickOther Locations.4. When Select Other Location window appears, in the text entry bar type in your systems CD drivelocation letter ( D for example ), followed by a colon ( : ), then a back slash ( \ ), followed by theRFC1483 driver for Windows 95 . For example, type in: D:\BEoA\Win95 Then click OK.5. When the Service Option window appears, click Advanced.6. The Service Options window appears indicating the Connection Address.& select ADSL modeEnter in the VPI and VCI values provided by your ISP. Make sure the Framing is set toLLC/SNAPIn the Select ADSL Mode section , select the mode(s)  recommended by your ADSL serviceprovider. Click on the mode(s) required and then click ok
NOTE: The service mode type will be one of the followingANSI  T1.413 Issue 2ITU G. 992.2 Annex A  (G.lite)ITU G. 992.1 Annex A  (G.dmt)7. The previous Service Option window will appear, click Next.NOTE: During the installation process you may be asked to insert your Windows 95 CD. Insert theWindows 95 CD into your systems CD drive and click OK. If during the file copying process a file isreported as “not found” enter the path <CD Drive letter> and :\Win95 (e.g. D:\Win95)8. Proceed to Making an Internet connection for Bridged Ethernet. Go to page 25.Bridged Ethernet over ATM (RFC 1483) – Windows98, 98A1. The Add New Hardware Wizard will detect the RECSPEED-2021P ADSL NIC as a PCINetwork Controlle r, click Next.2. Still in the Add New Hardware Wizard you will be prompted What do you want Windows todo? Select the Search for the best driver for your device. Click Next.3. Again in the Add Ne w Hardware Wizard, select the Specify a location option and then type inyour systems CD drive location letter ( D for example ), followed by a colon ( : ), then a back slash( \ ), followed by the RFC1483 driver for Windows 98 . For example, type in: D:\BEoA\Win98Then click Next.4. The Add New Hardware Wizard will then find the RECSPEED-2021P ADSL PC NIC, clickNext.5. When the Service Option window appears, click Advanced.The Service Options window now indicaties the Connection Address.& select ADSL mode Enterin the VPI and VCI values provided by your ISP. Make sure the Framing is set to LLC/SNAP, Inthe Select ADSL Mode section , select the mode(s)  recommended by your ADSL serviceprovider. Click on the mode(s) required and then click ok    NOTE: The service mode type will be one of the followingANSI  T1.413 Issue 2ITU G. 992.2 Annex A  (G.lite)ITU G. 992.1 Annex A  (G.dmt)6. The previous Service Option window will appear, click Next.NOTE: During the installation process you may be asked to insert your Windows 98 CD. Insert theWindows 98 CD into your systems CD drive and click OK. If during the file copying process a file isreported as “not found” enter the path <CD Drive letter> and :\Win98 (e.g. D:\Win98)7. The Add New Hardware Wizard appears, click Finish.8. When the System Settings Change window appears and asks; Do you want to restart yourcomputer now? Click Ye s.9. Proceed to Making an Internet connection for Bridged Ethernet. Go to page 25.
Making an Internet Connection for Bridged Ethernet on Win 95, 98,2000Enternet 300 InstallingEnterNet 300 v. 1.34 for Windows is desktop connectivity software used by the world’s largest andmost reputable ISPs to enable their end-user customers to gain access to their high-speedInternet access services. World wide, more users rely on EnterNet for high speed Internet accessthan any other PPPoE desktop connectivity product.EnterNet 300 for Windows provides the user with the following capabilities:PPPoE client software to access high-speed “broadband” Internet access services like DSL, cablemodem, and fixed wireless, and compatibility with Sybergen's Sygate Internet connection sharingsoftware .A rich compliment of application controls to tailor EnterNet to the specific needs and desires ofboth the host ISP and the end user.Extensive, built- in diagnostics tools to help technical support personnel quickly determine andcorrect the cause of technical difficulties.System RequirementsEnterNet 300 for Windows minimum system requirements include:•Microsoft Windows 9x, Windows NT 4.0, or Windows 2000•Pentium™ class processor or equivalent•Recommended minimum of 16MB RAM•Minimum of 4MB free hard drive space•Microsoft-compatible Ethernet adapter with an NDIS 3.0 or higher compliant driver.OptionalMicrosoft Dial-Up Networking version 1.2c or later, with a minimum of one profile established.(Required to support EnterNet’s optional Dial-on-Demand feature.)Installing EnterNet 300 from a CDTo install EnterNet 300 when received as a stand-alone application on a CD-ROM, locate and runthe file named setup.exe in the root directory of the CD-ROM. Follow the on-screen instructions,as described below in “The EnterNet Installer, Step-by-Step”.The "EnterNet 300 Setup" PanelBefore the EnterNet installation process gets underway, you will be presented with the EnterNet300 setup panel. This panel allows you to choose between an automatic or manual installationprocess. If you select the radio button marked "Quick Install," the EnterNet installation processwill require no further input from you until the Setup Complete panel appears at the end of theinstallation. If you select the radio button marked "Step-by-Step" install, the EnterNet installer willguide you step-by-step through the process of choosing the install location and other EnterNetsettings as the application is installed.
The “Welcome” PanelIf you are installing EnterNet 300 for the first time, or if you were presented the “ExistingInstallation Detected” panel and you clicked the “Yes” button, the next panel you will encounter isthe EnterNet “Welcome” panel. This panel will advise you to exit all other programs beforeproceeding with the installation process.The “Software License Agreement Panel” (continued)This panel presents you with an opportunity to view the EnterNet ReadMe file, which containshelpful information about installing EnterNet and getting support for it. Clicking the “View ReadMe”button will launch your default text editor (usually Microsoft Notepad) and open the EnterNetReadMe file for your review. The installer will remain paused while you review the file. You shouldclose the ReadMe file before proceeding with EnterNet installation.This panel also presents the Software License Agreement, the terms of which you must accept inorder to proceed with EnterNet installation. By pressing the “Yes” button you are indicating thatyou have read, understand, and agree to comply with the terms and conditions of the SoftwareLicense Agreement.
The “Choose Destination Location” PanelHere you are informed of the program's default installation directory. Click the Next button toaccept the default installation location (recommended), or click Browse to specify a differentinstallation location.The “Choose Folder” PanelIf you wish to install EnterNet to other than the default installation folder, clicking the Browsebutton on the Choose Destination Location panel will present the “Choose Folder” panel.You can either manually type the path to the desired installation location in the Path window, oryou can navigate to the desired folder in the Directories tree. If the folder where you wish to installEnterNet does not yet exist, you will need to create it with Windows Explorer before you can selectit here. If you need to create the folder, do so now. Before the newly created folder will appear inthe Choose Folder panel, you must close Choose Folder and click the Browse button on the“Choose Destination Location” panel again. Once the desired installation location is reflected inthe Path window, click the OK button to close the Choose Folder panel and resume EnterNetinstallation.NOTE: Installing EnterNet on a network drive, as would occur if the installation location wereselected from the Network button on the Choose Folder panel, is not supported.
The "Question" PanelThe EnterNet installer will present you with the option of automatically creating a shortcut to theEnterNet application during the installation process. Click "Yes" if you wish to create a shortcut onyour desktop. Your Service Provider may have elected not to present this option.The “EnterNet 300 Setup” Panel (Optional Dial-on-Demand)If your ISP has pre-configured EnterNet to provide you the option to install EnterNet’s optionalDial-on-Demand feature, you will be presented with the “EnterNet 300 Setup” panel. To learnmore about this optional feature, see the “EnterNet Dial-on-Demand” section of this User’s Guide.The options presented by “EnterNet 300 Setup” panel are:•Yes: If you wish to install EnterNet’s optional Dial-on-Demand feature, click this button.NOTE: Familiarity with MS DUN and the Windows Connection Wizard will be helpful wheninstalling Dial-on-Demand.•Info: Clicking this button will launch the EnterNet Help facility, presenting the Topic thatthat discusses Dial-on-Demand. The installer will remain paused while you review theHelp facility. It is advisable to close the Help facility before continuing with EnterNetinstallation.•No: Some users will not care to activate Dial-on-Demand. Click this button to skip Dial-on-Demandactivation and proceed with the installation process. EnterNet will functionnormally in all respects.The “Setup Complete” PanelWhen the EnterNet installer has completed its tasks, you will be presented with this final panel.Please note that a system restart is required after installing EnterNet. The requisite restart maytake longer than usual. This is due to the remaining, behind-the-scenes tasks being performed bythe EnterNet installer and by Windows. This process may result in as much as two minutes ofapparent inactivity, depending on the speed and configuration of your system.
SummaryBy successfully completing the above steps you have installed EnterNet 300 for Windows. Youmay now begin using EnterNet to establish a connection to your ISP.The next section of this User’s Guide, “Getting Help with EnterNet”, describes ways you can learnmore about EnterNet 300 for Windows. Review the getting help section if you like, or jump aheadto “Opening the EnterNet Folder” if you would like to get started right away using EnterNet 300.Opening the EnterNet FolderYou can easily access EnterNet by launching either the EnterNet 300 shortcut on your desktop (ifyour service provider pre-configured the EnterNet installer to place one there, and you answered“Yes” when the installer asked if you want the shortcut installed) or you can launch EnterNet 300from the Windows Start menu. From the Windows Start menu, navigate to the folder where theEnterNet 300 application was installed. By default, the Start menu path will be:Start\Programs\NTS EnterNet 300.Launching either of the above Windows shortcuts will start the EnterNet folder application, whichis where you will create and launch the Connection Profiles and Profiles that serve to provideEnterNet with programmatic information about each specific profile, and to authenticate you ontothe desired network.Connection NameThe first step in creating your profile is to choose a name. Enter the desired name (i.e., "DSLConnection”, “Work Connection”, etc.) in the text field of the Connection Name panel. When youhave finished, click Next to continue.Note: The name you give your connection need not be the same as the User Name that will beassociated with the profile.
User Name and PasswordYour profile's User name and Password will be used to authenticate you as a valid network user.They are both case-sensitive: "Password" and "PASSWORD" differ from "password." You mustenter them exactly as they are specified. When you have finished, click Next to continue. If youwish to modify information entered on a previous panel, click Back.
The "Locate Servers" PanelThe next panel to be displayed will be the Locate Servers panel. This panel will inform you thatEnterNet is ready to attempt to locate servers and services.Entering the Server SelectionThe EnterNet application displays a list of network servers and services that may be accessible toyou via the network. These values are discovered by EnterNet automatically and listed in thewindow. It also enables you to select a specific network server and the available servicesprovided by that server. The Server and Services fields are left blank by default, which means thefirst available server will respond to your request for a connection.You should leave these fields blank unless otherwise instructed by your service provider orNetwork Administrator.Finishing the ProfileThe last panel the Profile Wizard will display is the Finish Connection panel. In the text field youwill find the name of your profile as it was entered in the first panel of the Profile Wizard. If youare satisfied that you have correctly completed the Connection Profile, click the Finish button.Yo u may click the Back button to review and change any o f the information you pro vided to theProfile Wizard.Once you have clicked the Finish button, your new profile will appear in the right-hand pane of theEnterNet folder (the same window as the Create New Profile icon).
Modifying a ProfileYou can modify the information entered for a Connection Profile at any time by right-clicking onthe desired Profile icon in the EnterNet folder and selecting Properties from the pop-up menu. Ifyou have already launched the profile you wish to modify, right-click on the profile's system trayicon and select Properties from the pop-up menu.Adve rtised ServicesServices carried and advertised by your service provider will be discovered by EnterNetautomatically and, if you have enabled the “Show advertised services in main folder” option on theApplication Settings panel, they will be displayed as icons in the right-hand pane of the EnterNetfolder; the same place where Connection Profiles are displayed. Service Profiles can bedistinguished from Connection Profiles by the small red bar they feature.Before you can use a Service Profile, you must configure it. To configure a Service Profile,double-click its icon in the EnterNet folder and provide the requested information. Service Profilesare differentiated from Connection Profiles by the red bar Service Profiles feature. You will be ableto identify Service Profiles that you have configured by the green ‘screens’ on their EnterNet foldericons. Un-configured Service Profiles have black screens. Sample Connection Profiles andService Profiles appear below.Note: Most servers do not advertise Services and thus Service Profiles may not appear in thefolder, even though you have elected to disp lay them.
Making the ConnectionConnecting with EnterNetOnce your Connection Profile has been saved, an icon representing it will appear in the right-handpane of the EnterNet folder. Double-clicking on this icon will invoke the Connect panel, on whichthe User Name and Password are displayed. It will also result in the appearance of an EnterNeticon in the Windows system tray, which is by Windows default present in the lower right corner ofyour computer’s screen. To establish a connection, ensure that the User Name and Passwordpresented on the Connect panel are correct, and then click the Connect button. Once you haveclicked the Connect button, EnterNet’s system tray icon will change. See the user’s guide sectiontitled "System Tray" for more information about the various states of the EnterNet system trayicon.Once a connection has been successfully established, the Connection panel will disappear fromyour screen. If the attempt to establish a connection fails, the Connection panel will remain onyour screen and a message indicating the reason for the failure will be present in the Messageswindow of the Connection panel, directly above the Connect button. By double-clicking themessage, you will be presented with an activity log for this session, at the bottom of which will bethe error message that was in the Messages window. This information will help you and yourservice provider determine and correct the problem that led to your connection failure. You willfind more information about error messages in the “Connection Errors” section of this User’sGuide.System Tray IconOnce you have launched an EnterNet Connection Profile, EnterNet will place a status icon in theWindows system tray, which by Windows default appears in the lower right corner of your screen,at the end of the Windows taskbar.The EnterNet status icon provides you with information about the current state of your connection.The icons reflect the following information:•Connection status•Send data status
•Receive data status•Network Health (see “Advanced Diagnostics”)Refer to the images below to better understand the meaning of each EnterNet system tray iconstate.Disconnecting with EnterNetThere are several ways to disconnect with EnterNet. If you want both to terminate your sessionand close the Active Connection Profile, right-click on the EnterNet system tray icon and selectExit from the pop-up menu. If you want to terminate your session but leave the active ConnectionProfile open, either select Disconnect from the system tray pop-up menu, or select ConnectionDetails, and press the Disconnect button when the Connection Details panel appears (SeeConnection Details).
Bridged Ethernet over ATM (RFC 1483) - Windows 20001. The Add New Hardware Wizard will detect  the RECSPEED-2021P ADSL NIC as a PCI Network Controller, click Next.2.Still in the Add New Hardware Wizard window, select Search for the best driver  for your device. (Recommended), click Next3.Again in the Add Ne w Hardware Wizard window,  select Specify a location option, then click Next.4.Insert the CD labeled RECSPEED-2021P ADSL MODEM into your systems CD drive,  then type F:\BEoA\Win2000 (F for example). And then click Next.5. The Add New Hardware Wizard will find the driver, click Next.6. When the Add New Hardware Wizard ask about additional installation, click Yes.7. When the Service Options window appears, click Advanced.   The Service Options window now indicates the Network Protocol and PVC setting section.   Type your provided values from service provider in the VPI and VCI columns. And then   make sure the Framing setting as LLC/SNAP. In the Select ADSL Mode section, select the   mode(s) recomanded by your ADSL service provider. Click on the mode(s) required and then   click Ok.   NOTE: The service mode type will be one of the following                    ANSI  T1.413 Issue 2                    ITU G. 992.2 Annex A  (G.lite)                    ITU G. 992.1 Annex A  (G.dmt)8. The previous Service Options window will appear, click Next.NOTE: During the installation process you may be asked to insert your Windows 2000 CD.Insert the Windows 2000 CD into your systems CD drive and click OK.9.The Add New Hardware Wizard appears, click Finish.10.When the System Settings Change window appears and asks; Do you want to restart   your co mp uter now? C lick Ye s.11.You will find new icon on your monitor
Bridged Ethernet over ATM (RFC 1483) – Windows NT 4.0NOTE: To perform the installation, logon as Administrator. TCP/IP protocol must be installed prior tothe driver installation. At the Network window select the Protocols tab and verify that the TCP/IP ispresent.1. At the desktop, double click My Computer, double click Control Pane l, double click Networkand then select the Adapters tab and click Add (to add new adapters).2. In the Select Network Adapter window click Have Disk.3. Insert the RECSPEED-2021P ADSL MODEM CD into your co mputers CD drive.4. The Insert Disk window appears. In the text entry bar type in your systems CD drive location letter( D for example ), followed by a colon ( : ), then a back slash ( \ ), followed by the RFC1483 driverfor Windows NT 4.0 . For example, type in: D:\BEoA\NT4.0 Then click OK.5. The Select OEM Option window will find the RECSPEED-2021P ADSL PCI NIC. Click OK.6. When the Service Option window appears, click Advanced.7. The Service Options window appears indicating the Connection Address & select ADSL modeEnter in the VPI and VCI values provided by your ISP. Make sure the Framing is set toLLC/SNAP, In the Select ADSL Mode section , select the mode(s)  recommended by your ADSL serviceprovider. Click on the mode(s) required and then click ok    NOTE: The service mode type will be one of the followingANSI  T1.413 Issue 2ITU G. 992.2 Annex A  (G.lite)ITU G. 992.1 Annex A  (G.dmt)8. The previous Service Option window will appear, click Next.9. Then the Network window will appear, click Close.10. The TCP/IP Properties window will appear and prompt the user for information. When notconnecting to a DHCP server, enter the IP address provided by your ISP.11. Enter the Subnet Mask provided by your ISP12. Enter the Default Gateway address.NOTE: Consult your ISP for the TCP/IP Properties.13. Select the DNS Configuration tab and enter the Host Name14. Then enter the Domain Name (e.g. pacbell.net)NOTE: Use the DNS Service Search and Domain Sufix Search to locate the Host Name andDomain. Click Add to save the address. Repeat the process for additional DNS entries.15. Click OK to update the changes.16. The system must be restarted for the changes to take effect. Click Ye s  to restart.
Appendix A - Diagnostic ToolsOn the Diagnostic Tools icon on the right hand side of the status bar. Right-click the icon to display themenu, then Click Open. The ADSL Diagnostic Tools window appears on the desktop. The three tabs ofthe Diagnostic Tools are ADSL Status, Diagnostic and ADSL Statistics.ADSL Status window displays the current state of the RECSPEED-2021P ADSL connection, includingcurrent ADSL State, ADSL protocol in use and the net data rates for upstream and downstream data.NOTE: ADSL protocols supported by the RECSPEED-2021P drivers are T1.413_i2, G.dmt and G.lite.The protocol must be supported also by the ADSL equipment located at the central office. TheRECSPEED-2021P drivers use the protocol that results in the most efficient ADSL connection.ADSL Diagnostic Tools window is used for hardware testing of the RECSPEED-2021P ADSL modemCard. ADSL Statistic window keeps tabs on errors that that might affect overall system performance.The counts are reset whenever the PC system is restarted.Re-training Count tracks the number of ADSL connections performed. Due to unexpected linecondition changes, the RECSPEED-2021P drivers can retrain the connection causing the Re-trainingCount total to increment. The Diagnostic Tool icon will flash yellow while reconnecting.ADSL implements Reed Solomon (RS) error checking:FEC Count tracks the forward error correction count.CRC Count tracks the accuracy of correcting data errors over each 17msec.ATM HEC Count (header error check) errors are recorded as an indication of ATM packet accuracy.As a measure of packet transfer performance, the Packet Errors are counted and tracked against thetotal number of Packets Received. An error rate of less than 0.1% is reasonable under clean ADSL lineconditions.If you have Bad Received Packets and are concerned about your service, multiply the BadReceived Packets count by 1000 and compare the result with the total Packets Received count. If thenumber is smaller than the total Packets Received count, then the board is operating normally.Hardware DiagnosticsThe Diagnostic Tool is used to verify the RECSPEED-2021P card functionality. Running theDiagnostic program will disconnect the NIC from the ADSL line. Close all Dial-up sessions and closeall files before running the Diagnostic program.  Right-click the Diagnostic Tool icon (located on thetaskbar), then select the Diagnostic option. Product Information, e.g. driver revisions, are displayed byclicking the Product Info tab.Product Information lists the versions of the Diagnostic Tools (e.g. version 2.1) and the protocolDrivers installed (e.g. Version 1.3). The DLL version describes the software being used by both thedrivers and Diagnostic Tools software.
NOTE: This information is helpful whenever making a technical support call. Click Close and exit theproduct information window.Click Run Diagnostics to run the diagnostic program that will test PC functionality and report thestatus. A warning message pops up that the ADSL service will disconnect before performing theDiagnostic test. If connected to the Internet at this time, disconnect any Dial-up sessions. Click Ye s tobegin the diagnostic program or click No to exit diagnostic program.The Diagnostic program performs a brief hardware check and displays the hardware status.If the RECSPEED-2021P fails the Diagnostic tests (shown below), then record the test result andcontact customer support.ADSL bridge - PCI I/O Test  I90188 chip test  %PassI90135 Register Test  I90135 chip test %PassI90135 Memory Test I90135 chip test %PassADSL Bridge - Loopback   I90188 Fast datapath %Trial 20, Pass 20…Interleave datapath %Trial 20, Pass 2090135 Utopia Loopback I90135 Fast datapath %Trial 20, Pass 20…Interleave datapath %Trial 20, Pass 20NOTE: For all loopback tests, both Trial and Pass counts equal 20 for success.Click Close to exit the Diagnostic program. The modem is disconnected for these diagnostic tests. ToRECSPEED-2021P card is functioning properly, it will automatically reconnect.Configuring the connection serviceTo view or edit the ADSL connection service address, Right-click the Diagnostic Tool ico n (located onthe taskbar), and select the Configuration option.The PVC Setup (Permanent Virtual Connection) window displays the connection service address. ClickClose to exit window.To edit the connection service address, select and enter the VPI and VCI address in the field shownand click PVC Setting.To accept a Connection Address that has been changed (and Restart the PC system) click Ye s. Click Noto quit and return to PVC setup window.
Connector PinoutThe RECSPEED-2021P card is equipped with a RJ-11 jack for connection to theADSL data port – identified by the ADSL installation. The center two pins, pins 3and 4, are used for ADSL data. For the RECSPEED-2021P card to make a properADSL connection, the installed ADSL data port should also use pins 3 and 4 fordata. If the ADSL data port installation uses pins 2 and 5 for data, then a wiring converter will berequired. Do not alter or remove the wiring converter if present.NOTE: Consult with your ADSL provider before attempting any wiring changes.
Appendix B - Trouble ShootingIf you have completed the RECSPEED-2021P installation procedures and your ADSL connection is notoperational, then refer to the following guidelines for assistance in getting your ADSL modemconnection up and running.Description of Problem1Is there a Diagnostic ICON on the taskbar?# Try Restarting the PC system.# Are the correct drivers installed for the Operating system used?# PPPoA – If system operating system is Windows 95, is the DUN upgraded v1.3?# Have you deleted the drivers and tried the installation again?2Is the NIC achieving ADSL connection?# Try using the Diagnostic Too ls Connect option# Is the cable installed between the RECSPEED-2021P and the ADSL service?# Try Restarting the PC system.# Has any cabling adapter or wiring converter been removed?3Is the NIC constantly trying to negotiate a connection – with blinking yellow panels – butfailing to reach ADSL connection?# Select Disconnect from the Diagnostic Tools then try to reconnect.# Restart the PC system and try to reconnect.# Examine the RJ-11 connectors and cable for any deterioration.# Has the wiring for your ADSL service been altered recently?# Does condition change with time of day? (a possible problem with line noise)# Are appliances near the PC system introducing noise into your ADSL service?# Power down the PC system and re-seat the Speed Touch card.4Is the NIC achieving ADSL connection - but you can’t reach the Internet?# Is the service connection address correct?# Can you PING the Internet? To run the PING command, Open DOS and type:<C:\Windows\PING  Gateway_Addr  (e.g. C:\Windows\Ping www.microsoft.com)# Ping Connects? If Yes then upgrade the Internet Browser or check the Option settings forthe Internet Browser.# Bridged Ethernet – Are the TCP/IP, Gateway and DNS addresses correct (refer to yourADSL or ISP provider documentation)# PPPoA – For Windows 95 is the Dial-Up Network Upgrade to v1.3 installed?# Win NT4.0 – Is service Pack 3.0 installed?# Browser configured correctly – check your browser documentation.5How can I determine the TCP/IP address for PPPoA?# For Windows 95/98, run the program Ipconfig from the DOS prompt (e.g.C:\Windows\IPCONFIG) All network devices will list their TCP/IP and Gateway
Address. By knowing what network hardware is installed and configured in your PCsystem, any unusual TCP/IP address belongs to PPPoA.6How do I tell if Service Pack 3.0 is installed on my Windows NT4.0?# Click on the Start menu at the tool bar, select Programs, Administrative Tools andthen Windows NT Diagnostics. Verify that Service Pack 3.0 is installed.# When the system is restarting, service pack 3 is displayed at the beginning of the driverloading sequence.7How do I resolve confusion about which protocol to install?# Refer to your ADSL or ISP provider documentation8Can I determine which protocol is installed?# Windows 95/98 – Yes. In the Network window (in the Control Panel) select theConfiguration tab and look for component TCP/IP & RECSPEED-2021P ADSL PCINIC (scroll through the list). If found, then the Bridged Ethernet drivers are installed.# PPPoA for Windows 95/98 or NT4.0 – No.9Can I determine which upgrade of Dial-Up Network (DUN) is installed?# There is no easy way to determine the version of the DUN. The safest approach is toinstall the DUN v1.3 downloaded from the Microsoft Corporation website &www.microsoft.com10 Must TCP/IP be loaded for both PPPoA and Bridged Ethernet protocols?# Yes. Please carry out the TCP/IP installation procedure before loading the Speed Touchdriver.11 Driver installation resulted in unexpected errors or warnings, and you can’t connect.# Perform the driver removal procedure.# Verify which version of Microsoft Windows is loaded in the PC system.# Perform the RECSPEED-2021P driver removal procedure# For PPPoA – Reload Dial-Up Network upgrade 1.3# Install the RECSPEED-2021P driver again.
Appendix C - Removing RECSPEED-2021P Drivers (Ver2.1.0)Windows 95, 981. To Delete RECSPEED-2021P drivers; on the desktop, right-click on My Computer, then selectProperties, then click on the Device Manager tab, then double click Network adapters.2. Select the RECSPEED-2021P ADSL PCI NIC, then click on the Remove button.3. A warning message “You are about to remove this device from your system” will appear. ClickOK to remove drivers or click Cancel to abort the driver removal.4. Remove your *.inf files under INF folder in the Windows folder for perfect driver removal' Location  : “C:\Windows\INF”' Windows 98 1st : W95AMGM.inf, W95ITEX.inf' Windows 95/ 98 2nd  : ITEXAMGM.INF, ITEXW9X.INF5. The PC system must be restarted for the changes to take effect. Click Yes . Windows 20001. On the desktop; right-click on the Network neighborhood icon, then select Properties.   Right-click on the Local Area Connection icon, then select Properties.2. Click the Configure in the Local Area Connection Properties.3. Select Drivers tab in the RECSPEED-2021P ADSL PCI NIC  Properties, then click Remove.4. Click Ye s.5. Remove your *.inf files under INF folder in the Windows folder for perfect driver removal.(Location: C:\WINDOWS\INF)
Windows NT4.0NOTE: For driver removal, you need to logo n as Administrator.1. On the desktop; double click My Computer, double click Control Panel, double click theNetwork ico n a nd s e lec t t he Adapters tab.2. Select the RECSPEED-2021P ADSL PCI NIC, then click Remove.3. A warning message will inform you that a component is about to be removed. Click Yes .4. Once the RECSPEED-2021P ADSL PCI NIC is removed from the adapter list, click Close.5. The PC system must be restarted for the changes to take effect. Click Yes .Removing RECSPEED-2021P Drivers (Ver 2.1.2)1. Click  “Start” -> “Recsol” -> “Uninstaller”2. The PC system must be restarted for the changes to take effect. Click Yes . Appendix D - System Requirements & ComplianceInformationPower Requirements( 0.75A Max @ +5V ± 5%, 0.1A max @ ± 12V, ± 5%Environmental Requirements( Operating Temperature: 0 °C to 70°C with airflow( Non-operating Temperature: -10 °C to 85 °C( Operating Humidity: 10% to 90% non-condensing( Non-operating storage humidity: 5% to 95% non-condensingCompliance Certification( UL 1950( CE approved( FCC Part 15 Class B
RECSOL I&C Co. LtdFl. 6. Hanna B/D 123Kwangjang - Dong,  Kwangjin-GuSeoul, KoreaTel  : 82 - 2 - 456 - 3911Fax : 82 - 2 - 456 – 8744http://www.recsol.co.kr

Navigation menu