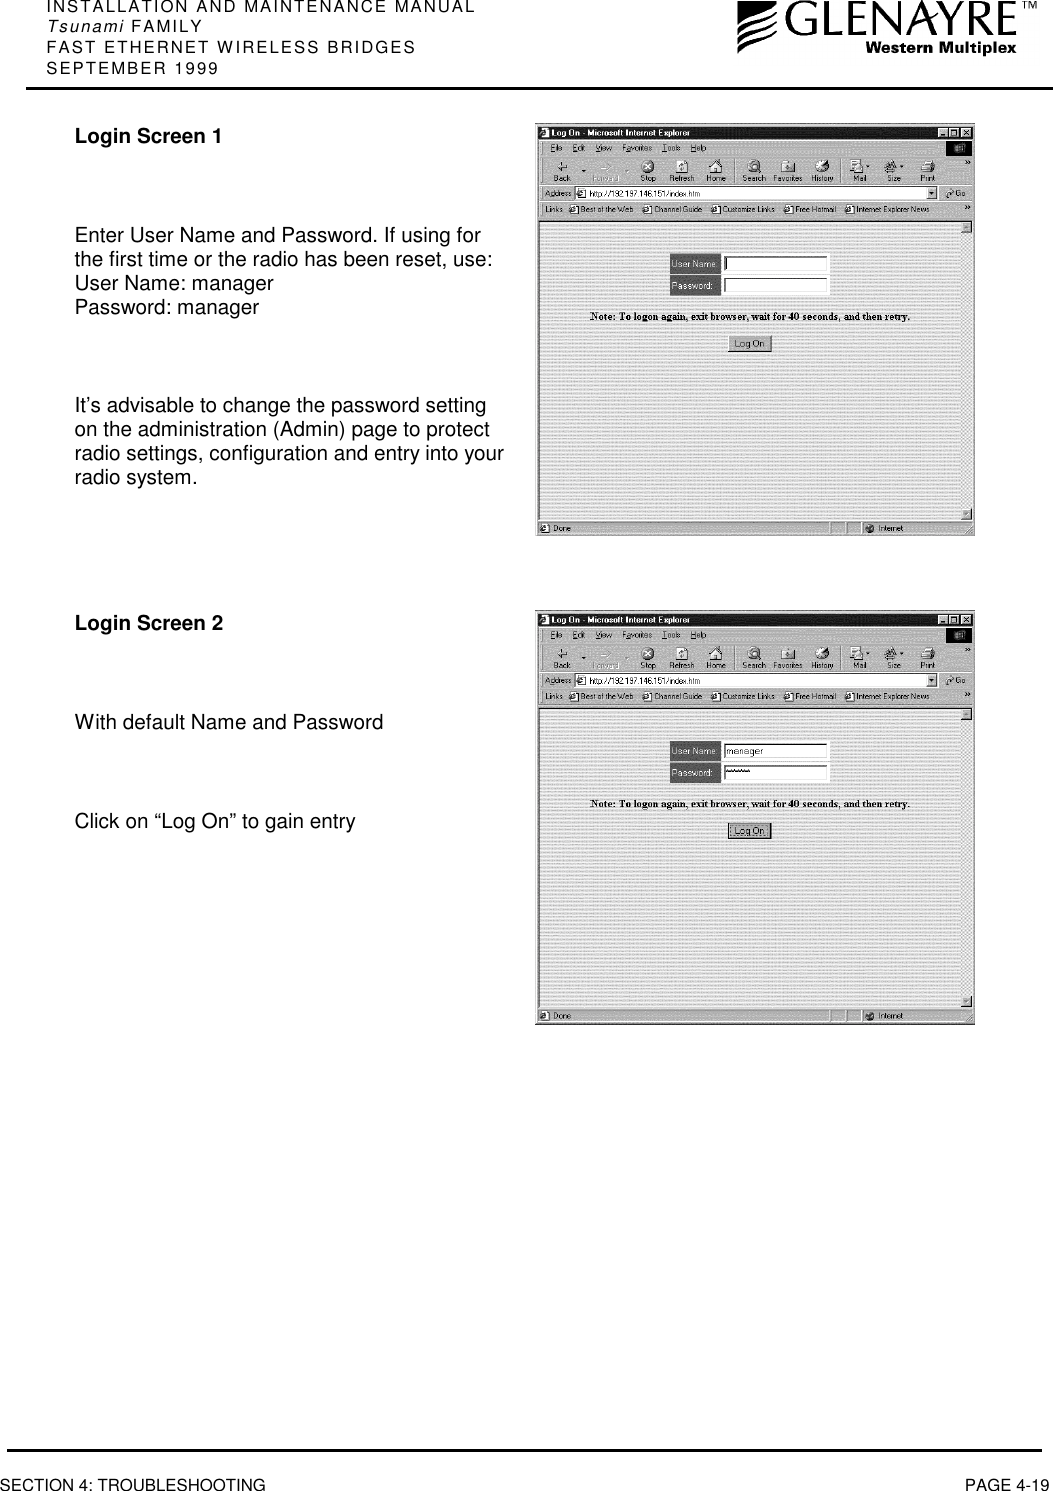
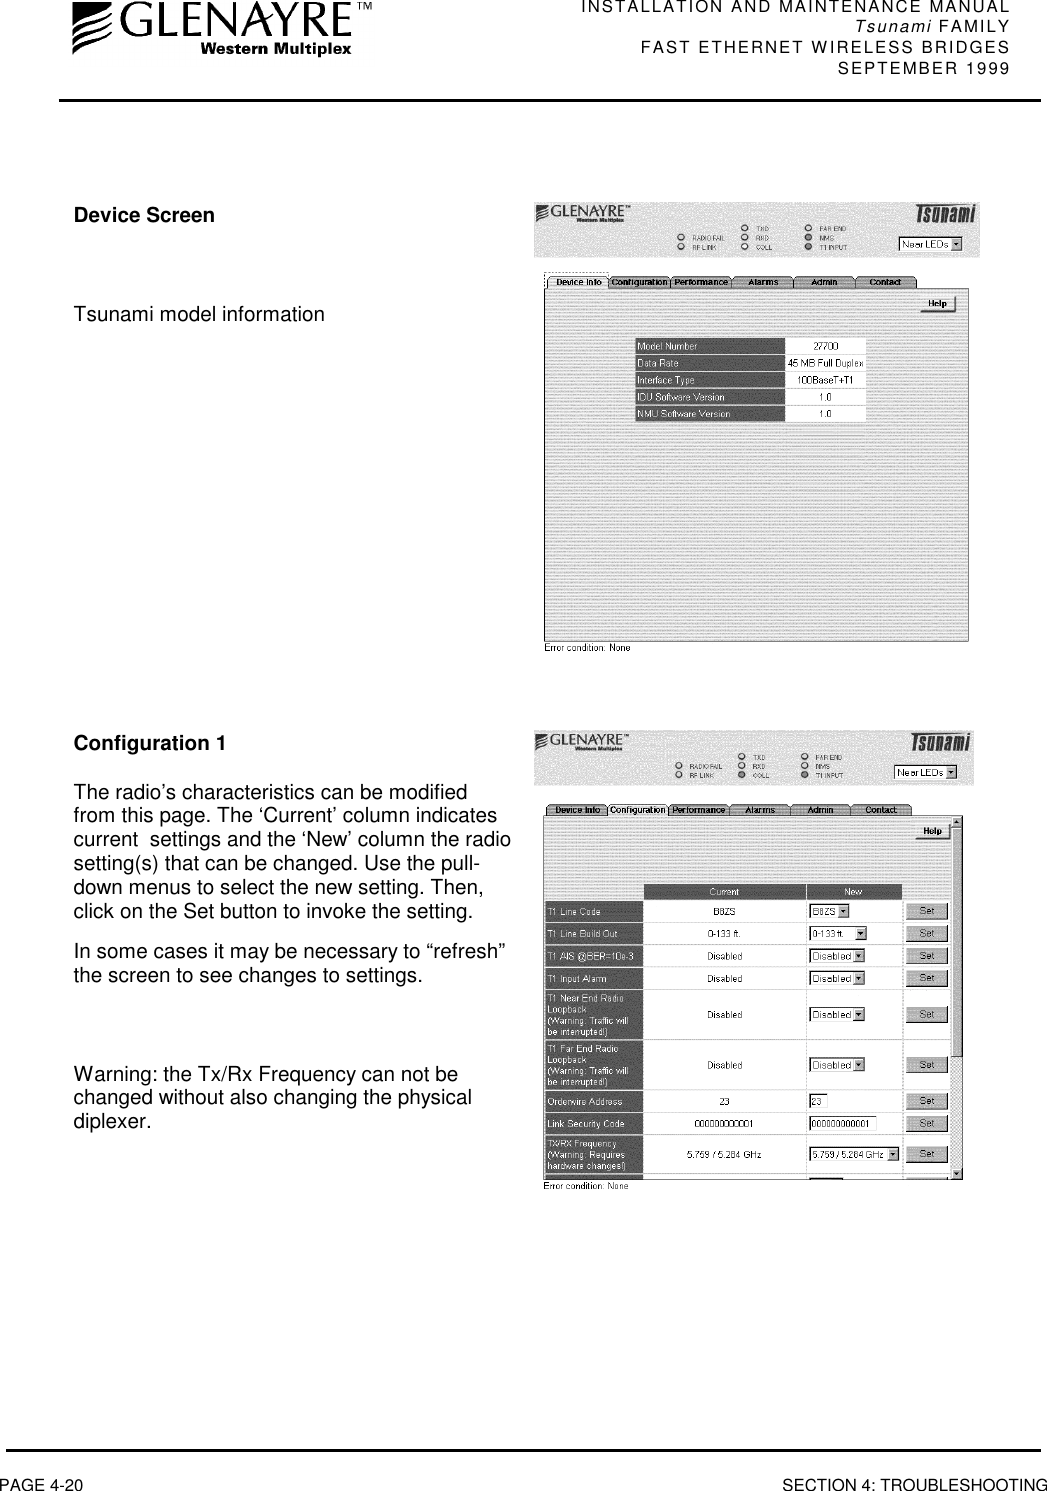
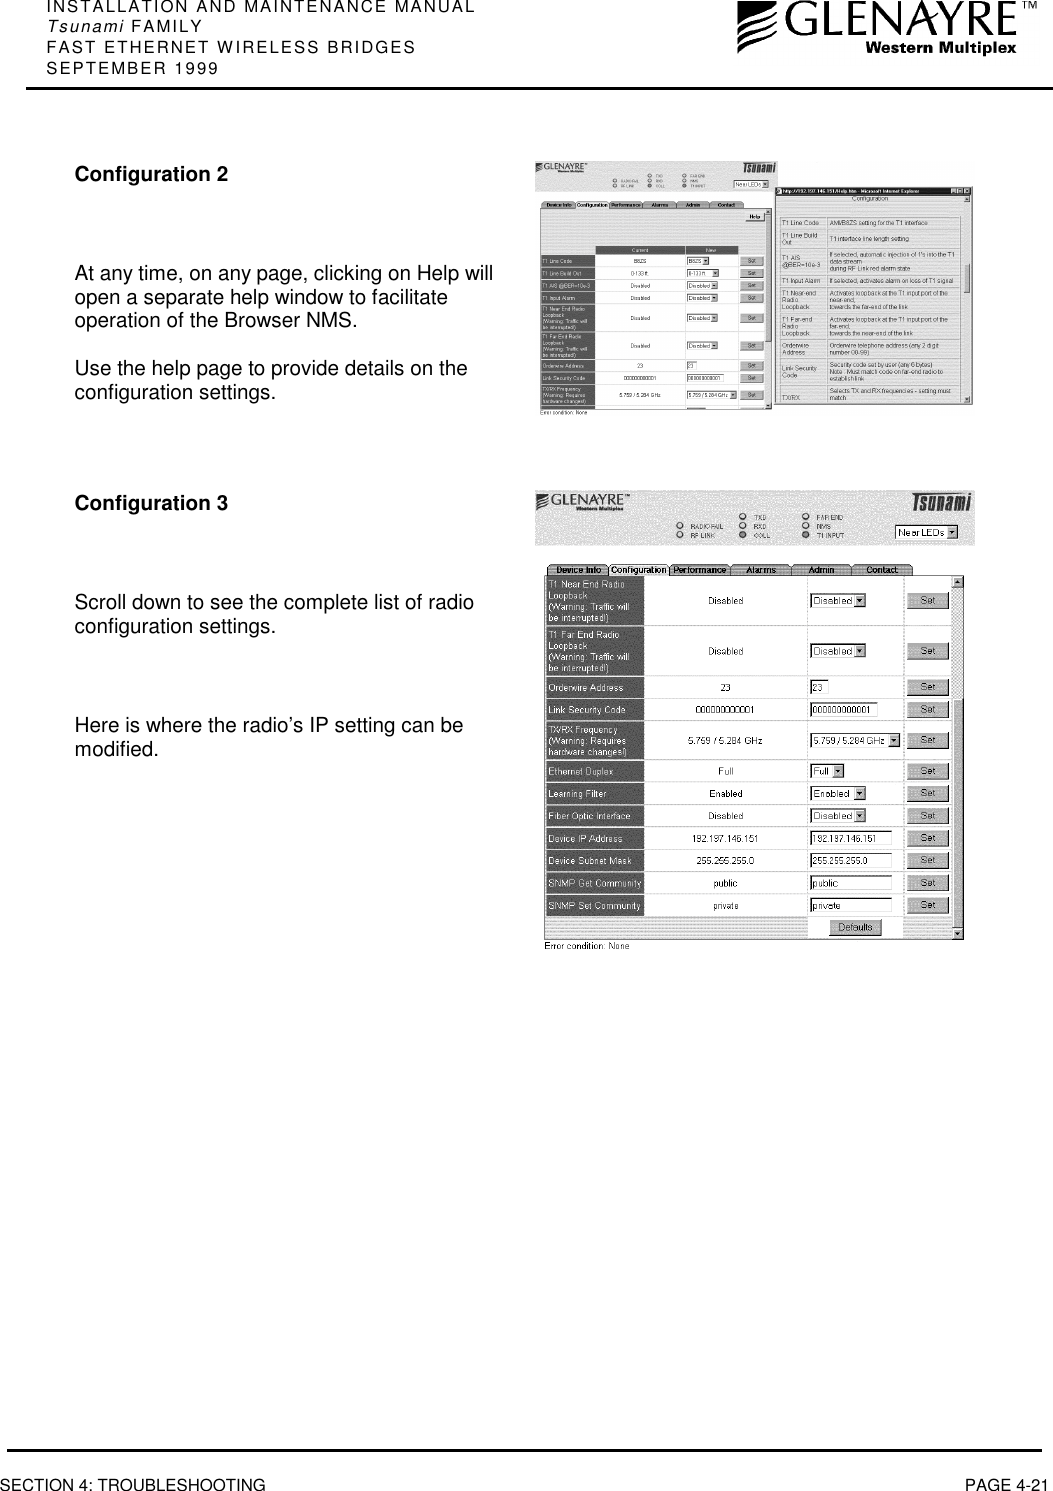
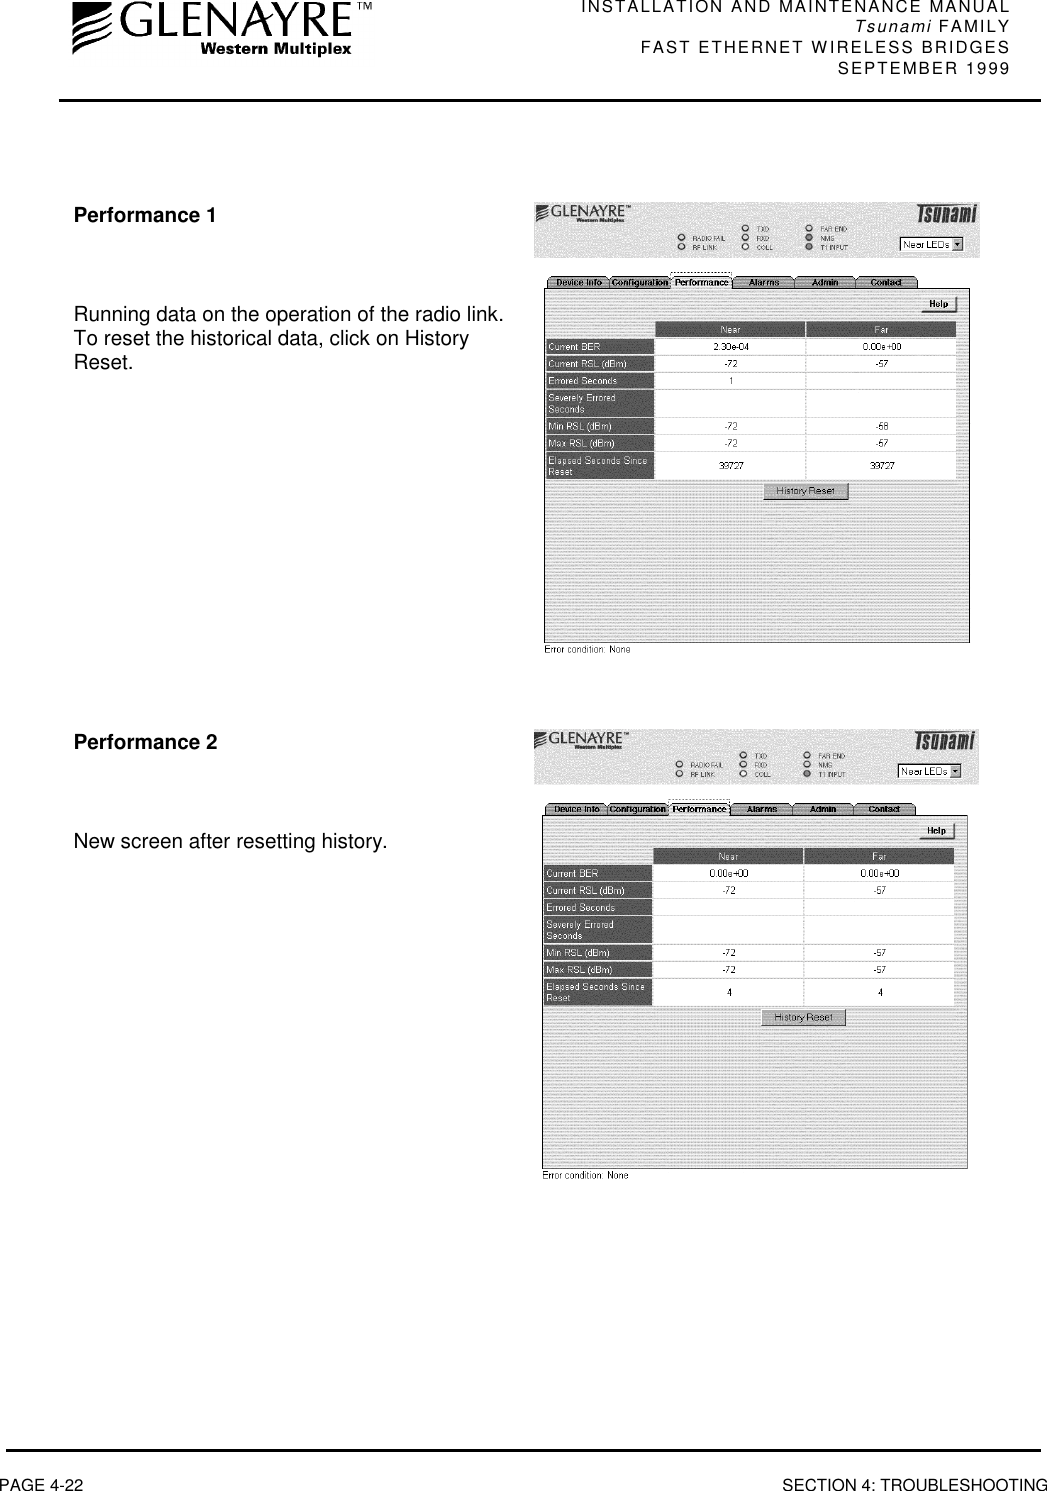
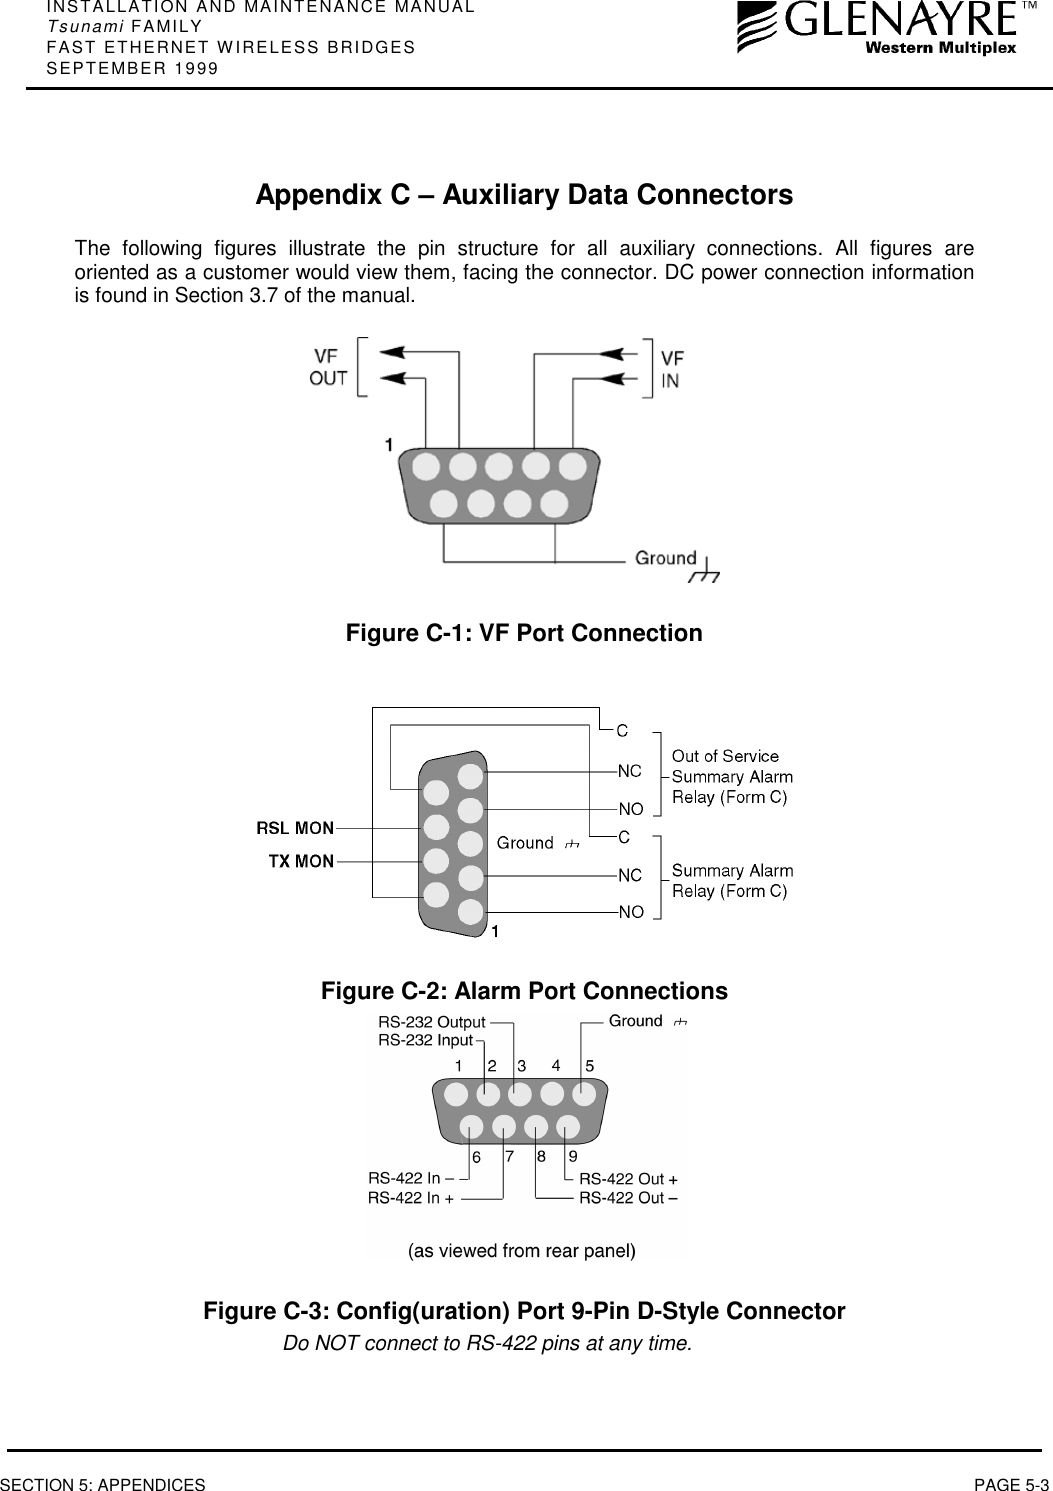
Proxim Wireless U58-45 User Manual Updated Installation and Maintenance Manual

Proxim Wireless Corporation Updated Installation and Maintenance Manual

Contents

Updated Installation and Maintenance Manual

INSTALLATION  ANDMAINTENANCE  MANUALWIRELESSFAST  ETHERNET  BRIDGES(5.3/5.8 and 5.8 GHz, UNII/LE-LAN)
INSTALLATION AND MAINTENANCE MANUALTsunami FAMILYFAST ETHERNET WIRELESS BRIDGESSEPTEMBER 1999iInstallation and Maintenance ManualCopyright © 1999 by Glenayre Western Multiplex. All rights reserved. No part of this manualmay be reproduced without prior written permission from Glenayre Western Multiplex.The information contained in this manual is subject to change without notice. GlenayreWestern Multiplex shall not be liable for errors contained herein or for incidental orconsequential damages in connection with the furnishing, performance, or use of thismanual or equipment supplied with this manual. Glenayre Western Multiplex makes nowarranty of any kind with regard to this manual or any equipment supplied with this manual,including, but not limited to, the implied warranties of merchantability and fitness for aparticular purpose.Heliax is a registered product of Andrews Corporation.Printed in the United States of AmericaNotice: Y2K (Year 2000 Issue)All software supplied by and for Glenayre Western Multiplex products adheres to the four-(4) digit year nomenclature as required for Year 2000 compliance.Glenayre Western Multiplex1196 Borregas AvenueSunnyvale, CaliforniaUSATel: +1 408 542-5200Fax:: +1 408 542-5300Our facility has been Registered to the International Organization for StandardizationISO 9000 Series Standards for quality.Issue: September 1999
INSTALLATION AND MAINTENANCE MANUALTsunami FAMILYSPREAD SPECTRUM RADIOSSEPTEMBER 1999iiThis page intentionally left blank
INSTALLATION AND MAINTENANCE MANUALTsunami FAMILYFAST ETHERNET WIRELESS BRIDGESSEPTEMBER 1999iiiRegulatory NoticeThis equipment has been tested and found to comply with the limits for a class B digital device,pursuant to Part 15 of the FCC Rules. These limits are designed to provide reasonable protectionagainst harmful interference in a residential installation. This equipment generates, uses and canradiate radio frequency energy and, if not installed and used in accordance with the instructions, maycause harmful interference to radio communications. However, there is no guarantee that interferencewill not occur in a particular installation. If this equipment does cause harmful interference to radio ortelevision reception, which can be determined by turning the equipment off and on, the user isencouraged to try to correct the interference by one or more of the following measures:* Reorient or relocate the receiving antenna.* Increase the separation between the equipment and receiver.* Connect the equipment into an outlet on a circuit different from that to which the receiver isconnected.* Consult the dealer or an experienced radio/TV technician for help.Shielded cables and I/O cords must be used for this equipment to comply with the relevant FCCregulations.Changes or modifications not expressly approved in writing by Glenayre Western Multiplex may voidthe user's authority to operate this equipment.This device complies with RSS-210 of Industry Canada. Operation is subject to the following twoconditions: (1) this device may not cause interference, and (2) this device must accept anyinterference, including interference that may cause undesired operation of the device.This device must be professionally installed.
INSTALLATION AND MAINTENANCE MANUALTsunami FAMILYSPREAD SPECTRUM RADIOSSEPTEMBER 1999ivThis page intentionally left blank
INSTALLATION AND MAINTENANCE MANUALTsunami FAMILYFAST ETHERNET WIRELESS BRIDGESSEPTEMBER 1999vW/CS97-1GENERAL TERMS1.1  All Definitions contained in Glenayre Western Multiplex'sConditions of Sale (Glenayre Western Multiplex document numberCS96-8), apply to the Warranty.1.2  Subject to the provisions of the Warranty, Glenayre WesternMultiplex warrants that the equipment described in Paragraph 1.3shall conform to their specifications described in Paragraph 1.4 inall material respects and that the equipment shall be free frommaterial defects in materials and workmanship.1.3  This Warranty applies to all original purchases of GlenayreWestern Multiplex manufactured equipment and accessories(collectively the "Equipment").1.4  This Warranty applies to the specifications contained in the mostrecent version of the manual for the model of the Equipmentpurchased (the "Specifications").1.5  This Warranty does not apply to the following items of Equipmentwhich are covered by the Original Equipment Manufacturer'swarranty:(a)  antenna systems, including coax cable, waveguide, connectorsflex-sections, mounts, other parts of the antenna system andinstallation materials;(b)  non-Glenayre Western Multiplex manufactured rack mountedequipment that is assembled wired and tested at GlenayreWestern Multiplex's factory or supplied as part of a system,including orderwire items, channel banks, multiplexers,fuse/alarm panels, remote alarm items; and(c)  equipment which is not listed in Glenayre Western Multiplex'sprice book.1.6  The effective period of this Warranty shall start on the date ofshipment of the Equipment and shall end:(a)  for all spread spectrum unlicensed radio products and for alllicensed digital microwave radio products, two (2) years later;(b)  for all analog microwave radio products, three (3) years later; or(c)  for all baseband products, five (5) years later (in each case the"Warranty Period").1.7  The Customer acknowledges that Glenayre Western Multiplexdoes not represent or warrant that the services provided byGlenayre Western Multiplex under this Warranty will ensureuninterrupted or error-free operation of the Equipment.RETURN OF EQUIPMENT UNDER WARRANTY2.1 If an item of Equipment malfunctions or fails in normal intendedusage and maintenance within the applicable Warranty Period:(a)  the Customer shall promptly notify Glenayre Western Multiplexof the problem and the serial number of the defective item;(b)  Glenayre Western Multiplex shall, at its sole option, eitherresolve the problem over the telephone or provide the Customerwith a Returned Materials Authorization number (RMA #) andthe address of the location to which the Customer may ship thedefective item;(c)  if the problem is not resolved over the telephone, the Customershall attach a label to each Returned item describing the faultand the Customer's Return address. The Customer shall, at itscost, properly pack the item to be Returned, prepay theinsurance and shipping charges, and ship the item to thespecified location;(d)  if the Glenayre Western Multiplex product shall prove to bedefective in material or workmanship upon examination byGlenayre Western Multiplex, Glenayre Western Multiplex shalleither repair or replace the Returned item at its sole option. Thereplacement item may be new or refurbished; if refurbished, itshall be equivalent in operation to new Equipment. If aReturned item is replaced by Glenayre Western Multiplex, theCustomer agrees that the Returned item shall become theproperty of Glenayre Western Multiplex.(e)  Glenayre Western Multiplex shall at its cost, ship the repaireditem or replacement to any destination within the United Statesof America by carrier and method of delivery chosen byGlenayre Western Multiplex. If the Customer has requestedsome other form of conveyance, such as express shipping, or islocated beyond the USA borders, then the Customer shall payto the cost of return shipment.2.2 Equipment which is repaired or replaced by Glenayre WesternMultiplex under this Warranty shall be covered under all of theprovisions of this Warranty for the remainder of the applicableWarranty Period or ninety (90) days from the date of shipment ofthe repaired item or replacement, whichever period is longer.DEFAULT AND TERMINATION3.1  Glenayre Western Multiplex may immediately terminate thisWarranty and all of its performance under this Warranty, uponnotification to the Customer, if the Customer:(a)  makes any unauthorized modifications to the Equipment;(b)  assigns or transfers the Customer's rights or obligations underthis Warranty without the written consent of Glenayre WesternMultiplex;(c)  becomes bankrupt or insolvent, or is put into receivership; or(d)  has not paid Glenayre Western Multiplex all amounts for theEquipment, services, or other additional charges within thirty(30) days of receipt of written notice from Glenayre WesternMultiplex.3.2  If this Warranty is terminated by Glenayre Western Multiplex, theCustomer shall remain liable for all amounts due to GlenayreWestern Multiplex.FORCE MAJEURE4.1  "Force Majeure" has the same meaning as defined in GlenayreWestern Multiplex's Conditions of Sale (Glenayre WesternMultiplex document number CS96-8).4.2  Glenayre Western Multiplex shall not be responsible for failure todischarge its obligations under this Warranty due to ForceMajeure.LIMITATIONS AND QUALIFICATIONS OF WARRANTY5.1 This Warranty does not apply to any damage, defect or failurecaused by:(a)  any part of the Equipment having been modified, adapted,repaired, or improperly installed, operated, maintained, transportedor relocated by any person other than Glenayre Western Multiplexpersonnel or a Glenayre Western Multiplex authorized serviceagent, without Glenayre Western Multiplex's prior written consent;(b)  storage or environmental conditions which do not conform to theapplicable sections of the appropriate Glenayre Western MultiplexEquipment Manual;(c)  failure to conform with the Equipment Installation, Operating andMaintenance Instructions of the appropriate Glenayre WesternMultiplex Equipment Manual;(d)  external causes, including external electrical stress or lightning, oruse in conjunction with incompatible equipment, unless such usewas with Glenayre Western Multiplex's prior written consent;(e) cosmetic damage;(f)  accidental damage, negligence, neglect, mishandling, abuse ormisuse, other than by Glenayre Western Multiplex personnel or aGlenayre Western Multiplex authorized service agent; or(g) Force Majeure.Please see reverse side for additional limitations on damages.WARRANTY
INSTALLATION AND MAINTENANCE MANUALTsunami FAMILYFAST ETHERNET WIRELESS BRIDGES SEPTEMBER 1999W/CS97-1 viLIMITATIONS ON DAMAGES (North America)6.1  THE WARRANTY STATED IN THIS DOCUMENT ISTHE CUSTOMER'S EXCLUSIVE WARRANTY FOR THEEQUIPMENT; GLENAYRE WESTERN MULTIPLEXSPECIFICALLY DISCLAIMS ALL OTHERWARRANTIES OF ANY KIND, EXPRESS OR IMPLIED,INCLUDING ANY WARRANTIES OF FITNESS FOR APARTICULAR PURPOSE AND OF MERCHANTABILITY.6.2  GLENAYRE WESTERN MULTIPLEX SHALL NOT BELIABLE IN TORT, INCLUDING LIABILITY INNEGLIGENCE OR STRICT LIABILITY, AND SHALLHAVE NO LIABILITY AT ALL FOR INJURY TOPERSONS OR PROPERTY. GLENAYRE WESTERNMULTIPLEX'S LIABILITY FOR FAILURE TO FULFIL ITSOBLIGATIONS UNDER THIS WARRANTY OR ANYOTHER LIABILITY UNDER OR IN CONNECTION WITHTHE EQUIPMENT SHALL BE LIMITED TO THEAMOUNT OF THE PURCHASE PRICE OF THEEQUIPMENT. THE REMEDIES STATED IN THISWARRANTY ARE THE CUSTOMER'S EXCLUSIVEREMEDIES AGAINST GLENAYRE WESTERNMULTIPLEX REGARDING THE EQUIPMENT.6.3  EVEN IF GLENAYRE WESTERN MULTIPLEX HASBEEN ADVISED OF THE POSSIBILITY OF THEM,GLENAYRE WESTERN MULTIPLEX SHALL NOT BELIABLE FOR ANY INDIRECT, INCIDENTAL, SPECIALOR CONSEQUENTIAL DAMAGES, INCLUDING THECOST OF LABOR BY THE CUSTOMER'S OWNEMPLOYEES, AGENTS OR CONTRACTORS INIDENTIFYING, REMOVING OR REPLACING THEDEFECTIVE ITEM; LOST PROFITS, AND REVENUES;FAILURE TO REALIZE EXPECTED SAVINGS; ANYCLAIM AGAINST A CUSTOMER BY A THIRD PARTY;OR ANY OTHER COMMERCIAL OR ECONOMICLOSSES OF ANY KIND.6.4  THESE LIMITATIONS AND DISCLAIMERS ARE NOTMADE BY GLENAYRE WESTERN MULTIPLEX WHEREPROHIBITED BY LAW.LIMITATIONS ON DAMAGES (International)6.1  THE WARRANTY STATED IN THIS DOCUMENT ISTHE CUSTOMER'S EXCLUSIVE WARRANTY FOR THEEQUIPMENT; ALL OTHER WARRANTIES OF ANYKIND, EXPRESS OR IMPLIED, INCLUDING ANYWARRANTIES OF FITNESS FOR A PARTICULARPURPOSE AND OF MERCHANTABILITY AREEXCLUDED TO THE FULLEST EXTENT PERMITTEDBY LAW.6.2  GLENAYRE WESTERN MULTIPLEX'S LIABILITY FORFAILURE TO FULFIL ITS OBLIGATIONS UNDER THISWARRANTY OR IN TORT OR AS A RESULT OFSTRICT LIABILITY OR ANY OTHER LIABILITY UNDEROR IN CONNECTION WITH THE EQUIPMENT OR ITSSUPPLY SHALL BE LIMITED, EXCEPT IN RESPECTOF DEATH AND PERSONAL INJURY CAUSED BYGLENAYRE WESTERN MULTIPLEX'S NEGLIGENCE,TO THE AMOUNT OF THE PURCHASE PRICE OF THEEQUIPMENT. THE REMEDIES STATED IN THISWARRANTY ARE THE CUSTOMER'S EXCLUSIVEREMEDIES AGAINST GLENAYRE WESTERNMULTIPLEX REGARDING THE EQUIPMENT.6.3  EVEN IF GLENAYRE WESTERN MULTIPLEX HASBEEN ADVISED OF THE POSSIBILITY OF THEM,GLENAYRE WESTERN MULTIPLEX SHALL NOT BELIABLE FOR ANY INDIRECT, INCIDENTAL, SPECIALOR CONSEQUENTIAL DAMAGES, INCLUDING THECOST OF LABOR BY THE CUSTOMER'S OWNEMPLOYEES, AGENTS OR CONTRACTORS INIDENTIFYING, REMOVING OR REPLACING THEDEFECTIVE ITEM; LOST PROFITS, AND REVENUES;FAILURE TO REALIZE EXPECTED SAVINGS; ANYCLAIM AGAINST A CUSTOMER BY A THIRD PARTY;OR ANY OTHER COMMERCIAL OR ECONOMICLOSSES OF ANY KIND.
INSTALLATION AND MAINTENANCE MANUALTsunami FAMILYFAST ETHERNET WIRELESS BRIDGESSEPTEMBER 1999vii W/CS97-1DEFINITIONS1.1  In these Conditions, unless there is something in the subjectmatter or context necessarily inconsistent:(a) "Glenayre Western Multiplex" means Glenayre Western Multiplex(d.b.a. Glenayre Western Multiplex), Sunnyvale, CA;(b) "Equipment" means the equipment itemized on theQuotation/Order Acknowledgment;(c) "International" means any location other than United States ofAmerica and Canada, including their territories and possessions;(d) "North America" means any location in the United States ofAmerica and Canada, including their territories and possessions;(e) "Order Acknowledgment" means the sales order acknowledgmentprovided by Glenayre Western Multiplex to the Customer;(f) "Payment Instructions" means Glenayre Western Multiplex'spayment instructions, (Glenayre Western Multiplex documentP197-1);(g) "Quotation" means the quotation signed by an authorizedrepresentative of Glenayre Western Multiplex and provided to theCustomer;(h) "Shipping Date" means the actual date on which the Equipmentleft Glenayre Western Multiplex's factory at Sunnyvale, CA, U.S.A.;(i) "Warranty" means Glenayre Western Multiplex's warranty,document W97-1;(j) "Invoice" means the bill of goods prepared by Glenayre WesternMultiplex for the equipment with the shipping and any insurancecosts.1.2 Headings have been inserted in these Conditions for convenienceof reference only and will not effect their construction.ENTIRE AGREEMENT2.1 The Quotation, these Conditions of Sale, the OrderAcknowledgment, the Payment Instructions and the Warranty shallapply to all sales made by Glenayre Western Multiplex and shallconstitute the entire agreement by Glenayre Western Multiplex andthe Customer (the "Agreement ").2.2 Any terms and/or conditions of sale, which may be included on theCustomer's purchase order form or any communication from theCustomer, that are not identical with the terms and conditionssteed in this document shall NOT become a part of the agreementof sale unless expressly agreed to in writing in the Quotation.2.3 Glenayre Western Multiplex's failure to object to any terms and/orconditions of sale contained in any communication from theCustomer shall not be considered as acceptance of such termsand/or conditions or as a waiver of the terms and conditions of salecontained herein.2.4 Glenayre Western Multiplex shall sell to the Customer, and theCustomer shall purchase from Glenayre Western Multiplex, theEquipment in accordance with the Agreement. Glenayre WesternMultiplex accepts the Customer's purchase orders for Equipmentand agrees to deliver the Equipment to the Customer only on theterms of the Agreement.2.5 No variation of the Agreement shall be binding unless agreed to inwriting by authorized representatives of Glenayre WesternMultiplex and the Customer.PRICING3.1 All prices in the Quotation are exclusive of all shipping chargesand all applicable taxes including but not limited to, federal, state,local, excise, sales and use taxes.3.2 All prices in the Quotation unless otherwise stated:(a) for North American customers are FOB Sunnyvale, CA, USA.(New York Uniform Commercial Code); or(b) for international customers are Ex-Works, Sunnyvale, CA, U.S.A.(Incoterms 1990).3.3 All prices in the Quotation include standard domestic packing,unless a separate line item is provided detailing export or specialpacking charges.SHIPPING AND INSURANCE4.1 Glenayre Western Multiplex shall arrange shipping and insurancewhen requested by the Customer, and shall bill the Customer forthe Equipment with the shipping and any insurance costs asseparate items, on an invoice (the "Invoice").4.2 Delivery dates quoted by Glenayre Western Multiplex are to beconsidered estimates only. In no event will Glenayre WesternMultiplex be liable for any loss or damage resulting from its failureto deliver products within a specified time.TERMS OF PAYMENT5.1 The Customer shall pay for all Equipment, including shipping andinsurance in accordance with the terms of the Invoice.5.2 All Invoices for North American Customers are due and payable inthirty (30) days from the date of the Invoice.5.3 International Customers shall make payments in accordance withGlenayre Western Multiplex's Payment Instructions by either:(a) providing a wire transfer (telegraphic transfer) for the full amount ofthe Equipment, shipping and insurance charges contained in theQuotation or the pro-forma Invoice sent to the Customer, prior tothe Shipping Date; or(b) establishing an acceptable Letter of Credit (LC) for the full amountof the Equipment, shipping and insurance charges contained in theQuotation prior to the order being booked and accepted byGlenayre Western Multiplex.5.4 If a Customer fails to pay an Invoice when due, Glenayre WesternMultiplex may, without prejudice to am other remedy, postponeshipments, alter payment terms, terminate the Agreement andcharge interest on all overdue amounts the rate of 1.5% per monthcompounded monthly (or if less, the maximum allowed by law).Upon demand, the Customer shall pay all such interest chargesand all reasonable collection fees, including reasonable legalexpenses.SECURITY FOR PAYMENT6.1  If the Customer is located in North America, the Customer grantsto Glenayre Western Multiplex a purchase money security interestin the Equipment to secure the payment of the purchase price ofthe Equipment and all other amounts due from the Customer.6.2  If the Customer is not located in North America:(a) despite delivery and passing of risk in the Equipment and anyother provision of these Conditions, the title in the Equipment shallnot pass to the Customer until Glenayre Western Multiplex hasreceived payment in full of the purchase price of the Equipmentand all other amounts then due from the Customer, and(b) until the title in the Equipment passes to the Customer:(i) the Customer shall hold the equipment as Glenayre WesternMultiplex 's fiduciary agent and bailee, and shall properly store,protect and insure the Equipment and shall identify the Equipmentas Glenayre Western Multiplex property;(ii) if the Customer fails to pay Glenayre Western Multiplex inaccordance with the agreed payment terms, Glenayre WesternMultiplex may require the Customer to deliver up the Equipment toGlenayre Western Multiplex, and, if the Customer does not,Glenayre Western Multiplex may enter on the premises where theEquipment is stored and repossess the Equipment; and(iii) the Customer shall not pledge the Equipment by way of security forany, indebtedness of the Customer, but if the Customer does so allmoneys owed by the Customer to Glenayre Western Multiplexshall, without prejudice to any other remedy of Glenayre WesternMultiplex, immediately become due.CHANGES TO PRODUCT SPECIFICATIONS7.1 Glenayre Western Multiplex may, without notice to the Customer,make changes to the specifications of Equipment which do notmaterially affect the quality or performance of the Equipment.EQUIPMENT CONFIGURATION AND EXPEDITING CHARGES8.1 At the Customer's request, Glenayre Western Multiplex may, for afee agreed in advance:(a) reconfigure the Equipment; or(b) expedite the Customer's order.CONDITIONS OF SALE
INSTALLATION AND MAINTENANCE MANUALTsunami FAMILYFAST ETHERNET WIRELESS BRIDGES SEPTEMBER 1999W/CS97-1 viiiSHORTAGES9.1 The customer shall not make any claim for shortages (which areitems that the Invoice does not show are on back-order) aftertwenty-one (21) days after the date of the Invoice.RETURNS AND EXCHANGES10.1 The return of defective Equipment is covered by the Warranty .10.2 The Customer may only return Equipment that is not defective if:(a) the Equipment does not correspond with the Customer's purchaseorder; or(b) the Equipment has been ordered in error by the Customer andGlenayre Western Multiplex has permitted the Customer to remedythe mistake by ordering the correct equipment and resuming theEquipment and the Customer obtains a Returned MaterialsAuthorization number ("RMA #") from Glenayre Western Multiplexprior to returning any Equipment.10.3 Glenayre Western Multiplex reserves the right to charge a fee forreturned equipment under Subparagraph 10.2(b) with the amountof the fee being determined prior to an RMA # being given byGlenayre Western Multiplex.10.4 Authorized returns of equipment under Paragraph 10.2 must be inan undamaged condition, in the original configuration, in theoriginal packing materials and within a time period agreed to whenthe RMA # was issued.10.5 If the Customer does not comply with the provisions of Paragraphs10.2, 10.3, and 10.4, the Customer shall pay the full amount of theInvoice.10.6 The party liable for all shipping, insurance and any other expensesincurred by the Customer in returning the Equipment underParagraph 10.2 and for all loss or damage to the Equipment untilreceived by Glenayre Western Multiplex, shall be: (a) for all itemsreturned under Subparagraph 10.2(a), Glenayre Western Multiplexand (b) for all items resumed under Subparagraph 10.2(b), theCustomer.CANCELLATION11.1 If the Customer cancels an order before the Shipping Date,Glenayre Western Multiplex reserves the right to charge theCustomer a cancellation charge up to 100% of the amount of theorder.11.2 The Customer shall pay all cancellation charges within thirty (30)days from date of the Invoice.FORCE MAJEURE12.1 Glenayre Western Multiplex shall not be liable if its performance ofthe Agreement becomes commercially impractical due to anycontingency beyond Glenayre Western Multiplex's reasonablecontrol, including acts of God, fires, floods, wars, sabotage, civilunrest, accidents, labor disputes or shortages, government laws,rules and regulations, whether valid or invalid, inability to obtainmaterial, equipment or transportation, incorrect, delayed orincomplete specifications, drawings or data supplied by theCustomer or others (collectively "Force Majeure"). In no event ofForce Majeure shall Glenayre Western Multiplex be required topurchase goods from others to enable it to deliver the Equipmentunder the Agreement.ENGINEERING AND SYSTEM DESIGN13.1 The Customer is solely responsible for the engineering, design,integration and normal preventative and remedial maintenance ofthe Customer's system for which Glenayre Western Multiplexsupplies Equipment.13.2 Glenayre Western Multiplex is not responsible for the satisfactoryoperation of the Equipment in conjunction with othermanufacturer's equipment, nor for any losses which may occur asa result of a failure of the Equipment to operate in conjunction withother manufacturer's equipment.WARRANTY14.1 All Equipment is covered by the Warranty.14.2  THE WARRANTY CONTAINS LlMITATIONS ON THECUSTOMER'S RIGHTS AND REMEDIES AGAINST GLENAYREWESTERN MULTIPLEX UNDER THE AGREEMENT.THE CUSTOMER ACKNOWLEDGES HAVING READ,UNDERSTOOD AND AGREED TO THOSE LIMITATIONS.DAMAGES FOR BREACH OF AGREEMENT15.1 If either party is successful in any litigation between the partiesbased on the Agreement, the successful party shall recover fromthe other, in addition to direct damages, the successful party'sreasonable attorney's fees and other costs of litigation.INSOLVENCY OF CUSTOMER, ETC.16.1 Glenayre Western Multiplex may cancel the Agreement andsuspend any further deliveries under the Agreement without anyliability to the Customer, and, if Equipment has been delivered butnot paid for, the price shall become immediately due and payabledespite any other agreement to the contrary if:(a)  any proceedings in bankruptcy, insolvency, receivership orliquidation are taken against the Customer;(b)  the Customer makes an assignment for the benefit ofcreditors or commits an act of bankruptcy or insolvency;(c)  the Customer ceases, or threatens to cease, to carry on theordinary course of its business, or transfers all or substantially allof its property;(d)  the Equipment is seized under any legal process orconfiscated; or(e)  Glenayre Western Multiplex in good faith believes that theability of the Customer to pay or perform any provision of theAgreement is impaired, or that any of the events mentioned aboveis about to occur.NOTICE17.1 All requests, instructions and notices from one party to the othermust be in writing and may be given via registered post orfacsimile transmission to the address of the parties shown on theQuotation or Order Acknowledgment.EXPORT PROVISIONS18.1 The Customer shall not, whether directly or indirectly (includingfacilitating a third party) export or re-export the Equipment outsidethe country in which the Customer has stated these items are to beused without obtaining the licenses required under ail applicablerules. The Customer shall indemnify Glenayre Western Multiplexagainst any liability incurred by Glenayre Western Multiplex due toany violation by the Customer of any of the provisions of thisSection, but this indemnity shall not apply if the Customerreasonably relies on information supplied to it by GlenayreWestern Multiplex with respect to export licenses. Upon receipt ofa governmental consent to export the receiving party shallimmediately notify the other in writing.MISCELLANEOUS19.1 No waiver by Glenayre Western Multiplex of any breach of thisAgreement shall be considered as a waiver of any subsequentbreach of the same or any other provision.19.2 Any provision of the Agreement which is, or is deemed to be,unenforceable in any jurisdiction shall be severable from theAgreement in that jurisdiction without in any way invalidating theremaining portions of the Agreement, and that unenforceabilityshall not make that provision unenforceable in any otherjurisdiction.19.3 The rights which accrue to Glenayre Western Multiplex by virtue ofthe Agreement shall inure for the benefit of and be binding uponthe successors and assigns of Glenayre Western Multiplex.19.4 The agreement shall be governed by the laws of the State ofCalifornia including the California Uniform Commercial Code.However Glenayre Western Multiplex may enforce the provisionsof the Agreement in accordance with the laws of the jurisdiction inwhich the Equipment is situated. The United Nations Conventionon the Sale of Goods (The Vienna Convention) shall not apply tothe Agreement.19.5 Les parties ont exigés que cette entente soit rédigée en anglais.
INSTALLATION AND MAINTENANCE MANUALTsunami FAMILYFAST ETHERNET WIRELESS BRIDGESSEPTEMBER 1999TOC & INTRODUCTION  iTable of Contents1. HOW TO USE THIS MANUAL ....................................................................................................................1-11.1 MANUAL ORGANIZATION............................................................................................................................1-11.2 ICONS.......................................................................................................................................................... 1-22. PRODUCT DESCRIPTION ...........................................................................................................................2-12.1 GENERAL DESCRIPTION ............................................................................................................................ 2-12.2 SPECIFICATIONS .......................................................................................................................................... 2-22.2.1 Transmitter.........................................................................................................................................2-22.2.2 Antenna / Antenna Coupling Unit...................................................................................................... 2-32.2.3 Receiver..............................................................................................................................................2-32.2.4 System (Single Hop Performance) .....................................................................................................2-42.2.5 Line Interfaces ...................................................................................................................................2-52.2.6 Auxiliary Connections........................................................................................................................2-62.2.7 Temperature and Environment ..........................................................................................................2-72.2.8 Power.................................................................................................................................................2-72.2.9 Regulatory Information......................................................................................................................2-82.2.10 Mechanical......................................................................................................................................... 2-82.3 FRONT PANEL DESCRIPTION .......................................................................................................................2-92.3.1 General ..............................................................................................................................................2-92.3.2 Test Points / Power Indicator ..........................................................................................................2-102.3.3 Alarm and Status Indicators ............................................................................................................ 2-112.3.4 Controls............................................................................................................................................2-122.3.5 Connections......................................................................................................................................2-132.4 REAR PANEL DESCRIPTION ....................................................................................................................... 2-152.5 INSTALLATION ACCESSORIES....................................................................................................................2-163. INSTALLATION & ADJUSTMENTS ..........................................................................................................3-13.1 SHIPPING CONTAINER .................................................................................................................................3-13.2 PACKING ITEMS IDENTIFICATION ................................................................................................................ 3-23.3 BEFORE INSTALLATION TASK LIST.............................................................................................................. 3-33.3.1 Site Selection Requirements...............................................................................................................3-33.3.2 Line-of-Sight and Path Clearance Guidelines ...................................................................................3-43.3.3 RSL Calculation and Link Budget......................................................................................................3-53.3.4 Fade Margin Calculation...................................................................................................................3-63.3.5 Availability Calculation.....................................................................................................................3-63.3.6 Frequency Plan Determination..........................................................................................................3-73.3.7 Power Supply Planning......................................................................................................................3-83.3.8 Antenna Planning .............................................................................................................................. 3-83.4 TOOLS REQUIRED .......................................................................................................................................3-93.5 FREQUENCY CHANNEL PLANS .................................................................................................................. 3-103.6 MOUNTING THE TSUNAMI.......................................................................................................................... 3-113.7 POWER CONNECTION AND WIRING ...........................................................................................................3-123.7.1 DC Power Wiring............................................................................................................................. 3-133.7.2 AC Power Connection......................................................................................................................3-153.8 ANTENNA CONNECTION............................................................................................................................ 3-163.9 TRANSMISSION LINE CONNECTION ...........................................................................................................3-173.10 ANTENNA INSTALLATION & ALIGNMENT..................................................................................................3-18
INSTALLATION AND MAINTENANCE MANUALTsunami FAMILYFAST ETHERNET WIRELESS BRIDGES SEPTEMBER 1999 ii TOC & INTRODUCTION3.11 ETHERNET INTERFACE CONNECTION ........................................................................................................3-213.12 SYSTEM TURN-UP TO SERVICE..................................................................................................................3-223.13 OUTPUT POWER ADJUSTMENT.................................................................................................................. 3-283.14 ADDITIONAL CONNECTIONS...................................................................................................................... 3-293.14.1 Orderwire Connection...................................................................................................................3-293.14.2 Alarm Connections...........................................................................................................................3-313.14.3 Configuration Port Operation .........................................................................................................3-333.14.4 AUX DATA (Digital Service Channel) Connection .........................................................................3-343.14.5 T1 (DSX-1) Interface Connection ....................................................................................................3-353.14.6 NMS Interface Connection...............................................................................................................3-364. TROUBLESHOOTING ..................................................................................................................................4-14.1 REGULAR MAINTENANCE ........................................................................................................................... 4-14.2 CHANGING FREQUENCY PLANS...................................................................................................................4-24.3 USING A SPARE TERMINAL.......................................................................................................................... 4-34.4 TECHNICAL SUPPORT.................................................................................................................................. 4-44.5 REPAIR POLICY ........................................................................................................................................... 4-54.6 FRONT PANEL STATUS LEDS...................................................................................................................... 4-64.6.1 RF LINK Alarm..................................................................................................................................4-74.6.2 RADIO FAIL Alarm ...........................................................................................................................4-94.6.3 FAR END Alarm ..............................................................................................................................4-104.7 ERRORS IN THE DATA STREAM .................................................................................................................4-114.8 INTERFERENCE COUNTERMEASURES ........................................................................................................4-124.8.1 Use of a Spectrum Analyzer to Evaluate Potential Interference......................................................4-144.9 BACK-TO-BACK TESTING..........................................................................................................................4-154.10 LINK TESTING .........................................................................................................................................4-174.11 NETWORK MANAGEMENT SYSTEM (NMS)...............................................................................................4-184.11.1 SNMP...............................................................................................................................................4-184.11.2 Browser GUI....................................................................................................................................4-184.11.3 TelNet...............................................................................................................................................4-285. APPENDICES..................................................................................................................................................5-1APPENDIX A - DIGITAL INTERFACE SPECIFICATIONS...............................................................................................5-11. General Characteristics.............................................................................................................................5-12. Specifications.............................................................................................................................................5-1APPENDIX B – CONFIGURATION PORT ....................................................................................................................5-2APPENDIX C – AUXILIARY DATA CONNECTORS .....................................................................................................5-3
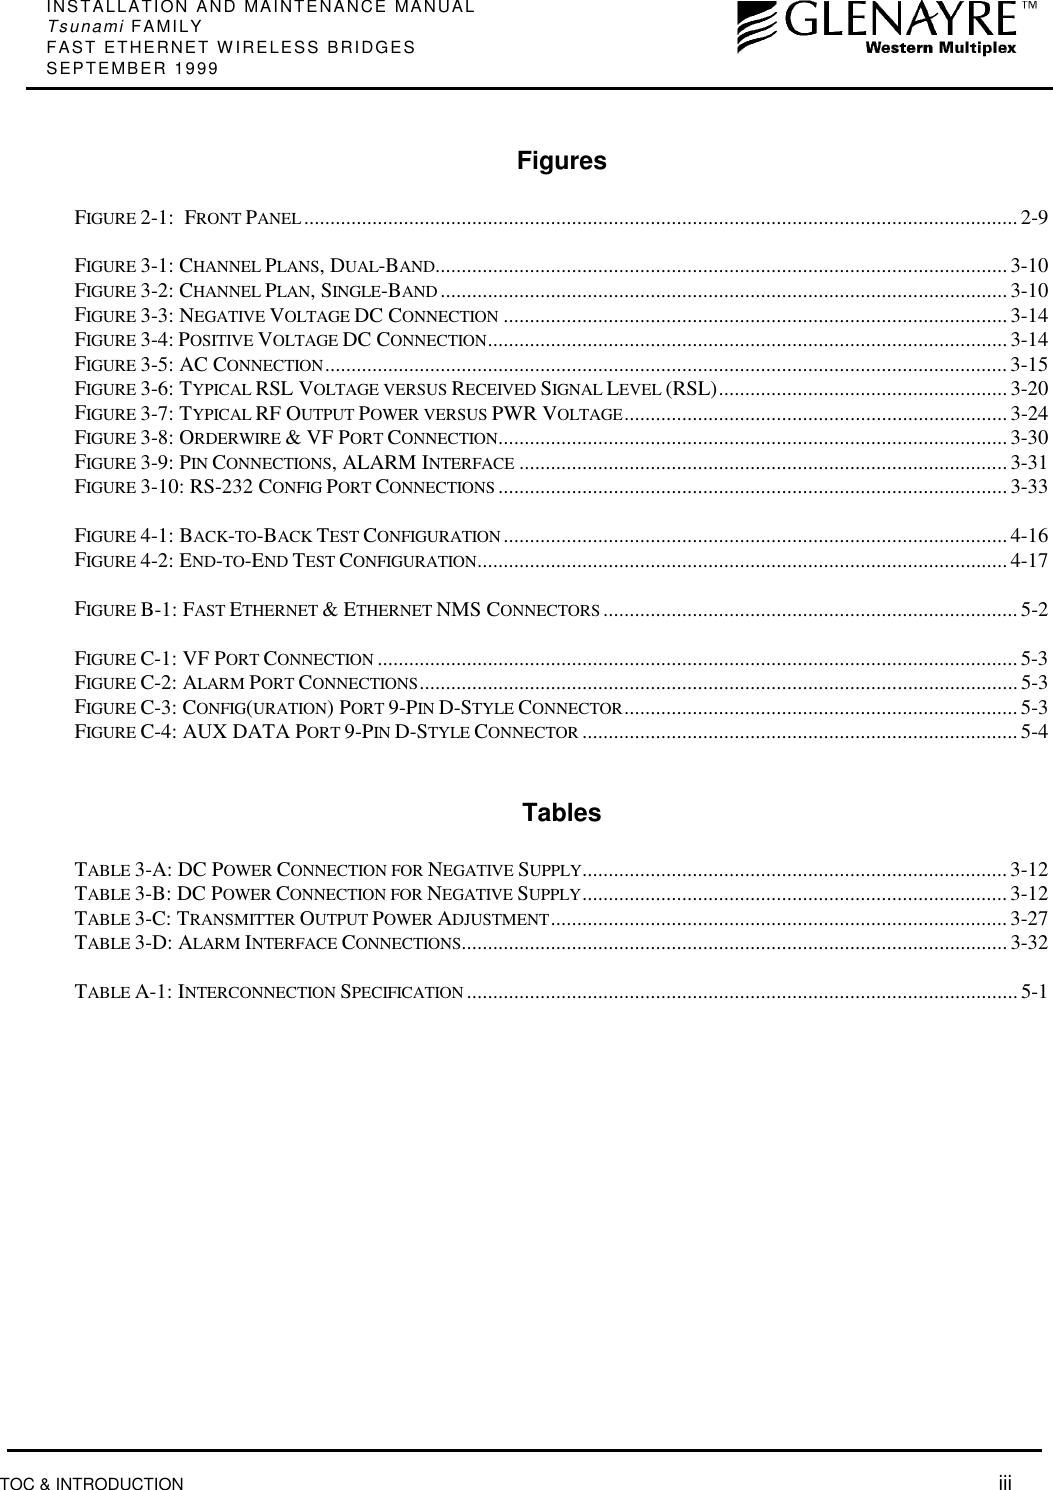
INSTALLATION AND MAINTENANCE MANUALTsunami FAMILYFAST ETHERNET WIRELESS BRIDGESSEPTEMBER 1999TOC & INTRODUCTION  iiiFiguresFIGURE 2-1:  FRONT PANEL ........................................................................................................................................ 2-9FIGURE 3-1: CHANNEL PLANS, DUAL-BAND............................................................................................................. 3-10FIGURE 3-2: CHANNEL PLAN, SINGLE-BAND ............................................................................................................ 3-10FIGURE 3-3: NEGATIVE VOLTAGE DC CONNECTION ................................................................................................3-14FIGURE 3-4: POSITIVE VOLTAGE DC CONNECTION................................................................................................... 3-14FIGURE 3-5: AC CONNECTION..................................................................................................................................3-15FIGURE 3-6: TYPICAL RSL VOLTAGE VERSUS RECEIVED SIGNAL LEVEL (RSL).......................................................3-20FIGURE 3-7: TYPICAL RF OUTPUT POWER VERSUS PWR VOLTAGE.........................................................................3-24FIGURE 3-8: ORDERWIRE & VF PORT CONNECTION................................................................................................. 3-30FIGURE 3-9: PIN CONNECTIONS, ALARM INTERFACE .............................................................................................3-31FIGURE 3-10: RS-232 CONFIG PORT CONNECTIONS ................................................................................................. 3-33FIGURE 4-1: BACK-TO-BACK TEST CONFIGURATION ................................................................................................4-16FIGURE 4-2: END-TO-END TEST CONFIGURATION.....................................................................................................4-17FIGURE B-1: FAST ETHERNET & ETHERNET NMS CONNECTORS ...............................................................................5-2FIGURE C-1: VF PORT CONNECTION ..........................................................................................................................5-3FIGURE C-2: ALARM PORT CONNECTIONS.................................................................................................................. 5-3FIGURE C-3: CONFIG(URATION) PORT 9-PIN D-STYLE CONNECTOR........................................................................... 5-3FIGURE C-4: AUX DATA PORT 9-PIN D-STYLE CONNECTOR ...................................................................................5-4TablesTABLE 3-A: DC POWER CONNECTION FOR NEGATIVE SUPPLY.................................................................................3-12TABLE 3-B: DC POWER CONNECTION FOR NEGATIVE SUPPLY................................................................................. 3-12TABLE 3-C: TRANSMITTER OUTPUT POWER ADJUSTMENT.......................................................................................3-27TABLE 3-D: ALARM INTERFACE CONNECTIONS........................................................................................................ 3-32TABLE A-1: INTERCONNECTION SPECIFICATION .........................................................................................................5-1
INSTALLATION AND MAINTENANCE MANUALTsunami FAMILYFAST ETHERNET WIRELESS BRIDGESSEPTEMBER 1999SECTION 1: HOW TO USE THIS MANUAL PAGE 1-11. How to Use This Manual1.1 Manual OrganizationThe Installation and Maintenance Manual provides information required to install and maintainTsunami and to use its many features to the fullest advantage. This manual is divided into thefollowing sections:Section 1 Provides instructions on how to most effectively utilize the information inthis manual.Section 2 Provides a brief description and specifications of the Tsunami.Section 3 Explains the Tsunami installation and adjustments in detail.Section 4 Provides maintenance, repair and troubleshooting information for theTsunami Fast Ethernet radios.Appendices Charts and diagrams are provided for radio connections and DIP switchsettings along with other general information.This device must be professionally installed. Instructions onsetting the transmitter RF output power are contained inSection 3 of this Manual.This device is to be used exclusively for fixed point-to-pointoperation that employs directional antennas.
INSTALLATION AND MAINTENANCE MANUALTsunami FAMILYFAST ETHERNET WIRELESS BRIDGES SEPTEMBER 1999PAGE 1-2 SECTION 1: HOW TO USE THIS MANUAL1.2 IconsThroughout this manual, the following icons are used to highlight areas of special interest andimportance.Note Practical Tip Caution
INSTALLATION AND MAINTENANCE MANUALTsunami FAMILYFAST ETHERNET WIRELESS BRIDGESSEPTEMBER 1999SECTION 2: PRODUCT DESCRIPTION PAGE 2-12. Product Description2.1 General DescriptionThe  Tsunami license-free radios provide a new level of control and convenience in a digitalcommunications network.These Tsunami radios provide 100BaseT intelligent bridging between two locations without the delayand expense of installing cable or traditional microwave.Because each owner controls the operation of the link, there is no reliance on any outside services.Tsunami radio operators are able to operate instant links whenever needed, and to be in control oftheir own network.The Tsunami offers two primary benefits:❖ CONVENIENCE Easy to install and operate with no user licenserequirements or frequency coordination in the USA.(Other countries may require a user license and/orfrequency coordination).❖ CAPABILITY Full transparent Fast Ethernet connections with nothroughput reduction over any line-of-sight distance (withinlegal limits of government regulation)
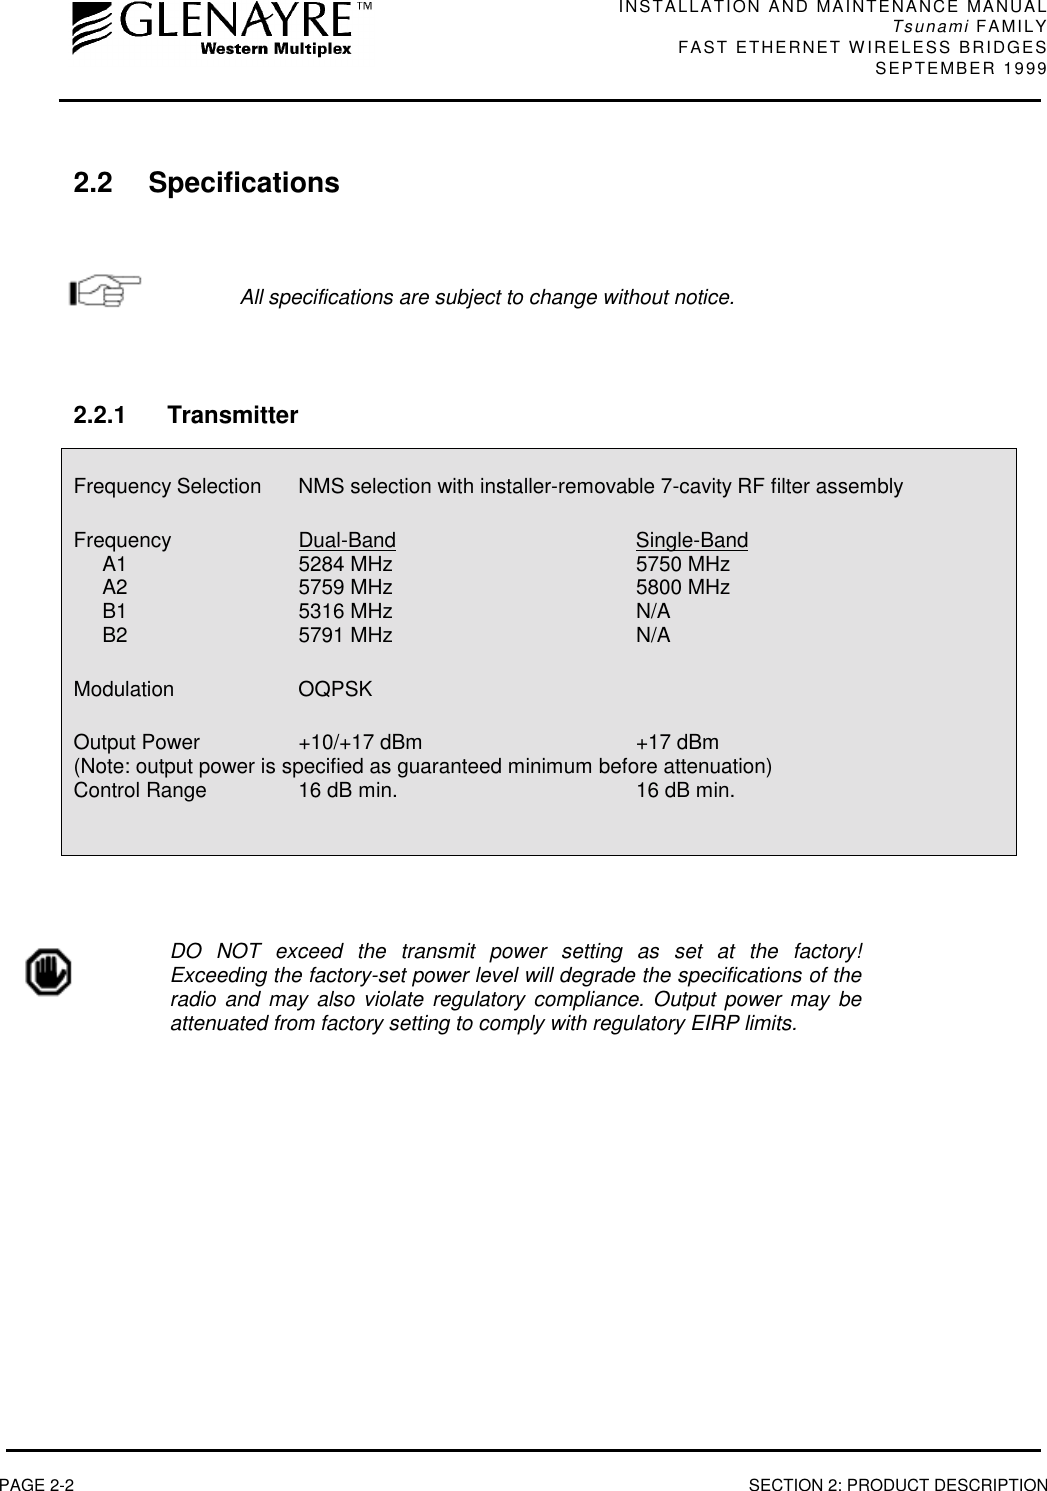
INSTALLATION AND MAINTENANCE MANUALTsunami FAMILYFAST ETHERNET WIRELESS BRIDGES SEPTEMBER 1999PAGE 2-2 SECTION 2: PRODUCT DESCRIPTION2.2 SpecificationsAll specifications are subject to change without notice.2.2.1 TransmitterFrequency Selection NMS selection with installer-removable 7-cavity RF filter assemblyFrequency Dual-Band Single-Band     A1 5284 MHz 5750 MHz     A2 5759 MHz 5800 MHz     B1 5316 MHz N/A     B2 5791 MHz N/AModulation OQPSKOutput Power +10/+17 dBm +17 dBm(Note: output power is specified as guaranteed minimum before attenuation)Control Range 16 dB min. 16 dB min.DO NOT exceed the transmit power setting as set at the factory!Exceeding the factory-set power level will degrade the specifications of theradio and may also violate regulatory compliance. Output power may beattenuated from factory setting to comply with regulatory EIRP limits.
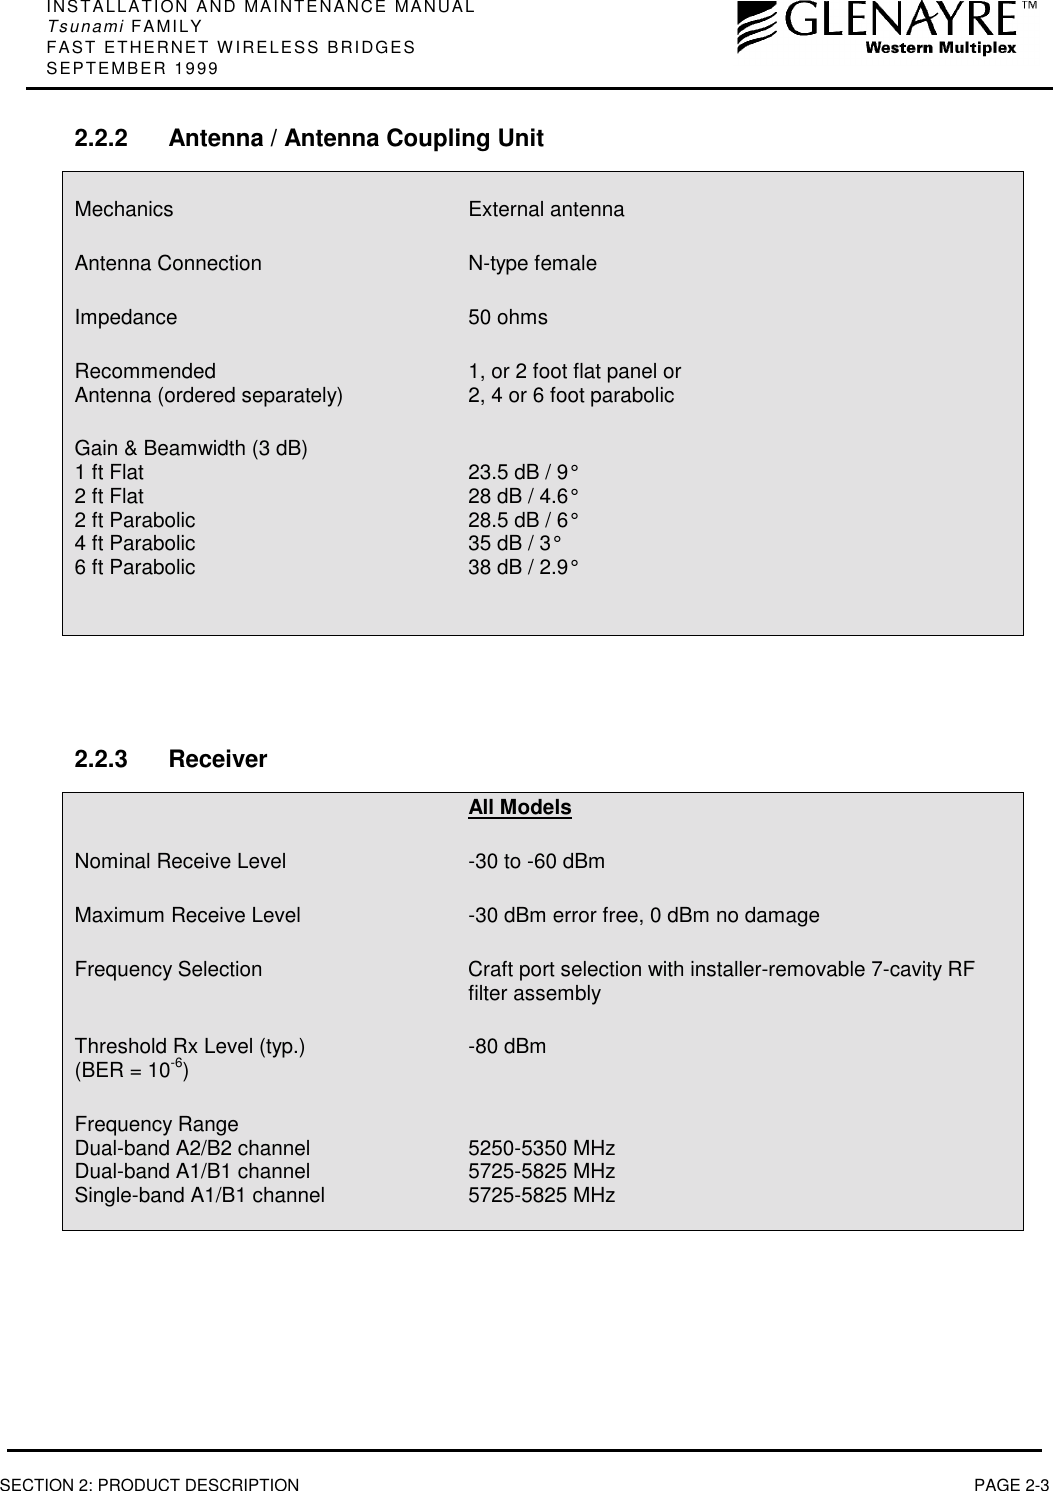
INSTALLATION AND MAINTENANCE MANUALTsunami FAMILYFAST ETHERNET WIRELESS BRIDGESSEPTEMBER 1999SECTION 2: PRODUCT DESCRIPTION PAGE 2-32.2.2 Antenna / Antenna Coupling UnitMechanics External antennaAntenna Connection N-type femaleImpedance 50 ohmsRecommended 1, or 2 foot flat panel orAntenna (ordered separately) 2, 4 or 6 foot parabolicGain & Beamwidth (3 dB)1 ft Flat 23.5 dB / 9°2 ft Flat 28 dB / 4.6°2 ft Parabolic 28.5 dB / 6°4 ft Parabolic 35 dB / 3°6 ft Parabolic 38 dB / 2.9°2.2.3 ReceiverAll ModelsNominal Receive Level -30 to -60 dBmMaximum Receive Level -30 dBm error free, 0 dBm no damageFrequency Selection Craft port selection with installer-removable 7-cavity RFfilter assemblyThreshold Rx Level (typ.) -80 dBm(BER = 10-6)Frequency RangeDual-band A2/B2 channel 5250-5350 MHzDual-band A1/B1 channel 5725-5825 MHzSingle-band A1/B1 channel 5725-5825 MHz
INSTALLATION AND MAINTENANCE MANUALTsunami FAMILYFAST ETHERNET WIRELESS BRIDGES SEPTEMBER 1999PAGE 2-4 SECTION 2: PRODUCT DESCRIPTION2.2.4 System (Single Hop Performance)Error Floor 10-11Transmission delay(radio only) 250 µsec, maximum(10 mile path) 300 µsec, maximumTransmit FrequenciesDual-band Single-bandA1 channel 5284 MHz 5750MHzA2 channel 5759 MHz 5800 MHzB1 channel 5316 MHz N/AB2 channel 5791 MHz N/AReceive FrequenciesDual-band Single-bandA1 channel 5759 MHz 5800 MHzA2 channel 5284 MHz 5750 MHzB1 channel 5791 MHz N/AB2 channel 5316 MHz N/A
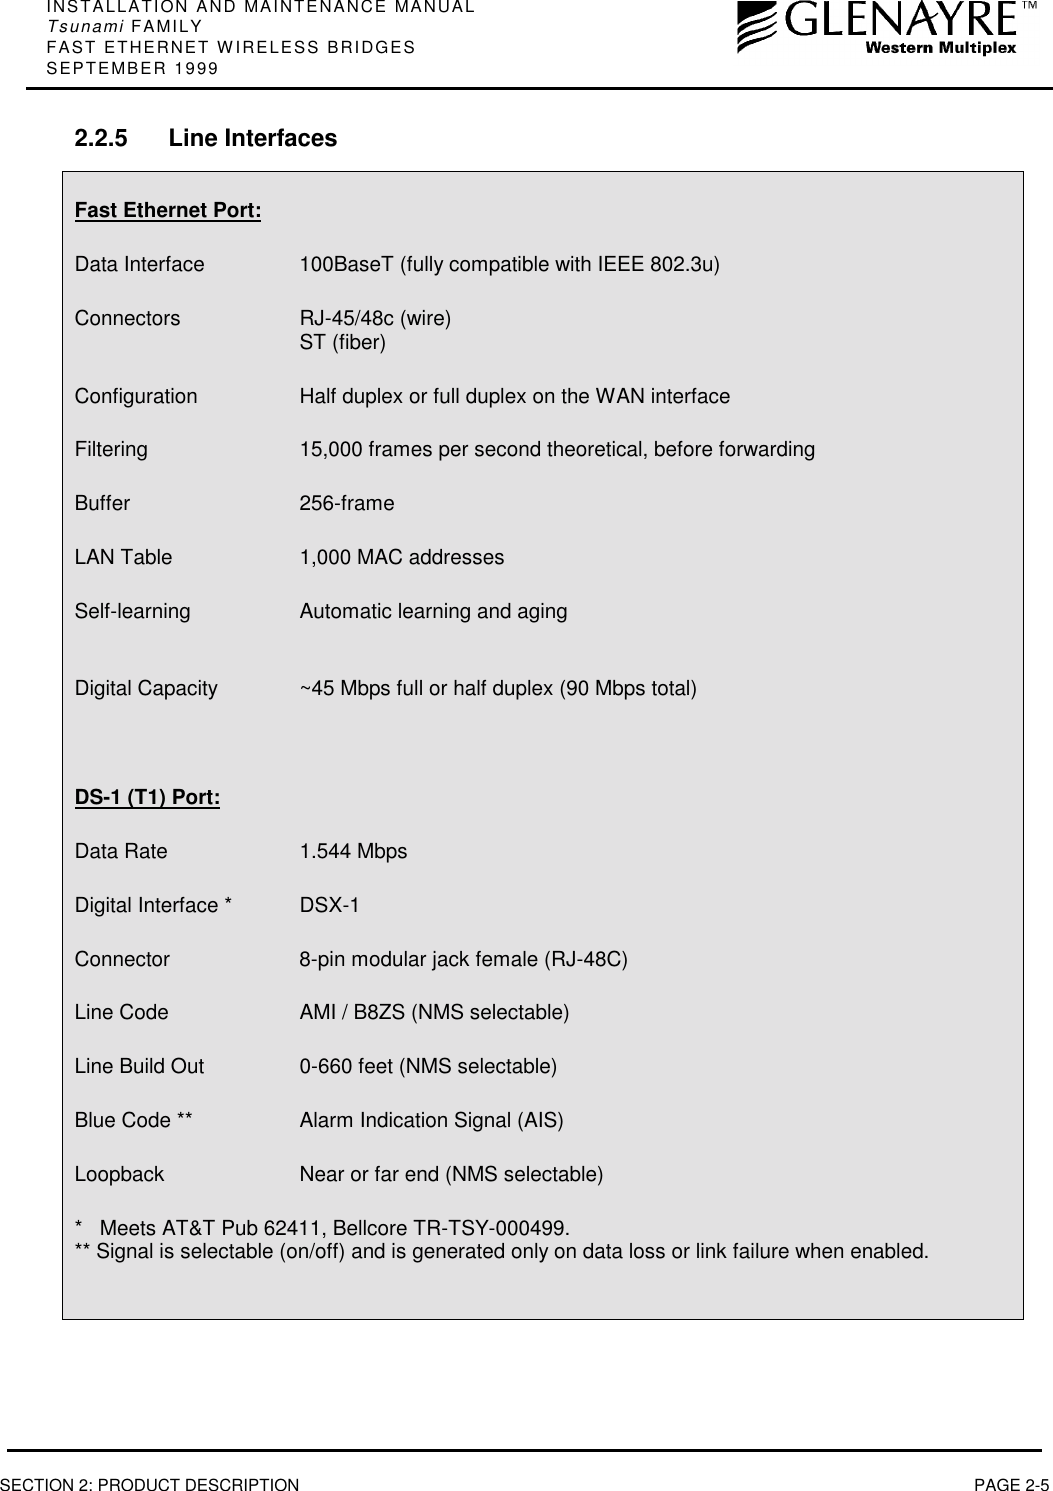
INSTALLATION AND MAINTENANCE MANUALTsunami FAMILYFAST ETHERNET WIRELESS BRIDGESSEPTEMBER 1999SECTION 2: PRODUCT DESCRIPTION PAGE 2-52.2.5 Line InterfacesFast Ethernet Port:Data Interface 100BaseT (fully compatible with IEEE 802.3u)Connectors RJ-45/48c (wire)ST (fiber)Configuration Half duplex or full duplex on the WAN interfaceFiltering 15,000 frames per second theoretical, before forwardingBuffer 256-frameLAN Table 1,000 MAC addressesSelf-learning Automatic learning and agingDigital Capacity ~45 Mbps full or half duplex (90 Mbps total)DS-1 (T1) Port:Data Rate 1.544 MbpsDigital Interface * DSX-1Connector 8-pin modular jack female (RJ-48C)Line Code AMI / B8ZS (NMS selectable)Line Build Out 0-660 feet (NMS selectable)Blue Code ** Alarm Indication Signal (AIS)Loopback Near or far end (NMS selectable)*   Meets AT&T Pub 62411, Bellcore TR-TSY-000499.** Signal is selectable (on/off) and is generated only on data loss or link failure when enabled.
INSTALLATION AND MAINTENANCE MANUALTsunami FAMILYFAST ETHERNET WIRELESS BRIDGES SEPTEMBER 1999PAGE 2-6 SECTION 2: PRODUCT DESCRIPTION2.2.6 Auxiliary ConnectionsOrderwire Interface 2-wire, 4-pin modular jack, female (RJ-11)REN (Ringer Equivalency Number) 1.0 BDTMF tones within ±1.5% of nominal freq. (+0-6 dB)Ringing Voltage 48 VDC, typical(use telephones with solid state ringers, NOT adequate for older style mechanical ringers)VF Orderwire Bridge 600 ohm balanced, 4-wire, 0 dBm, DB-9, maleConfig(uration) Port RS-232, DB-9, maleAux Data (clear service channel) RS-232, ≤9600 baud, DB-9, femaleAlarm 2 x Form C, DB-9, femaleTest Points Output PowerNear-end and far-end received signal level (RSL)10BaseT NMS Ethernet Port:Data Interface 10BaseTConnectors RJ-45/48c (wire)Configuration Half duplex
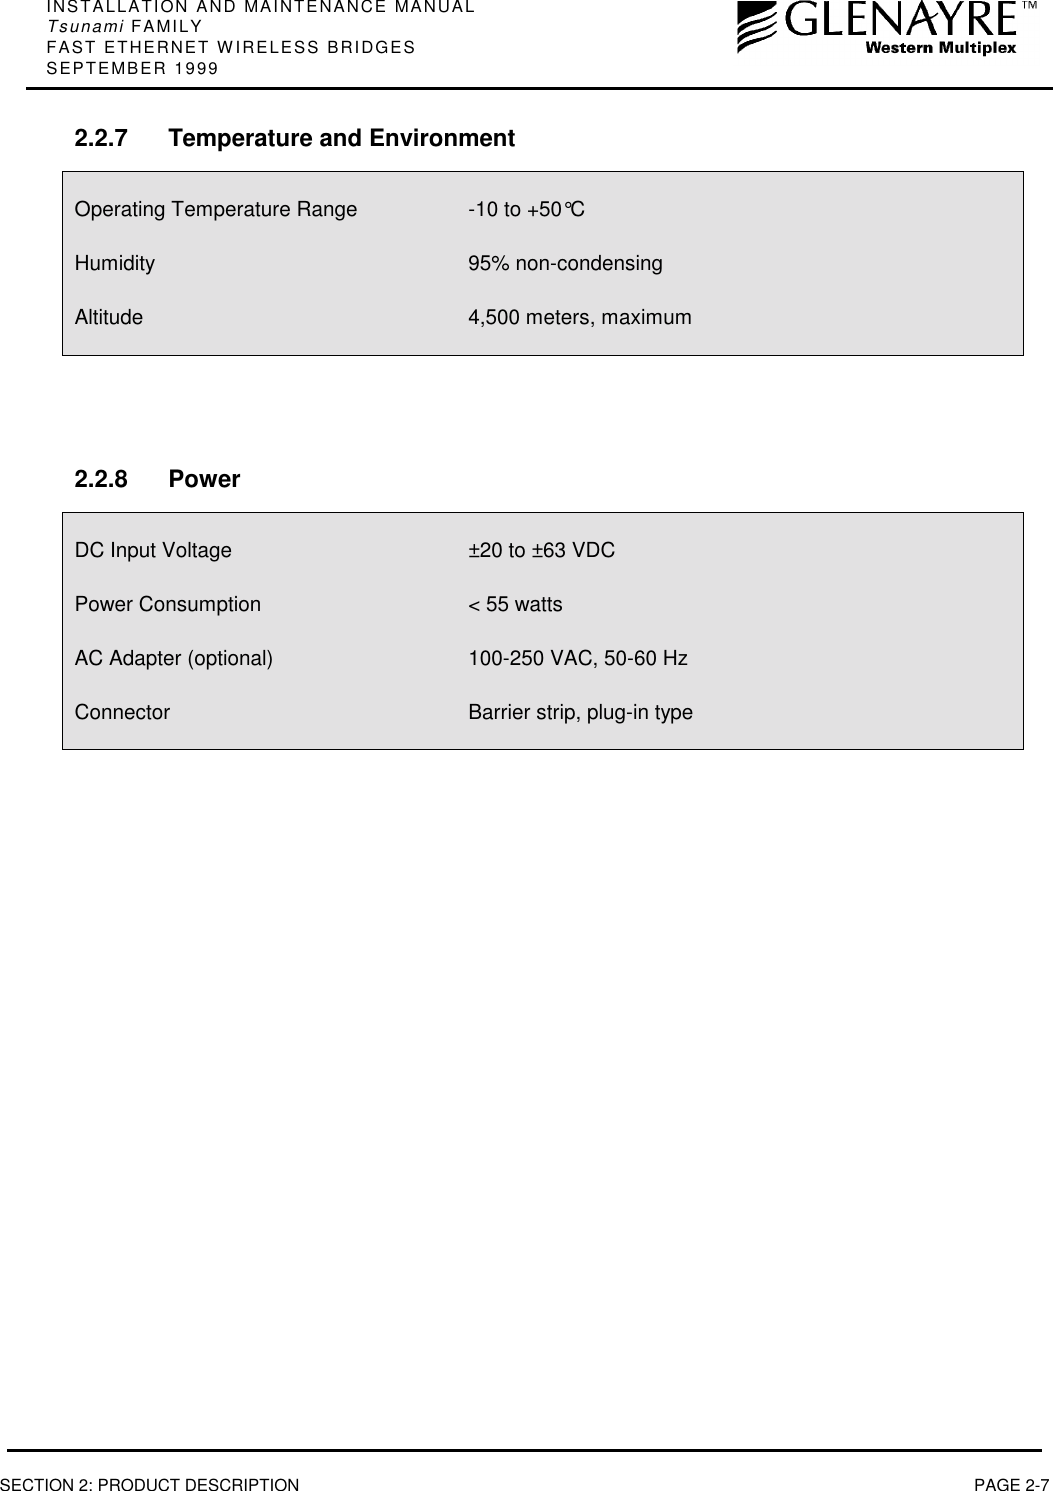
INSTALLATION AND MAINTENANCE MANUALTsunami FAMILYFAST ETHERNET WIRELESS BRIDGESSEPTEMBER 1999SECTION 2: PRODUCT DESCRIPTION PAGE 2-72.2.7 Temperature and EnvironmentOperating Temperature Range -10 to +50°CHumidity 95% non-condensingAltitude 4,500 meters, maximum2.2.8 PowerDC Input Voltage ±20 to ±63 VDCPower Consumption < 55 wattsAC Adapter (optional) 100-250 VAC, 50-60 HzConnector Barrier strip, plug-in type
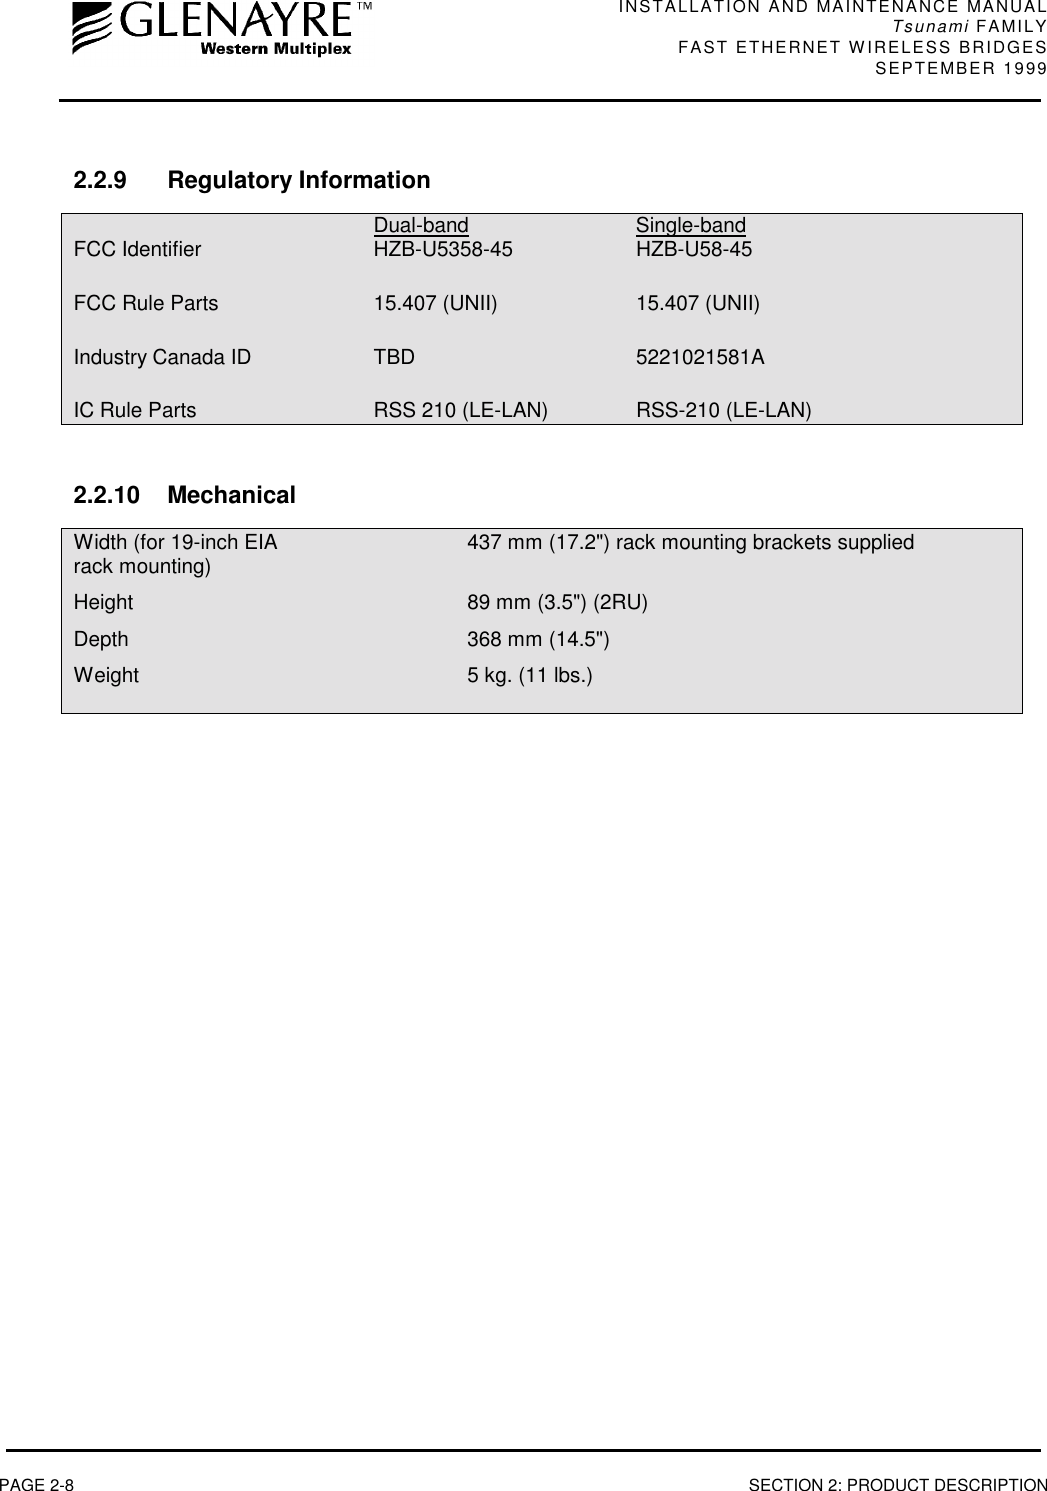
INSTALLATION AND MAINTENANCE MANUALTsunami FAMILYFAST ETHERNET WIRELESS BRIDGES SEPTEMBER 1999PAGE 2-8 SECTION 2: PRODUCT DESCRIPTION2.2.9 Regulatory InformationDual-band Single-bandFCC Identifier HZB-U5358-45 HZB-U58-45FCC Rule Parts 15.407 (UNII) 15.407 (UNII)Industry Canada ID TBD 5221021581AIC Rule Parts RSS 210 (LE-LAN) RSS-210 (LE-LAN)2.2.10 MechanicalWidth (for 19-inch EIA 437 mm (17.2") rack mounting brackets suppliedrack mounting)Height 89 mm (3.5") (2RU)Depth 368 mm (14.5")Weight 5 kg. (11 lbs.)
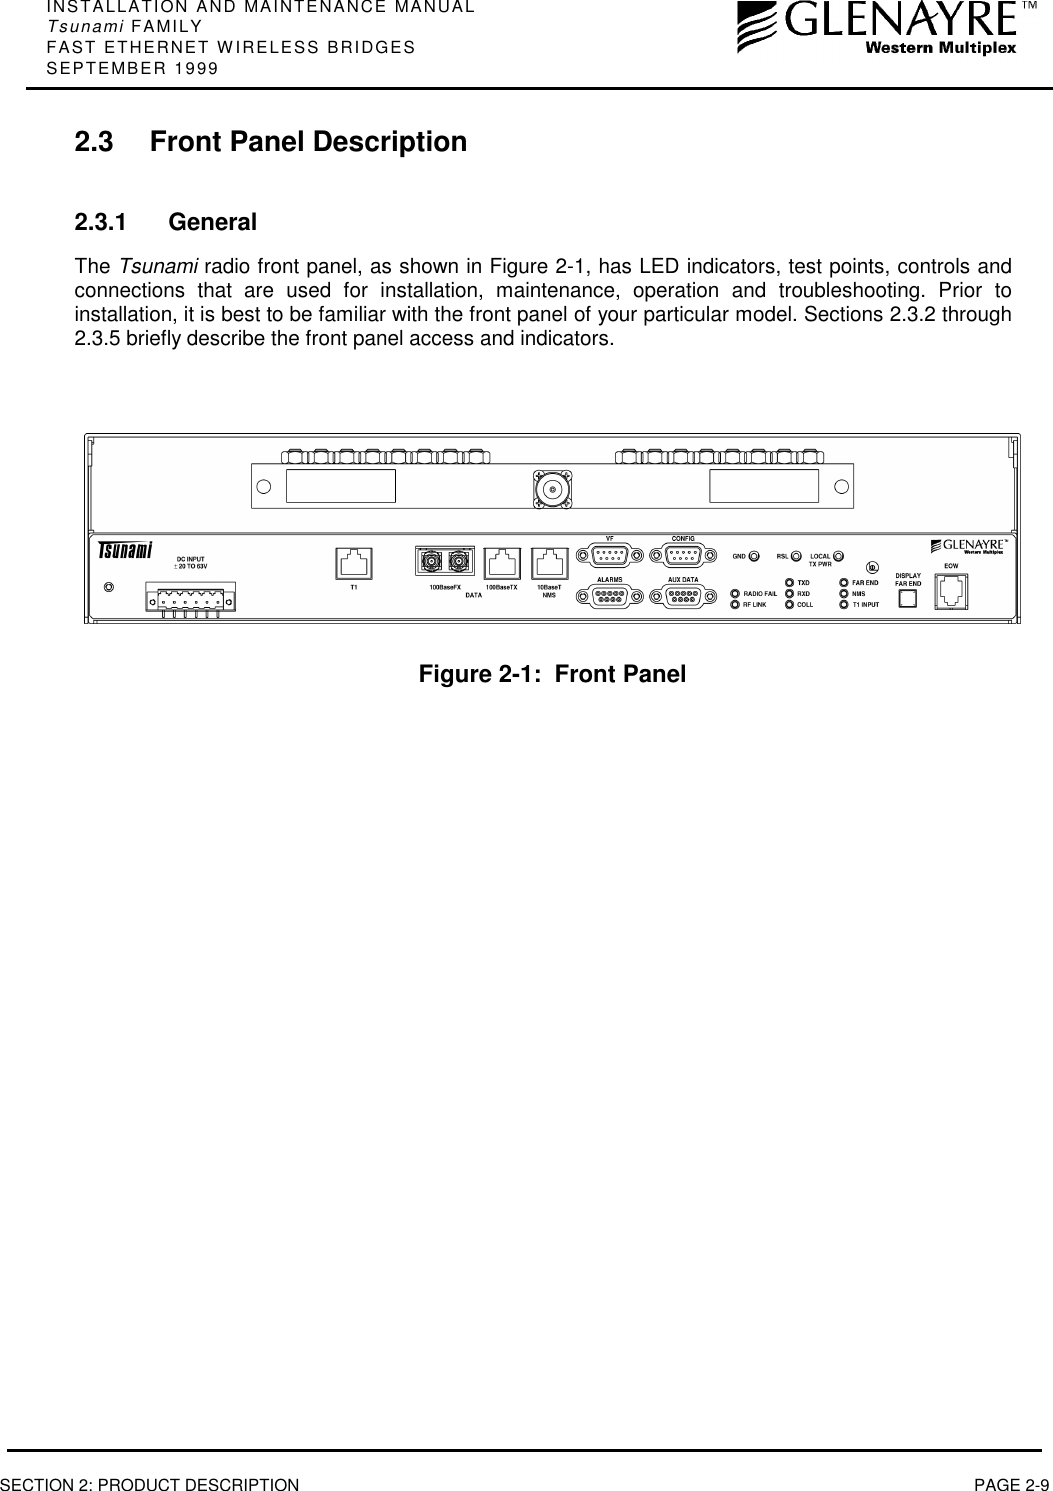
INSTALLATION AND MAINTENANCE MANUALTsunami FAMILYFAST ETHERNET WIRELESS BRIDGESSEPTEMBER 1999SECTION 2: PRODUCT DESCRIPTION PAGE 2-92.3 Front Panel Description2.3.1 GeneralThe Tsunami radio front panel, as shown in Figure 2-1, has LED indicators, test points, controls andconnections that are used for installation, maintenance, operation and troubleshooting. Prior toinstallation, it is best to be familiar with the front panel of your particular model. Sections 2.3.2 through2.3.5 briefly describe the front panel access and indicators.Figure 2-1:  Front Panel
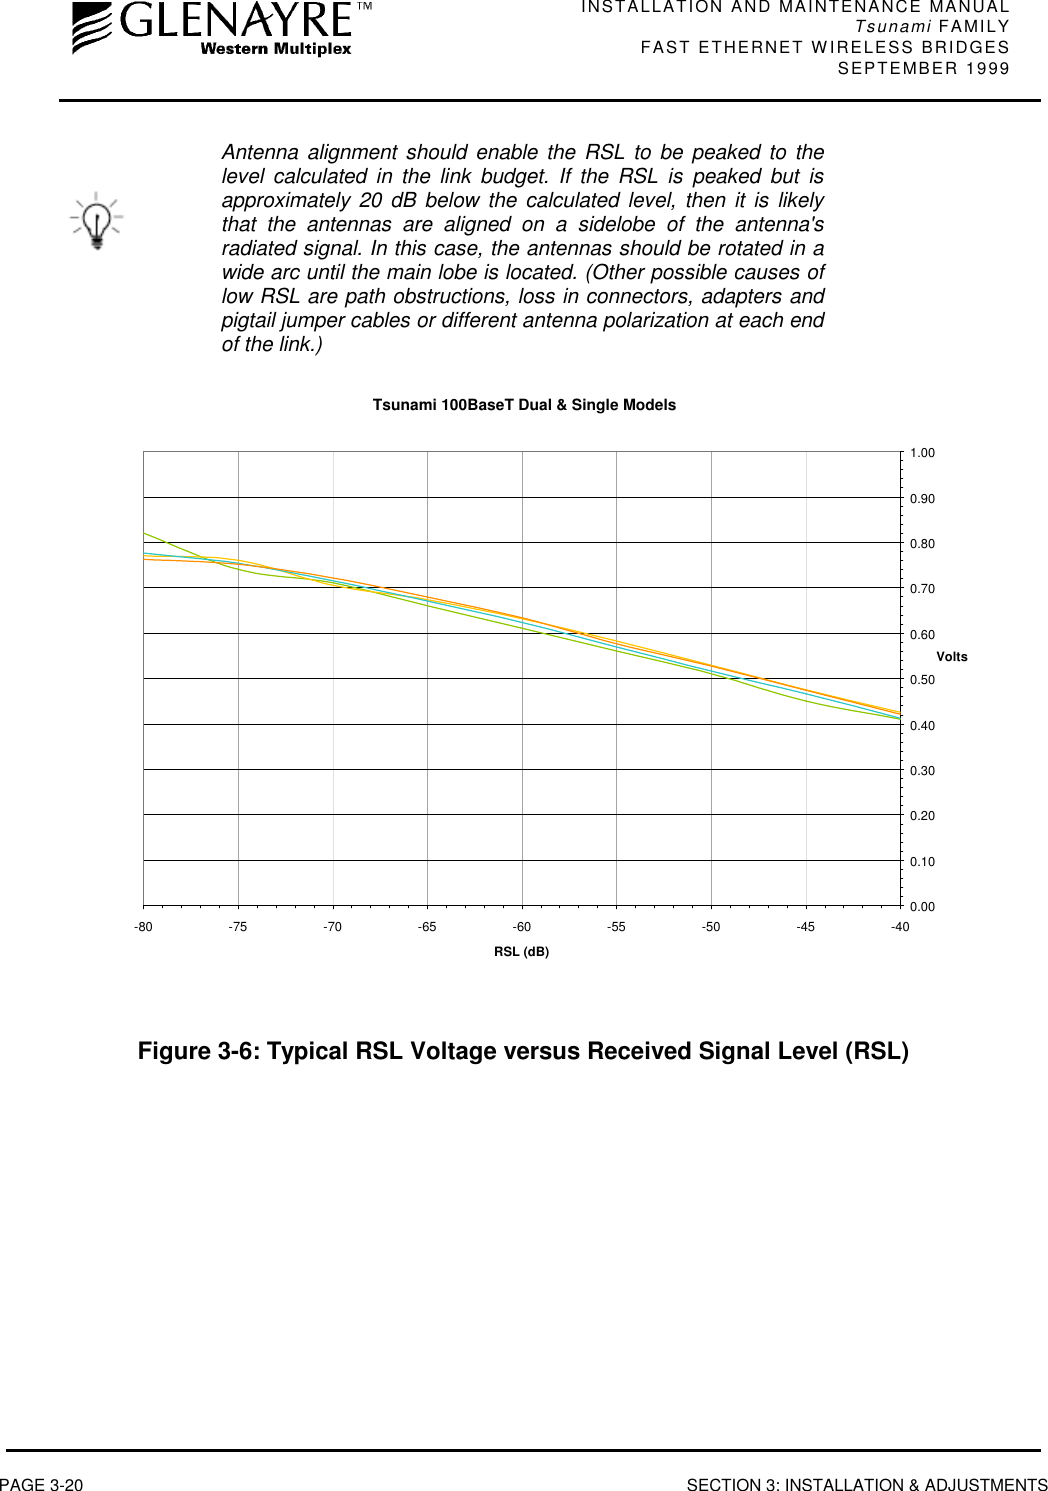
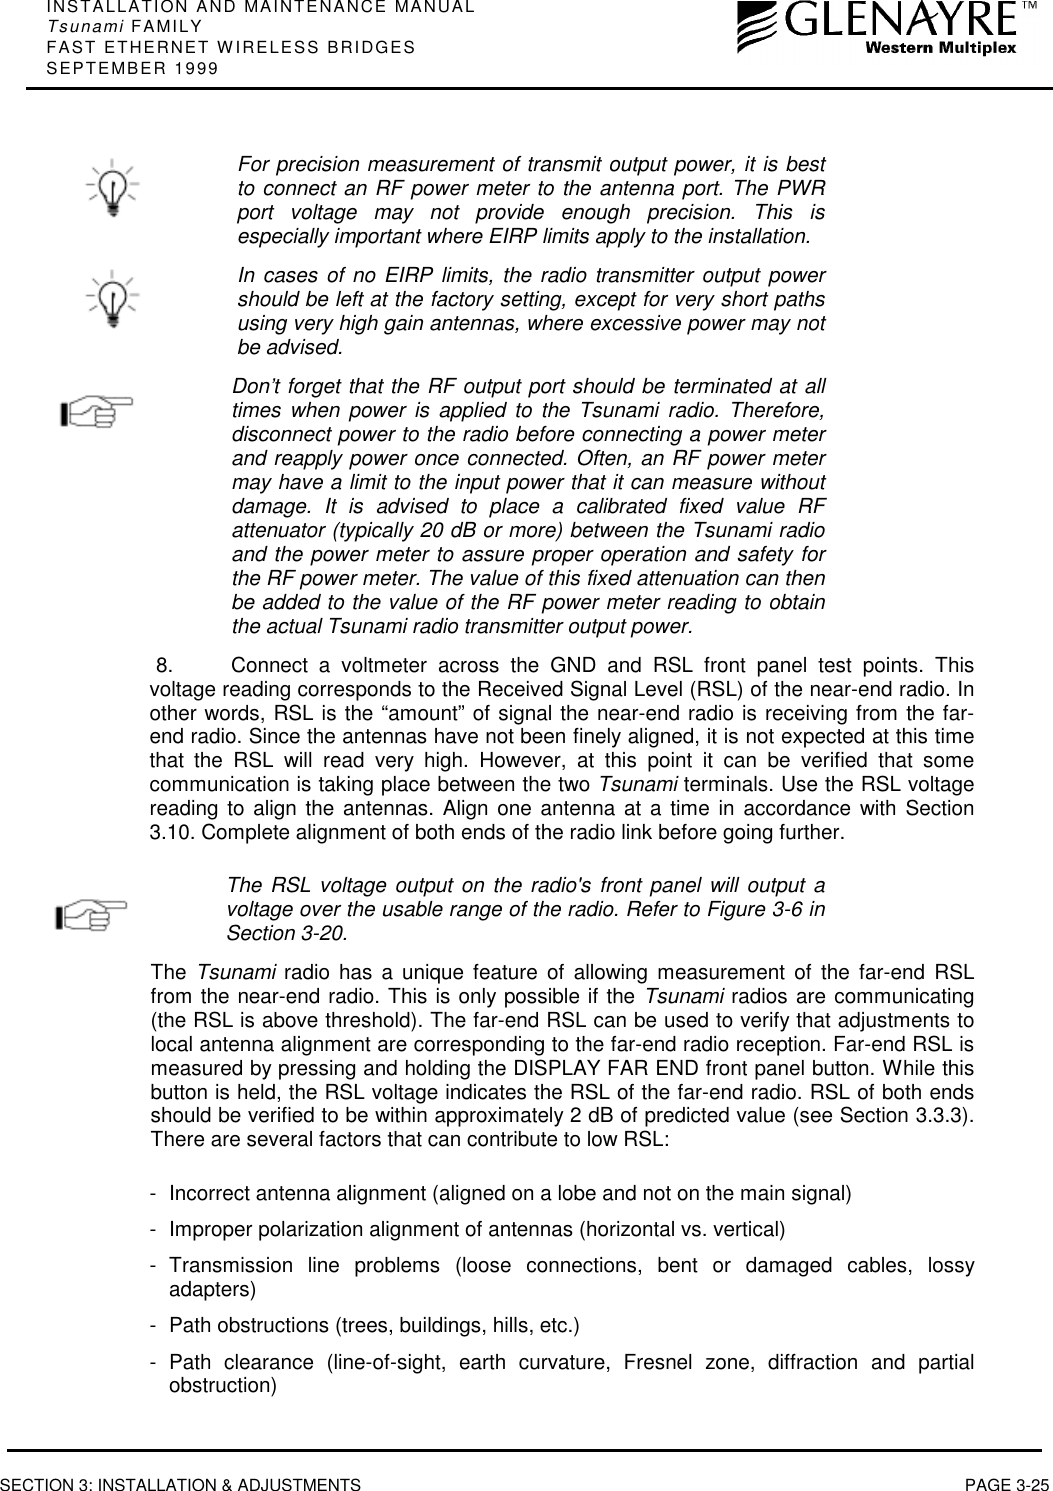
INSTALLATION AND MAINTENANCE MANUALTsunami FAMILYFAST ETHERNET WIRELESS BRIDGES SEPTEMBER 1999PAGE 2-10 SECTION 2: PRODUCT DESCRIPTION2.3.2 Test Points / Power IndicatorON This is an LED indication. When lit GREEN, Tsunami is powered.The Tsunami radio products do not have an on/off switch.GND This is a test point referenced to chassis ground. This is used in conjunction with thenext two test points to measure voltages related to radio performance.RSL This is a test point that relates to the Received Signal Level (RSL). The voltage ismeasured with a voltmeter (using the GND test point for reference) whichcorresponds to the actual power level of the incoming received signal. While theDISPLAY FAR END button is pressed, this RSL voltage corresponds to the RSL ofthe far-end radio. These measurements are used during installation, maintenanceand troubleshooting. Refer to Figure 3-6 in Section 3-20.LOCALTX PWR This is a test point which corresponds to the output transmit power of the radio. Thevoltage is measured with a voltmeter (using the GND test point for reference) whichcorresponds to the actual power level of the outgoing signal. This measurement isused during installation, maintenance and troubleshooting.This voltage only applies to the near-end and does not allow measurementof the far-end output transmit power, even when the DISPLAY FAR ENDbutton is pressed.There is a receptacle on the front panel to the right of the LOCAL TX PWR test pointwhich is an installation adjustment allowing the output transmit power to beincreased or decreased within the radio's specified limits. Using a small screwdriver,this adjustment is used to set the output power of the transmitter, in accordance tothe path planning.The Tsunami system requires professional installation. Transmitted outputpower limits may apply when using this radio. Consult FCC, IC, GlenayreWestern Multiplex or other regulatory authorities for limits which may apply.See Section 3.13.1 for details on setting output power. Do not adjustoutput power above factory settings.
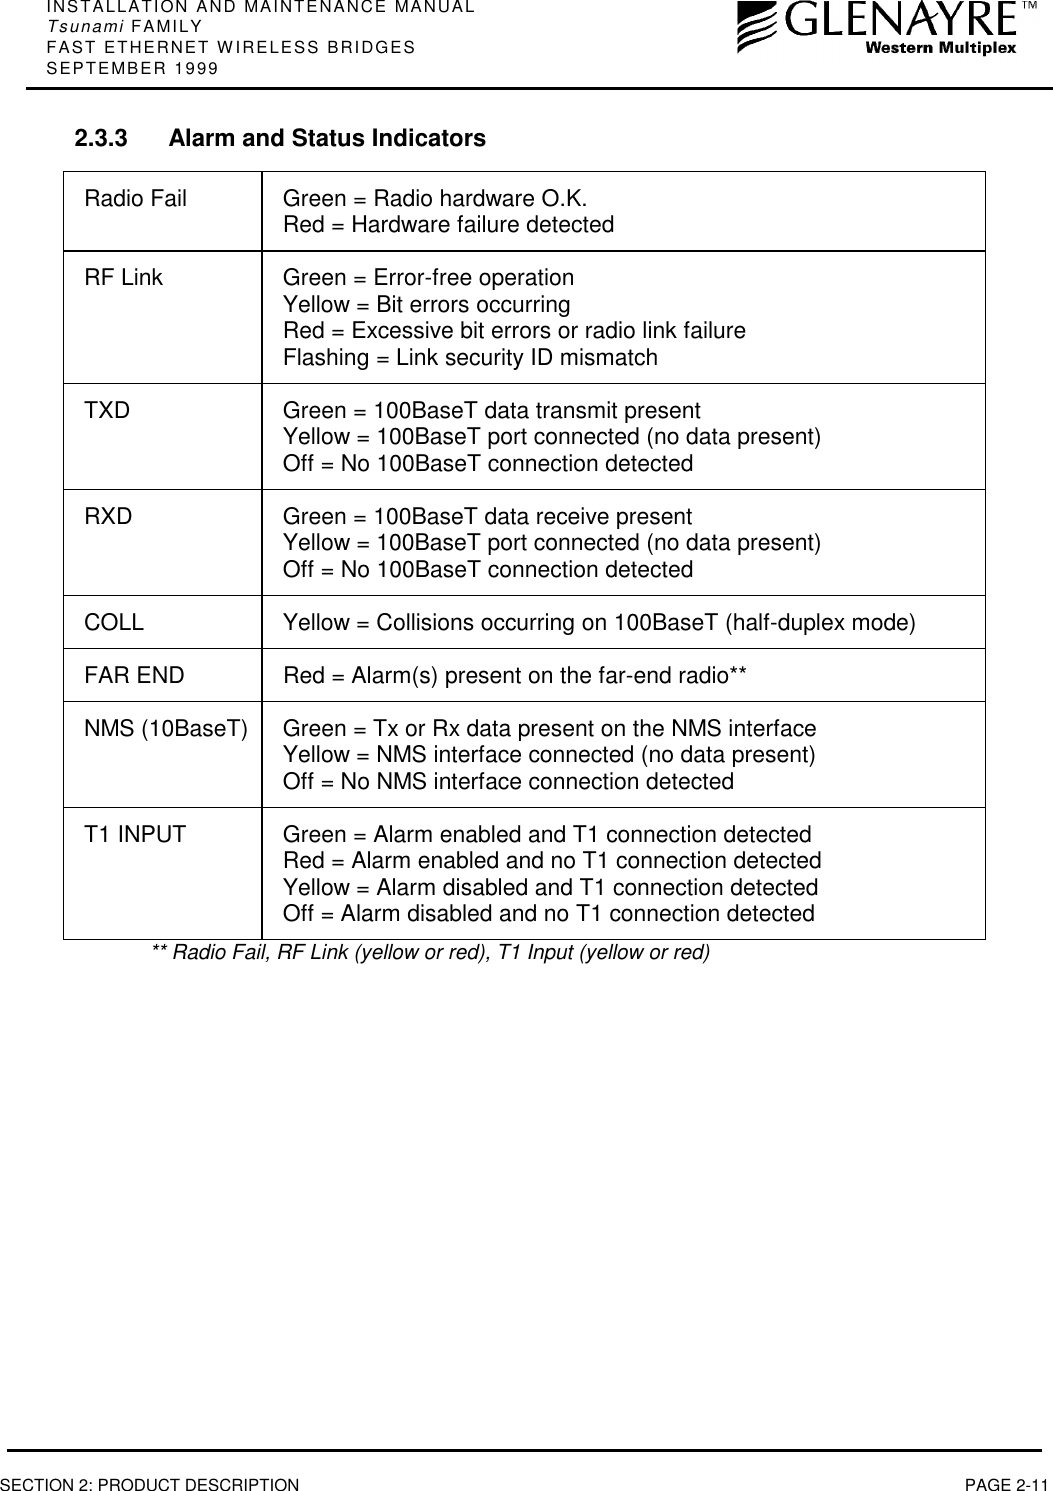
INSTALLATION AND MAINTENANCE MANUALTsunami FAMILYFAST ETHERNET WIRELESS BRIDGESSEPTEMBER 1999SECTION 2: PRODUCT DESCRIPTION PAGE 2-112.3.3 Alarm and Status IndicatorsRadio Fail Green = Radio hardware O.K.Red = Hardware failure detectedRF Link Green = Error-free operationYellow = Bit errors occurringRed = Excessive bit errors or radio link failureFlashing = Link security ID mismatchTXD Green = 100BaseT data transmit presentYellow = 100BaseT port connected (no data present)Off = No 100BaseT connection detectedRXD Green = 100BaseT data receive presentYellow = 100BaseT port connected (no data present)Off = No 100BaseT connection detectedCOLL Yellow = Collisions occurring on 100BaseT (half-duplex mode)FAR END Red = Alarm(s) present on the far-end radio**NMS (10BaseT) Green = Tx or Rx data present on the NMS interfaceYellow = NMS interface connected (no data present)Off = No NMS interface connection detectedT1 INPUT Green = Alarm enabled and T1 connection detectedRed = Alarm enabled and no T1 connection detectedYellow = Alarm disabled and T1 connection detectedOff = Alarm disabled and no T1 connection detected** Radio Fail, RF Link (yellow or red), T1 Input (yellow or red)
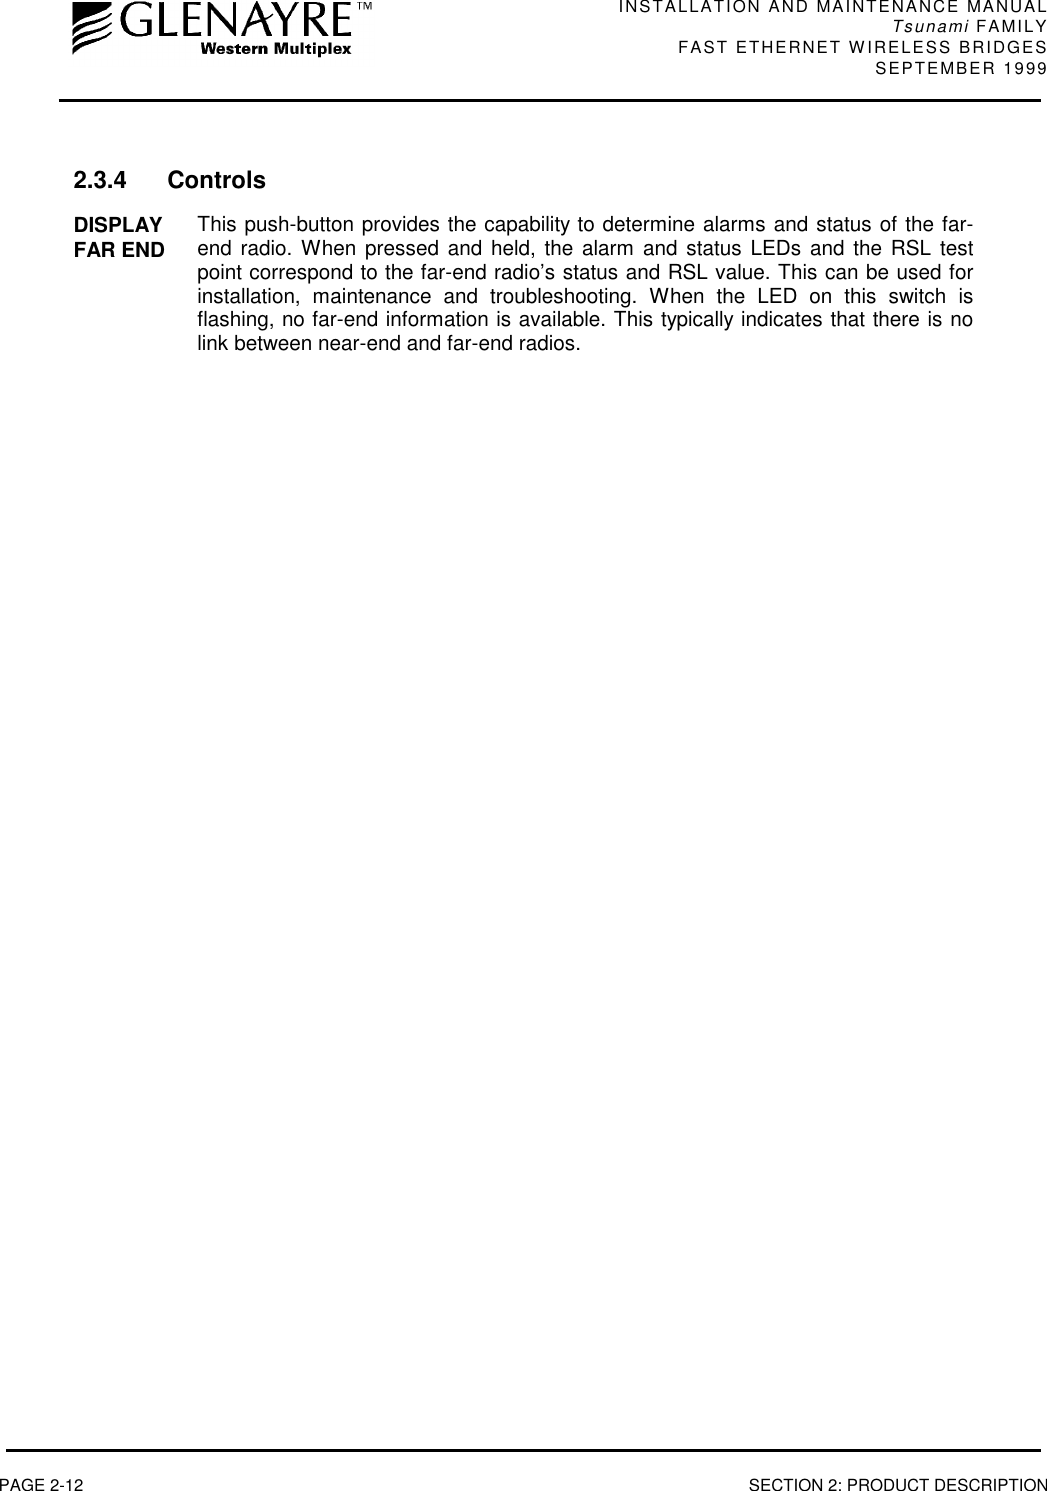
INSTALLATION AND MAINTENANCE MANUALTsunami FAMILYFAST ETHERNET WIRELESS BRIDGES SEPTEMBER 1999PAGE 2-12 SECTION 2: PRODUCT DESCRIPTION2.3.4 ControlsDISPLAYFAR END This push-button provides the capability to determine alarms and status of the far-end radio. When pressed and held, the alarm and status LEDs and the RSL testpoint correspond to the far-end radio’s status and RSL value. This can be used forinstallation, maintenance and troubleshooting. When the LED on this switch isflashing, no far-end information is available. This typically indicates that there is nolink between near-end and far-end radios.
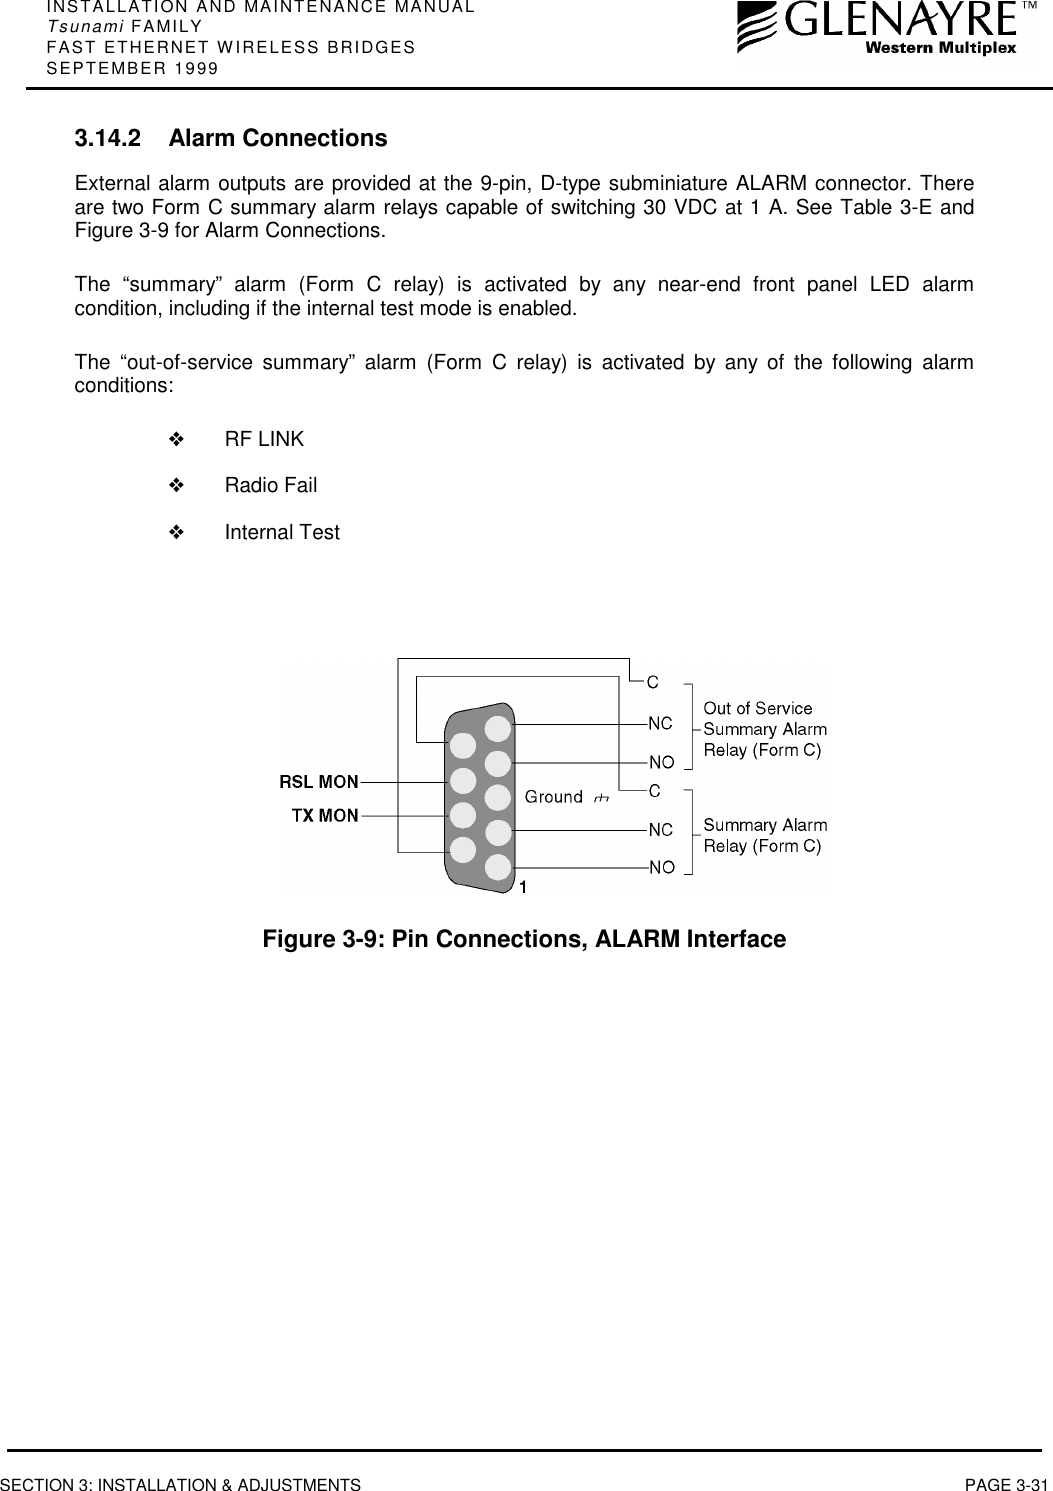
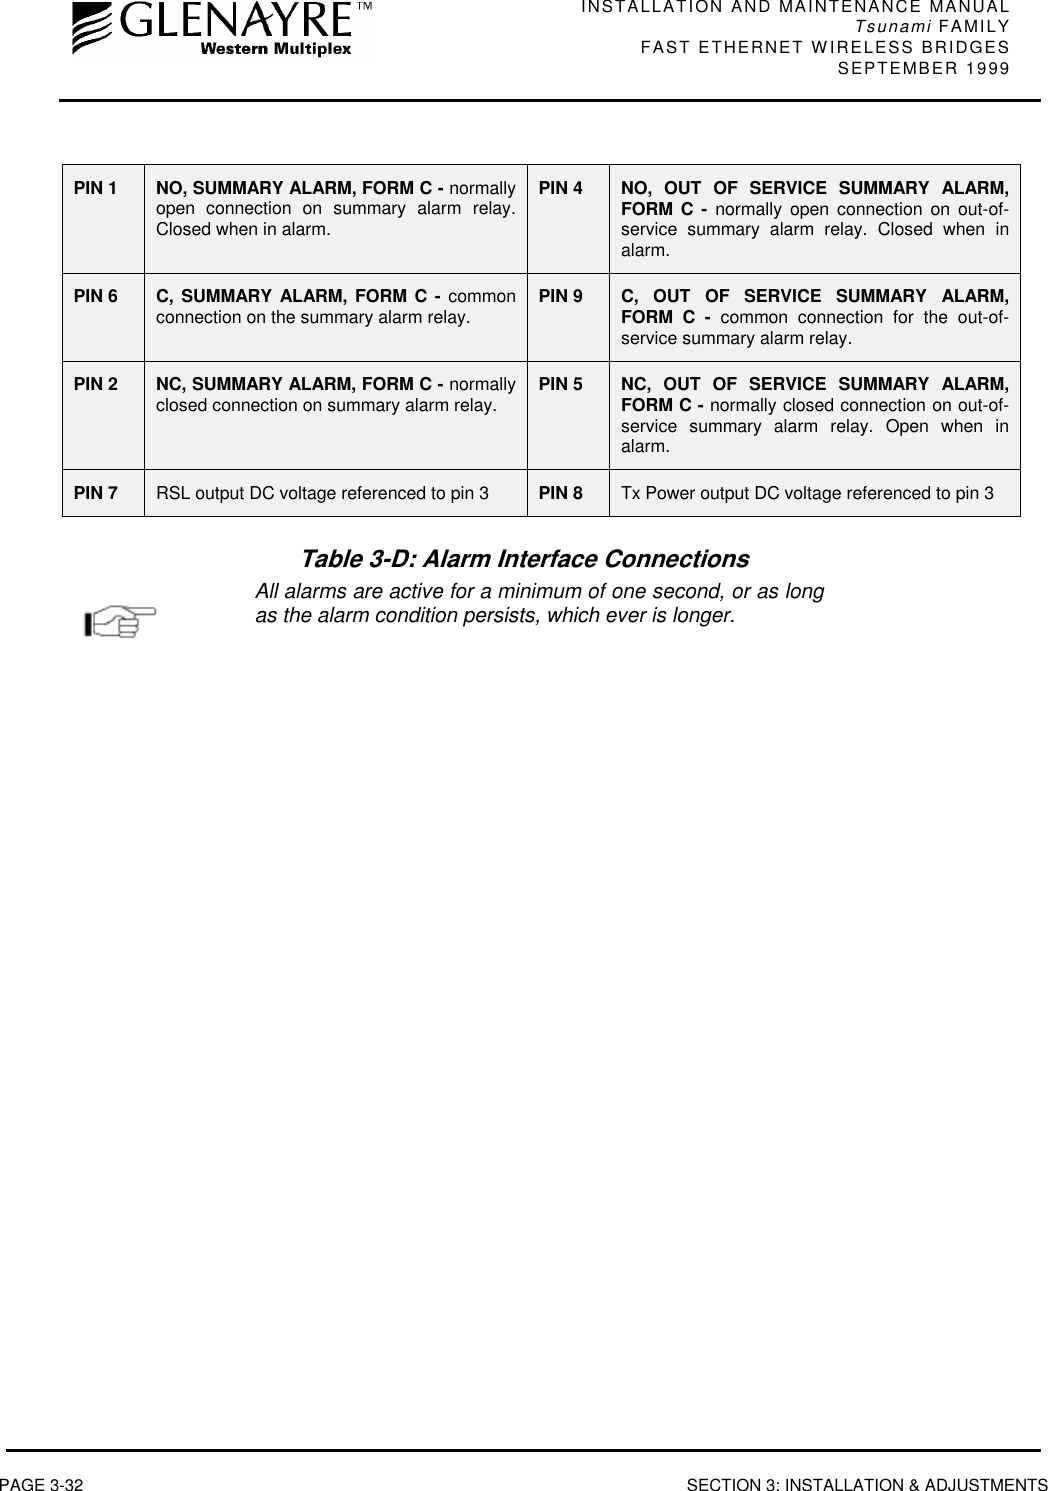
INSTALLATION AND MAINTENANCE MANUALTsunami FAMILYFAST ETHERNET WIRELESS BRIDGESSEPTEMBER 1999SECTION 2: PRODUCT DESCRIPTION PAGE 2-132.3.5 ConnectionsRF CONNECTIONThe RF port of the Tsunami radio is an N-type female connector that is an integral part of the filterassembly. The filter assembly occupies nearly the entire top half of the front panel. The N-Typeconnector is used to connect the antenna, typically using coaxial transmission line. In some cases,waveguide may be used as the primary transmission line, in which case a waveguide-to-N adapter isrequired.For the Tsunami, 1/2" or 5/8” coaxial cable (LDF4-50 or LDF4.5-50)is recommended. Coaxial cable that is 7/8” or larger can exhibitmoding at 5.8 GHz and is not recommended for 5.8 GHz radios.For waveguide transmission line at 5.8 GHz, EW-52 waveguide isrecommended. EW-63 will also work, but may exhibit more loss.DATA CONNECTIONThe connection for the Fast Ethernet interface that carries the signals in and out of the radio is anRJ45 100BaseT wire connection or ST 100BaseT fiber connection.DC POWER CONNECTIONThe input accepts positive or negative DC power at any voltage between 20 and 63 Volts. Optionally,an AC power adapter can be used.OPTIONAL CONNECTIONSThere are several connections that are not required for operation, but provide additional facilities tothe user.EOWVFThis connection is used to access the electronic orderwire function. This is a facilityfor "telephone" style service from one radio to another. A standard electronictelephone [one with a handset and DTMF (push-button tone) dialing] plugs into thisconnector. The user can dial the orderwire address of the far-end radio (or any radioin the Tsunami network) to establish telephone communication between sites. Thiscommunication does not interrupt or interfere with the other radio communications.The radio link must be operational to use this facility. The orderwire feature can bevery useful for installation, maintenance and troubleshooting.This connector is used to link two Tsunami radios at a repeater site for Orderwireoperation. This would allow orderwire "telephone" calls to and from any point in theTsunami network.The Tsunami orderwire circuit can also be connected to other existingorderwire networks. See Section 3.14.1 for details.ALARM This connector is used for monitoring alarms electrically. The Form C relays can beconnected to other transmission equipment for monitoring alarm status locally orremotely.
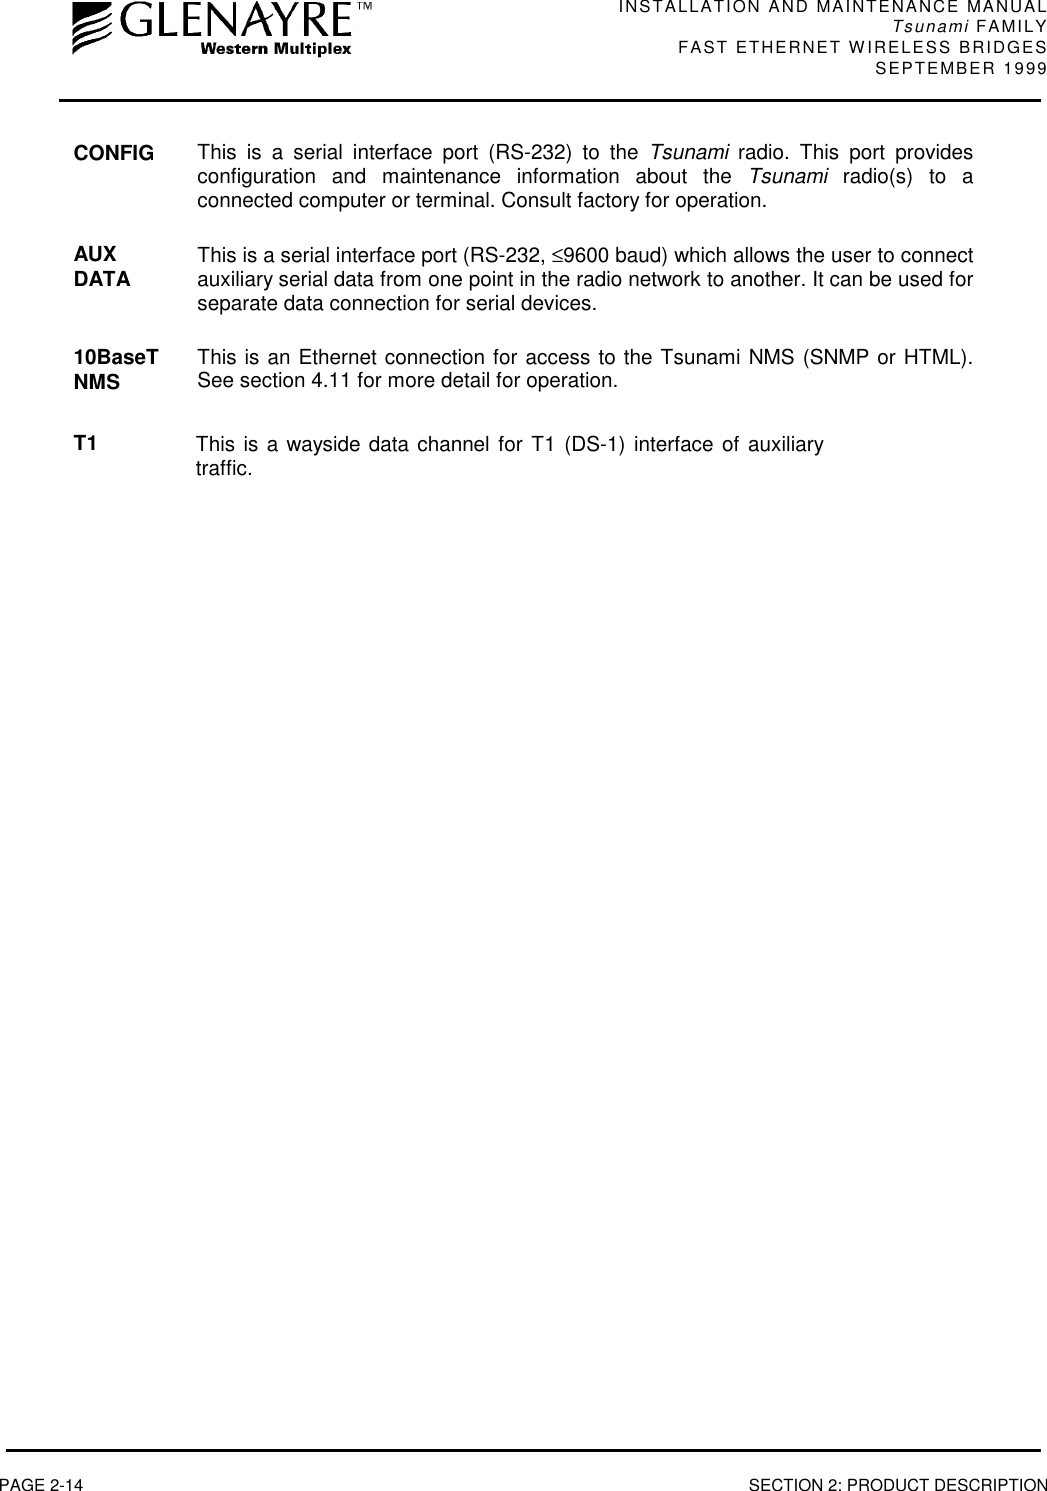
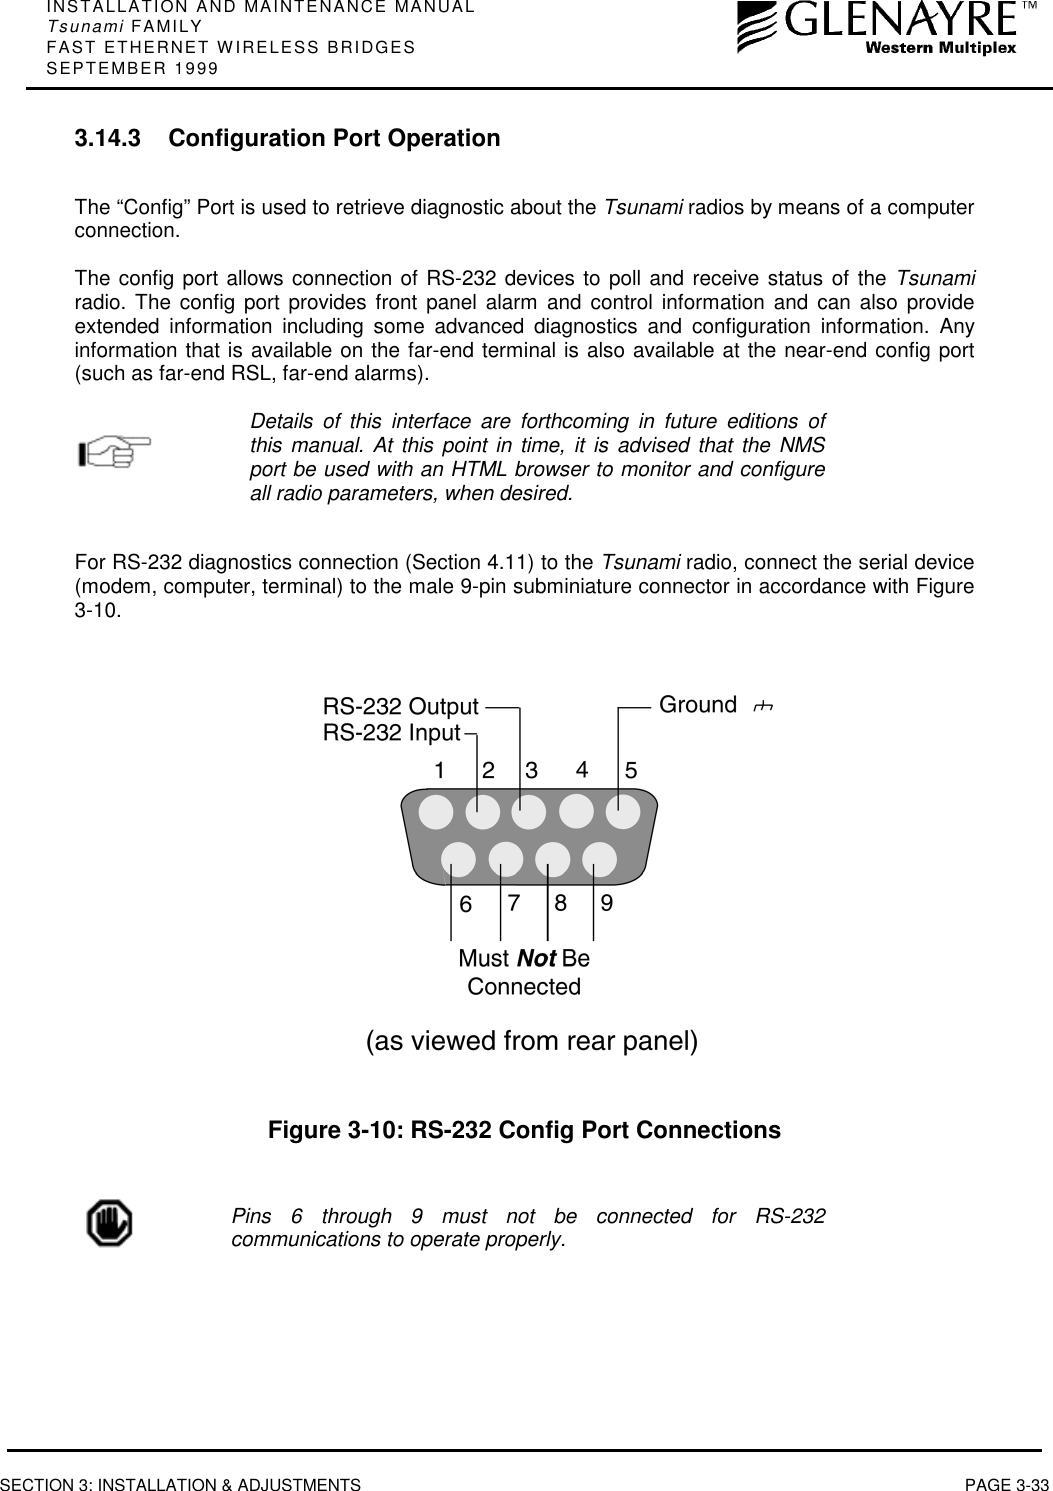
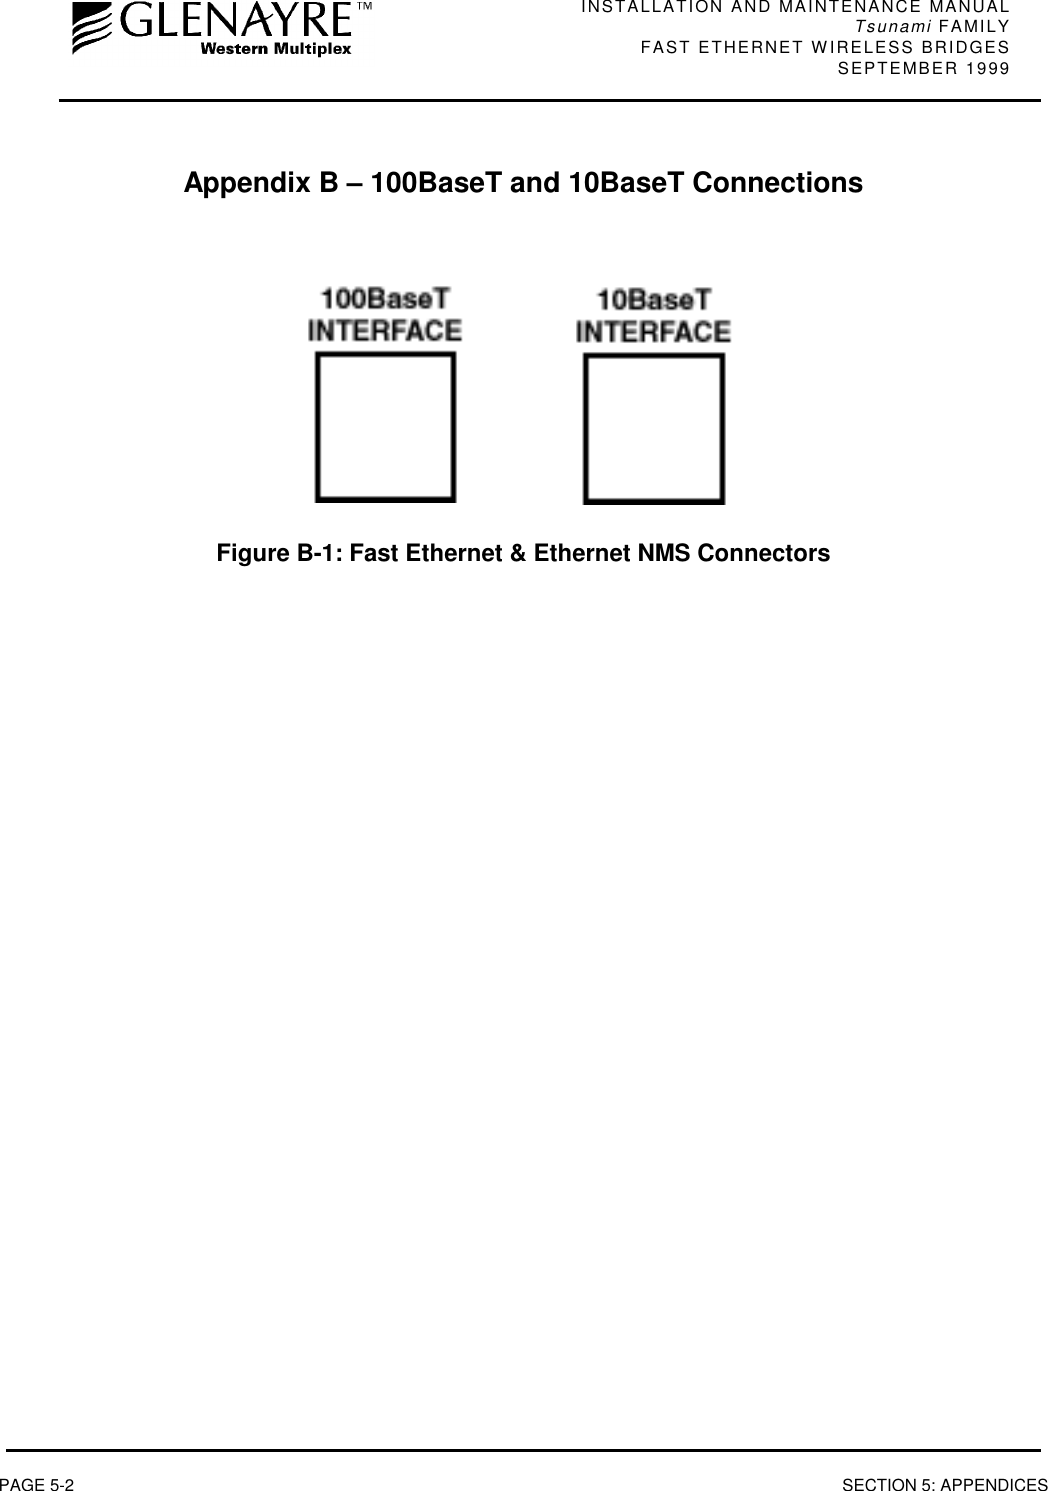
INSTALLATION AND MAINTENANCE MANUALTsunami FAMILYFAST ETHERNET WIRELESS BRIDGES SEPTEMBER 1999PAGE 2-14 SECTION 2: PRODUCT DESCRIPTIONCONFIG This is a serial interface port (RS-232) to the Tsunami radio. This port providesconfiguration and maintenance information about the Tsunami radio(s) to aconnected computer or terminal. Consult factory for operation.AUXDATA This is a serial interface port (RS-232, ≤9600 baud) which allows the user to connectauxiliary serial data from one point in the radio network to another. It can be used forseparate data connection for serial devices.10BaseTNMS This is an Ethernet connection for access to the Tsunami NMS (SNMP or HTML).See section 4.11 for more detail for operation.T1 This is a wayside data channel for T1 (DS-1) interface of auxiliarytraffic.
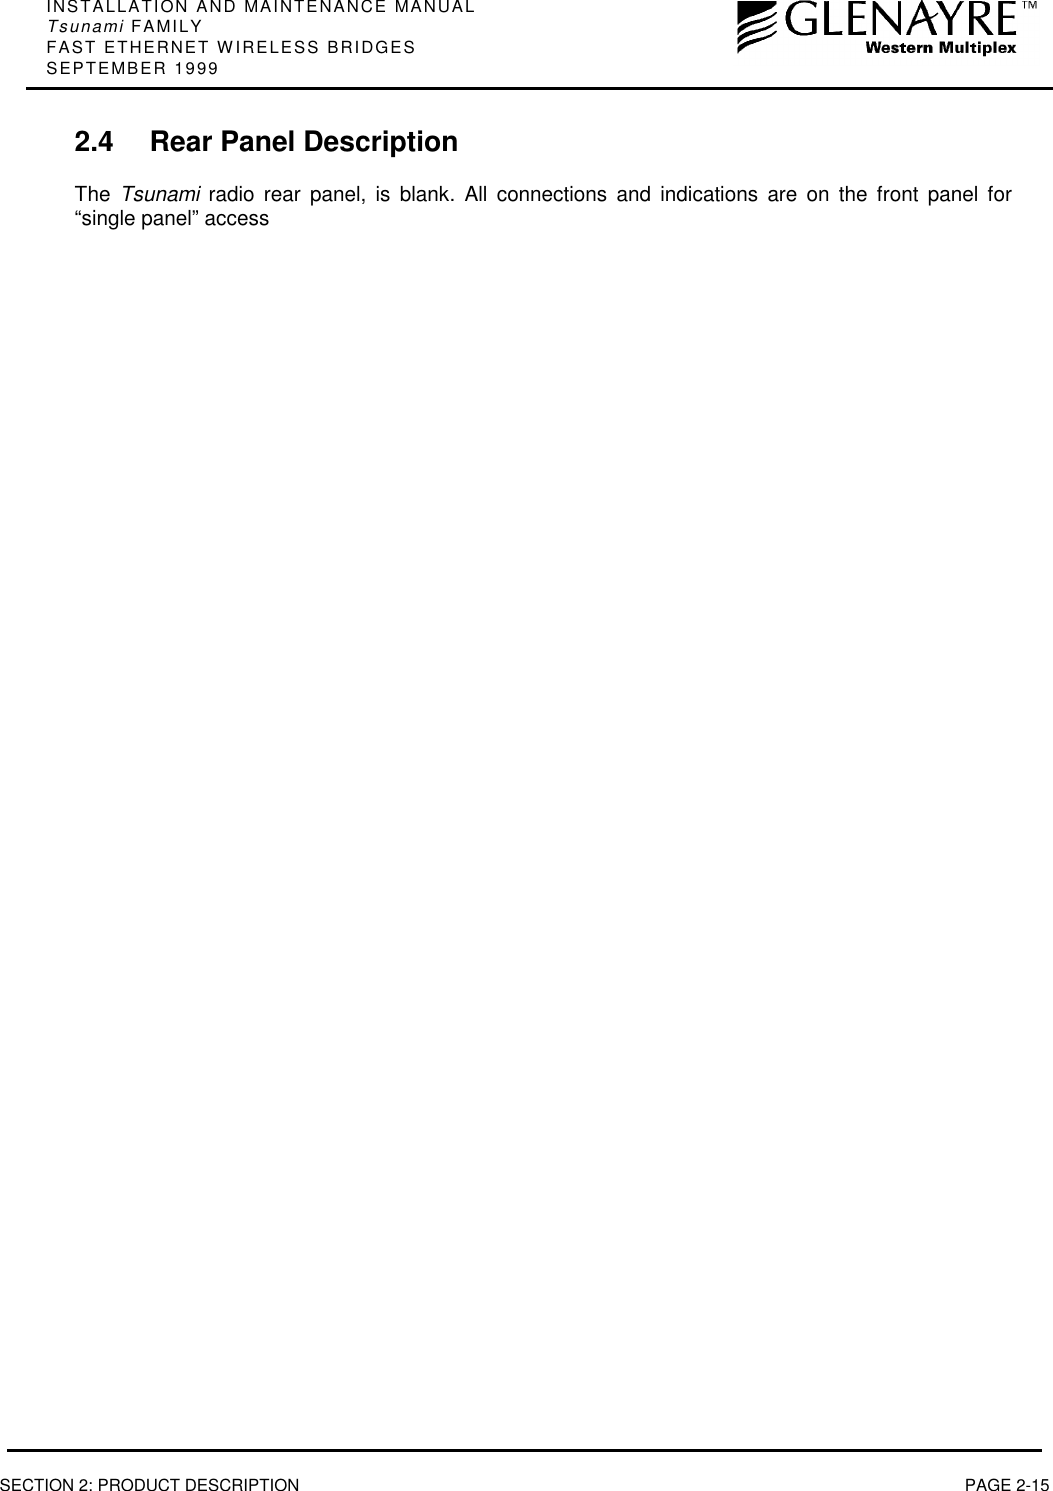
INSTALLATION AND MAINTENANCE MANUALTsunami FAMILYFAST ETHERNET WIRELESS BRIDGESSEPTEMBER 1999SECTION 2: PRODUCT DESCRIPTION PAGE 2-152.4 Rear Panel DescriptionThe  Tsunami radio rear panel, is blank. All connections and indications are on the front panel for“single panel” access
INSTALLATION AND MAINTENANCE MANUALTsunami FAMILYFAST ETHERNET WIRELESS BRIDGES SEPTEMBER 1999PAGE 2-16 SECTION 2: PRODUCT DESCRIPTION2.5 Installation AccessoriesThe Tsunami radio is shipped with several accessories commonly required for the radio as describedbelow:AC PowerSupply If ordered as an option, this power supply provides AC to DC conversion for usewith AC powered locations.AC PowerCord This power cord connects the AC Power Supply, if ordered, to a standard 115VU.S. AC outlet.Rack MountBrackets Two brackets (along with required mounting screws) are provided which allow 19-inch rack mounting of the Tsunami radio.TerminalConnector This is a 6-pin mating connector used for DC power supply.DConnector9-pinFour of these mating connectors are provided. One is used for the VF port, one forthe CONFIG port, one for the ALARMS port and one for the AUX DATA port.RF PowerAdjustmentCoverA small plastic cap is provided which is placed over the RF output poweradjustment receptacle once output power has been set by professional installationpersonnel.Do not adjust the power higher than the factory setting! Before setting thepower level lower, note the factory setting or keep the radio’s configurationsheet attached for future reference.Other accessories are available, such as orderwire handsets, connector adapters and special cables.These can be ordered separately upon request.
INSTALLATION AND MAINTENANCE MANUALTsunami FAMILYFAST ETHERNET WIRELESS BRIDGESSEPTEMBER 1999SECTION 3: INSTALLATION & ADJUSTMENTS PAGE 3-13. Installation & Adjustments3.1 Shipping ContainerThe equipment is shipped in boxes unless ordered as an integrated system and configured at thefactory, in which case the equipment may be racked and shipped in a crate. The equipment ispackaged so as to prevent damage in transit.The boxes should be left intact and sheltered until arrival at the installation site.If the shipping container shows signs of damage, thetransportation company should be notified immediately. Extracare and inspection of the contents is advised immediately uponreceipt.It is recommended that all the packaging materials beretained. In the unlikely event that the equipment must bereturned to the factory, use the original packing materials forreturn shipment. The original packaging materials are alsorecommended for transporting the equipment fromlocation to location.Inside the primary shipping containers, internal boxes may contain other items. These boxesshould also be saved for future use.Also, save the Tsunami radio test data sheet that is provided.The test data sheet can be placed where the Tsunami terminalwill be installed for future quick reference. All Tsunami units areindividually tested and the actual measured performancerecorded on the Factory Test Data Sheet. You will find thisinformation to be of use during installation, troubleshooting andmaintenance.A set of “quick installation instructions” is also provided which can be useful for easy referenceduring installation.
INSTALLATION AND MAINTENANCE MANUALTsunami FAMILYFAST ETHERNET WIRELESS BRIDGES SEPTEMBER 1999PAGE 3-2 SECTION 3: INSTALLATION & ADJUSTMENTS3.2 Packing Items IdentificationThe primary shipping container houses the radio along with other items including:❖This manual❖Installation accessory kit (see Section 2.5)
INSTALLATION AND MAINTENANCE MANUALTsunami FAMILYFAST ETHERNET WIRELESS BRIDGESSEPTEMBER 1999SECTION 3: INSTALLATION & ADJUSTMENTS PAGE 3-33.3 Before Installation Task ListThere are several tasks that should be accomplished prior to installing the Tsunami radio system.This section briefly describes the following:- Site selection- Line-of-Sight and Path Clearance determination- Anticipated RSL calculation- Fade margin calculation- Availability calculation- Frequency plan determination- Power supply planning- Antenna (and accessories) purchaseOnly directional antennas should be used with Tsunami radios.These are typically flat panel or solid parabolic antennas.Glenayre Western Multiplex recommends a maximumbeamwidth of 10 degrees for directional systems.3.3.1 Site Selection RequirementsThe radio site must have:- access to the appropriate power- close proximity to the telephone or computer system you wish to interconnect- line-of-sight to the other radio location with adequate clearance- location for mounting the antenna
INSTALLATION AND MAINTENANCE MANUALTsunami FAMILYFAST ETHERNET WIRELESS BRIDGES SEPTEMBER 1999PAGE 3-4 SECTION 3: INSTALLATION & ADJUSTMENTS3.3.2 Line-of-Sight and Path Clearance GuidelinesThe  Tsunami radios will not operate properly unless they have line-of-sight between theircorresponding antennas. The Tsunami radio transmission will not pass through trees or otherobstacles. Factors to consider include:- Earth curvature- Future growth of trees- Height of buildingsIn addition to the line-of-sight requirement, a well-engineered path will also have additional pathclearance to allow for signal loss due to partial obstructions, atmospheric ducting and groundreflections. To maximize radio reception, 0.6 times the first Fresnel zone should be calculated andthis distance added to the path clearance (in addition to trees or buildings).
INSTALLATION AND MAINTENANCE MANUALTsunami FAMILYFAST ETHERNET WIRELESS BRIDGESSEPTEMBER 1999SECTION 3: INSTALLATION & ADJUSTMENTS PAGE 3-53.3.3 RSL Calculation and Link BudgetThe received signal level (RSL) can be estimated using the following formula:RSL (dBm) = Pout - FL1+ G1 + G2 - FL2 - Lpwhere: Pout is the transmitter output power (in dBm)FL1 is the feeder loss of the transmit side (in dB)G1 is the gain of the transmit antenna (in dB)G2 is the gain of the receive antenna (in dB)FL2 is the feeder loss of the receive side (in dB)Lp is the Path loss, defined by:Lp (dB) = 96.6 + 20 log10F + 20 log10Dwhere: F = Frequency in GHz (2.4 or 5.8)D = Distance of path in milesThis link budget is very important for determining any potential problems during installation. If youhave calculated the expected RSL, you can see if it has been achieved during installation, andtroubleshoot if necessary.In the USA and Canada, Tsunami radios may be installed with any gain directionalantennas but with a total system limit of +30 dbm EIRP for the 5.3 GHz transmitterchannel frequencies. 5.8 GHz transmitters have an EIRP limit of +53 dBm. For theequation above, replace the Pout - FL1+ G1 by the EIRP limit.
INSTALLATION AND MAINTENANCE MANUALTsunami FAMILYFAST ETHERNET WIRELESS BRIDGES SEPTEMBER 1999PAGE 3-6 SECTION 3: INSTALLATION & ADJUSTMENTS3.3.4 Fade Margin CalculationThe fade margin is the difference between the actual received signal and the radio’s threshold.Using the formula provided in Section 3.3.3, the anticipated RSL can be calculated. Compare thisRSL to the specified threshold of the Tsunami radio (shown in Section 2.2) and calculate the fademargin as the difference between the two signal levels.3.3.5 Availability CalculationAvailability of the microwave path is a measure of the percent of the time that the link will operatewithout producing an excessive BER due to multipath fading. In the absence of direct interference,availability is affected by the following:- Path length- Fade margin- Frequency (5.3 or 5.8 GHz in the case of these Tsunami radios)- Terrain (smooth, average, mountainous)- Climate (dry, temperate, hot/humid)Depending on the type of traffic carried over the link, the system designer may wish to design fora specific availability. For example, if the data or voice traffic that is carried by the radio is criticalthen it may be designed for a very high availability (e.g. 99.999% or 5.3 minutes of outage peryear). To improve availability, for example, the fade margin can be increased by making the pathshorter, or by using higher gain antennas in conjunction with lower loss feeders (by using highquality transmission line or shortening feed length).
INSTALLATION AND MAINTENANCE MANUALTsunami FAMILYFAST ETHERNET WIRELESS BRIDGESSEPTEMBER 1999SECTION 3: INSTALLATION & ADJUSTMENTS PAGE 3-73.3.6 Frequency Plan DeterminationWhen configuring radios in a hub or repeater configuration, careful engineering of the Tsunamiradio frequency plans and antenna locations should be performed in order to minimize potentialinterference between the nearby radios. As a rule of thumb, do not place identical frequency planradios (e.g. two “A” channel radios) at the same site. In most cases, it is desirable to use adifferent frequency plan (e.g. A versus B). However, with careful engineering, placing more thanone radio of the same frequency channel plan at the same site is easily accomplished. In fact, theTsunami frequency plan is designed to allow complex hub configurations that may require re-using the same frequency plan. When designing these types of configurations, antenna size andantenna location are critical. If identical channel plans must be used at the same site, the sameradio channel (e.g. A1 and A1) should be used at a site to minimize interference. Using alternatechannels (e.g. A1 and A2) is less likely to be successful (and therefore not recommended) due tothe high level of transmitter to receiver isolation required from the antenna system.Sometimes it is required to locate the Tsunami radio nearby a transmitter that is the same as, orclose to the Tsunami receive or transmit frequencies. In this case, the Tsunami terminal thatshould be placed closest to this interfering transmitter should be the specific terminal with thereceive frequency which is furthest from this unwanted transmitted frequency. This approachminimizes the potential of interference. While interference conditions are rare when using theTsunami radios, cases of interference may be overcome by exchanging the radios from end toend or simply reinstalling a different filter unit (if applicable), as described in Section 4.2. In somecases, changing frequency plans (e.g. from A to B) can also help mitigate any interference.Section 4.8 of this manual describes interferencecountermeasures in further detail.
INSTALLATION AND MAINTENANCE MANUALTsunami FAMILYFAST ETHERNET WIRELESS BRIDGES SEPTEMBER 1999PAGE 3-8 SECTION 3: INSTALLATION & ADJUSTMENTS3.3.7 Power Supply PlanningThe Tsunami radio must have access to a supply of appropriate power, either DC or AC (if the ACadapter option has been ordered). The Tsunami can be powered from a DC battery system, orfrom a solar or generator power plant, usually with battery reserves. Typically either a positive ornegative ground 24 or 48 volt supply is used. For DC, be sure the cable is of sufficient gauge tocarry the necessary current and it is less than three (3) meters (9.75 feet) in length.Before installing the radio, plan for the continuous power consumption needs in accordance withthe specifications given in Section 2.2 of this manual. It is also wise to plan for backup power forcritical communication circuits (including the Tsunami radio). Backup power allows the radios andassociated equipment to continue operation when primary power is interrupted.3.3.8 Antenna PlanningUsing path planning mathematics, proper antenna size can be determined which will yield thedesired path performance. In general, the larger the antenna that is used with the Tsunami radio,the better the link will perform. Larger antennas have narrower beamwidth and higher gain, whichwill yield better link performance (higher fade margin, better availability) and improve immunity tointerference (due to the smaller beamwidths). However, larger antennas are more costly topurchase and install than smaller antennas, in some cases requiring special equipment forinstallation. All of these factors should be taken into consideration when selecting antennas.In areas where transmitted output power restrictions apply, theuse of larger antennas will maintain the benefit of narrowbeamwidths and receive gain. However, output power may needto be reduced to meet regulations. (See Section 3.13.1)Prior to installation, the specific antenna location and mounting should be determined. Thisadvanced planning also yields the transmission line requirements. Only directional antennas should be used with Tsunamiradios. These can be flat panel or solid parabolic antennas.
INSTALLATION AND MAINTENANCE MANUALTsunami FAMILYFAST ETHERNET WIRELESS BRIDGESSEPTEMBER 1999SECTION 3: INSTALLATION & ADJUSTMENTS PAGE 3-93.4 Tools RequiredThe following tools may be required for the installation of the Tsunami radios:-  Phillips (cross tip) screwdrivers (for 19-inch rack mounting and attachment ofbrackets)-  Small blade standard screwdriver (for power supply connector and RF output poweradjust)-  Soldering iron (if using any D-type connectors)-  Wire strippers (for removing insulation from power supply and other wiring)- Wire crimpers (if using any RJ-style connectors that aren’t pre-made)-  Digital Voltmeter (to measure RSL, Tx output power, Alarms)The following tools are recommended for the installation of the Tsunami radios:-  RF power meter (to measure transmitter output power)-  Cellular phone or two-way radio (for talking with far-end crew and tower crew)-  Bit Error Rate test set (to test link after installation)-  Computer (for NMS access with 10BaseT interface and cable)-  Touch-tone Telephone* (to test orderwire circuits and for communication with far-end)Additional tools will likely be needed for antenna and transmission line installation and antennaalignment. Consult Sections 3.8 through 3.10 of this manual for more details.*Telephone connection specifications:REN (Ringer Equivalency Number) 1.0 BDTMF tones within ±1.5% of nominal freq.Ringing Voltage 48 VDC, typical(Ringing voltage is adequate for modern solid state ringers,NOT for the older mechanical type ringers)
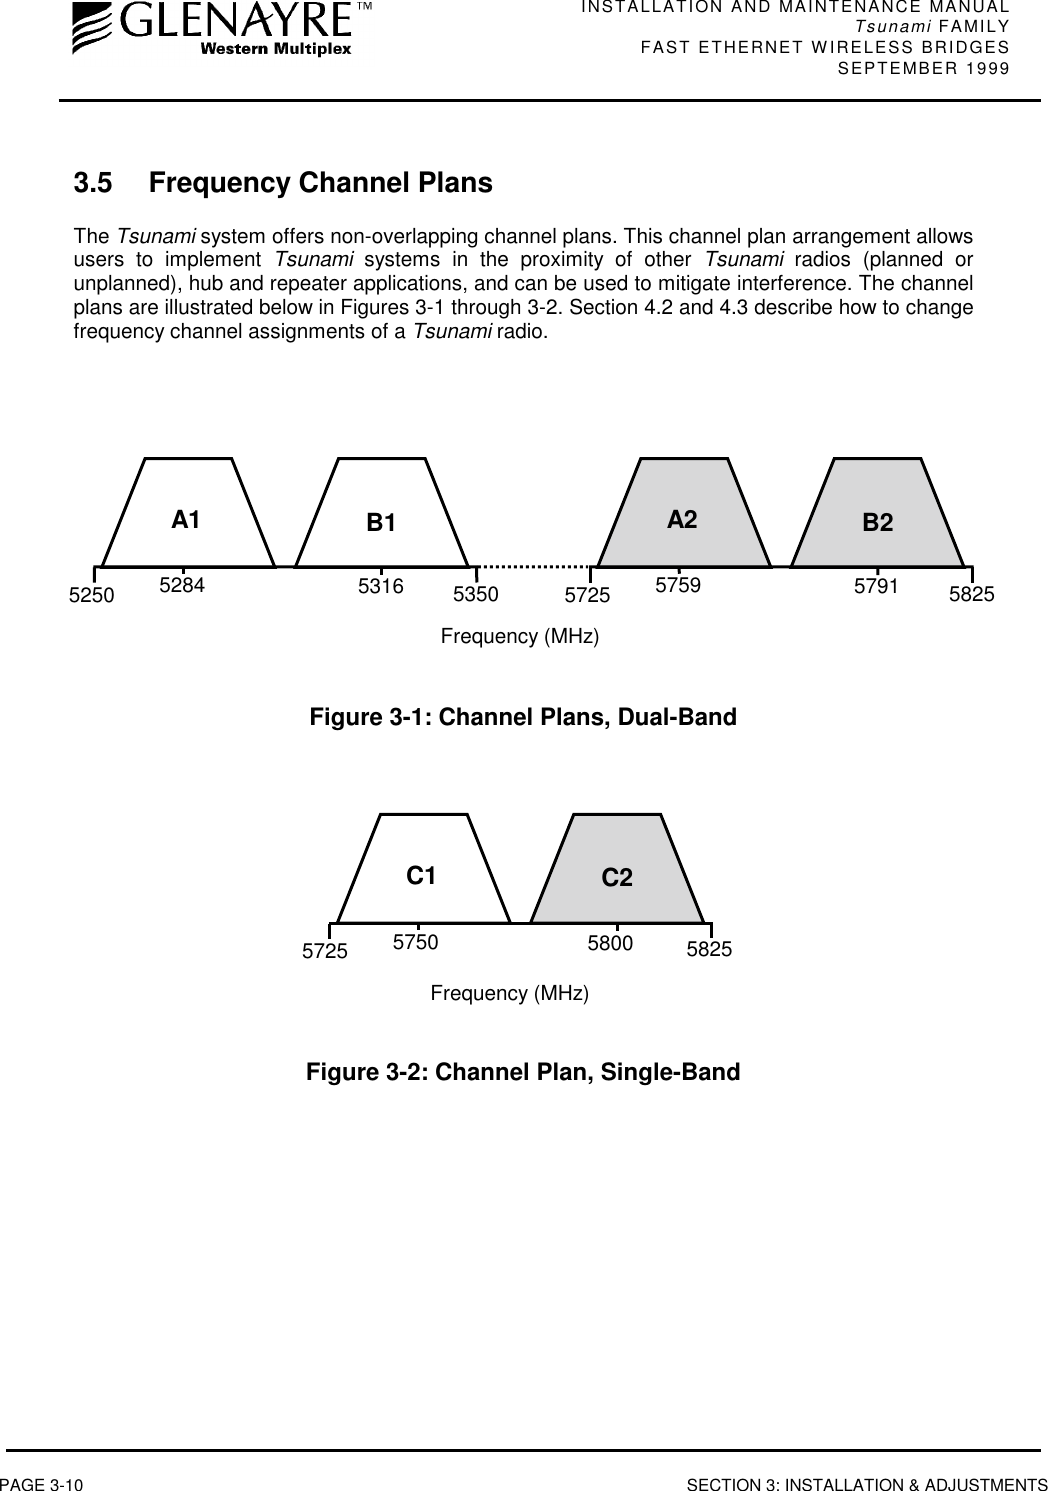
INSTALLATION AND MAINTENANCE MANUALTsunami FAMILYFAST ETHERNET WIRELESS BRIDGES SEPTEMBER 1999PAGE 3-10 SECTION 3: INSTALLATION & ADJUSTMENTS3.5 Frequency Channel PlansThe Tsunami system offers non-overlapping channel plans. This channel plan arrangement allowsusers to implement Tsunami systems in the proximity of other Tsunami radios (planned orunplanned), hub and repeater applications, and can be used to mitigate interference. The channelplans are illustrated below in Figures 3-1 through 3-2. Section 4.2 and 4.3 describe how to changefrequency channel assignments of a Tsunami radio.Figure 3-1: Channel Plans, Dual-BandFigure 3-2: Channel Plan, Single-BandFrequency (MHz)535053165250 5284A1 B1582557915725 5759A2B2Frequency (MHz)582558005725 5750C1 C2
INSTALLATION AND MAINTENANCE MANUALTsunami FAMILYFAST ETHERNET WIRELESS BRIDGESSEPTEMBER 1999SECTION 3: INSTALLATION & ADJUSTMENTS PAGE 3-113.6 Mounting the TsunamiThe Tsunami radio can be mounted at any height in a standard 19-inch rack. Blank rack-mountingspaces above and below the Tsunami are recommended, especially if the surrounding equipmentdissipates a considerable amount of heat (over 40W).The Tsunami radio may be set up for mounting with the front edge projecting from the front faceof a standard 19-inch rack using the rack mounting brackets enclosed with the screws in theAccessory Kit (4 per bracket). The rack mounting brackets may be reversed, in order to install forflush or cabinet mounting if preferred. Depending on rack configuration, it may be necessary toremove the four adhesive backed rubber feet on the bottom of the unit.The Tsunami radio has internal fans which intake andexhaust on the left and right sides of the chassis. When rackmounting, it is important to leave a small gap between theouter edges of the radio and the inside edge of the rack.The Tsunami radio may alternatively be placed on a table or shelfattached to a wall. Because of the low weight of the Tsunami, anymounting option other than rack mounting will be less secure.
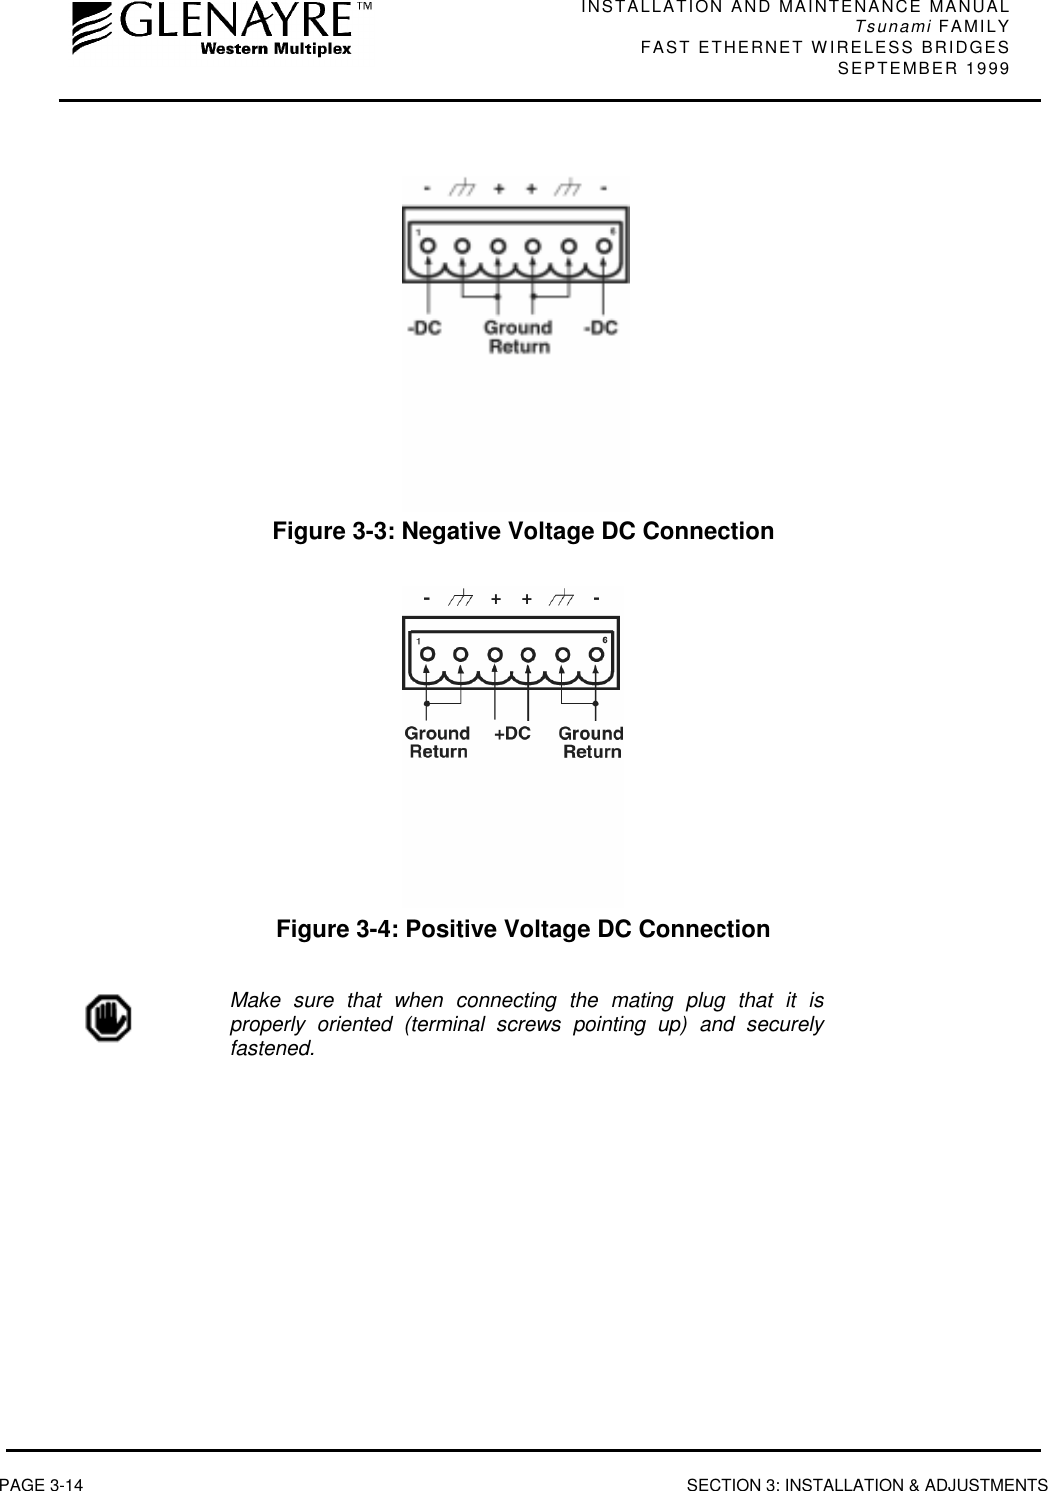
INSTALLATION AND MAINTENANCE MANUALTsunami FAMILYFAST ETHERNET WIRELESS BRIDGES SEPTEMBER 1999PAGE 3-12 SECTION 3: INSTALLATION & ADJUSTMENTS3.7 Power Connection and WiringThere is no ON/OFF switch on the Tsunami. As soon aspower is applied, the equipment will be operational. Thismeans that there can be up to 1W of RF power present atthe antenna port. The antenna port should be terminatedbefore power is applied.Power is connected using the DC power plug contained in the Accessory Kit. Use Table 3-A or 3-B along with the associated diagram of Figure 3-3 or 3-4 to connect the DC power cables. Forexample, for a negative DC power input, use Table 3-A and Figure 3-3.NEGATIVE DC POWER INPUT(–20 TO –63 VDC)PIN FUNCTION1 Power (–DC)2 Ground (see figure 3-7)3 Return (+DC)4 Return (+DC)5 Ground (see figure 3-7)6 Power (–DC)Table 3-A: DC Power Connection for Negative SupplyPOSITIVE DC POWER INPUT(+20 TO +63 VDC)PIN FUNCTION1 Return (–DC)2 Ground (see figure 3-8)3 Power (+DC)4 Power (+DC)5 Ground (see figure 3-8)6 Return (–DC)Table 3-B: DC Power Connection for Negative SupplyPins 1 and 6 are connected together on the motherboard. Eitherpin may be used to apply (-DC) DC power input. Similarly, pins3 and 4 are connected together on the motherboard and maybe used to apply (+DC) DC power input.For DC power return connection, connect to the oppositevoltage (either the -DC or the +DC Pin) and connect the returnto ground at the DC power plug on pins 2 and/or 5.
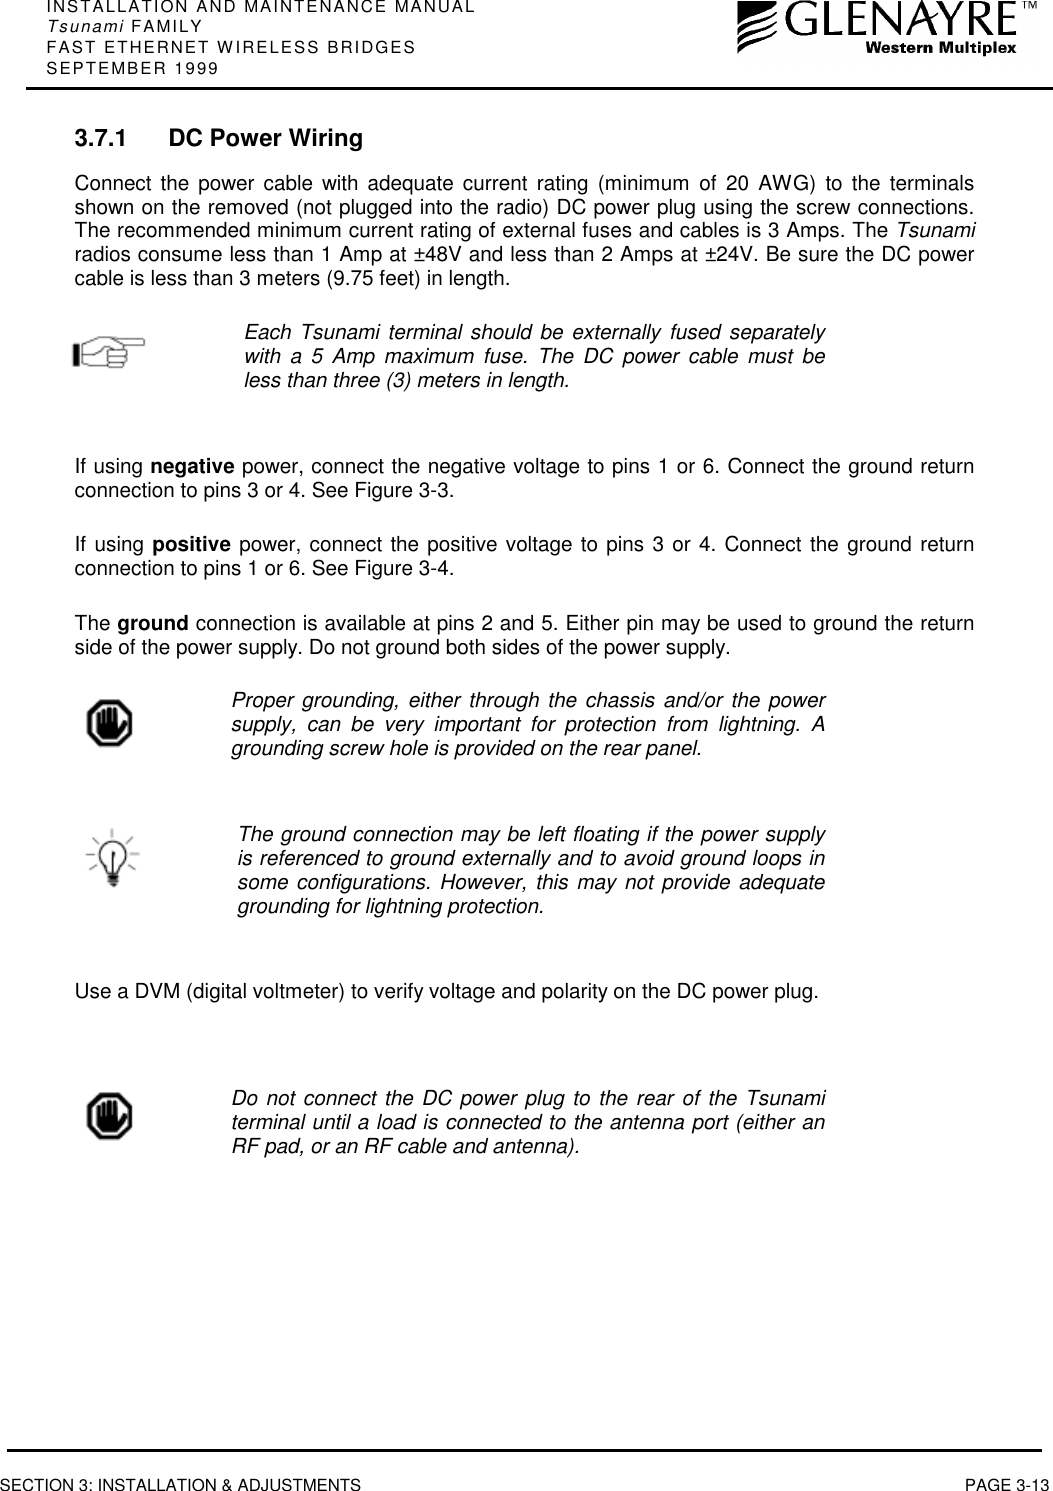
INSTALLATION AND MAINTENANCE MANUALTsunami FAMILYFAST ETHERNET WIRELESS BRIDGESSEPTEMBER 1999SECTION 3: INSTALLATION & ADJUSTMENTS PAGE 3-133.7.1 DC Power WiringConnect the power cable with adequate current rating (minimum of 20 AWG) to the terminalsshown on the removed (not plugged into the radio) DC power plug using the screw connections.The recommended minimum current rating of external fuses and cables is 3 Amps. The Tsunamiradios consume less than 1 Amp at ±48V and less than 2 Amps at ±24V. Be sure the DC powercable is less than 3 meters (9.75 feet) in length.Each Tsunami terminal should be externally fused separatelywith a 5 Amp maximum fuse. The DC power cable must beless than three (3) meters in length.If using negative power, connect the negative voltage to pins 1 or 6. Connect the ground returnconnection to pins 3 or 4. See Figure 3-3.If using positive power, connect the positive voltage to pins 3 or 4. Connect the ground returnconnection to pins 1 or 6. See Figure 3-4.The ground connection is available at pins 2 and 5. Either pin may be used to ground the returnside of the power supply. Do not ground both sides of the power supply.Proper grounding, either through the chassis and/or the powersupply, can be very important for protection from lightning. Agrounding screw hole is provided on the rear panel.The ground connection may be left floating if the power supplyis referenced to ground externally and to avoid ground loops insome configurations. However, this may not provide adequategrounding for lightning protection.Use a DVM (digital voltmeter) to verify voltage and polarity on the DC power plug.Do not connect the DC power plug to the rear of the Tsunamiterminal until a load is connected to the antenna port (either anRF pad, or an RF cable and antenna).
INSTALLATION AND MAINTENANCE MANUALTsunami FAMILYFAST ETHERNET WIRELESS BRIDGES SEPTEMBER 1999PAGE 3-14 SECTION 3: INSTALLATION & ADJUSTMENTSFigure 3-3: Negative Voltage DC ConnectionFigure 3-4: Positive Voltage DC ConnectionMake sure that when connecting the mating plug that it isproperly oriented (terminal screws pointing up) and securelyfastened.
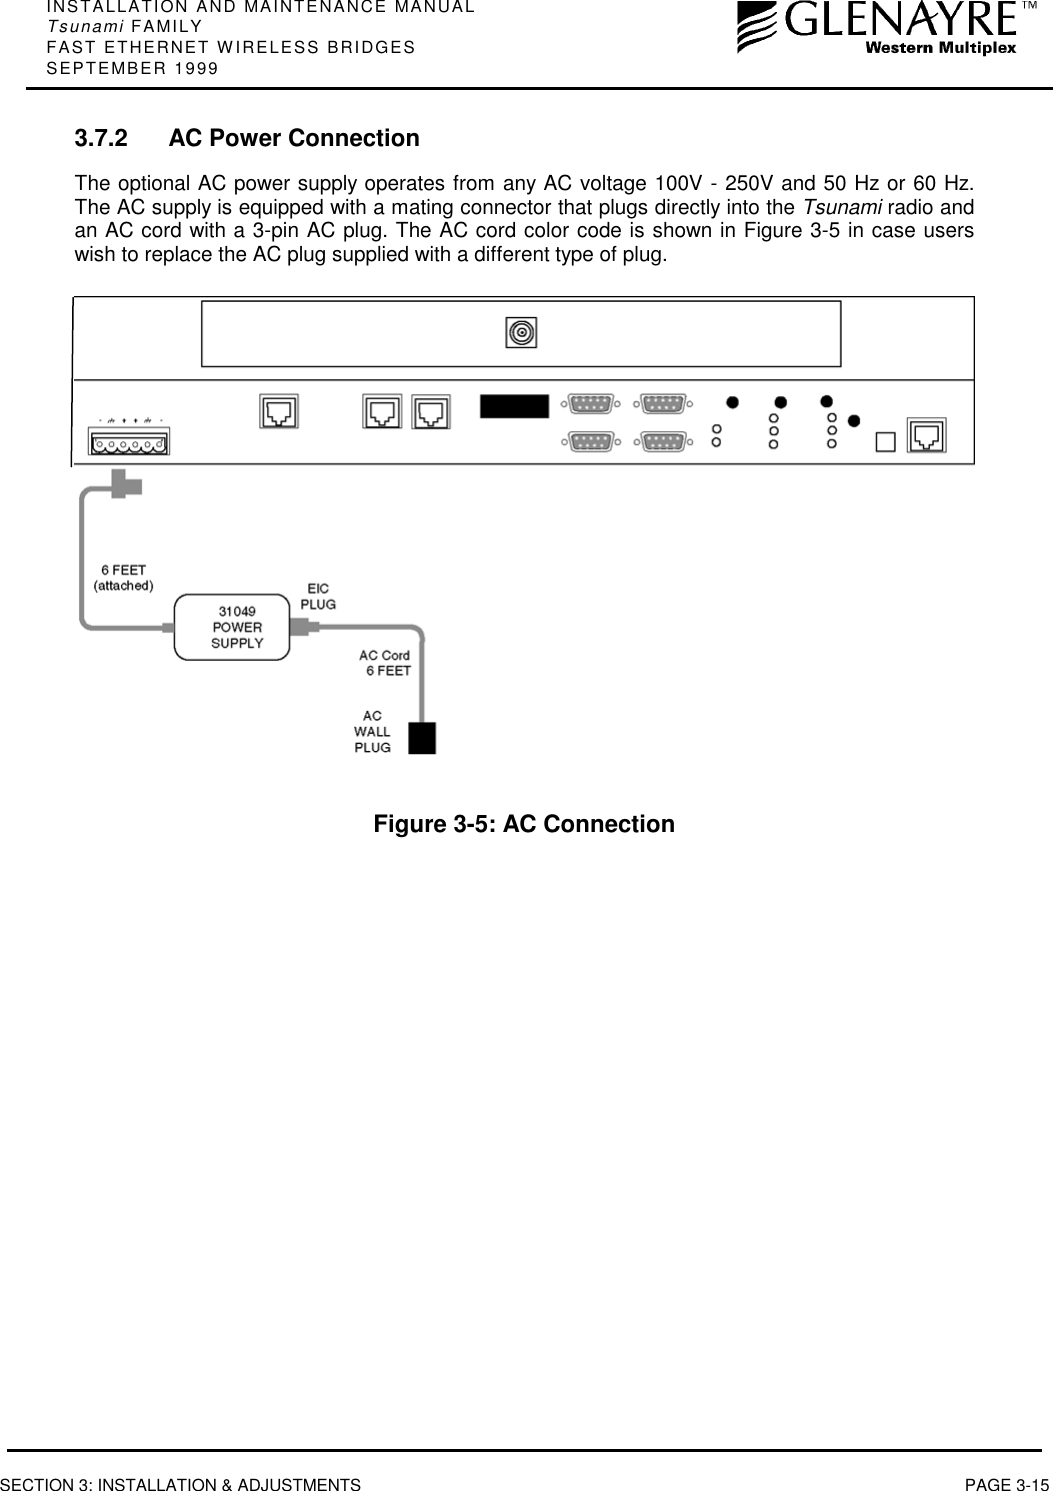
INSTALLATION AND MAINTENANCE MANUALTsunami FAMILYFAST ETHERNET WIRELESS BRIDGESSEPTEMBER 1999SECTION 3: INSTALLATION & ADJUSTMENTS PAGE 3-153.7.2 AC Power ConnectionThe optional AC power supply operates from any AC voltage 100V - 250V and 50 Hz or 60 Hz.The AC supply is equipped with a mating connector that plugs directly into the Tsunami radio andan AC cord with a 3-pin AC plug. The AC cord color code is shown in Figure 3-5 in case userswish to replace the AC plug supplied with a different type of plug.Figure 3-5: AC Connection
INSTALLATION AND MAINTENANCE MANUALTsunami FAMILYFAST ETHERNET WIRELESS BRIDGES SEPTEMBER 1999PAGE 3-16 SECTION 3: INSTALLATION & ADJUSTMENTS3.8 Antenna ConnectionThe Tsunami radio is equipped with an N-type female connector at the antenna port located onthe rear panel. A short length (~6 feet) jumper cable such as RG-214 coax (or “pigtail”) fitted withtwo N-type male connectors can be used to connect the antenna port to the antenna transmissionline (see Section 3.9). The recommended cable type for a jumper is RG-214.A low loss 50-ohm cable (for example LDF4-50 1/2 inch coax) or EW-52 waveguide isrecommended for the antenna transmission line between the top of the rack and the antenna. Thereturn loss presented by the transmission line at the top of the rack should be as high as possible(20 dB, minimum recommended). The length of the antenna transmission line should be kept asshort as possible (to minimize losses).To minimize feeder losses, the use of elliptical waveguide is recommended (typical loss is 1.25dB/100 ft) for feeder lengths in excess of 200 feet. Depending on path length and feeder length,1/2 inch or 5/8 inch coax cable can be used.For the Tsunami radio, 1/2” or 5/8” coaxial cable (LDF4-50 orLDF4.5-50) is recommended. Coaxial cable 7/8” or larger canexhibit moding at 5.8 GHz and is not recommended for 5.8 GHzradios. For waveguide transmission line at 5.8 GHz, EW-52waveguide is recommended. EW-63 will also work, but mayexhibit more loss.Do not use right angle N-type connectors with the 5.8 GHzTsunami radios: they may present high loss at 5.8 GHz. Do notuse a low quality N-type jumper cable with the Tsunami. Somecable types, such as RG-8, may have high loss at 5.8 GHz.
INSTALLATION AND MAINTENANCE MANUALTsunami FAMILYFAST ETHERNET WIRELESS BRIDGESSEPTEMBER 1999SECTION 3: INSTALLATION & ADJUSTMENTS PAGE 3-173.9 Transmission Line ConnectionThe transmission line feeder (such as LDF4-50 1/2 inch coax cable or EW-52 ellipticalwaveguide) should be prepared first by cutting to the approximate length (allowing some excess)and installing the appropriate connector on the antenna end.The prepared transmission line is then pulled through the cable ducts, trays or conduit (asrequired) to the antenna, while being careful not to kink or damage the transmission line in anyway.The transmission line should be supported in a tray on horizontal runs and by hangers on verticalruns. Hangers should be spaced according to the manufacturer’s instructions (typically every 5feet under conditions of no ice and not greater than 85 mph winds).The transmission line should be grounded using the manufacture’s recommended grounding kit.Grounding kits attach to the outer copper conductor. Grounds must be installed at the antenna, atthe bottom of the tower (if applicable) and where the transmission line enters the building. Longtransmission line runs should be grounded every 100 feet. In areas of high incidence of lightning,dissipaters should be attached to antennas. In addition, coaxial, in-line, spark-gap type, lightningsuppressors should be added at the bottom of the coax cable before entering thebuilding/enclosure.Any in-line lightning protection device must be rated for theoperating frequency of the Tsunami (5.3/5.8 GHz).After installation, the transmission line is terminated with an N-type male connector/adapterattached at the equipment end. For waveguide, this typically requires a CPR-to-N adapter.Prior to operation, the electrical integrity of the transmission line, including all connectors, can bechecked with a simple DC check between the center conductor and outer conductor. (This isneither possible, nor required for waveguide).The transmission line should ideally be connected directly to the antenna at one end and to theTsunami antenna port at the other end. However, short RG-214 type pigtail jumper cables may berequired to avoid sharp bends in the transmission line to limit stress on either connection.7/8 inch coax cable or larger is not recommended for use at 5.3GHz and higher frequencies.Do not use right angle N-type connectors with the 5.3 or 5.8GHz Tsunami radios: they may present high loss at 5.3 or 5.8GHz. Do not use a low quality N-type jumper cable with theTsunami. Some cable types, such as RG-8, may have too higha loss at 5.3 and 5.8 GHz.
INSTALLATION AND MAINTENANCE MANUALTsunami FAMILYFAST ETHERNET WIRELESS BRIDGES SEPTEMBER 1999PAGE 3-18 SECTION 3: INSTALLATION & ADJUSTMENTS3.10 Antenna Installation & AlignmentThe antenna installation consists of permanently mounting the antenna outdoors on a tower,building roof, or other location that provides line-of-sight path clearance to the far-end location. Ingeneral, antennas smaller than 2 feet diameter are not recommended for urban areas due to theirwider beamwidths, which results in higher interference susceptibility.Antennas should be ordered with a suitable mounting kit specific to the site requirements. Forexample, specifying round or angle tower leg adapters, or a roof tripod as necessary.The antenna must be very rigidly mounted, with adequate room for azimuth and elevationadjustment from the rear.The antenna polarization must be the same at both ends of the link, either vertical or horizontal.In general, antenna mountings require a support pipe to which upper and lower support bracketsare attached with “U” bolts. The antenna and optional elevation and azimuth adjustment rods arethen mounted onto the support brackets. The whole structure must be adequately grounded forlightning protection. The antenna system must always be installed according to the manufacturer’sinstructions.Unless special test equipment is available, two operating Tsunami terminals are required to alignthe antennas. Alternatively, a CW generator may be used to transmit a signal toward the endunder alignment.The antenna is coarse aligned using visual sighting and then fine aligned using the receive signallevel (RSL) voltage of the Tsunami.The RSL voltage reading can still be used to peak antennaseven if the radios have not synchronized, however far-end RSLcannot be measured from the near-end terminal until radiosare synchronized.To coarse align the antenna, first set it for flat elevation (no up or down tilt) using a spirit level.Then point it at a heading marker obtained using a compass back-bearing from an adjacentlocation, (ideally, 100 feet or more away from the antenna).If a heading marker cannot be set sufficiently far away (for example when on a city building roof orlooking through a window) then a rough azimuth setting can be obtained by sighting along theantenna feed.Due to the possibility of exposure to RF radiation above the recommendedlevels, do not stand within five (5) feet of the antenna during systemoperation. It is the responsibility of the installer to insure that the antenna isfix-mounted in a place that is not accessible to the public and not pointed ina direction where human exposure may exceed these recommendations.
INSTALLATION AND MAINTENANCE MANUALTsunami FAMILYFAST ETHERNET WIRELESS BRIDGESSEPTEMBER 1999SECTION 3: INSTALLATION & ADJUSTMENTS PAGE 3-19It should be verified that both antennas are on the samepolarization by using the manufacturer’s instructions. Otherwisethe RSL will be approximately 25 to 30 dB below the calculatedlevel.Most antennas will also need fine alignment obtained using an operating link because it is veryimportant to maximize the receive RF signal level at each end of the radio link.Read Section 3.7 before applying DC power to the Tsunami radio.Once the coarse alignment has been set-up at both ends, then the link can be powered and somelevel of reliable communication established. The voltage at the Tsunami front panel RSL test pointshould be measured with a DVM to determine the relative receive RF signal level.For the fine alignment, adjusting first the azimuth and then the elevation of the local antenna willmaximize the RSL voltage. Then, the far antenna is aligned in the same way, using the RSLvoltage of its local Tsunami radio.When aligning antennas it may be convenient to run two wires from the RSL and ground testpoints to the antenna so that the voltmeter reading is directly visible to the technicians aligning theantenna. Also, a cellular telephone or two-way radio may be useful for coordinating alignmentactivities between both ends of the link. Once the radios are coarse aligned and synchronized, thebuilt-in orderwire phone service can also be used to coordinate alignment between both ends ofthe link.An orderwire telephone will provide end-to-end voicecommunications once radios are synchronized. Synchronizationusually can be accomplished by coarse alignment only. Aftersynchronization, the orderwire phones can be used to communicatebetween radio sites for antenna fine alignment. The phoneinterconnect cable can be extended to the antenna when desired.The larger the antenna size, the more critical alignment becomes: for example, with a 2 foot dish,the antenna can be moved ±3 degrees off the correct heading before the receive signal leveldrops by 3 dB. This compares with a 6-foot dish which may only be moved ±1 degree for thesame degradation.The graph shown in Figure 3-6 shows the typical variation of RSL voltage as the receive signallevel is increased from threshold to a higher level. There is some variation between Tsunamireceivers, but an approximate estimate of the potential RSL value may be made using this figure.Use the Factory Test Data Sheet shipped with your Tsunami terminal toobtain the best estimate of your RSL.Above 0 dBm RSL, the receiver may produce errors: however this level is rarely likely to beexceeded. A link budget calculation should be made to calculate the anticipated RSL as describedin Section 3.3.3. During anomalous propagation conditions, the RSL may fade but will notincrease up more than 10 dB (except in unusual very long paths which may fade up by 15 dB).
INSTALLATION AND MAINTENANCE MANUALTsunami FAMILYFAST ETHERNET WIRELESS BRIDGES SEPTEMBER 1999PAGE 3-20 SECTION 3: INSTALLATION & ADJUSTMENTSAntenna alignment should enable the RSL to be peaked to thelevel calculated in the link budget. If the RSL is peaked but isapproximately 20 dB below the calculated level, then it is likelythat the antennas are aligned on a sidelobe of the antenna'sradiated signal. In this case, the antennas should be rotated in awide arc until the main lobe is located. (Other possible causes oflow RSL are path obstructions, loss in connectors, adapters andpigtail jumper cables or different antenna polarization at each endof the link.)Tsunami 100BaseT Dual & Single Models0.000.100.200.300.400.500.600.700.800.901.00-80 -75 -70 -65 -60 -55 -50 -45 -40RSL (dB)VoltsFigure 3-6: Typical RSL Voltage versus Received Signal Level (RSL)
INSTALLATION AND MAINTENANCE MANUALTsunami FAMILYFAST ETHERNET WIRELESS BRIDGESSEPTEMBER 1999SECTION 3: INSTALLATION & ADJUSTMENTS PAGE 3-213.11 Ethernet Interface ConnectionThe 100BaseT interface connection to the Tsunami radio is on the front panel.Additional external lightning protection devices are recommendedfor the connections if the radio is installed in an area prone tolightning.The 100BaseT connection to the Tsunami is at the data interface on the front of the shelf. Eitherwire or fiber connections can be used.
INSTALLATION AND MAINTENANCE MANUALTsunami FAMILYFAST ETHERNET WIRELESS BRIDGES SEPTEMBER 1999PAGE 3-22 SECTION 3: INSTALLATION & ADJUSTMENTS3.12 System Turn-up to Service1. Prior to installing the system, it may be desirable to perform a back-to-back test of theTsunami radio pair. Consult Section 4.9 for further details. Back-to-back testing is a simpleway to verify that the Tsunami radios are fully operational before they are installed.Installation adds several variables (such as antenna alignment) which can lead to systemturn-up delays. Also, during back-to-back testing, the DIP switch settings and someconnections can be tested. This step can eliminate a majority of troubleshooting once theradios are installed.A cellular phone or two-way radio system (walkie talkie, CB,mobile radio) can be very useful during installation. Thesecan be used for temporary near-end and far-endcommunications between the installation personnel at onesite and installation personnel at the other site whileinstalling the system. These can also be helpful forcommunication between a person at the top of a very talltower and ground personnel.The Tsunami radio incorporates an internal Orderwire featurethat provides end-to-end “telephone” style communications.However, the link must be partially operational to use thisfeature. In lieu of, or in addition to the use of cellular phonesor two-way radio, this Orderwire feature can also be veryuseful for installation, but typically cannot be put into serviceuntil step 8 or 9 of this procedure is completed. See Section3.14.1 for more details.2.  Perform a general alignment of the antennas on both ends of the path using binoculars,compass or other related tools. It is important to have the antennas aligned as accuratelyas possible before putting radio traffic over the link. This will help in getting the systemrunning more rapidly. See Section 3.10 for more details.3.  Connect the transmission line to the antenna, and feed it to the Tsunami radio location(see Section 3.9). Connect the opposite end of the transmission line to the N-type femaleconnector located on the filter assembly which occupies the top half of the Tsunami rearpanel. The connection must be terminated into an antenna or a load before DC power isapplied to the radio.4.  Verify that the same channel plan (e.g. A, B) as the near-end radio, and the opposite Txand Rx frequencies (e.g. A1 and A2 make up a matched pair of radios).5.  With the DC power source active, but not plugged into the Tsunami radio, using avoltmeter, confirm that the DC mating connector has the proper power connections inaccordance with Section 3.7. Verify the polarity and the absolute voltage on all pins. Verifyground connection for power.6.  Connect power to the Tsunami radio. Verify that the Front Panel “ON” LED indication isilluminated. This confirms that power has been properly applied.
INSTALLATION AND MAINTENANCE MANUALTsunami FAMILYFAST ETHERNET WIRELESS BRIDGESSEPTEMBER 1999SECTION 3: INSTALLATION & ADJUSTMENTS PAGE 3-23Ensure that the RF Antenna port connection is properlyterminated before applying power to the Tsunami terminal, asin step 3.When the Tsunami radio is initially powered-on, some alarmconditions may be present. This is normal and alarms can beignored at this time.7.  Place a voltmeter across the GND and PWR front panel test points. See Figure 3-7 forvoltage setting information and Table 3-C for typical output power levels for given cablelengths where EIRP limits apply. If necessary, use a small screwdriver at the front panelreceptacle to adjust the output power of the local transmitter in accordance with the pathanalysis calculations. The recessed potentiometer is rotated clockwise to increasetransmit output power and counter clockwise to decrease transmit output power. Afterverifying correct setting of the transmit output power, disconnect the voltmeter. Place thecover cap found in the installation accessory kit over the front panel receptacle.The Tsunami radio requires professional installation. With someTsunami models, in certain countries, there may be EffectiveIsotropic Radiated Power (EIRP) limits which dictate themaximum output power that the Tsunami radio can transmitgiven the transmission line loss and the gain of the antenna.Consult with appropriate government agencies or GlenayreWestern Multiplex if there is any question regarding maximumoutput power allowed. Do not adjust output power abovefactory settings.
INSTALLATION AND MAINTENANCE MANUALTsunami FAMILYFAST ETHERNET WIRELESS BRIDGES SEPTEMBER 1999PAGE 3-24 SECTION 3: INSTALLATION & ADJUSTMENTSTsunami 100BaseT Dual & Single Models00.511.522.533.544.550510152025Tx Power (dB)Volts   5.8 GHz Tx   5.3 GHz Tx   5.3 GHz Tx   5.3 GHz TxFigure 3-7: Typical RF Output Power versus PWR VoltageUse the Tsunami Factory Test Data sheet that came withyour radio(s) to determine more precisely the voltagecorresponding to the RF output power.
INSTALLATION AND MAINTENANCE MANUALTsunami FAMILYFAST ETHERNET WIRELESS BRIDGESSEPTEMBER 1999SECTION 3: INSTALLATION & ADJUSTMENTS PAGE 3-25For precision measurement of transmit output power, it is bestto connect an RF power meter to the antenna port. The PWRport voltage may not provide enough precision. This isespecially important where EIRP limits apply to the installation.In cases of no EIRP limits, the radio transmitter output powershould be left at the factory setting, except for very short pathsusing very high gain antennas, where excessive power may notbe advised.Don’t forget that the RF output port should be terminated at alltimes when power is applied to the Tsunami radio. Therefore,disconnect power to the radio before connecting a power meterand reapply power once connected. Often, an RF power metermay have a limit to the input power that it can measure withoutdamage. It is advised to place a calibrated fixed value RFattenuator (typically 20 dB or more) between the Tsunami radioand the power meter to assure proper operation and safety forthe RF power meter. The value of this fixed attenuation can thenbe added to the value of the RF power meter reading to obtainthe actual Tsunami radio transmitter output power.8.  Connect a voltmeter across the GND and RSL front panel test points. Thisvoltage reading corresponds to the Received Signal Level (RSL) of the near-end radio. Inother words, RSL is the “amount” of signal the near-end radio is receiving from the far-end radio. Since the antennas have not been finely aligned, it is not expected at this timethat the RSL will read very high. However, at this point it can be verified that somecommunication is taking place between the two Tsunami terminals. Use the RSL voltagereading to align the antennas. Align one antenna at a time in accordance with Section3.10. Complete alignment of both ends of the radio link before going further.The RSL voltage output on the radio's front panel will output avoltage over the usable range of the radio. Refer to Figure 3-6 inSection 3-20.The  Tsunami radio has a unique feature of allowing measurement of the far-end RSLfrom the near-end radio. This is only possible if the Tsunami radios are communicating(the RSL is above threshold). The far-end RSL can be used to verify that adjustments tolocal antenna alignment are corresponding to the far-end radio reception. Far-end RSL ismeasured by pressing and holding the DISPLAY FAR END front panel button. While thisbutton is held, the RSL voltage indicates the RSL of the far-end radio. RSL of both endsshould be verified to be within approximately 2 dB of predicted value (see Section 3.3.3).There are several factors that can contribute to low RSL:- Incorrect antenna alignment (aligned on a lobe and not on the main signal)- Improper polarization alignment of antennas (horizontal vs. vertical)- Transmission line problems (loose connections, bent or damaged cables, lossyadapters)- Path obstructions (trees, buildings, hills, etc.)- Path clearance (line-of-sight, earth curvature, Fresnel zone, diffraction and partialobstruction)
INSTALLATION AND MAINTENANCE MANUALTsunami FAMILYFAST ETHERNET WIRELESS BRIDGES SEPTEMBER 1999PAGE 3-26 SECTION 3: INSTALLATION & ADJUSTMENTS- Weather (inversion layers, ducting and multipath)- Antenna feed (coaxial/connector) problemThe Tsunami radio requires professional installation. Don’tforget that the transmitter output power adjustment on theTsunami radio effects the RSL. Depending on EIRP limits (ifany), path distance, and antenna gain, you may need toadjust the output transmit power to the proper level beforeputting the radios in service.If radio synchronization has been established, the radio linkmay be able to provide some limited communications over thelink. It can be helpful to establish voice communications fromone end of the radio link to the other using the Orderwirefeature of the Tsunami radio. See Section 3.14.1 for details.If RSL is lower than anticipated, recheck the path clearance and transmission line as these arethe typical causes of low RSL. Radio operations can be verified by connecting radios back-to-backwith attenuators (40-60 dB), (see Section 4.9). If the problem remains, consult Section 4 of thismanual for troubleshooting techniques which will help determine the source of the problem.9.  Once radio performance is verified and acceptable, the Tsunami radios can now be putinto service with the intended Fast Ethernet traffic. Connect to the LAN or computer usingthe RJ45 (wire) or ST (fiber) 100BaseT connector. With Fast Ethernet traffic applied inboth directions, all front panel LEDs, except for POWER and the data TXD/RXD lightsshould be off. If any other LEDs are on, consult the trouble shooting sections of thismanual.10.  Now that the link is operational, other services can be connected including T1 (DSX-1),Orderwire, Diagnostics, Alarms and Aux Data (Service Channel). Consult Section 3.14 fordetails on these connections.
INSTALLATION AND MAINTENANCE MANUALTsunami FAMILYFAST ETHERNET WIRELESS BRIDGESSEPTEMBER 1999SECTION 3: INSTALLATION & ADJUSTMENTS PAGE 3-27                                                           TRANSMITTER POWER (dBm) .                                                                        .Feeder Feeder A/B Chan., 1/2" Coax A/B Chan., 5/8" Coax       C Channel, 1/2" Coax      C Channel, 5/8" CoaxLength Length 1' Panel 2' Panel 1' Dish 1' Panel 2' Panel 1' Dish 1' Panel 2' Panel 1' Dish 2' Dish 1' Panel 2' Panel 1' Dish 2' DishMeters Feet3.0 106.1 209.1 3012.2 4015.2 5018.3 6021.3 7024.4 8027.4 9030.5 10033.5 11036.6 12039.6 13042.7 14045.7 15048.8 16051.8 17054.9 18057.9 19061.0 20064.0 21067.1 22070.1 23073.2 24076.2 25079.2 26082.3 27085.3 28088.4 29091.4 30094.5 31097.5 320100.6 330103.6 340106.7 350109.7 360112.8 370115.8 380118.9 390121.9 400Table 3-C: Transmitter Output Power Adjustment(0 dBW (5.3 GHz) and +23 dBW (5.8 GHz)  EIRP Installations)(As apply to the in US and Canada)This chart not yet available.Consult factory if setting of EIRPlimits is unclear.
INSTALLATION AND MAINTENANCE MANUALTsunami FAMILYFAST ETHERNET WIRELESS BRIDGES SEPTEMBER 1999PAGE 3-28 SECTION 3: INSTALLATION & ADJUSTMENTS3.13 Output Power AdjustmentThe Tsunami radio requires professional installation. In certain cases, it is necessary to adjust theoutput power lower (never higher) from the factory setting, for example:❖to meet EIRP (effective isotropic radiated power) limits.❖to avoid exceeding the maximum far-end RSL of -30 dBm.❖to coordinate a hub or repeater location.To ensure maximum protection of the radio circuits, alwaysensure the antenna connector is terminated when power isapplied. Never adjust output power above factory settings.For precise measurement of transmitter power, a calibrated RF power meter (such as the HP435B with Power Sensor HP8481) is recommended. This power sensor can be connected directlyto the output of the radio without exceeding the power rating. With some power meters, it may benecessary to place a calibrated in-line fixed attenuator between the radio antenna port and thepower meter so as to not exceed the power meter’s maximum input level. Thruline power metersdo not operate at Tsunami RF frequencies.If adjusting the output power to meet an EIRP limit, it will be first necessary to calculate the overallsystem gains and losses, including feeder losses for the type of transmission line installed and theantenna gain. Also refer to Table 3-C for transmitter output power settings where installed withvarious transmission line lengths and antenna sizes. You may determine the radio transmit powerfor EIRP limited installations by the following equation:Tx Power (dBm) = EIRP Limit(dBm) + Feeder Loss(dB) - Antenna Gain(dB)For the US and Canada, a +30 dBm EIRP limit applies for thedual band (5.3/5.8 GHz) Tsunami radios and a +53 dBm EIRPlimit applies for the single band (5.8 GHz) Tsunami radios.Output power may be adjusted using a small screwdriver and rotating the potentiometer which isrecessed behind the front panel. Clockwise rotation increases output power while counter-clockwise rotation decreases output power.In lieu of a calibrated RF power meter, the PWR test port voltage can be used to estimate theoutput power. Figure 3-7 illustrates the voltage reading for various output power levels. Thefactory test data sheet should be used to establish a more precise setting of this adjustment.After setting the correct output power, place the cover capfound in the installation accessory kit over the front panelreceptacle.
INSTALLATION AND MAINTENANCE MANUALTsunami FAMILYFAST ETHERNET WIRELESS BRIDGESSEPTEMBER 1999SECTION 3: INSTALLATION & ADJUSTMENTS PAGE 3-293.14 Additional ConnectionsThere are additional customer connections which are optional and are not required to make theTsunami operational but may prove useful.3.14.1 Orderwire ConnectionOrderwire is a “telephone” type wayside service which allows users of the Tsunami radio toestablish voice communications from one radio to another, either directly to the companion far-end, or through a repeater configuration, or several repeater configurations.Telephone connection specifications:REN (Ringer Equivalency Number) 1.0 BDTMF tones within ±1.5% of nominal freq.Ringing Voltage 48 VDC, typical(Ringing voltage is adequate for modern solid state ringers,NOT for the older mechanical type ringers)This Orderwire service does not affect the normal radio transmission of traffic. Refer to Section2.3.5 for the telephone specifications. For simple near-end to far-end communications, follow thesteps below:1.  Using a standard RJ-11 telephone cable, connect a standard electronic telephone (atouch tone phone, complete with dialer; a handset by itself will not work) to the Orderwireconnector on the Tsunami front panel. This connector is wired identically to a standardtwo-wire telephone jack, see Figure 3-18 for details.2.  With a telephone connected to each Tsunami terminal on opposite ends of the link, eithertelephone can be used to “dial-up” the far-end location. The far-end terminal’s internalringer and the connected telephone will ring, and if answered, two-way full-duplex voicecommunication is established.If using the Orderwire or Network management functions, allTsunami radios connected must have unique address settings(telephone numbers).4. If the Tsunami radios are connected in a repeater configuration, Orderwire services can beestablished to all Tsunami terminals in the network by implementing a connection of theirrear-panel connectors between repeater terminals. At the repeater site, a cable can beconnected to the two Tsunami terminals between their rear panel VF 9-pin connectors asshown in Figure 3-8. With this cable in place, the Orderwire function will operate at terminalsat each end of the repeater and at the repeater site. This function can be continued throughseveral repeater sites if desired. For hub connections of 3 or more Tsunami radios at thesame site, an external 4-wire bridge is required to connect all radios to the orderwire.The orderwire system can be integrated with orderwireequipment supported by many other vendors. If your existingorderwire network uses 2 digit addressing, and 0 dBm VFinterface, it can be connected to a Tsunami as shown in Figure3-8.
INSTALLATION AND MAINTENANCE MANUALTsunami FAMILYFAST ETHERNET WIRELESS BRIDGES SEPTEMBER 1999PAGE 3-30 SECTION 3: INSTALLATION & ADJUSTMENTSDialing a ✶ (star key) on the orderwire telephone implements an “all call”feature which rings all connected radios. Also, if a phone anywhere in theconnected network has accidentally been left off-hook, the # (pound key)key can be used to mute all off-hook handsets until they are placed onand off hook again.The orderwire operates like a “party line”. All telephones providecommunication to all other telephones in the connected network. Even ifa particular telephone does not ring, it can still be used to talk and listento any ongoing orderwire activity if the orderwire is in use at otherterminal locations.Orderwire ConnectionVF Port ConnectionFigure 3-8: Orderwire & VF Port Connection
INSTALLATION AND MAINTENANCE MANUALTsunami FAMILYFAST ETHERNET WIRELESS BRIDGESSEPTEMBER 1999SECTION 3: INSTALLATION & ADJUSTMENTS PAGE 3-313.14.2 Alarm ConnectionsExternal alarm outputs are provided at the 9-pin, D-type subminiature ALARM connector. Thereare two Form C summary alarm relays capable of switching 30 VDC at 1 A. See Table 3-E andFigure 3-9 for Alarm Connections.The “summary” alarm (Form C relay) is activated by any near-end front panel LED alarmcondition, including if the internal test mode is enabled.The “out-of-service summary” alarm (Form C relay) is activated by any of the following alarmconditions:❖RF LINK❖Radio Fail❖Internal TestFigure 3-9: Pin Connections, ALARM Interface
INSTALLATION AND MAINTENANCE MANUALTsunami FAMILYFAST ETHERNET WIRELESS BRIDGES SEPTEMBER 1999PAGE 3-32 SECTION 3: INSTALLATION & ADJUSTMENTSPIN 1 NO, SUMMARY ALARM, FORM C - normallyopen connection on summary alarm relay.Closed when in alarm.PIN 4 NO, OUT OF SERVICE SUMMARY ALARM,FORM C - normally open connection on out-of-service summary alarm relay. Closed when inalarm.PIN 6 C, SUMMARY ALARM, FORM C - commonconnection on the summary alarm relay. PIN 9 C, OUT OF SERVICE SUMMARY ALARM,FORM C - common connection for the out-of-service summary alarm relay.PIN 2 NC, SUMMARY ALARM, FORM C - normallyclosed connection on summary alarm relay. PIN 5 NC, OUT OF SERVICE SUMMARY ALARM,FORM C - normally closed connection on out-of-service summary alarm relay. Open when inalarm.PIN 7 RSL output DC voltage referenced to pin 3 PIN 8 Tx Power output DC voltage referenced to pin 3Table 3-D: Alarm Interface ConnectionsAll alarms are active for a minimum of one second, or as longas the alarm condition persists, which ever is longer.
INSTALLATION AND MAINTENANCE MANUALTsunami FAMILYFAST ETHERNET WIRELESS BRIDGESSEPTEMBER 1999SECTION 3: INSTALLATION & ADJUSTMENTS PAGE 3-333.14.3 Configuration Port OperationThe “Config” Port is used to retrieve diagnostic about the Tsunami radios by means of a computerconnection.The config port allows connection of RS-232 devices to poll and receive status of the Tsunamiradio. The config port provides front panel alarm and control information and can also provideextended information including some advanced diagnostics and configuration information. Anyinformation that is available on the far-end terminal is also available at the near-end config port(such as far-end RSL, far-end alarms).Details of this interface are forthcoming in future editions ofthis manual. At this point in time, it is advised that the NMSport be used with an HTML browser to monitor and configureall radio parameters, when desired.For RS-232 diagnostics connection (Section 4.11) to the Tsunami radio, connect the serial device(modem, computer, terminal) to the male 9-pin subminiature connector in accordance with Figure3-10.Figure 3-10: RS-232 Config Port ConnectionsPins 6 through 9 must not be connected for RS-232communications to operate properly.
INSTALLATION AND MAINTENANCE MANUALTsunami FAMILYFAST ETHERNET WIRELESS BRIDGES SEPTEMBER 1999PAGE 3-34 SECTION 3: INSTALLATION & ADJUSTMENTS3.14.4 AUX DATA (Digital Service Channel) ConnectionThe AUX DATA port is a separate wayside serial port which can be configured to allow theconnection of any user serial data (to 9600 baud) through the radio network. Connection to theAUX DATA port is an RS-232 serial interface, identical to the config port (see Section 3.14.3).This port does not affect the Ethernet traffic on the Tsunami radio.
INSTALLATION AND MAINTENANCE MANUALTsunami FAMILYFAST ETHERNET WIRELESS BRIDGESSEPTEMBER 1999SECTION 3: INSTALLATION & ADJUSTMENTS PAGE 3-353.14.5 T1 (DSX-1) Interface ConnectionThe Tsunami radio also provides a wayside T1 connection. This connection allows for standardDSX-1 connect of voice circuits without affecting the Ethernet traffic. A standard RJ-48c connectoris provided for this connection
INSTALLATION AND MAINTENANCE MANUALTsunami FAMILYFAST ETHERNET WIRELESS BRIDGES SEPTEMBER 1999PAGE 3-36 SECTION 3: INSTALLATION & ADJUSTMENTS3.14.6 NMS Interface ConnectionThe NMS connection provides connection for the network management system. This allows anHTML interface to the Tsunami radio for purposes of monitoring, configuration and securitysettings. This connection is an RJ-45 style connection and complies to standard 10BaseTinterface. Typically, the installer or manager will connect to the NMS with a stand-alone computerto initially configure the radio prior to installation. If IP addresses and security are set properly, theconnection can also be used as an out-of-band connection for radio management. Alternatively, ifthe 10BaseT is connected to a network, or combined with the 100BaseT traffic on the link, via anexternal 10/100 switch, hub or router, full wireless NMS can be achieved for all radios in thenetwork.More details on the NMS connection can be found inSection 4 of this manual. In the future, this connection willalso allow NMS via SNMP (Simple Network ManagementProtocol) in addition to the HTML interface that is presentlysupplied. Consult factory for details or assistance with NMSconnections, if required.
INSTALLATION AND MAINTENANCE MANUALTsunami FAMILYFAST ETHERNET WIRELESS BRIDGESSEPTEMBER 1999SECTION 3: INSTALLATION & ADJUSTMENTS PAGE 3-37Your Notes on the Tsunami Radio
INSTALLATION AND MAINTENANCE MANUALTsunami FAMILYFAST ETHERNET WIRELESS BRIDGESSEPTEMBER 1999SECTION 4: TROUBLESHOOTING PAGE 4-14. Troubleshooting4.1 Regular MaintenanceThe Tsunami radios do not require any regular maintenance, however, it is prudent to monitor theradio link at regular intervals to assure that the link conditions are not changing. When visiting aradio site for maintenance, the following items may be checked and their results recorded:❖RSL Voltage❖PWR Voltage❖Far-end RSL Voltage❖Alarm conditions❖Verify radio has adequate ventilation❖Verify security ID is set the same at each radio through NMSIf any alarm conditions exist, they should be recorded, and troubleshooting procedures from thisSection of the manual should be followed.
INSTALLATION AND MAINTENANCE MANUALTsunami FAMILYFAST ETHERNET WIRELESS BRIDGES SEPTEMBER 1999PAGE 4-2 SECTION 4: TROUBLESHOOTING4.2 Changing Frequency PlansThe Tsunami RF frequency selections are listed in Section 3.5. The near-end radio and the far-end radio must be corresponding (e.g. A1 / A2). The frequency of a given Tsunami terminal is setby the specific filter, the physical orientation of this assembly, and a setting within the CONFIGport (or NMS configuration instructions, Section 4.11). With respect to a given filter, thefrequencies are fixed, because tuned RF filters are required for normal operation. Changing of the(pre-tuned) radio frequencies may be required when installing spares or for special situations,such as interference mitigation. This is accomplished by installing an alternate filter.It is not necessary to remove the cover assembly of the Tsunami1.  Remove any cables connected to the antenna connector on the diplexer (filter) and thenremove the two screws that mount the filter to the Tsunami chassis.2.  Slowly remove the filter from the chassis being careful to not endanger the cables that areconnected to the rear side of the filter.3.  Disconnect the two SMA connectors that are attached to the rear of the filter with a 5/16”open end wrench.4.  Select the new filter such that the frequency channel label on the filter corresponds to thedesired frequency channel (or rotate filter if applicable – see note below).5.  Connect the two SMA connectors to the new or reoriented filter with the 5/16” open endwrench.6.  Slowly place the wired filter assembly so that it is flush with the rear panel.7.  Install the two screws that mount the filter to the rear panel.8.  Modify the operating frequency as described in the CONFIG menus (Section 4.11)Single-band versions of this radio can be interchanged fromA1 to A2 by changing (but not rotating) the installed filter.After filter is changed, the frequency settings within theconfiguration menu (NMS) must be changed to match theinstalled filter.Dual-band versions of this radio also can change channels,but the orientation of low-side or high-side transmit must beretained. That is, an A1 radio can only be changed into a B1radio with a new filter, but not into an A2 or a B2. Likewise,the A2 radio can only be changed into a B2 radio with a newfilter, but not into an A1 or B1. The diplexer filters can go onany radio and must be properly oriented. After filter ischanged, the frequency setting within the configuration menu(NMS) must be changed to match the installed filter.
INSTALLATION AND MAINTENANCE MANUALTsunami FAMILYFAST ETHERNET WIRELESS BRIDGESSEPTEMBER 1999SECTION 4: TROUBLESHOOTING PAGE 4-34.3 Using a Spare TerminalFor dual-band units, a spare of each band may be required. For single-band units, one spareTsunami terminal will service both channel orientations. See Section 4.2 for changing frequenciesof a spare radio.Customers with several radios, or radios in critical operations are encouraged to purchase one ormore spare radios of each model in their system. This will allow rapid restoration of radio servicein the unlikely event of a radio failure.
INSTALLATION AND MAINTENANCE MANUALTsunami FAMILYFAST ETHERNET WIRELESS BRIDGES SEPTEMBER 1999PAGE 4-4 SECTION 4: TROUBLESHOOTING4.4 Technical SupportGlenayre Western Multiplex provides 24-hour telephone technical support for installed Tsunamiradios. Customers are encouraged to troubleshoot the radio and link in accordance with the latterpart of this section in this manual before contacting Glenayre Western Multiplex. GlenayreWestern Multiplex also has a limited supply of Tsunami radios that can be loaned to out-of-servicecustomers for installation while units are being repaired. Loaner supply is limited, and is only usedfor critical applications on a first-come, first-served basis.Customer service #: +1 408  542-5390
INSTALLATION AND MAINTENANCE MANUALTsunami FAMILYFAST ETHERNET WIRELESS BRIDGESSEPTEMBER 1999SECTION 4: TROUBLESHOOTING PAGE 4-54.5 Repair PolicyThe  Tsunami terminal includes comprehensive alarm indicators designed to diagnose potentialfaults. Should a fault occur, it often may be resolved by operator adjustment.Should a fault occur that cannot be resolved by operator adjustment and has been confirmed bylooping terminals together on the bench (See Section 4.9), then the equipment should be returnedto the factory for repair.The Tsunami radio is a complex system not designed for user repair. Do not remove the cover oropen any part of the Tsunami terminal. The complete Tsunami terminal should be sent back in itsoriginal packing material for factory repair.Please contact the factory in advance of returning the product. You will be assigned a ReturnMaterial Authorization (RMA) number that authorizes your return. Units sent to the factory withoutan RMA number may be delayed in the processing of the repair. Be sure to include the followinginformation:❖RMA number❖description of the problem❖your name and telephone number❖return shipping address❖urgency of repairPlease refer to the published Warranty policy for repair policydetails.Tsunami radios should be packaged in their original packingboxes for shipment whenever possible Glenayre WesternMultiplex can provide an empty box shipment to facilitateproper packaging. Regardless, proper and adequate packagingmust be used for shipments to protect the radio(s) fromdamage. Glenayre Western Multiplex can not be heldresponsible for any repairs due to inadequately packedmaterials. Damage caused by improper packing will likely resultin higher repair costs and delays (refer to the Warranty sectionat the beginning of this manual).
INSTALLATION AND MAINTENANCE MANUALTsunami FAMILYFAST ETHERNET WIRELESS BRIDGES SEPTEMBER 1999PAGE 4-6 SECTION 4: TROUBLESHOOTING4.6 Front Panel Status LEDsThere are several front panel status LEDs on the Tsunami radio. These LEDs indicate conditionswhere either a hardware failure has occurred or the radio link is not optimum. In many cases, acombination of LEDs may be illuminated. The following sections describe the necessarytroubleshooting procedures should any LED(s) indicate a problem during or after installation.Radio Fail Green = Radio hardware O.K.Red = Hardware failure detectedRF LinkGreen = Error-free operationYellow = Bit errors occurringRed = Excessive bit errors or radio link failureFlashing = Link ID mismatchedTXD Green = 100BaseT data transmit presentYellow = 100BaseT port connected (no data present)Off = No 100BaseT connection detectedRXD Green = 100BaseT data receive presentYellow = 100BaseT port connected (no data present)Off = No 100BaseT connection detectedCOLL Yellow = Collisions occurring on 100BaseT (half-duplex mode)FAR END Red = Alarm(s) present on the far-end radio**NMS (10BaseT) Green = Tx or Rx data present on the NMS interfaceYellow = NMS interface connected (no data present)Off = No NMS interface connection detectedT1 INPUTGreen = Alarm enabled and T1 connection detectedRed = Alarm enabled and no T1 connection detectedYellow = Alarm disabled and T1 connection detectedOff = Alarm disabled and no T1 connection detected** Radio Fail, RF Link (yellow or red), T1 Input (yellow or red)
INSTALLATION AND MAINTENANCE MANUALTsunami FAMILYFAST ETHERNET WIRELESS BRIDGESSEPTEMBER 1999SECTION 4: TROUBLESHOOTING PAGE 4-74.6.1 RF LINK AlarmFunction:This LED indicates that the demodulator function is not synchronizing with the intended receivedsignal.Possible Causes:❖Severe path fading due to atmospheric conditions, usually accompanied by low RSLvoltage reading❖Poor transmission line connections usually accompanied by low RSL voltage reading❖Antenna problems, misalignment, or path clearance usually accompanied by low RSLvoltage reading❖Improper radio settings (e.g. frequency channel)❖Received signal level (RSL) is too strong❖Interference❖Far-End radio transmitter circuitry is faulty❖Near-End radio receiver circuitry is faulty❖Link security ID not the same for each radioRecommended Actions:Check the following at each end of the link:❖Verify that rear panel filters are opposite channel plans on each end (e.g. one is A1 andother is A2).❖Verify that radio frequency settings match each installed filter (in NMS menus).❖Verify that all connections between radios and antennas are secure and all devicesbetween radios and antennas are rated for the radio frequency band (5.3/5.8 GHz).Measure RSL by placing a voltmeter across RSL and GND test points. Compare this voltage tothe Factory Test Data Sheet and estimate the RSL in dBm. Compare this to the RSL that wasexpected using path calculations (see Section 3.3.3). Press and hold the DISPLAY FAR ENDbutton and measure the far-end RSL (while continuing to hold the button). Compare this RSL tothe Factory Test Data Sheet for the far-end radio and estimate the RSL in dBm. Again, comparethis RSL to the expected RSL from the link budget calculations.If RSL from both ends of the radio are approximately the same as each other, but lower thananticipated for this installation, then the likely cause of the BER alarm(s) is excessive lossesbetween the radios. Excessive loss problems could include the transmission line at either end, alladapters, connectors, the antennas, the antenna alignment as well as the path itself (anyobstructions or clearance problems). Antenna alignment, line-of-sight and path clearance shouldbe verified; if this does not improve RSL, all devices between the radios and their antennas atboth ends should be checked. Make sure all transmission line, connectors and any other devices
INSTALLATION AND MAINTENANCE MANUALTsunami FAMILYFAST ETHERNET WIRELESS BRIDGES SEPTEMBER 1999PAGE 4-8 SECTION 4: TROUBLESHOOTINGare properly rated for operation at the radio's frequency (5.3/5.8 GHz).If only one end has low RSL, this could be caused by low transmit output power from the oppositeend radio. Verify that the transmitter output power of the radio opposite to the low RSL receiverhas been set in accordance to path calculations, or EIRP restrictions (where applicable). Poweradjustment must be performed by professional installation personnel only. The PWR test pointcan be used and compared with the Factory Test Data Sheet, the front panel recessedpotentiometer can be turned clockwise to increase power. If an RF power meter is available, thiscan be connected to the RF output of the radio for precision measurement. This test will alsoverify that the radio transmitter is working properly.If one terminal (or both) has high RSL, this could be caused by a very short path or interference.To verify the possible presence of interference, remove DC power to the radio which is opposite tothe one that is reading high RSL. Once power is removed, measure RSL on the remaining radio.If RSL voltage is lower than that which is listed for "Threshold" in the Factory Test Data Sheet,then an interfering signal is present. If interference is suspected, the easiest potential remedy is toswap frequency channels on both sides of the link. See Section 4.2 for details. Swap terminals atboth ends of the link so that they are the opposite from their original installation. After both endsare moved, reconnect the radios and determine if the BER alarm is still active. If the BER alarm isstill active, other frequency channels can be installed, or other interference countermeasures canbe tried, in accordance with Section 4.8.If all path related and data input problems have been pursued and the BER alarm is still active,the problem could be related to a radio failure. While radio failure is typically indicated by moresevere alarm conditions, it is possible that one of the radios may be out of specification, and thiscould be the cause of the BER alarm. A back-to-back test will verify proper radio operation. SeeSection 4.9 for details. A threshold test on both radios along with a test to verify proper RF outputpower would be beneficial.Perform a back-to-back test before returning any radio terminal tothe factory for repair. A back-to-back test verifies radio operation.(See Section 4.9).If the radios successfully pass their back-to-back testing, the problem is likely with the path or theconnections between the radio and the antenna or interference. Before reinstalling the radios, besure to set the output power to the appropriate level for the installation.
INSTALLATION AND MAINTENANCE MANUALTsunami FAMILYFAST ETHERNET WIRELESS BRIDGESSEPTEMBER 1999SECTION 4: TROUBLESHOOTING PAGE 4-94.6.2 RADIO FAIL AlarmFunction:The RADIO FAIL alarm indicates a known problem with the radio hardware.Possible Causes:❖Internal synthesizers are unlocked❖Internal digital circuits have failedRecommended Actions:1.  Remove power from the unit.2.  Check to make sure power supply voltages are within specification.3.  Even if the voltages were within specification, reapply power to the unit.4.  If RADIO FAIL alarm clears, place the radio back into service.5.  If RADIO FAIL alarm does not clear, perform a back-to-back test to verify radio operation, asdescribed in Section 4.9.6.  If RADIO FAIL alarm is still active in a back-to-back test, return the radio to the factory forrepair (see Section 4.5).
INSTALLATION AND MAINTENANCE MANUALTsunami FAMILYFAST ETHERNET WIRELESS BRIDGES SEPTEMBER 1999PAGE 4-10 SECTION 4: TROUBLESHOOTING4.6.3 FAR END AlarmFunction:This LED indicates that there is an alarm condition present on the far-end radio. When theDISPLAY FAR END button is pressed (and held), the status LEDs indicate the alarm conditions ofthe far-end radio.Possible Cause:❖One or more alarm condition(s) exist on the far-end radioRecommended Actions:1.  Press and hold the DISPLAY FAR END button and observe the LED status.2.  Follow instructions for troubleshooting the far-end radio in accordance to the appropriateLEDs which are in alarm, as described in Section 4.6.1 through 4.6.4.
INSTALLATION AND MAINTENANCE MANUALTsunami FAMILYFAST ETHERNET WIRELESS BRIDGESSEPTEMBER 1999SECTION 4: TROUBLESHOOTING PAGE 4-114.7 Errors in the Data StreamWhen the radio is in service, errors in the data stream may occur. This is usually known to theoperator by either faulty data indications of downstream equipment or external bit error ratetesting.It is possible that no alarms appear on the front panel during normal operations, but there areerrors present in the data stream. Some errors will not result in no alarm (such as bipolarviolations, slow "dribbling" errors, improperly terminated connections or incorrect settings), but willbe exhibited on downstream data processing equipment or during a BER test. In other cases,there may be data errors due to atmospheric conditions (fading), interference or other reasons,but not at a high enough error level to be indicated with the BER alarm LED. In the case of thesetypes of errors, the following information can be helpful to troubleshoot the radio link.Indications:❖During external BER test, test equipment indicates errors❖Downstream equipment (mux, channel bank, CODEC, router, etc.) indicates errorsPossible Causes:❖Path fading due to atmospheric conditions❖Poor transmission line connections❖Antenna problems, misalignment or path clearance❖Received signal level (RSL) is too strong❖Far-End radio transmitter circuitry is faulty❖Near-End radio receiver circuitry is faulty❖InterferenceRecommended Actions:1.  Verify 100BaseT wiring.2.  Follow the instructions described in Section 4.6.1
INSTALLATION AND MAINTENANCE MANUALTsunami FAMILYFAST ETHERNET WIRELESS BRIDGES SEPTEMBER 1999PAGE 4-12 SECTION 4: TROUBLESHOOTING4.8 Interference CountermeasuresThe recommended interference countermeasures available to the Tsunami operator are asfollows:1. Short PathsThe single most effective countermeasure against interference is to maintain "short path" length.This may be achieved by dividing long paths into multiple small paths by cascading hops.Intermediate repeaters may be formed using back-to-back Tsunami terminals and transmit outputpower reduced, if required.By definition, "short path" is defined as a path where fades are extremely rare and signal levelsvary by no more than ±3 dB during fades. This distance will vary with the RF frequency. Typicallya "short path" is defined as any path length shorter than 5 miles at 5.3/5.8 GHz.2. Narrow Beam Antennas (high gain)This is the next most effective countermeasure. Narrow beam antennas ensure that thetransmitted power is sent in a single direction and this minimizes the possibility of causinginterference inadvertently to other users. Narrow beam antennas also reject off-azimuth signalsbeing received from potential sources of interference and have high gain which boosts desiredreceive levels and improves the carrier to interference ratio. When selecting narrow beamantennas, it is helpful to know that larger antennas generally outperform smaller antennas.Another important antenna specification is the front-to-back ratio which ensures rejection ofunwanted signals from azimuth angles behind the antenna.3. Frequency SelectionThis is another very effective countermeasure. The Tsunami radio offers several distinct non-overlapping frequency channel plans (see Sections 3.5 and 4.2) and the radio’s RF filter is able toreject interference more than 10 MHz away from the receive frequency. Offset frequenciescombined with other countermeasures may enable several receive channels to operate at a singlehub site. Because of the limited spreading ratio used, frequency selection is more efficient thancode selection for interference rejection when operating multiple Tsunami terminals at a singlesite. Interference can often be overcome by exchanging frequencies of both-ends of the radio link(e.g. change your A1 terminal to an A2 and change the other end from an A2 to an A1). Also,changing channel plans (e.g. from A to B) can be very effective. (See Section 4.2).
INSTALLATION AND MAINTENANCE MANUALTsunami FAMILYFAST ETHERNET WIRELESS BRIDGESSEPTEMBER 1999SECTION 4: TROUBLESHOOTING PAGE 4-134. Antenna PolarizationCross-polarized antennas can provide approximately 20 to 30 dB discrimination of unwantedsignals. The actual discrimination will depend upon the antenna design and any rotation ofpolarization along the path, for example, due to reflections. Discrimination only exists between twoorthogonal polarizations:- vertical vs. horizontal or- left-hand circular vs. right-hand circularThere is only 3 dB discrimination between circular and linear (vertical or horizontal) polarization.Interference can sometimes be overcome by changing antenna polarization at both ends of thelink.5. Transmit PowerThe maximum level into the receiver is -30 dBm. Above this level, errors may occur in the receivedata stream. Transmit output power should be reduced on very short paths to avoid overload.6. Equipment/Antenna LocationOccasionally, interference is caused by the radio or the antenna being too close to another similartransmitter. Moving the radio, the antennas, or the interfering equipment can reduce or eliminateinterference.Interference countermeasures rely to some extent on themeasurement of the received interference level and frequency.Prior to turning up a new hop, a spectrum analyzer can be usedto monitor the spectrum at each end to check for possibleinterfering signals. See Section 4.8.1 for more details.
INSTALLATION AND MAINTENANCE MANUALTsunami FAMILYFAST ETHERNET WIRELESS BRIDGES SEPTEMBER 1999PAGE 4-14 SECTION 4: TROUBLESHOOTING4.8.1 Use of a Spectrum Analyzer to Evaluate Potential InterferenceConnecting to the antenna and using "peak hold" on a spectrum analyzer, the spectrum acrossthe receive frequency range of the radio can be swept and any signals being received at levelsabove the radio’s specified threshold identified. If potential interfering signals are found, then theTsunami frequency plan can be changed to avoid a receive channel which may contain significantinterference (see Section 4.2).For example, interference may be reduced by moving from the A1/A2 plan to the B1/B2 plan or byswapping terminals or RF filters so that A1 becomes A2.Signals outside the receiver frequency range may be ignored:they will not cause interference.If a spectrum analyzer is not available, the RSL voltage can be used to indicate the backgroundnoise and interference level within the receiver RF filter band when the far-end transmitter isturned off. With the far-end radio turned off, if an RSL voltage level below the radio’s thresholdlevel is measured, there is potentially interference in this frequency channel.When using a spectrum analyzer for determining the presenceof interference, very narrow resolution bandwidth settings mustbe used to detect signals down to the radio’s threshold(approximately -80 dBm, depending on radio type).
INSTALLATION AND MAINTENANCE MANUALTsunami FAMILYFAST ETHERNET WIRELESS BRIDGESSEPTEMBER 1999SECTION 4: TROUBLESHOOTING PAGE 4-154.9 Back-to-Back TestingBack-to-back testing, as shown in Figure 4-1, is an ideal method of testing the Tsunami radios.This testing eliminates link problems caused by auxiliary equipment, installation, or the radio pathand isolates potential radio hardware problems. Back-to-back testing must be performed with bothradios at the same location. The following test equipment is required:❖DC power source capable of supplying approximately 90 Watts (total) to the radios (ortwo AC adapters)❖One low-loss coaxial cable, N-to-N male❖One (or more) coaxial in-line calibrated fixed attenuators, 40 to 80 dB total attenuationThe following test equipment may also be useful to perform further testing of the Tsunami radio:❖BER tester❖Variable (60 dB range or more) RF attenuator (rated for the proper frequency, 2.4 or 5.8GHz)❖RF power meterBack-to-back testing must be performed to verify a radioproblem before returning any radio to the factory for repair.When the equipment is connected as shown in Figure 4-1, both Tsunami radios should have noalarm conditions. If these conditions have been met, then it is likely that the Tsunami radio isoperating in accordance to specifications. If errors or alarms occur during this test, verify that allDIP switch settings are properly set. If alarms or errors are still present, the radio is likely to befaulty.If further troubleshooting is required, a variable RF attenuator can be inserted between the radiosto fade down the path to determine that the threshold specification is being met. The thresholdtests can be run in both directions to isolate the radio problem (if any). More information testing isprovided in Section 4.10. An RF power meter can be used to individually test each radio’s outputpower.
INSTALLATION AND MAINTENANCE MANUALTsunami FAMILYFAST ETHERNET WIRELESS BRIDGES SEPTEMBER 1999PAGE 4-16 SECTION 4: TROUBLESHOOTINGFigure 4-1: Back-to-Back Test ConfigurationThe Tsunami radios will be damaged if appropriate attenuation isnot supplied between radios. You must provide a minimum of 40dB and no more than 80 dB attenuation between the two radios.Tsunami 5284
INSTALLATION AND MAINTENANCE MANUALTsunami FAMILYFAST ETHERNET WIRELESS BRIDGESSEPTEMBER 1999SECTION 4: TROUBLESHOOTING PAGE 4-174.10 LINK TestingLink testing is the preferred way to evaluate a radio link’s performance. It can be performed fromend-to-end or in link test mode (which tests both directions of the radio path). Figure 4-2 illustratesa typical test configuration (which may include the radio’s path instead of in-line attenuators).Figure 4-2 illustrates a typical test configuration for end-to-end testing.When performing testing, make sure of the following:-  Disconnect all 100BaseT inputs and outputs to both radios.-  Verify all configuration settings.Link testing may be performed on the bench, with two terminals back to back, or over the radiopath. Also, it may be performed from end-to-end (which requires two 100BaseT test sets over alink, the far-end unit slaved to the near-end unit’s clock) or in loopback mode, as described inSection 4.9.If link testing indicates an unacceptable level of errors, follow the instructions in Section 4.6.1. orperform a back-to-back test as described in Section 4.9.Figure 4-2: End-to-End Test ConfigurationTsunami Tsunami100baseTTester 100baseTTester
INSTALLATION AND MAINTENANCE MANUALTsunami FAMILYFAST ETHERNET WIRELESS BRIDGES SEPTEMBER 1999PAGE 4-18 SECTION 4: TROUBLESHOOTING4.11  Network Management System (NMS)The Tsunami 100BaseT radio platform provides multiple methods of managing the radio networkthrough one of three ways:1) SNMP2)  Browser graphical user interface3)  TelNet (not implemented at this printing)4.11.1 SNMPInstructions to be supplied4.11.2 Browser GUIUse Internet Explorer™ or Netscape™ to access the radio by typing in its IP address. If you aresetting up the radios for the first time, the default IP address is: 10.0.0.1 You will have to configureyour computer to this domain first by setting its address to 10.0.0.2 and then changing the radio’sIP to one within the domain of your network. After changing one radio’s IP address (seeConfiguration tab) change the other radio’s IP address also, but not to the same address of theprevious radio. Reconfigure the IP address of your computer to it’s original address and thenrestart the PC so it is now in the same domain as the radios.The browser interface shows a “virtual” front panel of the radio that is addressed. To view the frontpanel of the associated far-end radio, click on the window that is located on the virtual front panel(see following illustrations). Illustrations on the next few pages of this manual provide details on allbrowser screens and operations.
INSTALLATION AND MAINTENANCE MANUALTsunami FAMILYFAST ETHERNET WIRELESS BRIDGESSEPTEMBER 1999SECTION 4: TROUBLESHOOTING PAGE 4-19Login Screen 1Enter User Name and Password. If using forthe first time or the radio has been reset, use:User Name: managerPassword: managerIt’s advisable to change the password settingon the administration (Admin) page to protectradio settings, configuration and entry into yourradio system.Login Screen 2With default Name and PasswordClick on “Log On” to gain entry
INSTALLATION AND MAINTENANCE MANUALTsunami FAMILYFAST ETHERNET WIRELESS BRIDGES SEPTEMBER 1999PAGE 4-20 SECTION 4: TROUBLESHOOTINGDevice ScreenTsunami model informationConfiguration 1The radio’s characteristics can be modifiedfrom this page. The ‘Current’ column indicatescurrent  settings and the ‘New’ column the radiosetting(s) that can be changed. Use the pull-down menus to select the new setting. Then,click on the Set button to invoke the setting.In some cases it may be necessary to “refresh”the screen to see changes to settings.Warning: the Tx/Rx Frequency can not bechanged without also changing the physicaldiplexer.
INSTALLATION AND MAINTENANCE MANUALTsunami FAMILYFAST ETHERNET WIRELESS BRIDGESSEPTEMBER 1999SECTION 4: TROUBLESHOOTING PAGE 4-21Configuration 2At any time, on any page, clicking on Help willopen a separate help window to facilitateoperation of the Browser NMS.Use the help page to provide details on theconfiguration settings.Configuration 3Scroll down to see the complete list of radioconfiguration settings.Here is where the radio’s IP setting can bemodified.
INSTALLATION AND MAINTENANCE MANUALTsunami FAMILYFAST ETHERNET WIRELESS BRIDGES SEPTEMBER 1999PAGE 4-22 SECTION 4: TROUBLESHOOTINGPerformance 1Running data on the operation of the radio link.To reset the historical data, click on HistoryReset.Performance 2New screen after resetting history.
INSTALLATION AND MAINTENANCE MANUALTsunami FAMILYFAST ETHERNET WIRELESS BRIDGESSEPTEMBER 1999SECTION 4: TROUBLESHOOTING PAGE 4-23AlarmsBoth near-end and Far-end information on therunning status of the link are displayed on thissingle page.AdministrationChange the default password for subsequententry into the browser NMS.Click on set after changing the password.If you forget the password, you must fully resetthe radio by holding in the far-end button on thefront of the radio while powering it up.
INSTALLATION AND MAINTENANCE MANUALTsunami FAMILYFAST ETHERNET WIRELESS BRIDGES SEPTEMBER 1999PAGE 4-24 SECTION 4: TROUBLESHOOTINGContact InformationThe E-mail and the URL links are active text ifselected. Each will start your e-mail or browserwhen either is clicked on.Alarm Condition!A loss of connection in the radio link or anyalarm condition will cause a red bar to bedisplayed at the top of the screen and awarning message will indicate the errorcondition at the bottom of the window.
INSTALLATION AND MAINTENANCE MANUALTsunami FAMILYFAST ETHERNET WIRELESS BRIDGESSEPTEMBER 1999SECTION 4: TROUBLESHOOTING PAGE 4-25Link failure indication!If the link is lost, the severely errored secondswill display the amount of time the link was notpassing sufficient data.In this example, the link had almost twominutes of corrupt data since the last time thehistory had been reset (4287 seconds, orapproximately 1 hour and 20 minutes).4.11.2.1 NMS Help screen details:LEDsRadio Fail Green = Radio hardware O.K.Red = Hardware failure detectedRF Link Green = Error-free operationYellow = Bit errors occurringRed = Excessive bit errors or radio link failureTXD Green = 100BaseT data transmit presentYellow = 100BaseT port connected (no data present)Off = No 100BaseT connection detectedRXD Green = 100BaseT data receive presentYellow = 100BaseT port connected (no data present)Off = No 100BaseT connection detectedCOLL Yellow = Collisions occurring on 100BaseT (half-duplex mode)FAR END Red = Alarm(s) present on the far-end radio**NMS (10BaseT) Green = Tx or Rx data present on the NMS interfaceYellow = NMS interface connected (no data present)
INSTALLATION AND MAINTENANCE MANUALTsunami FAMILYFAST ETHERNET WIRELESS BRIDGES SEPTEMBER 1999PAGE 4-26 SECTION 4: TROUBLESHOOTINGOff = No NMS interface connection detectedT1 INPUTGreen = Alarm enabled and T1 connection detectedRed = Alarm enabled and no T1 connection detectedYellow = Alarm disabled and T1 connection detectedOff = Alarm disabled and no T1 connection detected** Radio Fail, RF Link (yellow or red), T1 Input (yellow or red)ConfigurationT1 Line Code AMI/B8ZS setting for the T1 interfaceT1 Line Build Out T1 interface line length settingT1 AIS @BER=10e-3 If selected, automatic injection of 1's into the T1data stream during RF Link red alarm stateT1 Input Alarm If selected, activates alarm on loss of T1 signalT1 Near-end Radio Loopback Activates loopback at the T1 input port of the near-end,towards the far-end of the linkT1 Far-end Radio Loopback Activates loopback at the T1 input port of the far-end,towards the near-end of the linkOrderwire Address Orderwire telephone address (any 2 digit number 00-99)Link Security Code Security code set by user (any 6 bytes)Note: Must match code on far-end radio to establish linkTx/Rx Frequency Selects Tx and Rx frequencies – setting must matchinstalled diplexer filter assembly – see manual for detailsEthernet Duplex Selects half or full duplex for the 100BaseT interfaceLearning Filter Enables the ability to acquire and store IP addressesfor efficient bridging operation (normally enabled)Fiber Optic Interface Enables the fiber 100BaseT interfaceDevice IP Address Configure the IP address for the networkmanagement Ethernet interfaceDevice Subnet Mask Configure the subnet mask for the networkmanagement Ethernet interface
INSTALLATION AND MAINTENANCE MANUALTsunami FAMILYFAST ETHERNET WIRELESS BRIDGESSEPTEMBER 1999SECTION 4: TROUBLESHOOTING PAGE 4-27SNMP Get Community Configure the ‘Get’ community string for the radio'sSNMP network management agentSNMP Set Community Configure the ‘Set’ community string for the radio'sSNMP network management agentPerformanceCurrent BER Current estimated RF link bit error rateCurrent RSL (dBm) Current estimated received signal level, in dBmErrored Seconds Number of seconds that incurred an error since the last resetof the "clear history" functionSeverely Errored Seconds Number of seconds that incurred errors in excess ofBER=10e-6 since the last reset of the "clear history" functionMin RSL (dBm) Minimum estimated received signal level (in dBm) measuredsince the last reset of the "clear history" functionMax RSL (dBm) Maximum estimated received signal level (in dBm) measuredsince the last reset of the "clear history" functionElapsed Seconds Since Reset Number of seconds since the last reset of the "clear history"functionAlarmsIF GREEN IF REDT1 Input T1 Input is present orT1 input alarm is disabled T1 Input is NOT present andT1 input alarm is enabledT1 CodeViolation No T1 code violation error detected T1 code violation error detectedT1 Line Driver Line driver is adequate Line driver is in fault conditionT1 AIS NOT injecting all 1s Injecting all 1s in data streamRadio Sync Radio link is synchronized Radio link NOT establishedBit Error Error-free operation Bit Error Rate worse than 10e-7
INSTALLATION AND MAINTENANCE MANUALTsunami FAMILYFAST ETHERNET WIRELESS BRIDGES SEPTEMBER 1999PAGE 4-28 SECTION 4: TROUBLESHOOTINGFan 1 Fan 1 is operating correctly Fan 1 is NOT operating correctlyFan 2 Fan 2 is operating correctly Fan 2 is NOT operating correctlyRx Synth Receive synthesizer is locked Receive synthesizer NOT lockedTx Synth Transmit synthesizer is locked Transmit synthesizer NOT locked4.11.3 TelNetTo be supplied
INSTALLATION AND MAINTENANCE MANUALTsunami FAMILYFAST ETHERNET WIRELESS BRIDGESSEPTEMBER 1999SECTION 4: TROUBLESHOOTING PAGE 4-29 Your Notes on the Tsunami Radio
INSTALLATION AND MAINTENANCE MANUALTsunami FAMILYFAST ETHERNET WIRELESS BRIDGESSEPTEMBER 1999SECTION 5: APPENDICES PAGE 5-15. AppendicesAppendix A - Digital Interface Specifications1. General Characteristics100baseT (IEEE 802.3u) Fully compliant to Ethernet V.22. SpecificationsTransmission Medium UTPSignaling Technique ManchesterTopology StarLAN Table 1,000 addresses (automatic learning and aging)Filtering 15,000 ppsData Rate Up to 10 Mbps (limited to throughput of particular radio model)Delay 2-5 framesBuffer 256 framesDuplex Full or halfTable A-1: Interconnection Specification
INSTALLATION AND MAINTENANCE MANUALTsunami FAMILYFAST ETHERNET WIRELESS BRIDGES SEPTEMBER 1999PAGE 5-2 SECTION 5: APPENDICESAppendix B – 100BaseT and 10BaseT ConnectionsFigure B-1: Fast Ethernet & Ethernet NMS Connectors
INSTALLATION AND MAINTENANCE MANUALTsunami FAMILYFAST ETHERNET WIRELESS BRIDGESSEPTEMBER 1999SECTION 5: APPENDICES PAGE 5-3Appendix C – Auxiliary Data ConnectorsThe following figures illustrate the pin structure for all auxiliary connections. All figures areoriented as a customer would view them, facing the connector. DC power connection informationis found in Section 3.7 of the manual.Figure C-1: VF Port ConnectionFigure C-2: Alarm Port ConnectionsFigure C-3: Config(uration) Port 9-Pin D-Style ConnectorDo NOT connect to RS-422 pins at any time.
INSTALLATION AND MAINTENANCE MANUALTsunami FAMILYFAST ETHERNET WIRELESS BRIDGES SEPTEMBER 1999PAGE 5-4 SECTION 5: APPENDICESFigure C-4: AUX DATA Port 9-Pin D-Style ConnectorDo NOT connect to RS-422 pins at any time.
INSTALLATION AND MAINTENANCE MANUALTsunami FAMILYFAST ETHERNET WIRELESS BRIDGESSEPTEMBER 1999SECTION 5: APPENDICES PAGE 5-5Your Notes on the Tsunami Radio
IndexAAC...............................................................................................................................................3-15Accessories.................................................................................................................................2-16AIS................................................................................................................................................2-5Alarm connections......................................................................................................................3-31Alarms.........................................................................................................................................3-26Alignment, antenna.....................................................................................................................3-19AMI...............................................................................................................................................2-5Antenna......................................................................................................2-3, 3-3, 3-20, 3-26, 4-13Antenna connection....................................................................................................................3-16Antenna installation....................................................................................................................3-18Antenna planning..........................................................................................................................3-8Auxiliary connectors.....................................................................................................................5-3Availability calculation ................................................................................................................3-6BB8ZS.............................................................................................................................................2-5Bit Error Rate................................................................................................................................3-6Buffer.....................................................................................................................................2-5, 5-1CCalculations ..................................................................................................................................3-5Caution..........................................................................................................................................1-2Channel plan...............................................................................................................................3-10Coaxial cable ..............................................................................................................................3-17Connections .................................................................................................2-5, 2-6, 2-13, 3-21, 5-1Container ......................................................................................................................................3-1DDC........................................................................................................................................3-8, 3-13Delay.............................................................................................................................................5-1Digital Capacity............................................................................................................................2-5Duplex ..........................................................................................................................................5-1EEIRP............................................................................................................................................3-23Environment .................................................................................................................................2-7Errors ..........................................................................................................................................4-11FFade margin ..................................................................................................................................3-6Filtering .................................................................................................................................2-5, 5-1Frequency ............................................................................................................................3-10, 4-2Frequency plan .............................................................................................................................3-7Fresnel ..........................................................................................................................................3-4Front panel....................................................................................................................................2-9
GGrounding...................................................................................................................................3-13IIcons..............................................................................................................................................1-2Installation .......................................................................................................... 1-1, 2-16, 3-3, 3-22Interference.................................................................................................................................4-12ISO 9000...........................................................................................................................................iLLAN..............................................................................................................................................2-5Line-of-sight .................................................................................................................................3-4Link budget...................................................................................................................................3-5Loopback ......................................................................................................................................2-5MMechanical....................................................................................................................................2-8Mounting ....................................................................................................................................3-11NNote ..............................................................................................................................................1-2OOrderwire.................................................................................................2-6, 2-13, 3-22, 3-26, 3-29Output power ..............................................................................................................................3-24Output power, adjust .........................................................................................................3-27, 3-28PPath ...............................................................................................................................................3-4Path planning................................................................................................................................3-8Power........................................................................................ 2-2, 2-7, 2-16, 3-3, 3-12, 3-28, 4-13Power connection .......................................................................................................................3-15Power connection, DC................................................................................................................3-13Power supply planning .................................................................................................................3-8Professional installation ......................................................................................................... iii, 1-1RRear panel...................................................................................................................................2-15Receive signal level..............................................2-10, 2-12, 3-3, 3-5, 3-18, 3-19, 3-20, 3-25, 4-14Receiver........................................................................................................................................2-3Regulatory............................................................................................................................... iii, 2-8REN ............................................................................................................................................3-29Repair............................................................................................................................................4-5RS-232..................................................................................................................... 2-14, 3-33, 3-34RSL.............................................................................................................................................3-19SShipping...............................................................................................................................2-16, 3-1Spares............................................................................................................................................4-3System...........................................................................................................................................2-4
TTechnical support .........................................................................................................................4-4Telephone ...................................................................................................................................3-29Test ......................................................................................................................................2-6, 2-10Tips ...............................................................................................................................................1-2Tools .............................................................................................................................................3-9Transmission line........................................................................................................................3-17Transmitter...........................................................................................................................2-2, 3-27Troubleshooting............................................................................................................................4-1Turn-up .......................................................................................................................................3-22WWarranty.......................................................................................................................................... v
For ISO Purposes -Last Page of this Manual

Navigation menu