Primatronix CV200RT 433MHz Transceiver User Manual 1
Primatronix Ltd 433MHz Transceiver 1
UserManual.wiki
>
Primatronix
>
CV200RT User Manual
User Manual
Navigation menu
Upload a User Manual
Namespaces
Wiki Guide
HTML
PDF
Info
Views
User Manual
Discussion / Help
Navigation
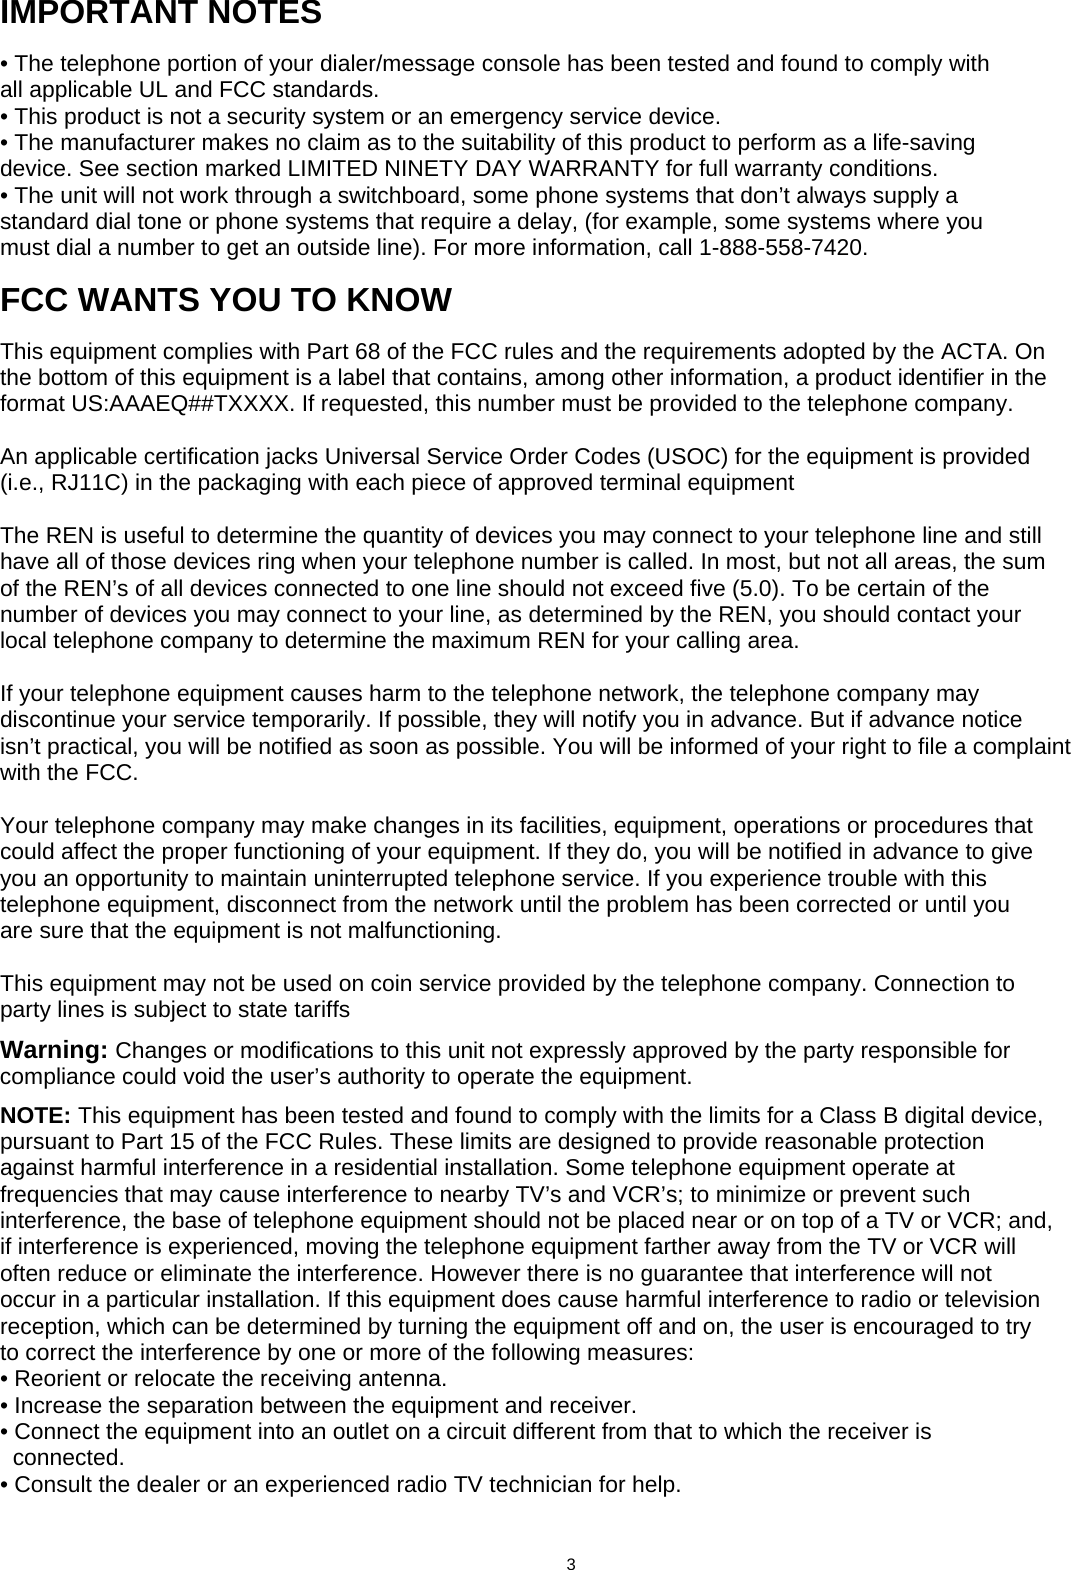

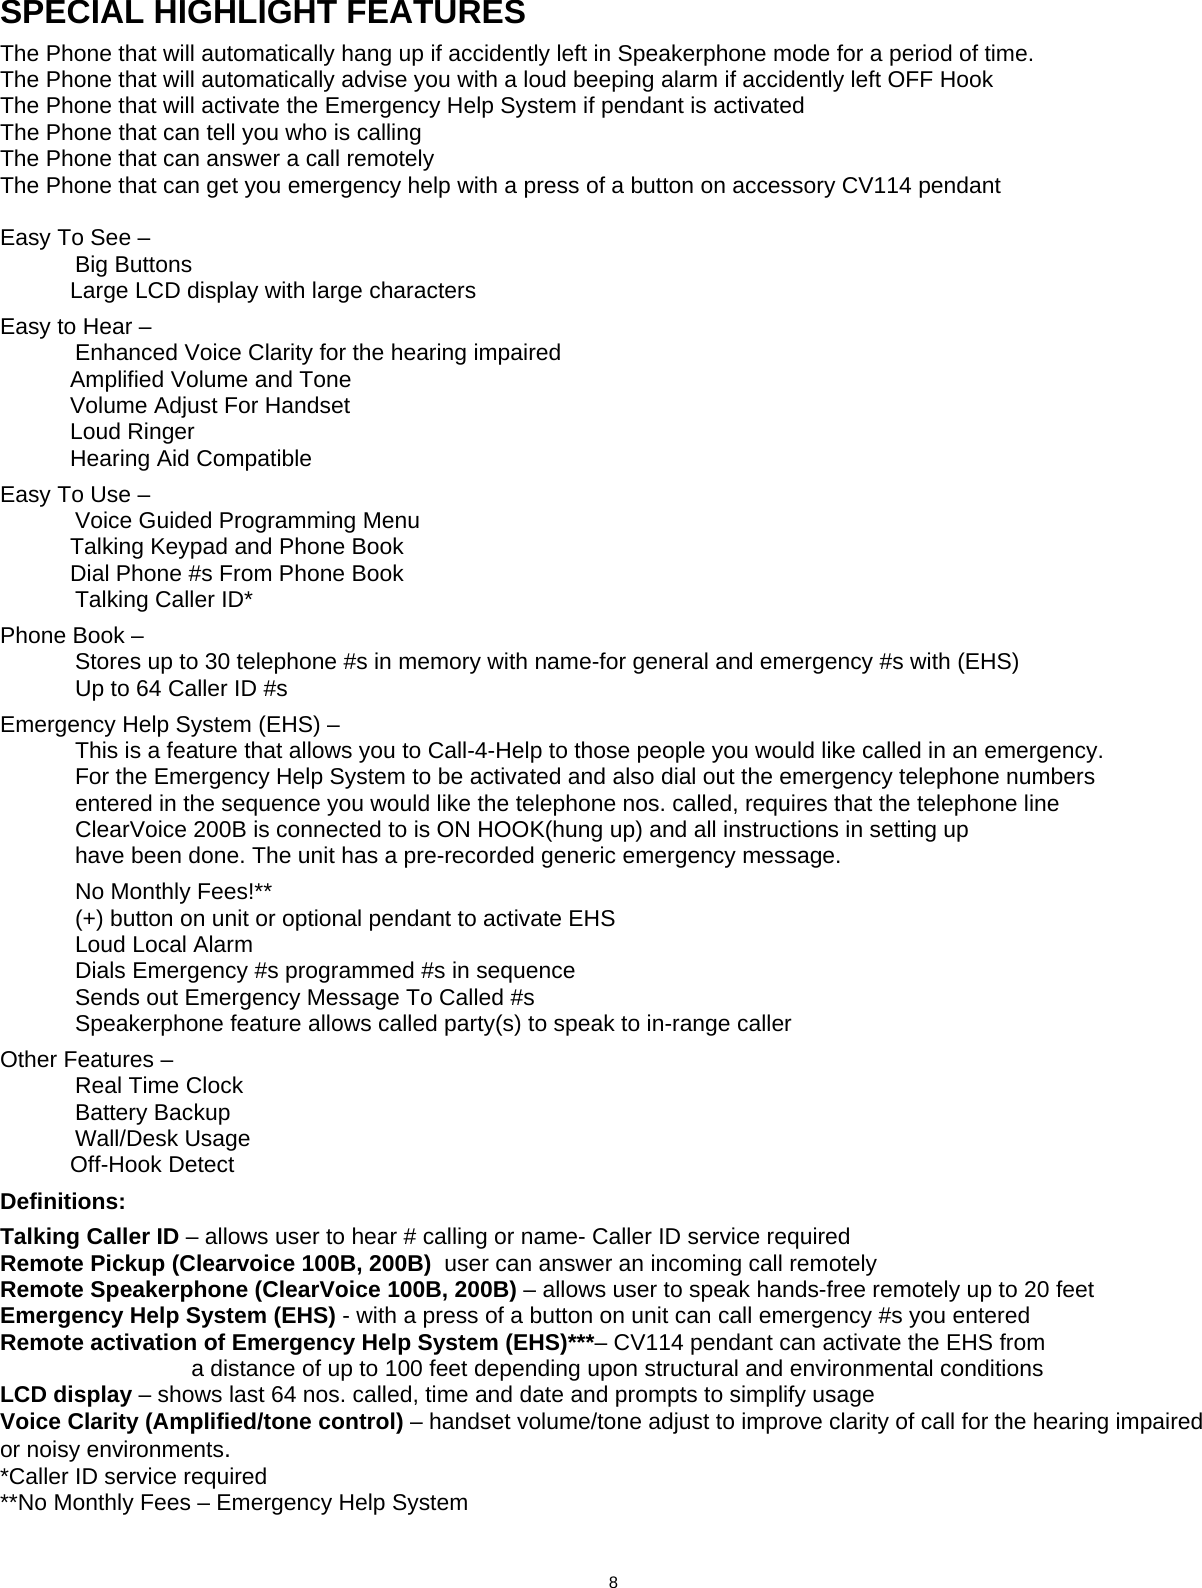
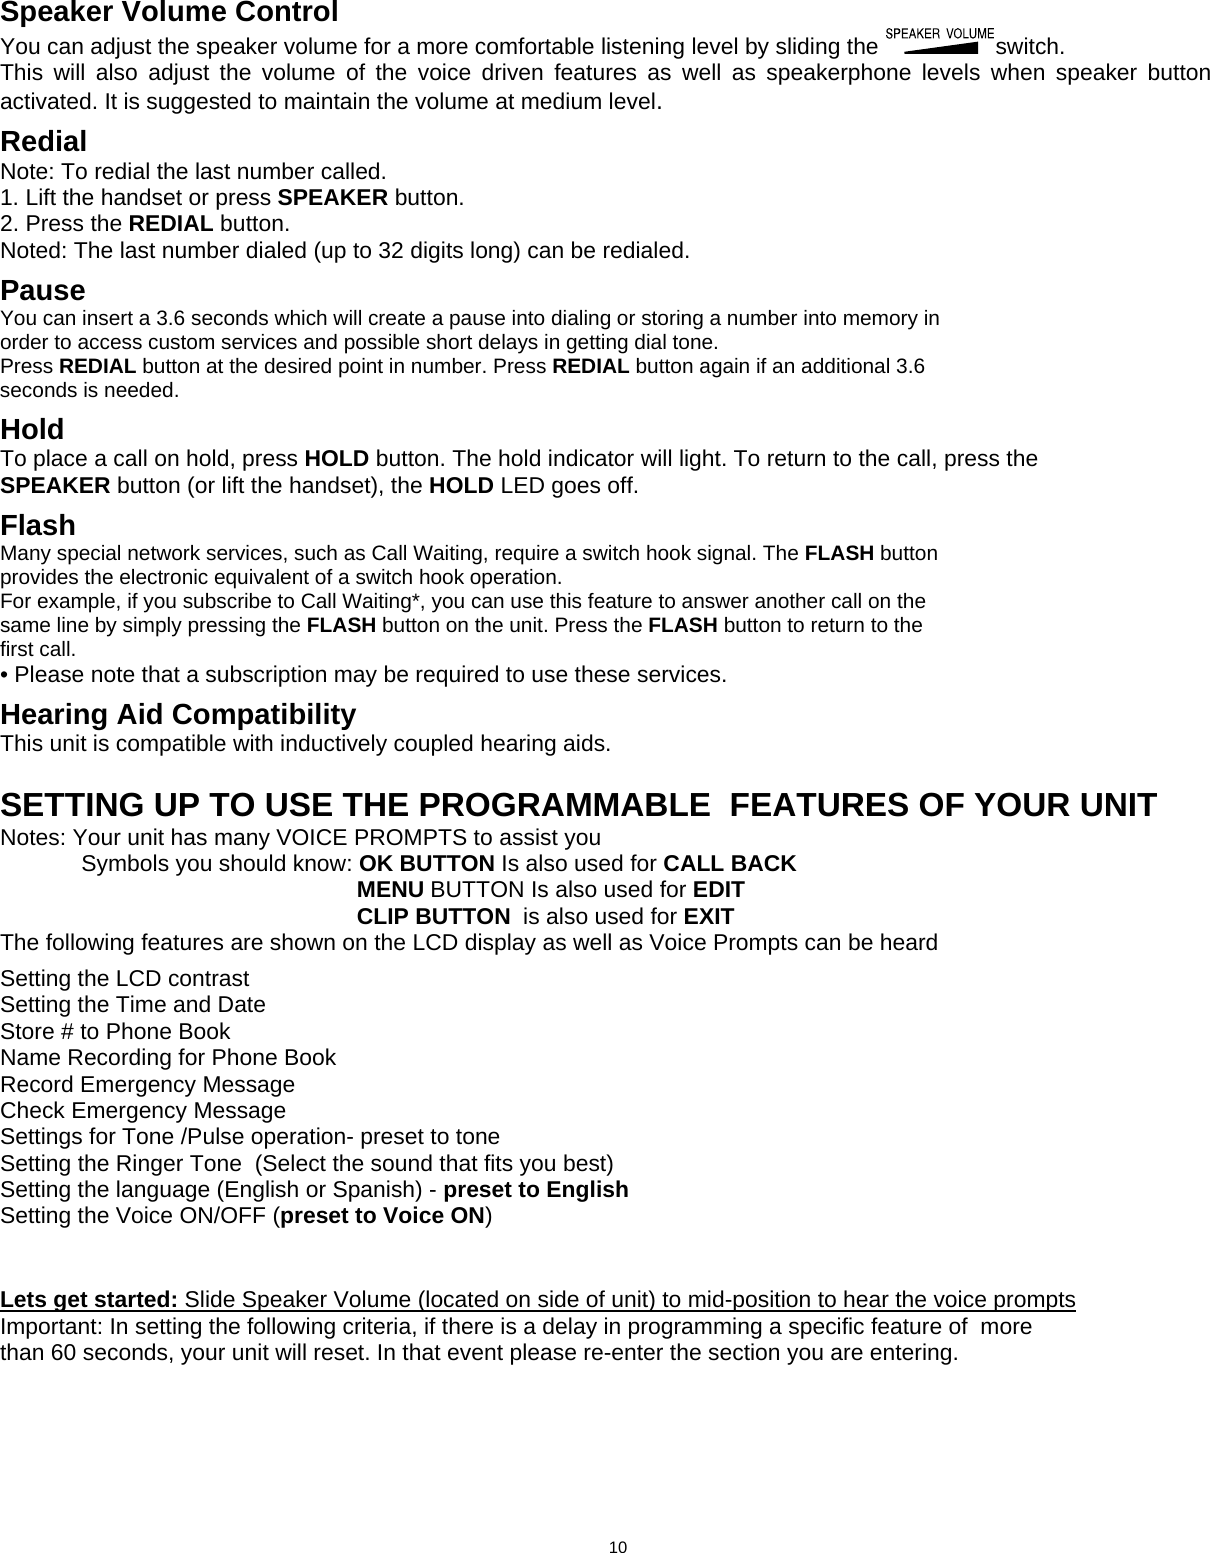
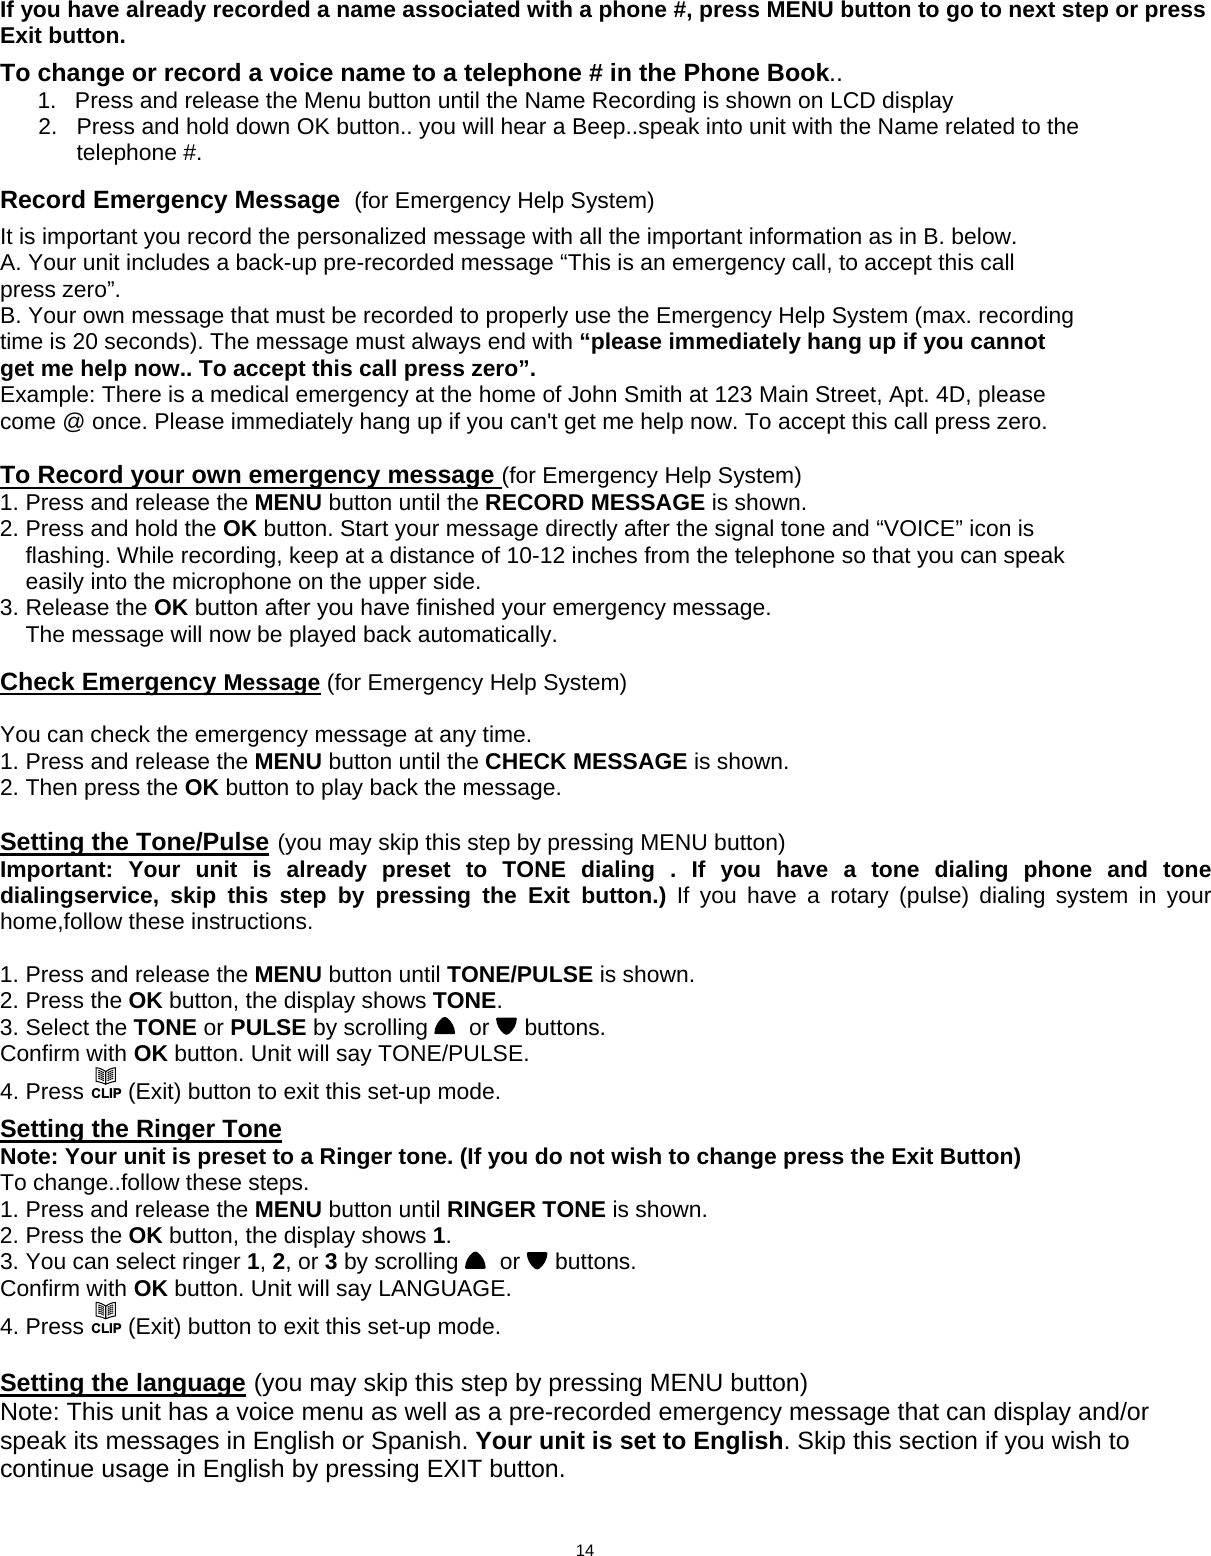
![Storing up to 30 telephone numbers in the phone book including emergency nos. to be called in a n emergency. E ntering Emergency telephone numbers and names: (for Emergency Help System) Note: If you have a telephone system where it is may be required to put a pause (P) before dialing a particular digit press the REDIAL button and a 3.6 second pause will be created. This is also important if you are using on a PABX or PBX where you insert a pause before and after entering 1,8 or 9,or other systems where outside line dial tone can be delayed. 1. Press (EXIT) button until PHONE BOOK icon is displayed on LCD display and states Phone Book. 2. Press and release the MENU button until STORE NUMBER is shown and states Store #s to Phone Book. 3. Press the OK button. The cursor will flash on the left side of the LCD display in the first position. 4. Enter the required telephone number (Table 1) with a maximum of 22 digits using the number pad and Press OK button to confirm, (both the erase feature and pause feature can be used when storing the Telephone number), telephone numbers are to be entered exactly as you would dial the telephone no. manually from where the ClearVoice model is to be used. 5. Enter the required name with a maximum of 16 letters. Cursor shown as (I) is all the way on left side of LCD display……..See Table A below for details (How to enter names in the phone book). 6. Press OK button to confirm.The display now shows EMERGENCY OFF. Since it is an Emergency Telephone #, Press a scroll button or until it reads Emergency ON on LCD display 7. Press OK button. 8. Press a scroll button or to desired Location…For example: If it is the 1st # to be called, press a scroll button until it reads 1 on the display, 2 for 2nd etc. 9. Press OK button..unit will say “Number Saved” Unit will now say Name Recording For Phone Book 10. Press and hold down OK button.. you will hear a Beep..speak into unit with Name related to a telephone #. Note:To record voice (example ‘this is John’), hold down OK button, immediately speak clearly into microphone after a beep and “VOICE” icon is flashing on LCD display.. Release the button when you finished or the unit will stop recording after 3 seconds. The voice prompt will then be played automatically. [Recording the Voice is necessary for the personalized talking Caller ID and talking phone book feature]. You can repeat steps 1 to 9 to enter more numbers or press CLIP (Exit) button to exit How to enter names in the phone book The number buttons are also inscribed with letters for entering the name. By repeatedly pressing the appropriate button, upper case letters as well as numbers and special characters can be entered. Overview: Note: In entering a name Note: The numeric keys 1 thru # can be used as shown in Table I 1 space + & - / 1 2 A B C 2 3 D E F 3 4 G H I 4 5 J K L 5 6 M N O 6 7 P Q R S 7 8 T U V 8 9 W X Y Z 9 0 , . : ; ? 0 * ‘ @ ( ) * # $ _ % ! # TABLE A Example: To enter the name JIM. Press 5 button until J is displayed ........... Wait 2 seconds Press 4 button until I is shown ................. Wait 2 seconds Press 6 button until M is shown ................Wait 2 seconds 12](https://usermanual.wiki/Primatronix/CV200RT/User-Guide-794937-Page-13.png)
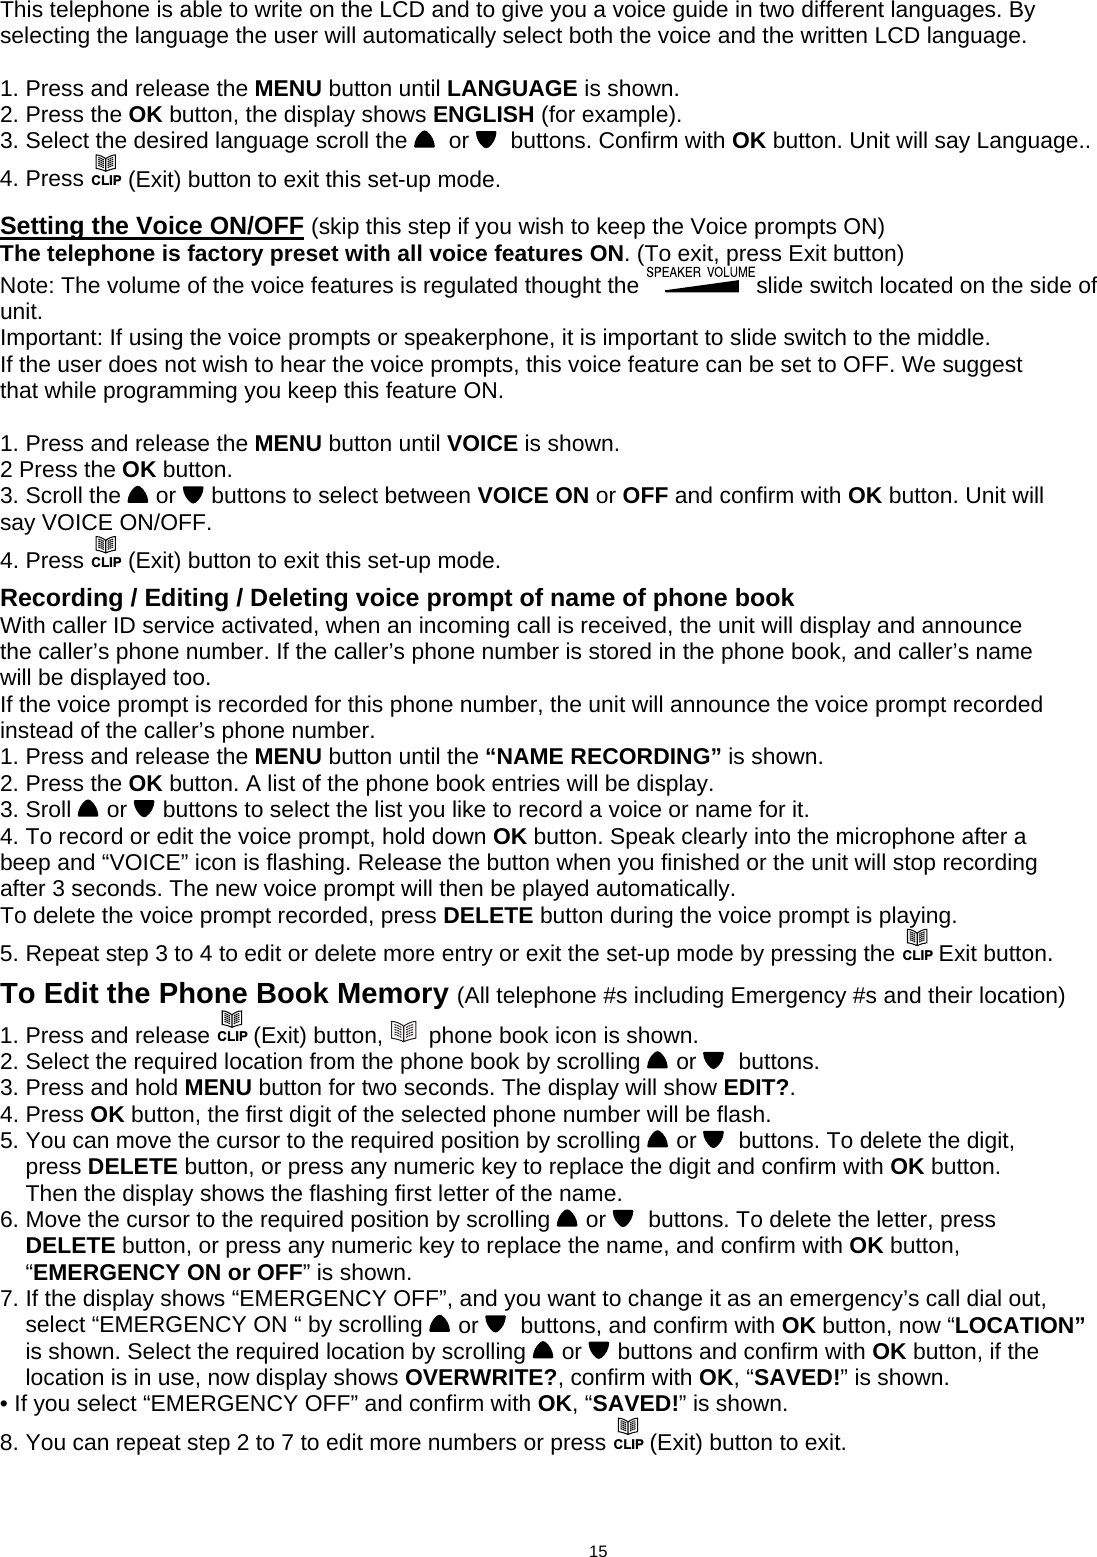
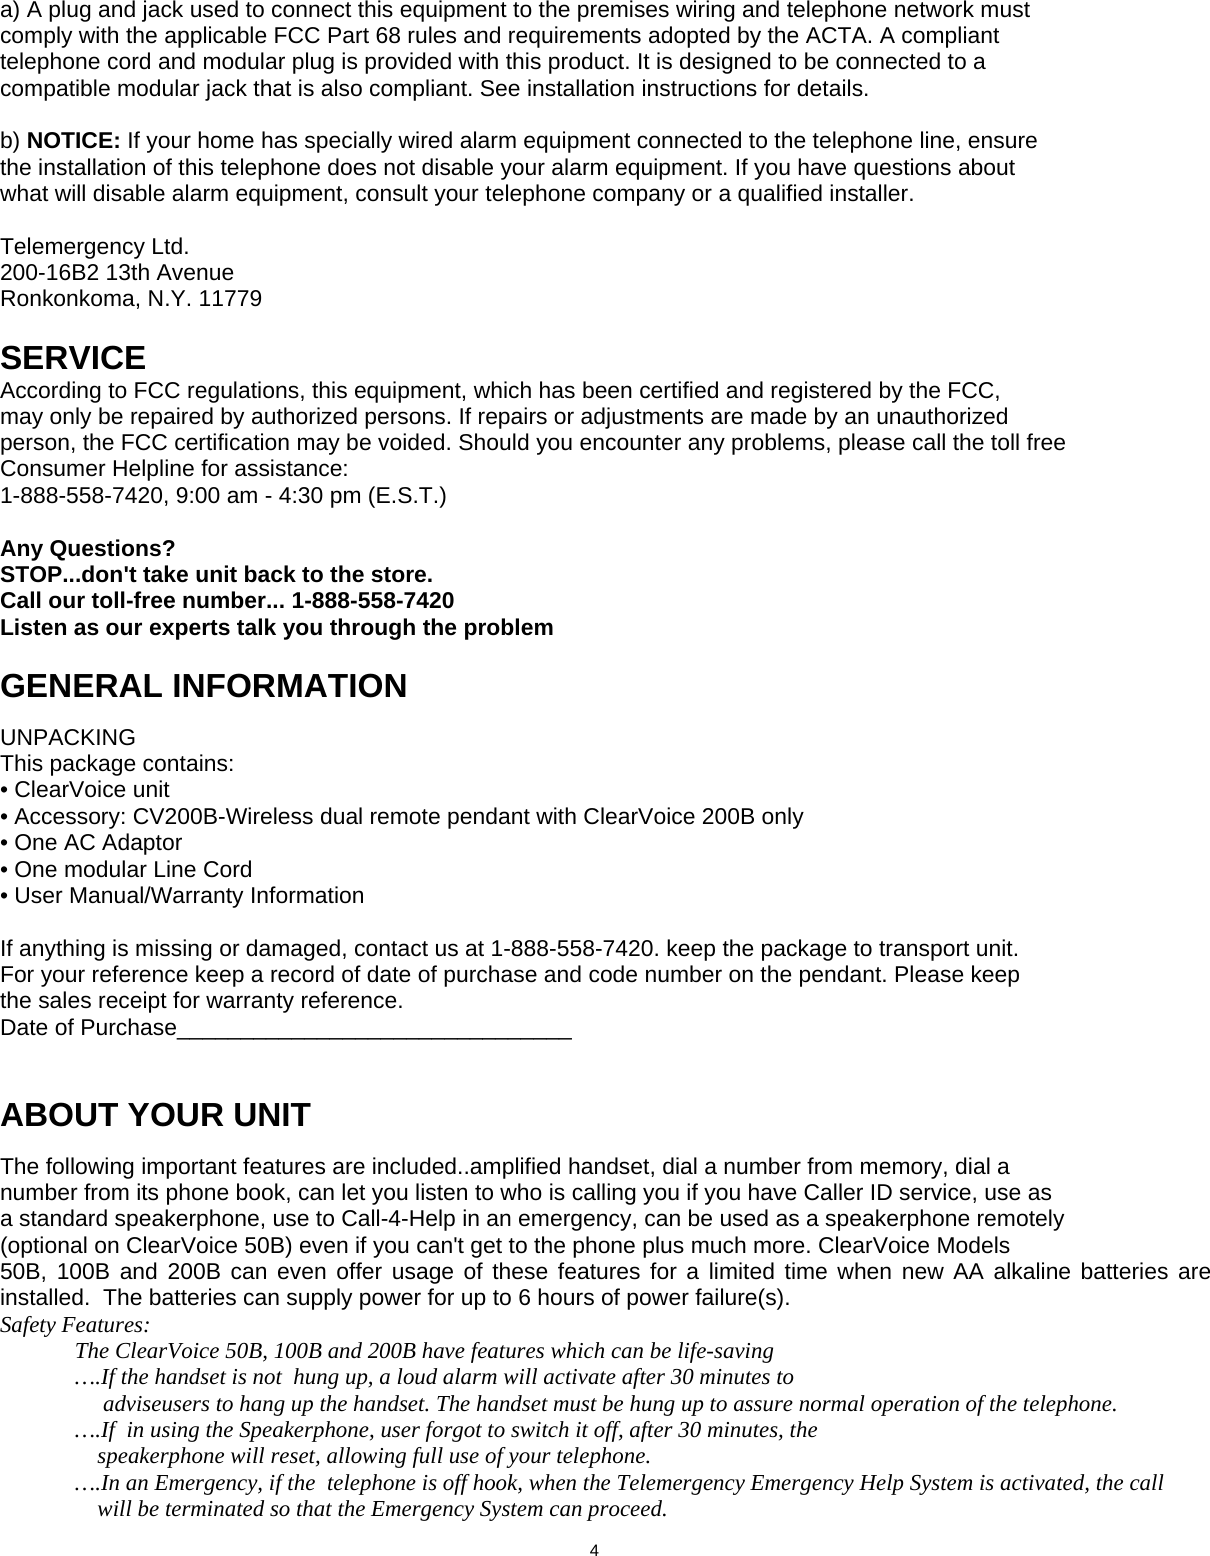
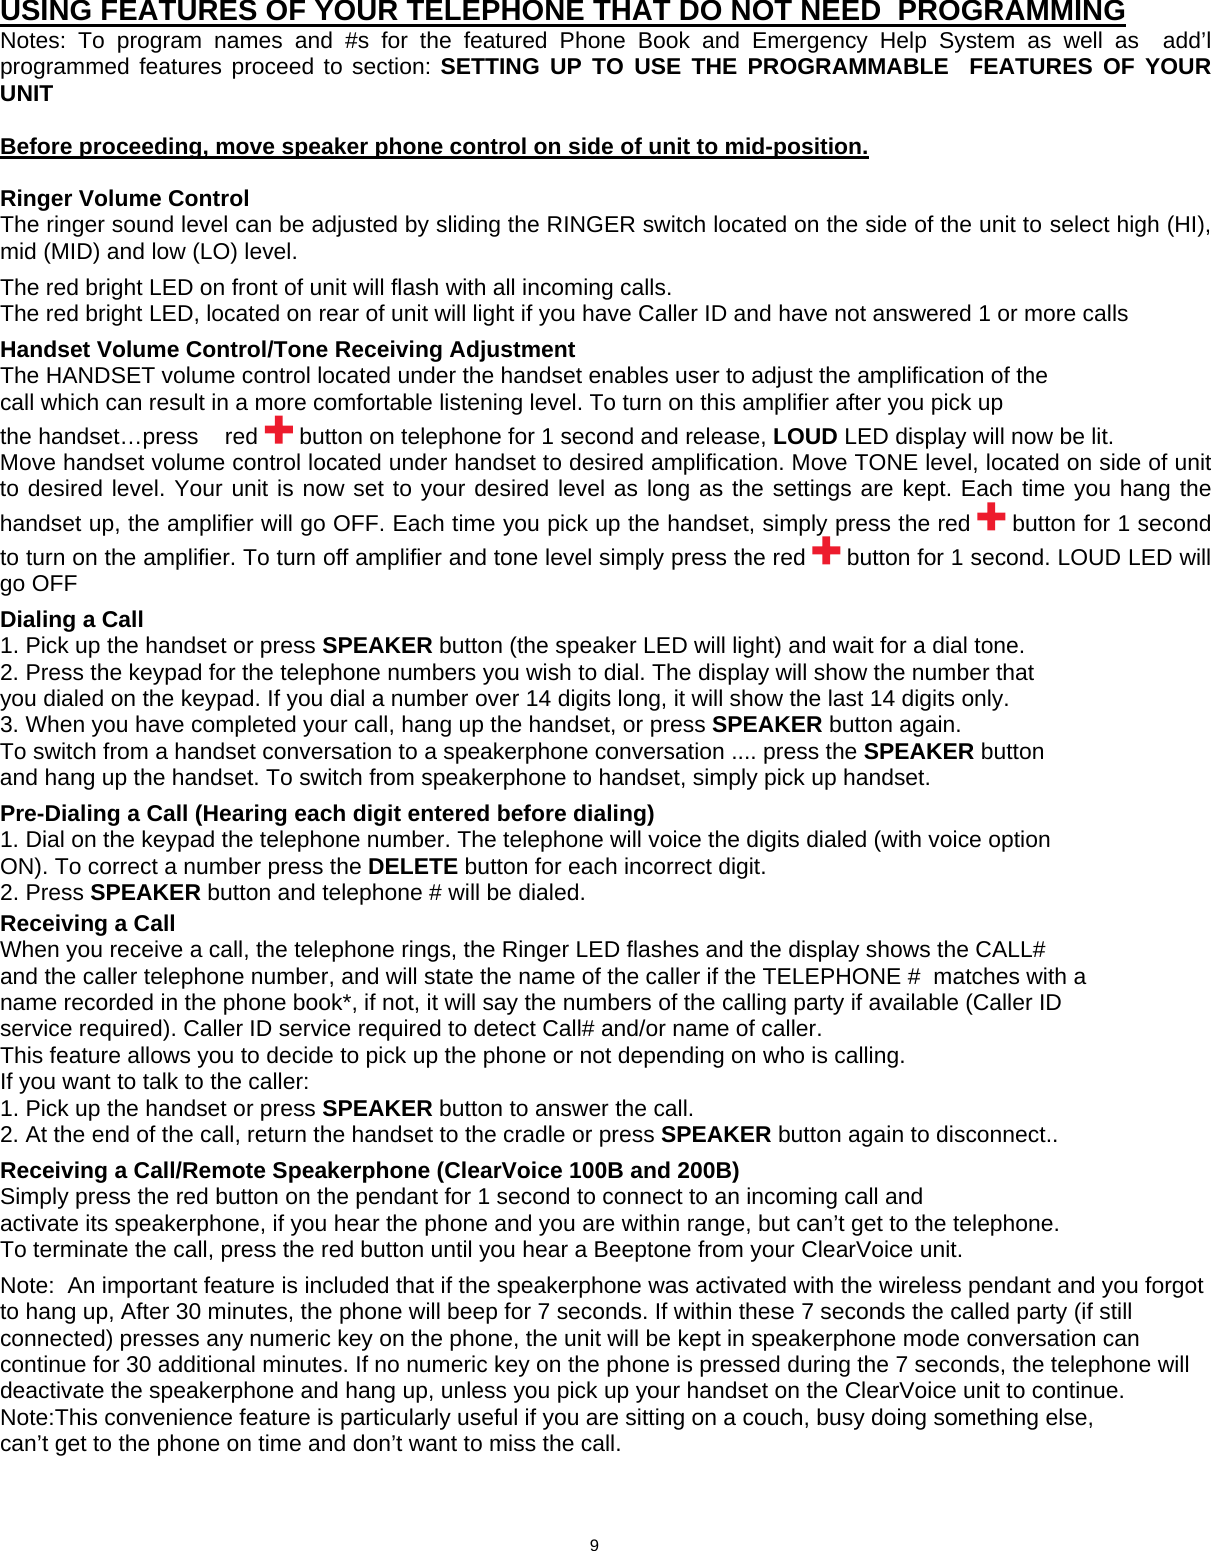
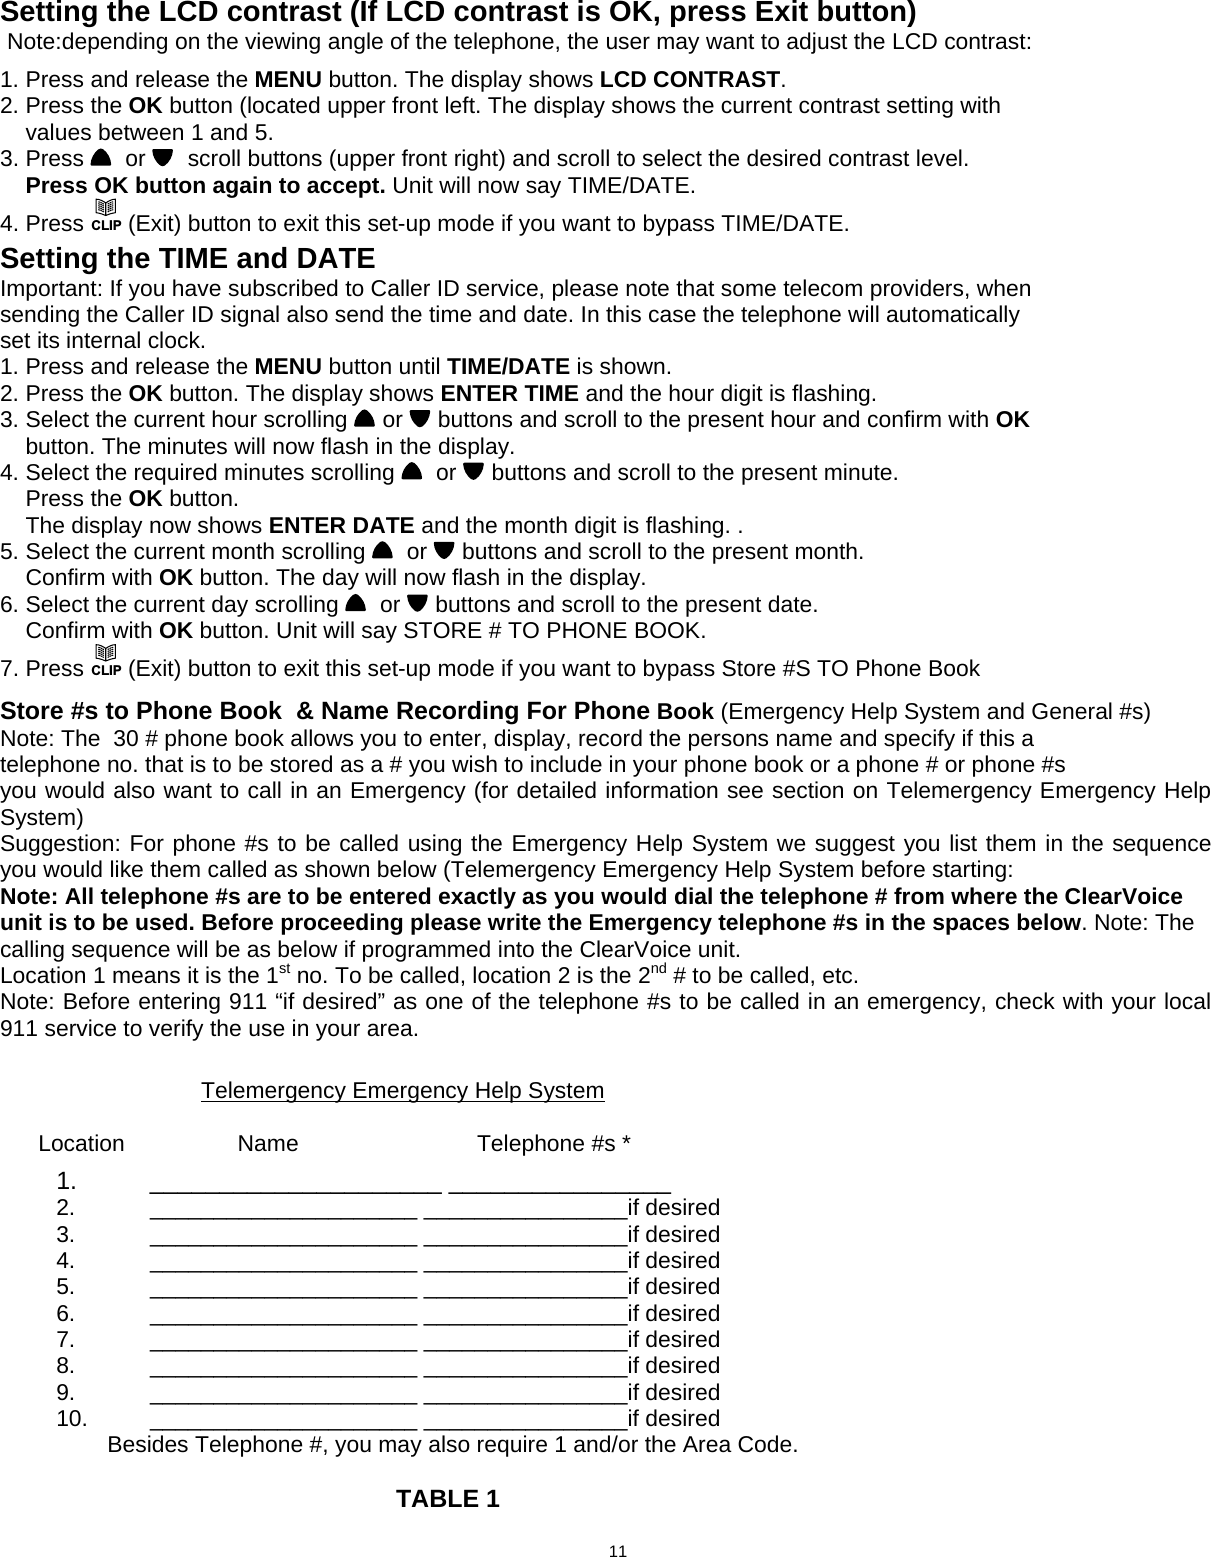
![General Telephone nos. to be entered Name: Telephone# * Name: Telephone# * ____________________ ________________ ____________________ _______________ ____________________ ________________ ____________________ _______________ ____________________ ________________ ____________________ _______________ ____________________ ________________ ____________________ _______________ ____________________ ________________ ____________________ _______________ ____________________ ________________ ____________________ _______________ ____________________ ________________ ____________________ _______________ ____________________ ________________ ____________________ _______________ ____________________ ________________ ____________________ _______________ ____________________ ________________ ____________________ _______________ Besides Telephone #, you may also require 1 and/or the Area Code TABLE 2 Entering General Telephone #s and Names Notes: You can enter a total of 30 telephone #s. Ex. If you entered 10 telephone #s for the Emergency Help System, you can enter 20 General Tel #s. If you have a telephone system where it is may be required to put a pause (P) before dialing a particular digit press the REDIAL button and a 3.6 second pause will be created. This is also important if you are using on a PABX or PBX where you insert a pause before and after entering 1,8 or 9,or other systems where outside line dial tone can be delayed. You must enter the tel. no. and name on t he LCD display 1. Press (EXIT) button until PHONE BOOK icon is displayed on LCD display and states Phone Book. 2. Press and release the MENU button until STORE NUMBER is shown and states Store #s to Phone Book. 3. Press the OK button. The cursor will flash on the left side of the LCD display in the first position. 4. Enter the required telephone number with a maximum of 22 digits from Table 2 above using the number pad and press OK button to confirm, (both the erase feature and pause feature can be used when storing the telephone number), telephone numbers are to be entered exactly as you would dial the telephone no. manually from where the ClearVoice model is to be used. 5. Enter the required name with a maximum of 16 letters. Cursor shown as (I) is all the way on left side of LCD display. See Table A above for details (How to enter names in the phone book). 6. Press OK button. The display now shows EMERGENCY OFF. 7. Press OK button. unit will say “Number Saved” Unit will now say Name Recording For Phone Book 8. Press and hold down OK button.. you will hear a Beep..speak into unit with the Name related to the telephone #. Note:To record voice (example ‘this is John’), hold down OK button, after a beep and “VOICE” icon is flashing on LCD display, immediately speak clearly facing the unit. Release the button when you finish or the unit will automatically stop recording after 3 seconds. The recorded voice will then be played back automatically. [Recording the Voice is desirable for the personalized talking Caller ID and talking phone book feature]. You can repeat steps 1 to 9 to enter more numbers or press CLIP (Exit) button to exit. Name Recording for Phone Book Notes: If you have Caller ID in, it can be important to record a name with the entered phone # in the phone book. In this way when a caller rings your phone, the talking Caller ID will say the name of the caller. Otherwise the phone # will be stated. It is also useful if you are scrolling for a particular persons telephone # you enter into the Phone Book. 13](https://usermanual.wiki/Primatronix/CV200RT/User-Guide-794937-Page-14.png)