Philips Consumer Lifestyle MX6000 Wireless Home Entertainment System User Manual MX6000i 37 2 ame
Philips Consumer Lifestyle Wireless Home Entertainment System MX6000i 37 2 ame
UserManual.wiki
>
Philips Consumer Lifestyle
>
MX6000 User Manual
>
Users Manual Main
Contents
1.
Users Manual Addendum
2.
Users Manual Main
Users Manual Main
Navigation menu
Upload a User Manual
Namespaces
Wiki Guide
HTML
PDF
Info
Views
User Manual
Discussion / Help
Navigation

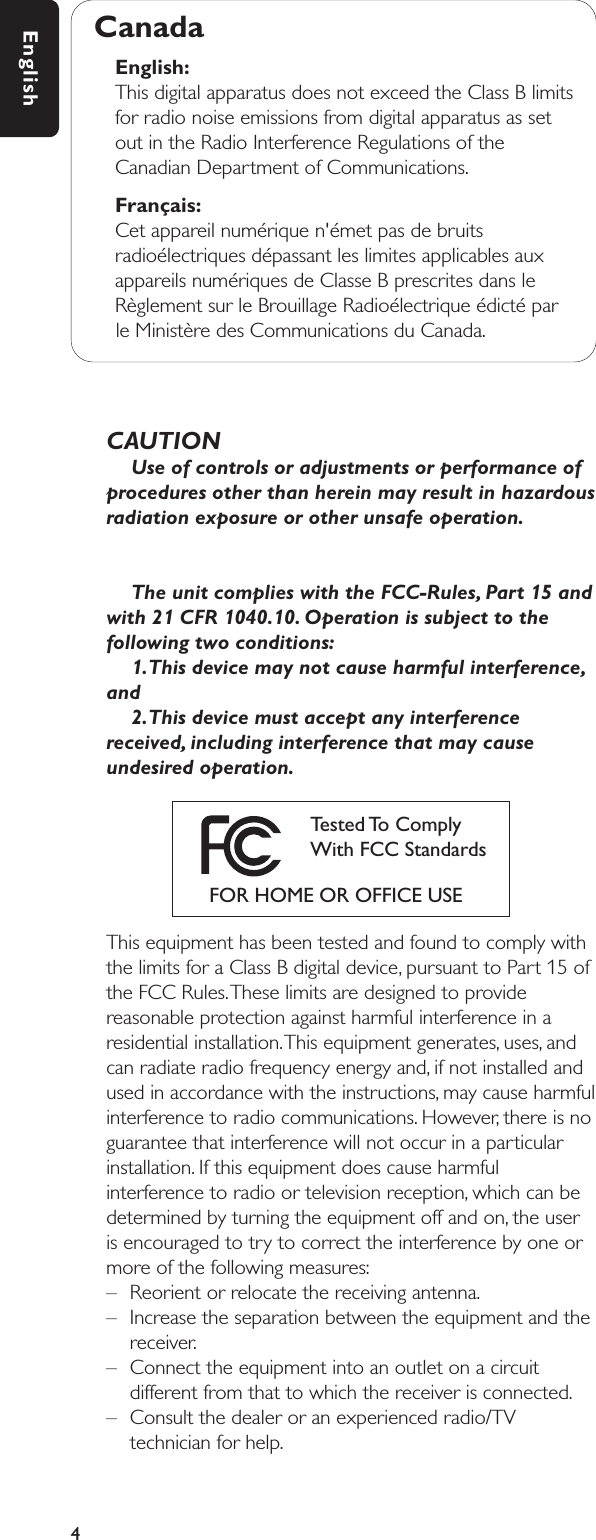

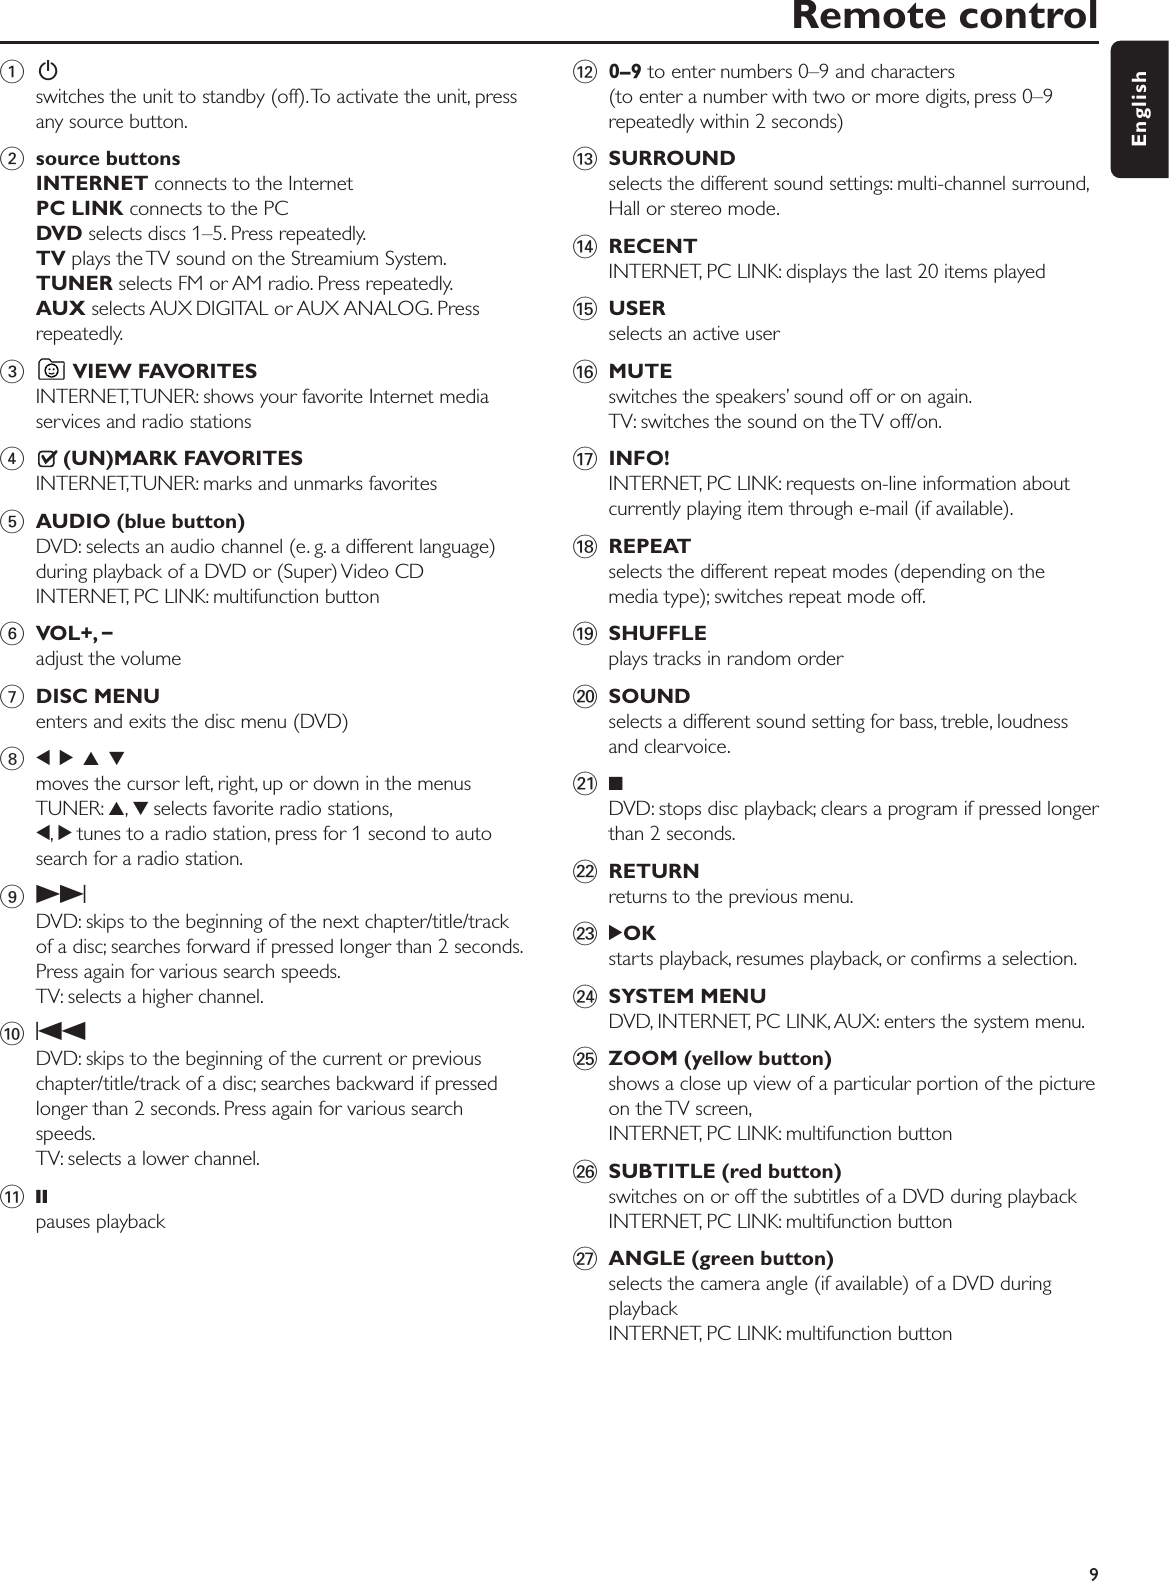
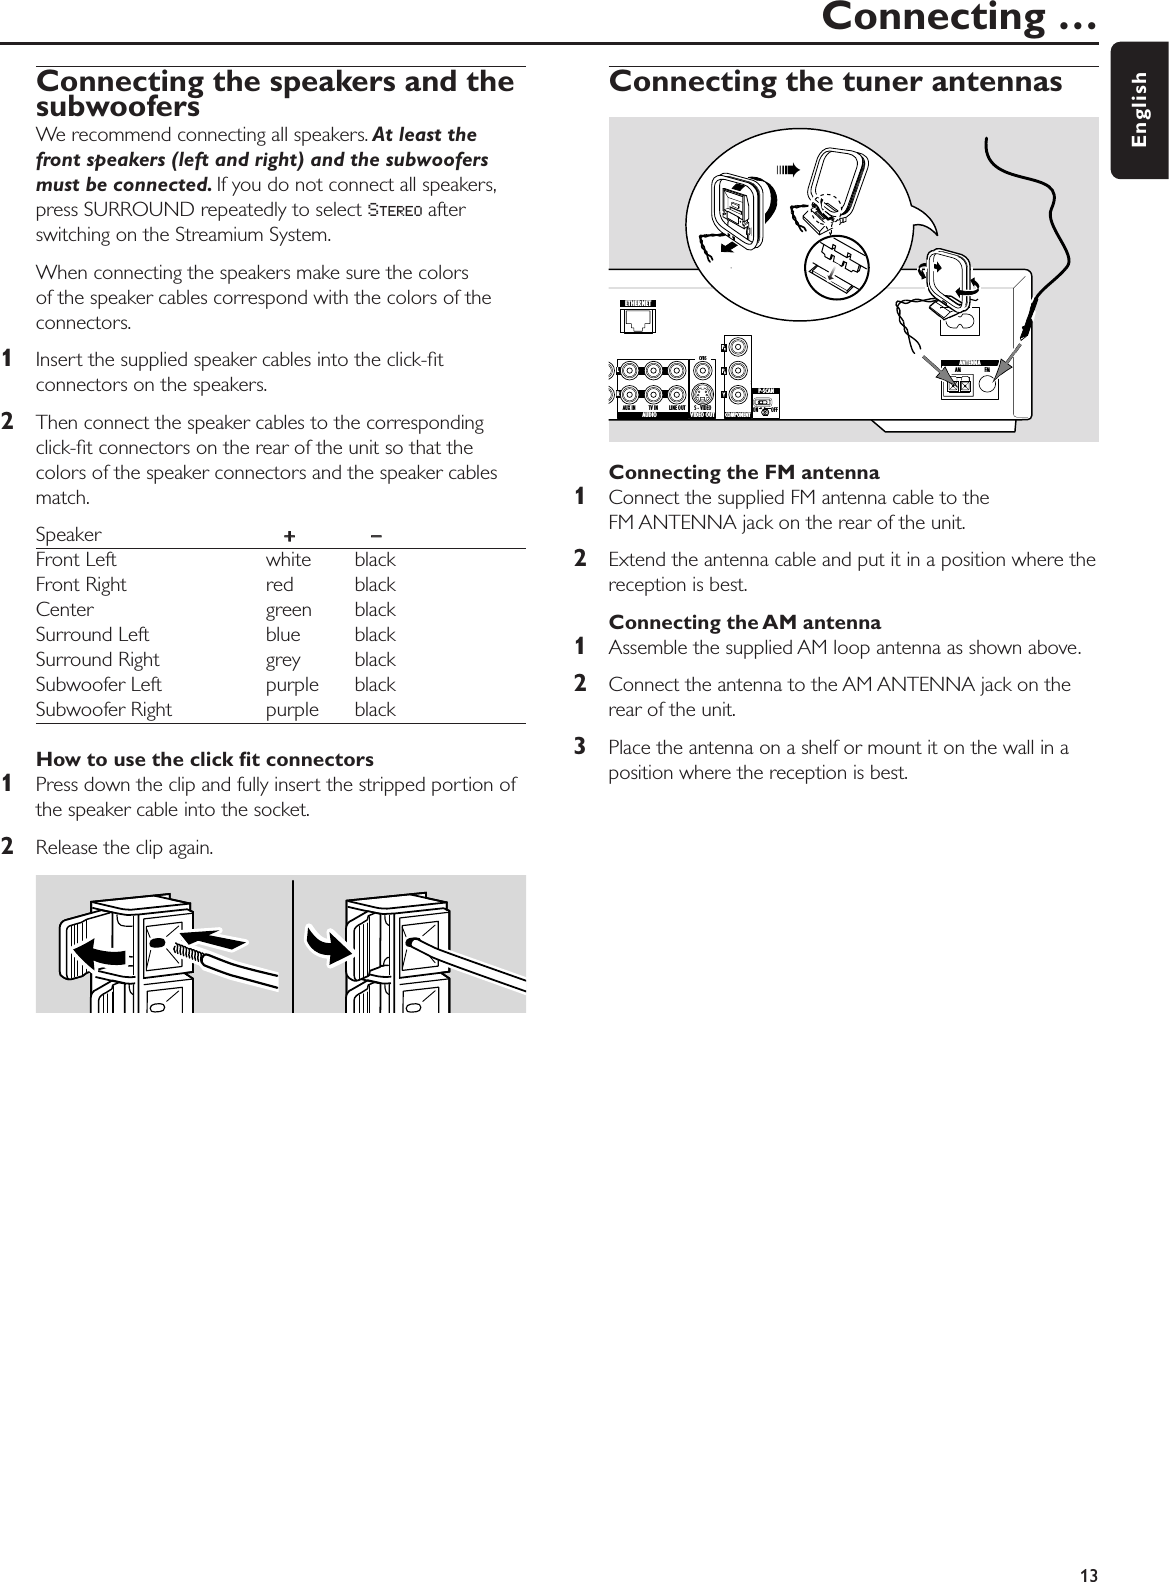

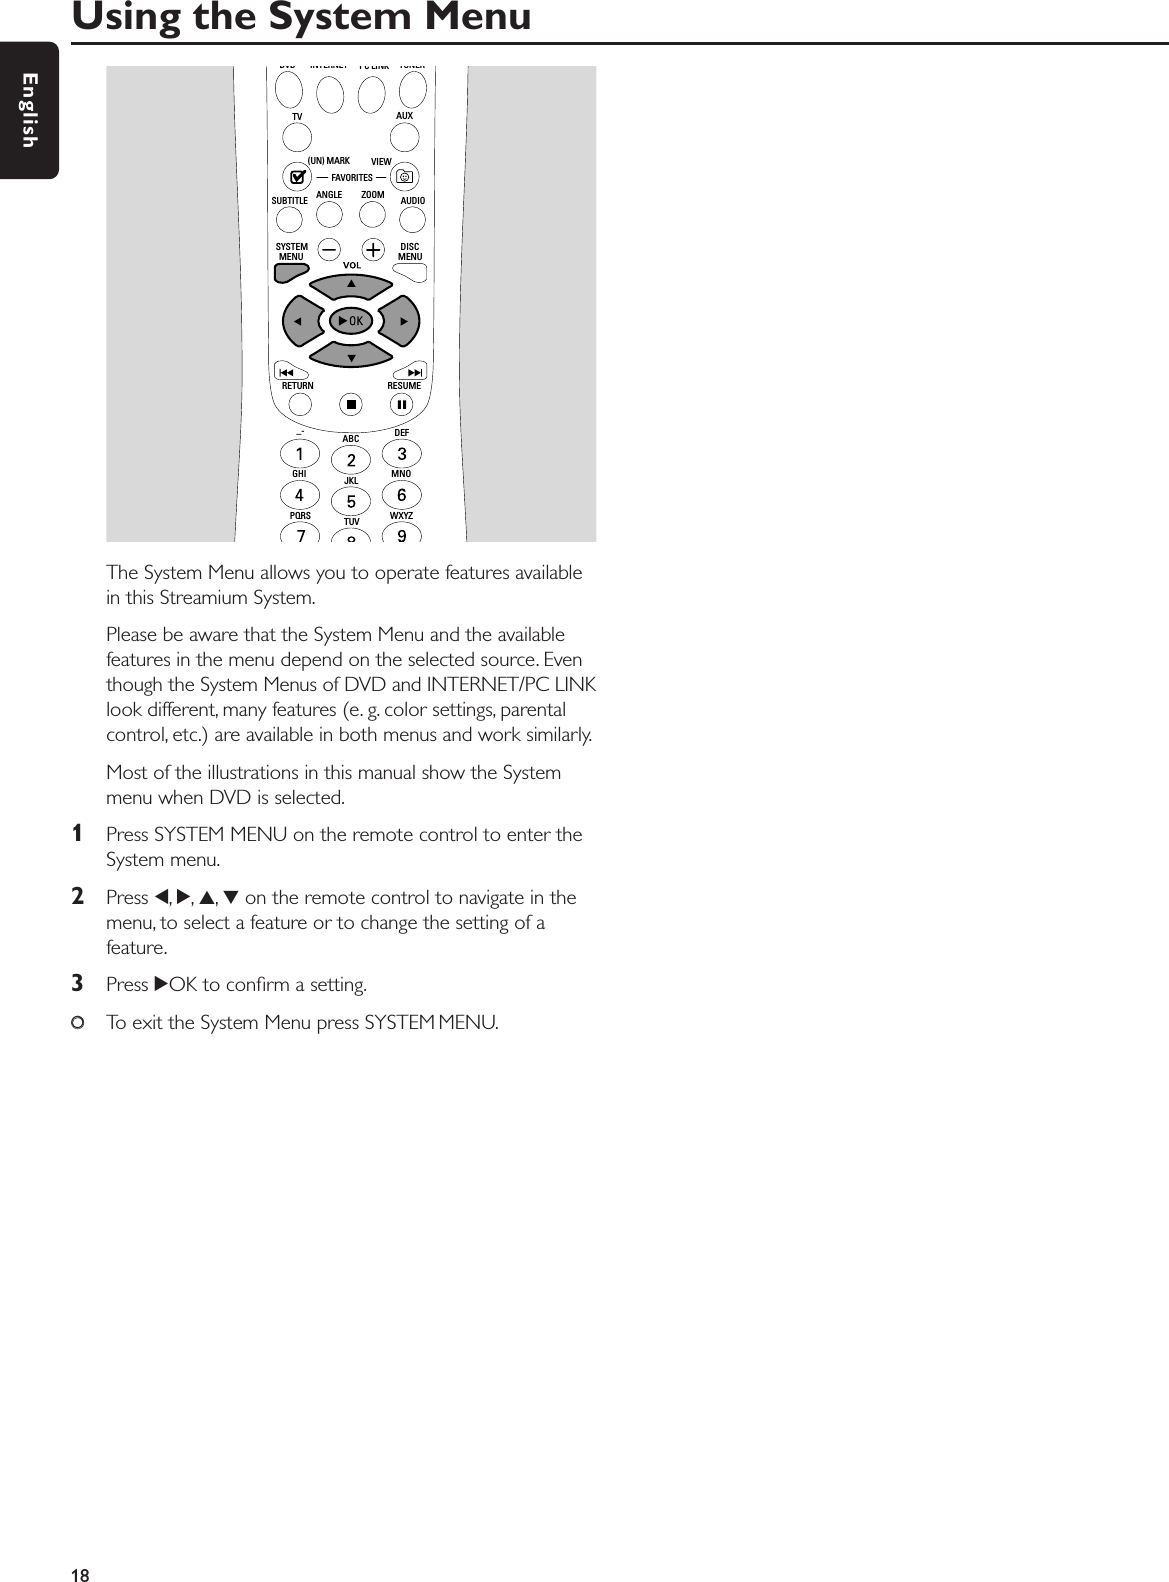
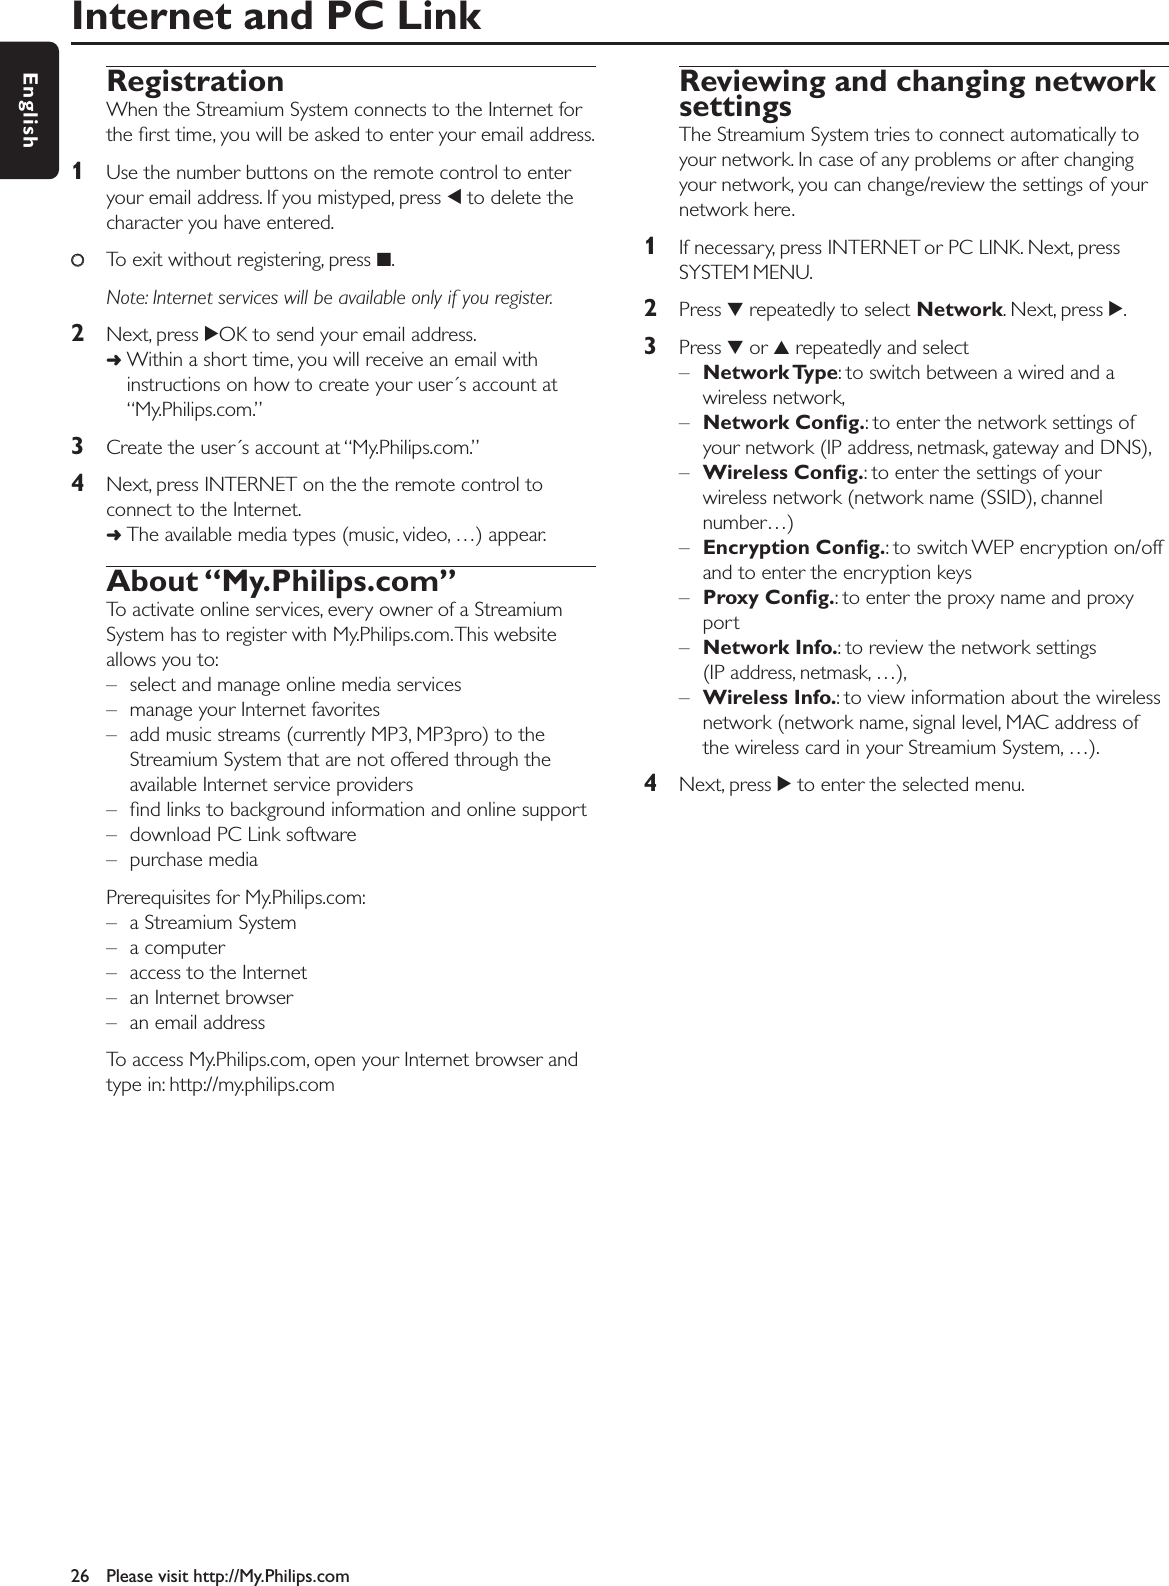

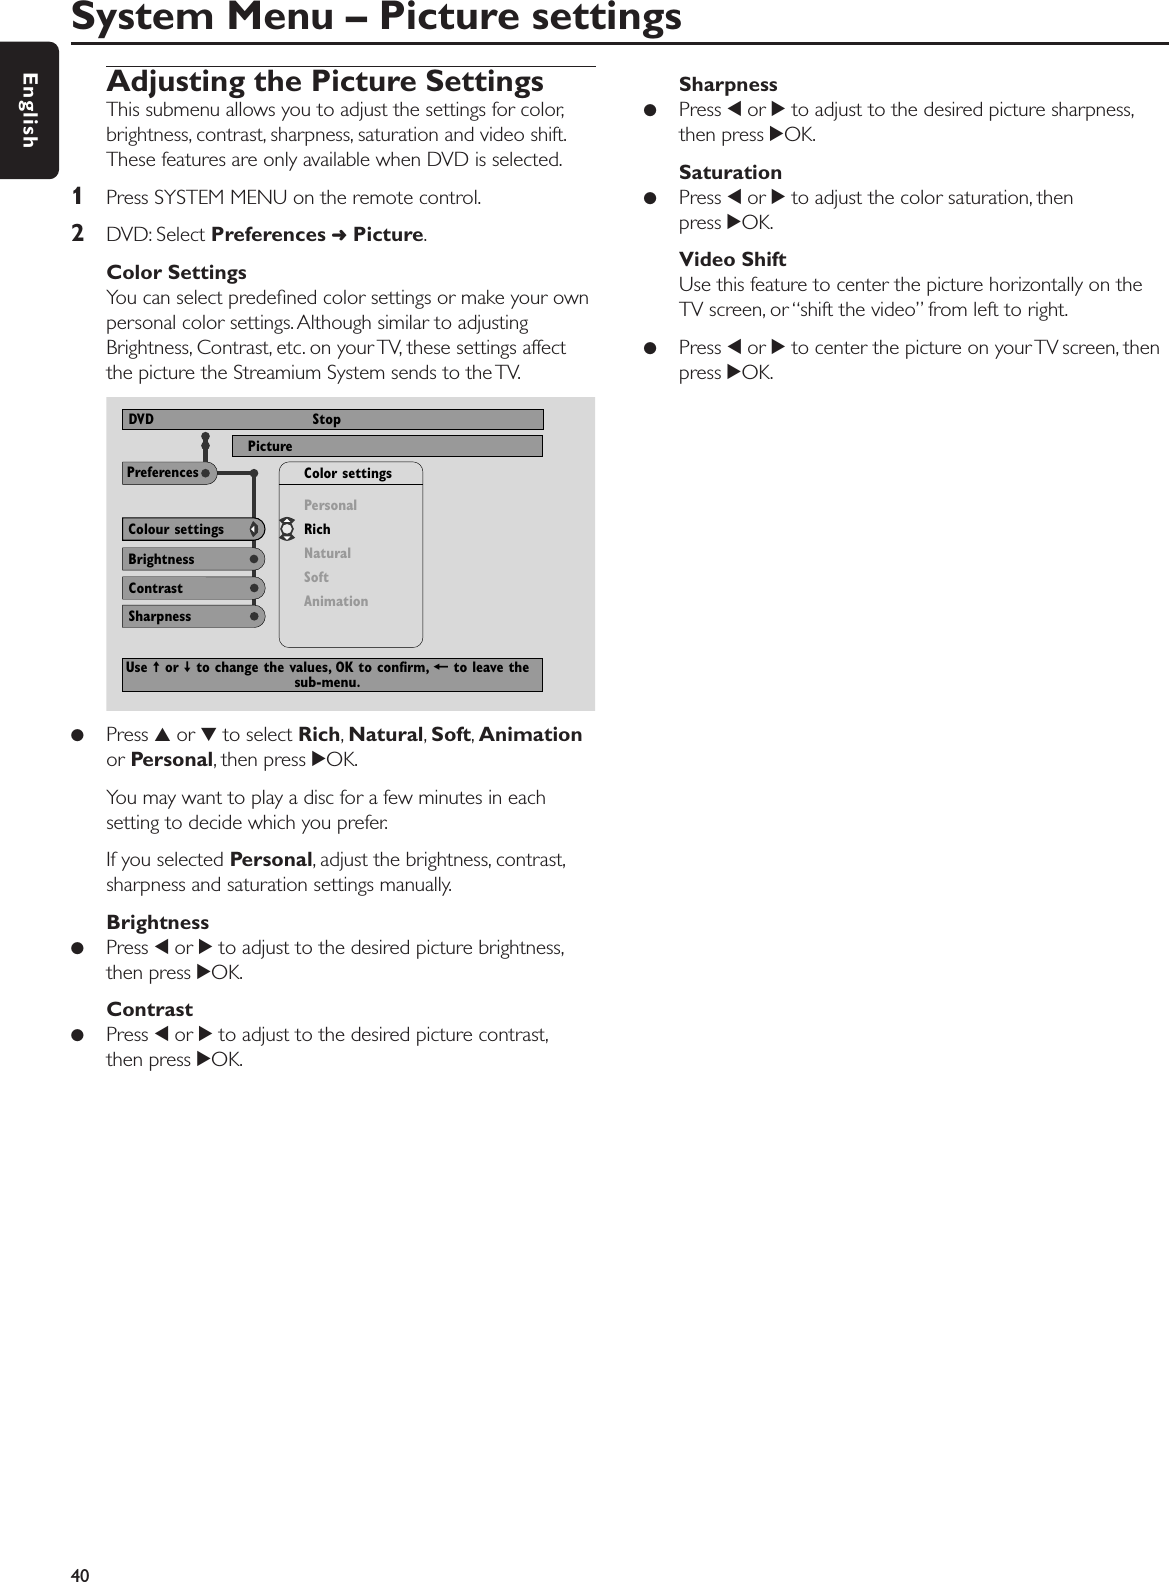
![General InformationWhen referring to this manual, remember …[DVD] Indicates the feature may be on some Digital VideoDiscs.[CD] Indicates the feature may be on some AudioCompact Discs.[VCD] Indicates the feature may be on some VideoCompact Discs.[MP3] Indicates the feature may be on some MP3 Discs.Playable DiscsThis system will play Digital Video Discs (DVDs),(Super) Video CDs, and Audio CDs.This system will alsoplay MP3 files (music tracks compressed with MPEG 1Audio Layer 3 technology) recorded onto a Compact Disc Recordable (CD-R) or a Compact Disc Rewritable(CD-RW).Discs having the following logos should play on thisStreamium System.This Streamium System supports only the first session ofmulti-session discs.Important!1) This system is designed for regular discs.Therefore, do not use any accessories such as discstabilizer rings or disc treatment sheets, etc. asoffered on the market, because they may causejamming of the changer mechanism.2) Do not load more than one disc into onedisc tray.Region CodesDVDs must be labelled for ALL regions or for Region 1in order to play on this system.You cannot play discs thatare labelled for other regions.The number inside the globe refers to a region of theworld. A disc encoded in a specific region format can playonly on DVD Players that have the same region code. So, ifa disc is labelled for Region 2, you cannot play that DVD onthis Streamium System (because it is a Region 1 system).Available disc FeaturesFeatures described in this manual may not be available onevery disc. If the feature is not on the disc, you cannot usethe system to make the feature available. An “X” will appearin the top left corner of the TV screen if you try to access afeature that is not on the disc.Disc30English](https://usermanual.wiki/Philips-Consumer-Lifestyle/MX6000.Users-Manual-Main/User-Guide-428001-Page-30.png)
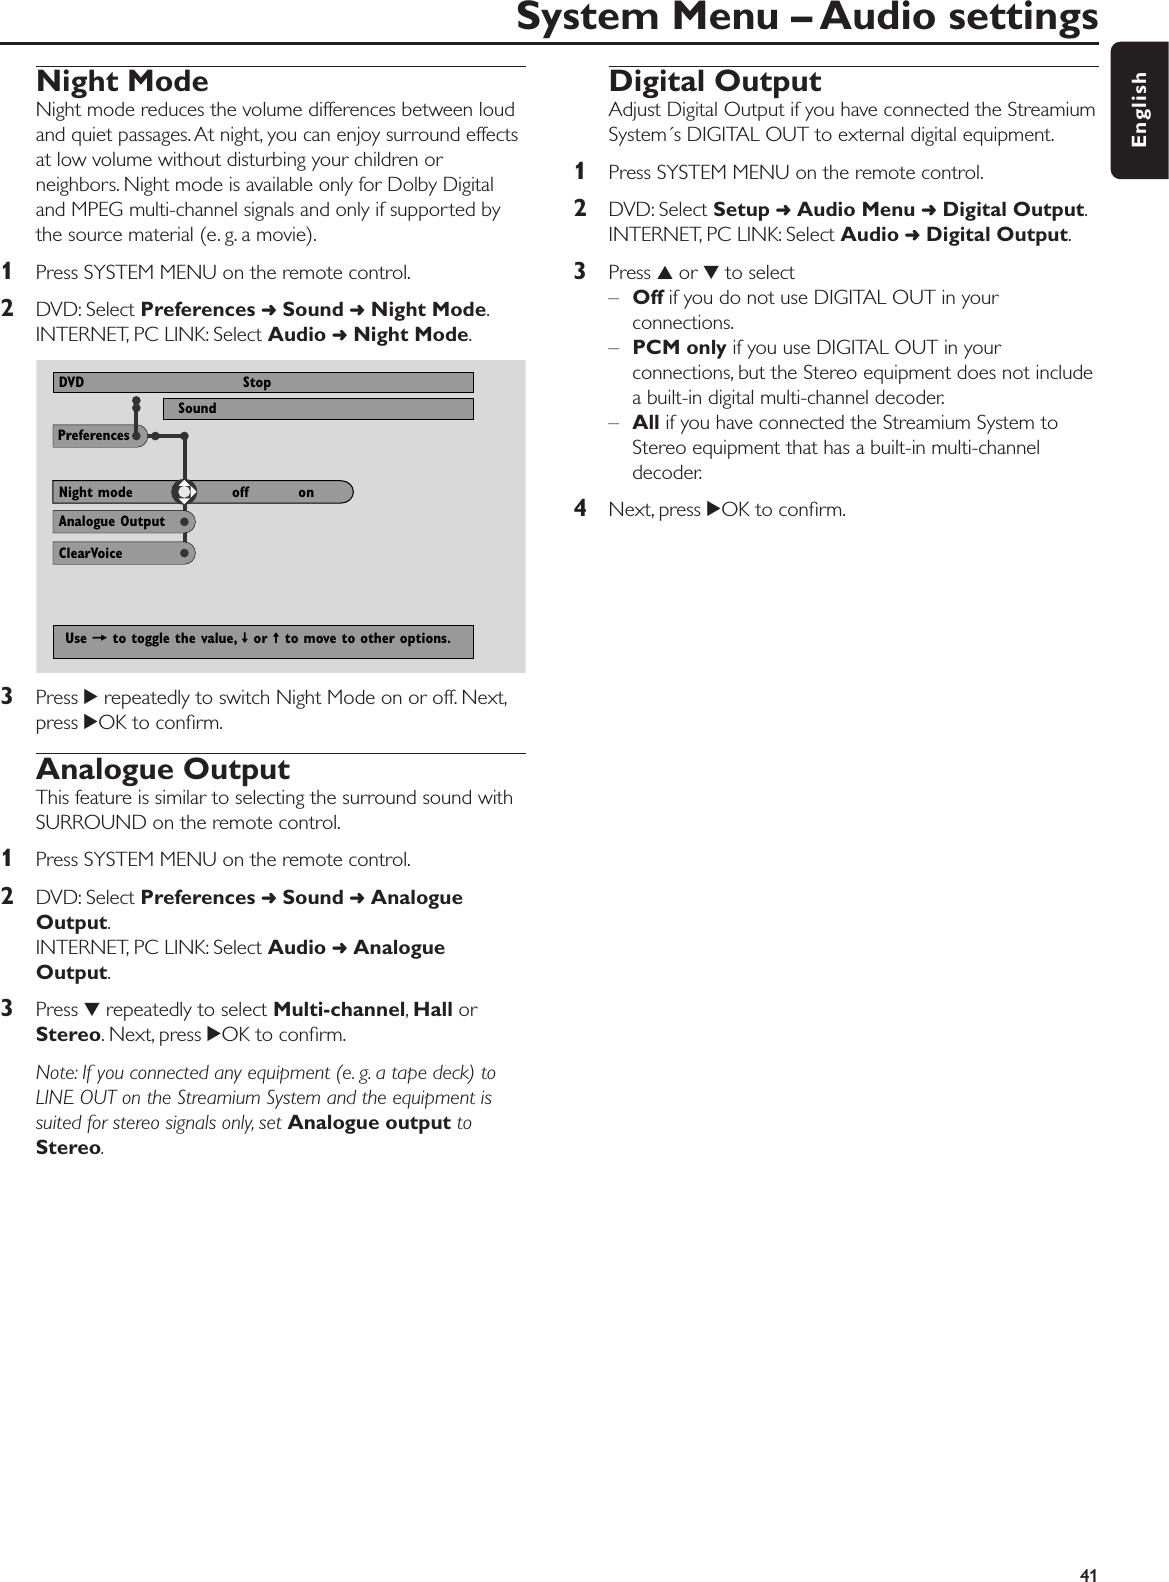
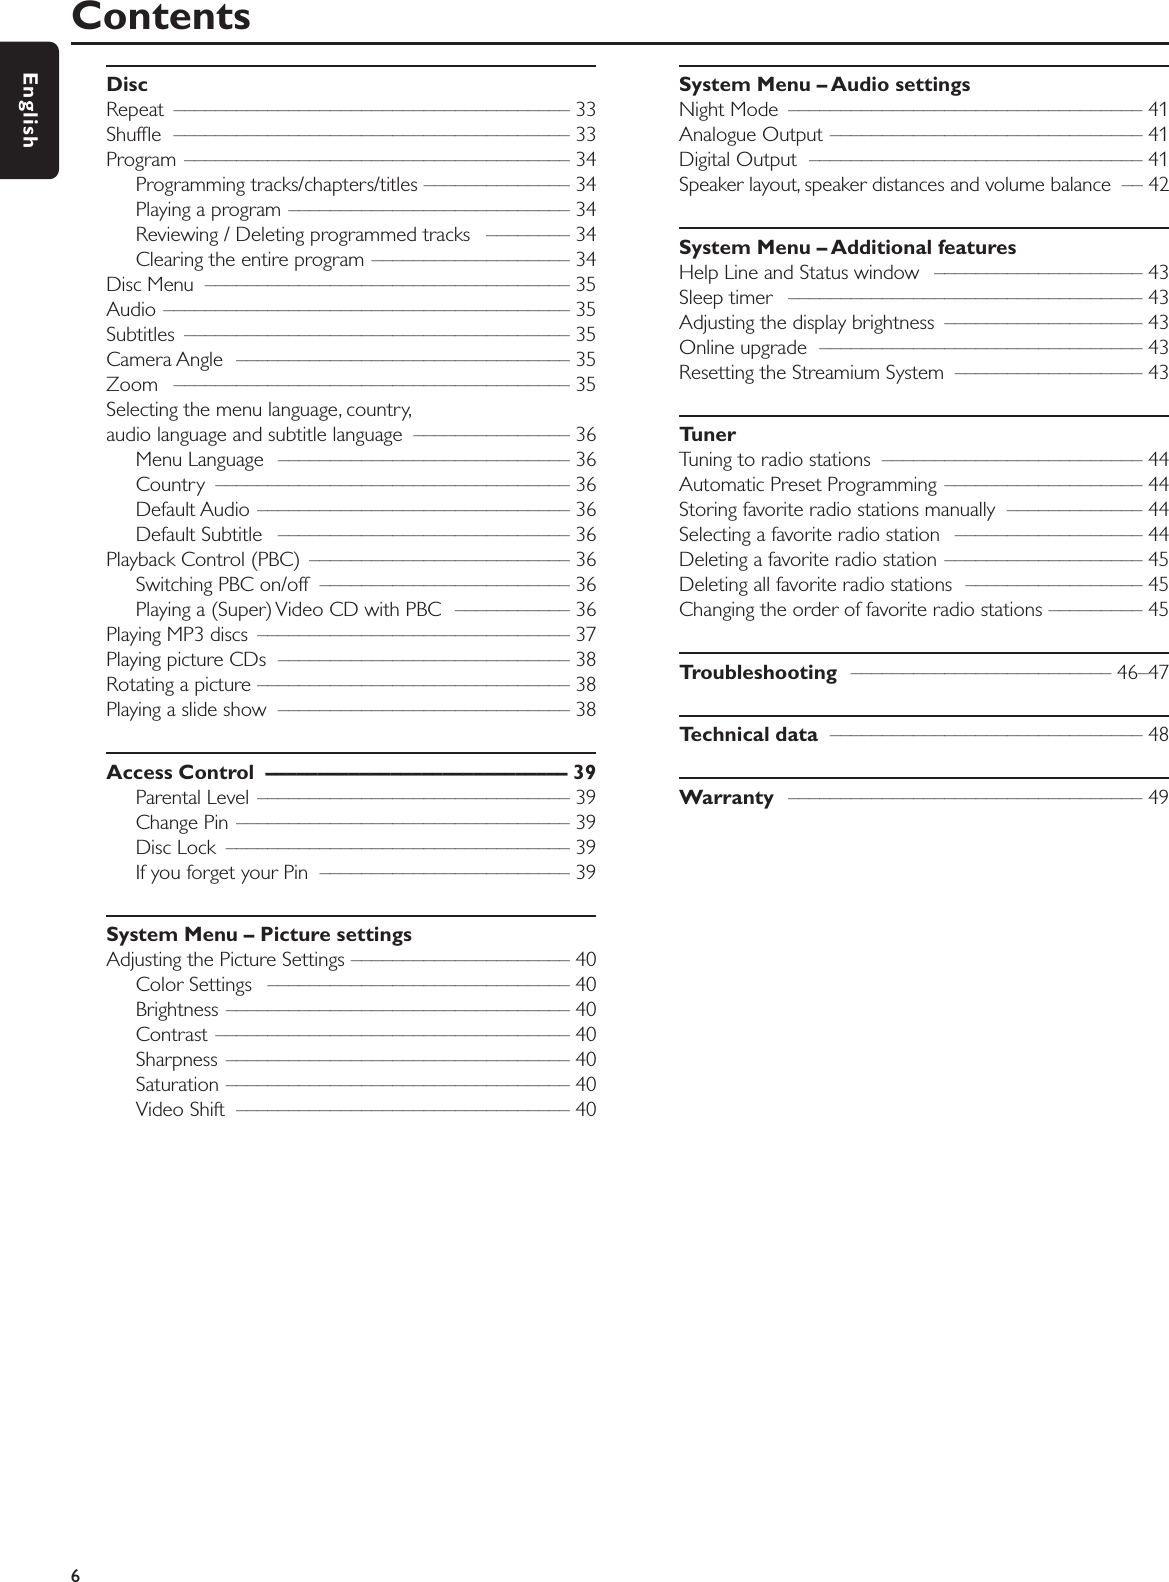
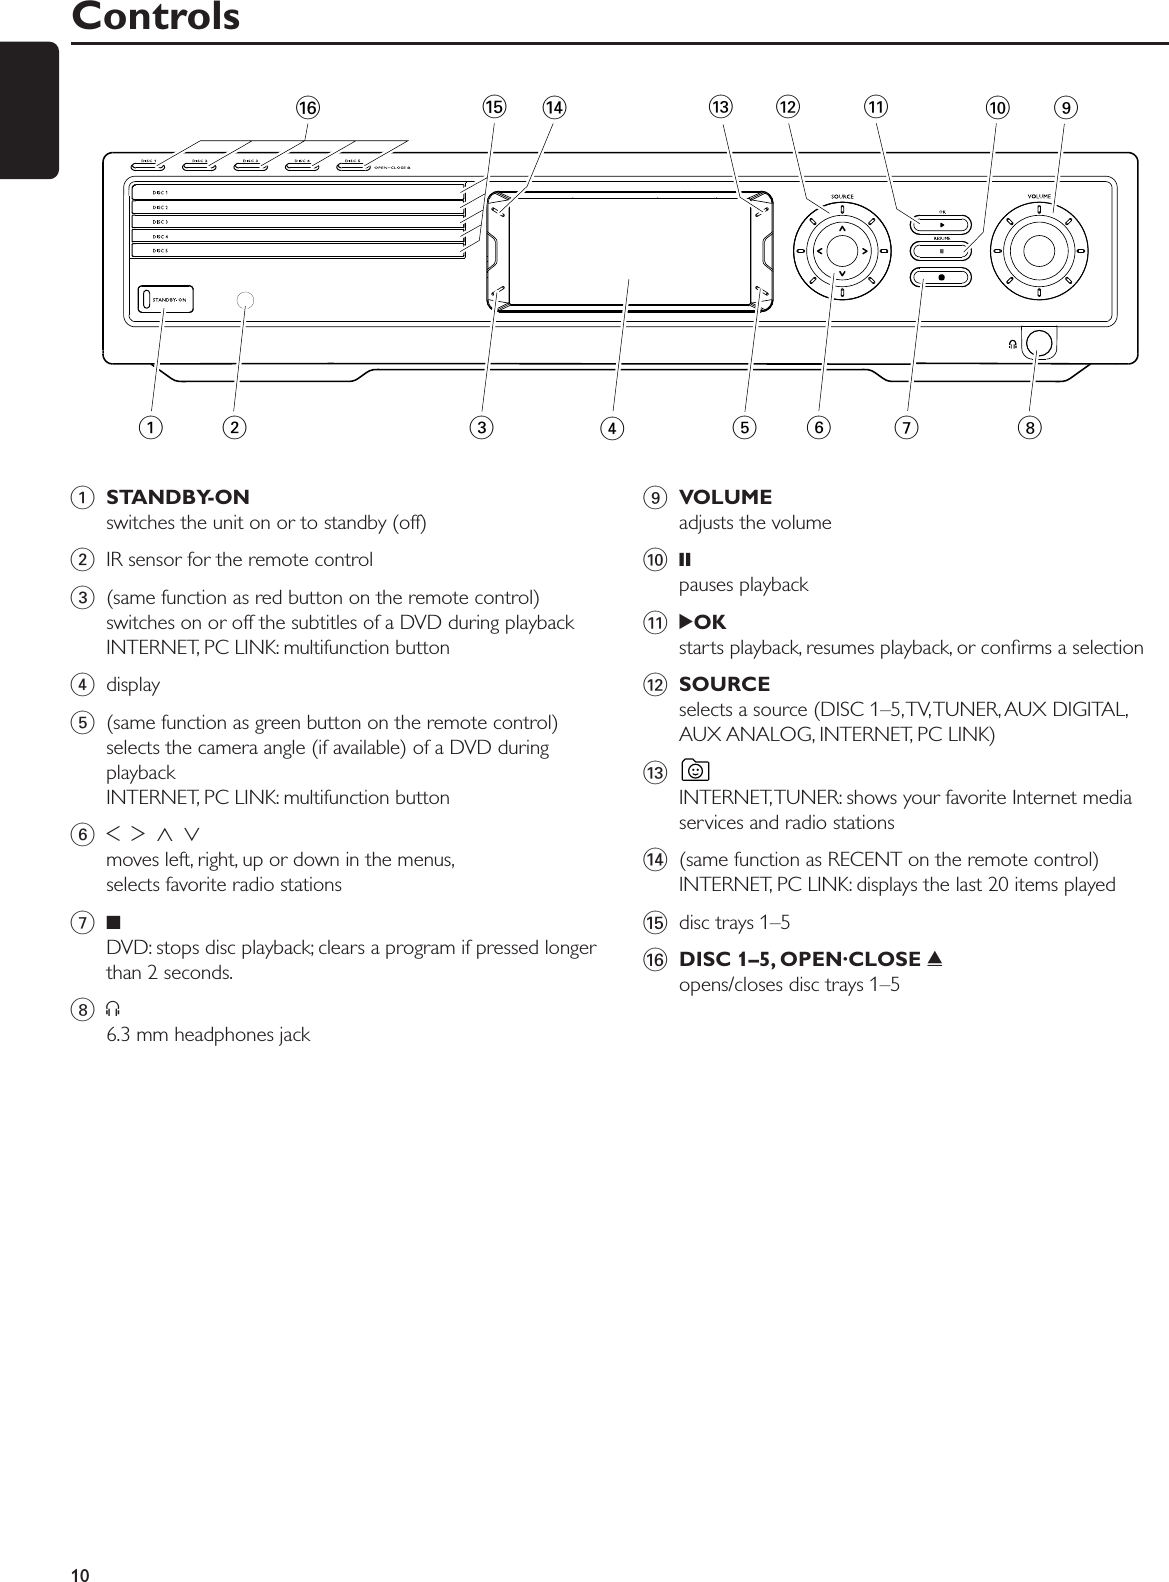
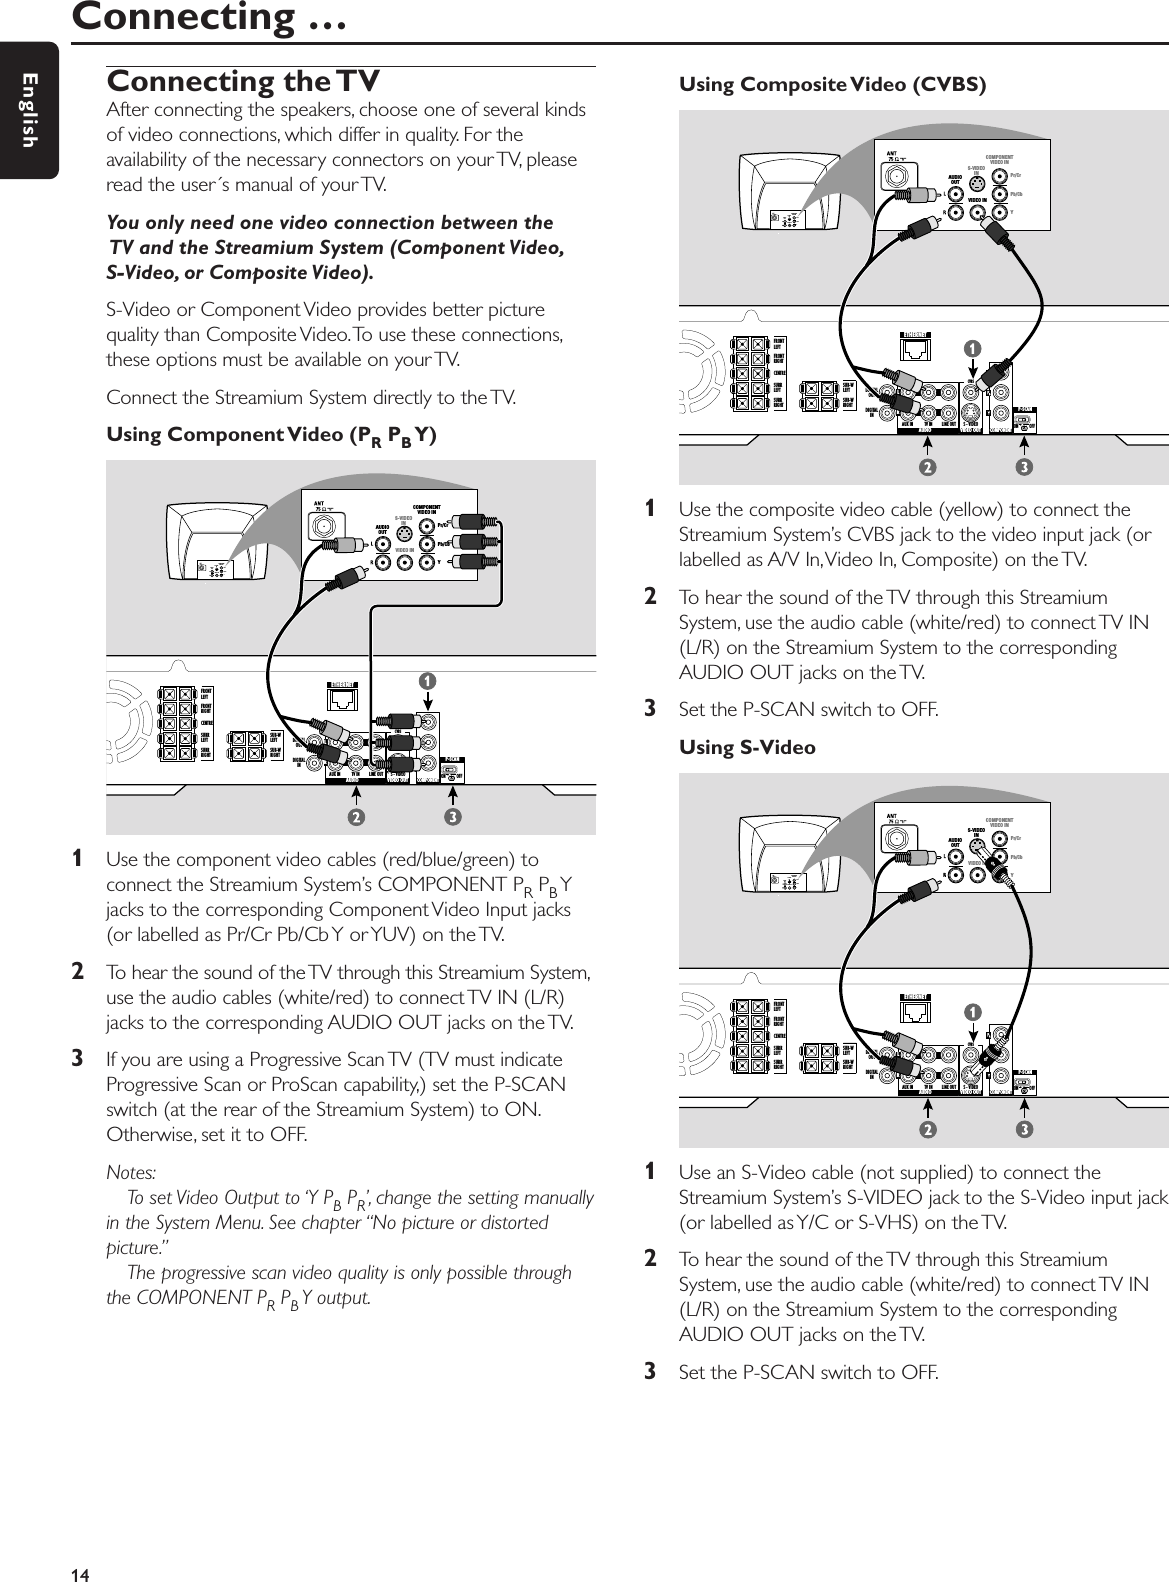
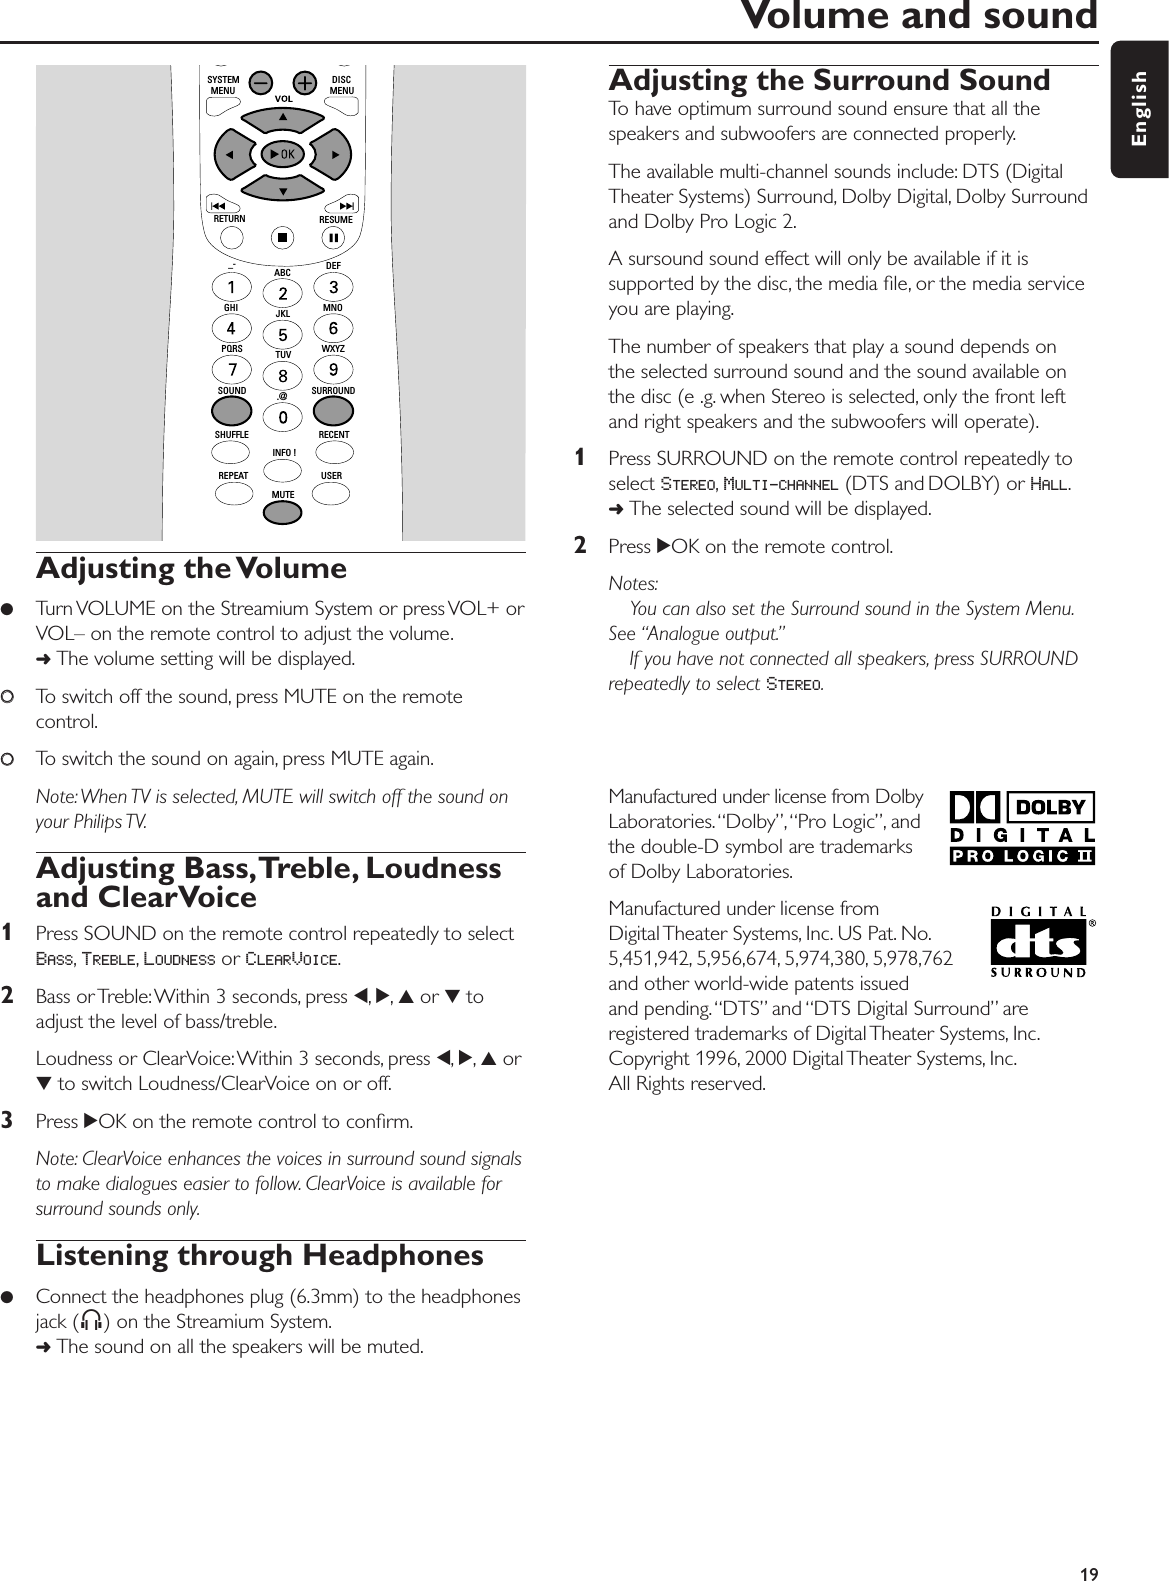
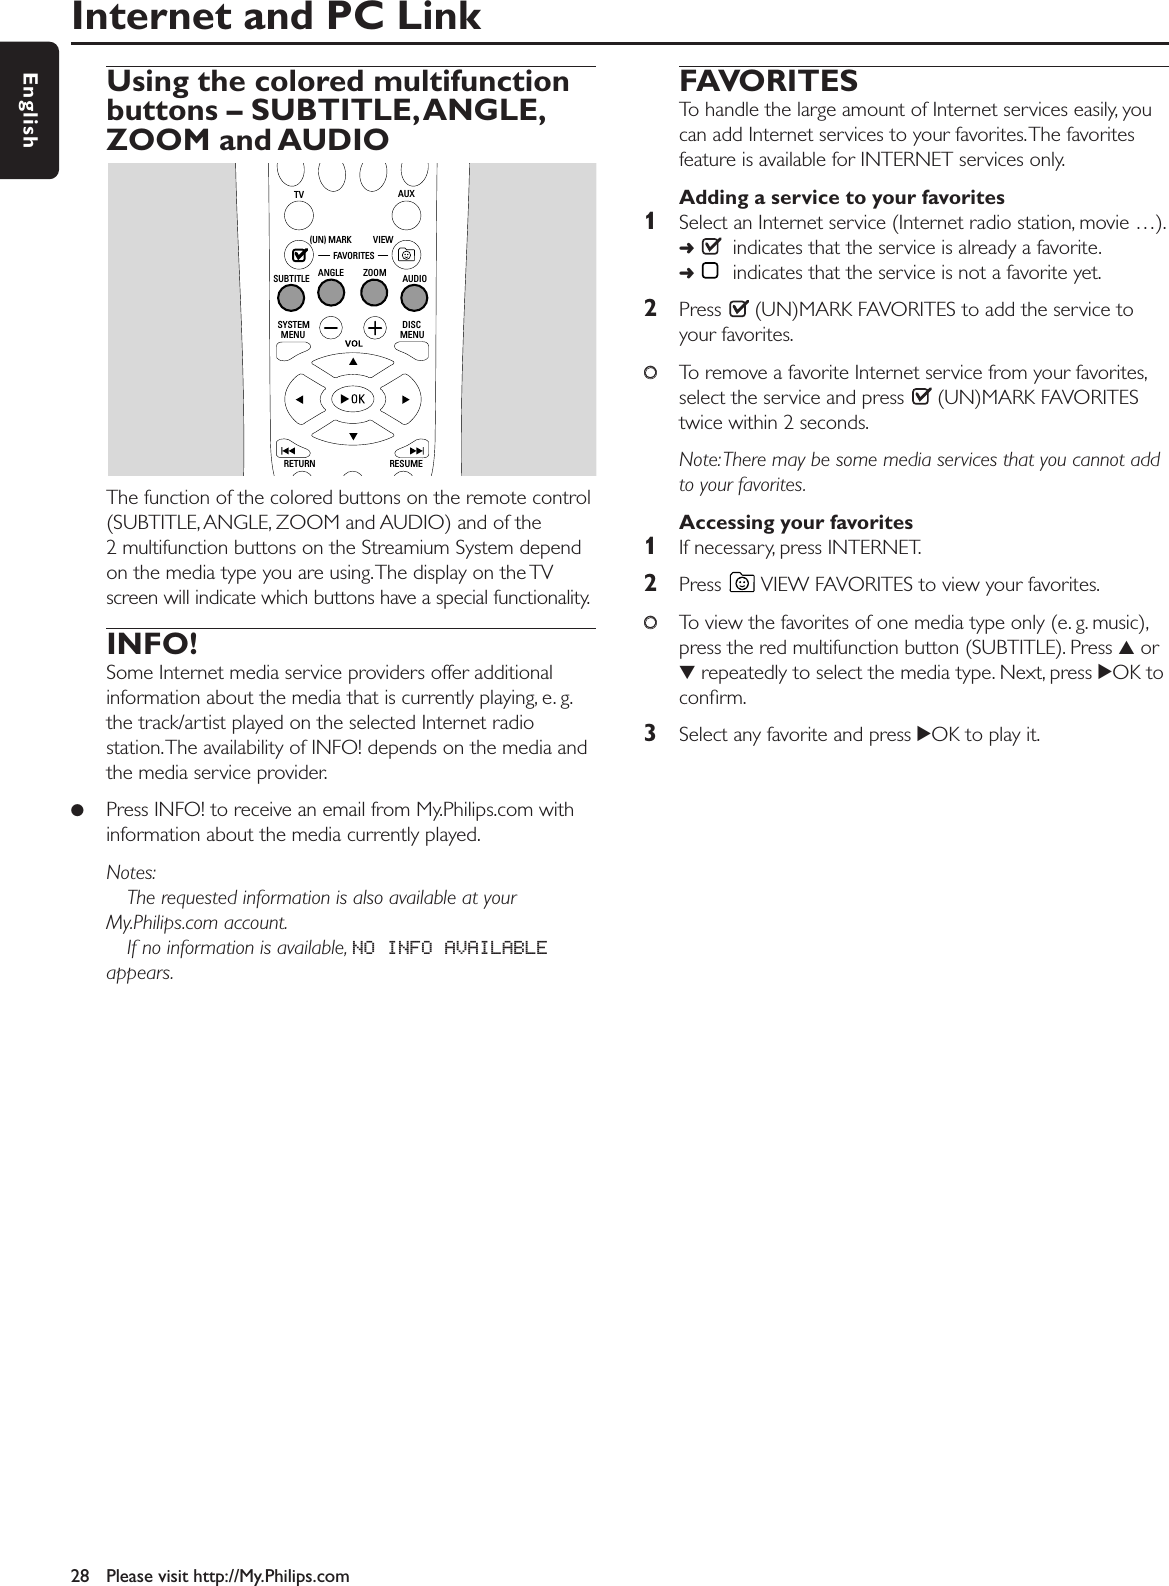
![Disc Playback [DVD/VCD/CD]1Press DVD on the remote control to turn on the system.2Turn on your TV. Set it to the correct Video In channel.➜You should see the Streamium System’s blue backgroundscreen on the TV.3Press DISC 1 (OPEN/CLOSE /) on the Streamium Systemto open disc tray 1. Load your disc in the tray, with the labelfacing up and the shiny side facing down. If the disc is two-sided, ensure that the side you wish to play is facing up.4Press DISC 1 (OPEN/CLOSE /) again to close the tray.00To load the rest of the disc trays, press the respective DISC(OPEN/CLOSE /) button.Then press the same buttonagain to close the disc tray.5Press DVD on the remote control repeatedly or rotateSOURCE on the Streamium System to select the disc thatyou want to play.6If playback does not start automatically, press 2OK.00If DVD playback does not start automatically, a disc menumay appear. If the title or chapter selections are numbered,press a Number button on the remote control to select anitem. Or press 1,2,3,4to select an item for playing, thenpress 2OK.00Press ;to pause playback temporarily.To resume playback,press 2OK.7Press 9 to stop playback.Note:You can only open one disc tray at a time. If the currentdisc tray is open and you attempt to open another disc tray,the first disc tray will close automatically before the second disctray can be opened.Selecting next disc00Press DVD on the remote control or rotate SOURCE onthe Streamium System to select the next disc you wish toplay.Resume [DVD/VCD]The resume feature is available with the last five DVDs and(Super) Video CDs you played.1Press 9on the remote control to stop playback.➜Resume feature is activated.➜The next time you start playing the same disc, play willresume at the same point at which you last stopped it.00However, if you press 9twice to stop disc playback, resumewill not be activated.The next time you start playing thesame disc, play will start at the beginning of the disc.00If the resume symbol appears on the TV screen when youreload a disc, play will resume from the point at which youlast stopped playback if you press 2while the resumesymbol is still displayed.Note: Resume may not be available with some discs.Chapter Preview [DVD]This feature allows you to preview the first 10 seconds ofeach DVD chapter.1Press SYSTEM MENU. Next, select Toolbar ➜View ➜Chapter Preview.2Press 2to select On. Next, press SYSTEM MENU to exitthe system menu.➜The first 10 seconds of every chapter will be shown.After that, playback will stop.00To switch Chapter Preview off and continue withnormal playback, press 2OK.Disc31EnglishABCDEF–-RETURN RESUMEMENUMENUSYSTEM DISCSUBTITLE ANGLE ZOOM AUDIOFAVORITES(UN) MARK VIEWTV AUXDVD INTERNET PC LINK TUNER](https://usermanual.wiki/Philips-Consumer-Lifestyle/MX6000.Users-Manual-Main/User-Guide-428001-Page-31.png)
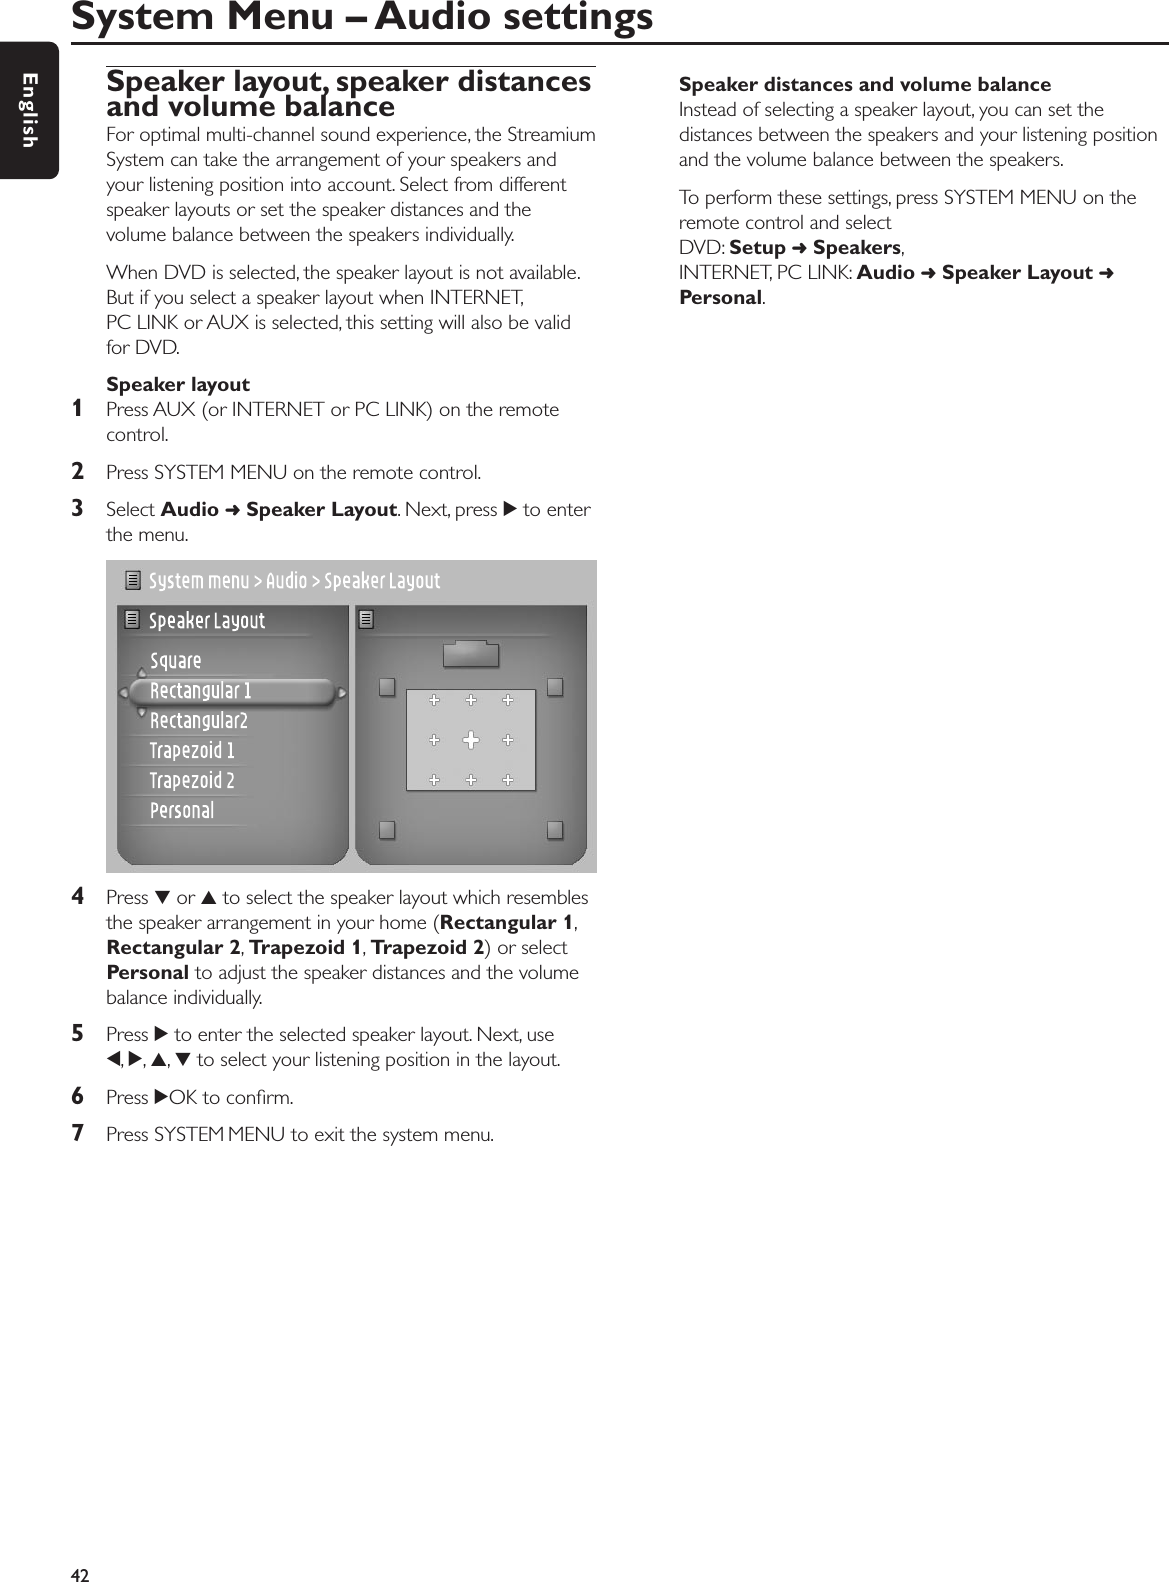
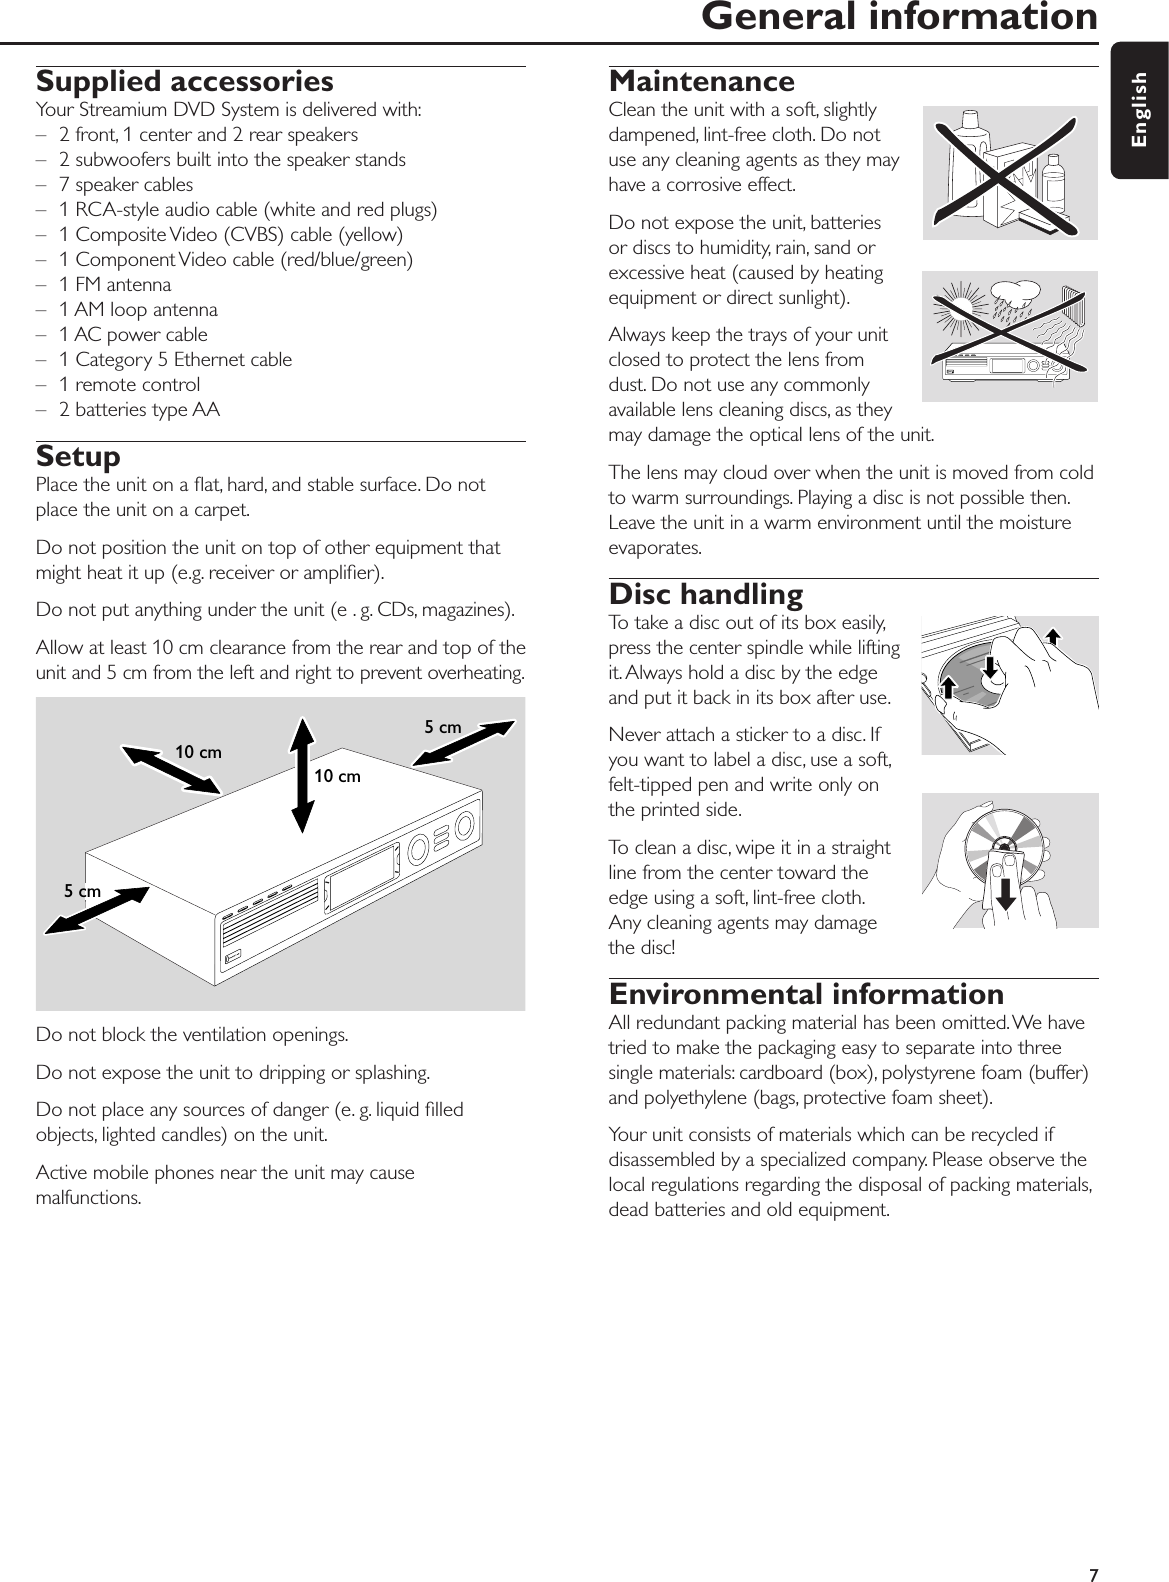
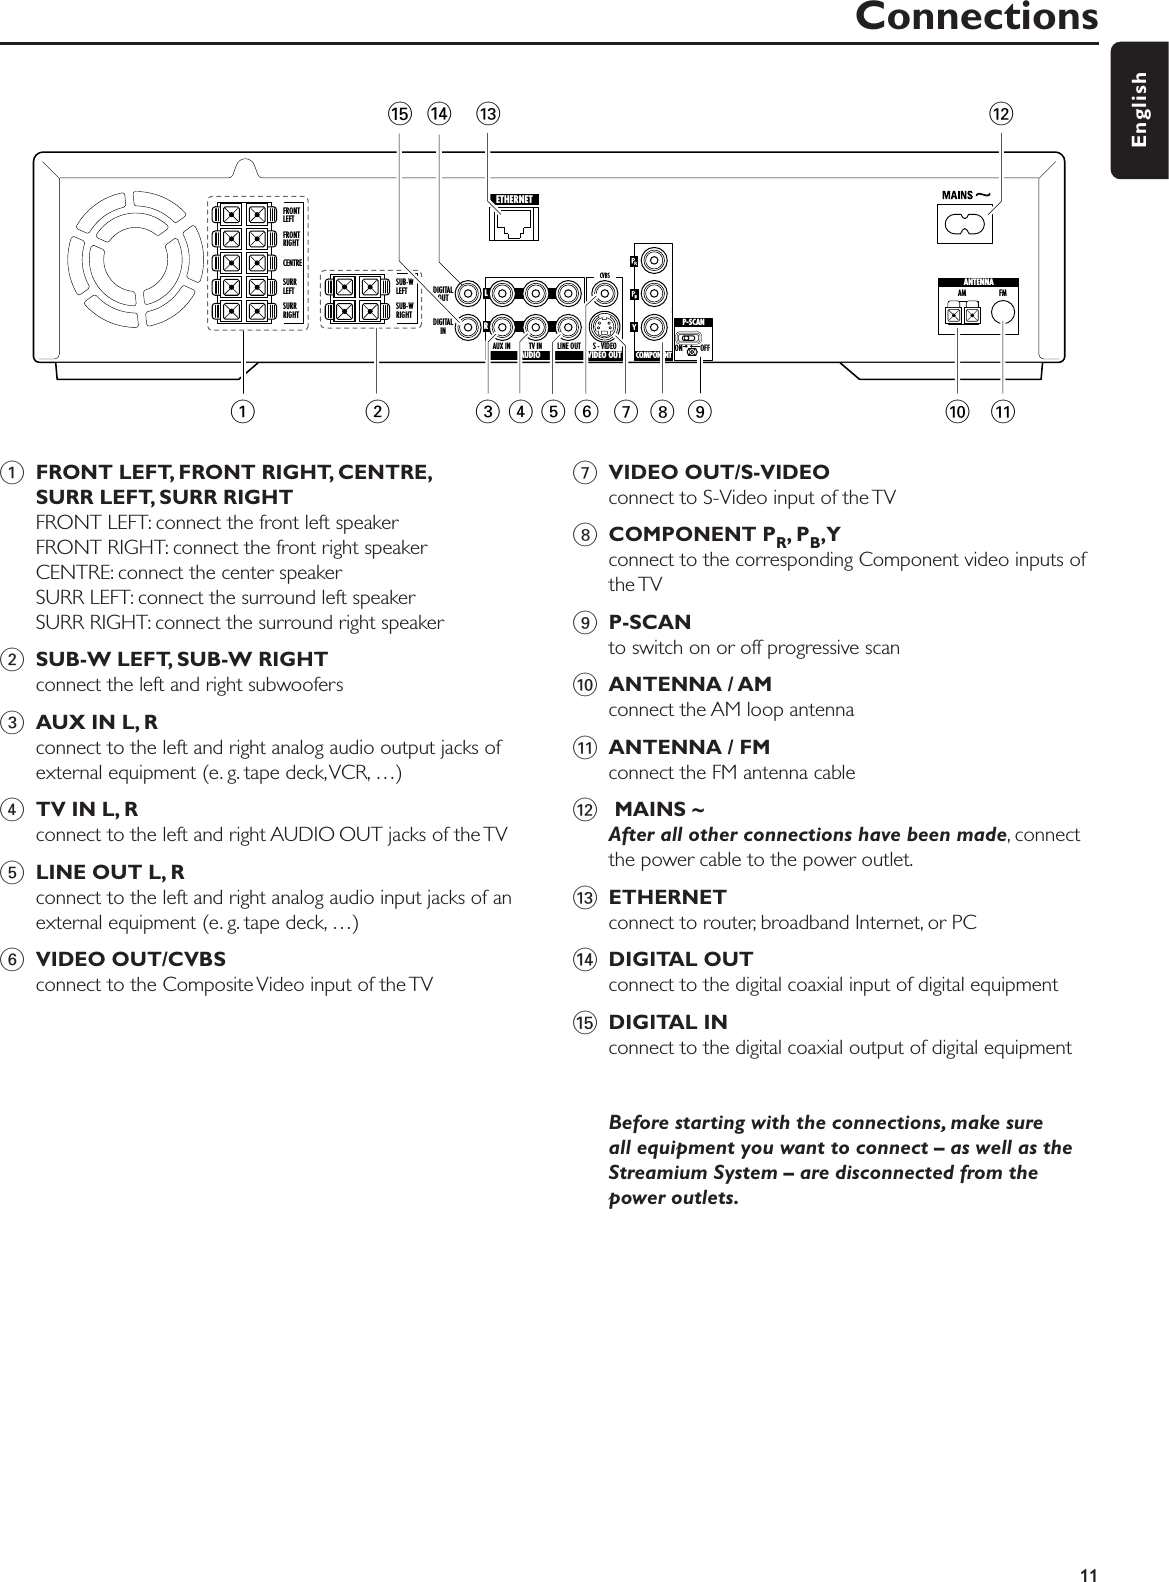
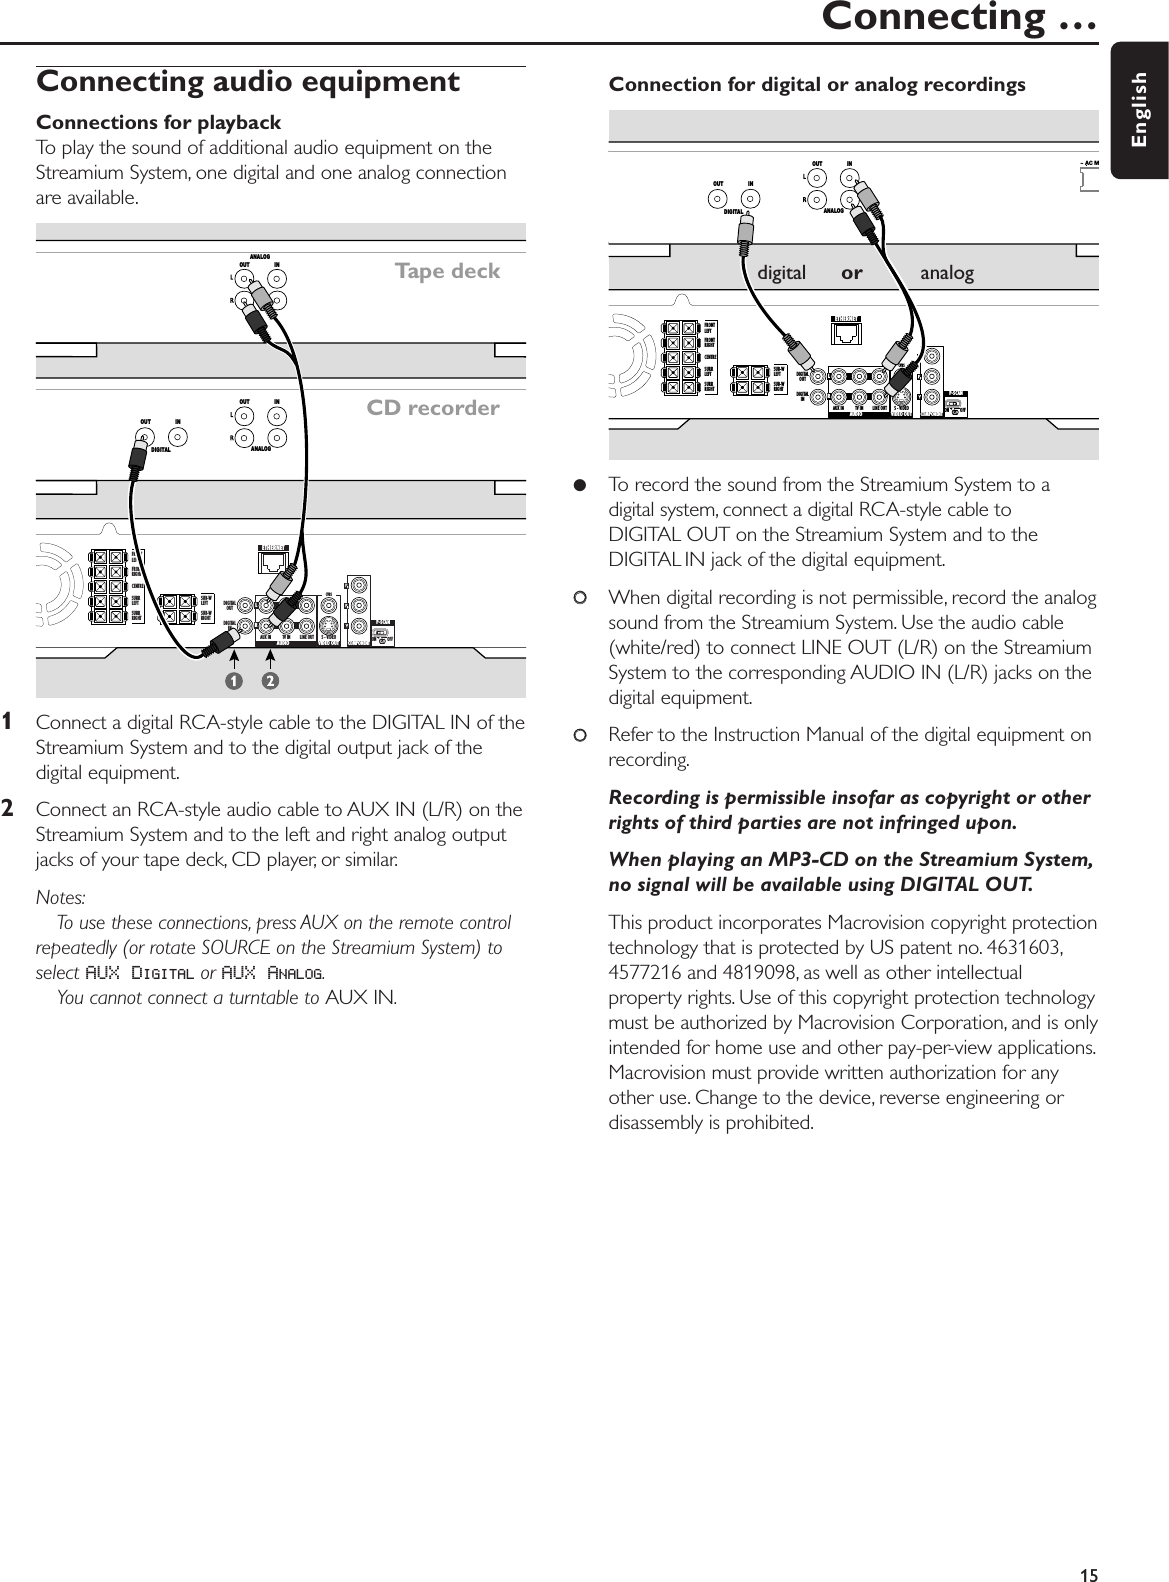
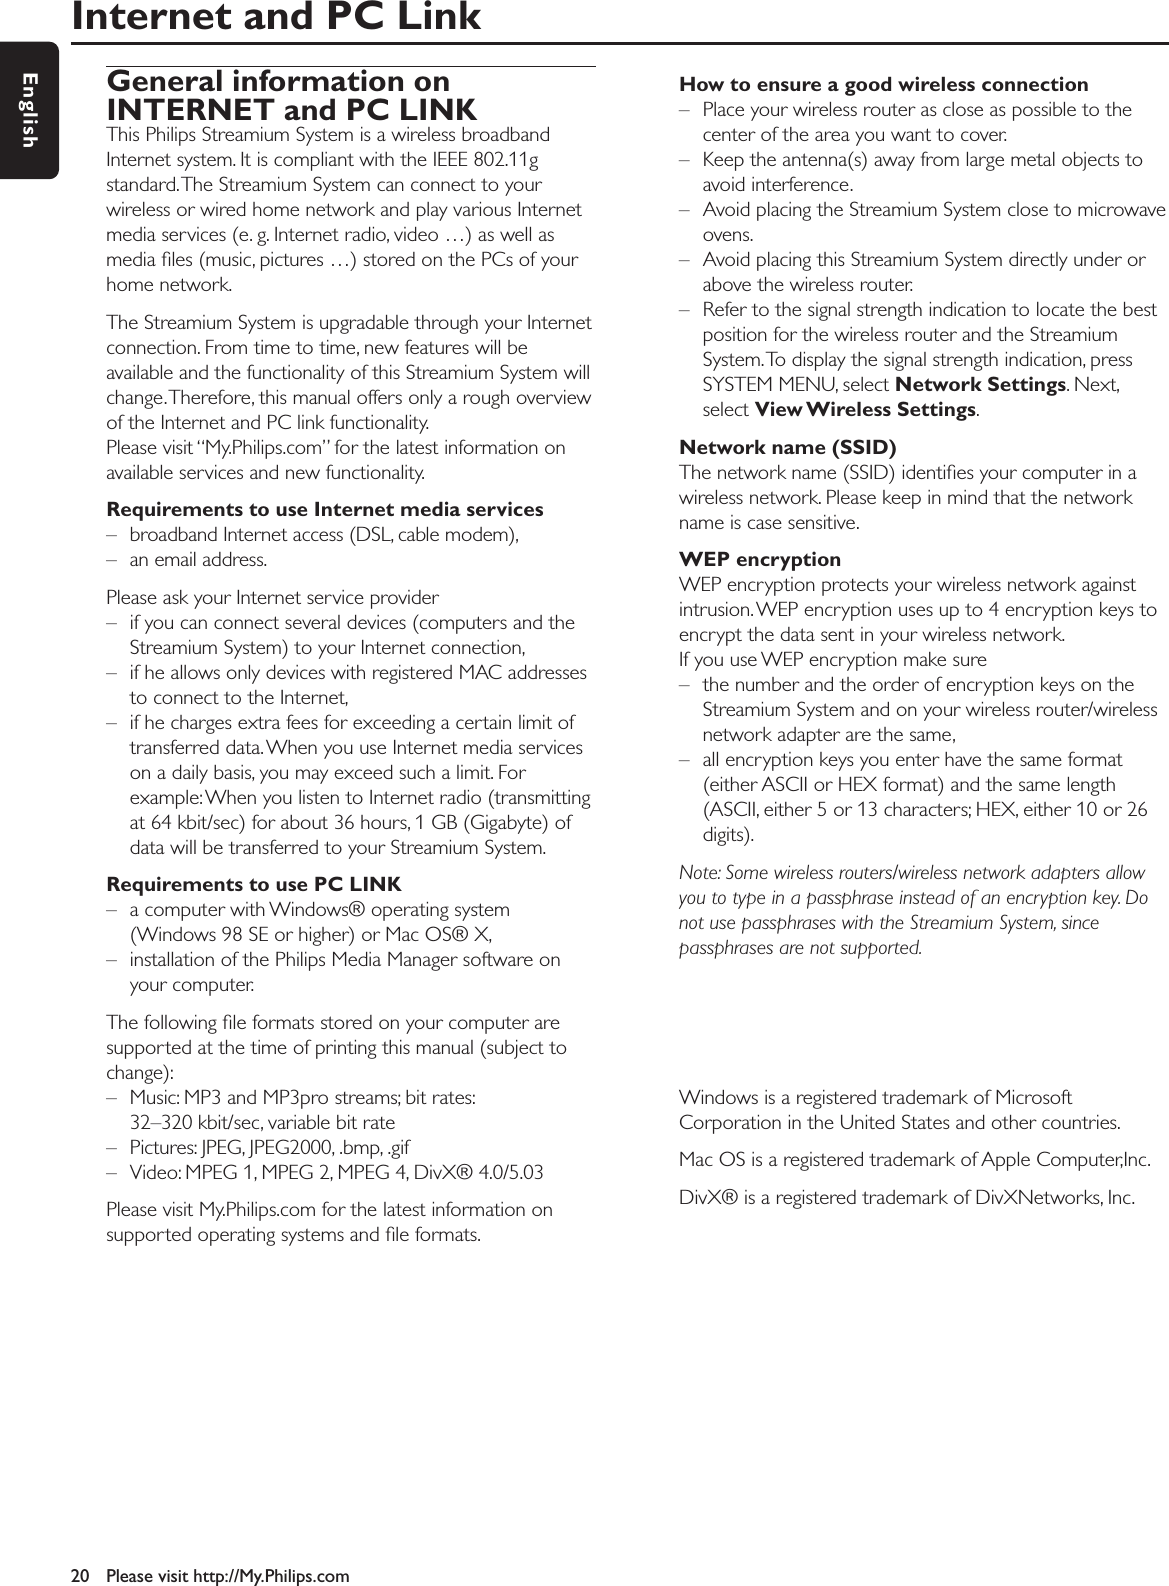
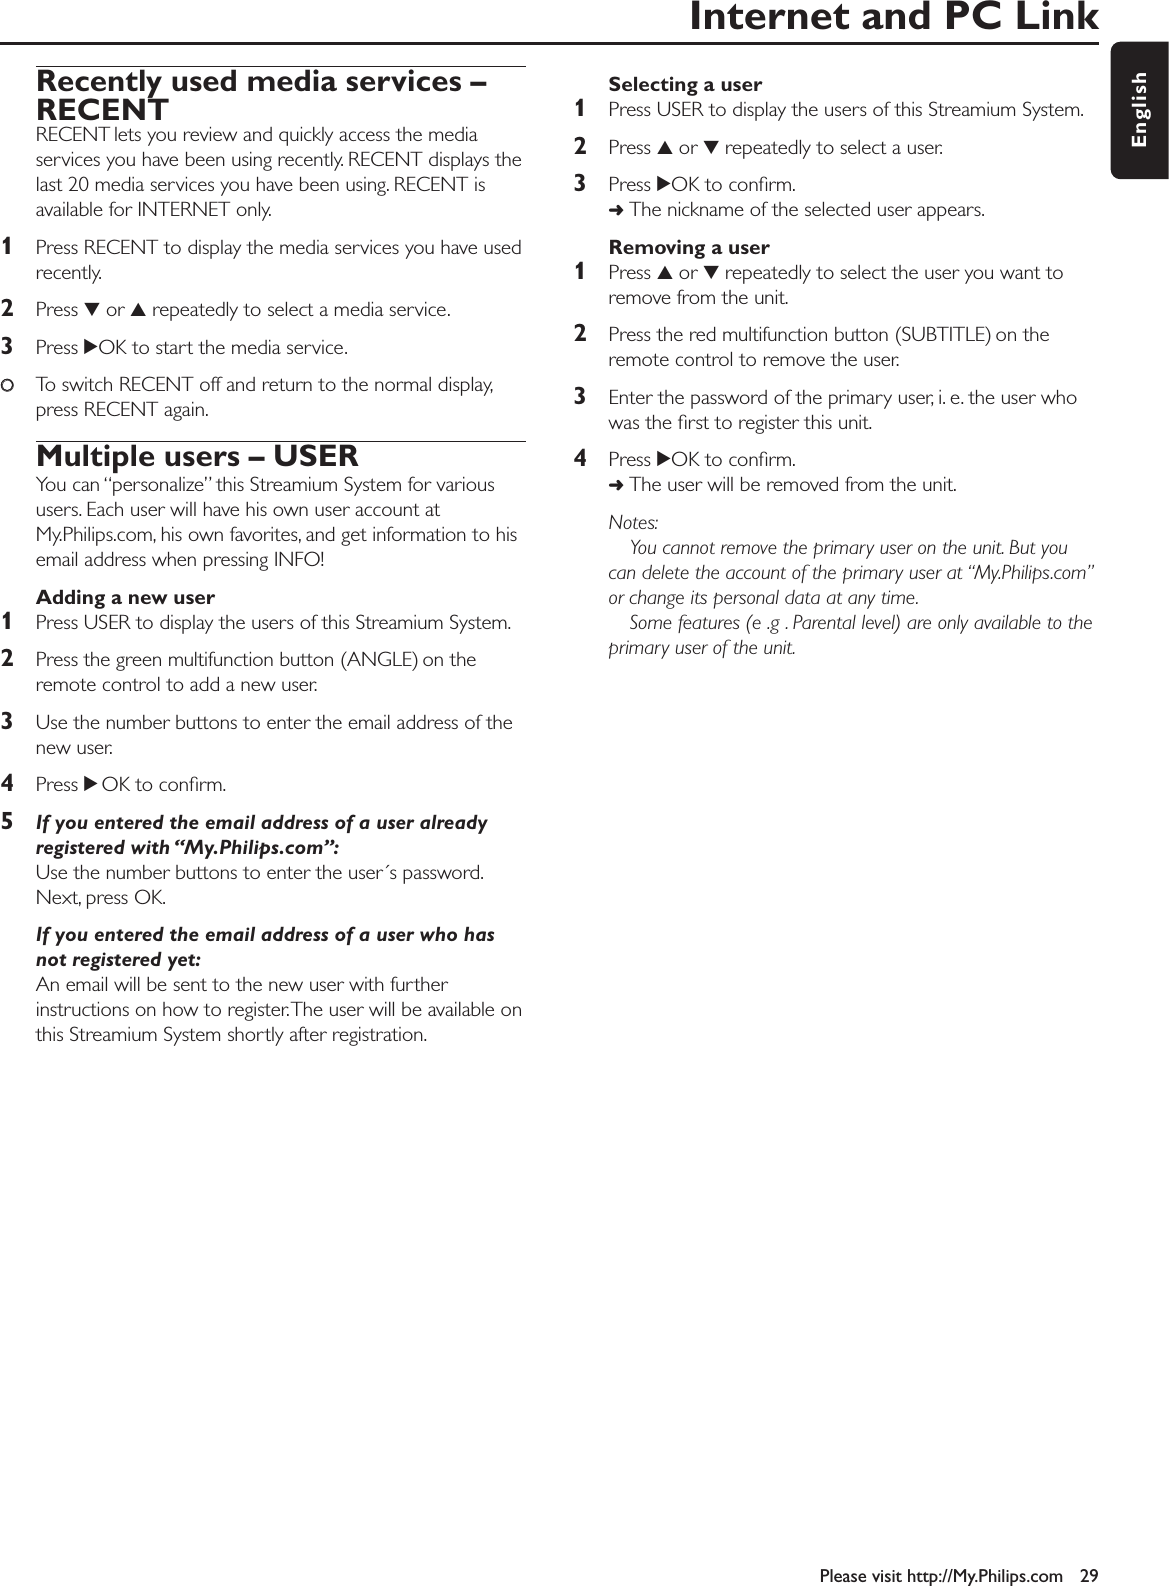
![Chapter/track selection[DVD/VCD/CD]1Press Tbriefly during playback to go to the nexttrack/chapter.Press Sbriefly to return to the beginning of the currenttrack/chapter.Press Srepeatedly and quickly to step back to previoustracks/chapters.2To go directly to any track/chapter during playback, pressthe number buttons to enter the track/chapter number.➜The System Menu Bar may appear briefly. It willdisappear once the new track/chapter starts to play.Make sure the track/chapter number you enter is availableon the disc. When you enter an invalid number➜an “X” may appear in the top left corner of the TVscreen.➜the current track or Chapter will continue to play.➜an incorrect track/chapter may begin to play.Forward and Reverse Searching[DVD/VCD/CD/MP3]You can do a forward or reverse searching while playingback a DVD,VCD, CD or MP3 disc.1On a DVD or (Super) Video CD, to search the disc at fourtimes the normal speed, press and hold Sor Tforabout two seconds during playback.To search at 32 timesthe normal speed, press and hold Sor Tagain(DVD only).➜The sound will be muted.On an Audio CD, to search the disc at four times thenormal speed, press and hold Sor Tfor about twoseconds during playback. Sound will be intermittent.Tosearch at eight times the normal speed, press and holdSor Tagain.➜The sound will be muted.2To end the search, press 2OK to resume playback or press9to stop playback.Note:This feature is available in the System Menu as Fast.Searching in the System MenuIn the system menu, additional search features are available:Time Search, Fast Motion, Slow Motion.1Press SYSTEM MENU.2Select Toolbar ➜Search.Time Search [DVD/VCD]Time Search lets you choose a specific elapsed playing timeat which you want to begin disc playback.1Select Time.➜Playback will pause.➜A time edit box will appear, showing the elapsed playingtime of the current disc, or the point at which the disc iscurrently.2Press the number buttons to enter the time at which youwant playback to begin. Enter the hour, minute, and secondfrom left to right in the box.➜Make sure the time you enter is within the total playingtime of the current Title/track.3Press 2OK.➜Playback will start at the point you have selected after afew seconds.00If you enter an invalid time, the incorrect information willblink in the time edit box. Enter a time that is available inthe current Title/track and press 2OK again.Disc32EnglishToolbarSearch View ProgramDVD StopFastTimeSlowFrame by Frame](https://usermanual.wiki/Philips-Consumer-Lifestyle/MX6000.Users-Manual-Main/User-Guide-428001-Page-32.png)
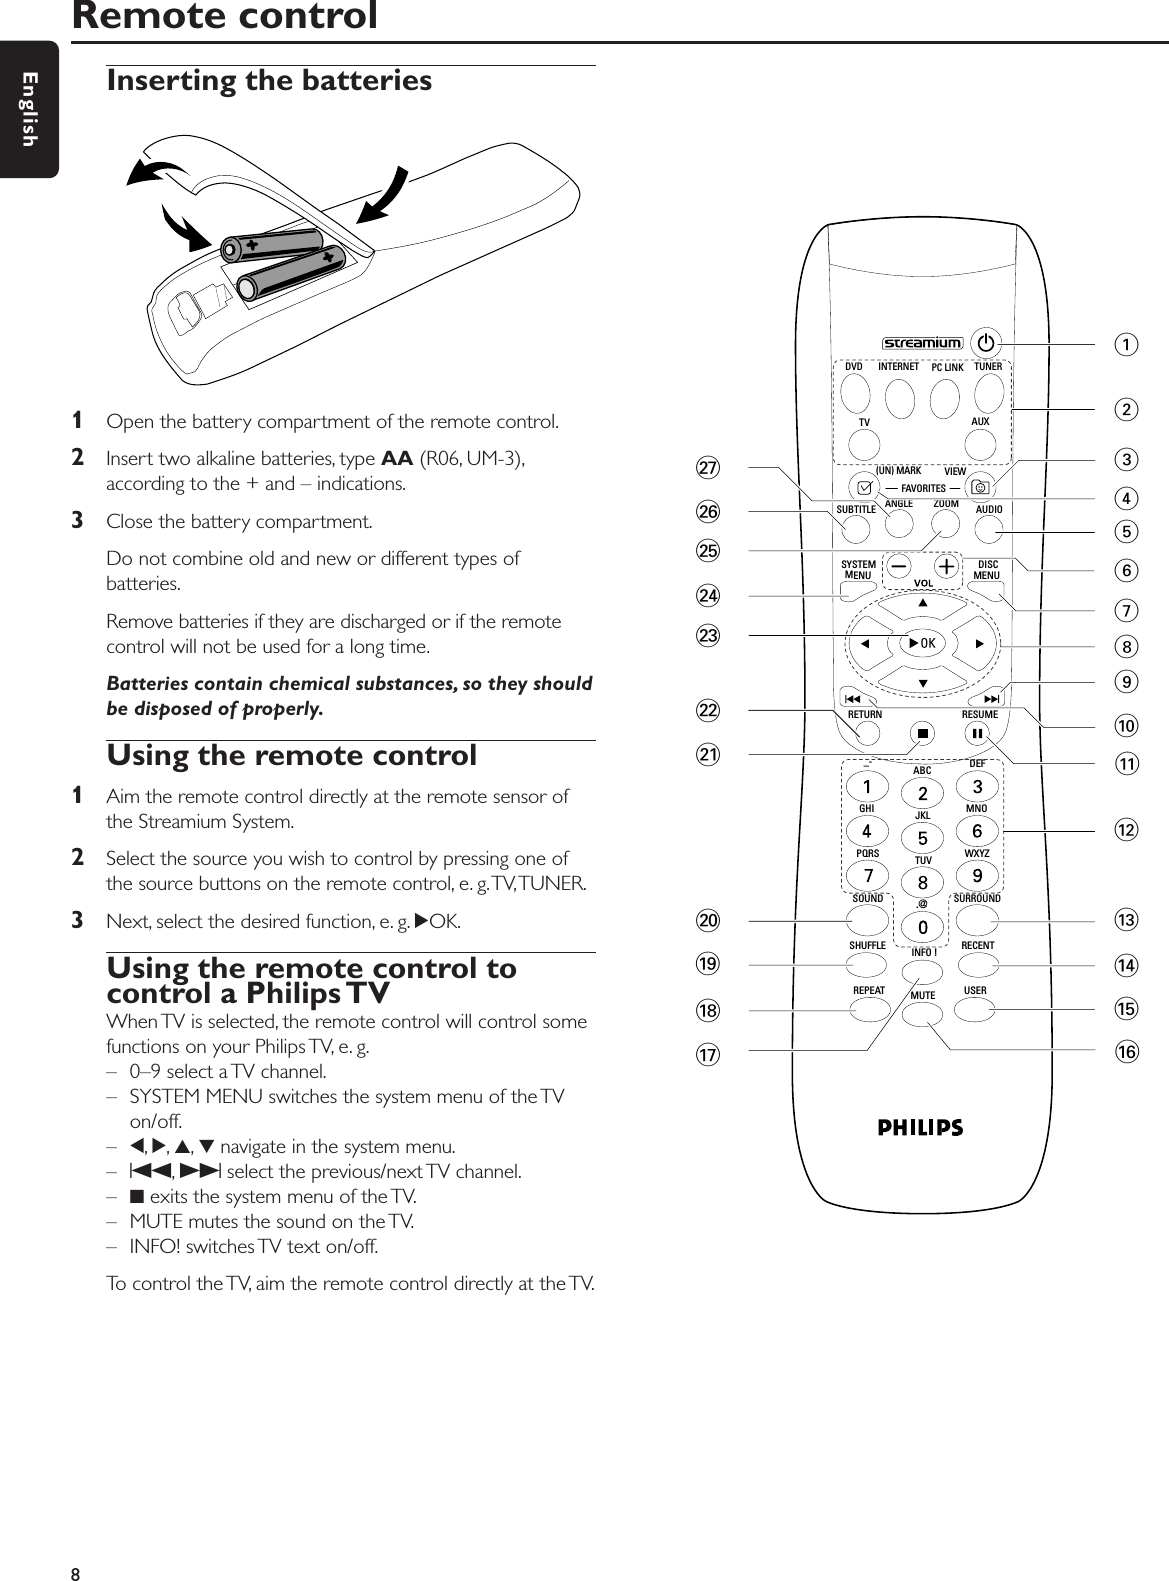
![Fast, Slow [DVD/VCD]1Select the speed:Fast: -32x, -8x, -4x (backward), or 1x, 4x, 8x, 32x (forward).-32x, 32x … DVD only.Slow: -1, -1/2, -1/4 or -1/8 (backward), or 1/8, 1/4, 1/2 or 1(forward).➜Sound will be muted during Fast (Slow) Motion playback.00Press ;on the remote control to pause the picture.2To return to normal playback, press 2OK.Notes:Start forward Fast Motion playback simply by pressing 4during playback. Press 4repeatedly to choose a Fast Motionspeed.If you reach the beginning of the disc or title during a reversesearch, regular playback will resume automatically.Still Picture/Frame-by-FramePlayback [DVD/VCD]This feature allows you to view individual frames as stillpictures during playback.1During playback, press ;on the remote control.➜A still picture will appear on the TV screen.2To advance the still picture one frame at a time, press ;repeatedly.3To resume normal playback, press 2OK.Notes:You can also pause the picture by pressing 3duringplayback.Frame-by-Frame playback is also available in the SystemMenu.Repeat [DVD/VCD/CD]You may play a chapter, track, title, or entire disc repeatedly.1During playback, press REPEAT on the remote controlrepeatedly to choose a repeat mode.00To repeat the current chapter/track, press REPEAT once.➜REPEAT CHPT or REPEAT TRK will appear on thedisplay of the Streamium System.00To repeat the current title, press REPEAT repeatedly untilREPEAT TITL appears on the display of the StreamiumSystem.00To repeat the entire disc, press REPEAT repeatedly untilREPEAT DISC appears on the display of the StreamiumSystem.2To cancel repeat playback, press REPEAT repeatedly untilREPEAT OFF appears on the display of the StreamiumSystem.Notes:Repeat can only be used for the selected disc tray.Repeating more than one disc tray is not possible.Shuffle [DVD/VCD/CD]On a DVD, this shuffles the playing order of chapters withina title, if the title includes more than one chapter. On anAudio CD and (Super) Video CD, activating Shuffle will playall the tracks in random order.1Press SHUFFLE on the remote control.➜SHUFFLE will appear briefly on the display of theStreamium System.The tracks or chapters will beginplaying in random order.2To return to normal order playback, press SHUFFLE again.➜Regular playback will resume from the currenttrack/chapter.➜SHUFFLE OFF will appear briefly on the display of theStreamium System.Notes:Shuffle can only be used for the selected disc tray.Shuffling more than one disc tray is not possible.Disc33English](https://usermanual.wiki/Philips-Consumer-Lifestyle/MX6000.Users-Manual-Main/User-Guide-428001-Page-33.png)
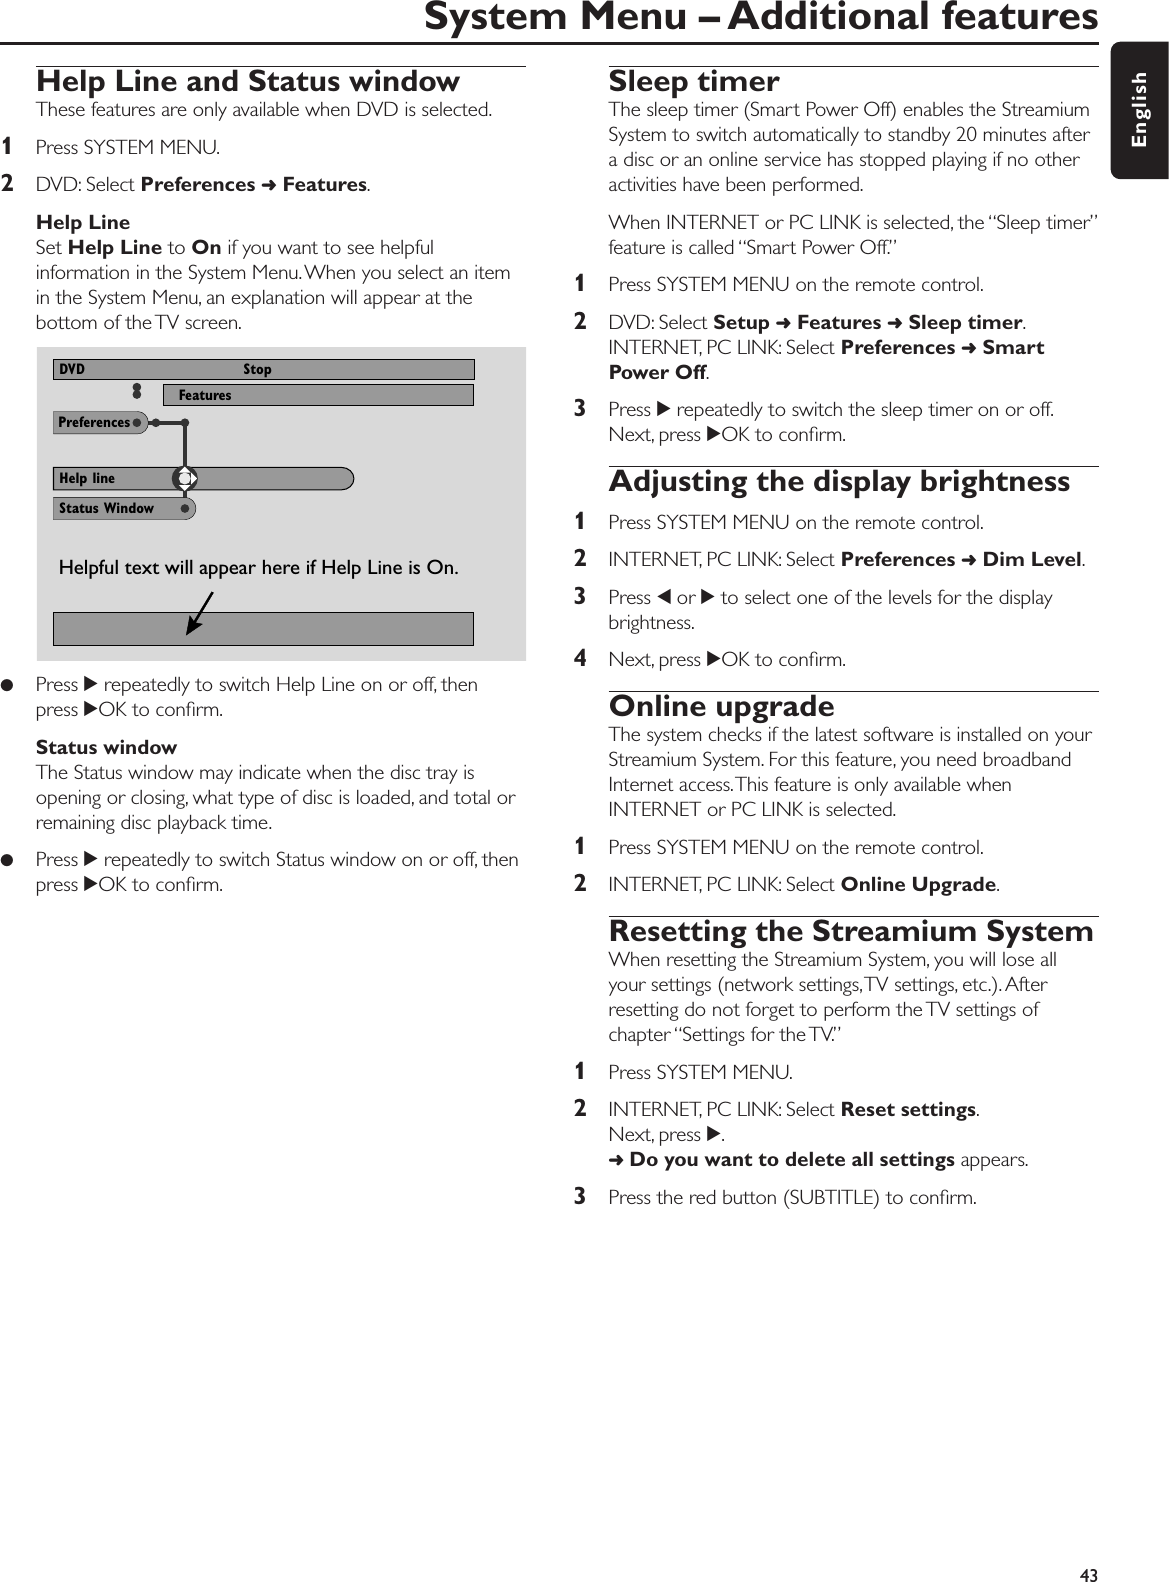
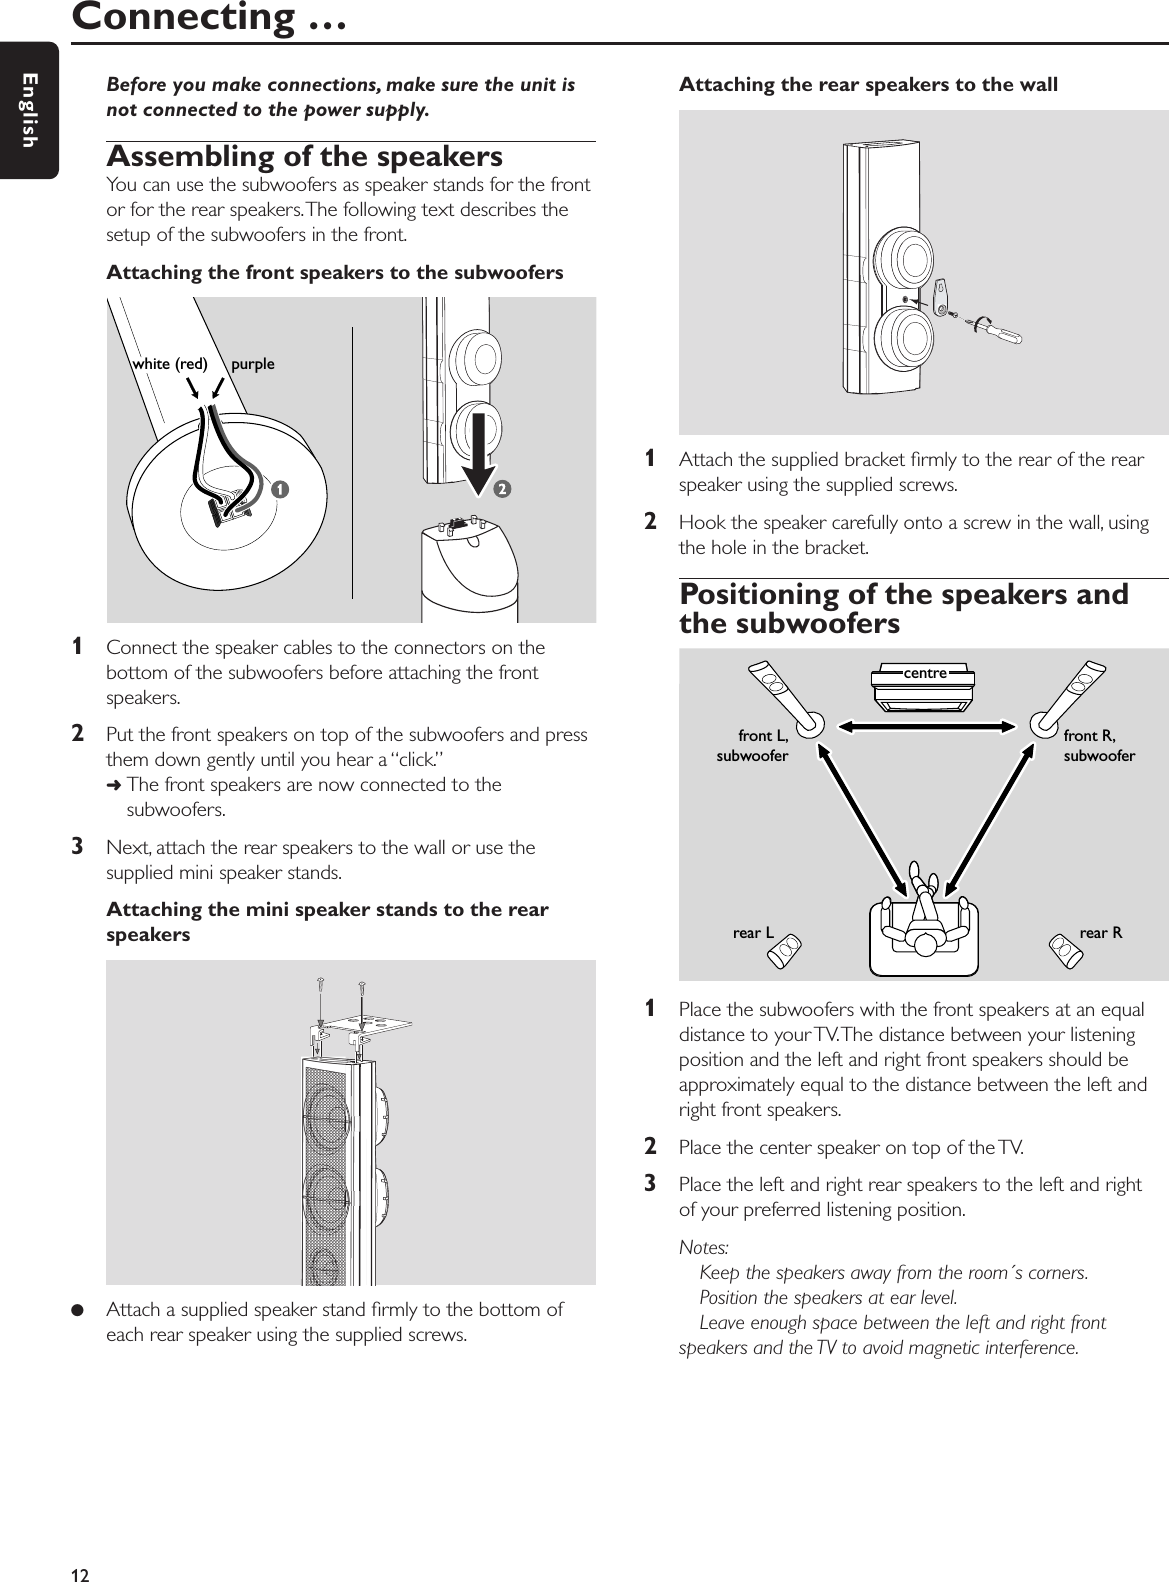
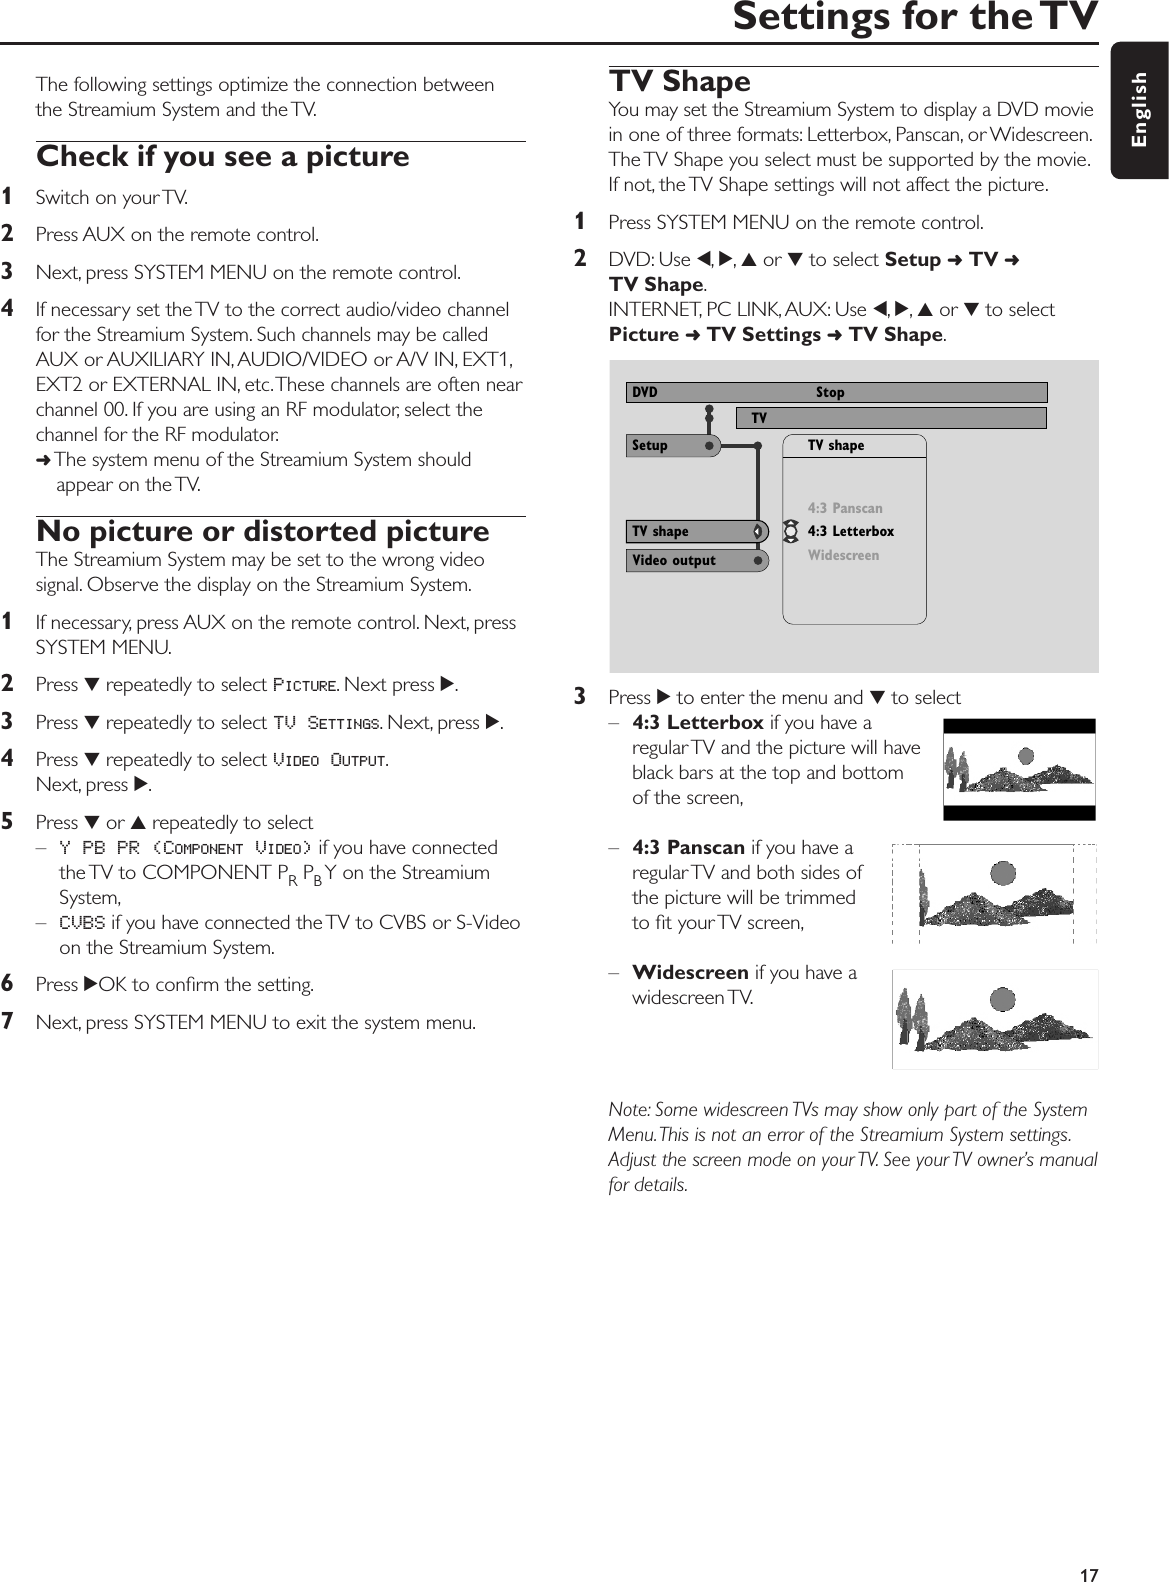
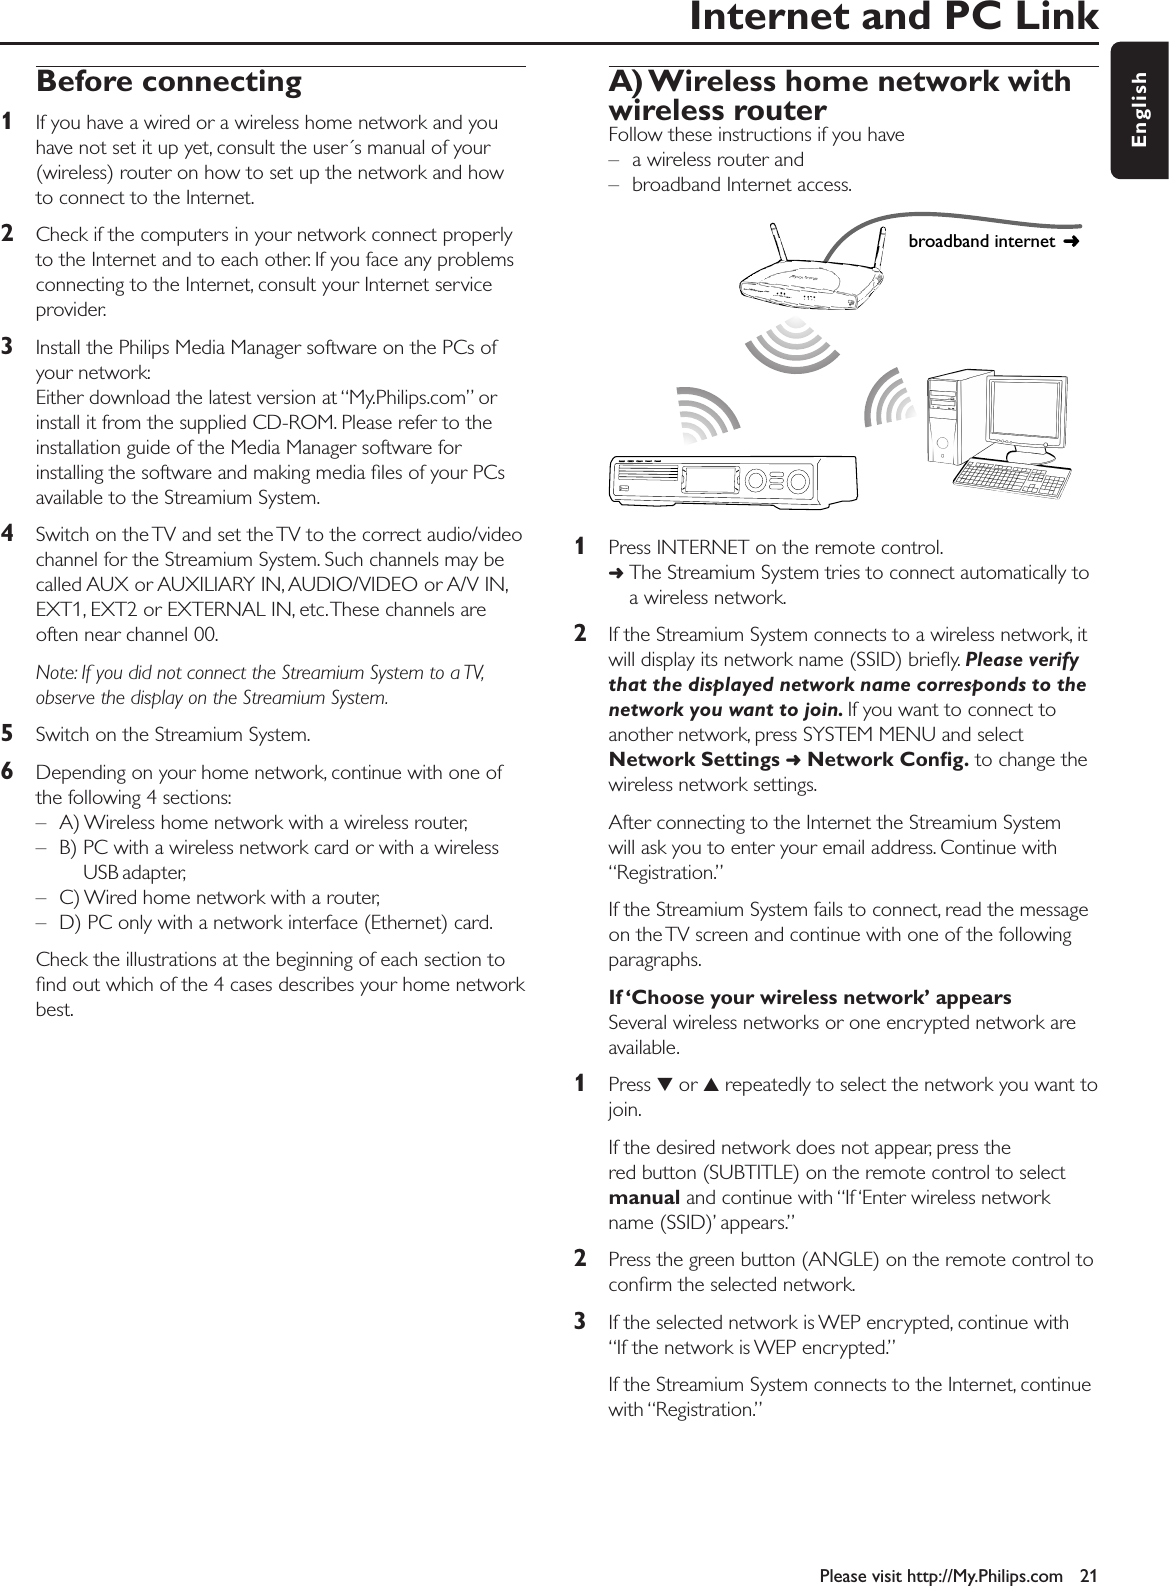
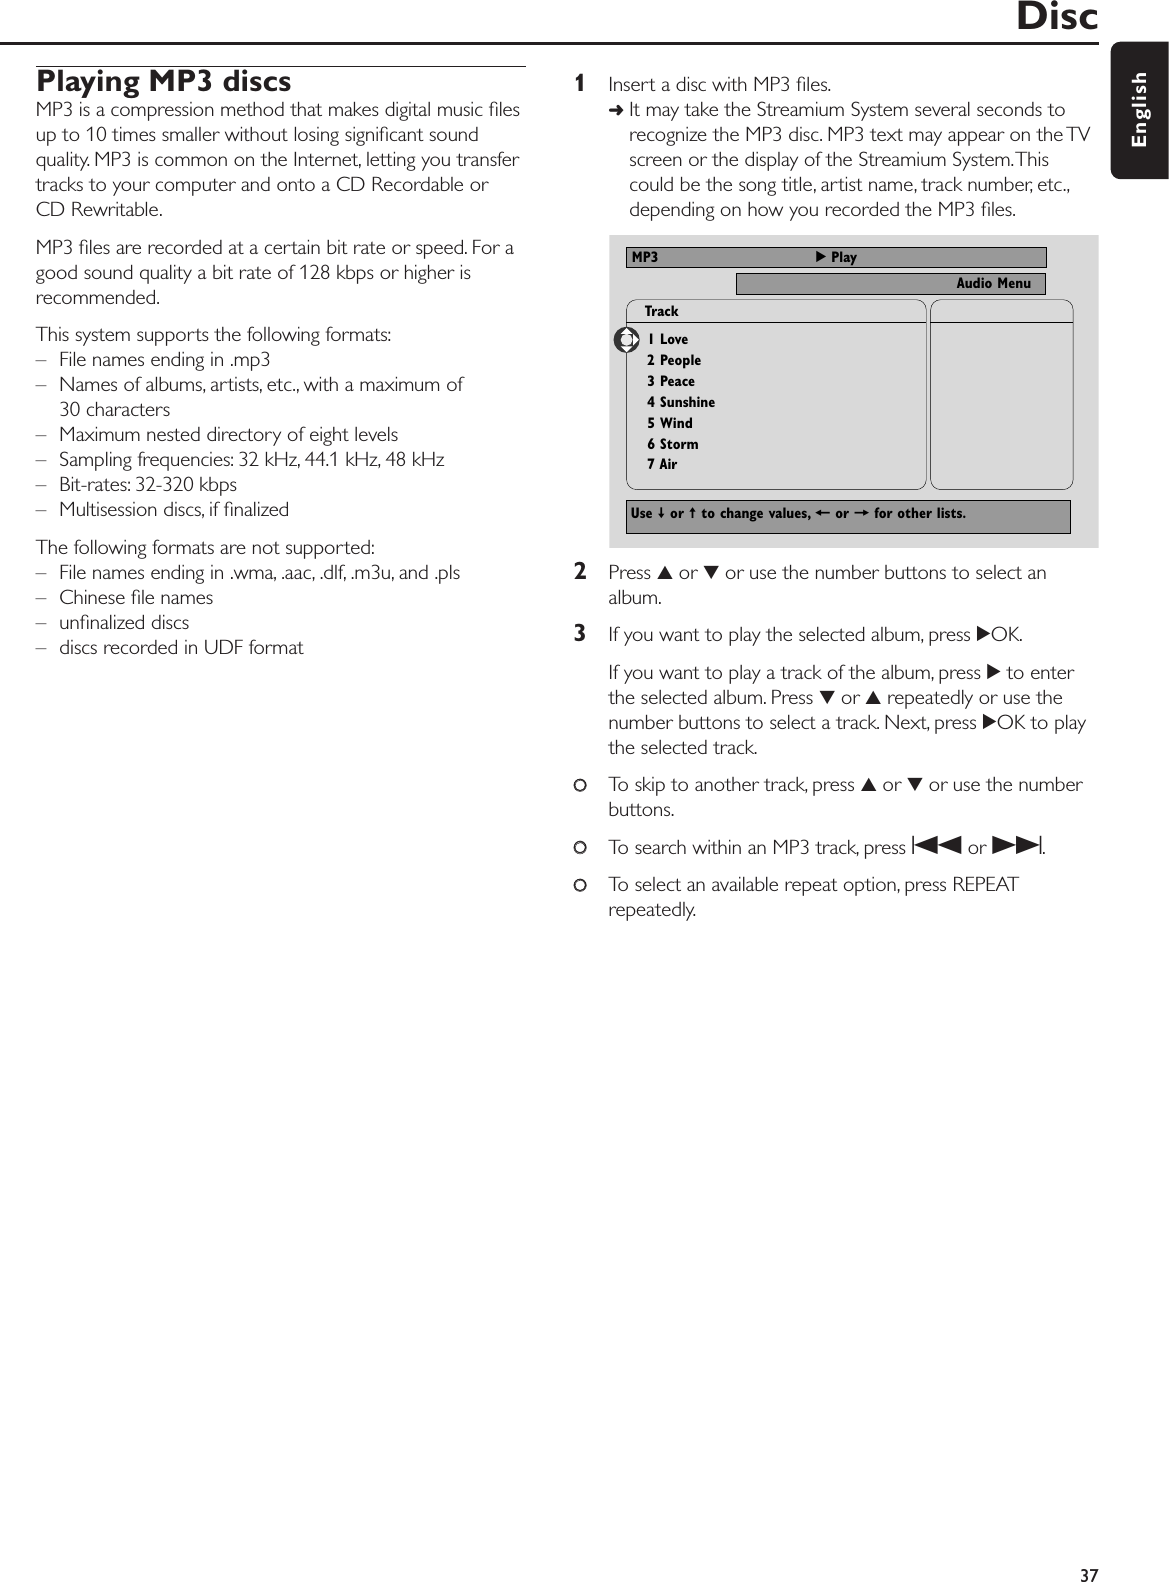
![Program [DVD,VCD, CD, MP3]Program allows you to play your favorite titles/chapters ortracks/indexes in the order you select.1Press SYSTEM MENU.2Select Toolbar ➜Program.Programming tracks/chapters/titles1To program your favorite tracks, chapters, or titles, press4repeatedly to select Tracks. Next, press 2.2Press 3or 4to select the desired track, chapter, or title,then press 2OK.➜The selected track, chapter, or title will be stored.00To store other tracks, chapters or titles, repeat step 2.3Press 1to exit the menu.Playing a program1Press 3to select Program.2Press 2repeatedly to select On. Next, press 2OK.➜FTS on (Favorite track selection) appears.Your program will play.00To return to normal playback, select Toolbar ➜Program ➜Program. Press 2repeatedly to select off.Next, press 2OK.➜FTS off appears.Reviewing / Deleting programmed tracksPlaylist allows you to view the tracks, chapters or titles ofyour program.1Press 4repeatedly to select Playlist. Next, press 2.2Press 3or 4repeatedly to scroll through the tracks,chapters, or titles of your program.00To delete a track, chapter or title from your program, press3or 4repeatedly to select the track, then press 2OK.➜The selected track, chapter or title will be deleted fromyour program.3Press 1to exit the menu.Note: Playlists generated on a computer and stored on the CD-ROM are not supported.Clearing the entire program1Press 4repeatedly to select Clear all.2Press 2to clear the entire program.➜Cleared will be displayed and the program will be cleared.Disc34EnglishToolbarProgram View ProgramDVD StopTracksProgramUse ≠ or ± to select other options, = to enter the optionPlaylistClear all](https://usermanual.wiki/Philips-Consumer-Lifestyle/MX6000.Users-Manual-Main/User-Guide-428001-Page-34.png)
![Disc Menu [DVD]1Press DISC MENU on the remote control.➜If the current title of the current disc has a menu, the titlemenu will appear on the screen.➜Otherwise, the main DVD disc menu will appear.The menu may list camera angles, spoken language andsubtitle options, chapters for the title, or other discfeatures.2Press 1 2 3 4 on the remote control to select the desireditems in the menu, then press 2OK.3If you do not start playback from the menu, pressDISC MENU to exit.Audio [DVD,VCD]Some DVDs are recorded in different languages.You maybe able to hear the same movie dialog in English, French,Spanish, etc.1Press AUDIO on the remote control during DVD playback.2Press AUDIO repeatedly within five seconds to see thedifferent languages available. Or press 3or 4to see thedifferent languages.➜The language you select will be audible in a few seconds.3Press 2OK to exit.Note: Audio is also available in the System Menu.Subtitles [DVD]Some DVDs include subtitles in different languages.You can choose subtitles only if they are available onthe DVD.1Press SUBTITLE on the remote control during DVDplayback.2Press SUBTITLE repeatedly within five seconds to see the different subtitle languages. Or press 3or 4to see the different subtitle languages.➜The language may be abbreviated or numbered.➜Subtitles will appear after a few seconds.3Press 2OK to exit.Note: Subtitle is also available in the System Menu.Camera Angle [DVD]Some DVDs include scenes recorded from different angles.You can watch these different angles if the angle symbolFANGLE appears during DVD playback. If the DVD wasnot recorded with different angles, this feature is notavailable. Check the DVD case first to see if multiple anglesare available.1During DVD playback, FANGLE will appear at the topof the TV screen if multiple angles are available.2Press ANGLE on the remote control during DVD playback.➜The available angles will appear.3Press ANGLE or 4or 3repeatedly to select the anglefrom which you want to watch the current scene.4Press 2OK to exit.Note: Angle is also available in the System Menu.Zoom [DVD]This feature lets you enlarge the video image duringplayback and pan through the enlarged image.1Press ZOOM on the remote control during playback.➜Four arrows and a yellow dot appear on the TV screen.2While the arrows and the yellow dot are displayed:Press 2OK repeatedly to select the zoom factor: Zoom 1,Zoom 2,Zoom 4,Zoom 8.Press 1234to move to the left, right, top, or bottom ofthe picture.3Press ZOOM to exit.00To return to normal playback, press ZOOM. Next, press2OK repeatedly to select Zoom 1. Press ZOOM again.Note: Zoom is also available in the System Menu.Disc35EnglishZoom 4Use ≠=+± to pan, OK to zoom in, RETURN to zoom out, ZOOM key to exit.](https://usermanual.wiki/Philips-Consumer-Lifestyle/MX6000.Users-Manual-Main/User-Guide-428001-Page-35.png)
![Selecting the menu language,country, audio language andsubtitle languageThese features are only available when DVD is selected.1Press SYSTEM MENU on the remote control.2DVD: Select Setup ➜Language.Menu Language [DVD,VCD, CD, MP3]Select your preferred language for the System menu.●Press 3or 4to select the desired language , then press2OK to confirm.Country [DVD,VCD, CD, MP3]Select the country where this Streamium System is used.●Press 3or 4to select the country, then press 2OK toconfirm.Default Audio (DVD)Select the audio language you prefer whenever you playany DVD. If the default language is not available on theDVD, the first audio language on the disc will be selected.●Press 3or 4to select the desired default audio language,then press 2OK.Default Subtitle (DVD)Select the subtitle language you prefer whenever you playany DVD. If the default subtitle is not available on the DVD,the first subtitle on the disc will be selected.●Press 3or 4to select the desired default subtitle language,then press 2OK.Playback Control (PBC) [VCD]This feature is available only for (Super) Video CDscompatible with PBC. (Super) Video CDs with PlaybackControl offer additional features. Check the (Super) VideoCD case for details.Switching PBC on/off [VCD]1Press SYSTEM MENU on the remote control.2Select Setup ➜Features ➜PBC.3Press 2repeatedly to switch PBC on or off.Next, press 2OK.Note: If a (Super) Video CD does not play, set PBC to Off.Playing a (Super) Video CD with PBC1Load a (Super) Video CD with PBC and press 2OK.➜The (Super) Video CD will show instructions or optionson the TV screen.2Use the remote control buttons as directed by the (Super)Video CD.00To return to a previous menu, press RETURN.00If a PBC menu has titles, select a title directly by pressingthe number buttons on the remote control.Disc36EnglishUse ± or ≠ to select other options, = to enter the optionNTSCLanguage View ProgramDVD StopCountryMenu LanguageDefault AudioBahasa MelayuEnglishEspañolFrançaisPortuguêsMenu LanguageSetupDefault Subtitle](https://usermanual.wiki/Philips-Consumer-Lifestyle/MX6000.Users-Manual-Main/User-Guide-428001-Page-36.png)
![Access Control [DVD]Some DVDs may not be suited for children.With AccessControl you can limit the scenes to be shown.This featurewill not work if the disc is not provided with access controlinformation. Philips cannot guarantee the availability ofAccess Control with all discs, and therefore denies anyliability associated with unintended viewing of discs. Makesure your discs play according to your Access Controlsettings before you allow children to access to the StreamiumSystem.1Press SYSTEM MENU on the remote control.2DVD: Select Setup ➜Access.3Press 4to select Enter Current Pin. Next, press 2.4Use the number buttons to enter the four digit code.When using the Streamium System for the first time, enter“0000.”5Press 4repeatedly to select either Parental Level,Change Pin or Disc Lock. Press 2to enter the selectedmenu.Parental LevelDVDs may contain alternative scenes that conform to theParental Level, or movie rating, that you select.The ParentalLevel may apply to the complete disc or to certain sceneson the disc. Follow the steps below to set the ParentalLevel at which you want the discs to play.●Press 3or 4or the number buttons (0-8) to select arating, then press 2OK.00Select “0” (– –) to deactivate Parental level. Or choose arating between 1-8; discs or scenes with the same rating orlower will play. Higher rated discs or scenes will not playunless you enter your four digit code. Follow the directionsgiven by the disc to enter your code and start playback.Note:The rating numbers compare to standard U.S. movieratings as follows: 7 for NC-17; 6 for R; 4 for PG-13; 3 for PG,and 1 for G.Change Pin1Use the number buttons to enter the current Pin.➜Enter New Pin appears.2Use the number buttons to enter the new Pin.➜Confirm Pin appears.3Enter the new Pin again to confirm it.➜The Pin code is changed.Note: Sometimes, the system will ask you to enter your codetwice to confirm the code.This is normal.Disc LockUse Disc Lock to disable viewing of a specific disc,regardless of its rating. A DVD must be in the disc tray.●Press 2repeatedly to lock or unlock the loaded disc. Next,press 2OK.➜Locked discs will not play unless you enter your four digit code.Note: Lock/unlock each side of two sided DVDs and eachvolume of multi-volume (Super) Video CDs.If you forget your Pin1When asked to enter the Pin, press 9on the remotecontrol 4 times.2Next you will be asked to enter a new Pin (see “ChangePin”).Access Control39EnglishUse ± or ≠ to select other options, = to enter the optionSetupAccessDVD StopParental LevelEnter Current Pin * * * *Change PinDisc Lock](https://usermanual.wiki/Philips-Consumer-Lifestyle/MX6000.Users-Manual-Main/User-Guide-428001-Page-39.png)