Pantech PN-310 Dual-Band Phone ( CDMA/ PCS-CDMA ) User Manual 061010 PN 310 EN M indd
Pantech Co., Ltd. Dual-Band Phone ( CDMA/ PCS-CDMA ) 061010 PN 310 EN M indd
UserManual.wiki
>
Pantech
>
PN 310 User Manual
User Manual
Navigation menu
Upload a User Manual
Namespaces
Wiki Guide
HTML
PDF
Info
Views
User Manual
Discussion / Help
Navigation


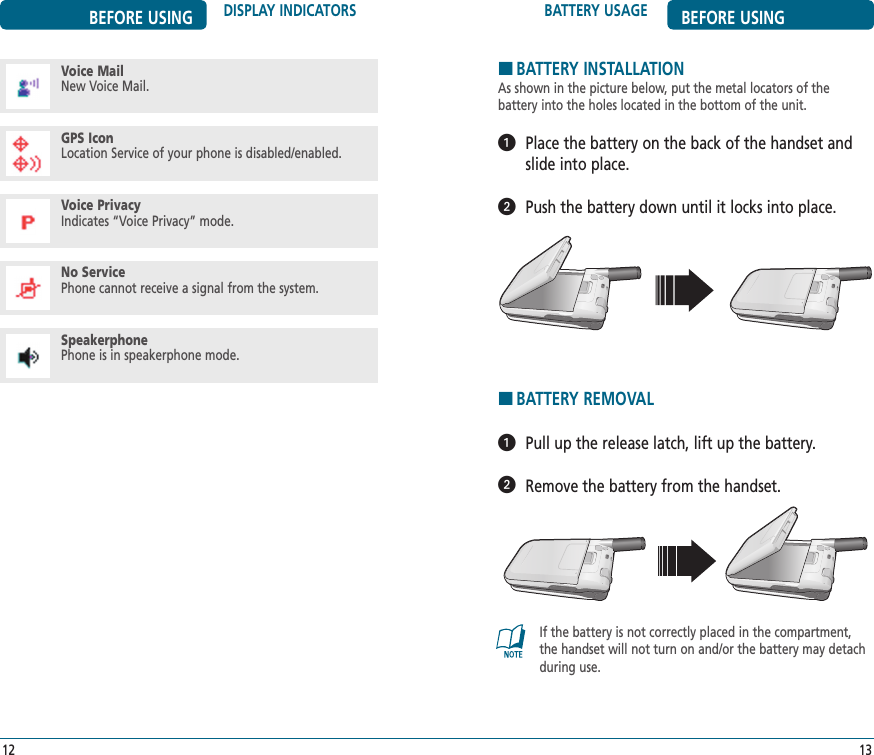
![ACCESSING THE MENU BASIC OPERATION To access the menu in idle mode, press [MENU]. Use the Navigation Key to scroll through the menu. To return to the previous page, press . To exit the current menu and return to idle mode, press . Press the Navigation Key to enter a function when its main page is displayed or press its assigned number to have direct access to the function.19Your phone can be customized via the menu. Each function can be accessed by scrolling with the Navigation Key or by pressing the number that corresponds with the menu item.Hotkey In idle mode, move the Navigation Key as follows to access these functions:• Leftward movement: Shortcut Key 1 • Upward movement: Shortcut Key 2• Rightward movement: Shortcut Key 3• Downward movement: Shortcut Key 4BASIC OPERATION TURNING THE PHONE ON / OFFHTURNING THE PHONE ON Press , until animation appears and the wake up tone sounds.HTURNING THE PHONE OFF Press and hold .• Immediately change or recharge the battery when “Low Battery Warning Power Off” appears on the display. Memory may possibly be damaged if the phone turns off due to the battery completely draining.• Turn the phone off before removing or replacing the battery. If the phone is on, unsaved data may be lost.18](https://usermanual.wiki/Pantech/PN-310/User-Guide-726524-Page-10.png)

![HANSWERING A CALL When your phone rings or vibrates, press to answer the incoming call. (Depending on your phone’s settings, you may also answer incoming calls by opening the phone or by pressing any number key.)To ignore incoming calls and silence the ringer, press [IGNORE]. To end the call, press .HSPEAKERPHONEThe speakerphone feature lets you hear audio through the speaker and talk without holding the phone. To activate the speakerphone in idle, answering or calling modes, press . The phone returns to normal (Speakerphone Off) after ending a call or when the phone is turned off and back on.HCALLER IDIdentifies callers by displaying their phone number. If the caller’s name and number are already stored in your phone book, the name will be displayed.The caller ID information is stored in Recent Calls.BASIC FUNCTIONS BASIC OPERATION25BASIC OPERATION BASIC FUNCTIONS24H3-WAY CALLINGWith 3-Way Calling, you can talk to two people at the same time. When using this feature, normal airtime rates will apply to both of the calls. Enter a number you wish to call and press . Once you have established the connection, enter the second number you wish to call and press . When you’re connected to the second party, press again to begin your 3-Way call.If one of the people you called hangs up during your call, you and the remaining caller stay connected. If you initiated the call and are the first to hang up, all three callers are disconnected.HCALL WAITINGNotifies you of an incoming call when you are already on a call by sounding a beep tone and displaying the caller’s phone number.To answer another call while on the phone, press . This places the first call on hold. To switch back to the first caller, press again.NUMBERNUMBER](https://usermanual.wiki/Pantech/PN-310/User-Guide-726524-Page-13.png)
![DURING A CALL BASIC OPERATION27BASIC OPERATION BASIC FUNCTIONS26HADJUSTING MASTER VOLUMEAdjust the volume of the master volume. In idle mode, press up or down side volume key. Select one of the following options, press [OK] to save it.• Move the Navigation Key up or down to adjust Earpiece volume during a call.• Move the Side Volume Key up or down to adjust Earpiece volume during a call.HWAIT/2-SEC PAUSEPauses are used for automated systems (i.e., voice mail, calling cards). Insert a pause after a phone number then enter another group of numbers. If “2-Sec Pause” selected, after 2 second is dialed automati-cally after the pause. If “Wait” selected, press is dialed auto-matically after the wait. This feature is useful for dialing into systems that require a code. To insert a pause, enter a phone number then press [OPTIONS]. Select either a 2-Sec Pause (“P” appears) or a Wait (“W” appears). Press to dial or [SAVE] to store.Please refer to page 30 for more details about storing a phone number.HAVAILABLE OPTIONS DURING A CALLTo display menu options during a call, press [OPTIONS].MUTE (UNMUTE)The caller cannot hear you or any sounds from your side but you can still hear them.Press [MUTE].SEND MSGEnables you to send a message while on a call.Press [OPTIONS] .CONTACTSEnables you to review your contacts list while on a call.Press [OPTIONS] .RECENT CALLSEnables you to review the all calls list while on a call.Press [OPTIONS] .• To deactivate, press [UNMUTE].• The phone will automatically unmute in Emergency Call or Callback mode.• All Sounds Off• Alarms Only• Vibrate Only• Low / Med Low / Med / Med High / HighNUMBERSelect“P”or”W” OR](https://usermanual.wiki/Pantech/PN-310/User-Guide-726524-Page-14.png)
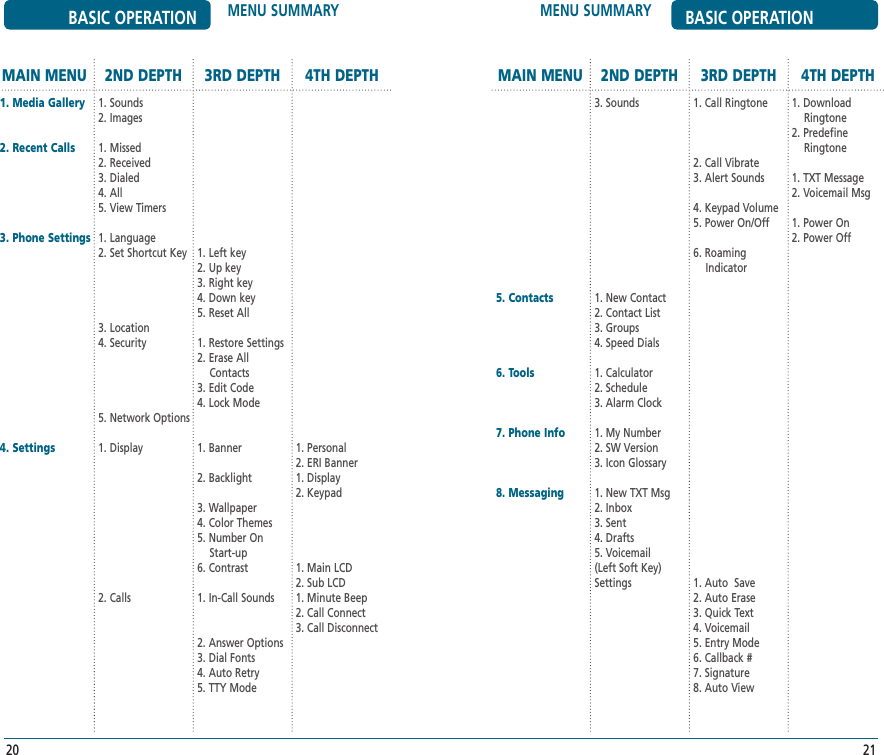
![ENTERING LETTERS, NUMBERS & SYMBOLS MEMORY FUNCTIONSThe input mode (Alpha editor) will automatically be activated when necessary to enter letters and numbers. As shown below, there are 5 available modes ; Standard input mode (Abc) and standard all capitals (ABC), T9Word input mode (Word), Numeric mode (123), and symbol mode (Symbols).The input mode indicator appears on the upper right of the display when letters and numbers are entered. To select the desired input mode among the 5 modes below, press [Abc], then enter letters and numbers.The following illustrates the function assigned to each key in the Alpha Editor.31MEMORY FUNCTIONS STORING A PHONE NUMBERThe phone book stores up to 500 entries. Enter phone # then press [SAVE] then choose “Create New” or “Update Existing”. Press [OK] to select. If “Create New” is selected, the phone number will appear above a list. Press the Navigation Key up or down to choose the type of number you’re adding, as indicated by the icon. Press [OK] to select. If “Update Existing” is selected, your contact list is displayed. Choose the entry to add the phone num-ber to, then press [OK]. Press the Navigation Key up or down to choose the type of number you’re adding, as indicated by the icon. Press [OK] to select. Enter a name. Please refer to page 31 for more details on enter-ing letters, numbers & symbols. To change the input mode, press [Abc]. Press the Navigation Key down to select other options (Mobile1.2, E-mail1.2, etc...). If you entered a phone number, press [OPTIONS] to select one of the following options: To store the entry, press [SAVE]. “CONTACT SAVED” will be displayed.30• Set speed dial• Save as default• Add PauseFUNCTIONKEYAbcPress to change mode. [Word][Abc][ABC][123][Symbols]NextPress to view the next matching word if the highlighted word is not the word you intended in Word input mode.SpacePress to accept a word and add a space.ClearPress to delete a character to the left of the cursor.OKConfirm the letters and numbers you entered.Caps LockPress to select a letter case of the standard text input or T9 text input mode. [Abc], [ABC] and [abc] indicate the standard text input. [Word], [WORD] and [word] indicate the predictive text input. Press and hold to change mode.](https://usermanual.wiki/Pantech/PN-310/User-Guide-726524-Page-16.png)
![ENTERING LETTERS, NUMBERS & SYMBOLS MEMORY FUNCTIONSHWORD INPUT MODEThe Word input mode incorporates a built-in-dictionary to determine a word based on the entered characters. A Word can be entered more quickly by pressing a key once per character. Select the Word mode by pressing [Abc], scroll down to Entry Mode and select “Word”, press [OK]. Press a digit key once to enter the character you want then enter all the characters to input the word you want. To view the next matching word, press . To accept the matching word and enter a space, press .To enter a compound word:• Enter the first part of the word then press to accept it.• Enter the last part of the word then press to enter the word.33MEMORY FUNCTIONS ENTERING LETTERS, NUMBERS & SYMBOLSHSTANDARD INPUT MODEUse the number keys to enter letters, numbers and characters. Enter letters using the key pad as follows: Press to select the symbol you want to enter with the Navigation Key or press the corresponding numeric keys. To change the input mode, press [Abc]. To enter a space, press . The cursor will automatically move to the next column. Repeat until letters are entered. To delete one digit, press . If you press and hold , it will delete the entire entry, and entire numbers. To change from lowercase to uppercase, press .32Key Pad Press1 TimePress2 timesPress3 timesPress4 timesPress5 times2ABC3DEF4GHI:9WXYZADG:WBEH:XCFI:Y234:ZADG:9](https://usermanual.wiki/Pantech/PN-310/User-Guide-726524-Page-17.png)
![MAKING A CALL FROMTHE PHONE BOOK MEMORY FUNCTIONSHONE-TOUCH/TWO-TOUCH DIALINGIdeal for frequently dialed numbers, this feature allows phone book entries to be dialed via the keypad with only one or two key presses.ONE-TOUCH DIALING:1-9: Press and hold the corresponding memory number for more than 1 second.TWO-TOUCH DIALING:10-22, 97, 98, 99: Press the first digit and second digits of the memory number short and long respectively.If no phone number is stored in the location entered, “UNASSIGNED LOCATION” will appear on the screen.35MEMORY FUNCTIONS ENTERING LETTERS, NUMBERS & SYMBOLSHNUMERIC MODEAllows you to enter numbers. Select the Numeric mode by pressing [OPTIONS], scroll down to Entry Mode and select “123”, press [OK]. To enter a number, press a digit key. HSYMBOL MODEAllows you to enter symbols. Select the Symbol mode by pressing [OPTIONS], scroll down to Entry Mode and select “Symbols”, press [OK]. Select the symbol you want to enter with the Navigation Key or press the corresponding numeric keys.34](https://usermanual.wiki/Pantech/PN-310/User-Guide-726524-Page-18.png)

![RECENT CALLS MENU FUNCTIONS3938MENU FUNCTIONS MEDIA GALLERYHMEDIA GALLERYSOUNDSThis menu shows the list of downloaded ringtones. Press [MENU] . To play downloaded sounds, select the sound you want to play, then press [PLAY]. You want to assign then press [SET]. IMAGESThis menu shows the list of downloaded images. Press [MENU] . To view downloaded image, scroll through the list and press [VIEW]. You want to assign then press [SET]. HMISSEDDisplays information about the 90 most recently missed calls. Place a call to a missed call number by simply pressing . To see a list of the 90 most recently missed calls, press [MENU] . If the number is already stored in your phone book, only the name appears. If the number is not stored, only the phone number appears. To view missed call details, press [OPEN].Call details include date, time and phone number. Press [MESSAGE] to send the TXT message. Press [OPTIONS] to see the options below:After 90 missed calls, the oldest call will automatically be erased from the history.• Save: To store the phone number in your phone book.• Erase: To erase a missed calls listing.• Lock/Unlock: To lock or unlock a missed calls listing. • Erase All: To erase all missed calls listings.• View Timers: To display usage time.](https://usermanual.wiki/Pantech/PN-310/User-Guide-726524-Page-20.png)
![RECENT CALLS MENU FUNCTIONS41MENU FUNCTIONS RECENT CALLS40HRECEIVEDDisplays information about the 90 most recently answered calls. Place a call to a received call by simply pressing . To see a list of the 90 most recently answered calls, press [MENU] . If the number is already stored in your phone book, only the name appears. If the number is not stored, only the phone number appears. To view received call details, press [OPEN].Call details include date, time and phone number. Press [MESSAGE] to send the TXT message. Press [OPTIONS] to see the options below:After 90 received calls, the oldest call will automatically be erased from the history.• Save: To store the phone number in your phone book.• Erase: To erase a received calls listing.• Lock/Unlock: To lock or unlock a received calls listing. • Erase All: To erase all received calls listings.• View Timers: To display usage time.HDIALEDDisplays information about the 90 most recently dialed numbers. Place a call to a dialed call by simply pressing . To see a list of the 90 most recently dialed numbers, press [MENU] . If the number is already stored in your phone book, only the name appears. If the number is not stored, only the phone number appears. To view dialed call details, press [OPEN].Call details include type of call, date, time and phone number. Press [MESSAGE] to send the TXT message. Press [OPTIONS] to see the options below:After 90 dialed calls, the oldest call will automatically be erased from the history.• Save: To store the phone number in your phone book.• Erase: To erase a dialed calls listing.• Lock/Unlock: To lock or unlock a dialed calls listing. • Erase All: To erase all dialed calls listings.• View Timers: To display usage time.](https://usermanual.wiki/Pantech/PN-310/User-Guide-726524-Page-21.png)
![RECENT CALLS MENU FUNCTIONS43MENU FUNCTIONS RECENT CALLS42HALL CALLSDisplays information about the most recent received, dialed and missed calls. To see a list of the 270 most recent received, dialed and missed calls, press [MENU] . If the number is already stored in your phone book, only the name appears. If the number is not stored, only the phone number appears. To view details, press [OPEN].Call details include type of call, date, time and phone number. Press [MESSAGE] to send the TXT message. Press [OPTIONS] to see the options below:After the 270 received, dialed or missed calls, the oldest call will automatically be erased from the history when a new call is added.• Save: To store the phone number in your phone book.• Erase: To erase a recent calls listing.• Lock/Unlock: To lock or unlock a recent calls listing. • Erase All: To erase all recent calls listings.• View Timers: To display usage time.HVIEW TIMERSTracks the usage time to help you manage your calls within the limit you set. The 4 timers include (Last Call, All Calls, Received Calls, Dialed Calls): Press [MENU] . “Last Call”, “All Calls”, “Received Calls”, “Dialed Calls” is selected with Navigation Key.To reset the timer, press [RESET], then select “Yes”, press [OK].To reset all timer, press [RESET ALL], then select “Yes”, press [OK]. To return to the previous page, press .](https://usermanual.wiki/Pantech/PN-310/User-Guide-726524-Page-22.png)
![4544PHONE SETTINGS MENU FUNCTIONSMENU FUNCTIONS PHONE SETTINGSHPHONE SETTINGSAllows you to customize the phone settings.LANGUAGESelects the language in which letters are displayed on the screen. Press [MENU] . Select one of the following options with the Navigation Key. Press [OK] to save it.SET SHORTCUT KEYYour phone offers you the option of assigning a shortcut key (Up, Down, Left, Right Navigation Key) to a favorite or often-used function. To assign a shortcut to the key: Press [MENU] . Select “Left Key”, “Up Key”, “Right Key” or “Down Key”. Select one of the following options with the Navigation Key, press [OK] to save it. To reset all already set shortcut key, press “Reset All”, then select “Yes”, press [OK].• English• Español• Images / Sounds / Inbox / Settings / Alarm Clock / Calculator / CalendarLOCATIONTo determine whether or not the network system can detect your position: Press [MENU] . Select one of the following options with the Navigation Key. Press [OK] to save it.SECURITYPrevents unauthorized use of your phone. The following settings can be restricted:RESTORE SETTINGSResets phone to default settings. Press [MENU] then enter “Password”, press [OK]. The default pass-word is the last 4 digits of your phone number. A message, asking for your confirmation, will appear as following. “Reset all Settings to default?”, then select “Yes”, press [OK]. Your phone will reset all settings to the factory defaults.• Location On: Your location is now available to the network.• E911 Only: Your location will be hidden from network & application except 911.](https://usermanual.wiki/Pantech/PN-310/User-Guide-726524-Page-23.png)
![4746MENU FUNCTIONS PHONE SETTINGS PHONE SETTINGS MENU FUNCTIONSERASE ALL CONTACTSTo clears all Phone Book entries. Press [MENU] then enter “Password”, press [OK]. The default pass-word is the last 4 digits of your phone number. A message, asking for your confirmation, will appear as following. “Erase All Contacts?”, then select “Yes”, press [OK]. Your phone will erase all contact entries.EDIT CODEChanges your 4-digit password. Press [MENU] then enter “Password”, press [OK]. The default pass-word is the last 4 digits of your phone number. Enter a “New Code” then press . Enter a “Confirm Code” then press [OK] to save it. Since the data cannot be retrieved once it is erased, a warning will appear on the display before erasing everything.LOCK MODEPrevents the phone from being used without entering the pass-word first. Press [MENU] then enter “Password”, press [OK]. The default pass-word is the last 4 digits of your phone number. Select one of the following options with the Navigation Key. Press [OK] to save it.NETWORK OPTIONSNAM SELECTChanges the NAM used by the phone when you have multiple registrations. Press [MENU] . Select one of the following options with the Navigation Key. Press [OK] to save it.• Lock: Lock the phone now.• Unlock: Do not lock the phone.• On Power Up: Do not lock the phone now, but automatically lock phone when power is recycled.• NAM 1 - Verizon• NAM 2 - Verizon](https://usermanual.wiki/Pantech/PN-310/User-Guide-726524-Page-24.png)
![4948SETTINGS MENU FUNCTIONSMENU FUNCTIONS PHONE SETTINGSSYSTEM SELECTSelects the Preferred System. Press [MENU] . Select one of the following options with the Navigation Key. Press [OK] to save it.• Automatic B• Automatic A• Home OnlyCustomizes your phone and optimizes performance through a variety of settings.HDISPLAYAllows you to customize the displays.BANNERYou can choose to display a personal Banner greeting or the Enhanced Roaming Indicator (ERI) banner on the phone’s screens:PERSONALThe text greeting can be up to 20 characters and is displayed on your phone’s screen in standby mode. Press [MENU] . Enter a new personal greeting. To change the input mode, press [Abc]. Press [OK] to save it. ERI BANNER Press [MENU] . Select “On” or “Off” with the Navigation Key. Press [OK] to save it.](https://usermanual.wiki/Pantech/PN-310/User-Guide-726524-Page-25.png)
![SETTINGS MENU FUNCTIONS51MENU FUNCTIONS SETTINGS50BACKLIGHTBacklights the display and key pad and activates dimming for easy viewing in dark places.DISPLAY Press [MENU] . Select one of the following options with the Navigation Key. Press [OK] to save it. KEYPAD Press [MENU] . Select one of the following options with the Navigation Key. Press [OK] to save it.• 7 Seconds• 15 Seconds• 30 Seconds• Always On• Always Off• 7 Seconds• 15 Seconds• 30 Seconds• Always OnWALLPAPERTo set your phone to display it when the phone is in standby mode. Press [MENU] . To display full screen image, scroll through the list and press [VIEW]. You want to assign then press [OK]. COLOR THEMESTo select main display color. Press [MENU] . Select one of the following options by pressing the Navigation Key. Press [OK] to save it.NUMBER ON STARTUP Press [MENU] . Select “On” or “Off” with the Navigation Key. Press [OK] to save it.• Default• Tropical• Business• Blue](https://usermanual.wiki/Pantech/PN-310/User-Guide-726524-Page-26.png)
![5352SETTINGS MENU FUNCTIONSMENU FUNCTIONS SETTINGSCONTRASTTo adjust the display contrast. Press [MENU] . Select “Main LCD” or “Sub LCD” with the Navigation Key. Select one of the following options by pressing the Navigation Key. Press [OK] to save it.• 1• 2• 3• 4• 5HCALLSAllows you to customize the call settings.IN-CALL SOUNDSYour phone can alert you with an audible tone when once a minute during a voice call, or for connect or disconnect calls.MINUTE BEEPTo sets a minute reminder that beeps ten seconds before the end of each minute during a call. Press [MENU] . Select “On” or “Off” with the Navigation Key. Press [OK] to save it.CALL CONNECTNotifies you that a call has been successfully placed. Press [MENU] . Select “On” or “Off” with the Navigation Key. Press [OK] to save it.](https://usermanual.wiki/Pantech/PN-310/User-Guide-726524-Page-27.png)
![SETTINGS MENU FUNCTIONS55MENU FUNCTIONS SETTINGS54CALL DISCONNECTNotifies you that a call has been unsuccessfully placed. Press [MENU] . Select “On” or “Off” with the Navigation Key. Press [OK] to save it.ANSWER OPTIONSTo allows you to specify how you want to answer calls. Press [MENU] . Select one of the following options with the Navigation Key. Press [OK] to save it.DIAL FONTSTo select the size of the dial font to appear in display. Press [MENU] . Select “Normal” or “Large” with the Navigation Key. Press [OK] to save it.• Send Only• Flip Open• Any Key• Auto AnswerAUTO RETRYTo sets automatically redials a call up to 5 times after a set time interval. Press [MENU] . Retry time field is shown. Press the Navigation Key to choose the amount of time. When a time is chosen for retry time, the repeat field is shown. Press the Navigation Key down to highlight the repeat field. Press the Navigation Key to choose the number of repeats. Press [OK] to save it.• Off• 3 SECS• 5 SECS• 7 SECS• 10 SECS• 1 Time• 3 Times• 5 Times](https://usermanual.wiki/Pantech/PN-310/User-Guide-726524-Page-28.png)
![SETTINGS MENU FUNCTIONS57MENU FUNCTIONS SETTINGS56TTY MODEYour phone is able to operate with a TTY (Teletypewriter) device in both analog and digital modes. This feature is system dependent and may not be available in all areas. Press [MENU] . Select one of the following options with the Navigation Key. Press [OK] to save it.• TTY Full• TTY Talk• TTY Hear• TTY OffHSOUNDSAllows you to customize the sound settings.CALL RINGTONETo select a ringer type for incoming calls. Press [MENU] . Select “Download Ringtone” or “Predefine Ringtone” with the Navigation Key. Select your desired ringer type. To play ringtone, select the ringtone you want to play, then press [PLAY]. You want to assign then press [OK]. CALL VIBRATEYour phone has a built-in vibrating alert so you can receive calls or message silently. Press [MENU] . Select “On” or “Off” with the Navigation Key. Press [OK] to save it.• Download Ringtone: To select a downloaded right to your phone.• Predefine Ringtone: To select a variety of standard ringer types and familiar music.](https://usermanual.wiki/Pantech/PN-310/User-Guide-726524-Page-29.png)
![SETTINGS MENU FUNCTIONS59MENU FUNCTIONS SETTINGS58ALERT SOUNDSTo select type of sound you will hear when you receive an incoming TXT message or voicemail message.TXT MESSAGETo select a ringer type for receiving TXT Message. Press [MENU] . Select “Tone” or “Vibrate” with the Navigation Key and then select one of the following options by pressing the Navigation Key. Press [OK] to save it.VOICEMAIL MSGTo select a ringer type for receiving Voicemail Message. Press [MENU] . Select “Tone” or “Vibrate” with the Navigation Key and then select one of the following options by pressing the Navigation Key. Press [OK] to save it.• Tone: Select your desired ringer type. To play ringtone, select the ringtone you want to play, then press [PLAY]. • Vibrate: Select “On” or “Off” with the Navigation Key.• Tone: Select your desired ringer type. To play ringtone, select the ringtone you want to play, then press [PLAY]. • Vibrate: Select “On” or “Off” with the Navigation Key.KEYPAD VOLUMETo select a keypad tone you will hear when you press a key. Press [MENU] . Select one of the following options with the Navigation Key. Press [OK] to save it.POWER ON/OFFTo set a start-up/power-off tone:POWER ONTo allows you to activate/deactivate the power on tones. Press [MENU] . Select “On” or “Off” with the Navigation Key. Press [OK] to save it.POWER OFFTo allows you to activate/deactivate the power off tones. Press [MENU] . Select “On” or “Off” with the Navigation Key. Press [OK] to save it.• High• Med High• Med• Med Low• Low](https://usermanual.wiki/Pantech/PN-310/User-Guide-726524-Page-30.png)
![CONTACTS MENU FUNCTIONS61MENU FUNCTIONS SETTINGS60ROAMING INDICATORThe Enhanced Roaming Indicator (ERI) feature displays a text banner on the display screen informing the handset user of which systems the wireless device is using as compared to the service plan they purchased. The ERI Banner text changes to tell a customer if they are using the: “Verizon Network”, “Extended Network” or “Roaming”. Press [MENU] . Select “On” or “Off” with the Navigation Key. Press [OK] to save it.Menu -> Settings -> Display -> Banner -> ERI Banner must be set for “ON” for smooth operation of all the functions. Stores up to 500 entries, each of which can be assigned to a group. Entries can be retrieved by name or group. HNEW CONTACTAdds a new contact entry. To add a new entry to the phone book, press [MENU] . To enter a name or number, use the Navigation Key to select the contact fields.Please refer to page 31 for more details on entering letters, numbers & symbols. To save the entry, press [SAVE]. To return to the previous page, press .If only a phone number is entered and the name field is left blank, the contact will still be saved and the Contact List will display the phone number.• Contact Fields: Name/Mobile1/Home/Work/E-mail1/Group/ Ringtone/Mobile2/Fax/E-mail2.](https://usermanual.wiki/Pantech/PN-310/User-Guide-726524-Page-31.png)
![6362CONTACTS MENU FUNCTIONSMENU FUNCTIONS CONTACTSHCONTACT LISTRetrieves an entry by name and number, and calls the number by simply pressing . You can review all the entries stored in your phone book list or find an entry quickly by entering all or part of a name. Press [MENU] . The list of names in your phone book is displayed alphabetically. Enter a name or part of a name or scroll through the list with the Navigation Key. Please refer to page 31 for more details on entering letters, numbers & symbols. All matching entries will be displayed. Highlight an entry. Press [VIEW] to view the entry. Press [EDIT] to edit the entry. Press [OPTIONS] to 1. New Contact, 2. Erase, 3. Send TXT Msg, 4. Call or 5. Erase All To call the selected number, press or press [OPTIONS] and select “Call”.HGROUPSAllows you to classify phone entries into as many as 30 groups. Existing group names include Family and Work and can’t be renamed or erased, however the user can create up to 28 additional group names which can be changed or deleted. The user can add up to 10 phone numbers per group.ADD NEW GROUP To add a new group, press [MENU] . A maximum of 30 groups is allowed. Press [NEW]. Input a new group name. Press [SAVE] to save it.ASSIGN PHONE NUMBER TO GROUP Press [MENU] . Select an existing group name with the Navigation Key, press [VIEW]. Press [ADD]. Your phone book entries will be displayed in alphabetical order. Select the contact with the press [MARK] or press [MARK ALL].OR](https://usermanual.wiki/Pantech/PN-310/User-Guide-726524-Page-32.png)
![6564CONTACTS MENU FUNCTIONSMENU FUNCTIONS CONTACTS Press [DONE]. “CONTACT ADDED TO GROUP” will be displayed. Repeat for each location for the Group.CHANGE GROUP NAME Press [MENU] . Select an exist-ing group name that you have added with the Navigation Key. Press [OPTIONS] to select “Rename”. Input a new group name. Press [SAVE] to save it.The default group names (Family, Work) cannot be changed.ERASE GROUP Press [MENU] . Use the Navigation Key to select, then delete the group. Press [OPTIONS] to select “Erase Group”. “Erase Group?” will be displayed, select “Yes” to erase it.The default group names (Family, Work) cannot be erased.SEND MSG TO A GROUP Press [MENU] . Select an existing group name with the Navigation Key. Press [OPTIONS] to select “Send TXT Msg”. Input a Message, press [OPTIONS] to select “Add Graphics”, “Add Sound”, “Add Format Text” and “Quick Text”. To send the text message, press [SEND].To save the text message, press [OPTIONS], then select “Save as Draft”, then press [OK].To set priority level, press [OPTIONS], then select “Priority”, then select “Normal” or “High”, then press [OK].To cancel message, press [OPTIONS], then select “Cancel Msg”, then select “Yes”, message is saved in the drafts box.Please refer to page 74 for more details on “New TXT Msg”.](https://usermanual.wiki/Pantech/PN-310/User-Guide-726524-Page-33.png)
![6766TOOLS MENU FUNCTIONSMENU FUNCTIONS CONTACTSHSPEED DIALSIn idle mode, calls can be placed to numbers stored in speed dial by pressing & holding the location number on the key pad. For a 2-digit location number, press the first number, then press and hold the second number. Press [MENU] . To assign a phone number to a location, select the location and press [SET]. Select the entry with the Navigation Key and press [OK]. Select phone number with the Navigation Key and press [OK]. “SPEED DIAL SET” will be displayed.To call an assigned number, press & hold the last digit of the speed dial #.• If a phone number is already assigned to the location, to view details, press [VIEW] or press [REMOVE], “Remove speed dial?” will be displayed, select “Yes” to remove it.• “Unassigned” appears if the location is available.HCALCULATORTo access the calculator: Press [MENU] . Follow the instructions below to calculate 8*6/4-2.5 To reset, press [CLEAR].• To change the displayed number from positive (+) to negative (-) and vice versa, press [=].• Press [OPERATOR] to use parenthesis and “Exponent”.• Input 8.• Press the Navigation Key rightward (*).• Input 6.• Press the Navigation Key leftward (/).• Input 4.• Press the Navigation Key downward (-).• Input 2 and press the to input (.).• Press 5, .• Answer appears on the right side of the grey box below calculation.](https://usermanual.wiki/Pantech/PN-310/User-Guide-726524-Page-34.png)
![6968TOOLS MENU FUNCTIONSMENU FUNCTIONS TOOLSHSCHEDULESets an event and reminds you of that event.ADD NEW PLAN Press [MENU] . Move the Navigation Key left, right, up or down to choose a date in the calendar and then press [OK]. Press [OPTIONS] to 1. Weekly View, 2. Add, 3. Go To Date, 4. Erase Passed or 5. Erase All. To set a new event, press [OPTIONS] then select “Add”. The appointment field is highlighted. Press the Navigation Key down to set the alarm options.APPOINTMENTUse the keypad to enter an appointment in your schedule.START TIMEUse the keypad to set a start time and to select “am” or “pm”.END TIMEUse the keypad to set an end time and to select “am” or “pm”.START DATEUse the keypad to change or enter the start date.TIME ZONEUse the Navigation Key to select a time zone, press [SET]. (EST, EDT, CST, CDT, MST, MDT, PST, PDT, AKST, AKDT, HAST, HADT, GMT/UTC).RECURRENCEUse the Navigation Key to select a repeat setting for the the calendar. (Daily, Weekly, Monthly or Yearly).BY COUNTUse the keypad to enter an account.END DATEUse the keypad to change or enter the end date.ALERTUse the keypad to select the alert tone you wish to set.VIBRATEUse the Navigation Key to select vibrate On/Off.](https://usermanual.wiki/Pantech/PN-310/User-Guide-726524-Page-35.png)
![7170TOOLS MENU FUNCTIONSMENU FUNCTIONS TOOLSREMINDERUse the Navigation Key to select an alert time interval option (0 Minutes, 5 Minutes, 10 Minutes, 15 Minutes). Press [SAVE], then select “Yes” to save it or press to return to the calendar. The date of the event will be marked on your calendar.VIEW PLAN LISTTo view the Calendar List: Move the Navigation Key to choose an event and then press [VIEW]. Press [OPTIONS] to 1. Monthly View, 2. Weekly View, 3. Add, 4. Go To Date, 5. Erase, 6. Erase Today or 7. Erase Passed. HALARM CLOCK To display alarm entries, press [MENU] . Select one of the entries using the Navigation Key. To set a new alarm, choose alarm 1, 2 or 3. To edit an existing alarm, select that alarm. Press [OK]. The setting field will be highlighted. Press the Navigation Key down to select alarm options.ALARMUse the Navigation Key to select alarm On/Off.TIMEUse the keypad to set a time for the alarm and to select “am” or “pm”.FREQUENCYUse the Navigation Key to select a setting for the alarm (Once, Daily, Mon - Fri, Weekends).RINGERPress [SET], to use the keypad to select the alert tone you wish to set. To save an alarm setting press [SAVE].](https://usermanual.wiki/Pantech/PN-310/User-Guide-726524-Page-36.png)
![7372MESSAGING MENU FUNCTIONSMENU FUNCTIONS PHONE INFOHPHONE INFOMY NUMBERDisplays your phone number. Press [MENU] . You will see the MDN/MIN. To return to the previous page, press [OK].SW VERSIONDisplays the (Software/PRL/ERI) version. Press [MENU] . You will see the version of software and other software versions. To return to the previous page, press [OK].ICON GLOSSARYDisplays the Indicator Icons of your cellular telephone. Press [MENU] . You should see a list of the Indicator Icons of your cellular telephone with a short label or description. To return to the previous page, press [OK].HWHEN A NEW MESSAGE ARRIVES The following display appears when a new message arrives. To display the message, press [OK].HVOICE MAILDisplays the number of voice mails and accesses them by pressing . To access your voice mail, press [MENU] or . FIRST TIME USER Dial *86 and press . At the recording, press . Follow the voice tutorial to set up your account.OR](https://usermanual.wiki/Pantech/PN-310/User-Guide-726524-Page-37.png)
![MESSAGING MENU FUNCTIONSEXISTING USER Dial *86 and press . At the recording, enter your 4 digit password, then press . To listen to new messages, press .HNEW TXT MSGTo send a new TXT message: Press [MENU] or . Under “To”, input the phone number and press . Under text filed, input a new text message. (Please refer to page 33 for more details on entering letters, numbers and symbols.)75• By pressing [ADD], you can choose from the following: 1. From Contacts: Search for a phone number stored in the Contacts list. 2. Recent Calls: Search the phone number which is stored in the recent calls list. 3. Groups: Search the groups stored in the contacts list. 4. Number To Contacts: To store the phone number in contacts.MENU FUNCTIONS MESSAGING74 To send the text message, press [SEND].• If one of the fields is inserted in text msg field, the mes-sage is saved in the draft box.• Input at least one text msg field to save in the draft box.• By pressing [OPTIONS], you can choose from the following: 1. Save As Draft: To save message in draft folder. 2. Add Graphic: Inserts simple graphic images in Text Msg. 3. Add Sound: Inserts EMS sound in Text Msg. 4. Add Format Text: To choose from the following: Default: Reset to default text setting. Font Size: To select “Small”, “Normal” or “Large”. Font Style: To select “Bold”, “Italic”, “Underline” or “Strokeline”. Text Colour: To select one of the pre-installed 16 text colours. Text Back Colour: To select one of the pre-installed 16 text back colours. 5. Quick Text: Inserts already written sentences in Text Msg. 6. Priority: To select “Normal” or “High”. 7. Cancel Msg: To cancel message.OR](https://usermanual.wiki/Pantech/PN-310/User-Guide-726524-Page-38.png)
![7776MESSAGING MENU FUNCTIONSFORWARD To forward the Text message. Input the phone number of the person you are sending the message to, then press . Input any Text message to go along with the forwarded message, then press [SEND].LOCK & UNLOCKSelect “Lock” to lock the message or “Unlock” to unlock the message.SAVE GRAPHICSTo save a graphic image. This option is only available if you are reading an enhanced (EMS) text message. It will not display in a standard text message.SAVE SOUNDTo save a sound file. This option is only available if you are reading an enhanced (EMS) text message. It will not display in a standard text message.ADD TO CONTACTSTo save number to contacts.MENU FUNCTIONS MESSAGINGHINBOXThe Inbox manages received Text messages. To access: Press [MENU] or . Select a message and press [OPEN]. The message is displayed. To erase a received message [ERASE]. Pressing [OPTIONS], the user can choose from the following:REPLYType your reply and then press [SEND].REPLY W. COPY To reply to a received message and include the received message into the message. Select to reply with the original message included. The default call back number is automatically included in the Default CB# field. To send the text message, press [SEND].OR](https://usermanual.wiki/Pantech/PN-310/User-Guide-726524-Page-39.png)
![MESSAGING MENU FUNCTIONS79MENU FUNCTIONS MESSAGING78ERASE INBOXTo erase all the inbox messages, select “Erase Inbox” and then select “Yes”, press [OK].MESSAGE INFOTo show received text message information.HSENTManages sent TEXT messages or messages waiting to be sent. Press [MENU] or . Select a message and press [VIEW]. The message is displayed. To erase a sent message [ERASE]. Pressing [OPTIONS], the user can choose from the following:FORWARD To forward the Text message. Input the phone number of the person you are sending the message to, then press . Input any Text message to go along with the forwarded message, then press [SEND].RESENDSelect to resend a TXT message.LOCK & UNLOCKSelect “Lock” to lock the message or “Unlock” to unlock the message.OR](https://usermanual.wiki/Pantech/PN-310/User-Guide-726524-Page-40.png)
![MESSAGING MENU FUNCTIONS81MENU FUNCTIONS MESSAGING80ADD TO CONTACTSTo save number to contacts.MESSAGE INFOTo show received text message information.HDRAFTSDraft Folder contains any draft messages or saved messages. If message composition is interrupted by a voice call or other interrupting event, the text of the current composition is automatically saved in the drafts folder. Press [MENU] or . Select a message and then press [EDIT]. The message is displayed. To erase a draft message [ERASE]. Pressing [OPTIONS], the user can choose from the following:SENDTo send a selected message.LOCK & UNLOCKSelect “Lock” to lock the message or “Unlock” to unlock the message.ADD TO CONTACTSTo save number to contacts.ERASE DRAFTSTo erase all draft messages, select “Erase Drafts” and then select “Yes”, press [OK].OR](https://usermanual.wiki/Pantech/PN-310/User-Guide-726524-Page-41.png)
![MESSAGING MENU FUNCTIONS83MENU FUNCTIONS MESSAGING82HSETTINGSManages messaging features through various features.AUTO SAVEAutomatically saves sent messages when new messages send. Press [MENU] or . Select either “On”, “Off” or “Prompt” with the Navigation Key then press [OK].AUTO ERASEAutomatically erases inbox/sent messages when new messages arrive. Press [MENU] or . Select either “On” or “Off” with the Navigation Key then press [OK].HERASE ALL MESSAGETo erase message. Press [MENU] or . Select one of the following options with the Navigation Key. Select “Yes”, then press [OK] to erase it.• Erase Inbox• Erase Sent• Erase Drafts• Erase AllOR OR](https://usermanual.wiki/Pantech/PN-310/User-Guide-726524-Page-42.png)
![MESSAGING MENU FUNCTIONSENTRY MODESets an Entry Mode as a default. For example, if Word Mode is the default, its icon will appear. Press [MENU] or . Select one of the following options with the Navigation Key. Press [OK].CALLBACK #Edits a default callback number so that the recipient can callback or reply. Press [MENU] or . Select “On” or “Off” with the Navigation Key. If you select “On”, then input a new callback number. Press [OK].85MENU FUNCTIONS MESSAGING84• Word• Abc• ABC• abc• 123• SymbolsQUICK TEXTTo edit the Quick Text message you have saved: Press [MENU] or . Select a message from the list. Press [OK]. To edit saved Quick Text, press [EDIT], enter text, press [OK] to save Quick Text. VOICEMAIL Press [MENU] or . Input a new voicemail number or edit voicemail number. (Default *86) Press [OK] save it.• To add a new Quick Text message, press [NEW]. Enter text, press [OK] to save Quick Text.• To erase the saved Quick Text message, press [ERASE]. “Erase Quick Text?” will be displayed, select “Yes” to erase it.Pre-defined quick text as below:1. What’s up?/2. Let’s meet/3. Check this out!/4. Whacha doing?/ 5. Thanks/6. What do you think?/7. You’ve gotta be here to enjoy this./8. Would you like to join me for a date tonight?/ 9. On My Way/10. Yes/11. You’re the best!/12.Call Me.](https://usermanual.wiki/Pantech/PN-310/User-Guide-726524-Page-43.png)
![EMERGENCY CONTACTS MENU FUNCTIONS87MENU FUNCTIONS MESSAGING86SIGNATURECreate a signature that can automatically be inserted at the end of a message. Press [MENU] or . To activate Signature function, then select “Custom” by using up or down direction keys. To deactivate Signature function, select “None”. To input “Signature”, enter Signature Edit window by selection “Custom”. Press [OK] save it.AUTO VIEWIf the “Auto View” is set to on, the user will be able to view the message. If the “Auto View” is set to off, the user can view the message by entering SMS Menu -> Inbox. Press [MENU] or . Select “On” or “Off” with the Navigation Key. Press [OK] save it.• On: Text message displayed automatically.• Off: Text message displayed by going to the inbox or responding to interactive notification.HEMERGENCY CONTACTSYou can set up to 3 Emergency Number. Stores 3 phone numbers that can be called even in the lock mode. Press [MENU] . To set a new Emergency Number, choose Emergency Contact 1, 2 or 3. Press [ADD]. The contact list appears. Use the Navigation Key to select a contact and then press [OK]. To view assigned number, press [VIEW].To edit an existing Emergency Contact, select that entrie, then press [EDIT]. To edit Emergency Contact. Press [SAVE] save it.To erase assigned number, press [REMOVE].To call assigned number, press [CALL].• #BAL/Balance: #BAL is a VZW Customer Service VRU number (Free call) that provides customers information on their Verizon Wireless billing balance. When a customer calls #BAL/#225 from their mobile phone, once connected (3 seconds or less), the user will have the option to - Stay on the line - the VRU system will read balance information in detail, along with some explanation to the user. - Hang-up - the VRU system will automatically send user a SMS Message with the balance information to the device.](https://usermanual.wiki/Pantech/PN-310/User-Guide-726524-Page-44.png)


![FCC HEARING-AID COMPATIBILITY (HAC) REGULATIONS FOR WIRELESS DEVICESSAFETY AND WARRANTYIn the above example, if a hearing aid meets the M2 level rating and the wireless phone meets the M3 level rating, the sum of the two values equal M5. This should provide the hearing aid user with “normal usage” while using their hearing aid with the particular wireless phone. “Normal usage” in this context is defined as a signal quality that is acceptable for normal operation.The M mark is intended to be synonymous with the U mark. The T mark is intended to be synonymous with the UT mark. The M and T marks are recommended by the Alliance for Telecommunications Industries Solutions (ATIS). The U and UT marks are referenced in Section 20.19 of the FCC Rules. The HAC rating and measure-ment procedure are described in the American National Standards Institute (ANSI) C63.19 standard.99SAFETY AND WARRANTY FCC HEARING-AID COMPATIBILITY (HAC) REGULATIONS FOR WIRELESS DEVICESOn July 10, 2003, the U.S. Federal Communications Commission (FCC) Report and Order in WT Docket 01-309 modified the exception of wireless phones under the Hearing Aid Compatibility Act of 1988 (HAC Act) to require digital wireless phones be compatible with hearing-aids. The intent of the HAC Act is to ensure reasonable access to telecommunications services for persons with hearing disabilities.While some wireless phones are used near some hearing devices (hearing aids and cochlear implants), users may detect a buzz-ing, humming, or whining noise. Some hearing devices are more immune than others to this interference noise, and phones also vary in the amount of interference they generate.The wireless telephone industry has developed a rating system for wireless phones, to assist hearing device users find phones that may be compatible with their hearing devices. Not all phones have been rated. Phones that are rated have the rating on their box or a label located on the box.The ratings are not guarantees. Results will vary depending on the user’s hearing device and hearing loss. If your hearing device happens to be vulnerable to interference, you may not be able to use a rated phone successfully. Trying out the phone with your hearing device is the best way to evaluate it for your personal needs.M-Ratings: Phones rated M3 or M4 meet FCC requirements and are likely to generate less interference to hearing devices than phones that are not labeled. M4 is the better/higher of the two ratings.Hearing devices may also be rated. Your hearing device manufacturer or hearing health professional may help you find this rating. Higher ratings mean that the hearing device is relatively immune to interference noise. The hearing aid and wireless phone rating values are then added together. A sum of 5 is considered acceptable for normal use. A sum of 6 is considered for best use.98For information about hearing aids and digital wireless phone• Fcc Hearing Aid Compatibility and Volume Control http://www.fcc.gov/cgb/dro/hearing.html• Gallaudet University, RERC http://tap.gallaudet.edu/DigWireless.KS/DigWireless.htm• Self Help for Hard of Hearing People Inc. [SHHH] www.hearingloss.org/hat/TipsWirelessPhones.htm• The Hearing Aid Compatibility FCC Order http://hraunfoss.fcc.gov/edocs_public/attachmatch/ FCC-03-168A1.pdf](https://usermanual.wiki/Pantech/PN-310/User-Guide-726524-Page-50.png)