Pantech HWP-130 Fixed WLL Telephone (CDMA) User Manual Revised Users Manual per CRN 23111
Pantech Co., Ltd. Fixed WLL Telephone (CDMA) Revised Users Manual per CRN 23111
Pantech >
Contents
- 1. Users Manual
- 2. Revised Users Manual per CRN 22729
- 3. Revised Users Manual per CRN 23111
Revised Users Manual per CRN 23111

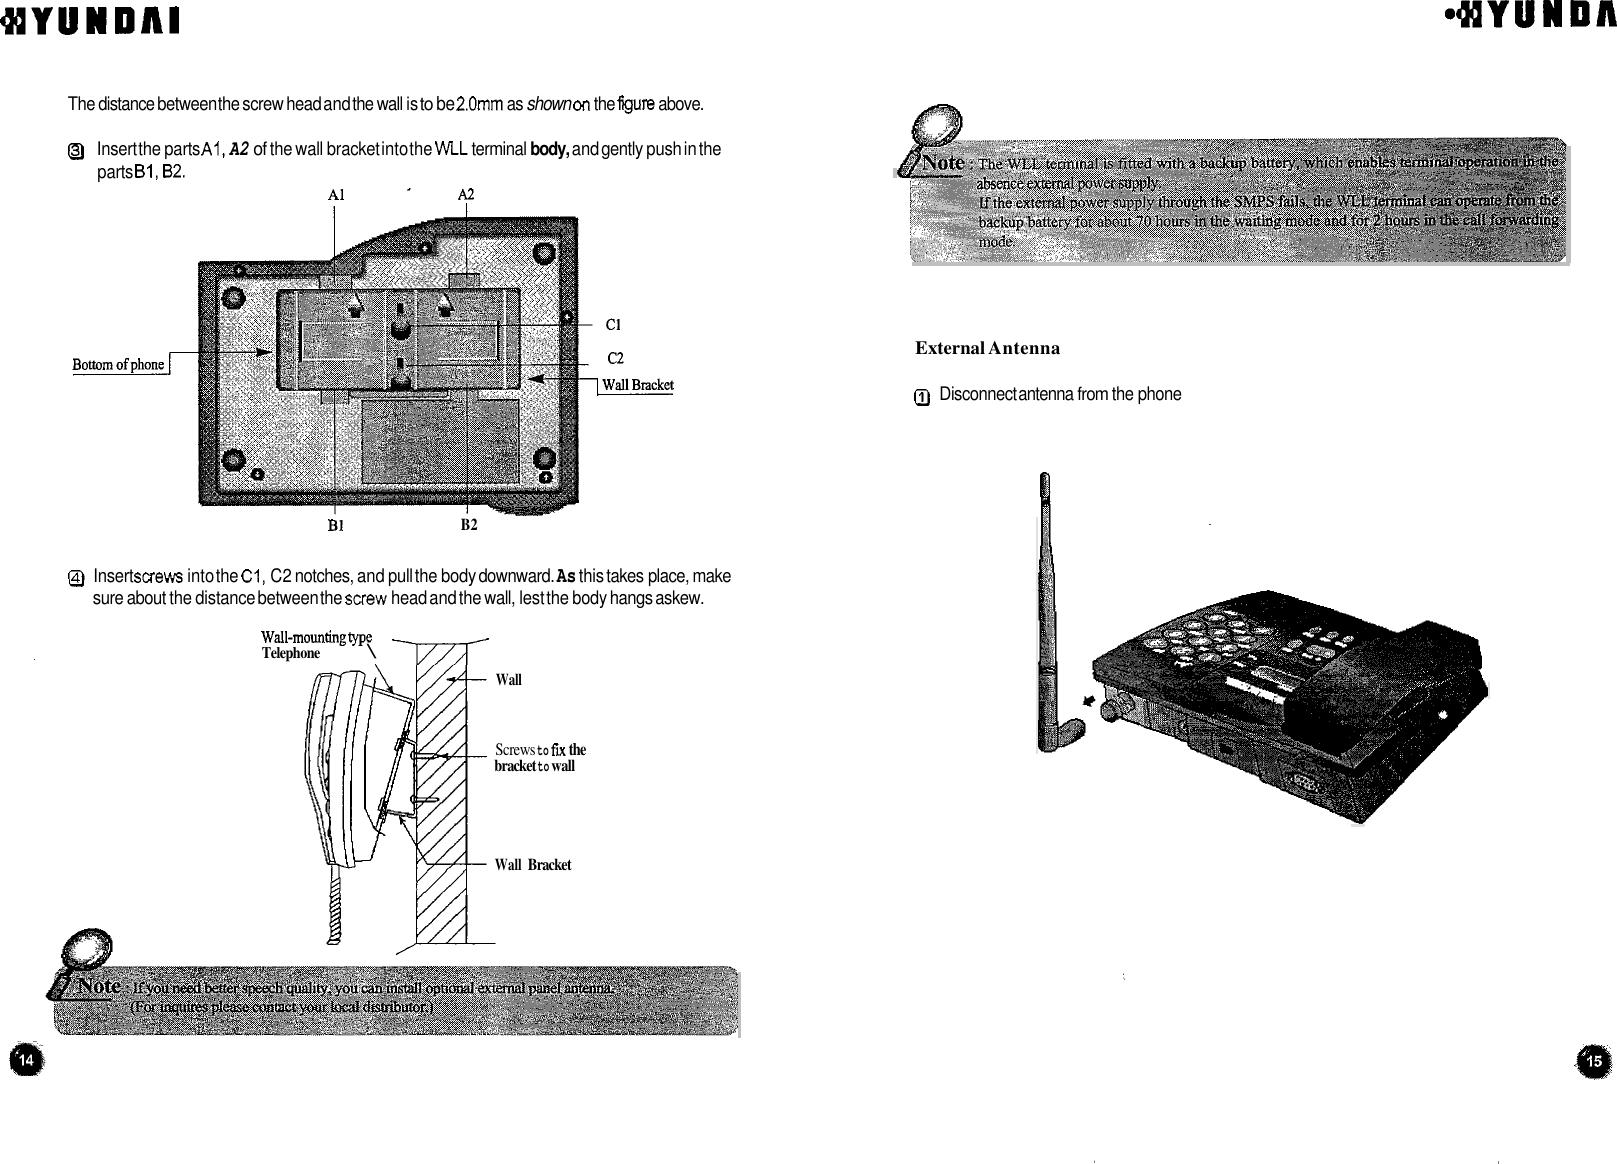
![4iYUWDAI 2. Using Basic Functions 2.2 To Receiving an Incoming Call 2.2.1 In on-hook state 2. I Call Process 8 Call Process by Special Funcfion 2.1 .I Call press . Pick up the handset. You will hear the dial tone. (In the“ No Service” state however, the . In the No Service” state, you cannot make calls. . Pick up the handset and press [REDIAL] button. The call will be made to the last dialed . Dial the telephone number and press [SEND] button to make a call. . If you do not [SEND] button after dialing the number, the call will be made automatically 6 seconds later. . Speak on the telephone. . Place the handset on-hook to terminate the call. warning tone is heard at the interval of 0.5 second.) number. 2.1.2 Call process by special function . You can make a phone call by special fundion.(Special Dial, Emergency Dial, Hot Line Dial) . If the telephone starts ringing, Pick up the handset. . Speak on the telephone. . Place the handset on-hook to terminate the call. 2.2.2 In off-hook state . If a call comes when you dial the number, the telephone starts ringing. . Press [SEND] button to accept the call. . Speak on the telephone. . Place the handset on-hook to terminate the call. % ww*- ringing singal the tekphone. 2) ff the nnger comes into actio 3) During a cal1,you canadju 2.3 To Lasf Number Redial (Redial Function) . You can easily make a call to the last dialed telephone number. Q Pick up the handset and press [REDIAL] button. Q When the call is connected, you can speak on the telephone. Q Place the handset on-hook to terminate the call.](https://usermanual.wiki/Pantech/HWP-130.Revised-Users-Manual-per-CRN-23111/User-Guide-249430-Page-11.png)
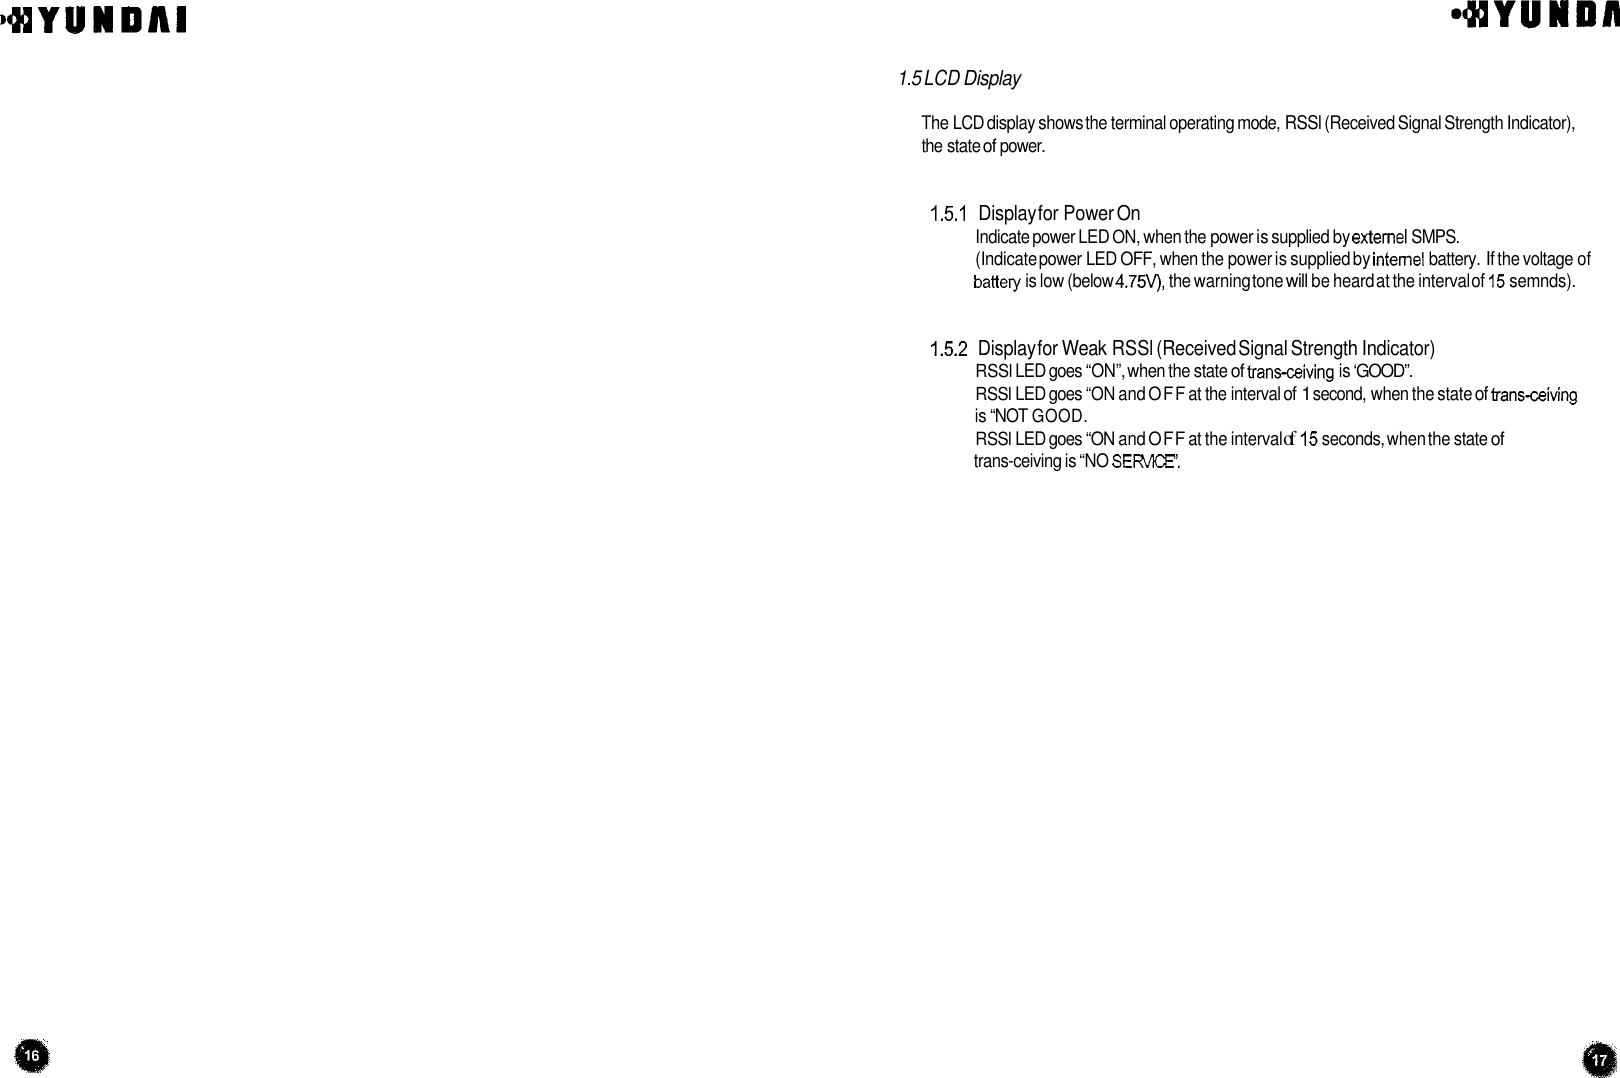
![QQYUWDAI 4YUWDA 3. Using Memory Functions 3.1 To Sore Telephone Numbers . You can store up to 99 telephone numbers using 2digit addresses from 01 to 99. To make a call to the stored telephone number, you have simply dial its address. 3.2 To Make a Phone Call fo fhe Stored Telephone Number. 3.2.1 Speed Dial (Before you can use Speed Dialing, you must enable this option. To learn how this option is enabled, refer to 4.1.3.) 0 l-Digit Address Using Speed Dialing you can quickly make a call to 9 telephone numbers stored under addresses 01 through 09: . Pick up the handset, press a digit from 1 to 9, and then press [SEND]. or . Pick up the handset, press and hold a digit from 1 to 9. . The telephone number will be dialed automatically. Q 2-Digit Address You can to easily make a call to the telephone numbers stored under addresses from 10 to 99: . Pick up the handset, press 2 digits of the stored address (10-99), and then press or . Pick up the handset, press the first digit of the stored address, and then press and hold - For example, if you want to dial to the number stored under the address" 16", [SEND]. the second digit . press [I] and then press and hold 161. The telephone number will be dialed automatically. 3.2.2 Emergency Dialing . You can quickly make a one-touch call to emergency numbers stored under addresses 011 02/ 03 (you have also to enable emergency dialing). Once the call is originated, it is kept connected until the called party goes off-hook. Refer to the Chapter 4.1.4 for more details. . To make an emergency call in the off-hook state, you can press and hold the last digit of the address, or press two address digits one after other, and press [SEND].](https://usermanual.wiki/Pantech/HWP-130.Revised-Users-Manual-per-CRN-23111/User-Guide-249430-Page-12.png)
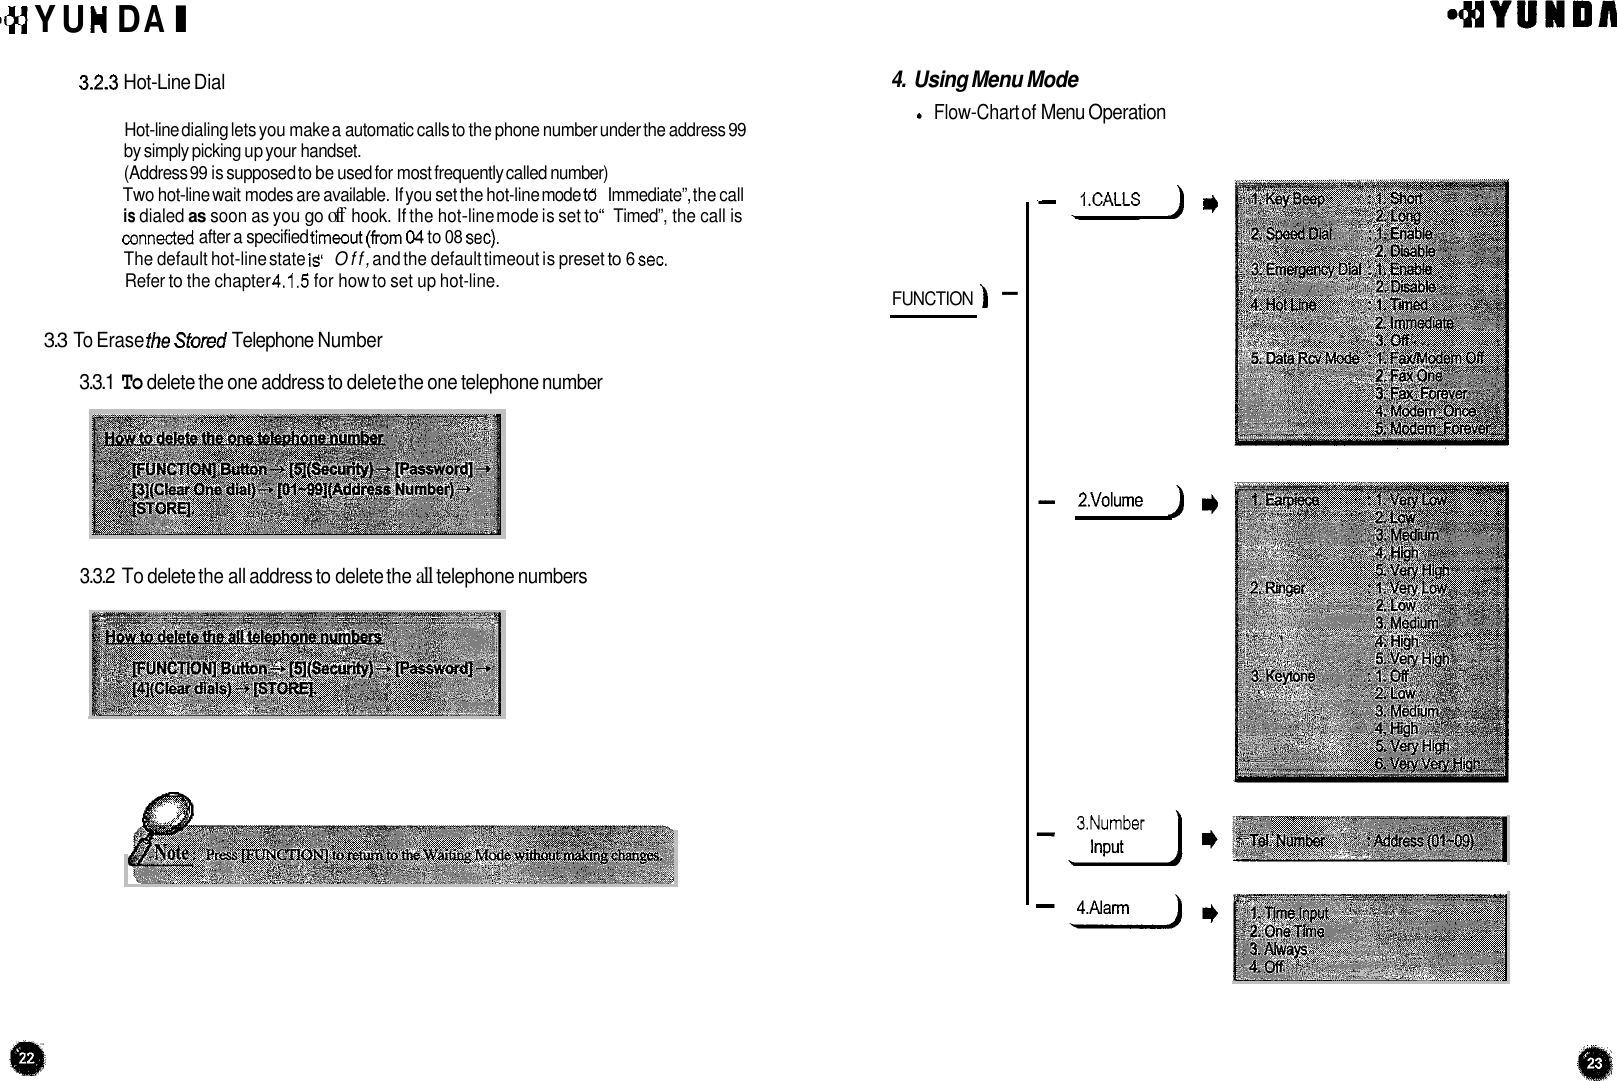
![QQYUWDAl *QQ Y U W 0 A 4. Using Menu Mode . Flow-Chart of Menu Operation FUNCTION) - - 5.seculity 6.Setup 7.Setup 2 -1 required) (Password I) 4.1 Calls 4.1.1 Key Beep Length Adjust Function (Key Beep) This function is allows you to change the duration of WLL terminal beep tone. Press [FUNCTION] to return to the Waiting Mode without making changes. 1) SHORT : KEY TOW,‘ 2) LONG. REY TOW -- 4.1.2 Ring Type Function You can select between 10 ring types to inform about incoming call: Q When you press [RING] in the waiting mode, you can choose 10 ring types (Ring Type 1 - Ring type 10). Q If you press [RING], you can hear sample melody for 2 seconds and this sample melody will be selected as “RING TYPE.](https://usermanual.wiki/Pantech/HWP-130.Revised-Users-Manual-per-CRN-23111/User-Guide-249430-Page-14.png)
![,QQ Y U W D A I 4.1.3 Speed Dialing Function (Speed Dial) This menu is used to turn the speed dialing on and off. Press [FUNCTION] to return to the Waiting Mode without making changes. 4.1.4 Emergency Call Hold Function (Emergency) You can store up to three numbers (addresses 01 to 03) to quickly make a call in case of emergency. The main feature of emergency calling is that the call is kept connected until the called party picks up the handset. In other words, until the call is answered. By default, Emergency Call Hold is disabled. To enable this function: Press [FUNCTION] to return to the Waiting Mode without making changes. 4.1.5 Hot Line Function (Hot Line) You can make a call automatically without entering the phone number. In other words, if you store a frequently used number at the address 99 and the hot line function is enabled (timed or immediate), you can automatically make a call to that number : For immediate call, you simply pick up the handset and the call will be connected. For timed call, you pick up the handset and wait for a few seconds until the call is connected. Press [FUNCTION] to retum to the Waiting Mode without making changes. led 4.1.6 Data Receive Mode . This service enables you to access the Internet and PC communication and to receivelsend fax messages by connecting your PC to the WLL terminal. The wireless data communication service may not be available from your service provider. Please check whether or not the service provider supports data communication services. You will also need RS-232 cable. . For more details about settings up the computer environment and other related issues, refer to the correspondent technical documentation.](https://usermanual.wiki/Pantech/HWP-130.Revised-Users-Manual-per-CRN-23111/User-Guide-249430-Page-15.png)
![44 Y U W D A I 4iYUWDh 4.1.6.1 Data Receiving Mode Setup Methcd I~J~~~~ Press [FUNCTION] to return to the Waiting Mode without making changes. Method p~ ~usingATc~mmand You can setup receiving mode you want using AT commands from your computer connected to the WLL terminal. Enter [AT+HDVAD=O] and press Enter. This command disables data receiving mode. . Enter [AT+HDVAD=l] and then press Enter. This command enables PC fax receiving mode for one time. Enter [AT+HDVAD=2] and then press Enter. This command enables PC fax receiving mode for always. Enter [AT+HDVAD=3] and press Enter key. This command enables modem mode for one time. . Enter [AT+HDVAD=4] and press Enter. This command enables modem mode for always. . Default is [AT+HDVAD=O]. 4.2 To Ac@f Wume 4.2.1 To adjust the handset volume Mahod Q . Use [UP]I[DOWN] buttons to adjust the volume, and press [STORE] to save the changes you have made. . Press [FUNCTION] to return to the Waiting Mode without making changes. Method I~J - Use [UPl/[DOWN] button to adjust the volume during the call.](https://usermanual.wiki/Pantech/HWP-130.Revised-Users-Manual-per-CRN-23111/User-Guide-249430-Page-16.png)
![4lYUWDAI 4YUWDA 4.3 Alarm Reminder Function (ALARM REMINDER) Alarm reminder enables the alarm ring when the specified time is reached. The ring discontinues when you pick up the handset. The default is disabled. , - . ... Press [FUNCTION] to return to the Waiting Mode without making changes. &@q& -_ 1)ALAM MODE 'IIME INPUT" ; Afkren 2) ALARMMODF ONE 3) ALARM MODE ALM' 4) ALARM MODF OFF' . 4.4 Securify 4.4.1 Outgoing Call Restrict Function (RESTRICT. OUTGOING) (FUNCTION] Button -+ Press [FUNCTION] to return to the Waiting Mode without making changes. 4.4.2 Lock NO. SET Function (SET LOCK#) Press [FUNCTION] to return to the Waiting Mode without making changes. 4.4.3 To Delete One Address in Memory Press [FUNCTION] to return to the Waiting Mode without making changes. . .. 1)LotkOff 2~Loi:kOn The default it Allow".](https://usermanual.wiki/Pantech/HWP-130.Revised-Users-Manual-per-CRN-23111/User-Guide-249430-Page-18.png)
![49YUWDAI Hot line Alarm Rest. Outgoing 4YUWPA Off Off Allow 4.4.4 Memory Clear Function (CLEAR MEMOW) Press [FUNCTION] to return to the Waiting Mode without making changes. [STOW Clears rhe list ot dials 4.4.5 Reset Default Function You can easily restore all options of your WLL terminal to their default values. You are not recommended however, to use this command too often. I Sveed dial I Enable I 1- ______~ Emergencv call hold I Disable I 1 I Earpiece volume Level 3 I Press [FUNCTION] to return to the Waiting Mode without making changes. 4.4.6 Voice Privacy 4.4.6.1 During Menu Setup Press [FUNCTION] to return to the Waiting Mode without making changes. 4.4.6.2 In on-hook state, menu set up Press [FUNCTION] to return to the Waiting Mode without making changes.](https://usermanual.wiki/Pantech/HWP-130.Revised-Users-Manual-per-CRN-23111/User-Guide-249430-Page-19.png)
![)QQYUWDAl 4.5 Sefup I 4YUWDA 4.5.3 Dial Time Control 4.5.1 Data Rate You can change the default data transmission speed. Available data speed options are: Rate set 1 based on IS-99, Rate set 2 based on IS-99, Rate set 1 based in IS-707.4, and Rate set 2 based on IS-707.4. Press [FUNCTION] to return to the Waiting Mode without making changes. "" - r -_ , -- Y v r--- T : [I] : RS 1 (lS-9Y). p] : RS 2 (IS-%). 141 : RS 2 (IS-'707.4). [3] : Rs 1 (IS-707.4). 4.5.2 Dial Tone Frequency You can change the dial tone frequency. Four types are available: 350+440 Hz dual, 300+400Hz dual, 400 Hz single, 425 Hz single and 450 Hz single. Press [FUNCTION] to return to the Waiting Mode without making changes. You can adjust the automatic calling time. If you set up dial time to 4 sec, the terminal will make a call 4 sec after you press the last digit of called number. (You can set up dial time from 4 to 8 sec. The default is 6 sec.) Press [FUNCTION] to return to the Waiting Mode without making changes. 4.5.4 Vocoder Selection You can use 8 types of Vocoder when speaking on the phone: 8K QCELP, 13K QCELP, 8K EVRC (8K Loop Back, 13K Loop Back, Markov old 8k, Markov 8k, Markov 13k). Press [FUNCTION] to return to the Waiting Mode without making changes.](https://usermanual.wiki/Pantech/HWP-130.Revised-Users-Manual-per-CRN-23111/User-Guide-249430-Page-20.png)
![44YUWDAI 4YUWDA 4.5.5 A-key Input Enables you to input authentication key. 4.5.6 Dial Tone Function Dial Tone feature is available in HWP-1301230 depending upon system configuration. For the Network Dial Tone support, HWP-1301230 must provide "LE-Generated dial tone". Othelwise, HWP-I301230 supports "NIU-Generated dial tone". Press [FUNCTION] to retum to the Waiting Mode without making changes. 4.5.7 Serial Interface (Serial Data Rate) Your WLL terminal supports RS-232 serial interface for data communication. Two baud rates are available: 19200bps for modem, PC Fax and QNC services; and 115200bps for High-speed Packet service. Press [FUNCTION] to retum to the Waiting Mode without making changes. A#%& 4.6 Sefup 2 4.6.1 CDMA Chanel Setting Press [FUNCTION] to retum to the Waiting Mode without making changes. 4.6.2 Input telephone number Input telephone number.](https://usermanual.wiki/Pantech/HWP-130.Revised-Users-Manual-per-CRN-23111/User-Guide-249430-Page-21.png)
![<Appendix> I. Summary Table SAVE Save /Delete 2. FNC-K + 3 + Number + STO-K +Address + STO-K Troubleshooting - - . - , - -. - _- phone Number Speed Dial Delete One Address Delete All Address On FNC-K+l+2+1+STO-K Off FNC-K+ 1 + 2 +2 --t STO-K FNC-K+ 5 + Password + 3 +Address+ STO-K FNC-K+ 5 + Password -B 4 - STO-K Emergency Call Hold Hot Line On FNC-K-t 1 + 3 + 1 + STO-K Off FNC-K+1+3+2+STO-K Time Hot Line On FNC-K+ 1 +4+ 1 + STO-K Immediate Hot Line FNC-K+1+4+2+STO-K I Off I FNC-K+ 1 + 4- 34STO-K I Time Input (One Time) One Time mode Always Mode Alarm Off Alarm Reminder Problem FNC-K+4+1+ TIME+STO-K FNC-K+4+2+STO-K FNC-K-.4+3+STO-K FNC-K+4-.4+STO-K There is no indication on the POWER LED. Data Service Receive Mode Release Fax Receive Mode RSSl LED goes on and off at the interval of 15 seconds. Using The Normal Phone Using The Emulator Using The Normal Phone FNC-K+1+5+2+STO-K FNC-K+ 1 + 5 + 1 + STO-K [ATtHDVAD-O] + Enter Your terminal beeps or you can hear nothing in the handset. I Using The Emulator There is no ring when a call comes. [AT+HDVAD=3] + Enter What To Do I Make sure the terminal is turned on. If the switch is on, turn off the terminal and then turn where service coverage is available. If necessary, move the terminal to the serviced location. Your handset is not properly placed. Place the several times to adjust the ringer volume In case that simple remedy steps does not help, contact the local agency from where you have purchased the product, a service center or a qualified technician to solve the trouble. Lock I On I FNC-K+ 5 + Password -B 1 + 1 + STO-K I r------ Change Password FNC-K-, 5 + Password -2 +New Password + STO-K + Re New Password+ STO-K Ear-Piece Volume Adjusting (5steps) FNC-K -+ 2 + 1 + 1/2/3/4/5 + STO-K (1:Very Low ... 5Very High) Press Up or Down Key (Off Hook) I I Reset I FNC-K + 5 + Password -+ 5 -+ STO-K I Modem Receive Mode (One Time) Modem Receive Mode (Until Power OM 1 Using The Normal Phone I FNC-K+1+5+4+STO-K I I Using The Emulator I [AT+HDVAD=4] +Enter I](https://usermanual.wiki/Pantech/HWP-130.Revised-Users-Manual-per-CRN-23111/User-Guide-249430-Page-22.png)