Panasonic of North America B21R1401 Bluetooth Module RSNE031B0 User Manual SC MAX670
Panasonic Corporation of North America Bluetooth Module RSNE031B0 SC MAX670
Contents
- 1. User Manual
- 2. User Manual (SC-MAX670)
- 3. User Manual (SC-MAX770)
User Manual (SC-MAX670)
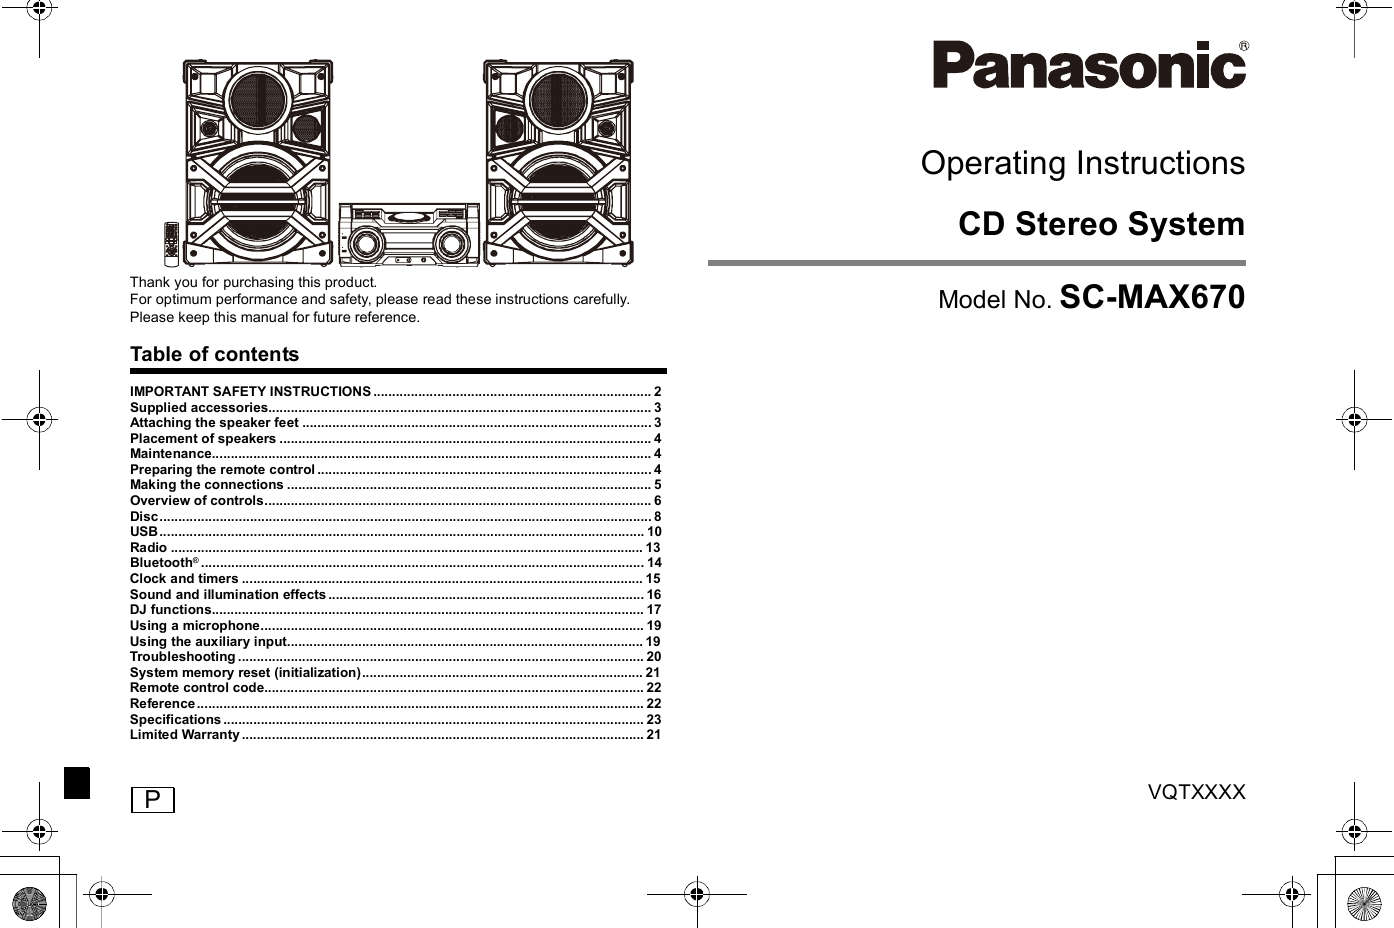
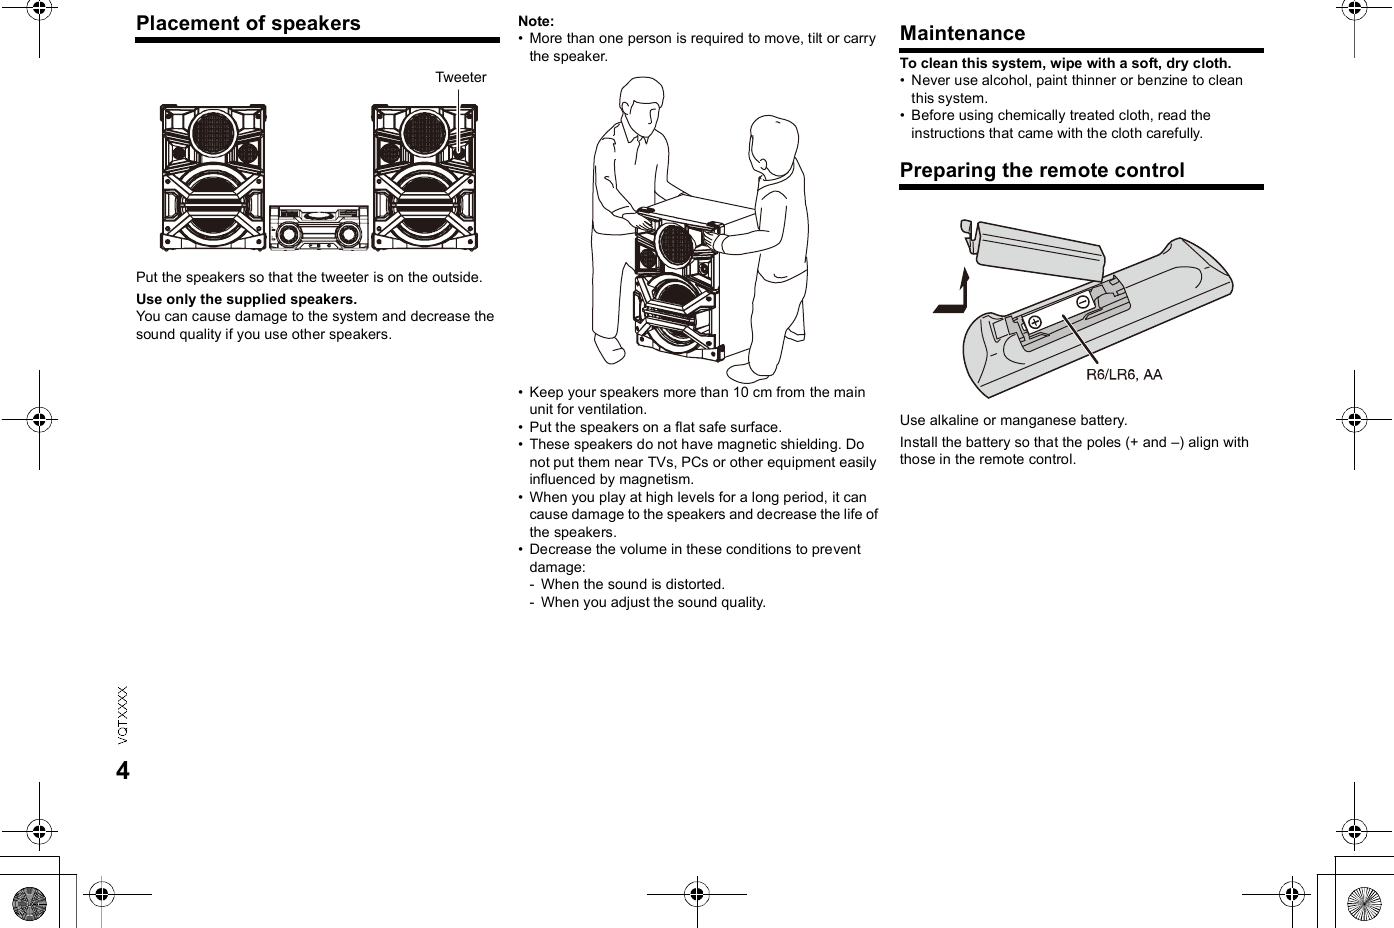
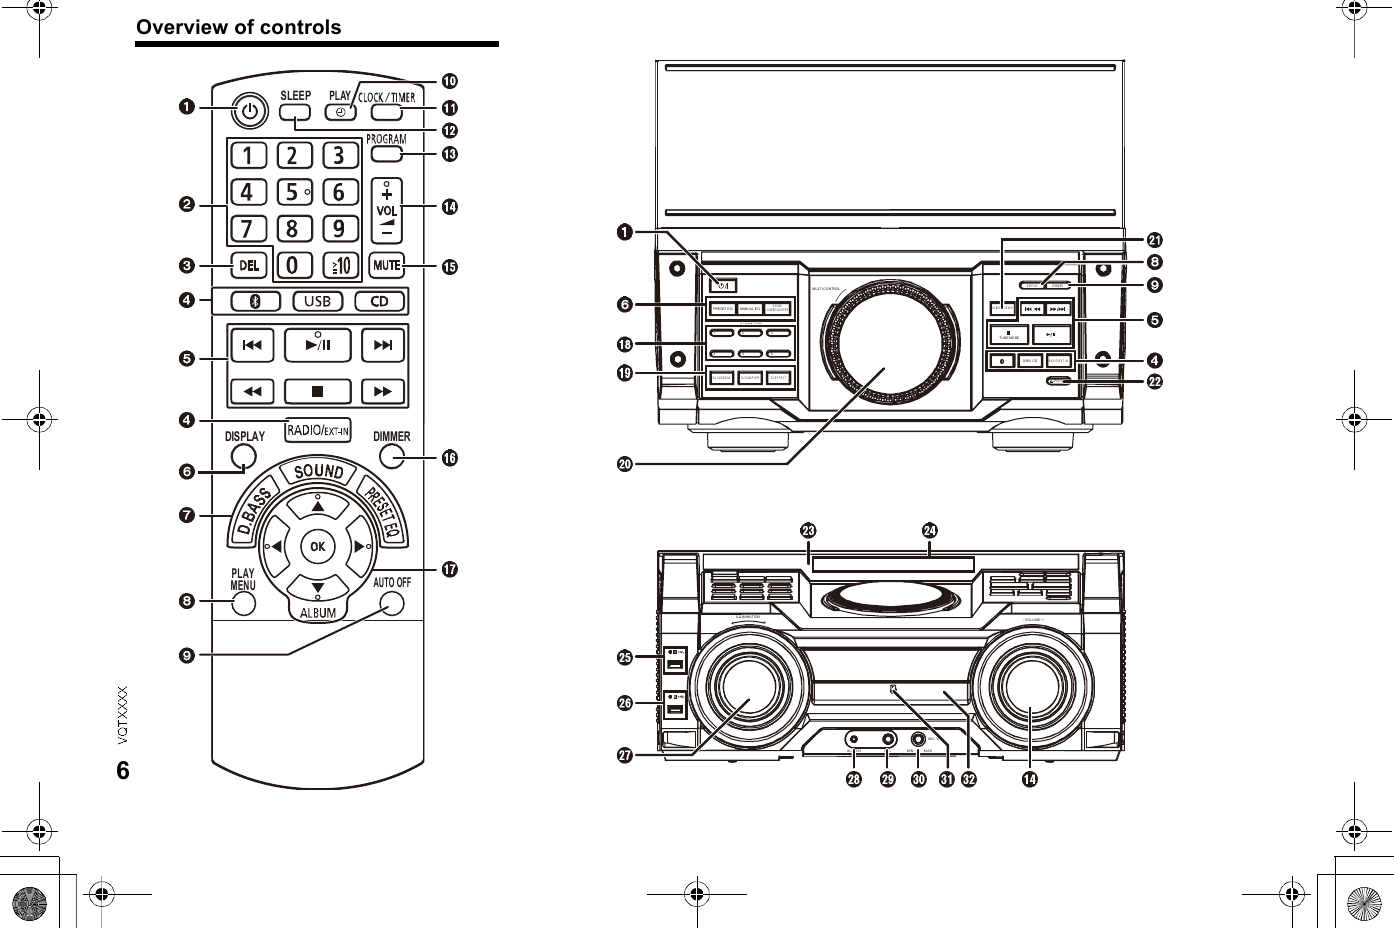
![7Standby/on switch [ ], [ /I]Press to switch the unit from on to standby mode orvice versa. In standby mode, the unit is stillconsuming a small amount of power.Alphanumeric buttonsTo select a 2-digit numberExample: 16: [ 10] [1] [6]To set a characterExample: B: [2] [2]Delete a programmed trackDelete a selected track in a playlistSelect audio sourceBasic playback controlView content informationSelect the sound effectsSet the play menu itemAutomatically switch off the systemWhen you are in disc, USB or internal memorysource, the auto off function switches off the systemif you do not use the system for 30 minutes.Press the button to select ON.To cancel, select OFF.Set the play timerSet the clock and timerSet the sleep timerSet the program functionAdjust the volume of the systemMute the sound of the systemTo cancel, press the button again.MUTE is also canceled when you adjust the volumeor when you switch off the system.Decrease the brightness of the display panel and DJfunction buttonsPress the button to use this function.To cancel, press and hold the button again.Select and enter buttonsInternal memory playlist direct buttonsPress and hold to add a track to the correspondingplaylist.Press to select the playlist.DJ function direct buttonsPress [DJ JUKEBOX], [DJ SAMPLER] or[DJ EFFECT] to switch on the DJ function.Press [1] to [6] on main unit to select the desiredfunction.To cancel, press the selected [1] to [6] again.Switch on the DJ functionTo cancel, press the button again.Turntable for DJ and multi controlBrowse playlist of the internal memoryBrowse tracks or albumsTurn [MULTI CONTROL] to browse the track.Press [ / ] to start playback from the selection.Press [ALBUM/TRACK] to select album or track andthen turn [MULTI CONTROL] to browse.Press [ /] to start playback from the selection.Open or close the disc trayRemote control sensorDistance: Within approximately 7 mAngle: Approximately 20° up and down, 30° left andrightDisplay panel[USB[A]USB port ( )USB status indicator[USB[B]USB port ( )USB status indicatorSelect the illumination effectAuxiliary input 2 jackMicrophone jackAdjust the volume of the microphoneNFC touch areaDisc tray](https://usermanual.wiki/Panasonic-of-North-America/B21R1401.User-Manual-SC-MAX670/User-Guide-2139909-Page-7.png)
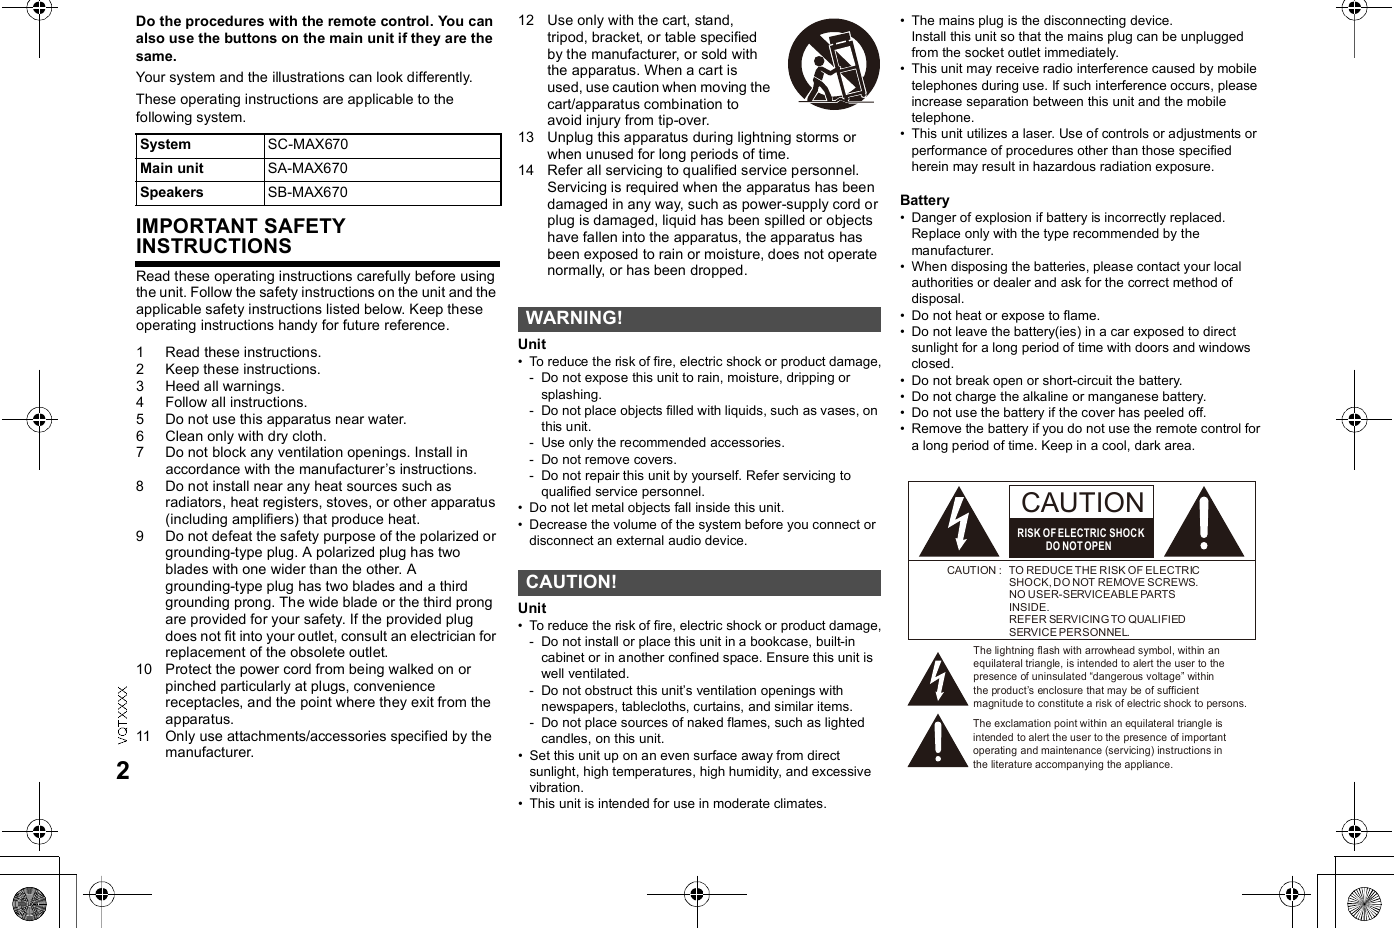
![8Disc1Press [ OPEN/CLOSE] on the main unit to openthe disc tray.Put in a disc with the label facing up.Press [ OPEN/CLOSE] again to close the disctray.2Press [CD] and then press [ /] to startplayback.You can view the available information on the displaypanel.Press [DISPLAY].Note:Maximum characters that can be shown:approximately 32This system supports ver. 1.0 and 1.1 ID3 tags.Text data that the system does not support can showdifferently.1Press [PLAY MENU] to select PLAYMODE orREPEAT.2Press [ ,] and then press [OK] to select thedesired mode.Note:The setting returns to the default OFF PLAYMODE whenyou open the disc tray.Playing discStop playbackPress [ ].Pause playbackPress [ / ].Press again to continue playback.Skip albumPress [ , ].Skip trackPress [ ] or [ ](main unit: [ / ] or [ / ]).Search through trackPress and hold [ ] or [ ](main unit: [ /] or [ / ]).Viewing available information Play menuPLAYMODEOFF PLAYMODEPlay all tracks.1-TRACKPlay one selected track on the disc.Press the alphanumeric buttons to select the track.1-ALBUMPlay one selected album on the disc.Press [ ,] to select the album.RANDOMPlay a disc randomly.1-ALBUM RANDOMPlay all tracks in one selected album randomly.Press [ ,] to select the album.REPEATON REPEATRepeat playback. appears.OFF REPEATCancel repeat playback.JUKEBOXOFF JUKEBOXEnable the DJ jukebox functionON JUKEBOXDisable the DJ jukebox function](https://usermanual.wiki/Panasonic-of-North-America/B21R1401.User-Manual-SC-MAX670/User-Guide-2139909-Page-8.png)
![9This function allows you to program up to 24 tracks.1Press [PROGRAM] in the stop mode.PGM is shown.2Press the alphanumeric buttons to select thedesired track.Do this step again to program other tracks.1 Press [ ,] to select the desired album.2 Press [ ] and then press the alphanumericbuttons to select the desired track.3 Press [OK].Do these steps again to program other tracks.3Press [ / ] to start playback. Note:You cannot use program playback together withPLAYMODE function.The program memory is cleared when you open the disctray.Note on discThis system can play CD-R/RW with CD-DA or MP3 formatcontent.Some CD-R/RW cannot be played because of thecondition of the recording.MP3 files are defined as tracks and folders are defined asalbums.This system can access up to:- CD-DA: 99 tracks- MP3: 999 tracks, 255 albums and 20 sessionsDisc must conform to ISO9660 level 1 or 2 (except forextended formats).Recordings will not necessarily be played in the order yourecorded them.Program playbackCancel program modePress [PROGRAM] in the stop mode.Check program contentsPress [ ] or [ ] when PGM is shown in thestop mode.Clear the last trackPress [DEL] in the stop mode.Clear all programmed tracksPress [ ] in the stop mode.CLR ALL is shown.Within 5 seconds, press [ ] again.](https://usermanual.wiki/Panasonic-of-North-America/B21R1401.User-Manual-SC-MAX670/User-Guide-2139909-Page-9.png)
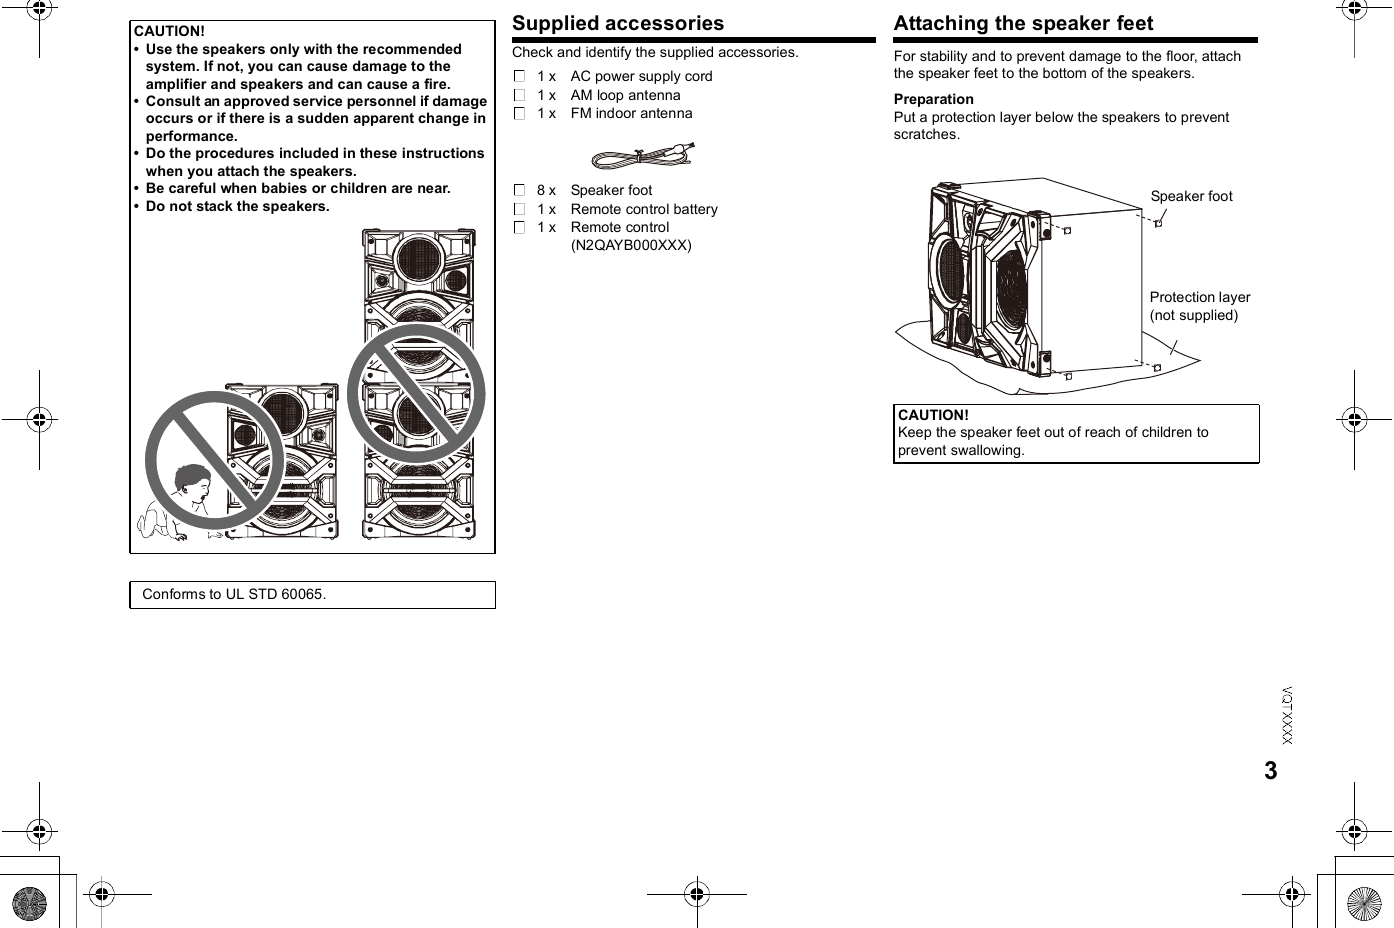
![10USBYou can connect and play music tracks from your USBdevice.PreparationBefore you connect a USB device to the system, makesure you do a backup of the data.Do not use a USB extension cable. The system cannotrecognize USB device connected through a cable.Decrease the volume and connect the USB device tothe USB port.Hold the main unit when connecting or disconnecting theUSB device.Note:USB status indicator lights up when selected.4Press [MEMORY REC /] to start recording.1Press [USB] to select USB A or USB B.2Press [ /] to start playback.For other operations, refer to Disc.You can view the available information on the displaypanel.Press [DISPLAY].Connecting a USB deviceUSB device(not supplied)USB at a glance[USB[A] [USB[B]Play MP3 tracks.USB status indicator[USB[A][USB[B]PlaybackStop playbackPress [ ]. RESUME is shown.Press [ /] to continue playback.ORPress [ ] two times to stop the playback fully.Viewing available information](https://usermanual.wiki/Panasonic-of-North-America/B21R1401.User-Manual-SC-MAX670/User-Guide-2139909-Page-10.png)
![11Radio1Press [RADIO/EXT-IN] to select FM.2Press [ ] or [ ] to select the frequency ofthe required station.To tune automatically, press and hold the button untilthe frequency starts changing quickly.STEREO is shown when a stereo broadcast isbeing received.Using the main unit1Press [RADIO/EXT-IN] to select FM.2Press [TUNE MODE] to select MANUAL.3Press [ /] or [ / ] to select thefrequency of the required station.1Press [PLAY MENU] to select FM MODE.2Press [ , ] to select MONO and then press[OK].To cancel, select STEREO.MONO is also canceled when you change thefrequency.30 FM stations can be preset.1Press [OK] to select LOWEST or CURRENTfrequency.2Press [PLAY MENU] to select A.PRESET andthen press [OK].START? is shown.3Press [OK] to start presetting.To cancel, press [ ].1Press [ ] or [ ] to tune in to the station.2Press [PROGRAM].3Press the alphanumeric buttons to select apreset number.Do steps 1 through 3 again to preset more stations.The new station replaces any station that occupiesthe same preset number.Press the alphanumeric buttons, [ ] or [ ] toselect the preset station.Using the main unit1Press [TUNE MODE] to select PRESET.2Press [ /] or [ / ] to select the presetstation.Manual tuningImproving the sound qualityMemory presettingAutomatic presettingManual presettingSelecting a preset station](https://usermanual.wiki/Panasonic-of-North-America/B21R1401.User-Manual-SC-MAX670/User-Guide-2139909-Page-11.png)
![12Bluetooth®You can connect and play an audio device wirelesslythrough Bluetooth®.Refer to the operating instructions of the Bluetooth®device for details.If you intend to use an NFC (Near FieldCommunication)-compatible Bluetooth® device,proceed to One-Touch Connection (Connecting byNFC).PreparationTurn on the Bluetooth® feature of the device and placethe device near this unit.1Press and hold [ -PAIRING] on main unit.2Select SC-MAX670 from the Bluetooth® menuof the device.The device connects with this system automaticallyafter pairing is complete.3Start playback on the Bluetooth® device.For other operations on main unit, refer to Playingdisc.Note:You can also operate with the remote control.1 Press [ ] to select BLUETOOTH.2 Press [PLAY MENU] to select PAIRING.3 Press [ ,] to select OK? YES and then press [OK].4 Select SC-MAX670 from the Bluetooth® menu of thedevice.If prompted for a passkey, input 0000.A device must be paired to connect.You can register up to 8 devices with this unit. If a 9thdevice is paired, the device that has not been used for thelongest time will be replaced.This system can only connect to one device at a time.When BLUETOOTH is selected as the source, thissystem will automatically try and connect to the lastconnected device.For NFC-compatible AndroidTM devices onlySimply by touching an NFC (Near FieldCommunication)-compatible Bluetooth® device by theunit, you can complete all preparations, from registeringa Bluetooth® device to establishing a connection.AndroidTM device version less than 4.1 requires theinstllation app Panasonic MAX Juke (Free of charge).Download the app Panasonic MAX Juke to yourBluetooth® device. Enter Panasonic MAX Juke in thesearch box of Google PlayTM to search, and then selectPanasonic MAX Juke.PreparationTurn on the NFC feature of the device.1Touch and hold your device on the NFC toucharea of this unit [ ].Once the registration and connection of theBluetooth® device is complete, the name of theconnected device is indicated on the display for awhile. Move the device away from the unit.When the connection is not established even ifyour device has touched the NFC touch area,change its touching position.2Start playback on the Bluetooth® device.Note:If you touch another device to this unit, you can update theBluetooth® connection. The previously connected devicewill be disconnected automatically.If the image and sound are out of sync during playback,restart the playback app you are using. If the problempersists, connect the Bluetooth® device and this unit withan audio cable (not supplied).The One-Touch Connection may not work properlydepending on the type of device being used.If you enable this function, even when the main unit isturned off, it will turn on automatically when a Bluetooth®device sends a connection request.1Press [ ] (main unit: [ -PAIRING]) to selectBLUETOOTH.2Press [PLAY MENU] to select STANDBYMODE.3Press [ ,] to select ON STANDBY MODE orOFF STANDBY MODE and then press [OK].You can view the following information on the displaypanel:Name of the connected device (maximum16 characters).Bluetooth® profile used.Press [DISPLAY].Pairing a deviceOne-Touch Connection(Connecting by NFC)Bluetooth® deviceBluetooth® standby modeViewing available information](https://usermanual.wiki/Panasonic-of-North-America/B21R1401.User-Manual-SC-MAX670/User-Guide-2139909-Page-12.png)
![13You can change the transmission speed to prioritizetransmission quality or sound quality.PreparationIf this system is connected to a Bluetooth® device,disconnect it ( Disconnecting a device).1Press [PLAY MENU] to select LINK MODE.2Press [ ,] to select MODE 1 or MODE 2and then press [OK].Note:The default setting is MODE 2.1Press [PLAY MENU] repeatedly to selectDISCONNECT?.2Press [ ,] to select OK? YES and thenpress [OK].For NFC-compatible devices onlyTouch and hold your device to the NFC touch area of thisunit again.Once the Bluetooth® device is disconnected,PAIRING is indicated on the display. Move the deviceaway from the unit.Note:A device is disconnected when you:Select a different source.Move the device out of the maximum range.Disable the Bluetooth® transmission of the device.Switch off the system or the device.Clock and timersThis is a 24-hour clock.1Press [CLOCK/TIMER] to select CLOCK.2Within 10 seconds, press [ ,] to set the time.3Press [OK].Press [CLOCK/TIMER] to show the clock for a fewseconds.Note:Reset the clock regularly to maintain accuracy.Except for Bluetooth® sourceYou can set the timer to come on at a certain time to:Wake you upPreparationSet the clock.1Press [CLOCK/TIMER] to select PLAY.2Within 10 seconds, press [ ,] to set the starttime.3Press [OK].4Do steps 2 and 3 again to set the end time.5Press [ ,] to select the source you want toplay and then press [OK].To start the timer1Prepare the audio source.Prepare the music source you want to listen to (disc,USB, internal memory, radio or external equipment)and set the volume.2Press [PLAY ] to select PLAY.PLAY is shown.To cancel, press [PLAY ] again.The system must be switched off for the timer tooperate.To check the settingsPress [CLOCK/TIMER] to select PLAY.Note:The play timer starts at a low volume and increasesgradually to the preset level.The timer comes on at the set time every day if the timer ison.Link modeMODE 1Emphasis on connectivity.MODE 2Emphasis on sound quality.Disconnecting a deviceSetting the clockPlay timer](https://usermanual.wiki/Panasonic-of-North-America/B21R1401.User-Manual-SC-MAX670/User-Guide-2139909-Page-13.png)
![14The sleep timer switches off the system after the settime.Press [SLEEP] to select the setting (in minutes).To cancel, select OFF.To show the remaining timePress [SLEEP].Note:The sleep timer always comes first. Be sure not to set anoverlap of timers.Sound and illumination effects1Press [SOUND] to select the sound effect.2Press [ ,] to select the desired setting.Preset EQPress [PRESET EQ] to select desired preset.Using the main unitYou can adjust certain sound effect using the controls onthe main unit.1Press the button to select the sound effect.2Turn [MULTI CONTROL] to select the desiredsetting.By main unit onlyYou can change the illumination pattern or color on thissystem.Turn [ILLUMINATION] to select pattern or color.Note:To ensure the illumination effects are shown properly, makesure to arrange the speakers accordingly as in Placement ofspeakers.Sleep timer30 MIN 60 MIN 90 MIN 120 MIN OFF BASS/MID/TREBLE-4 to +4SURROUNDON SURROUND or OFF SURROUNDINPUT LEVEL(For AUX IN 2)NORMAL or HIGHNote:Select NORMAL if the sound is distorted duringHIGH input level.SUPERWOOFERSW1, SW2, SW3 or OFFD.BASSON D.BASS, AUTO D.BASS or OFF D.BASSPRESET EQPress [PRESET EQ]BASS/MID/TREBLEPress [MANUAL EQ]D.BASSPress [D.BASS-SUPER WOOFER]SUPERWOOFERPress and hold [D.BASS-SUPER WOOFER]Illumination effectsPATTERNIlluminate with pattern in multiple colors.COLORIlluminate in one color.OFF](https://usermanual.wiki/Panasonic-of-North-America/B21R1401.User-Manual-SC-MAX670/User-Guide-2139909-Page-14.png)
![15DJ functionsUsing these functions, you can add various effects to thetrack you are playing back.By installing the app Panasonic MAX Juke (free ofcharge) on your AndroidTM device, you can use a widervariety of functions.Download the app Panasonic MAX Juke to yourAndroidTM device. Enter Panasonic MAX Juke in thesearch box of Google PlayTM to search, and then selectPanasonic MAX Juke.[USB[A],[USB[B]This mode adds an effect to the intervals between thetracks you play back.1Press [DJ JUKEBOX] on main unit.2Press [1] to [6] to select the desired function.The selected button lights up in red.To cancel, press the button again.To cancel the DJ jukeboxPress [DJ JUKEBOX].If you use the app Panasonic MAX JukeYou can call up the tracks you want to play backthrough the app.By main unit onlyBy turning [MULTI CONTROL] (Turntable), you canapply a scratch sound or sample sound to the track youare playing back.1Press [DJ SAMPLER].2Press [1] to [6] to select the desired sound.3Turn [MULTI CONTROL].To cancel the DJ samplerPress [DJ SAMPLER].If you use the app Panasonic MAX JukeYou can change the sample sound on the app.(To return all sample sounds to the factory preset,press and hold [DJ SAMPLER] when the DJ sampler isturned off.)By main unit onlyYou can use the DJ effect function to adjust the soundquality.1Press [DJ EFFECT].2Press [1] to [6] to select the desired DJ effect.To cancel, press the button again.3Turn [MULTI CONTROL] to select the desiredsetting.To cancel the DJ effectPress [DJ EFFECT].DJ jukebox[1]Crossfade[2] to [6]Sample Sound MixDJ sampler DJ effects[1] PHASERAdd space and dimension to the sound.[2] FILTEREnhance or filter specific ranges of the sound.[3] SOUND CHOPPERCut off the sound periodically.[4] ELECTRO ECHOAdd digital echo to the sound.[5] PITCH SHIFTERAdjust the keys of the sound.[6] HARMONIZERAdd notes to the sound to create harmony.](https://usermanual.wiki/Panasonic-of-North-America/B21R1401.User-Manual-SC-MAX670/User-Guide-2139909-Page-15.png)
![16Using a microphonePreparationDecrease the volume of the system to its minimumbefore you connect or disconnect a microphone.1Connect a microphone (not supplied) to themicrophone jack.Plug type: 6.5 mm monaural2Turn [MIC VOL, MIN/MAX] on the main unit toadjust the volume of the microphone.3If you want to sing with the background music.Play the music source and adjust the volume ofthe system.Note:If a strange noise (howling) is emitted, move themicrophone away from the speakers, or decrease thevolume of the microphone.When you do not use the microphone, disconnect it fromthe microphone jack, and decrease the volume of themicrophone level to MIN.Using the auxiliary inputPreparationDisconnect the AC power supply cord.Switch off all equipment and read the appropriateoperating instructions.Note:Components and cables are sold separately.You can play music from a portable audio equipment.PreparationSwitch off the equalizer (if any) of the portable audioequipment to prevent sound distortion.Decrease the volume of the system and the portableaudio equipment before you connect or disconnect theportable audio equipment.1Connect the portable audio equipment toAUX IN 2.Plug type: 3.5 mm stereo (not supplied)2Press [RADIO/EXT-IN] to select AUX 2.3Play the portable audio equipment.You can connect a VCR, DVD player etc. and listen tothe audio through this system.1Connect the external equipment.2Press [RADIO/EXT-IN] to select AUX 1.3Play the external equipment.Note:If you want to connect equipment other than thosedescribed, refer to the audio dealer.Sound distortion can occur when you use an adapter.To connect a portable audio equipment etc.To connect a VCR, DVD player etc.DVD player (not supplied)Audio cable(not supplied)Rear panel of this main unit](https://usermanual.wiki/Panasonic-of-North-America/B21R1401.User-Manual-SC-MAX670/User-Guide-2139909-Page-16.png)
![17TroubleshootingBefore requesting service, make the following checks.If you are in doubt about some of the check points, or ifthe solutions indicated do not solve the problem, consultyour dealer for instructions.The display panel lights up and changescontinuously in standby mode.Press and hold [ ] on the main unit to select DEMOOFF.No operations can be done with the remote control.Examine that the battery is installed correctly.Sound is distorted or no sound.Adjust the volume of the system.Switch off the system, determine and correct thecause, then switch the system on again. It can becaused by straining of the speakers through excessivevolume or power, and when using the system in a hotenvironment.A humming sound can be heard during playback.An AC power supply cord or fluorescent light is nearthe cables. Keep other appliances and cords awayfrom the cables of this system.The sound level reduces.The protection circuit has been activated due to thecontinuous use at high volume output. This is toprotect the system and maintain the sound quality.Display not shown correctly.Playback does not start.You have not put in the disc correctly. Put it in correctly.Disc is dirty. Clean the disc.Replace the disc if it is scratched, warped, ornon-standard.There is condensation. Let the system dry for 1 to2 hours.The total number of tracks displayed is incorrect.The disc cannot be read.Distorted sound is heard.You put in a disc that the system cannot play. Changeto a playable disc.You put in a disc that has not been finalized.The USB device or the contents in it cannot be read.The format of the USB device or the contents in itis/are not compatible with the system.USB devices with storage capacity of more than 32 GBcannot work in some conditions.Slow operation of the USB device.Large content size or large memory USB device takeslonger time to read.Sound is distorted.Use an optional FM outdoor antenna. The antennashould be installed by a competent technician.A beat sound is heard.Switch off the TV or move it away from the system.Pairing cannot be done.Check the Bluetooth® device condition.The device cannot be connected.The pairing of the device was unsuccessful.Do pairing again.The pairing of the device has been replaced.Do pairing again.This system might be connected to a different device.Disconnect the other device and try pairing the deviceagain.The device is connected but audio cannot be heardthrough the system.For some built-in Bluetooth® devices, you have to setthe audio output to SC-MAX670 manually. Read theoperating instructions of the device for details.Sound from the device is interrupted.The device is out of the 10 m communication range.Move the device nearer to the system.Remove any obstacle between the system and thedevice.Other devices that use the 2.4 GHz frequency band(wireless router, microwaves, cordless phones, etc.)are interfering. Move the device nearer to the systemand distance it from the other devices.Select MODE 1 for stable communication.The One-Touch Connection (NFC feature) is notworking.Turn on the NFC feature of the device.Common problemsDiscUSB[USB[A] : Depending on the USB device, power maybe supplied to the USB device connected to [USB[A]when USB A is selected.[USB[B] : Depending on the USB device, power maybe supplied to the USB device connected to [USB[B]when USB A is selected.RadioBluetooth®](https://usermanual.wiki/Panasonic-of-North-America/B21R1401.User-Manual-SC-MAX670/User-Guide-2139909-Page-17.png)
![18USB A NO DEVICEUSB B NO DEVICEThe USB device is not connected. Examine theconnection.ERRORAn incorrect operation was done. Read the instructionsand try again.F61Examine and correct the speaker cords connection.Disconnect the USB device. Switch off the system andthen switch it on again.F70Examine the Bluetooth® device.Disconnect the Bluetooth® device. Switch off thesystem and then switch it on again.F77Switch off the system and then switch it on again.NO PLAYUNSUPPORTExamine the content. You can only play supportedformat.The files in the USB device can be corrupted. Formatthe USB device and try again.NO TRACKThere is no album or track in the USB device or theinternal memory.PLAYERRORYou played an unsupported MP3 file. The system willskip that track and play the next one.REMOTE 1REMOTE 2The remote control and the main unit are usingdifferent codes. Change the code of the remotecontrol.- When REMOTE 1 is shown, press and hold [OK]and [1] for a minimum of 4 seconds.- When REMOTE 2 is shown, press and hold [OK]and [2] for a minimum of 4 seconds.TEMP NGThe temperature protection circuit has been activated,and the system will switch off. Let the unit cool downbefore switching it on again.Check that the ventilation opening of the unit is notobstructed.Ensure this unit is well ventilated.USB OVER CURRENT ERRORThe USB device is using too much power.Disconnect the USB device, switch off the system andthen switch on again.VBR-The system cannot show the remaining play time forvariable bit rate (VBR) tracks.System memory reset (initialization)Reset the memory when the following situations occur:There is no response when buttons are pressed.You want to clear and reset the memory contents.1Disconnect the AC power supply cord.2While you press and hold [ /I] on the main unit,connect the AC power supply cord again.Continue to press and hold the button (approximately10 seconds) until - - - - - - - - is shown.3Release [ /I].All the settings are set back to the factory preset.It is necessary to set the memory items again.Main unit displays](https://usermanual.wiki/Panasonic-of-North-America/B21R1401.User-Manual-SC-MAX670/User-Guide-2139909-Page-18.png)
![19Remote control codeWhen other Panasonic equipment responds to theremote control of this system, change the remote controlcode for this system.PreparationPress [RADIO/EXT-IN] to select AUX.1Press and hold [RADIO/EXT-IN] on the main unitand [2] on the remote control until REMOTE 2is shown.2Press and hold [OK] and [2] for a minimum of4 seconds.1Press and hold [RADIO/EXT-IN] on the main unitand [1] on the remote control until REMOTE 1is shown.2Press and hold [OK] and [1] for a minimum of4 seconds.ReferenceFrequency bandThis system uses the 2.4 GHz frequency band.CertificationThis system conforms to the frequency restrictions andhas received certification based on frequency laws.Thus, a wireless permit is not necessary.The actions below are punishable by law:- Taking apart or modifying the main unit.- Removing specification indications.Restrictions of useWireless transmission and/or usage with all Bluetooth®equipped devices is not guaranteed.All devices must conform to standards set by BluetoothSIG, Inc.Depending on the specifications and settings of adevice, it can fail to connect or some operations can bedifferent.This system supports Bluetooth® security features. Butdepending on the operating environment and/orsettings, this security is possibly not sufficient.Transmit data wirelessly to this system with caution.This system cannot transmit data to a Bluetooth®device.Range of useUse this device at a maximum range of 10 m.The range can decrease depending on theenvironment, obstacles or interference.Interference from other devicesThis system may not function properly and troublessuch as noise and sound jumps may arise due to radiowave interference if this unit is located too close toother Bluetooth® devices or the devices that use the2.4 GHz band.This system may not function properly if radio wavesfrom a nearby broadcasting station, etc. is too strong.Intended usageThis system is for normal, general use only.Do not use this system near an equipment or in anenvironment that is sensitive to radio frequencyinterference (example: airports, hospitals, laboratories,etc.).To set the code to REMOTE 2To set the code to REMOTE 1Operation is subject to the following two conditions:(1) This device may not cause harmful interference, and (2) thisdevice must accept any interference received, includinginterference that may cause undesired operation.About Bluetooth®Panasonic bears no responsibility for data and/orinformation that can possibly be compromised during awireless transmission.LicensesMPEG Layer-3 audio coding technology licensed fromFraunhofer IIS and Thomson.The Bluetooth® word mark and logos are owned by the BluetoothSIG, Inc. and any use of such marks by Panasonic Corporation isunder license.Other trademarks and trade names are those of their respectiveowners.Google Play and Android are trademarks of Google Inc.](https://usermanual.wiki/Panasonic-of-North-America/B21R1401.User-Manual-SC-MAX670/User-Guide-2139909-Page-19.png)