Panasonic of North America 9TGRI11A RFID Module User Manual CF H1mk2 DFQW5343WA Win7 OI US indb
Panasonic Corporation of North America RFID Module CF H1mk2 DFQW5343WA Win7 OI US indb
Contents
- 1. User Manual [Module]
- 2. Users Manual [End product]
Users Manual [End product]
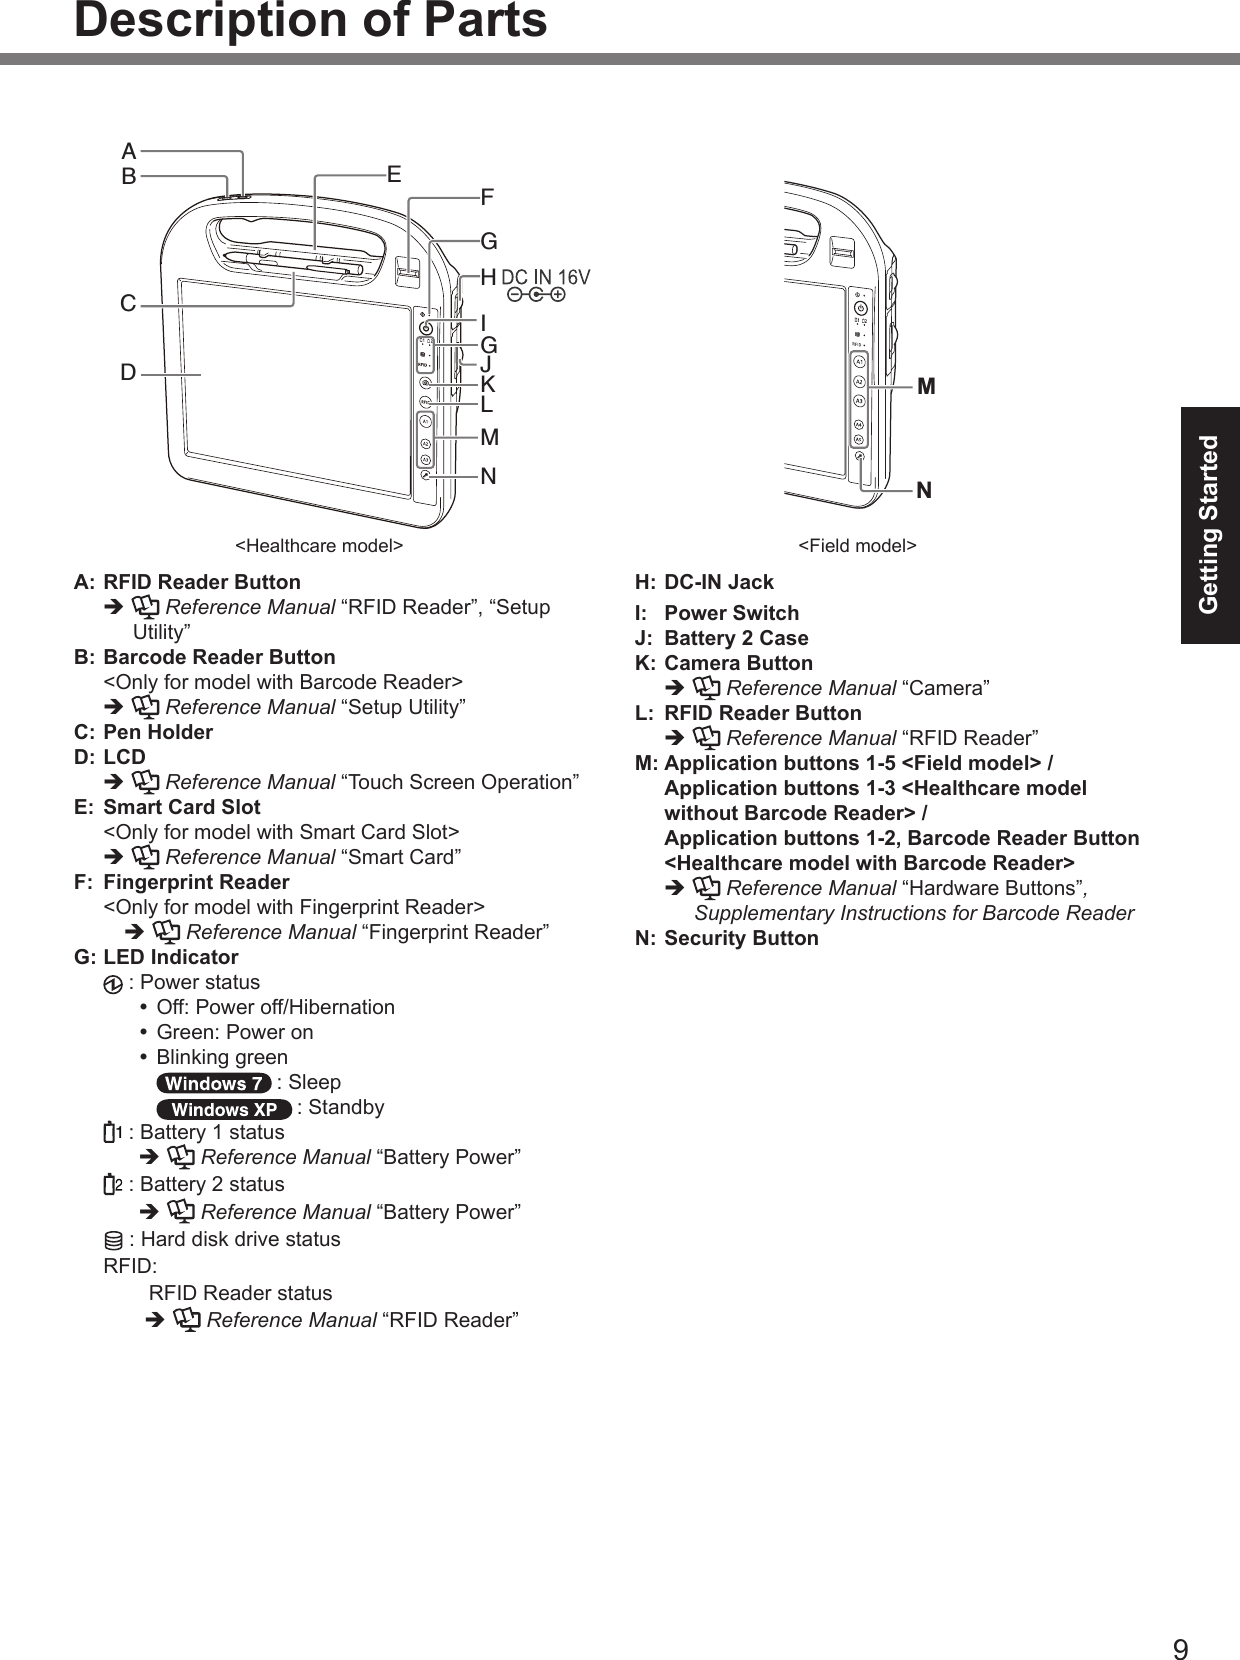
![2Getting StartedIntroductionThank you for purchasing this Panasonic product. For optimum performance and safety, please read these instructions carefully.In these instructions, the names are referred as follows. l Genuine “Windows® 7 Professional” as “Windows” or “Windows 7” l Genuine “Microsoft® Windows® XP Tablet PC Edition Service Pack 3” as “Windows” or “Windows XP” n Terms and illustrations in these instructionsè : Page in these Operating Instructions or in the Reference Manual. : Reference to the on-screen manuals.CAUTION : Conditions that may result in minor or moderate injury.NOTE : Useful and helpful information.Click : Touch the screen with the digitizer pen.Right-click : Touch and hold with the digitizer pen, or press and hold the right button, and then touch the object. (Start) - [All Programs] : Click (Start), and then click [All Programs]. [start] - [All Programs] : Click [start], and then click [All Programs]. You may need to double-click in some cases.<Only when connected to Cradle and keyboard> : Press [ ] (Enter) key.Ctrl + F7: Press and hold Ctrl key, and then press F7 key.l The display of the key may be different from this manual according to the keyboard used. (e.g. “Delete” instead of “Del”) <For ash memory model> Read the term “hard disk” as “ash memory” whenever it appears in this manual.l Some illustrations are simplied to help your understanding and may look different from the actual unit.l If you do not log on as an administrator, you cannot use some functions or cannot display some screens.l Refer for the latest information about optional products to the catalogs, etc.n DisclaimerComputer specications and manuals are subject to change without notice. Panasonic Corporation assumes no liability for damage incurred directly or indirectly from errors, omissions or discrepancies between the computer and the manuals.n TrademarksMicrosoft®, Windows® and the Windows logo are registered trademarks of Microsoft Corporation of the United States and/or other countries.Intel, Core, Centrino and PROSet are either registered trademarks or trademarks of Intel Corporation.Adobe, the Adobe logo and Adobe Reader are either registered trademarks or trademarks of Adobe Systems Incorporated in the United States and/or other countries.Computrace® is a registered trademark of Absolute® Software Corp.Bluetooth™ is a trademark owned by Bluetooth SIG, Inc., U.S.A. and licensed to Panasonic Corporation.Names of products, brands, etc., appearing in this manual are trademarks or registered trademarks of their respective own companies.](https://usermanual.wiki/Panasonic-of-North-America/9TGRI11A.Users-Manual-End-product/User-Guide-1487570-Page-2.png)

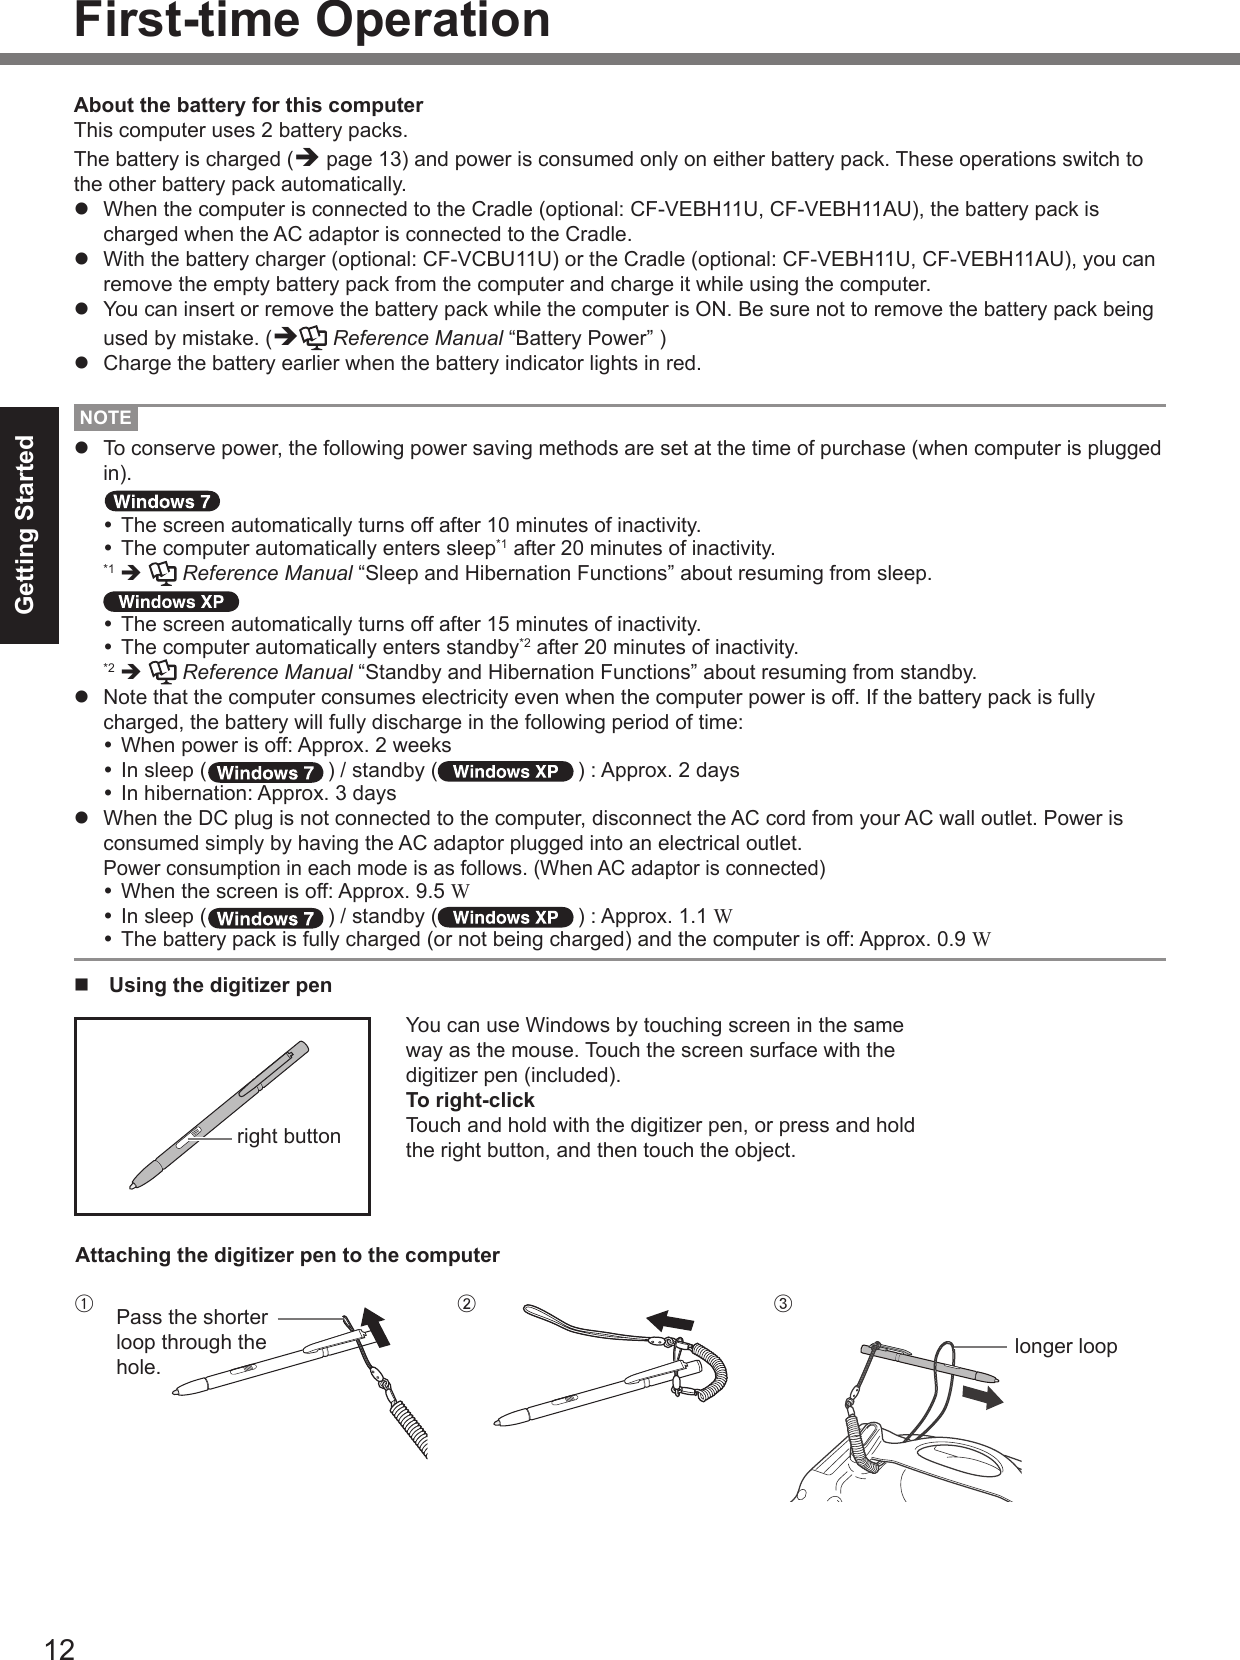
![14Getting Startedl You can change the user name, password, image, Wireless Networks ( ) and security setting ( ) after setup of Windows.l Remember your password. If you forget the password, you cannot use the Windows. Creating a password reset disk beforehand is recommended. l When you set date/time/time zone and click [Next], the screen may not go to the next step for a few minutes. Do not touch the screen, the keyboard, the mouse and wait until the screen changes.l If “An unexpected error has occurred…” (or a similar message) is displayed, click [OK]. This is not a malfunction.l Wait until the hard disk drive indicator has turned off.4 Perform the touchscreen calibration.l To calibrate the touchscreen, do not use the digitizer pen (included). Use your nger or other objects.l Before performing the calibration, close Tablet PC Input Panel.A Click (Start) - [Control Panel] - [Hardware and Sound] - [Tablet PC Setting]. Click [start] - [Control Panel] - [Other Control Panel Option] - [Touch Settings].B Click [Calibrate].C Touch each of the “+” target marks one by one, and then click [Finished].NOTEl You can also calibrate the digitizer, if you need. (è Reference Manual “Touch Screen Operation”) 5 Create a new account.A Click [start] - [Control Panel] - [User Accounts] - [Create a new account].CAUTIONl Remember your password. If you forget the password, you cannot use the Windows. Creating a password reset disk beforehand is recommended.First-time OperationNOTEl PC Information Viewer This computer periodically records the management information of the hard disk, etc. The maximum data volume for each record is 2048 bytes. This information is only used for estimating the cause when the hard disk goes down by any possibility. They are never sent to outside via network nor used for any other purpose except for the purpose described the above. To disable the function, add the check mark for [Disable the automatic save function for management information history] in [Hard Disk Status] of PC Information Viewer, and click [OK]. (è Reference Manual “Checking the Computer’s Usage Status”)n Precaution against Starting Up/Shutting Downl Do not do the following Connecting or disconnecting the AC adaptor Pressing the power switch Touching the screen or external mouse](https://usermanual.wiki/Panasonic-of-North-America/9TGRI11A.Users-Manual-End-product/User-Guide-1487570-Page-14.png)
![15Getting Startedn Precaution against Logging on to Windowsl Do not log on to Windows by the Guest account. n To set the screen saverWhen setting the screen saver, perform the following steps to select a standard Windows screen saver.However, do not select the [3D Text] or [Blank] screen saver.A Right-click any blank area on the desktop, and click [Personalize].B Click [Screen Saver].C Select any [Screen Saver] option other than [3D Text] and [Blank], and click [OK].If you select [3D Text] or [Blank], the computer may not transition properly into sleep mode or hibernation mode while the screen saver is active, due to incompatibilities with Windows 7. In addition, the computer may not resume from sleep mode or hibernation mode even when the power switch and keys are operated.In such cases, you will have to force shutdown by pressing and holding the power switch for four seconds or more, losing any unsaved data in the process.n To change the partition structureYou can shrink a part of an existing partition to create unallocated drive space, from which you can create a new partition. This computer has a single partition in the default setting.A Click (Start) and right-click [Computer], then click [Manage].l A standard user needs to enter an administrator password.B Click [Disk Management].C Right-click the partition for Windows (“c” drive in the default setting), and click [Shrink Volume].l The partition size depends on the computer specications.l If the size of Windows partition is set to smaller than 30,000 MB, data partition will disappear after reinstallation (è page 19).D Input the size in [Enter the amount of space to shrink in MB] and click [Shrink].l You cannot input a larger number than the displayed size.E Right-click [Unallocated] (the shrunk space in the step D) and click [New Simple Volume].F Follow the on-screen instructions to make the settings, and click [Finish].Wait until formatting is completed.NOTEl You can create an additional partition using remaining unallocated space or newly creating unallocated space.l To delete a partition, right-click the partition and click [Delete Volume] in the step C.n Hard Disk Backup/Restorel Use the commercial software to backup the entire data on the hard disk drive.](https://usermanual.wiki/Panasonic-of-North-America/9TGRI11A.Users-Manual-End-product/User-Guide-1487570-Page-15.png)
![1Useful InformationOn-screen ManualYou can access the Reference Manual and the Important Tips on the computer screen.When you access the Reference Manual and the Important Tips for the rst time, the License Agreement of the Adobe Reader may be displayed. Read it carefully and select [Accept] to proceed.n Reference Manual The Reference Manual contains the practical information to help you fully enjoy the computer’s performance.To access the Reference Manual: A Double-click on the desktop.l Alternatively click (Start) - [All Programs] - [Panasonic] - [On-Line Manuals] - [Reference Manual]. A Click [start] - [Reference Manual].n Important Tips The Important Tips will provide you with the battery information so that you can use the battery pack in the optimum condition to obtain longer operation time.To access the Important Tips: A Double-click on the desktop.l Alternatively click (Start) - [All Programs] - [Panasonic] - [On-Line Manuals] - [Important Tips]. A Double-click on the desktop.l Alternatively click [start] - [All Programs] - [Panasonic] - [Battery] - [Important Tips] or click [start] - [All Programs] - [Panasonic] - [On-Line Manuals] - [Important Tips].NOTEl When Adobe Reader update notice is displayed, we recommend you follow the on-screen procedure and update. See http://www.adobe.com/ for the latest version of Adobe Reader.](https://usermanual.wiki/Panasonic-of-North-America/9TGRI11A.Users-Manual-End-product/User-Guide-1487570-Page-16.png)
![4Useful InformationReinstalling SoftwareReinstalling software will return the computer to the default condition. When you reinstall the software, the hard disk data will be erased.Back up important data to other media or an external hard disk before reinstallation.Preparationl Prepare the following items: Product Recovery DVD-ROM (included) USB CD/DVD drive (optional) (refer to recent catalogs and other sources for information about the products available) Cradle (optional): Model No. CF-VEBH11U, CF-VEBH11AU External keyboard Mousel Remove all peripherals (except for the external keyboard, mouse and CD/DVD drive).l Connect the AC adaptor to the Cradle and do not remove it until reinstallation is complete.1 Turn off the computer and set the computer to the Cradle.2 Connect the CD/DVD drive and an external keyboard and mouse to the USB port.3 Turn on the computer, and press F2 or Del while [Panasonic] boot screen is displayed.The Setup Utility starts up.l If the password is requested, enter the Supervisor Password.4 Write down all of the contents of the Setup Utility and press F9.At the conrmation message, select [Yes] and press (Enter).5 Press F10.At the conrmation message, select [Yes] and press (Enter). The computer will restart.6 Press F2 or Del while [Panasonic] boot screen is displayed.The Setup Utility starts up.l If the password is requested, enter the Supervisor Password.7 Set the Product Recovery DVD-ROM into the CD/DVD drive.8 Select the [Exit] menu, then select your CD/DVD drive in [Boot Override].9 Press (Enter).The computer will restart. 10 Click [Reinstall Windows] and click [Next].The License Agreement screen appears.11 Click [Yes, I agree to the provisions above and wish to continue!] and click [Next].12 Select the setting and click [Next].l [Reinstall Windows to the whole Hard Disk to factory default.] You will have two partitions.l [Reinstall to the rst 2 partitions.]*1 Select this option when the hard disk has already been divided into several partitions. For how to create a new partition, refer to “To change the partition structure” (è page 15). You can keep the partition structure.*1 This does not appear if Windows cannot be reinstalled to the partition containing boot les and the area usable by Windows. When reinstalling Windows 7 from Windows XP:Click [Next].13 At the conrmation message, click [YES].Reinstallation starts according to the instructions on the screen. (It will take approximately 50 minutes.)l Do not interrupt reinstallation, for example by turning off the computer or pressing Ctrl + Alt + Del. Otherwise reinstallation may become unavailable as Windows may not start up or the data may be corrupted.14 Remove the Product Recovery DVD-ROM, and then click [OK] to turn off the computer, then remove the CD/DVD drive.15 Turn on the computer.l If the password is requested, enter the Supervisor Password.](https://usermanual.wiki/Panasonic-of-North-America/9TGRI11A.Users-Manual-End-product/User-Guide-1487570-Page-19.png)
![5Useful Information16 Perform the steps 3 to 4 for setting up the computer (è pages 13 to 14).17 Start the Setup Utility and change the settings as necessary.18 Perform Windows Update. 10 Press 1 to execute [1. [Recovery]].The License Agreement screen appears.l To cancel partway, press 0.11 Press 1 to select [1. Yes, I agree to the provisions above and wish to continue!].12 Select the settings.l [2]: Enter the size of operating system partition and press (Enter). (The size of data partition will be determined by subtracting the operating system partition size from the maximum size.)l [3]: Windows will be installed in the rst partition. (The size of the rst partition must be 20 GB or more. If smaller, installation will not be possible.)At the conrmation message, press Y.Reinstallation starts automatically. (It will take approximately 30 - 75 minutes.) When reinstalling Windows XP from Windows 7:Do not select.l Do not interrupt reinstallation, for example by turning off the computer or pressing Ctrl + Alt + Del. Otherwise reinstallation may become unavailable as Windows may not start up or the data may be corrupted.13 Remove the Product Recovery DVD-ROM, and then press any key to turn off the computer.l If additional instructions are included with the computer, be sure to read them. It may be necessary to perform additional operations during the following procedure.14 Turn on the computer.l If the password is requested, enter the Supervisor Password.15 Perform the steps 3 to 4 for setting up the computer (è pages 13 to 14).16 Start the Setup Utility and change the settings as necessary.Reinstalling Software](https://usermanual.wiki/Panasonic-of-North-America/9TGRI11A.Users-Manual-End-product/User-Guide-1487570-Page-20.png)
![1TroubleshootingTroubleshooting (Basic)Follow the instructions below when a problem has occurred. There is also an advanced troubleshooting guide in the “Reference Manual”. For a software problem, refer to the software’s instruction manual. If the problem persists, contact Panasonic Technical Support. You can also check the computer’s status in the PC Information Viewer (è Reference Manual “Checking the Computer’s Usage Status”).l When operating the computer with the keyboard, you need to set the computer to the Cradle and connect the external keyboard and AC adaptor to the Cradle.n Starting UpCannot start up.The power indicator or battery indicator is not lit.l Connect the AC adaptor.l Insert a fully charged battery.l Remove the battery pack and the AC adaptor, then connect them again. l If a device is connected to the USB port, disconnect the device, or set [Legacy USB Support] to [Disabled] in the [Advanced] menu of the Setup Utility. (è Reference Manual “Setup Utility”)The power is turned on but “Warming up the system (up to 30 minutes)” appears.l The computer is warming up before start up. Wait for the computer to start up (takes up to 30 minutes). If, “Cannot warm up the system” is displayed, the computer failed to warm up and does not start. In this case, turn off the computer, leave it in an environment of 5 °C {41 °F} or higher temperature for about an hour, and then turn on the power again.Cannot turn on the computer.The computer does not resume from sleep ( ) /standby ( ).(The power indicator blinks quickly in green.)l Leave it in an environment of 5 °C {41 °F} to 35 °C {95 °F} for about an hour, then turn on the power again.The computer does not enter sleep mode while the screen saver is running (The screen stays black).l Press and hold the power switch for four seconds or longer to shut down the computer forcibly (data not saved will be lost). Then disable the screen saver.You have forgotten the password.l Supervisor Password or User Password: Contact Panasonic Technical Support.l Administrator password: If you have a password reset disk, you can reset the administrator password. Set the disk and enter any wrong password, then follow the on-screen instructions and set a new password. If you do not have a password reset disk, reinstall (è page 19) and set up Windows, and then set a new password.Cannot log on to Windows. (“The user name or password is incorrect” is displayed.)l The user name (account name) includes an “@”. If another user account exists: Log on to Windows using another user account, and delete the account that includes “@”. Then create a new account. If no other account exists: You need to reinstall Windows (è page 19).“Remove disks or other media. Press any key to restart” or a similar message appears.l If a device is connected to the USB port, disconnect the device, or set [Legacy USB Support] to [Disabled] in the [Advanced] menu of the Setup Utility. (è Reference Manual “Setup Utility”)l If the problem persists after having tried the above solutions, it may be a hard disk failure. Contact Panasonic Technical Support.The date and time are incorrect.l Make the correct settings. Click (Start) - [Control Panel] - [Clock, Language, and Region] - [Date and Time]. Click [start] - [Control Panel] - [Date, Time, Language, and Regional Options] - [Date and Time].l If the problem persists, the internal clock battery may need to be replaced. Contact Panasonic Technical Support.l When the computer is connected to LAN, check the date and time of the server.l The 2100 A.D. or later year will not be correctly recognized on this computer.](https://usermanual.wiki/Panasonic-of-North-America/9TGRI11A.Users-Manual-End-product/User-Guide-1487570-Page-21.png)
![2TroubleshootingTroubleshooting (Basic)n Starting UpWindows startup and operation is slow. l Press F9 in the Setup Utility (è Reference Manual “Setup Utility”) to return the Setup Utility settings (excluding the passwords) to the default values. Start the Setup Utility and make the settings again. (Note that the processing speed depends on the application software, so this procedure may not make Windows faster.)l Due to the overall performance capabilities of this computer, application startup and other operations may take longer to complete when compared to other computers. Examples: Applications do not start up immediately after Windows startup. Applications do not nish installing. The operation will complete in a few moments, so please wait until the hard disk drive indicator turns off. Be aware that the cursor will not always change from the arrow icon () to an hourglass icon ( , ) while you are waiting.l If you installed a resident software after purchase, turn off the residence. l Disable the pop-up menu and Input Panel Tab.A Open the Input Panel, and click [Tools] - [Options] - [Opening].B Remove the check mark of [Show Input Panel sliding open from the tab] and click [OK]. l Disable Indexing Service in the following menu. Click [start] - [Search] - [Change preferences] - [With Indexing Service (for faster local service)].[Executing Battery Recalibration] screen appears.l The Battery Recalibration was canceled before Windows was shut down last time. To start up Windows, turn off the computer by the power switch, and then turn on.[Enter Password] does not appear when resuming from sleep ( ) /standby ( ) or hibernation.l The password you have set in the Setup Utility is not requested at resuming. To use the password security at resuming, set the Windows password.A Click (Start) - [Control Panel] - [User Accounts and Family Safety] - [Add or remove user accounts] and select the account, and set the password.B Click (Start) - [Control Panel] - [System and Security] - [Require a password when the computer wakes] and add a check mark for [Require a password]. A Click [start] - [Control Panel] - [User Accounts] and select the account, and set the password.B Click [start] - [Control Panel] - [Performance and Maintenance] - [Power Options] - [Advanced] and add a check mark for [Prompt for password when computer resumes from standby].Cannot resume. l An error may occur when the computer automatically enters the sleep ( ) / standby ( ) or hibernation mode while the screensaver is active. In this case, turn off the screensaver or change the pattern of the screensaver.l If you press and hold the power switch for 4 seconds or longer, the power will be turned off forcibly and the computer will not resume. In this case, all unsaved data will be lost.l You disconnected the AC adaptor and the battery pack while the computer was in sleep ( ) / standby ( ). If the computer’s power supply is disconnected in sleep ( ) / standby ( ), unsaved data will be lost and the computer will not resume.l The battery is exhausted. Sleep ( ) / standby ( ) and hibernation consume some power.The error message “Debug Assertion Failed!” appears.l This error message may appear in the following cases. When you log on to Windows for the rst time after setting up Windows with First-time Operation. When you create a user account, and log on to Windows for the rst time using that account. When you log on to Windows for the rst time after changing [Trigger Mode] in [Advanced] - [Serial Port Conguration] of the Setup Utility.In such case, click [Retry], and then click [Retry] on the next error message. The same error will not occur again after performing this operation.](https://usermanual.wiki/Panasonic-of-North-America/9TGRI11A.Users-Manual-End-product/User-Guide-1487570-Page-22.png)
![3Troubleshootingn Starting UpOther startup problems. l Press F9 in the Setup Utility (è Reference Manual “Setup Utility”) to return the Setup Utility settings (excluding the passwords) to the default values. Start the Setup Utility and make the settings again.l Remove all peripheral devices.l Check to see if there was a disk error. A Remove all peripheral devices including an external display.B Click (Start) - [Computer] and right-click [Local Disk (C:)], and click [Properties].C Click [Tools] - [Check Now]. A standard user needs to enter an administrator password.D Select the option in [Check disk options] and click [Start].E Click [Schedule disk check] and restart the computer. A Click [start] - [My Computer] and right-click [Local Disk(C:)], and click [Properties].B Click [Tools] - [Check Now].C Select the option in [Check disk options] and click [Start].l Start the computer in Safe Mode and check the error details. When the [Panasonic] boot screen disappears*1 at startup, press and hold F8 until the Windows Advanced Options Menu is displayed.*1 When [Password on boot] is set to [Enabled] in the [Security] menu of the Setup Utility, [Enter Password] appears after the [Panasonic] boot screen disappears. As soon as you enter the password and press (Enter), press and hold F8.n Shutting downWindows does not shut down.l Remove the computer from the Cradle.l Wait one or two minutes. It is not a malfunction.n DisplayNo display. l When using an external display, Check the cable connection. Turn on the display. Check the settings of external display.l The display is turned off by the power-saving function. To resume, do not press the direct selection keys, but press any other key like Ctrl.l The computer entered sleep ( ) / standby ( ) or hibernation by the power-saving function. To resume, press the power switch. l The screen may not be displayed even after the computer resumed from standby or hibernation. In this case, press the power switch to enter standby and resume the computer again.The screen is dark. l The screen might be darker when the AC adaptor is not connected. Adjust the brightness by using Panasonic Dashboard. As you increase the brightness, battery consumption increases.You can separately set the brightness for when the AC adaptor is connected and when not connected.The screen is disordered. l Changing the number of display colors and resolution may affect the screen. Restart the computer.l Connecting/disconnecting an external display may affect the screen. Restart the computer.During Simultaneous display, one of the screens becomes disordered.l Simultaneous display cannot be used until Windows startup is complete (during Setup Utility, etc.).l When using the Extended Desktop, use the same display colors for the external display as those used by the LCD.l If you continue to experience problems, try changing the display. Right-click on the desktop, and click [Graphics Properties] - [Display Devices].The external display does not work normally.l If the external display does not support the power saving function, it may not work normally when the computer enters the power saving mode. Turn off the external display.](https://usermanual.wiki/Panasonic-of-North-America/9TGRI11A.Users-Manual-End-product/User-Guide-1487570-Page-23.png)
![4Troubleshootingn Display <Only for model with GPS>The cursor cannot be controlled properly.l Operate the following steps.A Set [GPS] to [Disabled] in the [Advanced - Serial Port Conguration] of the Setup Utility.B Press F10 and select [Yes] at the conrmation message, and press (Enter). The computer will restart.C Log on to Windows as an administrator.D Click (Start) and input “c:\util\drivers\gps\GPS.reg” in [Search programs and les], and press (Enter).E Click [Yes], click[Yes] and click [OK]. Then restart the computer.F Press F2 or Del while [Panasonic] boot screen is displayed.G Set [GPS] to [Enabled] in the [Advanced - Serial Port Conguration].H Press F10 and select [Yes] at the conrmation message, and press (Enter).n Touch Screen OperationThe cursor does not work. l When using the external mouse, connect it correctly.l Restart the computer using the keyboard. Press (Windows) and press two times, and press to select [Restart] and press (Enter). Press (Windows), U and R to select [Restart].l If the computer does not respond to keyboard commands, read “No response.” (è below).Cannot point the correct position.l Perform the touchscreen calibration (è page 14).n Reference ManualThe Reference Manual is not displayed.l Install Adobe Reader.A Log on to Windows as an administrator.B Click (Start) and input “c:\util\reader\setup.exe” in [Search for programs and les] then press (Enter). Click [start] - [Run], input “c:\util\reader\setup.exe”, then click [OK]. Follow the on-screen instructions.C Update Adobe Reader to its latest version. If your computer is connected to the internet, start up Adobe Reader and click [Help] - [Check for Updates].Cannot close full screen mode of Adobe Reader.l Click [Edit] - [Preferences] - [Full Screen] and add the check mark to [Show navigation bar] before starting full screen mode.l If you started full screen mode without above setting, set the computer to the Cradle and connect the external keyboard to the Cradle, then press Esc.n OthersNo response. l Press[ ] button to open Task Manager and close the software application that is not responding.l An input screen (e.g., password input screen at startup) may be hidden behind another window. Press Alt + Tab to check.l Press the power switch for 4 seconds or longer to shut down the computer, and then press the power switch to turn it on. If the application program does not work normally, uninstall and reinstall the program. To uninstall: Click (Start) - [Control Panel] - [Uninstall a program]. Click [start] - [Control Panel] - [Add or Remove Programs].The battery indicator lights in red.l Connect the AC adaptor to charge the battery. The computer may not enter hibernation, even if [Hibernate] is selected as the action when the battery level becomes low.Troubleshooting (Basic)](https://usermanual.wiki/Panasonic-of-North-America/9TGRI11A.Users-Manual-End-product/User-Guide-1487570-Page-24.png)

![27AppendixSpecicationsThis page provides the specications for the basic model. The model number is different according to the unit conguration.l To check the model number: Check the bottom of the computer or the box the computer came in at the time of purchase.l To check CPU speed, memory size and the hard disk drive (HDD) size: Run the Setup Utility (è Reference Manual “Setup Utility”) and select [Information] menu. [Processor Speed]: CPU speed, [Memory Size]: Memory size, [Hard Disk]: Hard disk drive sizen Main SpecicationsModel No. CF-H2ASAAZDM CPU/ Secondary cache memory Intel® Core™ i5-2557M vPRO™ processor (2.40 GHz with Turbo Boost up to 2.70 MHz, Intel® Smart Cache 3 MB*)Chipset Intel® System Controller HubMain Memory 4 GB*1 DDR2 SDRAM (8 GB*1 Max.)Video Memory 256 MB*1 Max.*2Hard Disk Drive 320 GB*3 / Flash Memory Drive 128 GB*3Display Method 10.1 XGA type (TFT) (1024 × 768 dots)65,536/16,777,216 colors*4Wireless LAN*5 Intel® Centrino® Advanced-N 6205 (è page 28 “Wireless LAN”) BluetoothTM*6 (è page 28 “Bluetooth™”)Sound WAVE and MIDI playback, Monaural speaker, Intel® High Denition Audio subsystem support Security Chip TPM (TCG V1.2 compliant)*7Fingerprint Reader*8 Array Size: 192×4 pixels, Image Size: 192×512 pixels, Image Resolution: 508 DPICamera*9 Effective pixels: 2.0 Mpixels, reading pixels: Up to 1600×1200 pixels, LED functions: MountedRFID reader*10 RF frequency: 13.56 MHz, compatible with ISO14443 TYPE-A, ISO14443 TYPE-B, ISO15693Barcode reader*11 Read Pattern: CMOS Reading, Light Source: LED, Minimum Optical Resolution: 1D - 0.127 mm {5 mil}, 2D - PDF417 0.17 mm {67 mil}, Angular Orientation Tolerances: Skew - ± 60° (“front to back”), Pitch - ± 60° from plane parallel to symbol (“side-to-side”), Ambient Light Immunity Articial Lighting Sunlight: 100,000lx {9290 ft. candles}Contact Smart Card Slot*12 1 slotInterface Expansion Bus Connector (Dedicated 19-pin female)Pointing Device Touchscreen/DigitizerButton Camera*9, RFID Reader*10, Barcode Reader*11, Application × 3*13, × 2*11 or ×5*14, SecurityPower Supply AC adaptor or Battery packAC Adaptor*15 Input: 100 V to 240 V AC, 50 Hz/60 Hz, Output: 16.0 V DC, 3.75 ABattery Pack Li-ion 7.2 V, 2.9 Ah (typ.), 2.7 Ah (min) x 2 packsOperating Time*16 Approx. 6 hoursCharging Time*17Power on Approx. 5.5 hoursPower off Approx. 5.5 hoursPower Consumption*18 Approx. 45 W*19 / Approx. 30 W (Maximum when recharging in the ON state)Physical Dimensions (W × D × H) (excluding the hand strap) 274 mm × 34-58 mm × 268 mm {10.4”×1.3”-2.3”×10.6”}Weight (including the hand strap) Approx. 1.6 kg {Approx. 3.5 lb.}Operation Environment Temperature: 5 °C to 35 °C {41 °F to 95 °F}Humidity: 30% to 80% RH (No condensation)Storage Environment Temperature: –20 °C to 60 °C {–4 °F to 140 °F}Humidity: 30% to 90% RH (No condensation)](https://usermanual.wiki/Panasonic-of-North-America/9TGRI11A.Users-Manual-End-product/User-Guide-1487570-Page-27.png)
![28Appendixn SoftwareOperating System*20 Genuine Windows® 7 Professional Genuine Microsoft® Windows® XP Tablet PC Edition Service Pack 3Utility Programs*20 Adobe Reader, PC Information Viewer, Loupe Utility, Intel® PROSet/Wireless WiFi Connection Utility*5, BluetoothTM Stack for Windows® by TOSHIBA*6, Wireless Switch Utility, Panasonic Hand Writing, Panasonic Dashboard, Application Button Setting Utility, Cleaning Utility, Wireless Connection Disable Utility*21, Display Switch Utility, Battery Recalibration Utility, Inneon TPM Professional Package*21, Protector Suite QL*7*21, Setup Utility, Hard Disk Data Erase Utility*22, PC-Diagnostic Utility, MCA Platform Driver , Panasonic Camera Utility*9, Right Click Utility, Camera Light Switch Utility*9*21, Software Keyboard*21−Icon Enlargern Wireless LANData Transfer Rates IEEE802.11a: 54/48/36/24/18/12/9/6 Mbps (automatically switched)*23IEEE802.11b: 11/5.5/2/1 Mbps (automatically switched)*23IEEE802.11g: 54/48/36/24/18/12/9/6 Mbps (automatically switched)*23IEEE802.11n: (HT20) 144.4/130/117/115.6/104/86.7/78/65/58.5/57.8/52/43.3/39/28.9/26/19.5/14.4/13/7.21 6.5 Mbps (automatically switched)*23(HT40) 300/270/243/240/216/180/162/135/121.5/120/117/108/104/90/81/78/60/54/40.5/40/30/27/15/13 Mbps (automatically switched)*23Standards Supported IEEE802.11a/IEEE802.11b/IEEE802.11g/IEEE802.11nTransmission method OFDM system, DS-SS systemWireless Channels Used IEEE802.11a: Channels 36/40/44/48/52/56/60/64/100/104/108/112/116/132/136/140/149/153/157/161/165IEEE802.11b/IEEE802.11g: Channels 1-11IEEE802.11n: Channels 1-11 /36/40/44/48/52/56/60/64/100/104/108/112/116/132/136/140/149/153/157/161/165RF Frequency Band IEEE802.11a: 5.18 GHz - 5.32 GHz, 5.5 GHz - 5.58 GHz, 5.66 GHz - 5.7 GHz, 5.745 GHz -5.825 GHzIEEE802.11b/IEEE802.11g: 2.412 GHz - 2.462 GHzIEEE802.11n: 2.412 GHz - 2.462 GHz, 5.18 GHz - 5.32 GHz, 5.5 GHz - 5.58 GHz, 5.66 GHz -5.7 GHz, 5.745 GHz - 5.825 GHzn BluetoothTMBluetooth Version 2.1 + EDRTransmission method FHSS systemWireless Channels Used Channels 1 to 79RF Frequency Band 2.402 GHz - 2.48 GHz*1 1 KB = 1,024 bytes / 1 MB = 1,048,576 bytes / 1 GB = 1,073,741,824 bytes*2 A segment of the main memory is allotted automatically depending on the computer’s operating status. The size of the Video Memory cannot be set by the user. The size of Video memory is allotted depending on the operating system.*3 1 GB = 1,000,000,000 bytes. Your operating system or some application software will report as fewer GB.*4 A 16,777,216 color display is achieved by using the dithering function.*5 Only for model with Wireless LAN*6 Only for model with Bluetooth*7 Only for model with Security Chip For information on TPM, click (Start) and input “c:\util\drivers\tpm\README.pdf” in [Search programs and les] and press (Enter), and refer to the Installation Manual of “Trusted Platform Module (TPM)”. click [start] - [Run] and input “c:\util\drivers\tpm\README.pdf”, and refer to the Installation Manual of “Trusted Platform Module (TPM)”.*8 Only for model with Fingerprint Reader*9 Only for model with Camera*10 Only for model with RFID Reader*11 Only for model with Barcode reader*12 Only for model with Contact Smart Card Slot*13 Only for model without Barcode Reader*14 Only for Field model*15 The AC adaptor is compatible with power sources up to 240 V AC adaptor. The unit for North America (identied by the sufx ‘M’ on the model number) is supplied with a 125 V AC compatible AC cord. 20-M-1-1*16 Measured at LCD brightness: 60 cd/m2. Varies depending on the usage conditions, or when an external device is attached.Specications](https://usermanual.wiki/Panasonic-of-North-America/9TGRI11A.Users-Manual-End-product/User-Guide-1487570-Page-28.png)