Panasonic of North America 927130TX FM Transmitter used With TV/VCR User Manual Amended Pgs 2 to 10

Panasonic Corporation of North America FM Transmitter used With TV/VCR Amended Pgs 2 to 10

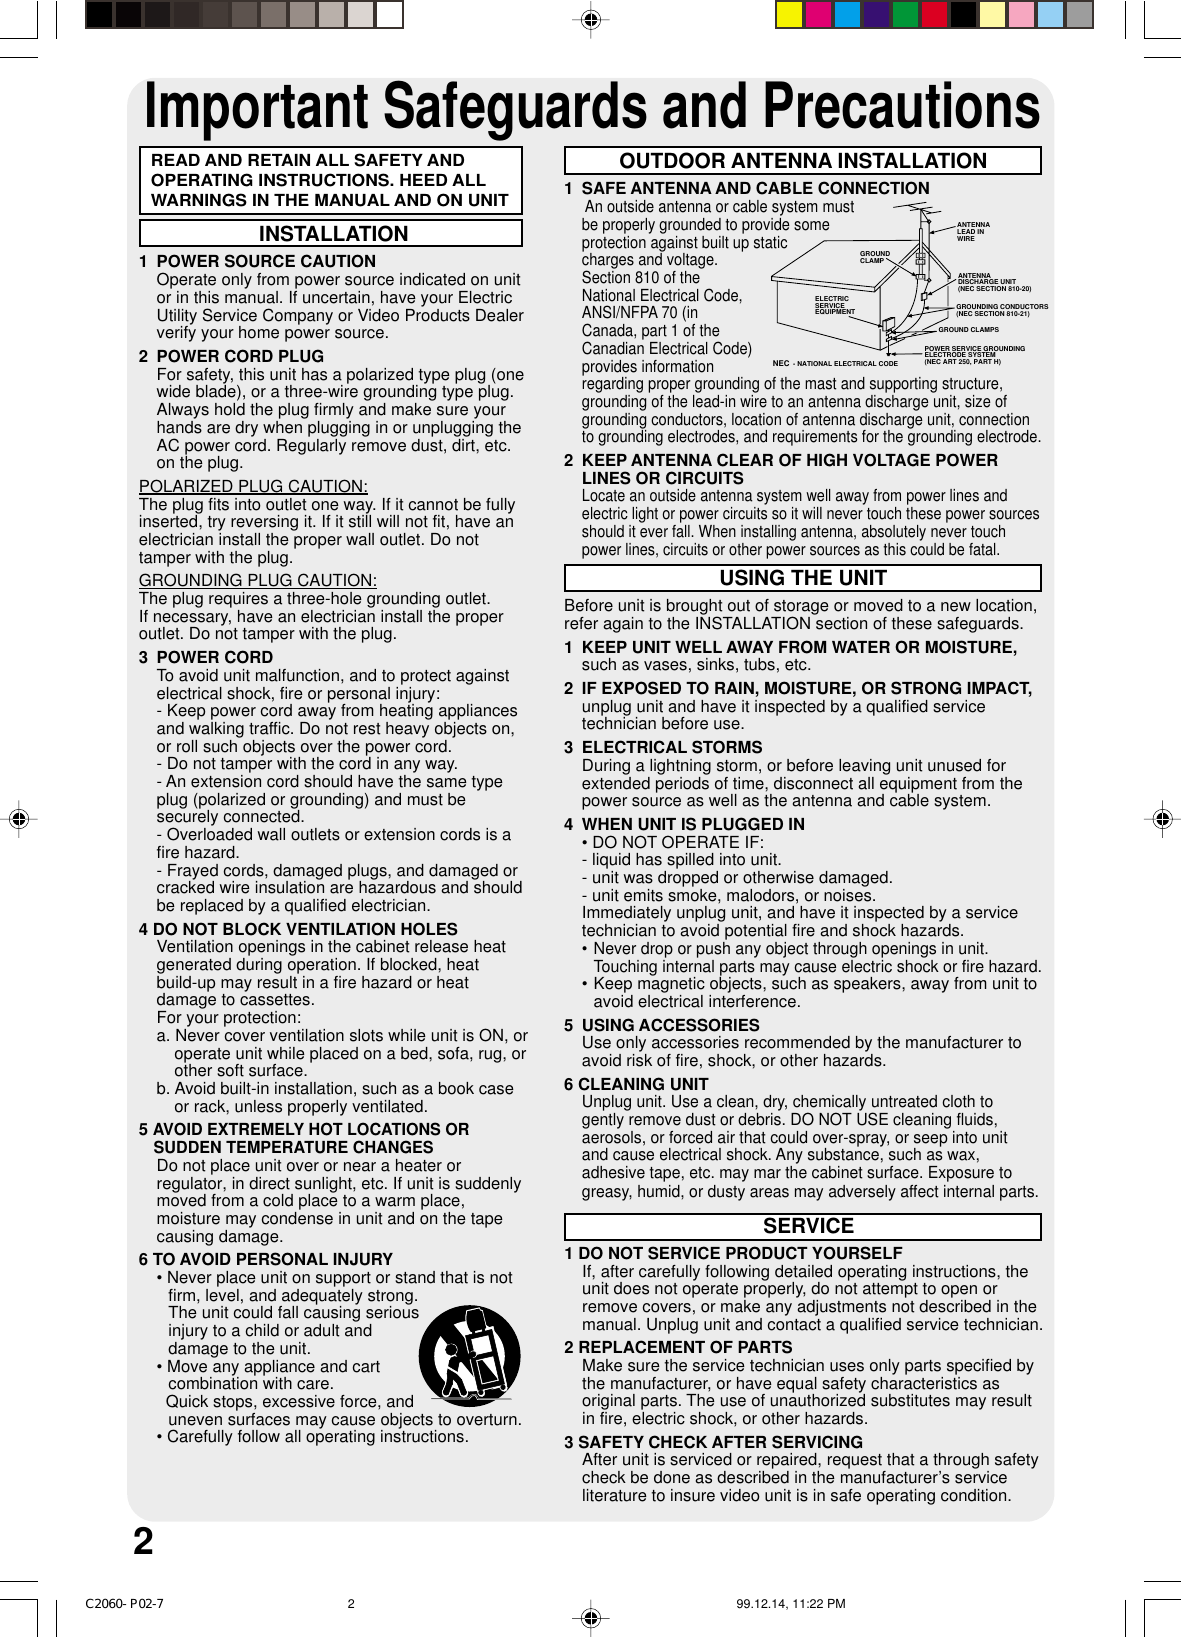
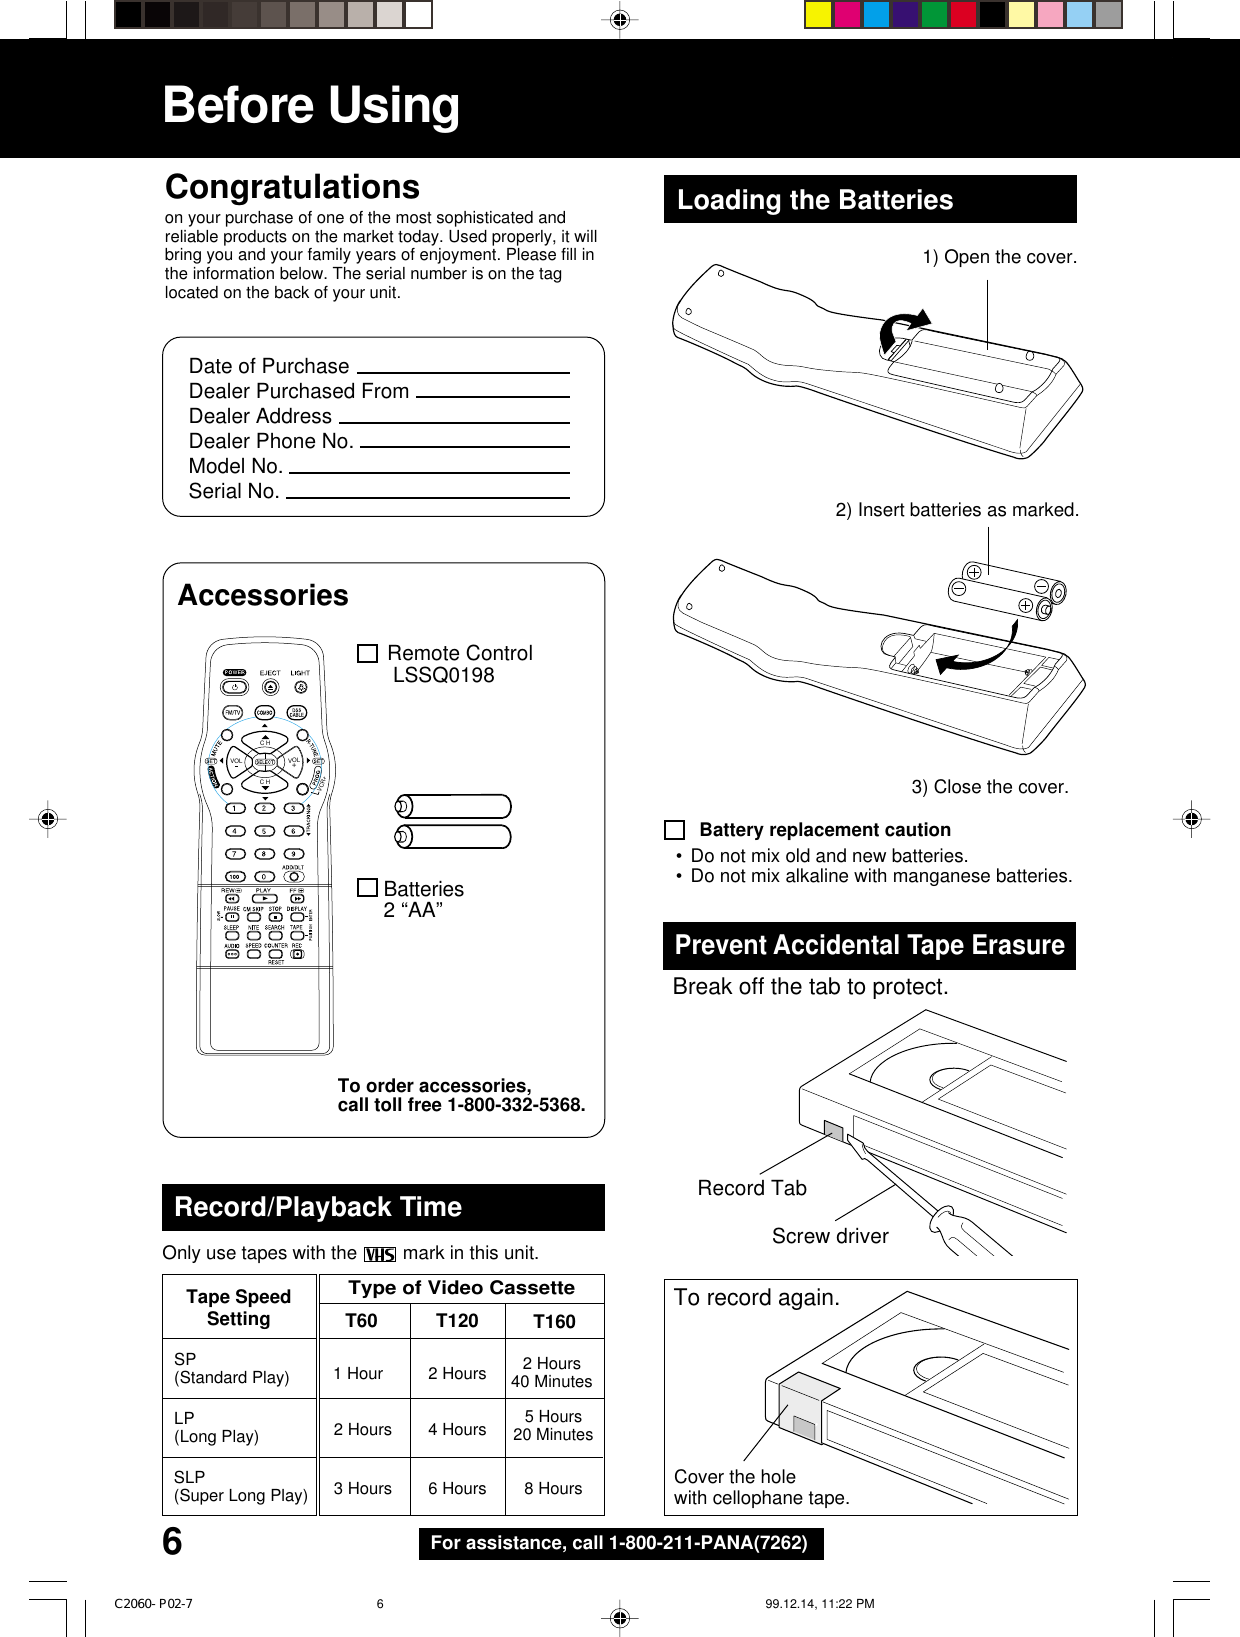
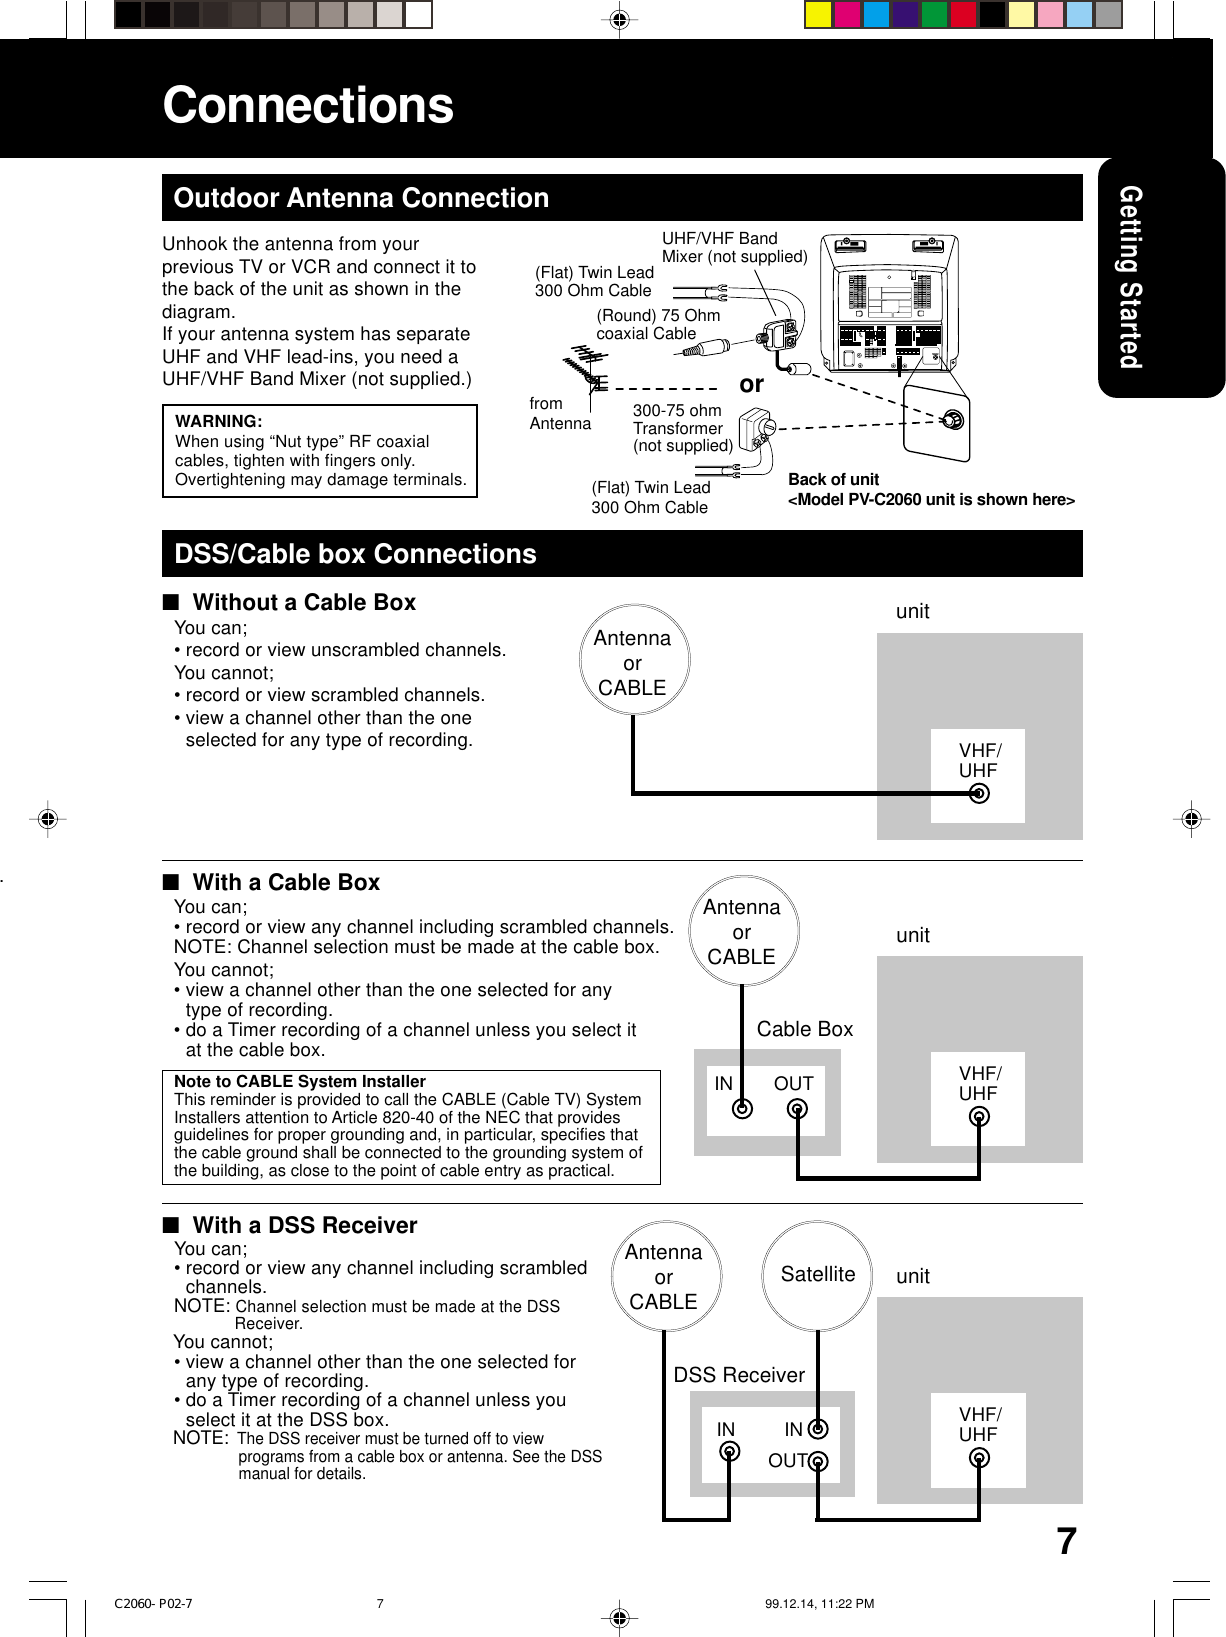
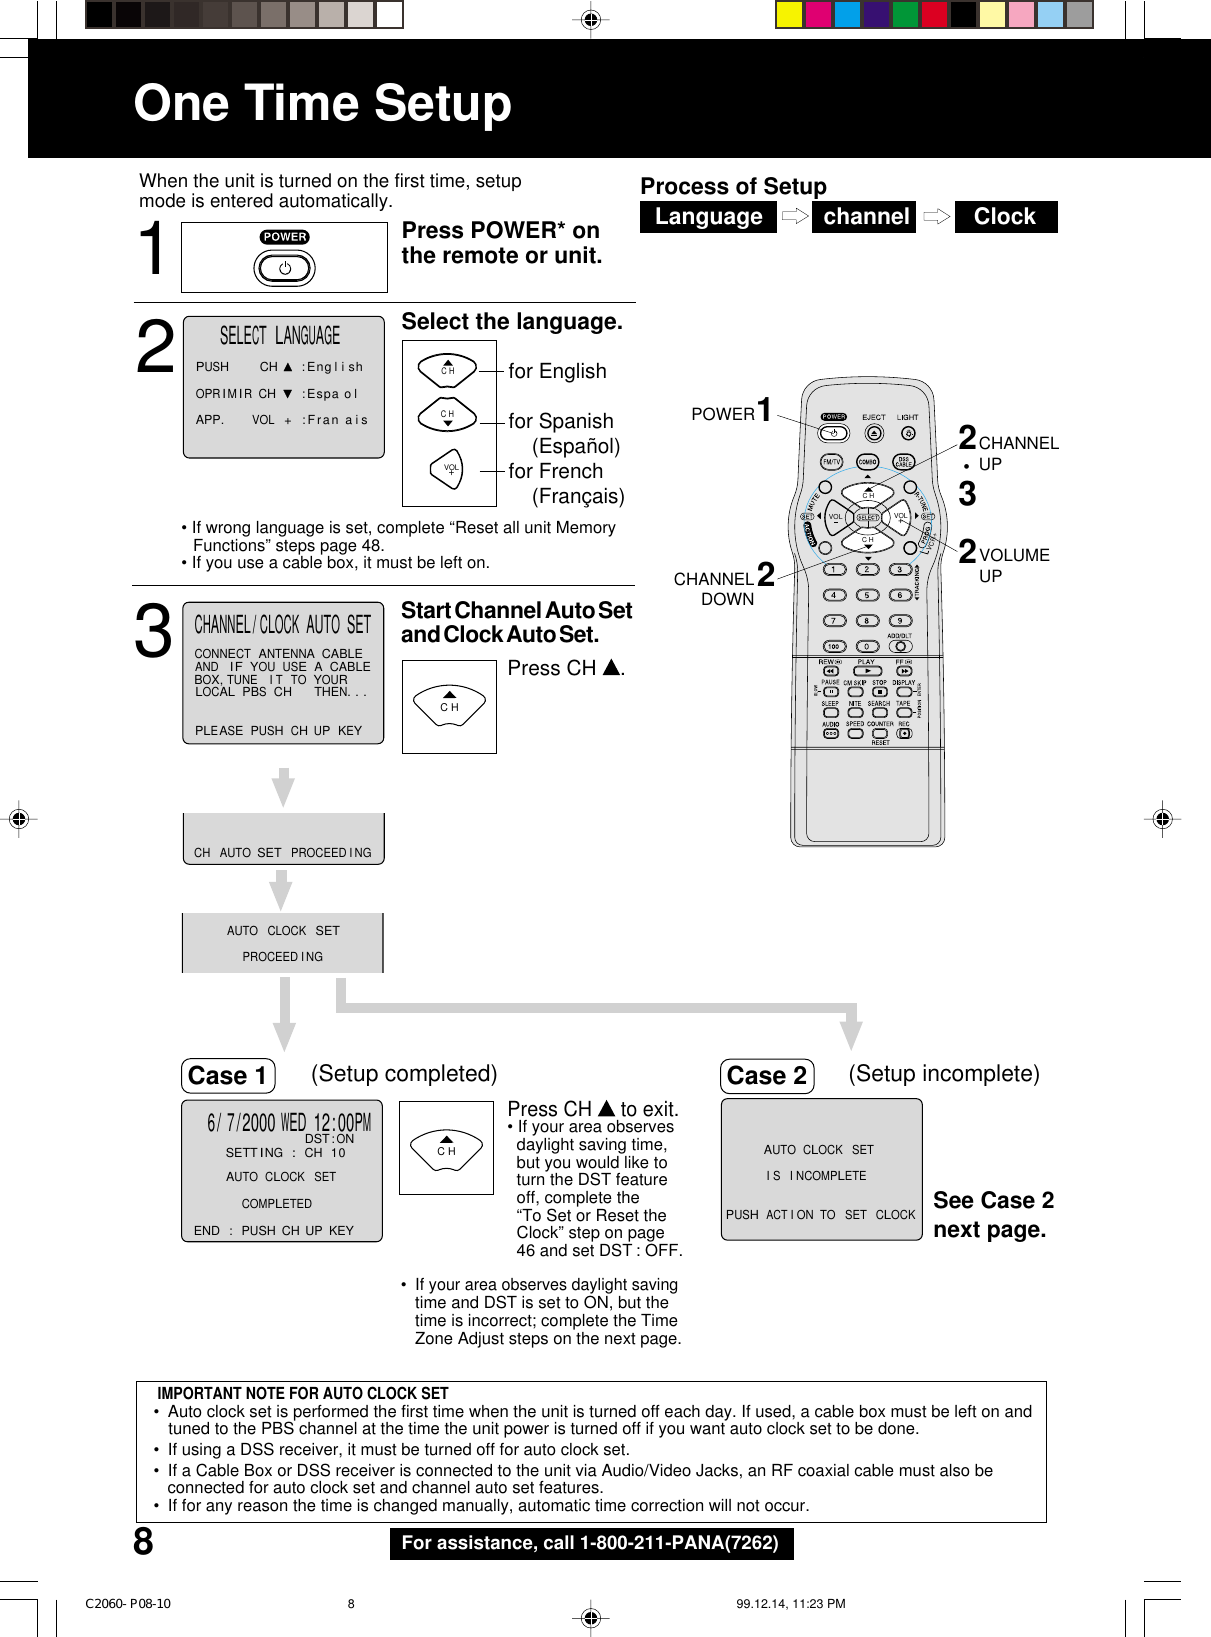
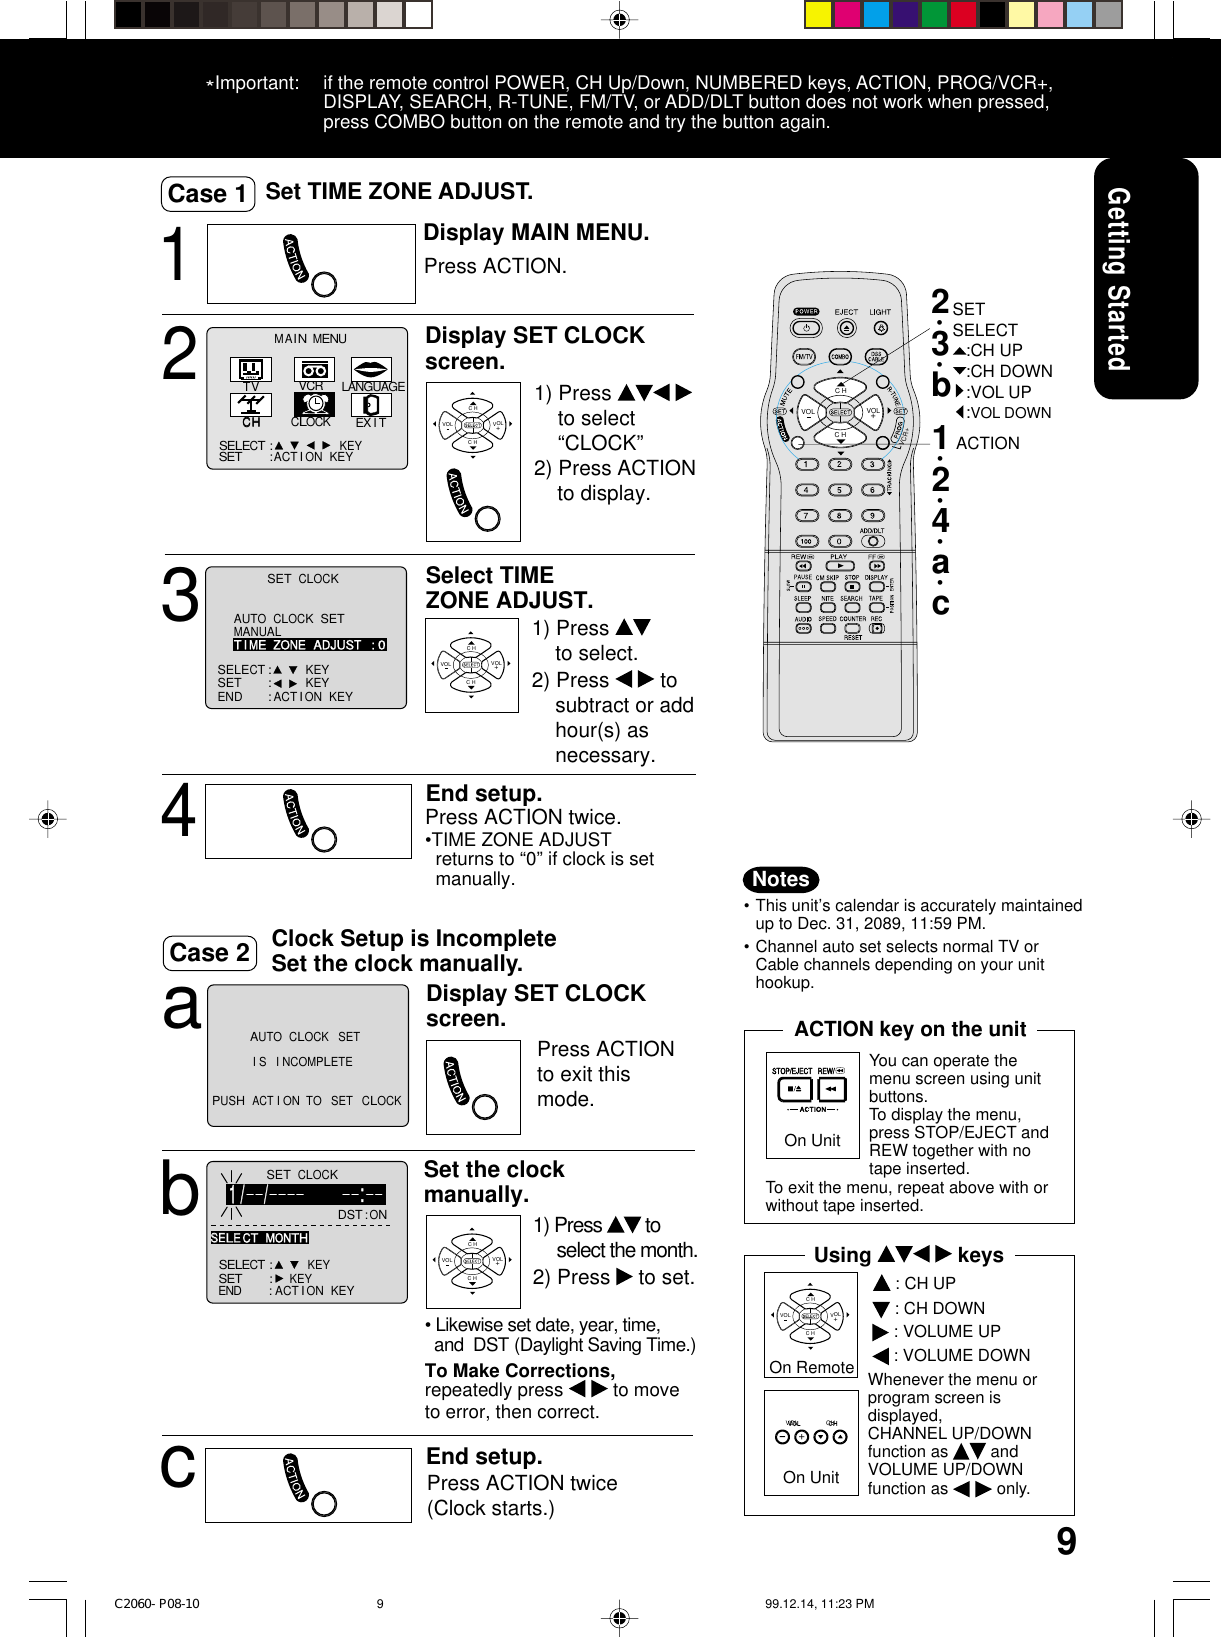
Amended User Manual Pgs 2 to 10

Important Safeguards and PrecautionsGROUND CLAMPELECTRICSERVICEEQUIPMENTANTENNALEAD INWIREANTENNADISCHARGE UNIT(NEC SECTION 810-20)GROUNDING CONDUCTORS(NEC SECTION 810-21)GROUND CLAMPSPOWER SERVICE GROUNDINGELECTRODE SYSTEM(NEC ART 250, PART H)NEC - NATIONAL ELECTRICAL CODE2INSTALLATION1 POWER SOURCE CAUTIONOperate only from power source indicated on unitor in this manual. If uncertain, have your ElectricUtility Service Company or Video Products Dealerverify your home power source.2 POWER CORD PLUGFor safety, this unit has a polarized type plug (onewide blade), or a three-wire grounding type plug.Always hold the plug firmly and make sure yourhands are dry when plugging in or unplugging theAC power cord. Regularly remove dust, dirt, etc.on the plug.POLARIZED PLUG CAUTION:The plug fits into outlet one way. If it cannot be fullyinserted, try reversing it. If it still will not fit, have anelectrician install the proper wall outlet. Do nottamper with the plug.GROUNDING PLUG CAUTION:The plug requires a three-hole grounding outlet.If necessary, have an electrician install the properoutlet. Do not tamper with the plug.3 POWER CORDTo avoid unit malfunction, and to protect againstelectrical shock, fire or personal injury:- Keep power cord away from heating appliancesand walking traffic. Do not rest heavy objects on,or roll such objects over the power cord.- Do not tamper with the cord in any way.- An extension cord should have the same typeplug (polarized or grounding) and must besecurely connected.- Overloaded wall outlets or extension cords is afire hazard.- Frayed cords, damaged plugs, and damaged orcracked wire insulation are hazardous and shouldbe replaced by a qualified electrician.4 DO NOT BLOCK VENTILATION HOLESVentilation openings in the cabinet release heatgenerated during operation. If blocked, heatbuild-up may result in a fire hazard or heatdamage to cassettes.For your protection:a. Never cover ventilation slots while unit is ON, oroperate unit while placed on a bed, sofa, rug, orother soft surface.b. Avoid built-in installation, such as a book caseor rack, unless properly ventilated.5 AVOID EXTREMELY HOT LOCATIONS ORSUDDEN TEMPERATURE CHANGESDo not place unit over or near a heater orregulator, in direct sunlight, etc. If unit is suddenlymoved from a cold place to a warm place,moisture may condense in unit and on the tapecausing damage.6 TO AVOID PERSONAL INJURY• Never place unit on support or stand that is notfirm, level, and adequately strong.The unit could fall causing seriousinjury to a child or adult anddamage to the unit.• Move any appliance and cartcombination with care.  Quick stops, excessive force, anduneven surfaces may cause objects to overturn.• Carefully follow all operating instructions.OUTDOOR ANTENNA INSTALLATION1 SAFE ANTENNA AND CABLE CONNECTIONAn outside antenna or cable system mustbe properly grounded to provide someprotection against built up staticcharges and voltage.Section 810 of theNational Electrical Code,ANSI/NFPA 70 (inCanada, part 1 of theCanadian Electrical Code)provides informationregarding proper grounding of the mast and supporting structure,grounding of the lead-in wire to an antenna discharge unit, size ofgrounding conductors, location of antenna discharge unit, connectionto grounding electrodes, and requirements for the grounding electrode.2 KEEP ANTENNA CLEAR OF HIGH VOLTAGE POWERLINES OR CIRCUITSLocate an outside antenna system well away from power lines andelectric light or power circuits so it will never touch these power sourcesshould it ever fall. When installing antenna, absolutely never touchpower lines, circuits or other power sources as this could be fatal.USING THE UNITBefore unit is brought out of storage or moved to a new location,refer again to the INSTALLATION section of these safeguards.1 KEEP UNIT WELL AWAY FROM WATER OR MOISTURE,such as vases, sinks, tubs, etc.2 IF EXPOSED TO RAIN, MOISTURE, OR STRONG IMPACT,unplug unit and have it inspected by a qualified servicetechnician before use.3 ELECTRICAL STORMSDuring a lightning storm, or before leaving unit unused forextended periods of time, disconnect all equipment from thepower source as well as the antenna and cable system.4 WHEN UNIT IS PLUGGED IN• DO NOT OPERATE IF:- liquid has spilled into unit.- unit was dropped or otherwise damaged.- unit emits smoke, malodors, or noises.Immediately unplug unit, and have it inspected by a servicetechnician to avoid potential fire and shock hazards.• Never drop or push any object through openings in unit.Touching internal parts may cause electric shock or fire hazard.• Keep magnetic objects, such as speakers, away from unit toavoid electrical interference.5 USING ACCESSORIESUse only accessories recommended by the manufacturer toavoid risk of fire, shock, or other hazards.6 CLEANING UNITUnplug unit. Use a clean, dry, chemically untreated cloth togently remove dust or debris. DO NOT USE cleaning fluids,aerosols, or forced air that could over-spray, or seep into unitand cause electrical shock. Any substance, such as wax,adhesive tape, etc. may mar the cabinet surface. Exposure togreasy, humid, or dusty areas may adversely affect internal parts.SERVICE1 DO NOT SERVICE PRODUCT YOURSELFIf, after carefully following detailed operating instructions, theunit does not operate properly, do not attempt to open orremove covers, or make any adjustments not described in themanual. Unplug unit and contact a qualified service technician.2 REPLACEMENT OF PARTSMake sure the service technician uses only parts specified bythe manufacturer, or have equal safety characteristics asoriginal parts. The use of unauthorized substitutes may resultin fire, electric shock, or other hazards.3 SAFETY CHECK AFTER SERVICINGAfter unit is serviced or repaired, request that a through safetycheck be done as described in the manufacturer’s serviceliterature to insure video unit is in safe operating condition.READ AND RETAIN ALL SAFETY ANDOPERATING INSTRUCTIONS. HEED ALLWARNINGS IN THE MANUAL AND ON UNITC2060- P02-7 99.12.14, 11:22 PM2
Safety Precautions/Mesures de sécuritéWarning: To prevent fire or shock hazard, do not expose this equipment to rain or moisture.Caution: To prevent electric shock, match wide blade of plug to wide slot, fully insert.Avertissement: Afin de prévenir tout risque d’incendie ou de chocs électriques, ne pas           exposer cet appareil à la pluie ou à une humidité excessive.Attention: Pour éviter les chocs électriques, introduire la lame la plus large de la fiche dans la borne correspondante de la prise et pousser jusqu’au fond.This video recorder, equipped with the HQ (High Quality) System, is compatible with existing VHSequipment.Only use those tapes with the        mark. It is recommended that only cassette tapes that havebeen tested and inspected for use in 2, 4, 6, and 8 hour VCR machines be used.This television receiver provides display of television closed captioning in accordance with §15.119of the FCC rules.FCC WARNING: Any unauthorized changes or modifications to this equipment   would void the user’s authority to operate.3CAUTION: TO REDUCE THE RISK OF ELECTRIC SHOCK, DO NOT REMOVE COVER (OR BACK) NO USER-SERVICEABLE PARTS INSIDE REFER SERVICING TO QUALIFIED SERVICE PERSONNELRISK OF ELECTRIC SHOCKDO NOT OPENCAUTIONThis symbol warns the user that uninsulatedvoltage within the unit may have sufficientmagnitude to cause electric shock.Therefore, it is dangerous to make any kindof contact with any inside part of this unit.This symbol alerts the user that importantliterature concerning the operation andmaintenance of this unit has been included.Therefore, it should be read carefullyin order to avoid any problems.sC2060- P02-7 99.12.14, 11:22 PM3
4For assistance, call 1-800-211-PANA(7262)Important Safeguards and Precautions...2Before Using ..................................6•Accessories .................... 6 • Record/Playback Time ... 6•Loading the Batteries...... 6 • Prevent AccidentalTape Erasure .................. 6Table of ContentsReset Language, Channels, Clock...46On-Screen Display (OSD) ...........47Unit Information...........................48Before Requesting Service ........49Other Information!To        Start!Use        Now!Enjoy       more!Timer Recording..................14 ~ 15(Main Operation, Cancel, Replace or Clear Program Contents)Tape Operation..................... 24 ~ 27•Commercial Skip........... 24 • Zero Search .................. 25•Program End Search .... 24 • Auto Operation Functions ...25•Tape Position ................ 24 • VHS Index Search System ..26, 27•Repeat Play .................. 25TV Timer Features................ 20 ~ 21• ON-TIMER with Alarm ............ 20• SLEEP TIMER ........................ 21•INSTANT ALARM ................... 21Closed Caption System ......22 ~ 23• Closed Caption Mode Feature .....22• Caption On Mute Feature.............23Timer Program usingVCR Plus+ System .............. 16 ~ 19• CABLE BOX SETUP .............. 17•VCR Plus+ Channel Setup ..... 18•VCR Plus+ System Programming ...19TV Operation................................ 10(Main Operation, NIGHT (NITE) Mode, Using the 100 Key,Rapid Tune, Audio Mute, Phones, SELF-DEMO Mode)MTS Broadcast /TV Stereo System........................ 11(Stereo/SAP/Mono broadcast, Select Audio Mode for TV Viewing)C2060- P02-7 99.12.14, 11:22 PM4
5Advanced OperationFor Your InformationBasic OperationGetting StartedGetting StartedService Center List .................................................. 50Spanish Quick Use Guide ............................... 51 ~ 53Location of Controls................................................ 54Warranty................................................... Back CoverV-Chip Control Feature ................................... 38 ~ 41Cable Box Universal Remote Control Feature .....42 ~ 43Connections............................................................... 7•Outdoor Antenna Connections ...... 7•DSS/Cable box Connections ......... 7One Time Setup ................................................... 8 ~ 9(Language, Channel, Clock)Playback a Tape....................................................... 12     (Main Operation, Forward or Reverse Search, Still Picture, Slow Motion, Frame by Frame     Advance, Features for a Quality Picture)Record On a Tape .................................................... 13(Main Operation, One Touch Recording(OTR), Selecting Input Mode)Getting Started Basic  OperationFor Your InformationAdvanced OperationFM Radio .......................................................... 34 ~ 35Copy Your Tapes (Dubbing) .................................... 33Special VCR Features...................................... 28 ~ 32Picture Adjustment ................................................. 37FM Transmitter (For Model PV-C2080 only).................. 36(FM Transmitter Carry Frequency Setup, FM Transmitter Setup, Speaker with FM Transmitter Setup)Audio Feature (For Model PV-C2080 only)...........44 ~ 45•Channel Caption .................... 28, 29•Time Stamp ........................... 30, 31 •Weak Signal Display ON/OFF......... 32•VCR Lock ..................................... 32•FM Radio Setup ........................... 34•FM ANTENNA Setup ................... 34 •Using FM Radio ........................... 35•To select Audio Mode for FM Radio ....35•Enter Secret Code ....................... 38•Setup US MOVIES Ratings ......... 39 •Setup US TV PROGRAMS Ratings ..40•Blocking Message........................ 41•The Universal Remote Control Setup ....42•Using the Universal Remote Controls ....42 •Remote Warning ON/OFF .................43•DSS/Cable Box Brand Code Numbers ....43C2060- P02-7 99.12.14, 11:22 PM5
6For assistance, call 1-800-211-PANA(7262)Before UsingCongratulationson your purchase of one of the most sophisticated andreliable products on the market today. Used properly, it willbring you and your family years of enjoyment. Please fill inthe information below. The serial number is on the taglocated on the back of your unit.Date of PurchaseDealer Purchased FromDealer AddressDealer Phone No.Model No.Serial No.Remote Control LSSQ0198Batteries2 “AA”Loading the BatteriesAccessoriesBattery replacement caution3) Close the cover.Prevent Accidental Tape ErasureBreak off the tab to protect.Record TabScrew driverCover the holewith cellophane tape.To record again.•Do not mix old and new batteries.•Do not mix alkaline with manganese batteries.C H+VOLVOLC HVCR+Record/Playback TimeSP(Standard Play) 2 Hours40 Minutes1 Hour 2 Hours5 Hours20 Minutes2 Hours 4 HoursLP(Long Play)3 Hours 6 Hours 8 HoursSLP(Super Long Play)Type of Video CassetteTape SpeedSetting T160T120T60Only use tapes with the   mark in this unit.2) Insert batteries as marked.1) Open the cover.To order accessories,call toll free 1-800-332-5368.C2060- P02-7 99.12.14, 11:22 PM6
7Advanced OperationFor Your InformationBasic OperationGetting StartedGetting StartedVHF/UHFConnectionsUnhook the antenna from yourprevious TV or VCR and connect it tothe back of the unit as shown in thediagram.If your antenna system has separateUHF and VHF lead-ins, you need aUHF/VHF Band Mixer (not supplied.)DSS/Cable box Connections■  Without a Cable BoxYou can;•record or view unscrambled channels.You cannot;•record or view scrambled channels.•view a channel other than the oneselected for any type of recording.■  With a Cable BoxYou can;•record or view any channel including scrambled channels.NOTE: Channel selection must be made at the cable box.You cannot;•view a channel other than the one selected for anytype of recording.•do a Timer recording of a channel unless you select itat the cable box.Note to CABLE System InstallerThis reminder is provided to call the CABLE (Cable TV) SystemInstallers attention to Article 820-40 of the NEC that providesguidelines for proper grounding and, in particular, specifies thatthe cable ground shall be connected to the grounding system ofthe building, as close to the point of cable entry as practical.■  With a DSS ReceiverYou can;•record or view any channel including scrambledchannels.NOTE: Channel selection must be made at the DSS               Receiver. You cannot;•view a channel other than the one selected forany type of recording.•do a Timer recording of a channel unless youselect it at the DSS box. NOTE:  The DSS receiver must be turned off to view    programs from a cable box or antenna. See the DSS    manual for details.AntennaorCABLEunitVHF/UHFAntennaorCABLE unitVHF/UHFOUTINCable BoxAntennaorCABLEunitVHF/UHFOUTINDSS ReceiverSatelliteIN(Flat) Twin Lead300 Ohm CableUHF/VHF BandMixer (not supplied)fromAntenna(Flat) Twin Lead300 Ohm Cable300-75 ohmTransformer(not supplied)or(Round) 75 Ohmcoaxial CableBack of unit<Model PV-C2060 unit is shown here>WARNING:When using “Nut type” RF coaxialcables, tighten with fingers only.Overtightening may damage terminals.Outdoor Antenna Connection.C2060- P02-7 99.12.14, 11:22 PM7
8For assistance, call 1-800-211-PANA(7262)One Time SetupWhen the unit is turned on the first time, setupmode is entered automatically.1Press POWER* onthe remote or unit.Start Channel Auto Setand Clock Auto Set.Press CH  .(Setup completed)Press CH   to exit.• If your area observes  daylight saving time,  but you would like to  turn the DST feature  off, complete the  “To Set or Reset the  Clock” step on page  46 and set DST : OFF.3Case 12Select the language.for Englishfor Spanish    (Español)for French    (Français)• If wrong language is set, complete “Reset all unit MemoryFunctions” steps page 48.• If you use a cable box, it must be left on.(Setup incomplete) IMPORTANT NOTE FOR AUTO CLOCK SET•  Auto clock set is performed the first time when the unit is turned off each day. If used, a cable box must be left on andtuned to the PBS channel at the time the unit power is turned off if you want auto clock set to be done.•  If using a DSS receiver, it must be turned off for auto clock set.•  If a Cable Box or DSS receiver is connected to the unit via Audio/Video Jacks, an RF coaxial cable must also be   connected for auto clock set and channel auto set features.•  If for any reason the time is changed manually, automatic time correction will not occur.Case 2See Case 2next page.SELECT  LANGUAGEPUSH           CH       : E n g l  i  s hOPR I M I R  CH      : E s p a  o lAPP.          VOL   +   : F r a n  a i s CHANNEL / CLOCK  AUTO  SETCONNECT  ANTENNA  CABLELOCAL  PBS  CH       THEN. . .AND   I F  YOU   USE  A  CABLEBOX, TUNE    I T   TO  YOUR PLE ASE  PUSH  CH UP  KEYC HC HC HProcess of Setup   Language            channel          ClockC HCH   AUTO  SET   PROCEED I NGAUTO   CLOCK   SET     PROCEED I NG 6 /  7 / 2000   WED 12 : 00PMDST : ONAUTO  CLOCK   SETCOMPLETEDSETT I NG : CH 1 0END : PUSH  CH  UP  KEYPUSH  ACT I ON  TO   SET   CLOCKAUTO  CLOCK   SET I S   I NCOMPLETEVOLC H+VOLC HVCR+POWERCHANNEL UPVOLUME UPCHANNEL DOWN122 •32+VOL  •If your area observes daylight savingtime and DST is set to ON, but thetime is incorrect; complete the TimeZone Adjust steps on the next page.C2060- P08-10 99.12.14, 11:23 PM8
9Advanced OperationDisplay MAIN MENU.Press ACTION.Display SET CLOCKscreen.1) Press   to select“CLOCK”2) Press ACTION    to display.2End setup.Press ACTION twice.•TIME ZONE ADJUST  returns to “0” if clock is set  manually.14Case 1 Set TIME ZONE ADJUST.Select TIMEZONE ADJUST.1) Press to select.2) Press     tosubtract or addhour(s) asnecessary.3•This unit’s calendar is accurately maintainedup to Dec. 31, 2089, 11:59 PM.•Channel auto set selects normal TV orCable channels depending on your unithookup.NotesGetting Started*Important: if the remote control POWER, CH Up/Down, NUMBERED keys, ACTION, PROG/VCR+,DISPLAY, SEARCH, R-TUNE, FM/TV, or ADD/DLT button does not work when pressed,press COMBO button on the remote and try the button again.AUTO  CLOCK  SETMANUALT I ME  ZONE  ADJUST   : 0SELECT :         KEYSET       :         KEYEND       : ACT I ON  KEY                SET  CLOCK  C H+VOLVOLC HC H+VOLVOLC HC H+VOLC HVOL2 •3 •b1 •2 •4 •a •cACTIONSET               SELECT                :CH UP        :CH DOWN        :VOL UP        :VOL DOWNVCR+M A I N  MENUVCRCLOCKC HSET          : ACT I ON  KEYSELECT  :                           KEY   T VEX I TC HLANGUAGEDisplay SET CLOCKscreen.aPress ACTIONto exit thismode.Set the clockmanually.1) Press   toselect the month.2) Press   to set.bCase 2 Clock Setup is IncompleteSet the clock manually.End setup.Press ACTION twice(Clock starts.)c• Likewise set date, year, time,  and  DST (Daylight Saving Time.)To Make Corrections,repeatedly press    to moveto error, then correct.PUSH  ACT I ON  TO   SET   CLOCKAUTO  CLOCK   SET I S   I NCOMPLETESET          :       KEY SELECT  :              KEY   END          :  ACT I ON  KEYSET  CLOCKDST : ONSESELE CT  MONTH1 /     /1 /     /:ACTION key on the unitYou can operate themenu screen using unitbuttons.To display the menu,press STOP/EJECT andREW together with notape inserted.To exit the menu, repeat above with orwithout tape inserted.On UnitSTOP/EJECT REW/ACTIONUsing    keys  : CH UP  : CH DOWN  : VOLUME UP  : VOLUME DOWNWhenever the menu orprogram screen isdisplayed,CHANNEL UP/DOWNfunction as   andVOLUME UP/DOWNfunction as    only.On RemoteOn UnitC H+VOLVOLC HVOLVOLCHCHC H+VOLVOLC HC2060- P08-10 99.12.14, 11:23 PM9
10 For assistance, call 1-800-211-PANA(7262)VIDEO INVIDEO INAUDIO INAUDIO INPOWERPOWERVOLVOLCHCHSTOP/EJECTSTOP/EJECTREW/REW/PLAY/REPEATPLAY/REPEATFF/FF/RECRECTIMER/FMTIMER/FMACTIONACTIONRECRECON TIMERON TIMERPROG TIMERPROG TIMERCheck list before you begin.All connections are made. (See page 7.)Your unit is plugged in.PHONESJack31Press POWER* onthe remote or unit.Select a channel.Using CH   orNUMBEREDkeys.Adjust volume.Press VOL + -.23■Using the 100 keyWhen selecting CABLE channels 100 to 125 with theNUMBERED keys, first press the 100 key, and then enter theremaining two digits.■Rapid TunePress R-TUNE to display the last channel you were watching.■Audio MutePress MUTE to instantly mute the sound.Press again, to restore the previous sound level.■PhonesConnect an earphone (not supplied) or headphones (notsupplied) to the Phones Jack.■SELF-DEMO ModeWith Power ON, hold down PLAY/REPEAT on the unit for 5seconds to display demo screen.Repeat this to exit.orTV OperationNIGHT (NITE) ModeColor and picture intensity levels are adjusted so the screen iseasier on your eyes during night time use.Set NIGHT mode.Press NITE.• NIGHT mode may beselected when watchingTV, playing a tape, orwhile in FM mode.To Cancel, press NITE.•Previous settings are restored.•NIGHT mode is canceled whenpower is turned off or powerfailure occurs.2Model PV-C2060 unit is shown here.C HC H+VOLVOLNITE1PLAY/REPEAT24if the remote control POWER, CH Up/Down, NUMBERED keys,ACTION, PROG/VCR+, DISPLAY, SEARCH, R-TUNE, FM/TV,or ADD/DLT button does not work when pressed, press COMBObutton on the remote and try the button again.*Important:CH  0 8     ABCN I GHTC2060- P08-10 99.12.14, 11:23 PM10

Navigation menu