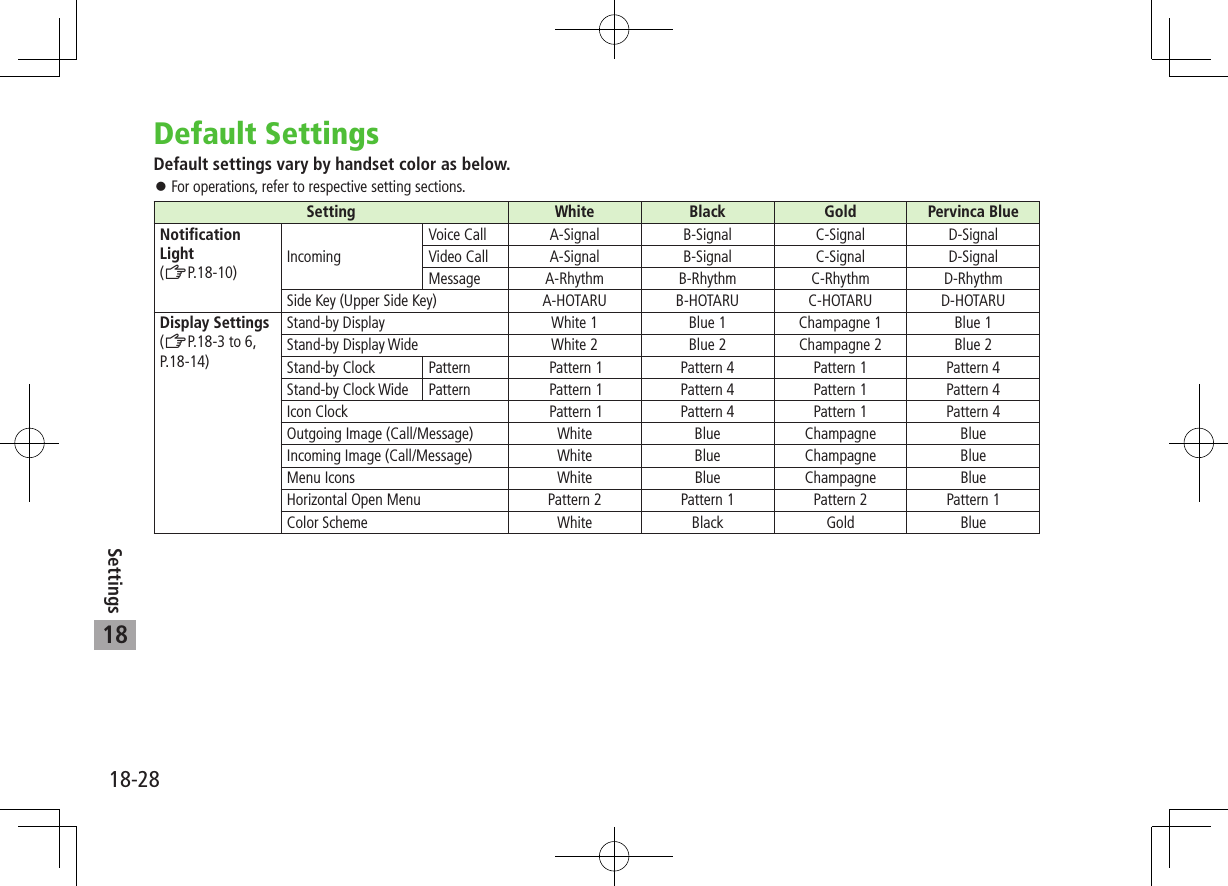
Panasonic Mobile Communications 210030A GSM Cellular Mobile with Bluetooth®, WLAN and RFID User Manual Part 3 of 6
Panasonic Mobile Communications Development of Europe Ltd GSM Cellular Mobile with Bluetooth®, WLAN and RFID Part 3 of 6
Contents
User Manual Part 3 of 6
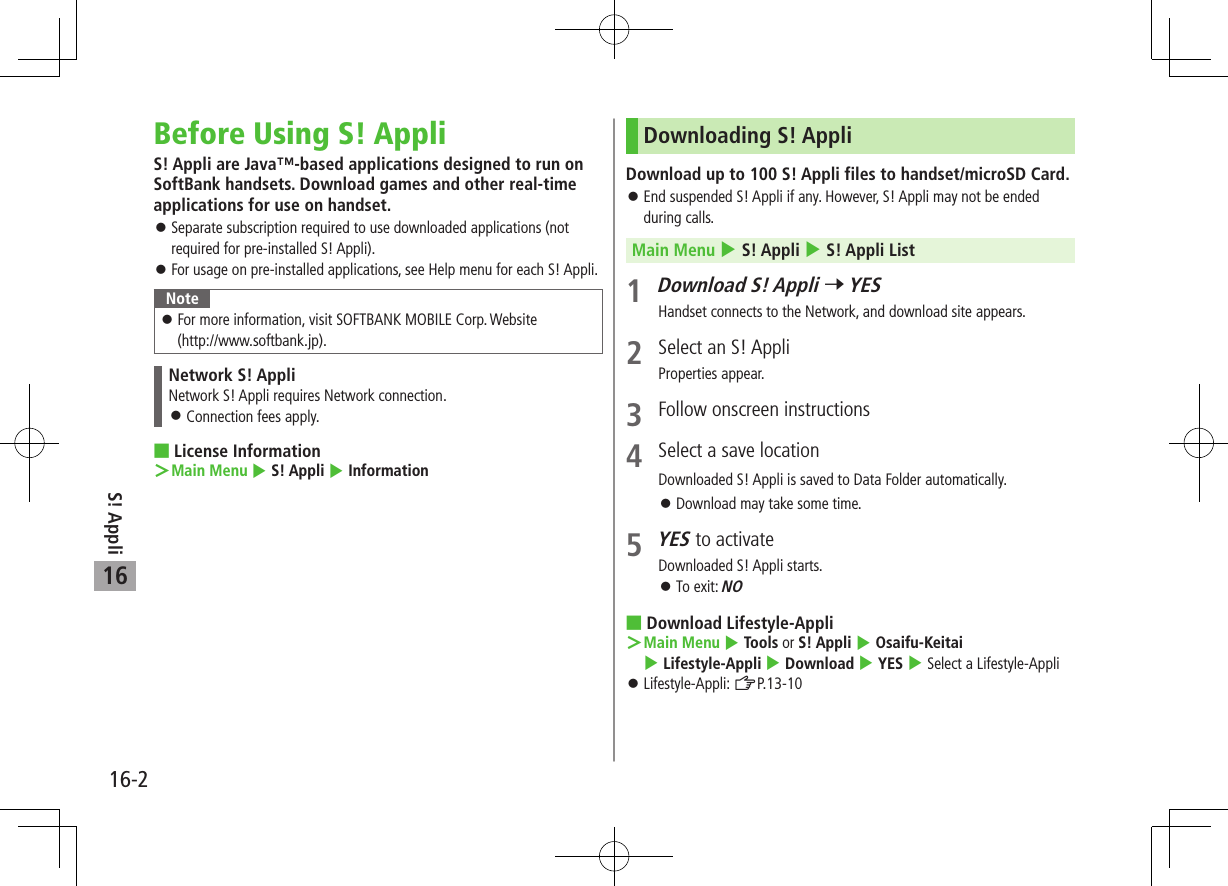
![S! Appli16-316Using S! AppliActivating S! AppliMain Menu 4 S! Appli 4 S! Appli List1 Select an S! AppliApplication starts and appears. See application Help menu for usage information. Confirmation appears when selecting Network S! Appli. For a microSD Card S! Appli, press [microSD] before Step 1.Note Activate an S! Appli; Main Menu 4 Data Folder 4 S! Appli 4 Select an S! Appli Incoming transmissions pause S! Appli. AV output compatible applications may be viewed on a TV set (ZP.11-18).TipSettings Volume Backlight On/Off Deactivate Vibration Update S! Appli Information on microSD Card from Another Handset (ZP.18-26)Terminate/Suspend & ResumeTerminating/Pausing S! Appli1 While running an S! Appli, L2 Suspended or Stopped appears for a suspended application.Resuming/Terminating Paused S! AppliMain Menu 4 S! Appli 4 S! Appli List1 Replayed or StoppedResumed application starts from paused point.Using S! Appli Startup HistoryMain Menu 4 S! Appli 4 S! Appli History1 Highlight a record 7 S[Menu] 7 Start, S! Appli info or Delete](https://usermanual.wiki/Panasonic-Mobile-Communications/210030A.User-Manual-Part-3-of-6/User-Guide-1296397-Page-3.png)
![S! Appli16-416Managing ApplicationsMoving S! Appli between Handset and microSD Card Main Menu 4 S! Appli 4 S! Appli List1 Highlight an S! Appli 7 S[Menu] 7 Move to microSD or Move to phone Some S! Appli may not be moved to microSD Card.Deleting S! AppliMain Menu 4 S! Appli 4 S! Appli List1 Highlight an S! Appli 7 S[Menu] 7 Delete 7 YES Some pre-installed S! Appli may not be deleted.Viewing S! Appli PropertiesMain Menu 4 S! Appli 4 S! Appli List1 Highlight an S! Appli 7 S[Menu] 7 S! Appli infoSetting Security Level while Running S! Appli Security Level cannot be set for some applications.Main Menu 4 S! Appli 4 S! Appli List1 Highlight an S! Appli 7 S[Menu] 7 Security level2 Select an item (See below)Item Operation/DescriptionNetwork Access Connect to the NetworkAuto Invocation Activate S! AppliMultimedia Recording Activate CameraData Reading Access Read data in Data FolderData Rewrtng Accss Write/delete data in Data FolderLocation Access Retrieve Location information3 Always Allowed, Ask First Time*, Ask Every Time or Not Allowed * Confirmation appears the first time application is activated. Reset Security Level SettingsReset security level settings to default or condition when downloading. >In Step 2, Reset Sec. Setting 7 YES](https://usermanual.wiki/Panasonic-Mobile-Communications/210030A.User-Manual-Part-3-of-6/User-Guide-1296397-Page-4.png)
![17-2S! GPS Navi17About S! GPS NaviS! GPS Navi provides location information by communicating with base stations and by GPS satellite. Check your position on map, area information or route to your destination using a Navi Appli.Note Location information may be inaccurate due to location or signal conditions. SoftBank is not liable for any resulting damages. Position cannot be determined while Positioning Lock is active (ZP.18-27). For more information, visit SOFTBANK MOBILE Corp. Website (http://www.softbank.jp).Using S! GPS NaviChecking Your Current PositionActivate Navi Appli to check your position.Main Menu 4 Tools 4 S! GPS Navi1 Current Location 7 YESPositioning starts. To check your current position during positioning: When [Use] appears at lower right, S 7 OK2 When positioning is complete, [Map] 7 YESHandset connects to the Network and web page opens. To reposition: A[Retry] Save to Phone BookSave obtained location information to Phone Book. >Positioning is complete 7 S[Menu] 7 Add to Phone Book 7 YES 7 Follow the steps for saving to Phone Book (ZFrom Step 2 on P.4-5)Indicating Positioning Accuracy LevelAccuracy Level ... Fairly accurateAccuracy Level ... Relatively accurateAccuracy Level ... No accurate location information retrievedRetrieve location information again.](https://usermanual.wiki/Panasonic-Mobile-Communications/210030A.User-Manual-Part-3-of-6/User-Guide-1296397-Page-6.png)
![17-3S! GPS Navi17Activating Navi AppliSearch for current area information or route to your destination. End all applications including suspended applications.Main Menu 4 Tools 4 S! GPS Navi 4 Navi AppliUsing Location Navi (Japanese)Use Location Navi to locate a person via a SoftBank 3G handset or PC. For more information, visit SOFTBANK MOBILE Corp. Website (http://www.softbank.jp).Main Menu 4 Tools 4 S! GPS Navi 4 Location NaviNote Event Indicator appears when location information is automatically provided or location information request is rejected. Select indicator to show location log.Using Location LogUp to 50 latest location info are saved. Delete as required.Main Menu 4 Tools 4 S! GPS Navi 4 Location Logs 1 Show DetailsSelect a record to view details appears if positioning fails. Delete a RecordHighlight a record 7 S[Menu] 7 Delete 7 Delete this 7 YES Delete AllS[Menu] 7 Delete 7 Delete all 7 Enter Phone Password 7 YESNote When 50 records are saved, oldest is deleted first. When positioning is requested while viewing a record, a message appears and log window returns.TipSettings S! GPS Navi Settings (ZP.18-27)](https://usermanual.wiki/Panasonic-Mobile-Communications/210030A.User-Manual-Part-3-of-6/User-Guide-1296397-Page-7.png)
![18-5Settings18Clock Standby Clock (Horizontal Open Position) (ZP.18-14) External Display Clock (ZP.18-6)From Main Menu 4 Settings 4 Display Settings 4 Internal Display 4 ClockSetting/Operation Default ■Change Standby Clock Pattern1 >Stand-by Clock 7 S[Pattern] 7 Select a pattern 7 [Set](ZP.18-28) ■Change Standby Clock Position1 2 >Stand-by Clock 7 A[Position] 7 Select a position 7 [Set]Pattern 1 ■Change Standby Clock Size1 >Stand-by Clock 7 [Size] 7 Small 7 [Set] Large ■Change Standby Clock at Upper Right (lower right in Landscape View) >Icon Clock 7 Select a pattern(ZP.18-28)1 Highlight Stand-by Clock 7 A[Play] to view Standby Clock.2 Clock appears in Pattern 1 when: Calendar, World Clock or Operator Name is set to appear in Standby. Time zone is set to other than GMT+9. Privacy Key Lock is active.Back LightFrom Main Menu 4 Settings 4 Display SettingsSetting/Operation Default ■Turn Back Light On/Off; Set Power Saver Mode1 >Back Light Time 7 Lighting 7 ON or OFF 7 Enter time to Power Saver modeON + 45secs. ■Illuminate Back Light while Charging >Back Light Time 7 Charging 7 Constant LightStandard2 ■Limit Back Light to Display Only >Back Light Time 7 Area 7 LCDLCD + Keys ■Adjust Brightness >Back Light Time 7 Brightness 7 Select a brightness levelAuto3 ■Set Soft Light Off >Back Light Time 7 Soft Light 7 OFFON ■Disable Auto Image Compensation >LCD AI 7 OFFON1 During operation (except when in Standby or S! Appli is active), press and hold to toggle ON/OFF.2 When set to Standard, Back Light illuminates with the same setting as Lighting setting.3 When set to Auto, Back Light is automatically adjusted according to ambient light.](https://usermanual.wiki/Panasonic-Mobile-Communications/210030A.User-Manual-Part-3-of-6/User-Guide-1296397-Page-13.png)
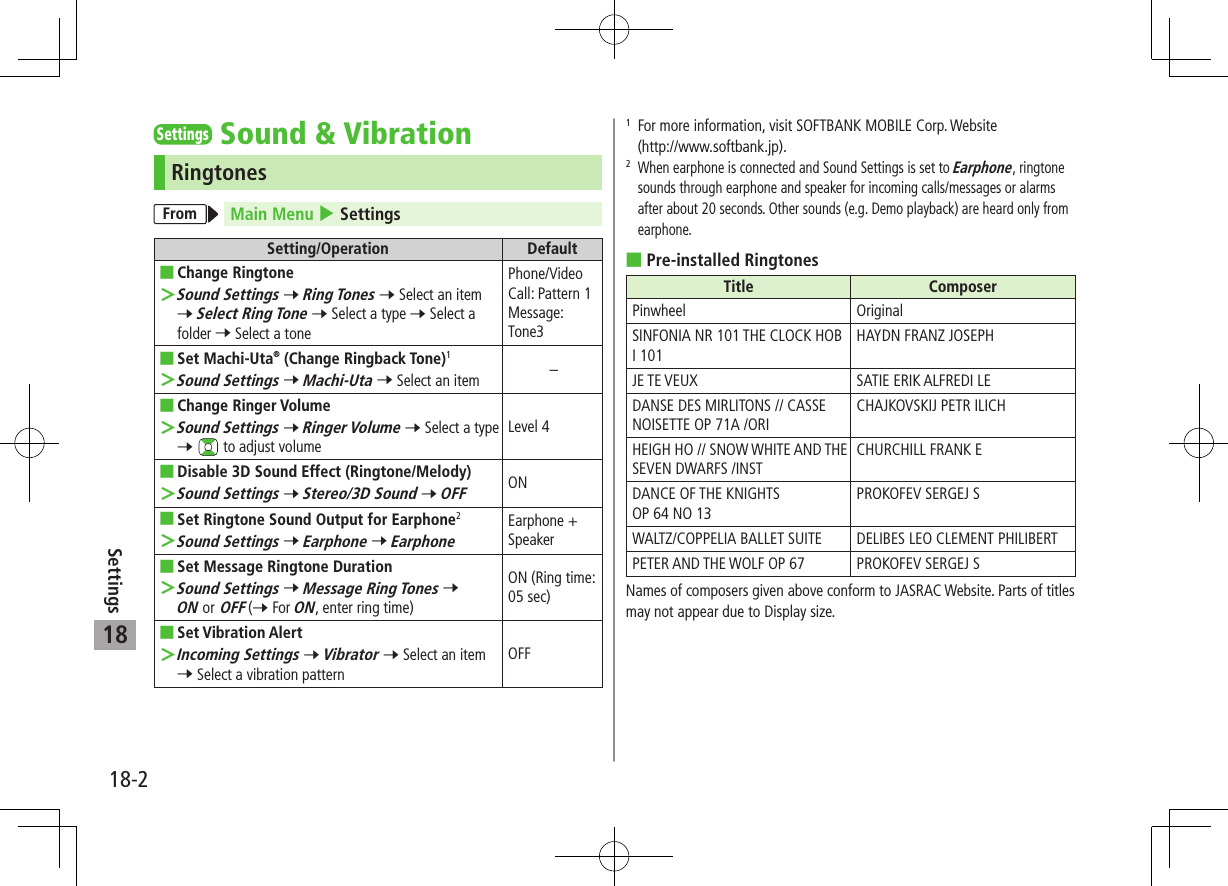
![18-7Settings18SettingsTouchpadFrom Main Menu 4 Settings 4 Phone Settings 4 Touchpad SettingSetting/Operation Default ■Change Touchpad Speed >Touchpad Speed 7 High Speed or Low Speed Medium Speed ■Adjust Tap Sensitivity >Tapping Sensitivity 7 StandardHigh ■Scroll Setting >Auto Scroll 7 Normal or Y! Keitai/PC Site Brw. 7 ON or OFF1Normal: ONY! Keitai/PC Site Browser:ON (High Speed) ■Set Touchpad to Activate for Web Browser/Mobile Widget >Touchpad Auto ON 7 Select an item 7 Activate or DeactivateY! Keitai Brw. Start:DeactivatePC Site Browser Start/Mobile Widget:Activate ■Adjust Touchpad Sensitivity2 >Auto Sensitivity 7 Execute or Return to Default– ■Deactivate Keypad while Touchpad is On >Touchpad Switch Key 7 Touchpad OnlyTouchpad +Keys1 For Y! Keitai/PC Site Brw.:ON (High Speed), ON (Low Speed) or OFF2 Do not touch keypad until setting is complete.SettingsManner ModeFrom Main Menu 4 Settings 4 Incoming Settings 4 Manner Mode TypeSetting/Operation Default ■Set Manner Mode Type >Manner Mode, Super Silent or User Mode (7 For User Mode, set individual items 7 A[Finish])Manner Mode ■Default Settings by ModeManner Mode Super Silent Driving Mode User ModeAnswer PhoneValue set for Answer PhoneValue set for Answer Phone ON OFFVibratorON ON OFF ONVolume (In. Calls/Msg Ring T./Alarm)Silent Silent Silent SilentRec. Check ToneON OFF ON ONKey ToneOFF OFF OFF OFFMic Sensitiv.Up Up Up UpLVA Tone (Low battery alarm)OFF OFF OFF OFF](https://usermanual.wiki/Panasonic-Mobile-Communications/210030A.User-Manual-Part-3-of-6/User-Guide-1296397-Page-15.png)
![18-8Settings18SettingsIncoming SettingsFrom Main Menu 4 Settings 4 Incoming SettingsSetting/Operation Default ■Change Answer Setting (ZRight) >Answer Setting 7 Quick Silent or OFF Any Key Answer ■Answer Calls by Opening Handset >Open-to-Ans. Call 7 Phone or Video Call 7 AnswerKeep Ringing ■Hide Caller Image Saved in Phone Book >Phone Book Image 7 OFFON ■Set Tone for Missed Call/New Message Notification Set to (ZRight) >Info Notice Setting 7 ON or OFFON ■Activate Auto Answer with Earphone >Auto Answer 7 ON 7 Enter ring time OFF ■Set Call Waiting Response >In-call Management 7 Call Forwarding or Call RejectionAnswer Answer Setting Key OperationsAny Key AnswerTo answer a call, press any of the following keys:Voice Call: , J, - , G, H, , A, , , , , Video Call: , J, Quick SilentTo cancel ringtone/vibration, press any of the following keys:Voice Call: - , G, H, , A, , , , , Video Call: - , G, H, , A, , , , OFF To answer a call, press any of the following keys:Voice Call: , JVideo Call: , J, When [Voice Mail] is assigned to A indicated at the bottom of Display, press A to start voice or video recording. Info Notice Setting ResponseON No Missed Calls/No Received Messages: Triple-beep soundsMissed Calls/Received Messages: Double-beep sounds twiceボイス (Voice)*No Missed Calls/No Received Messages: Triple-beep soundsMissed Calls: Double-beep sounds; voice message announces that you have a missed callReceived Messages: Double-beep sounds; voice message announces that you have a new message When Vibrator is set for Incoming Settings, vibration activates with beeps. In Manner Mode, only vibration activates. Set Side-keys Guard to OFF beforehand (ZP.12-9).* Japanese only](https://usermanual.wiki/Panasonic-Mobile-Communications/210030A.User-Manual-Part-3-of-6/User-Guide-1296397-Page-16.png)
![18-11Settings18SettingsText EntryText Entry MethodFrom Main Menu 4 Settings 4 Phone Settings 4 Text Entry MethodSetting/Operation Default ■Set Input Mode >Input Mode 7 Check input mode(s) to use 7 A[Finish] 7 Select a input mode to prioritizeInput mode: All Prioritized mode: Mode 1 (5-touch) ■Hide Predictive Candidates/Context Forecast List >Predict 7 OFFON (Show) ■Disable Learning for Secret Mode/Secret Data Only >Learn in Secret Mode 7 Enter Phone Password 7 OFFON ■Reset Learned Words >Reset Learned Words 7 Enter Phone Password 7 YES–ConversionFrom Text entry window, cS[Menu] 4 Text entry settingSetting/Operation Default ■View Learned Words >Learned words 7 Select a row 7 Select a log To delete learned words: Highlight a log 7 S[Menu] 7 Delete this or Delete all (7 For Delete all, enter Phone Password) 7 YES– ■Hide Predictive Candidates and Context Forecast Lists >Predict 7 OFFON (Show) ■Hide Context Forecast List >Candidate display 7 OFFON (Show) ■Fix Entered Characters Automatically >Character set time 7 Select a speed OFF ■Hide Word Suggestion Guidance for 2/NIKO-touch Input Method >2/NIKO-touch guide 7 OFFON (Show)](https://usermanual.wiki/Panasonic-Mobile-Communications/210030A.User-Manual-Part-3-of-6/User-Guide-1296397-Page-19.png)

![18-13Settings18SettingsVideo CallFunction MenusFrom Main Menu 4 Settings 4 Video CallSetting/Operation Default ■Change Incoming Image Quality >Incoming Video Qlty 7 Quality Prioritized or Motion PrioritizedStandard ■Change Outgoing Image >Select Images 7 Select a category 7 Highlight Original 7 S[Menu] 7 Change setting 7 Select a folder 7 Select a file 7 A[Play] to view imagePre-installed ■Switch Earpiece On >Loud Speaker 7 OFFON (Loud Speaker ON) ■Switch to Voice Call when Video Call Fails >Voice Call Auto Redial 7 ONOFF ■Toggle Outgoing/Incoming Image Setting >Switch Images 7 Select an itemReceiving PriorityEngaged Video Call SettingsFrom During a Video Call, cS[Menu] 4 V. Call settingsSetting/Operation Default ■Change Incoming Image Quality >IncomingVideo Qlty 7 Qlty Prioritized or Motion PrioritizedStandard ■Change Brightness >Brightness 7 Select a brightness level 0 ■Adjust Outgoing Image Color Tone to Lighting Conditions >White balance 7 Select an environmentAutomatic ■Change Outgoing Image Color Tone >Color mode set 7 Select a color tone Normal ■Enhance Image Quality in Low Light Conditions >Night mode 7 ONOFF ■Set Focus >Focus 7 Select a focus type Landscape](https://usermanual.wiki/Panasonic-Mobile-Communications/210030A.User-Manual-Part-3-of-6/User-Guide-1296397-Page-21.png)
![18-14Settings18SettingsHorizontal Open PositionHorizontal Open Menu/WallpaperFrom Main Menu 4 SettingsSetting/Operation Default ■Set a Default Operation when Handset is Opened to Horizontal Open Position >Phone Settings 7 Horizontal View 7 Horizontal Open Menu, TV or CameraOFF ■Change Menu Theme in Horizontal Open Position >Display Settings 7 Hor. Open Menu 7 Select a pattern(ZP.18-28) ■Change Wallpaper >Display Settings 7 Internal Display 7 Stand-by Display Wide 7 Select a folder 7 Select an image(ZP.18-28) ■Show Calendar in Standby >Display Settings 7 Internal Display 7 Stand-by Display Wide 7 Calendar 7 BG Image ON or BG Image OFF (7 For BG Image ON, select a folder 7 Select an image)– ■Change Wallpaper Randomly >Display Settings 7 Internal Display 7 Stand-by Display Wide 7 Random Display 7 Select a folder 7 Every Hour or Every Day–Standby ClockFromMain Menu 4 Settings 4 Display Settings 4 Internal Display 4 Clock 4 Stand-by Clock WideSetting/Operation Default ■Change Standby Clock Display1 >S[Pattern] 7 Select a pattern 7 [Set] (ZP.18-28) ■Change Standby Clock Position1 2 >A[Position] 7 Select a pattern 7 [Set] Pattern 3 ■Change Standby Clock Size1 >[Size] 7 Small 7 [Set] Large1 Highlight Stand-by Clock Wide 7 A[Play] to view clock.2 Even if clock position is changed, clock appears in Pattern 1 when:Calendar, World Clock or Operator Name is set to appear in StandbyTime zone is set to other than GMT+9Privacy Key Lock is active](https://usermanual.wiki/Panasonic-Mobile-Communications/210030A.User-Manual-Part-3-of-6/User-Guide-1296397-Page-22.png)
![18-16Settings18 ■Delete Information in Broadcasting Storage Area >Reset Storage Area 7 (Highlight an affiliated channel 7) S[Menu] 7 Delete 7 Delete this or Delete all (7 For Delete all, enter Phone Password) 7 YES– ■Reset TV Settings >Reset TV Settings 7 Enter Phone Password 7 YES– ■Check TV Settings >Check TV Settings–1 Remaster/Listening/Equalizer Settings: ZP.5-72 To cancel ECO Mode, perform same operation. When ECO Mode is set, following settings automatically activate and cannot be changed. When canceled, original settings return. Mobile W-Speed: OFFImage Quality: NormalRemaster: OFFListening: OFFEqualizer: NormalSettingsCamera Change settings before capturing images. (ZP.6-5). Some settings are not available depending on camera mode, image size or photo mode.Camera Settings (Camera Mode/Action Mode)Camera ModeFrom Main Menu 4 Camera 4 Camera 4 cS[Menu]Action ModeFrom Main Menu 4 Camera 4 Camera 4 [Video] 4 [Cont.] 4 cS[Menu]Setting/Operation Default ■Change Camera Mode >CHG camera-mode 7 Select a mode – ■Change Photo Mode >Photo mode (ZP.6-9)Camera mode: Intelligent AutoAction mode: Normal ■Change Image Size >Image size 7 Select a sizeCamera mode: Standby (480x854)Action mode: VGA(480x640)](https://usermanual.wiki/Panasonic-Mobile-Communications/210030A.User-Manual-Part-3-of-6/User-Guide-1296397-Page-24.png)
![18-18Settings18Video Camera Settings (Video Camera Mode)From Main Menu 4 Camera 4 Video Camera 4 cS[Menu]Setting/Operation Default ■Change Camera Mode >CHG camera-mode 7 Select a mode – ■Change Photo Mode >Photo mode (ZP.6-9) Normal ■Change Image Size >Image size 7 Select a sizeQVGA(320x240) ■Change Recording Time >File size setting 7 Mail restrict’n(S) or Long timeMail restrict’n (L) ■Change Brightness >Camera settings 7 Brightness 7 Select a level ±0 ■Adjust Color Balance According to Lighting Conditions >Camera settings 7 White balance 7 Select an itemAuto ■Change Color Mode >Camera settings 7 Color mode set 7 Select an itemNormal ■Change Focus Setting >Camera settings 7 Focus 7 Select an item Face Detection ■Change Image Quality >Camera settings 7 Image quality 7 Select an item Fine ■Deactivate Image Stabilizer >Camera settings 7 Img. stabilizer 7 OFFAuto ■Change Shutter Click Sound >Camera settings 7 Shutter sound 7 Select an itemSound 1 ■Minimize Flicker while Shooting near Fluorescent Light >Camera settings 7 Flicker correction 7 Mode 1 (50Hz) or Mode 2 (60Hz)Automatically ■Change Save Location >Storage setting 7 Store in 7 microSDPhone ■Set Auto-Save Off >Storage setting 7 Auto save set 7 OFFON (Automatically save) ■Set Photo Light (Auto-flash) >Photo light set. 7 ONOFF ■Set Auto Timer >Auto timer (ZP.6-7) OFF ■Forbid Recording Audio >Movie type set 7 VideoNormal ■Change Viewfinder Size >Display size 7 Fit in displayActual size ■Change to Mail Attachment Mode >Attach msg. mode 7 YES– ■Hide Display Indicators >Icon 7 OFFON (Show) ■View Memory Information >Memory Status–](https://usermanual.wiki/Panasonic-Mobile-Communications/210030A.User-Manual-Part-3-of-6/User-Guide-1296397-Page-26.png)
![18-21Settings18 ■View Bluetooth® Properties >Device Properties2–1 In Private Mode, device that makes/answers call takes priority.2 Device name, address, class and supported services appear.To change device name: A[Edit]SettingsMessagingUniversal SettingsFrom Main Menu 4 Messaging 4 Settings 4 Universal SettingsSetting/Operation Default ■Change Font Size1 >Font Size 7 Small or LargeNormal ■Set Scroll Unit in Text Entry/Preview Window >Scroll Unit 7 Half Screen or Whole ScreenSingle Line ■Quote Original Message in Reply >Quote Message 7 Check items 7 A[Finish]SMS: OFFS! Mail/PC Mail: ON ■Set Attachment Size2 >Image Compression 7 Select a size or OFF500KB ■Request Delivery Confirmation (Available when messaging to SoftBank handset numbers) >Delivery Report 7 ONOFF ■Change Anti-Spam Measures >Anti-Spam Measures 7 Report Spam 7 [Edit] 7 Edit recipient address 7 A[Finish] 7 YESstop@meiwaku.softbankmobile.co.jp](https://usermanual.wiki/Panasonic-Mobile-Communications/210030A.User-Manual-Part-3-of-6/User-Guide-1296397-Page-29.png)
![18-22Settings18 ■Reset Anti-Spam Measures >Anti-Spam Measures 7 Report Spam 7 S[Menu] 7 Reset Address 7 A[Finish] 7 YES– ■Set Auto Delete Off (For Sent/Unsent) >Auto Sent Msg Del 7 OFFON ■Set Auto Delete Off (For Incoming Mail) >Auto Received Msg Del 7 ON (Read Msg Only) or OFFON (All Msg) ■Hide Incoming Mail Notification while Other Function is Active >Receiving Display 7 Operation PreferredAlarm Preferred (Show) ■Hide Outgoing Mail Display >Sending Display 7 OFFON (Show)1 Character size in SMS or S! Mail subject field does not change. Check preview to see actual size.2 JPEG files onlyS! Mail SettingsFrom Main Menu 4 Messaging 4 Settings4 S! Mail SettingsSetting/Operation Default ■Set Reply-to Address >Sending Options 7 Set Reply-To 7 ON 7 Select reply-to address entry field 7 Select a reply-to address or enter directly 7 A[Finish]OFF (Not set) ■Set Signature >Sending Options 7 Set Signature 7 ON or ON When New 7 Select signature entry field 7 Enter signature 7 A[Finish]OFF (Not set) ■Change Maximum Outgoing Message Size >Sending Options 7 Create Msg. Size 7 300KB2MB ■Limit Maximum Incoming Message Size >Incoming Options 7 Download Size Limit 7 300KB2MB ■Deactivate/Limit Auto Retrieval >Incoming Options 7 Auto Retrieve Size 7 Auto Retrieve OFF or Up to 300KBUp to 1MB ■Limit Auto-retrieval by Message Type >Incoming Options 7 Auto Retrieve for 7 Selected Messages 7 Check Address Stored in PB or SoftBank Domain Only1 7 A[Finish]All Messages ■Play Attached Music Files Automatically2 >Incoming Options 7 Auto Sound Play 7 ONOFF (Not play back)1 Including messages received from Disney Mobile2 When multiple sound files are attached, the first file plays.](https://usermanual.wiki/Panasonic-Mobile-Communications/210030A.User-Manual-Part-3-of-6/User-Guide-1296397-Page-30.png)
![18-23Settings18PC Mail SettingsFrom Main Menu 4 Messaging 4 Settings4 PC Mail SettingsSetting/Operation Default ■Disable Auto-retrieval for New Messages >Check New Mail 7 Auto Check 7 Select an account (Each selection toggles ON/OFF) 7 A[Finish]ON* ■Set Auto-retrieval Interval for New Messages >Check New Mail 7 Check Interval 7 Select an interval or When Power ON2 hours ■Automatically Retrieve New Messages while Abroad >Check New Mail 7 Auto Check in Roaming 7 ONOFF ■Disable Auto-retrieval between Set Time Period >Check New Mail 7 Inactivate Time 7 ON or OFF (7 For ON, enter time)ON (Start time: 22:00/End time: 06:00)* Setting automatically turns ON once account is registered.SMS SettingsFrom Main Menu 4 Messaging 4 Settings 4 SMS SettingsSetting/Operation Default ■Change SMS Center Number* >Message Center 7 Enter SMS Center number+819066519300 ■Set Input Character to English >Set Input Character 7 English (160char.)Japanese(70char.)* Do not change Message Center number unless instructed so by SoftBank. Changing Message Center number may disable SMS.](https://usermanual.wiki/Panasonic-Mobile-Communications/210030A.User-Manual-Part-3-of-6/User-Guide-1296397-Page-31.png)
![18-27Settings18SettingsS! GPS Navi SettingsFromMain Menu 4 Tools 4 S! GPS Navi 4 NAVI SettingsSetting/Operation Default ■Select Navi Appli to Activate >Select Navi Appli 7 Select a Navi Appli NAVITIME ■Save Current Map URL >Map URL Settings 7 Highlight <Not Recorded> 7 A[Edit] 7 URL Name 7 Enter a name 7 Map URL 7 Enter a URL ("http://" or "https://") 7 A[Finish]– ■Select Map URL >Map URL Settings 7 Select a name NAVITIME ■Edit/Delete Map URL* >Map URL Settings 7 Highlight a name 7 S[Menu] 7 Edit or Delete– ■Activate to Lock Positioning Function >Positioning Lock 7 Enter Phone Password 7 ONOFF ■Hide Confirmation when Sending Location Information >Send Location Info 7 Enter Phone Password 7 Send without Check (Send location information without showing confirmation)Send with Check (Show confirmation every time) ■Hide Notification of Incoming Location Provision Request >Notification Setting 7 Enter Phone Password 7 OFFON ■Set Positioning Ringtone/Vibrator/Ringtone Duration >Recv Location Request 7 Ringtone, Vibration Alert or Ringtone Duration 7 Set individual itemRingtone: Pattern 2 Vibrator Alert: Pattern 1 Ringtone Duration: 05 seconds* Pre-installed NAVITIME cannot be edited or deleted.](https://usermanual.wiki/Panasonic-Mobile-Communications/210030A.User-Manual-Part-3-of-6/User-Guide-1296397-Page-35.png)
![Appendix19-1219Warning SignsProblem Causes and Remedies appears Handset is out-of-range.Move to a location where signal is strong. appearsSide-keys Guard is ON (ZP.12-9).To activate Side Keys while handset is closed, setSide-keys Guard to OFF. appearsKeyguard is active (ZP.12-4).Cancel Keyguard to use keys. Answer calls even if Keyguard is active. appearsPrivacy Key Lock is active (ZP.12-4). Cancel it to use handset. Answer calls even if Privacy Key Lock is active.Low battery message appears and battery alarm tone soundsBattery is low.Charge (ZP.1-16) or replace battery (ZP.1-15).Software UpdateCheck for 942P software updates and download as required. Choose to begin update or schedule update. Connection fees do not apply to updates (including checking for updates, downloading and rewriting). Fully charge battery beforehand. Even if appears, low battery message may appear. In this case, charge battery until Notification Light/Charging Indicator goes out. Select a place where signal is strong and stable. Do not remove battery during the update. Update will fail. Other functions are not available during Software Update. The update may take some time.Updating Software ManuallyMain Menu 4 Settings 4 Phone Settings 4 Software Update 4 Software Update1 A[YES] 7 Follow onscreen instructionsAfter download is complete, handset automatically turns off and restarts before Software Update begins.After Software Update is complete, handset automatically turns off and restarts before information appears for successful update (This process takes approximately 60 seconds.).](https://usermanual.wiki/Panasonic-Mobile-Communications/210030A.User-Manual-Part-3-of-6/User-Guide-1296397-Page-50.png)
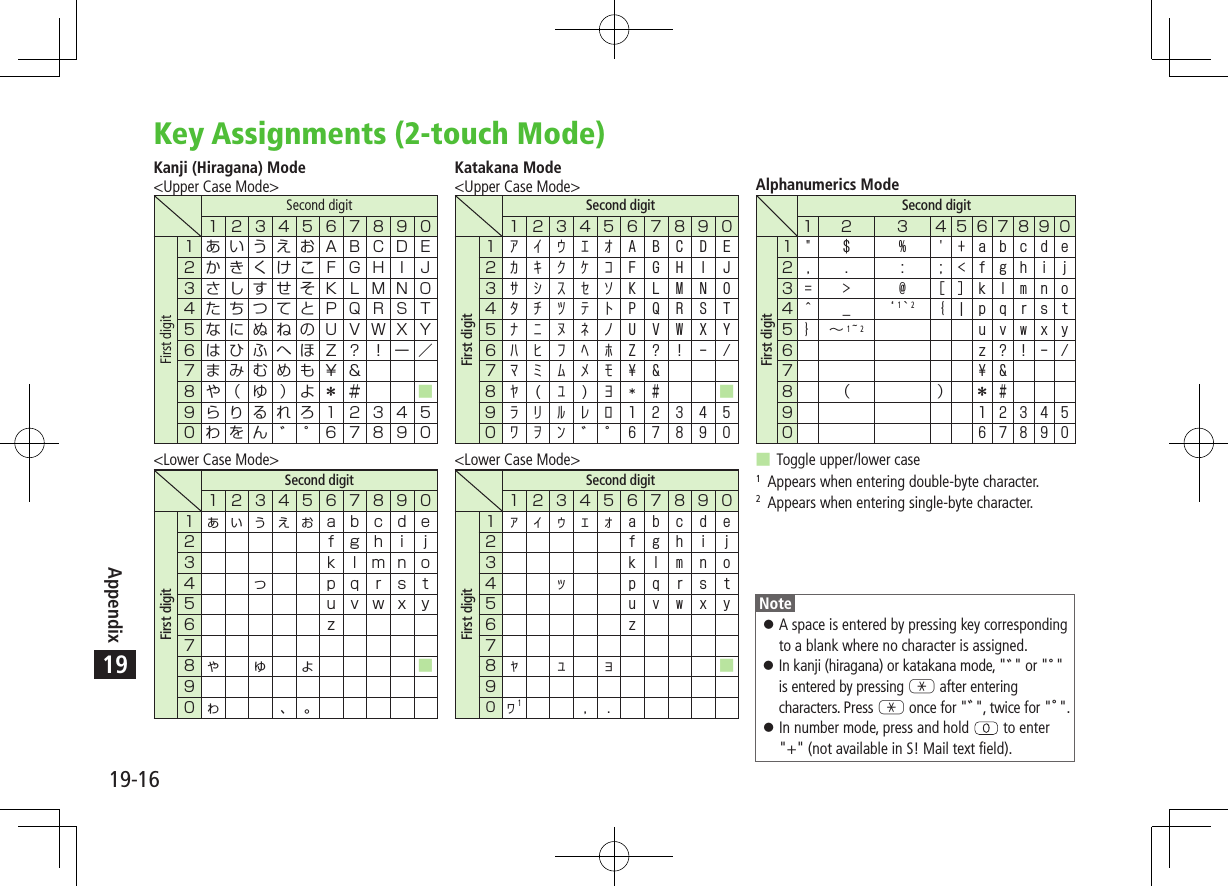
![19-15Appendix19Key Assignments (5-touch Mode)DisplayKey 漢 カナ abc 123 1 2_ 2 [Press and hold] +4xG3/Pictograph List5Pictograph List5[Press and hold] TemplatesxH(Single-byte Space) (Single-byte Space) [Press and hold] Symbol List61 Appears when entering single-byte character. 4 Not Available in S! Mail text entry window2 Appears when entering double-byte character. 5 Press G to toggle symbol list/pictograph list while pictograph list is open.3 Added to highlighted character. 6 In number mode, symbol list may not appear. In alphanumerics mode, last entered case appears first. To toggle input modes: A[Mode] To toggle double-byte/single-byte characters: S[Menu] 7 2bytes character or 1byte character To toggle upper/lower case characters: J after entering hiragana, katakana or alphanumerics To insert line feeds: [Line FD]](https://usermanual.wiki/Panasonic-Mobile-Communications/210030A.User-Manual-Part-3-of-6/User-Guide-1296397-Page-53.png)
![19-17Appendix19Key Assignments (NIKO-touch Mode)Kanji (Hiragana) ModeSecond digitFirst digit Second digitFirst digit Katakana ModeNote Press A[Mode] to toggle kanji (hiragana) and single-byte number modes. To switch to katakana mode: In kanji (hiragana) mode, S[Menu] 7 1 byte character To toggle lower/upper case: Enter a character 7 J A space is entered by pressing key corresponding to a blank where no character is assigned. Press G once for "", twice for "". In kanji (hiragana) mode, enter characters before pressing G. In number mode, press and hold to enter "+" (not available in S! Mail text field).](https://usermanual.wiki/Panasonic-Mobile-Communications/210030A.User-Manual-Part-3-of-6/User-Guide-1296397-Page-55.png)