Panasonic Mobile Communications 209025A UMTS/ GSM Cellular Mobile User Manual 2 of 5
Panasonic Mobile Communications Development of Europe Ltd UMTS/ GSM Cellular Mobile 2 of 5
Contents
- 1. User Manual 1 of 5
- 2. User Manual 2 of 5
- 3. User Manual 3 of 5
- 4. User Manual 4 of 5
- 5. User Manual 5 of 5
User Manual 2 of 5
![6-5Camera6Pictures/Videos Confirm battery strength (ZP.1-9) and available memory (ZP.15-15, P.15-16) before recording. When battery is low, video cannot be recorded.Capturing Still Images1 Press F to activate Camera2 Frame subject3 [Shoot] to capture the imageCamera automatically focuses on subject before capturing image.Shutter click sounds at fixed volume.4 [Save] To return to preview window without saving the image: K5 L to exitReturn to Standby.Note Data Folder opens when Phone memory becomes full. Delete files; image is automatically saved. If save location is set to Memory Card and memory becomes full, image is saved to Phone memory automatically.Picture Preview WindowContinuous ShootingCapture a succession of 15 still images automatically with a single press. Picture size is fixed to QVGA (240x320). When Multi Shot is ON, Night Mode is set to OFF automatically.1 In Picture Preview Window, R2 Frame subject 7 [Shoot] Image thumbnails appear. To stop shooting halfway: K To return to preview window without saving the image: S[Delete] 7 Go to Step 13 To view captured images, to select an imageFull-size image appears. to toggle full-size images.4 When Viewing a Full-size ImageA[Save All] or [Save] Press [Save] to save the full-size image. When Viewing Thumbnailed ImagesA[Menu] 7 Save All Pictures or Save This One Only](https://usermanual.wiki/Panasonic-Mobile-Communications/209025A.User-Manual-2-of-5/User-Guide-1228968-Page-5.png)
![6-6Camera6Recording Videos1 F 7 S to activate Video Camera2 Frame subject3 [Record] to start recordingTone sounds.4 [Stop] to end recordingTone sounds. Recording stops automatically at maximum recording time. To return to preview window without saving the image: S[Back] To review: Playback5 To save the video, select Save to Data Folder6 L to exitReturn to Standby.Note If Phone memory becomes full, Data Folder opens. Delete files; image is automatically saved. If save location is set to Memory Card, file is saved to Memory Card automatically. To delete the saved file, select Delete.Video Preview WindowFunctions Available while ShootingFrom Camera: FVideo Camera: F 7 S Auto Focus LockTo focus on an off-centered subject, lock focus on the subject and recompose your picture. Check if Focus Setting is set to Auto Focus (ZP.5-3). >Adjust Focus Guide to subject 7 7 When focus is on subject, recompose your picture 7 [Shoot] 7 [Save] When in focus, handset sounds and Focus Guide turns green. To try again: K Self-Timer >T 7 Frame subject 7 [Shoot]/[Record] ( 7 For Video Camera, [Stop]) 7 [Save] or Save to Data Folder Self-Timer tone sounds. After set period of time, shutter is released and capturing starts. Press T to toggle 5 seconds, 10 seconds and OFF. When Self-Timer is active, press S[Cancel] to return to preview window without canceling Self-Timer.](https://usermanual.wiki/Panasonic-Mobile-Communications/209025A.User-Manual-2-of-5/User-Guide-1228968-Page-6.png)
![6-7Camera6 Send Still Images via S! Mail >Frame subject 7 [Shoot] 7 A[S! Mail] 7 Create message (ZFrom Step 2 on P.12-4) Send Video via S! Mail Set Recording Time to Attach to S! Mail beforehand (ZP.5-4). >Frame subject 7 [Record] 7 [Stop] 7 Attach to S! Mail 7 Create message (ZFrom Step 2 on P.12-4)Note Attach image files up to 290KB. Files exceeding the limit are saved to Data Folder. Resize still images to attach (ZP.8-11). Images captured by handset Camera may rotate 90° on cross-carrier handsets or PC. Set Still Images to Wallpaper >Frame subject 7 [Shoot] 7 S[W.paper] The image is saved to Data Folder. Camera Settings Default Settings: ZP.15-15, P.15-16 Available settings per image size are as follows.Still ImageSize Zoom Level Zoom Ratio*UXGA(1200x1600) – –SXGA(960x1280) 1 - 2 1.3xVGA(480x640) 1 - 25 2.5xQVGA(240x320) 1 - 25 5.0xQQVGA(120x160) 1 - 25 10.0x(240x427) 1 - 25 3.7xVideoRecording Time*Quality (Dots) Zoom Ratio*Phone Memory CardAttach to S! Mail 30 seconds 30 seconds Normal (176 x 144) 6.8xExtended Video160 seconds 60 minutes Normal (176 x 144) 6.8x85 seconds 60 minutes Fine (176 x 144) 6.8x30 seconds 45 minutes Super Fine (352 x 288) 3.4x* Values are approximates. Video Camera zoom level: 1 - 25 Set Night Mode to ON when capturing still images in dark places; record video in well-lit conditions. Pictures and Videos folders share memory with other folders in Data Folder. Files saved in other folders reduce available memory for picture/video files. The number of files that can be saved to Memory Card depends on the capacity of the card in use.](https://usermanual.wiki/Panasonic-Mobile-Communications/209025A.User-Manual-2-of-5/User-Guide-1228968-Page-7.png)
![6-8Camera6Viewing Saved ImagesMain Menu 4 Data Folder1 Open PicturesPictures Open VideosVideos2 Select a file Open Pictures Saved on Memory Card >After selecting Pictures in Step 1, Switch to Digital Camera 7 Select a folder Open Videos Saved on Memory Card >After selecting Videos in Step 1, Switch to Video Camera 7 Select PRL folderTip#Editing Still Images (ZP.8-11)Example: PicturesMagnifying LoupeUse handset as a magnifying glass. Enlarged image appears on Display at camera's maximum zoom level. Freeze image on Display for easy viewing.1 Press and hold FMagnifying Loupe is activated. To adjust brightness: G or H To adjust zoom: Frame subject from as close ten centimeters. If focus detection stalls, adjust distance from subject by moving handset. Press to adjust focus. 2 To freeze image on Display, [Still] To cancel: S[Back]](https://usermanual.wiki/Panasonic-Mobile-Communications/209025A.User-Manual-2-of-5/User-Guide-1228968-Page-8.png)
![7-4News/Entertainment7 Manually Update Weather IndicatorSelect Weather in Information window. Alternatively, Main Menu 4 News/Ent. 4 S! Information Channel/Weather 4 Weather Indicator 4 Manual Update. Hide Information Window >Main Menu 4 News/Ent. 4 S! Information Channel/Weather 4 Weather Indicator 4 Missed Event settings(Weather) 4 OFFNote Alternatively, view forecast details from Main Menu 4 News/Ent. 4 S! Information Channel/Weather 4 Weather Indicator 4 Weather.Hiding Weather IndicatorMain Menu 4 News/Ent. 4 S! Information Channel/Weather 4 Weather Indicator 4 Display Settings1 OFF When Display Settings is set to OFF, update is also deactivated.Option Menu ItemsOpen information and press A[Menu] for these options.Item Operation/DescriptionForward Go to next pageText Copy Copy page textPage OperationJump to top/end of pageSelect Item View, play or save file to Data Folder (From Step 2 in Downloading Image/Sound Files: P.13-11)More Search text or enter URLYahoo! Keitai View top menuSettings Change font size* and encoding type* Linked with Font Size setting in Internet option menu.](https://usermanual.wiki/Panasonic-Mobile-Communications/209025A.User-Manual-2-of-5/User-Guide-1228968-Page-12.png)
![7-6News/Entertainment7Opening S! Quick News ListMain Menu 4 News/Ent. 4 S! Quick News 4 S! Quick News List1 Select an itemContent list appears.2 Select informationDetailed information appears.3 To connect to the Network, select a title Update Manually >In Step 1, A[Menu] 7 Update 7 One or All 7 View Summary >In Step 1, highlight information 7 A[Menu] 7 Summary Display Delete Registered Items >In Step 1, (highlight information 7 ) A[Menu] 7 Delete 7 One or All ( 7 For All, enter Phone Password)TipSettings #Automatically Update Special News #Delete S! Quick News Information (ZP.15-17)E-Books (Japanese)Use BookSurfing® to acquire/view e-books, comics, photo books, etc.), or e-Book Viewer to view XMDF files on handset. BookSurfing® and e-Book Viewer are S! Appli. Download Content Keys (ZP.8-6) to read CCF/XMDF files. Some copy protected files have extensions different from the ones below.Application File FormatBookSurfing®CCF (.ccf)e-Book Viewer XMDF (.zbf, .zbk, .zbs) Some PC content may not be viewable via e-Book Viewer.](https://usermanual.wiki/Panasonic-Mobile-Communications/209025A.User-Manual-2-of-5/User-Guide-1228968-Page-14.png)

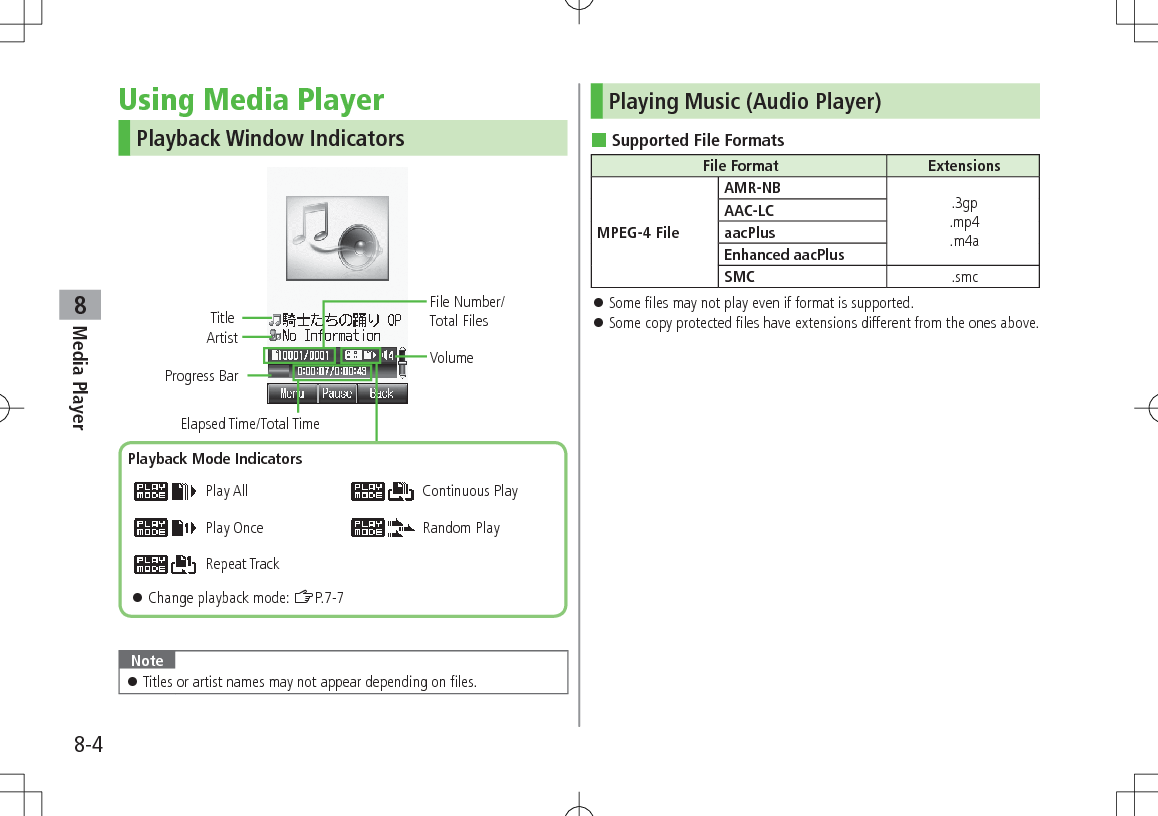
![8-5Media Player8Main Menu 4 Media 4 Audio1 Select an item (See below)Item Operation/DescriptionAll Select files from handset & Memory CardMusic Select files from Music folderRing Song Select files from Ring Song folderPlaylist Select group of files saved to Playlist >Select a Playlist Press to select files from Memory Card.2 Select a fileSelected file plays. Playback Window Operations: ZP.7-73 To end, L or S[Back] 7 S[NO] To return to Playback window: K Change Playback Position >During playback, A[Menu] 7 Set Playback Position 7 Enter time to start playbackBackground MusicListen to music while using other handset functions.1 While music plays, K or S[Back] 7 To cancel Background Music: In Standby, L 7 Note Unavailable for some functions (S! Appl, etc.). While Background Music plays, volume level and playback mode settings cannot be changed. Alternatively, end playback from Main Menu 4 Media 4 Audio 4 Display Playback Screen 4 K or S[Back] 4 S[NO].Playing SMC FilesPlay SMC (Softbank Music Content) files; CD jackets and lyrics appear during playback.The first jacket appears when playback starts. When appears, press P to toggle jacket window and lyric window. To view next or previous jacket/lyric window, press H or G.](https://usermanual.wiki/Panasonic-Mobile-Communications/209025A.User-Manual-2-of-5/User-Guide-1228968-Page-21.png)
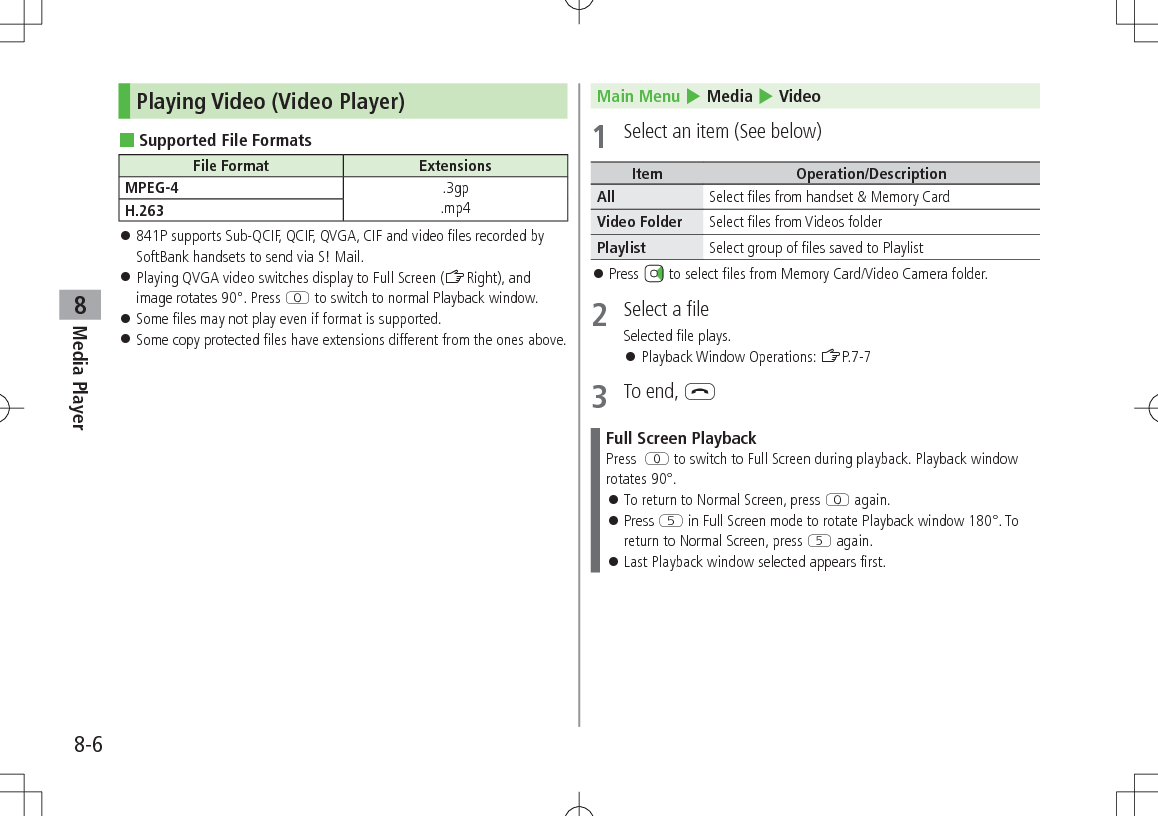
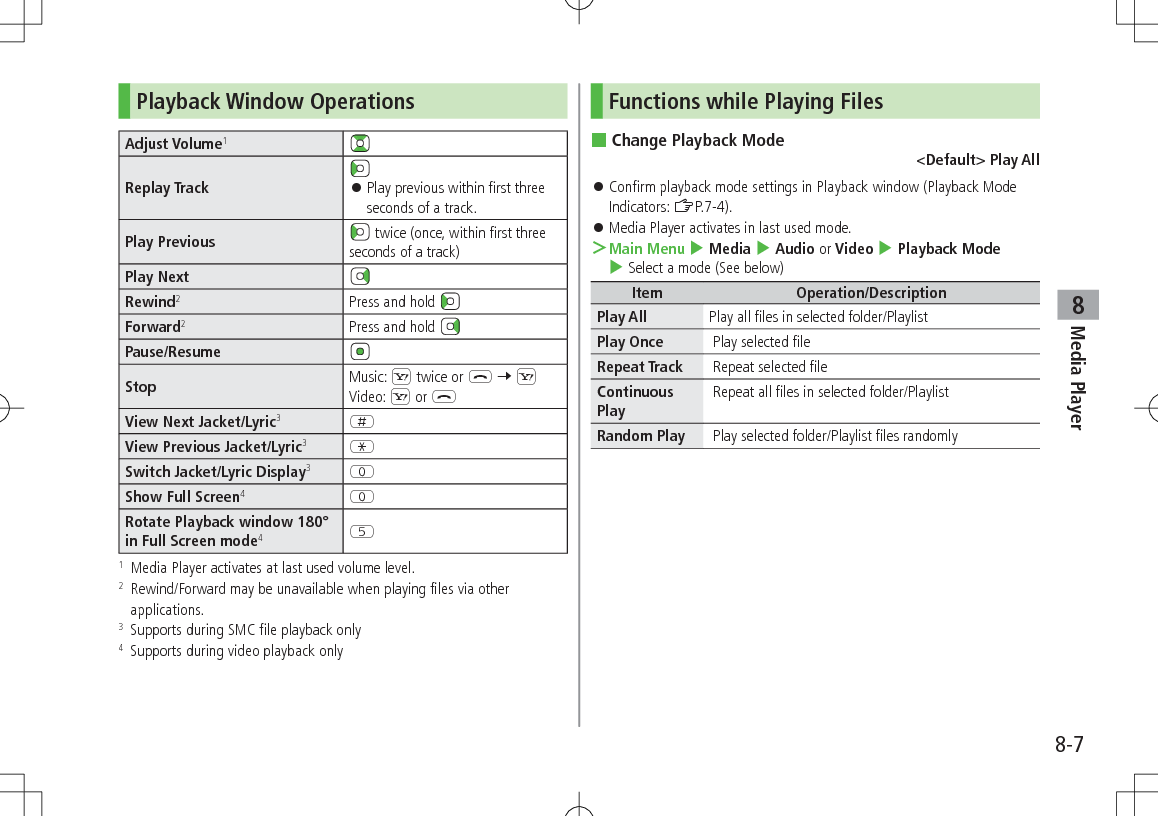
![8-8Media Player8 Options >During playback, A[Menu] 7 Select an item (See below)Item Operation/DescriptionPlayback/PausePlay or pause filesPlayback Mode Select playback mode (ZP.7-7)Display Jacket/Display Lyric1Show lyric or jacketNext Jacket/Next Lyric1Show next jacket or lyricPrevious Jacket/Previous Lyric1Show previous jacket or lyricFull Screen (Video)/Normal Screen2Select display size for video playbackUpside down(Full Screen)2Rotate Full Screen Playback 180°Set Playback PositionStart playback from specified pointConnect to URL3Open site link; music plays as BGMProperty Show file detailsHelp Show Playback window key assignments1 Supports during SMC file playback only2 Supports video playback only3 May not be available for some filesUsing PlaylistUse Playlists to organize Data Folder music/video files. Select Ring Songs·Tones, Music or Videos folder files to create Playlist links to each file in its original folder.Note A single Playlist cannot contain both music and video files, or files from both handset and Memory Card. Some files cannot be added to Playlist.](https://usermanual.wiki/Panasonic-Mobile-Communications/209025A.User-Manual-2-of-5/User-Guide-1228968-Page-24.png)
![8-9Media Player8Creating New Playlists Create up to 30 Playlists on handset and Memory Card each. Add up to 99 files to a single Playlist. Main Menu 4 Media 4 Audio or Video 4 Playlist1 A[Menu] 7 Create Playlist2 Enter a Playlist nameA new Playlist is added to top of list.3 Select a Playlist 7 A[Menu] 7 Add4 Add Files to Music PlaylistsMusic or Ring Song 7 Select a file Add Files to Video PlaylistsSelect a file To playback Playlist: ZP.7-5, P.7-6Playlists WindowPlaylist Functions Functions Available in Playlist Window >Main Menu 4 Media 4 Audio or Video 4 Playlist 4 (highlight a Playlist 4) A[Menu] 4 Select an item (See below)Item Operation/DescriptionSelect Select a PlaylistPlayback Mode Change playback mode (ZP.7-7)Create Playlist Create new Playlists (ZLeft)Edit Playlist NameChange Playlist name >Edit nameDelete Delete Playlists (ZP.7-10) Change Playlist Order >Main Menu 4 Media 4 Audio or Video 4 Playlist 4 Select a Playlist 4 Highlight a file 4 A[Menu] 4 Change Order 4 Select new playback order The Playlist moves to above the selected order.](https://usermanual.wiki/Panasonic-Mobile-Communications/209025A.User-Manual-2-of-5/User-Guide-1228968-Page-25.png)
![8-10Media Player8Deleting Playlists/FilesFrom Main Menu 4 Media 4 Audio or Video4 Playlist Delete Playlists >Follow the steps belowItem Operation/DescriptionOne >Highlight a Playlist 7 A[Menu] 7 Delete 7 One 7 A[YES]Selected items >A[Menu] 7 Delete 7 Selected Files 7 Check Playlists 7 A[OK] 7 A[YES]All >A[Menu] 7 Delete 7 All 7 A[YES] 7 Enter Phone Password Delete Files in a Playlist >Select a Playlist 7 Follow the steps belowItem Operation/DescriptionOne >Highlight a file 7 A[Menu] 7 Delete 7 One 7 A[YES]Selected items >A[Menu] 7 Delete 7 Selected Files 7 Check files 7 A[OK] 7 A[YES]All >A[Menu] 7 Delete 7 All 7 A[YES] 7 Enter Phone Password](https://usermanual.wiki/Panasonic-Mobile-Communications/209025A.User-Manual-2-of-5/User-Guide-1228968-Page-26.png)
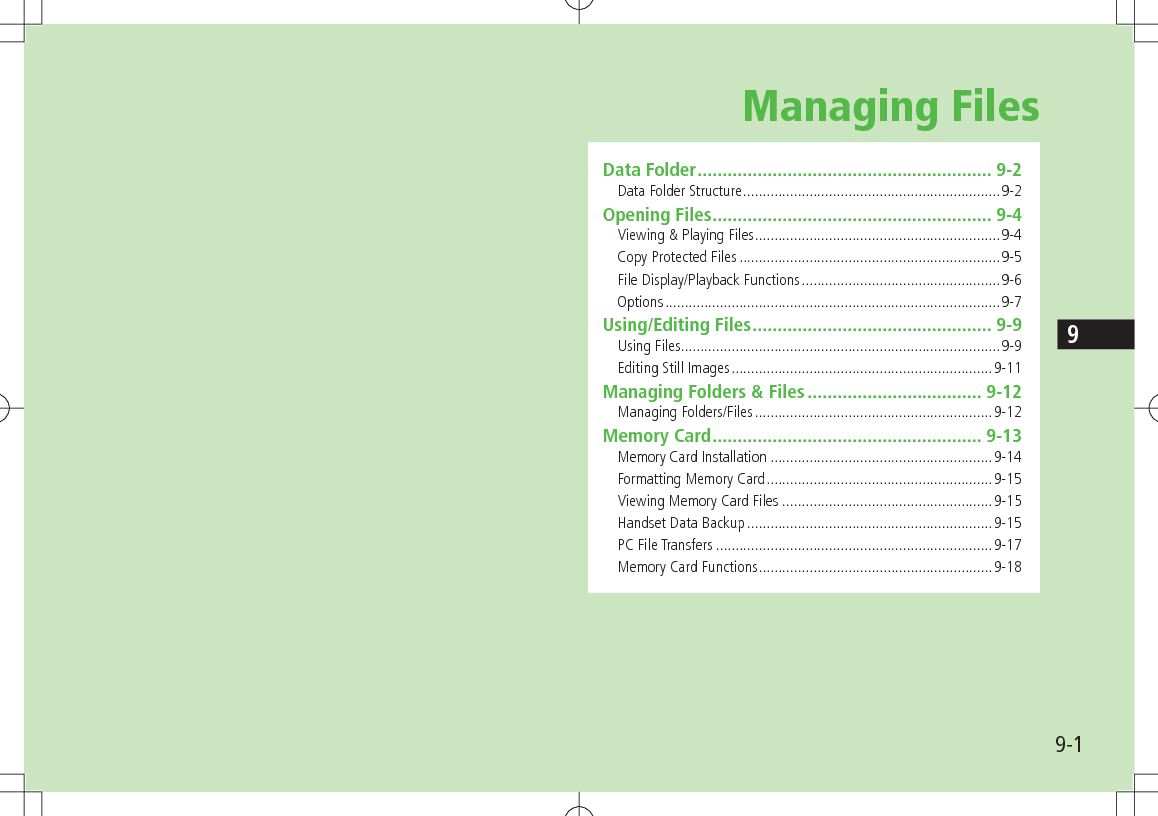
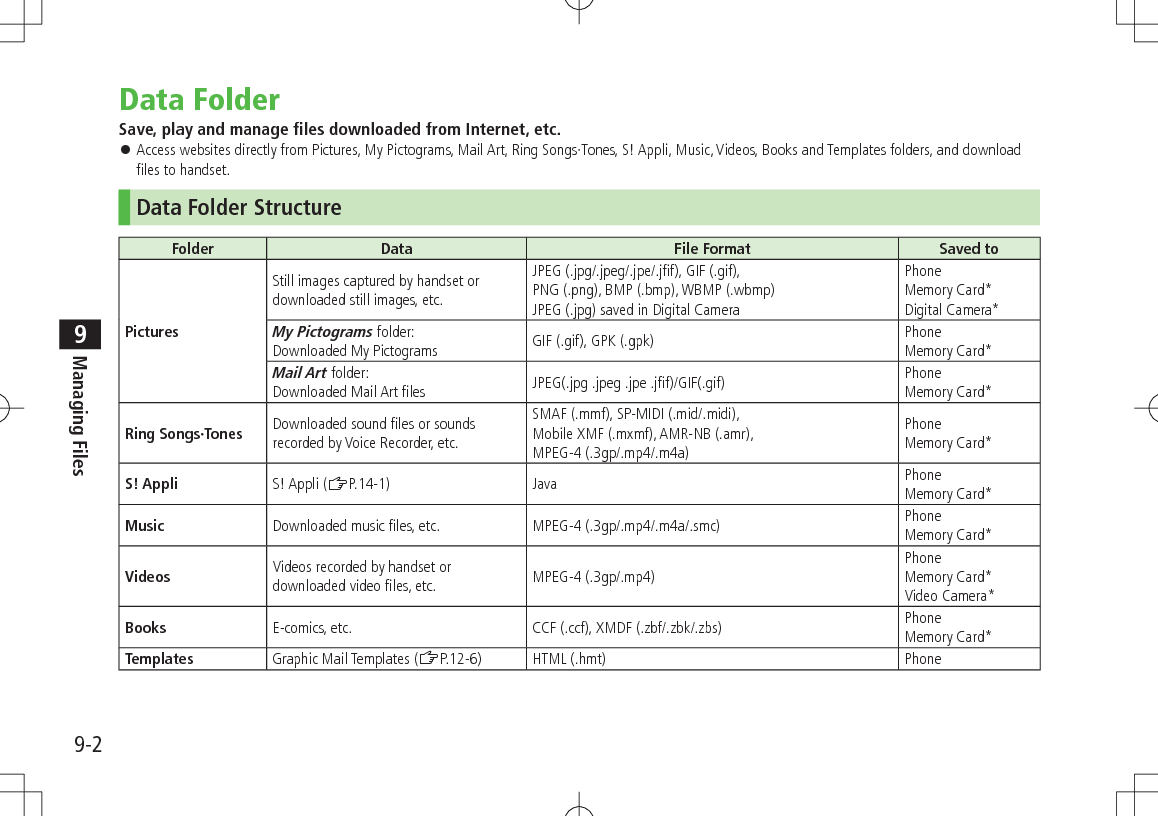
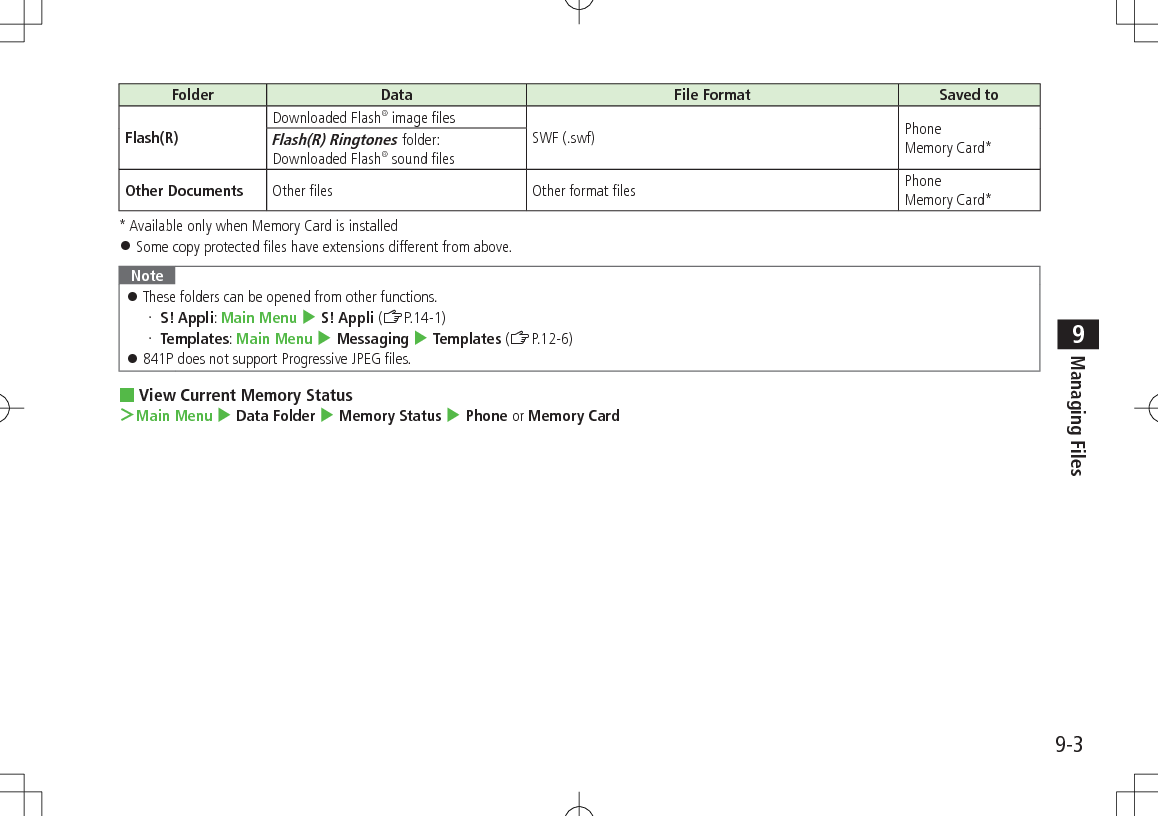
![9-4Managing Files9Opening FilesViewing & Playing FilesMain Menu 4 Data Folder1 Select a folderPictures and Videos appear in Thumbnail view by default. 2 Select a fileFile appears/plays.To Digital Camera FolderTo Download SiteTo Download SiteTo Memory Card FolderTo Memory Card FolderTo Phone FolderPictures (Thumbnail) Ring Songs·Tones (List) Change Memory View >In List view, to switch views, Phone, Memory Card, Digital Camera1 or Video Camera2 >In Thumbnail view, select (Memory Card), (Digital Camera)1 or (Video Camera)2 7 To return to handset memory, select (Phone)1 In Pictures folder only2 In Videos folder only Change Folder ViewSelect Thumbnail or List for Pictures/Videos view. >In Step 1, Pictures or Videos 7 A[Menu] 7 More 7 Change View 7 Thumbnail or ListNote Some still images may not appear, or may be reduced in size depending on image or file size. 841P supports MPEG-4 and H.263 formats, and Sub-QCIF, QCIF, QVGA and CIF size. Video files that were recorded by SoftBank handsets and can be sent via S! Mail are also supported. Some files may not play even if format and size are supported.Tip#Playback Window Operations (ZP.7-7)#Viewing e-Books & Documents (ZP.6-6)#Using S! Appli (ZP.14-3)](https://usermanual.wiki/Panasonic-Mobile-Communications/209025A.User-Manual-2-of-5/User-Guide-1228968-Page-30.png)
![9-5Managing Files9Changing Playback MethodMain Menu 4 Data Folder 4 Ring Songs·Tones, Music or Videos1 Highlight a file 7 A[Menu] 7 Playback Method2 Select a methodContinuous Play Repeat all files in selected folderRandom Play Play all files in selected folder randomlyRepeat Track Repeat selected file Confirm playback method settings in Playback window (Playback Mode Indicators: ZP.7-4). Note When selecting Continuous Play or Random Play, playback starts from the file selected in Step 1.Copy Protected FilesPlaying/forwarding/saving may be restricted and Content Key may be required for usage. If Content Key is expired, obtain a new Key to use file. or (Silver) appears for copy protected files requiring Content Keys. files are accessible. files are inaccessible. appears on images in Thumbnail view of expired files. When deleting files or folders containing files, confirmation appears asking whether to delete corresponding Content Key. Other files requiring same Content Key may become unusable. See Property to confirm restrictions such as expiry term or usage limitation (Options: ZP.8-7) 841P holds up to 1000 Content Keys. Multiple Keys may be required to use a file.](https://usermanual.wiki/Panasonic-Mobile-Communications/209025A.User-Manual-2-of-5/User-Guide-1228968-Page-31.png)
![9-6Managing Files9Using Copy Protected Files Files downloaded on 841P cannot be used on PCs. Network setting may be required for usage. File usage may require insertion of USIM Card in use at time of download. When set as Wallpaper or Ringtone, license expiry or inserting a different USIM Card may reset default. Limited use files cannot be set as Wallpaper or Ringtone.Obtaining Content KeyIf Content Key is expired, a message appears when the file is opened. To obtain a new Key, press A[YES]. 841P connects to Content Key site.Note Alternatively, obtain Content Key as follows: Highlight a file 7 A[Menu] 7 More 7 Download Content Key 7 . Depending on contents, some Content Keys may not be obtained from websites even when warning for expired contents appears. When 1000 Content Keys have been saved, a message appears. Delete old Keys; otherwise downloads may fail (transmission fees apply).Tip#Back Up Content Key (ZP.8-18)File Display/Playback FunctionsFrom Main Menu 4 Data Folder View Still Images at Original Size >Pictures 7 Select a file 7 [Zoom] 7 to change the position Press K to return. Still images larger than VGA (480x640) appear at VGA (480x640). Rotate Still Images >Pictures 7 Select a file 7 S[Rotate R] 7 A[Rotate L] or S[Rotate R] Press K to return. View File Properties >Select a file 7 Highlight a file 7 A[Menu] 7 More 7 Property Available information varies by file.](https://usermanual.wiki/Panasonic-Mobile-Communications/209025A.User-Manual-2-of-5/User-Guide-1228968-Page-32.png)
![9-7Managing Files9OptionsHighlight a file in Data Folder, and press A[Menu] for the following operations. PicturesItem Operation/DescriptionView Open filesSend1Send files via S! Mail (ZP.8-10) or Infrared (ZP.9-3)Send S! Mail2Send files via S! MailSet as1Set as wallpaper (ZP.8-9), Phone Book image, Main Menu Icons (ZP.8-10), etc.Edit1Resize files, trim files, rotate files, add frame, clear shadow, etc. (ZP.8-11)Rename Change file names (ZP.8-12)New Folder1Create new folders (ZP.8-12)Move Move files to other folders (ZP.8-13)Copy Copy files (ZP.8-13)Delete Delete files (ZP.8-12)More Change folder view1 (ZP.8-4), obtain Content Key1 (ZP.8-6), open Memory Card folder/Phone folder/Digital Camera folder1, view file properties (ZP.8-6)1 Picture files only2 My Pictogram/Mail Art files only Ring Songs·Tones, Music, VideosItem Operation/DescriptionPlay Play filesSend Send files via S! Mail (ZP.8-10) or Infrared (ZP.9-3)Set as1Set ringtone (Voice Call, Video Call and messages) (ZP.8-9) or save to Phone Book (ZP.8-10)Playback MethodSelect playback method (ZP.8-5)Rename Change file names (ZP.8-12)New Folder Create new folders (ZP.8-12)Move Move files to other folders (ZP.8-13)Copy Copy files (ZP.8-13)Delete Delete files (ZP.8-12)More Change folder view2 (ZP.8-4), obtain Content Key (ZP.8-6), open Memory Card folder/Phone folder/Video Camera folder2, view file properties (ZP.8-6)1 Ring Songs·Tones and Music only2 Videos only](https://usermanual.wiki/Panasonic-Mobile-Communications/209025A.User-Manual-2-of-5/User-Guide-1228968-Page-33.png)
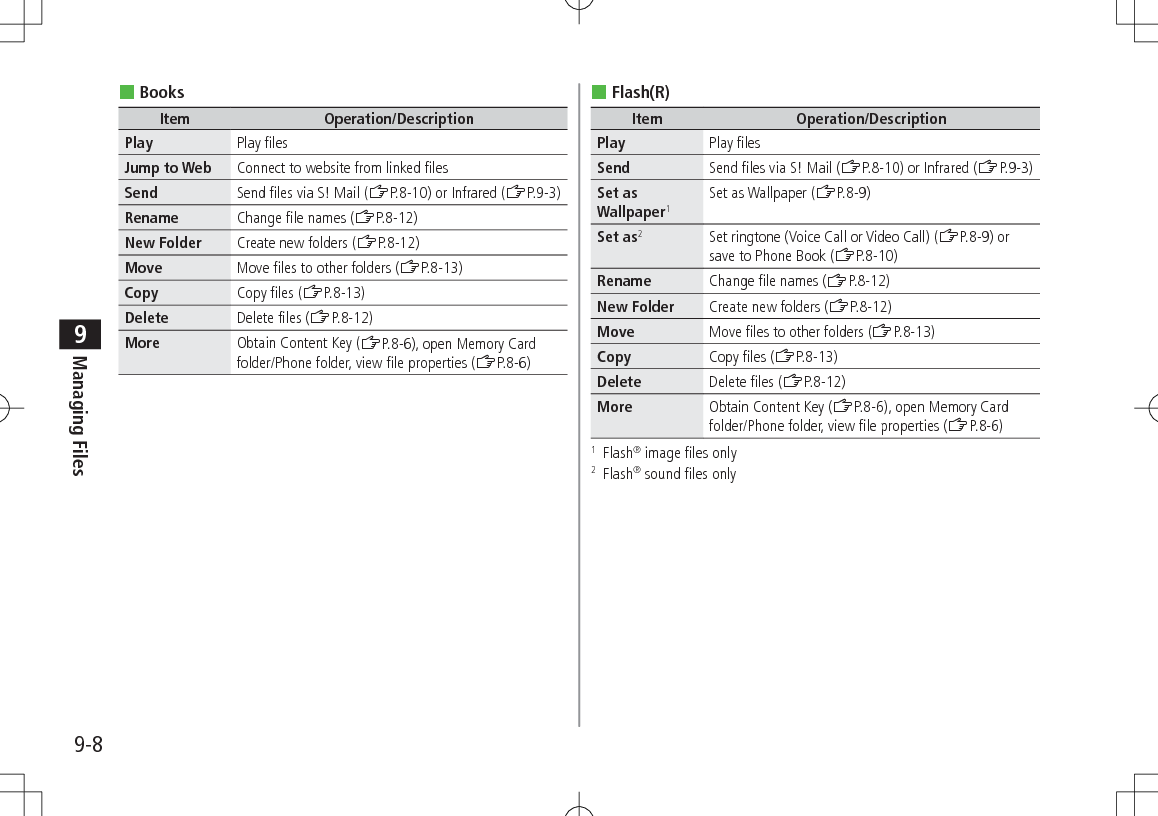
![9-9Managing Files9 Other DocumentsItem Operation/DescriptionRename Change file names (ZP.8-12)New Folder Create new folders (ZP.8-12)Move Move files to other folders (ZP.8-13)Copy Copy files (ZP.8-13)Delete Delete files (ZP.8-12)More Open Memory Card folder/Phone folder, view file properties (ZP.8-6)Using/Editing FilesUsing FilesWallpaperFrom Main Menu 4 Data Folder Select from Pictures Folder >Pictures 7 Highlight a file 7 A[Menu] 7 Set as 7 Wallpaper Select from Flash(R) >Flash(R) 7 Highlight a file 7 A[Menu] 7 Set as WallpaperRingtonesFrom Main Menu 4 Data Folder Select from Ring Songs·Tones/Music Folder >Ring Songs·Tones or Music 7 Highlight a file 7 A[Menu] 7 Set as 7 Select an item ( 7 For SMC file, highlight a Play Point 7 A[Set]) Select from Flash(R) Folder >Flash(R) 7 Flash(R) Ringtones 7 Highlight a file 7 A[Menu] 7 Set as 7 Select an item Flash® Ringtones cannot be set as Message Ringtone.](https://usermanual.wiki/Panasonic-Mobile-Communications/209025A.User-Manual-2-of-5/User-Guide-1228968-Page-35.png)
![9-10Managing Files9Saving to Phone BookFrom Main Menu 4 Data Folder Save a Still Image to a Phone Book Entry Unavailable when Change View is USIM. >Pictures 7 Highlight a file 7 A[Menu] 7 Set as 7 Phone Book Picture 7 Select a Phone Book entry ( 7 When warning message appears, 7 Enter file name) 7 A[Save] Save Sound/Music Files to a Phone Book Entry >Ring Songs·Tones or Music 7 Highlight a file 7 A[Menu] 7 Set as 7 Add to Phone Book ( 7 For SMC files, highlight a Play Point 7 A[Set]) 7 Select a Phone Book entry 7 Select a ringtone ( Voice Call Ringtone/ Video Call Ringtone/ Message Ringtone) 7 A[Save] Save Flash® Sound Files to a Phone Book Entry >Flash(R) 7 Flash(R) Ringtones 7 Highlight a file 7 A[Menu] 7 Set as 7 Add to Phone Book 7 Select a Phone Book entry 7 Select a ringtone ( Voice Call Ringtone/ Video Call Ringtone) 7 A[Save]Main Menu IconsFrom Main Menu 4 Data Folder 4 Pictures 4 Highlight a file 4 A[Menu] 4 Set as 4 Main Menu Icons Change Background >Change Full Image 7 S[Back] 7 S[Back]** Handset returns to Pictures folder top menu. Change Menu Icons >Change Image 7 Select an icon 7 S[Back] 7 S[Back]** Handset returns to Pictures folder top menu.Sending Files via S! Mail >Main Menu 4 Data Folder 4 Select a folder 4 Highlight a file 4 A[Menu] 4 Send 4 Attach to S! Mail 4 Enter information 4 S[Send]Note Sounds recorded by Voice Recorder cannot be set as Ringtone.](https://usermanual.wiki/Panasonic-Mobile-Communications/209025A.User-Manual-2-of-5/User-Guide-1228968-Page-36.png)
![9-11Managing Files9Editing Still Images Edit features are not available for some file types.Main Menu 4 Data Folder 4 Pictures1 Highlight a file 7 A[Menu] 7 Edit2 Select an item (See below)Files Operation/DescriptionResize Change image size >Select an image size 7 To start over: After selecting file size, S[Back]Rotate >(When warning message appears, 7 ) A[Rotate L] or S[Rotate R] 7 Images captured by handset Camera may rotate 90° on cross-carrier handsets or PC.Add Frame >Select a frame 7 To change frame: to toggle frames Available only for Wallpaper(240x427), QQVGA(120x160) and QVGA(240x320)Trimming >Trim to preset size: Select a size 7 to move rectangle to crop point 7 >Trim to selected size: Free Size 7 to move [ ] to specify the area 7 7 to adjust crop point 7 To start over: After setting crop point, S[Back]Super Clear Shadow >(When warning message appears, 7 ) 3 Enter file name](https://usermanual.wiki/Panasonic-Mobile-Communications/209025A.User-Manual-2-of-5/User-Guide-1228968-Page-37.png)
![9-12Managing Files9Managing Folders & FilesThe following operations are available in Pictures, Ring Songs·Tones, Music, Videos, Books, Flash(R) and Other Documents. Digital Camera, Video Camera, S! Appli, My Pictograms, Mail Art and Templates do not support new folders. Only names of created folders and files can be changed. Digital Camera and Video Camera folder names are fixed.Main Menu 4 Data Folder1 Select a folder 7 (Highlight a folder 7 ) A[Menu] 7 Select an item (See below)Item Operation/DescriptionOpen Open foldersPlayback Method1Select playback method (ZP.8-5)Rename Change folder names >Enter folder nameNew Folder Create new folders >Enter folder nameDelete Delete folders (ZRight)More2Change folder view (ZP.8-4), open Memory Card folder, open Digital Camera folder/Video Camera folder, open Phone folderMemory Card/Phone3Open Memory Card folder/Phone folder1 Ring Songs·Tones, Music and Videos only2 Pictures and Videos only3 Ring Songs·Tones, Music, Books, Flash(R) and Other Documents onlyManaging Folders/FilesFrom Main Menu 4 Data Folder 4 Select a folder Delete Folders/Files >(Highlight a folder or file 7 ) A[Menu] 7 Delete 7 Select an item (See below)Item Operation/DescriptionOne >A[YES] ( 7 If confirmation appears, A[YES] orS[NO] 7 When selecting a folder, enter PhonePassword)Selected Files >Check files 7 A[Menu] 7 Delete 7 A[YES] 7 A[YES] ( 7 If confirmation appears, A[YES] or S[NO]) To select all files or release all checkmarks: A[Menu] 7 Check All or Uncheck AllAll >A[YES] 7 in confirmation window, A[YES] or S[NO] 7 Enter Phone Password Some files may not be deleted. Folders including undeleted files cannot be deleted. Multiple folders cannot be selected.](https://usermanual.wiki/Panasonic-Mobile-Communications/209025A.User-Manual-2-of-5/User-Guide-1228968-Page-38.png)
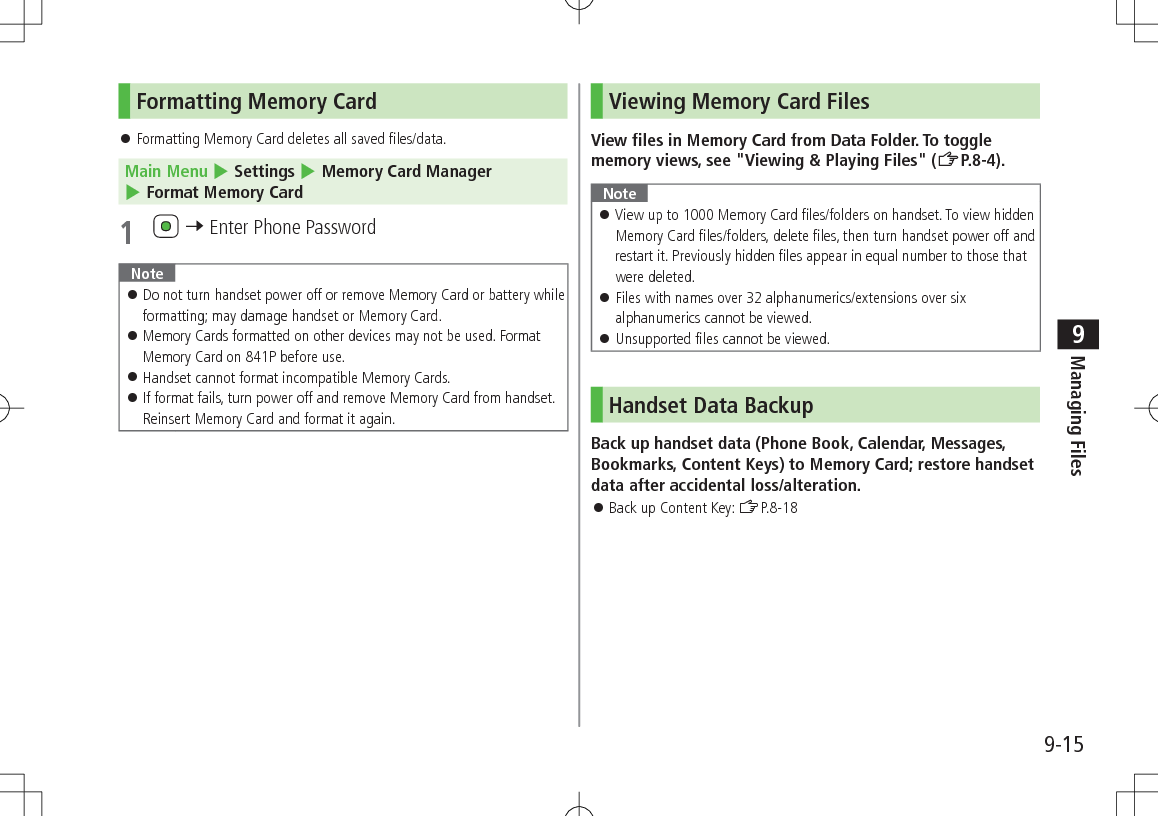
![9-13Managing Files9 Move/Copy Files >(Highlight a file 7 ) A[Menu] 7 Move or Copy 7 Select an item (See below) 7 Select a folder ( 7 For Selected Files or All, A[YES])Item Operation/DescriptionOne Move/Copy a fileSelected Files Move/Copy multiple files >Check files 7 A[Menu] 7 Move or Copy To select all files or release all checkmarks: A[Menu] 7 Check All or Uncheck AllAll Move/copy all the folders/files in a folder Only JPEG files saved in handset memory can be moved/copied to Digital Camera folder. Only Video files saved in handset memory can be moved/copied to Video Camera folder. In Other Documents folder, copy protected files can be copied, but handset does not recognize copyright. Files may not be moved/copied depending on file format or data. Forward protected files may be moved to other folders by retrieving Network information (ZP.1-14). After being copied/moved between handset and Memory Card, some files may be unusable on other SoftBank handsets or PCs, etc.Memory Card 841P is compatible with up to 2 GB commercial Memory Cards (as of November 2009). For information on memory card compatibility, visit the website below (Japanese). Note that Memory Cards not listed on the website may not function properly. From Yahoo! Keitai P-egg (as of November 2009) Main Menu 4 Yahoo! 4 Bookmarks 4 Panasonic Site (P-egg) From PC http://panasonic.jp/mobile/ Not all operations are guaranteed by the Memory Cards listed. Format new Memory Cards for use with handset (ZP.8-15).Note SoftBank is not liable for damages from accidental loss/alteration of Memory Card information. Keep a copy of Phone Book entries, etc. in a separate place. Memory Card has no write protect feature; there is a risk of accidental erasure/overwriting of files.](https://usermanual.wiki/Panasonic-Mobile-Communications/209025A.User-Manual-2-of-5/User-Guide-1228968-Page-39.png)
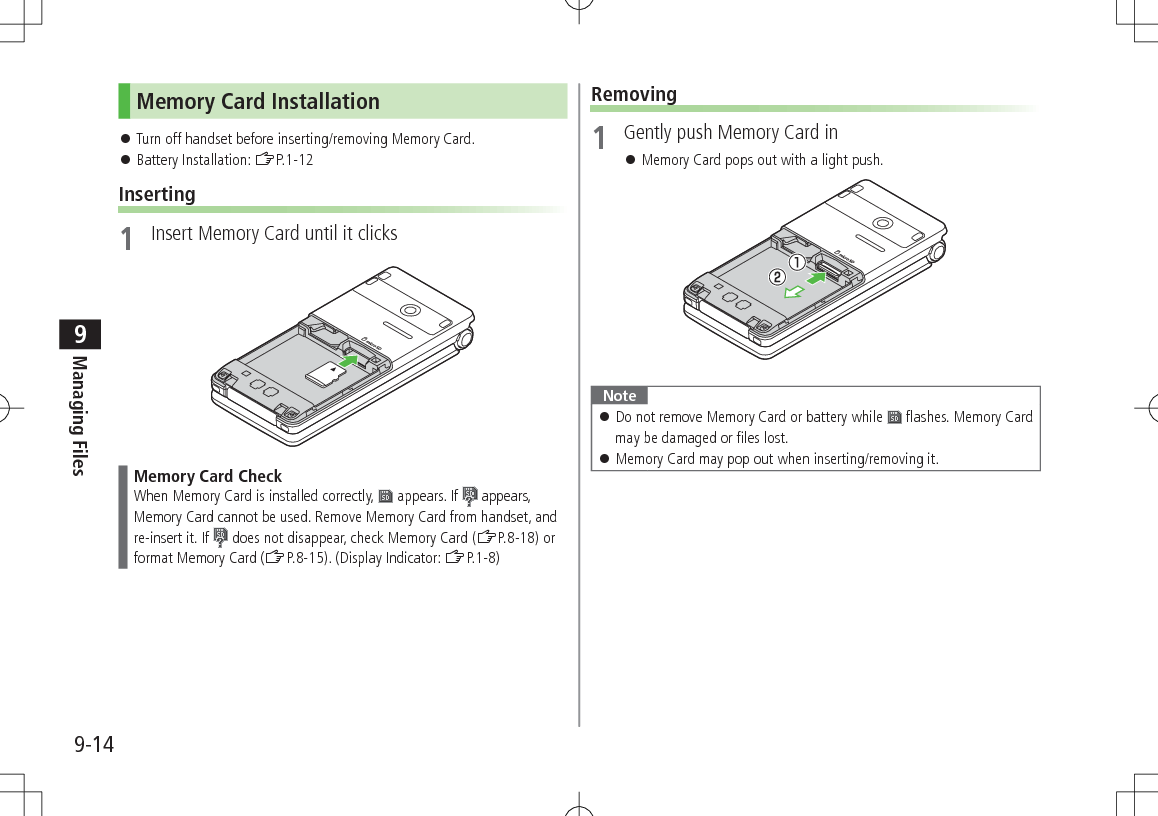
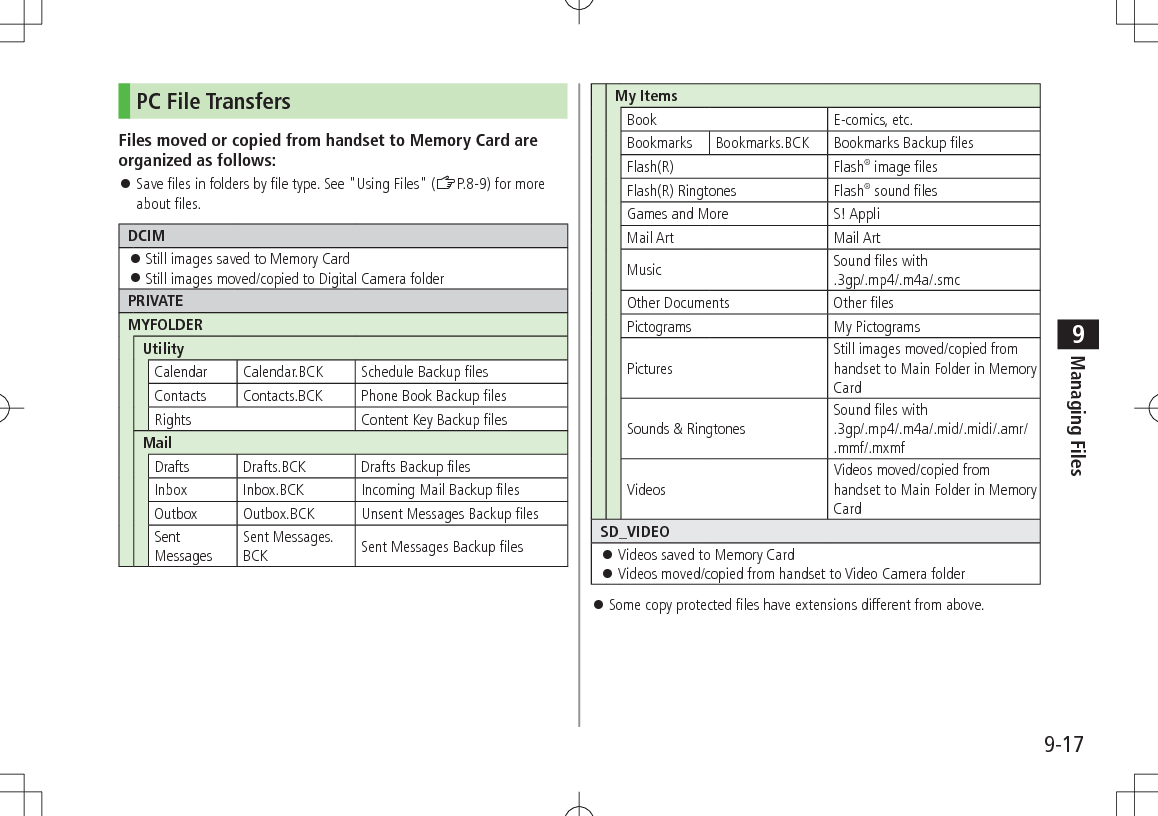
![9-16Managing Files9Notes Backup is not available when battery is low. Check memory beforehand (ZP.8-3). Handset transmission unavailable during backup/restoration. When restoring files other than Content Keys from Memory Card, the same type files are all deleted from handset before restoration. Back up files saved on handset beforehand. Backup files created on other SoftBank handsets may not be restored or usable on 841P. Settings such as Reminder, Schedule Tone and Notification Light cannot be backed up/restored. Schedule entries that date/time are not specified cannot be restored. Schedule entries that cannot be saved on handset (ZP.11-3) cannot be restored. The initial portion of S! Mail messages are restored as complete S! Mail messages, and complete message retrieval is invalidated. Mail Delivery Rule for Incoming Mail folder cannot be backed up/restored. Depending on contents, Phone Book/Schedule entries, messages or bookmarks may not be backed up/restored, or may be altered beyond the parameters.Backup/RestoreMain Menu 4 Settings 4 Memory Card Manager 4 Memory Card Backup/Restore1 Enter Phone Password2 Select an item For Messaging, select a messaging folder3 BackupCopy to Memory Card 7 7 RestoreOverwrite to Phone 7 7 Select a file 7 Backup date serves as file name. Example: "090202000.vcf" indicates that the file was backed up on 2 February 2009 Backup files restored from Incoming Mail/Sent Messages folders are saved to Received/Sent folders. Delete Backup Files >In Step 3, Overwrite to Phone 7 7 Highlight a file 7 A[Menu] 7 Delete 7 Content Key backup files cannot be deleted.](https://usermanual.wiki/Panasonic-Mobile-Communications/209025A.User-Manual-2-of-5/User-Guide-1228968-Page-42.png)
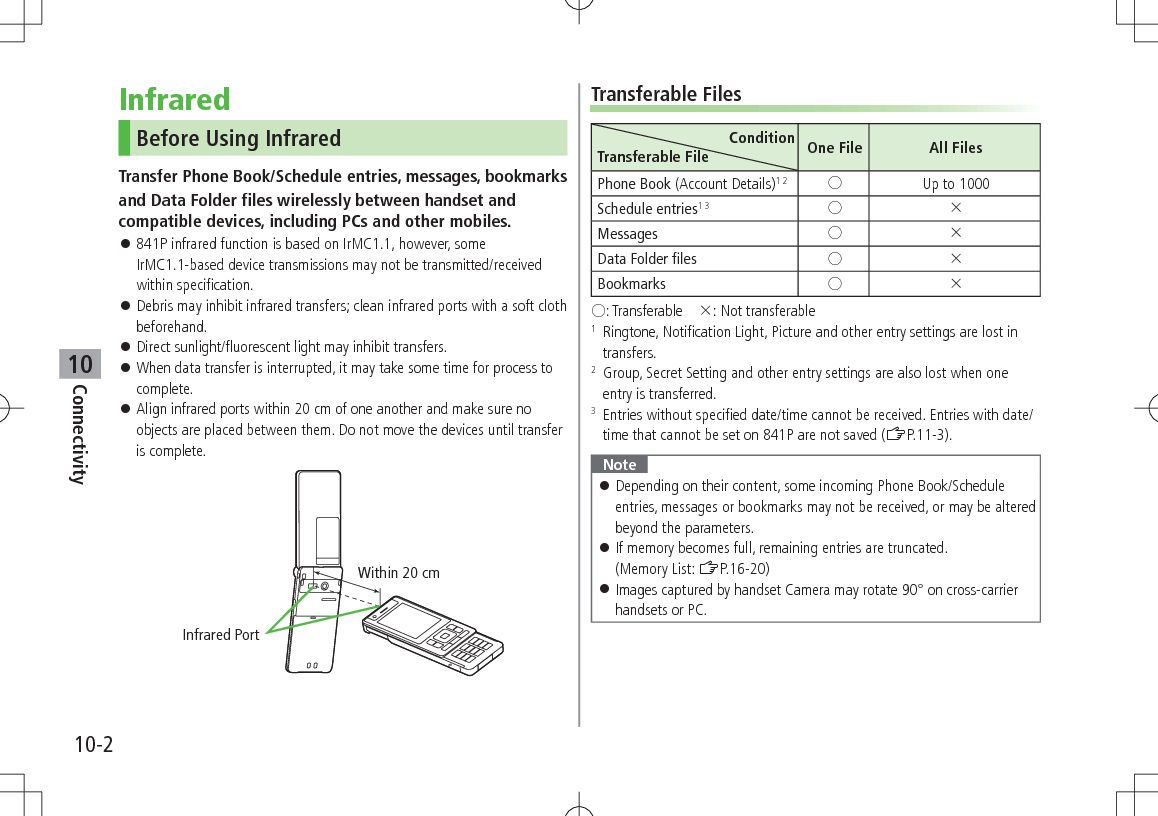
![10-3Connectivity10One File Transfer Transferable Files: ZP.9-2Sending1 Highlight a file 7 A[Menu] 7 Follow the steps belowFiles Operation/DescriptionPhone Book/Account Details/ Data Folder files >Send 7 InfraredMessages/Schedule entries/Bookmarks >Send via InfraredSMS in Incoming Mail folder >Local Connectivity 7 InfraredTransfer starts.Note Alternatively, follow the steps below to send Account Details: Main Menu 4 Infrared 4 Send Account Details.ReceivingMain Menu 4 Infrared 4 Infrared ON/OFF1 ON appears. Acquire signal within three minutes.2 When receiving transfer request from sender, confirmation appearsFile name and size appear.3 7 Follow the steps belowFiles Operation/DescriptionData Folder files >Phone or Memory CardPhone Book/Schedule entriesA[Save]Messages Saved in a messaging folder automaticallyBookmarks Saved in Bookmarks List automaticallyNote Handset receives files only in Standby. Infrared is canceled if no transmission is made within three minutes or handset power is turned off.](https://usermanual.wiki/Panasonic-Mobile-Communications/209025A.User-Manual-2-of-5/User-Guide-1228968-Page-47.png)
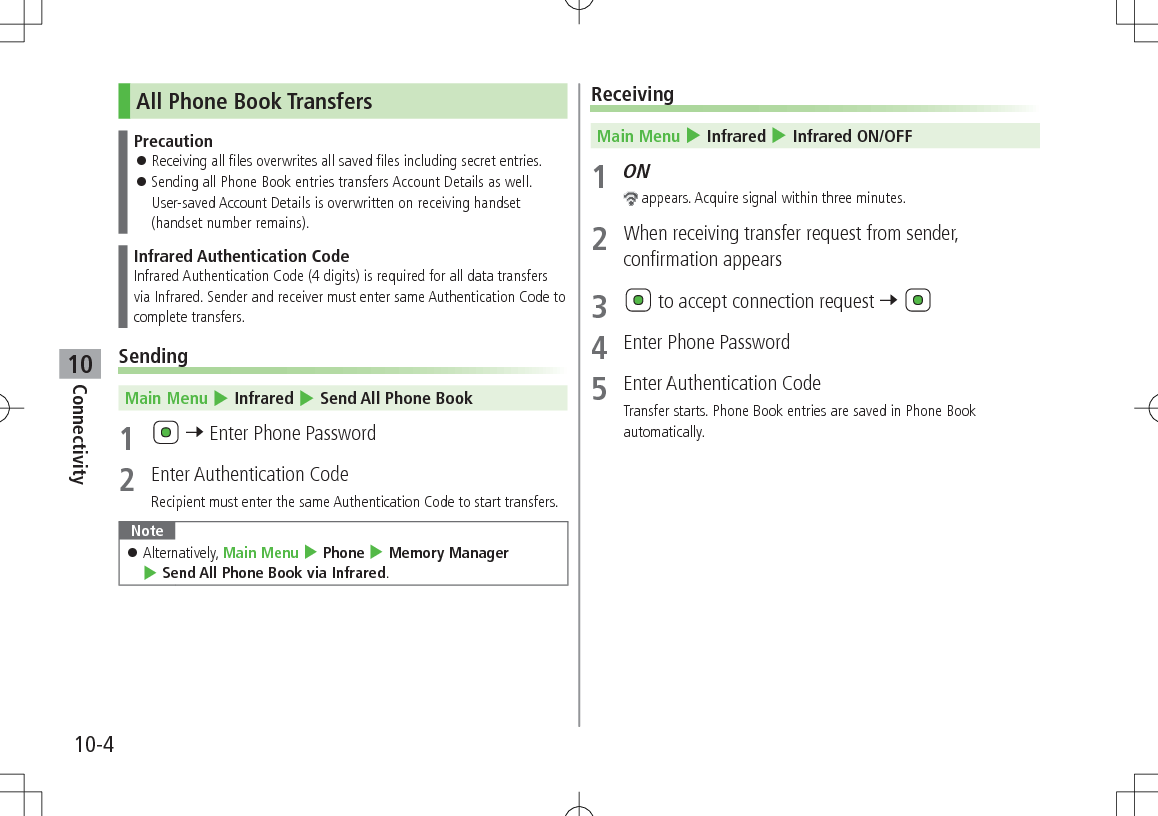
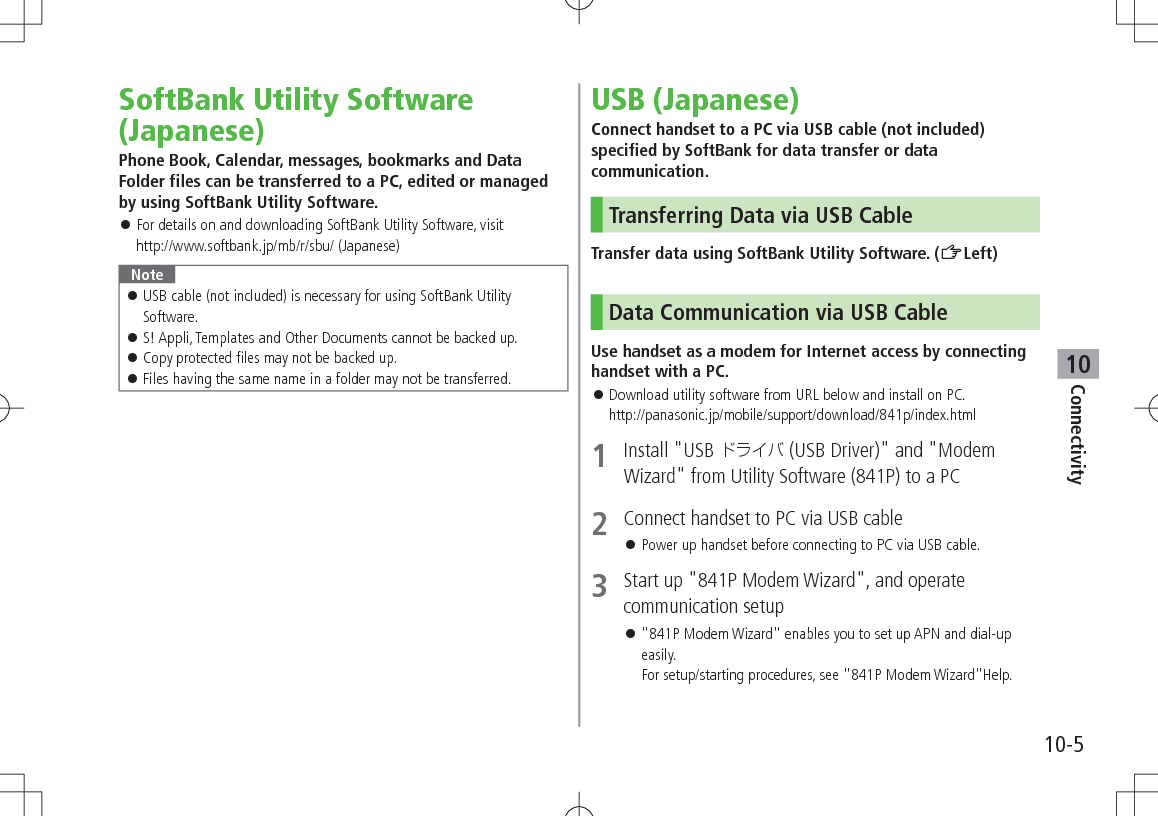
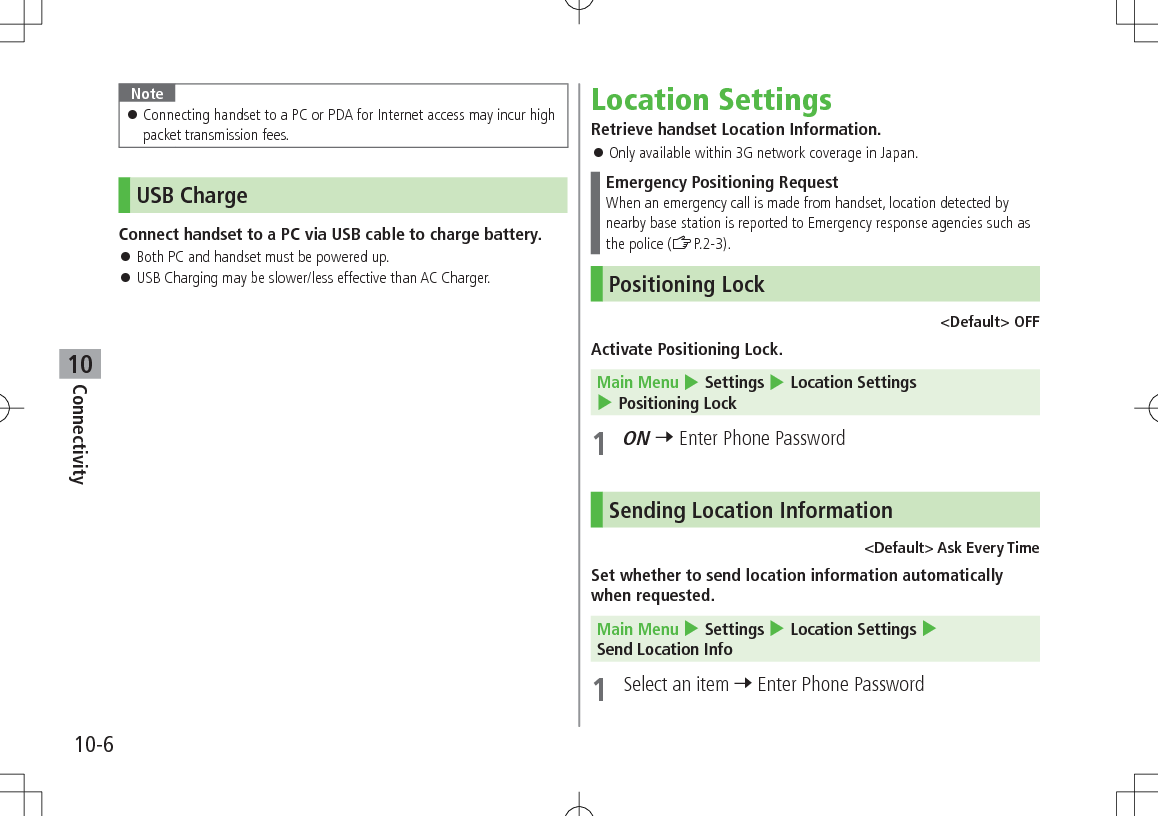
![11-3Handset Security11Changing PIN/PIN2 Set PIN Certification to ON before changing PIN (ZP.10-2).Main Menu 4 Settings 4 Security 4 Change PIN or Change PIN21 Enter current PIN/PIN22 Enter new PIN/PIN23 Reenter new PIN/PIN2PIN/PIN2 Lock & Cancellation (PUK/PUK2)PIN Lock or PIN2 Lock is activated if PIN or PIN2 is incorrectly entered three times. Cancel PIN Lock or PIN2 Lock by entering PIN Unblocking Key (PUK/PUK2). For information about PUK/PUK2, contact SoftBank Mobile Customer Center, General Information (ZP.16-30).1 In PIN lock mode, enter PUK/PUK22 Enter new PIN/PIN23 Reenter new PIN/PIN2Note If PUK/PUK2 is incorrectly entered ten times, USIM Card is locked and handset is disabled (turning off power counts as one incorrect entry). Write down PUK/PUK2. For procedures required to unlock USIM Card, contact SoftBank Mobile Customer Center, General Information (ZP.16-30).KeyguardLock handset keys to prevent accidental operation. While locked, appears in Standby.1 In Standby, press and hold 7 To cancel: In Standby, 7 A[YES]Note Alternatively, Main Menu 4 Settings 4 Phone Settings 4 Keyguard 4 . Emergency numbers (110, 119, 118) are dialable even when Keyguard is active (Entered numbers do not appear on Display). To correct misentries, press L, then re-enter number. When Keyguard is active, handset will not power down. Cancel Keyguard then press and hold L.](https://usermanual.wiki/Panasonic-Mobile-Communications/209025A.User-Manual-2-of-5/User-Guide-1228968-Page-53.png)
![11-5Handset Security11Restricting Calls/MessagesRejecting Incoming CallsRejecting Calls by Call-type<Default> OFFReject calls from unknown numbers (numbers not saved in Phone Book, blocked Caller ID, pay phones, etc.).Main Menu 4 Settings 4 Call Settings 4 Reject Incoming Calls1 Select an item2 ON or OFFRejecting Specific NumbersAdd numbers to Reject List to reject specific incoming calls, then set Activate Reject List to ON.Main Menu 4 Settings 4 Call Settings 4 Reject Incoming Calls 4 Reject List1 Select an item (See below)Item Operation/DescriptionActivate Reject ListReject incoming calls from numbers in Reject List >ON or OFFEdit Reject List Add numbers to Reject List to reject specific incoming calls >A[Menu] 7 Add 7 Select an item 7 Highlight number in Phone Book/Call Log 7 A[Select] (For Direct Entry, enter number directly) Edit/Delete Numbers in Reject List >In Step1, Edit Reject List 7 Highlight number 7 A[Menu] 7 Edit or Delete ( 7 For Delete, )Calls from Rejected NumbersHandset does not ring/vibrate, but Information window appears. Press to confirm. If call is rejected because Caller ID was not sent (Withheld), caller is instructed via voice message or Picture to send ID.Note Set handset to reject all incoming calls or incoming calls while abroad (Call Barring: ZP.2-19).](https://usermanual.wiki/Panasonic-Mobile-Communications/209025A.User-Manual-2-of-5/User-Guide-1228968-Page-55.png)
![11-6Handset Security11Phone Book Lock<Default> OFFWhile Phone Book Lock is active, viewing Phone Book, saving new entries, changing settings, etc. are restricted. When Phone Book Lock is active, appears. When Phone Book Lock and Messaging Lock are both active, appears. Main Menu 4 Settings 4 Security 4 Phone Book Lock1 ON 7 To cancal, select OFF.2 Enter Phone Password Note Mail & Call Log, Account Details, S! Address Book and Phone Book backup to Memory Card are available while Phone Book is active. When Phone Book Lock is active, only phone numbers/mail address appear for incoming communications from Phone Book entries.Messaging Lock[Default] OFFWhile Messaging Lock is active, creating messages, viewing Messaging folders, changing settings, etc. are restricted. When Messaging Lock is active, appears. When Phone Book Lock and Messaging Lock are both active, appears. Main Menu 4 Settings 4 Security 4 Messaging Lock1 ON 7 To cancel, select OFF.2 Enter Phone PasswordNote When receiving a new message while Messaging Lock is active, sender information does not appear in Standby or ticker. When Messaging Lock is active, Message/template backup to Memory Card, template download etc. are available, but templates cannot be edited or used for S! Mail messages.](https://usermanual.wiki/Panasonic-Mobile-Communications/209025A.User-Manual-2-of-5/User-Guide-1228968-Page-56.png)
![11-8Handset Security11Secret Mail Setting<Default> ShowHide messages to/from secret Phone Book entries. Even if Secret Mail Display is set to Hide, secret mail appears when Secret Mode/Secret Data Only is active.1 A[ ] 7 Settings 7 Universal Settings2 Display Settings 7 Secret Mail Display3 Enter Phone Password 7 HideMail Security SettingSet handset to require Phone Password for opening messaging folders or operating Server Mail.1 A[ ] 7 Settings2 Universal Settings 7 Mail Security Setting3 Enter Phone Password 7 Check items 7 A[OK] Set/Cancel Mail Security for Folders in Incoming Mail/Sent Messages Folders >A[ ] 7 Incoming Mail or Sent Messages 7 Highlight a folder 7 A[Menu] 7 Set Mail Security or Cancel Mail Security 7 Enter Phone Password](https://usermanual.wiki/Panasonic-Mobile-Communications/209025A.User-Manual-2-of-5/User-Guide-1228968-Page-58.png)

![12-2Tools12CalendarView by day, week or month; set Alarms for events.Opening Calendar1 DCurrent month appears. When a date with schedule events is selected, up to four events appear. Press D or F to display previous/next month calendar. To switch Monthly/Weekly view: ZP.11-5 Note Alternatively, Main Menu 4 Tools 4 Calendar.One Month WindowCreating Schedule EventsSave up to 100 entries.1 D2 to highlight a date 7 A[Menu] 7 New Entry3 Select an item (See below)Item Operation/DescriptionSummary >Enter title or contentCategory Select an event type; icon appears in Standby >Select a categoryStart >Enter date and time the schedule event startsEnd >Enter date and time the schedule event endsDescription >Enter event descriptionRepetition >Select a repeat type ( 7 Enter repeating time)](https://usermanual.wiki/Panasonic-Mobile-Communications/209025A.User-Manual-2-of-5/User-Guide-1228968-Page-62.png)
![12-3Tools12Item Operation/DescriptionReminder >Select an alarm typeLocation >Enter locationSchedule Tone >Select an itemDefault ToneRing Songs·Tones or Music 7 Highlight a file 7 A[Set]Schedule Volume > to adjust volumeNotification LightSet schedule alarm notification light color >Select a color or OFF4 A[Save]Note Schedule events between 00:00 on 2000/01/01 and 23:59 on 2099/12/31 can be saved on handset.Schedule IconSelected icon in Category appears in Standby.Example: (Meeting), (Anniversary), (Birthday) If nothing selected, appears. Icon disappears after scheduled event has passed.At Reminder TimeSchedule Tone sounds and Notification Light flashes.1 When Schedule Tone sounds, Schedule Tone stops and Schedule Event List appears.2 to view detailsCanceling Schedule Tone Press L to return to Standby. Press S[Stop] to return to previous menu. Press any key except for L, S[Stop], A[View] or to cancel Schedule Tone without returning to Standby. Press to view detailed schedule.Note Schedule Tone does not sound in the following cases: During a call (Notification appears and handset vibrates) In Manner Mode (Manner Mode settings take priority) When handset power is turned off For entries invalidated by Time Correction](https://usermanual.wiki/Panasonic-Mobile-Communications/209025A.User-Manual-2-of-5/User-Guide-1228968-Page-63.png)
![12-4Tools12Setting Day Off Day Off dates appear in red.1 D2 (Highlight a date 7 ) A[Menu] 7 Set Day Off3 Select an item (See below)Item Operation/DescriptionWeekly >Check the dates 7 A[OK]Today* >Once or YearlyReset All Reset all Day off dates >* To cancel selection: Reset HolidayViewing/Editing Schedule Events Holidays appear in red.1 D 7 Select a date2 Select a schedule eventDetailed schedule appears. Press to switch Schedule tab and Contents tab. To edit: [Edit] 7 Edit selected items (ZFrom Step 3 on P.11-2)Schedule Event ListSchedule Event Details](https://usermanual.wiki/Panasonic-Mobile-Communications/209025A.User-Manual-2-of-5/User-Guide-1228968-Page-64.png)
![12-5Tools12Calendar FunctionsFrom D Switch Calendar View<Default> One Month >A[Menu] 7 View Format 7 One Month or One Week Select One Week view to see daily schedules. Search Specific Day >A[Menu] 7 Go to Date 7 Enter date Set Week Start Day >A[Menu] 7 Start Week From 7 Select a day Delete Schedule Events >Follow the steps belowItem Operation/DescriptionOne >Select a date 7 Highlight an event 7 A[Menu]7 Delete 7Scheduled Events* >Highlight a date 7 A[Menu] 7 Delete 7 Day 7 7Past Events* > Highlight a date 7 A[Menu] 7 Delete 7 Past 7 7All >A[Menu] 7 Delete 7 All 7 A[YES] 7 Enter Phone Password* Repetitive entries cannot be deleted. Calendar Memory Status >A[Menu] 7 Memory StatusTip#Send Schedule Data via Infrared (ZP.9-3)](https://usermanual.wiki/Panasonic-Mobile-Communications/209025A.User-Manual-2-of-5/User-Guide-1228968-Page-65.png)
![12-6Tools12AlarmsWhen scheduled time arrives, alarm tone sounds and animation appears on Display. Notification Light illuminates. Setting AlarmSet up to five alarms. Alarm tone sounds at the specified time once, everyday or weekly as set. appears in Standby when Alarm is set.Main Menu 4 Tools 4 Alarms1 Select an Alarm2 Select an item (See below)Item Operation/DescriptionAlarm ON/OFF Activate or cancel Alarm >ON or OFFTime >Enter timeItem Operation/DescriptionRepetition >Select a repeat type ( 7 For Weekly, check days 7 A[OK])Alarm Tone >Select an itemDefault ToneRing Songs·Tones or Music 7 Highlight a file* 7 A[Set]Set Alarm SnoozeAlarm Tone sounds for 60 seconds, repeating up to five times at specified intervals >ON or OFF ( 7 For ON, enter interval)Alarm Volume > to adjust volumePicture Select image to appear >Select an itemDefault PicturePictures 7 Highlight a still image 7 A[Set]Set Alarm VibrationSelect Vibration type >Select pattern or OFFNotification LightSelect Notification Light color >Select a color or OFFSet Alarm PrioritySet Manner Mode or Alarm priority >Manner Mode Prioritized or Alarm Prioritized* When selecting an SMC file, highlight a Play Point 7 A[Set]3 A[Save]](https://usermanual.wiki/Panasonic-Mobile-Communications/209025A.User-Manual-2-of-5/User-Guide-1228968-Page-66.png)
![12-7Tools12At Alarm TimeAlarm Tone sounds, Notification Light flashes and image appears on Display.1 Press any keyAlarm stops and confirmation window appears.(When pressing L, confirmation does not appear.) Alarm stops automatically after 60 seconds of inactivity, and confirmation window appears. Cancel/Reactivate Alarm >Main Menu 4 Tools 4 Alarms 4 Highlight an alarm 4 A[Menu] 4 Alarm ON or Alarm OFF Activate a canceled Alarm to apply previous settings. appears for set alarms; for unset/canceled ones.Snooze FunctionIf ON, press any key except L; confirmation appears. To cancel Alarm, press A[Stop]. When pressing L to stop alarm, confirmation does not appear.(Snooze function is still active.)Note Alarm Tone does not sound in the following cases: During a call (Notification appears and handset vibrates) In Manner Mode Prioritized (Manner Mode settings take priority) When handset power is turned off For entries invalidated by Time CorrectionCalculatorCalculates up to 10 digits.Main Menu 4 Tools 4 CalculatorOperation Assigned keyNumber (0 - 9) P - O+–x÷=Decimal point AClear SorKToggle + and – D%F Enter Negative Numbers >Enter number, then D Press D to toggle negative/positive value.Example:-17+28.5=11.5Q U D W I A T](https://usermanual.wiki/Panasonic-Mobile-Communications/209025A.User-Manual-2-of-5/User-Guide-1228968-Page-67.png)
![12-8Tools12NotepadMain Menu 4 Tools 4 Notepad1 A[Menu] 7 New2 Enter textNew note is added to the top of the list. Up to 64 characters can be entered.Notepads WindowNotepad FunctionsFrom Main Menu 4 Tools 4 Notepad Edit Notes >Select a note 7 [Edit] 7 Edit text Edited note is overwritten. Delete Notes >Highlight a note 7 A[Menu] 7 Delete 7 One or All 7 A[YES] ( 7 For All, enter Phone Password) Note Property >Highlight a note 7 A[Menu] 7 Property Insert Notes into Message Text >Highlight a note 7 A[Menu] 7 Send 7 Send via S! Mail or Send via SMS 7 Enter mail address, etc. (S! Mail: ZFrom Step 2 on P.12-4/SMS: ZFrom Step 2 on P.12-8) 7 S[Send]](https://usermanual.wiki/Panasonic-Mobile-Communications/209025A.User-Manual-2-of-5/User-Guide-1228968-Page-68.png)
![12-9Tools12Count Down TimerAlarm Tone sounds, handset vibrates and Notification Light flashes when specified time elapses.Main Menu 4 Tools 4 Count Down Timer1 Enter time2 A[Start] To pause: A[Stop] Stop Alarm Tone >When Alarm tone sounds, to stop Alarm stops automatically after 30 seconds.Note Incoming calls/other alarms do not interfere with timer operation. However, if timer reaches 00:00 while other functions are active, alarm does not sound. Alarm tone volume and vibration pattern follow Assign Ringtone (ZP.15-2).Voice RecorderRecord voice memos. Record for up to 60 seconds each. Recording conversation during a call: ZP.2-9Main Menu 4 Tools 4 Voice Recorder1 Recording starts.2 to stop recording To playback: 3 A[Save]Recorded sounds are saved in RingSongs·Tones folder. Note Sounds recorded by Voice Recorder cannot be set as Alarm, Ringtone or Schedule Tones.](https://usermanual.wiki/Panasonic-Mobile-Communications/209025A.User-Manual-2-of-5/User-Guide-1228968-Page-69.png)
![12-10Tools12Bar Code ReaderScan barcodes (JAN) or QR Codes with built-in camera. Access websites, send messages, etc. from QR Codes.JAN CodesJAN Code is a one-dimensional bar code denoting numerals with bars and spaces of different widths.QR CodesQR Code is a two-dimensional bar code containing information.Example: SoftBank mobile phonesScanning Barcodes Up to ten items can be saved. For split data, up to 16 QR Codes can be scanned at a time and saved as one item.Main Menu 4 Bar Code 4 Scan Barcodes1 Frame barcode in the center of Display To adjust Display brightness: G or H To zoom: To use Focus Lock: 2 Scanning starts, and scanned results appear when completed. For split data, 7 Repeat Step 1 and 23 S[Save] To start over: K 7 7 Go to Step 2Note Handset cannot read barcodes or two-dimensional codes other than JAN/QR Codes. Some barcodes may be unreadable. Barcode recognition may be slow. Hold handset steady while scanning. Brightness can be adjusted while scanning; however, zoom level cannot be changed. Saved items are automatically named "yymmdd_hhmmss" unless changed. (yy: year, mm: month, dd: day, hh: hour, mm: minute, ss: second) Barcodes may not be correctly read owing to scratch, dirt, damage, quality of printed material, light reflection, or QR code version.](https://usermanual.wiki/Panasonic-Mobile-Communications/209025A.User-Manual-2-of-5/User-Guide-1228968-Page-70.png)
![12-11Tools12Viewing/Editing Scanned Data Main Menu 4 Bar Code 4 Saved Data List1 View Saved DataSelect an item Edit TitleHighlight an item 7 A[Menu] 7 Rename 7 Edit title Delete Saved Data >In Step 1, highlight an item 7 A[Menu] 7 Delete One 7 Using Barcode DataFrom Main Menu 4 Bar Code 4 Saved Data List Use URLs/Mail Addresses/Phone Numbers >Select an item 7 Follow the steps belowItem Operation/DescriptionURL (http:// or https://)Connect to websites; add to Bookmarks (ZP.13-8)URL (rtsp://) Streaming; add to BookmarksMail Address Create S! Mail (ZP.12-4); save to Phone Book (ZP.4-3)Phone Number Make calls; create messages* (S! Mail: ZP.12-4/SMS: ZP.12-8); save to Phone Book (ZP.4-3) Phone Book Data(MEMORY: text)Save to Phone Book Save MEMORY: text only Saved to Phone regardless of Save Settings selection* SoftBank handset numbers only](https://usermanual.wiki/Panasonic-Mobile-Communications/209025A.User-Manual-2-of-5/User-Guide-1228968-Page-71.png)
![12-12Tools12 Insert Scanned Text into Messages >Select an item 7 A[Menu] 7 Paste Data & Create Mail 7 S! Mail or SMS 7 Create message (S! Mail: ZFrom Step 2 on P.12-4/SMS: ZFrom Step 2 on P.12-8) Copy Text from Scanned Results >Select an item 7 A[Menu] 7 Copy 7 Follow the steps belowItem Operation/DescriptionAll Text >S[All] 7 Selected Text >Place cursor before (or after) text to copy 7 7 Place cursor after (or before) text to copy 7 One Touch GuideAccess One Touch Guide for instructions to key operations.Main Menu 4 Tools 4 One Touch Guide1 Select a functionInstructions appear. Press or to view previous or next information.Note Alternatively, view from Shortcuts (ZP.1-19) or Private Menu (ZP.1-20).Example: Magnifying Loupe](https://usermanual.wiki/Panasonic-Mobile-Communications/209025A.User-Manual-2-of-5/User-Guide-1228968-Page-72.png)
![13-2Messaging13BasicsSend messages via S! Mail or SMS.S! Mail[Separate subscription required]Exchange text messages with SoftBank or e-mail compatible handsets, PCs, etc.; attach image or sound files etc. 841P is compatible with Graphic Mail (ZP.12-6) and Feeling Mail (ZP.12-5).SMS Exchange short text messages with SoftBank handsets. For more information, visit SOFTBANK MOBILE Corp. Website (http://www.softbank.jp).Tip#Messaging Lock (ZP.10-6)Available Entry Items & Character Entry LimitsItem S! Mail SMSAddressE-mailaddress Up to 246 single-byte alphanumerics/ Up to 20 recipients–Phonenumber1 Up to 20 single-byte alphanumerics/ten recipientsSubject Up to 256 double-/ single-byte alphanumerics–Text 30 KB2Up to 70 double-/single-byte alphanumerics 3Attachment Up to 20 files –1 SoftBank handset numbers only2 S! Mail Entry Limit decreases when mail attachments exceed 260 KB.3 When Input Character Settings is set to English(160characters) (ZP.15-21), up to 160 single-byte alphanumerics can be entered.Note Send up to 300 KB including subject, message text and attachment via S! Mail. Message text character limit differs by attachment size. SMS messages can be converted to S! Mail (ZP.12-8), but not in the following cases: S! Mail memory is full (ZP.12-3) During a call (S! Mail messages cannot be created during a call) S! Mail cannot be converted to SMS.](https://usermanual.wiki/Panasonic-Mobile-Communications/209025A.User-Manual-2-of-5/User-Guide-1228968-Page-74.png)
![13-3Messaging13Messaging Folders & Memory StatusMessages are organized in folders by message type.1 Set Mail Delivery Rule to sort received messages automatically (ZP.12-19, P.12-20).2 Add up to ten folders (ZP.12-22).Deleting Messages AutomaticallyWhen memory for messaging folders is low, read messages and sent messages are automatically deleted one by one. Protect important messages from unintentional deletion (ZP.12-24), or set Auto Delete Sent Messages/Auto Delete Incoming Messages to OFF (ZP.15-18, P.15-19). SMS messages saved in USIM Card are not automatically deleted.Create MessagesReceive MessagesSave as DraftsSend MessagesCompleteNot CompleteFolder 1-32SentDraftsUnsent MessagesMessaging FoldersIncoming MailSent MessagesReceivedFolder 1-32Spam Folder11When Messaging Memory is Full (Received Full) appears in Standby and no more new incoming messages are received. Delete old messages in Incoming Mail folder (ZP.12-24). Retrieve new messages after deleting some S! Mail (ZP.12-17). View Memory Status >A 7 Memory Status 7 Phone or USIM ( 7 For Phone, Outgoing or Incoming)TipSettings #Mail Security Setting (ZP.10-8)Customizing Handset AddressChange your handset mail address (alphanumerics before @) to reduce the risk of receiving spam. Default account name is random alphanumerics.abc123-xyz @ softbank.ne.jpDomain NameAccount Name (Customize here) For details, visit SOFTBANK MOBILE Corp. Website (http://www.softbank.jp). Handset mail address cannot be changed in Emission OFF Mode. For operations while using Internet: ZP.13-61 A[ ]7 Settings 7 Custom Mail AddressHandset connects to the Network.Follow onscreen instructions.](https://usermanual.wiki/Panasonic-Mobile-Communications/209025A.User-Manual-2-of-5/User-Guide-1228968-Page-75.png)
![13-4Messaging13Sending S! Mail & SMSSending S! Mail Text Entry (ZP.3-2)Example: Select a Phone Book entry to send S! Mail.1 Press and hold A[ ]2 Select Address field 7 Phone Book3 Select a Phone Book entry 7 Select a SoftBank handset number or mail addressComposition WindowAddress fieldSubject fieldText fieldAttachment field4 Select Subject field 7 Enter subject5 Select Text field6 Enter text7 S[Send]Tip#Addresses (ZP.12-9) #Other Functions (ZP.12-10) #Sending Messages (ZP.12-11)Settings #Request Delivery Confirmation (ZP.15-18)Text Entry Window](https://usermanual.wiki/Panasonic-Mobile-Communications/209025A.User-Manual-2-of-5/User-Guide-1228968-Page-76.png)
![13-5Messaging13Adding Attachments1 After Step 6 on page 12-4, select Attachment field2 Select an item 7 Highlight an item 7 A[Set]/[Select]3 S[Send] Attach Captured Pictures/Videos >For picture: After Step1, Launch Camera 7 Frame subject 7 [Shoot] 7 [Save] >For video: After Step 1, Launch Camera 7 S[Video] 7 Frame subject 7 [Record] 7 [Stop] 7 Attach to S! MailNote Some files cannot be attached depending on the file format or size. Some copy protected files cannot be sent.Tip#Attachments (ZP.12-9)Sending Feeling MailRecipient's handset responds to your Feeling setting. Send Feeling Mail to compatible SoftBank handsets only. Ringtone, vibration and Notification Light settings vary depending on recipient's settings. (ZP.15-20)1 After Step 6 on page 12-4, A[Menu] 7 Sending Options 7 Feeling Expression2 Select an item 7 Select an iconSelected icon appears in Subject field.3 S[Send]](https://usermanual.wiki/Panasonic-Mobile-Communications/209025A.User-Manual-2-of-5/User-Guide-1228968-Page-77.png)
![13-6Messaging13Graphic MailCreate HTML messages; select font color/size, background color, or insert images, etc.Example: Use various Templates to create Graphic Mail Change font size Scroll text1 After Step 4 on page 12-4, A[Menu] 7 Insert Template 7 Highlight a template 7 [View] A[Set] to set template S[Back] to re-select template2 Select Text field 7 Delete " "3 J to open Graphic Palette Alternatively, press A[Menu] 7 Graphic Mail.Graphic Palette4 Font Size 7 select a font size 7 Enter text5 Select Mail Art Area 7 Place cursor before a sentence to scroll 7 A[Start] 7 Move cursor to end of sentence 7 A[End] Text is highlighted. To cancel selection (Cancel Mail Art Area): 6 Start Scrolling 7 S[Close] To preview: A[Menu] 7 Preview7 Text field preview appears.8 S[Send]](https://usermanual.wiki/Panasonic-Mobile-Communications/209025A.User-Manual-2-of-5/User-Guide-1228968-Page-78.png)
![13-7Messaging13 Reset Operations >To cancel previous operation: Close Graphic Palette 7 A[Menu] 7 Undo >To reset all Graphic operations: J 7 Reset All Graphic Mail 7 Note In Simple Mode, text in composition window appears in Large Size regardless of Font Size setting. When placing cursor at text, Font Size icon ( : Large Size, : Small Size) appears. (When Normal Size is selected, Font Size icon does not appear.) In preview window, text appears in selected font size.Using My Pictograms1 After Step 5 on page 12-4, in a text entry window, GMy Pictogram list appears. Previously used pictographs appear first. List Log shows pictographs in upper half of window and My Pictograms in lower half.2 A[Switch] repeatedly until My Pictogram list appears Alternatively, press R to open My Pictogram.3 D or F to open previous/next page 7 Select a My PictogramMy Pictogram is entered.4 K 7 Enter text 7 S[Send] Use My Pictograms from Graphic Palette >In a text entry window, J 7 My Pictograms 7 Highlight a My Pictogram 7 A[Set] 7 S[Close] Use My Pictograms Saved in Memory Card >In a text entry window, J 7 My Pictograms 7 Switch to Memory Card 7 Highlight a My Pictogram 7 A[Set] 7 S[Close]Tip#Graphic Mail Functions (ZP.12-10)#Save Templates #Download Templates via Internet (ZP.12-11)](https://usermanual.wiki/Panasonic-Mobile-Communications/209025A.User-Manual-2-of-5/User-Guide-1228968-Page-79.png)
![13-8Messaging13Sending SMS Messages Text Entry (ZP.3-2)Example: Select a Phone Book entry to send SMS.1 A[ ] 7 Create New SMS2 Select Address field 7 Phone Book3 Select a Phone Book entry 7 Select a SoftBank handset numberAddress fieldText fieldComposition Window4 Select Text field5 Enter text When number of entered character exceeds limit, S! Mail conversion option message appears.6 S[Send] Manual Mail Conversion >In SMS Composition window, A[Menu] 7 Switch Message TypeTip#Addresses (ZP.12-9) #Other Functions (ZP.12-10)Settings #Request Delivery Confirmation (ZP.15-18) #Set a Time Limit to Store All Sent SMS at the Center #Change SMS Center Number #Set Input Character to English (ZP.15-21)Text Entry Window](https://usermanual.wiki/Panasonic-Mobile-Communications/209025A.User-Manual-2-of-5/User-Guide-1228968-Page-80.png)
![13-9Messaging13Creating MessagesAddressesFrom Composition window, select Address field Enter Address Directly >Enter Number or Enter Address* 7 Enter a SoftBank handset number or mail address* S! Mail only Select Address from Send/Receive Logs >Send Logs or Receive Logs 7 Select a log Select S! Mail Address from Mail Group >Mail Group 7 Highlight a Mail Group 7 A[Select] Add/Edit/Delete Address >Follow the steps (See below)Item Operation/DescriptionAdd Address ><Add Recipient> 7 Search/enter address 7 Select an address or enter directlyEdit >Highlight an address 7 Edit addressDelete >Highlight an address 7 A[Menu] 7 Delete Change To/Cc/Bcc (S! Mail only) >Highlight an address 7 A[Menu] 7 Change To/Cc/Bcc 7 Select a typeAttachmentsFrom After attaching a file, select Attachment field Open/Play Attached Files >Select a file Add Attachments ><Add New> 7 Select an item 7 Highlight a file/entry 7 A[Set]/[Select] To attatch Account Details: <Add New> 7 Account Details To attach captured pictures/videos: (ZP.12-5) Delete Attachments >Highlight a file 7 A[Menu] 7 Delete](https://usermanual.wiki/Panasonic-Mobile-Communications/209025A.User-Manual-2-of-5/User-Guide-1228968-Page-81.png)
![13-10Messaging13Other Functions Functions Available while Creating Messages >In Composition window, A[Menu] 7 Select an item (See below)Item Operation/DescriptionEdit Edit messageSend Send messageSave as Drafts Save message to Drafts without sendingInsert Template1 >Select a templateSave as Template1Save edited templateSending OptionsSet options for outgoing messages (ZP.12-11)Preview1Preview S! Mail3D Preview Message text appears in 3D animationSwitch Message Type2Switch SMS to S! Mail1 S! Maill only2 SMS onlyGraphic Mail Functions Use Other Graphic Mail Settings >In S! Mail text entry window, J 7 Select an arrange item (See below)Item Operation/DescriptionSelect Mail Art AreaSpecify text to be arranged >Place cursor before (or after) text 7 A[Start] 7 Place cursor after (or before) text 7 A[End] 7 Select an icon 7 Follow the steps for selected items To cancel selection: A[End] 7 Font Color >Select a colorStart Blink Flash textBackground Color >Select a colorInsert Files Insert still images, music or Flash® files; activate Camera and insert captured imageMusic files are sent as BGM >Select an itemSelect File 7 Select a folder 7 Select a file 7 A[Set]Launch Camera 7 Frame subject 7 [Shoot] 7 [Save] To delete inserted music files: Delete BGMReset All Graphic MailCancel all Graphic Mail settings >Font Size >Select a font sizeAlignment >Select a typeStart Scrolling Scroll textStart Swing Swing text](https://usermanual.wiki/Panasonic-Mobile-Communications/209025A.User-Manual-2-of-5/User-Guide-1228968-Page-82.png)
![13-11Messaging13Item Operation/DescriptionInsert Line Insert separator lineMy Pictograms Insert My Pictograms >Highlight a My Pictogram 7 A[Set] One file of BGM or Flash®, and up to 40 types of My Pictograms or images can be inserted per Graphic Mail. To delete inserted images, lines, My Pictograms, etc.: Close Graphic Palette 7 Move cursor before images, etc. 7 K Save Edited Templates >In S! Mail Composition window, A[Menu] 7 Save as Template Download Templates via Internet >A 7 Templates 7 Download Templates Handset connects to the Network. Follow onscreen instructions.Sending Messages Set for Sending Messages >In composition window, A[Menu] 7 Sending Options 7 Select an items (See below)Item Operation/DescriptionDelivery Report >ON Request Delivery Confirmation (ZP.15-18)Set Priorities1Set S! Mail priority >Select a levelExpiry2Set SMS expiry time >Select a limit Set a Time Limit to Store All Sent SMS at the Center (ZP.15-21)Feeling Expression1(ZP.12-5)1 S! Maill only2 SMS only](https://usermanual.wiki/Panasonic-Mobile-Communications/209025A.User-Manual-2-of-5/User-Guide-1228968-Page-83.png)
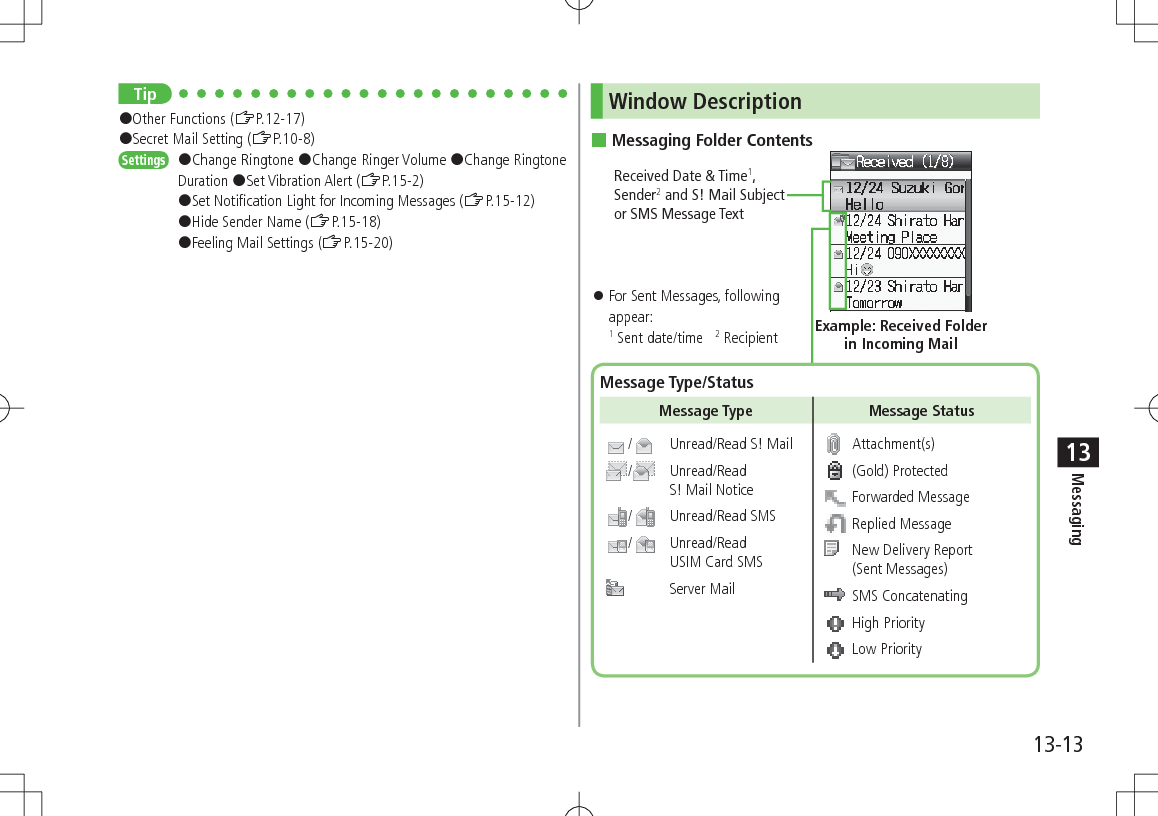
![13-14Messaging13 Message ContentsNote Status icons for forwarded/replied SMS messages saved in USIM Card do not appear. After retrieving complete messages, S! Mail Notice icons with (Forwarded) or (Replied) change to / (S! Mail). Messages remain protected after complete messages are retrieved via protected S! Mail Notices.Tip#Functions Available for Received/Sent/Draft Message List (ZP.12-23)#Functions Available In Received/Sent Message Window (ZP.12-24)Settings #Change Font Size #Change Message List View (ZP.15-18)Sender/RecipientSent or Received Date/TimeSubjectNumber of AttachmentsThe number of files (images, sounds, videos, text, etc.) appears.Message WindowMessage TextSystem Message Icon (ZP.12-17)Retrieving Complete S! MailThe complete message may not be downloaded during handset operations. Center sends initial portion of message as an S! Mail Notice. Manually retrieve the complete message.1 At the end of message text, There are sequels Retrieve from Message List >In received message list, A[Menu] 7 Retrieve 7 One Retrieve Multiple Messages >In received message list, A[Menu] 7 Retrieve 7 Selected Messages 7 Check messages 7 A[Retrieve] 7](https://usermanual.wiki/Panasonic-Mobile-Communications/209025A.User-Manual-2-of-5/User-Guide-1228968-Page-86.png)
![13-15Messaging13Opening & Saving Attachments1 In Message window, A[Menu] 7 Attachment List2 Select a file 7 S[Back]3 To save the file, highlight file 7 A[Menu] 7 Save 7 Phone or Memory Card For some music files, press A[Save] 7 Phone or Memory Card.Note When messages are opened, attached image files appear/play automatically. Copy Protected Files (ZP.8-5)File formats Supported by Auto Playback Picture files (JPEG, GIF, PNG) Music files (SMAF, AMR, MIDI, SP-MIDI)TipSettings #Open Image Files Manually #Play Music Files Automatically (ZP.15-19)Mail Log Mail from Email Address Mail from Phone Number Received SMS Mail Sent to Email Address Mail Sent to Phone Number Sent SMSAll Mails Logs: All sent/received messagesReceive Logs: All received messages (up to 20 records)Send Logs: All sent messages (up to 20 records)Mail Type](https://usermanual.wiki/Panasonic-Mobile-Communications/209025A.User-Manual-2-of-5/User-Guide-1228968-Page-87.png)
![13-16Messaging131 to open Call Log 7 S[Switch]Mail Log appear.2 to select a Log3 To view entry details, select an entry To send a message: 7 Create message (S! Mail: ZFrom Step 4 on P.12-4/SMS: ZFrom Step 4 on P.12-8)Note Newest record appears at top of list. Names appear if saved in Phone Book. Mail Log records remain even if handset is turned off. Alternatively, Main Menu 4 Phone 4 Mail & Call Log 4 S[Switch].Tip#Call Log Functions (ZP.2-12)#Change Font Size by Function (ZP.15-5)3D PictogramsMessage text appears in 3D animation. Animation unavailable for S! Mail Notice.1 In Message window, A[Menu]2 3D PreviewThe first 150 characters of message text appear animated. To pause/resume: To cancel: A[Stop]TipSettings #Enable 3D Pictograms when Opening Messages #Change Font/Background Color (ZP.15-18)](https://usermanual.wiki/Panasonic-Mobile-Communications/209025A.User-Manual-2-of-5/User-Guide-1228968-Page-88.png)
![13-17Messaging13Using Server MailRetrieve mail list stored at the Center to view Server Mail.Viewing Server Mail1 A[ ] 7 Server Mail Box2 Mail List 7 A[Update] 7 Update Server Mail List >After Step 1, Mail List 7 A[Menu] 7 Update Mail List 7 Retrieving Server Mail1 A[ ] 7 Server Mail Box 7 Mail List2 (Highlight an S! Mail 7 ) A[Menu] 7 Retrieve3 Retrieve a New MessageOne Retrieve Multiple MessageSelected Messages 7 (Repeat: Select a message)* 7 A[Retrieve] 7 Retrieve All Messages >A 7 Server Mail Box 7 Mail List 7 A[Menu] 7 Retrieve 7 All 7 A[YES]Tip#Mail Security Setting (ZP.10-8)#Server Mail Functions (ZBelow)Other FunctionsRetrieving New Messages ManuallyRetrieve S! Mail messages saved at the Center while handset is off/out-of-range. >A 7 Retrieve NewViewing System Messages indicates a problem with incoming message (e.g., undelivered attachments). >A 7 Incoming Mail 7 Select a folder 7 Select a message 7 A[Menu] 7 System Message](https://usermanual.wiki/Panasonic-Mobile-Communications/209025A.User-Manual-2-of-5/User-Guide-1228968-Page-89.png)
![13-18Messaging13Server Mail FunctionsFrom A 4 Server Mail Box Delete Server Mail >Mail List 7 (Highlight Server Mail 7 ) A[Menu] 7 Delete Server Mail 7 One or Selected Files 7 (For Selected Files, Check messages 7 A[Delete]) 7 To delete Server Mail using S! Mail Notice: Highlight S! Mail Notice (from Message list) 7 A[Menu] 7 Delete 7 Delete Server Mail 7 Delete All Server Mail >Delete Server Mail All 7 A[YES] 7 Enter Phone Password Forward Server Mail >Mail List 7 Highlight an S! Mail 7 A[Menu] 7 Forward Server Mail 7 Select Address field 7 Search/enter address 7 Select an address or enter directly 7 S[Send] To forward Server Mail via S! Mail Notice: Highlight S! Mail Notice (from Message list) 7 A[Menu] 7 Forward Server Mail 7 Select Address field 7 Search/enter address 7 Select an address or enter directly 7 S[Send] Forwarded Server Mail messages remain in Mail List. appears for forwarded Server Mail messages in Drafts, Unsent Messages and Sent Messages folders. Sort Server Mail >Mail List 7 A[Menu] 7 Sort 7 Date or From View Server Mail Property >Mail List 7 Highlight an S! Mail 7 A[Menu] 7 PropertyOrganizing/Using MessagesChecking Messages in Messaging Folders At time of purchase, information messages are provided for your convenience (Transmission fee does not apply).1 A[ ] 7 Incoming Mail, Drafts, Sent Messages or Unsent Messages In Incoming Mail/Sent Messages folders, select a folder then message. Messaging Folders: ZP.12-32 Select a message To toggle previous/next messages in Received/Sent Message window: Open Incoming Mail Folder Directly >In Step 1, press and hold The newest unread message opens. Open Sent Messages Folder Directly >In Step 1, press and hold Tip#Organizing Messages (ZP.12-22)#Using Messages (ZP.12-24)](https://usermanual.wiki/Panasonic-Mobile-Communications/209025A.User-Manual-2-of-5/User-Guide-1228968-Page-90.png)
![13-19Messaging13Mail Delivery RuleSave messages that satisfy set conditions to designated folder automatically. Up to 10 conditions can be set per folder. Previously sent/received messages are not sorted. When same conditions are set to several folders, messages are sorted in numerical order of designated folders.1 A[ ] 7 Incoming Mail or Sent Messages2 Highlight a folder 7 A[Menu] 7 Mail Delivery Rule3 A[Menu] 7 Select an item (See below)Item Operation/DescriptionAdd Sender/Add AddressSort messages by sender address >Search/enter address 7 Select sender/recipient or enter directlyAdd Subject Sort messages by mail subject >Enter subject SMS cannot be sorted by mail subject. To edit saved address/subject: Select address/subject 7 Edit address/subject To delete saved address/subject: Highlight an address/subject 7 A[Menu] 7 Delete4 S[Set] Re-Sort Set FoldersRe-sort messages in folders by set conditions. >After Step 1, highlight a folder 7 A[Menu] 7 Distribute in Folder 7 Note Alternatively, Main Menu 4 Messaging 4 Settings 4 Universal Settings 4 Mail Delivery Rule (ZP.15-18).](https://usermanual.wiki/Panasonic-Mobile-Communications/209025A.User-Manual-2-of-5/User-Guide-1228968-Page-91.png)
![13-20Messaging13Filter SpamSort messages from unknown senders into Spam Folder without incoming notification. Use Safe List to receive messages from certain addresses/phone numbers and domains.Note Messages from unknown senders may be sorted into Spam Folder. Be careful when deleting messages from Spam Folder.Setting Spam Folder<Default> OFF1 A[ ] 7 Settings 7 Universal Settings 7 Anti-Spam Measures2 Spam Filter 7 Enter Phone Password3 ON 7 Safe List Specify up to 20 addresses/phone numbers and domains (for example, @softbank.ne.jp) to receive messages from without sorting into Spam Folder.1 A[ ] 7 Settings 7 Universal Settings 7 Anti-Spam Measures 7 Safe List2 <No Items> When saved items exist: A[Menu] 7 Add3 Add Domains/Phone Numbers/Mail AddressesInput Domain, Enter Number or Enter Address 7 Enter a domain/phone number/mail address Select from Receive LogReceive Logs 7 Highlight a message 7 A[Select]4 S[Set] Edit Saved Addresses/Numbers >After Step 1, highlight an item 7 [Edit] 7 Edit Delete Addresses/Numbers >After Step 1, (highlight an item 7 ) A[Menu] 7 DeleteTip#Report Spam (ZP.12-23)](https://usermanual.wiki/Panasonic-Mobile-Communications/209025A.User-Manual-2-of-5/User-Guide-1228968-Page-92.png)
![13-21Messaging13Replying to Messages1 In Message window, S[Reply] Re: appears before Subject when replying to S! Mail. Received message text is quoted.2 Complete message 7 S[Send] Reply without Quoting >In Message window, A[Menu] 7 To Sender or Reply to All Reply to All >In Step 1, A[Menu] 7 Reply 7 Reply to All with Quote or Reply to AllNote Alternatively, reply to messages by selecting a message from Message List (ZP.12-23). When replying/forwarding a message, words used in received message take priority in Forecast list (ZP.3-5).TipSettings #Base Word Predictions on Received Message When Replying (ZP.15-18)#Quote Original Message in Reply (ZP.15-19)Using Mail GroupsSave mail addresses by group. Messages can be sent to specified group of recipients. Save up to 20 recipients per group. Create up to 20 groups.Creating Mail Groups1 A[ ] 7 Settings 7 S! Mail Settings 7 Mail Group Setting2 Select a group3 Select Mail Address from Phone Book <Empty> 7 Select an entry Select Mail Address from Send/Receive LogsHighlight <Empty> 7 A[Menu] 7 Send Logs or Receive Logs 7 Select an entry Enter Mail Address DirectlyHighlight <Empty> 7 A[Menu] 7 Enter Number or Enter Address 7 Enter phone number or mail address Repeat Step 3 to save addresses.](https://usermanual.wiki/Panasonic-Mobile-Communications/209025A.User-Manual-2-of-5/User-Guide-1228968-Page-93.png)
![13-22Messaging13 Change Group Names >In Step 2, highlight a mail group 7 A[Menu] 7 Rename 7 Edit group name Reset Group Names >In Step 2, highlight a mail group 7 A[Menu] 7 Reset Name 7 Delete Saved Addresses >After Step 2, (highlight an address 7 ) A[Menu] 7 Delete 7 One or All 7 A[YES] ( 7 For All, enter Phone Password) Send a Message to All Group Members >In Step 2, highlight a group 7 A[Menu] 7 Create S! Mail 7 Create message (ZFrom Step 4 on P.12-4) To select a mail group from S! Mail composition window: ZP.12-9Note Alternatively, Main Menu 4 Phone 4 Settings 4 Mail Group Setting.Organizing Messages Functions Available in Incoming Mail/Sent Messages Folders >A 7 Incoming Mail or Sent Messages 7 (Highlight a folder 7 ) A[Menu] 7 Select an item (See below)Item Operation/DescriptionAdd Folder >Enter folder nameEdit Folder Name* >Edit folder nameMail Delivery Rule*Sort messages (ZFrom Step 3 on P.12-19)Distribute in FolderRe-sort messages in selected folder >Delete Folder* > 7 Enter Phone PasswordSet Mail Security/Cancel Mail SecuritySet/Cancel Mail Security. Set to require Phone Password for opening a folder >Enter Phone Password* User Folder only](https://usermanual.wiki/Panasonic-Mobile-Communications/209025A.User-Manual-2-of-5/User-Guide-1228968-Page-94.png)
![13-23Messaging13 Functions Available from Message Lists >A 7 Incoming Mail, Drafts or Sent Messages ( 7 Select a folder) 7 Highlight a message 7 A[Menu] 7 Select an item (See below)Item Operation/DescriptionRetrieve1Retrieve complete S! MailEdit2 3 Edit message to send (S! Mail: ZFrom Step 2 on P.12-4/SMS: ZFrom Step 2 on P.12-8)Send3Send messageReply1 >To Sender with Quote, To Sender, Reply to All with Quote or Reply to All 7 Create message (S! Mail: ZFrom Step 4 on P.12-4/SMS: ZFrom Step 4 on P.12-8)Forward1 >Select Address field 7 Search/enter address 7 Select an address or enter directly 7 S[Send] When forwarding S! Mail Notice, select Forward or Forward Server Mail. Attachments are also forwarded. (Messages with copy protected attachments may not be forwardable.)Call >Select an item 7 Follow the stepsAdd Destination to Phone Book2Save recipient address to Phone Book (Other Ways to Add New Entries: ZFrom Step 2 on P.4-5)Add Sender to Phone Book1Save sender address to Phone Book (Other Ways to Add New Entries: ZFrom Step 2 on P.4-5)Protect/Unprotect1 2(ZP.12-24)Item Operation/DescriptionMove1 2 Move messages to specific folders >One or Selected Files ( 7 For Selected Files, check messages to move 7 A[Move]) 7 Select a folder ( 7 For Selected Files, ) SMS saved on USIM Card cannot be moved.Outgoing+ Incoming1 2Show sent/received message records >Select a sender/recipient address or appears. Select a record to open Message window. Press K to return to previous window.Mail List Display SettingChange list view >Select an itemReport Spam1Report received message as Spam Mail >S[Send] Change destination to report to (ZP.15-18).Delete (ZP.12-24)Local Connectivity1 >Select an itemInfrared: Send SMS messages via InfraredCopy to USIM or Copy to Phone: Copy SMS messages between USIM Card and handsetSend via InfraredSend S! Mail messages via InfraredDelivery Report2View Delivery reportSort Change display order >Select an itemProperty View detailed information (Subject, From, To, etc.)1 Received messages only2 Sent messages only3 Drafts/Unsent messages only](https://usermanual.wiki/Panasonic-Mobile-Communications/209025A.User-Manual-2-of-5/User-Guide-1228968-Page-95.png)
![13-24Messaging13 Delete Messages >In Message List window, follow the steps (See below)Item Operation/DescriptionDelete >Highlight a message 7 A[Menu] 7 Delete 7 One 7 Delete Selected Messages >A[Menu] 7 Delete 7 Selected File 7 Check messages 7 A[Delete] 7 Delete All Messages >A[Menu] 7 Delete 7 All 7 A[YES] 7 Enter Phone Password SMS saved in USIM cannot be deleted. Protect Messages >In Message List window, follow the steps (See below)Item Operation/DescriptionProtect/Unprotect One message >Highlight a message 7 A[Menu] 7 Protect or Unprotect 7 OneProtect/Unprotect Selected Messages >(Highlight a message 7 ) A[Menu] 7 Protect or Unprotect 7 Protect Selected Items or Unprotect Selected Items 7 Check messages 7 A[Execute] SMS saved in USIM Card cannot be deleted.Using Messages Functions Available in Received/Sent Message Window >In Received/Sent Message window, A[Menu] 7 Select an item (See below)Item Operation/DescriptionRetrieve1Retrieve complete S! MailEdit2Edit message to send (S! Mail: ZFrom Step 2 on P.12-4/SMS: ZFrom Step 2 on P.12-8)Reply1 >To Sender with Quote, To Sender, Reply to All with Quote or Reply to All 7 Create message (S! Mail: ZFrom Step 4 on P.12-4/SMS: ZFrom Step 4 on P.12-8)Forward1 >Select Address field 7 Search/enter address 7 Select an address or enter directly 7 S[Send] When forwarding S! Mail Notice, select Forward or Forward Server Mail. Attachments are also forwarded. (Messages with copy protected attachments may not be forwardable.)Call >Select an item 7 Follow the stepsText Copy Copy address, subject or text >Select an item ( 7 For Address, select an address) 7 Copy (Copy/Cut & Paste: ZFrom Step 2 on P.3-8)Add Destination to Phone Book2Save recipient address to Phone Book (Other Ways to Add New Entries: ZFrom Step 2 on P.4-5)Add Sender to Phone Book1Save sender address to Phone Book (Other Ways to Add New Entries: ZFrom Step 2 on P.4-5)](https://usermanual.wiki/Panasonic-Mobile-Communications/209025A.User-Manual-2-of-5/User-Guide-1228968-Page-96.png)
![13-25Messaging13Item Operation/DescriptionAttachment ListShow attached filesSave as TemplateSave edited templates3D Preview View message in 3D animationOutgoing+ IncomingShow sent/received message records >Select a sender/recipient address or appears. Select a record to open Message window. Press K to return to previous window.Report Spam1Report received message as Spam >S[Send] Change destination to report to (ZP.15-18).Font Size >Select a sizeDelete (ZP.12-24)System Message1View System Messages (ZP.12-17)Delivery Report2View Delivery reportProperty View detailed information (Subject, From, To, etc.)1 Received Message window only2 Sent Message window only Use Linked Information >In Message List window, select a message 7 Follow the steps (See below)Item Operation/DescriptionMake Calls >Select a number (highlighted) 7 Call 7 Voice Call or Video Call 7 Send Messages >Select a number or address (highlighted) 7 Create Message 7 S! Mail or SMS 7 Create message 7 S[Send] Selecting S! Mail or SMS is not available when using addresses.Add to PhoneBook >Select a number or address (highlighted) 7 Add to Phone Book 7 Create New Entry or select an existing entry 7 Add to Phone Book (Zfrom Step 2 on P.4-3)Access Website >Select a URL (highlighted) 7 Connect with Yahoo! Keitai or Connect with PC Site Browser 7 Add to Bookmarks >Select a URL (highlighted) 7 Add to Bookmark 7 <Title> 7 Enter a title 7 Select Folder field 7 Select a folder 7 A[Save]](https://usermanual.wiki/Panasonic-Mobile-Communications/209025A.User-Manual-2-of-5/User-Guide-1228968-Page-97.png)

![14-3Internet14SSL/TLSSSL (Secure Sockets Layer) and TLS (Transport Layer Security) are encryption protocols for secure Internet transmissions of important/sensitive information such as credit card numbers.Server certificates are saved on handset (ZP.15-22).NotesWhen a security notice appears, subscribers must decide for themselves whether or not to open the page. SOFTBANK MOBILE Corp., VeriSign Japan K.K., Cybertrust Japan Co., Ltd., Entrust Japan Co.,Ltd., GlobalSign K.K., RSA Security Inc. and SECOM Trust Systems Co., Ltd. cannot be held liable for any damages associated with the use of SSL and TLS.TipSettings #Security Settings (ZP.15-22)Using Yahoo! KeitaiOpening Yahoo! Keitai Main MenuSelect Yahoo! Keitai Main Menu items to access websites.Main Menu 4 Yahoo!1 Yahoo! KeitaiHandset connects to the Network.2 Select a menu item Repeat Step 2 as required. Basic Operations: ZP.13-6Note Shortcut: In Standby, press S [ ]Web SearchMain Menu 4 Yahoo! 4 Web Search1 Enter text](https://usermanual.wiki/Panasonic-Mobile-Communications/209025A.User-Manual-2-of-5/User-Guide-1228968-Page-101.png)
![14-4Internet14Entering URLEnter URLs (addresses beginning with "http://" or "https://") directly to access websites, or open previously viewed pages using URL histories. Up to 20 URL histories are stored.Main Menu 4 Yahoo! 4 Enter URL1 Enter URL DirectlyDirect Entry 7 Enter URL Use URL HistoryURL History List 7 Select a URL Edit URL Histories >In Step 1, URL History List 7 Highlight URL 7 A[Menu] 7 Edit 7 Edit URL Delete URL Histories >In Step 1, URL History List 7 (Highlight URL 7 ) A[Menu] 7 Delete 7 One or All 7 A[YES]URL History List WindowUsing Access HistoriesOpen previously viewed pages using access histories. Up to 100 access histories are stored. (The number of savable histories varies depending on data amount.)Main Menu 4 Yahoo! 4 History1 Select a history Delete Access Histories >In Step 1, (Highlight URL 7 ) A[Menu] 7 Delete 7 One or All 7 A[YES] ( 7 For All, enter Phone Password)Exiting Mobile Internet1 L 7 Note Closing handset does not affect active browser.History Window](https://usermanual.wiki/Panasonic-Mobile-Communications/209025A.User-Manual-2-of-5/User-Guide-1228968-Page-102.png)
![14-5Internet14Using PC Site BrowserOpening MenuView PC websites using PC Site Browser. When PC Site Browser is active, appears. Some pages may not be viewable. Viewing PC websites may incur high charges.Main Menu 4 Yahoo! 4 PC Site Browser1 Homepage 7 A[OK] 7 A[YES]/S[NO]2 Select a menu itemRepeat Step 2 as required.TipSettings #Hide Warning Messages when Activating PC Site Browser or Switching to Yahoo! Keitai (ZP.15-21)Web SearchFollow same operation accessed from Yahoo! Keitai. Main Menu 4 Yahoo! 4 PC Site Browser 4 Web Search Follow Step 1 of same operation accessed from Yahoo! Keitai. (ZP.13-3)Entering URLFollow same operation accessed from Yahoo! Keitai. Main Menu 4 Yahoo! 4 PC Site Browser 4 Enter URL Follow Step 1 of same operation accessed from Yahoo! Keitai. (ZP.13-4)Using Access HistoriesFollow same operation accessed from Yahoo! Keitai. Main Menu 4 Yahoo! 4 PC Site Browser 4 History Follow Step 1 of same operation accessed from Yahoo! Keitai. (ZP.13-4)Exiting Internet1 L 7 Note Closing handset does not affect active browser.](https://usermanual.wiki/Panasonic-Mobile-Communications/209025A.User-Manual-2-of-5/User-Guide-1228968-Page-103.png)
![14-6Internet14Basic OperationsUsing CursorMove CursorUse cursor to select underlined menu items. to move right to move left to move to previous line to move to next lineScroll PagesScroll bar appears on right side or at bottom of Display when page content continues beyond view. scroll up/down scroll left/rightD scroll page up by a screenfulF scroll page down by a screenful To scroll continuously, press and hold above keys.Move toprevious page/next pagePreviously viewed pages are temporarily saved in Cache Memory (ZP.13-2).S[Back]: Return to previous pageA[Menu] 7 Forward: View next page Some web pages may not appear after performing the steps above.When Authentication is RequiredSome pages require user authentication for access.If required, enter user ID or password.TipSettings #Change Font Size #Scroll Unit #Images Off #Sounds Off (ZP.15-21) #Delete User ID or Password Entered when Authentication is Required (ZP.15-22)](https://usermanual.wiki/Panasonic-Mobile-Communications/209025A.User-Manual-2-of-5/User-Guide-1228968-Page-104.png)
![14-7Internet14Text Entry & Item SelectionEnter text or select items to send information.Example: Actual web pages may differ in appearance.Text Entry FieldCheck BoxRadio ButtonMenu ListCommand ButtonText Entry FieldHighlight field 7 7 Enter text 7 Enter previously entered text (input memory).A[Menu] 7 Insert 7 Input Memory 7 Select input memoryMenu ListHighlight field 7 Menu list appears.Highlight an item 7 Selected items are highlighted.Radio Button Highlight 7 When selected, appears.Check BoxHighlight 7 When selected, appears. Press again to cancel selection.Command Button Highlight the button 7 Corresponding command is executed.TipSettings #Delete Input Memory (ZP.15-22)](https://usermanual.wiki/Panasonic-Mobile-Communications/209025A.User-Manual-2-of-5/User-Guide-1228968-Page-105.png)
![14-8Internet14Using InformationBookmarks & Saved PagesBookmark websites or save page content to Saved Pages. Some copy protected materials cannot be saved.Bookmarks Save links to websites. Handset connects to the Network to open the link.Saved Pages Save page content. Handset opens saved pages without connecting to the Network.Saving Web Pages1 Open a web page 7 A[Menu] 7 Bookmarks or Saved Pages 7 Add2 Save BookmarksSelect title 7 Edit title 7 A[Save] To save to folders: Select Folder 7 Select a folder (Not selectable when no folders exist in Bookmarks.) Save Saved PagesEdit titleViewing Bookmarks & Saved PagesMain Menu 4 Yahoo! (4 PC Site Browser)1 Bookmarks or Saved Pages 7 Select an itemExample: Yahoo! Keitai Browser Open Bookmarks/Saved Pages while Online >Open a web page 7 A[Menu] 7 Bookmarks or Saved Pages 7 ListNote Create folders in Bookmarks List to organize Bookmarks (ZP.13-9).Tip#Sending Bookmarks via Infrared (ZP.9-3)#Save URLs to Bookmarks #Send Bookmark URLs via S! Mail (ZP.13-10)Saved Pages List WindowBookmarks List Window](https://usermanual.wiki/Panasonic-Mobile-Communications/209025A.User-Manual-2-of-5/User-Guide-1228968-Page-106.png)
![14-9Internet14Managing Bookmarks & Saved PagesFollow the steps below to open Bookmarks or Saved pages list: Yahoo! KeitaiMain Menu 4 Yahoo! 4 Bookmarks or Saved Pages PC Site BrowserMain Menu 4 Yahoo! 4 PC Site Browser 4 Bookmarks or Saved PagesNote Panasonic site bookmark cannot be edited/deleted. When a different USIM Card is inserted, Saved Pages do not appear or title name cannot be changed.Creating New Bookmark Folders Folders cannot be created within existing folders.1 In Bookmarks list window, A[Menu] 7 Create2 Folder 7 Enter title Move Bookmarks to Folder >In Step 1, highlight a bookmark 7 A[Menu] 7 Move to 7 Select a folder Edit Folder Title >In Step 1, highlight a folder 7 A[Menu] 7 Edit 7 Edit folder titleEditing Bookmark Titles/URLs1 In Bookmark list window, highlight a bookmark 7 A[Menu] 7 Edit2 Select a title/URL3 Edit title/URL 7 A[Save]Renaming Saved Pages1 In Saved Pages list window, highlight an item 7 A[Menu] 7 Rename2 Edit titleTip#Delete Bookmarks/Folders #Delete Saved Pages #Reorder Bookmarks/Folders (ZP.13-10)](https://usermanual.wiki/Panasonic-Mobile-Communications/209025A.User-Manual-2-of-5/User-Guide-1228968-Page-107.png)
![14-10Internet14Bookmarks/Saved Pages FunctionsFrom Main Menu 4 Yahoo! (4 PC Site Browser) 4 Bookmarks or Saved Pages Save URLs to Bookmarks >A[Create]* 7 Bookmark 7 <Title> 7 Enter Title 7 <URL> 7 Enter URL 7 When saving to a folder, select Folder 7 Select a folder 7 A[Save]* When saved items exist: A[Menu] 7 Create Delete Bookmarks/Folders >Highlight a bookmark/folder 7 A[Menu] 7 Delete 7 Follow the steps belowItem Operation/DescriptionOne >Selected Files >Check bookmarks/folders 7 A[Delete] 7 All >A[YES] 7 Enter Phone Password Panasonic site bookmark cannot be edited/deleted. Delete Saved Pages >(Highlight a saved page 7 ) A[Menu] 7 Delete 7 Follow the steps belowItem Operation/DescriptionOne >Selected Files >Check saved pages 7 A[Delete] 7 All >A[YES] 7 Enter Phone Password Reorder Bookmarks/Folders >Highlight a bookmark/folder 7 A[Menu] 7 Reordering 7 to select new order Send Bookmark URLs >Highlight a bookmark 7 A[Menu] 7 Send Bookmark 7 S! Mail or SMS 7 Create message (S! Mail: ZFrom Step 2 on P.12-4/SMS: ZFrom Step 2 on P.12-8)](https://usermanual.wiki/Panasonic-Mobile-Communications/209025A.User-Manual-2-of-5/User-Guide-1228968-Page-108.png)
![14-11Internet14Downloading Image/Sound FilesSave images, sounds, etc. to Data Folder or Memory Card. For PC Site Browser, only still images can be saved.1 Open a web page 7 A[Menu] 7 Select item2 Select a fileFile details appear.3 A[Save] 7 Phone or Memory CardAvailable menu items vary by saved content.Note 841P does not support Progressive JPEG files. Do not remove/install Memory Card while saving files to it. Do not turn handset power off while downloading or saving files. Files may be damaged. Some copy protected files may not be saved.Using Number, Address or URLUse linked numbers, addresses or URLs to make calls, send messages, access websites, or save them directly to Phone Book.1 Open a web page containing phone numbers, mail addresses or URLs2 Phone NumberSelect a phone number 7 Select an item (See below)Item Operation/DescriptionVoice Call Make a Voice Call >Video Call Make a Video Call >Phone Book Save number to Phone Book (ZFrom Step 2 on P.4-5) E-mail AddressSelect an address 7 Select an item (See below)Item Operation/DescriptionS! Mail Create S! Mail (ZFrom Step 4 on ZP.12-4)SMS Create SMS (ZFrom Step 4 on ZP.12-8)Phone Book Save mail address to Phone Book (ZFrom Step 2 on P.4-5) URLSelect URLHandset connects to the Network.](https://usermanual.wiki/Panasonic-Mobile-Communications/209025A.User-Manual-2-of-5/User-Guide-1228968-Page-109.png)
![14-12Internet14Streaming Supported by compatible files on Yahoo! Keitai sites only. Streaming files cannot be saved.Main Menu 4 Yahoo! 4 Yahoo! Keitai1 Open a web page 7 Select a fileMedia Player activates and streaming starts. To pause: 7 to resume Playback Window Operations: ZP.7-7(Replay Track, Play Previous and Play Next are unavailable)2 L or S[Back] to exitNote Streaming requires a continuous Network connection. Network remains connected even during a pause (Transmission fees apply). Streaming indicator appears (ZP.1-8). Paused streams may stop after three minutes of inactivity. When roaming abroad, streaming may be unavailable or not be performed properly.Incoming Voice Calls while StreamingIncoming call pauses an active stream. Video Calls cannot be received while streaming.](https://usermanual.wiki/Panasonic-Mobile-Communications/209025A.User-Manual-2-of-5/User-Guide-1228968-Page-110.png)
![14-13Internet14Option Menu ItemsIn Yahoo! Keitai, press A[Menu] for these options: Some functions may not be available depending on web pages.Item Operation/DescriptionForward Go to next page (ZP.13-6)Bookmarks View Bookmarks list, add bookmarks, or access web pagesSaved Pages View Saved Pages list or save page content to Saved PagesText Copy Copy page textReload Page Refresh page informationSmall Screen/PC Screen1Toggle display sizePage OperationFrame In/Frame Out : Select full screen frameJump to Top : Jump to top of pageJump to Bottom : Jump to end of pageZoom In/Out1: Zoom page in/outSelect Item View, play or save file to Data Folder (Downloading Images/Sounds: ZFrom Step 2 on P.13-11)MoreWeb Search : Search text in InternetSearch in this page : Search text within pageHistory : Open previously viewed pagesSend Bookmark : Send URL via S! Mail/SMSEnter URL : Enter URL directly or select URL from URL History list to open siteProperty : View page details or electronic certificates for secure pagesFlash(R) Menu : Playback/pause Flash® filesItem Operation/DescriptionTo PC Site Browser2/Change Browser1Toggle Yahoo! Keitai/PC siteYahoo! Keitai2/Homepage1View top menuSettings2/PC Site Browser Settings1Change font size and encoding type1 PC Site Browser only2 Yahoo! Keitai only](https://usermanual.wiki/Panasonic-Mobile-Communications/209025A.User-Manual-2-of-5/User-Guide-1228968-Page-111.png)

![15-2S! Appli15Before Using S! AppliS! Appli are Java™-based applications designed to run on SoftBank handsets. Download games and other real-time applications for use on handset. Separate subscription required to use downloaded applications (not required for pre-installed S! Appli). For usage on pre-installed applications, see Help menu for each S! Appli.Note For more information, visit SOFTBANK MOBILE Corp. Website (http://www.softbank.jp).Network S! AppliNetwork S! Appli requires Network connection. Transmission fees apply. License Information >Main Menu 4 S! Appli 4 InformationDownloading S! AppliDownload up to 100 S! Appli file to handset/Memory Card.Main Menu 4 S! Appli 4 S! Appli List1 Download S! AppliHandset connects to the Network, and download site appears.2 Select an S! AppliProperties appear.3 Follow onscreen instructions4 Select a save locationDownloaded S! Appli is saved to Data Folder automatically. Download may take some time.5 A[YES] to activateDownloaded S! Appli starts. To exit: S[NO]](https://usermanual.wiki/Panasonic-Mobile-Communications/209025A.User-Manual-2-of-5/User-Guide-1228968-Page-114.png)
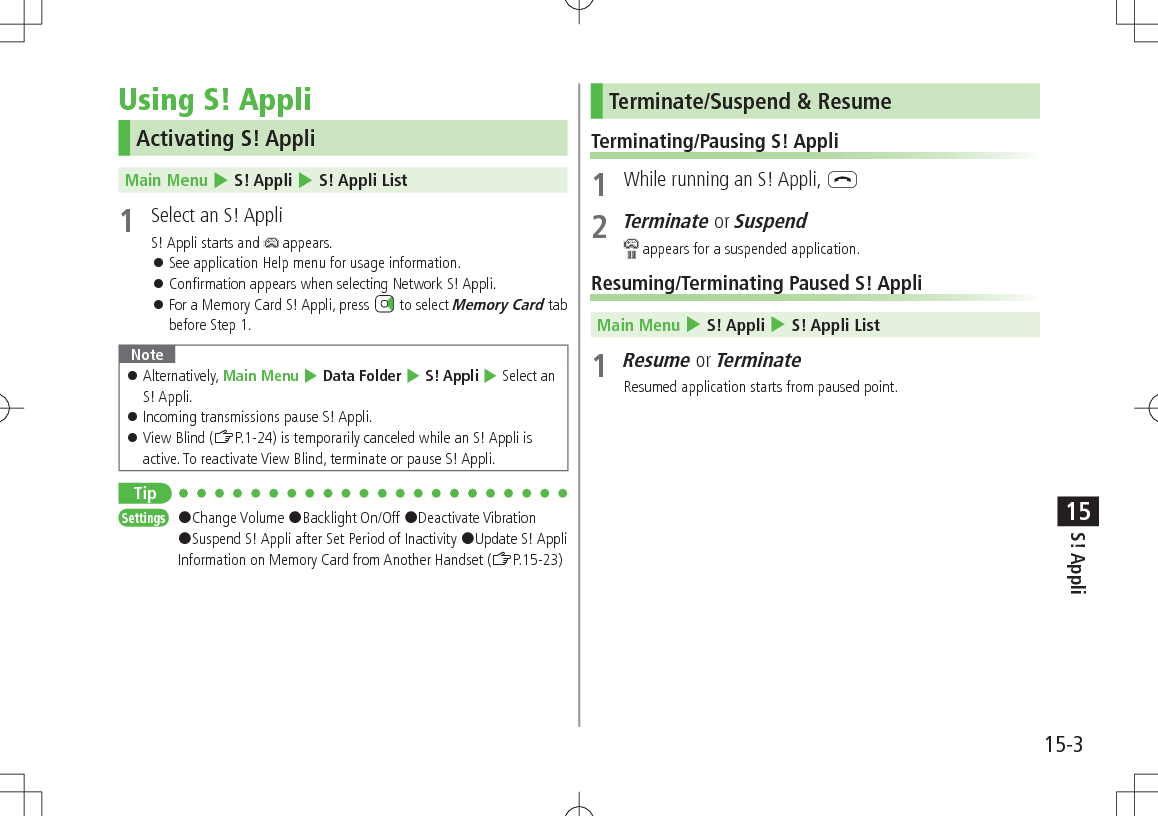
![15-4S! Appli15Managing ApplicationsMoving S! Appli between Handset and Memory CardMain Menu 4 S! Appli 4 S! Appli List1 Highlight an S! Appli 7 A[Menu] 7 Move Some S! Appli may not be moved to Memory Card.Deleting S! AppliMain Menu 4 S! Appli 4 S! Appli List1 Highlight an S! Appli 7 A[Menu] 7 Delete 7 Some pre-installed S! Appli may not be deleted.Viewing S! Appli PropertiesMain Menu 4 S! Appli 4 S! Appli List1 Highlight an S! Appli 7 A[Menu] 7 PropertySet Security Level while Running S! Appli Security Level cannot be set for some S! Appli. Main Menu 4 S! Appli 4 S! Appli List 1 Highlight an S! Appli 7 A[Menu] 7 Permission2 Select an item (See below)Item Operation/DescriptionNetwork AccessConnect to the NetworkAuto InvocationActivate S! AppliMultimedia RecordingActivate CameraData Reading AccessRead data in Data FolderData Rewriting AccessWrite/delete data in Data FolderLocation AccessRetrieve Location information3 Always Allowed, Ask First Time*, Ask Every Time or Not Allowed* Confirmation appears the first time application is activated.](https://usermanual.wiki/Panasonic-Mobile-Communications/209025A.User-Manual-2-of-5/User-Guide-1228968-Page-116.png)
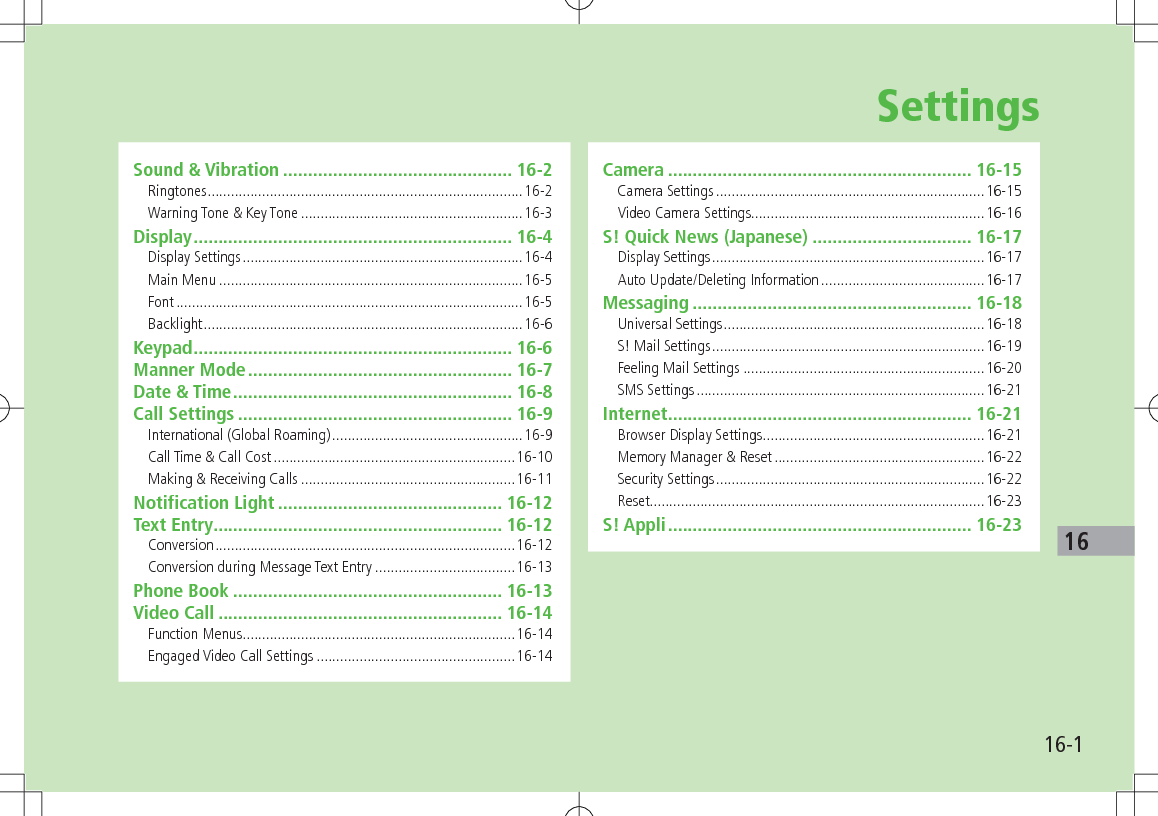
![Settings16-216SettingsSound & VibrationRingtonesFrom Main Menu 4 Settings 4 Sound SettingsSetting/Operation Default ■Change Ringtone (Voice Call or Video Call)1 2 3 >Assign Ringtone 7 Voice Call or Video Call 7 Select a folder in Data Folder 7 Highlight a tone 7 A[Set].mmf ■Change Ringtone (Message or S! Quick News)1 2 >Assign Ringtone 7 Message or S! Quick News 7 Select a folder in Data Folder 7 Highlight a tone 7 A[Set]().mmf ■Change Ringer Volume(Voice Call, Video Call or Message)4 >Ringer Volume 7 Voice Call, Video Call or Message 7 Adjust volumeVolume 3 ■Change Ringer Volume (S! Quick News) >Ringer Volume 7 S! Quick News 7 Adjust volumeSilent ■Change Ringtone Duration (Message or S! Quick News) >Ringtone Duration 7 Message or S! Quick News 7 Enter ring time5 seconds ■Set Vibration Alert (Voice Call, Video Call, Message or S! Quick News)5 >Vibration Alert 7 Voice Call, Video Call, Message or S! Quick News 7 Select a vibration patternOFF1 Files recorded by Voice Recorder cannot be set for ringtones.2 When unique tones for each Phone Book entry or group are set (ZP.4-4, P.4-5), Phone Book settings take priority.3 If a Voice Call is received while streaming/downloading, default ringtone may sound.4 Same setting applies to sound effects from: Web pages, messages and S! Information Channel. When Escalating Tone is set, volume sounds at Volume 6 (setting may not apply to some content).5 Avoid placing handset on unstable surface when Vibration Alert is active/while charging battery; cancel Vibration Alert before charging battery.](https://usermanual.wiki/Panasonic-Mobile-Communications/209025A.User-Manual-2-of-5/User-Guide-1228968-Page-118.png)
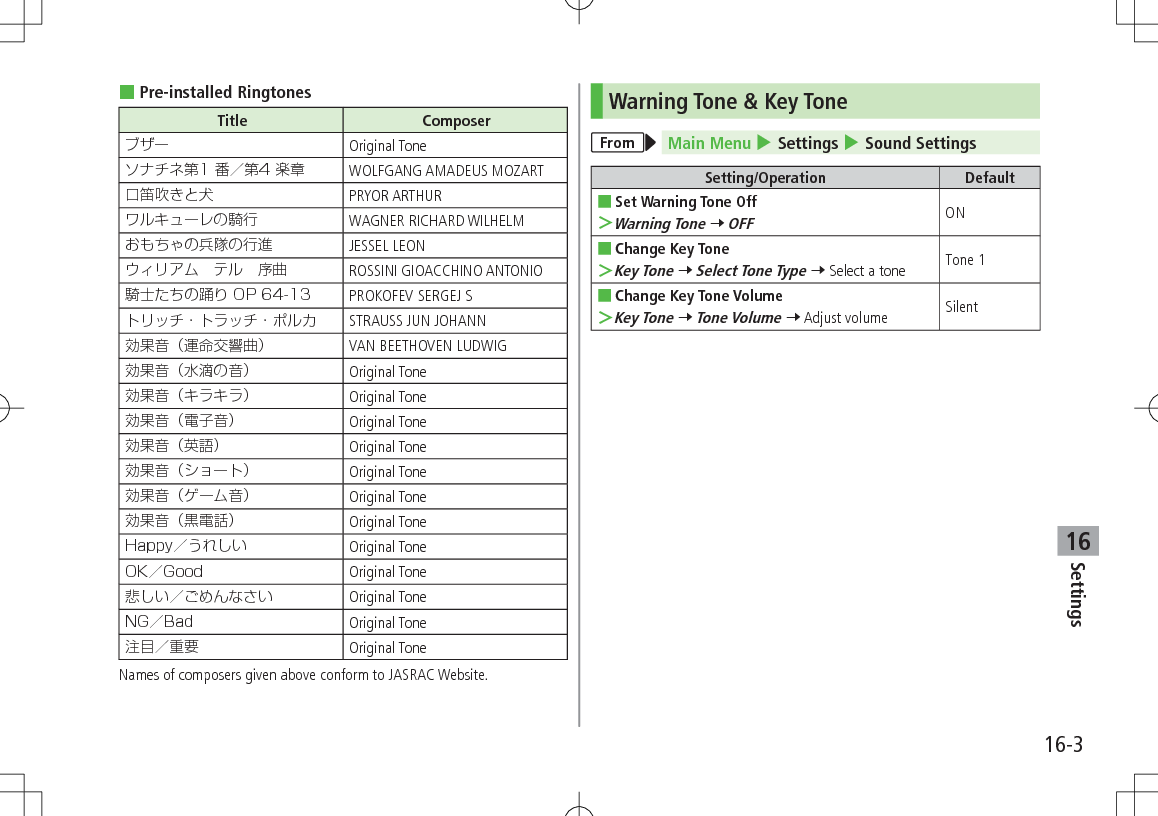
![Settings16-416SettingsDisplayDisplay SettingsFrom Main Menu 4 SettingsSetting/Operation Default ■Change Wallpaper >Display Settings 7 Customize Main Display 7 Internal Display 7 Select a folder in Data Folder 7 Highlight an image 7 A[Set]COLOR LIFE.jpg ■Change Outgoing/Incoming Call/Message Image >Display Settings 7 Customize Main Display 7 Select an item 7 Select a folder 7 Select an imageDefault Picture ■Change Battery/Antenna Indicator1 >Display Settings 7 Customize Main Display 7 Select an icon type 7 Select a patternPattern 1 ■Change Display Color Theme >Display Settings 7 Themes 7 Select a pattern Themes 1 ■Set Interface Language >Phone Settings 7 言語選択 7 English or 日本語Automatic2 ■Change Clock/Calendar Style >Display Settings 7 Standby Display 7 Clock/Calendar Display 7 Select a clock/calendar typeStandard Clock (Upper Center) ■Show Operator Name in Standby >Display Settings 7 Standby Display 7 Operator Name 7 ONOFF ■Set Standby Window On/Off3 >Display Settings 7 Standby Display 7 Standby Window 7 ON (Always) or OFFON (Manually)1 Regardless of setting, battery indicator appears in Pattern 1 while handset is off.2 Automatic applies USIM Card language.3 S! Quick News Display Settings (ZP.15-17)](https://usermanual.wiki/Panasonic-Mobile-Communications/209025A.User-Manual-2-of-5/User-Guide-1228968-Page-120.png)
![Settings16-516Main MenuFrom Main Menu 4 Settings 4 Display SettingsSetting/Operation Default ■Change Main Menu Theme1 >Change Menu Theme 7 Select a menu 7 Normal Menu 1 ■Change Main Menu Background >Main Menu Icons 7 Change Full Image 7 Highlight an image 7 A[Set]– ■Change Main Menu Icons >Main Menu Icons 7 Change Image 7 (Repeat: Select an icon 7 Highlight an image 7 A[Set])– ■Reset Main Menu Icons2 >Main Menu Icons 7 Reset Defaults 7 –1 While changing theme, other functions are unavailable. For approximately 30 seconds after process is complete, calls/messages may be blocked.2 When Menu Theme is Normal Menu 2, Menu Theme setting returns to default after resetting Main Menu icons.FontFrom Main Menu 4 Settings 4 Display SettingsSetting/Operation Default ■Change Font Size by Function >Font Size 7 Select an item 7 Select a size Normal ■Set Menu Font Sizes Collectively >Font Size 7 Collective Setting 7 Set to Large or Set to Small1– ■Change Font Style2 >Font Pattern 7 Select a pattern Font 11 When Set to Small is set, font size for Phone Book, Message List and Mail & Call Log is Normal.2 Font Pattern returns to Font 1 while S! Appli is active.](https://usermanual.wiki/Panasonic-Mobile-Communications/209025A.User-Manual-2-of-5/User-Guide-1228968-Page-121.png)
![Settings16-616BacklightFrom Main Menu 4 Settings 4 Display Settings 4 Backlight SettingsSetting/Operation Default ■Adjust Brightness >Internal Display 7 Brightness 7 Select a brightness levelLevel 3 ■Change Display Backlight Time* >Internal Display 7 Backlight Time 7 Select a duration15 seconds ■Set Key Backlight Time/OFF >Key Backlight Time 7 Select a duration or OFF15 seconds* Backlight duration for calls remains unchanged at 5 seconds.SettingsKeypadFrom Main Menu 4 Settings 4 Phone Settings 4 Key SettingsSetting/Operation Default ■Change Functions Assigned to D, F, in Standby* >Customization 7 Select a key & operation 7 Select an item 7 Select a function(ZP.1-6) ■Disable Functions Assigned to D, F, in Standby >Customization 7 Select a key & operation 7 A[Menu] 7 Invalidate 7 – ■Reset Functions Assigned to D, F, in Standby >Customization 7 A[Menu] 7 Reset Defaults 7 – ■Hide Confirmation when Pressing Bookmark Key >Access Confirm 7 OFFON* Key functions are set to default while Simple Mode is active.](https://usermanual.wiki/Panasonic-Mobile-Communications/209025A.User-Manual-2-of-5/User-Guide-1228968-Page-122.png)
![Settings16-716SettingsManner ModeFrom Main Menu 4 Settings 4 Manner Mode SettingsSetting/Operation Default ■Set Manner Mode Type* >Select a mode When Manner, Drive or Original Manner is set, an indicator appears in Standby (ZP.1-8).Normal ■Personalize Individual Mode Settings >Highlight a mode 7 A[Menu] 7 Edit 7 Select an item 7 Edit–* Manner Mode and Drive Mode can be activated/deactivated in Standby (ZP.1-15, P.1-16). ■Default Settings by ModeNormal Manner Drive Original MannerAssign Ringtone (Voice Call/Video Call).mmf – – .mmfAssign Ringtone (Message/S! Quick News)().mmf – – ().mmfRinger Volume (Voice Call/Video Call/Message)Volume 3 – – Volume 3Ringer Volume (S! Quick News)Silent – – SilentRingtone Duration (Message/S! Quick News)5 sec 5 sec 5 sec 5 secKey Tone (Tone Type)Tone 1 – Tone 1 Tone 1Key Tone (Tone Volume)Silent – Silent Silent Warning ToneON – OFF ONVibration Alert (Voice Call/Video Call/Message)OFF Pattern 1 OFF OFFVibration Alert (S! Quick News)OFF OFF OFF OFFAnswer PhoneON ON * ON* When Drive Mode is active, Answer Phone activates automatically, and cannot be set to OFF.](https://usermanual.wiki/Panasonic-Mobile-Communications/209025A.User-Manual-2-of-5/User-Guide-1228968-Page-123.png)
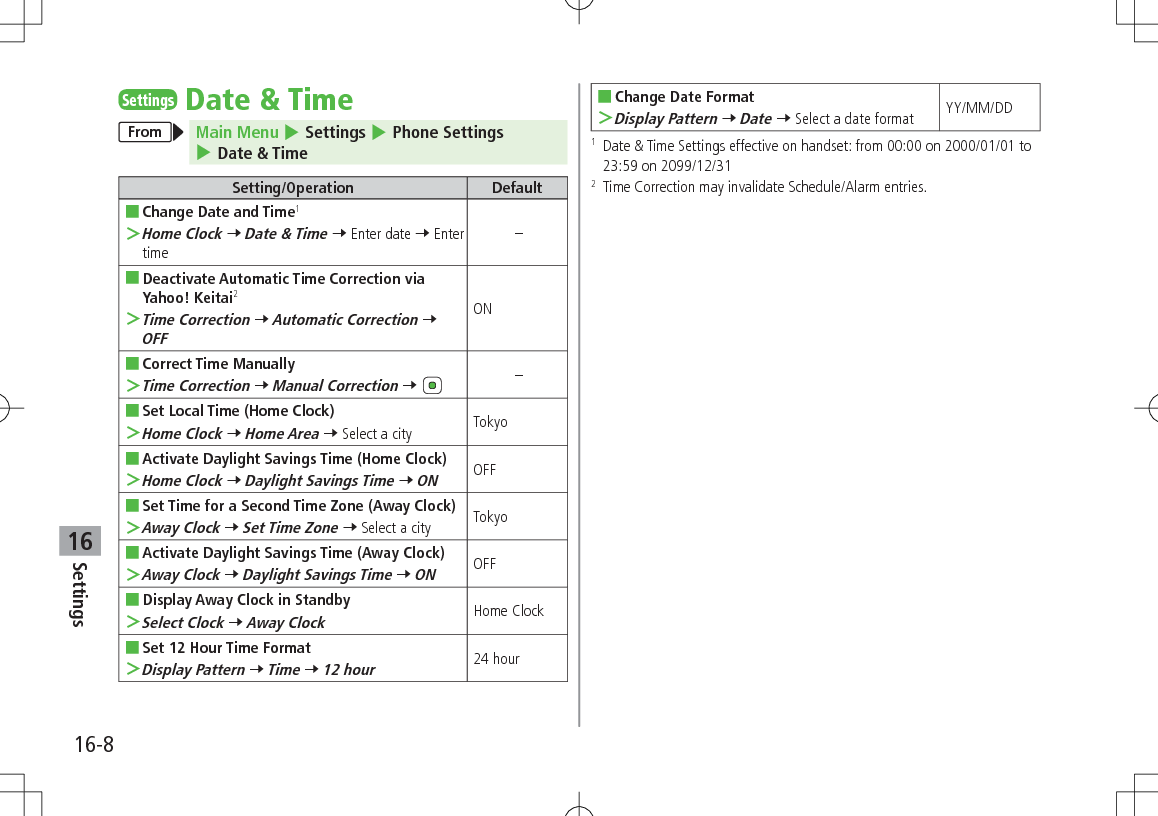
![Settings16-916SettingsCall SettingsInternational (Global Roaming)From Main Menu 4 Settings 4 Call Settings 4 Optional Services 4 International SettingSetting/Operation Default ■Change International Code1 >International Code 7 Enter Phone Password 7 Enter International Code0046010 ■Edit Country/Region Code >Country/Area Number List 7 Select a country/region 7 Edit country/region name 7 Edit country/region code– ■Add Country/Region Code >Country/Area Number List 7 A[Menu] 7 Add 7 Enter country/region name 7 Enter country/region code– ■Delete Country/Region Code >Country/Area Number List 7 Highlight a country/region 7 A[Menu] 7 Delete 7 A[YES]– ■Select Operator >Select Operator 7 Select Auto/Manual 7 Manual 7 Select an operatorAutomatic ■Set Operator Priority for Automatic Search2 >Select Operator 7 Set Priority 7 A[Menu] 7 Add, Insert, Edit or Delete Add : new network appears at the end of the list; place cursor at the end of the list beforehand. Insert : new network appears above selected one.– ■Deactivate Roaming Dial Assistant3 >Roaming Dial Assistant 7 OFFON(Active)1 In Standby, press J 7 Press and hold P (+ appears) to enter International Code automatically. (+ indicates International Code.)2 Available operators vary by network conditions.3 When Roaming Dial Assistant is set to OFF, follow the same steps as making Voice Call/Video Call within Japan and Calling abroad from Japan (ZP.2-2, P.2-6, P.2-7).](https://usermanual.wiki/Panasonic-Mobile-Communications/209025A.User-Manual-2-of-5/User-Guide-1228968-Page-125.png)
![Settings16-1016Call Time & Call CostFrom Main Menu 4 Settings 4 Call Settings 4 Call Time & CostSetting/Operation Default ■View Total Call Charge for Outgoing Calls >All Calls ( 7 To reset, 7 7 Enter PIN2) – ■View Total Call Time for Outgoing Calls1 >Total Call Time ( 7 To reset, 7 ) – ■Display Call Charge2 >Display Cost 7 ONOFF ■Set Charge Limit3 4 >Set Cost Limit 7 A[Menu] 7 Edit 7 Enter PIN2 7 Enter charge limit– ■View Remaining Cost >Remaining– ■Enter Currency Denomination and Price per Unit of Call Time >Currency Setting 7 7 Enter PIN2 7 Enter three letter abbreviation for the designated currency 7 Enter value–1 For Group Calling, total length of all calls made from handset remains.2 May not be available depending on subscription; if not, Charge Limit setting is also unavailable.3 If charge limit is set below the value set in All Calls, outgoing calls are blocked. Reset All Calls or change charge limit to a higher value.4 Emergency numbers (110, 119, 118) are dialable even when the limit is reached.](https://usermanual.wiki/Panasonic-Mobile-Communications/209025A.User-Manual-2-of-5/User-Guide-1228968-Page-126.png)
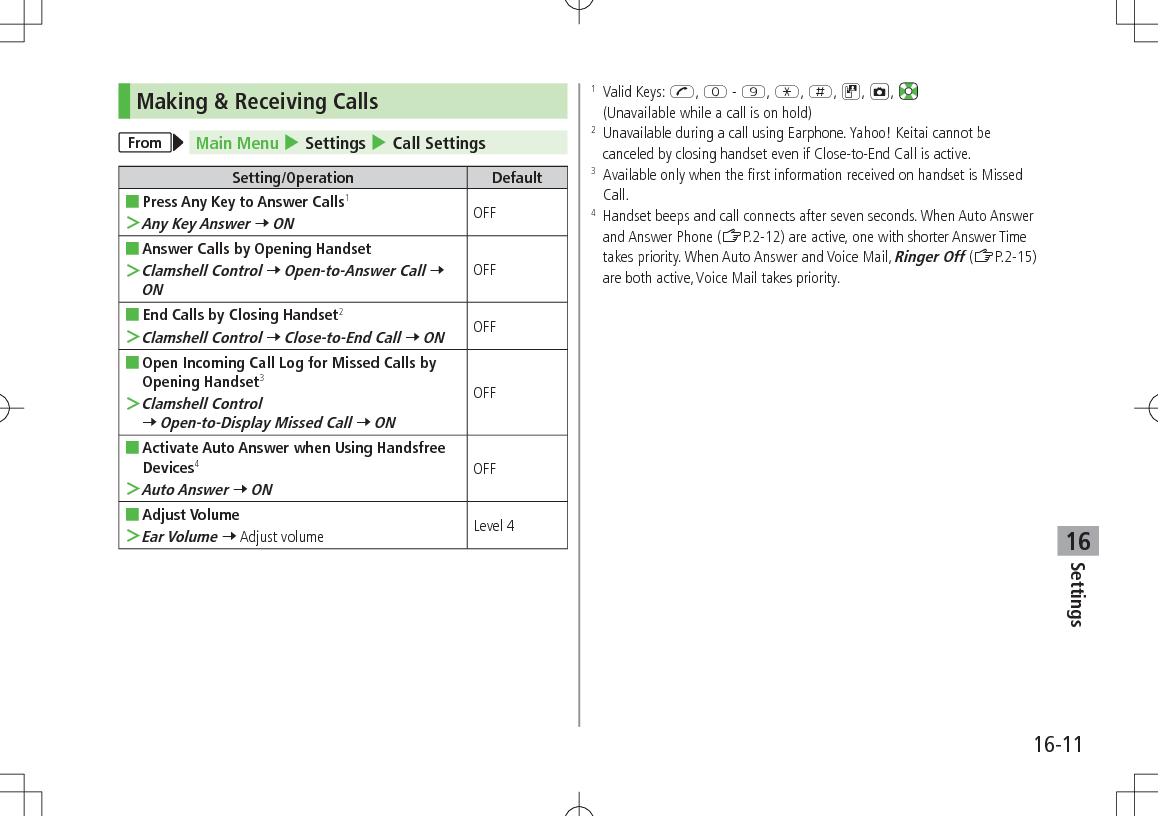
![Settings16-1216SettingsNotification LightFrom Main Menu 4 Settings 4 Phone Settings 4 Notification LightSetting/Operation Default ■Set Notification Light for Voice Calls* >Voice Call 7 Select a color or OFFColor 5 ■Set Notification Light for Video Calls* >Video Call 7 Select a color or OFFColor 5 ■Set Notification Light for Incoming Messages* >Message 7 Select a color or OFFColor 2 ■Set Notification Light for Voice Calls in Progress >In Conversation 7 Select a colorOFF ■Set Notification Light for S! Quick News >S! Quick News 7 Select a color or OFFColor 2 ■Set Notification Light for Clamshell Closing >Clamshell Closing 7 Select a color or OFFColor 6 ■Turn Off Notification Light for Data Transfer >Data Transfer 7 OFFON When highlighting a color, Notification Light illuminates.* Phone Book entry Notification Light (ZP.4-4, P.4-5) takes priority over this setting.SettingsText EntryConversionFrom Text entry widow, A[Menu] 4 Input OptionsSetting/Operation Default ■Disable Learning (Kana Conversions) >Learning 7 Enter Phone Password 7 OFF or OFF in Secret ModeON ■Reset Learned Words >Reset Learned Words 7 A[YES] 7 Enter Phone Password– ■Change Input Font Size >Input Size 7 Large or SmallNormal ■Change Candidate Font Size >Candidate Display Size 7 Large or SmallNormal ■Hide Predictive Candidates >Prediction Setting 7 OFFON(Show) ■Hide Context Forecast List >Context Prediction 7 OFFON(Show) ■Fix Entered Characters Automatically >Character Set Time 7 Select a speed OFF](https://usermanual.wiki/Panasonic-Mobile-Communications/209025A.User-Manual-2-of-5/User-Guide-1228968-Page-128.png)
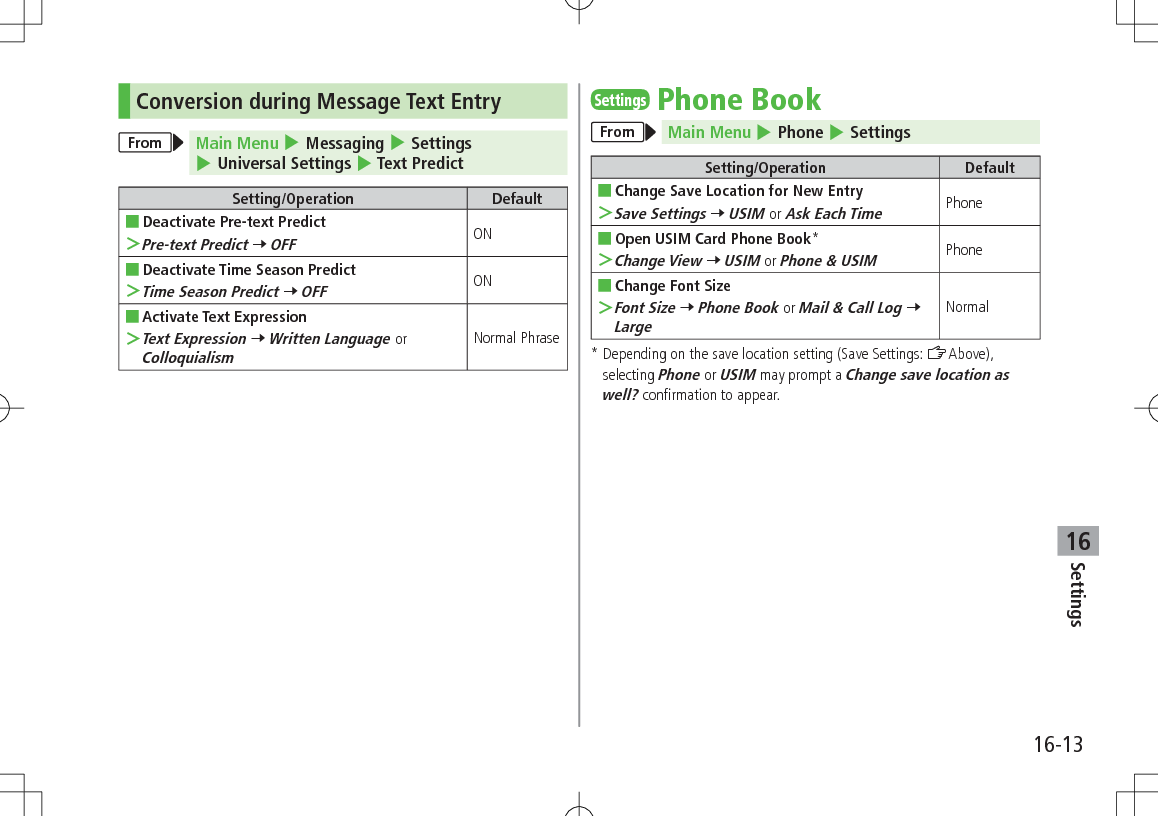
![Settings16-1416SettingsVideo CallFunction MenusFrom Main Menu 4 Settings 4 Call Settings 4 Video CallSetting/Operation Default ■Change Outgoing Image and Sound Settings1 >Video & Voice Setting 7 Select an itemAlternative Picture ■Change Display Backlight Brightness1 >Display Backlight 7 Brightness 7 Select a level Level 3 ■Change Display Backlight Duration1 >Display Backlight 7 Backlight Time 7 Follow General Setting2 or Always OFFAlways ON ■Change Incoming Video Image Quality1 >Incoming Video Quality 7 Motion Prioritized or Quality PrioritizedStandard ■Change Alternative Picture >Alternative Picture 7 Highlight a file 7 A[Set]TV1.bmp ■Switch Speaker OFF1 >Loud Speaker 7 OFFON1 To change settings during a call: ZP.2-10, Right2 Display Backlight Time setting (ZP.15-6) applies.Engaged Video Call SettingsFrom During a Video Call, A[Menu] 7 SettingsSetting/Operation Default ■Change Brightness >Display Backlight 7 Brightness 7 Select a level Level 3 ■Change Backlight Duration >Display Backlight 7 Backlight Time 7 Follow General Setting* or Always OFFAlways ON ■Change Incoming Image Quality >Incoming Video Quality 7 Motion Prioritized or Quality PrioritizedStandard ■Adjust Color Tone to Lighting Conditions >White Balance 7 Select an environment Automatic* Display Backlight Time setting (ZP.15-6) applies.](https://usermanual.wiki/Panasonic-Mobile-Communications/209025A.User-Manual-2-of-5/User-Guide-1228968-Page-130.png)
![Settings16-1516SettingsCamera Change settings before capturing images. (ZP.5-3, P.5-4)Camera SettingsFrom Main Menu 4 Camera 4 Camera 4 A[Menu]Setting/Operation Default ■Switch Camera Mode >Change Camera Mode 7 Bar Code Reader or Magnifying Loupe– ■Change Image Size >Size 7 Select a size VGA(480x640) ■Change Image Quality >Quality 7 Select an item Super Fine ■Change Focus Setting >Focus Setting 7 Close-up or SceneryAuto Focus ■Capture Images in Low Light Conditions >Night Mode 7 ONOFF ■Capture 15 Images Sequentially >Multi Shot 7 ONOFF ■Change Color for Images >Effect 7 Select an item Normal ■Adjust Color Balance According to Lighting Conditions >White Balance 7 Select an itemAutomatic ■Set Self-Timer >Self-Timer (ZP.5-6) OFF ■Change Shutter Click Sound >Shutter Sound 7 Select a pattern Pattern 1 ■Change Save Location >Save to 7 Memory CardPhone ■Save Captured Images Automatically >Auto Image Saving 7 ONOFF ■View Memory Status >Available Memory 7 to select a size Shows savable number of still image files for the selected size/quality. Press A[Quality] to toggle image quality.– ■Reset Settings to Defaults >Reset Defaults 7 – ■Show Key Operation List >Key Operation List–](https://usermanual.wiki/Panasonic-Mobile-Communications/209025A.User-Manual-2-of-5/User-Guide-1228968-Page-131.png)
![Settings16-1616Video Camera SettingsFrom Main Menu 4 Camera 4 Video Camera 4 A[Menu]Setting/Operation Default ■Change Image Quality* >Quality 7 Select an itemNormal (176x144) ■Extend Recording Time >Recording Time 7 Extended VideoAttach to S! Mail ■Change Focus Setting >Focus Setting 7 Close-upScenery ■Change Color for Images >Effect 7 Select an item Normal ■Adjust Color Balance According to Lighting Conditions >White Balance 7 Select an itemAutomatic ■Set Self-Timer >Self-Timer (ZP.5-6) OFF ■Change Save Location >Save to 7 Memory CardPhone ■Save Recorded Videos Automatically >Auto Image Saving 7 ONOFF ■View Memory Status >Available Memory 7 Extended Video or Attach to S! Mail Shows total recordable time and maximum recordable time per file at the set recording time/quality. When Extended Video is set, press A[Quality] to toggle recording video quality.– ■Reset Settings to Defaults >Reset Defaults 7 – ■Show Key Operation List >Key Operation List–* Available only when Recording Time is set to Extended Video.](https://usermanual.wiki/Panasonic-Mobile-Communications/209025A.User-Manual-2-of-5/User-Guide-1228968-Page-132.png)
![Settings16-1716SettingsS! Quick News (Japanese)Display SettingsFrom Main Menu 4 Settings 4 Display Settings 4 S! Quick News SettingsSetting/Operation Default ■Show Only Unread Items in Standby >Unread/Read Setting 7 UnreadUnread + Read ■Change Marquee Speed >Marquee Speed 7 Fast or Slow Medium ■Image Download >Image Display 7 ONOFFAuto Update/Deleting InformationFrom Main Menu 4 News/Ent. 4 S! Quick News 4 SettingsSetting/Operation Default ■Change Update Interval or Disable News Flash Auto Update1 2 >Auto Refresh 7 News Flash 7 Select update frequency or OFF1 hour ■Disable General News Auto Update (Once a day)1 2 >Auto Refresh 7 General 7 OFFON1 2 ■Automatically Update Special News >Auto Refresh 7 Special 7 7 ONOFF3 ■Delete S! Quick News Information >Del S! Quick News List 7 A[YES] 7 Enter Phone Password–1 If calls are in progress at update time, auto update does not occur until next update.2 Video Calls are rejected during auto update.3 Retrieving Network Information may change setting to ON.](https://usermanual.wiki/Panasonic-Mobile-Communications/209025A.User-Manual-2-of-5/User-Guide-1228968-Page-133.png)
![Settings16-1816SettingsMessagingUniversal SettingsFrom Main Menu 4 Messaging 4 Settings 4 Universal SettingsSetting/Operation Default ■Hide Sender Name >Display Settings 7 Display New Mail 7 Without Sender NameWith Sender Name ■Open Incoming Mail Folder Automatically by Opening Handset for New Messages1 >Display Settings 7 Clamshell Control 7 ONOFF (Not open) ■Change Font Size >Display Settings 7 Font Size 7 Large or SmallNormal ■Change Message List View2 >Display Settings 7 Mail List Display Setting 7 Select an itemName+Subject ■Enable 3D Pictograms when Opening Messages >Display Settings 7 3D Pictograms 7 3D Picto Auto Play 7 Always Display or Display only UnreadOFF ■Change Font/Background Color >Display Settings 7 3D Pictograms 7 Color Settings 7 Select a colorWhite ■Change Anti-Spam Measures Setting >Anti-Spam Measures 7 Spam Report Address 7 [Edit] 7 Edit recipient address 7 stop@meiwaku. softbankmobile. co.jp ■Reset Anti-Spam Measures >Anti-Spam Measures 7 Spam Report Address 7 A[Menu] 7 Reset to Default– ■Filter Messages by Sender/Recipient >Mail Delivery Rule 7 Incoming Mail or Sent Messages 7 Select a folder 7 A[Menu] 7 Add Sender or Add Address 7 Select a search/entry method 7 Select or enter sender/address– ■Filter Messages by Subject >Mail Delivery Rule 7 Incoming Mail or Sent Messages 7 Select a folder 7 A[Menu] 7 Add Subject 7 Enter subject– ■Request Delivery Confirmation (Available when Messaging to SoftBank Handset Numbers) >Delivery Report 7 ONOFF ■Base Word Predictions on Received Message When Replying >Learning from Received Message 7 OFFON ■Require Password to Access Messages/Server Mail >Mail Security Setting 7 Enter Phone Password 7 Check items 7 A[OK]OFF ■Set Auto Delete Off (For Drafts or Sent/Unsent Messages) >Auto Delete 7 Auto Delete Sent Messages 7 OFFON](https://usermanual.wiki/Panasonic-Mobile-Communications/209025A.User-Manual-2-of-5/User-Guide-1228968-Page-134.png)
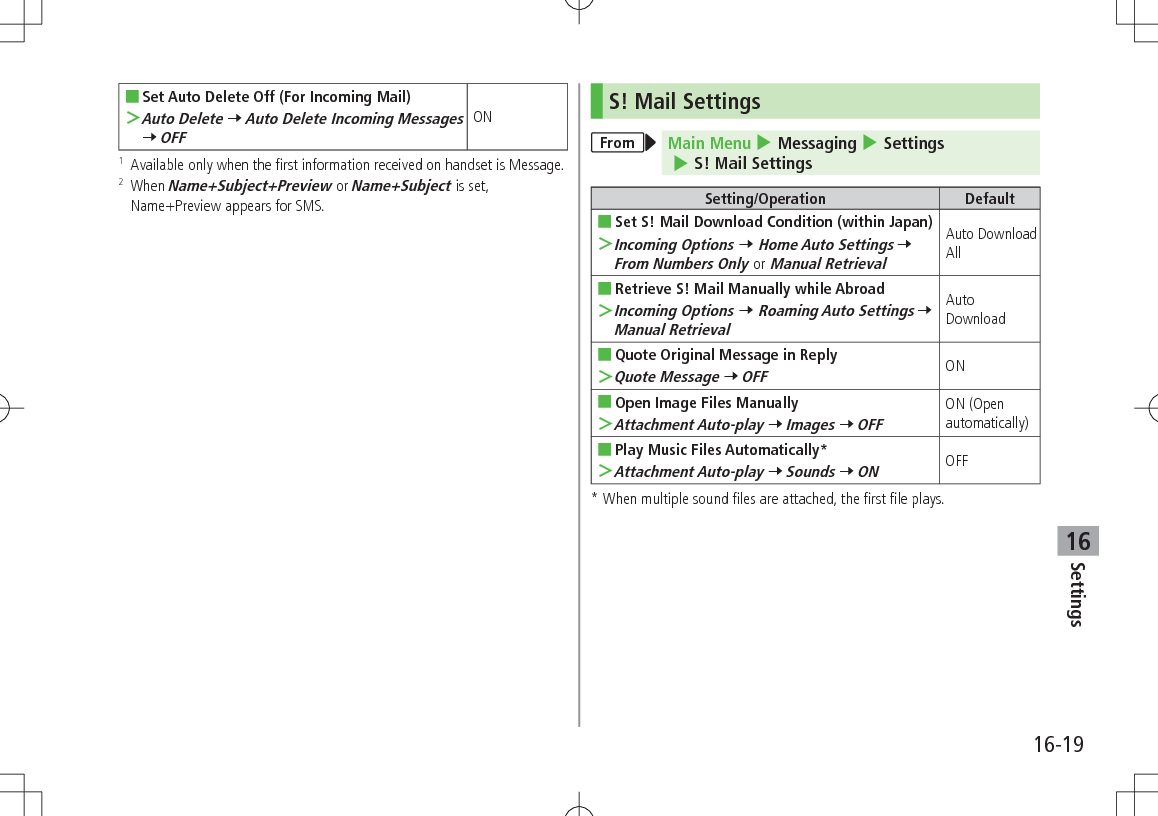
![Settings16-2016Feeling Mail SettingsSet handset response for new Feeling Mail.From Main Menu 4 Messaging 4 Settings 4 S! Mail Settings 4 Feeling ExpressionSetting/Operation Default ■Hide Information >Information Display Settings 7 OFFON ■Deactivate Notification Light >Notification Light Patterns 7 Settings ON/OFF 7 OFFON ■Notification Light Color >Notification Light Patterns 7 Select an item 7 Select a color1(See chart below) ■Deactivate Vibration >Vibration Patterns 7 Settings ON/OFF 7 OFFON ■Vibration Pattern >Vibration Patterns 7 Select an item 7 Select a pattern– ■Ringtone >Message Ringtone 7 Settings ON/OFF 7 ONOFF ■Change Ringtone2 >Message Ringtone 7 Select an item 7 Select a folder in Data Folder 7 Highlight a tone 7 A[Set]–1 When highlighting a color, Notification Light illuminates.2 Set a ringtone for each preset feeling Default SettingsEmotion Notification Light Vibration Message RingtoneHappy Color 6 Pattern 1 Happy.mmfOK/Good Color 2 Pattern 1 OKGood.mmfSad/Sorry Color 1 Pattern 2 .mmfNG/Bad Color 3 Pattern 2 NGBad.mmfNotice/Important Color 4 Pattern 3 .mmf When sender is saved in Phone Book, Phone Book settings take priority in the following case (ZP.4-4). Message Ringtone is set to a ringtone other than Follow General Setting Notification Light is set to a color other than Follow General Setting](https://usermanual.wiki/Panasonic-Mobile-Communications/209025A.User-Manual-2-of-5/User-Guide-1228968-Page-136.png)
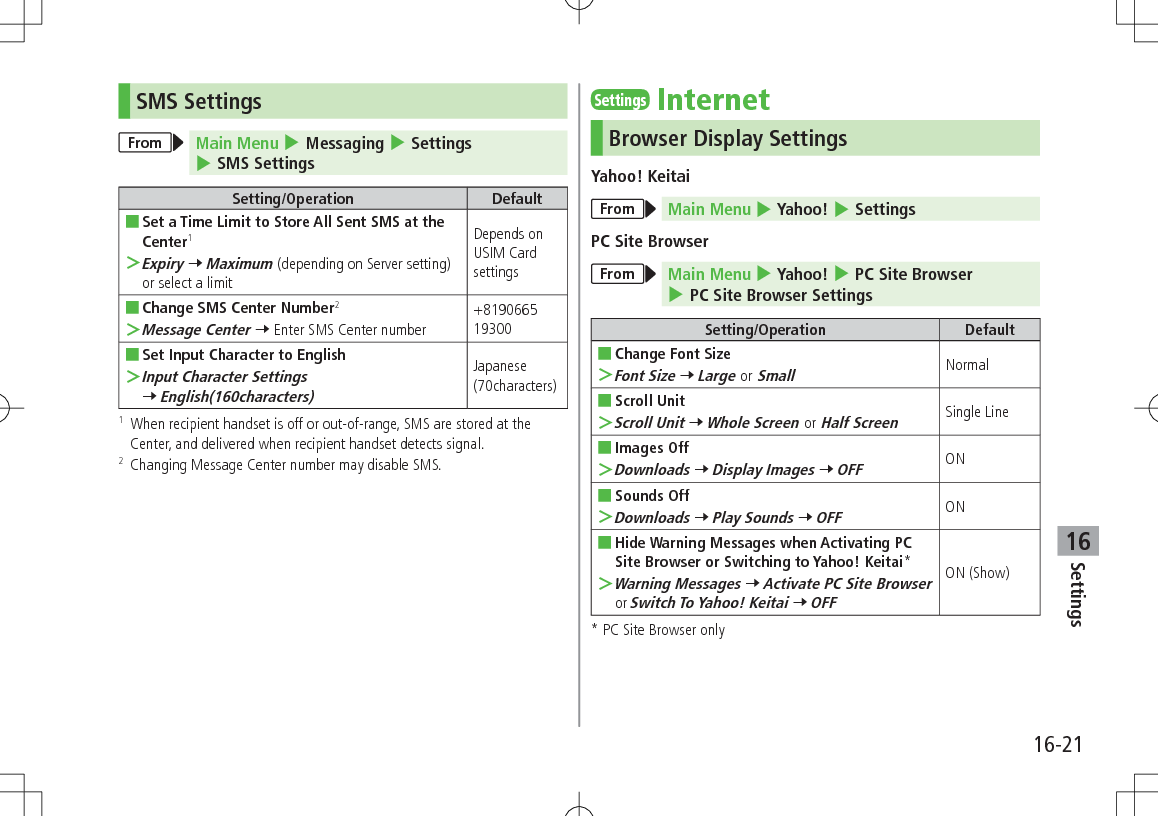
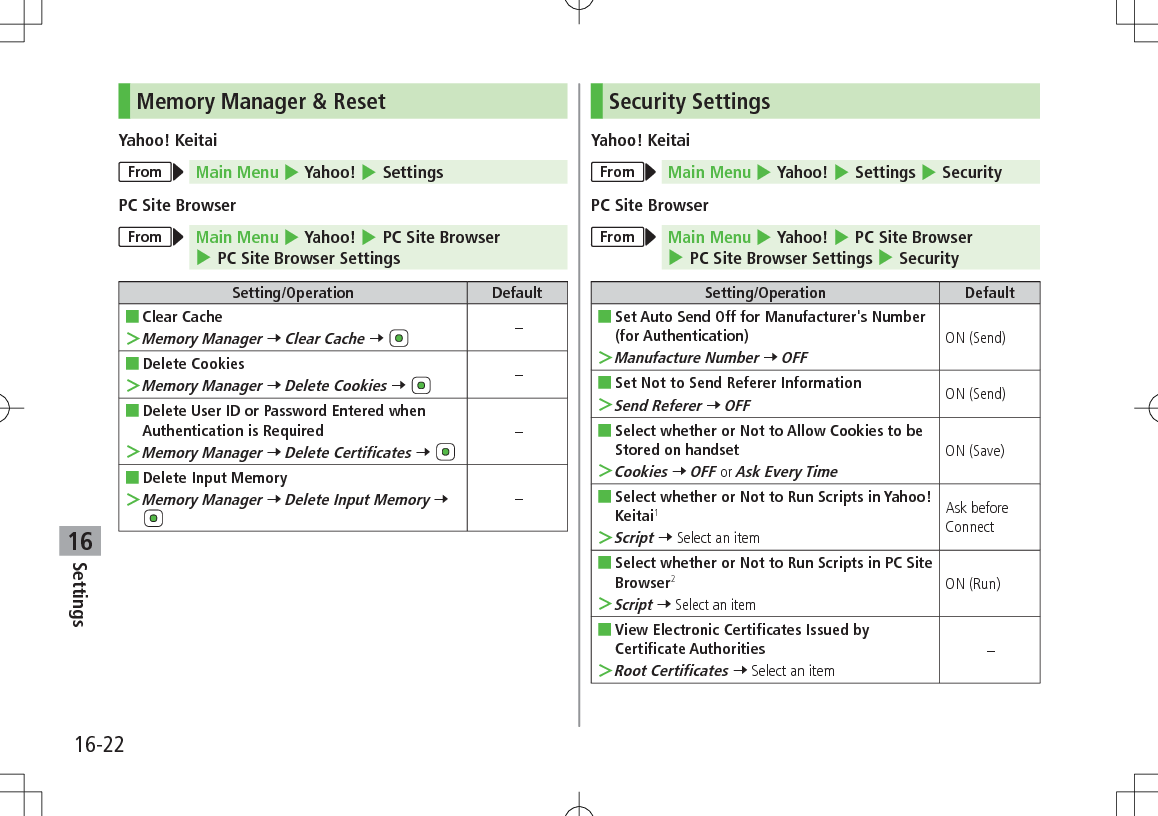
![Settings16-2316Setting/Operation Default ■Select whether or Not to Retain Authentication Information >Certificate Retention 7 Always Keep or Not KeepKeep while Browsing1 Yahoo! Keitai Browser only2 PC Site Browser onlyResetYahoo! KeitaiFrom Main Menu 4 Yahoo! 4 SettingsPC Site BrowserFrom Main Menu 4 Yahoo! 4 PC Site Browser 4 PC Site Browser SettingsSetting/Operation Default ■Initialize Browser >Initialized Browser 7 7 Enter Phone Password– ■Reset Browser Settings >Reset Defaults 7 A[YES] 7 Enter Phone Password–SettingsS! AppliFrom Main Menu 4 S! Appli 4 S! Appli SettingsSetting/Operation Default ■Change Volume >Volume 7 Adjust volume Volume 4 ■Backlight On/Off >Display Backlight 7 Always ON or Always OFFFollow General Setting* ■Deactivate Vibration >Vibration 7 OFFON ■Suspend S! Appli after Set Period of Inactivity >Auto Suspend Timer 7 Select a duration Not Suspended ■Update S! Appli Information on Memory Card from Another Handset >Synchronize Memory Card–* Display Backlight Time setting (ZP.15-6) applies.](https://usermanual.wiki/Panasonic-Mobile-Communications/209025A.User-Manual-2-of-5/User-Guide-1228968-Page-139.png)
