Panasonic Mobile Communications 209020A UMTS/ GSM Cellular Mobile with Bluetooth® and RFID User Manual BAILA E OI
Panasonic Mobile Communications Development of Europe Ltd UMTS/ GSM Cellular Mobile with Bluetooth® and RFID BAILA E OI
Contents
User Manual 2
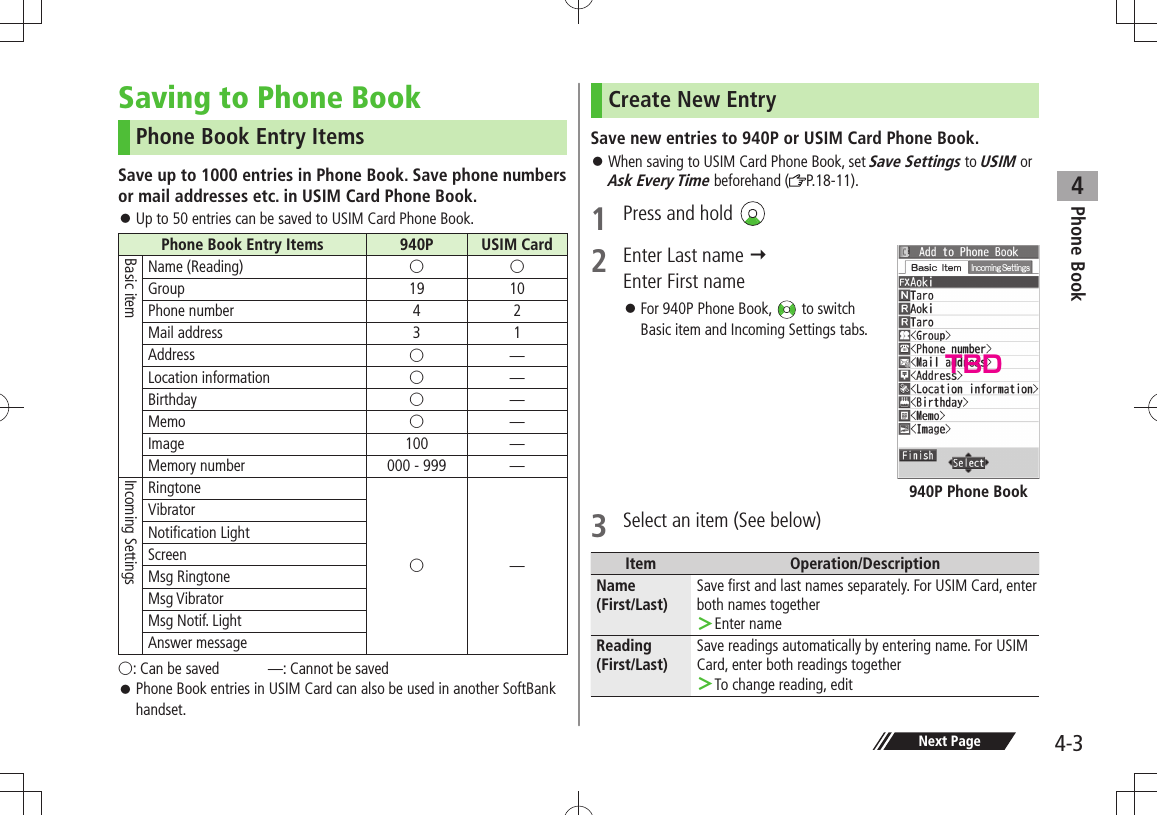
![Call22-3Outgoing Call FunctionsShowing/Hiding Caller IDEnter number > [Menu] Notify caller ID OFF or ONTo cancel setting: [Menu] Notify caller ID Cancel prefixSetting Caller ID on/off (Caller ID: P.2-21)Adding Prefix to Phone NumberSave Prefix ■Main Menu > Settings Call Settings Prefix Highlight <Not Recorded> [Edit] Enter a name Enter a prefix numberUp to seven entries can be saved. To check entries: Select a saved prefix. To delete entries: Highlight a prefix [Menu] Delete this or Delete all ( For Delete all, enter Phone Password) YESMake Calls Using Prefix ■Enter a number > [Menu] Prefix numbers Select an entry Voice Calls: / Video Calls: [V. Call]Alternatively, in detail window of Phone Book, Redial, Outgoing Call Logs or Incoming Call Logs, [Menu] Prefix numbers Select an entry Voice Calls: / Video Calls: [V. Call]Example: Save "186" and "184" as prefixes, and add them to phone numbers to show/hide your caller ID when making calls.Sending Touch-tone SignalsSend touch-tone signals for services such as reserving tickets, checking bank balance, etc. Save number strings to be sent as a touch-tone signal. Use P (pause) to separate numbers when saving.Save Pause Dial ■Main Menu > Settings Phone Settings Pause Dial [Edit] Enter a number stringTo enter a pause (p): Press and hold To delete: In Pause Dial window, [Menu] Delete YESSend Pause Dial ■Main Menu > Settings Phone Settings Pause Dial [Send] Enter a phone number Once line is connected, press [Send]Number string is sent each time [Send] is pressed.To send all number strings at one time: Once line is connected, press and hold Send at one time](https://usermanual.wiki/Panasonic-Mobile-Communications/209020A.User-Manual-2/User-Guide-1193816-Page-3.png)
![Call22-5Answering Voice CallsWhen a Call Arrives…940P rings; Notification Light flashes.If Caller ID is sent, number appears in Display; if saved in Phone Book, caller's name appears.When an International call arrives, appears at upper left of caller's phone number.1 to talk To adjust volume: or 2 to end callCall Time appears.Adjust Ringer Volume ■While 940P is ringing, >Volume adjustment is disabled in following cases: During Manner Mode (・ P.1-17)While ・ Ringer Volume is set to Escalating Tone ( P.18-2)NoteWhen Caller ID is not sent, Withheld appears.Tip●Operations Available during a Voice Call ( P.2-12)●Rejecting Unknown Callers ●Rejecting Calls without Caller ID (P.11-11)Settings ●Change Answer Setting ●Answer Calls by Opening Handset (P.18-7)Incoming Call FunctionsFollowing operations are available for incoming calls.Place Calls on Hold >Answer Phone > / Call Rejection >[Menu] Call RejectionRejecting Unknown Callers/Rejecting Calls without Caller ID ( P.11-11)Call Forwarding >[Menu] Call ForwardingActivate Call Forwarding ( P.2-17) beforehand to forward incoming calls to a preset number. If Call Forwarding is not active, call is rejected.Making Voice Clear (Shikkari Talk)<Default> ONMake other party's voice clear according to surrounding noise.Main Menu Settings Call Settings Shikkari Talk1 ON or OFF](https://usermanual.wiki/Panasonic-Mobile-Communications/209020A.User-Manual-2/User-Guide-1193816-Page-5.png)
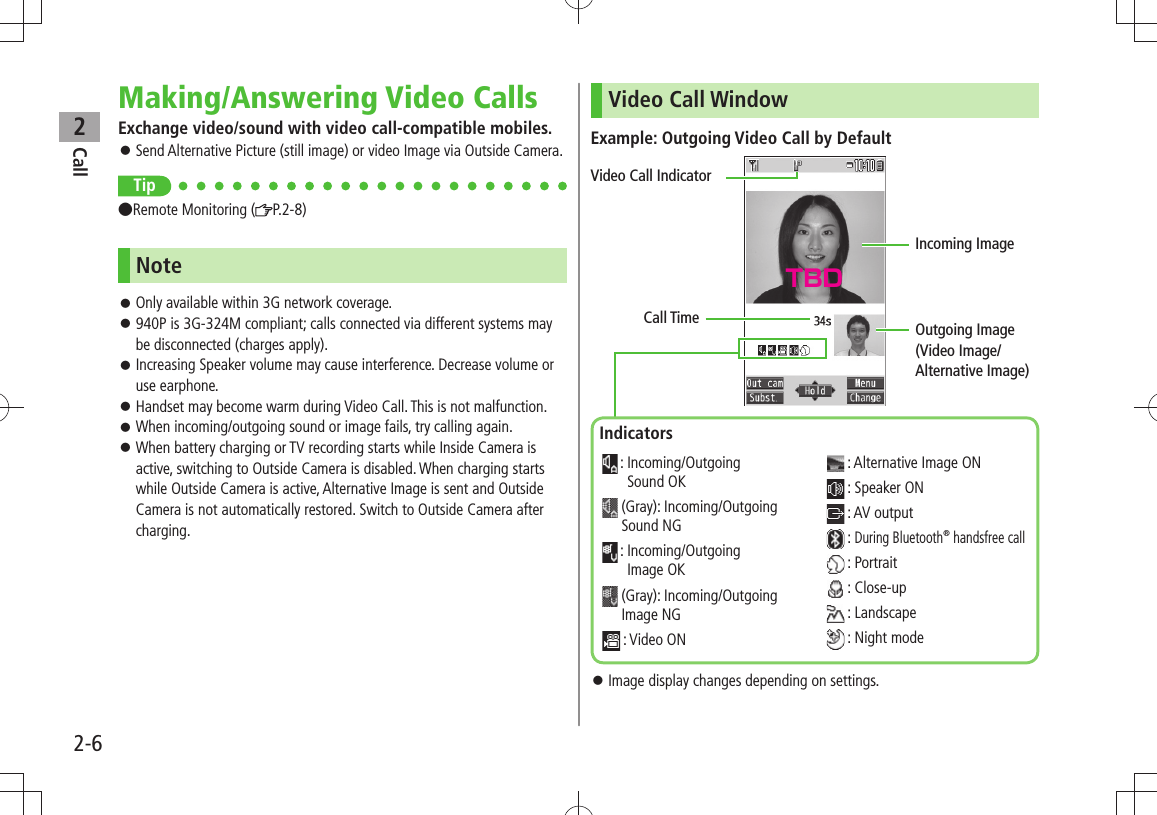
![Call22-7Making Video CallsBefore CallingConfirm signal strength ( P.1-10)If any of these indicators appear: Video Calls cannot be made ( P.1-10, P.1-11, P.19-12)1 Enter a phone number2 Confirm the number, then [V. Call]When answered, outgoing and incoming images appear; other party's voice sounds via Speaker. To adjust volume: or 3 to end callNoteOther party's voice sounds via Earpiece in Manner Mode; activate Speaker ( P.2-12).Tip●Outgoing Call Functions ( P.2-3)●Operations Available during a Video Call ( P.2-12)●Making Calls from Call Log ( P.2-14) ●Other Ways to Add New Entries ( P.4-5) ●Making Calls from Phone Book ( P.4-6)Settings ●Change Outgoing Image ●Switch to Voice Call when Video Call Fails ( P.18-12)](https://usermanual.wiki/Panasonic-Mobile-Communications/209020A.User-Manual-2/User-Guide-1193816-Page-7.png)
![Call22-8Answering Video CallsWhen a Video Call Arrives…940P rings; Notification Light flashes.If Caller ID is sent, number appears in Display; if saved in Phone Book, caller's name appears.When an International call arrives, appears at upper left of caller's phone number.1 Inside Camera Image is sent.To send Alternative Image: [Subst.]2 to end callNoteOther party's voice sounds via Earpiece in Manner Mode; activate Speaker ( P.2-12).Tip●Adjust Ringer Volume ●Incoming Call Functions ( P.2-5) ●Operations Available during a Video Call ( P.2-12)Remote MonitoringUse 940P as a monitoring camera to observe a remote place from a phone with 3G-324M compliant Video Call functions. Remote Monitoring starts when 940P receives a Video Call from preset phone number.Saving Numbers to Activate Remote MonitoringMain Menu Settings Video Call Remote Monitoring 1 Enter Phone Password Other ID2 <Not Recorded> Enter a phone number 3 Ring Tone Duration Enter time (sec)4 Setting ONSetting cannot be set to ON in Manner Mode.TBDTBD](https://usermanual.wiki/Panasonic-Mobile-Communications/209020A.User-Manual-2/User-Guide-1193816-Page-8.png)
![Call22-9Select Numbers from Phone Book/Call Log ■In Step 2, highlight ><Not Recorded> [Menu] Refer to Select an item Select a numberDelete Numbers ■After Step 1, (highlight a number >) [Menu] Delete this or Delete all YESUsing Remote Monitoring1 Make a Video Call to 940P from a preset phone numberAfter ring time elapses, Remote Monitoring starts.A Video Call starts if 940P answers before auto answer activates. 2 To quit Remote Monitoring, (caller or recipient side)International CallsCalling Abroad from JapanApplication not required. For details, go to: http://mb.softbank.jp/en/global_services/call/1 Enter a phone number2 [Menu] Int'l dial assistCountry/region code list appears.3 Select a country/region4 Voice Calls Video Calls[V. Call]Enter Country/Region Code Directly ■ > Press and hold to display + (IDD Prefix) Enter a country/region code Enter a number (omit first 0) Voice Calls: / Video Calls: [V. Call]Do not omit leading 0 to call Italy (country code: 39).](https://usermanual.wiki/Panasonic-Mobile-Communications/209020A.User-Manual-2/User-Guide-1193816-Page-9.png)
![Call22-10Calling while AbroadMay require application to Global Roaming Service. Download and take Global Roaming Guide when traveling abroad. For details, go to: http://mb.softbank.jp/en/global_services/global_roamingExample: When Roaming Dial Assistant is ONRoaming Dial Assistant ( Right) is set to ON and Japan by default.1 Voice CallsEnter a phone number Video CallsEnter a phone number [V. Call]2 Select an item (See below)First 0 is replaced by +81.To call a number just as saved in Phone Book: Dial with orig.No.Item Operation/DescriptionCall to Japan* Call Japan Call to set code*Call a country/region set for Roaming Dial AssistantAs is Call Call a number just as enteredSelect when calling within the country/region you stay* First 0 is replaced by IDD Prefix and country/region code (e.g. +81). (When calling Italy, +39 is added before first 0.)Confirmation window appears for the first time. Select NO to set Roaming Dial Assistant to OFF.NoteIn Step 1, to dial number as is, enter an IDD Prefix and a country/region code directly or select an entry with an IDD Prefix and a country/region code.Global Roaming SettingsFrom Main Menu Settings International Call ■International Call SettingsInt'l Dial Assist > Select an item (See below)Item Operation/DescriptionRoaming Dial AssistantReplace IDD Prefix with +ON > or OFF ( For ON, select a country/region)Country/ Area CodeSave up to 27 country/region codesHighlight ><Not Recorded> [Edit] Enter a country/region name Enter a country/region codeTo view an entry: Select a saved country/region name To delete: Highlight a country/region name [Menu] Delete this or Delete all ( For Delete all, enter Phone Password) YESIDD Prefix Edit IDD Prefix. IDD Prefix is set to 0046010 by default >[Menu] Edit Edit IDD Prefix](https://usermanual.wiki/Panasonic-Mobile-Communications/209020A.User-Manual-2/User-Guide-1193816-Page-10.png)
![Call22-11Network Mode ■<Default> AutomaticallySelect Network > Select an item (See below)Item Operation/DescriptionAutomatically3G/GSM service area in Japan or abroad.940P selects 3G network in Japan or an available network automatically using area (network condition) abroad.Manually Select an item >3G/GSM・ : 3G/GSM service area in Japan or abroad. 940P selects an available network using area (network condition).3G・ : 3G service area in Japan or abroadGSM・ : GSM service area abroad. Unavailable in JapanAutomatically is recommended.Select Operator ■<Default> AutoSelect Operator > Select an item (See below)Item Operation/DescriptionAuto Select an operator automaticallyManual Select an operator manuallySelect an operator >Operators with X are not available.To show operator list: [Update]Network Re-searchSearch available networksWhen Auto is set, 940P selects an available operator automatically. When Manual is set, operator list appears.Operator Priority for Automatic Search ■PLMN Setting > [Menu] Select an item (See below)Item Operation/DescriptionAdd your networkSave currently connected operator >[Finish] YESAdd from list Select an operator > [Set] Select a network type [Finish] YESTo search operators by country/region: [Search] Select a country/region (To search again in country/region list: [Search] Enter a country/region name)Direct input Save unlisted operators by entering country/region code and operator codeEnter country/region code (3 digits) and operator code >(2 to 3 digits) Select a network type [Finish] YESChange prioritySelect a priority > [Finish] YESDelete this/Delete allYES > [Finish] YESView ■Operator Name in Standby<Default> OFFOperator Name > ON or OFFWhen ON is set, Clock Position is set to Pattern 1 ( P.18-4).](https://usermanual.wiki/Panasonic-Mobile-Communications/209020A.User-Manual-2/User-Guide-1193816-Page-11.png)
![Call22-12Engaged Call FunctionsOperations Available during a Voice CallAdjust Volume > / Adjust volume within two seconds. Adjusted volume is retained even after calls end or handset is turned off.Place Call on Hold >[Hold]To resume call: Speaker ON/OFFToggle Speaker or Earpiece >Record ConversationRecord for about three minutes per callPress and hold > or [Rec]To end recording: [Stop], or press and hold To play back recorded data: P.2-16Toggle Manner ModePress and hold >Toggle Handset/Bluetooth®Toggle handset or Bluetooth® devicePress and hold > Operations Available during a Video CallAdjust Volume > / Adjust volume within two seconds. Adjusted volume is retained even after calls end or handset is turned off.Place Call on Hold >[Hold]To resume call: To send Alternative Image: [Subst.] Speaker ON/OFFToggle Speaker or Earpiece >Record ConversationRecord up to five calls for about 20 seconds eachPress and hold >To end recording: [Stop] or press and hold To play back recorded data: P.2-16Inside Camera/Outside Camera >[In cam/Out cam]Camera/Alternative ImageToggle Camera Image and Alternative Image >[Image/Subst.]Toggle Image Size >[Change]Zoom Adjust zoom level for Camera Image to be sent > (zoom in) or (zoom out)Toggle Manner ModePress and hold >](https://usermanual.wiki/Panasonic-Mobile-Communications/209020A.User-Manual-2/User-Guide-1193816-Page-12.png)
![Call22-13Toggle Handset/ Bluetooth®Toggle handset or Bluetooth® device >[Menu] Talk on BT/Phone Bluetooth or PhoneBacklightSetting >[Menu] Back light Constant light or 15 seconds lightVideo CallSetting >[Menu] V. Call settings Follow the steps for selected item ( P.18-12)LCD AI Activate/deactivate auto image compensation >[Menu] LCD AI ON or OFFAccount Details >[Menu] Account detailsKey Guide >[Menu] Key guideCall LogIncoming and outgoing call records appear here. Use these records to call back.Redial Up to 30 outgoing call records (Voice and Video) are saved. Older records of same number are deleted.Outgoing Call LogsUp to 30 outgoing call records (Voice and Video) and up to 30 outgoing transmission records (64K data and packet transmission) are saved. Older records of same number are also retained.Incoming Call LogsUp to 30 incoming call records (Voice and Video) and up to 30 incoming transmission records (64K data transmission) are saved. Older records of same number are also retained.Indicators for Redial/Outgoing Call Logs/Incoming Call Logs Dialed/received Voice Calls* Missed Voice Calls Dialed/received Video Calls* Missed Video Calls New messages recorded on Answer Phone Dialed/received international Voice Calls* Missed international Voice Calls Dialed/received international Video Calls* Missed international Video Calls* Calls received while handset is off, out-of-range, engaged, etc. ( P.2-19) Received Remote Monitoring calls Dialed calls of 64K data transmission Received calls of 64K data transmission* Missed calls of 64K data transmission Dialed calls of packet transmission Received calls of 64K data/packet transmission when no external device is connected* Unchecked calls are highlighted.](https://usermanual.wiki/Panasonic-Mobile-Communications/209020A.User-Manual-2/User-Guide-1193816-Page-13.png)
![Call22-14Viewing Call Logs1 Redial Outgoing Call Logs Phone Book Call Log Outgoing Call Logs Incoming Call LogsRecords appear.To show Received/Sent address logs: [Change]View Missed Calls ■Main Menu > Phone Book Call Log Incoming Call Logs Missed CallsUnknown Calls appears in Call Log for unchecked calls.NoteNewest record appears at top of list. Names appear if saved in Phone Book.Call Log records remain even if 940P is turned off. When the maximum number of records are saved, oldest is deleted first. Incoming Call Logs can also be opened from Main Menu Phone Book Call Log Incoming Call Logs All CallsRedialMaking Calls from Call Log1 Open Call Logs ( Left)2 Voice CallsHighlight a phone number or name Video CallsHighlight a phone number or name [V. Call] International CallsSelect a phone number or name [Menu] Int'l dial assist Select a country/region Voice Calls: /Video Calls: [V. Call]TBD](https://usermanual.wiki/Panasonic-Mobile-Communications/209020A.User-Manual-2/User-Guide-1193816-Page-14.png)
![Call22-15Functions Available from Call LogHighlight a call record and press [Menu].Available functions vary by selected log/record. Item Operation/DescriptionNotify caller IDNotify or withhold your Caller ID ( P.2-3)Prefix numbersAdd a prefix to phone number before dialingSelect an entry > Int’l dial assistAdd international dialing prefixSelect a country/region > Character size Toggle font sizeAdd to Phone BookSave number to Phone Book ( P.4-5)Ring time 1Show ring time (missed calls)Add shortcut iconCreate a shortcut ( P.1-22)Compose S! MailCreate S! Mail(From Step 4 on P.13-4)Compose SMS 2Create SMS(From Step 4 on P.13-7)Received address/ Sent addressShow Received/Sent address logDelete this/ Delete selected/Delete allDelete record(s) in selected list >1 Available only for Incoming Call Logs2 Message can be sent to SoftBank handsets onlyAnswer Phone/Call DataAnswer PhoneRecord up to five voice messages for Voice Calls or up to two for Video Calls (up to 20 seconds per message) on 940P.When Answer Phone is active, – (Voice Call) or – (Video Call) appears in Standby.Unavailable when: handset is off or in Emission OFF Mode; appears. Use Voice Mail ( P.2-18).Activating/Canceling Answer Phone<Default> ON1 Press and hold To toggle setting, repeat operation. Redirect a Call to Answer Phone ■ >[Ans. Ph] or NoteAlternatively, activate/cancel from Main Menu Tools Sound Recorders Answer Phone Setting ON or OFFWhen full, new messages cannot be recorded even if Answer Phone is activated. Delete old messages.While Manner Mode (set for User Mode) is active, Answer Phone setting for User Mode ( P.18-7) is prioritized.TBD](https://usermanual.wiki/Panasonic-Mobile-Communications/209020A.User-Manual-2/User-Guide-1193816-Page-15.png)
![Call22-16Playing MessagesWhen a new message is recorded,Event Indicator appears ( P.1-21) in Standby.1 Select indicator2 Select a messagePlayback starts.After playback ends, indicator disappears.NoteAlternatively, press in Standby (for Voice Call messages) or Main Menu Tools Sound Recorders Voice Call Data or Video Call Data Select a recordingCall DataRecord one Voice Call (up to 3 minutes). Record up to 5 Video Calls (up to 20 seconds for message). Recording Calls1 During a call, press and hold Recording starts.2 To end recording, [Stop] or press and hold NoteAlternatively, record a Voice Call by following the steps: [Rec] to start and to endChecking Call DataMain Menu Tools Sound Recorders1 Voice CallsVoice Call Data Call Data2 Video CallsVideo Call Data Select a Call DataCall Data is played back.TBD](https://usermanual.wiki/Panasonic-Mobile-Communications/209020A.User-Manual-2/User-Guide-1193816-Page-16.png)
![Call22-17Answer Phone/Call Data FunctionsFrom Main Menu Tools Sound RecordersSelect Answer Message/ ■Set Ring TimeAnswer Phone Setting > ON Select an answer message Enter ring timeWhen Answer Phone and Optional Service (Voice Mail or Call Forwarding) are both active, function with shorter ring time takes priority. For example, if Answer Phone ring time is 18 seconds and Optional Service is 20 seconds, Answer Phone responds first (Priority may change due to signal conditions.).Even when Answer Phone is prioritized, Call Forwarding or Voice Mail takes priority when maximum number of recorded Answer Phone messages reaches.Delete Recorded Call Data ■Voice Call Data > or Video Call Data (Highlight an item) [Menu] Erase this, Erase rec. msg., Erase Call Data* or Erase all YES* Video Call Data onlyOptional ServicesOverviewFor details, visit SOFTBANK MOBILE Corp. Website (http://www.softbank.jp).Call Forwarding(Right)Forward unanswerable calls to a preset number when handset is off, out-of-range, etc.Voice Mail(P.2-18)Unanswered calls are forwarded to Voice Mail Center as set or when handset is off, out-of-range, engaged, etc.Missed Call Notification ( P.2-19)Call Waiting*(P.2-20)Place the current call on hold and answer a second, or alternate between calls.Call Barring (P.2-20)Restrict incoming/outgoing Voice Calls/Video Calls and SMS messagesCaller ID (P.2-21) Show or hide your number when calling.* Separate subscription required.](https://usermanual.wiki/Panasonic-Mobile-Communications/209020A.User-Manual-2/User-Guide-1193816-Page-17.png)
![Call22-18Call ForwardingCall Forwarding and Voice Mail cannot be set simultaneously. When forwarding Video Calls, set a destination phone that supports 3G-324M standard video calls. If not, Video Calls are not forwarded.Activating Call ForwardingMain Menu Settings Call Settings Voice Mail/Call Fwding Call Forwarding ON1 Select a type2 Enter a destination phone number to select number from Phone Book.3 Select an item (See below)Item Operation/DescriptionRinger ON Forward missed callsSelect a ring time > YESRinger OFF Forward all calls without ringing/vibratingYES >Check Call Forwarding Status ■ >Main Menu Settings Call Settings Voice Mail/Call Fwding Get Status Cancel Call Forwarding ■ >Main Menu Settings Call Settings Voice Mail/Call Fwding Deactivate All YESNoteToll free numbers and international call numbers cannot be saved as a destination number.When using Call Forwarding together with Answer Phone, the function with shorter ring time takes priority (Priority may change due to signal conditions.).When Ringer ON is set, following operations are available while 940P is ringing (within ring time):To answer call: ・ To forward call: ・ [Menu] Call Forwarding](https://usermanual.wiki/Panasonic-Mobile-Communications/209020A.User-Manual-2/User-Guide-1193816-Page-18.png)
![Call22-19Voice MailCalls are forwarded to Voice Mail Center via Call Forwarding function; Call Forwarding and Voice Mail cannot be set simultaneously.Voice Mail is not available for Video Calls. Activating Voice MailMain Menu Settings Call Settings Voice Mail/Call Fwding Voice Mail ON1 Select an item (See below)Item Operation/DescriptionRinger ON Forward missed callsSelect a ring time > YESRinger OFF Forward all calls without ringing/vibratingYES >Check Voice Mail Status ■Main Menu > Settings Call Settings Voice Mail/Call Fwding Get StatusCancel Voice Mail ■Main Menu > Settings Call Settings Voice Mail/Call Fwding Deactivate All YESNoteWhen using Voice Mail together with Answer Phone, the function with shorter ring time takes priority (Priority may change due to signal conditions.).When Ringer ON is set, following operations are available while 940P is ringing (within ring time):To answer call: ・ To forward call: ・ [Menu] Call ForwardingChecking Voice Mail MessagesEvent Indicator ( P.1-21) and appear in Standby when new messages are recorded.1 Select indicator YESFollow voice guidance. Indicator and disappear after messages are checked.View Details ■View callers' phone numbers and date/time Voice Mail messages were left before playing messages.Activate Missed Call Notification beforehand ( P.2-20).TBD](https://usermanual.wiki/Panasonic-Mobile-Communications/209020A.User-Manual-2/User-Guide-1193816-Page-19.png)
![Call22-20 > Voice Mail Notif. [ ] ( P.2-20).Delete ■ Indicator >Main Menu Settings Call Settings Voice Mail/Call Fwding Delete Voice Mail Icon YESNoteAlternatively, follow these steps to check Voice Mail: Main Menu Settings Call Settings Voice Mail/Call Fwding Listen to Voice Mail YESMissed Call NotificationWhen Missed Call Notification function is active, Event Indicator appears for calls missed while 940P was off, out-of range, engaged etc.Available only when Voice Mail is active. Main Menu Settings Call Settings Missed Call Notifi.1 YES940P connects to the Network.Follow voice guidance. When Calls are Received while Missed Call Notification is Active…Event Indicator appears for missed calls when 940P is turned on or comes into range. Select indicator to view Missed Calls.Voice mail indicator appears when Voice Mail messages are recorded ( Left).Call WaitingActivating/Canceling Call WaitingMain Menu Settings Call Settings Call Waiting1 Activate or Deactivate YESCurrent status appears.Check Call Waiting Status ■Main Menu > Settings Call Settings Call Waiting Get StatusAnswering Second Call1 When tone sounds, to alternate between calls. to disconnect active call.When the party hangs up, active call ends. to re-engage the party on hold.When a second call comes in while first call is on hold, hold status is canceled and first call resumes.Reject Second Call ■When tone sounds, >[Menu] Call RejectionTBD](https://usermanual.wiki/Panasonic-Mobile-Communications/209020A.User-Manual-2/User-Guide-1193816-Page-20.png)
![Text Entry33-2Text EntryEnter alphanumerics, hiragana, kanji, katakana, symbols and pictographs.Three types of character input methods are available: Mode 1 (5-touch), Mode 2 (2-touch), Mode 3 (NIKO-touch) In this guide, examples are described in Mode 1 (5-touch).Mode 2 (2-touch)/Mode 3 (NIKO-touch)Press two numeric keys to enter a character.List of Key Assignments ( P.19-15 to 17) ■HelpHelp describes text entry operations.In text entry window, >[Menu] Help Select an item❶ Character Input Methods Operations: Mode 2 (2-touch): Mode 3 (NIKO-touch)No icon appears for Mode 1 (5-touch). Press and hold [Mode]❷ Input Modes* Operationsabc: Alphanumerics123: Numbers漢: Kanji (hiragana)カナ: Katakana[Mode]❸ Double-byte/Single-byte* Operations1/1: Double-byte1/2: Single-byte[Menu] 2bytes character (1byte character)❹ Remaining/Maximum Bytes in Message* Operations in Mode 3 (NIKO-touch): P.19-17❶❷❸❹TBD](https://usermanual.wiki/Panasonic-Mobile-Communications/209020A.User-Manual-2/User-Guide-1193816-Page-24.png)
![Text Entry33-3Entering TextEntering CharactersExample: Enter 鈴木1 In alphanumerics mode, twice to switch to kanji (hiragana) modeす: three timesず: * three times き: twice* When the next character is on the same key, press first to move cursor.2 to enter Predictive Candidates ListTo change word before converting, press .There are four types of word suggestion lists: Predictive Candidates, Conversion Candidates, Context Forecast and abc/123/Kana Candidates ( P.3-6) 3 to select 鈴木Other Input Functions ■Enter katakana/alphanumericsPress [Mode] several times to select an input mode Enter charactersEnter small kana (っ, ッ, etc.)Enter a character to convert to small characterAlternatively, press a key repeatedly to enter an assigned small kana.Enter upper case charactersEnter a character Alternatively, press a key repeatedly to enter an assigned upper case character.Add ゛or ゜Enter a character to add ゛or ゜ for ゛or twice for ゜ In single-byte katakana mode, ゛and ゜ are entered as a single-byte character.Insert line breakPress [Line FD] to insert line breaks in textInsert space at end of textInsert space within textPress repeatedly until single-byte space appears*, or [Menu] Pictograms/symbols Space to enter a space (Double-byte (single-byte) space is entered in 2 bytes (1 byte) input mode.)Toggle characters in reverse order[Rev]Example: From c, press to toggle as follows: c b a 2…Move cursor to beginning/end of sentence[Menu] Jump To beginning or To endUndo [Undo]* Space cannot be entered within text in number mode by following the steps above. Use symbol list.TBDTBD](https://usermanual.wiki/Panasonic-Mobile-Communications/209020A.User-Manual-2/User-Guide-1193816-Page-25.png)
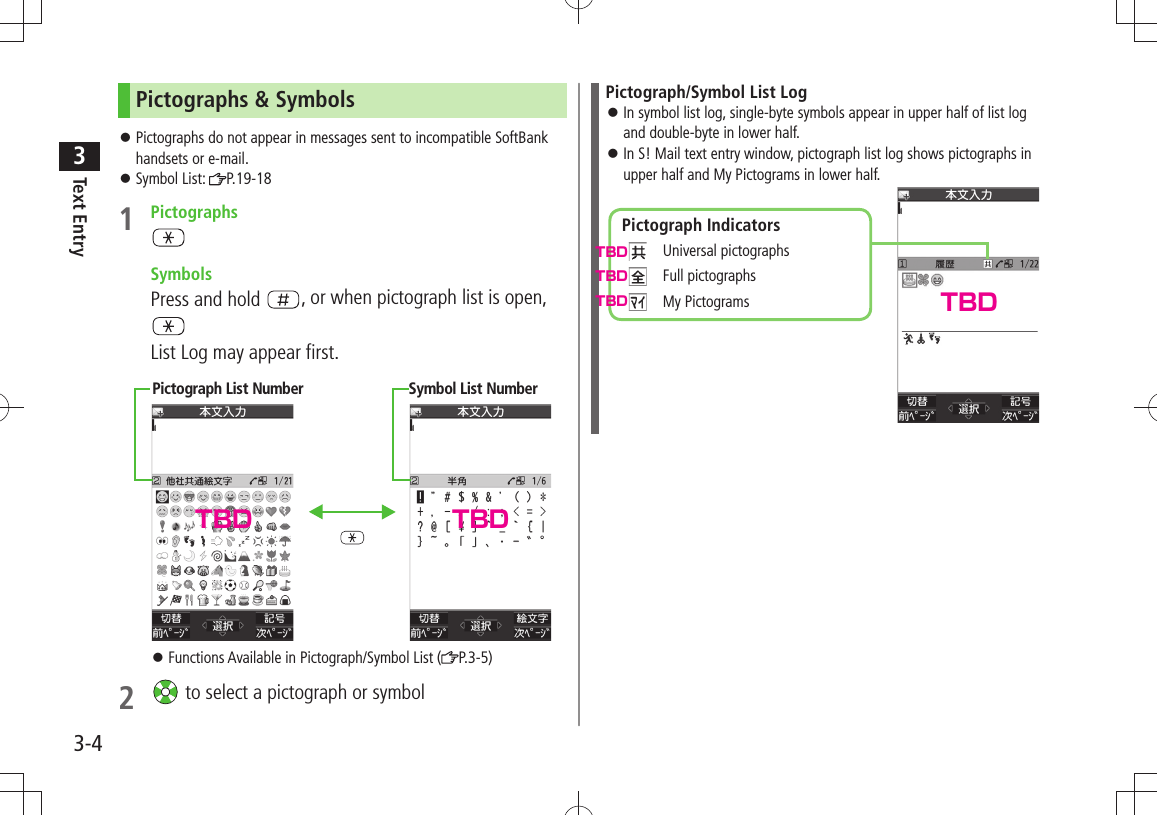
![Text Entry33-5Functions Available in Pictograph/Symbol List ■Toggle pictograph listsIn pictograph list, [Switch]Toggle lists: (Log ) Universal pictographs 1 Full pictographs My Pictograms 2Alternatively, toggle lists by pictograph list number (1-9,0)Toggle symbol listsIn symbol list, [Switch]Toggle lists: (Log ) Single-byte symbols Double-byte symbolsAlternatively, toggle lists by symbol list number (1-3)Jump to next page In pictograph/symbol list, [Next]Jump to previous page IIn pictograph/symbol list, [Prev.]Toggle pictograph/symbol listIn pictograph, /[Symbol]In symbol list, /[Pict.]Toggle full screen/standard screenClose list1 In messages only2 In S! Mail Text field onlyNoteIn number mode, follow the steps to show pictograph list: [Menu] Pictograms/symbols PictogramsIf there are no data in folder corresponding to assigned number, pressing number key does not change pictograph list.Smileys1 In test entry window, [Menu] Pictograms/symbols Smiley2 Select a smileyTo show next/previous page: [Next]/ [Prev.]](https://usermanual.wiki/Panasonic-Mobile-Communications/209020A.User-Manual-2/User-Guide-1193816-Page-27.png)
![Text Entry33-6TemplatesInsert templates (greetings, URLs, emoticons) or edit preinstalled templates.Inserting Templates1 In text entry window, press and hold Not available in number mode. 2 Select a category Select a templateNoteAlternatively, in a text entry window, [Menu] Input assistance Templates to enter a templateEditing TemplatesMain Menu Tools Templates/Users Dic. Templates1 Select a category2 Highlight a template [Edit] Edit templateReset Edited Templates ■After Step 1, (highlight a template > ) [Menu] Reset this or Reset all ( For Reset all, enter Phone Password) YESManage Template Folders ■In Step 1, highlight a category > [Menu] Edit folder name Edit folder nameTo reset folder name, [Menu] Reset name YESAdditional Features1 In text entry window, [Menu] Input assistance2 Select an item (See below)Item Operation/DescriptionKuten Code Enter a character code ( P.19-19)Enter a character code (4 digits) >Input date/timeSelect a style to enter date/timeSelect a display style > Enter date/timeQuote phone bookQuote Phone Book entry detailSelect an entry > Check item(s) to quote [Finish]Quote accnt detlsQuote Account DetailsEnter Phone Password > Check item(s) to quote [Finish]Bar code readerActivate Bar Code Reader to insert scanned result (P.12-11)](https://usermanual.wiki/Panasonic-Mobile-Communications/209020A.User-Manual-2/User-Guide-1193816-Page-28.png)
![Text Entry33-7Conversion Methods (Japanese)Predictive ConversionThe following suggestion lists appear while entering text orafter a word is fixed.Before Entering Text*Predictive Candidates (Pre-text Predict)Lists likely conversions used for beginning of textExample: こんにちは, お疲れさま, etc.While Entering TextPredictive CandidatesLists likely conversions (Predictive Candidates) and matching conversions (Conversion Candidates)Predictive Candidates わ 私, わたし, etc.Conversion Candidates わ 和, 輪, etc.Conversion CandidatesSuggests matching conversionsExample: わ 和, 輪, etc.abc/123/Kana CandidatesLists alphanumerics/katakana assigned to key ( P.3-7)After a Word is FixedContext ForecastSuggests words likely to followExample: 私 is fixed です, の, は, etc.* Shown when message text field is open.Predictions change with each letter entered. Press [Pred.]/[Conv.] to toggle Predictive Candidates List and Conversion Candidates List.Predictive CandidatesTime Season Predict function preferentially shows word suggestions according to current season and time.Text Expression function shows formal or informal word suggestions ( P.18-12).Note940P learns entered characters and suggests them for future conversions ( P.3-8).TipSettings ●Set Learning Feature Off for Secret Mode/Secret Data Only ●Delete All Learned Words ( P.18-10)](https://usermanual.wiki/Panasonic-Mobile-Communications/209020A.User-Manual-2/User-Guide-1193816-Page-29.png)
![Text Entry33-8Example: Enter 私の鼻1 In kanji (hiragana) mode, わ is entered and Predictive Candidates List appears.2 to move to Predictive Candidates List to select 私私 is entered and Context Forecast List appears.3 to move to Context Forecast List to select のの is entered and Context Forecast List appears.4 はな is entered and Predictive Candidates List appears.5 [Conv.]Conversion Candidates List appears.6 to move to Conversion Candidates List to select 鼻If the Word is Not ListedPress to return to hiragana, and segment hiragana to convert separately.Example: Segment はるか into はる and か, then convert to 春香① Move cursor to る, then convert はる to 春 ② Convert か to 香 Using Previously Entered WordsEnter the first one or two hiragana to access previously enteredwords in the list.TBDTBDTBD](https://usermanual.wiki/Panasonic-Mobile-Communications/209020A.User-Manual-2/User-Guide-1193816-Page-30.png)
![Text Entry33-9Converting Hiragana to Katakana/AlphanumericsEnter katakana and alphanumerics in kanji (hiragana) mode. Date and time can be entered quickly.Example 1: Enter OKStep 1 2 3 4Key (3 times) (twice) [a1Kana]Display ふふにabc/123/Kana Candidates OKPress after highlighting OK.Example 2: Enter 10/30, 10:30 or 10月30日Step 1 2 3Key [a1Kana]Display あわさわ abc/123/Kana Candidates10/3010:30or10月30日Press after highlighting 10/30, 10:30 or 10月30日Narrowing Down Predictive Candidates by Number of CharactersIn kanji (hiragana) mode, narrow down Predictive Candidates by specifying number of characters.Example: Show word suggestions of seven or more characters starting with かさ1 Enter かさ 2 (five times)Word suggestions of seven or more characters appear. to change number of charactersTo show word suggestions of only seven characters: [Change]TBDTBD](https://usermanual.wiki/Panasonic-Mobile-Communications/209020A.User-Manual-2/User-Guide-1193816-Page-31.png)
![Text Entry33-10Editing TextDeleting & Replacing1 Delete Characters within LinesPlace cursor before a character A character after cursor is deleted.Press and hold to delete all characters after cursor. Delete Characters from the End of TextPlace cursor at the end of text A character before cursor is deleted.Press and hold to delete all characters before cursor.2 Enter another characterCopy/Cut/PasteCopy/cut text to save, then paste to another place.1 In text entry window, [Menu] Copy or Cut2 Select Text to Copy/CutPlace cursor before (or after) text to select [Start] Place cursor after (or before) text [End] Select All[All] [End]3 Place cursor at target location [Menu] Paste](https://usermanual.wiki/Panasonic-Mobile-Communications/209020A.User-Manual-2/User-Guide-1193816-Page-32.png)
![Text Entry33-11User's DictionarySave frequently used words/phrases (up to 100 entries). Saved words/phrases appear among word suggestions.Saving User's Dictionary Entries1 In text entry window, [Menu] Text entry setting User's Dictionary2 <New>3 Enter a word Enter readingEdit User's Dictionary Entries ■After Step 1, highlight a word > [Edit] Edit word Edit readingDelete User's Dictionary Entries ■After Step 1, >[Menu] Delete Delete this or Delete all ( For Delete all, enter Phone Password) YESNoteAlternatively, Main Menu Tools Templates/Users Dic. User's DictionaryDownload DictionaryDownload dictionaries from P-egg, a download site for 940P users (see below). Activate downloaded dictionaries to add character conversions to conversion suggestions (Japanese).P-egg (as of October 2009) Main Menu Yahoo! Bookmarks Panasonicメーカーサイト P-eggActivating Downloaded DictionariesMain Menu Tools Templates/Users Dic. Download Dictionary1 Select a dictionary★ appears next to active dictionary.To cancel: follow the same step Change Title ■In Step 1, highlight a dictionary > [Menu] Edit title EditView Details ■In Step 1, highlight a dictionary > [Menu] Dictionary infoDelete Dictionaries ■In Step 1, (highlight a dictionary) > [Menu] Delete this or Delete all ( For Delete all, enter Phone Password) YES](https://usermanual.wiki/Panasonic-Mobile-Communications/209020A.User-Manual-2/User-Guide-1193816-Page-33.png)
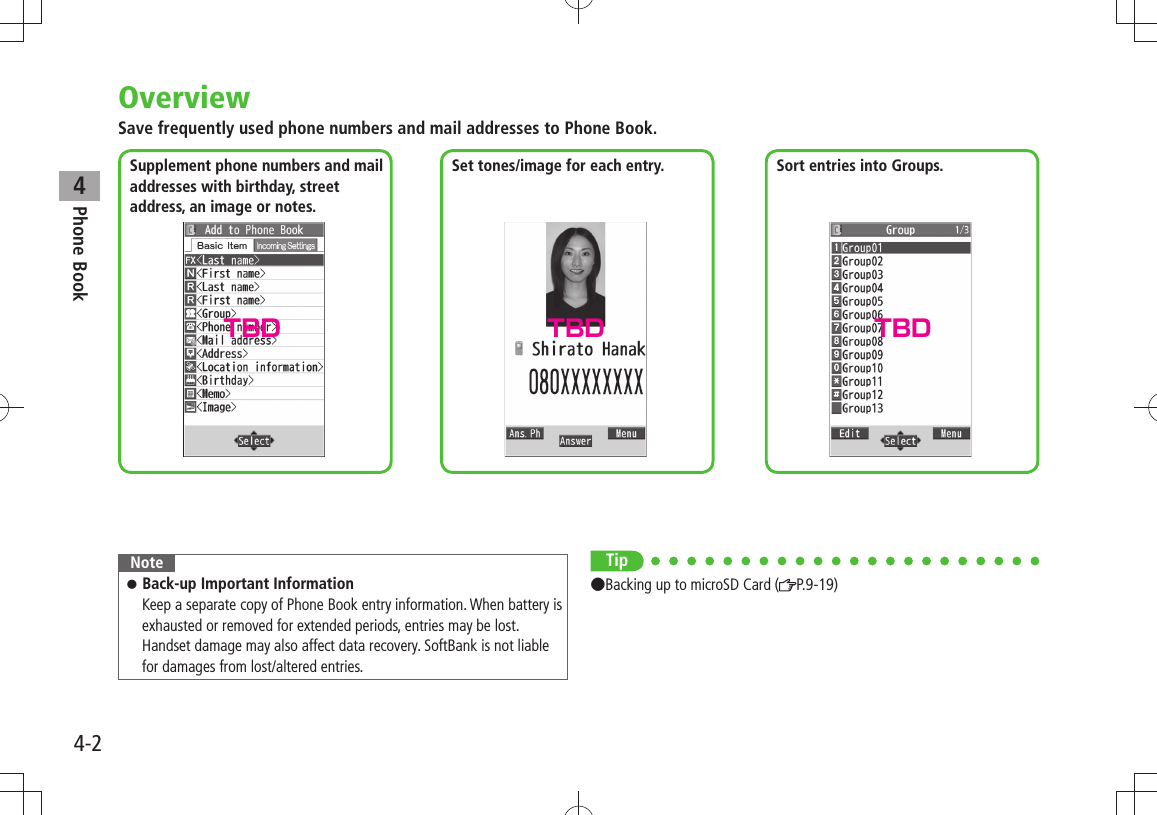
![Phone Book44-4Item Operation/DescriptionGroup Save as a group member. Entries can be searched by the group.Select a group >Change group name or set ringtone by the group ( P.4-6).Phone numberEnter phone number ( > For 940P, select an icon)Mail address Enter mail address ( > For 940P, select an icon)Save only phone number if mail address is "phone number@softbank.ne.jp".Address Save zip code, country/region, prefecture, city, number/street and additional informationSelect an item > Enter each information Home or Office For entering other information, [Return]Location informationIdentify handset location and save information. Also, save location record selected from location logsSelect an item > ・ By position loc. YES Check information [Set] (To show information while positioning: When [Use] appears at lower right of display, press [OK]. To retry positioning: [Retry]) ・ From loc. history Select a location record to saveBirthday Enter birthday >Memo Enter memo >Item Operation/DescriptionImage Save a still image to appear for incoming callsSelect an item >Select image・ Select a folder Select a file ・ Shoot image Frame subject [Record]/ / [Save]/ / Saved still image appears for an incoming call only when Phone Book Image ( P.18 - 7 ) i s ON. If there is an image saved for Screen, the image preferentially appears.Memory numberEnter memory number >Ring toneRing Tones > Select a type Select a folder Select a ringtoneVibratorSelect vibrator > Select a patternNotification LightSelect illumination > Select a patternScreen*SEL picture > Select a screen type Select a folder Select an imageSaved still image appears for an incoming call whether Phone Book Image is ON or OFF. Phone Book Image setting applies only when still image is saved for Image.Msg RingtoneRing Tones > Select a type Select a folder Select a ringtoneMsg VibratorSelect vibrator > Select a patternMsg Notif. LightSelect illumination > Select a patternAnswer messageSelect answer message > Select a message* To cancel: Select RLS picture](https://usermanual.wiki/Panasonic-Mobile-Communications/209020A.User-Manual-2/User-Guide-1193816-Page-37.png)
![Phone Book44-54 [Finish]Other Ways to Add New EntriesSave currently displayed phone numbers, mail addresses, still images or location information to Phone Book.Example: Saving Numbers from Incoming Call Logs1 Highlight a record [Menu] Add to Phone Book2 New EntryNew Enter details ( Step 3 on P.4-4) Add to Existing EntryAdd Select entry Enter other details (Step 3 on P.4-4)When saving to USIM Card, Overwrite appears instead of Add.3 When complete, [Finish] ( YES)NotePress [Menu] from a function. If Add to Phone Book appears, the information is savable to Phone Book. From a text message window, select Add Address to save entries; from still image list/still image, select Set display Phone Book to save entries.When saving new entries in Secret Mode or Secret Data Only, entries are saved to handset regardless of Save Settings.](https://usermanual.wiki/Panasonic-Mobile-Communications/209020A.User-Manual-2/User-Guide-1193816-Page-38.png)
![Phone Book44-6Setting GroupsSort entries by Group. Custom set ringtones/vibrators/notifications per group.Main Menu Phone Book Group appears for USIM Card Group.1 Highlight a group [Edit] Select an item Set itemEnter group name for " Group name."For other item operations: P.4-4 Custom settings unavailable for USIM Card Groups.2 When complete, [Finish]Check Settings ■Select a group entry, or >[Menu] Check settingSettings cannot be checked in USIM Card Group Phone Book. Reset Group Setting ■Highlight a group > [Menu] Reset group YESNoteCustom settings unavailable for USIM Card Groups. Individually set ringtones are prioritized over those set for groups. Searching/Using Phone BookMaking Calls from Phone Book<Default> A-KA-SA-TA-NA1 2 Search Phone Book (See below)To change search method: Select a search method (See below)Search Method Operation/DescriptionA-KA-SA-TA-NASearch entries by katakana syllabary. Names saved in Roman characters are saved under the 英 tab.Highlight a reading page >Alternatively, enter partial reading Reading Enter partial reading > Group Select a group >Memory Number*Enter memory (entry) number to search for an entryEnter a memory number >Name Enter partial name > Phone NumberEnter partial phone number > Mail Address Enter partial mail address > 2-touch Dial* Show entries with memory (entry) numbers 000 - 009* 940P Phone Book only3 Select an entry4](https://usermanual.wiki/Panasonic-Mobile-Communications/209020A.User-Manual-2/User-Guide-1193816-Page-39.png)
![Phone Book44-75 Voice CallsHighlight a phone number Video CallsHighlight a phone number [V. Call]NoteTo scroll through entries, enter nothing and press (not available in Group or 2-touch Dial).If no matches are found in Reading or Memory Number method, entries closest to condition appear.Once a method is selected, same method retains. Additional Search/Dialing Methods ■Open Tab Assigned to Key from StandbyPress and hold – Open search window assigned to key.Enter Partial Number from Standby or during CallEnter partial number By Memory Number Enter a memory numberBy Single-digit Memory Number (2-touch Dial)Enter last digit ( – ) of memory number 000-009 Voice Call: /Video Call: [V. Call]Using Phone BookUse Phone Book Entries ■ > Highlight an entry [Menu] Select an item (See below)Item Operation/DescriptionNew Add a new entry ( From Step 2 on P.4-3)Sort 1Change display orderSelect an order >Send Ir data 2( P.10-3)IC transmission 2( P.10-5)Send to Bluetooth 2( P.10-9)Copy to microSD 2Copy an entry to microSD CardYES >To display copied data: P.9-18S! Addressbook BkUp(P.4-10)Delete phone bookSelect an item > Follow steps for selected option (P.4-9)Character sizeSwitch character size to large/standardSet secret mode/Release secret 2Set/cancel Secret Mode for selected entryEntries saved as secret data appear only when Secret Mode or Secret Data Only is active (P.11-9).1 Available only when search method ( P.4-6) is set to Name, Phone Number or Mail Address2 Not available in USIM Card Phone Book](https://usermanual.wiki/Panasonic-Mobile-Communications/209020A.User-Manual-2/User-Guide-1193816-Page-40.png)
![Phone Book44-8Use Entry Details ■ > Select an entry [Menu] Select an item (See below)Item Operation/DescriptionNotify caller IDShow/hide caller ID ( P.2-3)Prefix numbersMake a call using a prefix number ( P.2-3)Int'l dial assistSet International dial assist ( P.2-10)Restrictions* Activate restrictions on specified entry ( P.11-10)Edit Phone BookEdit entry ( From Step 3 on P.4-4)Delete phone bookPhone number > or Delete this YESItem names vary by selected item: Mail address/Address/Location info/Birthday/Memo/ImageAdd shortcut iconCreate a shortcut ( P.1-22)Compose S! MailCreate a message to mail address of selected entry(From Step 4 on P.13-4)Compose SMSCreate an SMS message to phone number of selected entry ( From Step 4 on P.13-7)Message can be sent to SoftBank handsets only. Send Ir data*( P.10-3)IC transmission*( P.10-5)Send to Bluetooth*(P.10-9)Item Operation/DescriptionS! Addressbook BkUp(P.4-10)Copy to microSD*Copy an entry to microSD CardYES >To display copied data: P.9-18Copy names Copy a nameCopy phone numbersCopy an itemItem names vary by selected item. Copy mail add./Copy address/Copy location info/Copy birthday/Copy memoCharacter sizeSwitch character size to large/standardSet secret mode/Release secret*Set/cancel Secret Mode for selected entryEntries saved as secret data appear only when Secret Mode or Secret Data Only is active ( P.11-9).Copy to USIM/Copy from USIMCopy an entry to USIM CardYES >* Not available in USIM Card Phone BookNoteInsert entry details to a message ( P.3-5).](https://usermanual.wiki/Panasonic-Mobile-Communications/209020A.User-Manual-2/User-Guide-1193816-Page-41.png)
![Phone Book44-9Managing Phone BookEditing Phone Book Entries1 Select an entry [Edit]2 Edit ( From Step 3 on P.4-4) YESDeleting Phone Book Entries1 Highlight an entry [Menu] Delete phone book2 Select an item (See below)Item Operation/DescriptionDelete thisYES >Delete select Check entries to delete > [Finish] YES [Menu] Select all in tab*, Select all, Release all in tab* or Release all to check/uncheck all entries at a timeDelete all in tab*YES >Delete all Delete all entries (940P/USIM Card Phone Book) including Secret Mode entriesEnter Phone Password > YES YES* Available in A-KA-SA-TA-NA, Reading, Group and Memory Number search methods ( P.4-6)Copying/Deleting Phone Book DataMain Menu Phone Memory Manager1 Enter Phone Password2 Select an item (See below)Item Operation/DescriptionCopy Copy data between 940P/USIM Card Phone BookCopy to USIM > or Copy from USIMDelete Delete data in 940P/USIM Card Phone BookPhone > or USIM3 Phone Book Select an entry** To clear, repeat operation.4 [Finish] YESPhone Book Memory StatusMain Menu Phone Memory StatusView 940P/USIM Card Phone Book memory status.](https://usermanual.wiki/Panasonic-Mobile-Communications/209020A.User-Manual-2/User-Guide-1193816-Page-42.png)

![Phone Book44-11Manual SynchronizationRegular UpdateUpdate S! Addressbook and 940P Phone Book with changed contents.Main Menu Phone S! Addressbook BkUp 1 Start SyncUpdating by Selecting Sync TypeMain Menu Phone S! Addressbook BkUp Details Backup/Restore 1 Select an item (See below)Item Operation/DescriptionSync from ClientSend data changed in 940P Phone Book to S! AddressbookBackup Delete all S! Addressbook entries and save 940P Phone Book to S! AddressbookSync from ServerSend data changed in S! Addressbook to 940P Phone BookRestore Delete all 940P Phone Book entries and save S! Addressbook to 940P Phone Book2 YESAuto SynchronizationMain Menu Phone S! Addressbook BkUp Details Auto Sync Settings1 ONTo cancel, select OFF2 Select an item (See below)Item Operation/DescriptionEvery month Synchronize monthly at specified time of the dateEnter a date > Set start timeEvery week Synchronize weekly at specified time of daySelect a day > Enter start timeAfter Editing PBSynchronize ten minutes after editing3 Select a Sync Type YESView Auto Sync Settings ■In Step 1, >Confirm SettingsViewing Sync LogMain Menu Phone S! Addressbook BkUp Details Sync Log1 Select a logDelete Sync Log ■In Step 1, (highlight a log >) [Menu] Delete this or Delete all ( For Delete all, enter Phone Password) YES](https://usermanual.wiki/Panasonic-Mobile-Communications/209020A.User-Manual-2/User-Guide-1193816-Page-44.png)
![Phone Book44-12Account DetailsSave phone number, mail address, street address, etc. in Account Details.Editing Account Details1 2 [Edit]3 Enter Phone Password Edit [Finish]Your subscribing phone number cannot be edited or deleted. Account Details FunctionsIn Account Details, press [Menu] for following operations.Item Operation/DescriptionEdit* Edit Account Details ( From Step 3 above)Character sizeSwitch character size to large/standardDisplay all data*View all saved items such as phone numbers and mail addressesCopy names Copy a nameCopy phone numbersCopy an itemItem names vary by selected item. Copy mail add./Copy address/Copy birthday/Copy notepadItem Operation/DescriptionSend Ir data Send details via Infrared ( P.10-3)Alternatively, while Account Details is open, press [Ir].IC transmissionSend details via IC transmission ( P.10-5)Alternatively, while Account Details is open, press [ICtrans].Copy to microSDCopy details to microSD CardYES >To display copied data: P.9-18Account Details is saved as a Phone Book entry. Erase phone number*Select an item > YESDelete items saved in Account Details Item names vary by selected item. Erase mail add./Erase address/Erase birthday/Erase memorandums/Delete imageReset* Reset all Account Details except your subscribing phone numberYES >* Enter Phone Password if required.NoteQuote a content from Account Details to a message ( P.3-5).](https://usermanual.wiki/Panasonic-Mobile-Communications/209020A.User-Manual-2/User-Guide-1193816-Page-45.png)
![Phone Book44-13Voice DialMake a call by saying a voice dial name.NoteKeep microphone about 10 cm away from your mouth, and pronounce a Voice Dial name clearly. If microphone is too distant, your voice may not be recognized.Avoid making sounds unrelated to Voice Dial names (clearing your throat, clicking your tongue, heavy breathing, etc.).Say Voice Dial names in quiet places. Avoid pressing or brushing keys, or covering microphone with fingers when pronouncing a Voice Dial name.Adding Entries to Voice DialMain Menu Phone Settings Voice Dial1 <New> Select a Phone Book entryEntries with ★ are already saved in Voice Dial list.2 Enter a Voice Dial nameOnly katakana entry is available for Voice Dial names. Edit Voice Dial Names ■In Step 1, highlight a Voice Dial name > [Edit] Edit name YESDelete Voice Dial Entries ■In Step 1, (highlight a Voice Dial name >) [Menu] Delete this or Delete all YESSearching Entries by Voice Dial1 Press and hold Say a Voice Dial nameSay the name within four seconds after voice recognition tone sounds.Once Voice Dial is recognized, result appears.2 [Detail] to show phone number3 Voice CallsHighlight phone number Video CallsHighlight phone number [V. Call]TipSettings ●Activate Voice Dial Automatically ●Activate Voice Dial via Earphone or Bluetooth® Device ( P.18-11)](https://usermanual.wiki/Panasonic-Mobile-Communications/209020A.User-Manual-2/User-Guide-1193816-Page-46.png)

![Digital TV5-25Basics940P supports One Seg terrestrial digital TV broadcasting.Operation descriptions are based on Portrait View. One SegOne Seg is a digital TV broadcasting service for mobile phones. For more information, visit The Association for Promotion of Digital Broadcasting Website:[PC] http://www.dpa.or.jp/[Handset] http://www.dpa.or.jp/1seg/k/(Japanese only)FeaturesWatch TV Programs (P.5-5)Watch One Seg Digital TV on handset.View Data Broadcast (P.5-7)Access a variety of program-related information.Record TV Programs (P.5-12)Record program/capture still image while watching the program.Set Timer (P.5-14)Use Timer to view/record programs. You can easily set Timer by using Program List ( P.5-7).Mobile W-SpeedFrame rate of Digital TV images are automatically enhanced. Enjoy smooth image flow ( P.18-14).Mobile W-Speed is set to ON by default.When this function is set to ON, full effect of Image Quality may not be achieved.Depending on broadcasting condition, full effect of this function may not be achieved.Disabled during ECO Mode ( P.18-14) or AV output ( P.10-13).Disabled for playing back videos recorded with Mobile W-Speed set to ON.Tip ●Use Other Functions while Viewing TV ( P.5-8)PrecautionsDigital TV is available only in Japan. Incoming calls/messages may affect TV image or audio quality while TV is activated.Digital TV may be disabled if USIM Card is not installed or SoftBank subscription is terminated.SoftBank is not liable for damages from accidental loss/alteration of handset/microSD Card information. Data saved to handset (TV Links, Channel List, etc.) cannot be restored after repairs or handset replacement. Back up important information.](https://usermanual.wiki/Panasonic-Mobile-Communications/209020A.User-Manual-2/User-Guide-1193816-Page-49.png)
![Digital TV5-45Initial SetupSet channels for your area.Up to ten Channel Lists can be saved. Set channels after extending TV Antenna. Main Menu TV Channel Setting Select Area1 Select a region Select a prefecture 2 YESNoteIf manual setup fails, try automatic channel setup ( Below).940P detects a change in reception area after moving to a different area. Set Channel List for that area.Channel SettingsAutomatic Channel SetupMain Menu TV Channel Setting Automatic1 YES2 After channel search, YES Enter titleIf title is not entered, date (year/month/day/hour/minute) is automatically saved as title.Using Channel ListFrom Main Menu TV Channel ListSet Channels ■Select a Channel List >Channel List is set, and available channels appear. Select a channel to access the station. Delete Channel List ■Highlight a Channel List > [Menu] Delete YESSelected Channel List cannot be deleted. Delete Channels from Channel List ■Highlight a Channel List > [Detail] Highlight a channel [Menu] Delete YESChannels in selected Channel List cannot be deleted. Edit Title ■Highlight a Channel List > [Menu] Edit title EditReassign a Remote Control Number (Keypad) to a ■ChannelHighlight a Channel List > [Detail] [Menu] Remote control # Select a channel Select a new remote control number [Finish] YES](https://usermanual.wiki/Panasonic-Mobile-Communications/209020A.User-Manual-2/User-Guide-1193816-Page-51.png)
![Digital TV5-55Watching TVSet channels beforehand ( P.5-4).1 Viewer appears.2 Select a channelDirect ChannelAccess – (Channel 10)(Channel 11)(Channel 12)Previous/Next ChannelChannel Search Press and hold To stop: [Cancel] / 3 To end TV, End TVTo play TV sound in the background: Change to BGMViewerNoteAlternatively, Main Menu TV Watch TVRotate handset while viewing TV to switch Portrait/Landscape View. While Motion Control Setting ( P.18-6) is OFF, press to switch Portrait/Landscape View.Tip●Display Digital TV Images on a TV ( P.10-13) ●Use Bluetooth® Device for Wireless Playback ( P.10-10)TBD](https://usermanual.wiki/Panasonic-Mobile-Communications/209020A.User-Manual-2/User-Guide-1193816-Page-52.png)
![5-6Digital TV5IndicatorsScreenshots are provided for reference only. Actual handset windows differ in appearance.❶❷❸❺❻❼ ❽ ❾❹❶❾Indicator Display❷❼❽❺ ❻Item Description Operation●❶Image ––●❷Captions ––●❸Data Broadcast ( P.5-7) –●❹Data Broadcast ModeData Broadcast Mode off Data Broadcast Mode on[TV/data] 2●❺Off timer ( P.5-10) –●❻ECO Mode ( P.18-14) –●❼Channel ( P.5-4)When multiple programs are available in the same broadcasting station, "service number/total numbers" appears.–●❽Signal Strength Level Strong←――→Weak Out of range –●❾Receiving Captions ––●Volume – Adjust volume: 1/Mute/Resume: 1●Program Title – / 3●Recorder Status 1 Recording Timer Set ( P.5-11, P.5-13)●Display/Caption 2Display: ON/OFF/LargeCaption: ON/OFF Each key press toggles settings.●Indicator/Caption 3 Indicators: ON/OFFCaption: Upper position/Lower position/OFF Each key press toggles settings.1 Available only when Data Broadcast Mode is off 2 Available only in Portrait View3 Available only in Landscape ViewTBDTBD](https://usermanual.wiki/Panasonic-Mobile-Communications/209020A.User-Manual-2/User-Guide-1193816-Page-53.png)
![Digital TV5-75Program List (Japanese)Check program schedules and set timer to view/record TV programs.Main Menu TV Program ListConfirmation appears when using Program List for first time. Follow onscreen instructions.See Program List Help menu for usage information. View Program List while TV is Active ■ >[EPG]Show Program Information while TV is Active ■Press and hold > [EPG] To return to Viewer, Data Broadcast (Japanese)Access a variety of program-related information such as still images and videos.Data Broadcast is not available in Landscape View. 1 Activate TV (Data Broadcast Mode off) [TV/data] appears. to select informationTo deactivate Data Broadcast Mode: [TV/data]NoteViewing Data Broadcast information requires no fees: however, accessing websites will incur connection fees.Functions while Viewing TVSound Settings ■While TV is active, >[Menu] Settings Sound Sound Effect Select an item (See below)Item Operation/DescriptionAuto Volume Automatically increase to optimum volumeON > or OFFRemaster Adjust sound quality to reproduce original soundON > or OFFListening Adjust to natural sound when using earphone or Bluetooth® deviceSelect an item >Surround・ : Reproduce natural and stereophonic soundNatur 1・ or Natur 2: Complement sound specific to earphone to reproduce natural soundOFF・ : Turn off Listening settingEqualizer Change sound quality when using earphone or Bluetooth® deviceSelect an item >Normal・ : Reproduce normal soundH. BASS1・ : Enhance low-pitched soundH. BASS2・ : Enhance low-pitched sound even moreVoice・ : Make voice clearTrain・ : Minimize sound leakage](https://usermanual.wiki/Panasonic-Mobile-Communications/209020A.User-Manual-2/User-Guide-1193816-Page-54.png)
![Digital TV5-85Other Functions ■While TV is active, follow the steps below. >Item Operation/DescriptionAccess Internet via Yahoo! KeitaiPress and hold >To return to viewer: While Yahoo! Keitai is active, press and hold Access Internet via PC Site Browser > Open Menu Yahoo! PC Site BrowserFollow onscreen instructions Make a Voice Call/Video Call > Stand-by display Enter a number (For Video Call, [V. Call])Interrupt TV during call. After call, TV resumes. Recording will not be interrupted. Use Messaging > Stand-by display Functions Available while Viewing TV ■While TV is active, >[Menu] Select an item (See below)Item Operation/DescriptionProgram info View current program informationProgram listView Program ListDisp.Ch./operation 1Select an item >Channel info・ : View channel details. Select a channel to watch that StationChannel List・ : View Channel List ( P.5-4)Channel Setting・ : Set channels for your area (P.5-4)Add to ch. list・ : Add current station to Channel List. Assign current station to lowest available number key.Tune service・ : Select a program when multiple programs are available from the same broadcasting company](https://usermanual.wiki/Panasonic-Mobile-Communications/209020A.User-Manual-2/User-Guide-1193816-Page-55.png)
![Digital TV5-105TV Links (Japanese)Saving TV LinksFollowing function is not available in Landscape View. 1 Switch Data Broadcast Mode on Select a link2 YESFollow onscreen instructions to save link.Opening TV LinksMain Menu TV TV Link1 Select a TV LinkConfirmation appears when Internet access is required. Select YES to proceed.If TV Link is expired, confirmation appears asking whether to delete link.Functions Available in TV Link ListMain Menu TV TV Link1 [Menu] Select an item (See below)Item Operation/DescriptionDisplay detail Show TV Link title, URL, summary, content type, expiration dateNo. of TVlink Show number of saved TV LinksDelete Select an item >Delete this・ YESDelete selected・ Check TV link(s) to delete [Finish] YESDelete all・ Enter Phone Password YES](https://usermanual.wiki/Panasonic-Mobile-Communications/209020A.User-Manual-2/User-Guide-1193816-Page-57.png)
![Digital TV5-115Recording/Playing ProgramsRecording Current ProgramSave programs as videos or still images. Recordings are saved to microSD Card.microSD Card: P.9-16Save up to 2GB of data at a time. Recording Time (total)*Approx. 640 minutesSavable Files 99 files* Average recordable time per 2GB of dataRecording is unavailable when signal strength drops to .1 Activate TV [Record] appears, and recording starts.2 [Stop] to stop recordingProgram is saved to microSD Card.NoteIn the following cases, recording ends and recorded portion is automatically saved:File size is over 2GB・ microSD Card memory is full・ Recorded files are not saved to handset. Do not remove microSD Card while recording. Recording continues even if signal strength level is ; however, images and audio are not saved.Recording is disabled during AV output. Capturing ScreenshotsCaptured screenshots are saved to handset.This feature is unavailable when signal strength is or Data Broadcast Mode is on.1 Activate TV (Data Broadcast Mode off) press and hold NoteCaptions cannot be captured. Capturing is disabled during AV output. ](https://usermanual.wiki/Panasonic-Mobile-Communications/209020A.User-Manual-2/User-Guide-1193816-Page-58.png)
![Digital TV5-125Playing Recorded ProgramsMain Menu Data Folder TV Video1 Select a videoPlayback starts.When a playback position is recorded to video, playback starts from the position. Press [FromTop] to paly back from beginning.When selecting a video containing divided videos, select a video to play back from divided video list.2 to stop playbackPlayback OperationsVolume /Mute/Cancel Mute [ / ]Fast Forward (Press once: 10x; Press twice: 30x)Fast Rewind (Press once: 10x; Press twice: 30x)Pause/Resume [ / ]Play Frame by FramePause playback [Frame]Play back frame by frame. Skip Rewind 1Press and hold /Skip Forward 2Press and hold /Example: Video FolderToggle Playback Speed[ / / / (Summary View)]Summary View adjusts playback speed according to audio.View Title Time bar also appears. Title also appears when views are switched. Toggle DisplayDisplay title In Landscape View, each key press toggles indicators (icons) and captions on/off. (Each key press also switches time bar position regardless of whether caption is shown.)Toggle View 3/Full DisplayWhen Data Broadcast Mode is off, each key press toggles views.When Data Broadcast Mode is on, each key press toggles normal/full display.Data Broadcast Mode On/Off In Landscape View, turn program title on. 1 Unavailable if file is under 10 seconds long2 Unavailable if file is under 30 seconds long3 Available only when Motion Control Setting ( P.18-6) is OFF.TBD](https://usermanual.wiki/Panasonic-Mobile-Communications/209020A.User-Manual-2/User-Guide-1193816-Page-59.png)
![Digital TV5-135Viewing Captured ScreenshotsMain Menu Data Folder TV Image1 Select an imageTimerSet up to 100 timer entries to watch or record programs. Main Menu TV1 Timer Watching or Timer Recording2 [New] Select an item (See below)Item Operation/DescriptionStart date settingSet date and time to start and end viewing/recording a programSelect an item >Enter date・ Enter a date and timeChoose date・ Select a date Enter date and timeEnd date setting 1Channel Select a channel >Edit title Enter a program name >Repeat Select a repetition > For Select day, select a day (days) [Finish]Alarm (Alarm notice) 2ON > or ON/Set time For ON/Set time, select an alarm timeItem Operation/DescriptionAlarm tone 2Select an alarm type > Select a folder Select an alarmAlarms (Alarm on/off) 1ON > or OFFAlarms (Alarm volume) > to adjust volumeFor Timer Recording, Escalating Tone cannot be set.Activate TV w/ alarm 2ON > or OFFWhen ON is set, Digital TV activates from alarm notification window.Priority 1Set handset response when Timer Recording startsRecording > or OperationWhen Recording is set, active function suspends/ends, and recording starts.When Operation is set, confirmation appears. To suspend/end active function, select YES and to start recording.1 Timer Recording only2 Timer Watching only3 [Finish] For Timer Recording, select YES or YES (confirm once)](https://usermanual.wiki/Panasonic-Mobile-Communications/209020A.User-Manual-2/User-Guide-1193816-Page-60.png)
![Digital TV5-145NoteSelect timer entries to check details; [Edit] to edit details.Timer Recording does not start if Internet and two other functions are active simultaneously.Alarm does not sound for Timer Watching/Timer Recording in following functions. For Timer Recording, complete followings (in parentheses) one minute before timer starts; otherwise, recording does not start.While handset is off (Turn on handset)・ While Privacy Key Lock is active (Cancel lock)・ While Personal Data Lock is active (Cancel/change lock)・ During data transfer (Complete transfer)・ During Infrared transmission, IC transmission or Bluetooth・ ® transmission (Complete transmission)During software update (Complete update)・ Other Timer OperationsMain Menu TV1 Timer Watching or Timer Recording2 [Menu] Select an item (See below)Item Operation/DescriptionNew Set a timer entry to watch/record a program ( P.5-14)Edit Edit entry details ( P.5-14)Sort Sort timer entriesSelect an order >Delete thisYES >Delete past Timer entries with start/end time set prior to current date/time are deletedYES >Delete selectedCheck timer entries to delete > [Finish] YESDelete all Enter Phone Password > YESMemory Status*Show memory status* Timer Recording onlyChecking Timer Recording ResultsMain Menu TV1 Recording Result Select a resultDetails appear. ](https://usermanual.wiki/Panasonic-Mobile-Communications/209020A.User-Manual-2/User-Guide-1193816-Page-61.png)
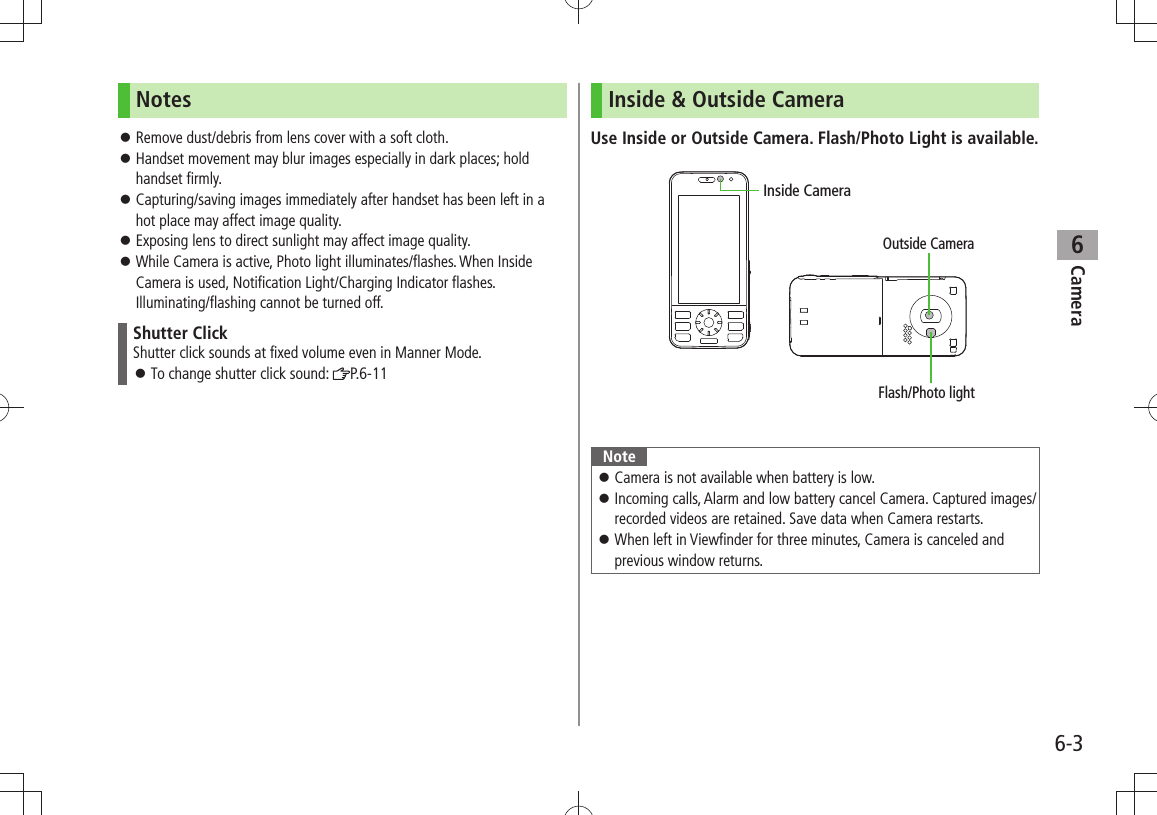
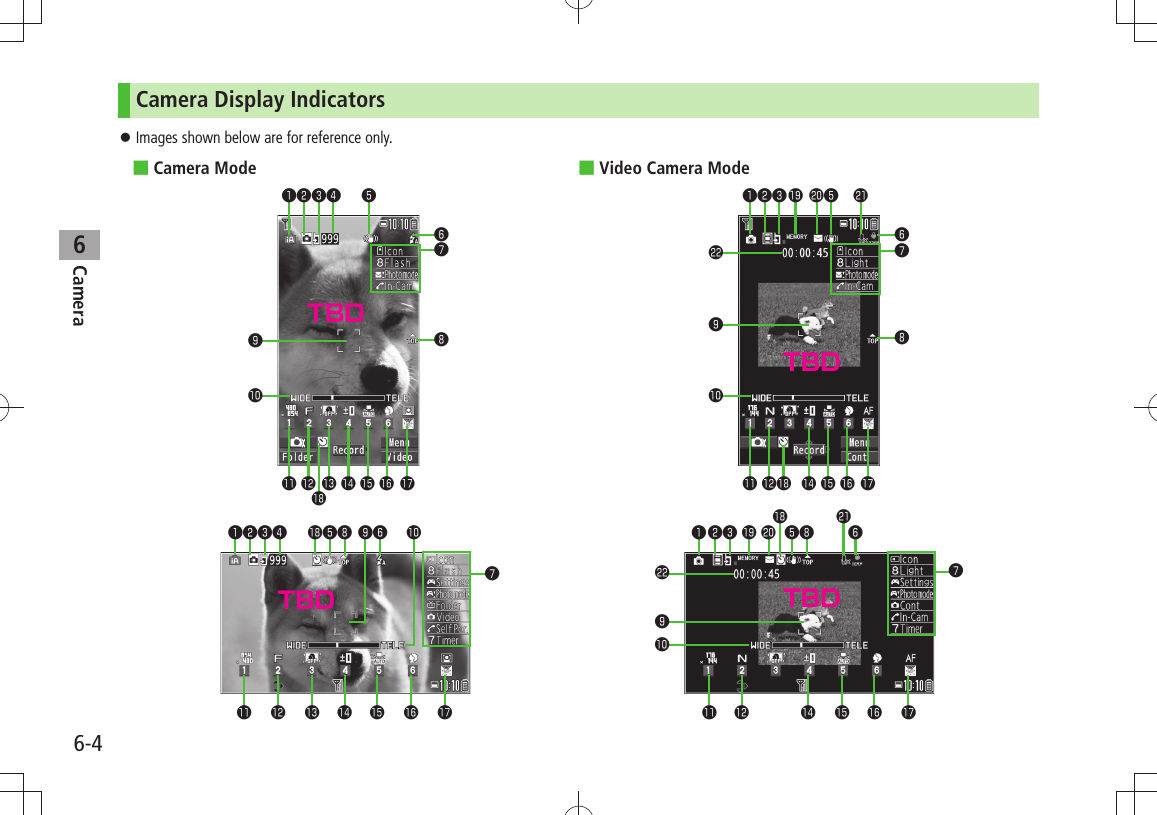
![6-5Camera6Item Description Operation❶Photo mode ( P.6-10) Intelligent Auto Normal Scene My original set.For Scene/My original set., indicators may vary depending on setting. Press and hold [ ] Select a mode ( For Scene/My original set., select an item)❷CHG Camera-mode Camera mode Video Camera mode / / Action mode (Auto/Auto bracket/Manual) (Cont. shooting set.: P.6-8)[Video/Cont./Camera]Toggle Action mode ( P.6-11)❸Storage setting Phone microSD Card❹No. of frames Show number of remaining frames —❺Img. stabilizer Correct camera shake ( P.6-11)❻Flash setting (Still image) Auto Forced ON Always light ON Forced OFFPhoto light setting (Action/Video) ON OFF❼Key Guidance Show key operation guidance —❽Top indicator Indicate vertical direction —❾Focus Guide Auto focus guide AF tracking guide —Auto shutter 1 Love shutter (Sweetheart) Love shutter (Friends) Group shutter (Group)Zoom bar Indicate zoom level ( P.6-9)zoom in/ zoom out Long press: continuous zoomImage size 2Show image size ( P.6-9) Select a sizeImage quality 2 Normal Fine Super fine Select a modeHigh sensitiv. 2 ON OFF Select ON/OFFBrightness 2Adjust brightness (Level -3 to +3) Select a levelWhite balance 2 Auto Fine Cloudy Light bulb Fluorescent light Select a modeScene 2 Portrait Sports Food Scenery Night mode Backlight Character Snow Sunset Pet Select a sceneFocus 2 ( P.6-13) Face Detection Auto Close-up Landscape AF tracking Select a modeAuto timer ( P.6-8) Toggle ON/OFFMemory capacity bar Indicate memory status (appears in red when memory is full) —File size setting Mail restrict'n(S) Long time ( P.6-11)Movie type set Record video with/without audio ( P.6-11)Recordable time Indicate recordable time —1 Key Guidance appears when Photo mode is set to Intelligent Auto and Auto shutter is not set.2 Alternatively, [ ] to highlight an item to select a setting](https://usermanual.wiki/Panasonic-Mobile-Communications/209020A.User-Manual-2/User-Guide-1193816-Page-66.png)
![Camera6-66Pictures/VideosConfirm battery strength ( P.1-11) and memory ( P.6-11) before recording. When battery is low, video cannot be recorded.Captured images and videos are automatically saved to Data Folder. To select save location each time, turn Auto save set to OFF ( P.6-11).Operation descriptions are based on Portrait View operations. NoteWhen using Inside Camera, mirror image appears on Viewfinder. Captured images appear correctly.For Camera/capturing images by , press firmly.Capturing Still Images (Camera Mode)1 Picture Viewfinder appears.2 Frame subjectTo toggle Inside/Outside Camera: 3 [Record], or to capture the imageShutter click sounds at fixed volume. Image is automatically saved.When Focus is set to Face Detection, Auto or AF tracking, Outside Camera automatically focuses on subject before capturing image.Picture Viewfinder4 to exitReturn to Standby.Continuous ShootingCapture a succession of up to 20 still images automatically with a single press.Number of captured images differs depending on image size and Continuous shooting setting ( P.6-10).1 In Picture Viewfinder, [Video] [Cont.] appears (Indicators vary by Action mode).2 Frame subject [Record], or Images are automatically saved.When Focus is set to Auto, Outside Camera automatically focuses on subject before capturing image.To stop shooting halfway: TBD](https://usermanual.wiki/Panasonic-Mobile-Communications/209020A.User-Manual-2/User-Guide-1193816-Page-67.png)
![Camera6-76Recording Videos (Video Camera Mode)1 Press and hold Video Viewfinder appears.2 Frame subjectTo toggle Inside/Outside Camera: 3 [Record], or to start recordingTone sounds and appears.When Focus is set to Face Detection or Auto, Outside Camera automatically focuses on subject before recording begins. During recording, auto focus functions regardless of Focus setting.4 [Stop], or to end recordingTone sounds. Video is automatically saved.Recording stops automatically at maximum recording time. 5 to exitReturn to Standby.NoteAlternatively, [Video] to activate Video CameraVideo ViewfinderFunctions Available while ShootingFrom Camera mode: Action mode: [Video] [Cont.]Video camera mode: Press and hold ■Auto Timer >[Menu] Auto timer ON Enter time (seconds) [Record], or ( For video, [Stop], or )Auto timer tone sounds. After set period of time, shutter is released and recording starts.When Auto timer is active, [Quit] or to return to Viewfinder without canceling Auto timer.Auto timer is not available when Cont. shooting set. is set to Manual.Auto Shutter (Camera Mode Only) ■Handset automatically captures still images by detecting number of and distance between people (When Photo mode is set to Intelligent Auto or Focus is set to Face Detection.). >[Menu] Auto shutter Select an item (See below)Item Operation/DescriptionOFF Cancel Auto shutter settingLove shutter Detect up to two faces and automatically capture an image when faces come close to each otherFriend > or SweetheartWhen Sweetheart is set, distance between two faces is closer than Friends.Group shutterDetect up to five people. When number of detected faces is larger than set number, Auto timer activates to capture an image in three seconds.Select number of people >Alternatively, capture still images by [Record], or even when Auto shutter is set (Auto timer activates for Group shutter.).TBD](https://usermanual.wiki/Panasonic-Mobile-Communications/209020A.User-Manual-2/User-Guide-1193816-Page-68.png)
![Camera6-86 ■Zoom > (zoom in) or (zoom out) to adjust zoom [Record], or For continuous zoom: Press and hold or rotate Speed SelectorPress and hold for continuous zoom.Zoom is available during video recording. Zoom is disabled when Image size is set as follows:Inside Camera:・ VGA, HVGA Wide or QVGA (individual mode)Zoom may change image quality. Maximum zoom levels for individual image size are as follows.. Camera modeSizeZoom level Max. level (approx.)Outside CameraCamera (High sensitiv.: OFF) 8M 21 levels 2.6 times 6M Wide 21 levels 2.6 times 5M 21 levels 2.6 times 3M 21 levels 2.6 times 2M Wide 21 levels 2.6 times 2M 21 levels 2.6 times Stand-by 21 levels 2.6 times VGA 21 levels 2.6 times QVGA 31 levels 5.1 times QCIF 31 levels 8.5 times Sub-QCIF 31 levels 12.8 timesCamera (High sensitiv.: ON) 2M 21 levels 2.6 times Stand-by 21 levels 2.6 times VGA 21 levels 2.6 times QVGA 31 levels 5.1 times QCIF 31 levels 8.5 times Sub-QCIF 31 levels 12.8 timesCamera modeSizeZoom level Max. level (approx.)Continuous shooting VGA 21 levels 2.6 times QVGA 31 levels 5.1 times QCIF 31 levels 8.5 times Sub-QCIF 31 levels 12.8 timesVideo camera (Img. stabilizer: Auto) VGA 21 levels 1.9 times HVGA Wide 21 levels 1.9 times QVGA 31 levels 2.9 times QCIF 31 levels 5.2 times Sub-QCIF 31 levels 7.2 timesVideo camera (Img. stabilizer: OFF) VGA 21 levels 2.6 times HVGA Wide 21 levels 2.6 times QVGA 31 levels 3.8 times QCIF 31 levels 7.0 times Sub-QCIF 31 levels 9.6 timesInside CameraCamera/Continuous shooting VGA 1 level 1.0 time QVGA 1 level 1.0 time QCIF 6 levels 1.6 times Sub-QCIF 21 levels 2.1 timesVideo camera VGA 1 level 1.0 time HVGA Wide 1 level 1.0 time QVGA 1 level 1.0 time QCIF 6 levels 1.9 times Sub-QCIF 21 levels 2.8 times](https://usermanual.wiki/Panasonic-Mobile-Communications/209020A.User-Manual-2/User-Guide-1193816-Page-69.png)
![Camera6-96Use ■Flash/Photo LightSelect a Flash/Photo Light setting for Outside Camera.In Picture Viewfinder, >[Menu] Flash setting Select an item (See below)Item Operation/DescriptionAuto Flash goes off automatically in low-light situations.Forced ON Flash always goes off when capturing images.Always light ONPhoto Light illuminates.Forced OFF Flash/Photo Light is disabled. >In Continuous Shooting/Video Viewfinder, [Menu] Photo light set. ON or OFFFlash/Photo light is not available when battery is low. When Camera is ended or changed to Inside Camera while a setting other than Forced OFF is set, Flash setting is changed to Auto next time Camera activates or Outside Camera is used. When Forced OFF is set, setting remains.Even if Forced OFF (Flash setting) or OFF (Photo light set.) is set, Photo light illuminates or flashes when Camera is active or during shooting.When Photo mode is set to Intelligent Auto, Forced ON cannot be set.When using flash, maintain an appropriate distance from subject of 40 to 100 cm.When image is captured at close range or with Flash/Photo Light area held, image color and brightness may look different from subject as a result of poor exposure.Set Photo Mode According to Scene ■ >[Menu] Photo mode Select an item (See below)Item Operation/DescriptionIntelligent AutoAutomatically switch Photo mode according to occasion (in Camera mode)Indicator is animated when mode changes (Example: Close-up).Mode does not change after Auto Focus Lock. Cancel Auto Focus Lock.Normal Capture an image in normal modeScene Adjust brightness and color tone according to sceneSelect an item >My original set.(P.6-12)](https://usermanual.wiki/Panasonic-Mobile-Communications/209020A.User-Manual-2/User-Guide-1193816-Page-70.png)
![Camera6-106Change Continuous Shooting Settings ■ >[Menu] Cont. shooting set. Select an item (See below)Item Operation/DescriptionAction mode Select an item >Auto : Capture multiple still images automatically*Manual : Capture one by one manuallyAuto bracket : Capture nine different still images automaticallyShot interval Select an interval when Action mode is set to AutoSelect an interval >Shot number Set number of images to be captured when Action mode is set to Auto or ManualSelect a number >* Number of images to be captured is as follows:VGA (480×640): 4・ QVGA (240×320): 5 to 10・ QCIF (144×176): 5 to 20・ Sub-QCIF (96×128): 5 to 20・ Save as ■Original SettingPress and hold > Photo mode MyOriginal Follow the steps (See below)Item Operation/DescriptionSave setting Highlight a setting > [Save] ( YES) Edit title Open setting Select a setting >Edit title Highlight a setting > [Edit] Edit titleView detail Highlight a setting > [Detail]Delete settingHighlight a setting > [Delete] YESSave up to three settings each in Camera mode and Action mode. ](https://usermanual.wiki/Panasonic-Mobile-Communications/209020A.User-Manual-2/User-Guide-1193816-Page-71.png)
![Camera6-116Focus Functions (Outside Camera)Changing Focus Settings<Default> Camera mode/Video camera mode: Face DetectionAction mode: AutoSelect a focus setting according to occasion (Except When Photo mode is set to Intelligent Auto). Focus on Individual scenes automatically.Face Detection (Camera mode/Video camera mode only): For portraits Auto: Auto detection Close-up: For nearby objects Landscape: For distant landscapes AF tracking (Camera mode only): Tracks subject automatically 1 In Picture/Video Viewfinder, 2 to select a setting NoteWhen Photo mode is set to Intelligent Auto, toggle current focus setting and AF tracking by .While focus function is active, focus sound is heard from Camera. Focus sound comes out in the following situations:When Focus setting is set to ・ AF trackingWhen Photo mode is set to ・ Intelligent AutoDuring video recording・ Face DetectionDetect up to five faces within 2.5 meters. Show yellow Focus Guide when a face is detected. Automatically focus on one face when more than one is detected (Focus guide turns yellow once focus is on the face.).Faces may not be detected in following conditions: Face is tilted.・ A part of face is covered by glasses, hat, mask or shadow.・ Face is too small, big or dark for screen.・ Face is at edge of screen.・ Subject or handset moves too fast.・ Shoot with Auto focus if detection fails. AF TrackingBring AF tracking guide on subject and press . Yellow AF tracking guide appears and tracks moving subject while adjusting focus and exposure for subject. During AF tracking, press [Record], or to lock focus on subject and capture an image.Alternatively, press halfway to lock focus, then to capture an imageTo cancel AF tracking: or When Camera is unable to track subject (e.g. when subject is out of Viewfinder), AF tracking is canceled.Depending on situation, intended subject may not be tracked or unintended subject may be tracked.AF tracking is not available when Auto shutter is in use or certain image size is set.](https://usermanual.wiki/Panasonic-Mobile-Communications/209020A.User-Manual-2/User-Guide-1193816-Page-72.png)
![Camera6-126Auto Focus LockBring focus on subject at center of display automatically. Lock focus on subject, and recompose your picture.1 In Picture/Video Viewfinder, , or halfway① When in focus, handset sounds.② Focus Guide turns green, and focus is locked.When out of focus, Focus Guide turns red. To cancel focus locked by or : To cancel focus locked by : Release finger from 2 Determine composition3 Capture image in selected camera mode (Camera mode: P.6-6/Action mode: P.6-7/Video camera mode: P.6-8)In Step 1, press halfway to lock focus, then press firmly to shoot.Viewing Saved ImagesMain Menu Camera1 Open PicturesPictures Open VideosVideos2 Select a folder3 Select a fileOpen Pictures Saved on microSD Card ■In Step 1, >Pictures [microSD] Select a folderOpen Videos Saved on microSD Card ■In Step 1, >Videos [microSD] Select a folderCheck Still Images in Picture Viewfinder ■In Picture Viewfinder, >[Folder]To return to Picture Viewfinder: Tip ●Editing Still Images ( P.9-12)Example: PicturesTBD](https://usermanual.wiki/Panasonic-Mobile-Communications/209020A.User-Manual-2/User-Guide-1193816-Page-73.png)