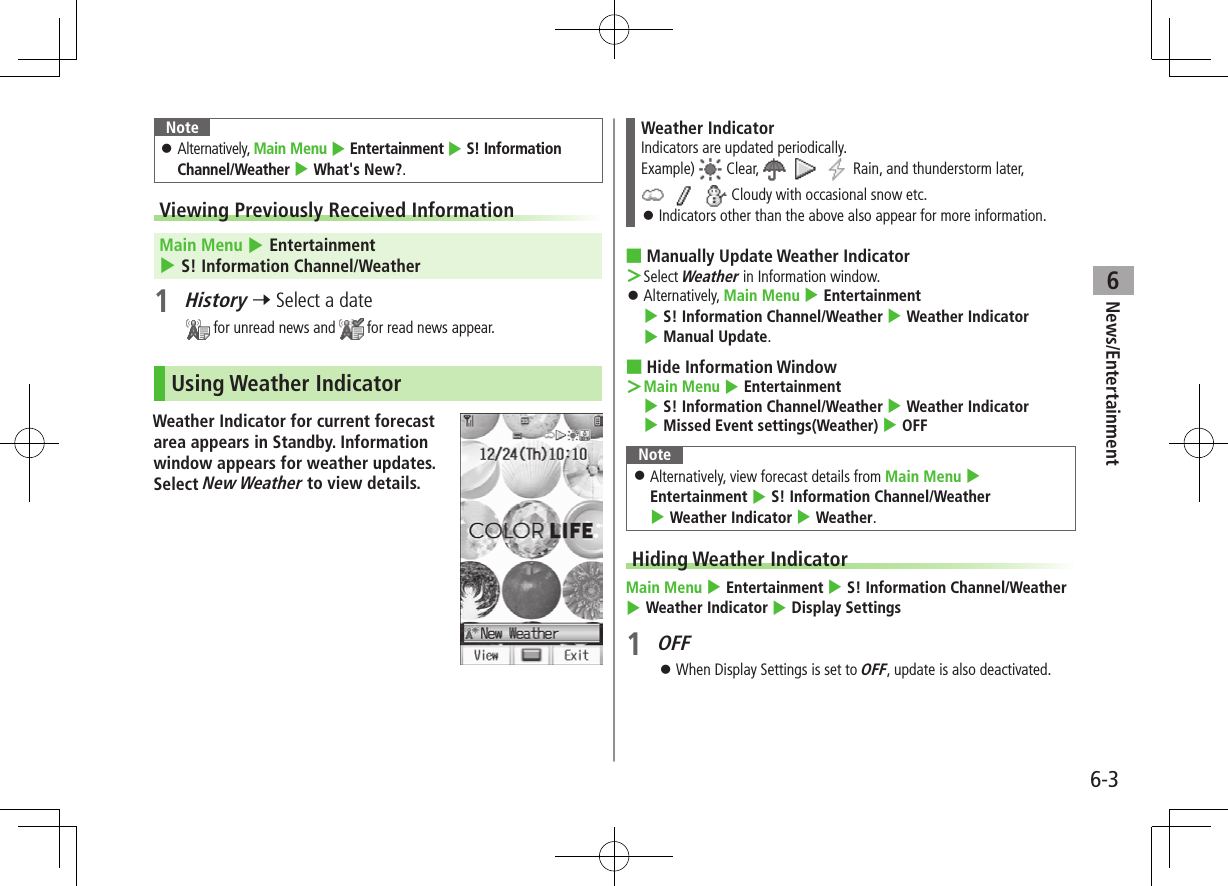
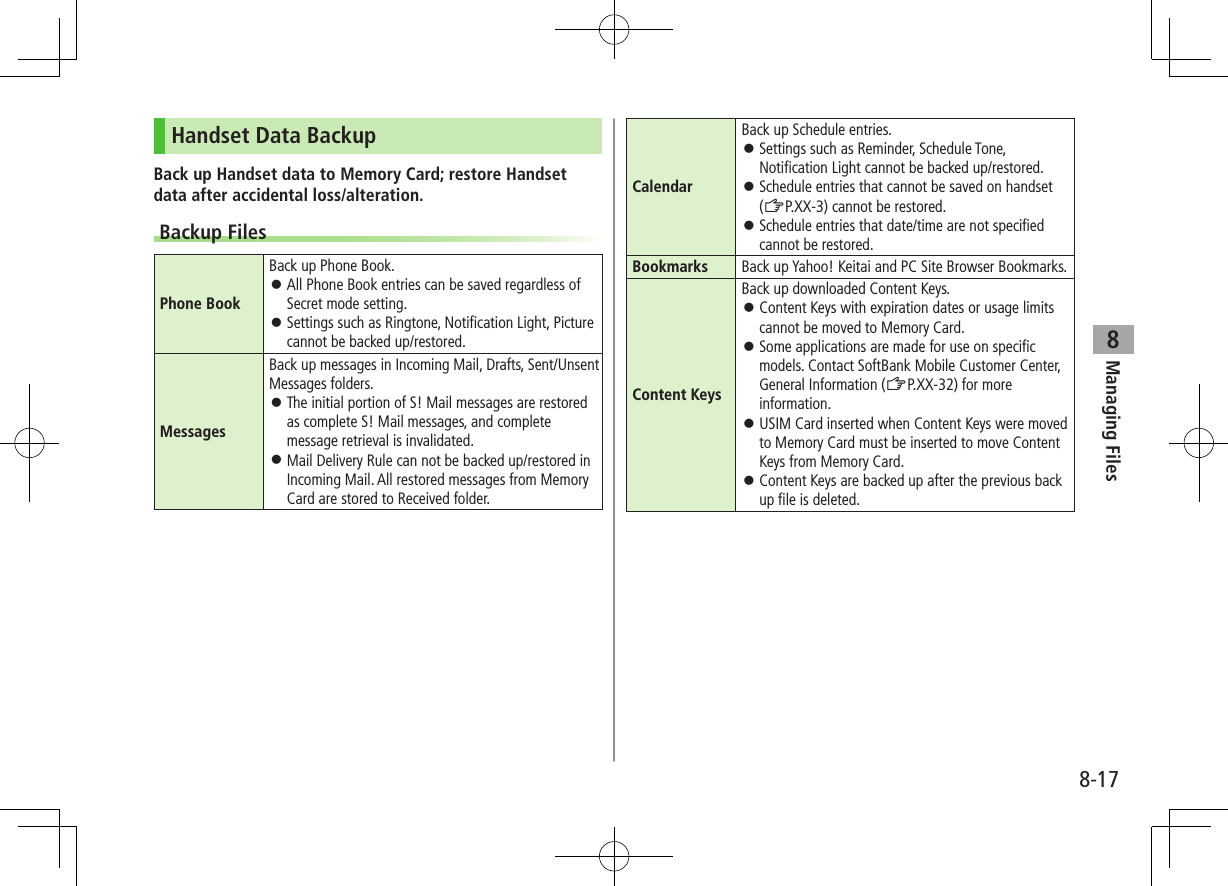
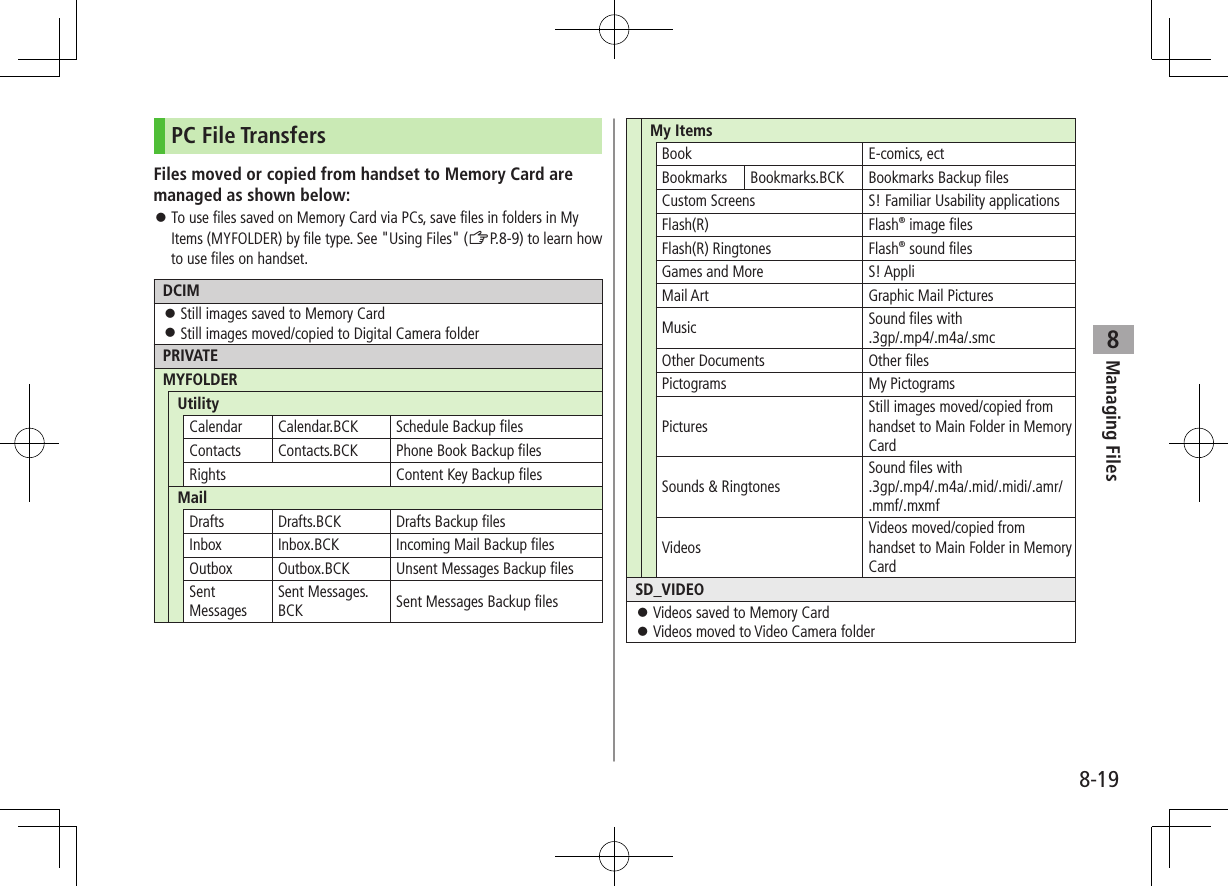
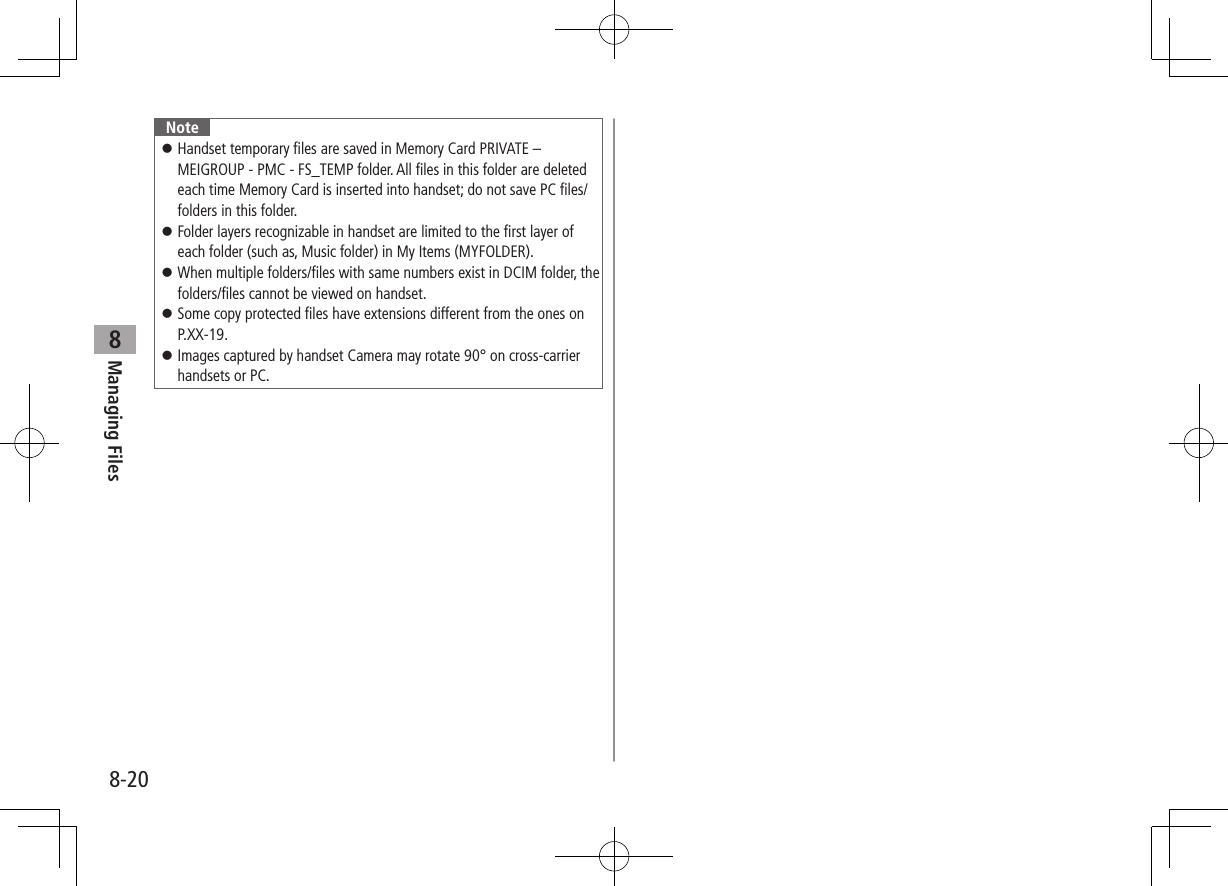
Panasonic Mobile Communications 209019A UMTS/ GSM Cellular Mobile Radio User Manual 1

Panasonic Mobile Communications Development of Europe Ltd UMTS/ GSM Cellular Mobile Radio 1

User Manual 1

840PUser Guide
IntroductionThank you for purchasing SoftBank 840P.◦..For proper handset use, read First Step Guide and User Guide (this guide).◦   Accessible services may vary by service area, subscription, etc.SoftBank 840P is compatible with both 3G and GSM network technologies.Note◦...Unauthorized copying of any part of this guide is prohibited.◦...Guide content is subject to change without prior notice.◦.Efforts have been made to ensure the accuracy and clarity of this guide. Please contact SoftBank Mobile Customer Center, General Information (ZP.16-30) about unclear or missing information.
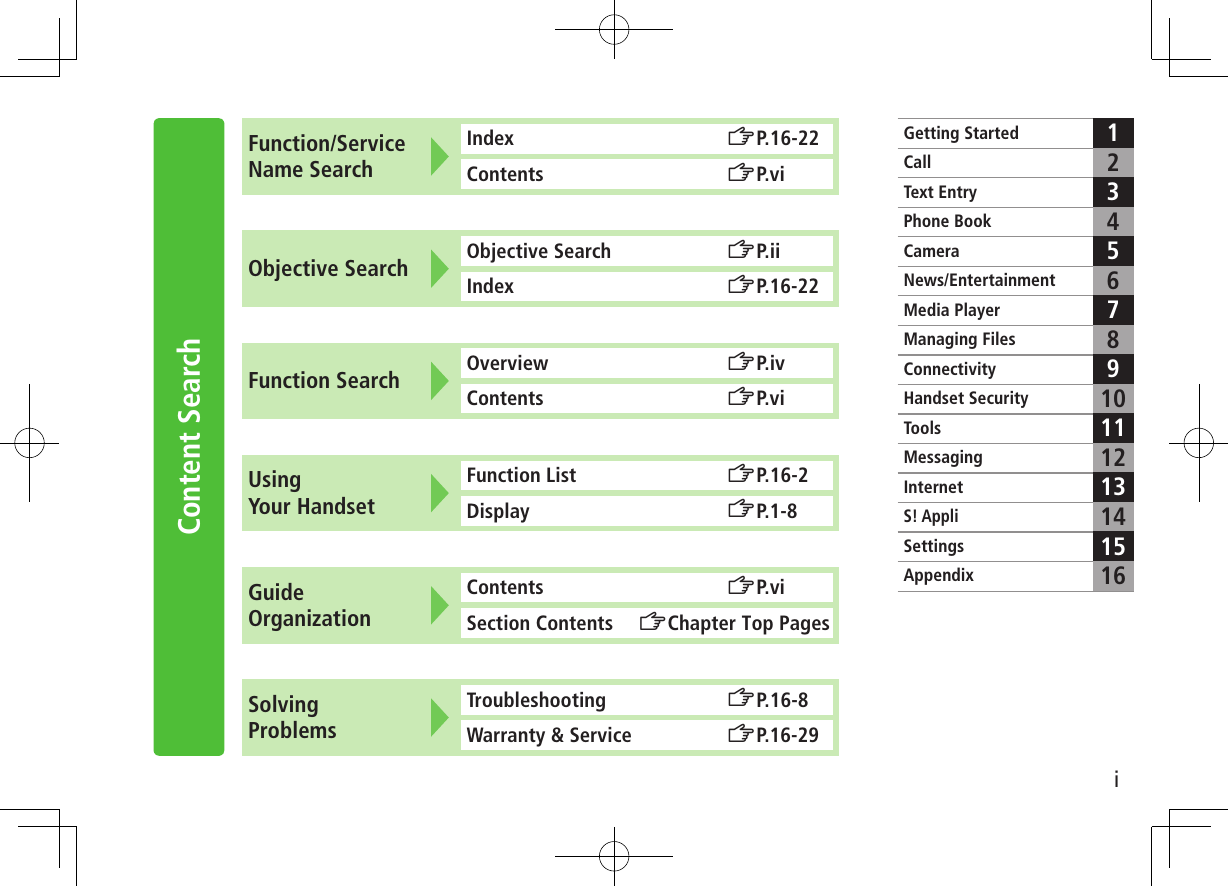
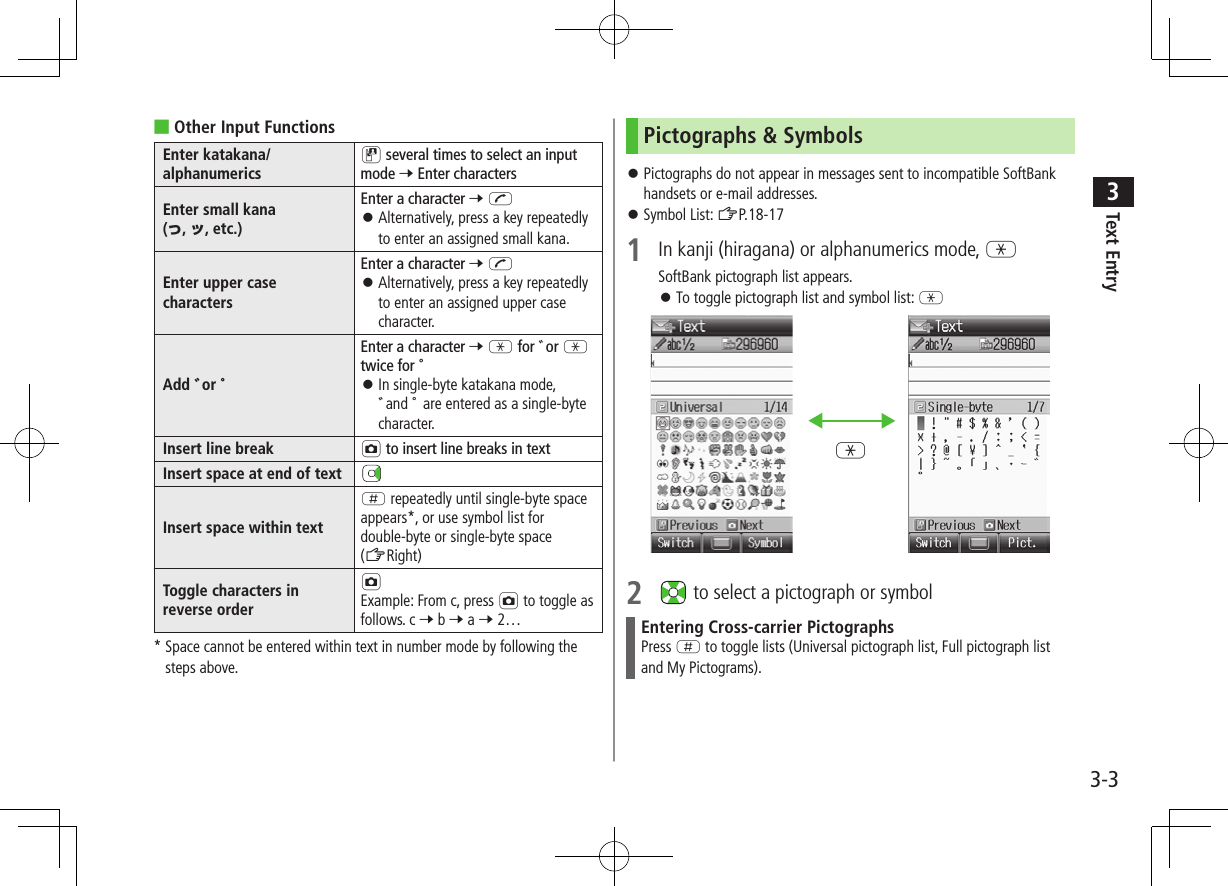
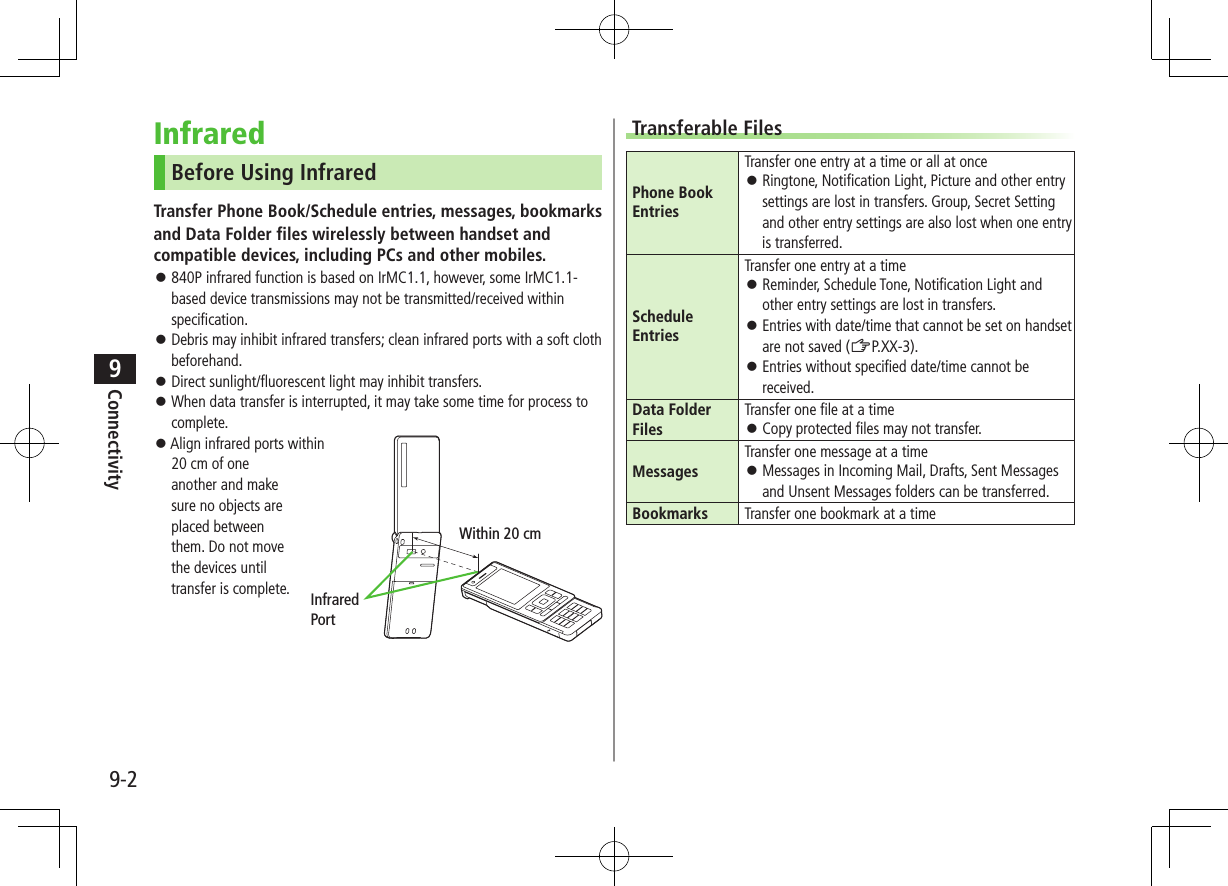
iContent SearchFunction/Service Name SearchIndex  ZP.16-22Contents  ZP.viObjective Search Objective Search  ZP.iiIndex  ZP.16-22Function Search Overview  ZP.ivContents  ZP.viUsing  Your HandsetFunction List  ZP.16-2Display  ZP.1-8Guide OrganizationContents  ZP.viSection Contents  ZChapter Top PagesSolving  ProblemsTroubleshooting  ZP.16-8Warranty & Service  ZP.16-29Getting StartedCall12Text EntryPhone Book345678910111213141516CameraNews/EntertainmentMedia PlayerManaging FilesConnectivityHandset SecurityToolsMessagingInternetS! AppliSettingsAppendix
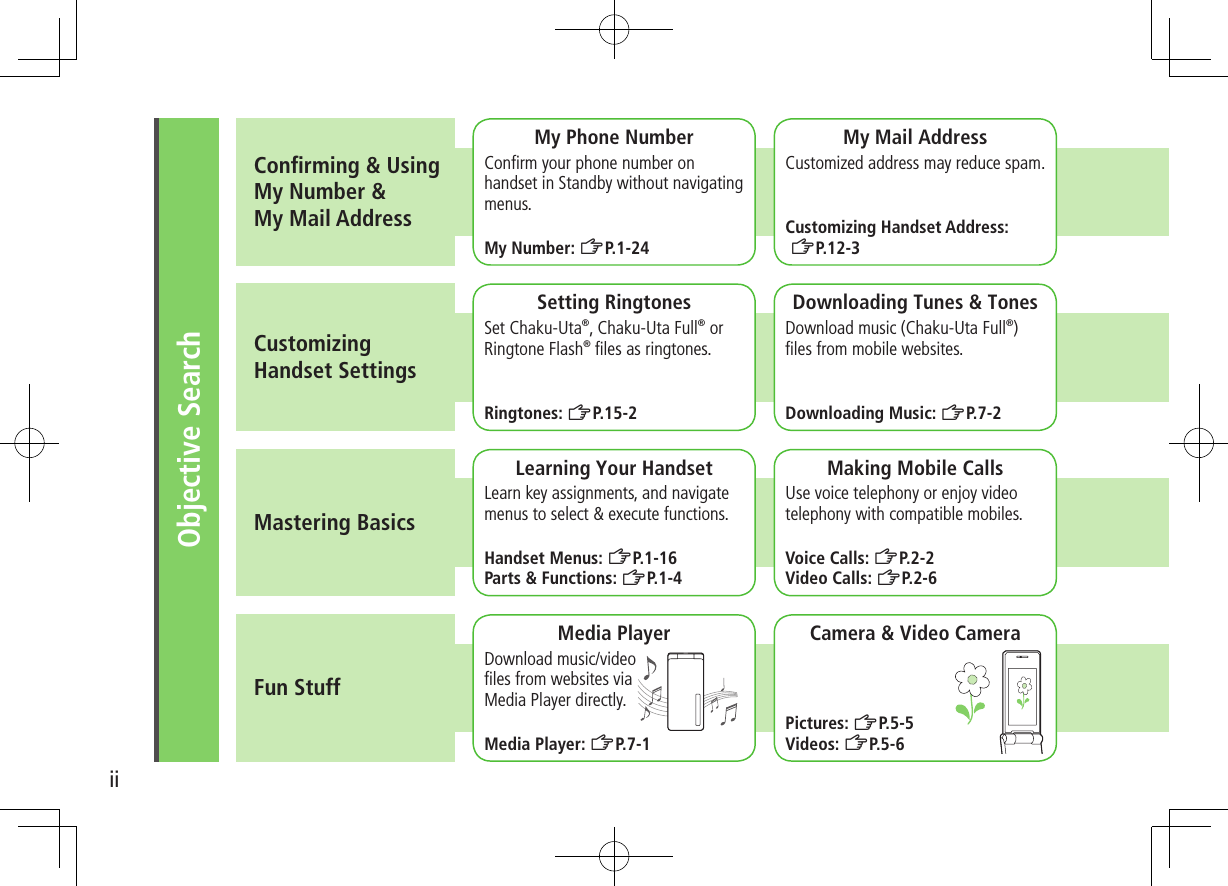
iiObjective SearchConfirming & UsingMy Number &My Mail AddressCustomizing  Handset SettingsMastering BasicsFun StuffMy Phone NumberConfirm your phone number on handset in Standby without navigating menus.My Number: ZP.1-24My Mail AddressCustomized address may reduce spam.Customizing Handset Address: ZP.12-3Setting RingtonesSet Chaku-Uta®, Chaku-Uta Full® or Ringtone Flash® files as ringtones.Ringtones: ZP.15-2Downloading Tunes & TonesDownload music (Chaku-Uta Full®) files from mobile websites.Downloading Music: ZP.7-2Learning Your HandsetLearn key assignments, and navigate menus to select & execute functions.Handset Menus: ZP.1-16Parts & Functions: ZP.1-4Making Mobile CallsUse voice telephony or enjoy video telephony with compatible mobiles.Voice Calls: ZP.2-2Video Calls: ZP.2-6Media PlayerDownload music/video  files from websites via  Media Player directly.Media Player: ZP.7-1Camera & Video CameraPictures: ZP.5-5Videos: ZP.5-6
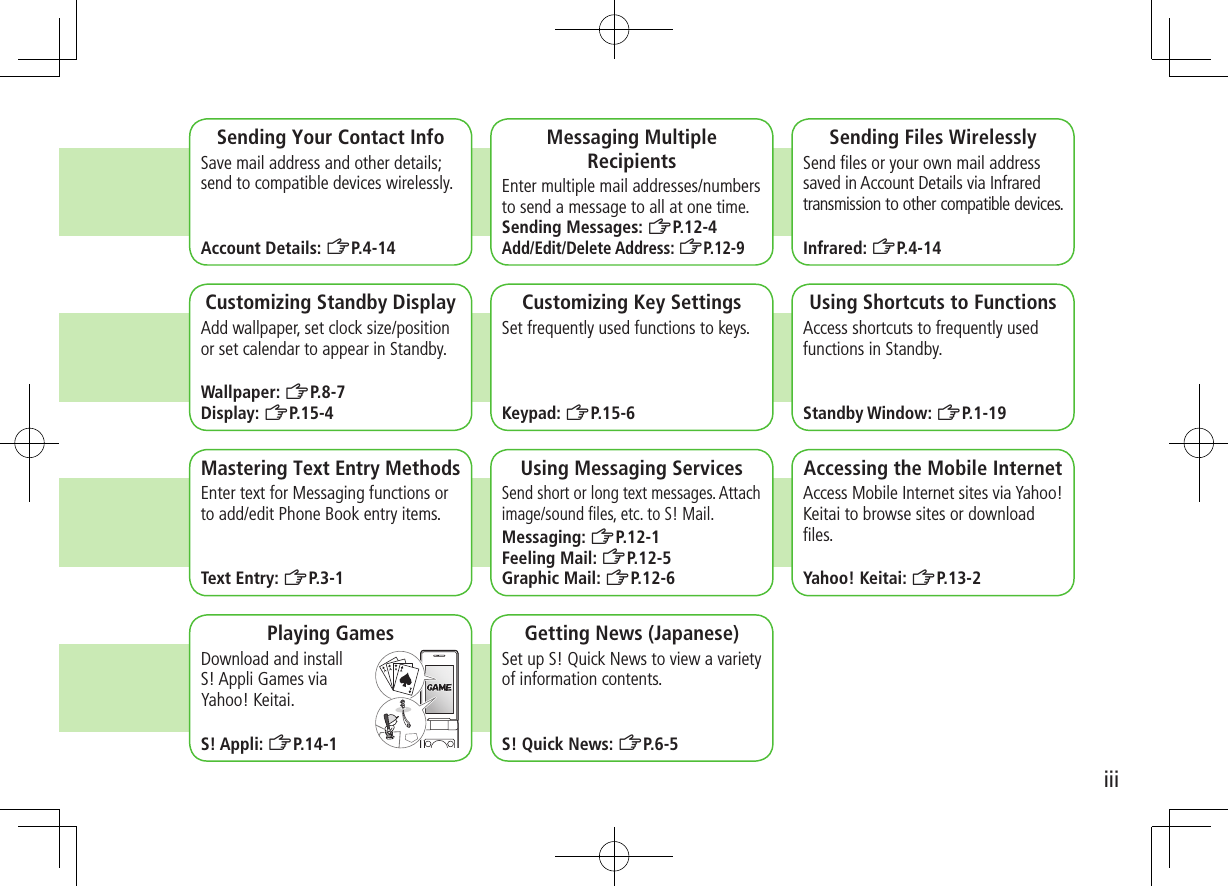
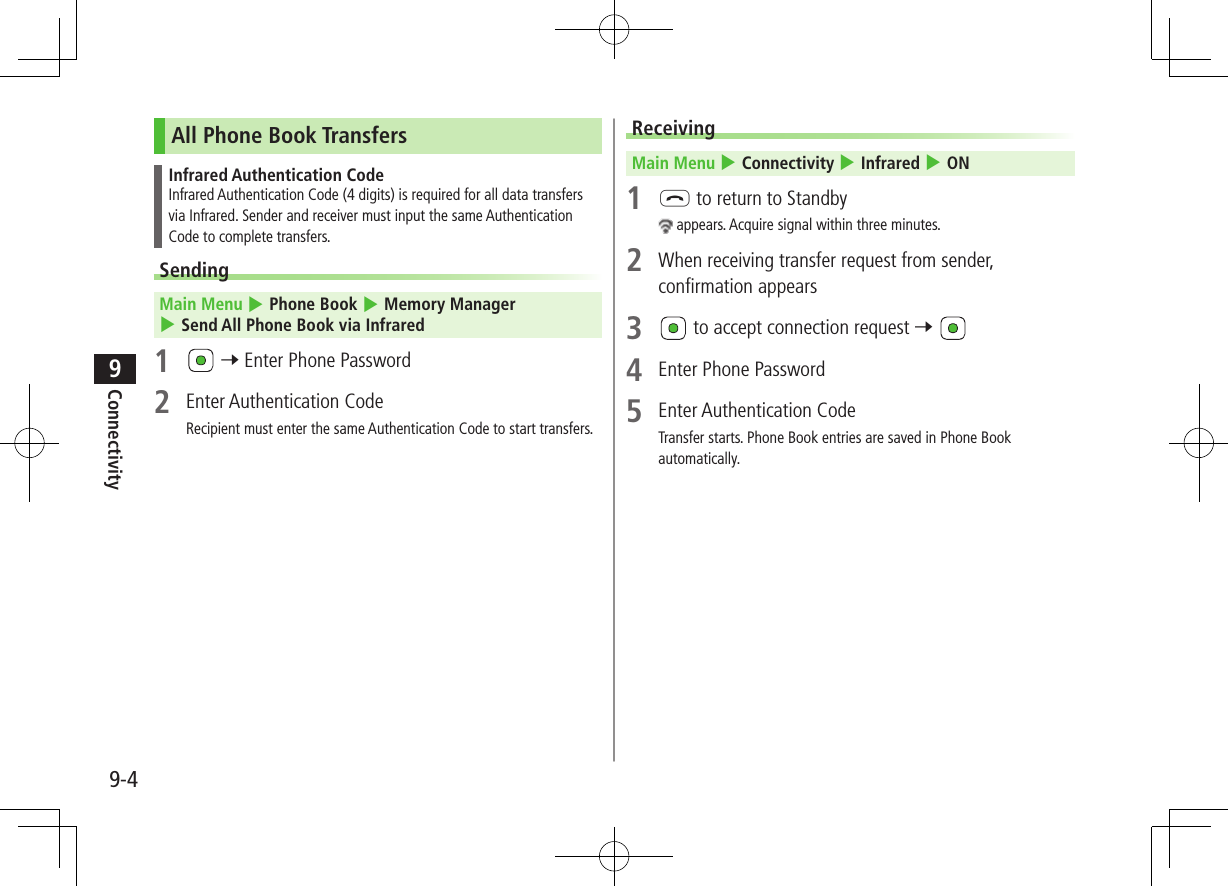
iiiSending Your Contact InfoSave mail address and other details; send to compatible devices wirelessly.Account Details: ZP.4-14Messaging Multiple RecipientsEnter multiple mail addresses/numbers to send a message to all at one time.Sending Messages: ZP.12-4Add/Edit/Delete Address: ZP. 1 2 - 9Sending Files WirelesslySend files or your own mail address saved in Account Details via Infrared transmission to other compatible devices.Infrared: ZP.4-14 Customizing Standby DisplayAdd wallpaper, set clock size/position or set calendar to appear in Standby.Wallpaper: ZP.8-7Display: ZP.15-4Customizing Key SettingsSet frequently used functions to keys.Keypad: ZP.15-6Using Shortcuts to FunctionsAccess shortcuts to frequently used functions in Standby.Standby Window: ZP.1-19Mastering Text Entry MethodsEnter text for Messaging functions or to add/edit Phone Book entry items.Text Entry: ZP.3-1Using Messaging ServicesSend short or long text messages. Attach image/sound files, etc. to S! Mail.Messaging: ZP.12-1Feeling Mail: ZP.12-5Graphic Mail: ZP.12-6Accessing the Mobile InternetAccess Mobile Internet sites via Yahoo! Keitai to browse sites or download files.Yahoo! Keitai: ZP.13-2Playing GamesDownload and install  S! Appli Games via  Yahoo! Keitai.S! Appli: ZP.14-1Getting News (Japanese)Set up S! Quick News to view a variety of information contents.S! Quick News: ZP.6-5
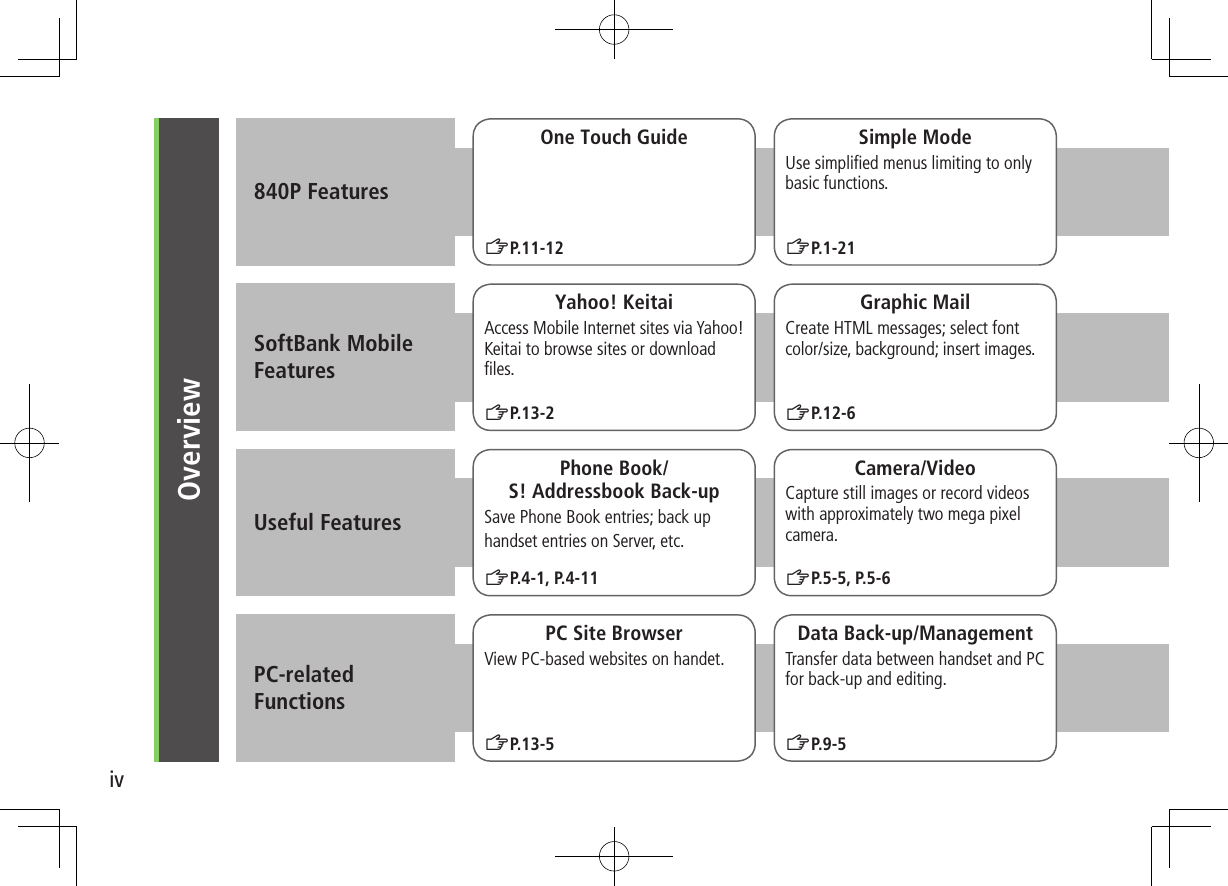
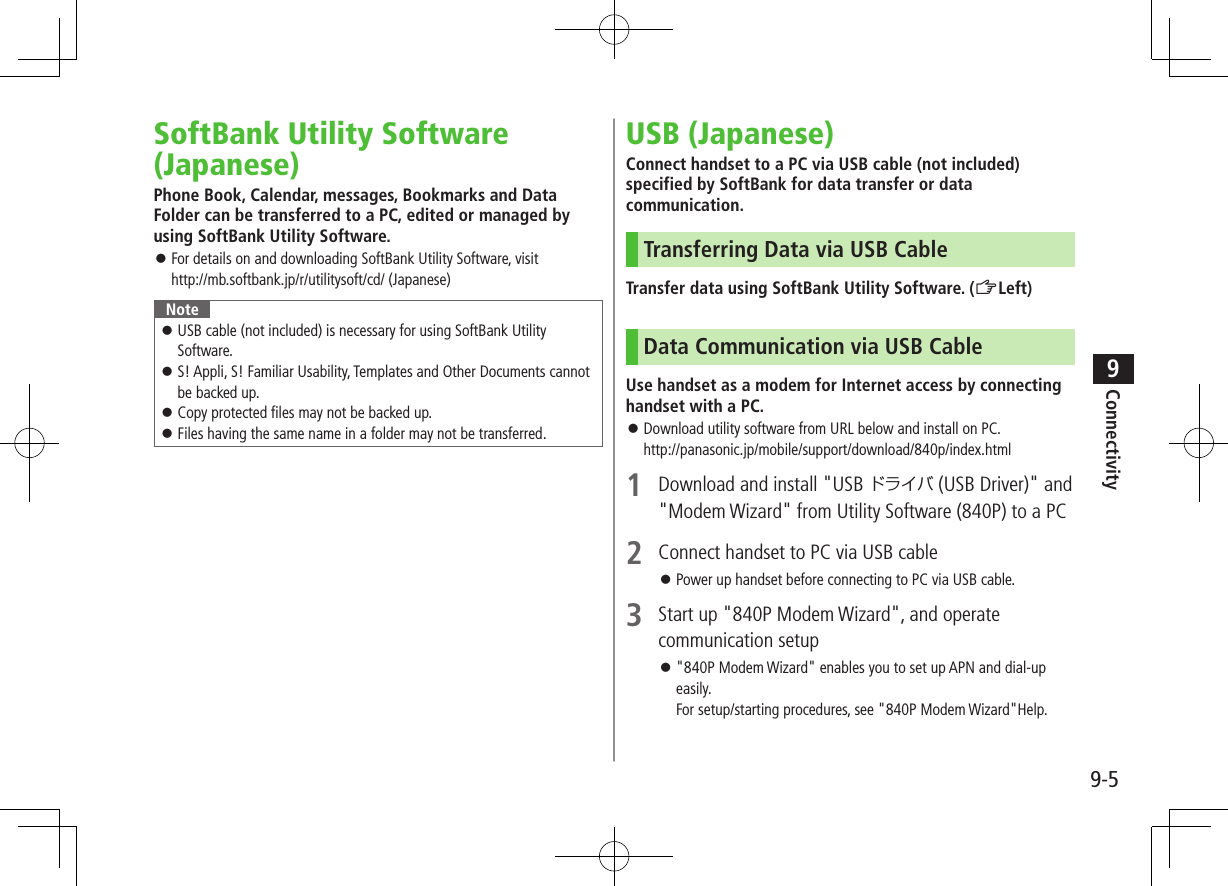
ivOverview840P FeaturesSoftBank Mobile FeaturesUseful FeaturesPC-related  FunctionsOne Touch GuideZP.11-12Simple ModeUse simplified menus limiting to only basic functions. ZP.1-21Yahoo! KeitaiAccess Mobile Internet sites via Yahoo! Keitai to browse sites or download files.ZP.13-2Graphic MailCreate HTML messages; select font color/size, background; insert images.ZP.12-6Phone Book/ S! Addressbook Back-upSave Phone Book entries; back uphandset entries on Server, etc.ZP.4-1, P.4-11Camera/VideoCapture still images or record videos with approximately two mega pixel camera.ZP.5-5, P.5-6PC Site BrowserView PC-based websites on handet.ZP.13-5Data Back-up/ManagementTransfer data between handset and PC for back-up and editing.ZP.9-5
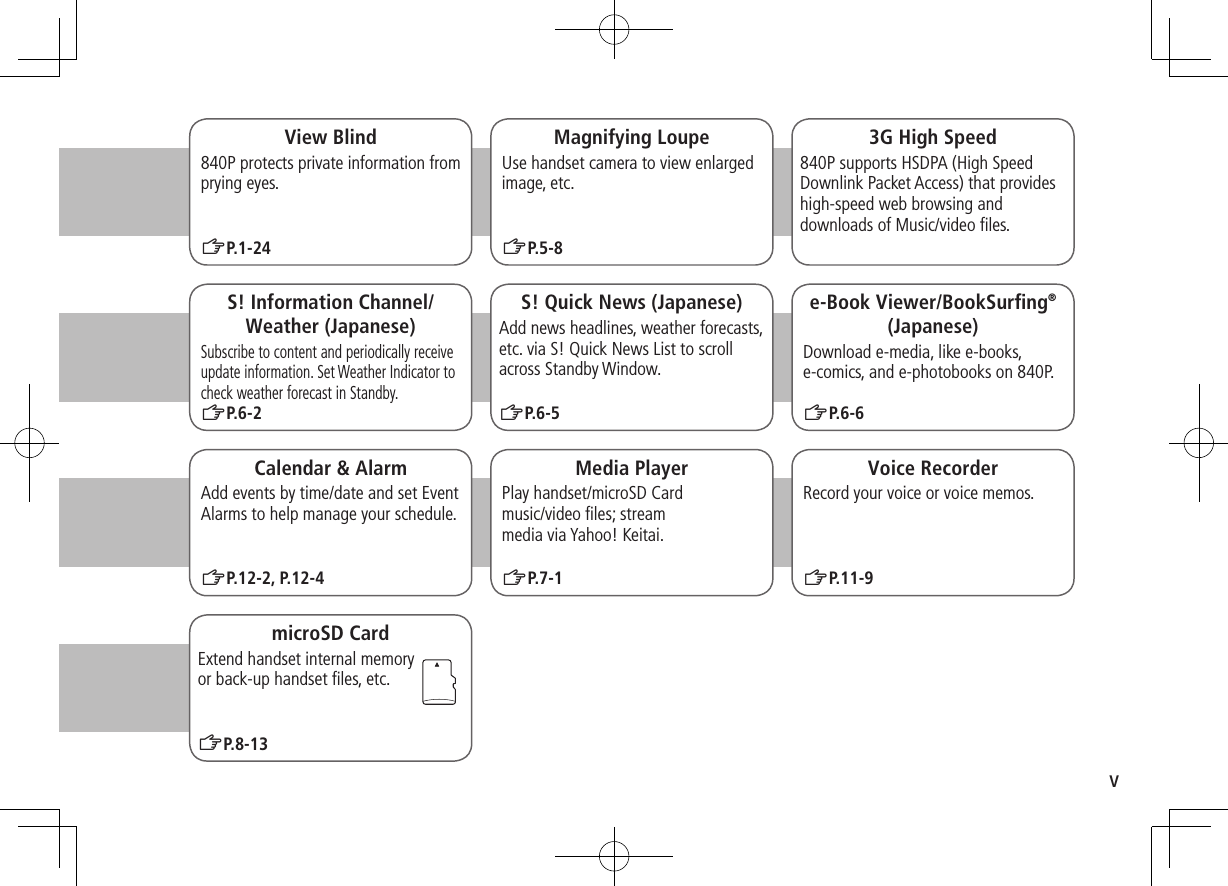
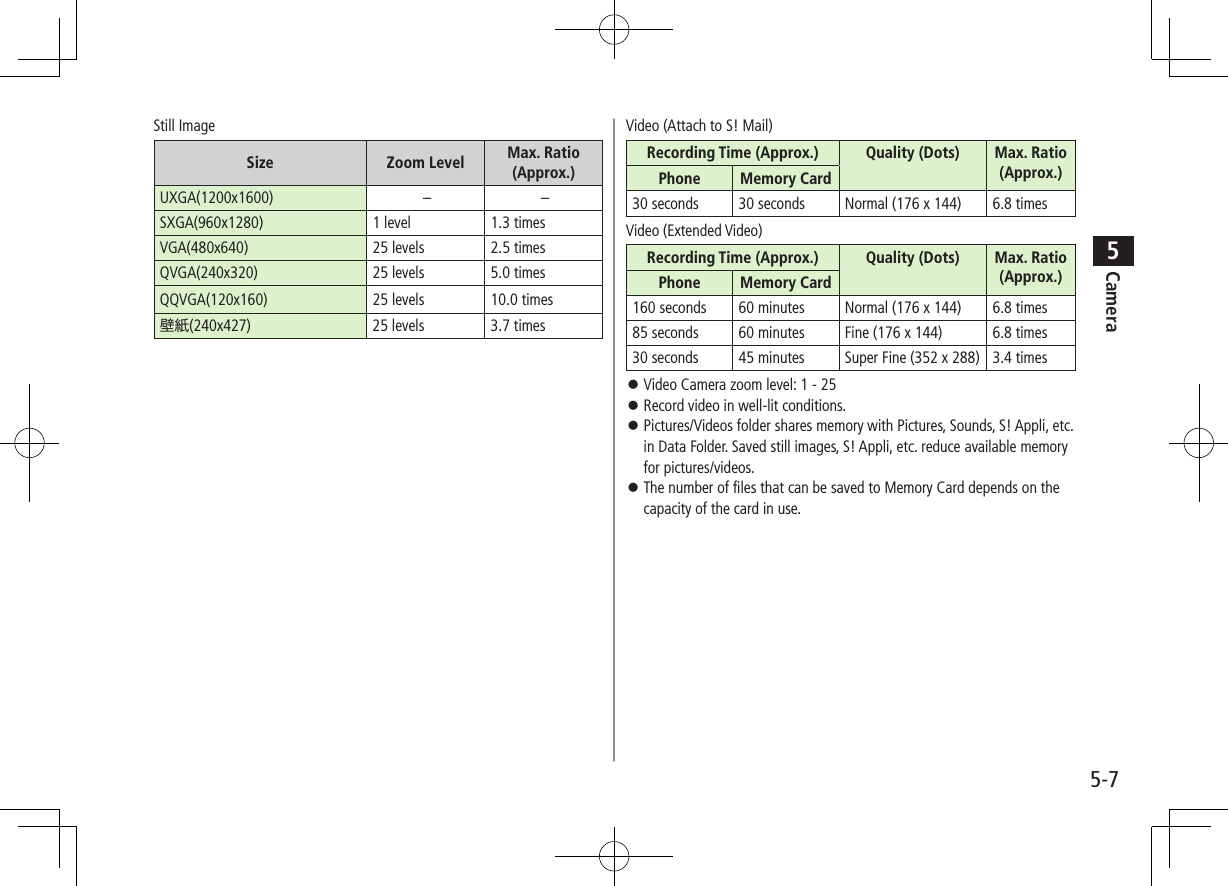
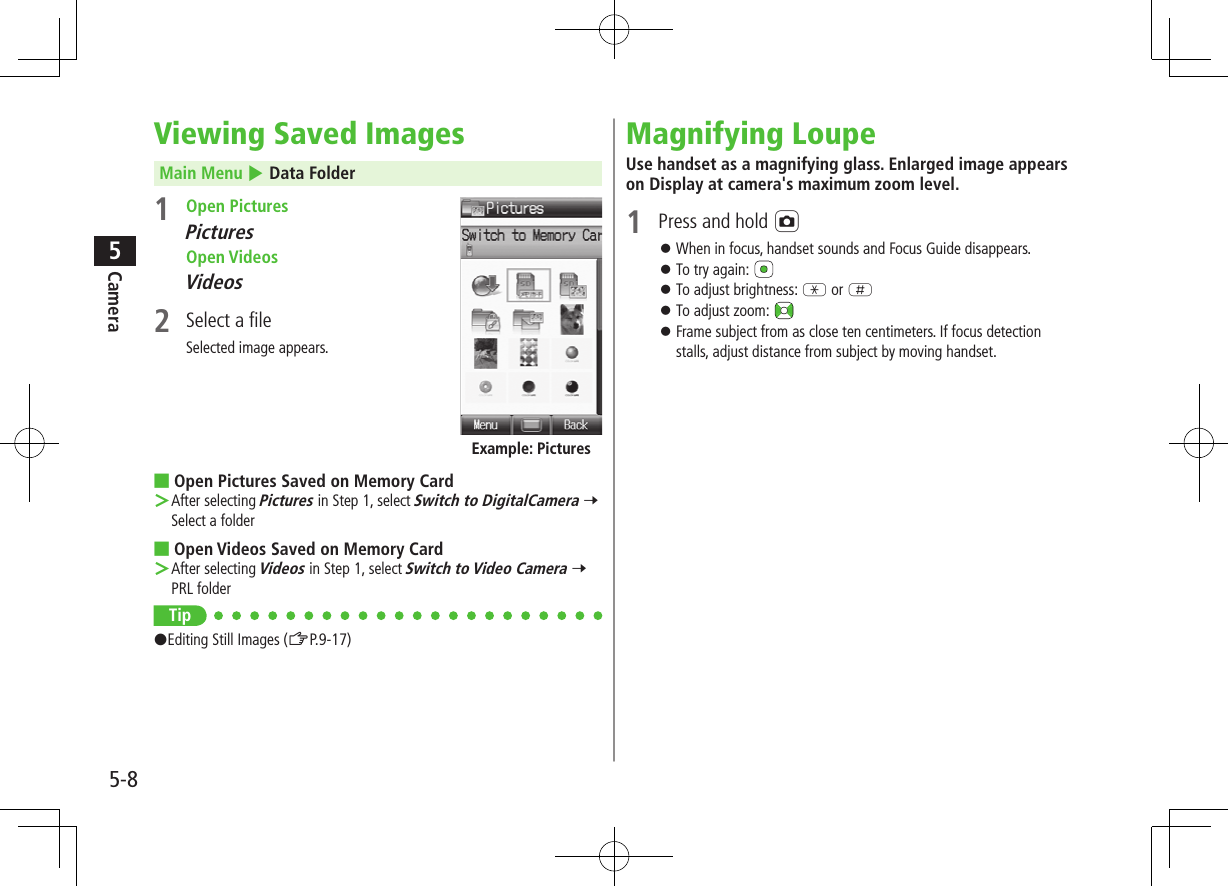
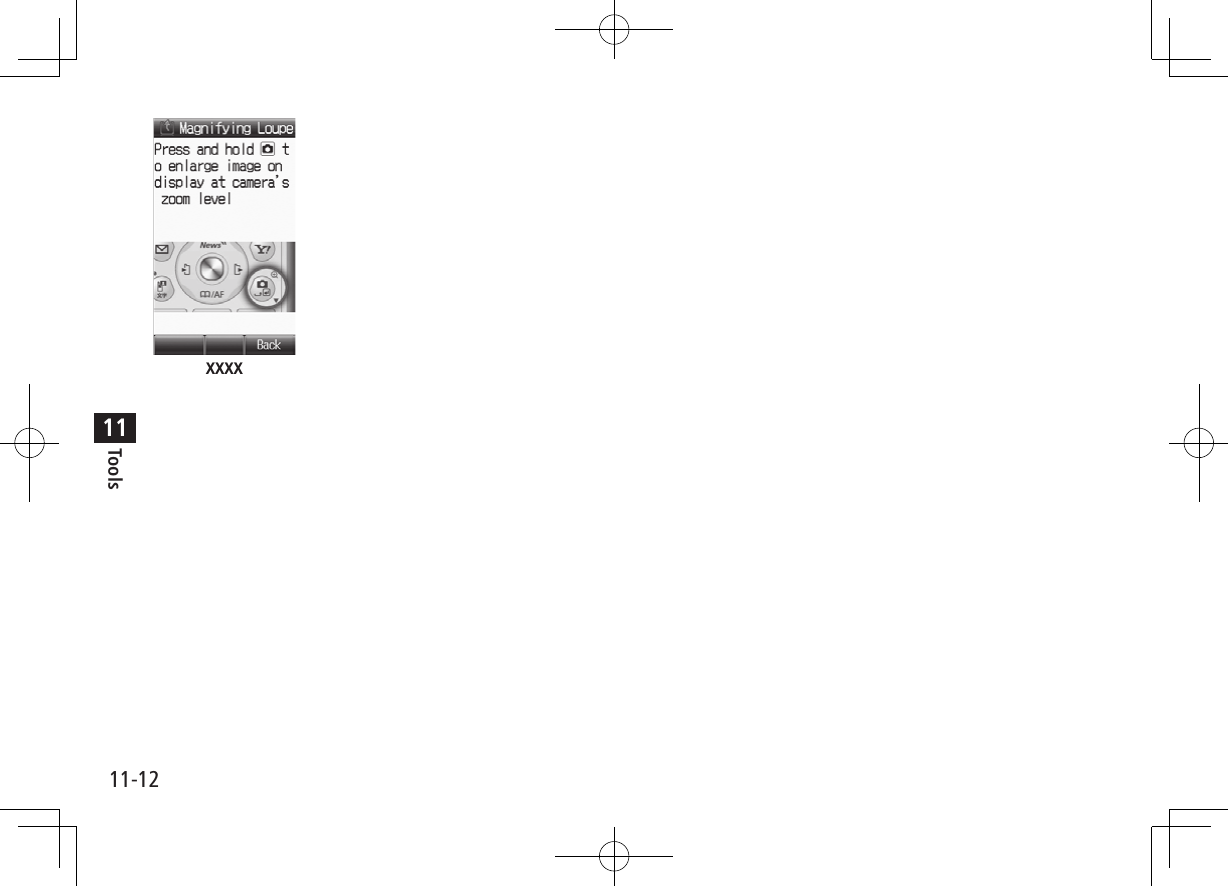
vMagnifying LoupeUse handset camera to view enlarged image, etc.ZP.5-83G High Speed840P supports HSDPA (High Speed Downlink Packet Access) that provides high-speed web browsing and downloads of Music/video files.S! Information Channel/Weather (Japanese)Subscribe to content and periodically receive update information. Set Weather Indicator to check weather forecast in Standby.ZP.6-2Calendar & AlarmAdd events by time/date and set Event Alarms to help manage your schedule.ZP.12-2, P.12-4e-Book Viewer/BookSurfing®(Japanese)Download e-media, like e-books, e-comics, and e-photobooks on 840P.ZP.6-6Media PlayerPlay handset/microSD Card  music/video files; stream  media via Yahoo! Keitai.ZP.7-1S! Quick News (Japanese)Add news headlines, weather forecasts, etc. via S! Quick News List to scroll across Standby Window.ZP.6-5Voice RecorderRecord your voice or voice memos.View Blind840P protects private information from prying eyes.ZP.1-24ZP.11-9microSD CardExtend handset internal memory  or back-up handset files, etc.ZP.8-13
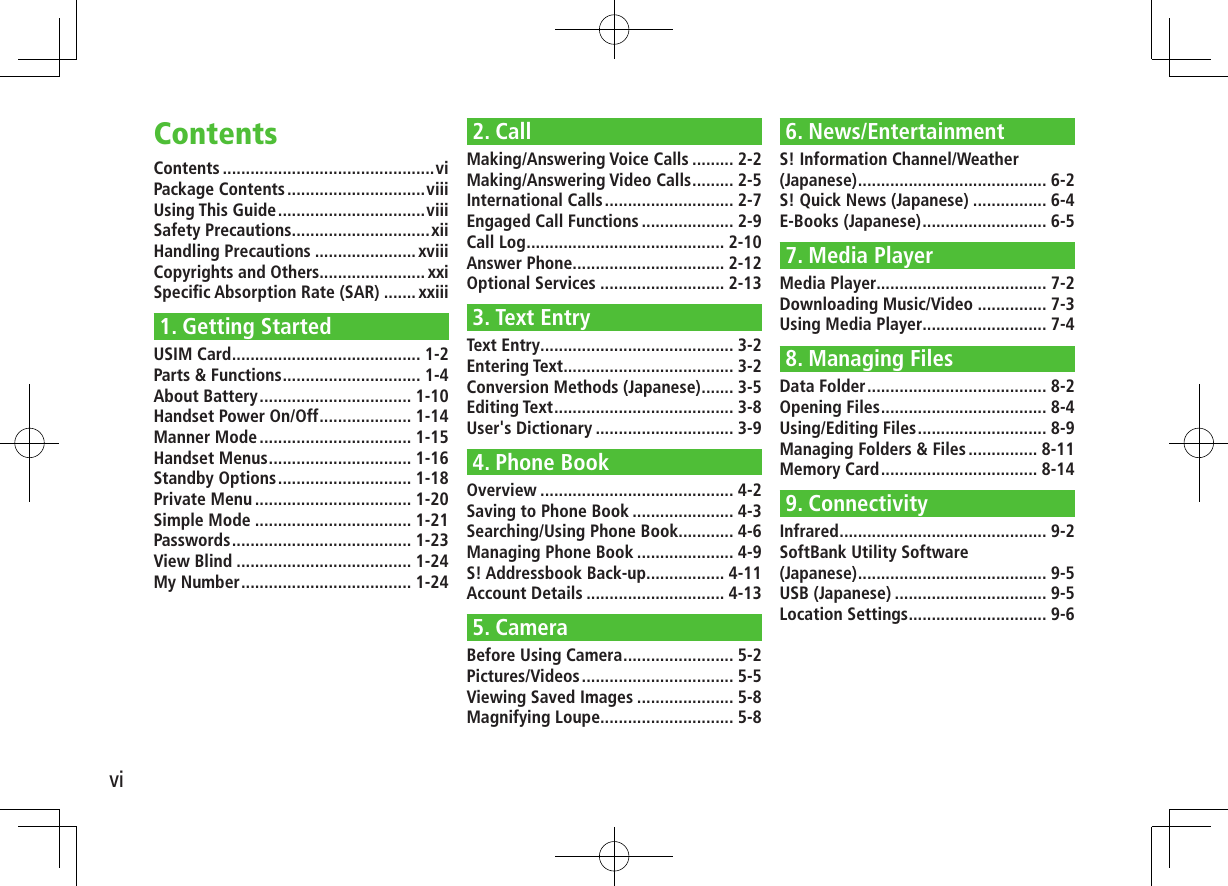
viContentsContents ..............................................viPackage Contents ..............................viiiUsing This Guide ................................viiiSafety Precautions ..............................xiiHandling Precautions ...................... xviiiCopyrights and Others....................... xxiSpecific Absorption Rate (SAR) ....... xxiii1. Getting StartedUSIM Card ......................................... 1-2Parts & Functions .............................. 1-4About Battery ................................. 1-10Handset Power On/Off .................... 1-14Manner Mode ................................. 1-15Handset Menus ............................... 1-16Standby Options ............................. 1-18Private Menu .................................. 1-20Simple Mode .................................. 1-21Passwords ....................................... 1-23View Blind ...................................... 1-24My Number ..................................... 1-242. CallMaking/Answering Voice Calls ......... 2-2Making/Answering Video Calls ......... 2-5International Calls ............................ 2-7Engaged Call Functions .................... 2-9Call Log ........................................... 2-10Answer Phone................................. 2-12Optional Services ........................... 2-133. Text EntryText Entry .......................................... 3-2Entering Text ..................................... 3-2Conversion Methods (Japanese) ....... 3-5Editing Text ....................................... 3-8User's Dictionary .............................. 3-94. Phone BookOverview .......................................... 4-2Saving to Phone Book ...................... 4-3Searching/Using Phone Book ............ 4-6Managing Phone Book ..................... 4-9S! Addressbook Back-up................. 4-11Account Details .............................. 4-135. CameraBefore Using Camera ........................ 5-2Pictures/Videos ................................. 5-5Viewing Saved Images ..................... 5-8Magnifying Loupe............................. 5-86. News/EntertainmentS! Information Channel/Weather (Japanese) ......................................... 6-2S! Quick News (Japanese) ................ 6-4E-Books (Japanese) ........................... 6-57. Media PlayerMedia Player..................................... 7-2Downloading Music/Video ............... 7-3Using Media Player........................... 7-48. Managing FilesData Folder ....................................... 8-2Opening Files .................................... 8-4Using/Editing Files ............................ 8-9Managing Folders & Files ............... 8-11Memory Card .................................. 8-149. ConnectivityInfrared ............................................. 9-2SoftBank Utility Software  (Japanese) ......................................... 9-5USB (Japanese) ................................. 9-5Location Settings .............................. 9-6
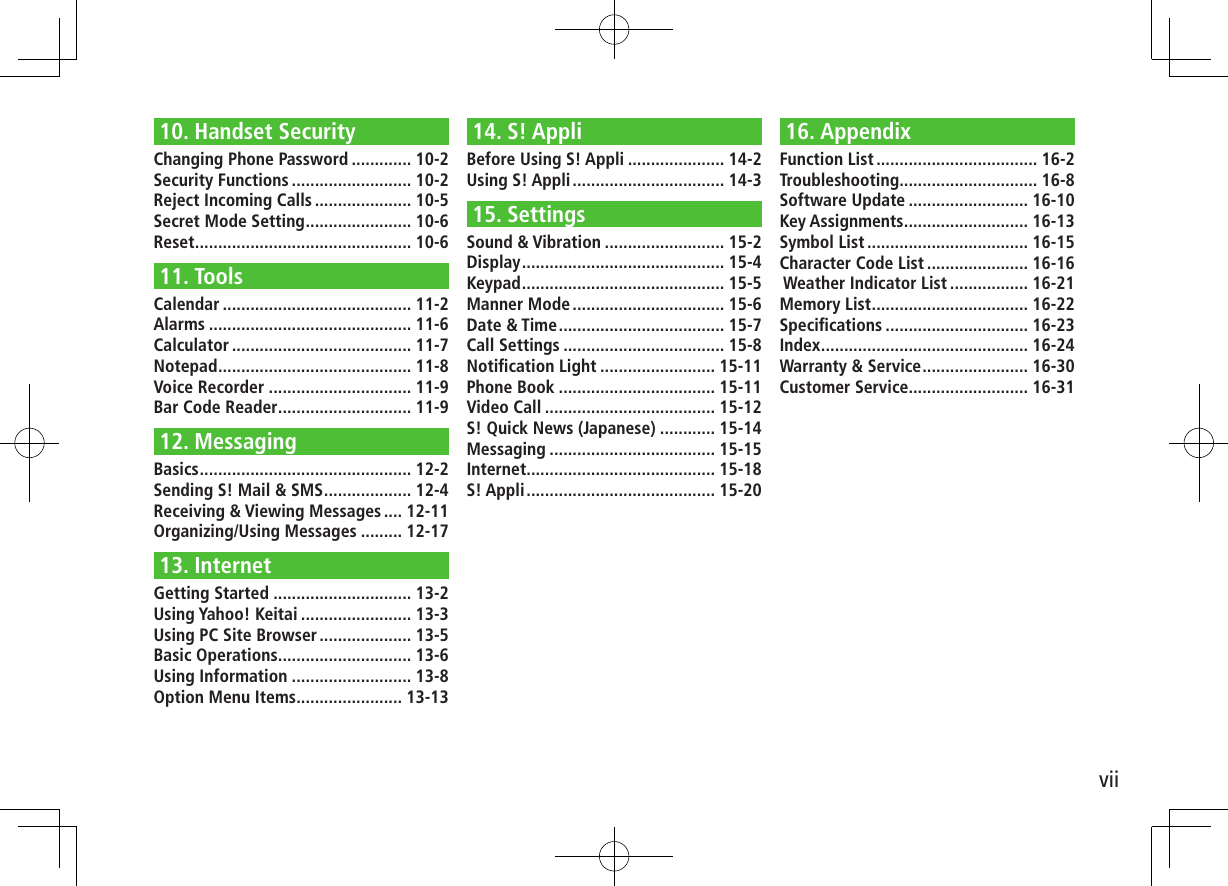
vii10. Handset SecurityChanging Phone Password ............. 10-2Security Functions .......................... 10-2Reject Incoming Calls ..................... 10-5Secret Mode Setting ....................... 10-6Reset ............................................... 10-611. ToolsCalendar ......................................... 11-2Alarms ............................................ 11-6Calculator ....................................... 11-7Notepad .......................................... 11-8Voice Recorder ............................... 11-9Bar Code Reader ............................. 11-912. MessagingBasics .............................................. 12-2Sending S! Mail & SMS ................... 12-4Receiving & Viewing Messages .... 12-11Organizing/Using Messages ......... 12-1713. InternetGetting Started .............................. 13-2Using Yahoo! Keitai ........................ 13-3Using PC Site Browser .................... 13-5Basic Operations ............................. 13-6Using Information .......................... 13-8Option Menu Items ....................... 13-1314. S! AppliBefore Using S! Appli ..................... 14-2Using S! Appli ................................. 14-315. SettingsSound & Vibration .......................... 15-2Display ............................................ 15-4Keypad ............................................ 15-5Manner Mode ................................. 15-6Date & Time .................................... 15-7Call Settings ................................... 15-8Notification Light ......................... 15-11Phone Book .................................. 15-11Video Call ..................................... 15-12S! Quick News (Japanese) ............ 15-14Messaging .................................... 15-15Internet ......................................... 15-18S! Appli ......................................... 15-2016. AppendixFunction List ................................... 16-2Troubleshooting .............................. 16-8Software Update .......................... 16-10Key Assignments ........................... 16-13Symbol List ................................... 16-15Character Code List ...................... 16-16 Weather Indicator List ................. 16-21Memory List .................................. 16-22Specifications ............................... 16-23Index ............................................. 16-24Warranty & Service ....................... 16-30Customer Service.......................... 16-31
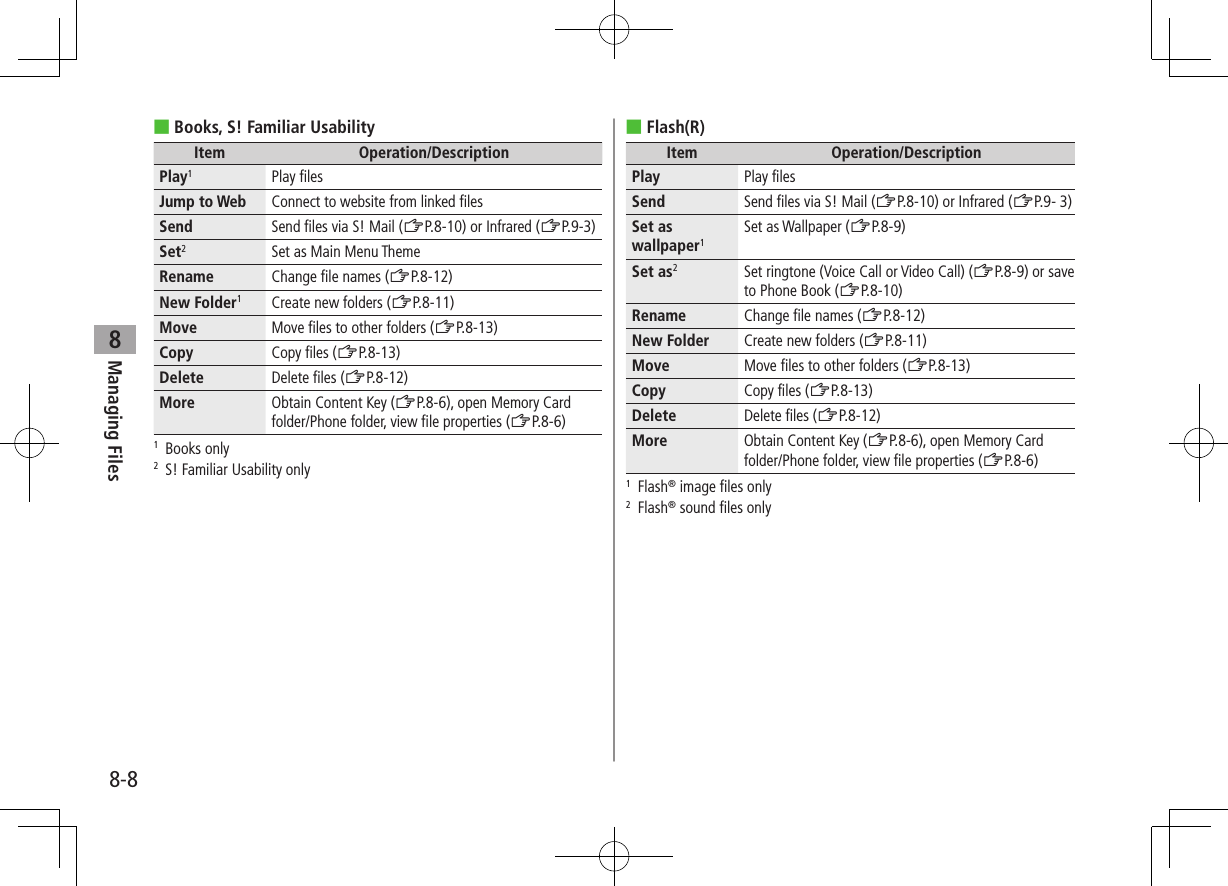
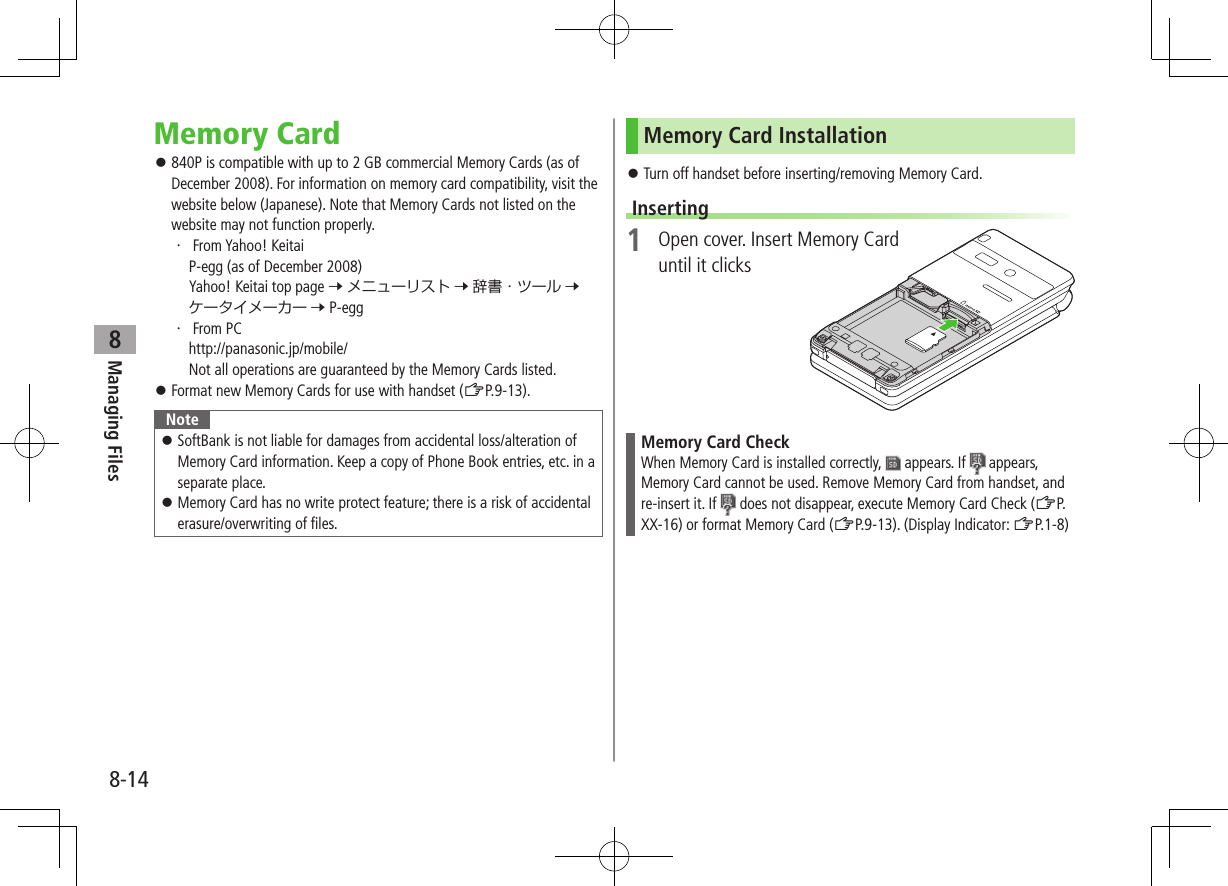
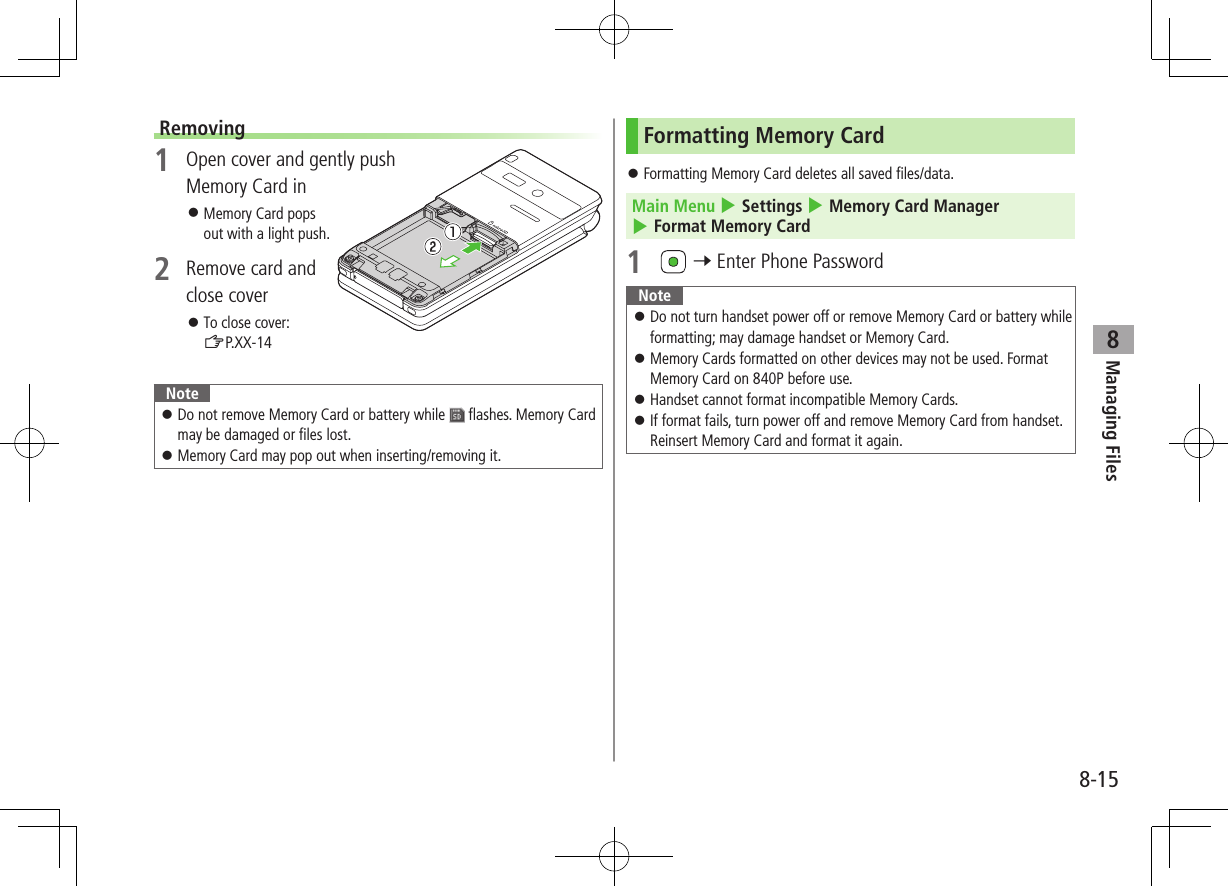
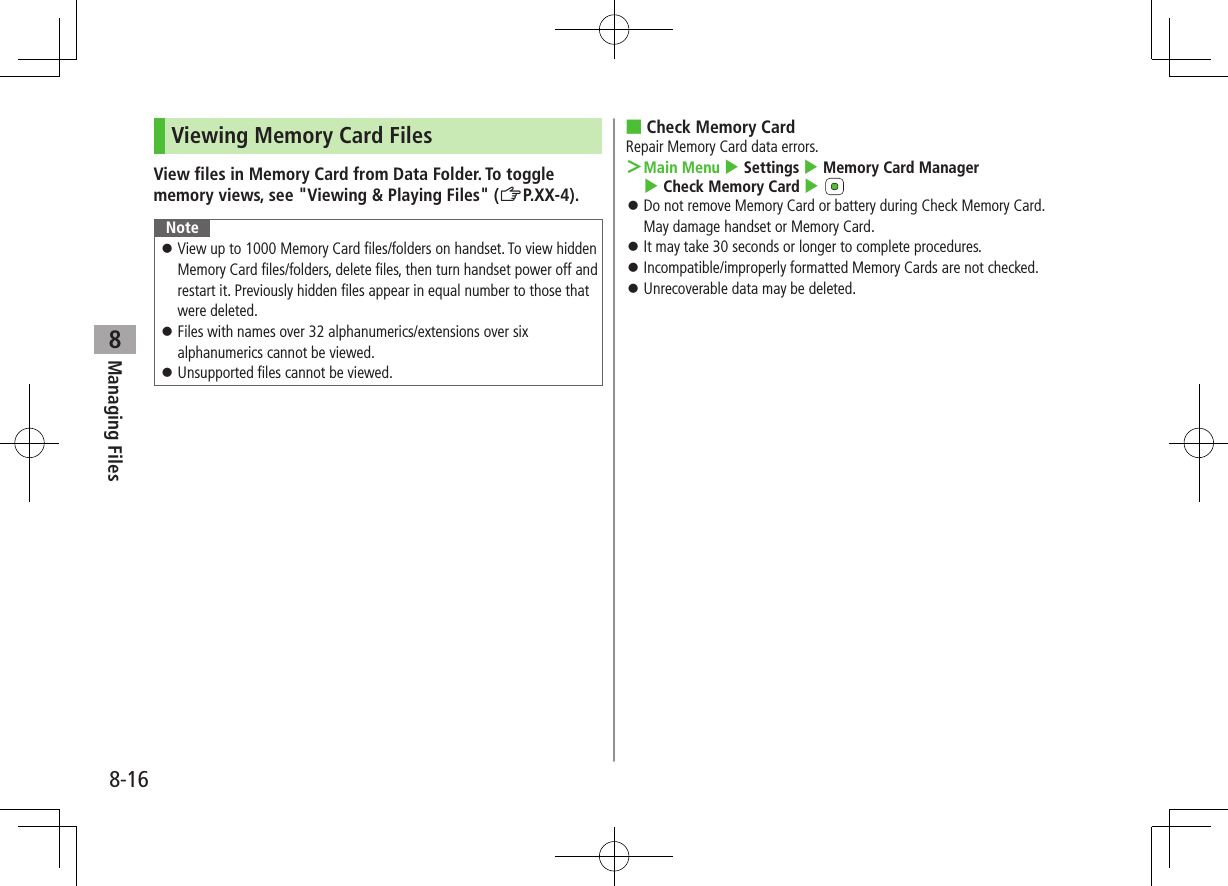
viiiPackage ContentsHandset (840P)Battery (PMBAT1)Starter GuideNote ⿟Use SoftBank specified AC Charger (sold separately) to charge battery. ⿟For more information about AC Charger and accessories, please contact SoftBank Mobile Customer Center, General Information (ZP.16-30). ⿟Optional battery is available for separate purchase. ⿟840P accepts microSD Card (not included). Purchase microSD Card to use related functions (ZP.8-13).Using This GuideScreenshotsBefore reading this guide, make a note of the following: ⿟In this manual, SoftBank 840P User Guide, SoftBank 840P is abbreviated as 840P. ⿟"microSD Card" is referred to as "Memory Card" in this guide. ⿟Sample screenshots, etc. are provided for reference only. Actual handset windows, menus, etc. may differ in appearance. ⿟Key icons use simplified labels. ⿟Most operation descriptions begin in Standby. ⿟Pressing a key for more than one second is described as "Press and hold."
ixGuide SymbolsPress the corresponding key to execute the function or operation indicated at the bottom of Display.Example: ⿟Softkey labels vary by menu.Multi Selector (❶)Use Multi Selector to select items, navigate menus, etc. In this guide, Multi Selector operations are indicated as shown below.Softkeys (❷❸)In this guide, Softkey operations are indicated as shown below.Example ❷❸: A [Chg.Menu], S [Back]⿟[Chg.Menu] and [Back] are Softkey label examples; Softkey labels vary by menu.Japanese Functions & ServicesWhen "(Japanese)" appears in a title, Japanese ability is required to use full range of the function or service.UpUp/Down  Up/Down/Left/RightDownLeftLeft/Right CenterRightLeft RightUpDown Center
xOperation Descriptions ⿟Following are examples of operation descriptions. Please note, actual operations may differ.Basic OperationsOperations are expressed as shown here.Example:Main Menu 4 Phone Book 4 Group1  Highlight a group 7 A[Menu] 7 Rename 7 Enter group nameAMenu Selection BStepsAMenu Selection❶.Press   in Standby to open Main Menu.❷.Use   to highlight Phone Book; then press  .❸.Use   to highlight Group; then press  .BSteps❶.Use   to highlight a group.❷.Press A[Menu].❸.Use   to highlight Rename; then press  .❹.Enter a Group name.Advanced OperationsFor advanced features and settings, go to pages indicated under Tip.Example:Tip#Operations Available during a Voice Call (ZP.2-9)#Making Calls from Call Log (ZP.2-8)#Save Entered Phone Number (ZP.4-5)#Making Calls from Phone Book (ZP.4-6)#Speed Dial (ZP.4-8)Settings   #Call Time & Call Cost (ZP.XX-9)#End Calls by Closing Handset (ZP.XX-10)Settings   Refer to Chapter 17 "Settings."
xiAbbreviated DescriptionsFor advanced settings (Chapter 15), initial operations may be abbreviated or omitted.Example:From Main Menu 4 Entertainment 4Answer Phone ■Delete Playlists >Follow the steps belowItem Operation/DescriptionOne >Highlight a Playlist 7 A[Menu] 7 Delete 7 One 7 A[YES]AAbbreviated StepsInitial steps are abbreviated.BStepsFollow these steps after Abbreviated Steps.COmitted StepsInitial steps are omitted. Start operations from specified window. ■Mail & Web Extensions >In text entry window (in alphanumerics mode), 0→Select an extension
xiiSafety Precautions ■Before use, read these safety precautions carefully and use your handset properly. Keep this guide in a safe place for future reference. ■These safety precautions contain information intended to prevent bodily injury to the user and to surrounding people, as well as damage to property, and must be observed at all times. ■SoftBank is not liable for any damages resulting from use of this product. ■These symbols indicate level of harm from failure to observe cautions or improper usage. Make sure to understand these symbols and precautions before reading this guide.Danger Great risk of death or serious injury from improper useWarning Risk of death or serious injury from improper useCaution Risk of injury or damage to property from improper use ■Symbol Explanations Make sure to understand these symbols and precautions before reading this guide.Prohibited Action Avoid MoistureDisassembly  ProhibitedAlways Dry Hands  FirstCompulsory Action Disconnect Power SourceHandset, Battery, USIM Card, Charger (soldseparately) & Memory Card (not included)DangerDo not use or leave handset, battery or charger in locations subject to high temperature, such as near an open flame/heater, in sunlight or inside a car on an extremely hot day.Battery may leak, overheat, explode, catch fire, or deform handset and cause damage. Part of the casing may also become hot and cause burns.Do not use excessive force to attach battery or connect charger to handset. Battery or connector may be the wrong way around.Battery may leak, overheat, explode or catch fire.Do not disassemble, modify or solder handset.May cause accidents such as fire, bodily injury, electric shock or equipment malfunction. Battery may leak, overheat, explode or catch fire. Modifying handset is a violation of Radio Law and subject to prosecution.Do not get handset, battery and charger wet.If handset, battery or charger is left wet or battery is charged after exposure to liquids such as water or pet urine, overheating, electric shock, fire, injury or malfunction may occur.Be mindful of location when using handset, battery and charger.Handle with care.Use specified battery, charger (sold separately) and Desktop Holder (not included).Battery may leak, overheat, explode or catch fire, and charger may overheat, catch fire or cause malfunction.
xiiiWarningDo not place handset, battery or charger inside cooking appliances, such as microwave ovens or high-pressure containers, or on IH cooking heaters.Battery may leak, overheat, explode or catch fire, and handset and charger may overheat, emit smoke, catch fire or cause malfunction.Do not drop, throw or otherwise subject to strong force or impacts.Battery may leak, overheat, explode, catch fire, or cause electric shock or damage to handset.Do not allow liquids (water, pet urine, etc.) or conductive objects (pencil leads, metal pieces, necklaces, hair pins, etc.) to contact charger terminals, external port terminals or Memory Card slot.May cause fire or malfunction triggered by short-circuit.Keep handset off and charger disconnected near propane gas, in filling stations or places where flammable gas is generated.Handset use in such areas may lead to fire.If handset, battery or charger emits an unusual sound, smoke or odor, perform following steps:1. Unplug charger from outlet.2. Turn off handset.3. Remove battery. (Take care to avoid burns or injuries.)May cause fire or electric shock.CautionDo not place handset, battery or charger on an unstable surface. May fall, causing injury or malfunction. Take extra precautions while vibration alert is active or during charging.Keep handset out of the reach of young children.May result in accidental ingestion or bodily injury.If for use by child, guardian should teach proper handling and ensure handset is used as directed.May result in bodily injury.BatteryDangerSee battery label to confirm battery type.Do not throw battery into fire.Battery may leak, explode or catch fire.Do not pierce battery with a nail or other sharp object, hit it with a hammer, step on it, or subject it to strong shocks.Battery may leak, overheat, explode or catch fire.Do not touch terminals with metallic objects or  carry/store battery with conductive objects (pencil leads, metal pieces, necklaces, hair pins, etc.). Battery may leak, overheat, explode or catch fire.Label Battery TypeLi-ion 00 Lithium-ion
xivIf battery fluid gets into eyes, do not rub; flush with clean water and see a doctor immediately.Failure to do so may cause blindness.WarningIf battery fluid comes into contact with your skin or clothing, stop using handset immediately and rinse it off with clean water.Battery fluid is harmful to your skin.If battery does not charge after specified time, stop charging.Battery may leak, overheat, explode or catch fire.If battery emits an unusual odor, overheats, discolors or deforms, immediately remove battery and move it away as far as possible from any flame or fire. Take care to avoid burns or injuries.Battery may leak, overheat, explode or catch fire.CautionDo not dispose of battery with ordinary refuse.Place tape over the terminals to insulate battery, and take it to a SoftBank retailer or institution that handles used batteries in your area. Comply with local waste disposal regulations for recycling.HandsetWarningDo not use handset while driving a vehicle.Doing so may interfere with safe driving and cause an accident. Stop your vehicle to park in a safe place before using handset. Drivers using handsets while driving are subject to prosecution.Do not aim the infrared port at eyes when using infrared communication.Doing so may affect eyes.Turn off handset near high-precision electronic devices or devices using weak electronic signals.Handset may cause these devices to malfunction.*Electronic devices that may be affected: Hearing aids, implantable cardiac pacemakers, implantable cardioverter defibrillators, other medical electronic devices, fire alarms, automatic doors and other automatically controlled devices.Turn off handset aboard aircraft. Handset signal may interfere with aircraft operation.When in-flight handset use is permitted, follow airline instructions for proper use.If you have a weak heart, take extra precautions when setting functions such as Vibration or Ringer Volume for incoming transmissions.May affect heart.In a thunderstorm, immediately turn off handset and seek shelter.There is a risk of being struck by lightning and suffering electric shock.
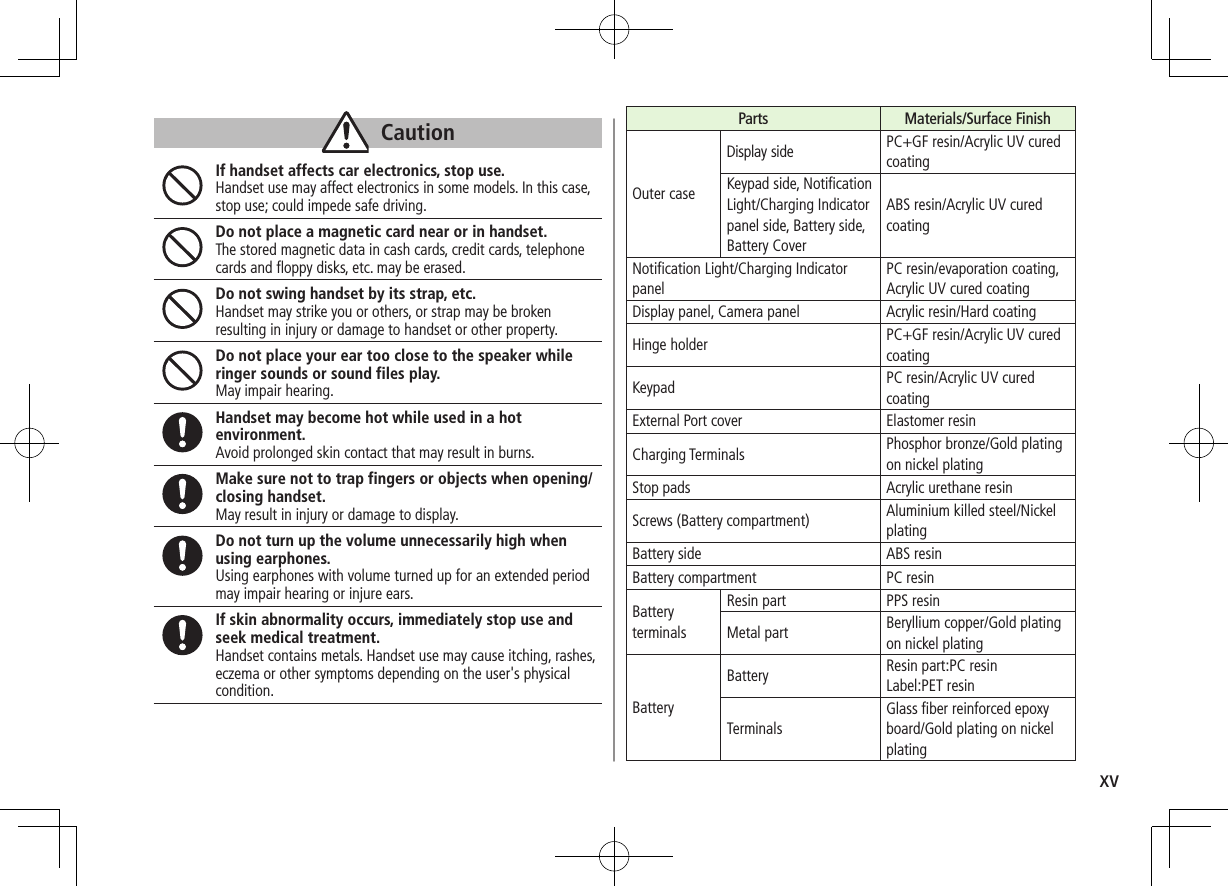
xvCautionIf handset affects car electronics, stop use.Handset use may affect electronics in some models. In this case, stop use; could impede safe driving.Do not place a magnetic card near or in handset.The stored magnetic data in cash cards, credit cards, telephone cards and floppy disks, etc. may be erased.Do not swing handset by its strap, etc.Handset may strike you or others, or strap may be broken resulting in injury or damage to handset or other property.Do not place your ear too close to the speaker while ringer sounds or sound files play.May impair hearing.Handset may become hot while used in a hot environment. Avoid prolonged skin contact that may result in burns.Make sure not to trap fingers or objects when opening/closing handset.May result in injury or damage to display.Do not turn up the volume unnecessarily high when using earphones.Using earphones with volume turned up for an extended period may impair hearing or injure ears.If skin abnormality occurs, immediately stop use and seek medical treatment.Handset contains metals. Handset use may cause itching, rashes, eczema or other symptoms depending on the user's physical condition. Parts Materials/Surface FinishOuter caseDisplay side PC+GF resin/Acrylic UV cured coatingKeypad side, Notification Light/Charging Indicator panel side, Battery side, Battery CoverABS resin/Acrylic UV cured coatingNotification Light/Charging Indicator panelPC resin/evaporation coating, Acrylic UV cured coatingDisplay panel, Camera panel Acrylic resin/Hard coatingHinge holder PC+GF resin/Acrylic UV cured coatingKeypad PC resin/Acrylic UV cured coatingExternal Port cover Elastomer resinCharging Terminals Phosphor bronze/Gold plating on nickel platingStop pads Acrylic urethane resinScrews (Battery compartment) Aluminium killed steel/Nickel platingBattery side ABS resinBattery compartment PC resinBattery terminalsResin part PPS resinMetal part Beryllium copper/Gold plating on nickel platingBatteryBattery Resin part:PC resin Label:PET resinTerminalsGlass fiber reinforced epoxy board/Gold plating on nickel plating
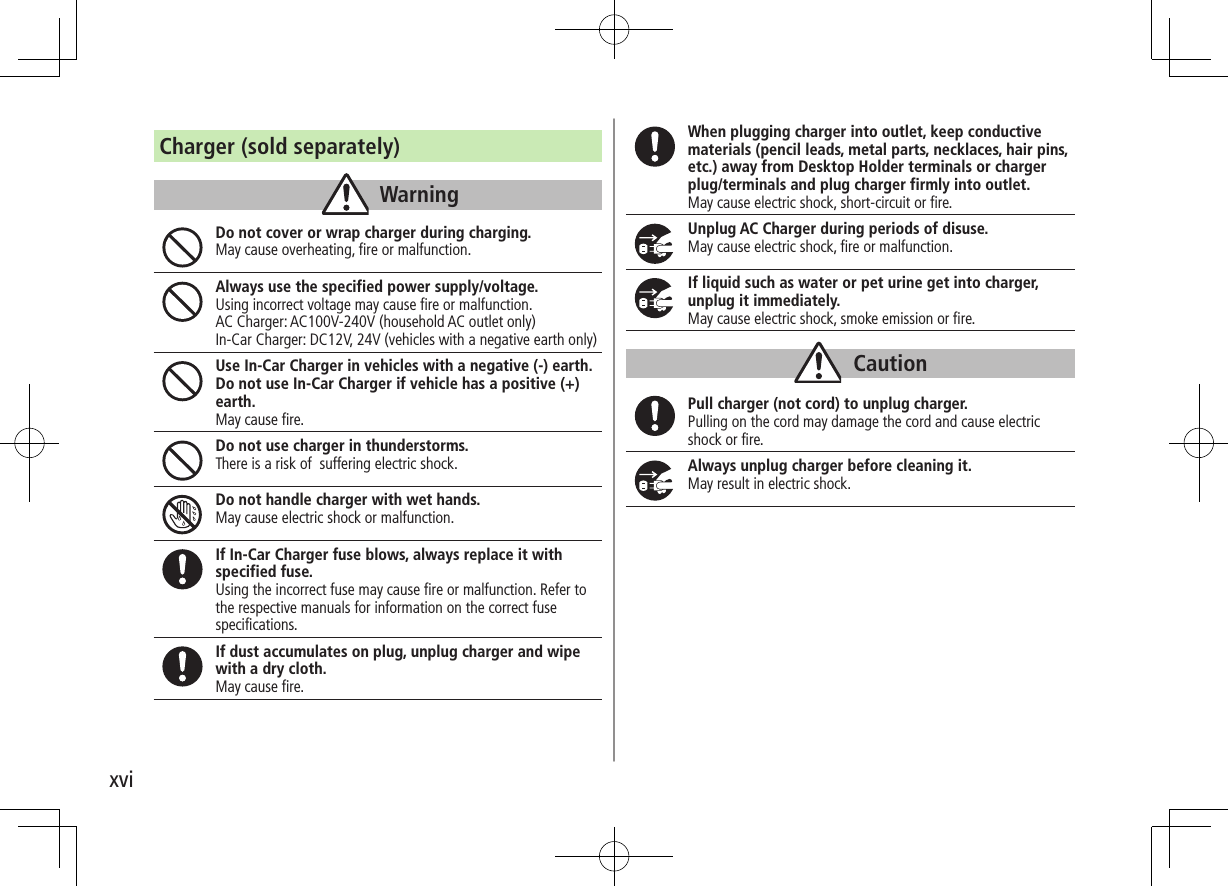
xviCharger (sold separately)WarningDo not cover or wrap charger during charging.May cause overheating, fire or malfunction.Always use the specified power supply/voltage.Using incorrect voltage may cause fire or malfunction. AC Charger: AC100V-240V (household AC outlet only) In-Car Charger: DC12V, 24V (vehicles with a negative earth only)Use In-Car Charger in vehicles with a negative (-) earth. Do not use In-Car Charger if vehicle has a positive (+) earth.May cause fire.Do not use charger in thunderstorms.There is a risk of  suffering electric shock.Do not handle charger with wet hands.May cause electric shock or malfunction.If In-Car Charger fuse blows, always replace it with specified fuse.Using the incorrect fuse may cause fire or malfunction. Refer to the respective manuals for information on the correct fuse specifications.If dust accumulates on plug, unplug charger and wipe with a dry cloth.May cause fire.When plugging charger into outlet, keep conductive materials (pencil leads, metal parts, necklaces, hair pins, etc.) away from Desktop Holder terminals or charger plug/terminals and plug charger firmly into outlet.May cause electric shock, short-circuit or fire.Unplug AC Charger during periods of disuse.May cause electric shock, fire or malfunction.If liquid such as water or pet urine get into charger, unplug it immediately.May cause electric shock, smoke emission or fire.CautionPull charger (not cord) to unplug charger.Pulling on the cord may damage the cord and cause electric shock or fire.Always unplug charger before cleaning it.May result in electric shock.
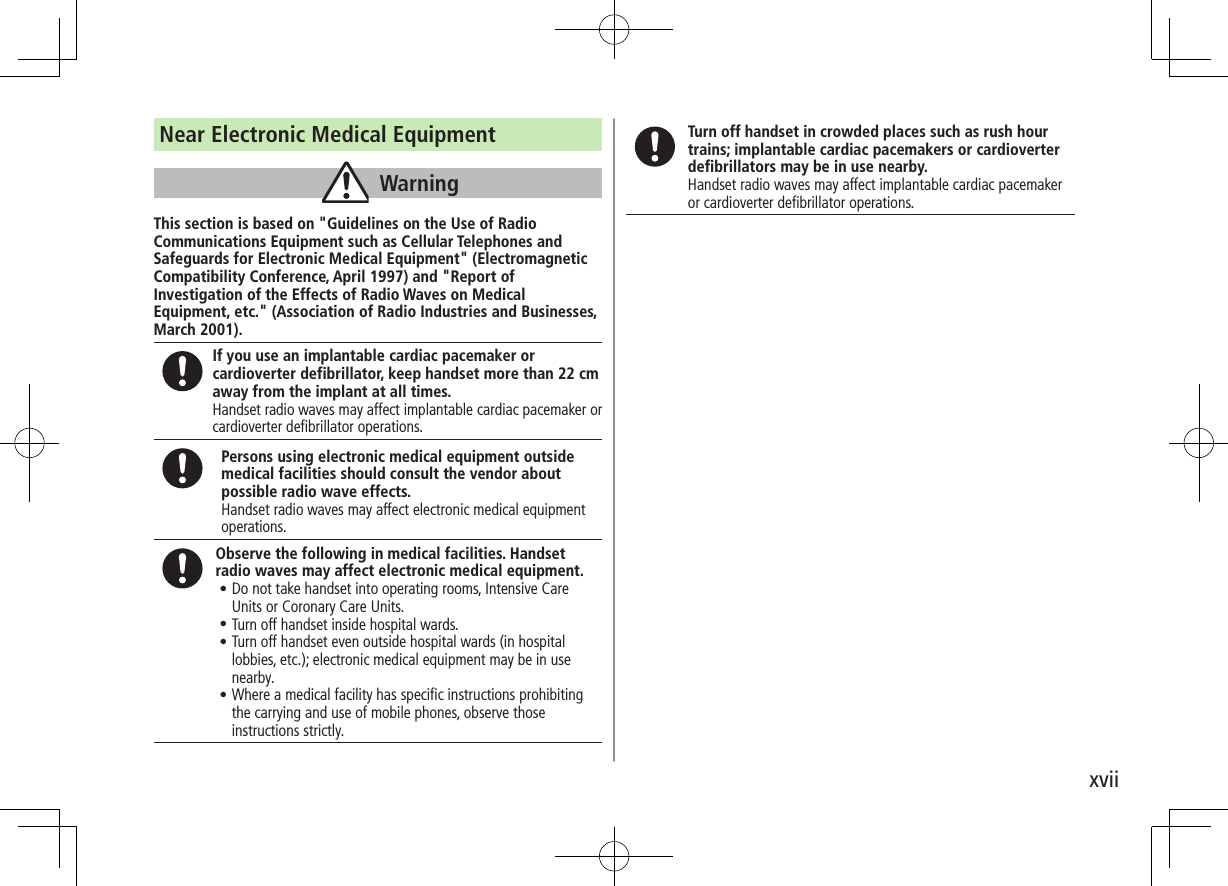
xviiNear Electronic Medical EquipmentWarningThis section is based on "Guidelines on the Use of Radio Communications Equipment such as Cellular Telephones and Safeguards for Electronic Medical Equipment" (Electromagnetic Compatibility Conference, April 1997) and "Report of Investigation of the Effects of Radio Waves on Medical Equipment, etc." (Association of Radio Industries and Businesses, March 2001).If you use an implantable cardiac pacemaker or cardioverter defibrillator, keep handset more than 22 cm away from the implant at all times.Handset radio waves may affect implantable cardiac pacemaker or cardioverter defibrillator operations.Persons using electronic medical equipment outside medical facilities should consult the vendor about possible radio wave effects.Handset radio waves may affect electronic medical equipment operations.Observe the following in medical facilities. Handset radio waves may affect electronic medical equipment.•.Do not take handset into operating rooms, Intensive Care Units or Coronary Care Units.•.Turn off handset inside hospital wards.•.Turn off handset even outside hospital wards (in hospital lobbies, etc.); electronic medical equipment may be in use nearby.•.Where a medical facility has specific instructions prohibiting the carrying and use of mobile phones, observe those instructions strictly.Turn off handset in crowded places such as rush hour trains; implantable cardiac pacemakers or cardioverter defibrillators may be in use nearby.Handset radio waves may affect implantable cardiac pacemaker or cardioverter defibrillator operations.
xviiiHandling PrecautionsGeneral Notes ⿟SoftBank is not liable for damages from accidental  loss/alteration/repair of handset/Memory Card information (Phone Book entries, image/sound files, etc.). Back-up important information. ⿟Handset transmissions may be disrupted inside buildings, tunnels or underground, or when moving into/out of such places. ⿟Use handset without disturbing others. ⿟Handsets are radios as stipulated by the Radio Law. Under the Radio Law, handsets must be submitted for inspection upon request.  ⿟Handset use near landlines, TVs or radios may cause interference. ⿟Read Memory Card manual beforehand for proper use. ⿟Beware of eavesdropping. Digital signals reduce interception, however transmissions may be overheard. Deliberate/accidental interception of communications constitutes eavesdropping. "eavesdropping" means radio communication is received by another receiver deliberately or accidentally.  ⿟Be cautious of unsafe websites. Take extra precautions especially when posting personal information on websites.Electromagnetic Waves ⿟For body worn operation, this mobile phone has been tested and meets RF exposure guidelines when used with an accessory containing no metal and positioning the handset a minimum 15 mm from the body. Use of other accessories may not ensure compliance with RF exposure guidelines.FCC Notice ⿟This device complies with part 15 of the FCC Rules. Operation is subject to the following two conditions:  (1) This device may not cause harmful interference, and (2) this device must accept any interference received, including interference that may cause undesired operation. ⿟Changes or modifications not expressly approved by the manufacturer responsible for compliance could void the user's authority to operate the equipment.
xixFCC RF Exposure InformationYour handset is a radio transmitter and receiver. It is designed and manufactured not to exceed the emission limits for exposure to radio frequency (RF) energy set by the Federal Communications Commission of the U.S. Government.The guidelines are based on standards that were developed by independent scientific organization through periodic and thorough evaluation of scientific studies. The standards include a substantial safety margin designed to assure the safety of all persons, regardless of age and health.The exposure standard for wireless handsets employs a unit of measurement known as the Specific Absorption Rate, or SAR. The SAR limit set by the FCC is 1.6 W/kg. The tests are performed in positions and locations (e.g. at the ear and worn on the body) as required by the FCC for each model.The highest SAR value for this model handset as reported to the FCC whentested for use at the ear is 0.769 W/kg, and when worn on the body in a holder or carry case, is 0.454 W/kg.Body-worn Operation; This device was tested for typical body-worn operations with the back of the handset kept 1.5 cm from the body. To maintain compliance with FCC RF exposure requirements, use accessories that maintain a 1.5 cm separation distance between the user's body and the back of the handset. The use of beltclips, holsters and similar accessories should not contain metallic components in its assembly.The use of accessories that do not satisfy these requirements may not comply with FCC RF exposure requirements, and should be avoided. The FCC has granted an Equipment Authorization for this model handset with all reported SAR levels evaluated as in compliance with the FCC RF emission guidelines. SAR information on this model handset is on file with the FCC and can be found under the Display Grant section of http://www.fcc.gov/oet/ea/ after searching on FCC ID UCE209019A.Additional information on Specific Absorption Rates (SAR) can be found on the Cellular Telecommunications & Internet Association (CTIA) website athttp://www.phonefacts.net.European RF Exposure InformationYour mobile device is a radio transmitter and receiver. It is designed not to exceed the limits for exposure to radio waves recommended by international guidelines. These guidelines were developed by the independent scientific organization ICNIRP and include safety margins designed to assure the protection of all persons, regardless of age and health.The guidelines use a unit of measurement known as the Specific Absorption Rate, or SAR. The SAR limit for mobile devices is 2 W/kg and the highest SAR value for this device when tested at the ear was 0.800 W/kg*. As mobile devices offer a range of functions, they can be used in other positions, such as on the body as described in this user guide**. In this case, the highest tested SAR value is 0.545 W/kg. As SAR is measured utilizing the devices highest transmitting power the actual SAR of this device while operating is typically below that indicated above. This is due to automatic changes to the power level of the device to ensure it only uses the minimum level required to reach the network.The World Health Organization has stated that present scientific information does not indicate the need for any special precautions for the use of mobile devices. They note that if you want to reduce your exposure then you can do so by limiting the length of calls or using a hands-free device to keep the mobile phone away from the head and body.*The tests are carried out in accordance with international guidelines for testing.** Please see Electromagnetic Waves on page xix for important notes regarding body worn operation.
xxDeclaration of ConformityWe, Panasonic Mobile Communications Development of Europe Ltd., declare that SoftBank 840P conforms with the essential and other relevant requirements of the directive 1999/5/EC.A declaration of conformity to this effect can be found athttp://panasonic.net/pmc/support/index.html ⿟This product is only intended for sale in Japan. ⿟Compliance to the European RTTE directive applies to: SoftBank 840P handset, Battery (PMBAT1) and AC Charger (SoftBank ZTDAA1).Handset Care ⿟840P is not waterproof. Avoid exposure to liquids and high humidity. • Do not expose handset to precipitation. • Air conditioned air may cause condensation, resulting in corrosion. • Do not put handset in damp places like bathrooms. • On the beach, keep handset away from sun and surf. • Perspiration in handset may cause malfunction. ⿟If handset is left with no battery or an exhausted one, data may be altered/lost. SoftBank is not liable for any resulting damages. ⿟Use handset within temperatures of 5°C to 35°C and humidity 35% to 85%. Avoid extreme temperatures/direct sunlight. ⿟Handset may become warm during use or charging. This is not malfunction. ⿟Battery may swell as service life nears end; this is not a problem. ⿟Exposing lens to direct sunlight may damage color filter and affect image color. ⿟Soiled terminals may cause poor connection. If the terminals are dirty, use a dry cloth or cotton swab to wipe them clean. ⿟Clean handset with dry, soft cloth. Using alcohol, thinner, etc. may damage it. ⿟Avoid forceful rubbing or scratching handset display. ⿟Do not subject handset to excessive force. • Do not sit down with handset in a back pocket.  • Do not place heavy objects on handset in a bag. ⿟Do not remove nameplate; doing so invalidates warranty. ⿟Always turn off handset before removing battery. If battery is removed while saving or sending mail, data may be altered or lost. ⿟LCD is manufactured with high precision technology, however, some pixels may appear darker/brighter. ⿟Connect only specified products to External Port. ⿟While walking, moderate earphone volume to make sounds around you audible and help avoid accidents. ⿟When holding handset in use, do not cover Speaker.
xxiFunction Usage LimitsThese functions are disabled after handset replacement/upgrade or service cancellation: Camera; Media Player; S! Appli.After a period of disuse, these functions may become unusable.Mobile Camera ⿟Be sure to observe proper etiquette when using the camera. ⿟Do not expose the camera lens to direct sunlight. Concentrated sunlight through the lens may cause the handset to malfunction. ⿟Be sure to try taking and previewing pictures before using the camera on important occasions like wedding ceremonies. ⿟Do not commercially use or transfer pictures taken with the camera without the permission of the copyright holder (photographer), except for personal use. ⿟Do not use the camera in locations where taking photos and recording videos are prohibited.Copyrights and OthersRight of PortraitPortrait right is the right of an individual to refuse to be photographed by others and protects from the unauthorized publication or use of an individual's photograph by others. Right of personality is a portrait right applicable to all citizens and right of publicity is a portrait right (property right) designed to protect celebrities' interests. Be careful when taking pictures with the handset camera. Photographing, publicizing and distributing photographs of citizens and celebrities without permission are illegal.CopyrightsSounds, images, computer programs, databases, other copyrighted materials, their respective works and copyright holders are protected by copyright laws. Duplicated materials are limited to private use only. If duplications (including conversion of data types), modifications, transfer of duplicates or distribution on networks are made without permission of copyright holders, this constitutes "Literary Piracy" and "Infringement of Copyright Holder Rights" and a criminal action for reparations and criminal punishment may be filed. If duplicates are made using handset, please observe the copyright laws. Materials captured with handset camera are also subject to the above.
xxiiThis product contains NetFront Mobile Client Suite of ACCESS CO., LTD.ACCESS and NetFront are trademarks or registered trademarks of ACCESS CO., LTD. in the United States, Japan and other countries.©2008 ACCESS CO., LTD. All rights reserved.This software is based in part on the work of the Independent JPEG Group.This product contains Adobe® Flash® Lite™ Player under license from Adobe Systems Incorporated.Copyright© 1996-2008 Adobe Macromedia Software LLC. All rights reserved.Adobe, Flash and Flash Lite are either registered trademarks or trademarks of Adobe Systems Incorporated in the United States and/or other countries."SOFTBANK," SOFTBANK's equivalent in Japanese, and the SOFTBANK logo are trademarks or registered trademarks of SOFTBANK CORP. in Japan and in other countries.S! Appli, Input Memory, S! Mail, Graphic Mail, Feeling Mail and 3G HighSpeed are trademarks or registered trademarks of SOFTBANK MOBILE Corp.Yahoo! and the "Yahoo!" or "Y!" logos are trademarks and/or registered trademarks of Yahoo! Inc. in the US.This product is manufactured or sold under license from InterDigital Technology Corporation.Other company and product names mentioned herein are trademarks or registered trademarks of their respective owners.This product is licensed under the MPEG-4 patent portfolio license and AVC patent portfolio license for the personal and non-commercial use of a consumer to(i) encode video in compliance with the MPEG-4 Visual Standard and AVC Standard (“MPEG-4/AVC Video”) and/or(ii) decode MPEG-4/AVC Video that was encoded by a consumer engaged in a personal and non-commercial activity and/or was obtained from a licensed video provider licensed to provide MPEG-4/AVC video.No license is granted or implied for any other use.Additional information may be obtained from MPEG LA, L.L.C. See http://www.mpegla.com.Java and all Java based trademarks and logos are trademarks or registered trademarks of Sun Microsystems, Inc. in the U.S. and other countries.Aplix, microJBlend and JBlend, and all Aplix-or JBlend-related trademarks and logos are trademarks or registered trademarks of Aplix Corporation in the U.S., Japan and other countries.BookSurfing® is a registered trademark of CELSYS Inc., VoyagerJapan, Inc. and INFOCITY Inc.QR Code is registered trademarks of DENSO WAVE INCORPORATED.microSD Logo is a trademark.Chaku-Uta® and Chaku-Uta Full® are registered trademarks ofSony Music Entertainment (Japan) Inc.Powered by MascotCapsule®MascotCapsule® is a registered trademark of HI CORPORATION© 2009 HI CORPORATION. All Rights Reserved.
xxiiiSpecific Absorption Rate (SAR)840P meets the government's requirements for exposure to radio waves.These requirements are based on scientific basis to assure that radio waves emitted from mobile phones and other handheld wireless devices do not affect human health. They require that the Specific Absorption Rate (SAR), which is the unit of measurement for the amount of radiofrequency absorbed by the head shall not exceed 2 W/kg*. This limit includes a substantial safety margin designed to assure the safety of all persons, regardless of age or health, and meets the international standard set by International Commission on Non-Ionizing Radiation Protection (ICNIRP) in cooperation with World Health Organization (WHO).All mobile phones, prior to product launch, must be certified as compliant with government requirements as stipulated by the Radio Law.840P has been granted Technical Regulations Conformity Certification by TELECOM ENGINEERING CENTER. Its highest SAR value is 0.975 W/kg. This value was obtained by TELECOM ENGINEERING CENTER as part of the certification process. SAR tests were conducted with handset transmitting at its highest certified power level in accordance with testing methods set by the government. While there may be differences between the SAR levels for various handsets, they all meet the governmental requirements for safe exposure. The actual SAR level of the handset while operating can be well below the highest value. This is because the handset is designed to operate at multiple power levels so as to use only the power required to reach the Network.Additional information on SAR can be obtained on the following Websites:Ministry of Internal Affairs and Communicationshttp://www.tele.soumu.go.jp/e/sys/ele/index.htmAssociation of Radio Industries and Businesses (ARIB)http://www.arib-emf.org/index02.html (Japanese only)The software contained in 840P is copyrighted material;copyright, moral right and other related rights are protected by copyright laws. Do not copy, modify, alter, disassemble, decompile or reverse-engineer the software, and do not separate it from hardware in whole or part.
xxiv*  Requirements are stipulated in Radio Law (Ordinance Regulating Radio Equipment, Article 14-2).
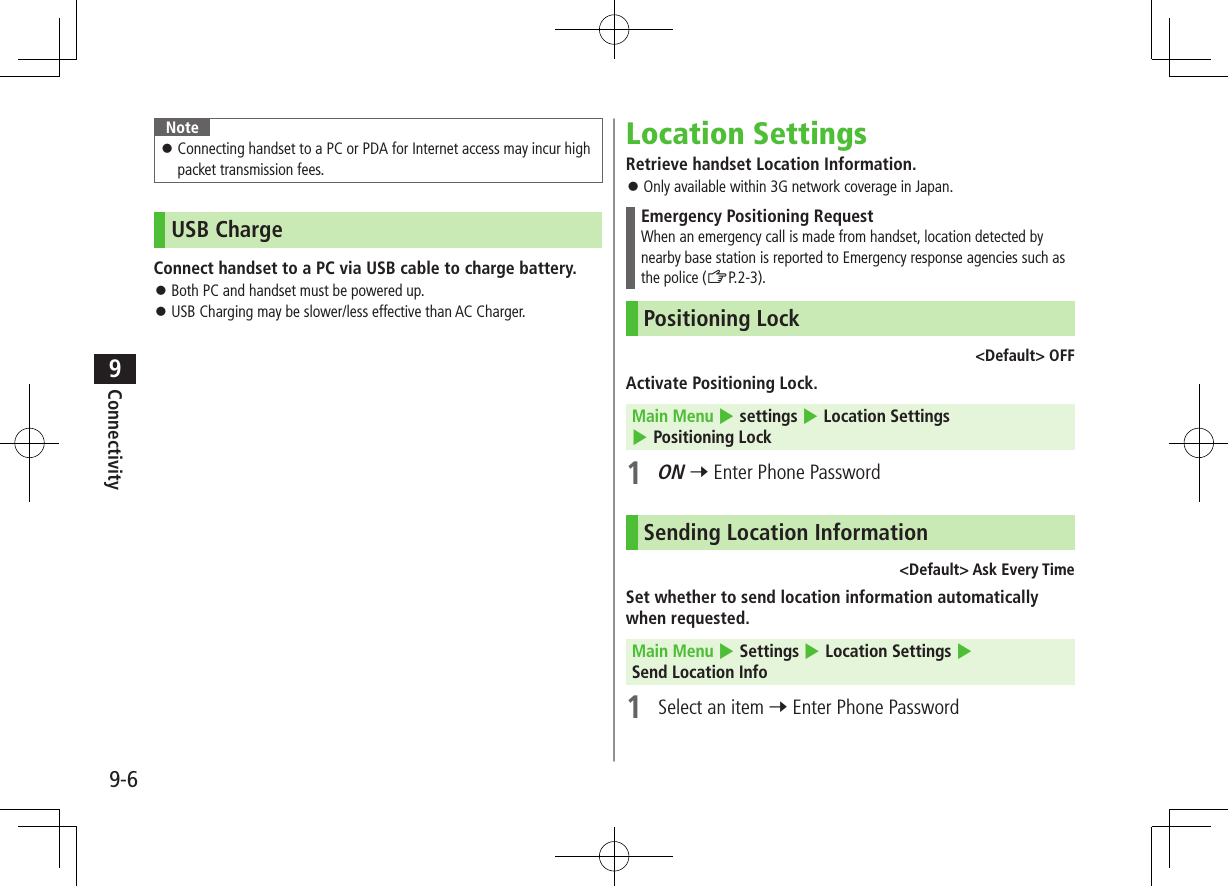
11-1Getting StartedUSIM Card ............................................................. 1-2About USIM Card .......................................................................1-2USIM Card Installation ................................................................1-3USIM PINs ..................................................................................1-3Parts & Functions .................................................. 1-4Handset .....................................................................................1-4Key Operations in Standby ..........................................................1-6Display .......................................................................................1-8About Battery ..................................................... 1-10Before Charging .......................................................................1-10Battery Installation ...................................................................1-12Charging Battery ......................................................................1-13Handset Power On/Off ........................................ 1-14Manner Mode ..................................................... 1-15Minding Mobile Manners ..........................................................1-15Manner-related Features ...........................................................1-15Activating Manner Mode ..........................................................1-15Activating Emission OFF Mode ..................................................1-16Activating Drive Mode ..............................................................1-16Standby Options ................................................. 1-16Information Window .................................................................1-16Standby Window ......................................................................1-17Handset Menus ................................................... 1-18Main Menu ..............................................................................1-18Menu Numbers ........................................................................1-19S! Familiar Usability ........................................... 1-20One Touch Site Button ........................................ 1-21Using One Touch Site Button.....................................................1-21Adding Websites.......................................................................1-22Private Menu ...................................................... 1-22Opening Private Menu ..............................................................1-22Customizing Private Menu  .......................................................1-23Simple Mode ...................................................... 1-23Activating Simple Mode ............................................................1-24Simple Mode ............................................................................1-24Passwords ........................................................... 1-25Phone Password .......................................................................1-25Center Access Code ..................................................................1-25Call Barring Password ...............................................................1-25View Blind .......................................................... 1-26My Number ......................................................... 1-26
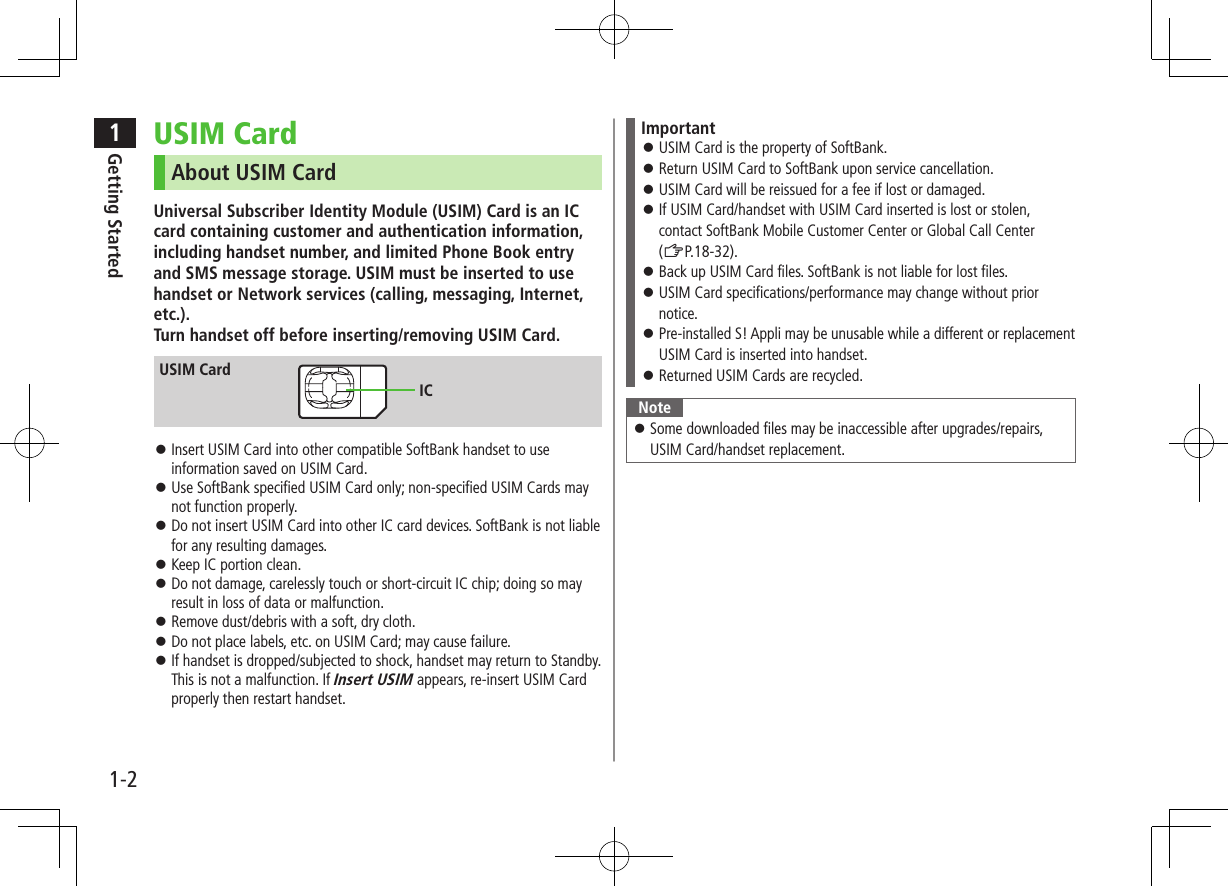
1Getting Started1-2USIM CardAbout USIM CardUniversal Subscriber Identity Module (USIM) Card is an IC card containing customer and authentication information, including handset number, and limited Phone Book entry and SMS message storage. USIM must be inserted to use handset or Network services (calling, messaging, Internet, etc.). Turn handset off before inserting/removing USIM Card. ⿟Insert USIM Card into other compatible SoftBank handset to use information saved on USIM Card. ⿟Use SoftBank specified USIM Card only; non-specified USIM Cards may not function properly. ⿟Do not insert USIM Card into other IC card devices. SoftBank is not liable for any resulting damages. ⿟Keep IC portion clean. ⿟Do not damage, carelessly touch or short-circuit IC chip; doing so may result in loss of data or malfunction. ⿟Remove dust/debris with a soft, dry cloth. ⿟Do not place labels, etc. on USIM Card; may cause failure. ⿟If handset is dropped/subjected to shock, handset may return to Standby. This is not a malfunction. If Insert USIM appears, re-insert USIM Card properly then restart handset.USIM CardICImportant ⿟USIM Card is the property of SoftBank. ⿟Return USIM Card to SoftBank upon service cancellation. ⿟USIM Card will be reissued for a fee if lost or damaged. ⿟If USIM Card/handset with USIM Card inserted is lost or stolen, contact SoftBank Mobile Customer Center or Global Call Center (ZP.18-32). ⿟Back up USIM Card files. SoftBank is not liable for lost files. ⿟USIM Card specifications/performance may change without prior notice. ⿟Pre-installed S! Appli may be unusable while a different or replacement USIM Card is inserted into handset. ⿟Returned USIM Cards are recycled.Note ⿟Some downloaded files may be inaccessible after upgrades/repairs, USIM Card/handset replacement.
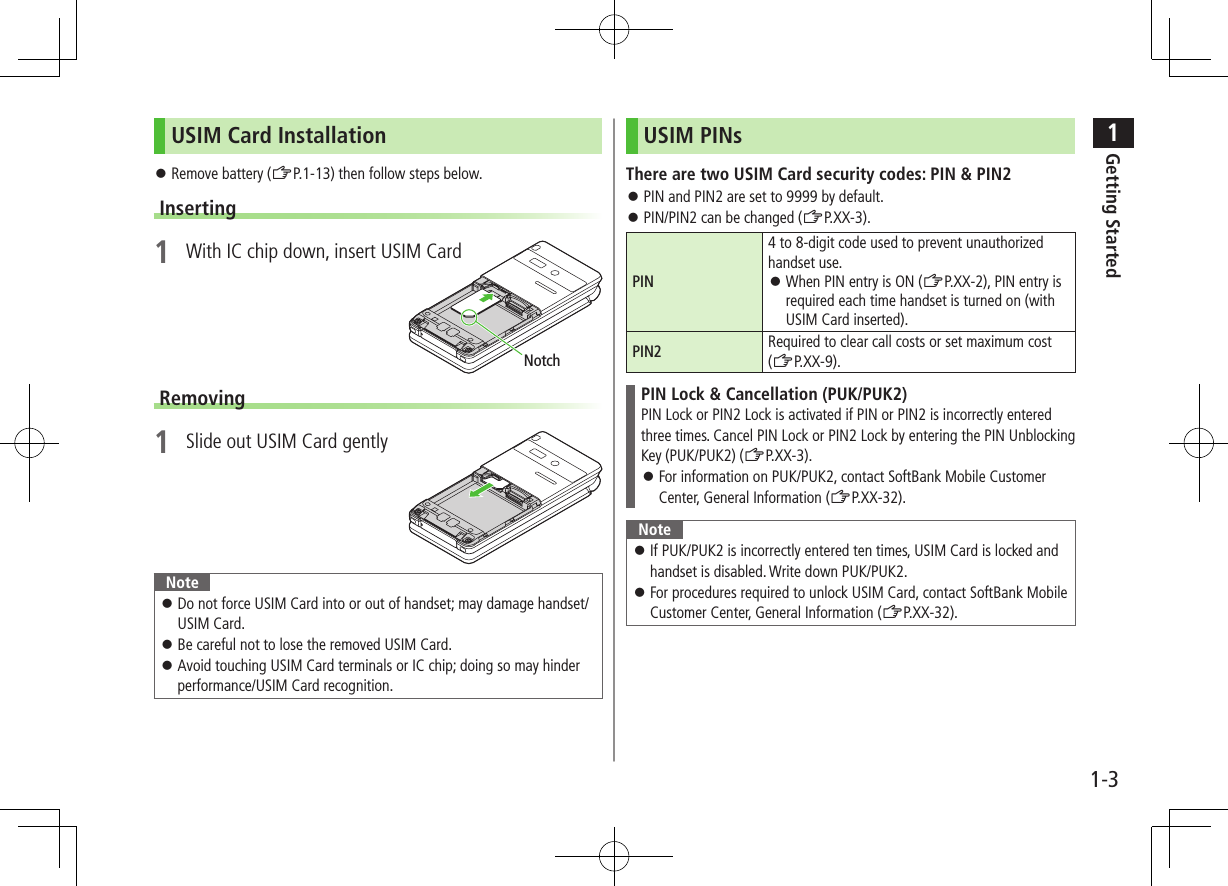
1Getting Started1-3USIM Card Installation ⿟Remove battery (ZP.1-13) then follow steps below.Inserting1  With IC chip down, insert USIM CardRemoving1  Slide out USIM Card gentlyNote ⿟Do not force USIM Card into or out of handset; may damage handset/USIM Card. ⿟Be careful not to lose the removed USIM Card. ⿟Avoid touching USIM Card terminals or IC chip; doing so may hinder performance/USIM Card recognition.NotchUSIM PINsThere are two USIM Card security codes: PIN & PIN2 ⿟PIN and PIN2 are set to 9999 by default. ⿟PIN/PIN2 can be changed (ZP.XX-3).PIN4 to 8-digit code used to prevent unauthorized handset use. ⿟When PIN entry is ON (ZP.XX-2), PIN entry is required each time handset is turned on (with USIM Card inserted).PIN2 Required to clear call costs or set maximum cost (ZP.XX-9).PIN Lock & Cancellation (PUK/PUK2)PIN Lock or PIN2 Lock is activated if PIN or PIN2 is incorrectly enteredthree times. Cancel PIN Lock or PIN2 Lock by entering the PIN Unblocking Key (PUK/PUK2) (ZP.XX-3). ⿟For information on PUK/PUK2, contact SoftBank Mobile Customer Center, General Information (ZP.XX-32).Note ⿟If PUK/PUK2 is incorrectly entered ten times, USIM Card is locked and handset is disabled. Write down PUK/PUK2. ⿟For procedures required to unlock USIM Card, contact SoftBank Mobile Customer Center, General Information (ZP.XX-32).
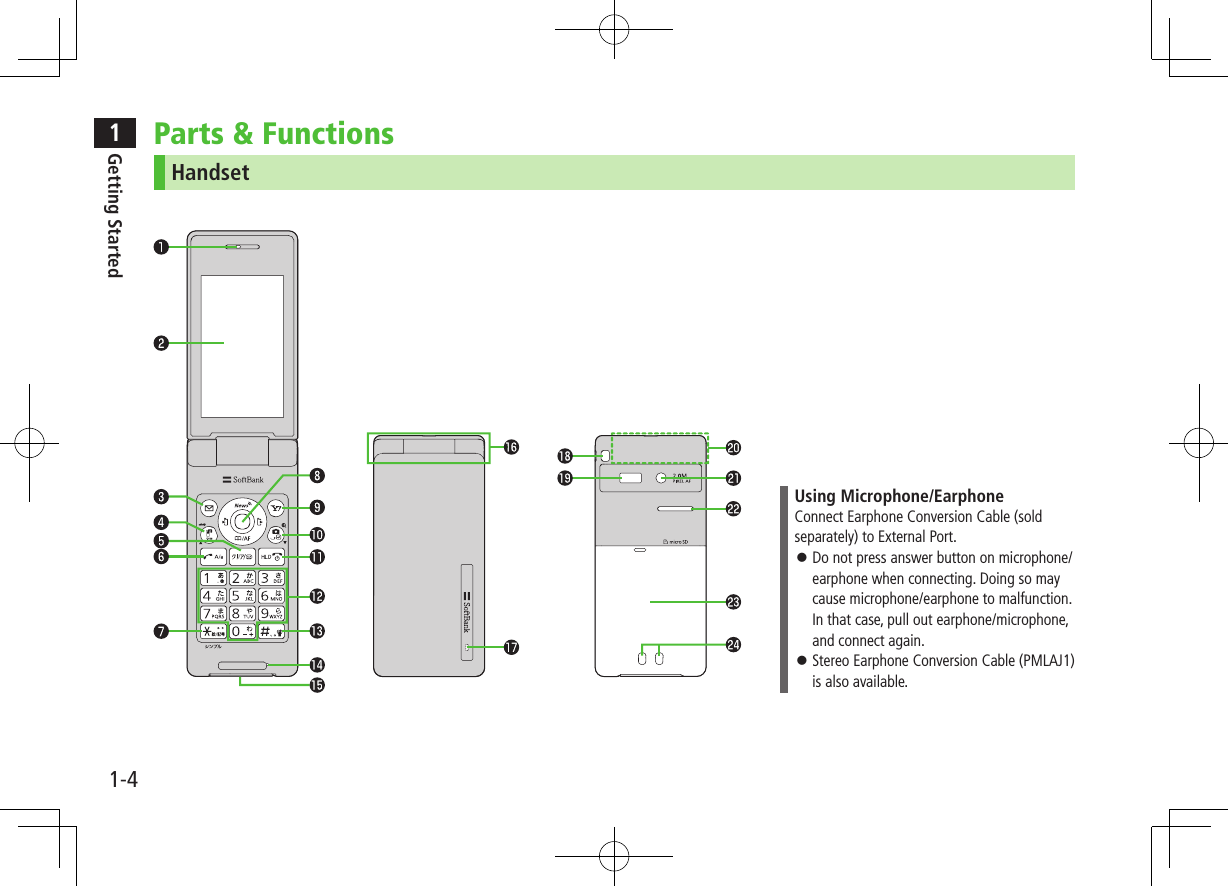
1Getting Started1-4Parts & FunctionsHandsetUsing Microphone/EarphoneConnect Earphone Conversion Cable (sold separately) to External Port. ⿟Do not press answer button on microphone/earphone when connecting. Doing so may cause microphone/earphone to malfunction. In that case, pull out earphone/microphone, and connect again. ⿟Stereo Earphone Conversion Cable (PMLAJ1) is also available.
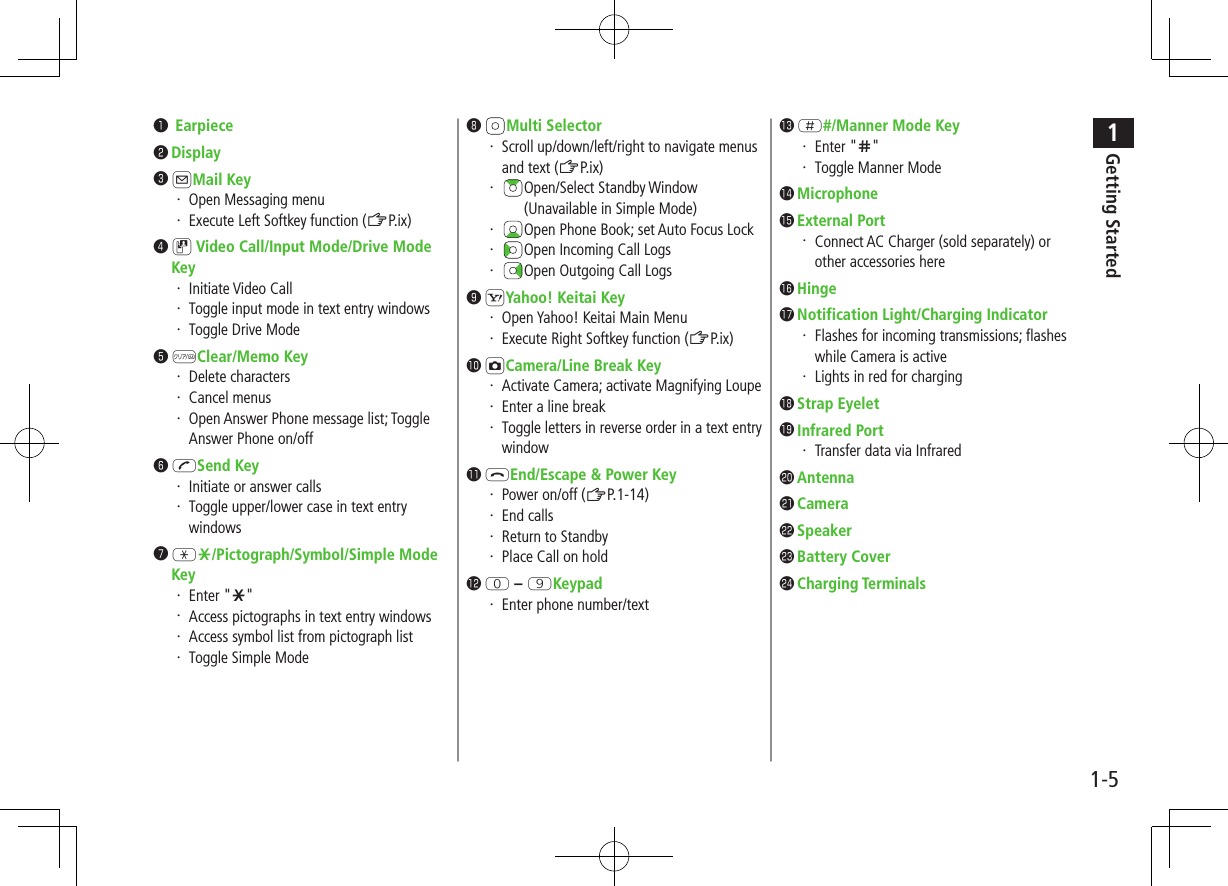
1Getting Started1-5❶  Earpiece❷ Display❸ AMail Key・ Open Messaging menu・ Execute Left Softkey function (ZP.ix)❹ D Video Call/Input Mode/Drive Mode Key・ Initiate Video Call・ Toggle input mode in text entry windows・ Toggle Drive Mode❺ KClear/Memo Key・ Delete characters・ Cancel menus・ Open Answer Phone message list; Toggle Answer Phone on/off❻ JSend Key・ Initiate or answer calls・ Toggle upper/lower case in text entry windows❼ Ge/Pictograph/Symbol/Simple Mode Key・ Enter "e"・ Access pictographs in text entry windows・ Access symbol list from pictograph list・ Toggle Simple Mode❽  Multi Selector・ Scroll up/down/left/right to navigate menus and text (ZP.ix)・  Open/Select Standby Window (Unavailable in Simple Mode)・  Open Phone Book; set Auto Focus Lock・  Open Incoming Call Logs・  Open Outgoing Call Logs❾ SYahoo! Keitai Key・ Open Yahoo! Keitai Main Menu・ Execute Right Softkey function (ZP.ix)󱀓 FCamera/Line Break Key・ Activate Camera; activate Magnifying Loupe・ Enter a line break・ Toggle letters in reverse order in a text entry window󱀔 LEnd/Escape & Power Key・ Power on/off (ZP.1-14)・ End calls・ Return to Standby・ Place Call on hold󱀕 P – OKeypad・ Enter phone number/text󱀖 H#/Manner Mode Key・ Enter "r"・ Toggle Manner Mode󱀗 Microphone󱀘 External Port・ Connect AC Charger (sold separately) or other accessories here󱀙 Hinge󱀚 Notification Light/Charging Indicator・ Flashes for incoming transmissions; flashes while Camera is active・ Lights in red for charging󱀛 Strap Eyelet󱀜 Infrared Port・ Transfer data via Infrared󱀝 Antenna󱀞 Camera󱀟 Speaker󱀠 Battery Cover󱀡 Charging Terminals
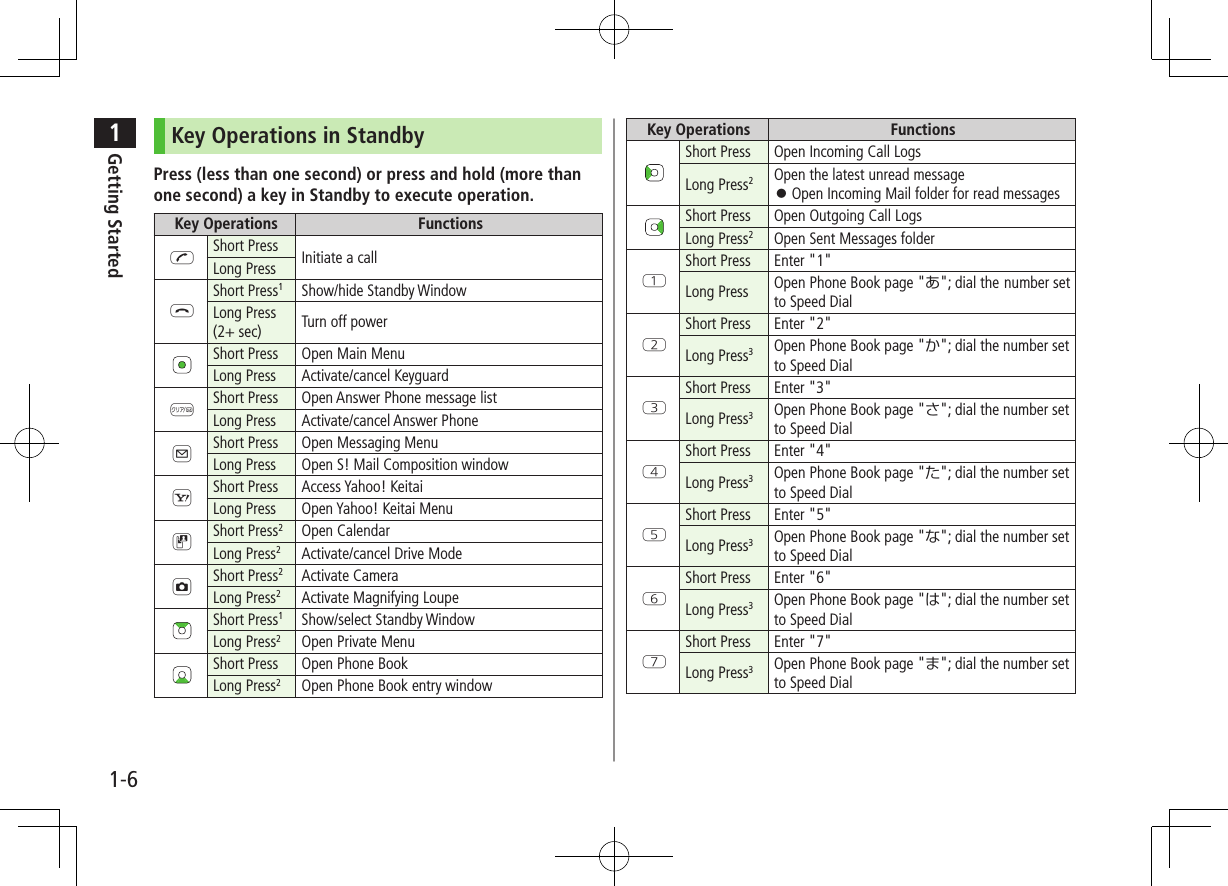
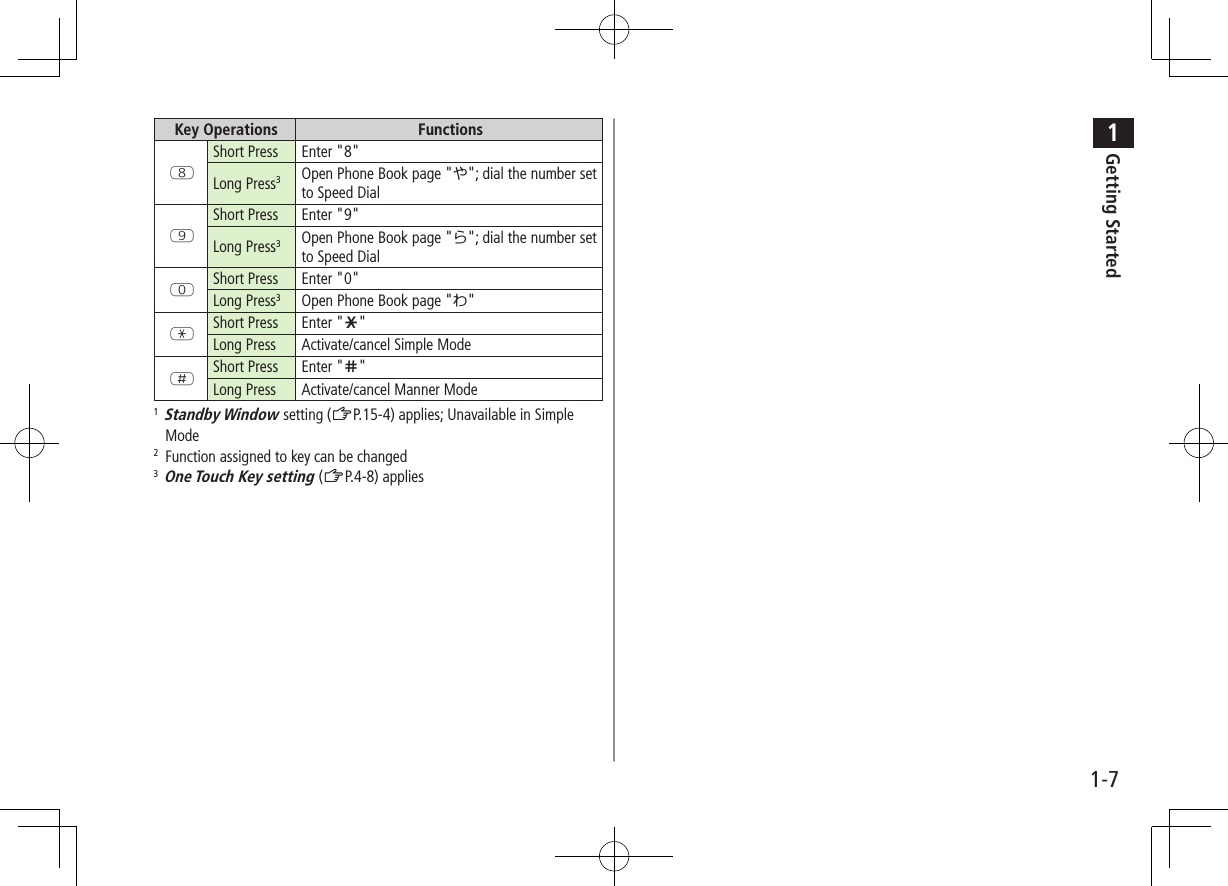
1Getting Started1-6Key Operations in StandbyPress (less than one second) or press and hold (more than one second) a key in Standby to execute operation.Key Operations FunctionsJShort Press Initiate a callLong PressLShort Press1Show/hide Standby WindowLong Press  (2+ sec) Turn off powerShort Press Open Main MenuLong Press Activate/cancel KeyguardKShort Press Open Answer Phone message listLong Press Activate/cancel Answer PhoneAShort Press Open Messaging MenuLong Press Open S! Mail Composition windowSShort Press Access Yahoo! KeitaiLong Press Open Yahoo! Keitai MenuDShort Press2Open CalendarLong Press2Activate/cancel Drive ModeFShort Press2Activate CameraLong Press2Activate Magnifying LoupeShort Press1Show/select Standby WindowLong Press2Open Private MenuShort Press Open Phone BookLong Press2Open Phone Book entry windowKey Operations FunctionsShort Press Open Incoming Call LogsLong Press2Open the latest unread message ⿟Open Incoming Mail folder for read messagesShort Press Open Outgoing Call LogsLong Press2Open Sent Messages folderQShort Press Enter "1"Long Press Open Phone Book page "あ"; dial thenumber set to Speed DialWShort Press Enter "2"Long Press3Open Phone Book page "か"; dial the number set to Speed DialEShort Press Enter "3"Long Press3Open Phone Book page "さ"; dial the number set to Speed DialRShort Press Enter "4"Long Press3Open Phone Book page "た"; dial the number set to Speed DialTShort Press Enter "5"Long Press3Open Phone Book page "な"; dial the number set to Speed DialYShort Press Enter "6"Long Press3Open Phone Book page "は"; dial the number set to Speed DialUShort Press Enter "7"Long Press3Open Phone Book page "ま"; dial the number set to Speed Dial
1Getting Started1-7Key Operations FunctionsIShort Press Enter "8"Long Press3Open Phone Book page "や"; dial the number set to Speed DialOShort Press Enter "9"Long Press3Open Phone Book page "ら"; dial the number set to Speed DialPShort Press Enter "0"Long Press3Open Phone Book page "わ"GShort Press Enter "e"Long Press Activate/cancel Simple ModeHShort Press Enter "r"Long Press Activate/cancel Manner Mode1   Standby Window setting (ZP.15-4) applies; Unavailable in Simple Mode2  Function assigned to key can be changed3 One Touch Key setting (ZP.4-8) applies
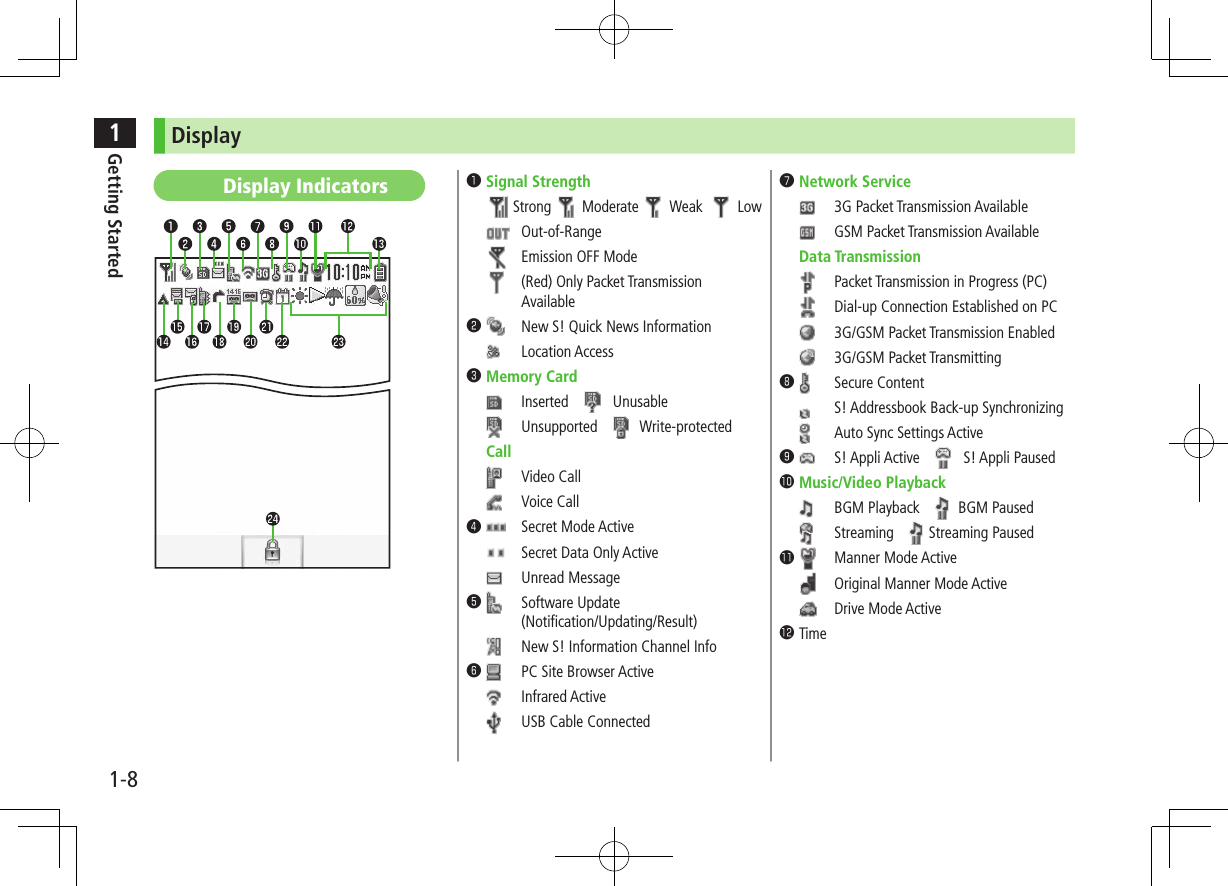
1Getting Started1-8DisplayDisplay Indicators ❶Signal StrengthStrong Moderate Weak   Low  Out-of-Range  Emission OFF Mode  (Red) Only Packet Transmission Available❷  New S! Quick News Information  Location Access❸Memory Card  Inserted       Unusable  Unsupported      Write-protectedCall  Video Call  Voice Call❹  Secret Mode Active  Secret Data Only Active  Unread Message❺  Software Update(Notification/Updating/Result)  New S! Information Channel Info❻  PC Site Browser Active  Infrared Active  USB Cable Connected❼Network Service  3G Packet Transmission Available  GSM Packet Transmission AvailableData Transmission  Packet Transmission in Progress (PC)  Dial-up Connection Established on PC  3G/GSM Packet Transmission Enabled  3G/GSM Packet Transmitting❽  Secure Content  S! Addressbook Back-up Synchronizing  Auto Sync Settings Active❾  S! Appli Active       S! Appli Paused󱀓Music/Video Playback  BGM Playback      BGM Paused  Streaming      Streaming Paused󱀔  Manner Mode Active  Original Manner Mode Active  Drive Mode Active󱀕Time
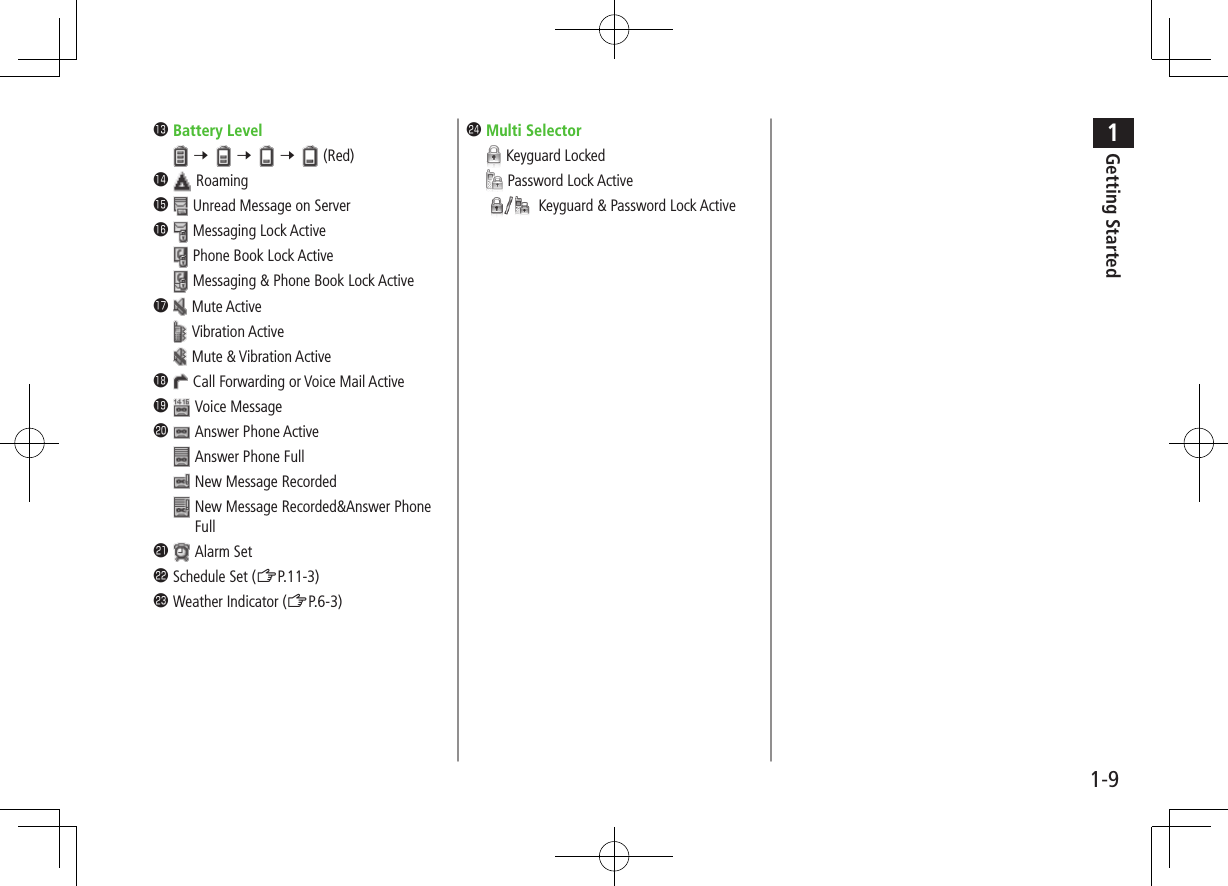
1Getting Started1-9󱀖Battery Level7   7   7   (Red)󱀗Roaming󱀘Unread Message on Server󱀙Messaging Lock ActivePhone Book Lock ActiveMessaging & Phone Book Lock Active󱀚Mute ActiveVibration ActiveMute & Vibration Active󱀛Call Forwarding or Voice Mail Active󱀜Voice Message󱀝Answer Phone ActiveAnswer Phone FullNew Message Recorded New Message Recorded&Answer Phone Full󱀞Alarm Set󱀟Schedule Set (ZP.11-3)󱀠Weather Indicator (ZP.6-3)󱀡Multi SelectorKeyguard LockedPassword Lock ActiveKeyguard & Password Lock Active
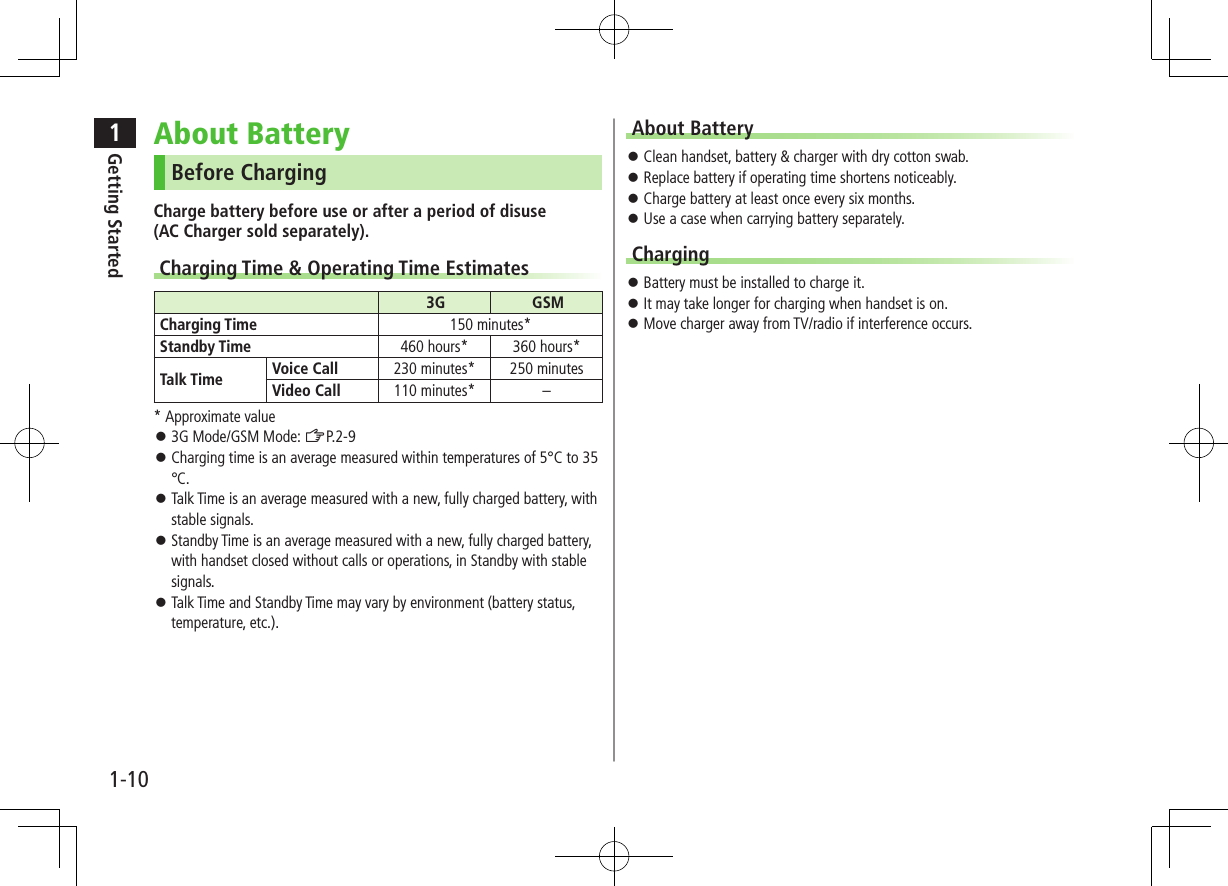
1Getting Started1-10About BatteryBefore ChargingCharge battery before use or after a period of disuse  (AC Charger sold separately).Charging Time & Operating Time Estimates3G GSMCharging Time 150 minutes*Standby Time 460 hours* 360 hours*Talk Time Voice Call  230 minutes* 250 minutesVideo Call 110 minutes* –* Approximate value ⿟3G Mode/GSM Mode: ZP.2-9 ⿟Charging time is an average measured within temperatures of 5°C to 35°C. ⿟Talk Time is an average measured with a new, fully charged battery, with stable signals. ⿟Standby Time is an average measured with a new, fully charged battery, with handset closed without calls or operations, in Standby with stable signals. ⿟Talk Time and Standby Time may vary by environment (battery status, temperature, etc.).About Battery ⿟Clean handset, battery & charger with dry cotton swab. ⿟Replace battery if operating time shortens noticeably. ⿟Charge battery at least once every six months. ⿟Use a case when carrying battery separately.Charging ⿟Battery must be installed to charge it. ⿟It may take longer for charging when handset is on. ⿟Move charger away from TV/radio if interference occurs.
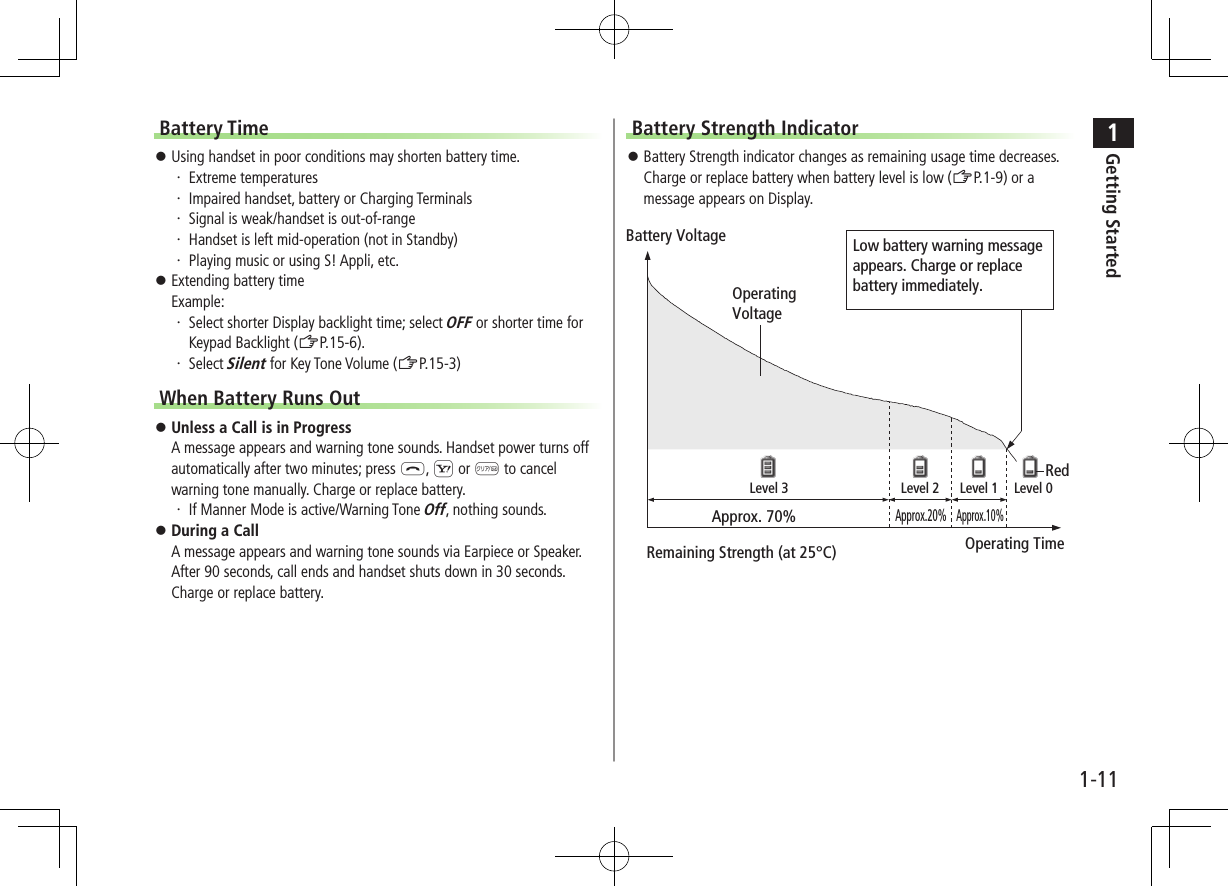
1Getting Started1-11Battery Time ⿟Using handset in poor conditions may shorten battery time.・ Extreme temperatures・ Impaired handset, battery or Charging Terminals・ Signal is weak/handset is out-of-range・ Handset is left mid-operation (not in Standby)・ Playing music or using S! Appli, etc. ⿟Extending battery time Example:・ Select shorter Display backlight time; select OFF or shorter time for Keypad Backlight (ZP.15-6).・ Select Silent for Key Tone Volume (ZP.15-3)When Battery Runs Out ⿟Unless a Call is in Progress A message appears and warning tone sounds. Handset power turns off automatically after two minutes; press L, S or K to cancel warning tone manually. Charge or replace battery.・ If Manner Mode is active/Warning Tone Off, nothing sounds. ⿟During a Call A message appears and warning tone sounds via Earpiece or Speaker. After 90 seconds, call ends and handset shuts down in 30 seconds. Charge or replace battery.Battery Strength Indicator ⿟Battery Strength indicator changes as remaining usage time decreases. Charge or replace battery when battery level is low (ZP.1-9) or a message appears on Display.Low battery warning messageappears. Charge or replacebattery immediately.OperatingVoltageBattery VoltageRemaining Strength (at 25°C)Operating TimeApprox. 70%Approx.20%Approx.10%Level 3 Level 2  Level 1  Level 0Red
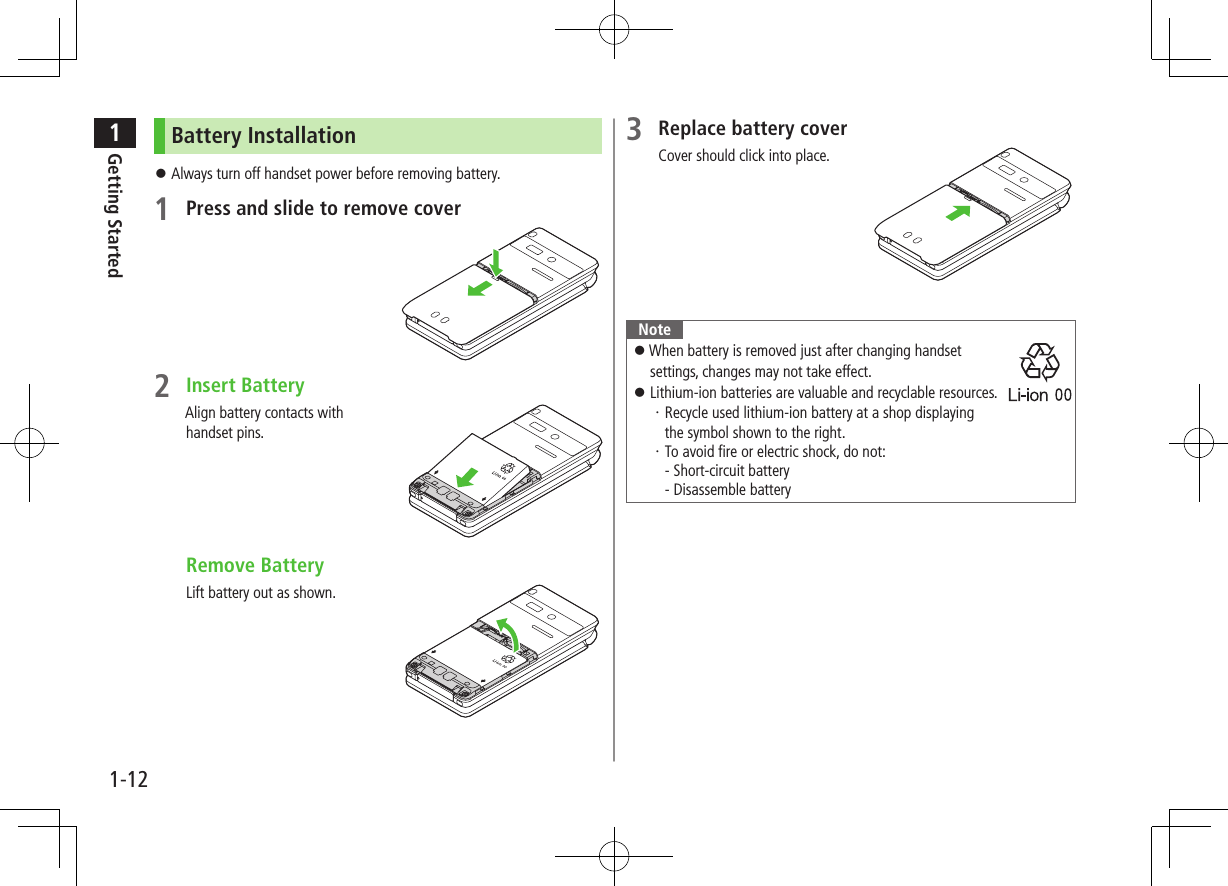
1Getting Started1-12Battery Installation ⿟Always turn off handset power before removing battery.1 Press and slide to remove cover2 Insert BatteryAlign battery contacts with handset pins. Remove BatteryLift battery out as shown.3 Replace battery coverCover should click into place.Note ⿟When battery is removed just after changing handset settings, changes may not take effect. ⿟Lithium-ion batteries are valuable and recyclable resources.・Recycle used lithium-ion battery at a shop displaying  the symbol shown to the right.・To avoid fire or electric shock, do not: - Short-circuit battery - Disassemble battery
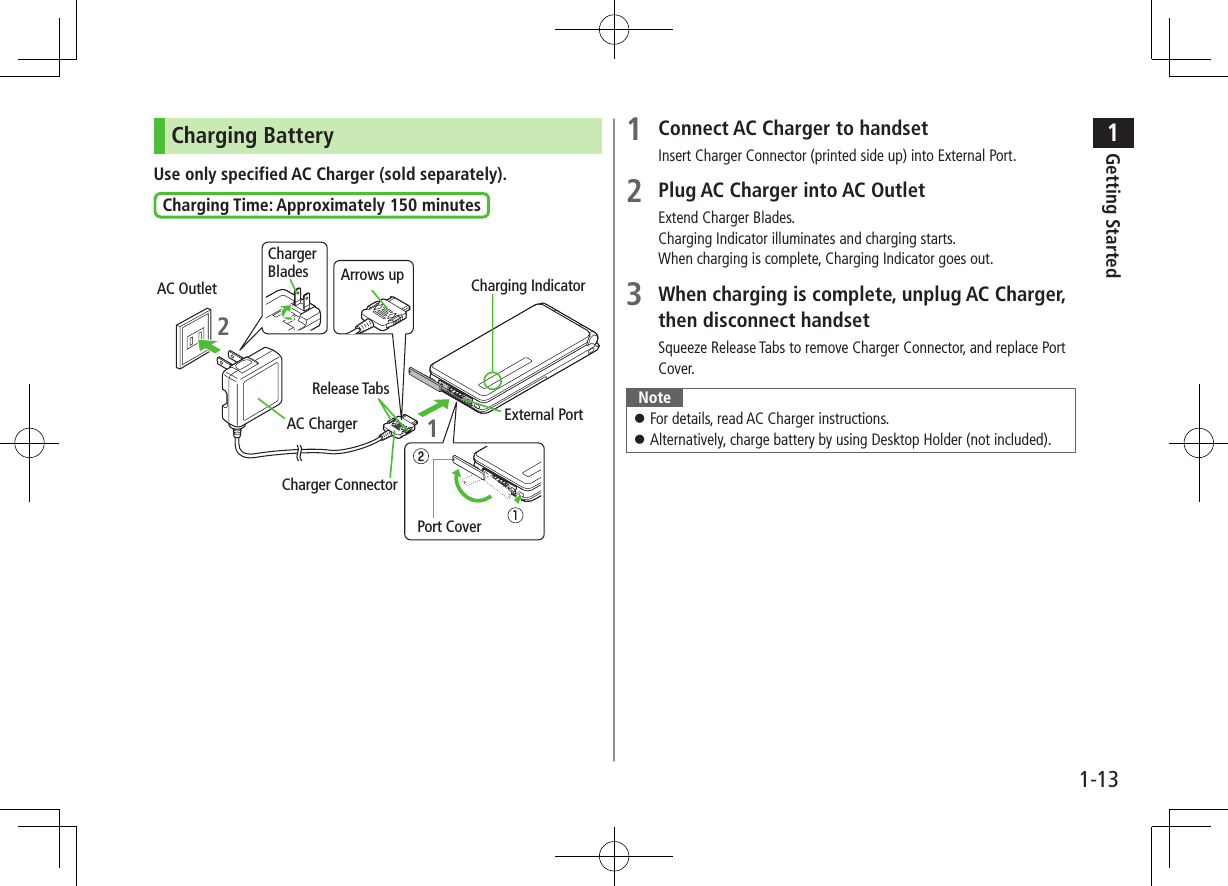
1Getting Started1-13Charging BatteryUse only specified AC Charger (sold separately).Charging Time: Approximately 150 minutes Charging IndicatorExternal PortPort CoverAC OutletChargerBlades2Release TabsAC ChargerCharger ConnectorArrows up11 Connect AC Charger to handsetInsert Charger Connector (printed side up) into External Port.2 Plug AC Charger into AC OutletExtend Charger Blades.Charging Indicator illuminates and charging starts.When charging is complete, Charging Indicator goes out.3 When charging is complete, unplug AC Charger, then disconnect handsetSqueeze Release Tabs to remove Charger Connector, and replace Port Cover.Note ⿟For details, read AC Charger instructions. ⿟Alternatively, charge battery by using Desktop Holder (not included).
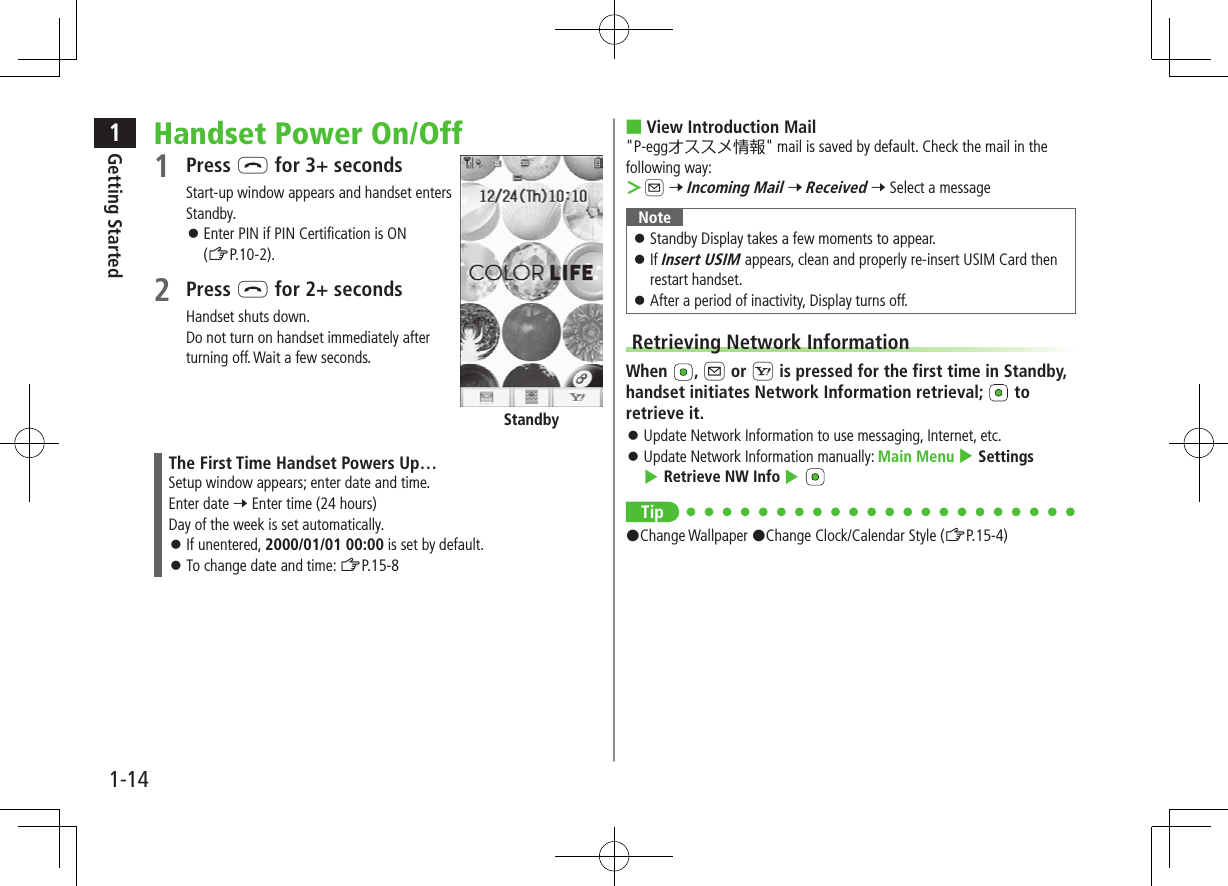
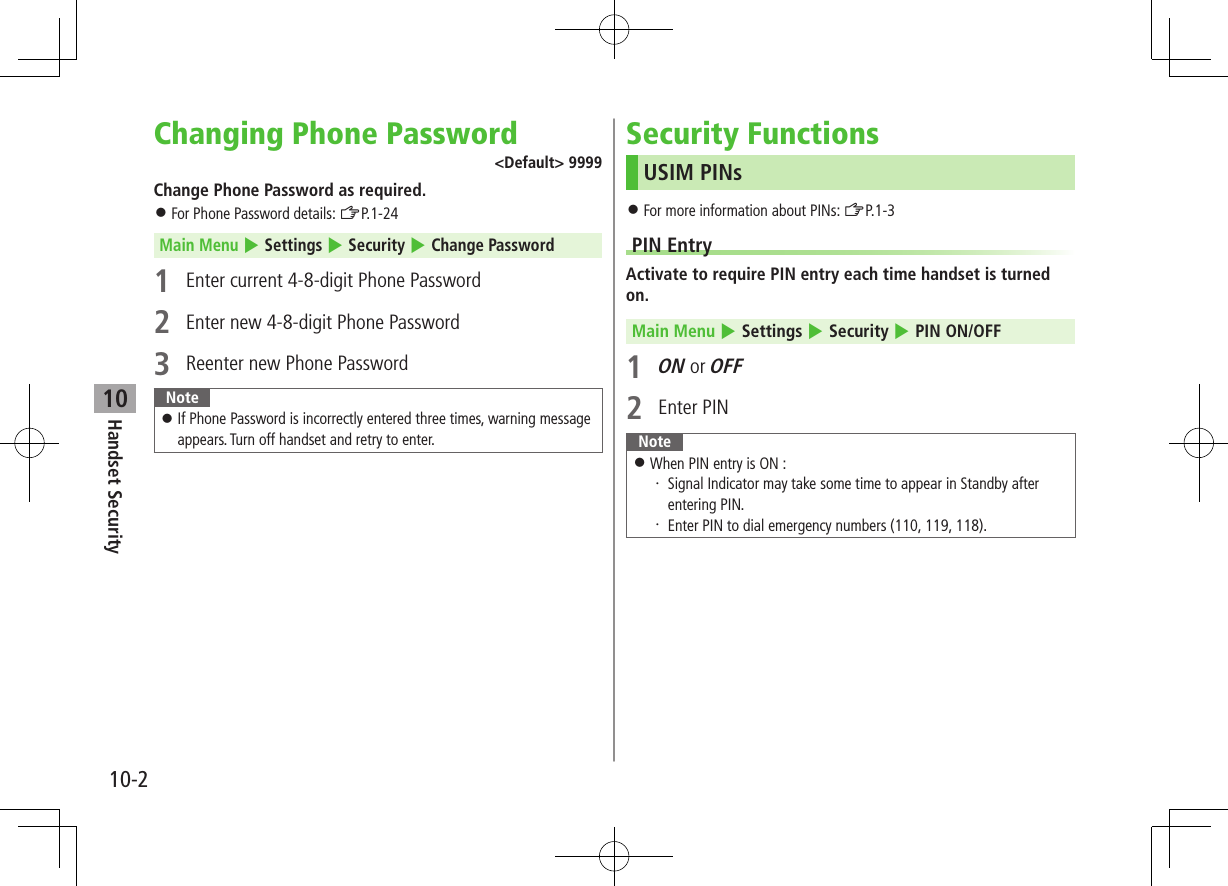
1Getting Started1-14Handset Power On/Off1 Press L for 3+ secondsStart-up window appears and handset enters Standby. ⿟Enter PIN if PIN Certification is ON (ZP.10-2).2 Press L for 2+ secondsHandset shuts down.Do not turn on handset immediately after turning off. Wait a few seconds.The First Time Handset Powers Up…Setup window appears; enter date and time.Enter date 7 Enter time (24 hours)Day of the week is set automatically. ⿟If unentered, 2000/01/01 00:00 is set by default. ⿟To change date and time: ZP.15-8Standby ■View Introduction Mail"P-eggオススメ情報" mail is saved by default. Check the mail in the following way: >A 7 Incoming Mail 7 Received 7 Select a messageNote ⿟Standby Display takes a few moments to appear. ⿟If Insert USIM appears, clean and properly re-insert USIM Card then restart handset. ⿟After a period of inactivity, Display turns off.Retrieving Network InformationWhen  , A or S is pressed for the first time in Standby, handset initiates Network Information retrieval;   to retrieve it. ⿟Update Network Information to use messaging, Internet, etc. ⿟Update Network Information manually: Main Menu 4 Settings 4 Retrieve NW Info 4 Tip#Change Wallpaper #Change Clock/Calendar Style (ZP.15-4)
1Getting Started1-15Manner ModeMinding Mobile MannersPlease use your handset responsibly. Use these basic tips as a guide. Inappropriate handset use can be both dangerous and bothersome. Please take care not to disturb others when using your handset. Adjust handset use according to your surroundings. ⿟Turn it off in theaters, museums and other places where silence is the norm. ⿟Refrain from use in restaurants, lobbies, elevators, etc. ⿟Observe signs and instructions regarding handset use aboard trains, etc. ⿟Refrain from use that interrupts the flow of pedestrian or vehicle traffic.Manner-related FeaturesManner Mode(ZRight)Press Manner key to mute handset tones and activate vibration for incoming transmissions.Vibration Mode(ZP.15-2)Activate in public places, meetings, etc. for silent call/message alerts.Ringer Volume(ZP.15-2) Mute call/message tones.Emission OFF Mode(ZP.1-16) Suspend all handset transmissions.Answer Phone(ZP.2-12)Use to handle incoming calls when inappropriate/unsafe to answer.Drive Mode(ZP.1-16)While driving, send a voice message informing the caller that you cannot answer the call. (Handset does not ring.)Activating Manner ModePress one key to mute handset tones and vibration for incoming transmissions. ⿟Manner Mode settings can be changed (ZP.15-7). ⿟When Manner Mode is active,   appears.1  In Standby, press and hold H ⿟To cancel: Press and hold H againNote ⿟Shutter click, Auto Answer tone, and incoming tone via Earphone (Volume 1) sound even in Manner Mode. ⿟Media Player files are initially muted in Manner Mode; adjust volume in Playback window. ⿟When Alarm Priority is set to Alarm prioritized (ZP.11-6), Alarm sounds even if Manner Mode is active.TipSettings   #Set Manner Mode Type (ZP.15-7)
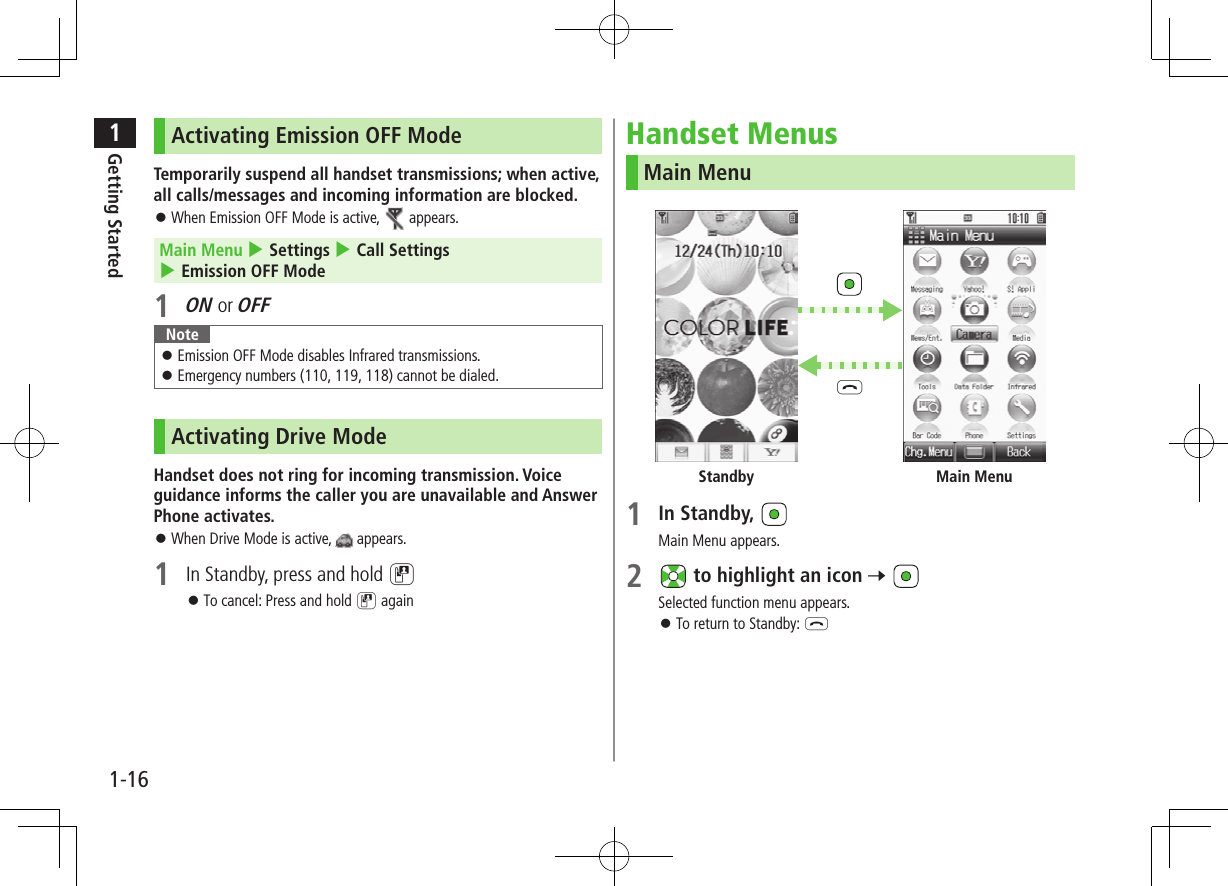
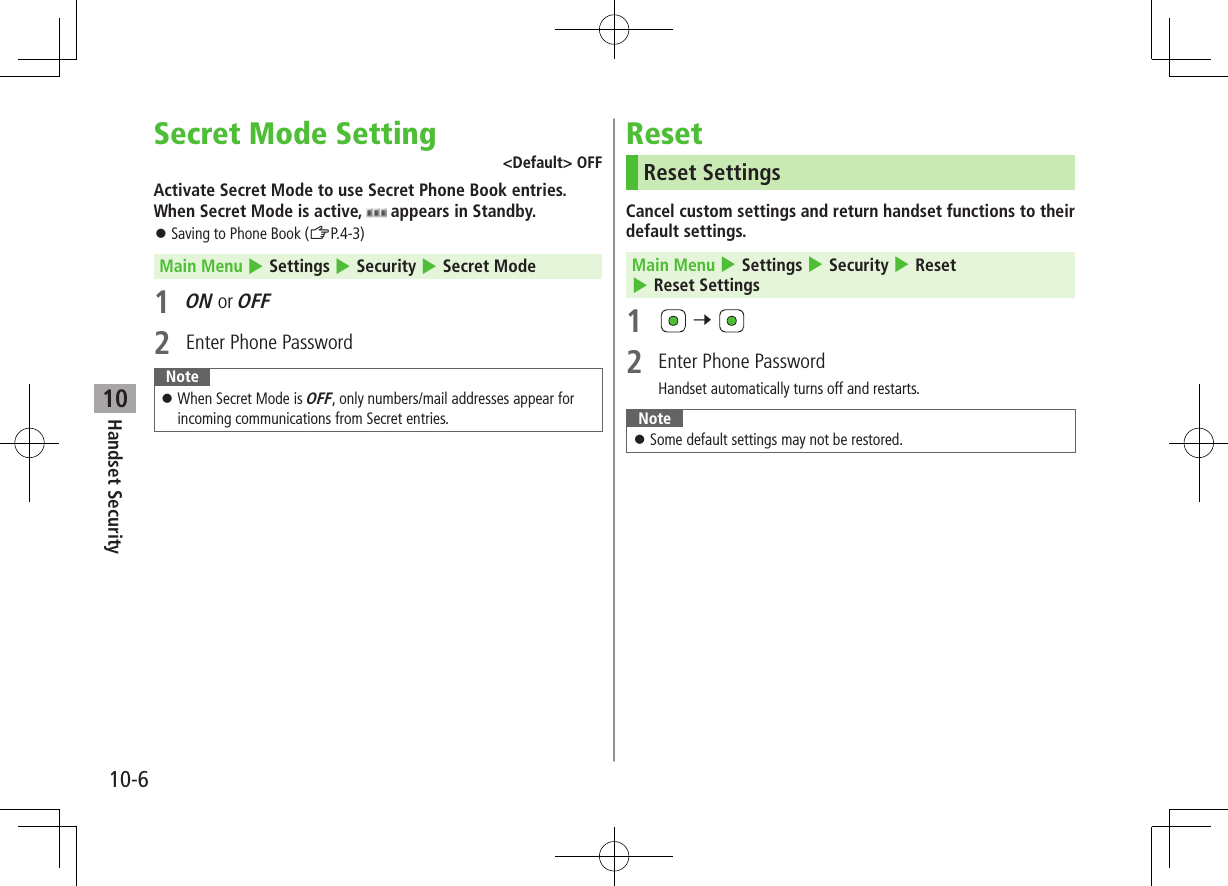
1Getting Started1-16Activating Emission OFF ModeTemporarily suspend all handset transmissions; when active, all calls/messages and incoming information are blocked. ⿟When Emission OFF Mode is active,   appears.Main Menu 4 Settings 4 Call Settings 4 Emission OFF Mode1 ON or OFFNote ⿟Emission OFF Mode disables Infrared transmissions. ⿟Emergency numbers (110, 119, 118) cannot be dialed.Activating Drive ModeHandset does not ring for incoming transmission. Voice guidance informs the caller you are unavailable and Answer Phone activates. ⿟When Drive Mode is active,   appears.1  In Standby, press and hold D ⿟To cancel: Press and hold D againHandset MenusMain Menu1 In Standby, Main Menu appears.2   to highlight an icon 7 Selected function menu appears. ⿟To return to Standby: LMain MenuLStandby
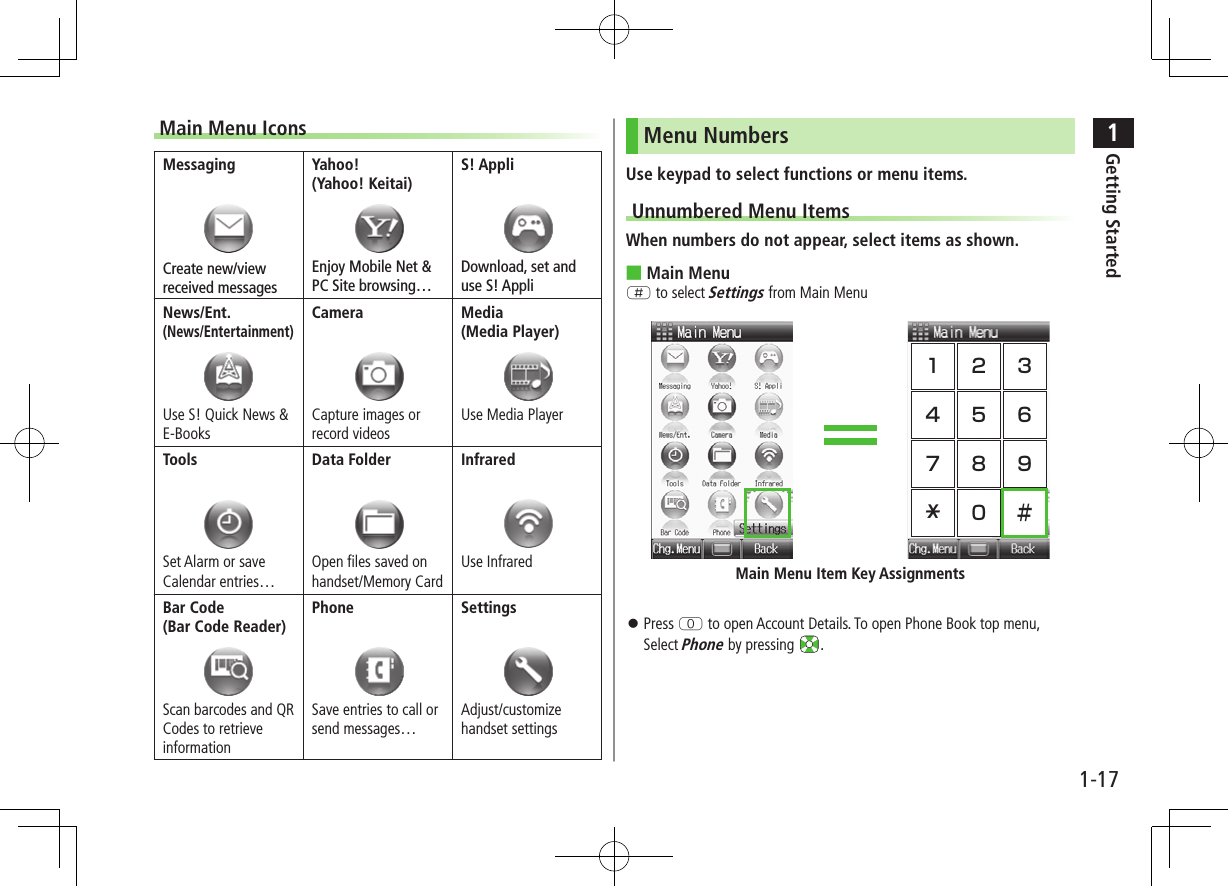
1Getting Started1-17Main Menu IconsMessagingCreate new/view received messagesYahoo! (Yahoo! Keitai)Enjoy Mobile Net &  PC Site browsing…S! Appli Download, set and use S! AppliNews/Ent. (News/Entertainment)Use S! Quick News & E-BooksCameraCapture images or record videosMedia (Media Player)Use Media PlayerToolsSet Alarm or save Calendar entries…Data FolderOpen files saved on handset/Memory CardInfraredUse InfraredBar Code (Bar Code Reader)Scan barcodes and QR Codes to retrieve informationPhoneSave entries to call or send messages…SettingsAdjust/customize handset settingsMenu NumbersUse keypad to select functions or menu items.Unnumbered Menu ItemsWhen numbers do not appear, select items as shown. ■Main MenuH to select Settings from Main Menu ⿟Press P to open Account Details. To open Phone Book top menu, Select Phone by pressing  .123456789e0 #Main Menu Item Key Assignments
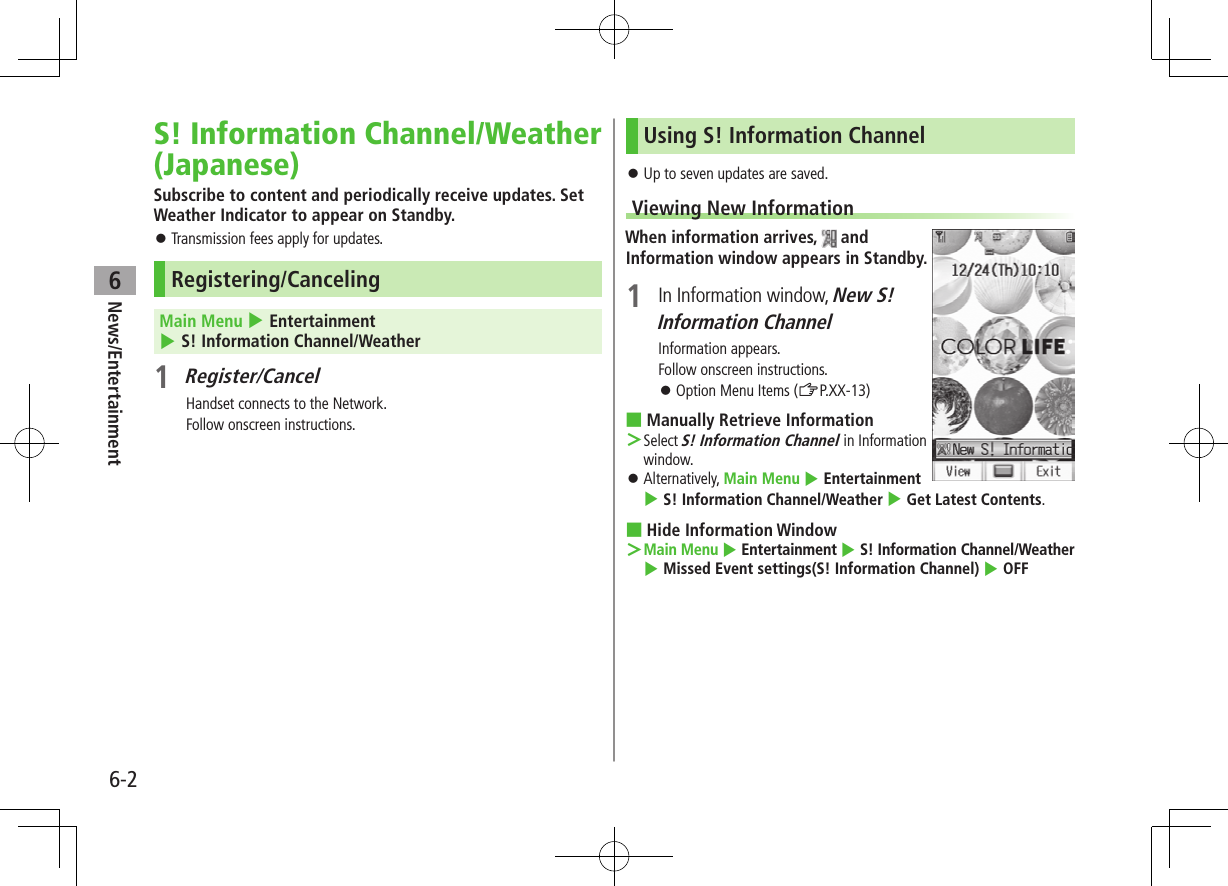
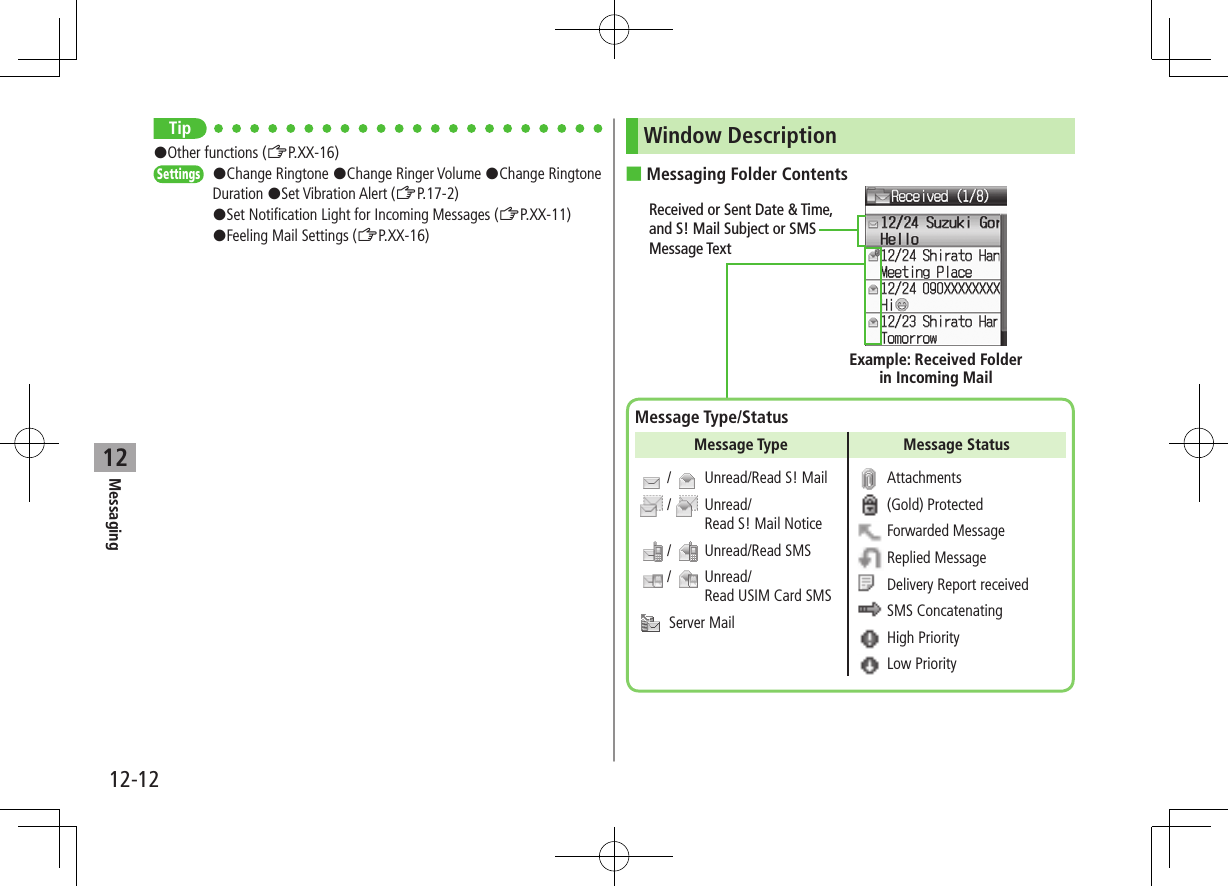
1Getting Started1-18Numbered Menu ItemsPress key corresponding to menu number to select a menu.In Display Settings (from Settings Top Menu),  press U to select ThemesStandby OptionsInformation WindowIn Standby, Information window opens for missed calls, messages, etc.1   to select an item ⿟To close Information window: L, S[Exit] or K ■EventsCall Missed calls (ZP.2-10)MessageNew messages (ZP.12-12) When Feeling Mail is received, a pictograph that shows emotion set by sender, and sender name, mail address or phone number appearAnswer Phone Recorded caller messages (ZP.2-13)Voice Mail New Voice Mail messages (ZP.2-16)Missed CallIf Missed Call Notification is active, Information window opens for calls missed while handset is off,out-of-range, engaged, etc. (ZP.2-16)Update Results Received software update results (ZP.16-10)New  S! Information ChannelReceived S! Information Channel updates (ZP.6-2)S! Information ChannelFailed to receive S! Information Channel updates  (ZP.6-2)New Weather Received weather forecast updates (ZP.6-3)Weather Failed to receive weather forecast updates (ZP.6-4)
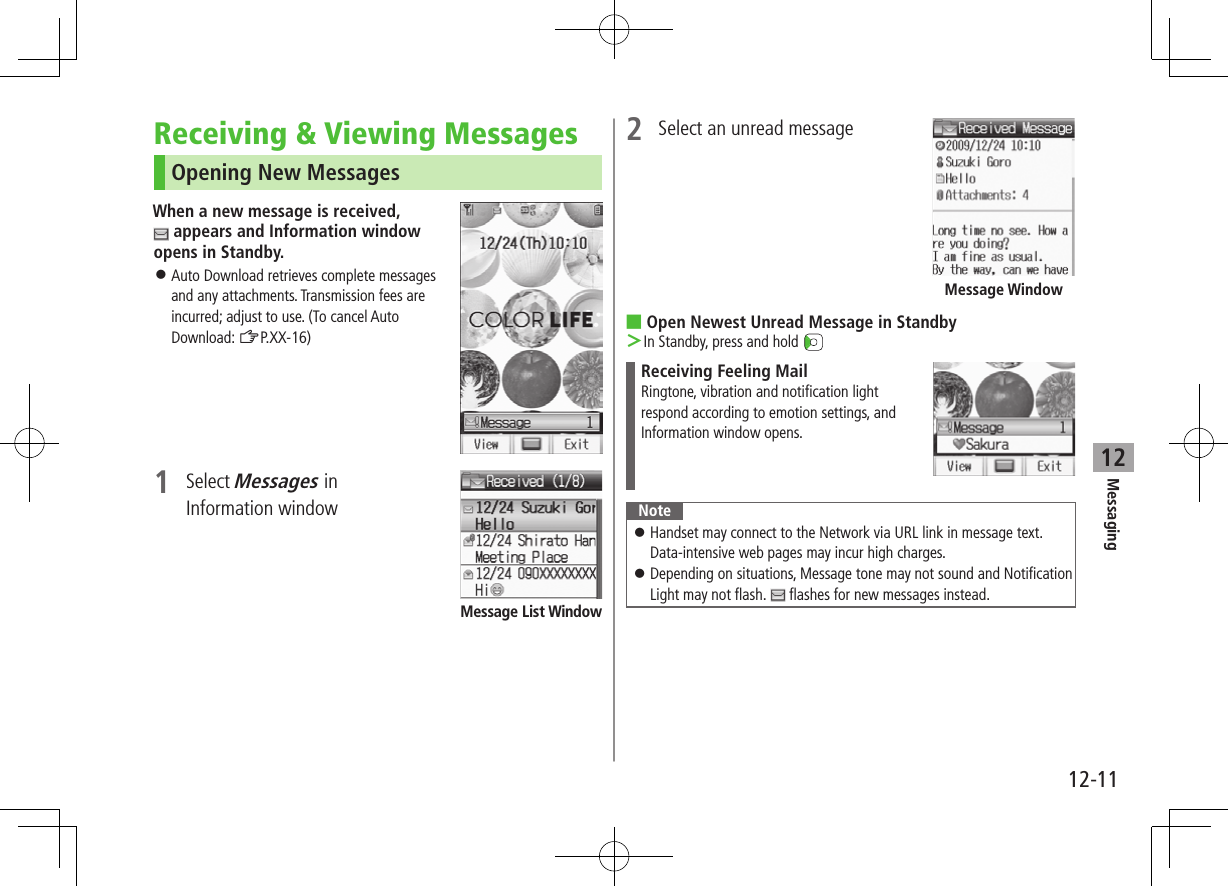
1Getting Started1-19Standby WindowAccess S! Quick News or Shortcuts from Standby Window. ⿟S! Quick News: ZP.XX-2Show/Hide Standby WindowPress L to show/hide Standby Window. When hidden, press   to show Standby Window. Press K to deselect a shortcut icon or ticker. ⿟Set Standby Window On/Off: ZP.XX-4Changing Templates<Default> S! Quick NewsSet to appear both or either S! Quick News/Shortcuts.1  In Standby,   7 A[Menu] 7 Change Templates2  Select an item ■TransparencySet transparency level of Standby Window. >In Standby,   7 A[Menu] 7 Background of Panel 7 Select a levelAdding Content & Changing SettingsAdd or Set S! Quick News in Standby Window.1  In Standby,   7 highlight ticker 7 A[Menu]S! Quick News2  Add ContentAdd S! Quick NewsHandset connects to the Network.Follow onscreen instructions. SettingsS! Quick News Settings 7 Auto Refresh or Display SettingGo to P.15-17 and follow steps.Accessing Functions from Shortcuts1  In Standby,   7 Select an iconThe selected function name appears at top of panel. ⿟To deselect: K2   to access function
1Getting Started1-20Adding ShortcutsAdd frequently used functions to Shortcuts. ⿟Preset items are as follows: Panasonic Site; Sound Settings; Display Settings; Pictures (Data Folder); Alarms; Calculator; Calendar1  In Standby,   7 highlight target 7 A[Menu] 7 Set Shortcut2 Applications, Bookmarks or Phone Book 7 highlight an item 7 A[Entry] ■Move Icons >In Step 1, highlight an icon to move 7 A[Menu] 7 Move Shortcut 7 Select a position ■Delete Icons >In Step 1, highlight an icon to move 7 A[Menu] 7 Remove Shortcut 7 Private MenuSave frequently used functions in Private Menu. ⿟Up to 12 items can be saved. ⿟Change preset functions as needed.Opening Private Menu1  In Standby, press and hold Private Menu appears. ⿟To return to Standby: S[Back]2  Select a menuPrivate Menu
1Getting Started1-21Customizing Private Menu 1  In Standby, press and hold 2  Highlight target 7 A[Menu] 7 Set Shortcut3  Select an item4  Highlight an item 7 A[Entry] ■Change Menu Order >After Step 1, highlight a function 7 A[Menu] 7 Move Shortcut 7 Select a position ■Delete Functions >After Step 1, highlight a function 7 A[Menu] 7 Remove Shortcut 7  ■Reset Private Menu >After Step 1, A[Menu] 7 Reset Defaults7 Simple ModeActivate Simple menu to limit mode options to basic ones. Enlarge fonts in Messaging, Phone Book, Call Log and Browser menus, and maximize volume. ⿟Handset is limited to basic operations (ZP.1-22). ⿟Font size cannot be changed. ⿟To change volume: ZP.1-22Font Size: LargeEarpiece Volume: Volume 6Normal Mode WindowSimple Mode Window
1Getting Started1-22Activating Simple Mode1  In Standby, press and hold G 7  ⿟To cancel: Press and hold G 7   again ■Change Earpiece Volume >In Standby, press and hold   or   (short press during a call). ■Position Clock in Standby >In Simple Mode, Main Menu 4 Settings 4 Standby Display Clock 4 Lower Center ■Cancel from Main Menu >In Standby,   7 A[Normal] 7 Note ⿟While switching between modes, other functions are not available. For approximately 30 seconds after mode switching is complete, all calls/messages are blocked. ⿟Turning off the power does not cancel Simple Mode. ⿟Standby Window and Private Menu is not available in Simple Mode. ⿟Alternatively, Main Menu 4 Settings 4 Phone Settings 4 Change Simple Mode 4 .Simple ModeSimple Mode Menu PagePhoneView Phone Book XX-XXCreate New Entry XX-XXCall Log XX-XXMessage List  XX-XXVoice Mail XX-XXAccount Details XX-XXMessagingIncoming Mail  XX-XXCreate New S! Mail  XX-XXDrafts XX-XXRetrieve New XX-XXSent Messages XX-XXUnsent Messages  XX-XXCreate New SMS XX-XXYahoo! KeitaiYahoo! Keitai XX-XXBookmarks XX-XXSaved Pages XX-XXEnter URL XX-XXCameraTake Photos XX-XXView Photos XX-XXRecord Movies XX-XXView Movies XX-XXSimple Mode Menu PageToolsCalendar XX-XXAlarms XX-XXBar Code Reader XX-XXCalculator XX-XXNotepad XX-XXVoice Recorder XX-XXInfrared XX-XXSettingsRinger Volume XX-XXAssign Ringtone XX-XXVibration Alert  XX-XXWallpaper  XX-XXStandby Display Clock XX-XXDate & Time XX-XXData FolderView Photos XX-XXView Movies XX-XXRing Songs&Tones XX-XXAmusement XX-XXS! Familiar Usability XX-XXOther Documents XX-XXMemory Status XX-XX
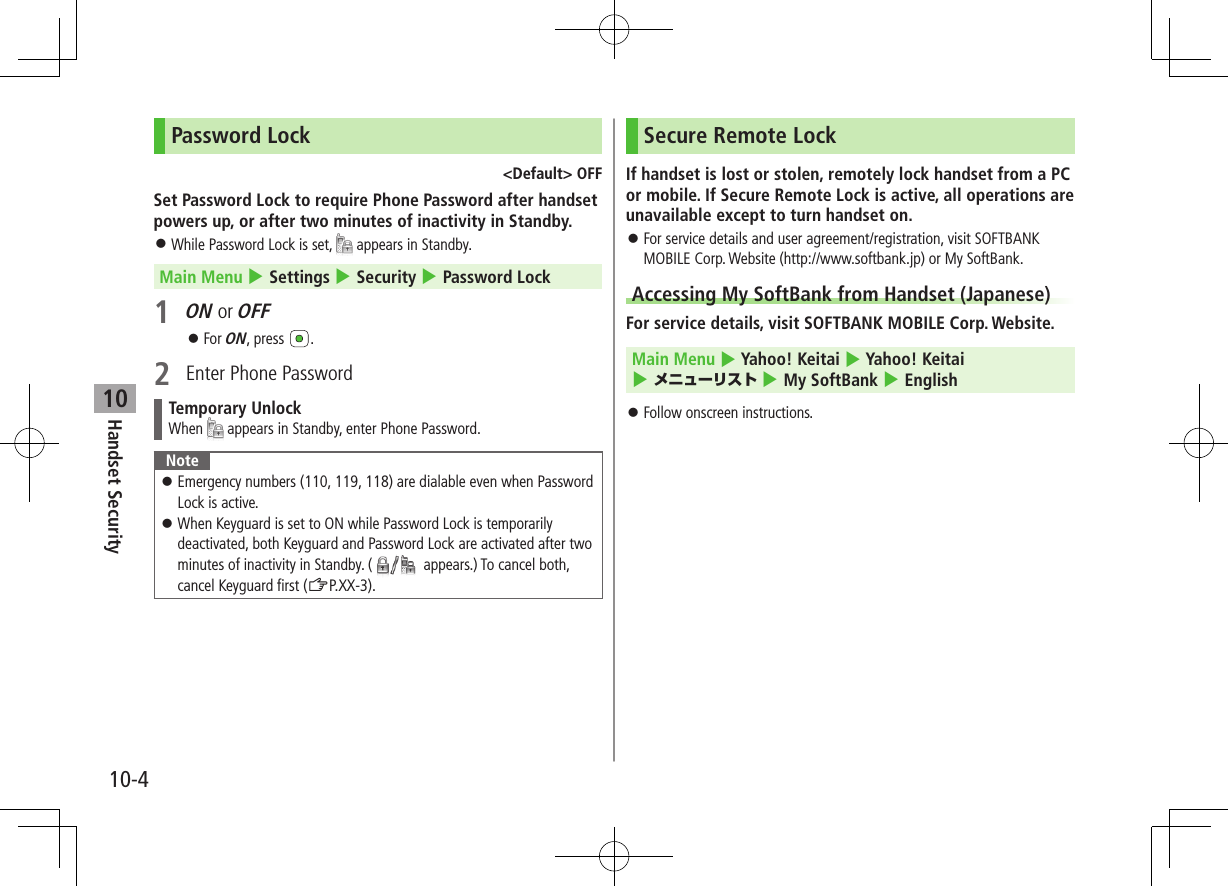
1Getting Started1-23PasswordsPhone Password, Center Access Code and Call Barring Password are needed for handset use.Phone Password<Default> 99994 to 8-digit number required to use/change some handset functions. ⿟e appears for each digit entered. ⿟Phone Password can be changed on handset (ZP.10-2). ⿟If Phone Password is incorrectly entered three times, warning message appears. Turn off handset and try again.Center Access Code4-digit number specified at initial subscription; required to access Voice Mail via landlines or subscribe to fee-based information. ⿟Do not attempt to change Center Access Code. For details, contact SoftBank Mobile Customer Center, General Information (ZP.16-30).Call Barring Password4-digit number specified at initial subscription, required to restrict handset services (ZP.2-19). ⿟If entered incorrectly three times, Call Barring Password settings lock; Call Barring Password & Center Access Code must be changed. Reach SoftBank Mobile Customer Center, General Information (ZP.18-32) for details. ⿟Call Barring Password can be changed on handset (ZP.2-19).Note ⿟Write down Phone Password, Center Access Code and Call Barring Password. ⿟Do not reveal Phone Password, Center Access Code and Call Barring Password. SoftBank is not liable for misuse or damages. ⿟For details, contact SoftBank Mobile Customer Center, General Information (ZP.16-30).
1Getting Started1-24View BlindActivate View Blind to protect Display from prying eyes.  ⿟Select from three levels (Highest protection: Level 3).1  Press and hold I ⿟To cancel: Press and hold I again ■Change Level >Main Menu 4 Settings 4 Display Settings 4 View Blind 4 Level 4 Select a level ⿟View Blind is set to Level 1 by default.Note ⿟Alternatively, Main Menu 4 Settings 4 Display Settings 4 View Blind 4 Settings ON/OFF. ⿟View Blind cannot be activated: While calling; in View Blind Setting; while S! Appli is active ⿟When activating S! Appli, View Blind is temporarily canceled. After terminating/suspending S! Appli, View Blind reactivates.My NumberConfirm handset phone number in Account Details (ZP.4-14). Also confirm data saved in Account Details: name, mail address, etc.1  In Standby,   7 PAccount Details appears.
22-1CallMaking/Answering Voice Calls ............................. 2-2Making Voice Calls .....................................................................2-2Calling Abroad from Japan ..........................................................2-3Emergency Calls (110, 119, 118) ................................................2-3Answering Voice Calls .................................................................2-4Making Voice Clear (Shikkari Talk) ...............................................2-4Making/Answering Video Calls ............................. 2-5Note ..........................................................................................2-5Video Call Window .....................................................................2-5Making Video Calls .....................................................................2-6Answering Video Calls ................................................................2-6Call Log ................................................................. 2-7Viewing Call Logs .......................................................................2-7Making Calls from Call Log .........................................................2-8Answer Phone....................................................... 2-8Activating/Canceling Answer Phone ............................................2-8Playing Messages .......................................................................2-9Calling while Abroad ............................................ 2-9Calling within the Same Country .................................................2-9Calling Japan and Other Countries ............................................2-10Optional Services ............................................... 2-11Overview ..................................................................................2-11Call Forwarding ........................................................................2-11Voice Mail ................................................................................2-12Advanced Features ............................................. 2-14Dialing Functions ......................................................................2-14International Call Functions ......................................................2-14Incoming Call Functions ............................................................2-15Engaged Call Functions ............................................................2-15Video Call Image Settings .........................................................2-16Call Log Functions ....................................................................2-16Answer Phone/Recording Functions ..........................................2-17Global Roaming Settings ..........................................................2-17Optional Service Functions  .......................................................2-18
Call22-2Making/Answering Voice CallsMaking Voice CallsBefore Calling ⿟Confirm signal strength (ZP.1-8) ⿟If any of these indicators appear:         (red)     7Calls cannot be made (ZP.1-8, P.18-9)1 Enter a phone number ⿟Include area code for all numbers.2 Confirm the number, then J ⿟To adjust volume:   or 3 L to end callCall Time appears.Correcting MisentriesUse   to place cursor after digit(s) to delete, then press K.Press and hold K to delete all digits.Note ⿟Do not cover antenna area (ZP.1-6) with hand or sticker; may weaken signal strength and cause calls/transmissions to be unavailable.Tip#Operations Available during a Voice Call (ZP.2-9)#Making Calls from Call Log (ZP.2-11)#Save Entered Phone Number (ZP.4-5)#Making Calls from Phone Book (ZP.4-6)#Speed Dial (ZP.4-8)Settings   #Call Time & Call Cost (ZP.XX-9)#End Calls by Closing Handset (ZP.XX-10)Outgoing Call FunctionsShowing/Hiding Caller ID1  Enter a phone number 7 A[Menu] 7 My Caller ID2 Show or Hide ⿟To always show/hide Caller ID: ZP.2-18Sending Touch-tone SignalsSend touch-tone signals for services such as reserving tickets, checking bank balance, etc. Save number strings to be sent as a touch-tone signal.1  When entering a phone number, press and hold H 7 Enter a number string
Call22-3Emergency Calls (110, 119, 118)Call 110 (Police), 119 (Fire & Ambulance) or 118 (Coast Guard) even when some handset restrictions are active.Calls cannot be Made in Following Cases: ⿟When Emission OFF Mode is ON ⿟In PIN entry window upon turning on handset (PIN entry is ON) ⿟When Secure Remote Lock is active ⿟When USIM Card is not insertedEmergency Positioning RequestWhen an emergency call is made from a mobile phone, location is reported to first response agencies such as the police. ⿟Location information may be inaccurate due to location or signal conditions. Describe location or nearby landmarks. ⿟Base Station Positioning System is accurate within 100 meters to 10 kilometers. Location information from distant base stations may be inaccurate. ⿟Function available where first response agencies have completed system installation. ⿟Dialing 184 before 110, 119 or 118, cancels location report. However, first responders may obtain location information for immediate and serious threats to life. ⿟Not available for international roaming. ⿟Requires no separate subscription or transmission fees.Note ⿟Emergency numbers may not be dialable outside Japan depending on the network available or handset settings.
Call22-4Answering Voice CallsWhen a Call Arrives…Handset rings; Notification Light flashes.If Caller ID is sent, number appears in  Display; if saved in Phone Book, caller's  name appears.1 J to talk ⿟To adjust volume:   or 2 L to end callCall Time appears.Note ⿟When Caller ID is not sent, Withheld appears.Tip#Operations Available during a Voice Call (ZP.2-9)#Rejecting Unknown Callers #Rejecting Specific Numbers (ZP.XX-5)Settings   #Press Any Key to Answer Calls #Answer Calls by Opening Handset #End Calls by Closing Handset (ZP.XX-10)Incoming Call Functions ■Operations Available when Incoming Call ArrivesMute Ringtones   >[Mute]Place Calls on Hold  >LAnswer Phone*  >KCall Rejection   >S[Reject]Call Forwarding >A[Forward] ⿟Activate Call Forwarding (ZP.2-14) beforehand to forward incoming calls to a preset number. If Call Forwarding is not active, call is rejected.* Voice Call only
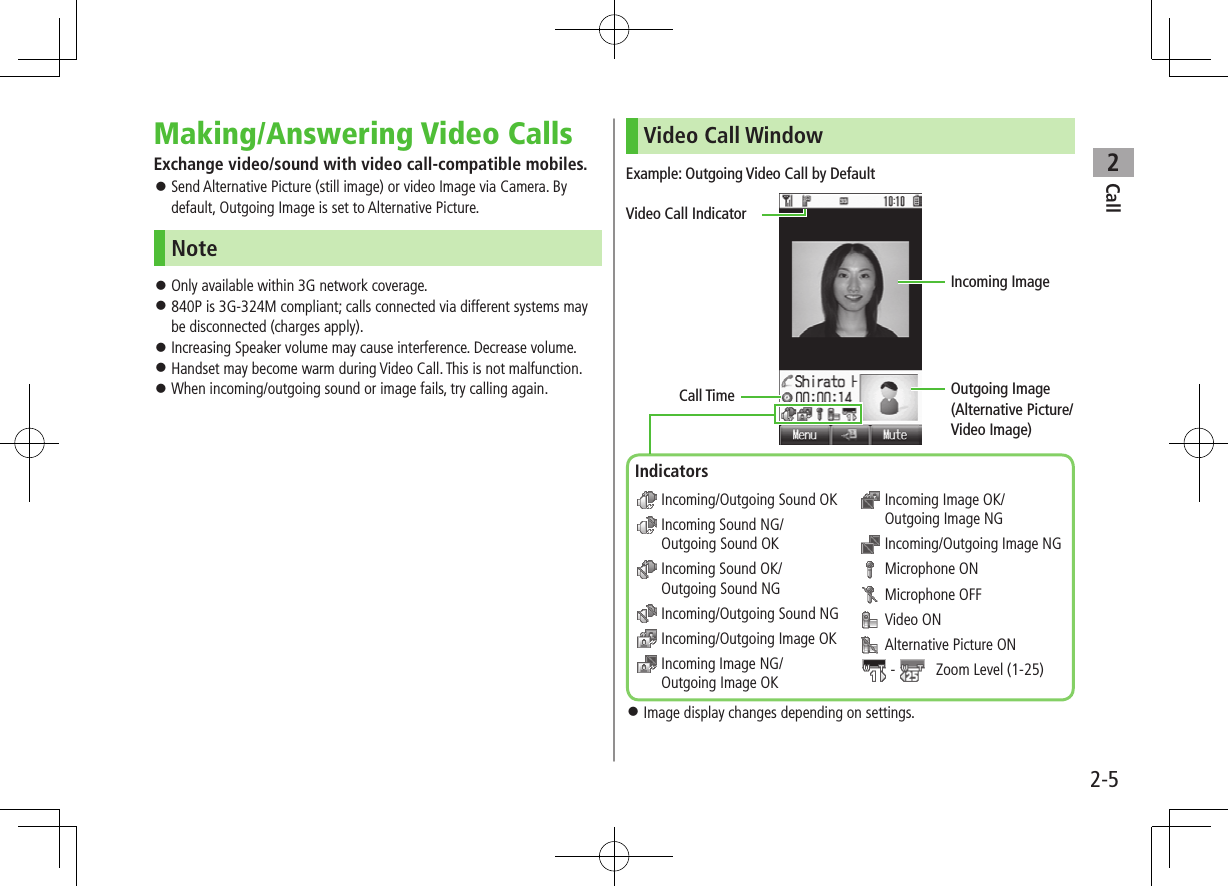
Call22-5Making/Answering Video CallsExchange video/sound with video call-compatible mobiles. ⿟Send Alternative Picture (still image) or video Image via Camera. By default, Outgoing Image is set to Alternative Picture.Note ⿟Only available within 3G network coverage. ⿟840P is 3G-324M compliant; calls connected via different systems may be disconnected (charges apply). ⿟Increasing Speaker volume may cause interference. Decrease volume. ⿟Handset may become warm during Video Call. This is not malfunction. ⿟When incoming/outgoing sound or image fails, try calling again.Video Call WindowExample: Outgoing Video Call by Default ⿟Image display changes depending on settings. Incoming/Outgoing Sound OK  Incoming Sound NG/Outgoing Sound OK  Incoming Sound OK/Outgoing Sound NG Incoming/Outgoing Sound NG Incoming/Outgoing Image OK  Incoming Image NG/Outgoing Image OK  Incoming Image OK/Outgoing Image NG Incoming/Outgoing Image NG  Microphone ON  Microphone OFF  Video ON  Alternative Picture ON -    Zoom Level (1-25)Call TimeVideo Call IndicatorIncoming ImageOutgoing Image(Alternative Picture/Video Image)Indicators
Call22-6Making Video CallsBefore Calling ⿟Confirm signal strength (ZP.1-8) ⿟If any of these indicators appear:      (red)     7 Video Calls cannot be made (ZP.1-8, P.18-9)1 Enter a phone number2 Confirm the number, then DWhen answered, outgoing (alternative) and incoming images appear; other party’s voice sounds via Speaker. ⿟To adjust volume: 3 L to end callNote ⿟Other party’s voice sounds via Earpiece in Manner Mode; activate Speaker (ZP.2-9).Tip#Outgoing Call Functions (ZP.2-2)#Operations Available during a Video Call (ZP.2-9)#Making Calls from Call Log (ZP.2-11)#Save Entered Phone Numbers (ZP.4-5)#Making Calls from Phone Book (ZP.4-6)Settings   #Change Alternative Picture (ZP.XX-12)Answering Video CallsWhen a Video Call Arrives…If Caller ID is sent, number appears in Display; if saved in Phone Book, caller's name appears.1 J or D2  Send Video ImageA[YES]Video Image is sent.
Call22-7 Send Alternative PictureS[NO]Alternative Picture is sent.3 L to end call Note ⿟When no image is selected in Step 2, Alternative Picture is sent. ⿟Other party’s voice sounds via Earpiece in Manner Mode; activate Speaker (ZP.2-9).Tip#Incoming Call Functions (ZP.2-4)#Operations Available during a Video Call (ZP.2-9)Settings   #Change Alternative Picture (ZP.XX-12)International Calls Calling Abroad from Japan ⿟Application not required. For details, go to: http://mb.softbank.jp/en/global_services/call/1  Enter a phone number2 A[Menu] 7 International CallCountry/region code list appears.3  Select a country/region4  Voice CallJ Video CallD ■Enter Country/Region Code Directly >J 7 Press and hold P to display "+(IDD Prefix)" 7 Enter a country/region code 7 Enter a number (omit first 0) 7 Voice Call: J / Video Call: D ⿟International Code is set to 0046010 by default. The number can be changed if required (ZP.XX-8). ⿟Do not omit leading 0 to call to Italy (country code: 39).
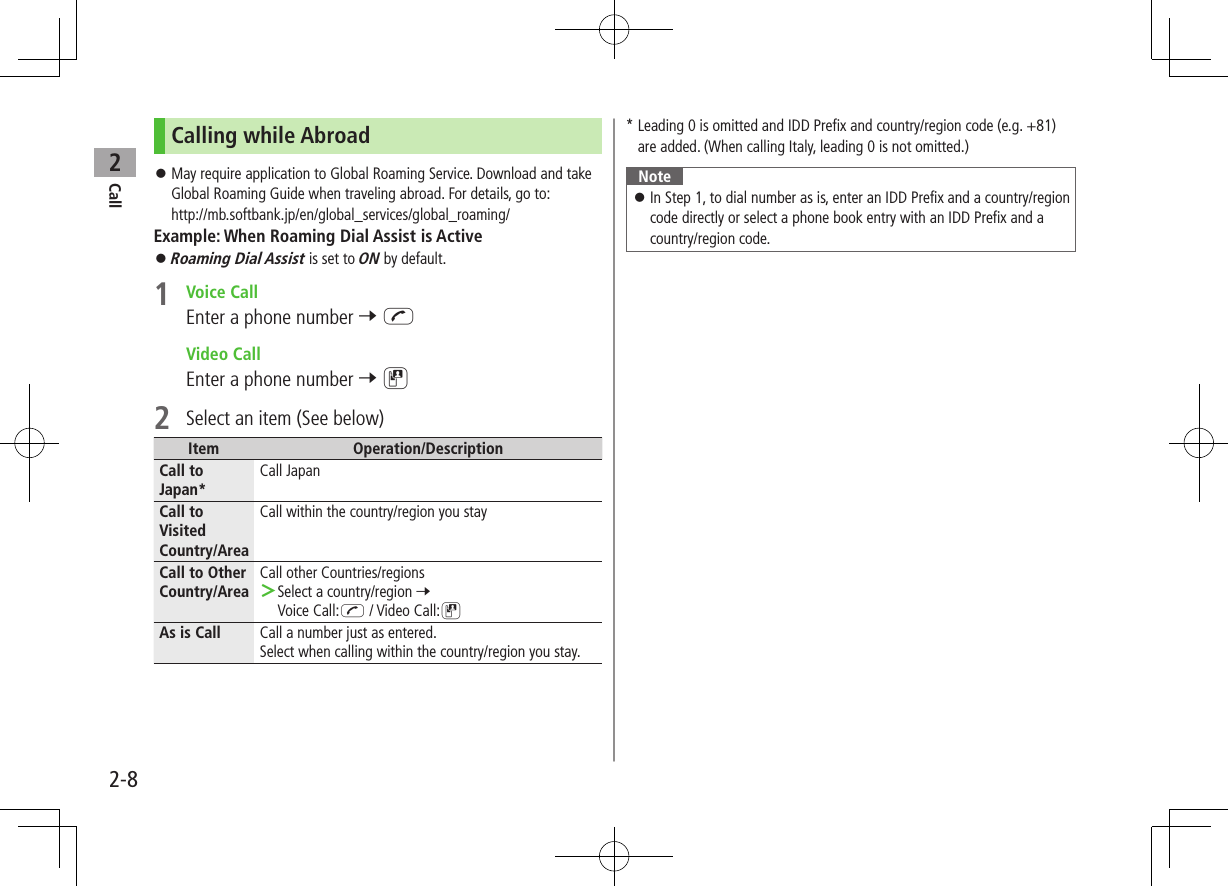
Call22-8Calling while Abroad ⿟May require application to Global Roaming Service. Download and take Global Roaming Guide when traveling abroad. For details, go to: http://mb.softbank.jp/en/global_services/global_roaming/Example: When Roaming Dial Assist is Active ⿟Roaming Dial Assist is set to ON by default.1  Voice CallEnter a phone number 7 J Video CallEnter a phone number 7 D2  Select an item (See below)Item Operation/DescriptionCall to Japan*Call JapanCall to Visited Country/AreaCall within the country/region you stayCall to Other Country/AreaCall other Countries/regions >Select a country/region 7 Voice Call:J / Video Call:DAs is Call Call a number just as entered.Select when calling within the country/region you stay.*  Leading 0 is omitted and IDD Prefix and country/region code (e.g. +81) are added. (When calling Italy, leading 0 is not omitted.)Note ⿟In Step 1, to dial number as is, enter an IDD Prefix and a country/region code directly or select a phone book entry with an IDD Prefix and a country/region code.
Call22-9Global Roaming Settings ■Add to Country/Area Number List >Enter a number 7 A[Menu] 7 International Call 7 A[Menu] 7 Add 7 Enter a country/region name 7 Enter country/region code ■Select Operator<Default> Automatic >Main Menu 4 Settings 4 Call Settings 4 Optional Services 4 International Setting 4 Select Network 4 Select an item (See below)Item Operation/DescriptionManual3G/GSM : 3G/GSM service area in Japan or abroad.Handset selects an available network automatically using area (network condition). 3G : 3G service area in Japan or abroad.GSM : GSM service area abroad. Unavailable in Japan.Automatic 3G/GSM service area in Japan or abroad. Handset selects 3G service area in Japan, and selects available network automatically using area (network condition) abroad. ⿟Automatic is recommended.Tip#Change International Code #Edit Country/Region Code #Select Operator #Set Operator Priority for Automatic Search #Deactivate Roaming Dial Assist (ZP.15-9)Engaged Call FunctionsOperations Available during a Voice CallItem Operation/DescriptionAdjust Volume >/ ⿟Adjust volume within two seconds. ⿟Adjusted volume is retained even after calls end or handset is turned off.Place Call on Hold >J ⿟To resume call:J ⿟Call Waiting or Group Calling subscription required to use Hold (ZP.2-16).Speaker ON/OFFToggle Speaker or Earpiece >A[Menu] 7 Speaker ON or Speaker OFFRecord ConversationRecord up to 60 seconds of a call > ⿟To end recording: ⿟Recorded data is saved to Ring Songs&Tones  (ZP.XX-2). ⿟Alternatively, A[Menu] 7 Record.Send Touch TonesUse keypad to send touch tones for Voice Mail or othertouch tone activated services >P to O, G or HOpen Phone Book >A[Menu] 7 Phone Book 7 Select a Phone Book entrySend SMS  >A[Menu] 7 Create New SMS 7 Create an SMS 7 S[Send]
Call22-10Operations Available during a Video CallItem Operation/DescriptionAdjust Volume > ⿟Adjust volume within two seconds. ⿟Adjusted volume is retained even after calls end or handset is turned off.Speaker ON/OFFToggle Speaker or Earpiece >A[Menu] 7 Speaker ON or Speaker OFFSwitch Image PriorityToggle between Incoming and Outgoing Images >A[Menu] 7 Image Priority 7 Priority Incoming or Priority  OutgoingImage & Sound SettingsChange Outgoing Image and sound settings > 7 Select an item (See below)・Send Voice & Video : Send video image and sound・Alternative Picture : Send Alternative Picture and sound・Mute Voice : Send video image only・Alt. Picture & Mute Voice : Send Alternative Picture onlyMute  >S[Mute] ⿟ appears. ⿟To cancel Mute: S[Mute OFF]Zoom  >(zoom in) or  (zoom out)Open Phone Book >A[Menu] 7 View Phone Book  7 Select a Phone Book entryCall LogIncoming and outgoing call records appear here. Use these records to call back.All Calls: All dialed/received callsIncoming: All received calls (up to 50 records)Outgoing: All dialed calls (up to 50 records)Status Indicators Answered Voice Call Missed Voice Call Rejected Voice Call Outgoing Voice Call Answered Video Call Missed Video Call Rejected Video Call Outgoing Video Call
Call22-11Viewing Call Logs1   7 Select a Call Log2  To see record details, select oneNote ⿟Newest record appears at top of list. Names appear if saved in Phone Book. ⿟When a number is called more than once, only last record appears. ⿟Call Log records remain even if handset is turned off. ⿟When the maximum number of records are saved, oldest is deleted first. ⿟Call Log can also be opened from Main Menu 4 Phone Book 4 Call Log.TipSettings   #Open Incoming Call Log for Missed Calls by Opening Handset (ZP.XX-10)Making Calls from Call Log1   to select a Call Log2  Highlight a record 7 A[Menu] 7 Call3  Voice CallsVoice Call Video CallsVideo Call International CallsInternational Call 7 Select a country/region 7 Voice Calls: J / Video Calls: D ■Show/Hide Caller ID >In Step 3, Show Number or Hide Number 7 A[Menu] 7 Call 7 Voice Call or Video Call
Call22-12Call Log FunctionsPress A[Menu] in individual records for following operations.Item Operation/DescriptionView View Call Log detailsCall Make calls from recorded numberCreate Message >S! Mail or SMS 7 Create a message (S! Mail: ZFrom Step 4 on P.XX-4/SMS: ZFrom Step 4 on P.XX-8) ⿟Message can be sent to SoftBank handsets only.Add to Phone Book >Create New Entry or Select an entry to add 7 (ZFrom Step 2 on P.4-3)Delete  >One or All 7 A[YES] (7 For All , Enter Phone Password)Answer PhoneRecord up to eight voice messages on handset. ⿟When Answer Phone is active,   appears in Standby. ⿟Unavailable when: handset is off or in Emission OFF Mode;   appears. Use Voice Mail (ZP.2-12).Activating/Canceling Answer Phone<Default> OFF1  Press and hold K ⿟To cancel: Press and hold K again.Redirecting a Call to Answer PhoneWhen a call arrives while Answer Phone is not active, press K to activate Answer Phone. Recording starts. Answer Phone remains active.Note ⿟Alternatively, activate/cancel from Main Menu 4 Tools  4 Answer Phone 4 Settings 4 ON/OFF. ⿟When full, new messages cannot be recorded even if Answer Phone is activated. Delete old messages. ⿟Answer Phone does not respond to Video Calls.
Call22-13Playing MessagesWhen a new message is recorded, Information window opens (ZP.1-17) and   appears in Standby.1  In Information window, Answer Phone2  Select a messagePlayback starts.After playback ends, Information window and  disappear.Note ⿟Alternatively, press K in Standby, or Main Menu 4 Tools 4 Answer Phone 4 Message List 4 Select a message.Answer Phone FunctionsFrom Main Menu 4 Tools 4 Answer Phone ■Set Answer Time<Default> 18 secondsSet time before which call is redirected to Answer Phone. >Settings 7 Answer Time 7 Enter ring time ⿟When Answer Phone and Voice Mail or Call Forwarding are both active, function with shorter ring time takes priority.For example, if Answer Phone ring time is 18 seconds and Optional Service is 20 seconds, Answer Phone responds first. (Priority may change due to signal conditions.) ⿟Even if Answer Phone takes priority, call is forwarded to Voice Mail or forwarding number when Answer Phone is full. ■Call Sender >Message List 7 Highlight a message 7 A[Menu] 7 Call ■Delete Messages >Message List 7 Highlight a message 7 A[Menu] 7 Delete or Delete All 7 A[YES] 7 For Delete All, enter Phone Password ■Save to Phone Book >Message List 7 Highlight a message 7 A[Menu] 7 Add to Phone Book 7 Create New Entry or select an entry to add 7 (ZFrom Step 2 on P.4-3)
Call22-14Optional ServicesOverview ⿟For details, visit SOFTBANK MOBILE Corp. Website  (http://www.softbank.jp).Call Forwarding(ZRight)Forward unanswerable calls to a preset number when handset is off, out-of-range, etc.Voice Mail(ZP.2-12)Unanswered calls are forwarded to Voice Mail Center as set or when handset is off,  out-of-range, engaged, etc. ⿟Missed Call Notification (ZP.2-13)Call Waiting*(ZP.2-19)Place the current call on hold and answer a second, or alternate between calls.Group Calling*(ZP.2-17)Call another party during a call and alternate between calls. Add other parties to talk on up to five lines simultaneously.Call Barring (ZP.2-19)Restrict calls by condition. ⿟While Call Forwarding or Voice Mail Service is active, Bar All Outgoing Calls and Bar All Incoming Calls are not available. (Call Forwarding or Voice Mail Service is prioritized.)Caller ID (ZP.2-20) Show or hide your number when calling.* Separate subscription requiredCall Forwarding ⿟Call Forwarding and Voice Mail cannot be set simultaneously. ⿟When forwarding Video Calls, set a destination phone that supports 3G-324M standard video calls. If not, Video Calls are not forwarded.Activating Call ForwardingMain Menu 4 Settings 4 Call Settings 4 Optional Services 4 Voice Mail/Call Forwarding 4 Call Forwarding ON1  Select a type2  Select an item (See below)Item Operation/DescriptionRinger Off Forward all calls without ringing/vibratingRinger On Forward missed calls3  Select from Phone BookPhone Book 7 Select an entry 7 Select a phone number Direct EntryDirect Entry 7 Enter a phone number4  If Ringer On is selected in step 2, select ring time
Call22-15 ■Check Call Forwarding Status >Main Menu 4 Settings 4 Call Settings 4 Optional Services 4 Voice Mail/Call Forwarding 4 Confirm Status ■Cancel Call Forwarding >Main Menu 4 Settings 4 Call Settings 4 Optional Services 4 Voice Mail/Call Forwarding 4 Cancel All 4 Note ⿟Toll free numbers and international call numbers cannot be saved as a destination number. ⿟When using Call Forwarding together with Answer Phone, the function with shorter ring time takes priority. (Priority may change due to signal conditions.)  ⿟When Ringer On is set, press J to answer calls while handset is ringing/vibrating (within ring time). To forward calls immediately while handset is ringing/vibrating, press A[Forward].Voice Mail ⿟Calls are forwarded to Voice Mail Center via Call Forwarding function; Call Forwarding and Voice Mail cannot be set simultaneously. ⿟Voice Mail is not available for Video Calls.Activating Voice MailMain Menu 4 Settings 4 Call Settings 4 Optional Services 4 Voice Mail/Call Forwarding 4 Voice Mail ON1  Select an item (See below)Item Operation/DescriptionRinger Off Forward all calls without ringing/vibratingRinger On Forward missed calls >Select a ring time ■Check Voice Mail Status >Main Menu 4 Settings 4 Call Settings 4 Optional Services 4 Voice Mail/Call Forwarding 4 Confirm Status ■Cancel Voice Mail >Main Menu 4 Settings 4 Call Settings 4 Optional Services 4 Voice Mail/Call Forwarding 4 Cancel All 4
Call22-16Note ⿟When using Voice Mail together with Answer Phone, the function with shorter ring time takes priority. (Priority may change due to signal conditions.) ⿟When Ringer On is set, press J to answer calls while handset is ringing/vibrating (within ring time). To forward calls immediately while handset is ringing/vibrating, press A[Forward].Checking Voice Mail MessagesInformation window (ZP.1-17) and appear in Standby when new messages are recorded.1  In Information window, select Voice Mail ⿟Follow voice guidance.Information window and   disappear after messages are checked. ■View DetailsView callers' phone numbers and date/time Voice Mail messages were left before playing messages. ⿟Activate Missed Call Notification beforehand. (ZP.2-16) > to open Incoming Call Log 7 Select a Voice Mail notification 7 View details 7 A[Menu] 7 Listen to Voice MailNote ⿟Alternatively, follow these steps to check Voice Mail:  Main Menu 4 Settings 4 Call Settings  4 Optional Services 4 Voice Mail/Call Forwarding 4 Listen to Voice MailMissed Call NotificationWhen Missed Call Notification function is active, Information window appears for calls missed while handset was off, out-of range, engaged etc. ⿟Available only when Voice Mail is active.Main Menu 4 Settings 4 Call Settings 4 Optional Services 4 Missed Call Notification1 Handset connects to the Network. ⿟Follow voice guidance.When Calls are Received while Missed Call Notification is Active…Information window appears for missed calls when handset is turned on or comes into range.Press   to view Incoming Call Log. ⿟Voice Mail appears in Information window when Voice Mail messages were recorded (ZP.2-15).
Call22-17Call WaitingActivating/Canceling Call Waiting Main Menu 4 Settings 4 Call Settings 4 Optional Services 4 Call WaitingCurrent status appears.1 A[Menu] 7 Activate or Deactivate ■Check Call Waiting Status >Main Menu 4 Settings 4 Call Settings 4 Optional Services 4 Call WaitingAnswering Second Call1  When tone sounds, J ⿟Press J to alternate between calls. ⿟When the party hangs up, active call ends. ⿟Press J to re-engage the party on hold. ⿟Press L to disconnect active call. ■Reject Second Call >When tone sounds, S[Reject]Note ⿟When Voice Mail or Call Forwarding is set to Ringer On while Call Waiting is active, unanswered calls are transferred to Voice Mail Center or the forwarding number. ⿟When Voice Mail or Call Forwarding is set to Ringer Off, Call Waiting is disabled.
Call22-18Group Calling ⿟Separate subscription is required for this service.Dialing New Number during a Call1  Enter a phone number during a call 7 JThe line switches. The other line is placed on hold. ■Use Phone Book >During a call, A[Menu] 7 Phone Book 7 Select an entry 7 Select a number 7 JSwap Calls1  During a call, J ⿟Press J to toggle lines. ⿟When the party hangs up, the call ends. ⿟Press J to re-engage the line on hold. ⿟Press L to disconnect all lines.Connecting to Multiple Parties1  While switching between two lines, A[Menu] 7 Speak with All ⿟Connect up to six lines simultaneously. ⿟Press L to disconnect all lines. ■Add a New Party to a Call >Enter a number during Group Calling 7 J 7 After the party is connected, A[Menu] 7 Speak with All ■Check Members >Enter a number during Group Calling 7 A[Menu] 7 Member ■Talk with One Party >Highlight a member 7 A[Menu] 7 Split ■End Calls Individually >Highlight a member 7 S[End]
Call22-19Call Barring ⿟When Call Forwarding or Voice Mail is active, Bar All Outgoing Calls or Bar All Incoming Calls is not available. (Call Forwarding or Voice Mail takes priority.) ⿟Call Barring Password specified at initial subscription (ZP.1-23) is required to change Call Barring settings.Activating/Deactivating Call BarringMain Menu 4 Settings 4 Call Settings 4 Optional Services 4 Call Barring1 Outgoing Calls or Incoming Calls 7 Select an item (See below)Item Operation/DescriptionBar All Outgoing Calls Restrict all non-emergency callsBar All International CallsAllow only domestic callsBar International Calls Restrict all international calls except to JapanBar All Incoming Calls Reject all callsBar All If Roamed Reject calls when outside Japan2 A[Menu] 7 ON or OFF3  Enter Call Barring Password ■Check Call Barring Status >In Step 1, Confirm Status 7 Select an item (Zabove) ■Cancel All Call Barring >In Step 1, Cancel All Barring 7 Enter Call Barring Password ■Change Call Barring Password >In Step 1, Call Barring Password 7 Enter current Call Barring Password 7 Enter new Call Barring Password 7 Reenter new Call Barring PasswordNote ⿟Emergency numbers (110, 119, 118) are dialable when Call Barring for outgoing calls is active. ⿟If call is attempted when Call Barring is active, warning message appears. It may take longer to appear in some areas. Check Call Barring settings if the message does not appear.
Call22-20Caller ID<Default> Network SetMain Menu 4 Settings 4 Call Settings 4 Show My Number1  Select an item ⿟Network Set Caller ID setting varies by subscription.Note ⿟Alternatively, enter these numbers/symbols before the phone number to show or hide Caller ID: Show: Q I Y or G E Q HHide: Q I R or H E Q H
33-1Text EntryText Entry .............................................................. 3-2Entering Text ......................................................... 3-3Entering Characters ....................................................................3-3Pictographs & Symbols ...............................................................3-4Editing Text ........................................................... 3-5Deleting & Replacing ..................................................................3-5Copying/Cutting/Pasting .............................................................3-5Conversion Methods (Japanese) ........................... 3-6Predictive Conversion .................................................................3-6Converting Hiragana to Katakana/Alphanumerics ........................3-7Advanced Features ............................................... 3-8Text Entry Features .....................................................................3-8Templates ...................................................................................3-9Learned Words ...........................................................................3-9Conversion .................................................................................3-9User's Dictionary ......................................................................3-10
Text Entry33-2Text EntryEnter alphanumerics, hiragana, kanji, katakana, symbols and pictographs. ■HelpHelp describes text entry operations. >In text entry window, A[Menu] 7 Help 7 Select an item❶.Input ModesPress D to toggle input modes.漢: Kanji (Hiragana)カナ: Katakanaabc: Alphanumerics123: Numbers ⿟Alternatively, follow the steps below to toggle input modes. A[Menu] 7 Input Options 7 Change Input Mode❷.Double-byte/Single-bytePress and hold D to toggle double-/single-byte.1/1: Double-byte1/2: Single-byte❸.Character/Byte Count  Remaining number of enterable characters appears, regardless of input mode. Remaining number of enterable byte appears.❶❷❸Entering TextEntering CharactersExample: Enter 鈴木1  In alphanumerics mode, Dtwice to switch to kanji (hiragana) modeす: E three timeず:  * 7 E three times 7 Gき: W twice*When the next character is on the same key, press   first to move cursor.2   to enter Forecast List ⿟To change word before converting, press K. ⿟There are four types of word suggestion list: Forecast, Normal, E-1-Kana and Prediction (ZP.3-5)3   to select 鈴木
Text Entry33-3 ■Other Input FunctionsEnter katakana/alphanumericsD several times to select an input mode 7 Enter charactersEnter small kana  (っ, ッ, etc.)Enter a character 7 J ⿟Alternatively, press a key repeatedly to enter an assigned small kana.Enter upper case charactersEnter a character 7 J ⿟Alternatively, press a key repeatedly to enter an assigned upper case character.Add ゛or ゜Enter a character 7 G for ゛or G twice for ゜ ⿟In single-byte katakana mode,  ゛and ゜ are entered as a single-byte character.Insert line break F to insert line breaks in textInsert space at end of textInsert space within textH repeatedly until single-byte space appears*, or use symbol list for double-byte or single-byte space (ZRight)Toggle characters inreverse orderFExample: From c, press F to toggle asfollows. c 7 b 7 a 7 2…*  Space cannot be entered within text in number mode by following the steps above.Pictographs & Symbols ⿟Pictographs do not appear in messages sent to incompatible SoftBank handsets or e-mail addresses. ⿟Symbol List: ZP.18-171  In kanji (hiragana) or alphanumerics mode, GSoftBank pictograph list appears. ⿟To toggle pictograph list and symbol list: G2   to select a pictograph or symbolEntering Cross-carrier PictographsPress H to toggle lists (Universal pictograph list, Full pictograph list and My Pictograms).G
Text Entry33-4 ■Functions Available in Pictograph/Symbol ListEnter same pictograph or symbol again S[Besides]Toggle  pictograph/symbol list GJump to previous page DJump to next page A[Next] / FToggle double-/single-byte [symbol list only] HClose list  K ⿟Press H to toggle pictograph/symbol list while List Log is open. To open List Log, press G.XXXXXXXX XXXXX XXXXX XXXXXNote ⿟Alternatively, follow the steps below to access pictograph or symbol:  A[Menu] 7 Pictograph or SymbolAdditional Features ■Mail & Web Extensions >In text entry window (in alphanumerics mode), 0 7 Select an extension ■Emoticons >In text entry window, A[Menu] 7 Emotions 7 Select an emoticon ■Copy from Phone Book/Account Details/Notepad >In text entry window, A[Menu] 7 Insert 7 Select an item (See below)Item Operation/DescriptionPhone Book Data* >Select an entry 7 Select an itemAccount Details* >Select an itemNotepad  >Highlight a note 7 A[Set] ⿟Alternatively, in kanji (hiragana), katakana and alphanumerics (double-/single-byte) mode, press and hold G 7 Highlight a note 7 A[Set].*  Last Name/First Name, Reading, Phone Number, Email Address, Address or Note can be inserted. ■Enter Kuten Code >In text entry window, A[Menu] 7 Input Options 7 Kuten Code 7 Enter a character code (4 digits) (ZP.XX-16)
Text Entry33-5Conversion Methods (Japanese)Predictive ConversionThe following suggestion lists appear while entering text orafter a word is fixed.While Entering TextForecastLists likely conversions (Predictive Candidates) and matching conversions (Normal Candidates) Predictive Candidates: わ 7 私, わたし, etc.Normal Candidates: わ 7 和, 輪, etc.Normal Suggests matching conversions Example: わ 7 和, 輪, etc.E-1-Kana Lists alphanumerics/katakana assigned to key (ZP.3-6)After a Word is FixedPrediction Suggests words likely to follow Example: 私 is fixed 7 です, の, は, etc. ⿟Predictions change with each letter entered. ⿟Press A[Forecast]/[Normal] to toggle Forecast List and Normal List. ■Cancel Prediction List >In text entry window, A[Menu] 7 Input Options 7 Context Prediction 7 OFFNote ⿟Handset learns entered characters and suggests them for future conversions.Example: Enter 私の鼻1  In kanji (hiragana) mode, Pわ is entered and Forecast List appears.2   to move to Forecast List 7  to select 私私 is entered and Prediction List appears.3   to move to Prediction List 7   to select のの is entered and Prediction List appears.4 Y 7 Tはな is entered and Forecast List appears.5 A[Normal]Normal List appears.
Text Entry33-66   to move to Normal List 7   to select 鼻If the Word is Not ListedPress K to return to hiragana, and segment hiragana to convert separately.Example: Segment はるか into はる and か, then convert to 春香① Move cursor to る, then convert はる to 春 7 ② Convert か to 香 7 Using Previously Entered WordsEnter the first one or two hiragana to access previously enteredwords in the list.Converting Hiragana to Katakana/AlphanumericsEnter katakana and alphanumerics in kanji (hiragana) mode. Date and time can be entered quickly.Example 1: Enter OKStep 1 2 3 4Key Y(3 times)T(twice) S[E-1-Kana]Display ふ ふに E-1-Kana List OK ⿟Press   after highlighting OK.Example 2: Enter 10:30 or 10/30 ⿟To enter: or /, enter 、 by pressing H.Step 1 2 3Key QPEP S[E-1-Kana]Display あわさわ E-1-Kana List10:30or10/30 ⿟Press   after highlighting 10:30 or 10/30.
Text Entry33-7ConversionSetting Learning Future Off<Default> ON1  In text entry window, A[Menu] 7 Input Options2 Learning 7 Enter Phone Password3 OFF or OFF in Secret Mode ■Delete All Learned Words >In Step 2, Reset Learned Words 7 A[YES] 7 Enter Phone PasswordChanging Candidate Font Size<Default> Normal1  In text entry window, A[Menu] 7 Input Options2 Candidate Display Size 7 Select a sizeCanceling Prediction List<Default> ON1  In text entry window, A[Menu] 7 Input Options2 Prediction Setting 7 OFFFixing Entered Characters Automatically<Default> OFFFix character automatically after specified time elapses.1  In text entry window, A[Menu] 7 Input Options2 Character Set Time 7 Select a speed
Text Entry33-8Editing TextDeleting & Replacing1  Delete Characters within LinesPlace cursor before a character 7 KA character after cursor is deleted. ⿟Press and hold K to delete all characters after cursor. Delete Characters from the End of TextPlace cursor at the end of text 7 KA character before cursor is deleted. ⿟Press and hold K to delete all characters before cursor.2  Enter another characterCopy/Cut & PasteCopy or cut text and paste to another place.1  In text entry window, A[Menu] 7 Copy or Cut2  Select Text to Copy/CutPlace cursor before (or after) text to select 7 7 Place cursor after (or before) text 7 Select AllS[All] 73  Place cursor at target location 7 A[Menu] 7Paste
Text Entry33-9User's DictionarySave frequently used words/phrases (up to 100 entries). Saved words/phrases appear among word suggestions.Saving User's Dictionary Entries1  In text entry window, A[Menu] 7 Input Options 7 User's Dictionary2 A[Create]** When saved items exist: A[Menu] 7 Create3  Enter a word 7 Enter reading ■Edit User's Dictionary Entries >Highlight a word 7 A[Menu] 7 Edit 7 Edit word 7 Edit readingDeleting User's Dictionary Entries1  In text entry window, A[Menu] 7 Input Options 7 User's Dictionary2 A[Menu] 7 Delete 7 Select an item (See below)Item Operation/DescriptionOne  >Selected Words >Select an entry* 7 A[OK] 7 *  Repeat as required to select multiple entries. (When selected,   appears.) To cancel selection, press   again.All  >A[YES] 7 Enter Phone Password
Text Entry33-10
44-1Phone BookOverview .............................................................. 4-2Saving to Phone Book .......................................... 4-3Phone Book Entry Items ..............................................................4-3Create New Entry .......................................................................4-3Other Ways to Add New Entries ..................................................4-5Making Calls from Phone Book ...................................................4-6Setting Groups ...........................................................................4-7S! Addressbook Back-up....................................... 4-7Account Details .................................................... 4-8Editing Account Details ...............................................................4-8Advanced Features ............................................... 4-9Editing/Deleting Phone Book Entries ...........................................4-9Searching/Using Phone Book ......................................................4-9S! Addressbook Back-up Functions ...........................................4-11Account Details Functions .........................................................4-12
4-2Phone Book4OverviewSave frequently used phone numbers and mail addresses to Phone Book.NoteBack-up Important InformationKeep a separate copy of Phone Book entry information. When battery is exhausted or removed for extended periods, entries may be lost.  Handset damage may also affect data recovery. SoftBank is not liable for damages from lost/altered entries.Supplement phone numbers and mail  addresses with birthday, street address, an image or notes.Set tones/image for each entry. Sort entries into Groups.Tip#Phone Book Lock (ZP.4-10)#Phone Data Backup (ZP.9-14)#Infrared (ZP.XX-3)
Phone Book44-3Saving to Phone BookPhone Book Entry ItemsSave up to 1000 entries in Phone Book. Save phone numbers or mail addresses etc. in USIM Card Phone Book. ⿟Savable number of entries varies by USIM Card.Phone Book Entry Items Handset USIM CardLast Name/First Name ○ ○Reading ○ ○Phone Number  3 2Email Address 3 1Birthday ○ ×Address ○ ×Note ○ ×Voice Call Ringtone ○ ×Video Call Ringtone ○ ×Message Ringtone ○ ×Notification Light ○ ×Picture ○ ×Group ○ ○Secret Setting ○ ×○: Can be saved  ×: Cannot be saved ⿟Phone Book entries in USIM Card can also be used in another SoftBank handset.Creating New EntrySave new entries to handset or USIM Card Phone Book. ⿟When saving to USIM Card Phone Book, set Save Settings to USIM or Ask Each Time beforehand (ZP. X X - 1 1 ) .1   7 A[Menu] 7 New Entry ⿟When no Phone Book entries exist:  7 A[Create] ⿟When Save Settings is set to Ask Each Time : Select Phone or USIM2  Select an item (See below)Item Operation/DescriptionLast Name1Save last name. For USIM Card Phone Book, enter both first name and last name in Name >Enter Last NameFirst Name1 Save first name >Enter First NameReading Automatically entered when Last Name and First Name are entered >To edit Reading,  [Edit] 7 Edit readingHandset Phone Book
Phone Book44-4Item Operation/DescriptionPhone Number 1-31 >Enter phone number (7 For handset, select an icon)Email Address 1-31 >Enter mail address (7 For handset, select an icon)Birthday  >Enter birthdayAddress Enter postal code, country/region, state/province, city, street address or additional information >Select an item 7 Enter text 7 A[Decide] to exit Address fieldNote  >Enter noteVoice Call RingtoneSet Incoming call/message ringtone >Follow General Setting2orSelect a folder in Data Folder 7 Highlight a file  7 A[Set]Video Call RingtoneMessage RingtoneNotification LightSet Incoming call/message light color >Follow General Setting3 or select a color Picture Save a still image. Captured still images can be set >Pictures 7 Highlight a file 7 A[Set]orTake Picture 7  to shoot 7 (To delete the image: No Pictures) ⿟Saved still image appears for incoming calls. (Saved still image may not appear while using other functions.)Group  >Select a group ⿟Sort Phone Book entries by groups.Item Operation/DescriptionSecret Setting Set to show or hide saved entries >Show or Hide ⿟When Secret Setting is set to Hide, active Secret Mode to open Secret Mode entries. (ZP.XX-6)1  To save an entry, enter at least one of the fields2  Follows General Ringtone settings (ZP.XX-2)3  Follows General Notification Light settings (ZP.XX-11)3 A[Save]
Phone Book44-5Other Ways to Add New EntriesSave currently displayed phone numbers or mail addresses to Phone Book.1  Save Entered Phone NumberEnter a phone number 7 A[Menu] 7 Add to Phone Book Save from Call Log 7 Select a Call Log 7 Highlight a record 7 A[Menu] 7 Add to Phone Book Save from Sent/Received MessagesA [ ] 7 Sent Messages or Incoming Mail (7 Select a folder) 7 Highlight a message 7 A[Menu] 7 Add Destination to Phone Book or Add Sender to Phone Book2  New EntryCreate New Entry 7 Enter details (From Step 2 on P.4-3) Add to Existing EntrySelect an existing entry 7 Enter details (From Step 2 on P.4-3)3 A[Save]Setting GroupsSort entries by Group. Custom set ringtones/notifications per group. ⿟Phone Book or USIM Card Phone Book Groups appear according to Change View setting. ⿟Assign Phone Book entries to Groups (ZP.4-4); otherwise, entries will be automatically assigned to Ungrouped. Main Menu 4 Phone Book 4 Group1  Highlight a group 7 A[Menu] 7 Rename 7 Enter group name ⿟When Change View is set to USIM : Highlight a group 7 A[Rename]2 A[Menu] 7 Sound & Notification Light3  Set RingtoneVoice Call Ringtone, Video Call Ringtone or Message Ringtone 7 Follow General Setting or select a folder in Data Folder 7 Highlight a file 7 A[Set] ⿟Selecting Follow General Setting applies Ringtone settings (ZP.XX-2). Set Notification LightNotification Light 7 Follow General Setting or select a color
Phone Book44-6 ⿟Selecting Follow General Setting applies Notification Light settings (ZP.XX-11).4 A[Set] ■Switch Between Handset & USIM CardWhen Change View is set to Phone & USIM (ZP.XX-11), follow these steps to switch view. >Main Menu 4 Phone Book 4 Group 4 A[Menu] 4 Change to Group(Phone) or Change to Group(USIM) ■Reset Group Setting >Highlight a group 7 A[Menu] 7 Reset Defaults 7 Note ⿟Ringtones/Notification Light settings are unavailable for USIM Card Phone Book Groups. ⿟Ringtone/Notification Light settings for each Phone Book entry take priority.Searching/Using Phone BookChanging Phone Book Search Method<Default> A-KA-SA-TA…Search for an entry using one of these search methods: A-KA-SA-TA-NA, Reading or Group.Main Menu 4 Phone Book 4 Settings 4 Search Method1  Select a search method Note ⿟Alternatively, for A-KA-SA-TA... and Reading,   7 A[Menu] 7 Search Method. Making Calls from Phone Book ⿟To change search method: ZAbove1 2  Search Phone Book (See below)Search Method Operation/DescriptionA-KA-SA-TA...  >Select a page of the required reading ⿟Alternatively, select a page by entering reading.Reading  >Enter a required readingGroup  >Select a group3  Select an entry
Phone Book44-74  Voice CallsHighlight a phone number 7 J Video CallsHighlight a phone number 7 D International CallsHighlight a phone number 7 A[Menu] 7 Call 7 International Call 7 Select a country/region 7 Voice Call: J / Video Call: D ■Show/Hide Caller ID >In Step 4, highlight a number 7 A[Menu] 7 Call 7 Show Number or Hide Number 7 Voice Call: J / Video Call: D ■Open Phone Book Entries in Standby (Quick Phone Book Search) >In Standby, press and hold P - O to open entries assigned to that key.Example: "NA" page: Press and hold T ⿟When pressing key for page without any entry, the next page with entries appears. ⿟Change One Touch Key setting to Speed Dial. (ZP.XX-5)Sending Messages from Phone Book1   7 Select an entry2  Use Mail AddressSelect a mail address Use Phone Number*Highlight a phone number 7 A[Menu] 7 Create Message 7 S! Mail or SMS* SoftBank handset numbers only3  Create a message (S! Mail: ZFrom Step 4 on P.XX-4/SMS: ZFrom Step 4 on P.XX-8)
Phone Book44-8Speed DialSet phone numbers to Speed Dial for easy dialing. ⿟Set One Touch Key setting to Speed Dial beforehand (ZP.XX-5). Main Menu 4 Phone Book 4 Speed Dial1  Select a key number [1] - [9] ⿟To enter phone number directly: Highlight a key number [1] - [9] 7 A[Edit] 7 Enter a number2  Select a Phone Book entry 7 Select a phone number Note ⿟When Secret setting is set to Show, Secret Mode entry numbers can be set to Speed Dial. While Secret setting is set to Hide, the numbers assigned to Secret Mode entries appear as Empty, and may be overwritten.Using Phone Book ■Using Phone Book Entries ⿟Some functions may not be available depending on entries/entry items. > 7 (Highlight an entry 7 ) A[Menu] 7 Select an item (See below)or > 7 Select an entry 7 (Highlight an item 7 ) A[Menu] 7 Select an item (See below)Item Operation/DescriptionView View detailsCall Make calls >Select an item 7 Operate selected item (ZFrom Step 3 on P.2-11)Create MessageCreate New S! Mail/SMS >S! Mail or SMS 7 Create a message (S! Mail: ZFrom Step 4 on P.XX-4/SMS: ZFrom Step 4 on P.XX-8)Edit  >Select an item 7 Edit entry 7 A[Save] ⿟Deleting Birthday/Address/Picture (ZP.4-9)New Entry (ZP.4-3)Send Send Phone Book entries via S! Mail/Infrared >Attach to S! Mail or Infrared 7 Operate selected item (S! Mail: ZFrom Step 2 on P.XX-4/Infrared: ZP.XX-3)Change View Select Phone Book to open >Select an itemSearch Method (ZP.4-6)
Phone Book44-9Item Operation/DescriptionSpeed Dial Set phone numbers to Speed Dial (ZP.4-8) for easy dialing >(Select a number 7) Select a key number ([1] - [9])Copy to USIM/Copy to Phone (ZP.4-10)Delete  >A[YES]Managing Phone BookEditing Phone Book Entries1   7 Highlight a Phone Book entry 7 A[Menu] 7 Edit2  Edit entry 7 A[Save] ■Delete Birthday >Highlight Birthday field 7 A[Menu] 7 Clear Birthday ■Delete All Items in Address Field >Highlight Address field 7 A[Menu] 7 Clear Address ■Delete Picture >Select Picture field 7 No PicturesDeleting Phone Book EntriesDeleting a Phone Book Entry1   7 Highlight a Phone Book entry 7 A[Menu]2 Delete 7
Phone Book44-10Deleting All Phone Book Entries Main Menu 4 Phone Book 4 Memory Manager 4 Delete All(Phone) or Delete All(USIM)1 A[YES] 7 Enter Phone PasswordCopying Phone Book Entries ⿟Entry items unsupported by USIM Card are not copied.Copying One by One1   7 Highlight a phone Book entry 7 A[Menu] 7 Copy to Phone or Copy to USIM** Warning message appears when copying entry items unsupported by USIM Card.Copying All Entries Main Menu 4 Phone Book 4 Memory Manager 4 Copy All from USIM or Copy All to USIM1 Phone Book Lock<Default> OFFWhile Phone Book Lock is active, saving new entries, viewing, changing settings, etc. are restricted. ⿟When Phone Book Lock is active,   appears. When Phone Book Lock and Messaging Lock are both active,   appears. Main Menu 4 Settings 4 Security 4 Phone Book Lock1 ON or OFF ⿟For ON, press 2  Enter Phone Password Note ⿟Call Log, My Details, S! Address Book and Phone Book backup to Memory Card are available while Phone Book ⿟Lock is active.Phone Book Memory Status Main Menu 4 Phone Book 4 Memory StatusView handset/USIM Card Phone Book memory status.
Phone Book44-11S! Addressbook Back-upBack up Phone Book entries to S! Addressbook (network server); synchronize handset Phone Book with S! Addressbook; restore Phone Book after accidental loss/alteration. ⿟Separate subscription is required for this service.Notes ⿟Fully charge battery beforehand (  appears). ⿟Transmission fees apply to synchronization, backup and restoration. ⿟Restoration cancels these Phone Book settings: Ringtone, Notification Light, Picture ⿟S! Addressbook is deleted upon contract termination. ⿟Addresses saved in Address field on handset Phone Book are saved to building name field in S! Addressbook. ⿟When number of characters saved in S! Addressbook exceeds maximum number of characters savable on handset Phone Book, excess characters do not appear on handset Phone Book. ■Synchronization/Back-up/Restoration ⿟Be careful of back-up/restoration timing or selecting a synchronization direction. ⿟When no handset Phone Book entries exist, selecting Synchronize, Sync from Phone or Backup to Server deletes S! Addressbook. ⿟When no S! Addressbook Back-up exist, selecting Synchronize, Sync from Server or Restore from Server deletes all handset Phone Book entries. ■Capacity Disparities ⿟When the number of savable items varies between handset Phone Book and S! Addressbook, synchronization reflects lower limit. ■Transfer to New Handsets ⿟S! Addressbook Back-up-compatible 3G Handsets: Data remains. ⿟Other 3G Handsets: Service subscription and data remains, but data is not accessible via handset (accessible via PCs). ⿟V3/V4/V5/V6/V8 Series: Service subscription is terminated and data is deleted.
Phone Book44-12Manual SynchronizationMain Menu 4 Phone Book 4 S! Addressbook Back-up 4 Start Sync1   7 Enter Phone Password2  Select an item (See below)Item Operation/DescriptionSynchronize Synchronize handset Phone Book with S! AddressbookSync from PhoneSend edited data to S! AddressbookSync from ServerReceive edited data from S! AddressbookBackup to ServerBack up handset Phone Book to S! AddressbookRestore from ServerRestore S! Addressbook to handset Phone Book3 Auto Synchronization Main Menu 4 Phone Book 4 S! Addressbook Back-up 4 Auto Sync Settings1  Enter Phone Password 7 ON/OFF 7 ON2 Start Time 7 Set start time3 Repetition 7 Select a repetition type (See below)Item Operation/DescriptionWeekly Synchronize weekly at specified time of the day >Select a dayMonthly Synchronize monthly at specified time of the date >Enter a dateAfter Modification of Phone BookSynchronize ten minutes after entries are edited4 Sync Mode 7 Select a Sync type 7   7 A[Save]View Sync LogView synchronization/back-up/restoration logs.Main Menu 4 Phone Book 4 S! Addressbook Back-up 4 Sync Log1  Select a log
Phone Book44-13Account DetailsSave phone number, mail address, street address, etc. in Account Details.Editing Account Details1   7 P2 A[Menu] 7 Edit 7 Select an item 7 Edit ⿟Phone Number 1 cannot be edited or deleted.3  Enter required items 7 A[Save] ■Delete Items Except Phone Number 1 >After Step 1, A[Menu] 7 Reset 7 Account Details Functions ■Send Account Details via S! Mail/Infrared >In Standby,   7 P 7 A[Menu] 7 Send 7 Attach to S! Mail or Infrared 7 Operate selected item (S! Mail: ZFrom Step 2 on P.XX-4/Infrared: ZP.XX-3) ⿟Images cannot be sent.
Phone Book44-14
5-15CameraBefore Using Camera ............................................ 5-2Image File Formats .....................................................................5-2Notes .........................................................................................5-2Camera ......................................................................................5-2Camera Display Indicators ...........................................................5-3Pictures/Videos ..................................................... 5-5Capturing Still Images.................................................................5-5Recording Videos ........................................................................5-6Functions Available while Shooting .............................................5-7Viewing Saved Images ......................................... 5-9Sending Images/Videos .............................................................5-10Magnifying Loupe............................................... 5-10
5-2Camera5Before Using Camera840P features approximately Two Mega Pixel CMOS  Auto-focus Camera capable of capturing still images and videos.Image File FormatsCaptured images/videos are saved to Data Folder.Image Type File Format Save Location Storage*Still images JPEG (.jpg) Pictures Approx. 1000Videos MPEG-4 (.3gp) Videos Approx. 130* Storage size is based on default settingsNotes ⿟Remove dust/debris from lens cover with a soft cloth. ⿟Handset movement may blur images; hold handset firmly. ⿟Capturing/saving images immediately after handset has been left in a hot place may affect image quality. ⿟Exposing lens to direct sunlight may affect image quality.Shutter Click ⿟Shutter click sounds at fixed volume even in Manner Mode. ⿟To change shutter click sound: ZP.5-8CameraPress F in Standby to activate Camera, or press S in Picture Preview Window to activate Video Camera; press and hold F in Standby to activate Magnifying Loupe (ZP.5-10).Note ⿟Alternatively, Main Menu 4 Camera 4 Camera, Video Camera or Magnifying Loupe. ⿟Camera is not available when battery is low. ⿟Incoming calls, Alarm and low battery cancel Camera. Captured images/recorded video clips are retained. ⿟When left in preview window for three minutes, Camera is canceled and previous window returns.Camera
5-3Camera5Camera Display Indicators ■Picture Preview Window ⿟Press P to open key assignment guide. Item Description Operation❶Save to  Phone    Memory Card Q❷Size  UXGA    SXGA    VGA   QVGA    QQVGA    Wallpaper W❸Quality  Super Fine    Fine   Normal E❹Multi Shot (ZP.XX-5)  Multi Shot RNight Mode (ZP.XX-8)  Night Mode Y❺Self-Timer (ZP.XX-7)  5 seconds    10 seconds T❻White Balance (ZP.XX-8)  Automatic    Fine   Cloudy   Light Bulb I❼Focus Setting  Auto Focus   Close-up    Scenery❽Focus Guide(ZP.XX-7) Adjust focus automatically –❾Effect(ZP.XX-8) Normal/ Sepia/Monochrome/Negative U󱀓Zoom Indicate zoom level (Level 1-25) to zoom in/ to zoom out ⿟Long press:  continuous zoom󱀔Auto Focus Lock Lock focus on the subject  to set Auto Focus Lock󱀕Brightnes Adjust brightness (Level -2 - +2) H Brighter/G darker❶❽❾󱀓󱀔 󱀕❷ ❸ ❹ ❺❻ ❼
5-4Camera5 ■Video Preview Window ⿟Press P to open key assignment guide.❶❽ ❾❷ ❸❹❺ ❻❼Item Description Operation❶Save to  Phone    Memory Card Q❷Quality    Super Fine   Fine      NormalE ⿟ Available only when Recording Time is set to Extended Video.❸Recording Time  Attach to S! Mail    Extended Video W❹Self-Timer (ZP.XX-7)  5 seconds    10 seconds T❺White Balance (ZP.XX-8)  Automatic    Fine Cloudy    Light Bulb I❻Focus Setting  Close-up    Scenery❼Effect (ZP.XX-8) Normal/ Sepia/Monochrome/Negative U❽Brightness Adjust brightness (Level -2 - +2) H Brighter/ G darker❾Zoom Indicate zoom level (Level 1-25)  to zoom in/ to zoom out ⿟Long press: continuous zoom
5-5Camera5Pictures/Videos ⿟Confirm battery strength (ZP.1-9) and memory (ZP.6-8) before recording. When battery is low, video cannot be recorded.Capturing Still Images1 Press F to activate Camera2 Frame subject3 [Shoot] to capture the imageCamera automatically focuses on subject before capturing image.Shutter click sounds at fixed volume.4 [Save] ⿟To return to preview window without saving the image: K5 L to exitReturn to Standby.Note ⿟Data Folder opens when Phone memory becomes full. Delete files; image is automatically saved. ⿟If save location is set to Memory Card (ZP.6-9) and memory becomes full, image is saved to Phone memory automatically.Picture Preview WindowContinuous ShootingCapture a succession of 15 still images automatically with a single press. ⿟Picture size is fixed to QVGA (240x320). ⿟When Multi Shot is ON, Night Mode is set to OFF automatically.1  In Picture Preview Window, R2  Frame subject 7 [Shoot]Image thumbnails appear. ⿟To stop shooting halfway: K ⿟To return to preview window without saving the image: S[Delete] 7 Go to Step 13  To view captured images,   to highlight an imageFull-size image appears. ⿟ to toggle full-size images.4  When Viewing a Full-size ImageA[Save All] or  [Save] ⿟Press  [Save] to save the full-size image. When Viewing Thumbnailed ImagesA[Menu] 7 Save All Pictures or Save This One Only
5-6Camera5Recording Videos1 F 7 S to activate Video Camera2 Frame subject3 [Record] to start recordingTone sounds.4 [Stop] to end recordingTone sounds. ⿟Recording stops automatically at maximum recording time. ⿟To return to preview window without saving the image: S[Back] ⿟To review clip: Playback5 To save the video clip, select Save to Data Folder6 L to exitReturn to Standby.Note ⿟If Phone memory becomes full, Data Folder opens. Delete files; image is automatically saved. ⿟If Save to is set to Memory Card (ZP.5-9), file is saved to Memory Card automatically. To delete the saved file, select Delete.Video Preview WindowFunctions Available while ShootingFrom Camera: FVideo Camera: F 7 S ■Auto Focus LockTo focus on an off-centered subject, lock focus on the subject and recompose your picture. ⿟Check if Focus Setting is set to Auto Focus (ZP.5-3). >Adjust Focus Guide to subject 7   7 When focus is on subject, recompose your picture 7 [Shoot] 7 [Save] ⿟When in focus, handset sounds and Focus Guide turns green. ⿟To try again: K ■Self-Timer >T 7 Frame subject 7 [Shoot]/[Record] ( 7 For Video Camera, [Stop]) 7 [Save] or Save to Data Folder ⿟Self-Timer tone sounds. After set period of time, shutter is released and capturing starts. ⿟Press T to toggle 5 seconds, 10 seconds and OFF. ⿟When Self-Timer is active, press S[Cancel] to return to preview window without canceling Self-Timer. ⿟Incoming calls or Alarm cancel image capture. Self-Timer is canceled and previous menu returns.
5-7Camera5Still ImageSize Zoom Level Max. Ratio (Approx.)UXGA(1200x1600) – –SXGA(960x1280) 1 level 1.3 timesVGA(480x640) 25 levels 2.5 timesQVGA(240x320) 25 levels 5.0 timesQQVGA(120x160) 25 levels 10.0 times壁紙(240x427) 25 levels 3.7 timesVideo (Attach to S! Mail)Recording Time (Approx.) Quality (Dots) Max. Ratio (Approx.)Phone Memory Card30 seconds 30 seconds Normal (176 x 144) 6.8 timesVideo (Extended Video)Recording Time (Approx.) Quality (Dots) Max. Ratio (Approx.)Phone Memory Card160 seconds 60 minutes Normal (176 x 144) 6.8 times85 seconds 60 minutes Fine (176 x 144) 6.8 times30 seconds 45 minutes Super Fine (352 x 288) 3.4 times ⿟Video Camera zoom level: 1 - 25 ⿟Record video in well-lit conditions. ⿟Pictures/Videos folder shares memory with Pictures, Sounds, S! Appli, etc. in Data Folder. Saved still images, S! Appli, etc. reduce available memory for pictures/videos. ⿟The number of files that can be saved to Memory Card depends on the capacity of the card in use.
5-8Camera5Viewing Saved ImagesMain Menu 4 Data Folder1  Open PicturesPictures Open VideosVideos2  Select a fileSelected image appears. ■Open Pictures Saved on Memory Card >After selecting Pictures in Step 1, select Switch to DigitalCamera 7 Select a folder ■Open Videos Saved on Memory Card >After selecting Videos in Step 1, select Switch to Video Camera 7 PRL folderTip#Editing Still Images (ZP.9-17)Example: PicturesMagnifying LoupeUse handset as a magnifying glass. Enlarged image appears on Display at camera's maximum zoom level.1  Press and hold F ⿟When in focus, handset sounds and Focus Guide disappears. ⿟To try again:  ⿟To adjust brightness: G or H ⿟To adjust zoom:  ⿟Frame subject from as close ten centimeters. If focus detection stalls, adjust distance from subject by moving handset.
6-16News/EntertainmentS! Quick News (Japanese) .................................... 6-2Registering S! Quick News Items ................................................6-2Opening New Information ..........................................................6-2Media Player......................................................... 6-4Downloading Music/Video ................................... 6-5Downloading Music (Chaku-Uta®/Chaku-Uta Full®)/Video ...........6-5Music Search ..............................................................................6-5Using Media Player............................................... 6-6Playback Window Indicators .......................................................6-6Playing Music (Audio Player) .......................................................6-6Playing Video (Video Player) ........................................................6-8Playback Window Operations ......................................................6-9Available Functions in Media Player ............................................6-9Using Playlist ............................................................................6-10Playlist Functions ......................................................................6-11E-Books (Japanese) ............................................. 6-12S! Information Channel/Weather (Japanese) ...... 6-13Registering/Canceling ...............................................................6-13Using S! Information Channel ...................................................6-14Using Weather Indicator ...........................................................6-14
6-2News/Entertainment6S! Information Channel/Weather (Japanese)Subscribe to content and periodically receive updates. Set Weather Indicator to appear on Standby. ⿟Transmission fees apply for updates.Registering/CancelingMain Menu 4 Entertainment 4 S! Information Channel/Weather1 Register/CancelHandset connects to the Network.Follow onscreen instructions.Using S! Information Channel ⿟Up to seven updates are saved.Viewing New InformationWhen information arrives,   and Information window appears in Standby.1  In Information window, New S! Information ChannelInformation appears.Follow onscreen instructions. ⿟Option Menu Items (ZP.XX-13) ■Manually Retrieve Information >Select S! Information Channel in Information window. ⿟Alternatively, Main Menu 4 Entertainment 4 S! Information Channel/Weather 4 Get Latest Contents. ■Hide Information Window >Main Menu 4 Entertainment 4 S! Information Channel/Weather 4 Missed Event settings(S! Information Channel) 4 OFF
6-3News/Entertainment6Note ⿟Alternatively, Main Menu 4 Entertainment 4 S! Information Channel/Weather 4 What's New?.Viewing Previously Received Information Main Menu 4 Entertainment 4 S! Information Channel/Weather1 History 7 Select a date for unread news and   for read news appear.Using Weather IndicatorWeather Indicator for current forecast area appears in Standby. Information window appears for weather updates. Select New Weather to view details.Weather IndicatorIndicators are updated periodically.Example)   Clear,         Rain, and thunderstorm later,       Cloudy with occasional snow etc. ⿟Indicators other than the above also appear for more information. ■Manually Update Weather Indicator >Select Weather in Information window. ⿟Alternatively, Main Menu 4 Entertainment 4 S! Information Channel/Weather 4 Weather Indicator 4 Manual Update. ■Hide Information Window >Main Menu 4 Entertainment 4 S! Information Channel/Weather 4 Weather Indicator 4 Missed Event settings(Weather) 4 OFFNote ⿟Alternatively, view forecast details from Main Menu 4 Entertainment 4 S! Information Channel/Weather 4 Weather Indicator 4 Weather.Hiding Weather IndicatorMain Menu 4 Entertainment 4 S! Information Channel/Weather 4 Weather Indicator 4 Display Settings1 OFF ⿟When Display Settings is set to OFF, update is also deactivated.
6-4News/Entertainment6S! Quick News (Japanese)Add news headlines, weather forecasts, etc. via S! Quick News List to scroll across Standby Window. ⿟Standby Window: ZP.1-18 ⿟Registering or viewing S! Quick News incurs transmission fees. No fees apply for viewing ticker information. For more information, visit SOFTBANK MOBILE Corp. Website (http://www.softbank.jp).Registering S! Quick News Items ⿟Register one News Flash, up to four General news and one Special news.Main Menu 4 Entertainment 4 S! Quick News 4 S! Quick News List1 Register from hereYahoo! Keitai connects and contents list appears.2  Select an item 7 Follow onscreen instructions.Opening New InformationViewing New Information in StandbyWhen new information is received,   appears in Standby.1   to highlight tickerInformation (up to three lines) appears above ticker.2   to check contentContent list appears.3  Select informationDetails appear.TipSettings   #Show Only Unread Items in Standby #Change Marquee Speed #Show Image Data (ZP.XX-14)
6-5News/Entertainment6Opening S! Quick News List/S! Loop ListMain Menu 4 Entertainment 4 S! Quick News 4 S! Quick News List or S! Loop List1  Select an itemContent list appears.2  Select informationDetailed information appears.3  To connect to the Network, select a title ■Update Manually >In Step 1, A[Menu] 7 Update 7 One or All 7  ■View Summary >In Step 1, highlight information 7 A[Menu] 7 Summary Display ■Delete Registered Items >In Step 1, (highlight information 7 ) A[Menu] 7 Delete 7 One or All ( 7 For All, enter Phone Password)TipSettings   #Automatically Update S! Quick News List #Delete S! Quick News Information (ZP.17-12)E-Books (Japanese)Use BookSurfing® to acquire/view e-books, comics, photo books, etc.), or e-Book Viewer to view XMDF files on handset. ⿟BookSurfing® and e-Book Viewer are S! Appli. ⿟Download Content Keys (ZP.XX-6) to read CCF/XMDF files. ⿟Some copy protected files have extensions different from the ones below.Application File FormatBookSurfing®CCF (.ccf)e-Book Viewer XMDF (.zbf, .zbk, .zbs) ⿟Some PC content may not be viewable via e-Book Viewer.
6-6News/Entertainment6Main Menu 4 Entertainment1 BookSurfing or e-Book Viewer ⿟See application Help menu for usage information. Note ⿟When an S! Appli is paused, Confirmation appears; A[YES] to end it and launch BookSurfing® or e-Book Viewer. ⿟Launch BookSurfing®/e-Book Viewer via S! Appli, or select a file from Books in Data Folder. ⿟Compatible file titles appear in Books;   appears next to incompatible files. ⿟For Option menu details: ZP.XX-8 ⿟When purchasing a new handset, move CCF/XMDF files via Memory Card. However, if CCF/XMDF files are copy protected, Content Keys backup may be needed (ZP.XX-17). Some contents require another Content Key after being moved/copied to a new handset or can not be moved/copied at all.
7-17Media PlayerOverview .............................................................. 8-2Downloading Music .............................................. 8-2Downloading Chaku-Uta Full® ....................................................8-3Transferring WMA Files ...............................................................8-3Using Music Player ............................................... 8-4Playback Window Indicators .......................................................8-4Playing Music .............................................................................8-4Playback Window Operations ......................................................8-5Using Play List ............................................................................8-6Advanced Features ............................................... 8-7Chaku-Uta Full®/WMA List ..........................................................8-7Available Functions in Music Player  ............................................8-8Play List .....................................................................................8-8
7-2Media Player7Media PlayerPlay music (Audio Player) or video clips (Video Player) saved on handset/Memory Card. ⿟Playlist: ZP.7-8Notes ⿟Files may not play due to file support issues or Memory Card status, etc. ⿟When battery is low, Media Player cannot play files. ⿟When playing files, Notification Light flashes. ⿟Playback stops for incoming calls, Alarm and low battery. ⿟If messages are received while Media Player is active, Notification Light flashes with a second of vibration and   appears in Playback window, but ringtone does not sound. ⿟Notification Light/Charging Indicator lights during playback; playback notification light does not light.Copy Protected FilesCopy protected files may not play, be saved or forwarded. To play acopy protected file, obtain Content Key (ZP.8-6).Confirm file expiry date or usage limitations (ZP.7-8).Saving Music Files on PCsWhen saving music files to Memory Card via PC or other devices for use with 840P, observe the following guidelines: ⿟Copyrighted Works・ Do not infringe on third party/intellectual property rights.・ Memory Card music files are limited to private use. ⿟Save files to specified Memory Card directory (ZP.8-17)
7-3Media Player7Downloading Music/VideoDownloading Music (Chaku-Uta®/Chaku-Uta Full®)/VideoAccess websites directly from Media Player to download music (Chaku-Uta®/Chaku-Uta Full®) or video files. ⿟View details (price, expiry date, etc.) on source website. Main Menu 4 Entertainmen 4 Media Player1  Download Music (Chaku-Uta®/Chaku-Uta Full®)Audio 7 Download Music 7  Download VideoVideo 7 Download Video 7 Handset connects to the Network and Download site appears. ⿟Follow onscreen instructions to download media files.Music SearchSearch by artist or title to download music files. Main Menu 4 Entertainmen 4 Media Player 4 Audio 4 Music Search1  ⿟Follow onscreen instructions to download music files.
7-4Media Player7Using Media PlayerPlayback Window IndicatorsNote ⿟Titles or artist names may not appear depending on files.  Play All  Play Once  Repeat Track  Continuous Play  Random PlayPlayback Mode Indicators ⿟Change playback mode: ZP.XX-9VolumeFile Number/ Total FilesElapsed Time/Total TimeProgress BarArtistTitlePlaying Music (Audio Player) ■Supported File FormatsFile Format ExtensionsMPEG-4 File AMR-NB .3gp.mp4.m4aAAC-LCaacPlusEnhanced aacPlusSMC .smc ⿟Some files may not play even if format is supported. ⿟Some copy protected files have extensions different from the ones above. ⿟Copy protected files do not play after license expiry (Content Key: ZP.XX-6).
7-5Media Player7Main Menu 4 Entertainment 4 Media Player 4 Audio1  Select an item (See below)Item Operation/DescriptionAll Select files from handset & Memory CardMusic Select files from Music folderRing Song Select files from Ring Song folderPlaylist Select group of files saved to a Playlist >Select a Playlist ⿟Press   to select files from Memory Card.2  Select a fileSelected file plays. ⿟Playback Window Operations: ZP.7-93  To end playback, L or S[Back] 7 S[NO] ⿟To return to Playback window: K ■Change Playback Position >During playback, A[Menu] 7 Set Playback Position 7 Enter time to start playbackBackground MusicListen to music while using other handset functions.1  While music plays, K/S[Back] 7  ⿟To cancel Background Music: In Standby, L 7 Note ⿟S! Appli, etc. are unavailable. ⿟While Background Music plays, volume level and playback mode settings cannot be changed. ⿟Alternatively, Main Menu 4 Entertainment 4 Media Player 4 Audio 4 Display playback Screen 4 K/S[Back] 4 S[NO].Playing SMC FilesPlay SMC (Softbank Music Content) files; CD jackets and lyrics appear during playback.The first jacket appears when playback starts. ⿟When   appears, press P to toggle jacket window and lyric window. ⿟To view next or previous jacket/lyric window, press H or G.
7-6Media Player7Playing Video (Video Player) ■Supported File FormatsFile Format ExtensionsMPEG-4  3gp .mp4H.263 ⿟840P supports Sub-QCIF, QCIF, QVGA, CIF and video files recorded by SoftBank handsets to send via S! Mail. ⿟Playing QVGA video switches display to Full Screen (ZRight), and image rotates 90°. Press P to switch to normal Playback window. ⿟Some files may not play even if format is supported. ⿟Some copy protected files have extensions different from the ones above. ⿟Copy protected files do not play after license expiry (Content Key: ZP.XX-6).Main Menu 4 Entertainment 4 Media Player 4 Video1  Select an item (See below)Item Operation/DescriptionAll Select files from handset & Memory CardVideo Folder Select files from Videos folderPlaylist Select group of files saved to a Playlist ⿟ to select Memory Card/Video Camera folder files.2  Select a fileSelected file plays. ⿟Playback Window Operations: ZP.XX-93 L to exitFull Screen PlaybackPress P to switch to Full Screen during playback. Playback window rotates 90°. ⿟To return to Normal Screen, press P again. ⿟Press T in Full Screen mode to rotate Playback window 180°. To return to Normal Screen, press T again. ⿟Last Playback window selected appears first.
7-7Media Player7Playback Window OperationsAdjust Volume1Replay Track  ⿟Play previous within first three seconds of a track.Play Previous  twice (once, within first threeseconds of a track)Play NextRewind2Press and hold Forward2Press and hold Pause/ResumeStop Music: S twice or L 7 SVideo: S or LView Next Jacket/Lyric3HView Previous Jacket/Lyric3GSwitch Jacket/Lyric Display3PShow Full Screen4PRotate Playback window 180° in Full Screen mode4T1  Media Player activates at last used volume level.2   Rewind/Forward may be unavailable when playing files via other applications.3  Supports during SMC file playback only4  Supports during video playback onlyAvailable Functions in Media Player ■Change Playback Mode<Default> Play All ⿟Confirm playback mode settings in Playback window (Playback Mode Indicators: ZP.XX-6). ⿟Media Player activates in last used mode. >Main Menu 4 Entertainment 4 Media Player 4 Audio or Video 4 Playback Mode 4 Select a mode (See below)Item Operation/DescriptionPlay All Play all files in selected folder/PlaylistPlay Once  Play selected fileRepeat Track  Repeat selected fileContinuous Play Repeat all files in selected folder/PlaylistRandom Play  Play selected folder/Playlist files randomly
7-8Media Player7 ■Options >During playback, A[Menu] 7 Select an item (See below)Item Operation/DescriptionPlayback/Pause Play or pause filesPlayback Mode Select playback mode (ZP.XX-9)Display Jacket/Display Lyric1Show lyric or jacketNext Jacket/Next Lyric1Show next jacket or lyricPrevious Jacket/Previous Lyric1Show previous jacket or lyricFull Screen (Video)/Normal Screen2Select display size for video playbackUpside down(Full Screen)2Rotate Full Screen Playback 180°Set Playback PositionStart playback from specified pointConnect to URL3Open site link; music plays as BGMProperty Show file detailsHelp Show Playback window key assignments1  Supports during SMC file playback only2  Supports video playback only3  May not be available for some filesUsing PlaylistUse Playlists to organize Data Folder music/video files. Select Ring Songs&Tones, Music or Videos folder files to create Playlist links to each file in its original folder.Note ⿟A single Playlist cannot contain both music and video files, or files from both handset and Memory Card. ⿟Some files can not be added to Playlist.
7-9Media Player7Creating New Playlists ⿟Create up to 30 Playlists on handset and Memory Card each. ⿟Add up to 99 files to a single Playlist. Main Menu 4 Entertainment 4 Media Player 4 Audio or Video 4 Playlist1 A[Menu] 7 Create Playlist2  Enter a Playlist nameA new Playlist is added to top of list.3  Select a Playlist 7 A[Menu] 7 Add4  Add Files to Music PlaylistsMusic or Ring Song 7 Select a file Add Files to Video PlaylistsSelect a file ⿟To play back Playlist: ZP.XX-7, P.XX-8Playlists WindowPlaylist Functions ■Functions Available in Playlist WindowMain Menu 4 Entertainment 4 Media Player 4 Audio or Video 4 Playlist 4 (highlight a Playlist 4) A[Menu] 4 Select an item (See below)Item Operation/DescriptionSelect Select a PlaylistPlayback Mode Change playback mode (ZP.XX-9)Create Playlist Create new Playlists (ZLeft)Edit Playlist NameChange Playlist name >Edit nameDelete Delete Playlists (ZP.XX-12) ■Change Playlist OrderMain Menu 4 Entertainment 4 Media Player 4 Audio or Video 4 Playlist 4 Select a Playlist  4 Highlight a file 4 A[Menu] 4 Change Order 4 Select new playback order ⿟The Playlist moves to above the selected order
7-10Media Player7Deleting Playlists/FilesFrom Main Menu 4 Entertainment 4 Media Player 4 Audio or Video4 Playlist ■Delete Playlists >Follow the steps belowItem Operation/DescriptionOne  >Highlight a Playlist 7 A[Menu] 7 Delete 7 One 7 A[YES]Selected items  >A[Menu] 7 Delete 7 Selected Files 7 (Select Playlists)* 7 A[OK] 7 A[YES]* To cancel selection: All  >A[Menu] 7 Delete 7 All 7 A[YES] 7 Enter Phone Password ■Delete Files in a Playlist >Select a Playlist 7 Follow the steps belowItem Operation/DescriptionOne  >Highlight a file 7 A[Menu] 7 Delete 7 One 7 A[YES]Selected items  >A[Menu] 7 Delete 7 Selected Files 7 (Select files)* 7 A[OK] 7 A[YES]* To cancel selection: All  >A[Menu] 7 Delete 7 All 7 A[YES] 7 Enter Phone Password
8-18Managing FilesData Folder ........................................................... 8-2Data Folder Structure ..................................................................8-2Opening Files ........................................................ 8-4Viewing & Playing Files ...............................................................8-4File Display/Playback Functions ...................................................8-6Options ......................................................................................8-7Using/Editing Files ................................................ 8-9Using Files ..................................................................................8-9Editing Still Images ...................................................................8-10Managing Folders & Files ................................... 8-11Managing Folders/Files .............................................................8-12Memory Card ...................................................... 8-14Memory Card Installation .........................................................8-14Formatting Memory Card ..........................................................8-15Viewing Memory Card Files ......................................................8-16Handset Data Backup ...............................................................8-17PC File Transfers .......................................................................8-19
8-2Managing Files8Data FolderSave, play and manage files downloaded from Internet, etc. ⿟Access websites directly from Pictures, My Pictograms, Graphic Mail Pictures, Ring Songs&Tones, S! Appli, Music, Videos, Books, S! Familiar Usability and Templates folders, and download files to handset.Data Folder StructureFolder Data File Format Saved toPicturesStill images captured by handset or downloaded still images, etc.JPEG (.jpg/.jpeg/.jpe/.jfif), GIF (.gif),PNG (.png), BMP (.bmp), WBMP (.wbmp)JPEG (.jpg) saved in Digital CameraPhoneMemory Card*Digital Camera*My Pictograms folder:Downloaded My Pictograms GIF (.gif), GPK (.gpk) PhoneMemory Card*Graphic Mail Pictures folder:Downloaded Graphic Mail Pictures JPEG(.jpg、.jpeg、.jpe、.jfif)/GIF(.gif) PhoneMemory Card*Ring Songs&Tones Downloaded sound files or sounds recorded by Voice Recorder, etc.SMAF (.mmf), SP-MIDI (.mid/.midi),Mobile XMF (.mxmf), AMR-NB (.amr),MPEG-4 (.3gp/.mp4/.m4a)PhoneMemory Card*S! Appli S! Appli (ZP.XX-1) Java PhoneMemory Card*Music Downloaded music files, etc. MPEG-4 (.3gp/.mp4/.m4a/.smc) PhoneMemory Card*Videos Video clips recorded by handset or downloaded video files, etc. MPEG-4 (.3gp/.mp4)PhoneMemory Card*Video Camera*Books E-comics, etc. CCF (.ccf), XMDF (.zbf/.zbk/.zbs) PhoneMemory Card*S! Familiar Usability S! Familiar Usability applications (ZP.1-21) UIE (.uie) PhoneMemory Card*Templates Graphic Mail Templates (ZP.XX-6) HTML (.hmt) Phone
8-3Managing Files8Folder Data File Format Saved toFlash(R)Downloaded Flash® image filesSWF (.swf) PhoneMemory Card*Flash(R) Ringtones folder:Downloaded Flash® sound filesOther Documents Other files Other format files PhoneMemory Card** Available only when Memory Card is installed ⿟Some copy protected files have extensions different from above.Note ⿟These folders can be opened from other functions. S! Appli: Main Menu 4 S! Appli (ZP.XX-1)Templates: Main Menu 4 Messaging 4 Templates (ZP.XX-6) ⿟840P does not support Progressive JPEG files.
8-4Managing Files8Using Copy Protected FilesPlaying/forwarding/saving may be restricted and Content Key (ZP.9-6) may be required for usage.See File Properties (ZP.XX-6) to confirm restrictions such as expiry term or usage limitation. ⿟ or   (Silver) appears for copy protected files requiring Content Keys.  files are inaccessible. ⿟Files downloaded on handset cannot be used on PCs. ⿟Network setting may be required for usage. ⿟File usage may require insertion of USIM Card in use at time of download. ⿟840P holds up to 1000 Content Keys. Multiple Keys may be required to use a file. Expired Keys are deleted automatically. ■View Current Memory Status >Main Menu 4 Data Folder 4 Memory Status 4 Phone or Memory CardOpening FilesViewing & Playing FilesMain Menu 4 Data Folder1  Select a folderPictures and Videos appear in Thumbnail view by default. 2  Select a fileFile appears/plays.To Digital Camera FolderTo Download SiteTo Download SiteTo Memory Card FolderTo Memory Card FolderTo Phone FolderPictures (Thumbnail) Ring Songs&Tones (List)
8-5Managing Files8Changing Memory View ⿟In List view,   to switch views, Phone, Memory Card, DigitalCamera1 or Video Camera2. ⿟In Thumbnail view, select   (Memory Card),   (Digital Camera)1 or   (Video Camera)2. To return to handset memory, select   (Phone).1  In Pictures folder only2  In Videos folder only ■Change Folder ViewSelect Thumbnail or List for Pictures or Videos view. >In Step 1, Pictures or Videos 7 A[Menu] 7 More 7 Change View 7 Thumbnail or ListNote ⿟Some still images may not appear, or may be reduced in size depending on image or file size. ⿟840P supports MPEG-4 and H.263 formats, and Sub-QCIF, QCIF, QVGA and CIF size. Video files that were recorded by SoftBank handsets and can be sent via S! Mail are also supported. Some files may not play even if format and size are supported.Tip#Playback Window Operations (ZP.XX-9)#Viewing e-Books & Documents (ZP.XX-12)#Using S! Appli (ZP.XX-3)Changing Playback MethodMain Menu 4 Data Folder 4 Ring Songs&Tones, Music or Videos1  Highlight a file 7 A[Menu] 7 Playback Method2  Select a methodContinuous Play Repeat all files in selected folderRandom Play Play all files in selected folder randomlyRepeat Track Repeat selected file ⿟Confirm playback method settings in Playback window (Playback Mode Indicators ZP.XX-6). Note ⿟When selecting Continuous Play or Random Play, playback starts from the file selected in Step 1.
8-6Managing Files8Content KeyIf Content Key is expired, a message appears when the file is opened. To obtain a new Key, press A[YES]. Handset connects to Content Key site. ⿟Copy Protected Files: ZP.9-4 ⿟ or   (Silver) appear for files requiring Content Keys.   files are inaccessible.   appears on images in Thumbnail view of expired files.Note ⿟Alternatively, obtain Content Key as follows: Highlight a file 7 A[Menu] 7 More 7 Download Content Key 7  . ⿟Depending on contents, some Content Keys may not be obtained from websites even when warning for expired contents appears. ⿟When 1000 Content Keys have been saved, a message appears. Delete old Keys; otherwise downloads may fail (transmission fees apply).Tip#Backing up Content Keys to Memory Card (ZP.XX-17)File Display/Playback FunctionsFrom Main Menu 4 Data Folder ■View Still Images at Original Size >Pictures 7 Select a file 7 [Zoom] 7   to change the position ⿟Press K to return. ⿟Still images larger than VGA (480x640) appear at VGA (480x640). ■Rotate Still Images >Pictures 7 Select a file 7 S[Rotate R] 7 A[Rotate L] or S[Rotate R] ⿟Press K to return. ■View File Properties >Select a file 7 Highlight a file 7 A[Menu] 7 More 7 Property ⿟Available information varies by file.
8-7Managing Files8OptionsHighlight a file in Data Folder, and press A[Menu] for the following operations. ■PicturesItem Operation/DescriptionView Open fileSend1Send files via S! Mail (ZP.8-10) or Infrared (ZP.9-3)Send S! Mail2Send files via S! MailSet as1Set as wallpaper (ZP.8-9), Phone Book image, Main Menu Icons (ZP.8-10), etc.Edit1Resize files, trim files, rotate files, add frame, clear shadow, etc. (ZP.8-10)Rename Change file names (ZP.8-12)New Folder1Create new folders (ZP.8-11)Move Move files to other folders (ZP.8-13)Copy Copy files (ZP.8-13)Delete Delete files (ZP.8-12)More Change folder view1 (ZP.8-5), obtain Content Key1 (ZP.8-6), open Memory Card folder/Phone folder/Digital Camera folder1, view file properties1  Ring Songs&Tones and Music only2  Videos only ■Ring Songs&Tones, Music VideosItem Operation/DescriptionPlay Play filesSend Send files via S! Mail (ZP.8-10) or Infrared (ZP.9-3)Set as1Set ringtone (Voice Call, Video Call and messages) (ZP.8-9) or save to Phone Book (ZP.8-10)Playback MethodSelect playback method (ZP.8-5)Rename Change file names (ZP.8-12)New Folder Create new folders (ZP.8-11)Move Move files to other folders (ZP.8-13)Copy Copy files (ZP.8-13)Delete Delete files (ZP.8-12)More Change folder view2 (ZP.8-5), obtain Content Key (ZP.8-6), open Memory Card folder/Phone folder/ Video Camera folder2, view file properties (ZP.8-6)1  Ring Songs&Tones and Music only2  Videos only
8-8Managing Files8 ■Books, S! Familiar UsabilityItem Operation/DescriptionPlay1Play filesJump to Web Connect to website from linked filesSend Send files via S! Mail (ZP.8-10) or Infrared (ZP.9-3)Set2Set as Main Menu ThemeRename Change file names (ZP.8-12)New Folder1Create new folders (ZP.8-11)Move Move files to other folders (ZP.8-13)Copy Copy files (ZP.8-13)Delete Delete files (ZP.8-12)More Obtain Content Key (ZP.8-6), open Memory Card folder/Phone folder, view file properties (ZP.8-6)1  Books only2  S! Familiar Usability only ■Flash(R)Item Operation/DescriptionPlay Play filesSend Send files via S! Mail (ZP.8-10) or Infrared (ZP.9- 3)Set as wallpaper1Set as Wallpaper (ZP.8-9)Set as2Set ringtone (Voice Call or Video Call) (ZP.8-9) or save to Phone Book (ZP.8-10)Rename Change file names (ZP.8-12)New Folder Create new folders (ZP.8-11)Move Move files to other folders (ZP.8-13)Copy Copy files (ZP.8-13)Delete Delete files (ZP.8-12)More Obtain Content Key (ZP.8-6), open Memory Card folder/Phone folder, view file properties (ZP.8-6)1  Flash® image files only2  Flash® sound files only
8-9Managing Files8 ■Other DocumentsItem Operation/DescriptionRename Change file names (ZP.8-12)New Folder Create new folders (ZP.8-11)Move Move files to other folders (ZP.8-13)Copy Copy files (ZP.8-13)Delete Delete files (ZP.8-12)More Open Memory Card folder/Phone folder, view file properties (ZP.8-6)Using/Editing FilesUsing FilesWallpaperFrom Main Menu 4 Data Folder ■Select from Pictures Folder >Pictures 7 Highlight a file 7 A[Menu] 7 Set as 7 Wallpaper ■Select from Flash(R) >Flash(R) 7 Highlight a file 7 A[Menu] 7 Set as WallpaperRingtonesFrom Main Menu 4 Data Folder ■Select from Ring Songs&Tones/Music Folder >Ring Songs&Tones or Music 7 Highlight a file 7 A[Menu] 7 Set as 7 Select an item ( 7 When selecting an SMC file, highlight a Play Point 7 A[Set]) ■Select from Flash(R) >Flash(R) 7 Flash(R) Ringtones 7 Highlight a file 7 A[Menu] 7 Set as 7 Select an item ⿟Flash® Ringtones cannot be set as Message Ringtone.
8-10Managing Files8Saving to Phone BookFrom Main Menu 4 Data Folder ■Save a Still Image to a Phone Book Entry ⿟Unavailable when Change View is USIM. >Pictures 7 Highlight a file 7 A[Menu] 7 Set as 7 Phone Book Picture 7 Select a Phone Book entry ( 7 When warning message appears,  7 Enter file name) 7 A[Save] ■Save Sound/Music Files to a Phone Book Entry >Ring Songs&Tones or Music 7 Highlight a file 7 A[Menu] 7 Set as 7 Add to Phone Book ( 7 For SMC files, highlight a Playback Position 7 A[Set]) 7 Select a Phone Book entry 7 Select a ringtone ( Voice Call Ringtone/   Video Call Ringtone/   Message Ringtone) 7 A[Save] ■Save Flash® Sound Files to a Phone Book Entry >Flash(R) 7 Flash(R) Ringtones 7 Highlight a file 7 A[Menu] 7 Set as 7 Add to Phone Book 7 Select a Phone Book entry 7 Select a ringtone (  Voice Call Ringtone/   Video Call Ringtone) 7 A[Save]Main Menu IconsFrom Main Menu 4 Data Folder 4 Pictures 4 Highlight a file 4 A[Menu] 4 Set as 4 Main Menu Icons ■Change Background >Change Full Image 7 S[Back] 7 S[Back]** Handset returns to Data Folder top menu. ■Change Menu Icons >Change Image 7 Select an icon 7 S[Back] 7 S[Back]** Handset returns to Data Folder top menu.Sending a File via S! MailMain Menu 4 Data Folder 4 Select a folder 4 Highlight a file 4 A[Menu] 4 Send 4 Attach to S! Mail 4 Enter information 4 S[Send]Note ⿟When set as Wallpaper or Ringtones, license expiry or inserting a different USIM Card may reset default. ⿟Limited use files cannot be set as Wallpaper or Ringtones. ⿟Sounds recorded by Voice Recorder cannot be set as Alarm, Ringtone or Schedule Tone.Editing Still ImagesFrom Main Menu 4 Data Folder 4 Pictures 4 Highlight a file 4 A[Menu] 4 Edit ■Resize >Resize 7 Select an image size 7   7 Enter a file name  ⿟Try again: After selecting file size, S[Back]
8-11Managing Files8 ■Rotate & Save Still Images >Rotate* ( 7 When warning message appears,  ) 7 A[Rotate L] or S[Rotate R] 7   7 Enter file name*   Images captured by handset Camera may rotate 90° on cross-carrier handsets or PC. ■Add a Frame >Add Frame 7 Select a frame 7 Enter file name ⿟To change frame:   to toggle frames ⿟Available only for Wallpaper(240x427), QQVGA(120x160) and QVGA(240x320). ■Trimming >Trimming ( 7 When warning message appears,  ) 7 Follow the steps below 7 7 Enter a file nameItem Operation/DescriptionTrim to Preset Size >Select a size 7   to move rectangle to crop point 7 Trim to Selected Size >Free Size 7   to move [┌] to specify the area7   7   to adjust crop point 7  ⿟Try again: After setting crop point, S[Back] ■Super Clear Shadow >Super Clear Shadow ( 7 When warning message appears,  ) 7 7 Enter file nameManaging Folders & FilesThe following operations are available in Pictures, Ring Songs&Tones, Music, Videos, Books, Flash(R) and Other Documents. ⿟Digital Camera, Video Camera, S! Appli, My Pictograms, Graphic Mail Pictures, S! Familiar Usability and Templates do not support new folders. ⿟Only names of created folders and files can be changed. ⿟Digital Camera and Video Camera folder names are fixed.Main Menu 4 Data Folder1  Select a folder 7 (Highlight a folder 7 ) A[Menu] 7 Select an item (See below)Item Operation/DescriptionOpen Open foldersPlayback Method1Select playback method (ZP.XX-5)Rename Change folder names >Enter folder nameNew Folder Create new folders >Enter folder nameDelete Delete folders (ZP.XX-12)More2Change folder view (ZP.XX-5), open Memory Card folder, open Digital Camera folder/Video Camera folder, open Phone folderMemory Card/Phone3Open Memory Card folder/Phone folder
8-12Managing Files81  Ring Songs&Tones, Music and Videos only2  Pictures and Videos only3  Ring Songs&Tones, Music, Books, Flash(R) and Other Documents onlyManaging Folders/FilesFrom Main Menu 4 Data Folder 4 Select a folder ■Change File Name >Highlight a file 7 A[Menu] 7 Rename 7 Enter a file name ⿟Only created files can be changed. ⿟Digital Camera, Video Camera and S! Appli folder names are fixed. ■Delete Folders/Files >Highlight a folder or file 7 A[Menu] 7 Delete 7 Select an item (See below)Item Operation/DescriptionOne  >A[YES] ( 7 If confirmation appears, A[YES] orS[NO] 7 When selecting a folder, enter PhonePassword)Selected Files  >(Select a file 7)* A[Menu] 7 Delete 7 A[YES] 7 A[YES] ( 7 If confirmation appears, A[YES] or S[NO])*  Checkmarks   indicate files are selected. Repeat the step as required. (To release checkmark, press .) ⿟To select all files or release all checkmarks: A[Menu] 7 Check All or Uncheck AllAll  >A[YES] 7 in confirmation window, A[YES] or S[NO] 7 Enter Phone Password ⿟Only created folders can be deleted. ⿟Some files may not be deleted. ⿟Folders including undeleted files cannot be deleted. ⿟ appear by copy protected files and indicate that handset holds Content Keys required to use the files. When deleting   files or folders containing   files, corresponding Content Keys are also deleted, and other files requiring deleted Content Keys may become unusable. When confirmation appears, press S[NO] to keep Content Keys. ⿟Multiple folders cannot be selected.
8-13Managing Files8 ■Move/Copy Files >Highlight a file 7 A[Menu] 7 Move or Copy 7 Select an item (See below) 7 Select a folder ( 7 For Selected Files or All, A[YES])Item Operation/DescriptionOne Move/Copy a fileSelected Files Move/Copy multiple files >(Select a file 7  )* A[Menu] 7 Move or Copy*  Checkmarks   indicate files are selected. Repeat the step as required. (To release checkmark, press .) ⿟To select all files or release all checkmarks: A[Menu] 7 Check All or Uncheck AllAll Move/copy all the folders/files in a folder ⿟Copy/forward protected files cannot be copied. ⿟Some pre-installed S! Appli cannot be moved. ⿟Only JPEG files saved in handset memory can be moved/copied to Digital Camera folder. ⿟Only Video files saved in handset memory can be moved/copied to Video Camera folder. ⿟In Other Documents folder, copy protected files can be copied, but handset does not recognize copyright. ⿟Files may not be forwarded/copied depending on file format or data. ⿟Forward protected files may be moved to other folders by retrieving Network information (ZP.1-15). ⿟After being copied/moved between handset and Memory Card, some files may be unusable on other SoftBank handsets or PCs, etc.
8-14Managing Files8Memory Card ⿟840P is compatible with up to 2 GB commercial Memory Cards (as of December 2008). For information on memory card compatibility, visit the website below (Japanese). Note that Memory Cards not listed on the website may not function properly.・ 、From Yahoo! Keitai P-egg (as of December 2008) Yahoo! Keitai top page 7 メニューリスト 7 辞書・ツール 7 ケータイメーカー 7 P-egg・ 、From PC http://panasonic.jp/mobile/ Not all operations are guaranteed by the Memory Cards listed. ⿟Format new Memory Cards for use with handset (ZP.9-13).Note ⿟SoftBank is not liable for damages from accidental loss/alteration of Memory Card information. Keep a copy of Phone Book entries, etc. in a separate place. ⿟Memory Card has no write protect feature; there is a risk of accidental erasure/overwriting of files.Memory Card Installation ⿟Turn off handset before inserting/removing Memory Card.Inserting1  Open cover. Insert Memory Card until it clicksMemory Card CheckWhen Memory Card is installed correctly,   appears. If   appears, Memory Card cannot be used. Remove Memory Card from handset, and re-insert it. If   does not disappear, execute Memory Card Check (ZP.XX-16) or format Memory Card (ZP.9-13). (Display Indicator: ZP.1-8)
8-15Managing Files8Removing1  Open cover and gently push Memory Card in ⿟Memory Card pops out with a light push.2  Remove card and close cover ⿟To close cover: ZP.XX-14Note ⿟Do not remove Memory Card or battery while   flashes. Memory Card may be damaged or files lost. ⿟Memory Card may pop out when inserting/removing it.Formatting Memory Card ⿟Formatting Memory Card deletes all saved files/data.Main Menu 4 Settings 4 Memory Card Manager 4 Format Memory Card1   7 Enter Phone PasswordNote ⿟Do not turn handset power off or remove Memory Card or battery while formatting; may damage handset or Memory Card. ⿟Memory Cards formatted on other devices may not be used. Format Memory Card on 840P before use. ⿟Handset cannot format incompatible Memory Cards. ⿟If format fails, turn power off and remove Memory Card from handset. Reinsert Memory Card and format it again.
8-16Managing Files8Viewing Memory Card FilesView files in Memory Card from Data Folder. To toggle memory views, see "Viewing & Playing Files" (ZP.XX-4).Note ⿟View up to 1000 Memory Card files/folders on handset. To view hidden Memory Card files/folders, delete files, then turn handset power off and restart it. Previously hidden files appear in equal number to those that were deleted. ⿟Files with names over 32 alphanumerics/extensions over six alphanumerics cannot be viewed. ⿟Unsupported files cannot be viewed. ■Check Memory CardRepair Memory Card data errors. >Main Menu 4 Settings 4 Memory Card Manager 4 Check Memory Card 4  ⿟Do not remove Memory Card or battery during Check Memory Card. May damage handset or Memory Card. ⿟It may take 30 seconds or longer to complete procedures. ⿟Incompatible/improperly formatted Memory Cards are not checked. ⿟Unrecoverable data may be deleted.
8-17Managing Files8Handset Data BackupBack up Handset data to Memory Card; restore Handset data after accidental loss/alteration.Backup FilesPhone BookBack up Phone Book. ⿟All Phone Book entries can be saved regardless of Secret mode setting. ⿟Settings such as Ringtone, Notification Light, Picture cannot be backed up/restored.MessagesBack up messages in Incoming Mail, Drafts, Sent/Unsent Messages folders. ⿟The initial portion of S! Mail messages are restored as complete S! Mail messages, and complete message retrieval is invalidated. ⿟Mail Delivery Rule can not be backed up/restored in Incoming Mail. All restored messages from Memory Card are stored to Received folder.CalendarBack up Schedule entries. ⿟Settings such as Reminder, Schedule Tone, Notification Light cannot be backed up/restored. ⿟Schedule entries that cannot be saved on handset (ZP.XX-3) cannot be restored. ⿟Schedule entries that date/time are not specified cannot be restored.Bookmarks Back up Yahoo! Keitai and PC Site Browser Bookmarks.Content KeysBack up downloaded Content Keys. ⿟Content Keys with expiration dates or usage limits cannot be moved to Memory Card. ⿟Some applications are made for use on specific models. Contact SoftBank Mobile Customer Center, General Information (ZP.XX-32) for more information. ⿟USIM Card inserted when Content Keys were moved to Memory Card must be inserted to move Content Keys from Memory Card. ⿟Content Keys are backed up after the previous back up file is deleted.
8-18Managing Files8Notes ⿟Backup is not available when battery is low. Change/charge battery before backup. ⿟Backup/restoration activates Emission OFF Mode. When backup/restoration starts in Emission OFF Mode, Emission OFF Mode is not canceled automatically even when backup/restoration is complete. ⿟When restoring files other than Content Keys from Memory Card, the same type files are all deleted from handset before restoration. Back up files saved on handset beforehand. ⿟Depending on contents, Phone Book/Schedule entries, messages or bookmarks may not be backed up/restored, or may be altered beyond the parameters. ⿟Backup files created on other SoftBank handsets may not be restored or usable on 840P.Backup/Restore ⿟Check memory beforehand (ZP.XX-4). Main Menu 4 Settings 4 Memory Card Manager 4 Memory Card Backup1  Enter Phone Password2  Select an item ⿟For Messaging, select a messaging folder3  BackupCopy to Memory Card 7   7  RestoreOverwrite to Phone 7   7 Select a file 7 ⿟Backup date serves as file name. Example: "090202000.vcf" indicates that the file was backed up on 2 February 2009 ■Delete a Backup File >In Step 3, select Overwrite to Phone 7   7 Highlight a file 7 A[Menu] 7 Delete 7  ⿟Content Key backup files cannot be deleted.
8-19Managing Files8PC File TransfersFiles moved or copied from handset to Memory Card are managed as shown below: ⿟To use files saved on Memory Card via PCs, save files in folders in My Items (MYFOLDER) by file type. See "Using Files" (ZP.8-9) to learn how to use files on handset.DCIM ⿟Still images saved to Memory Card ⿟Still images moved/copied to Digital Camera folderPRIVATEMYFOLDERUtilityCalendar Calendar.BCK Schedule Backup filesContacts Contacts.BCK Phone Book Backup filesRights Content Key Backup filesMailDrafts Drafts.BCK Drafts Backup filesInbox Inbox.BCK Incoming Mail Backup filesOutbox Outbox.BCK Unsent Messages Backup filesSent MessagesSent Messages.BCK Sent Messages Backup filesMy ItemsBook E-comics, ectBookmarks Bookmarks.BCK Bookmarks Backup filesCustom Screens S! Familiar Usability applicationsFlash(R) Flash® image filesFlash(R) Ringtones Flash® sound filesGames and More S! AppliMail Art Graphic Mail PicturesMusic Sound files with  .3gp/.mp4/.m4a/.smcOther Documents Other filesPictograms My PictogramsPicturesStill images moved/copied from handset to Main Folder in Memory CardSounds & RingtonesSound files with  .3gp/.mp4/.m4a/.mid/.midi/.amr/ .mmf/.mxmfVideosVideos moved/copied from handset to Main Folder in Memory CardSD_VIDEO ⿟Videos saved to Memory Card ⿟Videos moved to Video Camera folder
8-20Managing Files8Note ⿟Handset temporary files are saved in Memory Card PRIVATE – MEIGROUP - PMC - FS_TEMP folder. All files in this folder are deleted each time Memory Card is inserted into handset; do not save PC files/folders in this folder. ⿟Folder layers recognizable in handset are limited to the first layer of each folder (such as, Music folder) in My Items (MYFOLDER). ⿟When multiple folders/files with same numbers exist in DCIM folder, the folders/files cannot be viewed on handset. ⿟Some copy protected files have extensions different from the ones on P.XX-19. ⿟Images captured by handset Camera may rotate 90° on cross-carrier handsets or PC.
9-19ConnectivityInfrared ................................................................. 9-2Before Using Infrared ..................................................................9-2One File Transfer .........................................................................9-3All Phone Book Transfers ............................................................9-4SoftBank Utility Software  (Japanese) ............................................................. 9-5USB (Japanese) ..................................................... 9-5Transferring Data via USB Cable ..................................................9-5Data Communication via USB Cable............................................9-5USB Charge ................................................................................9-6Location Settings .................................................. 9-6Positioning Lock .........................................................................9-6Sending Location Information .....................................................9-6
9-2Connectivity9InfraredBefore Using InfraredTransfer Phone Book/Schedule entries, messages, bookmarksand Data Folder files wirelessly between handset and compatible devices, including PCs and other mobiles. ⿟840P infrared function is based on IrMC1.1, however, some IrMC1.1-based device transmissions may not be transmitted/received within specification. ⿟Debris may inhibit infrared transfers; clean infrared ports with a soft cloth beforehand. ⿟Direct sunlight/fluorescent light may inhibit transfers. ⿟When data transfer is interrupted, it may take some time for process to complete. ⿟Align infrared ports within 20 cm of one another and make sure no objects are placed between them. Do not move the devices until transfer is complete.Within 20 cmInfrared PortTransferable FilesPhone Book EntriesTransfer one entry at a time or all at once ⿟Ringtone, Notification Light, Picture and other entry settings are lost in transfers. Group, Secret Setting and other entry settings are also lost when one entry is transferred.Schedule EntriesTransfer one entry at a time ⿟Reminder, Schedule Tone, Notification Light and other entry settings are lost in transfers. ⿟Entries with date/time that cannot be set on handset are not saved (ZP.XX-3). ⿟Entries without specified date/time cannot be received.Data Folder FilesTransfer one file at a time ⿟Copy protected files may not transfer.MessagesTransfer one message at a time ⿟Messages in Incoming Mail, Drafts, Sent Messages and Unsent Messages folders can be transferred.Bookmarks Transfer one bookmark at a time
9-3Connectivity9Note ⿟Depending on their content, some incoming Phone Book/Schedule entries, messages or bookmarks may not be received, or may be altered beyond the parameters. ⿟If memory becomes full, remaining entries are truncated. (Memory List: ZP.18-23) ⿟Images captured by handset Camera may rotate 90° on cross-carrier handsets or PC.One File Transfer ⿟Transferable Files: ZP.10-2Sending1  Highlight a file 7 A[Menu]2  Prepare recipient device3  Send Phone Book Entry/Data Folder FileSend 7 Infrared Send Message/Schedule Entry/BookmarkSend via Infrared Send SMSLocal Connectivity 7 InfraredTransfer starts.ReceivingMain Menu 4 Connectivity 4 Infrared 4 ON1 L to return to Standby appears. Acquire signal within three minutes.2  When receiving transfer request from sender, confirmation appearsFile name and size appear.3 4  Receive Data Folder FilesPhone or Memory CardTransfer starts. Receive Phone Book/Schedule EntryA[Save] Receive Messages/BookmarksMessages are saved in messaging folders, and bookmarks added to Bookmark List automatically.Note ⿟Handset receives files only in Standby. ⿟Infrared is canceled if no transmission is made within three minutes or handset power is turned off.
9-4Connectivity9All Phone Book TransfersInfrared Authentication CodeInfrared Authentication Code (4 digits) is required for all data transfers via Infrared. Sender and receiver must input the same Authentication Code to complete transfers.Sending Main Menu 4 Phone Book 4 Memory Manager 4 Send All Phone Book via Infrared1   7 Enter Phone Password2  Enter Authentication CodeRecipient must enter the same Authentication Code to start transfers.Receiving Main Menu 4 Connectivity 4 Infrared 4 ON1 L to return to Standby appears. Acquire signal within three minutes.2  When receiving transfer request from sender, confirmation appears3   to accept connection request 7 4  Enter Phone Password5  Enter Authentication CodeTransfer starts. Phone Book entries are saved in Phone Book automatically.
9-5Connectivity9SoftBank Utility Software (Japanese)Phone Book, Calendar, messages, Bookmarks and Data Folder can be transferred to a PC, edited or managed by using SoftBank Utility Software. ⿟For details on and downloading SoftBank Utility Software, visit  http://mb.softbank.jp/r/utilitysoft/cd/ (Japanese)Note ⿟USB cable (not included) is necessary for using SoftBank Utility Software. ⿟S! Appli, S! Familiar Usability, Templates and Other Documents cannot be backed up. ⿟Copy protected files may not be backed up. ⿟Files having the same name in a folder may not be transferred.USB (Japanese)Connect handset to a PC via USB cable (not included) specified by SoftBank for data transfer or data communication.Transferring Data via USB CableTransfer data using SoftBank Utility Software. (ZLeft)Data Communication via USB CableUse handset as a modem for Internet access by connecting handset with a PC. ⿟Download utility software from URL below and install on PC.  http://panasonic.jp/mobile/support/download/840p/index.html1  Download and install "USB ドライバ (USB Driver)" and "Modem Wizard" from Utility Software (840P) to a PC2  Connect handset to PC via USB cable ⿟Power up handset before connecting to PC via USB cable.3  Start up "840P Modem Wizard", and operate communication setup ⿟"840P Modem Wizard" enables you to set up APN and dial-up easily. For setup/starting procedures, see "840P Modem Wizard"Help.
9-6Connectivity9Note ⿟Connecting handset to a PC or PDA for Internet access may incur high packet transmission fees.USB ChargeConnect handset to a PC via USB cable to charge battery. ⿟Both PC and handset must be powered up. ⿟USB Charging may be slower/less effective than AC Charger.Location SettingsRetrieve handset Location Information. ⿟Only available within 3G network coverage in Japan.Emergency Positioning RequestWhen an emergency call is made from handset, location detected by nearby base station is reported to Emergency response agencies such as the police (ZP.2-3).Positioning Lock <Default> OFFActivate Positioning Lock.Main Menu 4 settings 4 Location Settings 4 Positioning Lock1 ON 7 Enter Phone PasswordSending Location Information<Default> Ask Every TimeSet whether to send location information automatically when requested.Main Menu 4 Settings 4 Location Settings 4 Send Location Info1  Select an item 7 Enter Phone Password
10-110Handset SecurityChanging Phone Password ................................. 10-2Security Functions .............................................. 10-2USIM PINs ................................................................................10-2Keyguard ..................................................................................10-3Password Lock ..........................................................................10-4Secure Remote Lock .................................................................10-4Reject Incoming Calls ......................................... 10-5Rejecting Unknown Callers .......................................................10-5Rejecting Specific Numbers .......................................................10-5Secret Mode Setting ........................................... 10-6Reset ................................................................... 10-6Reset Settings ..........................................................................10-6All Reset ..................................................................................10-7
10-2Handset Security10Changing Phone Password<Default> 9999Change Phone Password as required. ⿟For Phone Password details: ZP.1-24Main Menu 4 Settings 4 Security 4 Change Password1  Enter current 4-8-digit Phone Password2  Enter new 4-8-digit Phone Password 3  Reenter new Phone PasswordNote ⿟If Phone Password is incorrectly entered three times, warning message appears. Turn off handset and retry to enter.Security FunctionsUSIM PINs ⿟For more information about PINs: ZP.1-3PIN EntryActivate to require PIN entry each time handset is turned on.Main Menu 4 Settings 4 Security 4 PIN ON/OFF1 ON or OFF2  Enter PINNote ⿟When PIN entry is ON :・ Signal Indicator may take some time to appear in Standby after entering PIN.・ Enter PIN to dial emergency numbers (110, 119, 118).
10-3Handset Security10Changing PIN/PIN2 ⿟Activate PIN entry before changing PIN (ZP.XX-2).Main Menu 4 Settings 4 Security 4 Change PIN or Change PIN21  Enter current PIN/PIN22  Enter new PIN/PIN23  Reenter new PIN/PIN2PIN/PIN2 Lock & Cancellation (PUK/PUK2)PIN Lock or PIN2 Lock is activated if PIN or PIN2 is incorrectly entered three times. Cancel PIN Lock or PIN2 Lock by entering Personal Unblocking Key (PUK/PUK2). ⿟For information about PUK/PUK2, contact SoftBank Mobile Customer Center, General Information (ZP.18-32).1  In PIN lock mode, enter PUK/PUK22  Enter new PIN/PIN23  Reenter new PIN/PIN2Note ⿟If PUK/PUK2 is incorrectly entered ten times, USIM Card is locked and handset is disabled. Write down PUK/PUK2. ⿟For procedures required to unlock USIM Card, contact SoftBank Mobile Customer Center, General Information (ZP.18-32).KeyguardLock handset keys to prevent accidental operation. ⿟While locked,   appears in Standby.1  In Standby, press and hold   7  ⿟To cancel: When   appears in Standby,  7 A[YES]Note ⿟Alternatively, Main Menu 4 Settings 4 Phone Settings 4 Keyguard 4 . ⿟Emergency numbers (110, 119, 118) are dialable even if Keyguard is activated (number does not appear on Display). To correct misentries, press L, then re-enter number. ⿟If Keyguard is activated, handset will not power down. Cancel Keyguard then press and hold L.
10-4Handset Security10Password Lock<Default> OFFSet Password Lock to require Phone Password after handset powers up, or after two minutes of inactivity in Standby. ⿟While Password Lock is set,   appears in Standby.Main Menu 4 Settings 4 Security 4 Password Lock1 ON or OFF ⿟For ON, press  .2  Enter Phone PasswordTemporary UnlockWhen   appears in Standby, enter Phone Password.Note ⿟Emergency numbers (110, 119, 118) are dialable even when Password Lock is active. ⿟When Keyguard is set to ON while Password Lock is temporarily deactivated, both Keyguard and Password Lock are activated after two minutes of inactivity in Standby. (  appears.) To cancel both, cancel Keyguard first (ZP.XX-3).Secure Remote LockIf handset is lost or stolen, remotely lock handset from a PC or mobile. If Secure Remote Lock is active, all operations are unavailable except to turn handset on. ⿟For service details and user agreement/registration, visit SOFTBANK MOBILE Corp. Website (http://www.softbank.jp) or My SoftBank.Accessing My SoftBank from Handset (Japanese)For service details, visit SOFTBANK MOBILE Corp. Website. Main Menu 4 Yahoo! Keitai 4 Yahoo! Keitai 4 メニューリスト 4 My SoftBank 4 English ⿟Follow onscreen instructions.
10-5Handset Security10Reject Incoming CallsRejecting Unknown Callers<Default> OFFReject calls from unknown numbers (numbers not saved in Phone Book, blocked Caller ID, pay phones, etc.).Main Menu 4 Settings 4 Call Settings 4 Reject Incoming Calls1  Select an item2 ON or OFFRejecting Specific NumbersAdd numbers to Reject List to reject specific incoming calls, then set Activate Reject List to ON.Adding Numbers to Reject List Main Menu 4 Settings 4 Call Settings 4 Reject Incoming Calls 4 Reject List 4 Edit Reject List1 A[Menu] 7 Add 7 Select an item2  Highlight a phone number in Phone Book/Call Log 7 A[Select], or enter a phone number directly ■Edit/Delete Numbers in Reject List >Highlight a number in the list 7 A[Menu] 7 Edit or Delete ( 7 For Delete,  )Activating Reject List<Default> OFFMain Menu 4 Settings 4 Call Settings 4 Reject Incoming Calls 4 Reject List 4 Activate Reject List1 ON or OFFCalls from Rejected NumbersHandset does not ring/vibrate, but Information window appears. Press  to confirm. ⿟If call is rejected because Caller ID was not sent (Withheld), caller is instructed via voice message or Picture to send ID.Note ⿟Set handset to reject all incoming calls or incoming calls while abroad (Call Barring: ZP.2-18).
10-6Handset Security10Secret Mode Setting<Default> OFFActivate Secret Mode to use Secret Phone Book entries. When Secret Mode is active,   appears in Standby. ⿟Saving to Phone Book (ZP.4-3) Main Menu 4 Settings 4 Security 4 Secret Mode1 ON or OFF2  Enter Phone Password Note ⿟When Secret Mode is OFF, only numbers/mail addresses appear for incoming communications from Secret entries.ResetReset SettingsCancel custom settings and return handset functions to their default settings.Main Menu 4 Settings 4 Security 4 Reset 4 Reset Settings1   7 2  Enter Phone PasswordHandset automatically turns off and restarts.Note ⿟Some default settings may not be restored.
10-7Handset Security10All ResetCancel custom settings and return handset functions to their default settings; clear all Phone Book/Data Folder entries etc.Main Menu 4 Settings 4 Security 4 Reset 4 All Reset1   7 2  Enter Phone PasswordHandset automatically turns off and restarts.3  Enter Date 7 Enter TimeNote ⿟Fully Charge battery ( ) beforehand. ⿟Phone Password is reset to default. ⿟USIM Card/Memory Card files are not affected. ⿟Non-restorable items deleted by All Reset:・ Customized settings, call logs, downloaded S! Appli, etc. ⿟Pre-installed S! Appli, Flash®, e-Book files, Graphic Mail Pictures or My Pictograms deleted by user are not recovered by All Reset.
10-8Handset Security10
11-111ToolsCalendar ............................................................. 11-2Opening Calendar ....................................................................11-2Creating Schedule Events ..........................................................11-2Setting Day Off .........................................................................11-4Viewing/Editing Schedule Events ...............................................11-4Calendar Functions ...................................................................11-5Alarms ................................................................ 11-6Setting Alarm ...........................................................................11-6Calculator ........................................................... 11-7Notepad .............................................................. 11-8Notepad Functions ...................................................................11-8Voice Recorder ................................................... 11-9Bar Code Reader ................................................. 11-9Scanning Barcodes ...................................................................11-9Viewing/Editing Scanned Data  ...............................................11-10Using Barcode Data ................................................................11-11
11-2Tools11CalendarView by day, week or month; set Alarms for events.Opening Calendar1 DCurrent month appears. ⿟When a date with schedule events is selected, up to four events appear. ⿟Press D or F to display previous/next month calendar. ⿟To switch Monthly/Weekly view ZP.XX-5 Note ⿟Alternatively, Main Menu 4 Tools 4 Calendar.One Month WindowCreating Schedule EventsSave up to 100 entries.1 D2   to highlight a date 7 A[Menu] 7 New Entry3  Follow the steps belowItem Operation/DescriptionSummary Enter content >Enter titleCategory Select an event type; icon appears in Standby >Select categoryStart Set date and time the schedule event starts/ends >Enter date 7 Enter timeEndDescription Enter event description >Enter content in detail
11-3Tools11Item Operation/DescriptionRepetition Set entry to appear again at regular Intervals >Select a repetition ( 7 Enter repeating time)Reminder Set schedule alarm time >Select an alarm typeLocation Enter location >Enter locationSchedule ToneSet schedule alarm ringtone ><Schedule Tone>orRing Songs&Tones or Music 7 Highlight a file 7 A[Set]Schedule VolumeSet schedule alarm volume > to adjust volumeNotification LightSet schedule alarm notification light color >Select a color or OFF4 A[Save]Schedule IconSelected icon in Category appears in Standby.Example:   (Meeting),   (Anniversary),   (Birthday) ⿟If nothing selected,   appears.Copy Protected Files ⿟When set as Schedule Tone, license expiry, or inserting a different USIM Card may reset default. ⿟Limited use files cannot be set as Schedule Tone.Note ⿟Schedule events between 00:00 on 2008/01/01 and 23:59 on 2099/12/31 can be saved on handset.At Reminder TimeSchedule Tone sounds and Notification Light flashes.1  When Schedule Tone sounds, Schedule Tone stops and Schedule Event List appears.2 to view detailsCanceling Schedule Tone ⿟L to return to Standby. ⿟Press S[Stop] to return to previous menu. ⿟Press any key except for L, S[Stop], A[View] or   to cancel Schedule Tone without returning to Standby. Press   to view detailed schedule.Note ⿟Schedule Tone does not sound in the following cases:・ During a call (Notification appears and handset vibrates)・ In Manner Mode (Manner Mode settings take priority)・ When handset power is turned off・ For entries invalidated by Time Correction
11-4Tools11Setting Day Off ⿟Day Off dates appear in red.1 D2  (Highlight a date 7 ) A[Menu] 7 Set Day Off3  Specify Day of WeekWeekly ( 7 Repeat: Highlight a day 7  )* 7 A[OK]* To cancel selection, press  Specify Current DateToday* 7 Once or Yearly* To cancel selection: Reset Holiday Reset AllReset All 7 Viewing/Editing Schedule Events1 D 7 Select a date2  Select a schedule eventDetailed schedule appears. ⿟ to switch Schedule tab and Contents tab.3 S[Back] to exitSchedule Event ListSchedule Event Details
11-5Tools11Calendar FunctionsFrom D ■Switch Calendar View<Default> One Month >A[Menu] 7 View Format 7 One Month or One Week ⿟Select One Week view to see daily schedules. ■Search Specific Day >A[Menu] 7 Go to Date 7 Enter a date ■Set Week Start Day >A[Menu] 7 Start Week From 7 Select a day ■Delete Schedule Events >Follow the steps belowItem Operation/DescriptionDelete  >Select a date 7 Highlight an event 7 A[Menu]7 Delete 7Delete Scheduled Events* >Highlight a date 7 A[Menu] 7 Delete 7 Day 7  7Delete Past Events* > Highlight a date 7 A[Menu] 7 Delete 7 Past 7   7Delete All Events >A[Menu] 7 Delete 7 All 7 A[YES] 7 Enter Phone Password* Repetitive entries cannot be deleted ■Calendar Memory Status >A[Menu] 7 Memory StatusTip#Infrared (ZP.XX-3)
11-6Tools11AlarmsWhen scheduled time arrives, alarm tone sounds and animation appears on Display. Notification Light illuminates.  Setting AlarmSet up to five alarms. Alarm tone sounds at the specified time once, everyday or weekly as set.Main Menu 4 Tools 4 Alarms1  Select an Alarm2  Follow the steps belowItem Operation/DescriptionAlarm ON/OFF Activate or cancel Alarm >ON or OFFTime Set Alarm time >Enter timeItem Operation/DescriptionRepetition Select repetition >Select a repetition ( 7 For Weekly, select a day (Repeat as required) 7 A[OK])Alarm Tone1Set Alarm Tone sound ><Alarm Tone>orRing Songs&Tones or Music 7 Highlight a file2 7 A[Set]Set Alarm SnoozeAlarm Tone sounds for 60 seconds, repeating up to five times at specified intervals >ON or OFF ( 7 For ON, enter interval)Alarm Volume Set Alarm Tone volume > to adjust volumePictures Select image to appear >Highlight a still image 7 A[Set]Set Alarm VibrationSelect Vibration type >Select pattern or OFFNotification LightSelect Notification Light color >Select a color or OFFSet Alarm PrioritySet Manner Mode or Alarm priority >Manner Mode Prioritized or Alarm Prioritized1  Copy Protected Files (ZP.XX-4)2  When selecting an SMC file, highlight a Play Point 7 A[Set]3 A[Save]
11-7Tools11At Alarm TimeAlarm Tone sounds, Notification Light flashes and image appears on Display.1  Press any keyAlarm stops and confirmation window appears.(When pressing L, confirmation does not appear.) ⿟Alarm stops automatically after 60 seconds of inactivity, and confirmation window appears.. ■Cancel/Reactivate Alarm >Main Menu 4 Tools 4 Alarms 4 Highlight an alarm 4 A[Menu] 4 Alarm ON or Alarm OFF ⿟Activate a canceled Alarm to apply previous settings. ⿟ appears for set alarms;   for unset/canceled ones.Snooze FunctionIf ON, press any key except L; confirmation appears. To cancel Alarm, press A[Stop]. ⿟When pressing L to stop alarm, confirmation does not appear.(Snooze function is still active.)Note ⿟Alarm Tone does not sound in the following cases:・ During a call (notification appears and handset vibrates)・ In Manner Mode Prioritized (Manner Mode settings take priority)・ When handset power is turned off・ For entries invalidated by Time CorrectionCalculatorComplete basic mathematical calculations up to ten digits.Main Menu 4 Tools 4 CalculatorOperation Assigned keyNumber (0 - 9) P - O+–x÷=Decimal point AClear SorKToggle + and – D ■Enter Negative Numbers >Enter a number, then press D to toggle negative/positive value.Example:-17+28.5=11.5Q U D   W I A T
11-8Tools11NotepadMain Menu 4 Tools 4 Notepad1 A[Menu] 7 New2  Enter textNew note is added to the top of the list. ⿟Up to 64 characters can be entered.Notepads WindowNotepad FunctionsFrom Main Menu 4 Tools 4 Notepad ■Edit Notes >Select a note 7 [Edit] 7 Edit text ⿟Edited note is overwritten. ■Delete Notes >Highlight a note 7 A[Menu] 7 Delete 7 One or All 7 A[YES] 7 When selecting All, enter Phone Password ■Note Property >Highlight a note 7 A[Menu] 7 Property ■Insert Notes into Message Text >Highlight a note 7 A[Menu] 7 Send 7 Send via S! Mail or Send via SMS 7 Enter mail address, etc. 7 S[Send]
11-9Tools11Voice RecorderRecord voice memos of up to 60-seconds. ⿟Recording during a call: ZP.2-9Main Menu 4 Tools 4 Voice Recorder1 Recording starts.2   to stop recording ⿟To play: 3 A[Save]Recorded sounds are saved in RingSongs&Tones folder. Note ⿟Sounds recorded by Voice Recorder cannot be set as Alarm, Ringtone or Schedule Tones.Bar Code ReaderScan barcodes (JAN) or QR Codes with built-in camera. Access websites, send messages, etc. from QR Codes.JAN CodesJAN Code is a one-dimensional bar code denoting numerals with bars and spaces of different widths.QR CodesQR Code is a two-dimensional bar code containing  information.Scanning BarcodesUp to ten items can be saved. For split data, up to 16 QR Codes can be scanned at a time and saved as one item.Main Menu 4 Bar Code Reader 4 Scan Barcodes1  Frame barcode in the center of Display ⿟To adjust display brightness: G or H ⿟To zoom:  ⿟To use Focus Lock:
11-10Tools112 Scanning starts, and scanned results appear when completed. ⿟For split data,   7 Repeat Step 1 and 23 S[Save] ⿟To start over: K 7   7 Go to Step 2Note ⿟ Handset cannot read barcodes or two-dimensional codes other than JAN/QR Codes. ⿟If recognition stalls, adjust display brightness and retry. ⿟Brightness can be adjusted while scanning; however, zoom level can not be changed. ⿟Saved items are automatically named "yymmdd_hhmmss" unless changed. (yy: year, mm: month, dd: day, hh: hour, mm: minute, ss: second) ⿟When memory is full, warning appears. Delete old data. ⿟ Barcodes may not be correctly read owing to scratch, dirt, damage, quality of printed material, light reflection, or QR code version.Viewing/Editing Scanned Data Main Menu 4 Bar Code Reader 4 Saved Data List1  View Saved DataSelect an item Edit TitleHighlight an item 7 A[Menu] 7 Rename 7 Edit title ■Delete Saved Data >In Step 1, highlight an item 7 A[Menu] 7 Delete One 7
11-11Tools11Using Barcode DataFrom Main Menu 4 Bar Code Reader 4 Saved Data List ■Use URLs/Mail Addresses/Phone Numbers >Select an item 7 Follow the steps belowItem Operation/DescriptionURL (http:// or https://)Connect to websites; add to Bookmarks (ZP.XX-8)URL (rtsp://) Streaming; add to BookmarksMail Address Create S! Mail (ZP.XX-4); save to Phone Book (ZP.4-3)Phone Number Make calls; create messages* (S! Mail: ZP.XX-4/SMS: ZP.XX-8); save to Phone Book (ZP.4-3) Phone Book Data(MEMORY: text)Save to Phone Book ⿟Save MEMORY: text only ⿟Saved to Phone regardless of Save Settings selection* SoftBank handset numbers only ■Insert Scanned Text into Messages > Select an item 7 A[Menu] 7 Paste Data & Create Mail 7 S! Mail or SMS ■Copy Text from Scanned Results >Select an item 7 A[Menu] 7 Copy 7 Follow the steps belowItem Operation/DescriptionCopy All Text  >S[All] 7 Copy Selected Text >Place cursor before (or after) text to copy 7   7 Place cursor after (or before) text to copy 7
11-12Tools11XXXX
12-112Basics .................................................................. 12-2Available Entry Items & Character Entry Limits ...........................12-2Messaging Folders & Memory Status .........................................12-3Customizing Handset Address ...................................................12-3Sending S! Mail & SMS ....................................... 12-4Sending S! Mail ........................................................................12-4Sending SMS Messages ............................................................12-8Creating Messages ...................................................................12-9Graphic Mail Functions ...........................................................12-10Sending Messages ..................................................................12-10Receiving & Viewing Messages ........................ 12-11Opening New Messages .........................................................12-11Window Description ...............................................................12-12Retrieving Complete S! Mail ...................................................12-13Opening & Saving Attachments ...............................................12-14Viewing Received Messages ...................................................12-14Viewing Sent Messages ..........................................................12-143D Pictograms ........................................................................12-15Using Server Mail ...................................................................12-15Other functions ......................................................................12-16Organizing/Using Messages ............................. 12-17Checking Messages in Messaging Folders ...............................12-17Mail Delivery Rule ...................................................................12-17Replying to Messages .............................................................12-18Mail Security Setting ...............................................................12-18Messaging Lock ......................................................................12-19Message Display .....................................................................12-19Organizing Messages..............................................................12-19Using Messages .....................................................................12-20Messaging
12-2Messaging12BasicsSend messages via S! Mail or SMS.S! Mail[Separate subscription required]Exchange text messages with SoftBank or e-mail compatible handsets, PCs, etc.; attach image or sound files etc. ⿟840P is compatible with Graphic Mail  (ZP.13-5) and Feeling Mail (ZP.XX-5).SMS Exchange short text messages with SoftBank handsets. ⿟For more information, visit SOFTBANK MOBILE Corp. Website  (http://www.softbank.jp).Tip#Messaging Lock (ZP.XX-19)Available Entry Items & Character Entry LimitsItem S! Mail SMSAddressE-mailaddress ○Up to 246 single-byte alphanumerics/ Up to 20 recipients×–Phonenumber1○ ○Up to 20 single-byte alphanumerics/ten recipientsSubject ○Up to 256 double-/  single-byte alphanumerics×–Text ○30 KB2○Up to 70 double-/single-byte alphanumerics 3Attachment ○Up to 20 files ×–1  SoftBank handset numbers only2  S! Mail Entry Limit decreases when mail attachments exceed 260 KB.3   When Input Character Settings is set to English(160characters) (ZP.XX-17), up to 160 single-byte alphanumerics can be entered.Note ⿟Send up to 300 KB including subject, message text and attachment via S! Mail. Message text character limit differs by attachment size. ⿟SMS messages can be converted to S! Mail (ZP.12-8), but not in the following cases:・ 、S! Mail memory is full (ZP.XX-3)・ 、During a call (S! Mail messages cannot be created during a call) ⿟S! Mail cannot be converted to SMS.
12-3Messaging12Messaging Folders & Memory StatusMessages are organized in folders by message type.*  Set Mail Delivery Rule to sort received messages automatically  (ZP.XX-17).Deleting Messages AutomaticallyWhen memory for messaging folders is low, read messages and sent messages are automatically deleted one by one. Protect important messages from unintentional deletion (ZP.XX-20), or set Auto Delete Incoming Messages/Auto Delete Sent Messages to OFF (ZP.XX-15).When Messaging Memory is Full (Received Full) appears in Standby and no more new incoming messages are received. Delete old messages in Incoming Mail folder (ZP.XX-19).Retrieve new messages after deleting some S! Mail (ZP.XX-16).Create MessagesReceive MessagesSave as DraftsSend MessagesCompleteNot completeUnsent MessagesSent MessagesDraftsMessaging FoldersIncoming MailReceivedFolder 1-10* ■View Memory Status >A 7 Memory Status 7 Phone or USIM 7 For Phone, Sent or IncomingTipSettings   #Require Phone Password Entry when Opening Messaging Folders/Retrieving Server Mail (ZP.XX-15)Customizing Handset AddressChange your handset mail address (alphanumerics before @) to reduce the risk of receiving spam. Default account name is random alphanumerics. ⿟For details, visit SOFTBANK MOBILE Corp. Website  (http://www.softbank.jp). ⿟Handset mail address cannot be changed in Emission OFF Mode. ⿟For operations while using Internet: ZP.14-61 A[ ]7 Settings 7 Custom Mail AddressHandset connects to the Network.Follow onscreen instructions.abc123-xyz @ softbank.ne.jpCustomize hereDomainNameAccountName
12-4Messaging12Sending S! Mail & SMSSending S! MailExample: Select a Phone Book entry to send S! Mail.1  Press and hold A[ ]2 <Add Address> 7 Phone Book3  Select a Phone Book entry 7 Select a SoftBank handset number or mail addressComposition WindowAddress fieldSubject fieldText fieldAttachment field4 <Add Subject> 7 Enter subject5 <Input Text>6  Enter text7 S[Send]Tip#Addresses #Message Preview (ZP.XX-9) #Sending Messages (ZP.13-16)Settings #Confirm Message Delivery (ZP.17-12)Text Entry Window
12-5Messaging12Adding AttachmentsExample: Attach image files to S! Mail.1  After Step 6 on page XX-4, <Add Attachment>2  Select an item 7 Highlight an item 7 A[Set]/[Select] ⿟After selecting Account Details, go to Step 3.3 S[Send]Note ⿟Some files can not be attached depending on the file format or size. ⿟Some copy protected files can not be sent.Tip#Attachments (ZP.13-15)Sending Feeling MailApply Feeling Mail setting to S! Mail; recipient handset responds according to link to Feeling settings. ⿟Send Feeling Mail to compatible SoftBank handsets only. ⿟Ringtone, vibration and notification light settings vary depending on Feeling Expression of recipient handset (ZP.XX-16).1  After Step 6 on page XX-4, A[Menu] 7 Sending Options 7 Feeling Expression2  Select an item 7 Select an iconSelected icon appears in Subject field.3 S[Send]
12-6Messaging12Graphic MailCreate HTML messages; select font color/size, background color, or insert images, etc.Example: Use various Templates to create Graphic Mail ⿟Change font size ⿟Scroll text1  After Step 4 on page XX-4, A[Menu] 7 Insert Template 7 Select a template 7 A[Set] ⿟To preview the template: Select a template 7 S[Back]2  Select Text field 7 Delete "ココに文字をいれてネ"3 J to open Graphic PaletteGraphic Palette4 Font Size 7 select a font size 7 Enter text5 Select Mail Art Area 7 Place cursor before a sentence to scroll  7 A[Start] 7 Move cursor to end of sentence 7 A[End] Text is highlighted. ⿟To cancel selection:  [Cancel Mail Art Area]6 Start Scrolling 7 S[Close]7 8 S[Send]
12-7Messaging12 ■Reset Operations ⿟To cancel previous operation: Close Graphic Palette 7 A[Menu] 7 Undo ⿟To reset all Graphic operations: J 7 Reset All Graphic Mail 7 Note ⿟In Simple Mode, text in composition window appears in Large Size regardless of Font Size setting. When placing cursor at text, Font Size icon (  : Large Size,  : Small Size) appears. (When Normal Size is selected, Font Size icon does not appear.) In preview window, text appears in selected font size.Using My Pictograms1  After Step 5 on page XX-4, in a text entry window, G 7 H[Full] 7 H[My Pict.]My Pictogram list appears.If previously used, press G 7 A[My Pict.].2  Select a My Pictogram 7 My Pictogram is entered.3  Enter text 7 S[Send] ■Use My Pictograms from Graphic Palette >In a text entry window, J 7 My Pictograms 7 Highlight a My Pictogram 7 A[Set] 7 S[Close] ■Use My Pictograms Saved in Memory Card >In a text entry window, J 7 My Pictograms 7 Switch to Memory Card 7 Highlight a My Pictogram 7 A[Set] 7 S[Close]Tip#Graphic Mail Functions (ZP.XX-10)
12-8Messaging12Sending SMS MessagesExample: Select a Phone Book entry to send SMS.1 A[ ] 7 Create New SMS2 <Add Address> 7 Phone Book3  Select a Phone Book entry 7 Select a SoftBank handset numberAddress fieldText fieldComposition Window4 <Input Text>5  Enter text ⿟When number of entered character exceeds limit, S! Mail conversion option message appears.6 A[Send] ■Manual Mail Conversion >In SMS Composition window, A[Menu] 7 Switch Message TypeTip#Addresses (ZP.13-14) Settings   #Confirm Message Delivery (ZP.17-12) #SMS Settings (ZP.XX-17)Text Entry Window
12-9Messaging12Creating MessagesAddressesFrom In composition window, select Address field ■Enter Address Directly >Enter Number or Enter Address* 7 Enter a SoftBank handset number or mail address* S! Mail only ■Select Address from Send Logs >Send Logs 7 Select a log ■Add/Edit/Delete Address >Follow the steps (See below)Item Operation/DescriptionAdd Recipients  >A[Menu] 7 Add 7 Select an address selection method 7 Select an address or enter directlyEdit   >Highlight an address 7 A[Menu] 7 Edit 7 Edit addressDelete  >Highlight an address 7 A[Menu] 7 Delete ■Change To/Cc/Bcc (S! Mail only) >Highlight an address 7 A[Menu] 7 Change To/Cc/Bcc 7 Select a typeAttachmentsFrom After attaching a file, select Attachment field ■Add Attachments >A[Menu] 7 Add 7 Select an item 7 Highlight an item 7 A[Set]/[Select] ■Delete Attachments >Highlight a file 7 A[Menu] 7 Delete
12-10Messaging12Graphic Mail Functions ■Use Other Graphic Mail Settings >In text entry window, J 7 Select an arrange item (See below)Item Operation/DescriptionSelect Mail Art AreaSpecify text to be arranged >Place cursor before (or after) text 7 A[Start] 7 Place cursor after (or before) text 7 A[End] 7 Select an icon 7 Follow the steps for selected itemsFont Color   >Select a colorStart Blink Flash textBackground Color >Select a colorInsert Files Insert images, BGM or Flash® >Select File 7 Select a folder 7 Select a file 7 A[Set] ⿟To delete BGM, Delete BGMReset All Graphic MailCancel all Graphic Mail settings >Font Size  >Select font sizeAlignment  >Select a typeStart Scrolling Scroll textStart Swing  Swing textInsert Line  Insert separator lineMy Pictograms Insert My Pictograms >Highlight a My Pictogram 7 A[Set] ⿟One file of BGM or Flash®, and up to 40 types of My Pictograms or images can be inserted per Graphic Mail. ⿟To delete inserted images, lines, My Pictograms, etc.: Close Graphic Palette 7 Move cursor before images, etc. 7 K ■Save Templates >In S! Mail Composition window, A[Menu] 7 Save as Template ■Download Templates via Internet >A 7 Templates 7 Download TemplatesSending MessagesFrom In composition window, A[Menu] ■Delivery Report >Sending Options 7 Delivery Report 7 ON ⿟Confirm Message Delivery (ZP.XX-15) ■Set Priority >Sending Options 7 Set Priorities 7 Select a level ■Set SMS Expiry Time >Sending Options 7 Expiry 7 Select a limit ⿟Set a Time Limit to Store All Sent SMS at the Center (ZP.XX-17) ■Save to Drafts >Save as Drafts
12-11Messaging12Receiving & Viewing MessagesOpening New MessagesWhen a new message is received,  appears and Information window opens in Standby. ⿟Auto Download retrieves complete messages and any attachments. Transmission fees are incurred; adjust to use. (To cancel Auto Download: ZP.XX-16)1  Select Messages in Information windowMessage List Window2  Select an unread message ■Open Newest Unread Message in Standby >In Standby, press and hold Receiving Feeling MailRingtone, vibration and notification lightrespond according to emotion settings, andInformation window opens.Note ⿟Handset may connect to the Network via URL link in message text. Data-intensive web pages may incur high charges. ⿟Depending on situations, Message tone may not sound and Notification Light may not flash.   flashes for new messages instead.Message Window
12-12Messaging12Tip#Other functions (ZP.XX-16)Settings   #Change Ringtone #Change Ringer Volume #Change Ringtone Duration #Set Vibration Alert (ZP.17-2) #Set Notification Light for Incoming Messages (ZP.XX-11)#Feeling Mail Settings (ZP.XX-16)Window Description ■Messaging Folder ContentsReceived or Sent Date & Time, and S! Mail Subject or SMS Message TextExample: Received Folder  in Incoming MailMessage Type/StatusMessage Type Message Status /    Unread/Read S! Mail /     Unread/Read S! Mail Notice /    Unread/Read SMS /     Unread/Read USIM Card SMS  Server Mail  Attachments (Gold) Protected Forwarded Message Replied Message  Delivery Report received SMS Concatenating High Priority Low Priority
12-13Messaging12 ■Message Contents* For Sent Messages, recipient appearsNote ⿟Status icons for protected/forwarded/replied SMS messages saved in USIM Card do not appear. ⿟After retrieving complete messages, S! Mail Notice icons with   (Forwarded) or   (Replied) change to   /   (S! Mail). ⿟Messages remain protected after complete messages are retrieved via protected S! Mail Notices.Tip#Message Display (ZP.XX-19)Sender*SubjectNumber of AttachmentsThe number of files (images, sounds, videos, text, etc.) appears.Example: Received MessageMessage TextSystem Message Icon (ZP.XX-16)Retrieving Complete S! Mail1  At the end of message text, There are sequels ■Retrieve from Message List >In received message list, A[Menu] 7 Retrieve 7 One ■Retrieve Multiple Messages >In received message list, highlight an S! Mail Notice 7 A[Menu] 7 Retrieve 7 Selected Messages 7 (Repeat: Select a message)* 7 A[Retrieve] 7 * To cancel selection, press   again.Note ⿟S! Mail may not be downloaded automatically while out of Standby. When the Center sends the initial portion of Mail (S! Mail Notice), retrieve the complete Mail.
12-14Messaging12Opening & Saving Attachments1  In Message window, A[Menu] 7 Attachment List2  Select a file 7 S[Back]3  To save the file, highlight a file 7 A[Save] 7 Phone or Memory CardNote ⿟When messages are opened, attached image files appear/play automatically. ⿟ (Silver) appears with file requiring a Content Key. If Content Key has expired, warning appears when opening a file. Acquire new Content Key (ZP.9-6).File formats Supported by Auto Playback ⿟Picture files (JPEG, GIF, PNG) ⿟Music files (SMAF, AMR, SMF, SP-MIDI)TipSettings   #Open Image Files Manually #Play Music Files Automatically (ZP.17-13)Viewing Received Messages1  Press and hold Incoming Mail folder is opened.2  Select a folder 7 Select a message ■Open an Unread Message >In Standby, press and hold   to open newest unread message.Viewing Sent Messages1  Press and hold Sent Messages folder is opened.2  Select a message
12-15Messaging12   XXXXXXXXXXXX   XXXXXXXXXXXXXX  XXXXXX    XXXXXXXXXXX   XXXXXXXXXXXXXX  XXXXXXXXXXXXX:XXXXXXXXXXXXXX:XXXXXXXXXXXXXX:XXXXXXXXXXXXXX:XXXXXXXX3D PictogramsMessage text appears in 3D animation. ⿟Incomplete S! Mail text does not appear animated.1  In Message window, A[Menu]2 3D PreviewThe first 150 characters of message text appear animated. ⿟To pause/resume:  ⿟To cancel: A[Stop]TipSettings   #Enable 3D Pictograms when Opening Messages #Change Font/Background Color (ZP.XX-15)
12-16Messaging12Using Server MailRetrieve mail list stored at the Center to view Server Mail.Viewing Server Mail1 A[ ] 7 Server Mail Box2 Mail List 7 A[Update] 7  ■Update Server Mail List >After Step 1, Mail List 7 A[Menu] 7 Update Mail List 7 Retrieving Server Mail1 A[ ] 7 Server Mail Box 7 Mail List2  (Highlight an S! Mail 7 ) A[Menu] 7 Retrieve3  Retrieve a New MessageOne Retrieve Multiple MessageSelected Messages 7 (Repeat: Select a message)* 7 A[Retrieve] 7 * To clear, repeat same operation. ■Retrieve All Messages >A 7 Server Mail Box 7 Mail List 7 A[Menu] 7 Retrieve 7 All 7 A[YES]Other functions ■Manually Retrieve New Messages >A 7 Retrieve New ⿟Retrieve S! Mail messages saved on Server while handset is off/out-of-range. ■View System Messages indicates a problem with incoming message (e.g., undelivered attachments). >A 7 Incoming Mail 7 Select a folder 7 Select a message 7 A[Menu] 7 System MessageServer Mail FunctionsFrom A 7 Server Mail Box ■Delete One/Selected Server Mail >Mail List 7 (Highlight an S! Mail 7 ) A[Menu] 7 Delete Server Mail 7 One or Selected Files 7 (For Selected Files, select messages* 7 A[Delete]) 7 * To clear, repeat same operation. ⿟Alternatively, in Message List window, select an S! Mail Notice 7 A[Menu] 7 Delete 7 Delete Server Mail 7  ■Delete All Server Mail >Mail List 7 (Highlight an S! Mail 7 ) A[Menu] 7 Delete Server Mail 7 All 7 A[YES] 7 Enter Phone Password ⿟Alternatively, from Main Menu, Messaging 7 Server Mail Box 7 Delete Server Mail All 7 A[YES] 7 Enter Phone Password
12-17Messaging12 ■Forward Server Mail >Mail List 7 Highlight an S! Mail 7 A[Menu] 7 Forward Server Mail 7 <Add Address> 7 Select/Enter a number or mail address 7 S[Send] ⿟To forward Server Mail via S! Mail Notice: In Message List window, highlight an S! Mail Notice 7 A[Menu] 7 Forward 7 Forward Server Mail 7 <Add Address> 7 Select/Enter a number or mail address 7 S[Send] ⿟Forwarded Server Mail messages remain in Mail List. ⿟ appears for forwarded Server Mail messages in Drafts, Unsent Messages and Sent Messages folders. ■Sort Server Mail >Mail List 7 A[Menu] 7 Sort 7 Date or From ■View Server Mail Property >Mail List 7 Highlight an S! Mail 7 A[Menu] 7 PropertyOrganizing/Using MessagesChecking Messages in Messaging Folders1 A[ ] 7 Incoming Mail, Drafts, Sent Messages or Unsent Messages ⿟In Incoming Mail folder, select a folder then message. ⿟Messaging Folders: ZP.13-32  Select a message ⿟To toggle back and forth between messages in Message window: G or HTip#Organizing Messages (ZP.XX-19)#Using Messages (ZP.XX-20)
12-18Messaging12Mail Delivery Rule ⿟Previously received messages are not sorted. ⿟If the same address or subject is set to multiple folders, lowest numbered folder has priority. ⿟Either address or mail subject can be specified per folder.1 A[ ] 7 Incoming Mail2  Highlight a folder 7 A[Menu] 7 Mail Delivery Rule3 A[Menu] 7 Select an item (See below)Item Operation/DescriptionAdd Address Sort received messages by sender’s address >Select an address selection method 7 Select an address or enter directly ⿟Save up to 10 addresses per folder.Add Subject Sort received messages by mail subject >Enter subject ⿟Save one subject per folder. ⿟SMS cannot be sorted by mail subject. ⿟To edit saved address/subject: Select address/subject 7 Edit address/subject ■Delete Mail Delivery Rule Settings >A 7 Incoming Mail 7 Highlight a folder 7 A[Menu] 7 Mail Delivery Rule 7 Highlight a condition 7 A[Menu] 7 DeleteReplying to Messages1  In Message window, S[Reply] ⿟Re: appears before Subject of replay2  Complete message 7 S[Send] ■Reply to All Addresses >In Message window, A[Menu] 7 Reply 7 Reply to All 7 Complete message 7 S[Send]Note ⿟Alternatively, in Message List window, highlight a message to reply to 7 A[Menu] 7 Reply 7 To Sender or Reply to All. ⿟When replying/forwarding a message, words used in received message take priority in Forecast list (ZP.3-5).TipSettings   #Change Word Prediction Priority (ZP.XX-15)#Set Not to Quote Message Text when Replying (ZP.XX-16)
12-19Messaging12Mail Security SettingActivate Mail Security to require Phone Password when opening Mail box and operating Server Mail.1 A[ ] 7 Settings2 Universal Settings 7 Mail Security Setting3  Enter Phone Password 7 (Repeat: Select an item)* 7 A[OK]* To cancel selection, press  again. ■Set/Cancel Mail Security on Folders in Incoming Mail >A[ ] 7 Incoming Mail 7 Highlight Received or a folder 7 A[Menu] 7 Set Mail Security or Cancel Mail Security 7 Enter Phone PasswordMessaging Lock[Default] OFFWhile Messaging Lock is active, creating messages, viewing Mail Boxes, changing settings, etc. are restricted. ⿟When Messaging Lock is active,   appears. When Phone Book Lock and Messaging Lock are both active,   appears. Main Menu 4 Settings 4 Security 4 Messaging Lock1 ON or OFF ⿟For ON, press  .2  Enter Phone PasswordNote ⿟When Messaging Lock is active, templates can be backed up to Memory Card or downloaded, but cannot be edited or used for S! Mail messages.
12-20Messaging12Message DisplayFrom In Message List window ■Sort Messages >A[Menu] 7 Sort 7 Select a sorting method ■Change Font Size >Select a message 7 A[Menu] 7 Font Size 7 Select a sizeOrganizing MessagesFrom In Message List window ■Delete Messages >Follow the steps (See below)Item Operation/DescriptionDelete  >Highlight a message 7 A[Menu] 7 Delete 7 One 7 Delete Selected Messages >A[Menu] 7 Delete 7 Selected File 7 (Repeat: Select a message)* 7 A[Delete] 7 * To cancel selection: press   again.Delete All Messages >A[Menu] 7 Delete 7 All 7 A[YES] 7 Enter Phone Password ⿟SMS in USIM cannot be deleted. ■Protect Messages >Highlight a message 7 A[Menu] 7 Protect or Unprotect 7 Follow the steps (See below)Item Operation/DescriptionProtect/Unprotect One message >OneProtect/Unprotect Selected Messages >Protect Selected Items or Unprotect Selected Items 7 (Repeat: Select a message)* 7 A[Execute]* To cancel selection: press   again. ■Move Messages to Specific Folders >In Message List window, (Highlight a message 7 ) A[Menu] 7 Move 7 One or Selected Files 7 (For Selected Files, select messages* 7 A[Move]) 7 Select a folder ( 7 For Selected Files,  )* To clear, repeat same operation. ⿟SMS saved on USIM Card cannot be moved. ■Copy SMS to USIM Card/Handset >A 7 Incoming Mail 7 Select a folder 7 Highlight an SMS 7 A[Menu] 7 Local Connectivity 7 Copy to USIM or Copy to Phone ■View Message Property >In Message List or Message window, A[Menu] 7 Property ⿟Check subject, sender (From), address (To, Cc, Bcc), Reply-to, date, size, message type, attachment, priority, etc. ⿟Details differ by messaging folder and message type.
12-21Messaging12Using Messages ■Forward Messages >A 7 Incoming Mail 7 Select a folder 7 Select a message 7 A[Menu] 7 Forward 7 <Add Address> 7 Select a method 7 Select an address or enter directly 7 S[Send] ⿟To forward Server Mail: ZP.XX-16 ⿟Attachments are also forwarded. (Copy protected attachments are not forwardable.) ■Send Drafts >A 7 Drafts 7 Highlight a message 7 [Edit] 7 S[Send] ■Use Linked Information >In Message List window, select a message 7 Follow the steps (See below)Item Operation/DescriptionMake Calls  >Select a number (highlighted) 7 Call 7 Voice Call or Video Call 7 Send Messages  >Select a number or address (highlighted) 7 Create Message 7 S! Mail or SMS 7 Create a message 7 S[Send] ⿟Selecting S! Mail or SMS is not available when using addresses.Add to PhoneBook >Select a number or address (highlighted) 7 Add to Phone Book 7 Create New Entry or select an existing entry 7 Add to Phone Book (Zfrom Step 2 on P.4-3)Access Website  >Select a URL (highlighted) 7 Connect with Yahoo! Keitai or Connect with PC Site Browser 7 Item Operation/DescriptionAdd to Bookmarks >Select a URL (highlighted) 7 Add to Bookmark 7 <Title> 7 Enter a title 7 Select Folder field 7 Select a folder 7 A[Save] ■Use Sender's/Recipient's Information >In Message List window, select a message 7 A[Menu] 7 Follow the steps (See below)Item Operation/DescriptionMake Calls  >Call 7 Voice Call or Video CallSave to Phone Book >Add Sender to Phone Book or Add Destination to Phone Book 7 Create New Entry or select an existing entry 7 Add to Phone Book (ZFrom Step 2 on P.4-3) ■Send Unsent Messages >A 7 Unsent Messages 7 Highlight a message 7 A[Menu] 7 Send ■Use Sent Messages >A 7 Sent Messages 7 Highlight a message 7 A[Menu] 7 Edit 7 Edit message 7 S[Send]
12-22Messaging12

Navigation menu