PARROT EBOX4R2 Bluetooth Car Kit with 433 MHz Receiver User Manual MKi9100

PARROT Bluetooth Car Kit with 433 MHz Receiver Users Manual MKi9100
Contents

Users Manual MKi9100
PARROTMKi9100Quick start guideGuide d’utilisation rapideGuía de instalación rápidaBedienungsanleitungGuida all’usoGebruikershandleidingManual do utilizador
www.parrot.comParrot MKi9100                     Installation diagrams........................   English.............................................    Français...........................................    Español...........................................     Deutsch ..........................................    Italiano ............................................    Nederlands .....................................   Português........................................  General Information.........................p.06p.11p.19p.27 p.35 p.43 p.51p.59p.67
4
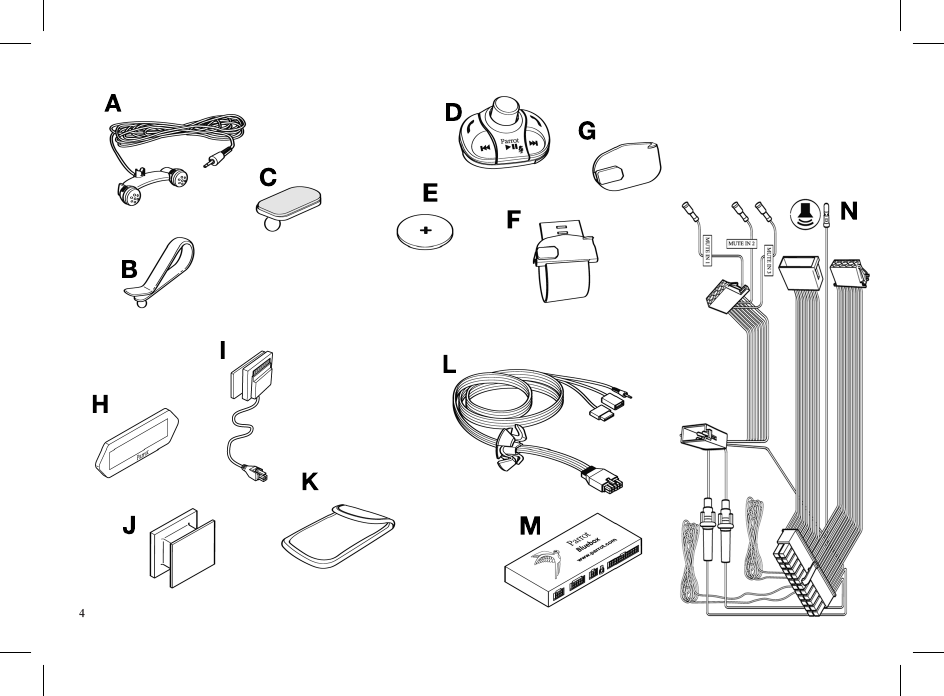
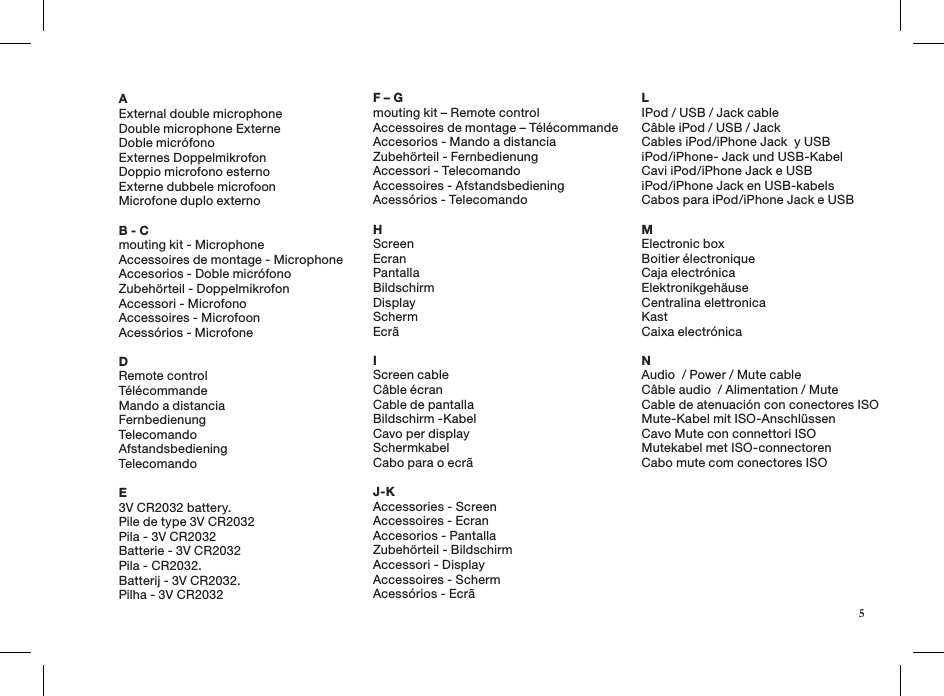
A External double microphoneDouble microphone ExterneDoble micrófonoExternes DoppelmikrofonDoppio microfono esternoExterne dubbele microfoonMicrofone duplo externoB - Cmouting kit - MicrophoneAccessoires de montage - MicrophoneAccesorios - Doble micrófonoZubehörteil - DoppelmikrofonAccessori - MicrofonoAccessoires - MicrofoonAcessórios - MicrofoneDRemote controlTélécommandeMando a distanciaFernbedienungTelecomandoAfstandsbediening TelecomandoE 3V CR2032 battery.Pile de type 3V CR2032 Pila - 3V CR2032Batterie - 3V CR2032Pila - CR2032.Batterij - 3V CR2032.Pilha - 3V CR2032F – G mouting kit – Remote controlAccessoires de montage – Télécommande Accesorios - Mando a distanciaZubehörteil - FernbedienungAccessori - TelecomandoAccessoires - Afstandsbediening Acessórios - TelecomandoHScreenEcranPantallaBildschirmDisplaySchermEcrãIScreen cableCâble écranCable de pantallaBildschirm -KabelCavo per displaySchermkabelCabo para o ecrãJ-KAccessories - ScreenAccessoires - EcranAccesorios - PantallaZubehörteil - BildschirmAccessori - DisplayAccessoires - SchermAcessórios - EcrãL IPod / USB / Jack cableCâble iPod / USB / JackCables iPod/iPhone Jack  y USBiPod/iPhone- Jack und USB-KabelCavi iPod/iPhone Jack e USBiPod/iPhone Jack en USB-kabels Cabos para iPod/iPhone Jack e USBMElectronic boxBoitier électroniqueCaja electrónicaElektronikgehäuseCentralina elettronicaKastCaixa electrónicaN Audio  / Power / Mute cableCâble audio  / Alimentation / MuteCable de atenuación con conectores ISOMute-Kabel mit ISO-AnschlüssenCavo Mute con connettori ISOMutekabel met ISO-connectorenCabo mute com conectores ISO5
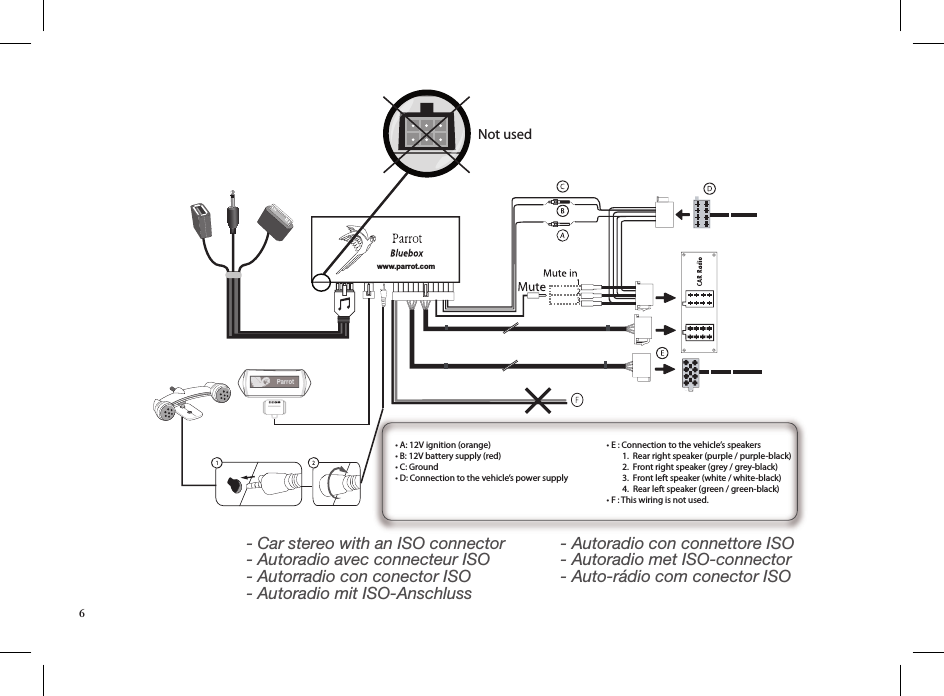
www.parrot.com• A: 12V ignition (orange)• B: 12V battery supply (red)• C: Ground• D: Connection to the vehicle’s power supply• E : Connection to the vehicle’s  speakers        1.  Rear right speaker (purple / purple-black)        2.  Front right speaker (grey / grey-black)        3.  Front left speaker (white / white-black)        4.  Rear left speaker (green / green-black)• F : This wiring is not used.Not used- Car stereo with an ISO connector - Autoradio avec connecteur ISO - Autorradio con conector ISO - Autoradio mit ISO-Anschluss  - Autoradio con connettore ISO - Autoradio met ISO-connector - Auto-rádio com conector ISO6
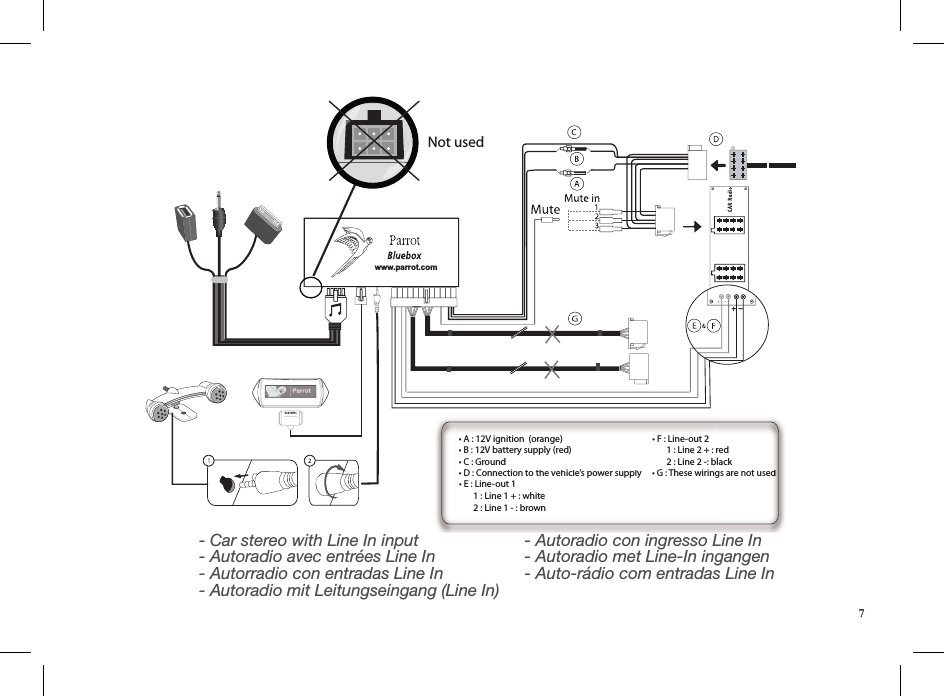
www.parrot.com• A : 12V ignition  (orange)• B : 12V battery supply (red)• C : Ground• D : Connection to the vehicle’s  power supply• E : Line-out 1       1 : Line 1 + : white       2 : Line 1 - : brown• F : Line-out 2       1 : Line 2 + : red       2 : Line 2 -: black• G : These wirings are not used• A : 12V ignition  (orange)• B : 12V battery supply (red)• C : Ground• D : Connection to the vehicle’s power supply• E : Line-out 1       1 : Line 1 + : white       2 : Line 1 - : brown• F : Line-out 2      1 : Line 2 + : red      2 : Line 2 -: black• G : These wirings are not useddNot used- Car stereo with Line In input - Autoradio avec entrées Line In - Autorradio con entradas Line In - Autoradio mit Leitungseingang (Line In)  - Autoradio con ingresso Line In - Autoradio met Line-In ingangen - Auto-rádio com entradas Line In7
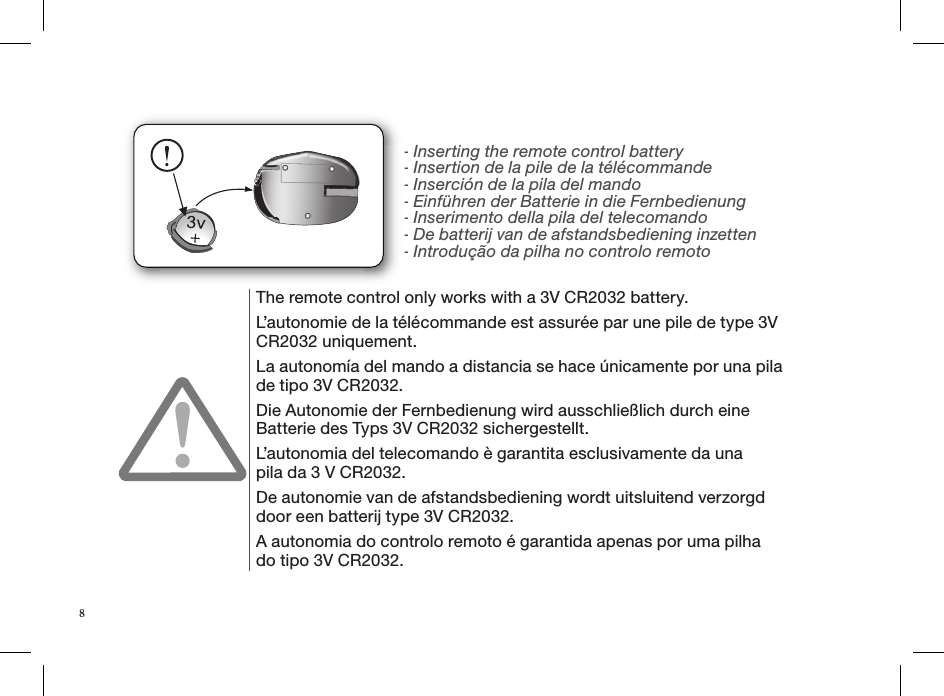
- Inserting the remote control battery - Insertion de la pile de la télécommande - Inserción de la pila del mando - Einführen der Batterie in die Fernbedienung - Inserimento della pila del telecomando - De batterij van de afstandsbediening inzetten - Introdução da pilha no controlo remotoThe remote control only works with a 3V CR2032 battery.  L’autonomie de la télécommande est assurée par une pile de type 3V  CR2032 uniquement.La autonomía del mando a distancia se hace únicamente por una pila  de tipo 3V CR2032.Die Autonomie der Fernbedienung wird ausschließlich durch eine  Batterie des Typs 3V CR2032 sichergestellt. L’autonomia del telecomando è garantita esclusivamente da una  pila da 3 V CR2032. De autonomie van de afstandsbediening wordt uitsluitend verzorgd  door een batterij type 3V CR2032. A autonomia do controlo remoto é garantida apenas por uma pilha  do tipo 3V CR2032.8
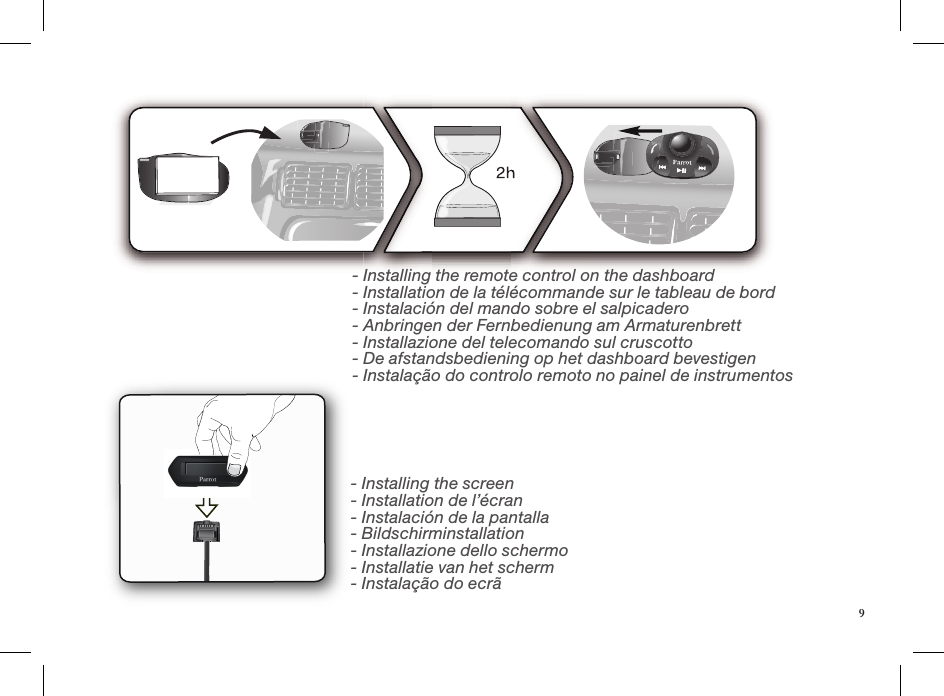
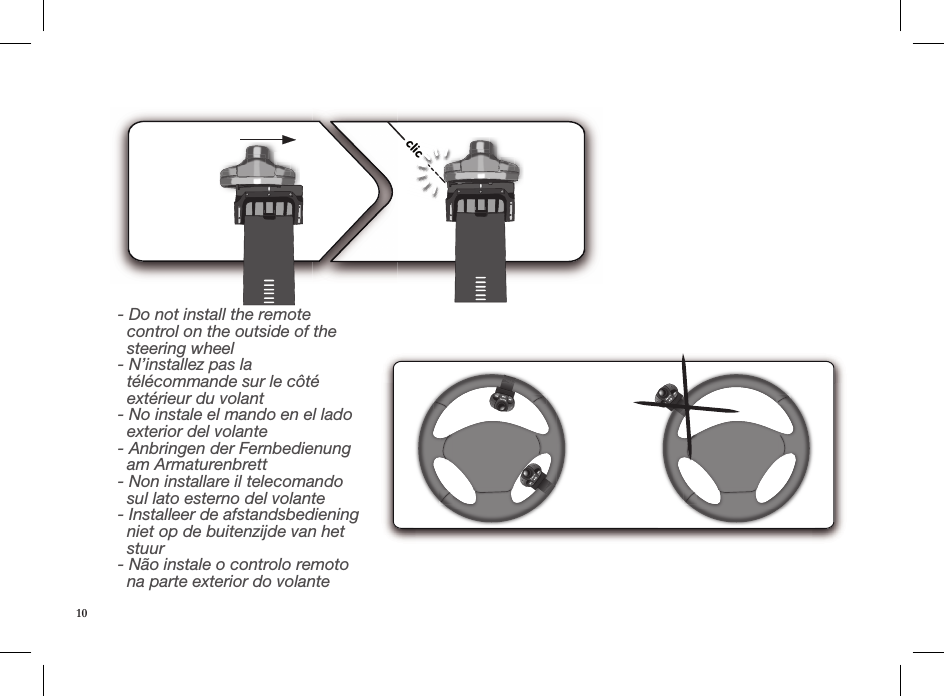
- Installing the remote control on the dashboard - Installation de la télécommande sur le tableau de bord - Instalación del mando sobre el salpicadero - Anbringen der Fernbedienung am Armaturenbrett - Installazione del telecomando sul cruscotto - De afstandsbediening op het dashboard bevestigen - Instalação do controlo remoto no painel de instrumentos- Installing the screen- Installation de l’écran- Instalación de la pantalla - Bildschirminstallation - Installazione dello schermo - Installatie van het scherm - Instalação do ecrã9
clic- Do not install the remote        control on the outside of the          steering wheel - N’installez pas la    télécommande sur le côté      extérieur du volant - No instale el mando en el lado    exterior del volante - Anbringen der Fernbedienung    am Armaturenbrett - Non installare il telecomando    sul lato esterno del volante - Installeer de afstandsbediening    niet op de buitenzijde van het    stuur - Não instale o controlo remoto    na parte exterior do volante10
This simplified guide of the Parrot MKi9100 gives you the main instructions to easily use this product. For further information, refer to the user guide available on our website www.parrot.com.   Contents                         • Remove the audio system from your vehicles dashboard to     access the wiring harness. • The cables supplied with the kit feature ISO connectors     and two pairs of line-out jacks. The line-out jacks can be     used if your audio system features this option (use of an     amplifier). Several set-ups are therefore possible  EnglishEnglishThe availability of some functionality only depends on your mobile phone. ► Refer to our website www.parrot.com, in the Compatibility section, for further information.We advise our customers to have the Parrot MKi9100 fitted by a professional.Installing the Parrot MKi9100..............................................   Installing the electronic box.........................................   Car stereo with an ISO connector................................   Car stereo with line-in..................................................   Car stereo without ISO connectors..............................   Installing the kit’s power cable.....................................   Checking the wiring......................................................   Installing the audio connectors....................................   Installing the remote control........................................   Installing the double microphone................................   Installing the screen..................................................... Using the Parrot MKi9100 for the 1st time.........................   Associating the control unit with the remote control...    Navigating through the menus.....................................   Pairing and connecting a phone to          the Parrot MKi9100...................................................... Using the telephone function..............................................   Synchronizing the phonebook.....................................   Commands...................................................................   Receiving a calll...........................................................   Making a call................................................................   Making a call via voice recognition..............................   Using the magic words................................................ Using the Music function.....................................................   Selecting an audio source............................................   Commands...................................................................11 12 12 12 12 12 13 13 13 14 14 14 14 14  14 15 15 15 16 16 16 17 17 17 18A steering wheel control interface can be  used to connect your vehicle’s steering wheel controls to your Parrot hands-free kit. With this  interface, you will be able to make phone calls via the steering wheel controls while keeping your hands on the wheel.  Refer to our website  www.parrot.com for more information.  Installing the PARROT MKi910011
   depending on the type of car stereo and your vehicle.  • The mute function is used to cut the sound of your car     stereo to enable a phone call. The choice of the mute-in     jack depends on your car stereo’s configuration.  • Make sure the cables are not pinched at the end of     the installation process.    Installing the electronic box      Avoid installing the electronic box:  - near heating or air-conditioning system;  - on a spot directly exposed to sunlight;  - behind metal walls.    Car stereo with an ISO connector     ► Refer to the installation diagram p.6. 1. Connect the male connectors of the hands-free kit to the      car stereo. 2. Join the vehicle’s audio and power supply cables to the      female connectors of the Parrot MKi9100.  3. On the installation cable, connect the free yellow wire to      one of the audio system’s corresponding mute-in jacks if      available (mute in 1, mute in 2 or mute in 3).  Car stereo with line-in     ► Refer to the installation diagram p.7.  • Use this type of connection by wiring the line-out          (brown & white wire or red & black wire) to your car     stereo’s line-in. • Using the two pairs of line-out will enable you to take     advantage of the streaming audio function in stereo     over your vehicle’s speakers. • On the installation cable, connect the free yellow wire     to the corresponding audio system’s mute-input if available     (mute in 1, mute in 2 or mute in 3).  Car stereo without ISO connectors   To simplify the wiring procedure, you will need to purchase an ISO adapter cable. Refer to the range of ISO adapters on our website: www.parrot.com.   Installing the kit’s power cable          In order to check the wiring, connect the screen  before placing it on the dashboard. ► Refer to the Checking the wiring section for more information.12
• Refer to your car stereo’s wiring diagram. • The red wire of the kit’s cable must correspond to the     constant +12V supply, the orange wire to the ignition +12V     and the black wire to ground. • Check that the orange wire is not connected to the      constant +12V supply, as you could run down the vehicle’s     battery, preventing your hands-free kit from operating     correctly.          Checking the wiring        To perform the installation check, turn the ignition on then off once the Parrot MKi9100 is installed: the message  “Good bye!” must be displayed. If it is not the case, it is necessary to inverse the positions of the red and orange wires. Indeed, the red wire of the power cable must be connected to the permanent 12V, the orange wire to the 12V ignition and the black wire to the ground. This can be done simply by reversing both fuse holders located on the Parrot wiring.   Installing the audio connectors      • Connect the music cable to the electronic box and         place the USB / iPod / Jack connectors into the glove     box, the central console or the parcel tray depending on     the configuration of your dashboard. Make sure that the     cable is not pinched.  • Use the provided protection cap to protect the connectors.    Installing the remote control      ► Refer to the diagrams p.9/10v.  • Choose the place for the remote control inside your     vehicle. We would advise you to fit it in the center of the     dashboard or close to the steering wheel.  • If you want to place the remote control on the steering     wheel, make sure it is securely attached, so that it does     not  move when you are driving. Do not install the          remote control on the outside of the steering wheel and     ensure it does not get in the way when driving.   • If you want to place the remote control on the dashboard,     stick the double-sided tape located on the flat side of the     bracket to fix it against the dashboard. You can then insert     the remote onto the bracket.      On some vehicles, there is no ignition +12V on the vehicle’s connectors. You must therefore connect the orange power supply wire to the fuse box or another ignition power source. 13
      Installing the double microphone     Parrots microphones are directional and need to be pointed towards the user to pick up clear speech. The microphone should be installed near the front roof light cluster, in the centre of the vehicle with a clear path to the user.    Installing the screen       Remember to remove your screen when leaving the vehicle  to avoid tempting any would-be thieves and to prevent  prolonged exposure to sunlight.     Associating the control unit with the remote control  If the remote control does not seem to be associated to the electronic box while using the Parrot MKi9100 for the first time, press several times the red button while holding down the green and Play buttons until the «Pairing remote control» message is displayed. This has to be done during a 30 seconds period once the ignition is turned on.   Navigating through the menus      • Press the central jog wheel to access the menus.   > The kit says and displays the name of the current menu. • Browse through the menus by turning the wheel and     confirm with the green button or by pressing the scroll     wheel. • To exit the menu, press the red button or wait for a     few seconds.   Pairing and connecting a phone    to the Parrot MKi9100      Prior to using your Parrot MKi9100 with your phone for the very first time, you must initially pair both devices.  1. Make sure the Parrot MKi9100 is set so that it is visible by      all Bluetooth ® devices. To do so, press the jog wheel and      select Settings > Bluetooth > Visibility > Visible.    The Parrot MKi9100 is visible by default. 2. Press the jog wheel and select Settings > Pair with...      > If your mobile phone’s model appears in the list, select it      and confirm.      > If your mobile phone model doesn’t appear in the list,      select the Other phones option.     Using the PARROT MKi9100 for the 1st timeOnce you have stuck the support on the  dashboard, wait for approximately 2 hours to make sure the adhesive tape adheres well.14
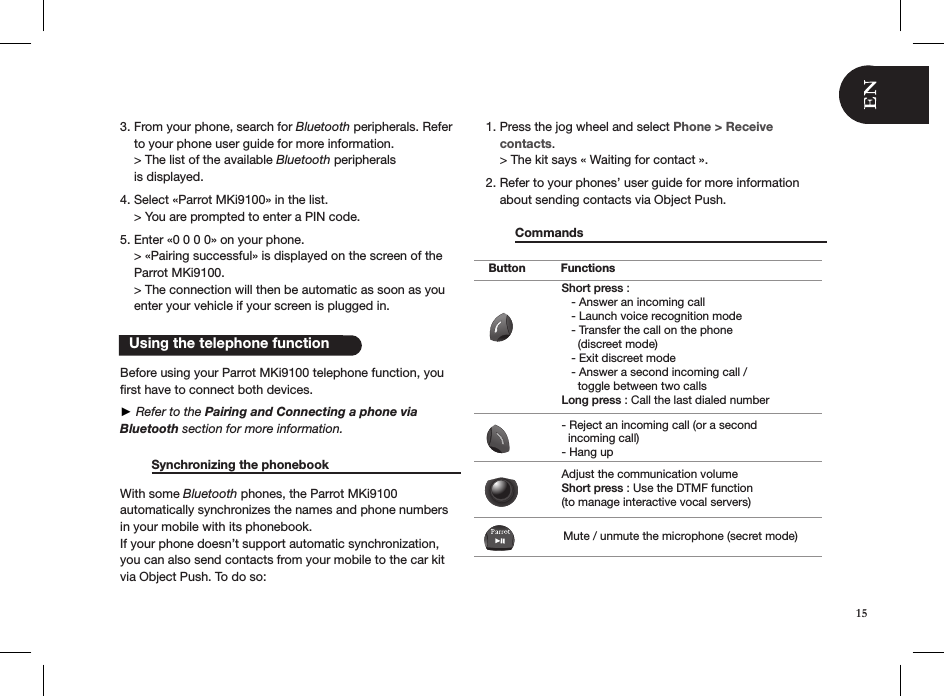
   Using the telephone function3. From your phone, search for Bluetooth peripherals. Refer      to your phone user guide for more information.        > The list of the available Bluetooth peripherals      is displayed.  4. Select «Parrot MKi9100» in the list.     > You are prompted to enter a PIN code.  5. Enter «0 0 0 0» on your phone.     > «Pairing successful» is displayed on the screen of the      Parrot MKi9100.     > The connection will then be automatic as soon as you      enter your vehicle if your screen is plugged in.   Before using your Parrot MKi9100 telephone function, you first have to connect both devices. ► Refer to the Pairing and Connecting a phone via  Bluetooth section for more information.           Synchronizing the phonebook     With some Bluetooth phones, the Parrot MKi9100  automatically synchronizes the names and phone numbers in your mobile with its phonebook.  If your phone doesn’t support automatic synchronization, you can also send contacts from your mobile to the car kit via Object Push. To do so: 1. Press the jog wheel and select Phone > Receive        contacts.    > The kit says « Waiting for contact ».  2. Refer to your phones’ user guide for more information      about sending contacts via Object Push.   Commands                                                ButtonFunctionsShort press :   - Answer an incoming call   - Launch voice recognition mode   - Transfer the call on the phone      (discreet mode)   - Exit discreet mode   - Answer a second incoming call /      toggle between two callsLong press : Call the last dialed number- Reject an incoming call (or a second  incoming call)- Hang upAdjust the communication volumeShort press : Use the DTMF function(to manage interactive vocal servers)Mute / unmute the microphone (secret mode)15
  Receiving a call       An incoming call is indicated by a ringtone.    The name of the caller is announced and displayed if his details are stored in the phonebook of the phone connected to the Parrot MKi9100.  • If you want to answer the call, press the green button.     Then press the red button to end the call.  • If you want to reject this call, press the red button.  ► If you want to use the voice recognition feature to  pick up or reject a call, refer to the Using the magic      words section.    Making a call        • If the contact you want to call is in the phonebook of the       phone connected to the Parrot MKi9100: 1. Press the jog wheel to enter the main menu and      select Phonebook.         > You access the phonebook of the connected phone.  2. Select a letter and press the jog wheel;    > Once the contact chosen:  - Press the green key to call this contact;  - or use the jog wheel to choose between different      numbers of the same contact. • If the contact you want to call is not in the phonebook     of the phone connected to the Parrot MKi9100, stop your     vehicle in a safe location, press the jog wheel and select     Phonebook > Dial a number.    Making a call via voice recognition    You can make a call using voice recognition directly after automatic synchronization or Object Push process. The Parrot MKi9100 will automatically recognize the contact you wish to call. 1. Press the green button to launch the voice    recognition feature.    > The Parrot MKi9100 asks you the name of the contact    you want to call. 2. Say the name of the contact and the type of number if    there are several numbers associated to your contact.    > The call is automatically launched if the voice tag is    correctly understood.     > If it is not the case, a confirmation message is asked    by the kit.    You can make a call via voice recognition using  several combinations of keywords. For example,  « call ‘Bob’» or simply « ‘Bob’ ». You can also  associate the type of number you want to call:  «call ‘Bob’ at home», «’Bob’ home », etc.16
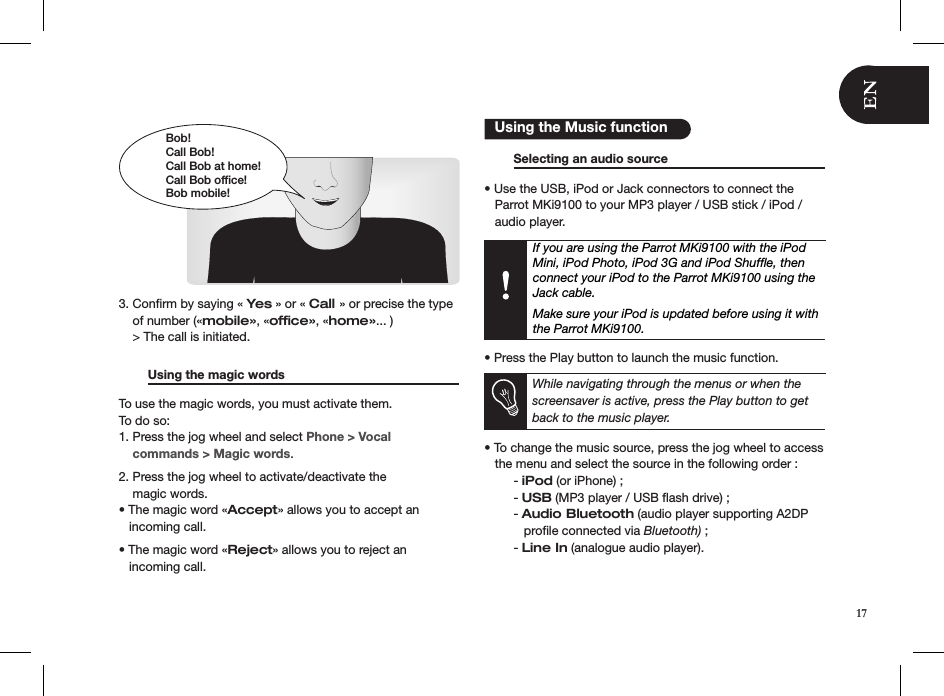
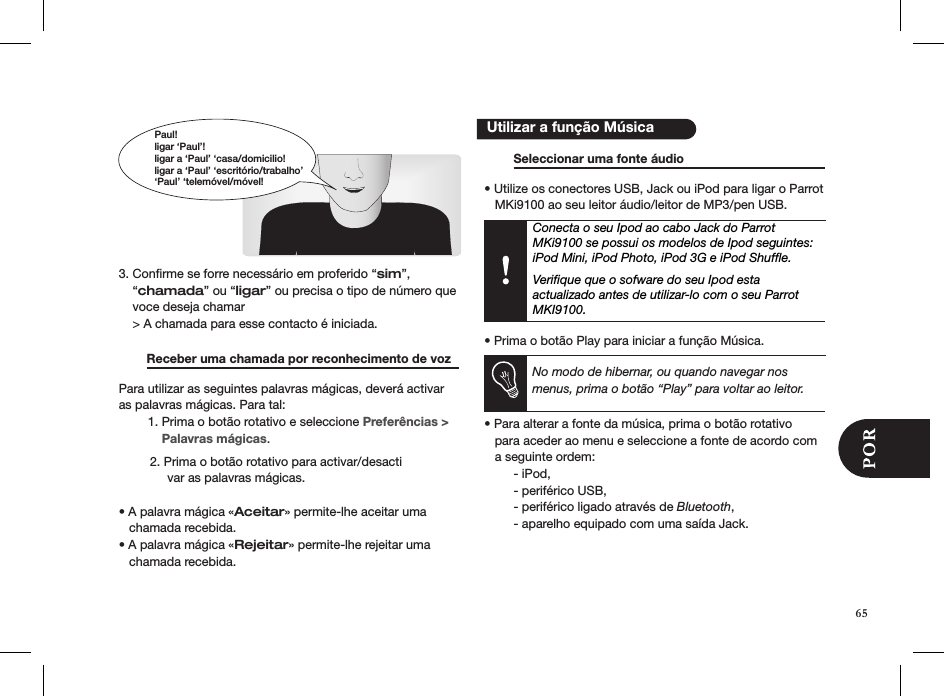
   Using the Music functionBob!Call Bob!Call Bob at home!Call Bob office!Bob mobile!  3. Confirm by saying « Yes » or « Call » or precise the type    of number («mobile», «office», «home»... )    > The call is initiated.   Using the magic words     To use the magic words, you must activate them.  To do so: 1. Press the jog wheel and select Phone > Vocal      commands > Magic words.  2. Press the jog wheel to activate/deactivate the      magic words. • The magic word «Accept» allows you to accept an     incoming call.  • The magic word «Reject» allows you to reject an     incoming call.    Selecting an audio source      • Use the USB, iPod or Jack connectors to connect the     Parrot MKi9100 to your MP3 player / USB stick / iPod /     audio player.If you are using the Parrot MKi9100 with the iPod Mini, iPod Photo, iPod 3G and iPod Shuffle, then connect your iPod to the Parrot MKi9100 using the Jack cable. Make sure your iPod is updated before using it with the Parrot MKi9100.• Press the Play button to launch the music function.   While navigating through the menus or when the screensaver is active, press the Play button to get back to the music player.• To change the music source, press the jog wheel to access     the menu and select the source in the following order :   - iPod (or iPhone) ;  - USB (MP3 player / USB flash drive) ;  - Audio Bluetooth (audio player supporting A2DP       profile connected via Bluetooth) ;  - Line In (analogue audio player).17
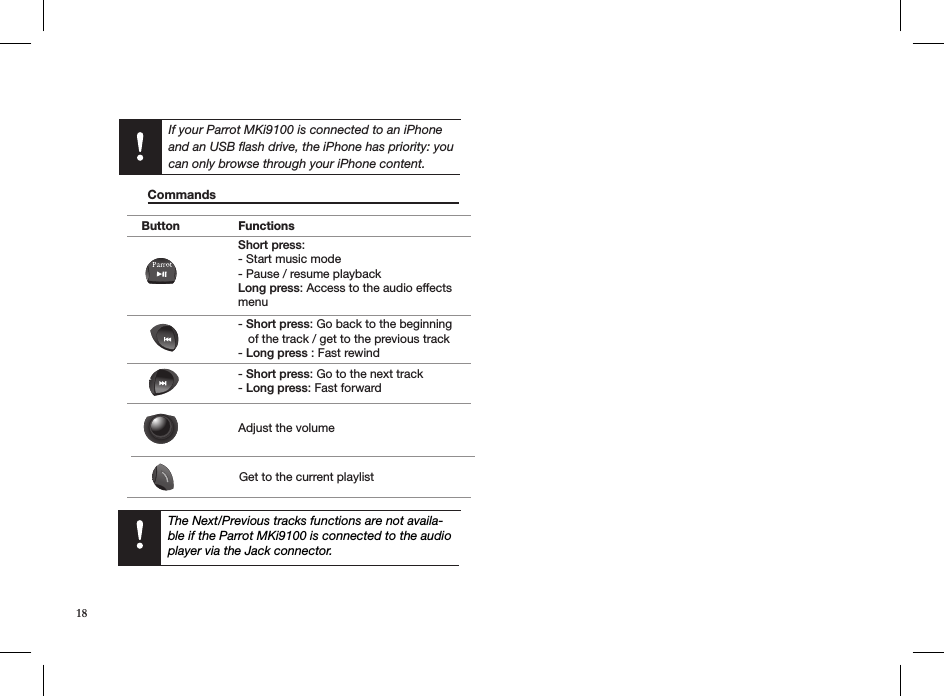
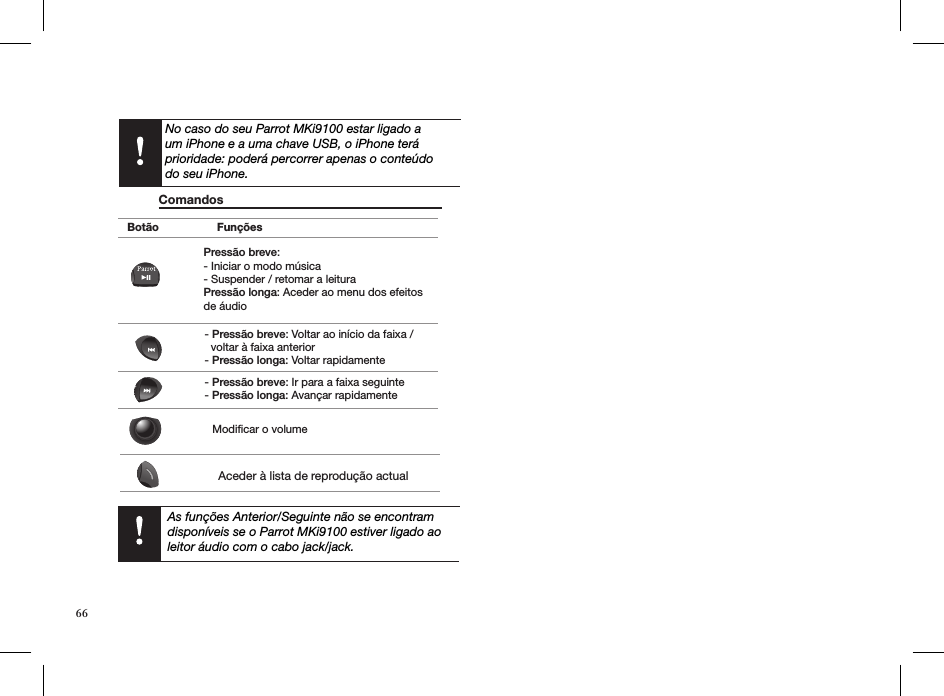
The Next/Previous tracks functions are not availa-ble if the Parrot MKi9100 is connected to the audio player via the Jack connector.  Commands       Button FunctionsShort press: - Start music mode - Pause / resume playback Long press: Access to the audio effects menu- Short press: Go back to the beginning    of the track / get to the previous track- Long press : Fast rewind- Short press: Go to the next track- Long press: Fast forwardAdjust the volumeGet to the current playlistIf your Parrot MKi9100 is connected to an iPhoneand an USB flash drive, the iPhone has priority: youcan only browse through your iPhone content.18
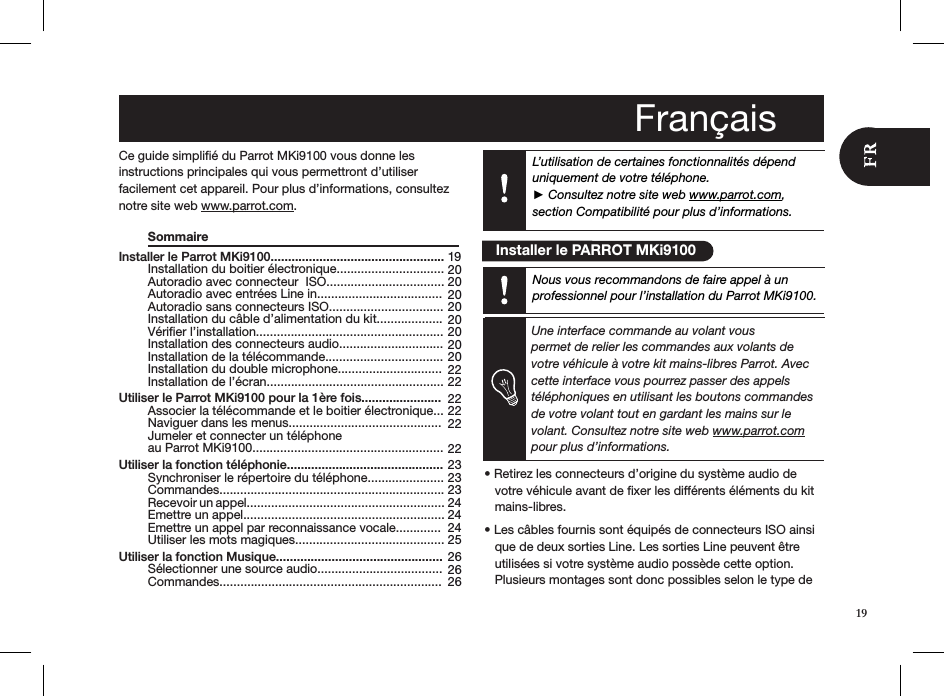
L’utilisation de certaines fonctionnalités dépend uniquement de votre téléphone.  ► Consultez notre site web www.parrot.com, section Compatibilité pour plus d’informations.Installer le Parrot MKi9100..................................................   Installation du boitier électronique...............................   Autoradio avec connecteur  ISO..................................   Autoradio avec entrées Line in....................................   Autoradio sans connecteurs ISO.................................   Installation du câble d’alimentation du kit...................   Vérifier l’installation......................................................   Installation des connecteurs audio..............................   Installation de la télécommande..................................   Installation du double microphone..............................   Installation de l’écran................................................... Utiliser le Parrot MKi9100 pour la 1ère fois.......................   Associer la télécommande et le boitier électronique...   Naviguer dans les menus............................................   Jumeler et connecter un téléphone    au Parrot MKi9100....................................................... Utiliser la fonction téléphonie.............................................   Synchroniser le répertoire du téléphone......................  Commandes.................................................................   Recevoir un appel.........................................................   Emettre un appel..........................................................   Emettre un appel par reconnaissance vocale.............    Utiliser les mots magiques........................................... Utiliser la fonction Musique................................................   Sélectionner une source audio....................................   Commandes................................................................19 20 20 20 20 20 20 20 20 22 22 22 22 22  22 23 23 23 24 24 24 25 26 26 26 Une interface commande au volant vous  permet de relier les commandes aux volants de votre véhicule à votre kit mains-libres Parrot. Avec cette interface vous pourrez passer des appels téléphoniques en utilisant les boutons commandes de votre volant tout en gardant les mains sur le volant. Consultez notre site web www.parrot.com pour plus d’informations.Ce guide simplifié du Parrot MKi9100 vous donne les instructions principales qui vous permettront d’utiliser facilement cet appareil. Pour plus d’informations, consultez notre site web www.parrot.com.   Sommaire                          • Retirez les connecteurs d’origine du système audio de     votre véhicule avant de fixer les différents éléments du kit     mains-libres. • Les câbles fournis sont équipés de connecteurs ISO ainsi     que de deux sorties Line. Les sorties Line peuvent être     utilisées si votre système audio possède cette option.       Plusieurs montages sont donc possibles selon le type de  Français   Installer le PARROT MKi9100Nous vous recommandons de faire appel à un  professionnel pour l’installation du Parrot MKi9100.19
   votre autoradio et de votre véhicule.  • La fonction Mute permet d’interrompre le son de votre     autoradio pour laisser place à la communication. Le choix     de l’entrée Mute dépend de la configuration de votre     autoradio.  • Assurez-vous que les câbles du Parrot MKi9100 ne se     retrouvent pas pliés ou coincés à l’issue de l’installation.    Installation du boitier électronique    Evitez d’installer le boîtier :  - près du chauffage ou de la climatisation  - à un endroit exposé au soleil  - derrière des parois métalliques.    Autoradio avec connecteur  ISO      ► Consultez le schéma d’installation p.6. 1. Branchez les connecteurs mâles du kit mains-libres      à l’autoradio.  2. Reliez les faisceaux audio et alimentation du véhicule aux      connecteurs femelles du Parrot MKi9100.  3. Sur le câble d’installation, reliez le fil jaune libre à l’une des      entrées mute correspondante du système audio s’il en est      équipé (mute in1, mute in2 ou mute in3).   Autoradio avec entrées Line in       ► Consultez le schéma d’installation p.7. • Utilisez ce type de connexion en reliant une sortie « Line »     (fils marron et blanc ou fils rouge et noir) sur l’entrée     « Line » de votre système audio.  • L’utilisation des deux paires de sorties « Line » permet de     bénéficier de la fonction Streaming Audio en stéréo sur les     haut-parleurs de votre véhicule.  • Sur le câble d’installation, reliez le l jaune libre à l’une des     entrées mute correspondante du système audio s’il en est     équipé (mute in1, mute in2 ou mute in3).         Autoradio sans connecteurs « ISO »   Afin de faciliter le montage, vous devez vous procurer un câble adaptateur ISO. Consultez la gamme d’adaptateur ISO sur notre site internet : www.parrot.com.   Installation du câble d’alimentation du kit      Afin de procéder à la vérification de l’installation, connectez d’abord l’écran sans le placer sur le tableau de bord. ► Consultez la section Vérifier l’installation pour plus d’informations.20
Sur certains véhicules, il n’y a pas de +12V après contact sur les connecteurs du véhicule. Il est alors nécessaire de brancher le fil d’alimentation orange sur la boite à fusible ou sur une autre source  d’alimentation après contact. • Consultez le schéma électrique de votre autoradio.  • Le l rouge du câble du kit doit correspondre au +12V     permanent, le fil orange au 12V après-contact et le fil noir     à la masse.   • Vériez que votre l orange n’est pas connecté au 12V     permanent, vous risqueriez de décharger la batterie du     véhicule et cela entraînerait un dysfonctionnement de votre     kit mains-libres.          Vérifier l’installation      Vérifiez la polarité de l’alimentation de votre kit mains-libres. Pour cela, coupez le contact de votre véhicule une fois le Parrot MKi9100 installé : le message « Au revoir » doit alors s’afficher à l’écran.  Si ce n’est pas le cas, vous devez inverser les positions des fils rouge et orange. En effet, le fil rouge du câble d’alimen-tation doit être connecté au 12V permanent, le fil orange au 12V après-contact et le fil noir à la masse. Cette opération s’effectue simplement en inversant les deux cosses situées sur le câblage Parrot.   Installation des connecteurs audio    • Reliez les connecteurs audio au boitier électronique et     installez les connecteurs audio (USB / iPod / Jack) dans     la boîte à gants, la console centrale ou le vide poche en     fonction de la configuration de votre tableau de bord.     Assurez vous que le câble ne se retrouve pas plié     ou coincé.  • Utilisez le bouchon de protection fourni an de protéger      les connecteurs.    Installation de la télécommande      ► Consultez les schémas p.9/10.  • Choisissez l’emplacement de la télécommande dans     l’habitacle de votre véhicule. Nous vous conseillons de la     positionner au centre de votre tableau de bord ou proche     du volant.   • Si vous la placez sur le volant, veillez à ce qu’elle soit     fermement attachée afin qu’elle ne bouge pas durant votre     conduite. Ne l’installez pas du côté extérieur du volant afin     de ne pas vous gêner lors de la conduite.   • Si vous utilisez le second support, utilisez l’adhésif double     face situé au dos de celui-ci afin de le coller sur le tableau     de bord. Vous pouvez ensuite insérer la télécommande sur     ce support.  21
      Installation du double microphone    Le double microphone doit être dirigé vers le conducteur et installé de préférence entre le pare-soleil et le rétroviseur central. Nous vous conseillons de l’installer au milieu du tableau de bord.    Installation de l’écran       Afin d’éviter les risques de vol et d’exposition prolongée au soleil, pensez à enlever votre écran lorsque vous quittez votre véhicule.    Associer la télécommande et le boitier électronique  Si lors de votre première utilisation du Parrot MKi9100 latélécommande ne semble pas associée au boitier  électronique, appuyez plusieurs fois sur le bouton rouge tout en maintenant enfoncés les boutons Play et vert. Cette manipulation doit être effectuée dans les 30 secondes sui-vant le démarrage de votre véhicule jusqu’à ce que le ParrotMKi9100 annonce «Réappairage de la télécommande».   Naviguer dans les menus      • Appuyez sur la molette centrale pour accéder aux menus.    > Le kit énonce et affiche le nom du menu atteint.  • Naviguez dans les menus en tournant la molette, et vali    dez avec le bouton vert ou en appuyant sur la molette.  • Pour sortir du menu, appuyez sur le bouton rouge ou     attendez quelques secondes.    Jumeler et connecter un téléphone    au Parrot MKi9100       Si vous utilisez votre téléphone avec le Parrot MKi9100 pour la 1ère fois, vous devez effectuer un jumelage des deux  appareils : lorsque les deux appareils se seront détectés mutuellement, il ne sera plus nécessaire de procéder à cette opération. Pour cela : 1. Assurez-vous que votre Parrot MKi9100 soit réglé pour      être visible par tous les appareils Bluetooth®. Pour cela,      appuyez sur la molette et sélectionnez Préférences >      Bluetooth > Visibilité > Visible.     Le Parrot MKi9100 est visible par défaut. 2. Appuyez sur la molette et sélectionnez Préférences >      Jumeler avec...     > Si le modèle de votre téléphone apparait dans la liste,     Utiliser le PARROT MKi9100 pour la 1ère foisPatientez environ 2 heures après la fixation du support adhésif et assurez-vous qu’il soit bien fixé à votre tableau de bord.22
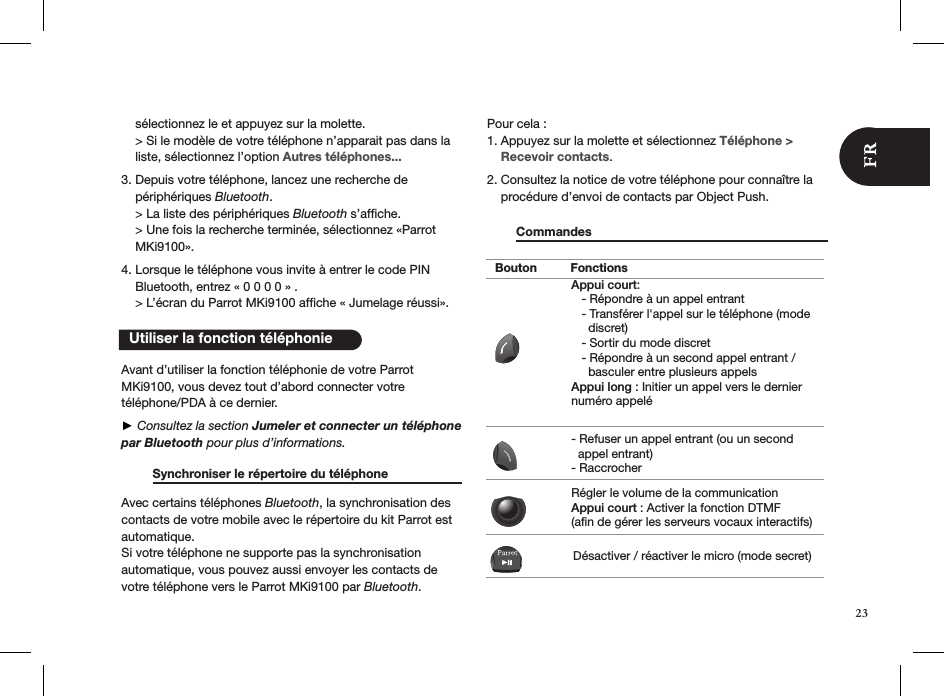
   Utiliser la fonction téléphonie    sélectionnez le et appuyez sur la molette.        > Si le modèle de votre téléphone n’apparait pas dans la      liste, sélectionnez l’option Autres téléphones...  3. Depuis votre téléphone, lancez une recherche de      périphériques Bluetooth.         > La liste des périphériques Bluetooth s’affiche.     > Une fois la recherche terminée, sélectionnez «Parrot      MKi9100».  4. Lorsque le téléphone vous invite à entrer le code PIN      Bluetooth, entrez « 0 0 0 0 » .      > L’écran du Parrot MKi9100 affiche « Jumelage réussi».    Avant d’utiliser la fonction téléphonie de votre Parrot MKi9100, vous devez tout d’abord connecter votre  téléphone/PDA à ce dernier.  ► Consultez la section Jumeler et connecter un téléphone par Bluetooth pour plus d’informations.          Synchroniser le répertoire du téléphone   Avec certains téléphones Bluetooth, la synchronisation des contacts de votre mobile avec le répertoire du kit Parrot est automatique.  Si votre téléphone ne supporte pas la synchronisation  automatique, vous pouvez aussi envoyer les contacts de votre téléphone vers le Parrot MKi9100 par Bluetooth.  Pour cela :1. Appuyez sur la molette et sélectionnez Téléphone >      Recevoir contacts.2. Consultez la notice de votre téléphone pour connaître la      procédure d’envoi de contacts par Object Push.   Commandes            Bouton FonctionsAppui court:   - Répondre à un appel entrant         - Sortir du mode discret   - Répondre à un second appel entrant /      basculer entre plusieurs appelsAppui long : Initier un appel vers le dernier numéro appelé- Refuser un appel entrant (ou un second  appel entrant)- RaccrocherRégler le volume de la communicationAppui court : Activer la fonction DTMF (afin de gérer les serveurs vocaux interactifs)Désactiver / réactiver le micro (mode secret)  - Transférer l'appel sur le téléphone (mode     discret)23
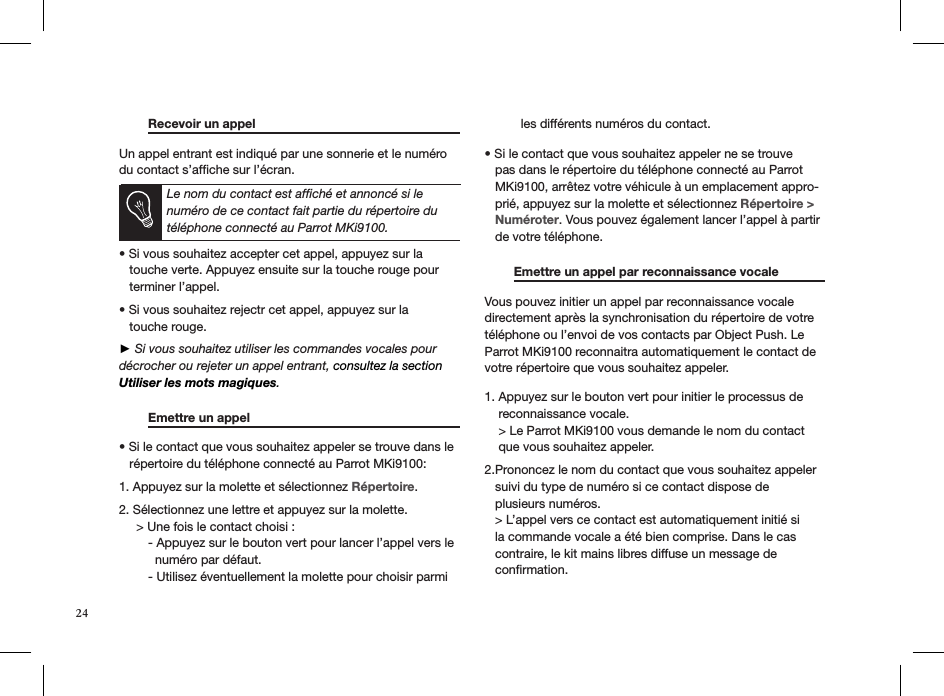
 Recevoir un appel       Un appel entrant est indiqué par une sonnerie et le numéro du contact s’affiche sur l’écran.   Le nom du contact est affiché et annoncé si le numéro de ce contact fait partie du répertoire du téléphone connecté au Parrot MKi9100.  • Si vous souhaitez accepter cet appel, appuyez sur la     touche verte. Appuyez ensuite sur la touche rouge pour     terminer l’appel. • Si vous souhaitez rejectr cet appel, appuyez sur la     touche rouge.  ► Si vous souhaitez utiliser les commandes vocales pour décrocher ou rejeter un appel entrant, consultez la section Utiliser les mots magiques.    Emettre un appel       • Si le contact que vous souhaitez appeler se trouve dans le     répertoire du téléphone connecté au Parrot MKi9100:  1. Appuyez sur la molette et sélectionnez Répertoire.  2. Sélectionnez une lettre et appuyez sur la molette.      > Une fois le contact choisi :   - Appuyez sur le bouton vert pour lancer l’appel vers le      numéro par défaut.   - Utilisez éventuellement la molette pour choisir parmi      les différents numéros du contact. • Si le contact que vous souhaitez appeler ne se trouve     pas dans le répertoire du téléphone connecté au Parrot     MKi9100, arrêtez votre véhicule à un emplacement appro-    prié, appuyez sur la molette et sélectionnez Répertoire >     Numéroter. Vous pouvez également lancer l’appel à partir     de votre téléphone.    Emettre un appel par reconnaissance vocale   Vous pouvez initier un appel par reconnaissance vocale directement après la synchronisation du répertoire de votre téléphone ou l’envoi de vos contacts par Object Push. Le Parrot MKi9100 reconnaitra automatiquement le contact de votre répertoire que vous souhaitez appeler. 1. Appuyez sur le bouton vert pour initier le processus de    reconnaissance vocale.    > Le Parrot MKi9100 vous demande le nom du contact    que vous souhaitez appeler. 2.Prononcez le nom du contact que vous souhaitez appeler   suivi du type de numéro si ce contact dispose de   plusieurs numéros.   > L’appel vers ce contact est automatiquement initié si   la commande vocale a été bien comprise. Dans le cas   contraire, le kit mains libres diffuse un message de   confirmation. 24
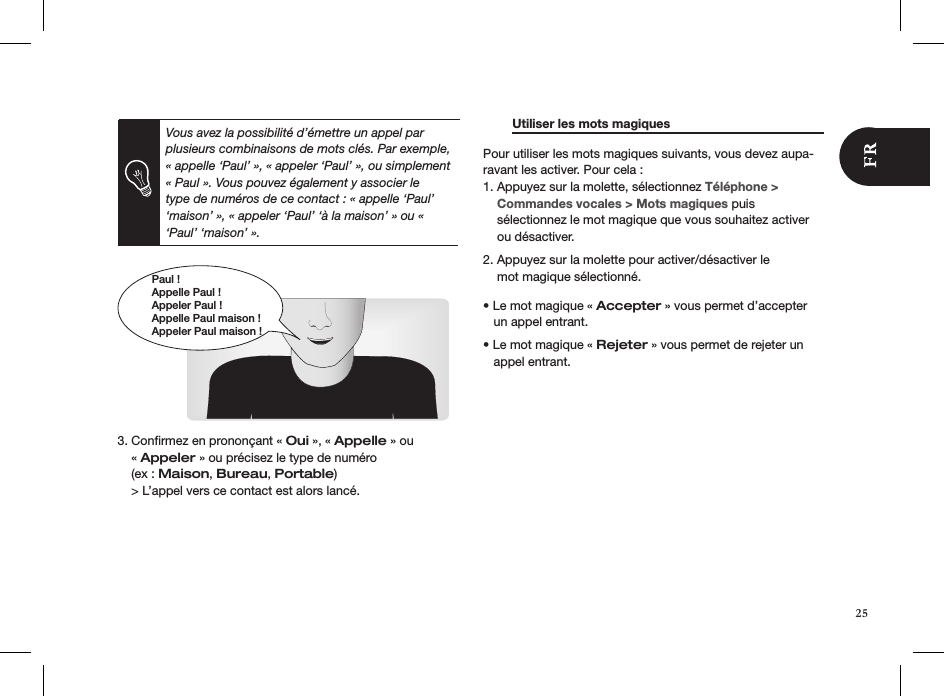
Paul !Appelle Paul !Appeler Paul !Appelle Paul maison !Appeler Paul maison !      3. Confirmez en prononçant « Oui », « Appelle » ou      « Appeler » ou précisez le type de numéro      (ex : Maison, Bureau, Portable)    > L’appel vers ce contact est alors lancé.     Utiliser les mots magiques     Pour utiliser les mots magiques suivants, vous devez aupa-ravant les activer. Pour cela : 1. Appuyez sur la molette, sélectionnez Téléphone >      Commandes vocales > Mots magiques puis      sélectionnez le mot magique que vous souhaitez activer      ou désactiver.  2. Appuyez sur la molette pour activer/désactiver le      mot magique sélectionné.   • Le mot magique « Accepter » vous permet d’accepter     un appel entrant.  • Le mot magique « Rejeter » vous permet de rejeter un     appel entrant.    Vous avez la possibilité d’émettre un appel par plusieurs combinaisons de mots clés. Par exemple, « appelle ‘Paul’ », « appeler ‘Paul’ », ou simplement « Paul ». Vous pouvez également y associer le type de numéros de ce contact : « appelle ‘Paul’ ‘maison’ », « appeler ‘Paul’ ‘à la maison’ » ou « ‘Paul’ ‘maison’ ». 25
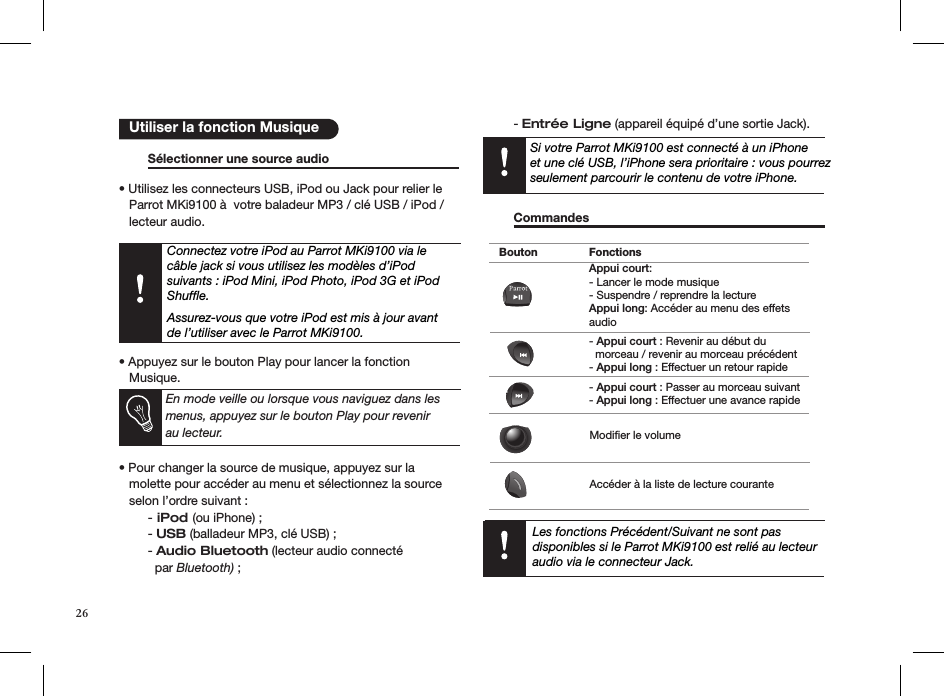
Les fonctions Précédent/Suivant ne sont pas disponibles si le Parrot MKi9100 est relié au lecteur audio via le connecteur Jack.  Sélectionner une source audio      • Utilisez les connecteurs USB, iPod ou Jack pour relier le     Parrot MKi9100 à  votre baladeur MP3 / clé USB / iPod /      lecteur audio.Connectez votre iPod au Parrot MKi9100 via le  câble jack si vous utilisez les modèles d’iPod suivants : iPod Mini, iPod Photo, iPod 3G et iPod Shuffle. Assurez-vous que votre iPod est mis à jour avant de l’utiliser avec le Parrot MKi9100.• Appuyez sur le bouton Play pour lancer la fonction        Musique.     • Pour changer la source de musique, appuyez sur la     molette pour accéder au menu et sélectionnez la source     selon l’ordre suivant :  - iPod (ou iPhone) ;  - USB (balladeur MP3, clé USB) ;   - Audio Bluetooth (lecteur audio connecté      par Bluetooth) ;  - Entrée Ligne (appareil équipé d’une sortie Jack).       Commandes          Utiliser la fonction MusiqueBouton FonctionsAppui court: - Lancer le mode musique- Suspendre / reprendre la lecture Appui long: Accéder au menu des effets audio- Appui court : Revenir au début du   morceau / revenir au morceau précédent- Appui long : Effectuer un retour rapide- Appui court : Passer au morceau suivant- Appui long : Effectuer une avance rapideModifier le volumeAccéder à la liste de lecture couranteEn mode veille ou lorsque vous naviguez dans les menus, appuyez sur le bouton Play pour revenir au lecteur.Si votre Parrot MKi9100 est connecté à un iPhoneet une clé USB, l’iPhone sera prioritaire : vous pourrezseulement parcourir le contenu de votre iPhone.26
El uso de algunas funciones depende únicamente de su teléfono.  ► Consulte nuestro sitio web www.parrot.com  pestaña Compatibilidad, para obtener más información.Instalar el Parrot MKi9100..................................................   Instalación de la caja electrónica................................   Autorradio con conector  ISO.....................................   Autorradio con entradas Line in..................................   Autorradio sin conectores ISO....................................   Instalación del cable de alimentación del  kit.............   Comprobar la instalación............................................   Instalación de los conectores de audio......................   Instalación del mando a distancia...............................   Instalación del doble micrófono..................................   Instalación de la pantalla............................................. Utilizar el Parrot MKi9100 por 1ª vez.................................   Asociar la caja electrónica al mando a distancia.........  Navegar por los menús...............................................   Enlazar y conectar un teléfono    con el Parrot MKi9100................................................ Utilizar el modo Teléfono....................................................   Sincronización de la agenda del teléfono...................      Mandos.......................................................................   Recibir una llamada.....................................................   Realizar una llamada...................................................   Realizar una llamada por reconocimiento de voz.......   Utilizar las palabras mágicas....................................... Utilizar el modo Música......................................................  Seleccionar una fuente de audio.................................   Mandos........................................................................27 28 28 28 28 28 29 29 29 30 30 30 30 30  30 31 31 31 32 32 32 33 33 33 34 Esta guía simplificada del Parrot MKi9100 le ofrece las  principales instrucciones que le permiten usar fácilmente este equipo. Para obtener más información, consulte nuestro sitio web www.parrot.com.   Indice                                • Antes de jar los distintos elementos del kit manos libres     en el interior del vehículo,  desconecte las conexiones de     origen del sistema de audio de su vehículo.     Español   Instalar el PARROT MKi9100Para esta instalación, recomendamosa nuestros clientes que recurran a un profesional del automóvil.Pronto estará disponible una interfaz de mando de control al volante permitiéndole conectar los mandos al volante de su vehículo a los kits manos libres Parrot. Con esta interfaz, podrá realizar llamadas telefónicas utilizando los botones de control del mando sin quitar las manos del volante. Consulte nuestro sitio web www.parrot.com para más información.27
• Los cables que se proporcionan con el kit van equipados     con conectores ISO y dos pares de salidas Line. Las     salidas Line pueden utilizarse si su sistema de audio está     equipado con esta opción (utilización de un amplificador).     Entonces, existen varios tipos de montaje, según su tipo     de autorradio y su vehículo.  • La función Mute permite interrumpir el sonido de su     autorradio para pasar al sonido de la comunicación. La     elección de la entrada del Mute depende de la     configuración de su autorradio. • Asegúrese de que los cables no se enreden o corten al     final de la instalación.    Instalación de la caja electrónica    Evitar la instalación de la caja:  - al lado del aire acondicionado o de la rejilla             de ventilación ,  - en un punto expuesto al sol ,  - tras superficies metálicas.   Autorradio con conector ISO       ► Vea los esquemas de instalación p.6. 1. Enchufe los conectores macho del kit manos libres     al autorradio.   2. Conecte el cableado del audio y el de alimentación del      vehículo a los conectores hembra del Parrot MKi9100.  3. En el cable de instalación, conecte el cable amarillo libre a      una de las entradas Mute que se  corresponda al sistema      de audio, si lo lleva (Mute in1, Mute in2 o Mute in3).   Autorradio con entradas Line in      ► Vea los esquemas de instalación p.7.  • Utilice este tipo de conexión conectando una salida «Line»     (cables marrón y blanco o cables rojo y negro) a la entrada     «Line» de su sistema de audio.  • La utilización de dos pares de salidas «Line» permite apro-    vechar la función de Streaming Audio en estéreo a través     de los altavoces de su vehículo.  • Una, en el cable de instalación, el cable amarillo libre a una     de las entradas Mute y que se  corresponden al sistema de     audio, si lo lleva (Mute in1, Mute in2 o Mute in3). Autorradio sin conectores ISO                   Para facilitar el montaje, debe conseguir un cable adaptador ISO. Consulte la gama de adaptadores ISO en nuestro sitio Internet: www.parrot.com.   28
 Instalación del cable de alimentación del kit       • Consulte el esquema eléctrico de su autorradio.  • El cable rojo del cable del kit debe corresponderse con     el de +12V permanente, el cable  naranja con el +12V bajo     llave y el cable negro a la masa.  • Compruebe que su cable naranja no está conectado al de     +12V permanente, ya que podría  descargar la batería del     vehículo lo que provocaría un malfuncionamiento de su kit     manos  libres.  • En algunos vehículos, es necesario invertir los cables rojo     y naranja de alimentación. Esta operación se efectúa     simplemente invirtiendo los dos porta-fusibles situados en     el cable de instalación del Parrot MKi9100.       Comprobar la instalación      Para comprobar la instalación, encienda y apague el contacto tras haber instalado el Parrot MKi9100:  debe aparecer el mensaje “hasta luego!” en la pantalla.Si no es el caso, tiene que invertir las posiciones de los cables rojo y naranja. En efecto, el cable rojo del cable de alimentación debe ser conectado al 12V permanente, el cable naranja al 12V bajo llave y el negro a la tierra. Esto se realiza simplemente invir tiendo los dos terminales ubicados en el cableado Parrot.   Instalación de los conectores de audio    • Conecte los conectores de audio a la caja electrónica e     instale los conectores (USB / iPod / Jack) en la guantera     o en la caja central en función de la configuración de su     salpicadero. • Utilice la tapa de protección proporcionada para proteger     los conectores.    Instalación del mando a distancia    ► Vea los esquemas de la p.9/10.  • Coloque el mando a distancia en el interior del vehículo.     Le recomendamos colocarlo al centro de su salpicadero o     cercano al volante. Para comprobar el cableado, conecte la pantalla antes de instalarla sobre el salpicadero. ► Consulte la sección Comprobar la instalación para más información.En algunos vehículos, no existe un +12V bajo llave en los conectores del vehículo. En ese caso, es necesario conectar el cable de alimentación naranja en la caja de fusibles o en otra fuente de alimentación bajo llave. 29
• Si lo coloca en el volante, asegúrese de que esté bien     sujeto para que no pueda moverse durante el trayecto.      No lo instale en el lado exterior del volante para que no le     moleste durante la conducción.  • Si utiliza el segundo soporte, pegue las bandas adhesivas     de doble cara en el soporte y péguelo en el salpicadero.     Después, se puede encajar el mando en este soporte.        Instalación del doble micrófono                         El doble micrófono debe ser orientado hacia el conductor y puede instalarse entre la visera y el retrovisor interior del vehículo.   Instalación de la pantalla                         Para evitar cualquier riesgo de robo o de exposición  prolongada al sol, no olvide retirar la pantalla al salir de su  vehículo.       Asociar la caja electrónica al mando a distancia  Si el mando a distancia parece que no está enlazado con la centralita del Parrot MKi9100 durante el primer uso, pulse varias veces el botón rojo mientras mantiene pulsado los botones de Play y verde hasta que vea el mensaje «Acoplamiento del mando a distancia». Esto sólo es posible durante los 30 primeros segundos después del encendido del producto.   Navegar por los menús     • Pulse la rueda central para acceder a los menús.   > El kit enuncia y muestra el nombre del menú      seleccionado.  • Navegue por los menús girando la rueda y valide pulsando     el botón verde o pulsando la rueda.  • Para salir del menú, pulse el botón rojo o espere algunos     segundos.  Enlazar y conectar un teléfono    con el Parrot MKi9100     Si es la primera vez que utiliza este teléfono con el Parrot MKi9100, debe enlazar ambos dispositivos. Una vez     Utilizar el PARROT MKi9100 por 1ª  vezEspere unas 2 horas tras haber colocado el  adhesivo y compruebe que está bien sujeto  al salpicadero.30
    Utilizar el modo Teléfonoenlazados, no será necesario realizar este proceso  de nuevo. Para hacer esto: 1. Compruebe que el Parrot MKi9100 esté visible por       todos los dispositivos Bluetooth®. Para hacer               esto, pulse la rueda y seleccione Preferencias >     Bluetooth > Visibilidad > Visible.             El Parrot MKi9100 está visible por defecto. 2. Pulse la rueda y seleccione Preferencias > Enlazar con...    > Seleccione el modelo de su teléfono móvil y valide la      opción.     > Si su teléfono no está en dicha lista, seleccione la      opción Otros teléfonos. 3. Desde su teléfono, inicie una búsqueda de dispositivos      Bluetooth.     > La lista de los dispositivos Bluetooth aparece.  4. Una vez finalizada la búsqueda, seleccione el «Parrot      MKi9100».  5. Introduzca «0 0 0 0» en su teléfono cuando éste así se      lo indique.    > El Parrot MKi9100 enuncia «Enlace realizado».       Antes de utilizar el modo Teléfono de su Parrot MKi9100, debe conectar su teléfono / PDA con el dispositivo.  ► Consulte la sección Enlazar y conectar un teléfono mediante Bluetooth para más información.        Sincronización de la agenda del teléfono   Con algunos teléfonos Bluetooth, la agenda se sincroniza automáticamente en la memoria del kit. Si su teléfono no  soporta la sincronización automática, también se puede utilizar la función Object Push de su teléfono para enviar contactos desde su teléfono hacia el Parrot MKi9100 me-diante Bluetooth.Para hacer esto:1. Pulse la rueda y seleccione Teléfono > Recibir      contactos.2. Consulte el manual de usuario de su teléfono para      conocer el proceso de envío de contactos mediante     Object Push. Si la pantalla está conectada, las próximas  conexiones entre este teléfono y el Parrot MKi9100 serán automáticas tras haber encendido el contacto del vehículo.31
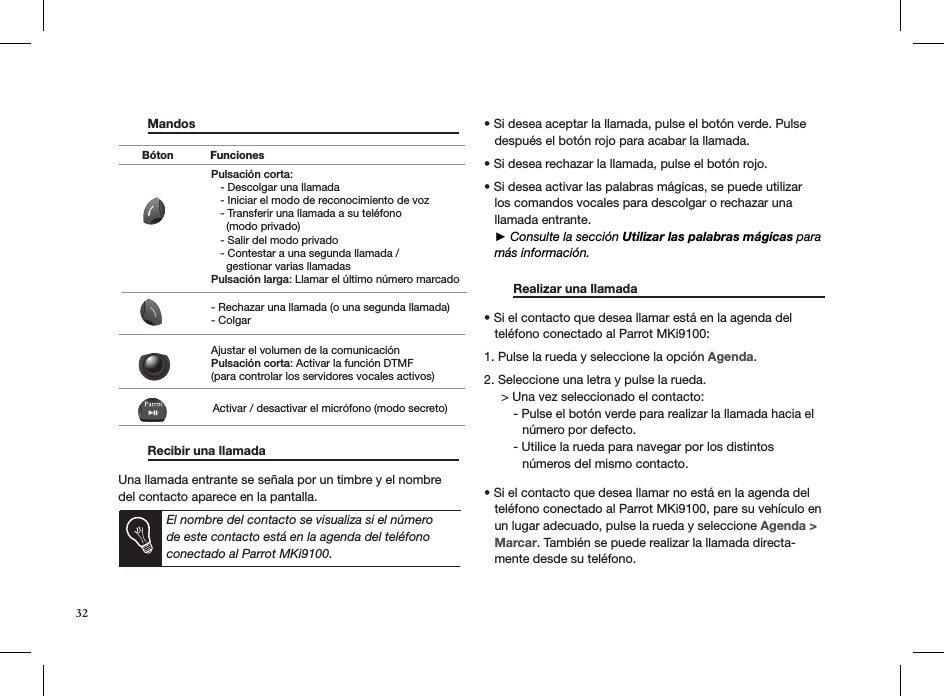
 Mandos                          Recibir una llamada      Una llamada entrante se señala por un timbre y el nombre del contacto aparece en la pantalla.   • Si desea aceptar la llamada, pulse el botón verde. Pulse     después el botón rojo para acabar la llamada. • Si desea rechazar la llamada, pulse el botón rojo.  • Si desea activar las palabras mágicas, se puede utilizar     los comandos vocales para descolgar o rechazar una     llamada entrante.   ► Consulte la sección Utilizar las palabras mágicas para     más información.   Realizar una llamada     • Si el contacto que desea llamar está en la agenda del     teléfono conectado al Parrot MKi9100:  1. Pulse la rueda y seleccione la opción Agenda.  2. Seleccione una letra y pulse la rueda.      > Una vez seleccionado el contacto:   - Pulse el botón verde para realizar la llamada hacia el             número por defecto.   - Utilice la rueda para navegar por los distintos             números del mismo contacto.• Si el contacto que desea llamar no está en la agenda del     teléfono conectado al Parrot MKi9100, pare su vehículo en     un lugar adecuado, pulse la rueda y seleccione Agenda >       Marcar. También se puede realizar la llamada directa-    mente desde su teléfono. Pulsación corta:   - Descolgar una llamada   - Iniciar el modo de reconocimiento de voz   - Transferir una llamada a su teléfono      (modo privado)   - Salir del modo privado   - Contestar a una segunda llamada /      gestionar varias llamadasPulsación larga: Llamar el último número marcado- Rechazar una llamada (o una segunda llamada)- ColgarAjustar el volumen de la comunicaciónPulsación corta: Activar la función DTMF(para controlar los servidores vocales activos)Activar / desactivar el micrófono (modo secreto)Bóton FuncionesEl nombre del contacto se visualiza si el número de este contacto está en la agenda del teléfono conectado al Parrot MKi9100.32
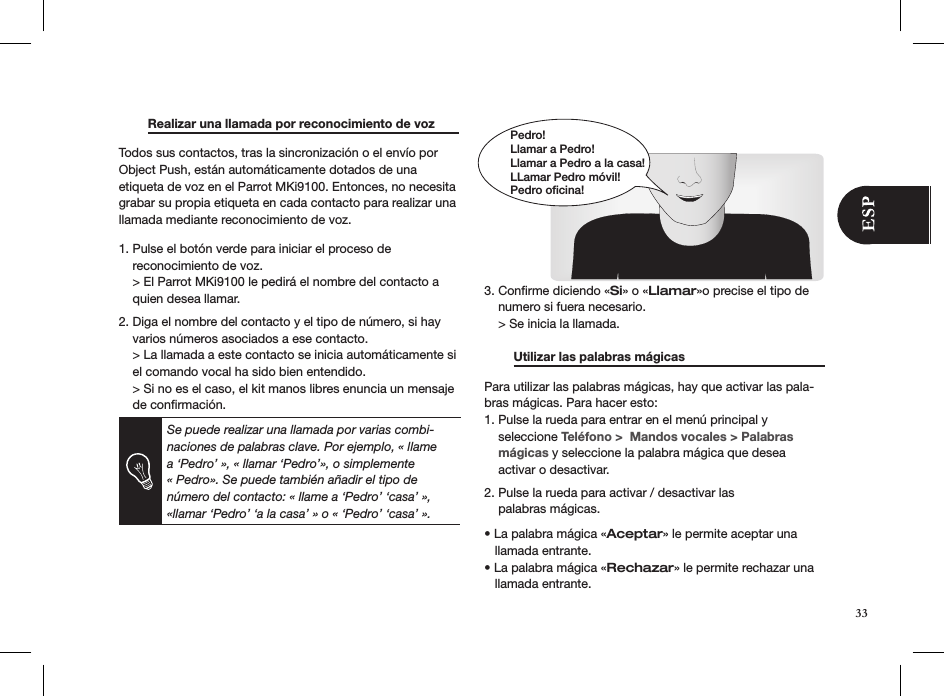
  Realizar una llamada por reconocimiento de voz Todos sus contactos, tras la sincronización o el envío por Object Push, están automáticamente dotados de una etiqueta de voz en el Parrot MKi9100. Entonces, no necesita grabar su propia etiqueta en cada contacto para realizar una llamada mediante reconocimiento de voz.   1. Pulse el botón verde para iniciar el proceso de    reconocimiento de voz.    > El Parrot MKi9100 le pedirá el nombre del contacto a    quien desea llamar. 2. Diga el nombre del contacto y el tipo de número, si hay    varios números asociados a ese contacto.    > La llamada a este contacto se inicia automáticamente si    el comando vocal ha sido bien entendido.    > Si no es el caso, el kit manos libres enuncia un mensaje    de confirmación.          3. Confirme diciendo «Si» o «Llamar»o precise el tipo de      numero si fuera necesario.     > Se inicia la llamada.    Utilizar las palabras mágicas     Para utilizar las palabras mágicas, hay que activar las pala-bras mágicas. Para hacer esto:1. Pulse la rueda para entrar en el menú principal y      seleccione Teléfono >  Mandos vocales > Palabras      mágicas y seleccione la palabra mágica que desea        activar o desactivar.  2. Pulse la rueda para activar / desactivar las      palabras mágicas.  • La palabra mágica «Aceptar» le permite aceptar una     llamada entrante. • La palabra mágica «Rechazar» le permite rechazar una     llamada entrante. Se puede realizar una llamada por varias combi-naciones de palabras clave. Por ejemplo, « llame a ‘Pedro’ », « llamar ‘Pedro’», o simplemente « Pedro». Se puede también añadir el tipo de número del contacto: « llame a ‘Pedro’ ‘casa’ », «llamar ‘Pedro’ ‘a la casa’ » o « ‘Pedro’ ‘casa’ ». Pedro!Llamar a Pedro!Llamar a Pedro a la casa!LLamar Pedro móvil!Pedro oficina!33
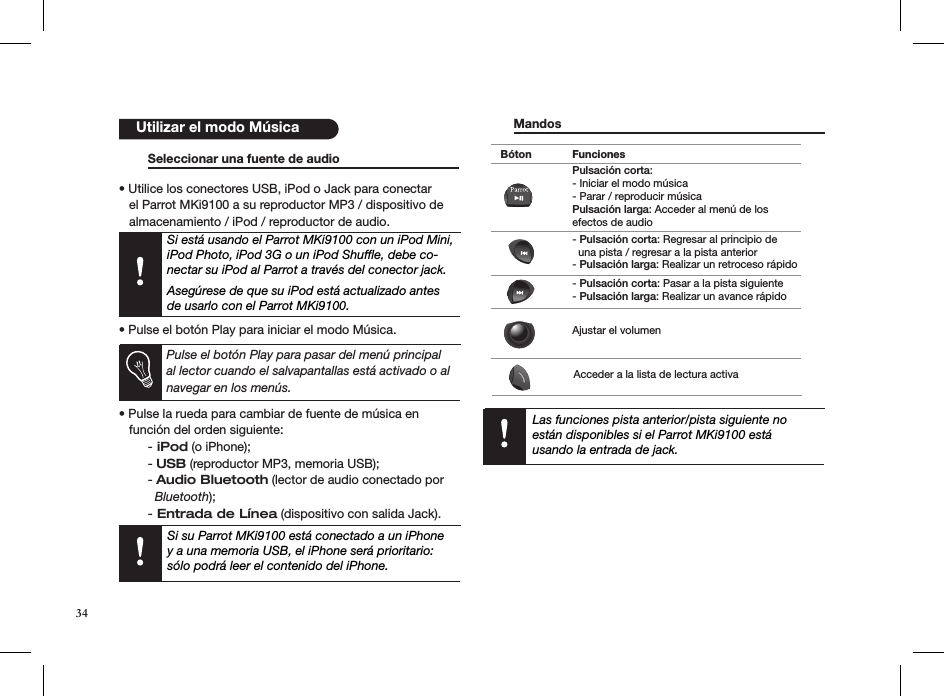
   Seleccionar una fuente de audio    • Utilice los conectores USB, iPod o Jack para conectar     el Parrot MKi9100 a su reproductor MP3 / dispositivo de     almacenamiento / iPod / reproductor de audio.    Si está usando el Parrot MKi9100 con un iPod Mini, iPod Photo, iPod 3G o un iPod Shuffle, debe co-nectar su iPod al Parrot a través del conector jack.   Asegúrese de que su iPod está actualizado antes de usarlo con el Parrot MKi9100.  • Pulse el botón Play para iniciar el modo Música.   Pulse el botón Play para pasar del menú principal al lector cuando el salvapantallas está activado o al navegar en los menús.  • Pulse la rueda para cambiar de fuente de música en     función del orden siguiente: - iPod (o iPhone);  - USB (reproductor MP3, memoria USB);  - Audio Bluetooth (lector de audio conectado por      Bluetooth); - Entrada de Línea (dispositivo con salida Jack).      Mandos       Las funciones pista anterior/pista siguiente no están disponibles si el Parrot MKi9100 está  usando la entrada de jack.     Utilizar el modo MúsicaBóton FuncionesPulsación corta: - Iniciar el modo música- Parar / reproducir música Pulsación larga: Acceder al menú de los efectos de audio- Pulsación corta: Regresar al principio de  una pista / regresar a la pista anterior- Pulsación larga: Realizar un retroceso rápido- Pulsación corta: Pasar a la pista siguiente- Pulsación larga: Realizar un avance rápidoAjustar el volumenAcceder a la lista de lectura activaSi su Parrot MKi9100 está conectado a un iPhoney a una memoria USB, el iPhone será prioritario:sólo podrá leer el contenido del iPhone.34
Die Verfügbarkeit einiger Funktionen ist von Ihrem Audio-Player oder Mobiltelefon abhängig. Weitere Informationen hierzu finden Sie auf unserer Websitewww.parrot.com, Rubrik «Kundendienst».Installation des Parrot MKi9100.........................................   Autoradio mit ISO-Stecker...........................................   Autoradio mit Line-In-Eingängen.................................   Autoradio ohne ISO-Stecker........................................   Einbau des Stromversorgungskabels des Kits............   Installation der Audio-Stecker......................................   Installation des Elektronikgehäuses.............................   Installation der Fernbedienung.....................................   Installation des doppelten Mikrofons........................... Erste Verwendung des Parrot MKi9100..............................   Zugriff auf die Menüs der Freisprechanlage................   Koppelung eines Mobiltelefons          mit dem Parrot MKi9100............................................. Verwendung der Telefoniefunktion.....................................   Verwendung des Adressbuchs....................................   Bedienung der Funktionstasten..................................   Empfangen eines Anrufs..............................................   Tätigen eines Anrufs.....................................................   Tätigen eines Anrufs über die Spracherkennung........    Die Verwendung der Zauberwörter.............................. Verwendung der Musikwiedergabefunktion.......................   Auswahl der Audioquelle.............................................   Bedienung der Funktionstasten.................................. 35 36 36 36 36 37 373737 38 38 38 39 39 40 40 40 41 41 42 42 42   Utiliser la fonction Musique35Diese Installationsanleitung in Form einer Kurzübersicht für die Freisprechanlage Parrot MKi9100 enthält alle  grundlegenden Anweisungen und Installationsschritte, die eine problemlose Verwendung der Anlage garantieren.Zusätzliche Informationen finden Sie in der Bedienungsan-leitung, die Ihnen auf unserer Website zur Verfügung steht:www.parrot.com.   Inhalt                            Eine Steuerungsschnittstelle am Lenkrad bietet die Möglichkeit, die Steuerung am Lenkrad Ihres  Fahrzeugs mit der Parrot Freisprechanlage zu  verbinden. Dank dieser Schnittstelle können Sie über die Steuerungstasten an Ihrem Lenkrad einen Anruf tätigen, ohne die Hände vom Steuer zu  nehmen. Weitere Informationen finden Sie auf unserer Website www.parrot.com.• Bevor Sie die verschiedenen Elemente der     Freisprechanlage im Fahrerbereich anbringen, verbinden     Sie die verschiedenen Kabel mit dem Elektronikgehäuse.     Ziehen Sie zuerst die Stecker des Audiosystems Ihres     Autos heraus. Deutsch  Installation des PARROT MKi9100Für diese Installation sollten Sie einen Fachmann heranziehen.
36• Die mitgelieferten Kabel sind mit ISO-Steckern sowie mit     2 Line-Ausgängen versehen. Sie können die Line-    Ausgänge verwenden, wenn Ihr Audio-System über     diese Option verfügt. Es gibt verschiedene Montage    Möglichkeiten, je nach Ausführung Ihres Autoradios und     Ihres Fahrzeugs.• Mit der Mute-Funktion können Sie die Tonausgabe Ihres     Autoradios für ein Gespräch unterbrechen. Die Wahl der     Mute-Eingabe hängt von der Konfiguration Ihres     Autoradios ab.   Autoradio mit ISO-Stecker       1. Schließen Sie die Stecker der Freisprechanlage an      das Autoradio an.  2. Verbinden Sie die Audio- und Stromversorgungskabeln      des Fahrzeugs mit den Buchse des Parrot MKi9100. 3. Verbinden Sie den freien gelben Draht (Mute) des      mitgelieferten Kabels mit dem Mute Eingang Ihres Audio     systems (mute in 1, mute in 2, mute in 3), falls ein solcher      vorhanden ist.   Autoradio mit Line-In-Eingängen    • Verwenden Sie diese Anschlussart, indem Sie einen     Line-Ausgang des mitgelieferten Kabels (brauner und     weißer Draht oder roter und schwarzer Draht) mit dem     Line-Eingang Ihres Audiosystems verbinden.  • Mit den beiden Line-Ausgängen können Sie die Funktion     Streaming Audio in  Stereo auf den Lautsprechern Ihres     Fahrzeugs nutzen.  • Verbinden Sie den freien gelben Draht (Mute) des     mitgelieferten Kabels mit dem Mute Eingang Ihres Audio    systems (mute in 1, mute in 2, mute in 3), falls ein solcher     vorhanden ist.          Autoradio ohne ISO-Stecker      Zur Erleichterung der Montage besorgen Sie sich ein ISO-Adapterkabel. Konsultieren Sie die Produktpalette an ISO-Adaptern auf unserer Website: www.parrot.com.   Einbau des Stromversorgungskabels des Kits  • Ziehen Sie den Schaltplan Ihres Autoradios zu Rate.   • Die rote Kabelader des Kits muss der +12V-    Dauerversorgung, die orange Ader der 12 V-Versorgung     über Zündung und die schwarze Ader der Masse     entsprechen.  • Überprüfen Sie, dass die orange Kabelader nicht an die     12V-Dauerversorgung angeschlossen ist. Sonst besteht     die Gefahr, die Fahrzeugbatterie zu entladen. Dies könnte     eine Funktionsstörung Ihrer Freisprechanlage zur     Folge haben.  • Bei bestimmten Fahrzeugen ist es nötig, die roten und
   orangen Stromversorgungsdrähte umzudrehen. Das macht     man einfach, indem man die beiden Sicherungshalter auf     dem Installationskabel des Parrot MKi9100 umkehrt.An gewissen Fahrzeugen gibt es an den Steckver-bindern des Fahrzeugs keinen +12V-Anschluss über Zündung. In diesem Fall muss die orange Kabelader mit dem Sicherungskasten oder einer anderen Stromquelle über die Zündung anges-chlossen werden.           Prüfung der Anlage        Überprüfen Sie die Polarität der Stromversorgung der Freis-prechanlage. Schalten Sie dazu nach dem Einbau die Anlage über die Zündung an und wieder aus: Auf dem Bildschirm wird „Auf Wiedersehen“ angezeigt. Ist das nicht der Fall, müssen die Anschlüsse der roten und der gelben Kabelader vertauscht werden. Die rote Ader des Stromkabels muss mit dem 12 V Dauerstrom, die gelbe mit den 12 V über die Zündung und die schwarze mit der Masse verbunden werden. Dazu müssen Sie nur die beiden Kabel an den Sicherungshaltern vertauschen (Rot auf Orange, Orange auf Rot).              Installation der Audio-Stecker      • Verbinden Sie die Audio-Stecker mit dem     Elektronikgehäuse und installieren Sie diese (USB,       iPod der Jack) im Handschuhfach, in der Mittelkonsole     oder im Ablagefach je nach der Konfiguration     Ihrer Armaturentafel. • Verwenden Sie den mitgelieferten Schutzdeckel.    Installation des Elektronikgehäuses     Vermeiden Sie die Installation des Gehäuses:   - in der Nähe der Heizung oder der Klimaanlage   - an einem Ort unter starker Sonnenbestrahlung   - hinter Metallwänden.    Installation der Fernbedienung       ► Betrachten Sie die Darstellungen auf Seite 9/10.  • Wählen Sie den Platz für die Fernbedienung im     Fahrerbereich Ihres Fahrzeugs. Wir empfehlen Ihnen,     sie mitten auf Ihrem Armaturenbrett oder in Ihrer Nähe zu     positionieren.  • Wenn Sie die Fernbedienung am Lenkrad anbringen     wollen, beachten Sie das diese gut befestigt ist und sich     während der Fahrt nicht bewegt. Installieren Sie sie nicht     auf der Außenseite des Lenkrads, damit Sie diese während     der Fahrt nicht stört.  37
• Wenn Sie die zweite Halterung verwenden, verwenden     Sie das hinten angebrachte doppelseitige Klebeband, um     sie auf das Armaturenbrett zu kleben. Sie können dann die     Fernbedienung in diese Halterung einfügen.    Installation des doppelten Mikrofons    Das doppelte Mikrofon muss auf den Fahrer gerichtet sein und sollte vorzugsweise zwischen Sonnenblende und  zentralem Rückspiegel angebracht werden.  Einbau des Bildschirms     Um Diebstahl und langer Sonneneinstrahlung vorzubeugen, empfehlen wir, den Bildschirm abzunehmen, wenn Sie das Fahrzeug verlassen.    Warten Sie noch etwa 2 Stunden nach der  Anbringung der Halterung und stellen Sie sicher,  dass sie gut am Armaturenbrett befestigt ist.                   Koppeln der Fernbedienung mit    dem Elektronikgehäuse      Wenn die Fernbedienung bei der ersten Verwendung der Parrot MKi9100 nicht mit dem Elektronikgehäuse gekoppelt zu sein scheint, drücken Sie mehrmals die rote Taste und halten dabei gleichzeitig die Wiedergabe- und die grüne Taste gedrückt. Führen Sie diesen Vorgang innerhalb von 30 Sekunden nach dem Start Ihres Wagens durch, bis die Parrot MKi9100 die Meldung Fernbedienung koppeln anzeigt bzw. laut ausgibt. Zugriff auf die Menüs der Freisprechanlage   • Drücken Sie der zentrale Drehknopf, um auf die Menüs     zuzugreifen.  • Die Fortbewegung zwischen den Menüs erfolgt durch    Drehen des Drehknopfs, zur Bestätigung einer Auswahl     drücken Sie die grüne Taste oder den Drehknopf. • Um die Menüs wieder zu verlassen, drücken Sie die rote     Taste oder warten Sie einfach ein paar Sekunden.          Erste Verwendung des PARROT MKi910038
   Verwendung der Telefoniefunktion  Koppelung eines Mobiltelefons mit    dem Parrot MKi9100     Wenn Sie Ihr Telefon zum ersten Mal mit dem Parrot MKi9100 verwenden, müssen Sie die beiden Geräte  koppeln: Wenn sich die beiden Geräte gegenseitig  erkannt haben, ist diese Operation nicht mehr nötig. Dafür:1. Stellen Sie sicher, dass Ihr Parrot MKi9100 so eingestellt      ist, dass er für alle Bluetooth®-Geräte sichtbar ist.      Drücken Sie auf das Reglerrädchen und wählen Sie      Einstellungen > Sichtbarkeit > Sichtbar. Die      Standardeinstellung des Parrot MKi9100 ist sichtbar.  2. Drücken Sie auf das Reglerrädchen und wählen Sie      Einstellung > Koppelung mit...     > Wenn das Modell Ihres Telefons auf der Liste erscheint,      wählen Sie es aus und drücken Sie auf das      Reglerrädchen.     > Wenn das Modell Ihres Telefons nicht auf der Liste      erscheint, wählen Sie die Option Andere Telefone...3. Von Ihrem Telefon aus starten Sie eine Suche nach      Bluetooth-Peripheriegeräten.     > Nach Beendigung der Suche wählen Sie      «Parrot MKi9100».4. Wenn Ihr Telefon Sie auffordert, den Bluetooth-PIN-Code      einzugeben, geben Sie « 0 0 0 0 » ein.     > Der Bildschirm des Parrot MKi9100 zeigt „Kopplung      erfolgreich“ an.  Bevor Sie die Telefoniefunktion der Parrot MKi9100 verwen-den können, müssen Sie eine Verbindung zu Ihrem Telefon/PDA herstellen. Bei der ersten Verwendung des Geräts muss zudem zunächst eine Kopplung durchgeführt werden. ► Detaillierte Anweisungen hierzu finden Sie im Abschnitt Koppelung eines Mobiltelefons mit dem Parrot MKi9100.  Verwendung des Adressbuchs     Für zahlreiche Telefone wird automatisch eine  Synchronisation des Adressbuchs mit der Parrot MKi9100 durchgeführt. Sollte Ihr Telefon keine automatische  Synchronisation unterstützen, können Sie Ihre  Telefonkontakte per Object Push auf die Parrot MKi9100 übertragen. Gehen Sie dazu vor wie folgt:1. Wählen Sie im Hauptmenü der Parrot MKi9100 die Option      Einstellung > Kontakte empfangen.    > Auf dem Display erscheint die Meldung Standby      für Kontakt. 2. Detaillierte Anweisungen zur Übertragung der Kontakte      per Object Push können Sie der Bedienungsanleitung      Ihres Telefons entnehmen.   Nur die im Speicher Ihres Telefons erfassten  Kontakte werden synchronisiert.39
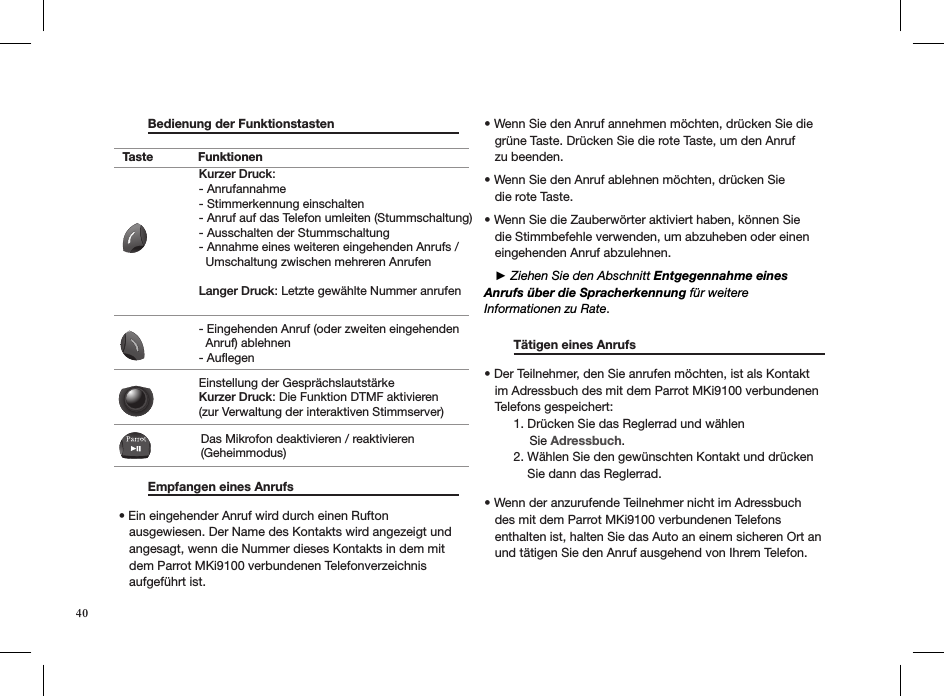
40  Bedienung der Funktionstasten                          Empfangen eines Anrufs     • Ein eingehender Anruf wird durch einen Rufton     ausgewiesen. Der Name des Kontakts wird angezeigt und     angesagt, wenn die Nummer dieses Kontakts in dem mit     dem Parrot MKi9100 verbundenen Telefonverzeichnis     aufgeführt ist. • Wenn Sie den Anruf annehmen möchten, drücken Sie die     grüne Taste. Drücken Sie die rote Taste, um den Anruf   zu beenden. • Wenn Sie den Anruf ablehnen möchten, drücken Sie   die rote Taste.  • Wenn Sie die Zauberwörter aktiviert haben, können Sie     die Stimmbefehle verwenden, um abzuheben oder einen     eingehenden Anruf abzulehnen.    ► Ziehen Sie den Abschnitt Entgegennahme eines Anrufs über die Spracherkennung für weitere  Informationen zu Rate.  Tätigen eines Anrufs     • Der Teilnehmer, den Sie anrufen möchten, ist als Kontakt     im Adressbuch des mit dem Parrot MKi9100 verbundenen     Telefons gespeichert:   1. Drücken Sie das Reglerrad und wählen               Sie Adressbuch.   2. Wählen Sie den gewünschten Kontakt und drücken        Sie dann das Reglerrad.       • Wenn der anzurufende Teilnehmer nicht im Adressbuch     des mit dem Parrot MKi9100 verbundenen Telefons     enthalten ist, halten Sie das Auto an einem sicheren Ort an     und tätigen Sie den Anruf ausgehend von Ihrem Telefon.  Taste FunktionenKurzer Druck:- Anrufannahme - Stimmerkennung einschalten - Anruf auf das Telefon umleiten (Stummschaltung) - Ausschalten der Stummschaltung - Annahme eines weiteren eingehenden Anrufs /   Umschaltung zwischen mehreren AnrufenLanger Druck: Letzte gewählte Nummer anrufen- Eingehenden Anruf (oder zweiten eingehenden   Anruf) ablehnen - AuflegenEinstellung der GesprächslautstärkeKurzer Druck: Die Funktion DTMF aktivieren (zur Verwaltung der interaktiven Stimmserver)Das Mikrofon deaktivieren / reaktivieren (Geheimmodus)
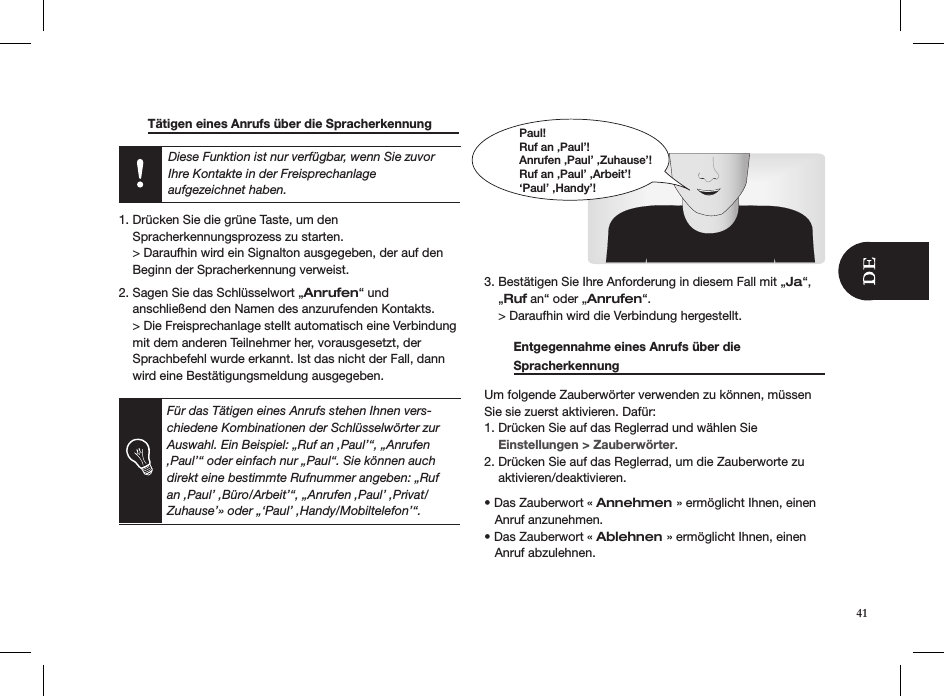
  Tätigen eines Anrufs über die Spracherkennung   Diese Funktion ist nur verfügbar, wenn Sie zuvor Ihre Kontakte in der Freisprechanlage  aufgezeichnet haben. 1. Drücken Sie die grüne Taste, um den    Spracherkennungsprozess zu starten.    > Daraufhin wird ein Signalton ausgegeben, der auf den      Beginn der Spracherkennung verweist. 2. Sagen Sie das Schlüsselwort „Anrufen“ und     anschließend den Namen des anzurufenden Kontakts.    > Die Freisprechanlage stellt automatisch eine Verbindung      mit dem anderen Teilnehmer her, vorausgesetzt, der      Sprachbefehl wurde erkannt. Ist das nicht der Fall, dann      wird eine Bestätigungsmeldung ausgegeben.   3. Bestätigen Sie Ihre Anforderung in diesem Fall mit „Ja“,      „Ruf an“ oder „Anrufen“.    > Daraufhin wird die Verbindung hergestellt.   Entgegennahme eines Anrufs über die  Spracherkennung       Um folgende Zauberwörter verwenden zu können, müssen Sie sie zuerst aktivieren. Dafür:1. Drücken Sie auf das Reglerrad und wählen Sie      Einstellungen > Zauberwörter.2. Drücken Sie auf das Reglerrad, um die Zauberworte zu      aktivieren/deaktivieren.  • Das Zauberwort « Annehmen » ermöglicht Ihnen, einen     Anruf anzunehmen.• Das Zauberwort « Ablehnen » ermöglicht Ihnen, einen     Anruf abzulehnen. Paul!Ruf an ‚Paul’!Anrufen ‚Paul’ ‚Zuhause’!Ruf an ‚Paul’ ‚Arbeit’!‘Paul’ ‚Handy’!Für das Tätigen eines Anrufs stehen Ihnen vers-chiedene Kombinationen der Schlüsselwörter zur Auswahl. Ein Beispiel: „Ruf an ‚Paul’“, „Anrufen ‚Paul’“ oder einfach nur „Paul“. Sie können auch direkt eine bestimmte Rufnummer angeben: „Ruf an ‚Paul’ ‚Büro/Arbeit’“, „Anrufen ‚Paul’ ‚Privat/Zuhause’» oder „‘Paul’ ‚Handy/Mobiltelefon’“.41
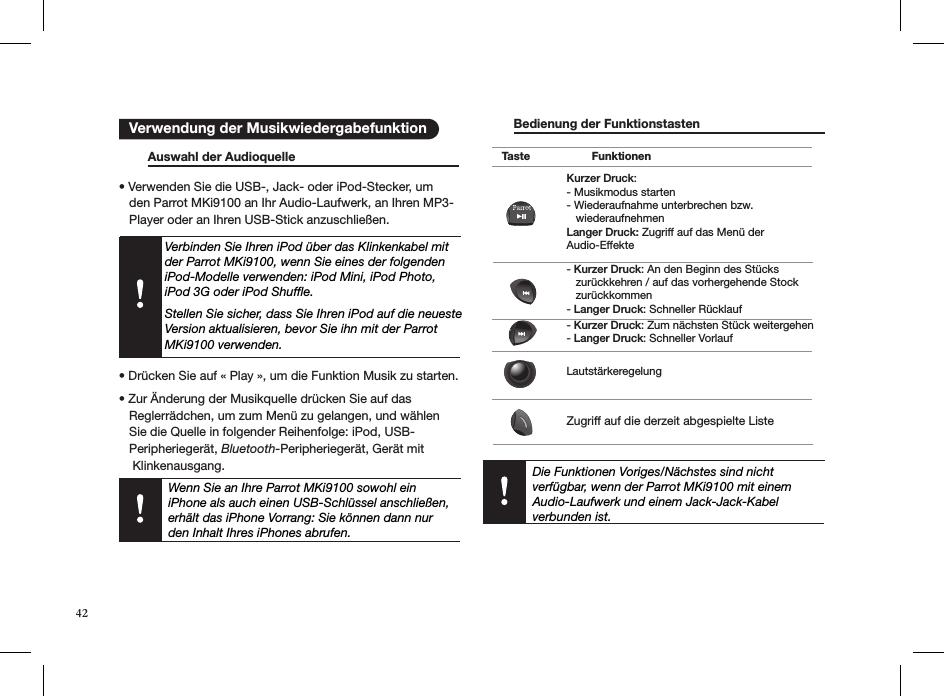
   Auswahl der Audioquelle      • Verwenden Sie die USB-, Jack- oder iPod-Stecker, um     den Parrot MKi9100 an Ihr Audio-Laufwerk, an Ihren MP3-    Player oder an Ihren USB-Stick anzuschließen.Verbinden Sie Ihren iPod über das Klinkenkabel mit  der Parrot MKi9100, wenn Sie eines der folgenden iPod-Modelle verwenden: iPod Mini, iPod Photo,  iPod 3G oder iPod Shuffle. Stellen Sie sicher, dass Sie Ihren iPod auf die neueste Version aktualisieren, bevor Sie ihn mit der Parrot MKi9100 verwenden.  • Drücken Sie auf « Play », um die Funktion Musik zu starten.  • Zur Änderung der Musikquelle drücken Sie auf das     Reglerrädchen, um zum Menü zu gelangen, und wählen     Sie die Quelle in folgender Reihenfolge: iPod, USB-    Peripheriegerät, Bluetooth-Peripheriegerät, Gerät mit      Klinkenausgang.          Bedienung der Funktionstasten        Verwendung der MusikwiedergabefunktionDie Funktionen Voriges/Nächstes sind nicht verfügbar, wenn der Parrot MKi9100 mit einem Audio-Laufwerk und einem Jack-Jack-Kabel verbunden ist.Taste FunktionenKurzer Druck: - Musikmodus starten- Wiederaufnahme unterbrechen bzw.    wiederaufnehmen Langer Druck: Zugriff auf das Menü der Audio-Effekte  - Kurzer Druck: An den Beginn des Stücks    zurückkehren / auf das vorhergehende Stock   zurückkommen- Langer Druck: Schneller Rücklauf- Kurzer Druck: Zum nächsten Stück weitergehen- Langer Druck: Schneller VorlaufLautstärkeregelungZugriff auf die derzeit abgespielte ListeWenn Sie an Ihre Parrot MKi9100 sowohl einiPhone als auch einen USB-Schlüssel anschließen,erhält das iPhone Vorrang: Sie können dann nurden Inhalt Ihres iPhones abrufen.42
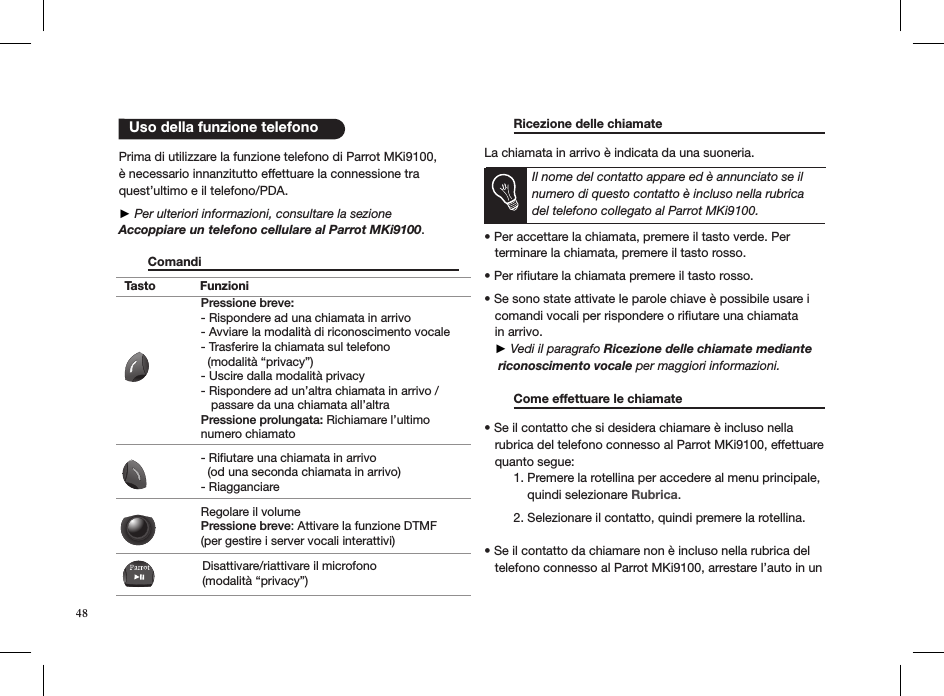
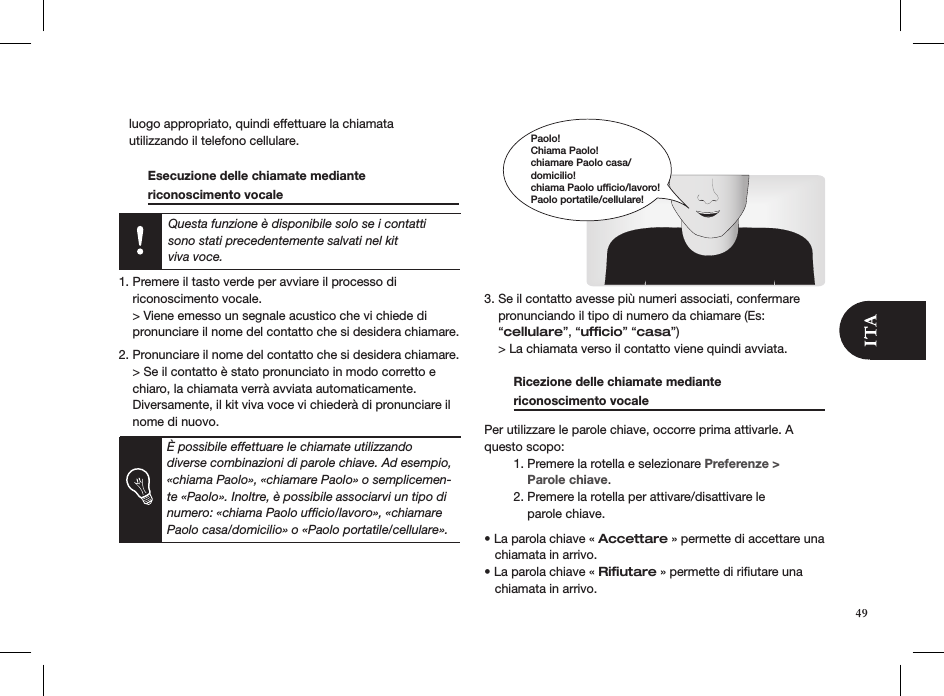
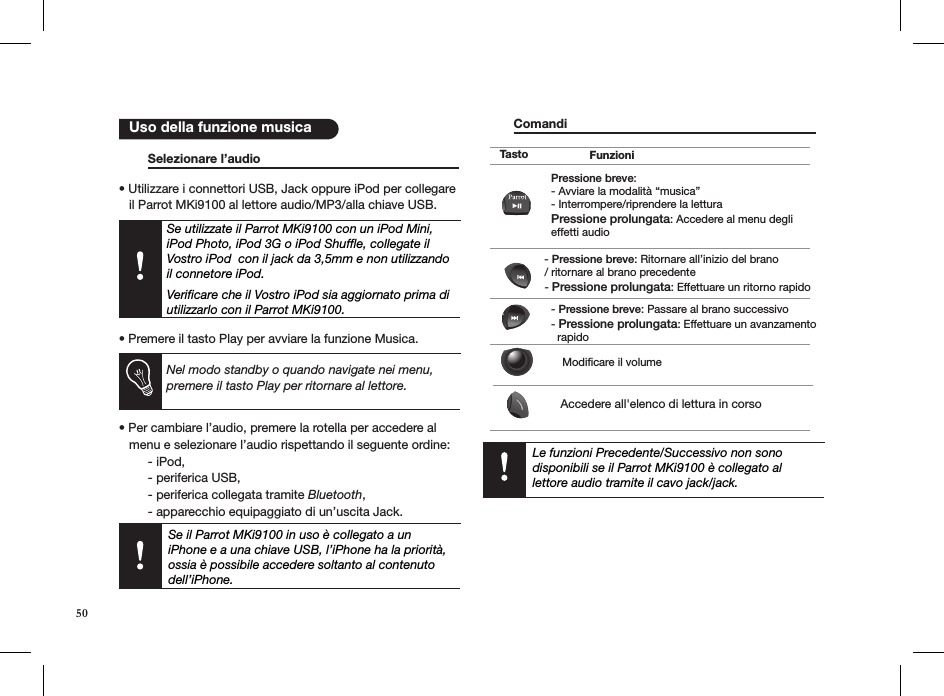
L’uso di alcune funzioni dipende esclusivamente dal telefono in uso. Per ulteriori informazioni, consul-tare il nostro sito Web www.parrot.com alla sezione dedicata alla compatibilità.Installazione del Parrot MKi9100....................................   Autoradio con connettore ISO.................................   Autoradio con entrate Line In...................................   Autoradio senza connettori ISO...............................   Installazione del cavo di alimentazione del kit........   Installazione dei connettori audio............................   Installazione della centralina elettronica..................   Installazione del telecomando.................................   Installazione del microfono doppio.........................   Installazione dello schermo..................................... Primo utilizzo del Parrot MKi9100.................................   Accesso ai menu del kit..........................................   Accoppiare un telefono cellulare  al Parrot MKi9100...................................................   Sincronizzazione della rubrica telefonica............... Uso della funzione telefono...........................................   Comandi.................................................................   Ricezione delle chiamate........................................   Come effettuare le chiamate...................................   Esecuzione delle chiamate mediante  riconoscimento vocale.............................................     Ricezione delle chiamate mediante  riconoscimento vocale............................................. Uso della funzione Musica..............................................   Selezionare l’audio...................................................   Comandi................................................................... 43 44 44 44 44 45 454546 46 46 46 46 47 47 47 48 48  48  49 49 49 5043Nella presente guida semplificata del Parrot MKi9100  vengono illustrate in modo semplice le principali istruzioni per l’uso dell’apparecchio. Per ulteriori informazioni,  consultare nostro sito Web www.parrot.com.  Indice                             Un’interfaccia di comando sul volante permette di collegare i comandi del veicolo installati sul volante al kit viva voce Parrot. Con questa interfaccia potete effettuare delle chiamate usando i tasti di comando posti sul volante, senza staccare le mani da quest’ultimo. Consultare il nostro sito web  www.parrot.com per maggiori informazioni.  • Prima d’installare nell’abitacolo i diversi elementi del kit     viva voce, collegare i cavi alla centralina elettronica.  Ri    muovere innanzi tutto i connettori originali del sistema     audio del veicolo.• I cavi forniti sono equipaggiati di connettori ISO e di due     uscite Line. Le uscite Line possono essere utilizzate se  Italiano   Installazione del PARROT MKi9100Per questa installazione, si consiglia di rivolgersi ad un tecnico professionista.
44   il sistema audio ha questo optional. E’ possibile effettuare     diversi tipi d’installazione, secondo il modello di autoradio     e di veicolo.• La funzione Mute permette d’interrompere il suono      dell’autoradio per utilizzare il telefono. La scelta     dell’entrata Mute dipende dalla configurazione dell’auto    radio.   Autoradio con connettore ISO     1. Collegare i connettori maschio del kit viva voce      all’autoradio.  2. Collegare i fasci dei fili audio e di alimentazione del      veicolo ai connettori femmina del Parrot MKi9100. 3. Sul cavo d’installazione, collegare il filo giallo libero ad      una delle entrate “mute” corrispondenti del sistema audio,      se quest’ultimo ne è equipaggiato (mute sull’entrata 1,      mute sull’entrata 2 o mute sull’entrata 3).    Autoradio con entrate Line In      • Utilizzare questo tipo di connessione collegando un’uscita     « Line » (fili marrone e bianco o fili rosso e nero) all’entrata     « Line » del sistema audio.  • L’impiego delle due coppie di uscite « Line » permette     di usufruire della funzione Streaming Audio in stereo, sugli     altoparlanti del veicolo.  • Sul cavo d’installazione, collegare il lo giallo libero ad     una delle entrate “mute” corrispondenti del sistema audio,     se quest’ultimo ne è equipaggiato (mute sull’entrata 1,     mute sull’entrata 2 o mute sull’entrata 3). Autoradio senza connettori « ISO »    Per semplificare l’installazione, utilizzare un cavo adattore ISO. Consultare la gamma di adattatori ISO nel nostro sito Internet: www.parrot.com.   Installazione del cavo di alimentazione del kit  • Vedi lo schema elettrico dell’autoradio.  • Il lo rosso del cavo del kit deve corrispondere al +12 V     permanente, il filo arancione al 12 V dopo contatto ed il filo     nero alla massa.  • Controllare che il lo arancione non sia collegato al 12 V     permanente: c’è il rischio di scaricare la batteria del veicolo     e di provocare un disfunzionamento del kit viva voce.  • In alcuni veicoli, è necessario invertire i li rosso e        arancione di alimentazione. Questa operazione si effettua     semplicemente invertendo i due portafusibili posti sul cavo     d’installazione del Parrot MKi9100.
       Controllare l’installazione     Controllare la polarità dell’alimentazione del kit viva voce. Dopo avere installato il Parrot MKi9100, spegnere il motore del veicolo: sullo schermo deve apparire il messaggio  « Arrivederci ». Se il messaggio non appare, invertire le posizioni dei fili rosso e giallo. In effetti, il filo rosso del cavo di alimentazione deve essere collegato al 12 V permanente, il filo giallo al 12 V dopo contatto ed il filo nero alla massa. Questa operazione si effettua semplicemente invertendo i due capicorda posti sul cablaggio del Parrot.   Installazione dei connettori audio    • Collegare i connettori audio alla centralina elettronica ed     installare i connettori audio (USB/iPod/Jack) nel vano     portaoggetti, nella console centrale o sulla mensola, a     seconda della configurazione del cruscotto. • Usare il tappo di protezione fornito.     Installazione della centralina elettronica     Si consiglia di non installare la centralina:   - vicino all’impianto di riscaldamento o di aria       condizionata   - in una zona esposta al sole   - dietro le pareti metalliche.    Installazione del telecomando       ► Vedi gli schemi a pagina 9/10  • Scegliere l’ubicazione del telecomando nell’abitacolo del     veicolo. Si consiglia di posizionarlo al centro del cruscotto     o vicino al posto di guida.  • Se il telecomando viene installato sul volante, ssarlo bene     per evitare che si sposti durante la guida. Non installarlo     sul lato esterno del volante per non ostacolare la guida.     • Se si desidera installare il secondo supporto, usare          l’adesivo “double face” posto a tergo, per fissare il     supporto sul cruscotto. In seguito, è possibile inserire il     telecomando nel supporto.  Attendere 2 ore circa dopo l’installazione del  supporto adesivo e accertarsi che sia  correttamente fissato sul cruscotto.   In alcuni veicoli, il 12 V dopo contatto non è presente sui connettori del veicolo. In tal caso, bisogna collegare il filo di alimentazione arancione alla scatola dei fusibili o ad un’altra fonte di alimen-tazione dopo contatto.45
  Installazione del microfono doppio    Il microfono doppio deve essere rivolto verso il conducente e installato preferibilmente tra l’aletta parasole e lo specchietto retrovisore centrale.Si consiglia agli utenti l’installazione al centro del cruscotto.  Installazione dello schermo     Per evitare il rischio di furto e di esposizione prolungata al sole, rimuovere lo schermo quando lasciate il veicolo.         Associzione del telecomando con la    centralina elettronica      Se il telecomando senza fili non funziona durante il primo  utilizzo del Parrot MKi9100, tenere premuti i tasti “Play/Pausa” e verde e premere ripetutamente il tasto rosso, entro 30 secondi dall’accensione del Parrot. Un segnale visivo vi avviserà dell’avvenuta associazione.  Accesso ai menu del kit     • Premere la rotellina centrale per accedere ai menu. Il kit     emette un messaggio con il nome del menu selezionato. • Utilizzare i menu ruotando la rotellina e confermare con il     tasto verde oppure premendo la rotellina stessa. • Per uscire da un menu, premere il tasto rosso oppure     attendere alcuni secondi.    Accoppiare un telefono cellulare    al Parrot MKi9100       Se il telefono viene utilizzato con il Parrot MKi9100 per la prima volta, effettuare l’accoppiamento dei due apparecchi: quando i due apparecchi si saranno identificati a vicenda, non sarà più necessario effettuare questa operazione.  Attendere 2 ore circa dopo l’installazione del  supporto adesivo e accertarsi che sia  correttamente fissato sul cruscotto.   Primo utilizzo del Parrot MKi9100 46
A questo scopo: 1. Accertarsi che il Parrot MKi9100 sia regolato in modo      da essere visibile a tutti gli apparecchi Bluetooth®. A      questo scopo, premere la rotella e selezionare      Preferenze > Visibilità > Visibile. Il Parrot MKi9100 è visibile per difetto.2. Premere la rotella e scegliere Preferenze > Accoppiare       con ...     > Se il vostro modello di telefono appare nell’elenco,      selezionarlo e premere la rotella.     > Se il vostro modello di telefono non appare nell’elenco,     selezionare l’opzione Altri modelli di telefono...3. Lanciare una ricerca delle periferiche Bluetooth dal      vostro telefono.      > Appare l’elenco delle periferiche Bluetooth.     > Quando la ricerca è terminata, selezionare      «Parrot MKi9100».4. Quando un messaggio vi chiede di immettere il codice PIN      Bluetooth, digitare « 0 0 0 0 ».     > Sullo schermo del Parrot MKi9100 appare il messaggio      « Accoppiamento riuscito».     Sincronizzazione della rubrica telefonica    La sincronizzazione della rubrica telefonica con il Parrot MKi9100 avviene automaticamente per molti telefoni cellulari Se il telefono in uso non consente di effettuare la  sincronizzazione automatica, è possibile trasferire i contatti del telefono sul kit tramite il profilo Object Push. A tale scopo:1. Nel menu principale di Parrot MKi9100, selezionare    Impostazioni > Ricevi contatti.   > Sul display viene visualizzato il messaggio In attesa     di contatto. 2. Per informazioni sulla procedura di invio di ontatti tramite      il profilo Object Push, consultare le istruzioni del telefono      in uso. Solo i contatti registrati nella memoria del telefono si sincronizzano.47
Tasto FunzioniPressione breve:- Rispondere ad una chiamata in arrivo - Avviare la modalità di riconoscimento vocale - Trasferire la chiamata sul telefono   (modalità “privacy”) - Uscire dalla modalità privacy - Rispondere ad un’altra chiamata in arrivo /    passare da una chiamata all’altraPressione prolungata: Richiamare l’ultimo numero chiamato- Rifiutare una chiamata in arrivo   (od una seconda chiamata in arrivo)- RiagganciareRegolare il volume Pressione breve: Attivare la funzione DTMF  (per gestire i server vocali interattivi)Disattivare/riattivare il microfono (modalità “privacy”)   Uso della funzione telefono48 Prima di utilizzare la funzione telefono di Parrot MKi9100, è necessario innanzitutto effettuare la connessione tra quest’ultimo e il telefono/PDA.  ► Per ulteriori informazioni, consultare la sezioneAccoppiare un telefono cellulare al Parrot MKi9100.   Comandi         Ricezione delle chiamate     La chiamata in arrivo è indicata da una suoneria.  Il nome del contatto appare ed è annunciato se il numero di questo contatto è incluso nella rubrica del telefono collegato al Parrot MKi9100.  • Per accettare la chiamata, premere il tasto verde. Per   terminare la chiamata, premere il tasto rosso. • Per riutare la chiamata premere il tasto rosso.  • Se sono state attivate le parole chiave è possibile usare i     comandi vocali per rispondere o rifiutare una chiamata     in arrivo.      ► Vedi il paragrafo Ricezione delle chiamate mediante    riconoscimento vocale per maggiori informazioni.    Come effettuare le chiamate     • Se il contatto che si desidera chiamare è incluso nella     rubrica del telefono connesso al Parrot MKi9100, effettuare     quanto segue:  1. Premere la rotellina per accedere al menu principale,        quindi selezionare Rubrica.   2. Selezionare il contatto, quindi premere la rotellina.  • Se il contatto da chiamare non è incluso nella rubrica del     telefono connesso al Parrot MKi9100, arrestare l’auto in un
   luogo appropriato, quindi effettuare la chiamata    utilizzando il telefono cellulare.    Esecuzione delle chiamate mediante  riconoscimento vocale        Questa funzione è disponibile solo se i contatti sono stati precedentemente salvati nel kit  viva voce.  1. Premere il tasto verde per avviare il processo di    riconoscimento vocale.    > Viene emesso un segnale acustico che vi chiede di    pronunciare il nome del contatto che si desidera chiamare. 2. Pronunciare il nome del contatto che si desidera chiamare.    > Se il contatto è stato pronunciato in modo corretto e    chiaro, la chiamata verrà avviata automaticamente.    Diversamente, il kit viva voce vi chiederà di pronunciare il    nome di nuovo.                    3. Se il contatto avesse più numeri associati, confermare    pronunciando il tipo di numero da chiamare (Es:      “cellulare”, “ufficio” “casa”)    > La chiamata verso il contatto viene quindi avviata.  Ricezione delle chiamate mediante  riconoscimento vocale     Per utilizzare le parole chiave, occorre prima attivarle. A questo scopo:  1. Premere la rotella e selezionare Preferenze >        Parole chiave.  2. Premere la rotella per attivare/disattivare le        parole chiave. • La parola chiave « Accettare » permette di accettare una     chiamata in arrivo.• La parola chiave « Rifiutare » permette di rifiutare una     chiamata in arrivo.Paolo!Chiama Paolo!chiamare Paolo casa/domicilio!chiama Paolo ufficio/lavoro!Paolo portatile/cellulare!49È possibile effettuare le chiamate utilizzando diverse combinazioni di parole chiave. Ad esempio, «chiama Paolo», «chiamare Paolo» o semplicemen-te «Paolo». Inoltre, è possibile associarvi un tipo di numero: «chiama Paolo ufficio/lavoro», «chiamare Paolo casa/domicilio» o «Paolo portatile/cellulare».
   Selezionare l’audio        • Utilizzare i connettori USB, Jack oppure iPod per collegare     il Parrot MKi9100 al lettore audio/MP3/alla chiave USB.Se utilizzate il Parrot MKi9100 con un iPod Mini, iPod Photo, iPod 3G o iPod Shuffle, collegate il Vostro iPod  con il jack da 3,5mm e non utilizzando il connetore iPod.  Verificare che il Vostro iPod sia aggiornato prima di utilizzarlo con il Parrot MKi9100. • Premere il tasto Play per avviare la funzione Musica.  Nel modo standby o quando navigate nei menu, premere il tasto Play per ritornare al lettore. • Per cambiare l’audio, premere la rotella per accedere al     menu e selezionare l’audio rispettando il seguente ordine:    - iPod,   - periferica USB,   - periferica collegata tramite Bluetooth,   - apparecchio equipaggiato di un’uscita Jack.   Comandi               Le funzioni Precedente/Successivo non sono  disponibili se il Parrot MKi9100 è collegato al lettore audio tramite il cavo jack/jack.Tasto FunzioniPressione breve: - Avviare la modalità “musica”- Interrompere/riprendere la lettura Pressione prolungata: Accedere al menu degli effetti audio- Pressione breve: Ritornare all’inizio del brano/ ritornare al brano precedente- Pressione prolungata: Effettuare un ritorno rapido- Pressione breve: Passare al brano successivo- Pressione prolungata: Effettuare un avanzamento   rapidoModificare il volumeAccedere all'elenco di lettura in corso   Uso della funzione musicaSe il Parrot MKi9100 in uso è collegato a uniPhone e a una chiave USB, l’iPhone ha la priorità,ossia è possibile accedere soltanto al contenutodell’iPhone.50
Het gebruik van bepaalde functies hangt uitsluitend af van uw telefoon. Kijk op onze website www.parrot.com rubriek ‘Support’ voor meer informatie.51 52 52 52 52 53 53 53 53 54 54 54 54 54 55 55 55 56 56 56  57 57 57 58  De Parrot MKi9100 installerenren.................................   Autoradio met ISO aansluiting...................................   Autoradio met Line In ingangen.................................   Autoradio zonder ISO aansluitingen...........................   Installatie van het voedingssnoer uit de set ..............   Installatie van de audioverbinding ............................   Installatie van de kast ...............................................   Installatie van de afstandbediening...........................   De dubbele microfoon installeren..............................   Installatie van het scherm ..........................................  Eerste ingebruikneming van de Parrot MKi9100..........   De afstandsbediening pairen met de kast..................   In de menu’s navigeren...............................................   Uw Bluetooth telefoon /PDA koppelen......................   Het telefoonboek gebruiken....................................... De telefoonfunctie gebruiken..........................................   Commando’s..............................................................   Een oproep ontvangen...............................................   Een oproep starten.....................................................   Telefoneren via spraakherkenning..............................     Een oproep aannemen door middel van  spraakherkenning.......................................................    De muziekfunctie gebruiken.........................................   Een audiobron kiezen.................................................   Commando’s..............................................................Met een interface “stuurbediening” kunt u de be-dieningen aan het stuur van uw voertuig aansluiten op uw Parrot hands-free set. Met deze interface kunt u telefoneren met behulp van de knoppen aan uw stuur, terwijl u beide handen aan het stuur houdt. Raadpleeg onze website www.parrot.com voor meer informatie.51In deze beknopte handleiding van de Parrot MKi9100 vindt u de voornaamste instructies om dit apparaat snel te kunnen gebruiken. Uitgebreidere informatie vindt u in de gebruikers-handleiding die beschikbaar is op onze websitewww.parrot.com.  Inhoudsopgave                          • Voordat u de verschillende onderdelen van de hands-free     set in cabine installeert, sluit u eerst de verschillende     snoeren aan op de kast. Verwijder eerst de aansluitingen     van het oorspronkelijke radiosysteem van uw voertuig.  • De meegeleverde snoeren zijn uitgerust met ISO     aansluitingen en twee Line uitgangen. De Line uitgangen     kunnen worden gebruikt als uw audiosysteem over deze  Nederlands  De PARROT MKi9100 installerenWij raden u aan de Parrot MKi9100 door een vakman te laten installeren.
Op sommige voertuigen heeft u geen +12V na contact op de aansluitingen van het voertuig. U moet hier de oranje voedingsdraad aansluiten op de zekeringkast of een andere voedingsbron  na contact.52   optie beschikt. U kunt dus op verschillende manieren     installeren, afhankelijk van uw autoradio en uw voertuig.• De functie Mute laat u het geluid van de autoradio     onderbreken, om plaats te maken voor gesprekken. De     keuze van de Mute ingang hangt af van de configuratie van     uw autoradio.  Autoradio met ISO aansluiting     1. Sluit de stekkers van de hands-free set aan op     de autoradio.  2. Sluit de audiobundel en de voeding van het voertuig aan      op de aansluitingen van de Parrot MKi9100. 3. Op het installatiesnoer sluit u de vrije gele draad aan op      één van de Mute ingangen van het audiosysteem, als      deze aanwezig zijn (mute in1, mute in2 of mute in3).  Autoradio met Line In ingangen      • Gebruik dit type aansluiting door een uitgang “Line” (bruine     en witte draad of rode en zwarte draad) op de ingang     “Line” van uw audiosysteem aan te sluiten.  • Door het gebruik van twee paar uitgangen “Line” kunt u     profiteren van de functie Streaming Audio in stereo op de     luidsprekers van uw voertuig.  • Op het installatiesnoer sluit u de vrije gele draad aan op     één van de Mute ingangen van het audiosysteem, als deze     aanwezig zijn (mute in1, mute in2 of mute in3). Autoradio zonder « ISO » aansluitingen   Om de installatie te vereenvoudigen moet u een snoer met een ISO adapter aanschaffen. Raadpleeg de ISO adapters op onze website: www.parrot.com.   Installatie van het voedingssnoer uit de set    • Raadpleeg het elektrische schema van uw autoradio.  • De rode draad van het snoer in de set moet overeenkomen     met +12V permanent, de oranje met 12V na contact en de     zwarte draad is de massa.  • Controleer dat de oranje draad niet aangesloten is op 12V     permanent, zo ontlaadt u de accu van het voertuig en uw     hands-free set functioneert niet correct.  • Op sommige voertuigen moet u de rode en oranje       voedingsdraden verwisselen. Dit doet u door de twee     zekeringdragers op het installatiesnoer van de Parrot     MKi9100 te verwisselen.
  De installatie controleren     Controleer de polariteit van de voeding van uw hands-free set. Hiervoor verbreekt u het contact van uw voertuig nadat u de Parrot MKi9100 heeft geïnstalleerd: het bericht “Tot ziens» moet nu op het scherm verschijnen. Als dit niet het geval is, moet u de posities van de rode en de gele draad omwisselen. De rode draad van het snoer in de set moet overeenkomen met 12V permanent, de oranje met 12V na contact en de zwarte draad is de massa. Dit doet u door de twee kabelschoenen op het snoer van de Parrot te verwisselen.          Installatie van de audioverbinding    • Sluit de audioverbinding aan op de kast en installeer     de audioverbinding (USB / iPod/ Jack) in het     handschoenenkastje, de middenconsole of het     rommelbakje, afhankelijk van uw dashboard. • Gebruik de meegeleverde beschermingsdop.    Installatie van de kast       Installeer deze niet:   - vlak bij de verwarming of de airco   - op een plek waar hij in de zon kan komen   - achter metalen wanden    Installatie van de afstandbediening     ► Raadpleeg de schema’s op blz. 9/10.• Kies de plek voor de afstandbediening in de cabine van uw     voertuig. Wij raden u aan deze midden op uw dashboard     of dicht bij u te plaatsen.  • Als u deze op het stuur plaatst, let er dan op dat hij       goed bevestigd is zodat hij niet beweegt tijdens het rijden.     Installeer hem niet aan de buitenzijde van het stuur zodat     u er geen last van heeft tijdens het rijden.  • Als u de tweede houder gebruikt, gebruik dan het     dubbelzijdige plakband op de rug ervan om hem op het     dashboard te plakken. U kunt vervolgens de     afstandbediening op deze steun bevestigen.   Wacht ongeveer 2 uur na bevestiging van de zelfklevende houder en let erop dat deze goed op het dashboard bevestigd is.     De dubbele microfoon installeren    De microfoon moet naar de bestuurder worden gericht en kan worden geïnstalleerd tussen de zonneklep en de achteruitkijkspiegel.Wij raden aan hem in het midden van het dashboard te plaatsen.53
  Installatie van het scherm     Om diefstal en een langdurige blootstelling aan de zon te voorkomen, moet u uw scherm verwijderen als u uw voertuig verlaat. Wacht ongeveer 2 uur na bevestiging van de zelfklevende houder en let erop dat deze goed op het dashboard bevestigd is. De afstandsbediening pairen met de kast   Als bij het eerste gebruik van de Parrot MKi9100 blijkt dat de afstandsbediening niet gepaird is met de elektronische bedieningsunit, druk dan meerdere keren op de rode toets terwijl u de Play en groene knop ingedrukt houdt.  U moet deze handeling uitvoeren binnen 30 seconden nadat u uw auto hebt gestart, totdat de Parrot MKi9100 het bericht Pairing van de afstandsbediening succesvol weergeeft.  In de menu’s navigeren     • Druk op de scrollknop in het midden om de menu’s op     te roepen.   > De handsfree-kit toont de naam van het bereikte menu.   • Navigeer in de menu’s door de scrollknop te draaien en     bevestig uw keuzes door een druk op de groene toets   of op de scrollknop.   • Om het menu af te sluiten, drukt u op de rode toets of     wacht u enkele seconden.   Uw Bluetooth telefoon /PDA koppelen   Voordat u de Parrot MKi9100 met uw telefoon kunt gebrui-ken, moet u eerst de verbinding tussen de twee apparaten tot stand brengen.Als u uw telefoon voor het eerst met de Parrot MKi9100 gebruikt, moet u de twee apparaten eerst koppelen. Als de twee apparaten elkaar eenmaal wederzijds hebben gedetec-teerd, is het voortaan niet meer nodig deze handelinguit te voeren.1. Verzekert u zich ervan dat de Parrot MKi9100 is ingesteld      om te worden gezien door alle Bluetooth® apparaten.      Daarvoor drukt u op het wieltje en kiest Voorkeuren      > Zichtbaarheid > Zichtbaar. De Parrot MKi9100 is      standaard zichtbaar.2. Druk op het wieltje en kies Voorkeuren > Koppelen met...     > Als het model van uw mobiel in de lijst staat, selecteert      u deze en drukt op het wieltje.     > Als het model van uw mobiel niet in de lijst staat, kiest u      de optie Andere telefoons….3. Vanaf uw telefoon gaat u naar Bluetooth apparaten      zoeken. 54 Eerste ingebruikneming van de Parrot MKi9100
    > De lijst met Bluetooth apparaten wordt zichtbaar.     > Wanneer u klaar bent met zoeken selecteert u      “Parrot MKi9100”.4. Als uw telefoon u vraagt om de Bluetooth PIN code, voert       u “0000” in.      > Op het scherm van de Parrot MKi9100 verschijnt       “Koppeling geslaagd”.         Het telefoonboek gebruiken       Alleen de contacten die in het geheugen van de mobiel staan worden gesynchroniseerd.  Bij vele telefoons wordt het telefoonboek van uw telefoon automatisch met de Parrot MKi9100 gesynchroniseerd.Als uw telefoon deze automatische synchronisatie niet toe-laat, kunt u met behulp van Object Push uw contacten van de telefoon naar de Parrot MKi9100 overbrengen.Hiervoor gaat u als volgt te werk:1. In het hoofdmenu van de Parrot MKi9100 selecteert u      Instellingen > Contacten ontvangen.    > Op het scherm verschijnt Wacht op een contact. 2. Zie de gebruiksaanwijzing van uw telefoon om te weten      wat de procedure is voor het verzenden van contacten    via Object Push.   Voordat u de telefoonfunctie van uw Parrot MKi9100 kunt gebruiken, moet u eerst de verbinding met uw telefoon/PDA tot stand brengen.► Zie het gedeelte Uw Bluetooth telefoon /PDA koppelen verbinden voor meer informatie.   Commando’s                              De telefoonfunctie gebruikenKnop FunctiesKort drukken:- Een binnenkomend gesprek aannemen- De modus stemherkenning inschakelen- Het gesprek overschakelen naar de mobiel    (discrete modus)- De discrete modus opheffen- Een tweede binnenkomend gesprek aannemen /    wisselen tussen verscheidene gesprekkenLang drukken: Bellen naar het laatst gedraaide nummer- Een binnenkomend gesprek weigeren (of een   tweede inkomend gesprek)- OphangenHet volume van het gesprek instellenKort drukken: De functie DTMF inschakelen (om interactieve stemservers te beheren)De microfoon in- of uitschakelen (discrete modus)55
U kunt een oproep starten door middel van verschillende combinaties van sleutelwoorden. Voorbeelden: «bel ‘Paul’», «‘Paul’ bellen», of alleen «Paul». U kunt er ook een type nummer aan  toevoegen: «bel ‘Paul’ ‘kantoor/werk’», «‘Paul’ bellen ‘huis/thuis’» of «‘Paul’ ‘mobiel/GSM’».56 Een oproep ontvangen     Een inkomend gesprek wordt gemeld door een beltoon   De naam van het contact wordt getoond en aangekondigd, als het nummer van dit contact is opgenomen in het telefoonboek van de telefoon die is aangesloten op de Parrot MKi9100.  • Als u de oproep wilt aannemen, drukt u op de groene     knop. Druk als u uitgesproken bent op de rode knop om   de oproep te beëindigen. • Om de oproep te weigeren, drukt u meteen op de   rode knop.  • Als u de trefwoorden heeft ingeschakeld, kun u de ste    mopdrachten gebruiken om op te hangen of een inkomend     gesprek te weigeren.    ► Raadpleeg het onderdeel Trefwoorden gebruiken     voor meer informatie.   Een oproep starten       • Als de contactpersoon die u wilt bellen in het   telefoonboek van de met de Parrot MKi9100 verbonden     telefoon staat, doet u het volgende:   1. Druk op de scrollknop om het hoofdmenu te openen        en selecteer Telefoonboek.   2. Selecteer het contact en druk op de scrollknop. • Als de contactpersoon die u wilt bellen niet in het   telefoonboek van de met de Parrot MKi9100 verbonden     telefoon staat, zet uw auto dan op een geschikte plaats     stil en start de oproep vanaf uw telefoon.    Telefoneren via spraakherkenning     Deze functie is slechts beschikbaar als uw contacten van tevoren in de handsfree-kit zijn opgenomen.  1. Druk op de groene knop om het procedure voor    spraakherkenning te starten.    > Er klinkt een geluidssignaal om u te melden dat de      procedure voor spraakherkenning is gestart. 2. Spreek het sleutelwoord «Bellen» uit gevolgd door de      naam van de persoon die u wilt bellen.    > Als het spraakcommando goed begrepen is, wordt de      oproep naar deze persoon automatisch gestart. Is dit niet      het geval, dan vraagt de handsfree-kit om bevestiging.
  3. Bevestig door «Ja», «bel» of «bellen» te zeggen.    > De oproep naar de contactpersoon wordt nu gestart.    Een oproep aannemen door middel    van spraakherkenning     Om de volgende trefwoorden te gebruiken moet u de  trefwoorden inschakelen. Hiervoor:  1. Druk op het wieltje en kies Instellingen >        Trefwoorden...  2. Druk op het wieltje om de trefwoorden in- of uit        te schakelen. • Het trefwoord « Aannemen » zorgt ervoor dat u een     inkomend gesprek kunt aannemen.• Het trefwoord « Weigeren » zorgt ervoor dat u een     inkomend gesprek kunt weigeren.     Een audiobron kiezen      • Gebruik de USB, Jack of iPod aansluitingen om uw Parrot     MKi9100 aan te sluiten op uw geluidsbron / MP3 speler /     USB stick. Sluit uw iPod met de jack-kabel op de Parrot MKi9100 aan, als u een van de volgende iPod modellen gebruikt: iPod Mini, iPod Photo, iPod 3G en iPod Shuffle. Controleer of uw iPod geüpdatet is, voordat u hem met de Parrot MKi9100 gebruikt.  • Druk op de knop Play om de Muziek functie te activeren.     In stand-by modus of wanneer u door de menu’s bladert, drukt u op Play om terug te gaan naar de lezer.  • Om een andere muziekbron te kiezen, drukt u op het     wieltje om het menu te openen en selecteert de bron in de     volgende volgorde:   - iPod,   - USB stick,   - Bluetooth verbinding,   - apparaat aangesloten op de jack uitgang.   De muziekfunctie gebruiken57Paul!bel ‘Paul’!‘Paul’ bellen ‘huis/thuis’!bel ‘Paul’ ‘kantoor/werk’!‘Paul’ ‘mobiel/GSM’!
 Commando’s         Knop FunctiesKort drukken: - Muziekmodus activeren- Het afspelen pauzeren / hervattenLang drukken: het menu voor de geluidseffecten openen- Kort drukken: Naar het begin van het stuk gaan / naar het voorgaande stuk gaan- Lang drukken: Snel terugdraaien- Kort drukken: Naar het volgende nummer gaan- Lang drukken: Snel vooruitdraaienHet volume wijzigenDe lijst met huidige nummers openenDe functies Voorgaande/Volgende wijn niet beschikbaar als de Parrot MKi9100 via het jack/jack snoer op de audiolezer aangesloten is.Als uw Parrot MKi9100 zowel op een iPhone als opeen USB-sleutel is aangesloten, krijgt de iPhonevoorrang: u zult enkel de inhoud van uw iPhonekunnen bekijken.58
A utilização de determinadas funcionalidades depende apenas do seu telefone. Para mais infor-mações, visite o nosso sítio da Internet  www.parrot.com, na secção de compatibilidade.59 60 60 60 60 61 61 61 62 62 62 62 62 63 63 63 64 64 64  65 65 65 66Instalar o Parrot MKi9100.................................................   Auto-rádio com conectores ISO.................................   Auto-rádio com entradas Line In ...............................   Auto-rádio sem conectores ISO.................................   Instalação do cabo de alimentação do kit .................   Instalação dos conectores áudio................................   Instalação da caixa electrónica...................................   Instalação do telecomando........................................   Instalar o microfone duplo.........................................   Instalação do ecrã...................................................... Utilizar o Parrot MKi9100 pela primeira vez..................   Navegação entre menus............................................   Acoplar um telemóvel ao Parrot MKi9100..................   Utilizar o directório...................................................... Utilizar a função de telefone............................................   Comandos...................................................................   Receber uma chamada...............................................   Fazer uma chamada  .................................................   Fazer uma chamada por reconhecimento de voz.......    Receber uma chamada por reconhecimento        de voz.......................................................................... Utilizar a função Música...................................................   Seleccionar uma fonte áudio.....................................   Comandos..................................................................59Este manual simplificado do Parrot MKi9100 indicalhe as principais instruções para utilizar facilmente esteequipamento. Para mais informações, consulte o manual do utilizador disponível no nosso sítio da Internet  www.parrot.com.  Ìndice                             • Antes de xar os diferentes elementos do kit mãos-livres     no habitáculo, ligue primeiro os diferentes cabos na caixa     electrónica. Retire previamente os conectores de origem     do sistema áudio do seu veículo.• Os cabos fornecidos estão equipados com conectores ISO     e duas saídas Line. As saídas Line podem ser utilizadas  Português    Instalar o PARROT MKi9100Recomendamos que solicite a ajuda de um  profissional para fazer a instalação. Um interface de comando no volante permite-lhe ligar os comandos no volante do seu veículo ao seu kit mãos-livres da Parrot. Com este interface, pode transferir as chamadas telefónicas, utilizando os botões dos comandos do seu volante, manten-do as mãos no volante. Consulte o nosso website www.parrot.com para obter mais informações.
60   se o seu sistema áudio possuir esta opção.     Consequentemente, são possíveis diversas montagens     consoante o tipo do seu auto-rádio e do seu veículo.• A função Mute permite interromper o som do seu auto-    rádio para passar para a comunicação. A selecção da     entrada Mute depende da configuração do seu auto-rádio.   Auto-rádio com conectores ISO     1. Ligue os conectores do tipo macho do kit mãos-livres      no auto-rádio.  2. Ligue os feixes áudio e alimentação do veículo aos      conectores do tipo fêmea do Parrot MKi9100. 3. No cabo de instalação, ligue o fio amarelo livre a uma     das entradas Mute correspondente do sistema áudio, se     equipado (mute in1, mute in2 ou mute in3).   Auto-rádio com entradas Line In    • Utilize este tipo de ligação para ligar uma saída Line (os     castanho e branco ou fios vermelho e preto) à entrada Line     do seu sistema áudio.  • A utilização dos dois pares de saídas Line permite tirar     partido da função Streaming Audio em estéreo nos     altifalantes do seu veículo.  • No cabo de instalação, ligue o o amarelo livre a uma     das entradas Mute correspondente do sistema áudio, se     equipado (mute in1, mute in2 ou mute in3). Auto-rádio sem conectores ISO     Para facilitar a montagem, deverá possuir um cabo adap-tador ISO. Consulte a gama de adaptadores ISO no nosso sítio da Internet: www.parrot.com.           Instalação do cabo de alimentação do kit    • Consulte o esquema eléctrico do seu auto-rádio.  • O o vermelho do cabo do kit deve corresponder ao de     +12V permanente, o fio cor-de-laranja ao de +12V     pós-ignição e o fio preto ao de terra.  • Certique-se de que o seu o cor-de-laranja não está     ligado ao de 12V permanente, pois arriscar-se-ia a     descarregar a bateria do veículo, provocando dessa forma     um mau funcionamento do seu kit mãos-livres.  • Em determinados veículos, é necessário inverter os os     vermelho e cor-de-laranja de alimentação. Para efectuar     esta operação, basta inverter os dois porta-fusíveis     localizados no cabo de instalação do Parrot MKi9100.
        Verificar a instalação     Verifique a polaridade da alimentação do seu kit mãos-livres. Para isso, corte o contacto do seu veículo quando tiver o Parrot MKi9100 instalado: A mensagem “Adeus” tem de aparecer no ecrã. Se não for o caso, deverá inverter as posições dos fios vermelho e amarelo. Na verdade, o fio vermelho do cabo da alimentação deverá ser ligado a 12V permanente, o fio ama-relo a 12V após contacto e o fio preto à terra. Esta operação é efectuada simplesmente invertendo os dois terminais que se encontram nos cabos da Parrot.   Instalação dos conectores áudio    • Ligue os conectores áudio à caixa electrónica e instale     os conectores áudio (USB/iPod/Jack) no porta-luvas,     na consola central ou no compartimento de arrumação     consoante a configuração do seu painel de instrumentos. • Utilize a tampa de protecção fornecida.    Instalação da caixa electrónica       Evite instalar a caixa:   - junto do aquecimento ou da climatização   - num local exposto ao sol   - atrás de paredes metálicas.    Instalação do telecomando       ► Consulte os esquemas apresentados na página 9/10.  • Seleccione o local onde pretende colocar o telecomando     no habitáculo do seu veículo. Aconselhamo-lo a colocá-lo     no centro do seu painel de instrumentos ou perto de si.   • Se o colocar no volante, certique-se de que está     correctamente fixado para não se deslocar enquanto     estiver a conduzir. Não o instale do lado exterior do     volante para que você não seja incomodado enquanto     estiver a conduzir.   • Se utilizar o segundo suporte, utilize a ta adesiva de     dupla face localizada na parte posterior do mesmo para     colá-lo no painel de instrumentos. Em seguida, pode     colocar o telecomando neste suporte.    Em determinados veículos, não existe fio de +12V pós-ignição nos conectores do veículo. Consequentemente, é necessário ligar o fio de alimentação cor-de-laranja à caixa de fusíveis ou a outra fonte de alimentação pós-ignição.61
  Instalar o microfone duplo      O microfone duplo deve ficar orientado para o condutor e instalado de preferência entre a pala protectora do sol e o retrovisor central. Aconselhamos a instalação a meio do painel de instrumentos.   Instalação do ecrã       De modo a evitar riscos de roubo e de exposição prolon-gada ao sol, retire o seu ecrã quando sair do veículo.Aguarde cerca de 2 horas após a fixação do suporte adesivo e certifique-se de que está correc-tamente fixado no seu painel de instrumentos.     Associar o control remoto a caixa electrónica  Se a primeira utilização do Parrot MKI9100, o control remoto não parece estar associado a caixa electrónica, carregue varias vezes na tecla vermelho sem relaxer as teclas verde e Play. Esta operação deve ser efectuada nos 30s seguinte a  ignição do motor até que a mensagem «Ligação com  telecomando» aparece no Parrot MKi9100.   Navegação entre menus     • Prima o botão rotativo central para aceder aos menus.   > O kit indica o nome do menu obtido. • Para navegar entre menus utilize o botão rotativo,       confirmando a sua opção com o botão verde ou premindo     o botão rotativo. • Para sair do menu, prima o botão vermelho ou aguarde     alguns segundos.    Acoplar um telemóvel ao Parrot MKi9100   Se utilizar pela primeira vez o seu telefone com o Parrot MKi9100, deverá proceder ao acoplamento dos dois aparelhos: quando os dois aparelhos se tiverem detectado mutuamente, já não será necessário proceder a esta  operação Para tal:1. Certifique-se de que o seu Parrot MKi9100 é regulado      para ser visível por todos os aparelhos Bluetooth®.      Para isso, prima o botão e seleccione Preferências >      Visibilidade > Visível. O Parrot MKi9100 é visível por      predefinição.  2. Prima o botão e seleccione Preferências > Emparelhar      com...    > Se o modelo do seu telefone aparecer na lista,      seleccione-o e prima o botão.    > Se o modelo do seu telefone não aparecer na lista,   Utilizar o PARROT MKi9100 pela primeira vez62
    seleccione a opção Outros telefones... 3. A partir do seu telefone, inicie uma procura de      periféricos Bluetooth.     > A lista de periféricos Bluetooth aparece.     > Quando a procura terminar, seleccione      “Parrot MKi9100”. 4. Quando o telefone lhe pedir para inserir o código PIN      Bluetooth, insira “0 0 0 0”.     > O ecrã do Parrot MKi9100 apresenta a mensagem      “Emparelhagem com sucesso”.  Utilizar o directório        A sincronização do seu directório (lista) telefónico com o Parrot MKi9100  é automática com a maior parte dos telefo-nes. No caso do seu telefone não permitir esta sincronização automática, pode transferir os seus contactos do telefone para o Parrot MKi9100 através de Object Push. Para tal :  1. No menu principal do Parrot MKi9100, seleccione      Telefone > Receber contactos.      > Surge no ecrã «A aguardar contacto».   2. Consulte o folheto informativo do seu telefone        para conhecer o procedimento de envio de        contactos através do Object Push.     Antes de utilizar a função de telefone do seu Parrot MKi9100 deverá, em primeiro lugar, ligar o seu telefone/PDA a  este último.► Consulte a secção Acoplar um telemóvel ao Parrot MKi9100 para mais informações.  Comandos                             Utilizar a função de telefoneApenas os contactos gravados na memória do telefone se sincronizam.63Botão FunçõesPressão breve:   - Responder a uma chamada recebida   - Iniciar o modo de reconhecimento de voz   - Transferir a chamada para o telefone      (modo discreto)   - Sair do modo discreto   - Responder a uma segunda chamada /      passar de uma chamada para outraPressão longa: Efectuar uma chamada para o último número marcado- Rejeitar uma chamada recebida (ou uma   segunda chamada recebida)- DesligarRegular o volume da comunicaçãoPressão breve: Activar a função DTMF (para gerir os servidores de voz interactivos)Desactivar/reactivar o micro (modo secreto)
Esta função estará disponível apenas se os seus contactos estiverem previamente registados no kit mãos-livres.64 Receber uma chamada     A recepção de uma chamada é assinalada por um  sinal sonoro.     • Se pretender aceitar a chamada, prima o botão verde. A     seguir, prima o botão vermelho para terminar a chamada. • Se pretender rejeitar a chamada, prima o botão vermelho.  • Se tiver activado as palavras mágicas, pode utilizar os     comandos de voz para atender ou rejeitar uma     chamada recebida.    ► Consulte a secção Receber uma chamada por     reconhecimento de voz para mais informações.   Fazer uma chamada     • Se o contacto que pretende ligar estiver memorizado no     directório do telefone ligado ao Parrot MKi9100:  1. Prima o botão para aceder ao menu principal, depois         seleccione Directório.   2. Seleccione o contacto e prima o botão rotativo. • Se o contacto que pretender ligar não se encontrar no     directório do telefone ligado ao Parrot MKi9100,          estacione o seu veículo num local adequado e efectue a     chamada no seu telefone.    Fazer uma chamada por reconhecimento de voz    1. Prima a tecla verde para iniciar o processo de    reconhecimento de voz.    > O Parrot MKi9100 precisará o nome do contacto que    voce quer chamar. 2. Pronuncie o nome do contacto que voce quer chamar    seguido do tipo de número se o contacto dispõe de vários    números.    > A chamada é automaticamente iniciada se a operação    foi bien compreendida.    > No caso contrario, o kits mãos livres anuncia un    mensagem de confirmaçãoPoderá efectuar uma chamada através de diversas combinações de palavras-chave. Por exemplo, “ligar ‘Paul’”, “ligar a ‘Paul’”, ou simplesmente “Paul”. Poderá associar a esta combinação um tipo de número ao nome: “ligar a ‘Paul’ ‘escritório/trabalho’”, “ligar a ‘Paul’ ‘casa/domicilio” ou “‘Paul’ ‘telemóvel/móvel”.O nome do contacto é apresentado e anunciado se o número deste contacto fizer parte da agenda telefónica ligada ao Parrot MKi9100.
3. Confirme se forre necessário em proferido “sim”,    “chamada” ou “ligar” ou precisa o tipo de número que    voce deseja chamar    > A chamada para esse contacto é iniciada.         Receber uma chamada por reconhecimento de voz  Para utilizar as seguintes palavras mágicas, deverá activar as palavras mágicas. Para tal:  1. Prima o botão rotativo e seleccione Preferências >        Palavras mágicas.          2. Prima o botão rotativo para activar/desacti                 var as palavras mágicas.  • A palavra mágica «Aceitar» permite-lhe aceitar uma     chamada recebida.• A palavra mágica «Rejeitar» permite-lhe rejeitar uma     chamada recebida.     Seleccionar uma fonte áudio      • Utilize os conectores USB, Jack ou iPod para ligar o Parrot     MKi9100 ao seu leitor áudio/leitor de MP3/pen USB.Conecta o seu Ipod ao cabo Jack do Parrot MKi9100 se possui os modelos de Ipod seguintes: iPod Mini, iPod Photo, iPod 3G e iPod Shuffle. Verifique que o sofware do seu Ipod esta  actualizado antes de utilizar-lo com o seu Parrot MKI9100.  • Prima o botão Play para iniciar a função Música.   No modo de hibernar, ou quando navegar nos menus, prima o botão “Play” para voltar ao leitor.• Para alterar a fonte da música, prima o botão rotativo     para aceder ao menu e seleccione a fonte de acordo com     a seguinte ordem:   - iPod,   - periférico USB,   - periférico ligado através de Bluetooth,   - aparelho equipado com uma saída Jack.    Utilizar a função MúsicaPaul!ligar ‘Paul’!ligar a ‘Paul’ ‘casa/domicilio!ligar a ‘Paul’ ‘escritório/trabalho’‘Paul’ ‘telemóvel/móvel!65
  Comandos       As funções Anterior/Seguinte não se encontram disponíveis se o Parrot MKi9100 estiver ligado ao leitor áudio com o cabo jack/jack.Botão FunçõesPressão breve: - Iniciar o modo música- Suspender / retomar a leituraPressão longa: Aceder ao menu dos efeitos de áudio - Pressão breve: Voltar ao início da faixa /   voltar à faixa anterior- Pressão longa: Voltar rapidamente- Pressão breve: Ir para a faixa seguinte- Pressão longa: Avançar rapidamente Modificar o volumeAceder à lista de reprodução actualNo caso do seu Parrot MKi9100 estar ligado aum iPhone e a uma chave USB, o iPhone teráprioridade: poderá percorrer apenas o conteúdodo seu iPhone.66
67WarrantyWithout  prejudice  of  legal  warranty, Parrot  products  are  warranted  during 1  year  from  the  date  of  purchase  for defects in materials and workmanship, provided  that  no  deterioration  to  the product has been made, and upon pre-sentation of proof of purchase (date of purchase, location of sale and product serial number) to the retailer. Warranty does not cover: upgrading of the  software  items  of  the  Parrot  pro-ducts  with  Bluetooth® cell  phones  for compatibility  purpose,  data  recovery, deterioration  of  the  external  aspect due to normal  use of  the product, any damage  caused  by  accident,  misuse, misapplication, or non-Parrot products. Parrot  is  not  responsible  for  storage, loss or damaged to data during transit or repair.Any product wrongfully declared to be defective will be returned to sender and inspection, process and carriage costs will be invoiced to him.Due to the technical nature of this pro-duct, we advise you to ask your garage mechanic  to  take  care  of  the  installa-tion.  Parrot  shall  not  be  held  respon-sible of  any dysfunction  caused by  an installation  which  does  not  follow  the instructions provided in this user guide or an incorrect installation. Correct  disposal  of  This  Product (Waste  Electrical  &  Electronic  Equip-ment)(Applicable in the European Union and other European countries with separate collection systems). This marking shown  on the pro-duct  or  its  literature,  indicates that  it  should  not  be  disposed with  other  household  wastes  at the  end  of  its  working  life.  To  prevent possible  harm  to  the  environment  or human health from uncontrolled waste disposal,  please  separate  this  from other  types  of  wastes  and  recycle  it responsibly to promote the sustainable reuse of material resources. Household users should contact either the  retailer  where  they  purchased  this product,  or  their  local  government  of-fice, for details of where and how they can  take  this  item  for  environmen-tally  safe  recycling.  Business  users should  contract  their  supplier  and  the terms  and  conditions  of  the  purchase contract.  This  product  should  not  be mixed  with  other  commercial  wastes for disposal.ModificationsThe  explanations  and  specifications in  this  guide  are  given  for  information purposes  only  and  may  be  modified without prior  notice. They  are deemed to be correct at time of going to press. The utmost care has been taken when writing this guide,as part  of the aim to provide you with accurate information. However,  Parrot shall  not  be held  res-ponsible for any consequences arising from  any  errors  or  omissions  in  the guide,  nor  for  any  damage  or  acci-dental loss of data resulting directly or General Information
68indirectly from  the  use of  the  informa-tion herein. Parrot reserves the right to amend or improve the product design or user guide without any restrictions and without  any  obligation  to  notify  users.  As  part  of  our  ongoing  concern  to upgrade and improve our products, the product that you  have purchased  may differ slightly from the model described in this guide.If so, a later version of this guide might be available in electronic format at Par-rot’s website at www.parrot.com.FCC Compliance StatementThis device complies with part 15 of the FCC rules.  Operation  is subject  to  the following two conditions:(1). this device may not cause harmful        interference, and(2). this device must accept any        interference received, including        interference that may cause unde       sired operation. FCC §15.105 statementThis  equipment  has  been  tested  and found  to  comply  with  the  limits  for  a Class B digital device, pursuant to part 15  of  the  FCC  Rules.  These  limits  are designed  to  provide  reasonable  pro-tection  against  harmful  interference  in a  residential  installation.  This  equip-ment  generates,  uses  and  can  radiate radio frequency energy and, if not ins-talled  and  used  in  accordance  with the  instructions,  may  cause  harmful interference  to  radio  communications. However,  there  is  no  guarantee  that interference will not occur in a particu-lar  installation.  If  this  equipment  does cause  harmful  interference  to  radio  or television reception,  which can  be de-termined  by turning the  equipment  off and on, the user is encouraged to try to correct the interference by one or more of the following measures:—Reorient or relocate the receiving antenna.—Increase the separation between the equipment and receiver.—Connect the equipment into an outlet on a circuit different from that to which the receiver is connected.—Consult the dealer or an experienced radio/ TV technician for help. Note: The manufacturer is not respon-sible  for  any  radio  or  tv  interference caused  by  unauthorized  modifications to  this  equipment.  Such  modifications could void the user’s authority to ope-rate the equipment. Caution to usersChanges  or  modifications  not  expres-sly  approved  by  the  party  responsible for  compliance  could  void  the  user’s authority to operate the equipment. Declaration of ConformityWe,  Parrot  S.A.  of  174  quai  de Jemmapes,  75010  Paris,  France, declare  under  our  sole  responsibility that  our  product,  the  Parrot  MKi9100 to  which  this  declaration  relates  in conformity  with  appropriate  standards EN300328,  EN300220-1,  for  a  class  2 receiver,  EN301489-17,  EN301489-3, EN60950  following  the  provision  of Radio  Equipment,  Telecommunication Equipment  directive  (1999/5/EC R&TTE),  with  requirements  covering EMC directive 89/336/EEC, Low Voltage directive  73/23/EEC  and  automotive directive 2006/28/EC.
69 Identification N. 394 149 496 R.C.S. PARIS - Parrot S.A. This Class B digital apparatus com-plies with Canadian ICES-003 Copyrights  Copyright © 2009 Parrot. LicencesThe Bluetooth ® word mark and logos are  owned  by  the  Bluetooth  SIG,  Inc. and  any  use  of  such  marks  by  Parrot S.A. is under license.  Bluetooth QDID : B013655, B013858, B012423iPod is a trademark of Apple Inc, regis-tered  in  the  US  and  others  countries. Made  for  iPod  means  that  an  electro-nic  accessory  has  been  designed  to connect  specifically  to  iPod  and  has been  certified  by  the  developer  to meet  Apple  performance  standards.  «Works  with  iPhone»  means  that  an electronic  accessory  has  been  desi-gned to connect specifically  to iPhone and has been certified by the developer to meet Apple performance standards.Other  trademarks  and  trade  names are  those  of  their  respective  owners.  Compatibility problemsSome  special  edition  cars  can  be  re-leased with  some differences from the original model. This could cause some compatibility  problems  with  the  inter-faces.Our  company  is  not  responsible  of compatibility problems caused by new equipment  or  devices  updated  by  the car manufacturer without advise.Speex & Flac LicencesRedistribution  and  use  in  source  and binary  forms,  with  or  without  modifi-cation, are permitted provided that the following conditions are met:• Redistributions  of source code must retain the  above  copyright  notice,  this list of conditions and the following dis-claimer.•  Redistributions  in  binary  form  must reproduce the above copyright notice,this list of conditions and the following disclaimer in the documentation and/orother materials provided with the distribution.•  Neither  the  name  of  the  Xiph.org Foundation nor the names of its contri-butors  may  be  used  to  endorse  or promote  products  derived  from  this software  without  specific  prior  written permission.This software is provided by the copy-right  holders  and  contributors  ``as  is’’ and any express or implied warranties, including, but not limited to, the implied warranties  of  merchantability  and  fi-tness  for a  particular  purpose  are dis-claimed. In no event shall the foundation or contributors be liable for any direct, indirect, incidental, special, exemplary, or  consequential  damages  (including, but  not  limited  to,  procurement  of substitute  goods  or  services;  loss  of use, data, or profits; or  business inter-ruption)  however  caused  and  on  any theory  of  liability,  whether  in  contract, strict liability, or tort (including negligen-ce or otherwise) arising in any way out of the use of this software, even if ad-vised of the possibility of such damage.
70   Informations généralesGarantieSans préjudice de la garantie légale, les produits Parrot sont garantis, pièces et main  d’oeuvre,  pendant  1 an  à  comp-ter  de  la  date  d’achat,  sauf  altération du  produit,  et  sur  présentation  d’une preuve d’achat (date et lieu  d’achat n° de série du produit) au revendeur.La garantie ne couvre pas la mise à jour des  logiciels  inclus  dans  les  produits Parrot  avec  des  téléphones  mobiles Bluetooth® à des fins de compatibilité, la  récupération  de  données,  la  dété-rioration  extérieure  du  produit  due  à une utilisation normale du produit, tout dommage causé par accident, une uti-lisation  anormale  ou  non  autorisée  du produit,  un  produit  non  Parrot.  Parrot n’est  pas  responsable  du  stockage, de  la  perte  ou  de  l’endommagement des  données  durant  le  transport ou  la réparation.Tout  produit  s’avérant  non  défectueux sera retourné à l’expéditeur et les frais de  traitement,  de  vérification  et  de transport lui seront facturés. En raison de la technicité de ce produit, nous vous  recommandons  de faire  ef-fectuer l’installation par votre garagiste. Parrot ne saurait en aucun cas être res-ponsable  de  tout  dysfonctionnement dû à une installation non conforme aux instructions figurant sur la notice  et/ou une installation non conforme effectuée par vous-même. Comment recycler ce produitDéchets  d’équipements  électriques  et électroniquesLe symbole sur le produit ou sa docu-mentation indique qu’il ne doit pas être éliminé  en  fin  de  vie  avec  les  autres déchets ménagers. L’élimination incon-trôlée des déchets pouvant porter pré-judice à  l’environnement ou  à  la santé humaine, veuillez le séparer des autres types  de  déchets  et  le  recycler  de  fa-çon responsable. Vous favoriserez ainsi la  réutilisation  durable  des  ressources matérielles.Les  particuliers  sont  invités  à  contac-ter  le  distributeur  leur  ayant  vendu  le produit  ou  à  se  renseigner  auprès  de leur mairie pour  savoir où  et comment ils  peuvent  se  débarrasser  de  ce  pro-duit afin qu’il soit recyclé en respectant l’environnement.  Les  entreprises  sont invitées  à  contacter  leurs  fournisseurs et  à  consulter  les  conditions  de  leur contrat de vente. Ce produit ne doit pas être  éliminé  avec  les  autres  déchets commerciaux. ModificationsLes  explications  et  spécifications contenues dans ce guide utilisateur ne sont fournies qu’à titre d’information et peuvent  être  modifiées  sans  notifica-tion  préalable.  Ces  informations  sont correctes au moment de l’impression et le  plus  grand  soin  est apporté  lors  de leur rédaction  afin de  vous fournir  des informations les plus précises possible. Cependant, Parrot  S.A. ne  saurait être tenu responsable, directement ou indi-rectement, des éventuels préjudicesou pertes de données accidentelles ré-sultant d’une erreur ou omission au sein du présent document. Parrot S.A.se réserve le droit d’amender ou amé-liorer  le  produit  ainsi  que  son  guide utilisateur  sans  aucune  restriction  ou
obligation de prévenir l’utilisateur.Dans le cadre de l’attention portée par Parrot  S.A.  sur  l’amélioration  de  nos produits, il  est possible  que  le produit que  vous  avez  acheté  diffère  légère-ment de celui décrit au sein du présent document. Dans  ce cas,  vous pourrez éventuellement  trouver  une  nouvelle version  du  guide  utilisateur  au  format électronique  sur  le  site  www.parrot.com.   Déclaration de conformitéParrot  SA,  174  quai  de  Jemmapes, 75010 Paris, France, déclare sous son unique responsabilité que le produit dé-crit dans le présent guide utilisateur est en conformité avec les normes techni-ques EN300328, EN300220-1 (pour un récepteur  de  classe  2),  EN301489-17, EN301489-3, EN60950 suivant les dis-positions  de  la  directive  R&TTE  99/5/CE,  ainsi  qu’avec  les  exigences  de  la directive EMC  89/336/CE, de  la direc-tive 73/23/CEE relative aux appareils à basse  tension  et  de  la  directive  Auto-mobile 2006/28/CE.Cet appareil numérique de la classe B est conforme à la  norme NMB-003 du Canada.Copyright Copyright © 2009 Parrot.  Tous droits réservés.  Marques déposéesLe  nom  et  le  logo  Bluetooth  sont  des marques  déposées  de  Bluetooth  ® SIG,  Inc.  et  toute  utilisation  de  ces derniers  par  Parrot S.A.  est  faite sous licence. iPod est une marque d’Apple Inc., dépo-sée aux Etats-Unis et dans d’autres pays. Le logo « Made for iPod » signifie qu’un accessoire électronique a été dévelop-pé  spécifiquement  pour  l’iPod  et  que son  développeur  certifie  qu’il  répond aux normes de performance Apple.Le  logo  «  Works  with  iPhone  »  sig-nifie  qu’un  accessoire  électron-ique  a  été  développé  spécifique-ment  pour  l’iPhone  et  que  son développeur  certifie  qu’il  répond aux  normes  de  performance  Apple. Toutes les autres marques de commer-ce et  marques déposées mentionnées dans le  présent  document  sont  proté-gées par Copyright et sont la propriété de leurs propriétaires respectifs.Problèmes de compatibilité Certaines voitures produites en édition limitée peuvent présenter des différen-ces par rapport au modèle original, ce qui peut entraîner certains problèmes de compatibilité avec cet appareil. Parrot S.A. n’est pas responsable de ces éventuels problèmes de compa-tibilité liés à ces équipements lancés sans notification par le fabricant.   Información general  GarantíaSin perjudicar la garantía legal, Parrot garantiza sus productos, piezas y mano de obra incluidos, por el período de 1 año a partir de la fecha de com-pra, salvo en caso de alteración del producto. Esta fecha de compra debe estar certificada por una prueba de compra original del producto (fecha y 71
lugar de compra, número de seri e del producto) presentada al dependiente. La garantía no cubre: la actualiza-ción de los programas incluidos en los productos Parrot con teléfonos móviles dotados de la funcionalidad Bluetooth® con objetivo de compa-tibilidad, la recuperación de datos, la deterioración exterior del producto causada por la utilización cotidiana del producto, cualquier daño causado por un accidente, un uso anormal o no autorizado del producto, un producto de una marca diferente. Parrot no es responsable del almacenamiento de los datos, de sus pérdidas o de daños ocurridos durante el transporte o la reparación.Cualquier producto que no sería de-fectuoso se retornará al cliente, y los gastos de intervención y de transporte serán a su carga. Debido a la tecnicidad de este producto, le recomendamos que haga efectuar la instalación por su garajista. Parrot no será responsable de ninguna disfunción resultante de una instalación no conforme con las instrucciones dadas en el manual y/o una instalación no conforme efectuada por usted.    Eliminación correcta de este producto La presencia de esta marca en el pro-ducto o en el material informativo que lo acompaña, indica que al finalizar su vida útil no deberá eliminarse junto con otros residuos domésticos. Para evitar los posibles daños al medio ambiente o a la salud humana que representa la eliminación incontrolada de residuos, separe este producto de otros tipos de residuos y recíclelo correctamente para promover la reutilización sosteni-ble de recursos materiales.Los usuarios particulares pueden contactar con el establecimiento donde adquirieron el producto, o con las autoridades locales pertinen-tes, para informarse sobre cómo y dónde pueden llevarlo para que sea sometido a un reciclaje ecológico y seguro. Los usuarios comerciales pueden contactar con su proveedor y consultar las condiciones del contrato de compra. Este producto no debe eli-minarse mezclado con otros residuos comerciales. ModificacionesLas explicaciones y especificaciones contenidas en este manual son mera-mente informativas y pueden ser modi-ficadas sin previo aviso. Se consideran correctas en el momento de enviar la publicación a imprenta. Este manual se ha redactado con el máximo cui-dado, con el fin de proporcionarle una información precisa. Sin embargo, Parrot no asume respon-sabilidad alguna por las consecuen-cias derivadas de los errores u omisio-nes que pueda haber en el manual, ni por los daños o pérdidas accidentales de datos que se produzcan como consecuencia directa o indirecta del uso de la información aquí contenida. Parrot se reserva el derecho a modifi-car o mejorar el diseño del producto o el manual de usuario sin restricciones y sin la obligación de notificárselo a los usuarios. 72
Declaración de conformidad Parrot  SA, 174 quai de Jemmapes, 75010 París, Francia, declara bajo su exclusiva responsabilidad la confor-midad del producto descrito en este mismo manual de usuario con las si-guientes normas técnicas: EN300328, EN300220-1 por un receptor de  clase 2, EN301489-17, EN301489-3, EN60950 de acuerdo con las disposi-ciones de la directiva R&TTE 1999/5/EC, de la directiva de Bajo Voltaje EMC 89/336/EEC y de la directiva Automóvil 2006/28/EC. Número de identificación: N.394 149 496 R.C.S. París  Marcas registradasEl nombre y el logotipo Bluetooth son marcas registradas de Bluetooth ® SIG, Inc. y toda utilización de estos últimos por Parrot S.A se hace con una licencia.  iPod es una marca de Apple Inc., registrada en los Estados Unidos y en otros países.  “Made for iPod” significa que un apa-rato electrónico fue especialmentediseñado para conectarse a un iPod y fue certificado por un desarrollador con el fin de satisfacer los resultados estándares de Apple. “Works with iPhone” significa que un aparato electrónico fue especialmentediseñado para conectarse a un iPhone y fue certificado por un desarrollador con el fin de satisfacer los resultados estándares de Apple. Apple no es responsable del funciona-miento de este dispositivo o de su con-formidad con las normas de seguridad. Todas las otras marcas de comercio y las marcas registradas mencionadas en este documento están protegidas por el Copyright y pertenecen a sus respectivos propietarios. Copyright Copyright © 2009 Parrot.Todos los derechos reservados.        Allgemeine HinweiseKompatibilitätsproblemeManche Kfz-Sondermodelle weichen in einigen Aspekten vom Originalmodell ab. Das kann zu Kompatibilitätsproble-men mit den Schnittstellen führen.Die Firma Parrot zeichnet nicht veran-twortlich für etwaige Kompatibilitäts-probleme, die auf neue Ausstattungen oder vom Kfz-Hersteller ohne entspre-chende Vorankündigung aufgerüstete Geräte zurückzuführen sind.ÄnderungenDie in dieser Anleitung enthaltenen Beschreibungen und technischen Kenndaten dienen ausschließlich der Information und können Änderungen ohne vorhergehende Ankündigung unterliegen. Zum Zeitpunkt des Drucks galten die enthaltenen Angaben als zutreffend. Bei der Verfassung dieser Anleitung wurde größte Sorgfalt auf deren Inhalt angewendet, damit Ihnen möglichst präzise Informationen bereitgestellt werden können. 73
Parrot haftet jedoch weder für Folgen, die sich aus ggf. in dieser Anleitung enthaltenen Fehlern oder Unterlas-sungen ergeben, noch für Schäden oder den versehentlichen Verlust von Daten als direkte oder indirekte Folge der Verwendung der enthaltenen Informationen. Parrot behält sich das Recht vor, das Produktdesign oder die Bedienungsan-leitung zu ändern bzw. zu verbessern, ohne dass diesbezüglich Beschrän-kungen vorliegen und ohne jede Verpflichtung, die Benutzer hiervon in Kenntnis zu setzen.Korrekte Entsorgung dieses Produkts (Elektromüll) (Anzuwenden in den Ländern der Europäischen Union und anderen euro-päischen Ländern mit einem separaten Sammelsystem) Die Kennzeichnung auf dem Produkt bzw. auf der dazuge-hörigen Literatur gibt an, dass es nach seiner Lebensdauer nicht zusammen mit dem normalen Haushaltsmüll entsorgt werden darf. Entsorgen Sie dieses Gerät bitte getrennt von ande-ren Abfällen, um der Umwelt bzw. der menschlichen Gesundheit nicht durch unkontrollierte Müllbeseitigung zu schaden. Recyceln Sie das Gerät, um die nachhaltige Wiederverwertung von stoffl ichen Ressourcen zu fördern.Private Nutzer sollten den Händler, bei dem das Produkt gekauft wurde, oder die zuständigen Behörden kontaktie-ren, um in Erfahrung zu bringen, wie sie das Gerät auf umweltfreundliche Weise recyceln können. Gewerbliche Nutzer sollten sich an Ihren Lieferanten wenden und die Bedingungen des Verkaufsvertrags konsultieren. DiesesProdukt darf nicht zusammen mit an-derem Gewerbemüll entsorgt werden.  Garantie Unbeschadet der gesetzlichen Ga-rantie gilt für die Produkte von Parrot eine 1-jährige Garantie ab Kaufdatum für Ersatzteile und Reparaturkosten, sofern am Produkt keine Änderungen vorgenommen werden. Für die Inans Inanspruchnahme der Garantie ist dem Fachhändler ein Kaufnachweis (Datum und Ort des Erwerbs, Seriennummer des Produkts) vorzulegen.Die Garantie deckt weder die Aktualisierung der im Lieferumfang der Parrot-Produkte enthaltenen Softwareprogramme mit Bluetooth®-Mobiltelefonen zu Kompatibilitätszwec-ken noch die Wiederherstellung von Daten, die äußere Abnutzung der Produkte aufgrund einer normalen Pro-duktverwendung, die auf einen Unfall oder eine unsachgemäße bzw. nicht autorisierte Verwendung der Produkte zurückzuführenden Schäden oder Produkte anderer Hersteller. Parrot haftet keinesfalls für die Speicherung, den Verlust oder die Beschädigung von Daten während des Transports oder im Rahmen von Reparaturarbeiten.Jedes Produkt, an dem keine Mängel festzustellen sind, wird an den Absen-der zurückgeschickt, wobei die Kosten für Bearbeitung, Prüfung und Transport dem Absender in Rechnung gestellt werden.  74
Eingetragene MarkenDie Marke und das Logo Bluetooth sind eingetragene Marken der Bluetooth iPod ist eine Marke der Apple Inc., eingetragen in den USA sowie in anderen Ländern.Das Label „Made for iPod“ verweist darauf, dass ein elektronisches Gerät speziell für den iPod entwickelt wurde und dass der Entwickler die Konformi-tät des Geräts mit den Leistungsstan-dards von Apple zertifiziert.Alle anderen Handelsmarken und eingetragenen Marken, die im  vorliegenden Dokument erwähnt wer-den, sind durch Copyright geschützt und das Eigentum ihrer jeweiligen Inhaber.    Informazioni generali  GaranziaSenza pregiudizio della garanzia lega-le, i prodotti Parrot sono garantiti, per sostituzione pezzi e mano d’opera, per 1 anno a partire dalla data di acquisto, salvo alterazioni del prodotto, e su presentazione di una prova di acquisto (data e luogo di acquisto, numero di serie del prodotto) al rivenditore.La garanzia non copre gli aggiorna-menti dei software inclusi nei prodotti Parrot con i telefoni cellulari Blue-tooth® ai fini di compatibilità, il recu-pero di dati, il deterioramento esterno del prodotto dovuto al normale uso del prodotto stesso, i danni causati accidentalmente, da un uso anomalo o non autorizzato del prodotto, un prodotto non Parrot. Parrot non è responsabile della memoria, della perdita o del danneggiamento dei dati durante il trasporto o la riparazione. Date le caratteristiche tecniche del presente prodotto, l’installazione deve essere effettuata da un tecnico. Parrot non potrà in alcun caso essere ritenuta responsabile per eventuali problemi di funzionamento dovuti ad un’installa-zione non conforme a quanto indicato nelle istruzioni e/o ad un’installazione non conforme effettuata dall’utente stesso. Corretto smaltimento del prodotto(rifi uti elettrici ed elettronici)(Applicabile nei Paesi dell’Unione Euro-pea e in quelli con sistema di raccolta differenziata)Il marchio riportato sul prodotto o sulla sua documentazione indica che il prodotto non deve essere smaltito con altri rifi uti domestici al termine del ciclo di vita. Per evitare eventuali danni all‘ambiente o alla salute causati dall‘inopportuno smaltimento dei rifi uti, si invita l‘utente a separare questo prodotto da altri tipi di rifi uti e di riciclarlo in maniera responsabile per favorire il riutilizzo sostenibile delle risorse materiali.Gli utenti domestici sono invitati a contattare il rivenditore presso il quale è stato acquistato il prodotto o l‘uffi cio locale preposto per tutte le informazioni relative alla raccolta diffe-renziata e al riciclaggio per questo tipo di prodotto. Gli utenti aziendali sono invitati a contattare il proprio fornitore e verifi care i termini e le condizioni del 75
contratto di acquisto. Questo prodotto non deve essere smaltito unitamente ad altri rifi uti commerciali.   Modifiche Le spiegazioni e le specifiche riportate nella presente guida sono solo a scopo informativo e possono subire modifi-che senza preavviso. Tali informazioni sono da considerarsi corrette al mo-mento della pubblicazione. La presente guida è stata redatta prestando grande attenzione, al fine di fornire ai clienti informazioni precise e attendibili. Tuttavia, Parrot non può essere ritenuta responsabile per eventuali conseguenze derivanti da omissioni o errori nella presente guida, né per eventuali danni o perdite accidentali di dati causati direttamente o indiret-tamente dall’uso delle informazioni ivi contenute. Parrot si riserva il diritto di modificare/migliorare il prodotto o la guida per l’utente senza limitazione alcuna e senza l’obbligo di notifica agli utenti.Poiché il costante impegno dell’azienda è volto a garantire continui aggiornamenti e miglioramenti, il pro-dotto acquistato dall’utente potrebbe risultare leggermente diverso dal modello descritto nella presente guida. In tal caso, verificare la disponibilità di una versione aggiornata della guida in formato elettronico nel sito Web di Parrot all’indirizzo www.parrot.com.  Marchi registratiIl nome e il logo Bluetooth sono marchi registrati di Bluetooth ® SIG, Inc. e il loro uso da parte di Parrot S.A. è sog-getto a regolari contratti di licenza.  iPod è un marchio di Apple Inc. depo-sitato negli Stati Uniti e in altri paesi.La dicitura «Made for iPod» indica che l’accessorio elettronico è stato svilup-pato specificamente per l’iPod e che il relativo sviluppatore ne garantisce la conformità alle norme prestazionali di Apple. Tutti gli altri marchi commerciali e marchi registrati citati nel presente documento sono protetti da Copyright e sono di proprietà dei rispettivi proprietari.Algemene informatie    Algemene informatie  Garantie Op de Parrot producten rust gedu-rende 1 jaar vanaf de verkoopdatum garantie op onderdelen en arbeidsloon, behoudens aan het product aange-brachte veranderingen, tegen overleg-ging van de koopbon (met datum en plaats van aankoop en serienummer van het product) aan de leverancier.De garantie heeft geen betrekking op het voor doeleinden van compatibiliteit met de mobiele Bluetooth ® telefoons updaten van de in de Parrot producten inbegrepen software, het terughalen van gegevens, de uitwendige vers-lechtering van het product tengevolge van normaal gebruik van het product, per ongeluk veroorzaakte schade, abnormaal of ongeoorloofd gebruik van het product, een niet-Parrot product. Parrot is niet aansprake-lijk voor de opslag, het verlies of de beschadiging van gegevens tijdens het transport of de reparatie. Ieder product dat niet defect blijkt te zijn zal aan de afzender worden geretourneerd en de 76
kosten voor behandeling, verificatie en transport zullen hem in rekening worden gebracht.Wegens het technisch karakter van dit product raden wij u aan de installatie te laten verrichten door uw garagehouder. Parrot is in geen geval aansprakelijk voor een verkeerde we-rking veroorzaakt door een installatie die niet overeenkomt met de in de gebruiksaanwijzing gegeven aanwijzin-gen en/of een door uzelf uitgevoerde niet-conforme installatie. Afgedankte elektrische en elektronis-che apparatuur (WEEE) In overeenstemming met de Europese richtlijn 2002/96/EG betreffende afge-dankte elektrische en elektronische apparatuur (AEEA) geeft de vermelding van het hierboven vermelde symbool op het product of de verpakking aan dat dit artikel niet in de normale, niet-gesorteerde stedelijke afvalstroom mag worden verwerkt. In plaats daar-van ligt de verantwoordelijkheid van de afvoer van dit product bij de gebruiker, die het dient aan te bieden bij een inzamelpunt voor de recyclage van afgedankte elektrische en elektronis-che apparatuur. De gescheiden inzameling van dit afval helpt de eventuele te recupereren materialen terug te winnen of te recycleren en vermindert de impact ervan op het milieu en de gezondheid van de mens. Voor meer informatie betreffende de juiste afvoermethode. WijzigingenDe in deze handleiding gegeven uitleg en technische gegevens dienen uitslui-tend ter informatie en kunnen zonder voorafgaande kennisgeving worden gewijzigd. Deze gegevens worden geacht correct te zijn op het moment van het ter perse gaan van deze handleiding. Aan het opstellen van deze handleiding is de uiterste zorg besteed in het kader van ons streven u accurate informatie te verschaffen. Parrot zal echter niet aansprakelijk gesteld kunnen worden voor de gevol-gen die voortvloeien uit vergissingen of weglatingen in deze handleiding, evenmin als voor enige beschadiging of accidenteel verlies van gegevens die direct of indirect voortkomen uit het gebruik van de in deze handleiding vervatte informatie. Parrot behoudt zich het recht voor het producton-twerp of de gebruikershandleiding te wijzigen of verbeteren zonder enige beperkingen en zonder de verplichting de gebruikers hiervan op de hoogte te stellen.In het kader van ons voortdurende streven om onze producten uit te brei-den en te verbeteren, kan het door u gekochte product enigszins verschillen van het in deze handleiding beschre-ven model. In dit geval is mogelijk een recentere versie van deze handleiding  in elektronische vorm beschikbaar op de Parrot website: www.parrot.com. Gedeponeerde merkenDe naam en het logo Bluetooth zijn gedeponeerde merken van Bluetooth ® SIG, Inc. en ieder gebruik hiervan 77
door Parrot S.A. gebeurt onder licentie.  iPod is een in de Verenigde Staten en in andere landen gedeponeerd merk van Apple Inc.Het etiket «Made for iPod» betekent dat een elektronisch accessoire speciaal voor de iPod is ontwikkeld en dat de ontwikkelaar certificeert dat het voldoet aan de prestatienormen van Apple. Alle andere in dit document vermelde handelsmerken en gedeponeerde merken worden door Copyright  beschermd en zijn het eigendom van hun respectieve eigenaren.    Informação geral  GarantiaOs produtos Parrot, peças e mão-de-obra, têm garantia de 1 ano a contar da data de aquisição, salvo alteração do produto e mediante a apresentação da prova de compra (data e local de compra, n.º de série do produto) ao revendedor. A garantia não cobre a actualização dos softwares incluídos nos produtos Parrot com telemóveis Bluetooth ® com vista a torná-los compatíveis, a recuperação de dados, a deterioração exterior do produto causada pelo seu uso normal, qual-quer dano resultante de acidentes, uma utilização anormal ou não confor-me do produto, um produto que não seja Parrot. A Parrot não é responsável pela armazenagem, perda ou dano de dados durante o transporte ou reparação.Todos os produtos conside-rados sem defeito serão remetidos ao expedidor e os custos de tratamento, de verificação e transporte ser-lhe-ão imputados. Devido à especificidade técnica deste produto, recomendamos que a sua instalação seja feita pelo seu mecânico. Em nenhum caso a Parrot será responsável por qualquer dano causado por uma instalação que não esteja em conformidade com as instruções constantes no folheto infor-mativo e/ou uma instalação incorrecta efectuada pelo cliente.  Eliminação correta deste produto(Resíduos de Equipamentos Elétricos e Eletrônicos)Esta marca, apresentada no produto ou no seu manual indica que ele não deverá ser eliminado juntamente com os resíduos domésticos comuns no final do seu período de vida útil. Para impedir danos ao ambiente e à saúde humana causados pela eliminação incontrolada de resíduos, este equipa-mento deverá ser separado de outros tipos de resíduos e reciclado de forma responsável, para promover uma reutilização sustentável dos recursos materiais. Modificações As explicações e especificações presentes neste manual são meras informações concedidas, podendo ser modificadas sem aviso prévio.  Marca registadaO nome e o logotipo Bluetooth são marcas registadas de Bluetooth ® SIG, Inc., e qualquer utilização pela Parrot S.A. encontra-se licenciada.  iPod é uma marca registada da Apple Inc., dos Estados Unidos e em outros países.FCC ID: RKXEBOX4R2              RKXSAMOS4HotlineOur hotline is at your disposal from Monday to Friday between 9 am and 6 pm (GMT + 1) - Hot-line@parrot.comItaly :   [+39] 02 59 90 15 97Spain :   [+34] 902 404 202UK :   [+44] (0)844 472 2360Germany :   0900 1727768USA :   [+1] (877) 9 Parrot (toll free)China : [+86] 755 8203 3307Hong Kong :  [+852] 2736 1169France :   01 48 03 60 69Europe :  [+33] 1 48 03 60 69 (Spoken languages : French, English and Spanish) ?...78
FCC ID: RKXEBOX4R2              RKXSAMOS4HotlineOur hotline is at your disposal from Monday to Friday between 9 am and 6 pm (GMT + 1) - Hot-line@parrot.comItaly :   [+39] 02 59 90 15 97Spain :   [+34] 902 404 202UK :   [+44] (0)844 472 2360Germany :   0900 1727768USA :   [+1] (877) 9 Parrot (toll free)China : [+86] 755 8203 3307Hong Kong :  [+852] 2736 1169France :   01 48 03 60 69Europe :  [+33] 1 48 03 60 69 (Spoken languages : French, English and Spanish) ?...
www.parrot.com

Navigation menu