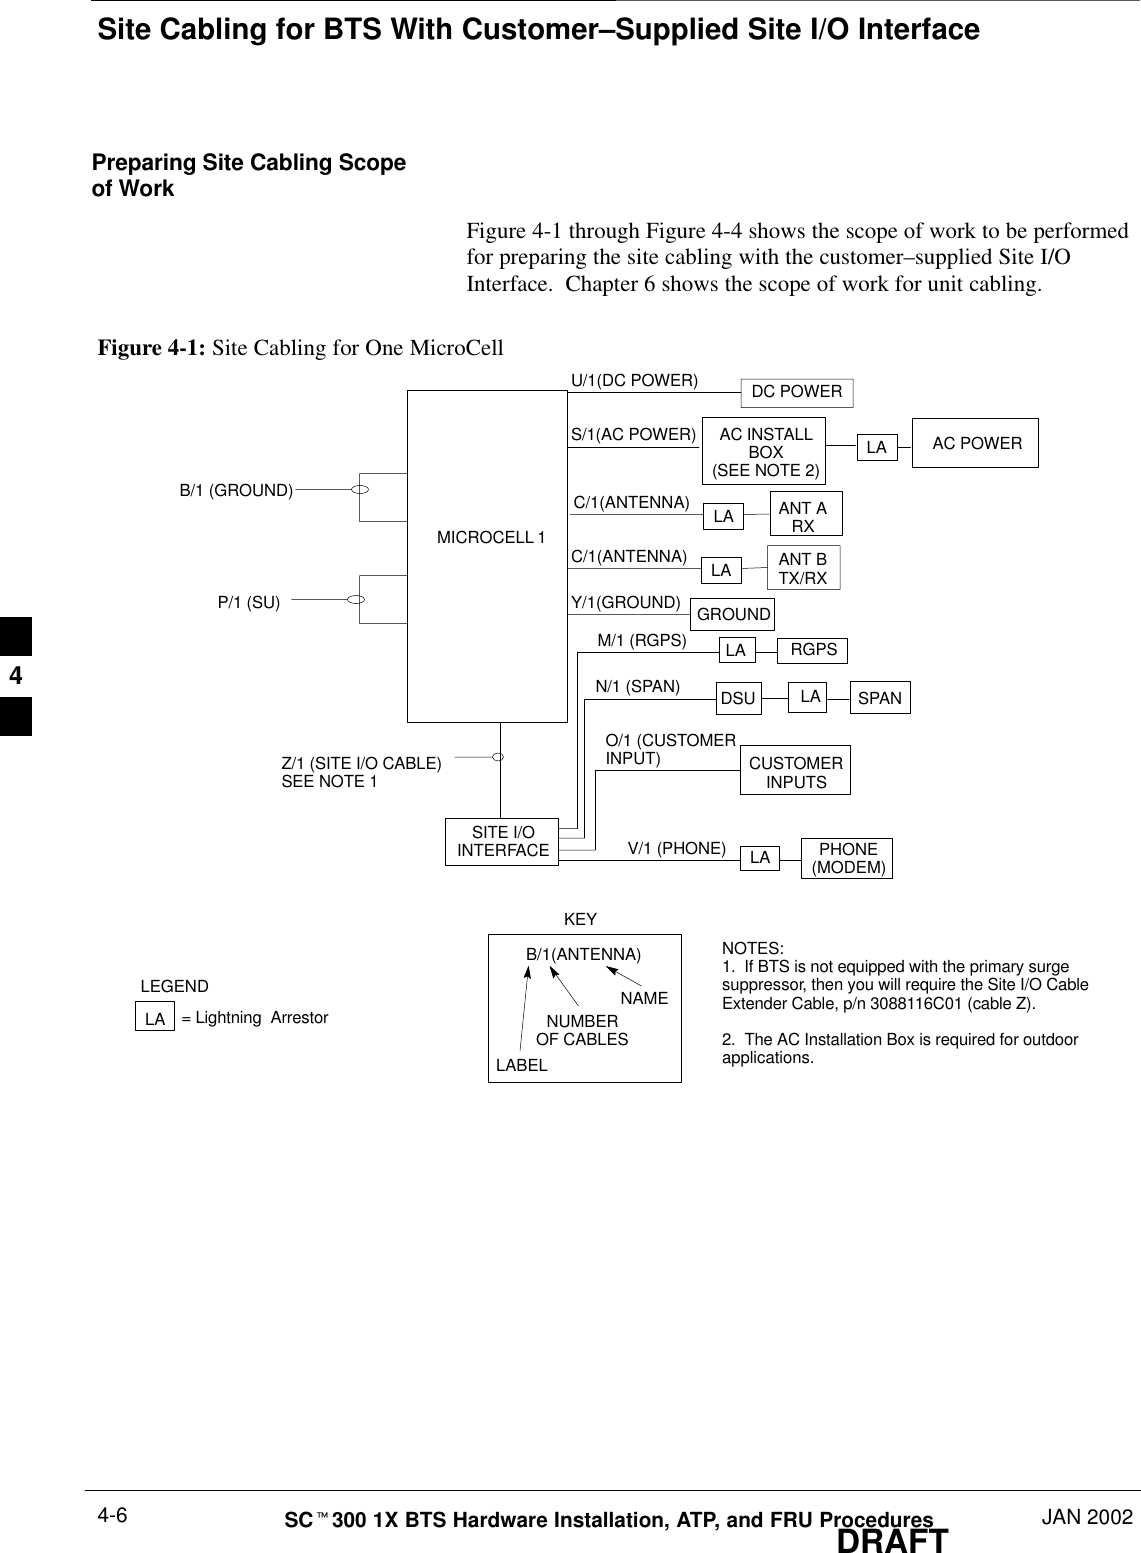
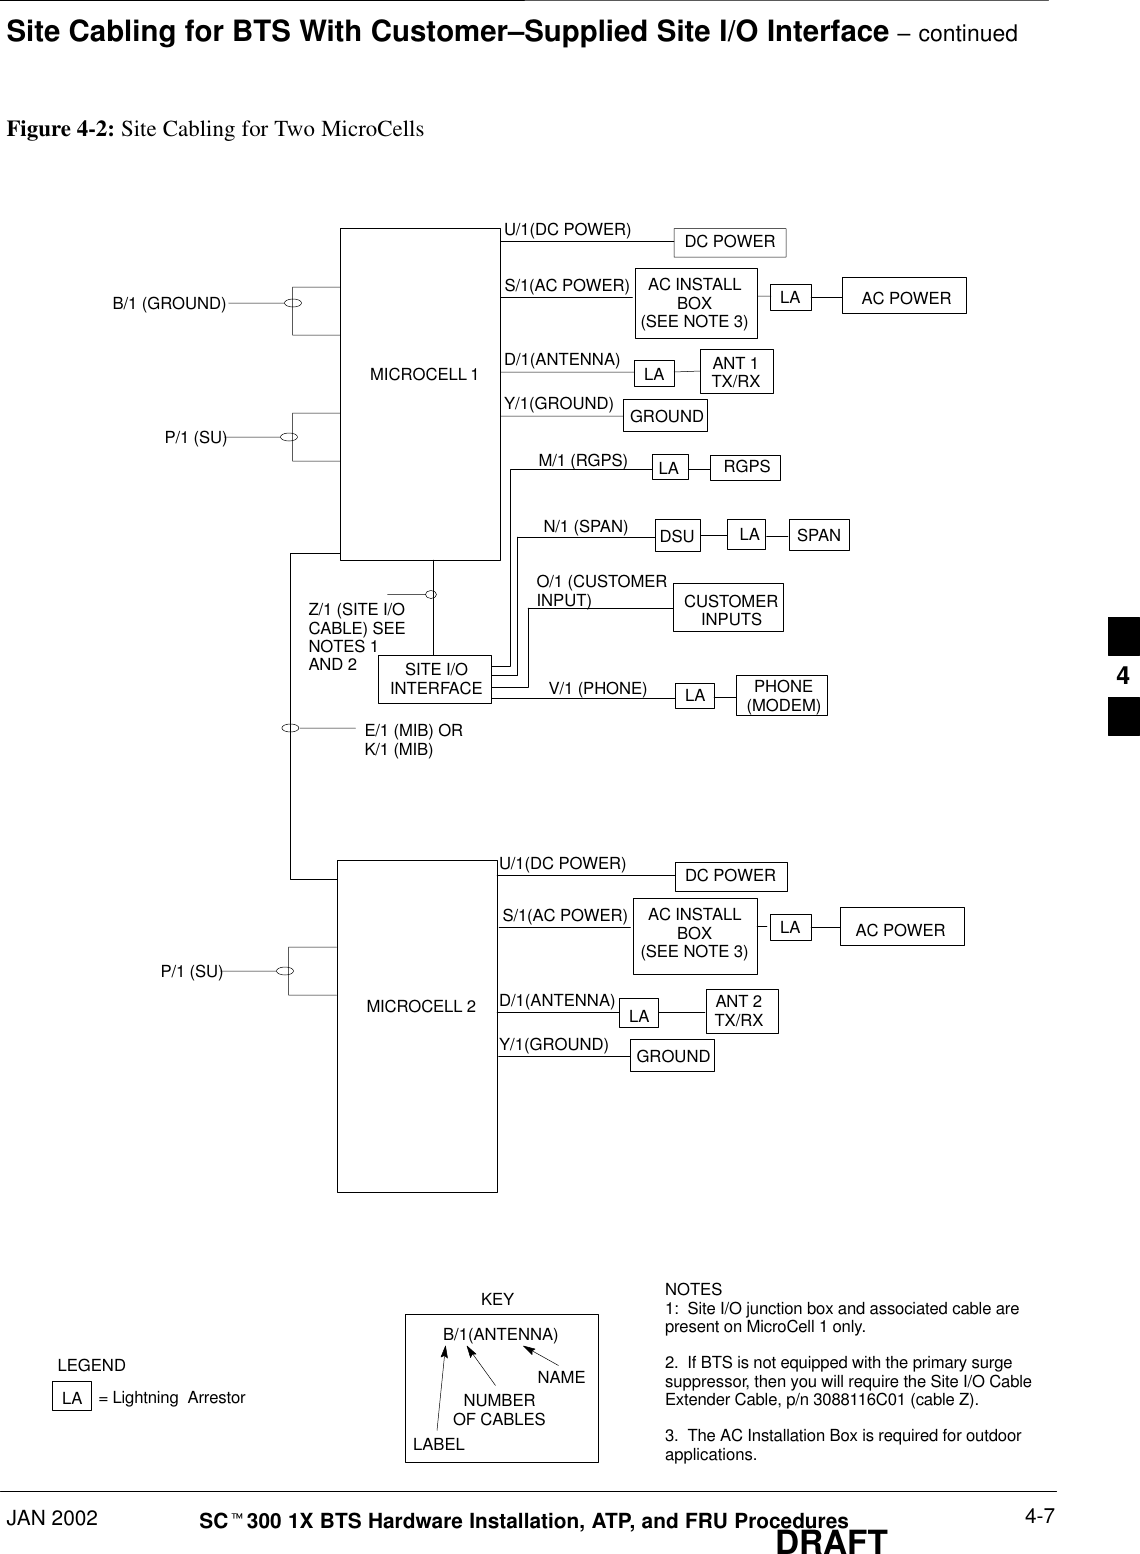
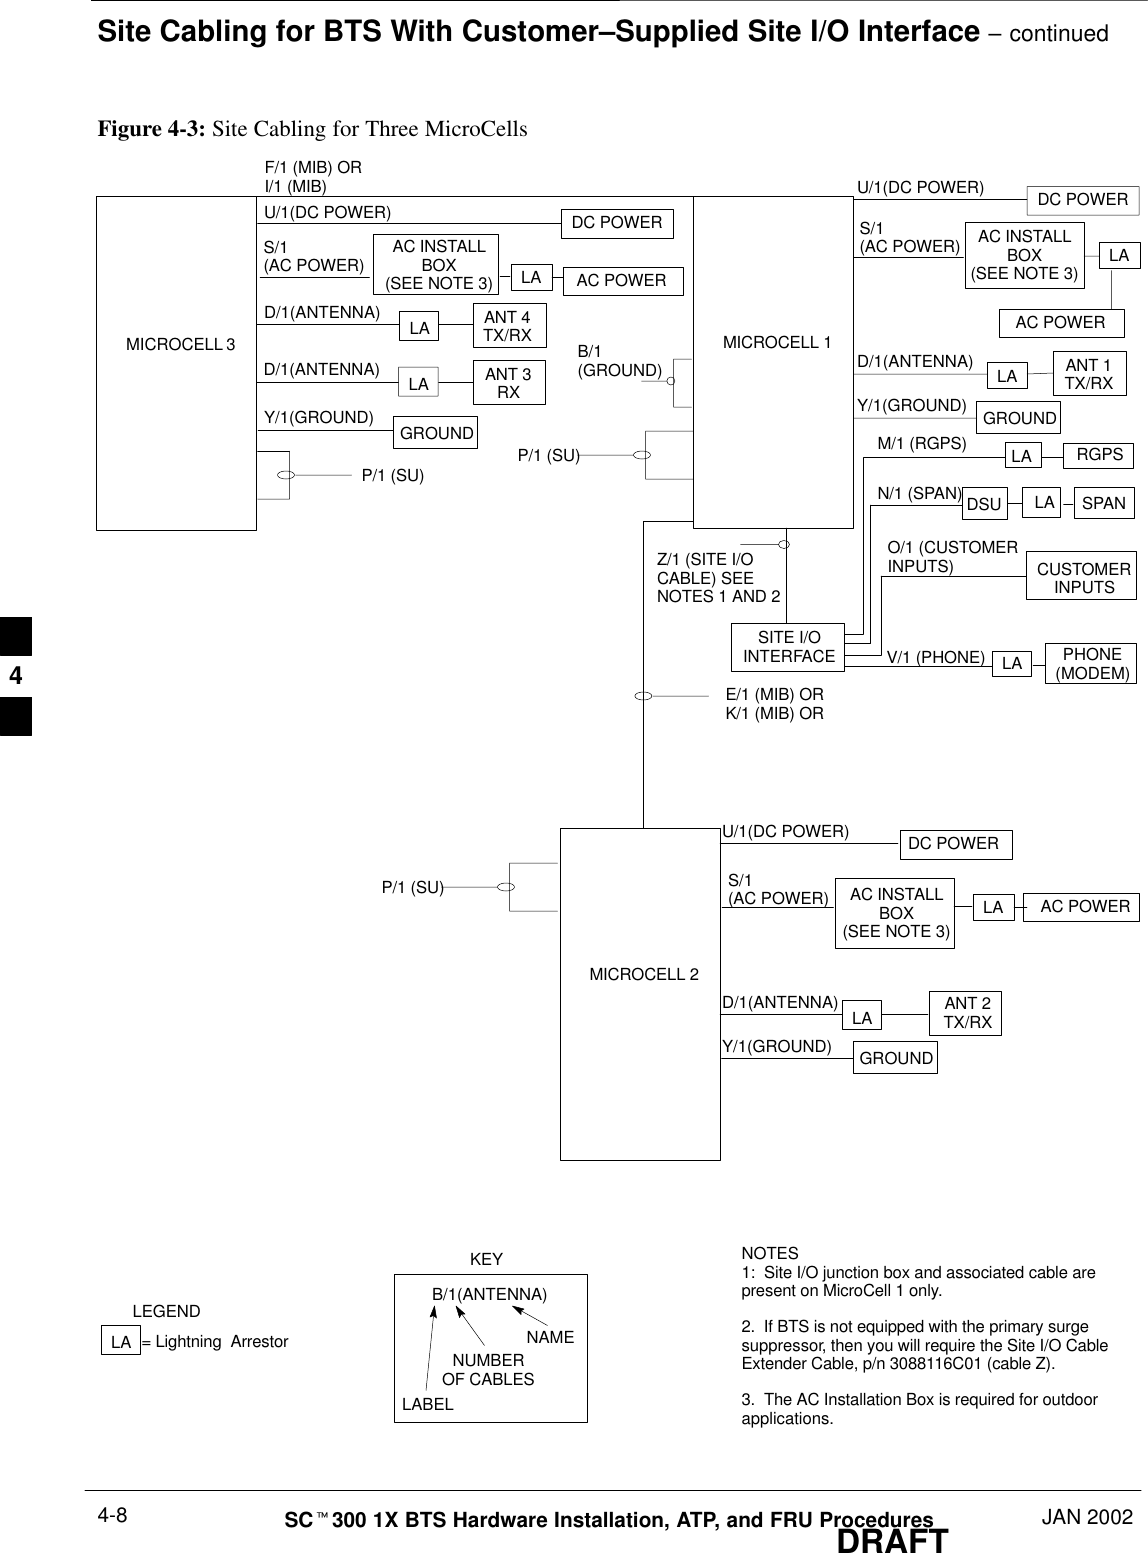
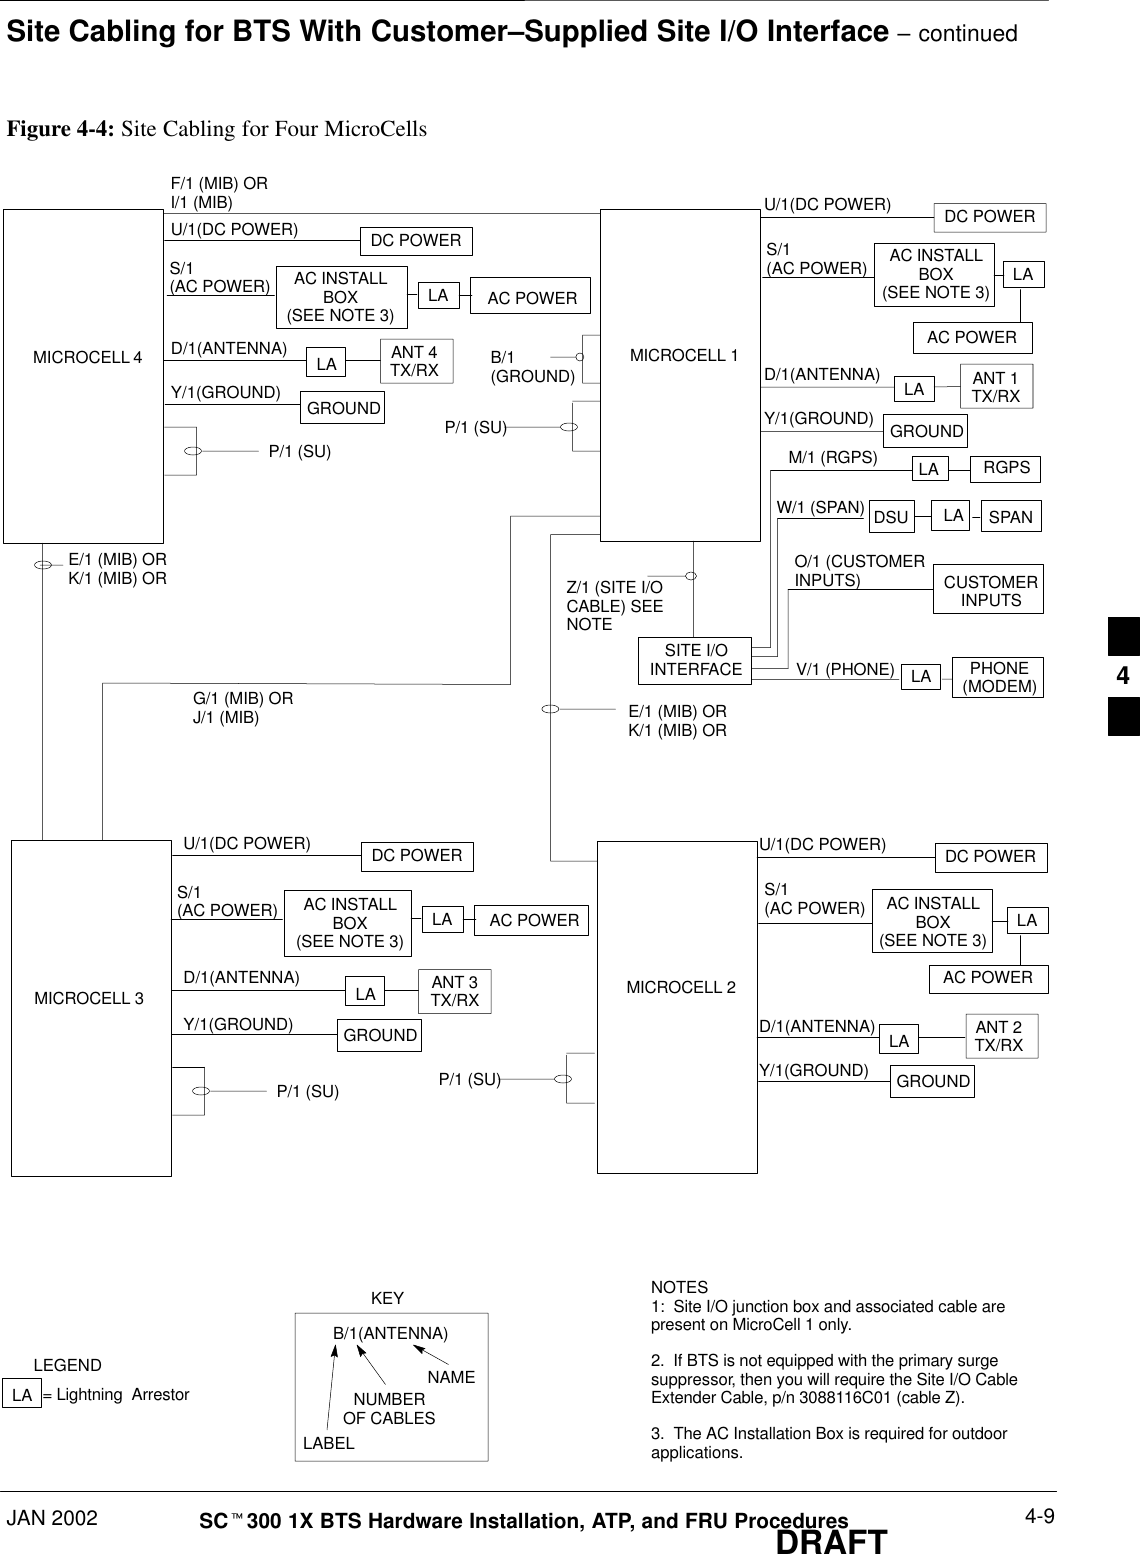
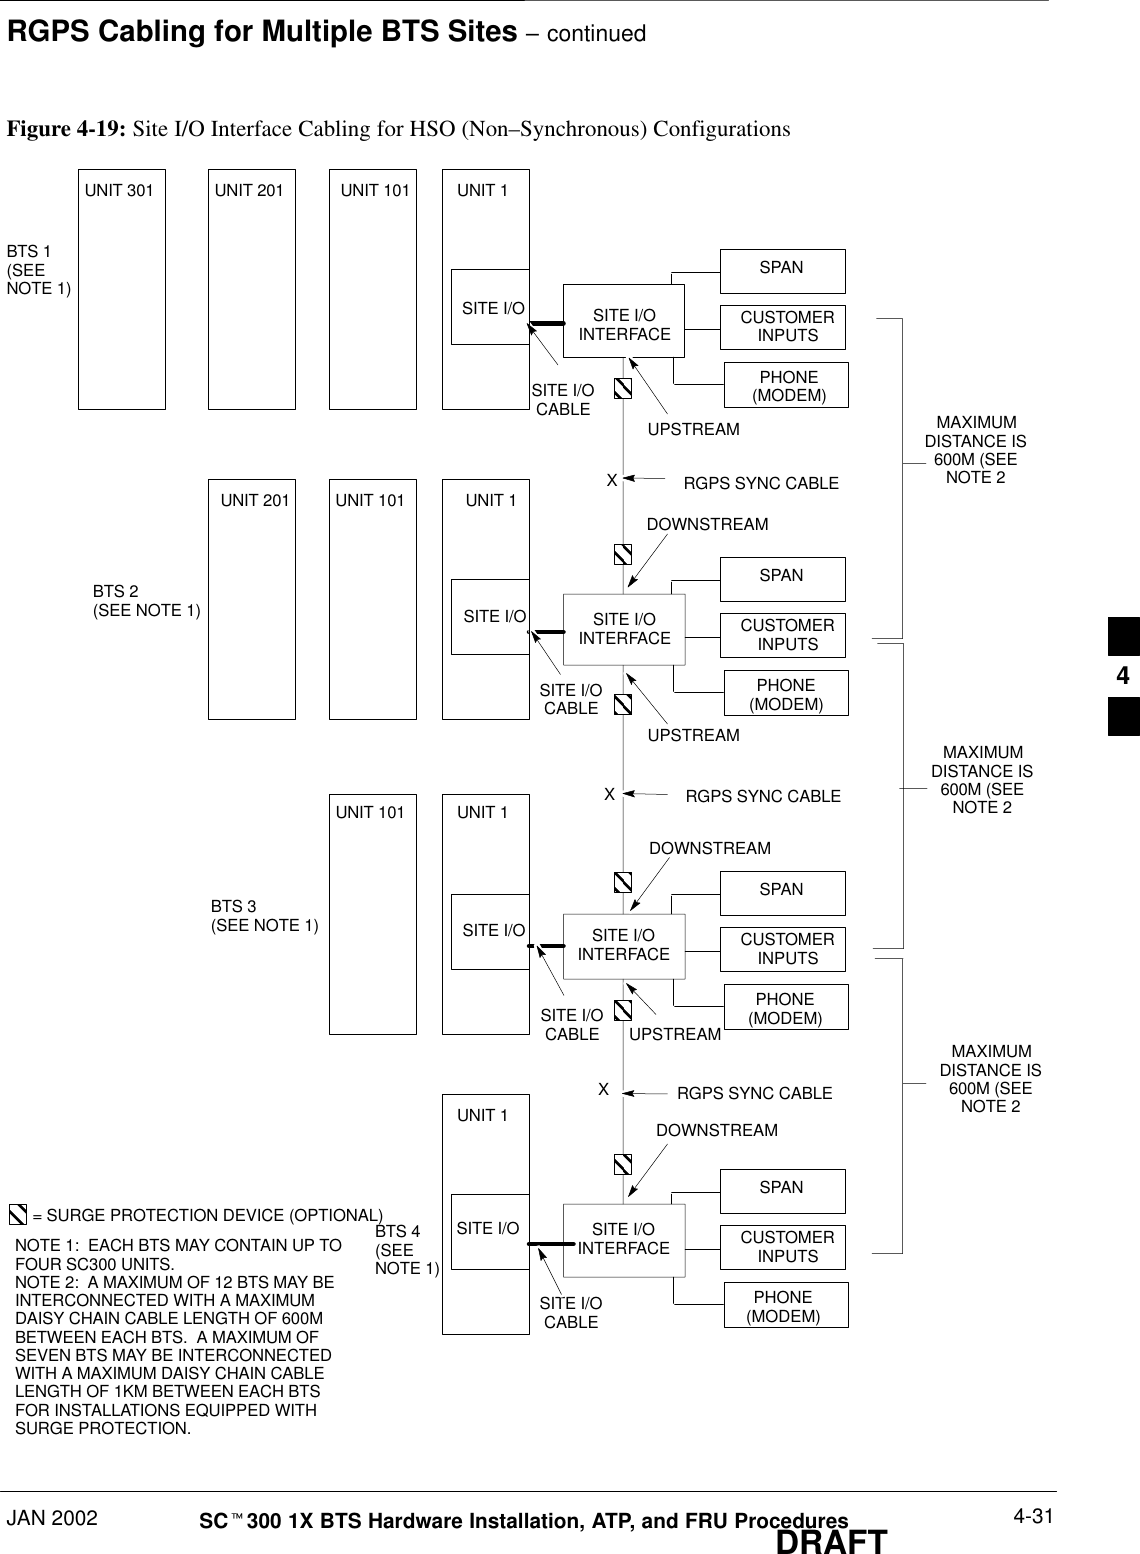
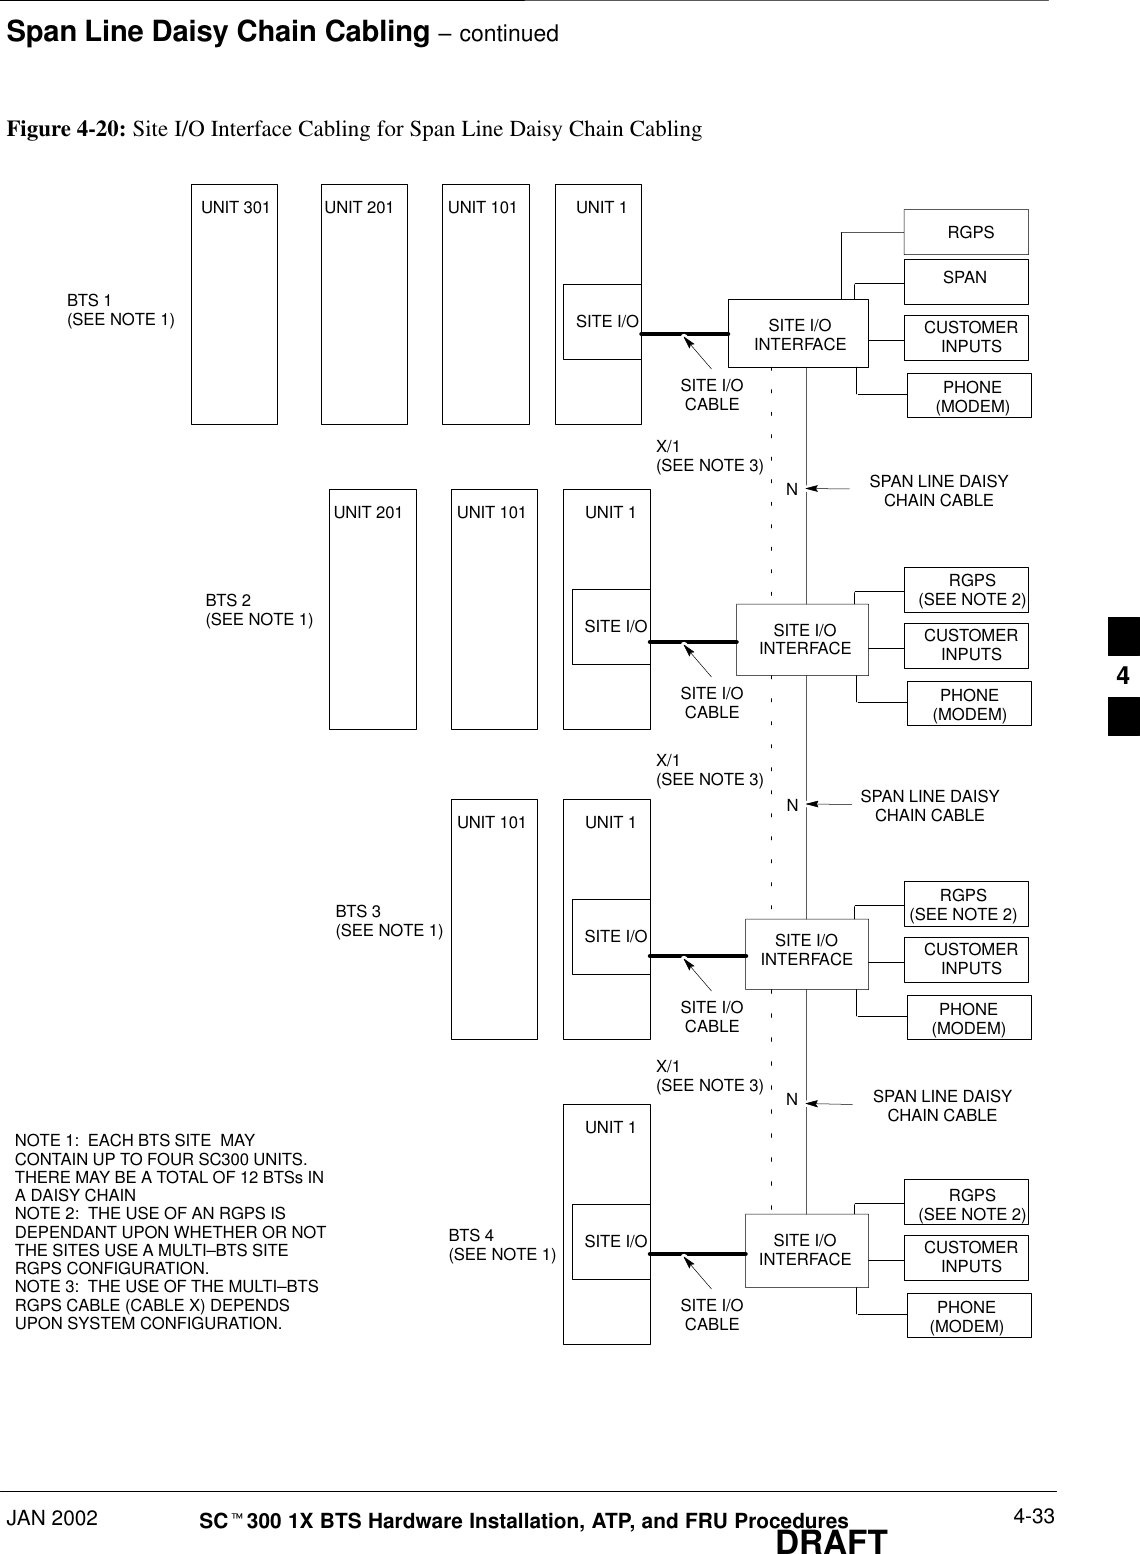
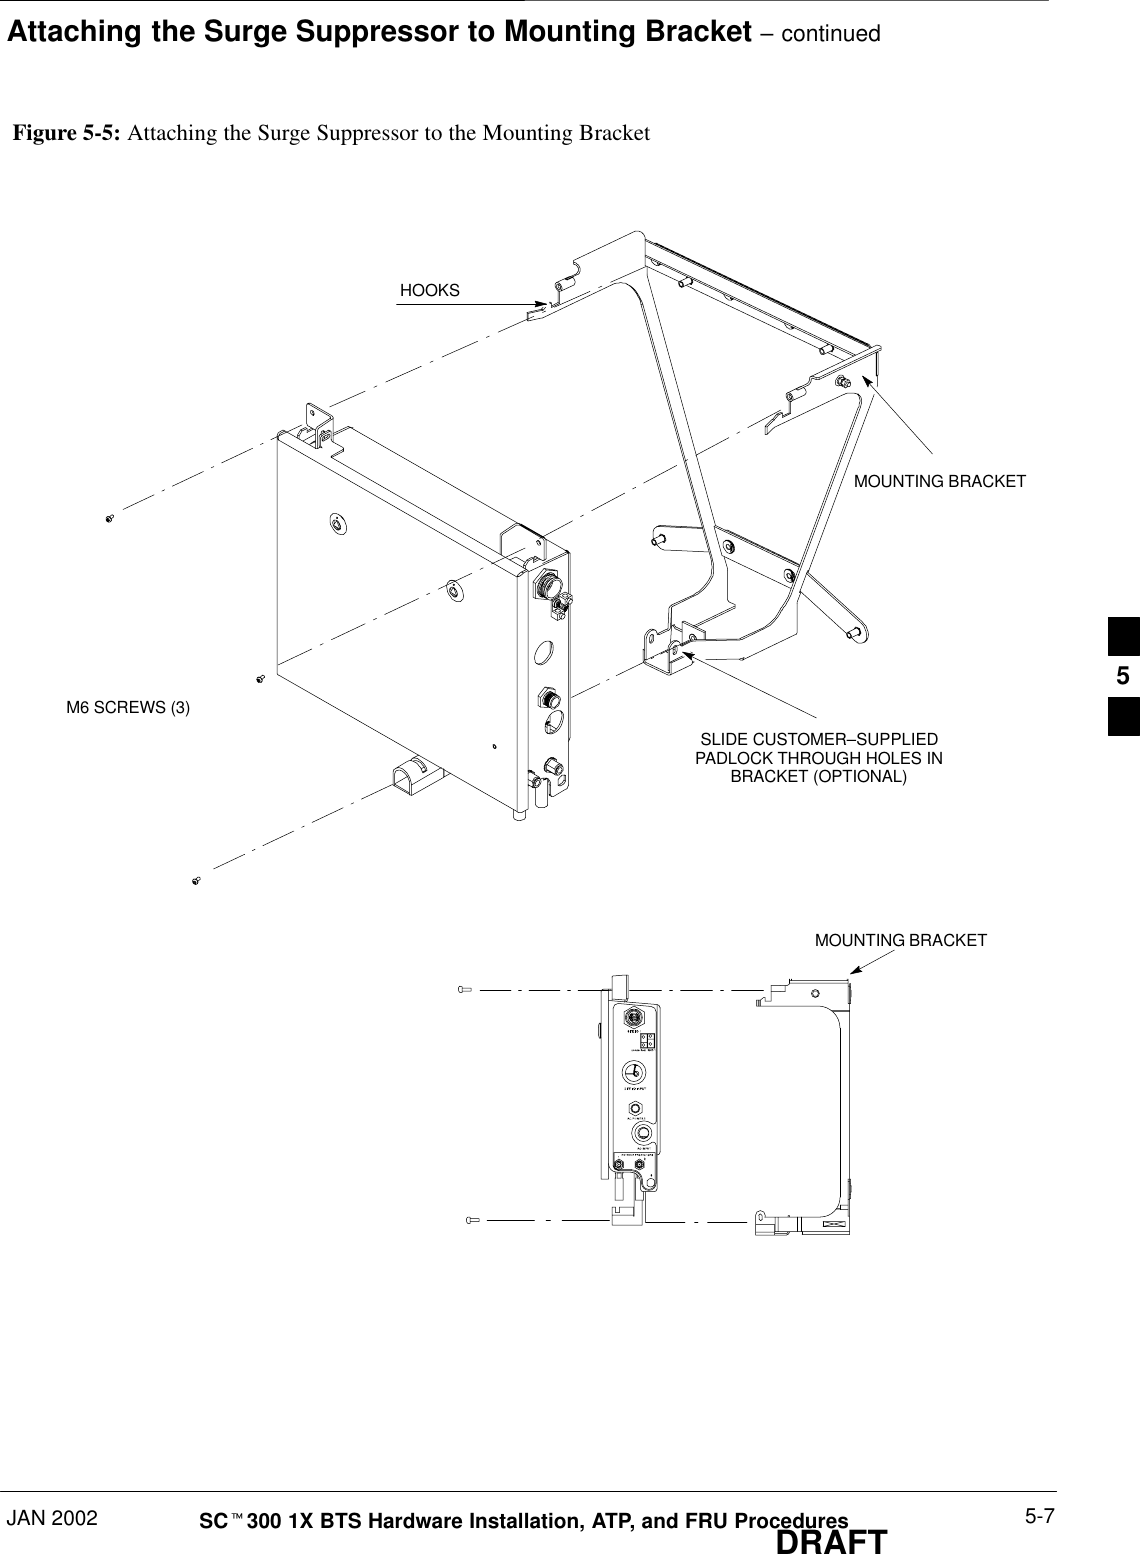
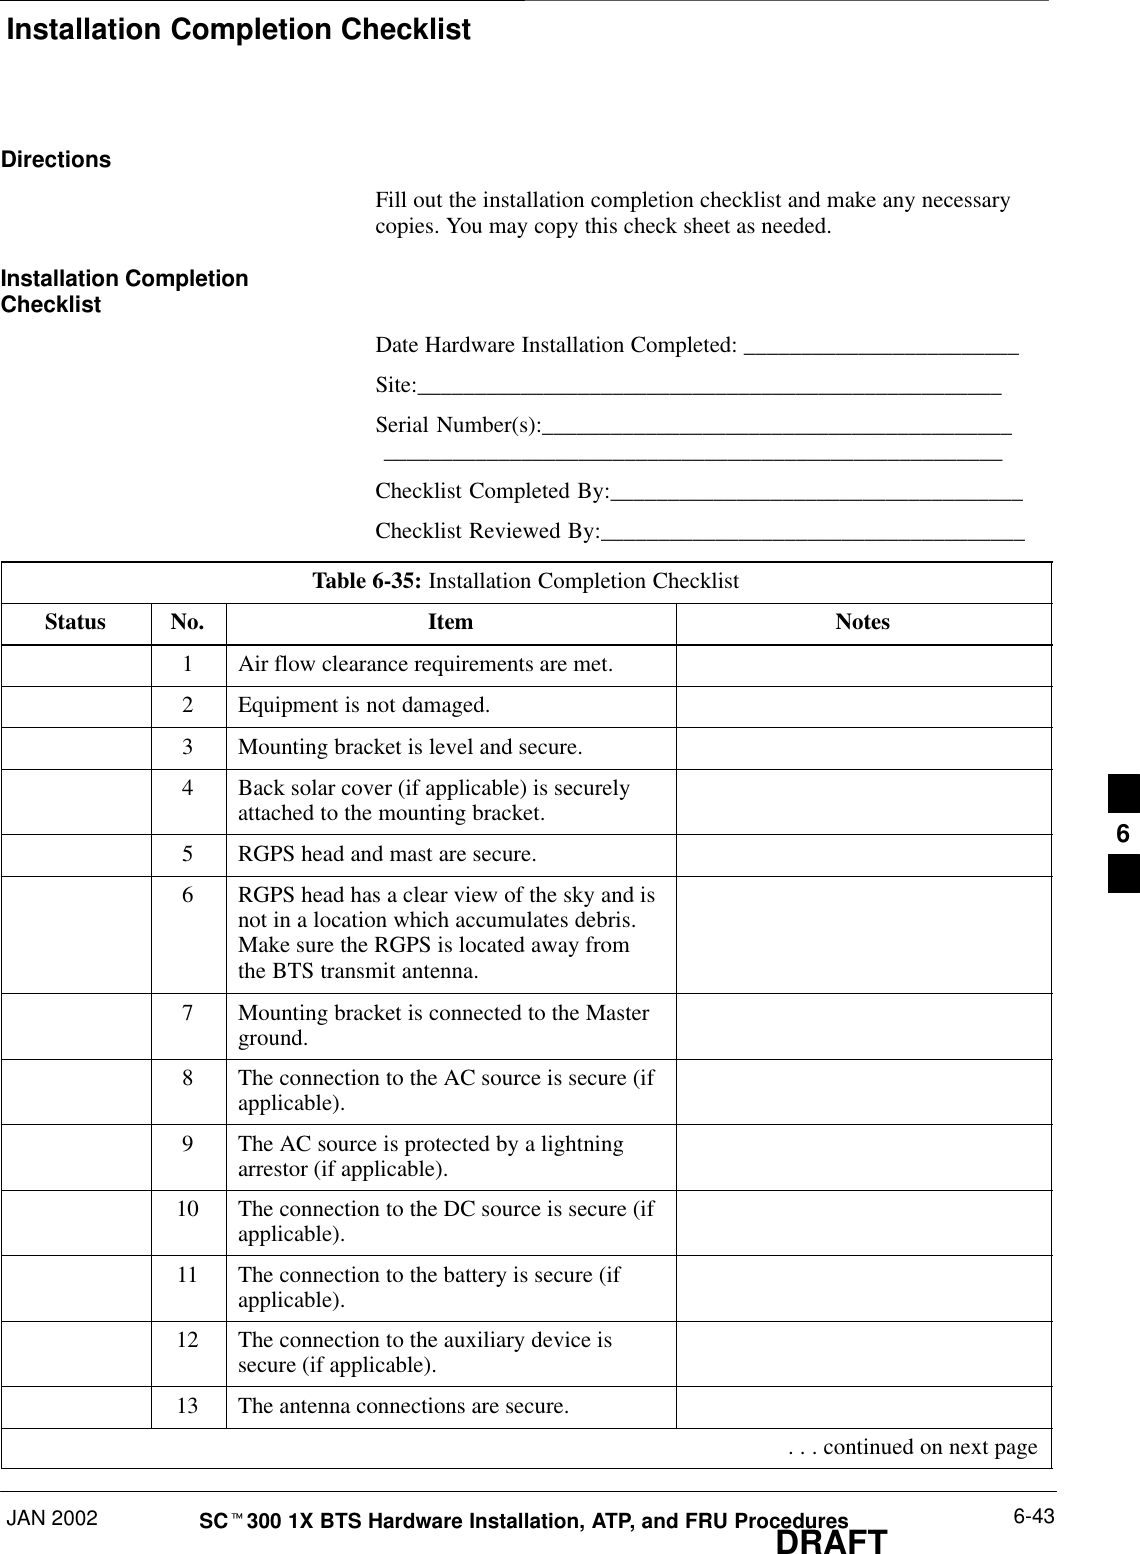
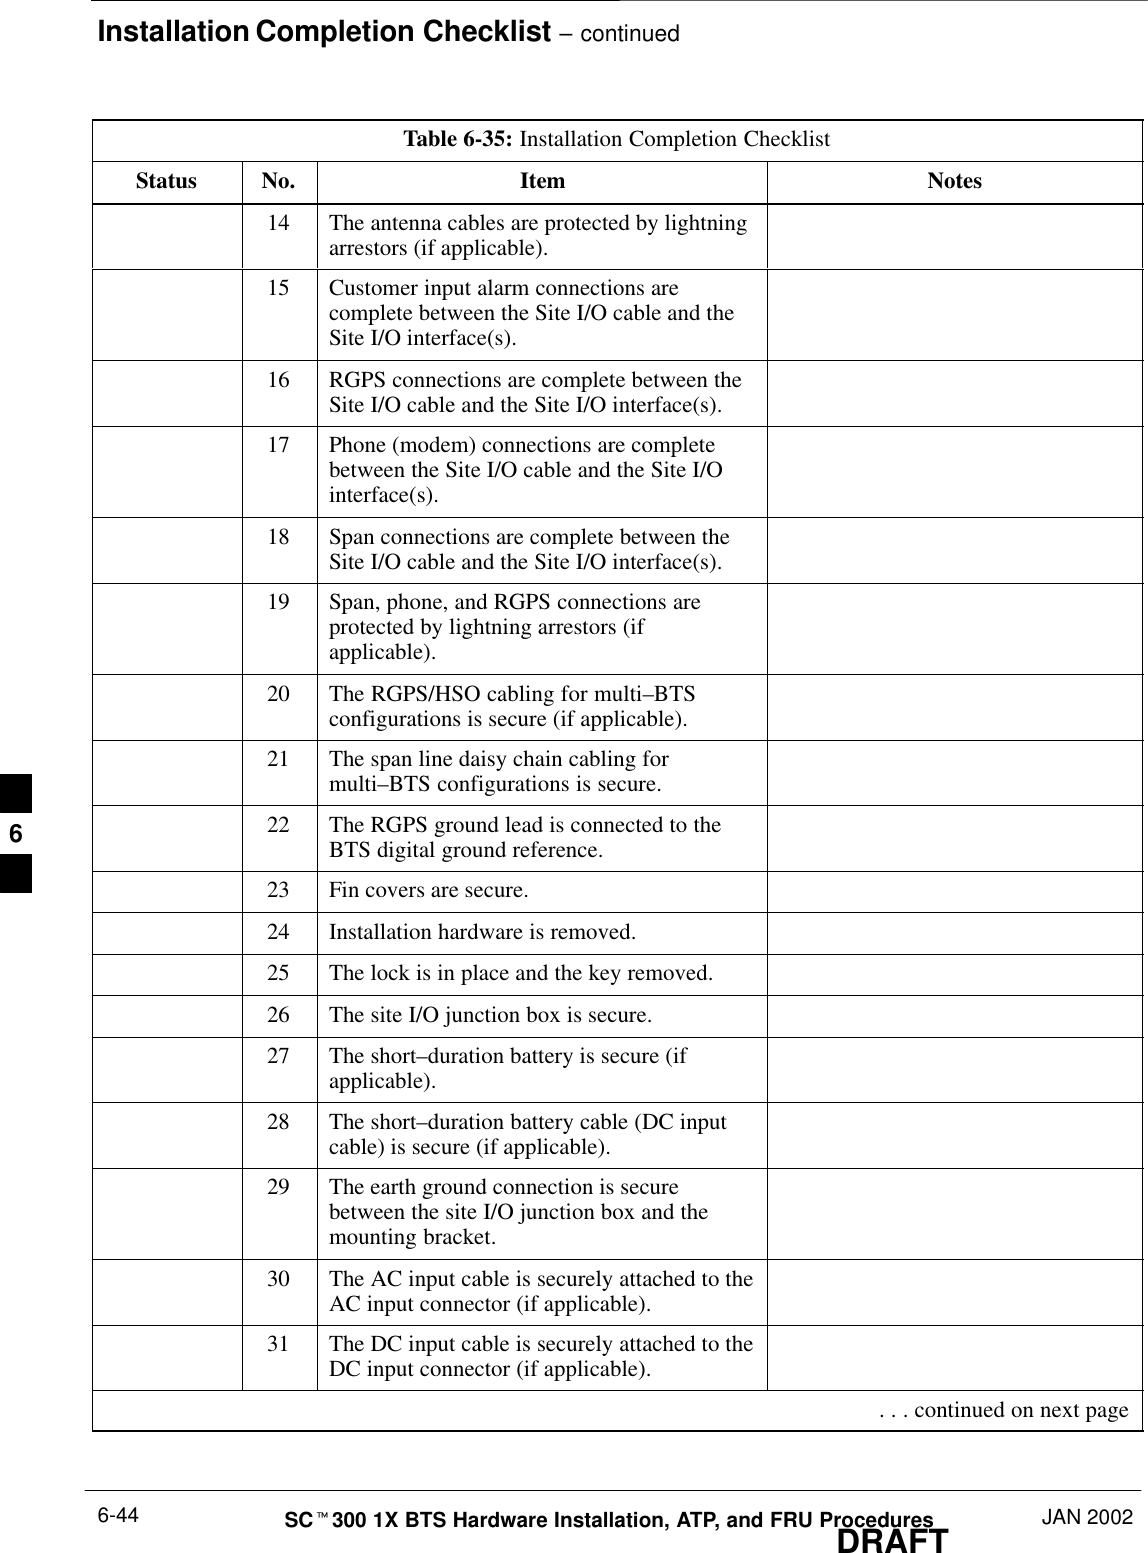
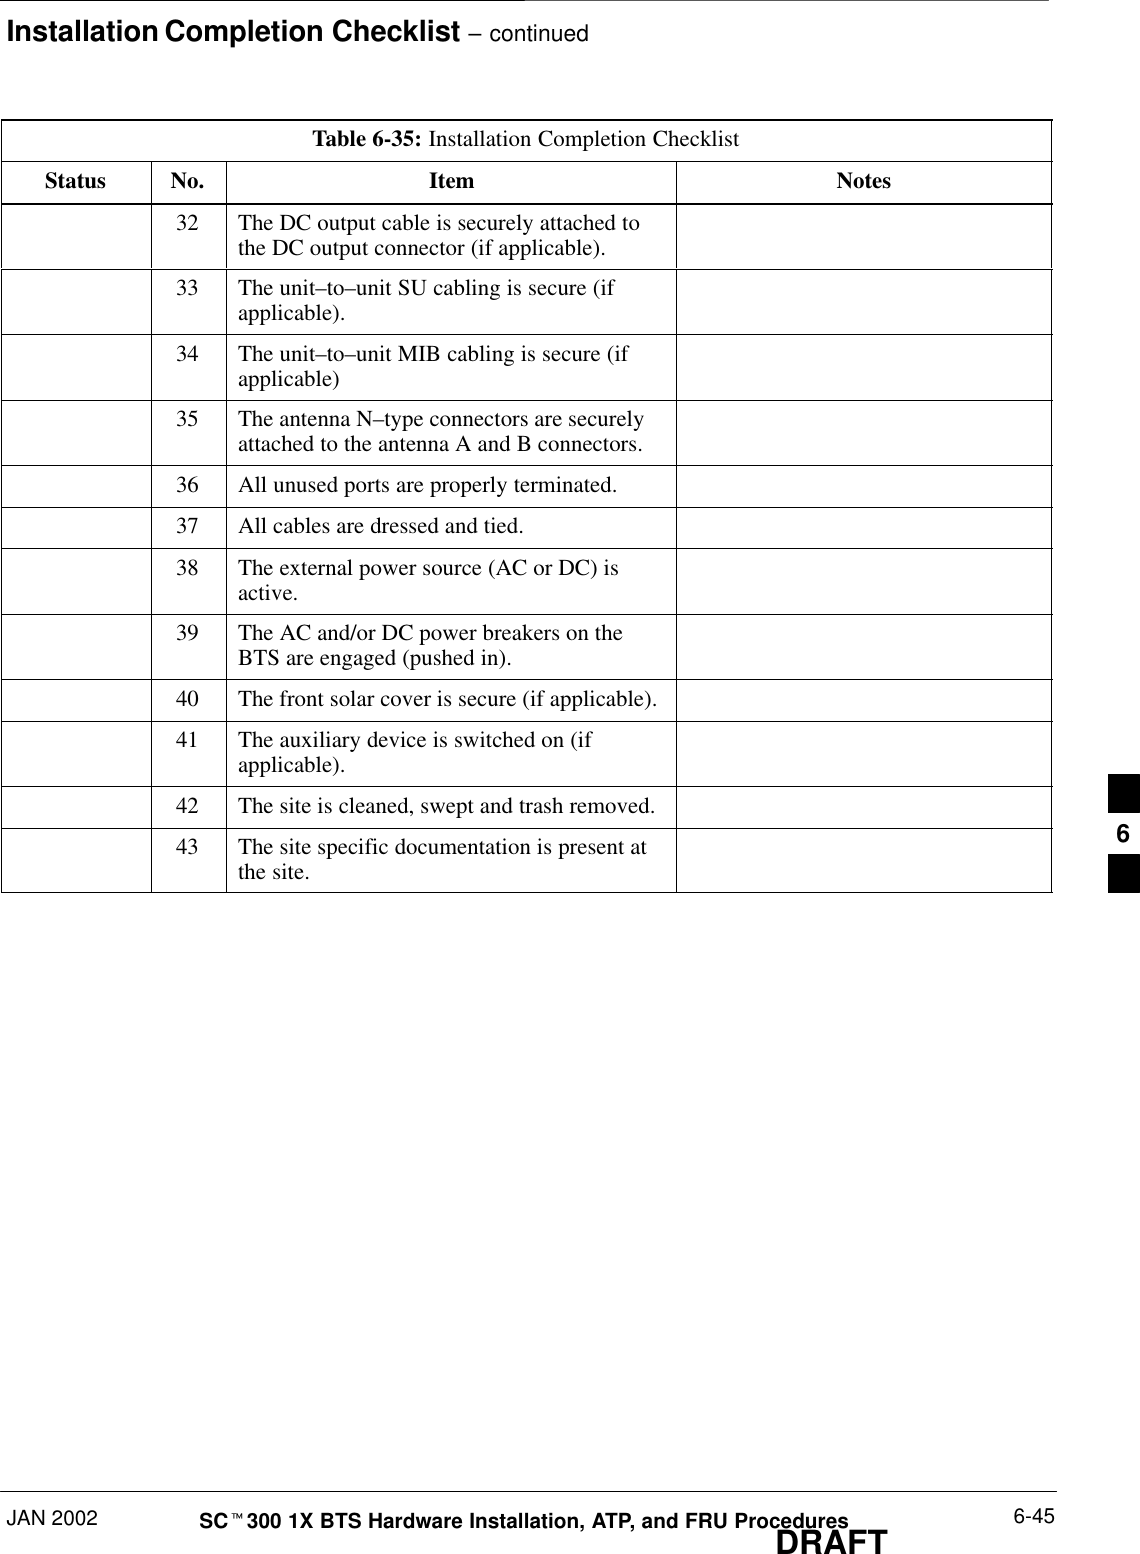
Nokia Solutions and Networks T6CB1 SC300 1X Microcell @ 1.9 GHz User Manual 2 of 3

Nokia Solutions and Networks SC300 1X Microcell @ 1.9 GHz Users Manual 2 of 3

Contents

Users Manual 2 of 3

Cabling OverviewJAN 2002 4-1SCt300 1X BTS Hardware Installation, ATP, and FRU ProceduresDRAFTOverviewThis chapter provides the procedures to prepare the BTS site cabling, butnot attach it to the unit.  Chapter 6 shows the scope of work for unitcabling.You will connect cables to the site and route them to the BTS location.You will attach the cables to the unit in Chapter 6.Repeat cabling installation as necessary for each unit at the BTS.Cabling is one of the most noticeable aspects ofworkmanship. Straight runs and proper turns are critical fora positive evaluation of the work.NOTEConfigurations SupportedThis chapter supports cable installation for single carrier omniconfigurations and multi–carrier omni configurations.  This chapter alsosupports cable installations for sites equipped with thecustomer–supplied Site I/O Interface.  Chapter 5 supports installationsfor sites equipped with the optional Primary Surge Suppressor.Cabling Installation OrderTo install the cables, Motorola recommends that the followingprocedures be completed in the order shown:1. Earth ground cabling2. AC power cabling3. DC power cabling4. Battery cabling (optional)5. Antenna cabling6. Site I/O interface cabling7. RGPS/HSO cabling (optional)8. Span line daisy chain cabling (optional)Cable LabelsThe “Cable Descriptions and Part Numbers” in Table 4-1 provides cabledescriptions and part numbers.  The labels used to designate the cables(A, B, C, etc.) are used throughout this manual.4
Cable DescriptionsDRAFTSCt300 1X BTS Hardware Installation, ATP, and FRU Procedures JAN 20024-2Cable Descriptions and PartNumbersTable 4-1 gives the cable descriptions and part numbers for the cablesused to install the BTS.  The following cables are necessary for sitesequipped with the customer–supplied Site I/O Interface and the PrimarySurge Suppressor.Table 4-1: Cable Descriptions and Part NumbersCable Qty. Part Number DescriptionA 1 3087701C02 Ground cable, 8 -AWG, insulated copper wire. Requires one ring lugconnector.  Used for Primary Surge Suppressor Installation.B 1–4 3087701C01 Ground cable.  Installed between Site I/O Junction Box and MountingBracket.C 1–8 CustomerSupplied Antenna cable, 50–Ohm coaxial terminated with at least one male,N–type connector.D 2–6 CustomerSupplied Antenna cable, terminated with 2 male N–type connectorsE 1* 3087707C03 MIB A cable (current, 2m; micro) (part of kit T448H, T448G andT448A)F 1* 3087707C04 MIB B cable (current, 2m) (part of kit T448AR, T448AY, and T448H)G 2* 3087707C05 MIB C cable (current, 2m) (part of kit T448H)I 1* 3087707C07 MIB B cable (long, 5m) (part of kit T448AS, T448AZ, and T448G)J 2* 3087707C08 MIB C cable (long, 5m) (part of kit T448G)K 1* 3087707C09 MIB A cable (short, 1m; micro) (part of kit T448B)L 1–4 3087701C04 Y–Ground cable (for Site I/O and external SU)M 1 3086039H11 RGPS cable, 125 ft.3086039H12 RGPS cable, 250 ft.3086039H13 RGPS cable, 500 ft.3086039H14 RGPS cable, 1000 ft.3086039H15 RGPS cable, 2000 ft.N 1 CustomerSupplied Span cable.  22–24 AWG solid copper twisted pair.O 1 CustomerSupplied Customer Input cable.  22–24 AWG solid copper twisted pair.P 1–4 3088120C03 SU RF cableQ 1 –SU Digital Cable . . . continued on next page4
Cable  Descriptions – continuedJAN 2002 4-3SCt300 1X BTS Hardware Installation, ATP, and FRU ProceduresDRAFTTable 4-1: Cable Descriptions and Part NumbersCable DescriptionPart NumberQty.S 1–4 3087854C02 AC input power cable.  14 AWG.  5m.  Designed for 120–240 VACpower input.  Cable has Deutsche connector on both ends.T 1 CustomerSupplied AC Input power cable.  10–14 AWG, 90_C wire.  Designed for120–240 VAC.U 1 3087854C04 DC input cable, 14 and 22 AWG, 5 m, is designed for 20 to 30 VDCpower input.V 1 CustomerSupplied Phone (Modem) cable.  22–24 AWG solid copper twisted pair.W 1–3 CustomerSupplied Span Line Daisy Chain cable.X 1–11 3086039H18 RGPS Synchronization cable (part of kit SGKN4351A).3086039H19 RGPS Synchronization cable (part of kit SGKN4352A).Y 1 CustomerSupplied Master Ground Cable, 6 -AWG, insulated copper wire.  Used for bothPrimary Surge Suppressor and non–Primary Surge Suppressorinstallations.Z 1 3088116C01 Site I/O Cable Extender.  Required for use in a BTS not equippedwith the Primary Surge Suppressor.*Quantity of cables depends upon system configuration.  Refer to “Motorola Kits for Multi–UnitInstallations” for more information.Motorola Kits for Multi–UnitLogical BTS InstallationsTable 4-2 through Table 4-9 gives the Motorola Kit numbers, cabledescriptions and part numbers for the Motorola kits required to performa multi–unit logical BTS installation.  Several kits are availabledepending upon the carrier installation.Table 4-2: MicroCell Expansion Kit for Units 1 to 2 Short MIB A (Cubicle) – T448BCable Qty. Motorola PartNumber Descriptionn/a 2 5882106P01 50 Ohm Antenna TerminatorA 1 3087701C02 Ground cable, 8 -AWG, insulated copper wire. Requires one ring lugconnector.K 1 3087707C09 MIB A cable (short, 1m; micro)4
Cable  Descriptions – continuedDRAFTSCt300 1X BTS Hardware Installation, ATP, and FRU Procedures JAN 20024-4Table 4-3: MicroCell Expansion Kit for Units 1 to 2 Long MIB A (Non–Cubicle) – T448ACable Qty. Motorola PartNumber Descriptionn/a 2 5882106P01 50 Ohm Antenna TerminatorA 1 3087701C02 Ground cable, 8 -AWG, insulated copper wire. Requires one ring lugconnector.E 1 3087707C03 MIB A cable (current, 2m; micro)Table 4-4:  MicroCell (800 MHz) Expansion Kit for Units 2 to 3 Current 2m MIB B – T448ARCable Qty. Motorola PartNumber DescriptionA 1 3087701C02 Ground cable, 8 -AWG, insulated copper wire. Requires one ring lugconnector.F 1 3087707C04 MIB B cable (current, 2m)n/a 2 8009573X06 Lightning arrestorTable 4-5:  MicroCell (800 MHz) Expansion Kit for Units 2 to 3 Long 5m MIB B – T448ASCable Qty. Motorola PartNumber DescriptionA 1 3087701C02 Ground cable, 8 -AWG, insulated copper wire. Requires one ring lugconnector.I 1 3087707C07 MIB B cable (long, 5m)n/a 2 8009573X06 Lightning arrestorTable 4-6:  MicroCell (1.9 GHz) Expansion Kit for Units 2 to 3 Current 2m MIB B – T448AYCable Qty. Motorola PartNumber DescriptionA 1 3087701C02 Ground cable, 8 -AWG, insulated copper wire. Requires one ring lugconnector.F 1 3087707C04 MIB B cable (current, 2m)n/a 2 8009573X01 Lightning arrestorTable 4-7:  MicroCell (1.9 GHz) Expansion Kit for Units 2 to 3 Long 5m MIB B – T448AZCable Qty. Motorola PartNumber DescriptionA 1 3087701C02 Ground cable, 8 -AWG, insulated copper wire. Requires one ring lugconnector.I 1 3087707C07 MIB B cable (long, 5m)n/a 2 8009573X01 Lightning arrestor4
Cable  Descriptions – continuedJAN 2002 4-5SCt300 1X BTS Hardware Installation, ATP, and FRU ProceduresDRAFTTable 4-8:  MicroCell Expansion Kit for Units 3 to 4 Current 2m MIBs A and C – T448HCable Qty. Motorola PartNumber DescriptionA 1 3087701C02 Ground cable, 8 -AWG, insulated copper wire. Requires one ring lugconnector.n/a 2 5882106P01 50 Ohm Antenna TerminatorE 1 3087707C03 MIB A cable (current, 2m; micro)G 1 3087707C05 MIB C cable (current, 2m)Table 4-9:  MicroCell Expansion Kit for Units 3 to 4 Longer 5M MIBs A and C – T448GCable Qty. Motorola PartNumber Descriptionn/a 2 5882106P01 50 Ohm Antenna TerminatorA 1 3087701C02 Ground cable, 8 -AWG, insulated copper wire. Requires one ring lugconnector.E 1 3087707C03 MIB A cable (current, 5m; micro)J 1 3087707C08 MIB C cable (long, 5m)Motorola Kits for RGPSCablingTable 4-10 and Table 4-11 show the contents of Motorola kitsSGKN4351A and SGKN4352A.  These kits are necessary for RGPScabling between multiple logical BTS locations.Table 4-10:  RGPS Synchronization Cable Kit – SGKN4351ACable Qty. Motorola PartNumber DescriptionX 1 3086039H18 RGPS Sync Cable, 2000 ft.n/a 2 5864461A03 Fitting, liquid tight.n/a 2 0264599A02 Nut, nylon lockingTable 4-11:  RGPS Synchronization Cable Kit – SGKN4352ACable Qty. Motorola PartNumber DescriptionX 1 3086039H19 RGPS Sync Cable, 3280 ft.n/a 2 5864461A03 Fitting, liquid tight.n/a 2 0264599A02 Nut, nylon locking4
Site Cabling for BTS With Customer–Supplied Site I/O InterfaceDRAFTSCt300 1X BTS Hardware Installation, ATP, and FRU Procedures JAN 20024-6Preparing Site Cabling Scopeof WorkFigure 4-1 through Figure 4-4 shows the scope of work to be performedfor preparing the site cabling with the customer–supplied Site I/OInterface.  Chapter 6 shows the scope of work for unit cabling.Figure 4-1: Site Cabling for One MicroCellMICROCELL 1CUSTOMERINPUTSSPANRGPSSITE I/OINTERFACE PHONE(MODEM)LALADSULAAC POWERLAANT BTX/RXLADC POWERGROUNDKEYB/1(ANTENNA)LABELNUMBEROF CABLESNAMEY/1(GROUND)C/1(ANTENNA)S/1(AC POWER)U/1(DC POWER)LEGENDLA = Lightning  ArrestorZ/1 (SITE I/O CABLE)SEE NOTE 1P/1 (SU)M/1 (RGPS)N/1 (SPAN)O/1 (CUSTOMERINPUT)V/1 (PHONE)LAC/1(ANTENNA) ANT ARXNOTES:1.  If BTS is not equipped with the primary surgesuppressor, then you will require the Site I/O CableExtender Cable, p/n 3088116C01 (cable Z).2.  The AC Installation Box is required for outdoorapplications.B/1 (GROUND)AC INSTALLBOX(SEE NOTE 2)4
Site Cabling for BTS With Customer–Supplied Site I/O Interface – continuedJAN 2002 4-7SCt300 1X BTS Hardware Installation, ATP, and FRU ProceduresDRAFTFigure 4-2: Site Cabling for Two MicroCellsMICROCELL 1CUSTOMERINPUTSSPANRGPSSITE I/OINTERFACE PHONE(MODEM)LALADSULAMICROCELL 2 ANT 2TX/RXLADC POWERGROUNDANT 1TX/RXLADC POWERGROUNDKEYB/1(ANTENNA)LABELNUMBEROF CABLESNAMEY/1(GROUND)Y/1(GROUND)D/1(ANTENNA)D/1(ANTENNA)U/1(DC POWER)U/1(DC POWER)LEGENDLA = Lightning  ArrestorNOTES1:  Site I/O junction box and associated cable arepresent on MicroCell 1 only.2.  If BTS is not equipped with the primary surgesuppressor, then you will require the Site I/O CableExtender Cable, p/n 3088116C01 (cable Z).3.  The AC Installation Box is required for outdoorapplications.E/1 (MIB) ORK/1 (MIB)P/1 (SU)M/1 (RGPS)N/1 (SPAN)O/1 (CUSTOMERINPUT)V/1 (PHONE)Z/1 (SITE I/OCABLE) SEENOTES 1AND 2B/1 (GROUND)AC POWERLAS/1(AC POWER) AC INSTALLBOX(SEE NOTE 3)AC POWERLAS/1(AC POWER) AC INSTALLBOX(SEE NOTE 3)P/1 (SU)4
Site Cabling for BTS With Customer–Supplied Site I/O Interface – continuedDRAFTSCt300 1X BTS Hardware Installation, ATP, and FRU Procedures JAN 20024-8Figure 4-3: Site Cabling for Three MicroCellsMICROCELL 3 MICROCELL 1CUSTOMERINPUTSSPANRGPSSITE I/OINTERFACE PHONE(MODEM)LALADSULAMICROCELL 2ANT 4TX/RXLAGROUNDDC POWERANT 2TX/RXLADC POWERGROUNDANT 1TX/RXLADC POWERGROUNDKEYB/1(ANTENNA)LABELNUMBEROF CABLESNAMEY/1(GROUND)Y/1(GROUND)Y/1(GROUND)D/1(ANTENNA)D/1(ANTENNA)D/1(ANTENNA)U/1(DC POWER)U/1(DC POWER)U/1(DC POWER)LEGENDLA = Lightning  ArrestorF/1 (MIB) ORI/1 (MIB)E/1 (MIB) ORK/1 (MIB) ORLAD/1(ANTENNA) ANT 3RXM/1 (RGPS)N/1 (SPAN)O/1 (CUSTOMERINPUTS)V/1 (PHONE)Z/1 (SITE I/OCABLE) SEENOTES 1 AND 2B/1(GROUND)NOTES1:  Site I/O junction box and associated cable arepresent on MicroCell 1 only.2.  If BTS is not equipped with the primary surgesuppressor, then you will require the Site I/O CableExtender Cable, p/n 3088116C01 (cable Z).3.  The AC Installation Box is required for outdoorapplications.AC POWERLAS/1(AC POWER) AC INSTALLBOX(SEE NOTE 3)AC POWERLAS/1(AC POWER) AC INSTALLBOX(SEE NOTE 3)AC POWERLAS/1(AC POWER) AC INSTALLBOX(SEE NOTE 3)P/1 (SU)P/1 (SU)P/1 (SU)4
Site Cabling for BTS With Customer–Supplied Site I/O Interface – continuedJAN 2002 4-9SCt300 1X BTS Hardware Installation, ATP, and FRU ProceduresDRAFTFigure 4-4: Site Cabling for Four MicroCellsMICROCELL 4 MICROCELL 1MICROCELL 3CUSTOMERINPUTSSPANRGPSSITE I/OINTERFACE PHONE(MODEM)LALADSULAMICROCELL 2ANT 4TX/RXLAGROUNDDC POWERANT 3TX/RXLADC POWERGROUND ANT 2TX/RXLADC POWERGROUNDANT 1TX/RXLADC POWERGROUNDKEYB/1(ANTENNA)LABELNUMBEROF CABLESNAMEY/1(GROUND)Y/1(GROUND)Y/1(GROUND)Y/1(GROUND)D/1(ANTENNA)D/1(ANTENNA)D/1(ANTENNA)D/1(ANTENNA)U/1(DC POWER)U/1(DC POWER)U/1(DC POWER)U/1(DC POWER)LEGENDLA = Lightning  ArrestorG/1 (MIB) ORJ/1 (MIB)M/1 (RGPS)W/1 (SPAN)O/1 (CUSTOMERINPUTS)V/1 (PHONE)Z/1 (SITE I/OCABLE) SEENOTEB/1(GROUND)NOTES1:  Site I/O junction box and associated cable arepresent on MicroCell 1 only.2.  If BTS is not equipped with the primary surgesuppressor, then you will require the Site I/O CableExtender Cable, p/n 3088116C01 (cable Z).3.  The AC Installation Box is required for outdoorapplications.AC POWERLAS/1(AC POWER) AC INSTALLBOX(SEE NOTE 3)AC POWERLAS/1(AC POWER) AC INSTALLBOX(SEE NOTE 3)AC POWERLAS/1(AC POWER) AC INSTALLBOX(SEE NOTE 3)AC POWERLAS/1(AC POWER) AC INSTALLBOX(SEE NOTE 3)F/1 (MIB) ORI/1 (MIB)E/1 (MIB) ORK/1 (MIB) ORE/1 (MIB) ORK/1 (MIB) ORP/1 (SU)P/1 (SU)P/1 (SU)P/1 (SU)4
Power, Ground, and Battery Cabling for Sites Equipped withCustomer–Supplied Site I/O InterfaceDRAFTSCt300 1X BTS Hardware Installation, ATP, and FRU Procedures JAN 20024-10ObjectiveThe objective of this procedure is to install the power, earth ground, andbattery cabling for one or more Microcell units at a site equipped withcustomer–supplied Site I/O Interface.Dangerous voltages, capable of causing death, are presentin this equipment. Use extreme caution when handling andtesting this equipment.WARNINGIf you are installing the unit outdoors and are not using thePrimary Surge Suppressor, then you must connect ACpower with the AC Installation Box.  The AC InstallationBox is included with the non–surge option.NOTEOther GroundingConsiderationsThis procedure covers only the grounding information for the cables thatattach to one or more MicroCell units. Grounding considerations beyondthe ground cables that attach to the MicroCell are summarized inAppendix A. Refer to Appendix A and the site documentation for othergrounding considerations.Motorola recommends that you use an oxide inhibitor suchas Burndy PENETROXt or Ilsco DE–OXt on all theexternal ground connections on the unit and on the site I/Ointerface for all outdoor installations.  This includes theground connections on the mounting bracket, the Site I/O,and the lugs on the customer–supplied site I/O interface.NOTEPower Requirements andConfigurationsThe power requirements for each unit is:  120–240 VAC (7.5 amps min.)or 20–30 VDC (20 amps min.) power input.The AC Installation Box is required for all outdoor installations whichuse the customer–supplied Site I/O interface.The customer–supplied site I/O interface must be able to pass the4kV/6kV transient impulse test (Motorola 12M09154A49 Sec. 3.5.3.2.1:Impulse Surge, Test Condition A).4
Power, Ground, and Battery Cabling for Sites Equipped withCustomer–Supplied Site I/O Interface – continuedJAN 2002 4-11SCt300 1X BTS Hardware Installation, ATP, and FRU ProceduresDRAFTThe power and battery configurations for the MicroCell units are:SAC power only (no battery)SAC power with short duration batterySDC powerNeither the ”+” or ”–” terminal of the DC Input isconnected to the BTS ground.  If a negative supply input isprovided, the ”+” terminal of the DC input must beconnected to the Master Ground Plate (MGP).  Byconnecting the ”+” terminal of the DC input to the MGP, anegative supply system is created.NOTERequired CablesTable 4-12 provides the quantity and description of the required cables.Table 4-12: Required Cables for Power, Earth Ground, and Battery ConnectionsCable Qty. Part Number DescriptionS 1–4 3087854C02 AC input cable, 14 AWG, 5 m, is designed for 88–260 VAC powerinput.U 1–4 3087854C04 DC input cable, 14 and 22 AWG, 5 m, is designed for 20 to 30 VDCpower input.Y 1–4 CustomerSupplied Master Ground cable, 6 -AWG, insulated copper wire.  Requires onering lug connector.  Used for both Primary Surge Suppressor andnon–Primary Surge Suppressor installations.AC Input Cable InformationThe pinout information for the AC input cable(s) (Cable S) is given inFigure 4-5 and Table 4-13.Figure 4-5: AC Input Cable Connector InformationABCSOCKET POSITION ON CABLECONNECTOR SHOWN4
Power, Ground, and Battery Cabling for Sites Equipped withCustomer–Supplied Site I/O Interface – continuedDRAFTSCt300 1X BTS Hardware Installation, ATP, and FRU Procedures JAN 20024-12Table 4-13: AC Input Cable InformationConnector Wire Color DescriptionA Black  LineB Green GroundC White NeutralDC Input Cable InformationThe information for the DC input cable(s) (Cable U) is given inFigure 4-6.Figure 4-6: DC Input Cable Connector InformationABCDSOCKET POSITION ONCABLE CONNECTOR SHOWNTable 4-14: DC Input Cable InformationConnector WireColor Description CommentsA Yellow Switch A No connectionB Red Positive Connect to positiveterminal of supply.C Blue Switch B Connect to negativeterminal of supply.D Black Negative Connect to negativeterminal of supply.Procedures to Install EarthGround, AC/DC Power, andBattery CablingThe system configuration determines which power cables are installed.The ground cable is always installed.  Perform the appropriateprocedures from the following tables based on the system configuration.4
Power, Ground, and Battery Cabling for Sites Equipped withCustomer–Supplied Site I/O Interface – continuedJAN 2002 4-13SCt300 1X BTS Hardware Installation, ATP, and FRU ProceduresDRAFTTable 4-15: Procedure to Install Earth Ground CableStep Action1Route cable Y (ground cable) from the ground on the mounting bracket to the customer definedgrounding location.2Connect cable Y to the customer defined master ground plate.Table 4-16: Procedure to Install AC Input Cable(s) (Indoor Applications)Step Action1If you will not use the AC Installation box, cut off the male  connector (with pins) from the ACinput power cable (cable S).2Connect the loose wires of cable S (AC input cable) to the customer defined AC power source.Refer to Table 4-13 for wiring information.3Verify all connections of cable S with an ohmmeter prior to routing the cable.4Route cable S from the AC power supply to the unit location.Table 4-17: Procedure to Install AC Installation Box (Optional – Required for Outdoor Installations)Step Action1Route the AC Power Cable (cable T) through 1–in. conduit from the customer–defined AC powersource to the AC Installation box.  Refer to Figure 4-7 and Table 4-18.2Attach the wires of cable T to the AC Installation Box terminal block.  Refer to Figure 4-7 andTable 4-18.3Place the round, black connector on the AC input cable (cable S) onto the AC power cableconnector on the AC installation box.  Turn the cable connector to align its key.4Route cable S from the AC installation box to the unit location.Table 4-18: AC Installation Box CablingPunchdown BlockConnector AC Power CableWire Color DescriptionL Black  LineN White NeutralGROUND Green Ground4
Power, Ground, and Battery Cabling for Sites Equipped withCustomer–Supplied Site I/O Interface – continuedDRAFTSCt300 1X BTS Hardware Installation, ATP, and FRU Procedures JAN 20024-14Figure 4-7: AC Installation BoxAC POWER CABLECONNECTORNOTE: Shown with door removed for clarity1–IN ACCONDUITTO MICROCELLLOCATIONCUSTOMERAC INPUTTERMINALBLOCKLINENEUTRALGROUNDCUSTOMER POWERCONNECTIONSTable 4-19: Procedure to Install DC Input Cable(s)Step Action1Connect the loose wires of cable U (DC input cable) to the  customer defined DC power source.Refer to Table 4-14 for wiring information.2Verify all connections of cable U with an multimeter prior to routing the cable.3Route cable U from the DC power supply to the unit location.4
Antenna Cabling for Sites Equipped with Customer–Supplied Site I/OInterfaceJAN 2002 4-15SCt300 1X BTS Hardware Installation, ATP, and FRU ProceduresDRAFTObjectiveThe objective of this procedure is to install the cabling for theantenna(s).  This cabling is installed between one or more units and thecustomer–supplied lightning arrestor(s).Cable LabelsThe cable designations are referenced to Table 4-1 in the “CableDescription” area of this chapter.Required CablesTable 4-20 provides the quantities and descriptions of the requiredcables.Table 4-20: Required Cables for Antenna ConnectionsCable Qty. Part Number DescriptionC1 to 8 Customer Supplied Antenna cable, 50–Ohm coaxial terminated with at least one male,N–type connector.Antenna Cable Pin and SignalInformationThe antenna cabling uses a 50–Ohm coaxial cable.  The inner conductorprovides signaling and the outer conductor provides shielding andground.  Refer to Figure 4-8 and Table 4-21.Figure 4-8: Antenna Cabling DetailsOUTERCONDUCTORINNERCONDUCTORANTENNA CABLE (COAXIAL)CONNECTORTable 4-21: Pin and Signal Information for Cable C (Antenna Cable)Antenna Inner Conductor OuterConductorB TX/RX GroundA RX GroundProcedure to Install AntennaCabling for One MicrocellYou must install lightning arrestors for all outdoorinstallations.IMPORTANT*4
Antenna Cabling for Sites Equipped with Customer–Supplied Site I/OInterface – continuedDRAFTSCt300 1X BTS Hardware Installation, ATP, and FRU Procedures JAN 20024-16Route the antenna cable between the unit and the customer–suppliedlightning arrestor.  Refer to Figure 4-9 and Table 4-21.  If a lightingarrestor is not required, route the cabling directly to the antenna.Figure 4-9: Antenna Cabling for One MicroCellMICROCELL 1ANT 4TX/RXLAANT 3RXLAKEYB/1(ANTENNA)LABELNUMBEROF CABLESNAMEC/1(ANTENNA)C/1(ANTENNA)LA =LIGHTNINGARRESTORProcedure to Install AntennaCabling for Multi–Unit LogicalBTS SitesIf your site has more than one MicroCell unit, refer to Figure 4-10through Figure 4-12 for site cabling information.  Route the antennacables between the units and the customer–supplied lightning arrestors.If lighting arrestors are not required, route the cabling directly to theantennas.Figure 4-10: Antenna Cabling for Two MicroCellsMICROCELL 1MICROCELL 2 ANT 2TX/RXLAANT 1TX/RXLAKEYB/1(ANTENNA)LABELNUMBEROF CABLESNAMEC/1(ANTENNA)C/1(ANTENNA)LA =LIGHTNINGARRESTOR4
Antenna Cabling for Sites Equipped with Customer–Supplied Site I/OInterface – continuedJAN 2002 4-17SCt300 1X BTS Hardware Installation, ATP, and FRU ProceduresDRAFTFigure 4-11: Antenna Cabling for Three MicroCellsMICROCELL 3 MICROCELL 1MICROCELL 2ANT 4TX/RXLAANT 3RXLAANT 2TX/RXLAANT 1TX/RXLAKEYB/1(ANTENNA)LABELNUMBEROF CABLESNAMEC/1(ANTENNA)C/1(ANTENNA)C/1(ANTENNA)C/1(ANTENNA)LA =LIGHTNINGARRESTORFigure 4-12: Antenna Cabling for Maximum of Four MicroCellsMICROCELL 4 MICROCELL 1MICROCELL 3 MICROCELL 2ANT 4TX/RXLAANT 3TX/RXLA ANT 2TX/RXLAANT 1TX/RXLAKEYB/1(ANTENNA)LABELNUMBEROF CABLESNAMEC/1(ANTENNA) C/1(ANTENNA)C/1(ANTENNA)C/1(ANTENNA)LA =LIGHTNINGARRESTOR4
Site I/O , Span Line, RGPS and Modem Cabling for Sites Equipped withCustomer–Supplied Site I/O InterfaceDRAFTSCt300 1X BTS Hardware Installation, ATP, and FRU Procedures JAN 20024-18ObjectiveThe objective of this procedure is to install the Site I/O cable betweenthe Site I/O junction box and the customer–supplied Site I/O interface.This procedure also covers the installation of the site cabling of the spanline, RGPS and modem cabling to the site I/O interface.If your multi–unit BTS is equipped with the optional Primary SurgeSuppressor, refer to the “Primary Surge Suppressor Cabling” proceduresin chapter 5.Cable LabelsThe cable designations are referenced to Table 4-1 in the “CableDescription” area of this chapter.Required CablesTable 4-22 provides the quantities and descriptions of the requiredcables.Table 4-22: Required Cables for Site I/O, Span Line, RGPS, and Modem CablingCable Qty. Part Number DescriptionM 1 3086039H11 RGPS cable, 125 ft.3086039H12 RGPS cable, 250 ft.3086039H13 RGPS cable, 500 ft.3086039H14 RGPS cable, 1000 ft.3086039H15 RGPS cable, 2000 ft.N 1 Customer Supplied Span Cable.  22–24 AWG solid copper twisted pair.O 1 Customer Supplied Customer Input Cable.  22–24 AWG solid copper twisted pair.V 1 Customer Supplied Phone (Modem) Cable.  22–24 AWG solid copper twisted pair.Z 1 3088116C01 Site I/O Extender Cable.  Required for use in a BTS not equippedwith the Primary Surge Suppressor.Site I/O CablingThe Site I/O interface and cabling are customer–supplied.  The cablebetween the Site I/O junction box and the Site I/O interface is part of theSite I/O junction box and is supplied by Motorola.  If your BTS uses thecustomer–supplied Site I/O Interface instead of the Primary SurgeSuppressor, then you will need to use the Site I/O Extender Cable (CableZ).  The Site I/O Extender cable is included with this option.The customer determines the Site I/O interface configuration.  The endresult is the correct signals getting to the correct pins on the Site I/Ocable.4
Site I/O , Span Line, RGPS and Modem Cabling for Sites Equipped withCustomer–Supplied Site I/O Interface – continuedJAN 2002 4-19SCt300 1X BTS Hardware Installation, ATP, and FRU ProceduresDRAFTProcedure to Install Site I/OCable Between Site I/OJunction Box and Site I/OInterface Route the Site I/O junction box cable from the unit location(s) to the SiteI/O Extender Cable (cable Z).  Route cable Z to the Site I/O interface.Connect the appropriate connectors within the Site I/O interface.  Referto Figure 4-13 and Table 4-23.If lightning arrestors are required, they must be customer–supplied.Lightning arrestors are not necessary for sites equipped with optionalPrimary Surge Suppressor.Figure 4-13: Site I/O Cabling DetailsCUSTOMERINPUTSSPANRGPSPHONE(MODEM)SITE I/OINTERFACESITE I/OJUNCTION BOXSITE I/OCABLEMNOVZDEUTSCHECONNECTOR4
Site I/O , Span Line, RGPS and Modem Cabling for Sites Equipped withCustomer–Supplied Site I/O Interface – continuedDRAFTSCt300 1X BTS Hardware Installation, ATP, and FRU Procedures JAN 20024-20Pin and Signal Information forSite I/O CablingTable 4-23 gives the pin and signal information for the Site I/O cable.Table 4-23: Pin/Signal Information for Site I/O CableBTS Interface Wire/StripeColor DescriptionBlack Customer Input 1 SignalBrown Customer Input 1 GroundRed Customer Input 2 SignalOrange Customer Input 2 GroundYellow Customer Input 3 SignalGreen Customer Input 3 GroundBlue Customer Input 4 SignalPurple Customer Input 4 GroundCustomer Input Grey Customer Input 5 SignalWhite Customer Input 5 GroundBlack/Brown Customer Input 6 SignalBlack/Red Customer Input 6 GroundBlack/Orange Customer Input 7 SignalBlack/Yellow Customer Input 7 GroundBlack/Green Customer Input 8 SignalBlack/Blue Customer Input 8 GroundBlack/Purple Data to Tail –Black/Grey Data to Tail +Black/White Data from Tail –Brown/Black Data from Tail +Brown/Red 1 PPS to Tail –Sync Reverse Brown/Orange 1 PPS to Tail +Brown/Yellow 1 PPS from Tail –Brown/Green 1 PPS from Tail +Brown/Blue Downstream BTS Detect +Brown/Purple Downstream BTS Detect – . . . continued on next page4
Site I/O , Span Line, RGPS and Modem Cabling for Sites Equipped withCustomer–Supplied Site I/O Interface – continuedJAN 2002 4-21SCt300 1X BTS Hardware Installation, ATP, and FRU ProceduresDRAFTTable 4-23: Pin/Signal Information for Site I/O CableBTS Interface DescriptionWire/StripeColorBrown/Grey Data from Head –Brown/White Data from Head +Red/Black Data to Head –Red/Brown Data to Head +Red/Orange 1 PPS from Head –Red/Yellow 1 PPS from Head +Red/Green 1 PPS to Head –Red/Blue 1 PPS to Head +Sync Forward Red/Purple RGPS 28VRed/Grey RGPS GroundRed/White RGPS 28VOrange/Black RGPS GroundOrange/Brown RGPS 28VOrange/Red RGPS GroundOrange/Yellow NO CONNECTIONOrange/Green NO CONNECTIONOrange/Blue RX TIP Primary (Network)Orange/Purple RX RING Primary (Network)Orange/Grey TX TIP Primary (Network)Orange/White TX RING Primary (Network)Span (Network) Yellow/Black RX TIP Secondary (Network)Yellow/Brown RX RING Secondary (Network)Yellow/Red TX TIP Secondary (Network)Yellow/Orange TX RING Secondary (Network) . . . continued on next page4
Site I/O , Span Line, RGPS and Modem Cabling for Sites Equipped withCustomer–Supplied Site I/O Interface – continuedDRAFTSCt300 1X BTS Hardware Installation, ATP, and FRU Procedures JAN 20024-22Table 4-23: Pin/Signal Information for Site I/O CableBTS Interface DescriptionWire/StripeColorYellow/Green RX TIP Primary (Redundant)Yellow/Blue RX RING Primary (Redundant)Yellow/Purple TX TIP Primary (Redundant)Yellow/Grey TX RING Primary (Redundant)Span (Redundant) Yellow/White RX TIP Secondary (Redundant)Green/Black RX RING Secondary (Redundant)Green/Brown TX TIP Secondary (Redundant)Green/Red TX RING Secondary (Redundant)Green/Orange  MODEM TIPGreen/Yellow MODEM TIPGreen/Blue No connectionPhone (Modem) Green/Purple No connectionGreen/Grey MODEM RINGGreen/White MODEM RINGConnecting Customer–DefinedInputs to the Site I/O InterfaceThe unit provides eight customer–defined inputs for connection toexternal contacts.  Each input (a signal/ground pair) is monitored for an“OPEN” (>50 k Ohms) or “CLOSED” (<3 Ohms) condition.4
Site I/O , Span Line, RGPS and Modem Cabling for Sites Equipped withCustomer–Supplied Site I/O Interface – continuedJAN 2002 4-23SCt300 1X BTS Hardware Installation, ATP, and FRU ProceduresDRAFTConnecting the RGPS Cable tothe Site I/O InterfaceThe RGPS (cable M) is connected to the Site I/O interface (SyncForward) of the BTS.  Table 4-24 provides the Sync Forward to RGPSconnections.Table 4-24: Connecting the RGPS to the Site I/O CableSite I/O Cable RGPS (Cable M)Sync ForwardDescriptions Sync Forward ColorCode (wire/stripe) RGPS Description RGPS Color Code(wire/stripe)Data from Head –Brown/Grey Transmit Port –Green/BlackData from Head + Brown/White Transmit Port + GreenData to Head –Red/Black Receive Port –White/BlackData to Head + Red/Brown Receive Port + White1 pps from Head –Red/Orange 1 PPS Timing –Brown/Black1 pps from Head + Red/Yellow 1 PPS Timing + BrownRGPS 28 V Red/Purple Power 1 BlueRed/WhiteRGPS Ground Red/Grey DC Ground 1 Blue/BlackOrange/BlackRGPS 28 V Orange/Brown Power 2 YellowRGPS Ground Orange/Red DC Ground 2 Yellow/BlackNo connect N/A No connect RedNo connect N/A No connect Red/BlackNOTE:  The Orange/Yellow and Orange/Green wires should be trimmed back to the grey outer jacket of theSite I/O cable.Connecting the Span LineCable to the Site I/O InterfaceThe unit provides two, four–wire T1/E1 interfaces for backhaul support.Each interface is made up of Transmit Tip/Ring and Receive Tip/Ringconnections.The Transmit and Receive data flow is given from the perspective of theunit.  Only a single span line (Primary) is required for BTS operation.Connecting a Phone Line to theSite I/O Interface (ModemSupport)The unit provides a two–wire analog phone line interface for modemsupport.  The unit Tip and Ring signals are connected to the externalphone line Tip and Ring.4
RGPS Cabling for Multiple BTS SitesDRAFTSCt300 1X BTS Hardware Installation, ATP, and FRU Procedures JAN 20024-24ObjectiveThis procedure gives information to connect multiple BTS sites for bothRGPS (synchronous) and HSO (non–synchronous) configurations inboth indoor and outdoor applications.BackgroundThe RGPS only connects to the first unit of a multi–unit logical BTS.This first unit sends timing signals to all other units.  You only need toconnect the site I/O interfaces of each multi–unit logical BTS to eachother.  This allows “sharing” of a single RGPS antenna between severalsingle or multi–unit logical BTSs.This also applies to systems using HSO instead of RGPS.  The HSOtiming is “shared” in the same way.Required Tools and EquipmentCablesThe RGPS Synchronization Cable is contained in the Motorola kitslisted in Table 4-25:Table 4-25: Required Cables for RGPS Cabling for Multiple BTS SitesCable Qty. Part Number DescriptionX 1–11 3086039H18 RGPS Synchronization cable (part of kit SGKN4351A).3086039H19 RGPS Synchronization cable (part of kit SGKN4352A).Motorola kitsTable 4-26 and Table 4-27 show the contents of Motorola kitsSGKN4351A and SGKN4352A.  These kits are necessary for RGPScabling between multiple BTS locations.Table 4-26:  RGPS Synchronization Cable Kit – SGKN4351ACable Qty. Motorola PartNumber DescriptionX 1 3086039H18 RGPS Sync Cable, 2000 ft.n/a 2 5864461A03 Fitting, liquid tight.n/a 2 0264599A02 Nut, nylon lockingTable 4-27:  RGPS Synchronization Cable Kit – SGKN4352ACable Qty. Motorola PartNumber DescriptionX 1 3086039H19 RGPS Sync Cable, 3280 ft.n/a 2 5864461A03 Fitting, liquid tight.n/a 2 0264599A02 Nut, nylon locking4
RGPS Cabling for Multiple BTS Sites – continuedJAN 2002 4-25SCt300 1X BTS Hardware Installation, ATP, and FRU ProceduresDRAFTSurge suppressorsSurge suppressors (Polyphaser 097–1017A–A.1) are required for certaininstallations.Cable Diagrams andDescriptionFigure 4-18 shows the RGPS cabling for a multi–BTS configuration foran RGPS (synchronous) configuration.  Figure 4-19 shows the RGPScabling for a multi–BTS HSO (non–synchronous) configuration.Figure 4-14 shows the general construction of the RGPS Sync Cable(cable X).  Cable X is supplied by Motorola with a 7.5 k Ohm, 1Wresistor already installed 150 mm from the end of the cable on theblue/black wire.  There is 200 mm on each end of the cable where thejacketing has been cut back.If necessary, the jacketing of cable X may be cut back further for properstrain relief.  For installations that require surge protection, you may cutcable X at the dashed lines and insert the surge protection devices.  Referto Table 4-29 for instructions to install the RGPS with surge protection.Figure 4-14: RGPS Sync Cable Diagram7.5 K OHM, 1WRESISTORRGPS SYNC CABLELOOSE WIRES LOOSE WIRESCABLE JACKET200mm150mm5M MAX5M MAX 5M MAX5M MAXProcedure to Install RGPSCabling for an IndoorInstallationUse the procedure in Table 4-28 to connect the RGPS Sync cable for anindoor installation.  Refer to the cable run list in Table 4-31, Figure 4-18,and Figure 4-19.Table 4-28: Procedure to Install RGPS Cabling for an Indoor InstallationStep Action1Connect the resistor end of the RGPS Sync Cable (cable X) to the sync reverse lines on the SiteI/O interface of BTS N.  Refer to Figure 4-15.  Refer to Table 4-31 for the cable X pinouts .2Connect the drain wire of cable X to a lug terminal tied directly to the master ground (earthground) of BTS N.3Route cable X from BTS N to BTS N+1. . . . continued on next page4
RGPS Cabling for Multiple BTS Sites – continuedDRAFTSCt300 1X BTS Hardware Installation, ATP, and FRU Procedures JAN 20024-26Table 4-28: Procedure to Install RGPS Cabling for an Indoor InstallationStep Action4Remove excess cable length from cable X and terminate to the sync forward lines on the Site I/Ointerface of BTS N+1.  Refer to Table 4-31 for the cable X pinouts.  Do not terminate the drainwire to the ground at the Site I/O interface at BTS N+1.wire to the ground at the Site I/O interface at BTS N+1.NOTEIf necessary for proper strain relief, the jacketing of cable X may be cut back further.Figure 4-15: RGPS Sync Cable for Indoor InstallationSITE I/OINTERFACE SITE I/OINTERFACEBTS NBTS N+17.5 K OHM, 1W RESISTORATTACH DRAIN WIRETO MASTER GROUNDOF BTS N ONLYRGPS SYNC CABLELOOSE WIRESLUG TERMINALMASTERGROUNDProcedure to Install RGPSCabling for an OutdoorInstallationUse the procedure in Table 4-29 to install the RGPS cabling for anyinstallation that may be susceptible to surges or where any portion of theRGPS cable is routed outside.  In these cases, you must reduce thelength of the RGPS cable by (still to be determined length) toaccommodate for the additional timing error incurred by adding surgeprotection.Table 4-29: Procedure to Install RGPS Cabling for an Outdoor InstallationStep Action1Follow all of the procedures in the “Connect RGPS Cables for Indoor Installation” procedure inTable 4-28.2Cut cable X to a maximum distance of 5m from BTS N.3Install the surge protection device at this point, with the protected side towards BTS N.4Ground the surge protection device to the master ground of BTS N. . . . continued on next page4
RGPS Cabling for Multiple BTS Sites – continuedJAN 2002 4-27SCt300 1X BTS Hardware Installation, ATP, and FRU ProceduresDRAFTTable 4-29: Procedure to Install RGPS Cabling for an Outdoor InstallationStep Action5When you cut the cable in step 2, the jacketing for the portion of cable X on the unprotected sideof the surge suppressor is not grounded.  To ground this portion of cable X, connect the drain wireto a lug terminal  tied directly to the master ground of BTS N.NOTEOnly ground the end of the cable jacket at BTS N.  Do not ground the jacket at BTS N+1.  Referto Figure 4-16.6Cut cable X to a maximum distance of 5m from BTS N+1.7Ground the surge protection device to the master ground of BTS N+1.8When you cut cable X in step 6, the jacketing for the portion of cable X between BTS N+1 andthe newly–inserted surge protector is ungrounded.  To ground this portion of cable X, connect thedrain wire from one end of the jacket of the cable to a lug terminal tied directly to the masterground of BTS N+1.  Refer to Figure 4-16.Figure 4-16: RGPS Sync Cable for Outdoor InstallationsSITE I/OINTERFACEBTS NBTS N+17.5 K OHM, 1WRESISTORAttach the drain wires to the earth grounds.  Thelength of cable between surge suppressors shouldbe attached to the earth ground at BTS N only.RGPS SYNC CABLE SITE I/OINTERFACESURGESUPPRESSORSURGESUPPRESSORGround the surgesuppressors to themaster grounds at eachBTS5M MAXMASTERGROUNDBTS N+1MASTERGROUNDBTS N5M MAXLUGTERMINALLUGTERMINALOutdoor installation exceptionsIn cases where it is impossible or impractical to route cable X in acontinuous stretch from BTS N to BTS N+1, you may cut and rejoin thecable using an inline splice (solder or crimp).  Both types of connectionsare acceptable as long as each wire remains electrically isolated fromevery other wire.  The twisted pairs must be kept together.  Refer toTable 4-30 for the pairing of the twisted pairs.4
RGPS Cabling for Multiple BTS Sites – continuedDRAFTSCt300 1X BTS Hardware Installation, ATP, and FRU Procedures JAN 20024-28You must splice the drain wire as well.  Apply a weatherproof heatshrink tubing or another weatherproof covering over the cable bundle inthe spliced section.  Refer to Figure 4-17.Figure 4-17: Cutting and Splicing RGPS Sync CableSplice each wire including thedrain wire.Shrink wrap entire spliced areaTable 4-30: Twisted Pairs for RGPS Sync Cable (Cable X)Pair Color1Red/BlackRed2White/BlackWhite3Green/BlackGreen4Blue/BlackBlue5Yellow/BlackYellow6Brown/BlackBrown4
RGPS Cabling for Multiple BTS Sites – continuedJAN 2002 4-29SCt300 1X BTS Hardware Installation, ATP, and FRU ProceduresDRAFTCable ConnectionsFor a full signal description of the Site I/O cable, refer to Table 4-23 inthe “Site I/O, Span Line, RGPS and Modem Cabling” procedure.The wire colors are based on the Site I/O cable.NOTETable 4-31: Multi–BTS Cable Run ListSite I/O Interface of BTS N(Sync Reverse) InterconnectingCable(Cable X)Site I/O Interface of BTS N+1(Sync Forward)Color Signal RGPS CableColor Color SignalBlack/Purple Data to Tail–Green/Black Brown/Grey Data from Head–Black/Grey Data to Tail+ Green Brown/White Data from Head+Black/White Data from Tail–White/Black Red/Black Data to Head–Brown/Black Data from Tail+ White Red/Brown Data to Head+Brown/Red 1 PPS to Tail–Brown/Black Red/Orange 1 PPS from Head–Brown/Orange 1 PPS to Tail+ Brown Red/Yellow 1 PPS from Head+Brown/Yellow 1 PPS from Tail–Red/Black Red/Green 1 PPS to Head–Brown/Green 1 PPS from Tail+ Red Red/Blue 1 PPS to Head+Black/Blue Ground* Blue/Black Black/Blue Ground**The Multi–BTS Synchronization interface must also be referenced to the BTS digital ground through a 7.5Kohm, 1W resistor.  This resistor has been integrated into the blue/black wire of Cable X.  The end of Cable Xwith the resistor should be connected to the Sync Reverse locations on the punch block of BTS N.  Theopposite end of Cable X is connected to the Sync Forward locations on the punch block of BTS N+1 and maybe cut to the appropriate length.4
RGPS Cabling for Multiple BTS Sites – continuedDRAFTSCt300 1X BTS Hardware Installation, ATP, and FRU Procedures JAN 20024-30Figure 4-18: Site I/O Interface Cabling for RGPS (Synchronous) ConfigurationsCUSTOMERINPUTSSPANRGPSPHONE(MODEM)SITE I/OINTERFACESITE I/OCABLECUSTOMERINPUTSSPANPHONE(MODEM)SITE I/OCABLECUSTOMERINPUTSSPANPHONE(MODEM)SITE I/OCABLECUSTOMERINPUTSSPANPHONE(MODEM)SITE I/OCABLERGPS SYNC CABLERGPS SYNC CABLERGPS SYNC CABLENOTE 1:  EACH BTS MAY CONTAIN UP TOFOUR SC300 UNITS.NOTE 2:  A MAXIMUM OF 12 BTS MAY BEINTERCONNECTED WITH A MAXIMUMDAISY CHAIN CABLE LENGTH OF 600MBETWEEN EACH BTS.  A MAXIMUM OFSEVEN BTS MAY BE INTERCONNECTEDWITH A MAXIMUM DAISY CHAIN CABLELENGTH OF 1KM BETWEEN EACH BTSFOR INSTALLATIONS EQUIPPED WITHSURGE PROTECTION.MAXIMUMDISTANCE IS1 KM (SEENOTE 2)BTS 1 (SEENOTE 1)BTS 3(SEE NOTE 1)BTS 4(SEENOTE 1)UNIT 1UNIT 1BTS 2(SEE NOTE 1)MAXIMUMDISTANCE IS1 KM (SEENOTE 2)MAXIMUMDISTANCE IS1 KM (SEENOTE 2)UPSTREAMUPSTREAMUPSTREAMDOWNSTREAMDOWNSTREAMDOWNSTREAMSITE I/OINTERFACESITE I/OINTERFACESITE I/OINTERFACEUNIT 301 UNIT 201 UNIT 101 UNIT 1UNIT 201 UNIT 101 UNIT 1UNIT 101= SURGE PROTECTION DEVICE (OPTIONAL)SITE I/OSITE I/OSITE I/OSITE I/OXXX4
RGPS Cabling for Multiple BTS Sites – continuedJAN 2002 4-31SCt300 1X BTS Hardware Installation, ATP, and FRU ProceduresDRAFTFigure 4-19: Site I/O Interface Cabling for HSO (Non–Synchronous) ConfigurationsCUSTOMERINPUTSSPANPHONE(MODEM)SITE I/OINTERFACESITE I/OCABLECUSTOMERINPUTSSPANPHONE(MODEM)SITE I/OCABLECUSTOMERINPUTSSPANPHONE(MODEM)SITE I/OCABLECUSTOMERINPUTSSPANPHONE(MODEM)SITE I/OCABLERGPS SYNC CABLERGPS SYNC CABLERGPS SYNC CABLEMAXIMUMDISTANCE IS600M (SEENOTE 2BTS 1 (SEENOTE 1)BTS 2(SEE NOTE 1)BTS 3(SEE NOTE 1)BTS 4(SEENOTE 1)UNIT 1UNIT 1UNIT 1XMAXIMUMDISTANCE IS600M (SEENOTE 2MAXIMUMDISTANCE IS600M (SEENOTE 2DOWNSTREAMDOWNSTREAMDOWNSTREAMUPSTREAMUPSTREAMUPSTREAMNOTE 1:  EACH BTS MAY CONTAIN UP TOFOUR SC300 UNITS.NOTE 2:  A MAXIMUM OF 12 BTS MAY BEINTERCONNECTED WITH A MAXIMUMDAISY CHAIN CABLE LENGTH OF 600MBETWEEN EACH BTS.  A MAXIMUM OFSEVEN BTS MAY BE INTERCONNECTEDWITH A MAXIMUM DAISY CHAIN CABLELENGTH OF 1KM BETWEEN EACH BTSFOR INSTALLATIONS EQUIPPED WITHSURGE PROTECTION.SITE I/OINTERFACESITE I/OINTERFACESITE I/OINTERFACEUNIT 301 UNIT 201 UNIT 101 UNIT 1UNIT 201 UNIT 101UNIT 101= SURGE PROTECTION DEVICE (OPTIONAL)SITE I/OSITE I/OSITE I/OSITE I/OXX4
Span Line Daisy Chain CablingDRAFTSCt300 1X BTS Hardware Installation, ATP, and FRU Procedures JAN 20024-32ObjectiveThe objective of this procedure is to install span line cabling betweenmultiple BTS sites in an open daisy chain configuration.BackgroundThis feature allows up to 12 BTS sites to be linked together in an opendaisy chain loop using a single T1/E1 span.  This will reduce the numberof spans necessary to support a CDMA system and minimize unusedchannels.Each multi–unit logical BTS may contain up to four units.  A maximumof 12 BTS sites may be combined in a single daisy chain.Required CablesThe following cables in Table 4-32 are necessary to do this procedure.Table 4-32: Required Cables for Span Line Daisy Chain CablingCable Qty. Part Number DescriptionN 1–3 CustomerSupplied Span Line Daisy Chain CableProcedureAttach the span line daisy chain cable (Cable N) to the site I/O interfacesof each BTS.  Refer to Figure 4-20 and Table 4-33.Cable ConnectionsTable 4-33 shows the cable run information for span line daisy chaincabling.For a full signal description of the Site I/O cable refer to Table 4-23 inthe “Site I/O, Span Line, RGPS and Modem Cabling” procedure.The pin number and wire color are based on the Site I/Ocable.  The pin number corresponds to pins on the Site I/Ojunction box connectors.NOTETable 4-33: Cable Run List for Span Line Daisy Chain CablingBTS (Secondary Backhaul) BTS (Primary Backhaul)Color Description Color DescriptionYellow/Black RX TIP Orange/Grey TX TIPYellow/Brown RX RING Orange/White TX RINGYellow/Red TX TIP Orange/Blue RX TIPYellow/Orange TX RING Orange/Purple RX RING4
Span Line Daisy Chain Cabling – continuedJAN 2002 4-33SCt300 1X BTS Hardware Installation, ATP, and FRU ProceduresDRAFTFigure 4-20: Site I/O Interface Cabling for Span Line Daisy Chain CablingCUSTOMERINPUTSSPANRGPSPHONE(MODEM)SITE I/OINTERFACESITE I/OCABLECUSTOMERINPUTSPHONE(MODEM)SITE I/OINTERFACESITE I/OCABLECUSTOMERINPUTSPHONE(MODEM)SITE I/OINTERFACESITE I/OCABLECUSTOMERINPUTSPHONE(MODEM)SITE I/OINTERFACESITE I/OCABLEBTS 1(SEE NOTE 1)SPAN LINE DAISYCHAIN CABLESPAN LINE DAISYCHAIN CABLESPAN LINE DAISYCHAIN CABLENNNBTS 2(SEE NOTE 1)BTS 3(SEE NOTE 1)BTS 4(SEE NOTE 1)UNIT 1UNIT 301 UNIT 201 UNIT 101SITE I/OUNIT 1UNIT 201 UNIT 101SITE I/OUNIT 1UNIT 101SITE I/OUNIT 1SITE I/ONOTE 1:  EACH BTS SITE  MAYCONTAIN UP TO FOUR SC300 UNITS.THERE MAY BE A TOTAL OF 12 BTSs INA DAISY CHAINNOTE 2:  THE USE OF AN RGPS ISDEPENDANT UPON WHETHER OR NOTTHE SITES USE A MULTI–BTS SITERGPS CONFIGURATION.NOTE 3:  THE USE OF THE MULTI–BTSRGPS CABLE (CABLE X) DEPENDSUPON SYSTEM CONFIGURATION.RGPS(SEE NOTE 2)RGPS(SEE NOTE 2)RGPS(SEE NOTE 2)X/1(SEE NOTE 3)X/1(SEE NOTE 3)X/1(SEE NOTE 3)4
Span Line Daisy Chain Cabling – continuedDRAFTSCt300 1X BTS Hardware Installation, ATP, and FRU Procedures JAN 20024-34Notes4
JAN 2002 SCt300 1X BTS Hardware Installation, ATP, and FRU ProceduresDRAFTChapter 5: Preparing Site Cabling for Sites Equipped with Optional Primary Surge SuppressorTable of ContentsCabling Overview 5-1. . . . . . . . . . . . . . . . . . . . . . . . . . . . . . . . . . . . . . . . . . . . . . . . Overview 5-1. . . . . . . . . . . . . . . . . . . . . . . . . . . . . . . . . . . . . . . . . . . . . . . . Configurations Supported 5-1. . . . . . . . . . . . . . . . . . . . . . . . . . . . . . . . . . . Cabling Installation Order 5-1. . . . . . . . . . . . . . . . . . . . . . . . . . . . . . . . . . . Cable Labels 5-1. . . . . . . . . . . . . . . . . . . . . . . . . . . . . . . . . . . . . . . . . . . . . Site Cabling for BTS With Optional Primary Surge Suppressor 5-2. . . . . . . . . . . . Preparing Site Cabling Scope of Work 5-2. . . . . . . . . . . . . . . . . . . . . . . . . Attaching the Surge Suppressor to Mounting Bracket 5-6. . . . . . . . . . . . . . . . . . . . Objective 5-6. . . . . . . . . . . . . . . . . . . . . . . . . . . . . . . . . . . . . . . . . . . . . . . . Background 5-6. . . . . . . . . . . . . . . . . . . . . . . . . . . . . . . . . . . . . . . . . . . . . . Required Tools and Equipment 5-6. . . . . . . . . . . . . . . . . . . . . . . . . . . . . . . Procedure to Attach the Surge Suppressor to the Mounting Bracket 5-6. . Power, Ground, and Battery Cabling for Sites Equipped with Optional Primary Surge Suppressor 5-8. . . . . . . . . . . . . . . . . . . . . . . . . . . . . . . . . . Objective 5-8. . . . . . . . . . . . . . . . . . . . . . . . . . . . . . . . . . . . . . . . . . . . . . . . Other Grounding Considerations 5-8. . . . . . . . . . . . . . . . . . . . . . . . . . . . . . Power Considerations and Configurations 5-8. . . . . . . . . . . . . . . . . . . . . . Required Cables 5-9. . . . . . . . . . . . . . . . . . . . . . . . . . . . . . . . . . . . . . . . . . . AC Input Cable Information 5-9. . . . . . . . . . . . . . . . . . . . . . . . . . . . . . . . . DC Input Cable Information 5-10. . . . . . . . . . . . . . . . . . . . . . . . . . . . . . . . . Procedures to Install the Ground and Power Cabling 5-10. . . . . . . . . . . . . . Antenna Cabling for Sites Equipped With Optional Primary Surge Suppressor 5-13Objective 5-13. . . . . . . . . . . . . . . . . . . . . . . . . . . . . . . . . . . . . . . . . . . . . . . . Cable Labels 5-13. . . . . . . . . . . . . . . . . . . . . . . . . . . . . . . . . . . . . . . . . . . . . Required Cables 5-13. . . . . . . . . . . . . . . . . . . . . . . . . . . . . . . . . . . . . . . . . . . Antenna Cable Pin and Signal Information 5-13. . . . . . . . . . . . . . . . . . . . . . Procedure to Install Antenna Cabling for Sites Equipped with Primary Surge Suppressor 5-14. . . . . . . . . . . . . . . . . . . . . . . . . . . . . . . . . . . Site I/O, Span Line, RGPS, and Modem Cabling for Sites Equipped With Primary Surge Suppressor 5-17. . . . . . . . . . . . . . . . . . . . . . . . . . . . . . . . . . . . . . . . . Objective 5-17. . . . . . . . . . . . . . . . . . . . . . . . . . . . . . . . . . . . . . . . . . . . . . . . Cable Labels 5-17. . . . . . . . . . . . . . . . . . . . . . . . . . . . . . . . . . . . . . . . . . . . . Required Cables 5-17. . . . . . . . . . . . . . . . . . . . . . . . . . . . . . . . . . . . . . . . . . . Site I/O Cabling 5-17. . . . . . . . . . . . . . . . . . . . . . . . . . . . . . . . . . . . . . . . . . . Procedure to Install Site I/O Cable Between Site I/O Junction Box and Optional Primary Surge Suppressor 5-18. . . . . . . . . . . . . . . . . . . . . . . . . . . Pin and Signal Information for Surge Suppressor Punchdown Block Cabling 5-20. . . . . . . . . . . . . . . . . . . . . . . . . . . . . . . . . . . . . . . . . . . . 5
Table of Contents  – continuedDRAFTSCt300 1X BTS Hardware Installation, ATP, and FRU Procedures JAN 2002Connecting Customer–Defined Inputs to the Primary Surge Suppressor 5-22Connecting the RGPS Cable to the Primary Surge Suppressor 5-23. . . . . . Connecting the Span Line Cable to the Primary Surge Suppressor 5-23. . . Connecting a Phone Line to the Primary Surge Suppressor (Modem Support) 5-23. . . . . . . . . . . . . . . . . . . . . . . . . . . . . . . . . . . . . . . . . . RGPS Cabling for Multiple BTS Sites Equipped with Optional Primary Surge Suppressor 5-24. . . . . . . . . . . . . . . . . . . . . . . . . . . . . . . . . . Objective 5-24. . . . . . . . . . . . . . . . . . . . . . . . . . . . . . . . . . . . . . . . . . . . . . . . Background 5-24. . . . . . . . . . . . . . . . . . . . . . . . . . . . . . . . . . . . . . . . . . . . . . Required Cables and Kits 5-24. . . . . . . . . . . . . . . . . . . . . . . . . . . . . . . . . . . Cable Diagrams and Description 5-25. . . . . . . . . . . . . . . . . . . . . . . . . . . . . . Procedure to Install RGPS Cabling for an Indoor Installation 5-25. . . . . . . Procedure to Install RGPS Cabling for an Outdoor Installation 5-26. . . . . . Cable Connections 5-29. . . . . . . . . . . . . . . . . . . . . . . . . . . . . . . . . . . . . . . . . Span Line Daisy Chain Cabling for Multiple BTS Sites Equipped with Optional Primary Surge Suppressor 5-32. . . . . . . . . . . . . . . . . . . . . . . . . . . . . . . . . . Objective 5-32. . . . . . . . . . . . . . . . . . . . . . . . . . . . . . . . . . . . . . . . . . . . . . . . Background 5-32. . . . . . . . . . . . . . . . . . . . . . . . . . . . . . . . . . . . . . . . . . . . . . Required Cables 5-32. . . . . . . . . . . . . . . . . . . . . . . . . . . . . . . . . . . . . . . . . . . Procedure 5-32. . . . . . . . . . . . . . . . . . . . . . . . . . . . . . . . . . . . . . . . . . . . . . . . Cable Connections 5-32. . . . . . . . . . . . . . . . . . . . . . . . . . . . . . . . . . . . . . . . . 5
Cabling OverviewJAN 2002 5-1SCt300 1X BTS Hardware Installation, ATP, and FRU ProceduresDRAFTOverviewThis chapter provides the procedures to prepare the BTS site cabling forsites equipped with the optional Primary Surge Suppressor.  Chapter 6shows the scope of work for unit cabling.You will connect the cables to the site and route them to the location ofthe BTS.  You will attach the cables to the unit during the unit cablingprocedures in Chapter 6.Repeat cabling installation as necessary for each unit at the BTS.Cabling is one of the most noticeable aspects ofworkmanship. Straight runs and proper turns are critical fora positive evaluation of the work.NOTEConfigurations SupportedThis chapter supports cable installation for single carrier omniconfigurations and multi–carrier omni configurations.  This chaptersupports cable installations for sites equipped with the optional PrimarySurge Suppressor.Cabling Installation OrderTo install the cables, Motorola recommends that the followingprocedures be completed in the order shown:1. Earth ground cabling2. AC power cabling3. DC power cabling4. Battery cabling (optional)5. Antenna cabling6. Site I/O interface cabling7. RGPS/HSO cabling (optional)8. Span line daisy chain cabling (optional)Cable LabelsThe “Cable Descriptions and Part Numbers” in Table 4-1 provides cabledescriptions and part numbers.  The labels used to designate the cables(A, B, C, etc.) are used throughout this manual.5
Site Cabling for BTS With Optional Primary Surge SuppressorDRAFTSCt300 1X BTS Hardware Installation, ATP, and FRU Procedures JAN 20025-2Preparing Site Cabling Scopeof WorkFigure 5-1 through Figure 5-4 shows the scope of work to be performedfor preparing the site cabling with the optional Primary SurgeSuppressor.  Chapter 6 shows the scope of work for unit cabling.Figure 5-1: Site Cabling for One MicroCell with Primary Surge SuppressorMICROCELL 1CUSTOMERINPUTSSPANRGPSPHONE(MODEM)ANT ARXDC POWERKEYB/1(ANTENNA)LABELNUMBEROF CABLESNAMEA/1(GROUND)U/1(DC POWER)SITE I/OCABLEP/1 (SU)M/1 (RGPS)N/1 (SPAN)O/1 (CUSTOMERINPUTS)V/1 (PHONE)AC POWERT/1(AC POWER)C/1 (ANTENNA)PRIMARYSURGESUPPRESSORD/1(ANTENNA)S/1 (ACPOWER)MASTERGROUNDY/1 (MASTERGROUND)D/1(ANTENNA)ANT BTX/RXC/1 (ANTENNA)B/1 (GROUND)SITE I/OINTERFACE5
Site Cabling for BTS With Optional Primary Surge Suppressor – continuedJAN 2002 5-3SCt300 1X BTS Hardware Installation, ATP, and FRU ProceduresDRAFTFigure 5-2: Site Cabling for Two MicroCells with Primary Surge SuppressorMICROCELL 1MICROCELL 2DC POWERKEYB/1(ANTENNA)LABELNUMBEROF CABLESNAMEA/1(GROUND)U/1(DC POWER)E/1 (MIB) ORK/1 (MIB)SITE I/OCABLEDC POWERU/1(DC POWER)A/1(GROUND)PRIMARYSURGESUPPRESSORD/1(ANTENNA 2)S/1(ACPOWER)D/1(ANTENNA 1)S/1 (ACPOWER)B/1 (GROUND)CUSTOMERINPUTSSPANRGPSPHONE(MODEM)M/1 (RGPS)N/1 (SPAN)O/1 (CUSTOMERINPUTS)V/1 (PHONE)SITE I/OINTERFACEANT ARXAC POWERT/1(AC POWER)C/1 (ANTENNA)MASTERGROUNDY/1 (MASTERGROUND)ANT BTX/RXC/1 (ANTENNA)P/1 (SU)P/1 (SU)5
Site Cabling for BTS With Optional Primary Surge Suppressor – continuedDRAFTSCt300 1X BTS Hardware Installation, ATP, and FRU Procedures JAN 20025-4Figure 5-3: Site Cabling for Three MicroCells with Primary Surge SuppressorMICROCELL 1MICROCELL 3 MICROCELL 2DC POWERKEYB/1(ANTENNA)LABELNUMBEROF CABLESNAMEA/1(GROUND)U/1(DC POWER)F/1 (MIB) OR I/1 (MIB)SITE I/OCABLEDC POWERU/1(DC POWER)DC POWERU/1(DC POWER)A/1(GROUND)PRIMARYSURGESUPPRESSORD/1(ANTENNA 2)S/1(ACPOWER)D/1(ANTENNA 1)S/1 (ACPOWER)A/1(GROUND)D/1(ANTENNA 4)S/1(AC POWER)D/1(ANTENNA 3)B/1 (GROUND)E/1 (MIB) ORK/1 (MIB)ANT ARXAC POWERT/1(AC POWER)C/1 (ANTENNA)MASTERGROUNDY/1 (MASTERGROUND)ANT BTX/RXC/1 (ANTENNA)CUSTOMERINPUTSSPANRGPSPHONE(MODEM)M/1 (RGPS)N/1 (SPAN)O/1 (CUSTOMERINPUTS)V/1 (PHONE)SITE I/OINTERFACEP/1 (SU)P/1 (SU)P/1 (SU)5
Site Cabling for BTS With Optional Primary Surge Suppressor – continuedJAN 2002 5-5SCt300 1X BTS Hardware Installation, ATP, and FRU ProceduresDRAFTFigure 5-4: Site Cabling for Four MicroCells with Primary Surge SuppressorMICROCELL 4 MICROCELL 1MICROCELL 3 MICROCELL 2DC POWERKEYB/1(ANTENNA)LABELNUMBEROF CABLESNAMEA/1(GROUND)U/1(DC POWER)G/1 (MIB) ORJ/1 (MIB)SITE I/OCABLEDC POWERU/1(DC POWER)DC POWERU/1(DC POWER)DC POWERU/1(DC POWER)A/1(GROUND)A/1(GROUND)PRIMARYSURGESUPPRESSORD/1(ANTENNA 2)S/1(ACPOWER)D/1(ANTENNA 1)S/1 (ACPOWER)A/1(GROUND)D/1(ANTENNA 3)S/1(AC POWER)D/1 (ANTENNA 4)S/1 (AC POWER)B/1(GROUND)E/1 (MIB) ORK/1 (MIB)E/1 (MIB) ORK/1 (MIB)F/1 (MIB) OR I/1 (MIB)CUSTOMERINPUTSSPANRGPSPHONE(MODEM)M/1 (RGPS)N/1 (SPAN)O/1 (CUSTOMERINPUTS)V/1 (PHONE)SITE I/OINTERFACEANT ARXAC POWERT/1(AC POWER)C/1 (ANTENNA)MASTERGROUNDY/1 (MASTERGROUND)ANT BTX/RXC/1 (ANTENNA)P/1 (SU)P/1 (SU)P/1 (SU)P/1 (SU)5
Attaching the Surge Suppressor to Mounting BracketDRAFTSCt300 1X BTS Hardware Installation, ATP, and FRU Procedures JAN 20025-6ObjectiveThe objective of this procedure is to attach the optional Primary SurgeSuppressor to the mounting bracket. This procedure applies to mountingbrackets that are attached to a rack, wall or pole.You must attach the Primary Surge Suppressor to themounting bracket before you install the unit cabling.IMPORTANT*BackgroundThe following procedures should be followed in order to mount thesurge suppressor to the mounting bracket. The unit attaches to themounting bracket with three (3) M6 screws.Required Tools and EquipmentThe following tools and materials are required to attach the unit to themounting bracket.STorque driver wrench, 1/4–in. hex female drive, 0–10 N–MST30 Torx tamper bitSThree M6X19 screws (Motorola Part Number 0387541C03)Procedure to Attach the SurgeSuppressor to the MountingBracketUse the procedure in Table 5-1 to attach the surge suppressor to themounting bracket.  Refer to Figure 5-5.Table 5-1: Procedure to Attach the Surge Suppressor to the Mounting BracketStep Action1Lift the unit and place it on the mounting bracket by aligning the bracket’s upper arms into therectangular cutouts in the mounting tabs.  The unit may need to be raised up slightly so that thelower bracket flange does not contact the unit’s lower surface.2Use a T30 Torx tamper bit to start, but not tighten, all three screws in the location shown inFigure 5-5.3Use a T30 Torx tamper bit to torque the three mounting screws to 5.0 N–M.5
Attaching the Surge Suppressor to Mounting Bracket – continuedJAN 2002 5-7SCt300 1X BTS Hardware Installation, ATP, and FRU ProceduresDRAFTFigure 5-5: Attaching the Surge Suppressor to the Mounting BracketHOOKSMOUNTING BRACKETSLIDE CUSTOMER–SUPPLIEDPADLOCK THROUGH HOLES INBRACKET (OPTIONAL)MOUNTING BRACKETM6 SCREWS (3)5
Power, Ground, and Battery Cabling for Sites Equipped with OptionalPrimary Surge SuppressorDRAFTSCt300 1X BTS Hardware Installation, ATP, and FRU Procedures JAN 20025-8ObjectiveThe objective of this procedure is to install the power, earth ground, andbattery cabling for one or more Microcell units at a site equipped withoptional Primary Surge Suppressor.Dangerous voltages, capable of causing death, are presentin this equipment. Use extreme caution when handling andtesting this equipment.WARNINGOther GroundingConsiderationsThis procedure covers only the grounding information for the groundcables that attach to one or more Microcell units.  Groundingconsiderations beyond the ground cables that attach to the Microcell aresummarized in Appendix A.  Refer to Appendix A and the sitedocumentation for other grounding considerations.Motorola recommends that you use an oxide inhibitor suchas Burndy PENETROXt or Ilsco DE–OXt on all theexternal ground connections on the unit and on the primarysurge suppressor for all outdoor installations.  Thisincludes the ground connections on the mounting bracket,the Site I/O, and the five mechanical lugs on the primarysurge suppressor.NOTEPower Considerations andConfigurationsThe Primary Surge Suppressor is designed for 120/240 VAC 3–wire plusground single phase 30 amp min. service.The power and battery configurations for the MicroCell unit is:SAC power only (no battery)SAC power with short duration batterySDC powerNeither the ”+” or ”–” terminal of the DC Input isconnected to the BTS ground.  If a negative supply input isprovided, the ”+” terminal of the DC input must beconnected to the Master Ground Plate (MGP).  Byconnecting the ”+” terminal of the DC input to the MGP, anegative supply system is created.NOTE5
Power, Ground, and Battery Cabling for Sites Equipped with OptionalPrimary Surge Suppressor – continuedJAN 2002 5-9SCt300 1X BTS Hardware Installation, ATP, and FRU ProceduresDRAFTRequired CablesTable 5-2 provides the quantity and description of the required cables.Table 5-2: Required Cables for Power, Earth Ground, and Battery ConnectionsCable Qty. Part Number DescriptionA 1–4 3087701C02 Ground cable, 8 -AWG, insulated copper wire.  Requires one ring lugconnector.S 1–4 3087854C02 AC input cable, 14 AWG, 5 m, is designed for 88–260 VAC powerinput.  Cable has Deutsche connector on both ends.T 1 CustomerSupplied AC Input power cable.  10–14 AWG, 90_C wire.  Designed for120–240 VAC.U 1–4 3087854C04 DC input cable, 14 and 22 AWG, 5 m, is designed for 20 to 30 VDCpower input.Y 1 CustomerSupplied Master Ground Cable, 6 -AWG, insulated copper wire.AC Input Cable InformationThe information for the AC input cable(s) (Cable S) is given inFigure 5-6 and Table 5-3.Figure 5-6: AC Input Cable Connector InformationABCSOCKET POSITION ON CABLECONNECTOR SHOWNTable 5-3: AC Input Cable InformationConnector Wire Color DescriptionA Black  LineB Green GroundC White Neutral5
Power, Ground, and Battery Cabling for Sites Equipped with OptionalPrimary Surge Suppressor – continuedDRAFTSCt300 1X BTS Hardware Installation, ATP, and FRU Procedures JAN 20025-10DC Input Cable InformationThe information for the DC input cable(s) (Cable U) is given inFigure 5-7 and Table 5-4.Figure 5-7: DC Input Cable Connector InformationABCDSOCKET POSITION ONCABLE CONNECTOR SHOWNTable 5-4: DC Input Cable InformationConnector WireColor Description CommentsA Yellow Switch A No connectionB Red Positive Connect to positiveterminal of supply.C Blue Switch B Connect to negativeterminal of supply.D Black Negative Connect to negativeterminal of supply.Procedures to Install theGround and Power CablingThe system configuration determines which power cables are installed.The ground cable is always installed.  Based on the system configurationperform the appropriate procedures from the following tables.Table 5-5: Procedure to Install the Master Ground Cable on a BTS Equipped with Optional Primary SurgeSuppressorStep Action1Connect the Master Ground cable (cable Y) to the EARTH GND connector on the Primary SurgeSuppressor.2Connect the other end of cable Y to the customer–defined master ground plate.5
Power, Ground, and Battery Cabling for Sites Equipped with OptionalPrimary Surge Suppressor – continuedJAN 2002 5-11SCt300 1X BTS Hardware Installation, ATP, and FRU ProceduresDRAFTTable 5-6: Procedure to Install the Earth Ground Cable on a BTS Equipped with Optional Primary SurgeSuppressorStep Action1Route cable A (ground cable) from the ground lug on the unit mounting bracket to the PrimarySurge Suppressor location.2Connect cable A to the GND connector 1–4 on the Primary Surge Suppressor.Table 5-7: Procedure to Install the AC Input Cable(s) on a BTS Equipped with Optional Primary SurgeSuppressorStep Action1Connect the customer–supplied AC input power cable (cable T) to the customer defined ACpower source. Refer to Table 5-3 for wiring information.2Verify all connections of cable T with an ohmmeter prior to routing the cable.3Route cable T via 1–in. conduit from the customer defined AC power source to the breakerterminals inside the Primary Surge Suppressor.  Refer to Figure 5-8.4Place the round, black connector on the AC input power cable (cable S) onto the appropriateCarrier 1–4 AC Output connector on the Primary Surge Suppressor.5Route the AC input power cable (cable S – Motorola part number 3087854C02) from the PrimarySurge Suppressor to the unit location(s).Table 5-8: Procedure to Install the DC Input Cable(s) on a BTS Equipped with Optional Primary SurgeSuppressorStep Action1Connect the loose wires of the DC Input Cable (cable U) to the  customer defined DC powersource. Refer to Table 5-4 for wiring information.2Verify all connections of cable U with an ohmmeter prior to routing the cable.3Route cable U from the DC power supply to the unit location.5
Power, Ground, and Battery Cabling for Sites Equipped with OptionalPrimary Surge Suppressor – continuedDRAFTSCt300 1X BTS Hardware Installation, ATP, and FRU Procedures JAN 20025-12Figure 5-8: Primary Surge Suppressor AC Input Power Connection LocationsGROUNDNEUTRALINPUT LINE 1INPUT LINE 21–IN CONDUITCUSTOMERAC POWERSOURCEAC LOADCENTER ALARMCONNECTION3 2 1ALARM WIREPOSITIONS5
Antenna Cabling for Sites Equipped With Optional Primary SurgeSuppressorJAN 2002 5-13SCt300 1X BTS Hardware Installation, ATP, and FRU ProceduresDRAFTObjectiveThe objective of this procedure is to install the cabling for theantenna(s).The antenna cabling is installed between one or more units and thePrimary Surge Suppressor.  No lightning arrestors are used.Cable LabelsThe cable designations are referenced to Table 4-1 in the “CableDescription” area of this chapter.Required CablesTable 5-9 provides the quantities and descriptions of the required cables.Table 5-9: Required Cables for Antenna ConnectionsCable Qty. Part Number DescriptionC1 to 8 Customer Supplied Antenna cable, 50–Ohm coaxial terminated with at least one male,N–type connector.D 2–6Customer Supplied Antenna cable, terminated with 2 N–type connectorsAntenna Cable Pin and SignalInformationThe antenna cabling uses a 50–Ohm coaxial cable.  The inner conductorprovides signaling and the outer conductor provides shielding andground.Figure 5-9: Antenna Cabling DetailsOUTERCONDUCTORINNERCONDUCTORANTENNA CABLE (COAXIAL)CONNECTORTable 5-10: Pin and Signal Information for Cables C and D (AntennaCable)Antenna Inner Conductor OuterConductorB (Microcell only) TX/RX GroundARX (Microcell) Ground5
Antenna Cabling for Sites Equipped With Optional Primary SurgeSuppressor – continuedDRAFTSCt300 1X BTS Hardware Installation, ATP, and FRU Procedures JAN 20025-14Procedure to Install AntennaCabling for Sites Equippedwith Primary Surge SuppressorDo the procedure in Table 5-11 to install the antenna cabling.Lightning arrestors are installed on the Primary SurgeSuppressor for two units.  You must add additionallightning arrestors when you expand from one to two units;two to three units and from three to four units.IMPORTANT*Table 5-11: Procedure to Install Antenna Cabling for Sites Equipped with Primary Surge SuppressorStep Action1Route cable D (antenna cable) between the unit(s) and the Primary Surge Suppressor.2Route cable C (antenna cable) from the Primary Surge Suppressor directly to the antenna(s).3Torque connectors to 4.3 N–m.Figure 5-10: Antenna Cabling for One Microcell with Primary Surge SuppressorMICROCELL 1KEYB/1(ANTENNA)LABELNUMBEROF CABLESNAMED/1(ANTENNA)PRIMARY SURGESUPPRESSORANT ARXANT BTX/RXD/1(ANTENNA) C/1(ANTENNA)C/1(ANTENNA)5
Antenna Cabling for Sites Equipped With Optional Primary SurgeSuppressor – continuedJAN 2002 5-15SCt300 1X BTS Hardware Installation, ATP, and FRU ProceduresDRAFTFigure 5-11: Antenna Cabling for Two Microcells with Primary Surge SuppressorMICROCELL 1KEYB/1(ANTENNA)LABELNUMBEROF CABLESNAMED/1(ANTENNA)PRIMARY SURGESUPPRESSORMICROCELL 2D/1(ANTENNA)ANTENNA 1TX/RXANTENNA 2TX/RXC/1(ANTENNA)C/1(ANTENNA)Figure 5-12: Antenna Cabling for Three Microcells with Primary Surge SuppressorMICROCELL 1KEYB/1(ANTENNA)LABELNUMBEROF CABLESNAMED/1(ANTENNA)PRIMARY SURGESUPPRESSORMICROCELL 2D/1(ANTENNA)MICROCELL 3D/1(ANTENNA)D/1(ANTENNA)ANTENNA 3RXANTENNA 4TX/RXANTENNA 2TX/RXANTENNA 1TX/RXC/1(ANTENNA)C/1(ANTENNA)C/1(ANTENNA)C/1(ANTENNA)5
Antenna Cabling for Sites Equipped With Optional Primary SurgeSuppressor – continuedDRAFTSCt300 1X BTS Hardware Installation, ATP, and FRU Procedures JAN 20025-16Figure 5-13: Antenna Cabling for Four Microcells with Primary Surge SuppressorMICROCELL 1KEYB/1(ANTENNA)LABELNUMBEROF CABLESNAMED/1(ANTENNA)PRIMARY SURGESUPPRESSORMICROCELL 2D/1(ANTENNA)MICROCELL 3D/1(ANTENNA)D/1(ANTENNA)MICROCELL 4ANTENNA 3TX/RXANTENNA 4TX/RXANTENNA 2TX/RXANTENNA 1TX/RXC/1(ANTENNA)C/1(ANTENNA)C/1(ANTENNA)C/1(ANTENNA)5
Site I/O, Span Line, RGPS, and Modem Cabling for Sites Equipped WithPrimary Surge SuppressorJAN 2002 5-17SCt300 1X BTS Hardware Installation, ATP, and FRU ProceduresDRAFTObjectiveThe objective of this procedure is to install the cabling between the SiteI/O junction box to the Primary Surge Suppressor.  This procedure alsoshows the punchblock cabling for the Site I/O cable.Cable LabelsThe cable designations are referenced to Table 4-1 in the “CableDescription” area of this chapter.Required CablesTable 5-12 provides the quantities and descriptions of the requiredcables.Table 5-12: Required Cables for Antenna ConnectionsCable Qty. Part Number DescriptionC 1–8Customer Supplied Antenna cable, 50–Ohm coaxial terminated with at least one male,N–type connector.D 2–6Customer Supplied Antenna cable, terminated with 2 N–type connectorsM 1 3086039H11 RGPS cable, 125 ft.3086039H12 RGPS cable, 250 ft.3086039H13 RGPS cable, 500 ft.3086039H14 RGPS cable, 1000 ft.3086039H15 RGPS cable, 2000 ft.N 1 Customer Supplied Span Cable.  22–24 AWG solid copper twisted pair.O 1 Customer Supplied Customer Input Cable.  22–24 AWG solid copper twisted pair.T 1 Customer Supplied AC Input Power Cable.  14 AWG.  Designed for 120–240 VAC.Terminated by at least 1 Deutsche connector.V 1 Customer Supplied Phone (Modem) Cable.  22–24 AWG solid copper twisted pair.Site I/O CablingThe Primary Surge Suppressor is optional and is supplied by Motorola.The Site I/O cable between the Primary Surge Suppressor and units 1and 2 is part of the Site I/O Junction box and is supplied by Motorola.The customer determines the Primary Surge Suppressor configuration.The end result is the correct signals getting to the correct punchblocklocation on the punchdown block.5
Site I/O, Span Line, RGPS, and Modem Cabling for Sites Equipped WithPrimary Surge Suppressor – continuedDRAFTSCt300 1X BTS Hardware Installation, ATP, and FRU Procedures JAN 20025-18Procedure to Install Site I/OCable Between Site I/OJunction Box and OptionalPrimary Surge SuppressorDo the procedure in Table 5-13 to connect the Site I/O cable.  Refer toFigure 5-14, Figure 5-15 and Figure 5-16.Table 5-13: Procedure to Install Site I/O Cable Between Site I/O Junction Box and Optional Primary SurgeSuppressorStep Action1Route the Site I/O cable(s) from the unit location to the Primary Surge Suppressor.2Connect the Site I/O cable from unit 1 to the connector labeled SITE I/O 1 on the right side of theSurge Suppressor.3Connect the appropriate conductors or wires to the Primary Surge Suppressor Punchdown block.Figure 5-14: Site I/O Cabling Details with Primary Surge SuppressorPRIMARYSURGESUPPRESSORSITE I/OJUNCTIONBOXSITE I/OCABLEACPOWERTANTENNADMASTERGROUNDYMICROCELL 1 CUSTOMERINPUTSSPANRGPSPHONE(MODEM)MNOVSITE I/OINTERFACE1–IN CONDUIT(FOR CABLES O, N,M, AND V)1–IN CONDUIT5
Site I/O, Span Line, RGPS, and Modem Cabling for Sites Equipped WithPrimary Surge Suppressor – continuedJAN 2002 5-19SCt300 1X BTS Hardware Installation, ATP, and FRU ProceduresDRAFTFigure 5-15: Punchdown Block LocationPUNCHDOWN BLOCKPRIMARY SURGESUPPRESSORFigure 5-16: Punchdown Block5
Site I/O, Span Line, RGPS, and Modem Cabling for Sites Equipped WithPrimary Surge Suppressor – continuedDRAFTSCt300 1X BTS Hardware Installation, ATP, and FRU Procedures JAN 20025-20Pin and Signal Information forSurge Suppressor PunchdownBlock CablingTable 5-14 gives the pin and signal information for connecting the loosewires to the customer locations on the Punchdown Block.The “CPE” half of the punchdown block connectors comesshipped  pre–wired and complete.  The user only needs towire the “OSP” half of the punchdown block connectors.NOTETable 5-14: Pin/Signal Information for Site I/O Cable and Punchdown BlockBTS Interface PunchblockLocation DescriptionOSP 1T Customer Input 1 SignalOSP 1R Customer Input 1 GroundOSP 2T Customer Input 2 SignalOSP 2R Customer Input 2 GroundOSP 3T Customer Input 3 SignalOSP 3R Customer Input 3 GroundOSP 4T Customer Input 4 SignalOSP 4R Customer Input 4 GroundCustomer Input OSP 5T Customer Input 5 SignalOSP 5R Customer Input 5 GroundOSP 6T Customer Input 6 SignalOSP 6R Customer Input 6 GroundOSP 7T Customer Input 7 SignalOSP 7R Customer Input 7 GroundOSP 8T Customer Input 8 Signal*OSP 8R Customer Input 8 Ground*OSP 9T Data to Tail –OSP 9R Data to Tail +Sync Reverse OSP 10T Data from Tail –OSP 10R Data from Tail + . . . continued on next page5
Site I/O, Span Line, RGPS, and Modem Cabling for Sites Equipped WithPrimary Surge Suppressor – continuedJAN 2002 5-21SCt300 1X BTS Hardware Installation, ATP, and FRU ProceduresDRAFTTable 5-14: Pin/Signal Information for Site I/O Cable and Punchdown BlockBTS Interface DescriptionPunchblockLocationSync Reverse OSP 11T 1 PPS to Tail –OSP 11R 1 PPS to Tail +OSP 12T 1 PPS from Tail –Sync Reverse OSP 12R 1 PPS from Tail +OSP 13T Downstream BTS Detect +OSP 13R Downstream BTS Detect –OSP 14T Data from Head –OSP 14R Data from Head +OSP 15T Data to Head –OSP 15R Data to Head +OSP 16T 1 PPS from Head –OSP 16R 1 PPS from Head +Sync Forward OSP 17T 1 PPS to Head –OSP 17R 1 PPS to Head +OSP 18T RGPS 28VOSP 18R RGPS GroundOSP 19T RGPS 28VOSP 19R RGPS GroundOSP20T UnusedUnused OSP20R UnusedOSP 21T RX TIP Primary (Network/Span A)OSP 21R RX RING Primary (Network/Span A)OSP 22T TX TIP Primary (Network/Span A)Span (Network) OSP 22R TX RING Primary (Network/Span A)OSP 23T RX TIP Secondary (Network/Span B)OSP 23R RX RING Secondary (Network/Span B)OSP 24T TX TIP Secondary (Network/Span B)Span (Network) OSP 24R TX RING Secondary (Network/Span B) . . . continued on next page5
Site I/O, Span Line, RGPS, and Modem Cabling for Sites Equipped WithPrimary Surge Suppressor – continuedDRAFTSCt300 1X BTS Hardware Installation, ATP, and FRU Procedures JAN 20025-22Table 5-14: Pin/Signal Information for Site I/O Cable and Punchdown BlockBTS Interface DescriptionPunchblockLocationOSP 25T MODEM TIPPhone (Modem) OSP 25R MODEM RING*Motorola recommends that you use the Customer Input 8 Signal and Ground for load center alarms.Connecting Customer–DefinedInputs to the Primary SurgeSuppressorThe unit provides eight customer–defined inputs for connection toexternal contacts.  Each input (a signal/ground pair) is monitored for an“OPEN” (>50 k Ohms) or “CLOSED” (<3 Ohms) condition.Motorola recommends using Customer Input 8 Signal and Ground forAC load center alarms.  The Primary Surge Suppressor is shipped withthe AC load center alarms already connected to positions 1 and 2(OSP8T and OSP8R).  Refer to Figure 5-8 and Table 5-15.Table 5-15: Customer Alarm Wiring Positions in AC Load Center on MOVsAlarm Wire Positions Circuit Alarm Reason for Alarm12Normally open Normally closed Damaged MOVs.Power interruption to surge box23Normally closed Normally open Damaged MOVs.Power interruption to surge boxAlarm interruption5
Site I/O, Span Line, RGPS, and Modem Cabling for Sites Equipped WithPrimary Surge Suppressor – continuedJAN 2002 5-23SCt300 1X BTS Hardware Installation, ATP, and FRU ProceduresDRAFTConnecting the RGPS Cable tothe Primary Surge SuppressorThe RGPS cable (cable M) is connected to the Primary Surge Suppressorpunchdown block (Sync Forward).  Table 5-16 provides the punchdownblock to RGPS connections.Table 5-16: Connecting the RGPS to the Site I/O CablePunchdown Block RGPS (Cable M)Sync ForwardDescriptions Punchdown BlockLocation RGPS Description RGPS Color Code(wire/stripe)Data from Head –OSP14T Transmit Port –Green/BlackData from Head + OSP14R Transmit Port + GreenData to Head –OSP15T Receive Port –White/BlackData to Head + OSP15R Receive Port + White1 pps from Head –OSP16T 1 PPS Timing –Brown/Black1 pps from Head + OSP16R 1 PPS Timing + BrownRGPS 28V OSP18T Power 1 BlueRGPS Ground OSP18R DC Ground 1 Blue/BlackRGPS 28V OSP19T Power 2 YellowRGPS Ground OSP19R DC Ground 2 Yellow/BlackN/A N/A No connect RedN/A N/A No connect Red/BlackConnecting the Span LineCable to the Primary SurgeSuppressorThe unit provides two, four–wire T1/E1 interfaces for backhaul support.Each interface is made up of Transmit Tip/Ring and Receive Tip/Ringconnections.The Transmit and Receive data flow is given from the perspective of theunit.  Only a single span line (Primary) is required for BTS operation.The second span is used to support the Span Line Daisy Chain cablingoption.Connecting a Phone Line to thePrimary Surge Suppressor(Modem Support)The unit provides a two–wire analog phone line interface for modemsupport.  The unit Tip and Ring signals are connected to the externalphone line Tip and Ring.5
RGPS Cabling for Multiple BTS Sites Equipped with Optional PrimarySurge SuppressorDRAFTSCt300 1X BTS Hardware Installation, ATP, and FRU Procedures JAN 20025-24ObjectiveThis procedure gives information to connect multiple BTS sites for bothRGPS (synchronous) and HSO (non–synchronous) configurations inboth indoor and outdoor applications.BackgroundThe RGPS connects to the site I/O interface of a multi–unit logical BTS.This first unit sends timing signals to all other units in a multi–unitlogical BTS.  You only need to connect the site I/O interfaces of eachBTS to each other.  This allows “sharing” of a single RGPS antennabetween several single or multi–unit logical BTSs.This also applies to systems using HSO instead of RGPS.  The HSOtiming is “shared” in the same way.Required Cables and KitsCablesThe RGPS Synchronization Cable is contained in the Motorola kitslisted  in Table 5-17:Table 5-17: Required Cables for Multi–BTS RGPS CablingCable Qty. Part Number DescriptionX 1–11 3086039H18 RGPS Synchronization cable (part of kit SGKN4351A).3086039H19 RGPS Synchronization cable (part of kit SGKN4352A).Motorola kitsTable 5-18 and Table 5-19 show the contents of Motorola kitsSGKN4351A and SGKN4352A.  These kits are necessary for RGPScabling between multiple BTS sites.Table 5-18:  RGPS Synchronization Cable Kit – SGKN4351ACable Qty. Motorola PartNumber DescriptionX 1 3086039H18 RGPS Sync Cable, 2000 ft.n/a 2 5864461A03 Fitting, liquid tight.n/a 2 0264599A02 Nut, nylon lockingTable 5-19:  RGPS Synchronization Cable Kit – SGKN4352ACable Qty. Motorola PartNumber DescriptionX 1 3086039H19 RGPS Sync Cable, 3280 ft.n/a 2 5864461A03 Fitting, liquid tight.n/a 2 0264599A02 Nut, nylon locking5
RGPS Cabling for Multiple BTS Sites Equipped with Optional PrimarySurge Suppressor – continuedJAN 2002 5-25SCt300 1X BTS Hardware Installation, ATP, and FRU ProceduresDRAFTSurge suppressorsSurge suppressors (Polyphaser 097–1017A–A.1) are required for certaininstallations.Cable Diagrams andDescriptionFigure 5-21 shows the RGPS cabling for a multi–BTS configuration foran RGPS (synchronous) configuration.  Figure 5-22 shows the RGPScabling for a multi–BTS HSO (non–synchronous) configuration.Figure 5-17 shows the general construction of the RGPS Sync Cable(cable X).  Cable X is supplied by Motorola with a 7.5 k Ohm, 1Wresistor already installed 150 mm from the end of the cable on theblue/black wire.  There is 200 mm on each end of the cable where thejacketing has been cut back.If necessary, the jacketing of cable X may be cut back further for properstrain relief.  For installations that require surge protection, you may cutcable X at the dashed lines and insert the surge protection devices.  Referto Table 5-21 for instructions to install the RGPS with surge protection.Figure 5-17: RGPS Sync Cable Diagram7.5 K OHM, 1WRESISTORRGPS SYNC CABLELOOSE WIRES LOOSE WIRESCABLE JACKET200mm150mm5M MAX5M MAX 5M MAX5M MAXProcedure to Install RGPSCabling for an IndoorInstallationUse the procedure in Table 5-20 to connect the RGPS Sync cable for anindoor installation.  Refer to the cable run list in Table 5-23, Figure 5-21,and Figure 5-22.Table 5-20: Procedure to Install RGPS Cabling for an Indoor InstallationStep Action1Connect the resistor end of the RGPS Sync Cable (cable X) to the sync reverse lines on the SiteI/O interface of BTS N.  Refer to Figure 5-18.  Refer to Table 5-23 for the cable X pinouts .2Connect the drain wire of cable X to a lug terminal tied directly to the master ground (earthground) of BTS N.3Route cable X from BTS N to BTS N+1. . . . continued on next page5
RGPS Cabling for Multiple BTS Sites Equipped with Optional PrimarySurge Suppressor – continuedDRAFTSCt300 1X BTS Hardware Installation, ATP, and FRU Procedures JAN 20025-26Table 5-20: Procedure to Install RGPS Cabling for an Indoor InstallationStep Action4Remove excess cable length from cable X and terminate to the sync forward lines on the Site I/Ointerface of BTS N+1.  Refer to Table 5-23 for the cable X pinouts.  Do not terminate the drainwire to the ground at the Site I/O interface at BTS N+1.wire to the ground at the Site I/O interface at BTS N+1.NOTEIf necessary for proper strain relief, the jacketing of cable X may be cut back further.Figure 5-18: RGPS Sync Cable for Indoor InstallationSITE I/OINTERFACE SITE I/OINTERFACEBTS NBTS N+17.5 K OHM, 1W RESISTORATTACH DRAIN WIRETO MASTER GROUNDOF BTS N ONLYRGPS SYNC CABLELOOSE WIRESLUG TERMINALMASTERGROUNDProcedure to Install RGPSCabling for an OutdoorInstallationUse the procedure in Table 5-21 to install the RGPS cabling for anyinstallation that may be susceptible to surges or where any portion of theRGPS cable is routed outside.  In these cases, you must reduce thelength of the RGPS cable by (still to be determined length) toaccommodate for the additional timing error incurred by adding surgeprotection.Table 5-21: Procedure to Install RGPS Cabling for an Outdoor InstallationStep Action1Follow all of the procedures in the “Connect RGPS Cables for Indoor Installation” procedure inTable 5-20.2Cut cable X to a maximum distance of 5m from BTS N.3Install the surge protection device at this point, with the protected side towards BTS N.4Ground the surge protection device to the master ground of BTS N. . . . continued on next page5
RGPS Cabling for Multiple BTS Sites Equipped with Optional PrimarySurge Suppressor – continuedJAN 2002 5-27SCt300 1X BTS Hardware Installation, ATP, and FRU ProceduresDRAFTTable 5-21: Procedure to Install RGPS Cabling for an Outdoor InstallationStep Action5When you cut the cable in step 2, the jacketing for the portion of cable X on the unprotected sideof the surge suppressor is not grounded.  To ground this portion of cable X, connect the drain wireto a lug terminal  tied directly to the master ground of BTS N.NOTEOnly ground the end of the cable jacket at BTS N.  Do not ground the jacket at BTS N+1.  Referto Figure 5-19.6Cut cable X to a maximum distance of 5m from BTS N+1.7Ground the surge protection device to the master ground of BTS N+1.8When you cut cable X in step 6, the jacketing for the portion of cable X between BTS N+1 andthe newly–inserted surge protector is ungrounded.  To ground this portion of cable X, connect thedrain wire from one end of the jacket of the cable to a lug terminal tied directly to the masterground of BTS N+1.  Refer to Figure 5-19.Figure 5-19: RGPS Sync Cable for Outdoor InstallationsSITE I/OINTERFACEBTS NBTS N+17.5 K OHM, 1WRESISTORAttach the drain wires to the earth grounds.  Thelength of cable between surge suppressors shouldbe attached to the earth ground at BTS N only.RGPS SYNC CABLE SITE I/OINTERFACESURGESUPPRESSORSURGESUPPRESSORGround the surgesuppressors to themaster grounds at eachBTS5M MAXMASTERGROUNDBTS N+1MASTERGROUNDBTS N5M MAXLUGTERMINALLUGTERMINALOutdoor installation exceptionsIn cases where it is impossible or impractical to route cable X in acontinuous stretch from BTS N to BTS N+1, you may cut and rejoin thecable using an inline splice (solder or crimp).  Both types of connectionsare acceptable as long as each wire remains electrically isolated fromevery other wire.  The twisted pairs must be kept together.  Refer toTable 5-22 for the pairing of the twisted pairs.5
RGPS Cabling for Multiple BTS Sites Equipped with Optional PrimarySurge Suppressor – continuedDRAFTSCt300 1X BTS Hardware Installation, ATP, and FRU Procedures JAN 20025-28You must splice the drain wire as well.  Apply a weatherproof heatshrink tubing or another weatherproof covering over the cable bundle inthe spliced section.  Refer to Figure 5-20.Figure 5-20: Cutting and Splicing RGPS Sync CableSplice each wire including thedrain wire.Shrink wrap entire spliced areaTable 5-22: Twisted Pairs for RGPS Sync Cable (Cable X)Pair Color1Red/BlackRed2White/BlackWhite3Green/BlackGreen4Blue/BlackBlue5Yellow/BlackYellow6Brown/BlackBrown5
RGPS Cabling for Multiple BTS Sites Equipped with Optional PrimarySurge Suppressor – continuedJAN 2002 5-29SCt300 1X BTS Hardware Installation, ATP, and FRU ProceduresDRAFTCable ConnectionsFor a full signal description of the Site I/O cable, refer to Table 5-14 inthe “Site I/O, Span Line, RGPS and Modem Cabling For Sites EquippedWith Primary Surge Suppressor” procedure.The pin number and wire color are based on the Site I/Ocable.  The pin number corresponds to pins on the Site I/Ojunction box connectors.NOTETable 5-23: Multi–BTS RGPS Cable Run List for Primary Surge SuppressorSync Reverse – From BTS N InterconnectingRGPS Cable(Cable X)Sync Forward – To BTS N+1PunchblockLocation Signal RGPS CableColor PunchblockLocation SignalOSP 9T Data to Tail–Green/Black OSP 14T Data from Head–OSP 9R Data to Tail+ Green OSP 14R Data from Head+OSP 10T Data from Tail–White/Black OSP 15T Data to Head–OSP 10R Data from Tail+ White OSP 15R Data to Head+OSP 11T 1 PPS to Tail–Brown/Black OSP 16T 1 PPS from Head–OSP 11R 1 PPS to Tail+ Brown OSP 16R 1 PPS from Head+OSP 12T 1 PPS from Tail–Red/Black OSP 17T 1 PPS to Head–OSP 12R 1 PPS from Tail+ Red OSP 17R 1 PPS to Head+OSP 20T Ground* Blue/Black OSP 20R Ground**The Multi–BTS Synchronization interface must also be referenced to the BTS digital ground through a 7.5Kohm, 1W resistor.  This resistor has been integrated into the blue/black wire of Cable X.  The end of Cable Xwith the resistor should be connected to the Sync Reverse locations on the punch block of BTS N.  Theopposite end of Cable X is connected to the Sync Forward locations on the punch block of BTS N+1 and maybe cut to the appropriate length.5
RGPS Cabling for Multiple BTS Sites Equipped with Optional PrimarySurge Suppressor – continuedDRAFTSCt300 1X BTS Hardware Installation, ATP, and FRU Procedures JAN 20025-30Figure 5-21: Site I/O Interface Cabling for RGPS (Synchronous) ConfigurationsPRIMARYSURGESUPPRESSORSITE I/OCABLESITE I/OCABLESITE I/OCABLESITE I/OCABLERGPS SYNCCABLENOTE 1:  EACH BTS MAY CONTAINUP TO FOUR SC300 UNITS.NOTE 2:  A MAXIMUM OF 12 BTS MAYBE INTERCONNECTED WITH AMAXIMUM DAISY CHAIN CABLELENGTH OF 600M BETWEEN EACHBTS.  A MAXIMUM OF SEVEN BTSMAY BE INTERCONNECTED WITH AMAXIMUM DAISY CHAIN CABLELENGTH OF 1KM BETWEEN EACHBTS.MAXIMUMDISTANCE IS1 KM (SEENOTE 2)BTS 1 (SEE NOTE 1)BTS 3(SEE NOTE 1)BTS 4(SEE NOTE 1)XXXBTS 2(SEE NOTE 1)MAXIMUMDISTANCE IS1 KM (SEENOTE 2)MAXIMUMDISTANCE IS1 KM (SEENOTE 2)UPSTREAMUPSTREAMUPSTREAMDOWNSTREAMDOWNSTREAMDOWNSTREAMPRIMARYSURGESUPPRESSORPRIMARYSURGESUPPRESSORPRIMARYSURGESUPPRESSORCUSTOMERINPUTSSPANRGPSPHONE(MODEM)MNOVSITE I/OINTERFACECUSTOMERINPUTSSPANPHONE(MODEM)NOVSITE I/OINTERFACECUSTOMERINPUTSSPANPHONE(MODEM)NOVSITE I/OINTERFACECUSTOMERINPUTSSPANPHONE(MODEM)NOVSITE I/OINTERFACE1–IN CONDUIT(CABLES O, N, V,AND X)1–IN CONDUIT(CABLES O, N, V,AND X)1–IN CONDUIT(CABLES O, N, V,AND X)1–IN CONDUIT(CABLES O, N, M, VAND X)= SURGE PROTECTION DEVICE (OPTIONAL)RGPS SYNCCABLERGPS SYNCCABLEUNIT301 UNIT201 UNIT 101 UNIT 1UNIT201 UNIT 101 UNIT 1UNIT 101 UNIT 1UNIT 15
RGPS Cabling for Multiple BTS Sites Equipped with Optional PrimarySurge Suppressor – continuedJAN 2002 5-31SCt300 1X BTS Hardware Installation, ATP, and FRU ProceduresDRAFTFigure 5-22: Site I/O Interface Cabling for HSO (Non–Synchronous) ConfigurationsPRIMARYSURGESUPPRESSORSITE I/OCABLESITE I/OCABLESITE I/OCABLESITE I/OCABLENOTE 1:  EACH BTS MAY CONTAIN UPTO FOUR SC300 UNITS.NOTE 2:  A MAXIMUM OF 12 BTS MAYBE INTERCONNECTED WITH AMAXIMUM DAISY CHAIN CABLELENGTH OF 600M BETWEEN EACHBTS.  A MAXIMUM OF SEVEN BTS MAYBE INTERCONNECTED WITH AMAXIMUM DAISY CHAIN CABLELENGTH OF 1 KM BETWEEN EACHBTS.MAXIMUMDISTANCE IS600 M (SEENOTE 2)BTS 1 (SEE NOTE 1)BTS 3(SEE NOTE 1)BTS 4(SEE NOTE 1)XXXBTS 2(SEE NOTE 1)MAXIMUMDISTANCE IS600 M (SEENOTE 2)MAXIMUMDISTANCE IS600 M (SEENOTE 2)UPSTREAMUPSTREAMUPSTREAMDOWNSTREAMDOWNSTREAMDOWNSTREAMPRIMARYSURGESUPPRESSORPRIMARYSURGESUPPRESSORPRIMARYSURGESUPPRESSORCUSTOMERINPUTSSPANPHONE(MODEM)NOVSITE I/OINTERFACECUSTOMERINPUTSSPANPHONE(MODEM)NOVSITE I/OINTERFACECUSTOMERINPUTSSPANPHONE(MODEM)NOVSITE I/OINTERFACECUSTOMERINPUTSSPANPHONE(MODEM)NOVSITE I/OINTERFACE1–IN CONDUIT(CABLES O, N, V,AND X)1–IN CONDUIT(CABLES O, N, V,AND X)1–IN CONDUIT(CABLES O, N, V,AND X)1–IN CONDUIT(CABLES O, N, V,AND X)= SURGE PROTECTION DEVICE (OPTIONAL)RGPS SYNCCABLERGPS SYNCCABLERGPS SYNCCABLEUNIT301 UNIT201 UNIT 101 UNIT 1UNIT201 UNIT 101 UNIT 1UNIT 101 UNIT 1UNIT 15
Span Line Daisy Chain Cabling for Multiple BTS Sites Equipped withOptional Primary Surge SuppressorDRAFTSCt300 1X BTS Hardware Installation, ATP, and FRU Procedures JAN 20025-32ObjectiveThe objective of this procedure is to install span line cabling betweenmultiple BTS sites equipped with Primary Surge Suppressor in an opendaisy chain configuration.BackgroundThis feature allows multiple BTS sites to be linked together in an opendaisy chain loop using a single T1/E1 span.  This will reduce the numberof spans necessary to support a CDMA system and minimize unusedchannels.Each BTS site may contain up to four units.  A maximum of 12 BTSsites may be combined in a single daisy chain.Required CablesThe following cables are necessary to do this procedure.Table 5-24: Required Cables for Span Line Daisy Chain CablingCable Qty. Part Number DescriptionW 1–3 CustomerSupplied Span Line Daisy Chain CableProcedureAttach the span line daisy chain cable (Cable W) to the site I/O interfaceof each BTS site.  Refer to Figure 5-23 and Table 5-25.Cable ConnectionsTable 5-25 shows the cable run information for span line daisy chaincabling for BTS sites equipped with the Primary Surge Suppressor.For a full signal description of the Site I/O cable refer to Table 5-14 inthe “Site I/O, Span Line, RGPS and Modem Cabling for Sites Equippedwith Optional Primary Surge Suppressor” procedure.The pin number and wire color are based on the Site I/Ocable.  The pin number corresponds to pins on the Site I/Ojunction box connectors.NOTE5
Span Line Daisy Chain Cabling for Multiple BTS Sites Equipped withOptional Primary Surge Suppressor – continuedJAN 2002 5-33SCt300 1X BTS Hardware Installation, ATP, and FRU ProceduresDRAFTTable 5-25: Cable Run List for Span Line Daisy Chain CablingBTS 1 (Secondary Backhaul –Span B Downstream) BTS 2 (Primary Backhaul –Span A Upstream)PunchdownBlock Location Desc. PunchdownBlock Location Desc.OSP 23T RX TIP OSP 22T TX TIPOSP 23R RX RING OSP 22R TX RINGOSP 24T TX TIP OSP 21T RX TIPOSP 24R TX RING OSP 21R RX RING5
Span Line Daisy Chain Cabling for Multiple BTS Sites Equipped withOptional Primary Surge Suppressor – continuedDRAFTSCt300 1X BTS Hardware Installation, ATP, and FRU Procedures JAN 20025-34Figure 5-23: Site I/O Interface Cabling for Span Line Daisy Chain CablingPRIMARYSURGESUPPRESSORSITE I/OCABLESITE I/OCABLESITE I/OCABLESITE I/OCABLESPAN LINE DAISYCHAIN CABLESPAN LINE DAISYCHAIN CABLESPAN LINE DAISYCHAIN CABLENOTE 1:  EACH BTS SITE MAYCONSIST OF UP TO FOUR SC300UNITS.  THERE MAY BE A TOTAL OF12 BTS IN A DAISY CHAIN.NOTE 2:  THE USE OF AN RGPS ISDEPENDANT UPON WHETHER ORNOT THE SITES USE A MULTI–BTSSITE RGPS CONFIGURATION.NOTE 3:  THE USE OF THEMULTI–BTS RGPS CABLE (CABLE X)DEPENDS UPON SYSTEMCONFIGURATION.BTS 1 (SEE NOTE 1)BTS 3(SEE NOTE 1)BTS 4(SEE NOTE 1)WWWBTS 2(SEE NOTE 1)PRIMARYSURGESUPPRESSORPRIMARYSURGESUPPRESSORPRIMARYSURGESUPPRESSORCUSTOMERINPUTSSPANRGPSPHONE(MODEM)MNOVSITE I/OINTERFACECUSTOMERINPUTSRGPS (SEE NOTE 2)PHONE(MODEM)MOVSITE I/OINTERFACECUSTOMERINPUTSPHONE(MODEM)MOVSITE I/OINTERFACECUSTOMERINPUTSPHONE(MODEM)MOVSITE I/OINTERFACE1–IN CONDUIT(CABLES O, M, V,W, AND X)(SEE NOTE 3)1–IN CONDUIT(CABLES O, M, V,W, AND X)(SEE NOTE 3)1–IN CONDUIT(CABLES O, M, V,W AND X)(SEE NOTE 3)1–IN CONDUIT(CABLES O, N, M,V, W, AND X)(SEE NOTE 3)RGPS (SEE NOTE 2)RGPS (SEE NOTE 2)X/1(SEE NOTE 3)X/1(SEE NOTE 3)X/1(SEE NOTE 3)UNIT301 UNIT201 UNIT 101 UNIT 1UNIT201 UNIT 101 UNIT 1UNIT 101 UNIT 1UNIT 15
JAN 2002 SCt300 1X BTS Hardware Installation, ATP, and FRU ProceduresDRAFTChapter 6: Installing the Unit and Installation Check Off List Table of ContentsUnit Installation Overview 6-1. . . . . . . . . . . . . . . . . . . . . . . . . . . . . . . . . . . . . . . . . Overview 6-1. . . . . . . . . . . . . . . . . . . . . . . . . . . . . . . . . . . . . . . . . . . . . . . . Unit Installation Procedure Order 6-1. . . . . . . . . . . . . . . . . . . . . . . . . . . . . Connector Locations 6-2. . . . . . . . . . . . . . . . . . . . . . . . . . . . . . . . . . . . . . . . . . . . . . Connector Locations for MicroCell and Primary Surge Suppressor 6-2. . . Attaching Back Fin Cover to Unit 6-4. . . . . . . . . . . . . . . . . . . . . . . . . . . . . . . . . . . Objective 6-4. . . . . . . . . . . . . . . . . . . . . . . . . . . . . . . . . . . . . . . . . . . . . . . . When to Use the Fin Covers 6-4. . . . . . . . . . . . . . . . . . . . . . . . . . . . . . . . . Procedure to Install Back Fin Cover to Unit 6-4. . . . . . . . . . . . . . . . . . . . . Attaching Optional Installation Handles to the Unit 6-5. . . . . . . . . . . . . . . . . . . . . Objective 6-5. . . . . . . . . . . . . . . . . . . . . . . . . . . . . . . . . . . . . . . . . . . . . . . . Required Tools and Materials 6-5. . . . . . . . . . . . . . . . . . . . . . . . . . . . . . . . Procedure to Attach the Installation Handles to the Unit 6-5. . . . . . . . . . . Attaching Unit to Mounting Bracket 6-7. . . . . . . . . . . . . . . . . . . . . . . . . . . . . . . . . Objective 6-7. . . . . . . . . . . . . . . . . . . . . . . . . . . . . . . . . . . . . . . . . . . . . . . . Background 6-7. . . . . . . . . . . . . . . . . . . . . . . . . . . . . . . . . . . . . . . . . . . . . . Required Tools and Equipment 6-7. . . . . . . . . . . . . . . . . . . . . . . . . . . . . . . Procedure to Attach the Unit to the Mounting Bracket 6-7. . . . . . . . . . . . . Earth Ground Cabling 6-9. . . . . . . . . . . . . . . . . . . . . . . . . . . . . . . . . . . . . . . . . . . . . Objective 6-9. . . . . . . . . . . . . . . . . . . . . . . . . . . . . . . . . . . . . . . . . . . . . . . . Other Grounding Considerations 6-9. . . . . . . . . . . . . . . . . . . . . . . . . . . . . . Required Cables 6-9. . . . . . . . . . . . . . . . . . . . . . . . . . . . . . . . . . . . . . . . . . . Required Tools and Materials 6-9. . . . . . . . . . . . . . . . . . . . . . . . . . . . . . . . Procedure to Attach the Earth Ground Cables 6-9. . . . . . . . . . . . . . . . . . . . Attaching Front Fin Cover to Unit 6-11. . . . . . . . . . . . . . . . . . . . . . . . . . . . . . . . . . . Objective 6-11. . . . . . . . . . . . . . . . . . . . . . . . . . . . . . . . . . . . . . . . . . . . . . . . When to Use the Fin Covers 6-11. . . . . . . . . . . . . . . . . . . . . . . . . . . . . . . . . Procedure to Attach the Front Fin Cover to Unit 6-11. . . . . . . . . . . . . . . . . Attaching the Site I/O Junction Box to the Unit 6-12. . . . . . . . . . . . . . . . . . . . . . . . Objective 6-12. . . . . . . . . . . . . . . . . . . . . . . . . . . . . . . . . . . . . . . . . . . . . . . . Required Tools and Materials 6-12. . . . . . . . . . . . . . . . . . . . . . . . . . . . . . . . Procedure to Attach the Site I/O Junction Box to the Unit 6-12. . . . . . . . . . Procedure to Attach a Site I/O Cap to the Unit (optional) 6-13. . . . . . . . . . 6
Table of Contents  – continuedDRAFTSCt300 1X BTS Hardware Installation, ATP, and FRU Procedures JAN 2002Attaching the Short Duration Battery to the Unit (optional) 6-14. . . . . . . . . . . . . . . Objective 6-14. . . . . . . . . . . . . . . . . . . . . . . . . . . . . . . . . . . . . . . . . . . . . . . . Required Tools and Materials 6-14. . . . . . . . . . . . . . . . . . . . . . . . . . . . . . . . Procedure to Attach the Short Duration Battery to the Unit 6-14. . . . . . . . . Short Duration Battery Cabling 6-16. . . . . . . . . . . . . . . . . . . . . . . . . . . . . . . . . . . . . Objective 6-16. . . . . . . . . . . . . . . . . . . . . . . . . . . . . . . . . . . . . . . . . . . . . . . . Battery Cable 6-16. . . . . . . . . . . . . . . . . . . . . . . . . . . . . . . . . . . . . . . . . . . . . Procedure to Install Short Duration Battery Cable to the Unit 6-16. . . . . . . AC Power Cabling 6-18. . . . . . . . . . . . . . . . . . . . . . . . . . . . . . . . . . . . . . . . . . . . . . . Objective 6-18. . . . . . . . . . . . . . . . . . . . . . . . . . . . . . . . . . . . . . . . . . . . . . . . Required Cables 6-18. . . . . . . . . . . . . . . . . . . . . . . . . . . . . . . . . . . . . . . . . . . Power Cable and Connector Signal Information 6-18. . . . . . . . . . . . . . . . . . Procedure to Connect AC Input Power Cable to the Unit 6-18. . . . . . . . . . . DC Power Cabling 6-20. . . . . . . . . . . . . . . . . . . . . . . . . . . . . . . . . . . . . . . . . . . . . . . Objective 6-20. . . . . . . . . . . . . . . . . . . . . . . . . . . . . . . . . . . . . . . . . . . . . . . . Required Cables 6-20. . . . . . . . . . . . . . . . . . . . . . . . . . . . . . . . . . . . . . . . . . . Power Cable and Connector Signal Information 6-20. . . . . . . . . . . . . . . . . . Procedure to Connect DC Input Power Cabling to the Unit 6-20. . . . . . . . . Antenna Cabling for Sites Equipped with Customer–Supplied Site I/O Interface 6-22. . . . . . . . . . . . . . . . . . . . . . . . . . . . . . . . Objective 6-22. . . . . . . . . . . . . . . . . . . . . . . . . . . . . . . . . . . . . . . . . . . . . . . . Required Cables 6-22. . . . . . . . . . . . . . . . . . . . . . . . . . . . . . . . . . . . . . . . . . . Procedure to Install Antenna Cabling 6-22. . . . . . . . . . . . . . . . . . . . . . . . . . Antenna Cabling for Sites Equipped with Optional Primary Surge Suppressor 6-25Objective 6-25. . . . . . . . . . . . . . . . . . . . . . . . . . . . . . . . . . . . . . . . . . . . . . . . Cable Labels 6-25. . . . . . . . . . . . . . . . . . . . . . . . . . . . . . . . . . . . . . . . . . . . . Required Cables 6-25. . . . . . . . . . . . . . . . . . . . . . . . . . . . . . . . . . . . . . . . . . . Procedure to Install Antenna Lightning Arrestors and Antenna Cabling 6-25MIB Cabling for Multi–Unit Logical BTS Configurations 6-30. . . . . . . . . . . . . . . . Overview 6-30. . . . . . . . . . . . . . . . . . . . . . . . . . . . . . . . . . . . . . . . . . . . . . . . Cable Labels 6-30. . . . . . . . . . . . . . . . . . . . . . . . . . . . . . . . . . . . . . . . . . . . . Required Tools and Equipment 6-30. . . . . . . . . . . . . . . . . . . . . . . . . . . . . . . Procedure to Install MIB Cabling 6-32. . . . . . . . . . . . . . . . . . . . . . . . . . . . . Subscriber Unit (SU) Cabling 6-34. . . . . . . . . . . . . . . . . . . . . . . . . . . . . . . . . . . . . . . Objective 6-34. . . . . . . . . . . . . . . . . . . . . . . . . . . . . . . . . . . . . . . . . . . . . . . . Required Tools and Equipment 6-34. . . . . . . . . . . . . . . . . . . . . . . . . . . . . . . Procedure to Install SU Cabling 6-34. . . . . . . . . . . . . . . . . . . . . . . . . . . . . . Terminating Unused Connections 6-36. . . . . . . . . . . . . . . . . . . . . . . . . . . . . . . . . . . . Objective 6-36. . . . . . . . . . . . . . . . . . . . . . . . . . . . . . . . . . . . . . . . . . . . . . . . List of Terminators for Unused Connections 6-36. . . . . . . . . . . . . . . . . . . . . Procedure 6-36. . . . . . . . . . . . . . . . . . . . . . . . . . . . . . . . . . . . . . . . . . . . . . . . Powering on the Unit and Mounting the Solar Cover 6-37. . . . . . . . . . . . . . . . . . . . Objective 6-37. . . . . . . . . . . . . . . . . . . . . . . . . . . . . . . . . . . . . . . . . . . . . . . . You May Want to Wait 6-37. . . . . . . . . . . . . . . . . . . . . . . . . . . . . . . . . . . . . . Required Tools and Materials 6-37. . . . . . . . . . . . . . . . . . . . . . . . . . . . . . . . 6
Table of Contents  – continuedJAN 2002 SCt300 1X BTS Hardware Installation, ATP, and FRU ProceduresDRAFTProcedure to Power On the Unit and Mount Solar Cover 6-37. . . . . . . . . . . Procedure to Power On the Surge Suppressor, the Unit, and Mount the Solar Cover 6-37. . . . . . . . . . . . . . . . . . . . . . . . . . . . . . . . . . . . . Site Cleanup 6-40. . . . . . . . . . . . . . . . . . . . . . . . . . . . . . . . . . . . . . . . . . . . . . . . . . . . Remove Protective Covering 6-40. . . . . . . . . . . . . . . . . . . . . . . . . . . . . . . . . Lighting Fixtures 6-40. . . . . . . . . . . . . . . . . . . . . . . . . . . . . . . . . . . . . . . . . . Tools 6-40. . . . . . . . . . . . . . . . . . . . . . . . . . . . . . . . . . . . . . . . . . . . . . . . . . . Materials 6-40. . . . . . . . . . . . . . . . . . . . . . . . . . . . . . . . . . . . . . . . . . . . . . . . Remove Debris 6-40. . . . . . . . . . . . . . . . . . . . . . . . . . . . . . . . . . . . . . . . . . . Environment 6-40. . . . . . . . . . . . . . . . . . . . . . . . . . . . . . . . . . . . . . . . . . . . . Installation Completion Checklist 6-41. . . . . . . . . . . . . . . . . . . . . . . . . . . . . . . . . . . Directions 6-41. . . . . . . . . . . . . . . . . . . . . . . . . . . . . . . . . . . . . . . . . . . . . . . . Installation Completion Checklist 6-41. . . . . . . . . . . . . . . . . . . . . . . . . . . . . 6
Table of Contents  – continuedDRAFTSCt300 1X BTS Hardware Installation, ATP, and FRU Procedures JAN 2002Notes6
Unit Installation OverviewJAN 2002 6-1SCt300 1X BTS Hardware Installation, ATP, and FRU ProceduresDRAFTOverviewThis chapter provides the procedures for unit installation and cabling.The site cabling has been installed and routed to the location of the BTS.In this chapter, the cables will be attached to the unit(s).  Cablinginstallation will be repeated as necessary for each unit at the BTS.This chapter provides the information and procedures to:SAttach the unit to the mounting bracketSAttach cables to the unitSPower on the unitSMount the solar coversSComplete the installation completion checklistUnit Installation ProcedureOrderThe process of installing the unit requires that the following proceduresbe completed in the order shown:1. Install back fin cover to unit (required for indoor applications if solarcovers will not be used).2. Attaching the installation handles to the unit (optional).3. Attaching the unit to the mounting bracket.4. Remove the installation handles (optional).5. Attach earth ground cable and optional master ground cable.6. Attach the Site I/O junction box to the unit.7. Attach Subscriber Unit (SU) to unit.8. Attach front fin cover (required for indoor applications if solarcovers will not be used).9. Attach the short duration battery (optional).10. Attach the AC input power or DC input power cable.11. Attach antenna cable(s).12. Attach the MIB cables (optional).13. Attach the SU cables (optional).14. Terminating unused connectors.15. Powering on the unit.16. Attach front solar cover (required for outdoor installations andoptional for indoor applications if fin covers will not be used).17. Cleaning up site.18. Filling out the installation completion checklist.6
Connector LocationsDRAFTSCt300 1X BTS Hardware Installation, ATP, and FRU Procedures JAN 20026-2Connector Locations forMicroCell and Primary SurgeSuppressorFigure 6-1 though Figure 6-3 show the location of the cable connectorson the Microcell and Primary Surge Suppressor.  The systemconfiguration determines which connectors are used.Figure 6-1: General Block Diagram Showing the Port NamesSITE I/OJUNCTION BOXDC POWERBREAKERDC INPUTMIB CMIB BMIB AANTENNA AAC POWERBREAKERAC INPUTSU RFSU DIGITALANTENNA BSUBSCRIBER UNITNOTE:  CABLES REMOVED FORILLUSTRATION PURPOSES6
Connector Locations – continuedJAN 2002 6-3SCt300 1X BTS Hardware Installation, ATP, and FRU ProceduresDRAFTFigure 6-2: General Block Diagram Showing the Unit, Site I/O Interface, and External ItemsANTTX/RXCUSTOMERINPUTSSPANRGPSDCPOWERPHONE(MODEM)ACPOWERSITE I/OINTERFACEMIBTERMINATORANT  RXNOTE:  CABLES REMOVED FORILLUSTRATION PURPOSES6
Connector Locations – continuedDRAFTSCt300 1X BTS Hardware Installation, ATP, and FRU Procedures JAN 20026-4Figure 6-3: Location of Primary Surge Suppressor ConnectorsSITE I/O 2AC POWER 2AC POWER 3AC POWER 4AC POWER 1AC INPUT(Conduit Hole)SITE I/O INPUT(Conduit Hole)SITE I/O 1ANTENNA PROTECTOR 2ANTENNA PROTECTOR 1LEFT SIDE RIGHT SIDEGROUND 4GROUND 3GROUND 2GROUND 1EARTHGROUNDANTENNA PROTECTOR 3(FOR FUTURE EXPANSION)ANTENNA PROTECTOR 6(FOR FUTURE EXPANSION)ANTENNA PROTECTOR 5(FOR FUTURE EXPANSION)ANTENNA PROTECTOR 4(FOR FUTURE EXPANSION)6
Attaching Back Fin Cover to UnitJAN 2002 6-5SCt300 1X BTS Hardware Installation, ATP, and FRU ProceduresDRAFTObjectiveThe objective of this procedure is to attach the back fin cover to theMicroCell unit.  The front fin cover is mounted to the unit after the unitis mounted to the mounting bracket.When to Use the Fin CoversYou must always use fin covers in an indoor application.Procedure to Install Back FinCover to UnitAttach the back fin cover to the unit by following the procedures inTable 6-1 and the information in Figure 6-4.Table 6-1: Procedure to Install Back Fin Cover to UnitStep Action1Install back fin cover prior to placing unit on the mounting bracket.2Center fin cover on the fins of the unit. See Figure 6-4 for snap locations.3Align snap with center tab on fins.4Push fin cover into place.Figure 6-4: Attaching Back Fin Cover to UnitLOCATION OF SNAPS TO ATTACHFIN COVER TO UNITMICROCELL FINS6
Attaching Optional Installation Handles to the UnitDRAFTSCt300 1X BTS Hardware Installation, ATP, and FRU Procedures JAN 20026-6ObjectiveThe objective of this procedure is to attach the installation handles to theunit. The location for the handles is shown in Figure 6-5. The handlesshould be used when lifting or carrying the unit.Installation handles are available with installation kit#SGLN5754NOTERequired Tools and MaterialsToolsAttaching the installation handles to the unit requires:ST30 Torx tamper bitSTorque driver wrench, 1/4–in. hex female drive, 0–10 N–MMotorola partsTable 6-2 lists the parts necessary to do this procedure.Table 6-2: Installation Handle KitQuantity Part Number Description2 0387541C08 Screws M6x252 0387541C09 Screws M6x352 5588425C01 HandleProcedure to Attach theHandles to the UnitAttach the installation handles to the unit by following the procedures inTable 6-3 and the information in Figure 6-5.Table 6-3: Procedure to Attach the Installation HandlesStep Action1Hold one handle in position and start the upper screw.  See Figure 6-5.2Start the lower screw.3Use a T30 Torx tamper bit to torque the two M6 screws to 5.0 N–m.4Repeat steps 1–3 for the other handle.6
Attaching Installation Handles to the Unit – continuedJAN 2002 6-7SCt300 1X BTS Hardware Installation, ATP, and FRU ProceduresDRAFTFigure 6-5: Attaching the Installation Handles to the UnitM6X19 (4)INSTALLATIONHANDLEHOLES USED FORMOUNTING HANDLESINSTALLATIONHANDLE6
Attaching Unit to Mounting BracketDRAFTSCt300 1X BTS Hardware Installation, ATP, and FRU Procedures JAN 20026-8ObjectiveThe objective of this procedure is to attach the unit to the mountingbracket. This procedure applies to mounting brackets that are attached toa rack, wall, or pole.BackgroundThe unit attaches to the mounting bracket with two (2) M6 screws andthe provided pin or a customer–supplied padlock.The handles should be mounted to the unit beforemounting the unit to the bracket. The handles should beused to lift the unit onto the bracket. If the solar cover is tobe used, the back cover must be attached prior to mountingthe unit. Remove the handles once the unit has beensecured to the mounting bracket.NOTERequired Tools and EquipmentThe following tools and equipment are required to attach the unit to themounting bracket:STorque driver wrench, 1/4–in. hex female drive, 0–10 N–MST30 Torx tamper bitSTwo M6X19 screws (Motorola Part Number 0387541C03)Procedure to Attach the Unit tothe Mounting BracketFollow the procedure in Table 6-4 to attach the unit to the mountingbracket.  Refer to Figure 6-6.Use caution when resting the MicroCell unit on the hooksof the mounting bracket. Do not leave unit supported byhooks only.CAUTIONTable 6-4: Procedure to Attach the Unit to the Mounting BracketStep Action1Lift the unit using the installation handles and place it on the mounting bracket by aligning thebracket’s upper arms into the rectangular cutouts in the heatsink. The unit will need to be raisedup slightly so that the lower bracket flange does not contact the unit’s lower surface.2Use a T30 Torx tamper bit to start, but not tighten, both screws in the location shown inFigure 6-6. . . . continued on next page6
Attaching Unit to Mounting Bracket – continuedJAN 2002 6-9SCt300 1X BTS Hardware Installation, ATP, and FRU ProceduresDRAFTTable 6-4: Procedure to Attach the Unit to the Mounting BracketStep Action3At the bottom of the unit, align the hole in the mounting bracket with the hole in the unit.  Placethe pin or customer–supplied padlock through this hole.  Screw pin together and tighten firmly.4Use a T30 Torx tamper bit to torque the two mounting screws to 5.0 N–M.5Use a T30 Torx tamper bit to remove the installation handles.Figure 6-6: Attaching Unit to V–Style Mounting BracketATTACH THE HANDLES TOTHE UNIT BEFORE LIFTINGHOOKSMOUNTINGBRACKETSLIDE PIN THROUGHHOLES IN BRACKET ANDSCREW TOGETHERM6 SCREWS (2)LOCKING INTERFACEMOUNTING BRACKETPIN (P/N 5587660C01 OR,5587660C02)6
Earth Ground CablingDRAFTSCt300 1X BTS Hardware Installation, ATP, and FRU Procedures JAN 20026-10ObjectiveThe objective of this procedure is to attach the earth ground cabling toone or more MicroCell units. This procedure covers just the groundingcables that attach to the MicroCell.Other GroundingConsiderationsGrounding considerations beyond the ground cables that attach to theMicroCell are summarized in Appendix A. Refer to Appendix A and thesite documentation for other grounding considerations.If your site is equipped with the optional Primary Surge Suppressor,refer to the “Power, Earth Ground, and Battery Cabling” Procedure inchapter 4 for information about installing the Master Ground cable.Required CablesThe following cables in Table 6-5 are necessary to do this procedure.Table 6-5: Required Cables for Earth Ground CablingCable Qty. Part Number DescriptionA 1–4 3087701C02 Ground cable, 8 -AWG, insulated copper wire. Requires one ring lugconnector.  Used for Primary Surge Suppressor Installation.B 1–4 3087701C01 Ground cable, Site I/O Junction Box to Bracket (for installationswithout external Subscriber Unit).L 1–4 3087701C04 Y–Ground Cable (for external SU and Site I/O).Y 1 CustomerSupplied Master Ground Cable, 6 -AWG, insulated copper wire.  Used for bothPrimary Surge Suppressor and non–Primary Surge Suppressorinstallations.Required Tools and MaterialsThe following tools are required to attach ground cabling to theMicroCell unit.S13 mm torque wrench set to 5.0 N–MSFlathead screwdriver bitST30 TORX bitProcedure to Attach the EarthGround CablesUse the following procedure to attach the ground cables. Refer toTable 6-6 and Figure 6-7.Table 6-6: Procedure to Attach the Earth Ground CablesStep Action1Remove the hex nuts and lock washers from the ground stud on the mounting bracket.  Refer toFigure 6-8. . . . continued on next page6
Earth Ground Cabling – continuedJAN 2002 6-11SCt300 1X BTS Hardware Installation, ATP, and FRU ProceduresDRAFTTable 6-6: Procedure to Attach the Earth Ground CablesStep Action2Attach the master ground cable (cable A or cable Y) to the ground stud on the mounting bracket.3Replace one lock washer and nut on the ground stud and tighten to 5 N–m.4Attach the single end of the Y–ground cable (cable L) to the ground stud on the mounting bracket.If the unit is not equipped with a Site I/O, attach one end of the Site I/O ground cable (cable B) tothe ground stud on the mounting bracket.5Replace the second lockwasher and hex nut to the ground stud on the mounting bracket.  Use atorque wrench and a 13mm socket to tighten to 5.0 N–m.Figure 6-7: Detail Location of Ground StudGROUNDING STUDCABLE A OR CABLE Y (MASTERGROUND CABLE) TO CUSTOMERDEFINED MASTER GROUNDPLATECABLE L (Y–GROUND CABLE) OR,CABLE B (SITE I/O GROUND CABLE)6
Earth Ground Cabling – continuedDRAFTSCt300 1X BTS Hardware Installation, ATP, and FRU Procedures JAN 20026-12Figure 6-8: Grounding Stud on Mounting BracketLOCK WASHERNUTNUTLOCK WASHERMOUNTING BRACKETCUSTOMER UNITGROUND LUGSITE I/O GROUND LUGGROUNDING STUD6
Attaching the Site I/O Junction Box to the UnitJAN 2002 6-13SCt300 1X BTS Hardware Installation, ATP, and FRU ProceduresDRAFTObjectiveThe objective of this procedure is to attach the Site I/O junction box tothe unit. The location for the Site I/O junction box is shown inFigure 6-9.If you do not mount a Site I/O Junction box to a unit, leave the installedSite I/O caps on the Site I/O Junction box connectors.Required Tools and MaterialsThe following tools and materials are necessary to do this procedure:STorque driver wrench, 1/4–in. hex female drive, 0–10 N–MST30 Torx tamper bitSSite I/O Junction boxProcedure to Attach the SiteI/O Junction Box to the UnitFollow the procedure below to attach the site I/O junction box to theunit.Table 6-7: Procedure to Attach the Site I/O Junction Box to the UnitStep Action1Use a T30 TORX bit to remove Site I/O Cap from the Site I/O connector.NOTESave Site I/O Cap for future use.2Remove the Site I/O Plate from the Site I/O Junction Box.3Attach the straight end of the Y–ground cable (cable L) or the Site I/O ground cable (cable B) tothe site I/O junction box.  Use one M6x19 tamper–resistant screw.  Torque to 5.0 N–m.NOTEThe free end of the Site I/O junction box cable should be connected to the customer–supplied SiteI/O interface.4The free end of the Site I/O junction box cable should be connected to the customer–supplied SiteI/O interface or to the Primary Surge Suppressor.5Position the Site I/O junction box as shown in Figure 6-9.6Insert the Site I/O junction box on to the housing, using the alignment feature on the housing.7Use a T30 Torx tamper bit to tighten (but do not torque) the upper tamper resistant screw.8Tighten but do not torque the lower tamper resistant screw.9Use a T30 Torx tamper bit to torque the upper and lower screw to  5 N–m.6
Attaching the Site I/O Junction Box to the Unit – continuedDRAFTSCt300 1X BTS Hardware Installation, ATP, and FRU Procedures JAN 20026-14Figure 6-9: Attaching the Site I/O Junction Box to the UnitSITE I/O JUNCTION BOXCAPTIVE SCREWSY–GROUND CABLE (CABLE L) OR, SITE I/O GROUND CABLE (CABLE B) MASTER GROUNDCABLE (CABLE Y)TO SU (IF EQUIPPED)Procedure to Attach a Site I/OCap to the Unit (optional)Use the following procedure in Table 6-8 to attach a Site I/O Cap to theunit.Table 6-8: Procedure to Attach a Site I/O Cap to the Unit (optional)Step Action1Position the Site I/O cap, Motorola Part Number 1587667C06, over the Site I/O socket.2Use a T30 Torx tamper bit to tighten (but do not torque) the upper tamper resistant screw.3Tighten but do not torque the lower tamper resistant screw.4Use a T30 Torx tamper bit to torque the upper and lower screw to  5 N–m.6
Subscriber Unit (SU) Installation and CablingJAN 2002 6-15SCt300 1X BTS Hardware Installation, ATP, and FRU ProceduresDRAFTObjectiveThe objective of this procedure is to install the Subscriber Unit (SU) tothe unit and to install the necessary cables.Cable LabelsThe cable designations are referenced to Table 4-1 in the “CableDescription” area of this chapter.Required Tools and MaterialsRequired toolsSTorque driver wrenchST30 TORX tamper bitS5/16–in. SMA 9 in–lb. break–away torque wrenchMotorola kitsThe Motorola Kit described in Table 6-9 is required to do this procedure.Table 6-9: External Subscriber Unit Kit – T529AACable Qty. Part Number Descriptionn/a 1–4 SGLN5976A Subscriber UnitP 1–4 3088120C03 SU RF cableL 1–4 3087701C04 Y–Ground Cable (for external SU and Site I/O).Motorola terminatorsThe following Motorola terminators in Table 6-10 are required to do thisprocedure.  The number of SU Terminators depends upon systemconfiguration.Table 6-10: Terminations of Unused ConnectorsConnector Motorola Part # DescriptionSU Digital 5887659C02 Terminator, PowerSC340 ACSU Distribution 0187683C03 Terminator, SMA(Microcell)6
Subscriber Unit (SU) Installation and Cabling – continuedDRAFTSCt300 1X BTS Hardware Installation, ATP, and FRU Procedures JAN 20026-16Procedure to Install SU BoxTable 6-11 gives the procedure to install the SU box on a MicroCell unit.You must install one SU on each unit at the BTS.Table 6-11: Procedure to Install the SU BoxStep Action1Attach one end of the Y–Ground cable (cable L) to the SU.  Use one M6x19 tamper–resistantscrew.  Torque to 5.0 N–m.NOTEIf unit is not equipped with a Site I/O, then one end of the Y–ground cable will hang loose.2Position the SU as shown in Figure 6-10.3Insert the oval protrusion of the SU onto the slotted hole on the cooling fins.4Use a torque driver and a T30 TORX bit to tighten the tamper–resistant screw.  Tighten to 5.0N–m.Figure 6-10: Attaching Subscriber Unit (SU) to UnitINSERT OVALPROTRUSION ONTOSLOTTED HOLE OFCOOLING FINS MASTER GROUNDCABLE (CABLE Y) Y–GROUND CABLE(CABLE L)TAMPER–RESISTANTSCREW6
Subscriber Unit (SU) Installation and Cabling – continuedJAN 2002 6-17SCt300 1X BTS Hardware Installation, ATP, and FRU ProceduresDRAFTProcedure to Install SU CablingTable 6-11 gives the procedure to install the SU cabling on a MicroCellunit.Table 6-12: Procedure to Install the SU CablingStep Action1Attach one end of the SU RF cable (cable P) to the SU 1 connector on the SU.  Attach the otherend of cable P to the SU RF connector on the unit.  Refer to Figure 6-11.2Use the 5/16–in. SMA breakaway wrench to tighten the SMA connectors on the SU RF cable.3Attach the free end of the SU Digital cable (cable Q) to the SU DIGITAL connector on the unit.Refer to Figure 6-11.  Hand tighten the SU Digital connector (you will hear soft clicks, this isnormal).  When the red line on the connector on the unit is covered,  the connection is complete.Figure 6-11: Attaching SU Cables to UnitSU DIGITAL CABLE (CABLE Q)SU RF CABLE (CABLE P)6
Attaching Front Fin Cover to UnitDRAFTSCt300 1X BTS Hardware Installation, ATP, and FRU Procedures JAN 20026-18ObjectiveThe objective of this procedure is to attach the front fin cover to theMicroCell unit.When to Use the Fin CoversAlways use fin covers for an indoor application.Procedure to Attach the FrontFin Cover to UnitFollow the procedure in Table 6-13 to attach the front fin cover to theunit.  Refer to Figure 6-12.Table 6-13: Procedure to Attach the Front Fin Cover to UnitStep Action1Center fin cover on the fins of the unit. See Figure 6-12 for snap locations.2Align snap with center tab on fins.3Push fin cover into place.Figure 6-12: Attaching Front Fin Cover to UnitMICROCELL FINSLOCATION OF SNAPS TO ATTACHFIN COVER TO UNIT6
Attaching the Short Duration Battery to the Unit (optional)JAN 2002 6-19SCt300 1X BTS Hardware Installation, ATP, and FRU ProceduresDRAFTObjectiveThe objective of this procedure is to attach the short duration battery tothe unit.Required Tools and MaterialsAttaching the battery to the unit requires:ST30 Torx tamper bit, 1/4–in. hexSTorque driver wrench, 1/4–in. hex female drive, 0–10 N–MSTwo (2) Screws M6x19 (Motorola Part Number 0387541C03)Procedure to Attach the ShortDuration Battery to the UnitFollow the procedure in Table 6-14 to attach the short duration battery tothe unit.  Refer to Figure 6-13.Table 6-14: Procedure to Attach the Short Duration Battery to the UnitStep Action1Hold the battery in the position shown in Figure 6-13.2The two holes at the end of the battery should align with the mounting holes on the unit. SeeFigure 6-13.3Start but do not tighten the M6x19 screws.4Use a T30 Torx tamper bit wrench, 1/4–in. hex female drive, 0–10 N–M, to torque the screws to 5N–M.6
Attaching the Short Duration Battery to the Unit (optional) – continuedDRAFTSCt300 1X BTS Hardware Installation, ATP, and FRU Procedures JAN 20026-20Figure 6-13: Attach Short Duration Battery to UnitM6X19 SCREWS (2)CONNECT TO DCINPUT CONNECTORWHEN BATTERY HASBEEN SECUREDSHORT DURATIONBATTERY6
Short Duration Battery CablingJAN 2002 6-21SCt300 1X BTS Hardware Installation, ATP, and FRU ProceduresDRAFTObjectiveThe objective of this procedure is to attach the short duration batterycable.Battery CableThe battery cable is part of the battery assembly.  The same typeconnector is used for the short duration battery and DC input cables.Procedure to Install ShortDuration Battery Cable to theUnitUse the following procedure in Table 6-15 to attach the short durationbattery (DC input) cable to the DC input connector.  Refer toFigure 6-14.  The cable should be connected before the solar cover isattached.The short duration battery should not be opened under anycircumstances. No wire termination is required by the user exceptconnection to the BTS, with the provided connector.Table 6-15: Procedure to Install Short Duration Battery Cable to UnitStep Action1Ensure that the ground wire has a connection to unit and the Master Ground Bus (also calledMaster Ground Plate).2Verify that the DC power breaker is open. The white collar on the breaker is visible when it isopen.3Place the round, black connector of the DC input cable onto the DC input connector on the BTS.Refer to Figure 6-14. Turn the cable connector to align its key.4Hand tighten the connector (a clicking sound is heard, this is normal). When the red line on theconnector on the unit is covered, connection is complete.6
Short Duration Battery Cabling – continuedDRAFTSCt300 1X BTS Hardware Installation, ATP, and FRU Procedures JAN 20026-22Figure 6-14: Battery Cable InstallationDC INPUT CONNECTORBATTERY CABLE IS PARTOF BATTERY ASSEMBLY6
AC Power CablingJAN 2002 6-23SCt300 1X BTS Hardware Installation, ATP, and FRU ProceduresDRAFTObjectiveThe objective of this procedure is to attach the AC input power cable tothe unit.  Use this procedure only when AC power is used to power theunit.If the Primary Surge Suppressor is not used, the AC Installation Box isrequired for all outdoor mounting applications.This equipment uses dangerous voltages and is capable ofcausing death. Use extreme caution when handling andtesting this equipment.WARNINGRequired CablesThe following cables in Table 4-1 are necessary to do this procedure:Table 6-16: Required Cables for AC Input Power CablingCable Qty. Part Number DescriptionS 1–4 3087854C02 AC input cable, 18 AWG, 5 m, is designed for 120–240 VAC powerinput.  Cable has Deutsche connector on both ends.Power Cable and ConnectorSignal InformationThe AC input connector is located on the side of the unit as shown inFigure 6-15.  The unit is designed for 88–260 VAC power input.Procedure to Connect AC InputPower Cable to the UnitUse the following procedure in Table 6-17 to connect the AC input cableto the unit.  The AC input cable should be connected before the solarcover is attached.Table 6-17: Procedure to Connect AC Power Cable to the UnitStep Action1Ensure that the ground wire has a connection to the Master Ground Bus (also called MasterGround Plate).2Verify that the AC power breaker is open. The white collar on the breaker is visible when it isopen.3Place the round, black connector on the AC input cable (cable S) onto the AC input connector.See Figure 6-15. Turn the cable connector to align its key.4Hand tighten the connector (a clicking sound is heard, this is normal). When the red line on theconnector on the unit is covered, connection is complete.6
AC Power Cabling – continuedDRAFTSCt300 1X BTS Hardware Installation, ATP, and FRU Procedures JAN 20026-24Figure 6-15: AC Power Cabling DetailsAC INSTALL BOXOR AC POWERSOURCE OROPTIONALPRIMARY SURGESUPPRESSORAC INPUTCONNECTORAC POWERBREAKERSAC CONDUIT6
DC Power CablingJAN 2002 6-25SCt300 1X BTS Hardware Installation, ATP, and FRU ProceduresDRAFTObjectiveThe objective of this procedure is to attach the DC input cable to theunit.  Use this procedure only when DC power is used to power the unit.This equipment uses dangerous voltages and is capable ofcausing death. Use extreme caution when handling andtesting this equipment.WARNINGRequired CablesThe following cables in Table 6-18 are necessary to do this procedure.Table 6-18: Required Cables for DC Input Power Cable InstallationCable Qty. Part Number DescriptionU 1 3087854C04 DC input cable, 18 AWG, 5 m, is designed for 20 to 30 VDC powerinput.Power Cable and ConnectorSignal InformationThe DC input connector is located on the side of the unit.  The unit isdesigned for 20 to 30 VDC.Procedure to Connect DC InputPower Cabling to the UnitUse the following procedure in Table 6-19 to connect the DC input cableto the unit.  Refer to Figure 6-16.  The DC input cable should beconnected before the solar cover is attached.Table 6-19: Procedure to Connect DC Input Power Cabling to the UnitStep Action1Ensure that the ground wire has a connection to the Master Ground Bus (also called MasterGround Plate).2Verify that the DC power breaker is open. The white collar on the breaker is visible when it isopen.3Place the round, black connector of the DC input cable onto the DC input connector. SeeFigure 6-16. Turn the cable connector to align its key.4Hand tighten the connector (a clicking sound is heard, this is normal). When the red line on theconnector on the unit is covered, connection is complete.6
DC Power Cabling – continuedDRAFTSCt300 1X BTS Hardware Installation, ATP, and FRU Procedures JAN 20026-26Figure 6-16: DC Power Cabling DetailsDC INPUTCONNECTORDC POWERSOURCEDC POWER BREAKERU6
Antenna Cabling for Sites Equipped with Customer–Supplied Site I/OInterfaceJAN 2002 6-27SCt300 1X BTS Hardware Installation, ATP, and FRU ProceduresDRAFTObjectiveThe objective of this procedure is to attach the antenna cabling for one ormore units.If your BTS is equipped with the optional Primary Surge Suppressor,then proceed to the “Antenna Cabling for Sites Equipped with theOptional Primary Surge Suppressor” procedure in Chapter 6.Required CablesThe following cables in Table 6-20 are necessary to do this procedure.Table 6-20: Required Cables for Antenna CablingCable Qty. Part Number DescriptionC 1–8 CustomerSupplied Antenna cable, 50–Ohm coaxial terminated with at least one male,N–type connector.Procedure to Install AntennaCablingThe cabling is installed between the unit(s) and the external lightningarrestors.  If lightning arrestors are not present, it connects to theantenna.If your BTS has one unit, cable the unit as shown in Figure 6-17.Torque the connectors to 4.3 N–M.If your BTS has more than one unit (logical BTS), cable the unit asshown in Figure 6-18, Figure 6-19, or Figure 6-20.Figure 6-17: Antenna Cabling Details for One MicroCell UnitANT AANT BMICROCELL 1LA ANTENNA 2TX/RXBLA ANTENNA 1RXBLA = LIGHTNING ARRESTORKEY6
Antenna Cabling for Sites Equipped with Customer–Supplied Site I/OInterface – continuedDRAFTSCt300 1X BTS Hardware Installation, ATP, and FRU Procedures JAN 20026-28Figure 6-18: Antenna Cabling for Two MicroCellsANT AANT BRFTANT AANT BRFTLAMICROCELL 1MICROCELL 101LA ANTENNA 2TX/RXLA ANTENNA 1TX/RXRFT= LIGHTNING ARRESTOR= 50 OHM RF TERMINATORKEYCCFigure 6-19: Antenna Cabling for Three MicroCellsANT AANT BANT AANT BRFTANT AANT BRFTLALAMICROCELL 1MICROCELL 201MICROCELL 101ANTENNA 3TX/RXLA ANTENNA 4RXLA ANTENNA 2TX/RXLA ANTENNA 1TX/RXRFT= LIGHTNING ARRESTOR= 50 OHM RF TERMINATORKEYCCCC6
Antenna Cabling for Sites Equipped with Customer–Supplied Site I/OInterface – continuedJAN 2002 6-29SCt300 1X BTS Hardware Installation, ATP, and FRU ProceduresDRAFTFigure 6-20: Antenna Cabling for Four MicroCellsANT AANT BRFT ANT AANT BRFTANT AANT BRFT ANT AANT BRFTLALAMICROCELL 1MICROCELL 201MICROCELL 101MICROCELL 301ANTENNA 3TX/RXLA ANTENNA 4TX/RXLA ANTENNA 2TX/RXLA ANTENNA 1TX/RXRFT= LIGHTNING ARRESTOR= 50 OHM RF TERMINATORKEYCCCC6
Antenna Cabling for Sites Equipped with Optional Primary SurgeSuppressorDRAFTSCt300 1X BTS Hardware Installation, ATP, and FRU Procedures JAN 20026-30ObjectiveThe objective of this procedure is to attach the antenna cabling for one ormore units at a site equipped with the optional Primary SurgeSuppressor.Cable LabelsThe cable designations are referenced to Table 4-1 in the “CableDescription” area of Chapter 4.Required CablesThe following cables in Table 6-21 are necessary to do this procedure.Table 6-21: Required Cables for Antenna CablingCable Qty. Part Number DescriptionC 1–8 CustomerSupplied Antenna cable, 50–Ohm coaxial terminated with at least one male,N–type connector.D 2–6 CustomerSupplied Antenna cable, terminated with 2 male N–type connectorsProcedure to Install AntennaLightning Arrestors andAntenna CablingLightning arrestors are shipped/installed in the Primary SurgeSuppressor for one or two unit configurations.  If you are expandingfrom two to three or from three to four units, then you must installlightning arrestors for units three and four.  Refer to the procedure inTable 6-22 to install antenna lightning arrestors.If your BTS has one unit and is equipped with the Primary SurgeSuppressor, cable the unit as shown in Figure 6-22.If your BTS has more than one unit and is equipped with the PrimarySurge Suppressor, cable the units as shown in Figure 6-23 throughFigure 6-25.Table 6-22: Procedure to Install Antenna Lightning ArrestorsStep Action1Remove the 3/4–in. nut and lock washer from N–type connector on antenna lightning arrestor.Refer to Figure 6-21.2Insert the antenna lightning arrestor through hole in mounting flange.NOTENOTEAntenna cable connectors may be connected to either side of the antenna protectors on thePrimary Surge Suppressor.3Install the lockwasher and 3/4–in. nut on the N–type connector.4Use a 3/4–in. wrench to tighten to 20 N–m.6
Antenna Cabling for Sites Equipped with Optional Primary SurgeSuppressor – continuedJAN 2002 6-31SCt300 1X BTS Hardware Installation, ATP, and FRU ProceduresDRAFTFigure 6-21: Installation of Third and Fourth Antenna Lightning ArrestorsANTENNA LIGHTNINGARRESTORSLOCKWASHER3/4–IN NUTFigure 6-22: Antenna Cabling Details for MicroCell Equipped with Primary Surge SuppressorANT AANT BMICROCELL 1DPRIMARYSURGESUPPRESSORANTENNA 1TX/RXANTENNA 2TX/RX12CCD6
Antenna Cabling for Sites Equipped with Optional Primary SurgeSuppressor – continuedDRAFTSCt300 1X BTS Hardware Installation, ATP, and FRU Procedures JAN 20026-32Figure 6-23: Antenna Cabling for Two MicroCells Equipped with Primary Surge SuppressorANT AANT BRFTANT AANT BRFTMICROCELL 1MICROCELL 101RFT = 50 OHM RF TERMINATORKEYDDPRIMARYSURGESUPPRESSORANTENNA 1TX/RXANTENNA 2TX/RX12CCFigure 6-24: Antenna Cabling for Three MicroCells Equipped with Primary Surge SuppressorANT AANT BANT AANT BRFTANT AANT BRFTMICROCELL 1MICROCELL 201MICROCELL 101ANTENNA 3TX/RXANTENNA 4RXANTENNA 2TX/RXANTENNA 1TX/RXRFT = 50 OHM RF TERMINATORKEYDDDDPRIMARYSURGESUPPRESSOR1234CCCCNOTE:  YOU MUST INSTALLANTENNA PROTECTOR6
Antenna Cabling for Sites Equipped with Optional Primary SurgeSuppressor – continuedJAN 2002 6-33SCt300 1X BTS Hardware Installation, ATP, and FRU ProceduresDRAFTFigure 6-25: Antenna Cabling for Four MicroCells Equipped with Primary Surge SuppressorANT AANT BANT AANT BRFTANT AANT BRFTMICROCELL 1MICROCELL 201MICROCELL 101ANTENNA 3TX/RXANTENNA 4TX/RXANTENNA 2TX/RXANTENNA 1TX/RXRFT = 50 OHM RF TERMINATORKEYDDDPRIMARYSURGESUPPRESSORANT AANT BMICROCELL 301RFTRFTD1234CCCC6
MIB Cabling for Multi–Unit Logical BTS ConfigurationsDRAFTSCt300 1X BTS Hardware Installation, ATP, and FRU Procedures JAN 20026-34OverviewThe objective of this procedure is to attach the MIB cabling for amulti–unit logical BTS configuration.Cable LabelsThe cable designations are referenced in Table 4–1 in the “CableDescriptions” procedure in Chapter 4.Required Tools and EquipmentMotorola partsThe following terminators in Table 6-23 are necessary to do thisprocedure for a single–unit installation and are shipped with the unit:Table 6-23: MIB TerminatorsQuantity Part Number Description3 3009865S04 Dust cap1 3009865S02 Terminator, MIB (Microcell)Motorola kits for multi–unit installationsTable 6-24 through Table 6-31 give the Motorola kit numbers, cabledescriptions and part numbers for the Motorola kits required to performa multi–unit installation.  Several kits are available depending upon thecarrier installation.Table 6-24: MicroCell Expansion Kit for Units 1 to 2 Short MIB A (Cubicle) – T448BCable Qty. Motorola PartNumber Descriptionn/a 2 5882106P01 50 Ohm Antenna TerminatorA 1 3087701C02 Ground cable, 8 -AWG, insulated copper wire. Requires one ring lugconnector.K 1 3087707C09 MIB A cable (short, 1m; micro)Table 6-25: Microcell Expansion Kit for Units 1 to 2 Long MIB A (Non–Cubicle) – T448ACable Qty. Motorola PartNumber Descriptionn/a 2 5882106P01 50 Ohm Antenna TerminatorA 1 3087701C02 Ground cable, 8 -AWG, insulated copper wire. Requires one ring lugconnector.E 1 3087707C03 MIB A cable (current, 2m; micro)6
MIB Cabling for Multi–Unit Logical BTS Configurations – continuedJAN 2002 6-35SCt300 1X BTS Hardware Installation, ATP, and FRU ProceduresDRAFTTable 6-26:  Microcell (800 MHz) Expansion Kit for Units 2 to 3 Current 2m MIB B – T448ARCable Qty. Motorola PartNumber DescriptionA 1 3087701C02 Ground cable, 8 -AWG, insulated copper wire. Requires one ring lugconnector.F 1 3087707C04 MIB B cable (current, 2m)n/a 2 8009573X06 Lightning arrestorTable 6-27:  Microcell (800 MHz) Expansion Kit for Units 2 to 3 Long 5m MIB B – T448ASCable Qty. Motorola PartNumber DescriptionA 1 3087701C02 Ground cable, 8 -AWG, insulated copper wire. Requires one ring lugconnector.I 1 3087707C07 MIB B cable (long, 5m)n/a 2 8009573X06 Lightning arrestorTable 6-28:  Microcell (1.9 GHz) Expansion Kit for Units 2 to 3 Current 2m MIB B – T448AYCable Qty. Motorola PartNumber DescriptionA 1 3087701C02 Ground cable, 8 -AWG, insulated copper wire. Requires one ring lugconnector.F 1 3087707C04 MIB B cable (current, 2m)n/a 2 8009573X01 Lightning arrestorTable 6-29:  Microcell (1.9 GHz) Expansion Kit for Units 2 to 3 Long 5m MIB B – T448AZCable Qty. Motorola PartNumber DescriptionA 1 3087701C02 Ground cable, 8 -AWG, insulated copper wire. Requires one ring lugconnector.I 1 3087707C07 MIB B cable (long, 5m)n/a 2 8009573X01 Lightning arrestorTable 6-30:  Microcell Expansion Kit for Units 3 to 4 Current 2m MIBs A and C – T448HCable Qty. Motorola PartNumber DescriptionA 1 3087701C02 Ground cable, 8 -AWG, insulated copper wire. Requires one ring lugconnector.n/a 2 5882106P01 50 Ohm Antenna TerminatorE 1 3087707C03 MIB A cable (current, 2m; micro)G 1 3087707C05 MIB C cable (current, 2m)6
MIB Cabling for Multi–Unit Logical BTS Configurations – continuedDRAFTSCt300 1X BTS Hardware Installation, ATP, and FRU Procedures JAN 20026-36Table 6-31:  Microcell Expansion Kit for Units 3 to 4 Longer 5M MIBs A and C – T448GCable Qty. Motorola PartNumber Descriptionn/a 2 5882106P01 50 Ohm Antenna TerminatorA 1 3087701C02 Ground cable, 8 -AWG, insulated copper wire. Requires one ring lugconnector.E 1 3087707C03 MIB A cable (current, 5m; micro)J 1 3087707C08 MIB C cable (long, 5m)Procedure to Install MIBCablingCable the units as shown in Figure 6-28, Figure 6-27 or Figure 6-26.Refer to the “Connector Locations” procedure in this chapter.  Make sureto terminate any unused connectors.Figure 6-26: MIB Cabling for Two UnitsUNIT 1UNIT 101MIB CMIB BMIB AMIB CMIB BMIB AE/1 MIBORK/1 MIB6
MIB Cabling for Multi–Unit Logical BTS Configurations – continuedJAN 2002 6-37SCt300 1X BTS Hardware Installation, ATP, and FRU ProceduresDRAFTFigure 6-27: MIB Cabling for Three UnitsMT = MIB TERMINATORKEYUNIT 1UNIT 201UNIT 101MIB CMIB BMIB AMIB CMIB BMIB AMIB CMIB BMIB AMTNOTE:  MIB TERMINATORUSED ON MICROCELL MIB ACONNECTOR ONLYE/1 MIB ORK/1 MIBF/1 MIB ORI/1 MIBFigure 6-28: MIB Cabling for Four UnitsUNIT 1UNIT 301UNIT 101UNIT 201MIB CMIB BMIB AMIB CMIB BMIB AMIB CMIB BMIB AMIB CMIB BMIB AE/1 MIB ORK/1 MIBE/1 MIB ORK/1 MIBG/1 MIBF/1 MIB6
Terminating Unused ConnectionsDRAFTSCt300 1X BTS Hardware Installation, ATP, and FRU Procedures JAN 20026-38ObjectiveThe objective of this procedure is to terminate any unused connections.Terminate all unused connections.IMPORTANT*List of Terminators for UnusedConnectionsTable 6-32: List of Terminators for Unused ConnectionsConnector Motorola Part # DescriptionAC Input 5887659C02 Terminator, ACDC Input 5887659C04 Terminator, DCMIB A 3009865S02 Terminator, MIBMIB B, C 3009865S04 Cap, MIBSU Distribution 0187683C02 Terminator, SMASU Digital 5887659C02 Terminator, PowerSC300 ACProcedureThe unit is shipped with the above terminators. Verify that a terminatoris on each unused connector.  Tighten the SMA terminators using a5/16 Breakaway 9 in. lb. Hand tighten all other terminators.6
Powering on the Unit and Mounting the Solar CoverJAN 2002 6-39SCt300 1X BTS Hardware Installation, ATP, and FRU ProceduresDRAFTObjectiveThe objective of this procedure is to power on the unit and mount thesolar cover on the chassis.You May Want to WaitDo not mount the front solar cover on the unit if you wish to perform theAcceptance Test Procedures (ATP).  Otherwise, mount the front solarcover until you perform the ATP.Required Tools and MaterialsThe following tamper–resistant keys are required to do this procedure.SKey for tamper–resistant stud (provided) for the solar cover.SKey for tamper–resistant locks (provided) for the Primary SurgeSuppressor.Procedure to Power On theUnit and Mount Solar CoverRefer to the procedure in Table 6-33 to power on the unit and mount thesolar cover.Table 6-33: Procedure to Power on the Unit and Mount the Solar CoverStep Action1n WARNINGMake sure the unit is properly grounded and that all connections are connected before poweringon unit.on unit.If not applying AC power, go to step 2.  If applying AC power, push down on the AC powerbreaker until it clicks and remains down.  The white collar on the breaker is not visible when thebreaker is closed.2If not applying DC power or providing for battery backup, go to step 3.  If applying DC power orhave short or long duration batteries present, push down on the DC power breaker until it clicksand remains down.  The white collar on the breaker is not visible when the breaker is closed.3Position the solar cover so the cooling vents are at the top and place the solar cover on the unit.Use the key to tighten the four tamper–resistant studs (two on each side).  Refer to Figure 6-29.Procedure to Power On theSurge Suppressor, the Unit,and Mount the Solar CoverIf your BTS is equipped with the Primary Surge Suppressor, refer to theprocedure in Table 6-34 to power on the unit and mount the solar cover.Table 6-34: Procedure to Power on the Surge Suppressor, the Unit, and Mount the Solar CoverStep Action1If closed, open the front cover of the Primary Surge Suppressor.  Use the tamper–resistant key andturn both the locks counter–clockwise.  Refer to Figure 6-29. . . . continued on next page6
Powering on the Unit and Mounting the Solar Cover – continuedDRAFTSCt300 1X BTS Hardware Installation, ATP, and FRU Procedures JAN 20026-40Table 6-34: Procedure to Power on the Surge Suppressor, the Unit, and Mount the Solar CoverStep Action2If not applying AC power, go to step 6.  If applying AC power, push the main AC power breakeron the Surge Suppressor to the “On“ position.  Refer to Figure 6-30.3Push the AC power breakers for each individual carrier to the “On” position.  All unused powerbreakers must be in the “Off” position.4Close the Primary Surge Suppressor door.  Use the tamper–resistant key to turn the locksclockwise to the “Locked” position.5Push down on the AC power breaker on the unit until it clicks and remains down.  The whitecollar on the breaker is not visible when the breaker is closed.6If not applying DC power or providing for battery backup, go to step 7.  If applying DC power orhave short or long duration batteries present, push down on the DC power breaker until it clicksand remains down.  The white collar on the breaker is not visible when the breaker is closed.7Position the solar cover so the cooling vents are at the top and place the solar cover on the unit.Use the tamper–resistant key to tighten the four screws (two on each side) to 2.2 N–M.  Refer toFigure 6-31.Figure 6-29: Lock Positions on Primary Surge SuppressorLATCHED POSITION UNLATCHED POSITION6
Powering on the Unit and Mounting the Solar Cover – continuedJAN 2002 6-41SCt300 1X BTS Hardware Installation, ATP, and FRU ProceduresDRAFTFigure 6-30: Location of AC Power Breakers on Primary Surge SuppressorAC POWER BREAKERCARRIER 1AC POWER BREAKERCARRIER 2AC POWER BREAKERCARRIER 3AC POWER BREAKERCARRIER 4MAIN INPUT BREAKERNOTE:  INTERNAL CABLINGNOT SHOWN FOR CLARITYFigure 6-31: Front Solar CoverFRONT COVERMOUNTINGSCREWS (4)6
Site CleanupDRAFTSCt300 1X BTS Hardware Installation, ATP, and FRU Procedures JAN 20026-42Remove Protective CoveringRemove any antistatic plastic or cloth sheeting that was used to cover theequipment.Lighting FixturesRemove the masking tape from the fluorescent light fixtures.ToolsPlace all hand and power tools in the installation tool kit or otherappropriate place. Note any tools that need replacement, cleaning, oradjustment.MaterialsPlace any leftover materials in a location specified by the site manager.Remove DebrisRemove any packing material.Ensure that all scrap materials have been removed from any tables orstands.Clean/sweep the floor. Ensure that all alignment marks have beenremoved.EnvironmentRemove any temporary weather protection used for installation.Check that all covers are in place.Check that the power connections are tight.Organize any items (manuals, materials, etc.) left on site and place themin a location specified by the site manager.Check that the unit lock is secure and key is removed.Check that solar cover is secure.Verify that cabling is properly secured between unit and enclosures.6
Installation Completion ChecklistJAN 2002 6-43SCt300 1X BTS Hardware Installation, ATP, and FRU ProceduresDRAFTDirectionsFill out the installation completion checklist and make any necessarycopies. You may copy this check sheet as needed.Installation CompletionChecklistDate Hardware Installation Completed: ________________________Site:___________________________________________________Serial Number(s):_________________________________________ ______________________________________________________Checklist Completed By:____________________________________Checklist Reviewed By:_____________________________________Table 6-35: Installation Completion ChecklistStatus No. Item Notes1Air flow clearance requirements are met.2Equipment is not damaged.3Mounting bracket is level and secure.4Back solar cover (if applicable) is securelyattached to the mounting bracket.5RGPS head and mast are secure.6RGPS head has a clear view of the sky and isnot in a location which accumulates debris.Make sure the RGPS is located away fromthe BTS transmit antenna.7Mounting bracket is connected to the Masterground.8The connection to the AC source is secure (ifapplicable).9The AC source is protected by a lightningarrestor (if applicable).10 The connection to the DC source is secure (ifapplicable).11 The connection to the battery is secure (ifapplicable).12 The connection to the auxiliary device issecure (if applicable).13 The antenna connections are secure. . . . continued on next page6
Installation Completion Checklist – continuedDRAFTSCt300 1X BTS Hardware Installation, ATP, and FRU Procedures JAN 20026-44Table 6-35: Installation Completion ChecklistStatus NotesItemNo.14 The antenna cables are protected by lightningarrestors (if applicable).15 Customer input alarm connections arecomplete between the Site I/O cable and theSite I/O interface(s).16 RGPS connections are complete between theSite I/O cable and the Site I/O interface(s).17 Phone (modem) connections are completebetween the Site I/O cable and the Site I/Ointerface(s).18 Span connections are complete between theSite I/O cable and the Site I/O interface(s).19 Span, phone, and RGPS connections areprotected by lightning arrestors (ifapplicable).20 The RGPS/HSO cabling for multi–BTSconfigurations is secure (if applicable).21 The span line daisy chain cabling formulti–BTS configurations is secure.22 The RGPS ground lead is connected to theBTS digital ground reference.23 Fin covers are secure.24 Installation hardware is removed.25 The lock is in place and the key removed.26 The site I/O junction box is secure.27 The short–duration battery is secure (ifapplicable).28 The short–duration battery cable (DC inputcable) is secure (if applicable).29 The earth ground connection is securebetween the site I/O junction box and themounting bracket.30 The AC input cable is securely attached to theAC input connector (if applicable).31 The DC input cable is securely attached to theDC input connector (if applicable). . . . continued on next page6
Installation Completion Checklist – continuedJAN 2002 6-45SCt300 1X BTS Hardware Installation, ATP, and FRU ProceduresDRAFTTable 6-35: Installation Completion ChecklistStatus NotesItemNo.32 The DC output cable is securely attached tothe DC output connector (if applicable).33 The unit–to–unit SU cabling is secure (ifapplicable).34 The unit–to–unit MIB cabling is secure (ifapplicable)35 The antenna N–type connectors are securelyattached to the antenna A and B connectors.36 All unused ports are properly terminated.37 All cables are dressed and tied.38 The external power source (AC or DC) isactive.39 The AC and/or DC power breakers on theBTS are engaged (pushed in).40 The front solar cover is secure (if applicable).41 The auxiliary device is switched on (ifapplicable).42 The site is cleaned, swept and trash removed.43 The site specific documentation is present atthe site.6
Installation Completion Checklist – continuedDRAFTSCt300 1X BTS Hardware Installation, ATP, and FRU Procedures JAN 20026-46Notes6

Navigation menu